LG Electronics USA P930 GSM/WCDMA AND LTE PHONE WITH BLUETOOTH AND WLAN User Manual LG P30 ATT EN 110405 indd
LG Electronics USA GSM/WCDMA AND LTE PHONE WITH BLUETOOTH AND WLAN LG P30 ATT EN 110405 indd
UserManual.wiki
>
LG Electronics USA
>
P930 User Manual
Users Manual
Navigation menu
Upload a User Manual
Namespaces
Wiki Guide
HTML
PDF
Info
Views
User Manual
Discussion / Help
Navigation
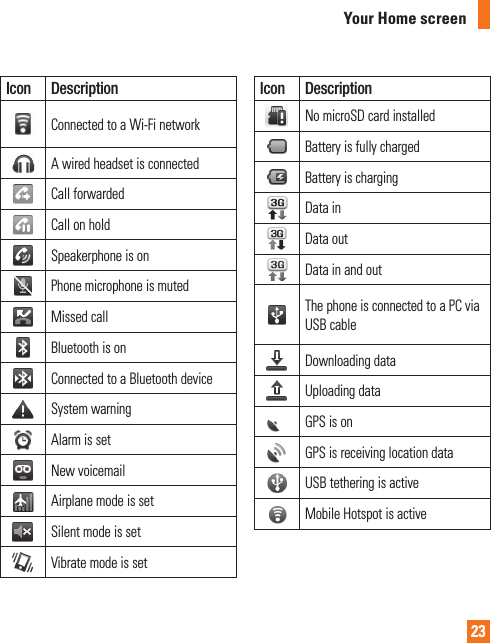
![22n TIPYou cannot delete the preloaded applications. (Only their icons can be deleted from the screen).Getting back to a recently used applicationPress and hold the 1 Home Key. The screen will display the icons of applications that you have used recently.Touch an icon to open its application or 2 press the Back Key to return to the current application.Notifications panelThe Notifications panel runs across the top of your screen. Ring Airplane ModeGPSBluetoothWi-FiTouch and slide the Notifications panel down with your finger. Or, from the Home screen, press the Menu Key and touch Notifications. From here, you can check and manage Wi-Fi, Bluetooth, GPS, Airplane mode, Ringer and view other notifications.Viewing the Status BarThe Status Bar uses different icons to display phone information, such as signal strength, new messages, battery life, and active Bluetooth and data connections.Below is a table explaining the meaning of icons you are likely to see in the Status Bar.[Status Bar]Icon DescriptionNo SIM card is installedNo signalYour Home screen](https://usermanual.wiki/LG-Electronics-USA/P930/User-Guide-1556928-Page-12.png)
![33Using smiliesLiven up your messages using smilies.When writing a new message, press the Menu Key, then touch Insert Smiley.Changing your message settingsYour phone's message settings are predefined, so you can send messages immediately. You can change the settings based on your preferences. EmailYou can use the Email application to read Email from providers other than Gmail. The Email application supports the following account types: POP3, IMAP and Microsoft Exchange ActiveSync (for Enterprise users).To open the Email application] From the Home screen, touch Email.The first time you open the Email application, a setup wizard opens to help you add an Email account. Email Accounts screenThe Accounts screenThe Accounts screen lists your Combined Inbox and each of your Email accounts. Open the Email application. If you’re not on 1 the Account screen, press the Menu Key and touch Accounts. - Touch to open your Combined Inbox, with messages sent to all of your accounts. - Touch to open a list of just your starred messages. - Touch the folder icon to open a specific account’s folders.You can touch an account to view its Inbox. The account from which you send Email by default is indicated with a checkmark.Your Combined InboxIf you have configured Email to send and receive Email from more than one account, you can view all messages sent to all accounts in your Combined Inbox.Touch 1 Email.From the Inbox, press the 2 Menu Key and touch Accounts.Messaging/Email](https://usermanual.wiki/LG-Electronics-USA/P930/User-Guide-1556928-Page-23.png)
![34Messaging/EmailTouch 3 Combined Inbox (on the Accounts screen). Messages in the Combined Inbox are color coded along their left sides, by account, using the same colors that are used for your accounts on the Accounts screen.Only your account’s most recent Email are downloaded to your phone. To download more (earlier) Email messages, touch Load more messages at the bottom of the Email list.Reading Your MessagesTouch the message you want to read. The message opens in a screen that includes information about who sent it, the date it was sent, and other related information.Responding to a MessageYou can reply to it, forward it or even just delete it.To delete a message] While reading a message, touch the Delete button. OR] While reading a message, press the Menu Key and touch Delete. For many types of accounts, deleted messages are moved to a Trash folder, so you can retrieve them in case they were deleted by mistake.Other options] To reply the message, touch the message you received from the Inbox and touch the Reply button.] Touch and hold the recieved message until the pop-up appears. From the pop-up, you can reply, forward, delete and mark messages as read or unread.Composing and Sending EmailTo compose and send a message While in the 1 Email application, press the Menu Key and touch Compose.Enter an address for the message’s intended 2 recipient. As you enter text, matching addresses are offered from your Contacts. Separate multiple addresses with commas.Press the 3 Menu Key and touch Add Cc/Bcc to copy other contacts or Email addresses.Enter the text of the message. 4 Press the 5 Menu Key and touch Attach to send a photo with the message.](https://usermanual.wiki/LG-Electronics-USA/P930/User-Guide-1556928-Page-24.png)
![50About Google applicationsGoogle applications, including mobile versions of Gmail, Google Talk, Google Calendar, and Google Maps, are loaded on your phone.First, set up a Google account. Then enter 1 your user name and password and sign in.After signing in, your contacts, email, 2 and calendar in your Google account will automatically synchronize with your phone.Google Maps™To open Google Maps and view your locationTouch 1 Maps on the Home screen or in the Launch screen. Touch the My location 2 icon on the map.The map centers on a blue dot that indicates your location. A blue circle around the dot indicates that your actual location is within the circle.To get an address and additional information for a location] Touch and hold a location on the map. A balloon with the address and a thumbnail from Street View (if available) opens over the location.] Touch the balloon to access additional options.To view map, satellite, or traffic layers] Touch the Layers icon on the map and select a layer option. You can choose from Traffic, Satellite, Terrain, Latitude, or More Layers.Searching For Locations and PlacesYou can search for a location and view it on a map. You can also search for places on the map that you're viewing.To search for a locationWhile viewing a map, press the 1 Menu Key and touch Search or press the Search Key.In the search box, enter the place 2 you're looking for. You can enter an address, a city, or a type of business or establishment. For example, “theater in New York”.Touch the Search icon. 3 Markers with letter labels indicate search matches on the map.Google applications](https://usermanual.wiki/LG-Electronics-USA/P930/User-Guide-1556928-Page-40.png)
![51Getting DirectionsTo get directionsWhile viewing a map, press the 1 Menu Key and touch Directions. Enter a starting point in the first text box and 2 your destination in the second text box. To reverse directions, press the Menu Key and touch Reverse Start & End. Touch the icon for car, public transit, bicycling, 3 or walking directions.Touch 4 Go. The directions to your destination appear in a list.To view turn-by-turn directions in a listYou can view each turn in your route as a list of written directions.When viewing a list of directions, touch the Navigate icon to view turn-by-turn directions in Navigation View.To search for locations along your routeYou can search for businesses, points of interest, and other features along your route. When you search while navigating, your results include locations along your route, rather than locations that are near your current location.] Press the Search Key and search for locations of interest. The results are displayed as markers along your route; the first result is labeled. You can use the left and right arrow buttons to move from result to result, zoom in and out, or touch a label for more information about the marker.] When you're finished, touch the Navigation icon to return to Navigation View.Starred Places Starred Places bookmarks your favorite places, such as addresses or local businesses, to be able to find them quickly later.To view Starred PlacesWhile viewing a map, press the Menu Key and touch Starred Places.Clear MapClear any information, such as routes and search results, from the map.To clear a mapWhile viewing a map, press the Menu Key and touch Clear Map.Google applications](https://usermanual.wiki/LG-Electronics-USA/P930/User-Guide-1556928-Page-41.png)
![52Google applicationsLatitudeFinding Your Friends with Google LatitudeTMGoogle Latitude lets you and your friends view each others' locations on maps and get directions to your friends' locations using Google Latitude. Your location is not shared automatically. It is by invitation only.You must join Latitude and then invite your friends to view your location or accept invitations from your friends.To join Latitude] While viewing a map, press the Menu Key and touch Join Latitude. The first time you join Latitude, you're prompted to accept or reject the Google privacy policy. After you've joined Latitude, the Join Latitude item changes to Latitude.To open LatitudeAfter you join Latitude, you can open it to find your friends and view their updates.] While viewing a map, press the Menu Key and touch Latitude.To invite friends to share their locationsAfter you join Latitude, you can start sharing your location with your friends. Only friends whom you have explicitly invited or accepted can see your location.Open Latitude, press the 1 Menu Key and touch Add friends.Touch 2 Select from Contacts or Add via email address in the menu that opens. Touch 3 Add friends at the bottom of the screen. If your friends already use Latitude, they receive an email request and a notification on Latitude. If they have not yet joined Latitude, they receive an email inviting them to sign in to Latitude with their Google Account.PlacesTo find placesTouch the Places icon while in Google Maps to find different venues, such as gas stations, coffee shops, bars, restaurants, etc.Once you select a category, you will see a list of closest matches, including their distance, compass bearing, description and even user reviews. You can customize your own location search categories, and even add the Places icon to your Home screen.](https://usermanual.wiki/LG-Electronics-USA/P930/User-Guide-1556928-Page-42.png)

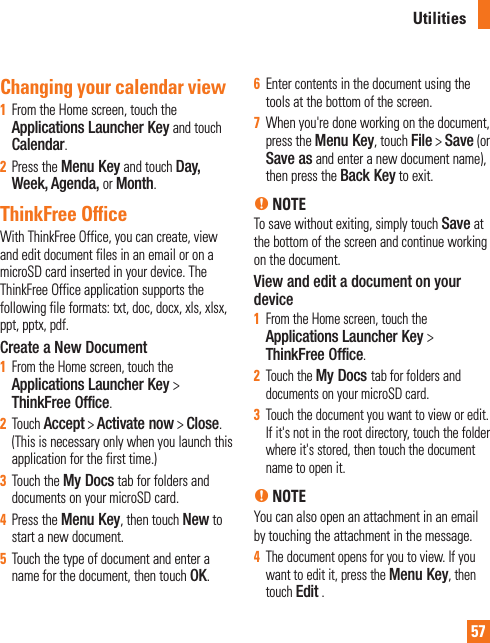
![58Utilities] To move between pages or pan through the document, scroll in the corresponding direction.] To change the zoom level, press the Menu Key, touch Zoom , then touch the zoom level you want.] Use the toolbar at the bottom of the screen to make edits to the document (Word, text, or Excel file).] Press the Menu Key for additional menu options such as search, preferences, and more.When you're finished editing, touch 5 Save , then press the Back Key to exit.ThinkFree Office document toolsThe ThinkFree Office application has a toolbar that appears automatically when you create a document. To display the toolbar in an existing document, press the Menu Key, then touch Edit. Touch a toolbar icon and corresponding tools display in a bar beneath it for you to touch and use. Left and right arrows on the toolbar indicate that you can scroll horizontally for more icons. Scrolling works independently. While a tool is selected (for example the Select text tool ), you can scroll the toolbar to touch an other toolbar icon (for example the clipboard tool to copy the text you just selected). Touch the toolbar icon again to close tool options.The tools in the toolbar vary depending on the document type. Manage documents onlineFrom the Home screen, touch the 1 Applications Launcher Key > ThinkFree Office.Touch the 2 Online tab for access to your ThinkFree Office online account.Enter your user name and password to 3 access your account, then touch Sign In.View and manage your documents on the 4 server as desired.Voice SearchYou can search by voice and complete other voice actions, such as calling or texting a contact, sending an email, creating a note or getting directions with just a simple touch of the Voice Search icon.From the Home screen, touch the 1 Applications Launcher Key > Voice Search.Wait for the "2 Speak now" prompt, then say your query.](https://usermanual.wiki/LG-Electronics-USA/P930/User-Guide-1556928-Page-48.png)
![59Available commands include: - Send text - Navigate to - Call - Send email - Map of - Go to - Note to self - Directions toFor a "Go to" web query, the search results 3 will be displayed in the web browser. Touch the result you want or continue searching.Voice DialerYou can search for and dial a contact by speaking, rather than by manually dialing a contact.] This feature may be unavailable depending on your region.] Your device can recognize only American English commands.] Recognized languages may vary depending on your region.To place a call by speakingFrom the Home screen, touch the 1 Applications Launcher Key > Voice Dialer.Say "2 Call" or "Dial" followed followed by the name of the contact to call.If Voice Dialer finds a match, it dials the contact's default number.Voice recorderUse the voice recorder to record voice memos or other audio files.Recording a sound or voiceFrom the Home screen, touch the 1 Applications Launcher Key and touch Voice Recorder.Touch 2 to begin recording.Touch 3 to end recording.n NOTE Touch Go to list to access your voice recordings. You can listen to the saved recordings.Sending the voice recordingOnce you have finished recording, you can 1 send the audio clip by pressing the Menu Key and touching Share.Choose from 2 Bluetooth, Email, Gmail and Messaging. When you select Email, Gmail or Messaging, the voice recording will be added to a message that you can write and send normally.Utilities](https://usermanual.wiki/LG-Electronics-USA/P930/User-Guide-1556928-Page-49.png)
![60Using Car HomeYou can use the Car Home application whether or not you have a phone car dock (the optional accessory.)] Insert the phone into the car dock.OR] Touch the Car Home icon in the Launch screen.From the Car Home application, you can access Navigate, Voice Search, Music, Phone, Contacts, Map, Settings, and the Brightness settings.Utilities](https://usermanual.wiki/LG-Electronics-USA/P930/User-Guide-1556928-Page-50.png)
![74For Your SafetyImportant InformationThis user guide contains important information on the use and operation of this phone. Please read all the information carefully for optimal performance and to prevent any damage to or misuse of the phone. Any changes or modifications not expressly approved in this user guide could void your warranty for this equipment. Any changes or modifications not expressly approved by the manufacturer could void the user’s authority to operate the equipment.Before You StartSafety InstructionsWARNING! To reduce the possibility of electric shock, do not expose your phone to high humidity areas, such as the bathroom, swimming pool, etc.Always store your phone away from heat. Never store your phone in settings that may expose it to temperatures less than 32°F or greater than 104°F, such as outside during extreme weather conditions or in your car on a hot day. Exposure to excessive cold or heat will result in malfunction, damage and/or catastrophic failure.Be careful when using your phone near other electronic devices. RF emissions from your mobile phone may affect nearby in adequately shielded electronic equipment. You should consult with manufacturers of any personal medical devices such as pacemakers and hearing aides to determine if they are susceptible to interference from your mobile phone. Turn off your phone in a medical facility or at a gas station. Never place your phone in a microwave oven as this will cause the battery to explode.IMPORTANT! Please read the TIA SAFETY INFORMATION before using your phone.Safety InformationRead these simple guidelines. Breaking the rules may be dangerous or illegal. Further detailed information is given in this user guide.]](https://usermanual.wiki/LG-Electronics-USA/P930/User-Guide-1556928-Page-62.png)
![77For Your SafetyIf this equipment does cause harmful interference or television reception, which can be determined by turning the equipment off and on, the user is encouraged to try to correct the interference by one or more of the following measures:] Reorient or relocate the receiving antenna.] Increase the separation between the equipment and receiver.] Connect the equipment into an outlet on a circuit different from that to which the receiver is connected.] Consult the dealer or an experienced radio/TV technician for help.Cautions for Battery]](https://usermanual.wiki/LG-Electronics-USA/P930/User-Guide-1556928-Page-64.png)