LG Electronics USA PB61UJE DLP PROJECTOR User Manual EMISSION TEST REPORT
LG Electronics USA DLP PROJECTOR EMISSION TEST REPORT
Users Manual

Order Number
: GETEC-C1-12-108
FCC Part 15 subpart B
Test Report Number
: GETEC-E3-12-046
Page 1 / 1
EUT Type: DLP PROJECTOR
FCC ID.: BEJPB61UJE
APPENDIX G
: USER’S MANUAL

Owner's Manual
DLP PROJECTOR
PB61U
Please read this manual carefully before operating
your projector and retain it for future reference.
www.lg.com

2LICENSES
This device meets the EMC requirements for home appliances (Class B) and is
intended for home usage. This device can be used in all regions.
LICENSES
Supported licenses may differ by model. For more information about licenses,
visit www.lg.com.
Manufactured under license from Dolby Laboratories.
“Dolby “and the double-D symbol are trademarks of Dolby
Laboratories.
ABOUT DIVX VIDEO: DivXr is a digital video format created
by DivX, LLC, a subsidiary of Rovi Corporation. . This is an
official DivX Certifiedr device that plays DivX video. Visit divx.
com for more information and software tools to convert your
files into DivX video.
ABOUT DIVX VIDEO-ON-DEMAND: This DivX Certifiedr
device must be registered in order to play purchased DivX
Video-on-Demand (VOD) movies. To obtain your registration
code, locate the DivX VOD section in your device setup menu.
Go to vod.divx.com for more information on how to complete
your registration.
“DivX Certifiedr to play DivXr video up to HD 1080p,
including premium content.”
“DivXr, DivX Certifiedr and associated logos are trademarks
of Rovi Corporation or its subsidiaries and are used under
license.”
“Covered by one or more of the following U.S. patents :
7,295,673; 7,460,668; 7,515,710; 7,519,274”
HDMI, the HDMI logo and High-Definition Multimedia
Interface are trademarks or registered trademarks of HDMI
Licensing LLC.
NOTE
y Image shown may differ from your projector.
y Your projector’s OSD (On Screen Display) may differ slightly from that shown in
this manual.
3
SAFETY INSTRUCTIONS
Read these instructions.
Keep these instructions.
Heed all warnings.
Follow all instructions.
Indoor Installation
WARNING
y Do not place the projector in direct
sunlight or near heat sources such as
radiators, fires, stoves, etc.
- This may cause a fire.
y Do not place flammable materials
such as aerosols near the projector.
- This may cause a fire.
y Do not allow your children to cling to
or climb up to the projector.
- The projector may fall down and
cause personal injury or death.
y Do not place the projector directly on
a carpet, rug or place where ventila-
tion is restricted such as a book shelf
or closet.
- This may cause the projector's in-
ternal temperature to rise and cause
a fire.
y Do not place the projector close to
sources of steam or oil such as a
humidifier or kitchen counter.
- This may cause a fire hazard or an
electric shock.
y Do not place the projector where it
might be exposed to excessive dust.
- This may cause a fire.
SAFETY INSTRUCTIONS
Please take note of the safety instructions to prevent any potential accident
or misuse of the projector.
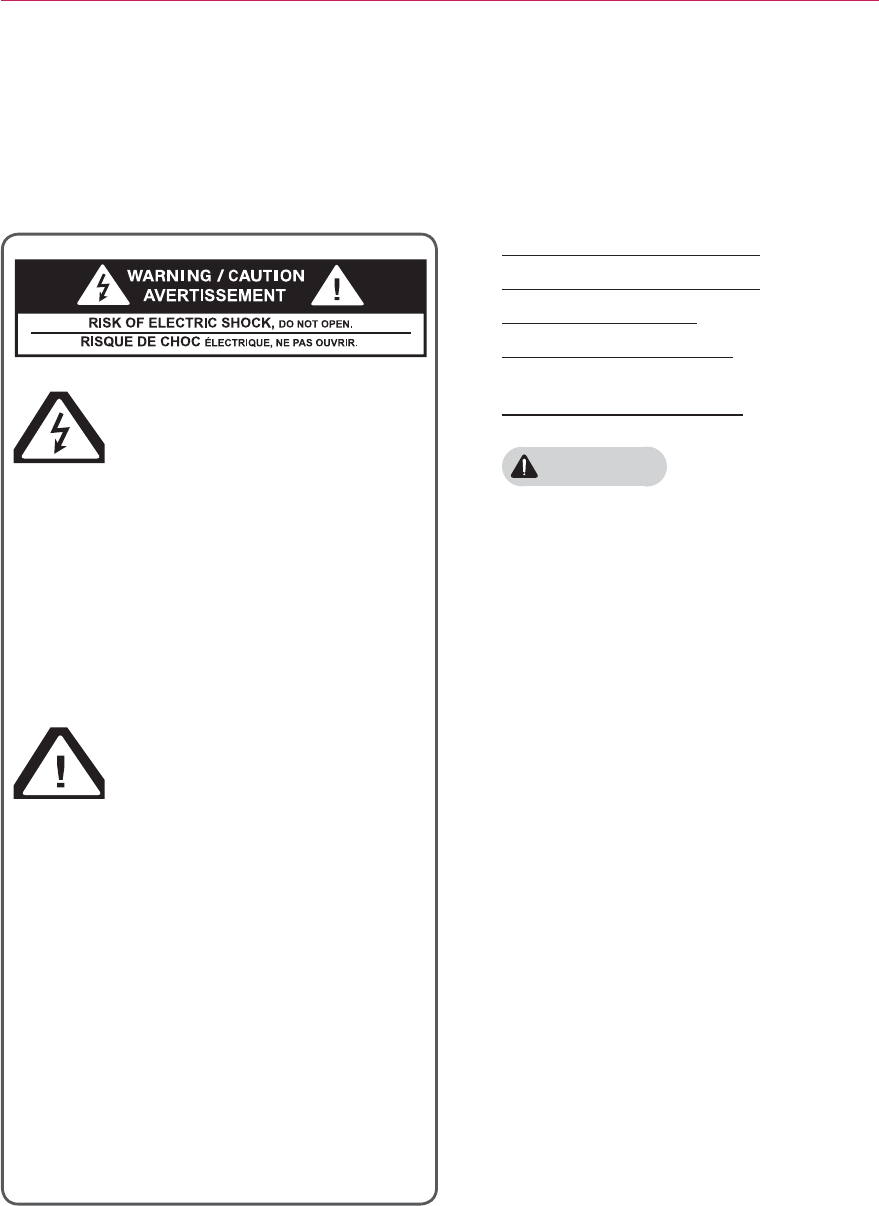
The lightning flash with
arrowhead symbol, within
an equilateral triangle, is
intended to alert the user to the
presence of uninsulated “dangerous
voltage” within the product’s
enclosure that may be of sufficient
magnitude to constitute a risk of
electric shock to persons.
The exclamation point
within an equilateral
triangle is intended to alert
the user to the presence
of important operating and
maintenance (servicing) instructions
in the literature accompanying the
appliance.
WARNING/CAUTION
0 TO REDUCE THE RISK OF FIRE
AND ELECTRIC SHOCK, DO NOT
EXPOSE THIS PRODUCT TO RAIN
OR MOISTURE.

4SAFETY INSTRUCTIONS
y Do not use the projector in a damp
place such as a bathroom where it is
likely to get wet.
- This may cause a fire or an electric
shock.
y Do not allow a tablecloth or curtain to
block the vents.
- This may cause the internal tem-
perature of the projector to rise and
cause a fire.
y The distance between the projector
and the wall should be more than 30
cm for ventilation purposes.
- Otherwise, this may cause the inter-
nal temperature of the projector to
rise and cause a fire.
CAUTION
y When installing the projector on a
table, be careful not to place it near
the edge.
- The projector may fall causing injury
to persons or damage to the projec-
tor. Make sure that you use a stand
suitable for the size of projector.
y Turn off the projector, disconnect the
power supply and remove all connec
tions before moving the projector.
- A damaged cord may cause a fire
or an electric shock.
y Do not install the projector on an
unstable or vibrating surface such as
a vibrating shelf or tilted surface.
- It may fall and cause injury.
y Be careful not to tip the projector over
when connecting external devices to
the projector.
- This may cause injury to persons or
damage to the projector.
Power
WARNING
y The earth wire should be connected.
- Inappropriate earth grounding may
cause damage to the projector or
an electric shock when there is an
electrical surge.
If the projector must be installed at
a place where earth grounding is not
possible, purchase a circuit breaker
and connect the projector to its wall
outlet.
Do not ground the projector to the
gas pipe, water pipe, lightning rod,
or telephone line, etc.
y The power plug should be fully insert-
ed into the wall outlet.
- Unstable connection may cause a
fire.
y Do not place heavy objects on the
power cord or place the cord under-
neath the projector.
- This may cause a fire or an electric
shock.
y Never touch the power plug with a
wet hand.
- This may cause an electric shock.
y Do not connect too many devices to
the same power extension.
- Overheating may cause a fire.
y Remove dust or contaminants around
power plug pins or wall outlets.
- This may cause a fire.

5
SAFETY INSTRUCTIONS
CAUTION
y Hold the plug firmly when unplug-
ging.
- A broken wire in the cord may
cause a fire.
y Ensure the power cord or plug is not
damaged, modified, severely bent,
twisted, pulled, sandwiched or heated.
Do not use a loose wall outlet.
- This may cause a fire or an electric
shock.
y Keep the power cord away from any
heating devices.
- The cord coating may melt and
cause an electric shock.
y Place the projector where people will
not trip over or tread on the power
cord or plug to protect the power
cord and plug from any damage.
- This may cause a fire hazard or an
electric shock.
y Do not turn the projector on or off by
plugging in the power plug or un-
plugging it from the wall outlet.
(Do not use the power plug as a
switch.)
- This may cause an electric shock or
damage to the projector.
y Do not insert a conductor into the
other side of the wall outlet while the
power plug is inserted into the wall
outlet.
In addition, do not touch the power
plug immediately after it is discon-
nected from the wall outlet.
- This may cause an electric shock.
y Use only the official power cord which
is provided by LG Electronics, Inc. Do
not use other power cords.
- This may cause a fire or an electric
shock.
When in Use
WARNING
y Do not place anything containing
liquid, such as a vase, flowerpot, cup,
cosmetics, chemicals, decorations or
candles, etc., on top of the projector.
- Possible fire, electric shock, or fall-
ing may cause physical injury.
y In the event that there is a big im-
pact to the projector or the cabinet is
damaged, switch it off, unplug it from
the wall outlet and contact an autho-
rized service center.
- Otherwise, this may cause a fire or
an electric shock.
y Do not insert pieces of metal such as
coins, hairpins or metal debris, nor
flammable materials such as paper or
matches into the projector.
- This may cause a fire or an electric
shock.
y In the event that liquid or a foreign
object falls into the projector, please
switch it off and unplug it from the
wall outlet and contact an LG Elec-
tronics Service Center.
- Otherwise, this may cause a fire or
an electric shock.
y When replacing a battery of the re-
mote control, make sure a child does
not swallow the battery. Keep the bat-
tery out of reach of children.
- In the case of a battery being swal-
lowed by a child, please consult a
doctor immediately.
y Do not remove any covers except for
the lens cap. There is a high risk of
electric shock.

6SAFETY INSTRUCTIONS
y Do not look directly into the lens
when the projector is in use. The
strong light may damage your eyes.
y When the lamp is on or has just been
turned off, avoid touching the air vent
or lamp because these will be very
hot.
y If there is a gas leak, do not touch
the wall outlet. Open the window for
ventilation.
- A spark may cause a fire or burn.
y Always open the lens door and re-
move the lens cap when the projector
lamp is on.
y Never touch the projector or power
cord during thunder or lightning.
- This may cause an electric shock.
y Do not use the projector near an
electronic device which generates a
strong magnetic field.
y Store the vinyl envelope used to pack
the projector in a safe place away
from children.
- It could cause suffocation if used
improperly.
y Do not use 3D glasses if you do not
watch 3D.
y Do not keep your hand on the projec-
tor for a long time when it is running.
CAUTION
y Do not place a heavy object on the
projector.
- It may fall down and cause physical
injury.
y Be careful to prevent the lens from
heavy impact during transportation.
y Do not touch the lens.
The lens may be damaged.
y Do not use any sharp tools on the
projector such as a knife or hammer,
because this may damage the casing.
y In the event that no image appears
on the screen, switch the projector
off, unplug it from the wall outlet and
contact an authorized service center.
- Otherwise, this may cause a fire or
an electric shock.
y Do not drop an object onto the pro-
jector or apply heavy pressure to it.
- This may cause injury to persons or
damage to the projector.
y The distance between your eyes
and the screen must be around 5 -
7 times the diagonal length of the
screen.
- If you watch the screen at a close
distance for a long time, your eye
sight may become worse.

7
SAFETY INSTRUCTIONS
Cleaning
WARNING
y Do not spray the projector with water
when cleaning. Do not allow water to
go into the projector or do not allow it
to get wet.
- This may cause a fire or an electric
shock.
y When there is smoke or a strange
smell coming out from the projector
or a foreign object falls into the pro-
jector, please switch it off and unplug
it from the power outlet and contact
an LG Electronics Service Center.
- If not, this may cause a fire or an
electric shock.
y Use an air spray or soft cloth or
cotton swab moistened with a lens
cleaning chemical or alcohol to
remove dust or stains on the front
projection lens.
CAUTION
y Contact your seller or the Service
Center once a year to clean the inter-
nal parts of the projector.
- If you do not clean the contaminat-
ed interior of the projector for a long
time, there may be a fire or damage
to the projector.
y When cleaning plastic parts such as
the projector case, unplug the power
first and wipe with a soft cloth. Do
not spray with water or wipe with a
wet cloth. When cleaning the plastic
parts, such as the projector case,
do not use cleanser, automobile or
industrial shiner, abrasive or wax, ben-
zene, alcohol, etc., which can damage
the product.
- This can cause fire, electric shock or
product damage (deformation, cor-
rosion and damage).

8SAFETY INSTRUCTIONS
OTHERS
WARNING
y Only a qualified technician can disas-
semble or modify the projector. For
inspection, adjustment, or repair, con-
tact your seller or the Service Center.
- Otherwise, this may cause a fire or
an electric shock.
CAUTION
y Do not mix new batteries with old
batteries.
- This may cause a fire or an electric
shock caused by overheating and
leakage.
y Unplug the power cord if the projec-
tor is not used for a long period.
- Accumulated dust may cause
overheating, an electric shock from
corroded insulation and a fire from an
electrical surge.
y Only use the specified type of battery.
- Otherwise, this may cause an elec-
tric shock caused by overheating
and leakage.

9
SAFETY INSTRUCTIONS
ANTENNA
Outdoor Antenna Grounding
y If an outdoor antenna is installed,
follow the precautions below. An
outdoor antenna system should not
be located in the vicinity of overhead
power lines or other electric light or
power circuits, or where it can come
in contact with such power lines or
circuits as death or serious injury can
occur. Be sure the antenna system
is grounded so as to provide some
protection against voltage surges and
built-up static charges. Section 810
of the National Electrical Code (NEC)
in the U.S.A. provides information
with respect to proper grounding of
the mast and supporting structure,
grounding of the lead-in wire to
an antenna discharge unit, size of
grounding conductors, location of
antenna discharge unit, connection
to grounding electrodes and
requirements for the grounding
electrode.
Antenna grounding according to the
National Electrical Code, ANSI/NFPA
70
Antenna Lead in Wire
Grounding Conductor
(NEC Section 810-21,
Antenna Discharge Unit
(NEC Section 810-20)
Power Service
GroundingElectrode
System (NEC Art 250,
Part H)
NEC: National Electrical Code
Ground Clamp
Electric Service
Equipment
Ground Clamp
FCC NOTICE
Warning - Class B
(b) For a Class B Digital device or peripheral,
the instructions furnished the user shall
include the following or similar statement,
placed in a prominent location in the text of
the manual:
NOTE: This equipment has been tested and
found to comply with the limits for a Class
B digital device, pursuant to part 15 of the
FCC Rules. These limits are designed to
provide reasonable protection against harmful
interference in a residential installation.
This equipment generates, uses and can
radiate radio frequency energy and, if not
installed and used in accordance with the
instructions, may cause harmful interference
to radio communications. However, there is
no guarantee that interference will not occur
in a particular installation. If this equipment
does cause harmful interference to radio or
television reception, which can be determined
by turning the equipment off and on, the
user is encouraged to try to correct the
interference by one or more of the following
measures:
- Reorient or relocate the receiving antenna.
- Increase the separation between the
equipment and receiver.
- Connect the equipment into an outlet on
a circuit different from that to which the
receiver is connected.
- Consult the dealer or an experienced radio/
TV technician for help.
10 SAFETY INSTRUCTIONS
Disposal of your old appliance
1. When this crossed-out wheeled bin
symbol is attached to a product it means
the product is covered by the European
Directive 2002/96/EC.
2. All electrical and electronic products
should be disposed of separately from the
municipal waste stream through designated
collection facilities appointed by your
government or your local authorities.
3. The correct disposal of your old appliance
will help prevent potential negative
consequences for the environment and
human health.
4. For more detailed information about
disposal of your old appliance, please
contact your city office, waste disposal
service or the shop where you purchased
the product.
Disposal of waste
batteries/accumulators
1. When this crossed-out wheeled bin symbol
is attached to batteries/accumulators of
Your product it means they are covered by
European Directive 2006/66/EC.
2. This symbol may be combined with
chemical symbols for mercury(Hg),
cadmium(Cd) or lead(Pb) if the battery
Contains more that 0.0005% of mercury,
0.002% of cadmium or 0.004% of lead.
3. All batteries/accumulators should be
disposed separately from the municipal
waste stream via designated collection
facilities appointed by the government or
the local authorities.
4. The correct disposal of Your old batteries/
accumulators will help to prevent
potential negative consequences for the
environment, animal and human health.
5. For more detailed information about
disposal of Your old batteries/accumulators,
please contact Your city office, waste
disposal service or the shop where You
purchased the product.
For USA
NOTE TO CABLE/TV INSTALLER
This reminder is provided to call the CATV
system installer’s attention to Article 820-
40 of the National Electric Code (U.S.A.).
The code provides guidelines for proper
grounding and, in particular, specifies that
the cable ground shall be connected to the
grounding system of the building, as close to
the point of the cable entry as practical.

11
Contents
ENTERTAINMENT 27
MY MEDIA 27
Connecting USB Storage Devices 27
MOVIE LIST 29
PHOTO LIST 34
MUSIC LIST 36
FILE VIEWER 38
3D FUNCTION 40
Before Watching 3D 40
While Watching 3D 40
Requirements for Watching 3D Images
42
To Use DLP-LINK (DLP-Ready) Type
Glasses 42
Watching 3D Images 43
CUSTOMIZING SETTINGS 44
SETUP Menu 44
PICTURE Settings 45
AUDIO Settings 49
CHANNEL Settings 50
TIME Settings 51
OPTION Settings 52
MAKING CONNECTIONS 54
Connecting to an HD Receiver, DVD, or
VCR Player 55
HDMI Connection 55
Connecting to a PC 55
RGB Connection 55
Connecting to the AV INPUT 56
Component Connection 57
Connecting to Headphones 57
LICENSES 2
SAFETY INSTRUCTIONS 3
PREPARATION 12
Accessories 12
Optional Extras 13
Parts and Components 14
Installation 15
Installation Precautions 15
Projection Distance per Screen Size
16
How to Install the Projector Using a
Tripod 17
Kensington Security System 17
REMOTE CONTROL 18
USING THE PROJECTOR 20
Connecting to an Antenna or Cable 20
Connecting an Antenna or Basic
Cable 20
Connecting a Cable Box 20
Watching Projector 21
Turning on the Projector 21
Focus and Position of the Screen
Image 21
Watching Projector 21
Managing Channels 22
Setting Up Channels 22
Using Additional Options 24
Adjusting Aspect Ratio 24
Using the Keystone
Function 25
Using the Input List 25
Blank Function 26
Using the Quick Menu 26
Contents

12 Contents
MAINTENANCE 58
Cleaning the Projector 58
Cleaning the Lens 58
Cleaning the Projector Case 58
How to Fix the Lens Cap 58
SPECIFICATIONS 59
13
PREPARATION
PREPARATION
Accessories
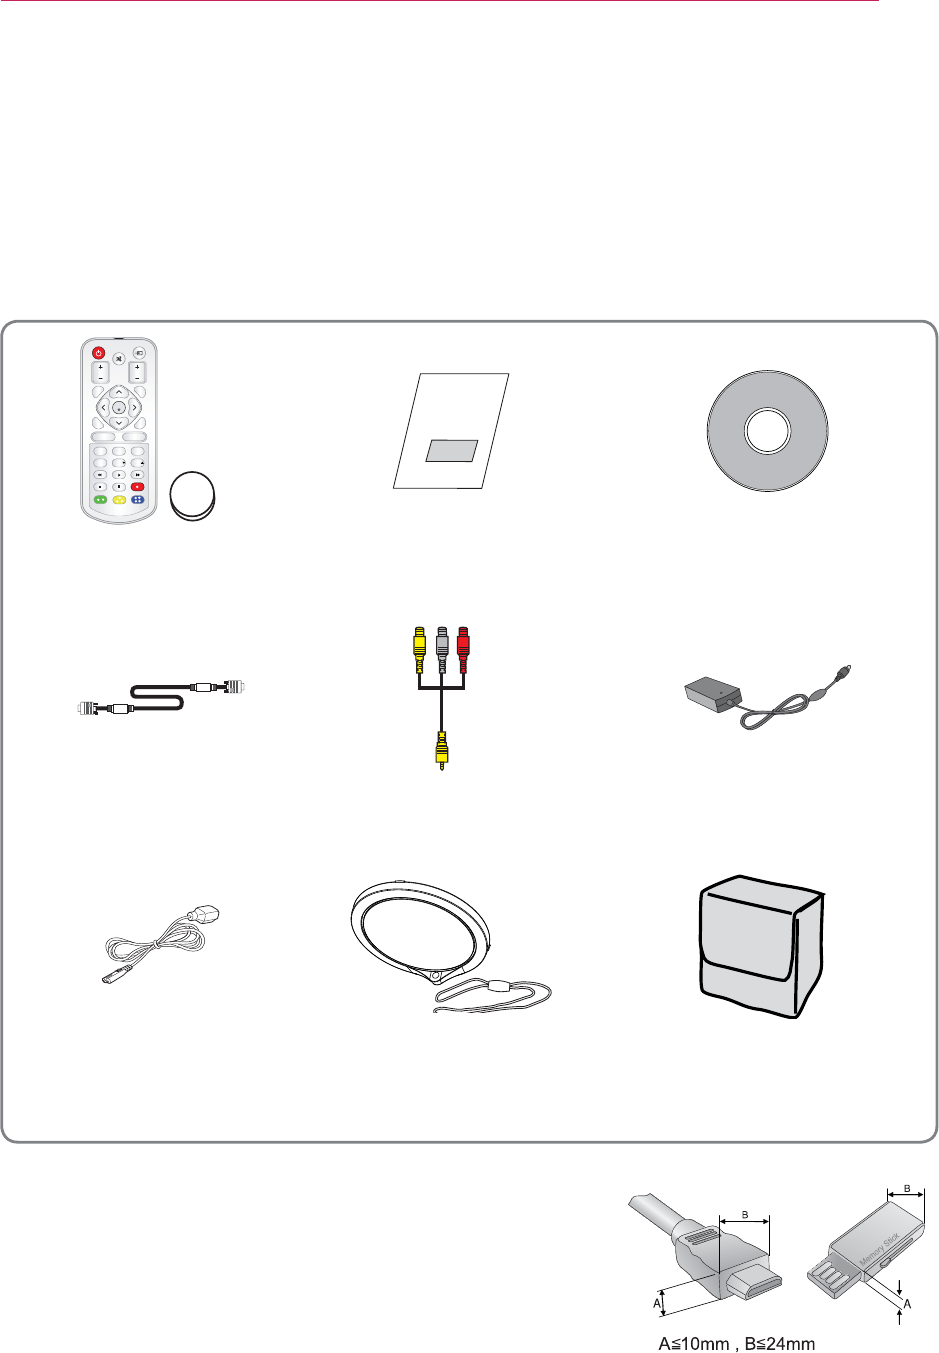
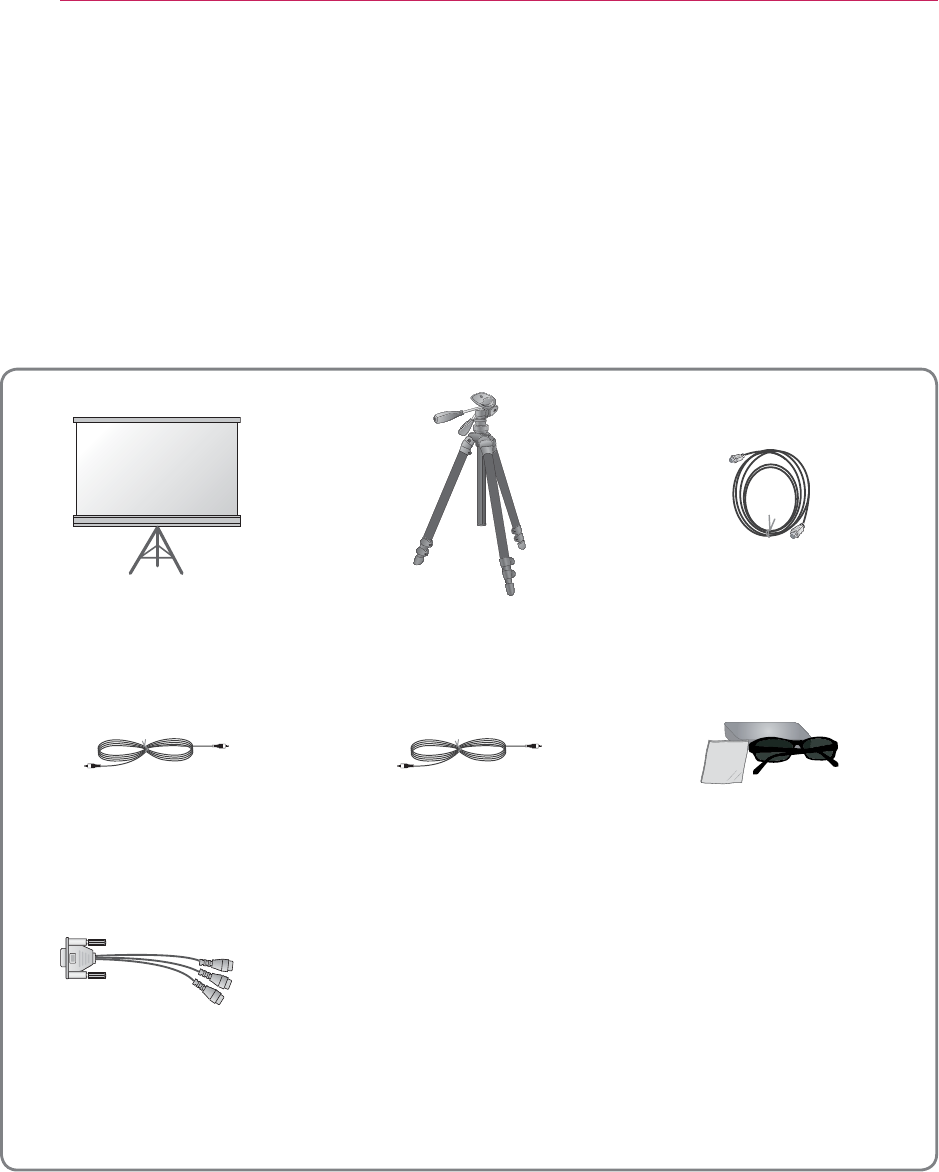
Check enclosed accessories.
The picture may be different from an actual product.
y When connecting a cable to the HDMI or USB port,
it may not be connected properly if the size of jack to
the USB/HDMI port is too big. Use a standard sized
jack.
219'4
/76'
+0276
81.7/'
-';5610'
#761 $.#0-
':+6ꕯ
ꕣ
5'66+0)5 3/'07
56+..
& .4
1-
4#6+1 75$
/#4- 2#)' 2#)'
Remote Control
Coin battery Owner's Manual CD Owner's manual
Computer Cable Composite Gender AC-DC Adaptor
Power Cord Lens Cap, Strap Portable Bag
14 PREPARATION
Optional Extras
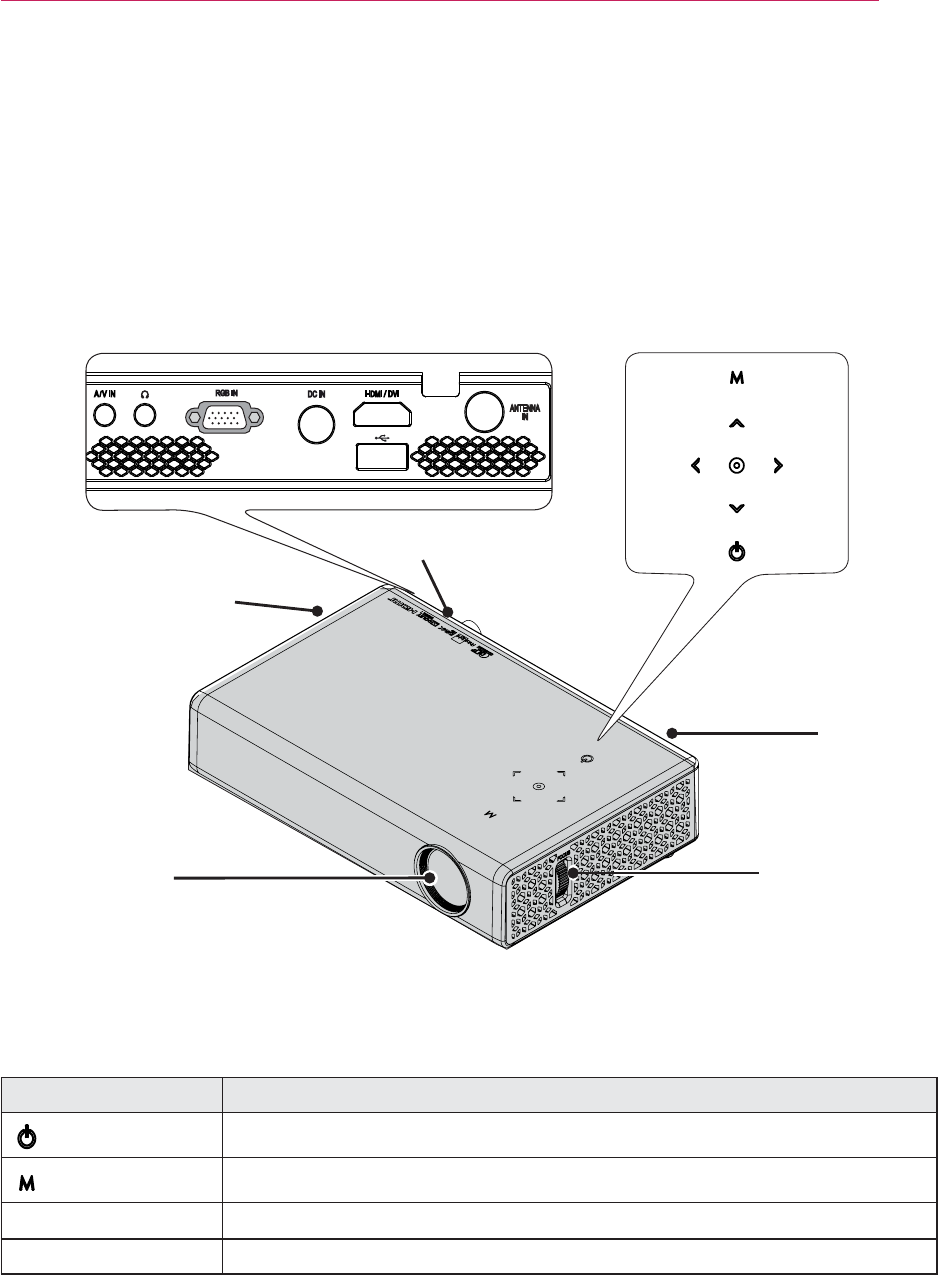
To purchase optional extras, visit an electronics store or online shopping site or contact
the retail store where you purchased the product.
Without prior notice, optional extras are subject to change in order to improve the per-
formance of the product, and new accessories may be added.
Screen for Projector Tripod HDMI Cable
Video Cable Audio Cable
3D glasses
(DLP-LINK or DLP-
Ready Type)
RGB to Component cable
15
PREPARATION
Parts and Components
* The projector is manufactured using high-precision technology. You may, however,
see tiny black dots and/or bright colored dots (red, blue or green) that continuously
appear on the projector screen. This is a normal result of the manufacturing process
and does not indicate a malfunction.
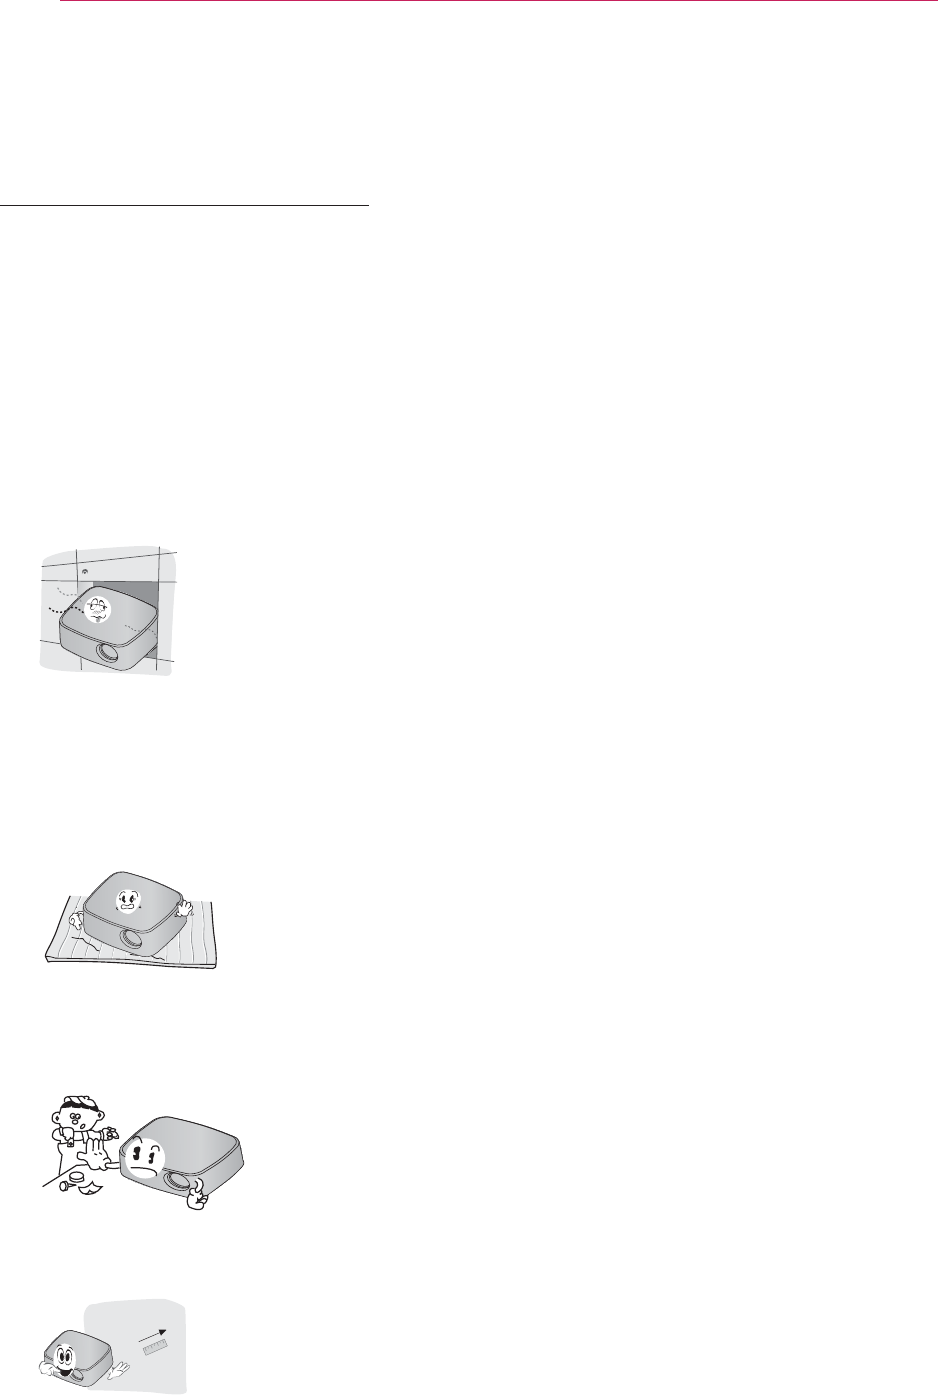
Speaker
Focus ring
Lens
2
Button Description
(Power) Turns the projector on or off.
(Menu) Selects or closes menus.
∧, ∨, <, > Adjusts functions of menus.
ᯙ(OK) Checks present mode and saves function changes.
1 Due to the high temperature air coming out of the vents, do not get close to the
vents.
2 Do not touch the lens when using the projector or opening the lens cap. The lens
may be damaged.
Control Panel
Back
Speaker
Vent
1
16 PREPARATION
Installation
Installation Precautions
y Place the projector in a well-ventilat-
ed environment.
- To prevent internal heat from build-
ing up, install the projector in a well-
ventilated place.
Do not place anything near the pro-
jector as this may block its air vents.
If the air vents are blocked, the inter-
nal temperature will increase.
- Do not place the projector on a car-
pet or rug. If a projector model has
its inlet vent on its bottom, do not
block the
vent and use the projector
on a leveled solid surface
.
- Be sure to prevent foreign objects
such as paper debris from entering
the projector.
- Leave an adequate distance (30 cm
or more) around the projector.
y Do not place the projector in a hot or
humid environment.
- Do not place the projector in a
hot, cold, or humid environment.
(See60Page regarding operating
temperature and humidity.)
y Do not place the projector in a place
where it will easily attract dust.
- This may cause a fire.
y Do not remove any covers except for
the lens cap. There is a high risk of
electric shock.
y The projector is manufactured using
high-precision technology. You may,
however, see tiny black dots and/
or bright colored dots (red, blue or
green) that continuously appear on
the projector screen. This is a normal
result of the manufacturing process
and does not indicate a malfunction.
y The remote control may not work
in an environment where a lamp
equipped with electronic ballasts or
a three-wavelength fluorescent lamp
is installed. Replace the lamp with an
internationally standardized lamp for
the remote control to work normally.
17
PREPARATION
Projection Distance per Screen Size
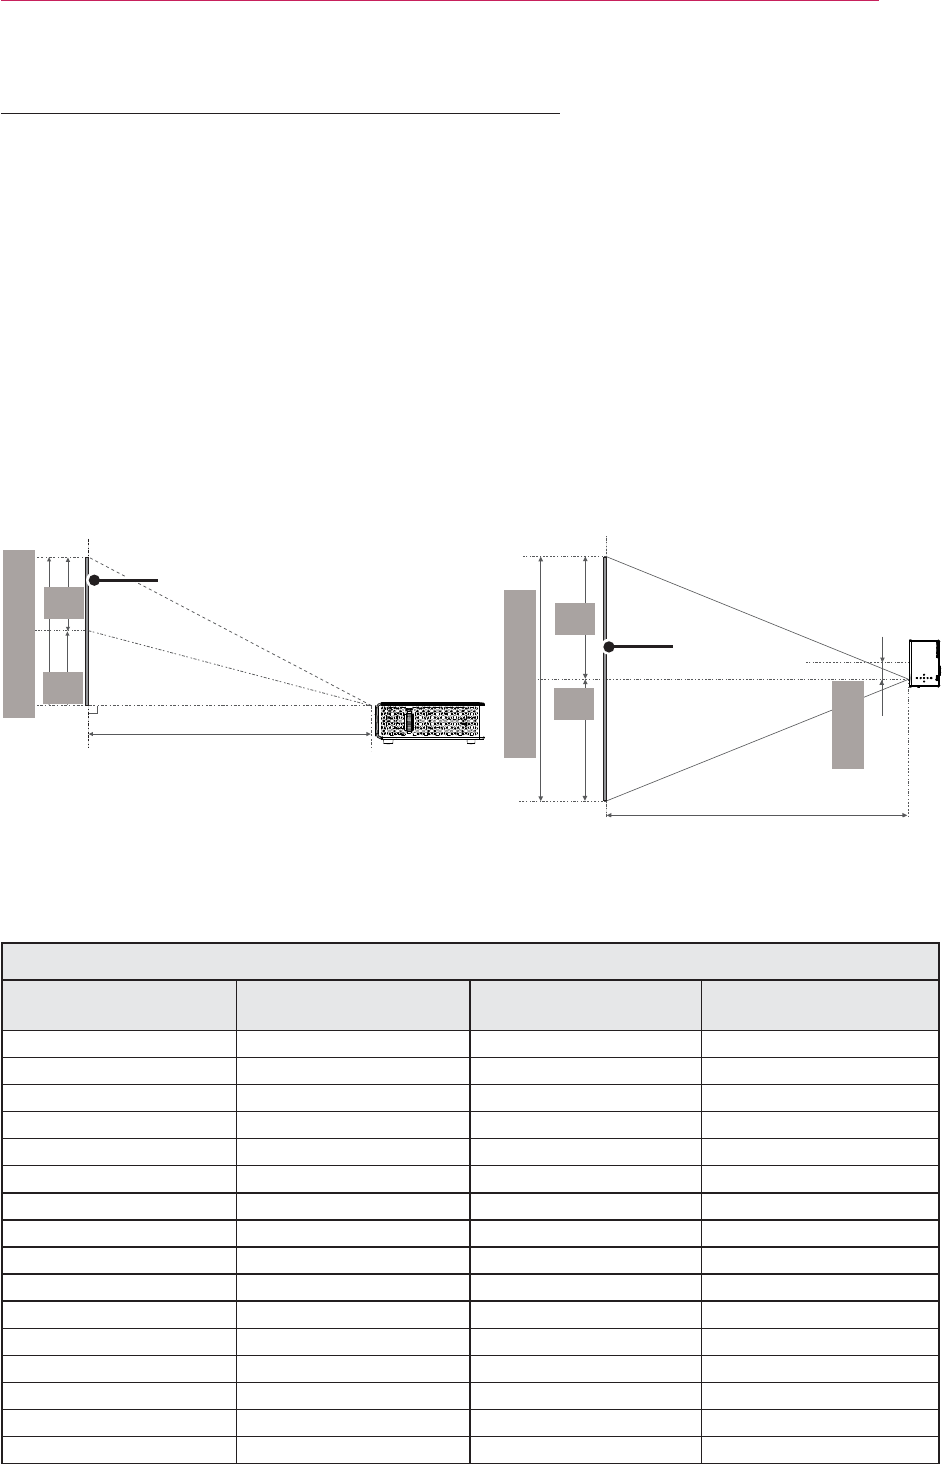
1 Place the projector on a sturdy, level surface, together with the PC or audio/video
source.
2 Place the projector at an appropriate distance from the screen. The distance be-
tween the projector and the screen determines the actual size of the image.
3 Position the projector so that the lens is set at a right angle to the screen. If the
projector is not set at a right angle, the image on the screen will be tilted and the
image quality will be poor. If the screen image is crooked, use the Keystone function.
(see page26)
4 Connect the power cords of the projector and the connected devices to the wall
outlet.
Ratio of upward projection: 100%
Screen Height (X)
X/2
X/2
Screen Width (Y)
Y/2
Y/2
DISPLAY
Projection distance (D) Projection distance (D)
DISPLAY
51 mm
16:10 Screen
Screen Size (mm) Screen Width (Y) (mm) Screen Height (X) (mm) Projection Distance (D)
(mm)
635 538 337 748
762 646 404 902
889 754 471 1056
1016 861 539 1210
1143 969 606 1365
1270 1077 673 1520
1397 1185 741 1674
1524 1292 808 1828
1651 1400 875 1983
1778 1508 943 2137
1905 1615 1010 2291
2032 1723 1077 2445
2159 1831 1145 2600
2286 1938 1212 2755
2413 2046 1279 2909
2540 2154 1347 3063
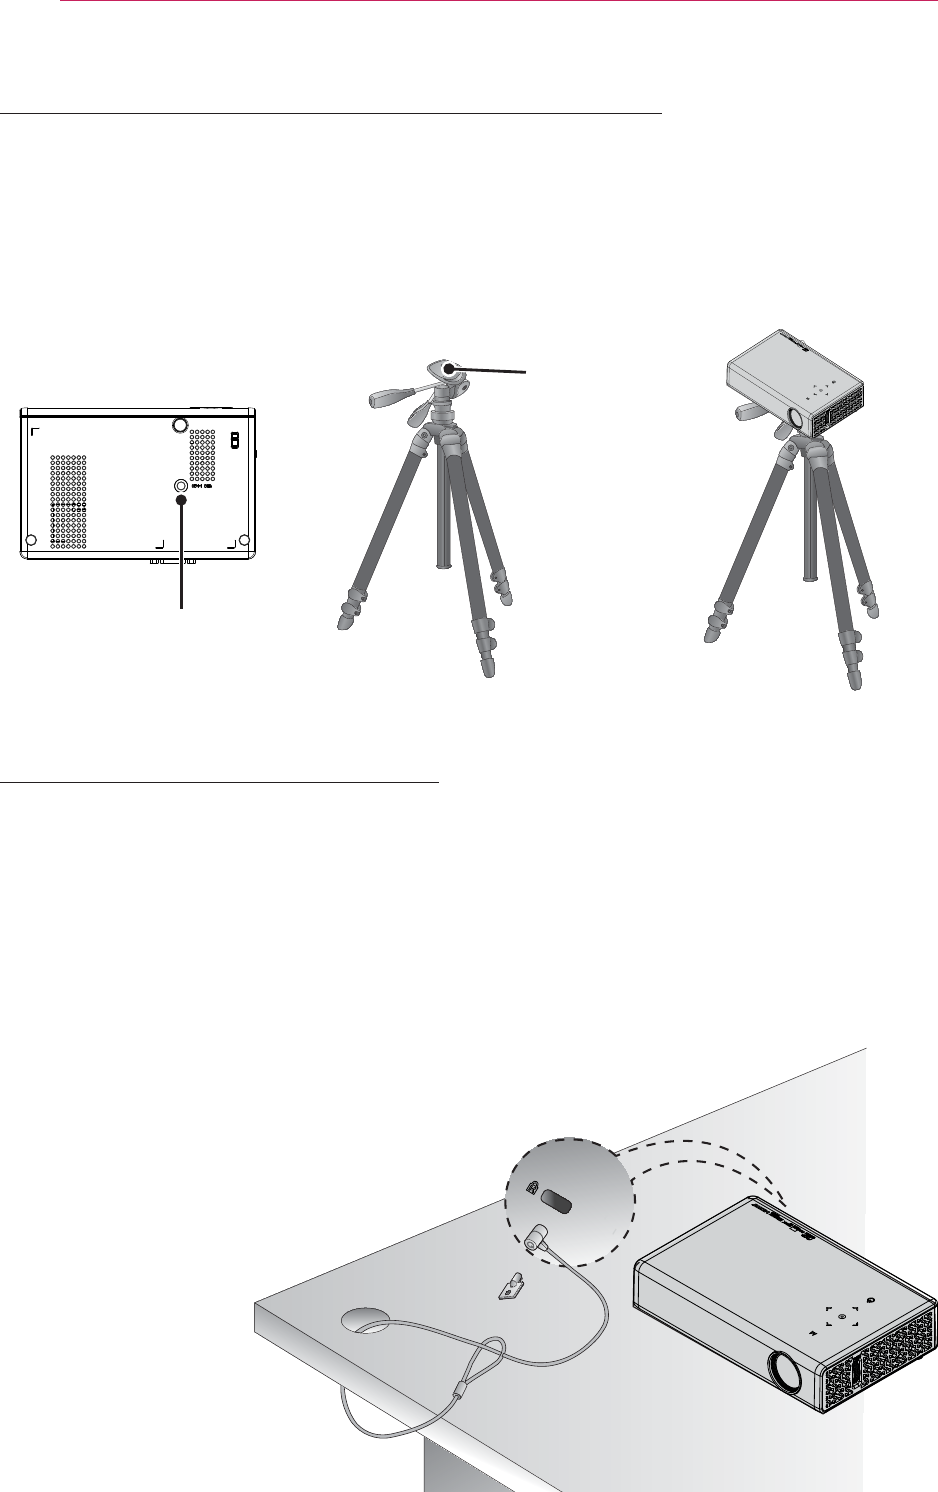
18 PREPARATION
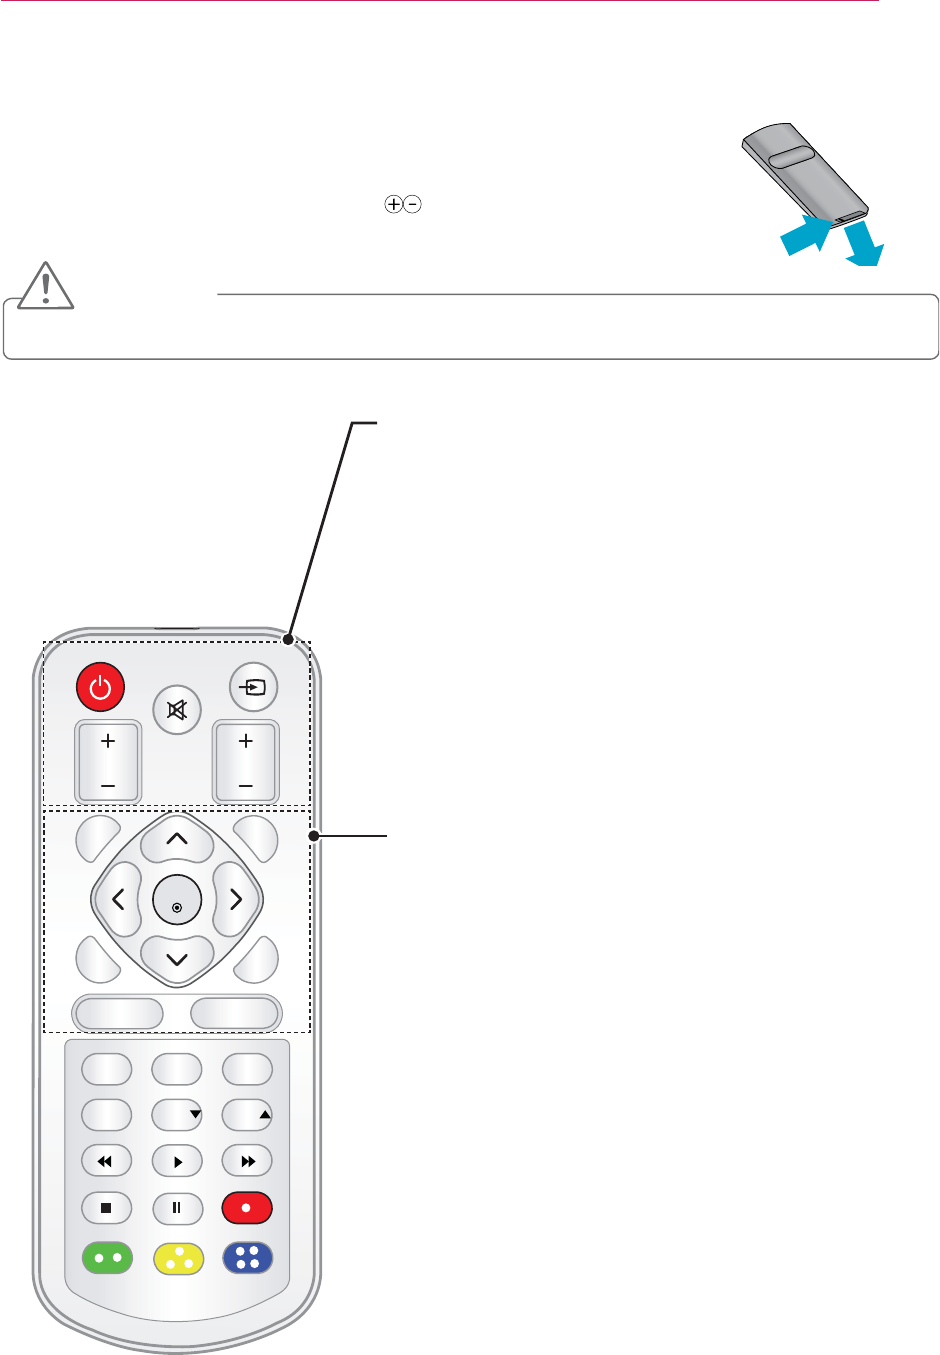
Kensington Security System
y This projector has a Kensington Security System Connector on the panel. Connect a
Kensington Security System cable as below.
y For detailed installation and use of the Kensington Security System, refer to the
user’s guide included with the Kensington Security System set.
y The Kensington Security System is an optional item.
y What is Kensington?
Kensington is a company that sells security systems that prevent expensive elec-
tronic equipment such as a computer or laptop from being stolen.
Internet Homepage: http://www.kensington.com
How to Install the Projector Using a Tripod
y You can install this projector using a camera tripod.
As shown below, you can mount the projector instead of a camera on the tripod.
y When stabilizing the tripod, we recommend using the locking bolt of standard size 4.5
mm or less. The maximum size allowed for the locking bolt is 5.5 mm. (If it is longer
than the maximum allowed size, it may damage the projector.)
+س
The projector is connected
to this part.
Tripod
Bolt used to fix
the projector
Bottom side of the
projector
19
REMOTE CONTROL
REMOTE CONTROL
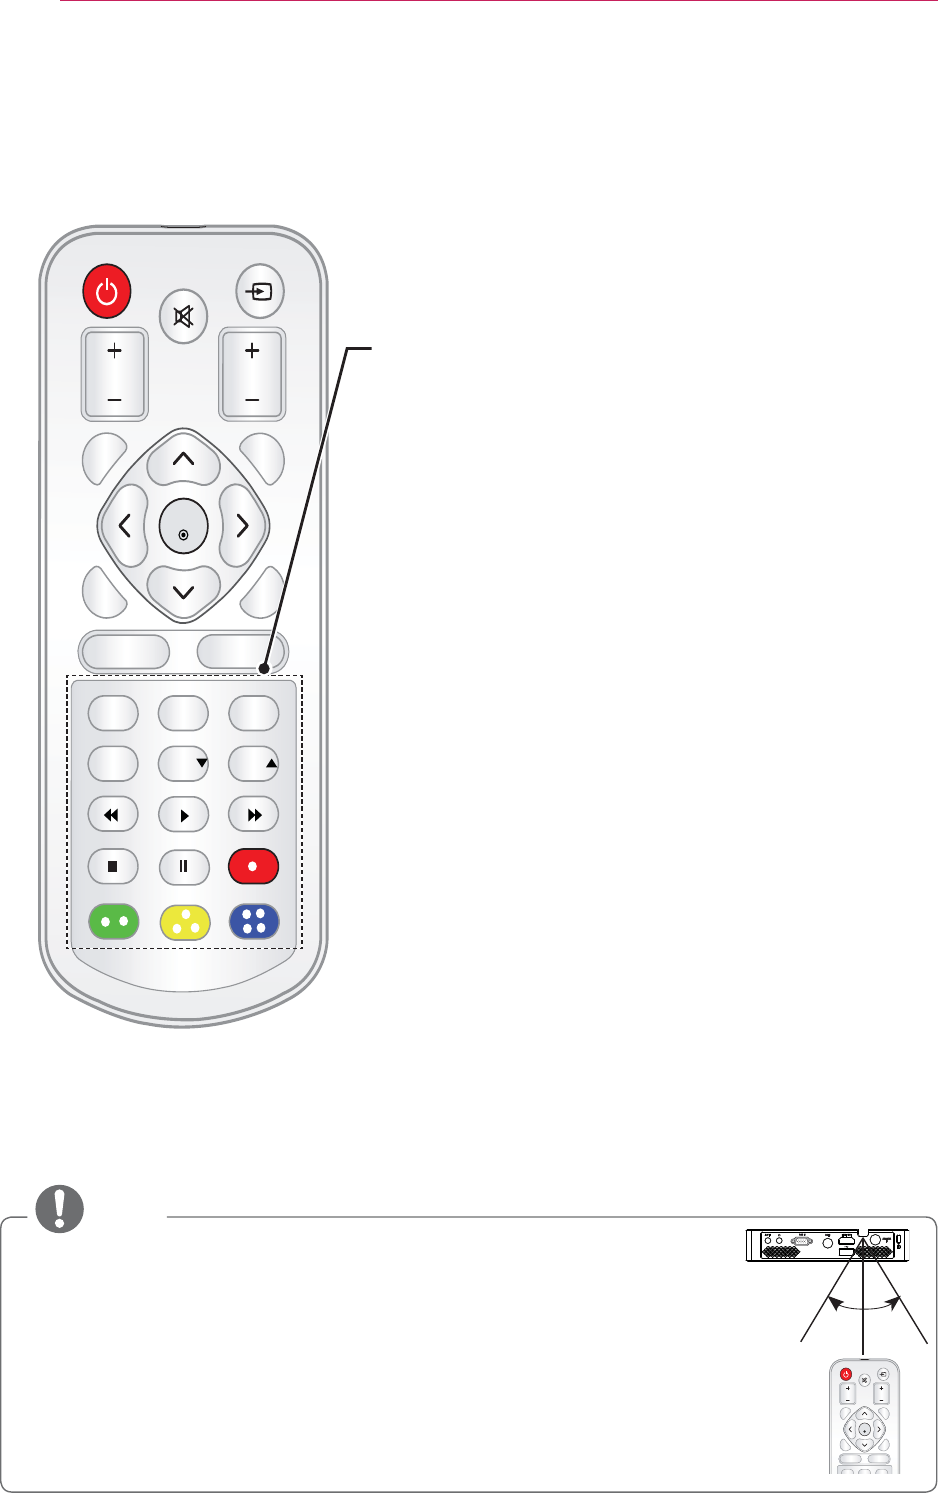
Open the battery cover on the back of the remote control and insert the
specified batteries as per instructions . The same type of batteries
must be used.
CAUTION
y Do not mix a new battery with an old battery.
219'4
/76'
+0276
81.7/'
-';5610'
#761 $.#0-
':+6ꕯ
ꕣ
5'66+0)5 3/'07
56+..
& .4
1-
4#6+1 75$
/#4- 2#)' 2#)'
POWER
Turns the projector on or off.
INPUT
Changes the input source.
MUTE
Mutes all sounds.
VOLUME
Adjusts the volume level.
KEYSTONE
Adjusts Keystone.
AUTO
Automatically adjusts the PC input image.
BLANK
Turns the projector screen on or off.
Up/Down/Left/Right Buttons
Adjusts functions of menus.
OK
Checks present mode and saves function changes..
EXIT弁
Clears all on-screen displays and returns to projector viewing.
廵
Returns to the previous level.
SETTINGS
Selects or closes menus.
Q.MENU
Accesses the quick menu.
①②
20 REMOTE CONTROL
NOTE
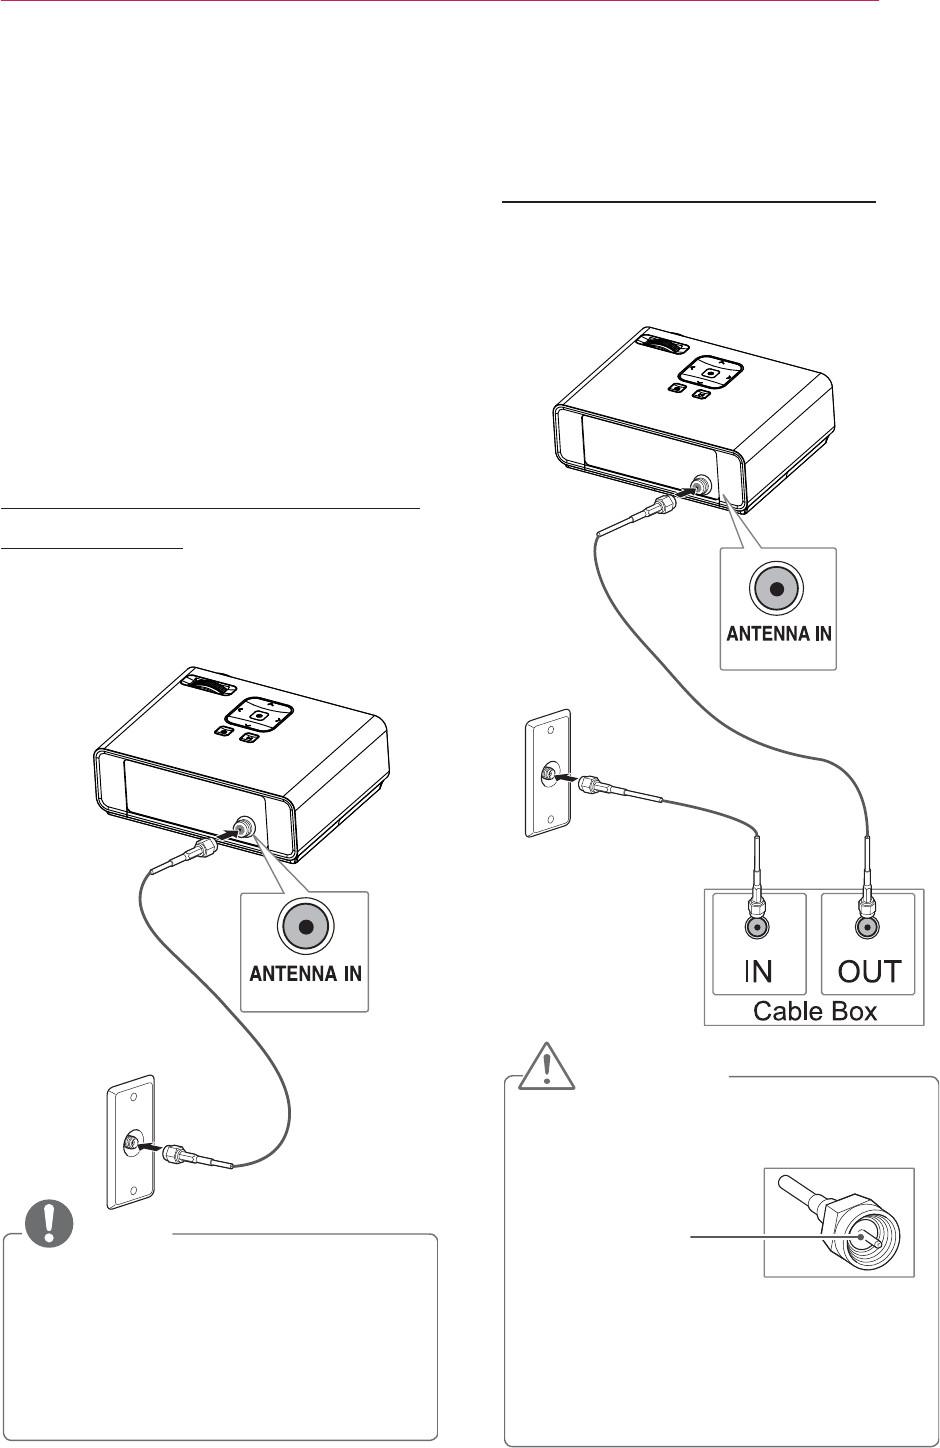
y When using the remote control, the optimal remote range is less than 3
meters (left/right) and within a 30 degree arc of the IR receiver.
y If cables are connected, the remote range is less than 3 meters (left/right)
and within a 30 degree arc of the IR receiver.
y For seamless operation, do not block the IR receiver.
y When you carry the remote control in the portable bag, make sure that the buttons
on the remote control are not pressed by the projector, cables, documents or any
other accessories in the bag. Otherwise, it may significantly reduce the battery life.
219'4
/76'
+0276
81.7/'
-';5610'
#761 $.#0-
':+6ꕯ
ꕣ
5'66+0)5 3/'07
56+..
& .4
1-
4#6+1 75$
/#4- 2#)' 2#)'
STILL
Freezes the moving image.
(Available in any mode other than DivX)
RATIO
Resizes an image.
USB
Accesses MY MEDIA.
MARK
Select menus or options.
PAGE ▲▼
Moves to the previous or next screen.
Playback Control Buttons
Controls playback of MY MEDIA.
3D
Shows 3D images.
L/R
Switches left and right in 3D mode.
219'4
/76'
+0276
81.7/'
-';5610'
#761 $.#0-
':+6ꕯ
ꕣ
5'66+0)5 3/'07
56+..
1-
4#6+1 75$
63䮋#63䮋
21
Using the PROJECTOR
Using the PROJECTOR
Connecting to an
Antenna or Cable
Connect an antenna, cable, or cable
box to watch TV while referring to the
following. The illustrations may differ
from the actual items and a RF cable is
optional.
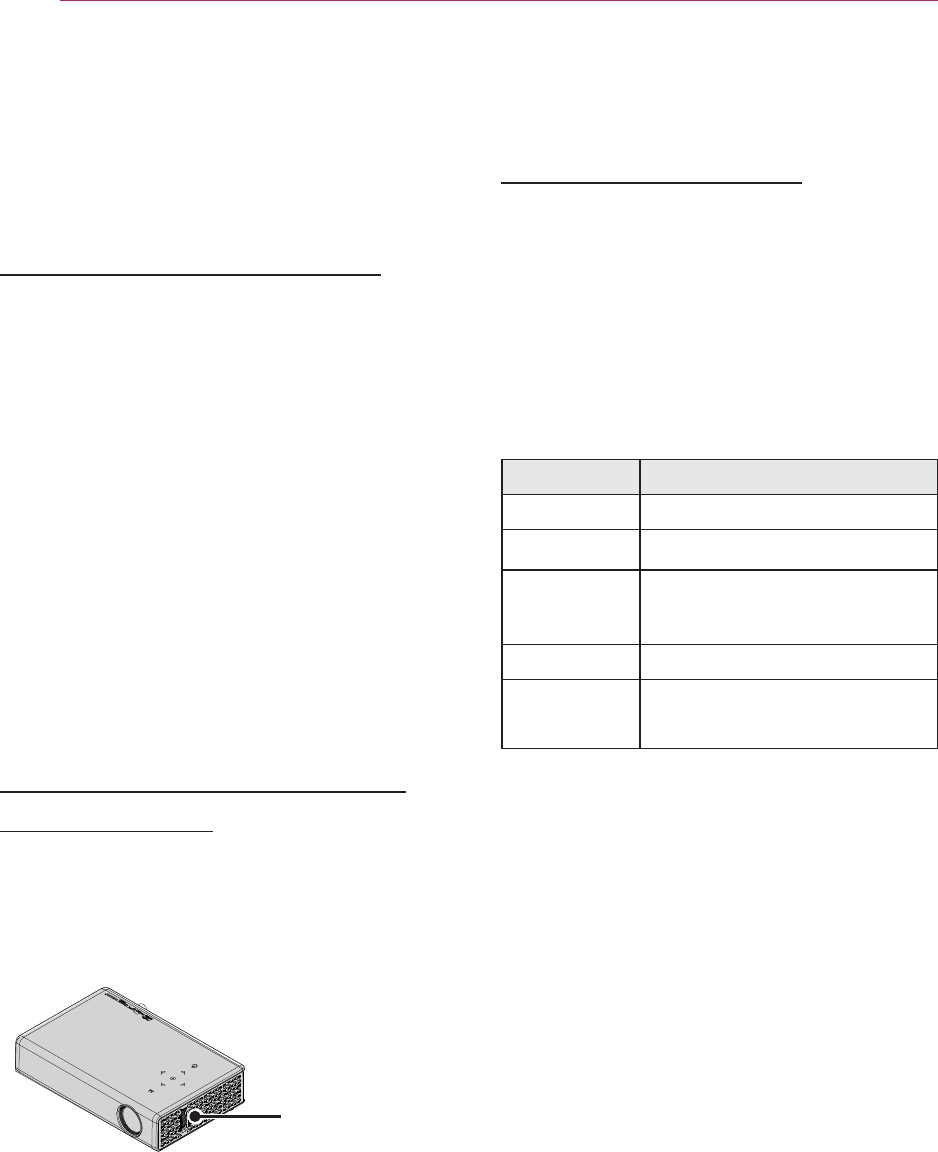
Connecting an Antenna or
Basic Cable
Connect the projector to a wall antenna
socket with an RF cable
(75 Ω).
NOTE
y Use a signal splitter to use more
than 2 projectors.
y Visit http://lgknowledgebase.com
for more information about the
antenna and cable connection.
Search for antenna.
Connecting a Cable Box
Connect the projector to a cable box
and the cable box to a wall antenna
socket with 2 RF cables (75 Ω).
#CAUTION
y Make sure not to bend the copper
wire of the RF cable.
Copper wire
Complete all connections between
devices, and then connect the power
cord to the power outlet to prevent
damage to your projector.
22 Using the PROJECTOR
Watching Projector
Turning on the Projector
1 Connect the power cord correctly.
y Check if the lens cap is open before
turning on the projector.
2 After waiting for a moment, press
the POWER button on the remote
control or the control panel.
(The light on the control panel will be
turned on.)
y Select an input signal by using the
INPUT button on the remote con-
trol.
3 In the Language Selection screen,
select a language.
Focus and Position of the
Screen Image
When an image appears on the screen,
check if it is in focus and fits the screen
properly.
Focus ring
y To adjust the focus of the image,
rotate the focus ring.
Watching Projector
1 In Standby mode, press the POWER
button to turn the projector on.
2 Press the INPUT button and select
the input signal you want.
3 Control the projector using the fol-
lowing buttons while watching projec-
tor.
Button Description
VOL -, + Adjusts the volume level.
MUTE Mutes all sounds.
Q.MENU Accesses the quick menu.
(see page27)
RATIO Resizes an image.
Key'sS
,TAdjusts Keystone. (see
page26)
4 To turn the projector off, press the
POWER button.

23
Using the PROJECTOR
Managing Channels
Setting Up Channels
Storing Channels
To store channels automatically,
1 Press MENU to access the menu.
2 Press the Navigation buttons to scroll
to CHANNEL and press OK.
3 Press the Navigation buttons to scroll
to Auto Tuning and press OK.
4 Select Start to start automatic
tuning. The projector scans and saves
available channels automatically.
5 When you are finished, press EXIT.
To store channels manually,
1 Press MENU to access the menu.
2 Press the Navigation buttons to scroll
to CHANNEL and press OK.
3 Press the Navigation buttons to scroll
to Manual Tuning and press OK.
4 Scroll through the channel types, and
then add or delete channels.
5 When you are finished, press EXIT.
#NOTE
y If the projector scans a blocked
channel, you will be prompted to
enter your password to keep the
channel scanned.
y You can store up to 1000 channels.
The number of channels that you
can store differs depending on the
broadcasting signal environment.
y The channels are stored in the order
of DTV, TV, Cable DTV and Cable
TV.
24 Using the PROJECTOR
Editing Your Channel List
1 Press MENU to access the menu.
2 Press the Navigation buttons to scroll
to CHANNEL and press OK.
3 Press the Navigation buttons to scroll
to C
hannel Edit
and press OK.
4 Edit channels using the following
buttons.
&KDQQHO(GLW )DYRULWH*URXS $3DJH
'79 79 &DEOH'79 &DEOH79
ᯙ&K&KDQJH
ᯒ1DYLJDWLRQ
᱆)DYRULWH&K
᱇3DJH&KDQJH
ᱭ)DYRULWH&K*URXS
ᯕ%ORFN8QEORFN
ᰙ3URYLRXV
ᯕ$GG'HOHWH
Button Description
OK Selects the highlighted
channel to view.
∧, ∨,
<, > Scrolls through channel
types or channels.
FAV Adds a favorite channel list.
CH Moves to the previous or
next page.
Q.MENU Changes the favorite group.
Yellow Block or unblock a channel.
Blue Adds or deletes a channel.
The deleted channel
displays in blue.
5 When you are finished, press EXIT.
Favorite Channel Setup
1 Press C
H
or Number buttons to
access to select your desired channel.
2 Press FAV. to access the Favorite List.
3 Press the /##buttons to scrolls
through channel group.
4 Press the Yellow button.
Favorite Channel List
1 Press FAV. to access the Favorite List.
2 Press the Navigation buttons to scroll
to a channel.and press OK.
)DYRULWH/LVW ᰙ([LW
ᯑ)DYRULWH&K*URXS
܁*URXS $۽
᯦
᯦
ᯕ&K5HJ ᯕ&K(GLW
ᯱ
ᯙ
Button Description
∧, ∨ Scrolls through channels.
<, > Scrolls through channel
group.
CH Moves to the previous or
next page
Yellow Register or cancel the
current channel in favorite
channel list.
Blue Go to the “CHANNEL menu
- Channel Edit”.
25
Using the PROJECTOR
Using Additional Options
Adjusting Aspect Ratio
Resize an image to view at its optimal
size by pressing RATIO while you are
using the projector.
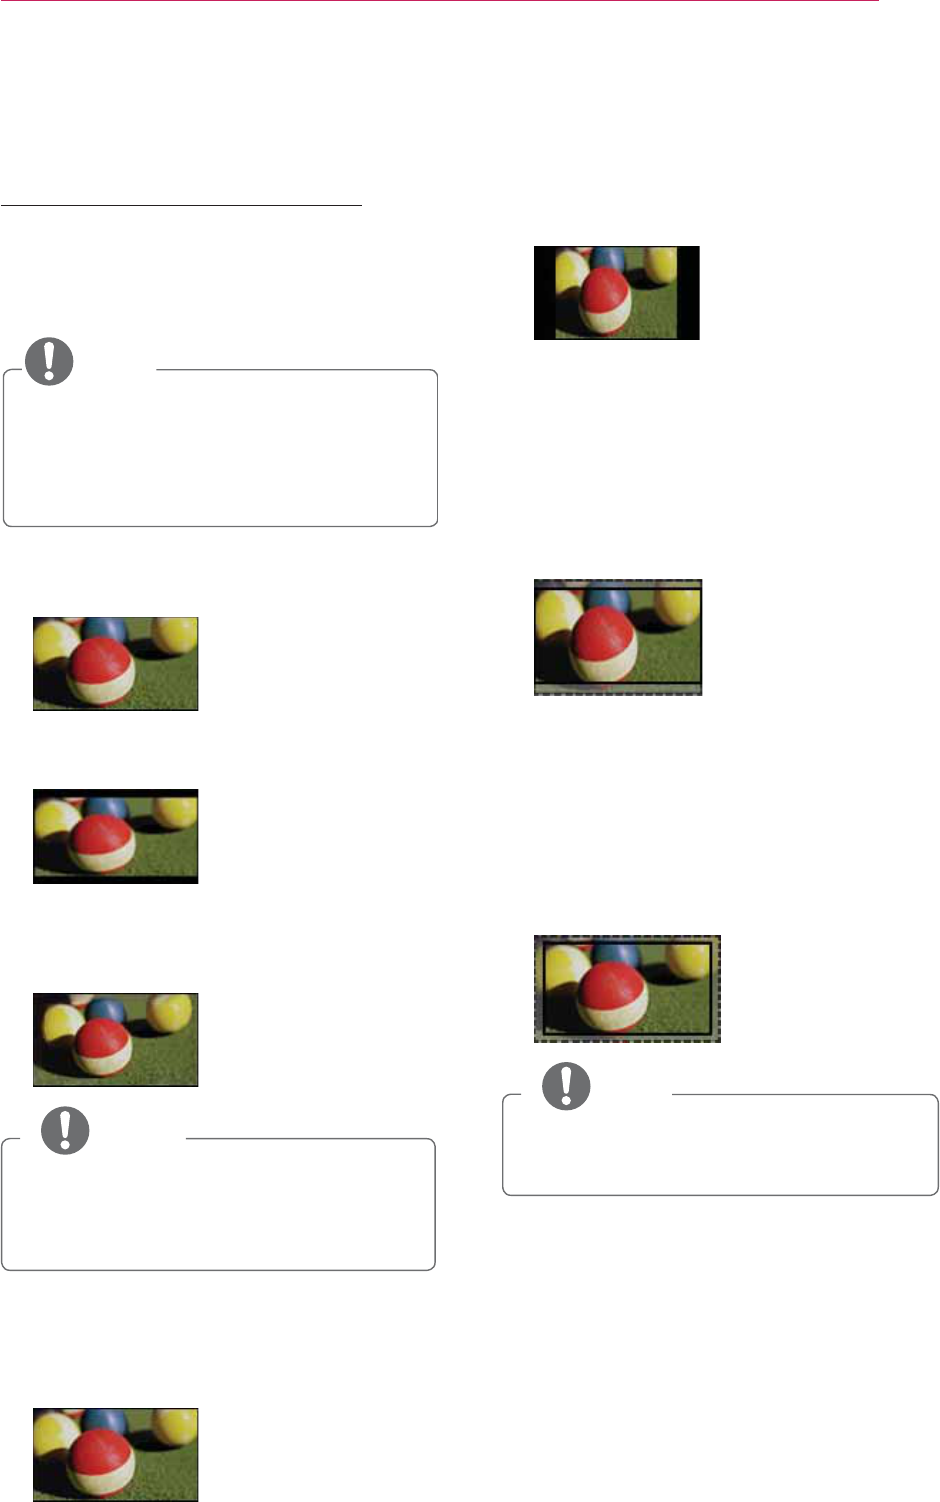
NOTE
y Some options may not be available
depending on input signals.
y You can also change the image size
by pressing Q.MENU or SETTINGS.
- FULL: Changes to the full screen
regardless of the aspect ratio.
- 16:9: Resizes images to fit the
screen width.
- Just Scan: Displays video images in
the original size without cutting off
the edges.
NOTE
y If you select Just Scan, you may see
image noises at the edge or edges
of the screen.
- Set By Program: Displays images in
the same aspect ratio as the original
image.
- 4:3: Resizes images to the 4:3
aspect ratio.
- Zoom: Enlarges an image to fit the
screen width. The top and bottom of
the image may be truncated.
y Press the or button to zoom in
or out of the image.
y Press the or button to move
the image.
- Cinema Zoom: Formats an image
to the cinemascope ratio, 2.35:1. It
ranges from 1 to 16.
y Press the or button to zoom in
or out of the image.
y Press the or button to move
the image.
NOTE
y If you enlarge or reduce an image,
the image may be distorted.
26 Using the PROJECTOR
Using the Keystone
Function
To prevent the screen image from
becoming trapezoidal, Keystone adjusts
the top and bottom width of the image
if the projector is not set at a right angle
to the screen.
Because the Keystone function may
cause inferior screen image quality, use
this function only when it is not possible
to set up the projector at an optimal
angle.
ؒ.H\VWRQH ܁ ۽
ᯙ2.
1 Press the Key's orKey's button to
adjust the screen.
y Keystone can be adjusted from -40
to 40.
2 Press the OK button after adjust-
ment.
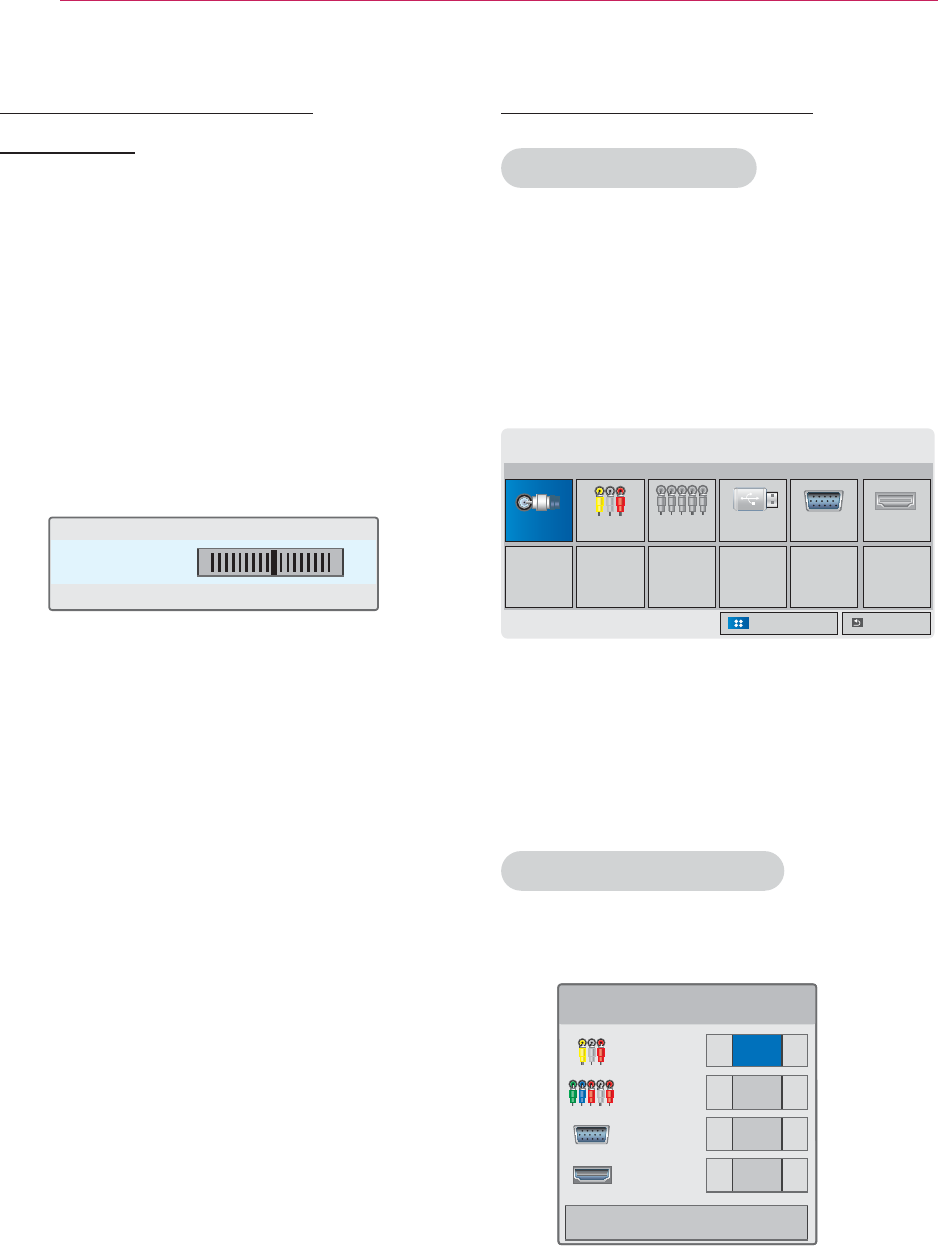
Using the Input List
Using the Input List
1 Press the INPUT button to access
the input sources.
- The connected input mode appears
first. However, AV / Component
input is always activated.
,1387 ᯒ0RYHᯙ2.
([LW,QSXW/DEHO
2
Select an input signal using the INPUT
button and the projector is switched
only to the connected input mode. You
can use the , , or button to
switch between all the input modes.
Adding an Input Label
Displays which devices are connected to
which input ports.
,QSXW/DEHO
,1387 ܁۽
&RPSRQHQW ܁۽
5*%3& ܁۽
+'0, ܁۽
&ORVH
1 Press the INPUT button to access
the input sources.
2 Press the BLUE button.
3 Use the or button to scroll to
one of the input sources.
4 Use the or button to select one
of the input labels.
79 $9 5*%3& 86% &RPSRQHQW +'0,

27
Using the PROJECTOR
Blank Function
Using the Blank Function
This function may be effective when you
need to draw attention during a meeting
or training.
1 Press the BLANK button, and the
screen is covered by the background
color.
You can change the background
color by referring to "Selecting a
Blank Image".
2 Press any button to clear the blank
function.
To cover the screen temporarily, press
the BLANK button on the remote
control.
Do not block the lens with any object
while the projector is running.
It may become overheated and de-
formed or even cause a fire.
Selecting a Blank Image
1 Press the SETTINGS button.
2 Press the , , or button to
select O
PTION
and press the OK
button.
3 Press the , , or button to
select B
lank Image
and press the
OK button.
4 Use the , , or button to
move to the setting or option you
want and press the OK button.
Using the Quick Menu
You can customize frequently used
menus.
1 Press Q.MENU to access the quick
menus.
2 Press the or button to scroll
through the following menus and
press OK.
Menu Description
Aspect
Ratio
Resizes an image.
(see page25)
Picture
Mode
Changes the picture
mode. (see page46)
Energy
Saving
Adjusts brightness.
Clear
Voice II
Makes the voice from the
projector crisp and clear.
Sound
Mode
Set each option as de-
sired.
Sleep
Timer
The projector is turned off
at the preset time.
PJT Mode Turns the projected image
upside down or flips it
horizontally.
3 Press the , , , or button to
scroll through the following menus.
28 ENTERTAINMENT
ENTERTAINMENT
MY MEDIA
Connecting USB Storage
Devices
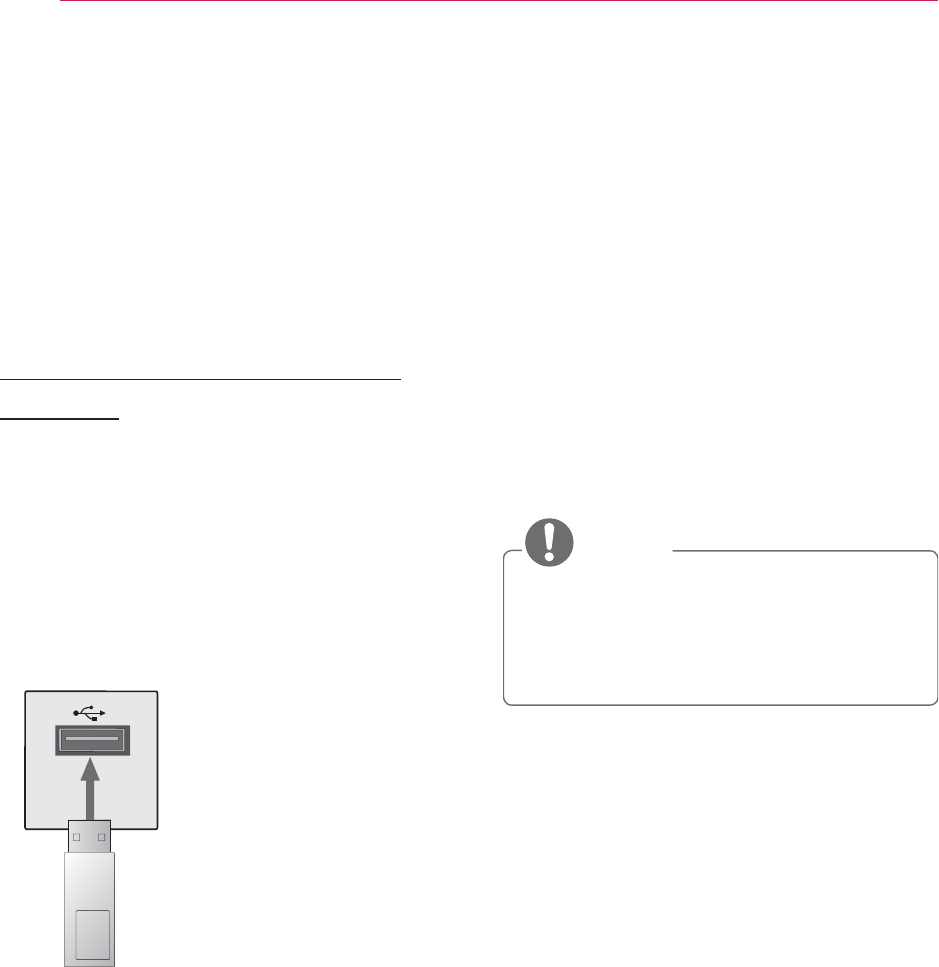
Connect a USB memory stick as shown
below.
When a USB storage device is connect-
ed, the USB adjustment screen appears.
You cannot write or delete data on the
USB storage device.
USB memory
stick
To disconnect the USB storage device,
1 Press the Q.MENU button.
2 Use the or button to move to
USB Device and press the OK
button.
3 Remove the USB device.
NOTE
y After the USB storage device is
disconnected, it cannot be read.
Remove the USB storage device
and connect it again.

29
ENTERTAINMENT
Tips for Using USB Devices
y Only a USB storage device is recog-
nizable.
y USB hubs are not supported.
y A USB storage device which uses its
own driver may not be recognized.
y The recognition speed of a USB
storage device will depend on each
device.
y If a normal USB device does not
work, disconnect and reconnect it.
Please do not turn off the projector
or unplug the USB device when the
connected USB device is working.
The USB device or stored files may
be damaged.
y Please do not connect the USB stor-
age device that has been manipu-
lated on the PC. The projector may
not operate properly or fail to play
files. Use a USB storage device which
contains normal music, photo, video,
or document files.
y Please only use a USB storage device
formatted as a FAT16, FAT32, or
NTFS file system provided by Win-
dows. In case a storage device for-
matted as a different utility program
is not supported by Windows, it may
not be recognized.
y Please connect power to a USB stor-
age device which requires an external
power supply. If not, the device may
not be recognized.
y Please connect a USB storage device
with a cable provided by the USB
manufacturer. When you use a cable
that is not provided by a USB manu-
facturer or an excessively long cable,
the device may not be recognized.
y Some USB devices may not be sup-
ported or will not work properly.
y If the length of a folder or file is too
long, the folder or file may not be
recognized properly.
y The files in a USB storage device are
sorted in the same way as Windows
XP. Up to 100 English characters for
a file name are allowed.
y The data of a USB device may be
damaged, so it is recommended to
backup any important files. Because
a user is responsible for data man-
agement, the manufacturer is not
responsible.
y It is recommended to use a USB
memory stick which is 32 GB or less
and a USB hard disk which is 1 TB or
less. Any device with more than the
recommended capacity may not work
properly.
y If a USB storage device is not working
properly, disconnect it and connect it
again.
y If a USB external hard disk with the
power saving function does not work,
turn the hard disk off and on again to
make it work properly.
y USB storage devices below USB 2.0
are supported as well. However, they
may not work properly in the movie
list.

30 ENTERTAINMENT
MOVIE LIST
In the Movie List, you can watch movies stored on the connected USB device.
Tips for Playing Video Files
y Some subtitles created by a user may
not work.
y Some special characters are not sup-
ported in subtitles.
y HTML tags are not supported in sub-
titles.
y Time information in a subtitle file
should be arranged in ascending
order to play the subtitle properly.
y Changing font and color in subtitles
is not supported.
y A language which is not specified
in the subtitle languages is not
supported. (see page33)
y Subtitle files of 1 MB or larger are not
supported.
y The screen may suffer temporary
interruptions (image stoppage, faster
playback, etc.) when the audio lan-
guage is changed.
y A damaged video file may not be
played properly, or some functions
may not be available.
y Video files created with some encod-
ers may not be played properly.
y Either audio or video may only be
supported depending on the video or
audio packet structure of a video file.
y Video files with higher resolution than
the maximum supported for each
frame may not be played properly.
y Video files in formats other than the
ones specified above may not be
played properly.
y Streaming files which include GMC
(Global Motion Compensation) or
Qpel (Quarterpel Motion Estimation)
is not supported.
y Up to 10,000 sync blocks are sup-
ported in the subtitle file.
y Seamless playback is not guaranteed
for files encoded level 4.1 or higher in
H.264/AVC.
y DTS audio codec is not supported.
y Video files larger than 30 GB (Giga-
bytes) are not supported.
y Playing a video via a USB connection
that does not support high speed
may not work properly.
y A video file and its subtitle file must
be located in the same folder. A video
file name and its subtitle file name
must be identical in order to display
the subtitle properly.
y While watching a video using the
movie list function, you cannot adjust
the picture mode.
y Trick Mode does not support other
functions than ᰩif video files do not
have index information.
y When playing a video file using net-
work, the Trick mode is limited to 2X
speed.
y Video file names that contain special
characters may not be playable.
31
ENTERTAINMENT
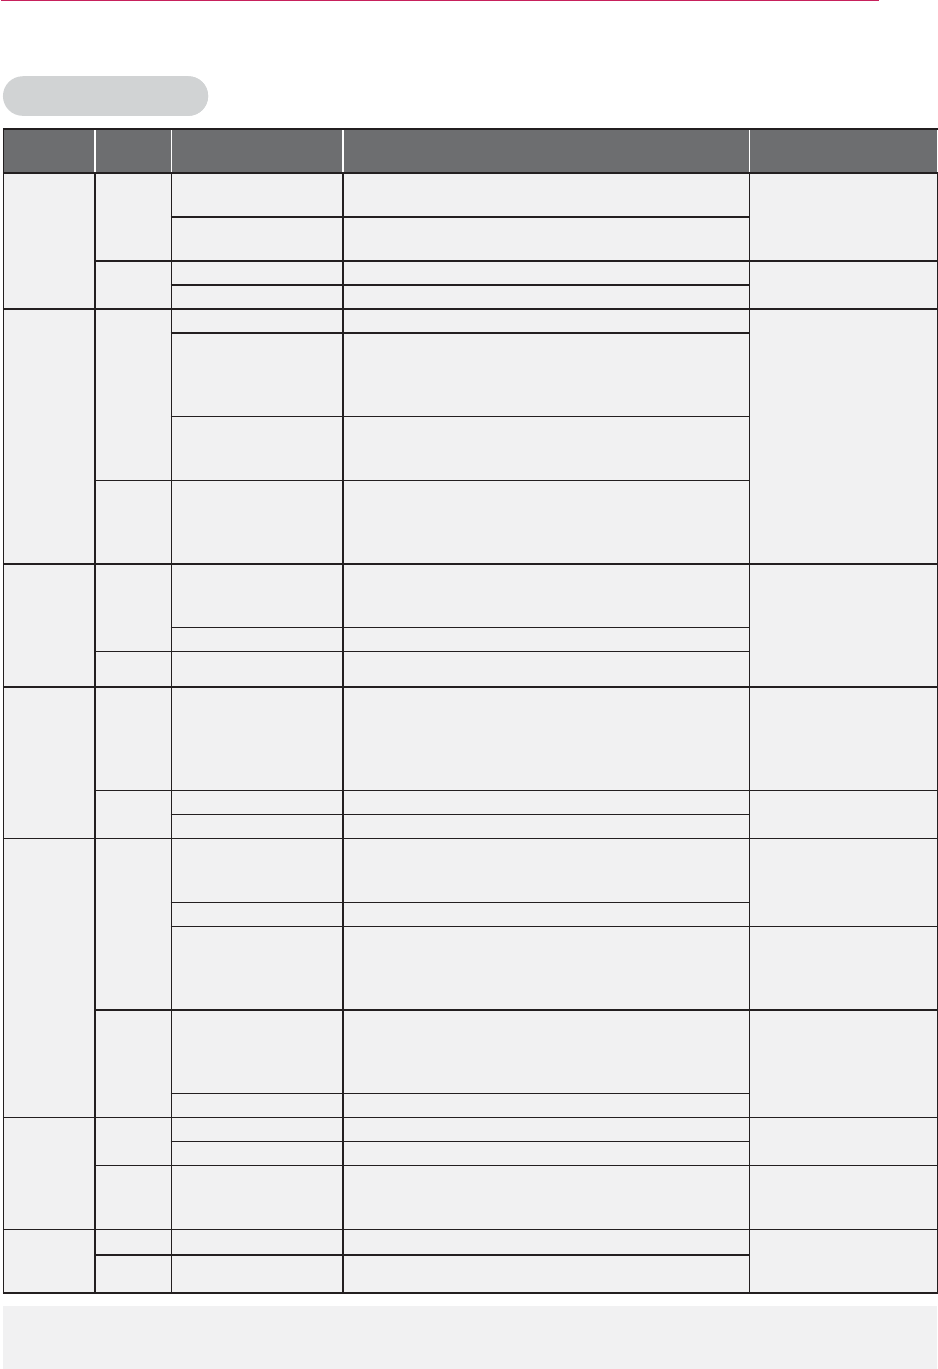
Supported Files
Extension Audio/
Video Codec Profile/Level Support
Description
.asf
.wmv
Video
VC-1 Advanced Profile Advanced Profile @ Level 3 (e.g. 720p 60, 1080i 60,
1080p 30)
Only files compliant
with SMPTE 421M
VC-1 standard can be
streamed.
VC-1 Simple
and Main Profiles
Simple Profile @ Medium Level (e.g. CIF, QVGA)
Main Profile @ High Level (e.g. 1080p 30)
Audio WMA Standard
WMA 9 Professional
.divx
.avi
Video
DivX3.11
Global motion com-
pensation or quarterpel
motion estimation is not
supported. Streaming
using this syntax is not
supported.
DivX4
DivX5
DivX6
XViD
Advanced Simple Profile (720p/1080i)
H.264 / AVC
Main Profile@ Level 4.1
High Profile@ Level 4.1 (e.g. 720p60, 1080i60,
1080p30)
Audio
MPEG-1 Layer I, II
MPEG-1 Layer III
(MP3)
Dolby Digital
.mp4
.m4v
Video H.264 /AVC
Main Profile @Level 4.1
High Profile @Level 4.1 (e.g. 720p 60, 1080i 60,
1080p 30)
Global motion com-
pensation or quarterpel
motion estimation is not
supported. Streaming
using this syntax is not
supported.
MPEG-4 Part 2 Advanced Simple Profile (e.g. 720p/1080i)
Audio AAC AAC-LC and HE-AAC
.mkv
Video H.264 /AVC
Main Profile @Level 4.1
High Profile @Level 4.1
(e.g. 720p 60, 1080i 60, 1080p 30)
Most of the MKV
content
available is encoded by
the open source x264
codec.
Audio HE-AAC HE-AAC-LC and HE-AAC
Dolby Digital
.ts
.trp
.tp
Video
H.264 /AVC
Main Profile @Level 4.1
High Profile @Level 4.1 (e.g. 720p 60, 1080i 60,
1080p 30)
MPEG-2 Main Profile @High Level (e.g. 720p 60, 1080i 60)
VC-1
Simple Profile @Medium Level (e.g. CIF, QVGA)
Main Profile @High Level (e.g. 1080p30)
Advanced Profile @Level 3 (e.g. 720p60, 1080i60,
1080p30)
Only files compliant
with SMPTE 421M
VC-1 standard can be
streamed.
Audio
MPEG-1 Layer I, II
MPEG-1 Layer III
(MP3)
Dolby Digital
AAC AAC-LC and HE-AAC
.vob
Video MPEG-1
MPEG-2 Main Profile @High Level (e.g. 720p 60, 1080i 60)
Audio
Dolby Digital
MPEG-1 Layer I, II
DVD-LPCM
.mpg
.mpeg
.mpe
Video MPEG-1 Main Profile @High Level (e.g. 720p60, 1080i60) Only files configured
properly for TS, PS or
ES can be streamed.
Audio MPEG-1 Layer I, II
Bit rate range: within 32 kbps - 320 kbps (MP3)
Subtitle format: *.smi/*.srt/*.sub (MicroDVD, SubViewer1.0/2.0)/*.ass/*.ssa/*.txt (TMPlayer)/*.psb (PowerDivX)
32 ENTERTAINMENT
Browsing Movie List
Play a video fi le stored in the connected
device.
1 Connect a USB storage device.
2 Press the USB button.
3 Use the , , or button to
select Movie List and press the OK
button.
4 If several devices are connected,
press the , , or button to
select a desired device and press the
OK button.
5 Use the , , or button to
select the fi le you want and press the
OK button.
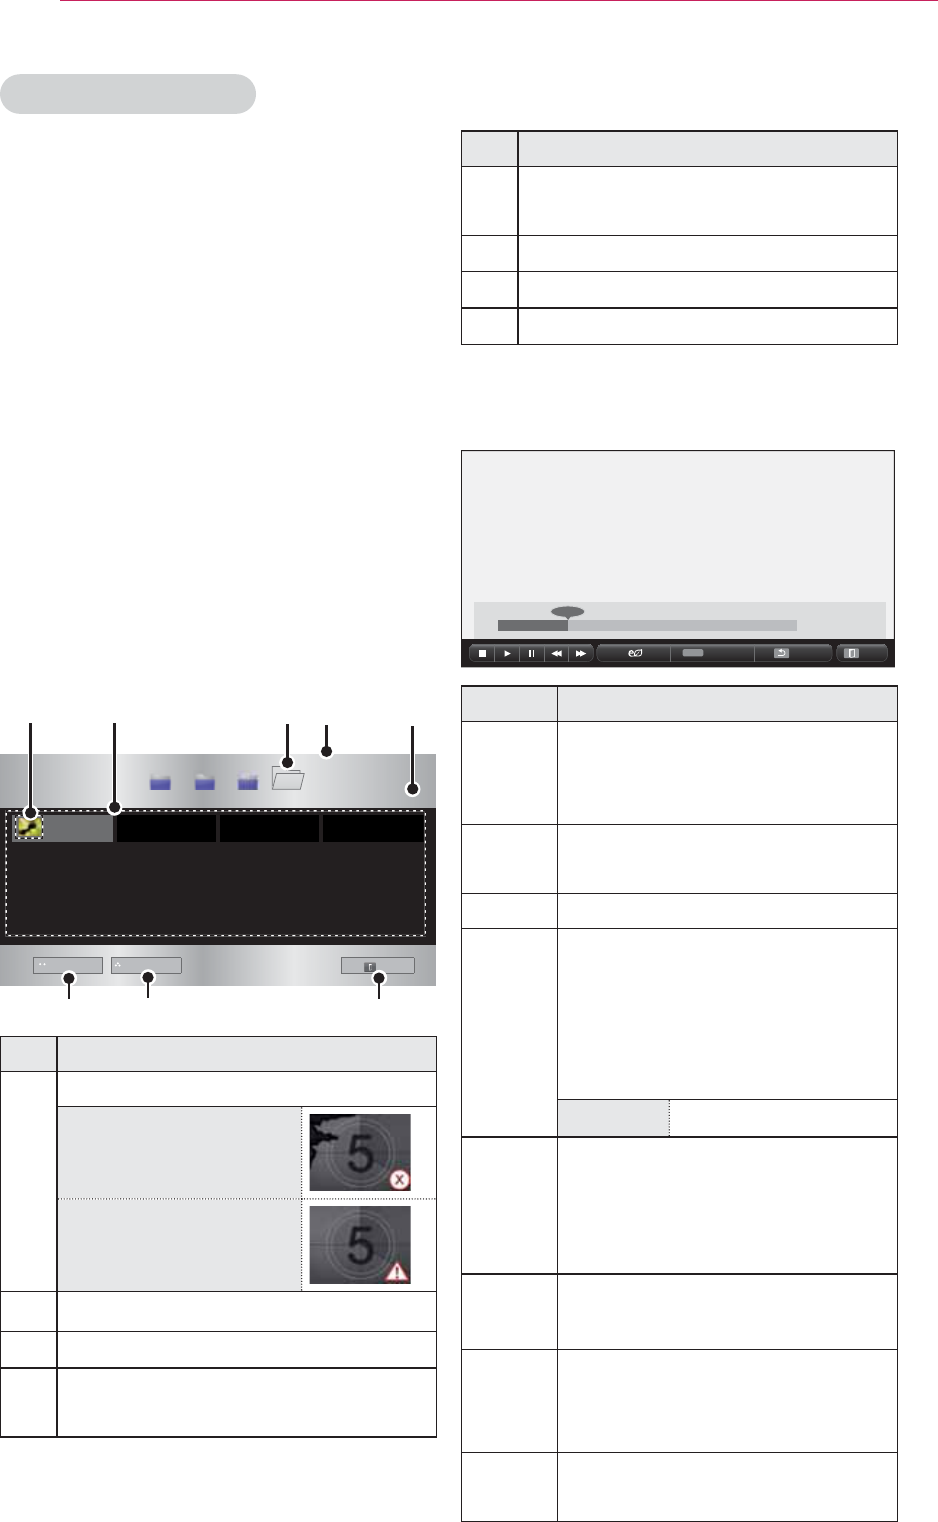
0RYLH/LVW
86%6725$*('(9,&(
#########
%XWWHUIO\B
G
ERRN GRF SLF YLG
ᯕ*RWRURRWIROGHU ᯕ*RWRXSSHUIROGHU
([LW
3DJH
3DJH
ᱫ3DJH&KDQJH
❹
❶❺
❷
❻❼❽
❸
Description
❶Thumbnails
Abnormal file
File not supported
❷File List
❸Moves to the upper level folder.
❹Current page/Total no. of folder
pages
Description
❺Current page/Total no. of fi le
pages
❻Moves to the top level folder.
❼Moves to the upper level folder.
❽Exit Movie List.
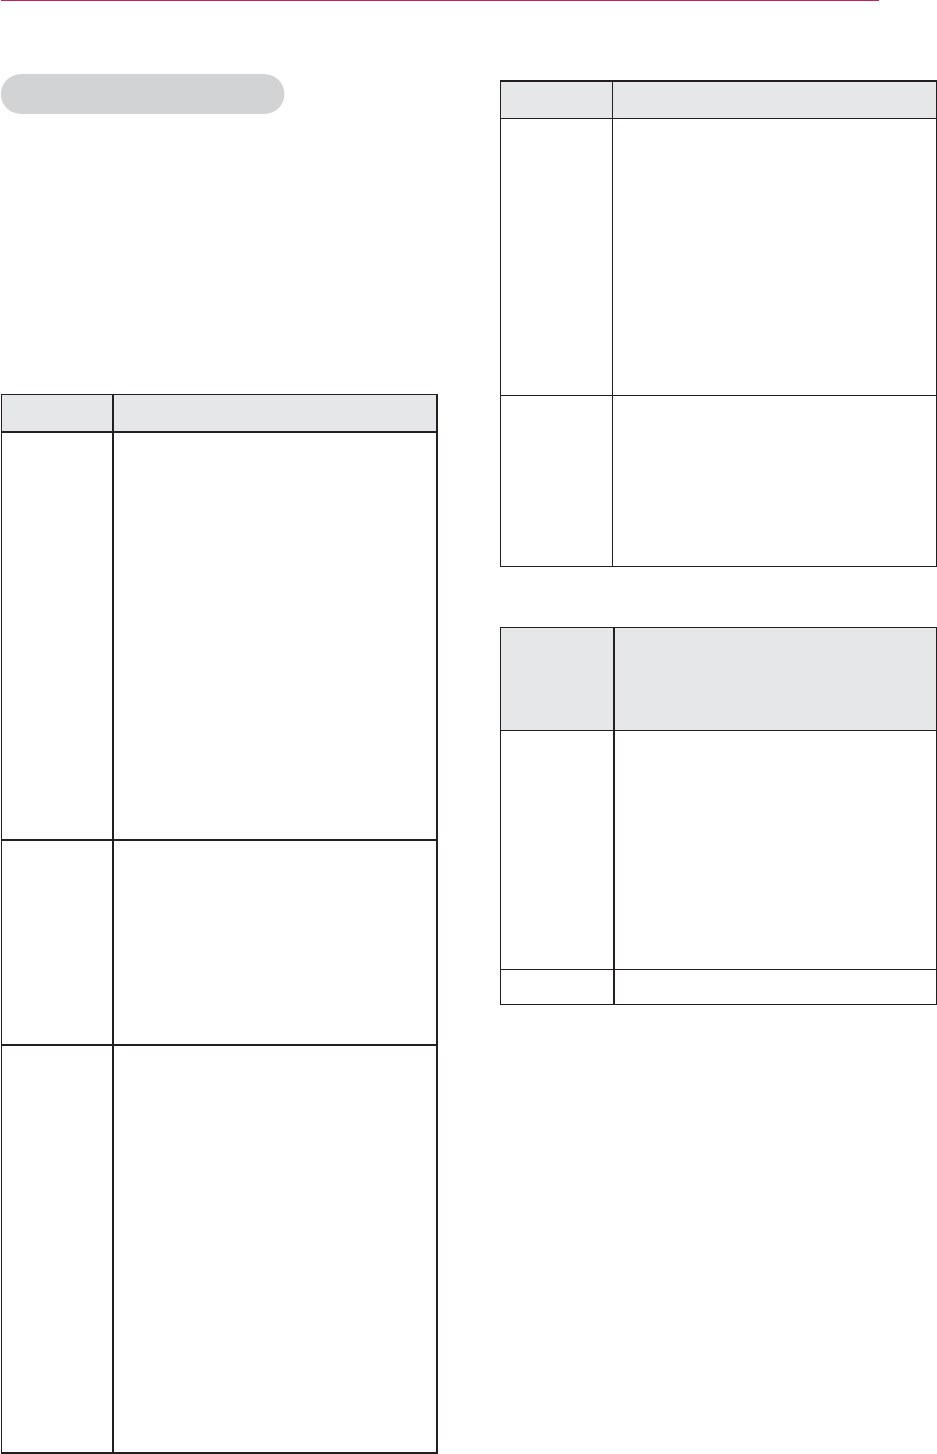
6 Control playback by using the follow-
ing buttons.
ᰦ
ᯚᯛ
Q.MENU
2SWLRQ +LGH ([LW
Setting Description
<, > Shows the current playing
position. Use <, > buttons to
move forward or backward.
ᰧStops playing and returns to
Movie List.
ᰦReturns to normal playback.
ᰨPauses the media player.
If no button is pressed on the
remote control for 10 minutes
after pausing, the playback is
restarted.
ᰨᰩ
Displays in slow motion.
ᰞWhenever this button is
pressed, the playback speed
is changed.
: x2, x4, x8, x16, x32
Option A pop-up window will appear.
+LGH Hides the playback bar. Press
the OK button to make it
appear.
([LW
Returns to the Movie List
screen.
33
ENTERTAINMENT
Options for Movie List
1 Press the Q.MENU button.
2 Use the or button to move to a
desired option and press the
OK button.
3 Use , , or button to set up
each item.
Set Video Play
Setting Description
Picture
Size
Selects the size of a playback
screen.
y Full: Files are played in
full screen mode accord-
ing to the aspect ratio of
video.
y 16:9: Displays the video
with the aspect ratio of
16:9.
y Just Scan: Displays the
video in the original as-
pect ratio.
Audio
Lan-
guage
Allows you to select the lan-
guage you want for the file
with multiple audio tracks.
This option is not available
if the file has only one audio
track.
Subtitle
Lan-
guage
The subtitle can be turned
on or off.
y Language: One of any of
the available languages
can be selected.
y Code Page: A character set
used for a subtitle can be
selected.
By default, the subtitle is
displayed in a language
configured in OPTION
Menu Language.
Setting Description
Subtitle
Lan-
guage
y Speed: If a subtitle is
not synchronized with its
video, you can adjust its
speed at 0.5 sec unit.
y Position: Moves the loca-
tion of a subtitle.
y Size: Changes the sub-
title font size.
Repeat
Turns the repeat function on
or off.
When it is set to off, the next
file can be played sequentially
if the file name is similar.
y Subtitle Language
Subtitle
Lan-
guage
Language
Latin1 French, Spanish, Catalan
Basque, Portuguese,
Italian, Albanian, Rhaeto-
Romanic, Dutch, German,
Danish, Swedish, Norwegian,
Finnish, Faeroese, Icelandic,
Irish, Scottish, English
Korean English, Korean
PICTURE Settings
You can change video settings.
(Refer to "PICTURE Settings" on page
46.)
AUDIO Settings
You can change audio settings.
(Refer to "AUDIO Settings" on page 50.)
34 ENTERTAINMENT
Registering the DivX code
Please check your DivX code. For more
information on the registration process,
visit www.divx.com/vod. After registra-
tion, your can enjoy DivX VOD content
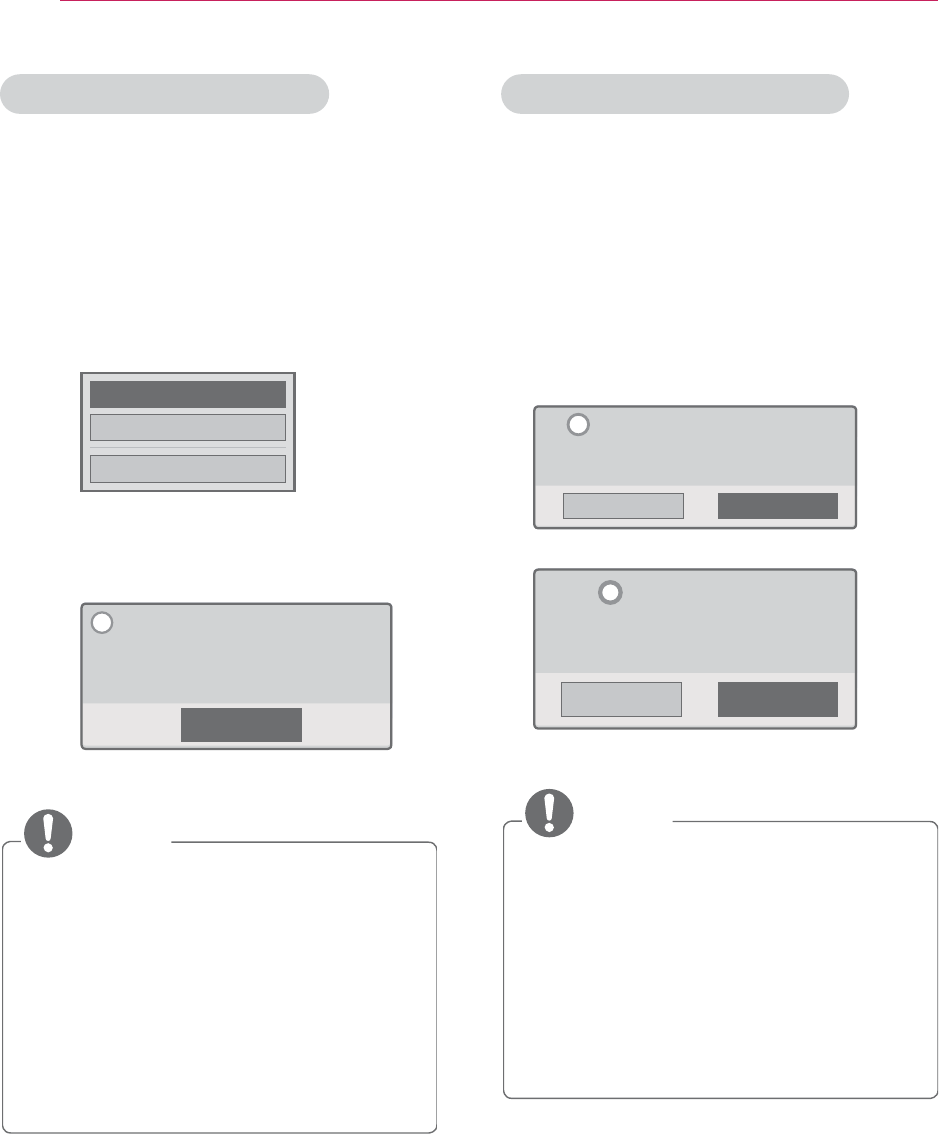
protected by the DivX DRM code.
1 In the Home menu, move to OPTION
and press DivX(R) VOD.
5HJLVWUDWLRQ
'HUHJLVWUDWLRQ
&ORVH
2 Press the or button to move to
Registration and press the OK but-
ton.
&ORVH
<RXPXVWUHJLVWHU\RXUGHYLFH
WRSOD\'LY;5'50SURWHFWHGYLGHRV
5HJLVWUDWLRQ&RGH;;;;;;;;;;
5HJLVWHUDWKWWSYRGGLY[FRP
L
3 Check the DivX registration code.
NOTE
y You cannot use DivX registration
codes assigned to other devices.
Make sure to use the DivX registra-
tion code assigned to your device.
y The video or audio files that are
not converted by the standard DivX
codec may be corrupted or not be
played.
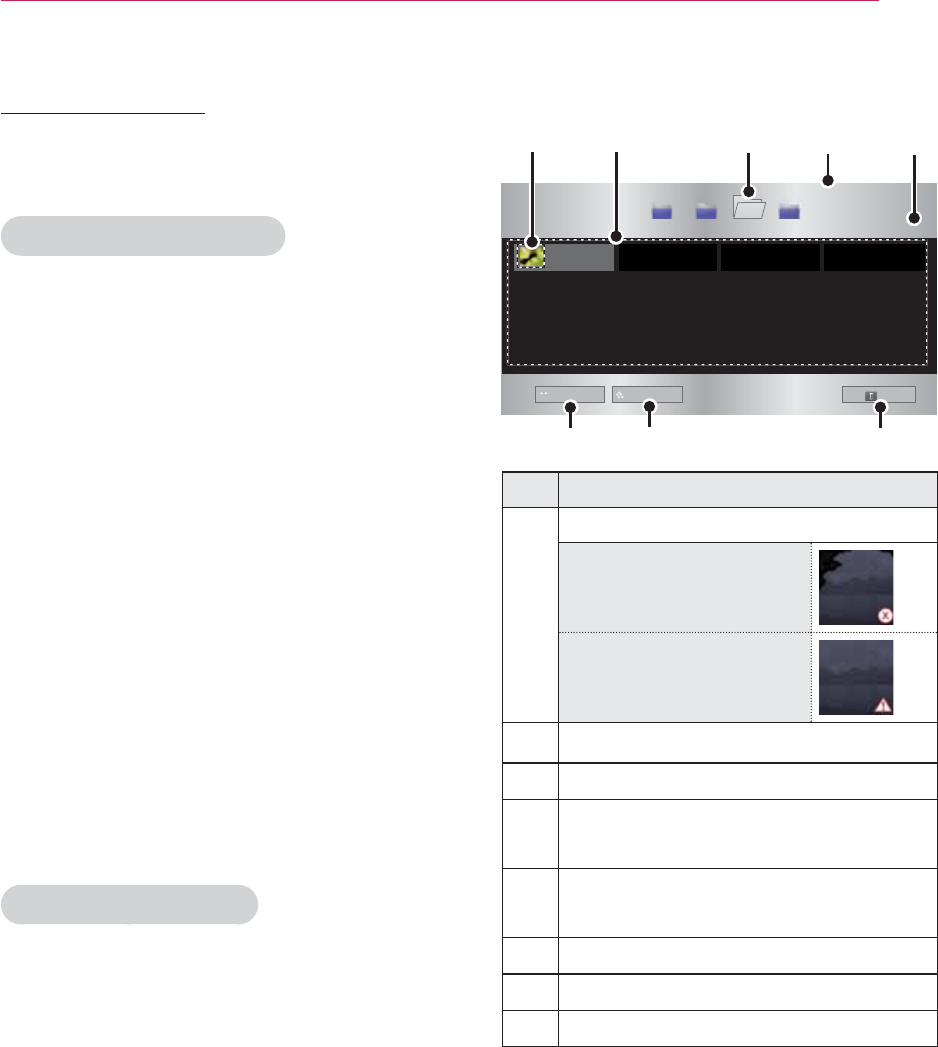
To deregister the DivX code
Use the DivX deregistration code to
deactivate the DivX DRM function.
1 In the Home menu, move to OPTION
and press DivX(R) VOD.
2 Use the or button to go to
Deregistration and press the
OK button.
<HV 1R
<RXUGHYLFHLVDOUHDG\
UHJLVWHUHG
$UH\RXVXUH\RXZLVKWRGHUHJLVWHU"
L
➡
<HV 1R
'HUHJLVWUDWLRQFRGH
'HUHJLVWHUDWKWWSYRGGLY[FRP
&RQWLQXHZLWKUHJLVWUDWLRQ"
L
3 Select Yes.
NOTE
y What is DRM
[Digital Rights Management]?
This is a technology and service that
prevents the illegal use of digital
contents to protect the benefits and
rights of the copyright owner. Files
can be played after the license is veri-
fied through an online method, etc.
35
ENTERTAINMENT
PHOTO LIST
You can see the photos stored on a con-
nected device.
Supported Photo Files
PHOTO (*.JPEG)
Baseline: 64-pixel (width) x 64-pixel
(height) - 15360-pixel (width) x
8640-pixel (height)
Progressive: 64-pixel (width) x 64-pixel
(height) - 1920-pixel (width) x 1440-pix-
el (height)
y Only JPEG files are supported.
y Non-supported files are displayed in
the form of an icon.
y An error message is displayed for
corrupted files or file formats that
cannot be played.
y Corrupted files may not be displayed
properly.
y It may take some time to view high-
resolution images in full screen.
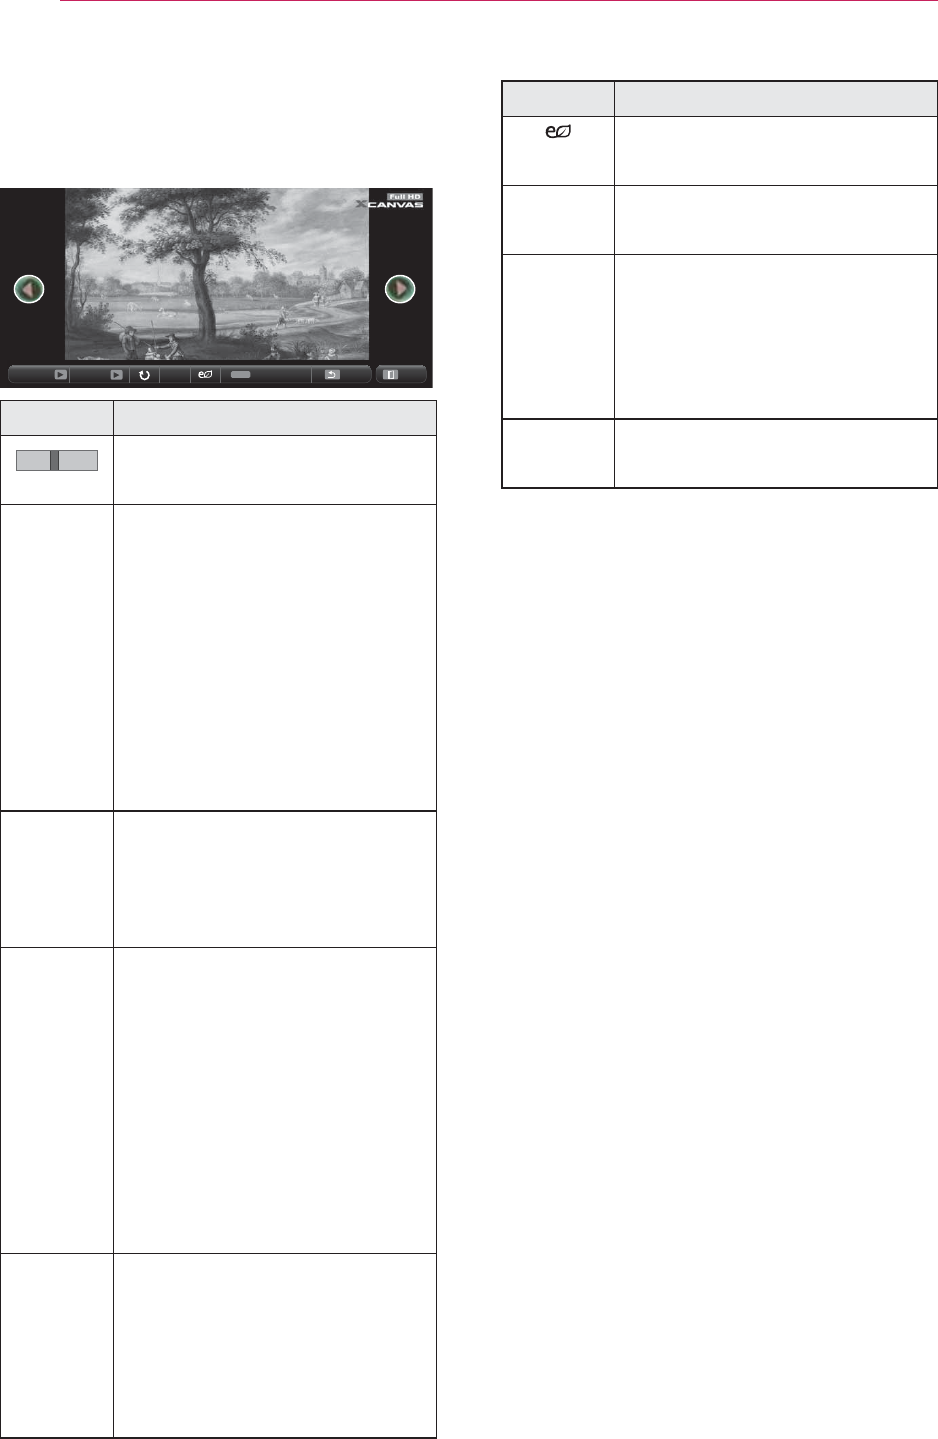
Browsing Photo List
1 Connect a USB storage device.
2 Press the USB button.
3 Use the , , or button to
select Photo List and press the OK
button.
4 If several devices are connected,
press the , , or button to
select a desired device and press the
OK button.
5 Use the , , or button to
select the fi le you want and press the
OK button.
3KRWR/LVW
86%6725$*('(9,&(
#########
%XWWHUIO\B
G
ERRN GRF SLF YLG
ᯕ*RWRURRWIROGHU ᯕ*RWRXSSHUIROGHU
([LW
3DJH
3DJH
ᱫ3DJH&KDQJH
❹
❶❺
❷
❻❼❽
❸
Description
❶Thumbnails
Abnormal file
File not supported
❷File List
❸Moves to the upper level folder.
❹Current page/Total no. of folder
pages
❺Current page/Total no. of file
pages
❻Moves to the top level folder.
❼Moves to the upper level folder.
❽Exit
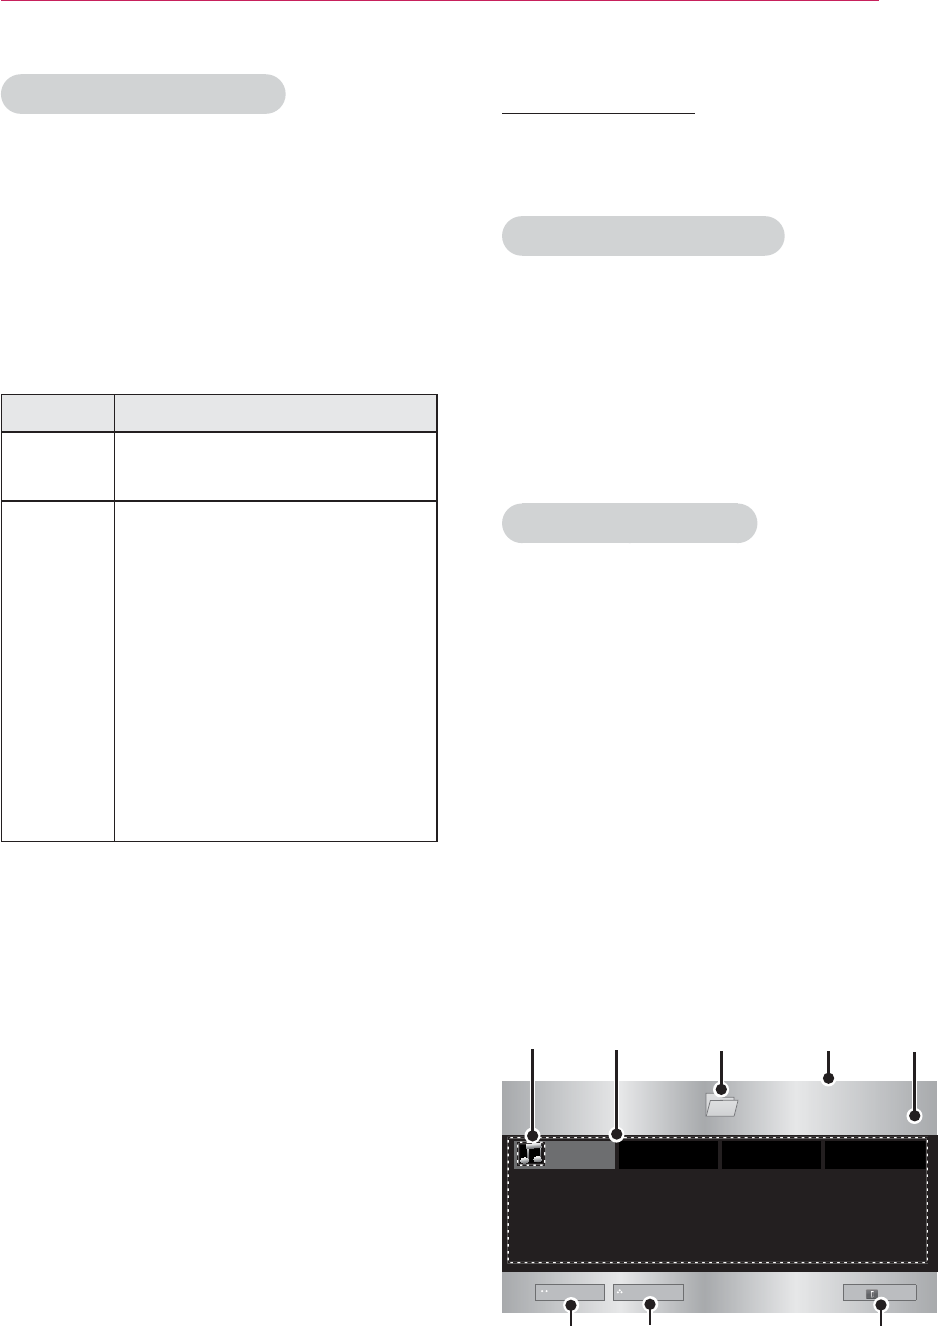
36 ENTERTAINMENT
6
Control playback by using the follow-
ing buttons.
BDMSJ
[
.%
>@
Q.MENU
ꔦ
2SWLRQ
6OLGHVKRZ %*0 +LGH ([LW
Setting Description
܁۽
Selects the previous or next
photo.
Slide-
show
If no picture is selected, all
photos in the current folder
are displayed during the
slide show. If some photos
are selected, those photos
are displayed.
y Set the time interval of
the slide show in Option
ނ Set Photo View menu.
BGM You can listen to music while
viewing photos in full size.
y Set the BGM in Option
ނ Set Photo View menu.
ᱨRotates photos.
y Rotates a photo 90°,
180°, 270°, 360° clock-
wise.
y Photos cannot be rotated
if their width is greater
than the height of the
max. supported resolu-
tion.
Views the photo in full mode
or original mode.
Use the Up/Down/Left/
Right buttons to select a
page and press the OK
button.
Setting Description
You can use the Energy Sav-
ing mode.
Option A pop-up window will ap-
pear.
Hide Hides the menu on the full
size screen.
y To see the menu, press
the OK button on the
remote control.
Exit Exit from full screen photo
view.
37
ENTERTAINMENT
Options for Photo List
1 Press the Q.MENU button.
2 Use the or button to move to a
desired option and press the OK but-
ton.
3 Use , , or button to set up
each item.
Set Photo View
Setting Description
Slide
speed
Selects a slideshow speed.
BGM
(Back-
ground
Music)
Selects a music folder for
the background music.
y You cannot change the
music folder while the
background music is
playing.
y For background music,
only the folder from the
same device can be se-
lected.
PICTURE Settings
You can change video settings.
(Refer to "PICTURE Settings" on page
46.)
AUDIO Settings
You can change audio settings.
(Refer to "AUDIO Settings" on page 50.)
MUSIC LIST
You can play audio fi les stored on the
connected device.
Supported Music Files
*.MP3
Bit rate range 32 Kbps - 320 Kbps
y Sampling rate MPEG1 Layer3: 32kHz,
44.1kHz, 48kHz
y Sampling rate MPEG2 Layer3: 16kHz,
22.05kHz, 24kHz
Browsing Music List
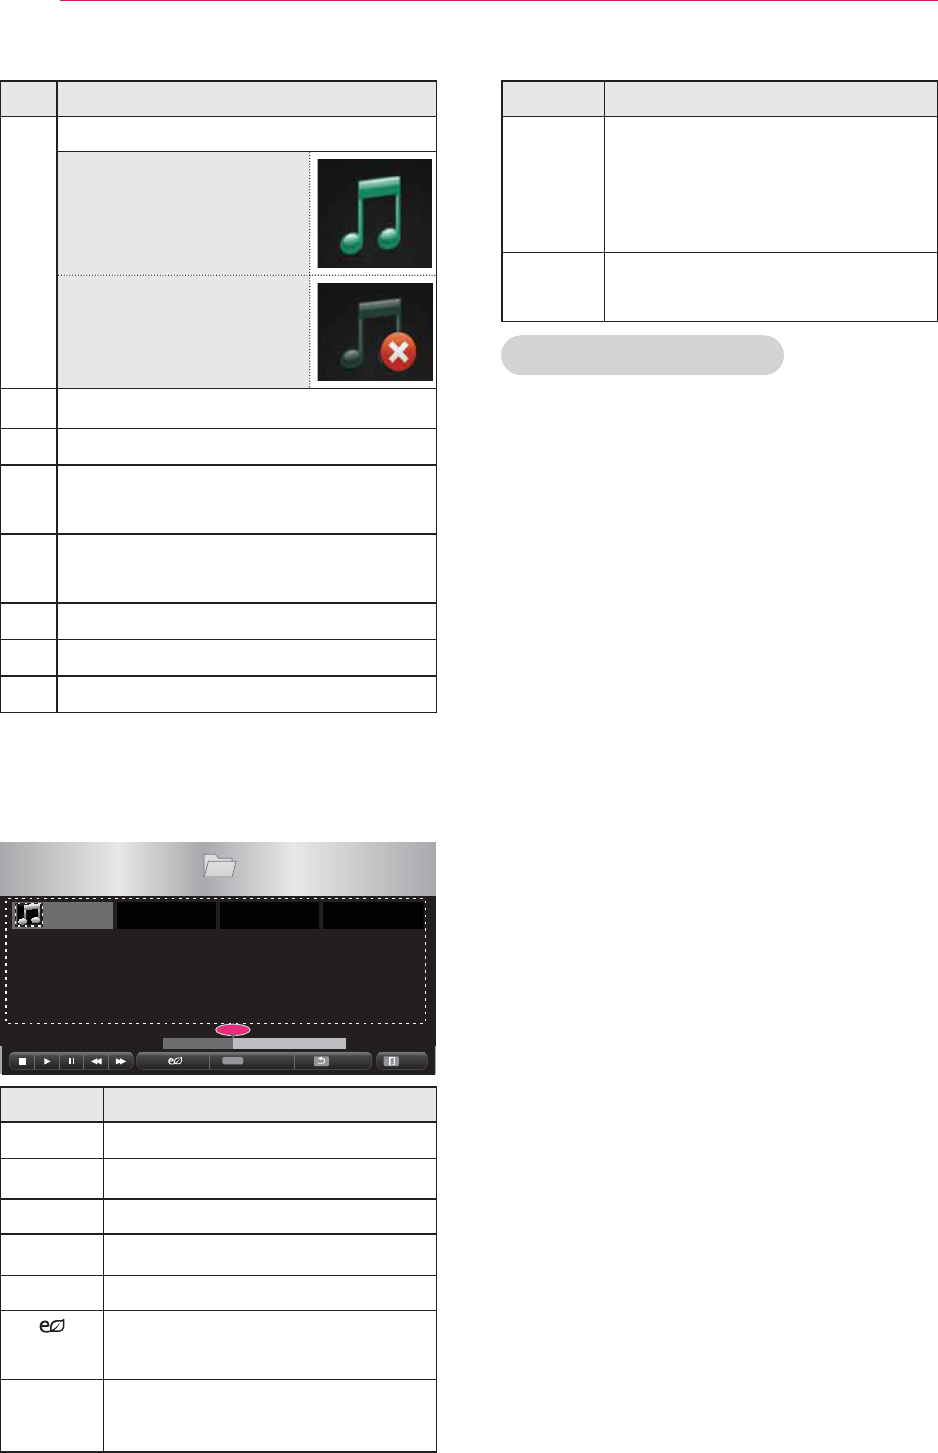
1 Connect a USB storage device.
2 Press the USB button.
3 Use the , , , button to select
Music List and press the OK button.
4 If several devices are connected,
press the , , or button to
select a desired device and press the
OK button.
5 Use the , , or button to
select the fi le you want and press the
OK button.
0XVLF/LVW
86%6725$*('(9,&(
#########
%XWWHUIO\B
G
'ULYH
ᯕ*RWRURRWIROGHU ᯕ*RWRXSSHUIROGHU
([LW
3DJH
3DJH
ᱫ3DJH&KDQJH
❹
❶❺
❷
❻❼❽
❸
38 ENTERTAINMENT
Setting Description
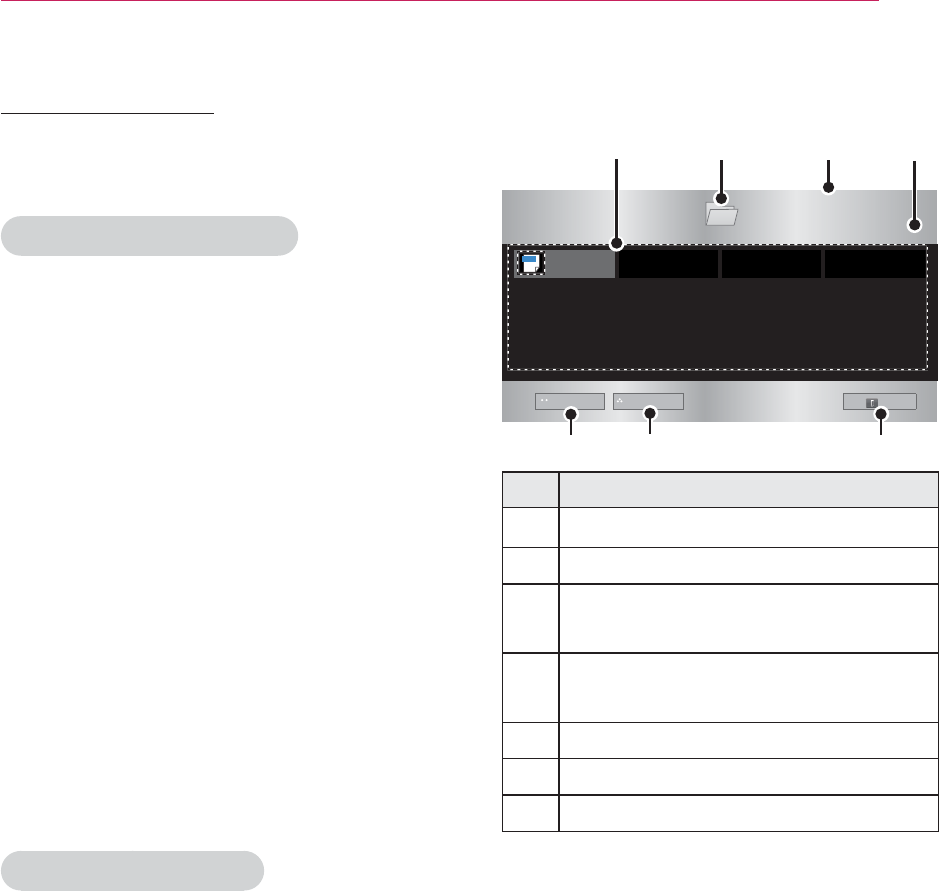
+LGH Hides the playback bar.
y Press the OK button to
make the playback bar
appear.
([LW Returns to the Music List
screen.
Options for Music List
1 Press the Q.MENU button.
2 Use the or button to move to a
desired option and press the OK but-
ton.
3 Use , , or button to set up
each item.
AUDIO Settings
You can change audio settings.
(Refer to "AUDIO Settings" on page 50.)
Description
❶Thumbnails
Abnormal file
File not supported
❷File List
❸Moves to the upper level folder.
❹Current page/Total no. of folder
pages
❺Current page/Total no. of file
pages
❻Moves to the top level folder.
❼Moves to the upper level folder.
❽Exit
6 Control playback by using the follow-
ing buttons.
0XVLF/LVW
86%6725$*('(9,&(
#########
%XWWHUIO\B
G
'ULYH
3DJH
3DJH
ᱫ3DJH&KDQJH
Q.MENU
ᰦ
%PS
ᯚᯛ
2SWLRQ +LGH ([LW
Setting Description
◀, ▶ Changes the playing position.
ᰧStops playing.
ᰦReturns to normal playback.
ᰨPauses the media player.
ᰞ
Plays the previous/next file.
You can use the Energy Sav-
ing mode.
2SWLRQ Sets up the options of Music
List.
39
ENTERTAINMENT
FILE VIEWER
You can see document fi les stored on a
connected device.
Supported File Formats
XLS, DOC, PPT, TXT, XLSX, PPTX,
DOCX, PDF,
Microsoft Offi ce
97/2000/2002/2003/2007
Adobe PDF
1.0/1.1/1.2/1.3/ 1.4
y File Viewer realigns a document, so
it may look different from what is
displayed on a PC.
y For documents that include images,
the resolution may look lower during
the realigning process.
y If the document volume is big or it
has many pages, it may take longer
to load the document.
y Unsupported fonts may be replaced
by other fonts.
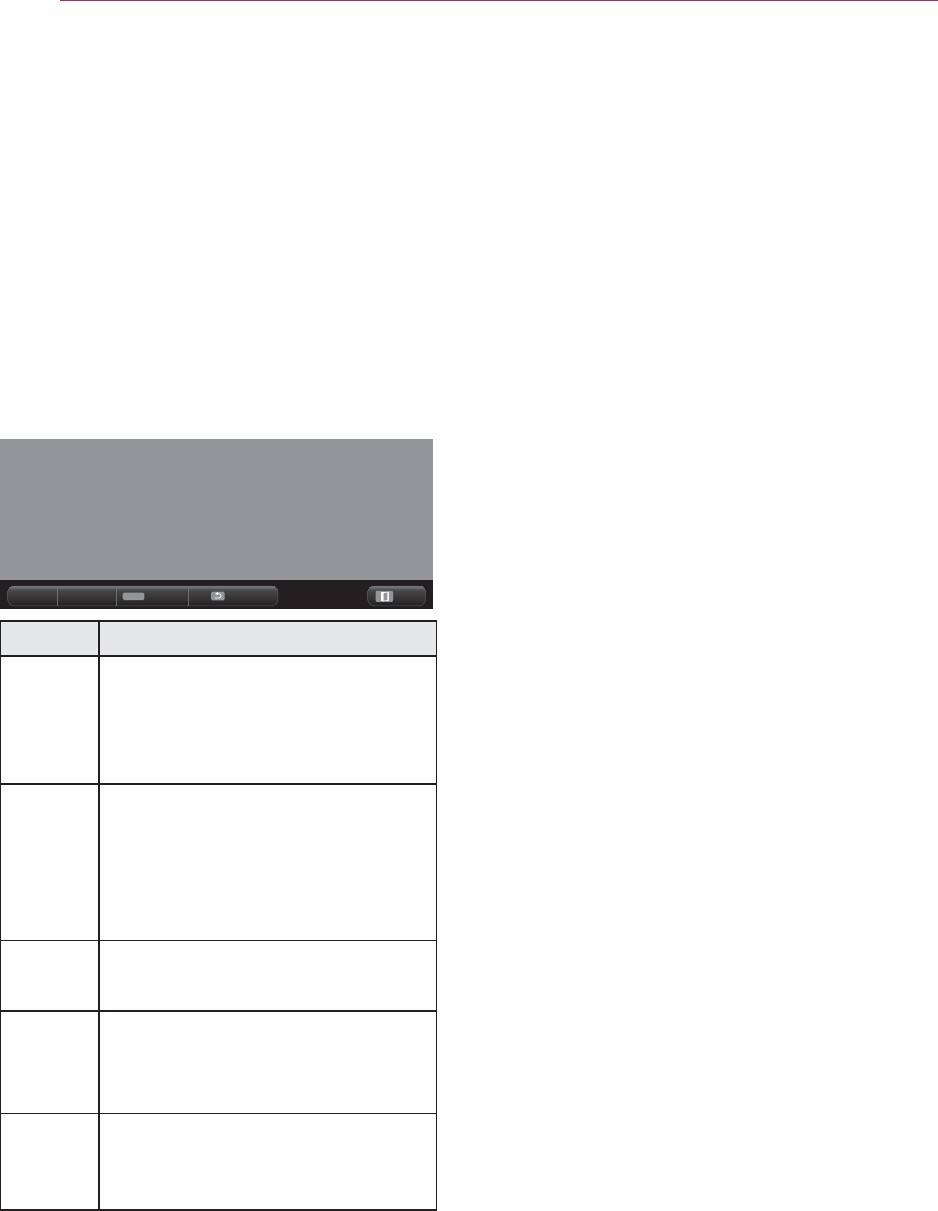
Browsing File Viewer
1 Connect a USB storage device.
2 Press the USB button.
3 Use the , , or button to
select File Viewer and press the OK
button.
4 If several devices are connected,
press the , , or button to
select a desired device and press the
OK button.
5 Use the , , or button to
select the fi le you want and press the
OK button.
)LOH/LVW
86%6725$*('(9,&(
#########
%XWWHUIO\B
G
'ULYH
ᯕ*RWRURRWIROGHU ᯕ*RWRXSSHUIROGHU
([LW
3DJH
3DJH
ᱫ3DJH&KDQJH
❸❹
❶
❺❻❼
❷
DOC
Description
❶File List
❷Moves to the upper level folder.
❸Current page/Total no. of folder
pages
❹Current page/Total no. of file
pages
❺Moves to the top level folder.
❻Moves to the upper level folder.
❼Exit
40 ENTERTAINMENT
6
Control playback by using the follow-
ing buttons.
y Press the Go Page button to move
to the previous
or next page.
y Press the volume button to zoom in
or zoom out.
1. Press SETTINGS.
2. Press the Up/Down/Left/Right
buttons to move to Go Page or
Zoom.
Q.MENU
ꔦ
*R3DJH =RRP 2SWLRQ +LGH ([LW
Setting Description
Go
Page
Moves to the page you want.
Use the Up/Down/Left/Right
buttons to select a page and
press the OK button.
Zoom Views the photo in full mode
or original mode.
Use the Up/Down/Left/Right
buttons to select a page and
press the OK button.
Option Sets up the options of File
Viewer.
Hide Hides the menu.
y Press the SETTINGS but-
ton to make it appear.
Exit Returns to the File Viewer
screen.

41
3D FUNCTION
3D FUNCTION
3D technology uses different video frames for each eye to add depth to the video.
y Warning about photosensitivity sei-
zures
- Some users may experience a
seizure or other abnormal symptoms
when they are exposed to a flash-
ing light or particular pattern from
a video game or movie. If anyone in
your family has a history of epilepsy
or has ever experienced any kind of
seizure, please consult your doctor
before viewing 3D images.
If you experience one of the follow-
ing symptoms while watching a 3D
video, stop watching the 3D video
immediately and take a rest.
- Dizziness, twitching of the eye or
facial muscles, involuntary move-
ments, cramp, loss of consciousness,
confusion, loss of sense of direction,
or nausea. If the symptom does not
disappear, please consult your doctor.
y You can reduce the risk of photosen-
sitive seizures by taking the following
preventive measures.
- Take a rest of 5 - 15 mins. for every
1 hour of viewing.
- If vision varies between each eye,
correct the variation before beginning
to watch a 3D video.
- Ensure that the 3D video is directly
in front of you, at eye level.
- You should stop watching if you
experience a headache, fatigue or
dizziness.
- Do not view 3D images when you
are tired or ill.
Before Watching 3D
While Watching 3D
WARNING
y If you view 3D images too closely for
a long period of time, it may cause
blurred vision.
y If you watch the projector or game
screen for a long time with 3D glass-
es on, you may experience dizziness
or eye fatigue.
y If you are pregnant, a senior citizen,
intoxicated, have heart problems, or
easily feel motion sickness, we rec-
ommend that you do not watch 3D
images.
y Because 3D images can be recog-
nized as real, some viewers may get
surprised or overexcited.
y Do not watch 3D images near fragile
objects or any objects that can be
knocked over easily.
y Take care not to injure yourself as you
may subconsciously try to move away
from the life-like 3D images.
y Prevent children of 5 years or young-
er from watching a 3D video. It may
impair the development of their eyes.

42 3D FUNCTION
CAUTION
y Extra special care is required for chil-
dren watching a 3D video.
When Watching 3D Video
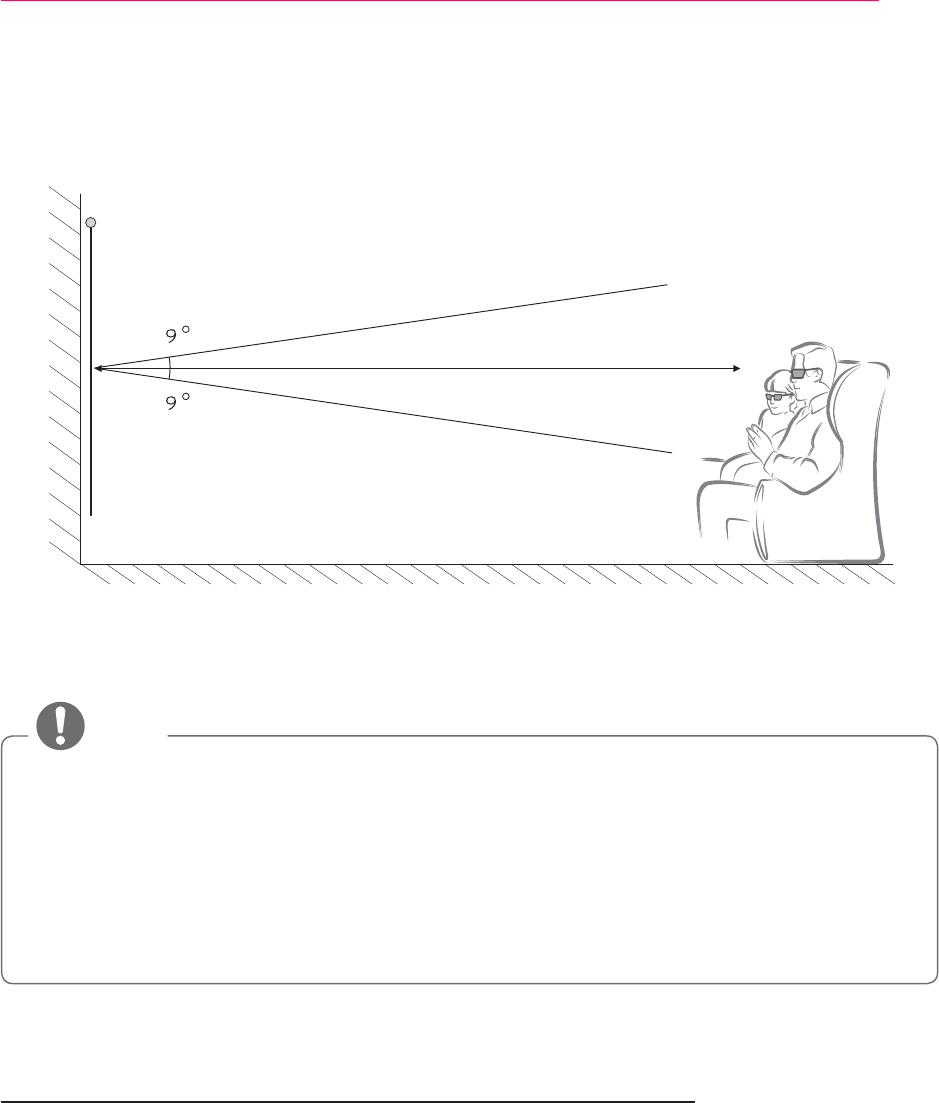
y Watch 3D images within the optimum
viewing angle and distance.
y If you are outside the viewing angle
or distance, you may not be able to
watch 3D images. You cannot view
3D images when you lie down.
y You may see left and right images
overlapped during projector initializa-
tion after it is powered on. It may take
some time for optimization.
y It may take some time for the 3D
image look normal after you turn your
eyes away from the screen and look
back at the 3D image.
y It may flicker slightly while watching
3D images under a 3 wavelength
lamp fluorescent light (50 Hz - 60
Hz) or near windows. If so, it is rec-
ommended to block the sun light
with a curtain and to dim the lights.
y The 3D glasses must be DLP-LINK
(DLP Ready) type.
y You may not be able to watch 3D
properly if there is an obstacle be-
tween the projector and 3D glasses.
y Install the 3D projector as far as pos-
sible from other devices.
43
3D FUNCTION
Requirements for Watching 3D Images
* Basically, Watching 3D videos should be done in dark room environments only.
* For 3D watching, set the energy saving mode to Minimum.
To Use DLP-LINK (DLP-Ready) Type Glasses
1 While watching 3D images from the projector, press buttons on the glasses.
2 When you press the button, the glasses flicker to be synchronized with the 3D im-
ages.
(The flickering is a unique operation method of DLP-LINK type glasses. It may be
different depending on the glasses type.)
3 If the glasses flicker or problems occur while watching 3D, first turn the lights off to
make the room darker. Contact your projector seller for queries about the glasses.
* Optimum viewing angle: Top/Bottom/Left/Right 9°
Optimum viewing distance: 3 m or less
Recommended screen size: 40 inches
NOTE
y The pairing with the DLP-LINK glasses is affected by the intensity of light reflected from the screen.
Therefore, the pairing with DLP-LINK glasses may not work properly if the light reflected from
the screen is not bright enough, such as when the surrounding area is bright, the screen is
big, or the maximum energy saving mode is enabled.
y Some menus may not work while playing a 3D video.
y You can only watch a 3D video properly when the 3D video format option has been selected
on the projector.

44 3D FUNCTION
Supported 3D input formats
Signal Resolution Vertical
Frequency (Hz) Supported 3D Formats
No sound XGA 1024x768 120 Frame Sequential / Frame Alternative
RGB-PC XGA 1024x768 120 Frame Sequential / Frame Alternative
y The resolution supporting 3D mode is 1024x768 for HDMI and RGB input.
y Some menus may not work in 120HZ input.
Watching 3D Images
1 Play supported 3D video titles.
2 For RGB-PC, you must press “AUTO" on the remote control before watching 3D.
3 Press the 3D button.
4 While watching 3D images from the projector, press buttons on the glasses.
5 Press the L/R button to switch the playing direction of an image. Select a screen
with better 3D display quality.
y If you press the 3D button during viewing, it returns to 2D.
6 If a 2D image is displayed on the 16:9 screen, a 3D image is also displayed at the
aspect ratio of 16:9. For ratios other than 16:9, a 3D image is displayed in 4:3.
y You cannot change the screen size for 3D images.
45
CUSTOMIZING SETTINGS
CUSTOMIZING SETTINGS
SETUP Menu
1 Press the SETTINGS button.
2 Use the , , or button to select a desired item and press the OK button.
3 Use the , , or button to set up a desired item and press the OK button.
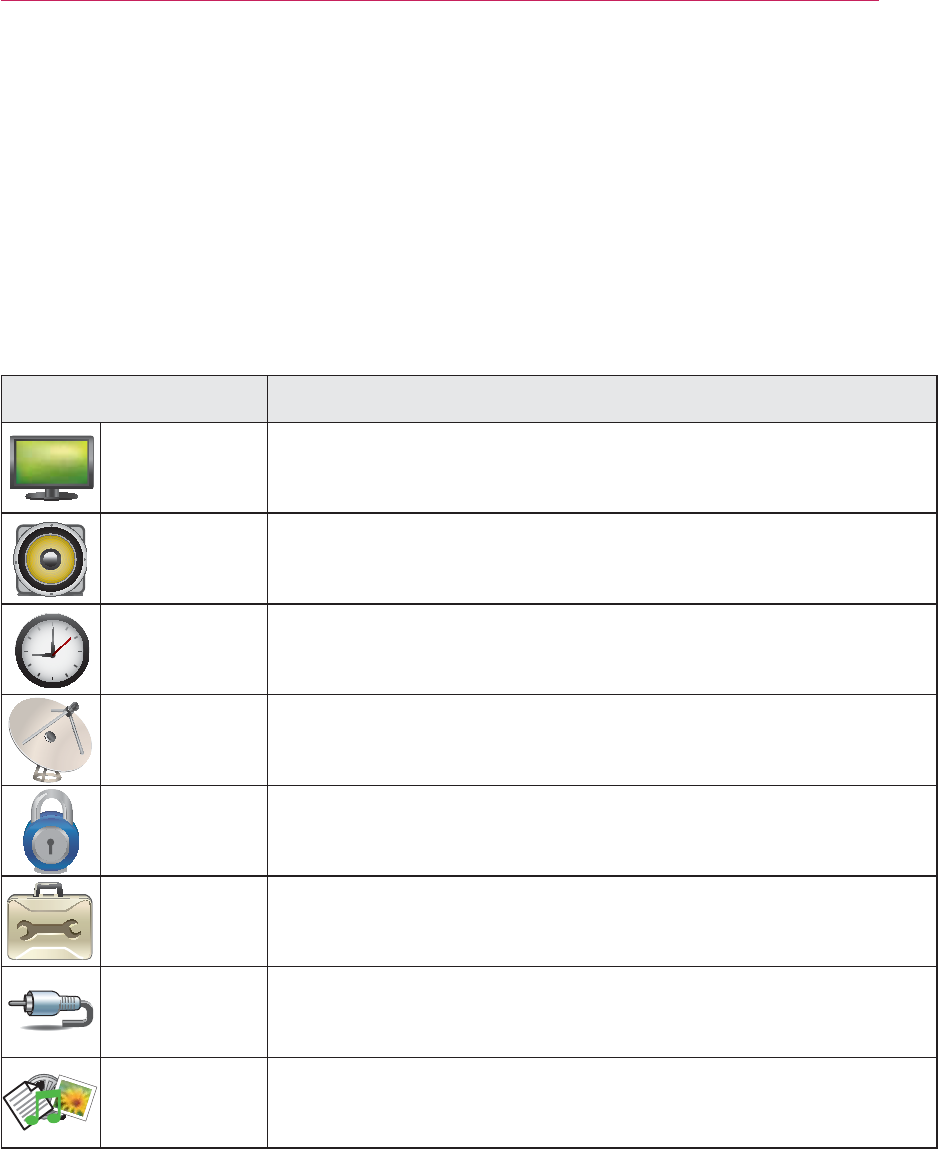
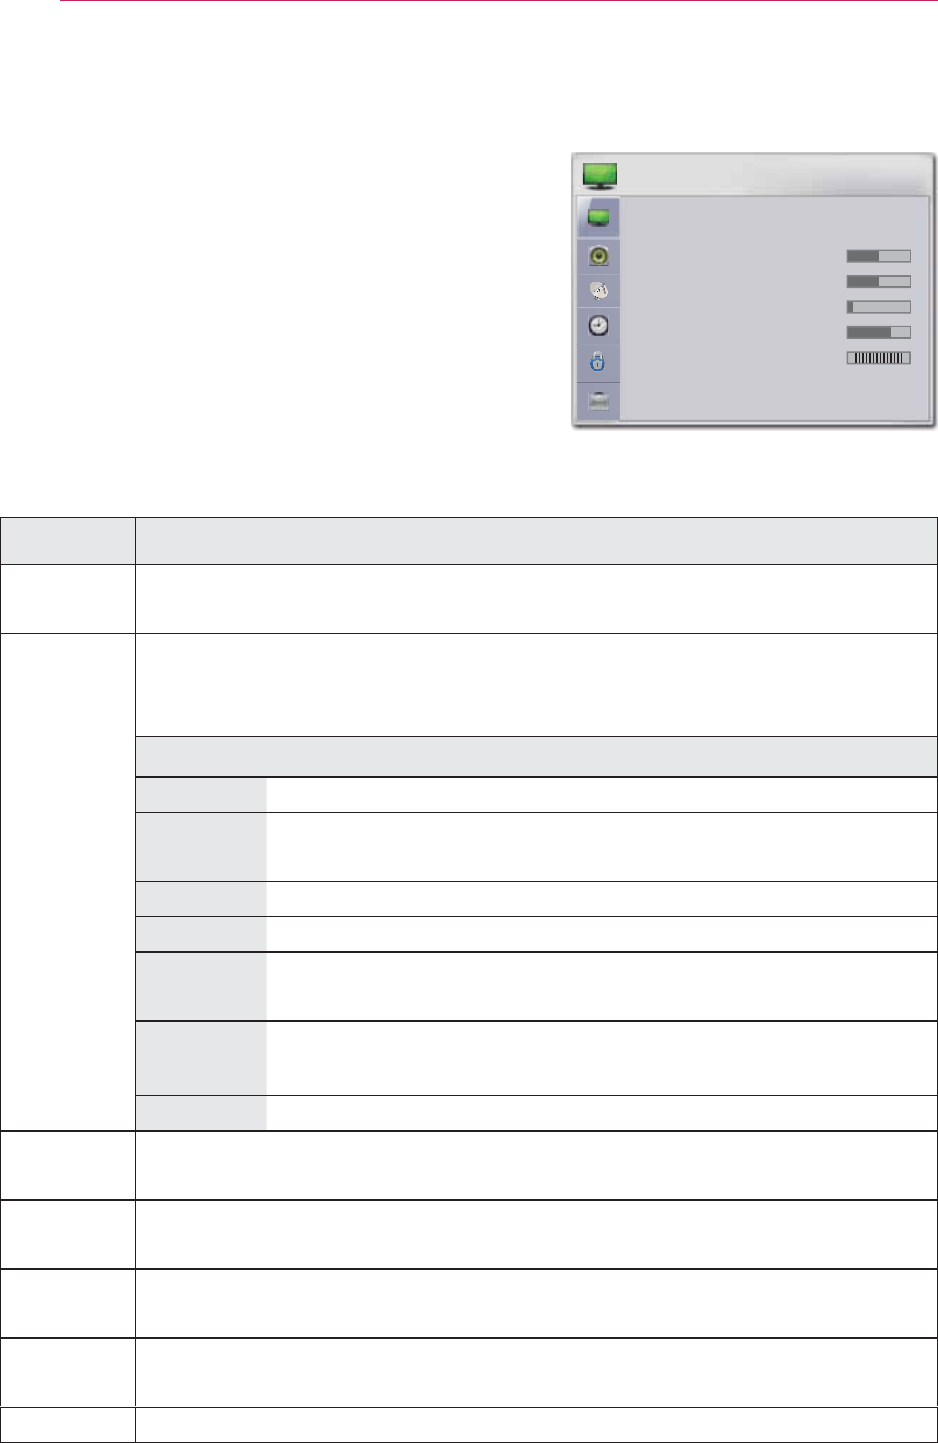
Menu Description
PICTURE Adjusts the image quality for optimal viewing.
AUDIO Adjusts the sound quality and volume level.
TIME Sets the time and time-related features.
CHANNEL Sets up and edit channels.
LOCK Locks or unlocks channels and programs.
OPTION Customizes the general settings.
INPUT Selects the desired input source.
MY MEDIA Accesses photo, music, movie, and document files.
46 CUSTOMIZING SETTINGS
PICTURE Settings
1
Press the SETTINGS button.
2 Use the , , or button to select PICTURE
and press the OK button.
3 Use the , , or button to set up a desired
item and press the OK button.
- To return to the previous menu, press the ᰳ
button.
The available picture settings are described as fol-
lows.
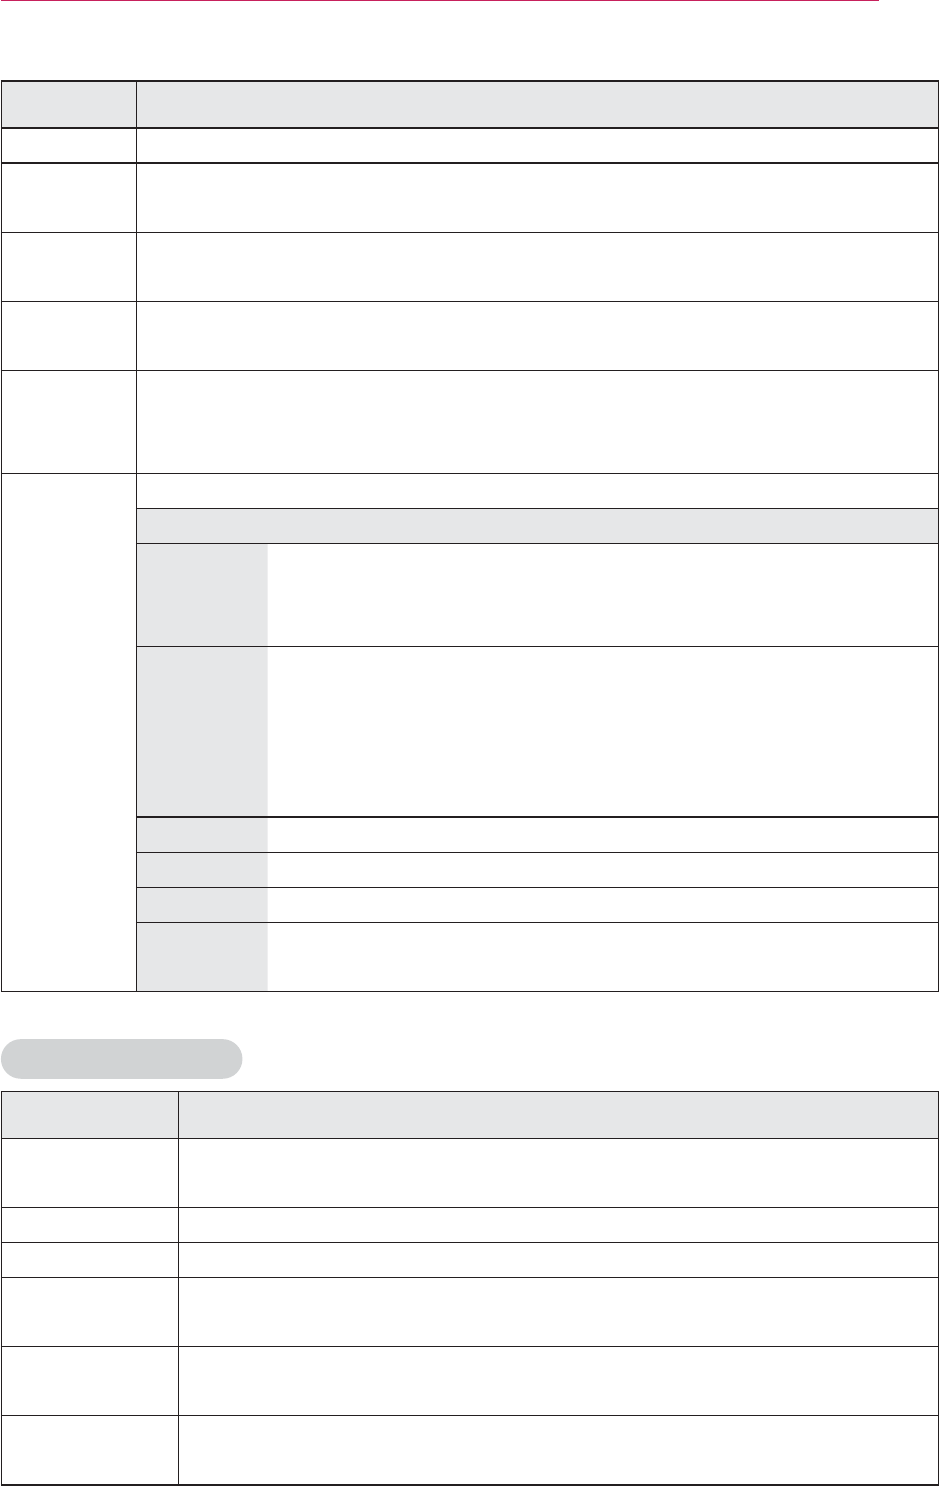
Setting Description
Energy
Saving
Adjusts brightness.
Picture
Mode
Selects one of the preset images or customizes options in each mode
for the best screen performance.
You are also able to customize advanced options of each mode.
Mode
Bright Has the brightness at the highest level with increased noise.
Vivid Maximizes the visual effect of video. Displays a crystal clear
picture by enhancing contrast, brightness, and sharpness.
Standard Has the contrast, brightness and sharpness at normal levels.
Movie Optimizes the image for movie.
Sport Optimizes the image for sports by emphasizing primary
colors and dynamic actions.
GAME Optimizes the image for playing games on fast-moving
screens.
Expert Adjusts the detailed image settings.
CON-
TRAST
Increases or decreases the gradient of the video signal.
BRIGHT-
NESS
Adjusts the base level of the video signal to make the image brighter or
darker.
Horizontal
Sharpness
Adjusts the level of sharpness in the edge between the light and dark
areas of the picture. The lower the level is, the softer the image looks.
Vertical
Sharpness
Adjusts the level of sharpness in the edge between the light and dark
areas of the picture. The lower the level is, the softer the image looks.
Color Adjusts the intensity of all colors.
3,&785(
ؒ (QHUJ\6DYLQJ 0HGLXP
ؒ 3LFWXUH0RGH 6WDQGDUG
ؒ &RQWUDVW
ؒ %ULJKWQHVV
ؒ 6KDUSQHVV
ؒ &RORU
ؒ 7LQW 5*
ؒ $GYDQFHG&RQWURO
ؒ 3LFWXUH5HVHW
ᯒ0RYHᯙ2.
47
CUSTOMIZING SETTINGS
Setting Description
Tint Adjusts the balance between red and green levels.
Advanced
Settings
Customizes the advanced settings.
Picture
Reset
Restores the options of each mode to the factory default.
Picture
Size
Resizes an image.
Picture
Wizard II
By following the instructions, using the remote control, you can eas-
ily adjust the picture quality to technical standards without needing an
expensive pattern device or a picture quality expert.
Screen
Display
(RGB-PC)
Adjusts the picture quality of RGB-PC input.
Option
Resolution Available resolutions are 768 resolution
(1024x768/1280x768/1360x768, 60Hz) and 1050 resolu-
tion (1400x1050/1680x1050, 60Hz).
Auto
Config.
Provides optimized picture quality by automatically calibrat-
ing the mismatch of horizontal width and picture shake
caused by clashes between the internal settings of the pro-
jector and various PC graphic signals.
y You can also use the AUTO button on the remote control.
Position Moves the image up/down/left/right.
Size Changes the screen size.
Phase Makes the picture look clear by removing horizontal noise.
Initial Set-
ting
Restores all the settings to the factory default.
Advanced Settings
Setting Description
Dynamic Con-
trast
Adjusts the contrast to keep it at the best level according to the
brightness of the screen.
Dynamic Color Adjusts screen colors so that they look natural.
Clear White Makes the white area of screen look brighter and whiter.
Skin Color Detects the skin area of image and adjusts it to render a natural skin
color.
Noise Reduc-
tion
Reduces image noise.
Digital Noise
Reduction
This option reduces the noise produced while creating digital video
signals.

48 CUSTOMIZING SETTINGS
Setting Description
GAMMA Sets a gradation curve between video input and output signal.
Black Level Compensates the brightness and contrast of a screen to balance
with the black level of the video input.
Not available for RGB-PC.
Real Cinema Provides the optimal picture quality for watching a movie.
Color Gamut Selects the range of colors to display.
y Standard: Displays the original colors of an input signal regardless
of the display features.
y Wide: Sets to use the rich colors of the display.
Edge En-
hancer
Provides much sharper and clearer edges to the picture.
xvYCC Displays much richer colors. This function is enabled in Cinema,
Expert for HDMI signal.
Expert Pattern This is a pattern used for expert adjustment.
Color Filter Accurately adjusts color and tint by filtering a specific color area of
RGB space.
Color Tem-
perature
Adjusts the overall color of the screen to suit your preference.
Select Warm, Cool or Medium.
In Expert mode, you can customize the options of each mode.
Gamma: Select 1.9, 2.2,or 2.4.
a. Method: 2 points
- Pattern: Inner, Outer
- Contrast Red/Green/Blue, Brightness Red/Green/Blue:
Adjustable range -50 - +50.
b. Method: 10 points IRE
- Pattern: Inner, Outer
- IRE (Institute of Radio Engineers) is the unit that indicates the
size of the video signal and can be set as either 10, 20, 30 - 90,
or 100. You can fine-tune for each setting as shown below.
- Luminance: If you set up luminance for 100 IRE, a luminance
value satisfying each gamma is automatically calcu-
lated for each step from 10 IRE to 90 IRE.
- Red/Green/Blue: The adjustment range is -50 - +50.
49
CUSTOMIZING SETTINGS
Setting Description
Color Manage-
ment
Adjusts Red/Green/Blue/Yellow/Cyan/Magenta colors. Allows an
expert to adjust the tint using a test pattern. Six colors (Red/Green/
Blue/Cyan/Magenta/Yellow) can be selectively adjusted without af-
fecting other colors.
You may not see colors change on a normal picture even after ad-
justment.
- Chroma Red/Green/Blue/Yellow/Cyan/Magenta,
Tone Red/Green/Blue/Yellow/Cyan, Magenta:
The adjustment range is -30 - +30 each.
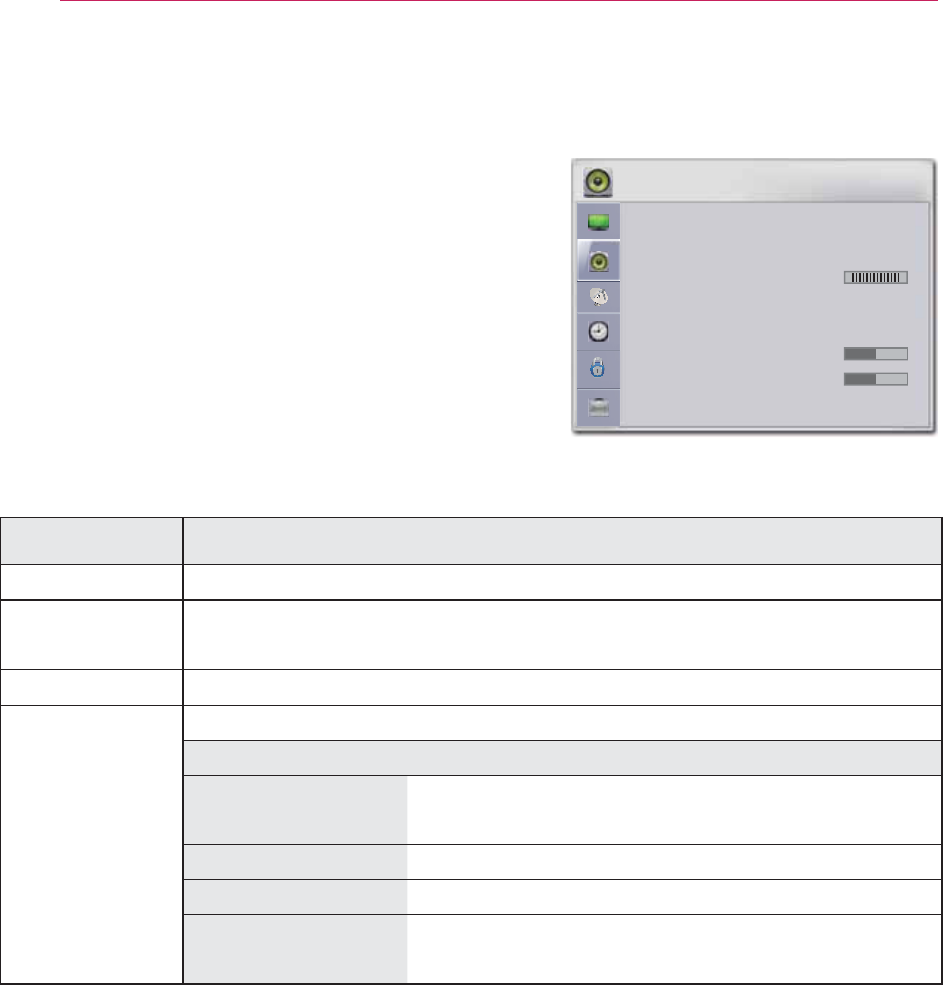
50 CUSTOMIZING SETTINGS
AUDIO Settings
1
Press the SETTINGS button.
2 Use the , , , buttons to select AUDIO
and press the OK button.
3 Use the , , or button to set up a desired
item and press the OK button.
- To return to the previous menu, press the ᰳ
button.
The available audio settings are described as fol-
lows.
Setting Description
Auto Volume Automatically adjusts the volume level.
Clear Voice II Makes the voice from the projector crisp and clear.
Balance Adjusts the balance of the left and right speakers.
Sound Mode Adjusts sound.
Option
Infi nite Surround LG's unique sound option provides 5.1 channel
stereo sound from two speakers.
Treble Adjusts the treble sound.
Bass Adjusts the base sound.
RESET Resets all the sound settings to the factory
default.
$8',2
ؒ $XWR9ROXPH 2Q
ؒ &OHDU9RLFH,, 2IIᰕ
ؒ %DODQFH / 5
ؒ 6RXQG0RGH 6WDQGDUG
ؒ ,QILQLWH6XUURXQG2II
ؒ 7UHEOH
ؒ %DVV
ؒ 5HVHW
ᯒ0RYHᯙ2.
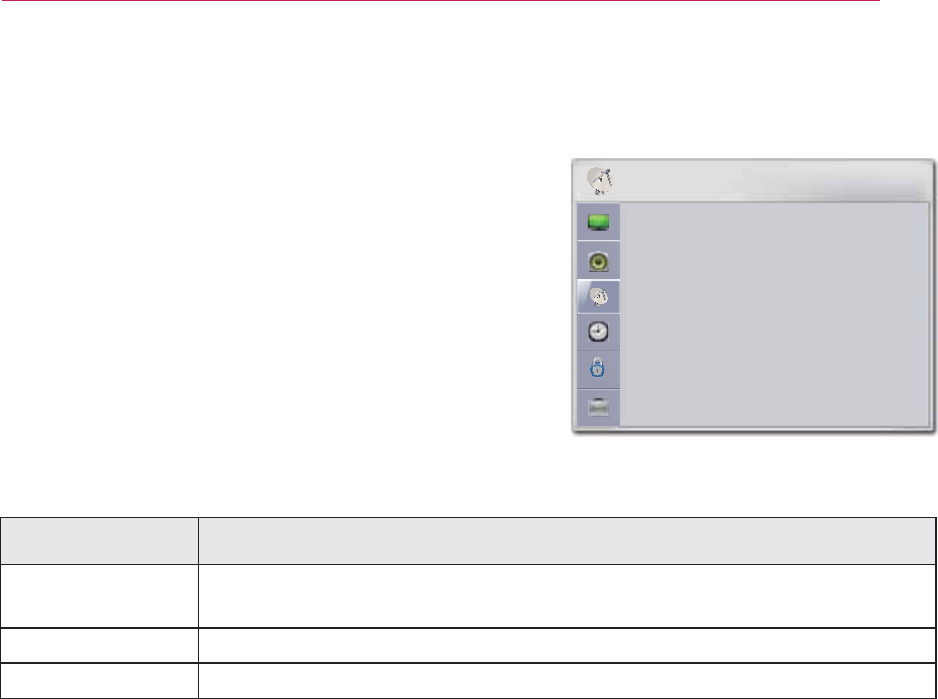
51
CUSTOMIZING SETTINGS
CHANNEL Settings
1
Press the SETTINGS button.
2 Use the , , or button to select CHAN-
NEL and press the OK button.
3 Use the , , or button to set up a desired
item and press the OK button.
- To return to the previous menu, press the ᰳ
button.
The available channel settings are described in the
following.
Setting Description
Auto Tuning Tunes and stores all available channels through antennas or cable
inputs. (See p.22)
Manual Tuning Tunes and stores the channels you want manually.
Channel Edit Adds or deletes channels. (See p.23)
&+$11(/
ؒ $XWR7XQLQJ
ؒ 0DQXDO7XQLQJ
ؒ &KDQQHO(GLW
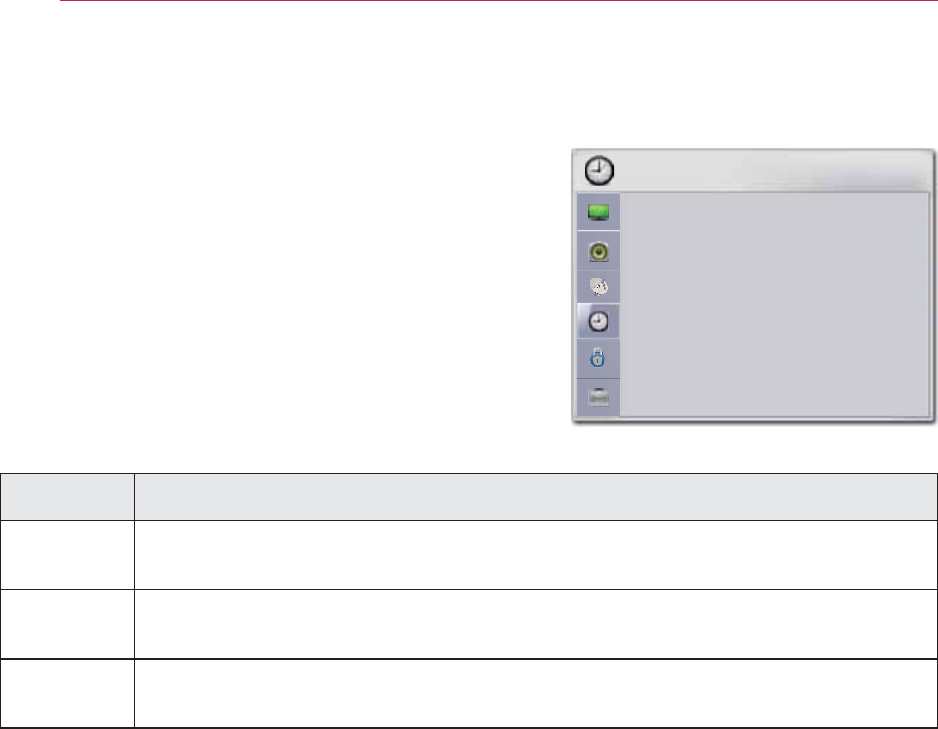
52 CUSTOMIZING SETTINGS
TIME Settings
1
Press the SETTINGS button.
2 Use the , , or button to select TIME and
press the OK button.
3 Use the , , or button to set up a desired
item and press the OK button.
- To return to the previous menu, press the ᰳ
button.
The available time settings are described as follows.
Setting Description
Sleep
Timer
The projector is turned off at the preset time.
Auto Off If there is no signal, the projector automatically turns off after the preset
time has elapsed.
Automatic
Standby
If there is no input for the preset time, the projector automatically goes to
standby mode.
7,0(
ؒ 6OHHS7LPHU 2II
ؒ $XWR2II PLQ
ؒ $XWRPDWLF6WDQGE\ KRXUV
ᯒ0RYHᯙ2.
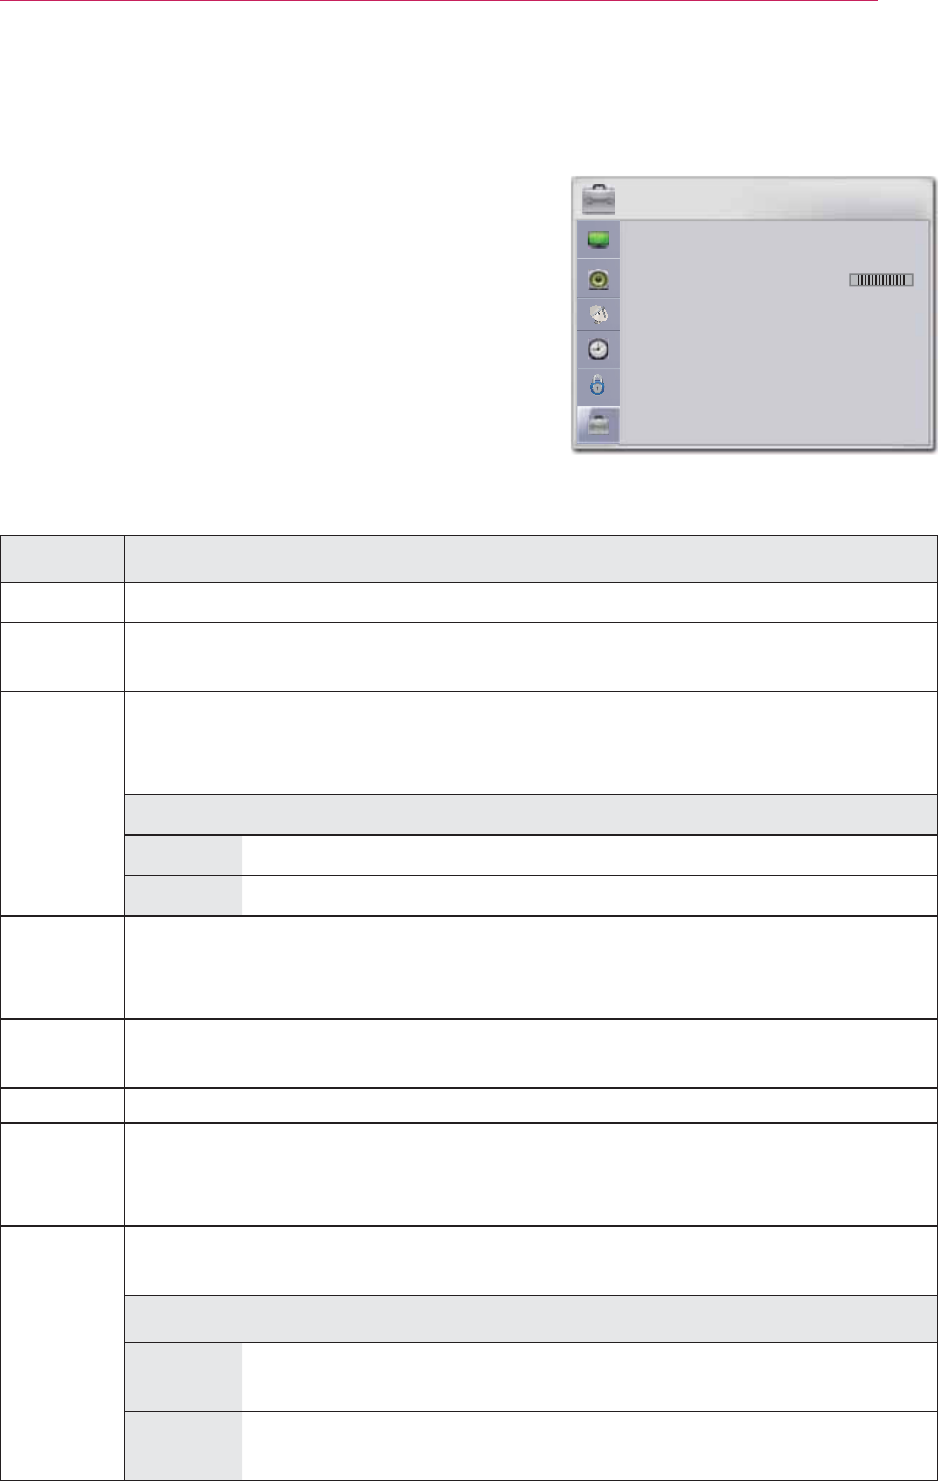
53
CUSTOMIZING SETTINGS
OPTION Settings
1
Press the SETTINGS button.
2 Use the , , or button to select OPTION
and press the OK button.
3 Use the , , or button to set up a desired
item and press the OK button.
- To return to the previous menu, press the ᰳ
button.
The available option settings are described as fol-
lows.
Setting Description
Language Selects a desired Menu Language.
PJT
Mode
Turns the projected image upside down or fl ips it horizontally.
Auto
Keystone
Auto Keystone provides a rectangular screen image by automatically
adjusting the Keystone number when there is a trapezoidal screen image
caused by tilting of the projector.
Option
ON Automatically adjusts the Keystone number.
Off Manually adjusts the Keystone number.
Keystone To prevent the screen image from becoming trapezoidal, Keystone adjusts
the top and bottom width of the image if the projector is not set at a right
angle to the screen.
Blank
Image
Selects a background for blank Image. (see page27)
3D Mode Selects 3D mode.
Auto
Input
Search
Automatically searches and displays an input signal type when it is re-
ceived.
Auto
Power
Makes the projector turn on automatically when the adaptor plug is in-
serted.
Option
On When the DC plug is connected to the projector, it turns on
automatically.
Off When the DC plug is connected to the projector, it goes into
standby mode.
237,21
ؒ /DQJXDJH
ؒ 3-70RGH )URQW
ؒ $XWR.H\VWRQH 2Q
ؒ .H\6WRQH
ؒ %ODQN,PDJH %OXH
ؒ '0RGH
ؒ $XWR,QSXW6HDUFK 2II
ؒ $XWR3RZHU 2II
ؒ +LJK$OWLWXGH 2II
ؒ &DSWLRQ 2II
ؒ 'LY;592'
ؒ ,QLWLDO6HWWLQJ
ᯒ0RYHᯙ2.
54 CUSTOMIZING SETTINGS
Setting Description
High
Altitude
If the projector is used at an altitude higher than 1200 meters, turn this
on.
Otherwise, the projector may overheat or its protection function may be
activated. If this happens, turn the projector off and then on again after
waiting for several minutes.
Caption You can select a desired language when a broadcasting company sends
out digital multilingual signals and
the selected language is displayed as a default when the projector is
turned on or
the channel is changed. If there is no information for a selected foreign
language, it is displayed in English
instead.
Digital Subtitle Settings (For digital broadcasting)
Size Selects the size of a subtitle.
Text Color Selects the color of a subtitle.
Text Opacity Selects the transparency of a subtitle.
Bg Color Selects the background color of a subtitle.
Bg Opacity Selects the transparency of a subtitle background.
DivX(R)
VOD
sets DivX related settings.
Initial
Setting
Resets all the projector settings to the factory default.
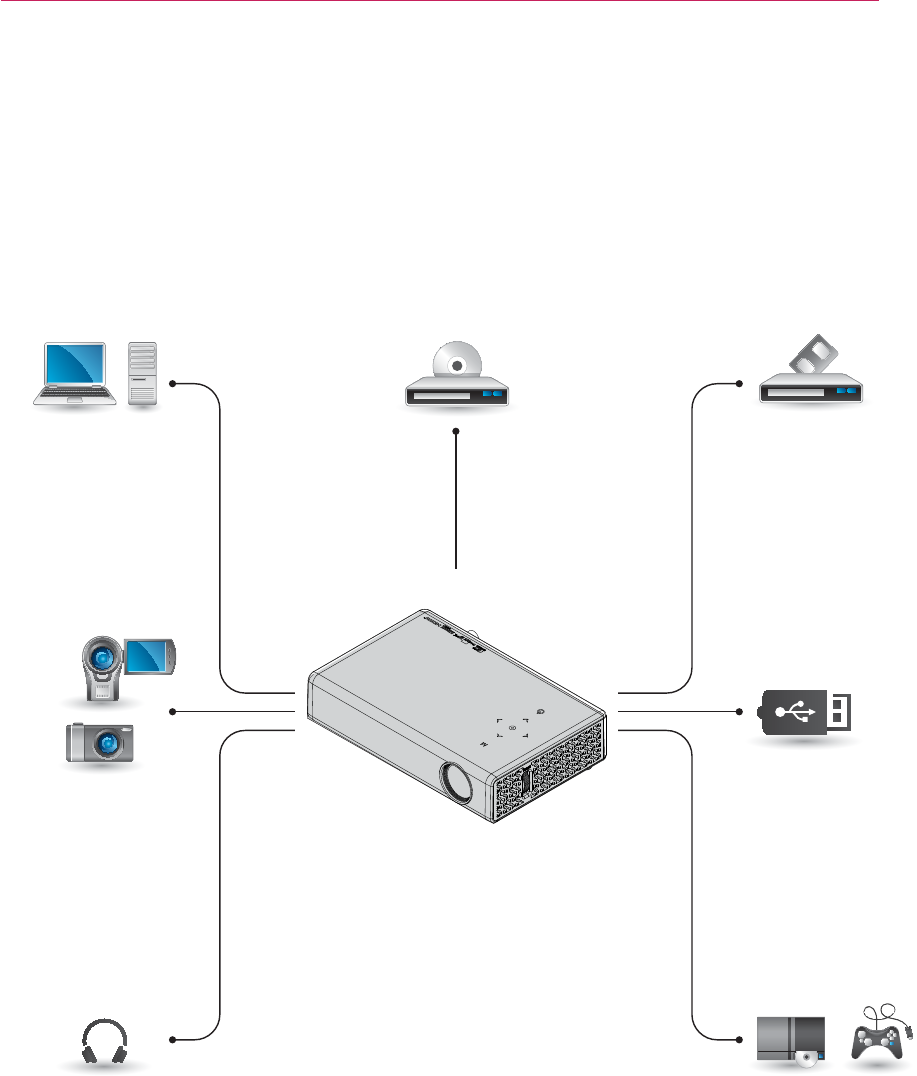
55
MAKING CONNECTIONS
MAKING CONNECTIONS
You can connect various external devices to the ports on the projector.
HDMI - 56Page
Component - 58Page
INPUT (AV) - 57Page
RGB - 56Page
Memory - 28Page
AUDIO - 58Page
Computer/Notebook VideoDVD
Digital Device
USB
Headphones Game Console
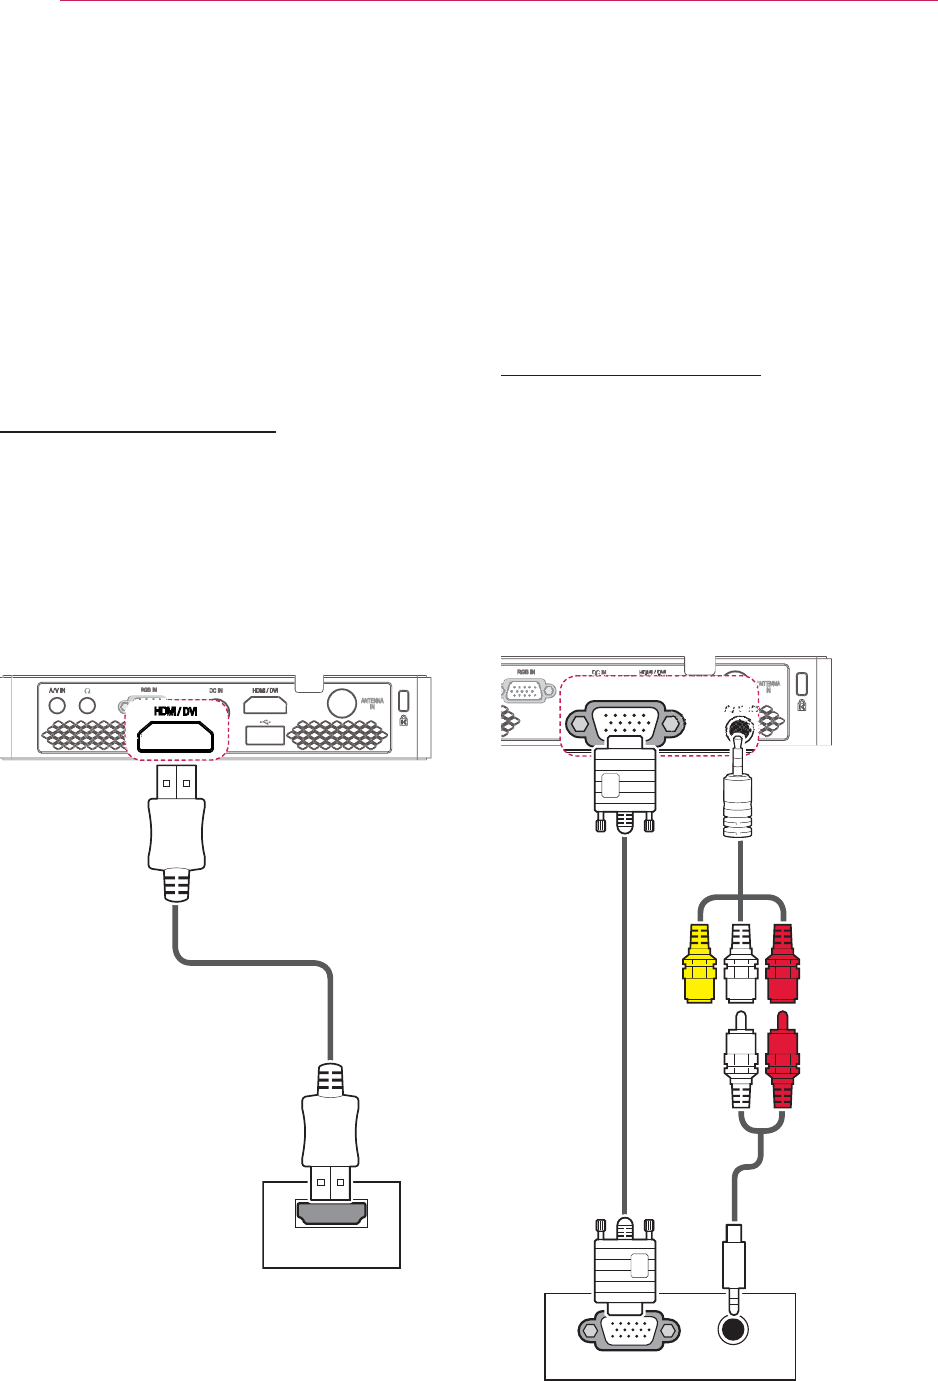
56 MAKING CONNECTIONS
Connecting to an HD
Receiver, DVD, or VCR
Player
Connect an HD receiver, DVD, or VCR
player to the projector and select an ap-
propriate input mode.
HDMI Connection
With an HDMI cable, you can enjoy high
quality picture and sound. Press the
INPUT button on the remote control to
select HDMI.
+'0,
Connecting to a PC
The projector supports Plug & Play.
A PC will automatically recognize the
projector and requires no driver to be
installed.
RGB Connection
Connect the PC output and the PC
video input port of the projector with the
RGB cable.
For audio signal, connect the PC and the
projector with an optional audio cable.
5*%,1
$9,1
$8',22875*%2873&
Accessories
Optional
Extras
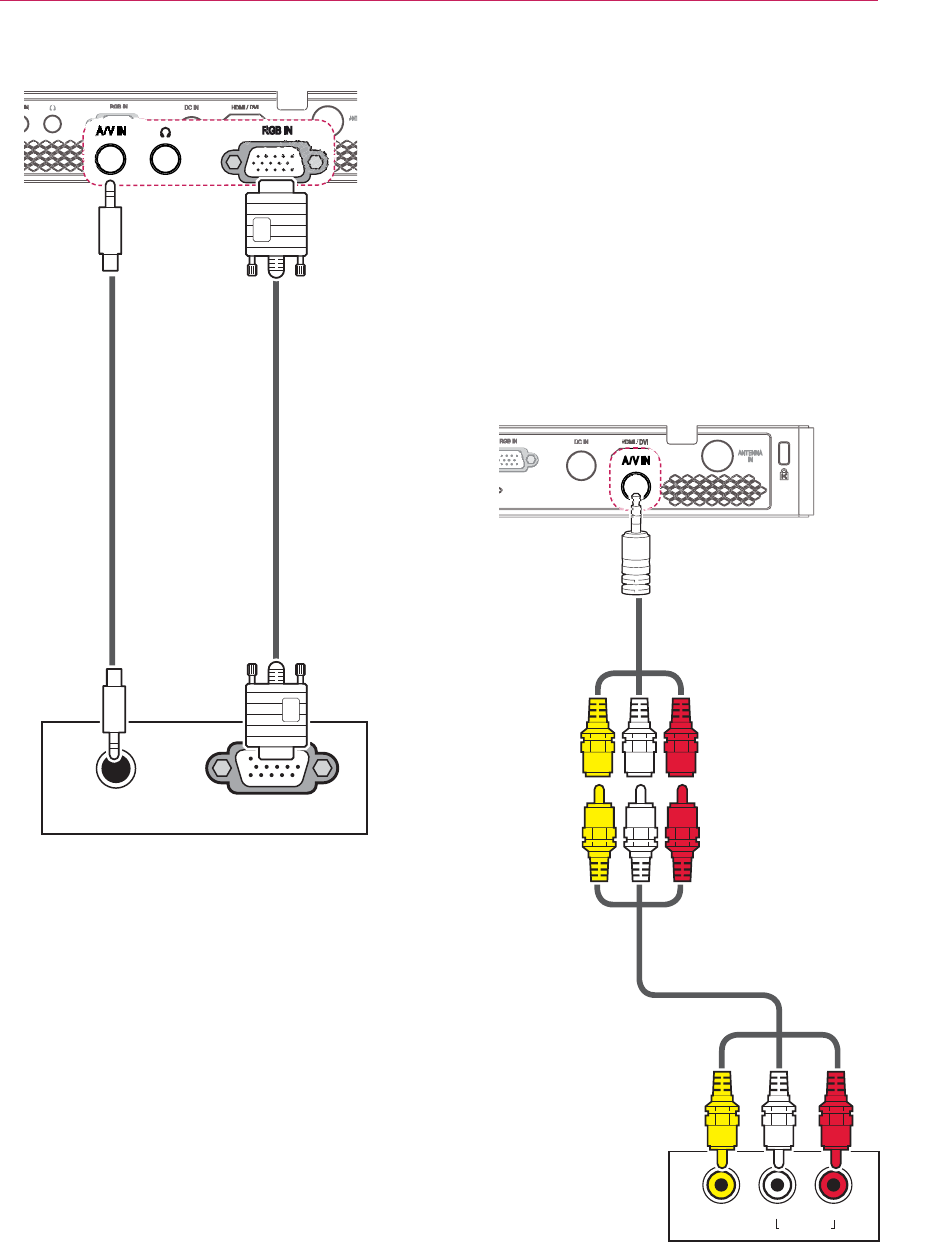
57
MAKING CONNECTIONS
Connecting to the AV
INPUT
Connect the output ports of an external
device and the AV INPUT port of the
projector. Press the INPUT button to
select AV.
$9287
/HIW 5LJKW
$8',2287
AUDIO OUT RGB OUT (PC)
You can connect the audio cable without
using a gender as shown in the illustra-
tion above.
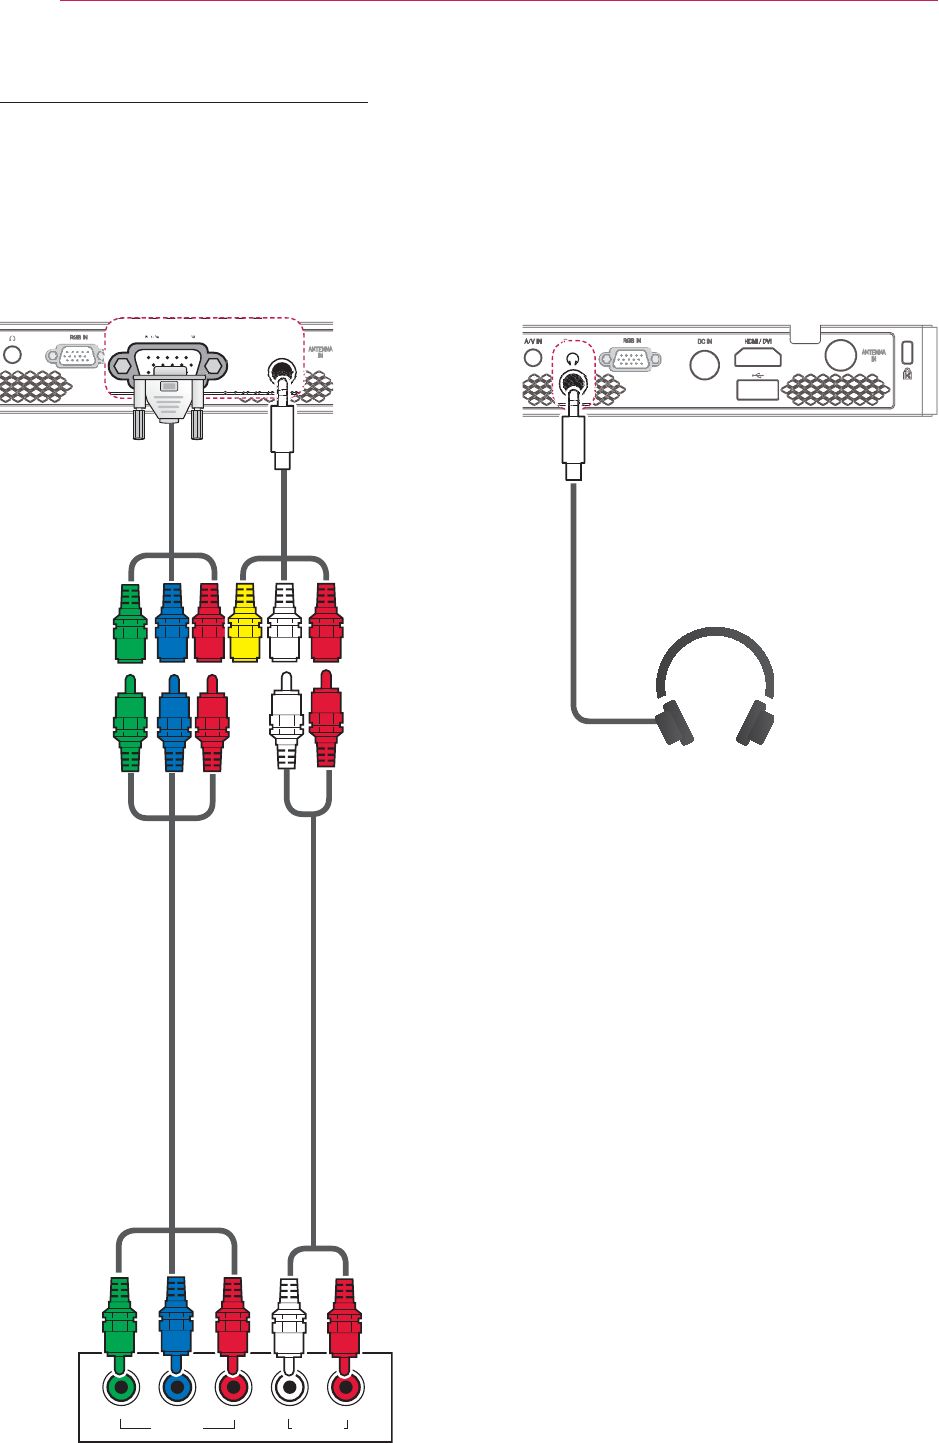
58 MAKING CONNECTIONS
Component Connection
You can enjoy vivid images when you
connect an external device with a RGB
IN port to the component port of the
projector. Press the INPUT button on
the remote control to select Component.
$9287
/HIW<3
%355LJKW
$8',2287
5*%,1
$9,1&
Connecting to
Headphones
You can listen to the audio through a
headphone.
1
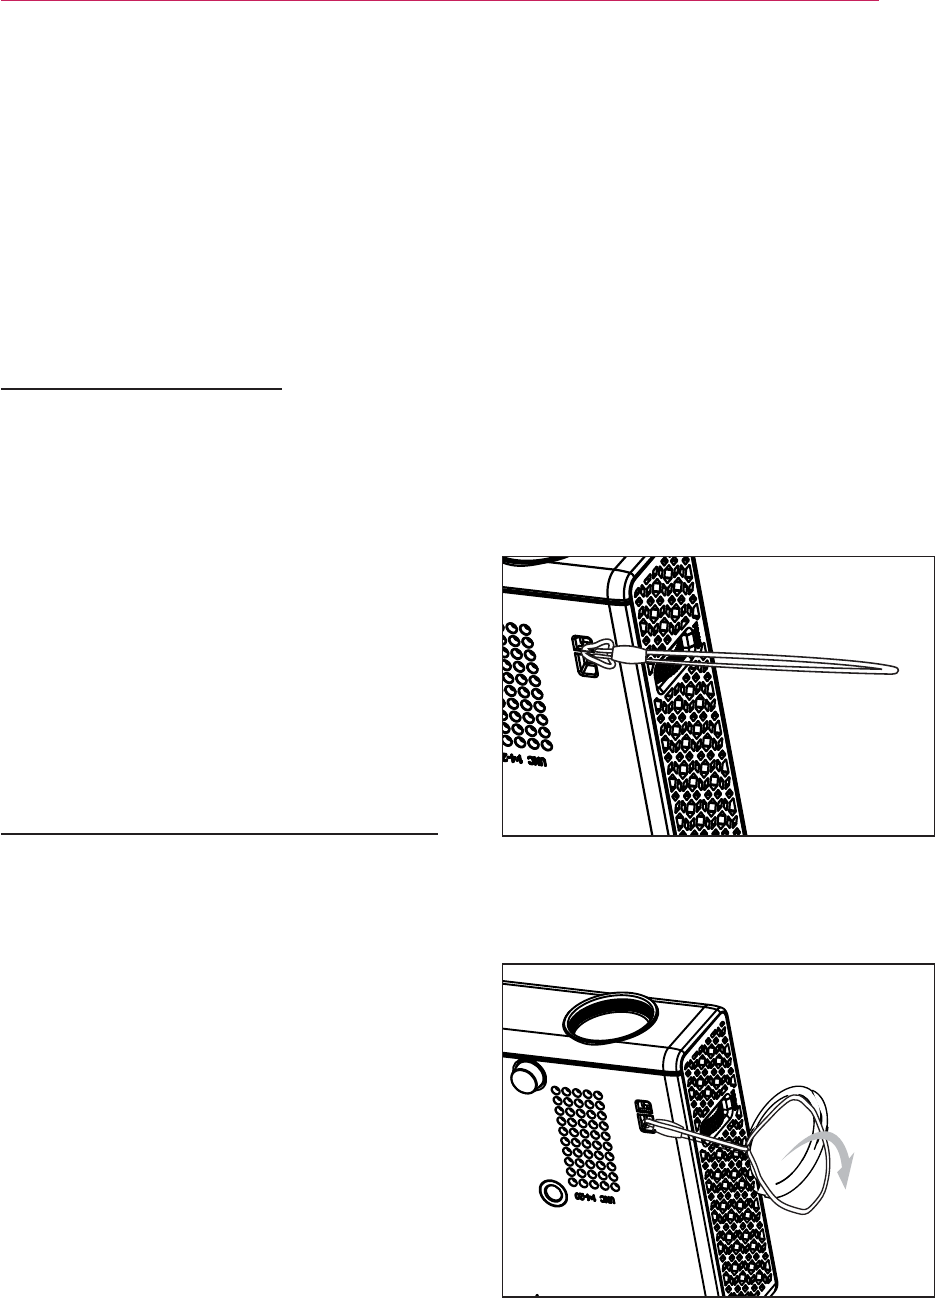
59
MAINTENANCE
MAINTENANCE
Clean your projector to keep it in opti-
mum condition.
Cleaning the Projector
Cleaning the Lens
If there is any dust or staining on the
lens surface, you must clean the lens.
Use an air spray or a cleaning cloth to
clean the lens.
To remove dust or stains, use an air
spray or apply a small amount of clean-
ing agent onto a swab or soft cloth to
lightly rub the lens.
Please be aware that liquid may flow
onto the lens if the product is sprayed
directly onto the lens.
Cleaning the Projector Case
To clean the projector case, first unplug
the power cord.
To remove dust or stains, use only a dry,
lint-free, nonabrasive cloth to polish the
lens.
Do not use alcohol, benzene, thinners
or other chemicals, which may damage
the case.
How to Fix the Lens
Cap
1 Prepare the lens cap and the strap
supplied as accessories.
2 Insert the end of the strap into the
hole at the bottom of the lens section
of the projector. Fix the strap to the
projector by inserting and pulling the
other end of the strap into the other
end.
3 Insert the other end of strap into the
hole of the lens cap, and then pass
the lens cap through the strap.
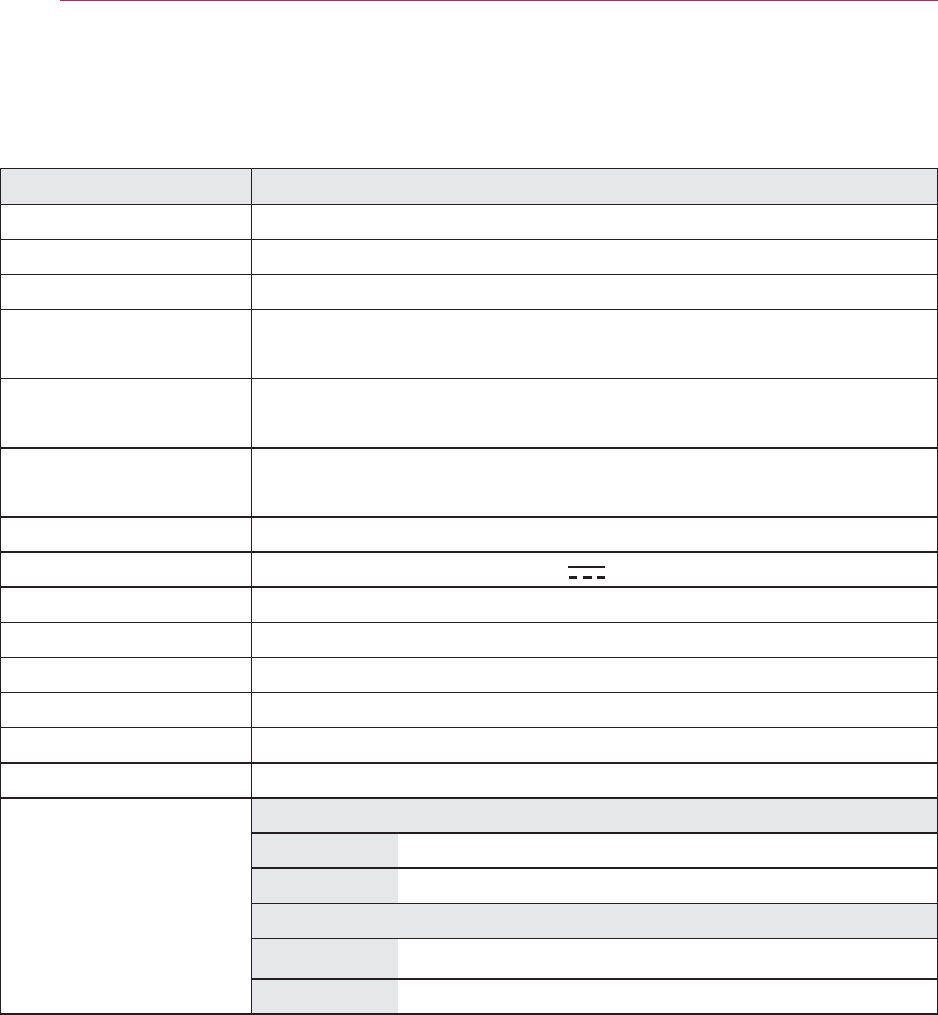
60 SPECIFICATIONS
SPECIFICATIONS
MODELS PB61U (PB61U-JE)
Resolution (Pixel) 1280 (Horizontal) × 800 (Vertical)
Aspect ratio 16:10 (Horizontal:Vertical)
Panel size (mm) 11.623
Projection distance
(Video size) 0.80 m - 3.25 m (63.5 cm - 254.0 cm)
Ratio of upward
projection 100 %
Working range of the
remote control 6 m
Video input
NTSC M / PAL-B, D, G, H, I / PAL M / PAL N / PAL 60
AC-DC Adaptor 19.5 V , 4.62 A
Audio Output 1W + 1W
Height (mm) 33.8 (without foot), 38.3 (with foot)
Width (mm) 158
Depth (mm) 101.5
Weight (g) 445
USB Device 5 V, 0.5 A (Max.)
Operation environ-
ment
Temperature
Operation 0°C - 40°C
Storage -20°C - 60°C
Relative Humidity
Operation 0 % - 80%
Storage 0 % - 85%
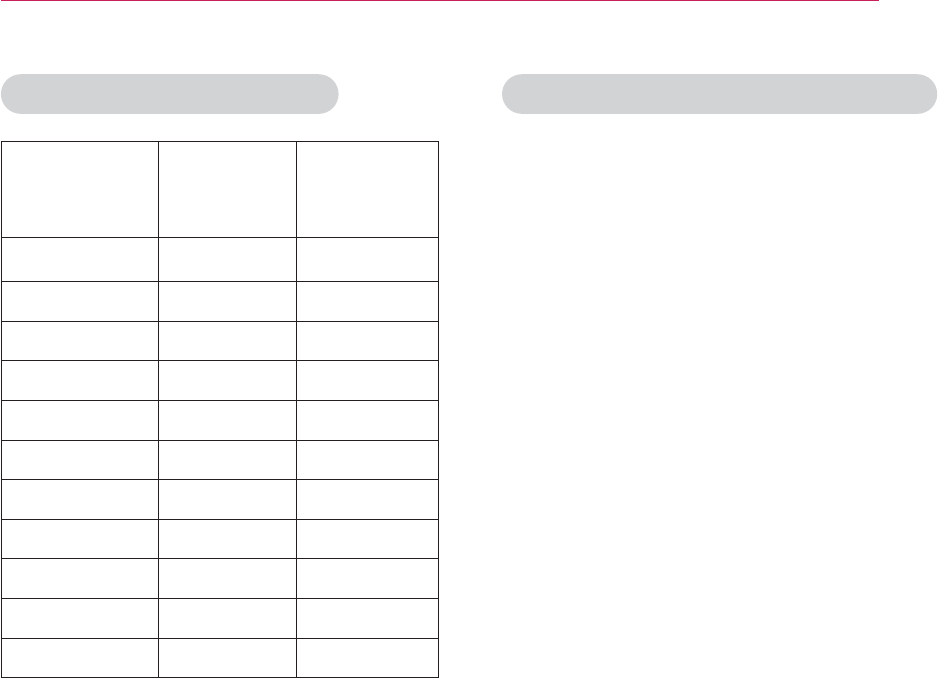
61
SPECIFICATIONS
Open Source Software Information
To obtain the source code under the
GPL, LGPL, MPL and other open source
licenses, which is contained in this prod-
uct, please visit
http://opensource.lge.com.
In addition to the source code, all re-
ferred license terms, warranty disclaim-
ers and copyright notices are available
for download.
If you send an email to opensource@lge.
com to request for the software’s open
source code installed into the projector
within three years of purchase, we will
send you a CD-ROM. You will only be
charged a minimum for packaging and
delivery.
y If an invalid signal is input into the
projector, it will not be displayed
properly on the screen or a message
such as “No Signal” or “Invalid
Mode”
will be displayed.
y The projector supports the DDC1/2B type
as the Plug & Play function (Auto-recog-
nition of PC monitor).
y PC synchronization signal types sup-
ported: Separate type synchronization.
y In PC mode, 1280x800 is recommended
for the best picture quality.
Supported Monitor Display
Resolution
Horizontal
Frequency
(kHz)
Vertical
Frequency
(Hz)
640*350 31.468 70.09
720*400 31.469 70.08
640*480 31.469 59.94
800*600 37.879 60.31
1024*768 48.363 60.00
1152*864 54.348 60.053
1280*800 49.68 60
1360*768 47.712 60.015
1280*1024 63.981 60.020
1400*1050 65.317 59.979
1680*1050 65.3 60

The model and serial number of the projec-
tor are located on the back or on the side
of the projector. Record them below should
you ever need service.
MODEL
SERIAL
