LG Electronics USA SJ2 WIRELESS SOUND BAR User Manual 15 SJ2 UserMan
LG Electronics USA WIRELESS SOUND BAR 15 SJ2 UserMan
15_SJ2 UserMan

OWNER’S MANUAL
Wireless
Sound Bar
Please read this manual carefully before operating
your set and retain it for future reference.
MODEL
SJ2 (SJ2, SPJ2B-W)
www.lg.com
*MFL00000000*
1 Getting Started
Getting Started2
Getting Started
1
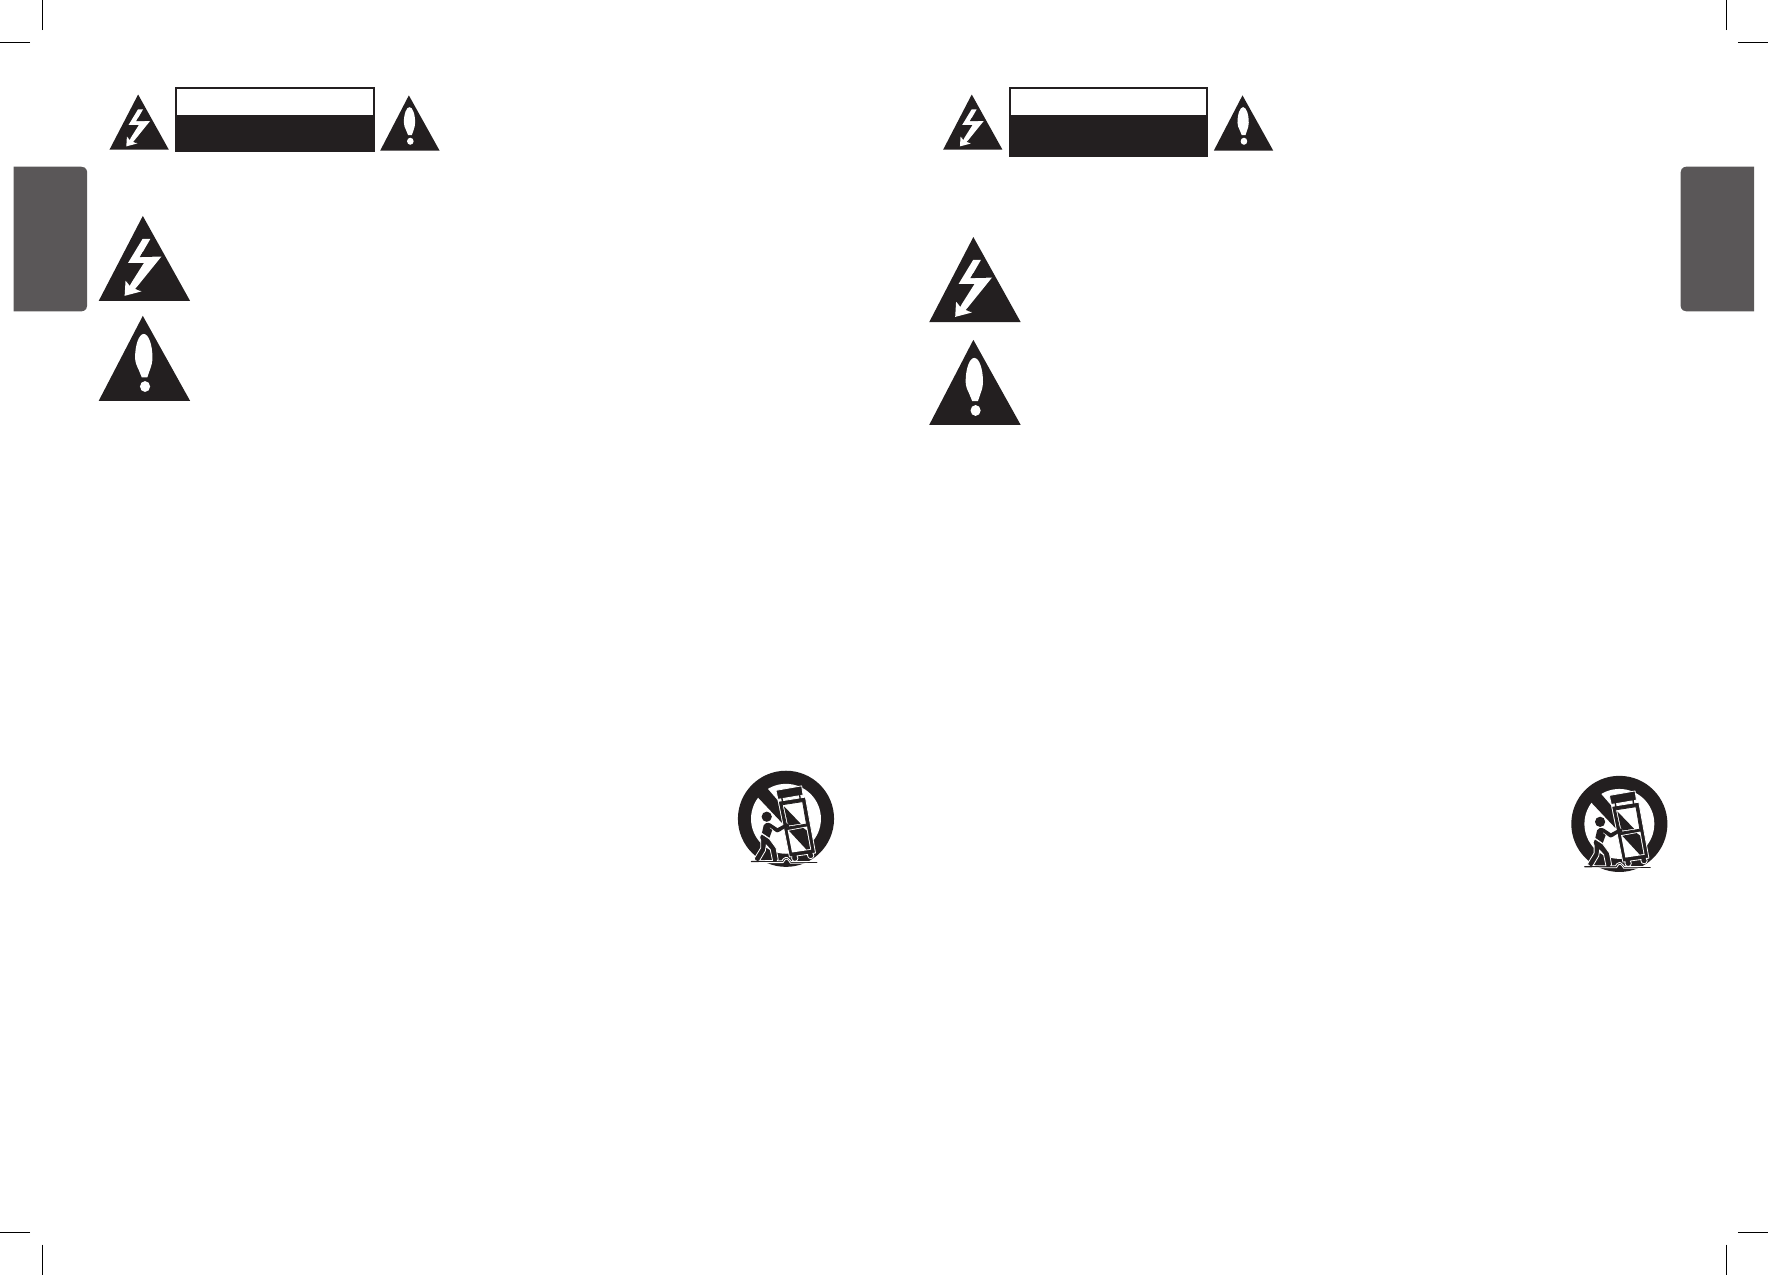
Safety Information
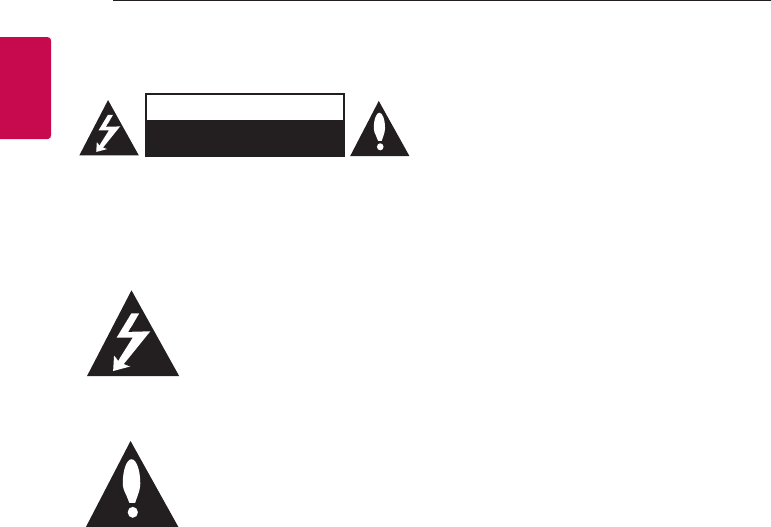
CAUTION
RISK OF ELECTRIC SHOCK
DO NOT OPEN
CAUTION: TO REDUCE THE RISK OF ELECTRIC
SHOCK DO NOT REMOVE COVER (OR BACK)
NO USER-SERVICEABLE PARTS INSIDE REFER
SERVICING TO QUALIFIED SERVICE PERSONNEL.
This lightning ash with arrowhead
symbol within an equilateral
triangle is intended to alert the
user to the presence of uninsulated
dangerous voltage within the
product’s enclosure that may be of
sufcient magnitude to constitute
a risk of electric shock to persons.
The exclamation point within an
equilateral triangle is intended
to alert the user to the presence
of important operating and
maintenance (servicing)
instructions in the literature
accompanying the product.
WARNING: TO PREVENT FIRE OR ELECTRIC SHOCK
HAZARD, DO NOT EXPOSE THIS PRODUCT TO RAIN
OR MOISTURE.
CAUTION: The apparatus should not be exposed to
water (dripping or splashing) and no objects lled
with liquids, such as vases, should be placed on the
apparatus.
WARNING: Do not install this equipment in a
conned space such as a book case or similar unit.
CAUTION: Do not use high voltage products around
this product. (ex. Electrical swatter) This product may
malfunction due to electrical shock.
CAUTION: No naked ame sources, such as lighted
candles, should be placed on the apparatus.
CAUTION: Do not block any ventilation openings.
Install in accordance with the manufacturer’s
instructions.
Slots and openings in the cabinet are provided
for ventilation and to ensure reliable operation of
the product and to protect it from over heating.
The openings shall be never be blocked by placing
the product on a bed, sofa, rug or other similar
surface. This product shall not be placed in a built-
in installation such as a bookcase or rack unless
proper ventilation is provided or the manufacturer’s
instruction has been adhered to.

Getting Started 3
Getting Started
1
CAUTION concerning the Power Cord
The Power Plug is the disconnecting device. In case
of an emergency, the Power Plug must remain readily
accessible.
Check the specication page of this owner’s manual
to be certain of the current requirements.
Do not overload wall outlets. Overloaded wall outlets,
loose or damaged wall outlets, extension cords, frayed
power cords, or damaged or cracked wire insulation
are dangerous. Any of these conditions could result
in electric shock or re. Periodically examine the
cord of your device, and if its appearance indicates
damage or deterioration, unplug it, discontinue use of
the device, and have the cord replaced with an exact
replacement part by an authorized service center.
Protect the power cord from physical or mechanical
abuse, such as being twisted, kinked, pinched, closed
in a door, or walked upon. Pay particular attention to
plugs, wall outlets, and the point where the cord exits
the device.
NOTICE: For safety marking information including
product identication and power supply ratings,
please refer to the main label on the bottom or the
other surface of the product.
This device is equipped with a portable battery or
accumulator.
Safety way to remove the battery from the
equipment: Remove the old battery or battery pack,
follow the steps in reverse order than the assembly.
To prevent contamination of the environment and
bring on possible threat to human and animal health,
the old battery or the battery put it in the appropriate
container at designated collection points. Do not
dispose of batteries or battery together with other
waste. It is recommended that you use local, free
reimbursement systems batteries and accumulators.
The battery should not be exposed to excessive heat
such as sunshine, re or the like.

Getting Started4
Getting Started
1
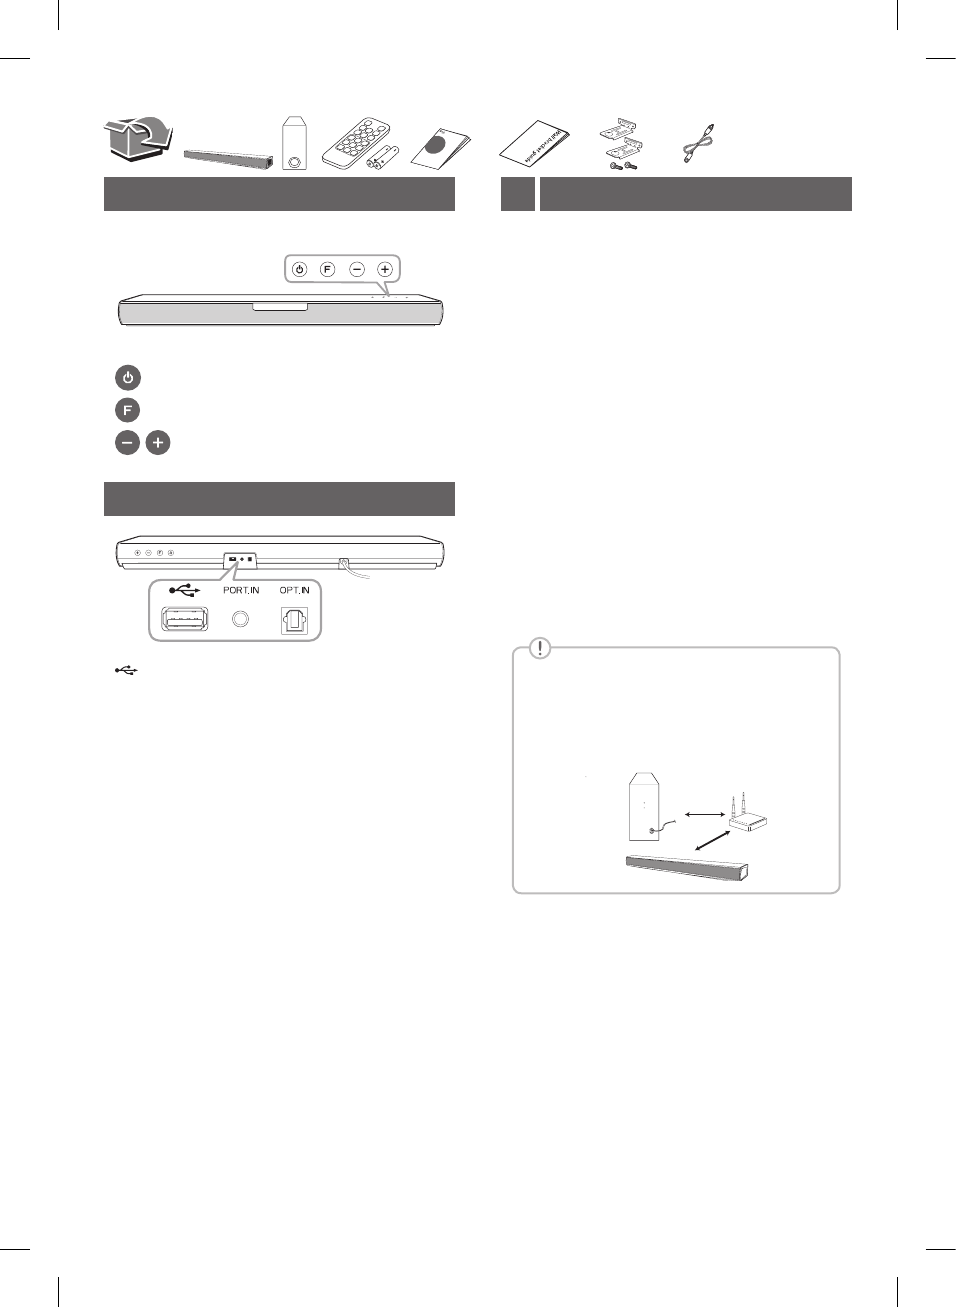
Symbols
~Refers to alternating current (AC).
0Refers to direct current (DC).
Refers to class II equipment.
1Refers to stand-by.
!Refers to “ON” (power).
Refers to dangerous voltage.

Table of Contents 5
1
2
3
4
5
Table of Contents
1 Getting Started
2 Safety Information
6 Unique features
6 Introduction
6 – Symbols used in this manual
7 Remote control
8 Front panel
8 Rear panel
9 About LED condition
10 Installing the sound bar
2 Connecting
11 Wireless subwoofer connection
12 Connecting to your TV
12 – Using an OPTICAL cable
13 Optional equipment connection
13 – OPT. IN connection
13 – PORT. IN connection
14 – USB connection
14 – Compatible USB devices
14 – USB device requirement
15 – Playable file
3 Operating
16 Basic operations
16 – USB operation
16 Other operations
16 – DRC (Dynamic Range Control)
16 – Turn off the sound temporarily
16 – Using your TV remote control
17 – Auto power down
17 – AUTO POWER On/Off
18 – Auto function change
19 Using BLUETOOTH® technology
19 – Listening to music stored on the Bluetooth
devices
21 Sound adjustment
21 – Setting the surround mode
21 – Adjust the woofer level settings
4 Troubleshooting
22 Troubleshooting
22 – General
23 – NOTES to use wireless
5 Appendix
24 Trademarks and licenses
25 Specifications
26 Maintenance
26 – Handling the unit

Getting Started6
Getting Started
1
Unique features
Auto power down
This unit supports to turn off by itself for saving
energy consumption.
Portable In
Listen to music from your portable device.
(MP3 player, Notebook, Smart phone, etc..)
BLUETOOTH®
Listens to music stored on your Bluetooth device.
USB playback
Listens to music stored on your USB device.
Introduction
Symbols used in this manual
, Note
Indicates special notes and operating features.
> Caution
Indicates cautions for preventing possible damages
from abuse.
Getting Started 7
Getting Started
1
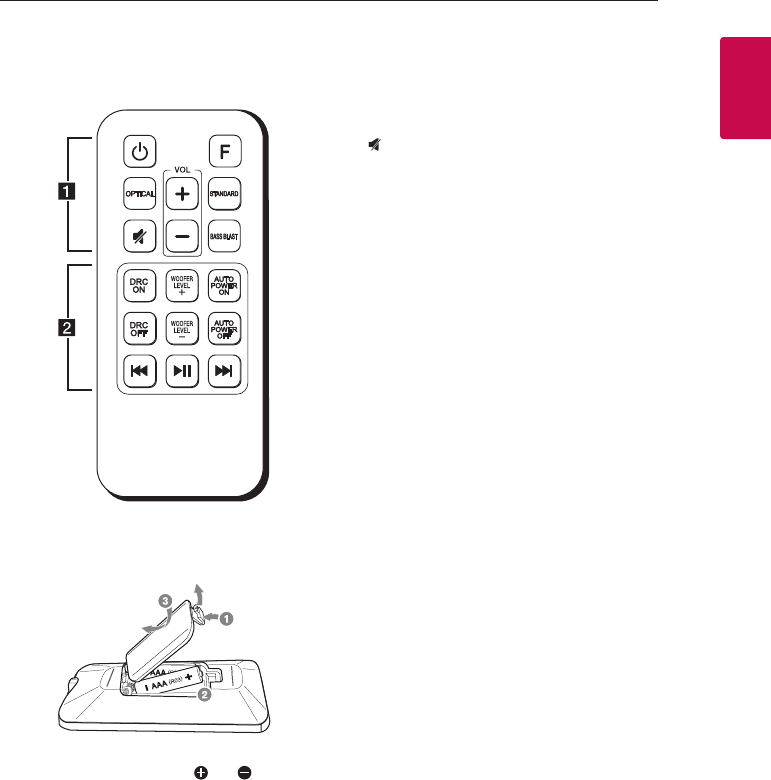
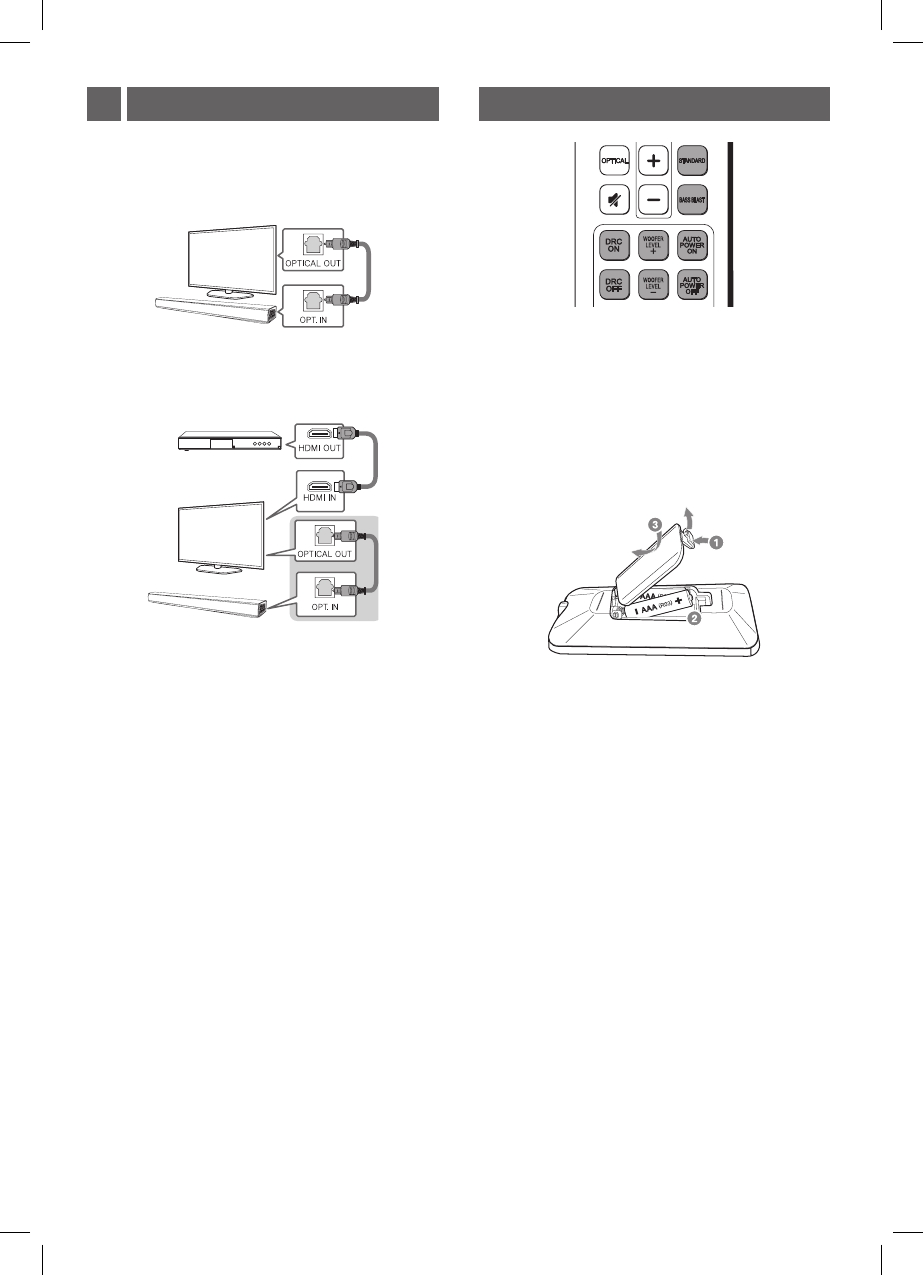
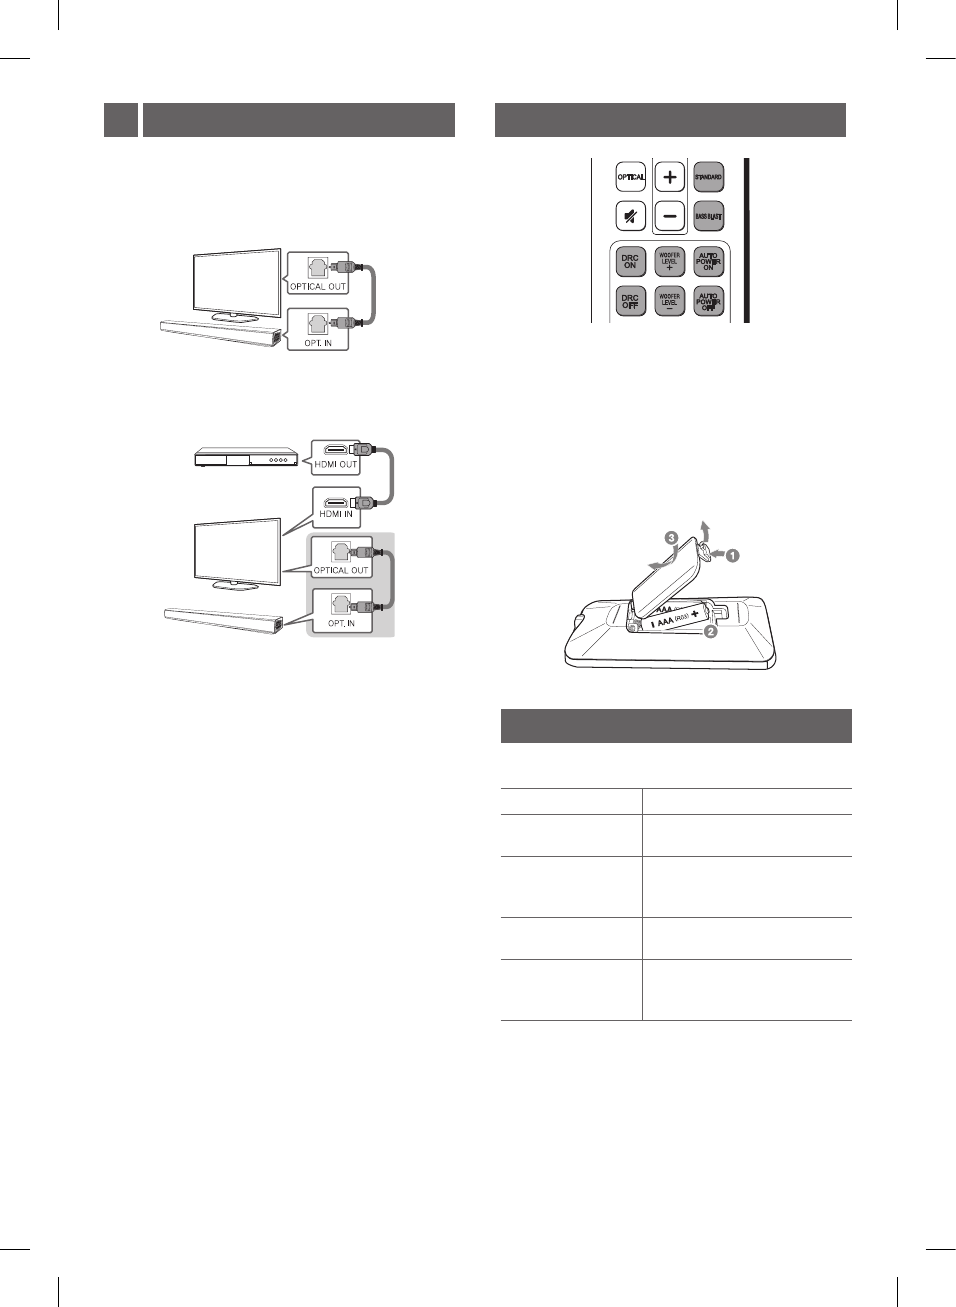
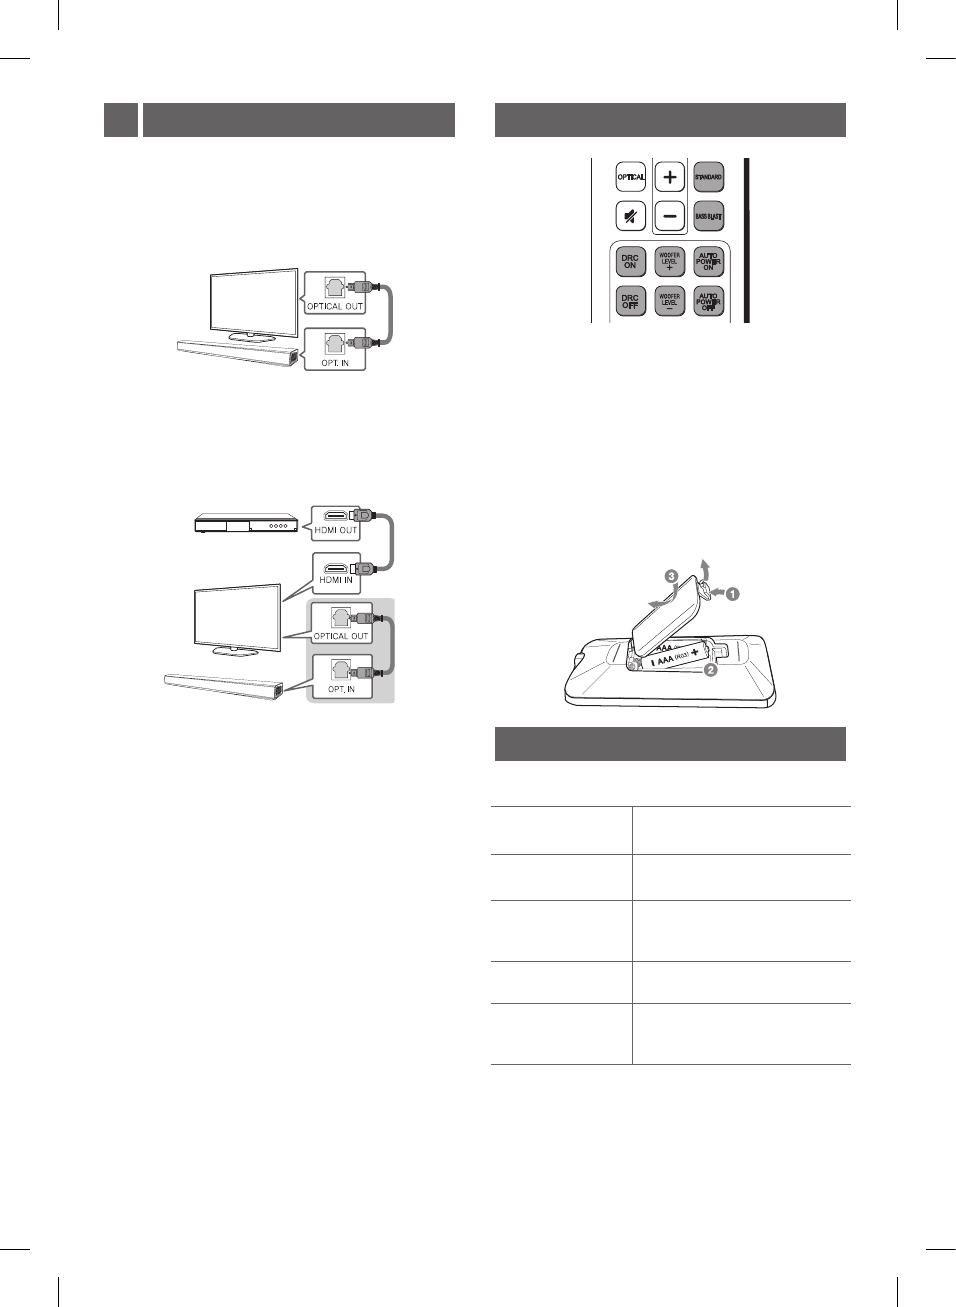
Remote control
Replacement of battery
Remove the battery cover on the rear of the remote
control, and insert battery with and matched
correctly.
• • • • • • • • • • • • • • a • • • • • • • • • • • • •
1 (Power) : Switches the unit ON or OFF
F : Selects the function.
OPTICAL : Selects the optical function.
(Mute) : Mutes the sound.
STANDARD : Selects standardized sound.
BASS BLAST: Reinforces the treble, bass and
surround sound effect.
VOL o/p : Adjusts speaker volume.
• • • • • • • • • • • • • • b • • • • • • • • • • • • •
DRC ON/OFF :
- Turns on or off DRC function.
(Page 16)
- Controls this unit using TV remote.
(Page 16)
WOOFER LEVEL o/p : Adjusts sound level of
subwoofer.
AUTO POWER ON/OFF :
- Turns on or off AUTO POWER function. (Page 17)
- Turns on or off the Bluetooth connection lock
function. (Page 20)
C/V (Skip) :
- Skips Fast backward or Forward.
dM (Play/Pause) :
- Starts playback.
- Pauses playback.
Getting Started8
Getting Started
1
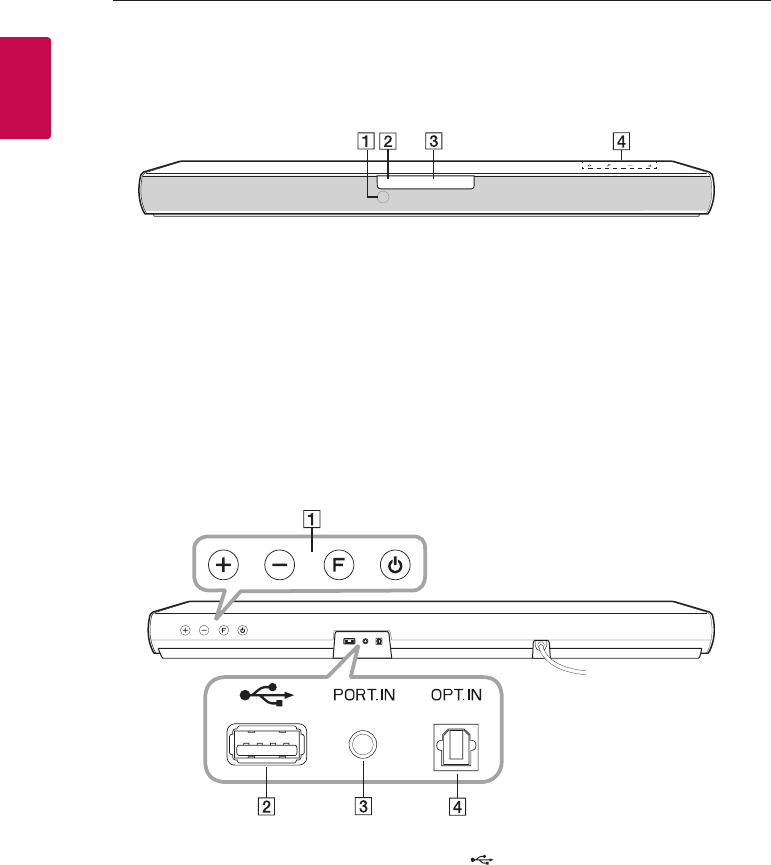
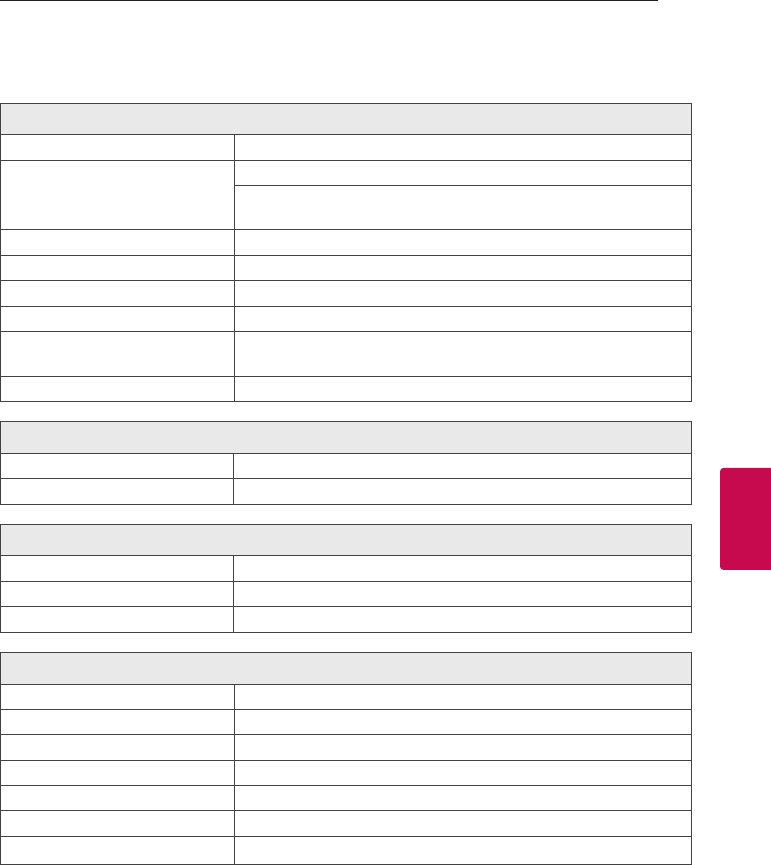
Front panel
Rear panel
A o/p (Volume) : Adjusts volume level
F (Function) : Selects the function.
1 (Standby)
B (USB) : Connect to a USB device.
C PORT.IN (Portable) : Connect to a Portable
device.
D OPT. IN (Optical) : Connect to an Optical device.
A
Remote sensor
B
Standby LED (Red)
C
Function LED (White)
D
The buttons are located on the rear.
Getting Started 9
Getting Started
1
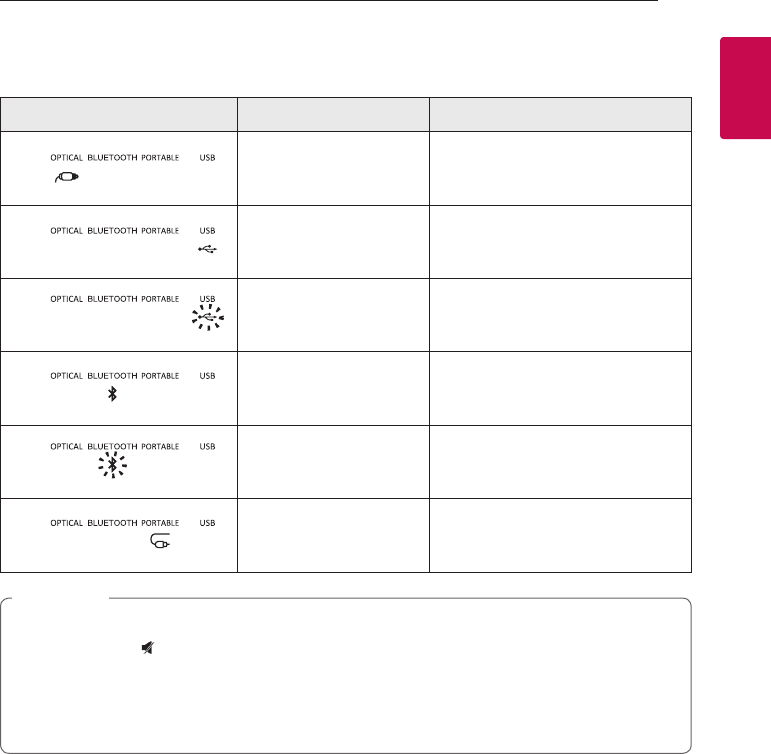
About LED condition
LED Condition Description
OPTICAL LED turns on. OPTICAL function is selected.
USB LED turns on. USB function is selected.
USB LED blinks. Paused USB playback.
Bluetooth LED turns on. Paired with Bluetooth device.
Bluetooth LED blinks. Waiting for Bluetooth connection.
PORTABLE LED turns on. PORTABLE function is selected.
yWhen you press any button, standby LED (Red) on the main unit blinks.
yWhen you press (Mute) button, standby LED (Red) blinks slowly.
yWhen this unit reaches minimum volume, standby LED (Red) turns on for 2 seconds.
yWhen this unit reaches maximum volume, standby LED (Red) turns on for 2 seconds.
yWhen you press volume (o/p) button continually, standby LED (Red) blinks quickly.
, Note
Getting Started10
Getting Started
1
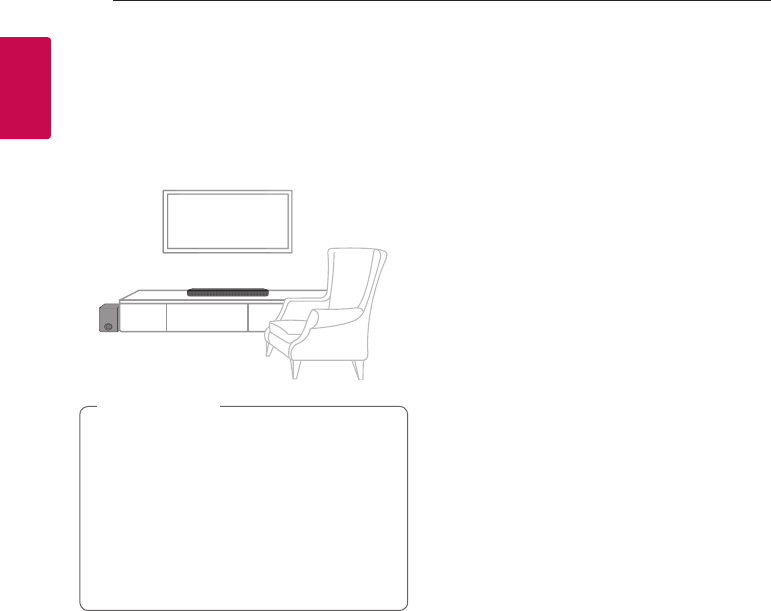
Installing the sound bar
You can hear the sound by connecting the unit to the
other device : TV, Blu-ray disc player, DVD player, etc.
Place the unit in front of the TV and connect it to the
device you want. (Page 12 - 15)
yFor best performance of wireless connection
such as Bluetooth or wireless subwoofer,
do not install the unit on Metallic furniture
because wireless connection communicates
through a module positioned on the bottom
of the unit.
yBe careful not to make scratches on the
surface of the Unit / Subwoofer when
installing or moving them.
> Caution
2 Connecting
Connecting 11
Connecting
2
Wireless subwoofer
connection
LED indicator of wireless subwoofer
LED Color Status
Green
(Blink)
Attempting to make
connection.
Green The connection is completed.
Red The wireless subwoofer
is in standby mode or the
connection is failed.
Off (No display) The power cord of wireless
subwoofer is disconnected.
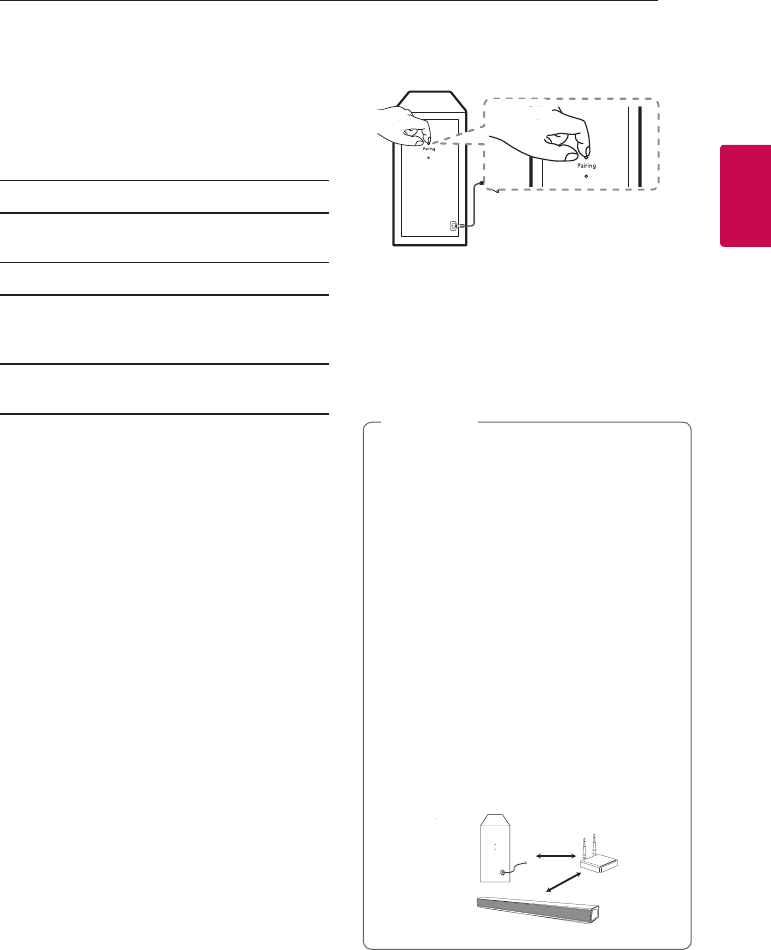
Setting up the wireless subwoofer for
the first time
1. Connect the power cord to the subwoofer and
plug the power cord into a power outlet.
2. Turn on the main unit : The sound bar and wireless
subwoofer will be automatically connected.
- Green LED on the rear of wireless subwoofer
turns on.
Manually pairing wireless subwoofer
When your connection is not completed, you can
check red LED on the wireless subwoofer and the
wireless subwoofer does not make sound. To solve
the problem, follow the steps below.
1. Press Pairing button on the rear of the wireless
subwoofer.
- The green LED on the rear of the wireless
subwoofer blinks quickly.
2. Turn on the main unit.
3. Pairing is completed.
- The green LED on the rear of the wireless
subwoofer turns on.
yIt takes a few seconds (and may take longer)
for the main unit and the subwoofer to
communicate with each other and make
sounds.
yThe closer the main unit and the subwoofer,
the better sound quality. It is recommended
to install the main unit and the subwoofer as
close as possible and avoid the cases below.
- There is an obstacle between the main
unit and the subwoofer.
- There is a device using same frequency
with this wireless connection such as
a medical equipment, a microwave or a
wireless LAN device.
- Keep the sound bar and the subwoofer
away from the device (ex. wireless router,
microwave oven, etc.) over 1 m to prevent
wireless interference.
!P
, Note
Connecting12
Connecting
2
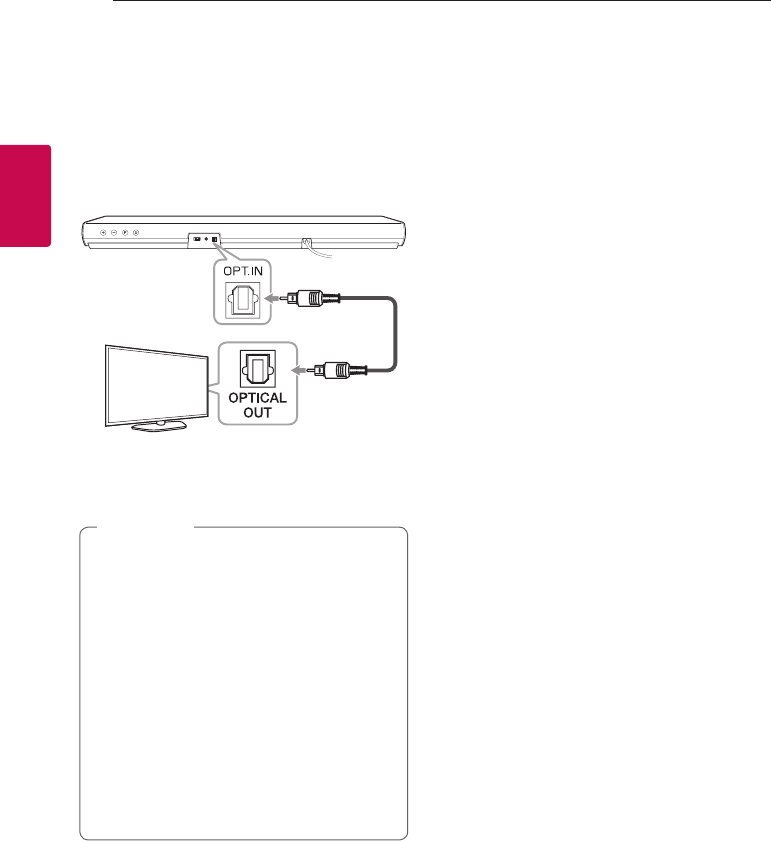
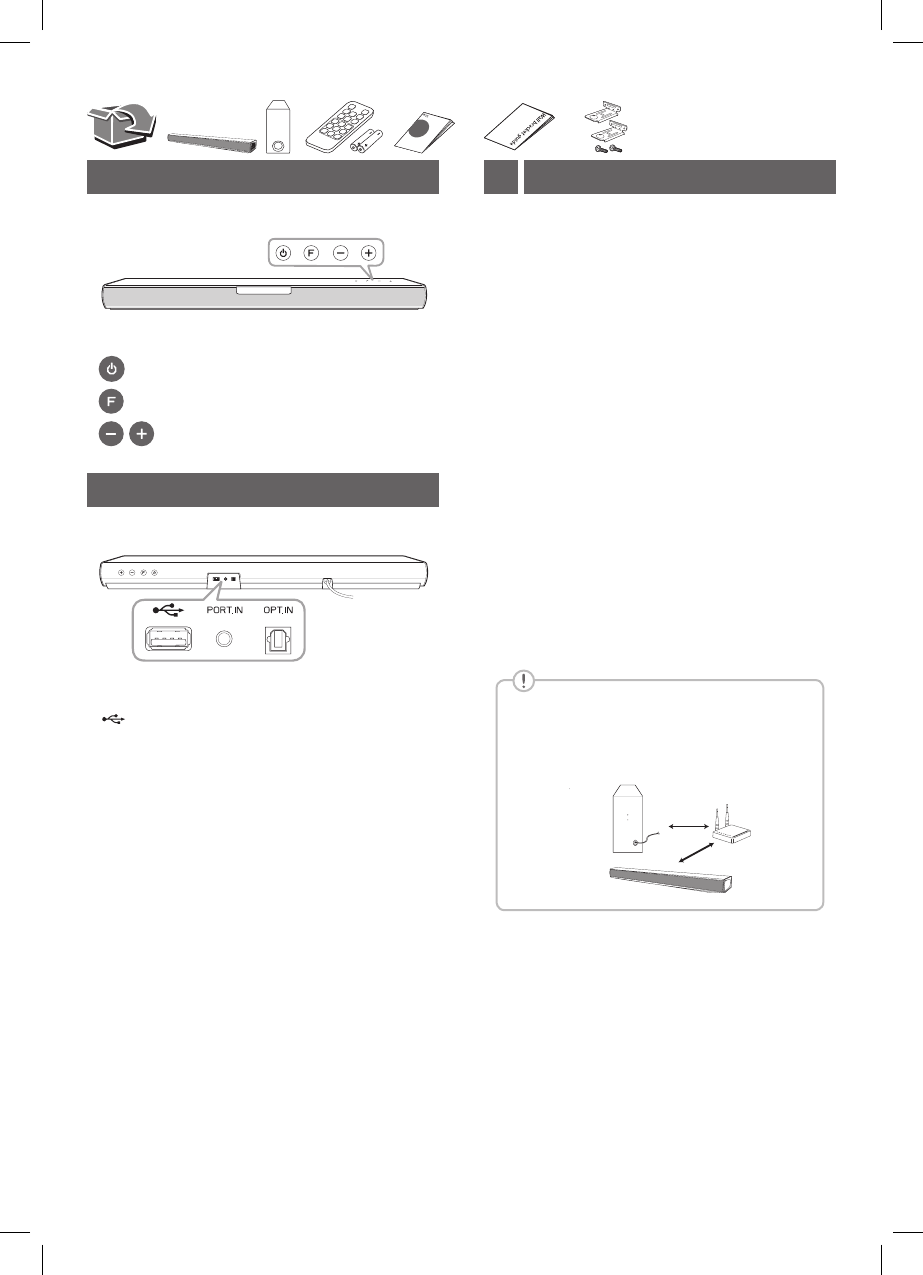
Connecting to your TV
Using an OPTICAL cable
1. Connect the OPT. IN jack on the back of the unit
to OPTICAL OUT jack on the TV using an OPTICAL
cable.
Optical
cable
2. Select the input source to Optical by
pressing OPTICAL button on the remote control
or F button on the unit repeatedly.
yBefore connecting the optical cable, be sure
to remove the protection plug cover if your
cable has the cover.
yYou can enjoy the TV audio through the
speakers of this unit. In the case of some TV
models, you must select the external speaker
option from the TV menu. (For details,
reference your TV user manual.)
ySet up the sound output of TV to listen to
the sound through this unit :
TV setting menu [ [Sound] [ [TV Sound
output] [ [External speaker (Optical)]
yDetails of TV setting menu vary depending
on the manufacturers or models of your TV.
, Note
Connecting 13
Connecting
2
Optional equipment
connection
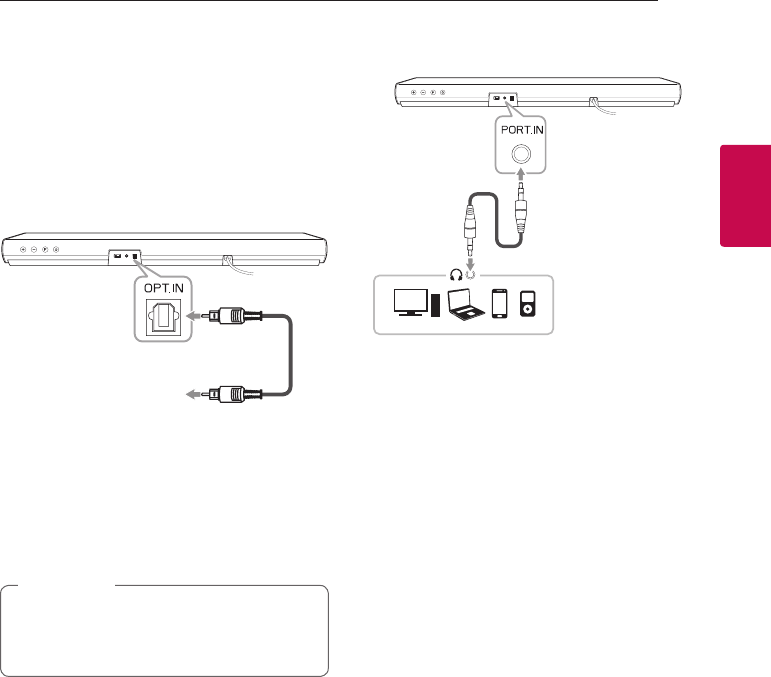
OPT. IN connection
Connect an optical output jack of external devices to
the OPT. IN jack.
To the digital
optical output jack of
external device
Optical
cable
1. Connect the OPT. IN jack on the back of the unit
to OPTICAL OUT jack of your external device.
2. Select the input source to Optical by
pressing OPTICAL button on the remote control
or F button on the unit repeatedly.
3. Listen to sound.
Before connecting the optical cable, be sure to
remove the protection plug cover if your cable
has the cover.
, Note
PORT. IN connection
Portable
cable
Listening to music from your portable
player
The unit can be used to play the music from many
types of portable players or external devices.
1. Connect the portable player to the
PORT. IN connector of the unit by using 3.5 mm
stereo cable.
2. Select the input source to PORTABLE by
pressing F button on the remote control or unit
repeatedly.
3. Turn on the portable player or external device and
start playing it.
Connecting14
Connecting
2
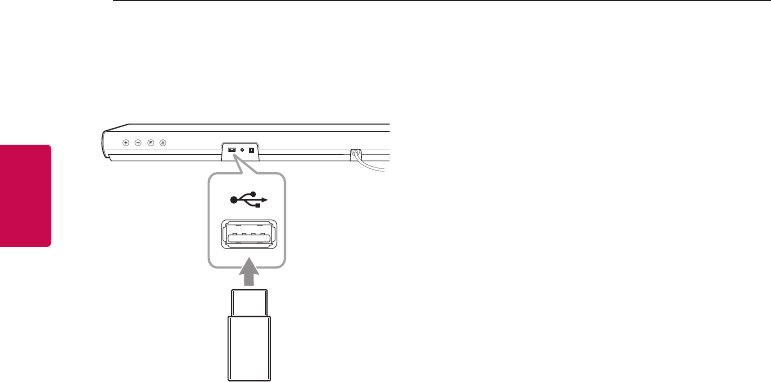
USB connection
Connect USB memory device to the USB port on the
back of the unit.
For more information of playing les on a USB, refer
to the page 16.
Removing the USB Device from the unit.
1.
Choose a different function/mode
.
2. Remove the USB device from the unit.
Compatible USB devices
yMP3 Player : Flash type MP3 player.
yUSB Flash Drive : Devices that support USB 1.1.
yThe USB function of this unit does not support
some USB devices.
USB device requirement
yDevices which require additional program
installation connected to a computer, are not
supported.
yDo not extract the USB device while in operation.
yFor a large capacity USB, it may take longer than a
few minutes to be searched.
yTo prevent data loss, back up all data.
yThis unit is not supported when the total number
of les is 1,000 or more.
yThe unit’s USB Port can not be connected to PC.
The unit can not be used as a storage device.
yThe exFAT le system is not supported on this
unit. (FAT16/FAT32 systems are available.)
yDepending on some devices, it may not available to
recognize the followings on this unit.
- External HDD
- Card readers
- Locked devices
- Hard type USB devices
- USB hub
- Using USB extension cable
- iPhone/iPod/iPad
- Android device
Connecting 15
Connecting
2
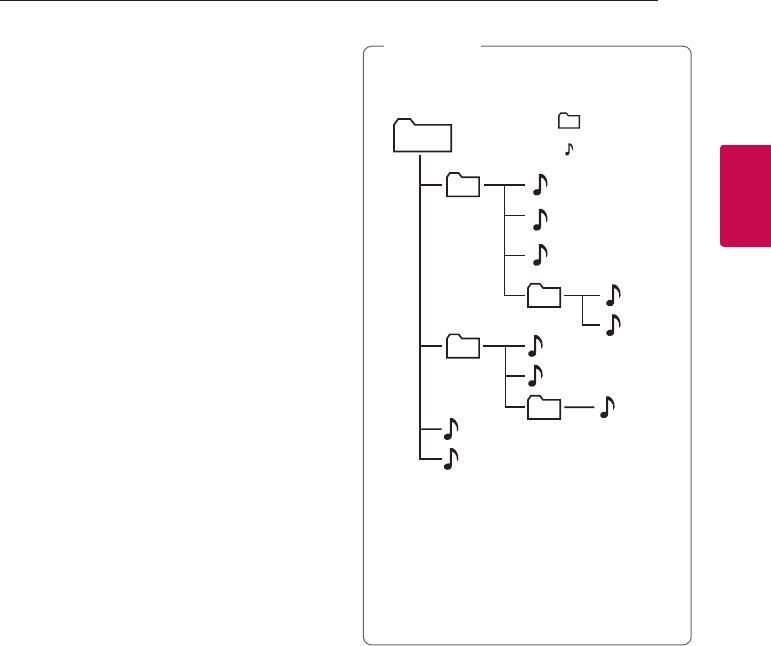
Playable file
Sampling Frequency
MP3 : within 32 to 48 kHz
WMA : within 32 to 48 kHz
Bitrate
MP3 : within 80 to 320 kbps
WMA : within 56 to 128 kbps
yMaximum les : Under 999
yMaximum directories : Under 99
yA protected le by DRM (Digital rights
management) cannot be played on the unit.
yVideo les in the USB storage device can not be
played.
yDepending on the performance of your USB
device, playback may not work well.
yFolders and les on the USB are recognized
as below.
A
: File
: Folder
B
C
D
E
F
G
H
I
J
a
c
b
d
yFile will be played from le $A to le $J
one by one.
yFiles will be played in order recorded and it
may be different depending on the record
circumstances.
yYou can't see a folder or le through this unit.
, Note
3 Operating
Operating16
Operating
3
Basic operations
USB operation
1. Connect the USB device to the USB port.
2. Select the input source to USB by
pressing F button on the remote control or unit
repeatedly.
To Do this
Playback Press dM.
Pause During playback, press dM.
Skip to the next/
previous le
During playback, press V on
the remote control to go to the
next le.
Playing less than 2 seconds,
press C on the remote
control to go to the previous
le.
Playing after 3 seconds, press
C on the remote control to
go to the beginning of the le.
Resume
playback
This unit memorizes a current
song which is played before
changing the function or
turning off the unit.
yThe resume point may be cleared when you
pull out the power cord or removing the USB
device from the unit.
yIf the USB function is not working, check the
USB function is selected.
yWhen you pause the USB playback, USB LED
on the main unit blinks.
, Note
Other operations
DRC (Dynamic Range Control)
Make the sound clear when the volume is turned
down and prevent sudden increase of sound (Dolby
Digital only). This function turns on or off when you
press DRC ON/OFF.
Turn off the sound temporarily
Press (Mute) to mute your unit. To cancel it,
press (Mute) again on the remote control or
change the volume level.
Using your TV remote control
You can control some functions of this unit by your
TV remote control even by other company’s product.
Controllable functions are volume up/down and
mute.
Press and hold DRC ON on the remote control for
about 2 seconds.
To turn off this function, press and hold DRC OFF
about 2 seconds.
ySupported TV brands
LG Panasonic Philips Samsung
Sharp Sony Toshiba Vizio
yMake sure that the sound output of your TV
is set to [External speaker].
yDepending on the remote control, this
function may not work well.
yThis function does not operate on LG TV's
magic remote control.
, Note

Operating 17
Operating
3
Auto power down
This unit will turn itself off to save electric
consumption if the main unit is not connected to
an external device and has not been used for 15
minutes.
This unit also turns off after six hours if the Main
unit has been connected to another device using the
analog input. (Ex : Portable, etc..)
How to disconnect the wireless
network connection or the wireless
device
Set up the AUTO POWER ON/OFF function to off
and turn off the unit.
AUTO POWER On/Off
This unit automatically turns on by an input source :
Optical or Bluetooth.
When you turn on your TV or an external device
connected to this unit, this unit recognizes the input
signal and select the suitable function. You can hear
the sound from your device.
If you try to connect your Bluetooth device, this
unit turns on and the unit will be connected your
Bluetooth device.
This function turns on or off you press
AUTO POWER ON/OFF.
yAfter the unit is turned on by AUTO POWER
function, it will be automatically turned off if
there is no signal for a certain period of time
from the external device.
yIf you turned off the unit directly, it cannot
be turned on automatically by AUTO POWER
function. However the unit can be turned on
by AUTO POWER function when optical signal
comes in after 5 seconds of no signal.
yDepending on the connected device, this
function may not operate.
yIf you disconnect Bluetooth connection by
this unit, some Bluetooth devices try to
connect to the unit continually. Therefore it is
recommended to disconnect the connection
before turn off the unit.
yWhen you turn on this unit for the rst time,
Auto Power function is turned on status.
yTo use this function, the main unit must be
registered in paired devices list of Bluetooth
device.
yYou can set the AUTO POWER function only
when this unit is turned on.
, Note

Operating18
Operating
3
Auto function change
This unit recognizes input signals such as Optical,
Bluetooth and Portable and then changes suitable
function automatically.
When optical signal comes in
When you turn on the external device connected
to this unit by an optical cable, this unit change the
function to optical. You can hear the sound from your
device.
When you try to connect Bluetooth
device
When you try to connect your Bluetooth device to
this unit, Bluetooth function is selected. Play your
music on the Bluetooth device.
When connect a Portable device
When you connect your portable device using a
portable cable, this unit changes the function to
Portable. You can hear the music from your device.
yTo change to optical function, it needs
5 seconds of no signal.
yIf the Bluetooth connection lock function
is set, Bluetooth connection will be only
available on Bluetooth function.
(Page 20)
, Note

Operating 19
Operating
3
Using BLUETOOTH®
technology
About Bluetooth
Bluetooth is wireless communication technology for
short range connection.
The sound may be interrupted when the connection
interfered by the other electronic wave or you
connect the Bluetooth in the other rooms.
Connecting individual devices under Bluetooth
wireless technology does not incur any charges.
A mobile phone with Bluetooth wireless technology
can be operated via the Cascade if the connection
was made via Bluetooth wireless technology.
yAvailable Devices : Smart phone, MP3 player,
Notebook, etc..
yVersion : 4.0
yCodec : SBC
Bluetooth Profiles
In order to use Bluetooth wireless technology,
devices must be able to interpret certain profiles.
This unit is compatible with following profile.
A2DP (Advanced Audio Distribution Profile)
Listening to music stored on the
Bluetooth devices
Pairing your unit and Bluetooth device
Before you start the pairing procedure, make sure the
Bluetooth feature is turned on in to your Bluetooth
device. Refer to your Bluetooth device’s user guide.
Once a pairing operation is performed, it does not
need to be performed again.
1. Select the input source to Bluetooth by pressing
F button on the remote control or unit repeatedly.
-Bluetooth LED will blink.
2. Operate the Bluetooth device and perform the
pairing operation. When searching for this unit
with the Bluetooth device, a list of the devices
found may appear in the Bluetooth device display
depending on the type of Bluetooth device.
Your unit appears as “LG SJ2 (XX)”.
yXX means the last two digits of
Bluetooth address. For example, if your
unit has a Bluetooth address such as
9C:02:98:4A:F7:08, you will see
“LG SJ2 (08)” on your Bluetooth device.
yDepending on the Bluetooth device type,
some device have a different pairing way.
Enter the PIN code (0000) as needed.
, Note
3. When this unit is successfully connected with
your Bluetooth device, Bluetooth LED will turn
on.
4. Listen to music.
To play a music stored on your Bluetooth device,
refer to your Bluetooth device’s user guide.

Operating20
Operating
3
yWhen using Bluetooth technology, you have
to make a connection between the unit and
the Bluetooth device as close as possible and
keep the distance.
However it may not work well in the cases
below :
- There is an obstacle between the unit and
the Bluetooth device.
- There is a device using same frequency
with Bluetooth technology such as a
medical equipment, a microwave or a
wireless LAN device.
yYou should connect your Bluetooth device to
this unit again when you restart it.
yThe sound may be interrupted when the
connection interfered by the other electronic
wave.
yPairing is limited one Bluetooth device per
one unit and multi-pairing is not supported.
yDepending on the type of the device, you may
not be able to use the Bluetooth function.
yYou can enjoy Bluetooth function using
Smart phone, MP3 player, Notebook, etc..
yThe more distance between the unit and the
Bluetooth device, the lower the sound quality
becomes.
yBluetooth connection will be disconnected
when the unit is turned off or the Bluetooth
device gets far from the unit.
yWhen Bluetooth connection is disconnected,
connect the Bluetooth device to the unit
again.
yWhen the unit is not connected with
Bluetooth device, Bluetooth LED will blink.
yWhen you connect a Bluetooth device
(iOS device etc.) to this unit or operate the
device, the volume level can be synchronized
between the two devices.
yYou can control a Bluetooth device using
C/V (Skip) and dM (Play/Pause)
buttons on the remote control.
, Note BLUETOOTH connection lock (BT lock)
You can limit Bluetooth connection to only
Bluetooth function to prevent unintended
Bluetooth connection.
Press and hold AUTO POWER ON on the remote
control for about 2 seconds to turn on this function
in Bluetooth function.
To turn off this function, press and hold AUTO
POWER OFF on the remote control for about 2
seconds in Bluetooth function.
Even if you set up Bluetooth connection lock
to On, this sound bar turns on by Auto Power
function. Turn off Auto Power function to
prevent it.
, Note
Operating 21
Operating
3
Sound adjustment
Setting the surround mode
This system has two pre-set surround sound fields.
You can select a desired sound mode by using each
sound mode button.
Sound effect Description
STANDARD You can enjoy optimized sound.
BASS BLAST Reinforces the treble, bass and
surround sound effect.
yIn some of sound effect mode, some speakers,
there’s no sound or low sound. It depends on
the mode of sound and the source of audio, it
is not defective.
yYou may need to reset the sound effect
mode, after switching the input, sometimes
even after the sound le changed.
, Note
Adjust the woofer level settings
You can adjust the sound level of woofer by pressing
WOOFER LEVEL o/p button.
When the woofer level reaches maximum
or minimum, standby LED (Red) on the main
unit turns on for 2 seconds.
, Note

4 Troubleshooting
Troubleshooting22
Troubleshooting
4
Troubleshooting
General
PROBLEM CAUSE & CORRECTION
The unit does not
work properly.
yTurn off the power of this unit and the connected external device
(TV, Woofer, DVD-player, Amplier, etc.) and turn them on again.
yDisconnect the power cord of this unit and the connected external device
(TV, Woofer, DVD-player, Amplier, etc.) and then try connecting again.
yPrevious setting may not be saved when device power is shut off.
No Power
yThe power cord is unplugged.
Plug in the power cord.
yCheck whether electricity failed.
Check the condition by operating other electronic devices.
No sound
yIncorrect input source is selected.
Check the input source and select the correct input source.
yThe mute function is activated.
Press (Mute) or adjust the volume level to cancel the mute function.
yWhen you are using connection with an external device
(set top box, Bluetooth device etc.), adjust volume level of the device.
No woofer sound
yThe power cord of woofer is not connected.
Plug the power cord into the wall outlet securely.
yPairing between the unit and woofer gets disconnected.
Connect the unit and woofer. (Page 11)
The remote control
does not work
properly.
yThe remote control is too far from the unit.
Operate the remote control within about 7 m.
yThere is an obstacle in the path of the remote control and the unit.
Remove the obstacle.
yThe batteries in the remote control is exhausted.
Replace the batteries with new one.
The AUTO POWER
function does not
work.
yCheck connection of the external device such as TV, DVD/Blu-Ray player or
Bluetooth device.
yDepending on the connected device, this function may not operate.
The unit does
not connect with
Bluetooth device
yTurn off the Bluetooth connection lock function. (Page 20)

Troubleshooting 23
Troubleshooting
4
PROBLEM CAUSE & CORRECTION
When you feel the
output sound of the
unit is low.
Check the details below and adjust the unit according to them.
ySwitch [ON] state of DRC function to [OFF] by using remote controller.
yWith the sound bar connected with TV, change the AUDIO DIGITAL OUT setting on
TV Setup Menu from [PCM] to [AUTO] or [BITSTREAM].
yWith the sound bar connected with Player, change the AUDIO DIGITAL OUT
setting on Player Setup Menu from [PCM] to [PRIMARY PASS-THROUGH] or
[BITSTREAM].
NOTES to use wireless
PROBLEM CAUSE & CORRECTION
This device may have
wireless interference.
yWireless may not operate normally in weak signal area.
yPlease install the device close enough to wireless subwoofer.
yDo not install the device on metal furniture for optimum performance.
Bluetooth device may
malfunction or make
noise in the following
cases.
yWhen any part of your body contact the transceiver of the Bluetooth device or
sound bar.
yWhen there is an obstacle or wall or the device is installed in a secluded spot.
yWhen there is a device(a wireless LAN, a medical equipment or a microwave) using
same frequency, make the distance between the products as far away as possible
each other.
yWhen to connecting the device to the Bluetooth device, make the distance
between the products as close as possible each other.
yWhen the device gets too far from the Bluetooth device, the connection is
disconnected and also malfunction may occur.

5 Appendix
Appendix24
Appendix
5
Trademarks and licenses
All other trademarks are trademarks of their
respective owners.
Manufactured under license from Dolby
Laboratories. Dolby, Dolby Audio, and the double-D
symbol are trademarks of Dolby Laboratories.
The Bluetooth® word mark and logos are
registered trademarks owned by the Bluetooth
SIG, Inc. and any use of such marks by LG
Electronics is under license.
Other trademarks and trade names are those of
their respective owners.
Appendix 25
Appendix
5
Specifications
General
Power requirements Refer to the main label.
Power consumption
Refer to the main label.
Networked standby : 0.5 W under
(If all network ports are activated.)
Dimensions (W x H x D) Approx. 660 mm x 56 mm x 99 mm with foot
Operating temperature 5 °C to 35 °C
Operating humidity 5 % to 90 %
Bus Power Supply 5 V 0 500 mA
Available Digital Input Audio
Sampling Frequency 32 kHz, 44.1 kHz, 48 kHz, 88.2 kHz, 96 kHz
Available Digital Input Audio format Dolby Audio, PCM
Inputs
OPT. IN (Digital audio in) 0 dBfs, Optical jack x 1
PORT. IN (Portable in) 0.4 Vrms (3.5 mm stereo jack) x 1
Amplier (RMS Output power)
Total 160 W RMS
Front 30 W RMS x 2 (8 Ω at 1 kHz, 10% THD)
Subwoofer 100 W RMS (3 Ω at 80 Hz, 10% THD)
Wireless subwoofer
Power requirements Refer to the main label on the subwoofer.
Power consumption Refer to the main label on the subwoofer.
Type 1 Way 1 Speaker
Impedance 3 Ω
Rated Input Power 100 W RMS
Max. Input Power 200 W RMS
Dimensions (W x H x D) Approx. 185.5 mm x 303 mm x 205 mm
yDesigns and specications are subject to change without prior notice.

Appendix26
Appendix
5
Maintenance
Handling the unit
When shipping the unit
Please save the original shipping carton and packing
materials. If you need to ship the unit, for maximum
protection, re-pack the unit as it was originally
packed at the factory.
Keeping the exterior surfaces clean
yDo not use volatile liquids such as insecticide spray
near the unit.
yWiping with strong pressure may damage the
surface.
yDo not leave rubber or plastic products in contact
with the unit for a long period of time.
Cleaning the unit
To clean the player, use a soft, dry cloth. If the
surfaces are extremely dirty, use a soft cloth lightly
moistened with a mild detergent solution. Do not use
strong solvents such as alcohol, benzine, or thinner,
as these might damage the surface of the unit.


SIMPLE MANUAL
Wireless
Sound Bar
Please read this manual carefully before operating your set
and retain it for future reference.
To view the instructions of advanced features,
visit http://www.lg.com and then download Owner's Manual.
Some of the content in this manual may differ from your unit.
SJ2
www.lg.com
ENGLISH
MODEL
*MFL00000000*

WARNING: This product contains chemicals known to the
State of California to cause cancer and birth defects or other
reproductive harm. Wash hands after handling.
FCC Compliance Statement
This equipment has been tested and found to comply with
the limits for a Class B digital device, pursuant to Part 15
of the FCC Rules. These limits are designed to provide
reasonable protection against harmful interference in a
residential installation. This equipment generates, uses,
and can radiate radio frequency energy and, if not installed
and used in accordance with the instructions, may cause
harmful interference to radio communications. However,
there is no guarantee that interference will not occur
in a particular installation. If this equipment does cause
harmful interference to radio or television reception, which
can be determined by turning the equipment off and on,
the user is encouraged to try to correct the interference
by one or more of the following measures:
yReorient or relocate the receiving antenna.
yIncrease the separation between the equipment and
the receiver.
yConnect the equipment to an outlet on a circuit
different from that to which the receiver is connected.
yConsult the dealer or an experienced radio/TV
technician for help.
This device complies with part 15 of the FCC Rules.
Operation is subject to the following two conditions:
(1) this device may not cause harmful interference and
(2) this device must accept any interference received,
including interference that may cause undesired operation
of the device. Any changes or modications in construction
of this device which are not expressly approved by the
party responsible for compliance could void the user’s
authority to operate the equipment.
FCC RF Radiation Exposure Statement : This equipment
complies with FCC radiation exposure limits set forth for
an uncontrolled environment. This transmitter must not
be co-located or operating in conjunction with any other
antenna or transmitter.
This equipment should be installed and operated with
minimum distance 20 cm (7.8 inches) between the
antenna and your body. Users must follow the specic
operating instructions for satisfying RF exposure
compliance.
FCC Radio Frequency Interference Requirements :
High power radars are allocated as primary users of the
5.725 to 5.85 GHz bands. These radar stations can
cause interference with and/or damage this device.
This device cannot be co-located with any other
transmitter.
Responsible Party :
LG Electronics USA, Inc.
1000 Sylvan Ave
Englewood Cliffs, NJ 07632
Tel: 1-800-243-0000
Front Panel
Rear Panel
· · · · · · · · · · · · · · · · · · · · · · · · · · · · · · · · · · · · · · Standby
······························ Selects Function.
/ ························· Adjusts Volume.
(USB) ··············· Connect to a USB device.
PORT. IN (Portable) ··· Connect to a Portable device.
OPT. IN (Optical) ······ Connect to an Optical device.
Subwoofer Connection1
Place the wireless subwoofer near the sound bar and
follow steps below.
a Connect the power cord of wireless subwoofer
and sound bar to the outlet.
b Turn on the main unit :
The sound bar and wireless subwoofer will be
automatically connected. The subwoofer's
green LED turns on.
Subwoofer Connection Manually
If the subwoofer does not make sound, try to
connect manually.
a Press Pairing button on the rear of the wireless
subwoofer.
yThe green LED on the rear of wireless
subwoofer blinks quickly.
b Turn on the main unit.
c Pairing is completed.
yThe green LED on the rear of wireless
subwoofer turns on.
Keep the sound bar and the subwoofer away
from the device (ex. wireless router, microwave
oven, etc.) over 1 m to prevent wireless
interference.
!P
The buttons are located on the rear.
STANDARD/BASS BLAST: Selects the sound effect.
DRC ON/OFF :
Makes comfortable sound at Dolby Digital.
.
WOOFER LEVEL +/-: Adjusts the volume level of
subwoofer.
AUTO POWER ON/OFF: Automatically turns on by an
input source.
Replacement of battery
Remote controlTV Connection 2
TV
a Connect the sound bar to the TV using
an Optical cable.
b Set up [External Speaker (Optical)] on
your TV setting menu.
Additional Device Connection
a Connect to the external device as follows.
TV
(Set-top
Box, Player
etc.)
b Set the input source by pressing OPTICAL on
the remote control or pressing F on the unit
repeatedly.

Additional Information
Specication
Power requirements Refer to the main label.
Power
consumption Refer to the main label.
Dimensions
(W x H x D)
Approx.
660 mm x 56 mm x 99 mm
(26 inch x 2.2 inch x 3.9 inch)
With foot
Bus Power Supply
(USB) 5 V 0 500 mA
Amplier
(Total RMS
Output power)
160 W RMS
Design and specications are subject to change without
notice.


LG Customer Information Center
1-800-243-0000 USA, Consumer
1-888-865-3026 USA, Commercial
Register your product Online!
www.lg.com
Printed in China

SIMPLE MANUAL
Wireless
Sound Bar
Please read this manual carefully before operating your set
and retain it for future reference.
To view the instructions of advanced features,
visit http://www.lg.com and then download Owner's Manual.
Some of the content in this manual may differ from your unit.
SJ2
www.lg.com
ENGLISH
MODEL
*MFL00000000*
SJ2.ACANLLK_SIM_ENG_.indd 1 2017-03-16 �� 5:21:46
Front Panel
Rear Panel
· · · · · · · · · · · · · · · · · · · · · · · · · · · · · · · · · · · · · · Standby
······························ Selects Function.
/ ························· Adjusts Volume.
(USB) ··············· Connect to a USB device.
PORT. IN (Portable) ··· Connect to a Portable device.
OPT. IN (Optical) ······ Connect to an Optical device.
Subwoofer Connection1
Place the wireless subwoofer near the sound bar and
follow steps below.
a Connect the power cord of wireless subwoofer
and sound bar to the outlet.
b Turn on the main unit :
The sound bar and wireless subwoofer will be
automatically connected. The subwoofer's
green LED turns on.
Subwoofer Connection Manually
If the subwoofer does not make sound, try to
connect manually.
a Press Pairing button on the rear of the wireless
subwoofer.
yThe green LED on the rear of wireless
subwoofer blinks quickly.
b Turn on the main unit.
c Pairing is completed.
yThe green LED on the rear of wireless
subwoofer turns on.
Keep the sound bar and the subwoofer away
from the device (ex. wireless router, microwave
oven, etc.) over 1 m to prevent wireless
interference.
!P
The buttons are located on the rear.
SJ2.ACANLLK_SIM_ENG_.indd 2 2017-03-16 �� 5:21:48
STANDARD/BASS BLAST: Selects the sound effect.
DRC ON/OFF :
Makes comfortable sound at Dolby Digital.
.
WOOFER LEVEL +/-: Adjusts the volume level of
subwoofer.
AUTO POWER ON/OFF: Automatically turns on by an
input source.
Replacement of battery
Remote controlTV Connection 2
a Connect the sound bar to the TV using
an Optical cable.
b Set up [External Speaker (Optical)] on
your TV setting menu.
Additional Device Connection
a Connect to the external device as follows.
TV
(Set-top
Box, Player
etc.)
b Set the input source by pressing OPTICAL on
the remote control or pressing F on the unit
repeatedly.
TV
Additional Information
Specication
Power requirements Refer to the main label.
Power
consumption Refer to the main label.
Dimensions
(W x H x D)
Approx.
660 mm x 56 mm x 99 mm
With foot
Bus Power Supply
(USB) 5 V 0 500 mA
Amplier
(Total RMS
Output power)
160 W RMS
Design and specications are subject to change without
notice.
SJ2.ACANLLK_SIM_ENG_.indd 3 2017-03-16 �� 5:21:49

LG Customer Information Center
Centre d’information à la clientèle de LG
1-888-542-2623 CANADA
Register your product Online!
Enregistrez votre produit en ligne!
www.lg.com
Industry Canada Statement
This device complies with Industry Canada’s licence-
exempt RSSs. Operation is subject to the following two
conditions:
(1) This device may not cause interference; and
(2) This device must accept any interference, including
interference that may cause undesired operation of
the device.
CAN ICES-3 (B)/NMB-3 (B)
IC Radiation Exposure Statement
This equipment complies with IC radiation exposure limits
set forth for an uncontrolled environment.
This equipment should be installed and operated with
minimum distance 20 cm (7.8 inches) between the
antenna & your body.
NOTE: THE MANUFACTURER IS NOT RESPONSIBLE
FOR ANY RADIO OR TV INTERFERENCE CAUSED BY
UNAUTHORIZED MODIFICATIONS TO THIS EQUIPMENT.
SUCH MODIFICATIONS COULD VOID THE USER’S
AUTHORITY TO OPERATE THE EQUIPMENT.
WARNING
[For product having the wireless function using 5 GHz
frequency bands]
(i)
for devices with detachable antenna(s), the maximum
antenna gain permitted for devices in the band
5725-5850 MHz shall be such that the equipment
still complies with the e.i.r.p. limits specied for
point-to-point and non-point-to-point operation as
appropriate; and
SJ2.ACANLLK_SIM_ENG_.indd 4 2017-03-16 �� 5:21:49
The device meets the exemption from the routine
evaluation limits in section 2.5 of RSS 102 and compliance
with RSS-102 RF exposure, users can obtain Canadian
information on RF exposure and compliance.

MANUEL SIMPLIFIÉ
Barre de son
sans l
Veuillez lire attentivement ce manuel avant d’utiliser votre appareil
et conservez-le pour le consulter ultérieurement.
Pour voir les instructions des fonctionnalités avancées, visitez le site
http://www.lg.com et téléchargez le manuel d’utilisation.
Certains éléments de ce manuel pourraient ne pas correspondre à votre appareil,
selon son modèle.
SJ2
www.lg.com
FRANÇAIS
MODÈLE
*MFL00000000*
SJ2.ACANLLK_SIM_FRE(CANADA)_.indd 1 2017-03-16 �� 5:24:27
Panneau avant
Panneau arrière
· · · · · · · · · · · · · · · · · · · · · · · · · · · · · · · · · · · · · · · · · Veille
·················· Permet de choisir la fonction
/ ··············· Permet de régler le volume
(USB) ············ Se branche à un appareil USB
PORT.IN (Portable) Se branche à un appareil portable
OPT. IN (Optique) ·· Se branche à un appareil optique
Connexion du caisson de basses1
Placez le caisson de basses sans l près de la barre
de son et suivez les étapes ci-dessous.
a Branchez le cordon d’alimentation du caisson
de basses sans l sur la prise.
b Mettez la barre de son sous tension :
La barre de son et le caisson de basses sans l
se connectent automatiquement. Le voyant
vert du caisson de basses s’allume.
Connexion manuelle du caisson de
basses
Si le subwoofer ne produit pas de son, essayez de
le connecter manuellement.
a Appuyez sur la touche Pairing à l'arrière du
caisson de basses sans l.
yLe voyant à DEL vert à l'arrière du caisson de
basses sans l se met à clignoter rapidement.
b Allumez l'appareil principal.
c Le jumelage est terminé.
yLe voyant à DEL vert à l'arrière du caisson de
basses sans l s'allume.
Pour éviter les interférences des équipements
sans l, la barre de son et le caisson de basses
doivent être à une distance d’au moins 1 m par
rapport à un autre appareil (comme le routeur
sans l, le four à micro-ondes, etc.).
!P
Les touches sont situées à l’arrière.
SJ2.ACANLLK_SIM_FRE(CANADA)_.indd 2 2017-03-16 �� 5:24:29
STANDARD/BASS BLAST : Permet de sélectionner
l’effet sonore.
DRC ON/OFF : procure un confort d'écoute en Dolby
Digital.
WOOFER LEVEL +/- : Permet de régler le volume du
caisson de basses.
AUTO POWER ON/OFF : Se met en marche
automatiquement grâce à une source d’entrée.
Remplacement des piles
Télécommande
Informations supplémentaires
Raccordement au téléviseur2
a Reliez la barre de son au téléviseur à l’aide du
câble optique.
b Congurez le [Haut-parleur externe (Optique)]
depuis le menu de conguration de votre
téléviseur.
Raccordement d’un périphérique
supplémentaire
a Raccordez le périphérique externe comme il est
indiqué sur le schéma ci-dessous.
TV
(boîtier décodeur,
lecteur, etc.)
b Dénissez la source d’entrée en appuyant sur
OPTICAL sur la télécommande ou sur F sur
l’appareil à plusieurs reprises. Caractéristiques
Exigences relatives
à l’alimentation
Se reporter à l’étiquette
principale.
Consommation
d’énergie
Se reporter à l’étiquette
principale.
Dimensions
(L x H x P)
Environ
660 mm x 56 mm x 99 mm
Avec les pieds
Alimentation bus
(USB) 5 V 0 500 mA
Amplicateur
(puissance de sortie
R.M.S. totale)
160 W RMS
La conception et les caractéristiques peuvent faire l’objet
de modications sans notication préalable.
TV
SJ2.ACANLLK_SIM_FRE(CANADA)_.indd 3 2017-03-16 �� 5:24:30

LG Customer Information Center
Centre d’information à la clientèle de LG
1-888-542-2623 CANADA
Register your product Online!
Enregistrez votre produit en ligne!
www.lg.com
Avis d’Industrie Canada
Le présent appareil est conforme aux CNR d’Industrie
Canada applicables aux appareils radio exempts de licence.
L’exploitation est assujettie aux deux conditions suivantes :
1) L’appareil ne doit pas produire d’interférences;
2) L’utilisateur de l’appareil doit accepter toute interférence,
même si elle est susceptible de nuire au fonctionnement
de l’appareil.
CAN ICES-3 (B)/NMB-3 (B)
Avis d’Industrie Canada sur l’exposition aux
rayonnements
Cet appareil est conforme aux limites d’exposition aux
rayonnements d’Industrie Canada pour un environnement
non contrôlé.
Cet appareil doit être installé de façon à maintenir une
distance minimale de 20 cm (7,8 po) entre l’antenne et
l’utilisateur.
REMARQUE : LE FABRICANT N’EST PAS RESPONSABLE
DES INTERFÉRENCES RADIOÉLECTRIQUES CAUSÉES
PAR DES MODIFICATIONS NON AUTORISÉES APPORTÉES
À CET APPAREIL. DE TELLES MODIFICATIONS
POURRAIENT ANNULER L’AUTORISATION
D’EXPLOITATION ACCORDÉE À L’UTILISATEUR DE
L’APPAREIL.
AVERTISSEMENTS
(Pour un produit doté de la fonction sans l utilisant la
bande de fréquences de 5 GHz.)
i)
Pour les appareils munis d’antennes amovibles, le gain
maximal d’antenne autorisé pour les appareils utilisant
la bande de 5 725 à 5 850 MHz doit être conforme à
la limite de la p.i.r.e. spéciée pour l’exploitation point à
point et l’exploitation non point à point, selon le cas.
SJ2.ACANLLK_SIM_FRE(CANADA)_.indd 4 2017-03-16 �� 5:24:30
Le dispositif rencontre l'exemption des limites courantes
d'evaluation dans la section 2.5 de RSS 102 et la conformite
a l'exposition de RSS-102 rf, utilisateurs peut obtenir
l'information canadienne sur l'exposition et la conformite de rf.
www.lg.com
PRECAUCIÓN
RIESGO DE CHOQUE
ELÉCTRICO. NO ABRIR.
PRECAUCIÓN: PARA REDUCIR EL RIESGO DE CHOQUE ELÉCTRICO, NO
RETIRE LA CUBIERTA (O LA PARTE POSTERIOR). EN EL INTERIOR NO HAY
PIEZAS REPARABLES POR EL USUARIO. SOLICITE AYUDA AL PERSONAL DE
SERVICIO CALIFICADO.
El símbolo del rayo con punta de echa dentro de un
triángulo equilátero pretende alertar al usuario de la
presencia de voltaje peligroso no aislado en el interior
del armario del producto que puede tener la
magnitud suciente para constituir un riesgo de
choque eléctrico para las personas.
El signo de exclamación dentro de un triángulo
equilátero pretende alertar al usuario de la presencia
de instrucciones importantes (de servicio) para el
funcionamiento y mantenimiento en la información
que acompaña al producto.
ADVERTENCIA:
yPARA REDUCIR EL RIESGO DE INCENDIO O CHOQUE ELÉCTRICO, NO
EXPONGA ESTE PRODUCTO A LA LLUVIA NI A LA HUMEDAD.
yNo instale el equipo en un espacio cerrado, como en un librero o
mueble similar.’
PRECAUCIÓN:
yNo usar equipos de alto voltage cerca de este producto. (ej.
Matamoscas electrónico). Este producto puede funcionar
incorrectamente debido a las descargas eléctricas.
yNo coloque sobre el aparato fuentes de calor con llama, como velas
encendidas.
yNo obstruya ninguno de los oricios de ventilación. Instale conforme
a las instrucciones del fabricante.
Las ranuras y oricios del armario cumplen un propósito de
ventilación y aseguran el funcionamiento adecuado del producto, a
n de protegerlo de un posible sobrecalentamiento. Los oricios no
deben obstruirse. El producto no debe colocarse sobre una cama,
sofá, tapete o una supercie similar. Este producto no debe colocarse
en una instalación empotrada, como un librero o estante, a menos
que haya una buena ventilación y se respeten todas las instrucciones
del fabricante.
yEl enchufe de corriente es el dispositivo de desconexión. En caso de
emergencia, el enchufe de corriente debe permanecer de fácil acceso.
yEl aparato no debe exponerse al agua (goteo o salpicaduras) y no
debe colocar sobre el aparato objetos llenos de líquidos, como
oreros.
yPara información sobre seguridad, se incluye la identicación del
producto y los índices de abastecimiento. Por favor consulte la
etiqueta principal en la base o en la parte posterior del aparato.
Este dispositivo está equipado con una batería o acumulador portátil.
Forma segura de retirar la batería del equipo: retire la batería o
baterías antiguas siguiendo el orden inverso al de instalación. Para
evitar contaminar el medioambiente y provocar posibles daños a la
salud pública, las baterías viejas deben llevarse a los puntos de recogida
designados. no se deshaga de las baterías con la basura normal. Es
recomendable utilizar los sistemas locales de recogida de baterías y
acumuladores. La batería no debe exponerse a calor excesivo como el del
sol, el fuego o fuente similar.
Para los modelos que usan un adaptador
Use sólo el adaptador CA suministrado con este dispositivo. No utilice
una fuente de alimentación de otro dispositivo o de otro fabricante. El
uso de otros cables o unidades de alimentación puede causar daños a la
unidad e invalidar la garantía.
Instrucciones
importantes de
seguridad
1. Lea estas instrucciones.
2. Guarde estas instrucciones.
3. Siga todas las advertencias.
4. Siga todas las instrucciones.
5. No use este aparato cerca del agua.
6. Limpie únicamente con un paño seco.
7. No obstruya ninguna salida de ventilación. Instale de acuerdo con
las instrucciones del fabricante.
8. No instale cerca de fuentes de calor como radiadores, registros de
calefacción, estufas u otros aparatos (incluyendo amplificadores) que
produzcan calor.
9. Respete el uso de la conexión del tomacorriente polarizado o con
conexión a tierra. Un tomacorriente polarizado tiene una cuchilla
más ancha que la otra. Un tomacorriente con tierra tiene dos
cuchillas y una pata para tierra. La cuchilla más ancha o la pata para
tierra sirven como protección. Si el tomacorriente proporcionado no
se ajusta a su tomacorriente, póngase en contacto con un electricista
para que lo reemplace.
10. Proteja el cable de alimentación para que no caminen sobre él o
quede atorado, particularmente en contactos, en receptáculos y en
el punto por donde sale del aparato.
11. Solamente use los aditamentos / accesorios especificados por el
fabricante.
12. Use únicamente con el carro, estante, trípode,
soporte o mesa especificados por el fabricante
o que haya sido vendido junto con el aparato.
Cuando use un carro, tenga cuidado cuando
mueva la unidad / carro para evitar accidentes
por vuelcos.
13. Desconecte este aparato durante tormentas
eléctricas o cuando no vaya a usarlo por períodos prolongados.
14. Haga que todo el mantenimiento sea realizado solamente por
personal técnico cualificado.Solicite mantenimiento cuando el
aparato haya sufrido cualquier tipo de daño, por ejemplo, si el cable
de alimentación o el tomacorriente están dañados, cuando se haya
derramado líquido sobre el aparato o hayan caído objetos sobre él,
cuando haya sido expuesto a lluvia o humedad, cuando no funcione
con normalidad o cuando haya sufrido una caída.
ESPAÑOL
Safety Information
Consignes de sécurité
Información de seguridad
*MBM65227008*
CAUTION
RISK OF ELECTRIC SHOCK
DO NOT OPEN
CAUTION: TO REDUCE THE RISK OF ELECTRIC SHOCK DO NOT REMOVE
COVER (OR BACK) NO USER-SERVICEABLE PARTS INSIDE REFER SERVICING
TO QUALIFIED SERVICE PERSONNEL.
This lightning ash with arrowhead symbol within an
equilateral triangle is intended to alert the user to the
presence of uninsulated dangerous voltage within
the product’s enclosure that may be of sucient
magnitude to constitute a risk of electric shock to
persons.
The exclamation point within an equilateral triangle
is intended to alert the user to the presence of
important operating and maintenance (servicing)
instructions in the literature accompanying the
product.
WARNING:
yTO PREVENT FIRE OR ELECTRIC SHOCK HAZARD, DO NOT EXPOSE THIS
PRODUCT TO RAIN OR MOISTURE.
yDo not install this equipment in a conned space such as a book case
or similar unit.
CAUTION:
yDo not use high voltage products around this product. (ex. Electrical
swatter) This product may malfunction due to electrical shock.
yNo naked ame sources, such as lighted candles, should be placed on
the apparatus.
yDo not block any ventilation openings. Install in accordance with the
manufacturer’s instructions.
Slots and openings in the cabinet are provided for ventilation and
to ensure reliable operation of the product and to protect it from
over heating. The openings shall be never be blocked by placing
the product on a bed, sofa, rug or other similar surface. This product
shall not be placed in a built-in installation such as a bookcase or rack
unless proper ventilation is provided or the manufacturer’s instruction
has been adhered to.
yThe Power Plug is the disconnecting device. In case of an emergency,
the Power Plug must remain readily accessible.
yThe apparatus shall not be exposed to water (dripping or splashing)
and no objects lled with liquids, such as vases, shall be placed on the
apparatus.
yFor safety marking information including product identication and
supply ratings, please refer to the main label on the bottom or the
other surface of the product.
This device is equipped with a portable battery or accumulator.
Safety way to remove the battery or the battery from the equipment:
Remove the old battery or battery pack, follow the steps in reverse order
than the assembly. To prevent contamination of the environment and
bring on possible threat to human and animal health, the old battery or
the battery put it in the appropriate container at designated collection
points. Do not dispose of batteries or battery together with other waste. It
is recommended that you use local, free reimbursement systems batteries
and accumulators. The battery shall not be exposed to excessive heat
such as sunshine, re or the like.
For models using an adapter
Only use the AC adapter supplied with this device. Do not use a power
supply from another device or another manufacturer. Using any other
power cable or power supply may cause damage to the device and void
your warranty.
IMPORTANT SAFETY
INSTRUCTIONS
1. Read these instructions.
2. Keep these instructions.
3. Heed all warnings.
4. Follow all instructions.
5. Do not use this apparatus near water.
6. Clean only with dry cloth.
7. Do not block any ventilation openings. Install in accordance with the
manufacturer’s instructions.
8. Do not install near any heat sources such as radiators, heat registers,
stoves, or other apparatus (including amplifiers) that produce heat.
9. Do not defeat the safety purpose of the polarized or grounding-type
plug. A polarized plug has two blades with one wider than the other.
A grounding type plug has two blades and a third grounding prong.
The wide blade or the third prong are provided for your safety. If the
provided plug does not fit into your outlet, consult an electrician for
replacement of the obsolete outlet.
10. Protect the power cord from being walked on or pinched particularly
at plugs, convenience receptacles, and the point where they exit
from the apparatus.
11. Only use attachments/accessories specified by the manufacturer.
12. Use only with the cart, stand, tripod, bracket,
or table specified by the manufacturer, or
sold with the apparatus. When a cart is used,
use caution when moving the cart/apparatus
combination to avoid injury from tip-over.
13. Unplug this apparatus during lightning storms
or when unused for long periods of time.
14. Refer all servicing to qualified service personnel. Servicing is required
when the apparatus has been damaged in any way, such as power-
supply cord or plug is damaged, liquid has been spilled or objects
have fallen into the apparatus, the apparatus has been exposed to
rain or moisture, does not operate normally, or has been dropped.
FRANÇAIS
ENGLISH
AVIS
RISQUE DE CHOC
ÉLECTRIQUE NE PAS OUVRIR
ATTENTION : POUR RÉDUIRE LE RISQUE DE CHOC ÉLECTRIQUE, N’ENLEVEZ
PAS LE COUVERCLE (OU LA PARTIE ARRIÈRE). IL N’Y A PAS DE COMPOSANTS
SUSCEPTIBLES D’ÊTRE RÉPARÉS PAR L’UTILISATEUR À L’INTÉRIEUR DE CET
APPAREIL. CONFIEZ LE SERVICE TECHNIQUE À DU PERSONNEL QUALIFIÉ.
Le symbole d’éclair avec une èche, dans un triangle
équilatéral, avertit l’utilisateur de la présence d’une
tension dangereuse non isolée à l’intérieur du boîtier du
produit et qui pourrait être d’une puissance susante
pour causer une électrocution.
Le point d’exclamation à l’intérieur d’un triangle équilatéral
avertit l’utilisateur de la présence d’importantes directives
à suivre concernant le fonctionnement ou la maintenance
(entretien) dans le manuel accompagnant ce produit.
AVERTISSEMENT :
yAFIN D’ÉVITER LES RISQUES D’INCENDIE ET D’ÉLECTROCUTION, GARDER
CE PRODUIT À L’ABRI DE LA PLUIE ET DE L’HUMIDITÉ.
yN’installez pas cet appareil dans un espace restreint tel qu’une
bibliothèque ou tout autre meuble similaire.
ATTENTION :
yN’utilisez pas d’équipement électrique à haute tension près du
téléviseur (comme un tue-mouches électrique). Cela pourrait entraîner
un mauvais fonctionnement du produit.
yAucune source de amme nue, telles qu’une bougie allumée, ne doit
être placée sur l’appareil.
yNe pas bloquer les ouvertures d’aération. Installer l’appareil en
respectant les directives du fabricant. Les fentes et les ouvertures de
l’appareil ont été conçues pour assurer une bonne ventilation et un
bon fonctionnement du produit en le protégeant de toute surchaue.
Les ouvertures ne doivent jamais être bloquées; l’obstruction pourrait
survenir en installant le produit sur un lit, un canapé, un tapis ou sur
toute autre surface similaire. Cet appareil ne doit pas être installé dans
un espace fermé comme une bibliothèque ou une étagère à moins
qu’une ventilation particulière soit assurée ou que les directives du
fabricant l’autorisent.
yLa che d’alimentation sert à débrancher l’appareil. En cas d’urgence,
elle doit être facilement accessible.
yL’appareil ne doit pas être exposé à l’eau (par immersion ou
éclaboussure) et aucun objet rempli de liquide, comme un vase, ne
devrait être placé sur l’appareil.
yPour obtenir des informations sur le marquage de sécurité,
l’identication du produit et les valeurs nominales d’alimentation,
reportez-vous à l’étiquette principale au-dessous de l’appareil ou sur un
autre côté.
Cet appareil est équipé d’une batterie transportable ou de piles rechargeables.
Retrait sans danger de la batterie ou des piles de l’appareil :
Pour retirer la batterie ou les piles usagées, procédez dans l’ordre inverse de
leur insertion. Pour empêcher toute contamination de l’environnement et tout
danger pour la santé des êtres humains et des animaux, la batterie ou les piles
usagées doivent être mises au rebut dans le conteneur approprié à un point de
collecte prévu pour leur recyclage. Ne pas jeter la batterie ou les piles usagées
avec les autres déchets. Recycler toujours les batteries et piles rechargeables
usagées. Ne pas exposer la pile à une chaleur extrême telle que la lumière du
soleil, le feu ou autre source du même genre.
Pour les modèles utilisant un adaptateur
Utilisez exclusivement l’adaptateur CA fourni avec cet appareil. N’utilisez
pas une source d’alimentation d’un autre appareil ou d’un autre fabricant.
L’utilisation d’un autre câble d’alimentation ou d’une autre source
d’alimentation peut endommager le l’appareil et annuler votre garantie.
Consignes de sécurité
importantes
1. Lire les directives.
2. Conserver ces directives.
3. Respecter tous les avertissements.
4. Suivre toutes les directives.
5. Ne pas utiliser ce produit près de l’eau.
6. Nettoyer seulement avec un chiffon propre.
7. Ne pas obstruer les ouvertures de ventilation. Installer conformément
aux directives du fabricant.
8. Ne pas l’installer près de sources de chaleur comme un radiateur,
une cuisinière ou d’autres appareils semblables (y compris des
amplificateurs) qui produisent de la chaleur.
9. Ne pas contourner la fonction sécuritaire de la prise polarisée ou de
mise à la terre. Une prise polarisée est dotée de deux fiches dont l’une
est plus large que l’autre. Une prise de mise à la terre est dotée de
deux fiches et d’une fiche de mise à la terre. La fiche la plus large ou la
fiche de mise à la terre contribuent à votre sécurité. Si la prise n’entre
pas dans la prise murale, consulter un électricien pour la remplacer.
10. Protéger le cordon d’alimentation contre le piétinement ou le
pincement, particulièrement près de la fiche, des prises et des points
de sortie du produit.
11. Utiliser seulement les accessoires recommandés par le fabricant.
12. Utiliser seulement des chariots, des supports,
des trépieds, des fixations ou tables
recommandés par le fabricant ou vendus avec
l’appareil. Si un chariot est utilisé, faire attention
au moment de déplacer l’appareil pour éviter
qu’il ne bascule.
13. Débrancher cet appareil pendant les orages ou
lorsqu’il n’est pas utilisé pendant de longues périodes.
14.
Consulter du personnel qualifié pour la réparation. Un entretien est
requis lorsque le produit est endommagé de quelque façon que ce soit
: dommage au cordon d’alimentation ou à la fiche, déversement de
liquide ou objets insérés à l’intérieur, exposition du produit à la pluie ou
à l’humidité, fonctionnement normal ou chute.