LG Electronics USA SPT860 Speak USB/Hub User Manual Speaker 1EN final 2
LG Electronics USA Speak USB/Hub Speaker 1EN final 2
Users Manual

Test Report No.: GETET-E3-02-013
FCC Class B Certification
APPENDIX H
: USER’S MANUAL
EUT Type: Speaker / USB HUB
FCC ID : BEJSPT860

IBM T860
Speaker/USB HUB
User Guide
ENGLISH

First Edition (May / 2002)
This publication could contain technical inaccuracies or typographical errors. Changes are
made periodically to the information herein; these changes will be made in later editions.
IBM may make improvements and/or changes in the product(s) and/or program(s) at any
time.
It is possible that this publication may contain reference to, or information about, IBM
products (machines and programs), programming, or services that are not announced in
your country.
Requests for copies of this publication and for technical information about IBM products
should be made to your IBM Authorized Dealer or IBM Retailer.
No part of this publication may be reproduced or distributed in any form or by any means
without prior permission in writing from the International Business Machines Corporation.
© Copyright International Business Machines Corporation 2002. All rights reserved.
Note to U.S. Government Users -- Documentation related to restricted rights -- Use,
duplication or disclosure is subject to restrictions set forth in GSA ADP Schedule Contract
with IBM Corp.
Notices
References in this publication to IBM products, programs, or services do not imply that IBM
intends to make these available in all countries in which IBM operates. Any reference to an
IBM product, program or service is not intended to state or imply that only IBM’s product,
program, or service may be used. Any functionally equivalent product, program, or service
that does not infringe any of IBM’s intellectual property rights or other legally protectable
rights may be used instead of the IBM product, program, or service. Evaluation and
verification of operation in conjunction with other products, programs, or services, except
those expressly designated by IBM, are the user’s responsibility.
IBM may have patents or pending patent applications covering subject matter in this
document. The furnishing of this document does not give you any license to these patents.
Trademarks
The following terms, used in this publication, are trademarks or service marks of the IBM
Corporation in the United States, other countries, or both:
HelpCenter
IBM
ENERGY STAR is a U.S. Govt. registered trademark.
Other company, product, and service names may be trademarks or service marks of others.
Note : For important information, refer to the Monitor Safety and Warranty manual that
comes with this monitor.

Table of Contents
Safety : Read First............................................................................A1
Connecting the Speaker..................................................................A2
Using the Audio Functions.......................................................A4
Side Jacks......................................................................................A4
Rear Panel Jacks............................................................................A4
Microphone Extension Operation..................................................A4
Audio Input...................................................................................A4
Front Panel Controls......................................................................A5
Audio Specifications .....................................................................A5
Using the USB (Universal Serial Bus) HUB Features................A6
Side Jacks......................................................................................A6
Rear Jack.......................................................................................A6
USB Connection ...........................................................................A7
USB Specifications ........................................................................A8
Service Information .................................................................A9
Service Information .......................................................................A9
A2
Before you connect the speaker to the monitor, be sure to turn off the
monitor, computer and any devices attached to the computer. To connect the
speaker, to the following:
1. Place the monitor in a convenient, well-ventilated location near your computer
system.
2. Find the attachment points on the underside and the back of the monitor.
Attach the speaker to the monitor as shown in the diagram. Using the hand
screws provided.
Connecting the Speaker
1
Figure 1.
A
2
Attach the speaker to
the monitor and
tighten the screws.
Power ON/OFF Switch
Figure 2.
Bottom Slot
Hook
Screw
A3
Connecting the Speaker
a
b
DC
12V IN
DC
12V IN
Audio Cable
Mic Cable
Mic Out Jack
Audio In Jack
4. Connect the Mic, Audio and USB cables as shown in the diagram.
Figure 4.
5. After connecting the cables, Power on the computer monitor , then the
speaker. Power ON/OFF/volume control. A
USB Cable
3. Connect one end of the Power cable to the dc OUT jack on the rear panel of
the monitor. Connect the other end to the dc IN jack on the rear panel of
the speaker option. b
a
b
DC
12V IN
DC
12V IN
Figure 3.
dc IN Jack
Power Cable
Audio dc OUT Jack
A4
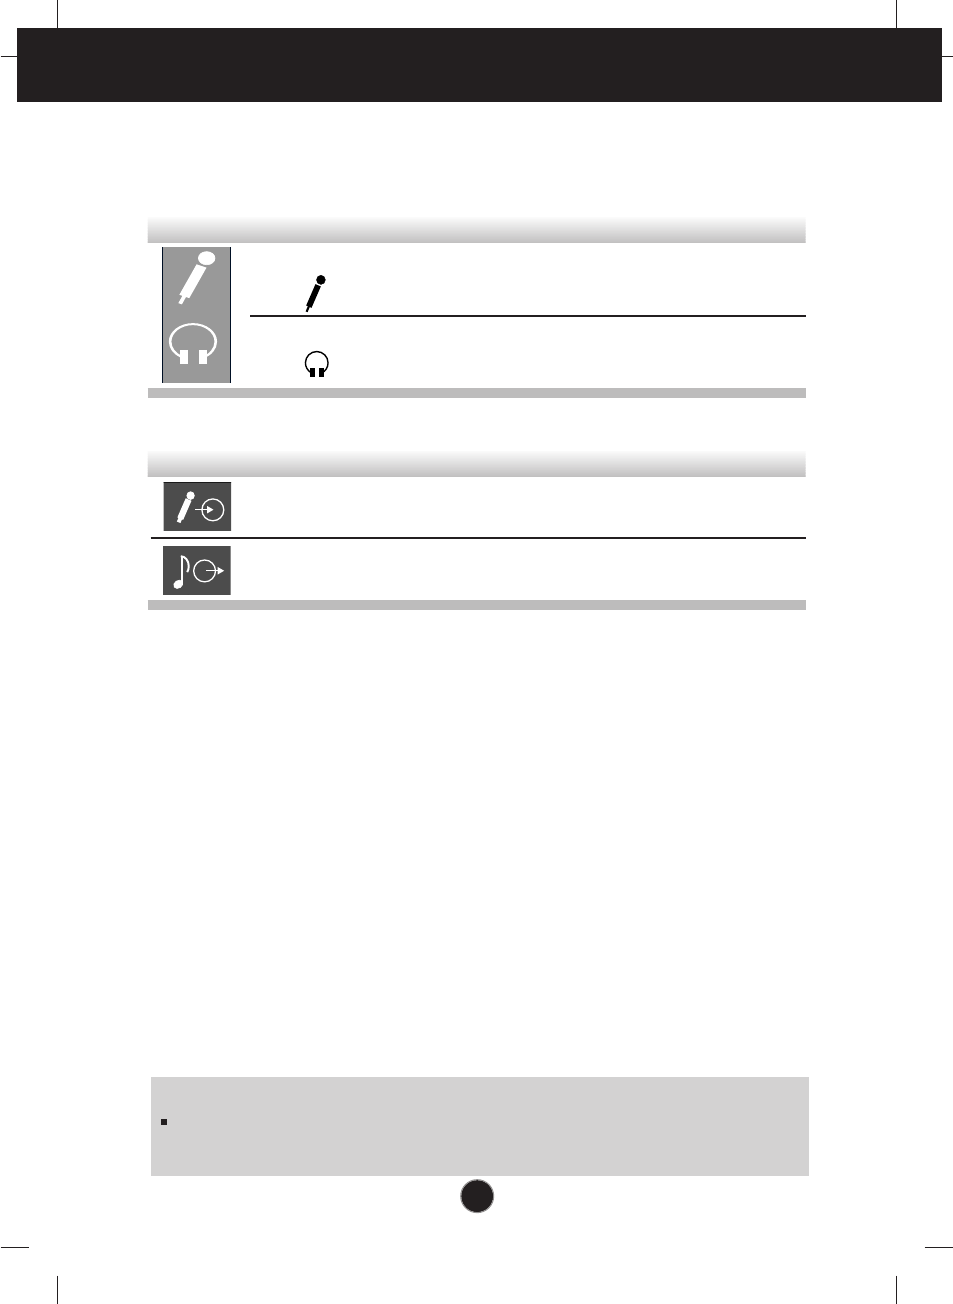
Using the Audio Functions
Side Jacks
Rear Panel Jacks
Headphone Jack A headphone jack that automatically
mutes the speaker volume when
headphones plugged in.
Microphone Jack An external microphone can be used
instead of the preinstalled microphone.
Mic Out - Pink Connects to the microphone jack of the
computer sound card.
Audio In -Lime Green Connects to the *LINE OUT jack of the
computer sound card.
Microphone Extension Operation
The Microphone Jacks on the Speaker/USB HUB Option provide a convenient
way to extend the microphone input connector to your desktop.
In order to use the MIC jack on the side of the Speaker/USB HUB Option, use the
provided Microphone extender cable (pink connectors) to plug into the rear of the
Speaker/USB HUB Option (MIC OUT) and into the MIC input jack of your sound
card (if available). A microphone (that meets the requirements defined for your
sound card) can then be plugged into the MIC jack on the side of the
Speaker/USB HUB Option.
Audio Input
The Audio Input on the back of the Speaker/USB HUB Option should be
connected to the Line Output jack on the computer system sound card using the
provided cable (Lime Green connectors). The Speaker/USB HUB Option has a
built-in amplifier (Amp). If the Audio Out of computer sound card has only Speaker
Out, reduce the volume control on the computer system.
NOTE
If the Audio Out of the
computer
supports both Speaker Out and Line Out,
Please use the Line Out function (For more information, refer to the
documentation that comes with your computer).
This section provides information on the speaker audio functions.
A5
Audio Specifications
dc Input Voltage dc 12 V
RMS Audio Output 1W + 1W (Right + Left)
Input Sensitivity 0.7 Vrms
Speaker Impedance 4Ω
Audio
Using the Audio Functions
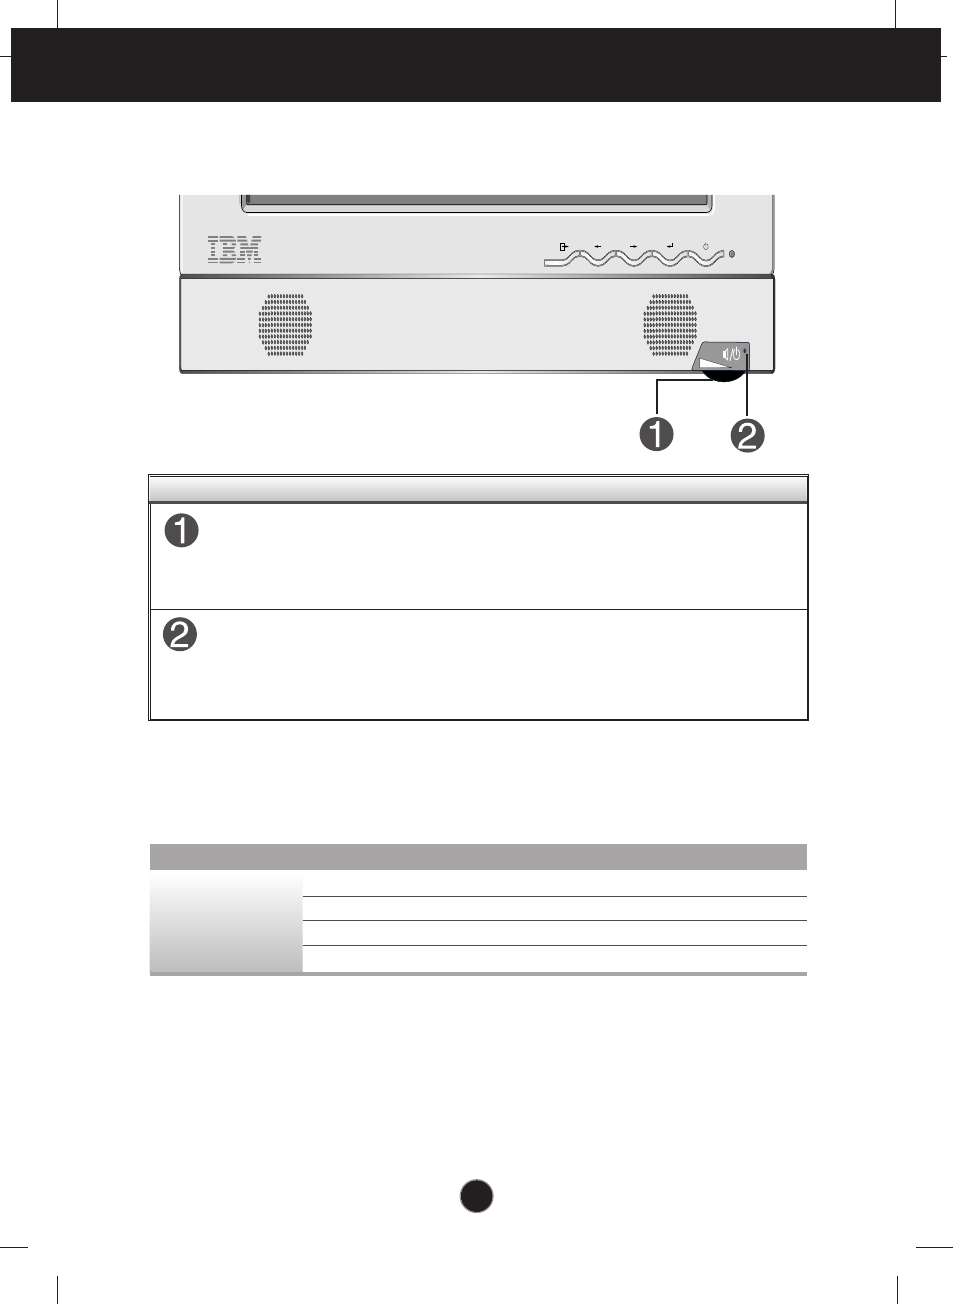
Front Panel Controls
Power ON/OFF and
Volume Control
Use to turn on/off audio and used to adjust
volume.
The light-emitting diode (LED) is turned on
for the speaker power ON and is turned off
for the speaker power OFF.
Indicator
Control Function

A6
Using the USB (Universal Serial Bus) HUB Featuers
Universal Serial Bus (USB) is an innovation that conveniently connects
different devices to your computer. USB enables you to have the flexibility to
connect your mouse, keyboard, and other devides to the monitor instead of the
computer. The Speaker/USB HUB Option provides a 4 port USB HUB that will
enabel you to connect a chain of up to 120 devices on a single USB connection.
You can “hot-plug” USB devices, that is, you can attach the devices while the
computer is on. You can also disconnect USB devices while maintaining “Plug
and Play” auto detection and configuration. This monitor comes with an
intergrated BUS-power USB hub that can have up to four other USB devices
attached to it. The Speaker/USB HUB Option has an intergrated BUS-powered
HUB that meets the USB 2.0 Specification for Full Speed Devides, allowing up
to 4 low power (<100 mA each) USB devices to be attached.
USB HUB Jacks External USB 1.1 low power devices such as
keyboards and mice can be connected to these
ports.
Side Jacks
USB Devices Jack Connects the USB HUB to the computer system
Downstream port.
Rear Jack
A7
Using the USB (Universal Serial Bus) HUB Featuers
USB downstream Ports
connect the cables from USB-
compliant peripherals-such as
keyboard, mouse, etc
To USB downstream port
of the USB-compliant
computer or another hub
cable
This is a simplified representation
of the rear view.
This is a simplified representation
of the side view.
Notes :
To activate the USB hub function, the
Speaker/USB HUB Option
must be connected to a
USB compliant computer (OS) or another hub with the USB cable(enclosed).
When connecting the USB cable, check that the shape of the connector at the cable side
matches the shape at the connecting side.
High powered devices (such as stand alone scanners and camera’s etc.) can not be
connected to the USB HUB ports. Self powered devices (use an extermal AC adapter to
meet the high power repuirement) can be connected to the USB HUB port.
The USB HUB is compliant to the USB 2.0 Specification and will support low speed and full
speed devices (same as USB 1.1). The HUB can not support high speed devices and will
connect them as full speed devices.
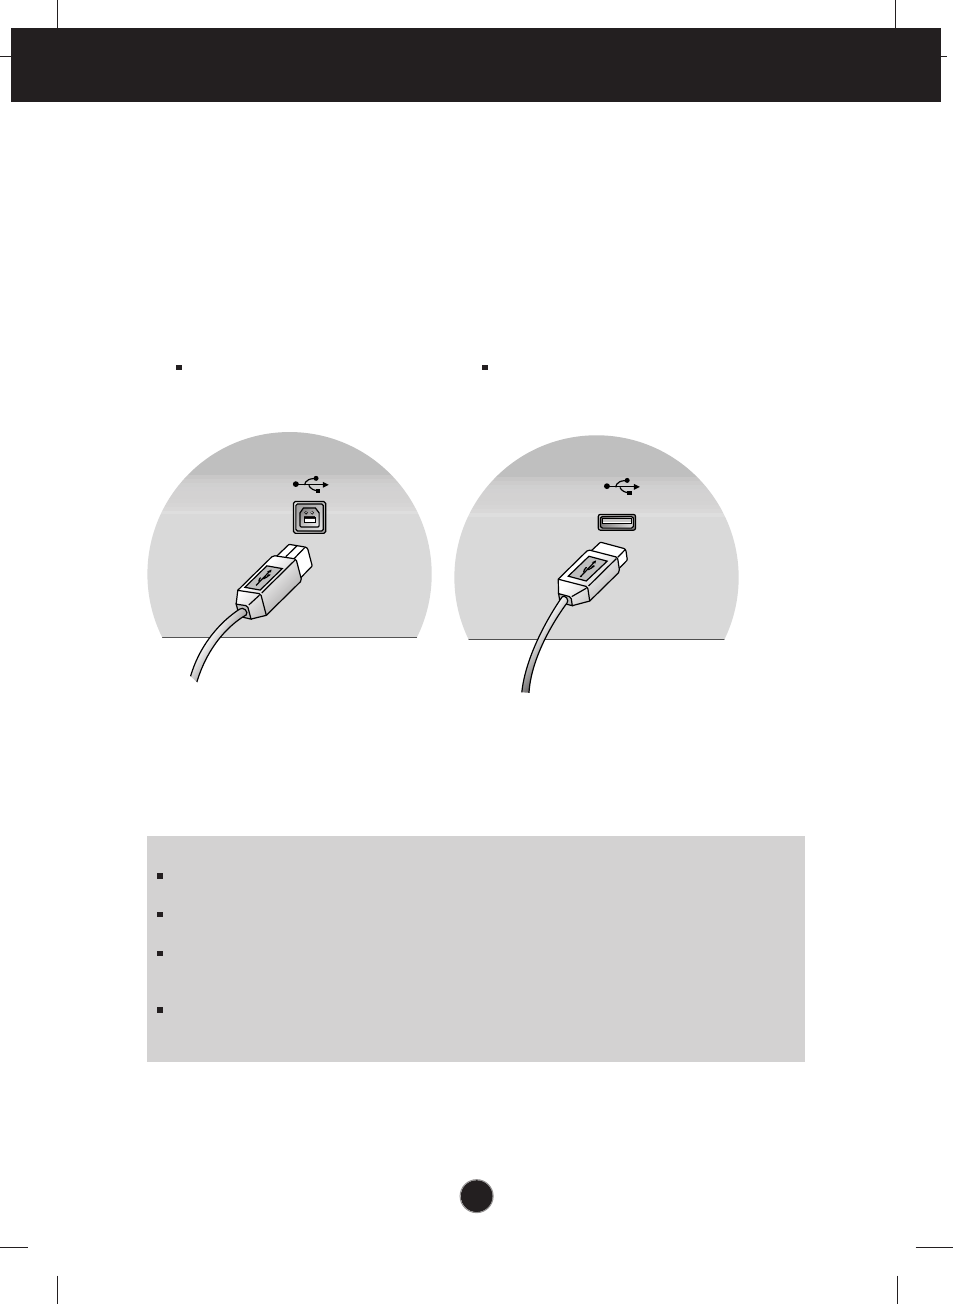
Connecting USB devices
1. Insert the USB cable into the square USB connector of the Speaker/USB HUB
Option as shown is the diagram on the left. Then, insert the other end of the
USB cable into the rectangular USB connector on a USB-compliant computer
or USB hub as shown in the diagram on the right.
2. Insert the USB cable for USB-compliant devices into the rectangular USB
connector in the monitor as shown in the diagram on the right.

A8
Using the USB (Universal Serial Bus) HUB Featuers
Rev. 1.1 Compliant BUS-powered hub
100 mA for each (maximum)
12 Mbps (full), 1.5 Mbps (low)
1 Upstream port / 4 Downstream ports
USB standard
Downstream power supply
Communication speed
USB port
USB Specifications
IMPORTANT: These USB connectors are not designed for use with high-power USB devices
such as a video camera, scanner, etc. For optimal performance, connecting high-power USB
devices directly to the computer.
A9
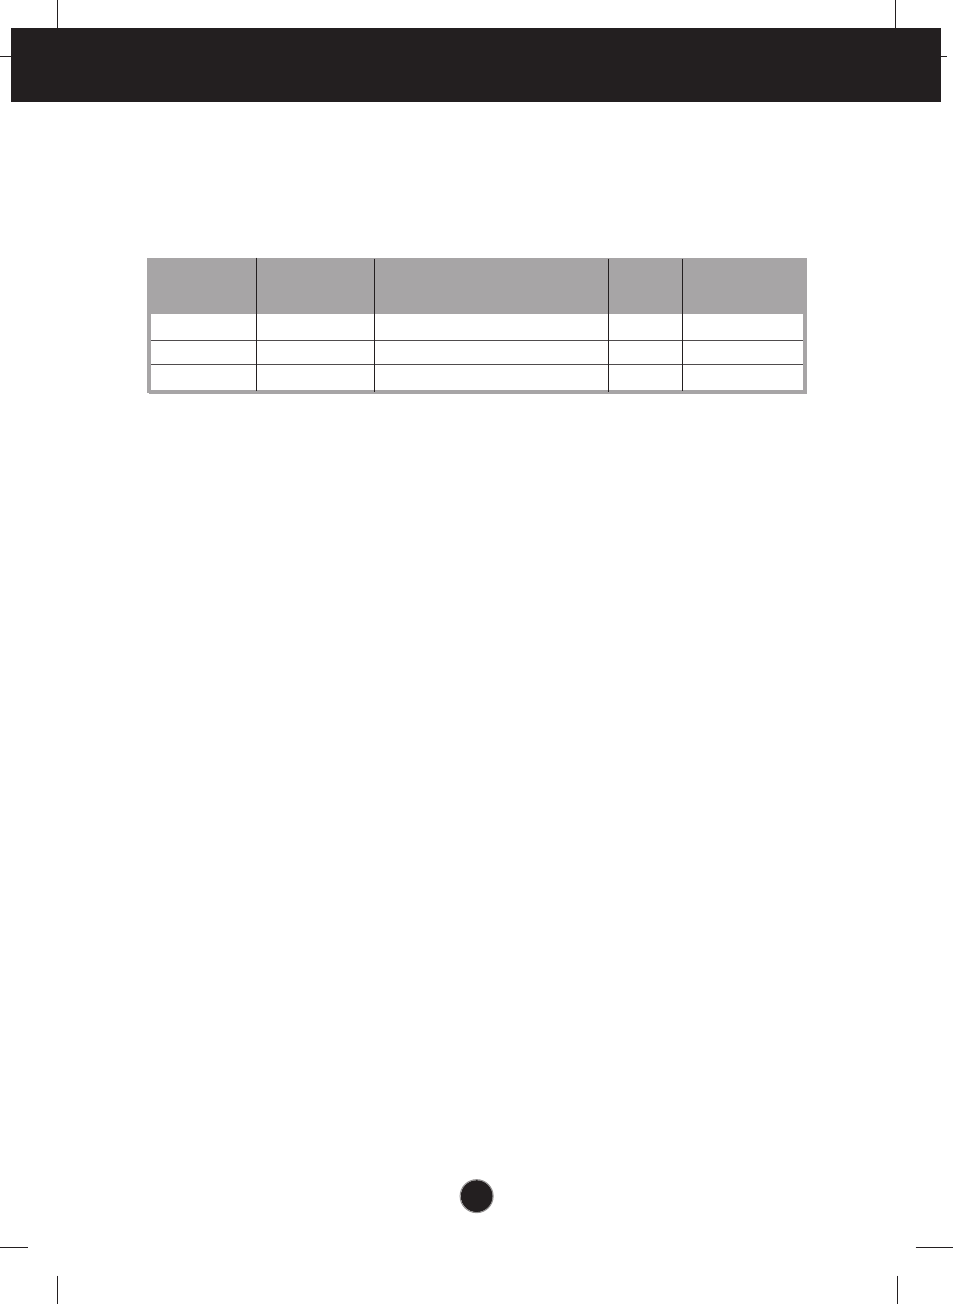
Service Information
Service Information
The following parts are for use by IBM services, or IBM authorized
dealers, to support customer warranty. Parts are for service use only.
19K1901
19K1902
N/A
PART
NUMBER
DESCRIPTION MODEL COLOR
FRU PART
NUMBER
Speaker/USB HUB Option
Speaker/USB HUB Option
Cable set
Stealth Black
Pearl White
24P0556
24P0557
19K1903