LG Electronics USA TBLT20 Tablet/Notebook PC with WLAN and Bluetooth User Manual 1
LG Electronics USA Tablet/Notebook PC with WLAN and Bluetooth 1
Contents
- 1. users manaul 1
- 2. users manual 2
- 3. Users manual 3
users manual 2
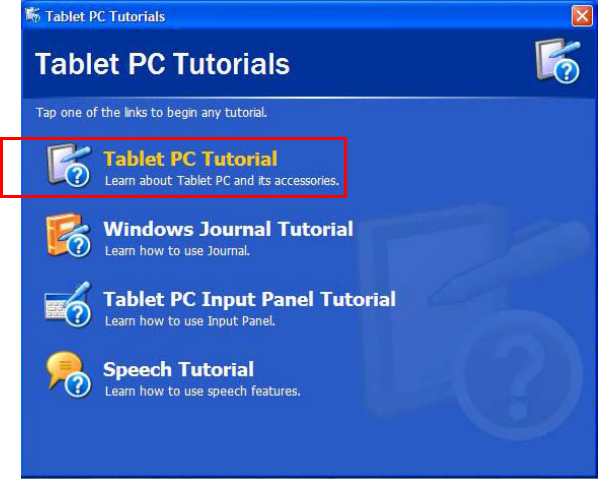
Using Tablet PC Tutorials
When using Tablet PC, it is very convenient to work.
Tablet PC Tutorials
1. Click [Start]-[All Programs]-[Tablet PC], and choose one of items.
2. When checking up other functions, click other Tablet PC Tutorials.
- 51 -
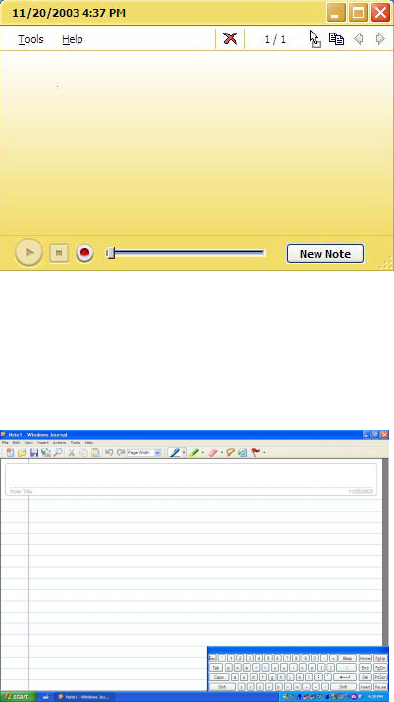
Using Tablet PC application programs
Sticky Notes
Sticky Notes has the function as convenient as normal notepad to save personal
information (name, phone number, address, etc.), and the function of recording
voice message.
Click [Start]-[All Programs]-[Sticky Notes]
Windows Journals
Click [Start]-[All Program]-[Windows Journals]
(* Press the button Windows Journal on LCD Panel)
- 52 -
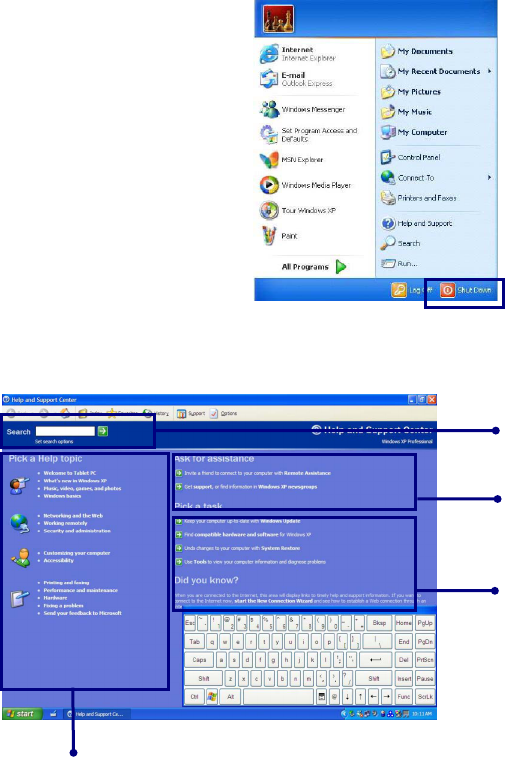
Help and Support
Click [Help and Support] to learn how to troubleshoot problems you may
encounter while using the computer.
- 53
You can search for useful
Help and Support
information.
Click to learn the features and troubleshooting information
You can connect to the
Internet and ask for
assistance online.
You can setup and
configure your computer
to personalize your
computing environment
LG
Click [Start]->[Help and Support].
LG
The following window appears.
-
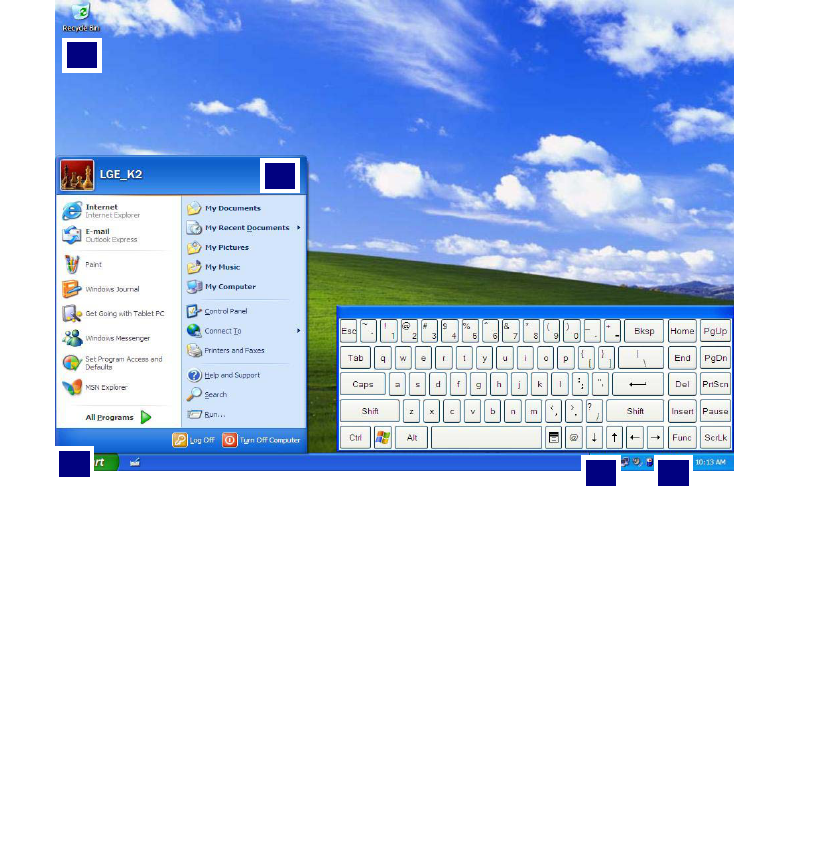
Windows XP desktop
5
3 4
2
1
1.[Start] button
Click [Start] button to open the [Start] menu. Click [All Programs] to open
the list of programs installed in the computer.
2.[Start] menu
[Start menu] shows everything you need to start working in the Windows XP
environment.
3. Taskbar
Taskbar shows programs that are currently open and running.
4. Taskbar icons and clock
Taskbar icons show and let you configure ongoing activities such as battery
power status, display properties, LAN settings, etc.
- 54 -
5. Recycle Bin
Put your unused items and files in the Recycle Bin. Right-click the Recycle Bin
and select [Empty Recycle Bin] to permanently delete the items inside the
Recycle Bin.
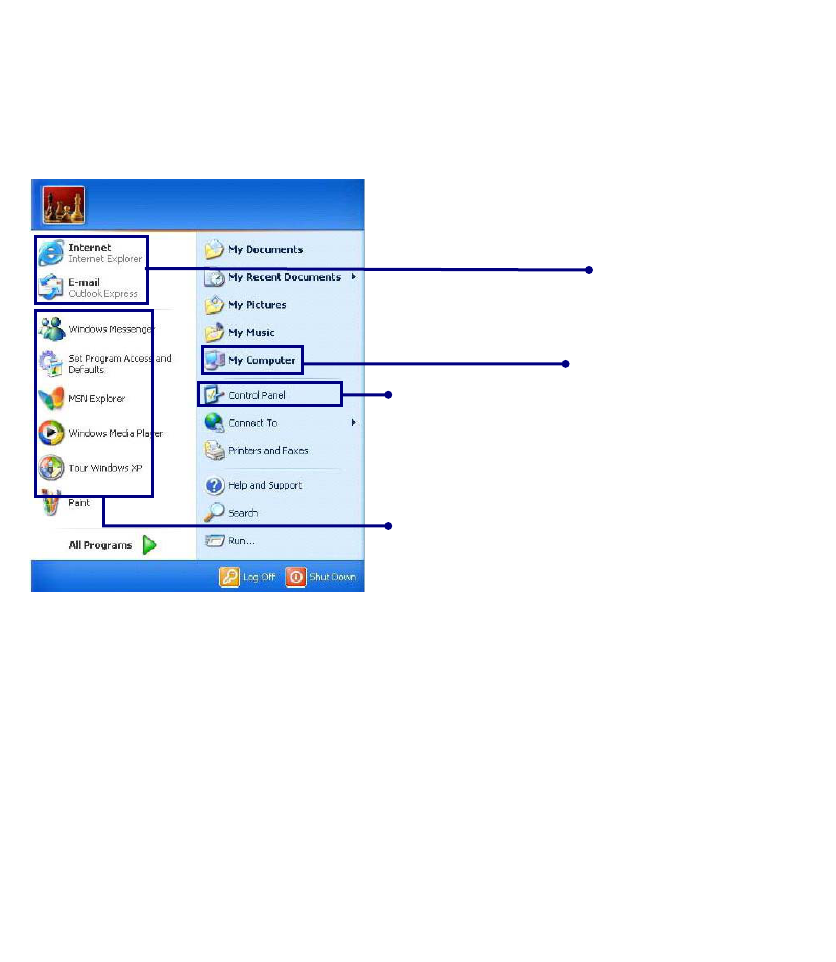
Start menu
Pinned items
Control Panel lets
you change the
settings in your
computer
Recently used items
My computer shows
the drive and network
information for your
computer
LG
Changing the look of the Start menu
Right click [Start] button and select [Properties].
In the Start menu tab, choose from either Start menu or Classic Start menu.
Click [OK] to apply the new setting.
Changing the pinned items in the Start menu
Right-click the item you want to pin it to the Start menu.
Select [Pin To Start Menu].
The item is pinned at the top of the Start menu.
Showing the recently used items on the Start menu
Right-click on [Start] button and click [Properties].
In [Start Menu] tab, select [Start menu] and click [Customize].
- 55 -
In [Advanced] tab, check [List my most recently opened documents] and
click [OK].In Taskbar and Start Menu Properties window, click [Apply]->[OK].
If you click [Start] button the next time, recently used items appear on the Start
Menu.
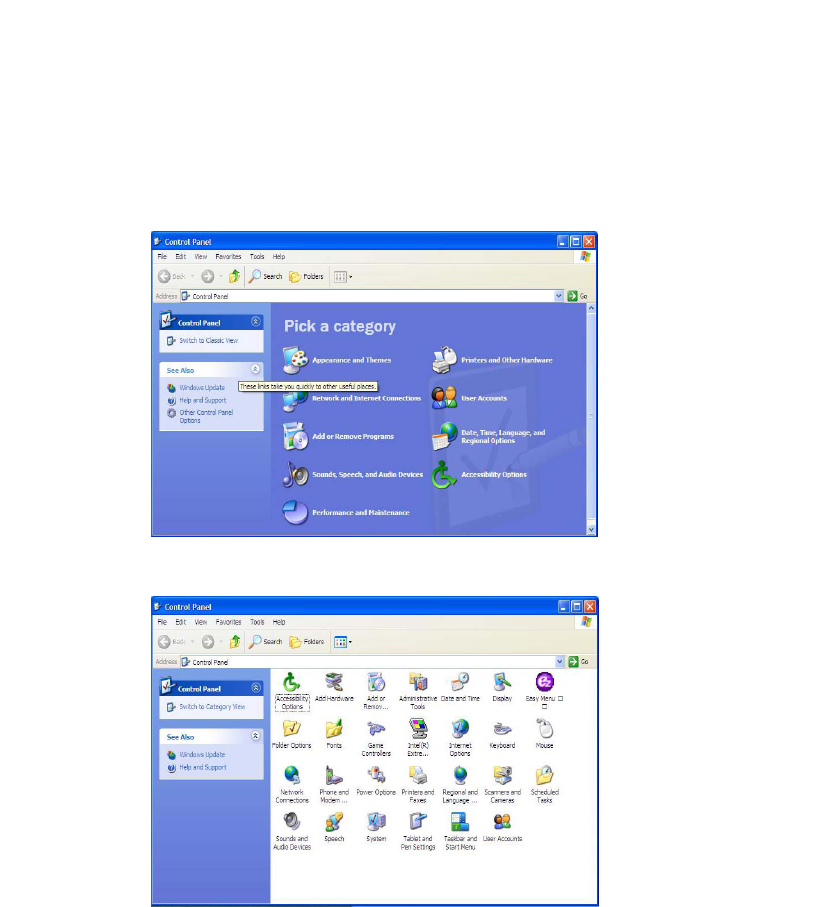
Control Panel
The Windows XP Control Panel can display items in either Category View or
Classic View.
Category View
Classic View
- 56 -
Setting up Local Area Network (LAN) connections
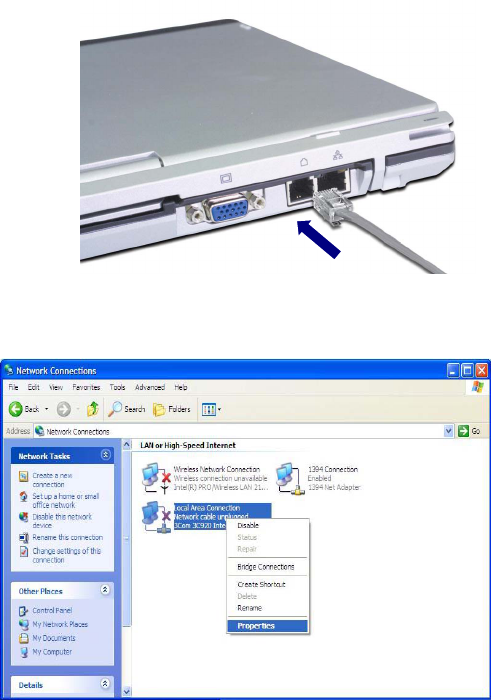
Local Area Network (LAN) connection provides high-speed network connection for
your home or company.
Attach a LAN cable to the Ethernet (LAN) port.
Click [Start]->[Control Panel]->[Network Connections].
Right-click a Local Area Connection and select [Properties].
- 57 -
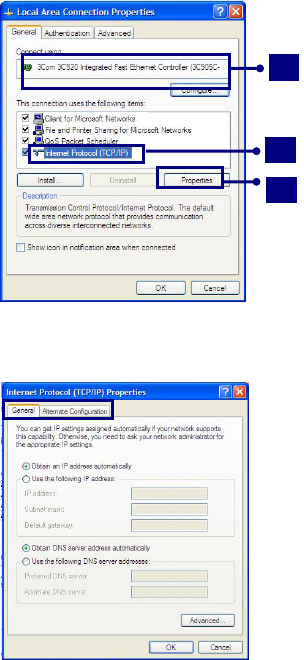
If the following window appears, click [General] tab and 1. check if 3COM 3C920
Integrated Fast Ethernet Controller is installed in the computer 2. Then, check
Internet Protocol, and 3. click on [Properties]
3
2
1
Click on [General] tab, and Select [Obtain an IP address automatically]
Click [Ok] when Internet protocol (TCP/IP) setting is completed.
Note:
Ask your network administrator for the appropriate IP settings.
- 58 -
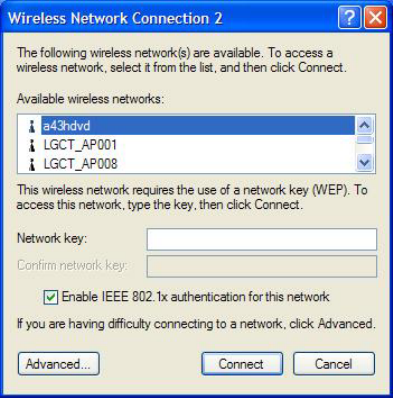
Using Wireless LAN
You can use Wireless LAN to connect to the network and use the Internet in your
home and office. You can share files and folders over the network without the
attaching network cables to the computer. For saving power, Wireless LAN is set
up as power off when shipping. When using the wireless network devices
(LAN/Bluetooth), use them on Easy Menu after turning on the wireless device.
Connecting and using the wireless network
Right-click the Wireless network icon on the Taskbar and select [View available
wireless network].
Select AP(Access Point) you want to connect to and type necessary information.
Click [Connect].
If you place the mouse pointer on the Wireless network icon on the Taskbar, you
can see the status of the wireless network.
- 59 -
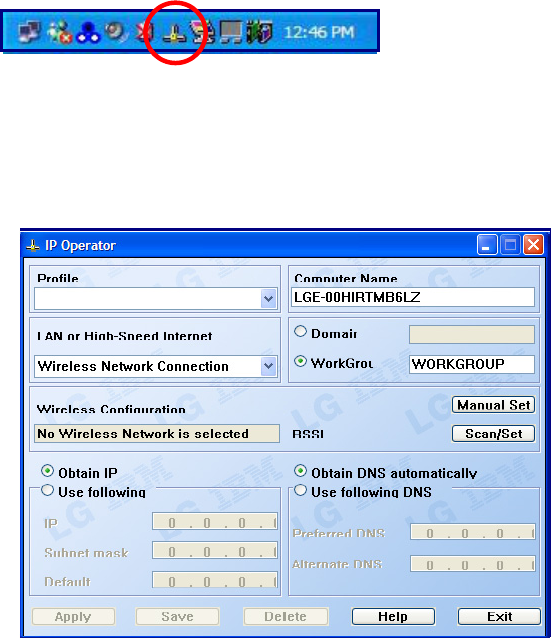
Using IP Operator
IP Operator is useful to access to network everywhere by notebook.
User access to network at the several places (Home, Office, and Vendor etc.) can
save and modify the network environment (IP address, Domain, Workgroup).
For more detailed information, refer to [IP Operator].
Double click [IP Operator] icon on Desktop System tray.
- 60 -
If the following window appears, select LAN or High-Speed Internet at the drop
down menu and type the computer name you use.
Type the name is appropriate at [Profile List] after making a decision whether a
user belonging to [Domain], or a member of [Work Group].
Choose one of setting options as below.
When setting [Obtain an IP address automatically],
- IP address, Subnet mask, Default Gateway windows are changed the color as
grey automatically.
When setting [Use the following IP address]
- Insert IP address, Subnet mask, Default Gateway window. Then, insert DNS
Server.
Click the [Profile Save] button when finishing inserting items in [Profile List]
Note:
When setting [Obtaining an IP address automatically], it is unavailable to
insert IP address, Subnet mask, and Default gateway.
When pressing [Profile Apply], no items appear at [Profile List].
If a user needs to apply the specific item, select one of items at [Profile List],
and click [Profile Apply].
Changing the Themes and Desktop background
Using the Windows Classic Theme
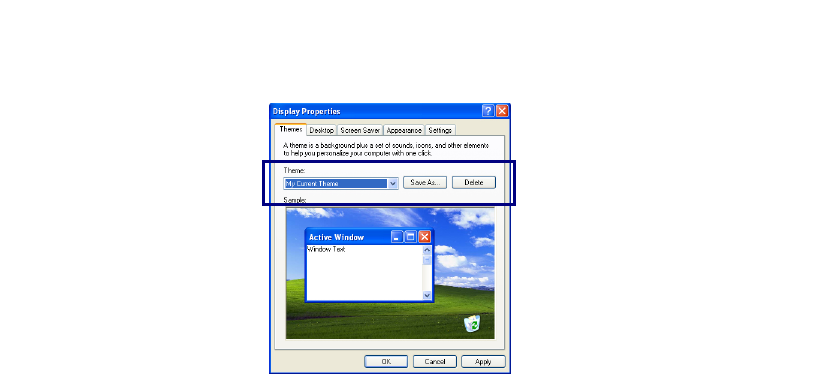
Click [Start]->[Control Panel]->[Display].
Click [Themes] tab
Select [Windows Classic] from the [Theme] drop down menu.
- 61 -
Using a different theme
1. Click [Start]->[Control Panel]->[Display].
2. Click [Themes] tab
3. Select another theme from the [Theme] drop down menu.
Note:
In Appearance tab, you can click [Advanced] button and change the color
scheme, font size, and windows and button styles.
In Themes tab, you can change the overall appearance of the desktop.
If there is more than one user using the computer, each user can apply different
theme and desktop appearances.
Changing the desktop background
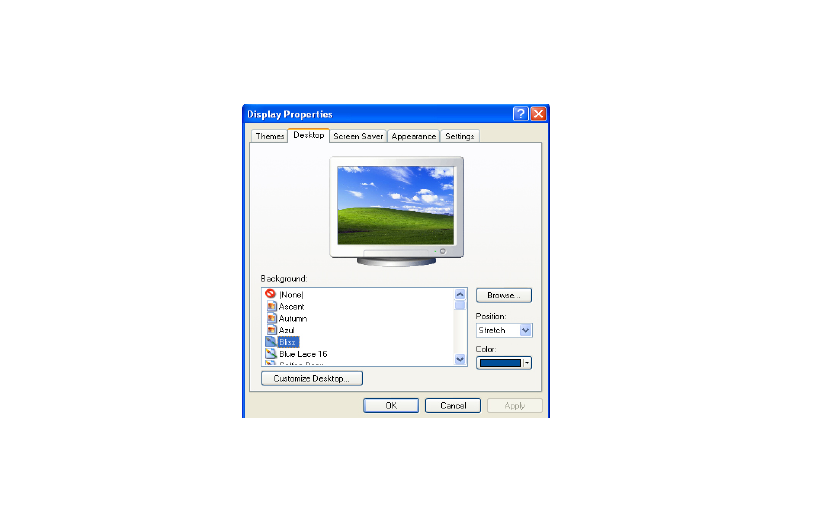
Click [Start]->[Control Panel]->[Display].
Click [Desktop] tab. (OR you can right click on the mouse while in desktop
background. When a short cut menu pops up, choose [Properties]
Scroll down the [Background] drop down menu and select an image for the
background. You can also click [Browse] button and select an image you have
saved.
- 62 -
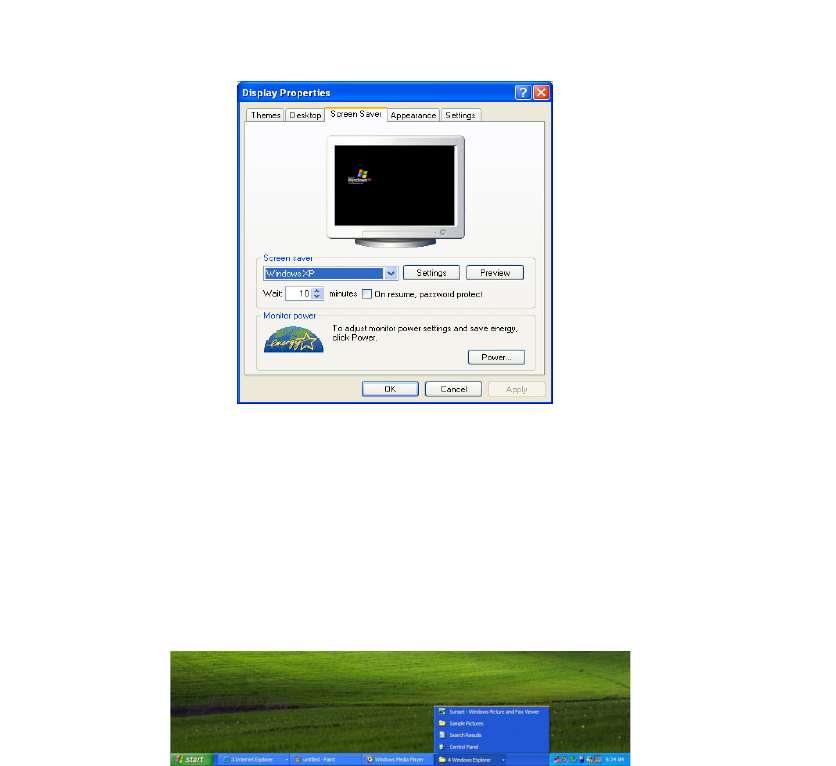
Setting the Screen Saver
Click [Start]->[Control Panel]->[Display].
Click [Screen Saver] tab.
- 63 -
Select the idle time before activating the Screen Saver from [Wait] drop down
menu. Check [On resume, password protect] to protect the computer from
unauthorized users.
Taskbar
Taskbar displays programs and files that are currently open. If there are many
programs running on the computer, the Taskbar group together files from the
same program to prevent taskbar icons from cluttering up the Taskbar.
Desktop cleanup
Desktop Cleanup Wizard removes unused desktop items to a folder. The Desktop
Cleanup Wizard runs every 60 days but you can also run it manually.
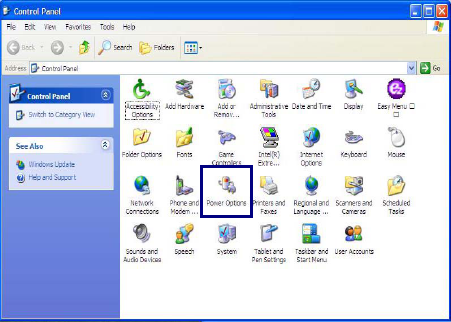
1. Click [Start]->[Control Panel]->[Display].
2. Click [Desktop] tab.
3. Click [Customize Desktop] -> [Clean Desktop Now] button.
Using the Power Options
Windows XP uses its own power-saving program to manage the battery power.
Click [Start]->[Control Panel]. Double-click [Power Options].
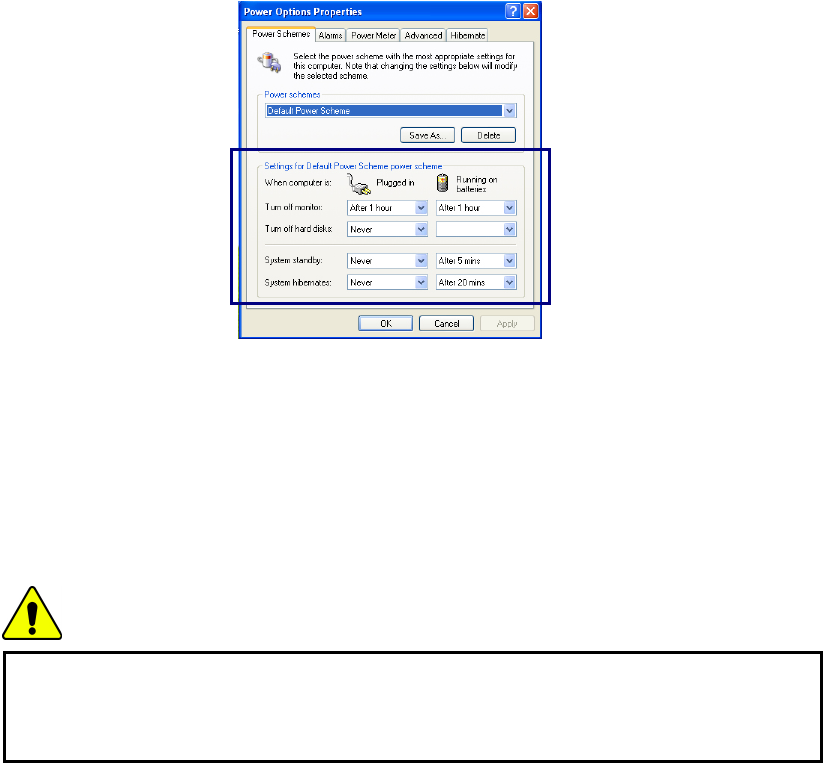
In Power Options Properties window, change the settings best suited for your
computing environment.
Power Options Properties
Click [Power Schemes] tab.
Drop down the menu and select [Portable/Laptop] to set notebook PC with the
appropriate power schemes. This includes detailed timeline for [Turn off
monitor], [Turn off hard disks], [System standby], and [System
hibernates].
- 64 -
Note:
If the computer enters System standby mode, the hard disk is turned off to
conserve the battery power.
In System standby mode, you cannot save your work. Be sure to save your work
before entering System standby mode.
When the computer enters System hibernation, the computer saves all your work
in the hard disk and turns off the computer.
Caution
If the computer enters System standby or hibernation mode while playing a
computer game, a serious error may occur. Be sure to quit the computer game
before entering a power-saving mode.
Power Options Properties
Click [Alarms] tab. Check [Low battery alarm] and [Critical battery alarm],
and move the sliders to set the power level to activate low battery alarm and
critical battery alarm.
- 65 -
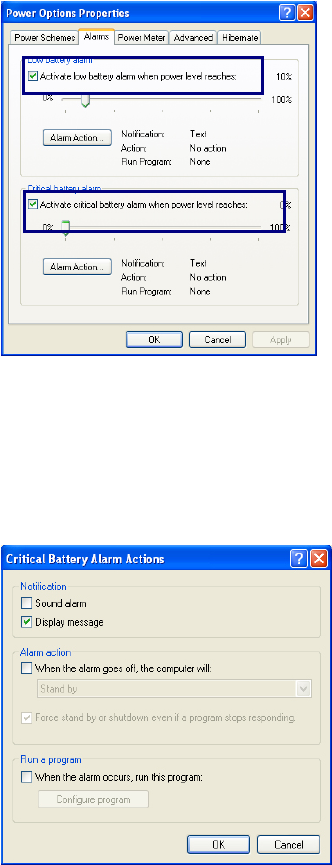
You can be notified with Sound alarm or Display message. You can also set the
alarm action such as putting the computer into System standby mode or System
hibernation mode. You can also run a specific program when the alarm goes off.
- 66 -
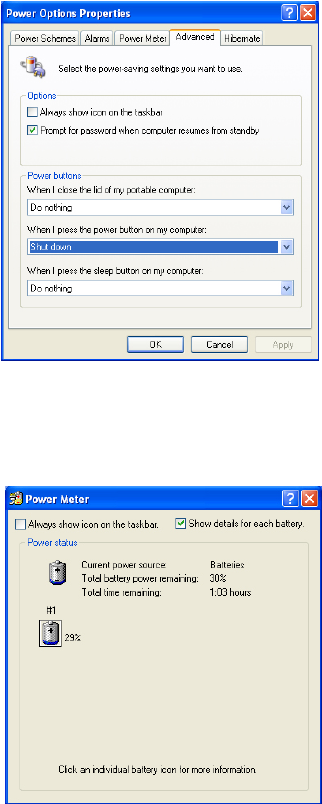
Advanced tab
In Options, you can set the computer to prompt for password when computer
resumes from standby. You can also set the computer to enter a power-saving
mode when closing the display panel, pressing the power switch or the
combination of Fn+F4.
Power Meter
You can click the Power Meter icon on the Taskbar to check the power level of
your computer.
- 67 -
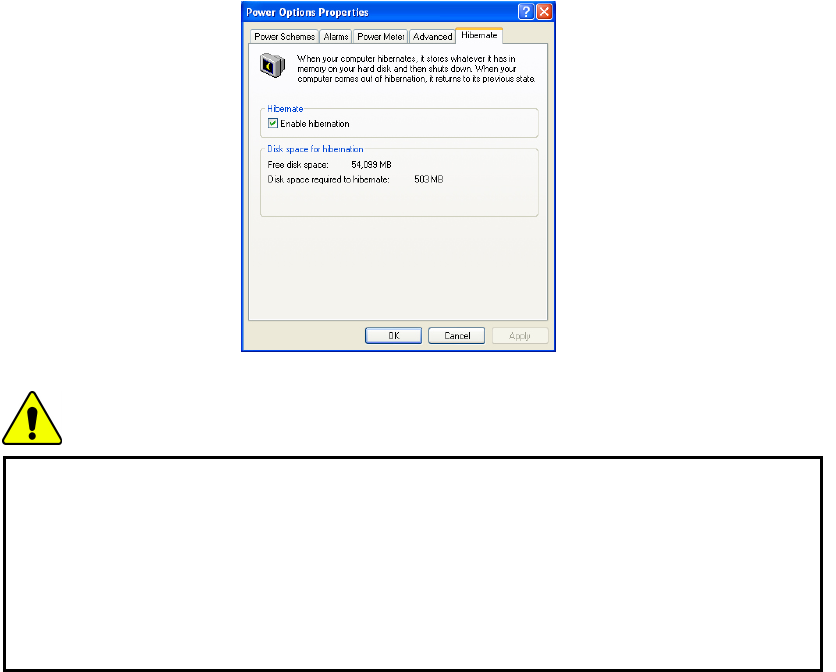
System Hibernation
In Hibernate tab, you can enable or disable System hibernation mode and check
the disk space needed for hibernation.
Caution
Do not remove the battery pack when the AC adapter is not connected to the
computer.
If you keep using the computer while low on the battery power, you may lose
the data when the battery power goes out. If you are notified of low battery
power, save your data and connect the AC adapter, or turn off the computer and
change the battery pack.
Using ez menu
To use ez menu is helpful for using Tablet PC.
Click [Start]-[All Program]-[Easy Menu], Or use ez menu button on LCD
Panel.
- 68 -
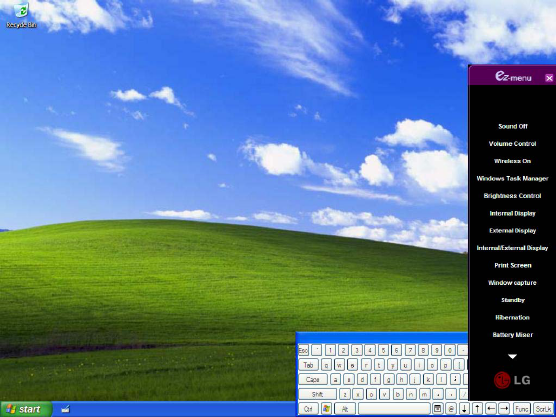
Note:
When pressing a triangle on lower column of ez menu, added menu will appear.
Sound On/Off: Turning sound on and off.
Volume Control: Adjust volume by using Up/Down button on LCD Panel
Wireless On/Off: When turning wireless off, it's available to extend the battery
power.
Windows Task Manager: Running Windows Task Manager.
Brightness Control: Adjusts brightness of the screen by using Up/Down button
on LCD Panel.
Internal Display: Using internal display.
External Display: Using external monitor that connected to VGA port at the
back of the computer.
- 69 -

Internal/External Display: Using both Internal Display and External Display.
Print Screen: Capturing the whole desktop screen as an image. It's possible to
edit and paste on the graphic program after the capture.
Window Capture: Capturing activated window.
Standby: Entering into standby mode.
Hibernation: Entering into hibernation mode. When pressing the power switch
on hibernation mode, it comes back as a normal.
Battery Miser: Running Battery Miser for setting up the power option.
Tablet PC Settings: Running the program for Tablet and Pen Settings.
Easy Menu Settings: User can modify, add, and delete Easy Menu Item
conveniently.
Using pen to input (attached pen in tilt / offered extra pen)
It’s possible to input letters by using pen.
Using pen to input (When inputting on notepad)
1. Tap Tablet PC icon on taskbar. Tablet PC Input Panel will appear.
2. Tap [Writing Pad] after running notepad.
- 70 -
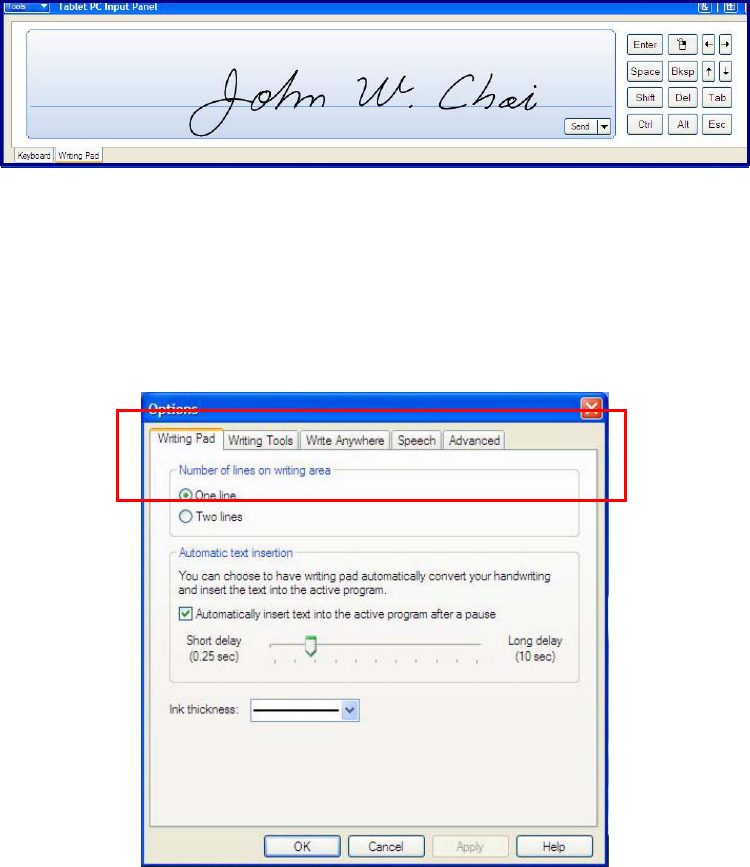
3. Write any letters on Writing Pad window.
4. Texts appear on notepad.
Defining font size
Press [Tools], and select [Options].
Define font size at [Number of lines on writing area].
- 71 -
Attaching external devices
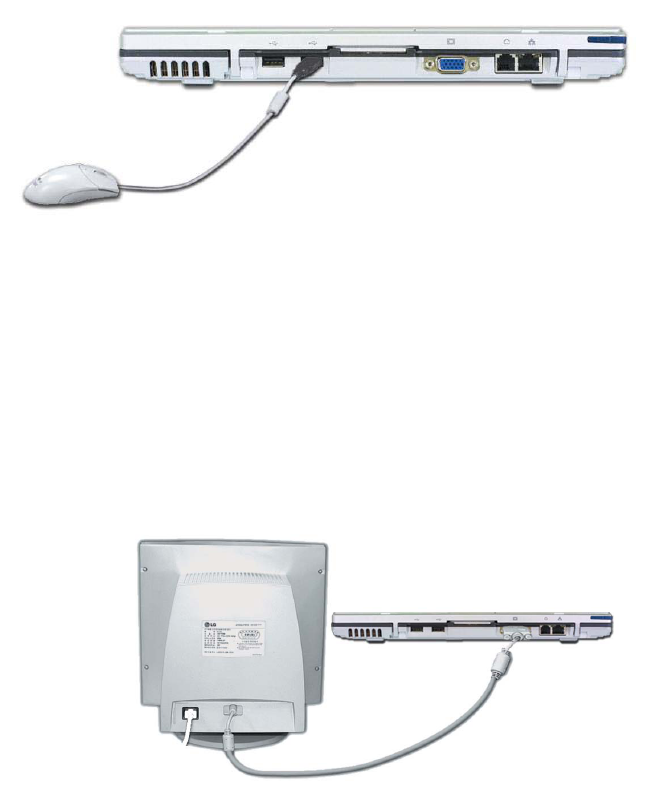
Attaching a USB device
USB mouse (not included)
You can connect to keyboard, hub, digital camera and other devices that support
USB.
Attaching an external monitor
Note: Turn off the computer before attaching an external monitor. Use a
standard VGA connector that should be 16mm wide. Connectors wider than
17mm will not fit in.
External monitor
(not included)
- 72 -
Monitor toggle function (switch the monitor by short-cut keys)
After install the external monitor to the notebook PC, use Fn + F7 to switch the
main monitor to LCD only, monitor only, and LCD + monitor both, in sequence.
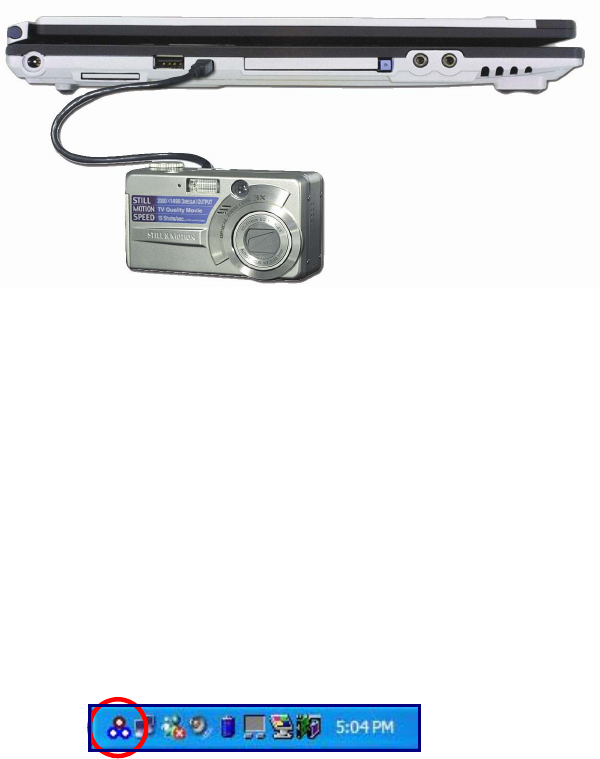
Attaching an IEEE 1394 device (Option)
Digital Camera
(Purchased separately)
You can attach IEEE 1394 devices such as external hard disk drive or CD-RW
drive, MP3 player, digital camera, and video camcorder.
Using Battery Miser
Battery Miser is the program to manage energy saving function makes the
battery of notebook computer maximum. When using Battery Miser, it is available
to use both original power management functions of Windows and the advanced
power management functions of battery miser.
For more detailed information, refer to [About Battery Miser]
Double click [Battery Miser] icon on Desktop System tray.
- 73 -
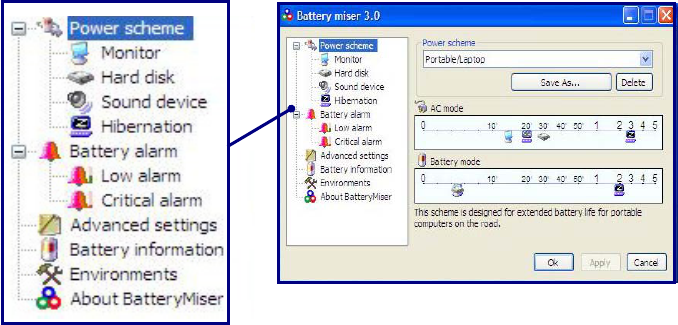
Battery Miser main screen appears as below.
Power scheme: The group that manages the power to reduce power
consumption of computer peripheral units.
Battery alarm: If the battery power gets down to low alarm, critical alarm,
user can define the option for alarm is working.
٭ Note:
When pressing the keys Fn + F8, it keeps unused sound device power
٭ management(Sound device is always ON).
٭ When pressing one more, it return to the original set point.
٭ When pressing the keys Fn + F9, it keeps unused Monitor power
٭ management(Monitor is always ON).
٭ When pressing one more, it return to the original set point.
- 74 -
Input/Output
Using the keyboard
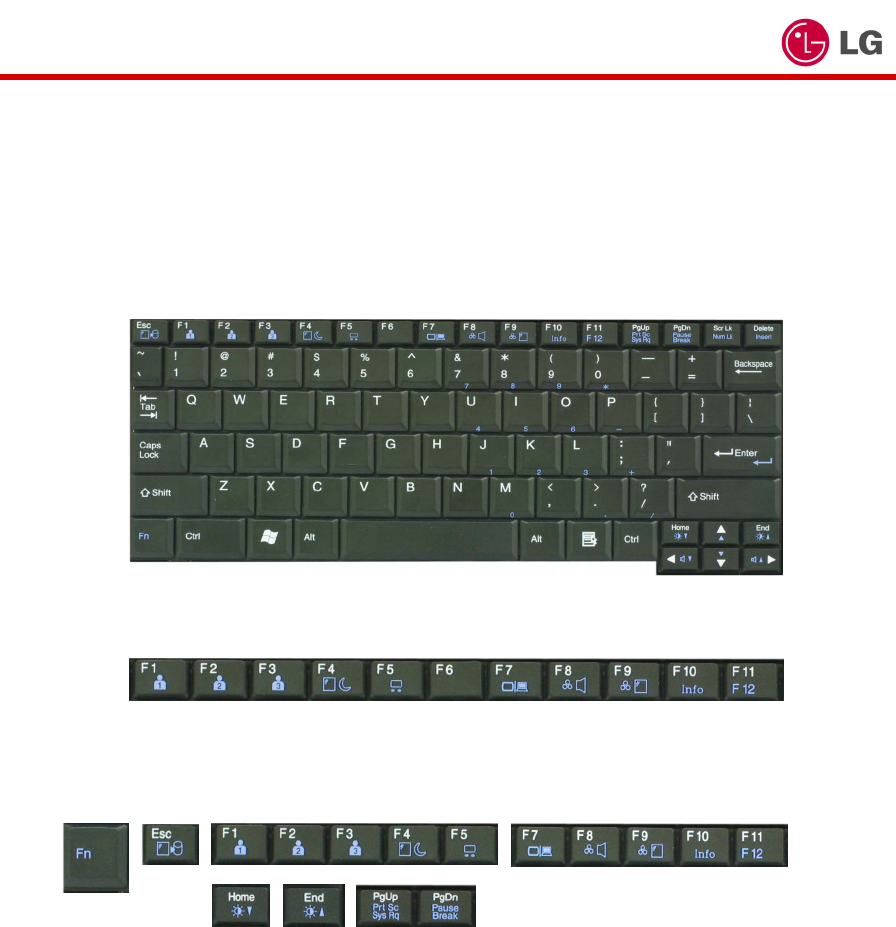
The keyboard is used for entering text and commands in the computer.
Component
The keyboard is composed of character, number, and other special function keys.
Function keys: Function keys enable you to perform different operations
depending on the operating system and application program you use.
Hot keys: Hot keys (shortcuts) are used in conjunction with Fn key to provide
shortcuts for some of the predefined operations, such as entering power-saving
mode.
- 75 -
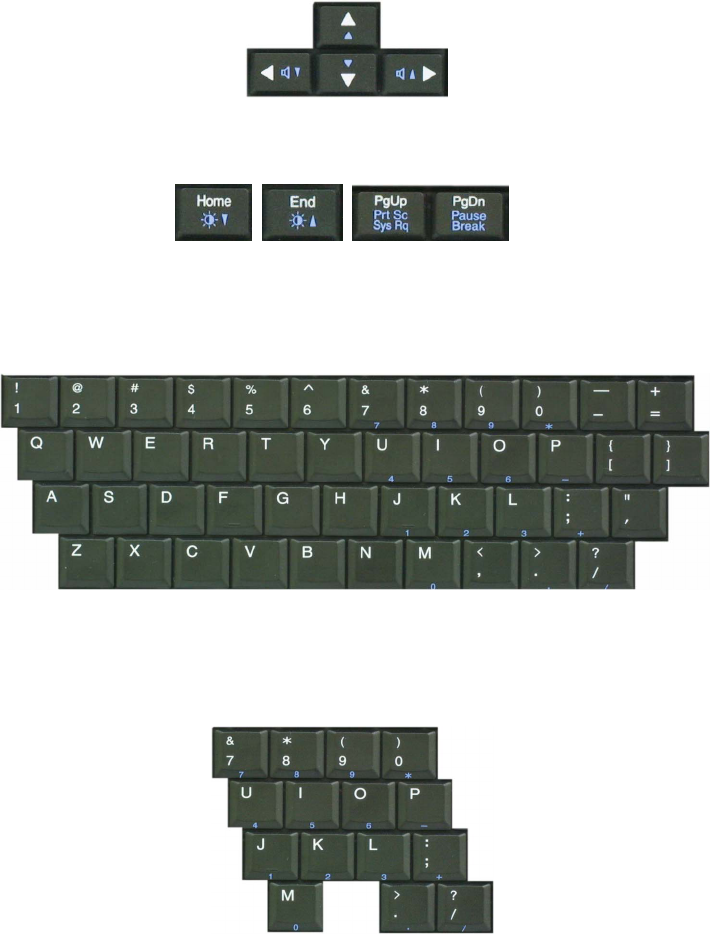
Cursor control keys: You can move the cursor in the direction of the arrows.
Editing keys: You can move the cursor to the beginning or end of the current line,
or up and down the screen.
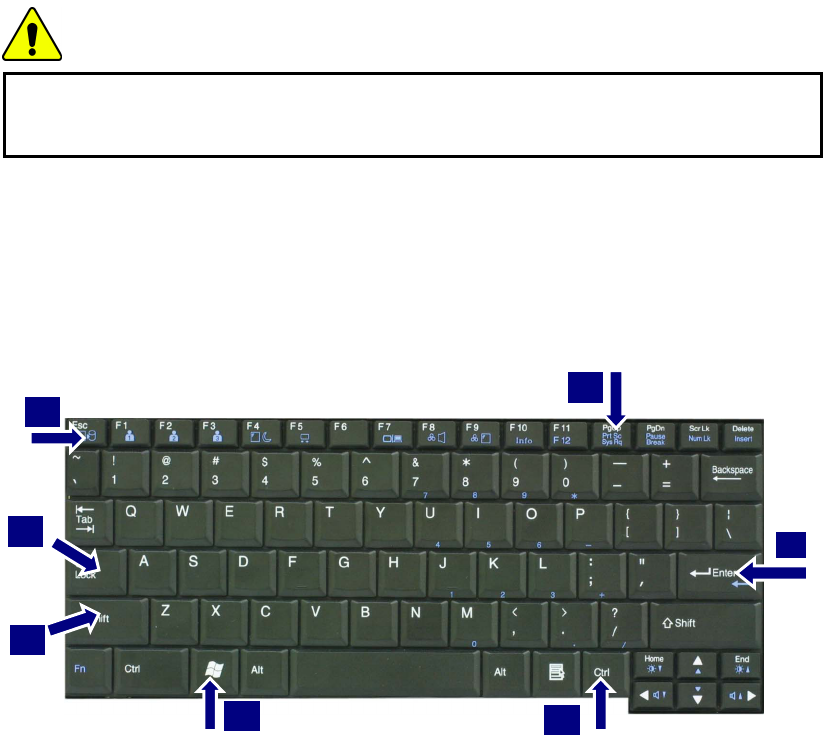
Character and number keys: consist of character keys, number keys, special
character keys, and spacebar. Spacebar is used for creating a space between
characters.
Embedded numeric keys: You can press the combination of Fn and ScrLk keys to
enable the embedded numeric keypad. Num Lock indicator lights up and enables
you to use the embedded numeric keypad shown below. You can press the
combination of Fn and ScrLk keys again to disable the embedded numeric keys.
- 76 -
Caution
Do not spill water, juice, coffee, etc on the keyboard as it may damage the
computer and cause an electric shock.
Note:
In the middle of entering characters, if numbers are entered instead of characters,
press the combination of Shift and ScrLk to disable the embedded numeric keys.
Modifier and special function keys
- 77 -
7
4
5
1
2
3
1. Shift key: Hold Shift key down and press another key to enter the upper case
letter for the key.
2. Caps Lock key: Press Caps Lock key to lock the keyboard in the upper case
position. When the Caps Lock indicator lights up, you can press another key in
combination with Shift to enter the lower case letter for the key.
3. Esc key: Use Esc key to quit programs or cancel a operation in a program.
4. PrtSc (Print Screen) key: Press PrtSc key to take the snapshot of the entire
1
2
6
4
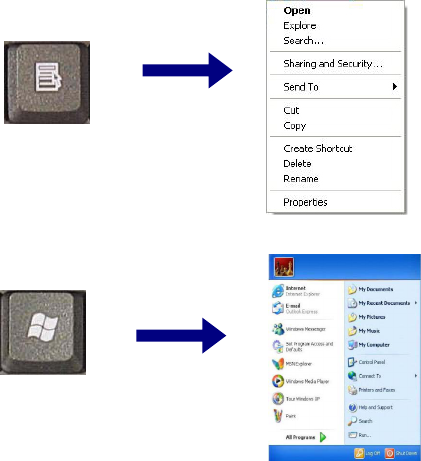
area visible on your screen and store it in the clipboard.
5. Enter key: Press Enter key to enter a command or to end a line.
6. Shortcut menu key: Press Shortcut menu key to view shortcuts for the
current program. (Shortcut menu key works the same as the right-clicking the
mouse button)
Windows(R) key: Press Windows key to view the Start menu.
LG
LG
Note:
You can lock the keyboard in the upper/lower case position by pressing Caps Lock
key. Caps Lock indicator lights up in upper case position. You can use the
combination of Shift and a character key to enter its upper/lower case letter.
Hot keys
The following Hot keys provide you with shortcuts to operations, such as
adjusting the brightness of the computer display.
Fn+F1 : User-defined Hot key. (Setting is available at OSD)
Fn+F2 : User-defined Hot key. (Setting is available at OSD)
Fn+F3 : User-defined Hot key. (Setting is available at OSD)
- 78 -
- 79 -
Fn+F4: Force the computer to enter power-saving mode. (ex: system standby
and hibernation)
Fn+F5:
Press the combination once to disable the touch pad, and press again to enable
the touch pad. (The touch pad initialization takes 1~2 seconds, so wait for the
Initialization to end before using the touch pad)
Fn+F7:
When the computer is attached to an external monitor, you can change the
display output location with Fn+F7 combination. You can switch to and from the
three types of display modes, LCD display only, the external monitor only, or both
at the same time.
Fn+Home:
The computer display becomes darker.
Fn+End:
The computer display becomes brighter.
Fn+F8:
Enbale/disable Auto Sound power management (battery mode only). Refer to
Battery Miser Help.
Fn+F9:
Enable/disable Auto Brightness control. Refer to Battery Miser Help.
Fn+F10: System Information
Fn+Esc : Maximum power-saving mode. (when OSD is installed)
Fn + ScrLk/Num Lk: Number lock
Fn+Delete : Insert
Fn+↑: Scroll Up
Fn+↓: Scroll Down
Fn+→ : Volume Up
Fn+← : Volume Down
Fn+F11: F12
Fn+PgUp : Prt SC
Fn+PgDown : Pause
Using the touch pad (Mouse)
1
3
2
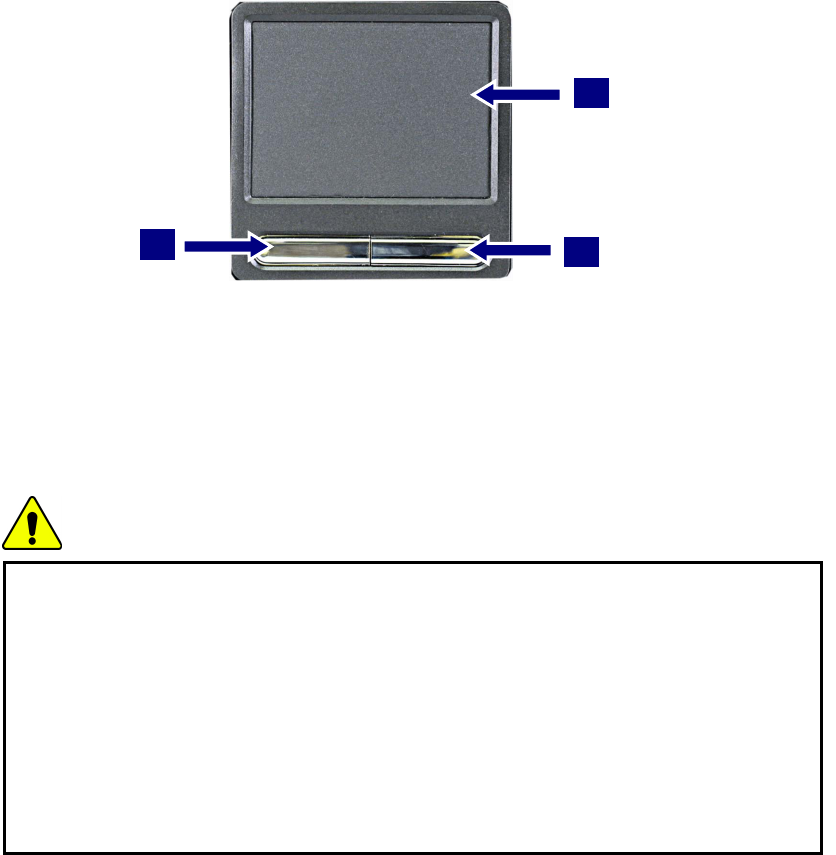
The touch pad can be used with a mouse at the same time. It has a scroll button,
which functions similar to a scroll wheel on a mouse.
1. Touch pad: used to move the pointer.
2. Left button: used to select or click items.
3. Right button: functions similar to the right button on a mouse.
Caution
Guidelines on using the touch pad
Do not touch the touch pad with a sharp or pointed object as doing so may
damage the touch pad.
Do not remove the cover sheet of the touch pad as doing so may damage the
touch pad.
Do not use the touch pad with two fingers, wearing gloves, or wet hand as it
may not function correctly. Using the touch pad with a dirty or oily finger may
damage the touch pad.
Do not exert too much pressure on the touch pad as doing so may result in
injuries to your finger or wrist.
- 80 -