LG Electronics USA TBLT20 Tablet/Notebook PC with WLAN and Bluetooth User Manual 1
LG Electronics USA Tablet/Notebook PC with WLAN and Bluetooth 1
Contents
- 1. users manaul 1
- 2. users manual 2
- 3. Users manual 3
Users manual 3
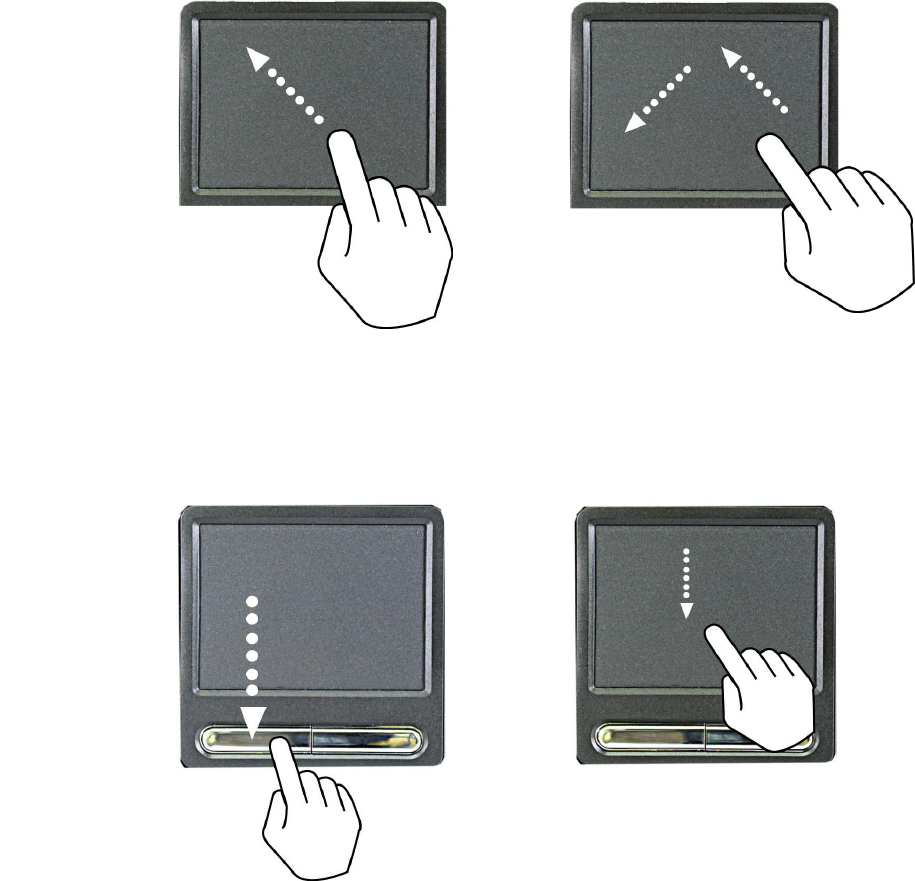
Moving the pointer on the screen
Gently place your finger on the touch pad and slide it in the direction in which you
want the pointer to move.
- 81 -
Making the selection (Click)
To click a button, quickly press and release the left button. You can click the left
button or gently tap the touch pad once to select an item on a menu or an icon
on the screen, or position the cursor in a document.
OR
Double-click (Run)
To double-click a button, quickly press and release the left button twice. You can
also tap the touch pad twice to get the same result. To launch an application, you
can select and double-click the .exe file or the program icon.
- 82 -
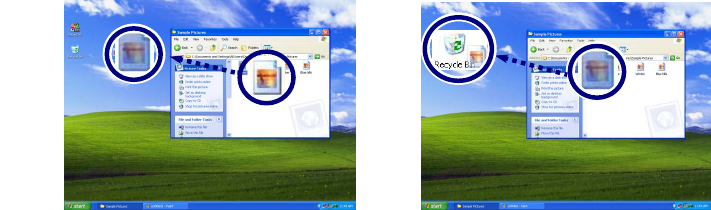
Drag and drop
To drag an object, select and move the object by clicking and holding the left
button and sliding the finger across the touch pad without releasing the button.
To drop the object you have just dragged, release the left button.
You can use drag and drop to move files from one location to another.
For example, if you want to place a file in the recycle bin, place the pointer above
the file you want to move, press the left button and hold, slide your finger across
the touch pad to move the file and release the left button above the recycle bin.
.
Drag: Move the icon without releasing the left button
Drop: Release the left button above the recycle bin.
- 83 -
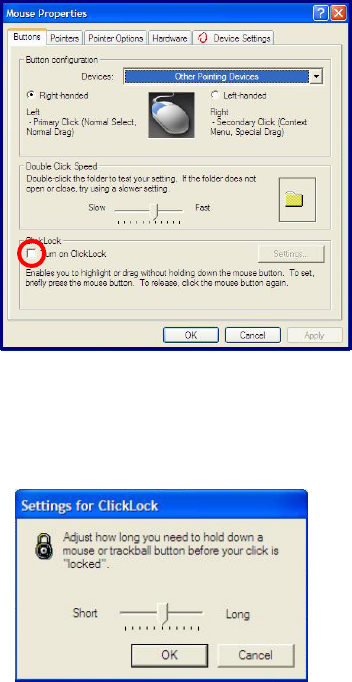
ClickLock: enables you to select text or drag a file without having to
continuously hold down the mouse button or touch pad button.
Follow the instruction below to enable ClickLock. If ClickLock is enabled, you can
hold down the mouse button or touch pad button for a moment and then release
it, and still get the same effect as continuously holding down the button. You can
drag an object with ClickLock enabled and press again to release the button and
drop the object.
Click and open the Mouse Properties window.
On the Buttons tab, under ClickLock, select Turn on ClickLock check box.
Click Settings and adjust how long you need to hold down a mouse or touch pad
button to enable ClickLock, and then Select [OK].
- 84 -
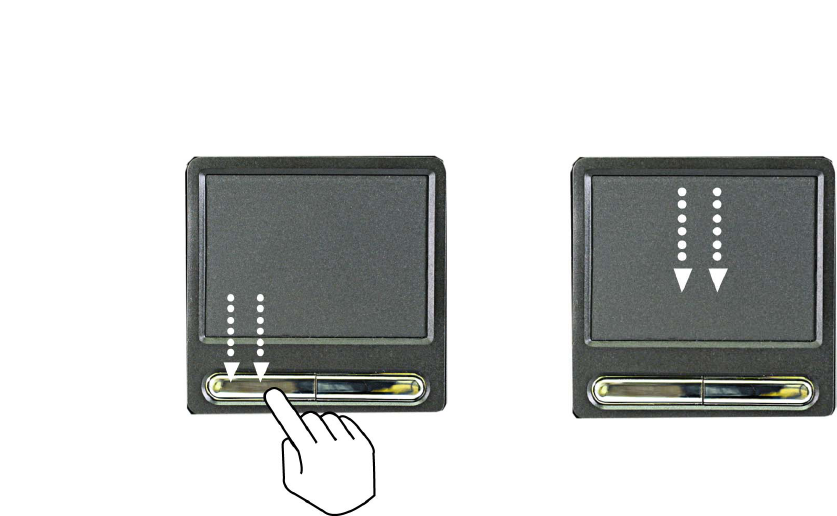
Using the scroll up/down function
Your computer supports scroll function. When using scroll function, mouse cursor
at the arrow does not move. Only the scroll function will move.
- 85 -
You can use the scroll up/down function by pressing Fn + direction key. In a
program window with a scroll bar, you can move up and down the windows using
Fn + direction key. When you scroll a window using the scroll up/down function,
the pointer on the screen does not move

- 86 -
System Setup
The system setup saves your computer’s hardware configurations in CMOS RAM.
The system setup provides you with information, such as the size and type of
your hard disk, size of the installed memory, date, and time.
Starting the system setup
Setting a password. (Page 89)
Changing or removing the password. (Page 89)
Recovering the factory default settings. (Page 90)
Caution
Do not change the system setup arbitrarily. Incorrect system setup may result in
errors while using the computer.
The menu and default factory settings of the BIOS Setup Utility may look
different from this manual. They may have been changed to improve the
performance of the system.
Keys used in the system setup
Enter: Select the current item.
Esc: Close the current window or move to the previous window.
CursorControl Keys: Move up, down, left, and right.
+ -: Increase and decrease the value.
Page Up: Move to the first item.
Page Down: Move to the last item.
F10: Save and exit the system setup.
Note:
Cursor control keys (arrow keys) move the cursor up, down, to the left and right.
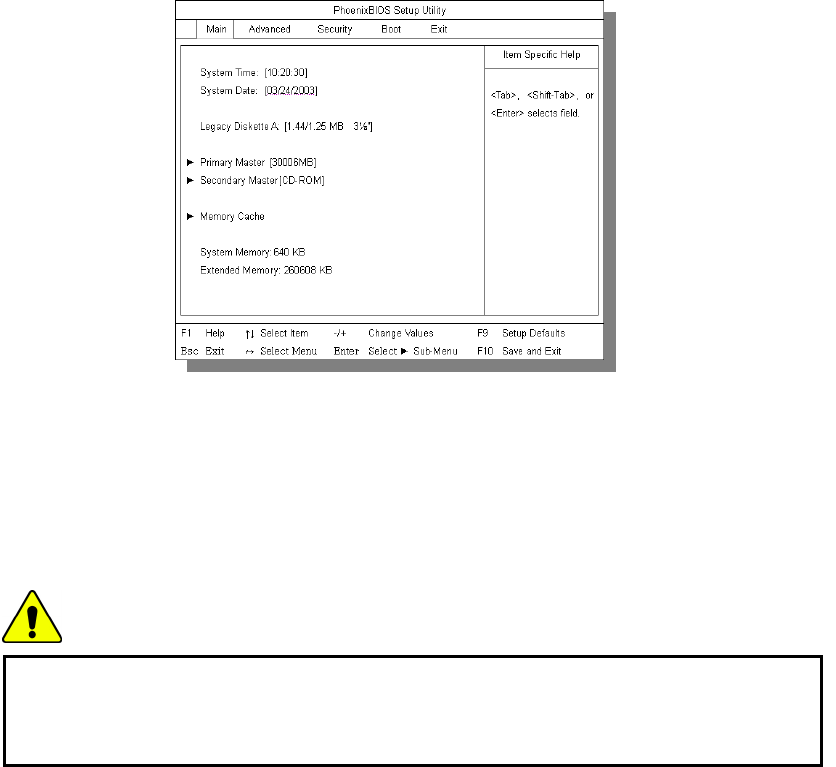
Turn on the computer.
When LG logo appears on the screen, press F2.
The BIOS Setup Utility window appears.
Setting a password
If you want to protect the system setup from an unauthorized user, follow the
instructions below to set a password.
You can set a password in the BIOS Setup Utility program.
Caution
If you forget the password, you cannot gain access to your system. Make sure
you write down the password in a safe place only you can refer to in case you
forget the password.
- 87 -
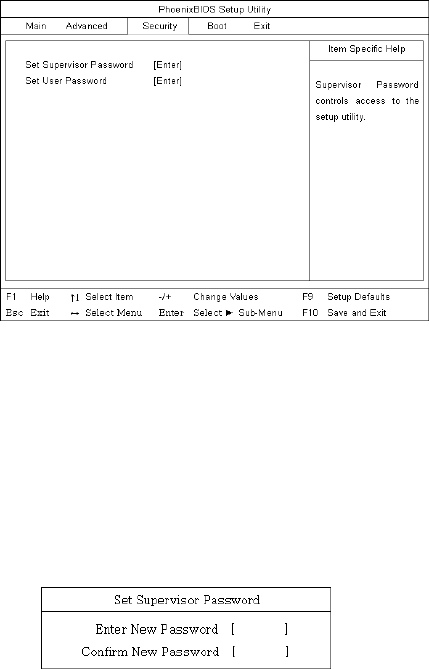
Setting a supervisor password
A password protects your computer from unauthorized users. The factory default
setup does not have a password. A supervisor password prevents unauthorized
users from changing the system setup.
Start the BIOS Setup Utility.
Use arrow keys to select Set Supervisor Password under Security menu, and then
press Enter.
Note:
You can use a supervisor password to gain access and change items in the BIOS
Setup Utility, and select Power on Boot. We recommend using a user password if
someone else has to use the computer.
If the following message appears, enter a new password and press Enter. A
password must be consisted of character A~Z and numbers 0~9, and have the
maximum length of 8.
If the following message appears, press Enter.
- 88 -
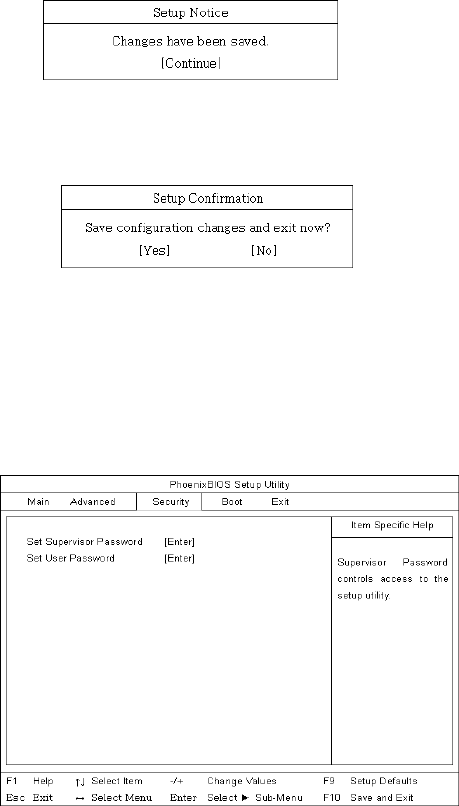
Press F10 to save the new settings.
If the following message appears, select [Yes] and press Enter to restart the
computer.
Setting a user password
A user password is a secondary compared to a supervisor password. You must set
a supervisor password in order to set a power-on password.
Start the BIOS Setup Utility and use arrow keys to select Security menu.
Use arrow keys to select Set User Password and press Enter.
Note:
A power-on password gives limited access for changing the settings in the BIOS
Setup Utility compared to a supervisor password.
If the following message appears, enter a new password and then press Enter. A
- 89 -
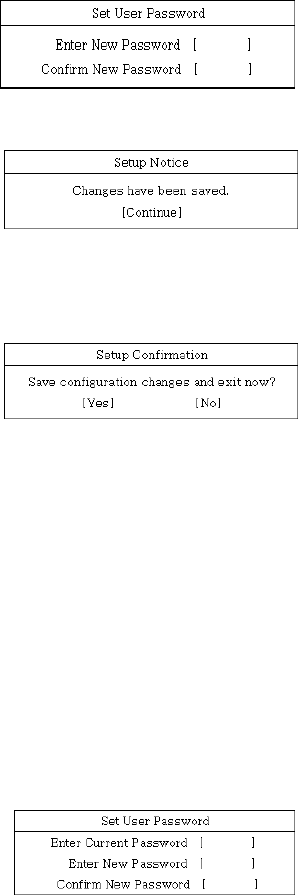
password must be consisted of character A~Z and numbers 0~9, and have the
maximum length of 8.
If the following message appears, press Enter.
Press F10 to save the new settings.
If the following message appears, select [Yes] and press Enter to restart the
computer.
Changing or removing the password
You must know the password to change or remove it.
Start the BIOS Setup Utility, enter your password, and then press Enter.
To change the password, follow the instruction on Setting a password.
To remove the password, follow the instructions below.
Use arrow keys to select Security menu, and select a password you want to
remove, and then press Enter.
If the following message appears, enter the current password in the bracket next
to Enter Current Password, and then press Enter.
Press Enter without entering a password in the brackets next to Enter New
Password and Confirm New Password.
- 90 -

If the following message appears, press Enter.
Press F10 to save the new settings.
If the following message appears, select [Yes] and press Enter to restart the
computer.
Recovering the factory default settings
If a user accidentally modifies the system setup, follow the instruction below to
recover the factory default settings.
Start the BIOS Setup Utility, and use arrow keys to select Exit.
Use arrow keys to select Load Setup Defaults, and press Enter.
If the following message appears, select [Yes] and press Enter to recover the
factory default settings.
- 91 -
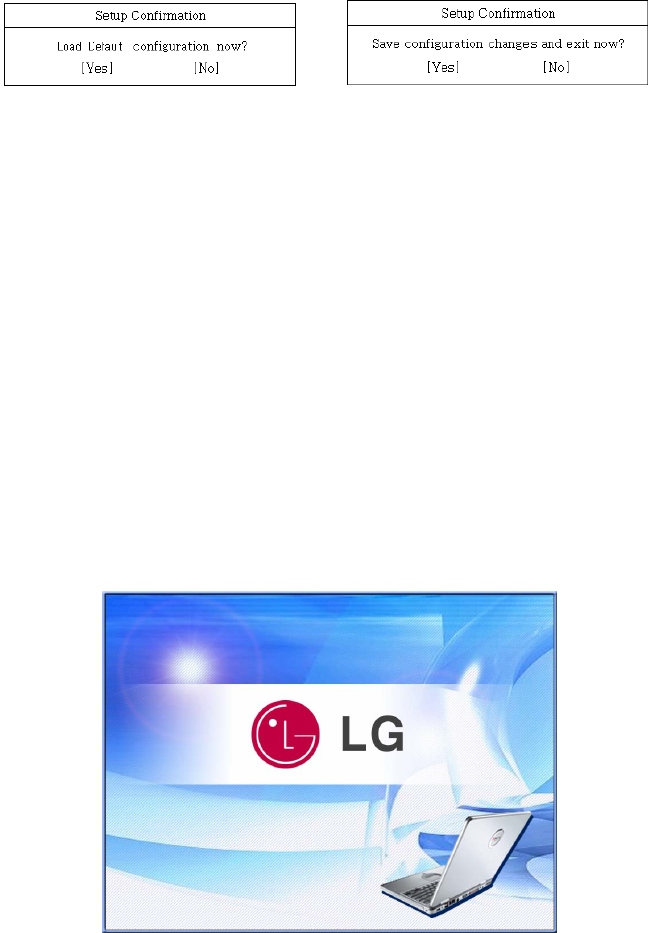
Press F10 to save the new settings. If the following message appears, select
[Yes] and press Enter to restart the computer.
System Recovery
System Recovery offers to format the hard disk as shipping statement of the
product. User must make backup files to minimize a risk of losing data.
Windows CD is not provided separately with the product that offers system
recovery contracted by Microsoft.
Using Full Recovery
To recover hard disk completely user must make backup for all software and data
on the computer.
If Windows installation is complete, user must fill out Windows user registration
information as the first time to buy the product.
Press F11 with appearing preload image on the screen.
- 92 -
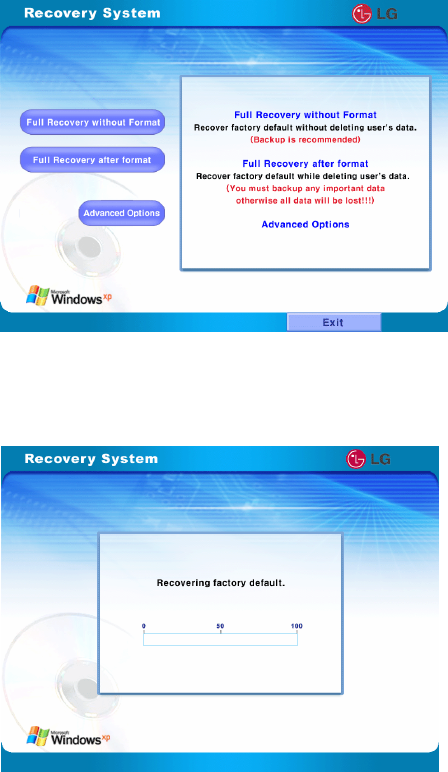
2. If the following screen appears, select one of items for work.
3. Select [Full Recovery without Format], or [Full Recovery after format].
* In the case of selecting [Full Recovery without Format].
- 93 -
[Recovering factory default] appears.
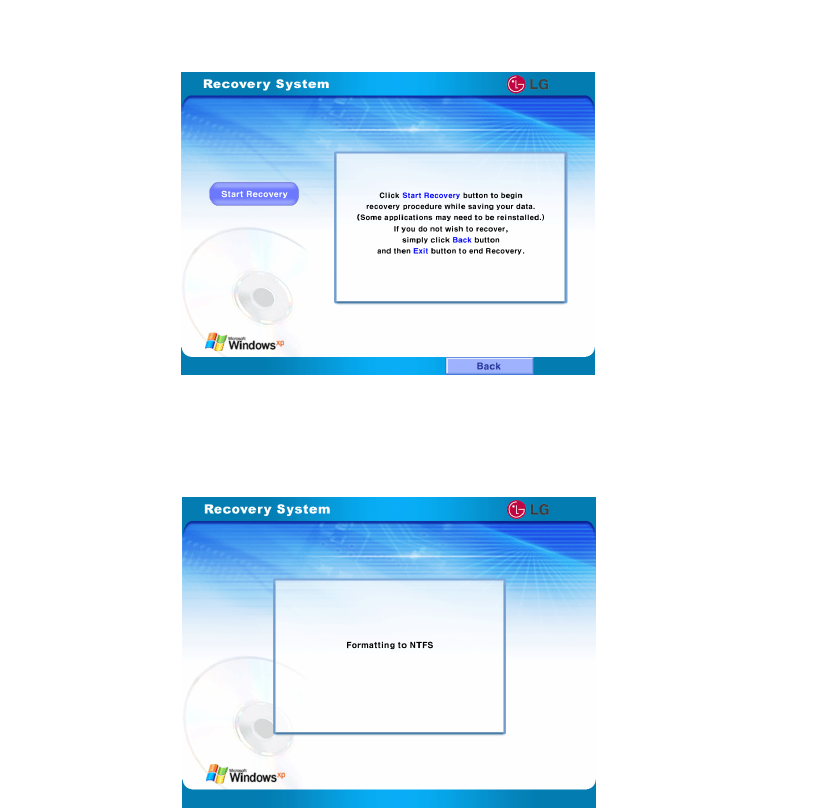
* In the case of selecting [Full Recovery after format]
Click [Start Recovery] .
- 94 -
"Formatting to NTFS" appears.
When starting [Full Recovery], next procedures appears on the screen.
If the following screen appears after restarting system, fill out Windows user
registraion information.
When clicking [Finish], the system returns to normal.
- 95 -
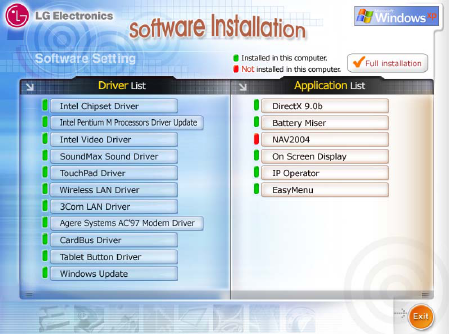
Driver Installation
1. Turn on the computer and go to [Start]-[All Programs]-[GIL JABI].
2. Select the device driver you want to install.
3. Follow the instructions to complete the installation. Some device drivers
require you to restart the computer after the installation.
- 96 -
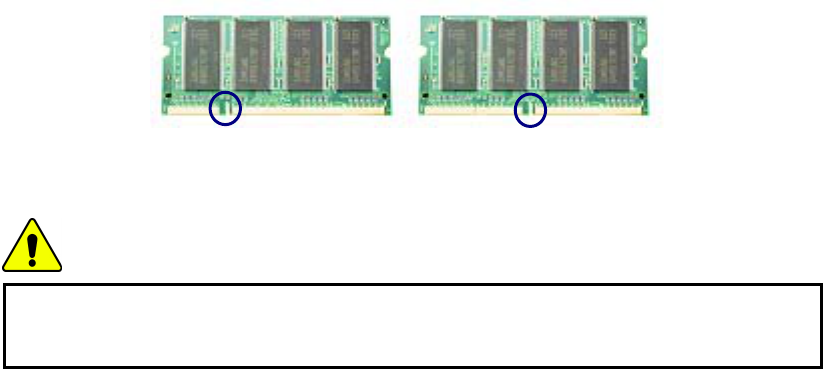
Installing memory
When you are using the computer, you may want to increase the memory
capacity.
About memory
Your computer uses DDR (Double Data Rate) SDRAM SO-DIMM(Dual In-Line
Memory Module) with 200 pins.
Each memory socket can support a memory module from 64MB to 1024MB, and
the maximum memory capacity of the computer is 2048MB.
Before installing memory
When installing or removing the memory modules, be careful not to expose them
to the static electricity as it can damage the modules.
Make sure the type of memory installed in your computer is the same as the
memory you are about to install.
Note:
Use only the correct type of memory module (DDR SDRAM using 2.5V).
Different models of computer can use different memory modules.
DDR memory has higher data-transfer rate and different shape compared to the
typical memory.
DDR SDRAM SDRAM
Caution
Your computer supports PC2700/DDR SDRAM SO-DIMM
333MHz/266MHz/200MHz with FSB Frequency of 400MHz.
- 97 -
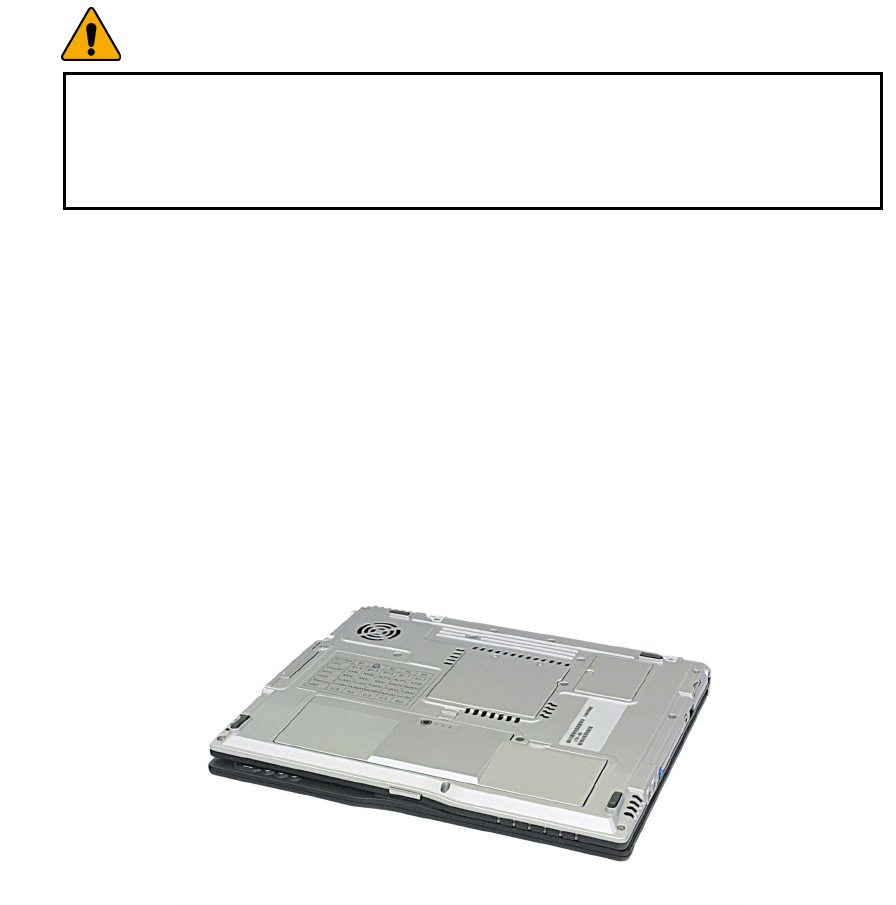
Warning
Before disassembling the computer for upgraing purposes, turn off the power
and remove the power cord, phone line, and battery pack.
There is the risk of electric shock or fire. If you need to open the computer
cover, contact the customer service for help.
Purchasing memory
Be sure to buy the correct type of memory modules for your computer.
Type: PC2700 (200 pin DDR SDRAM SO-DIMM)
Speed: 333MHz (166MHz X2), 266MHz (133MHz X2), 200MHz (100MHz X2)
Size: 128MB, 256MB, 512MB, 1024MB
Installing memory
Main board configuration, memory socket, and memory module may look
different in different models of computer.
Loosen the screw at the bottom of the computer, and remove the memory slot
cover.
Note:
Before removing the cover, shut down your computer, remove AC adaptor and
battery pack, and detach any device or cable that are attached to the computer.
- 98 -
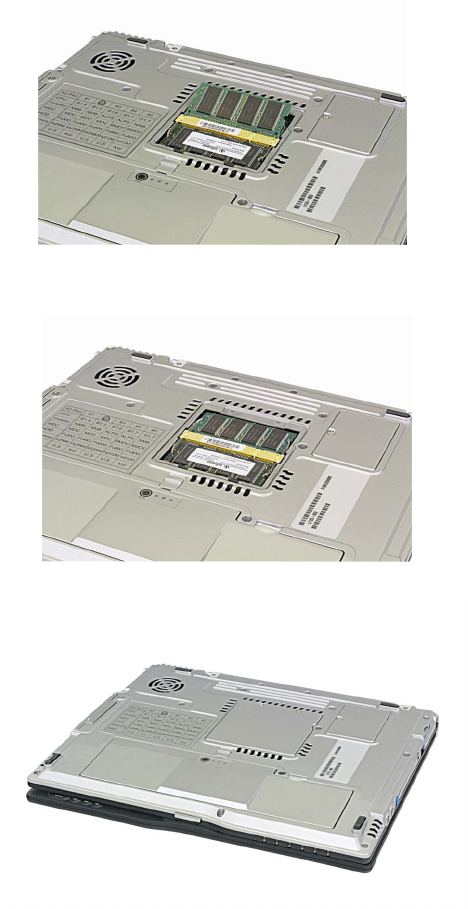
Use the notch on the memory to make sure the memory aligns with the socket,
and then inserts the memory into the socket at an angle of approximately 30
degrees.
Note:
Push down the memory until the latch firmly secures the memory on the socket.
- 99 -
Push down the memory until you hear a click.

Caution
Use only the memory module sold by LG. Using other memory modules can
damage your computer.
Close the cover and tighten the screw.
After the installation, reboot the computer. If you see an error message regarding
memory capacity, click F2 to enter the BIOS Setup Utility and save the settings.
Note:
When rebooting the computer, make sure the size of installed memory is correct.
If different, re-install the memory module.
- 100 -

Inserting SD Memory Card
Turn on the computer, and place the SD Memory Card in the SD Memory Card
slot.
Note: It may look different product by its option.
Push the SD Memory Card into the slot until it clicks.
Removing SD Memory Card
1. Press the SD Memory Card with the tip of your finger.
2. The SD Memory Card ejects.
- 101 -

Features
Model
LT 20
Processor
Intel Mobile Pentium-M processor
(L2 cache: 1024KB, Micro-FCBGA package : 1.4GHz or more)
Mobile Intel Celeron Processor
(L2 cache: 512KB, Micro-FCBGA package : 1.3GHz or more)
Note: The CPU cannot be replaced or upgraded by the user. The computer is
equipped with a different CPU depending on the model type.
Memory
Built-in: 256MB DDR SDRAM SO-DIMM
Maximum: 1024MB on each slot and 2048MB combined
Memory Type: DDR SDRAM SO-DIMM (128MB, 256MB, 512MB, and 1024MB)
BIOS ROM
ROM: 8Mbit
Storage devices
2.5-inch hard disk drive (The capacity of the hard disk drive is different
depending on the model type.)
PC Card slot
SD Memory Card slot
- 102 -
- 103 -
External I/O Interfaces
External monitor port
PC Card slot
Microphone jack
Speaker/Headphone jack
3 Universal Serial Bus (USB) port
RJ11 Modem port
RJ45 Ethernet port
IEEE 1394 port
SD Card slot
Display
Intel 855GME Internal Graphic Controller
Video Memory: 64MB (Using Dynamic Memory Allocation Technology)
Sound
ANALOG DEVICES AC’97 SoundMAX Codec (AD1981B)
Built-in Stereo Speaker
LCD
12.1” : XGA (1024X768) TFT Color LCD
Modem
AMBIT T60M283.13 (MDC Card)
RJ11 Telephone connector.
LAN
3COM 3c920
RJ45 Ethernet connector

Power specification
AC Adapter (Free Voltage)
Power capacity: 65W
Input: AC 100 ~ 240V, 1.6A, 50 ~ 60Hz
Output: DC 18.5V, 3.5A
Note: Use the correct adapter for your computer.
Battery Pack (Li-Ion)
DC 11.1V, 3600 mAh / 3800 mAh (6-cell)
Charging time
Less than 3 hours with the power off in room temperature (9.6 ~ 40 °C/ 49.28
~104 °F)
More than 16 hours with the power off in low temperature (0 ~ 9.6 °C/ 32 ~
49.28 °F)
Note: The battery cannot be charged below 0 degrees C (32 °F).
The temperature indicated above is the temperature inside the battery pack; the
actual temperature may be different.
Battery Life
More than 5hours (Battery Mark(TM) V4.0.1)
The life time may different from the system configuration.
Backup (standby) battery
RTC battery Ni-MH Coin 3V 60mm
Recommended battery: CR2032 manufactured by Sony, or equivalent type.
- 104 -

- 105 -
Operating environment
Operating
10 ~ 35 °C(50 ~ 95 °F), 20 ~ 80% relative humidity
Non-operating
-10 ~ 60 °C(14 ~ 140 °F), 10 ~ 80% relative humidity
Acknowledging Special Precautions and
the FCC Industry Canada Notice
Cautions
Modifications not expressly approved by the party responsible for compliance could
void the user’s authority to operate the equipment.
FCC compliance Information
This device complies with part 15 of FCC Rules.
Operation is subject to the following two conditions:
1. This device may not cause harmful interference, and
2. This device must accept any interference received.
Including interference that may cause undesired operation.
Information to User
This equipment has been tested and found to comply with the limits for a Class B
digital device, Pursuant to part 15 of the FCC Rules. These limits are designed to
provide reasonable protection against harmful interference in a residential
installation.
This equipment generates, uses and can radiate radio Frequency energy and, if not
installed and used in accordance with the instructions, may cause harmful
interference to radio communications.
However, there is no guarantee that interference will not occur in a particular
installation. If this equipment does cause harmful interference to radio or television
reception, which can be determined by turning the equipment off and on, the user
is encouraged to try to correct the interference by one or more of the following
measures:
▪ Reorient or relocate the receiving antenna.
▪ Increase the separation between the equipment and receiver
▪ Connect the equipment into an outlet on a circuit different from that to which the
receiver is connected.
Consult the dealer or an experienced radio/TV technician for help.