LG Electronics USA TM910B Tri-Mode Dual-Band Analog/PCS Phone User Manual
LG Electronics USA Tri-Mode Dual-Band Analog/PCS Phone Users Manual
UserManual.wiki
>
LG Electronics USA
>
TM910B User Manual
>
Users Manual
Contents
1.
Users Manual
2.
Revised Users Manual per CRN 21529
Users Manual
Navigation menu
Upload a User Manual
Namespaces
Wiki Guide
HTML
PDF
Info
Views
User Manual
Discussion / Help
Navigation
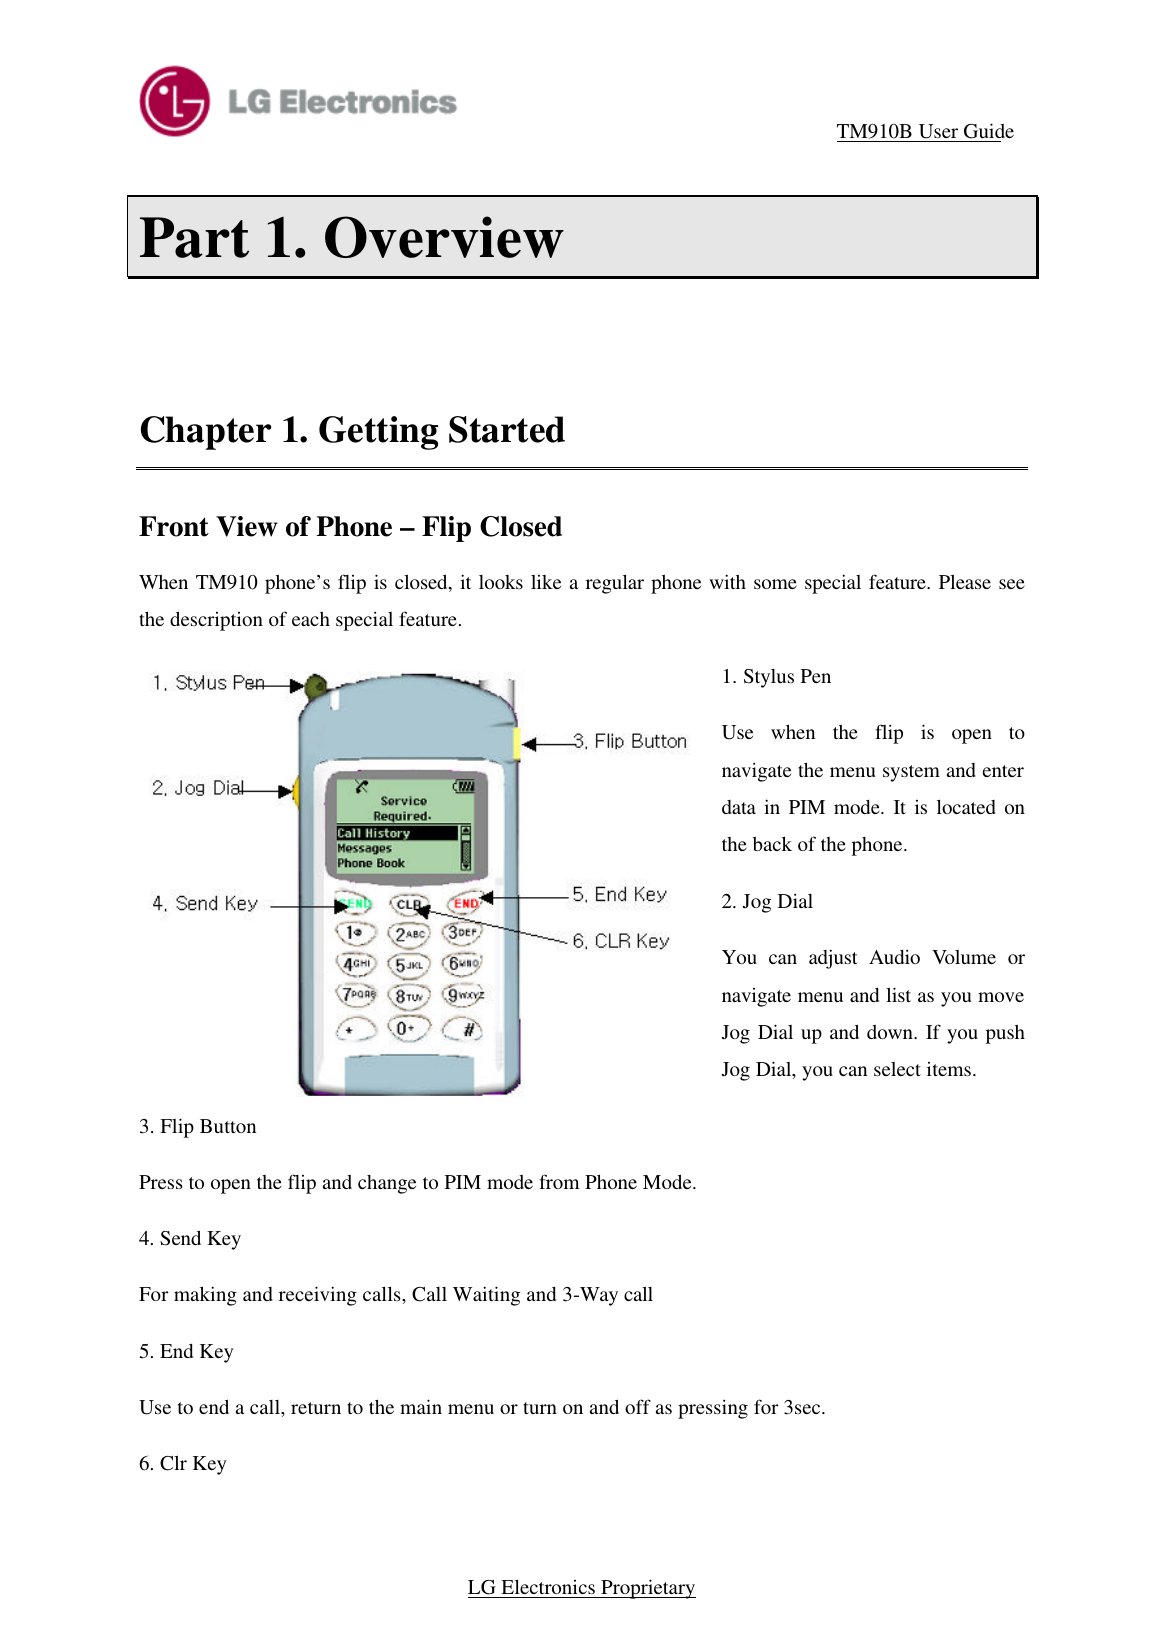
![TM910B User Guide LG Electronics Proprietary Part 2. Phone Mode Chapter 2. Basic Functions Making a Call 1.Make sure your phone is on -> If the phone is off, press to turn on the phone. 2.Dial the phone number with area code if you need. -> If the KeyGuard is locked press for 2 second to unlock KeyGuard. 3.Press . 4. Press the Jog to active nenu then choose [Call] ->If the phone is locked, select [Unlock] from the menu enter the lock code. 5.To disconnect the call, press 6.If ”The phone has been restricted” is on the screen, your phone is restricted. You can limit your outgoing calls to Emergency call and the numbers which is stored ib the PhoneBook in this condition.. Correcting Dialing Mistakes If you make a mistake while dialing, press to erase one digit at a time. Or if you need to erase the entire number at once, press for at least 1 second.](https://usermanual.wiki/LG-Electronics-USA/TM910B.Users-Manual/User-Guide-173780-Page-14.png)
![TM910B User Guide LG Electronics Proprietary Receiving Calls 1.When your phone rings, press 2.Highlight [Answer] when the menu is activated. If press, , or Jog Up & Down while your phone rings, ringer or vibration is stopped and you can answer the phone. If Settings->Features->Any Key Answer is on, press any key except , or Jog Up, Down, you can answer the phone. 3. To disconnect the call, press Using Quick Mode Manner Mode 1.IF you press in Standby mode for 2second, “Manner Mode Actived” displays on the screen and it changes to Manner Mode. -> When the phone is in Manner Mode, “Manner Mode” displays on the screen and Vibrate icon is indicated. -> When the phone is in Manner Mode, no key tone sound and ringer sound. 2.If you want to Deactive Manner Mode press for 2 second until “Manner Mode Deactived” disappears from the screen.](https://usermanual.wiki/LG-Electronics-USA/TM910B.Users-Manual/User-Guide-173780-Page-15.png)
![TM910B User Guide LG Electronics Proprietary 4. Press and tri to call. 5. When you’re connected to the second party, press once more to being your 3-Way Call. 6.If you press again, you’ll connect to the first people. 7.Press to disconnect both call. Mute Your caller does not hear you during a call. 1.Highlight Menu during a call using Jog. 2.Select [Mute] from the menu. [Mute] displays on the screen. 3.To cancel Mute mode, select [Unmute] from the menu. Redialing Calls 1.You can redial the last number by pressing and holding . Pause Feature Generally when you a call automated system like voicemail boxes or banks you are required to enter a password or calling card number. Rather than entering the numbers manually each time, you can store the numbers in your Phone book, separated by special characters, called pause. Hard Pause After connect the call , Select [Send Tones] from the menu or press This allow you to send digit after hard pause. It used “>” for the hard Pause.](https://usermanual.wiki/LG-Electronics-USA/TM910B.Users-Manual/User-Guide-173780-Page-17.png)
![TM910B User Guide LG Electronics Proprietary 2-Sec Pause The phone waits two seconds before sending the next string of digits. It used “,” for the 2-sec pause. To use Pause, select [Hard Pause] or [2-Sec Pause] from the menu, during dial. Adjusting the Volumes You can adjust the volumes by using the Jog up and down in Phone Mode. The jog is used to adjust Key Beep volume in call waiting mode and used to adjust Earpiece volume during a call. Jog Up key is for volume up, Jog Down key is for volume down. Not during a call, Ringer Volume is adjusted in the menu. Earpiece Volume can be adjusted in the menu, during a call. Power Save Mode When the phone is in an area without service for 15 minutes, it stops searching for service and enters into the Power Save Mode. When your phone activates this features, “Power Save” is displayed on LCD. The phone automatically checks for service periodically or you can check manually by pressing any key. Emergency Dialing You can dial Emergency number in a emergency situation even if keypad is locked or your account is restricted 1. To call 911, dial and press or press and hold for 2 seconds. 2.Dial ”911” and press for Emergency Call. The 3 numbers at Settings ->Security->Emergency Number are possible to Emergency Dialing. Speed Dialing With this feature, you can dial the 99 Phone Book entries through one or two key press.](https://usermanual.wiki/LG-Electronics-USA/TM910B.Users-Manual/User-Guide-173780-Page-18.png)
![TM910B User Guide LG Electronics Proprietary Chapter 3. Managing Call History The Call History list consists of outgoing, incomimg and missed call. It memories 12 recent call each Category. It is updated as new numbers are added to the beginning of the list. Each entry may contain a phone number, name, length of call and time stamp of when the call occurred. It makes redialing a number fast and easily. Phone Mode and PIM Mode have Call History list in common. Viewing the Call History List 1. Highlight [Call History] from the menu and press JOG or “Ok”. 2. Highlight Outgoing Calls or Incoming Calls or Missed Calls then press JOG or “Ok”. 3. The list displays. Scroll to review the call history using Jog key or Navigation Up/Down key. Viewing Call Detail 1.Highlight the phone number you want to review and press JOG or “Ok”. 2.Highlight Call [Time/Date]. The time, date and call length display. You can review receiving call time on Incoming Call and Missed Call list, making call time on Incoming Call and Missed Call list, call length on Incoming Call and Outgoing Call list. Making a phone call from the recent call history 1. Highlight the phone number you want to make a call and move to Entry screen. 2. Highlight [Call] from the menu or press . Connect to the Internal Phone Book 1. Highlight the phone number you want to make a call and move to Entry screen. 2. If the number is stored in Phone Book, [Alternate #] dispalys. If the number is not stored in Phone Book, [save] displays. 3. If [Alternate #] is indicated, you can review the Phone Book Entry which is saved the phone number. 4.IF [Save] is indicated, you can save the phone number to the Phone Book. Erasing a Call History Entry](https://usermanual.wiki/LG-Electronics-USA/TM910B.Users-Manual/User-Guide-173780-Page-20.png)
![TM910B User Guide LG Electronics Proprietary Erasing each Item 1. Highlight the phone number you want to erase from the Call History List and go to the Entry screen. 2. Select [Erase]. 3. Select [Yes]. Erasing all Category 1. Highlight [Call History] from the menu. 2. Highlight [Erase History]. 3. Highlight Outgoing Calls or Missed Calls you want to erase. 4. Select [Yes]. Viewing the Air Time You can review the calling time in Home Service area, calling time in Roaming Service area and total calling time. You can reset Home Calls time and Roam Calls time. The time on the screen means reckoned time from reset recently. 1. Highlight [Call History] from the menu. 2. Highlight [Air Time]. 3. Highlight Home Calls or Roam Calls or Life Call Timer you want to review. 4. If you want to reset the call time in Home Calls or Roam Calls, select [Reset] from the menu. Chapter 4. Internal Phone Book Internal Phone Book can store telephone number information for about 4,000 peoples maximum. Each person can have 5 telephone numbers. Each Phone Book Entry can have 32 letters for the names of](https://usermanual.wiki/LG-Electronics-USA/TM910B.Users-Manual/User-Guide-173780-Page-21.png)
![TM910B User Guide LG Electronics Proprietary people, each telephone number can have 32 letters maximum. Among these Phone Book data, telephone numbers often used can save as Speed Dial. Speed Dial can store 99. Besides, It is possible to record 20 Voice Dial Entry among the telephone numbers stored in Phone Book. The data of Internal Phone Book is same with the date Contacts application in PIM Mode. Contacts application of PIM Mode can make a phone call, change and store data. Internal Phone Book can't change the data directly and offer only function to erase, search data and make a phone call in Phone Mode. Finding a number using a person’ s name (Look Up Name) 1. From the main menu, highlight [Phone Book]. 2. When select [Look up Name] people’s name list appears. Names of people in the Phone Book that start with that letter are displayed at the top of Phone Book list. 3. Scroll to the name you want or enter the second letter of the name as it appears in the Phone Book. Names of people in the Phone Book starting with that two-letter combination are displayed at the top of the Phone Book. 4. Highlight the name you want then press Jog or “OK”. 5. Detail Screen of Phone Book Entry you choose appears. If the Entry have two number or more, Alternate Phone Numbers display on the screen. When this Entry is set Secret Entry, [Secret] display instead of phone number. Make a Phone Call from the Phone Book 1.Select the name you want to make a phone call from the Phone Book in Phone Mode and go to Detail Screen 2. Highlight [Call] or press . Editing a Phone Book Entry 1. Highlight the name you want from the Phone Book in Phone Mode and go to Detail Screen . 2. Highlight [Edit]. “Opening the flip” massage displays, when the phone is in Phone Mode. Erase a Phone Book Entry 1. Highlight a name you want from the Phone Book in Phone Mode and go to Detail Screen.](https://usermanual.wiki/LG-Electronics-USA/TM910B.Users-Manual/User-Guide-173780-Page-22.png)
![TM910B User Guide LG Electronics Proprietary 2. Highlight [Erase Entry] and “Erased” appears on the screen to confirm that you have successfully deleted the entry. 3. Highlight [Yes]. Speed Dialing 1. Highlight [Phone Book] from the menu. 2. Highlight [View Speed Dial] and the whole list of Speed Dial displays. Speed Dial Entry is arranged in Entry Index order. Speed Dial can be updated 99. 3. Use Scroll Up/Down and search Speed Dial Index you want in whole list or input index using keypad. In case user input number, Index come to top of menu, menu is updated continually 4. Highlight the list and press OK or JOG. 5. Highlight [Call] in Speed Dial screen and make a call to the number 6. If you select [Contact Info], Phone Book Entry screen displays so that review the number saved in the Entry Listening to a Voice Dial 1. Highlight [Phone Book] from the main menu. 2. Highlight menu [Voice Dial Entry] and the Voice Dial list appears. If there is no Voice Dial recorded “No Voice Dial Entry” alert is indicated. Viewing My Phone number 1. Highlight [Phone Book] from the main menu. 2. Highlight [My Phone #] and you can review your Phone number.](https://usermanual.wiki/LG-Electronics-USA/TM910B.Users-Manual/User-Guide-173780-Page-23.png)
![TM910B User Guide LG Electronics Proprietary can be changed the name what you want. When you choose one Environment, audio volume and Backlight setting is changed. Tap [Edit] from the menu and it moves to Environment Category in Setting of PIM Mode. For more information about editing Environment, see Environment at Setting. Touch Calibration Refer to Stylus in Setting.](https://usermanual.wiki/LG-Electronics-USA/TM910B.Users-Manual/User-Guide-173780-Page-26.png)
![TM910B User Guide LG Electronics Proprietary Part 3. PIM Mode Chapter 6. Contacts You learned how to making calls to the numbers stored in Internal Phone Book. The data of Internal Phone Book is based on the data stored in Contacts application. Call Log stores contents based on the data of Contacts and in Databook, you can add peoples stored in Contacts to Attendee. In addition, the data of Contacts is the most fundamental data that use different Application of TM910B, because Message application sends a message to phone number and Email Address saved in Contacts. Contacts can use phone number information about maximum 4000 people. Each person can have maximum 5 phone numbers and register maximum 3 Email Address. Each Phone Book Entry can input maximum 32 characters of people’s name and each phone number is possible to input maximum 32 characters. Email Address can be stored 48 characters. People saved in Contacts are controlled to be classified to 7 Groups. Among the Contacts data, phone numbers often used can be saved to Speed Dial. Speed Dial is possible up to 99. In addition, among the phone numbers saved in Phone Book can be recorded 20 Voice Dial Entry. You can also synchronize your contacts with the contacts you have stored in Address Book of personal computer application like Microsoft Outlook 97,98, 2000. Adding Contacts 1. If main menu appear in PIM mode, tap . If in the another application screen, tap “Goto” and then tap “Contacts” . 2.Choose the item from [New] in the ”Contacts” list screen. Or tap “Menu” and then tap[New]. 2.”Contacts” Edit screen appears. Adding a Name](https://usermanual.wiki/LG-Electronics-USA/TM910B.Users-Manual/User-Guide-173780-Page-27.png)
![TM910B User Guide LG Electronics Proprietary 1 Tap [Name] in ”Contacts Edit” screen or tap field next to icon. The Virtual Keyboard appears. 2.Input a name of Contacts Item you want to add to your Contacts. 3.Tap [Done] in Virtual Keyboard. Adding a Email Address Contacts Items can have 3 Email Addresses. To add Email Address 1.Tap in ”Contacts” Edit screen list and then choose one among Email1, Email2, Email3. 2. Tap the empty line next to icon and The Virtual Keyboard appears. 3.Enter the Email Address. 4. Tap [Done] in Virtual Keyboard. 5.If you want to input another Email Address, tap icon and then choose another label. Enter the Email Address. Adding Phone Numbers 1.Select the type of phone number in ”Contacts” Edit screen. Type of phone number : Home, Home2, Work, Work2, Mobile, Fax, Fax2, Pager, Other 2.Tap the empty line to the right of phone type. The Virtual Keyboard appears. 3.Enter the phone number. 4. Tap [Done] in Virtual Keyboard. Adding an ID Ringer 1. Tap pop-up next to icon in the ”Contacts” Edit screen. The ring types are displayed. 2.Tap the ring type you want used for the contact. When the contact calls you, the phone rings with the ring type selected. Setting up Groups 1. Tap pop-up next to icon in the ”Contacts” Edit screen. A list of groups appears. 2. Tap the group you want to file the contact into. If you don’t select the specific group when you save, the contact belongs to the “Unfiled” group.](https://usermanual.wiki/LG-Electronics-USA/TM910B.Users-Manual/User-Guide-173780-Page-28.png)
![TM910B User Guide LG Electronics Proprietary Adding a Address 1. Tap the empty line next to icon in the ”Contacts” Edit screen and The Virtual Keyboard appears 2.Enter the Address. 3.Tap [Done] in Virtual Keyboard. Adding Nores 1. Tap the empty line next to icon in the ”Contacts” Edit screen and The Virtual Keyboard appears 2.Enter any notes pertaining to the contact. 3. Tap [Done] in Virtual Keyboard and “Contacts” Edit screen appears. 4. Tap [Done] again. Contact inputted is saved and Contacts list screen appears. Make Secret You can make a phone number to Secret Entry, in order not to that the phone number saved in Contacts is changed by other people. The phone number assigned to the Secret Entry is not displayed, but [Secret] is displayed. You can still make and receive calls, but it is impossible to edit or delete before input the Lock Code. 1.Tap “Menu” in ”Contacts” Edit screen. 2.Tap [Make Secret]. Look Up Contacts 1.Tap “Menu” in ”Contacts” Edit screen. 2.Tap [Look Up] and the Virtual Keyboard appears. 3.Enter the name of person you are searching. As you add each letter, the display updates to show names with the same characters. 4. Select the name of person you are searching. 5.The phone numbers for that person appear. 6.To view more details on the person, tap [Detail] and it moves to Edit screen. You can change by using Virtual. Making a Phone Call from the Contacts 1.Tap the name of group contained the people you want to call or tap [All] in ”contacts” list screen. 2.Highlight the tap which have the first letter of the name. 3.Select the name you want to call from the list.](https://usermanual.wiki/LG-Electronics-USA/TM910B.Users-Manual/User-Guide-173780-Page-29.png)
![TM910B User Guide LG Electronics Proprietary 5.The selected name and the phone number of that person is displayed. 6.Tap to the right of the phone number and you can make a call. Erasing Contacts 1.Go to “Contacts” Edit screen you want to erase. 2.Tap ”Menu”. 3.Tap [Erase] and the “Erase Contacts” screen appear. 4.Tap [OK]. Editing Contacts Group 1.Tap [Edit Group] from the top right of Contacts. Or tap “Menu” then tap [Edit Group] and “Edit Group” screen appears. 2.Tap the group name you want to change. “Group Name as” keyboard appears.. 3.Enter the new name for the group.. 4.Tap [Done] and “Edit Group” screen reappears. 5.Tap [OK]. Viewing Speed Dial TM910B can have total 99 Speed Dial Entry. You can only assign the people saved in Contacts to the Speed Dial. To view Speed Dial list, tap [Speed Dial] to the upper-right of Contacts. Speed Dial List appears. Assigning Speed Dial 1.Tap [Speed Dial] in the Contacts. 2.Tap [Empty] Item from the list. “Speed Dial Edit” appears. 3.Select ”Speed Dial #” next to label. Speed Dial Index list is displayed. 4.Select Speed Dial Index you want assign. 5.Select the field next to the ”Name” label. “Look up Contacts” keyboard apprers. 6.Enter the name of the Contacts you want assign to Speed Dial. 7.Select name and “Speed Dial Edit” screen reappears. Name, Number and Phone Type is displayed according to Contact you select. Making a call from the Speed Dial 1.Go to the Speed Dial list in Contacts.](https://usermanual.wiki/LG-Electronics-USA/TM910B.Users-Manual/User-Guide-173780-Page-30.png)
![TM910B User Guide LG Electronics Proprietary 2.Search Speed Dial Entry. 3.Tap from the right of Speed Dial Entry you want to make a call. You can call to the number you want. Erasing Speed Dial 1.Select Entry from the Speed Dial list in Contacts. “Speed Dial Edit”appears. 3.Tap [Erase]. “Erase Speed Dial” appears. 3.Tap [OK] and Speed Dial list is displayed.](https://usermanual.wiki/LG-Electronics-USA/TM910B.Users-Manual/User-Guide-173780-Page-31.png)
![TM910B User Guide LG Electronics Proprietary Chapter 7. Call History The Call History list consists of outgoing, incoming and missed call. It stores 12 recent call at each Category. Each list arranges in recent call order. Each entry may contain a phone number, name, length of call and time stamp of when the call occurred. It makes redialing a number fast and easily. Viewing Call History Item 1. If main menu appears in PIM mode, tap . 2.Select pop-up from the top right part of Call History screen. 3.Select the Category you want to view. The list of the Category appears. Viewing Call Details 1.Select pop-up from the top right part of Call History screen. 2. Select the Category you want to view. The list of the Category appears. 3.Tap the phone number you want to view. The Call Detail screen appears with the contact name, (if it exists) phone number, date, time and duration. Making a Call from the Call History List Making a Call from the Call History List 1. Find the phone number you want to call. 2.Tap the icon in which next to the phone number. You can call to the number. Making a Call from the Call Detail 1.Find the phone number you want to call. 2.Tap the phone number you want to call. The Call Detail screen appears. 3.Tap [Call] to place the call. If the item of Call History doesn’t have the number or it is Data/ Fax/Browser Call, [Call] doesn’t appear. Adding Phone Numbers to the Contacts](https://usermanual.wiki/LG-Electronics-USA/TM910B.Users-Manual/User-Guide-173780-Page-32.png)
![TM910B User Guide LG Electronics Proprietary Adding New Contacts item 1. Go to Call Detail of phone number not saved in Contacts. 2. Select [Add New Contacts] 3. When "Add phone number as new contact" is appeared, select [OK]. If you don’t want to add the number to the Contacts, select [Cancel]. 4. To save in the Contacts tap [done], and Call Detail screen appears with name of people. Adding Existing Contacts Item 1. Go to Call Detail of phone number not saved in Contacts. 2. Select [Existing Contacts] and Virtual Keyboard appears for selecting Contacts Item 3. Select the name you want using scroll or enter the second letter of the name as it appears in the Phone Book. 4. In case of the phone number of Call History is added to selected people, the message displays and select button [OK]. If you don’t want to add the number in the Contacts, select [Cancel]. 5. Tap [Done], and phone number saved in the Contacts. Call Detail screen appears with name of people Finding Alternate Phone number from the Contacts 1. Go to Call Detail of phone number saved in Contacts. 2. Select [Alternate #] and move to [dial view] of Contacts. In this screen you can see the different phone numbers registered to the person. You can also make a call as selecting icon on the right part of each phone number.](https://usermanual.wiki/LG-Electronics-USA/TM910B.Users-Manual/User-Guide-173780-Page-33.png)
![TM910B User Guide LG Electronics Proprietary Chapter 8. Date Book In TM910B is supporting Date Book application to be able to control individual daily schedule. You can set up your daily planner, appointment, appointment attendees and also set alarms for appointments. Schedule can designate 30 a day and Date Book Application can store and control schedule up to total 4000. You can also synchronize your contacts with the contacts you have stored in Address Book of personal computer application like Microsoft Outlook 97,98, 2000. Adding Appointments 1. If main menu appear in PIM mode, tap If in the another application screen, tap “Goto” and then tap “Date Book” 2. Search [New] item of Date Book list screen and select item, or tap Menu and select [New] menu option. 3. Datebook Edit screen appears. Adding a date 1. Tap [Date] in ”Datebook Edit” screen or select field next to icon. Select Date screen appears. Fundamentally today is selected. 2. In case year isn't notified, move to the year you want by using ¢¸¢º. 3. Tap the month in which the appointment will take place The Calendar for that month appears. 4. Tap appointment date. 5. Tap [OK] and date selected displays instead of [Date] in Datebook Edit screen. At this time Start time is indicated in 30min unit to the nearest time of present, End time is indicated 1hour late time than the start time . Adding a Start and End Time 1. Tap [Time] in ”Datebook Edit” screen or select field next to icon. The set time screen appears.](https://usermanual.wiki/LG-Electronics-USA/TM910B.Users-Manual/User-Guide-173780-Page-34.png)
![TM910B User Guide LG Electronics Proprietary 2. Tap Start Time or End Time. 3. Tap the hour in which appointment starts and ends from the Set Hour field. One column is AM the other column is PM. Focus automatically move to minute when you finish input hour. 4. Tap the minute from the Set Min field. The left line is 10min unit and the right line is 2min unit. 5. Tap [OK] and time you input is notified instead of [Start Time],[End Time]. Setting an Alarm 1. Tap [Alarm] in ”Datebook Edit” screen or select field next to icon. The “Set Alarm” screen appears 2. Select one among Normal Alarm, Call Alarm, Message Alarm of Alarm Type - Time Alarm : alarm rings at setting time of schedule - Call Alarm : alarm rings at setting time, can call the first person added to Person. - Message Alarm : alarm rings at setting time, can send SMS stored Contents to peoples added to Person. Call Alarm or Message Alarm only display when you select people from Person. 3. Select one among radio buttons. - None : no alarm will sound - On Time : an alarm will sound at the exact time that appointment is to happen. - 00:15 before : an alarm will sound 15 minutes before the appointment is to happen. 4. If you select ”00:15 before”, you can change the amount of time to be more or less. To change the amount of time, tap the numbers related to the time in the onscreen keypad. 5. Tap [OK]. The appointment that set up alarm is indicated icon in the “Datebook” list screen.. Defining an Appointment as Repeating 1. Tap [Alarm] in ”Datebook Edit” screen or select field next to icon. The “Set Repeat” screen appears 2. Tap either Day, Week, Month or Year. Depending on how often you want the appointment is repeated, the bottom of the screen is different. 3. Set repeating period you want. Refer to the below table.](https://usermanual.wiki/LG-Electronics-USA/TM910B.Users-Manual/User-Guide-173780-Page-35.png)
![TM910B User Guide LG Electronics Proprietary period possible option(eg) definition Every ¢¸ 0N ¢º Day(s) Repeat every N day Day Weekday Repeat only from Mon to Fri a week Week Possible select by each day Repeat only a selected day Every ¢¸ 0N ¢º Month(s) Nth Day Repeat the same day every N month Month Every ¢¸ 0N ¢º Month(s) Nth Week day Repeat the same week day every N month Every year Same Day, Same Month Repeat only the same month and day every year Year Every year N Same week day, Same Month Repeat only the same month and week day every year £ª£ª£ª options such as ¢¸, ¢º can designate period as using ¢¸, ¢º ; each time press ¢¸ once, value reduce one and each time press ¢º once, value increase one 4. Select the date to the right of Until. One of screen appears among Daily Until, Weekly Until, Monthly Until, Yearly Until screen in order to set the end date of repeating. 5. Input repeating end date and tap [OK]. Set Repeat screen reappears. 6. Tap [OK] and return to the Datebook Edit screen. 7. If you tap [None] in the Set Repeat screen, setting is canceled and “None” appears in the Datebook Edit screen. Defining an Appointment as Repeating is indicated icon in the “Datebook” list screen.. Adding person 1.To add appointment person, tap [Person] in ”Datebook Edit” screen or select field next to icon. The “Meetings Attendees ” screen appears 2.Tap [Add Attendee] and “Lookup Contacts” screen appears. You can add Attendee. 3. By scrolling or inputting name at keyboard, search name you want. 4. Repeat [Add Attendee] process. You can add 5 Attendee. 5. In case of adding wrong Attendee, select the name by using scroll in Meetings Attendees screen and tap [Erase Attendee] to delete the Attendee. 6. Tap [Done] and the Datebook Edit screen appears.](https://usermanual.wiki/LG-Electronics-USA/TM910B.Users-Manual/User-Guide-173780-Page-36.png)
![TM910B User Guide LG Electronics Proprietary Adding a Location 1.Tap [Location] in ”Datebook Edit” screen or select field next to icon. “Set Location” Virtual Keyboard appears 2. Enter the name of the location. 3. Tap [Done] and the Datebook Edit screen appears. Adding a Description 1.Tap [Contents] in ”Datebook Edit” screen or select field next to icon. “Contents Virtual Keyboard” appears 2.Enter the description. 3.Tap [Done] and Datebook Edit screen appears. Changing the Datebook Display Form Basic screen of “Datebook” is Day View screen but you can choose to view for a week or for a month. Week View Week View shows appointments for an entire week. This view lets you quickly review your appointments and available time slots. In addition, you can spot appointment conflicts and overlaps with this view. 1.Go to the ”Datebook” main screen. 2.Tap ”Menu”. 3.Tap [Week View] and the screen is changed to the Week View screen. 4. By using “¢¸”, “¢º”, move to the previous week or next week. 5. Press scroll button or UP/DOWN key and you can change time zone. 6. Press LEFT/RIGHT Key and you can change date by the day. 7. Tap the date you want to see in detail and it moves to “Day View” screen of selected date. 8. If you select empty time zone and it moves to the Datebook Edit screen to add a schedule at the selected time zone. To cancel, select Revert of Menu and tap [Done]. 9. If you select the time zone contained schedules, Start/End Time and Content are displayed and you can change time or date of the schedule. If the schedule is overlapped at the same time zone, the schedule of the highest priority order is selected. The priority order is like below. Non repeat>Repeat, Day > Week > Month > Year at non repeat, The previous inputted schedule is prior at the same condition.](https://usermanual.wiki/LG-Electronics-USA/TM910B.Users-Manual/User-Guide-173780-Page-37.png)
![TM910B User Guide LG Electronics Proprietary Month View Month View shows the calendar of your events for an entire month. Daily schedule is notified to dots at the down part. Schedules are displayed maximum five. 1. Go to the main screen of Datebook 2. Tap “Menu”. 3. Tap [Month View] and the screen is changed to Month View. 4. Using “¢¸”, “¢º” you can move to the previous month or next month. 5. Press scroll button or UP/DOWN/LEFT/RIGHT key and you can change date. 6. Tap the date you want to see in detail and it moves to “Day View” screen of selected date. Move to Today Using scroll button, you can move to another day, week or month in Day View, Week View and Week View. If you want to check today’s schedule, to do so 1.Tap ”Menu”. 2.Tap [Today] and the screen is changed to the today’s Day View, Week View or Month View contained today. Erasing a Date Book <Erasing the selected appointment> 1.Tap the box to the left of the appointment you want to erase. 2.Tap “Menu” 3.Tap [Erase]. The “Erase Datebook” screen appears. 4.Tap [OK]. 5. If you would like to erase a schedule which is set by repetition option, there will be a message whether you want to get rid of the schedule for one day or every one. - Current : only the schedule on a day will be removed and the one for other day will remain unchanged. - All : Every schedule repeated will be removed. So the schedule for other day will also be removed. - Cancel : the selected schedule will not be changed.](https://usermanual.wiki/LG-Electronics-USA/TM910B.Users-Manual/User-Guide-173780-Page-38.png)
![TM910B User Guide LG Electronics Proprietary <Erasing old appointment> 1.Tap “Menu”. 2.Tap [Purge] and the “Purge” screen appears. 3. Tap the down arrow and select the period. 4. Tap [OK].](https://usermanual.wiki/LG-Electronics-USA/TM910B.Users-Manual/User-Guide-173780-Page-39.png)
![TM910B User Guide LG Electronics Proprietary Chapter 9. To Do List TM910 have To Do List Application. You can manage you time more effectively by using the To Do List. There are 2000 list in To Do List application. Adding a Task to the To Do List 1. If the main menu appears, tap icon. If the main menu doesn’t appear, tap Goto and then tap “To Do List” from the Application List. 2. Search [New] item from the ”To Do List” screen and select item, or tap Menu and select [New] menu option. 2.”To Do Note Edit” Virtual Keyboard appears. 3.Enter the task that you need to complete. 4.Tap [Done]. The “To Do Edit” screen appears. Adding a Due Date 1.Tap the line of [Due Date] in the “To Do Edit” screen. The “Select Due Date” screen appears. When you input a Due Date first, the date set by default is today. 2.Tap the year, month and day in which you need to complete the task. 3.Tap [OK] and the “To Do Edit” screen appears. The due date you input displays instead of [Due Date]. 4.Tap [Done]. The “To Do Edit” screen appears. Task items listed by the date in which they must be complete. Tasks that do not have dates are listed last. If there are old tasks in the list, “Past” is displayed. Changing a To Do Item To Do Item can change the task name or the Due Date of the task. To change a To Do Item, while in the “To Do List” screen, tap the task you want to change. Perform the following steps : Changing a Due Date](https://usermanual.wiki/LG-Electronics-USA/TM910B.Users-Manual/User-Guide-173780-Page-40.png)
![TM910B User Guide LG Electronics Proprietary 1. Tap the line of [Due Date]. The “Select Due Date” screen appears. 2. Input a new Due Date. 3.Tap [OK]. The “To Do Edit” screen appears. 4.Tap [Done]. To Do List is displayed and changing items are indicated. Completing a Task After completing a task, you can mark it as being completed. While in the To Do List screen, tap the box to the right of the task. A check mark displays in the box, indicating the task is complete. The check sign means your operation has been done. Since the sign can be toggled, you can go back to the unfinished job if the sign touched again. Viewing a To Do Item There are 3 methods by which you can choose to display tasks. 1.While on the To Do List, tap pop-up on the top right of screen. 2. There are 3 options. Tap the type of task you want to view. - All : to show all storing To Do Item. - Active: to show uncompleted tasks among the storing To Do Item - Completed: to show completed tasks among the storing To Do Item. Erasing a To Do Item Erasing while in the main list screen 1. While in the main list screen, tap the box to the right of the task. 2. Tap “Menu”. 3. Tap [Erase]. The “Erase To Do List” screen appears. 4. Tap [OK]. Erasing while in the “To Do Edit” screen 1. While in the “To Do Edit” screen, tap “Menu” 2. Tap [Erase]. The “Erase To Do List” screen appears. 3. Tap [OK]. The To Do List screen appears without the task. Chapter 10. Memo Pad](https://usermanual.wiki/LG-Electronics-USA/TM910B.Users-Manual/User-Guide-173780-Page-41.png)
![TM910B User Guide LG Electronics Proprietary The Memo Pad provides a place to take notes that not associated with records in the Data Book, Contacts or To Do List. Using it like a piece of scratch paper to make a note during a call. Memo Pad application can save 2000 text memo. You can input 1000 letter in each meno. Adding a Memo 1. If the main menu appears, tap icon. If the main menu doesn’t appear, tap Goto and then tap “Memo Pad” from the Application List. 2. Search [New] item from the ”Memo Pad List” screen and select the item, or tap Menu and select [New] menu option. 3. ”Memo Edit” Virtual Keyboard appears. 4. Enter the memo that you need to add. 5. Tap [Done]. The “MemoPad Edit” screen appears. 6. Tap [Done] again. The Memo Pad List screen apprars with the new memo. Memo List listed by the time, so new memo is listed first. Finding a Memo If you have too many lists of memo, you may not want to scroll through the list. In this case use, Finding a Memo 1.While in the Memo Pad List screen, tap “Menu”. 2.Tap [Find]. “Find” Virtual Keyboard appears. 3.Enter any information that you know is in the memo. 4.Tap [Done]. The Search Results screen appears. 5.Tap the memo that you want to review. The “Memo Pad Edit” screen appears. Erasing a Memo Erasing while in the main list screen 1. While in the main list screen, tap the box to the left of the task you want to erase. You can select memo more than 2 at once. If you don’t select the box, it is considered the changed item to be erased. You can also use Jog key to select items. 2. Tap “Menu”. 3. Tap [Erase]. The “Memo Erase” screen appears. 4. Tap [OK] to erase the memo. The Memo pad List screen appears without the task.](https://usermanual.wiki/LG-Electronics-USA/TM910B.Users-Manual/User-Guide-173780-Page-42.png)
![TM910B User Guide LG Electronics Proprietary Erasing while on the “Memo pad Edit” screen 1. While on the “Memo pad Edit” screen, tap “Menu”. 2. Tap [Erase]. The “Memo Erase” screen appears. 3. Tap [OK] to erase the memo. The Memo pad List screen appears without the task](https://usermanual.wiki/LG-Electronics-USA/TM910B.Users-Manual/User-Guide-173780-Page-43.png)
![TM910B User Guide LG Electronics Proprietary Chapter 11. Sketch Pad Sometimes you may need to make a note that is not text, like map. Now you can use your TM910B phone to create the sketch and save it electronically. It is possible to store 24 sketches of 160 * 160 dots. Creating a New Sketch 1. If the main menu appears, tap icon. 2. Search [New] item from the main list screen and select the item, or tap Menu and select [New] menu option. If 24 data are stored in the Sketch Pad, [New] list item or [Menu] list item doesn’t appear. 3.The Sketch Edit screen appears. You can now start creating your drawing. Naming a Sketch A sketch is named [Unnamed] in default. To give your sketch a name 1.While in the ”Sketch Edit” screen, tap “Menu”. Tap “Rename” or enter the title of the sketch on the top right part of screen. 2. Enter the title of the sketch using Virtual Keyborad and tap [Done]. 3.New sketch name displays on the top right part of screen. This name also displays on Sketch Pad List screen. Adding Text to a Sketch 1. While in the ”Sketch Edit” screen, tap . The “SketchPad Text” Virtual Keyboard appears. 2.Enter the text (12 characters maximum) that you want to add. 3.Tap [Done]. The ”Sketch Edit” screen reappears. 4.Tap the text indicated in and drag it to where you want to place in the drawing. 5.Tap on a blank area of the screen. The text indicated in disappears. Drawing Lines 1. While in the ”Sketch Edit” screen, tap . 2.Tap the right arrow of to select the line width you want. 3.To draw the line, drag the stylus on the screen to create the line. 4.When you take away the stylus from the screen, the line which you select width create.](https://usermanual.wiki/LG-Electronics-USA/TM910B.Users-Manual/User-Guide-173780-Page-44.png)

![TM910B User Guide LG Electronics Proprietary 2. Tap “Menu”. 3. Tap [Erase]. The “Sketch Erase” screen appears. 4. Tap [OK]. Sketch Pad List reappears with the sketch name gone. Erasing while on the “Sketch Edit” screen 1. While on the “Sketch Edit” screen, tap “Menu”. 2. Tap [Erase]. The “Sketch Erase” screen appears. Tap [OK]. Sketch Pad List reappears with the sketch name gone.](https://usermanual.wiki/LG-Electronics-USA/TM910B.Users-Manual/User-Guide-173780-Page-46.png)
![TM910B User Guide LG Electronics Proprietary There are several ways your phone alerts you for new messages. 1. “Alert” appears on the screen. 2. Sound, Vibrate, or Backlight as setting. 3.Flash Green LED. 4. icon is indicated in Status Bar, if Text Message. icon is indicated in Status Bar, if Voicemail Viewing a Incoming Text Message 1.Tap icon from the main menu in PIM mode. 2.Select pop up the Category on the top right part of the Message list screen and the Category of Message is indicated. 3.Select Inbox. The incoming text message list displays. 4.If you select the massage you want to check, the “Message View” screen appears. There are arriving time, sender’s name and massage. Reply to Message To reply to the phone number or Email Address 1.Tap “Menu” form the “Message View” screen of Inbox massage. 2.Tap [Reply]. [Replay] menu is only displayed when there is sender’s name. 3.The number from the incoming massage displays for sending a message. 4. IF you tap [Cancel] from the menu, it goes back to the “Message View” screen. 5.Input a massage and tap [Send] to send the massage. Forwarding Message To send the incoming massage to another person](https://usermanual.wiki/LG-Electronics-USA/TM910B.Users-Manual/User-Guide-173780-Page-49.png)
![TM910B User Guide LG Electronics Proprietary 1. Tap “Menu” form the “Message View” screen of Inbox massage. 2.Tap [Forward]. 3. IF you tap [Cancel] from the menu, it goes back to the “Message View” screen 4.The Message Content form the incoming message is displayed to Message Content of message you want to send. Editing a Message 1.Go to the “Outbox list” screen in “Message”. 2.Select [New] from Outbox list screen or tap “Menu” then select [New]. The “Message Edit” screen appears. Inputting recipient 1. Tap [To Person] and enter the letter on ”Message Edit” screen or tap field next to icon. The “Send To” screen appears 2.It is possible to input 10 people. It is displayed how many people inputted on the top part of “Send To” screen. 2.1 If input the number by using keyboard. : Tap and the Virtual keyboard appears. Enter the number then tap Done . 2.2 If input the number form the Contacts : Tap and the Look Up Contacts screen that you can look up the recipient by name appears. Highlight the name you want to input and tap [Done]. 2.3 After inputting the phone number, go to the “Send To” screen. You can review how many phone number is inputted and the icon appears next to the phone number. To erase the inputted phone number, tap . 3.Tap [Done]. The “Message Edit” screen appears. The name that you select displays next to icon. Inputting Callback Number 1.While in the “Message Edit” screen, tap field next to icon. The “SMS Callback Edit” Virtual Keyboard appears. 2.Enter the Callback number.](https://usermanual.wiki/LG-Electronics-USA/TM910B.Users-Manual/User-Guide-173780-Page-50.png)
![TM910B User Guide LG Electronics Proprietary 3. Tap [Done]. The “Message Edit” screen appears. The Callback number that you input dispays next to icon. If Outbox Setting->Default CB Number is “On”. The Phone Number of this phone is in the Callback number in default. Inputting a Text Message 1. While in the “Message Edit” screen, tap field next to icon. The “SMS Message Edit” Virtual Keyboard appears. 2.Enter Message. 3. Tap [Done]. “Message Edit” screen appears. The letter ‘s number of message displays in [] next to icon and the content of message displays. Setting the Message Priority 1. While in the “Message Edit” screen, tap pop-up next to icon. The “Message Priority” displays. There are Normal/Interactive/Urgency/Emergency Message Priority in TM910B. 2.Select Priority you want. Setting the Message Validity Indicates the validity of message delivered to the Short Message Center(SMC) without being transmitted to the sending address for certain period of time. Those message will be deleted within the programmed time frame. 1. While in the “Message Edit” screen, tap pop-up next to icon. The “Message Validity Time” displays. There are 30 Minutes/1 Hour/2 Hours/12 Hours/1 Day/2 Days/3 Days/Continue provide Validity time in TM910B. 2.Select Validity you want. Setting the Deferred time You can set Deferred Time so that you defer sending a message until the deferred time you set past. 1. While in the “Message Edit” screen, tap pop-up next to icon. The “Deferred Time” displays. There are Immediate/After 3 days/After 2days/After 1 day/After 12 hours/After 2 hours/After 1](https://usermanual.wiki/LG-Electronics-USA/TM910B.Users-Manual/User-Guide-173780-Page-51.png)
![TM910B User Guide LG Electronics Proprietary hour/After 30 minutes Deferred Time in TM910B. 2.Select Deferred Time you want. Setting the Delivery ACK 1. While in the “Message Edit” screen, tap pop-up next to icon. The “Delivery Ack”options display. There are Off/On/Enhanced in TM910B. 2.Select Delivery Ack option you want. 3. Tap [Done] in ”Message Edit” screen. The “Message View” screen appears. There are the message input time , the recipient, Callback number and the content of message in the “Message View” screen. Sending a Message To send a message, after editing a message. Follow the below steps, 1. While in the “Message Edit” screen, tap “Menu”. 2.Tap [Send]. 3.Animation about sending messages appears. The number of messages you are sending display. 4. After sending messages, the “End Send Message” screen appears. Tap “Ok” and the “Outbox View” screen that you can review the messages appears. 5.If you tap “Stop” in the middle of sending messages, the “Stop” button disappears and the “Stop Message” displays in “Send Message” screen. This screen last a couple of minute. Resending a message 1.Go to “Outbox List” in the “Message”. 2.Select the message you want to send from the Outbox list screen. The “Message View” screen appears. 3.Tap ”Menu”. 4.Tap [Resend]. The “Message Edit” screen appears. 5.If you want to change the message, tap “Menu”, after changing the message.](https://usermanual.wiki/LG-Electronics-USA/TM910B.Users-Manual/User-Guide-173780-Page-52.png)
![TM910B User Guide LG Electronics Proprietary 6.Tap [Send] to resend the message. Inbox Setting 1. Go to “Inbox List” in the “Message”. 2.Tap ”Menu”. 3.Tap [Setting]. The “Message Setting” screen appears with below items. Saving Messages Auto Save/No Not Save New Message Alert Lamp/Vibrate/Ring Every 2 Minutes Alert Off/On Memory Full 80%/90%/100% Outbox Setting 1. Go to “Outbox List” in the “Message”. 2.Tap ”Menu”. 3. Tap [Setting]. The “Message Setting” screen appears with below items. Saving Messages Auto Save/No Not Save Priority](https://usermanual.wiki/LG-Electronics-USA/TM910B.Users-Manual/User-Guide-173780-Page-53.png)
![TM910B User Guide LG Electronics Proprietary Normal/Interactive/Urgency/Emergency Validity 30 Minutes/1 Hour/2 Hours/12 Hours/1 Day/2 Days/3 Days/Continue Deferred Immediate/After 3 days/After 2days/After 1 day/After 12 hours/After 2 hours/After 1 hour/After 30 minutes Delivery Ack Off/On/Enhanced Memory Full Ack 80%/90%/100% Default CB Number On/Off Signature When you send a message, edit a Signature attached at the end of the message. Erasing all Messages in the Category Empty Inbox 1.Go to Inbox list on the top right of the Message List screen by using Category pop-up. 2.Tap ”Menu”. 3.Tap [Empty Inbox]. Empty outbox](https://usermanual.wiki/LG-Electronics-USA/TM910B.Users-Manual/User-Guide-173780-Page-54.png)
![TM910B User Guide LG Electronics Proprietary 1. Go to Outbox list on the top right of the Message List screen by using Category pop-up. 2.Tap ”Menu”. 3.Tap [Empty Outbox].](https://usermanual.wiki/LG-Electronics-USA/TM910B.Users-Manual/User-Guide-173780-Page-55.png)
![TM910B User Guide LG Electronics Proprietary 6.If you want to cancel the new setting, tap [Cancel]. Then the Environment list appears. Sound If you want to check or change the sound, see the list of Sound Category. Select main Category on the top right part of the Settings screen. The Category list appears and tap “Sound”. Changing Audio Volume 1.Tap [Audio Volume] 2.Tap the down arrow next to the item’s label you want to change and the Volume level appears. The meaning of each label is like below. Label Meaning Ringer Ringer Volume for receiving Voice Call and Message or Date Book alarm Option : High+Vibrate/High/Medium High/Medium Low/Low/Off/Vibrate Key Beep Key Tone Volume Option : High/Medium High/Medium Low/Low/Off Earpiece Volume came out from Earpiece Option : High/Medium High/Medium Low/Low 3.Select a sound you want from the Volume Level list. 4.Tap [OK] for saving. It moves to the Sound Category screen and saved in Audio Volume of Environment. 5.If you want to cancel, tap [Cancel]. It moves to the Sound Category screen. Changing Ringer Type You can change the Voice Message, Call and Alarm sounds. 1.Tap [Ringer Type]. 2. Tap the down arrow next to the item’s label you want to change and sound list appears. The meaning of each label is like below](https://usermanual.wiki/LG-Electronics-USA/TM910B.Users-Manual/User-Guide-173780-Page-57.png)
![TM910B User Guide LG Electronics Proprietary Label Meaning With ID The sound when Voice Call which have Caller ID is received Rest. ID The sound when Voice Call which have Restricted Caller ID is received No ID The sound when Voice Call which doesn’t have Caller ID is received Voice The sound when a Voicemail is received Text The sound when a text message is received Browser The sound when Browser Alert is received Alarms The sound for Date Book alarm 3.Choose a sound you want from the sound list. 4. Tap [OK] for saving. The Sound Category screen appears 6. If you want to cancel tap [Cancel]. The Sound Category screen appears. Setting Alerts 1. Tap [Alerts]. The screen that you can set each Alert appears. 2. Tap the down arrow next to the item you want to change. The list that you can choose on or off appears. The sound list appears. The meaning of each label is like below. Alert Meaning Call Fade When signal is going weak or shut down (due to the out-of-service case) during a call, alert beeps at for users. Option : on/off Minute Beep Alert will be ringing before 10 minutes by the time term you set. Option : off/1 min/3 min/10 min Service Change Alert will be ringing whenever service condition changed. . Option : on/off](https://usermanual.wiki/LG-Electronics-USA/TM910B.Users-Manual/User-Guide-173780-Page-58.png)
![TM910B User Guide LG Electronics Proprietary Call Connect Alert will be ringing after connecting when you try to make a call . . Option : on/off Roam Ringer If you have a call in roaming service area, select if you want roaming call or usual one. . Option : on/off 3. Choose a option you want from the list. 4. Tap [OK] for saving. The Sound Category screen appears. 6. If you want to cancel, tap [Cancel]. The Sound Category screen appears. Setting Melody Timbre Each ringer plays by using 4 instruments. Through setting the 4 instruments in your taste, you can make your own ringer sound. The Melody Timbre provides this function. 1.Tap [Melody Timbre]. The Melody Timbre screen appears. 2. Select the ringer you want to edit from the Melody pop-up on the top right part of the screen. The current instrument setting displays in Inst1, Inst2, Inst3 and Inst4. If you do not change the default, “Original” displays. 3.Change the instrument setting using pop-up next to Inst1, Inst2, Inst3 and Inst4. 4.If you want to listen to ringer sound beforehand after changing instrument setting, tap [Replay] and the ringer sound plays with instrument you set. 5.If you want to set in default setting, tap [Reset Original]. 6.Tap [OK] for saving. The ringer rings as setting from now on. The Sound Category screen appears. 7. If you want to cancel, tap [Cancel]. The Sound Category screen appears. Setting the Tone Length You can set up the length of Key Beep, when you press the key of keypad. 1.Select pop-up next to the ”Tone Length” Label. 2.Select option you want.](https://usermanual.wiki/LG-Electronics-USA/TM910B.Users-Manual/User-Guide-173780-Page-59.png)
![TM910B User Guide LG Electronics Proprietary 2.When the Virtual Keyboard appears you can edit the text you want. The banner contains 16 letters maximum. 3.If you want to use the text inputted with Virtual Keyboard, tap [OK]. If you want to use the previous text, tap [Cancel]. Reviewing Version 1.Tap [Version]. The Version screen appears. 2.You can review the S/W version, the last Compiled time and PRL version etc from the Version screen. 3.Tap [OK]. The Version screen disappears but the Display screen appears. Reviewing the amount of each data of PIM Application 1.Tap [PIM Info]. The PIM Info screen appears. 2.In the PIM Info screen, you can review that how many percent of the memory is used from whole PIM Memory and how many data is in each PIM Application. 3.Tap [OK]. The Display screen appears. System If you want to change the kind of service and system setting supported from the phone, review the items in System Category. On the top right part of the Settings screen, select main Category and the Category list displays. Tap “System”. Changing System Select You can change the system whether the phone works only in the Home Service Area or works in the other area supported Service. 1.Tap pop-up next to the ”System Sel” Label. 2.Highlight the item from the option. Standard : This setting seeks Sprint PCS Service. When Sprint PCS Service is unavailable, it searches for an alternative system. Home Only : This setting allows you to select only the Sprint PCS Nationwide Network and prevents](https://usermanual.wiki/LG-Electronics-USA/TM910B.Users-Manual/User-Guide-173780-Page-61.png)
![TM910B User Guide LG Electronics Proprietary PCS Phone is changed to the mode that is able to received a Fax Call. But you cannot receive Voice Call in this mode. Security 1. On the top right part of the Settings screen, select main Category and the Category list displays. Tap “Security”. 2.The Lock Code screen appears. 3.Enter the lock code for the phone. If the Lock Code you entered is wrong, you can not review the options in the Security category. 4.If the Lock Code is right, the Security menu displays. Locking the Phone Locking the phone prevents using your phone by other people. It is impossible to make a call and use PIM Application before you enter the lock code. But you can still receive a call, make a emergency call and call to the 3 special number you specify even the phone locked. 1.Tap [Lock Organizer] 2.Select the option you want. Unlocked: to keep the phone unlocked On Power Up: to lock when the phone is turned on next time Lock Now: to lock the phone immediately 3.Tap [OK] to work selected option. If you choose “Lock Now”, the screen asking lock code appears. 3.If you want to cancel, tap [Cancel]. The Security screen appears. Restricting Outgoing Calls You can limit your outgoing calls to emergency number, the number saved in Contacts and 3 numbers you specify. 1.Tap [Phone Restrict].](https://usermanual.wiki/LG-Electronics-USA/TM910B.Users-Manual/User-Guide-173780-Page-63.png)
![TM910B User Guide LG Electronics Proprietary 2. Select the option you want. Restrict On: limit your outgoing calls to emergency number, the number saved in Contacts and 3 numbers you specify Restrict Off: don’t limit your outgoing calls so you can call to all numbers 3. Tap [OK] to work selected option. If you try to make a call to the number that is not stored in Contacts, “This phone has been restricted.” message appears. Changing the Lock Code You can change the Lock Code you want. This is usually the last four digits of your phone number. 1.Tap [Change Lock Code]. 2.You have to enter the current lock code to change the Lock Code. Tap the empty space next to the “Old Code” Label, and the cursor appears. 3.Using the keypad, enter the current lock code. For security Lock Code display like “*”. 4.In the same way, enter the new lock code to the empty space next to “New Code” Label. 5.If you want to confirm, whether the new lock code entered is correct or not, enter the lock code in the next to “Re-enter to Confirm” label. 6.When you enter wrong number, tap [Clear]. The digit right before the cursor is deleted. 7.Tap [OK] to change the lock code as you enter. Security screen appears. 8.If you want to cancel, tap [Cancel]. Security screen appears and the Lock Code used currently is available. Setting the Special Phone Numbers TM910B can store 3 Special Number. You can still make call to the 3 special number you specify like “911”, even the phone is locked. 1.Tap [Special #]. The “Special #s” screen appears. The fields for inputting 3 Special # display. If there are Special # saved already, that number displays.](https://usermanual.wiki/LG-Electronics-USA/TM910B.Users-Manual/User-Guide-173780-Page-64.png)
![TM910B User Guide LG Electronics Proprietary 2.Select the field you want to input and the Virtual Keyboard appears. Enter the number using the Keyboard. 3.Tap [OK]. Erasing PIM Data To erase the data of each PIM Application 1.Tap [Erase PIM Data]. 2. Select the box in front of Application name you want erase the data from the PIM Application. You can select the box more than 2. 3.Tap [OK] to erase the data of all Application. It takes much time to erase, if the amount of data is much. Resetting to the default In the middle of using the phone, if you want to reset to the factory default, use this option. 1.Tap [Phone Reset]. 2.Tap [OK]. All Settings you changed reset to the factory default. 3.Tap [Cancel], if you don’t want to reset. Features Select the main Category on the top right of the Settings screen. The Category appears and then tap “Features”. Setting up the Any Key Answer To allow answering the phone by pressing any key : 1.Tap the pop-up to the right of ”Any Key Answer” label. 2.Tap ”On”. You can not receive a call by pressing [Send], [End], [ClR], Jog key even Any Key Answer Feature is activated.](https://usermanual.wiki/LG-Electronics-USA/TM910B.Users-Manual/User-Guide-173780-Page-65.png)
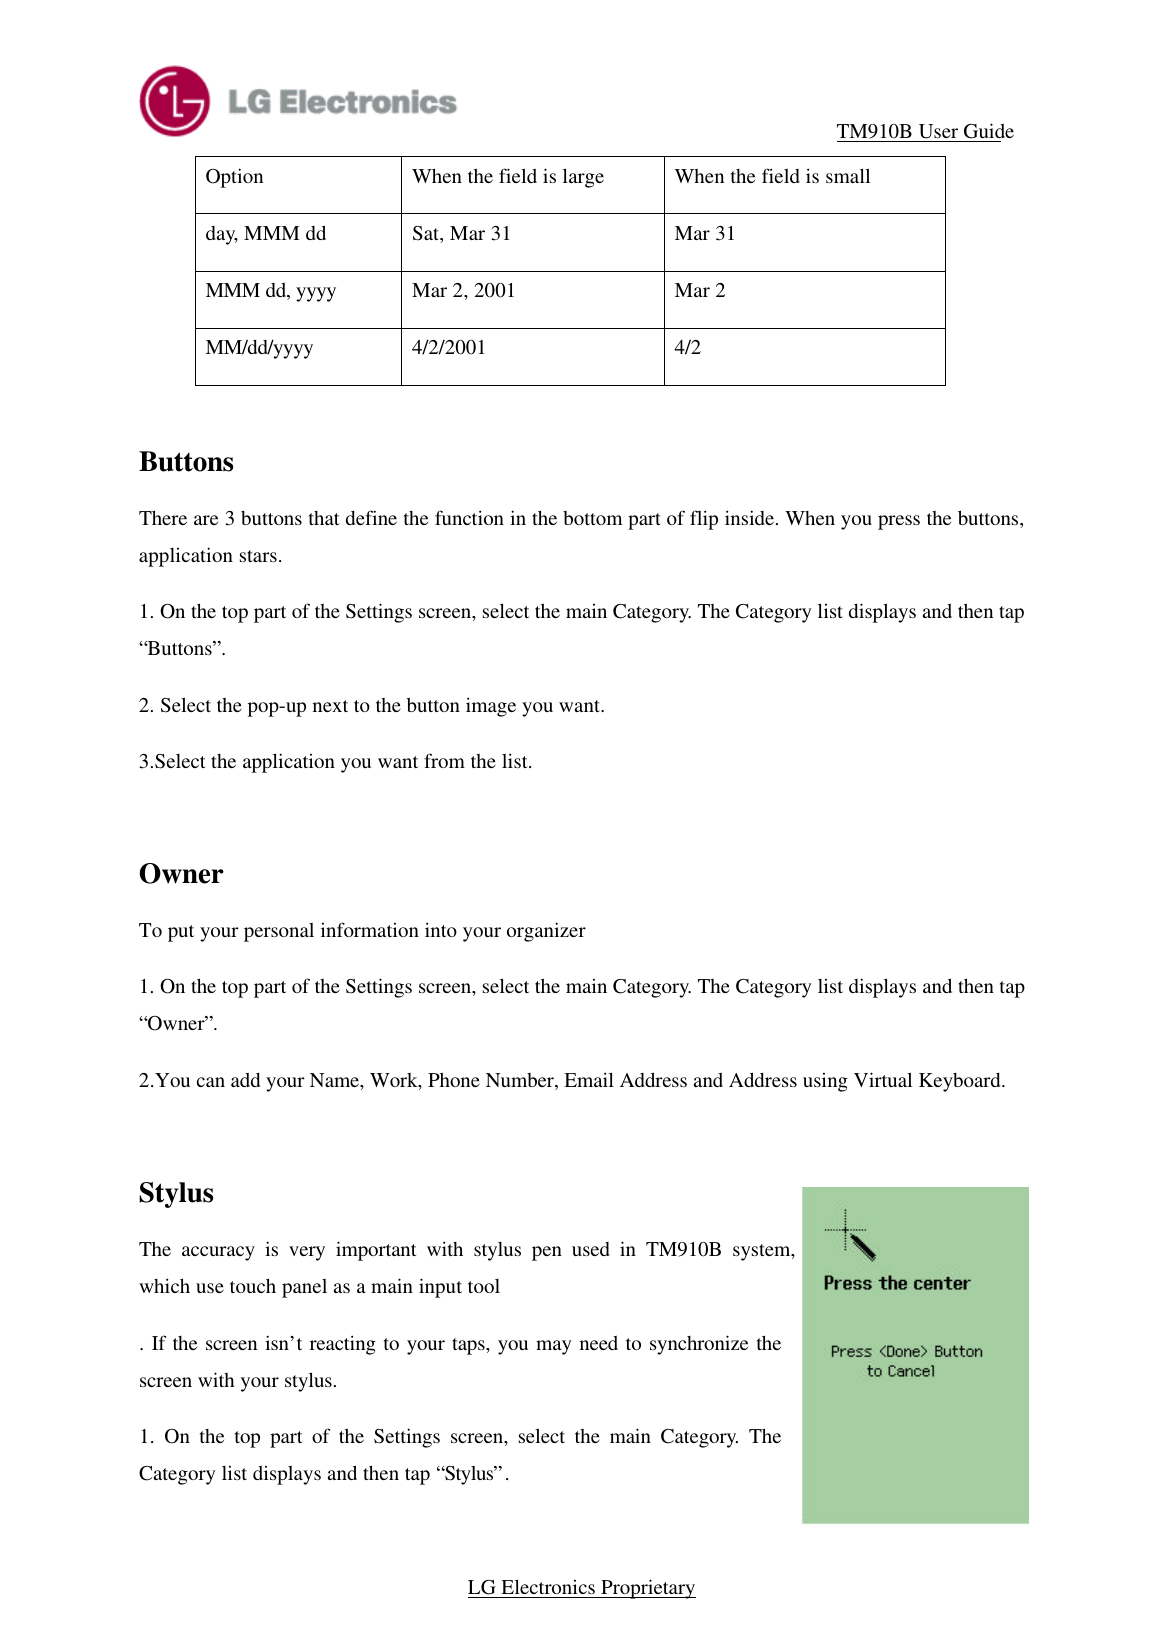
![TM910B User Guide LG Electronics Proprietary 2.“Press <OK> to configure stylus” message appears. Tap [OK]. 3.When the screen like the right picture appears, tap and press the middle of each plus sign on the screen until another order appears. This process repeat 4 times in different location. If you press wrong location, you can’t go to next step. 4.Tap [Done] to cancel this configuration](https://usermanual.wiki/LG-Electronics-USA/TM910B.Users-Manual/User-Guide-173780-Page-69.png)