LG Electronics USA TM910B Tri-Mode Dual-Band Analog/PCS Phone User Manual
LG Electronics USA Tri-Mode Dual-Band Analog/PCS Phone Users Manual
Contents
- 1. Users Manual
- 2. Revised Users Manual per CRN 21529
Users Manual

TM910B User Guide
S/W Development Group 5 Part
CDMA HANDSETS LAB.

For more information about RF exposure, please visit the FCC website at www.fcc.gov
FCC RF EXPOSURE INFORMATION
In August 1996 the Federal Communications Commission (FCC) of the United States
with its action in Report and Order FCC 96-326 adopted an updated safety standard
for human exposure to radio frequency electromagnetic energy emitted by FCC
regulated transmitters. Those guidelines are consistent with the safety standard
previously set by both U.S. and international standards bodies. The design of this
phone complies with the FCC guidelines and these international standards.
Use only the supplied or an approved antenna. Unauthorized antennas,
modifications, or attachments could impair call quality, damage the phone, or result in
violation of FCC regulations.
Do not use the phone with a damaged antenna. If a damaged antenna comes into
contact with the skin, a minor burn may result. Please contact your local dealer for
replacement antenna.
Body-worn Operation
This device was tested for typical body-worn operations with the back of the
phone kept 2.0 cm. from the body. To maintain compliance with FCC RF
exposure compliance requirements, use only belt-clips, holsters or similar
accessories that maintain a 2.0 cm. separation distance between the user’s
body and the back of the phone, including the antenna, whether extended or
retracted. The use of third-party belt-clips, holsters and similar accessories
should not contain metallic components in its assembly. The use of
accessories that do not satisfy these requirements may not comply with FCC
RF exposure compliance requirements, and should be avoided.
WARNING! Read this information before using your phone

TM910B User Guide
LG Electronics Proprietary
Contents
Part 1. Overview ....................................................................................................................................6
Chapter 1. Getting Started...............................................................................................................6
Front View of Phone – Flip Closed..........................................................................................6
Front View of Phone – Flip Open ............................................................................................7
LCD Icons ..............................................................................................................................8
Icons.......................................................................................................................................8
Descriptions............................................................................................................................8
Using the Phone Menu ..........................................................................................................9
Common Function of PIM mode ...........................................................................................9
Turning Your Phone On and Off............................................................................................10
Using the Battery
Part 2. Phone Mode..............................................................................................................................13
Chapter 2. Basic Functions............................................................................................................13
Making a Call .......................................................................................................................13
Correcting Dialing Mistakes..................................................................................................13
Receiving Calls.....................................................................................................................14
Using Quick Mode................................................................................................................14
Responding to Call Waiting...................................................................................................15
Using 3-Way Call..................................................................................................................15
Mute.....................................................................................................................................16
Redialing Calls......................................................................................................................16
Pause Feature........................................................................................................................16
Adjusting the Volumes ..........................................................................................................17
Power Save Mode .................................................................................................................17
Emergency Dialing................................................................................................................17
Speed Dialing .......................................................................................................................17
Chapter 3. Managing Call History ...............................................................................................19
Viewing the Call History List ..............................................................................................19
Viewing Call Details .............................................................................................................19
Making a Call from the Recent Call History List....................................................................20
Connect to the Internal Phone Book.......................................................................................19
Erasing a Call History Entry ................................................................................................19
Viewing the Air Time ..........................................................................................................20
Chapter 4. Internal Phone Book.....................................................................................................20
Finding a Number Using a Person’s Name(Look Up Name)...................................................21

TM910B User Guide
LG Electronics Proprietary
Making a Phone Call from the Phone Book ...........................................................................21
Editting a Phone Book Entry ...............................................................................................21
Erasing a Phone Book Entry ................................................................................................21
Speed Dialing .......................................................................................................................22
Listning to a Voice Dial .......................................................................................................22
Viewing My Phone Number ..................................................................................................22
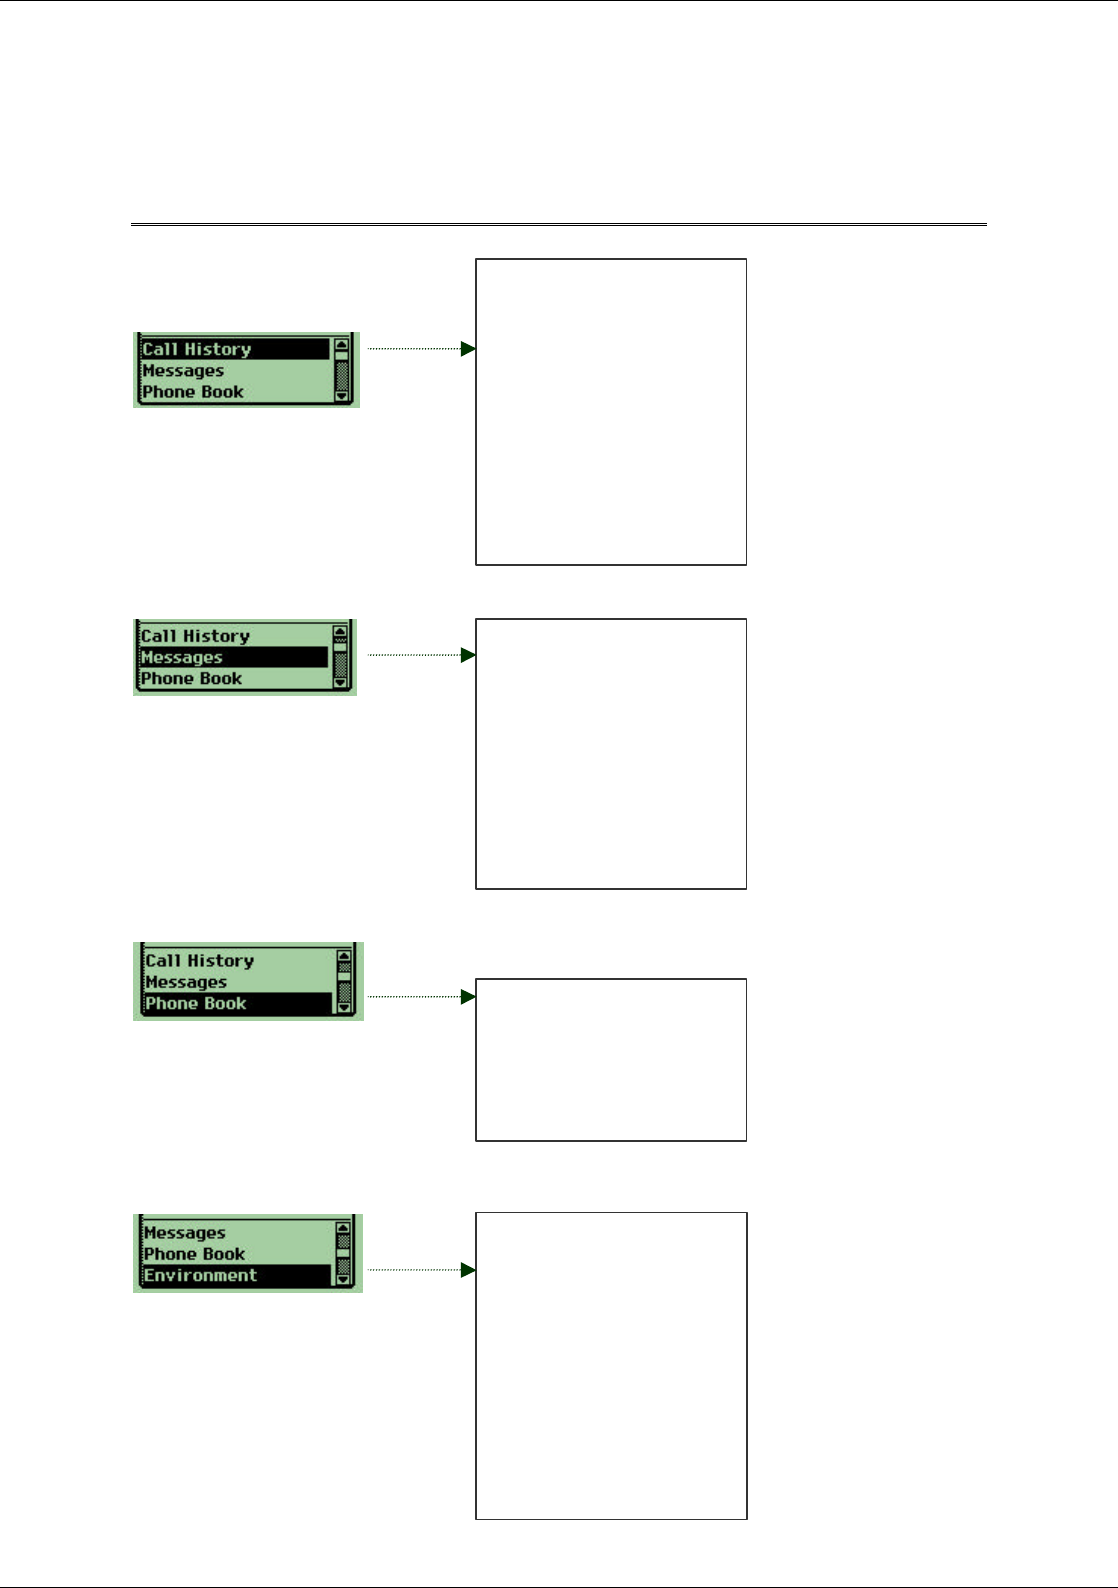
Chapter 5. Menu Features .............................................................................................................23
Menu Maps...........................................................................................................................23
Messages ..............................................................................................................................24
Environment .........................................................................................................................24
Touch Calibration..................................................................................................................25
Part 3. PIM Mode.................................................................................................................................26
Chapter 6. Contacts.......................................................................................................................26
Adding Contacts
Make Secret..........................................................................................................................28
Look Up Contacts .................................................................................................................28
Making a Phone Call from the Contacts ...............................................................................28
Erasing Contacts .................................................................................................................29
Editting Contacts Group ......................................................................................................29
Viewing Speed Dial .............................................................................................................29
Assigning Speed Dial ..........................................................................................................29
Dialing from a Speed Dial Entry............................................................................................29
Erasing a Speed Dial ...........................................................................................................30
Chapter 7. Call History .................................................................................................................31
Viewing the Call History Item .............................................................................................31
Viewing Call Details .............................................................................................................31
Making a Call from the Call History List...............................................................................31
Adding Phone Numbers to the Contacts.................................................................................31
Finding Alternate Phone number from the Contacts ...............................................................32
Chapter 8. Date Book....................................................................................................................34
Adding Appointment.................................................................................................................
Changing the Datebook Display Form .....................................................................................
Move to Today..........................................................................................................................
Erasing a Data Book ................................................................................................................
Chapter 9. To Do List....................................................................................................................39
Adding a Task to the To Do Item ...............................................................................................

TM910B User Guide
LG Electronics Proprietary
Chaging a To Do Item .........................................................................................................39
Viewing a To Do Item .........................................................................................................40
Erasing a To Do Item ...........................................................................................................40
Chapter 10. Memo Pad..................................................................................................................40
Adding a Memo ........................................................................................................................
Finding a Memo....................................................................................................................41
Erasing a Memo........................................................................................................................
Chapter 11. Sketch Pad .................................................................................................................43
Creating a New Sketch..............................................................................................................
Naming a Sketch.......................................................................................................................
Adding text to a Sketch .............................................................................................................
Drawing Lines ..........................................................................................................................
Drawing a Freeform Line ..........................................................................................................
Erasing Parts of a Sketch...........................................................................................................
Zooming In and Out of a Sketch............................................................................................44
Moving Parts of a Sketch...........................................................................................................
Erasing a Sketch........................................................................................................................
Chapter 12. Browser .....................................................................................................................46
Chapter 13. Messages ...................................................................................................................47
Category...............................................................................................................................47
New Message Alert...............................................................................................................47
Viewing a Incoming Text Message ......................................................................................48
Editing a Message.................................................................................................................49
Seding a Message......................................................................................................................
Resending a Massage ..........................................................................................................51
Inbox Setting ........................................................................................................................52
Outbox Setting......................................................................................................................52
Erasing All Massages in the Category....................................................................................53
Chapter 14. Setting .......................................................................................................................55
Environment .........................................................................................................................55
Sound ...................................................................................................................................56
Display .................................................................................................................................59
System..................................................................................................................................60
Security ................................................................................................................................62
Features ................................................................................................................................64
Formats.................................................................................................................................66

TM910B User Guide
LG Electronics Proprietary
Buttons .................................................................................................................................67
Owner...................................................................................................................................67
Stylus....................................................................................................................................67
Chapter 15. Connect .....................................................................................................................69
Chapter 16. Calculator ..................................................................................................................70
Preforming Simple Calculations ............................................................................................71
Chapter 17. World Clock...............................................................................................................72
Chapter 17. World Clock...............................................................................................................72
Setting the Time in the City You are Located .........................................................................72
Viewing a Different City’s Time............................................................................................72
Part 4. FCC Test.......................................................................................................................................
TM910B User Guide
LG Electronics Proprietary
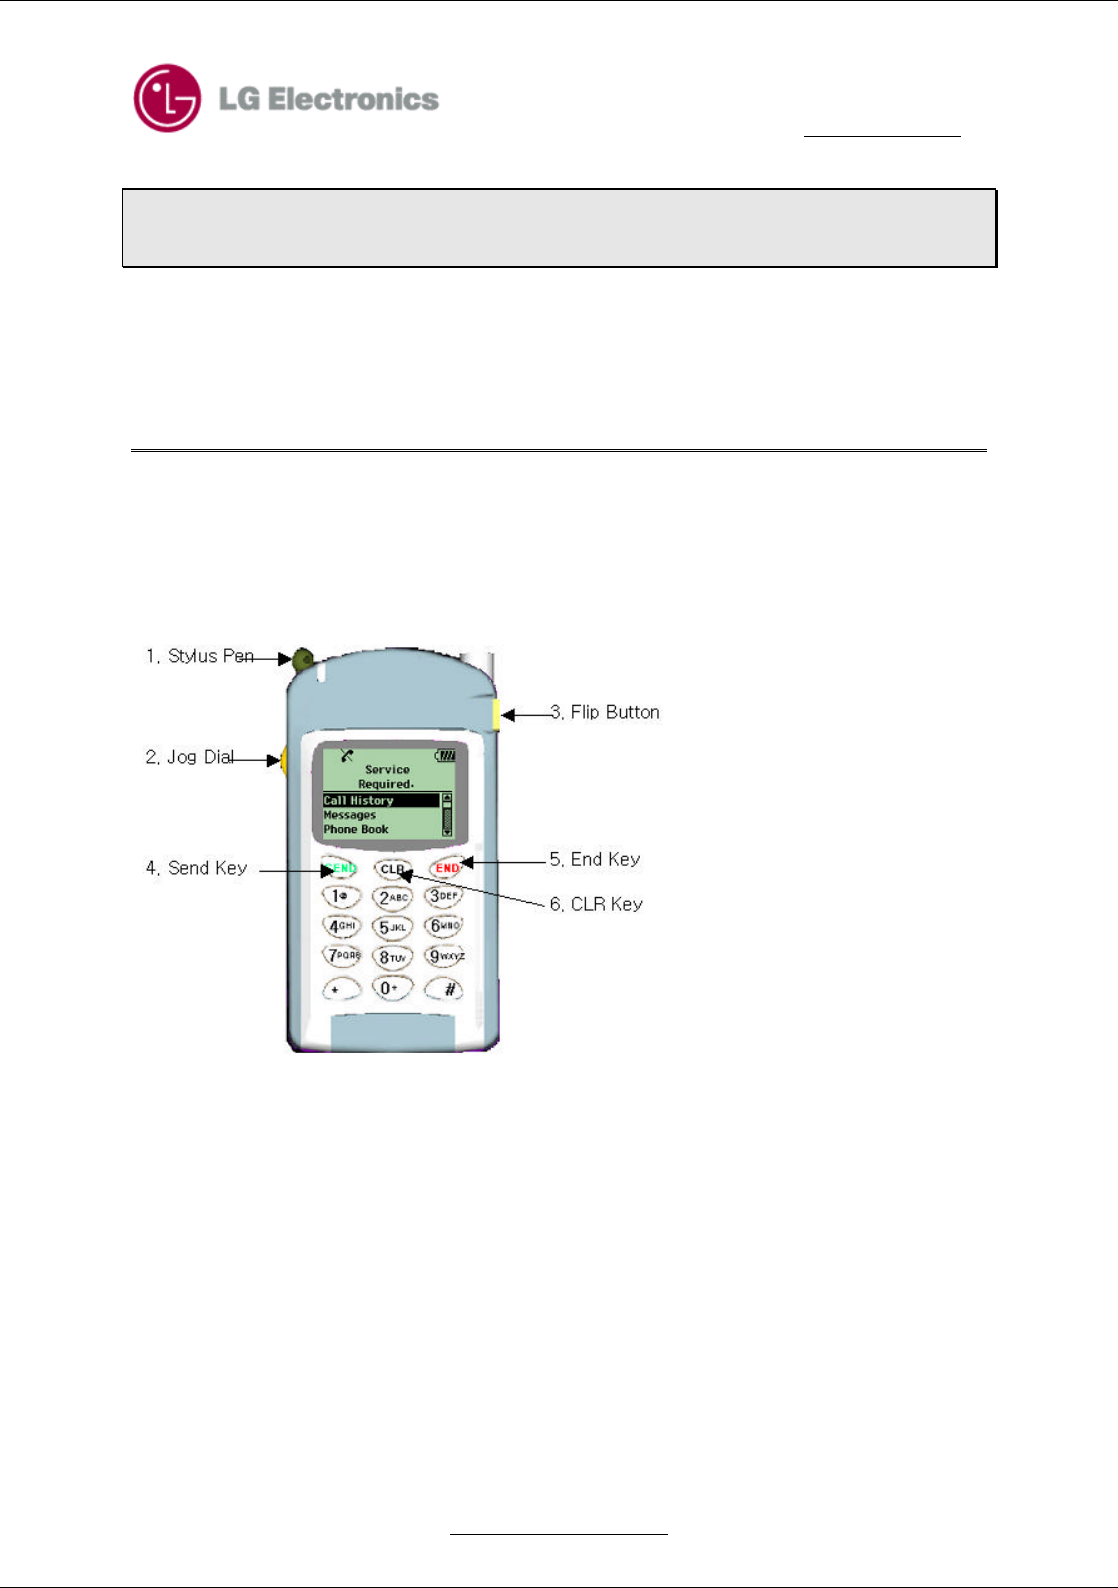
Part 1. Overview
Chapter 1. Getting Started
Front View of Phone – Flip Closed
When TM910 phone’s flip is closed, it looks like a regular phone with some special feature. Please see
the description of each special feature.
1. Stylus Pen
Use when the flip is open to
navigate the menu system and enter
data in PIM mode. It is located on
the back of the phone.
2. Jog Dial
You can adjust Audio Volume or
navigate menu and list as you move
Jog Dial up and down. If you push
Jog Dial, you can select items.
3. Flip Button
Press to open the flip and change to PIM mode from Phone Mode.
4. Send Key
For making and receiving calls, Call Waiting and 3-Way call
5. End Key
Use to end a call, return to the main menu or turn on and off as pressing for 3sec.
6. Clr Key
TM910B User Guide
LG Electronics Proprietary
Use to correct mistakes when you input data, and go to the Main Menu during Menu Navigation. It is also
activated Voice Recognition in Idle state.
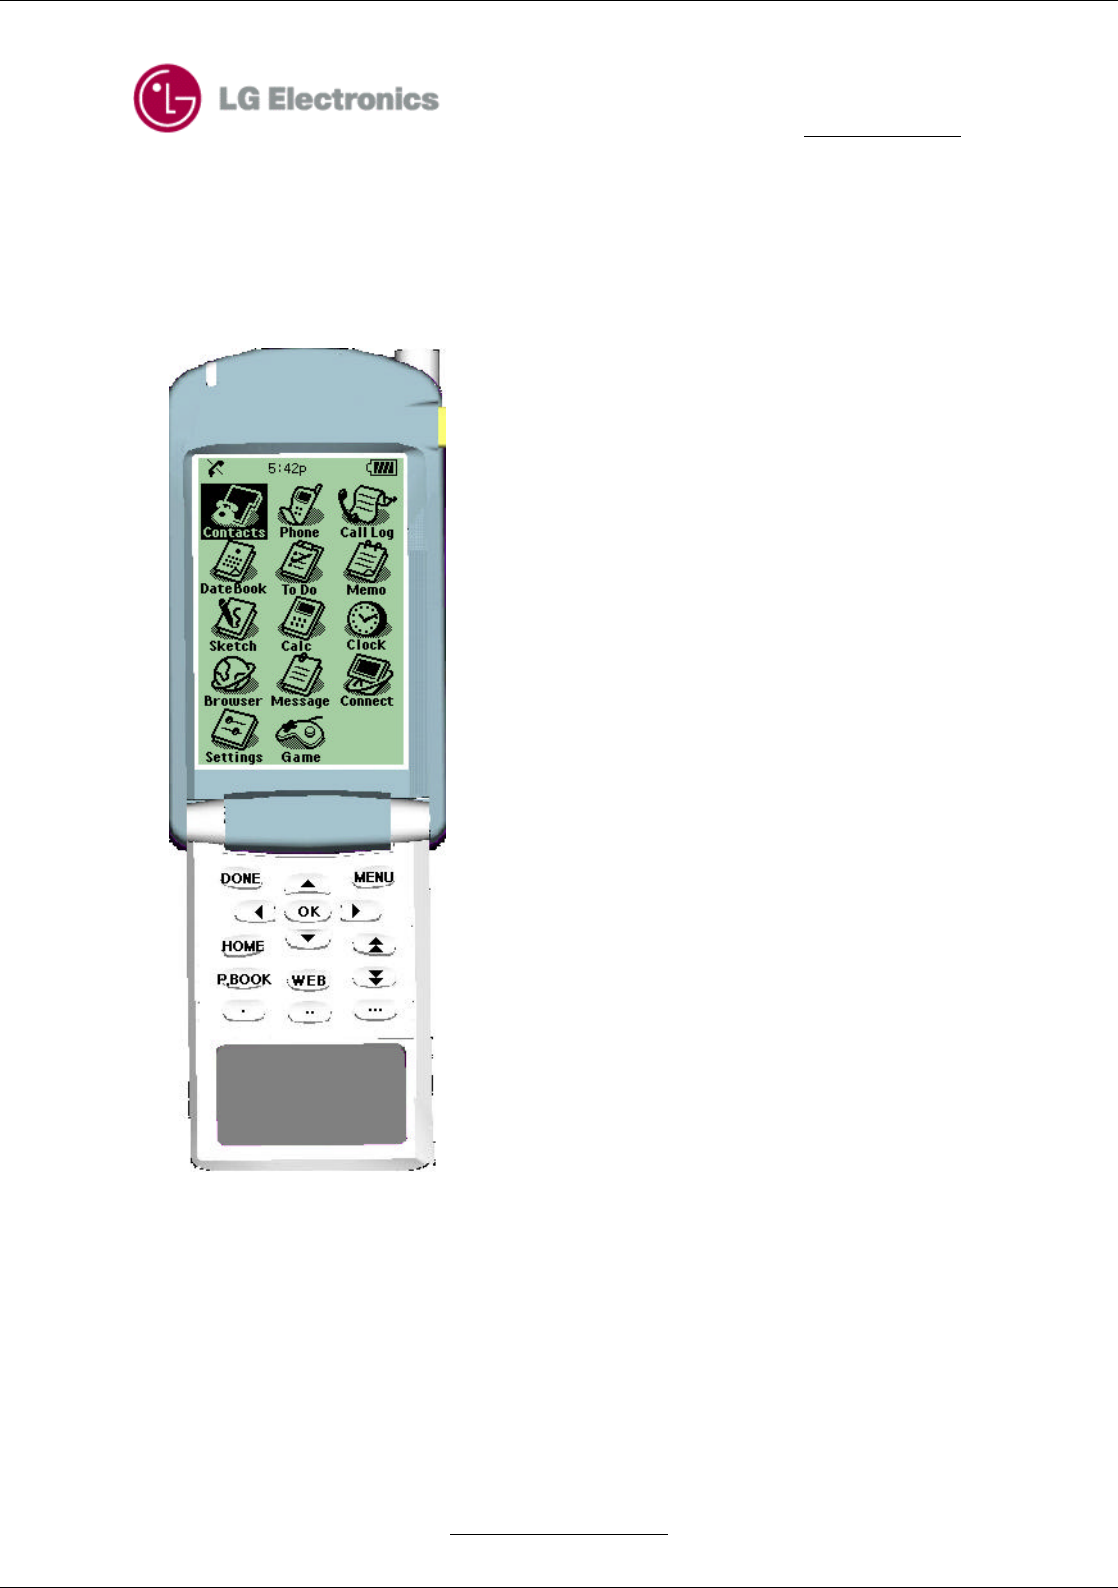
Front View of Phone – Flip Open
When TM910B phone’ s flip is open, it offers you all kind of data
management tools and features using LCD and touch panel. This
is PIM Mode. Please see the description of each special feature
Contacts : Phone book.
Phone : Phone when the flip open.
Call Log : Saving Call History(Incoming, Outgoing, Missed).
Date Book : Daily planner.
To Do : Daily task.
Memo : Taking notes.
Sketch : Making a note except text.
Calc : calculator.
Clock : Clock for the all cities.
Browser : Web browser
Message : Short Message Service .
Connect : PC Sync .
Settings : Setting a environment of the phone.
Game : Game .
BlueTooth : Bluetooth .(adding the icon later)
TM910B User Guide
LG Electronics Proprietary
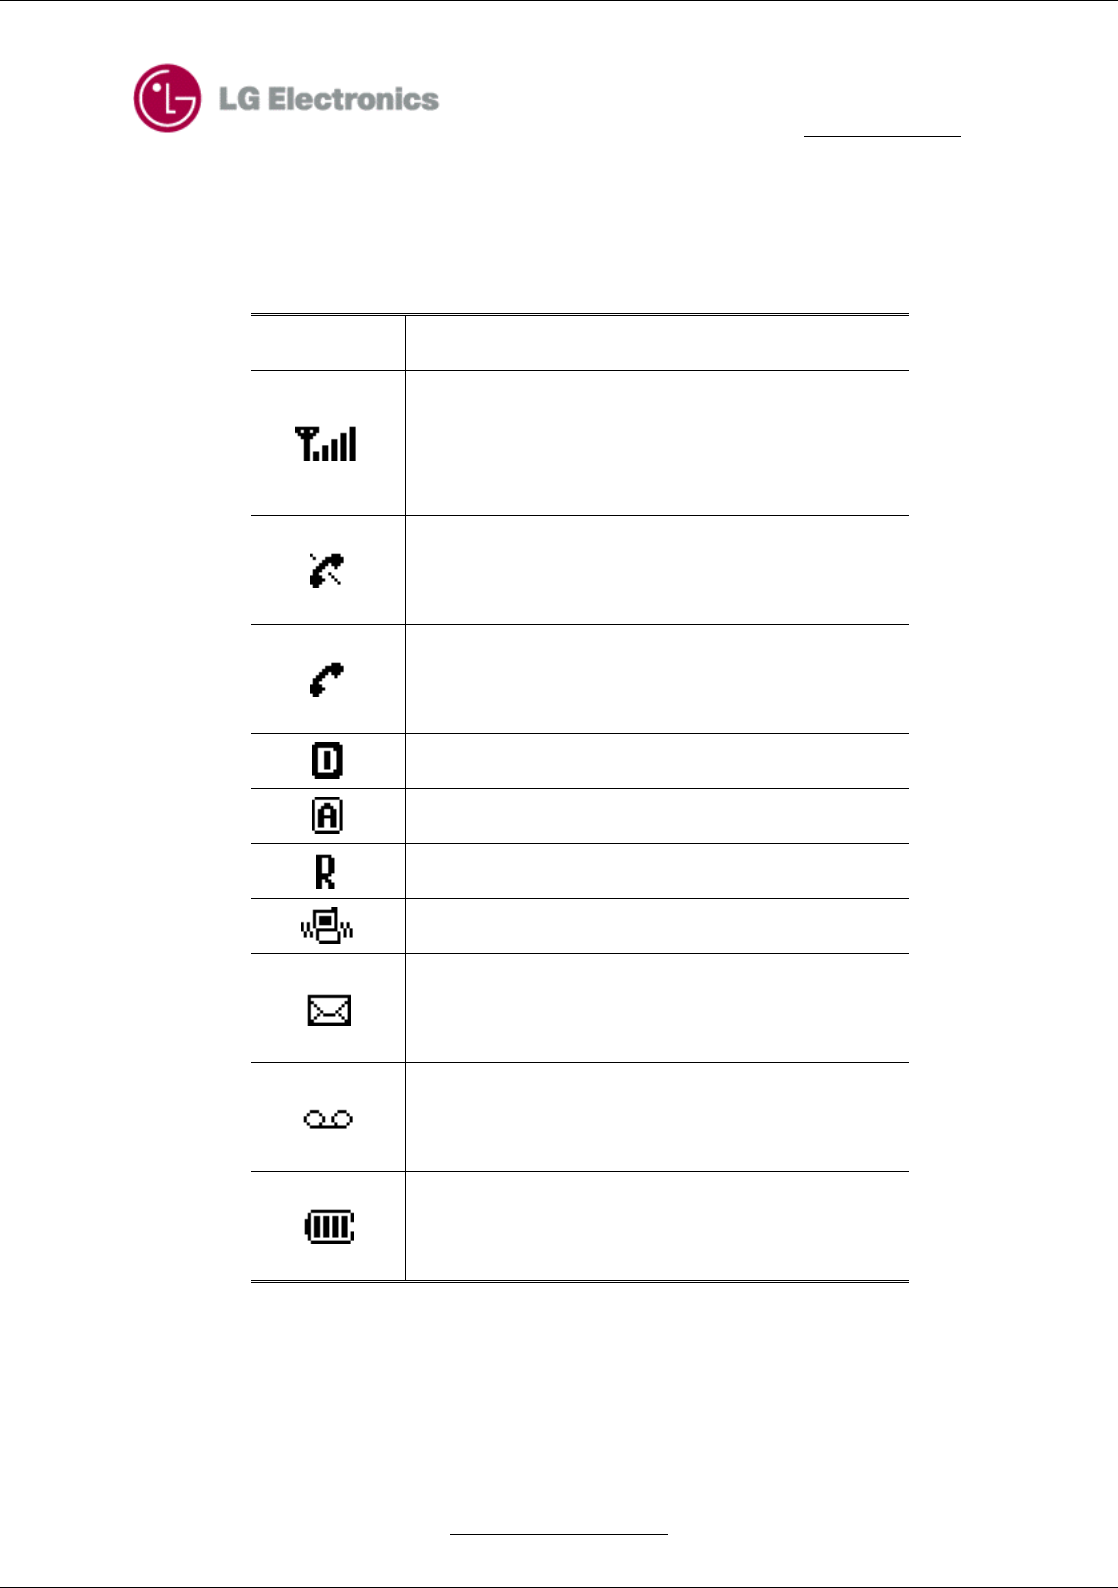
LCD Icons
This list identifies some of the more symbols you’ll see on your display screen.
Icons Descriptions
Signal Strength.
Current signal strength indicated as the number of bars
displayed on the screen.
No Service.
The Phone is not receiving a system signal
In Use. A call is in progress.
* No icon indicates the phone is in standby mode
Digital Indicator. Digital service is available
Analog Indicator. Analog service is available.
Roaming. The phone is outside if its home service area.
Vibrate On Indicator.
Text Message Indicator.
Indicates you have new text massages waiting.
Voice Message Indicator.
When a voice message arrives.
Charging Level
Battery charge Level.
TM910B User Guide
LG Electronics Proprietary
Using Phone Menu
TM910B phone is offering Application such as Call History, Phone Book and Call function such as Mute
by Menu style in Phone mode
Menu Activate
There is no Menu in Phone Mode but only present State. If you press Jog more than one minute, the menu
is activated.
Menu Navigation & Selection
If Menu appears in Phone Mode, you can navigate menu by using Jog up and down. Besides, if flip is
opened, Menu Navigation is possible with Navigation key up and down inside of flip.
When the Menu is activated, highlight the item you want and press Jog then the item is selected. When
flip is opened, you can select item with OK key of Navigation.
Common function of PIM Mode
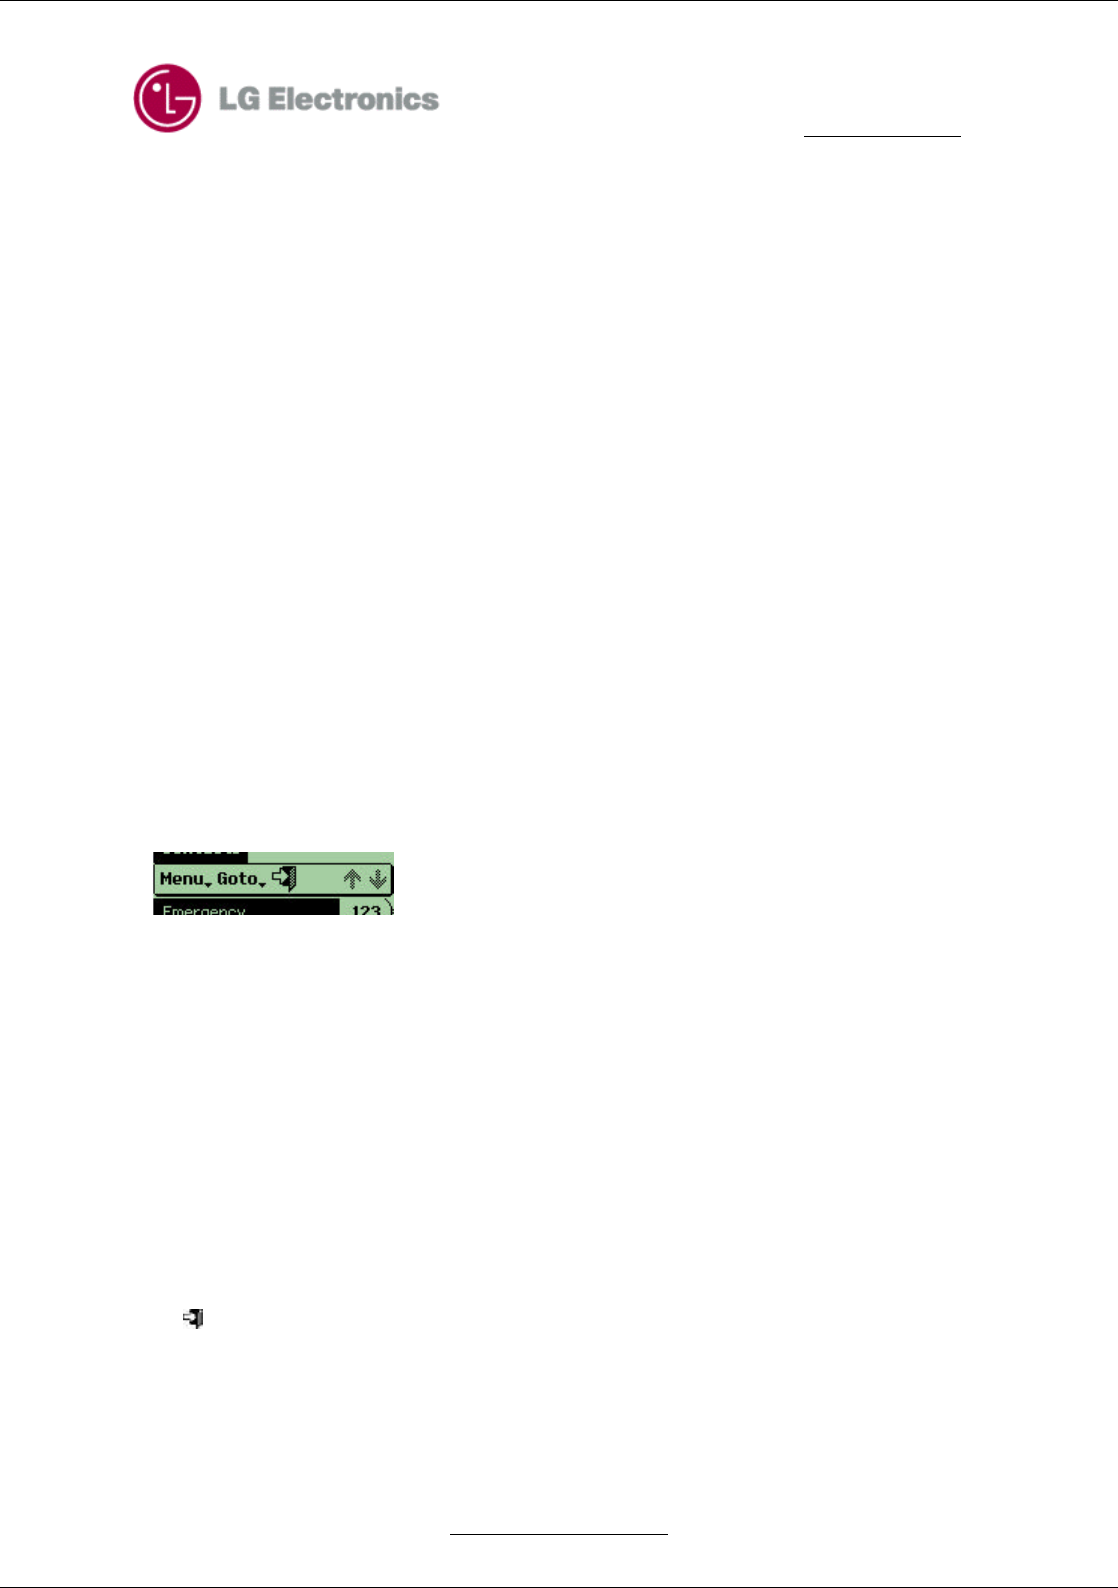
Tray Bar
In PIM Mode, Tray Bar like above picture displays through all kind of screen. This Bar displays menu
option, offer how to move between applications, end the present moving and store date. In addition, the
Scroll Bar displaying amount of date is indicated .
Menu : If you press Tray Bar, it offers options you need in each screen.
Goto : To move from present screen to another application, press this button and the name of movable
application displays. When you select the name of application you want, it moves to the screen.
Done( ) : Tap this button when you want to finish action at present screen. Changed item is saved and
the screen disappears then it moves to previous screen or application.
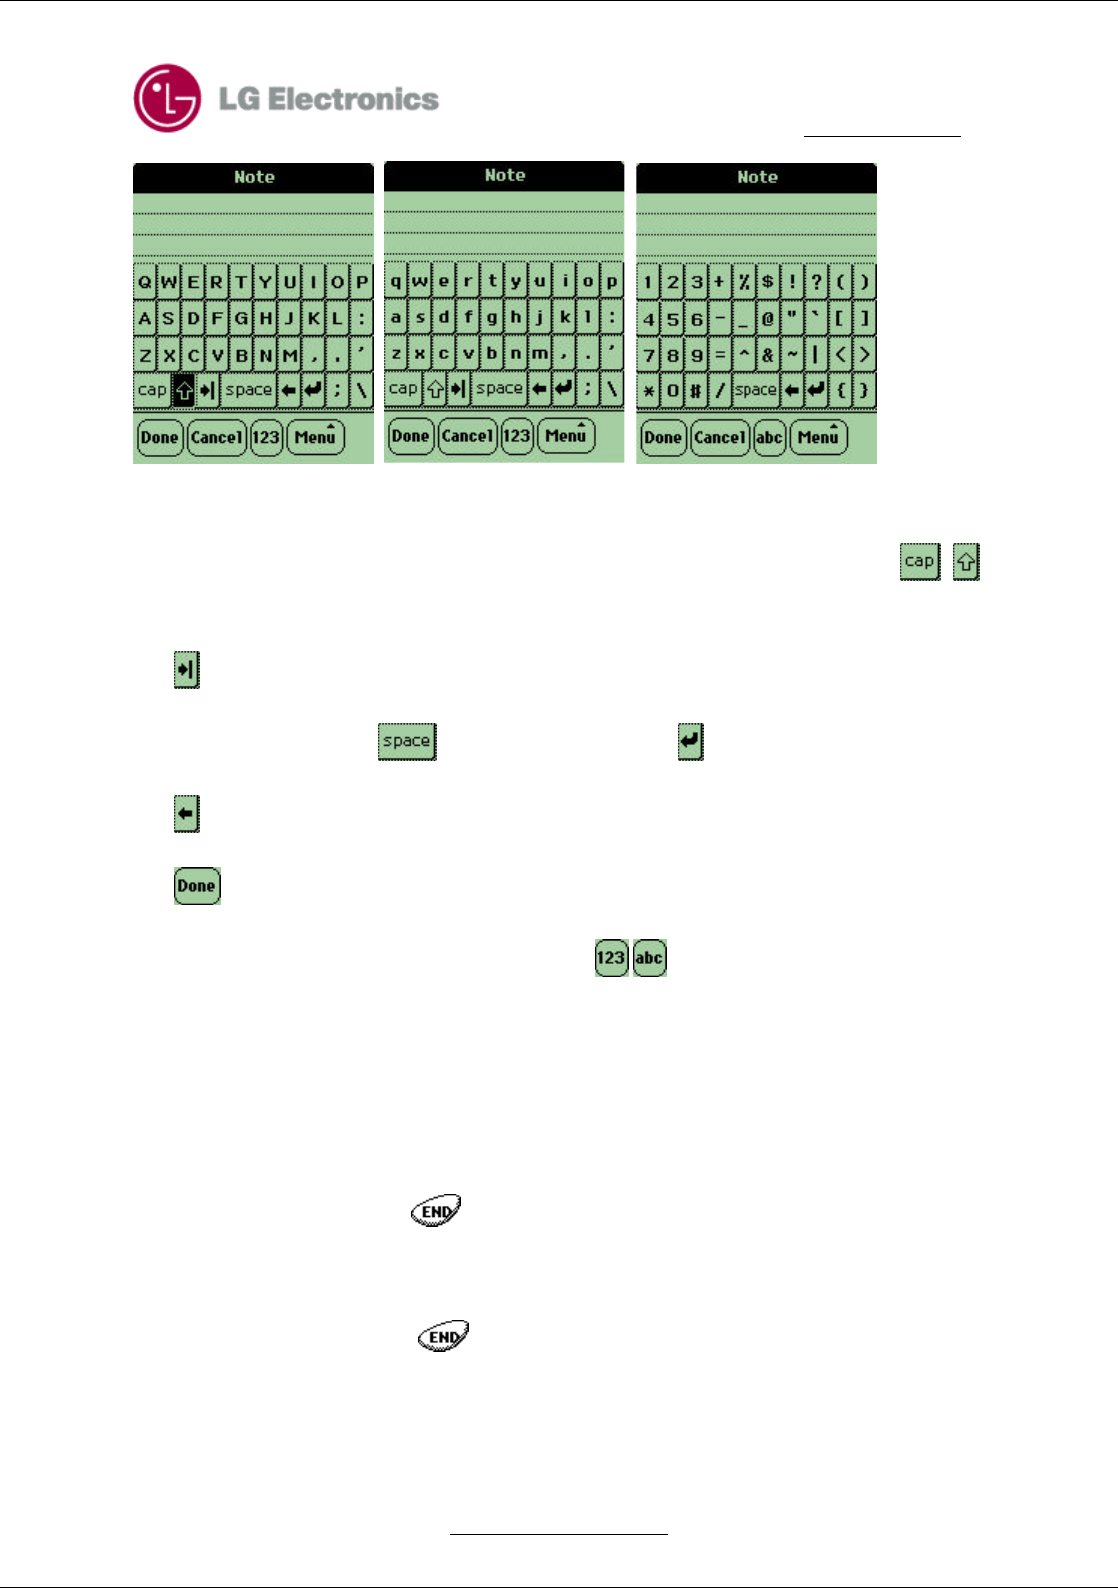
How to Input in PIM Mode :Virtual Keyboard
To input a data, you can use Virtual Keyboard at each application in PIM Mode.
TM910B User Guide
LG Electronics Proprietary
There are three kinds of Virtual Keyboard for alphabet and symbols like above pictures.
First letter is inputted a capital letter automatically. To change capital letter or small letter, tap , .
Cf. When you send E-mail, the first letter is inputted to small letter.
Tap for Tap.
To move one space next , tap and to move next line, tap .
Tap for correcting.
Tap for saving, when a text is completed.
To change Virtual Keyboard to alphabet or symbols, tap , .
Turning your phone on and off
TM910B is classified from phone mode and PIM mode. Phone mode is turned on and off in user’ s
necessity. PIM mode works even the phone is off.
To turning your phone on, press for 3 seconds. Once your phone is on, you can see the screen in
condition of the flip is closed. You can use both phone mode and PIM mode in this condition , it doesn’t
matter flip is open or closed.
To turning your phone off, press for 3 seconds. Your screen remains blank while your phone is
off. When you open the flip you can use all applications in PIM mode.

TM910B User Guide
LG Electronics Proprietary
Using the battery
The Duration period of the battery(Slim Battery)
Digital -> continuous call : about 200 minutes, call waiting status : about 40 hours
Analog -> continuous call : about 90, minutes, call waiting status: about 13 hours
- This continuous call and call waiting time is real measured material in LG electronics laboratory.
Installing and Charging the battery
Installing the battery :
Gently press down on the top of the battery until it snaps in place of phone.
Charging the battery
Use the phone after charging the battery.
1) Put the plug of the charger into the electrical outlet.
- You must use 110V.
- Flash once a red light when the power is on.
Insert the phone with the battery installed into the slot.
- A red light on the charger lets you know that the battery needs charge.
A green light on lets you know that the charge is finished.
Checking the battery level
To check your phone’s battery level, look at the battery charge indicator located in the upper-right corner
of the phone’s display screen.

TM910B User Guide
LG Electronics Proprietary
Causion: - It generally takes about 3 hours to fully recharge.
When the red light is flickering, the contact may be wrong or the battery be out of order. In that case,
check the cleanliness of battery contact and try it several times (4~5). If it were still in trouble, consult to
the service center.
Effective control way of the battery
Use the right battery charger. (Using the wrong battery charger could cause damage to your phone or
explosion.)
Don’t attempt to disassemble or short-circuit the battery.
Keep and charge battery inside. ( In case of very hot or very cool condition, this battery may not be
recharged and the red light would be flickering. Further if this is extremely recharged, the duration for
usage might be shorten, because the voltage could be down due to this characteristics.
It is very dangerous that you keep your charger and battery near by fire.
If you drop or hit the battery, it might be damaged or the duration for usage might be shorten.
With the Lithium battery, it is OK to recharge the battery before it becomes completely run down.
Don’t store and charge the battery in this place. (hot place : near fire, in a car in summer etc. /cold
place/the place can be reached by children)
In a case of high temperature and humidity condition our safety system will work and the power will be
shut down. In that case, take the battery off from the body and try it again.
Keep the battery in room temperature after charging if you will not use for a long period of time. (The
battery may need recharging if it has not been used for a long period of tine.)
TM910B User Guide
LG Electronics Proprietary
Part 2. Phone Mode
Chapter 2. Basic Functions
Making a Call
1.Make sure your phone is on
-> If the phone is off, press to turn on the phone.
2.Dial the phone number with area code if you need.
-> If the KeyGuard is locked press for 2 second to unlock KeyGuard.
3.Press .
4. Press the Jog to active nenu then choose [Call]
->If the phone is locked, select [Unlock] from the menu enter the lock code.
5.To disconnect the call, press
6.If ”The phone has been restricted” is on the screen, your phone is restricted. You can limit your
outgoing calls to Emergency call and the numbers which is stored ib the PhoneBook in this condition..
Correcting Dialing Mistakes
If you make a mistake while dialing, press to erase one digit at a time. Or if you need to erase the
entire number at once, press for at least 1 second.
TM910B User Guide
LG Electronics Proprietary
Receiving Calls
1.When your phone rings, press
2.Highlight [Answer] when the menu is activated.
If press, , or Jog Up & Down while your phone rings, ringer or vibration is stopped
and you can answer the phone.
If Settings->Features->Any Key Answer is on, press any key except , or Jog Up, Down,
you can answer the phone.
3. To disconnect the call, press
Using Quick Mode
Manner Mode
1.IF you press in Standby mode for 2second, “Manner Mode Actived” displays on the screen
and it changes to Manner Mode.
-> When the phone is in Manner Mode, “Manner Mode” displays on the screen and Vibrate icon is
indicated.
-> When the phone is in Manner Mode, no key tone sound and ringer sound.
2.If you want to Deactive Manner Mode press for 2 second until “Manner Mode Deactived”
disappears from the screen.
TM910B User Guide
LG Electronics Proprietary
Keyguard Mode
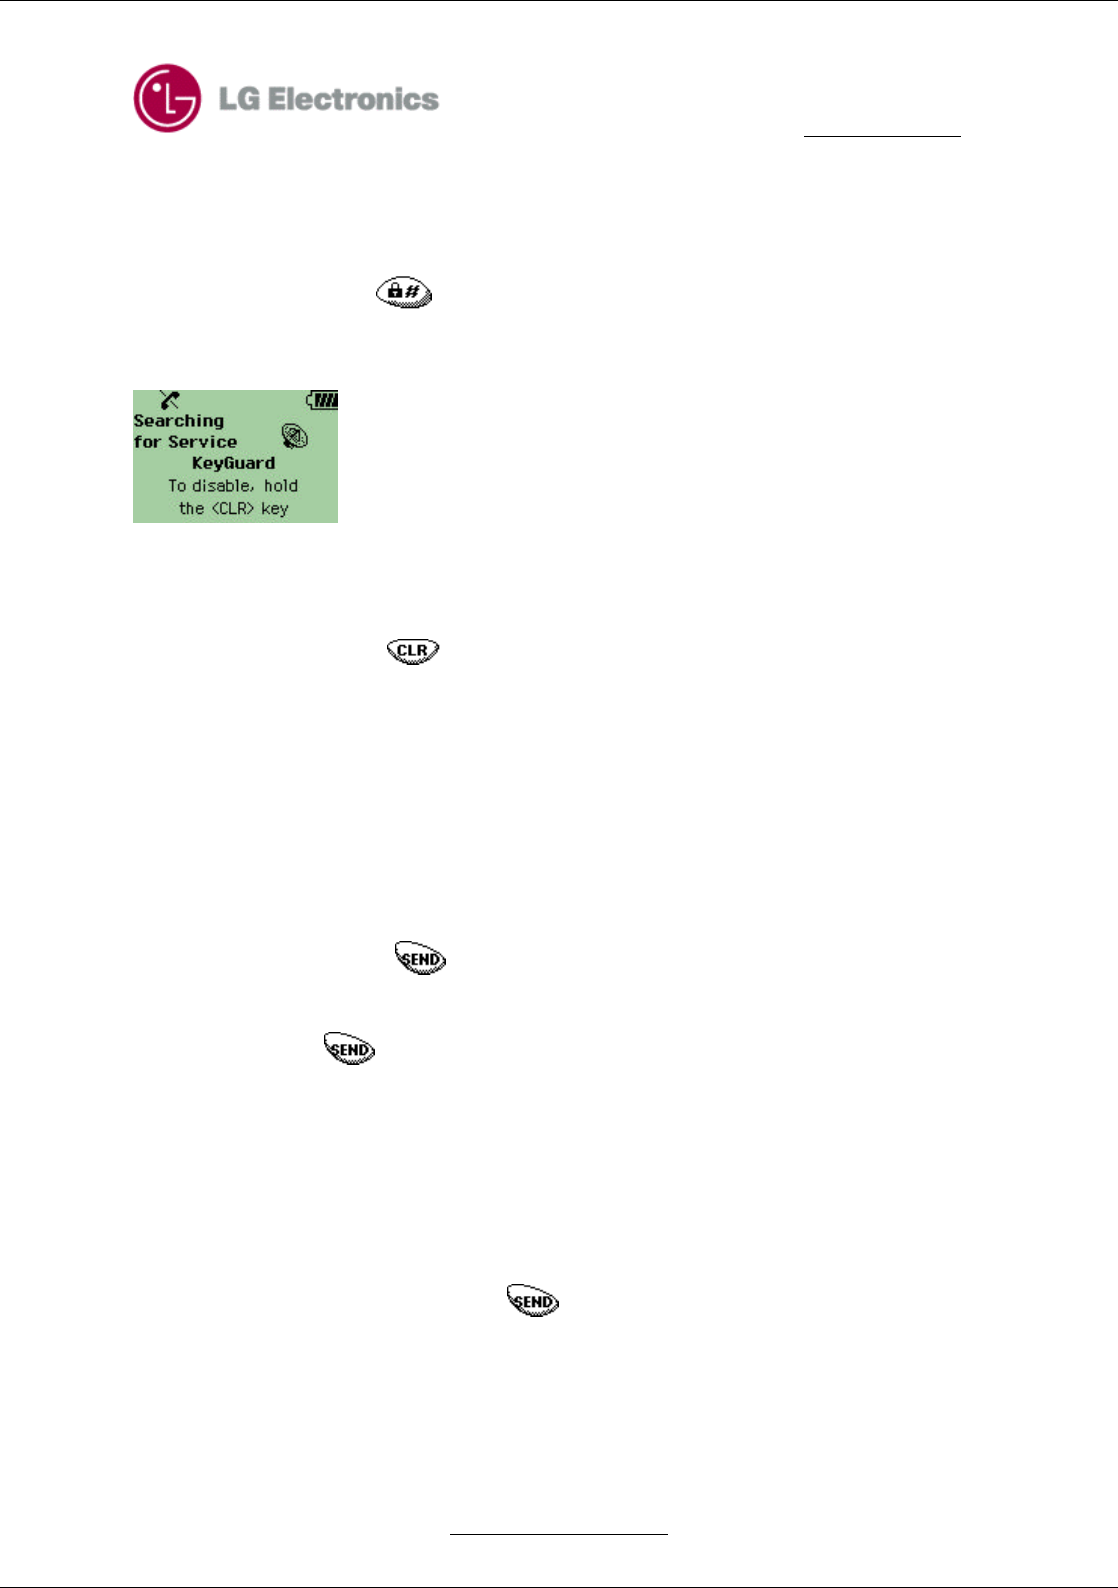
Keyguard is a safeguard against accidently dialing numbers.
1.To enable Keyguard, press for 2 seconds in standby mode. In this condition the screen is like
below.
KeyGuard only works when the flip is closed and any key is not inputted. When the flip is open, all key is
working even KeyGuard is set.
2. To disable Keyguard press for 2 seconds when the flip is open.
Responding to Call Waiting
Your cellular service may offer the call waiting function. While you are answering a call, you may hear
beeps indicating another incoming call. When call waiting is enabled, you may put the active call on hold
while you answer the other incoming call.
1.To receive waiting call, press
2.To switch call, press
Using 3-Way Call
With 3-way calling, you can talk to two different people at the same time.
1.If you want 3-Way Call during a call, press
2.The first caller’s phone is in hold condition.
3.Dial the second number you want to call.

TM910B User Guide
LG Electronics Proprietary
4. Press and tri to call.
5. When you’re connected to the second party, press once more to being your 3-Way Call.
6.If you press again, you’ll connect to the first people.
7.Press to disconnect both call.
Mute
Your caller does not hear you during a call.
1.Highlight Menu during a call using Jog.
2.Select [Mute] from the menu. [Mute] displays on the screen.
3.To cancel Mute mode, select [Unmute] from the menu.
Redialing Calls
1.You can redial the last number by pressing and holding .
Pause Feature
Generally when you a call automated system like voicemail boxes or banks you are required to enter a
password or calling card number. Rather than entering the numbers manually each time, you can store the
numbers in your Phone book, separated by special characters, called pause.
Hard Pause
After connect the call , Select [Send Tones] from the menu or press
This allow you to send digit after hard pause. It used “>” for the hard Pause.
TM910B User Guide
LG Electronics Proprietary
2-Sec Pause
The phone waits two seconds before sending the next string of digits. It used “,” for the 2-sec pause.
To use Pause, select [Hard Pause] or [2-Sec Pause] from the menu, during dial.
Adjusting the Volumes
You can adjust the volumes by using the Jog up and down in Phone Mode. The jog is used to adjust Key
Beep volume in call waiting mode and used to adjust Earpiece volume during a call. Jog Up key is for
volume up, Jog Down key is for volume down. Not during a call, Ringer Volume is adjusted in the menu.
Earpiece Volume can be adjusted in the menu, during a call.
Power Save Mode
When the phone is in an area without service for 15 minutes, it stops searching for service and enters into
the Power Save Mode. When your phone activates this features, “Power Save” is displayed on LCD. The
phone automatically checks for service periodically or you can check manually by pressing any key.
Emergency Dialing
You can dial Emergency number in a emergency situation even if keypad is locked or your account is
restricted
1. To call 911, dial and press or press and hold for 2 seconds.
2.Dial ”911” and press for Emergency Call.
The 3 numbers at Settings ->Security->Emergency Number are possible to Emergency Dialing.
Speed Dialing
With this feature, you can dial the 99 Phone Book entries through one or two key press.

TM910B User Guide
LG Electronics Proprietary
1.Press the number of the phone book location then press
2.Press and hold the key related to the phone book location for 2 seconds.
Speed Dial 9 is for Emergency Call, so you cannot change.

TM910B User Guide
LG Electronics Proprietary
Chapter 3. Managing Call History
The Call History list consists of outgoing, incomimg and missed call. It memories 12 recent call each
Category. It is updated as new numbers are added to the beginning of the list. Each entry may contain a
phone number, name, length of call and time stamp of when the call occurred. It makes redialing a
number fast and easily.
Phone Mode and PIM Mode have Call History list in common.
Viewing the Call History List
1. Highlight [Call History] from the menu and press JOG or “Ok”.
2. Highlight Outgoing Calls or Incoming Calls or Missed Calls then press JOG or “Ok”.
3. The list displays. Scroll to review the call history using Jog key or Navigation Up/Down key.
Viewing Call Detail
1.Highlight the phone number you want to review and press JOG or “Ok”.
2.Highlight Call [Time/Date]. The time, date and call length display. You can review receiving call time
on Incoming Call and Missed Call list, making call time on Incoming Call and Missed Call list, call
length on Incoming Call and Outgoing Call list.
Making a phone call from the recent call history
1. Highlight the phone number you want to make a call and move to Entry screen.
2. Highlight [Call] from the menu or press .
Connect to the Internal Phone Book
1. Highlight the phone number you want to make a call and move to Entry screen.
2. If the number is stored in Phone Book, [Alternate #] dispalys. If the number is not stored in Phone
Book, [save] displays.
3. If [Alternate #] is indicated, you can review the Phone Book Entry which is saved the phone number.
4.IF [Save] is indicated, you can save the phone number to the Phone Book.
Erasing a Call History Entry

TM910B User Guide
LG Electronics Proprietary
Erasing each Item
1. Highlight the phone number you want to erase from the Call History List and go to the Entry screen.
2. Select [Erase].
3. Select [Yes].
Erasing all Category
1. Highlight [Call History] from the menu.
2. Highlight [Erase History].
3. Highlight Outgoing Calls or Missed Calls you want to erase.
4. Select [Yes].
Viewing the Air Time
You can review the calling time in Home Service area, calling time in Roaming Service area and total
calling time. You can reset Home Calls time and Roam Calls time. The time on the screen means
reckoned time from reset recently.
1. Highlight [Call History] from the menu.
2. Highlight [Air Time].
3. Highlight Home Calls or Roam Calls or Life Call Timer you want to review.
4. If you want to reset the call time in Home Calls or Roam Calls, select [Reset] from the menu.
Chapter 4. Internal Phone Book
Internal Phone Book can store telephone number information for about 4,000 peoples maximum. Each
person can have 5 telephone numbers. Each Phone Book Entry can have 32 letters for the names of
TM910B User Guide
LG Electronics Proprietary
people, each telephone number can have 32 letters maximum. Among these Phone Book data, telephone
numbers often used can save as Speed Dial. Speed Dial can store 99. Besides, It is possible to record 20
Voice Dial Entry among the telephone numbers stored in Phone Book.
The data of Internal Phone Book is same with the date Contacts application in PIM Mode.
Contacts application of PIM Mode can make a phone call, change and store data. Internal Phone
Book can't change the data directly and offer only function to erase, search data and make a phone
call in Phone Mode.
Finding a number using a person’ s name (Look Up Name)
1. From the main menu, highlight [Phone Book].
2. When select [Look up Name] people’s name list appears. Names of people in the Phone Book that start
with that letter are displayed at the top of Phone Book list.
3. Scroll to the name you want or enter the second letter of the name as it appears in the Phone Book.
Names of people in the Phone Book starting with that two-letter combination are displayed at the top of
the Phone Book.
4. Highlight the name you want then press Jog or “OK”.
5. Detail Screen of Phone Book Entry you choose appears. If the Entry have two number or more,
Alternate Phone Numbers display on the screen. When this Entry is set Secret Entry, [Secret] display
instead of phone number.
Make a Phone Call from the Phone Book
1.Select the name you want to make a phone call from the Phone Book in Phone Mode and go to Detail
Screen
2. Highlight [Call] or press .
Editing a Phone Book Entry
1. Highlight the name you want from the Phone Book in Phone Mode and go to Detail Screen
.
2. Highlight [Edit]. “Opening the flip” massage displays, when the phone is in Phone Mode.
Erase a Phone Book Entry
1. Highlight a name you want from the Phone Book in Phone Mode and go to Detail Screen.

TM910B User Guide
LG Electronics Proprietary
2. Highlight [Erase Entry] and “Erased” appears on the screen to confirm that you have successfully
deleted the entry.
3. Highlight [Yes].
Speed Dialing
1. Highlight [Phone Book] from the menu.
2. Highlight [View Speed Dial] and the whole list of Speed Dial displays. Speed Dial Entry is arranged in
Entry Index order. Speed Dial can be updated 99.
3. Use Scroll Up/Down and search Speed Dial Index you want in whole list or input index using keypad.
In case user input number, Index come to top of menu, menu is updated continually
4. Highlight the list and press OK or JOG.
5. Highlight [Call] in Speed Dial screen and make a call to the number
6. If you select [Contact Info], Phone Book Entry screen displays so that review the number saved in the
Entry
Listening to a Voice Dial
1. Highlight [Phone Book] from the main menu.
2. Highlight menu [Voice Dial Entry] and the Voice Dial list appears. If there is no Voice Dial recorded
“No Voice Dial Entry” alert is indicated.
Viewing My Phone number
1. Highlight [Phone Book] from the main menu.
2. Highlight [My Phone #] and you can review your Phone number.
Chapter 5. Menu Features
Menu Maps
Outgoing Calls
Incoming Calls
Missed Calls
Air Time
Home Calls
Roam Calls
Life Call Timer
Erase History
Outgoing Calls
Incoming Calls
Missed Calls
All Calls
Inbox
Outbox
Voicemail
Call
Detail
Clear Count
Erase All
Look Up Name
View Speed Dial
Voice Dial Entry
My Phone #
Normal
Meeting
Car
Silent
Noisy
Custom1
Custom2
Edit
TM910B User Guide
LG Electronics Proprietary
Messages
Refer to Chapter 13, Message.
Environment
Environment is setting beforehand in consideration of the user’s situation that can be happened. As you
customize the Environment you need, you can set Audio volume and Backlight easily and quickly.
TM910B provide 7 Environment like below.
- Normal
- Meeting
- Car
- Silent
- Noisy
- Custom1
- Custom2
Each Environment has numerical value of Ringer, Earpiece, Key Beep Volume and Backlight Setting.
You can change the Setting each Environment.
The name of Normal, Meeting, Car, Silent and Noisy Environment are reserved, Custom1 and Custom2
Touch Calibration
Voice Privacy
Edit

TM910B User Guide
LG Electronics Proprietary
can be changed the name what you want.
When you choose one Environment, audio volume and Backlight setting is changed.
Tap [Edit] from the menu and it moves to Environment Category in Setting of PIM Mode.
For more information about editing Environment, see Environment at Setting.
Touch Calibration
Refer to Stylus in Setting.
TM910B User Guide
LG Electronics Proprietary
Part 3. PIM Mode
Chapter 6. Contacts
You learned how to making calls to the numbers stored in Internal Phone Book. The data of Internal
Phone Book is based on the data stored in Contacts application. Call Log stores contents based on the data
of Contacts and in Databook, you can add peoples stored in Contacts to Attendee. In addition, the data of
Contacts is the most fundamental data that use different Application of TM910B, because Message
application sends a message to phone number and Email Address saved in Contacts.
Contacts can use phone number information about maximum 4000 people. Each person can have
maximum 5 phone numbers and register maximum 3 Email Address. Each Phone Book Entry can input
maximum 32 characters of people’s name and each phone number is possible to input maximum 32
characters. Email Address can be stored 48 characters. People saved in Contacts are controlled to be
classified to 7 Groups.
Among the Contacts data, phone numbers often used can be saved to Speed Dial. Speed Dial is possible
up to 99. In addition, among the phone numbers saved in Phone Book can be recorded 20 Voice Dial
Entry.
You can also synchronize your contacts with the contacts you have stored in Address Book of personal
computer application like Microsoft Outlook 97,98, 2000.
Adding Contacts
1. If main menu appear in PIM mode, tap . If in the another application screen, tap “Goto” and then
tap “Contacts” .
2.Choose the item from [New] in the ”Contacts” list screen. Or tap “Menu” and then tap[New].
2.”Contacts” Edit screen appears.
Adding a Name
TM910B User Guide
LG Electronics Proprietary
1 Tap [Name] in ”Contacts Edit” screen or tap field next to icon. The Virtual Keyboard appears.
2.Input a name of Contacts Item you want to add to your Contacts.
3.Tap [Done] in Virtual Keyboard.
Adding a Email Address
Contacts Items can have 3 Email Addresses.
To add Email Address
1.Tap in ”Contacts” Edit screen list and then choose one among Email1, Email2, Email3.
2. Tap the empty line next to icon and The Virtual Keyboard appears.
3.Enter the Email Address.
4. Tap [Done] in Virtual Keyboard.
5.If you want to input another Email Address, tap icon and then choose another label. Enter the Email
Address.
Adding Phone Numbers
1.Select the type of phone number in ”Contacts” Edit screen.
Type of phone number : Home, Home2, Work, Work2, Mobile, Fax, Fax2, Pager, Other
2.Tap the empty line to the right of phone type. The Virtual Keyboard appears.
3.Enter the phone number.
4. Tap [Done] in Virtual Keyboard.
Adding an ID Ringer
1. Tap pop-up next to icon in the ”Contacts” Edit screen. The ring types are displayed.
2.Tap the ring type you want used for the contact.
When the contact calls you, the phone rings with the ring type selected.
Setting up Groups
1. Tap pop-up next to icon in the ”Contacts” Edit screen. A list of groups appears.
2. Tap the group you want to file the contact into.
If you don’t select the specific group when you save, the contact belongs to the “Unfiled” group.

TM910B User Guide
LG Electronics Proprietary
Adding a Address
1. Tap the empty line next to icon in the ”Contacts” Edit screen and The Virtual Keyboard appears
2.Enter the Address.
3.Tap [Done] in Virtual Keyboard.
Adding Nores
1. Tap the empty line next to icon in the ”Contacts” Edit screen and The Virtual Keyboard appears
2.Enter any notes pertaining to the contact.
3. Tap [Done] in Virtual Keyboard and “Contacts” Edit screen appears.
4. Tap [Done] again. Contact inputted is saved and Contacts list screen appears.
Make Secret
You can make a phone number to Secret Entry, in order not to that the phone number saved in Contacts is
changed by other people.
The phone number assigned to the Secret Entry is not displayed, but [Secret] is displayed. You can still
make and receive calls, but it is impossible to edit or delete before input the Lock Code.
1.Tap “Menu” in ”Contacts” Edit screen.
2.Tap [Make Secret].
Look Up Contacts
1.Tap “Menu” in ”Contacts” Edit screen.
2.Tap [Look Up] and the Virtual Keyboard appears.
3.Enter the name of person you are searching. As you add each letter, the display updates to show names
with the same characters.
4. Select the name of person you are searching.
5.The phone numbers for that person appear.
6.To view more details on the person, tap [Detail] and it moves to Edit screen. You can change by using
Virtual.
Making a Phone Call from the Contacts
1.Tap the name of group contained the people you want to call or tap [All] in ”contacts” list screen.
2.Highlight the tap which have the first letter of the name.
3.Select the name you want to call from the list.

TM910B User Guide
LG Electronics Proprietary
5.The selected name and the phone number of that person is displayed.
6.Tap to the right of the phone number and you can make a call.
Erasing Contacts
1.Go to “Contacts” Edit screen you want to erase.
2.Tap ”Menu”.
3.Tap [Erase] and the “Erase Contacts” screen appear.
4.Tap [OK].
Editing Contacts Group
1.Tap [Edit Group] from the top right of Contacts. Or tap “Menu” then tap [Edit Group] and “Edit
Group” screen appears.
2.Tap the group name you want to change. “Group Name as” keyboard appears..
3.Enter the new name for the group..
4.Tap [Done] and “Edit Group” screen reappears.
5.Tap [OK].
Viewing Speed Dial
TM910B can have total 99 Speed Dial Entry. You can only assign the people saved in Contacts to the
Speed Dial.
To view Speed Dial list, tap [Speed Dial] to the upper-right of Contacts. Speed Dial List appears.
Assigning Speed Dial
1.Tap [Speed Dial] in the Contacts.
2.Tap [Empty] Item from the list. “Speed Dial Edit” appears.
3.Select ”Speed Dial #” next to label. Speed Dial Index list is displayed.
4.Select Speed Dial Index you want assign.
5.Select the field next to the ”Name” label. “Look up Contacts” keyboard apprers.
6.Enter the name of the Contacts you want assign to Speed Dial.
7.Select name and “Speed Dial Edit” screen reappears. Name, Number and Phone Type is displayed
according to Contact you select.
Making a call from the Speed Dial
1.Go to the Speed Dial list in Contacts.

TM910B User Guide
LG Electronics Proprietary
2.Search Speed Dial Entry.
3.Tap from the right of Speed Dial Entry you want to make a call. You can call to the number you
want.
Erasing Speed Dial
1.Select Entry from the Speed Dial list in Contacts. “Speed Dial Edit”appears.
3.Tap [Erase]. “Erase Speed Dial” appears.
3.Tap [OK] and Speed Dial list is displayed.

TM910B User Guide
LG Electronics Proprietary
Chapter 7. Call History
The Call History list consists of outgoing, incoming and missed call. It stores 12 recent call at each
Category. Each list arranges in recent call order. Each entry may contain a phone number, name, length of
call and time stamp of when the call occurred. It makes redialing a number fast and easily.
Viewing Call History Item
1. If main menu appears in PIM mode, tap .
2.Select pop-up from the top right part of Call History screen.
3.Select the Category you want to view. The list of the Category appears.
Viewing Call Details
1.Select pop-up from the top right part of Call History screen.
2. Select the Category you want to view. The list of the Category appears.
3.Tap the phone number you want to view. The Call Detail screen appears with the contact name, (if it
exists) phone number, date, time and duration.
Making a Call from the Call History List
Making a Call from the Call History List
1. Find the phone number you want to call.
2.Tap the icon in which next to the phone number. You can call to the number.
Making a Call from the Call Detail
1.Find the phone number you want to call.
2.Tap the phone number you want to call. The Call Detail screen appears.
3.Tap [Call] to place the call.
If the item of Call History doesn’t have the number or it is Data/ Fax/Browser Call, [Call] doesn’t
appear.
Adding Phone Numbers to the Contacts

TM910B User Guide
LG Electronics Proprietary
Adding New Contacts item
1. Go to Call Detail of phone number not saved in Contacts.
2. Select [Add New Contacts]
3. When "Add phone number as new contact" is appeared, select [OK].
If you don’t want to add the number to the Contacts, select [Cancel].
4. To save in the Contacts tap [done], and Call Detail screen appears with name of people.
Adding Existing Contacts Item
1. Go to Call Detail of phone number not saved in Contacts.
2. Select [Existing Contacts] and Virtual Keyboard appears for selecting Contacts Item
3. Select the name you want using scroll or enter the second letter of the name as it appears in the Phone
Book.
4. In case of the phone number of Call History is added to selected people, the message displays and
select button [OK]. If you don’t want to add the number in the Contacts, select [Cancel].
5. Tap [Done], and phone number saved in the Contacts. Call Detail screen appears with name of people
Finding Alternate Phone number from the Contacts
1. Go to Call Detail of phone number saved in Contacts.
2. Select [Alternate #] and move to [dial view] of Contacts. In this screen you can see the different phone
numbers registered to the person. You can also make a call as selecting icon on the right part of each
phone number.
TM910B User Guide
LG Electronics Proprietary
Chapter 8. Date Book
In TM910B is supporting Date Book application to be able to control individual daily schedule. You can set
up your daily planner, appointment, appointment attendees and also set alarms for appointments.
Schedule can designate 30 a day and Date Book Application can store and control schedule up to total
4000.
You can also synchronize your contacts with the contacts you have stored in Address Book of personal
computer application like Microsoft Outlook 97,98, 2000.
Adding Appointments
1. If main menu appear in PIM mode, tap If in the another application screen, tap “Goto” and then
tap “Date Book”
2. Search [New] item of Date Book list screen and select item, or tap Menu and select [New] menu option.
3. Datebook Edit screen appears.
Adding a date
1. Tap [Date] in ”Datebook Edit” screen or select field next to icon. Select Date screen appears.
Fundamentally today is selected.
2. In case year isn't notified, move to the year you want by using ¢¸¢º.
3. Tap the month in which the appointment will take place The Calendar for that month appears.
4. Tap appointment date.
5. Tap [OK] and date selected displays instead of [Date] in Datebook Edit screen. At this time Start time
is indicated in 30min unit to the nearest time of present, End time is indicated 1hour late time than the
start time .
Adding a Start and End Time
1. Tap [Time] in ”Datebook Edit” screen or select field next to icon. The set time screen appears.
TM910B User Guide
LG Electronics Proprietary
2. Tap Start Time or End Time.
3. Tap the hour in which appointment starts and ends from the Set Hour field. One column is AM the
other column is PM. Focus automatically move to minute when you finish input hour.
4. Tap the minute from the Set Min field. The left line is 10min unit and the right line is 2min unit.
5. Tap [OK] and time you input is notified instead of [Start Time],[End Time].
Setting an Alarm
1. Tap [Alarm] in ”Datebook Edit” screen or select field next to icon. The “Set Alarm” screen
appears
2. Select one among Normal Alarm, Call Alarm, Message Alarm of Alarm Type
- Time Alarm : alarm rings at setting time of schedule
- Call Alarm : alarm rings at setting time, can call the first person added to Person.
- Message Alarm : alarm rings at setting time, can send SMS stored Contents to peoples added to Person.
Call Alarm or Message Alarm only display when you select people from Person.
3. Select one among radio buttons.
- None : no alarm will sound
- On Time : an alarm will sound at the exact time that appointment is to happen.
- 00:15 before : an alarm will sound 15 minutes before the appointment is to happen.
4. If you select ”00:15 before”, you can change the amount of time to be more or less. To change the
amount of time, tap the numbers related to the time in the onscreen keypad.
5. Tap [OK].
The appointment that set up alarm is indicated icon in the “Datebook” list screen..
Defining an Appointment as Repeating
1. Tap [Alarm] in ”Datebook Edit” screen or select field next to icon. The “Set Repeat” screen
appears
2. Tap either Day, Week, Month or Year. Depending on how often you want the appointment is repeated,
the bottom of the screen is different.
3. Set repeating period you want. Refer to the below table.
TM910B User Guide
LG Electronics Proprietary
period possible option(eg) definition
Every ¢¸ 0N ¢º Day(s) Repeat every N day Day
Weekday Repeat only from Mon to Fri a week
Week Possible select by each day Repeat only a selected day
Every ¢¸ 0N ¢º Month(s)
Nth Day
Repeat the same day every N month Month
Every ¢¸ 0N ¢º Month(s)
Nth Week day
Repeat the same week day every N month
Every year Same Day, Same
Month
Repeat only the same month and day every year Year
Every year N Same week day,
Same Month
Repeat only the same month and week day every
year
£ª£ª£ª options such as ¢¸, ¢º can designate period as using ¢¸, ¢º
; each time press ¢¸ once, value reduce one and each time press ¢º once, value increase one
4. Select the date to the right of Until. One of screen appears among Daily Until, Weekly Until, Monthly
Until, Yearly Until screen in order to set the end date of repeating.
5. Input repeating end date and tap [OK]. Set Repeat screen reappears.
6. Tap [OK] and return to the Datebook Edit screen.
7. If you tap [None] in the Set Repeat screen, setting is canceled and “None” appears in the Datebook Edit
screen.
Defining an Appointment as Repeating is indicated icon in the “Datebook” list screen..
Adding person
1.To add appointment person, tap [Person] in ”Datebook Edit” screen or select field next to icon. The
“Meetings Attendees ” screen appears
2.Tap [Add Attendee] and “Lookup Contacts” screen appears. You can add Attendee.
3. By scrolling or inputting name at keyboard, search name you want.
4. Repeat [Add Attendee] process. You can add 5 Attendee.
5. In case of adding wrong Attendee, select the name by using scroll in Meetings Attendees screen and
tap [Erase Attendee] to delete the Attendee.
6. Tap [Done] and the Datebook Edit screen appears.
TM910B User Guide
LG Electronics Proprietary
Adding a Location
1.Tap [Location] in ”Datebook Edit” screen or select field next to icon. “Set Location” Virtual
Keyboard appears
2. Enter the name of the location.
3. Tap [Done] and the Datebook Edit screen appears.
Adding a Description
1.Tap [Contents] in ”Datebook Edit” screen or select field next to icon. “Contents Virtual Keyboard”
appears
2.Enter the description.
3.Tap [Done] and Datebook Edit screen appears.
Changing the Datebook Display Form
Basic screen of “Datebook” is Day View screen but you can choose to view for a week or for a month.
Week View
Week View shows appointments for an entire week. This view lets you quickly review your appointments
and available time slots. In addition, you can spot appointment conflicts and overlaps with this view.
1.Go to the ”Datebook” main screen.
2.Tap ”Menu”.
3.Tap [Week View] and the screen is changed to the Week View screen.
4. By using “¢¸”, “¢º”, move to the previous week or next week.
5. Press scroll button or UP/DOWN key and you can change time zone.
6. Press LEFT/RIGHT Key and you can change date by the day.
7. Tap the date you want to see in detail and it moves to “Day View” screen of selected date.
8. If you select empty time zone and it moves to the Datebook Edit screen to add a schedule at the
selected time zone. To cancel, select Revert of Menu and tap [Done].
9. If you select the time zone contained schedules, Start/End Time and Content are displayed and you can
change time or date of the schedule. If the schedule is overlapped at the same time zone, the schedule of
the highest priority order is selected.
The priority order is like below.
Non repeat>Repeat, Day > Week > Month > Year at non repeat, The previous inputted schedule is prior at
the same condition.

TM910B User Guide
LG Electronics Proprietary
Month View
Month View shows the calendar of your events for an entire month. Daily schedule is notified to dots at
the down part. Schedules are displayed maximum five.
1. Go to the main screen of Datebook
2. Tap “Menu”.
3. Tap [Month View] and the screen is changed to Month View.
4. Using “¢¸”, “¢º” you can move to the previous month or next month.
5. Press scroll button or UP/DOWN/LEFT/RIGHT key and you can change date.
6. Tap the date you want to see in detail and it moves to “Day View” screen of selected date.
Move to Today
Using scroll button, you can move to another day, week or month in Day View, Week View and Week
View. If you want to check today’s schedule, to do so
1.Tap ”Menu”.
2.Tap [Today] and the screen is changed to the today’s Day View, Week View or Month View contained
today.
Erasing a Date Book
<Erasing the selected appointment>
1.Tap the box to the left of the appointment you want to erase.
2.Tap “Menu”
3.Tap [Erase]. The “Erase Datebook” screen appears.
4.Tap [OK].
5. If you would like to erase a schedule which is set by repetition option, there will be a message whether
you want to get rid of the schedule for one day or every one.
- Current : only the schedule on a day will be removed and the one for other day will remain
unchanged.
- All : Every schedule repeated will be removed. So the schedule for other day will also be
removed.
- Cancel : the selected schedule will not be changed.

TM910B User Guide
LG Electronics Proprietary
<Erasing old appointment>
1.Tap “Menu”.
2.Tap [Purge] and the “Purge” screen appears.
3. Tap the down arrow and select the period.
4. Tap [OK].

TM910B User Guide
LG Electronics Proprietary
Chapter 9. To Do List
TM910 have To Do List Application. You can manage you time more effectively by using the To Do List.
There are 2000 list in To Do List application.
Adding a Task to the To Do List
1. If the main menu appears, tap icon. If the main menu doesn’t appear, tap Goto and then tap “To
Do List” from the Application List.
2. Search [New] item from the ”To Do List” screen and select item, or tap Menu and select [New] menu
option.
2.”To Do Note Edit” Virtual Keyboard appears.
3.Enter the task that you need to complete.
4.Tap [Done]. The “To Do Edit” screen appears.
Adding a Due Date
1.Tap the line of [Due Date] in the “To Do Edit” screen. The “Select Due Date” screen appears.
When you input a Due Date first, the date set by default is today.
2.Tap the year, month and day in which you need to complete the task.
3.Tap [OK] and the “To Do Edit” screen appears. The due date you input displays instead of [Due Date].
4.Tap [Done]. The “To Do Edit” screen appears.
Task items listed by the date in which they must be complete. Tasks that do not have dates are listed
last. If there are old tasks in the list, “Past” is displayed.
Changing a To Do Item
To Do Item can change the task name or the Due Date of the task.
To change a To Do Item, while in the “To Do List” screen, tap the task you want to change. Perform the
following steps :
Changing a Due Date

TM910B User Guide
LG Electronics Proprietary
1. Tap the line of [Due Date]. The “Select Due Date” screen appears.
2. Input a new Due Date.
3.Tap [OK]. The “To Do Edit” screen appears.
4.Tap [Done]. To Do List is displayed and changing items are indicated.
Completing a Task
After completing a task, you can mark it as being completed.
While in the To Do List screen, tap the box to the right of the task. A check mark displays in the box,
indicating the task is complete.
The check sign means your operation has been done. Since the sign can be toggled, you can go back to
the unfinished job if the sign touched again.
Viewing a To Do Item
There are 3 methods by which you can choose to display tasks.
1.While on the To Do List, tap pop-up on the top right of screen.
2. There are 3 options. Tap the type of task you want to view.
- All : to show all storing To Do Item.
- Active: to show uncompleted tasks among the storing To Do Item
- Completed: to show completed tasks among the storing To Do Item.
Erasing a To Do Item
Erasing while in the main list screen
1. While in the main list screen, tap the box to the right of the task.
2. Tap “Menu”.
3. Tap [Erase]. The “Erase To Do List” screen appears.
4. Tap [OK].
Erasing while in the “To Do Edit” screen
1. While in the “To Do Edit” screen, tap “Menu”
2. Tap [Erase]. The “Erase To Do List” screen appears.
3. Tap [OK]. The To Do List screen appears without the task.
Chapter 10. Memo Pad

TM910B User Guide
LG Electronics Proprietary
The Memo Pad provides a place to take notes that not associated with records in the Data Book, Contacts
or To Do List.
Using it like a piece of scratch paper to make a note during a call.
Memo Pad application can save 2000 text memo. You can input 1000 letter in each meno.
Adding a Memo
1. If the main menu appears, tap icon. If the main menu doesn’t appear, tap Goto and then tap
“Memo Pad” from the Application List.
2. Search [New] item from the ”Memo Pad List” screen and select the item, or tap Menu and select [New]
menu option.
3. ”Memo Edit” Virtual Keyboard appears.
4. Enter the memo that you need to add.
5. Tap [Done]. The “MemoPad Edit” screen appears.
6. Tap [Done] again. The Memo Pad List screen apprars with the new memo.
Memo List listed by the time, so new memo is listed first.
Finding a Memo
If you have too many lists of memo, you may not want to scroll through the list. In this case use, Finding
a Memo
1.While in the Memo Pad List screen, tap “Menu”.
2.Tap [Find]. “Find” Virtual Keyboard appears.
3.Enter any information that you know is in the memo.
4.Tap [Done]. The Search Results screen appears.
5.Tap the memo that you want to review. The “Memo Pad Edit” screen appears.
Erasing a Memo
Erasing while in the main list screen
1. While in the main list screen, tap the box to the left of the task you want to erase. You can select
memo more than 2 at once. If you don’t select the box, it is considered the changed item to be
erased. You can also use Jog key to select items.
2. Tap “Menu”.
3. Tap [Erase]. The “Memo Erase” screen appears.
4. Tap [OK] to erase the memo. The Memo pad List screen appears without the task.

TM910B User Guide
LG Electronics Proprietary
Erasing while on the “Memo pad Edit” screen
1. While on the “Memo pad Edit” screen, tap “Menu”.
2. Tap [Erase]. The “Memo Erase” screen appears.
3. Tap [OK] to erase the memo. The Memo pad List screen appears without the task
TM910B User Guide
LG Electronics Proprietary
Chapter 11. Sketch Pad
Sometimes you may need to make a note that is not text, like map. Now you can use your TM910B phone
to create the sketch and save it electronically. It is possible to store 24 sketches of 160 * 160 dots.
Creating a New Sketch
1. If the main menu appears, tap icon.
2. Search [New] item from the main list screen and select the item, or tap Menu and select [New] menu
option.
If 24 data are stored in the Sketch Pad, [New] list item or [Menu] list item doesn’t appear.
3.The Sketch Edit screen appears. You can now start creating your drawing.
Naming a Sketch
A sketch is named [Unnamed] in default. To give your sketch a name
1.While in the ”Sketch Edit” screen, tap “Menu”. Tap “Rename” or enter the title of the sketch on the top
right part of screen.
2. Enter the title of the sketch using Virtual Keyborad and tap [Done].
3.New sketch name displays on the top right part of screen. This name also displays on Sketch Pad List
screen.
Adding Text to a Sketch
1. While in the ”Sketch Edit” screen, tap . The “SketchPad Text” Virtual Keyboard appears.
2.Enter the text (12 characters maximum) that you want to add.
3.Tap [Done]. The ”Sketch Edit” screen reappears.
4.Tap the text indicated in and drag it to where you want to place in the drawing.
5.Tap on a blank area of the screen. The text indicated in disappears.
Drawing Lines
1. While in the ”Sketch Edit” screen, tap .
2.Tap the right arrow of to select the line width you want.
3.To draw the line, drag the stylus on the screen to create the line.
4.When you take away the stylus from the screen, the line which you select width create.
TM910B User Guide
LG Electronics Proprietary
Drawing a Freeform Line
1. While in the ”Sketch Edit” screen, tap .
2. Tap the right arrow of to select the line width you want.
3. Drag the stylus on the screen to create the freeform line
Erasing Part of a Sketch
To erase an area of the sketch
1. While in the ”Sketch Edit” screen, tap .
2. Tap the right arrow of to select the eraser size you want.
3. Drag the stylus over the area you want to erase.
Zooming In / Out of a Sketch
1.To zoom in on a drawing, while in the ”Sketch Edit” screen, tap . The drawing is enlarged.
2. To zoom out of a drawing, while in the ”Sketch Edit” screen, tap . The drawing is scaled down..
Moving Part of a Sketch
1. While in the ”Sketch Edit” screen, tap .
2. Drag the stylus to create the square on the part of sketch you want to move.
3. Tap and drag the square to move to the area you want.
4. When you take away the stylus from the screen, the part of sketch you select displays on new area you
want in the screen.
Erasing a Sketch
Erasing while in the main list screen
1. While in the main list screen, tap the box to the left of the drawing you want to erase. You can
select more than 2 at once. If you don’t select the box, it is considered the changed item to be
erased. You can also use Jog key to select the drawings.

TM910B User Guide
LG Electronics Proprietary
2. Tap “Menu”.
3. Tap [Erase]. The “Sketch Erase” screen appears.
4. Tap [OK]. Sketch Pad List reappears with the sketch name gone.
Erasing while on the “Sketch Edit” screen
1. While on the “Sketch Edit” screen, tap “Menu”.
2. Tap [Erase]. The “Sketch Erase” screen appears. Tap [OK]. Sketch Pad List reappears with the
sketch name gone.

TM910B User Guide
LG Electronics Proprietary
Chapter 12. Browser
The Contents of Browser
TM910B User Guide
LG Electronics Proprietary
Chapter 13. Messages
When the power is on, TM910B is always ready for receiving Text Message, Page and Voice mail. And it is
possible to send a text message to 10 people each or Email. TM910B can store 2,000 Text Message and
Page maximum and a message can have 160 characters maximum.
Category
- Inbox : Received messages are stored. Messages are arranged in received time order in inbox category.
The messages not to checked are attached “*” sign
- Outbox : messages written by user for sending and messages sent already are stored. Within this
Category You can input a new message or send again editing message sent already. The meaning of icons
attached to each message is like below..
Save
Send – Messages saved in Short Message Center(SMC) have been
transmitted
Fail
Delivery – Message has been delivered
Cancel – Allow you to cancel sending a message
Multi-Sending Message
Voicemail
Browser Alerts : See Browser
New Message Alert
TM910B User Guide
LG Electronics Proprietary
There are several ways your phone alerts you for new messages.
1. “Alert” appears on the screen.
2. Sound, Vibrate, or Backlight as setting.
3.Flash Green LED.
4. icon is indicated in Status Bar, if Text Message. icon is indicated in Status Bar, if Voicemail
Viewing a Incoming Text Message
1.Tap icon from the main menu in PIM mode.
2.Select pop up the Category on the top right part of the Message list screen and the Category of Message
is indicated.
3.Select Inbox. The incoming text message list displays.
4.If you select the massage you want to check, the “Message View” screen appears. There are arriving
time, sender’s name and massage.
Reply to Message
To reply to the phone number or Email Address
1.Tap “Menu” form the “Message View” screen of Inbox massage.
2.Tap [Reply].
[Replay] menu is only displayed when there is sender’s name.
3.The number from the incoming massage displays for sending a message.
4. IF you tap [Cancel] from the menu, it goes back to the “Message View” screen.
5.Input a massage and tap [Send] to send the massage.
Forwarding Message
To send the incoming massage to another person
TM910B User Guide
LG Electronics Proprietary
1. Tap “Menu” form the “Message View” screen of Inbox massage.
2.Tap [Forward].
3. IF you tap [Cancel] from the menu, it goes back to the “Message View” screen
4.The Message Content form the incoming message is displayed to Message Content of message you
want to send.
Editing a Message
1.Go to the “Outbox list” screen in “Message”.
2.Select [New] from Outbox list screen or tap “Menu” then select [New]. The “Message Edit” screen
appears.
Inputting recipient
1. Tap [To Person] and enter the letter on ”Message Edit” screen or tap field next to icon. The “Send
To” screen appears
2.It is possible to input 10 people. It is displayed how many people inputted on the top part of “Send To”
screen.
2.1 If input the number by using keyboard. : Tap and the Virtual keyboard appears. Enter the
number then tap Done .
2.2 If input the number form the Contacts : Tap and the Look Up Contacts screen that you can look
up the recipient by name appears. Highlight the name you want to input and tap [Done].
2.3 After inputting the phone number, go to the “Send To” screen. You can review how many phone
number is inputted and the icon appears next to the phone number. To erase the inputted phone number,
tap .
3.Tap [Done]. The “Message Edit” screen appears. The name that you select displays next to icon.
Inputting Callback Number
1.While in the “Message Edit” screen, tap field next to icon. The “SMS Callback Edit” Virtual
Keyboard appears.
2.Enter the Callback number.
TM910B User Guide
LG Electronics Proprietary
3. Tap [Done]. The “Message Edit” screen appears. The Callback number that you input dispays next to
icon.
If Outbox Setting->Default CB Number is “On”. The Phone Number of this phone is in the Callback
number in default.
Inputting a Text Message
1. While in the “Message Edit” screen, tap field next to icon. The “SMS Message Edit” Virtual
Keyboard appears.
2.Enter Message.
3. Tap [Done]. “Message Edit” screen appears. The letter ‘s number of message displays in [] next to
icon and the content of message displays.
Setting the Message Priority
1. While in the “Message Edit” screen, tap pop-up next to icon. The “Message Priority” displays.
There are Normal/Interactive/Urgency/Emergency Message Priority in TM910B.
2.Select Priority you want.
Setting the Message Validity
Indicates the validity of message delivered to the Short Message Center(SMC) without being transmitted
to the sending address for certain period of time. Those message will be deleted within the programmed
time frame.
1. While in the “Message Edit” screen, tap pop-up next to icon. The “Message Validity Time”
displays.
There are 30 Minutes/1 Hour/2 Hours/12 Hours/1 Day/2 Days/3 Days/Continue provide Validity time in
TM910B.
2.Select Validity you want.
Setting the Deferred time
You can set Deferred Time so that you defer sending a message until the deferred time you set past.
1. While in the “Message Edit” screen, tap pop-up next to icon. The “Deferred Time” displays.
There are Immediate/After 3 days/After 2days/After 1 day/After 12 hours/After 2 hours/After 1

TM910B User Guide
LG Electronics Proprietary
hour/After 30 minutes Deferred Time in TM910B.
2.Select Deferred Time you want.
Setting the Delivery ACK
1. While in the “Message Edit” screen, tap pop-up next to icon. The “Delivery Ack”options display.
There are Off/On/Enhanced in TM910B.
2.Select Delivery Ack option you want.
3. Tap [Done] in ”Message Edit” screen. The “Message View” screen appears.
There are the message input time , the recipient, Callback number and the content of message in the
“Message View” screen.
Sending a Message
To send a message, after editing a message. Follow the below steps,
1. While in the “Message Edit” screen, tap “Menu”.
2.Tap [Send].
3.Animation about sending messages appears. The number of messages you are sending display.
4. After sending messages, the “End Send Message” screen appears. Tap “Ok” and the “Outbox View”
screen that you can review the messages appears.
5.If you tap “Stop” in the middle of sending messages, the “Stop” button disappears and the “Stop
Message” displays in “Send Message” screen. This screen last a couple of minute.
Resending a message
1.Go to “Outbox List” in the “Message”.
2.Select the message you want to send from the Outbox list screen. The “Message View” screen appears.
3.Tap ”Menu”.
4.Tap [Resend]. The “Message Edit” screen appears.
5.If you want to change the message, tap “Menu”, after changing the message.

TM910B User Guide
LG Electronics Proprietary
6.Tap [Send] to resend the message.
Inbox Setting
1. Go to “Inbox List” in the “Message”.
2.Tap ”Menu”.
3.Tap [Setting]. The “Message Setting” screen appears with below items.
Saving Messages
Auto Save/No Not Save
New Message Alert
Lamp/Vibrate/Ring
Every 2 Minutes Alert
Off/On
Memory Full
80%/90%/100%
Outbox Setting
1. Go to “Outbox List” in the “Message”.
2.Tap ”Menu”.
3. Tap [Setting]. The “Message Setting” screen appears with below items.
Saving Messages
Auto Save/No Not Save
Priority

TM910B User Guide
LG Electronics Proprietary
Normal/Interactive/Urgency/Emergency
Validity
30 Minutes/1 Hour/2 Hours/12 Hours/1 Day/2 Days/3 Days/Continue
Deferred
Immediate/After 3 days/After 2days/After 1 day/After 12 hours/After 2 hours/After 1 hour/After 30
minutes
Delivery Ack
Off/On/Enhanced
Memory Full Ack
80%/90%/100%
Default CB Number
On/Off
Signature
When you send a message, edit a Signature attached at the end of the message.
Erasing all Messages in the Category
Empty Inbox
1.Go to Inbox list on the top right of the Message List screen by using Category pop-up.
2.Tap ”Menu”.
3.Tap [Empty Inbox].
Empty outbox

TM910B User Guide
LG Electronics Proprietary
1. Go to Outbox list on the top right of the Message List screen by using Category pop-up.
2.Tap ”Menu”.
3.Tap [Empty Outbox].
TM910B User Guide
LG Electronics Proprietary
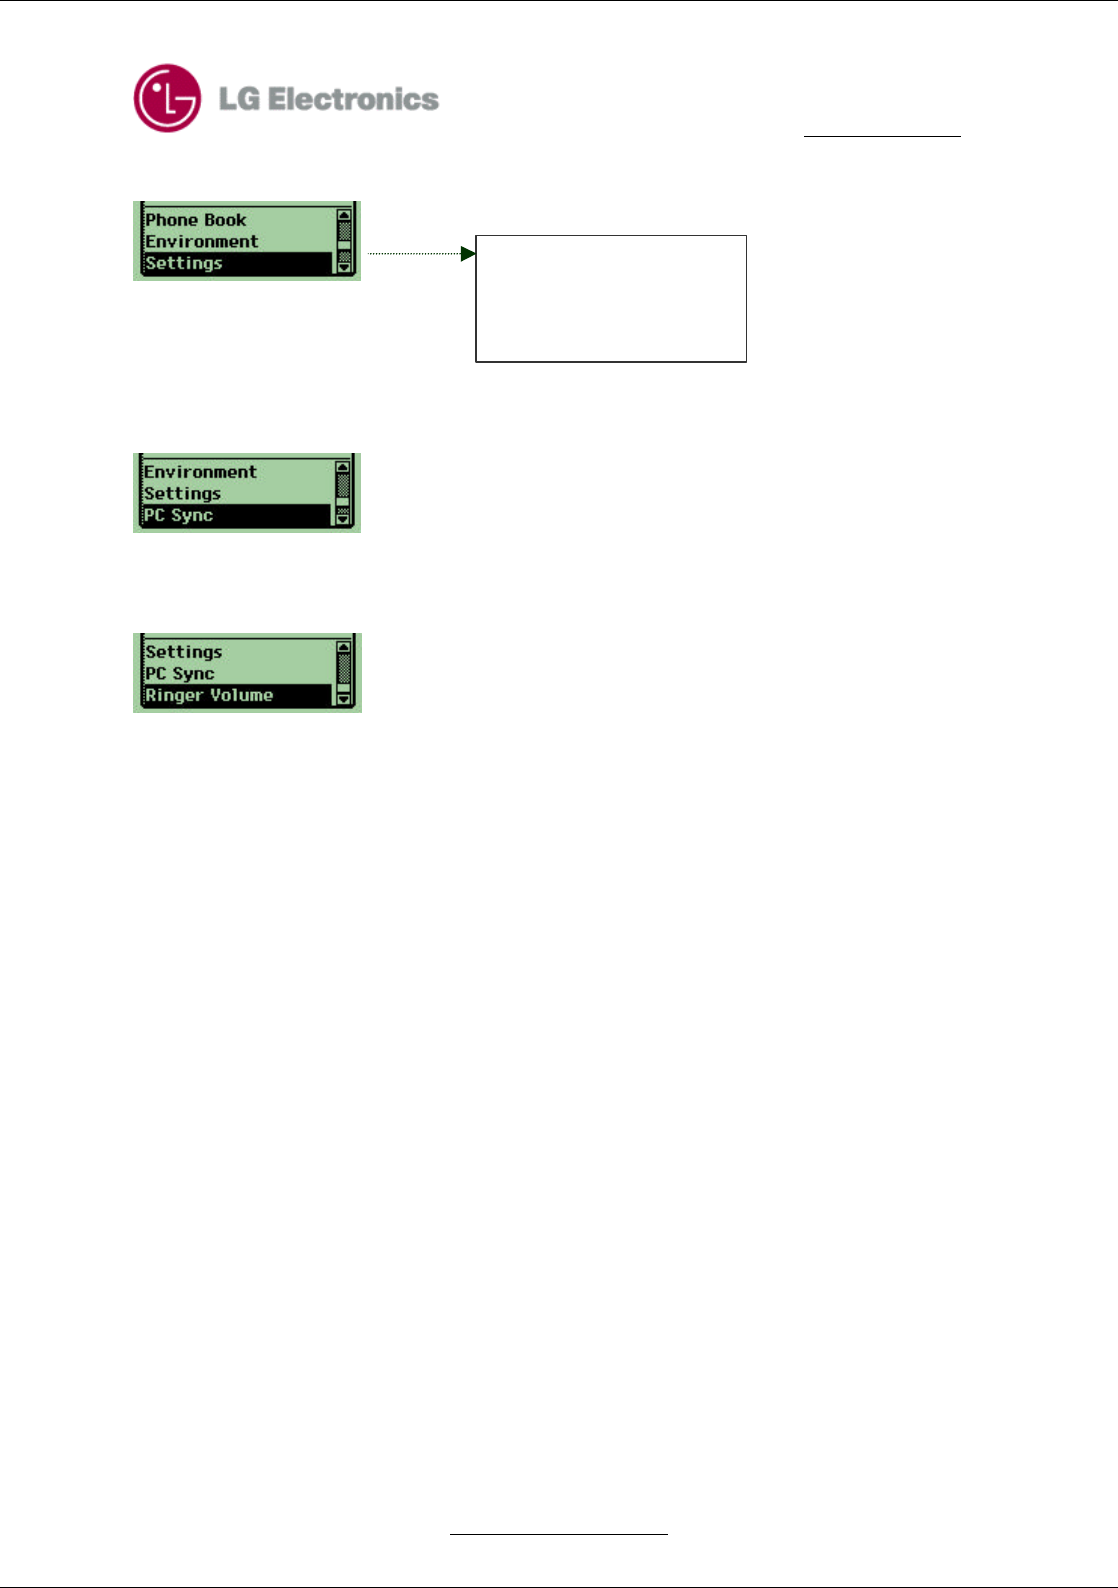
Chapter 14. Setting
By using the Settings application, you can customize your phone to meet your personal needs. You can
customize the Environment, Sound, Display, System, Security, Features, Formats, Buttons, Owner, Stylus.
Environment
Environment is kind of Package that the Volume and the Backlight set in advance imaging 7 situation.
By using the Environment setting, you can customize the tone, ring type, acceptance list and backlight for
typical situations you are in. There are Normal, Meeting, Car, Silent, Noisy, Custom1 and Custom2 in
Environment set beforehand on TM910
Selecting an Environment
1. If the main menu is PIM mode, tap icon. If the main menu doesn’t not appear, tap Goto and
then tap Settings in the Application List.
2. When you tap the main Category on the top right of screen, the Category list appears. Then tap
“Environment”.
3.Tap Radio Button what you want.
Changing the Environment
You can see the conditions of the Environment settings. If Environment settings does not meet your needs,
you can customize the Environment.
1.Move to Environment category from Settings.
2.Tap the Environment you want to customize. The ”Environment Edit” menu displays.
3.you can only change the name Custom1 and Custom2. If you want to change name, tap the name and
the Virtual Keyboard appears.
4.Tap the down arrow next to the item that you want to change, and options are displayed. In details see
the adjusting Audio Volume of Sound and adjusting Backlight of Display.
5.For saving the setting, tap OK. The Environment list appears. If the changing Environment is the
Environment set currently, the changing items are reflected in Environment immediately.
TM910B User Guide
LG Electronics Proprietary
6.If you want to cancel the new setting, tap [Cancel]. Then the Environment list appears.
Sound
If you want to check or change the sound, see the list of Sound Category. Select main Category on the top
right part of the Settings screen. The Category list appears and tap “Sound”.
Changing Audio Volume
1.Tap [Audio Volume]
2.Tap the down arrow next to the item’s label you want to change and the Volume level appears. The
meaning of each label is like below.
Label Meaning
Ringer Ringer Volume for receiving Voice Call and Message or Date Book alarm
Option : High+Vibrate/High/Medium High/Medium Low/Low/Off/Vibrate
Key Beep Key Tone Volume
Option : High/Medium High/Medium Low/Low/Off
Earpiece Volume came out from Earpiece
Option : High/Medium High/Medium Low/Low
3.Select a sound you want from the Volume Level list.
4.Tap [OK] for saving. It moves to the Sound Category screen and saved in Audio Volume of
Environment.
5.If you want to cancel, tap [Cancel]. It moves to the Sound Category screen.
Changing Ringer Type
You can change the Voice Message, Call and Alarm sounds.
1.Tap [Ringer Type].
2. Tap the down arrow next to the item’s label you want to change and sound list appears. The meaning of
each label is like below
TM910B User Guide
LG Electronics Proprietary
Label Meaning
With ID The sound when Voice Call which have Caller ID is received
Rest. ID The sound when Voice Call which have Restricted Caller ID is received
No ID The sound when Voice Call which doesn’t have Caller ID is received
Voice The sound when a Voicemail is received
Text The sound when a text message is received
Browser The sound when Browser Alert is received
Alarms The sound for Date Book alarm
3.Choose a sound you want from the sound list.
4. Tap [OK] for saving. The Sound Category screen appears
6. If you want to cancel tap [Cancel]. The Sound Category screen appears.
Setting Alerts
1. Tap [Alerts]. The screen that you can set each Alert appears.
2. Tap the down arrow next to the item you want to change. The list that you can choose on or off appears.
The sound list appears. The meaning of each label is like below.
Alert Meaning
Call Fade When signal is going weak or shut down (due to the out-of-service case) during
a call, alert beeps at for users.
Option : on/off
Minute Beep Alert will be ringing before 10 minutes by the time term you set.
Option : off/1 min/3 min/10 min
Service Change Alert will be ringing whenever service condition changed.
. Option : on/off

TM910B User Guide
LG Electronics Proprietary
Call Connect Alert will be ringing after connecting when you try to make a call
. . Option : on/off
Roam Ringer If you have a call in roaming service area, select if you want roaming call or
usual one.
. Option : on/off
3. Choose a option you want from the list.
4. Tap [OK] for saving. The Sound Category screen appears.
6. If you want to cancel, tap [Cancel]. The Sound Category screen appears.
Setting Melody Timbre
Each ringer plays by using 4 instruments. Through setting the 4 instruments in your taste, you can make
your own ringer sound. The Melody Timbre provides this function.
1.Tap [Melody Timbre]. The Melody Timbre screen appears.
2. Select the ringer you want to edit from the Melody pop-up on the top right part of the screen. The
current instrument setting displays in Inst1, Inst2, Inst3 and Inst4. If you do not change the default,
“Original” displays.
3.Change the instrument setting using pop-up next to Inst1, Inst2, Inst3 and Inst4.
4.If you want to listen to ringer sound beforehand after changing instrument setting, tap [Replay] and the
ringer sound plays with instrument you set.
5.If you want to set in default setting, tap [Reset Original].
6.Tap [OK] for saving. The ringer rings as setting from now on. The Sound Category screen appears.
7. If you want to cancel, tap [Cancel]. The Sound Category screen appears.
Setting the Tone Length
You can set up the length of Key Beep, when you press the key of keypad.
1.Select pop-up next to the ”Tone Length” Label.
2.Select option you want.

TM910B User Guide
LG Electronics Proprietary
Short : Sound Key Beep shortly as soon as you press the key.
Long : Sound Key Beep continually during you press the key.
Display
On the top right part of the Settings screen, select main Category and the Category list displays. Tap
“Display”.
Setting Backlight
1.To change the Backlight setting of Touch Panel and Phone Mode, select pop-up next to the “Backlight”
Label.
2. Select option you want.
Always Off : Backlight is always off.
8 Secs. : : Backlight is off 8 seconds later after last key touch or pen touch, and flip is open or closed.
15 Secs. : Backlight is off 15 seconds later after last key touch or pen touch, and flip is open or closed.
30 Secs. : Backlight is off 30 seconds later after last key touch or pen touch, and flip is open or closed.
Always On : Backlight is always on.
Setting Contrast
LCD’s Contrast is affected by temperature of environment. You can change the amount of contrast,
according to the temperature, bright or your taste.
1. To change the contrast setting of Touch Panel and Phone, select pop-up next to the “Contrast ” Label.
2. Select option you want.
options : Highest/High/Medium/Low/Lowest
Editing a Banner
Banner is a text which is displayed at Phone in Standby. You can edit the banner you want.
1.Select the current Banner next to the ”Banner” label.

TM910B User Guide
LG Electronics Proprietary
2.When the Virtual Keyboard appears you can edit the text you want. The banner contains 16 letters
maximum.
3.If you want to use the text inputted with Virtual Keyboard, tap [OK]. If you want to use the previous
text, tap [Cancel].
Reviewing Version
1.Tap [Version]. The Version screen appears.
2.You can review the S/W version, the last Compiled time and PRL version etc from the Version screen.
3.Tap [OK]. The Version screen disappears but the Display screen appears.
Reviewing the amount of each data of PIM Application
1.Tap [PIM Info]. The PIM Info screen appears.
2.In the PIM Info screen, you can review that how many percent of the memory is used from whole PIM
Memory and how many data is in each PIM Application.
3.Tap [OK]. The Display screen appears.
System
If you want to change the kind of service and system setting supported from the phone, review the items
in System Category.
On the top right part of the Settings screen, select main Category and the Category list displays. Tap
“System”.
Changing System Select
You can change the system whether the phone works only in the Home Service Area or works in the other
area supported Service.
1.Tap pop-up next to the ”System Sel” Label.
2.Highlight the item from the option.
Standard : This setting seeks Sprint PCS Service. When Sprint PCS Service is unavailable, it searches
for an alternative system.
Home Only : This setting allows you to select only the Sprint PCS Nationwide Network and prevents

TM910B User Guide
LG Electronics Proprietary
roaming on other networks.
Changing Force Call
TM910B support all CDMA, PCS and Analog call. You can select a call mode.
1. Tap pop-up next to the”Force Call” Label.
2. Highlight the item from the option.
Digital Only: Supporting Digital Call.( Supporting both PCS Only and Cell Only .)
PCS Only: Supporting PCS Call from Digital Call of 109G zone.
Cell Only: Supporting Cellular Call from Digital Call of 800M zone
Analog Only: Supporting Analog Call only.
Automatic : Calling by available service among DCN, PCS and Analog Service.
Setting Data Rate
1. Tap pop-up next to the”Data Rate” Label.
2. Highlight the item from the option.
19200: Data Rate set with 19200bps.
115200: Data Rate set with 115200bps.
230400: Data Rate set with 230400bps.
Setting Data/Fax Receiving Mode
1. Tap pop-up next to the”Data/ Fax In” Label.
2. Highlight the item from the option. (If disconnected to Network Emulator, “Off” displays only and if
connected, “Off / Data In / Fax In” display all.)
Off : If you select this option, Sprint PCS Phone is changed to the mode that is able to received a Voice
Call. But you cannot receive Data/Fax Call in this mode.
Data In: If you select this option while connecting to the network Emulator(ex. Hyper Terminal etc),
Sprint PCS Phone is changed to the mode that is able to received Data Call. But you cannot receive Voice
Call in this mode.
Fax In: If you select this option while connecting to the network Emulator(ex. Hyper Terminal etc), Sprint

TM910B User Guide
LG Electronics Proprietary
PCS Phone is changed to the mode that is able to received a Fax Call. But you cannot receive Voice Call
in this mode.
Security
1. On the top right part of the Settings screen, select main Category and the Category list displays. Tap
“Security”.
2.The Lock Code screen appears.
3.Enter the lock code for the phone. If the Lock Code you entered is wrong, you can not review the
options in the Security category.
4.If the Lock Code is right, the Security menu displays.
Locking the Phone
Locking the phone prevents using your phone by other people. It is impossible to make a call and use
PIM Application before you enter the lock code. But you can still receive a call, make a emergency call
and call to the 3 special number you specify even the phone locked.
1.Tap [Lock Organizer]
2.Select the option you want.
Unlocked: to keep the phone unlocked
On Power Up: to lock when the phone is turned on next time
Lock Now: to lock the phone immediately
3.Tap [OK] to work selected option. If you choose “Lock Now”, the screen asking lock code appears.
3.If you want to cancel, tap [Cancel]. The Security screen appears.
Restricting Outgoing Calls
You can limit your outgoing calls to emergency number, the number saved in Contacts and 3 numbers you
specify.
1.Tap [Phone Restrict].

TM910B User Guide
LG Electronics Proprietary
2. Select the option you want.
Restrict On: limit your outgoing calls to emergency number, the number saved in Contacts and 3 numbers
you specify
Restrict Off: don’t limit your outgoing calls so you can call to all numbers
3. Tap [OK] to work selected option.
If you try to make a call to the number that is not stored in Contacts, “This phone has been restricted.”
message appears.
Changing the Lock Code
You can change the Lock Code you want.
This is usually the last four digits of your phone number.
1.Tap [Change Lock Code].
2.You have to enter the current lock code to change the Lock Code. Tap the empty space next to the “Old
Code” Label, and the cursor appears.
3.Using the keypad, enter the current lock code.
For security Lock Code display like “*”.
4.In the same way, enter the new lock code to the empty space next to “New Code” Label.
5.If you want to confirm, whether the new lock code entered is correct or not, enter the lock code in the
next to “Re-enter to Confirm” label.
6.When you enter wrong number, tap [Clear]. The digit right before the cursor is deleted.
7.Tap [OK] to change the lock code as you enter. Security screen appears.
8.If you want to cancel, tap [Cancel]. Security screen appears and the Lock Code used currently is
available.
Setting the Special Phone Numbers
TM910B can store 3 Special Number. You can still make call to the 3 special number you specify like
“911”, even the phone is locked.
1.Tap [Special #]. The “Special #s” screen appears. The fields for inputting 3 Special # display. If there
are Special # saved already, that number displays.
TM910B User Guide
LG Electronics Proprietary
2.Select the field you want to input and the Virtual Keyboard appears. Enter the number using the
Keyboard.
3.Tap [OK].
Erasing PIM Data
To erase the data of each PIM Application
1.Tap [Erase PIM Data].
2. Select the box in front of Application name you want erase the data from the PIM Application. You can
select the box more than 2.
3.Tap [OK] to erase the data of all Application.
It takes much time to erase, if the amount of data is much.
Resetting to the default
In the middle of using the phone, if you want to reset to the factory default, use this option.
1.Tap [Phone Reset].
2.Tap [OK]. All Settings you changed reset to the factory default.
3.Tap [Cancel], if you don’t want to reset.
Features
Select the main Category on the top right of the Settings screen. The Category appears and then tap
“Features”.
Setting up the Any Key Answer
To allow answering the phone by pressing any key :
1.Tap the pop-up to the right of ”Any Key Answer” label.
2.Tap ”On”.
You can not receive a call by pressing [Send], [End], [ClR], Jog key even Any Key Answer Feature is
activated.

TM910B User Guide
LG Electronics Proprietary
Setting up the Car Kit Auto Answer
To allow answering the phone automatically after ringing for 3 seconds, when using the Car Kit.
1. Tap the pop-up to the right of ”Any Key Answer” label.
2. Tap ”On”.
Setting up the Web Guard
To pop up an extra Confirmation for the starting and end of the Browser Session, when the Mini Browser
starts and finishes
1.Select the pop-up next to the ”Web Guard” label.
2.Tap the option what you want.
To Start: When the Browser Session starts, pop up the Confirmation to ask Session starts
To Exit: When the Browser Session finishes, pop up the Confirmation to ask Session finishes.
Both: When the Browser Session starts and finishes, pop up the Confirmation.
None: When the Browser Session starts and finishes, don’t pop up the Confirmation.
Setting up the Voice Privacy
To set up the Voice Privacy feature of CDMA Call,
1. Select the pop-up next to the”Privacy” label.
2. Tap the option what you want.
Standard : doesn’t provide Voice Privacy.
Enhanced : If the mobile phone center provide Voice Privacy, the ( P) icon for the Voice Privacy appears
after connecting. The phone becomes Voice Privacy mode.
Setting up Speaker Phone
Basically you can turn on and off Speaker Phone by selecting a menu option on TM910B. Besides, to set
up Speaker Phone using the flip,

TM910B User Guide
LG Electronics Proprietary
1. Select the pop-up next to the ”Speaker Phone” label.
2. Tap the option what you want.
Open Flip : You can turn on and off Speaker Phone using the flip. Speaker Phone is turned on when you
open the flip, Speaker Phone is turned off when you close the flip
Select Menu : You can turn on and off Speaker Phone by selecting a menu option
Setting TTY mode
1. Select the pop-up next to the ”TTY” label.
2. Tap the option what you want.
Formats
TM910B for all applications shows date and time set by Formats category in settings
On the top part of the Settings screen, select the main Category. The Category list displays and then tap
“Formats”.
Time Display
1. Select the pop-up next to the ”Time” label.
2. Tap the option what you want.
hh:MM am/pm: 12 hour format
HH:MM(24hr.): 24 hour format
Date Display
1. Select the pop-up next to the ”Date” label.
2. Tap the option what you want.
TM910B User Guide
LG Electronics Proprietary
Option When the field is large When the field is small
day, MMM dd Sat, Mar 31 Mar 31
MMM dd, yyyy Mar 2, 2001 Mar 2
MM/dd/yyyy 4/2/2001 4/2
Buttons
There are 3 buttons that define the function in the bottom part of flip inside. When you press the buttons,
application stars.
1. On the top part of the Settings screen, select the main Category. The Category list displays and then tap
“Buttons”.
2. Select the pop-up next to the button image you want.
3.Select the application you want from the list.
Owner
To put your personal information into your organizer
1. On the top part of the Settings screen, select the main Category. The Category list displays and then tap
“Owner”.
2.You can add your Name, Work, Phone Number, Email Address and Address using Virtual Keyboard.
Stylus
The accuracy is very important with stylus pen used in TM910B system,
which use touch panel as a main input tool
. If the screen isn’t reacting to your taps, you may need to synchronize the
screen with your stylus.
1. On the top part of the Settings screen, select the main Category. The
Category list displays and then tap “Stylus”.

TM910B User Guide
LG Electronics Proprietary
2.“Press <OK> to configure stylus” message appears. Tap [OK].
3.When the screen like the right picture appears, tap and press the middle of each plus sign on the screen
until another order appears. This process repeat 4 times in different location.
If you press wrong location, you can’t go to next step.
4.Tap [Done] to cancel this configuration

TM910B User Guide
LG Electronics Proprietary
Chapter 15. Connect
input about PC Sync, Bluetooth
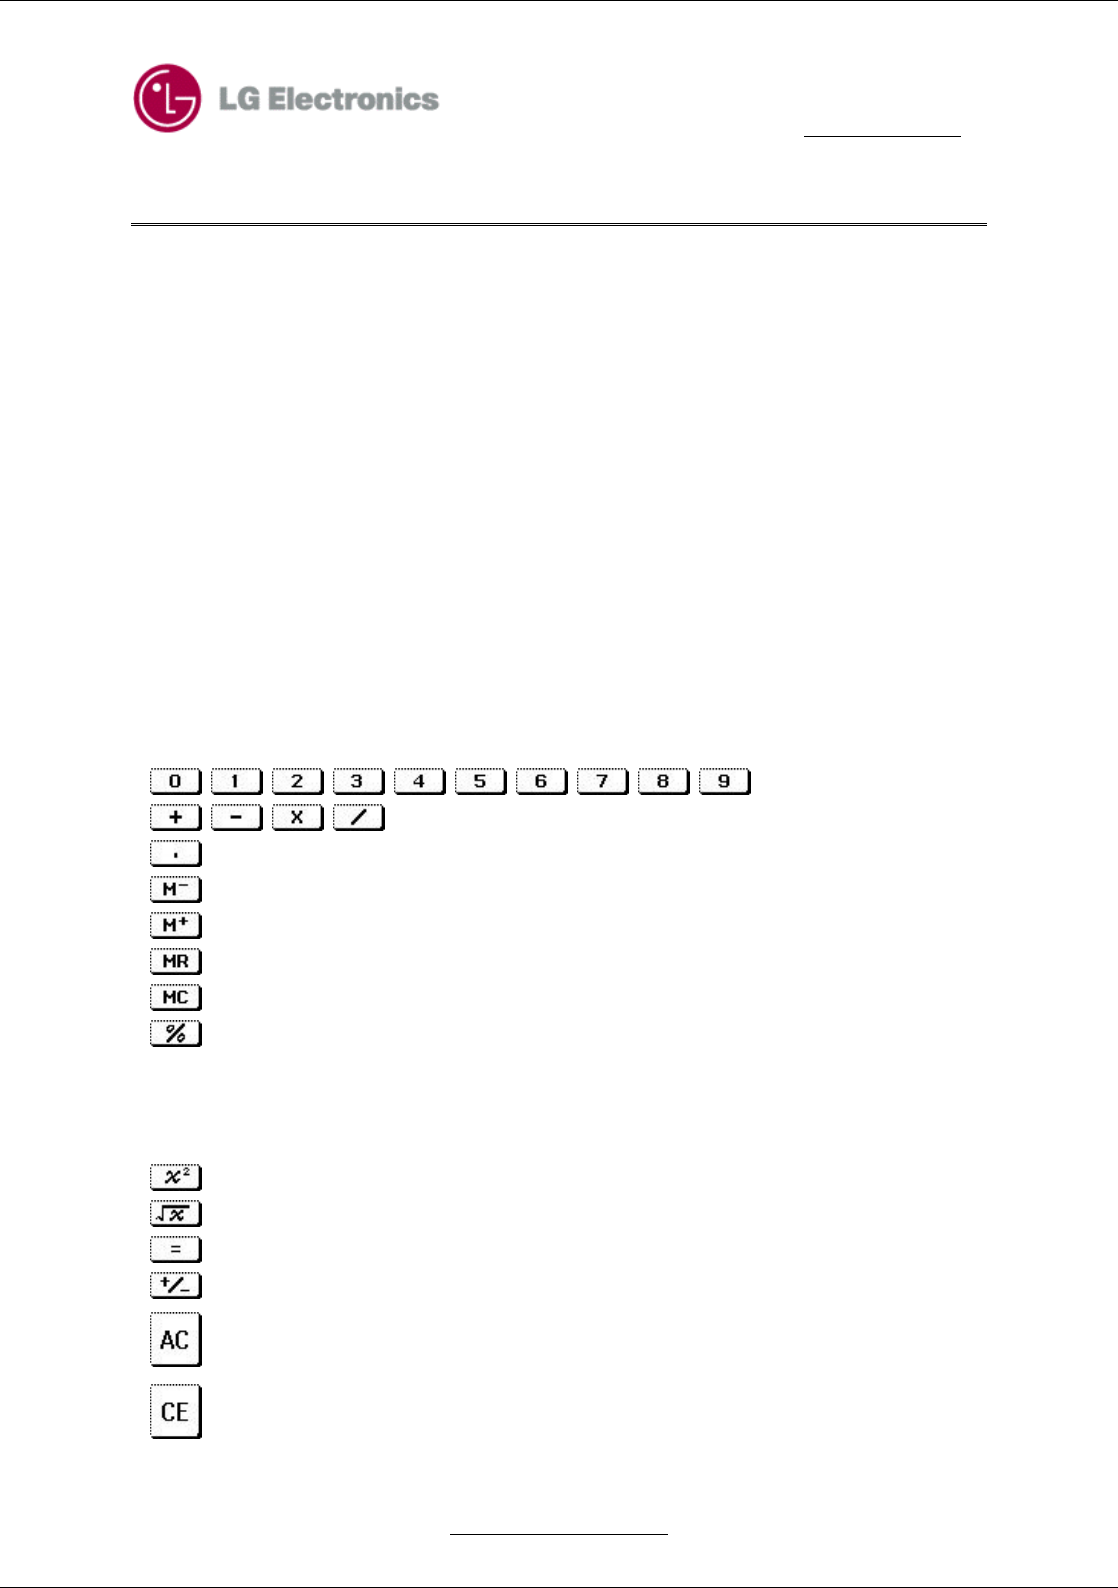
TM910B User Guide
LG Electronics Proprietary
Chapter 16. Calculator
The calculator of TM910B provides basic calculations and storing in memory.
You can input number of 12 figures maximum.
You will arrive at the correct calculation amount, only when there are no errors to the calculation formula,
and the error sign will appear when there is an internal error to the formula or/and the calculating amount
is out of range.
The calculator consists of the Display Window that shows a numerical formula and result and the buttons.
In display window, there are input value, selected operator and memorized value.
Memory section has the memorized value which is non zero.
The functions of button in bottom are summarized as follows
- : When you input a value
- : the fundamental rules of arithmetic buttons
- : a prime number point button
- : The calculated value substracted from memorized by will be stored in memory
- : The memorized value added with the calculated will be stored in memory.
- : recall value stored in memory
- : erase the memory value
- : Do the percentage operation. Input a value, select an operator(+,-,*,/), input second value, and
press "%" character to make it calculated.
For instance, if press " 50 * 25 %", 12.5 will be shown. If you press "50+25%", 25% of 50 will be
added to 50. So, you get "62.5"
- : Square the value.
- : Get the square root of input value.
- : Get the result of the input equation
- : Change the sign of input value
- : Clear the whole input equations.
- : Clear the input value just before
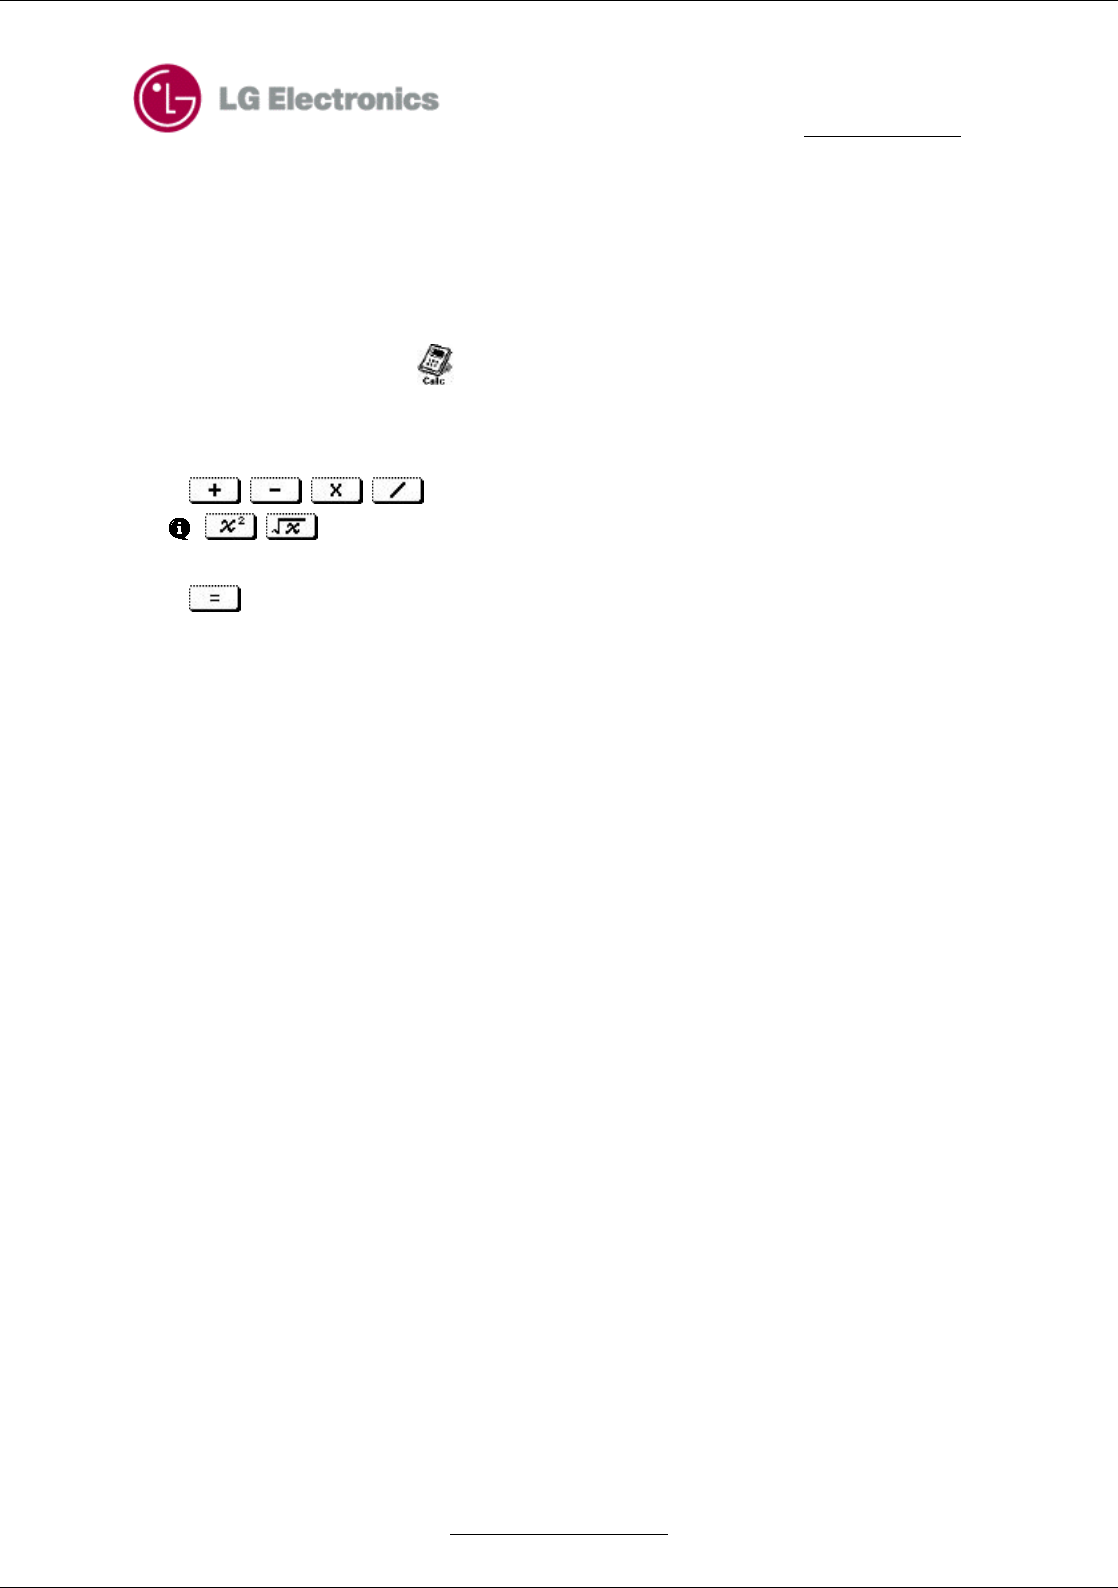
TM910B User Guide
LG Electronics Proprietary
Performing simple calculations
1. Open the flip.
2. If the main menu appears, tap icon. If the main menu is not appear, tap Go to and then tap
“Calculator”
3.Tap the first number in the calculation.
4.Tap
are calculated as soon as tap the icon.
5. Tap the next number in the calculation.
6.Tap
TM910B User Guide
LG Electronics Proprietary
Chapter 17. World Clock
You can discover the time in two other cities.
Setting the time in the city you are located
1.Open the flip.
2.If the main menu is PIM mode, tap icon to move to World Clock application.
3.On the top part of screen, tap the down arrow.
4.Tap the city you want displayed.
5.If the Daylight Saving Time is in effect in that city, tap the check box of the Daylight Saving.
Viewing the time in another city
1. On the bottom part of screen, tap the down arrow.
2. Tap the city you want to know in the list of cities
3. If the Daylight Saving Time is in effect in that city, tap the check box of the Daylight Saving.