LG Innotek REGXXOXXA ESL Gateway User Manual Manual
LG Innotek Co., Ltd. ESL Gateway Manual
User Manual
* LG Innotek REGX-XOXXA (Electronic Shelf Label Gateway)
This is the reference manual for ESL Gateway handling.
After fully understanding this manual, use the Gateway in proper way
◆ Read all instructions before performing any work.
◆ Installation must be done completely after fully understanding [Safety Rules]
◆ Installer should give this Instruction to actual user after fully understanding it.
◆ Please, keep this manual in a handy place. When reinstalling or repairing, give this manual to
new user or contractor
1. Safety Rules
◆ In case of mishandling, risk sign arises, Meaning of the sign is explained in below table.
◆ In this guide, the safety instruction levels are classified into "WARNING" and "CAUTION".
CAUTION - Indicates incorrect handling that may cause hazardous conditions, resulting in slight
injury or physical damage.
WARNING - Indicates incorrect handling that may cause hazardous conditions, resulting in death
or severe injury
! CAUTION
Only use rated voltage. (Using lower/higher
voltage than rated voltage may cause fire)
Do not touch this equipment or cable with wet
hands. (It may cause electrocution)
Do not install this equipment where using
combustible gas leak. (It may cause fire)
Do not locate it in high humidity environment.
(Condensation or Rust in the equipment cause
electrocution or fire)
Do not use excessive pressure on equipment to
remove. (It may cause damage to ceiling
material)
When you have minor trouble, please refer to
“Trouble Shooting” section first
! WARNING
Shut down your equipment immediately if it
produces smoke, a strange odor, or unusual
noise.
Keep your device away from radiators and heat
sources. (It may cause fire)
Never disassemble or modify this product.
(Improper work may result in injury or fire.
Contact selling office for repair.)
Be sure to set this equipment on a firm, stable,
horizontal ceiling. (The product could be
broken or cause injury if it falls)
Do not allow foreign body to fall into the
equipment. (It may cause fire or electrocution)
Installation must be done completely following
this instruction to prevent fire or electrocution.
Do not Install on the insulating material (It may
cause fire)
Do not connect both POE cable and DC cable
to ESL Gateway (It may cause break down or
fire)
Request to seller office or professional
contractor for installation.
Do not cover this equipment with a newspaper,
tablecloth, curtain, etc. (it may cause fire)
2. Installation Parts
Below parts are needed for installation. Please procure the parts before installation.
No. Category Description
1 LAN Cable 10BaseT Cat. 5 or 100BaseTX Cat. 5 STP (Shielded Twisted Pair)
RJ-45
2 DC Adaptor (Using DC) DC 12V / 1A or above, 3.5∅ DC Power Jack
3 POE hub (Using POE) More 12Watts Max Port Output
4 Screw driver
3. Contents of pack
- REGX-XOXXA (ESL Gateway) 1ea
- User’s Manual (this manual) 1ea
- Bracket 1ea (Optional)
- Screw 2ea (Optional)
4. Installation (Using Spring)
① Before Installation, Check following conditions.
- Ceiling should be able to stand weight of ESL Gateway (0.4kg)
- Fix reinforcement material to prevent ESL Gateway from moving on the ceiling.
② Secure space to insert ESL Gateway into the ceiling
- Make specified space (Diameter ∅100mm+3, -0)
- Mounting ceiling thickness : 5mm ~ 20mm
! WARRING - Be sure to set this equipment on a firm, stable, horizontal ceiling.
(The product could be broken or cause injury if it falls)
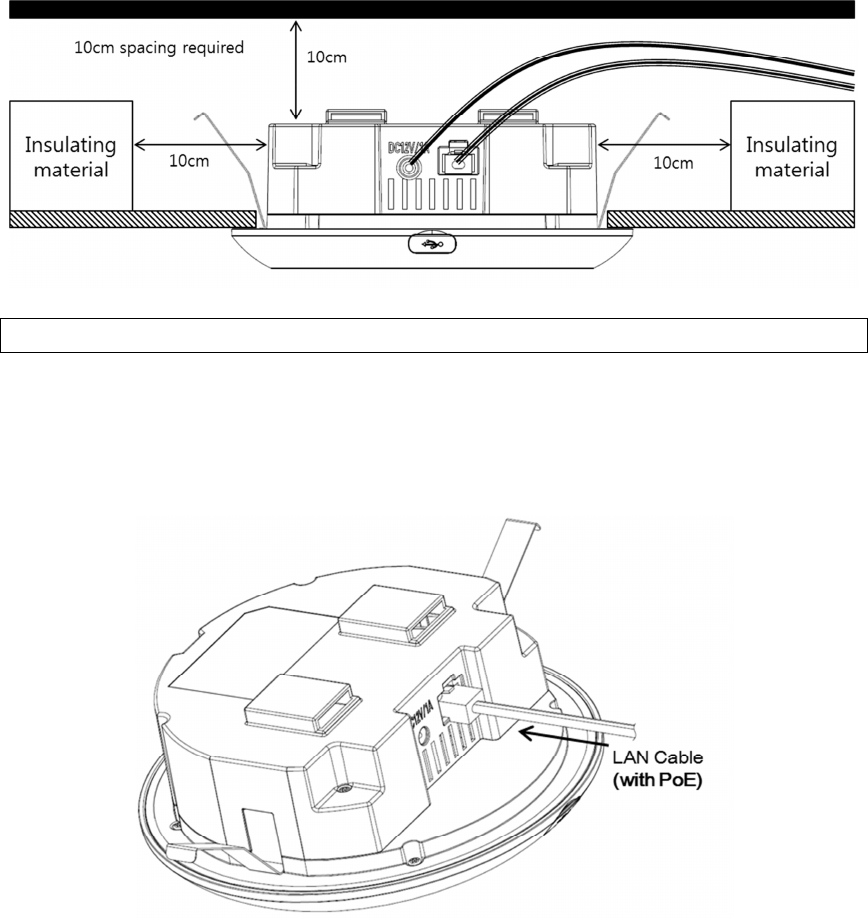
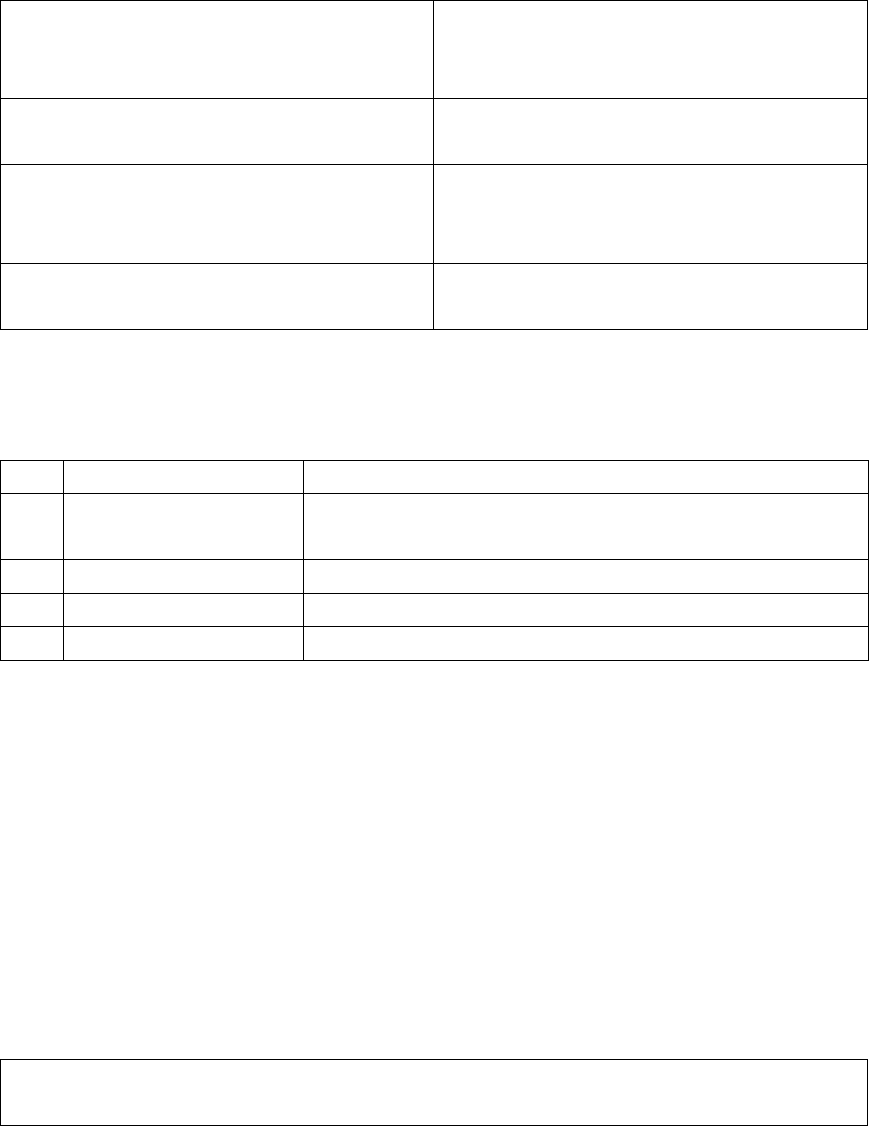
③ Connect (LAN Cable/Power Cable) Wire
There are 2 cases for powering ESL Gateway
- Case 1 : Using POE (Power Over Ethernet)
- Case 2 : Using DC Adapter
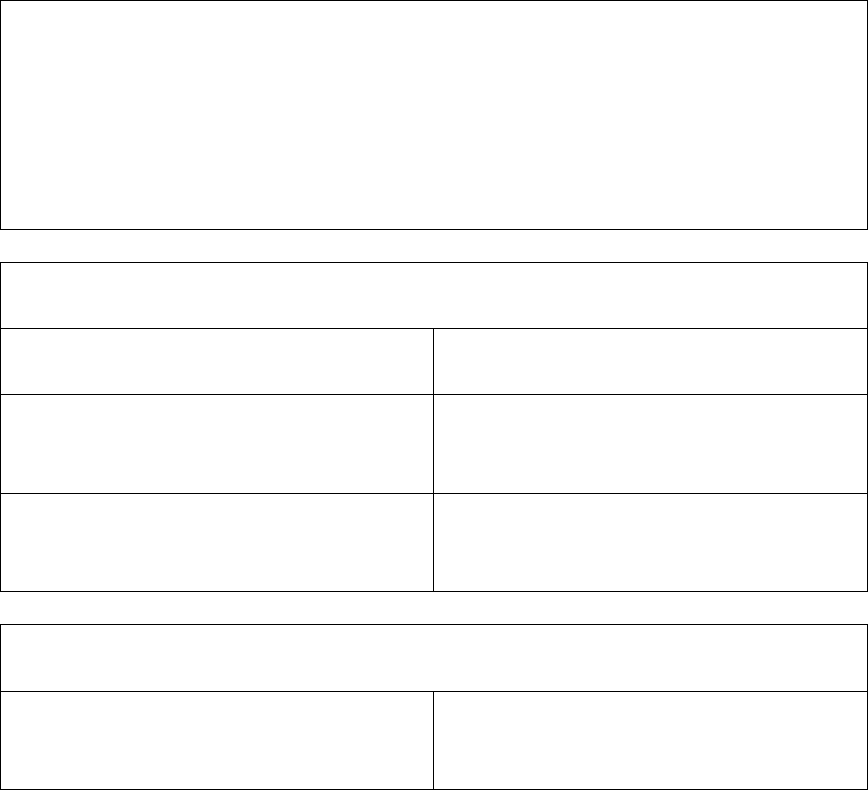
! WARRING – Do not Install on the insulating material (It may cause fire)
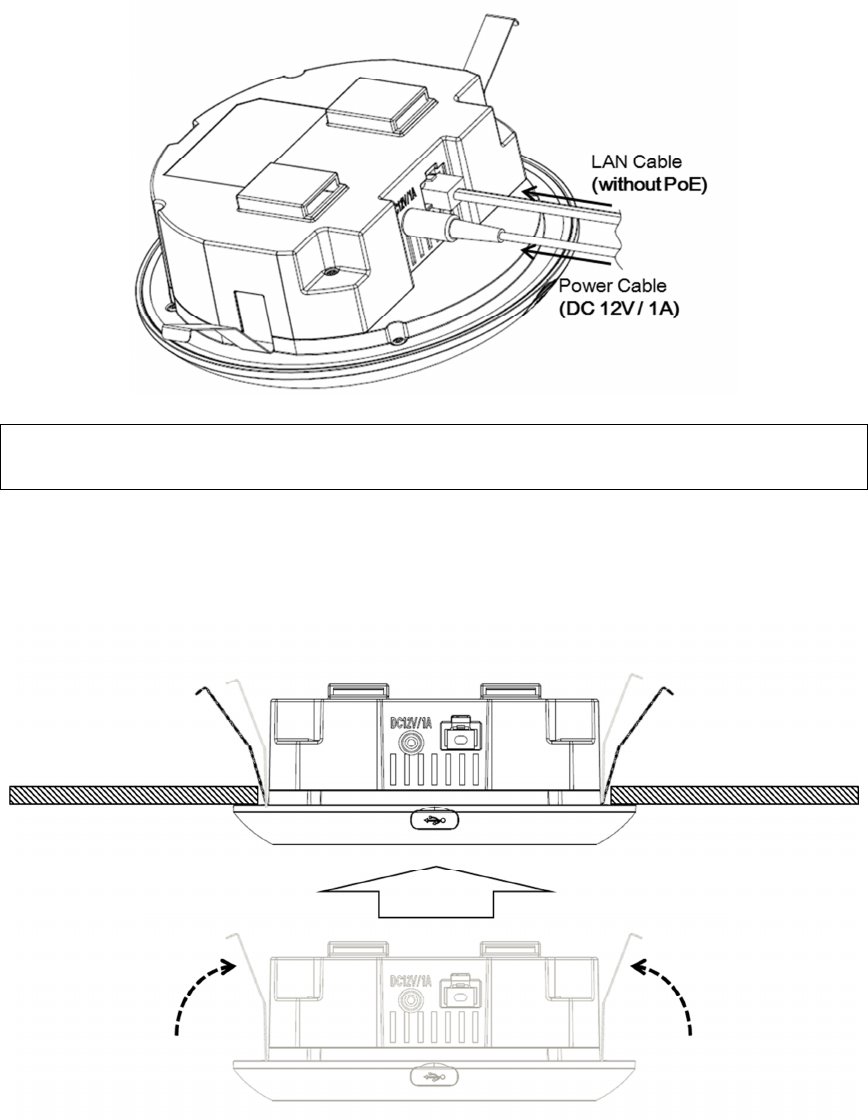
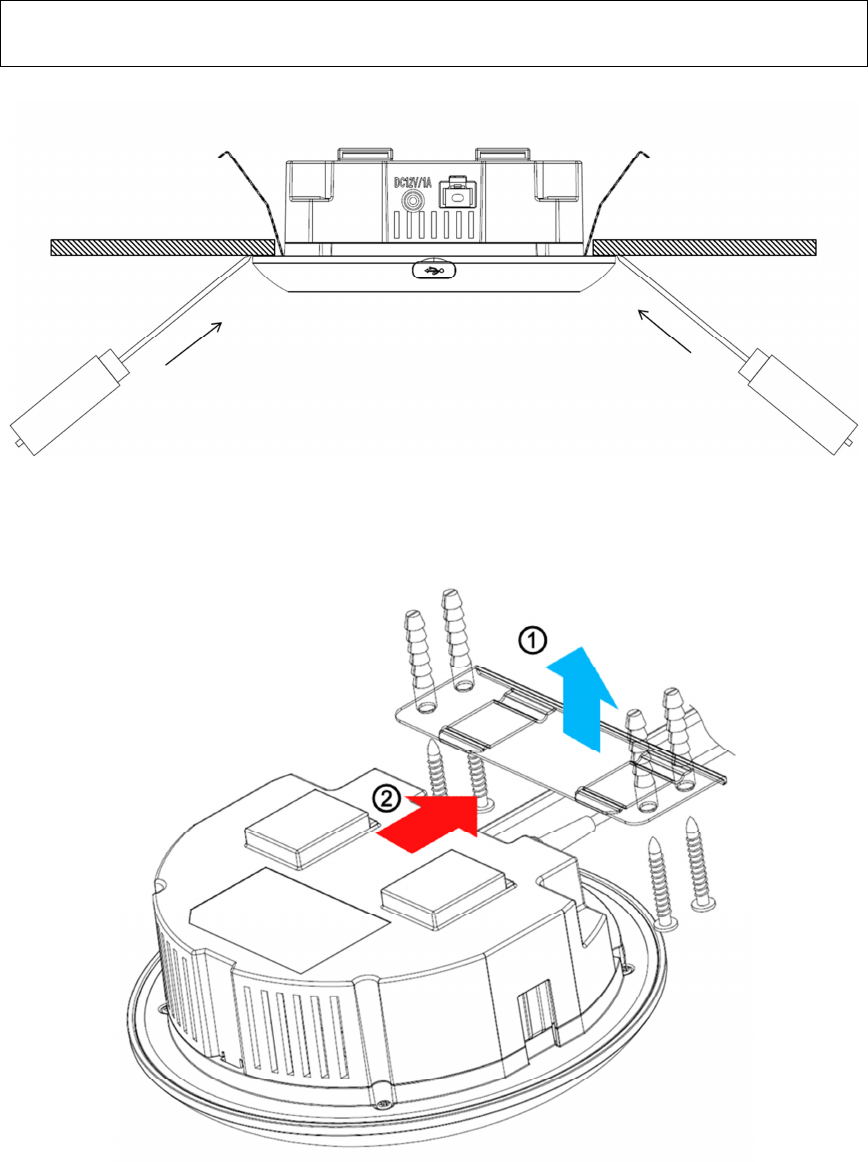
④ Insert Gateway into the Hole
- Pushing 2 springs in direction of arrow paint, put the ESL Gateway into the ceiling.
⑤ How to Remove
- Put flathead screwdriver to make hole on the both side.
- Push screwdriver in arrow direction to make gap between ceiling and equipment.
When gap is wider, Grab spring by hand and put down the equipment.
! WARRING – Do not connect both POE cable and DC cable to ESL Gateway
(It may cause break down or fire)
5-1. Using Bracket
If you cannot make a hole on the ceiling, use the bracket in the package to install the ESL
Gateway.
① Secure the bracket to the ceiling
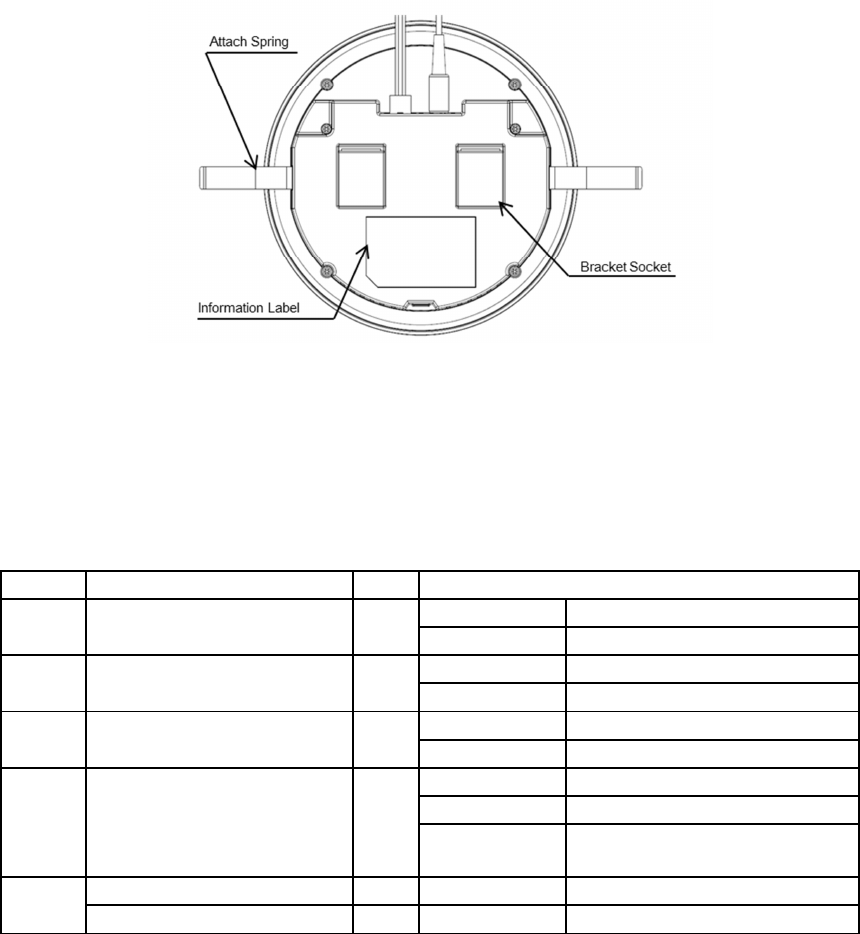
② Combine the ESL gateway with bracket and bracket socket
! CAUTION – Do not use excessive pressure on equipment to remove.
(It may cause damage to ceiling material)
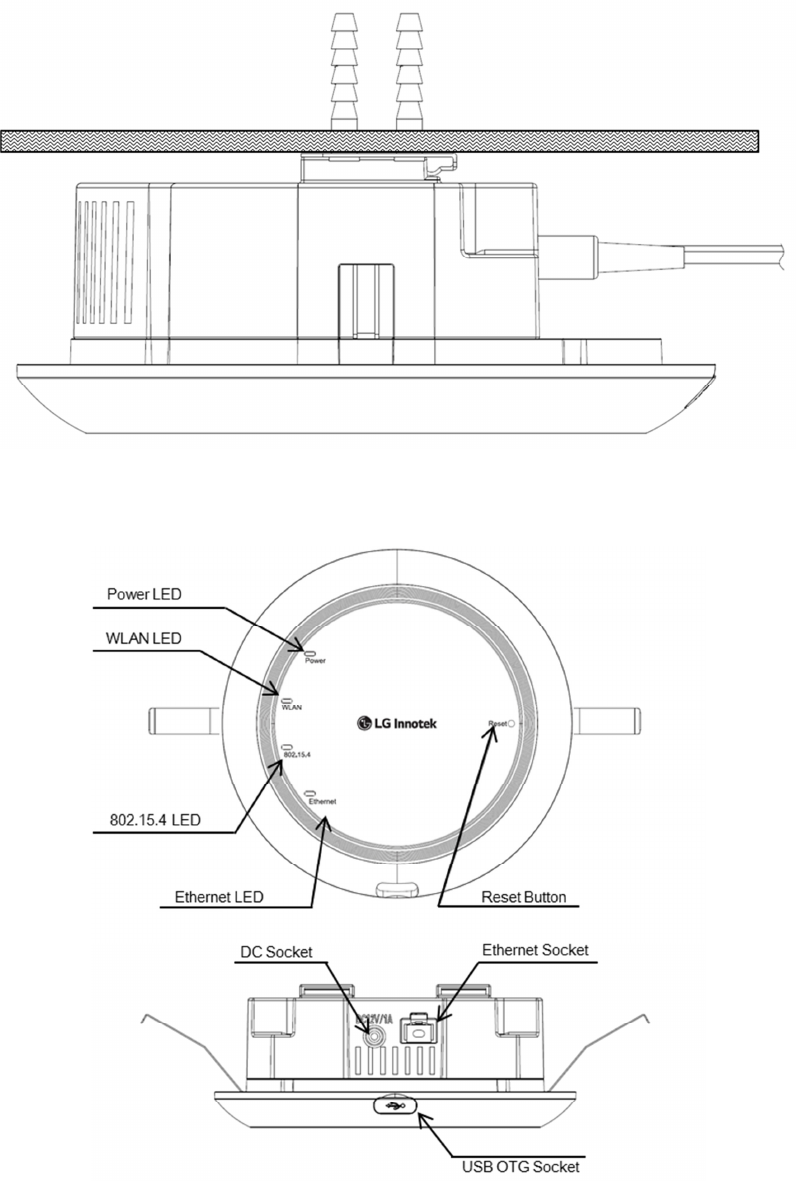
Associated side view is as below:
5. Specifications
6. LED Operating
LED on the ESL Gateway indicates equipment status. Before operating, check this LED Color.
After Booting and all OS loaded, red power LED turn is Normal Status.
LED Operating Table
LED
Explanation
Color
Scene
WLAN
Communication with PDA or
article matching device
Green
On
Active
Off
In-active
802.15.4
Communication with ESL Tag
(Transmit data)
Green
Blinking
Active
Off
In-active
Ethernet
Communication with EMS
Green
Blinking
Active
Off
In-active
Power
Gateway status indicating Red
On
Normal State
Off
Power Off
Blinking
(1-sec Interval)
Upgrade state or
Factory test mode
All LED
Boot up All
On
Boot up
OS loading All
Off
OS loading after Boot up
If there is any problem, turn off the equipment immediately and contact selling office.
7. Troubleshooting
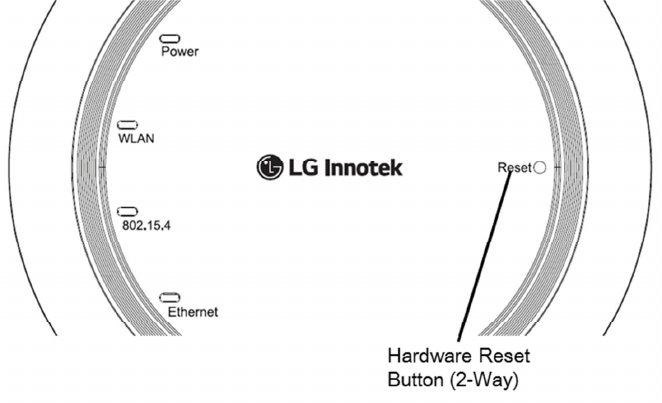
- Hardware Reset
In case of malfunctions, reset the gateway by Hardware Reset button.
On the top of the equipment there is a reset button. Pressing reset button strongly for 10
seconds
8. Warranty
Under normal use condition, products resulting from its own failures in the warranty period will
be free maintenance. Warranty Terms as following:
a) Charge-free maintenance of the product is one year. We can repair it for free during the
guarantee period (Damages not caused by misuse).
b) During guarantee period, breakdown caused by misuse or other reasons out of range of
warranty. You could ask repair and we charge for changed components and the
maintenance.
c) When the products need maintenance, contact to the local distributor.
d) Taking apart of the product or improper washing is out of warranty range.
e) We do not accept the damaged item due to modification or add other functions.
f) Spares or replacement parts will be available for a period of 5 years from the end-of-sale
date
The Following Circumstances will not be free warranty
a) Period check, maintenance or change components due to normal attrition.
b) The product was improperly installed
c) The damages due to crash extrusion, artificial flooding, moisture or other personal
reasons.
d) The damages due to floods, fire, lightning strike and other natural calamities or force
majeure incidents factors
e) Repaired item by non-authorized repair centers.
All above terms, if changed, regarded to relevant regulations.
9. Regulation Information
INFORMATION TO THE USER
This equipment has been tested and found to comply with the limits for a Class B digital device,
pursuant to part 15 of the FCC Rules. These limits are designed to provide reasonable protection
against harmful interference in a residential installation. This equipment generates, uses and can
radiate radio frequency energy and, if not installed and used in accordance with the instructions,
may cause harmful interference to radio communications.
However, there is no guarantee that interference will not occur in a particular installation. If this
equipment does cause harmful interference to radio or television reception, which can be
determined by turning the equipment off and on, the user is encouraged to try to correct the
interference by one or more of the following measures:
- Reorient or relocate the receiving antenna.
- Increase the separation between the equipment and receiver.
- Connect the equipment into an outlet on a circuit different from that to which the receiver is
connected.
- Consult the dealer or an experienced network technician for help.
This device complies with part 15 of the FCC Rules. Operation is subject to the following two
conditions:
(1) This device may not cause harmful interference, and
(2) This device must accept any interference received, including interference that may cause
undesired operation.
Caution: Any changes or modifications to the equipment not expressly approved by the party
responsible for compliance could void user’s authority to operate the equipment.
This appliance and its antenna must not be co-located or operation in conjunction with any other
antenna or transmitter.
A minimum separation distance of 20 ㎝ must be maintained between the antenna and the
person for this appliance to satisfy the RF exposure requirement