LG 50PX4DR User Manual PLASMA TV Manuals And Guides 1006694L
User Manual: LG 50PX4DR 50PX4DR LG PLASMA TV - Manuals and Guides View the owners manual for your LG PLASMA TV #50PX4DR. Home:Electronics Parts:LG Parts:LG PLASMA TV Manual
Open the PDF directly: View PDF ![]() .
.
Page Count: 132 [warning: Documents this large are best viewed by clicking the View PDF Link!]

PLASMATV
MODELS: 50PY2DR
and completely before
of the TV in the
and relate this
;r¢ice,
iiiiiii_,
Wa mingiCa ution
m
i
WARNING/CAUTION:
TO REDUCE THE RISK OF ELECTRIC SHOCK DO NOT REMOVE COVER (OR BACK). NO USER
SERWC_BLE PARTS _NSIDE. REFER TO QUALIFIED SERVICE PERSONNEL.
,i_lk The lightning flash with arrowhead symbol, within an equilateral triangle_ is intended to aiert the user to
the presence of uninsalated "_ngerous voffage" w_hin the product's enclosure that may be of suffi-
cient m_gn_ude to constitute a risk of electdc shock to persons.
The exclamation point within an equilateral triangle is intended to a_ert the user to the presence of
important o_rating and maintenance (sere'icing) instructions in the literature accompanying the appli _
ance.
WARNING/CAUTION:
TO PREVENT FIRE OR SHOCK HAZARDS, DO NOT EX_SE THIS PRODUCT TO RAIN OR MOISTURE
FCC NOTICE
AClass B digital device
This equipment has been tested and found to comply with the [imit_ for a Class B digital device, pursuant to Part
15 of the FCC Rules These Jim,s are designed to provi_ reasonable protection again_ harmful interference in
aresidential installatiom This equipment generates, uses and can radiate radio frequency energy and, if not
inspired and used in accordance with the instructions may cause harmful interference to radio communication&
However, there is no guarantee that interference will not occur in a particular installation, ff this equipment does
cause harmfu_ interference to radio or television reception, which can be determined by turning the equip_nt off
and on, the user is encouraged to try to correct the interference by one or more of the following measures:
Reorient or retocate the receiving antenna,
- Increase the separation _tween the equipment and receiver:
- Connect the equipment into an outJet on a circuit different from that to which the receiver is connected.
- Consult the dealer or an experienced radio,q_v technician for heJp,
•Any changes or modifi_tions not expressly approved by the party responsible for compli-
ance could void the user's authority to operate the equipment,
CAUTION:
Do not attempt to modify this product in any way w_thout written authorization from LG E_ectronics. Unauthorized mod-
fficetbn could void the user's author_ to o_rate this product
WARNI NG/CAUTION
TO REDUCE THE RISK OF FIRE AND ELECTRIC SHOCK, DO NOT EXPOSE THIS PRODUCT TO
RAIN OR MOISTURE,
2 Plasma TV
Trademark Notice
Aux Etats Unis TV GUIDE et d'autres marques relatives sont des tr_rques deposees de Gemstar-TV Guide International Inc,
et/ou d_une de ses societes affi[iees_ Au Canada TV GUIDE est une marque deposee de Transcontinental Inc. uti_isee sous
licorice de Gemstar-TV Guide _ntemational, inc.
License Notice
Le syste_ TV Guide On Screen est fabdques _us _icence de Ge_tar-TV Gum [ntemat_onaL [nc et/ou _u_ de s_ societ_s
Patent Notice
Le systeme TV Guide On Screen est protecJes par ur_ ou p[ueieurs brevets emis aux Etats Unis comme re 6498,895
6,418,556, 6,331,877; 6,239,794; 6,154,203; 5,940,073; 4,908,713; 4,751,578; 4,70,6,121,
Use of the Cab[eCARD _'_TradeMark,
"Cab_eCARD TM is a trademark of Cable TeJevision Laboratories inc."
This dig_i television is capable of receiving basic analog, digital _sic and digitaJ premium cable television programming by
direct connection to a cable system providing such programming, A security card provided by your cable operator is required
to view encrypted digital programming. Cable operator enhan_ program (For example, electronic program guide provided
by the cable operator), and data enhanced television service may require the use of a set top box. For more information con-
tact your [ocaJ cable operator.
Owner's Manual 3
Wamin_Caution
IMPORTANT SAFETY INSTRUCTIONS
important safety instructions shall be provided w_h each apparatus, This information shat[ be given in a separate booklet
or sheet, or be Iocatec{ before any operating inst_ctions in an instruction for ins_Hation for use and supplied wi_ the appa _
ratus
This inferm_ion shatl be given in a langua_ acceptable to the country where the apparatus is intended to be used.
The important safety instructions shall be ent_led 'Important: Safety instructions". The following safety instructions shag be
included where apptisabEe, and, when used shall be verbatim as fellows. Additional safety information may be included by
adding statements after the end of the foilowing safety instruction iist, At the manufacturer's option, a picture or drawing that
i_lustrates the intent of a specific safety instruction may be placed immediately adjacent to that _fety instruction :
1, Read these instructions.
2. Keep these instructions.
3. Heed all warnings,
4. Follow all Instructloas_
5. Do not use this apparatus near water,
6. Clean only with d_ cloth.
7. Do not block any ventilation openings. Install in accordance with the manufacturer's instructions.
8, Do not install near any heat sources such as radiators, heat registers_ stoves_ or other apparatus (including ampli-
fiers)that pr_uce heat
9_ Do not defeat the safety purpose of the polarized or grounding4ype plug. A polarized plug has two blades with
one wider than the other. A grounding type plug has two blades and a third grounding prong_ The wide blade or the
third prong ate provided for "yoursafety. If the provided plug does not fit into your outlet, consult an electrician for
rep|aeement of the obsolete outlet.
1;0_ Protect the power cord from _ing walked on or pinched pa_icu|arly at plugs, convenience receptacles_ and the
point where they exit from the apparatus.
1;1. Only use attachments/accessories specified by the mantifacturer;
12. Use only with the cart_ stand, tripod, bracket_ or table spacified by the manufacturer_ or sold with the apparatus.
When a cart is used, use caution when moving the cart_apparatus combination to avoid injury from tip-over.
PORTABLE CART WARNING
4 Plasma TV
Safety Instructions
13. Unplug this apparatus during lightning storms or when unused for long periods of time.
14. Refer all servicing to qualified service personnel. Servicing is required when the apparatus has been damaged
in any way, such as power-supply cord or plug is damaged, liquid has been spilled or objects have fallen into
the apparatus, the apparatus has exposed to rain or moisture, does not operate normally, or has been dropped.
15. CAUTION concerning the Power Cord :
Most appliances recommend they be placed upon a dedicated circuit; that
is, a single outlet circuit which powers only that appliance and has no
additional outlets or branch circuits. Check the specification page of
this owner's manual to be certain.
Do not overload wall outlets. Overloaded wall outlets, loose or damaged
wall outlets, extension cords, frayed power cords, or damaged or
cracked wire insulation are dangerous. Any of these conditions could
result in electric shock or fire. Periodically examine the cord of your
appliance, and if its appearance indicates damage or deterioration,
unplug it, discontinue use of the appliance, and have the cord replaced
with an exact replacement part by an authorized servicer.
Protect the power cord from physical or mechanical abuse, such as being
twisted, kinked, pinched, closed in a door, or walked upon. Pay
particular attention to plugs, wall outlets, and the point where the
cord exits the appliance.
16. Outdoor Use Marking :
WARNING - To Reduce The Risk Of Fire Or Electric Shock, Do Not Expose This Appliance To Rain Or Moisture.
17. Wet Location Marking :
Apparatus shall not be exposed to dripping or splashing and no objects filled with liquids, such as vases, shall
be placed on the apparatus.
18. Any DATA saved on HDD may be lost or damaged, making a back up copy of data is strongly recommended.
The manufacturer will NOT be responsible for any data loss or damage.
Owner's Manual 5
Contents
Warning/Caution ........................ 2
Digital Cable Compatibility ......................... 3
Surety Instructions ............................. 4~5
Introd uction
Controls/Connection Options ............. 8--il
Remote Control Key Functions ....... 12--13
Installation Accessories ...................... 14
InstaJlation instructions
Joining _e TV assem_ to lJ'_ walt to p_th_ set _m =
bling ............................... 14
Install the RING SPACER with the bo_ on the set
as shown ............................. 15
Remove or A_e the Ra_e Cover .......... 17
Swivel function ......................... 18
Arrangement wires ...................... 18
External Equipment Connections ........... 19~25
A_enna or Cable Connection ........... 19_20
VCR Setup
E_terna_NV%dr_'g;t;_p":: :',: [: ::: [: [::.20.21
DVD Setup ............................ 21
CableCARD _' Setup ..................... 22
HDSTB Setup ........................ 22
PC Setup ........................... 23-24
Monitor Out Setup ...................... 25
Digital Audio Output .................... 25
HDM_ ............................... 26-28
TV Gui_ On Screen Setup .............. 29~35
Operation
Turning the TV On ..................... 36
HOME Menu ........................... 37
TV Setup ............................ 38-56
On-screen Menus Language Selection ....... 38
Setup Menu Options
EZ Scan (Channel Search) ................ 39
Manual Scan .......................... 39
Channel Edit ........................... 40
DTV Signal Stren_ ..................... 40
Channel Label Setup ..................... 41
Main Picture Source Selection .............. 41
input Label ............................ 41
Video Menu Options
EZ Pic_re ........................ 42
Manuat Pic_are Control (Custom Option) ...... 42
Color Temper_ure Control ................ 42
Video Reset ....................... 42
Audio Menu Options
Audio Language ......................... 43
EZ Soundtlr_e /EZ Sound ................ 43
Manual Sound Control (custom Option) ....... 44
Front Surround ........................... 44
TV Speakers On/Off Setup ............... 45
Stereo/SAP Broadcasts Setup ............. 45
BBE .................................. 45
Time Menu Options
Auto Clock Setup ....................... 46
Manual Cbck Setup ..................... 46
On/Off Timer Setup ...................... 46
Sleep _mer /Auto Off .................... 47
Option Menu Features
Advanced ............................. 48
Cinema 3:2 M_e Setup ................ 48
Low Power ..................... 48
LG Lcgo ............................ 49
Aspect Ratio Cor_rol ..................... 50
Caption ......................... 51
Caption /Text .......................... 51
Caption Option ........................ 52
iSM Method ........................ 53
Front DispJay .......................... 53
Auto Demo ............................ 54
Lock Menu Options
Parental Lock Setup ..................... 56
CabteCARD _ Function
Cable menu options ..................... 57
_rambIed channel ...................... 57
Cabie Channel List ...................... 58
Emergency Ne_ Messa_ ............... 58
Xs"r,_
Recorded TV ....................... 59~63
Notes on Memory Card ................ 64~67
Photo List .......................... 68-69
Music List .......................... 70_-72
Timeshift ........................ 73~74
Recording ........................... 75W7
TV Guide On Screen TM System ........... 78-98
IEEE 1394 ........................ 9%110
Remote Control
PIP (Picture-in-Pictu_)iPOPiTwin Picture
Watching PIP/POP/Twin Picture .......... 11I
_ect_ng an Input Skjr,al_rce for PIP/Twin P_ure .111
Swapping PIPfTwin Picture ............... iil
TV Program Selection for PiP ............ 111
Moving the PIP sub picture ............... 112
FA1UpSflngMain and Sub P#_ure S_es for Twin Pic_Jre .i12
(Picture-out-of-Picture: Channel Scan) . .112
APM ................................ 113
Bned Info............................. 114
EZ Mute .......................... 115
Screen Setup for PC mode ............... 116
External Control Device Setup .............. 117q22
IR Codes ................................ 123~124
Programming the Remote ..................... 125
Programming Codes ..................... 1_q27
Troubleshooting Checklist ....................... 128
Maintenance ................................. 129
Product Specifications ........................ 130
Warranty .................................. 131~132
After reading this manuat, keep it handy for future reference,
6 Plasma TV
introduction
Ion
What is a Plasma Display Panel (PDP)?
A plasma display panel is the latest display technol_y and the best way to achieve fiat panef displays with exeeffent image quality
and large screen sizes that are easily viewabte, The POP can be thoughtof as adescendant of the neon [amp and it can be also
be viewed as a series of fluorescent _amps,
How does it work?
PDP is an array of eel[s, known as p[xels, which are comprised of 3 sub pixeEs, corresponding to the coiors red, green, and blue_
Gas in a plasma state is used to react with phosphors in each sub-pixel to produce co_ored fight (red, green, or blue)_ Theee phos-
phors are the same types used in Cathode Ray Tube (CRT) devices such as televisions and common computer monitors
You get the dch_ dynamic colors that you expect Each sub-pixel is: individually controlled by advanced electronics to produce over
16 million different colors All of these mean that you get perfect images that are easily viewab[e in a display that is less than 5
inches thick.
160° - Wide angle range of vision
Your flat panel plasma screen offers an exceptionally broad viewing angle -o over 160 degrees. This means that the display is
clear and visible to viewers anywhere in the room who can see the screen.
Wide _reen
The screen of the Plasma Display is so wide that your viewing experience is as if you are in a theater.
Multimedia
Connect your p_as_ display to a PC and you can use _ for confer_ncing, games, and tntemet browsing. The Picture-in-Picture
feature allows you to view your PC and video images simul_neously.
Versatile
The right weight and thin size n_kes it easy to install your plasma display in a variety of locations where conventional TVs will not
fit
The PDP Manufacturing Process: afew minute colored dots may be present on the PDP screen
The PDP (Plasma Display Panel), which is the display device of this product, is composed of 09 to 2.2 million cells. Afew cell
defects will normally occur in the PDP m_nufactudng process. _veral tiny, minute colored dots visible on the screen shoutd be
accepSable. This also occurs in other PDP manufacturers' produc*_. The tiny dots appearing does not mean that this PDP is defec-
tive. Thus a few cell defects are not sufficient cause for the PDP to be exchanged or returned. Our production technology mini-
mizes the_ ce_f defects during the manufacture and o_ration of this product.
Cooling Fan Noise
in the same way that a fan is used in a PC computer to keep the CPU (Central Processing Unit) cool, the PDP is equipped with
cooling fans to cool the Monitor and improve its re[i_ility. Therefore, a ce#.ain levet of noise could occur while the fans are oporat-
ing and cooling the PDP.
The fan noise doesn"t have any negative effect on the PDP"s efficiency or reliability: The noise from these fans is normal during the
oper_ion of this product. We hope you understand that a ce_n leve_ of noise from the coo_ing fans is acceptable and is not suffi =
cient cause for the PDP to be exchanged or returned.
OwneYs Manual 7
Inlroduction
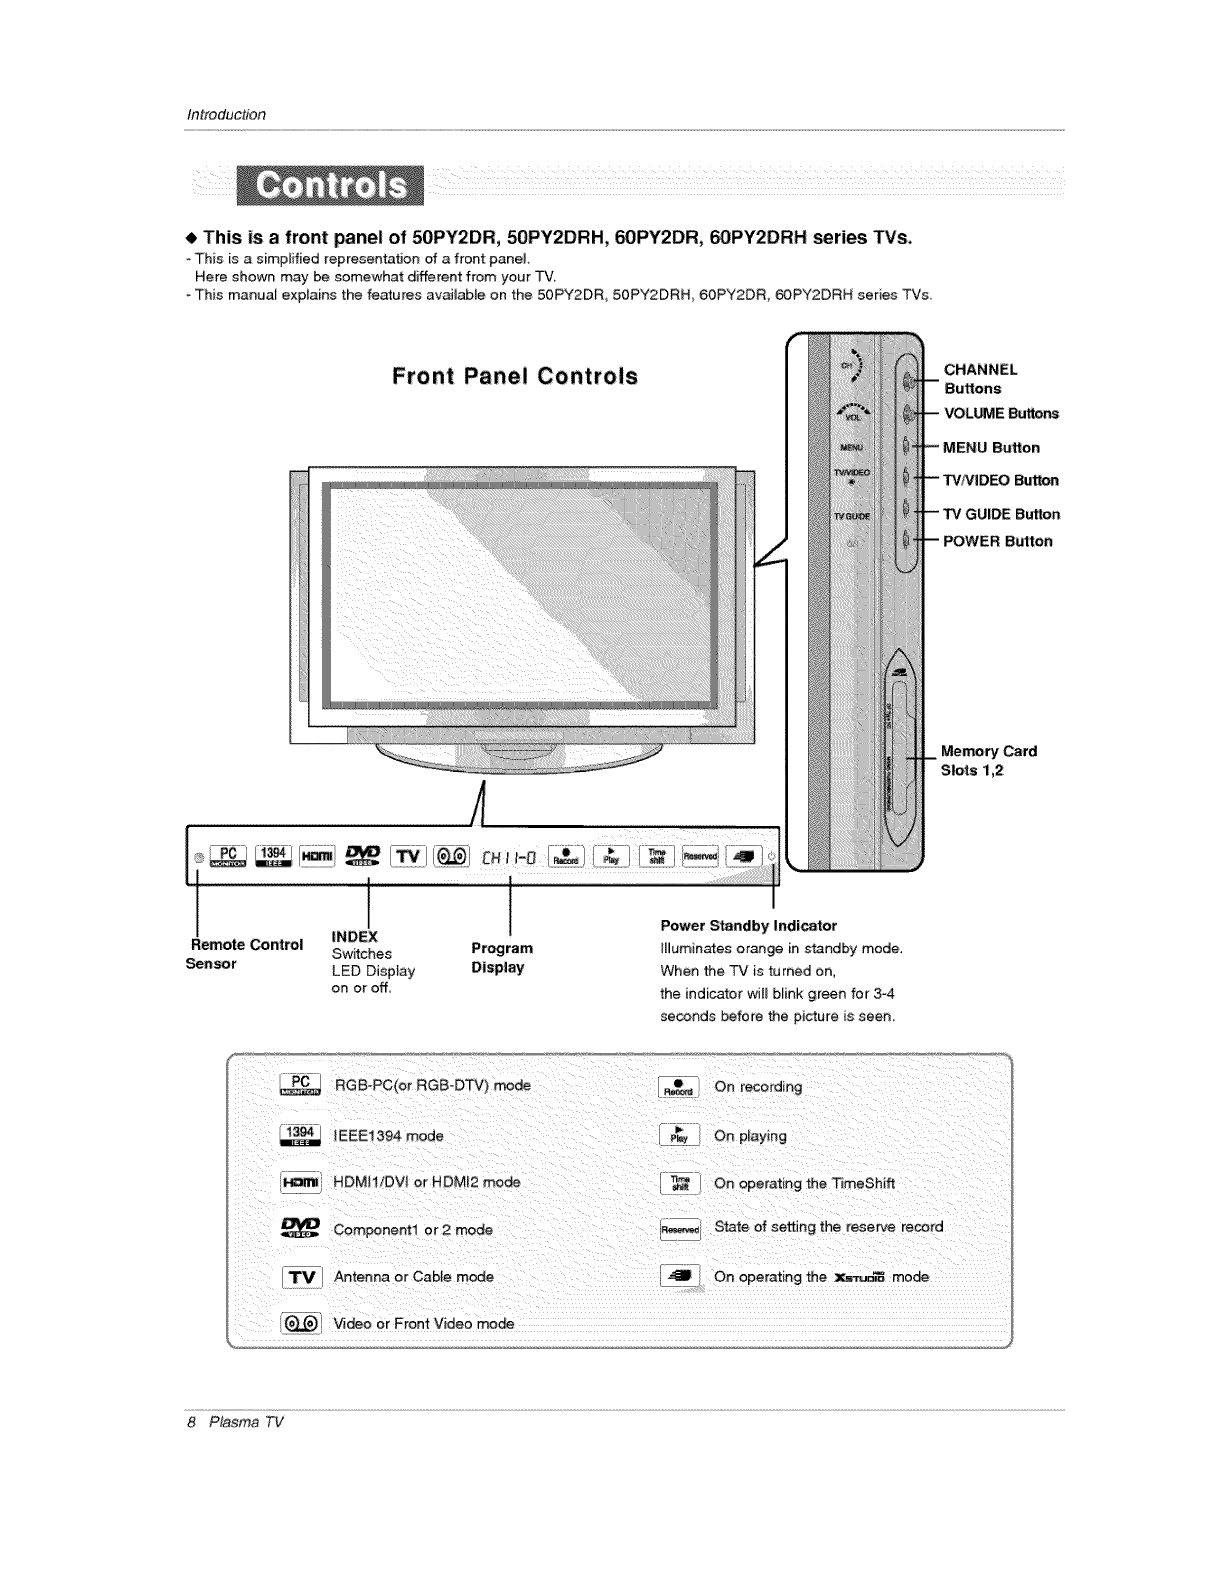
• This is afront panel of 50PY2DR, 50PY2DRH, 60PY2DR_ 60PY2DRH series TVs.
This is a simplified representa_on of a front panel
Here shown may be somewhat different from your TV_
- This manual explains the features available on the 50PY2DR, 50PY2DRH, 60PY2DR, 60PY2DRH series TVs
Front Panel Controls
A
@
i .......
!t
Power Standby Indicator
Remote Control _NDEX
Switches Program _[luminates orange in standby mode,
Sensor LED Display Display When the TV is turned on,
on or off the indicator wilU blink green for 3°4
seconds before the picture is seen.
CHANNEL
Button
_'tton
Button
Memory Card
Slots 1,2
RGB-PC(or RGB-DTV) mode _ On recording
=_ IF_EEl394 mode ____y_ On pSaying
I_ HDMII/DVI or HDM[2 mode On operating the TimeShift
Component1 or 2 mode _=-._,_ State of setting the reserve recorc
_. Antenna or Cable mode ,@IB_ On operating the xs_ mode
I (_=_) Video or Front Video mode
8 Plasma TV
Introduction
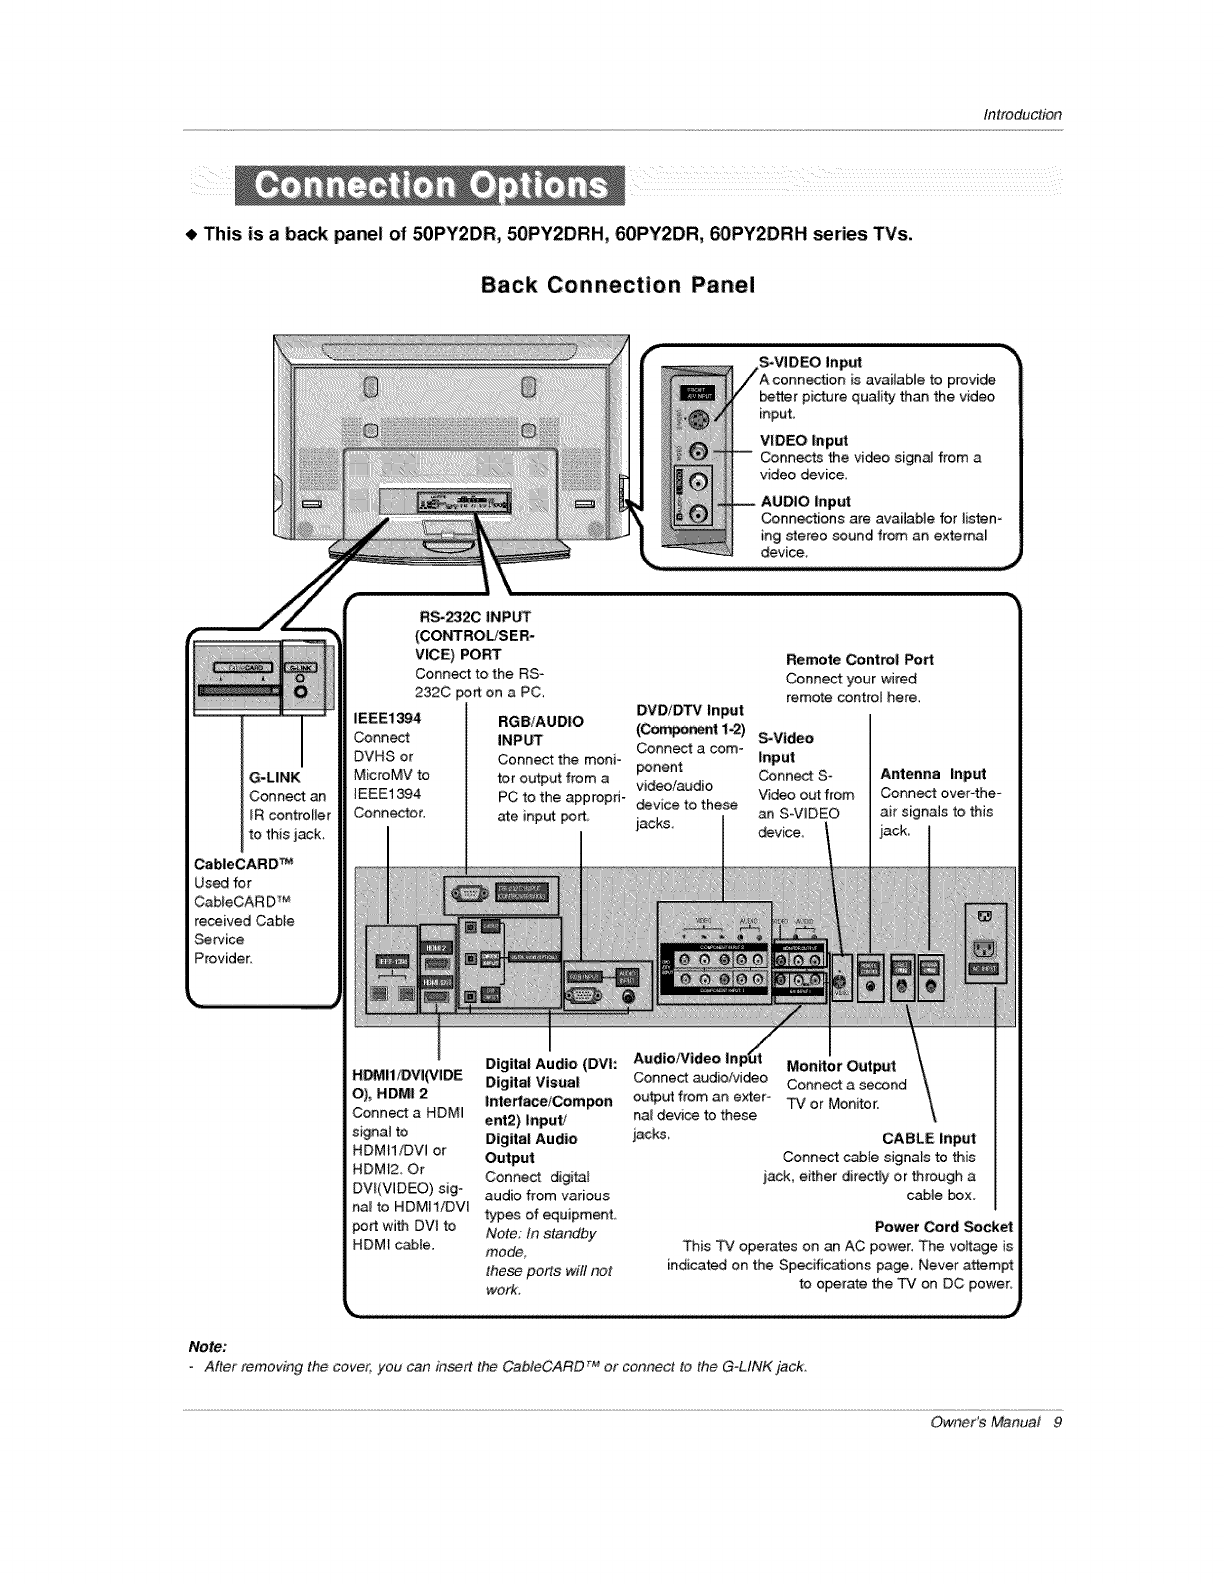
This is a back panel of 50PY2DR, 50PY2DRH, 60PY2DR, 60PY2DRH series TVs.
Back Connection Panel
S-VIDEO Input
is available to provide
better picture quality than the video
input.
VIDEO Input
Connects the video signa_ from a
video device
AUDIO Input
Connections are available for listen-
ing stereo sound from an extema_
device,
G-LINK
Connect an
IR controller
to this jack.
CableCARD TM
Used for
CaMeCAR DTM
received Cable
Sewice
Provider.
L
RS-_2C INPUT
(CONTROLfSER-
vicE) PORT
Connect to the RS-
232C port on a PC_
_E1394 RGBiAUDIO
Connect INPbq"
DVHS or Connect the moni-
MicroMV to tor output from a
IEEE1394
Connector.
Remote Control Port
Connect your wired
remote control here.
DVD/DTV input
(Cc_po_t 1-2) _Vtdeo
Conneat a com_ input
portent Conn_ S_
video/audio
PC to the appropri- device to these Video out from
ate input port, jacks, an S-VIDEO
device_
Antenna Input
Connect over4he-
air signals to this
/
Digital Audio (DVh Audio/Video InpUt
H_I1iDVI(VIDE Digital Visual
O)_ HDMI 2 lnterface/Compon
Connect a HDMI ent2) Input/
signal to Digital Audio
HDMHiDVI or Output
HDMt2 Or Connect digital
DVt(ViDEO) sig _ audio from various
na_ to HDMI1/DVl types of equipment,
port with DV_ to Note; In standby
HDM[ cable. mode,
fhese ports will no_
work.
Monitor Output
Connecff audio/video Connect a second
output from an exter- TV or Monitor,
hal device to these
jacks CABLE input
Conn_ cable signals to this
jack, either directly or through a
came box.
Power Cord Socket
_is _ operates on an AC power_ The voftage is
indicated on the Specifications page, Never attempt
to operate the TV on DC power.
Note:
- After removing the cover: you can inert the CableCARD TM or connect to the G-LINKjack.
OwnePs Manual 9
Inlroduction
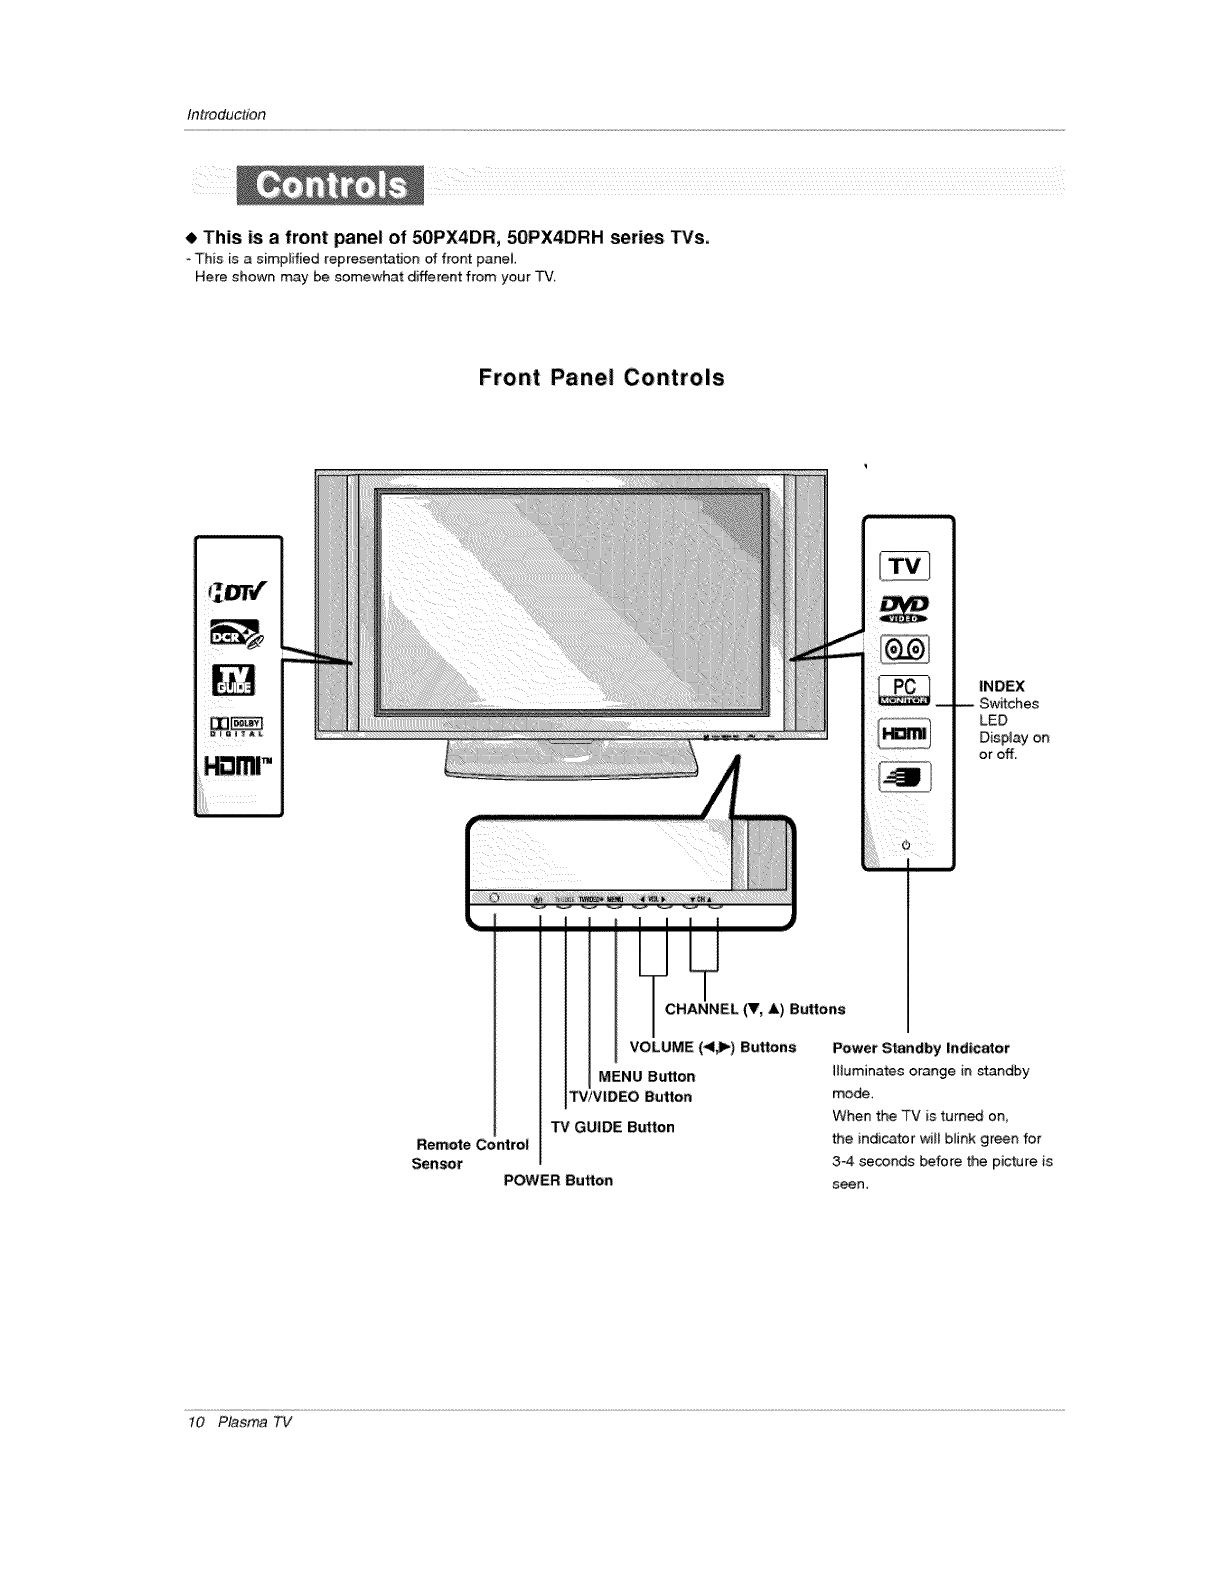
• This is a front panel of 50PX4DR, 50PX4DRH series TVs,
-This is a simplified representation of front panel
Here shown may be somewhat different from your TV
Front Panel Controls
INDEX
LED
Display on
or off.
CHANNEL (V, A) Buttons
VOLUME (*tJ_) Buttons
MENU Button
TViVIDEO Button
TV GUIDE Button
Remote Control
Sensor POWER Button
Power Standby _ndlcator
illuminates orange in standby
mode,
When the TV is turn_ on,
the indicator will blink green for
3-4 seconds before the picture is
seen,
t0 Plasma TV
fnlroduction
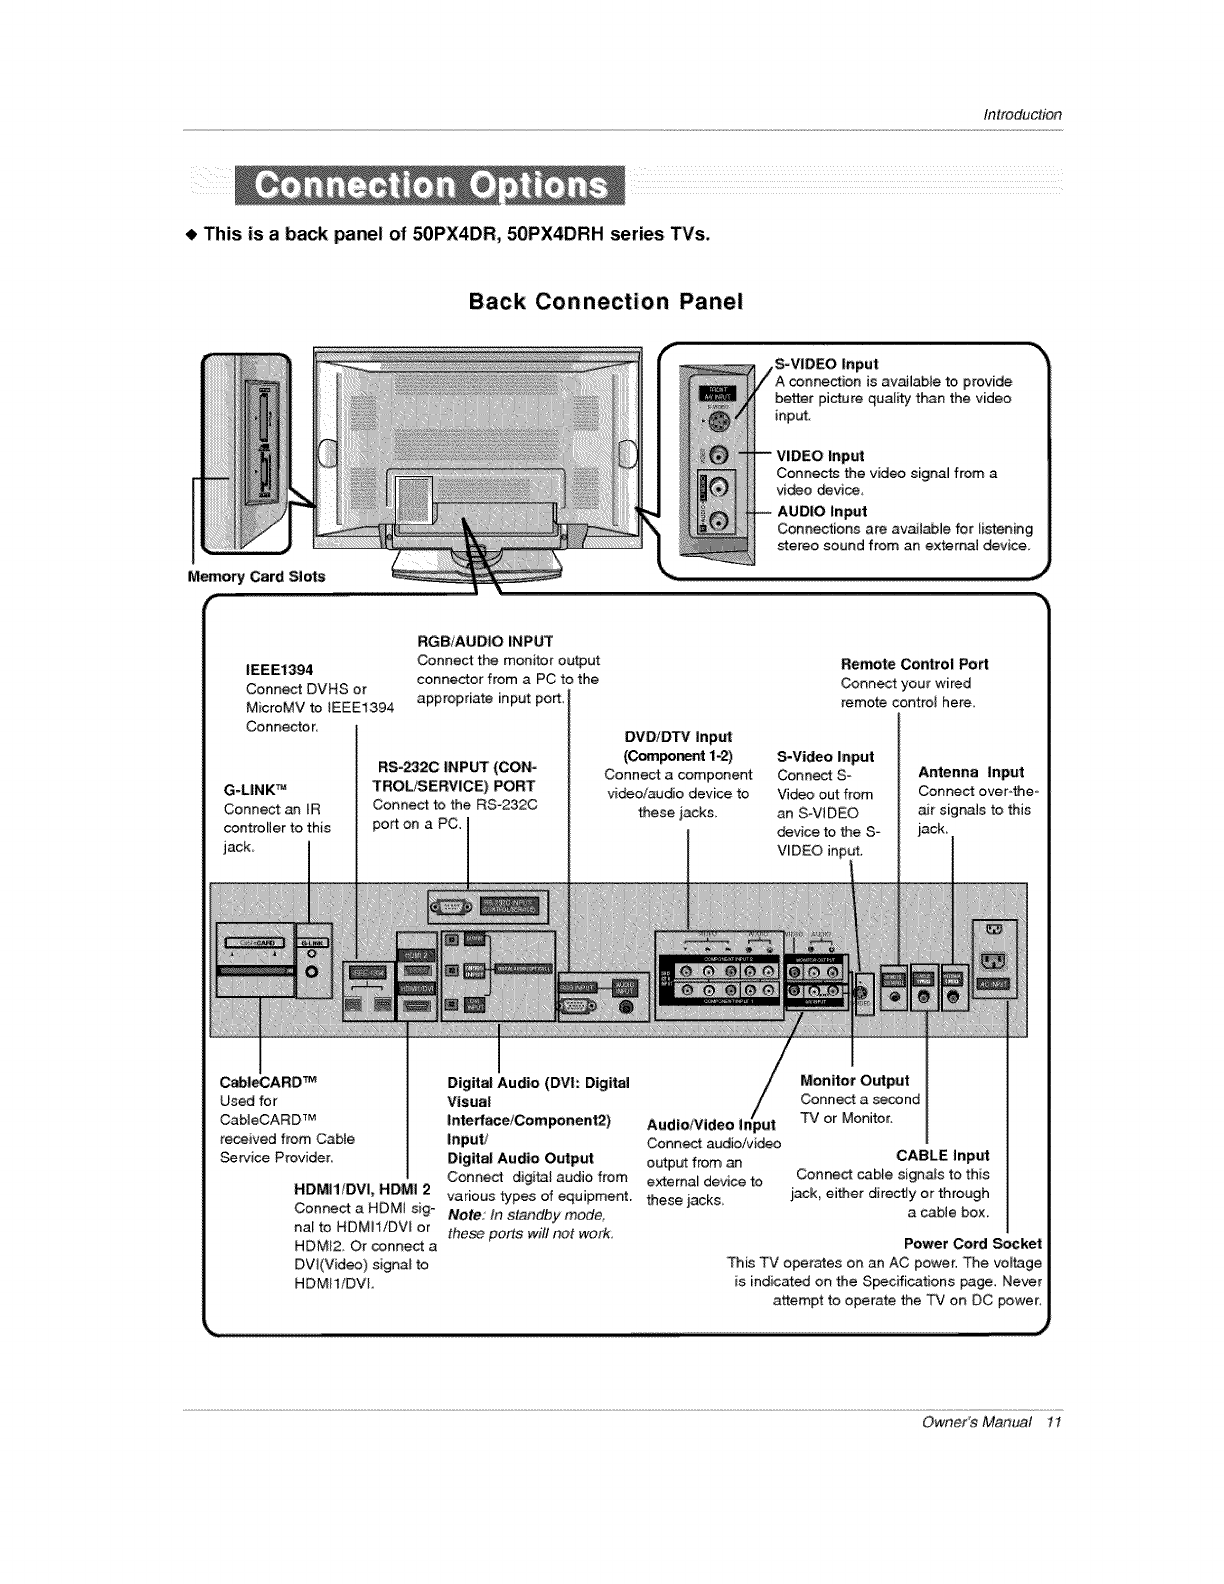
This is a back panel of 50PX4DR, 50PX4DRH series TVs,
Back Connection Panel
S-VIDEO
is available to provide
better picturequality than the video
input.
VIDEO Input
Connec.f_ the video signal from a
vi_o device
AUDIO Input
IEEE1394
Connect DVHS or
MicroMV to tEEEl_394
Connector,
G-LINK TM
Connect an IR
controller to this
jack_
RGB/AUDIO INPUT
Connect the monitor output
connector from a PC to the
appropriate input port
RS-2320 INPUT (CON-
TROL!SERVICE) PORT
Connect to the RS=232C
port on a PC.
DVDIDTV Input
(Component1-2)
Connect a component
video/audio device to
these jacks.
Route Control Port
Connect your wired
remote control here,
S-Video Input
Connect So
Vim out from
an SoV_DEO
device to the S _
VUDEO in L
Antenna Input
Connect over-the*
air signals to this
CableOARD TM Digital Audio (DVh Digital
Used for Visual
CableCARD TM Interface/Component2) AudiolVideo i_
received from Cable Input/ Conn_ audio/video
Service Provider. Digital Audio Output output from an
Connect digital audio from extema_ device to
NDMI1!DVI, HDMI 2 various types of equipment, these jacks
Connect a HDMi sig- Note: tn standby mode.
nal to HDMH/DW or these ports will not work.
HDMI2, Or connect a
DW(Video) signal to
HDMI1/DVI.
Monitor Output
Connect a second
TV or Monitor.
CABLE Input
Connect cable signals to this
_ack, either dkectJy or through
a cable box,
Power Cord Socket
This TV operates on an AC power. The voff.age
is indicated on the Specifications page. Never
attempt to operate the _FV en DC power,
Owner's Manual 1I
Inlroduction
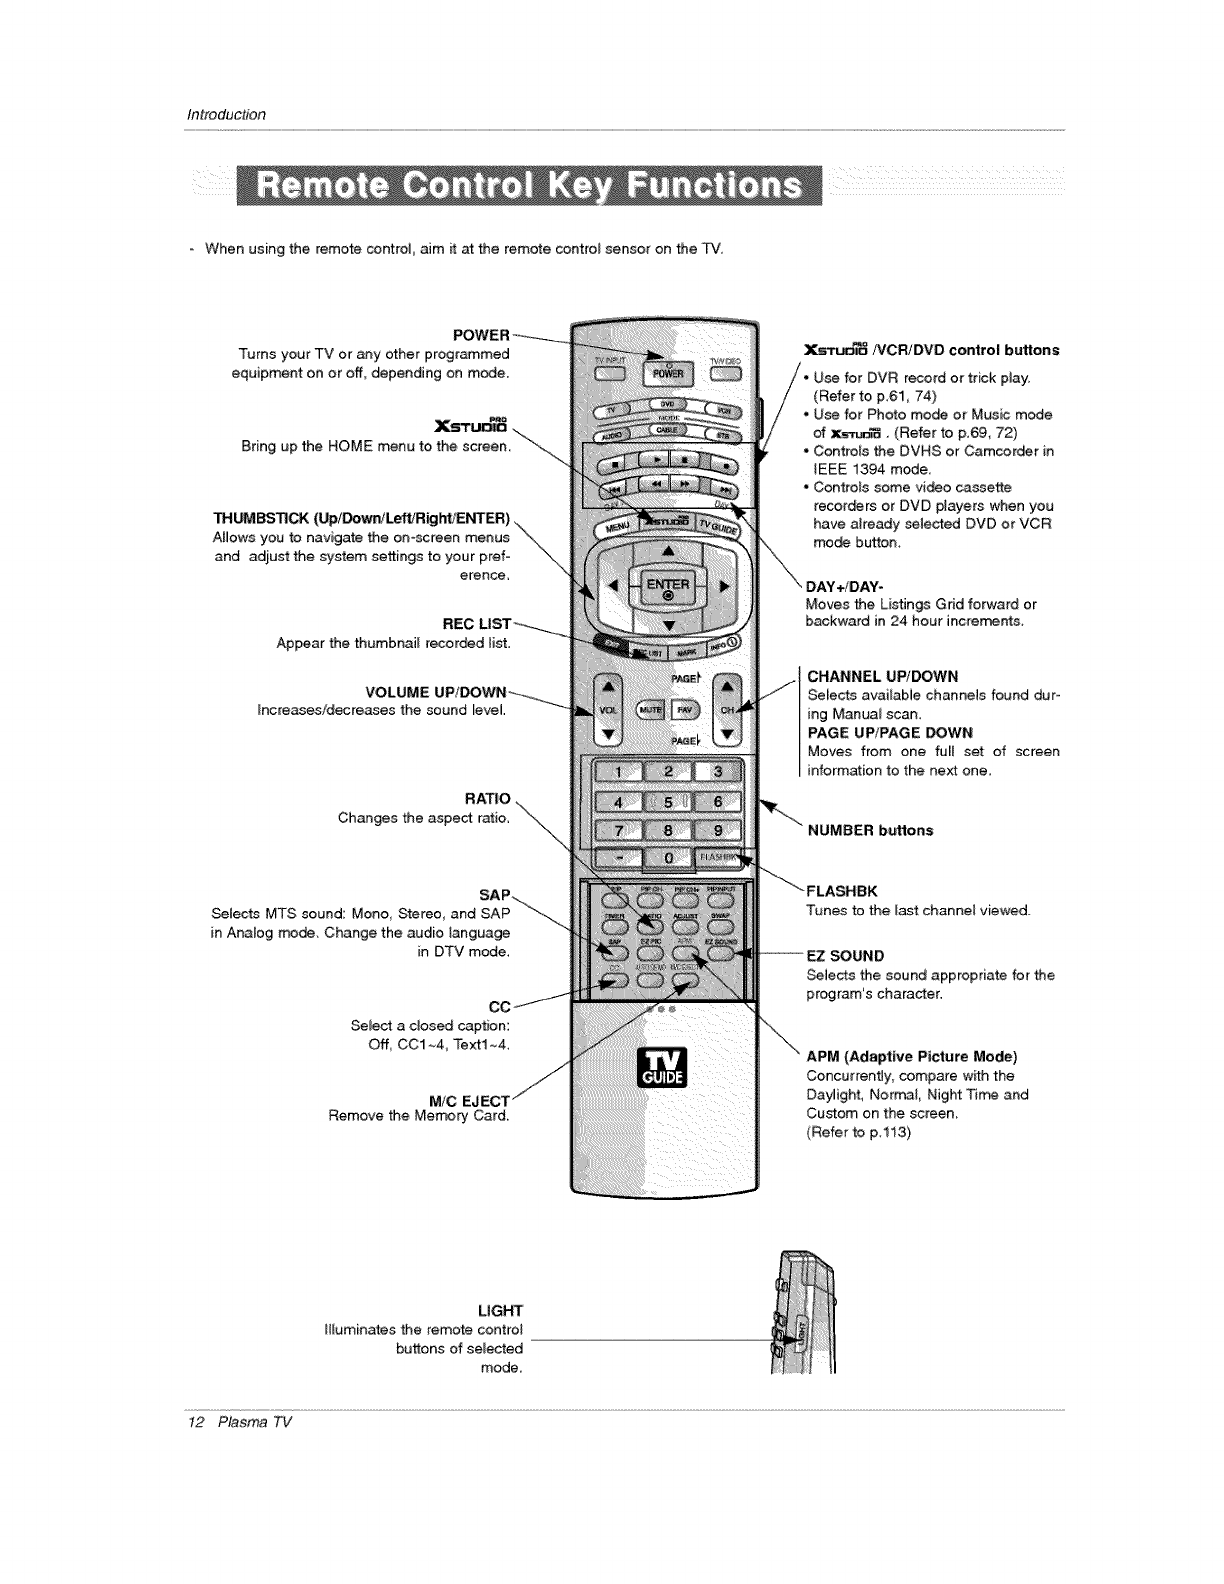
- When using the remote contro_, aim i_ at the remote contro_ sensor on the TV,
Turns your TV or any other prograJT_med
equipment on or off, depending on mode.
Xs_
Bring up the HOME menu to the screen,
THUMBSTICK (Up/Down/Left/Right/ENTER).
Allows you to navigate the on-screen menus _.
and adjust the system settings to your pref- _
erence
Ap_ar the thumbnail recorded {ist.
VOLUME
Increases/decreases the sound level.
RATIO
Changes the aspect ratio,
SAP.,..
Selects MTS sound: Mono, Stereo, and SAP -----_...
in Analog n_de, Change the audio tanguage
in DTV mode,
Select a dosed caption:
Off, CCt ~4, Text1 ~4,
MiC
Remove the Me_ Card.
X._/%'CRiDVD control buttons
record or trick play:
(Refer to p,61_ 74)
. Use for Photo mo_ or Music m_e
of x_-r_, (Refer to p.69, 72)
° Controls the DVHS or Camcorder in
iEEE 1394 modem
- Controls some video cassette
recor_rs ot DVD players when you
have already selected DVD or VCR
mo_ button
Moves the Listings Grid forward or
backward in24 hour increments.
CHANNEL UP/DOWN
Selects available channels found dur-
ing Manua_ scan,
PAGE UP/PAGE DOWN
Mows from one full set of screen
information to the next one.
NUMBER buttons
Tunes to the _ast channel viewed.
SOUND
Selects the sound appropriate for the
program's character.
[Adaptive Picture Mode)
Concurrently, compare with the
Daylight, Normal, Night Time and
Custom on the screen.
(Refer to p.113)
LIGHT
Hluminates the remote control
buttons of selected
mode,
t2 Plasma TV
introduction
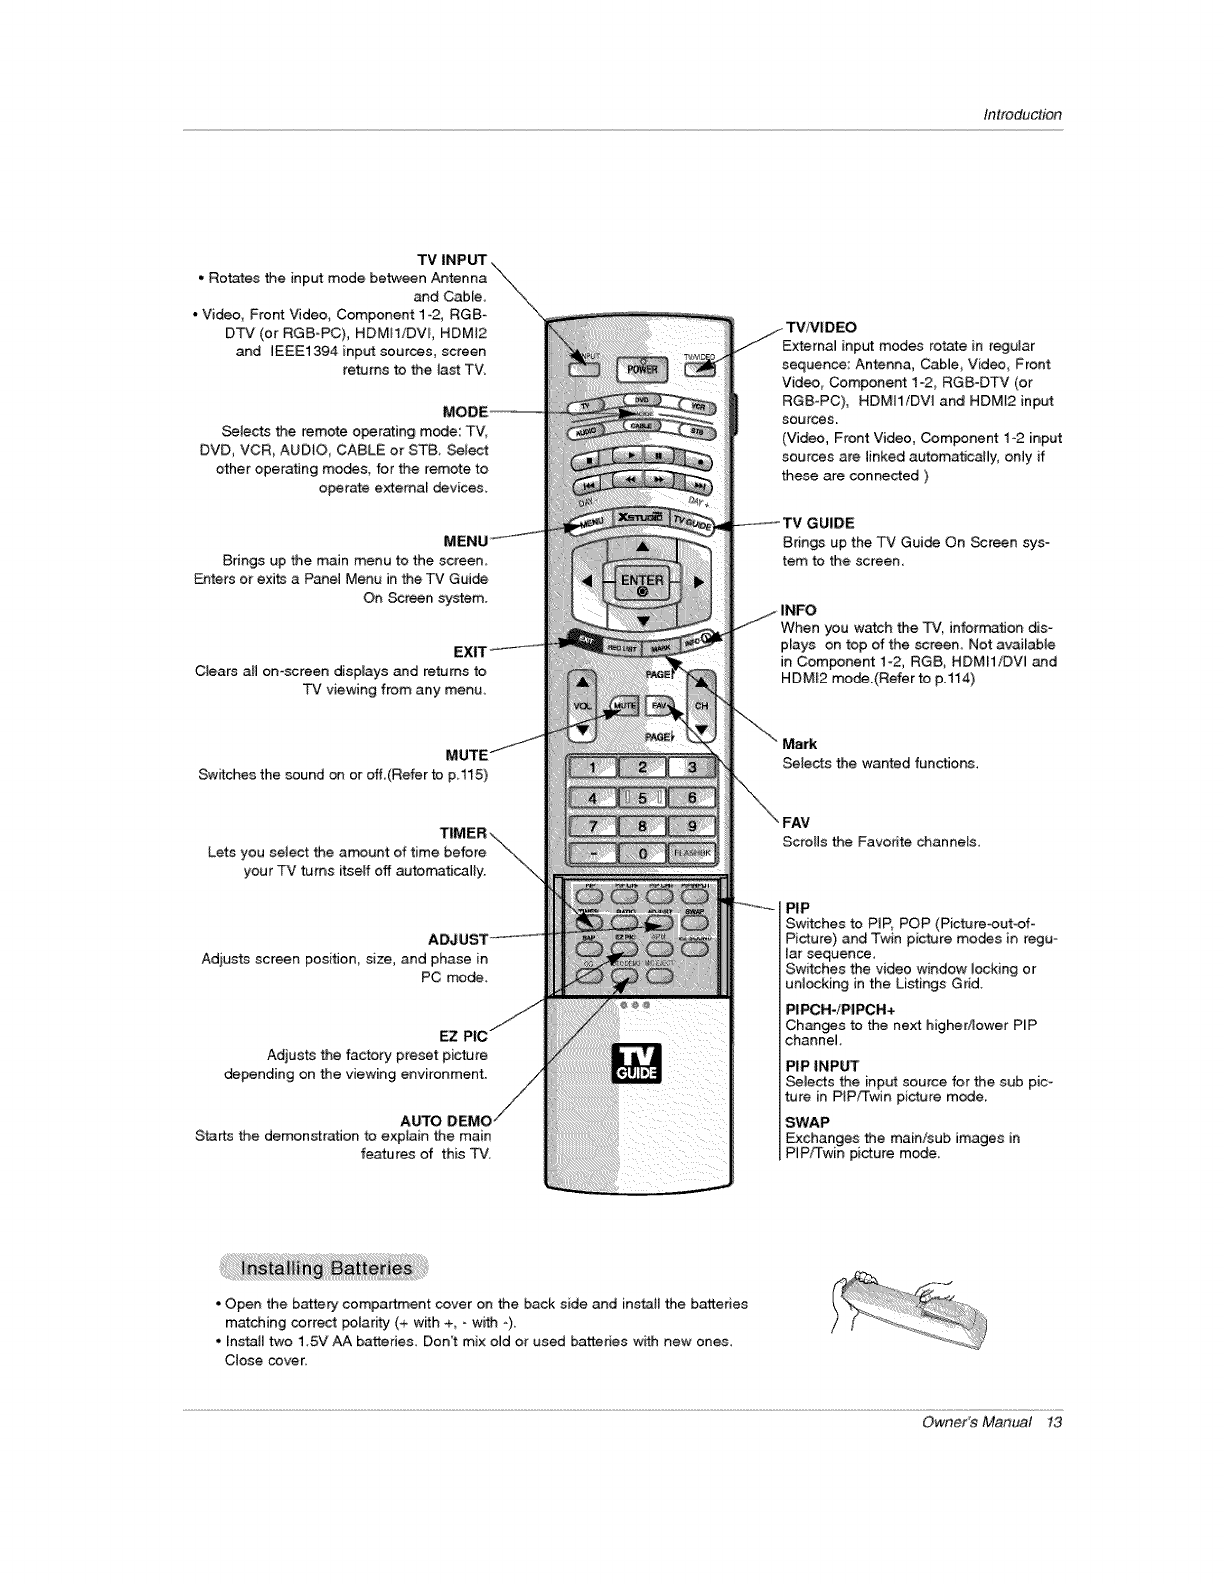
TV INPUT.
* Rotates the input mode between Antenna \._
and Cable x,
° Video_ Front Video, Component 1-2, RGB-
DTV (or RGB-PC), HDMI1/DVI, HDMI2
and EEE1394 input sources, screen
re.ms to the tast TV,
Selects the remote operating mode: TV,
DVD, VCR, AUDtO_ CABLE or STB, Select
other operating modes, for the remote to
operate extema_ devices.
Brings up the main menu to the screen,
Enters ot exi_ a Panel Menu in the TV Guide
On Screen system.
Clears all on-screen displays and returns to
TV viewing from any menu,
External input modes rotate in regular
sequence: Antenna, Cable, Vid_, Front
Video_ Component 1-2_ RGB-DTV (or
RGB-PC), HDMI1iDVl and HDMI2 input
sources
(Video, Front Video, Component 1-2 input
sources are linked automatically, only if
these are connected )
_UIDE
Brin_ up the TV Guide On Screen sys-
tem to the, screen.
When you watch the TV, information dis-
plays on top of the screen, Not available
in Com_nent 1-2, RGB, HDMH/DW and
HDM_2 mode.(Refer to p.114)
Switches the sound on or off(Refer to p,115) Selects the wanted functions.
Lets you select the a_unt of time before
your TV turns itself off automatically.
ADJ
Adjusts screen position_ size, and phase in
PC mode.
EZ
Adjusts the factory preset picture
depending on the viewing environment.
AUTO
Starts the demonstration to explain the main
features of this TV,
Scrolls the Favorite channels,
PIP
Switches to PiP, POP (Picture-out-of-
Picture) and Twin picture modes in regu-
lar sequence,
Switches the video window locking or
unlocking in the Lislings Grid.
Chants to the next higher/lower PiP
channel
Selects the inp_ source for the sub pic-
lure in PIP/Twin picture mode,
Exchang_ the main/sub images in
PiP1%win picture mode.
• Open the b_el3, compar#nent cover on the back side and instatl the batteries
matching correct _lar_ty (+ w_h +, -with _).
• Install two 1.5V AA batteries. Don't mix old or used battenes w_h new ones,
Close cover,
Owner's Manual 13
Installation
I!
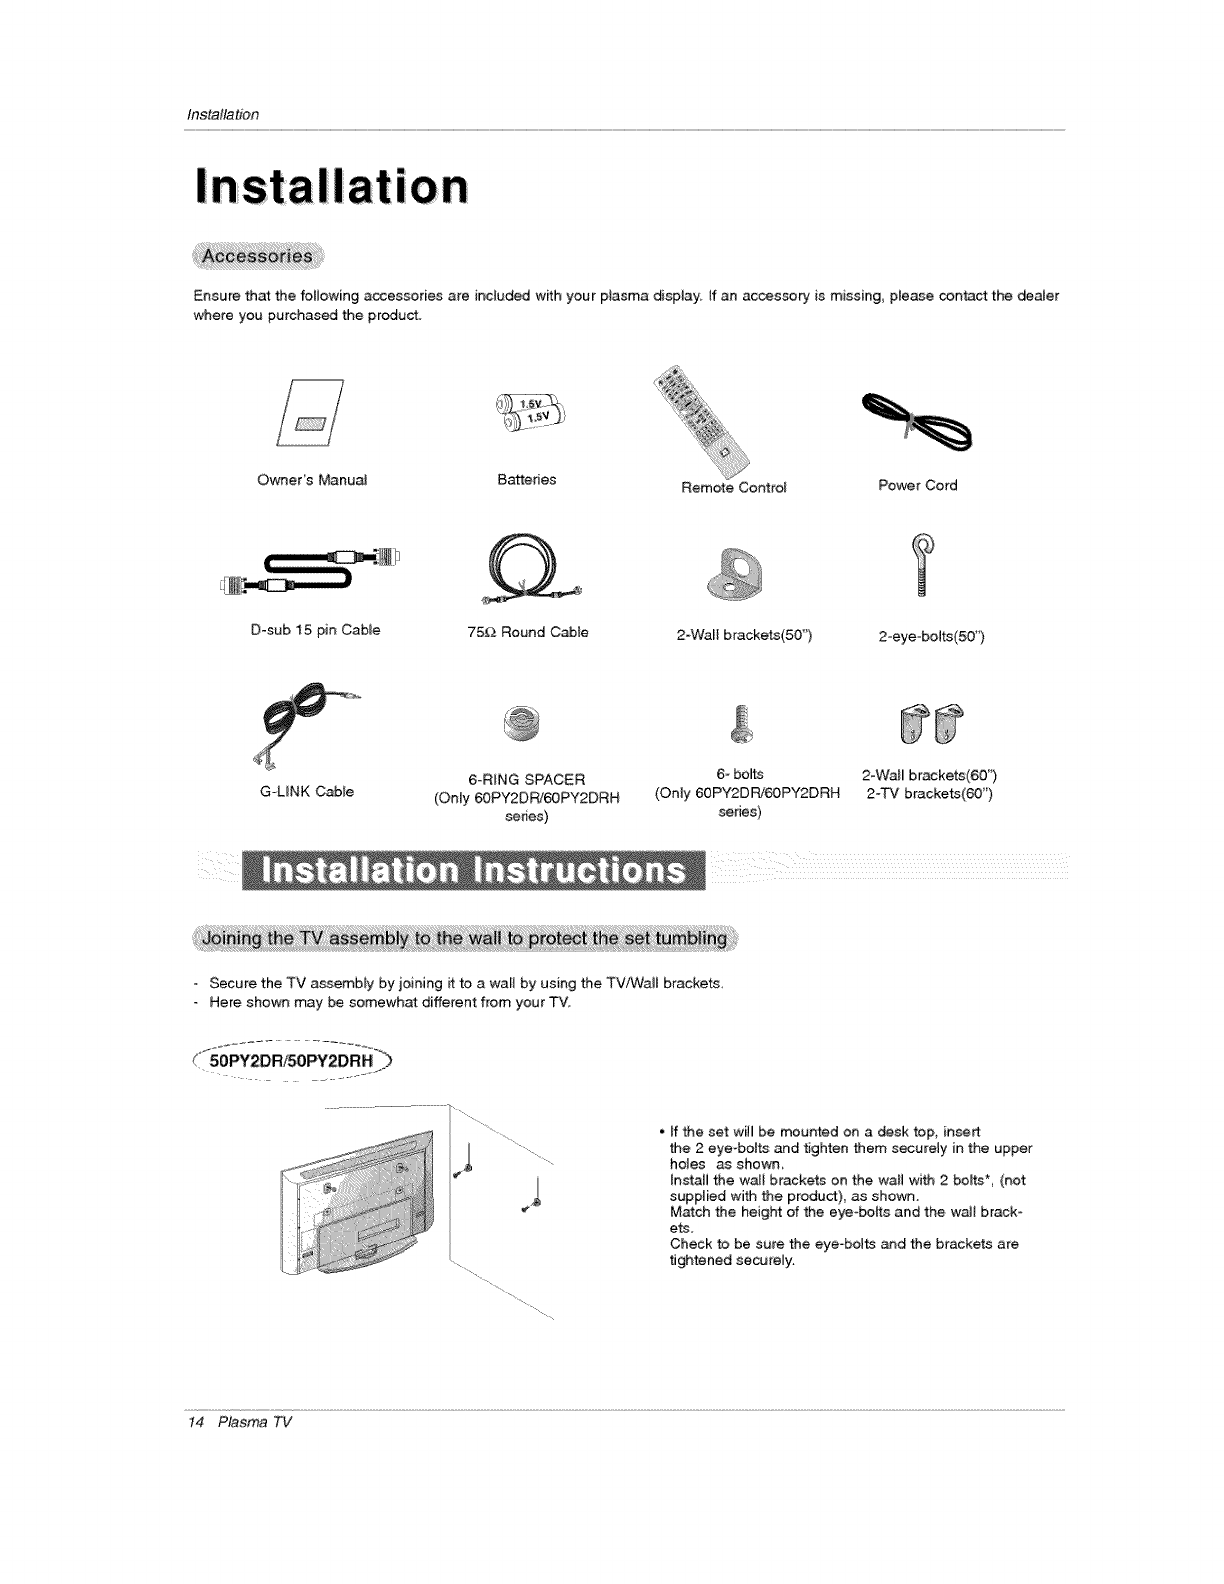
Ensure that the following accessories are included wffh your ptasma display, tf an accescory is missing, please contact the _ater
where you purchased the product.
Owners Manual Batteries Remote Control Power Cord
D-sub 15 pin Cable 75E2 Round Cable 2-Wall brackets(50") 2-eyeobolts(50 _')
G-LINK Cable 6-RING SPACER 6- bolts 2-Wail brackets(60 )
(Only 60PY2DRJ60PY2DRH (Only 60PY2DRI60PY2DRH 2-TV brackets(60')
series) series)
i i
Secure the TV assembly by joining it to a wall by using the TV/Wall brackets,
Here shown may be somewhat: different from your TV,
4
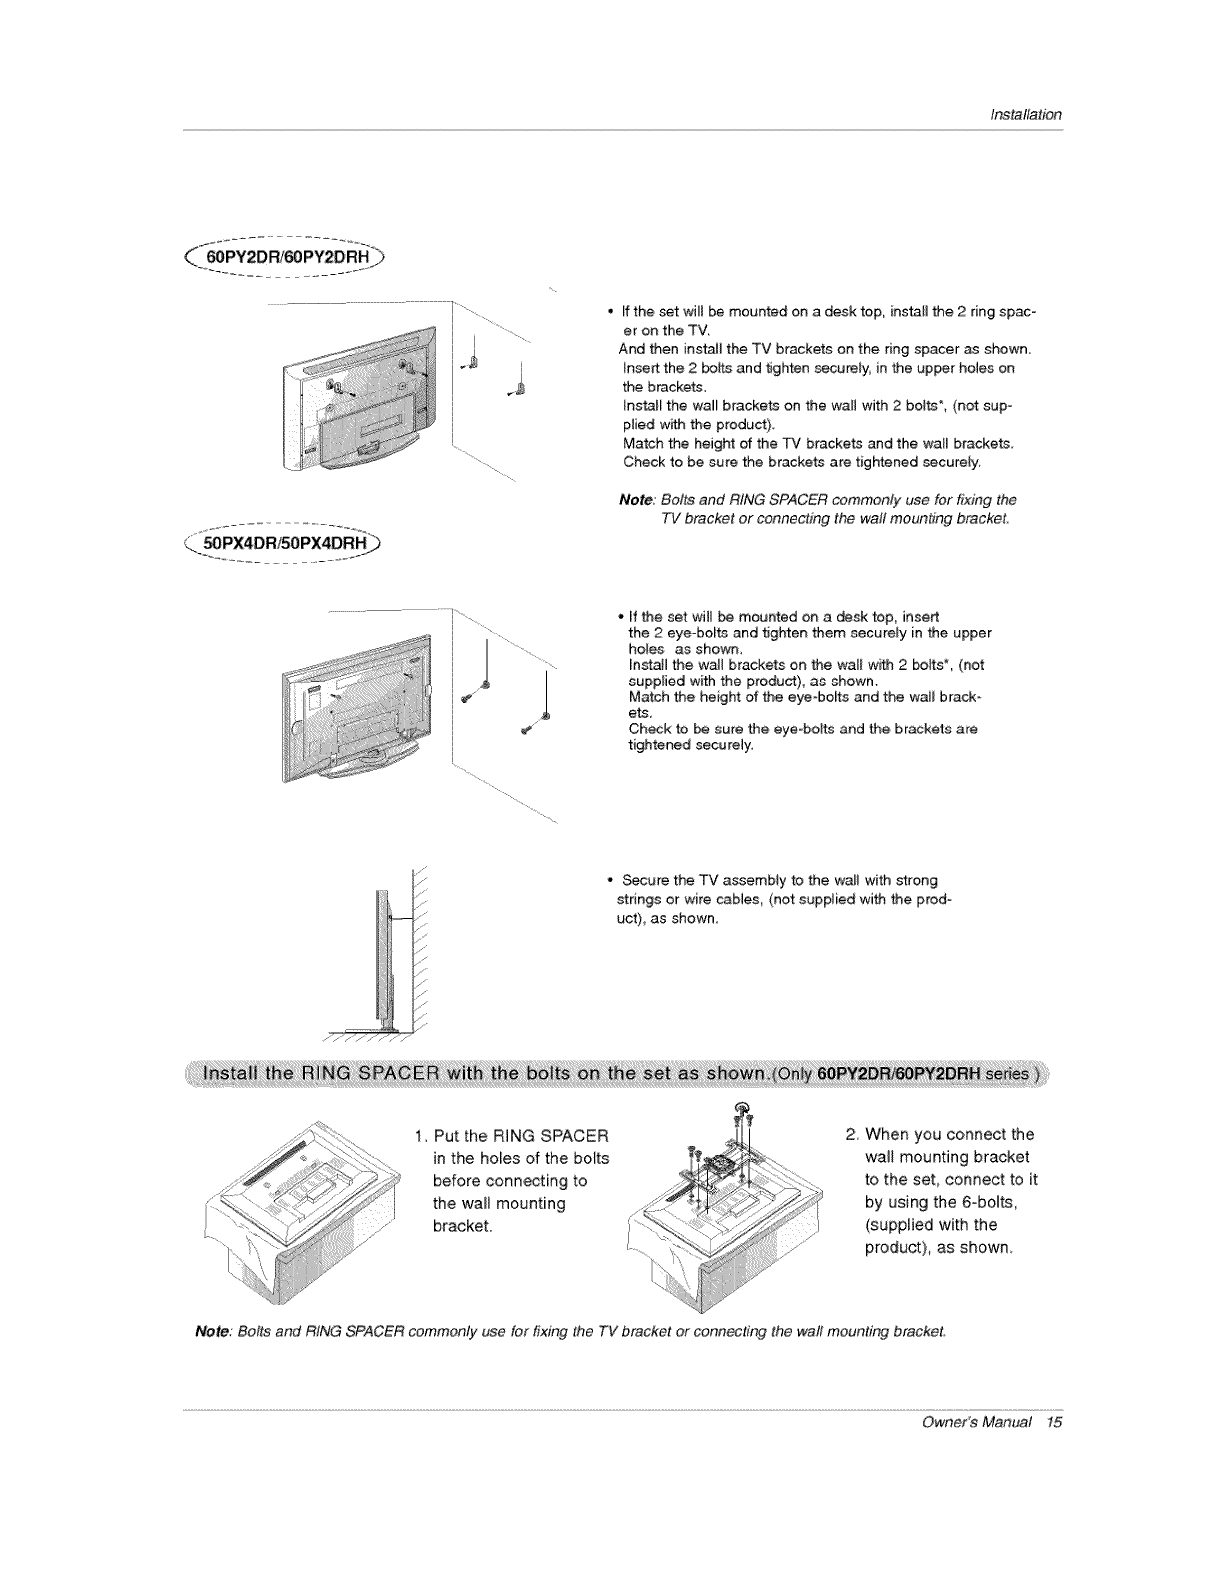
• ff the set wi_ be mounted on a desk top, insert
the 2 eye-botts and tighten them securely in the upper
holes as shown,
Install the wa[i brackets on the wall with 2 bo_*, (not
supplied with the product), as shown.
Match the height of the eye-bolts and the wail brack-
ets.
Check to be sure the eye bolts and the brackets are
tightened securely.
t4 Plasma TV
Installation
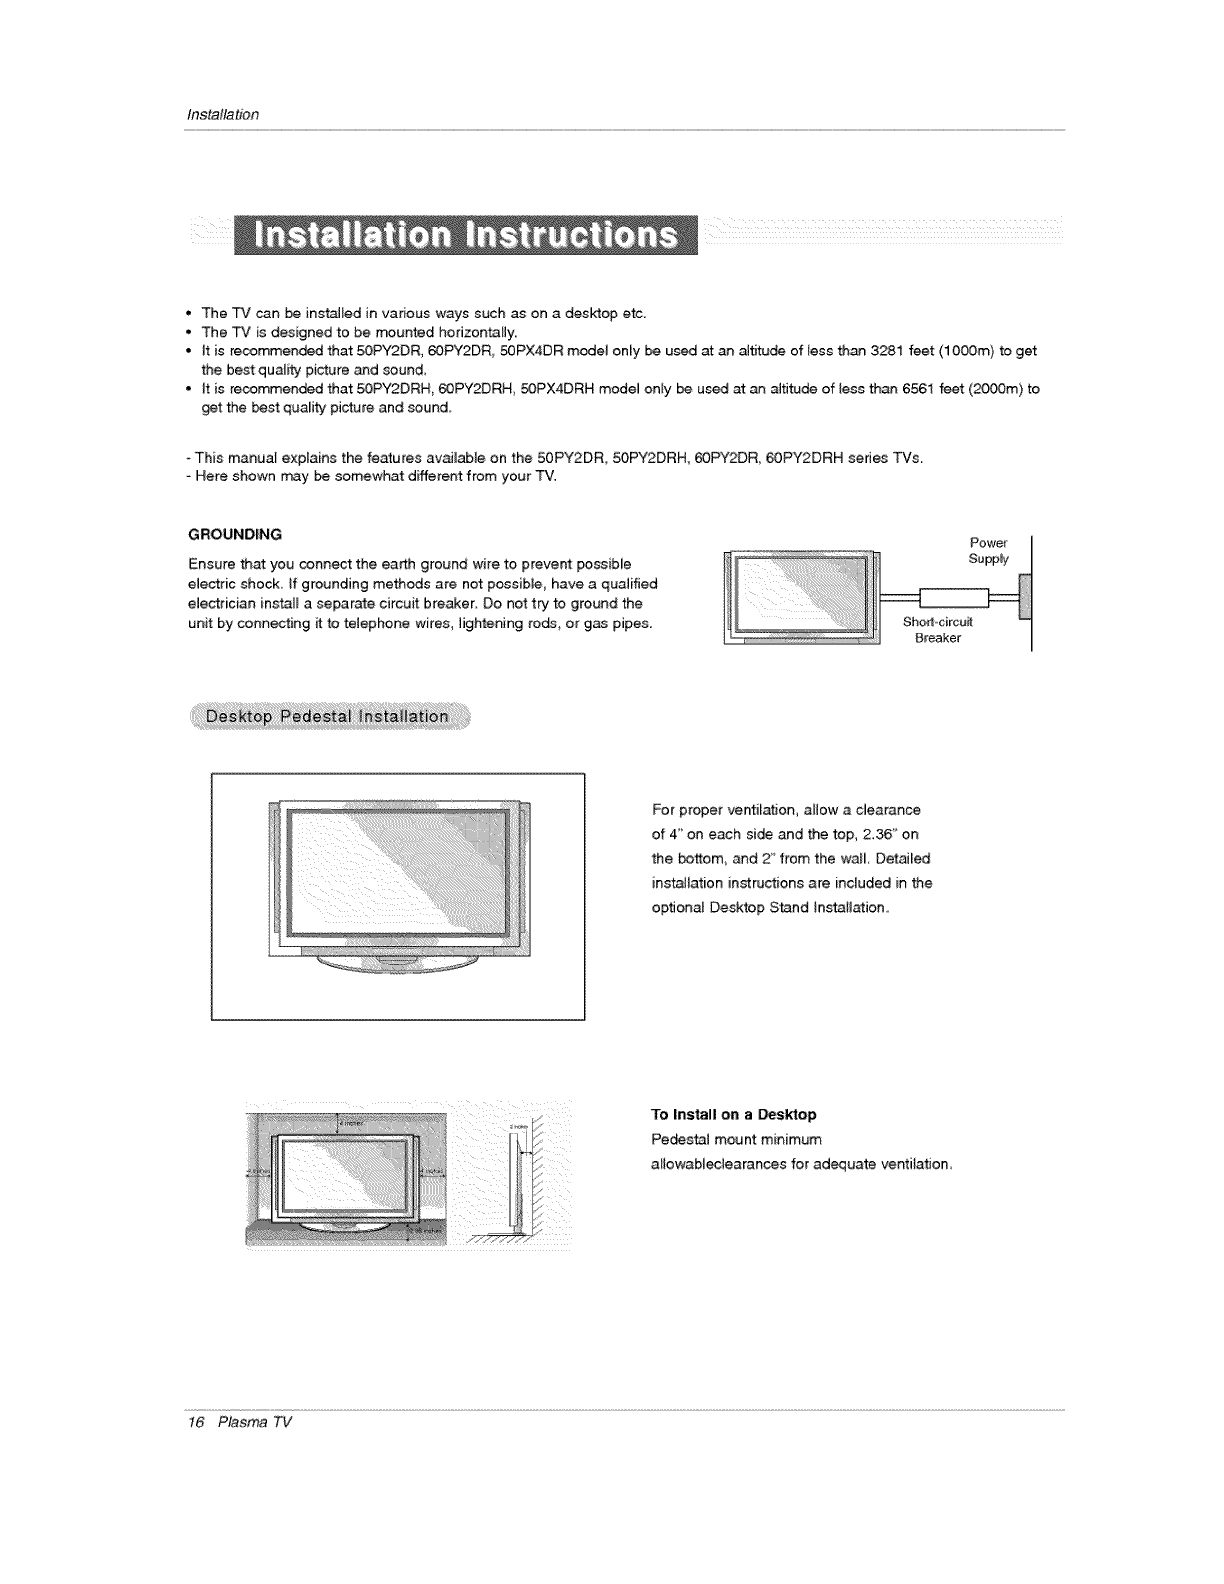
Ffthe set wi_J be mounted on a desk top, instal_ the 2 ring spac-
er on the TW
And then install the TV brackets on the ring spacer as shown.
InseCt the 2 boP_sand tighten secutely, in the up_r holes on
the brackets,
Instat_ the wal_ brackets on the wall with 2 bolts*, (not sup-
ptied with the product).
Match the height of the TV brackets and the wall brackets.
Check to be sure the brackets are tightened securely,
Note: Bolts and RING SPACER comrr_nly use for fixing the
TV bracket or connecting the wall mounting bracket.
'1
I
I1
I
. If the set will be mounted on a desk top, insert
the 2 eye-bolts and tighten them securely in the upper
holes as shown_
InstaJ_ the wa_l brackets on the walt with 2 _lts% (not
supplied with the product), as shown.
Match the height of the eye-bo_ts and the watl brack-
ets,
Check to be sure the eye-bolts and the brackets are
tightened secu re_y.
.....ii
* _ure the TV assembty to the wall with strong
strings or wire cables, (not supplied with the prod-
uct), as shown
; ,',d/ ....
....., i, s
...........ll Fj"
1_ Put the RiNG SPACER
in the holes of the bolts
before connecting to
the wait mounting
bracket.
2 When you connect the
,,vail mounting bracket
to the set, connect to it
by using the 6-bolt_,
(supplied with the
product}, as shown
Note.: Bolts and RING SPACER commonly use for fixingthe TV bracket or connecting the wall mounting bracket.
Owner's Manual 15
Installation
•The TV _n be instaJled in various ways such as on a desktop etc.
. The TV is designed to be Hunted horizontally
•It is recommended that 50PY2DR, 60PY2DR, 50PX4DR modeJ only be used at an aJtitode of less than 3281 feet (lO00m) to get
the best qual_ picture and sound
• It is recommended that 50PY2DRH 69PY2DRH, 50PX4DRH mode_ only be u_ at an altitude of tess than 6561 feet (_m) to
get the best quality picture and _und.
-This manual explains the fe_ures available on the 50PY2DR, _PY2DRH, 60PY2DR, 60PY2DRH series TVs.
Here shown rr_3y be somewhat different from your "H.
GROUNDING
Ensure that you connect the earth ground wire to prevent possible
electric shock. If grounding methods are not possible have a qualified
electrician install a separate circuit breaker. Do not try to ground the
unit by connecting it to telephone wires, lightening rods, or gas pipes. Sho.rtocircuit
Breaker
For proper ventilation allow a clearance
of 4" on each side and the top, 236" on
the bottom, and 2' from the wa_L Detailed
installation instructions are included in the
optional Desktop Stand [nstaliation..
To Install on a _sktop
Pedestal mount minimum
altowableciearances for adequate ventilation
t6 Plasma TV
Installation
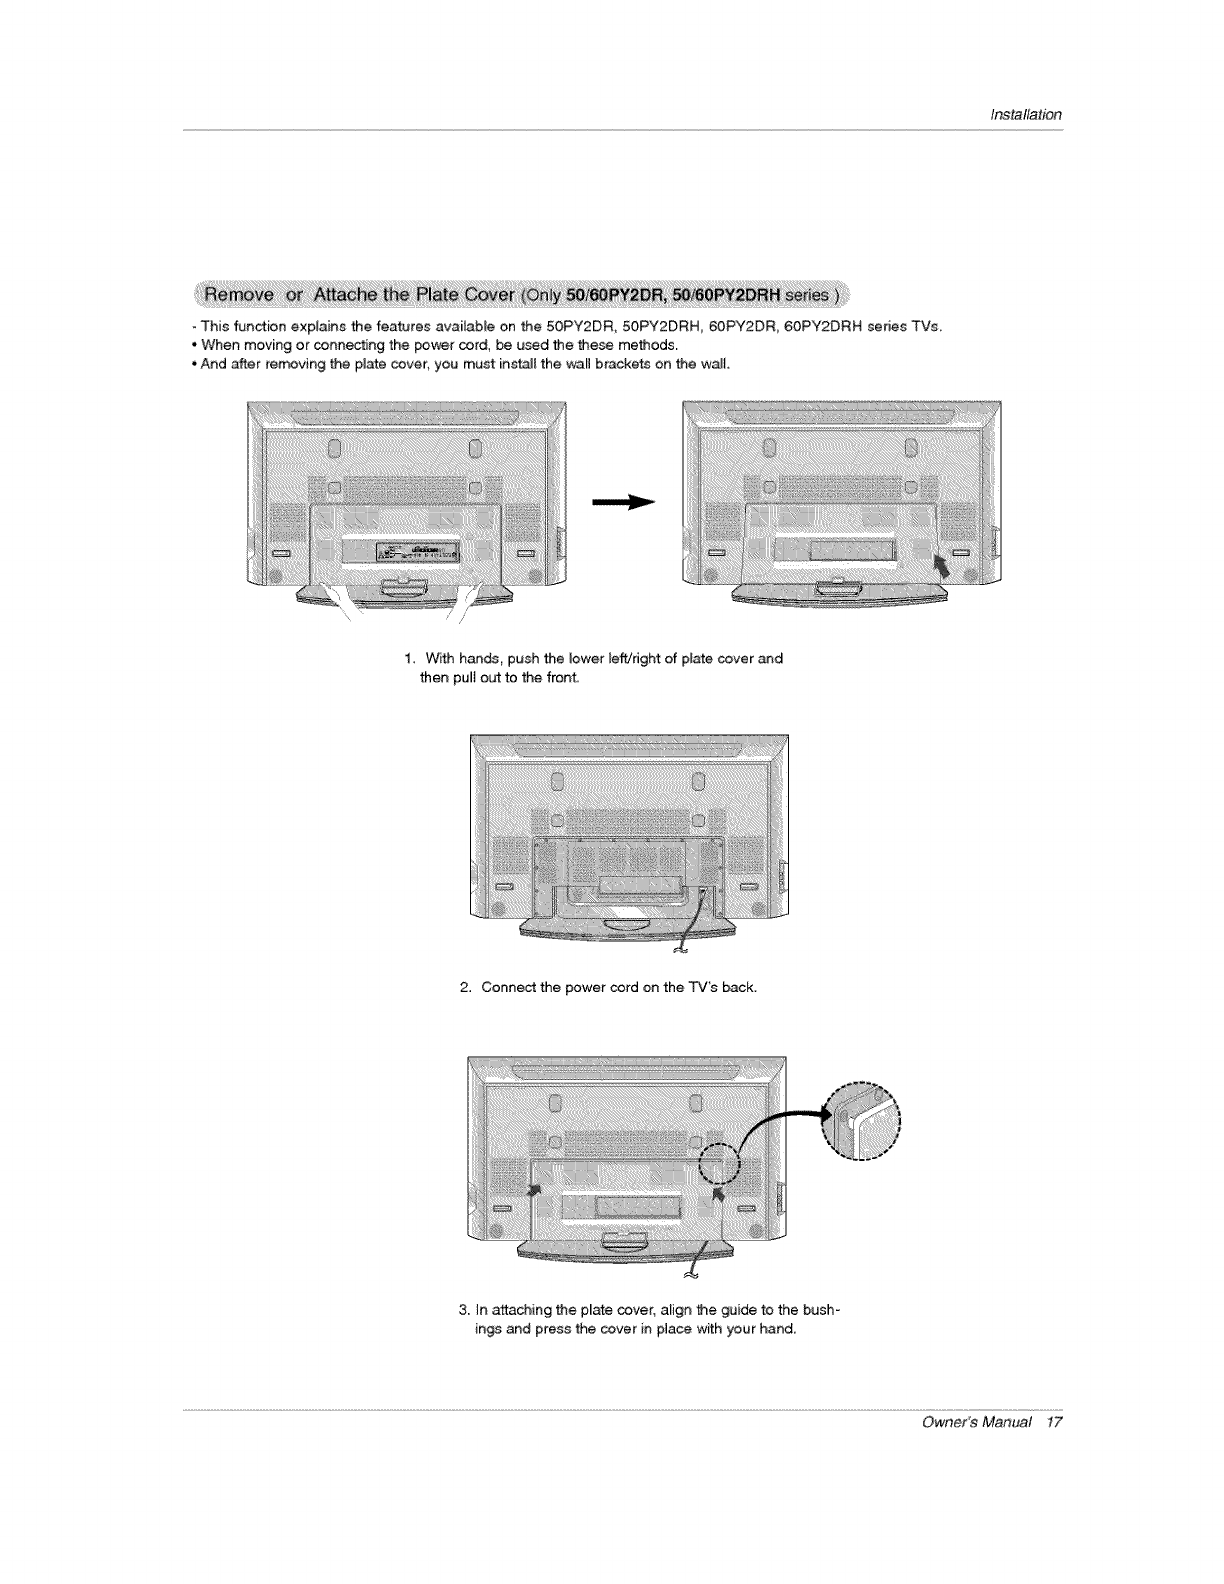
This function explains the features available on the 50PY2DR, 50PY2DRH, 60PY2DR, 60PY2DRH sedes TVs
.When moving or connecting the power cord, be used the these methods.
. And after re_ving the plate cover; you must ins_[ the _N brackets on the wait.
/ //
1_ With hands, push the lower left/right ofplate cover _d
then pu_[ out to the front,,
2. Connect the power cord on the TV's back.
3. In attaching the pEate cover, align the guide to the bush-
in_ and press the cover in place with your hand.
Owner's Manual 17
Installation
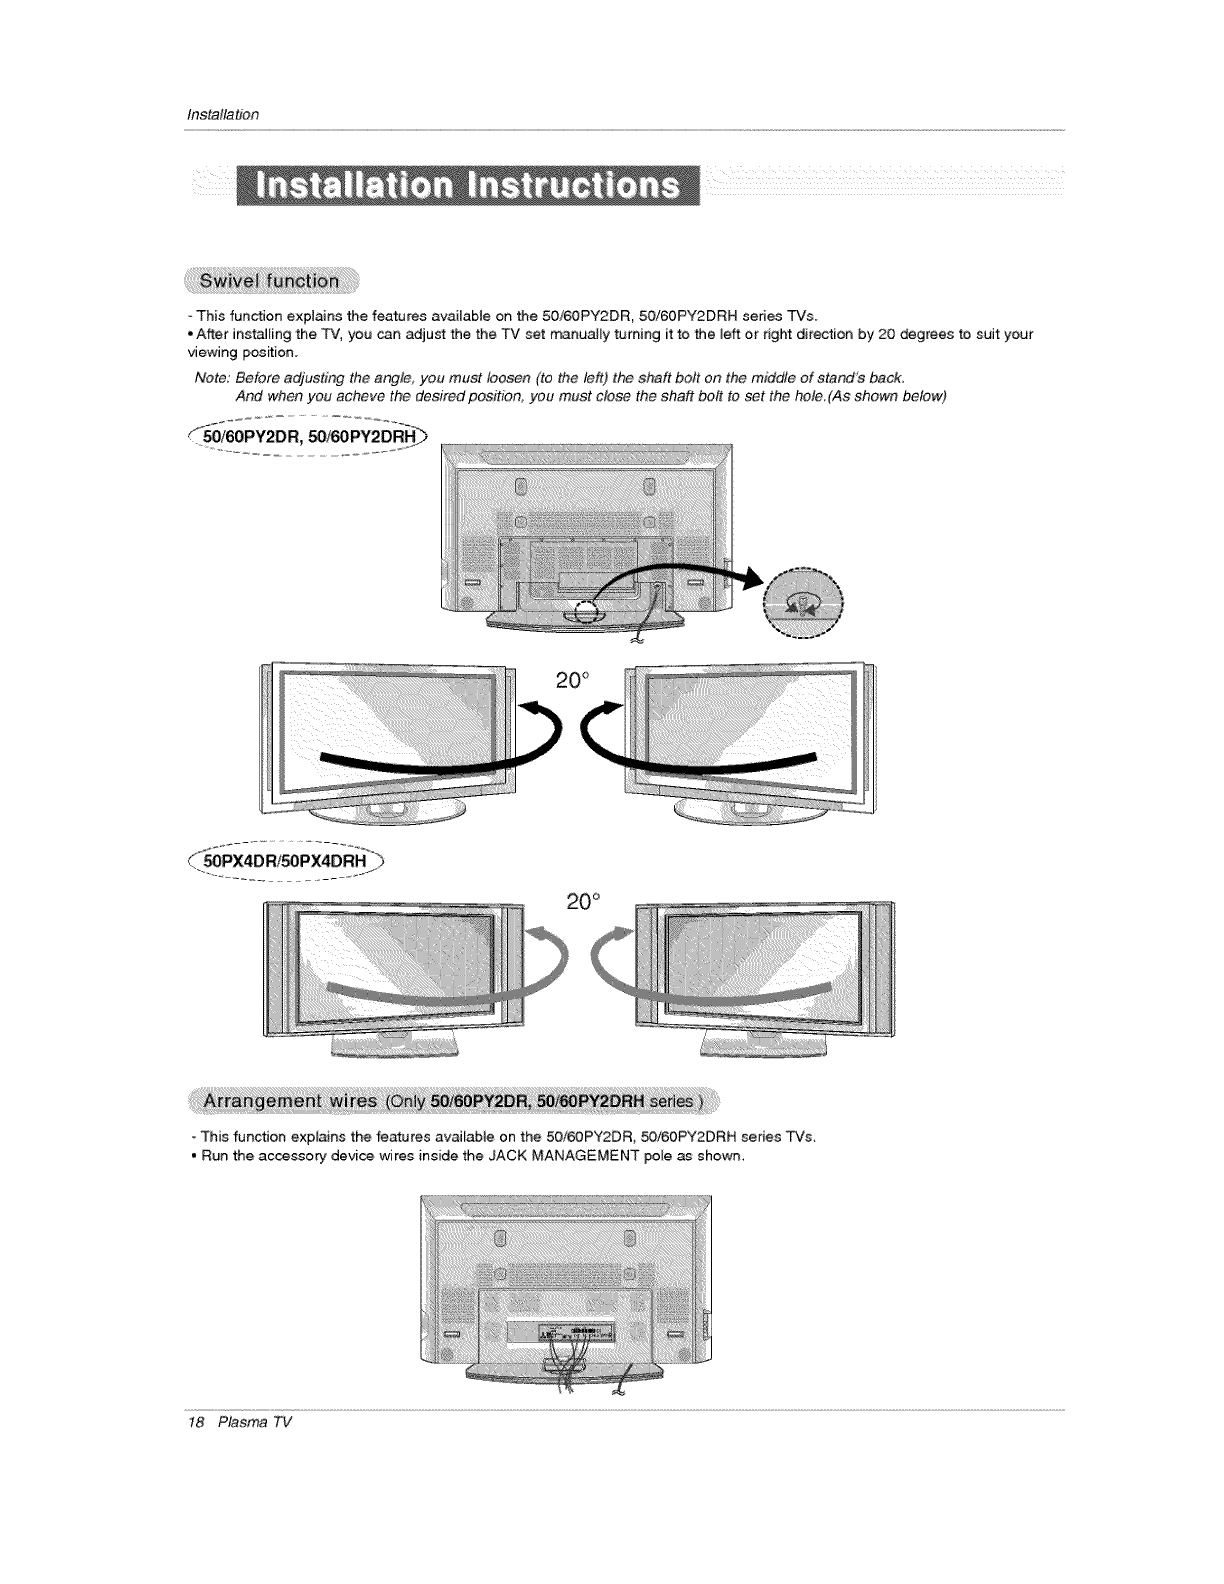
- This func_on explains the features available on the 50/60PY2DR, 50!60PY2DRH sedes TVs.
•After instaJ[ing the TV, you can adjust the the TV set m_nua[Ey turning it to the Jeff or dght direction by 20 degrees to suit your
viewing position.
Note: Before adjusting the angle, you must loosen (to the left) the shaft boll on the middle of stand'e back.
And when you acheve the de&#-ed position, you must c/o_ the shaft be# to set the hole(As shown below)
!iiiii_iii!ii_i!!i!!i!!ii;ii_i_iiiiiiiiiiii_!i_iiiiii_!i!_!_!%ii!!!_i_i!i!i!ii;ii_i;_;_i_i_i_i!_I_ i_...d
- This function explains the features available on the 50i60PY2DR, 50i60PY2DRH series TVs,
• Run the accessory device wires inside the JACK MANAGEMENT pole as shown,
t8 Plasma TV
Installation
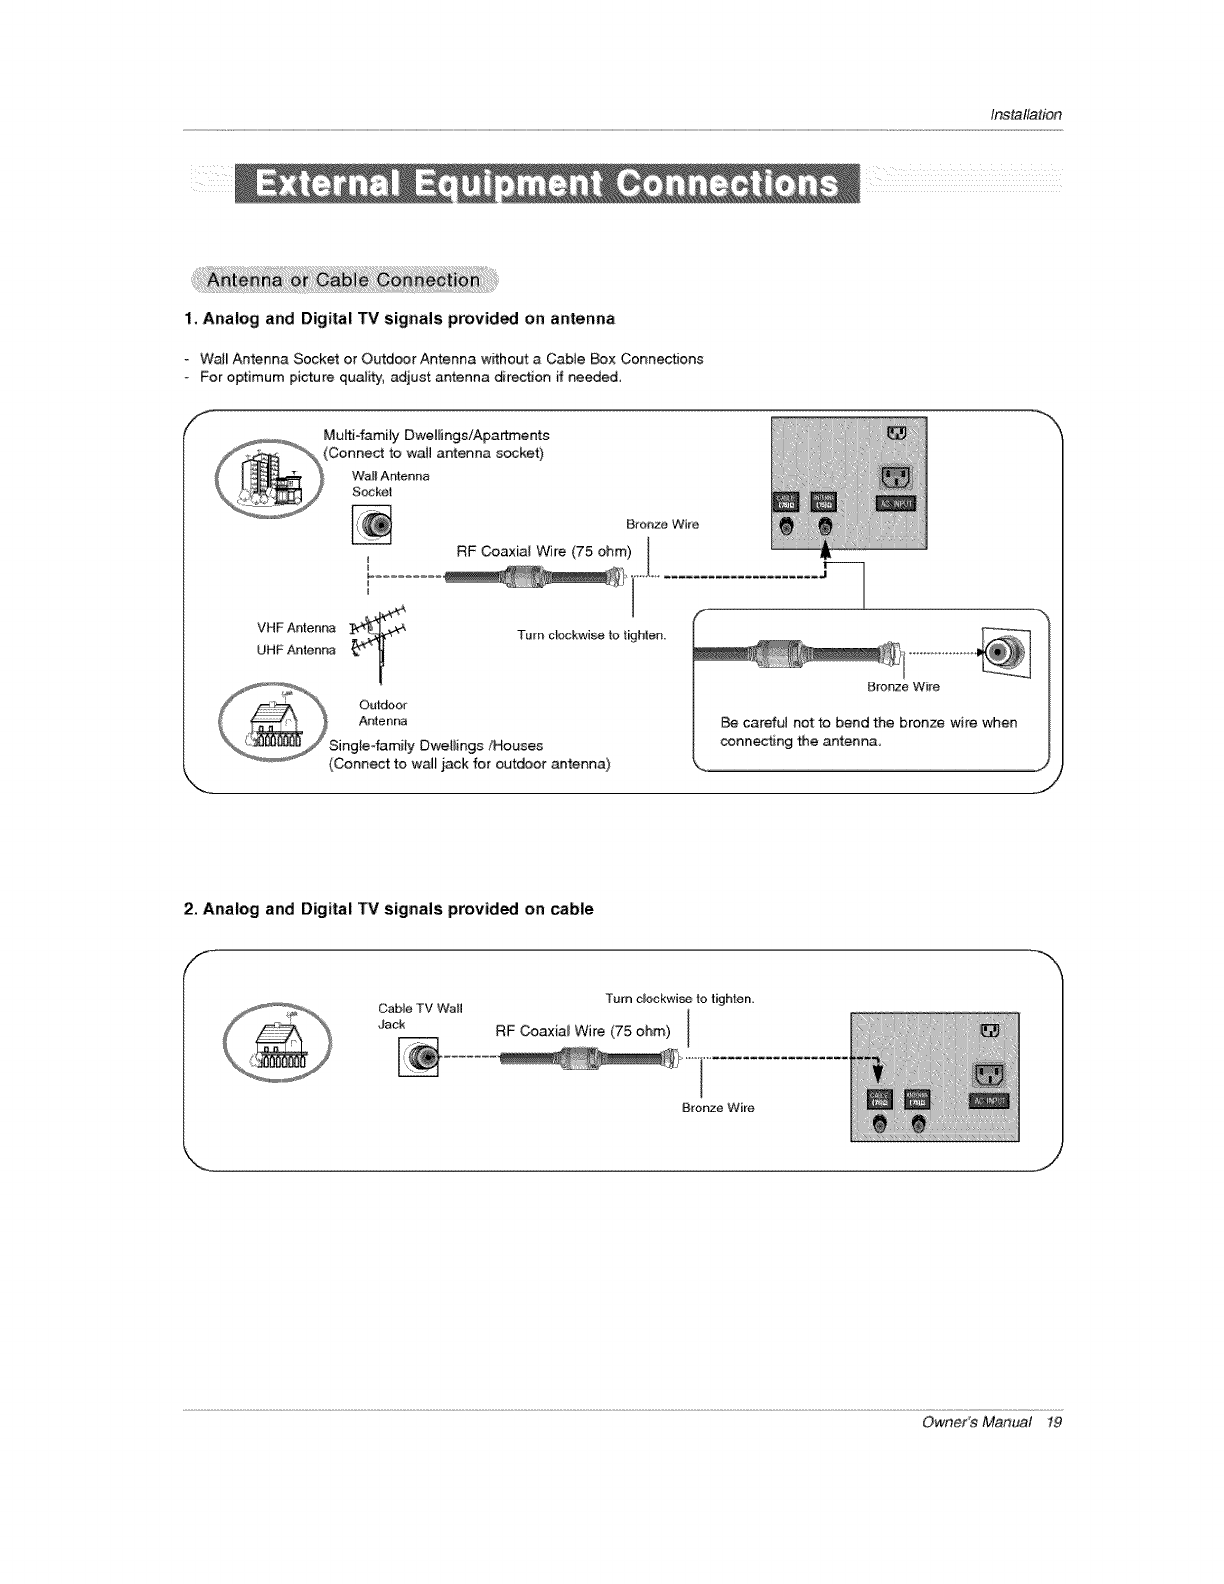
1. Analog and Digital TV signals provided on antenna
- Wail Antenna Socket or Outdoor Antenna wffhout a Cabie Box Connections
For optimum picture qual@, adjust antenna direction ff needed,
f
o,,_ Mu[tifamity Dwei_ings/Apa_ents
(Connect to wail antenna socket)
wait Antenna
NBronze Wire
VHF Antenn_
UHF Antenna Turn cl;c_kw _ to t_hlen.
Bronze Wire
careful notto bend the bronze wire when
connecting the antenna,
% J
/
2. Analog and Digital TV signals provided on cable
/
Turn clockwi_ to tighte_,
Cable TV Wall [
RF Coaxia_ Wire (75 ohm) [
t
Owner's Manual 19
Installation
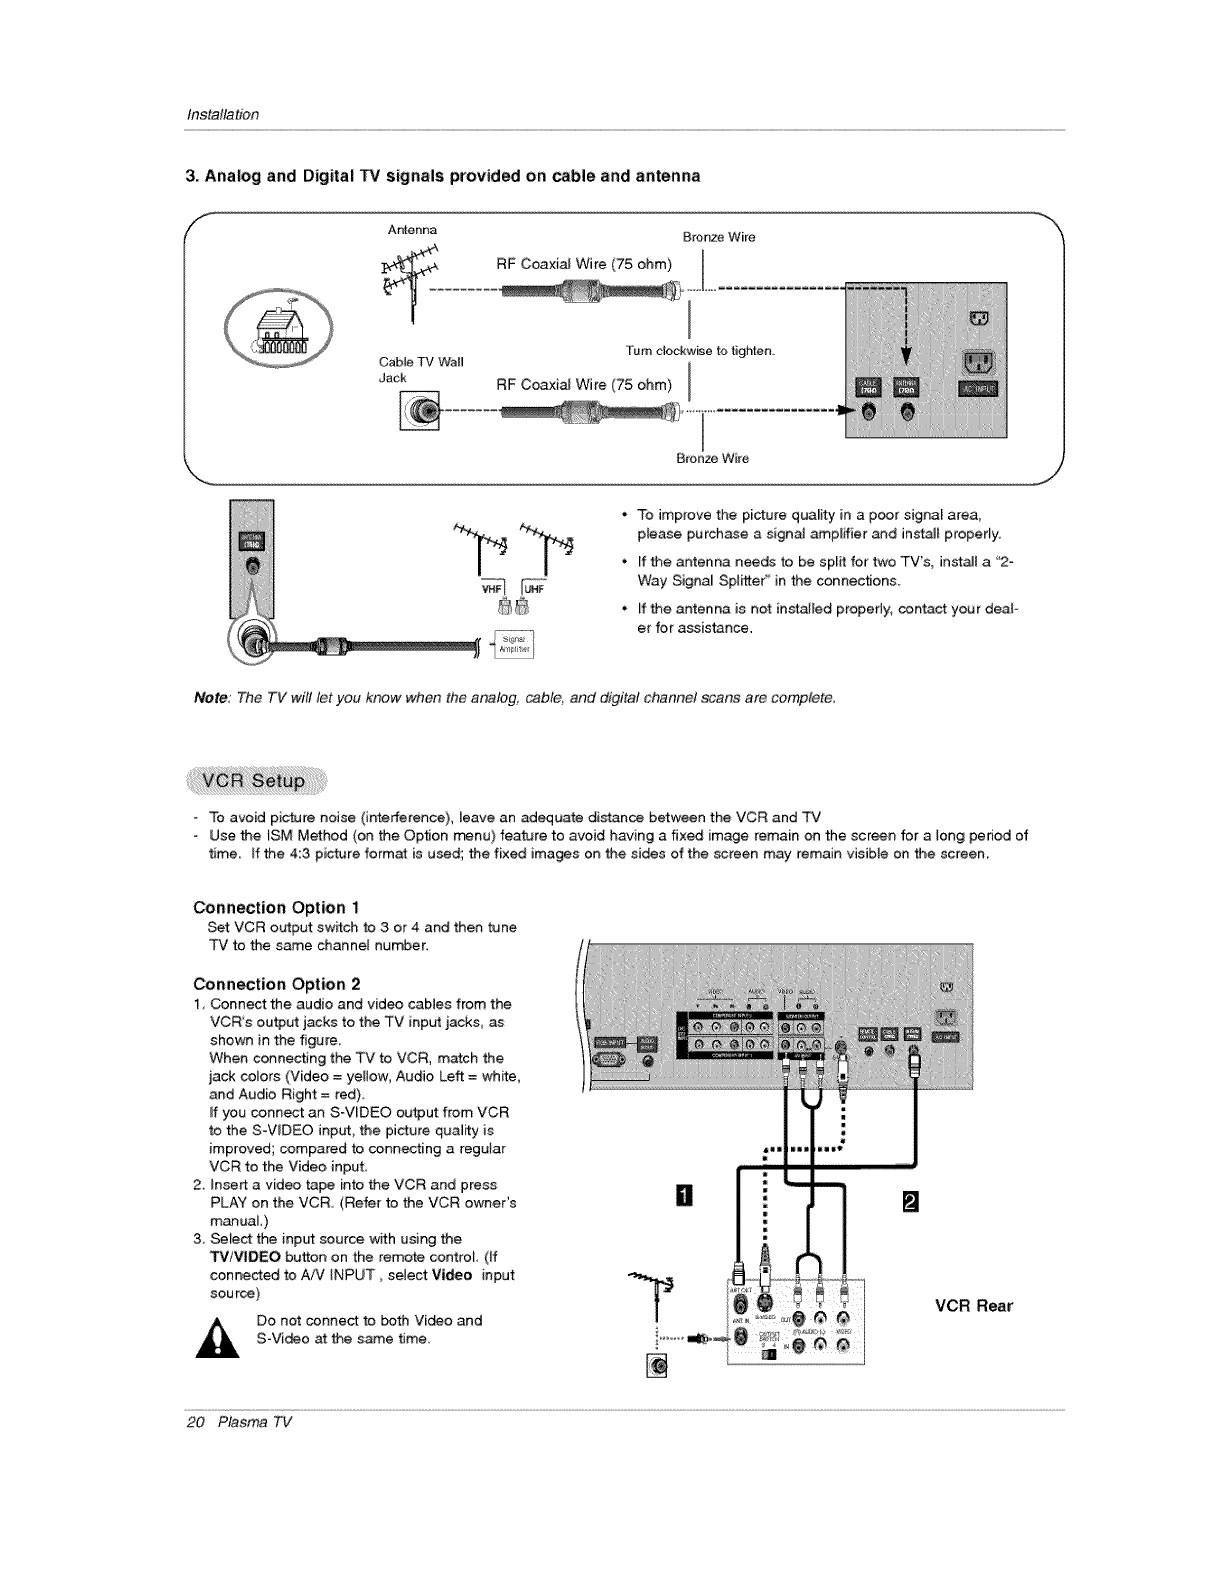
3_Ana|og and Digital TV signals provided on cable and antenna
/'_ Antenna Bronze Wire
, RF Coaxial Wire (75 ohm)
Turn clockwNe to tighten.
Cable TV Wall
dac_ RF Coaxial Wire (75 ohm) I
Bronze Wire
• ! #
• To improve the picture quality in a poor signa_ area,
ptease purchase a signal amplifier _d inst_ property.
• If the antenna needs to be split for two TV's, install a "2-
Way Signal Splitter'' in the connections.
• If the antenna is not installed properly, contact your deaF-
er for assis_nce.
Note: The TV will let you know when the analog, cable and digital channel scans are complete,
- To avoid picture noise (interference), leave an adequate distance between the VCR and TV
Use the ISM Method (on the Option menu} feature to avoid having a fixed image remain on the scr_n for a long period of
time. If the 4:3 picture format is used; the fixed images on the sides of the screen may remain visible on the screen.
Connection Option 1
Set:VCR output switch to 3 or 4 and then tune
PC to the same channel number
Connection Option 2
1, Connect the audio and video cables from the
VCRs output jacks to the TV input jacks, as
shown in the figure
When connecting the TV to VCR, match the
jack colors (Video = yellow; Audio Left = white,
and Audio Right = red)
ff you connect an S-WDEO output from VCR
to the S-WDEO inp_, the pi_ure quality is
improved; compared to connecting a regular
VCR to the Video input.
2 Insert a video tape into the VCR and press
PLAY on the VCR.. (Refer to the VCR owner's
manuaL)
3, Select the input source with using the
WlMIDEO button on the remote contro_ (If
connected to AN iNPUT _select Video input
sou rce)
Do not connect to both Vi_o and
S-Video at the same 8me.
[] []
VCR Rear
20 Plasma TV
Installation
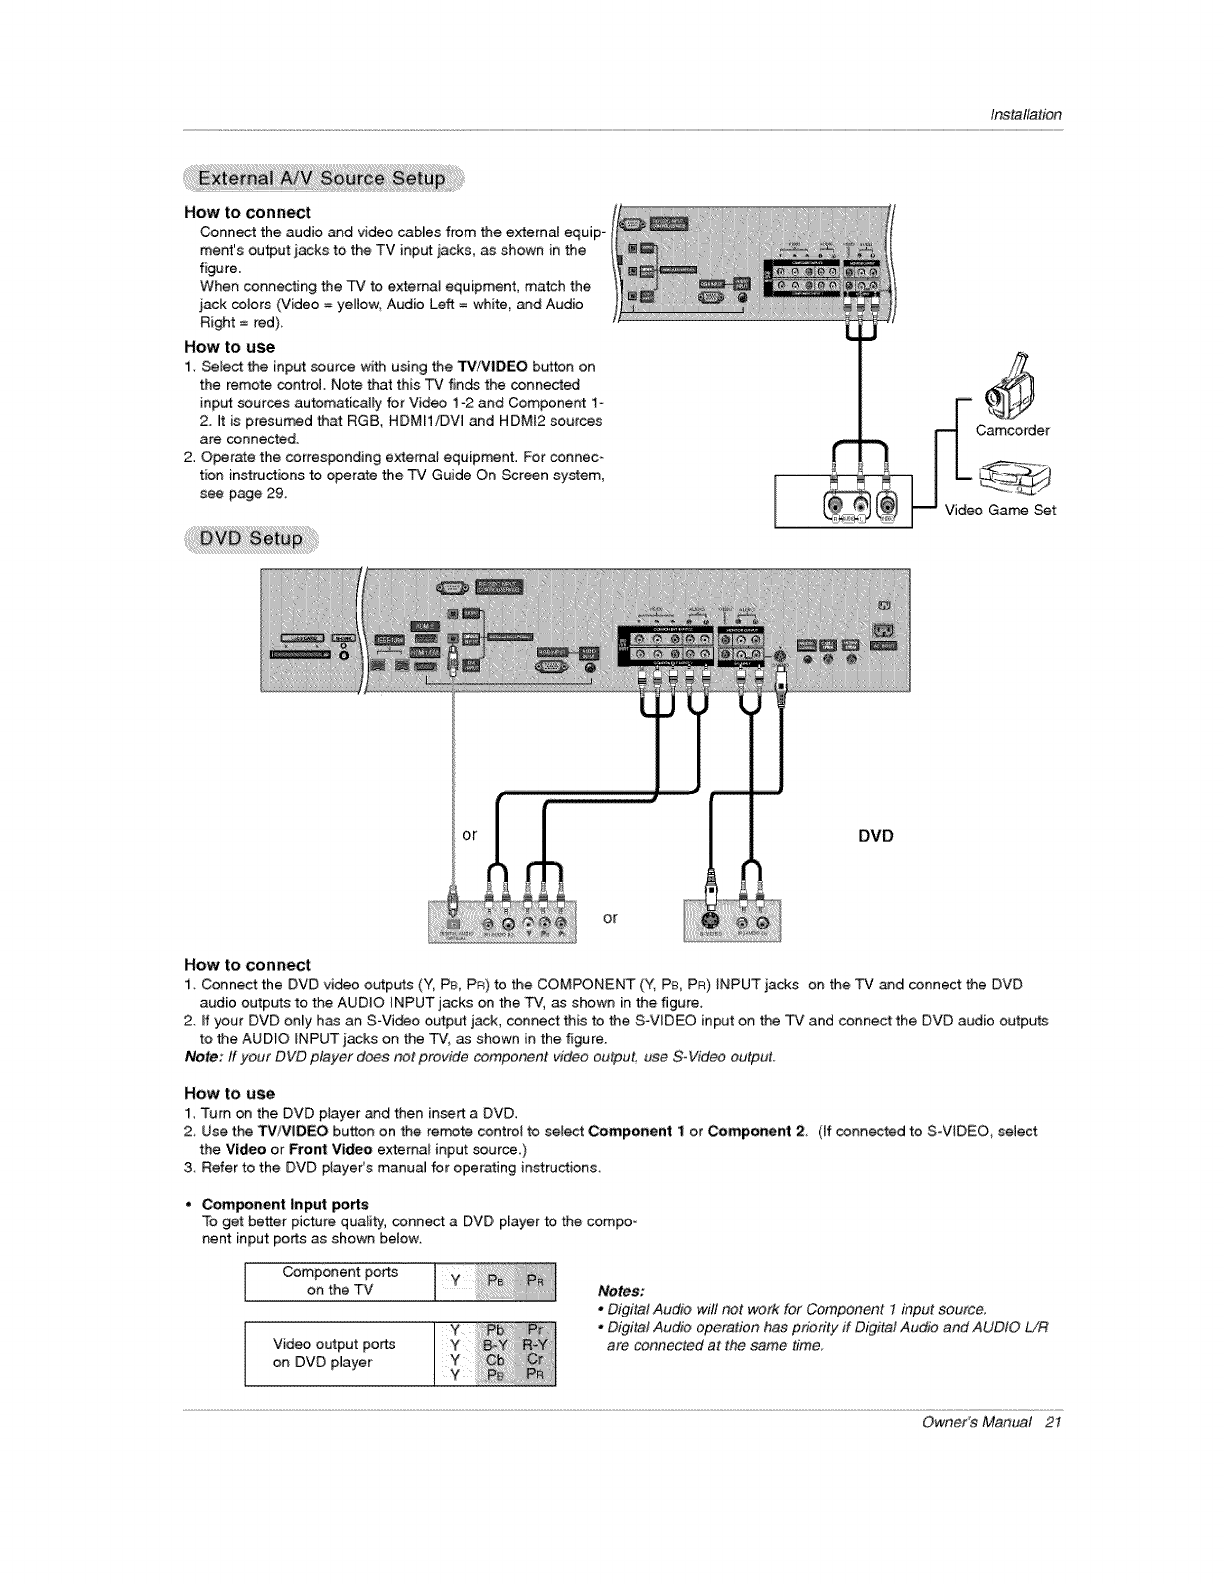
How to connect
Conn_ the audio and video cables from the e_ernal equip-
ment's output jacks to the TV input iacks, as shown in the
figure.
When connecting the _ to external equipment, match the
}ack colors (Video = yellow Audio Left = white and Audio
Right = red).
How to use
1. Sebct the input source with using the TV/VIDEO button on
the remote control. Note that this TV finds the connected
inp_ sources automaticalEy for Video 1o2 and Component 1-
2. it is presumed that RGB, HDMH/DW and HDMI2 sources
are connected
2. Operate the corresponding external equipment. For connec-
tion instructions to operate the TV Guide On Screen system,
see page 29_
o Game Set
DVD
or
How to connect
1. Connect the DVD video o_.qtputs (Y, PB, PR) to the COMPONENT (Y, PE_,PR} INPUT jacks on the TV and connect the DVD
audio outputs to the AUDIO {NPUT jacks on the TV, as shown in the figure.
2 ff your DVD en_y has an S-Video output jack, connect this to the SWIDEO input on the TV and connect the DVD audio outputs
to the AUDIO INPUT jacks on the TV, as shown in the figure.
Note: ff your DVD player does not provide eomponenl video output, use SoVideo output.
HOW to I,ise
1. Turn on the DVD player and then insert a DVD,
2, Use the TViVIDEO button on the remote control to sele:t Component 1 or Component 2 (if connected to S-VlDEO_ select
the Video or Front Video extema_ input source)
3, Refer to the DVD player's manual for operating instructions,
• Component Input _rts
To get better picture quality, connect a DVD, player to the compo-
nent input ports as shown below.
Component ports
on the TV
Video output po_
on DVD player
Notes:
.Digital Audio wil! not work for Component 1 input eouree_
=Digital Audio oF_ration has priority ff Digital Audio and AUDIO L/R
are connected at the same time,
Owner's Manual 2I
Installation
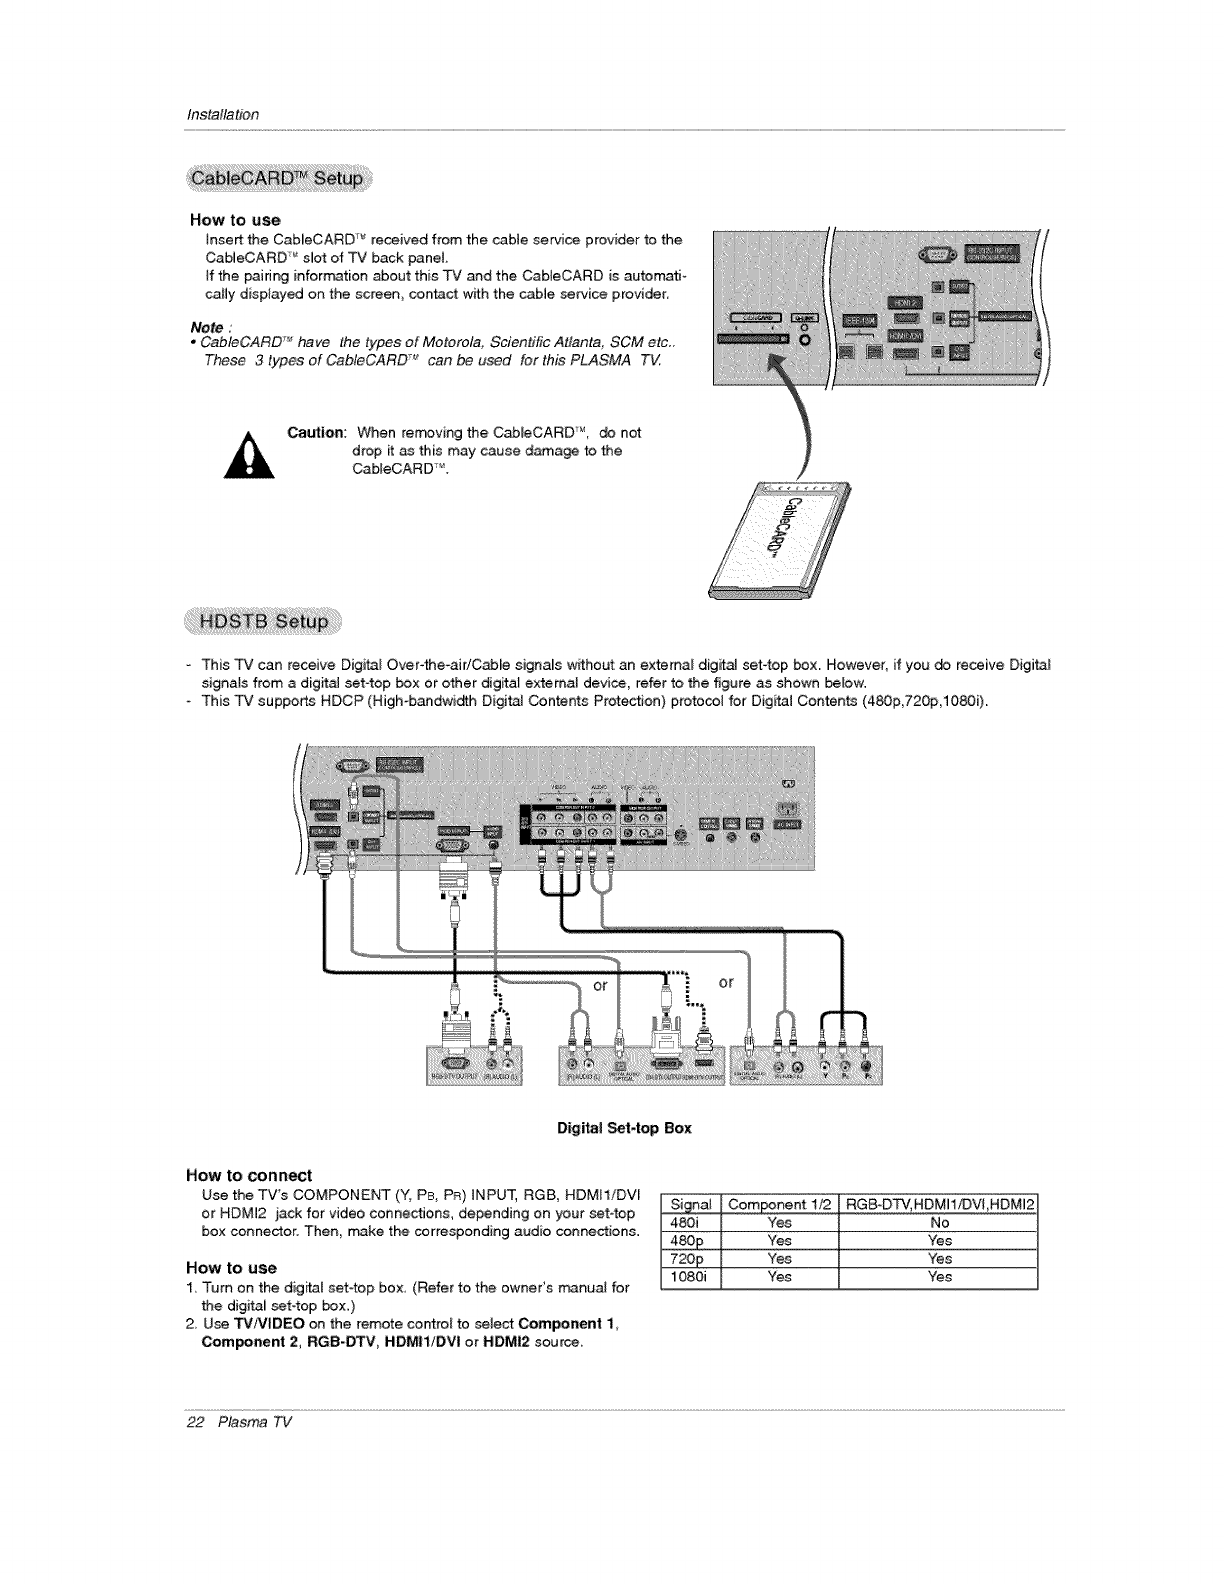
How to use
insert the Cab_eCARD TM _'eceived from the cabie service provider to the
CableCARD _ slot of _¢ back panel
if the pairing information Bout this "PV _d the CabieCARD is autematJo
catiy disptayed on the screen, co,tact with the cable service provider.
Note :
* CableCARD TM have the types of Motorola, Scientific Attanta, SCM etc_
These 3 types of CableCARD _can be used for this PLASMA TV
Caution: When rem#ving the C_eCARD ", do not
drop it _ this may cause damage to the
Cab[eCARD _.
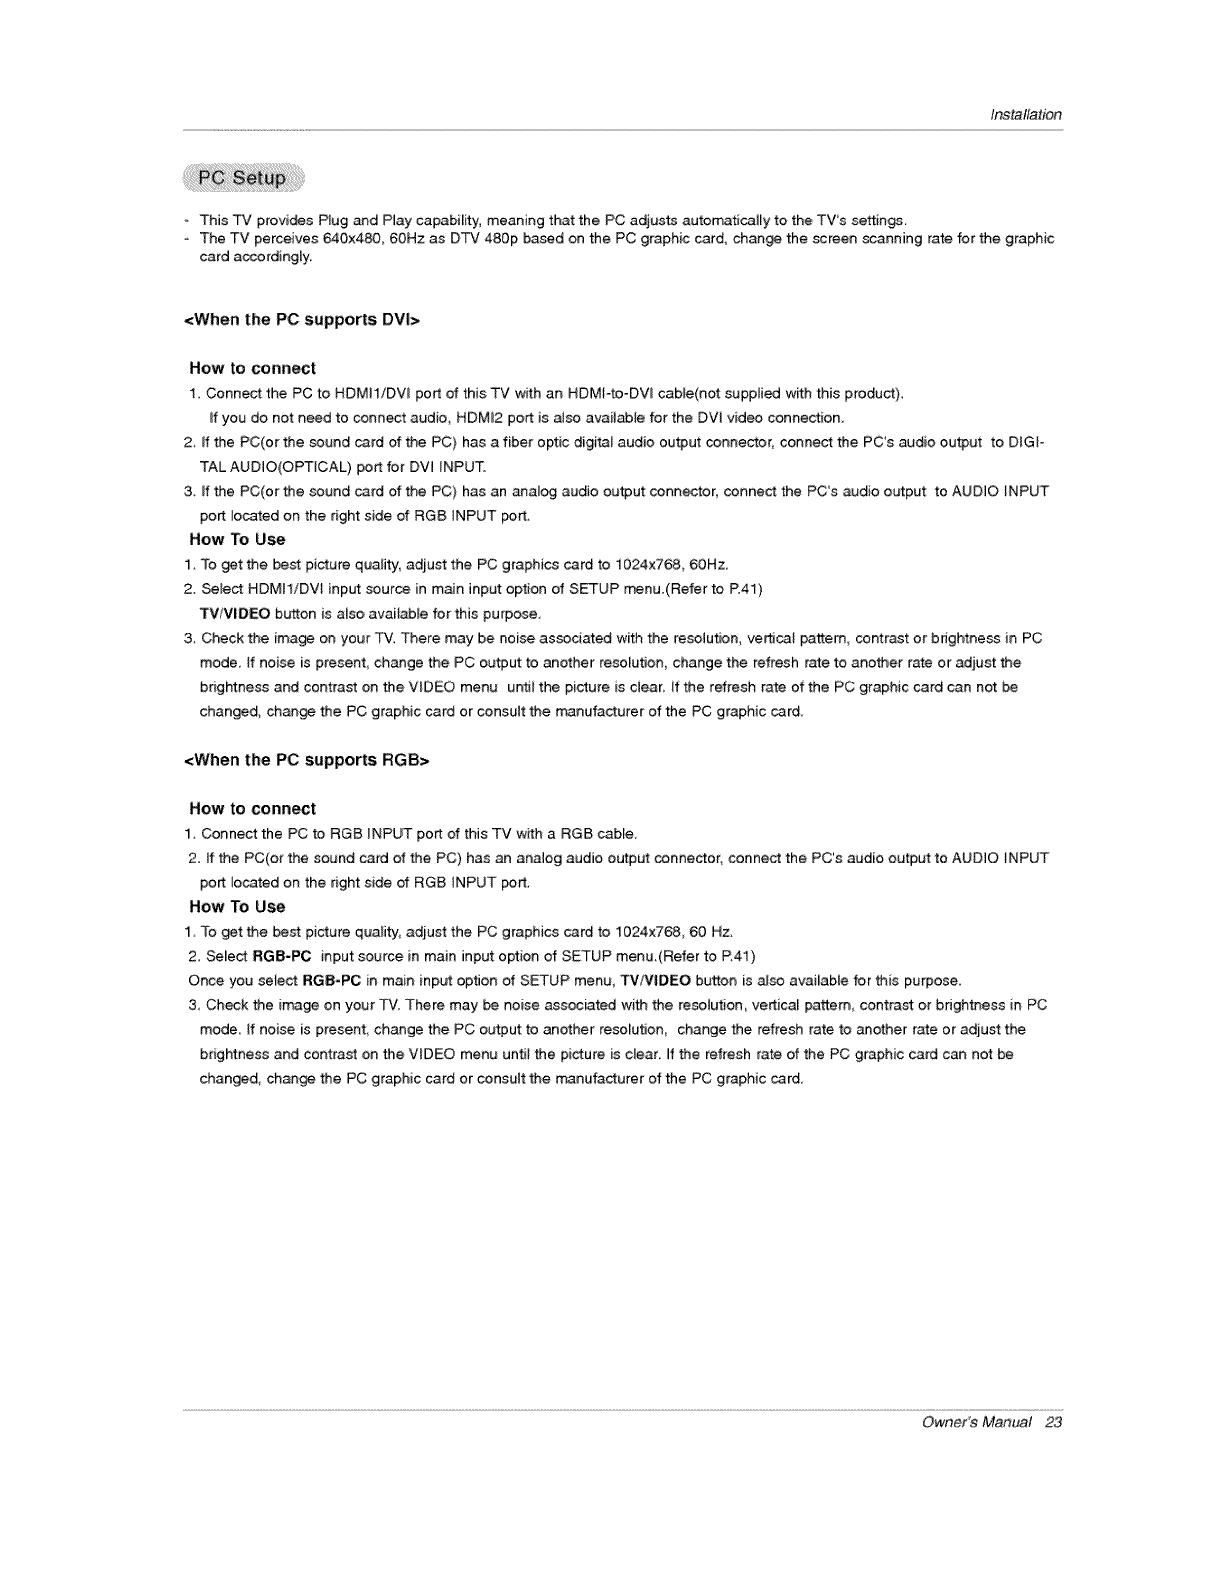
This TV can receive Digital Over4he-aidC_le signals without an external digital set4op box. However, if you do receive Digital
signals from a digital set4op box or other digita_ external devil, refer to the figure as shown below.
- This TV suppo_ HDCP (High-b_dwidth Digital Contents Protection) protocol for Digital Contents (480p 720p 1080i).
D[gita| Set4op Box
How to connect
Use the TV's COMPONENT (Y, PB, PR) tNPUT, RG£, HDMH!DVl
or NDM]2 jack for video connections, depending on your set4op
box connector. Then make the corresponding audio connections.
HOW tO use
1, Tt, m on the digital set4op box, (Refer to the owner's m_nual for
the digita_ set4op box_)
2_ Use TViVIDEO on the remote contro_ to select Component 1,
Com_nent 2, RGB-DTV, HDMIi/DVI or HDMI2 source,
Siena! Com_nent 1/2 RGB-DTV, HDM!1113VfHDM!2
480i Yes No
480£ Yes Yes
720p Yes "Yes
1080i Yes Yes
22 Plasma TV
Installation
- This TV provi_s Plug and Play capabi[ity, meaning that the PC adjusts autom_aticaHy to the TVs settings.
The TV perceives 640x480, 60Hz as DTV 480p based on the PC graphic card, change the _reen scanning rate for the graphic
card accordingly.
<When the PC supports DVI>
How to connect
1_ Connect the PC to HDMI1!DVI port of this TV _th an HDMFto-DVI cable(not supplied w_h this product),
_fyou do not need to connect audio, HDM_2 port is aJso available for the DW video conneotien,
2 ff the PC(or the sound card of the PC) has a fiber optic digital audio output connector, connect the PC's audio output to D_Gi-
TAL AUDIO(OPTiCAL) port for DVl INPUT,
3. _fthe PC(or the sound card of the PC) has an _alog audio output connector, connect the PCs audio output to AUDIO INPUT
port located on the right side of RGB INPUT port.
How To Use
1. To get the best picture quality, adiust the PC graphics card to 1024x768, 60Hz.
2. Select HDM[1iDV_ input source in m_n input option of SETUP menu.(Refer to R41)
TV/V[DEO button is also available for this purpose,
3. Check the image on your TV. There may be noise assodated with the resolution, ver_cal pattern contrast or brightness in PC
mode, tf noise is present, change the PC output to another resolution, change the refresh rate to another rate or adjust the
brightness and contrast on the VIDEO menu until the picture is ciear_ if the refresh rate of the PC graphic card can not be
changed, change the PC graphic card or consuit the n_nufacturer of the PC graphic card_
<When the PC supports RGB>
How to connect
1. Connect the PC to RGB iNPUT port of this TV with a RGB cable,
2. tf the PC(or the sound card of the PC) has an analog audio output conne_or, connect the PC's audio output to AUDIO INPUT
port located on the right side of RGB iNPUT po_.
How To Use
I To get the best picture quafity, adjust the PC graphics card to 1024x76& 60 Hz,
2_ Select RGB-PC input source in main input option of SETUP menu_(Refer to R41)
Once you se_eot RGB-PC in main input apron of SETUP menu, TV/VIDEO button is also available for this purpose_
3 Check the image on your -Fv'. There may be noise associated with the resolution_ vertical pattem_ contrast or bdghtt_ess in PC
mode If noise is presenL change the PC output to another resolution change the refresh rate to another rate or adiust the
brightness and contrast on the VIDEO menu until the picture is dear. If the refresh rate of the PC graphic card can not be
changed, change the PC graphic card or consult the manufacturer of the PC graphic card.
Owner's Manual 2,3
Installation
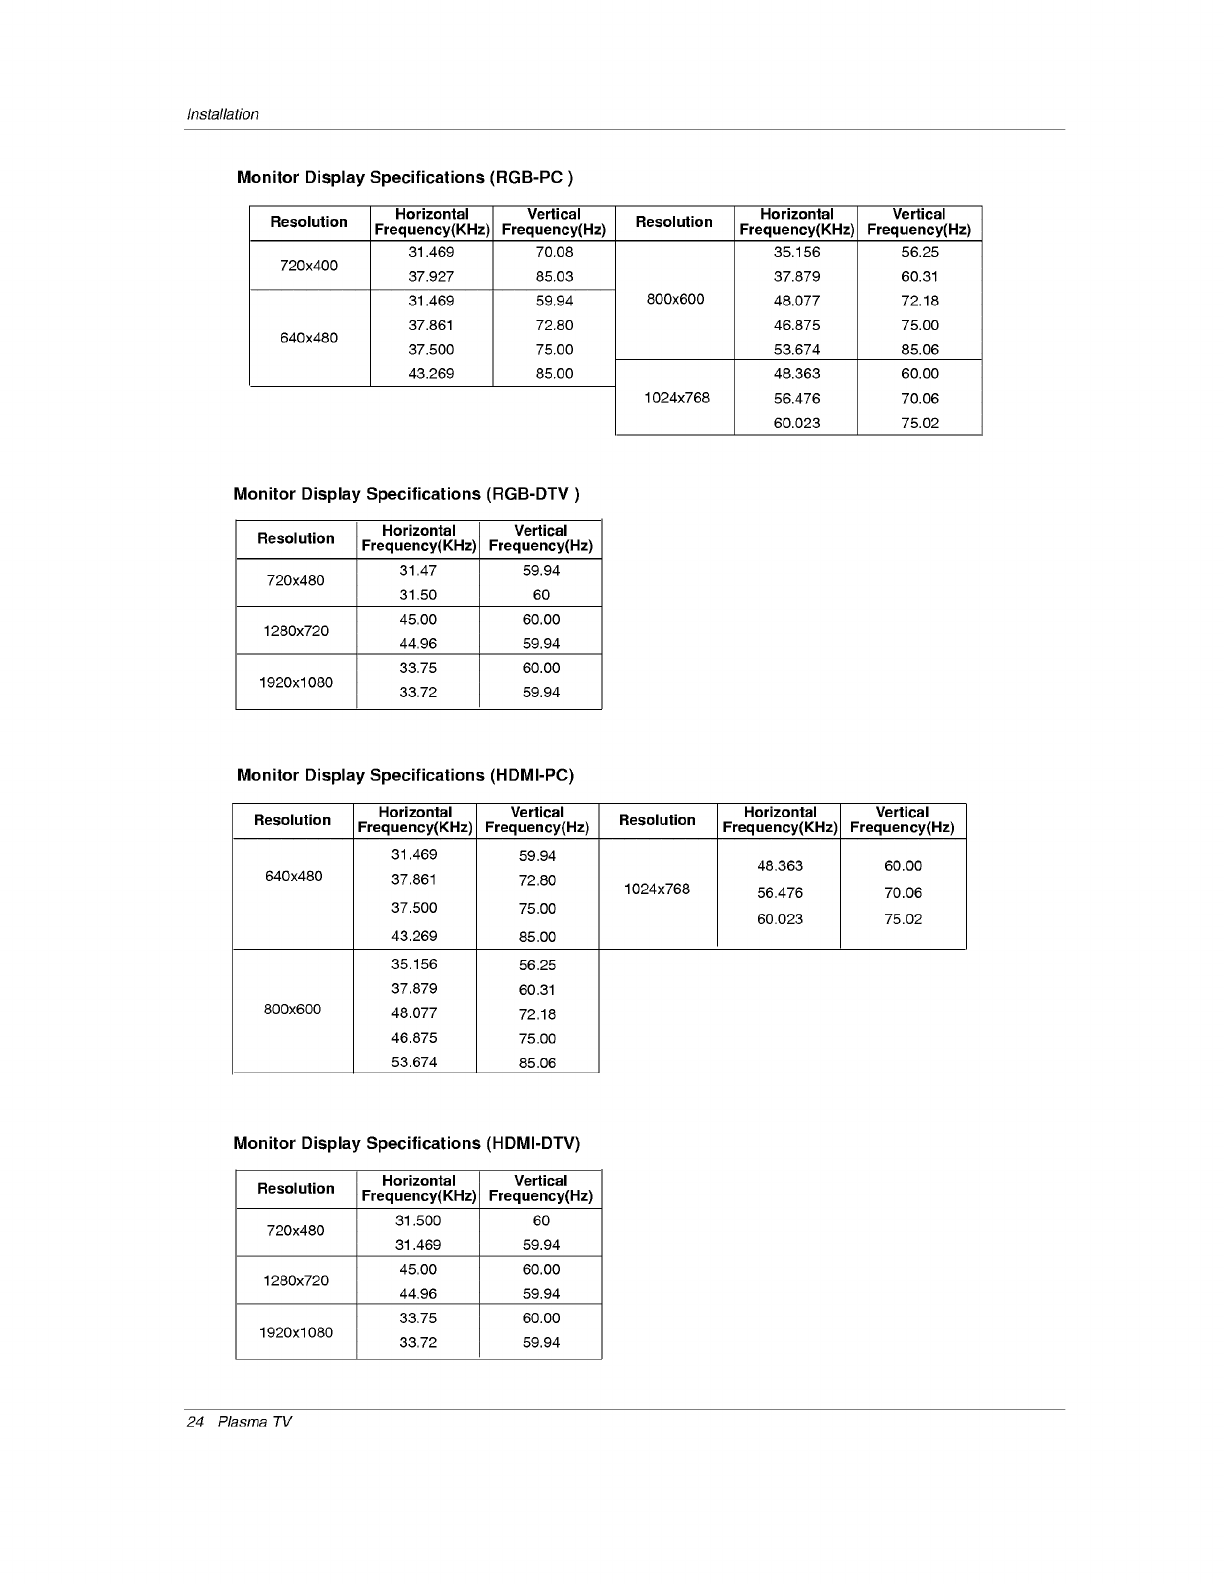
Monitor Display Specifications (RGB-PC)
Resolution Resolution
720x400
640x480
Horizontal
Frequency(KHz)
31.469
37.927
31.469
37.861
37.500
43.269
Vertical
Frequency(Hz)
70.08
85.03
59.94
72.80
75.00
85.00
800x600
1024x768
Horizontal
Frequency(KHz)
35.156
37.879
48.077
46.875
53.674
48.363
56.476
60.023
Vertical
Frequency(Hz)
56.25
60.31
72.18
75.00
85.06
60.00
70.06
75.02
Monitor Display Specifications (RGB-DTV)
Horizontal Vertical
Resolution Frequency(KHz) Frequency(Hz)
31,47 59.94
720x480 31,50 60
45,00 60.00
1280x720 44,96 59.94
33,75 60.00
1920x1080 33.72 59.94
Monitor Display Specifications (HDMI-PC)
Resolution Resolution
640x480
800x600
Horizontal
Frequency(KHz)
31,469
37,861
37,500
43,269
35.156
37,879
48,077
46,875
53,674
Vertical
Frequency(Hz)
59.94
72.80
75100
85.00
56.25
60.31
72.18
75.00
85.06
1024x768
Horizontal
Frequency(KHz)
48,363
56,476
60.023
Vertical
Frequency(Hz)
60.00
70.06
75.02
Monitor Display Specifications (HDMI-DTV)
Horizontal Vertical
Resolution Frequency(KHz) Frequency(Hz)
31.500 60
720x480 31.469 59.94
45,00 60.00
1280x720 44,96 59.94
33,75 60.00
1920x1080 33,72 59.94
24 Plasma TV

Installation
The TV has a s_cia] signal output capability which afiows you to
hook up the second TV or monitor.
Connect the second TV or monitor to the TV's MONITOR OUT-
PUT. See the Operating ManuaJ of the second TV or monitor for
further devils regarding the device's input settings.
Note
,, Component_ RGB-PC/_GB-DT_ HDM! 1!DVt, HDMI2, DTV input
sources cannot be used for Monitor out.
oWhen connecting with extemat audio equipments, such as
amplifers or speakers, please turn the TV speak_ers otf,(Refer to
p.45)
Send the TV's audio to _xternal audio equipment via the Digital Audio
Output (Optical) port.
How to conn_t
1. Connect one end of an optical cable to the TV Dig_taJ Audio
(Optica 0 Output _rt.
2. Connect the other end of the optical cable to the digi_ audio (opti-
cal) input on the audio equip_rrL
3. Set the "_.er option _¢_' in the AUDIO menu. Refer to
page 45.
See the external audio equipment instruction manual for oper_ion.
Note: When conne_ing with external audio equipment& such as
arnplifers or _eakers, please turn the TV speakers off,(Refer to
p,45)
Caution; Do not look into the optical output port.
Looking at the laser beam may damage
your vision.
Owner's Manual 25
Installation
HI_ _FINI_ION MLiLTI_D_ iiN'r_ACE
- HDMF_, the HDMi logo and High-Definition Muffimedia Interface is a trademark or registered trademark of HDMI Licensing"
- This TV can receive the High-Definition Multimedia Intefface(HDMI) or the Digitat Visual lnterface(DVl),
- This TV supports HDCP(High_bandwidth Digi_l Contents Protection) Protocol for 720x480p, 1280x720p, and 1920x1080i reso-
lution,
- When you connect this TV with a source device(DVD player, Set Top Box or PC) supporting Auto HDMt!DVl function, the output
resolution of the source device wil_ be automatically set to 1280x720p.
- If the source device does not support Auto HDMII/DVl, you need to set the output resolution appropriately
To get the best picture quality, adjust the DVD Player or Set Top Box's output resolution to 1280x720p, _d the PC graphics card's
output resolution to 1024x768, 60Hz,
-If the source device has an HDMI output, no other audio connection is necessary because HDMFto-HDMI connection includes
both video and audio,
- If the source device has a DVI output and no HDMI output, a separated audio connection is necessary
<When the source device (DVD player or Set Top Box) supers HDMI>
How To Connect
1. Connect the source device to HDMH!DVI or HDM_2 port of this TV with an HDMI cabJe(not supplied with this product),
2. No separated audio connection is necessary:
How To Use
-If the source device supports Auto HDMI function, the output resolution of the source _vice wil_ be autom.3ticaily set to
1280x720p.
- If the source device does not sup_rt Auto HDMI, you need to set the output resolution appropdateUy.
To get the _st picture quality, adjust the output resolution of the source device to 1280x720p.
=Select HDMI1/DVI or HDMI2 input source in m_n input option of SETUP menu.(Refer to R41)
TVfMIDEO button is also available for this purpose.
<When the source device(DVD player or Set Top Box) supports DVI>
How To Connect
1_ Connect the source device to HDMI1/DVI port of this TV with a HDMI-to-DVI cable(not supplied with this product),
Do not use HDM]2 port for DVl connection if you want to connect audio,
2, A separated audio connection is necessaPy,
3, If the source device has a fiber optic digital audio output, connect the audio output to DIGITAL AUDIO(OPTFCAL) port for DW
_NPU_
4 if the source device has an analog audio output connector, connect the PCs audio output to AUDIO INPUT port located on the
right side of RGB _NPUT porto
How To Use
- tf the source device supports Auto OVl func_on_ the output resolution of the source device will be automatically set to 1280x720p,
- If the source device does not sup_rt Auto DVi, you need to set the output resolution appropriately,
To get the _st picture qualify, adjust the output resolution of the source device to 1280x720p.
- Select HDMII/DVl input source in main input option on the SETUP menu. (Refer to R41)
_lVlDEO button is also available for this purpose.
26 Plasma TV
Installation
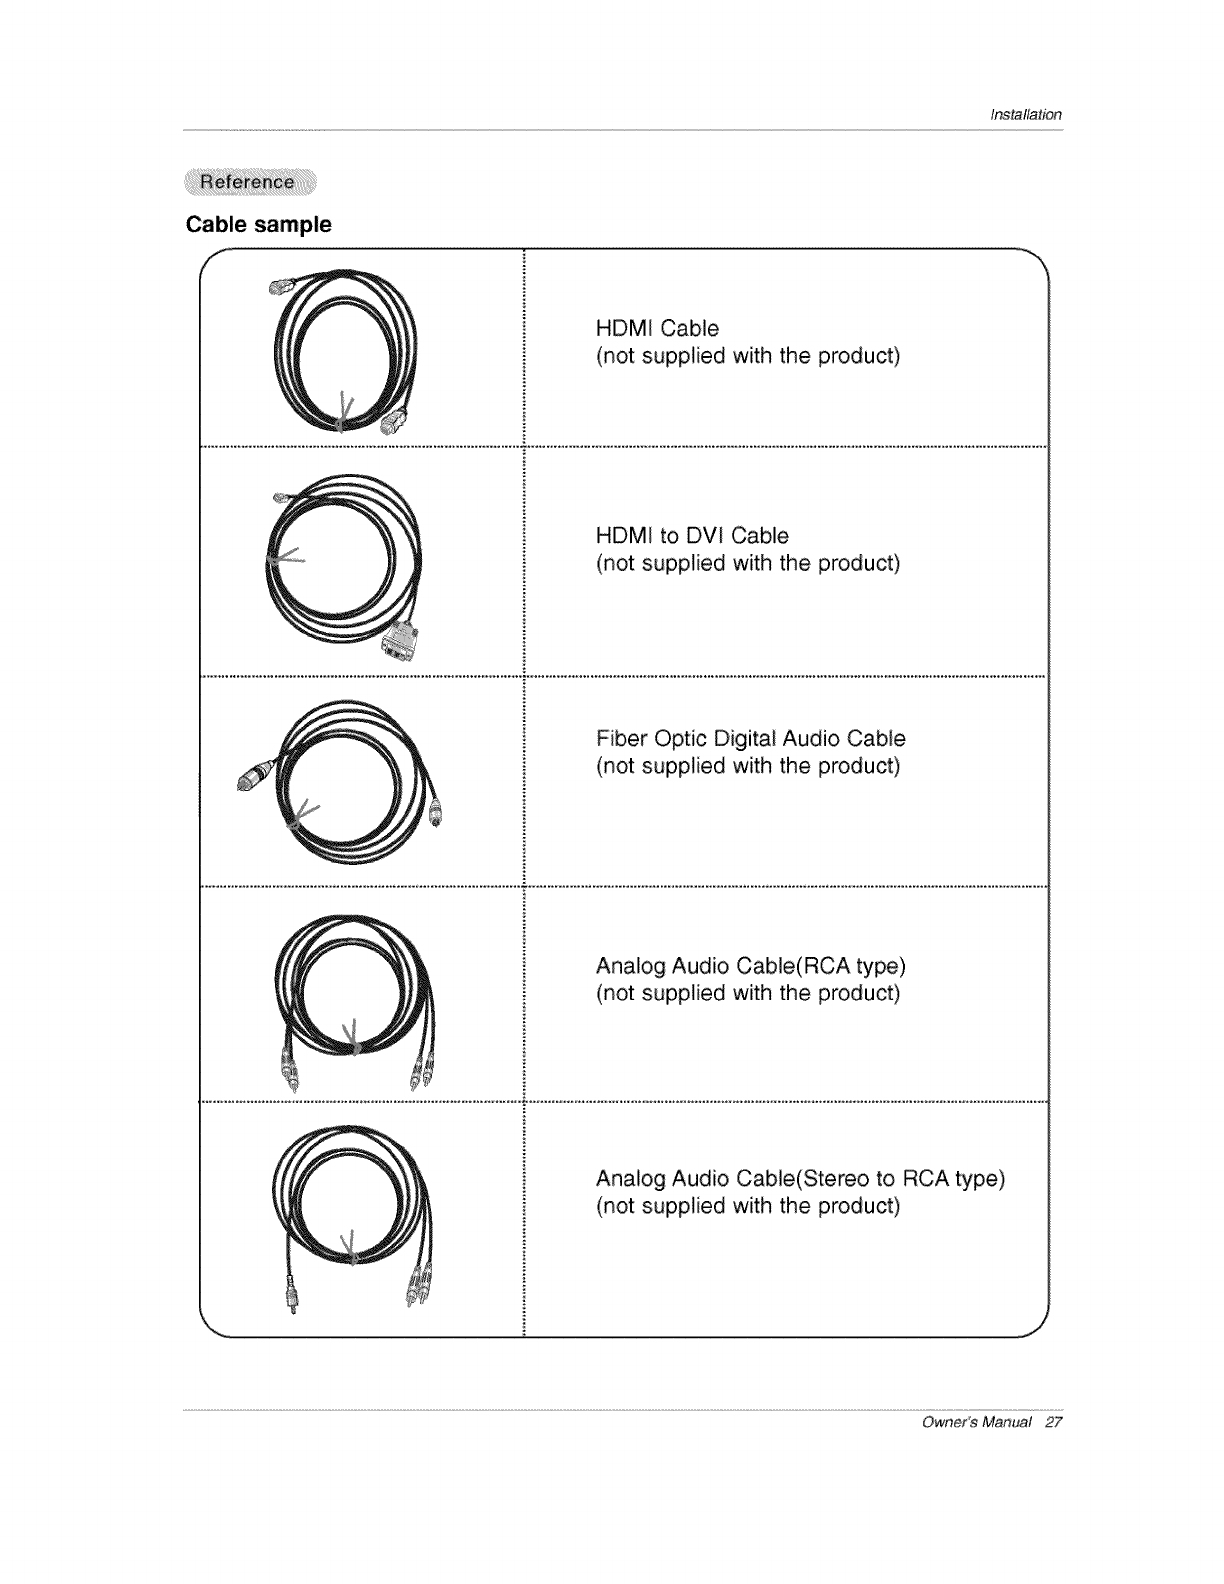
Cable sample
f
HDMI Cable
(not supplied with the product)
HDMI to DW Cable
(not supplied with the product)
Fiber Optic Digital Audio Cable
(not supplied with the product)
Analog Audio Cable(RCA type)
(not supplied with the product)
Analog Audio Cable(Stereo to RCA type)
(not supplied with the product)
,,J
Owner's Manual 27
Installation
How to use
1. Connect the HDMWDVI _urce Devices(DVD P_ayer or Set Top _x or PC) and the TV SET.
2 Turn on the display by pressing the POWER button on the TV SET and HDMI1/DVi Source Devices remote control
3 Select HDME1/DVU Input source in Main Input option on the SETUP menu.(Refer to P.41)
4_ Check the image on your TV SET, There may _ noise associated with the reso[ution, vertical pattern, contrast or bdgh_ess in
HDMWDW Source Devices ff noise is present, change the HDMIIiDV[ Source Devices to another teselution, change the
refresh rate or adjust the brightness and contrast on the menu until the picture is clear, ff the refresh rate of the PC graphics
card can not changed, change the PC graphics card or consult the rr,anufacturer of the PC graphics card
Notes:
Depending on the graphics card, DOS mode may not work if a HDMtl to DVI Cable is in use.
- Avoid keeping afixed image on the screen for a lonq period of time. The fixed image may become pe_anently imprinted on the
screen, Use the Orbiter feature on the ISM Method menu,
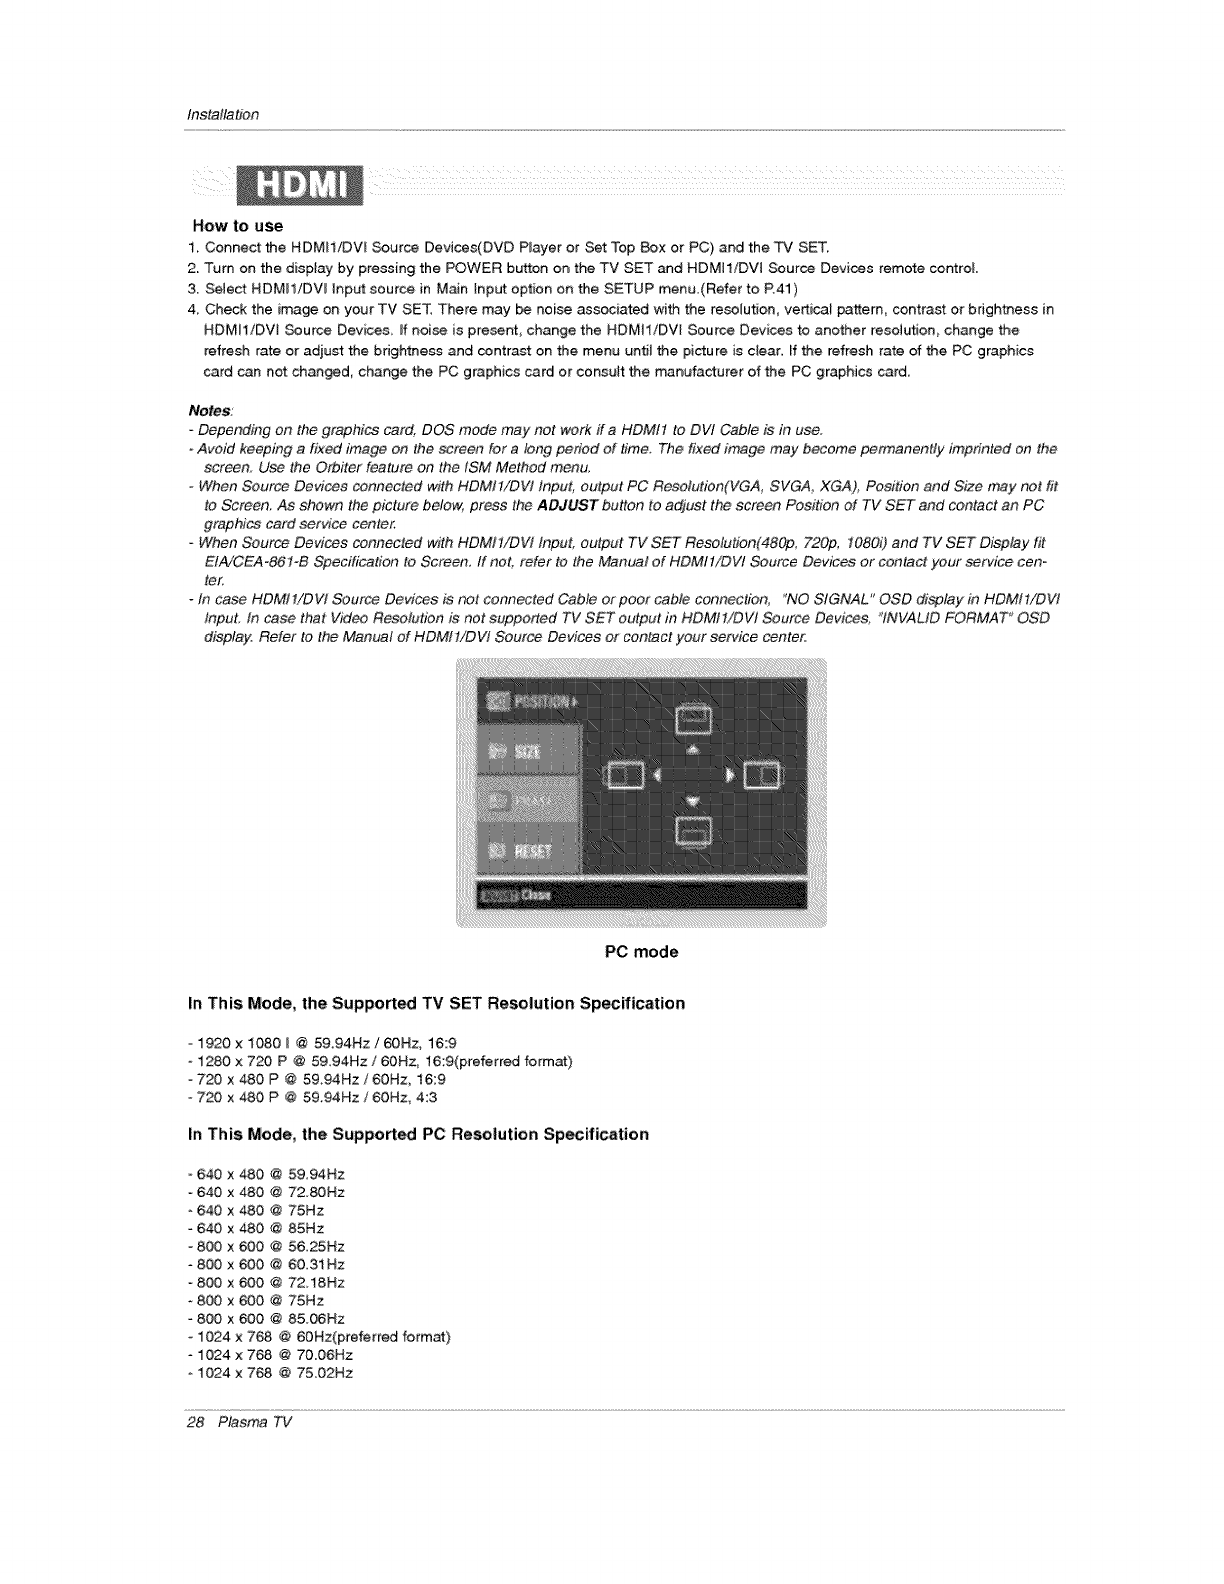
_Zhen Source Devices connoted _fith HDMtl/DVI Input, output PC R_.olut_On(VGA, SVGA, XGA), Positio_ and S_e m_y not fit
to Screen. As shown the picture below_ press the ADJUST button to adjust the screen Position of TV SET and contact an PC
graphics card service center.
- When Source Devices connected with HDMI1/DVI Input. output TV SET Resolution(480p, 720p, 1080i) and TV SET Display fit
E!_/CEA-861°B Specification to Screen, if not, refer to the Manual of HDMI 1/DV! Source Devices or contact your service con
ter.
-In case HDMI1/DVI Source Devices is not connected Cable or poor cable connection_ "NO SIGNAL" OSD display in HDMt!/DVi
Input: tn case that Video Resolution is not supported TV SET output in HDMtt/DW Source Devices, "INVALID FORMAT '_OSD
display, Refer to the Manual of HDMI 1/DW Source Devices or contact your service center;
PC mode
In This Mode, the Support_ TV SET Resolution Specification
- 1920 x 1080 _ @ 59.94Hz /60Rz, 16:9
-1280x 720 P @ 59.94Hz/60Hz, 16:9(preferred format)
720 x 480 P @ 59.94Rz /6OHz, 16:9
- 720 x 480 P @ 5&94Hz /60Hz, 4:3
In This Mode, the Supported PC Resolution Specification
- 640 x 480 @ 59.94Hz
640 x 480 @ 72.80Hz
640 x 480 @ 75Hz
°640 x 480 @ 85Hz
- 800 x 600 @ 56.25Hz
-800 x 600 @ 60.31Hz
800 x 600 @ 72.18Hz
800 x 600 @ 75Hz
-800 x 600 @ 85.06Hz
- 1024 x 768 @ 60Hz(preferred format)
-1024× 768 @ 70,06Hz
1024 x 768 @ 75,02Hz
28 Plasma TV
Installation
The TV Guide On _reen system uses Setup information to provide you with show listings and ]ineups in your area--which are
updated severaJ times a day,
-Once you set up the TV according to manufacturer's in_ructions, you are ready to set up the TV Guide On Screen system.
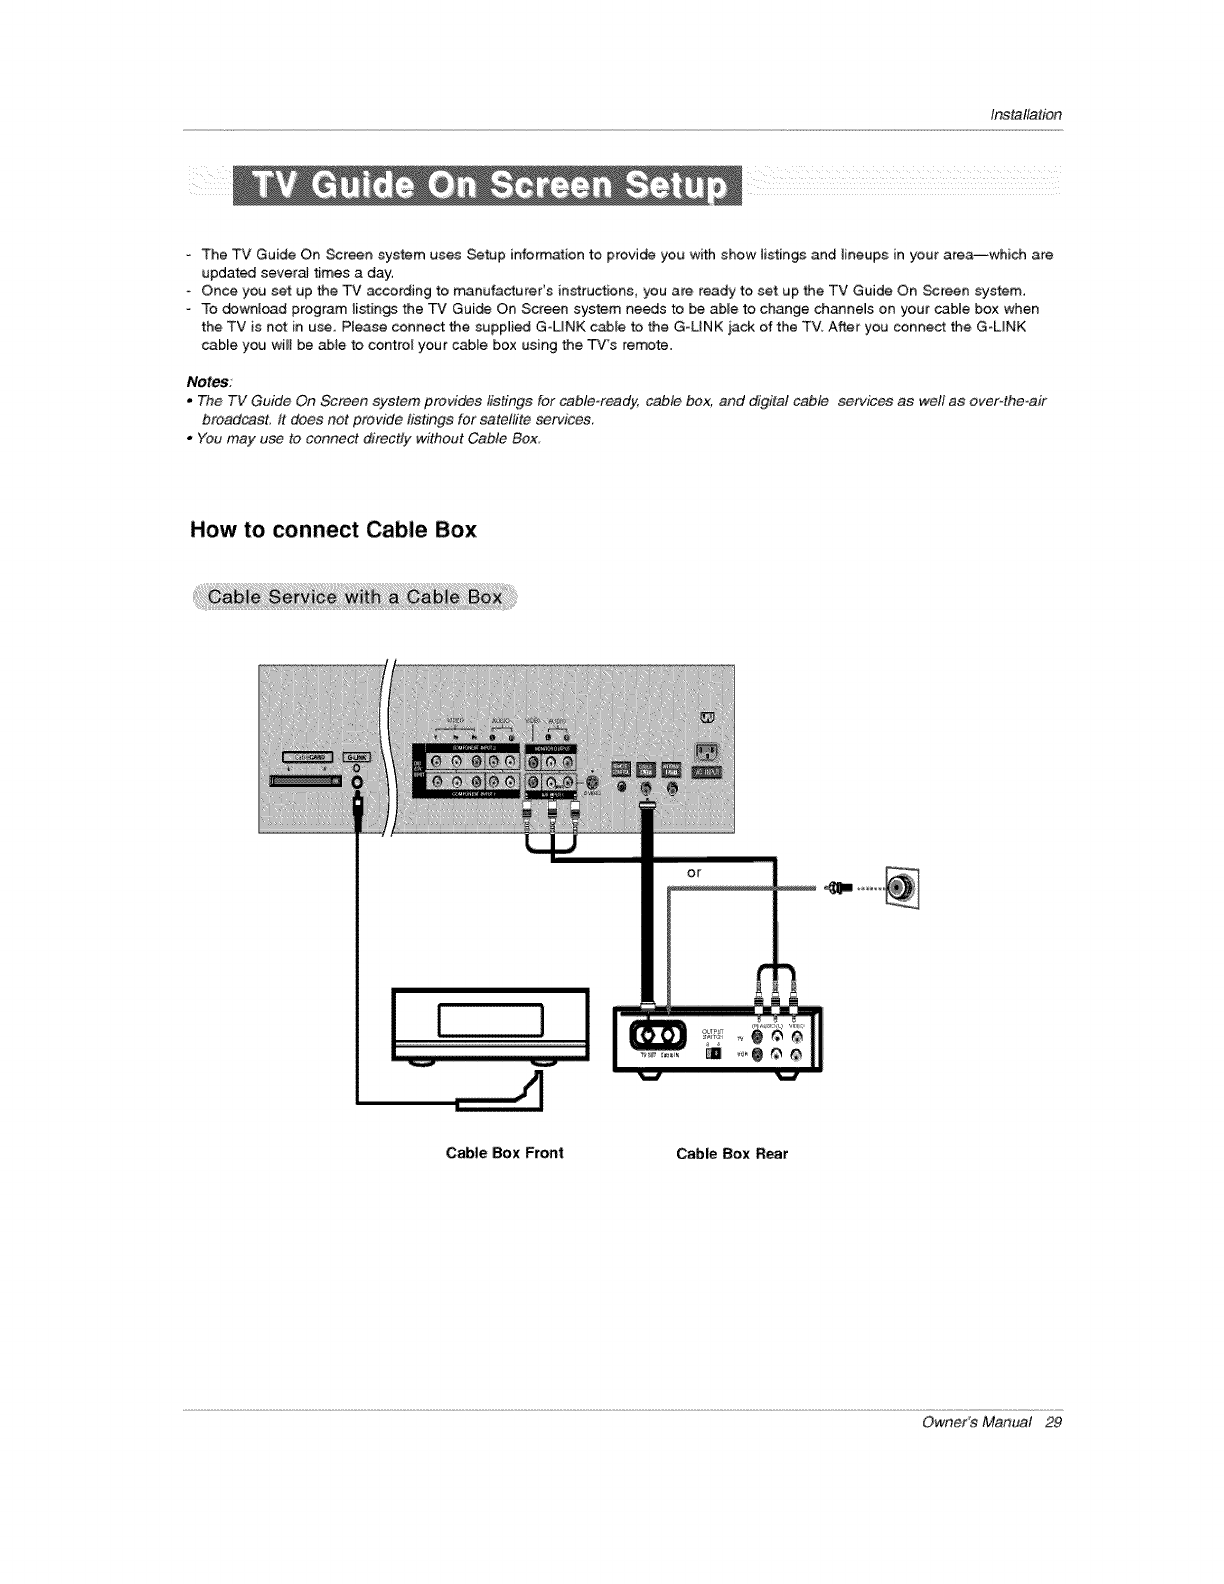
To download program listings the TV Gui_ On Screen system needs to be able to change channels on your cable box when
the TV is not in use. Please connect the supplied G-UNK cable to the G-UNK iack of the TV. After you connect the G-LINK
cable you wi_[ be abte to control your c_e box using the TVs remote.
Notes:
•The TV Guide On Screen system provides listings for cable-ready, cable box; and digital cable services as weft as over4he-air
broadcast: tt does not provide listings for satellite service&
oYou may u_ to connect directly without Cable Box,
How to connect Cable Box
or
Cable 8ox Front Cable Box Rear
Owner's Manual 29

Installation
Note;
,The G-LINK _cable is necessary for the TV Guide On Screen system to work with your Cable Box. See Page
29 for G-LflVK "_ connection instructions.
1.Welcome Screen
The TV Guide On _reen system's Wetcome Screen appears:
-= by pressing the TV Guide key
-- when you power On your TV if you previously skipped "Set up TV
Guide On Screen new s on the Remin_r Screen.
The Welcome Screen highlights features of the TV Guide On Screen
system
Press ENTER to begin Setup.
2,Reminder Screen
The TV Guide On Screen system's Reminder _reen appears:
-_ after initial TV set up
=- if you power Off the TV and then F_ower it back On
To make a selection, use the A ,,V button to highlight an option,
and press ENTER.
• *Set up TV Guide On Screen now, Illi displays the Welcome Screen.
Press ENTER to begin Setup.
• "Remind me to set up later ° re_rns you to watching TV,
- "Don_ remind me a_in" returns you to watching TV and stops the
reminder _reen from appearing upon power On,
How to use
1. Screen 1 : _untry
. This screen asks you the focation of your TV.
. Use the A IV button to highlight a countp/.
. Press ENTER to display Screen 2.
30 Plasma TV
Installation
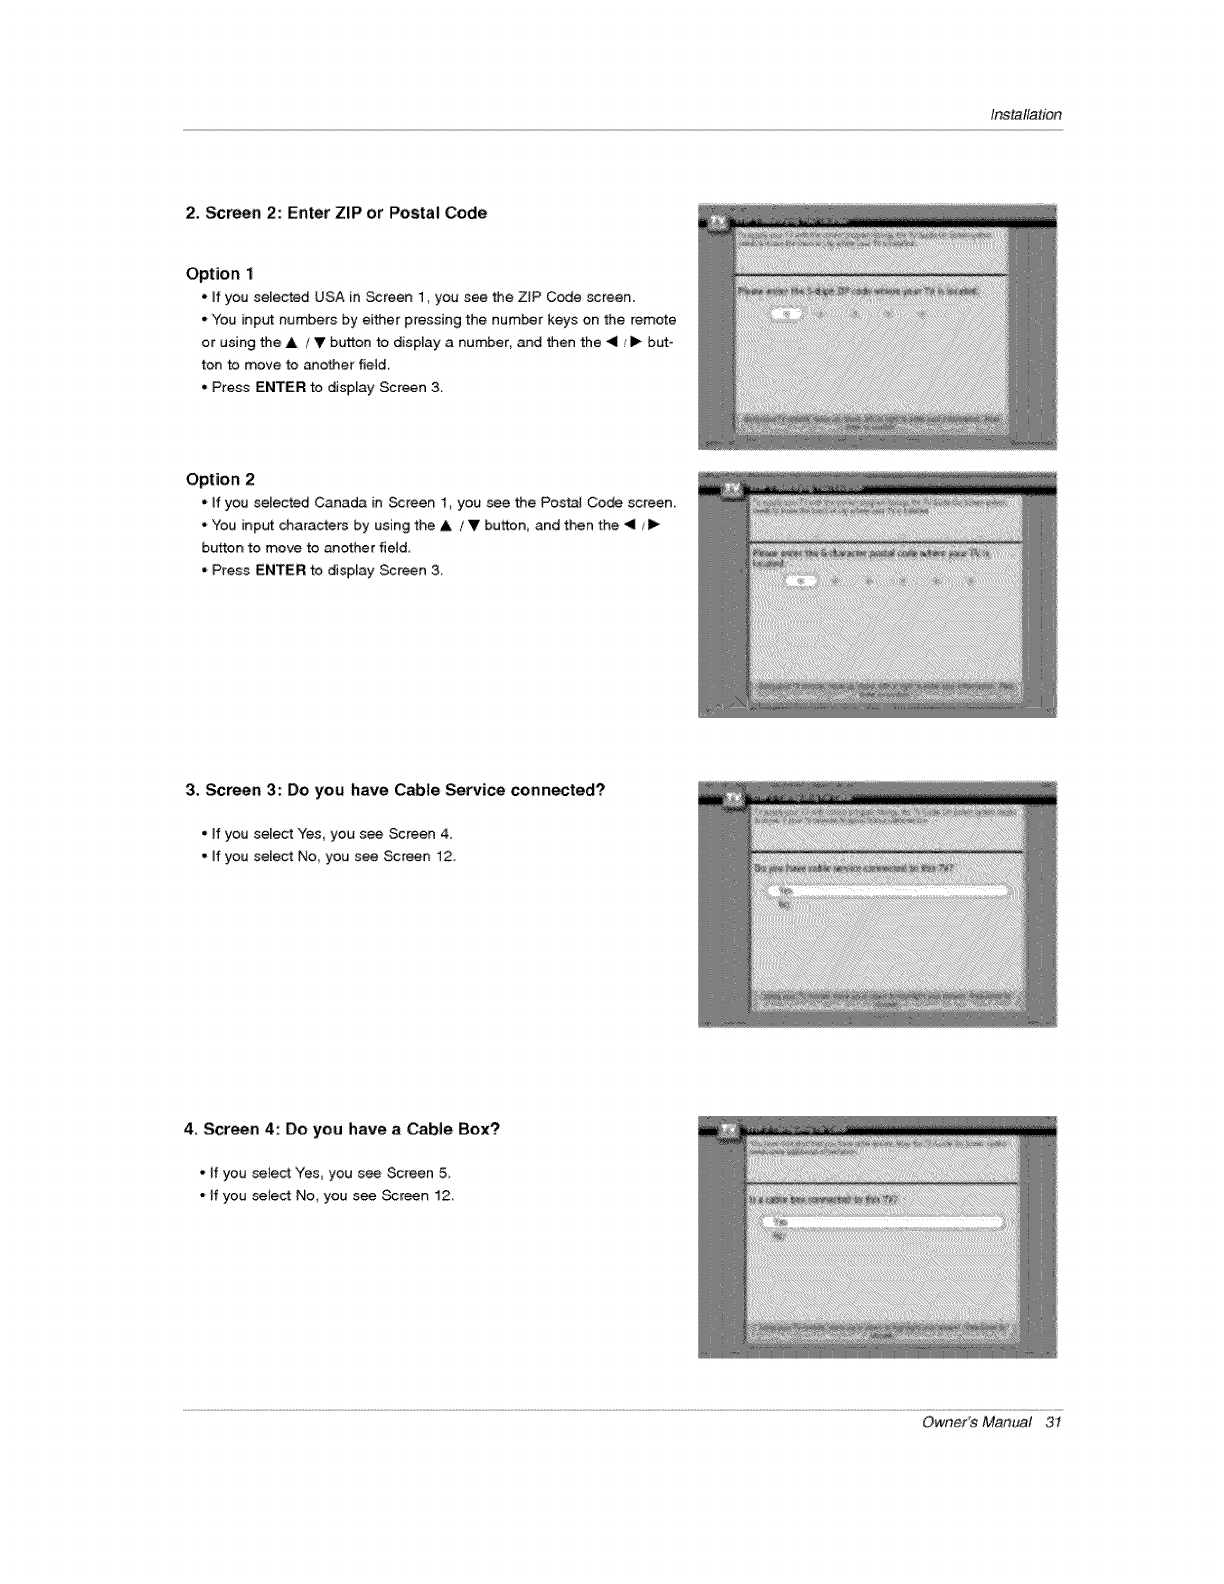
2_Screen 2: Enter ZIP or Postal Code
Option 1
• If you selected USA in Screen 1, you see the ZIP C_e screen.
• You input numbers by either pressing the number keys on the remote
or using the A /V button to display a number, and then the _11_,lll_but-
ton to move to another fieJd.
- Press ENTER to display Screen 3.
Option 2
•if you selected Canada in _creen 1, you see the Post_ Co_ screen
° You input characters by using the A /V button, and then the _11_1_
button to move to another field.
• Press ENTER to display Screen 3,
3, Screen 3: Do you have Cable Service connected?
=if you select Yes, you see Screen 4.
. Jfyou select No, you see Screen 12.
4. Screen 4: Do you have a Cable Box?
° if you sele_ Yes, you see Screen 5
°if you select No you see Screen 12,
Owner's Manual 3t
Installation
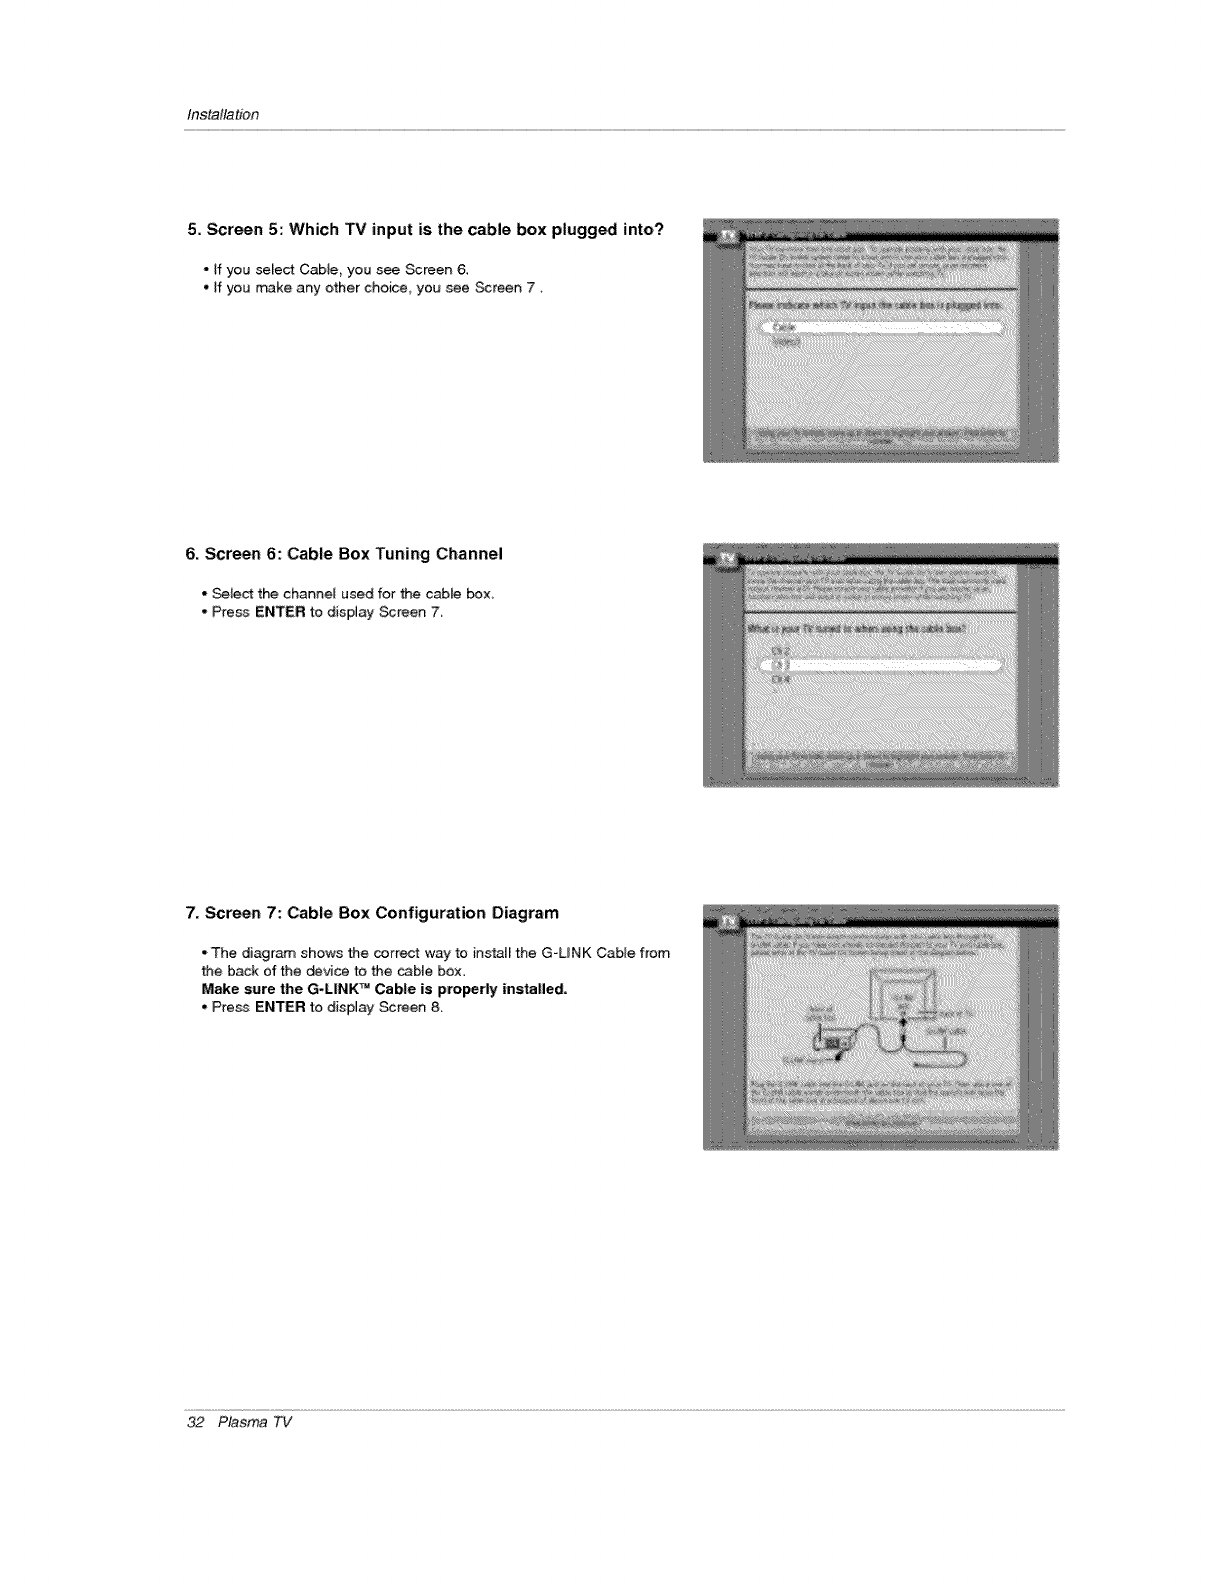
5, Screen 5: Which TV input is the cable box plugged into?
o if you select Cable, you see _reen 6,
oif you make any other choice, you see _reen 7
6. Screen 6: Cable Box Tuning Channel
= _ect the channel used for the cabte box
-Press ENTER to display _reen 7,
7, Screen 7: Cable Box Configuration Diagram
• The diagram shows the correct way to i#stalr the G-UNK Cabte from
the back of the device to the cabJe box.
Make sure the G-L|NK TM Cable is properly lnsta||ed,
. Press ENTER to display _reen 8,
32 Plasma TV
Installation
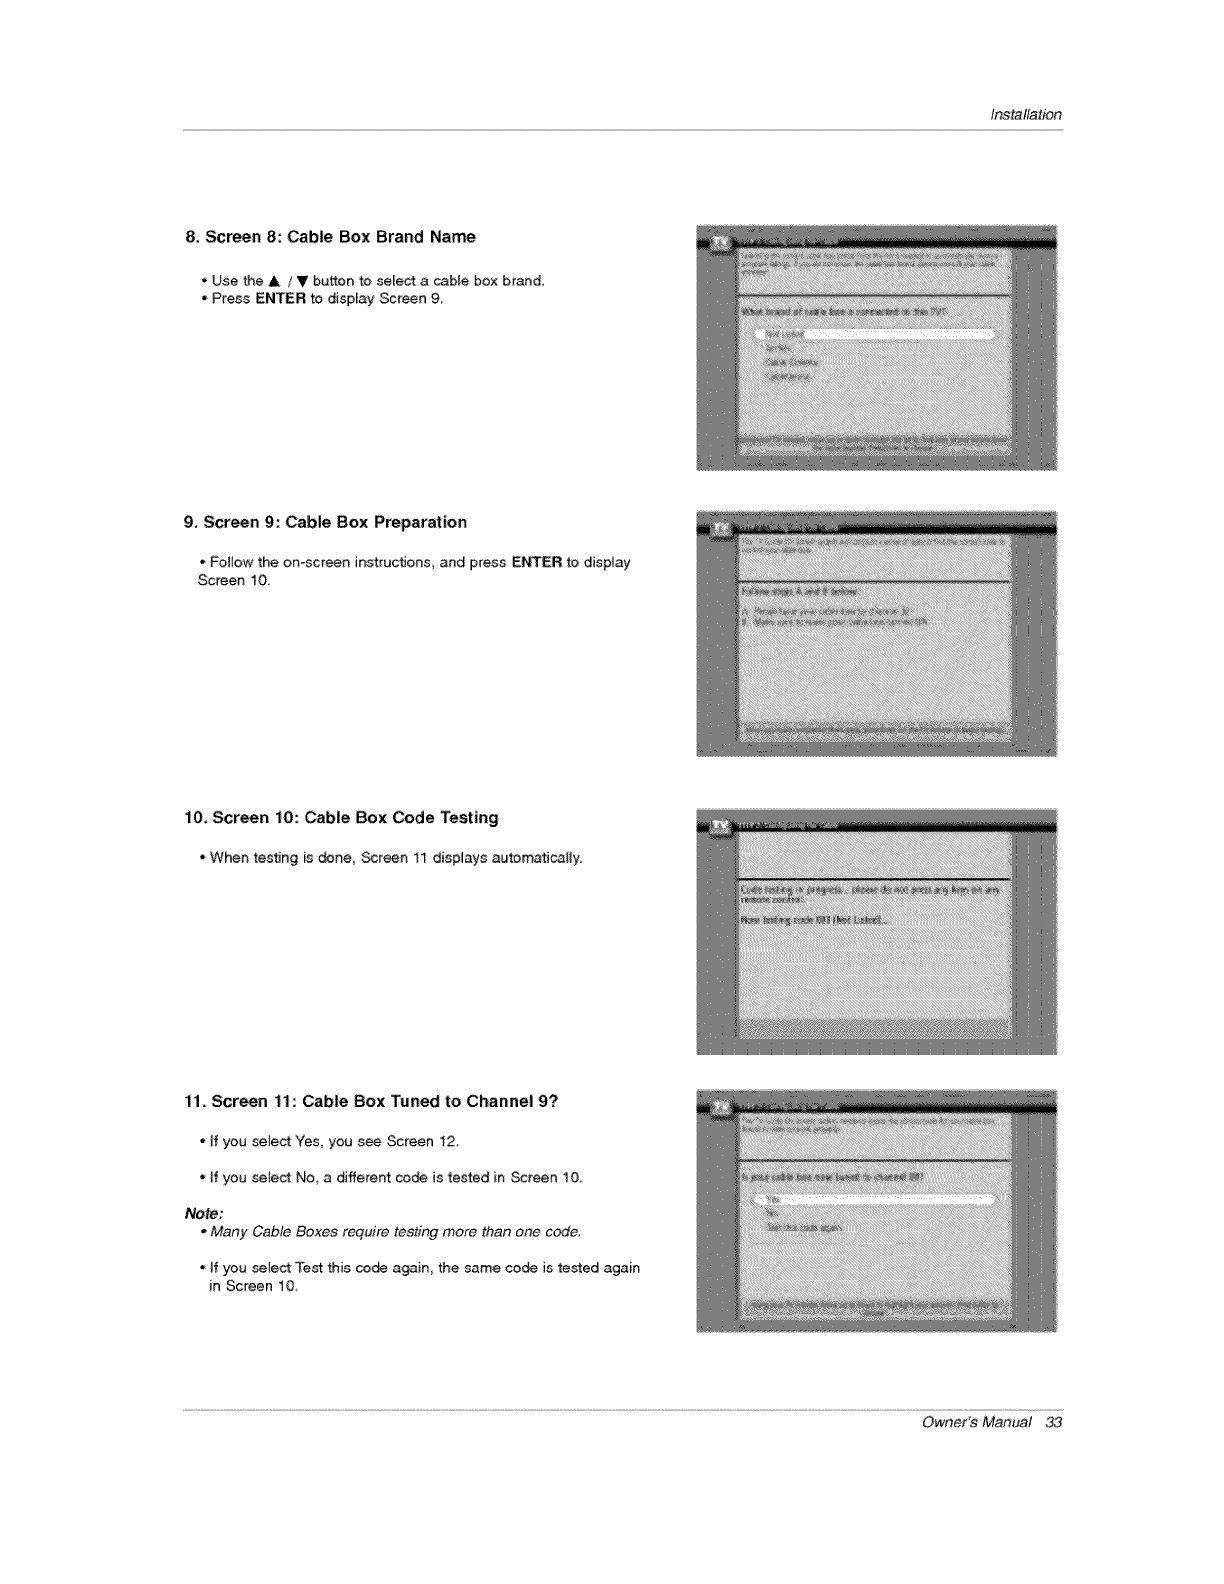
8, Screen 8: Cable Box Brand Name
• Use the &/V button to select a cable box brand,
•Press ENTER to display Screen 9_
9, Screen 9: Cable Box Preparation
*Foliow the on-screen instructions, and press ENTER to display
Screen 10
10, Scr_n i0: Cable Box Code Testing
° When testing is done, _reen 11 displays automatically,
11, Screen 11: Cable Box Tuned to Channel 9?
*if you setect Yes, you see Screen 12
- If you se}ect No_ a different code is tested in Screen 10_
Note:
.Many Cable Boxes require testing more than one co,de
- If you seiect Test this code again, the same code is te_ed again
in Screen 10,
Owner's Manual 33
Installation
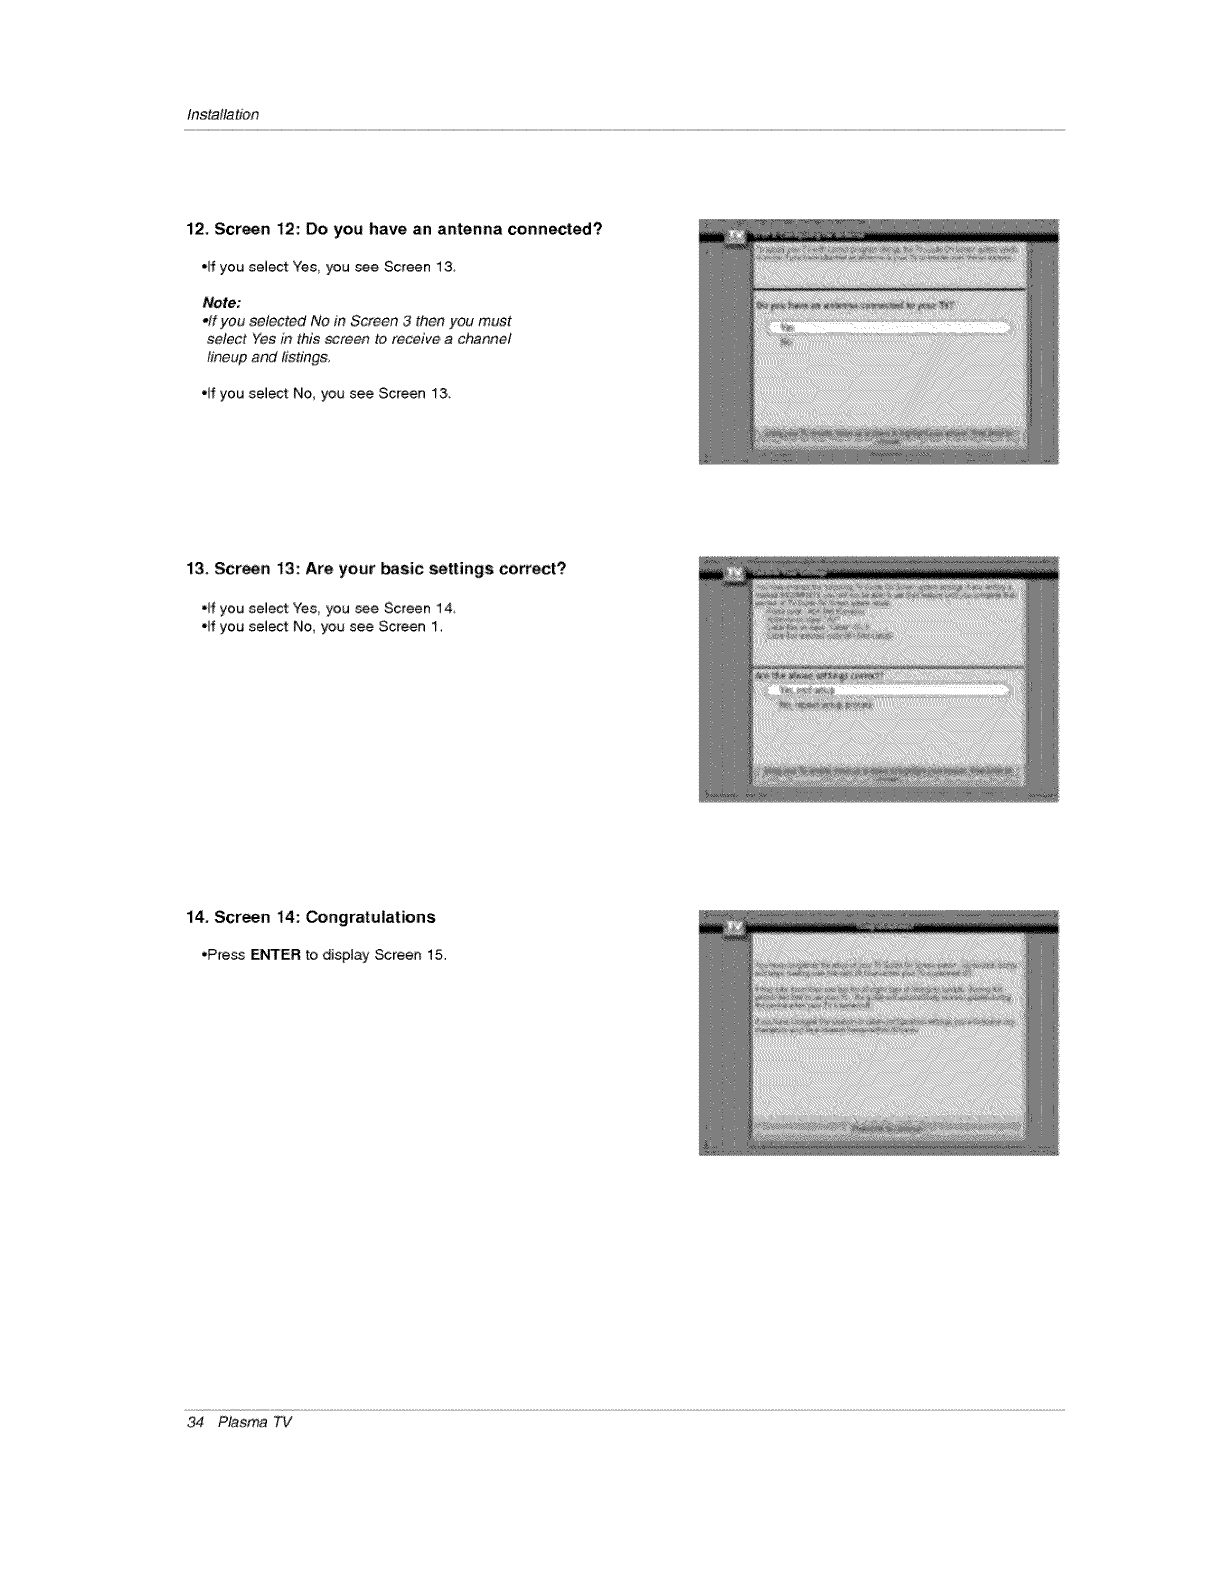
12. Screen 12: Do you have an antenna connectS?
elf you select Yes you see Screen 13
Note:
offyou selected No in Screen 3 then you must
select Yes in this screen to receive achannel
lineup and listing&
•ff you select No, you see Screen 33,
13. Screen 13: Are your basic settings correct?
°ff you select Yes you see Screen 14
"If you select No, you see Screen 1,
14, Screen i4: Congratulations
•Press ENTER to display _reen 15.
34 Plasma TV
Installation
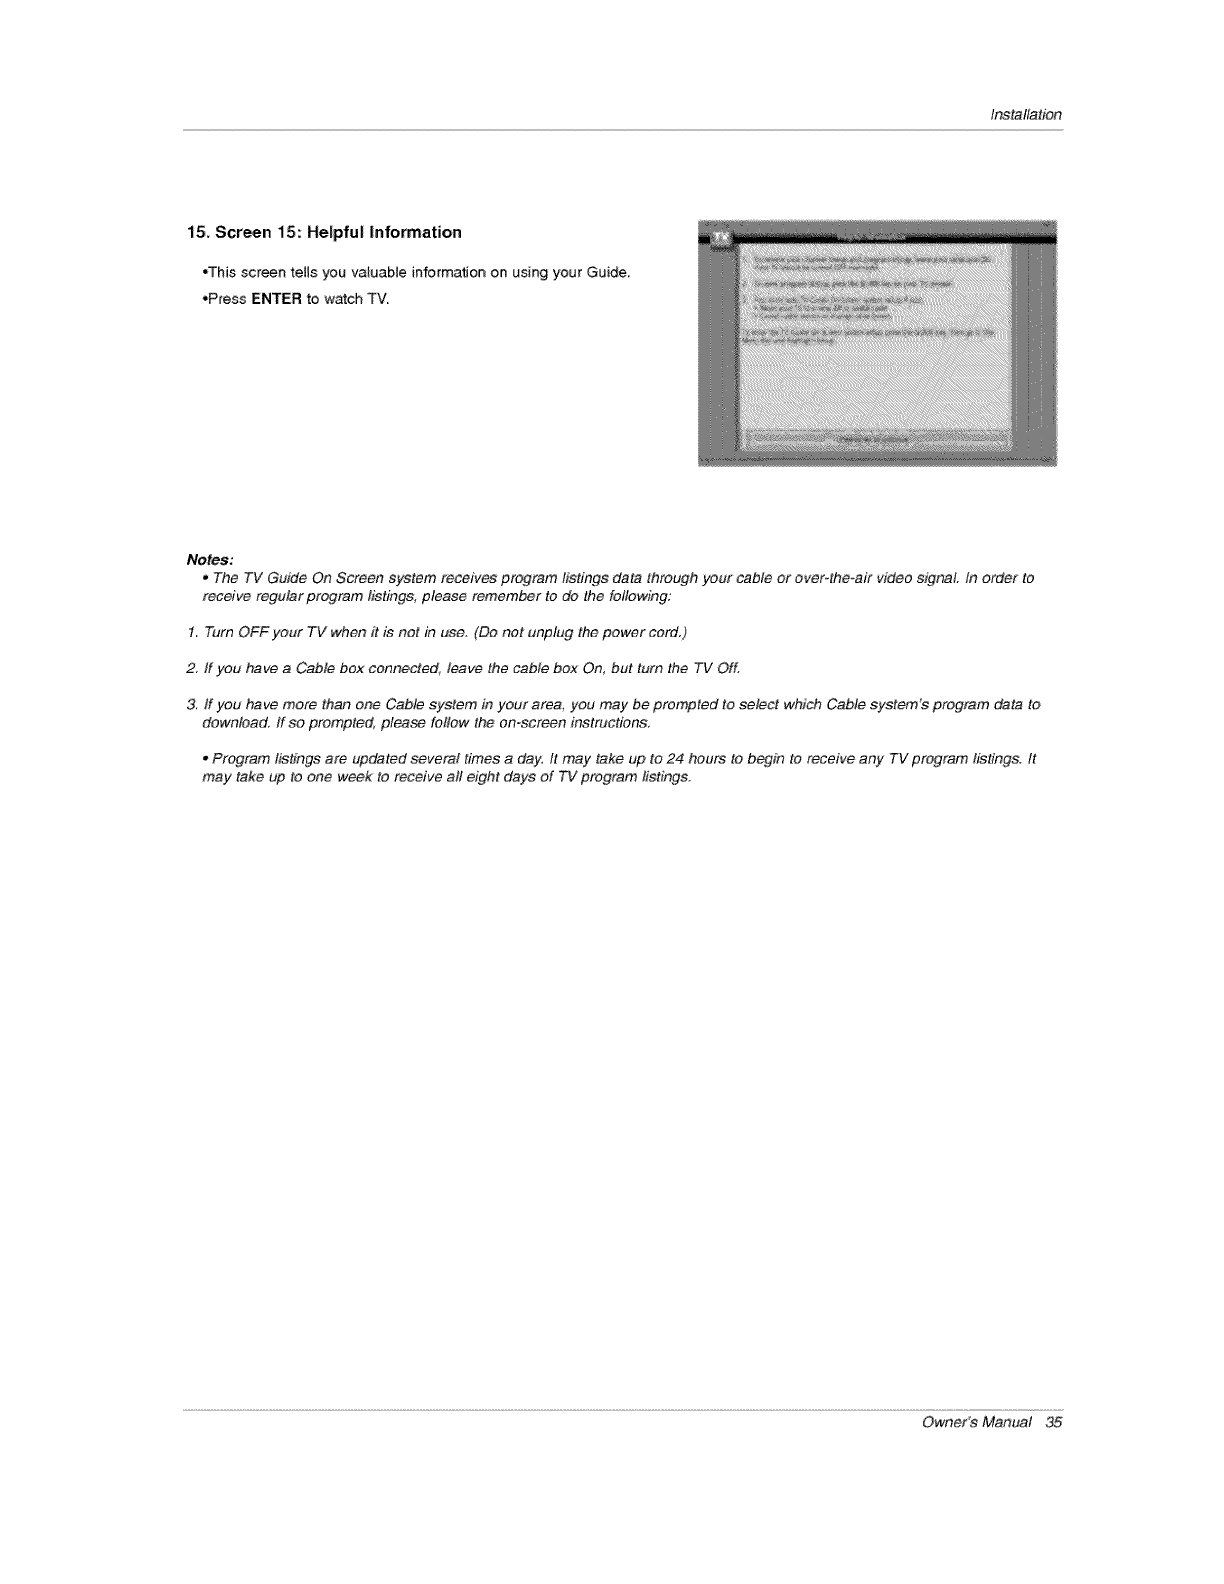
15. Screen 15: Helpful information
•This screen tells you valuable information on _sing your Guide,
•Press ENTER to watch TV.
Notes:
,The TV Guide On Screen system receives program listings data through }tour cable or over4he-air video signal In order to
receive regular program listings, please remember to do the following:
1. Turn OFF your TV when it is not in use. (Do nnt unplug the. power cord.)
2. ff you have a Cable box eennected, leave the cable box On, but turn the TV Off.
3. If you have more than one Cable system in your area, you may be prompted to select which Cable system's program data to
download. If so prompted, please fcfllow the on-screen instraction&
,Program listings are uPdated several times a day. ft may take up to 24 hours to b_#_ to r_.ceive any TV program listings. It
may take up to one week to receive all eight' days of TV program listings,
Owner's Manual 35
Opera#bn
I
I 0 n
1. First, connect power cord correcffy. At this moment, the TV switches to standby mode.
_n standby m_e to turn TV on, press the _)/hTVNIDEO _,, CH (A tV) button on the TV or press
the POWER, TV/VIDEO, TV INPUT, OH (_), Number (O ~ g) button on the remote controt.
2. Se_e_ the ,viewing source by using TVIVIDEO, TV INP_ button on the _mote controt,
This TV is programmed to remember which mo_ it was last set to, even if you turn the TV off.
3, When finished using the TV press the POWER button on the remote control The TV reverts to
s_ndby mode,
Notes:
*ff you intend to be away on vacation, disconnect the power plug from the walt _wer outlet,
.After turning _n the TV, #will take up to aweek for the TV Guide On Screen system to receive furl
listings data
.Illuminates orange in standby mode, When the TV is turn_ on, the indicator wifl blink green for 3°4
seconds before the picture is seen,
oWhen the TV is turned On, the TV Guide On Screen system is automaticatty displayed, The screen
may _ elightly delayed ff the TV was unplugged and then powered On.
36 Plasma TV
Operation
H0MEMe n u
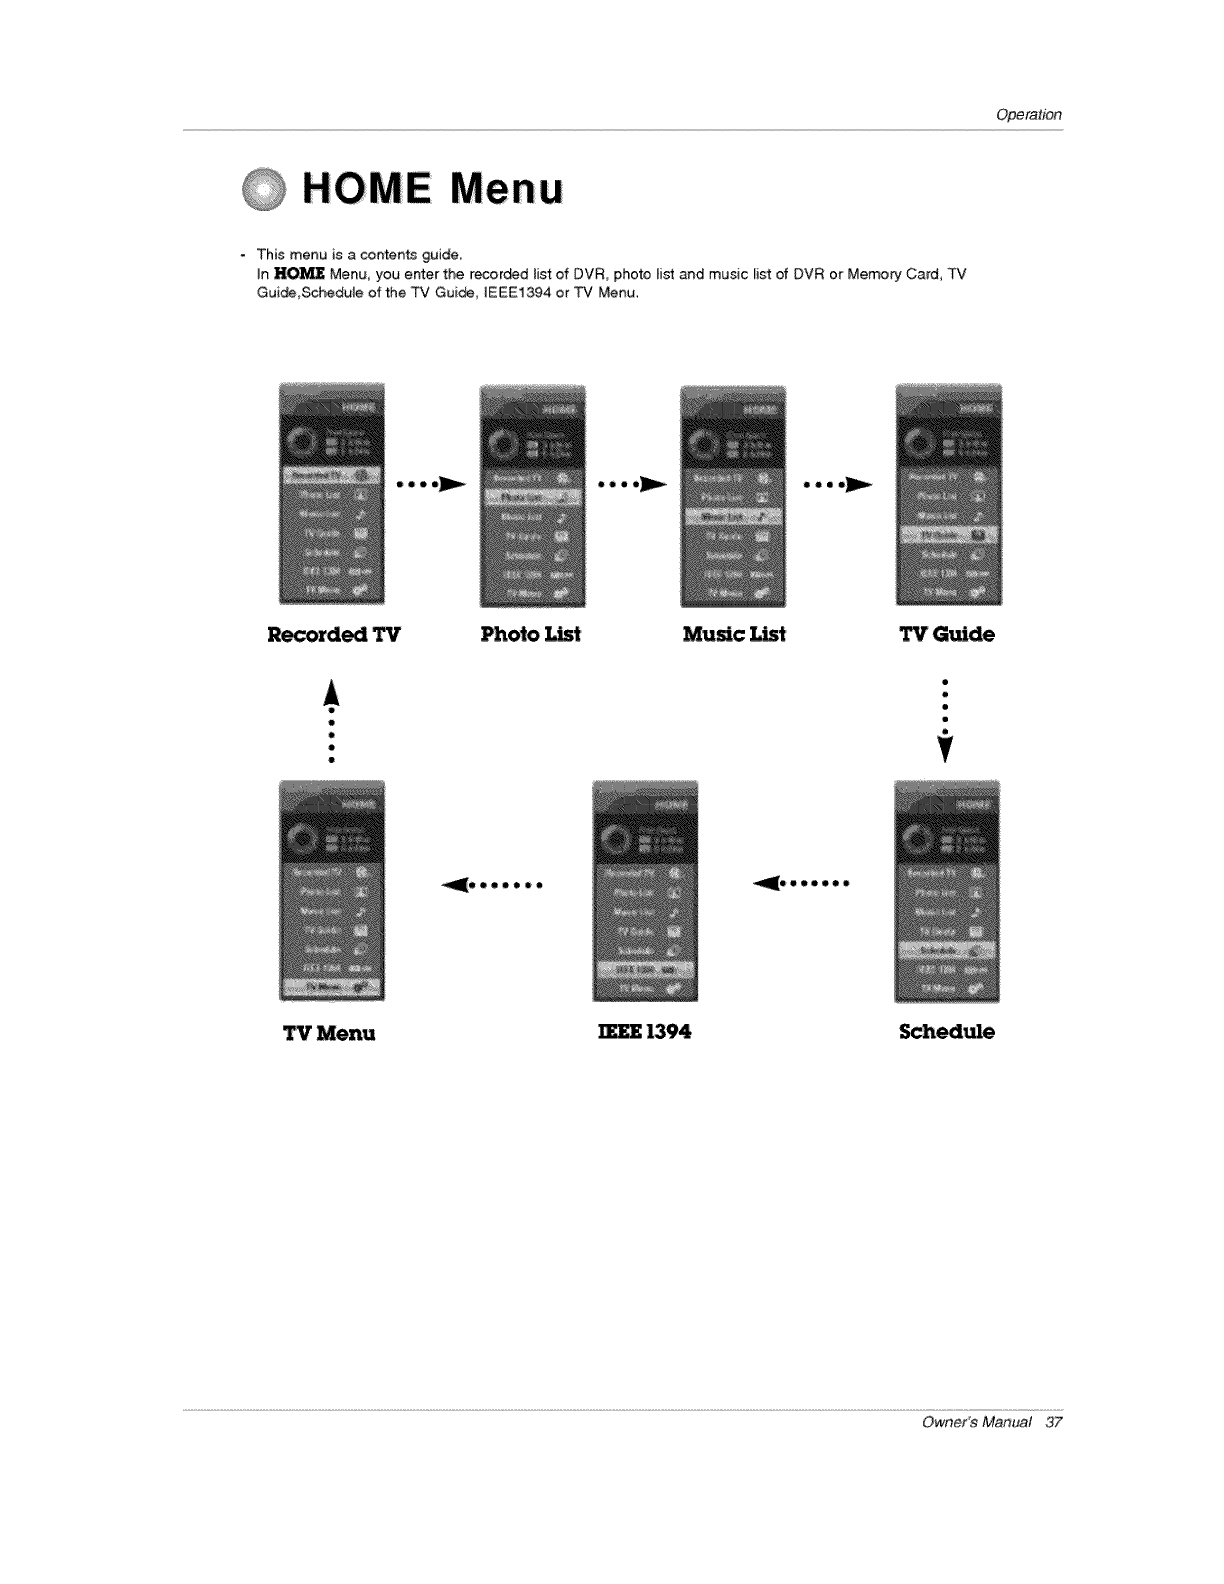
-This menu is a contents guide.
In I'IO_ Menu, you enter the recor_d list of DVR, pho_ list and music list of DVR or Memory Card, TV
Guide,Schedule of the TV Guide, IEEE1394 or TV Menu.
oeoo_ oeoo_Ju_
Recorded TV Photo _t Music _t TV Guide
o
o
o
u
t
_OQeO_OQ
TV Menu IEEE 1394 _hedule
Owner's Manual 37
Operation
TV
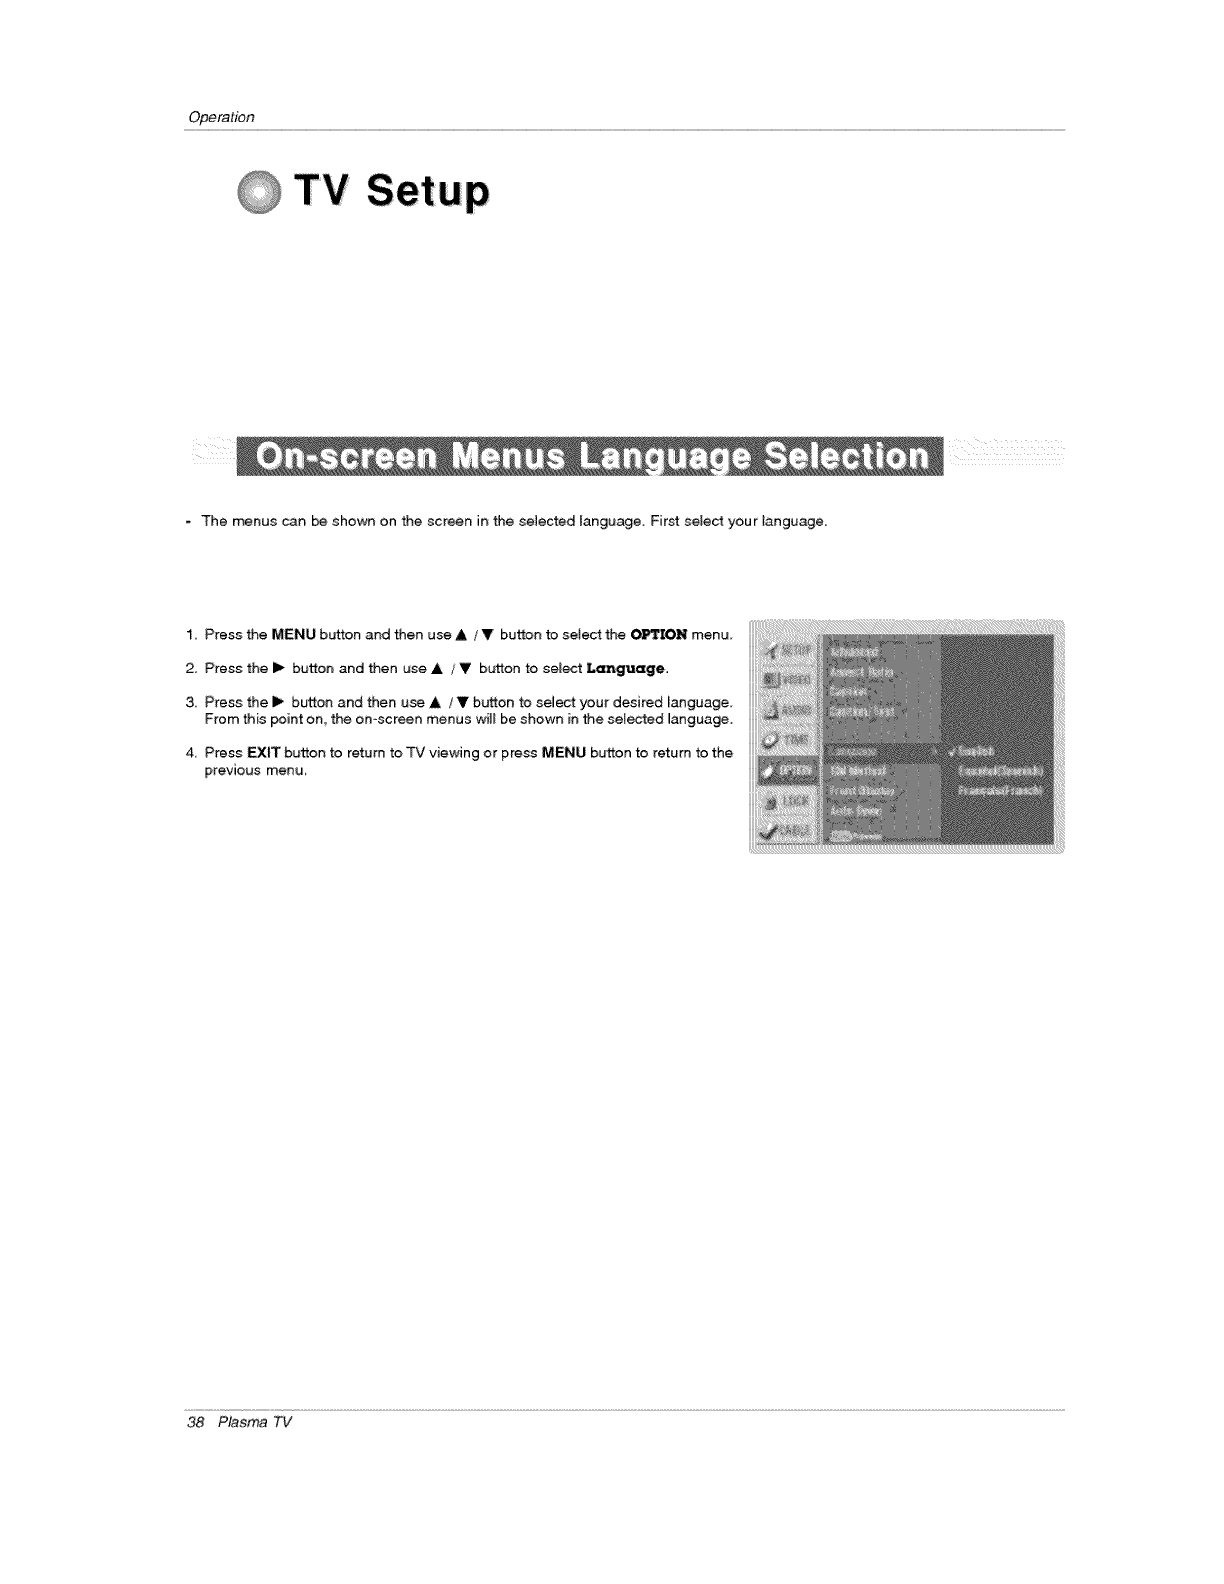
- The menus can _ shown on the screen in the selected language. First selest your l;anguage.
1,, Press the MENU button and then use A/V button to select the OPTION menu
2. Press the i_ button and then use & /VbL_on to semect Language,
3,, Press the _ button and then use & /Vbutton to select your desired Fanguage
From this point on, the on-screen menus wil_ be shown in the selected Janguage.
4 Press EXIT button to return to TV viewing or press MENU button to return to the
previous menu
38 Plasma TV
Operation
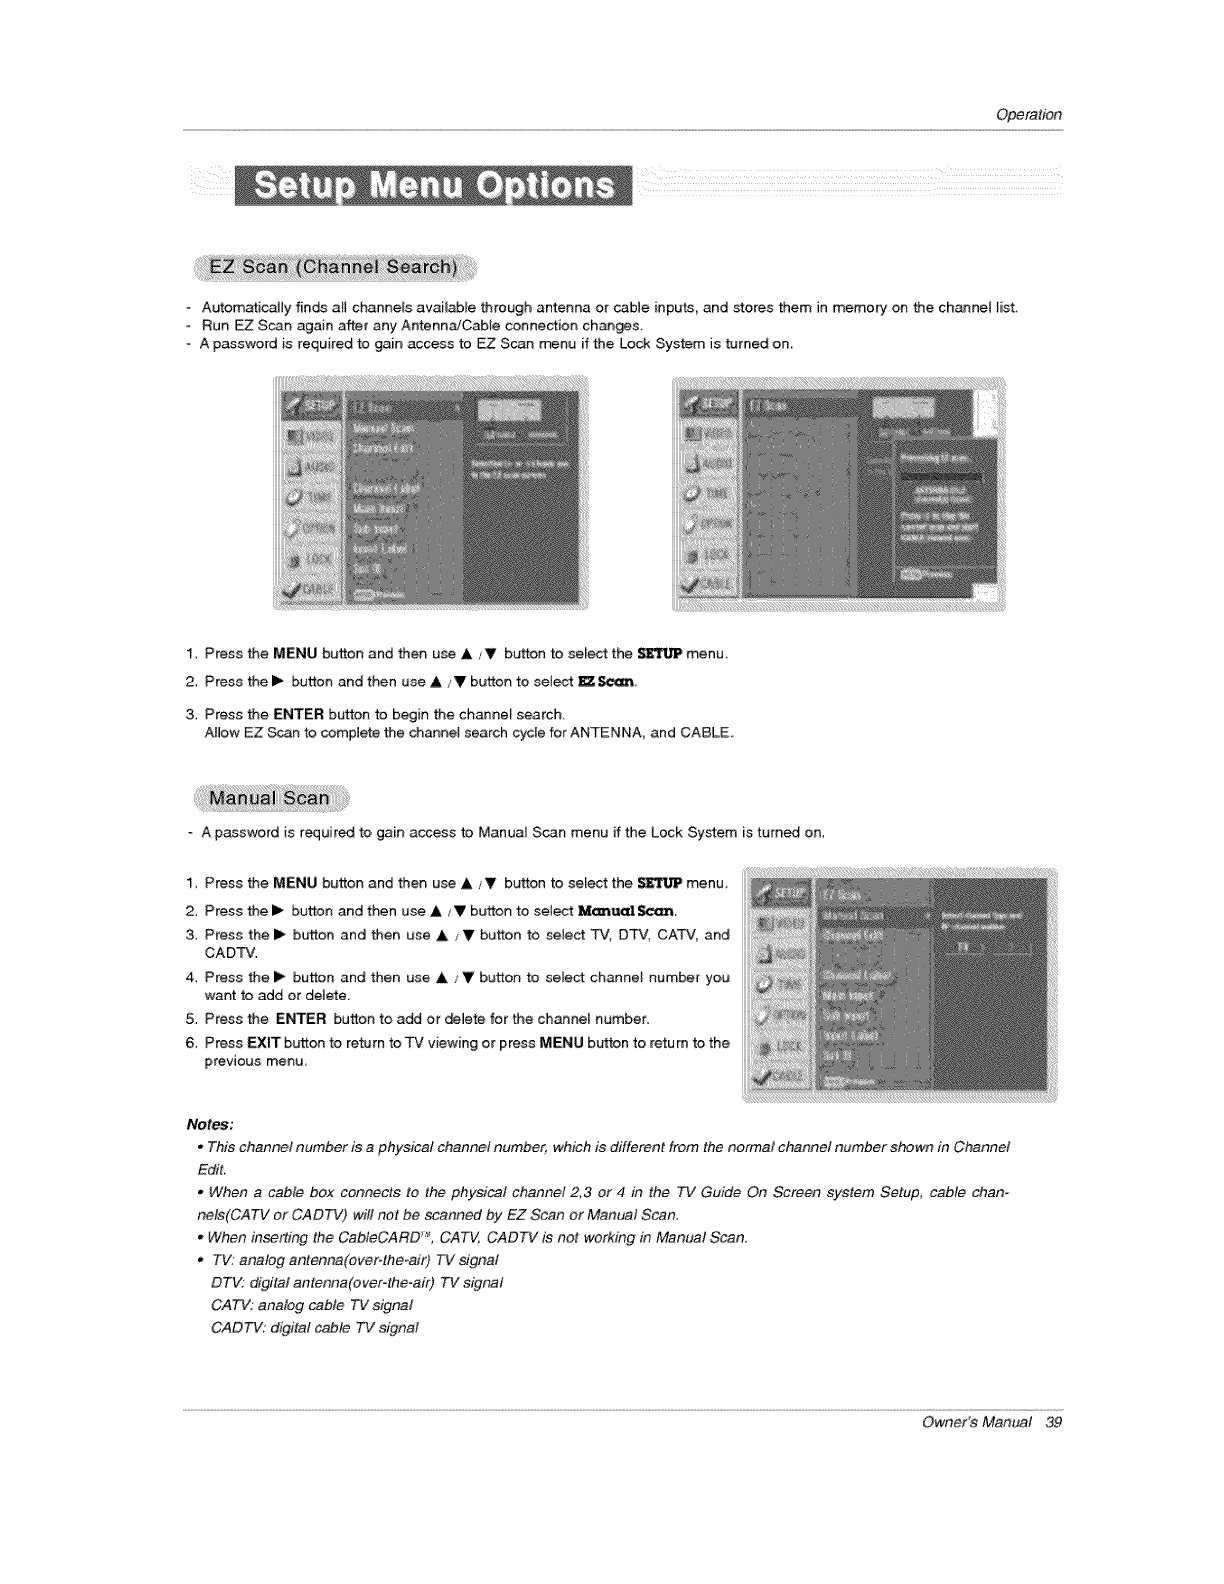
- Automatically finds all channels available through antenna or cable inputs, and stores them in memor:/on the channel list
- Run EZ Scan again after any Antenn_Cable connection changes
o A password is required to gain access to _ Scan _nu if the Lock System is turned on,
1 Press the MENU button and then use A fV button to select the _ menu.
2 Press the I_ button and then use A/V button to select _ Seem,
3. Press the ENTER button to begin the channel search.
Allow EZ _n to comptete the channel search cycle for ANTENNA, and CABLE.
Apassword is required to gain access to Manual Scan menu if the Lock System is turned on,
1_ Press the MENU button and then use ,I,/_1, button to select the _ menu,
2, Press the I_ button and then use &/V button to select Memttal _.
3. Press the I_ button and then use A / V button to select TV, DTV, CATV, and
CA DTV.
4. Press the i_ button and then use A /V button to select channel number you
want to add or delete
5. Press the ENTER button to add or _lete for the channel number.
& Press EXIT button to return to TV viewing or press MENU button to return to the
previous menu,
Notes:
This channel number is a physical channel number, which is different from the normal channel number shown in Channel
Edit,
. When a cable box connects to the physical channel 2,3 or 4 in the 77/Guide On Screen system Setup, cable chan-
nela(CATV or CADTV) will not be scanned by EZ Scan or Manual Scan.
.When in.fling the CabteCARD TM, CATV, CADTV is not working in Manual Scan.
.TV: ar_log antenna(over-the-air) TV signal
DTV; digital antenna(over-the-air) TV signal
CATV: analog cable TV signal
CADTV: digital cable TV signal
Owner's Manual 39
Operation
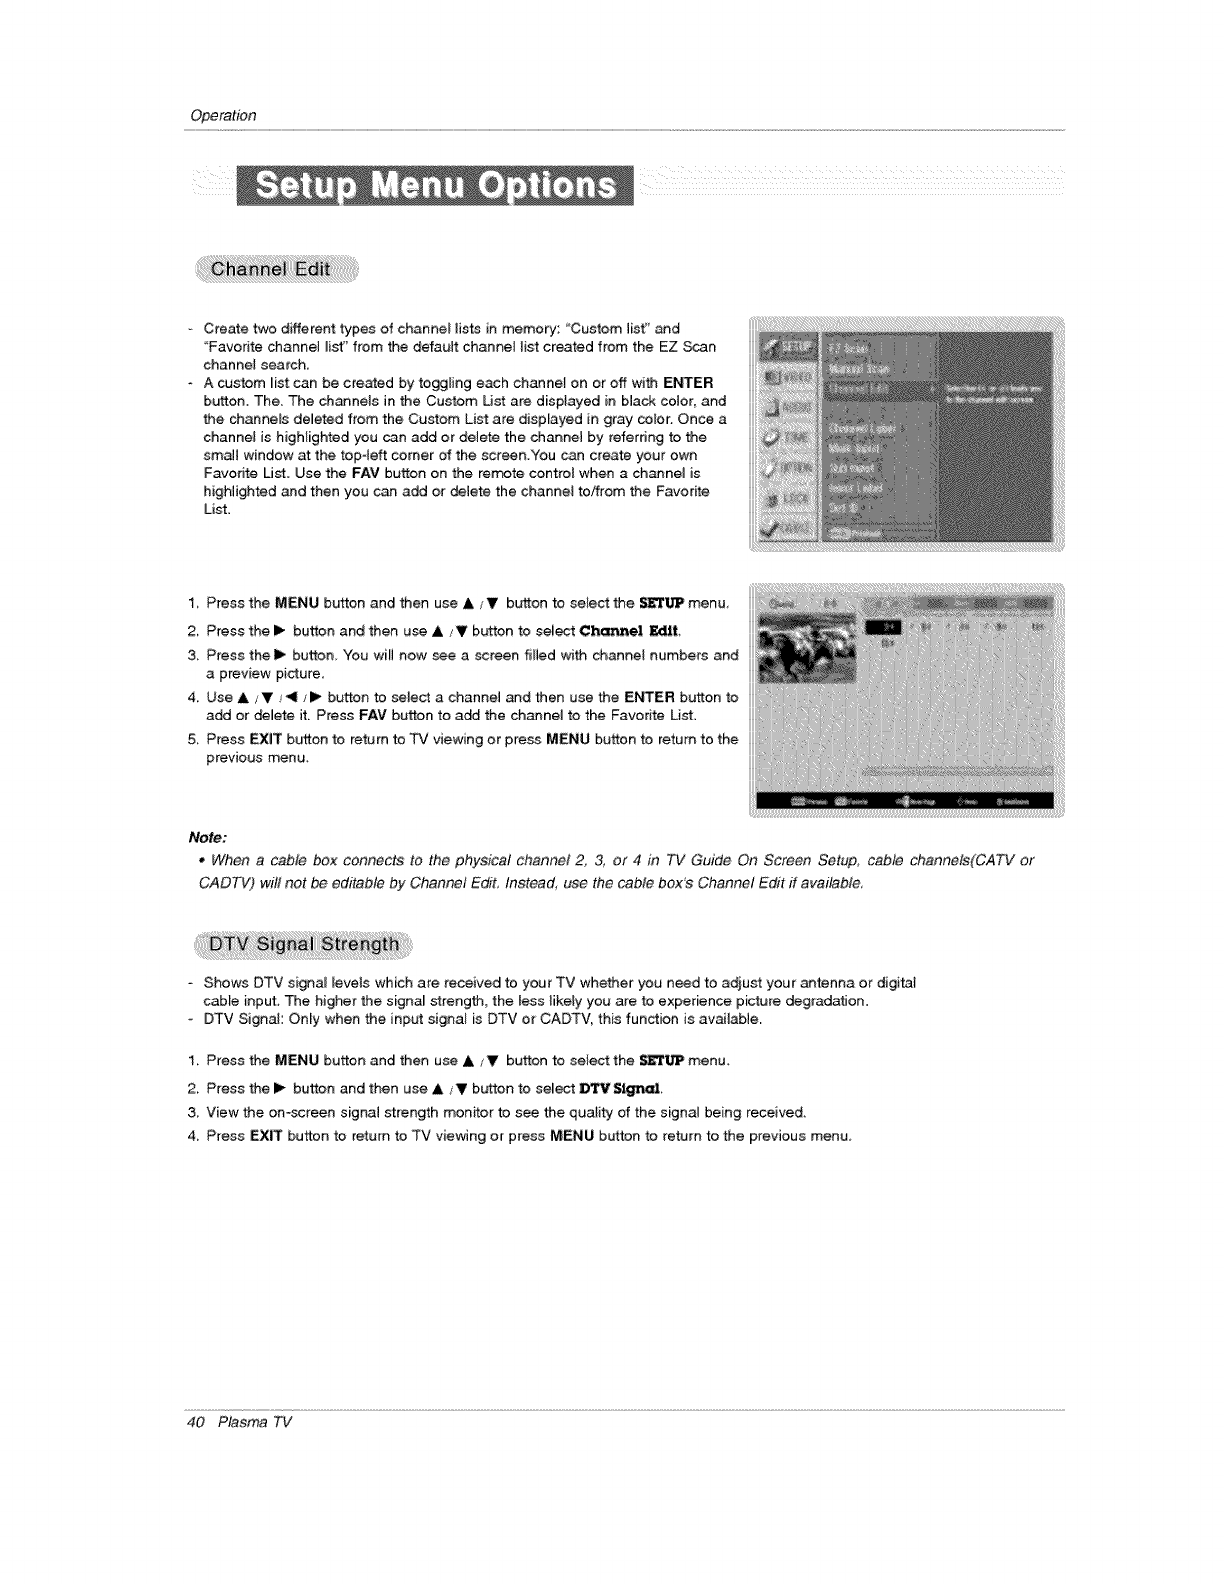
Create two different types of channel lists in memory: "Custom lisf' and
Favorite channel list" from the default channel list created from the EZ S_n
channel search.
A custom _ist can be created by toggling each channe_ on or off with ENTER
button. The. The channels in the Custom Us_ are displayed in black color, and
the channels deleted from the Custom List are displayed in gray color. Once a
channe_ is highlighted you can add or delete the channe_ by referring to the
smaJl window at the top4eft corner of the screen.You can create your own
Favorite List Use the FAY button on the rerr_te contrel when a channeJ is
higHighted and then you can add or deJete the channel to/_rom the Favorite
List
1, Press the MENU button and then use A JVbutton to select the $1_'l%rPmenu,
2, Press the !_ button and then use ,& tT button to sel_ Chart_h!! I_lit_
3. Press thelP button. You will now see a screen filled with channel numbers and
a preview picture.
4. Use A _I, _II/1_ button to seled a channel and then use the ENTER bu4ton to
add or delete it. Press FAV button to add the channel to the Favorite List.
5 Press EXiT button to return to TV viewing or press MENU button to return to the
previous menu
Nefe;
•When acable box connects to the physical channel 23, or 4 in 7"¢ Guide On Screen Setup, cable chan_ls(CATV or
CADTV) will not _ editable by Channel EdiL Instead use the cable box's Channel Edit ff available
-Shows DTV signa_ _eve_s which are received to your TV whether you need to adjust your antenna or digital
cable input. The higher the signa_ strength, the less likely you are to experience picture degradafJon.
- DTV Signal: Only when the input signal is DTV or CADTV, this fun_ion is available.
1_ Press the MENU button and then use A tV bt,_on to select the _l)lP menu.
2. Press the !_ button and then use &/V b_.rtton to select D*X'V _al.
3 View the on-screen signal strength monitor to see the quatity of the signaJ being received.
4_ Press EX_ button to return to TV viewing or press MENU button to return to the previous menu_
40 Plasma TV
Operation
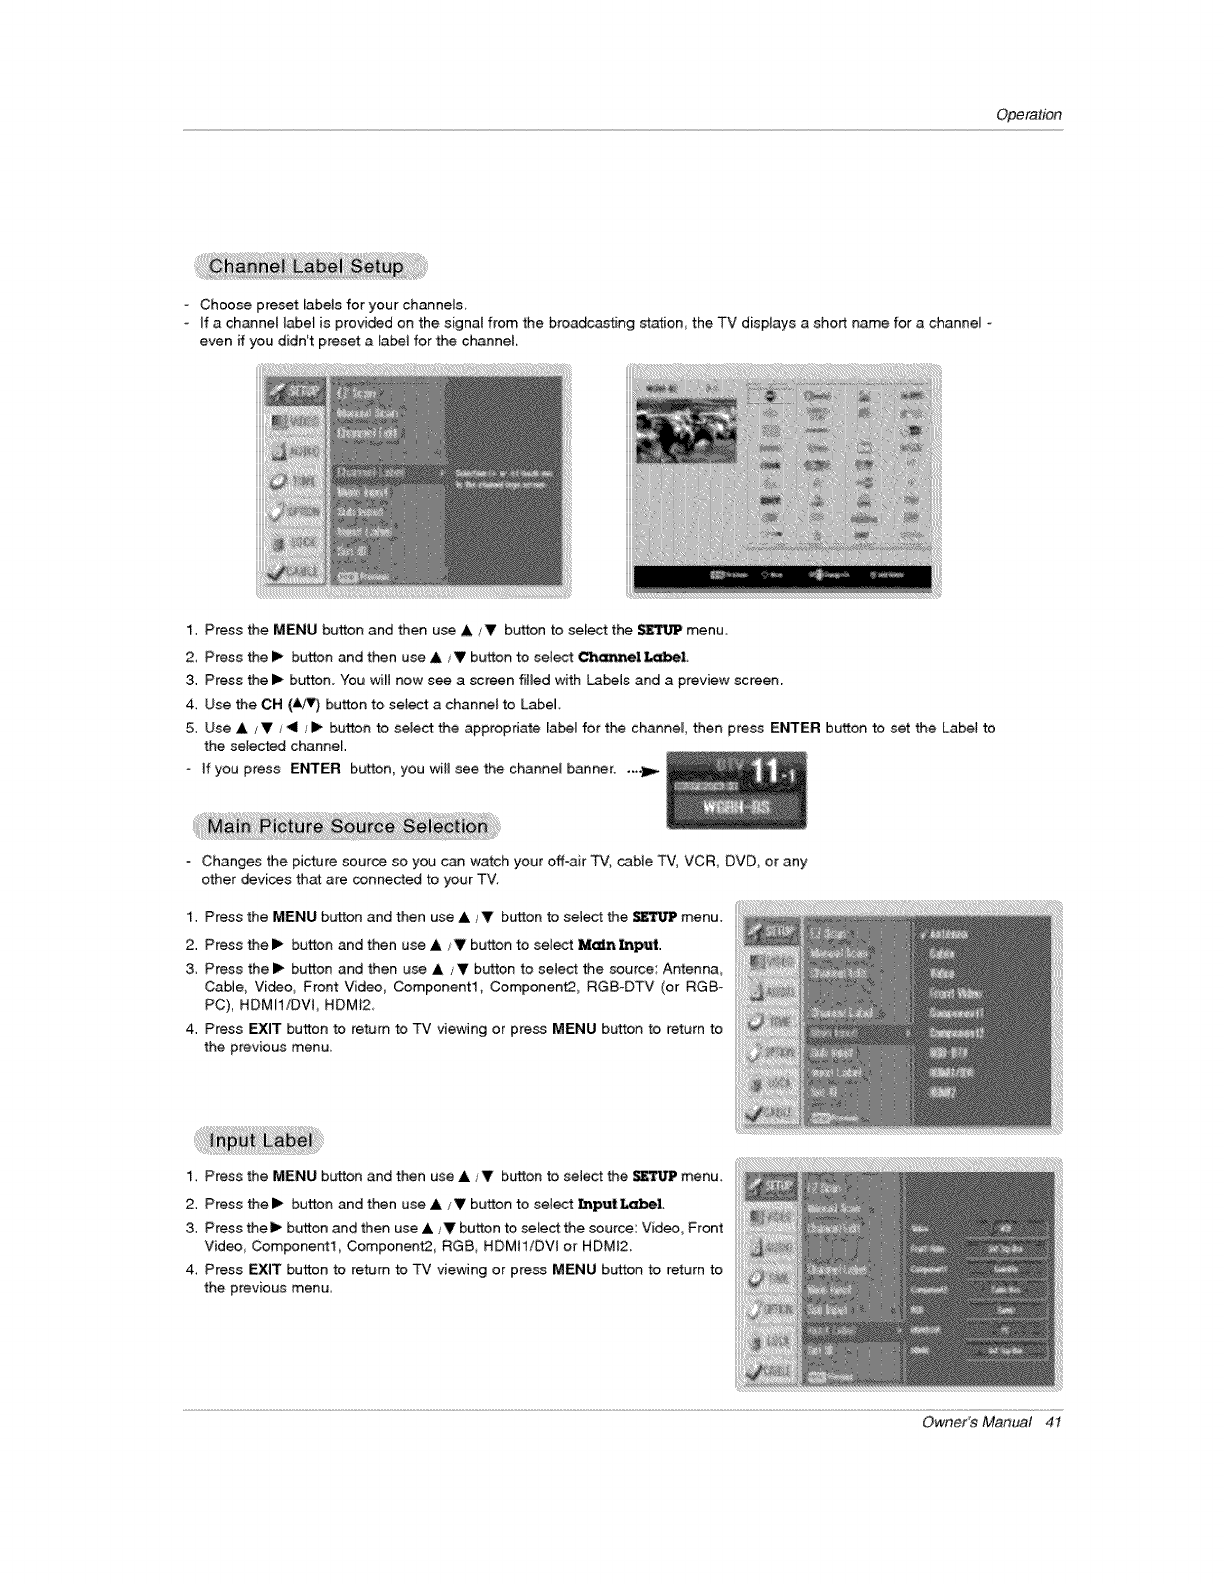
Choose preset labels for your channel&
ff a channel labe_ is provided on the signal from the broadcasting station_ the TV displays a short name for a channel
even if you didn't preset a _a_ for the channel
1. Press the MENU button and then use A _V button to sele_ the _ menu.
2_ Press the I_ button and then use &_V button to select Ch_l Label.
3. Press the I_ button. "You will now see a screen filled with _b,els and a preview screen.
4. Use the CH (A_) button to select a channel to Label
5. Use A /V/411_I_ button to select the appropriate la_l for the channel, then press E_ER button to set the Label to
the selected channel
-if you press ENTER button you will see the channel banner..__.
- Changes the picture source so you can watch your off-air TV, _ble TV, VCR, DVD, or any
other devices that are connected to your TV.
1. Press the MENU button and then use &_V button to sel_ the _TIJ1P menu.
2. Press thel_ button and then use A/V button to select iMk_n lnl_.zt.
3 Press the I_ button and then use &iVbutton to select the source Antenna_
Cable, Video, Front Videe, Companentl Component2, RGS-DTV (or RGB-
PC), HDMII/DVt, HDMt2
4. Press EXIT button to return to TV viewing or pre_ MENU button to return to
the previous menu.
1, Press the MENU button and then use &JV button to sele,ct the SETII_ menu,
2. Press the i1_ button and then use &JV button to sete_ l_putf_a_el.
3. Press thelP- button and then use ,i, iV button to select the source: Video_ Front
Video Component1, Compenent2_ RGB, HDMtt!DVt or HDM_2
4, Press EXIT button to return to _ viewing or press MENU button to return to
the previous menu.
Owner's Manual 4t
Operation
Picture adjusts the TV for the best picture appearance. Select the preset va_ue in the EZ Picture menu based on the
program category.
When ad)usting Video menu options (contrast_ brightness, color, sharpness, tint, and color temperature) manually,
Picture autom_icat_y changes to Custom_
-Daylight Norm_ Night T_e Movie_ Video _me_ and Spo_ settings are preset for optimum picture qualHeta_
the facto_ and are not adjustable.
1. Press the EZ PIC button repeatedly to select the picture appearance s_etup option as shown below:
Custom (your own settings)_ Dayiight, Normal, Night Time, Movie, Video G_e, and Sports.
• You can a_so use the VIDEO menu to adju_ _ Pi_lute.
2. Press the EXIT button to save and return to TV viewing..
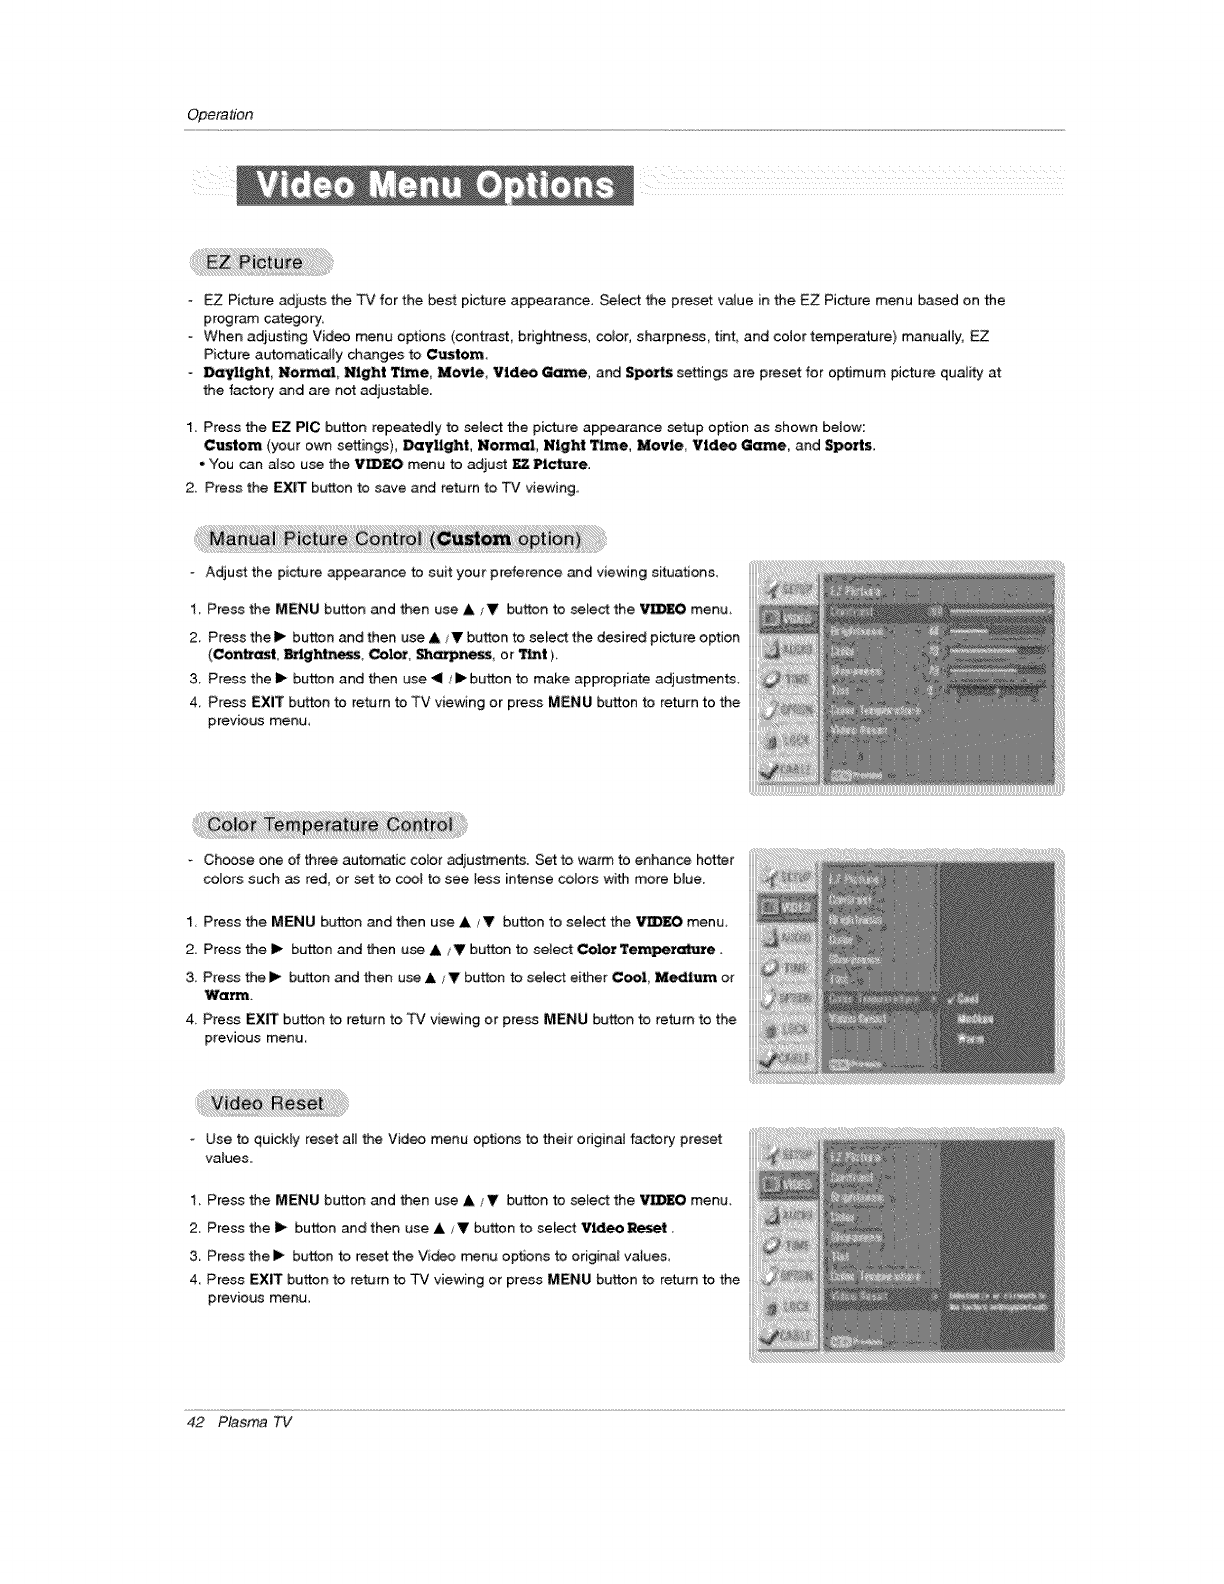
Adjust the picture appearance to suit your preference and viewing situation&
1. Press the MENU button and then use A/_ button to setect the VIDEO menu
2_ Press thel_ button and the_ use & _ button to select the desired picture option
(ContrasL Bt_.ghtne__s, Color, Shm_ne_ or Tint )_
3. Press the I_ button and then use _1 _!_ button to make appropriate adjust_ments_
4 Press EXIT button to return to TV viewing or press MENU button to return to the
previous menu
Choose one of three autom,_fJc cotor adjustments. Set to warm to enhance hotter
co_ors such as red, or setto c_l to see less intense colors with more b_ue.
1, Press the MENU button and then use _/_ button to select the VIDEO menu,
2. Press the I_ button and then use _/_ button to seiect Color TemPere_t_u_e.
3. Pre_ the I_ bLrtton and then use _ ,__ button to selec_ either Cool, Medium or
Warm,
4. Press EXIT button to return to FV viewing or press MENU button to return to the
previous menu
-Use to quickly reset a_ the Video menu options to their origina_ factory preset
vatues.
1_ Press the MENU button and then use _/_ button to select the V_ menu.
2_ Press the I_ button and then use _ ; _ button to select Vl(_o Reset
3. Press the I_ button to reset the Video menu options to origina_ values
4_ Press EXIT button to return to TV viewing or press MENU button to return to the
previous menu
42 Plasma TV
Operation
- Other _anguages may be available ff a dig_at signal is provided by the broad-
casting station.
1. Press the MENU button and then use _,/V button to select the AUDIO menu
2 Press the Ib button and then use A/V b_en to select Audio _e,
& Press the I_ button and then use A/V button to select: English, Spanish, or
French,
4. Press EXIT button to return to TV viewing or press MENU button to return to
';.he previous menu,
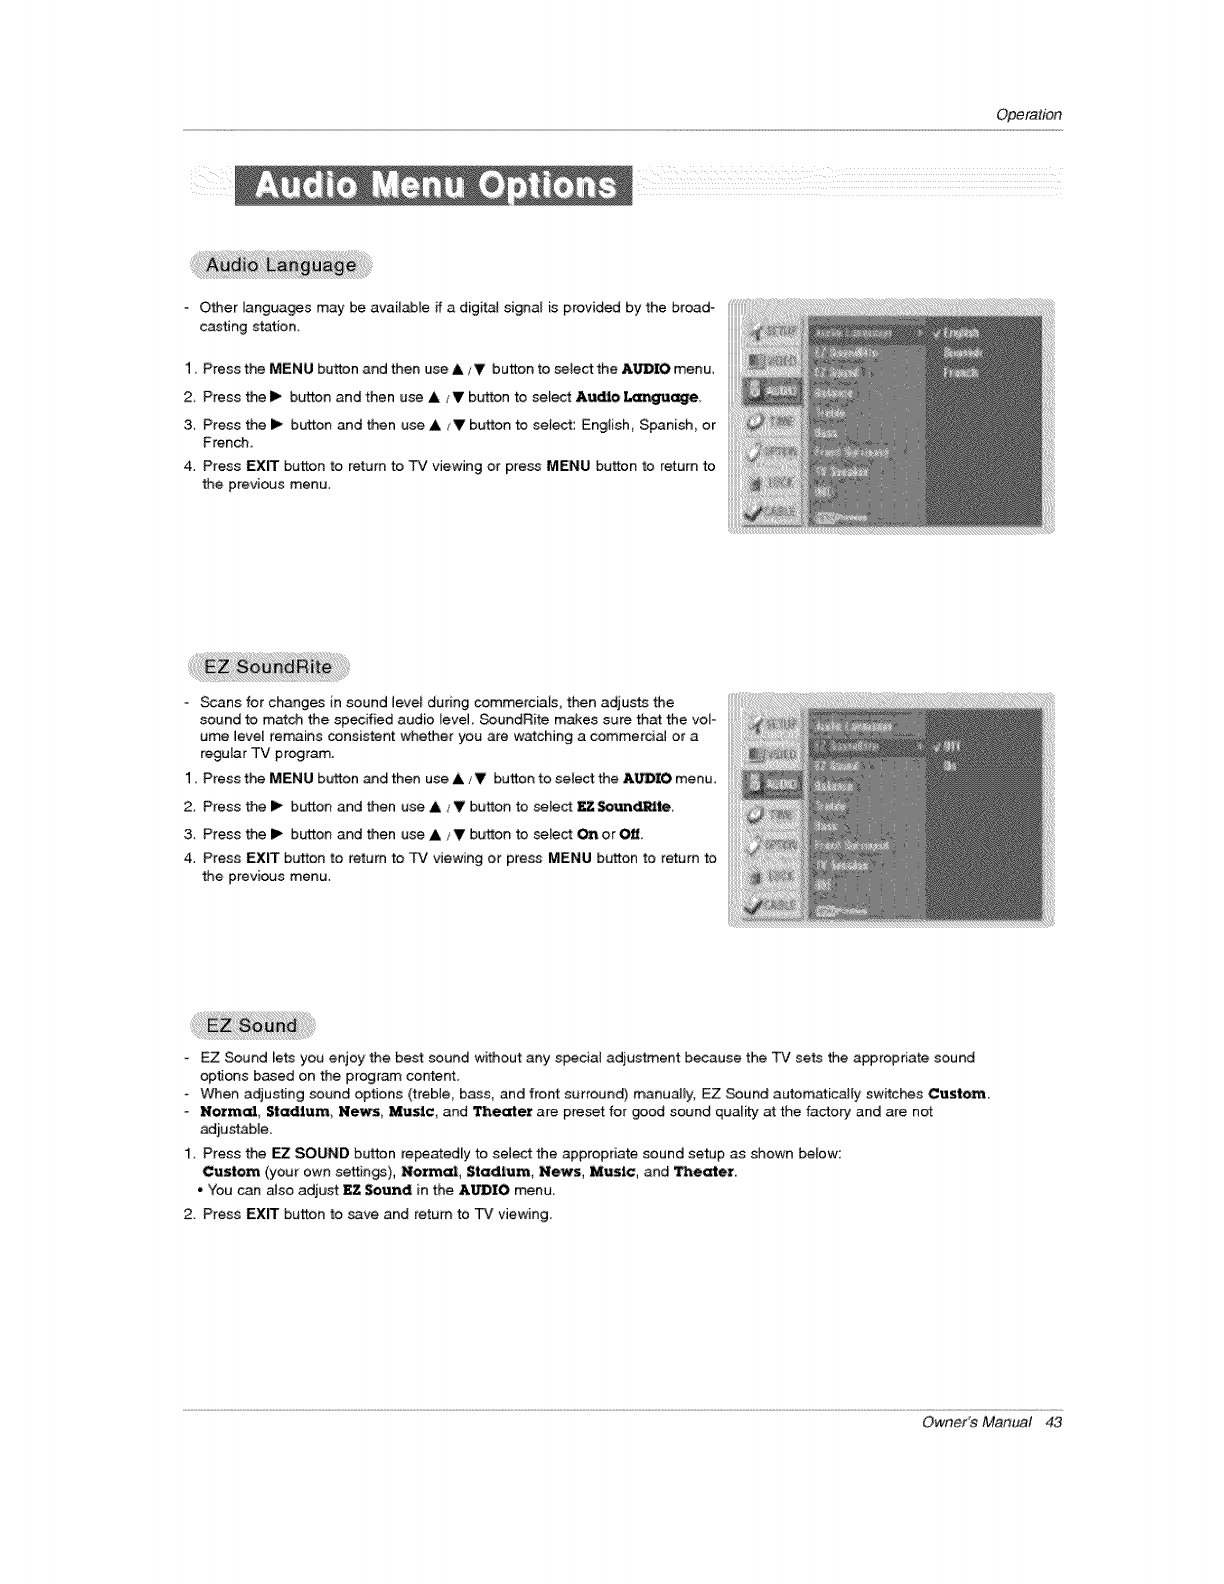
Scans for changes in sound Jevet during commerciais, then adjusts the
sound to m_ch the specified audio level SoundRite makes sure that the vole
ume 1eve[ remains consistent whether you are watching a commerciaJ or a
regular TV program.
1. Press the MENU button and then use A/V button to select the &b_O menu
2. Press the I_ button and then use &/V button to setect _S4_,tn_te.
3. Press the i_ button and then use A /V button to select On or Off,
4. Press EXIT button to return to TV viewing or press MENU button to return to
the previous menu.
EZ _und lets you enjoy the best sound without any special adjustment because the TV sets the appropriate sound
options based on the program content,
When adjusting sound options (treble, bass, and front surround) manuaJmy, EZ Sound automatically switches Custom.
Normal Stadium, News_ Music_ and Thief are preset for good sound quality atthe factory and are not
ad_ustabJe.
1. Press the F7 SOUND button repe_ed[y to select the appropriate sound setup as shown below:
Custom (your own setting), Normal, Stadium, News, Music, and Theater.
• You can atso adjust EZ Sound in the AUDIO menu
2. Press EXIT button to save and return to TV viewing.
Owner's Manual 43
Operadon
ii i_i _ ii_i!__iii_iii_iii_iii_iii_iii_iii_ill__ i
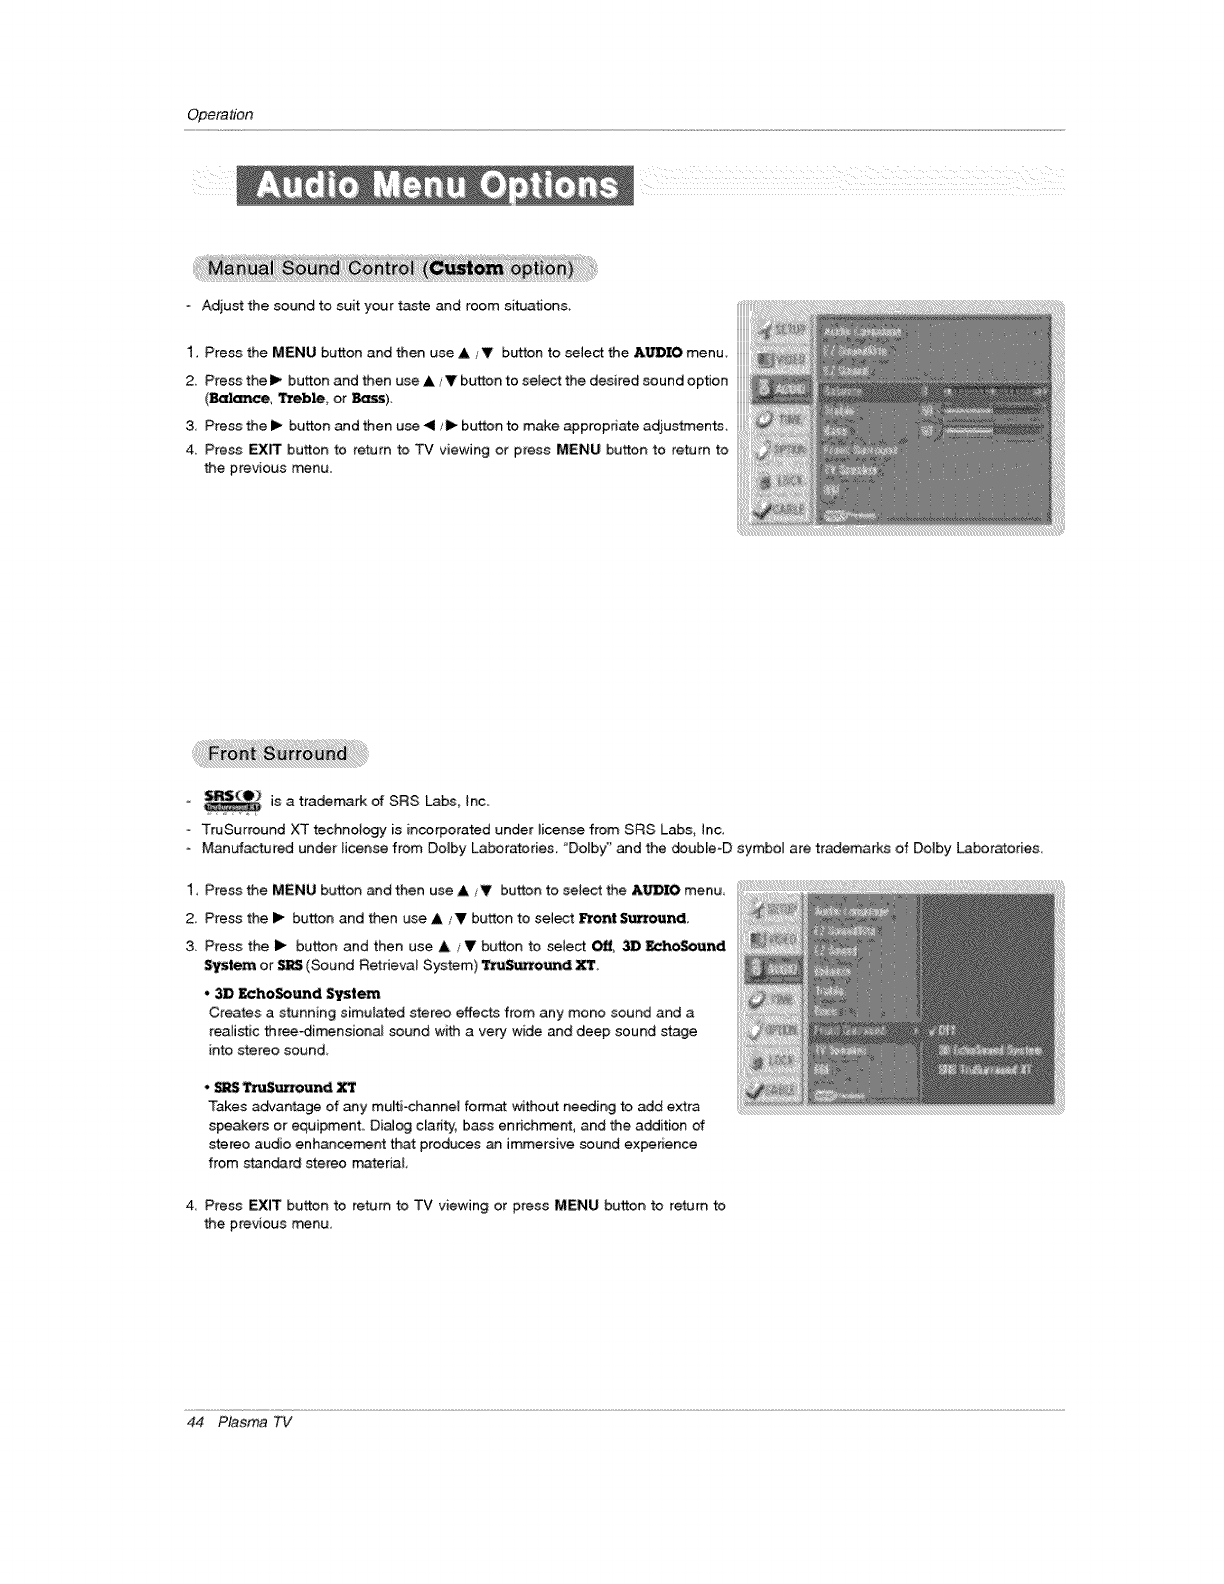
- Adjust the sound to suit your taste and room situation&
1. Press the MENU button and then use A/V button to select the _DIO menu.
2_ Press the I_ button and then use A _V button to select the desired sound option _
(_, Treble, or _).
3. Press the i_ button and then use 41/1_ button to make appropriate adjustments.
4. Press EXIT button to return to TV viewing or press MENU button to return to
the previous rr_nu.
-is a tradema_ of SRS Labs, {no.
o TruSurround XT technology is incorporated under license from SRS Labs, Inc
-Manufactured under license from Do,by Laboratories. "Dolby" and the doub[e-D symbo_ are trademarks of Doiby Laboratories.
1, Press the MENU button a_d then use A/V button to select the AUDIO menu,
2, Press the I_ button and then use A/V button to select _ront StL"rou_,
3. Press the I_ button and then use .i, ,_!' button to setest Off, .3D E_I_c-Sout_I
System or i&lgtS(Sound Retrieva_ System) TruSu_ound _,
*3:1B:llt_hoSoumd System
Creates a stunning simulated stereo effects from any mono sound and a
rea{istic three-dimensionai sound with a very wide and deep sound stage
into stereo sound
, _ _uttound
Takes advantage of any multi=channel format without needing to add extra
speakers or equipment. Dialog clarity, bass enrichment, and the addition of
stereo audio enhance_nt that produces an immersive sound experience
from standard stereo material
4, Press EXIT button to return to TV viewing or press MENU button to return to
the previous rr_nu,
44 Plasma TV
Operation
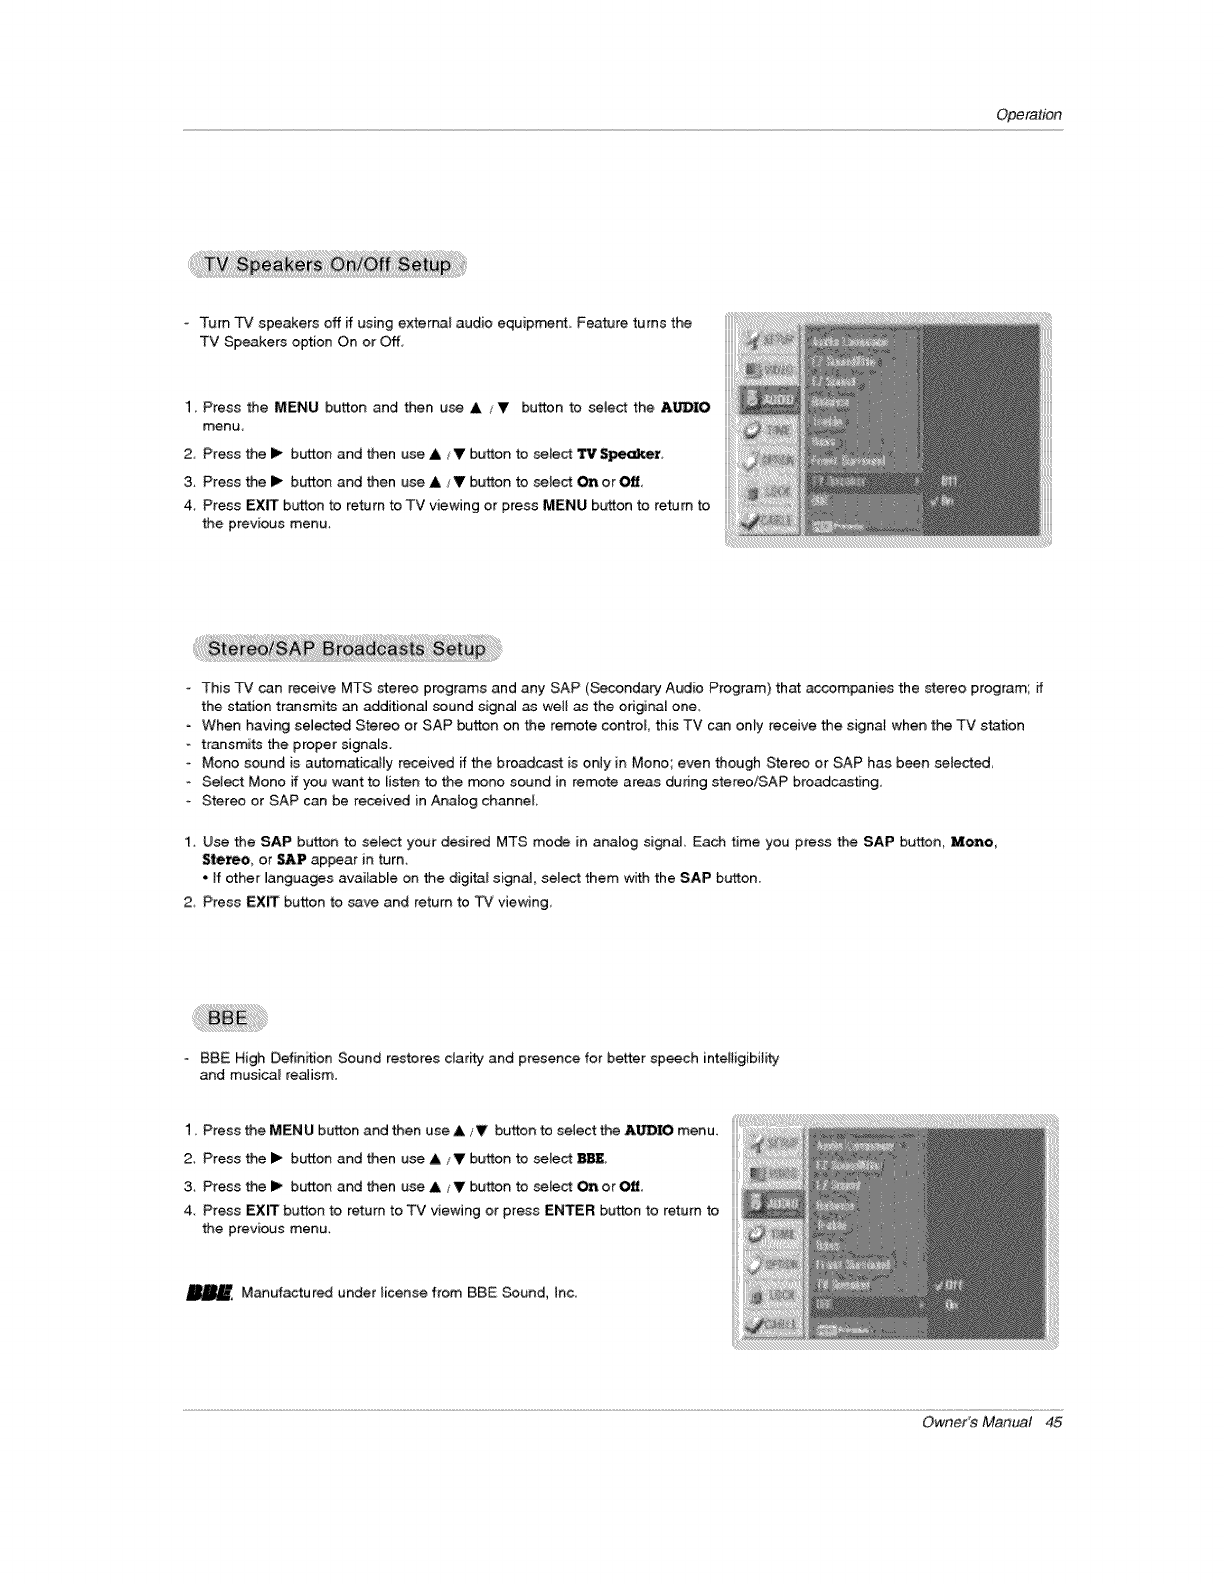
Turn TV speakers off ff using external audio equip_nt, Feature turns the
TV Speakers option On or Off,
1. Press the MENU button and then u_ A V button to selec_ the AUDIO
menu
2 Press the I_ button and then use A _V button to setect Tit Speaket_
3, Press the I_ button and then use A V button to selec_ _ or _
4, Press EXIT button to return to TV viewing or press MENU button to return to
the previous menu,
-This TV c_n receive MTS stereo programs and any SAP (Secondary Audio Program) that accompanies the stereo program; if
the station transmits an addition_J sound signa] as well as the odginal one,
-When having seJected Stereo or SAP button on the remote control this TV can on_y receive the signal when the TV station
transmits the proper signaEs.
Mono sound is automatically received if the broadcast is only in Mono; even though Stereo or SAP has been selected
Select Mono if you want to Uisten to the rr#no sound in remote areas during stereo/SAP broadcasting,
Stereo or SAP can be received in Analog channel
1. Use the SAP button to sele_ your desired MTS mode in analog signal _ch time you press the SAP button, Mono,
Stereo_ or _P appear in turn_
• ff other languages available on the digital signal, select them with the SAP b_ton.
2 Press EX_ button to save and return to TV viewing,
88E High Definition Sound restores clarity and presence for better speech intelligibility
and musica_ realism,
1, Press the MENU button and then use A iV button to select the AUDIO menu,
2, Press the I_ button and then use A /V button to setect BBE
3, Press the I_ button and then use A JV button to select On or _,
4 Press EXIT button to return to TV viewing or press ENTER button to return to
the previous menu.
Manufactur_ under license from BBE Sound, Inc.
Owner's Manual 45
Operation
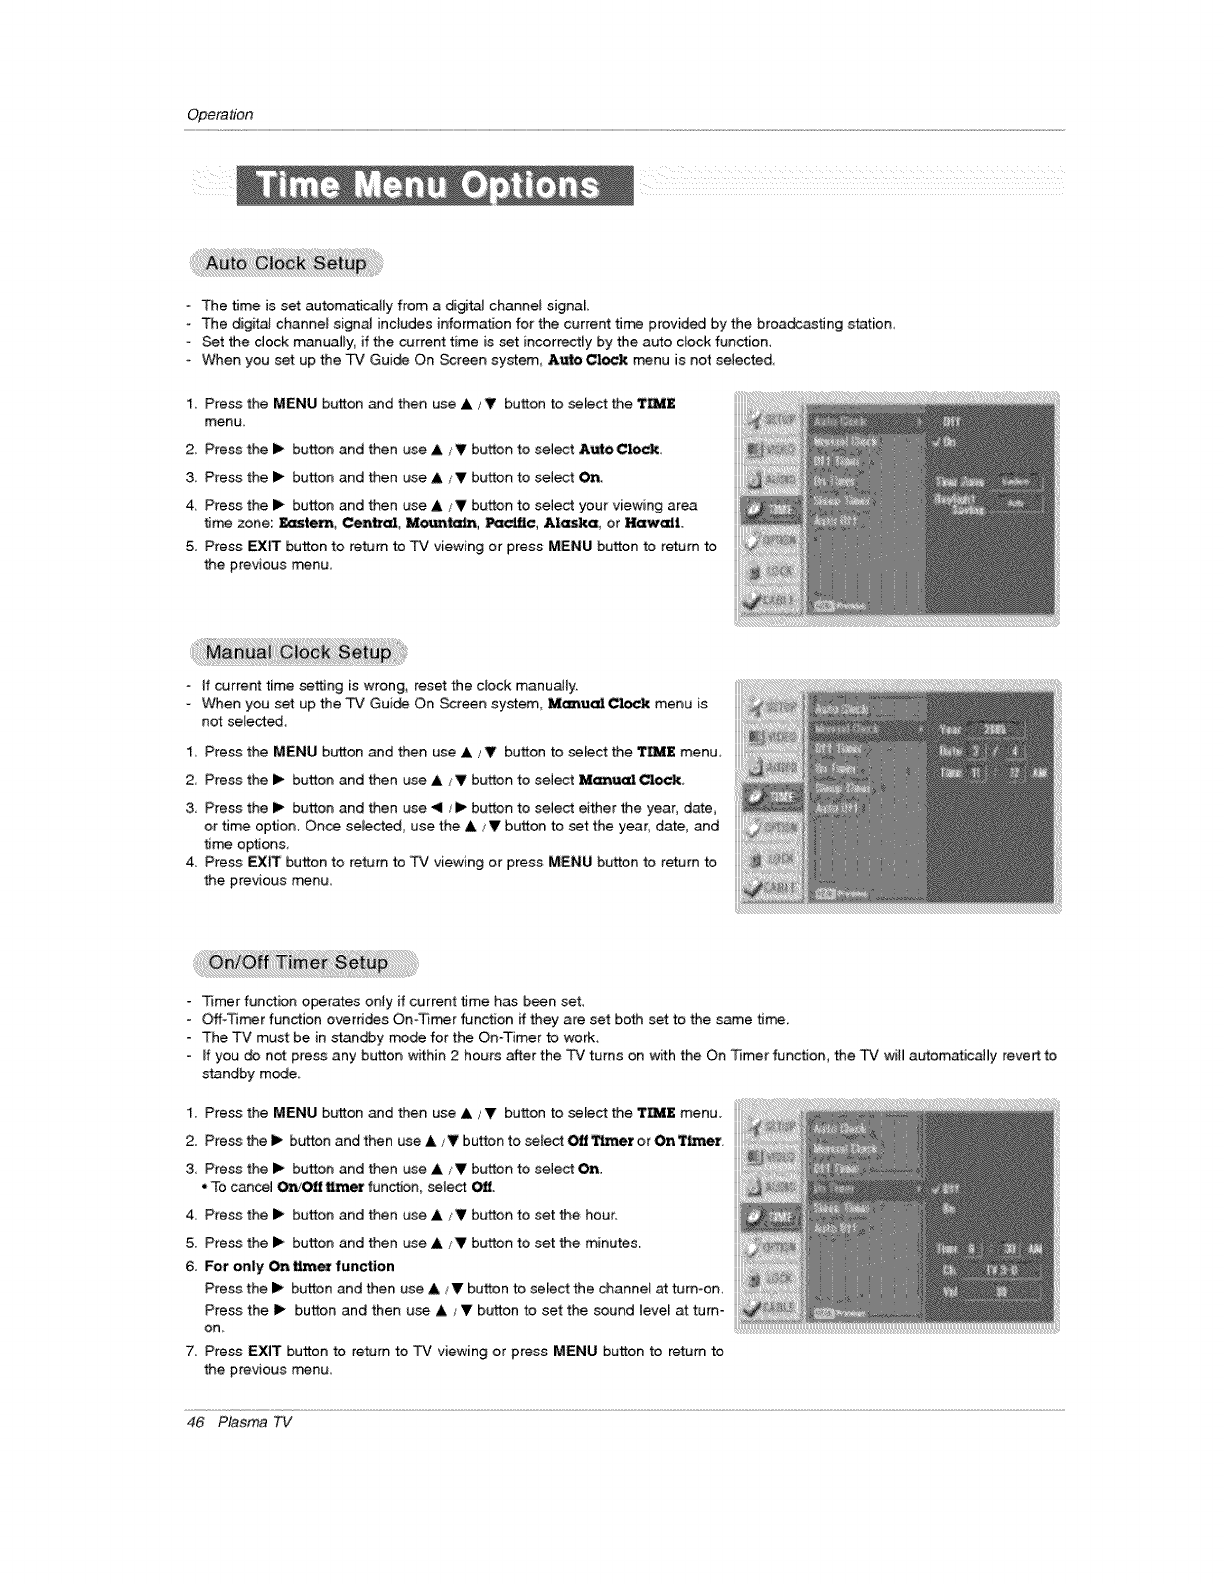
oThe time is set automatically from a digit_ channel signal
-The digital channeE signal includes it_formation for the current time provided by the broa_astmg station,
- Set the dock manually, if the current time is set incorrectly by the auto clock function,
When you set up the TV Guide On Screen system Au'_ Clock menu is not selected,
1. Press the MENU button _d then use A _V button to select the TEE
menu
2 Press the I_ button and then use &_!' button to select AutoCIo_
3, Press the I_ button and then use A IV button to select On
4, Press the I_ button and then use A iY button to select your viewing area
time zone: ]lt,,astem, Central, Mountain, Pacific, Alaska, or Hawaii.
5. Press EXIT button to return to TV viewing or press MENU button to return to
the previous _nu.
* If current time setting is wrong, reset the clock manually.
-When you set up the TV Gui_ On Screen system, MunualClock menu is
not selected,
1 Press the MENU button and then use A _V button to select the TEE menu
2, Press the I_ button and then use A IY button to select _ual Clock
3, Press the i_ button and then use .<1/I_ button to setect either the year, date,
or time option, Once se_ected, use the & _V button to set the year, date, and
ti_ options,
4, Press EXIT button to return to TV viewing or press MENU button to return to
the previous menu,
-Timer function operates onty if current _me has been seL
oOff-Tim_r function overrides On-_rr_r function if they are set both set to the same tim, e,
The TV must be in _andby mode for the On-Timer to work_
- ff you do not press any button within 2 hours after the TV turns on with the On Timer function, the TV will autom_ica_ly revert to
standby mode.
1. Press the MENU button _d then use A JV button to select the TEE menu.
2. Press the I_ button and then use & /Y button to setect Off _er or On TL_r.
3. Press the I_ button and then use & ,_V button to select On.
"To cancel Ol_O_t tL__er function, select Off.
4. Press the I_ button and then use & ,_ button to set the hour.
5. Press the 1_ button and then use _ _V button to set the minutes,
6. For only On timer f_nction
Press the I_ button and then use A/_ button to select the channe_ at torn-on,
Press the I_ button and then use &/ V btrtton to set the sound level a_ turn-
on,
7. Press EXIT button to return to TV viewing or press MENU button to return to
the previous rr_nu,
46 Plasma TV
Operation
The Sleep _rr_r _ms the -Pv' off at the preset time Note that this set_ng is cleared when the TV is turned off,
You can aiso set up the Sleep 'trainer in the 'rl_ menu
1_ Press the _MER button repeatedly to seU_ the number of minutes Firet the O_ op_on appears on the screen,
followed by the foilowing sleep timer options: 10, 20_ 30_ 60_ 90, 120_ 180_ and 240 minutes
2, When the number of minutes you want is displayed on the screen_ press the ENTER button., The timer begins to
count _wr_ from the number of minutes selected,
3. To check the rem_ning minutes before the TV _ms off, press the T|MER button once.
4. To cance_ the S_ep "Timer, press the TIMER b_n repeatedly to select O_.
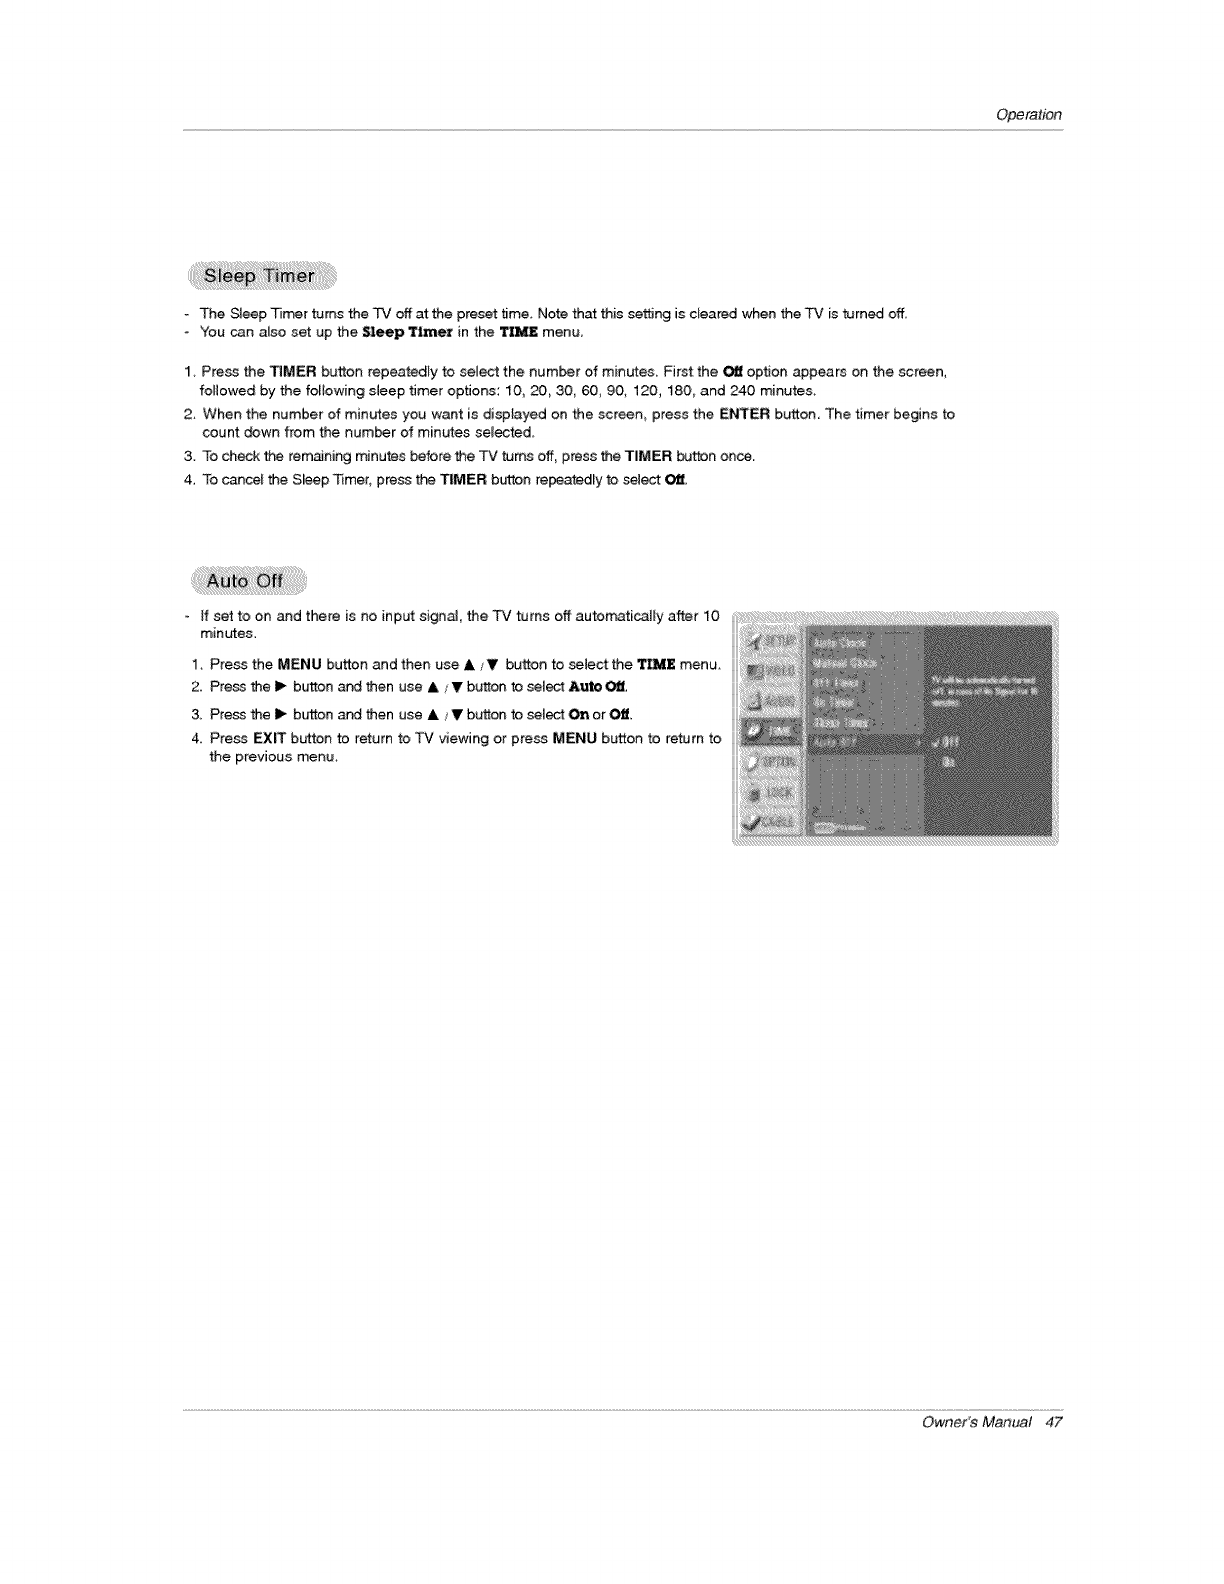
if set to on and there is no input signal, the TV turns off automatically after 10
minutes.
1, Press the MENU button and then use ksV button to select the IL'_E menu
2. Press the I_ button a_ then use A / V button to se[ec_ Auto O_.
& Press the I_ button _ then use A /V bt_tton to se[_ On or Off.
4, Press EXI[T button to return to T'v' viewing or press MENU button to return to
the previous menu,
Owner's Manual 47
Operation
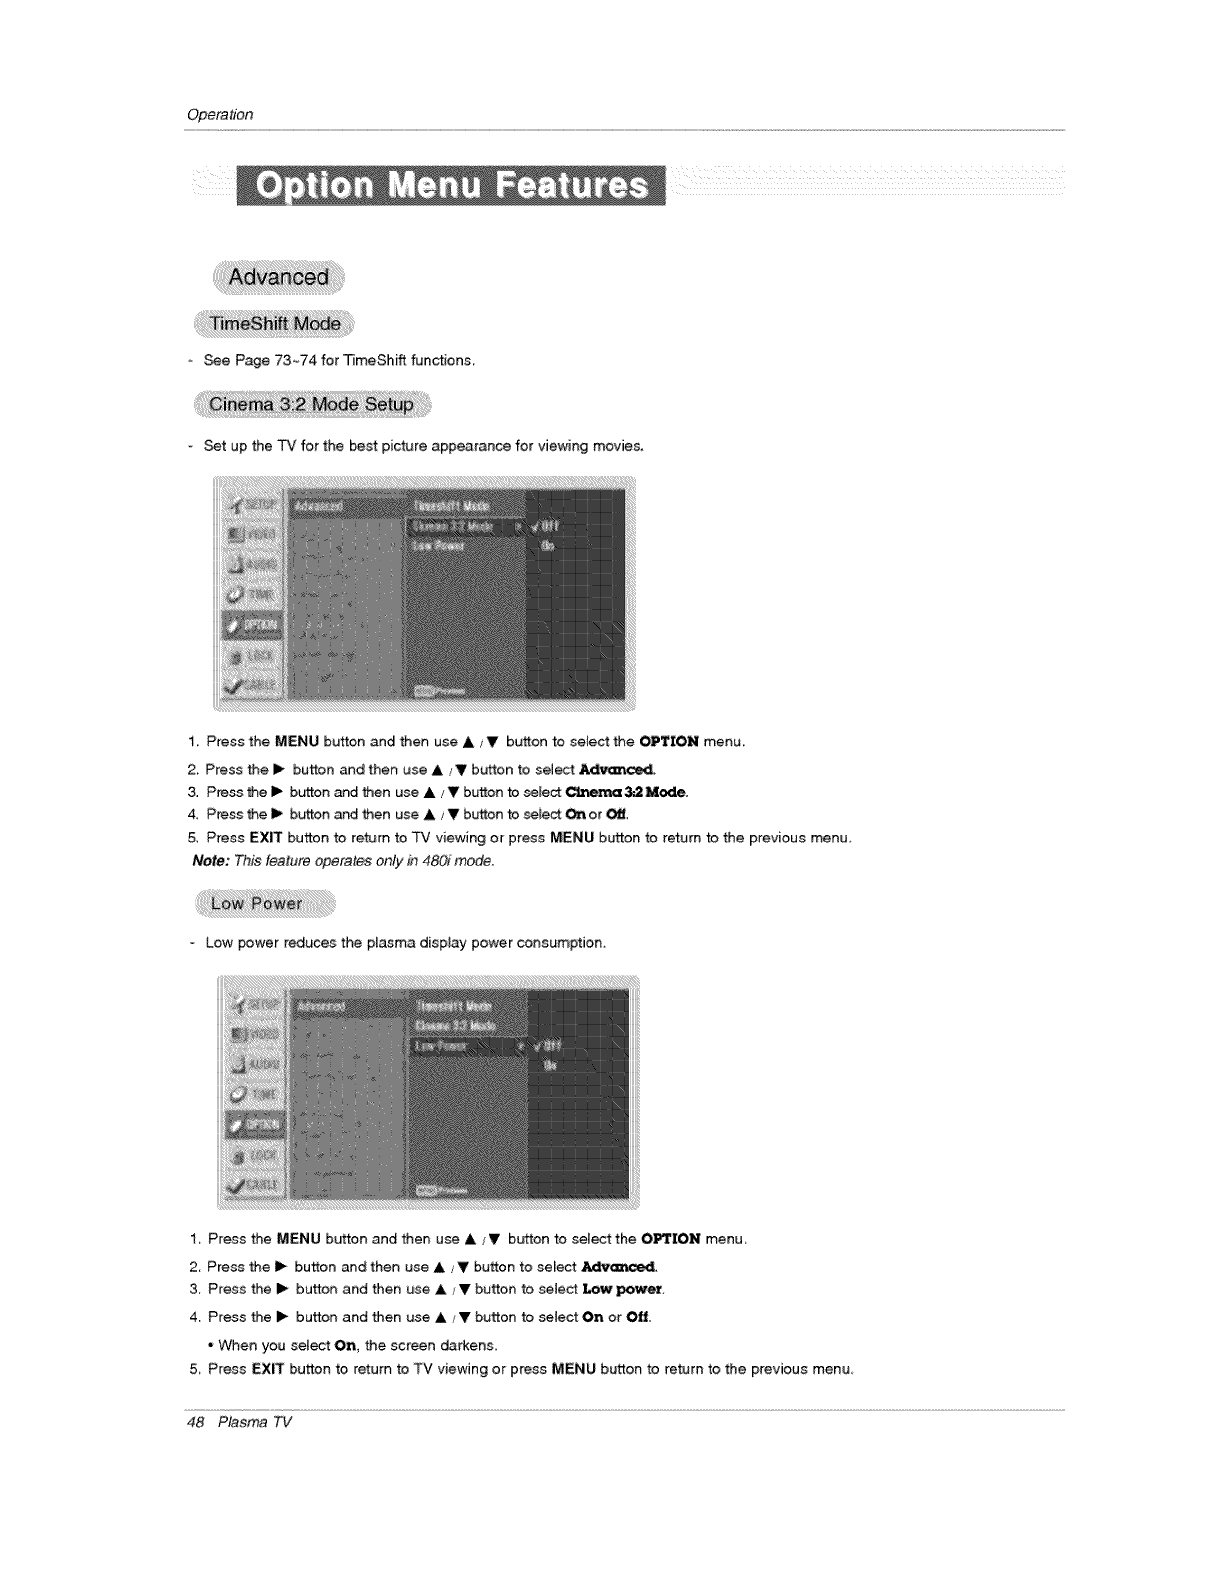
Be Page 73-.74 for TJmeShA functions.
o Set up the TV for the best picture appearance for viewing movies.
1. Press the MENU button and then use A ,_V b_on to select the OPTION menu.
2. Press the II_ button and then use A _V button to select _
3. Press the I_ b_ton _ then use A ,'Y button to s_lec_ C',t, en_:x 3_Mode,
4_ Press the Ii_ bb_on at_ then use &/Vbt_on to _Eect On or Off,
5, Press EX_ burn to return to TV viewing or press MENU button to return to the previous menu
Note: This feature operates only in 480i mode.
= Low power r_uces the plasma disptay power consumption,
1, Press the MENU button and then use A/Y button to select the OPTION menu,
2, Press the 11_button and then use A ;V button to select _:_'_
3. Press the I_ button and then #se A / V button to select Low powe_
4_ Press the I_ button and then use A/V button to select On or Off.
° When you select On, the screen darkens,
5 Press EX_ button to return to TV viewing or press MENU button to return to the previous menu
48 Plasma TV
Operation
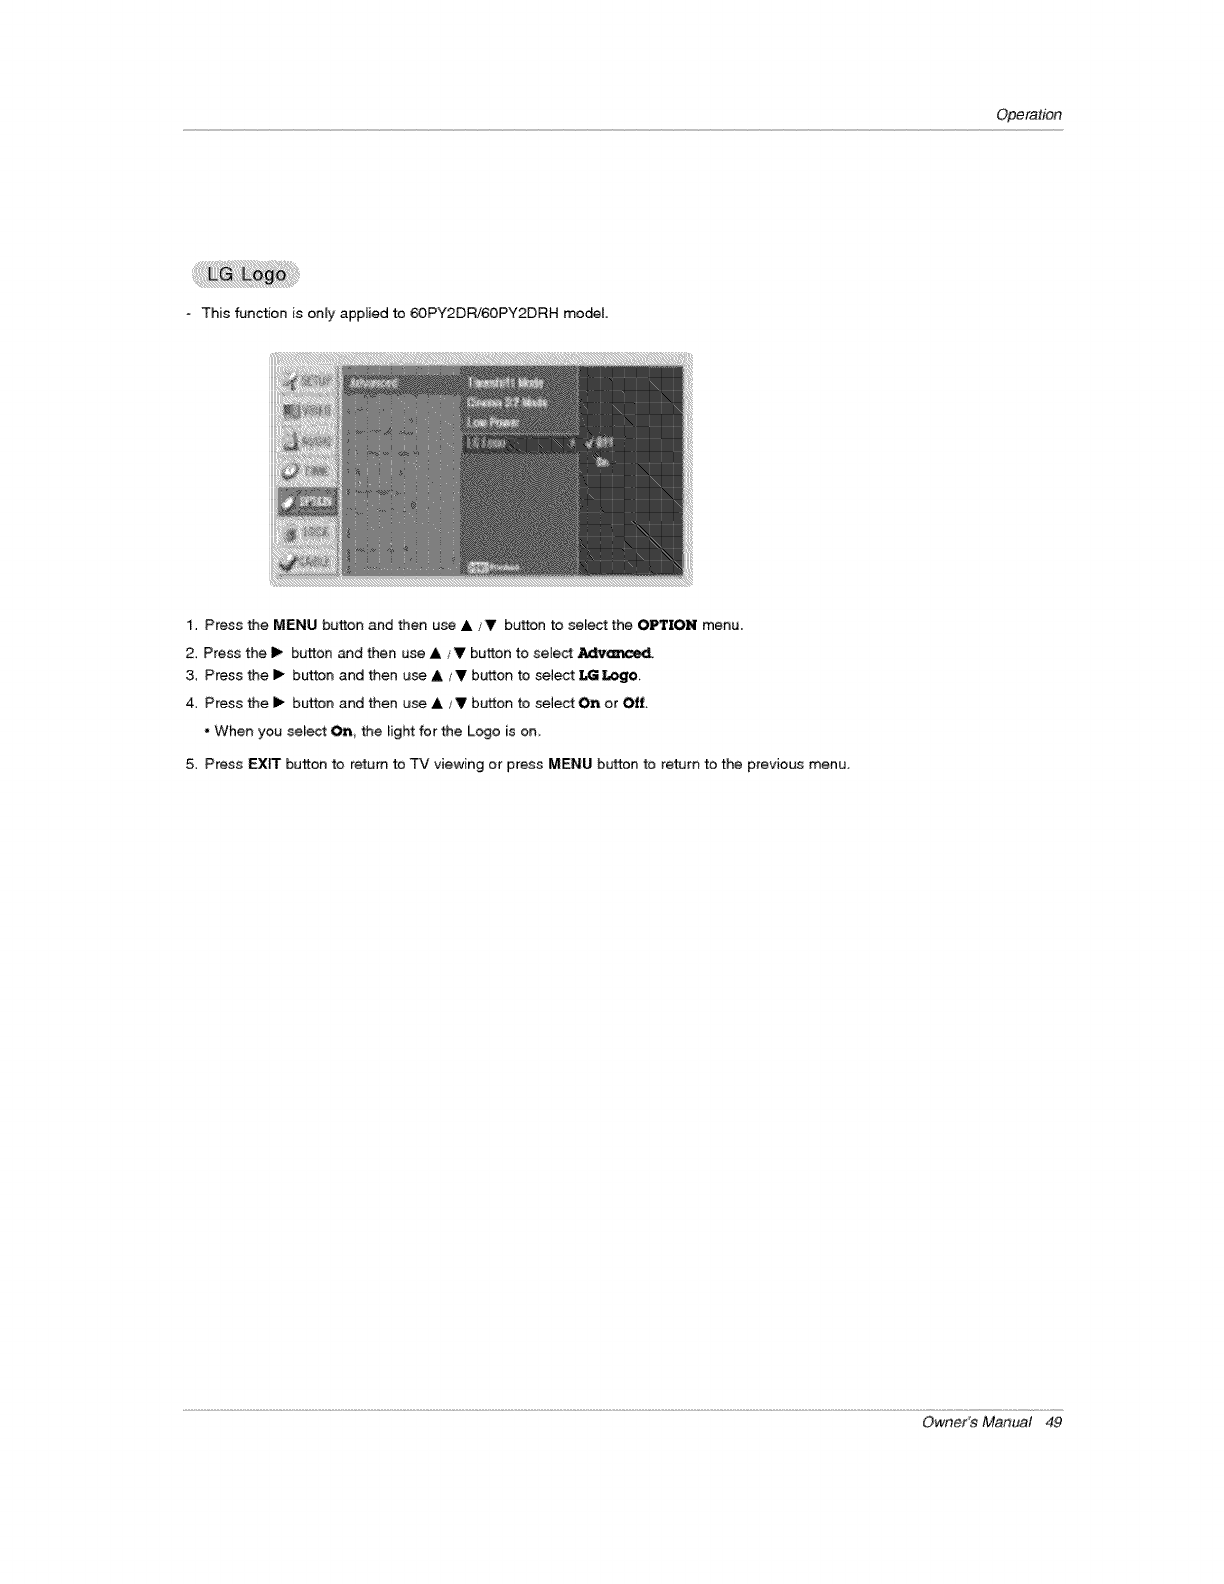
- This function is onEy applied to _PY2DRi60PY2DRH mo_L
1. Press the MENU button and then use & _Vbutton to select the O_ION' menu.
2. Press the i1_ button and then use A /V button to select J_lve_t_ed.
3. Press the I_ button and then use & / Vbutton to select f-Gi logo.
4 Press the II_ button and then use & /V button to select On or 0ti,
- When you select On, the _ight for the Logo is on_
5. Press EXIT button to return to TV viewing or press MENU button to return to the previous menu.
Owner's Manual 49
Operation
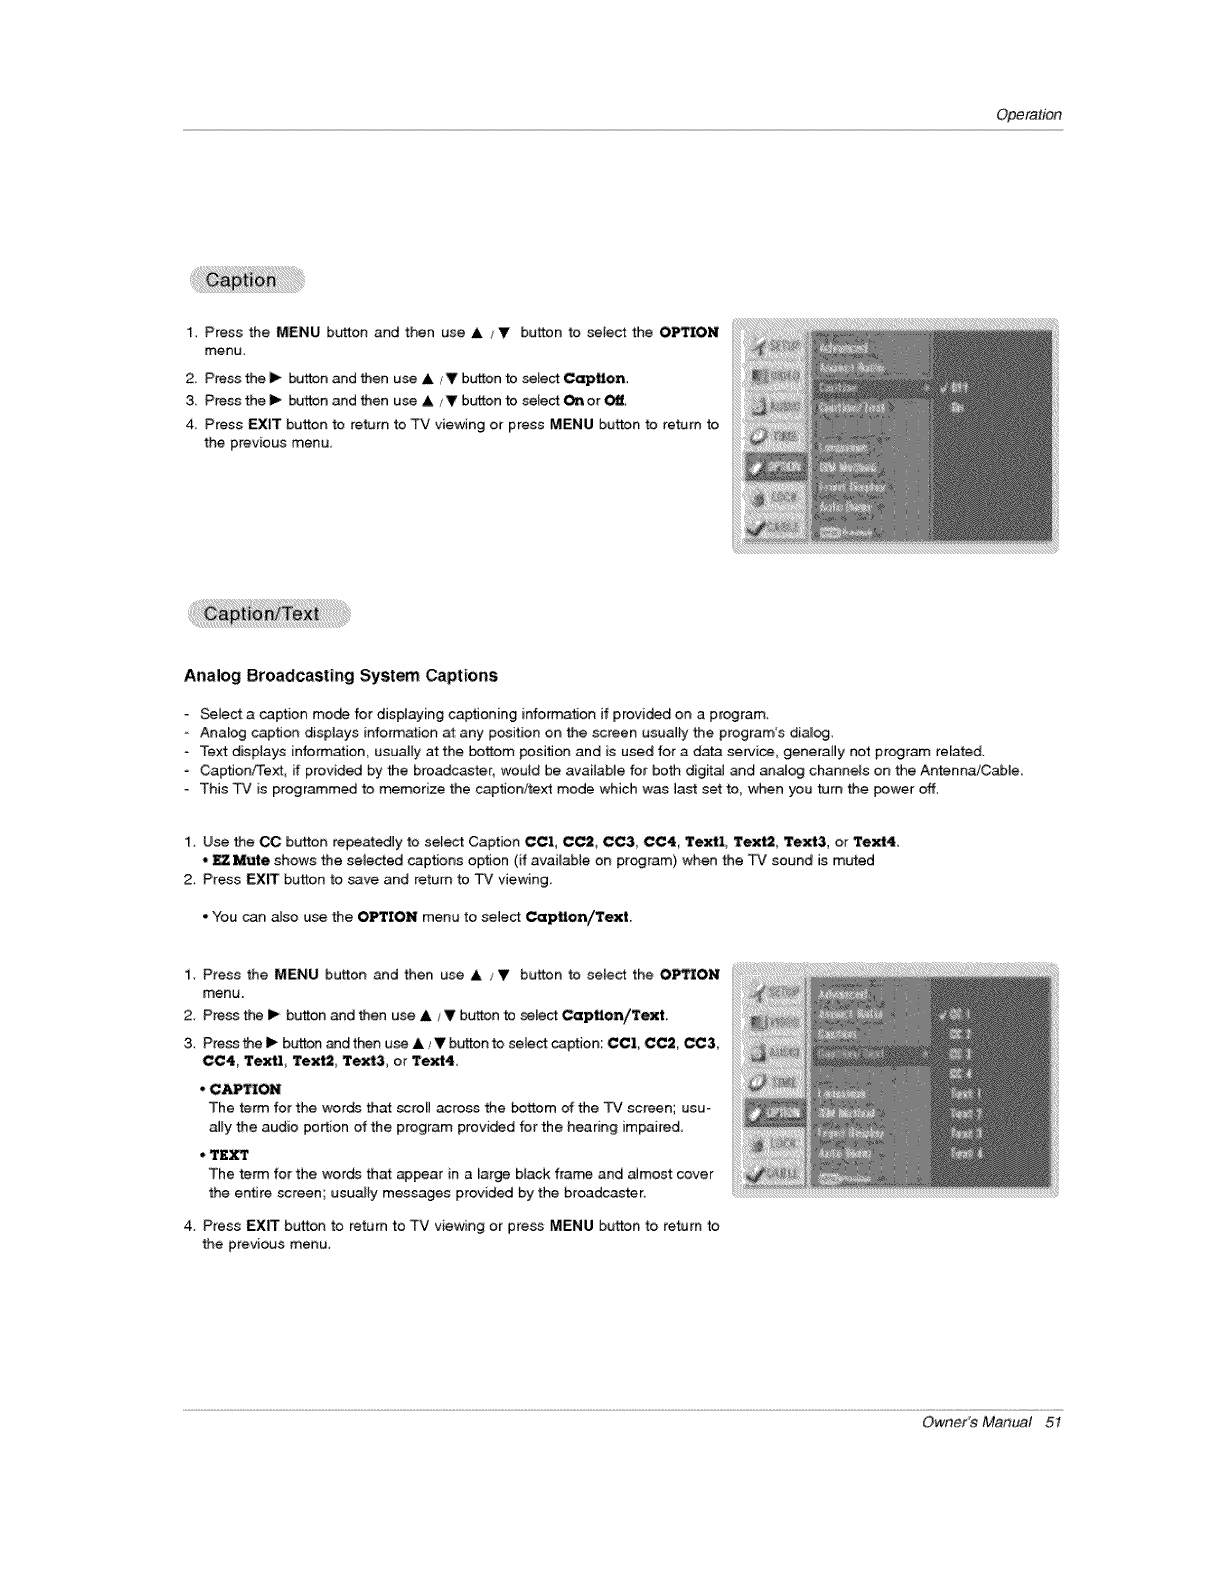
1. Press the MENU button and then use A /V button to select the ONION
menu.
2. Press the I_ _n _d then use A IV buttonto se[e_ C_lion,
3. Press the I_ buttonand then use A iV buttonto selectOn orOff,
4. Press EXIT button to return to TV viewing or press MENU button to t_etum to
the previous menu.
Analog Broadcasting System Captions
-Select a caption mode for displaying captioning information if provided on a program.
Analog caption displays information at any position on the screen usually the program's diary.
° Text displays information, usually at the bottom position and is used for a data service_ generally not program related.
-Caption/Text, if provided by the broadcaster, would be available for both digital and analog channels on the AntennaJCable
-This T¢ is programmed to memorize the caption/text mode which was la_ set to, when you turn the power off,
1. Use the CC button repeatedly to sel_ Caption CCI, C_, CC3, CC4 Textl, Text2_ Text3, or Text4.
• _ Mute shows the seiected captions option (if available on program) when the TV sound is muted
2, Press _X_ button to save and return to TV viewing
. You can a_so use the ONION menu to select Caption/Text.
1. Press the MENU button and then use &/V button to select the OP_ON
menu.
2. Press the i_ bLr_on _d then use A /V button to _[ect _pUon/Text.
3. Press the i_ bu_ton and then use &t Y bu_ton to se[e_ caption: CC1, CC2, CC3,
CC4_ Textl, Text2_ Text3, or Text4.
*CAPTION
The term for the worde that scroll across the bottom of the TV screen; usu-
ally the audio portion of the program provided for the hearing impaired.
* TEXT
The term for the words that appear in a large black fra_ and almost cover
the entire screen; usually messages provided by the broadcaster.
4. Press EXIT button to return to TV viewing or press MENU button to return to
the previous menu.
Owner's Manual 5I

Operation
Digital Broadcasting System Captions
Choose the language you want the DTV!CADTV Captions to appear in.
-L_guages can be chosen for digit_31sources onty if they are inctuded on the progr_.
1. Press the MENU button and then use & sV button to select the OPTION
menu,
2. Press the I_ button ar_ then use A _V button to se[e_ Cap,on/Text
3, Press the _ button and then use A ;Y button to select available caption _an o
guages: English, $_nish_ or French
4, Press EXIT button to return to -IV viewing or press MENU button to return to
the previous menu
-Customize the DTViCADTV captions that appear on your screen
1, Press the MENU button and then use A / V button to select the OPTION
menu.
2. Press the I_ but_n and then use & / V button to select Caption _n.
3, Press the I_ button and then use 411/i1_ button to select Custom.
4 Use ,Ik / V button to customize the St,_4e, Font_ etc,_ to your preference, A pre-
view k_n is provi_d at the bottom of the _creen use _ to see the caption [_°
guage
_: Set the size the words will appear in.
, Font: Set_t a typeface for the words.
* Text Color: Choose a color for the text
*Text Opacity Specify the opacity for the text colon
-Bg (Backg_nd) Color: SeIest a background color.
. Bg (_kground)Opacity: Select the opacity for the background cotor,
Edge _: Select an edge type,
* _ge Color: Select a color for the edges.
5. Press EXIT button to return to TV viewing or press MENU button to return
to the previous menu.
52 Plasma TV
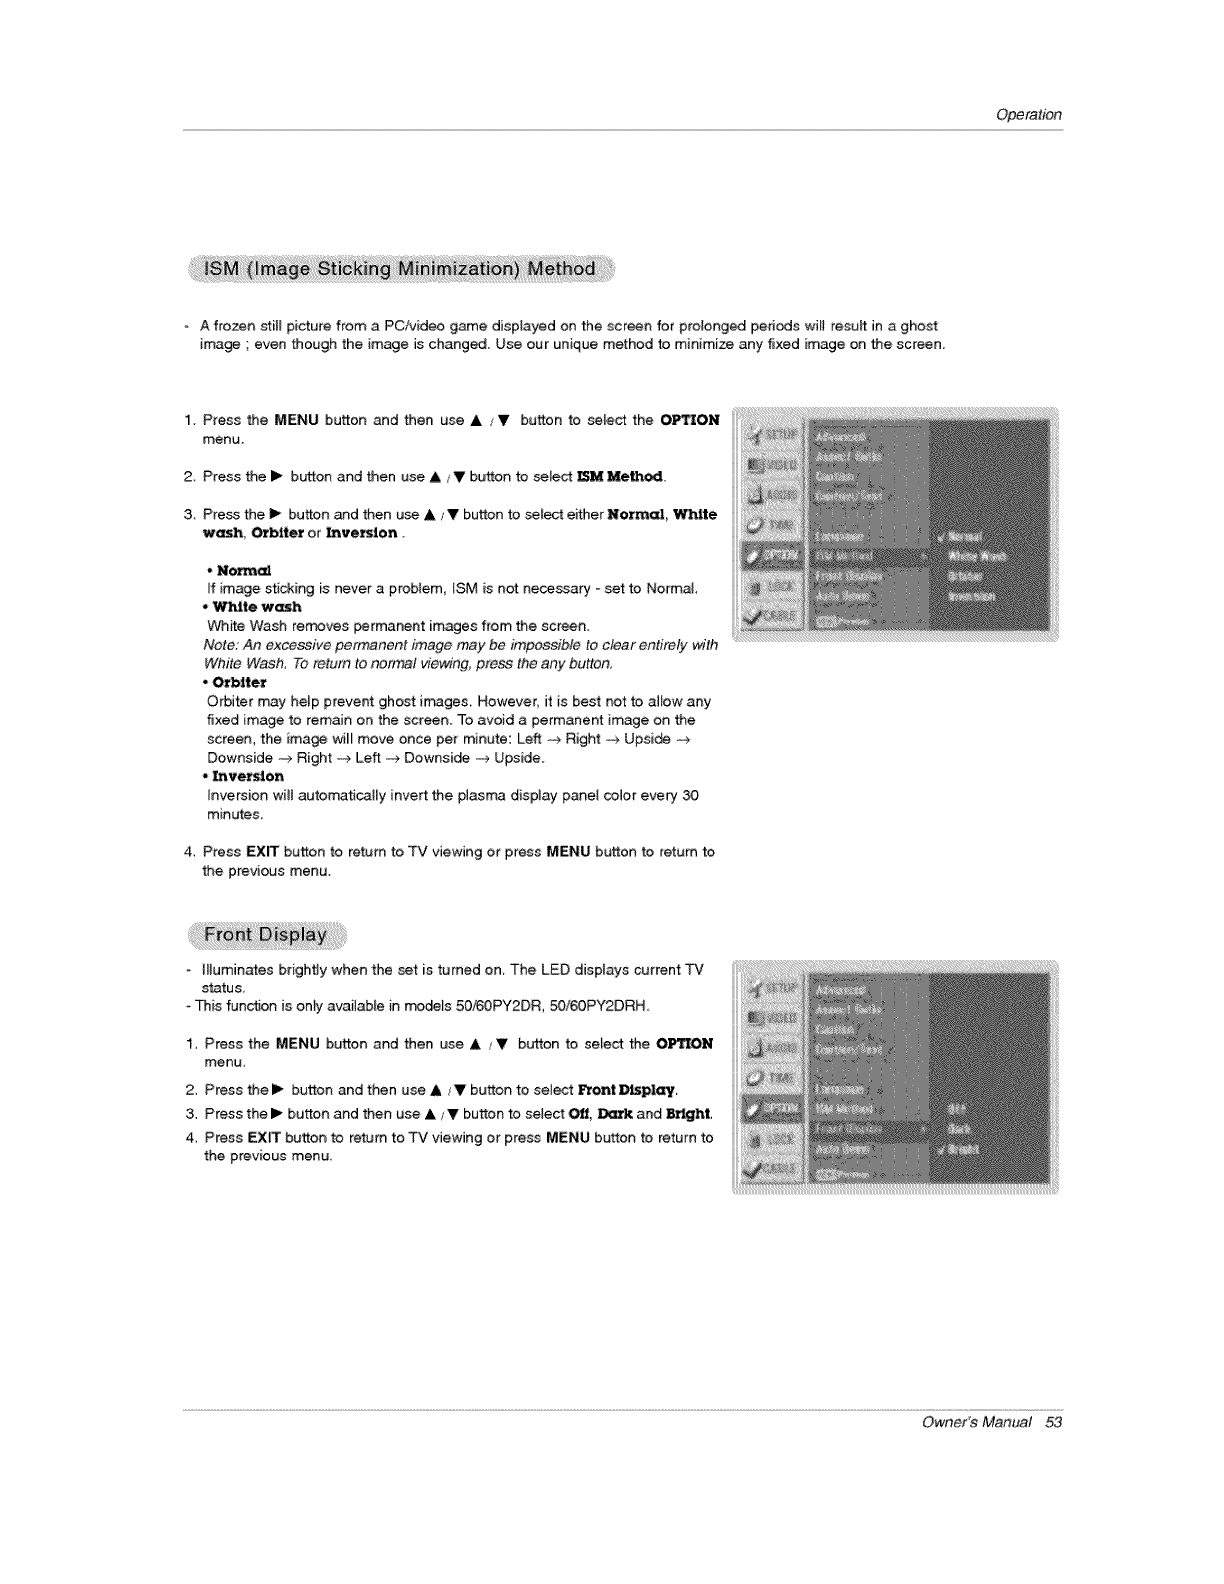
Operation
- A frozen _il_ picture from a PC/video game displayed on the screen for prolonged periods will resuff in a ghost
image ; even though the image is changed. Use our unique method to minimize any fixed image on the screen.
1. Press the MENU button and then use A /V button to select the OP_ON
menu,
2 Press the I_ button and then use & /V button to seiect _M Mett'_x1L
3Press the I_ button and then use A iV button to select either Normal_ White
wash Orbiter or Inversion.
, Na_'m(d
If image sticking is never a problem, _SM is not necessary _ set to Normal
• White wash
White Wash re_ves permanent images from the screen.
Note: An excessive permanent image may be impossible to clear entirely with
White Wash. To return to normal viewing, pre&_ the any button.
•Orbiter
Orbiter may help prevent ghost images However, it is best not to allow any
fixed image to remain on the screen. To avoid a permanent image on the
screen, the image wi_ move once per minute: Left _o._Right _o._Upsi_ _o._
Downside _ Right _._._._Left _ Downsi_ -_ Upside.
• Inversion
In_ersion will autorr_ticalIy invert the plasma display panel co,or every 30,
minutes.
4. Press EXIT button to retem to TV viewing or press MENU button to return to
the previous menu.
IHuminates brightly when the set is turned on. The LED disptays current TV
statu&
This fun_on is onty available in rr#_is 50/60PY2DR, 50/60PY2DRH.
1, Press the MENU bufton and then use A./V button to select the OPTION
menu_
2_ Press thel_ button and then use A/V button to sete_ Front Display,
3. Press thel_ button and then use ,L ,'V button to setect _, Dark and _.ght,
4 Press EX_ button to ream to TV viewing or press MENU button to return to
the previous menu,
Owner's Manual

Operation
Displays the siide show to explain the main features of this TV.
1 Press the MENU button and then use &_V button to select the o_rtroN
menu
2, Press the I_ button and then use & /V button to select AutoDemo
3, Press EXIT button to stop Auto Demo.
Note : The stooges on the Auto Demo may differ from the actual products,
54 Plasma TV

Operation
I_IZIII ii
Parental Contro_ can be used to block specific channels, ratings and other viewing sources.
The Parenta_ Control Function (V-Chip) is used to b_ock program viewing based on the ratings sent by the broadcasting station,
The defauff setting is to allow all programs to be viewed Viewing can be blocked by choosing the type of the program and the cat-
egsries, It is aJso poseible to block all program viewing for a time period, To use this fundion, the following must be done :
1, Set ratings and categories to be block_,
2_ Specify a password
3, Enable the bck
V-Chip rating and categories
Rating guidelines are provided by broadcasting stations. Most television programs and television movies can be blocked by TV
Rating and/or individual Categories. Movies that have been shown at the theaters or direct-to-video _vies use the Movie Rating
System (MPAA) on_y.
Ratings for Movies previously shown in theaters:
Movie Ratings :
• Blocking Off
.G
• PG
• PG-13
.R
• NCq7
.X
(Permks aH progr_s)
(GeneraJ audience)
(Parentam guidance suggosted)
(Parents strongly cautioned)
(Restricted)
(No one 17 and under admitted)
(Aduff only)
tf you set PG-13 : G and PG movies will be available, PG13, R, N0-17 and X wil_ be Mocked.
Ratings for Television programs including made-for-TV movies :
• TV-G
. TV-PG
•TV-14
• TV-MA
• TV-Y
• TV-Y7
"p,t Rating Children:
• Age
• Fantasy Violence
TV Rating General:
•Age
• DiaJogae -sexual dialogue
•Language _adult language
•Sex o sexual situations
• Violence
Input gl_k
•Video, Front Video (On_ Off)
• Component 1, 2 (On, Off)
• RGB HDMI1iDVI,HDMt2 (On_ Off)
(GeneraJ audience)
(Parental gaidance suggosted)
(Parents strongly cautioned)
(Mature audience only)
(All children}
(Children 7 years olde0
(applies to TV-Y, TV-Y7)
(applies to TV-Y7)
(applies to TV-G_ TV-PG, TV-14, TV-MA)
(applies b TV-PG, _¢-14)
(applies to TV-PG, TW14, TV_MA)
(applies to TV-PG, TV-14, TV-MA)
(applies to TVoPG, TV_14_ TVoMA)
Owner's Manual 55
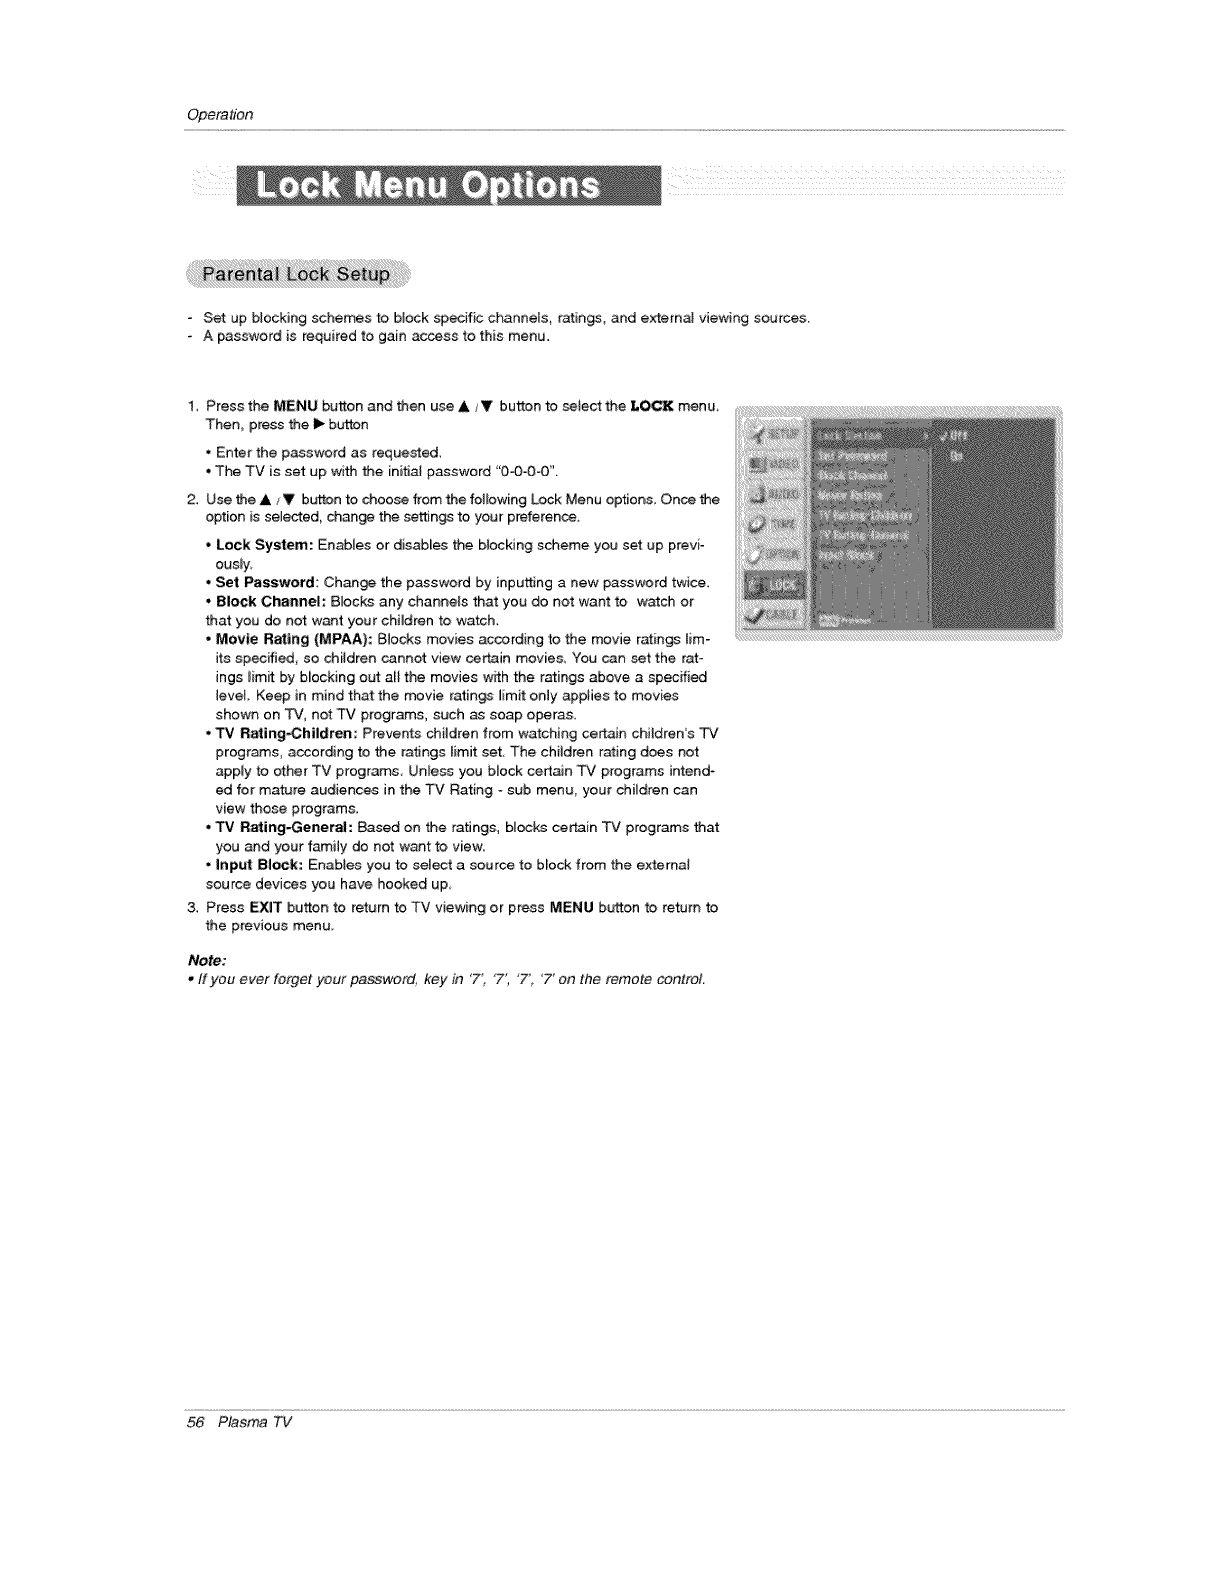
Operation
-Set up blocking schemes to bJock specific channels, ratings, and extern_ viewing sources.
-A password is required to gain access to this menu.
1, Press the MENU button and then use A /V button to select the T-O_ menu_
Then, press the i_ buttJon
• Enter the password as requested.
• The TV is set up with the initial password "0©-0-0".
2. Use the A /V button to choose from the following Lock Menu options. Once the
option is selected, change the se_n_ to your preference.
• Lock System: Enables or disables the b{ocking scheme you set up previ-
ously.
• Set Password: Change the password by inputting a new passer, oral twice.
• B|eek Channel: B_ocks any channels that you do not want to w_ch or
that you do not want your chiJdren to watch.
•Movie Rating (MPAA): Blocks movies acoording to the movie ratings _im_
its specified, so children cannot view certain movies, You cen set the rat-
ings _imit by b_ocking out aH the movies with the ratings above a specifi_
level Keep in mind that the movie ratin_ limit only app;ies to movies
shown on TV, not TV programs, such _ soap operas.
• TV Rating_hi|dren: Prevents children from watching certain children s TV
programs, according to the ratings timit set The chiJdren rating does not
apply to other TV programs Un_e_ you block certain TV programs intend-
ed for mature audiences in the TV Rating - sub menu, your children can
view those programs.
• TV Rating-General: _sed on the ratings, bEocks ce_in TV programs that
you and your family do not want to view.
• Inp_ Bl_k: Enabtes you to select a source to bFock from the external
source devices you have hooked up
3, Press EXIT btJtton to return to TV viewing or press MENU button to return to
the previous menu
Note:
,ffyou ever forge_your pa_word, key in 71, "7'i '7' '7" on the remote control.
56 Plasma TV
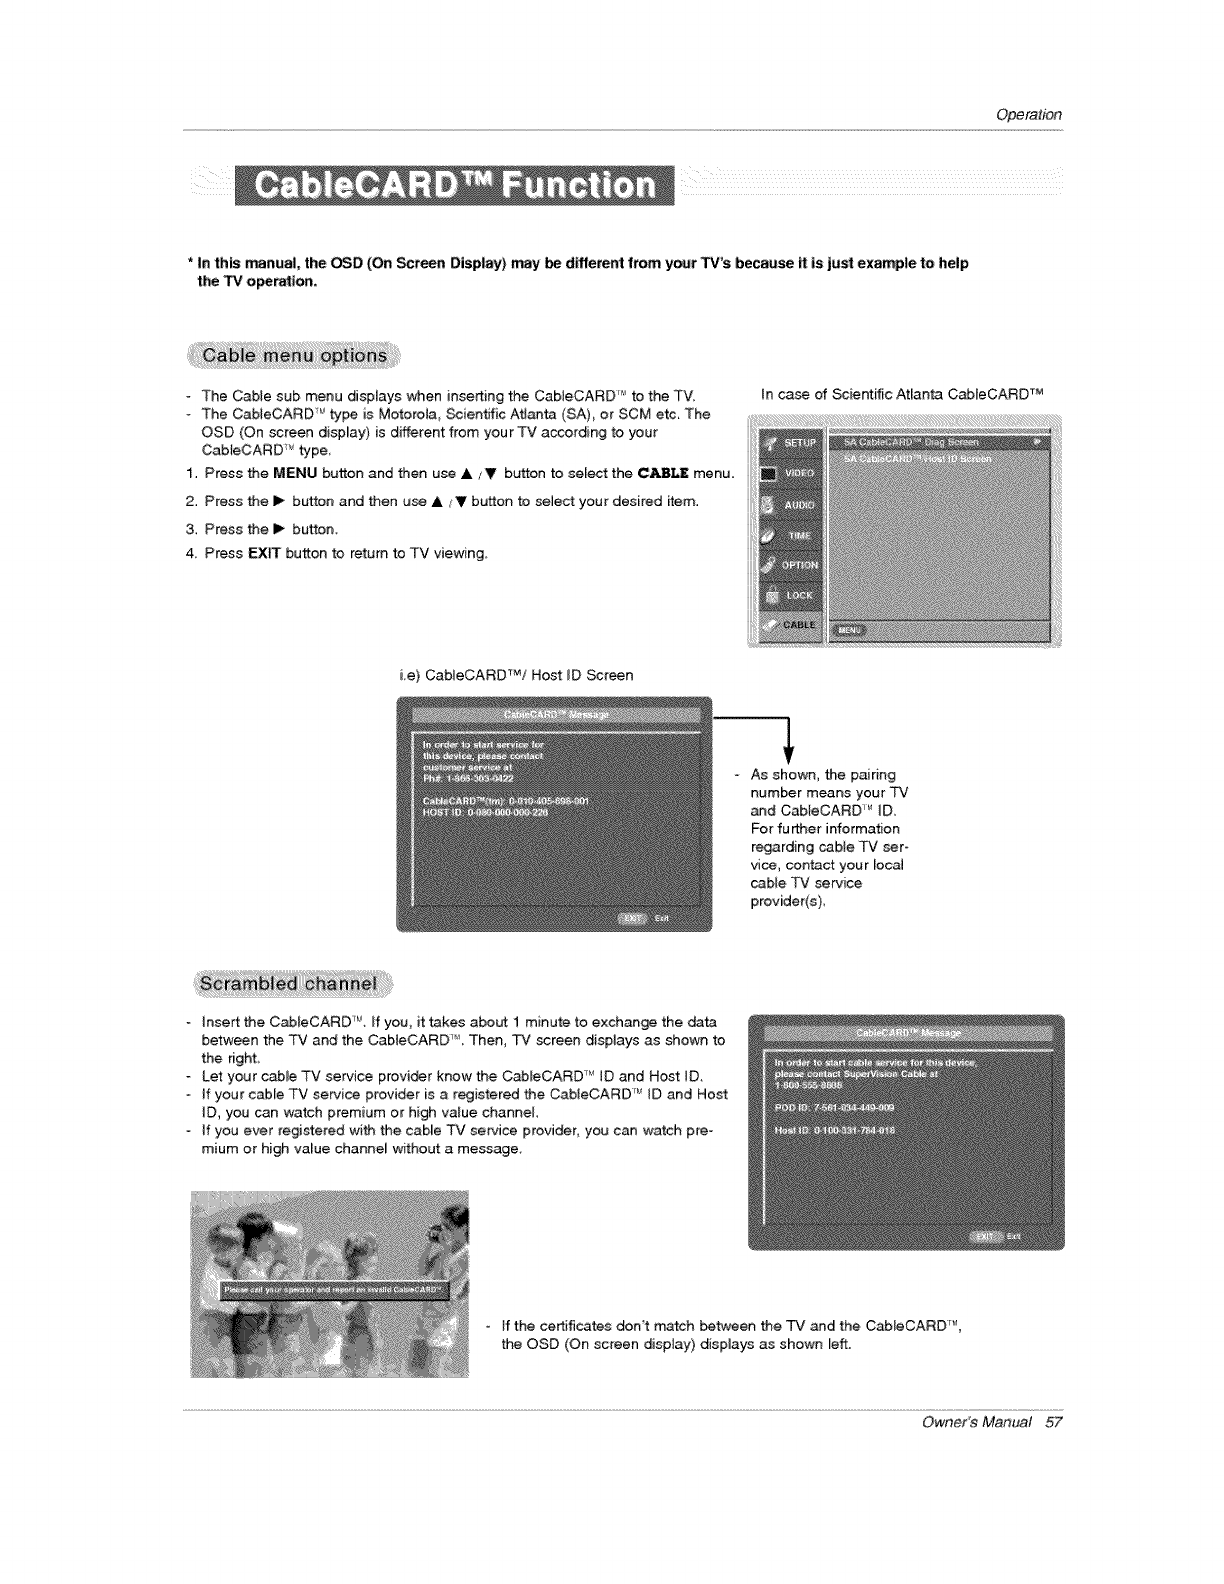
Operation
i_iiiiii ii
*In this manual, the OSD (On Sct_n Display) may be different from your TV's because it is just example to help
the TV o_ration,
- The Cable sub menu displays when inserting the CabLeCARD _* to the TV.
-The CableCARD _ type is Motorota, _ientJfic Atlanta (SA) or SCM etc. The
OSD (On screen display) is different from your TV according to your
CabIeCARD _ type
1. Press the MENU button and then use & zV button to seIe_ the CABLE menu.
2. Press the I_ button and then u_ &,/V button to _ect your desired item,
3. Press the I_ button.
4 Press EXIT button to return to TV viewing,
tn case of Scientific Atlanta CabIeCARD TM
ie) CaMeCARD_/Host _D Screen
- As shown, the pairing
humor means your TV
and Cab[eCARD _ _D.
For fu _er information
regarding cabJe TV ser-
vice, contact your leca_
cable TV service
provider(s)
insert the CableCARD '_, If you, it _kes about I minute to exchange the data
between the TV and the CabteCARD _' Then, TV screen displays as shown to
the right
- Let your cable TV service provi@r know the CableCARD _ [D and Host [D.
oif your cable TV service provider is a registered the CabIeCARD '_' tD and Host
ID, you can watch premium or high value channel
- if you ever registered with the cable TV se_ce provider, you can watch pre-
mium or high va_ue channel wffhout a message.
-if the certificates don't n'_tch between the qF'7and the Cab[eCARD _,
the OSD (On screen display) dispJays as shown Left.
Owner's Manual ,57
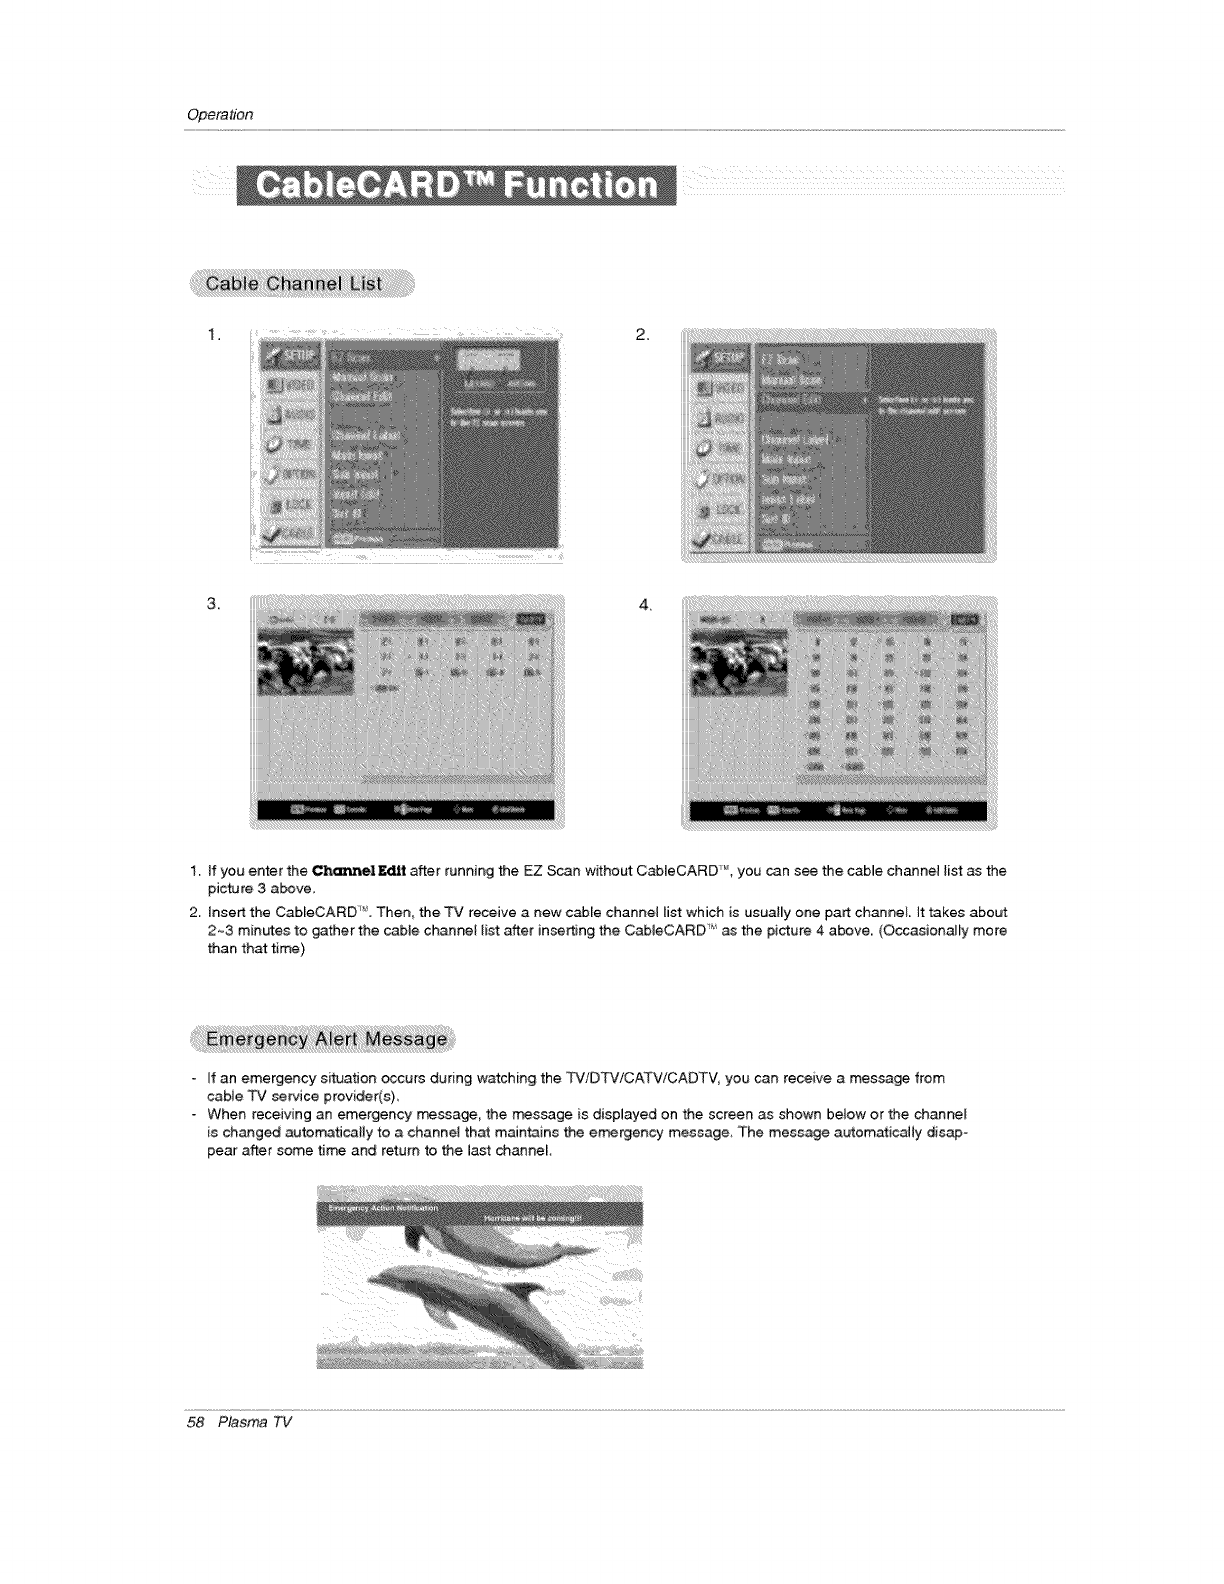
Operation
1,
3, 4,
1. If you e_er the ChannelE_Jt after running the EZ Scan w_hout Cab[eCARD _, you can see the cable channe_ list as the
picture 3 a_ve,
2. [nseA the CableCARD '_'.Then, the TV receive a new c_[e channel list which is usua{[y one part channel It takes about
2~3 minutes to gather the _ble channel _ist a_er inserting the CabJeCARD " as the picture 4 above,, (Occasionally more
than that time)
If an emergency situation _curs during watching the TV/DTV/CATV!CADTV, you can receive a message from
cable TV service provider(s)
When receiving an emergency message, the _ssage is displayed on the screen as shown below or the channel
is changed automatically to a channel that maintains the e_rgency message The message a_ematica_ly disap-
pear after some tim_ and return to the last channel
58 Plasma TV
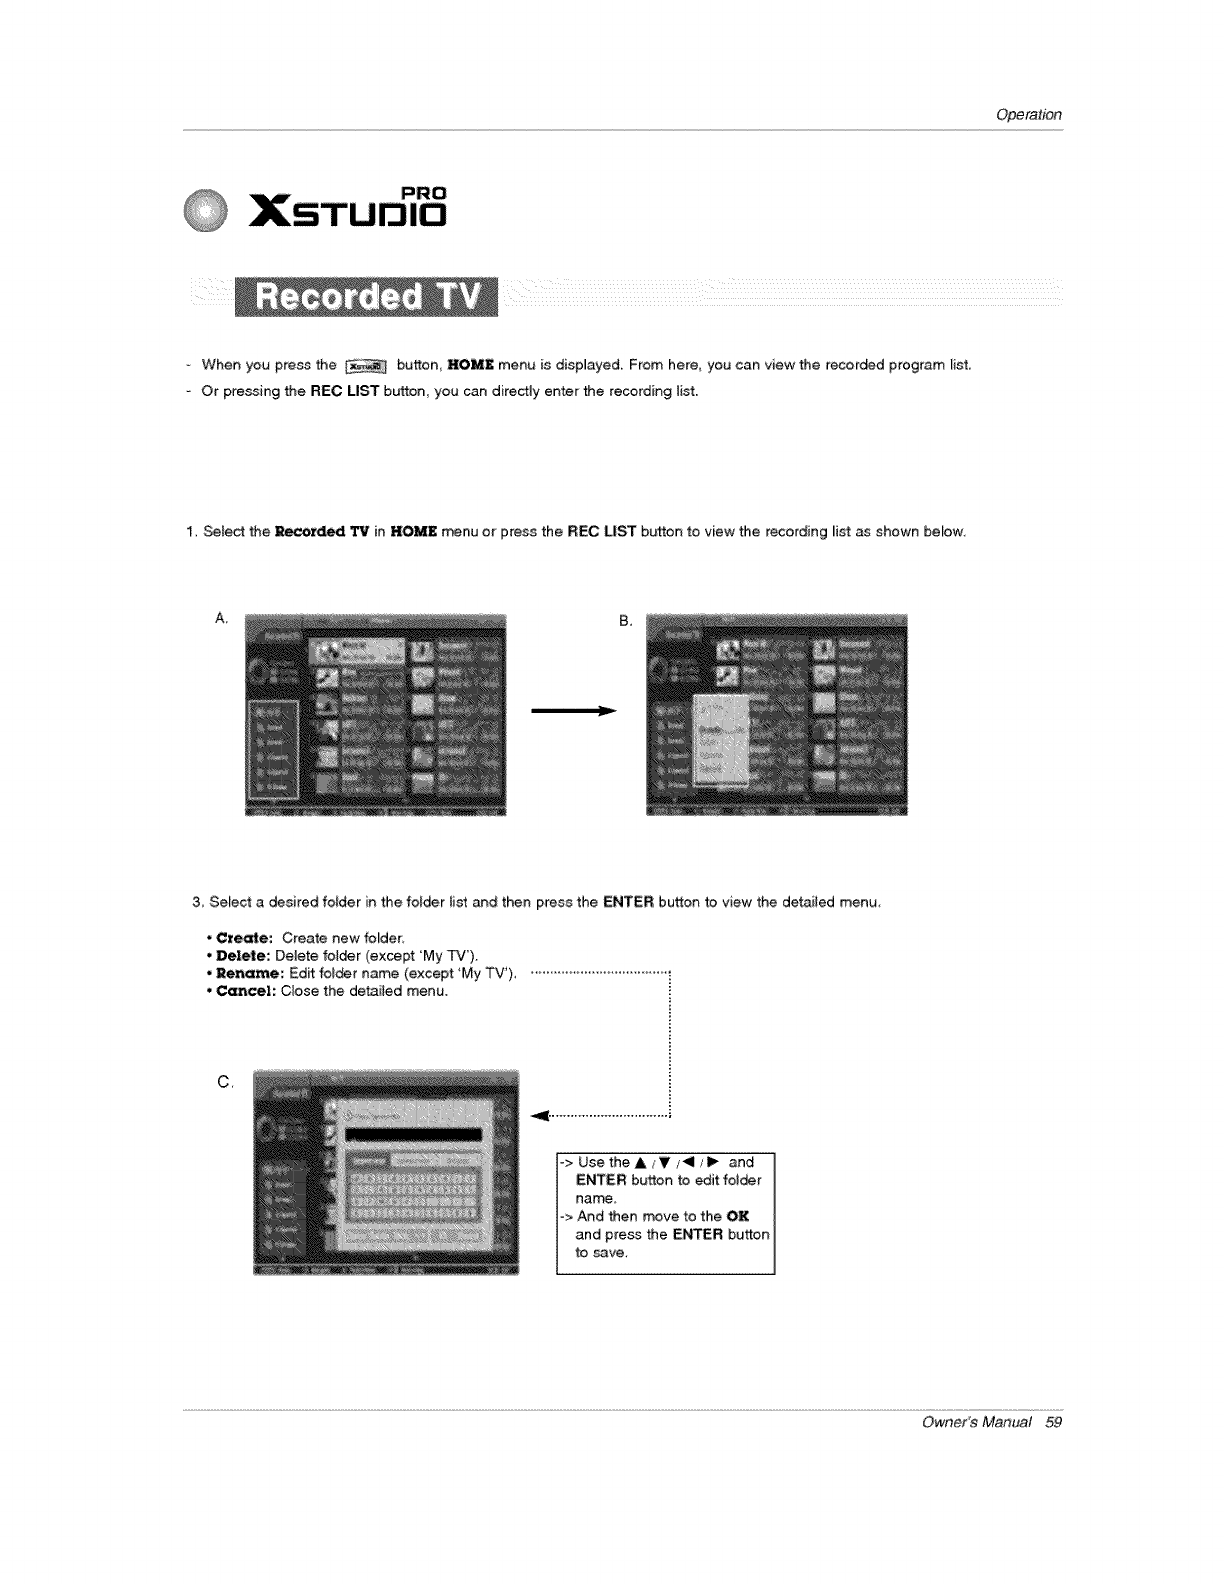
Operation
-When you press the button, HOME menu is displayed. From here, you can view the recorded program list.
-Or pressing the REC LIST button, you can directly enter the recording list.
1. Select the _rded 1P,tin HOME menu or press the IREC LIST button to view the recording list as shown be_ow,
A, B_
3, Select a desired folder in the fo_der list and then press the ENTER button to view the detailed menu.
•Create: Create new fo_der.
•Delete: Delete folder (except 'My TV').
•Rename: Edff fo_der name (except 'My TV'). •....................................
•Cemcel: C_ose the detai{ed menu.
C_
_> Use theA/V _11/1_ and
ENTER button to edit folder
name, I
°> And then move to the OK I
and press the ENTER button
to _ve.
Owner's Manual 59
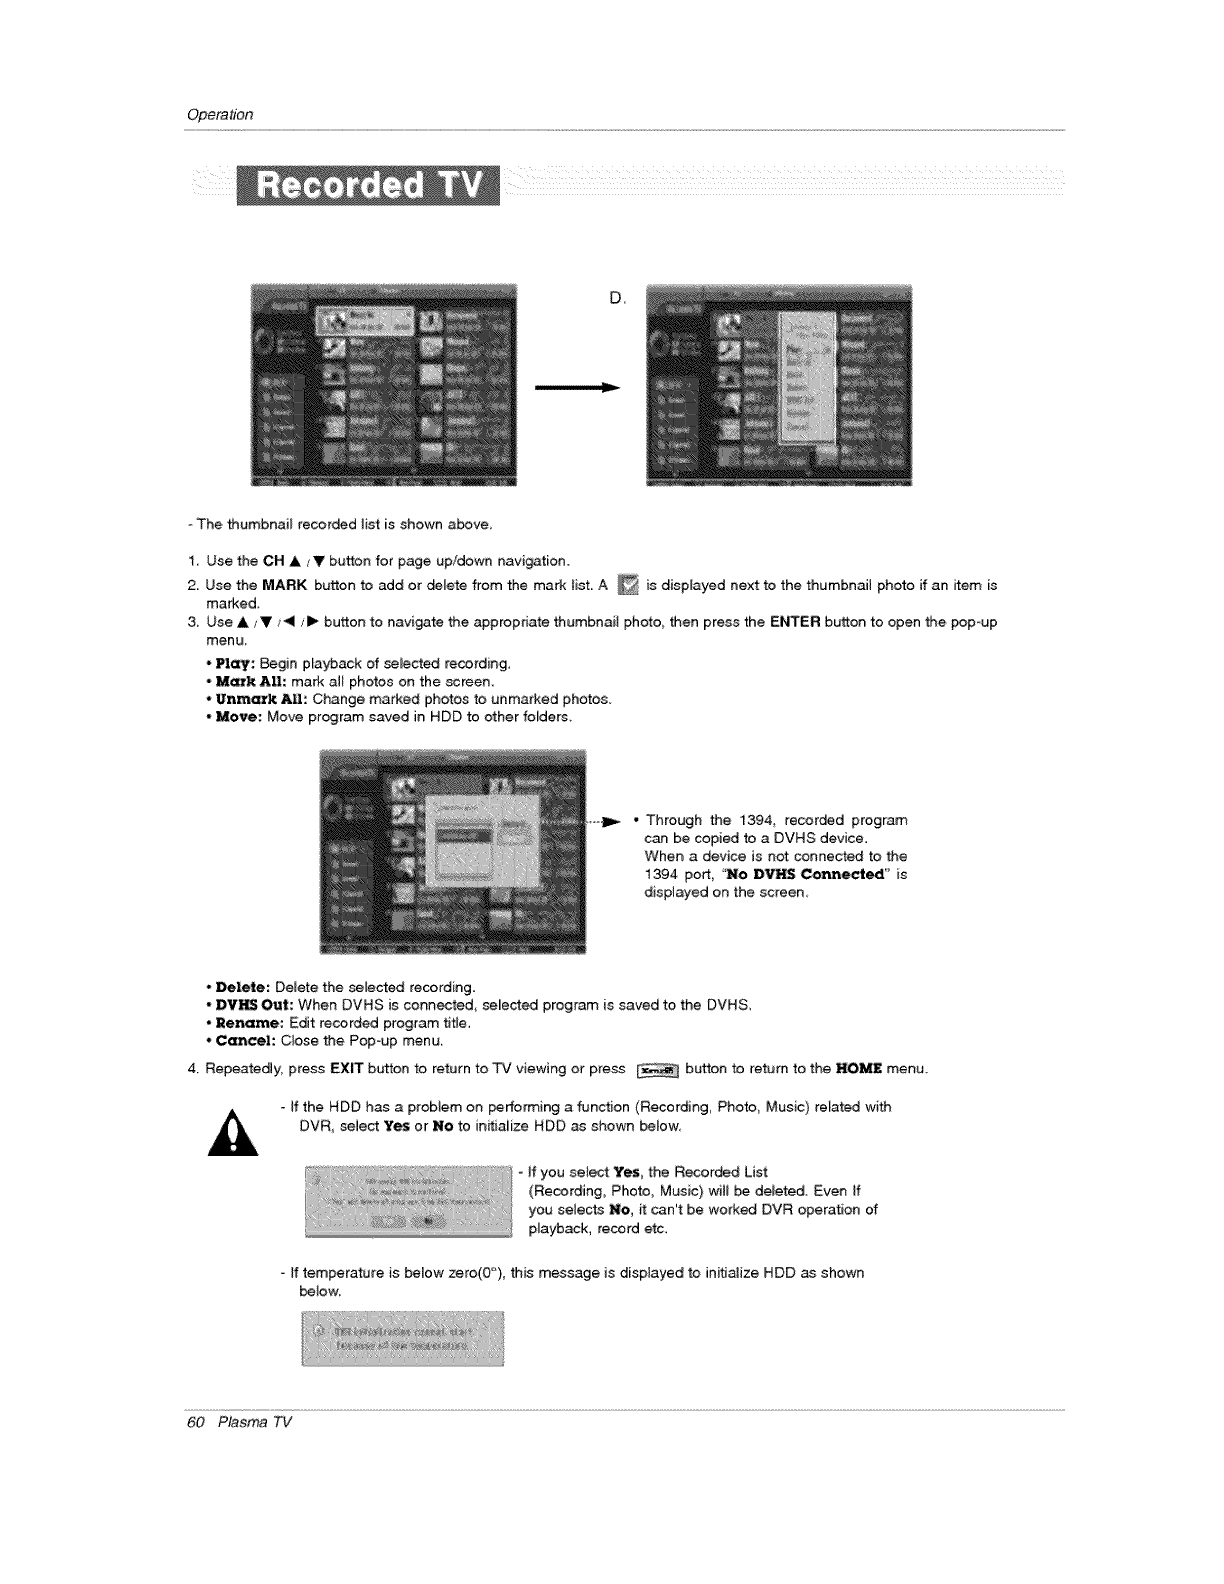
Operation
U_
- The thumbnail recor_d tist is shown a_ve,
1. Use the CH A/'V button for page up/down navigation.
2. Use the MARK button to add or delete from the mark _ist. A _ is disprayed next to the thumbnail photo if an item is
marked.
3, Use & iV _,_il ;1_ button to navigate the appropriate thumbnail photo, then press the EI'_ER button to open the _p-up
menu_
- _: Begin playback of selected recording,
-Mark All: mark all photos on the screen,
.Unmatk AIB." Change marked photos to unmarked photos.
-Move: Move pr_ram saved in HDD to other folders
- Through the 1394, recorded program
can be copied to a DVHS device.
When a device is not connected to the
1394 port, "NO DVHS Connected" is
displayed on the screen
- _lete: Delete the selected recording.
-DVI_I_ _t: When DVHS is connected_ selected program is saved to the DVHS,
-Rename: Edit recorded program title,
.Cemcel: C_ose the Pop-up menu.
4. Repeatedly press EXIT button to return to TV viewing or press button to return to the HO_ menu_
- tf the HDD has a proMem on performing a function (Recording, Photo, Music) related with
DVR, seiec_ Yes or No to in_ialize HDD as shown below,
- If you select Yes, the Recorded List
(Recording, Photo, Music) wil_ be deleted. Even ff
you selects No, it can't be worked DVR operation of
playback, record etc.
ff temperature is below zero(0_), this message is displayed to initialize HDD as shown
below.
60 Plasma TV
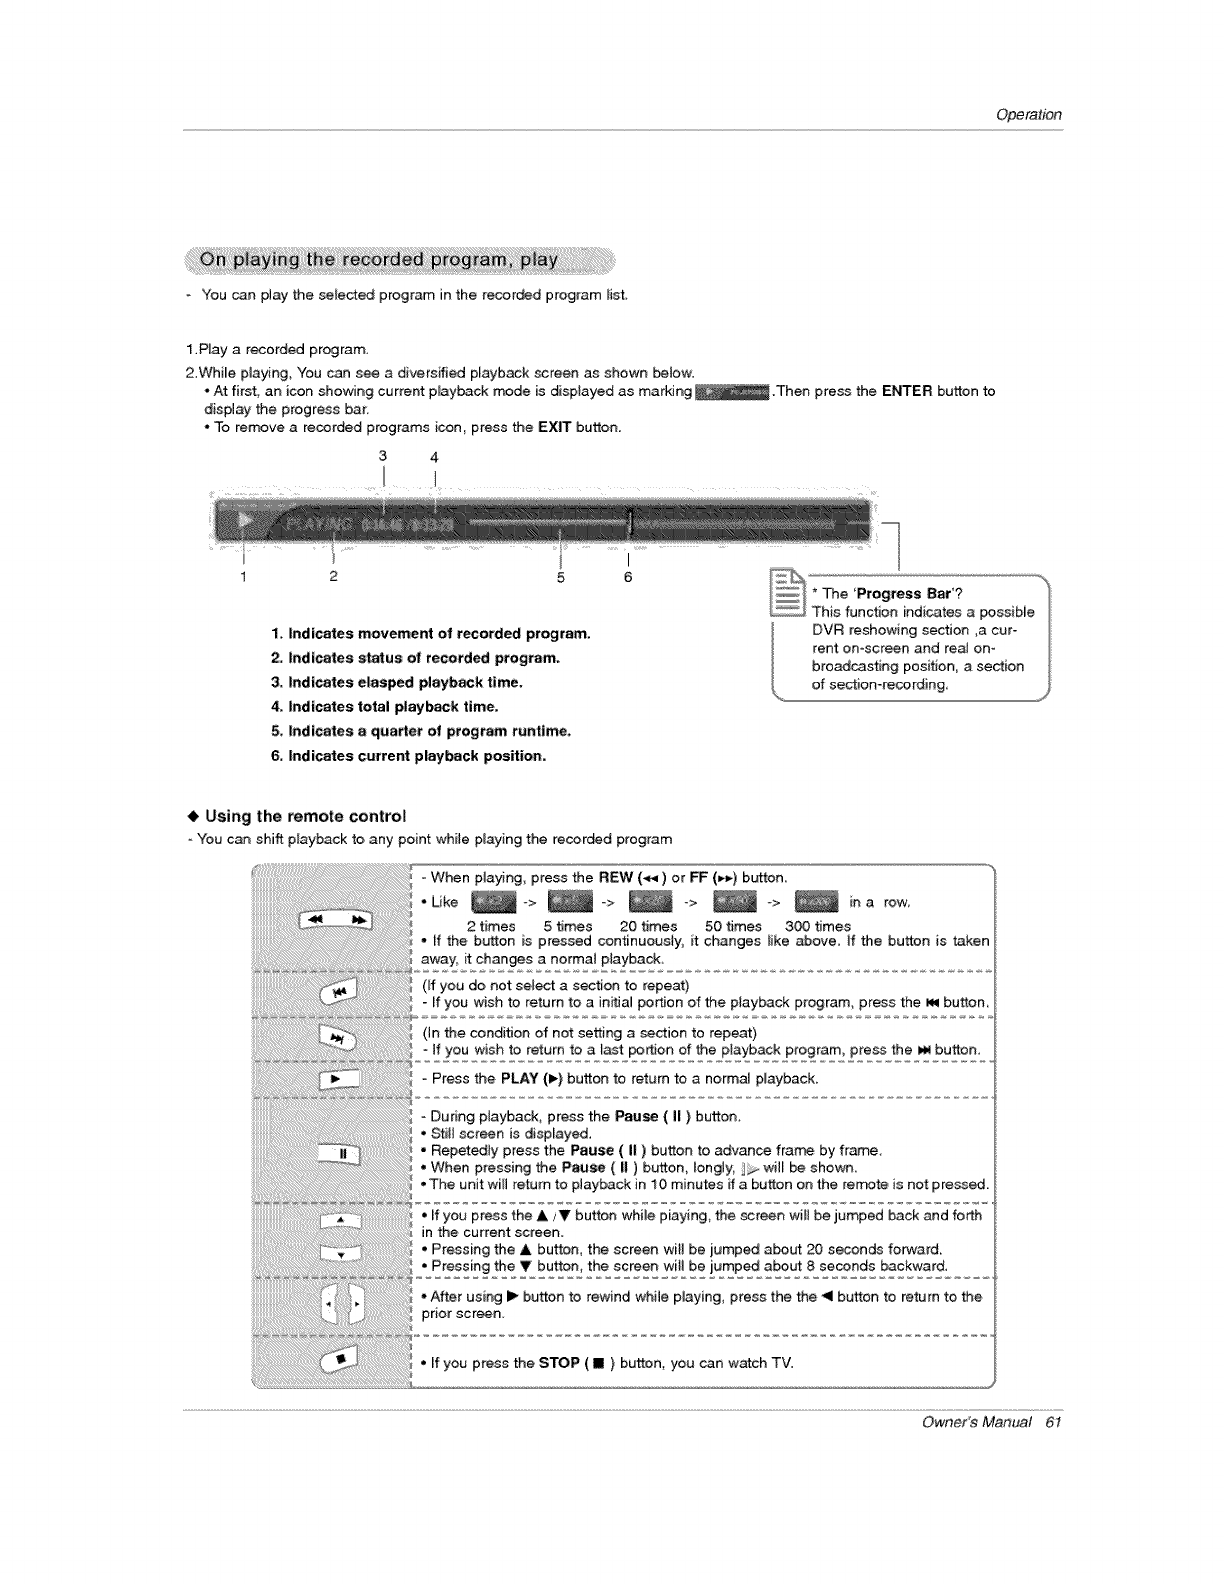
Operation
- You can play the selected program in the recorded program list
1.Play a recorded program.
2.While playing, You can see a diversified playback screen as shown _{ow:
* At first, an icon showing current p_ayback mode is disp{ayed as mar_Jng _ .Then press the EN3"ER button to
display the progress bar.
.To rerr_ve a recorded programs icon, press the EXIT button.
3 4
I
1
1. Indicates movement of recorded program.
2. Indicates status of recorded program.
3. Indicates elasped playback time.
4, Indicates total piay_k time,
5, Indicates a quarter of program runtime,
6, Indicates current playback position.
I
6 _* The 'Progress Bar'? _
_ This function indicates a possibie_
DVR reshowing section ,a cur-
rent on-screen and real om
broadcasting position, a section
of section-recording, J
Using the remote control
-You can shift playbackto any point whi{e p_ayingthe recorded program
Owner's Manual 6I
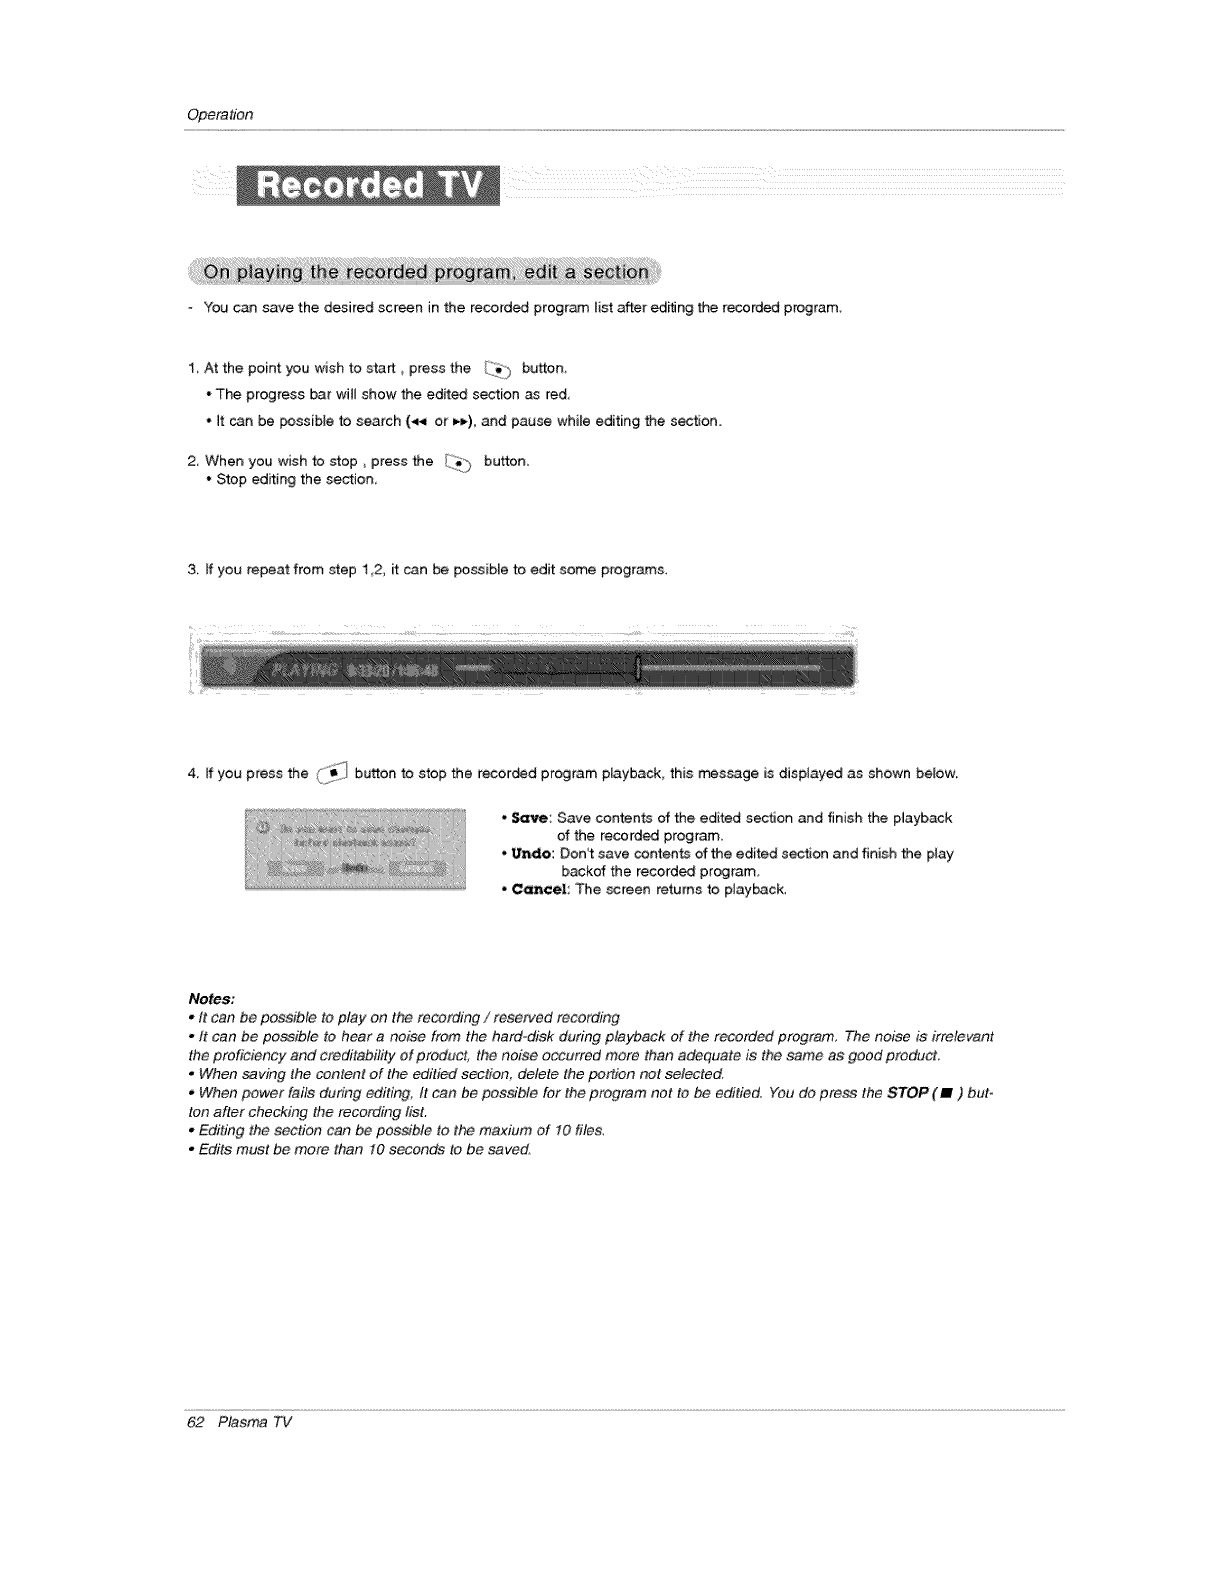
Operation
You can save the desired screen in the recorded program list after editing the recorded program
1 At the point you wish to start _press the I_ button
° The progress bar will show the edited section as red
*_t can be _ssible to search (4._ or H_), and: pause while editing the section.
2 When you wish to stop, press the Iii_i_ button,
• Stop editing the section
3, If you repeat from step 1,2, it can be possible _ edit some programs
4, If you press the (['_'_iii button to stop the recorded program playback, this message is displayed as shown below.
-Save: Save contents of the edited section and finish the playback
of the recorded program,
Undo: Don't save contents of the edited section and finish the p{ay
backer the recorded program,
•Cancel: The screen returns to p_ayback,
Notes:
*It can be possible to play on the recording /reserved recording
oIt can be possible to hear anoise from the hard-disk during playback of the recorded program, The noise is irrelevant
the proficiency and creditability of product, the noise occurred more than adequate is the same as good product
.When saving the content of the edified sectio#, de/ele the portion not selected.
oWhen power fails during editing; It can be possible for the program net to be editied. You do press the STOP (m) but-
ton after checking the recording tisL
.Editing the section can be possible to the maxium of t0 files,
oEdits must be more than 10 seconds to be saved,
62 Plasma TV
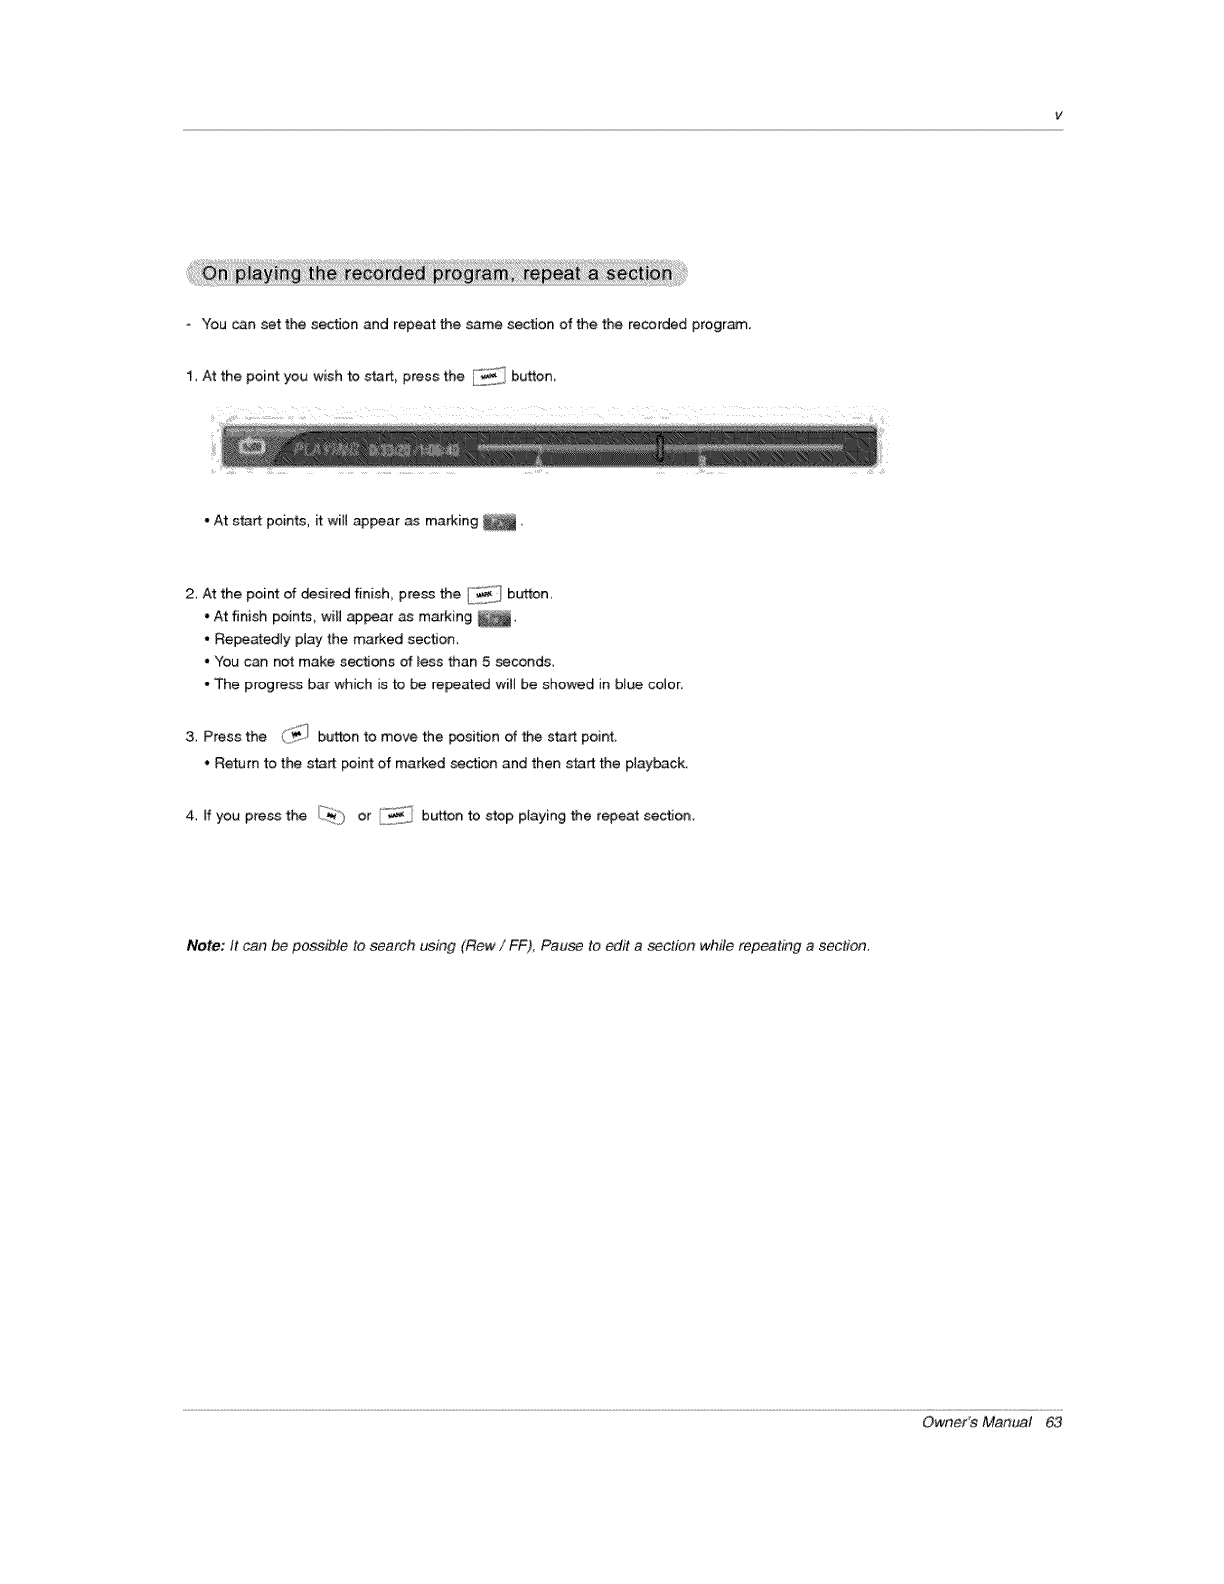
-You can set the section and repeat the same section of the the recorded program.
1_ At the point you wish to start, press the _' button
- At start points, it will appear as marking _,
2, At the point of desired finish_ press the "_'_ button,
"At finish points, will appear as marking
• Repeatedly ptay the marked section,
• You can not make sections of _ess than 5 seconds,
• The progress bar which is to be repeated will be showed in btue color,
3. Press the _'_iI button to move the position of the start point,
* Return to the start point of marked section and then start the playback.
4. If you press the _i_) or i_i button to stop playing the repeat section.
Note; It can be possible to search using (Row/FF), Pause to edit a section while repeating a section.
Owner's Manual 63
Opera_n
What is Memory Card
Precaution for Using the Memory Card
o Please be sure to insert the correct memory card type in the right direction.
(Confirm between the two memory slots before insertion.)
- Don't insert the metat substances rote the slots of the memory card.
o Do not bend, drop or apply strong shock to memory card.
- After pulling the memory card out from the TV, please keep the memory stick in a appropriate case to prevent
t from static sh_k
- The stored data may be changed or lost as a result of misuse static eIectricity,
o Do not turn the power off while the memory card is in operation,
- Don't eject the memory card while using it. Otherwise. it may cause a data loss or card damage
-_nsert onFy one card to each slot
o To prevent a change or loss for stored data. don't misuse the TV or don't let static electricib! or electrical noise
around the TV,
- This Company takes no responsibility for problems such as the damage or malfunction that ,occurs while using
the TV set, inapproeriate TV settings, or any other reasons, except for defects or malfunctions intrinsic to the
product.
o Ensure to use a memory card that l_sts the manufacturers name and serial number.
- The manufacturer will not be responsible for any data damage, Making back up data is strongly recommend-
ed
-Make sure to comply with the following steps when ejecting a memory card
- Each Memory Card is complied with standard.
64 Plasma TV
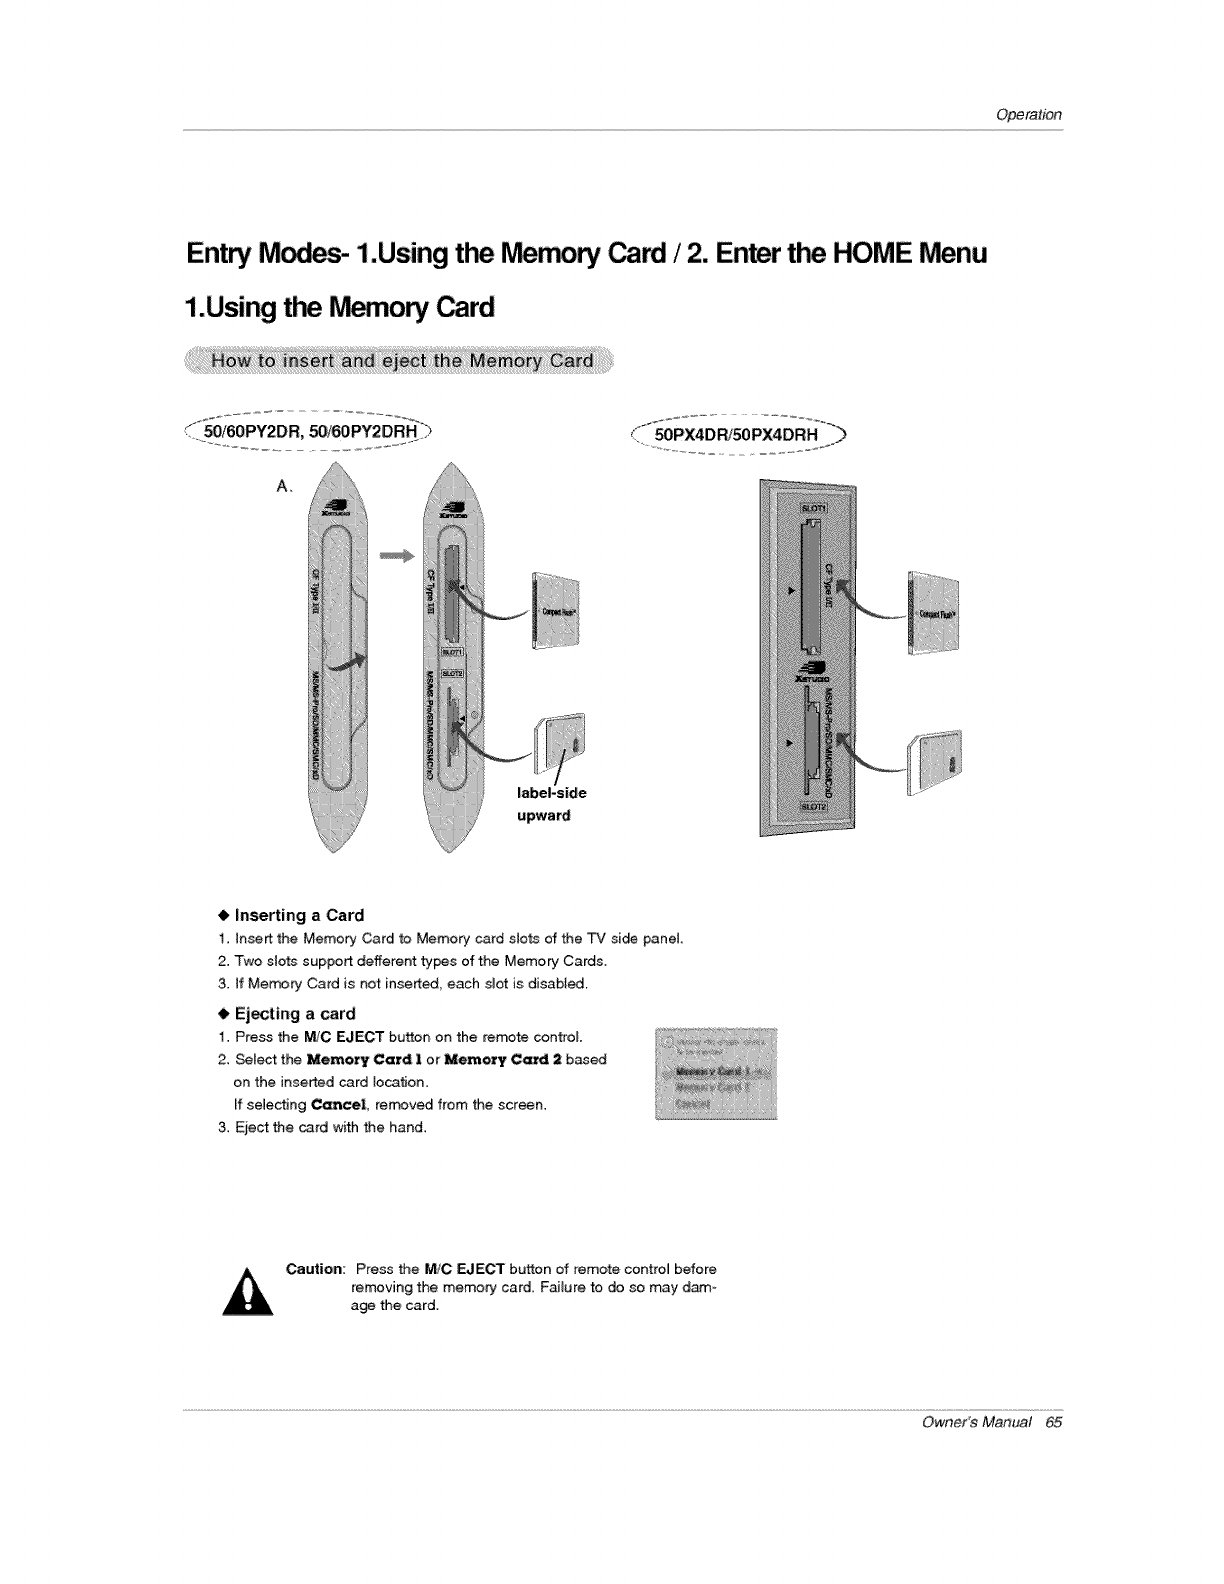
Operation
Entw M_ 1.Usingth_ rv_mory Cad /2. Enter the HOME Menu
1.Usingthe M_ory Card
A_
label-side
upward
•Inserting a Card
1. In_rt the Memory Card to Memory card slots of the TV side panel
2. Two slots support defferent t_s of the Memory Cards.
3. if Merry Card is not inserted, each dot is disabled.
•Ejecting a card
1. Pre_ the M/C EJECT button on the remote control
2. _lect the Memory Card I or Memory Card 2 b_ed
on the inserted card tecatien
ff selecting Cam=eel, rerr_ved from the screen.
3. Ejec_ the card with the hand.
Caution: Press the M/C EJECT button of remote control before
removing the memory card. F_Jure to do so may dam-
age the card.
Owner's Manual 65
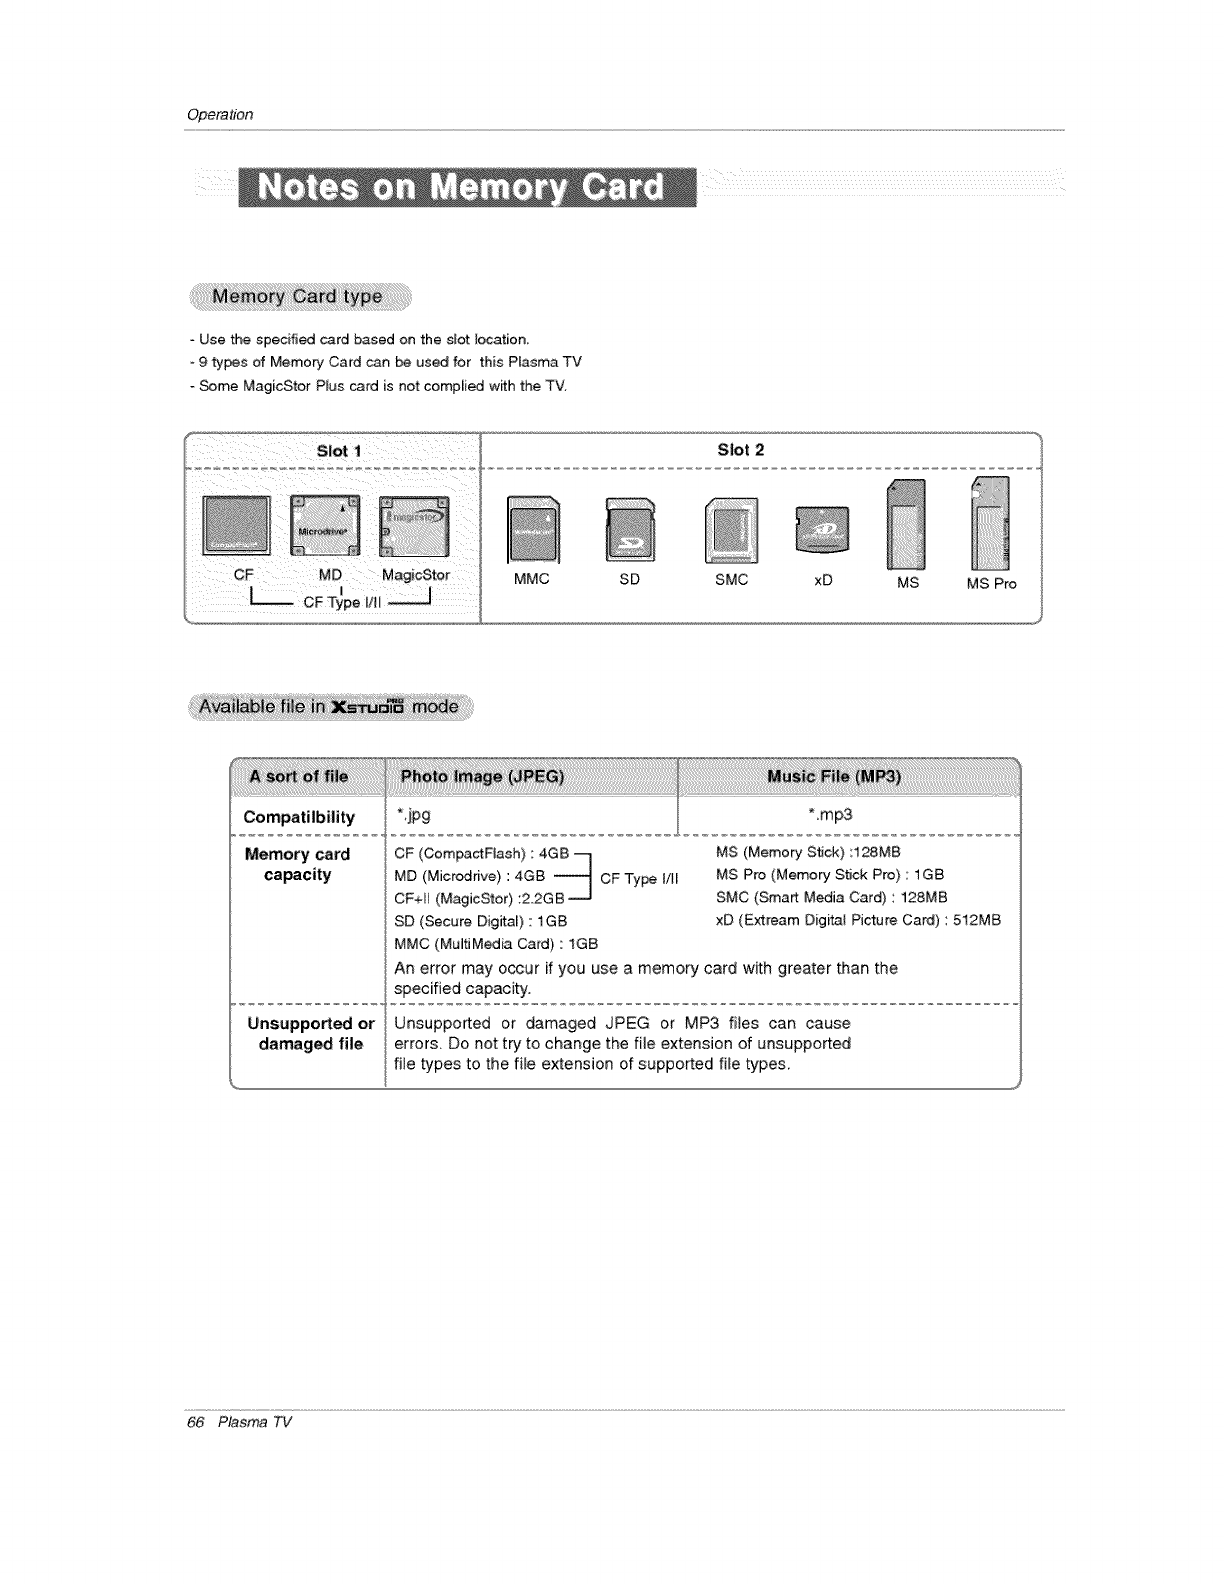
Opera_n
Use the specified card based on the slot location.
9 types of Memory Card can _ used for this Plasma TV
Some Mag[cS_or Plus card is not comp[;ed w_th the TV.
Slot 2
MMC SD SMC xD MS MS Pro
Memory card CF (CompactFJash) : 4GB --1 MS (Memory Stick) :128MB
capacity MD (Micredrive} : 4GB _ CF Type I!11 MS Pro (Memory St_ck Pro): 1GB
CF+I (MagicStor):22GB _J SMC (Smart Media Card) : 128MB
SD (Secure DigitaL) : 1GB xD (Kxtream DigP_al Picture Card) : 512MB
MMC (MultiMedia Card) : 1GB
An error may occur if you use a memory card with greater than the
specified capacity.
Unsupported or Unsupported or damaged JPEG or MP3 flies can cause
damaged file errors. Do not try to change the file extension of unsupported
file types to the file extension of supported file types_
66 Plasma TV
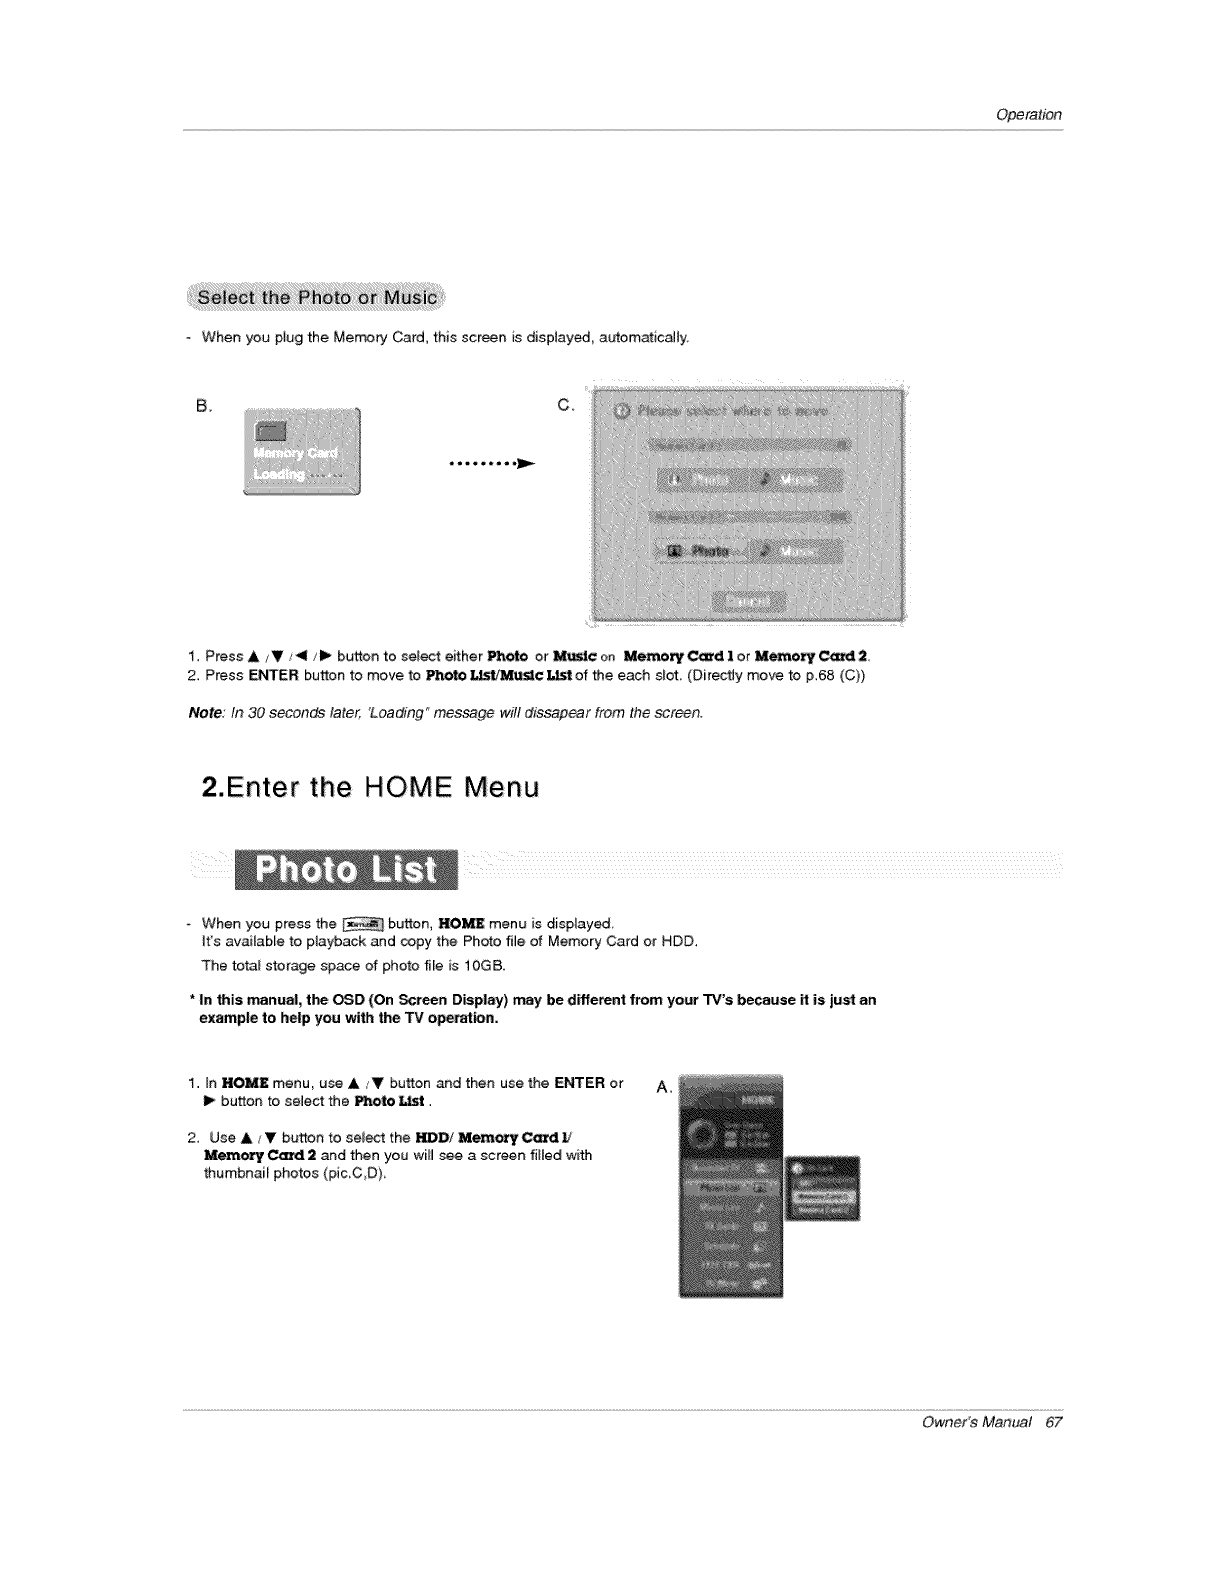
Operation
When you plug the Memory Card, this screen is dispJayed a_omaticaHy,
B. Co
t. Press A/Y/_11 _'1_ button to select either IF"_'_ or _c on Memory C_d Ior M_ty_2
2, Press E_ER button to move to _eto _t/_¢ _ of the each slot (Directly movie to p_68 (C))
Note: In 30 seconds later, 'Loading" message will dissapear from the screen.
2.Enter the HOME Menu
When you press the button, HOME menu is displayed
it's available to playback and copy the Photo file of Memory Card or HDD,
The total storage space of photo file is i0GB.
*In this manual, tim OSD (On Scr_n Display) may be different from your TV's because it is just an
example to help you with the TV operation,
t. In HOM£ menu, use A iV button and then use the ENTER or
I_ button to select the Photo _t.
2, Use A/_' button to seU_ the Z._BD/Mem_C_d _
Memo_ _2and then you will see a screen filled with
thumbnail photos (pic C,D),
A_
Owner's Manual 67

Opera_n
t
L
Card type
Usable Card _ ..... -//
memory Usable
Marked thumbnail photo humor
Current pageFTotal pages
Folder List
Direct Buttons
C_ D,
3, Select the desired folder in the folder list and then press the ENTER button to view t_qe de_iled menu
* Create: Create new fotder,
o _lete: Delete fol_r (except 'My Photo" )
°Rename: Edit folder name ...........................................
* Cancel: Close the detailed menu,
E,
=> Use the &/V ,_11/1_ b_ons
and then ENTER button to
select the figures
*> After editing folder name,
seiect OK and press the
EI_ER button !o s_ve:
68 Plasma TV
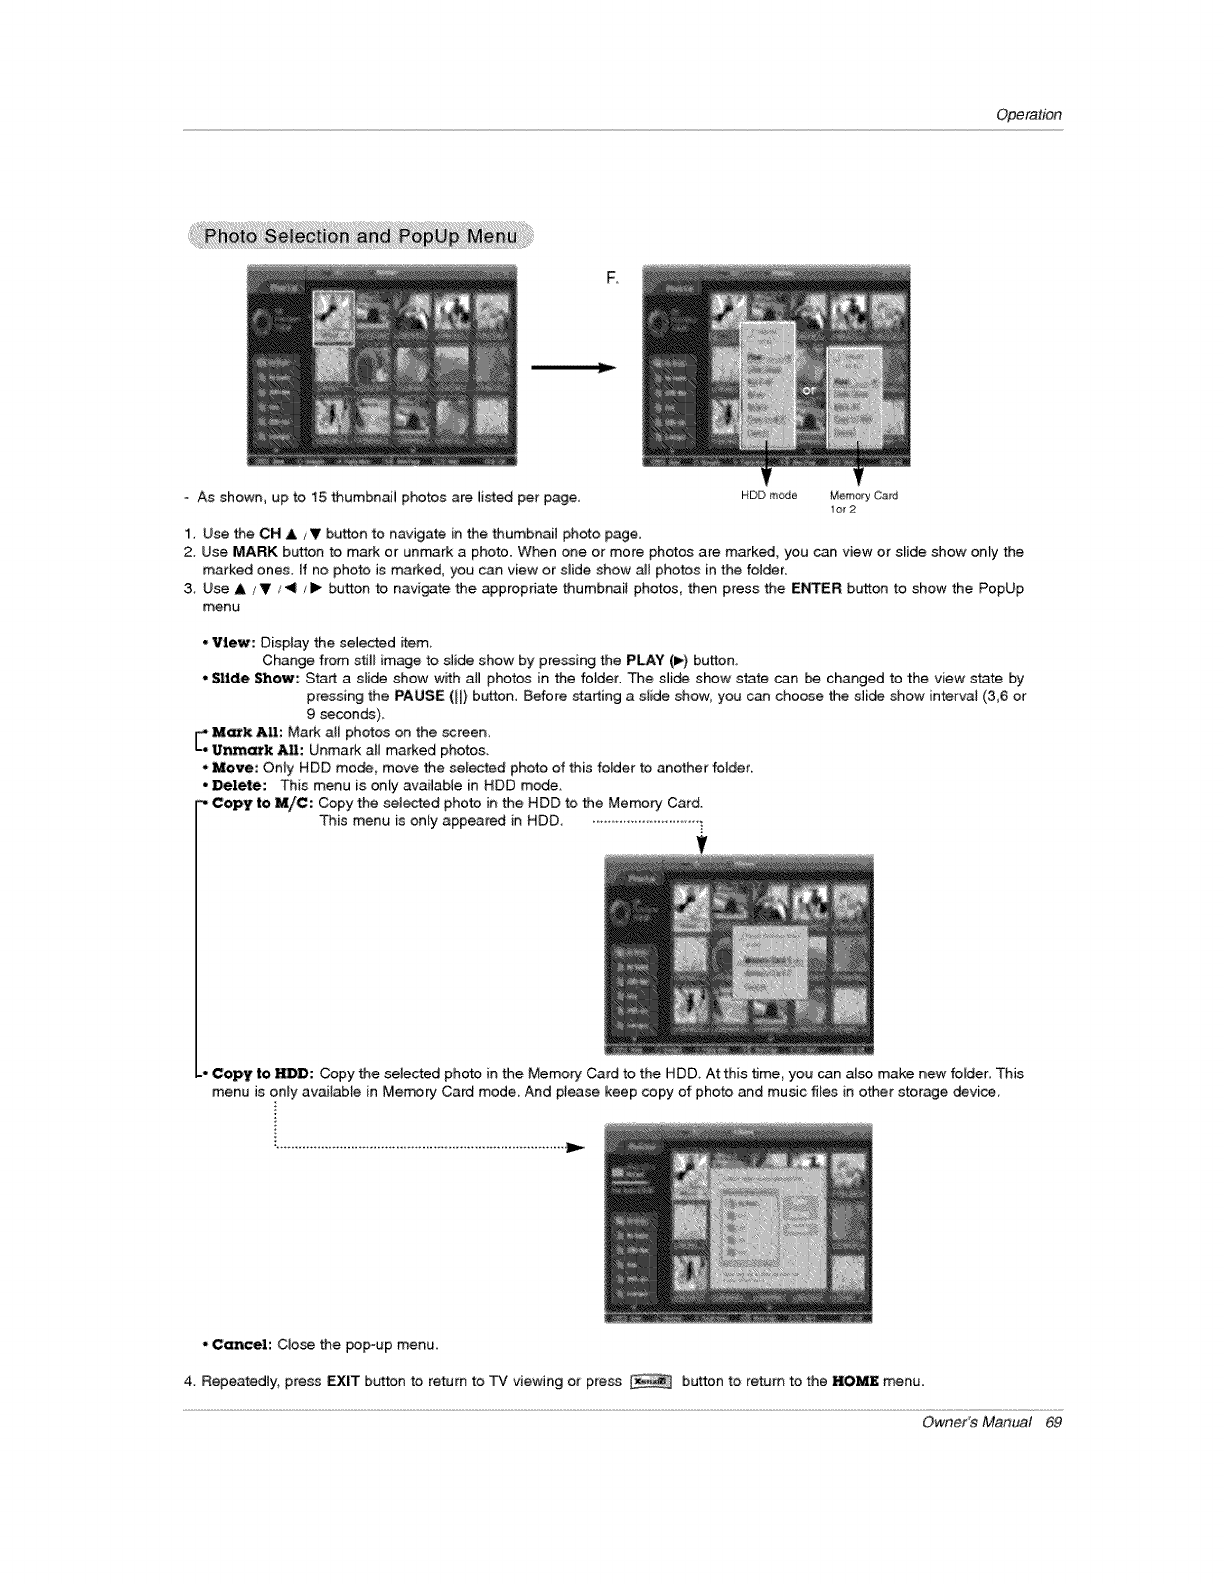
Operation
As shown, up to 15 thumbnaii photos are listed per page, HDD mode MemoryCard
1or 2
1. Use the CH A /V button to navigate in the thumbnaiJ photo page.
2. Use MARK button to mark or unrr_rk a photo. When one or more photos are marked, you can view or sride show only the
marked ones. If no photo is marked, you can view or smide show al_ photos in the fotder.
3. Use A /V/_11/1_ button to navigate the appropriate thumbnail photos, then press the ENTER button to show the PopUp
menu
• View; Display the selected _tem_
Change from stJl_ image to slide show by pressing the PLAY (1_.)button.
, Slide Show: Start a slide chow with aim photos in the fofder. The cJi_ show state can be changed to the view state by
pressing the PAUSE ([[) button. Before starting a slide show_ you can choose the s_ide show inte[va_ (3,6 or
9 seconds),
EM_k All: Mark al{ photos on the _reen,
•Unm_k All: Unmark all marked photos.
•Move: Only HDD mo_, move the sefected photo of this folder to another folder.
Delete: This menu is only available in HDD mode.
_, Copy to M/C: Copy the selected photo in the HDD to the Memory Card.
This menu is on{y appeared in HDD, ......................... _
COpy to HDD: Copy the selected photo in the Memory Card to the HDD, At this time, you can a[so make new folder This
menu is onry avai[ab[e in Morton,' Card mode And ptease keep copy of photo and music fi_es in other storage devise,
•C_cel: Close the pop-up menu,
4. Repeatedly, press EXIT b_on to return to PC viewing ot press button to return to the HOME menu.
Owner's Manual 69
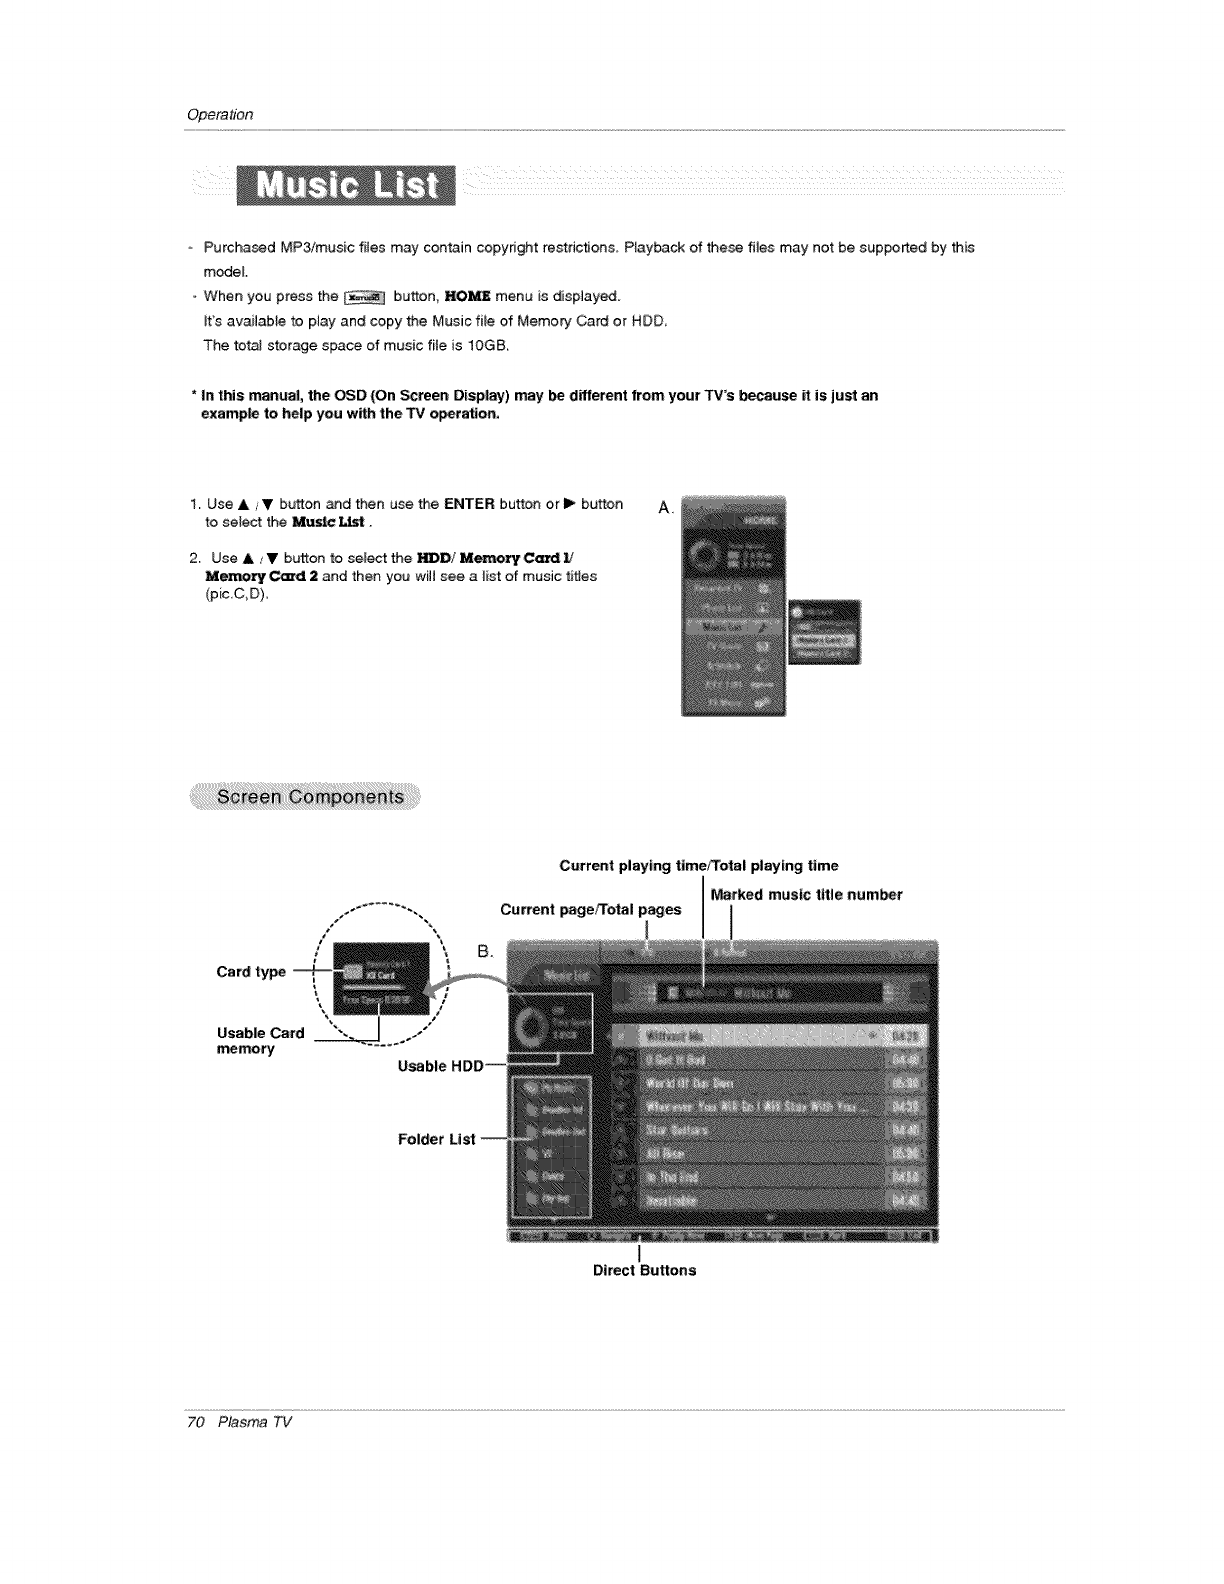
Operation
Purcha_d MP3q'music files may contain copyright restnctions. Playback of these files may not be supported by this
m_eL
o When you press the button, KO_ menu is displayed.
It's available to play and copy the Musicfile of MemoR/Card or HDD
The tofat storage space of music rite is 1OGB.
*In this manual, the OSD (On Screen Display) may be d_fferent from your TV's because it is just an
example to help you with the "IV operation,
1. Use A/V button _d then use the ENTER button or I_ button
to select the _s|c _.
2. Use &iV button to select the _D/M_r¥C_11
Me-,-r_)r¢ Card 2 and then you will see a list of music titles
(pic.C,D)
A.
Card type
Usable Card
memory
\
Folder List
Current playing time/Total playing time
I'_rked music title number
Current pageFrotal pages
Direct Buttons
70 Plasma TV
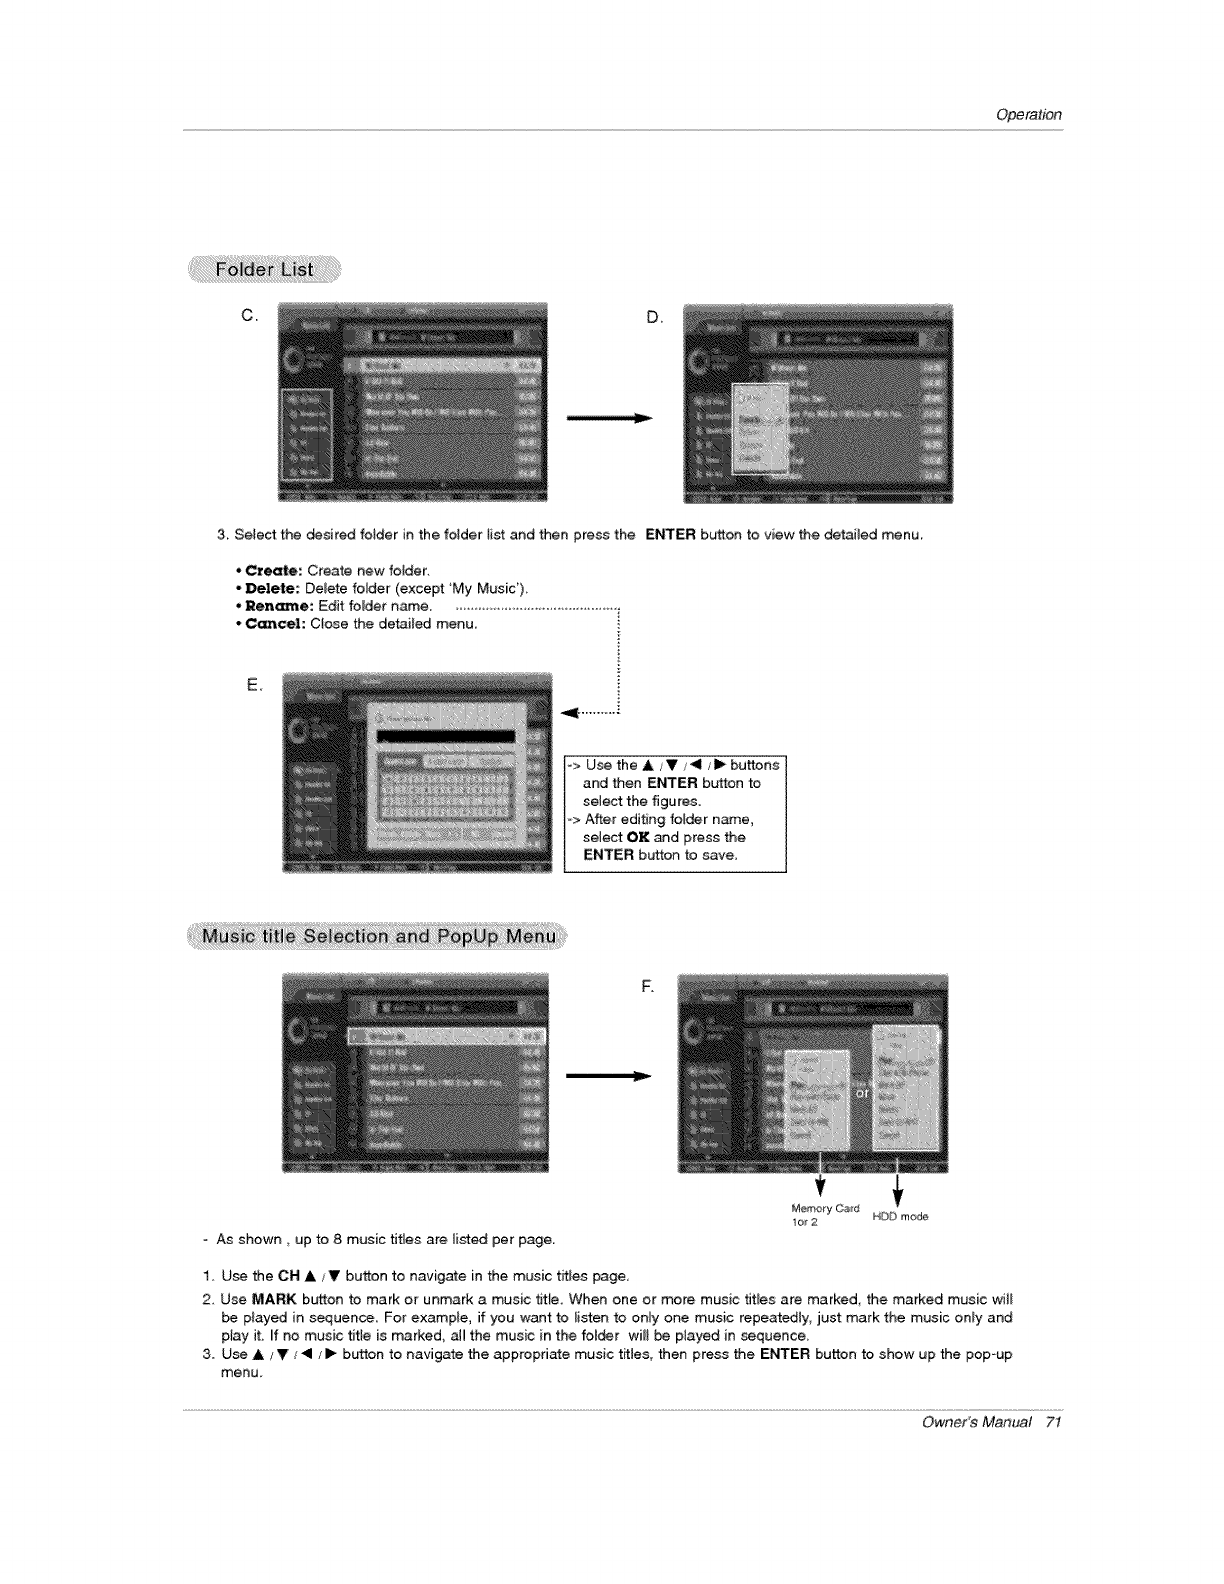
Operation
C, U.
3. Setect the desired fotder in the folder tist and then press the ENTER button to view the detailed menu.
*Creale: Create new foJder.
-Delete: Delete folder (except 'My Music')
*Rename: Edit fo_der name ..........................................
*C_cel: Ctose the detailed menu,
E,
-> U_ the A/V _1/i_ buttons
and then E_ER button to
select the figures.
-> After editing folder n_e,
select OK and press the
I ENTER: button to save,
MemoryCard
1or2 NDD mode
- AS shown, up to 8 music titles are listed per page.
1, U_ the CH A /V button to navigate in the music titles page
2, Use MARK button to mark or unmark a music flt_e When one or more music tit_es are marked, the marked music will
be p_ayed in sequen_ For example, if you want to _isten to only one music repeatedly just mark the music only and
ptay it. ff no music title is marked, all the music in the folder will be played in sequence_
3 U_ A Y_'_1 _I_ button to navigate the appropriate music rifles, then press the ENTER button to show up the pop-up
menu.
Owner's Manual 7t
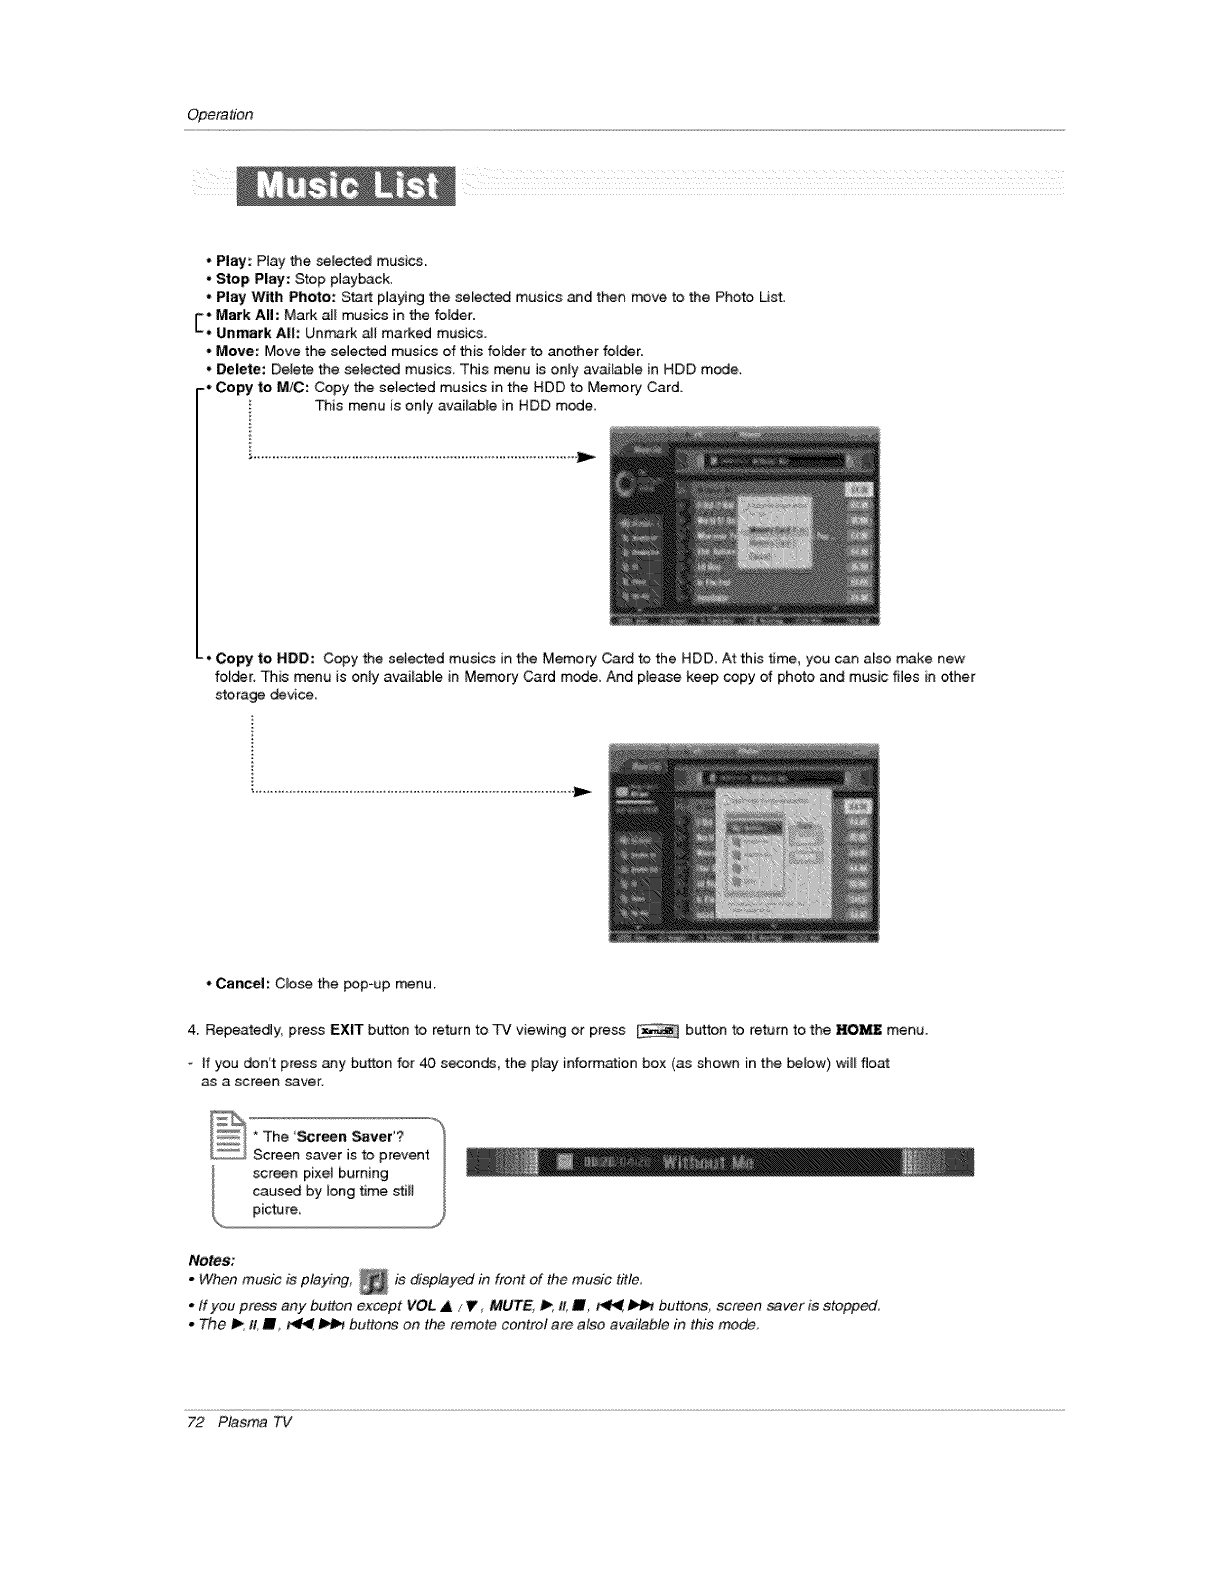
Operation
*Play'. Piay the selected musics.
.Stop Play: Stop playback,
, Play With Photo: Start playing the selected musics and then move to the Photo Ust.
*Mark All: Mark all musics in the folder.
F
L. Unmark All: Unmark a][ marked musics.
* Move: Move the selected musics of this fo_der to another folder.
*De|ete: Delete the _lected musics, This menu is only available in HDD mode.
-* Copy to M!C: Copy the selected musics in the HDD to Mer_#ry Card.
This menu is only avaifabEe in HDD mode,
........................................................................................ J_
-. Copy to HDD: Copy the sel_ed musics in the Memory Card to the HDD. At this time, you can also make new
folder, This menu is only available in Memory Card mode. And piease keep copy of photo and music files in other
storage _vice.
*Cancel: C_ose the pop-up menu.
4, Repeatedly, press EXIT button to return to TV viewing or press button to return to the HOk_ menu,
-If you don't press any button for 40 seconds, the play information box (as shown in the below) will float
as a screet_ saver.
Notes:
.When music is playing, _is display_ in front of the music title
.tfyou press any button except VOL ,A / It, MUTE. _, It, III __buttons, screen _ver is stopped,
. The I_, It, m, i_l_, t_ buttons on the remote control are also available h_ this mode,
72 Plasma TV
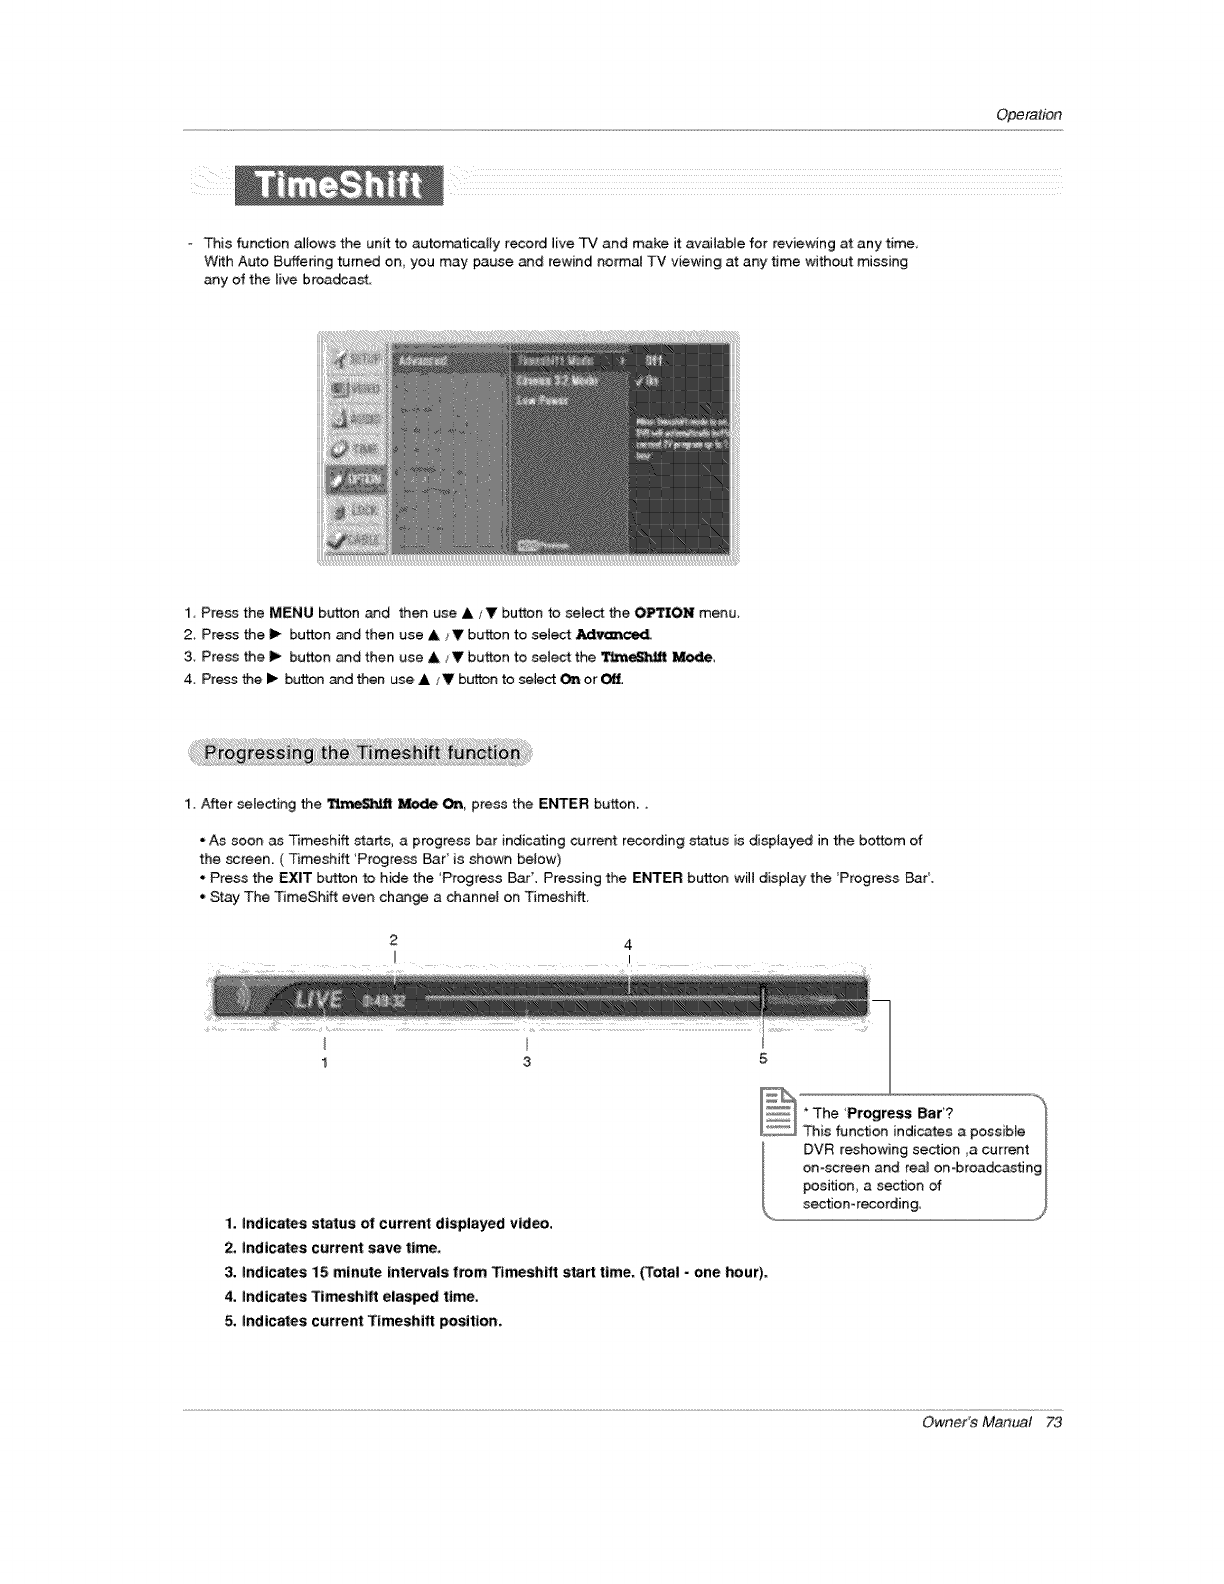
Operation
- This function allows the unit to automatically record live TV and make it available for reviewing at any time,
Wkh Auto Buffering turned on you may pause and rewind no_'mal TV viewing at any time without missing
any of the live broadcast
1 Press the MENU button and then use A/_11' button to select the OPTION menu,
2, Press the i_ button and then use A _V button to select _
3. Press the Ii_ button and then use ,L/V button to select the _ Mod, e.
4. Press the I_ button and then use & ;V button to select On or
1. After selecting the TL_c_eS_JJtMode On, press the E_ER button..
• As soon as Timeshiff starts, a progress bar indicating current recording status is displayed in the bottom of
the screen. ( Timeshift 'Progress Bar' is shown betow)
. Press the EXIT button to hide the 'Progress Bar'. Pressing the ENTER button will display the 'Progress BarL
• Stay The TimeShift even change a channel on Timeshift.
1 3
1, indicates status o1[current displayed video,
2, Indicates current save time,
3. indicates i5 minute intervals tram Tl_shtft start time. (Total - one hour).
4. Indicates Timeshift elasped time.
5, indicates current Tlmeshifl position,
Owner's Manual 73
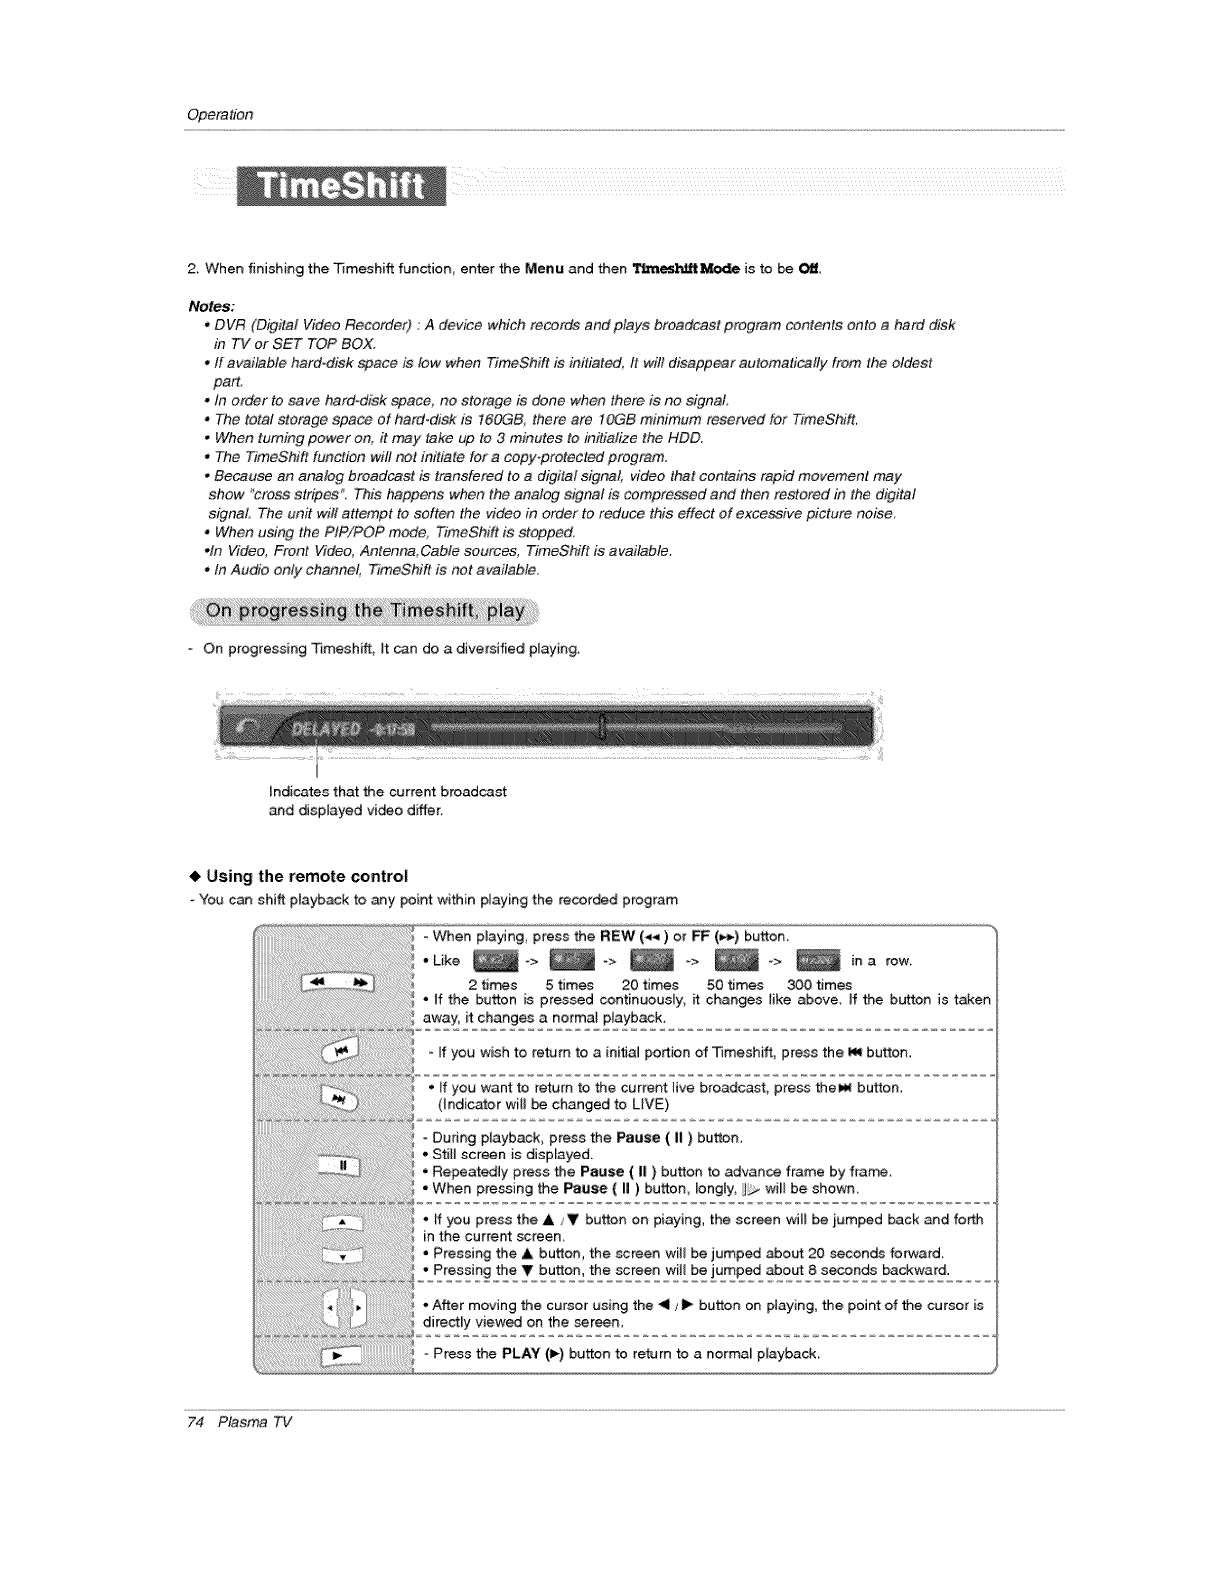
Opera#on
2 When finishing the Timeshift function enter the Menu and then __ is to be Off
Notes;
,DVR (Ds_qilal Video Recorder) : A device which records and plays broadcast program contents onto a hard disk
in TV or SET TOP BOX,
.ff available hard-disk space is low when TimeShift is initialled. It will disappear automalically from lhe oldest
part,
oIn order to _ve hard-disk space, no storage is done when there is no eignaL
•The total storage space of hard-disk is 160GB, there are tOGB minimum reserved for TimeShift,
.When turning power on, it may take up to 3 minutes to initialize the HDD.
,The TimeShifl function will not initiate for a copy-protected p_ogram.
.Because an analog broadcast is transfered to a d_gilal signal, video that contains rapid movement may
show "cross stripes", This happens when the analog signal is _mpre&_ed and then restored in the digital
signal. The unit wilt attempt to soften the video in order to reduce this effect of excessive picture noise,
• When using the PIP/POP mode, TimeShift is stopped,
.In Video, Front Video, Antenna, Cable sources, TimeShift is available.
. tn Audio only channel, TimeShift is not available.
On progressing _meshift, It can do a diversified playing.
Indicates that the curre_ broadcast
_d displayed vi_o differ,
4, Using the remote control
You can shift p_ayback to any point within pmayingthe recorded program
- When playing, press the REW (_*) or FF (=-_) button,
• Like _-> _-> _ -> _-> _ ina row
2 ti_s 5 times 20 times 50 times 300 times
• If the button is pressed continuously, ff changes like above, If the button is taken
away_ it changes a normaf playback,
- ff you wish to return to a initial portion of Timeshift, press the I_ button.
,, ff you want to return to the current live broadcast, press thel_ bution.
(Indicator will be changed to LIVE}
- During playback, press the Pause ( II ) button,
•Still screen is displayed.
• Repeatedly press the Pause ( II ) button to advance frame by frame.
• When pressing the Pause ( II )button, Iongly, will be shown,
-If you press the A /V button on piaying, the screen will be jumped back and forth
in the current screen.
• Pressing the A button, the screen wil_ be jumped about 20 seconds forward_
•Pressing the V button, the screen will be jumped about 8 seconds backward.
• After moving the cursor using the <1/_ button on playing, the point of the cursor is
directly viewed on the screen,
Press the PLAY (l_) button to return to a normal playback,
74 Plasma TV
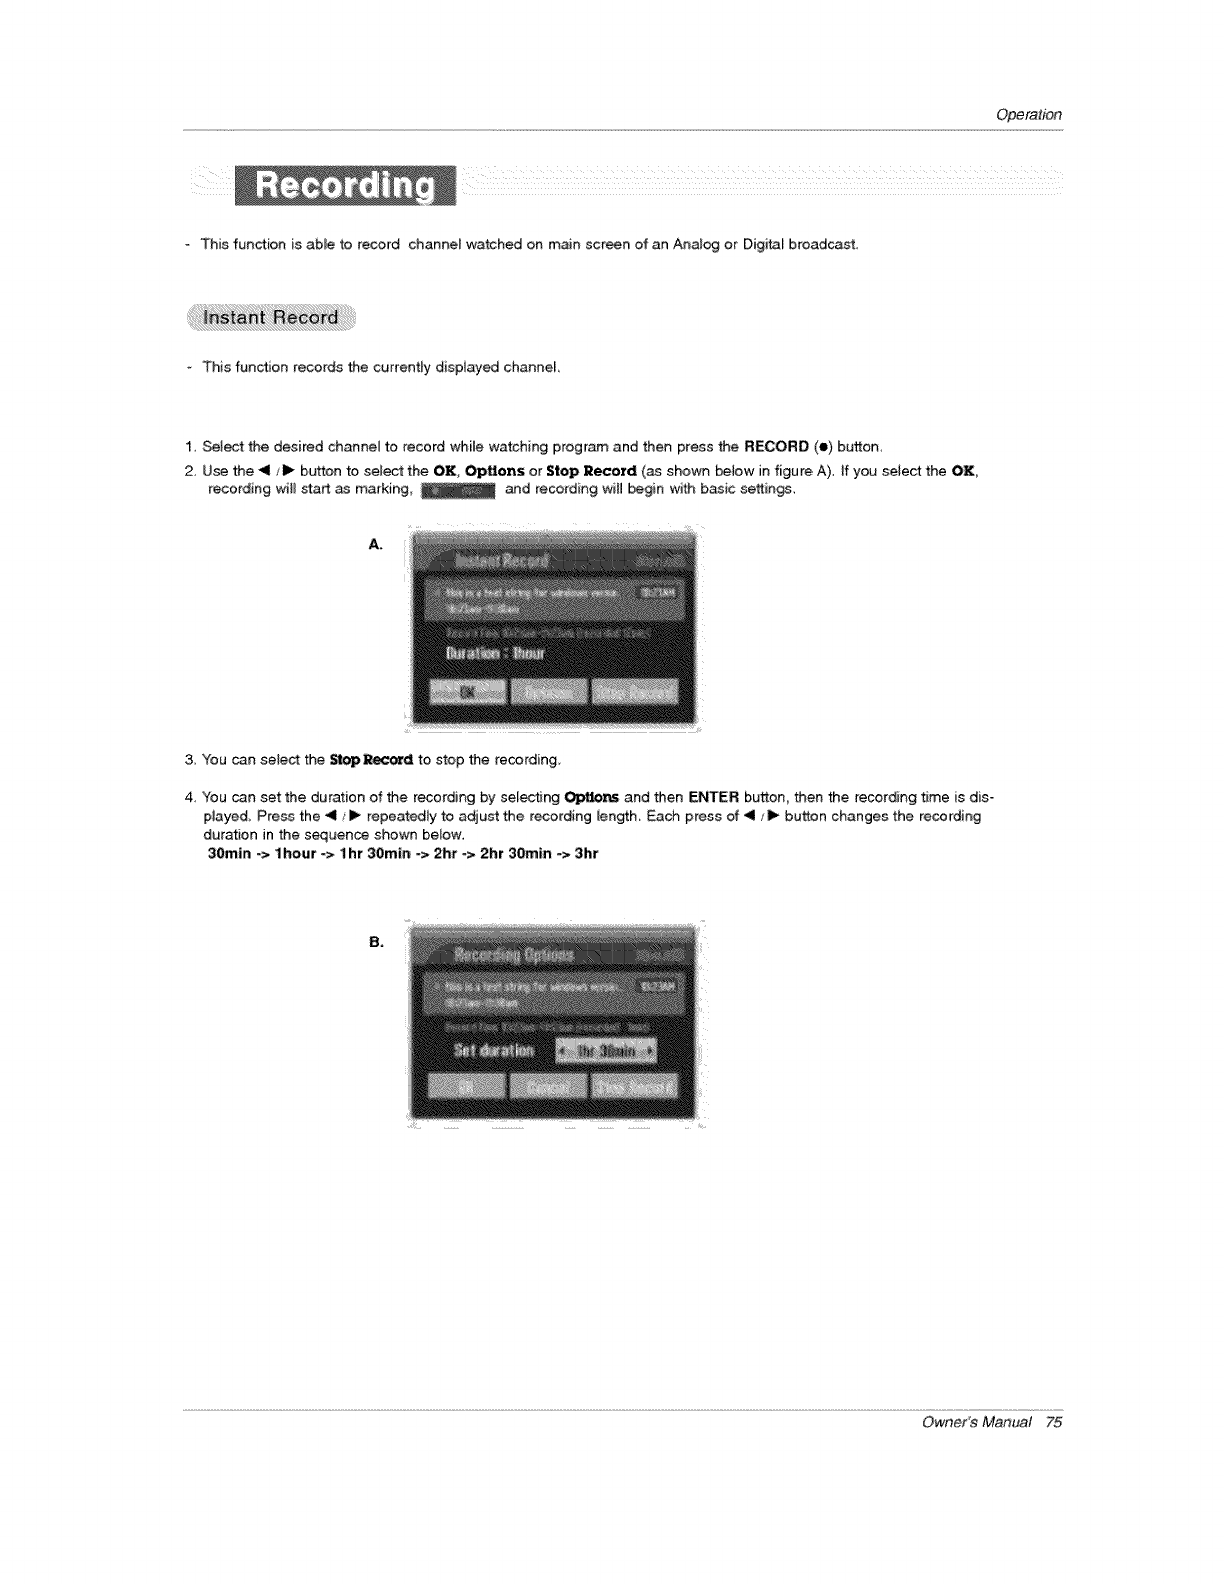
Operation
- This function is able to record channel watched on main scr_n of an Analog or Digital broadcast.
-"This function records the currently dispiayed channel,
1, Select the desired channel to record while watching program and then press the RECORD (e) button
2 Use the -41/1_ button to select the OK, OpUons or Stop Record (as shown _low in figure, A), If you setect the OK,
recording wil_ start as marking, _ and recording witl begin with basic settings.
3. You can select the _ep_d to stop the recording.
4. You can set the duration of the recording by selecting Ol;_lio_s and then ENTER button then the recording time is dis-
played_ Press the _11/ll_ repeatedly to adiust the recording _ength, Each press of _1 _1_ button changes the recording
duration in the sequence shown below:
30min -> I hour -> I hr 30rnin -> 2hr-> 2hr 30min -> 3hr
B,
Owner's Manual 75

Operation
5 You can aJso add recording time by pressing the RECORD (e) button during _nstant Record, Press the <1 fl_ repeatedly to
add to the recording time, Each press of _1/11_ button changes the recording duration in the sequence shown below,
No Change -,> +lOrntn -> +20rain -> +30rain -> +40m_n ->+_mln -> +1hi
The extra recording time added to existing setting vaiue makes final recording time length
C.
6. After adjusting the recording time, select OK and the progre_ bar will _ displayed.
Tota_ recording duration
time
•Press the EXIT button to hide the Progress Bar. Press the ENTER button to display the progress bar.
7, Press the STOP (III) to stop recording, or when the recording duration is reached, the HD DVR will stop recording,
Although recording has stopped, the T_meshift features remain active,
Notes:
.When recording, ff the available storage space become_ low, the re,_ording will be autometica@ stopped,
oR_ordings of less than 10 seconds wilt not be _ved,
.To save the disk space while recording analog or dtgital screen, no data is savc_ when no signal is pre_nt,
oTbe recording function will not initiale for a copy-protected program.
,After recording, marked time may be somewhat different from actual time,
*in no signal or film source, marked lime may be different from actual #me,
76 Plasma TV
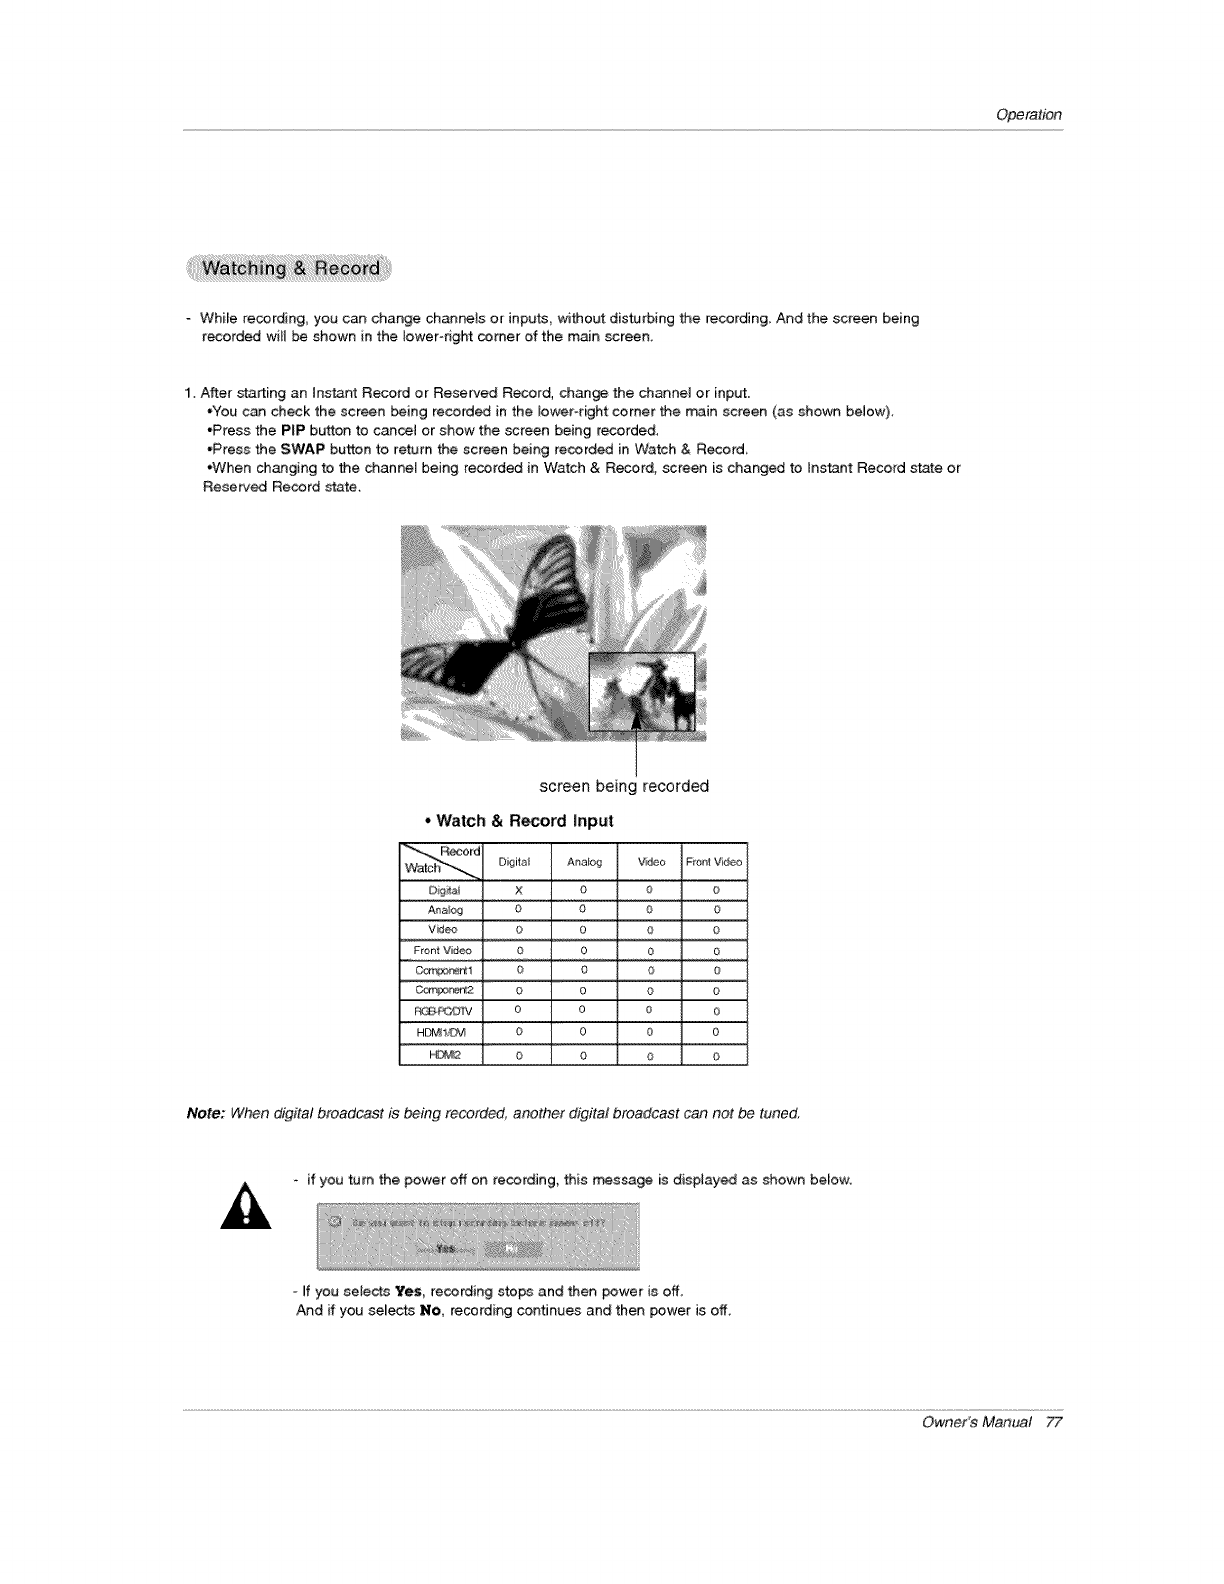
Operation
- White recording, you can change channels or inputs, without distu¢bing the recording. And the screen being
recorded will be shown in the lower-right comer of the main screen,
1. After _rting an instant Record or Reserved Record, chan_ the channel or input.
*You can check the screen being recorded in the lower-right corner the train screen (as shown below).
*Press the PIP button to cancem or show the screen being recorded.
*Press the SWAP button to return the screen being recorded in Watch & Record
,When changing to the channel being recorded in Watch & Record, _reen is changed to instant Record state or
Reserved Record slate.
screen being recorded
*Watch &R_ord Input
rd
Dg_i X O O 0
A_tog O O O O
Vi!deo 0, 0 O #J
Front Video 0 0 0 0
0_*_3 P_i_ 1 S O S S
_or_2 0 0 0 S
F_ 0 0 0 0
HDf_I,.'EM O 0 0 0
H_2 S O S S
Note: When digital broadcast is being recorded, another digital broadcast can net be tuned,
-if you turn the power off on recording, this _ssage is displayed as shown below.
-ff you selects Yes, recording stops and then power is off.
And if you selects No, recording continues and then power is off.
Owner's Manual 77
Opera#bn
i
0TV Gu de Screen,. System
-Your new TV contains the TV Guide On Screen interactive Program Guide.
- The TV Guide On Screen system has features that he_p you get the most out of your viewing
experience.
TV Guide On Screen system Overview
The TV Guide On _reen system has the following features:
•Eight days of show listings (today plus seven days),
•icons that indicate show rating, stereo, HDTV, new episode etc,
.intuitive up/dowrd_eft/right navigation using your remote control.
•Set shows to Record_
•Schedule show Reminder&
•Search shows by category (e.g. Movies, Sports, ChiMren, etc.)
•Search for shows based on keywords or alphabetically by title,
•Direct tuning to a channel.
•Show inforrr_ation while watching TV.
•Streamlined System Setup _d defautt setting options.
•Channel lineup customization.
•Help sc_'eens while in the TV Guide On Screen system,
78 Plasma TV
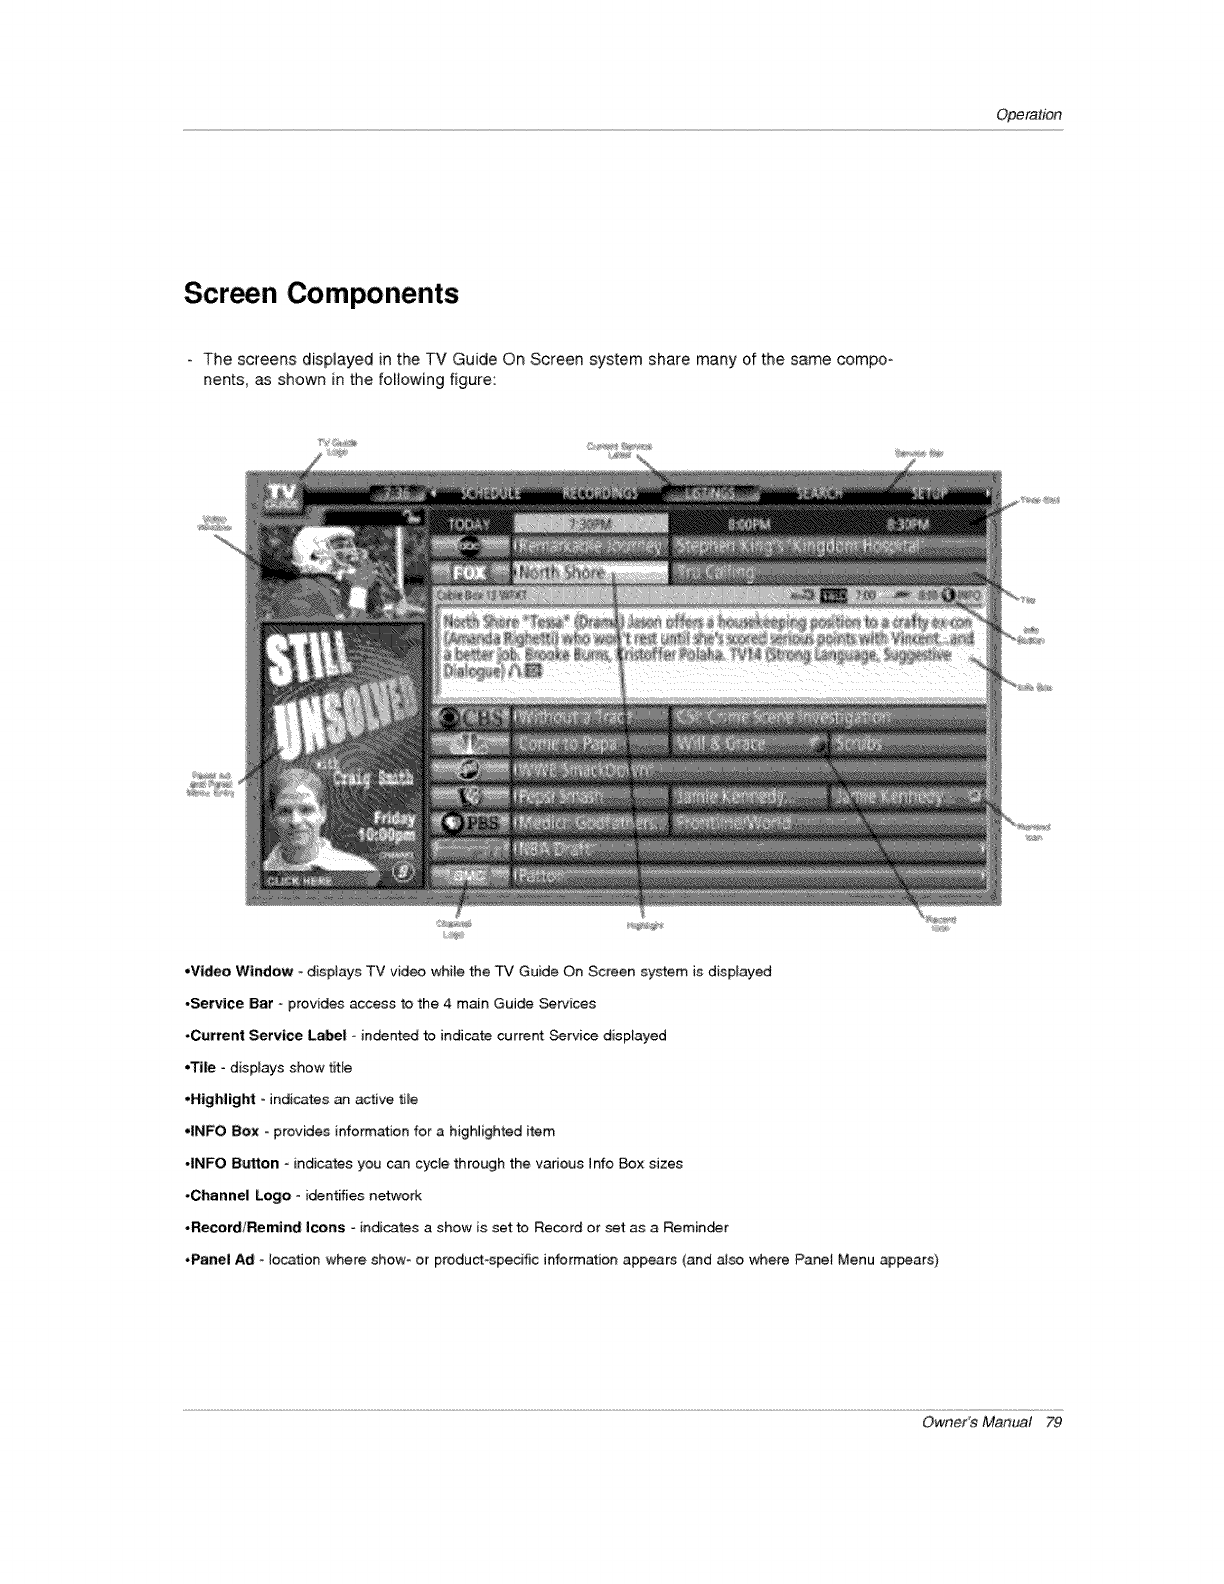
Operation
Screen Components
- The screens displayed in the TV Guide On Screen system share many of the same compo _
nents, as shown in the following fig:ure:
•Video Window - disptays TV video while the TV Guide On Screen system is displayed
•Service Bar - provides access to the 4 main Guide Services
•Current Service Label oindented to indicate current Service displayed
•Tile - displays show title
•Highlight oindicates an active tile
dNFO Box - provides information for a highlighted item
.INFO Button - indicates you can cycle through the various Info Box sizes
,Channel Logo* identifies netwoA
-Record/Remind Icons -indicates a show is set to Record or set as a Reminder
,Panel Ad - location where show_ or product-specific information appears (and also where Panel Menu ap_ars)
Owner's Manual 79

Operal/on
QTV Guide Scree nTM System
Panel Menu
•A Panel Menu appears when the Menu key is pressed on a highlighted tile and additional options are available, It also
apbears when you press ENTER on a show starting in the future.
•When aPanel Menu appears, the highlighted tile changes color to indicate the Panel Menu relates to this tile,
•The Panei Menu displays below the Video Win_w,
,Help is available for a displayed Panel Menu by pressing the INFO button.
•The A tV button move between the options within the Panel Menu,
•The left and tight arrows move to adjacent options unless the highlight is on an o_meter, where these arrows change the
odometer choice,
,Pressing E_ER from an odometer or number entry box moves the highlight to the default com_nd button of that Panel
Menu, for example, Schedule Reminder.
•Pressing E_ER from a highlighted command button executes the action and ctoses the Panel Menu (e,g,, Schedule
Reminder, Cancel),.
•Select Cance_ to cancel any changes and press ENTER to close this _nu,
,Pressing Menu is a shortcut to Cancel. Press Menu to cancel any changes and close the menu.
•If a Pane_ Menu contains more menu options than can be displayed on a single sereen_ A i Y button appear at the top or
bottom of a menu. Simply scroll down to access these options,
80 Plasma TV
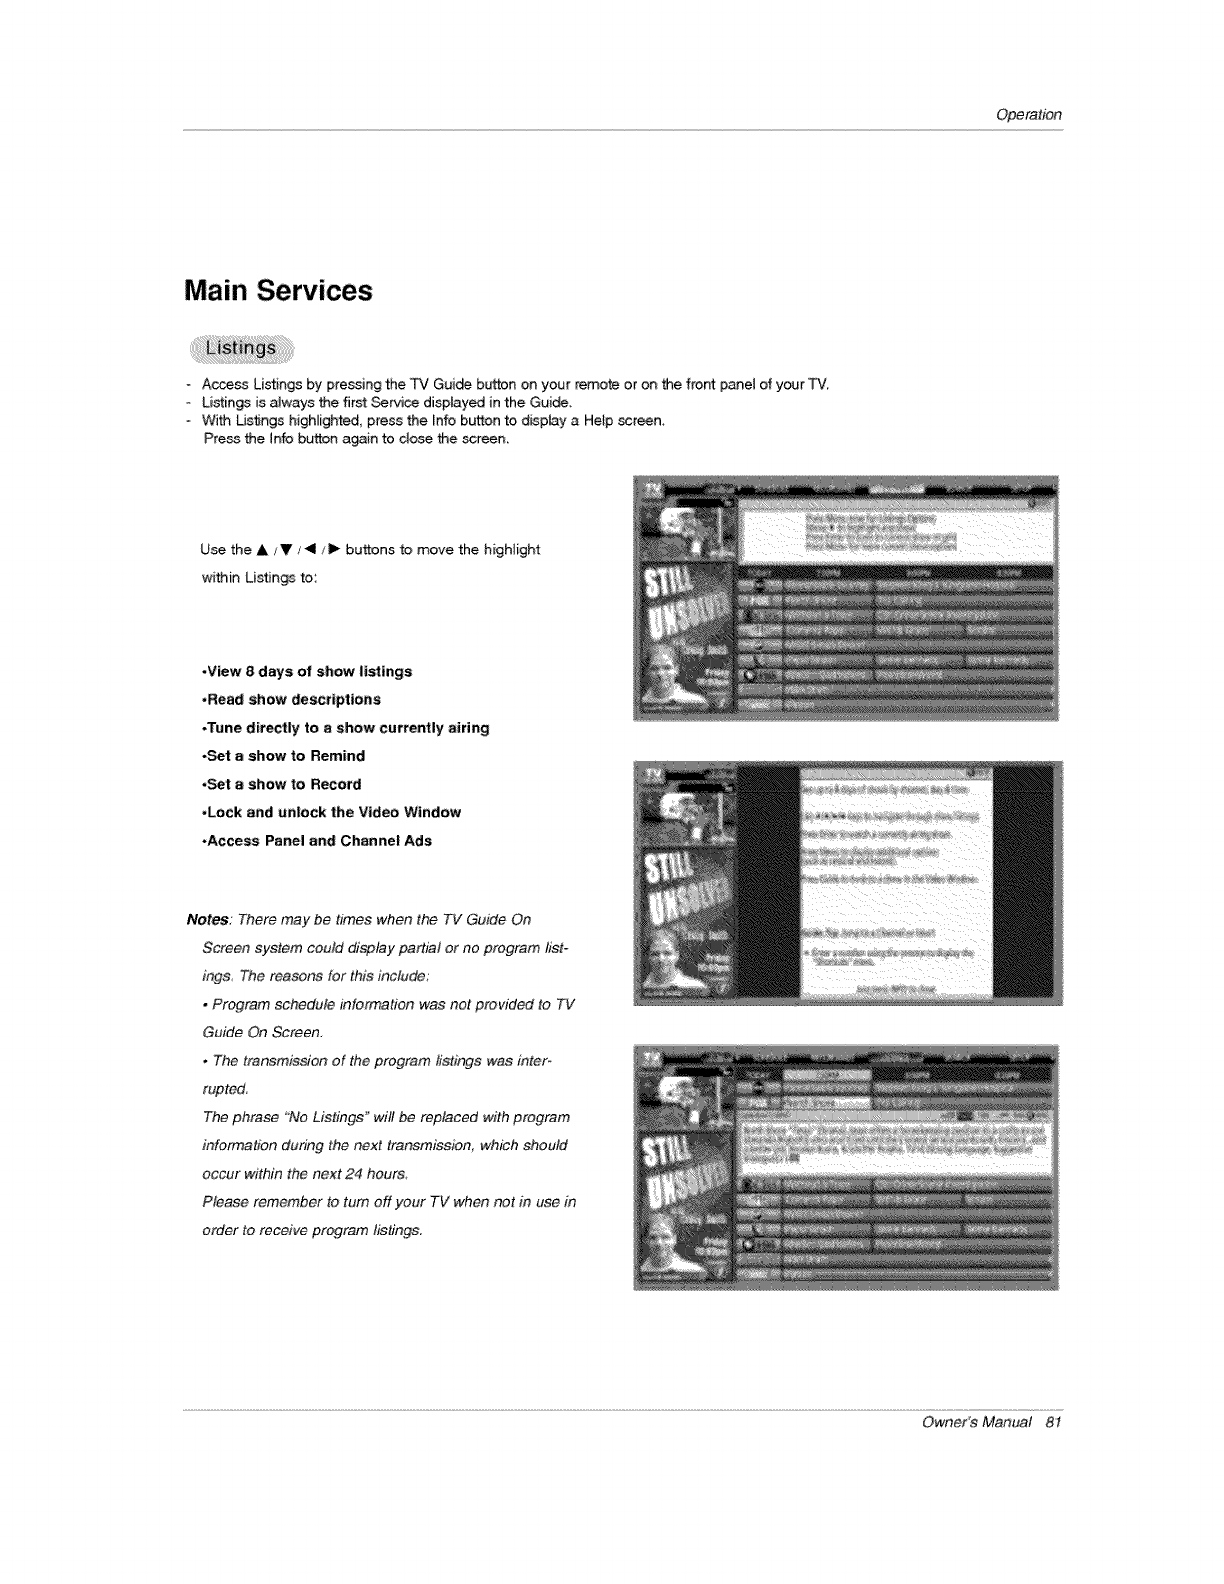
Operation
Main Services
Acce_ Listings by pressing the TV Guide button on your remote or on the front panet of your TV,
-Listings is always the first Service displayed in the Guide,
o With Us_ngs highlighted, press the Info button to d_play a Help screen_
Press the lnfo button again to d_ the screen,
Use the A/V/411 / I_ buttons to move the highiight
wi_in Ustin_ to:
,View 8days of show listings
,Read show descriptions
•Tune directly to ashow currenUy airing
•Set ashow to Remind
,Set ashow to Record
•Lock and unlock the Video Window
•Access Panel and Channel Ads
Notes: There may be times when the TV Guide On
Screen system could display partial or no program list-
ings The reasons for this include;
•Program schedule information was not provided to TV
Guide On Screen,
•The transmissJon of the program hstings was inter.
rupted,
The phrase "No Listings' will be replaced with program
#_formation during the next transmission, which should
occur within the next 24 hours,
Please remember to turn off your TV when not in use in
order to receive program listings.
Owner's Manual 8t
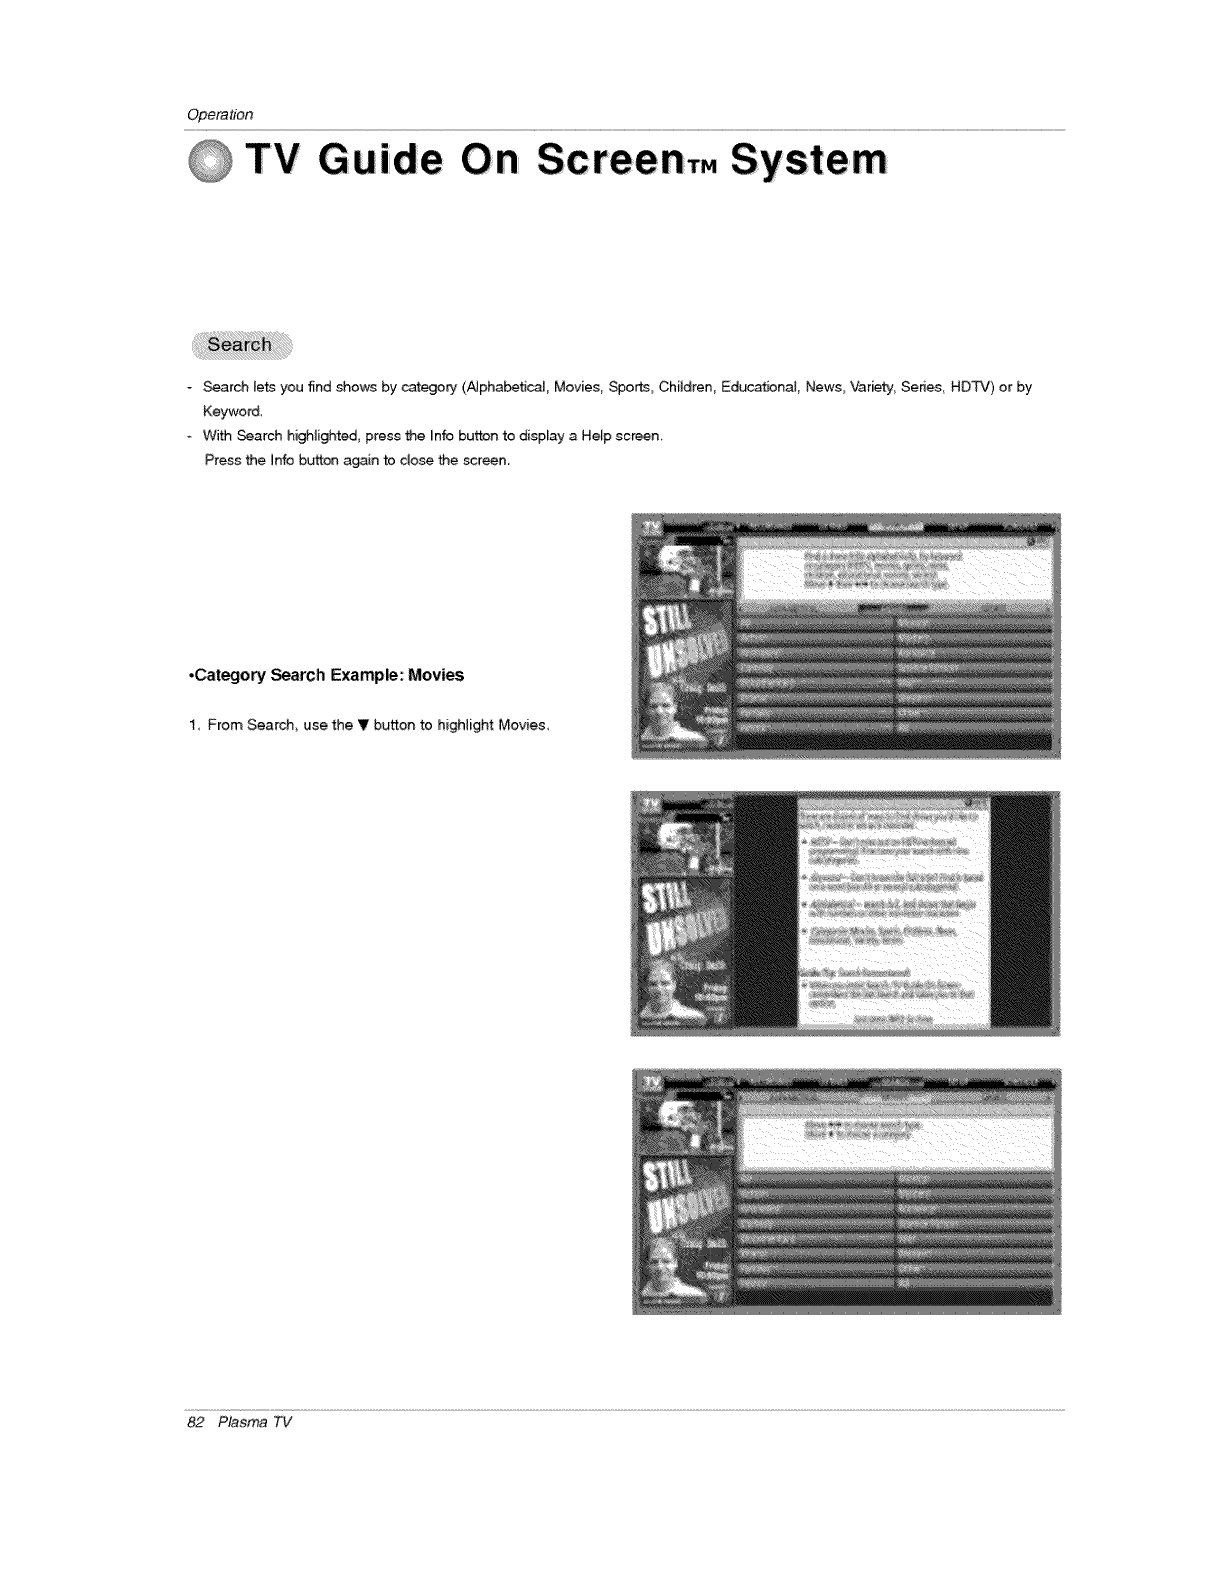
Opera_n
TV Guide Screen,. System
- Search lets you 5nd shows by catego_ (AJphabetica[_ Movie& Spor_, Children_ Educatbna[ News V.3r_ty, Senes, HDTV) or by
Keywo_,
o With Search highlighted, press the [nfo button to display a Help screen
Press the Info button again to dose the screen
.Category Search Examp_: Movies
I From Search, use the V button to higHight Movies,
82 Plasma TV
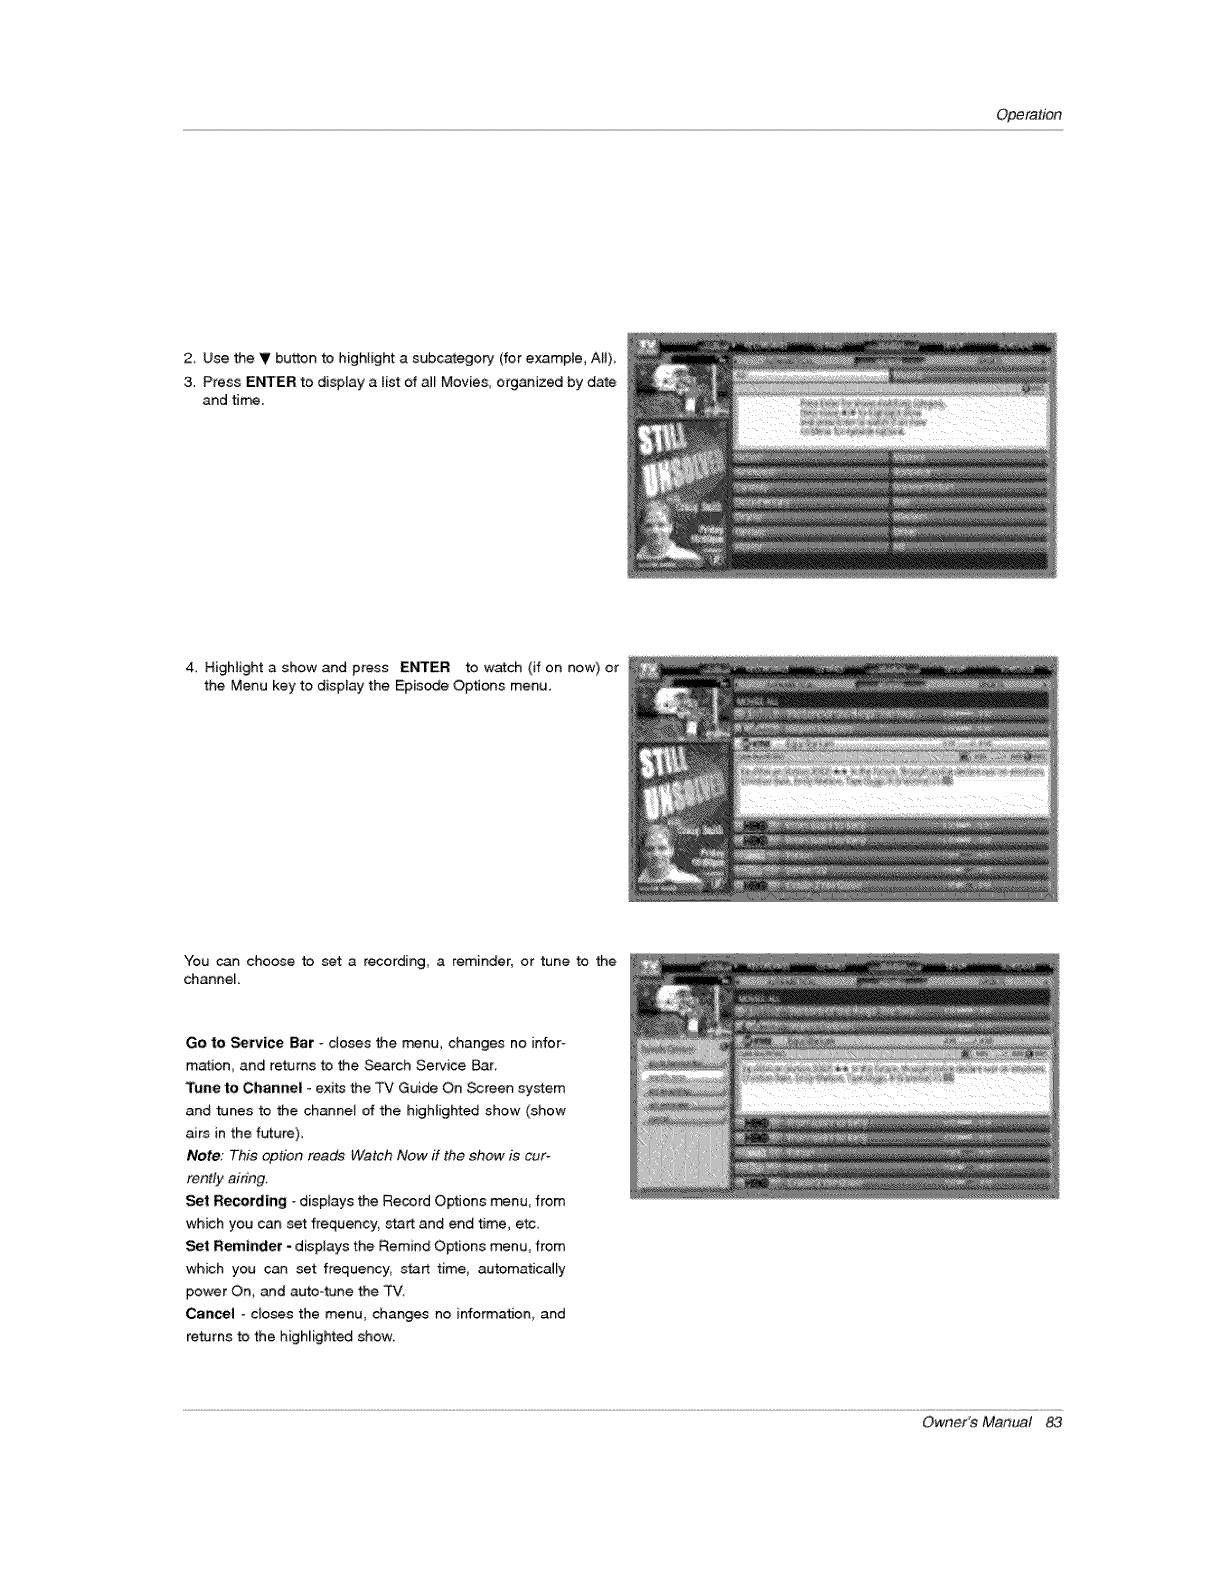
Operation
2 Use tile V button to highlight a subcategory (for example, AII)
3. Press ENTER to display a list of aJl Movies, organized by date
and tJm_.
4. Highlight a show and press ENTER to watch (if on now) or
the Menu key to display the Epis_e Op_ons menu.
You can choose to set a recording, a reminder, or tune to the
channel
Go to Service Bar -doses the menu, changes no infor-
m_ion, and returns to the Search Service _r.
Tune le Channel - exits the TV Guide On Screen system
and tunes to the channel of the highlighted show (show
airs in the future)
Note; This option r;gade Watch Now ff the show is cur-
rontiy airing.
Set Recording - displays the Record Op_Jons m_nu, from
which you can set frequency_ start and end time, etc
Set Reminder -displays the Remind Options menu, from
which you can set frequency, start time, automatically
power On, and auto4une the TV.
Cancel -c_oses the menu, changes no information, and
returns to the highlighted show
Owner's Manual 83

Operation
QTV Guide Scree nT. System
•Keyword Search
•Keyword search le_ you enter a word(s) to look for a particular show by cate_ry or for every show title that matches.
1, Highlight the Keyword navigation label, and press
ENTER button to display the Keyword Search menu,
2. Highlight New Search, and press ENTER button.
3The Search Options menu is displayed,
4. Highlight Category, and use the <1 /I_ button to select
a category to search (e.g. All, HDTV, Children, Sports,
etc.}. When finished, use the V button to highlight
Enter Keyword.
5. Highlight Enter Keyword_ and press ENTER.
6 Use the A /V .,'_1 /b" button to highlight a character,
and press ENTER to display it. When comptete, high_
light Done and press ENTER
84 Plasma TV
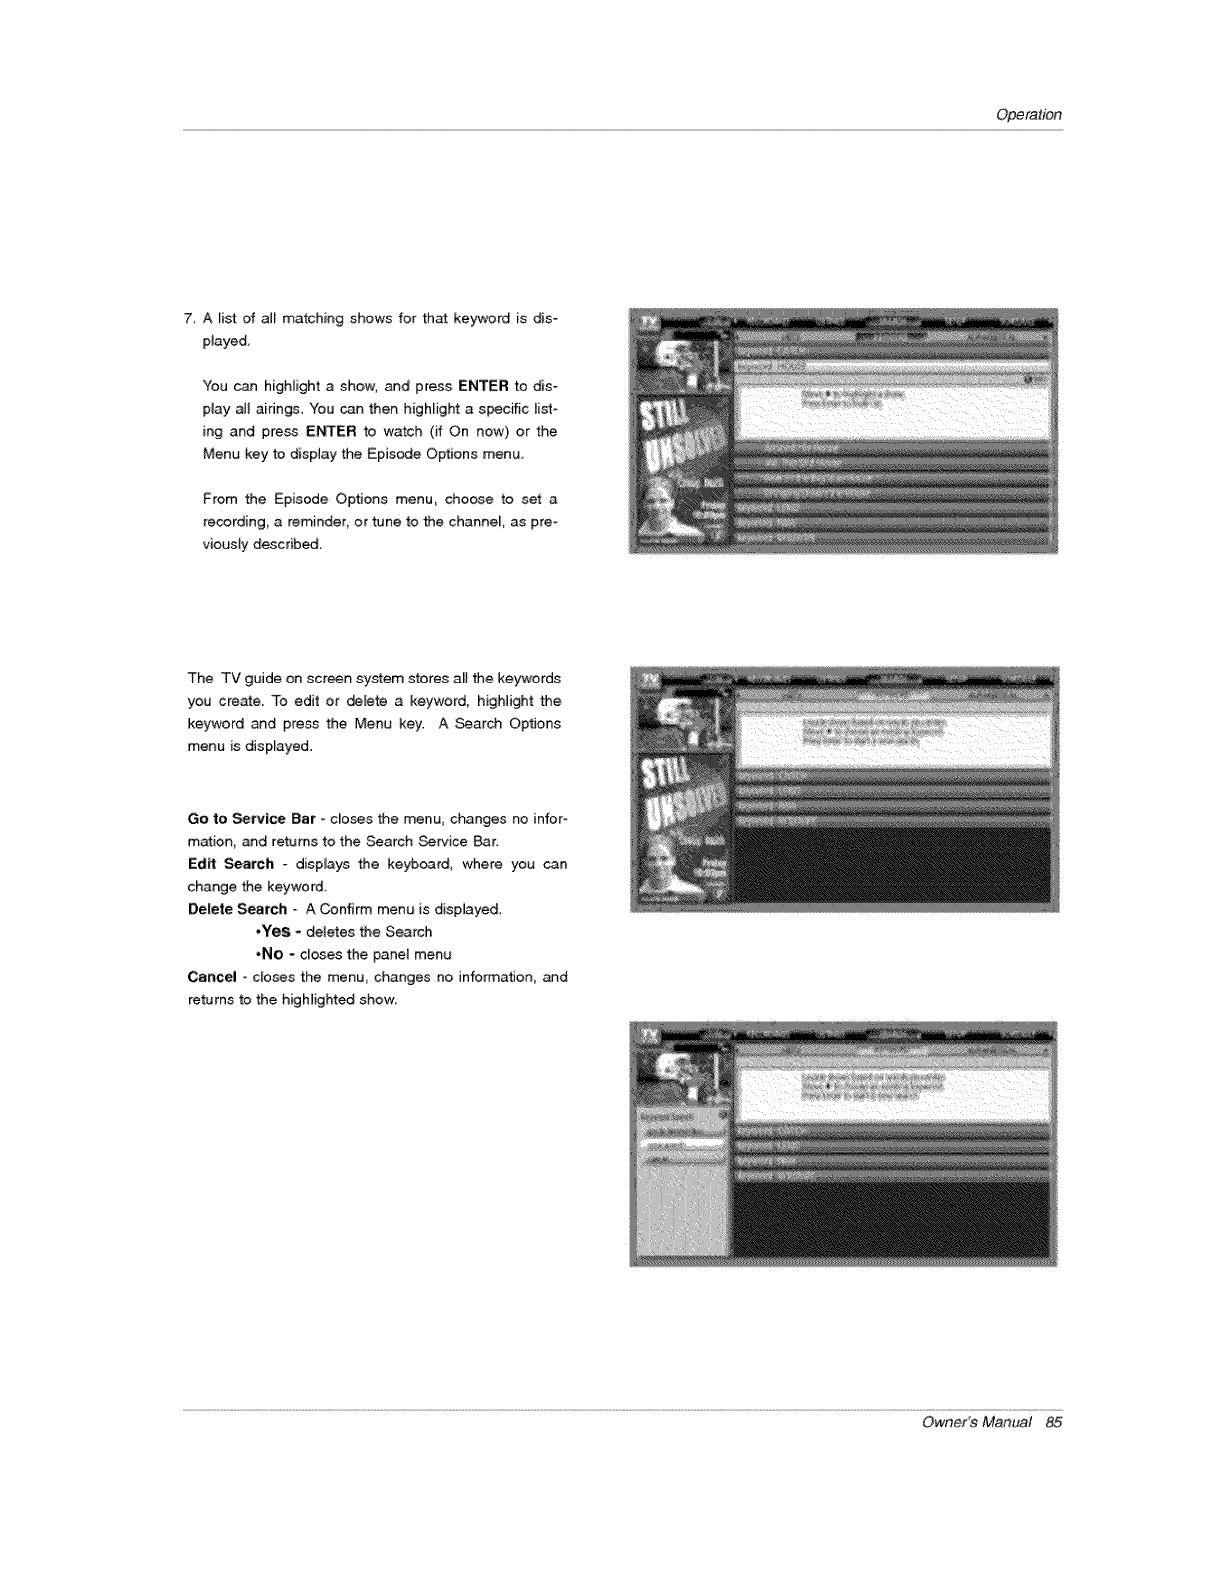
Operation
7 A Fist of all matching shows for that key"word is dis-
played
You can higNight a show, and press ENTER to dis-
play at_ aidngs, You can then higNight a specific list-
ing and press Er_£rER to watch (if On now) or the
Menu key to display the Episode Options menu,
From the Episode Options menu_ choose to set a
recording a reminder_ or tune to the channel as pre-
viousfy described
The TV guide on screen system stores all the keywords
you creme. To edit or delete a keyword, higHight the
keyword and pre_ the Menu key. A _arc_ Options
menu is displayed.
Go to service Bar - doses the menu, changes no infor-
mation and returns to the Search Service Bar.
Edit Search - displays the keyboard, where you can
change the keyword
Delete Search * A Confirm menu is dispiayed.
•Yes - deletes the Search
*No - closes the panel menu
Cancel - closes the menu, changes no info_ation_ and
returns to the higNighted show:
Owner's Manual 85
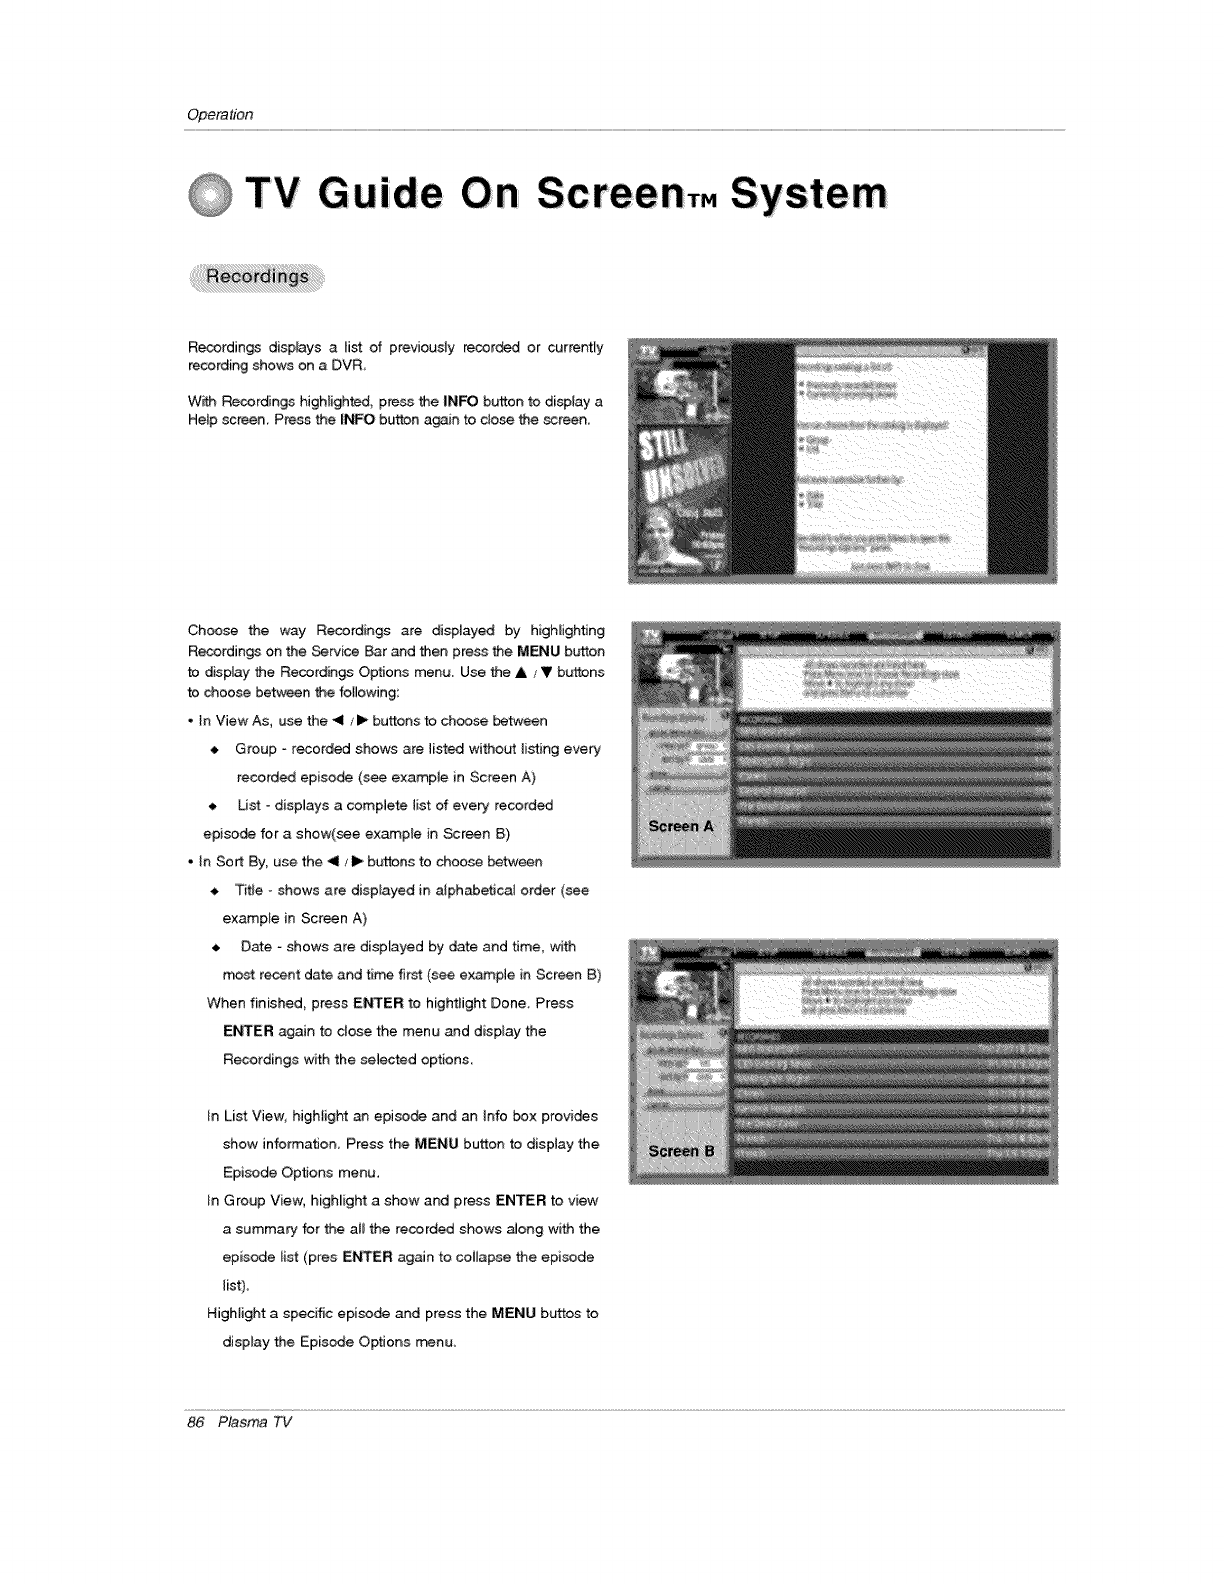
Opera#bn
i
TV Gu iide Screen,. System
Recordings displays a list of previously recor_ or currentiy
recording shows on a DVR,
W_h Recordings highlighted, press the INFO button to display a
Help screen, Press the INFO button again to close the _reen
Choose the way Recordings are displayed by higHightJng
Recordings on the Service Bar _d then press the MENU button
to display the Recordings Options menu. Use the & s !V buttons
to choose between the follo_4ng:
.In View As. use the <1 /I_ buttons to choose between
Group recorded shows are listed without 4isting every
recorded episode (see example in Screen A)
, Us_ - displays a complete list of every recorded
episode for a show(see ex_ple in _reen {3)
. In Sort By. use the <1/11_ buttons to choose between
• Titte -shows are displa-yed in a[ph_etical order (see
example in Screen A)
_. Date -shows are displayed by date and time. with
most recent date and tim._ first (see ex_p_e in Screen B)
When finished, press Et..rII'ER to hightlight Done_ Press
E_ER again to dose the menu and display the
Recordings with the selected options.
tn List View_ higNight an episode and an Info box provides
show information Press the MENU button to display the
Episode Options menu.
tn Group View. highUight a show and press ENTER to view
a summary for the a_ the recorded shows aJong with the
episode _ist (pres ENTER again to collapse the episode
lis£.
Highlight a specific episode and press the MENU bu;ttos to
display the Episode Options rr_nu.
86 Plasma TV
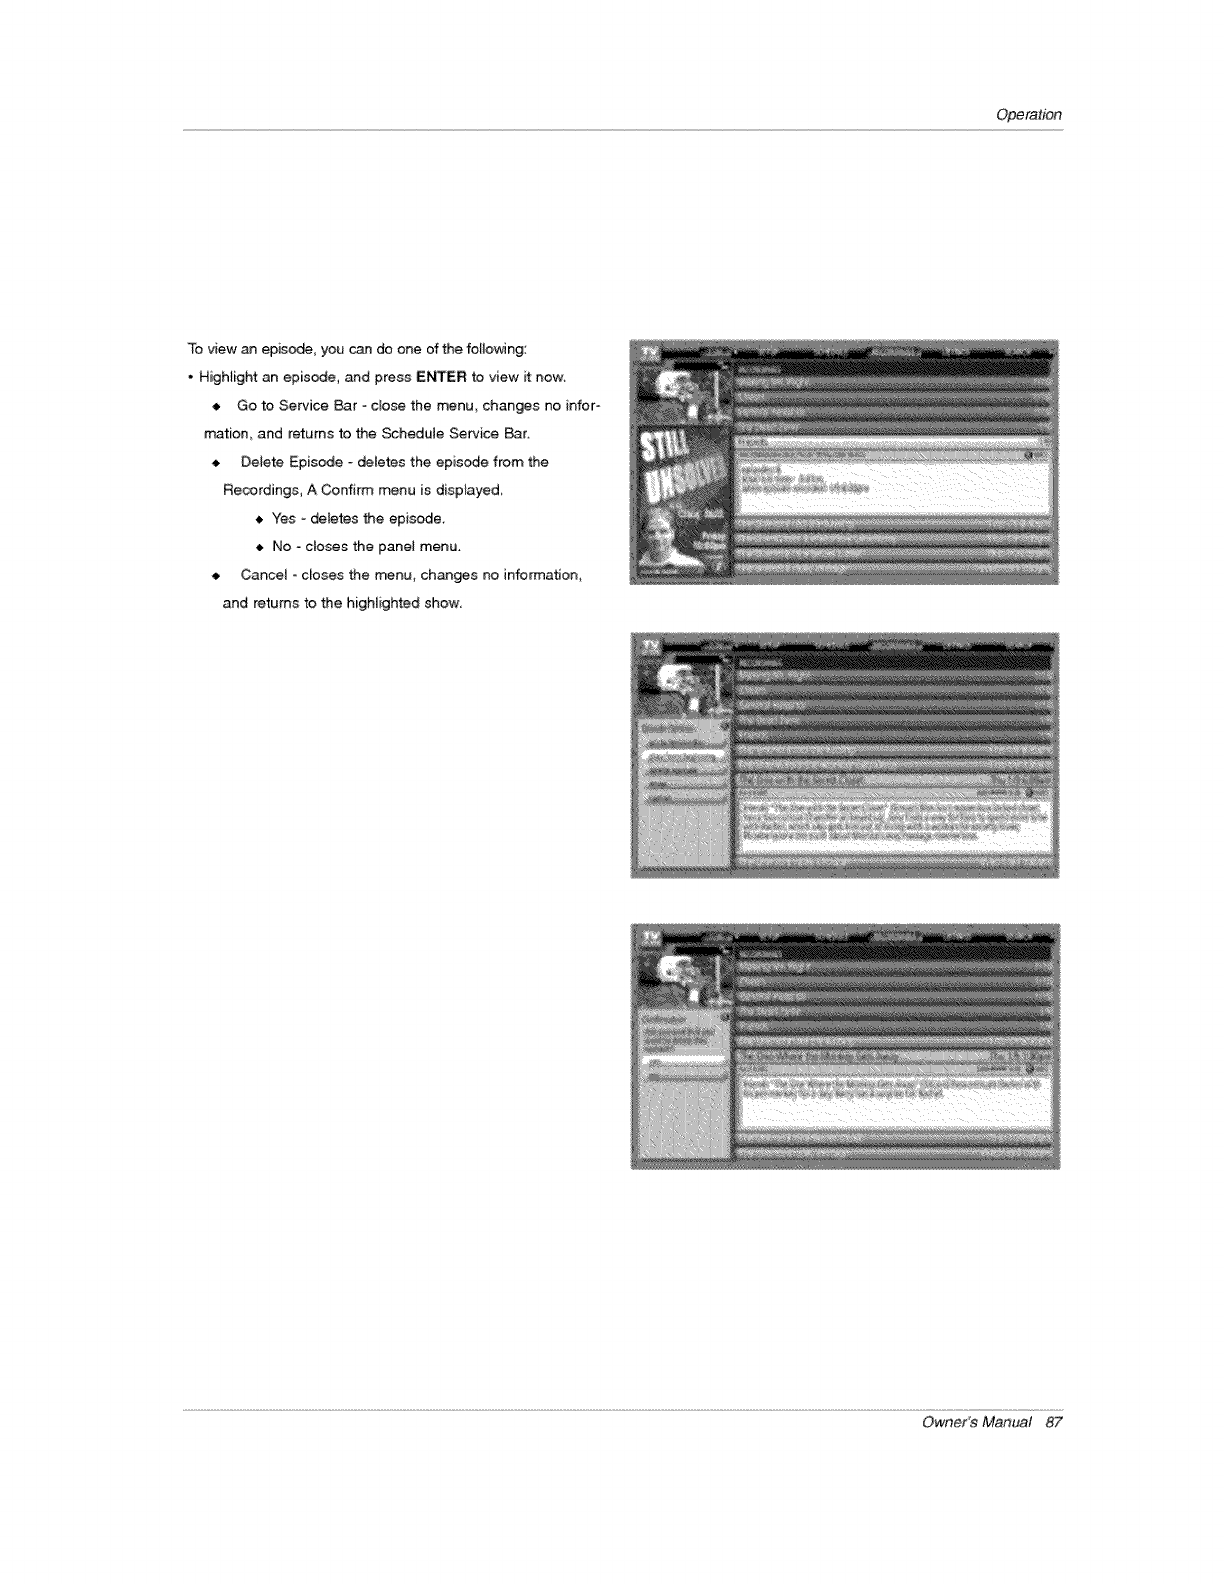
Operation
To view an epis_, you can do one of the following:
- Highlight an episode, and press ENTER to view it _ow_
• Go to Service Bar ° clo_ the menu, changes no infor_
mation_ and returns to the Schedule Service Bar.
Delete Episode - deletes the episode from the
Recordings, A Confirm menu is displayed
_, Yes -deletes the episode.
_, No -doses the panel menu.
. Cancel - closes the menu, changes no information,
and returns to the highlighted show
Owner's Manual 87
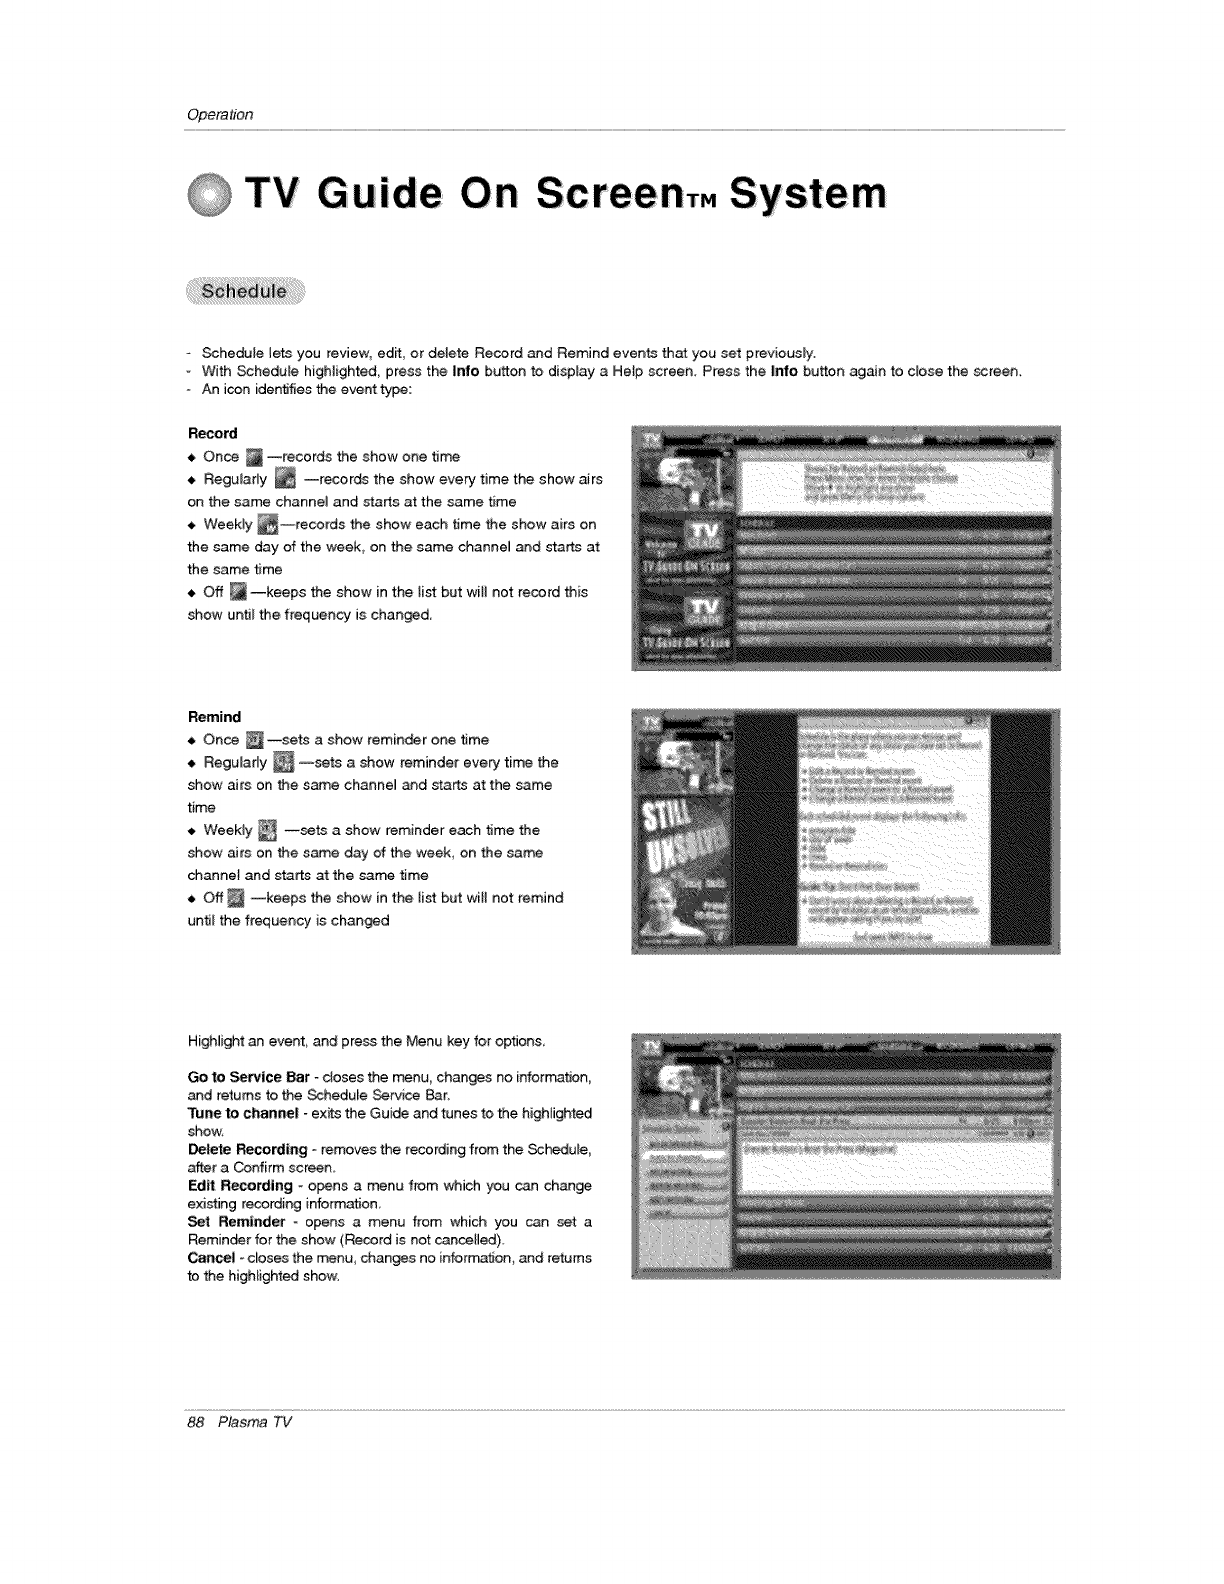
Operation
QTV Guiide On Screen,. System
-Schedule lets you review, edit, or delete Record and Remind events that you set previously.
-With Schedule highlighted, press the Info button to display a Hetp screen. Press the |are button ag_n to c_ose the screen.
- An icon identifies the event type:
Record
Once _ --records the show one time
Regularly _ --records the show every time the show airs
on the same channe_ and starts at the same time
_--records the show each time the show airsWeekly on
the same day of the week_ on the same channe_ and sta_ at
the same time
Off _--keeps the show in the list but wi[I not record this
show until the frequency is changed.
Remind
Once _--sets a show reminder one time
Regularly _ --sets a show reminder eve_ time the
show airs on the same channeJ and starts at the same
time
--sets a show reminder each time theWeekay
€.
show airs on the same day of the week, on the sam
channel and starbs at the sam time
Off_ --keeps the show in the list but will not remind
until the frequency is changed
Highlight an even_, and press the Menu key for options
Go to Service Bar - doses the menu changes no information,
and returns to the Schedule Service _r.
Tune to channel - exits the Guide and tunes to the highlighted
show.
Delete Recording - removes the recording from the _#_ule
after a Confirm screen.
Edit Recording _opens a menu from which you can change
existing recording information
Set Reminder - opens a menu from which you can set a
Reminder for the show (Record is not cancelled).
_ncel _c_oses the menu, changes no inforrr_tion, and returns
to the highlighted show,
88 Plasma TV
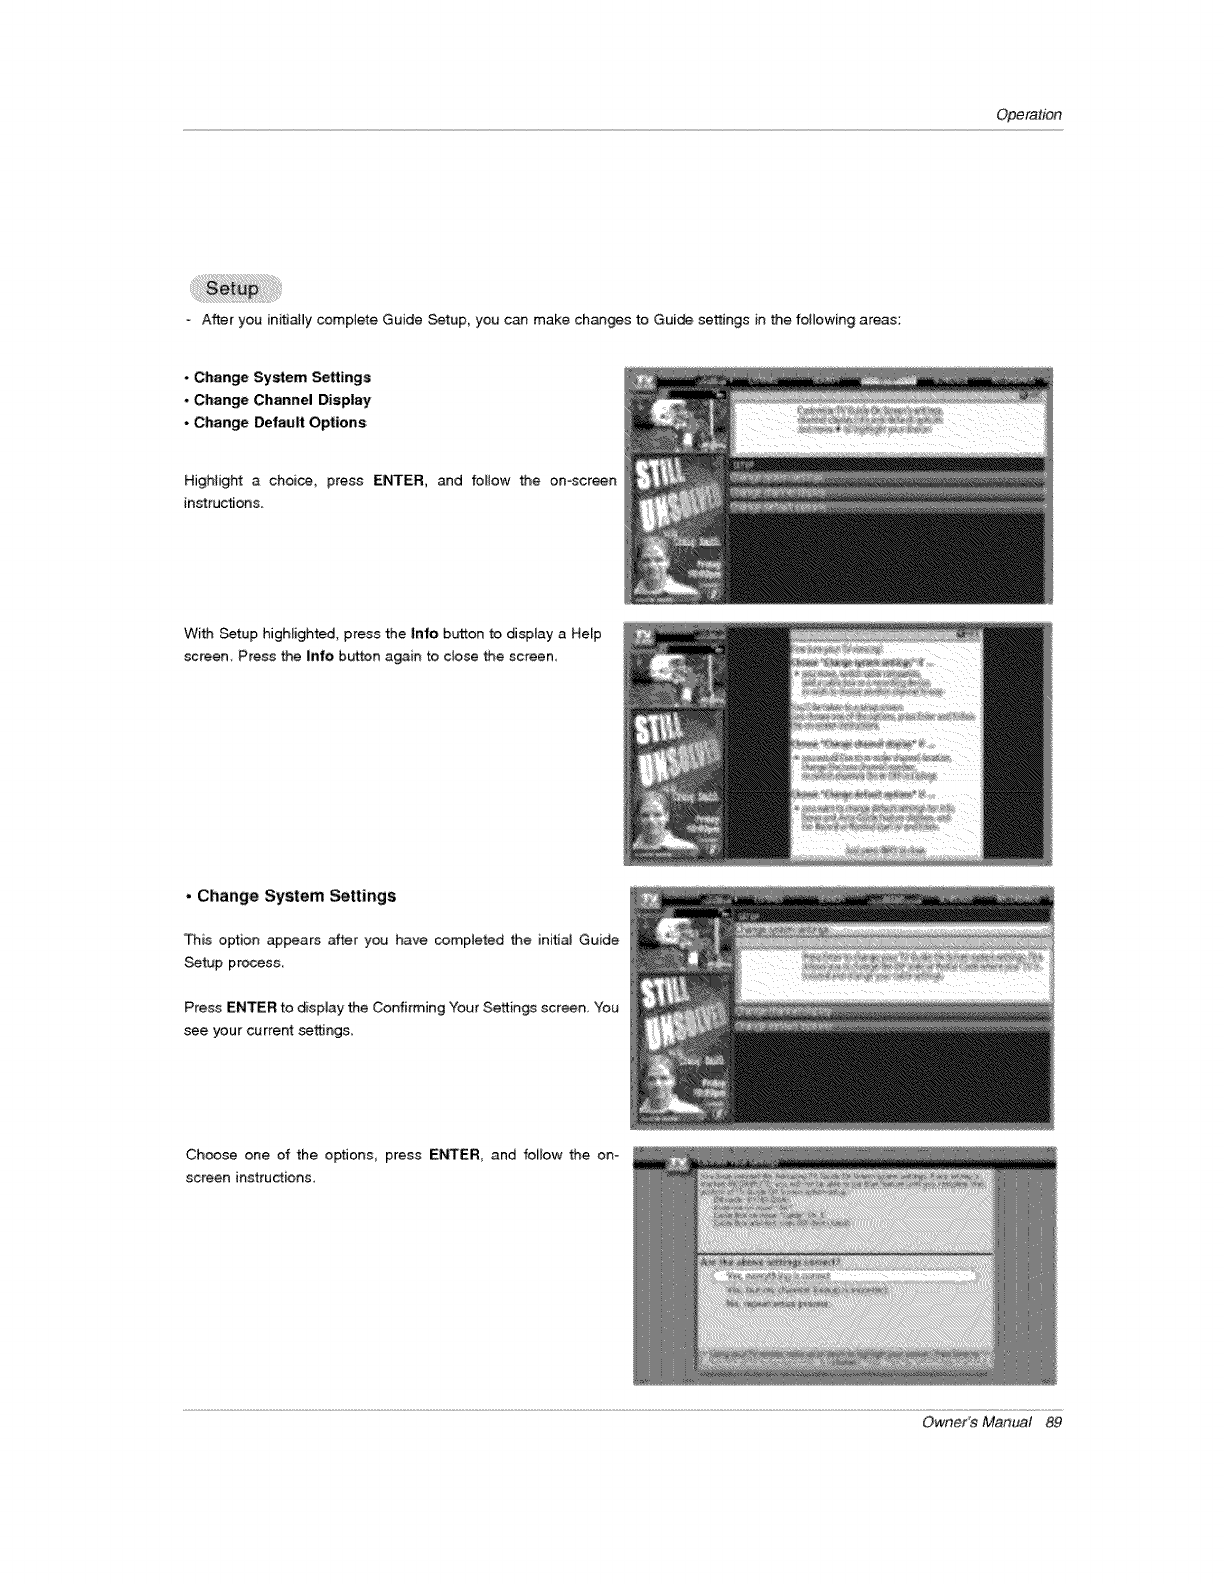
Operation
After you inifJatly complete Guide Setup, you can make chants to Guide settings in the following areas:
*Change System Settings
*Change Channel Display
- Change DefauR Options
Highlight a choic_, press ENTER, and follow the on-screen
instructions.
With Setup highlighted, press the Into button to display a Help
screem Press the infe button again to close the screen
• Change System Settings
This option appeam after you have completed the initial Guide
Setup process
Press ENTER to display the Confirming "four Settin_ screen, You
see your current setting&
Choose one of the optJons, press ENTER, and follow the on=
screen instructions,
Owner's Manual 89
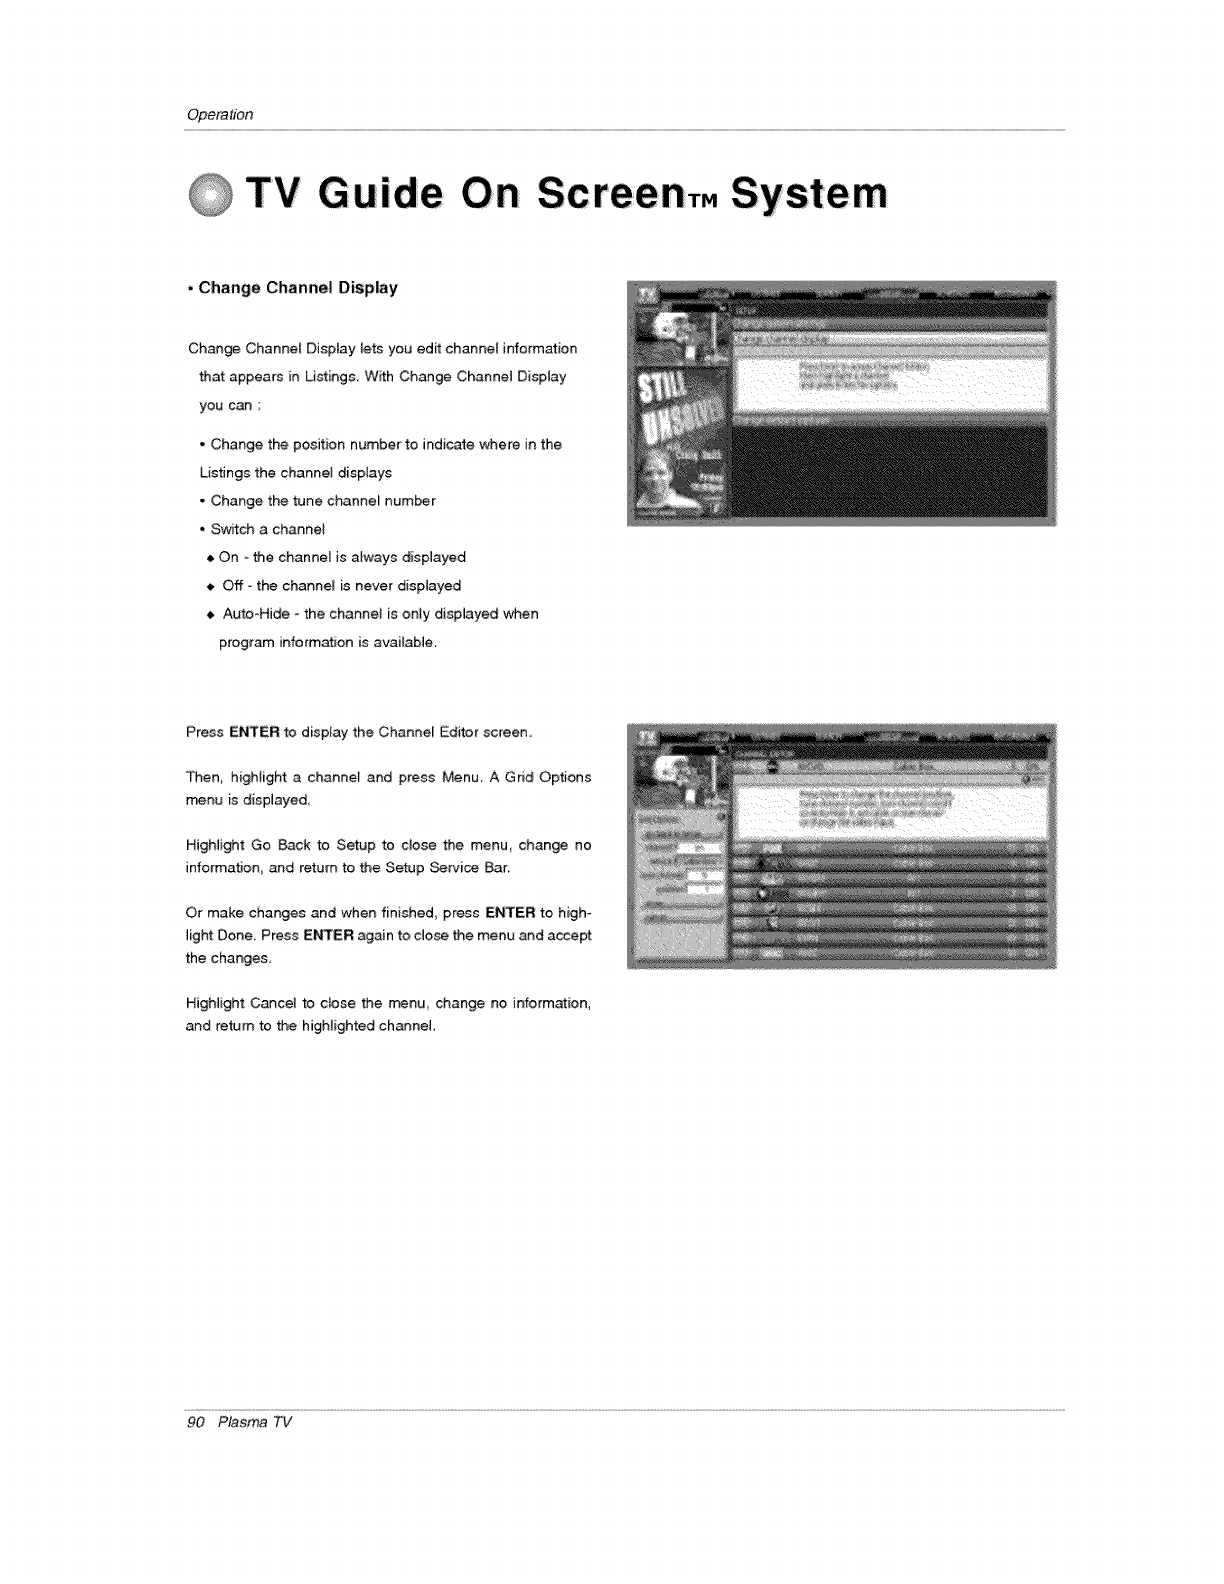
Opera#bn
i ,
GTV G u iide Screen,. System
. Change Channel Display
Change Channel Display lets you edit channel information
that appears in Listings, With Change Channel Display
you can
• Change the position number te indicate where in the
Listings the channel displays
• Change the tune channe_ number
• Swkch a channel
_, On -the channel is always displayed
Off - the channel is never displayed
Auto-Hide - the channel is only displayed when
program information is available.
Press ENTER to disptay the Channel Editor screen..
Then, highlight a channel and press Menu, A Grid Options
_nu is displayed,
Highlight Go Back to Setup te close the menu_ change no
informa_on_ and return to the Setup Service Bar
Or make changes and when finished press ENTER to high-
light Done_ Press ENTER again to dose the menu and accept
the changes
HigHight Cancel to ctese the n_nu change no information,
and return to the highlighted channel
90 Plasma TV
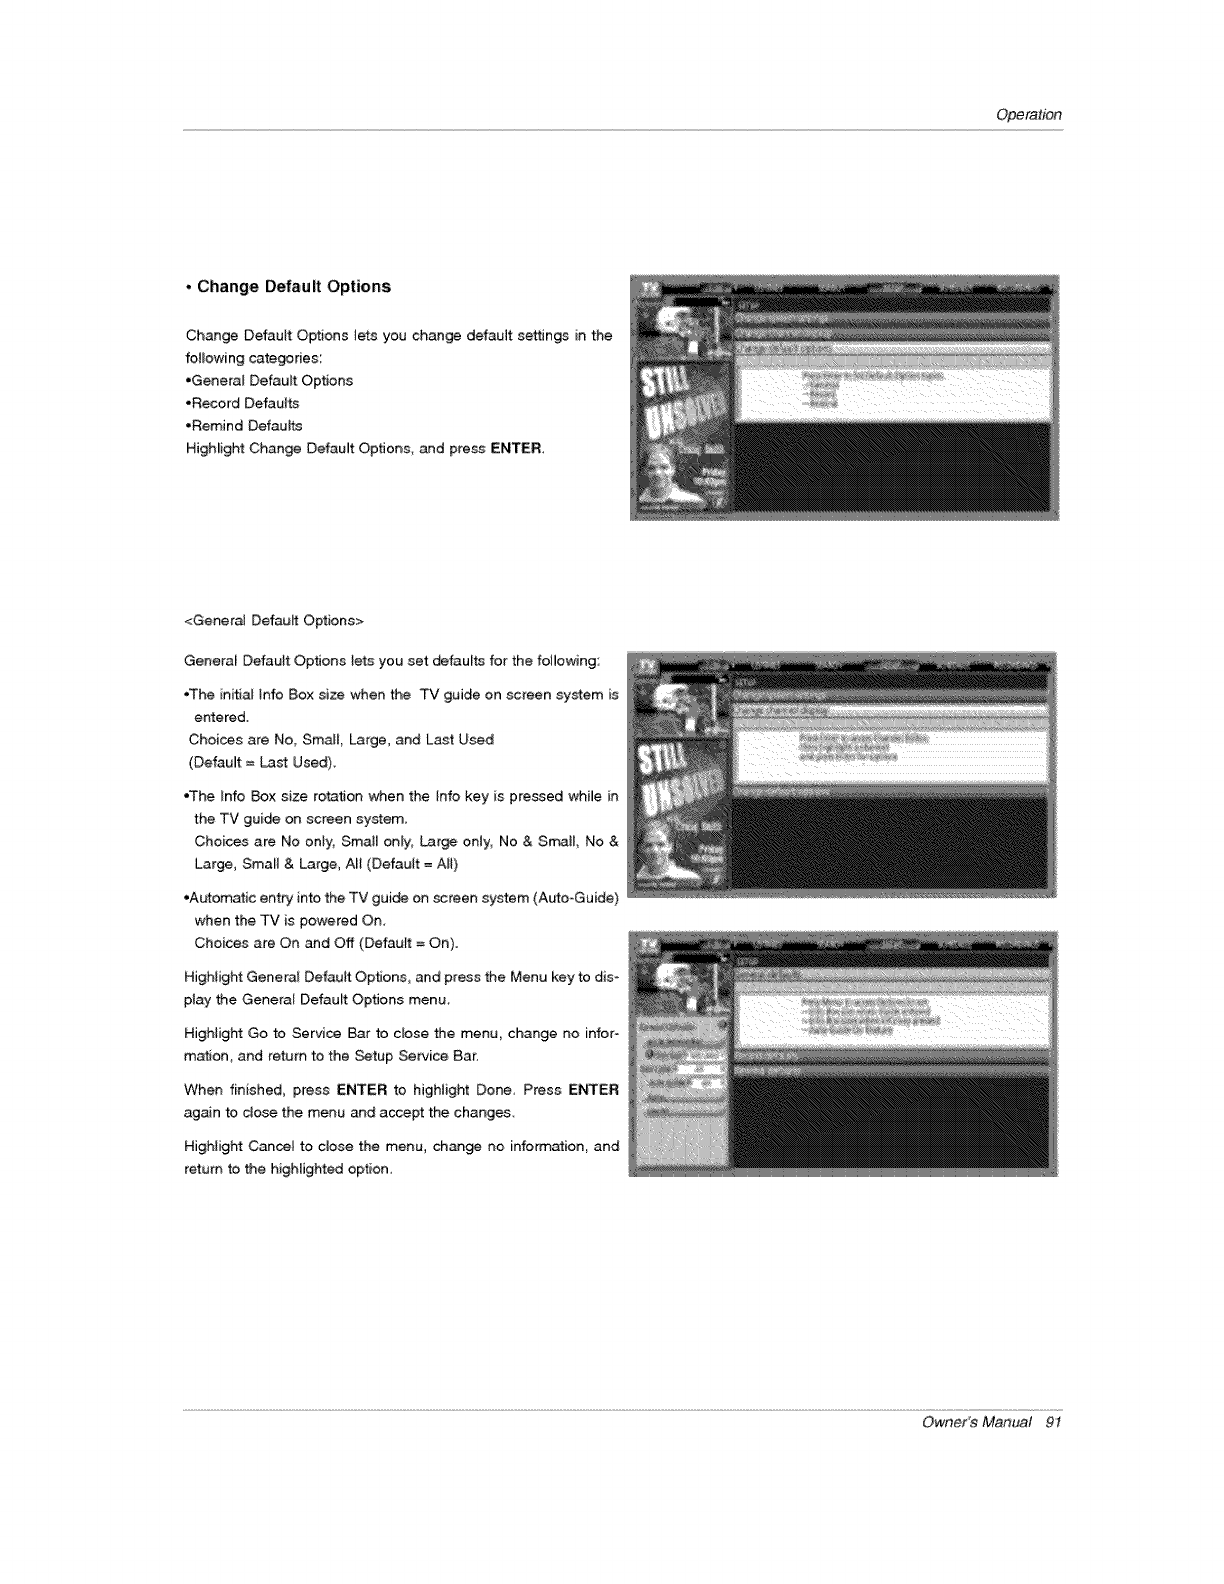
Operation
•Change Default Options
Change Default Options _ets you change default settings in the
following categories;
•General Default Op_ons
.Record Defaults
• Remind Defaults
Highlight Change Default Options, and pre_ ENTER
<Gener_ Default Options>
Genera[ Default Op_ons Iets you set defaults for the fo_owing:
.The initial tnfo Box size when the TV guide on sc_een system is
entered.
Choices are No, Small, Large, and Last Used
(DefauJt = Last Used).
•The Info _x size rota_on when the [nfo key is pressed wMe in
the TV guide on screen system
Choices are No only, Small onFy_ Large only, No & Sin.all, No &
Large, Small & Large, AH (Default = AH)
•Automatic entry into the TV guide on screen system (A_o-Guide)
when the TV is powered On.
Choices are On and Off (Default = On).
HigHight General Default Options, and press the Menu key to dis_
play the Genera[ Defaurt Options menu.
HigHight Go to Service Ear to close the menu, change no infor-
mation, and return to the Setup Se_ice Bar.
When finished, press ENTER to highlight Done, Press ENTER
again to dose the menu and accept the changes
HigHight Cancel to close the menu, change no information, and
return to the highlighted option.
Owner's Manual 9t
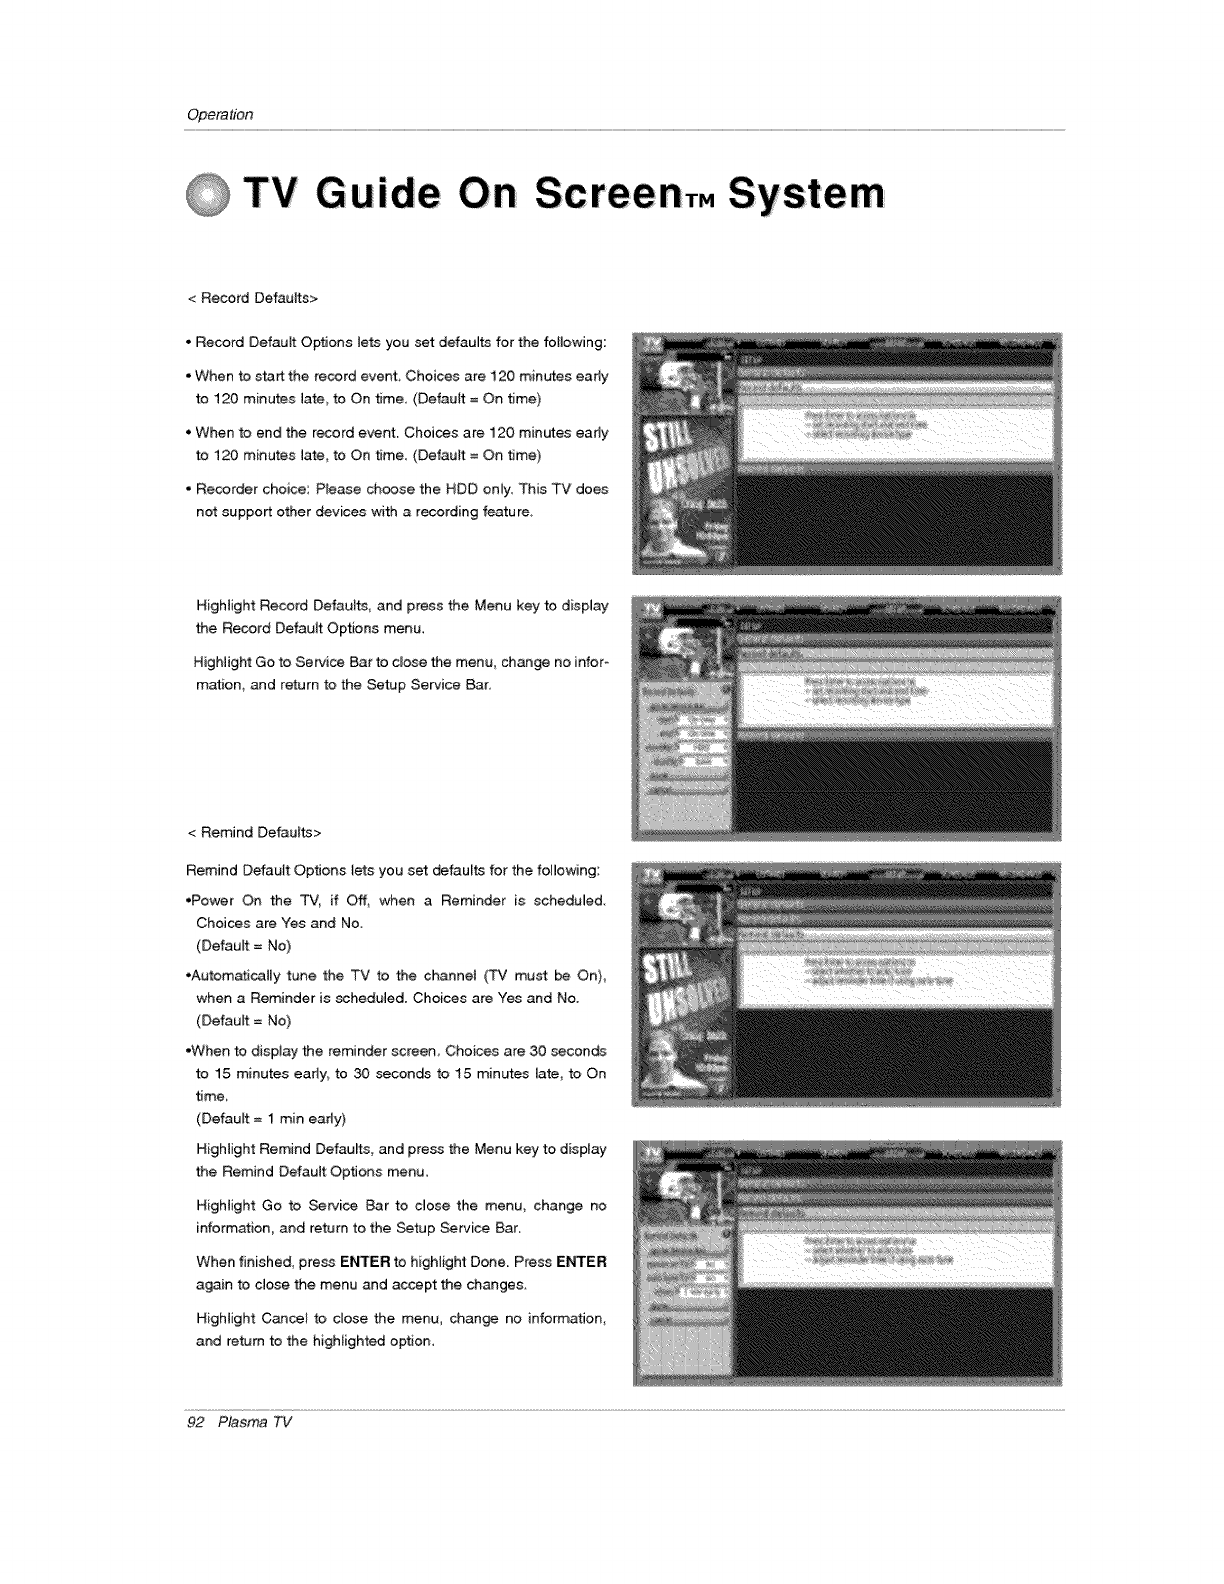
Opera#bn
0TV G u iide Sc reenT. System
<Record Defaults>
• Record Default Opttans lets you set defauffs for the following:
•When to start the record event, Choices are 120 minutes eady
to 120 minutes late to On time, (Defautt = On time)
• When to end the record event. Choices are 120 minutes eady
to 120 minutes ]ate, to On time. (Default = On time)
• Recorder choice: P_ease choose the HDD on4y. This TV does
not support other devices v,4th a recording feature_
Highlight Record Defaults, and press the Menu key to display
the Record Default Options menu.
Highlight Go to Service 8at to dose the menu_ change no infor-
mation, and return to the Setup Service Bar.
< Remind Detau_ts>
Remind Defautt Options tets you set defaults for the following:
,Power On the TV, if _, when a Reminder is scheduled
Choices are Yes and No
(Default = No)
oAutomaticaily tune the TV to the channe_ CCv' must be On),
when a Reminder is scheduled. Choices are Yes and No.
(Default = No)
•When to dispiay the reminder screen, Choices are 30 seconds
to 15 minutes early, to 30 seconds to 15 minutes late, to On
time,
(Default =I rain eady)
Highlight Remind Defaults and press the Menu key to display
the Remind Default Options menu.
Highlight Go to Service Bar to dose the menu, change no
information, and return to the Setup Service Bar
When finished, press ENTER to highlight Done. Press ENTER
again to close the menu and accept the changes.
Highlight Cancel to dose the menu, change no information,
and return to the highlighted option,
92 Plasma TV
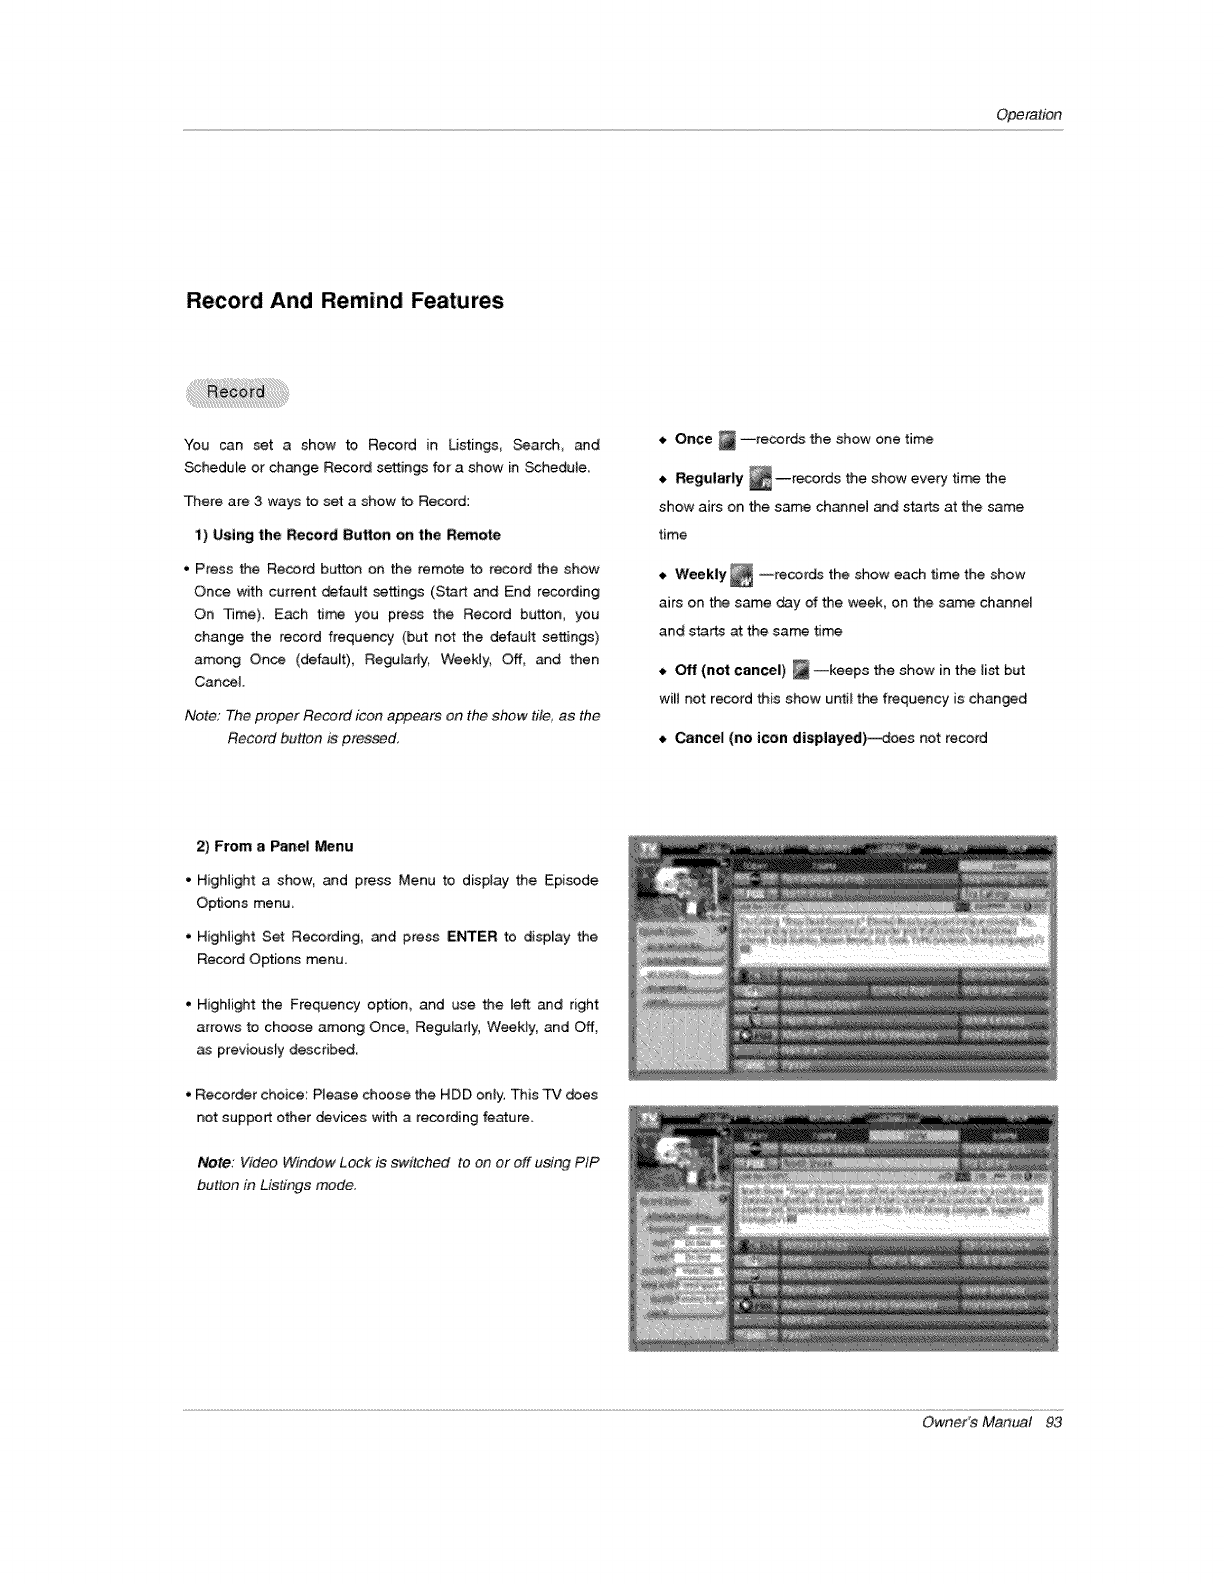
Operation
Record And Remind Features
You can set a show to Record in Listings, Search and
Schedule or change Record settings for a show in Schedule.
There are 3 ways to set a show to Record:
1) Using the Record Button:on the Remote
• Press the Record button on the remote to record the show
Once with current default settings (Start and End recording
On Time). Each time you press the Record button, you
change the record frequency (but not the default settings)
among Once (default), Regularly, WeePJy, Off, _d then
Cancel
Note; The proper Re_rd icon appears on the show ti/e as the
Record button is pressed
,, Once _ --records the show one time
--records the show every ti_ the
Regularly
4,
show airs on the same channel and starts at the same
time
--records the show each time the show
Weekly
O
airs on the same day of the week, on the same channel
and starts at the same flrr_
•Off (not cancel) _--keeps the show in the list but
will not record this show unti_ the frequency is changed
•Cancel (no icon displayed)-_oes not record
2) From a Panel Menu
• Highlight a show, and press Menu to display the Episode
Options menu.
•Highlight Set Recording, and press ENTER to display the
Record Options menu.
', Highlight the Frequency option, and use the left and right
arrows to choose among Once, Regularly, Weekly, and Off,
as previously describe.
•Recorder choice: Please choose the HDD only. This TV does
not support other devices with a recording fe_ure.
Note: Video Window Lc_ck is sw#ched to on or off using PIP
button in Listings mode.
Owner's Manual 93
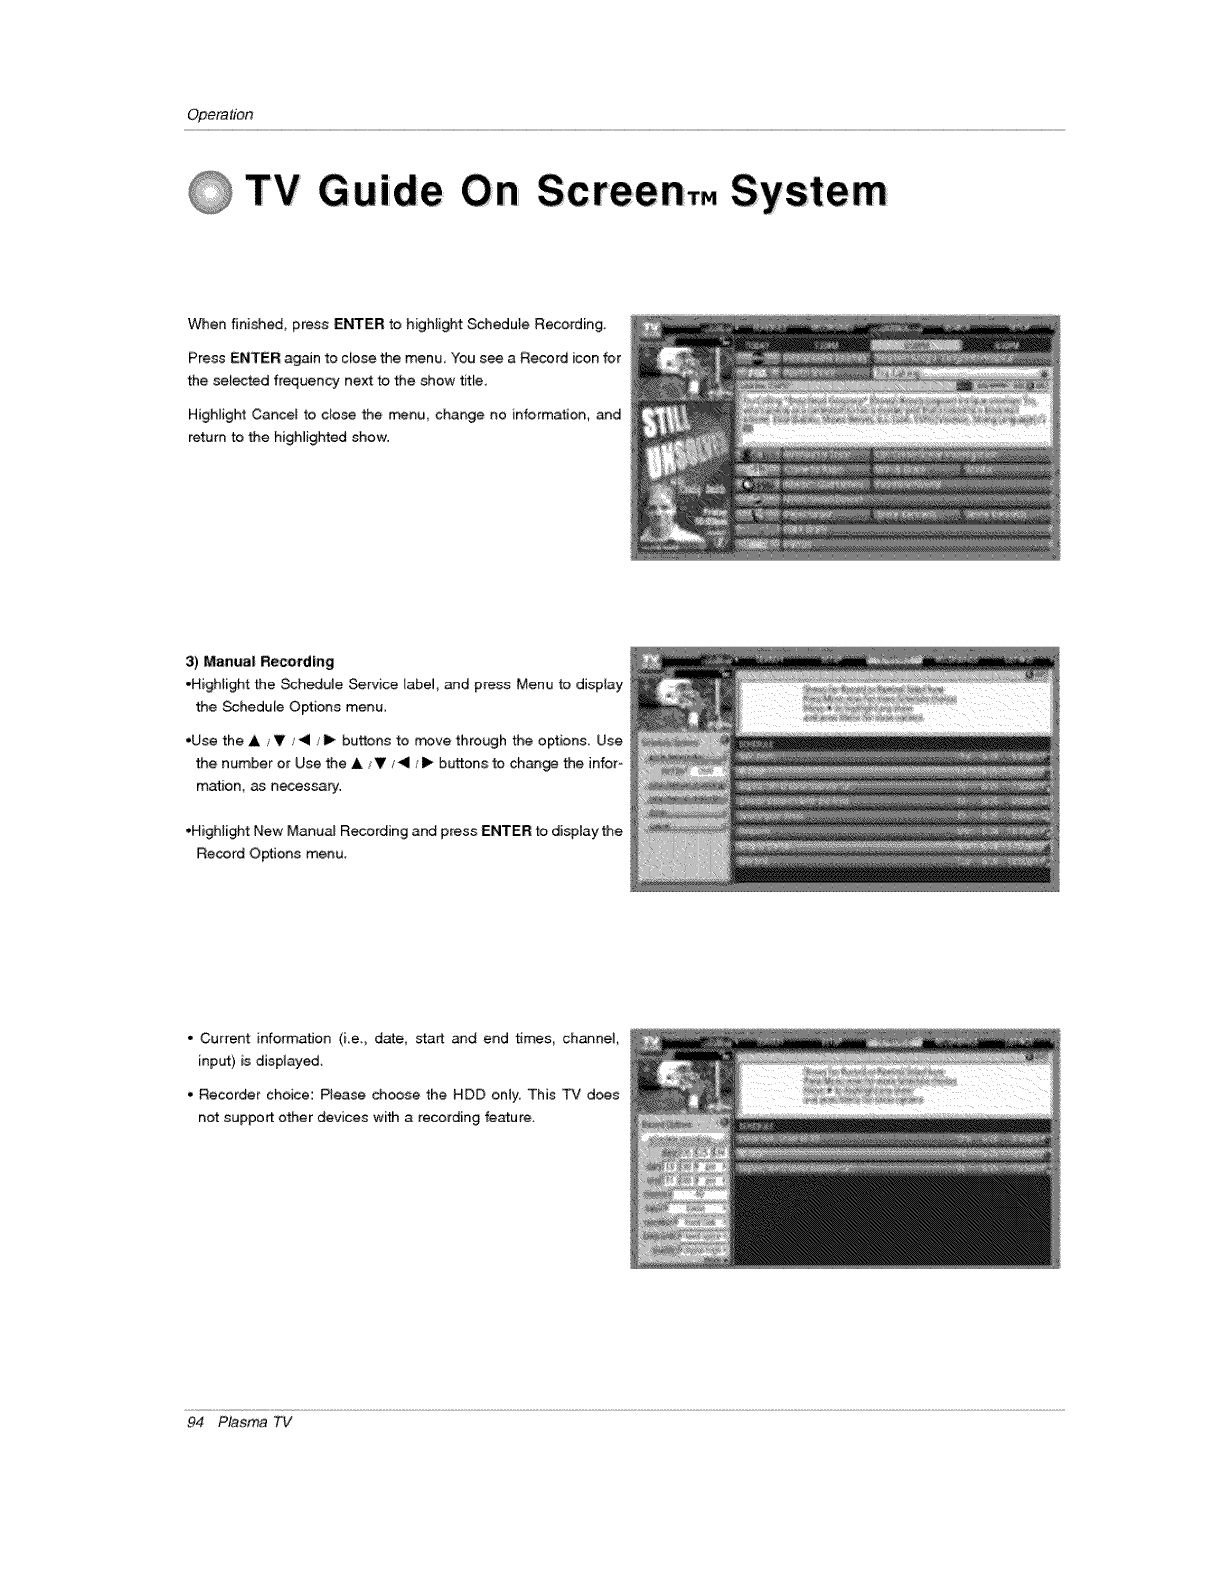
Opera#bn
TV Guide Screen,. System
When finished, press ENTER to highlight Schedule Recording.
Press ENTER again to ciose the menu, You see a Record icon for
the selected frequency next to the show title,
Highlight Cancel to clo_ the menu, change no information, _d
return to the highlighted show.
3) Manual Recording
•Highlight the Schedule _rvice label, and p_ess Menu to display
the Schedule Options menu
,Use the A _V l<l /ll_ buttons to _ve through the options. Use
the number or Use the A ,_V/_1/1_ buttons to change the infor-
mation, as necessa_.
,Highlight New Manual Recording and press ENTER to display the
Record Options menu.
• Current information (i,e,, date, start and end times channel,
input) is displayed.
• Recorder choice: Please ch_se the HDD only. This TV does
not support other devices with a recording feature.
94 Plasma TV

Operation
•Use the teft and right arrows to choose between Once, Daily,
WeeHy, and Off, as follows.
Once _ --recor_ the time, channel, input, recorder
combination one t_.
• Daily _--records the time, _anneL input, recorder
combination Monday through Friday.
• Weekly _ --records the time, channel, input, recorder
combination once a week on the selected day of the week.
• Off (not cancel) _--keeps the time, channel input, recorder
combination in the list without recording untJI the frequency is
changed.
When finished_ press ENTER to higHight Schedule
Recording.
Press ENTER again to dose the menu, You see a
Record icon for Me setected frequency next to the show
title
Note: Manual recording is listed by channel number.
HigHight Cancel to dose the menu, change no informa-
tion, and return to the higMighte.d show
Before a recording begins_ a notification screen appears
if your TV is On, At that time, you can choose to _rt or
cance_ recording If the TV is not On, the recording
occurs as scheduled. If there is no activity for 3 minutes,
the notification screen automatJcaBy doses and com-
pletes the highlighted _em
Record Conflict
A conflict message ap_ars for the following reasons:
• a show set to Record overlaps with any part of another show pre -
viously set to Record
• a show set to Record overlaps with a show previously set to auto-
tune
Select one of these options:
_, record anyway -this show will override an exi_ing show
set to Record or auto4une
don't record this show -cancel the Recording
Owner's Manual 95
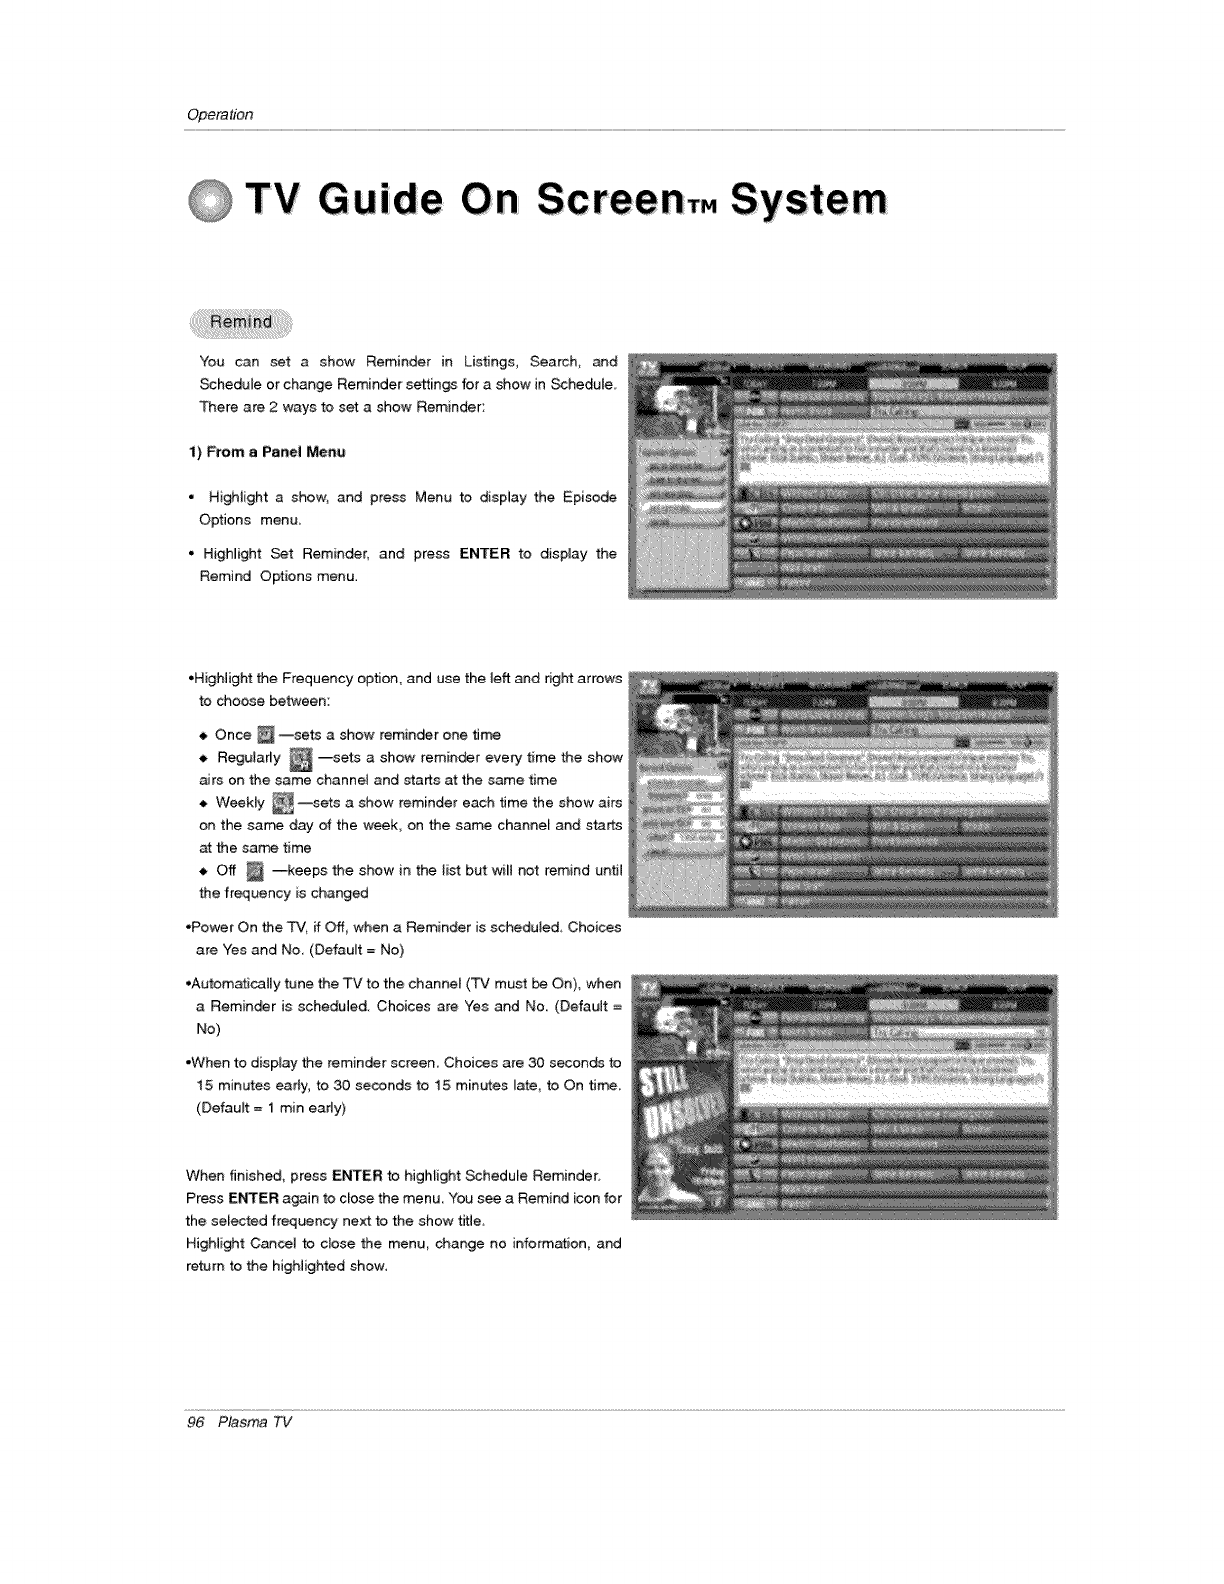
Opera#bn
TV Gurde Screen,. System
You can set a show Reminder in Listings, Search, and
Schedule or change Reminder settings for a show in _hedule.
There are 2 ways to set ashow Reminder:
1) From a Panel Menu
•Highlight a show, and press Menu to display the Episode
Options menu.
, Highlight Set Reminder, and press ENTER to display the
Remind Options menu.
•Highlight the Frequency option, and use the left and right arrows
to choose between:
_, Once _ --sets ashow reminder one time
_, R_ularly _ -_sets a show reminder every time the show
airs on the same channeJ and starts at the same time
--sets a show reminder each time the show airsWeekly
on the same day of the week, on the same channel and starts
at the same time
_, Off _ --keeps the show in the list but wilt not remind until
the frequency is changed
•Power On the _,/, if Off, when a Reminder is scheduled Choices
are Yes and No (Default = No)
,Automatically tune Me TV to the channel CFVmust _ On), when
a Reminder is scheduled Choices are Yes and No (Default =
No)
•When to display the reminder screen. Choices are 30 seconds to
15 minutes early, to 30 seconds to 15 minutes Uate, to On time.
(Default = 1 min eady)
When finished, press ENTER to highlight Schedule Reminder,
Press ENTER again to close the menu You see a Remind icon for
the selected frequency next to the show title
Highlight Cancel to close the menu change no information, and
return to the highlighted show.
96 Plasma TV
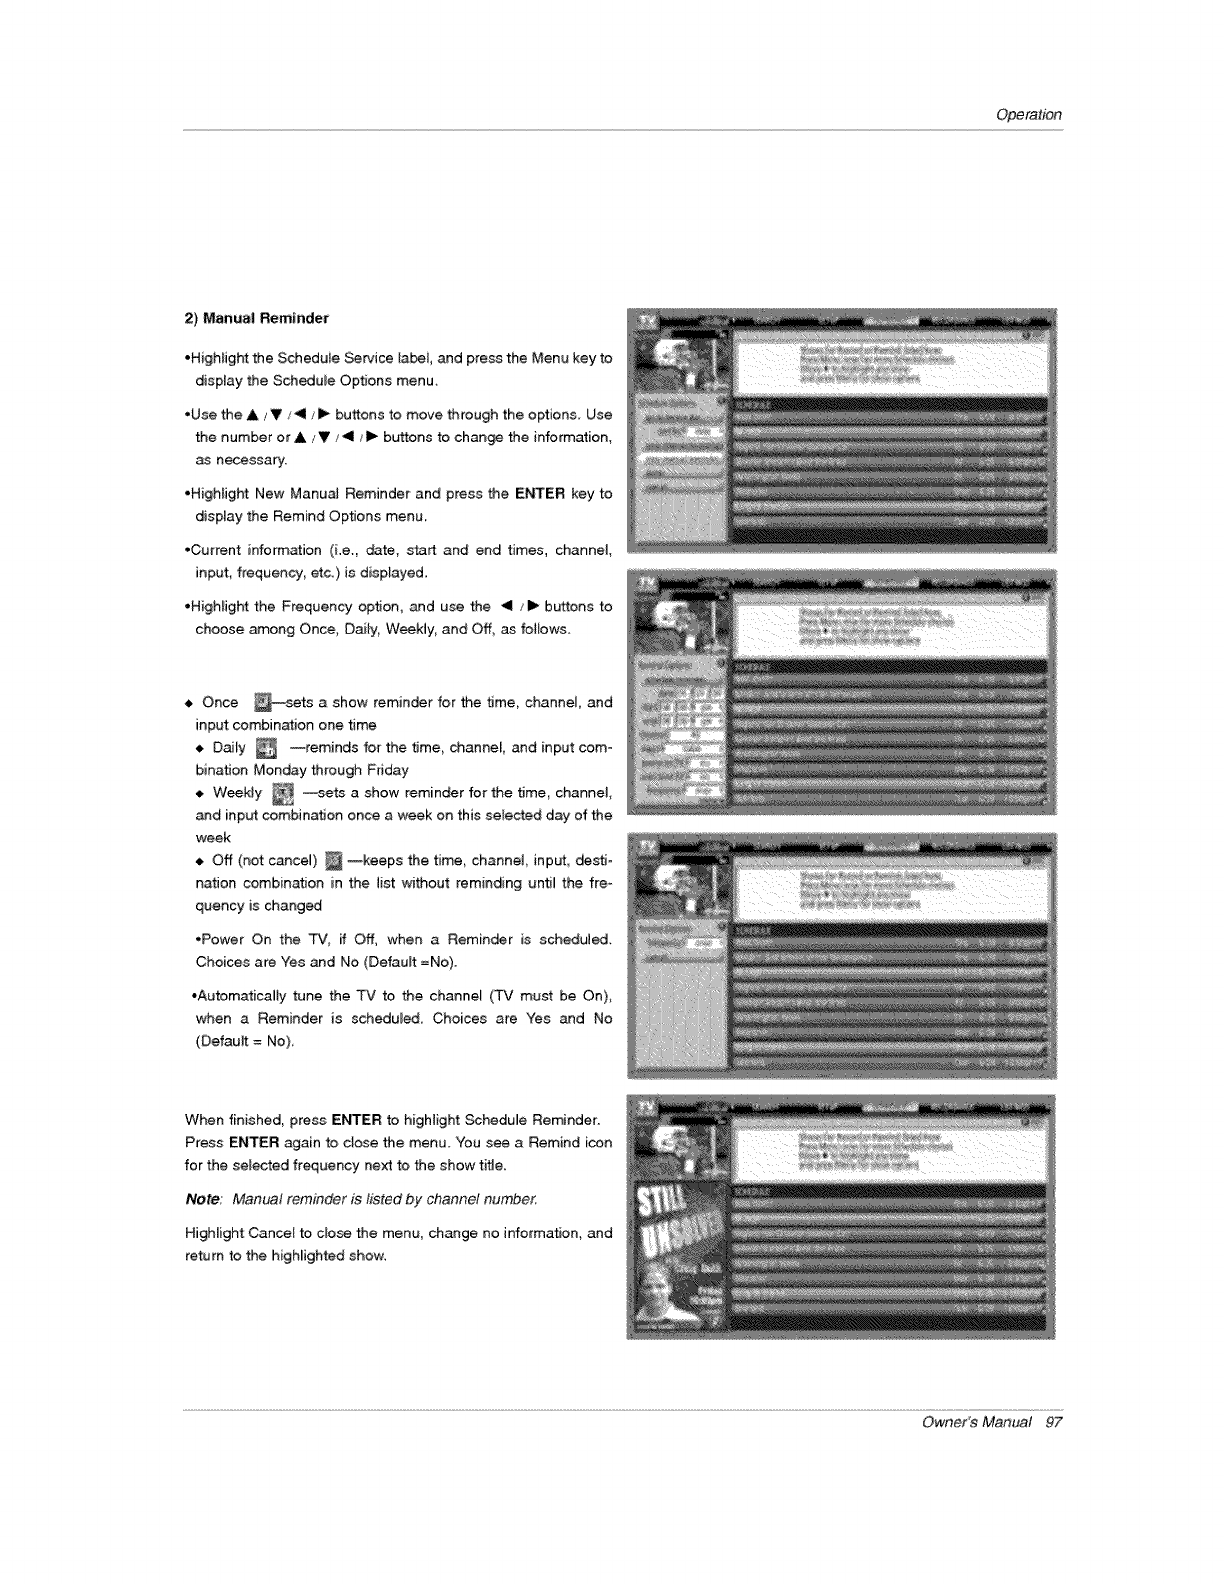
Operation
2) Manual Reminder
•Highfight the Scheduie Service [abei, and press the Menu key to
display the Schedule Options menu.
•Use the A / VJ _1 _i_ buttons to move through the options. Use
the number or A _'V/_11/l_ buttons to chan_ the information,
as necessary.
,Highlight New Manua] Reminder and press the E_ER key to
display the Remind Options menu.
•Current info_ation (i.e. date, start and end times, channel,
input, frequency, etc.) is displayed.
•Highlight the Frequency option, and use the _< /I_ buttons to
choose among Once, Dai_y, Week_y_ and Off_ as fot_ows_
Once _sets a show reminder for the time, channel, and
4,
input combination one time
--reminds for the t_me_ channel, and
Daily input com*
bination Monday through Friday
. Weekly _ --se_ a show reminder for the time, channei,
and input combination once a ,week on this setected day of the
week
4, Off (not cancel) _ --keeps the time, channel input, dest_*
nation combination in the list without reminding until the fre=
quency is changed
*Power On the _, if Off, when a Reminder is scheduled.
Choices are Yes and No (Default =No).
•Automatica#y tune the TV to the channel (TV must be On),
when a Reminder is scheduled Choices are Yes and No
(Default = No)
When finished, press ENTER to highlight Schedule Reminder.
Press ENTER again to close the menu. You see a Remind icon
for the selected frequency ne_ to the show title.
Note: Manual reminder is listed by channel numbe_
Highlight Cance_ to close the menu, change no information, and
retum to the highlighted show.
Owner's Manual 97
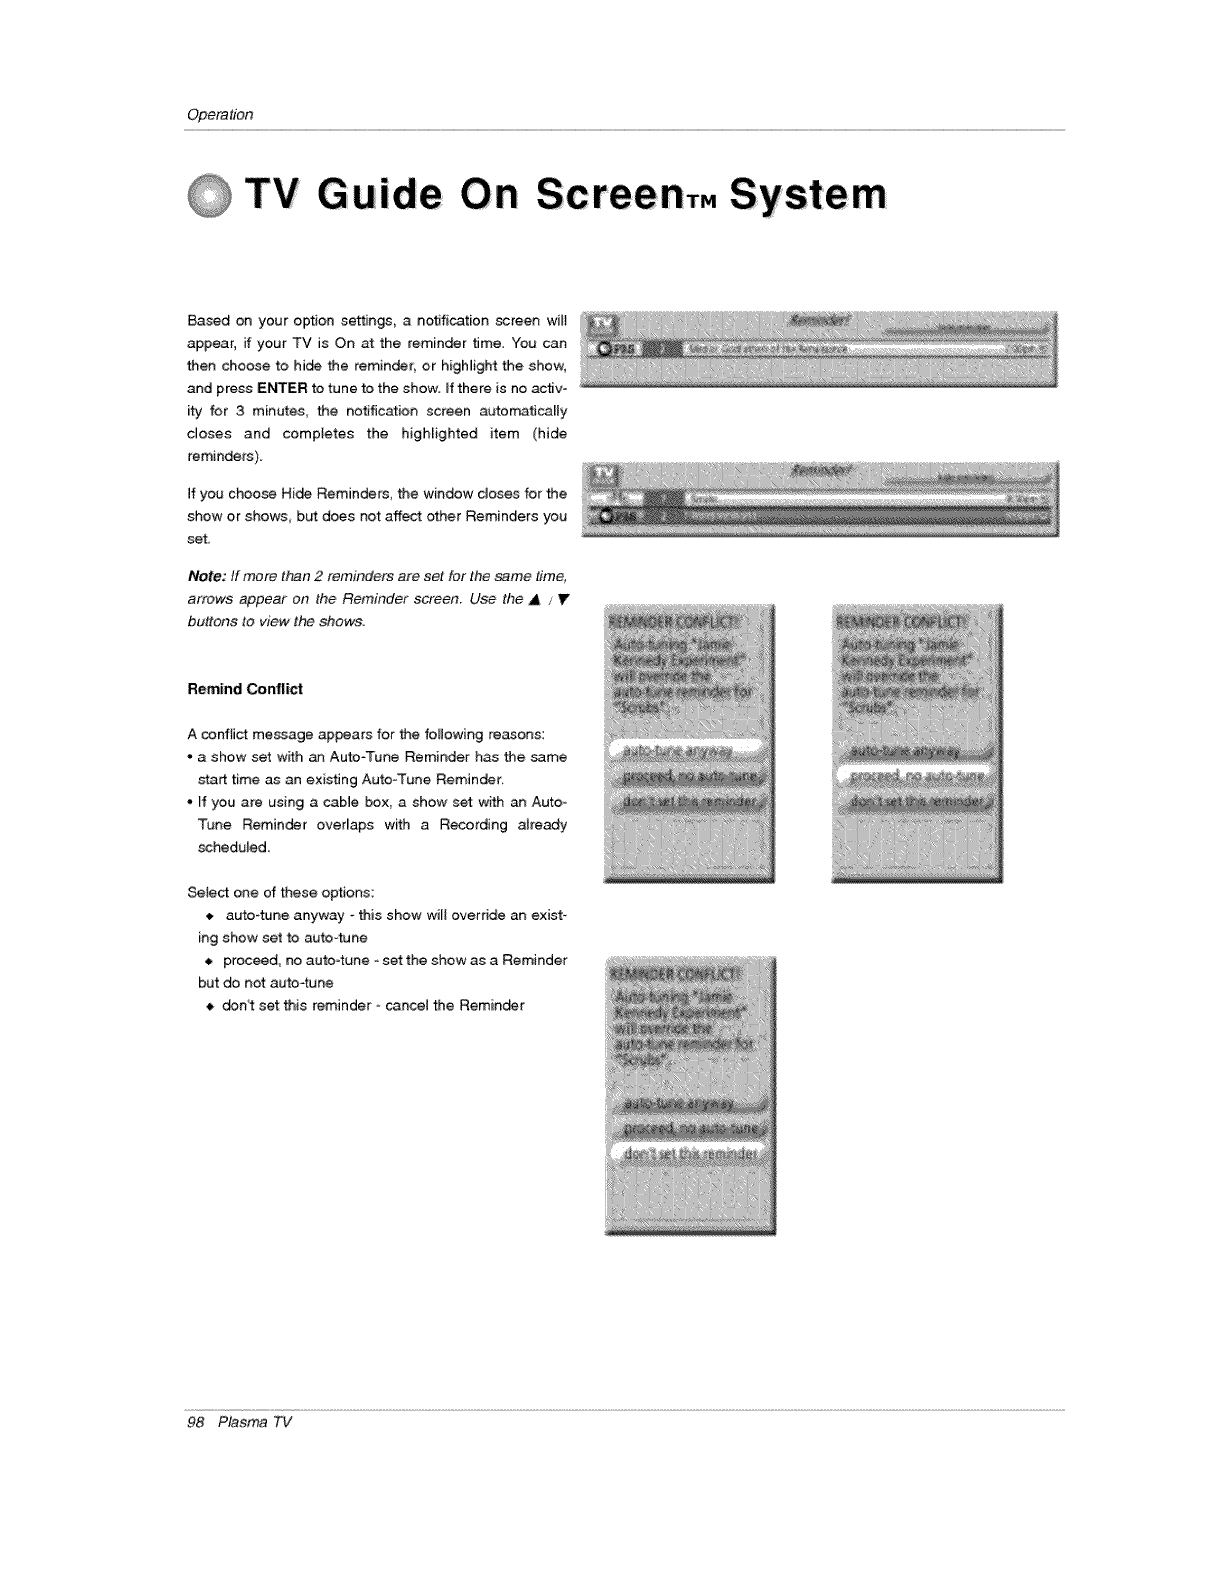
Opera#on
TV GuFde On Screen,. System
E_ased on your option settings, a notification screen wilI
appear, if your TV is On at the reminder time. You can
then choose to hide the reminder; or higNight the show,
and press E_ER to tune to the show. if there is no activ-
ity for 3 minutes, the notific_ion screen automatically
closes and completes the highlighted item (hide
reminders).
If you choose Hide Reminders, the window doses for the
show or shows_ b_ does not affect other Reminders you
set,
Note: tf more than 2 reminders are set for the same time,
arrows appear on the Reminder screen. Use the A / Y
buttons to view the shows.
Remind Conflict
A conflict message appears for the following reasons:
* a show set with an Auto-Tune Reminder has the same
start time as an existing Auto-Tune Reminder.
* If you are using a sable box, a show set with _ Auto-
Tune Reminder overlaps with a Recording atready
scheduied.
Setect one of these options:
auto-_ne anyway - this show will override an exist_
ing show set to au_4une
• proceed, no auto-tune -set the show as a Reminder
but do not auto4une
• don't se_ this reminder - cancel the Reminder
98 Plasma TV
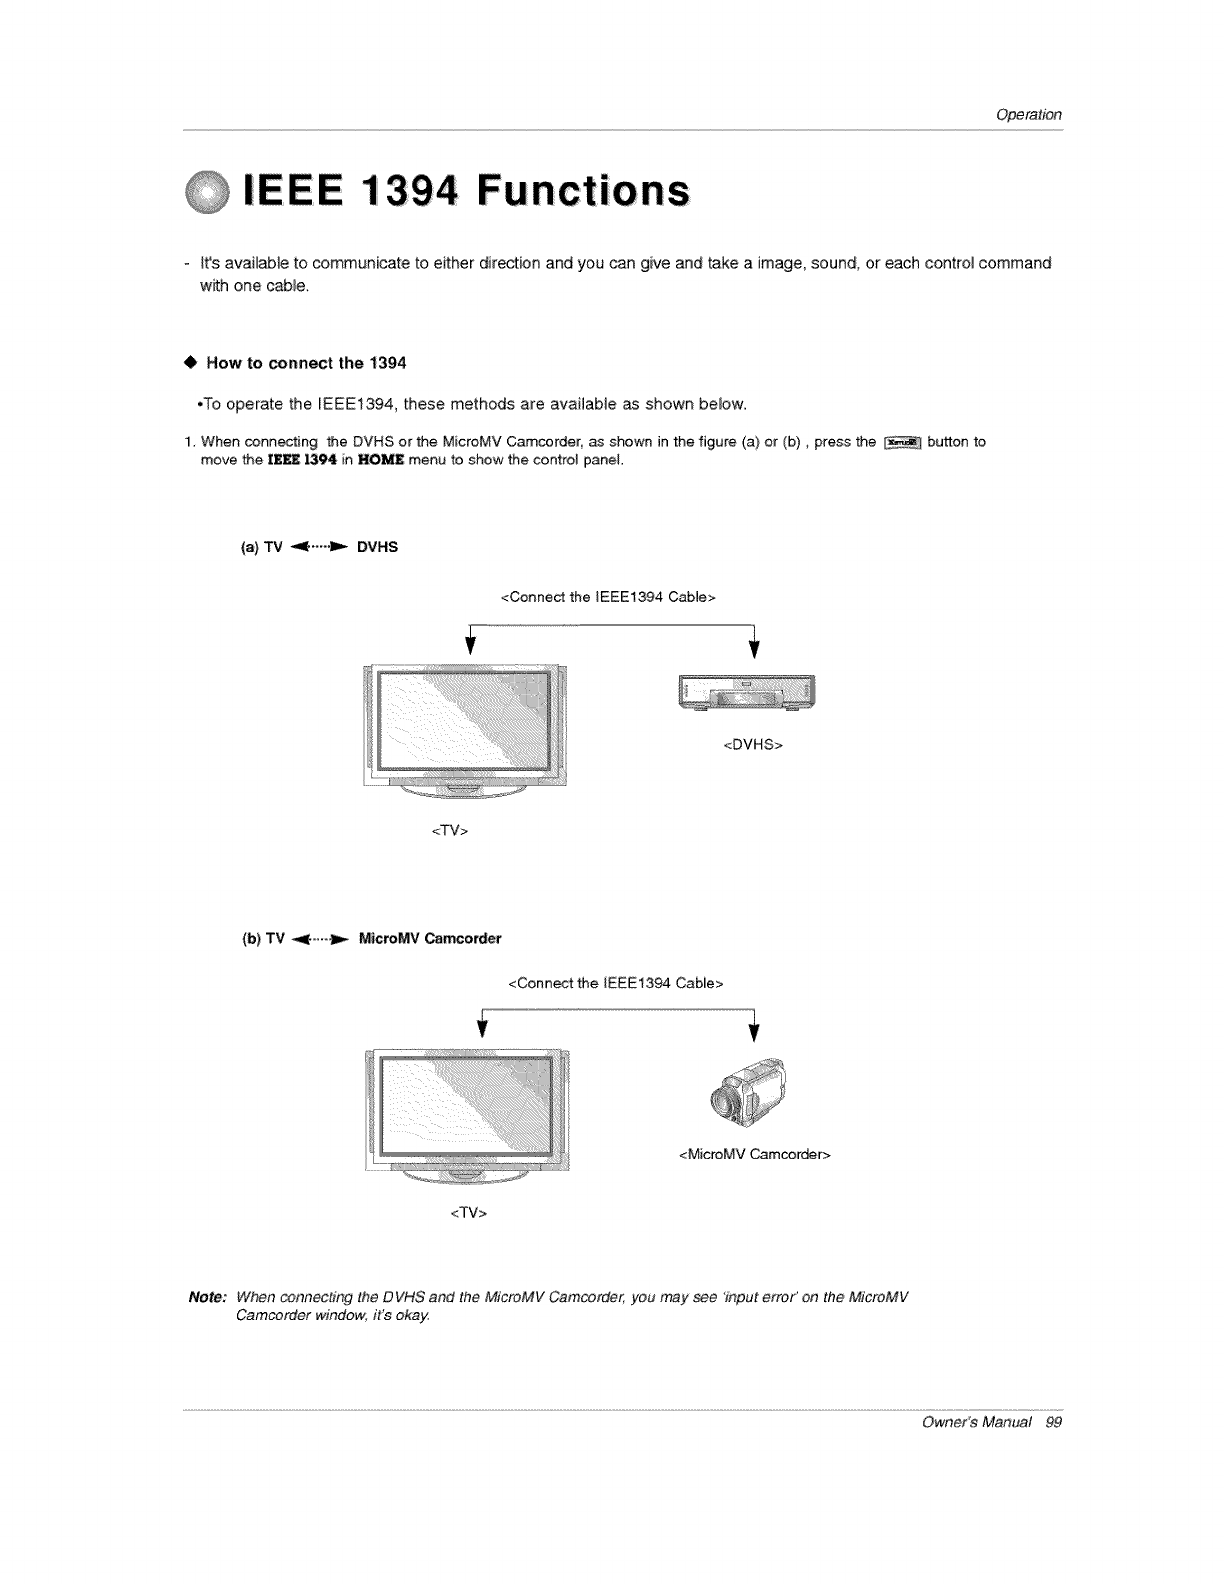
Operation
IE E E 1394 Fu nct io ns
-It's available to communicate to either direction and you can give and take a image, sound, or each control command
w_h one cable.
•How to connect the 1394
•To operate the IEEE1394, these methods are available as shown below:
1, When connecting the DVHS or the MicroMV Camcorder, as shown in the figure (a} or (b), press the _ button to
move the IEI_ _94 in I*I0_ menu to show the control panel.
<Connect the IEEEi394 Cable>
iiil ii_i!i!_i
<TV>
<DVHS>
(b) TV _1--_ MicroMV Camcorder
<Connect the iEEE1394 Cable>
<TV>
<MicroMV Camcorder>
Note: When connect#1g the DVHS and the MicreMV Camcorde_ you may see 'input error' on the MicroMV
Camcorder window, it's okay,
Owner's Manual 99

Opera#bn
IEEE 1394 Functions
2, When connecting the DVHS and the MicroMV Camcorder, as shown in the figure (c) or (d), press the button to
move the Ill_ 1394 in HOME menu to show the control pane] and then setect the DVHS or the MicroMV Camcorder
(c) TV _9( • ._ DVHS + MicroMV Camcorder
<Connect the IEEE1394 Cable>
<DVHS>
<TV> <MicroMV Camcorder>
<Connect the I EEE1394 Cab_e>
(d;) Daisy Chain Connection
<Connect the
EEE1394 Cable>
<DVHS>
<Connect the IEEE1394 Cable>
<Connect the
iEEE1394
Cable>
<M[croMV Camcor_r>
<Generic>
-When connecting the 1394 and then playing, you must use the original DVHS tape.
If not, it may not play or have errors.
-If the operation normally doesn't work on Daisy Chain connection, please change an arrange-
ment of connected device.
100 Plasma TV
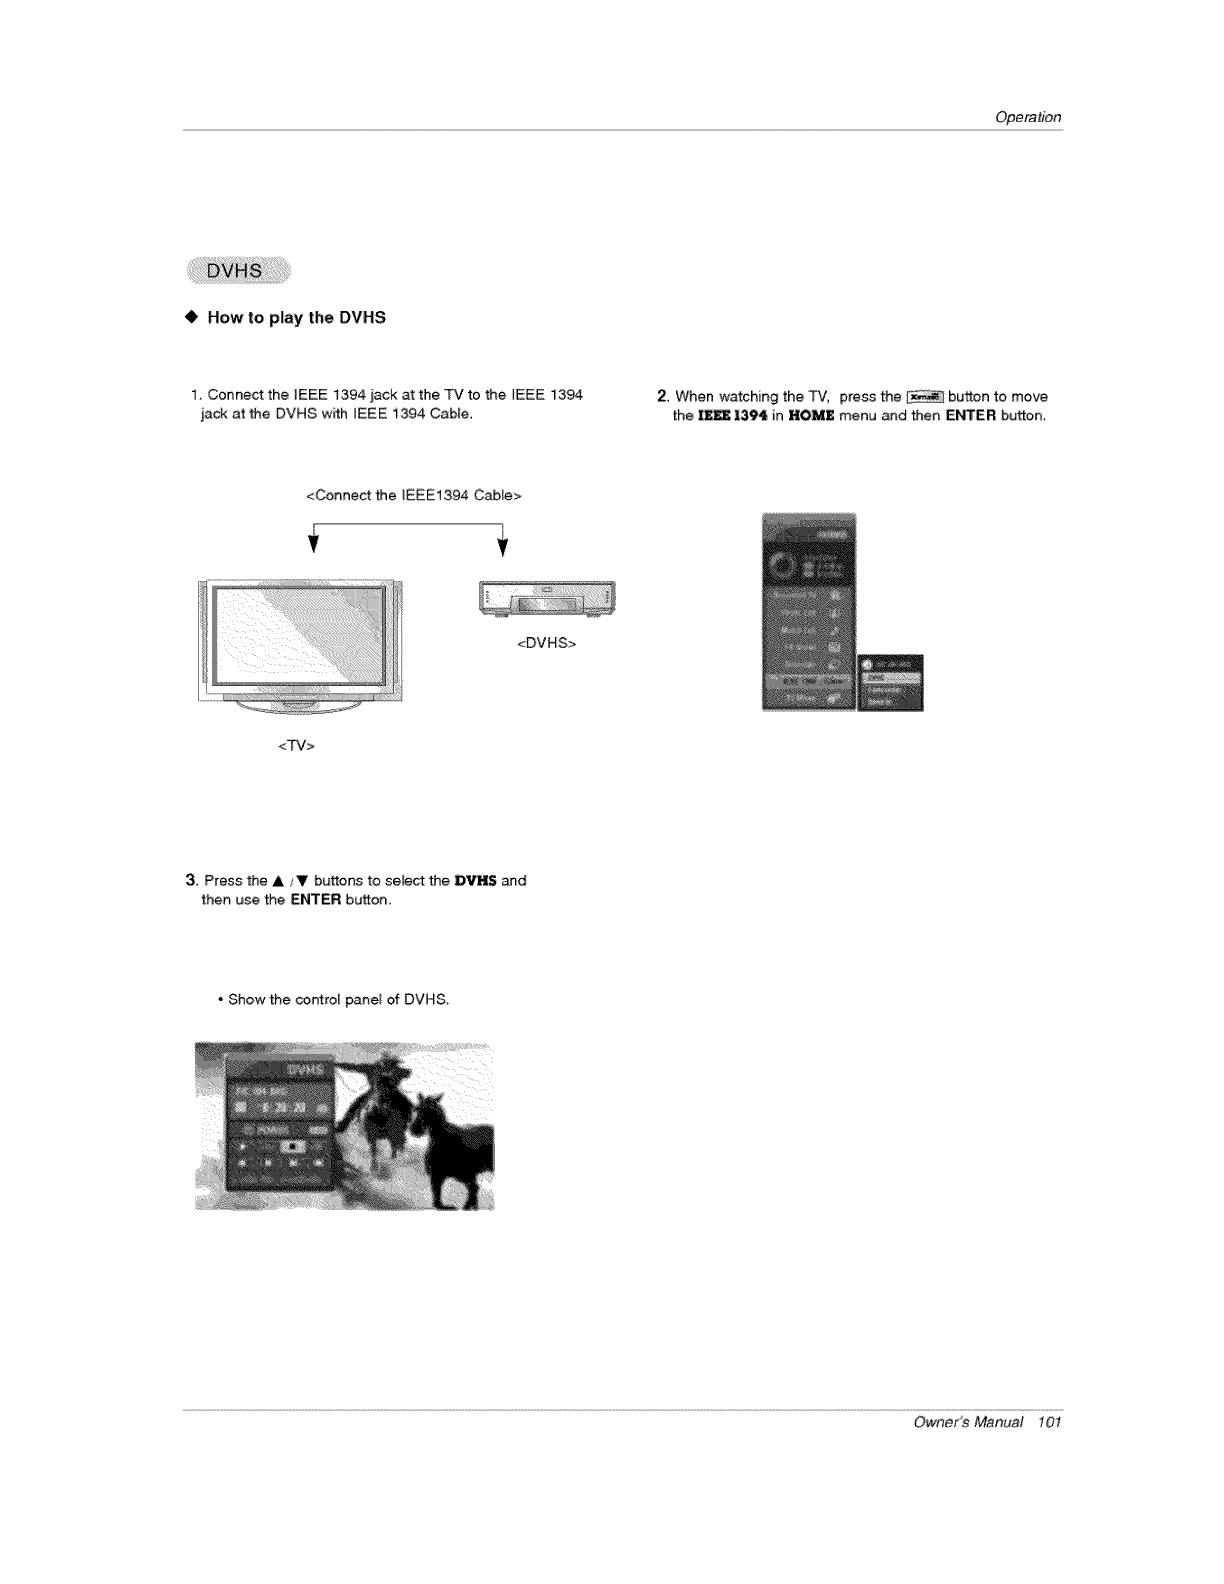
Operation
• How to play the DVHS
1. Connect the iEEE 1394 _ack at the TV to the {EEE 1394
jack at the DVHS with IEEE i394 Cable.
2. When watching the TV, press the button to move
the _ I394 in HOME menu and then ENTER button.
<Connect the IEEE1394 Cable>
<DVHS>
<TV>
3. Press the A _'V buttons to seEect the DVH$ and
then use the ENTER button.
• Show the controt panel of DVHS,
Owner_ Manual 10I

Operation
IEEE 1394 Functions
*The cor_tro[ panel of DVHS
-Depending on the connected equipment, marked control panel may be different.
1 2
1 DVHS Mode_
2, Connected Equipment to the 1394
3. DVHS Company
4. DVHS Operating Status
5. Power OtdOff
6. DVHS Ptay Time
7. Tape Status
• Ta_ shape Icon _Tape in or not
• Lock shape icon - Wdtabte or not
8 Initializing Play Time
9. DVHS P_ay; Pause, Step, Search Skip, Record, DVR Record, or DVR
Stop,
(Notes;
.Skip- This function is for a fast search,
It searches the program's start point.
On skipping_ Search (,_f _), Pause ( iI ) and Play (1_) are
displayed on the Control PaneL
In some models, Skipping is not aoption (_ p,_ ) function.
Supported DVHS List
Notes:
° In case the DVHS have a incorrect recogm_tion, the power cord of DVHS is cgm-
plete/y pulled out and then connected again.
* _'_;Sen.searching the screen(_ _tn.), the DVHS may be strangely seen. And also
the DVHS may tare respond by devices.
t02 Plasma TV
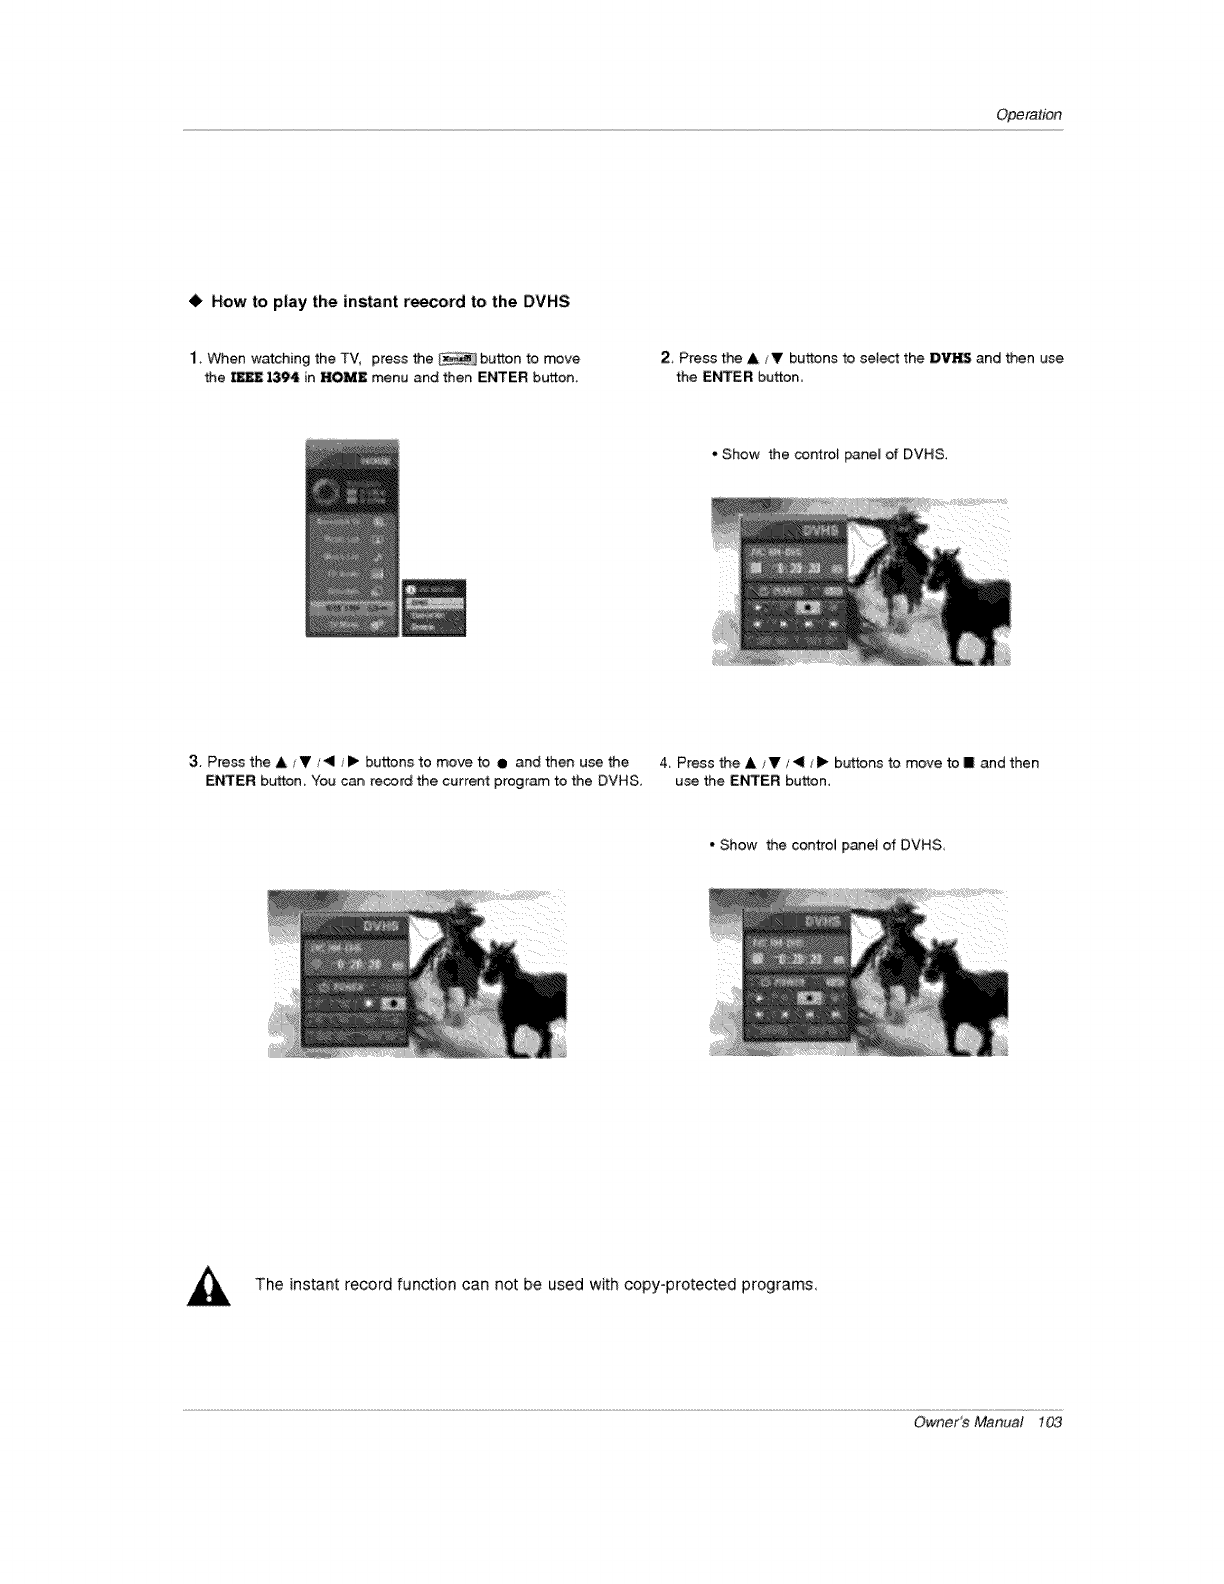
Operation
• How to play the instant reecord to the DVHS
1. When watching the TV, press the button to _ve
the _ 1394 in HOI¢I(£ menu and then ENTER: button.
2 Press the &/V buttons to se}ec_ the :DV[-_ and then use
the ENTER button,
•Show the control panel of DVHS.
3. Press the _1,/V/<11/I_ buttons to move to ill and then use the 4, Press the A /V/4/I_ buttons to move to I and then
ENTER button, You can record the current program to the DVHS, use the E_rTER button,
" Show the control panel of DVHS,
The instant record function can not be used with copy-protected programs,
Owner_Manua! 103
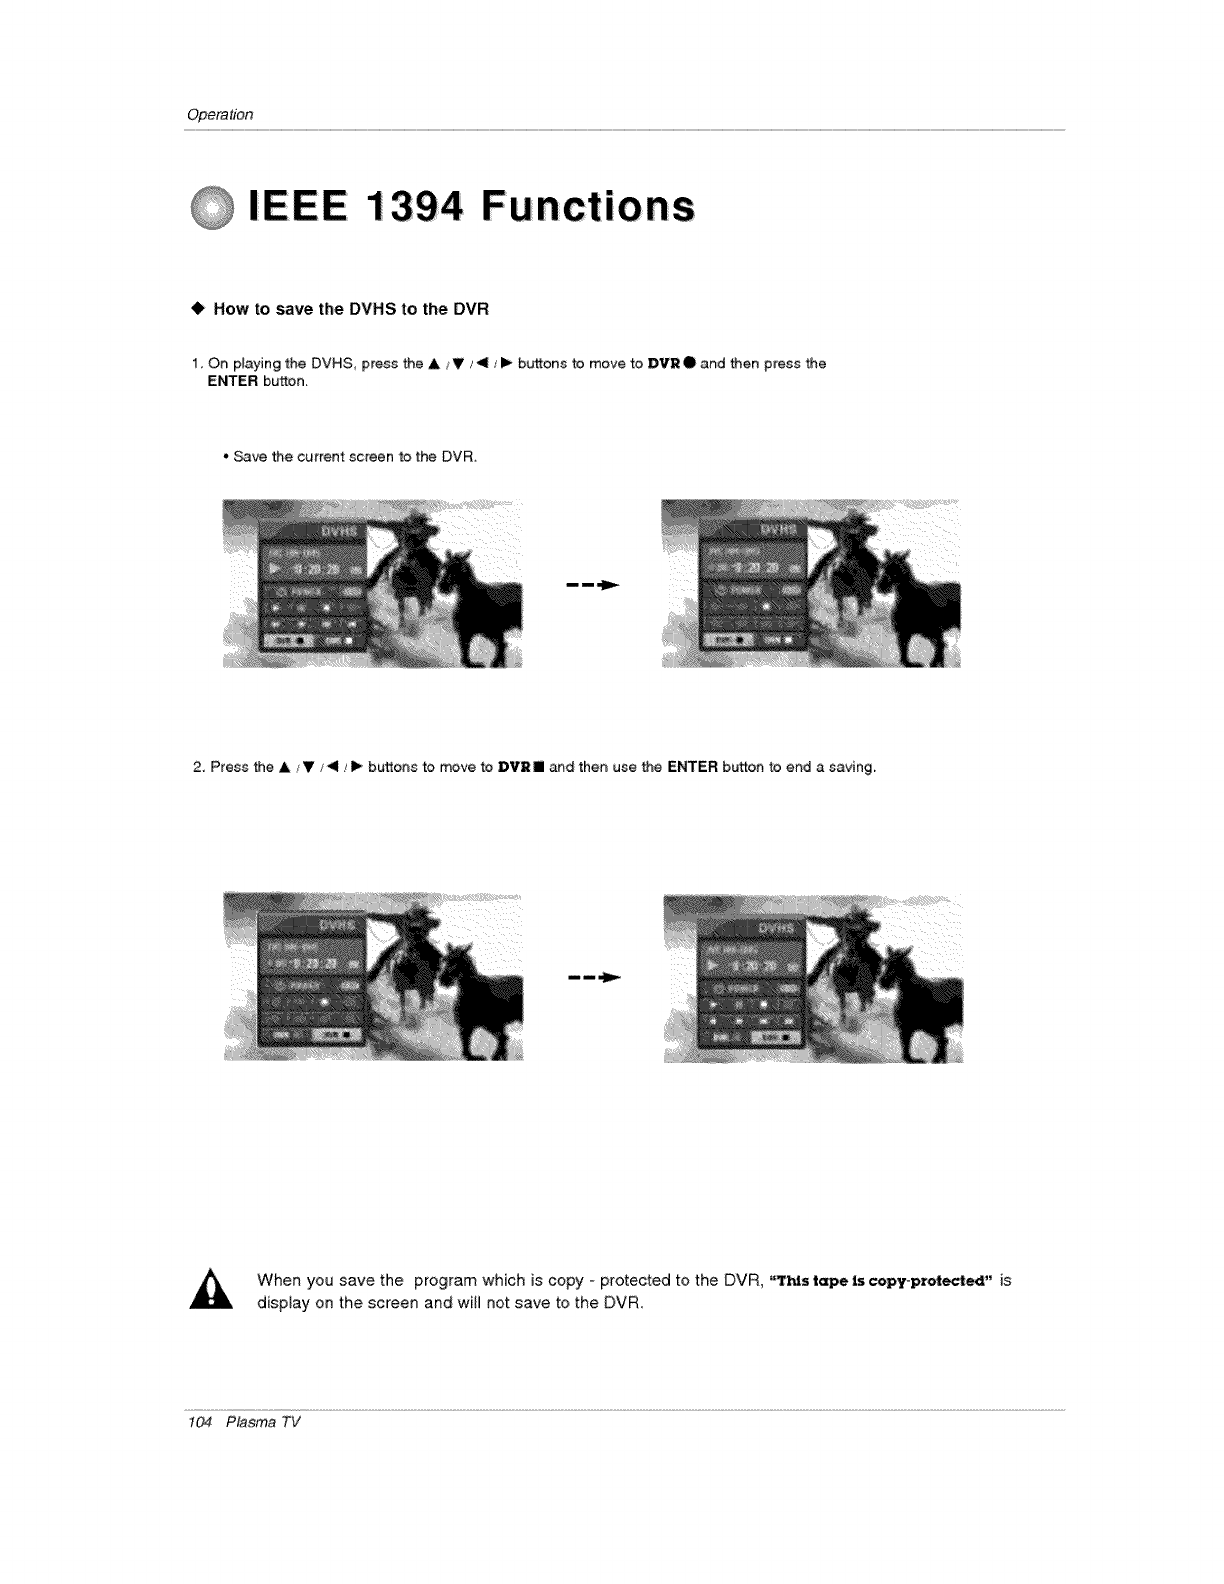
Opera#bn
IEEE 1394 Functions
41, How to save the DVHS to the DVR
1. On p_aying the DVHS press the A t V / </I_ buttons to move to DVR • and then press the
Et-KER button.
• _ve the current screen to the DVR.
2. Press the A/V ,_<1/ _ buttons to move to D'_'2 II and then use the ENTER button to end a saving.
When you save the program which is copy - protected to the DVR, "T_s t_e is copyoprotected" is
disptay on the screen and will not save to the DVR.
104 Plasma TV
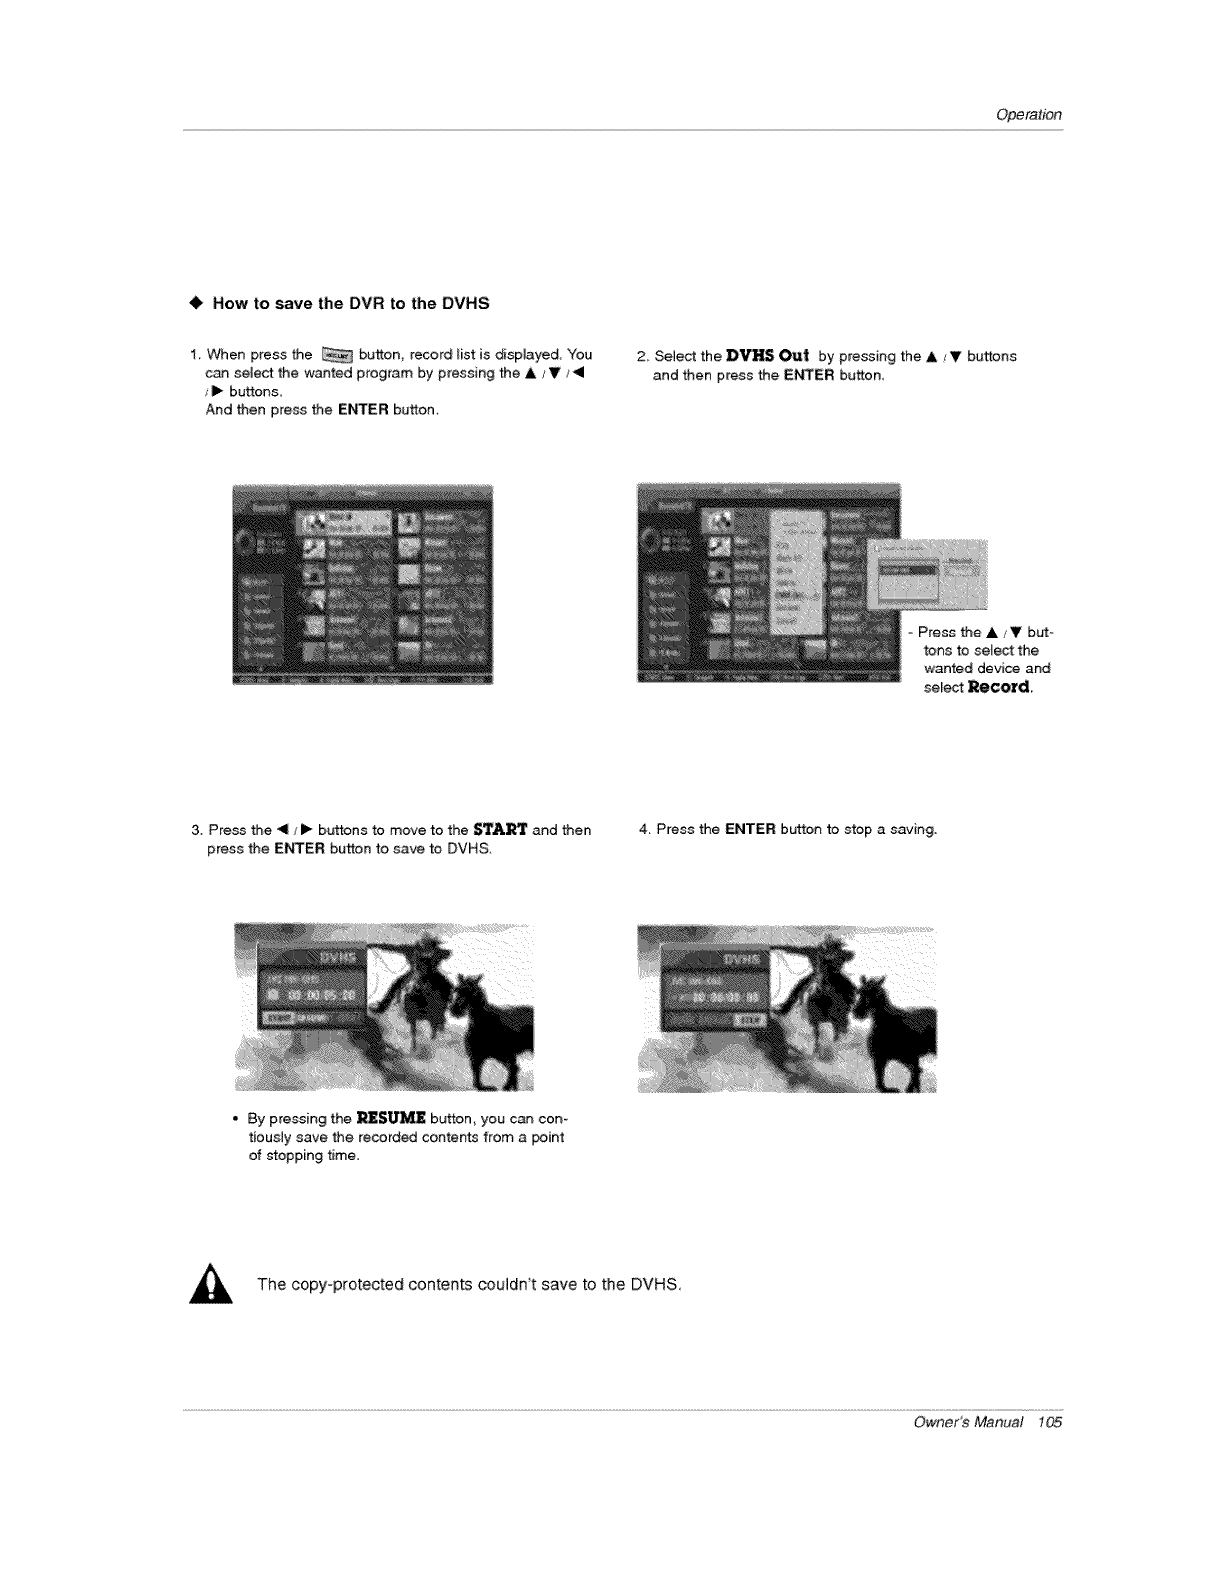
Operation
•How to save the DVR to the DVHS
1_ When press the button, record list is dispJayed, You
can select the wanted program by pressing the A _V/_1
,,I_ buttons
And then press the Et'_TER button.
2_ Select the D_S Out by pressing the A/Y buttons
and then press the E_ER button
Press the &/T but-
tons to se{ect the
wanted devioe and
select Record.
3. Press the _I/l_ buttons to move to the STA_ and then
press the ENTER button to save to DVHS,
4. Press the ENTER button to stop a saving,
• By pressing the _SUMZ bt_ton_ you can con-
tiously save the recorded contents from a _int
of Mopping time.
The copy-protected contents couldn't save to the DVHS,
Owner_Manua! 105

Operation
IEEE 1394 Functions
•How to play the MicroMV Camcorder
1. Connect the IEEE 1394 jack at the "r,! to the tEEE 1394 jack at the MicroMV
Camcorder with IEEE 1394 Cable.
<MicroMV Camcor_r>
<TV>
2. When watching the TV, press the button t:o move
the _EE 1394 in HOME menu and then ENTER button.
3, Press the A _V buttons to select the
Camco_er and then use the ENTER buttem
o Show the control pane[ of CAM;.
t06 Plasma TV
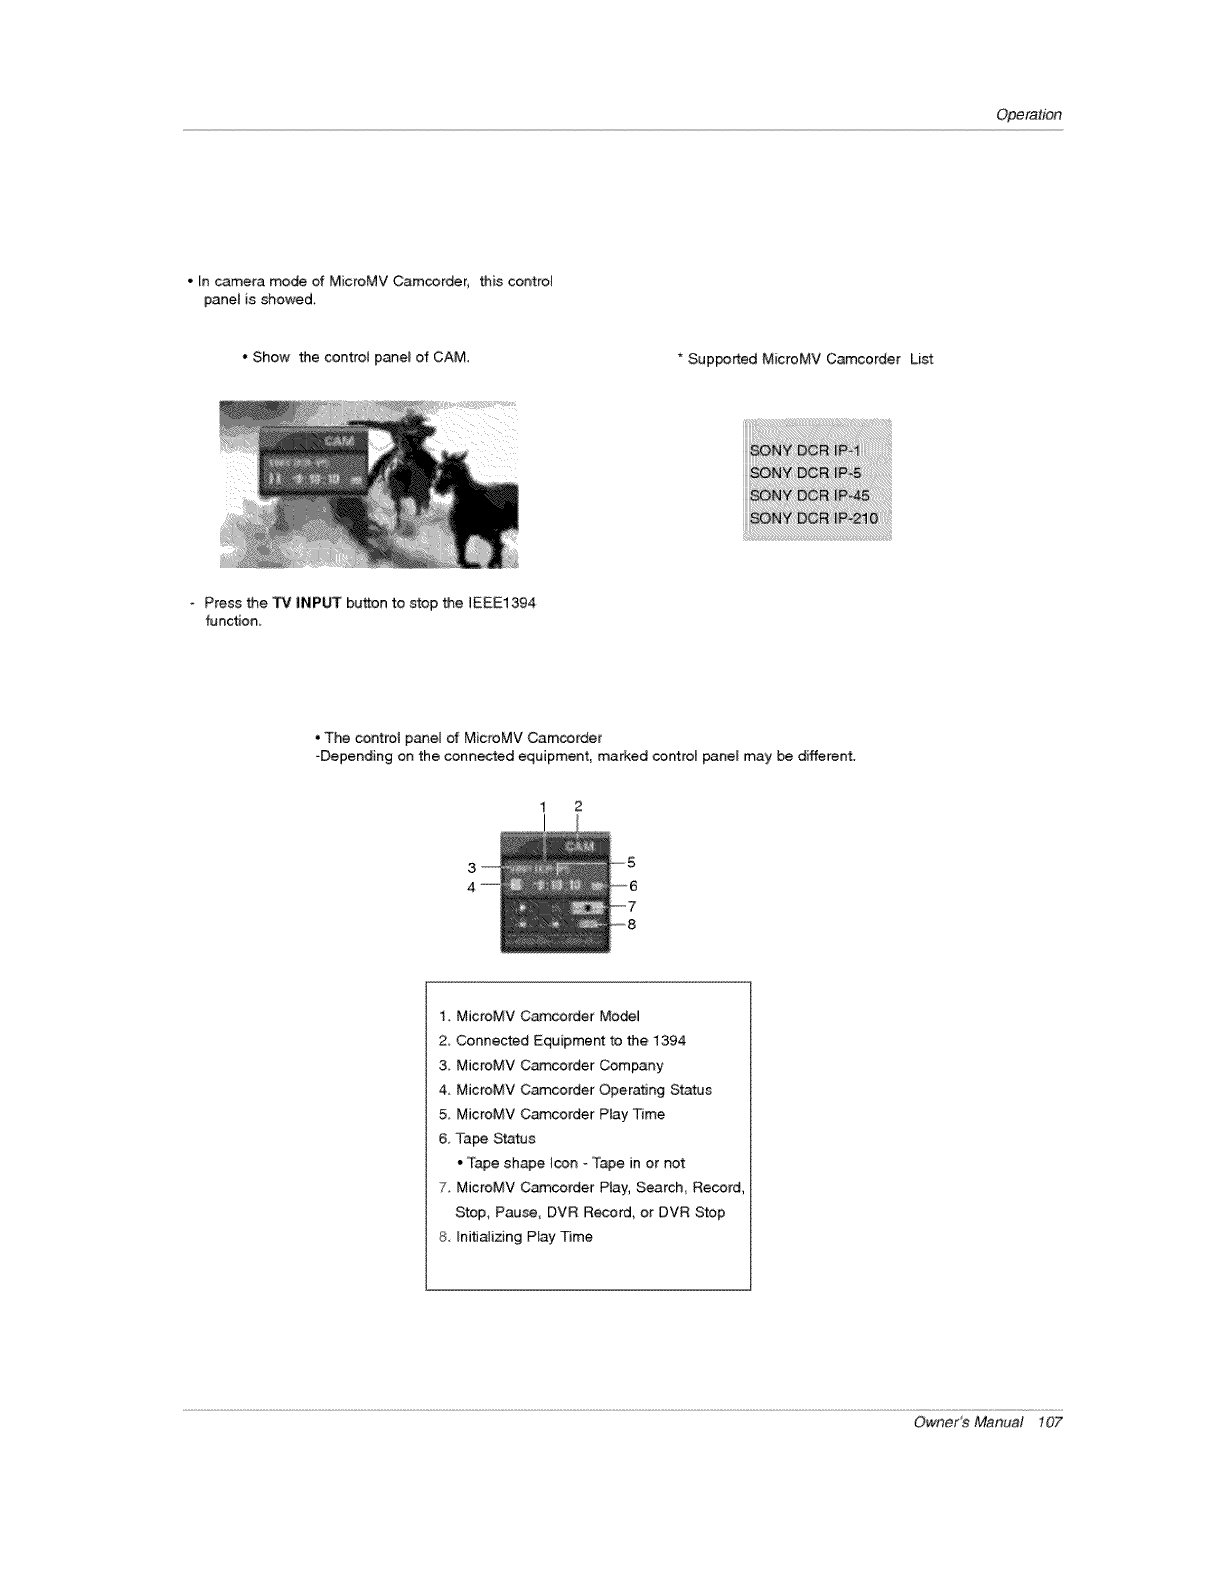
Operation
• _n camera mode of MicroMV Camcorder, this controM
panet is showed.
', Show the contro_ panel of CAM Supported MicroMV Camcorder List
Press the TV INPUT button to stop the JEEE1394
function
• The contro_ panel of MicroMV Camcorder
-Depending on the _nnected equipment, marked control panel may be different.
1 2
3
4
1, MicroMV Camcorder Mo_
2. Connected Equipment to the 1394
3 MicroMV Camcorder Company
4 MicroMV Camcorder Operating Status
5_ MicroMV Camcorder Play Time
& Tapa Status
- Tape shape Icon - Tape in or not
7 MicroMV Camcorder Play, Search_ Record,
Stop, Pause, DVR R_ord, or DVR Stop
8. Lnitializing Play Time
Owner_ Manual 107
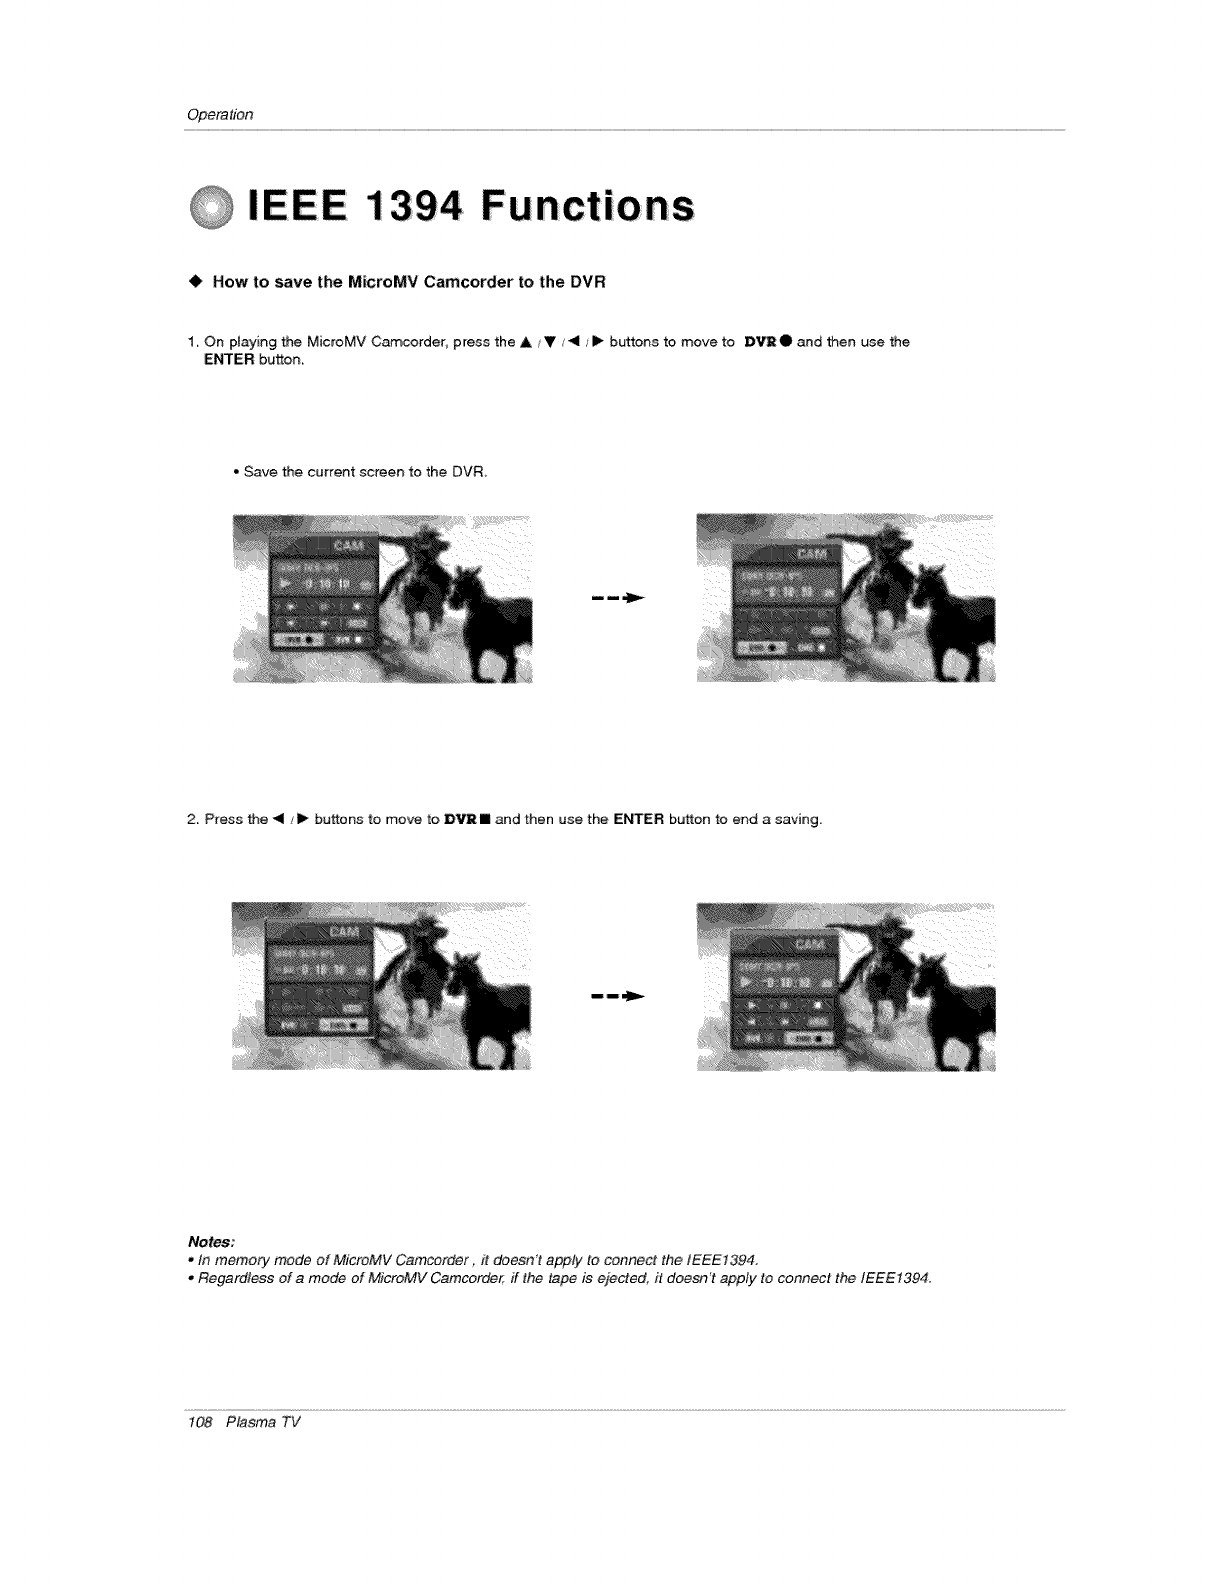
Opera#bn
IEEE 1394 Functions
•How to save the MicroMV Camcorder to the DVR
1, On ptaying the MicroMV Camcorder, press the &iV J< t_ buttons to move to D_O and Men use the
ENTER button,
,,Save the current screen to the DVR_
2, Press Me _ ,_ bu_ons to move to DV_I and then use the ENTER bu_on to end a saving.
Notes:
• tn memory mode of MicroMV Camcorder it doesn't apply to connect the IEEE1394.
•Regardless of amode of MicroMV Camcorder, if the tape is ejected, it doer': apply lo connect the IEEE1394.
108 Plasma TV
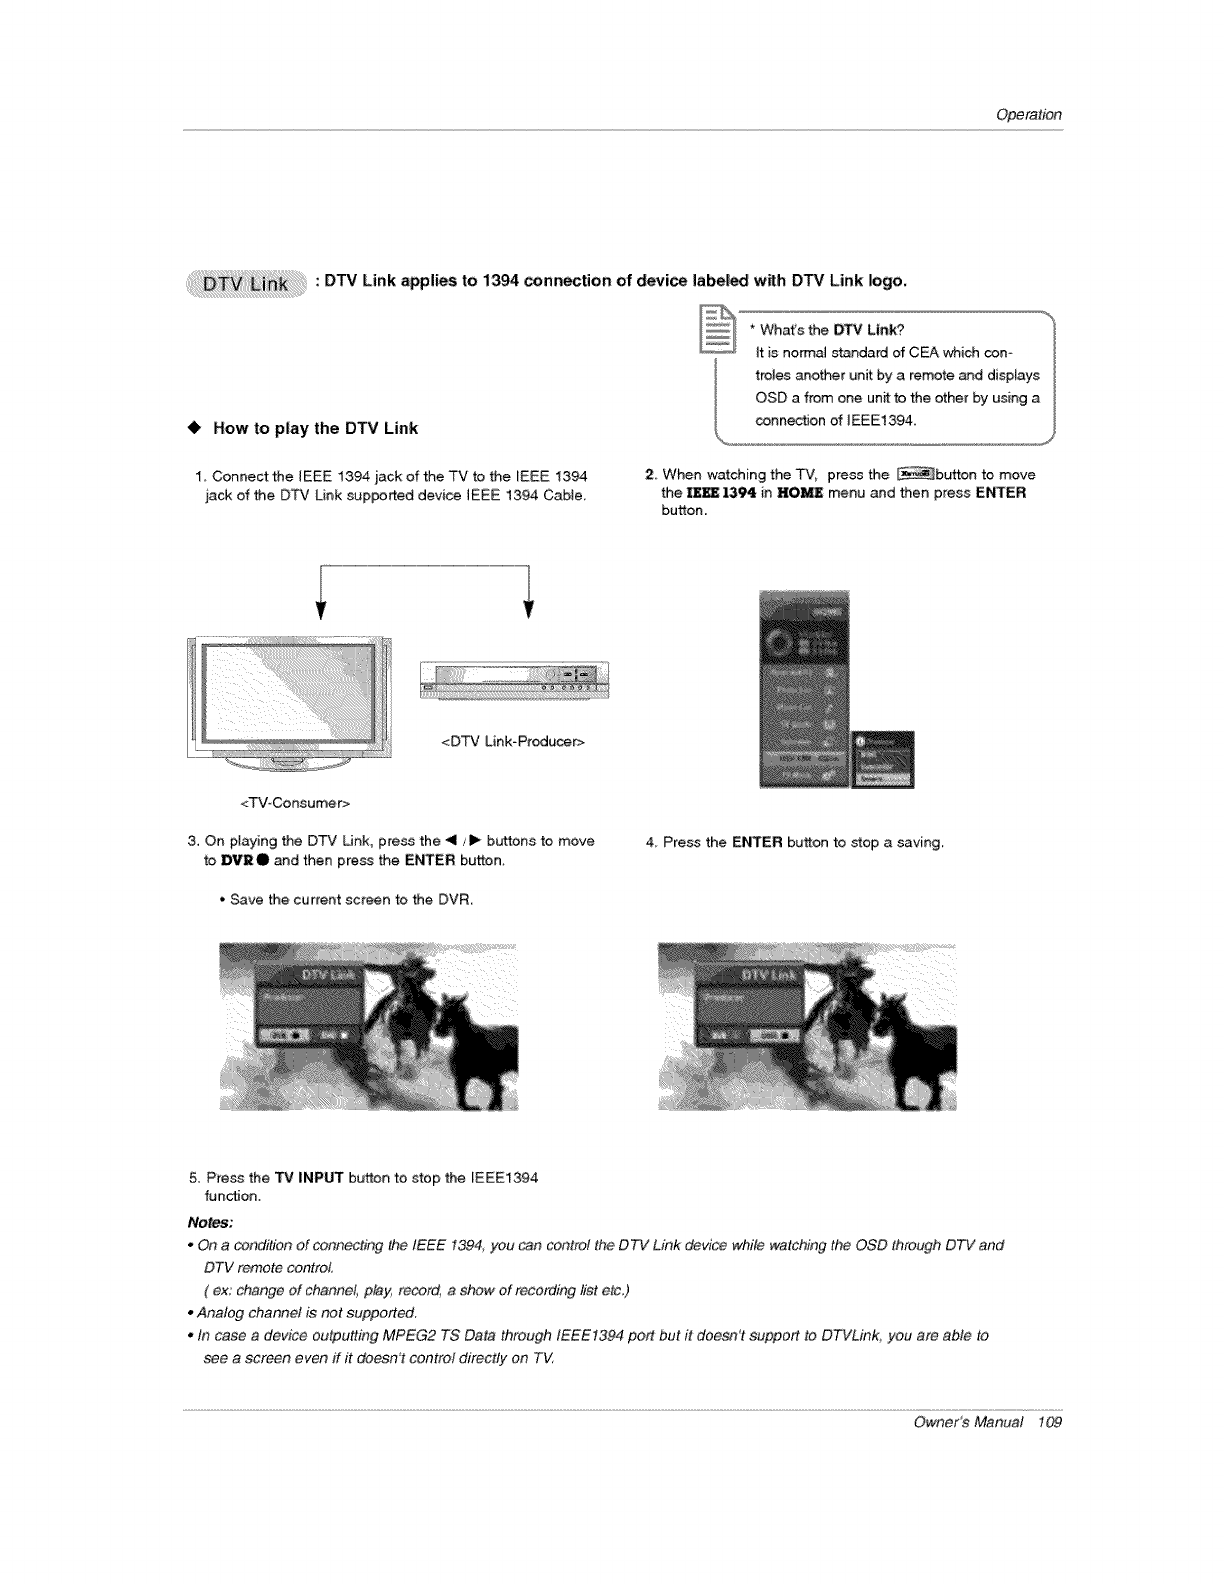
Operation
: DTV Link applies to 1394 connection of device labeled with DTV Link logo.
tt is normal s_ndard of CEA which con- /
troles another unit by a remote and displays /
OSD a from one un_ to the other by using a /
• How to play the DTV Link _.... conn_on of IEEE1394,
1, Connect the IEEE 1394 jack of the TV to the _EEE 1394
jack of the DTV Link supported device IEEE 1394 Cable,
2. When watching the TV_ press the _button to move
the [EEE 1394 in HOME menu and then press Et{lrER
button,
<DTV Link=Producer>
<TV-Consumer>
3. On playing the DTV Unk, press the 41 ,,'i_ buttons to move
to IBVRO and then press the ENTER button,
*Save the current screen to the DVR
4, Press the ENTER button to stop a saving,
5. Press the TV INPUT button to stop the [EEE1394
fun_on.
Notes:
oOn acondition of connecting t.he tEEE I394, you _n control the D_ Link device while watching the OSD through D_/and
DTV remote co_qtroL
( ex, change of c_nneL play_ record, a show of recording #',_ etc,)
oAnalog channel is not suppoded
o In case a device outputting MPEG2 TS Data through IEEEt394 port but #does'Yt support to DTVLin& you are able to
see a screen even ff #doesn't control directly on TV,
Owner_Manual 1_
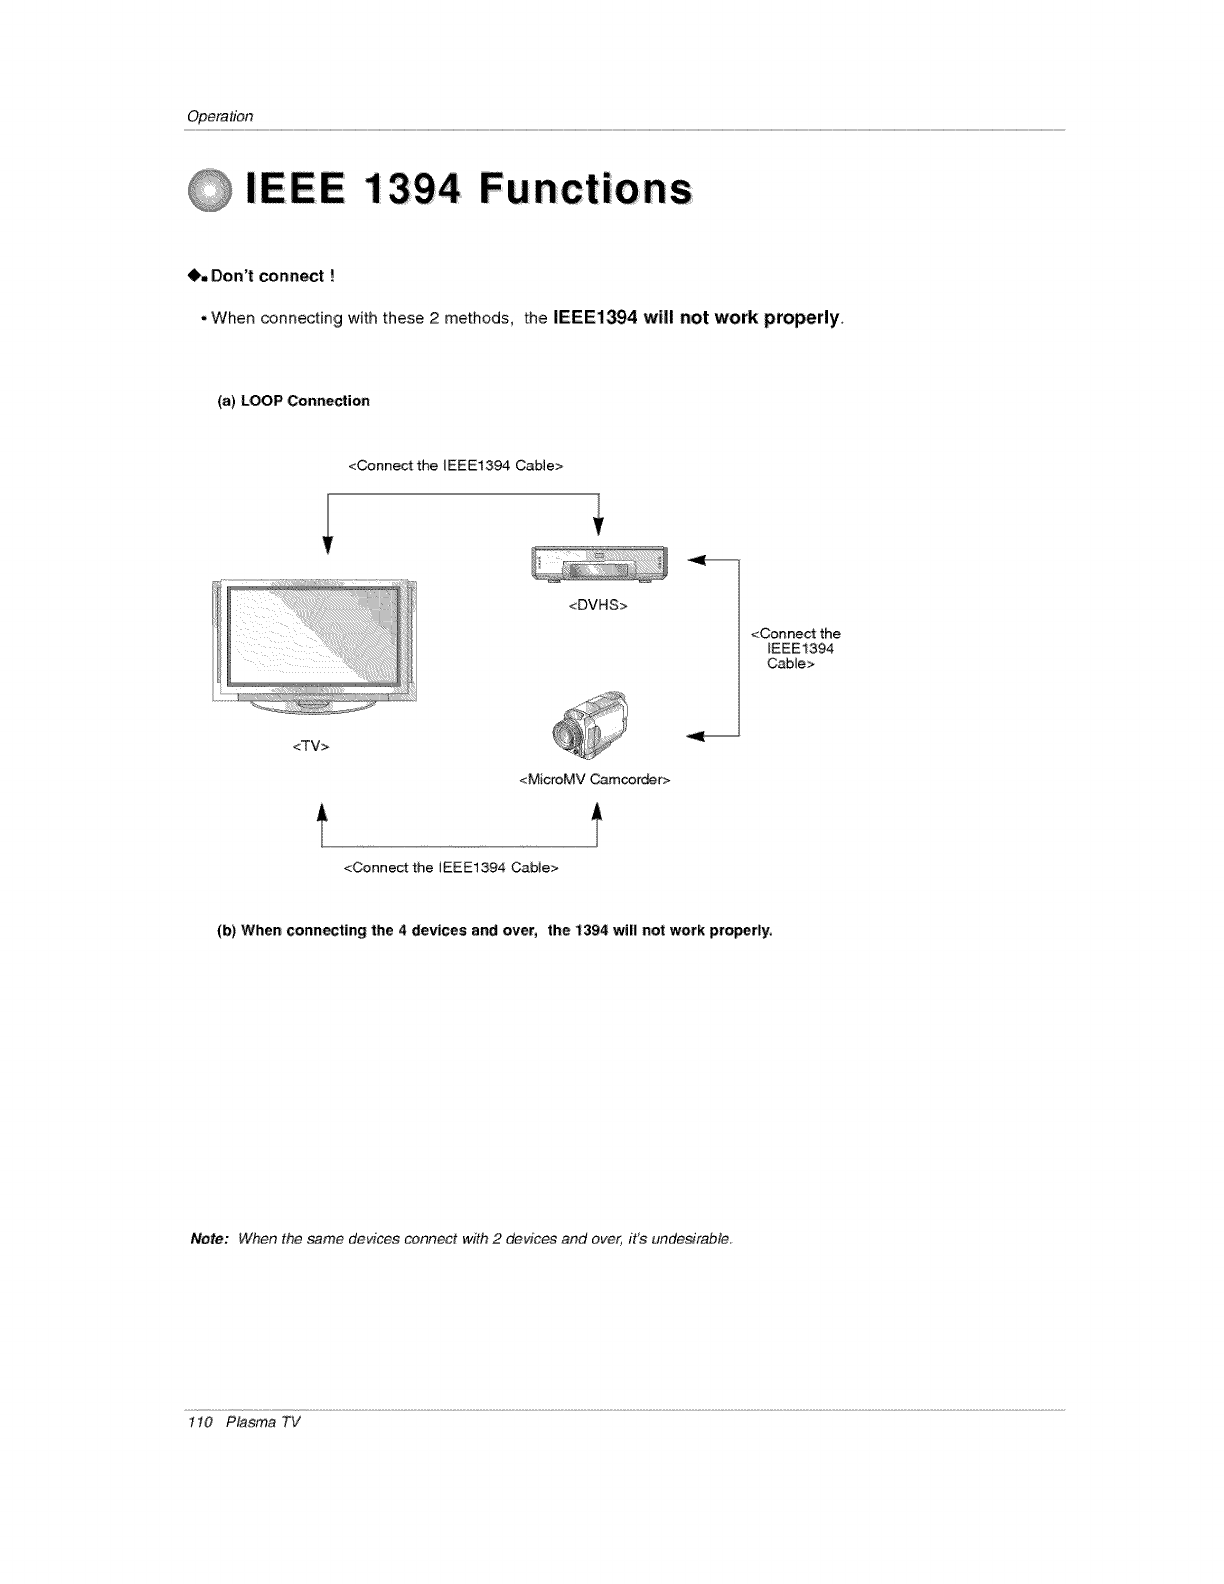
Operation
IEEE 1394 Functions
O, Don't connect !
•When connecting with these 2 methods, the iEEE1394 will not work properly.
(a) LOOP Connection
<Connect the IEEE1394 Cable>
!_'!!_l'_:_i_/__i_!_!_i_'_i_'i_'i!!_!_!_!!_iii_i!iiii!ii!I!
<TV>
<DVHS>
<MicroMV Camcorder>
<Connect the EEE1394 Cable>
<Connect the
(b) When connecting the 4 devices and over, the 1;394 wi|l not work proof|y,
Note: When the same devices connect with 2_vices and over, it's undesirable,
1t0 Plasma TV
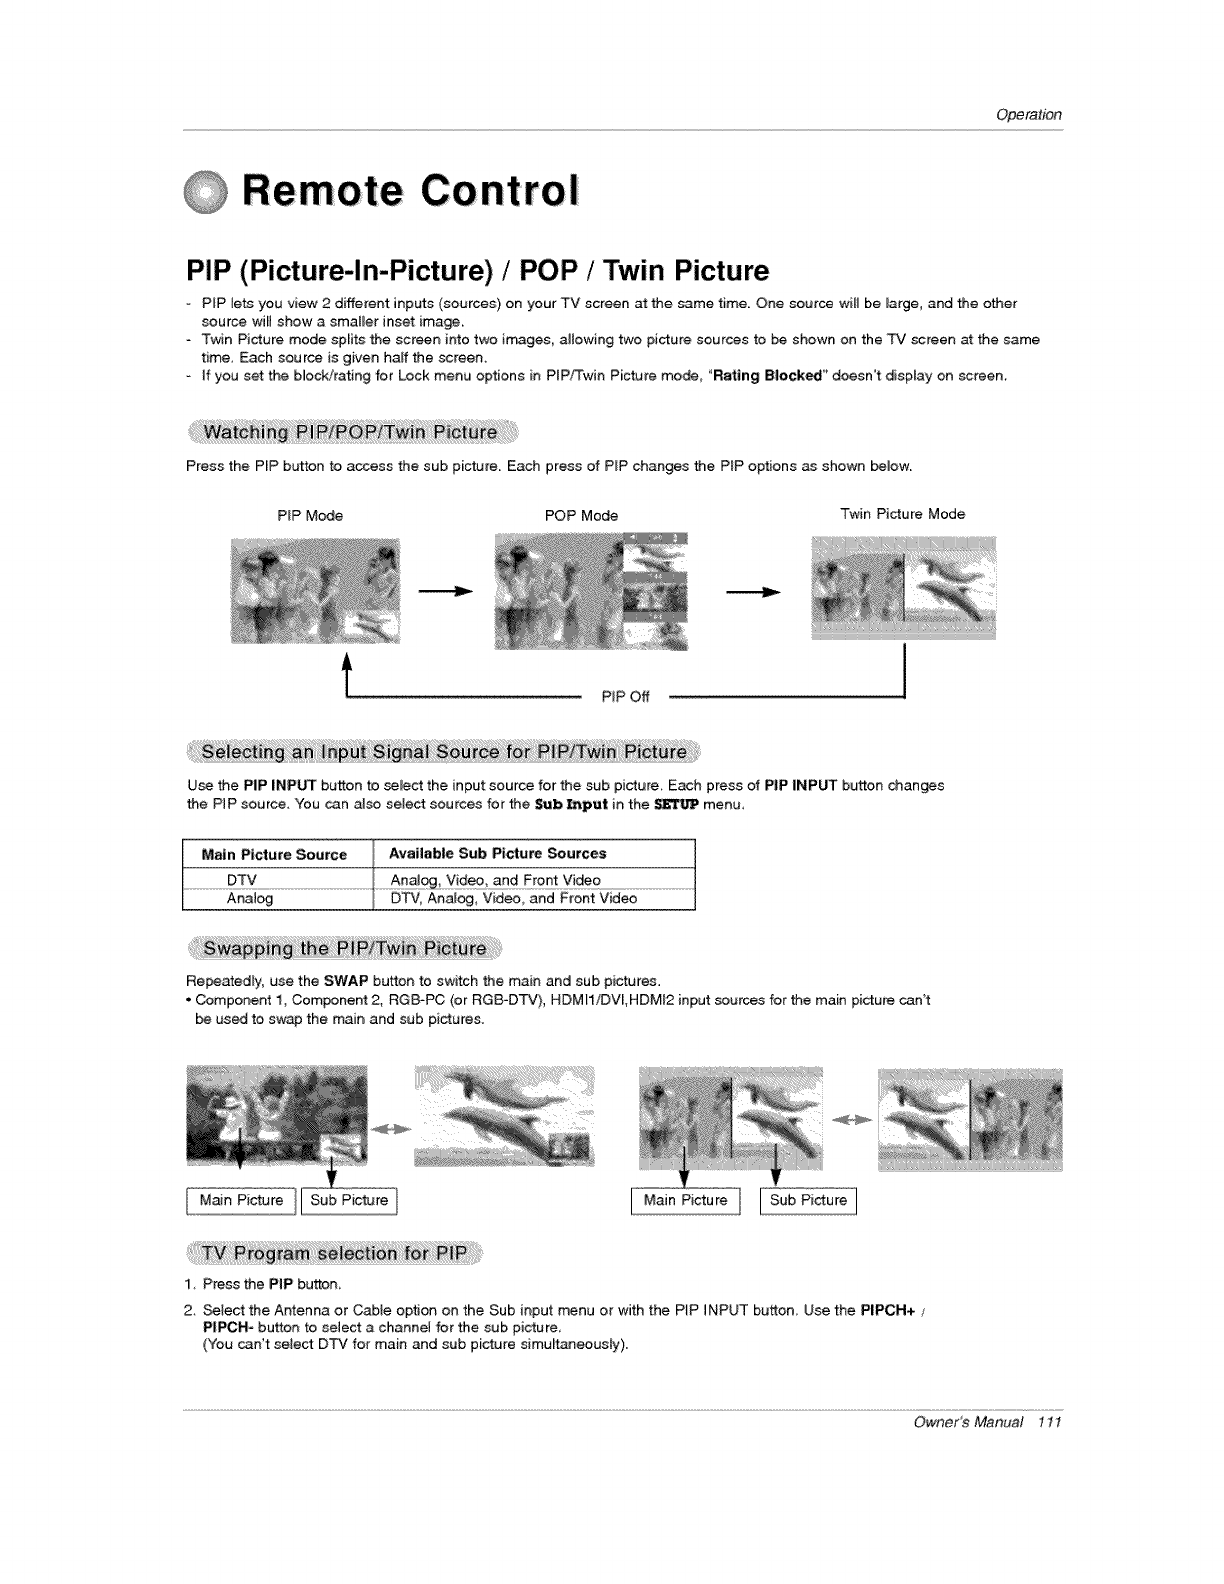
Operation
@Remote Control
PIP (Picture-In-Picture) /POP /Twin Picture
oPIP lets you view 2 different inputs (sources) on your TV screen at the same time. One source will be large, and the other
source will show a smat_er inset image.
-Twin Picture mode splits the screen into two irr_ges, allowing two picture sources to be shown on the TV screen at the same
time. Each source is given half the screen.
-if you set the bmock/rating for Lock menu options in PIP,_win Picture mode, "Rating Blocked" doesn't display on screen.
Press the P_P button to access the sub pic_te. Each press of P_P changes the PIP options as shown beJow.
PiP Mode POP Mode Twin Picture Mode
PIP Off
Use the PiP iNPUT button to select the input source for the sub picture Each press of PIP INP_ button changes
the P_P source, You can also select sources for the Sub _put in the $11_JP menu,
Main Picture Source Available Sub P_ctu,re Sources
.............................DTy .............................................................................................Y!_o .....................................................................
Analog DTV_Analog_ Video_ and Front Video
Relatedly, use the SWAP button to switch the main and sub pictures.
. Component i, Component 2, RG_PC (or RGS-DTV), HDMIiiDW,HDMI2 input sources for the main pictu_ can't
be used to swap the main and sub pictures.
Main Picture Sub Picture [ Main Picture
1, Ptess thePIP button,
2, _iect the Antenna or Cabte option on the Sub input menu or with the PiP INPUT button Use the PIPCH+ ,_
PITH- button to select a channel for the sub picture,
(You can't seiect DTV for main and sub picture simultaneously).
Owners Manual 11I
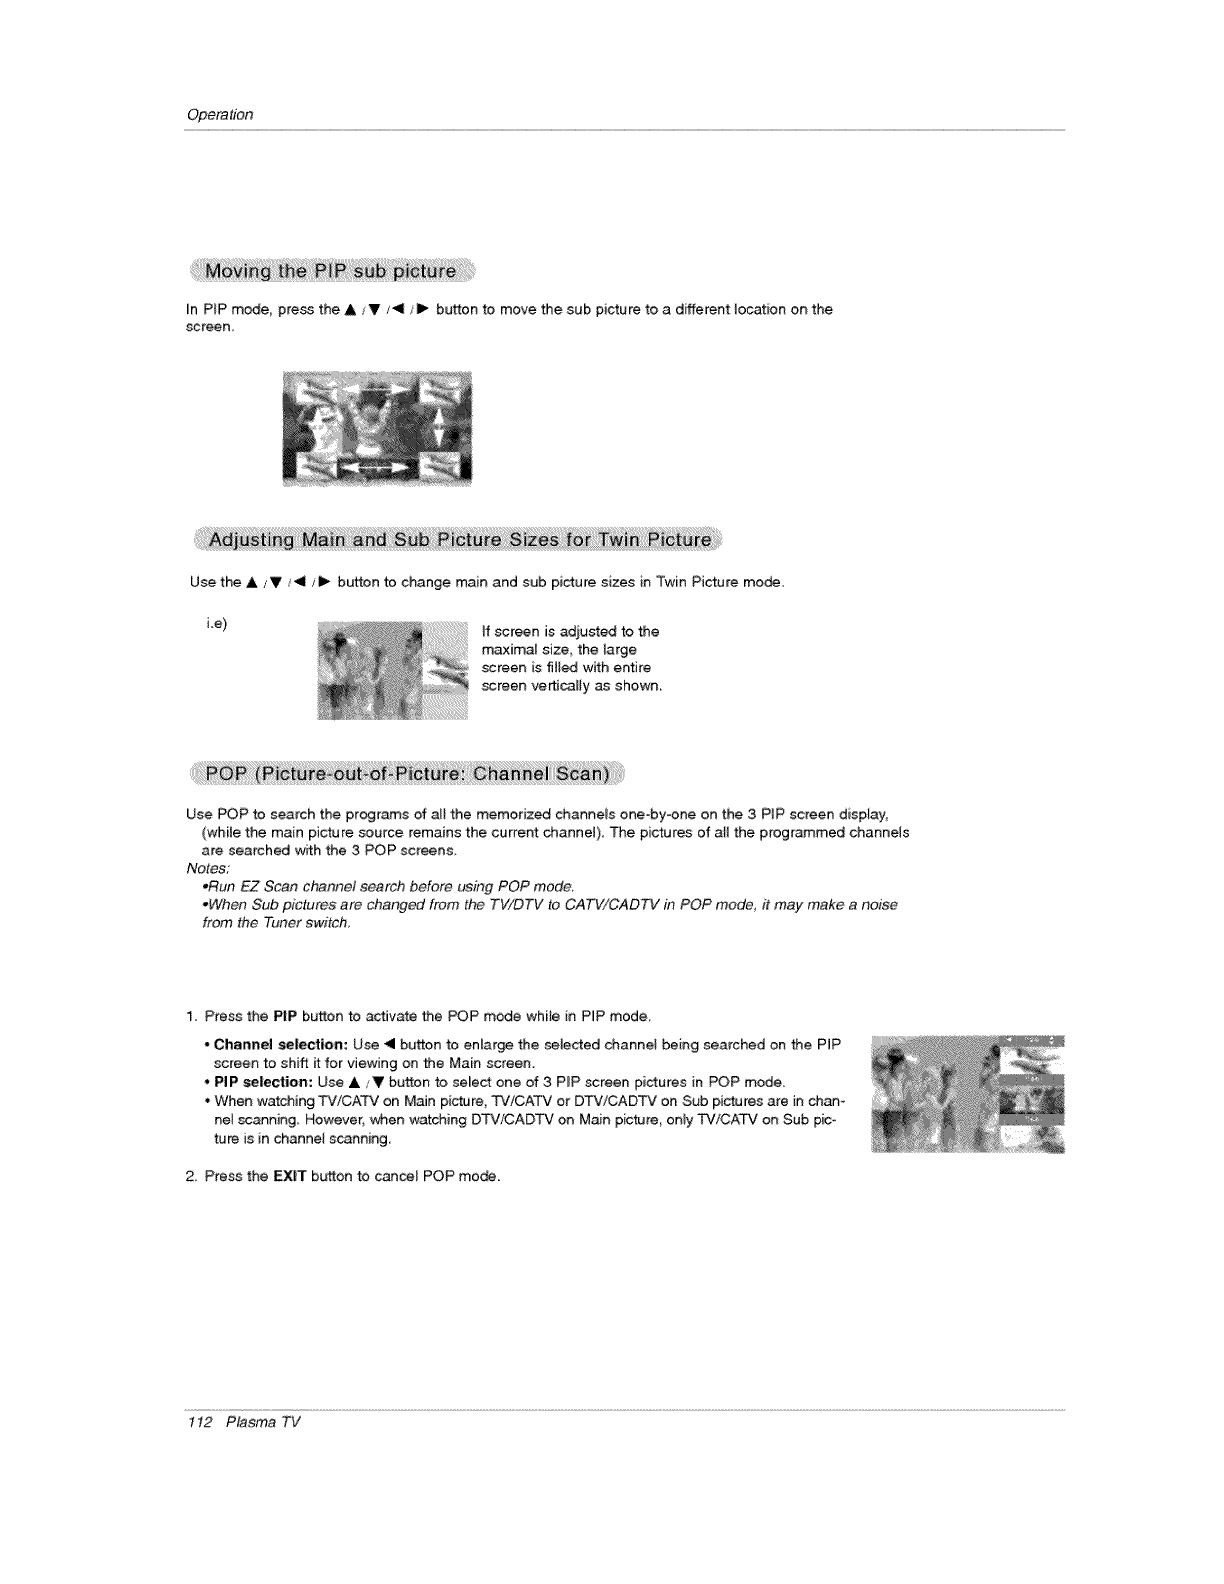
Opera#on
In PIP mode, press the & iV/4 I_ button to move the sub picture to a different location on the
screen
Use the &/V/_!1 t_ button to change main and sub picture sizes in Twin Picture mode,
Le) If screen is adjusted to the
maxima[ size, the large
screen is filled with entire
screen ve_caE[y as shown.
Use POP to search the programs of alt the memorized channels one-by-one on the 3 P_P screen display,
(while the main picture source remains the current channel), The pictures of aH the programmed channels
are searched with the 3 POP screens,
Notes:
*Run EZ Scan channet search b¢.*fore using POP mode.
°When Sub pictures are changed from the TV/DTV to CATV!CADTV in POP mode, it may make a noise
from the Tuner switch,
1. Press the PIP button to activate the POP m_e whi_e in PIP mode_
- Channel selection: Use _ button to enlarge the selected channel being searched on the PIP
screen to shift itfor viewing on the Main screen.
•PIP selection: Use A / V button to select one of 3 PIP screen pictures in POP mode.
, When watching TV!CATV on M_n picture, TV!CATV or DTV!CADTV on Sub pictures are in chan-
nel scanning_ However, when watching DTV/CADTV on Main pic#Jre, onUy TViCATV on Sub pico
ture is in channel s_nning
2, Press the EXIT button to cancel POP mo_,
1t2 Plasma TV
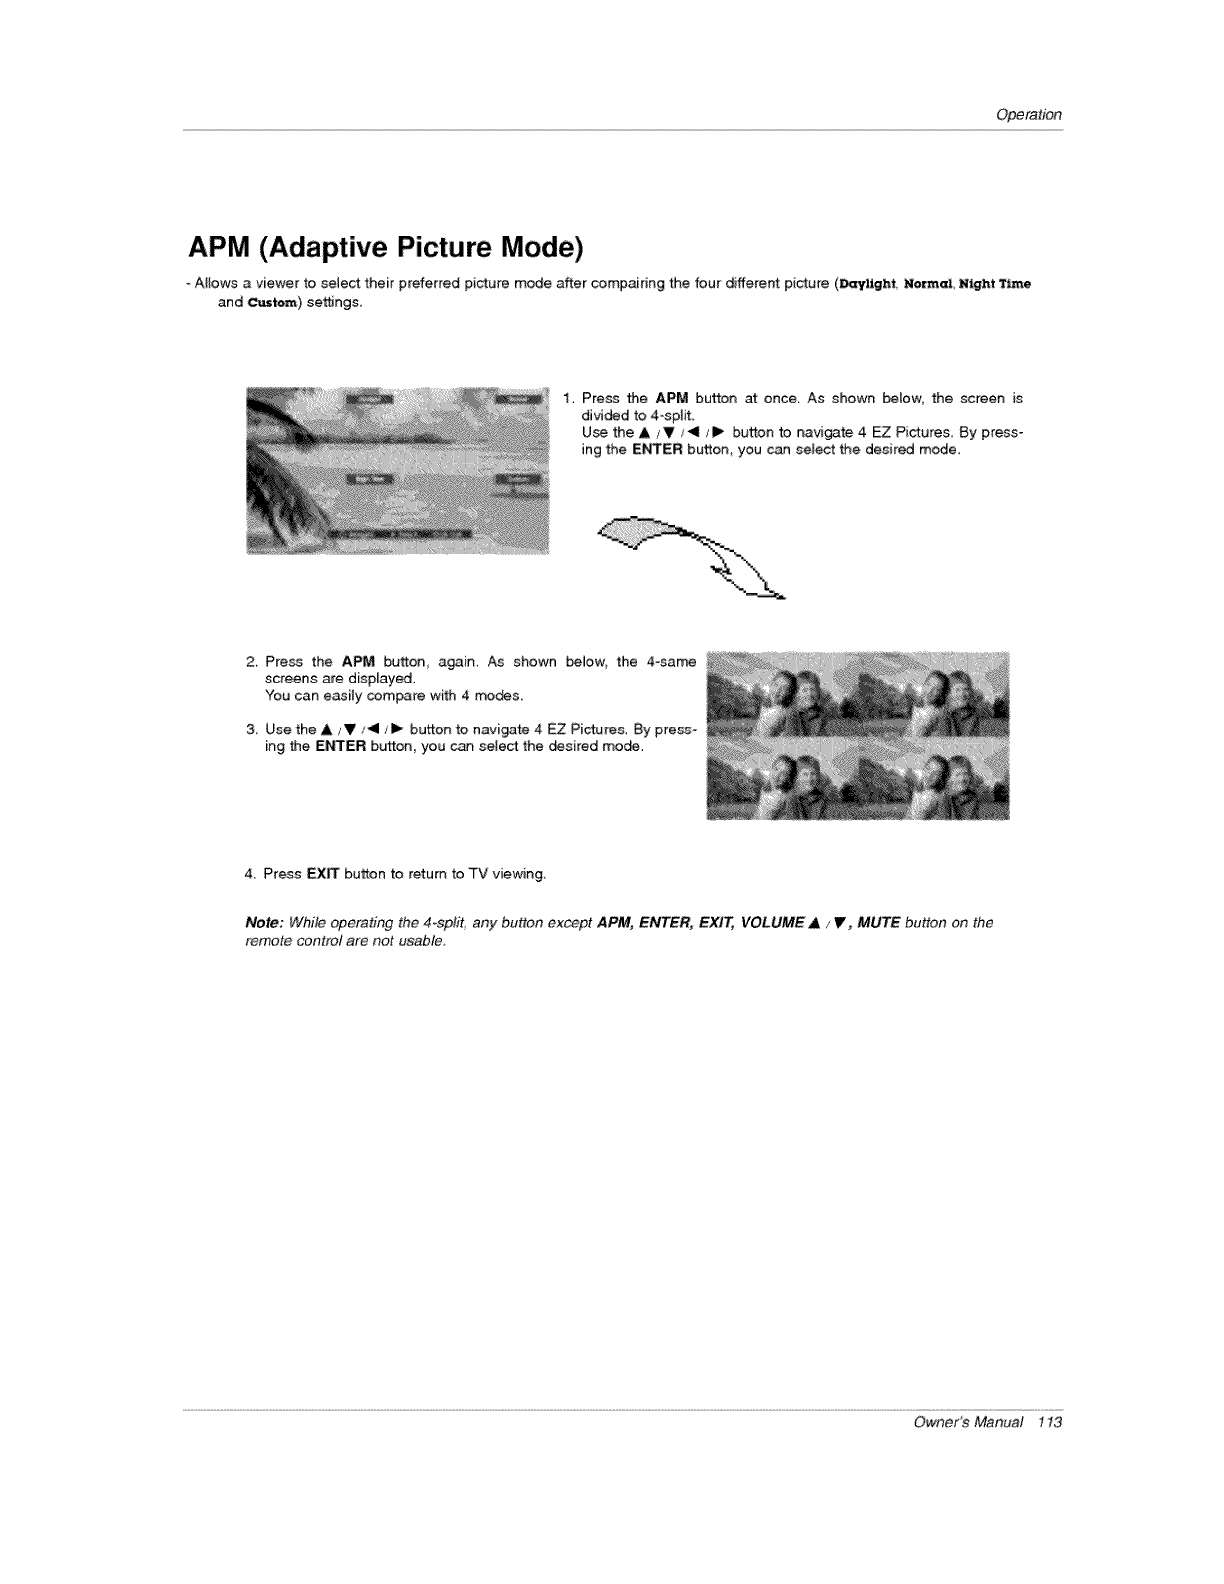
Operation
APM (Adaptive Picture Mode)
oAllows a viewer to select their preferred picture mode after compaidng the four different picture (_ighft, Morm_, Night TL_e
and _tom) settings
1. Press the APM button at once. As shown below, the screen is
divided to 4-split.
Use the & IV/4/1_ button to navigate 4 EZ Pictures By press-
ing the ENTER button, you can select the desired mode
2, Press the APM button, again A_ shown below, the 4=same
screens are displayed.
You can easily compare with 4 modes.
3 Use the A IV _1 tl_ button to navigate 4 EZ Pictures, By press-
ing the ENTER button, you can select the _sired mo_.
4_ Press EXIT button to return to TV viewing
Note: While operating the 4-split. any button except APM, ENTER, EXIT, VOLUME AiV, MUTE button on the
remote control are not usable_
Owner_Manual 113
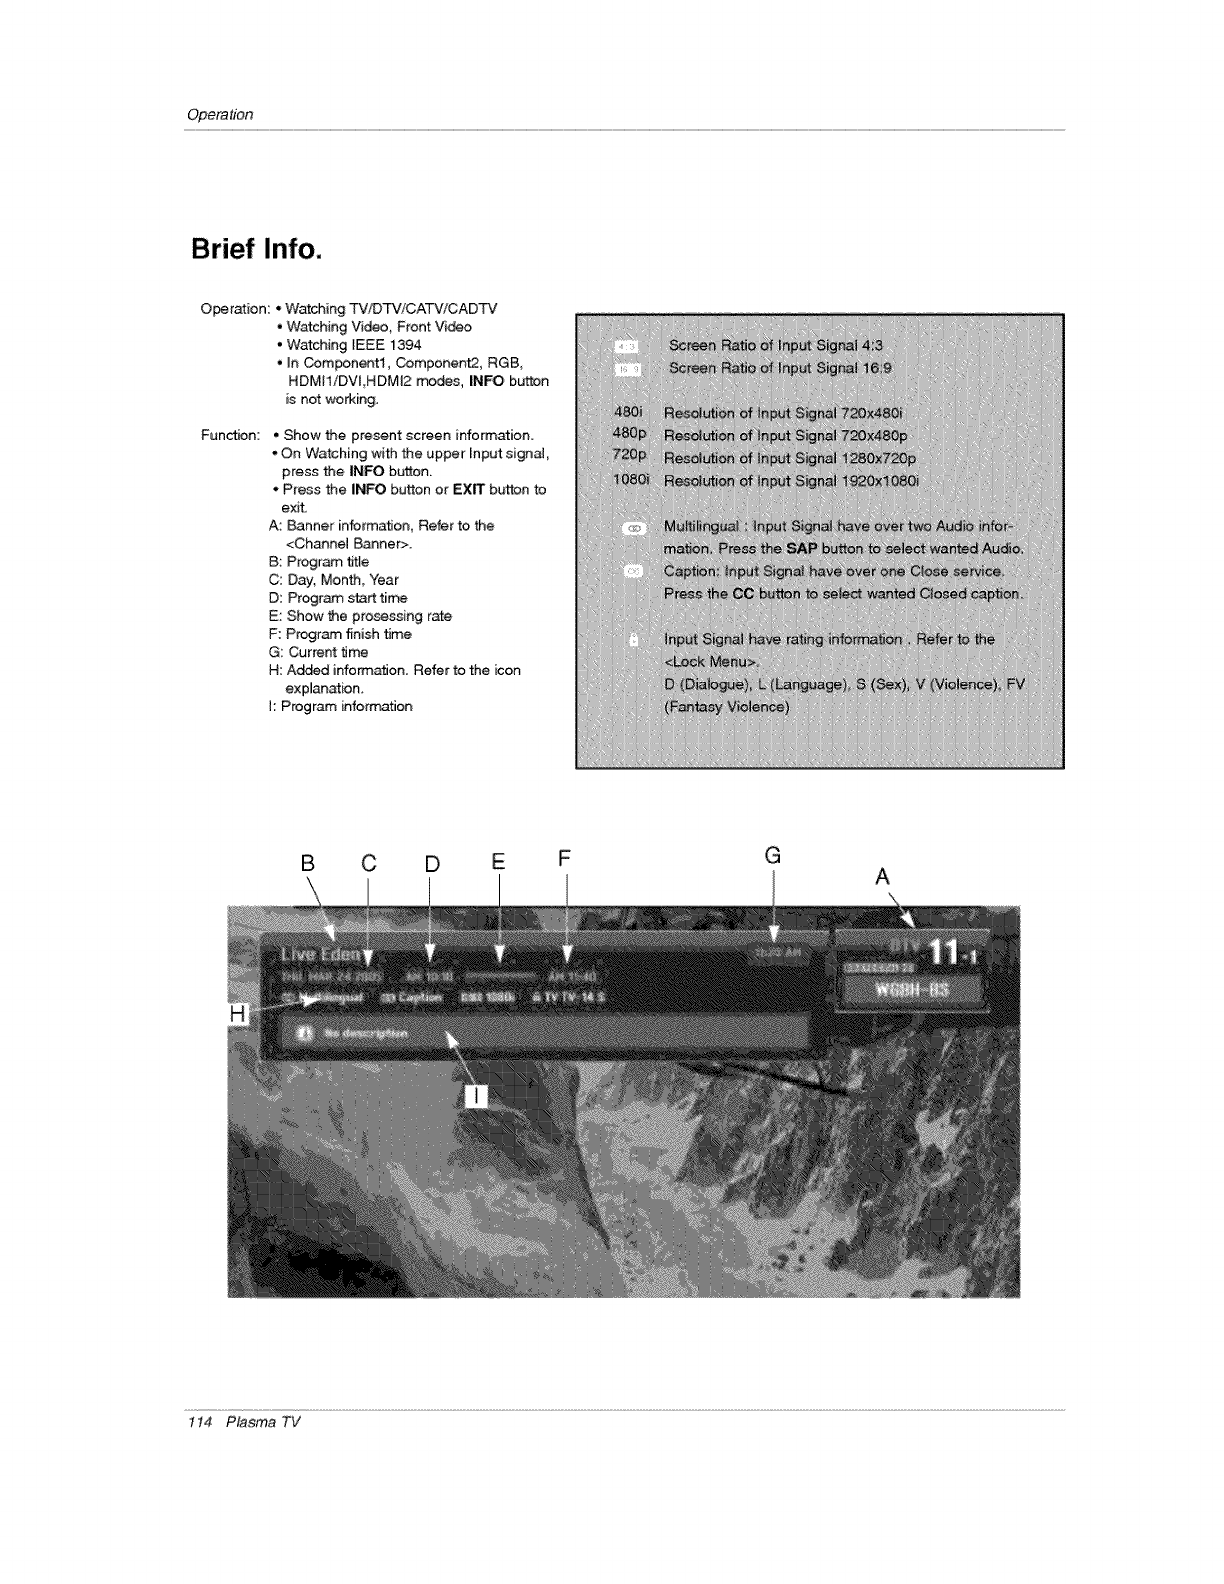
Opera#bn
Brief Info.
O_ration: * Watching TV/DTViCATV/CADTV
• Watching Video, Front Video
, Watching IEEE 1394
+ h Com_nentl, Component2, RGB,
HDMI1/DVt,HDMI2 modes, INFO button
is not working,
Function: • Show the present screen information.
• On Watching with the upper Input signaJ,
press the INFO button.
• Press the INFO button or EXIT button to
exit,
A: Banner information, Refer to the
<Chine( Banner>.
B: Program _te
C: Day, Month, Year
D: Program start tirr_
E: Show the prosessing rate
F: Program finish time
G: Current t_me
H: Ad#_d inform_on. Refer to the icon
exp(anation.
I: Program +nform_tJon
iiiiii)):H))ii_:
i'ii_iiii)i!ii)iiiii))_),iiii
+iiii+i!i:'i_pi+,ii
)iiii)i)i+iI)080i_
B C D E F G
,,, A
1t4 Plasma TV
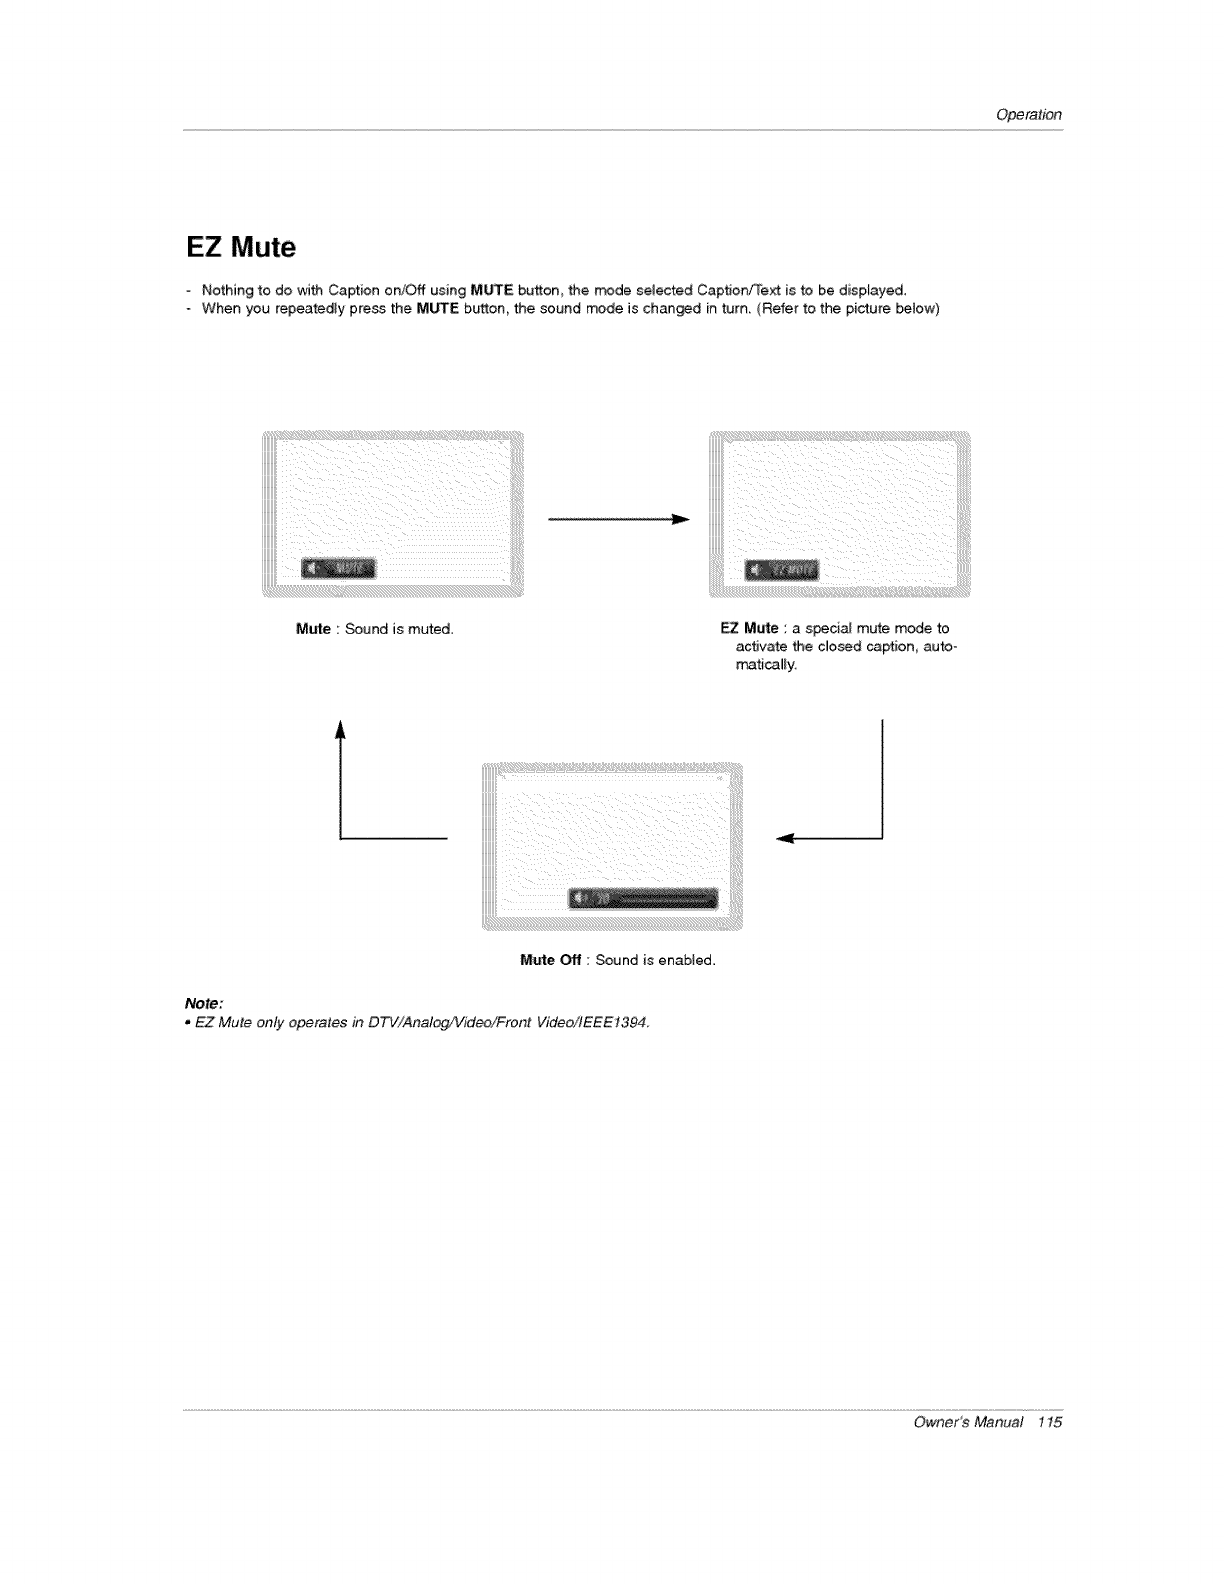
Operation
EZ Mute
-Nothing to do with Caption on/Off using M:_E button, De trade selected Caption!Text is to be displayed_
When you repeatedly press the MUTE bL_ton_ the sound mode is changed in turn, (Refer to the picture betow)
Mute : Sound is muted EZ Mute : a special mute mode to
activate the closed caption, auto-
m,atically.
Mute Off : Sound is enabted.
Note:
, EZ Mute only operates in DTV/Analog/Video/Front VideoilEEE1394.
Owner's Manual 115
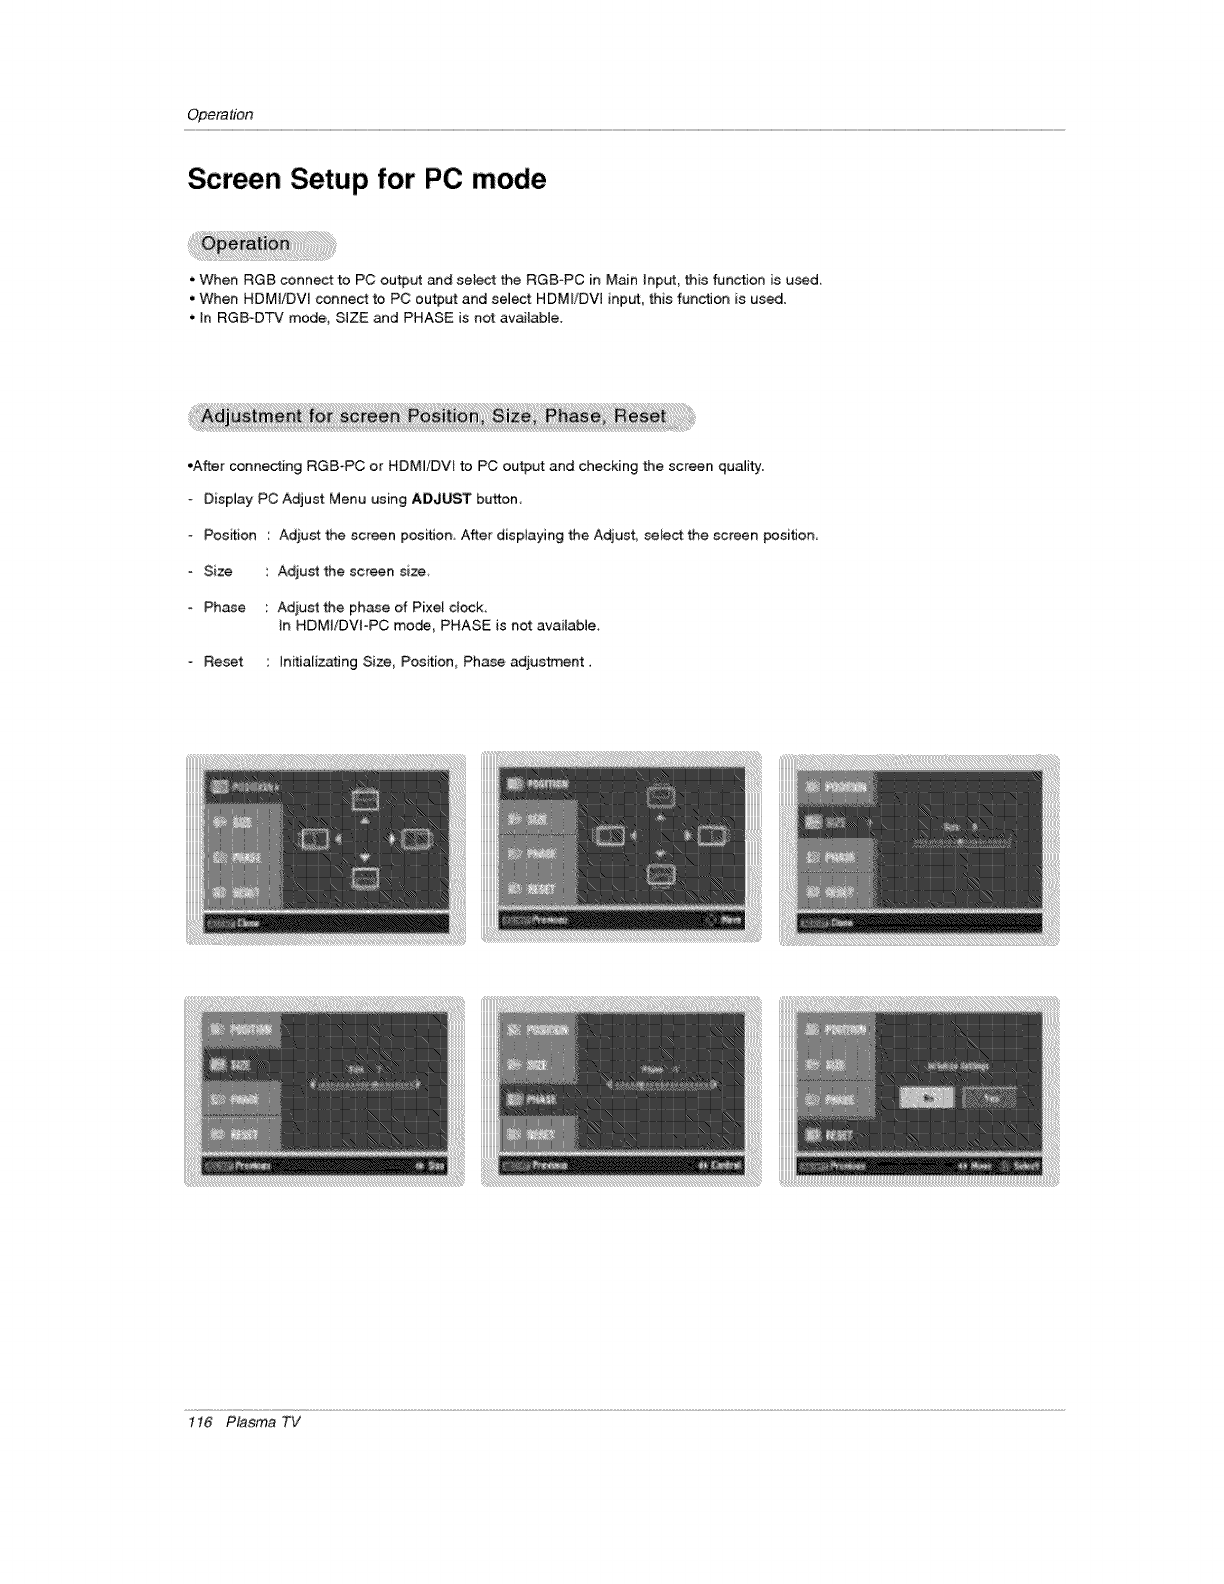
Opera#on
Screen Setup for PC mode
.When RGB connect to PC output and select the RGB-PC in Main Inp_, this function is used.
• When HDMI/DV[ connect to PC output and select HDMliDVt input, this function is used.
• _n RGB-DTV mode, SIZE and PHASE is net av_lable.
•After connecting RGB-PC or HDMI/DVI to PC output and checking the screen quality:
Display PC Adjust Menu using ADJUST button
Position
o Size
-Phase
Reset
Adjust _e screen position. After dispiayi#g _e Adjust, sele_ _e screen position.
Adjust the screen size
Adiust the ph_e of Pixe_ clock,
In HDMtiDVt-PC mo_ PHASE is not avaiiabte_
Initia[izatmg Size, Posffion_ Phase adjustment.
1t6 Plasma TV
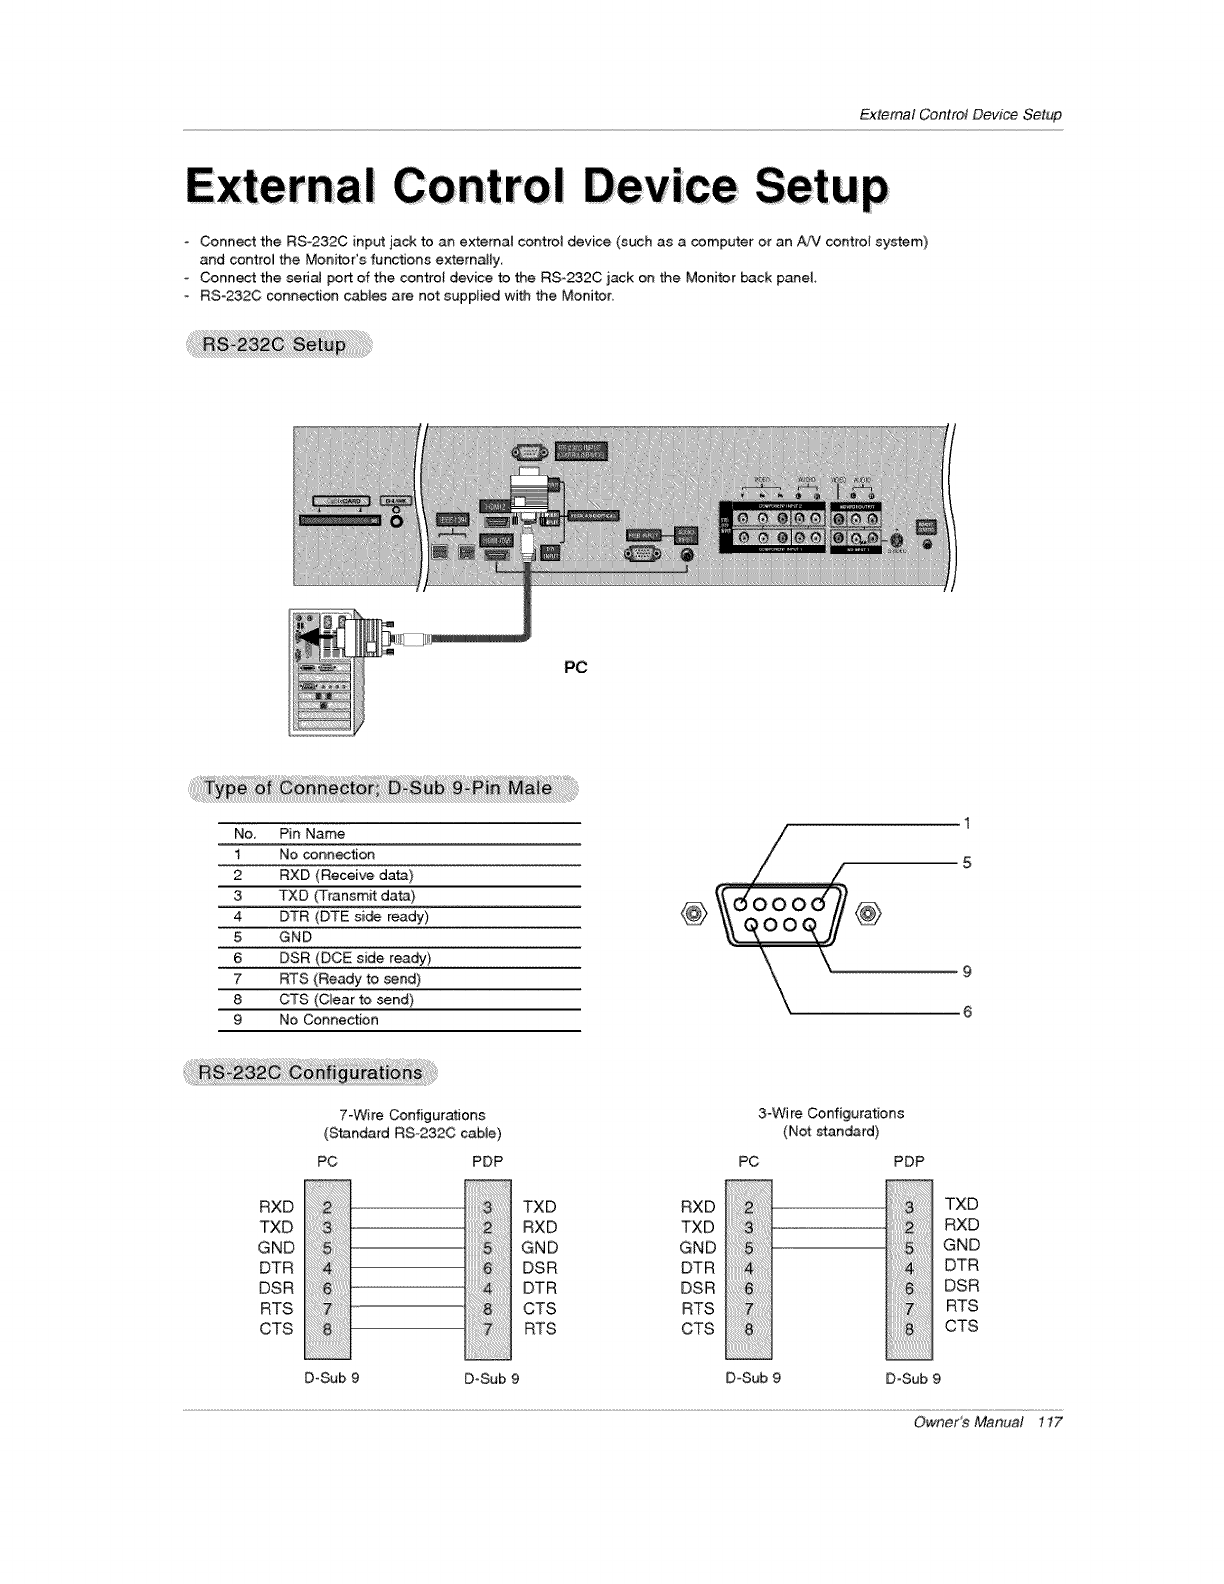
ExternalControlDeviceSetup
Connect the RS-232C inp_ jack to an external control device (such as a computer or an AiV centre(system)
and centre( the Monitor's functions externaJ(y
Connect the seda( port of the centre) device to the RS_232C jack on the Monitor back panel
- RS-232C connexion cab(es are not supplied with the Monitor
PC
No. Pin Name
1 No connection
2 RXD (Recebve data)
3 TXD (Transmit data)
4 DTR (DTE si_ ready)
5 GND
6 DSR (DCE side ready)
7 RTS (Ready to send)
8 CTS (C_ear to send)
9 No Connection
1
5
@ oood#@
\\ o
6
7-Wire Configurations
(Standard RSo232C cable)
PC PDP
i
i.......
RXD
TXD
GND
DTR
DSR
RTS
CTS
D-Sub 9 D-Sub
3-Wi re Configurations
(Not standard)
PC PDP
TXD RXD TXD
RXD TXD ....................................................................RXD
GND GND GND
DSR DTR DTR
DTR DSR DSR
CTS RTS RTS
RTS CTS CTS
D_Sub 9 D-Sub 9
Owner_ Manual 117
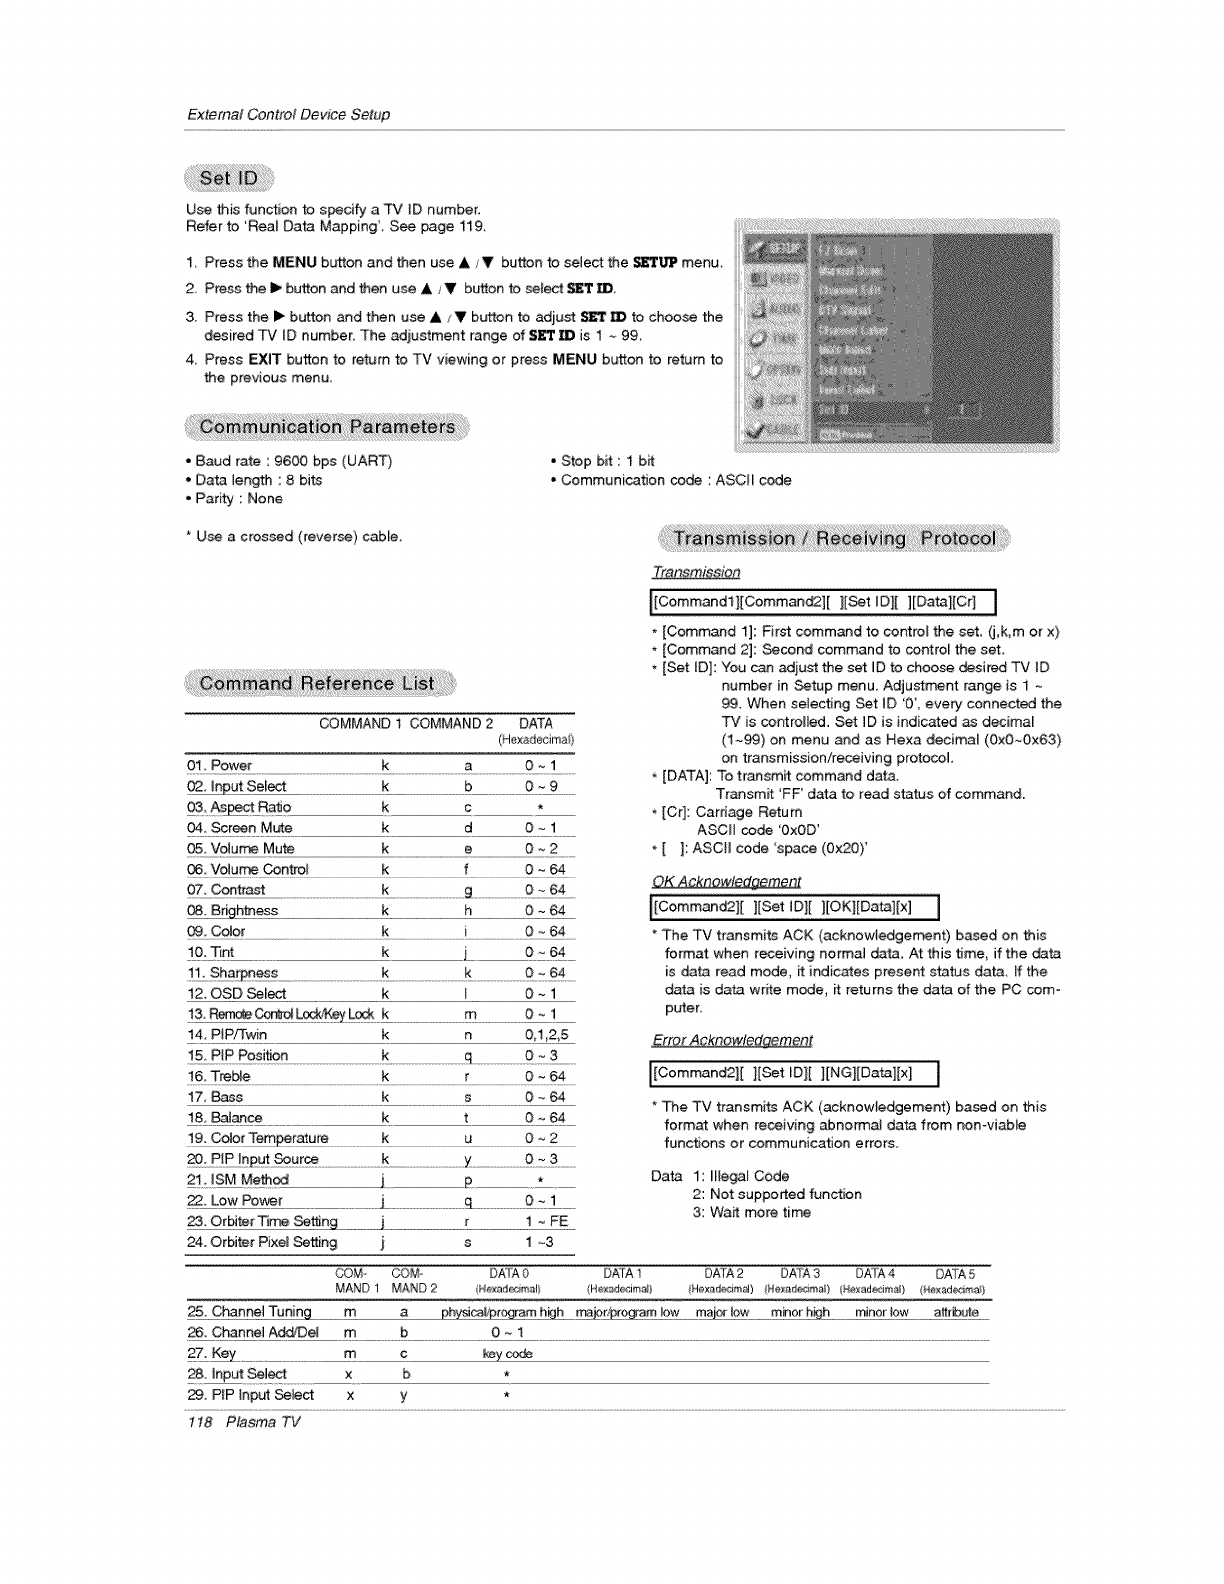
ExternalControlDeviceSelup
Use this function to s_cify a TV ID number.
Refer to 'Real Data Mapping _, See page 119,
1, Press the MENU button and then use &/V button to select the _'l'b'3ff menu,
2 Press the I_ button and then use A /V button to setect SET IZ),
3. Press the I_ button and then use A/V bL_on to adjust _ to choose the
desired TV [D number. The adiustment range of $FI'_B is 1 ~ 99_
4, Press EXIT button to return to TV viewing or press MENU button to return to
the previous menu,
• Baud rate : 9600 bps (UAR_
• Data length : 8 bi_
• Parity : None
• Stop bit : 1 bit
• Communication code : ASCII code
* Use a crossed (reverse) cable.
COMMAND i COMMAND 2 DATA
(Hexadecimaii,
01. Power k a 0 _ 1
02, Input Select k b 0 _ 9
O& Aspect Rat_o k c *
04, _reen Mt._te k d 0 _ 1
05, Vo_urr_ Mute k e O _,2
06 Vc4ume Control k f 0 ~ 64
09. Color k i 0 ~ 64
i0. "nr_ k L6__
12, OSD _le_ k _ 0 -. 1
:_ _ Lock¥÷/L_k .................................................._..................................
14, PIP/Twin k n 0,1,2,5
15, PIP Posff#n k
l& TreMe k r O _ 64
17, Bass k s 0 _64
18._ce ........................k t 0 _e4
!9. C_9 ratu_ .....................................K ..................................................U................................................
ut _u[_ ............................................k .........................................................Y ............................__:_3:.....
2t. mSM Method j £ *
.......................................................................J........................................................q.............................................
23. Orbiter Tirr_ _tting ......................j.........................................................[ .........................................
24. Orbiter Pixe_ _tt[ng j s 1 ~3
Transmisdon
I[Commandil[Comman_][ ][Set ID][ ][Datal[Cr] I
* [Command 1]: Fir_ command to control the set, (j,k,m or x)
* [Command 2]: Second command to control the set.
- [Set [D]: You can adjust the set JD to choose desired TV ID
number in Setup menu. Adjustment range is 1 ~
99. When selecting Set ID '0', every connected the
TV is controlled, Set iD is indicated _ decimal
(1_) on menu and as Hexa decimal (Ox0_Ox63)
on transmission/receiving protocol,
[DATA]: To transmit command data.
Transmit 'FF' data to read status of command.
*[Cr]: Carriage Return
ASCII code '0×0D'
* [ ]: ASCH code 'space (0x20)'
OK Acknowledgement
[[Command2][ ][Set tD][ ][OK][Data][x] ]
The TV transmits ACK (acknowledgement) based on this
format when receiving norma_ data, At this _me, if the data
is data read mode, _ indicates present status data. [f the
data is data wrffe mode, it returns the data of the PC com-
puter
Error Acknowledaeme_t
I[Command2][ ][Set _D][ ][Ne][Data][x] [
* _e TV transmi_ ACK (acknowledgement) based on this
format when receiving abnormal data from nonwiable
functions or communication errors
Data 1: Hle_t Code
2: Not supported function
3: Wait more time
COMa _M. DATA 0 DATA 1 DATA 2 DA_'A 3 DATA 4, DATA 5
MAND 1 MAND 2 (Nexa_mal} He>;adecJma]) He×8de_4ma[) He<edemaS} (Nexad_ia'_} (Ne_:ad_ima_}
25_ Cha££e[ Tuning ..................................m #[ #-_ _ £ h..........................._££[ !£w .........................._#!fl ...........
_. Channel Add/De[ m b 0 -- 1
27_ _ .....................................___ _y _
28. hput _ect x b *
29. PIP Inpu4 _ect x y *
t t8 Plasma TV
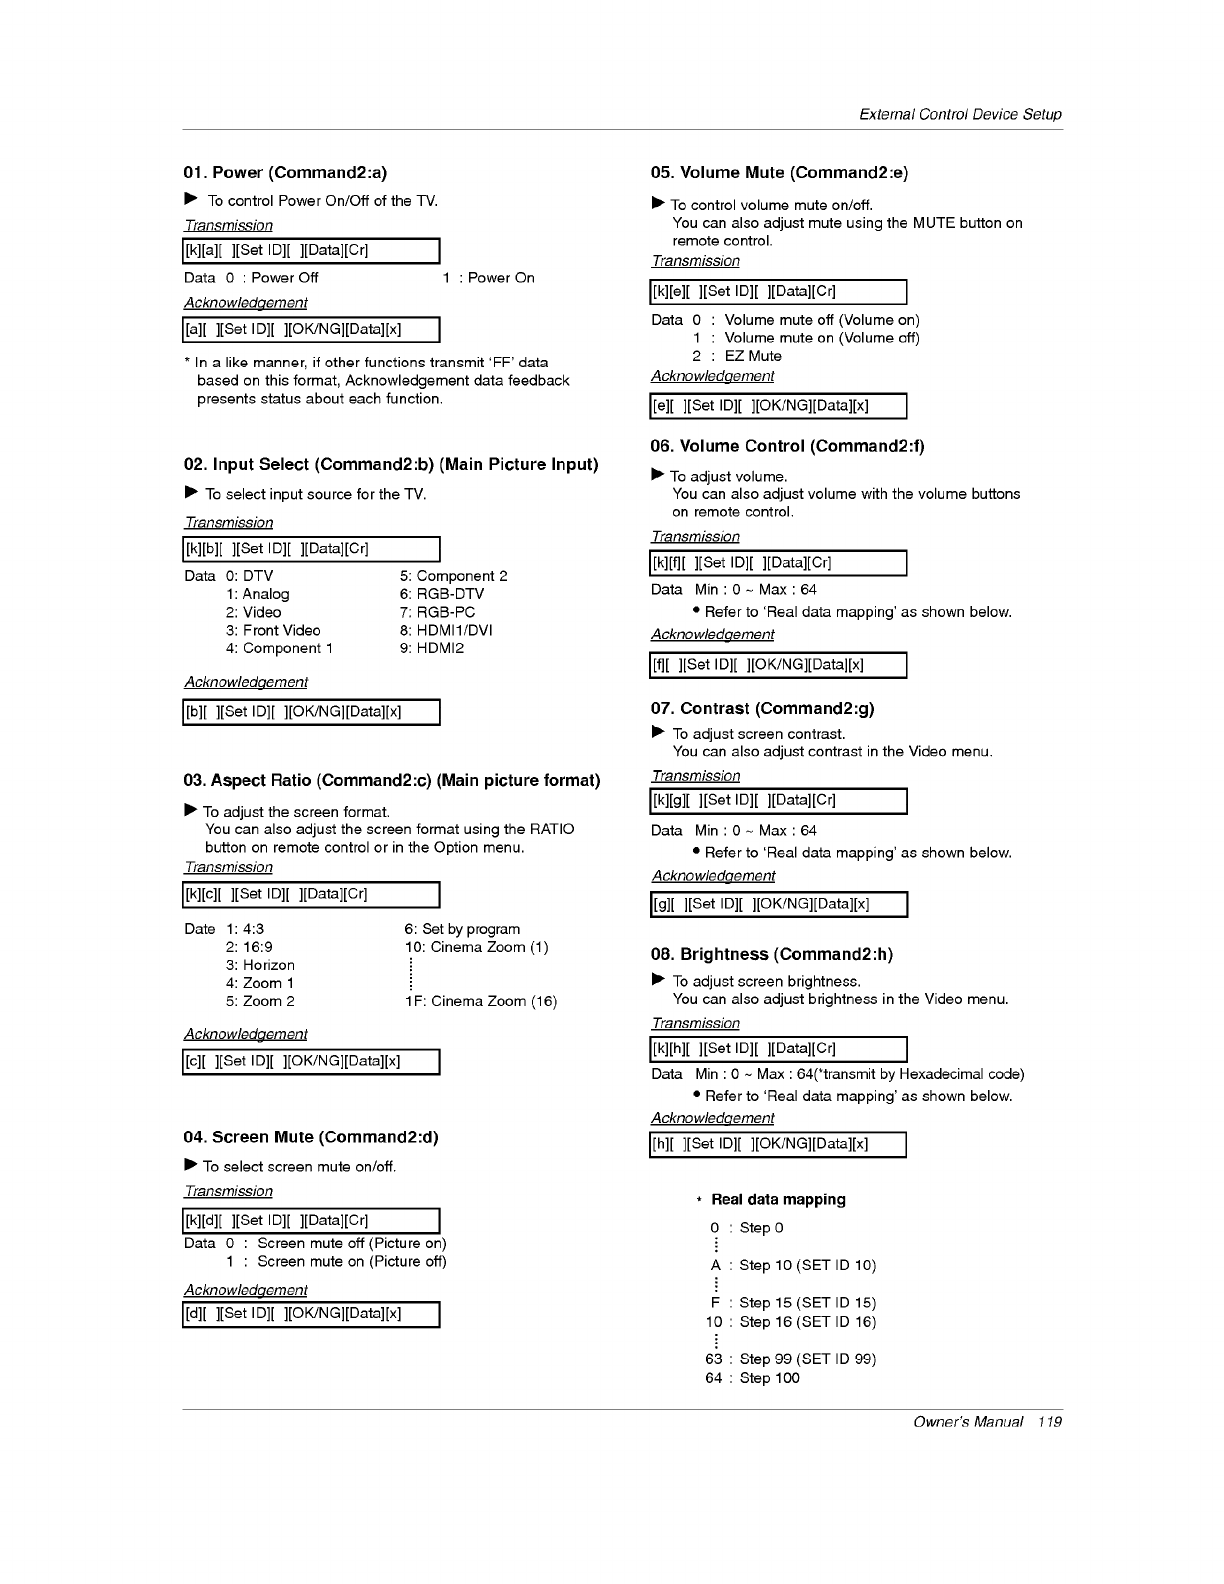
01. Power (Command2:a)
• To control Power On/Off of the TV.
Transmission
[[k][a][ ][Set In][ ][Data][Cr] I
Data 0 : Power Off 1 : Power On
Acknowledqement
[[a][ ][Set In][ ][OK/NG][Data][x] J
* In a like manner, if other functions transmit 'FF' data
based on this format, Acknowledgement data feedback
presents status about each function.
02. Input Select (Command2:b) (Main Picture Input)
• To select input source for the TV.
Transmission
I[k][b][ ][Set In][ ][gata][Cr] J
Data O: DTV 5: Component 2
1: Analog 6: RGB-DTV
2: Video 7: RGB-PC
3: Front Video 8: HDMI1/DVl
4: Component 1 9:HDMI2
Acknowledqement
I[b][ ][Set In][ ][OK/NG][Data][x] J
03. Aspect Ratio (Command2:c) (Main picture format)
• To adjust the screen format.
You can also adjust the screen format using the RATIO
button on remote controlor in the Option menu.
Transmission
[[k][c][ ][Set ID][ ][Data][Cr]
Date 1:4:3
2:16:9
3: Horizon
4: Zoom 1
5: Zoom 2
I
6: Set by program
10: Cinema Zoom (1)
1 F: Cinema Zoom (16)
Acknowledgement
[[c][ ][Set In][ ][OK/NG][Data][x] J
04. Screen Mute (Command2:d)
• To select screen mute on/off,
Transmission
[[k][d][ ][Set ID][ ][gata][Cr] J
Data 0 : Screen mute off (Picture on)
1 : Screen mute on (Picture off)
Acknowledqement
[[d][ ][Set In][ ][OK/NG][gata][x] J
Extemal Control Device Setup
05. Volume Mute (Command2:e)
• To control volume mute on/off.
You can also adjust mute using the MUTE button on
remote control.
Transmission
[[k][e][ ][Set In][ ][Data][Cr] ]
Data 0 : Volume mute off (Volume on)
1 : Volume mute on (Volume off)
2 : EZ Mute
Acknowledclement
[[e][ ][Set In][ ][OK/NG][Data][x] ]
06. Volume Control (Command2:f)
• To adjust volume.
You can also adjust volume with the volume buttons
on remote control.
Transmission
[[k][f][ ][Set In][ ][Data][Cr] ]
Data Min:O- Max:64
•Refer to 'Real data mapping' as shown below.
Acknowledqement
[[f][ ][Set ID][ ][OK/aG][Data][x] ]
07. Contrast (Command2:g)
• To adjust screen contrast.
You can also adjust contrast in the Video menu.
Transmission
[[k][g][ ][Set In][ ][gata][Cr] ]
Data Min:O- Max:64
• Refer to 'Real data mapping' as shown below.
Acknowledqement
[[g][ ][Set In][ ][OK/NG][Data][x] ]
08. Brightness (Command2:h)
• To adjust screen brightness.
You can also adjust brightness in the Video menu.
TransmissiQn
[[k][h][ ][Set In][ ][Data][Cr] ]
Data Min : 0 ~ Max : 64(*transmit by Hexadecimal code)
• Refer to 'Real data mapping' as shown below.
Acknowledqement
[[h][ ][Set In][ ][OK/NG][Data][x] J
* Real data mapping
0 : Step 0
A : Step 10 (SET ID 10)
F : Step 15 (SET ID 15)
10 : Step 16 (SET ID 16)
63 : Step 99 (SET ID 99)
64 : Step 100
Owner's Manual 119
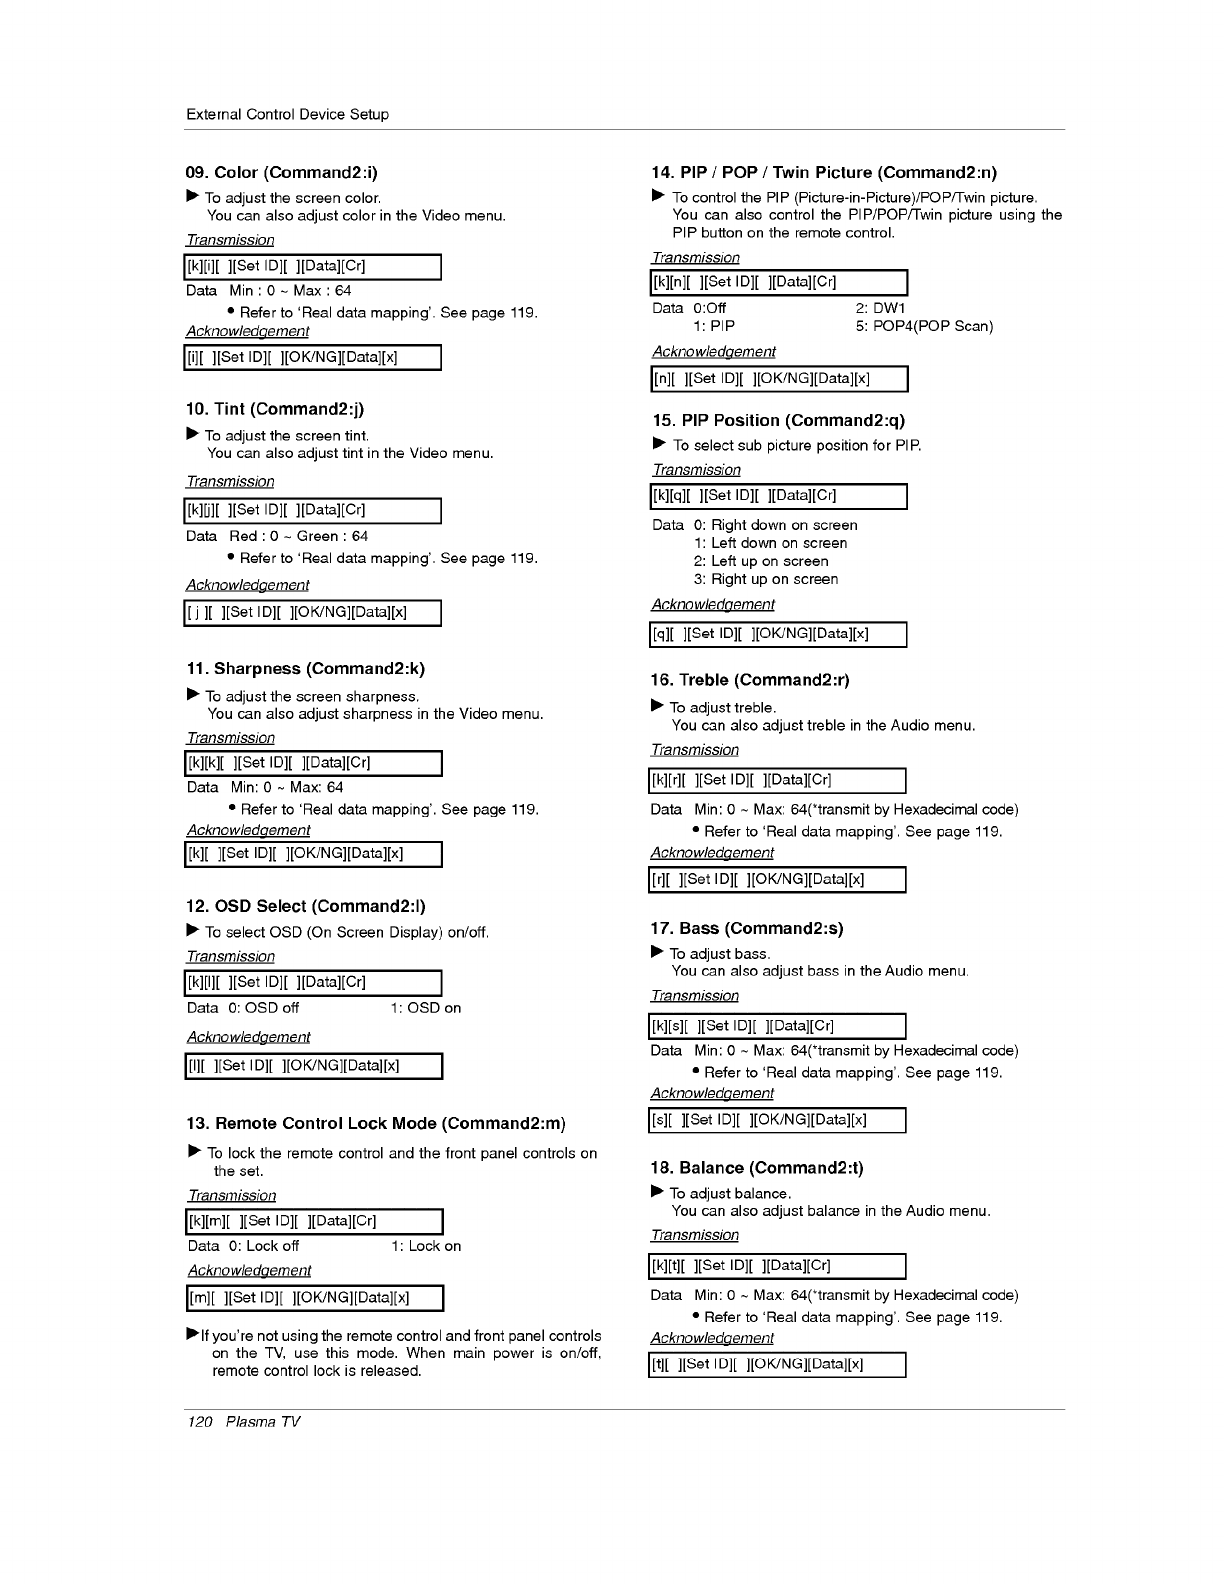
External Control Device Setup
09. Color (Command2:i)
• To adjust the screen color.
You can also adjust color in the Video menu.
Transmission
[[k][i][ ][Set Ig][ ][gata][Cr] ]
Data Min:0~ Max:64
•Refer to 'Real data mapping'. See page 119.
Acknowledqement
[[i][ ][Set ID][ ][OK/aG][Data][x] ]
10. Tint (Command2:j)
• To adjust the screen tint.
You can also adjust tint in the Video menu.
Transmission
[[k][j][ ][Set Ig][ ][gata][Cr] J
Data Red:0~Green:64
• Refer to 'Real data mapping'. See page 119.
Acknowledgement
I[ j][ ][Set I D][ ][OK/aG][Data][x] J
11. Sharpness (Command2:k)
• To adjust the screen sharpness.
You can also adjust sharpness in the Video menu.
Transmission
L[k][k][ ][Set ID][ ][Data][Cr] ]
Data Min: 0 ~ Max: 64
• Refer to 'Real data mapping'. See page 119.
Acknowledqement
L[k][ ][Set ID][ ][©K/NG][Data][x] ]
12. OSD Select (Command2:l)
• To select OSD (On Screen Display) on/off,
Transmission
[[k][I][ ][Set Ig][ ][gata][Cr] ]
Data 0: OSD off 1: OSD on
Acknowledgement
[[I][ ][Set ID][ ][OK/aG][Data][x] ]
13. Remote Control Lock Mode (Command2:m)
• To lock the remote control and the front panel controls on
the set.
Transmission
I[k][m][ ][Set ID][ ][Data][Cr] ]
Data 0: Lock off 1: Lock on
Acknowledqement
I[m][ ][Set ID][ ][OK/NG][Data][x] I
• If you're not using the remote control and front panel controls
on the TV, use this mode. When main power is on/off,
remote control lock is released.
14. PIP /POP /Twin Picture (Command2:n)
• To control the PIP (Picture-in-Picture)/POP/Twin picture,
You can also control the PIP/POP/Twin picture using the
PIP button on the remote control.
Transmission
l[k][n][][Set ID][ ][Data][Cr] ]
Data 0:Off 2:DW1
1: PIP 5: POP4(POP Scan)
Acknowledqement
I[n][ ][Set ID][ ][OK/aG][Data][x] ]
15. PIP Position (Command2:q)
• To select sub picture position for PIP.
Transmission
l[k][q][ ][Set Ig][ ][gata][Cr] ]
Data 0: Right down on screen
1: Left down on screen
2: Left up on screen
3: Right up on screen
Acknowledqement
[[q][ ][Set ID][ ][OK/NG][Data][x] ]
16. Treble (Command2 :r)
• To adjust treble.
You can also adjust treble in the Audio menu.
Transmission
[[k][r][ ][Set ID][ ][Data][Cr] J
Data Min: 0 ~ Max: 64(*transmit by Hexadecimal code)
• Refer to 'Real data mapping'. See page 119.
Acknowledqement
[[r][ ][Set ID][ ][OK/aG][Data][x] ]
17. Bass (Command2:s)
• To adjust bass.
You can also adjust bass in the Audio menu.
Transmission
[[k][s][ ][Set ID][ ][Data][Cr] ]
Data Min: 0 ~ Max: 64(*transmit by Hexadecimal code)
• Refer to 'Real data mapping'. See page 119.
Acknowledqement
[[s][ ][Set ID][ ][OK/NG][Data][x] J
18. Balance (Command2:t)
• To adjust balance.
You can also adjust balance in the Audio menu.
Transmission
[[k][t][ ][Set Ig][ ][gata][Cr] ]
Data Min: 0 ~ Max: 64(*transmit by Hexadecimal code)
• Refer to 'Real data mapping'. See page 119.
Acknowledqement
[[t][ ][Set ID][ ][OK/aG][Data][x] J
120 Plasma TV
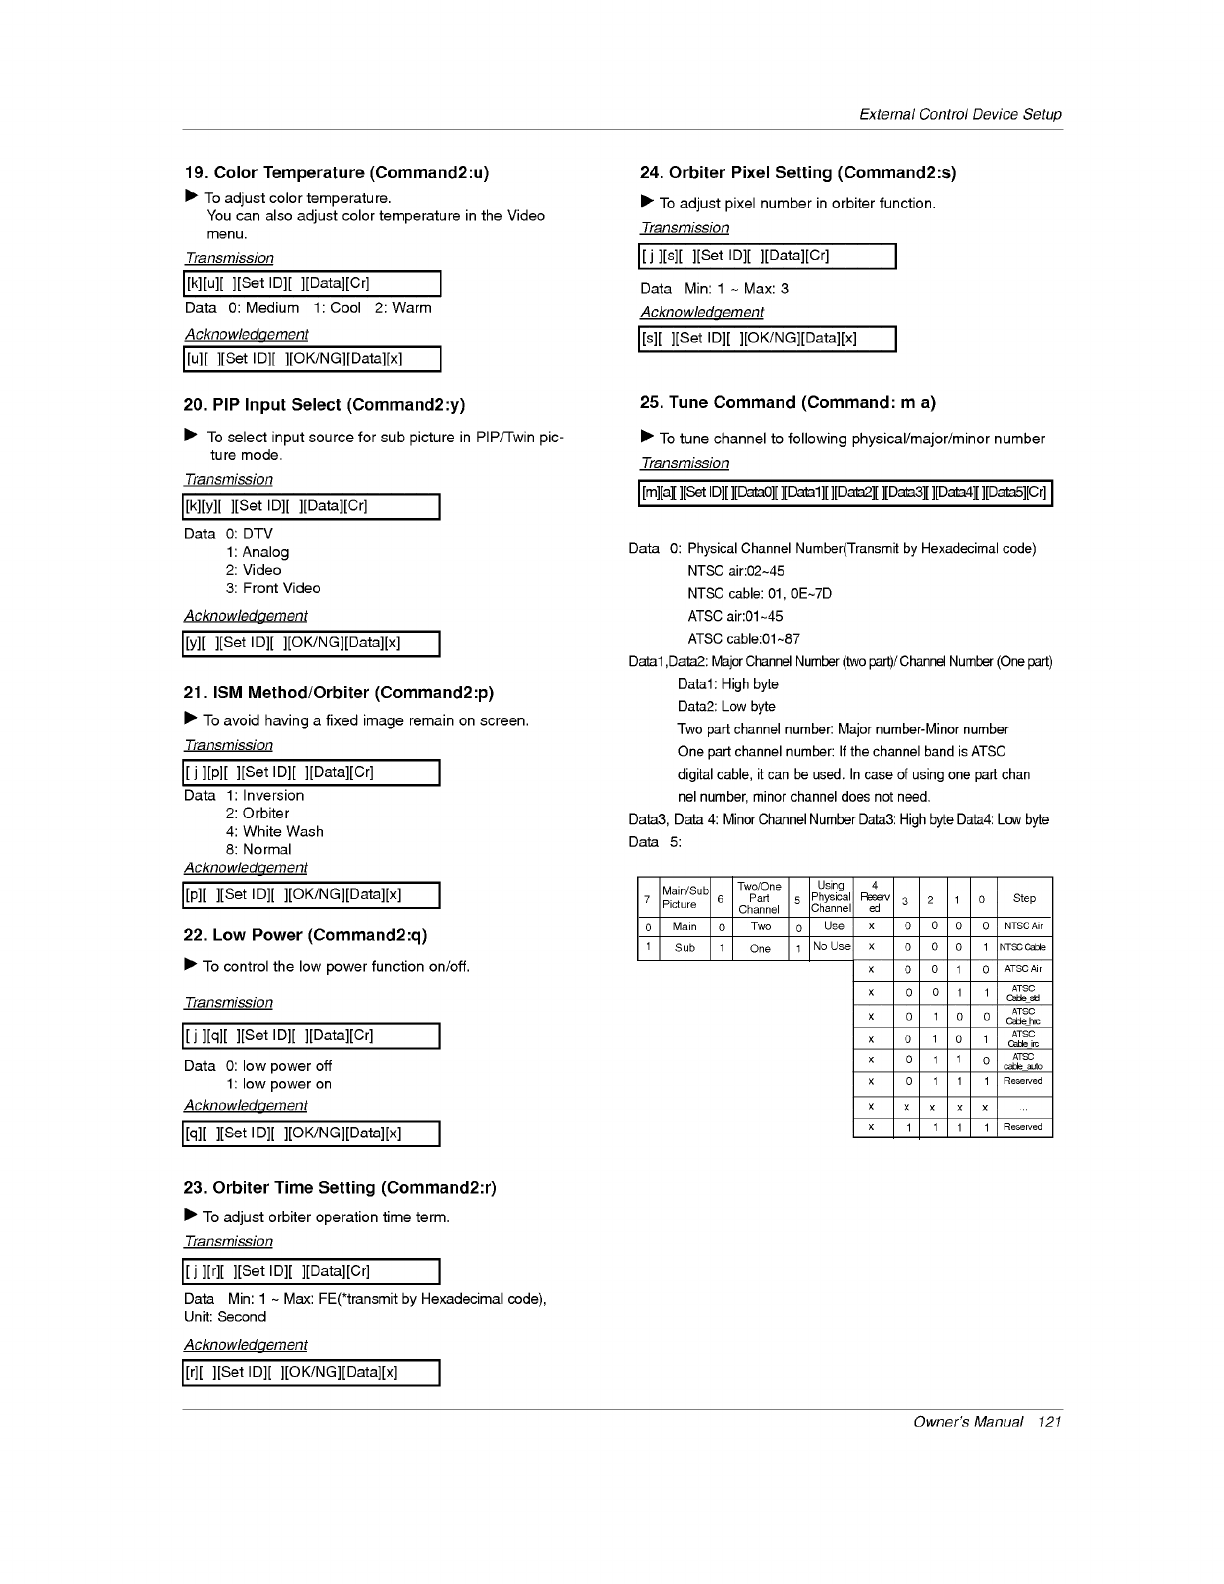
19. Color Temperature (Command2:u)
IP To adjust color temperature.
You can also adjust color temperature in the Video
menu.
Transmission
I[k][u][ ][Set ID][ ][Data][Cr] I
Data O: Medium 1: Cool 2: Warm
Acknowledqement
I[u][ ][Set ID][ ][OK/NG][Data][x] I
20. PIP Input Select (Command2:y)
I_ To select input source for sub picture in PIP/Twin pic-
ture mode,
Transmission
[[k][y][ ][Set ID][ ][Data][Cr] I
Data O: DTV
1: Analog
2: Video
3: Front Video
Acknowledgement
[[y][ ][Set ID][ ][OK/NG][Data][x] I
21. ISM Method/Orbiter (Command2:p)
I_ To avoid having a fixed image remain on screen.
Transmission
I[j][p][ ][Set ID][ ][Data][Cr] I
Data 1: Inversion
2: Orbiter
4: White Wash
8: Normal
Acknowledqement
I[p] [ ][Set ID][ ][OK/NG][gata][x] I
22. Low Power (Command2:q)
I_ To control the low power function on/off.
Transmission
[[j][q][ ][Set ID][ ][Data][Cr]
Data 0: low power off
1: low power on
Acknowledaement
[[q][ ][Set ID][ ][OK/NG][Data][x]
23. Orbiter Time Setting (Command2:r)
I_ To adjust orbiter operation time term,
Transmission
[[j ][r][ ][Set ID][ ][Data][Cr] I
Data Min: 1 ~ Max: FE(*transmit by Hexadecimal code),
Unit: Second
Acknowledqement
[[r][ ][Set ID][ ][OK/aG][Data][x] I
External Control Device Setup
24. Orbiter Pixel Setting (Command2:s)
I_ To adjust pixel number in orbiter function.
Transmission
I[j][s][ ][Set ID][ ][Data][Cr] I
Data Min: 1 -Max:3
Acknowledqement
I[s][ ][Set Ig][ ][OK/NG][Data][x] I
25. Tune Command (Command: m a)
I_ To tune channel to following physical/major/minor number
Transmission
I[m][a][][SetID][][DataO][][Data1][][Data2][][Data3][][Data4][][Data5][Cr]I
Data O: Physical Channel Number(Transmit by Hexadecimal code)
NTSC air:02~45
NTSC cable: 01, OE~7D
ATSC air:01 ~45
ATSC cable:01 ~87
Data1 ,Data2: Major Channel Number (two part)/Channel Number (One part)
Data1: High byte
Data2: Low byte
Two part channel number: Major number-Minor number
One part channel number: If the channel band is ATSC
digital cable, it can be used. In case of using one part chan
nel number, minor channel does not need.
Data3, Data 4: Minor Channel Number Data3: High byte Data4: Low byte
Data 5:
Main/SuL Two/One Using
7 Picture 6 Pad 5 Physical 0 Step
Channel Channe
0 Main 0 Two 0 Use
1 Sub 1 One 1 No Use
4
Reee_ 3
ed
x 0
x 0
x 0
x 0
x 0
x 0
x 0
x 0
x ×
x 1
2 1
O O 0 NTSC Air
0 O 1 NTSC Ca_e
0 1 0 ATSC Ai r
O 1 1 ATSC
Ca_ sld
ATSC
1 0 O C_de h,s
ATSC
1 O 1 OaLte i_
1 1 0 A_£O
cable auto
1 1 1 Reserved
x x x ..
1 1 1 Reserved
Owner's Manual 121
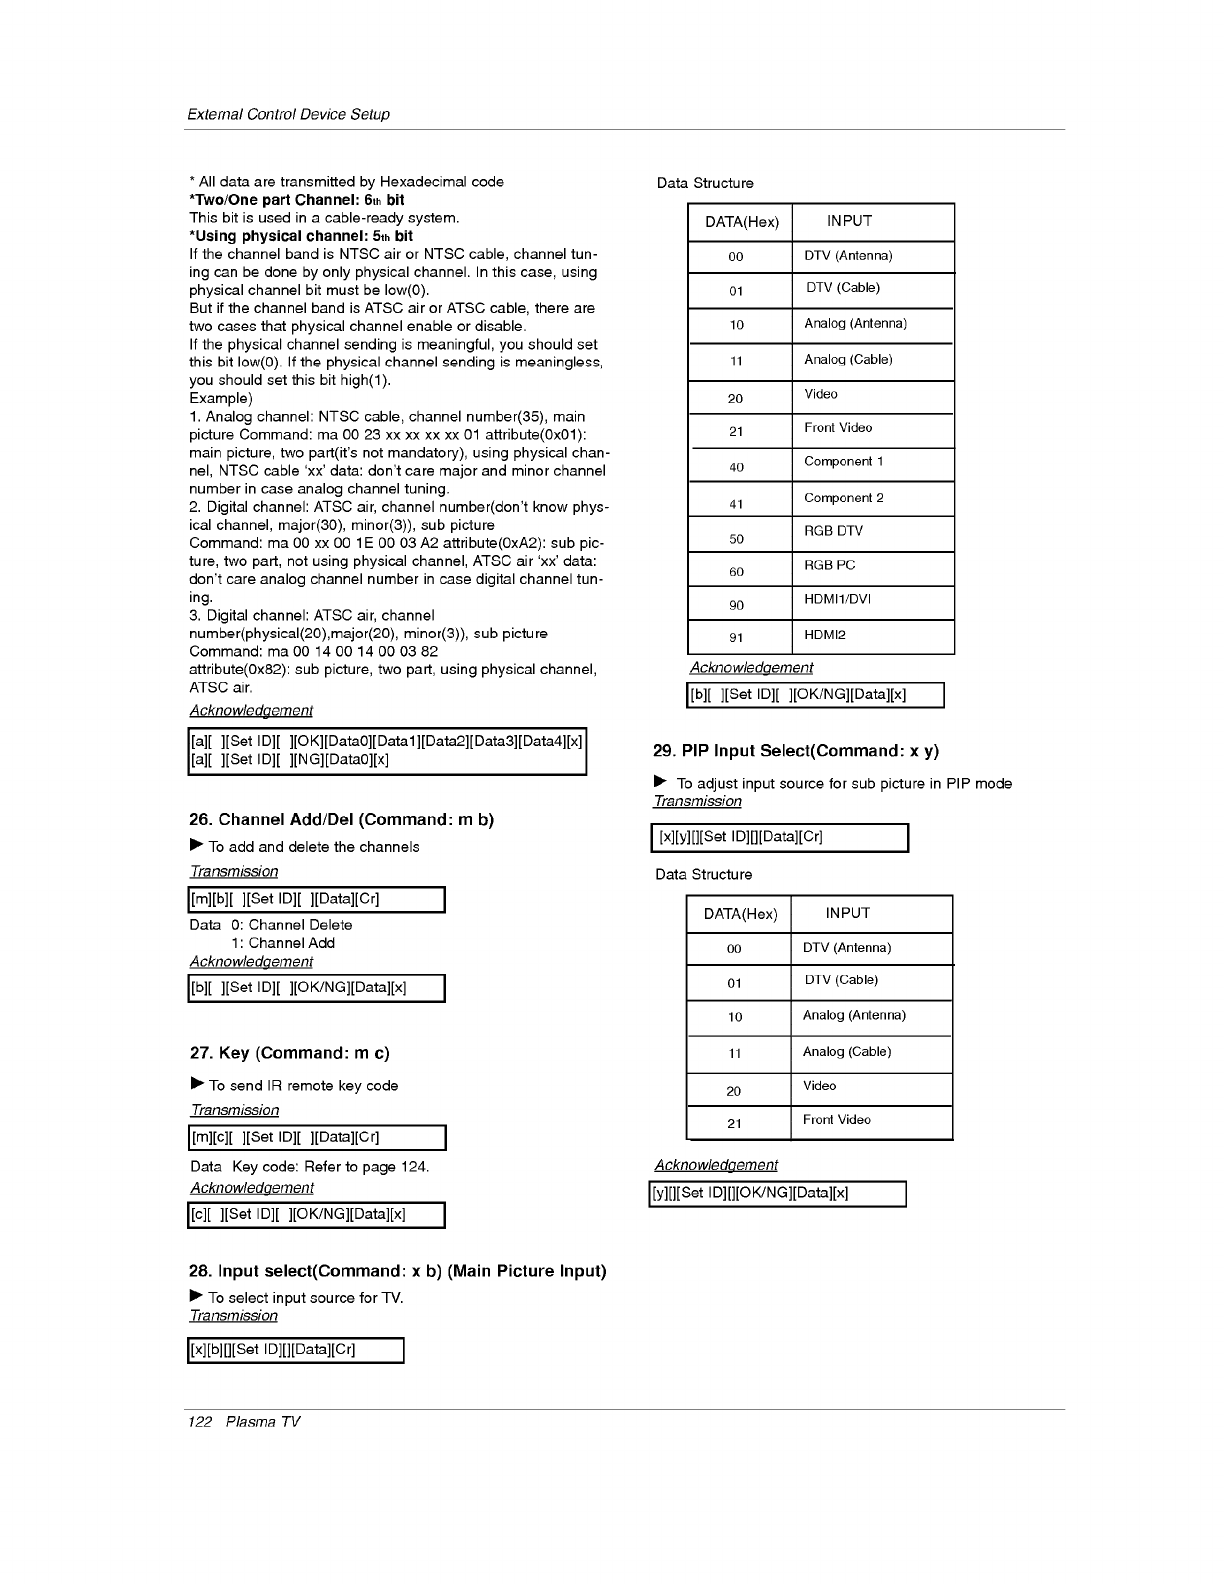
ExternalControlDeviceSetup
* All data are transmitted by Hexadecimal code
*Two/One part Channel: 6th bit
This bit is used in a cable-ready system.
*Using physical channel: 5th bit
If the channel band is NTSC air or NTSC cable, channel tun-
ing can be done by only physical channel. In this case, using
physical channel bit must be low(0).
But if the channel band is ATSC air or ATSC cable, there are
two cases that physical channel enable or disable.
If the physical channel sending is meaningful, you should set
this bit low(O). If the physical channel sending is meaningless,
you should set this bit high(l).
Example)
1. Analog channel: NTSC cable, channel number(35), main
picture Command: ma 00 23 xx xx xx xx 01 attribute(0x01):
main picture, two part(it's not mandatory), using physical chan-
nel, NTSC cable 'xx' data: don't care major and minor channel
number in case analog channel tuning.
2. Digital channel: ATSC air, channel number(don't know phys-
ical channel, major(30), minor(3)), sub picture
Command: ma 00 xx O0 1E 00 03 A2 attribute(0xA2): sub pic-
ture, two part, not using physical channel, ATSC air 'xx' data:
don't care analog channel number in case digital channel tun-
ing.
3. Digital channel: ATSC air, channel
number(physical(20),major(20), minor(3)), sub picture
Command: ma 00 14 00 14 00 03 82
attribute(0x82): sub picture, two part, using physical channel,
ATSC air.
Acknowledgement
[a][ ][Set ID][ ][OK][Data0][Datal][Data2][Data3][Data4][x]
[a [ ][Set ID][ ] NG] Data0][x
26. Channel Add/Del (Command: m b)
I_ To add and delete the channels
Transmission
I[m][b][ ][Set Ig][ ][gata][Cr] I
Data 0: Channel Delete
1: Channel Add
Acknowledqement
I[b][ ][Set Ig][ ][OK/NG][gata][x] I
27. Key (Command: m c)
I_ To send IR remote key code
Transmission
I[m][c][][Set ID][ ][Data][Cr] I
Data Key code: Refer to page 124.
Acknowledqement
I[c][ ][Set Ig][ ][OK/NG][gata][x] I
28. Input select(Command: x b) (Main Picture Input)
I1_To select input source for TV.
Transmission
I[x][b][][Set ID][][Data][Cr] I
Data Structure
DATA(Hex)
00
01
10
11
20
21
40
41
50
60
90
91
INPUT
DTV (Antenna)
DTV (Cable)
Analog (Antenna)
Analog (Cable)
Video
Front Video
Component 1
Component 2
RGB DTV
RGB PC
HDMI1/DVI
HDMI2
Acknowledclement
I[b][ ][Set ID][ ][OKlNG][Data][x] I
29. PIP Input Select(Command: x y)
I_ To adjust input source for sub picture in PIP mode
Transmission
I[x][y][][Set Ig][][gata][Cr] I
Data Structure
DATA(Hex)
co
01
lO
11
20
21
INPUT
DTV (Antenna)
DTV (Cable)
Analog (Antenna)
Analog (Cable)
Video
Front Video
Acknowledqement
I[y][][Set Ig][][O K/N G][Data][x] I
122 Plasma TV
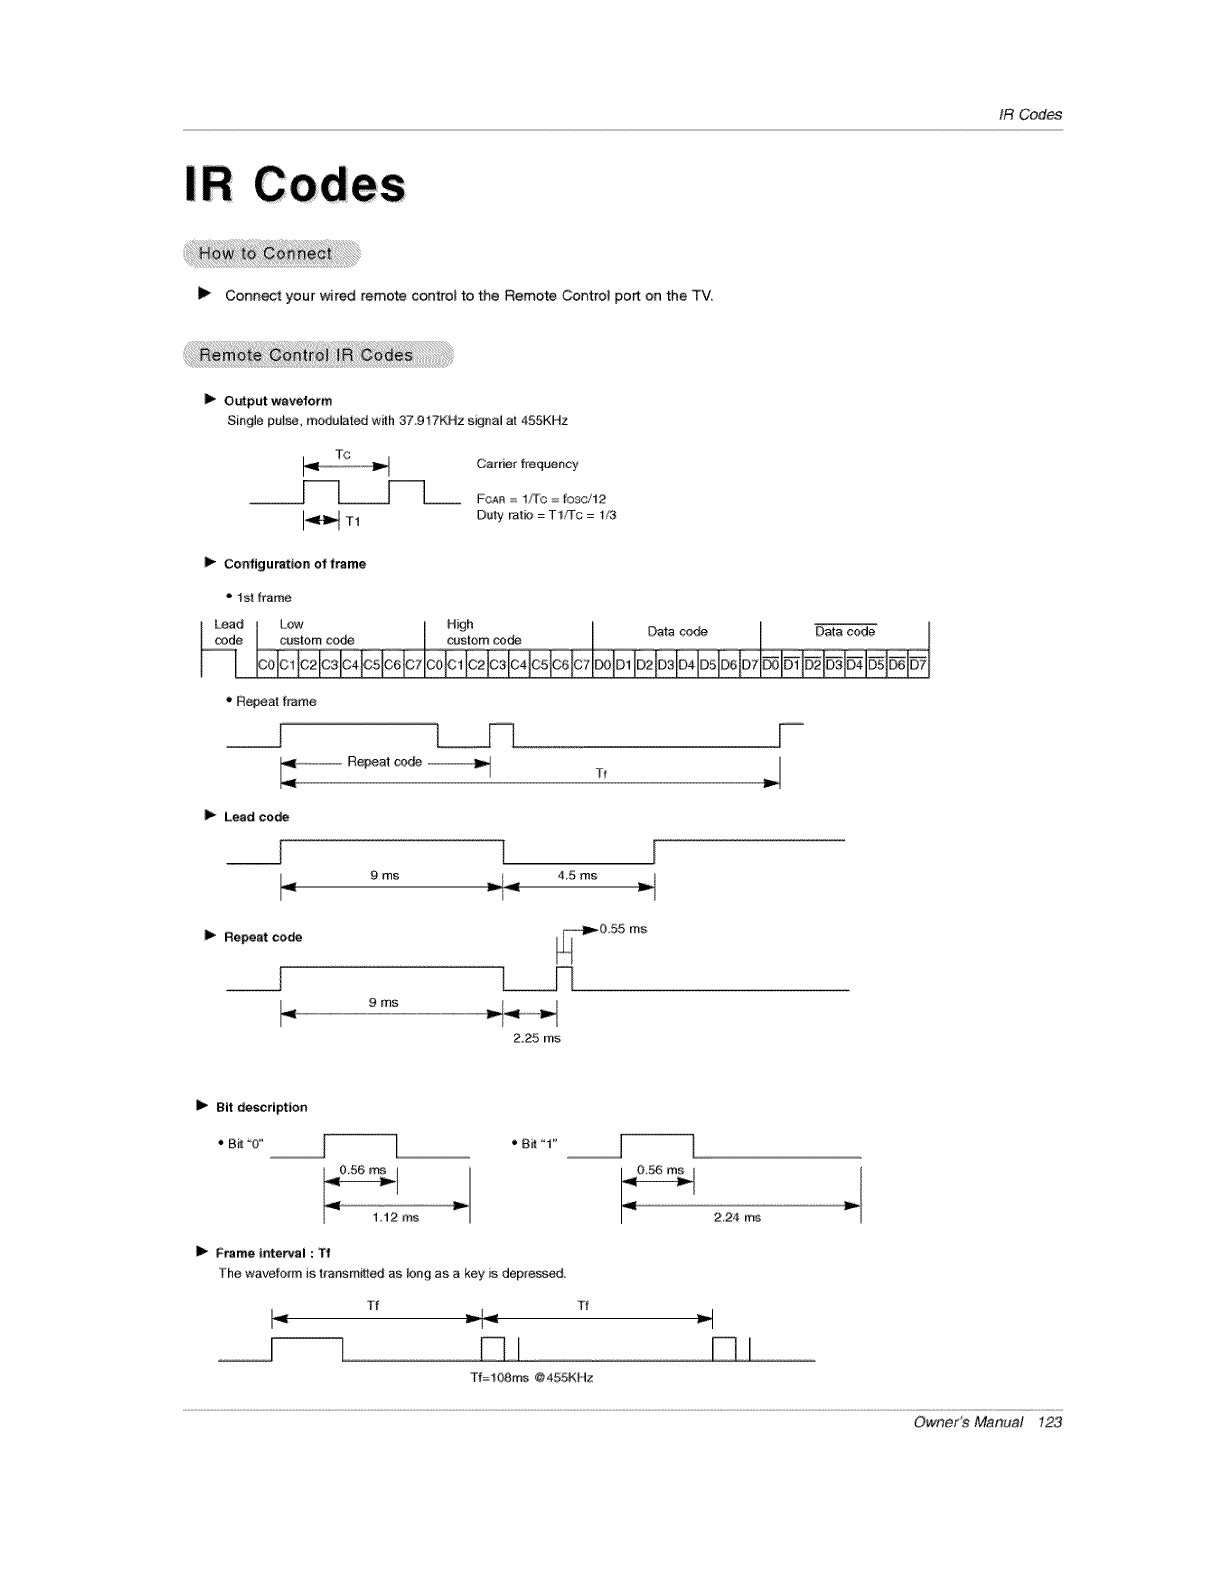
IRCedes
[1_ Connect your wired remote control to the Remote Centre] port on the TV
I1_ Output waveform
S#g# pulse, modulated wilh 37,917KHz s_jna] at 455KHz
TC Carr#r frequency
__1|.___--[__ FCA_ _, 1_C = fosc/12
I_ T1 Duty rat# = TYf[c = 1/3
I_ Configuratien of frame
* 1St frame
Lead Low High Data code
]00101 tO2 IC3104]O5106 lOT[C0] C1 I02 t03104105106 IC71P'X)] D110_lo_l_]o, lo+,l l 1
_' R_at frame
__J F
I_ Lead co_
__J
I_ Repeat code
9 ms _ I _ 4.5 ms _vl I
9 ms
2,25 r_s
Frame interval : Tf
The wavefo_m is t_a_sm_ as Ior_g as a key is depressed
Tf
Tf=t08ms @455KHz
2,24 ms
Owner's Manual 12.3
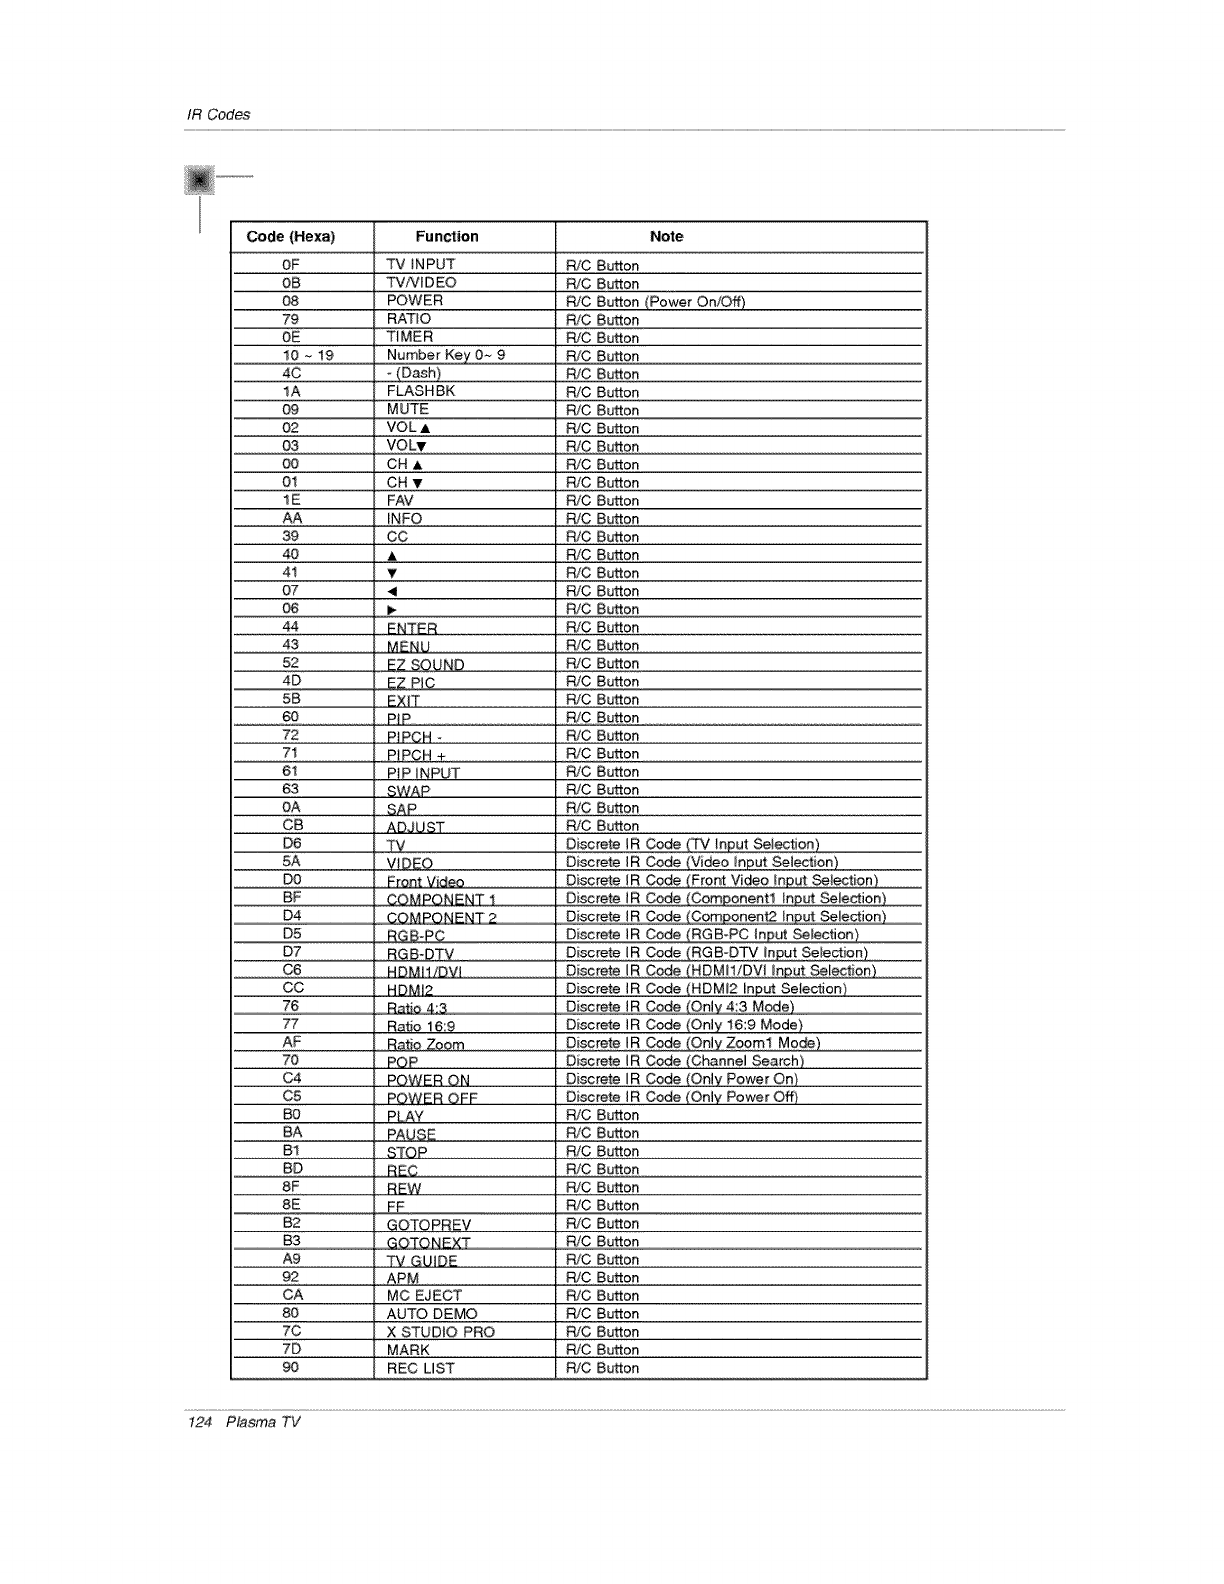
IR Codes
Code (Hexa) Function Note
OF _ iNPUT R/C Button
0B TV/VIDEO R/C Button
08 POWER R/C Button (Power On!G)
79 RATIO RiC Button
OE T_MER R/C Button
10 _ 19 .Number Key O_ 9 R/C Button
4C o (Dash) R/C Button
IA FLASHBK R/C Butto#
09 MUTE RiC Button
02 _ VOLA _ R/C Button
03 VOLv R/C Button
O0 CH A RiC Button
01 CH T R/C Button
1E FAV RiC Button
AA _ INFO _ R/C Button
39 CC R/C Button
40 , & . RiC Button
41 V R!C Button
07 _1 RiC Button
06 _ R/C Button
44 ENTER R/C Bu_on
43 MENU RiC Button
52 _NND R/C Button
4D E_ P_C RiC Button
5B EXII RiC Button
..................60................................P_P ..........................................£/0 Bu_Qn.........................................................................
72 PIPCH _ RiC Button
71 P]pCH + RiC Button
61 PIE INPUT RiC Button
63 SWAP RiC Button
OA SAP RiC ButtQ#
CB , ADJt_ST R/C Button
D6 TV #!screte !R €_e (TV !nput Se[e_ion)
DO Eront Video Disc[ere !B Cgide (ErgN_ Vi_o !0_ut _tiou)
D4 COMPONENI 2 Discrete IR C_e (Com£onen:t2 !£Put _Je_i#8)
D7 RGB-DTV Discrete IR Code (RGB-DTV Input Selection)
C6 HDMIllDVl Disc[ere !R C_:e (HDM!!/DV! !nput _!e_ien)
76 Ratio 8:3 DiD#fete JB #_e (Ont'¢ 4:3 Mode)
77 RatJ# 1_:£ , Discrete _R Code (Only 16:9 Mode)
AF _ Z£#m _D!screte_R Code (O£1,LZooml Mode)
70 POP Disc[ere !R C_:e _Channe_ Search)
C5 POWER OEE Discrete IR C_e _Only £#we[ O#)
B0 PI_AY , R/C Button
BA PAUG5 RiC Button
B1 STOP R!C Button
BD REC RiC Button
8F REW _ R/C Button
8E FF R/C Button
B2 GOTOPRSV RiC Button
B3 GOTONE_ RiC Button
A9 TV GUIDE R/C Button
92 APN ..... R/C BUttQ#
CA MC EJECT R/C Button
80 AUTO DEMO RiC Button
7C X STUDIO PRo R/C Button
7D MARK RiC Button
90 REC UST R/C Button
t24 Plasma TV
ProgrammingCodes
l
The remote is a multi-brand or a universal remote _t can be programmed to operate most remote-controllable devices of
ether manufacturers.
Note that the remote may not contro_ all models of other brands,
1. To fund out whether your remote can oporate the device without programming, turn on the device such as a VCR and press the
corresponding mode button on the remote.
After the, press the POWER button. If the device is turned off then it responds properly and the remote need not to be pro-
grammecL If not, the remote shouid be programmed to operate the device, The programming procedures are explained below,
2 Press the MENU and MUTE button continuously at the same time for 2 seconds, the current seJected device button will be illuo
minated.
if you den'it press any button for 20 seconds, the light on the mode button will be turned off, In that case, you have to repeat from
step 2,
3, Enter cede numbers using the number bu_on on the remote by refenng the cede table on the following pages, When pressing
the button, the tight Minks at a time. If the device turned off, the programming is successful,
4. Press the MENU button to store the code. A_er Minking twice, this code is stored.
5, Test the remote functions to see ff the device responds properly, ff not, repeat from step 2,
Owner_ Manual 125
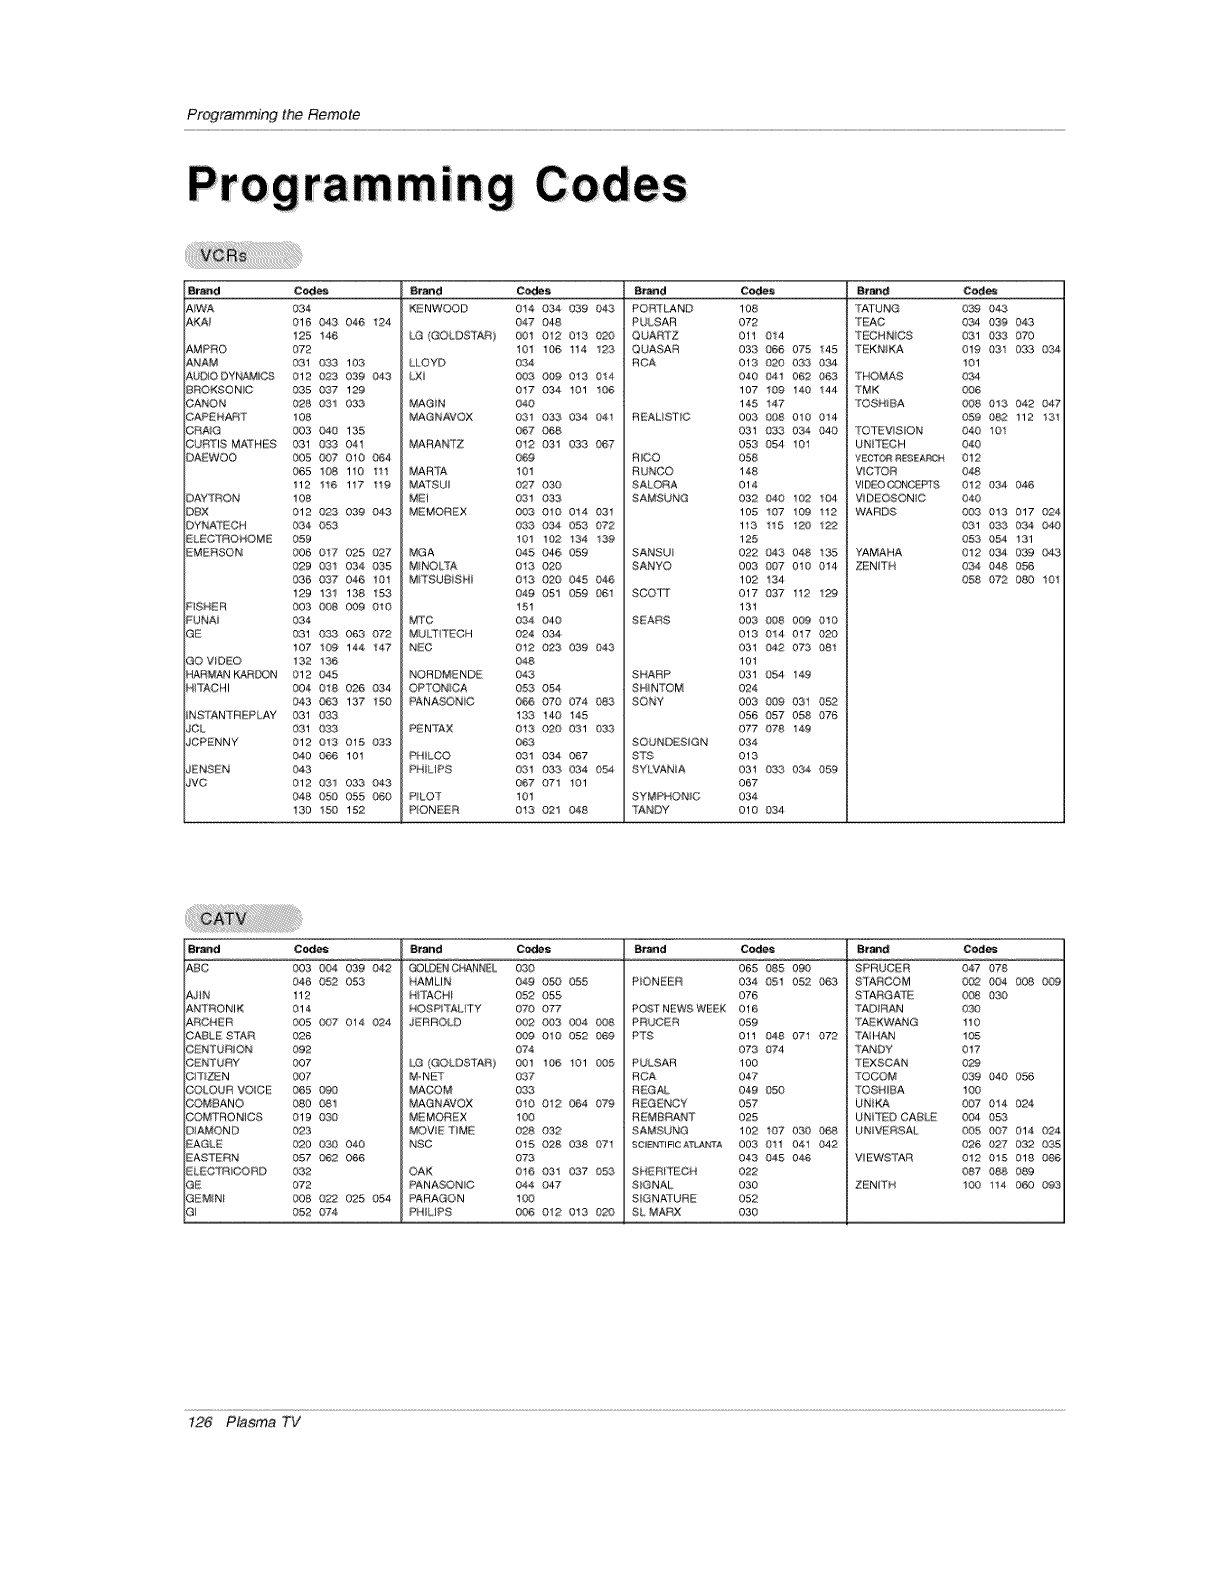
ProgrammingtheRemote
B_d Codes Brand Codes Br_d Codes Br_-_d
AiWA 034
AKAi 016 043 046 124
125 14,8
AMPRO 072
ANAM 031 0*33 103
_UDtODY_MIGS 012 023 039 043
_ROKSONiC 035 037 129
CANON 028 0£1,1 033
CAPEHA_T 108
CRAIG 003 040 135
CUm'iS MA_NES 031 033 041
DAEWOO 005 _17 010 064
065 108 110 111
112 116 117 11.9
3AY_ :_ON 108
)BX 012 {._3 039 04"3
)YNA'_'ECH 034 053
ELEC'[ROHOME 059
EMERSON 006 017 025 027
029 031 034 035
036 037 046 1(]1
129 131 138 153
qSHER 003 _38 009 010
UNAi 034
GE 031 C,G3 063 {'}72
107 10@ 144 !47
GO VIDEO 132 1_
HARMAN KAR[X3N 012 _5
H4i_ACHI 004 018 026 034
043 _33 137 15'0
_NSTANTREPLAY 031 O_
JOL 031 033
JCPENNY 012 O13 015 033
040 _ 101
_ENSEN 043
JVC 012 031 033 043
048 O_ 055
130 !50 152
K_NWOOD 0t4 004 039 043,
047 048
LG (GOLDSTAR) 001 012 013 020
101 106 t14 123
LLOYD 034
LXi 003 _ 0!3 014
017 034 t01 106
MAGiN O40
MAGNAVOX 031 (;'33 034 04!
067
MARANTZ 012 031 033 067
069
MARTA 101
MA"I'S UI 027 {.J_3_O
MI 031 033
MEMOREX 003 010 0t4 03!
033 034 053 072
101 102 t34 13£
MGA 045 046 059
M NOL_A 0!30_
M'TSUBiSH 0t3 _0 045 046
049 051 059 _1
151
MTC 034 040
MUi_ TECH 024 O_
N_C 012 023 039 043
048
NORDMENDE 043
OPTON CA 053 054
PANASONC 066 070 074 _3
133 !40 145
PEN_'AX 013 020 031 033
063
PHLCX') 031 0.34 067
PHLIPS 031 G33 034 05i4
067 071 101
PLOT t01
PONEER 0!3 021 048
POm_ND 108
PULSAR 072
QUARTZ 01t 014
QUASAR 033 _J_ 075 145
RCA 013 0_.0' 033 034
040 04! 062 Q_3
107 1_ 140 144
145 147
REALISTUC 003 (,_._8 010 0!4
031 033 034 040
053 054 101
RUCO 058
RUNCO 148
SALORA 014
SAMSUNG 032 040 102 04
105 107 109 112
113 115 120 12:9
125
SANSUI 022 Q43 048 135
SANYO 003 _7 010 014
102 134
SCOT1' 017 037 112 1_
131
S_ARS 003 _98 009 010
013 014 017 0"_
031 042 073 081
101
SHARP 031 054 149
SHiNTOM 024
SONY 003 0_9 031 052
056 057 058 07_
077 078 149
SOUNDESIGN 034
STS 013
SYtVA_',4A 03t 033 034 059
067
SYMPHONIC 034
"rANDY 010 034
'TATUNG 0g_ 043
'_'EAC 034 039 043
'!ECHNiCS 031 033 070
TEKN_KA 019 031 033 034
101
'THOMAS 034
"_MK 006
:'OSH_BA 008 013 042 047
059 _ 112 13,1
TOTEViSION 040 101
UN T_CH 040
VECTOR R_SEAF_N 012
V_CTOR 0_
VI_O_NCEFr8 012 (}3,4 046
VIDEOSONIC 040
WAR_ 003 0!3 017 024
031 033 034 040
053 054 131
YAMAHA 012 03,4 039 043
ZENITH 034 048 056
058 07_ 080 101
Brand Cedes B_d C_s B_d Codes iStal-_l_ Cedes
ABE 003 004 039 042 _ENCHAN_,_EL 030 065 0_5 090 SPRUCER 047 078
046 OEy2 053
AJtN 112
&N1 RONIK 014
_,RCH_R 005 @97 014 _4
_AE_LE S'fAR 026
;_N_I URiON 092
C£N'] URY 007
C_TI#_N 007
COLOUR VOICE 065 o_
COM_ANO 080 061
COMTRONiCS 019 030
DIAMOND 023
_AGLE 020 030 040
_A.STERN 057 062 066
L_CTr_CORD 032
GE 072
3EM_Nt 008 O_ 025 054
GI 052 074
HAMLIN 049 O_ 055
_"t TACHt 052 05,5
HOSPI_AL Fr Y 070 077
JERROLD 002 _3 004 _
009 010 052 069
074
LG (GOLDS/AH) 001 106 101 _5
M N['ZT 037
MADOM 033
MAGt_,_AVOX 0!0 012 064 079
M_MOREX t00
MOVIE TIME 028 032
NSC 015 028 038 07!
073
OAK 016 03! 037 05,3
PANASON C 044 047
PARAGON t00
PHLIPS 006 012 0!3 0_20
PIONEER 034 O51 052 063
076
POST NEWS WEEK 016
PRUC_R 059
P_rS 011 (148 071 072
073 074
P_ LSAR 100
RCA 047
R£°GAL 049 050
REGENCY 057
REM£_RAN_ 025
SAMSLNG 102 107 030 068
SCI_NqrlFICAT, At_A 003 0!1 041 042
043 _5 046
SH_:Rn°EcH 022
S_GNAL 030
S_GNA_URE 052
SL MARX 030
STARCOM 002 _4 008 0_
SI_AF_GA_ &_ 0C_ 030
TAD_RAN O3O
'_'A_KWANG 110
_'Ai HAN 105
"rANDY 017
_EXSCAN 029
"_©COM 039 040 056
_¢OSNIBA 100
UN_ 007 014 024
UNTED CABLE 004 053
UNVERSAL 005 _7 014 _24
026 027 032 03,5
ViEWS"f'AR 012 015 018
087 _ 089
ZENITH 100 114 060 (_3
126 Plasma TV
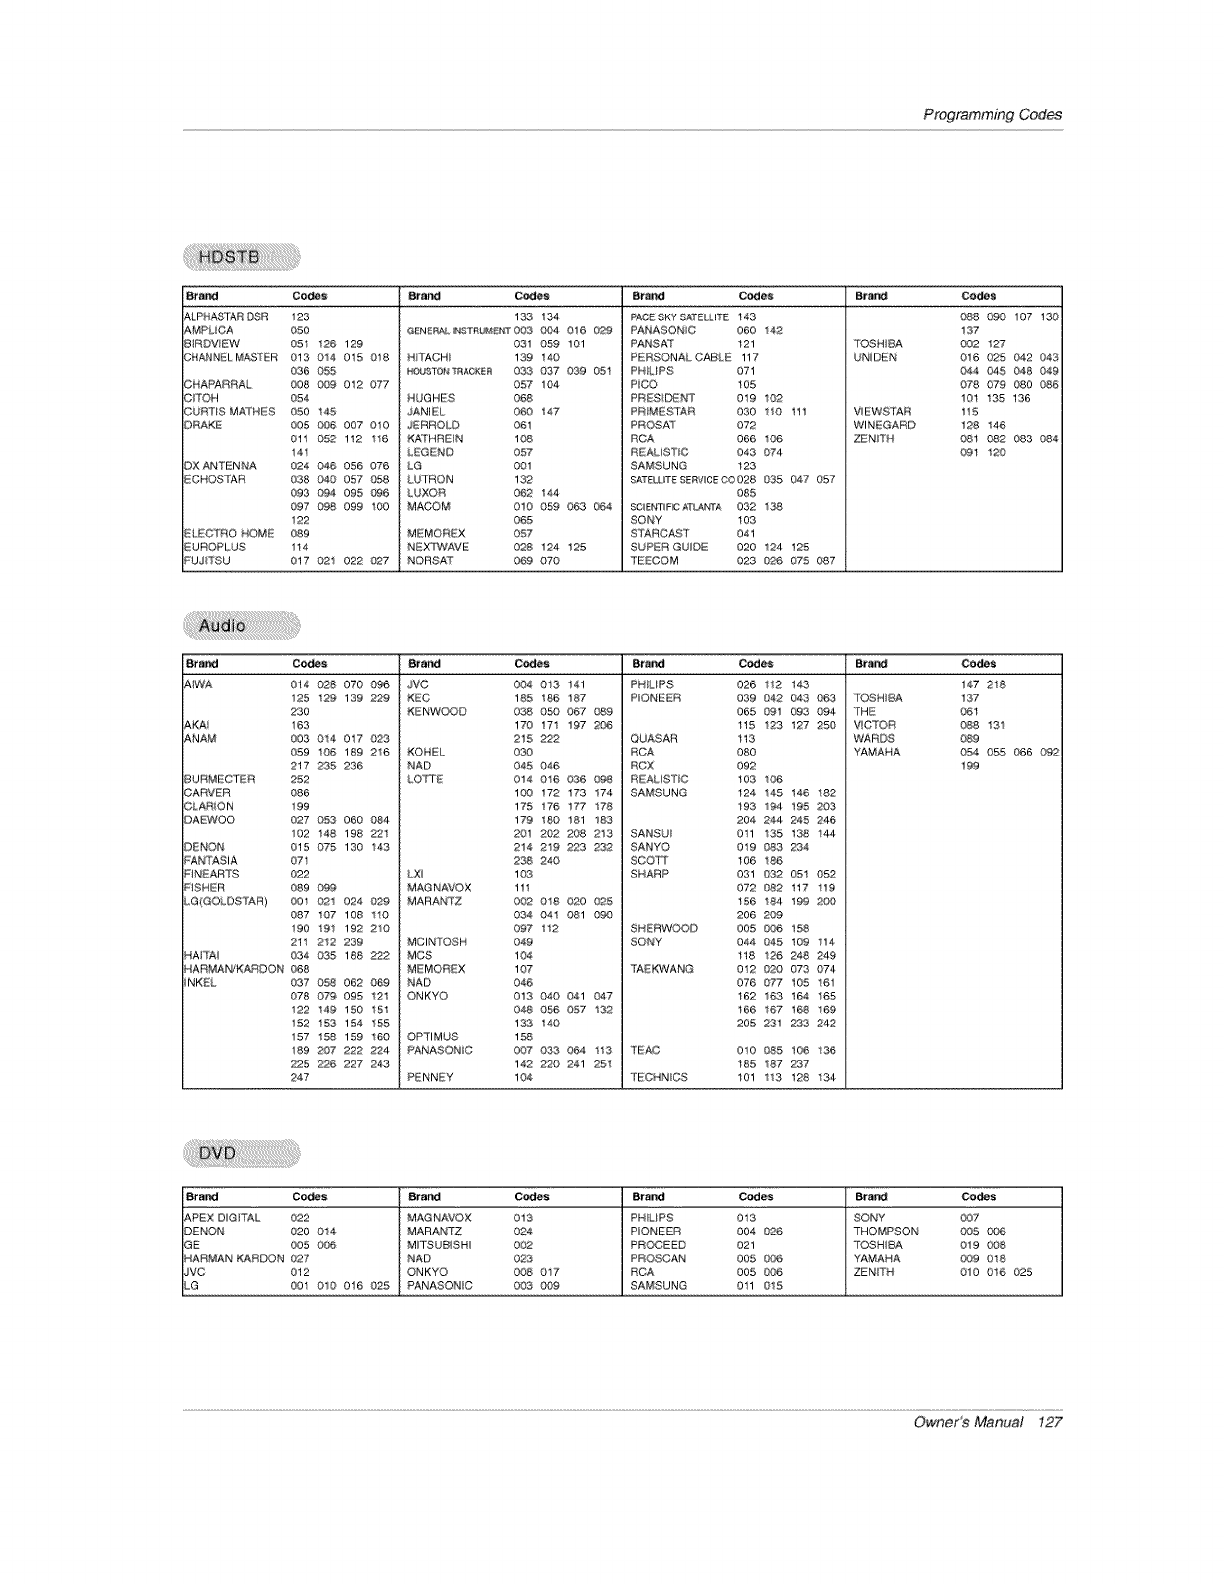
ProgrammingCodes
Brand Co_s 8ra_ Codes Brand Codes Br_ Codes
AL,PBA_TA_ _@ 123
AMPLnCA 050
BIRDVEW 05t 1213 129
C_,,ANNELi_IAS_ER 013 014 015 018
036 055
CNAPAR£AL 008 009 012 077
CiTOH 054
OUmtSMArH S 050 145
)RAKE 005 0¢_6 007 010
0!1 052 112 116
14!
OXAN'T[!,NNA 024 046 056 076
ECROSIAR 038 0,40 057 058
093 0_ 095 {1@6
097 0r_ 099 100
122
ELECTRO HOME 089
UROPLUS 114
FUJi"[SU 017 0'21 022 _7
133 13,4
GENERa, _&STR_N_ 003 004 016 029
031 059 101
_4 TACHI 139 140
_TONT_KER 033 037 039 051
057 104
HUGHES 068
JANIEL 060 147
JERROLD 061
KATHREIN 108
LEGEND 057
LG 001
LUTRON 132
LUXOR 062 144
MACOM 010 059 063 064
065
MEMOREX 057
N[;:X'rWAVE 028 124 125
NORSAT 069 070
PACE _KY SATELLITE 143
PANASONiC 060 14£
PANSAT 121
PERSONAL CABLE 117
PRILIPS 071
PC.() 105
PRESIDER1' 019 1_
PRIMESTAR 030 !10 tll
PROSA'T 072
RCA 066 1_
REALiSTUC 043 074
SAMSUNG 123
SATEU _TESERVICE CO 028 035 047 057
085
_1ENTUF_C ATI_,r[A 032 1_
BONY ! 03
STARCAST 041
SUPER GUIDE 020 124 125
TEECOM 023 _6 075 087
088 _8} 107 130
137
TOSHIBA 002 127
UNIDEN 016 025 042 043
044 _5 048 049
078 07g 080 086
101 135 136
Vt EWS 'tAR 115
WiNEGARD 128 146
ZEN_TN 08t _2 083 084
09t 120
Brand Codes Brand Codes 8rend Codes B¢_# Codes
_..
AIWA 014 028 070 _ JVC 004 013, 141 PRILtPS 026 112 143 147 28
125 129 139 229
230
AKAI 163
ANAM 003 014 017 023
059 lo_, 189 216
217 235 236
BURMEC"rER 252
CARVER 086
CLARiON 199
DAEWOO 027 053 060 0_4
102 148 198 _1
D NON 015 075 130 143
_ANTASiA 07t
PIN_AR?5_ 022
FISHER 089 0,9.9
LG(GO_OSTAR) 001 021 024 0_9
087 1(;7 108 1!0
190 191 192 210
211 212 239
RAt'TA_ 034 035 188
_'_AR N_I'¢_KARDON 068
iNK_L 037 O_ 062 069
078 079 095 121
122 14_ 150 151
152 153 154 155
157 158 159 1_
189 207 222 224
225 2?6 227 243
247
K_C 185 186 187
F_NW©O0 038 O_ 067 08,9
170 1171 197 2_
215 222
KO_/EL 030
NAD ,045 046
LO_E ,014 016 ,036 O_
10`0 "172 173 "174
175 "17_ 177 "178
179 180 181 153
201 202 208 213
214 2"19 223 232
238 240
LX_ 1,03
MAGNAVOX 111
MARANTZ 002 018 `02`0 025
,034 041 ,081 {-_
,097 "112
MCINTOSH ,049
MC8 1,04
MEMOf{_X 107
NAD 046
ONKYO `013 040 `041 047
,048 056 ,057 "132
133 "140
OPTIMUS 158
PANASONC 007 033 `064 "1"13,
142 22@ 241 251
P_NNEY 104
P_ONESR 039 042 043 OB3
065 09"1 093 094
115 !23 127 2\50
QUASAR 113
RCA 08`0
RCX 092
REALI8 [_C 103 1_
SAMSUNG 124 145 146 !82
193 194 195 203
204 244 245 246
SANSU_ 0tl 135 t38 !4,4
SANYO 0"19 083, 234
SCCIT_1 t,06 !_
SHARP 031 0,32 051 052
072 Og2 t17 !19
156 !_ "199 2_
206 20,9
SHERWOOD 0`05 ,0_ 158
SONY 044 _5 109 1!4
118 126 248 249
I'A_VANG 012 02"9 073 074,
076 `077 105 !61
162 163 164 165
t66 167 t68 !_
205 231 233 242
TEAC 0!,0 ,085 106 !_
185 187 237
TECHNCS t,01 113 t28 13,4
TOSHIBA 137
'1_t4_ ,06t
ViCT©R ,088 13!
WARDS 08g
YAMAHA `054 0,5,5 066 0'92
199
Brand Co,_ _rand Codes Brand Cedes B_ Codes
APEX DIGITAL 022 MAGNAV©X 013 PRILtPS 013 SONY `007
DENON 020 014 MARANTZ `024 PIONEER 004 02¢ THOMPSON 0`05 Og_
GE 005 006 MITSUB_SH_ 002 PROCEED 021 TOSHIBA 019 008
RARMAN KARDON `027 NAD 023 PROSCAN 005 _ YAMAHA `0`09 0"18
JVC `012 ONKYO 008 01'/ RCA 005 OC_ ZENITN 010 016 025
LG ,00"1 010 ,016 (_2S PANASONC 0`03 _ SAMSUNG 01i 015
Owner's Manual 127
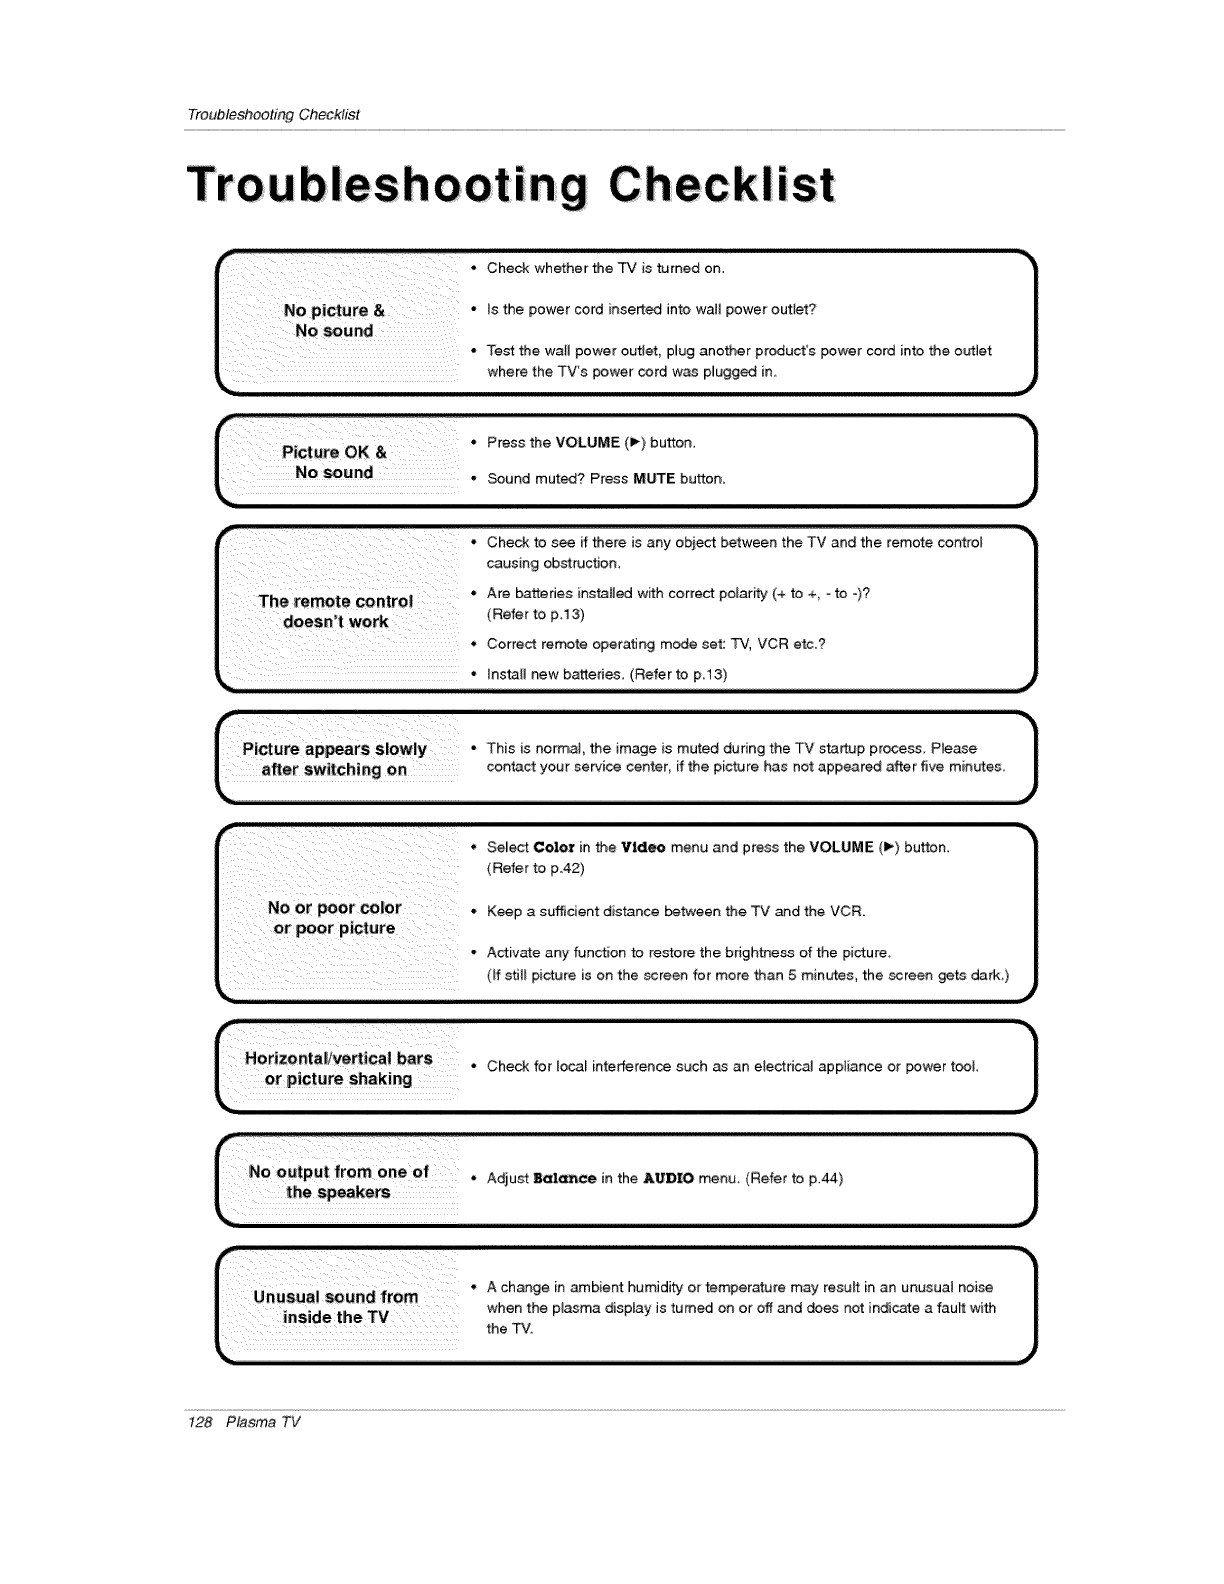
TroubleshootingChecklist
liB ist
*Check whether the TV is turned on.
the wall power outlet, plug another product's power cord into the outlet
r ..... - Check to see if there is any object between the TV and the remote control
causing obstrucflon_
The remote _ntrOi * Are batteries installed with correct polarity (+ to %-to -)?
eoesn't work (Refer to p.13)
.co,re_tre_teoperaflogm_o_e_:W,VCRetc._
install new batteries. (Refer to p.13)
*Select Color in the Video menu and press the VOLUME (_') button.
(Refer to p.42)
No or poor color. Keep a st,ffficient distance between the TV and the VCR.
; or poor picture
*Activate any function to restore the bdgh_ess of the picture_
(If still picture is on the screen for more than 5 minutes, the screen gets dark,)
_= ........................................................................................................................
1
_No outpu;tfrom one of.
the Adiust B_¢e in the AIJ']D1rO menu (Refer to p.44)
128 Plasma TV
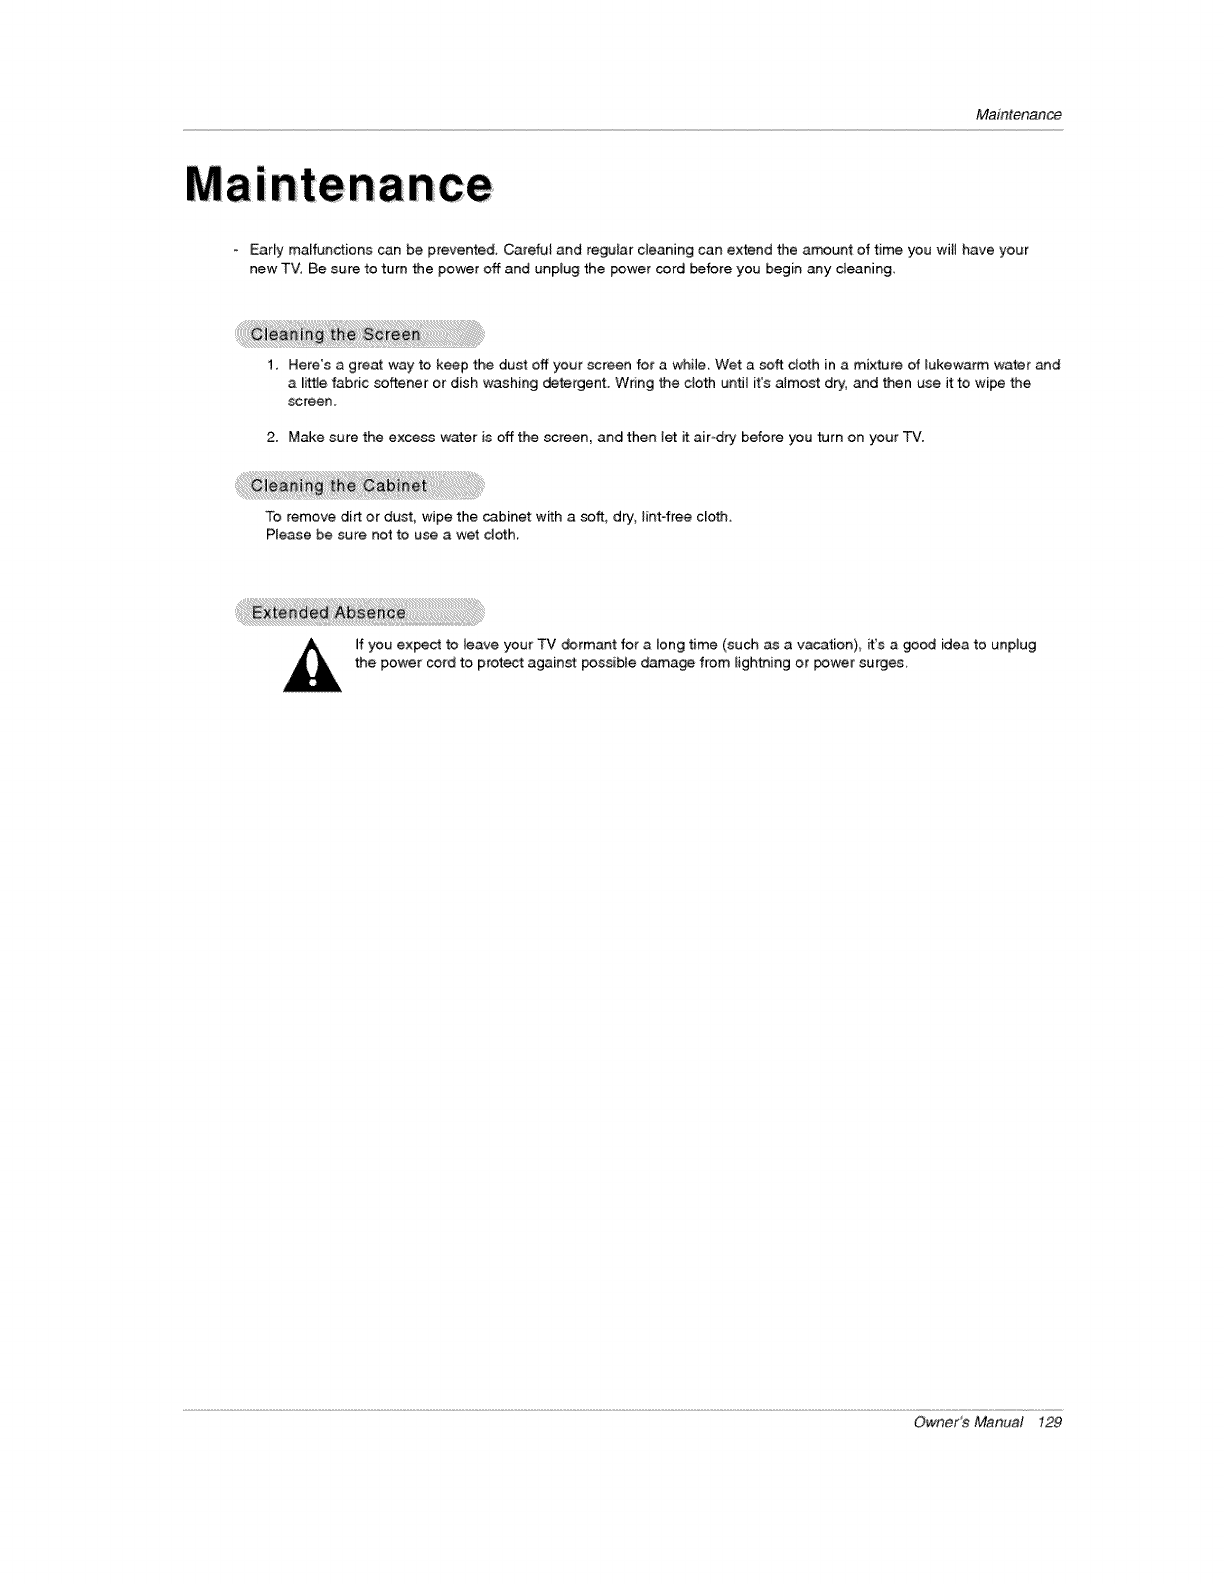
Maintenance
Early malfunctions can be prevented. Careful and regular cleaning can extend the amount of time you will have your
new TV, Be sun to turn the power off and unplug the power cord _fore you begin any cleaning,
1. Here's a great way to keep the dust off your screen for a while. Wet a soft cloth in a mixture of _ukewarm water and
a _i_e fabric softener or dish washing detergent. Wring the ctoth unfit it's almo_ dry, and then use it to wipe the
screen,
2. Make sure the excess water is off the screen, and then let it air-dry before you turn on your TV.
To remove dirt or dust, wipe the cabinet with a soft, dry, lint free clofll.
Please be sure not to use a wet cloth.
If you expect to leave your TV dormant for a long time (such as a vacation), it's a good idea to unplug
the power cord to protect against possible damage from lightning or _wer surges,
Owner_ Manual 129
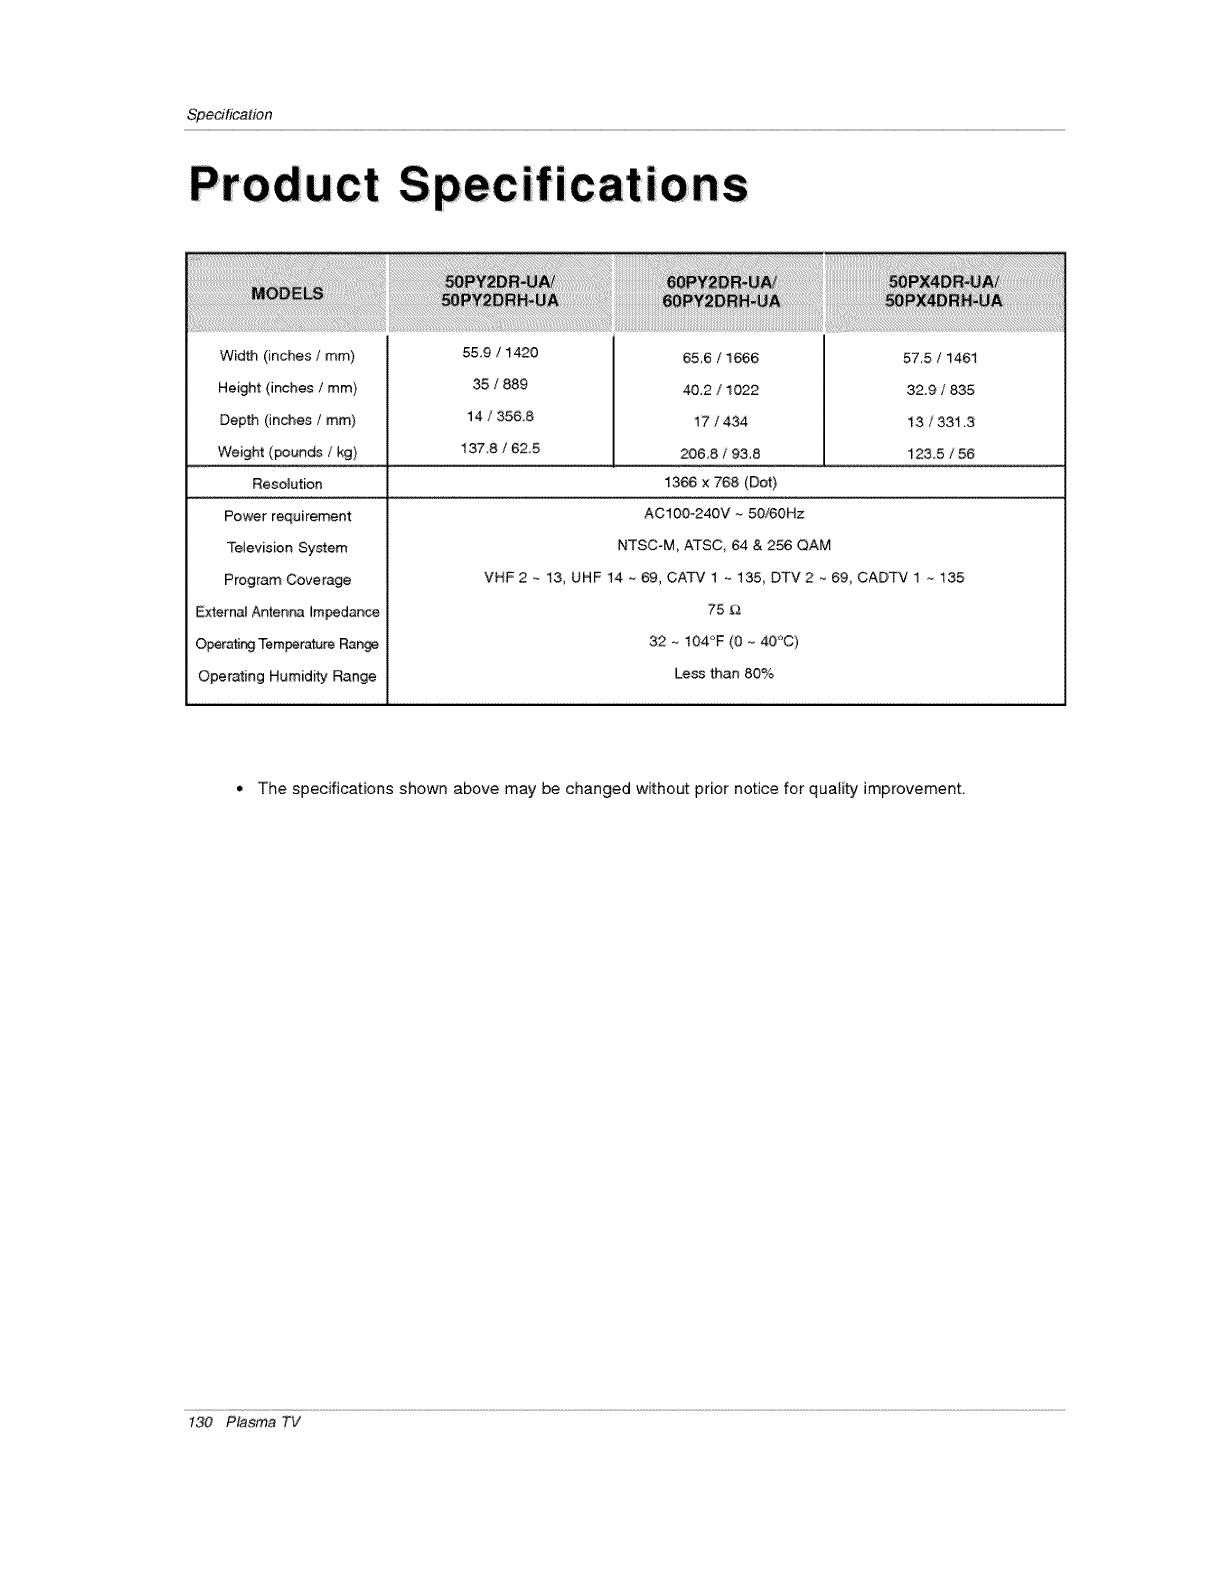
Specification
ions
57,5 /1461
32.9 /835
13 /33_ ,3
123,5 /56
Power requirement
Television System
Program Coverage
Externat AntenP_ Im_dance
O_r_r_ Temperature Ran_
Operating Humidity Range
ACIOO-240V ~ 50/60Hz
NTSC-M, ATSC, 64 & 256 QAM
VHF2 _ 13_ UHF 14 ~ 69, CAT',/1 ~ 135, DTV2 ~ 69, CADTV 1 ~ 135
75 £3
32 _- 104°F (0 - 40"C)
Less than 80%
•The specifications shown above may be changed without prior notice for quality improvement.
130 Plasma TV
Your LG Plasma TV will be repaired or replaced in accordance with the terms of this warranty, at LGE's option, if it
proves to be defective in material or workmanship under normal use, during the warranty period ("Warranty Period")
listed below, effective from the date ("Date of Purchase") of original consumer purchase of the product. This war-
ranty is good only to the original purchaser of the product and effective only when used in the United States, includ-
ing Alaska, Hawaii, and U.S. Territories.
WARRANTY PERIOD:
LABOR and PARTS: 2 YEARS from the Date of Purchase.
Your unit will be repaired or replaced with a new, substitute
model or factory reconditioned unit, at LGE's option. If
repaired, parts used in the repair may be new or remanufac-
tured.
Replacement Units and Repair Parts are warranted for the
remaining portion of the original unit's warranty period.
EFFECTIVE DATE OF WARRANTY: Your warranty period
begins on the date of sale to the original consumer/end user.
KEEP THE DEALER'S DATED BiLL QF SALE OR PROOF QF
DELIVERY as evidence of the purchase date. You will be
required to submit a legible copy of your bill of sale or proof
of delivery when requesting warranty service.
HOW SERVICE IS HANDLED:
In-Home Service: Please retain dealer's
dated bill of sale or delivery ticket as evidence
of the Date of Purchase for proof of warranty,
and submit a copy of the bill of sale to the ser-
vice person at the time warranty service is pro-
vided.
Please call 1-800-243-0000 to locate your
nearest LGE Authorized Service Center.
Visit our website at:
http://www.lgservice.com
THIS WARRANTY IS IN LIEU OF ANY OTHER WARRANTY, EXPRESS OR IMPLIED, INCLUDING WITHOUT
LIMITATION, ANY WARRANTY OF MERCHANTABILITY OR FITNESS FOR A PARTICULAR PURPOSE. TO THE
EXTENT ANY IMPLIED WARRANTY IS REQUIRED BY LAW, IT IS LIMITED IN DURATION TO THE EXPRESS
WARRANTY PERIOD ABOVE. NEITHER THE MANUFACTURER NOR ITS U.S. DISTRIBUTOR SHALL BE
LIABLE FOR ANY INCIDENTAL, CONSEQUENTIAL, INDIRECT, SPECIAL, OR PUNITIVE DAMAGES OF ANY
NATURE, INCLUDING WITHOUT LIMITATION, LOST PROFITS, LOST OR CORRUPTED PROGRAMMING OR
DATA, OR ANY OTHER DAMAGE WHETHER BASED IN CONTRACT, TORT, OR OTHERWISE. Some states do
not allow the exclusion or limitation of incidental or consequential damages or limitations on how long an implied
warranty lasts, so the above exclusion or limitation may not apply to you. This warranty gives you specific legal
rights and you may also have other rights that vary from state to state.
CONCERNING PIXEL FUNCTIONALITY: Your Plasma -iV contains about one million individual pixels. Plasma TV
typically contain asmall number of pixels that do not function normally. Your display has been inspected and is in
compliance with manufacturer's specifications, indicating that any pixel defects do not effect the operation or use
of your display.
IMPORTANT: Please fill out and mail in your Product Registration Card or go to www.lgservice.com to register your
product online. This information will allow us to reach you promptly should we discover a safety or reliability prob-
lem that could affect you.
THIS LIMITED WARRANTY DOES NOT APPLY TO:
• damage caused in shipping or transit
• service required as a result of improper installation,
including incorrect or insufficient AC supply (please
consult the owner's manual for power supply
requirements)
• installation or repair of antenna systems, cable con-
verters, cable company supplied equipment, or
other components in a video system
• set-up or adjustment on consumer controls, or
damage caused by improper adjustments
• damage caused by other system components
• any panelthat has been modified or incorporated
into any other product
• replacement of batteries on the remote control.
• damage (including cosmetic damage), failure, loss
or personal injury due to misuse, abuse, negli-
gence, improper maintenance or storage, or to acts
of nature or other causes beyond our control.
(Causes beyond our control include but are not lim-
ited to lightning strike, power surges, power out-
ages and water damage.)
• image burn-in
• repair or replacement of warranted parts by other
than LGE authorized service centers.
• units purchased or serviced outside of the coverage
area.
• product where the original factory serial numbers
have been removed, defaced or changed in any
way.
• product sold and labeled as "as is, where is" or sim-
ilar disclaimer.
The cost of repair or replacement under these excluded circumstances shall be borne by the consumer.
CUSTOMER INTERACTIVE CENTER NUMBERS:
To obtain customer assistance, product Call 1-800-243-0000
information or Dealer or Service locations 24 hours a day, 365 days per year
FOR SERVICE:
Before you call for warranty service, check your operating guide -you may avoid a service call.
For warranty service information, please contact the LGE Customer Interactive Center telephone number.
When calling for service, please have your product model number, serial number and the date of pur-
chase or the date of original installation available.
If a replacement unit is required, under some circumstances you may be asked to provide a reserve deposit to
the LGE Service Center against a credit card number as surety for advanced shipment. Your credit card will not
be charged if you return the defective unit within 10 working days.
If a replacement unit is received, please use the carton and packaging from that unit in returning the defective
unit to the LG®Brand Service Center.
Parts and service in accordance with the LGE warranty are LGE's responsibility and will be provided without
charge. Other service requirements will be at the owner's expense. If you have problems in obtaining satisfactory
warranty service, write or call the LGE Customer Interactive Center. Service may be provided by independently
owned and operated service organizations.
To assure proper credit and avoid unnecessary charges, you must obtain an LGE Return Authorization before
returning any product to the LGE Service Center. Contact the Customer Interactive Center for details.
TO CONTACT THE LGE CUSTOMER SERVICE CENTER BY MAIL:
LGE Customer Interactive Center
P.O. Box 240007
201 James Record Road
Huntsville, Alabama 35824
http ://www.lgservice.com
P/NO : 3828VA0528AC)(3828VBO002M)
