LG LWHD1200FR User Manual ROOM A/C Manuals And Guides L1005038
User Manual: LG LWHD1200FR LWHD1200FR LG ROOM A/C - Manuals and Guides View the owners manual for your LG ROOM A/C #LWHD1200FR. Home:Heating & Cooling Parts:LG Parts:LG ROOM A/C Manual
Open the PDF directly: View PDF ![]() .
.
Page Count: 52
www lgappliances.,com,
Window-Type
's
Air
MODEL& MODELOS: LWHD12,00FR
ventU!adorde
esta
FOR YOUR RECORDS
Write the model and serial numbers here:
Model #
Serial #
You can find them on a label on the side of each unit,,
Dealer's Name
Date Purchas_t
BStaple your receipt to this page in the event you e_eedit
to prove date of purchase or for warranty issues,
READ THIS MANUAL
Inside you will find many helpful hints on how to use and
maintain your air conditioner propedy Just a little preventive
care on your part can save you a great deal of time and
money over the life of your air conditioner_
You'll find many answers to common problems in the chart
of troubleshootingtips,, It you review our chart of
Troubleshooting Tips first, you may not need to call for
service at all
PRECAUTION
• Contact an Authorized Service Center !or repair or
maintenance of this unit. Call 1-800-243-O000 to
locate the nearest ASC.
•This air conditioner is not intended for use by young
children or invalids without supervision.
•Young children should be supervised Io ensure that
they do not play with the air conditioner..
• If the power cord requires replacement, have an
Authorized Servicer Install an exact replacement part.
• Installation work must be performed in accordance
with the National Electric Code by qualified and
authorized personnel only,
2 Room Air Conditioner
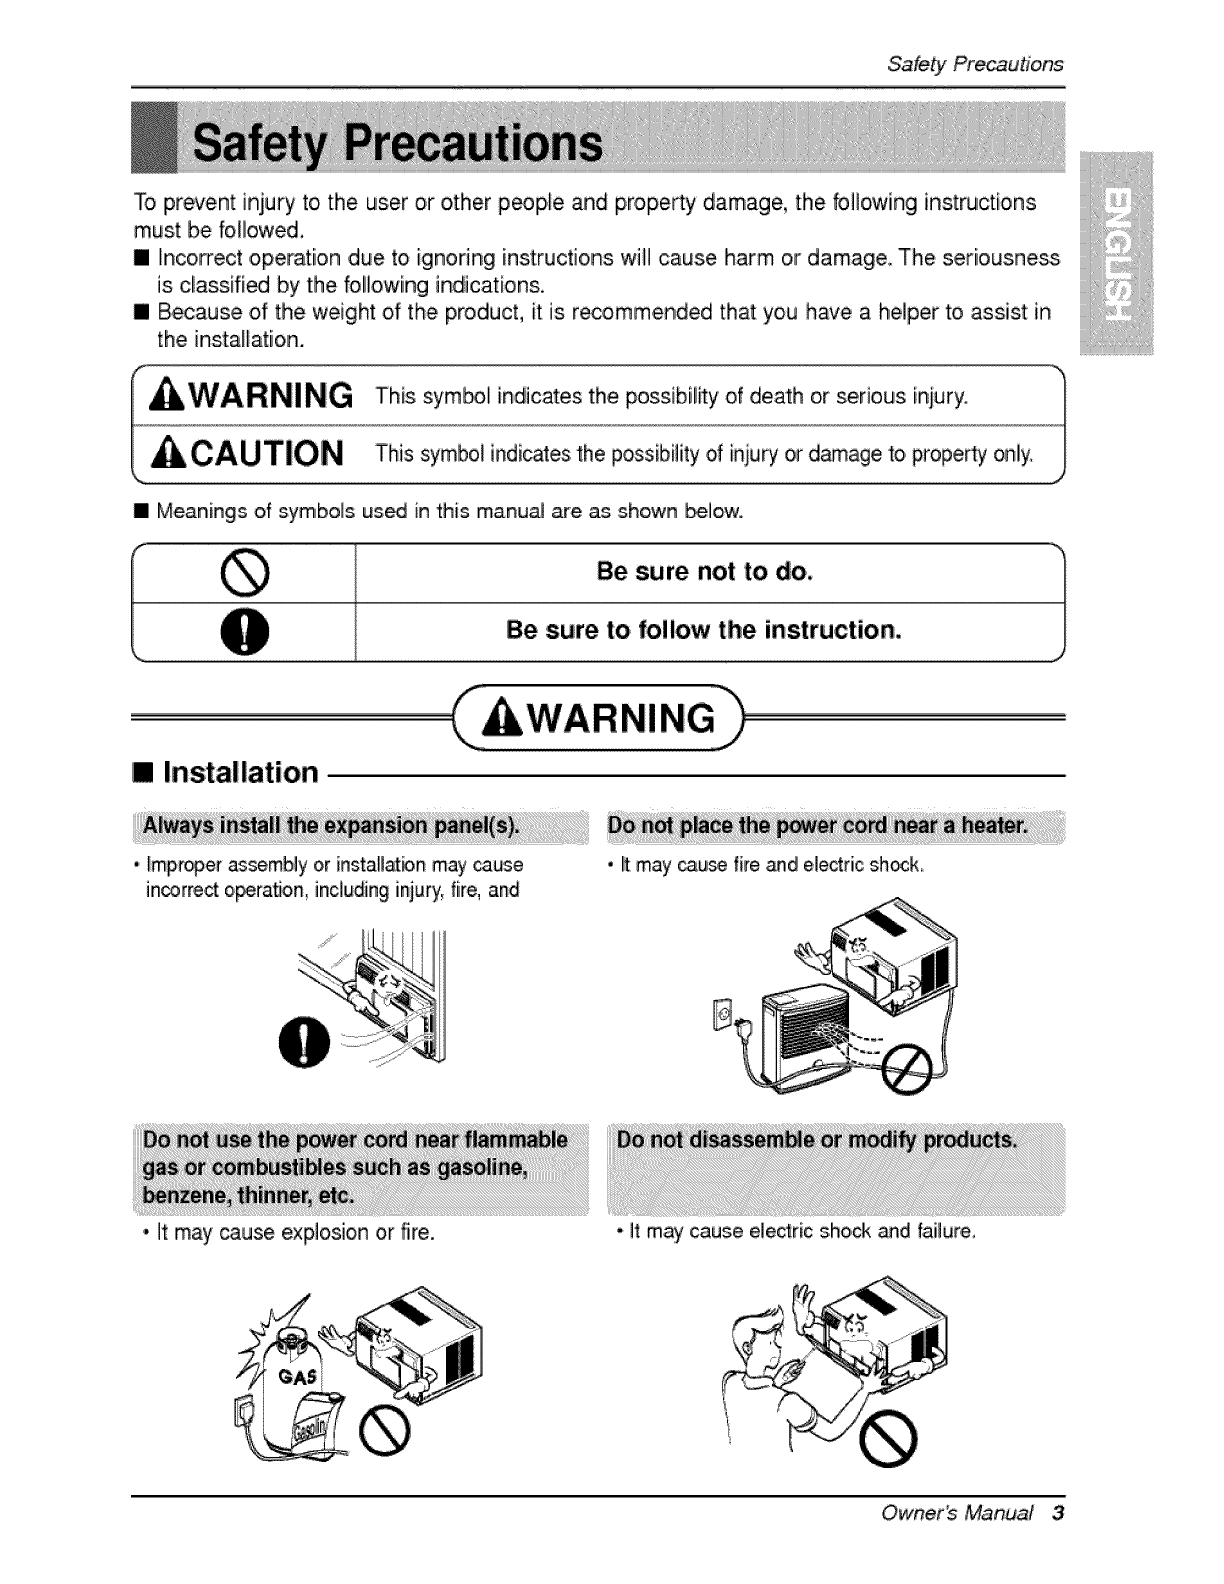
To prevent injury toi the user or other people _d property damage, the bHowing instructions
must be followed,
[] Incorrect ,operati,on due to ignoring instructions will cause harm or ,damage. The s,eri,ous.nes.s
is classifi_ by the bllowing
[] Because of the weight of the product, it is r_ommended that you have a helper to assist in
the installation.
[] Meanings of symbols us,_ in this manu_ are as, shown _low.
iB,e sure not to do. 1
J
Be sure to follow the instruction.
[] Installation
,_mpmper assembly or instaBatbn may cause
in_rre_ o,_ra_on, includinginjury,fire, and
*It may _use explosion or fire.
,It may _u_ {ire _dl e,]e_ric sh_k,
•It may cause electric shock _d failure°
Owner_ Manual 3
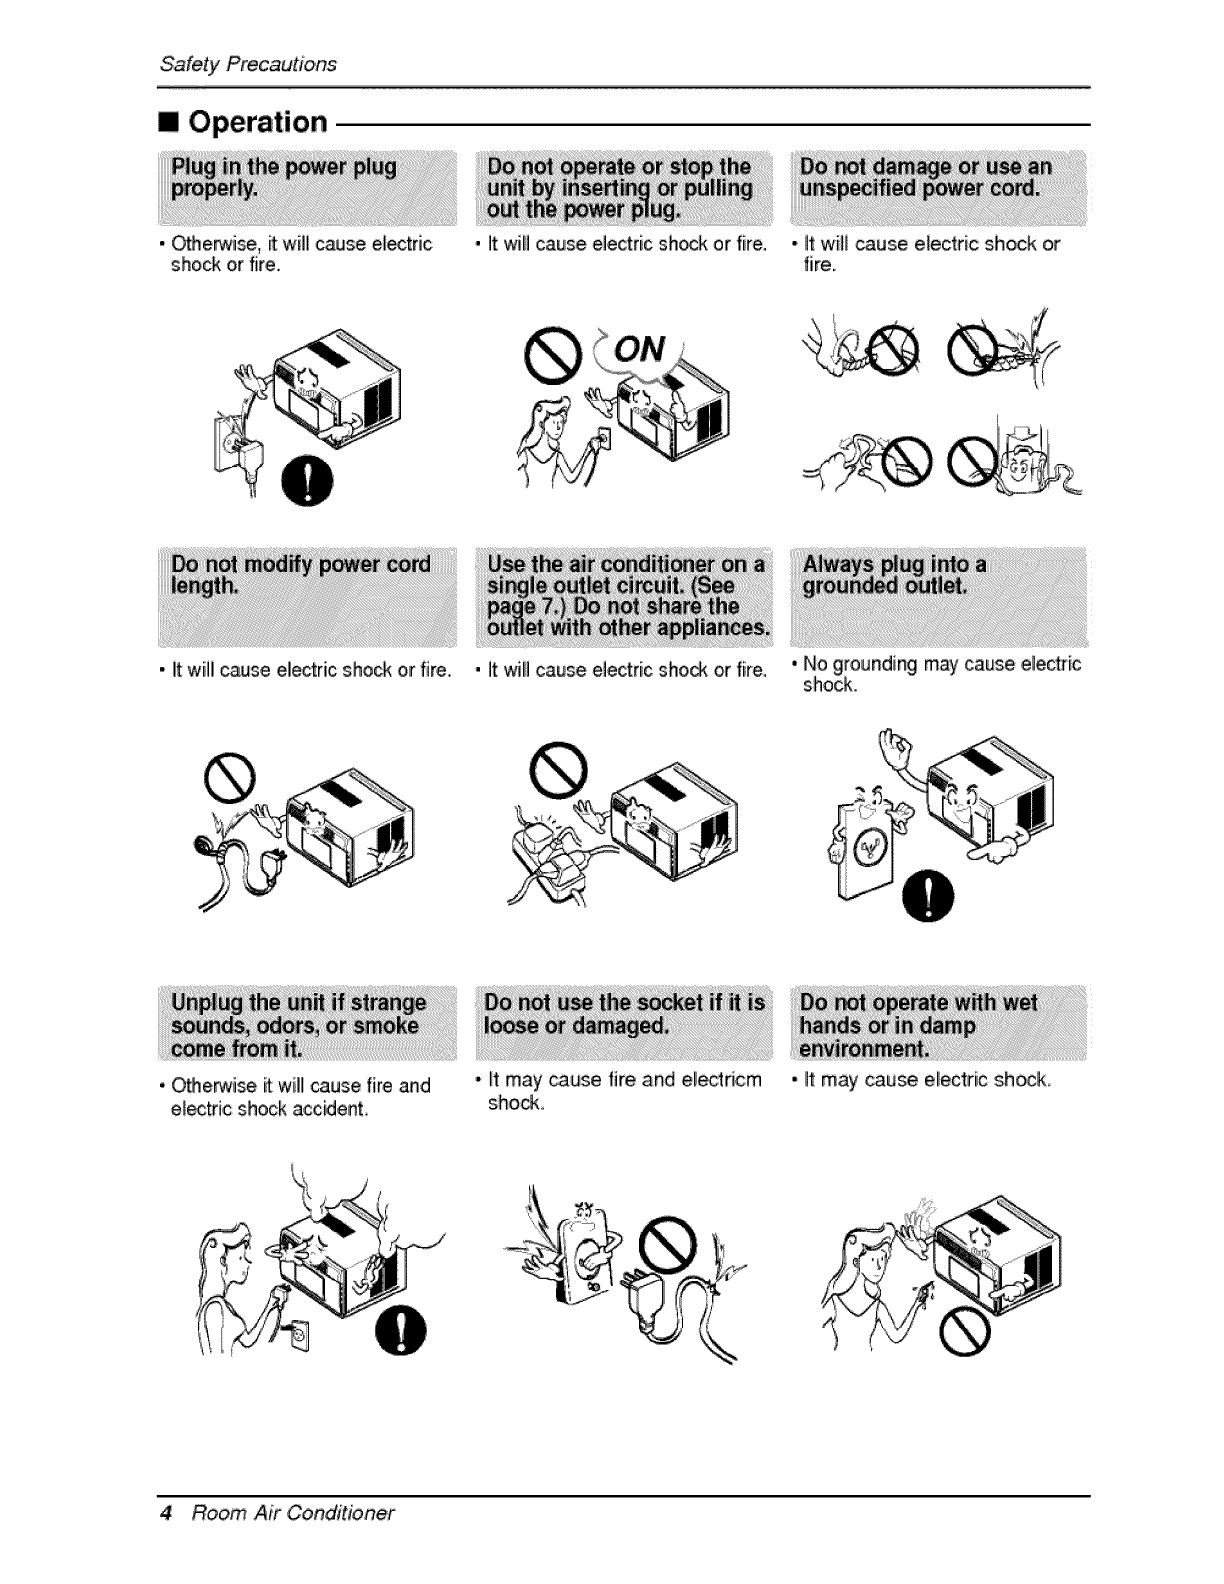
1Operation
'i _e_ise, _ will cause el_tdc
shockor fire.
• it will c_se electric shock olr fire.
•It will cause electric sh_k or fire.
•it will cause electric shod_ or fire.
•. It will cause eFectricshock or
fire.
• No grounding my cause eiec#ic
shock.
,,Othe_ise it will cause fire and
el_tdc shock a,cc_elnt,
4 Room Air Conditioner
it may _use fire and electdcm
sho_,, •It may _use electric shock
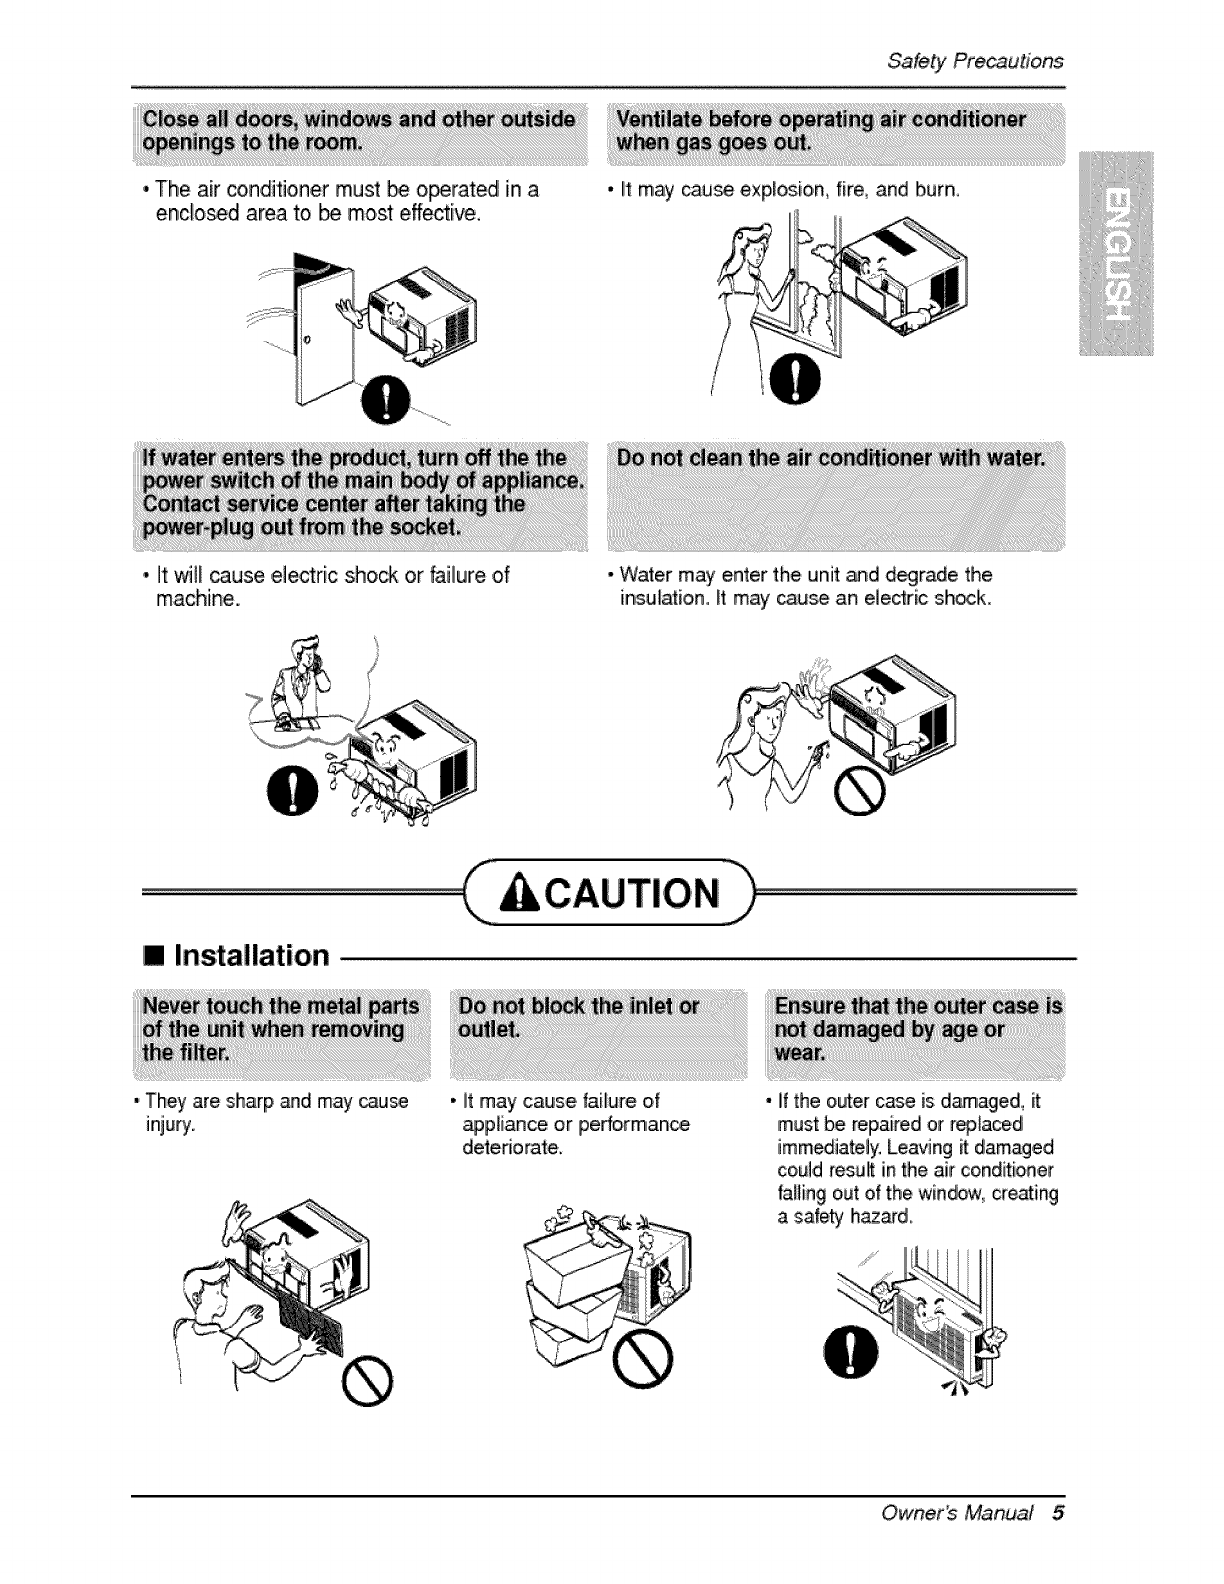
• The air conditioner must _ operated in a
enc[o_d area to _ most effective,
Sa_tyPr_u#ons
, II may cause expl_,i,o,n, fire and burn,
• It will _use ,electric sho_ or failure of
machine.
[] Installation
• They are sharp and may _use
inju_.
• Water may enter the unit and d_rade the
irlsu[atioiR, it may cau_ an eledric shock.
• lit may cause, failure of
a#p[iance or performan_
deleriorate.
, If the outer case is damaged,
must be repaired or replaced
immediately. Leaving it damaged
could result in the air conditioner
iaBing out of the window, creating
a safety h_ard.
Owner_ Manual 5
SafetyPrecautions
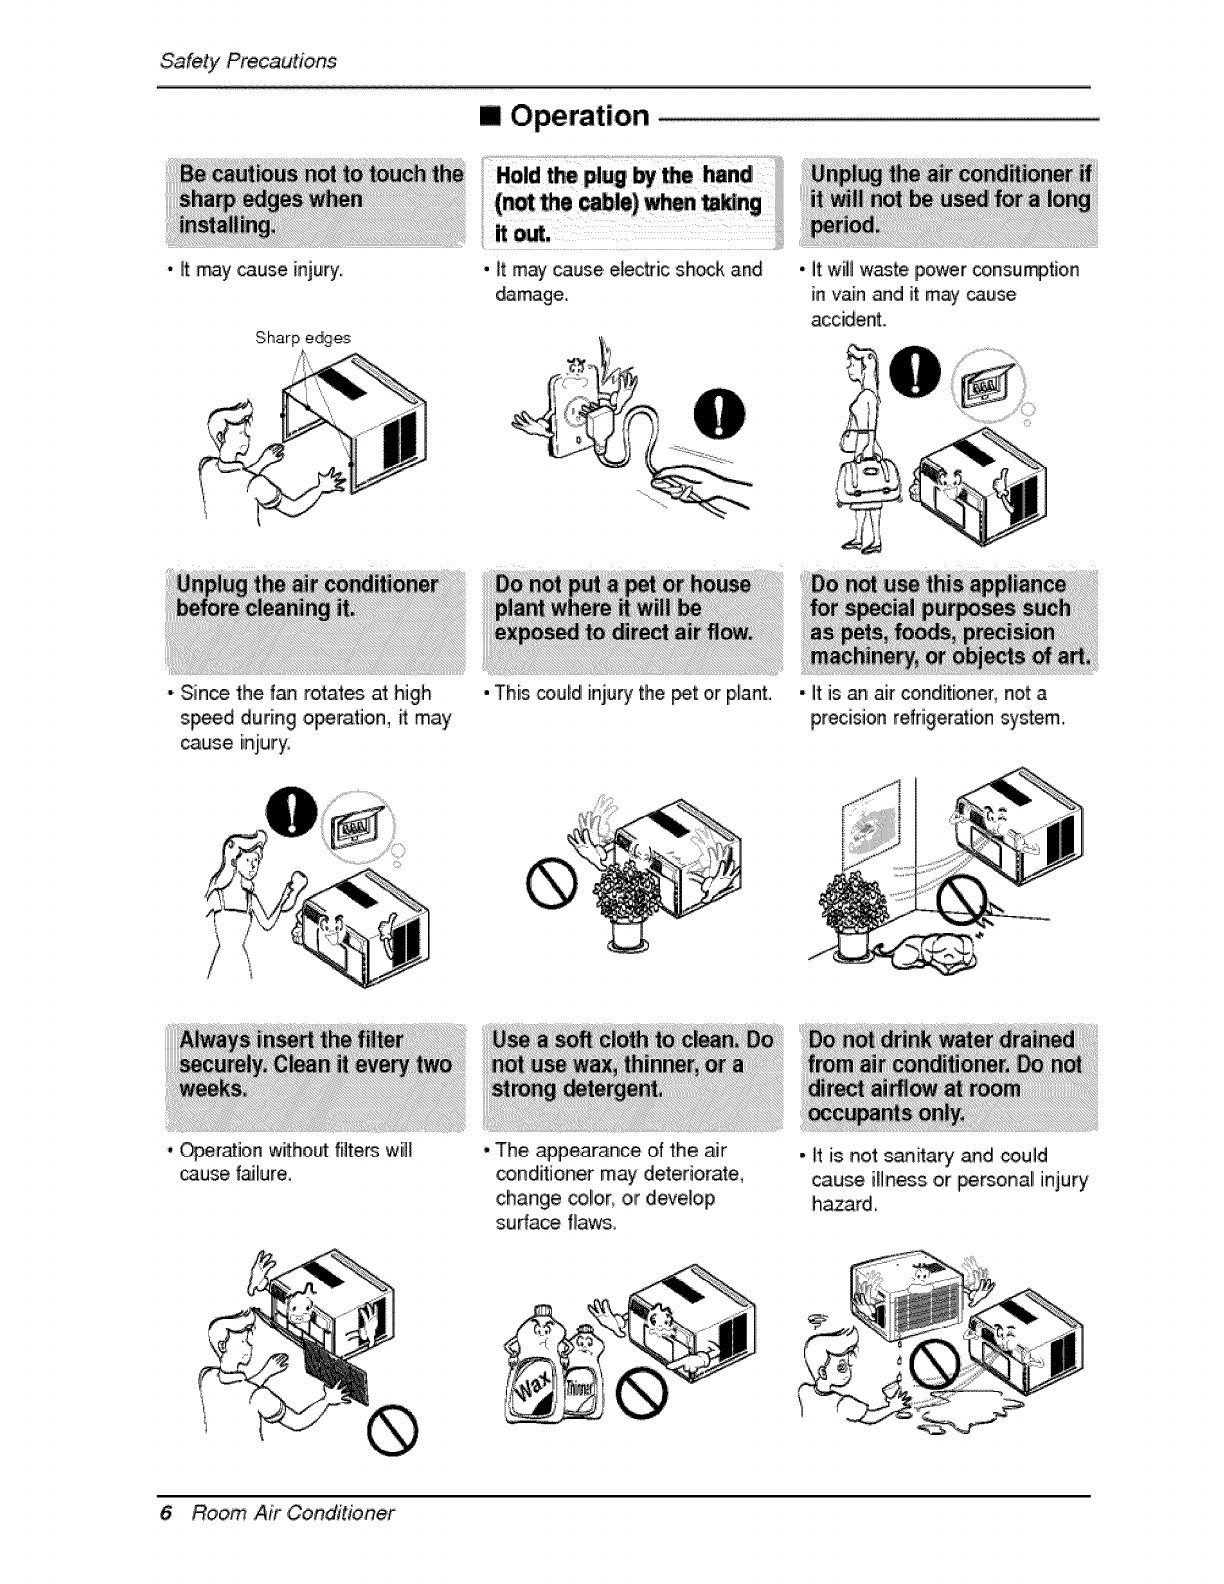
• ff _y cause injury:
[] Operation
Sharp edges
• it may cause e_ectric sh_k and
_mage.
• it wiBw_te power consumption
in vain _d it may _use
accidenL
- Sin_ the fan rotates at high
speed during o_raflon, H:may
cause iniury.
•Operation withoutfilters wBI
cause failure,
• This coulid injury the _t or p_ant.
*The appearance of the Mr
_nditJoner may deteriorate,
changie _lor, or develop
surface fla_,
• it is an air conditioner, not a
precision refrigeration system,,
• it is not s_ffary _d _uld
cau_ illness o,r personal injury
h_ard,
6Room Air Conditioner
Be_re Ope_tion
i. P_ug in the power cord propedy.
2o Use a dedi circuit. Overloading the line _uld create a fire hazard.
3. Do not use an extension cord. See page 11 for more detail&
4. Do not start/stop o_ration by pluggin_unplugging the power cord.
5. ff the _¢er cord Js damaged and requires replacement, have an Authorized
Se_-lcer install an exact replacement part.
iLiii_iii_iiiiiiiii'_iiiiiiiiiiiii!
!iiiH_iii!iiiiiii!!iiiiiiiiiiiitiiiii
!. Being exposed to direct aiflow for an extended period of time could be
hazardous to your heath, Do not expose occupants, pets, or plants to direct
airflow for extended periods of time.
2. Due to the possibili_ of oxygen deficiency, ventilate the room when used
together with stoves or other heating devices.
3. Do not use this air conditioner for non-speci_d special purposes (e.g.
preserving precision devices, food, pets, plan_, and art objects). Such usage
could damage the items.
4. The air conditioner is a consumer comfo_ appliance, not a precision climate
contro_ system.
i. Do not touch the metal parts of the unit when removing the filter, injuries can
occur when handling sharp meta_ edges.
2_ Do not use water to dean inside the air conditioner. Exposure to water can
destroy the insulation, leading to possible electric shock_
& When cleaning the unit, first make sure that the power and breaker are turn_
off. The fan rotates at a very high sp_d during operation. There is a
possibifi_ of injury if the unit's power is accidentally triggered on while
clean_ng _nner parts of the unit.
For repair and maintenance, _ntact an Authorized SepJice Center, See the
warran_ page for devils or _!1 (800) 243-_. Have your model number and
serial number availabie. They should be wri_en on page 2 of this manual.
7
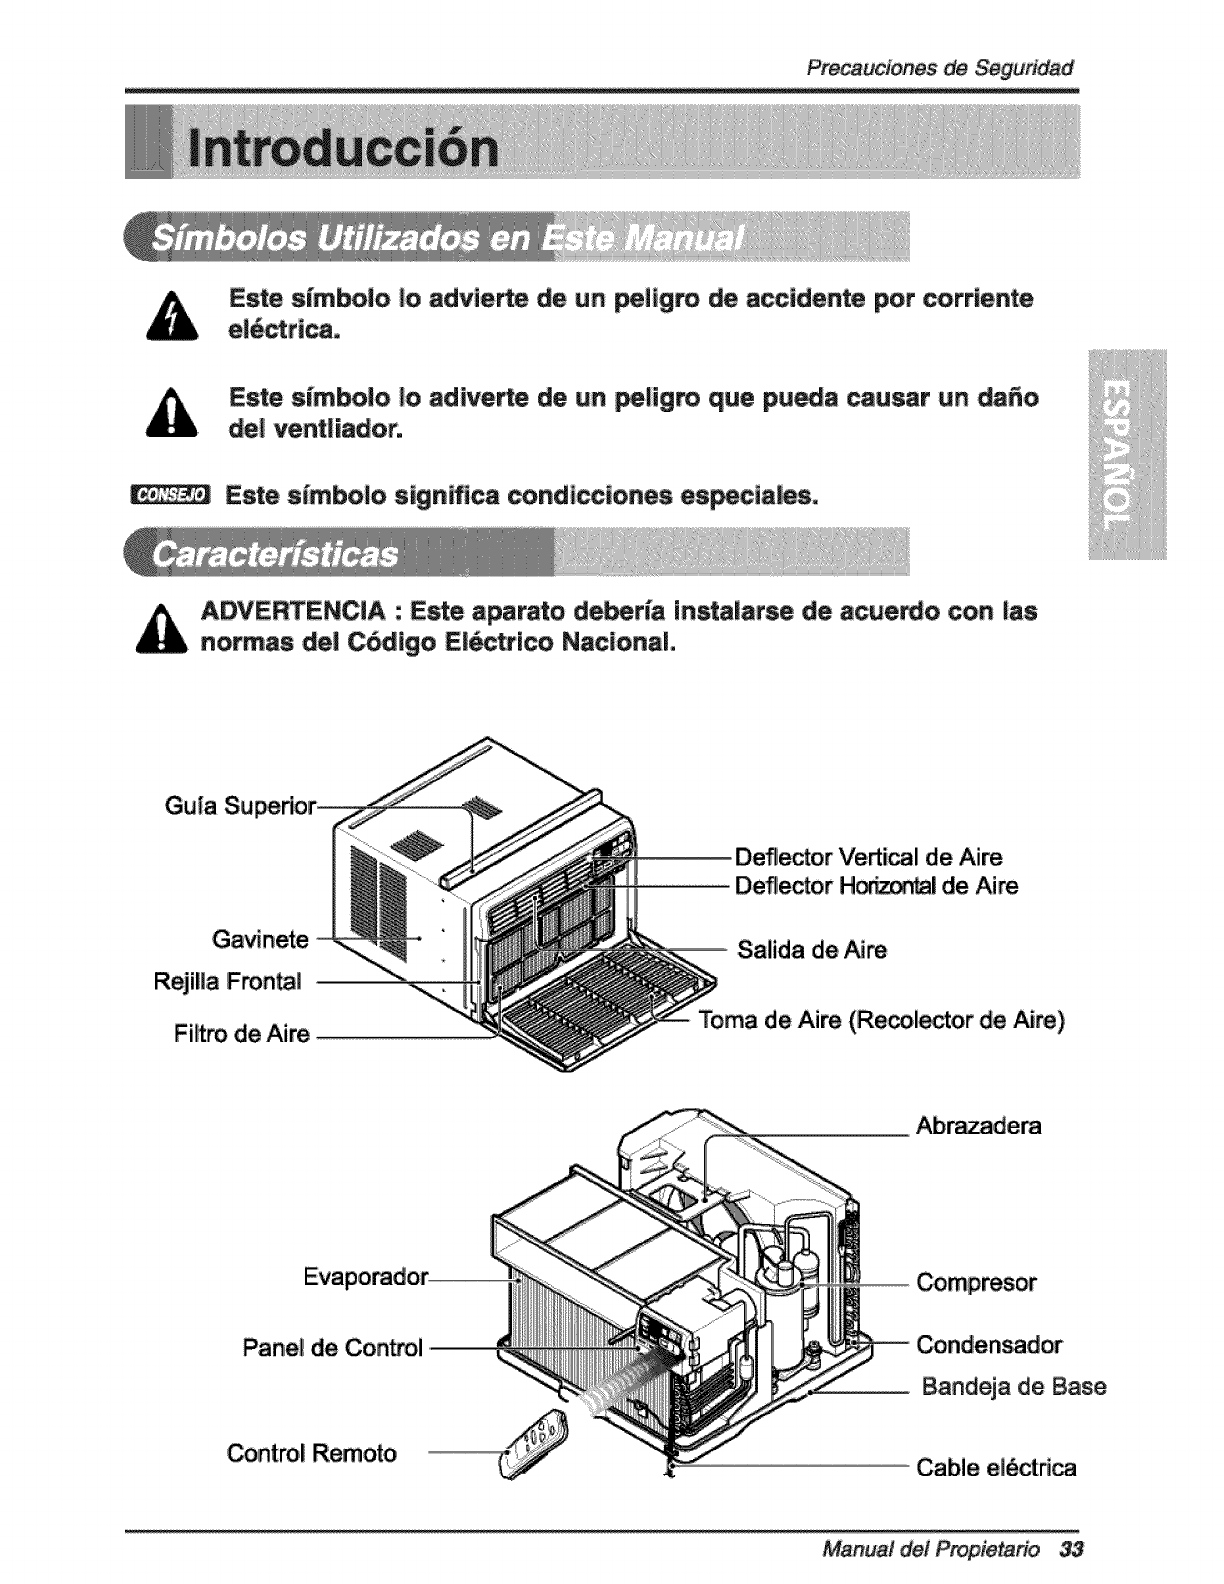
Introduction
This symbol alerts you to the risk _electric shock.
This symbol alerts you to haza_s _could cause harm to the
air conditioner,
This sym_l indicates s_cia| notes.
WARNING: _is appliance should be installed in accordan_ with the
National Ele_tic C_e°
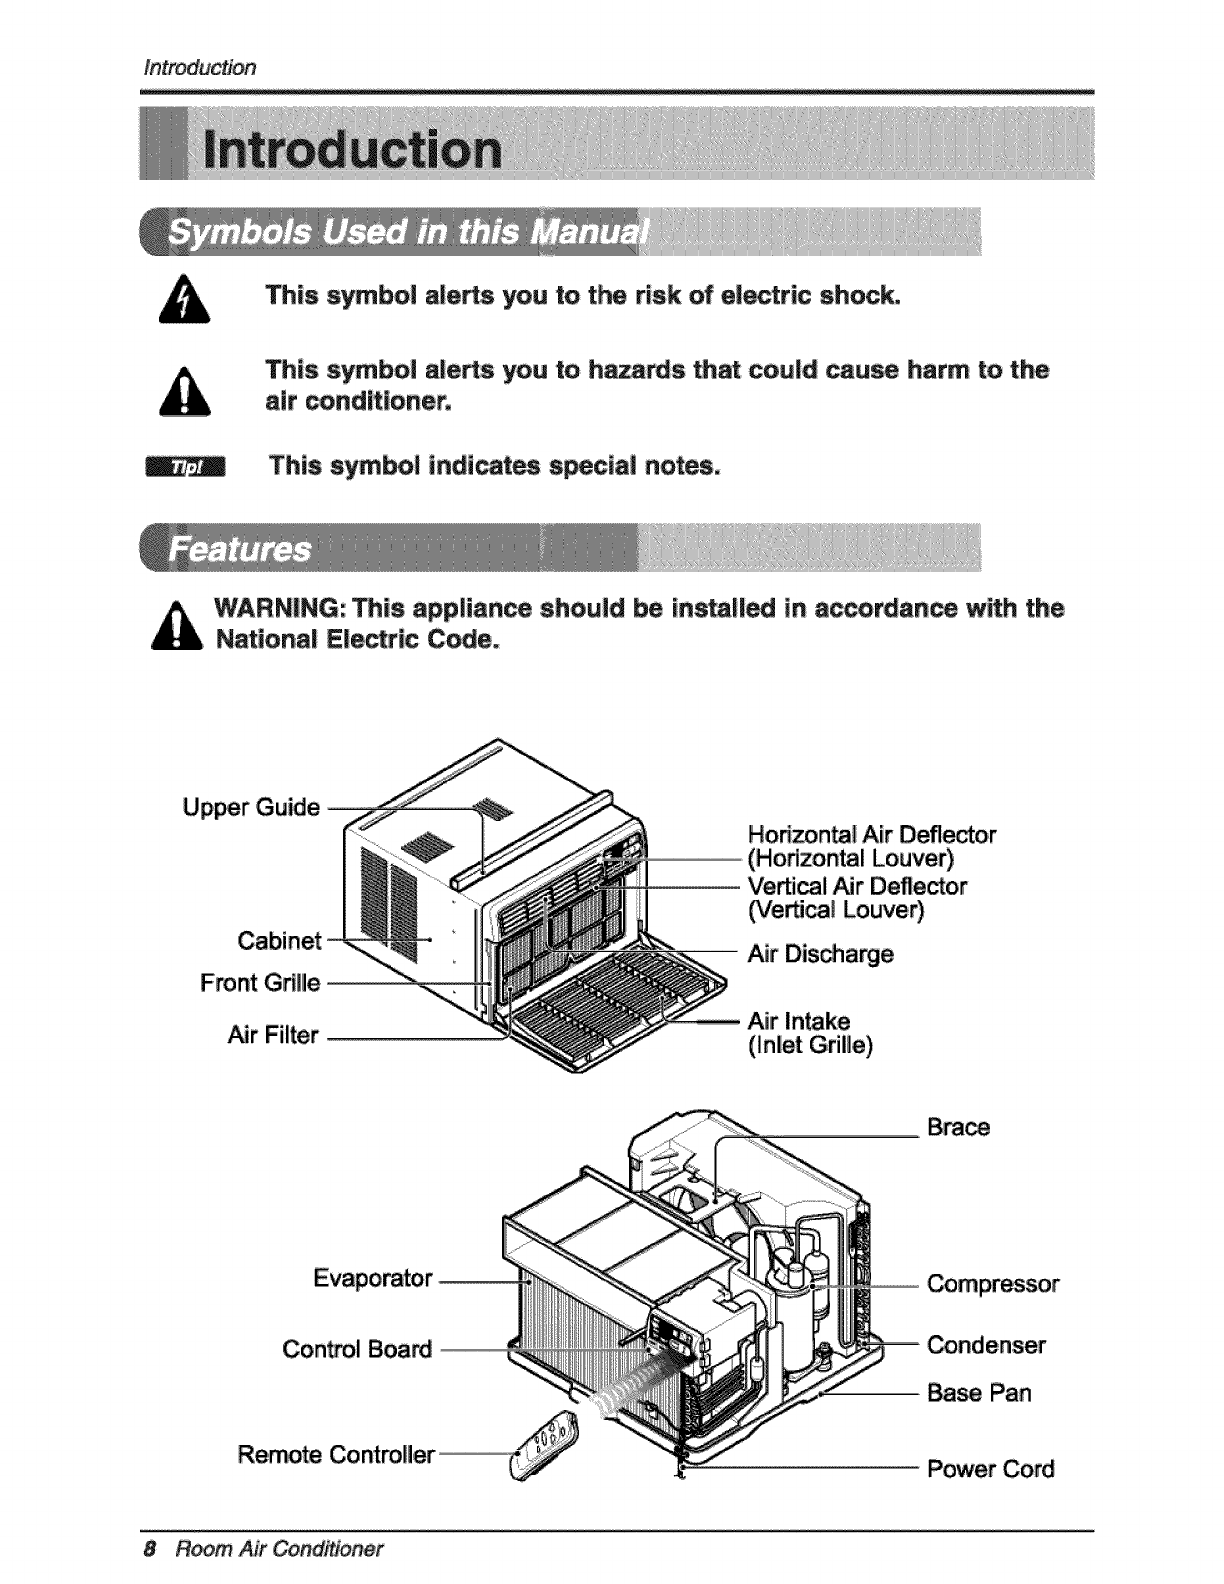
Up_r Guide
Front G_lle
Air Filter
Honzon_l Air Defl_o,r
(Horizontal Louver)
Verti_i Air D_e_or
(Ve_ca! Lo,_er)
-- Air Dis_arge
Air Intake
(Inlet Grille)
Con_ol Board
Re,_te Co _roller _,_':_ ......
Base Pan
Power Cord
8 Room Air Co r
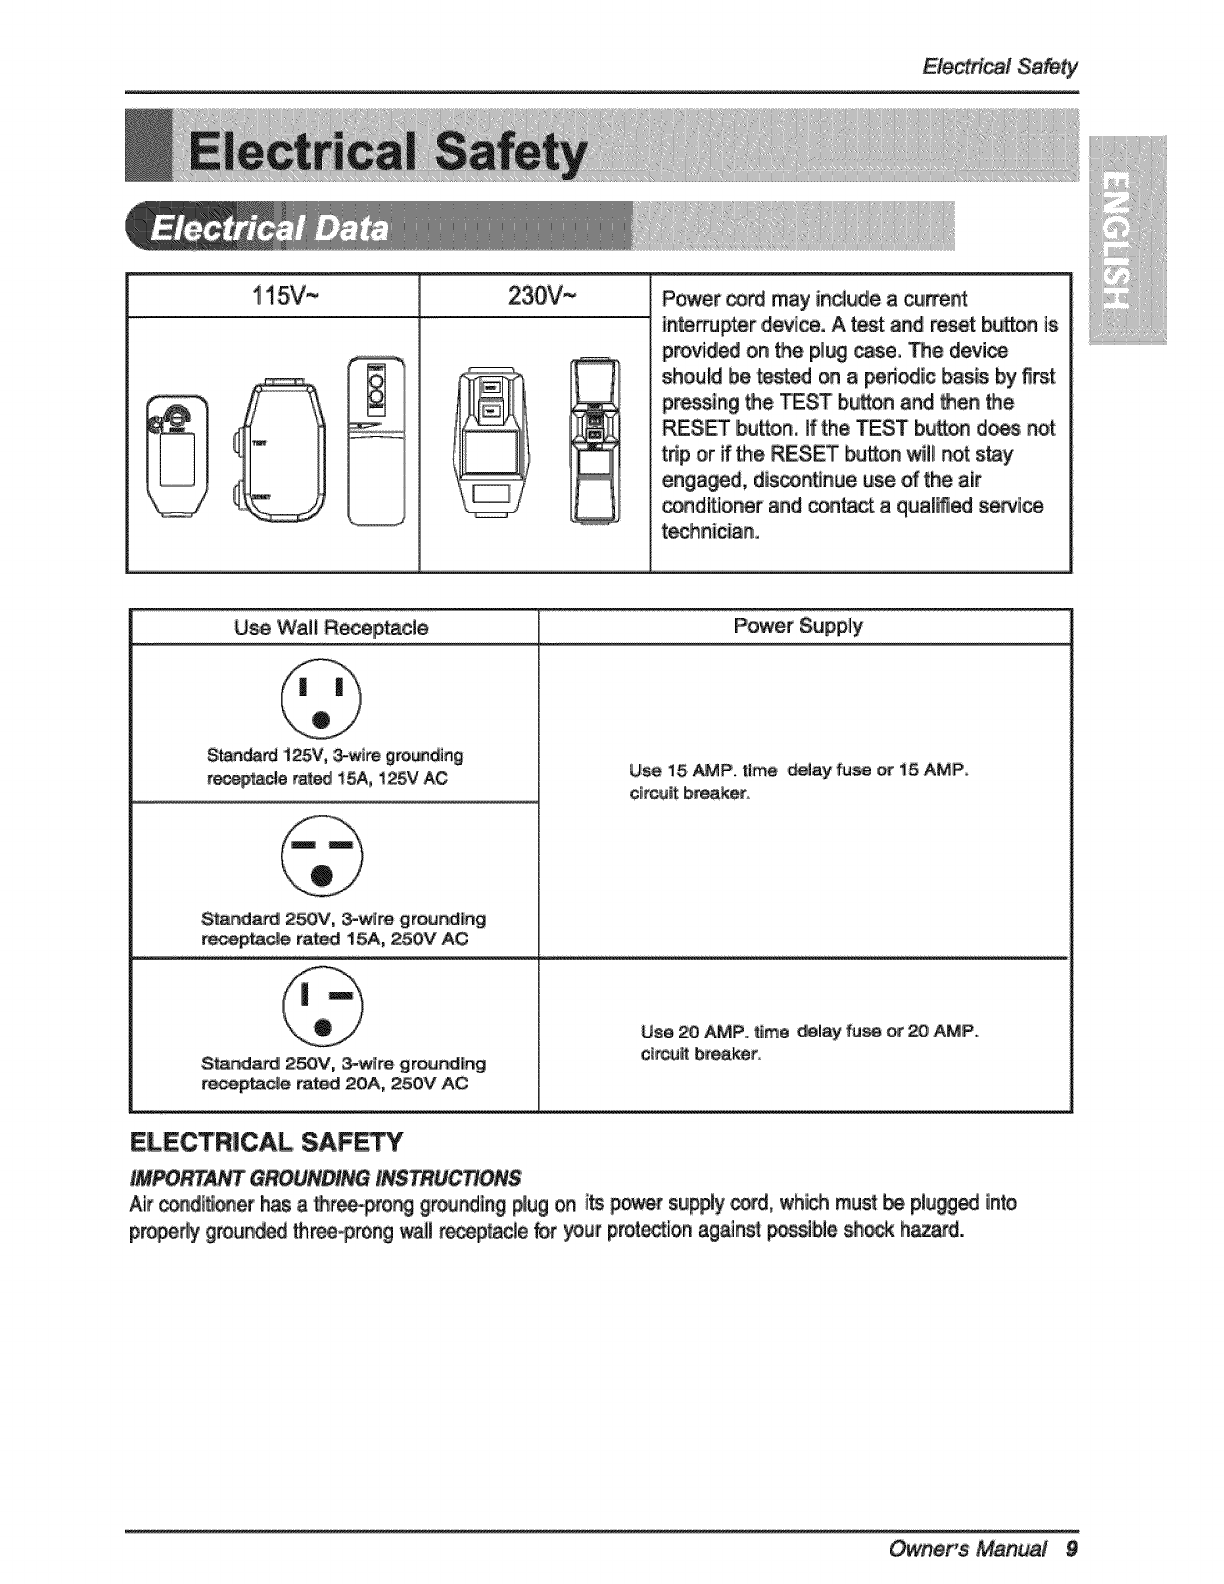
i15V~ 230V~ Power _rd may include 8 ,cu_e_
interrupter ,device, A test and re_t b_l is
provided on _e pl_ case. me de,Jim
should be.tested on a pe_edic bssis by _rst
presstng _e TEST b_ and Den De
_SET bu_on, if the TEST button does not
t_p e,r ff the RESET b,u_n '_ll not s_y
enga_d, dts_,ntJnue use of the air
_dtt]or_r and _tact a qualmed s_lce
technic_n.,
Power Supply
U_ Wall Recepta_Je
Stan_N 125V, 3-wt_ gm_ding
reo_acle r_ t5A, !25V AC
St_a_ 2._V, 3_wira gr_ng
recep_e rated t5A, 250V AC
,.@
S_a_ 2_V, 3-wira gr_ing
r_e rated 20A, 250V AC
U_ i5 _P. time _Jay fuse _ !5 AMP
c_tcattb_ak_.
Use 20 AMP.. _me _lay fu_ o_ 20 AMP.
c_r_ breast.
ELECTRICAL SAF_Y
IMPO_T GRO,UN_NG IN$_UC#ONS'
Air _er h_ a _r_o_ gr_n,dlng _ug on i_ p_ supptycord, wh_ must _ pl_g_g_ into
pr_e_y greu_ three-prong wa_l le _r yo,_/p,rot_ion ag_ns_ _ssible _ h_d..
9
Ele Safety
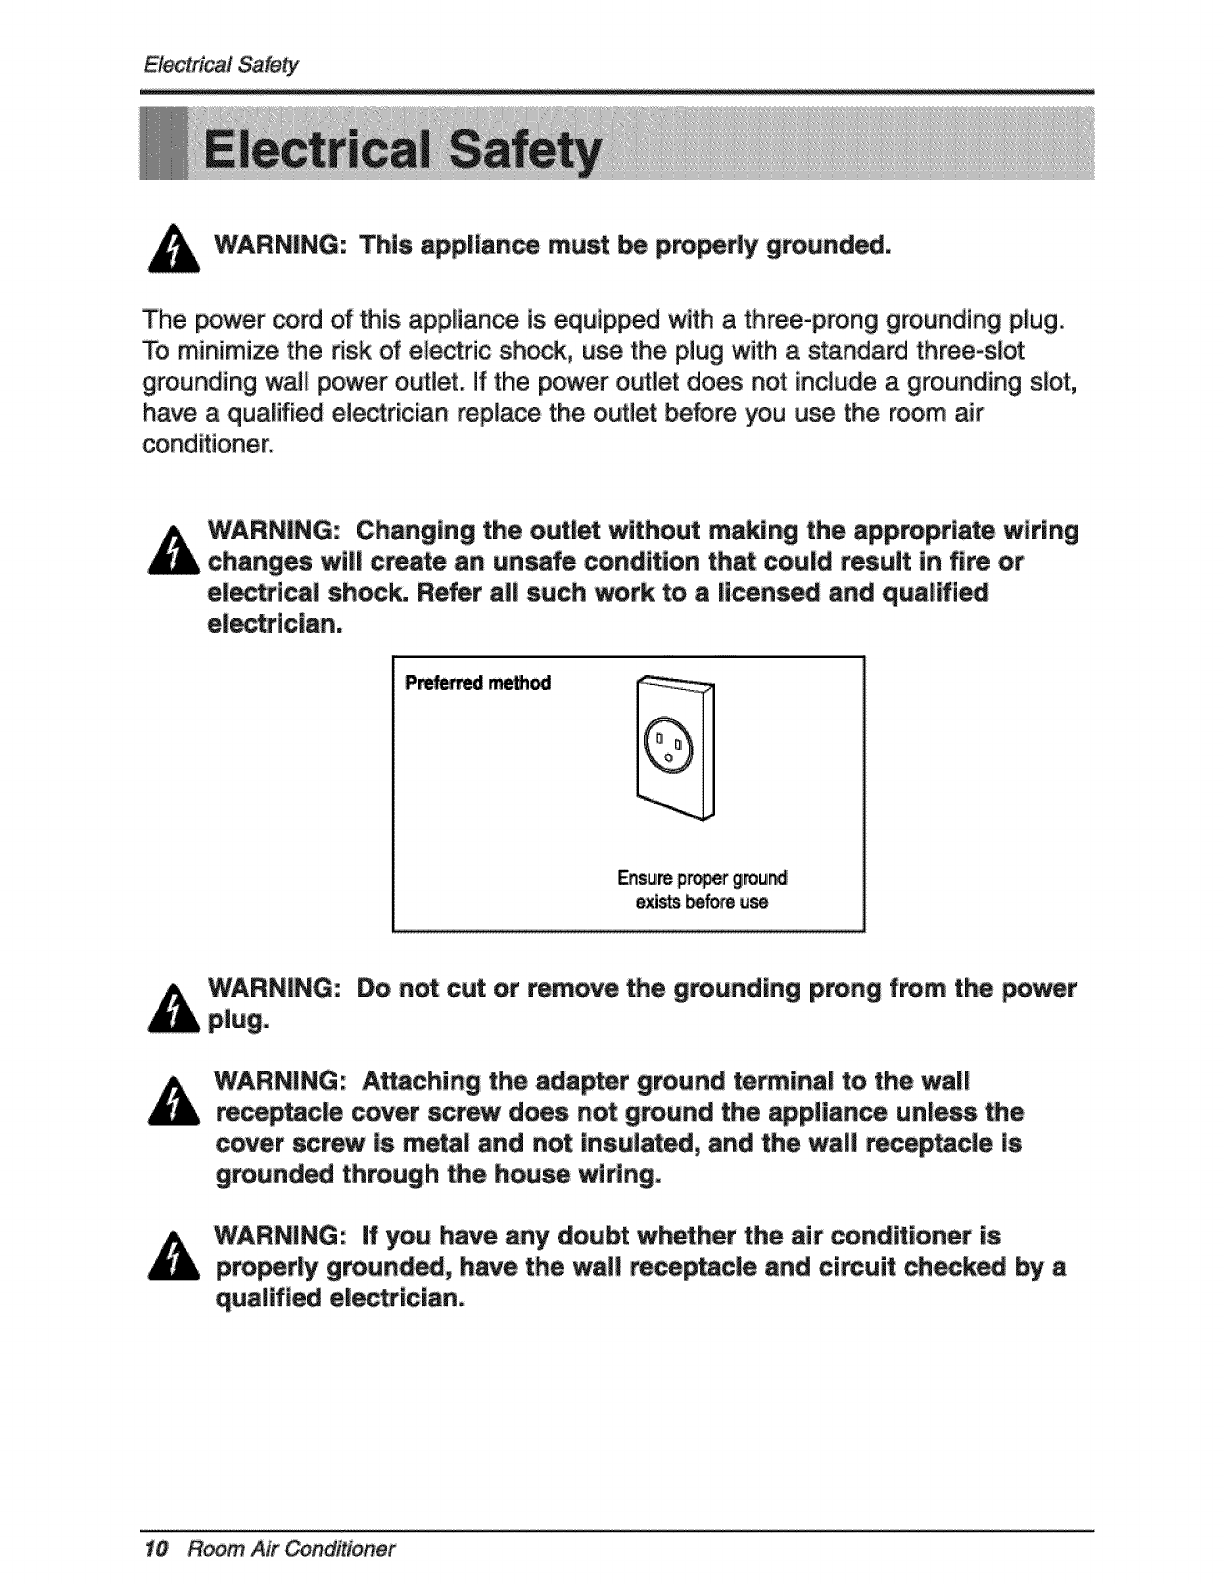
WARNING: This app|lance must _ p_pody g_unded,
The power cord of _is appliance is equip_d with a three-prong grounding plug.
To minimize the dsk of electric shock, use the plug with a standard three-slot
grounding wall power outlet, if the power outlet does not include a grounding slot,
have a quaLifi_ eiectrician repiace the outlet _fore you use the room air
conditioner.
WARNING: Changing the outlet without making the appropriate wiring
changes wiii create an unsafe condition that couid result in fire or
eiectrical shock. Refer all such work to a ilcens_ and qua|ifi_
el_iclan,
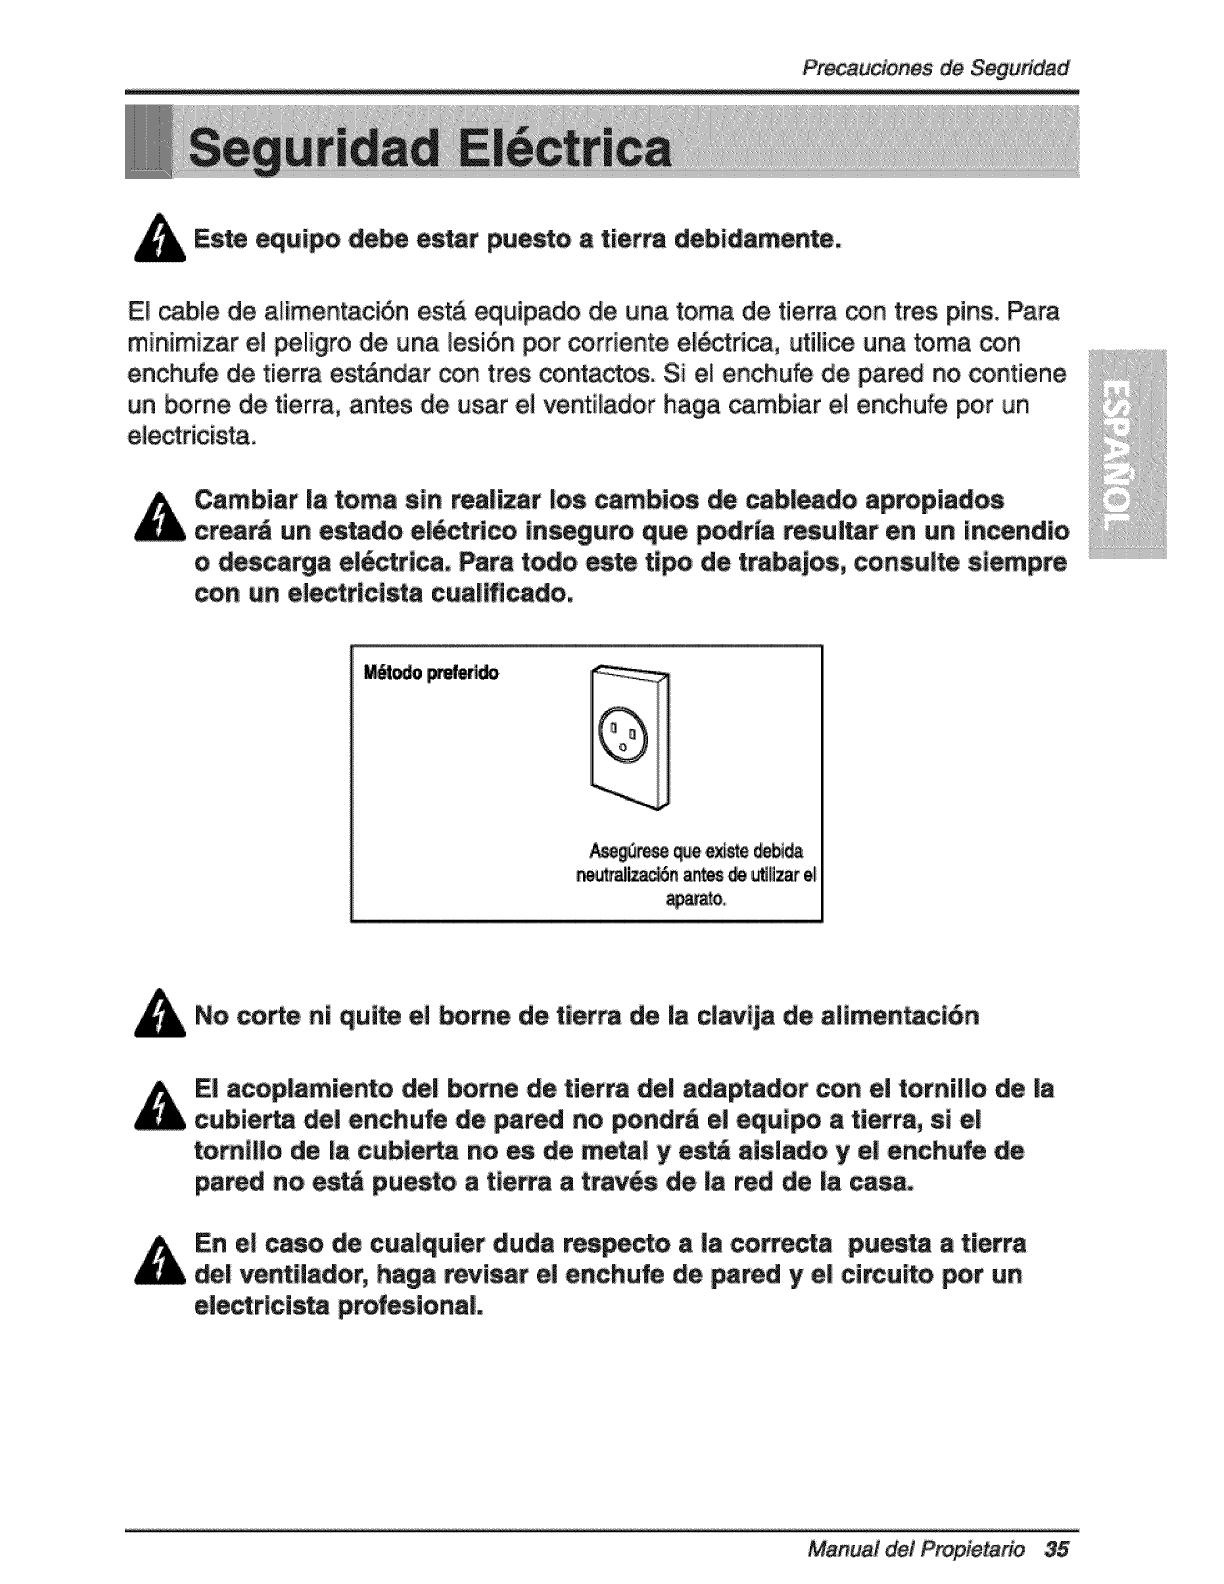
P_ meth_
Ensure p_r grou_
exi_ _f_e use
WARNING: Do n_ cut or remove the grounding prong from the power
plugo
WARNING: Attaching the adapter g_und retinal to the wall
_ceptacle cover _rew does not ground the appliance unless _e
cover screw is metal and not insulted, and the wall receptacle is
grounded though the house widngo
WARNING: if you have any doubt whether the air conditioner is
proporly grounded, have the wall rece_cle and ci_uit choked _a
qualified electrician,
10 Room A# Con r
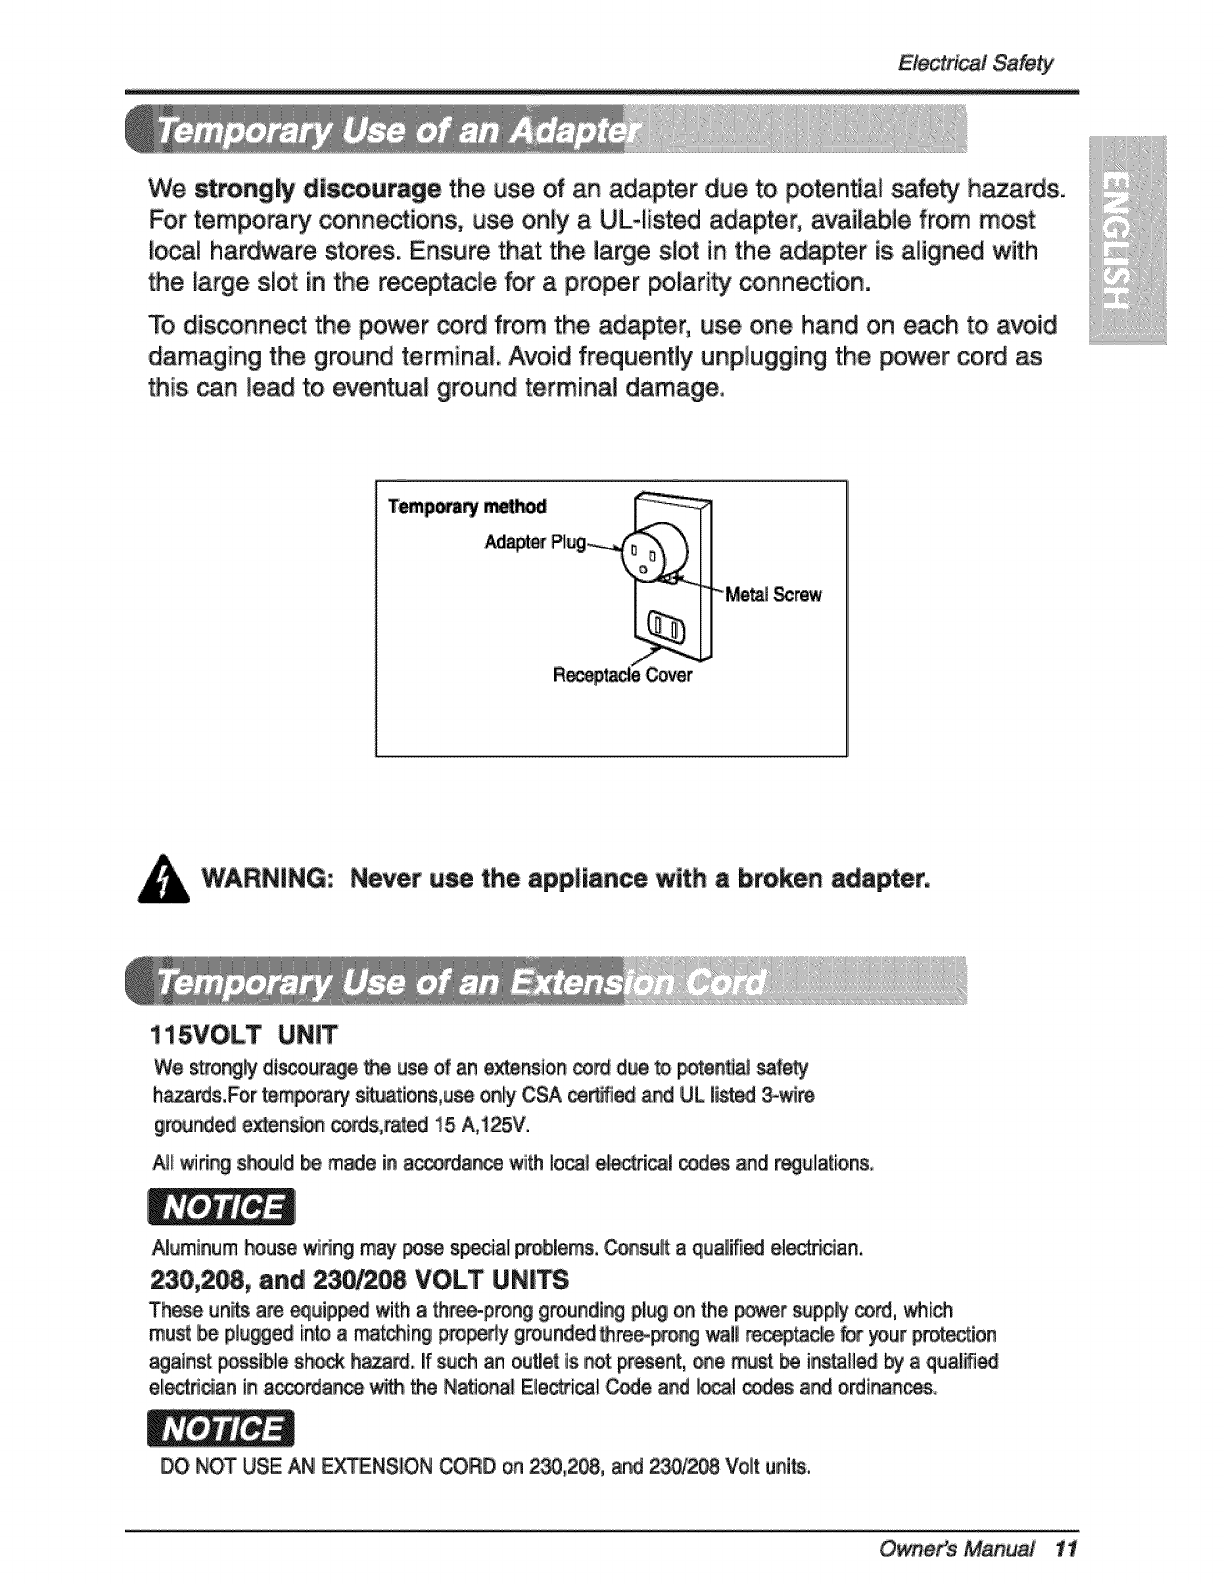
We strong_ discourage the use of an adapter due to potent_a_ s h_ards.
For temporary connections, u_ on_y a ULolisted adapte5 avaiiable from most
local hard#are Mores. Ensure that the _arge slot in. the adapter is. aligned with
the _arge slot in the r_eptac_e for a pro_r pofari_ connection.
To disconne_ the power cord from the adapter, use one hand on each to avoid
damaging the ground terminal Avoid frequentJy unplugging the power cord as
this can lead to eventual ground termina! damage,
iLiii_iii_iiiiiiiii'_iiiiiiiiiiiii!
!iiii_iiii!iii[ii_i!!iiiiii[i))iitiiiii¸
11!
_Me_J _rew
WARNING: Never u_ the app|lance with abroken adapter.
1iSVOLT UNiT
We _o_ di_oura,_ _e use of an extension _d_ to _e_a_ _ety
h_ards0For t,empo_ _tuations,u_ on_yCSA cert_ed a_ UL I_ 3-_
g_ed e_n_ _ds,mted 15 A,_25V.
N_ wiring s_ld _ made i_ a_a_ with Ioca__d_l codes and _u_a_ions,
,_J_minum house winng may pose s_al p_oblems,C_suit a.qualifi_ el_cian,
230,2_, a_ 23.0_8 VOLT UNITS
These un_ are _ipped with a _re_p, rong g_urndi_ ping o_ the p_#er _ppl!'y cord, which
must be !pluggedinto a matting pre_y groun_ _remp._g _ll r_pta_ _ _ur pro_ion
_ai_s[ _siblle sh_ h_. If s_ch an outie| is _t _esen_, _=e mu_ be i_lled by a q_al_i_
e!_d_an i_ a_orda_ _i the N!_o_a_ EI,e_i_ C_e a_ _i _es a_ ordinances.
DO NOT USE AN!E_NS_ON CORD on _,2_, a_ _._ Volt units°
O_er'sMa#uat 11
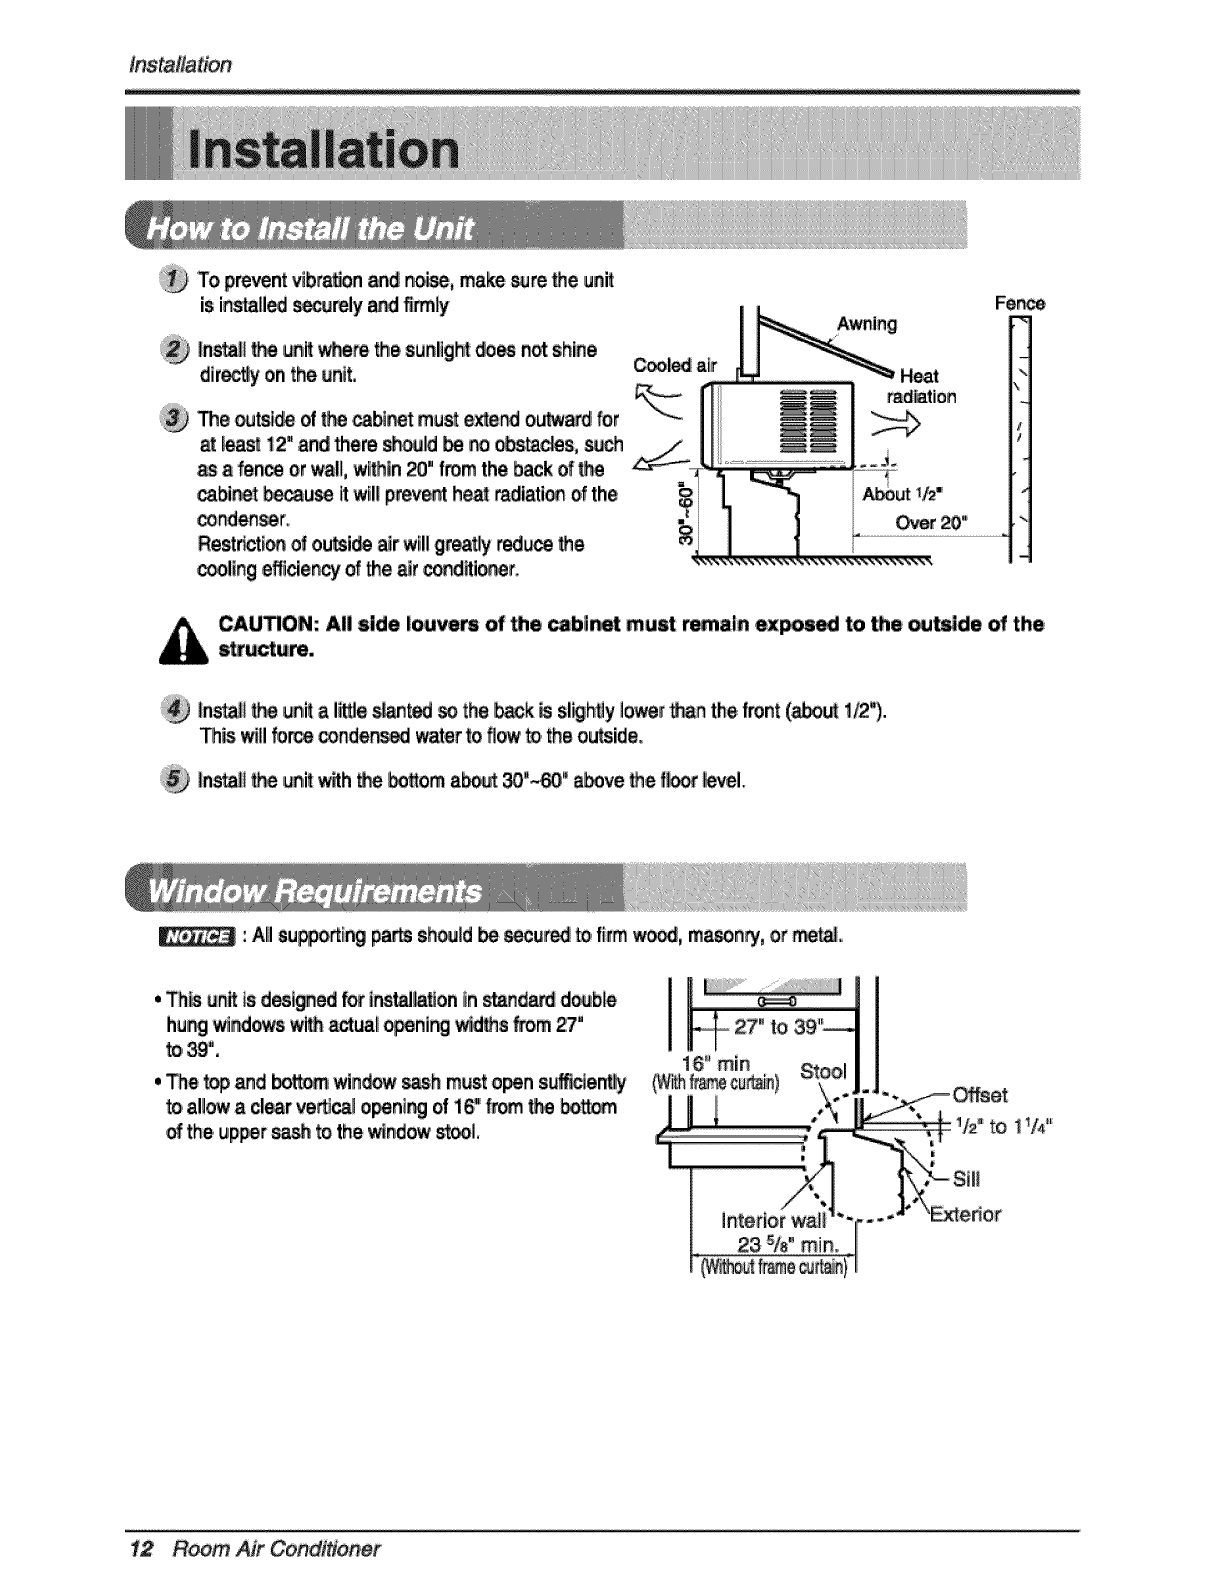
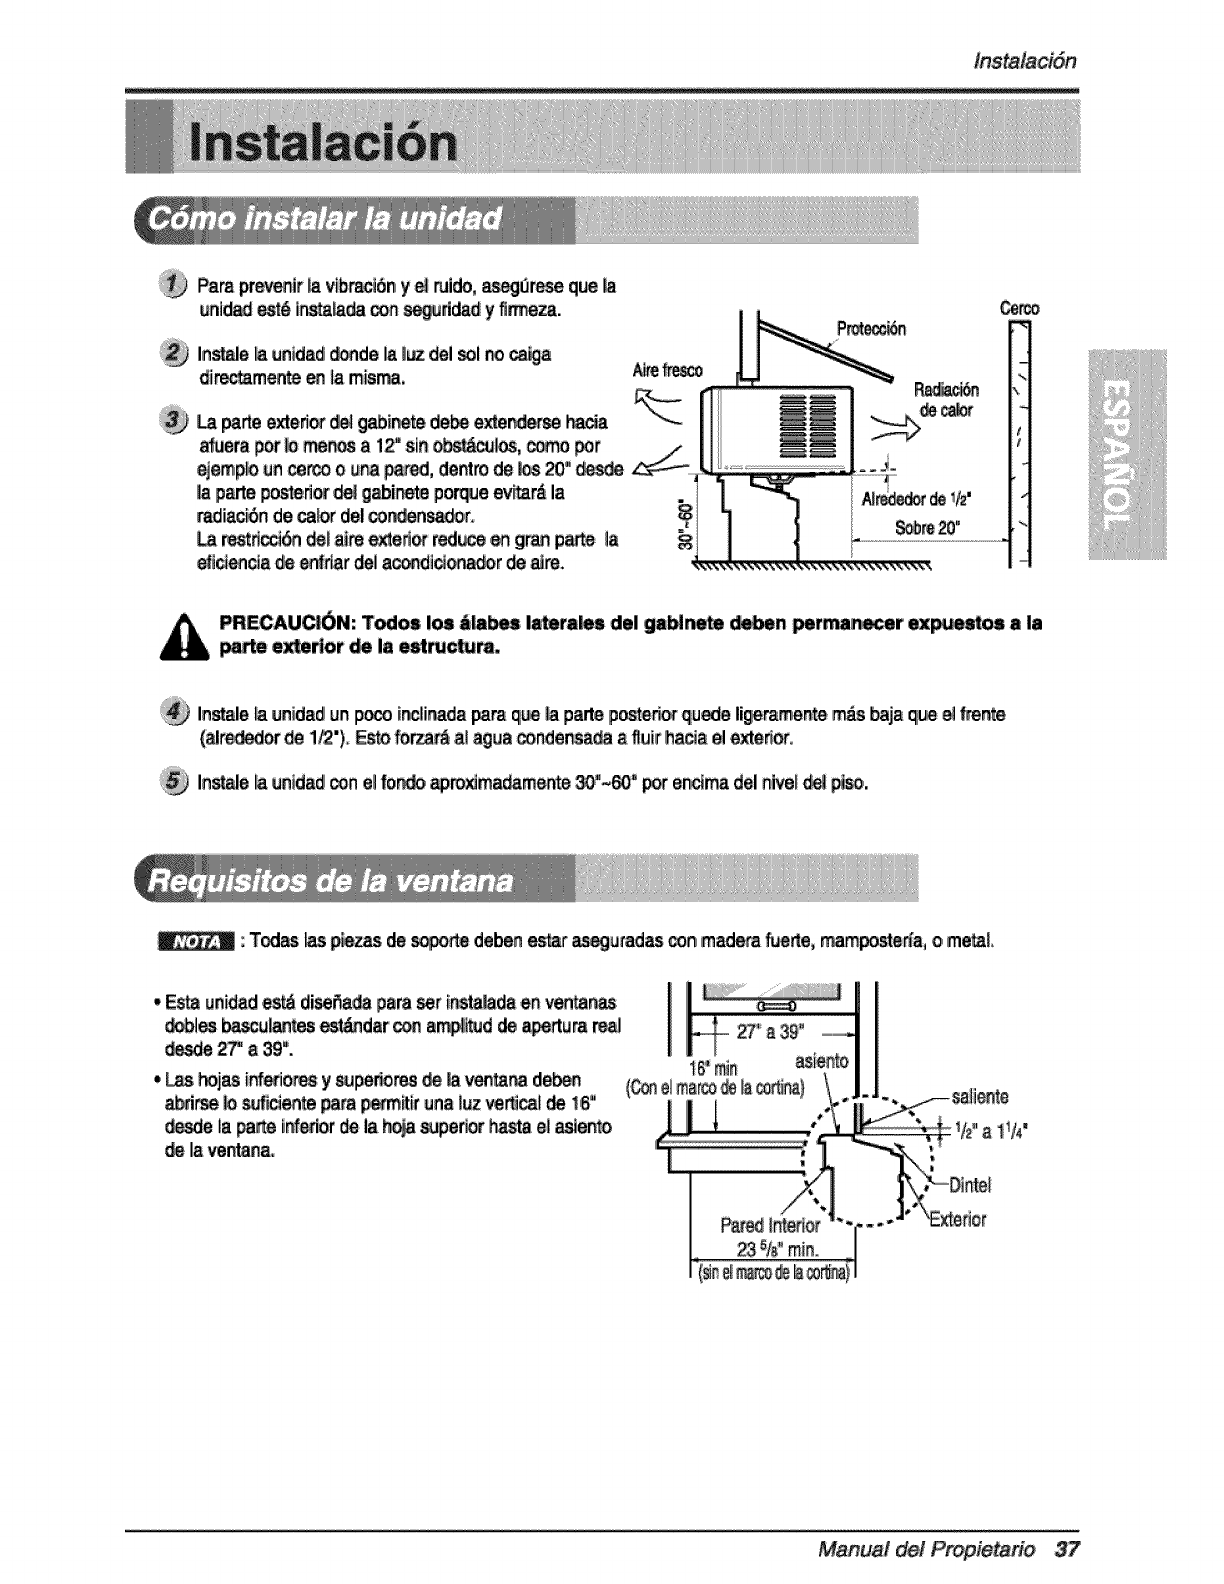
Installation
To preventvibr_n and n_, make su_ the un_
@
is ins_il_ _reiy a_ firmly
In_ t_ unit _re the sunlig_ _ not shine
dirty on the unit.
The _tside of the _ must exter_ outwa_ for
at _ast i2' and there _ld _ _ _tactes, _
a fen_ or wa!l,within_" from the back of t_
cabl_t _u_ It will prew_ he_ radiati_ of the
cozener.
Restr_t_ _outsl_ _r willgreatly reduce the
_Iing e_dency of the air co_i_r.
Awning
CAU_ON: All side Iouve_ of _e _bi_ must _ain ex_ed to _e _de _ the
_uctu_
in=all _ unit a I_e _t_ so tP__k _ sligh_dyi_r _ the front (_ 1/2").
This _11fo_ condens_ water to flow to.the outside,
,_ In_I__ un_ _h _ _om a_t 30_-60 __e the _ level.
:Alilsu_o_ing _sh_=_d_ _ut_ _ fi_mwoo_, m_o,n_, or _'i
. Th_ _n_ is d_i_edi fo_ Ins_on iIn_n_ double
hu_ _w_ _ua_ _nlng _hs from _"
_, 39%
.The _ _d _ win_ _h m_t o_n su_e_,
to al!owac!_r ve_ o_ni_ ef !6" _ _ _
the up_r s_ to the _ndow stool
|
interiorw_|!
23 %" rain,,
12 Room Air Co e_
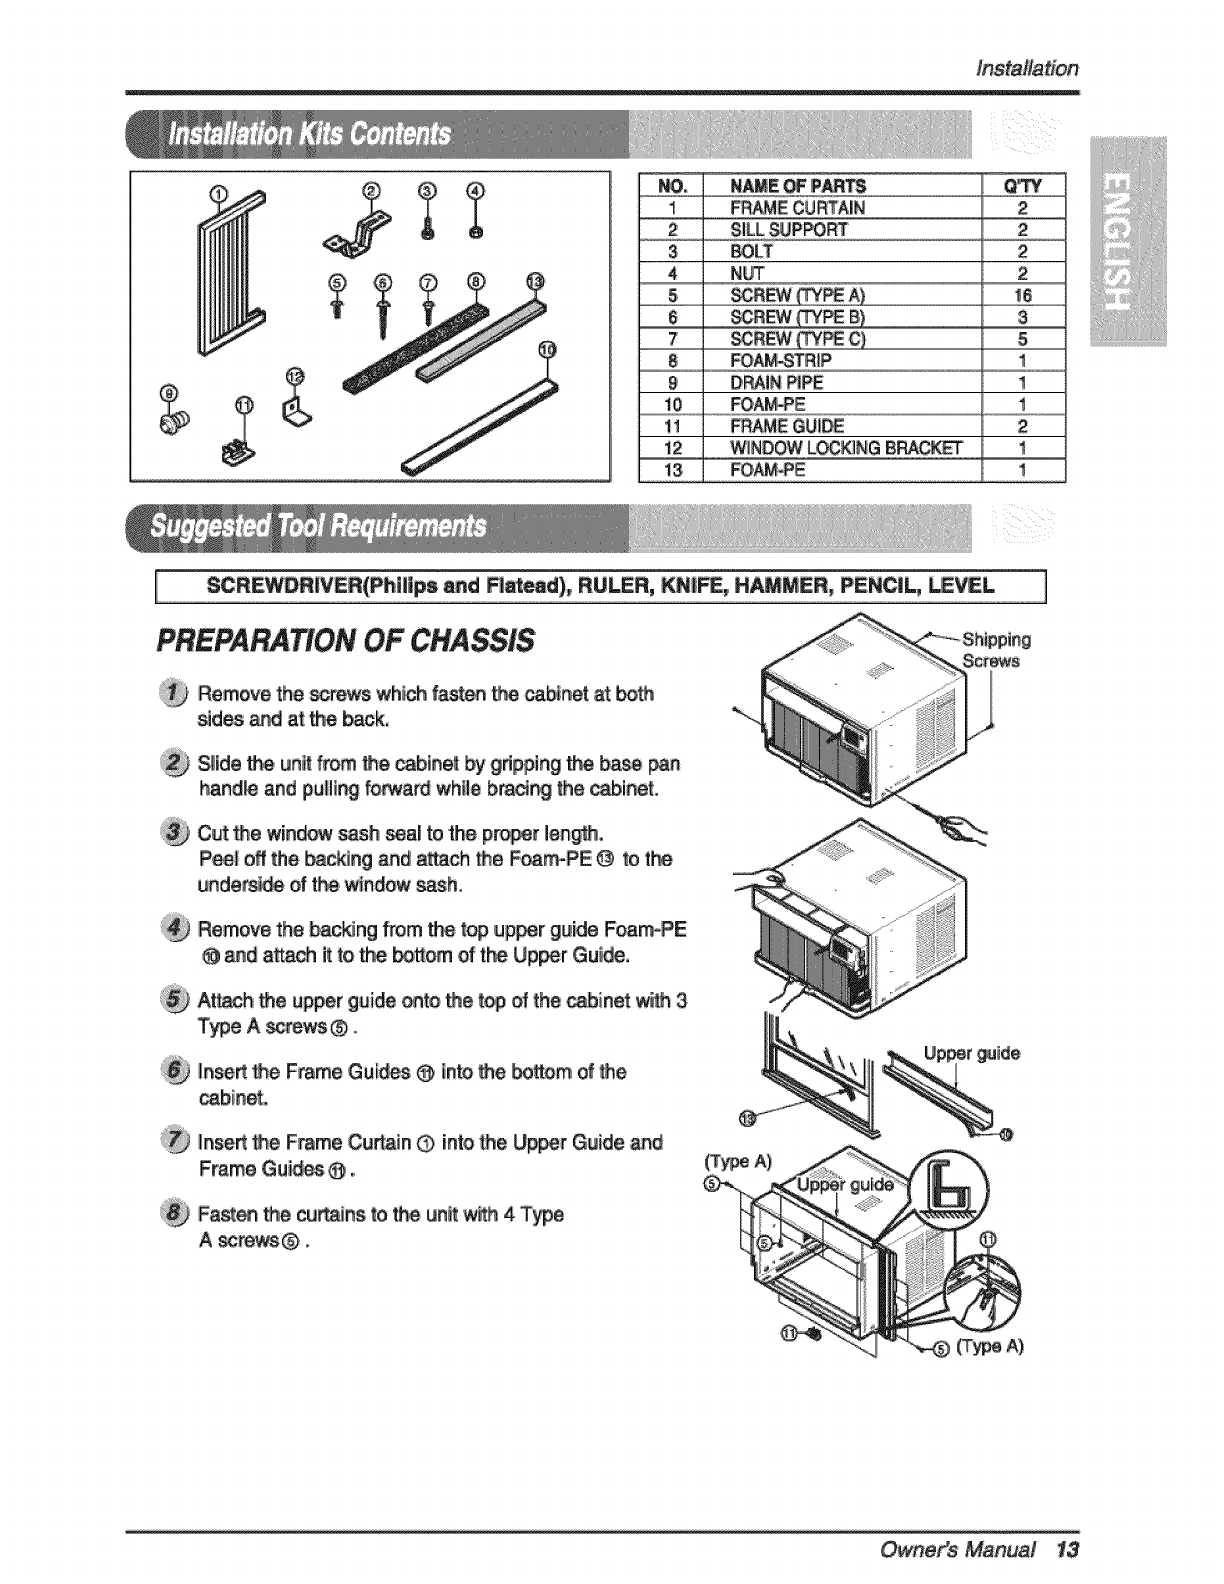
!
2
3
5
NAME _ IPAR_
FRAME CUmAIN
SiLL_JPPO,_'
_LT
NUT
2
2
2
2
16
............................_REW ..............................................................................................................................
7 5
8 FOA_IP 1
9 DRAINPIPE 1
FOAF_IE 1
1! F_AMEGU_ 2
...............................w!NDOW ..............................................._........................................
13 FO,AM_E 1
ii i ii_i
r
PREPARATION OF ,CHASSIS
SCRE_RIVER(PhlIIps and H_d), RULER;, KN|_,, H_IMER, PENCIL, LEVEL
Remove the _r_s wh_h f_en t_ _net at both
sides a_ at:the _ek°
_ide _ unit from _Secabinet _ gdpping _ _ _,n
I_nd_ and pulling forw:ard while bm_r_ |he _binet.
C_ 1he win_' s_h _a! to 'the pr_r len_.
P'ee| off the _ng and a_ch _e _m-PE @to th_
undets_ ,el t_ w_ndow_sh°
]
®
®
Remove the bac_ng _om _,e t_ ,up_r guide FoamoPE
@ _1_ a_ it to _e _:em of the Up_r Gu|_,,
At_h _e upper geide _te _e t_ of the _in_ _ 3
T_e A _ews®.
Inse_ _e Frame GuI_s @ In_ _e bo_m _ the
_binet
insert _e Frame C_n ®into _e U_,er G_ide an_
Frame GUii_S =@ ,,
Fa_ _e cumins _e_ un_'_th 4 Ty_
A _rewe® o
Owner's Manuat 13
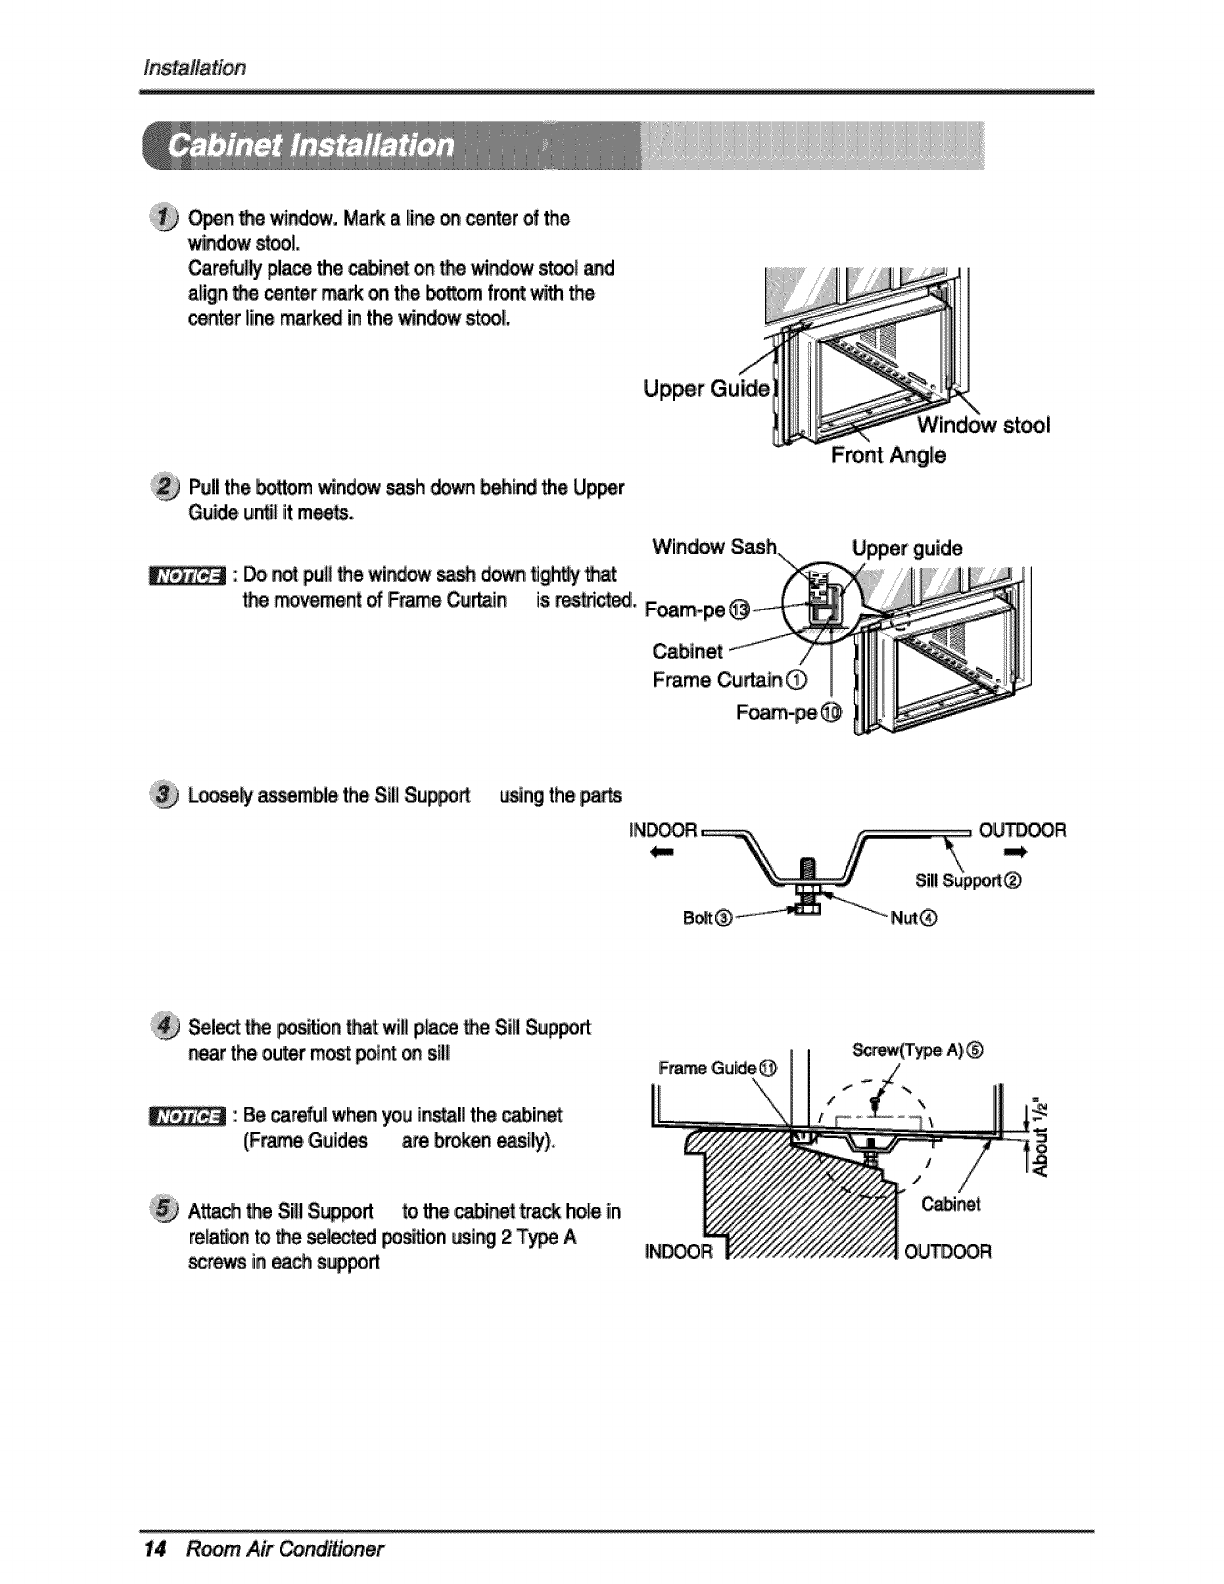
O_n tf'_ v,_, Mark a line _ _nter of the
Carefullypla_ the _inet on t_ wir_w s_! and
align_cen_r mark on the bottom front_.h the
centerline mar_ in the _ndow stY,
Pull the _m _nd_ sash down b_ind _e Up_r
Gu_e un_l it m_.
Win_ _pper_guide
_ _ pullthe wi_w _d_ _9_ _at
_emen_ of F_e Cu_n is _, F_m-pe _
Cabtn_
F_me CudaJln_ !
Loose_ as_mbie the SiI_Su_rt _ng the,_
_1_ _ _on _at _i p_ce _Sill iSup_
r_at the outer m_ _n't _ sllJ
" Be ,_refullwhen you i_ll the _i_
(F_e, Guid_ are broken _tly)_
_A_c_= _Si_lSupport to the _ir_t track ho_ in
re_a_ to _e se_ _tion _i_ 2 T_ A
R_m Air Condi#oner
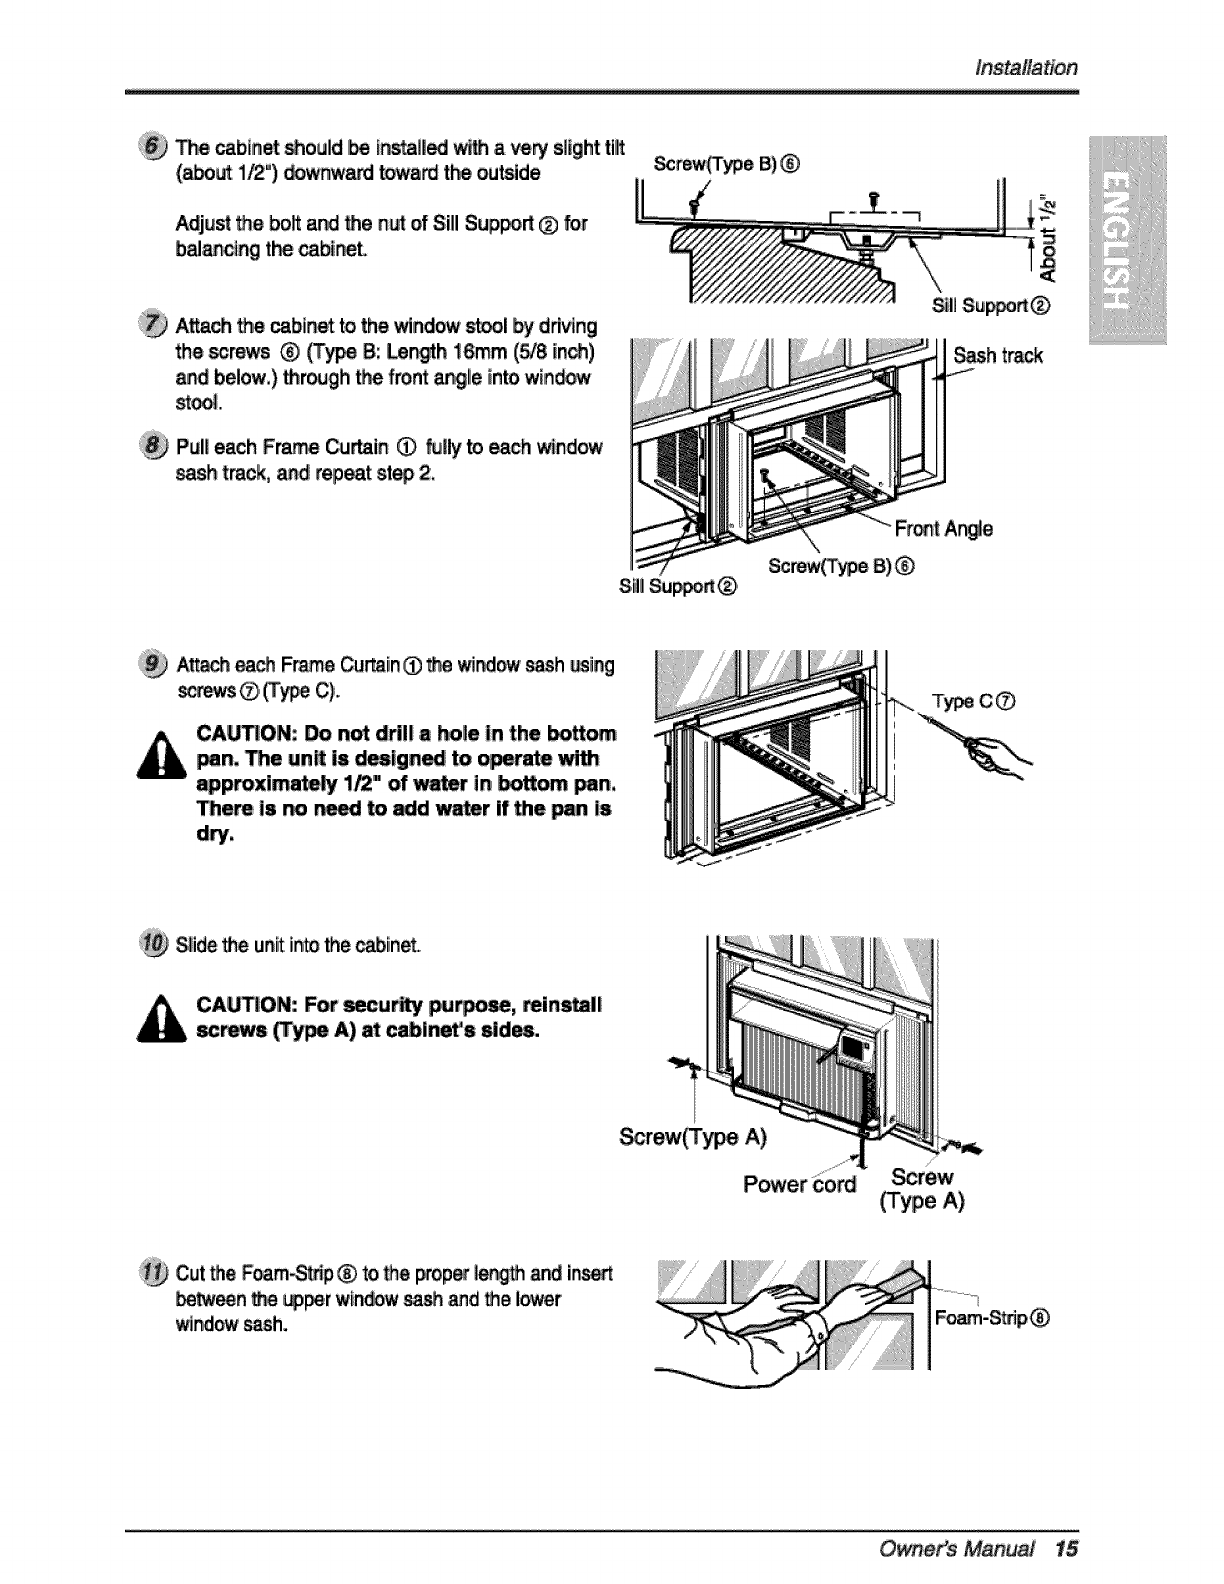
Ins_i?atlon
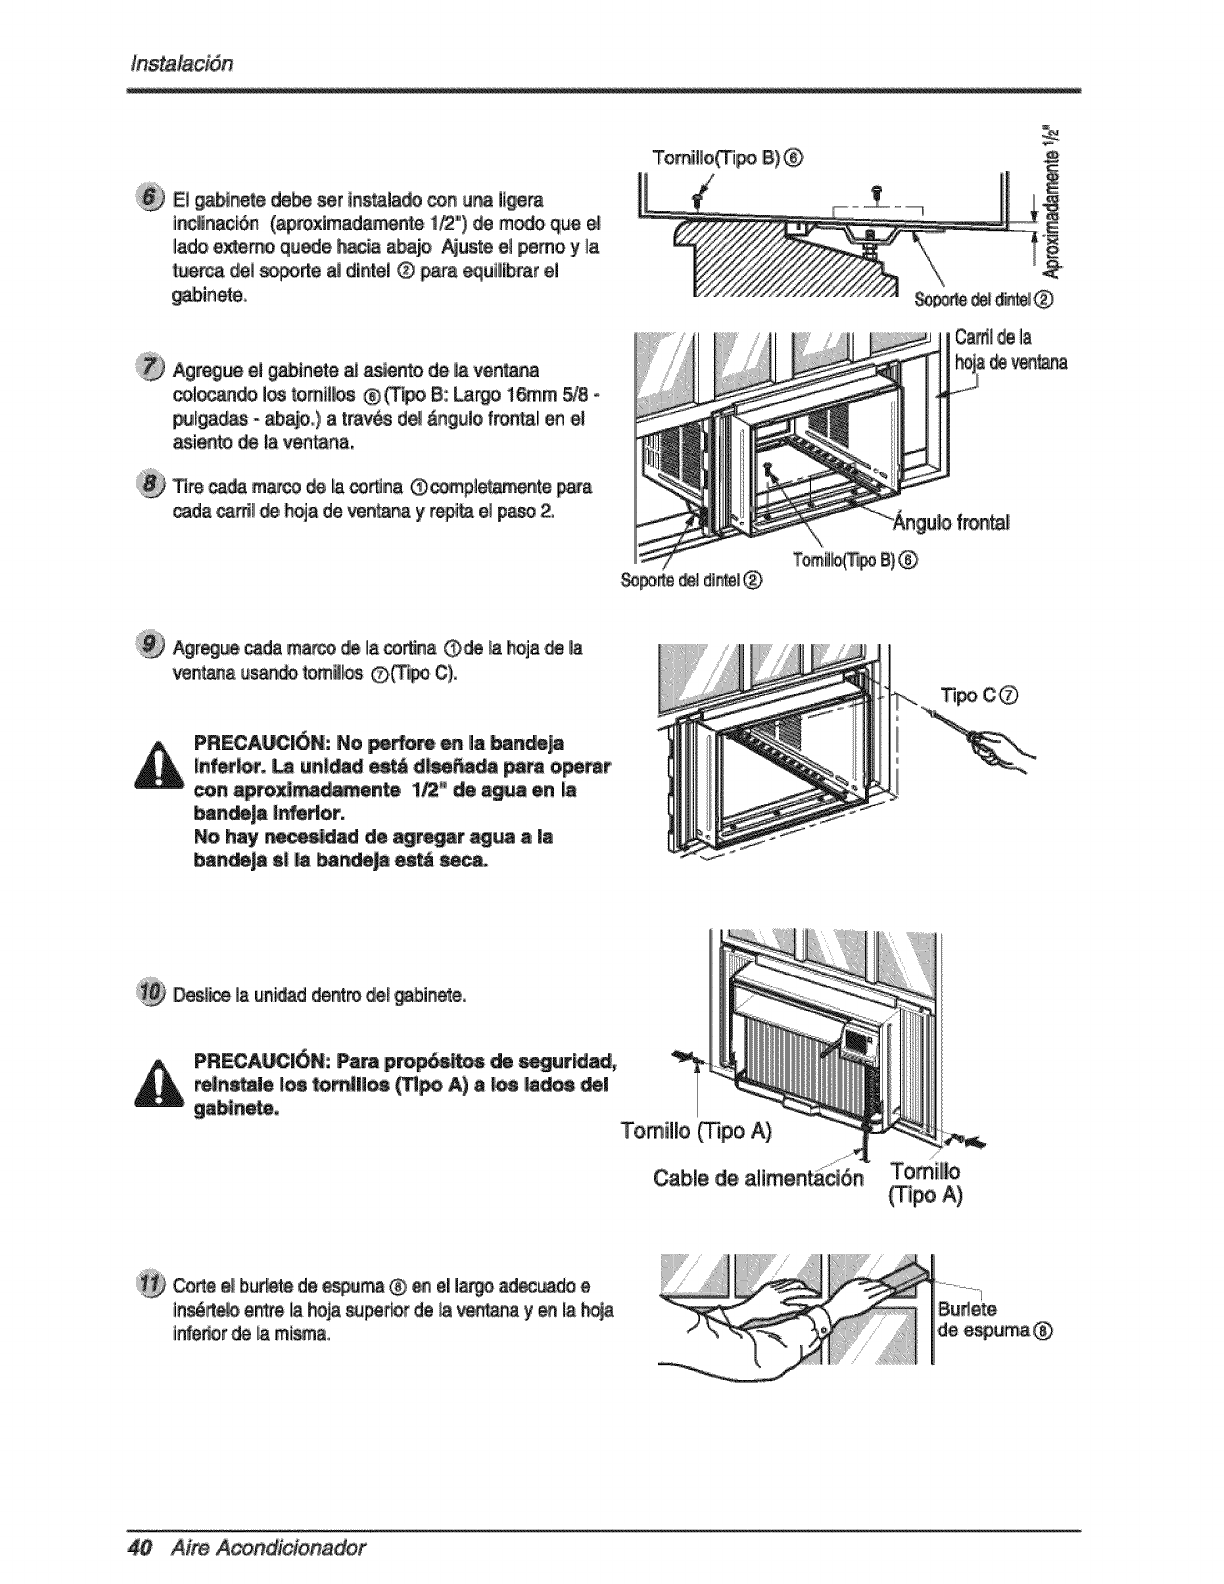
TI_ cabin_ _ould [_ in_li_ _ a _r !slight ti[It
(_u_ 1/2°) _wn_a_'d towa_ t_ ou_ide
Adju_ the bolt and the nut of SiIl S,up_d 0 for
b_a_ng the cabi_L
ii_ A_a_ the _bi_ to the _nd_ _1 by ddving
the _rews (_ (Ty_ B: Leith 16ram (5/8 in_)
_d below.) through tf_ front a_lie into win_
stY.
Pull each Fmm_ Cumin 0 fully _ each _nd_
_sh track, andi repeat st_ 2,
Screw_ype B)
Sil_Su_
iiiiiii;;?iii!iii[ii_i!!iii
A_h each Frame Cumin _ _ _ s_h _ing
_ews ® _ C).
CAUTION: Do n_ ddl! _ _|e in the _tt_
pan. _e unR i_ _ign_ to _e w_
approxi_ 1_ _of water in bottom _n,
_em is _ _ _ _ w_er if _e pan is
_ide the unit into the _ineto
CAU_O_: For _ur_ ipu_, _inmli
_rews _y_ A) at c_in_s _d_.
Cut _e F_m-_p ® _ _e _p_ _r_ and in_
_tween _ _r w_n_owsash and _e lower
_nd_ sash,
Owner's Ma#ua} 15
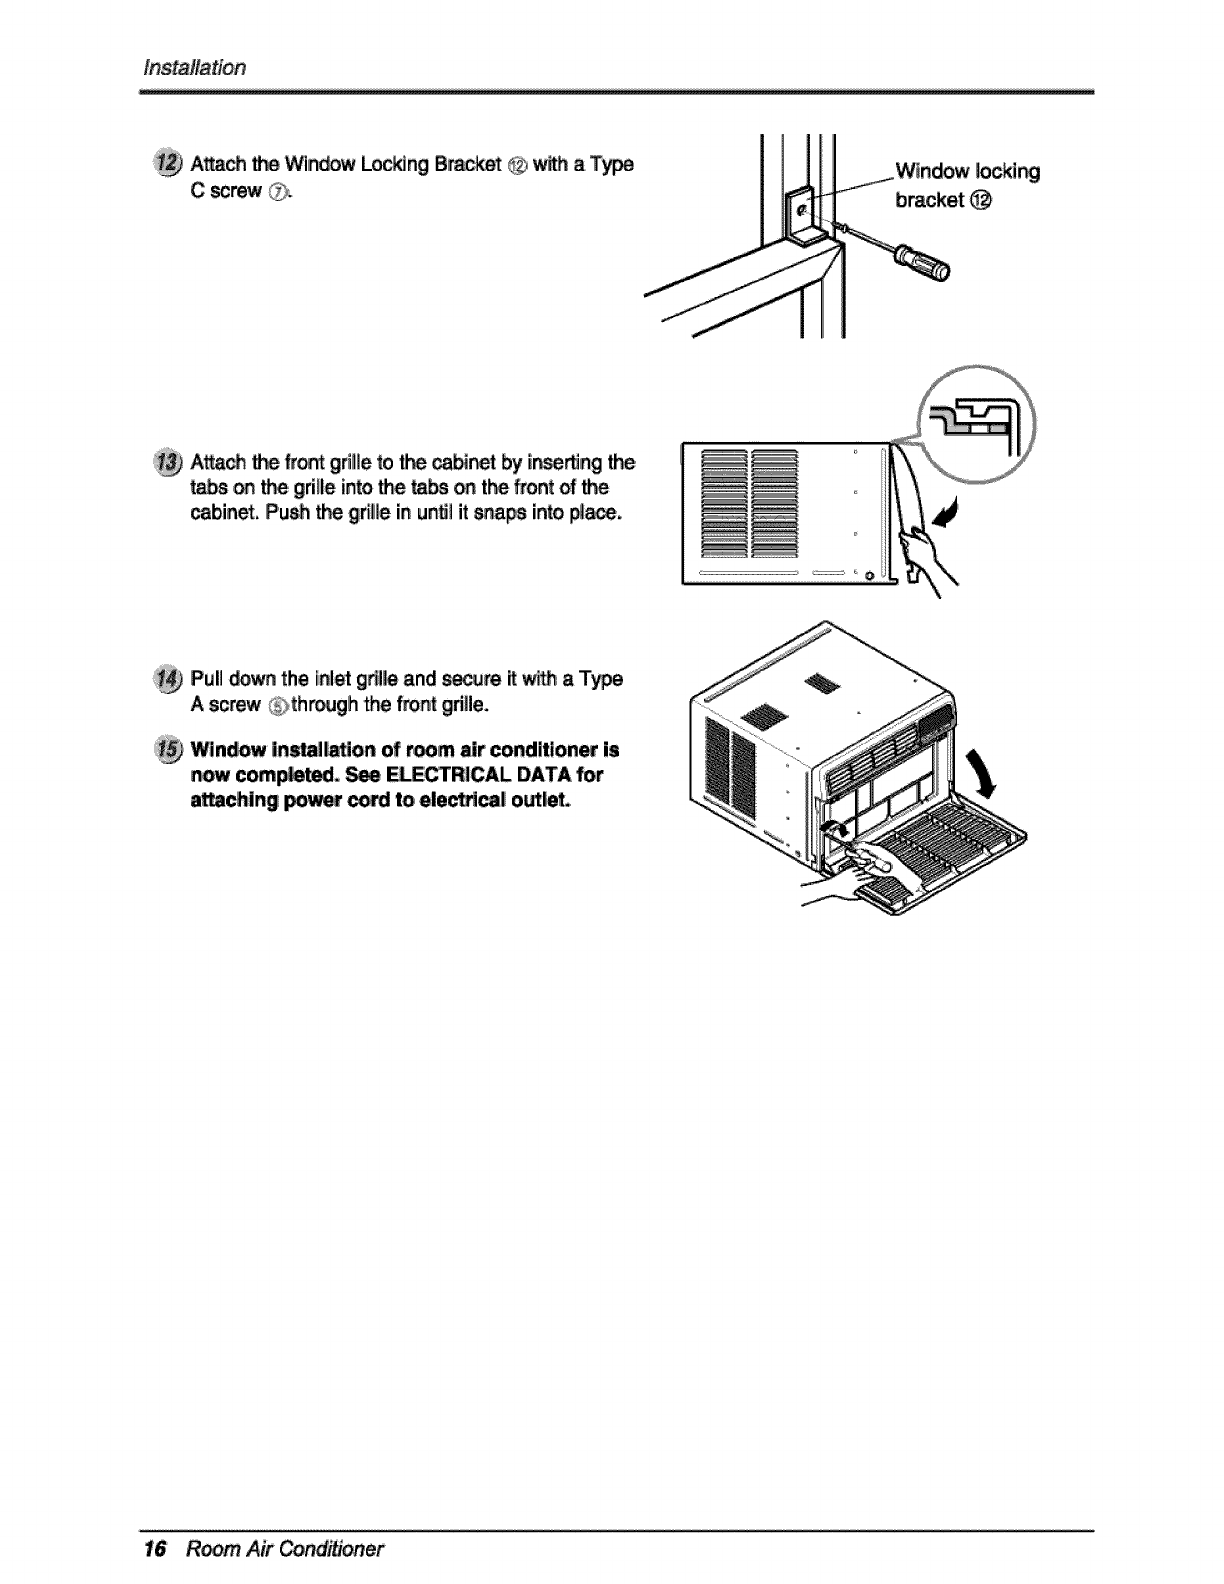
Ins_flation
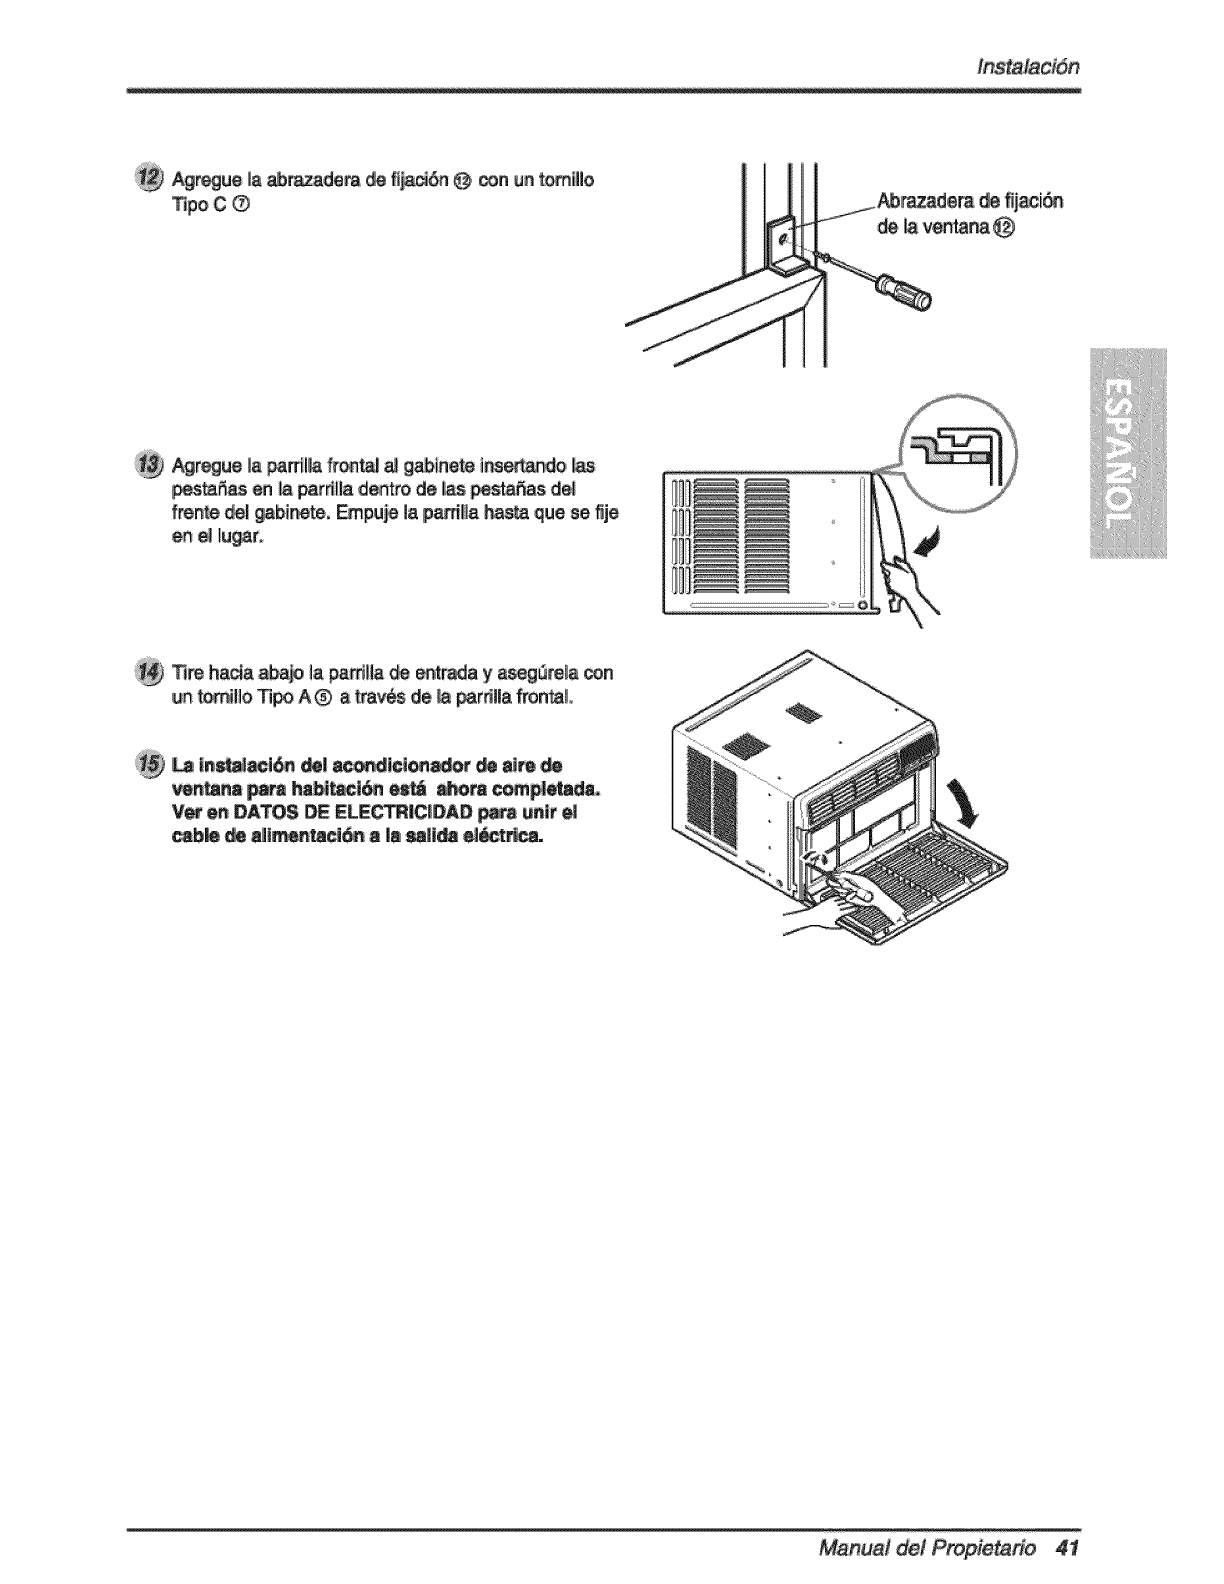
A_ t_ Win_' Lo_ng Bracket _w_ a Ty_
bracket
Atta_ _ trot gri_ie to t_ ._i_t _ i_rtJng _
_bs _ _ grilie into tl,_ _s on t_ _m-tt of _e
cabinet. Push _ gdlie in un_l it _ps into _.
Puff _,wn the [nl_ g_l}e and _re it _ a T_e
A screw _th_gh the front gillie.
_n_ inmi!_on of r,_m air condltion_ is
r_ com_Jed, _ _CTRICAL DATA _r
a_Ing _ _ to e!e_caJ out,t,
Room. Air er
Opera,rig Instructions
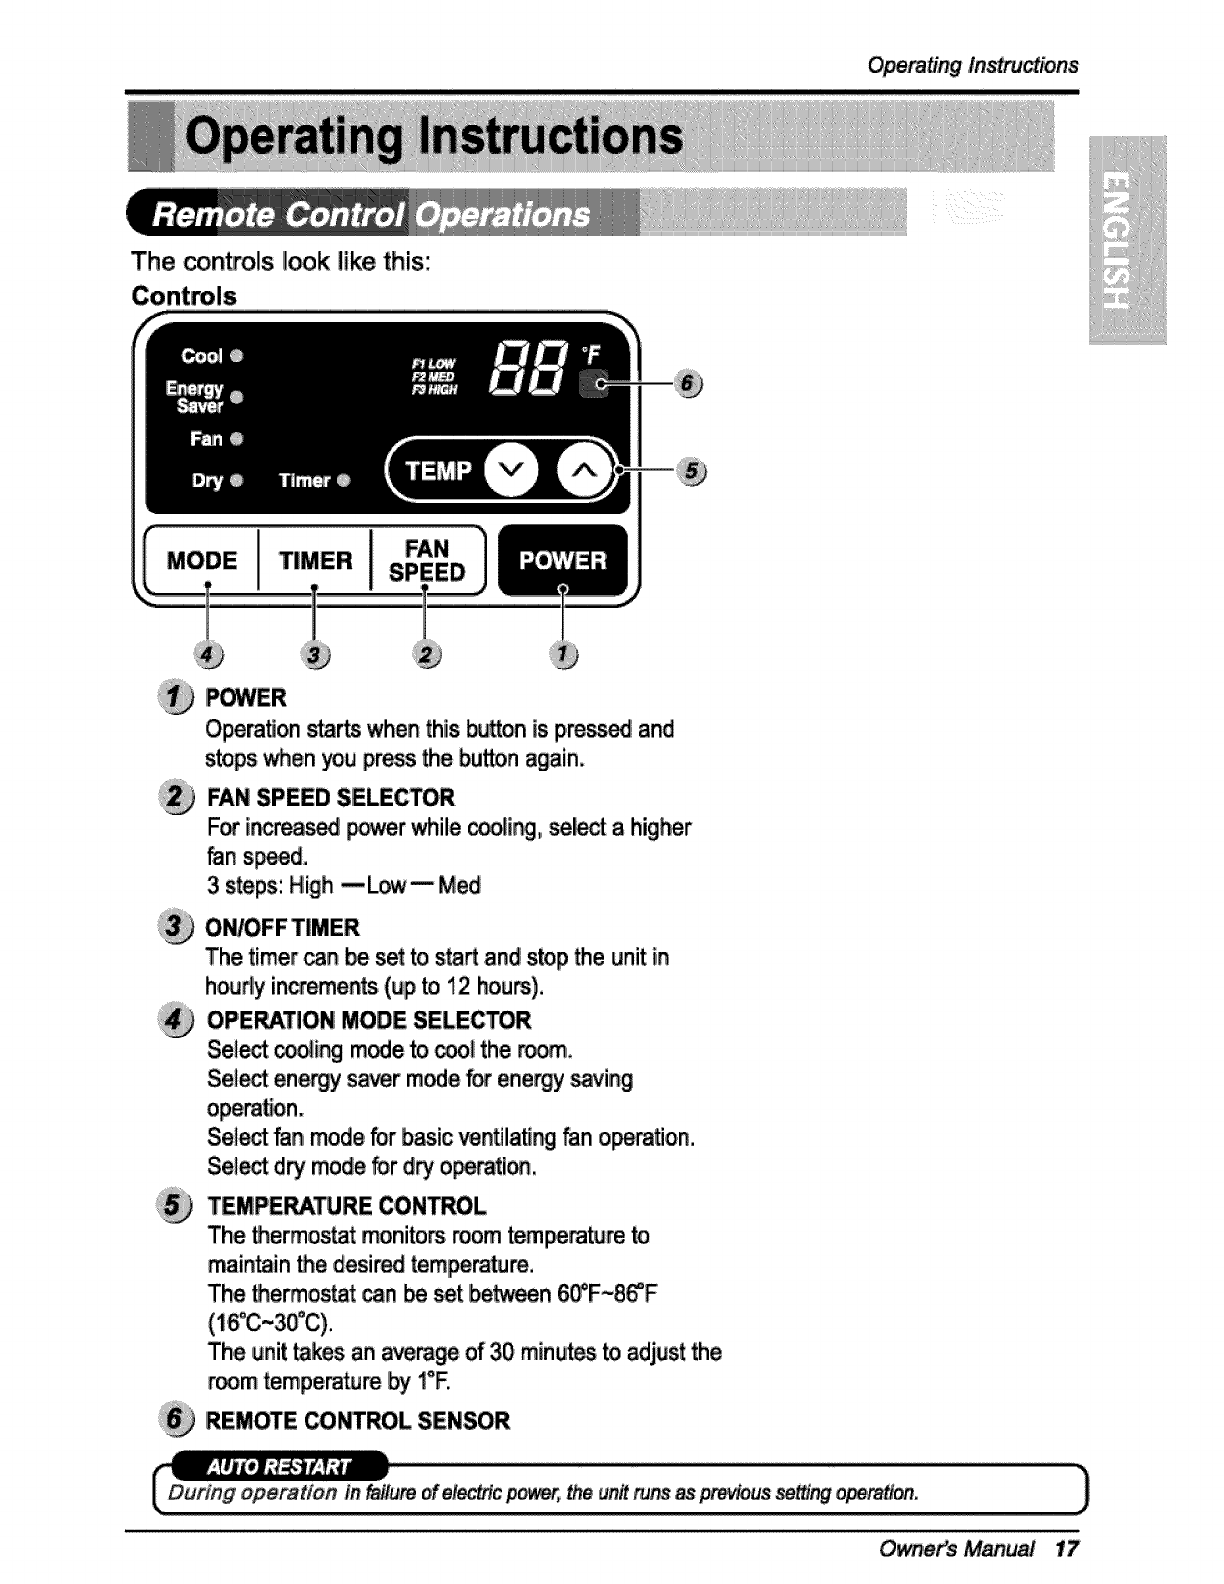
The controls !ook like this::
I I
iiiiiii;;?iii!iii[ii_i!!iii
Operationsta_ whenthiis_o,n is p,re_ and
stops _en you p_s the bu_3n again,
FANSPEED SELECTOR
Forir_reased _wer _ile _i_,, se_t a hig_r
fans_d,
3 steps: High --L_-- Med
The timer_n _ s_ to s_ and stopthe unit in
h_tliy in_men_ (up to i2 hour),
OPERATIONMODE SELECTOR
Se!_ coolingmodeto _ol ther_.
Select enemy s_er m_e forenergys_ing
Sel_t _n mode for b_ic _ntilaU_ _n o_mtion.
Sel_ dry mode _r dry o_ti_.
TEMiPERA_RE CONTROL
The _ermostat monito_ roomtempera_re to
mai_in _e desired tempe_um.
The _ermostat _n be set between 60_F~8_F
The unit _kes an avem_ of 30'minu_ _ adjust the
_m tempera'_re _ t°E
REMOTE CONTROLSENSOR
Ow,_,r's Mahdi
Operating/ns_tions
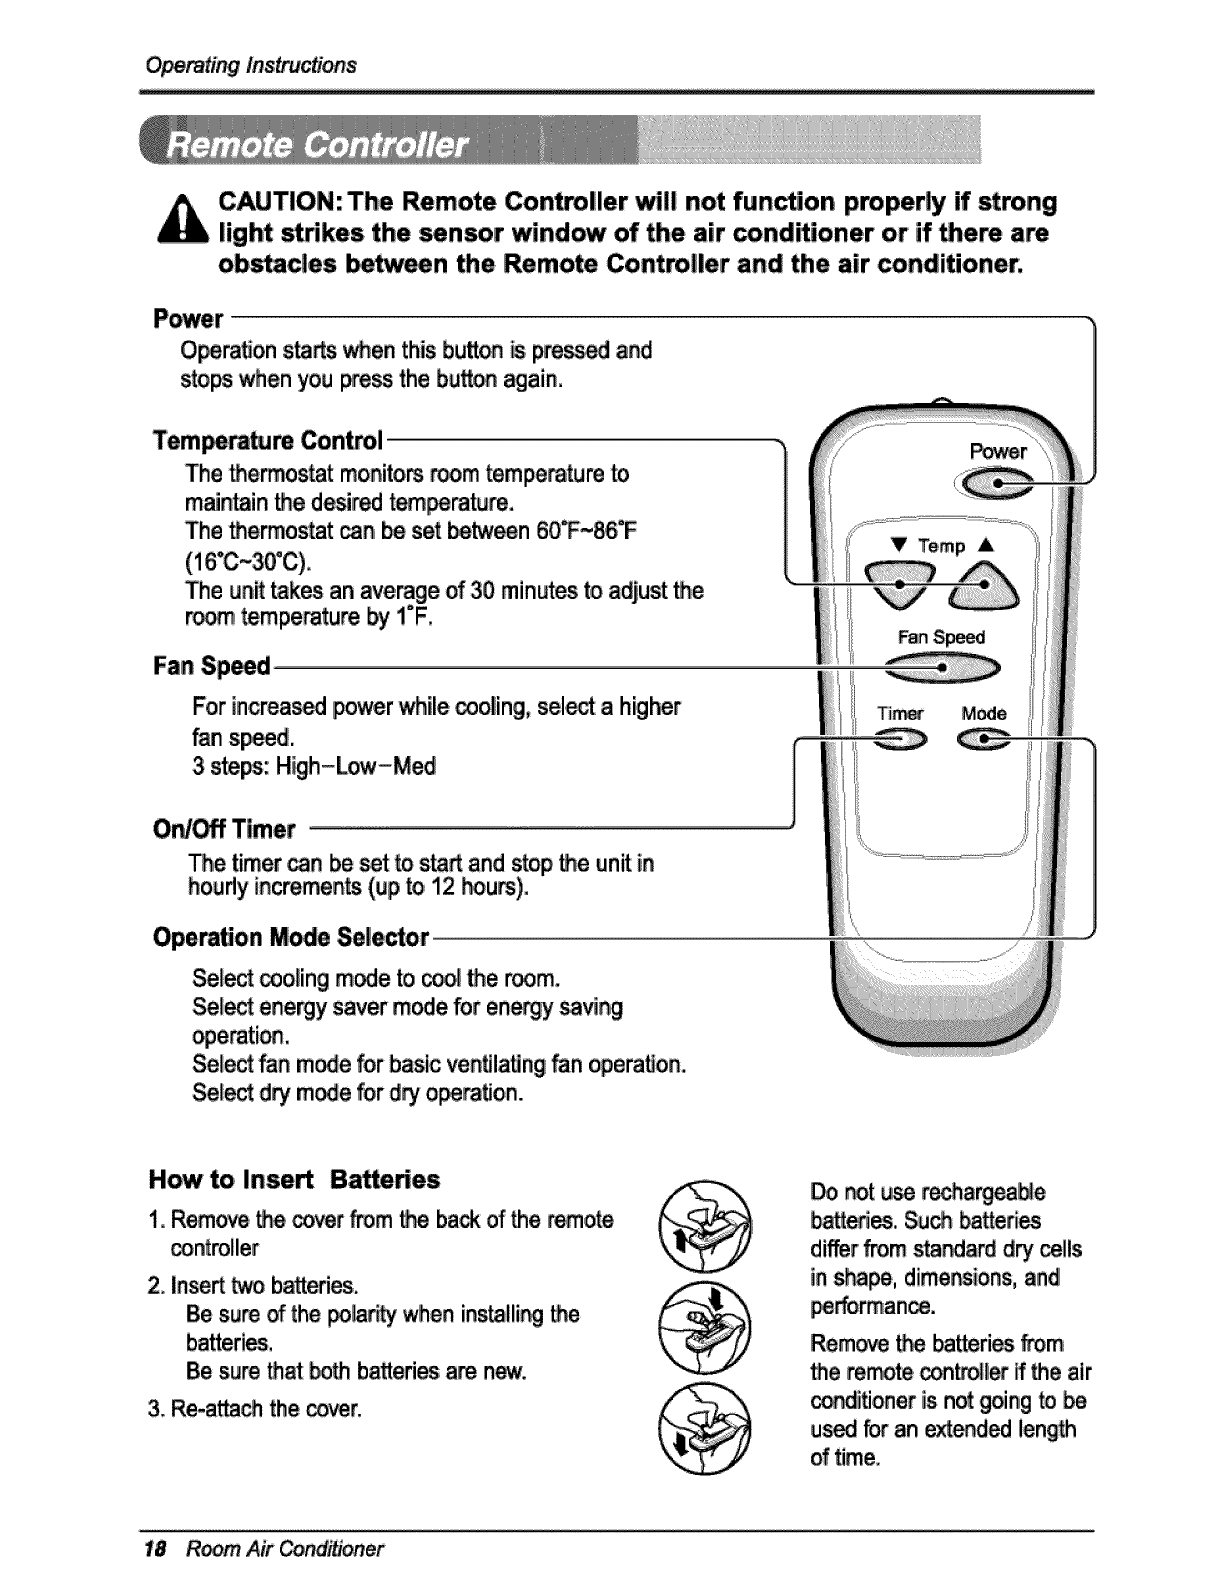
CAUTION:The Remote Con_ller will not fun_ion properly if strong
light strikes the sensor window _the air _nd_oner or if them are
ob_cies I_veen the Remote Controller and the air conditioner.
O_ra_on sta_s whenthisbu_ is,press_ and
stopswhenyou _e_ the bu_oin _ain.
Tem_Jm Con_l
The _ermostat rnonito_ _rn _mpe_tum
m_n_in _e desiredt_rature,
The _ermostat ,_n be set _n 60T~_'F
The unk _kes an _¢erage of 30 minutes to adjust_e
r_ tempe_ture by !°F.
!
Fan Sp_d
Forin,crea_ power_ile _oling, sel_ ahigher
fan s_d.
3 ste_: I-I_h-Low-Med
V Temp ,L
Mode
ON_ Timer ..............
Thetimer_n be set tosta_ and stop_e unitin
houdyincrernen_(up to,12 _u_),
Oper_on Mo_ Sele_or ................................................................................................................................................................:_" .....
Sei_ _oling m_e _ _ _e room.
Sel_ energysavermodefor energy_ving
Sele_ _n mode for basic ventilaUngfan operaUon,
Sel_ d_ mo_efor _ o_ration..
How to Inse_
i° Retake _cover_m tim,backof_e remote
2. Inse_ _ batteries.
Be s_re _the po_y when ins_lli_ _e
Be s_re _at _th ba._edes a_ new.
3. Re-a_ the _r.
_t _ recharg_e
batte_. Su_ batter, s
differ_m sta_a_ dry _lls
in s_'_pe, dimer_ions, and!
Rem_ _ batteries _m
• e re,re _nt,_er ff _heair
_iti_er is not going to _,
us_ _ an extend_ len_h
of tim.e.
Room, Air er
Operating Ins
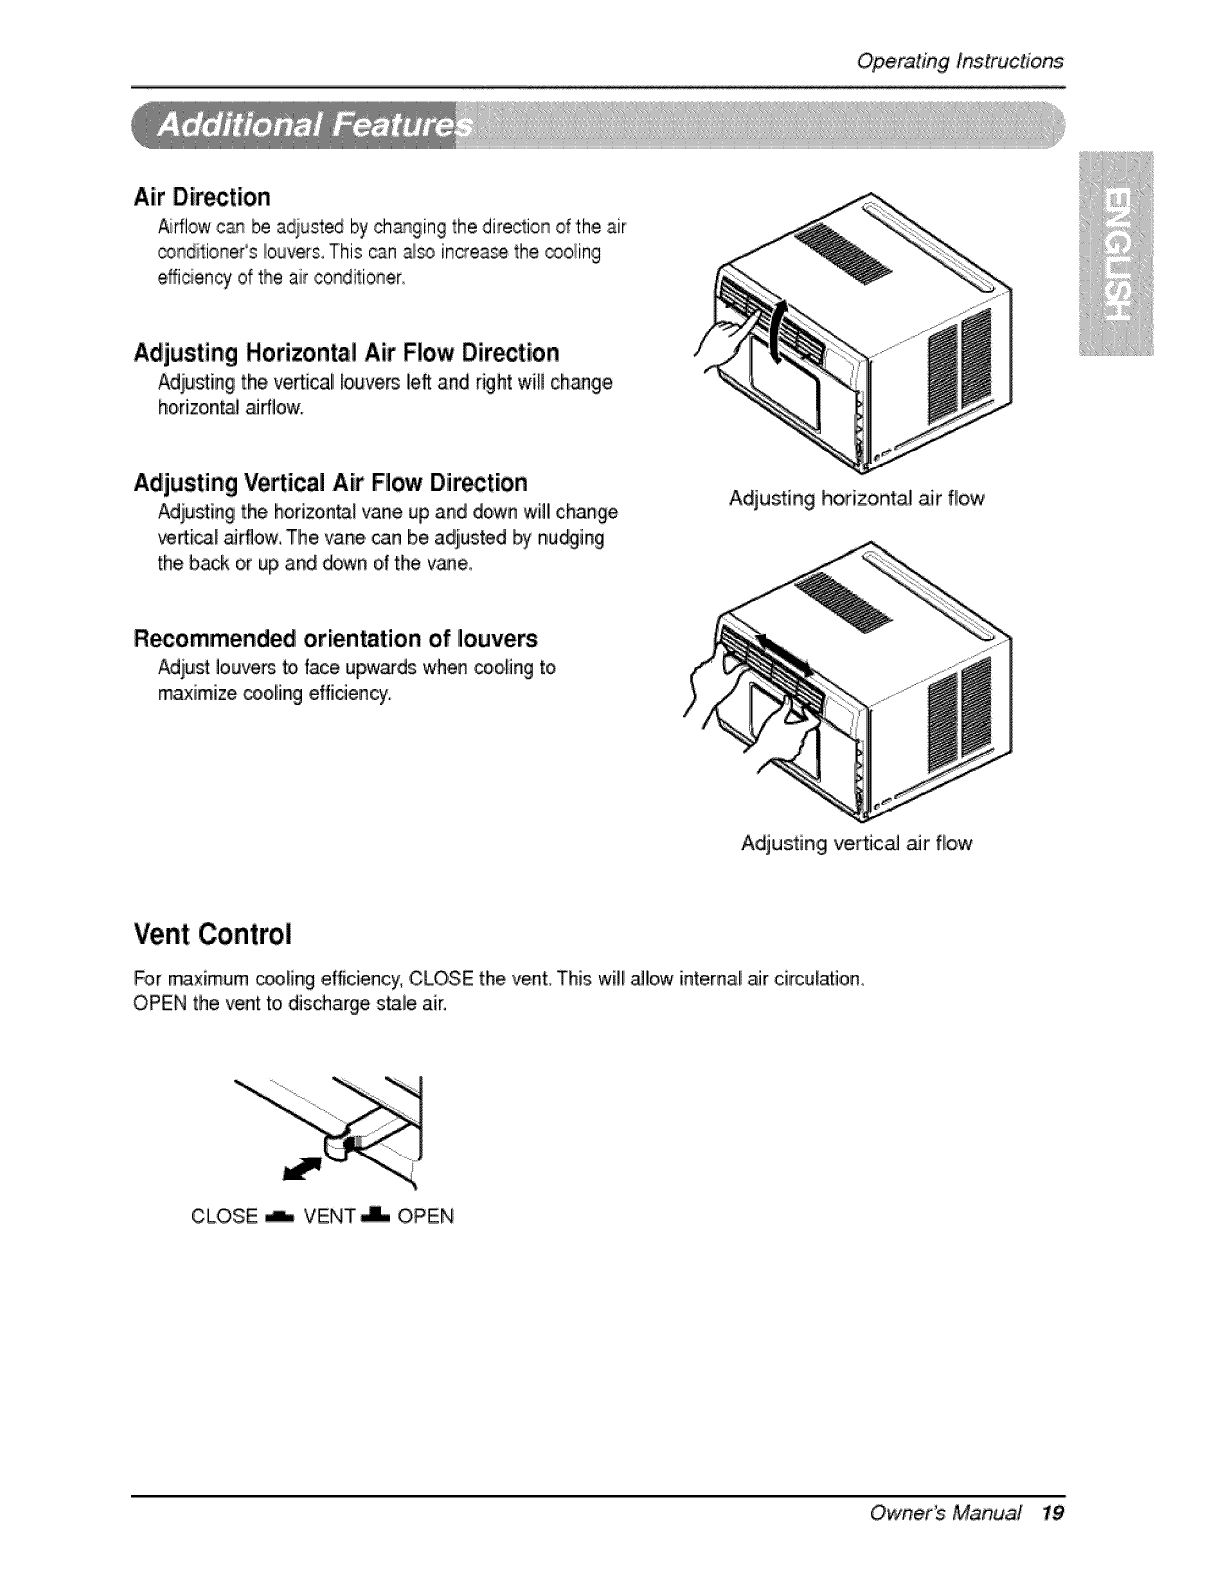
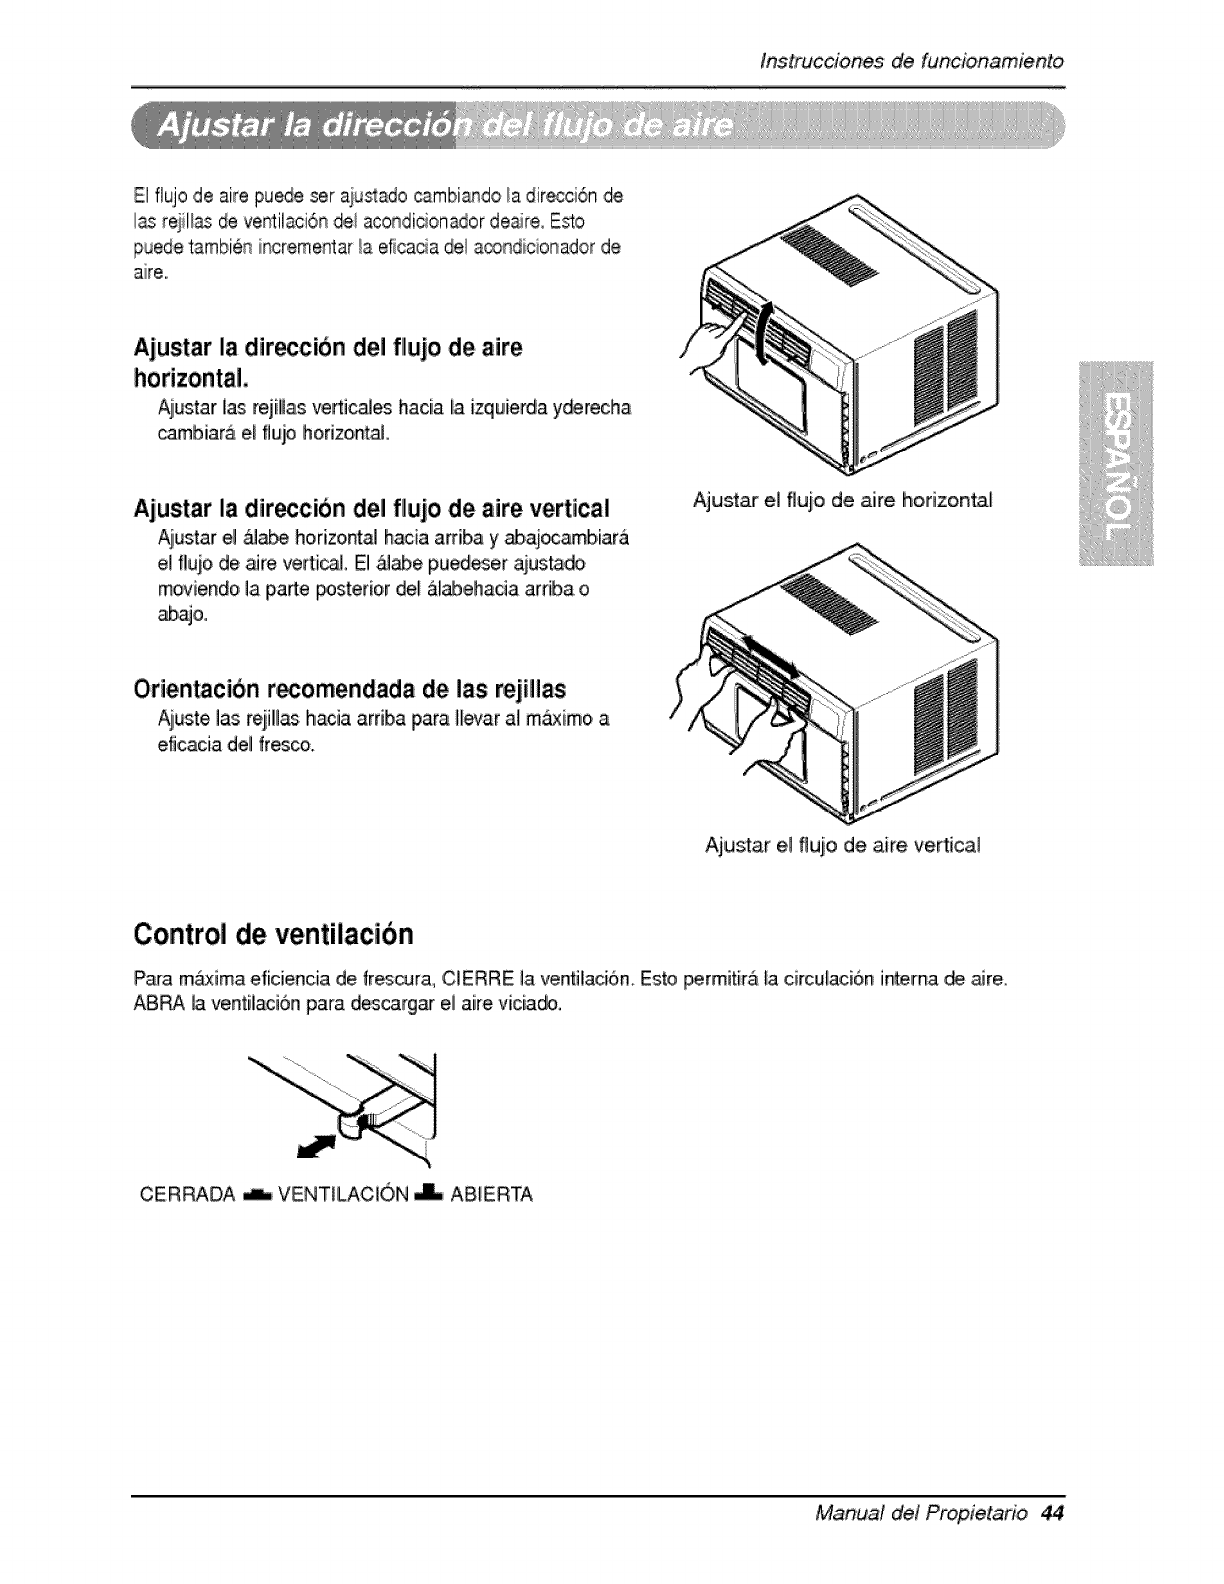
Air Direction
,_fflow c_ be adiu_ted by ch_ging the direction of the air
o:_ndit:io_qer's_ouvers_This can a_ increa,_ the oooling
efficiency of 'the air conditioner,
Adjusting Horizonta! Air Flow Direction
Adjusting the ve_ical louvers left and right wiBchange
horizon_ _rflow.
Adjusting Medical Air Flow Direction
Adjusting the horizonta_vane up and down will change
_i_l airflow, The ,Janecan be adjusted by nu_ing
the back o,r up and down o_the vane,,
Adjusting horizontal _r f!ow
R_ommended orientation of louvers
Adiust louvers to,face upwards when co,o,_ingto
maxiimize cooling effidency.
Adjusting vertical aJr f_ow
Vent Control
_r maximum _ling efficiency, CLOSE the vent, This wi!i aJ!ow internai air circulation_
OPEN the vent to, discharge s_le air.
CLOSE _ VENT _ OPEN
Owner_ Manua! 19
OperaUng
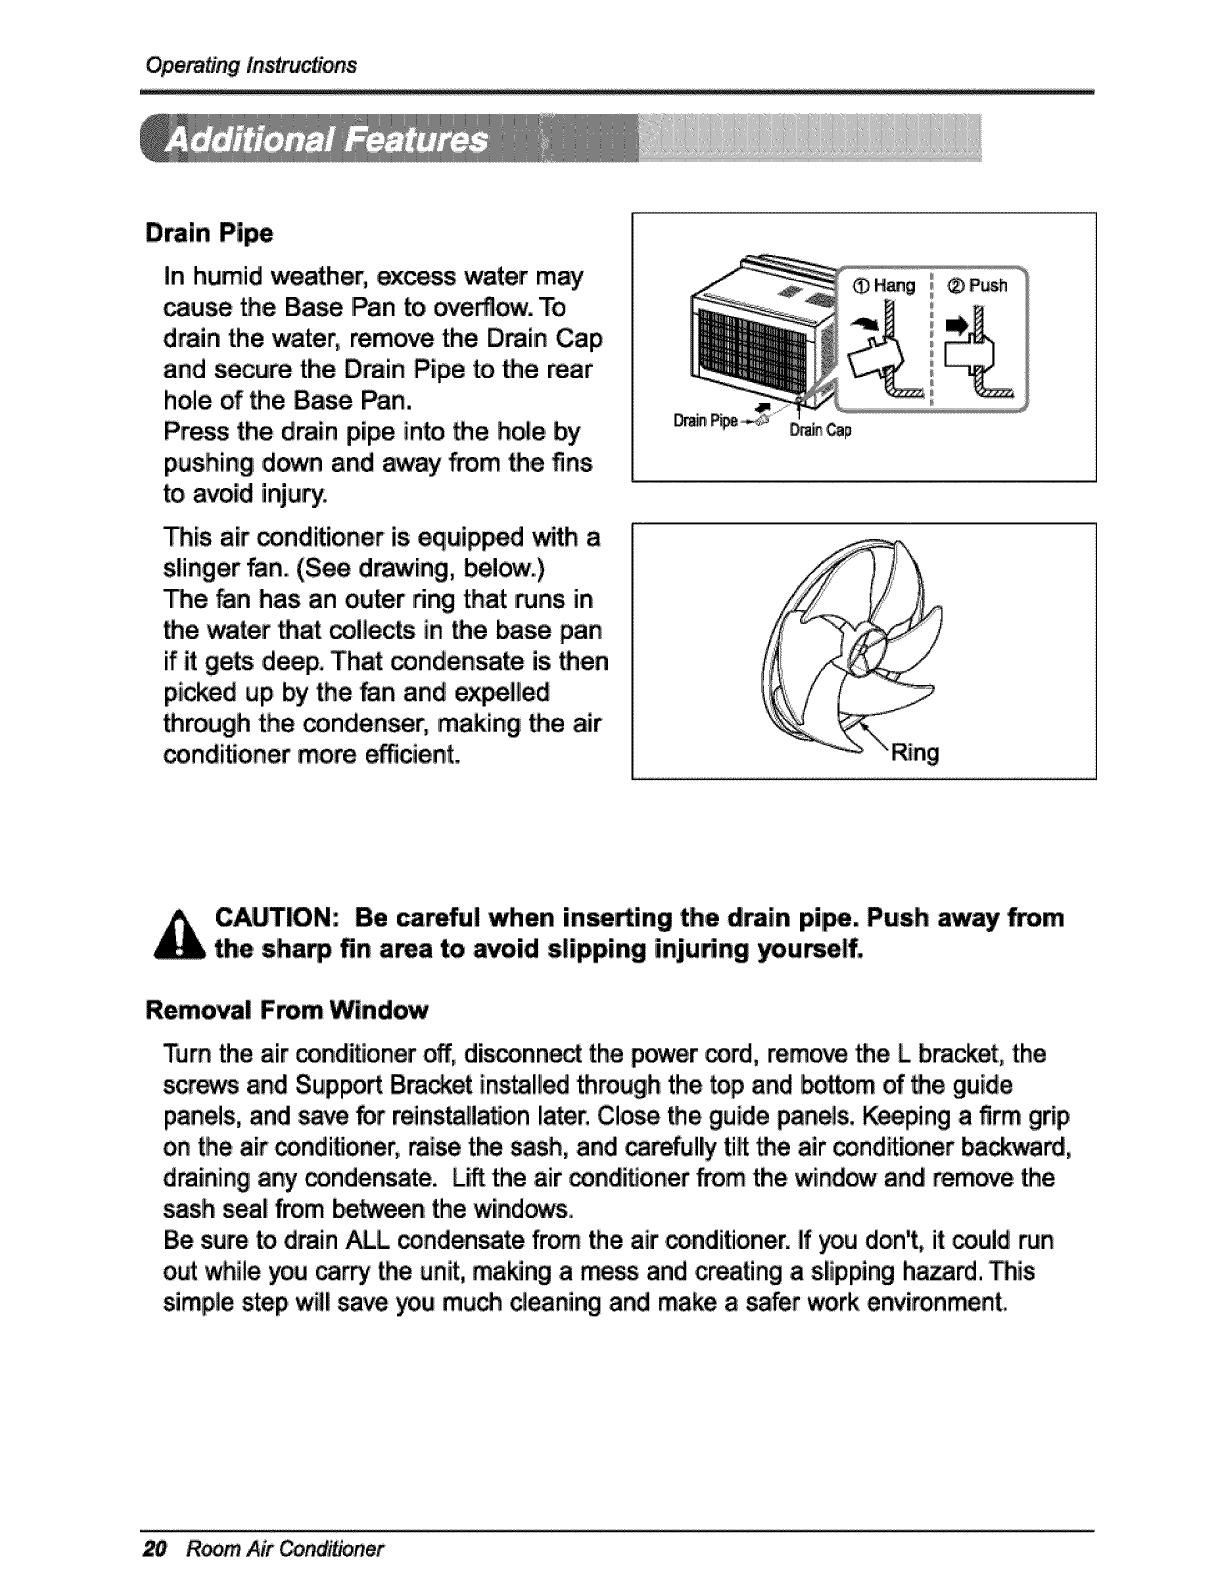
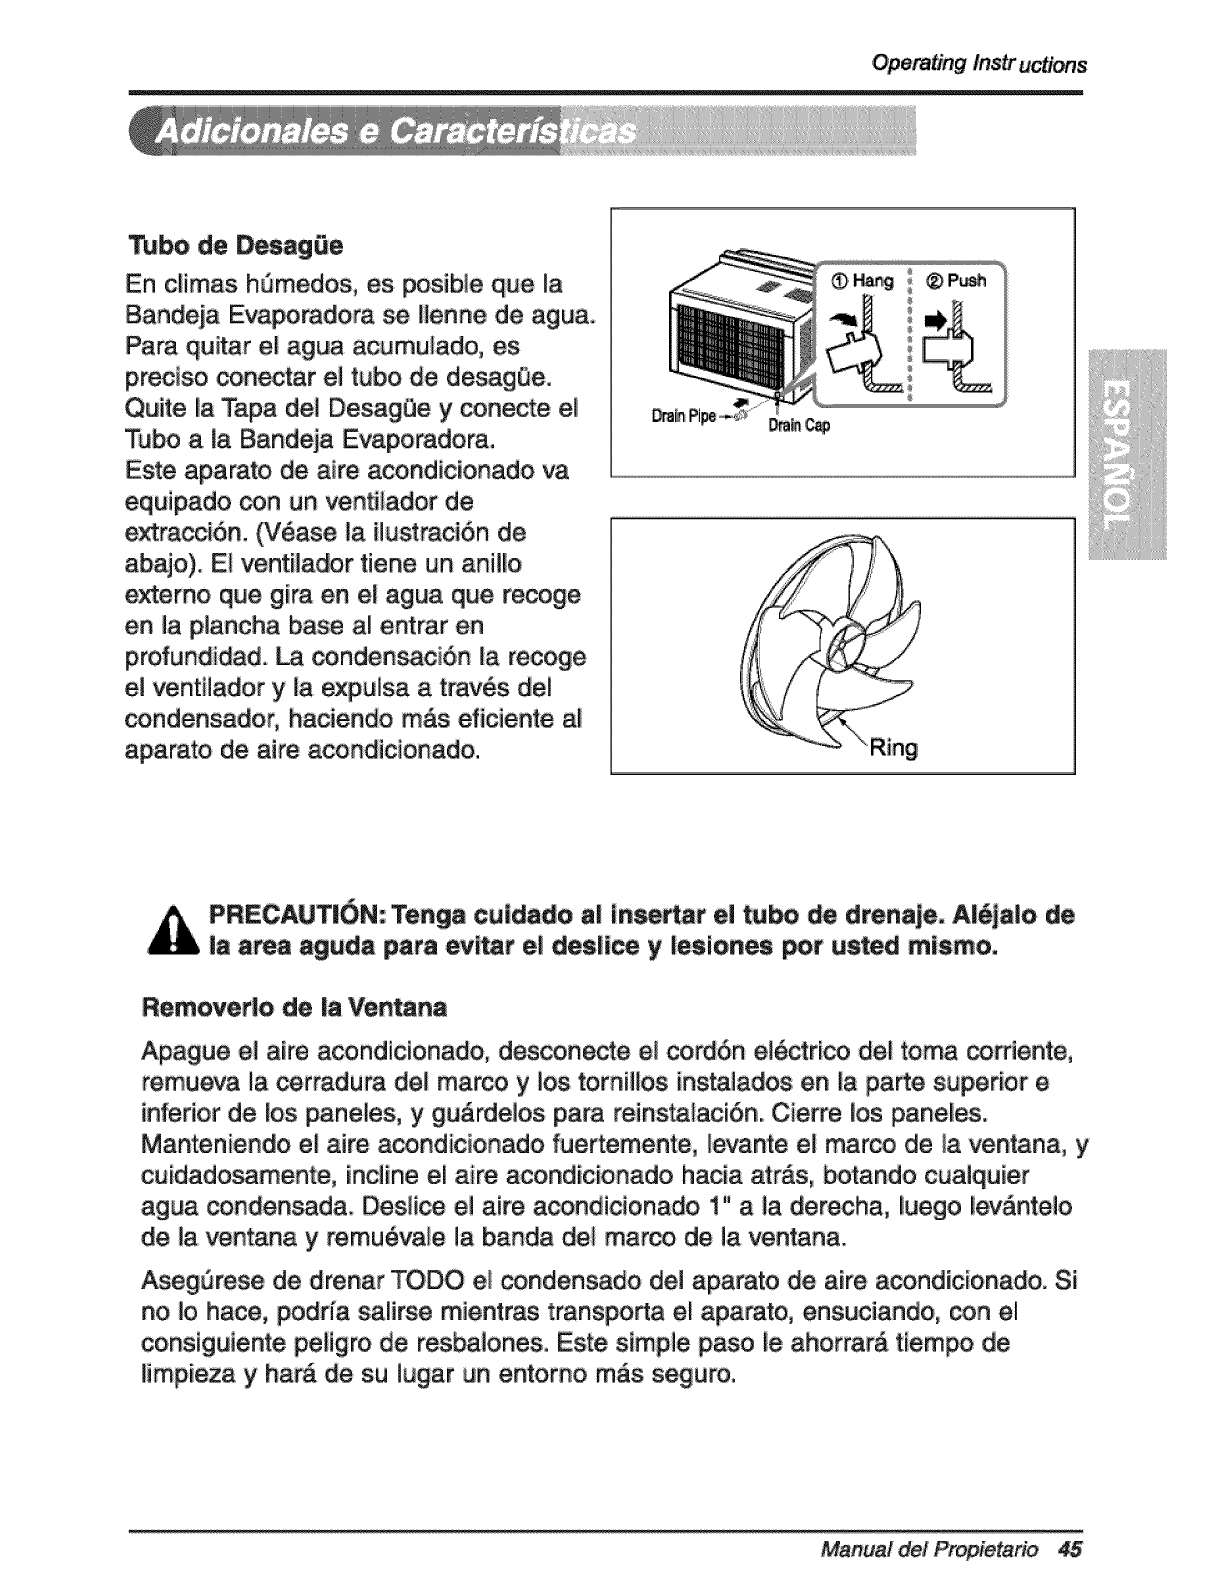
Drain Pipe
In Ihumid weather, excess water m_
_use the Base Pan to overflow. To
drain the water, remove the Drain Cap
and secure the Drain Pipe to _e rear
hole of the Ba_ Fan.
Press the drain pipe into _e hole by
pushing down and aw_ from bhe fins
to avoid injury.
_is air _nditioner is equipped _th a
slinger _n. (See drawing, _lc_,,v.)
The _n has an outer dng that runs in
• e water _at _lie_ in _e base pan
if it gets deep. That _ndensate is _en
picked up by the fan and expelled
_rough the _nden_r, making _e air
conditioner more efficient.
Be careful when inse_ing the d_in pi!_, Push away _m
the shma_ 'fin area to avoid slipping injudng youmelf.
Removal From Window
• arn the air _nditioner off,disconn_ the power _rd, iremove the L bracket, the
screws and Support Bra_et installed through the top and bo_om of _e guide
panels, and save _r reins_fla_on later, Close _e guide panels, K_ping a firm grip
on the air _nditioner, raise the sash, and _refulFi tilt _e air _ndiUoner bayard,
draining any _ndensate. Lift the air _nditioner from the _ndow and remove the
sash seal from be_en the windows.
Be sure to drain _L condensate from the air _nditioner. If you don't, it _uId run
out _ile you carry _e unit, ma_ng a mess and creating a slipping hazard. This
simpie step will save you mu_ cleaning and make a safer work e_ironment°
Room Air er
Maintenance and Service
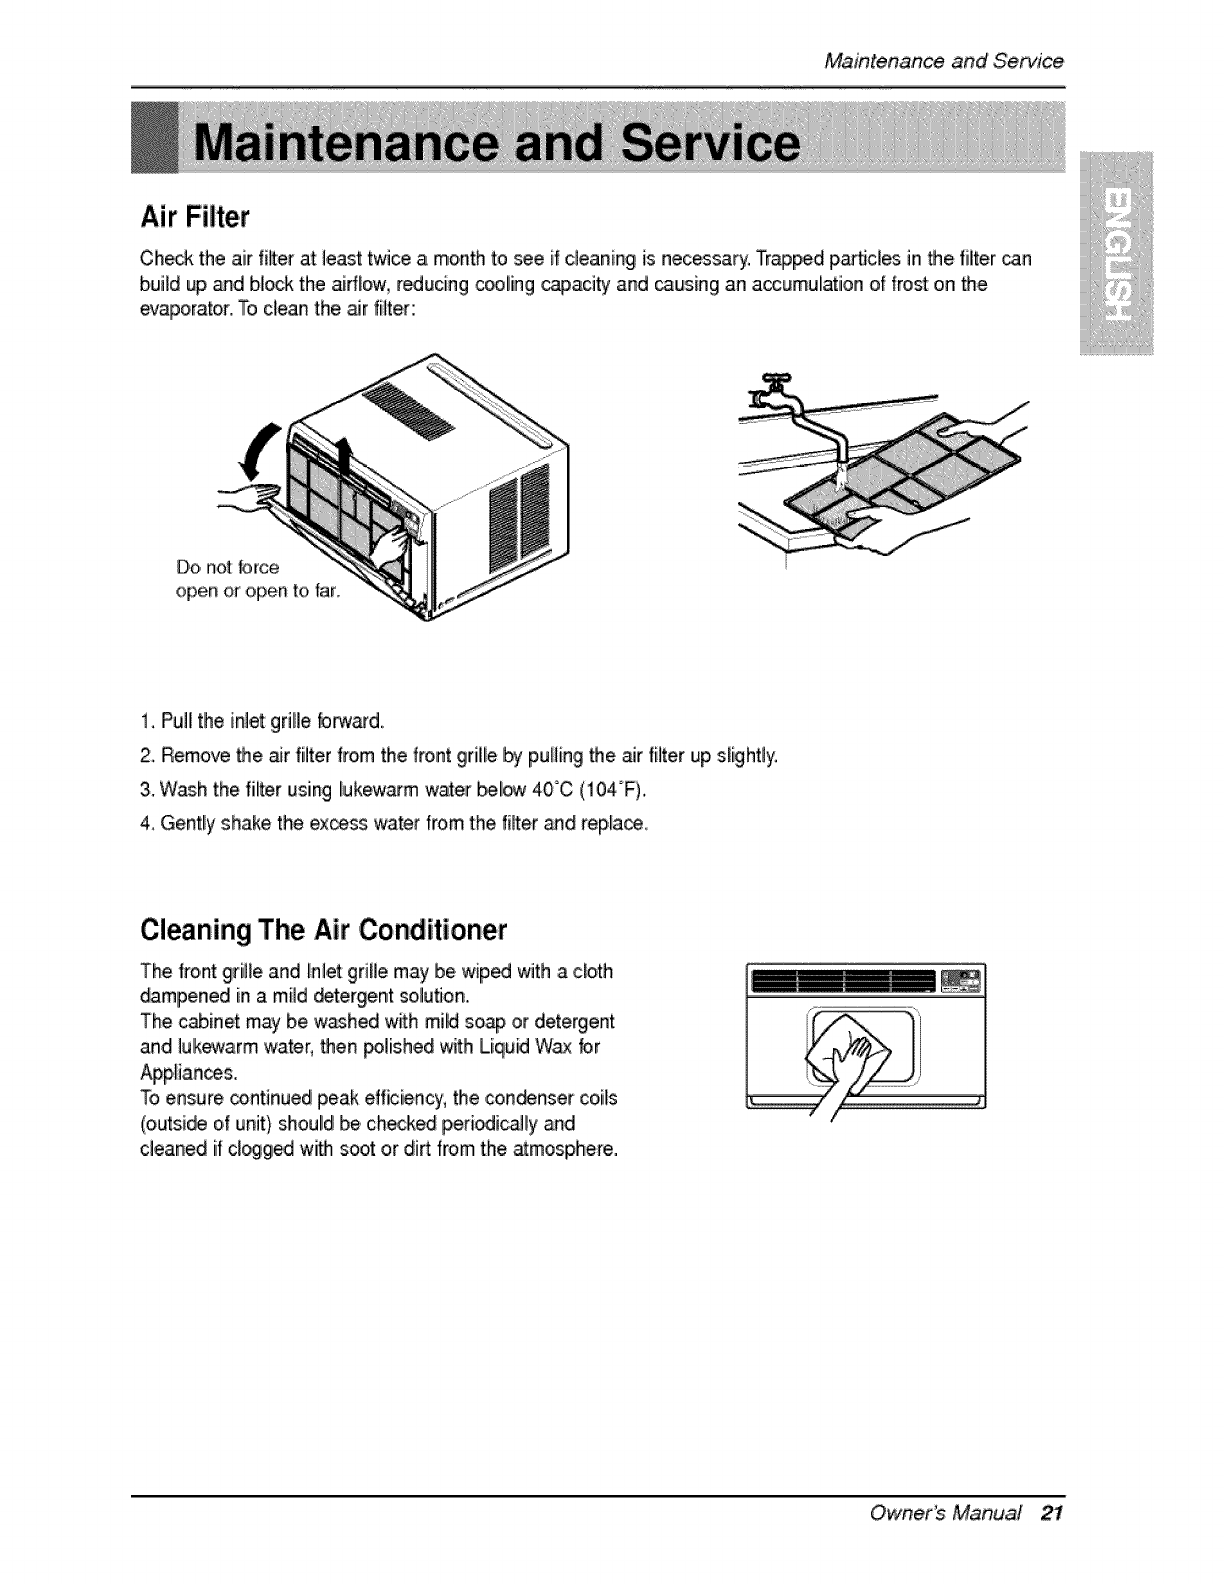
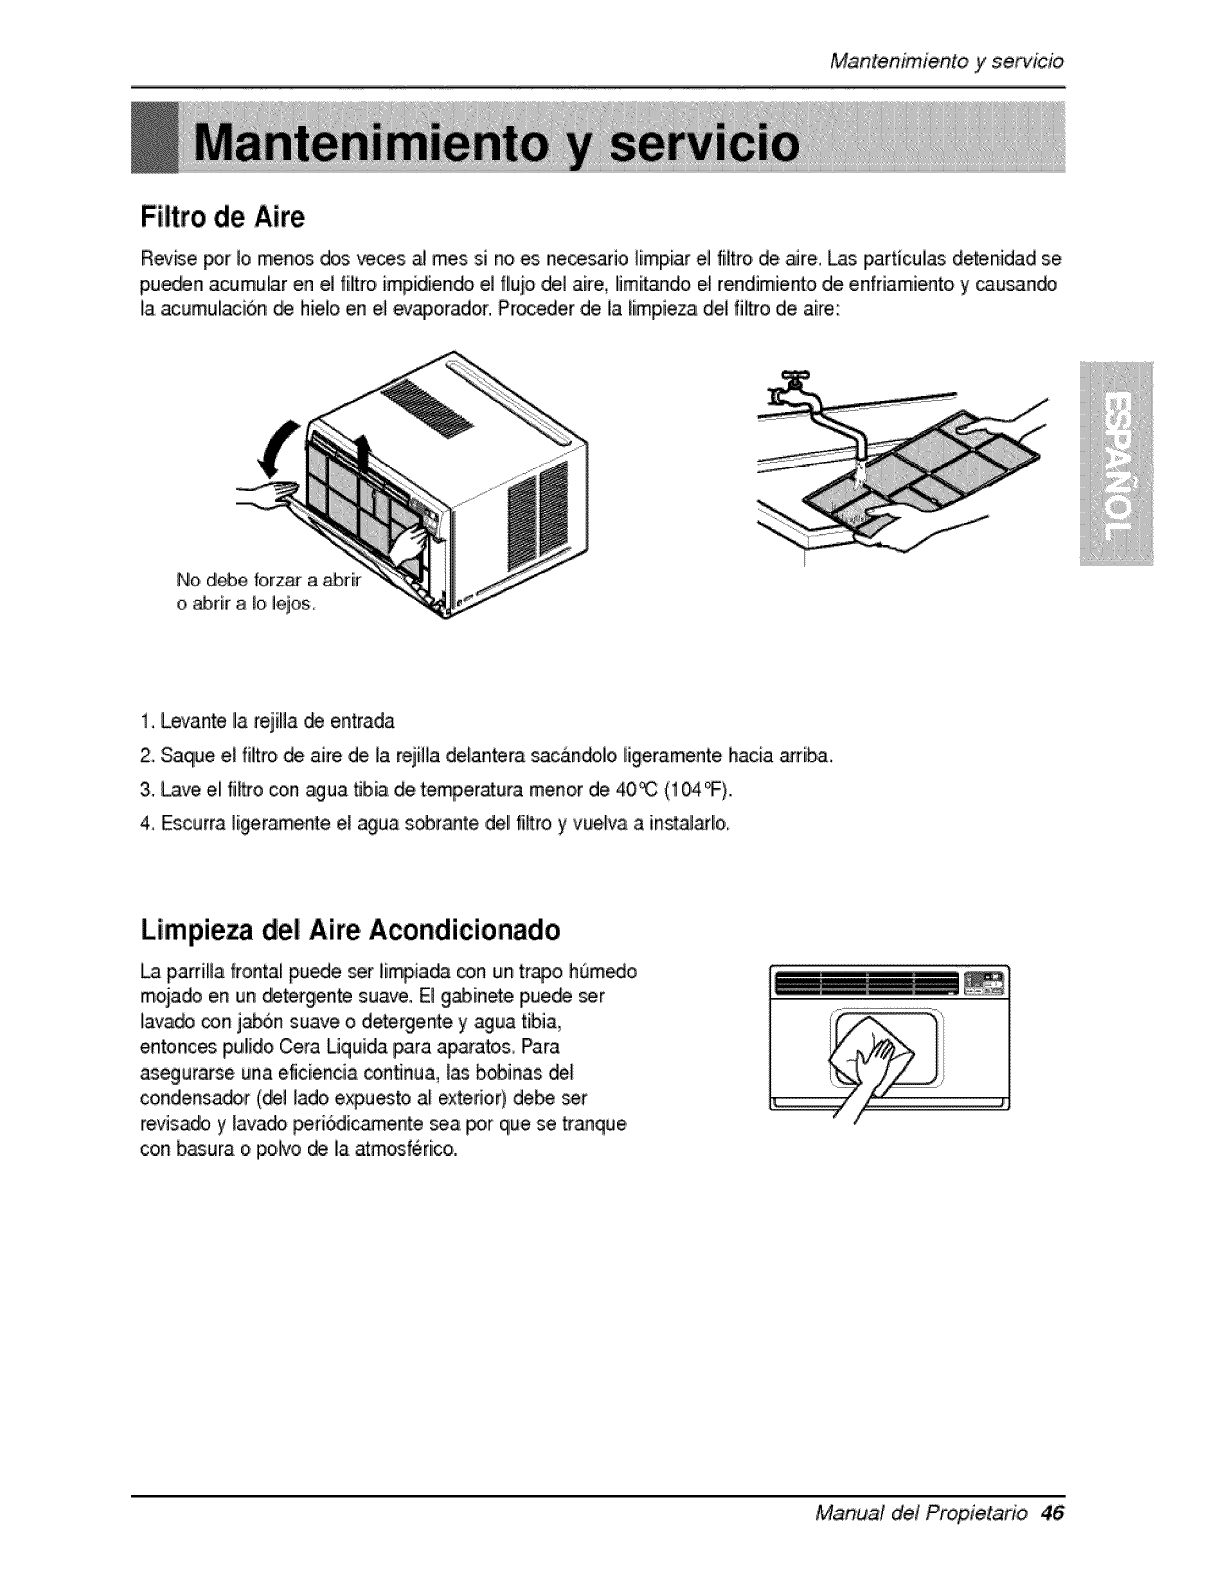
Air Filter
Check the air fi_terat least twice a month to see if cleaning is necessary. Tr_d p_cles in the filter can
build up _d bl_ the airflow, reducing c_ling _aci_y and _using an accumulation of fro_ on the
eJaporator. To clean the, air fiffer:
1, Pull the inJetgrille brw_d.
2, Remove the Jr filter from the front grille by pulling the air filter up slightly.
3. Wash the filter using lukewarm water _1_ 40°C (104°F).
4, Gently shake the ex_ss, water from the fiffer and rep_a_
Cleaning The Air Conditioner
The front gri_e and _n_etgrille may be wiped with a cloth
_mpened in a mi_d_tergent solu_tJon.
The c_inet may"be washed with mild so_ or detergent
and lukewarm water, then polished with Liqu_ W_ br
Appliances.
To ensure continued peak efficiency, the ,con_nser ceils
(outside of unit) should be checked periedic_ly .and
cleaned if cl_g_ with soot or dirt from the _mosphere.
Owner_ Manua! 21
Ma,intenance,and Service
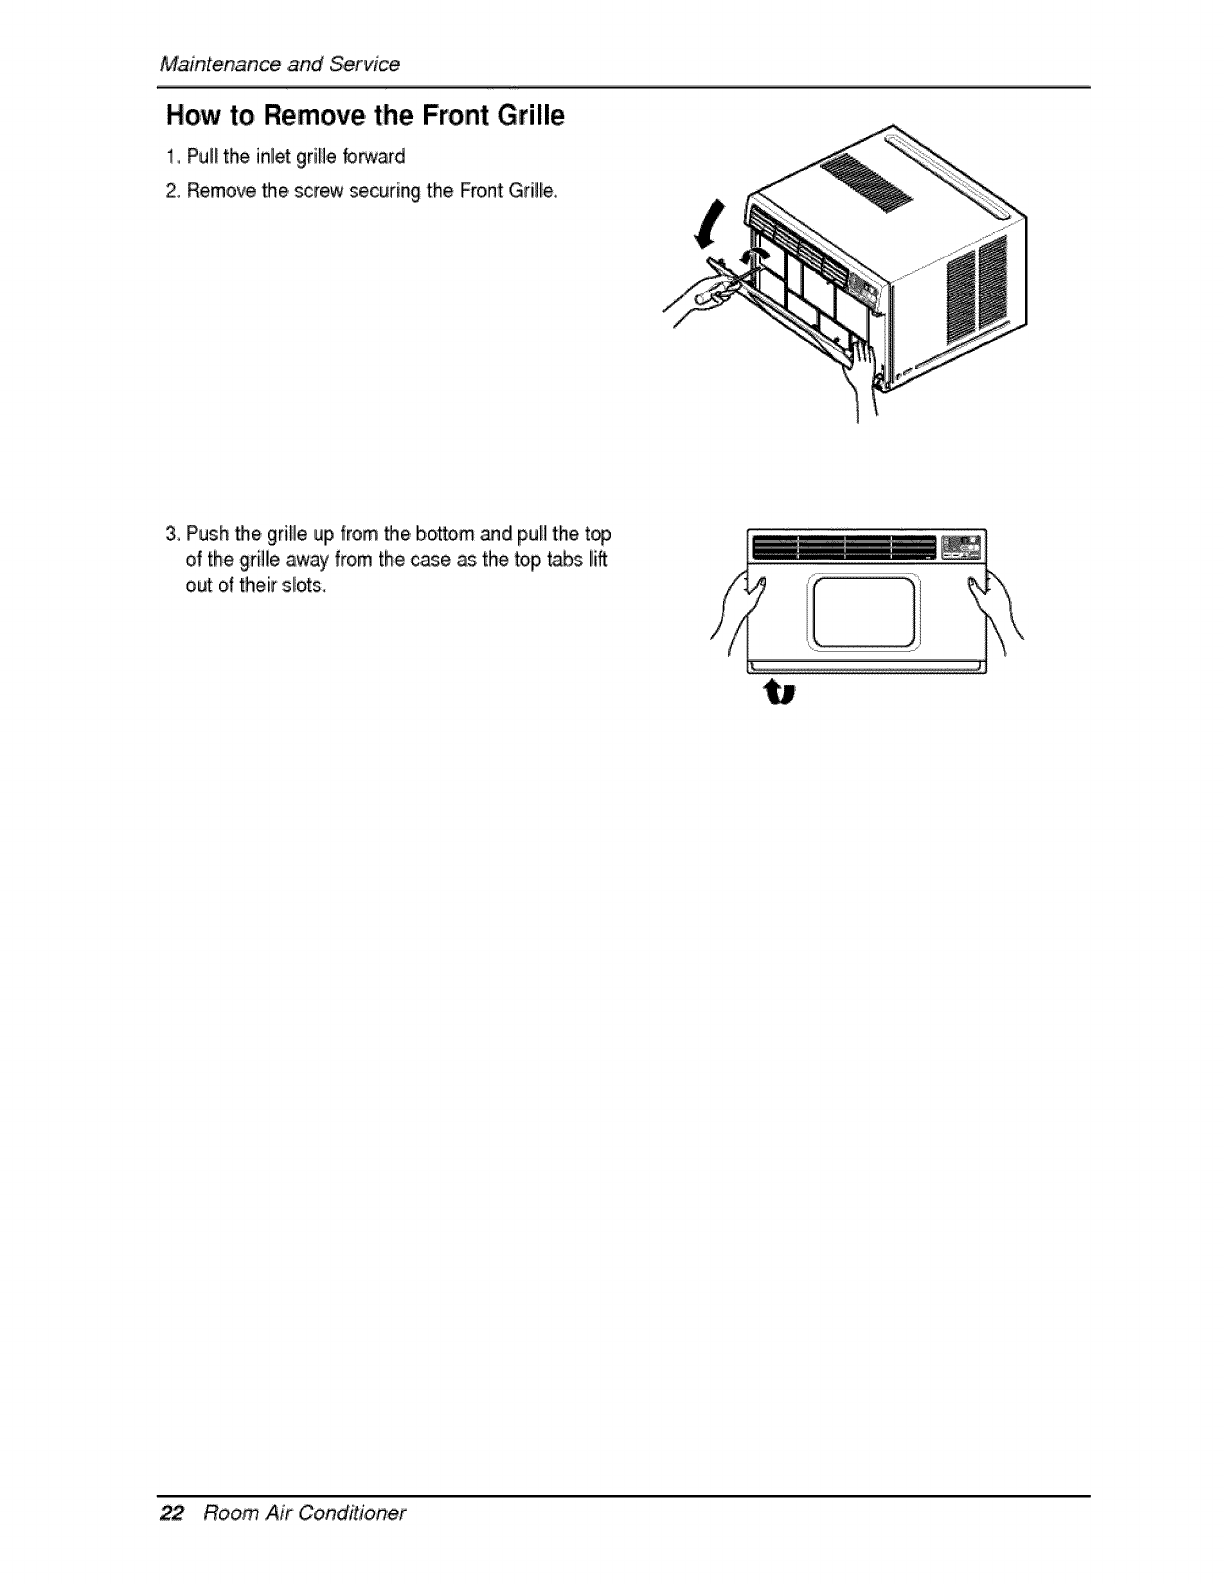
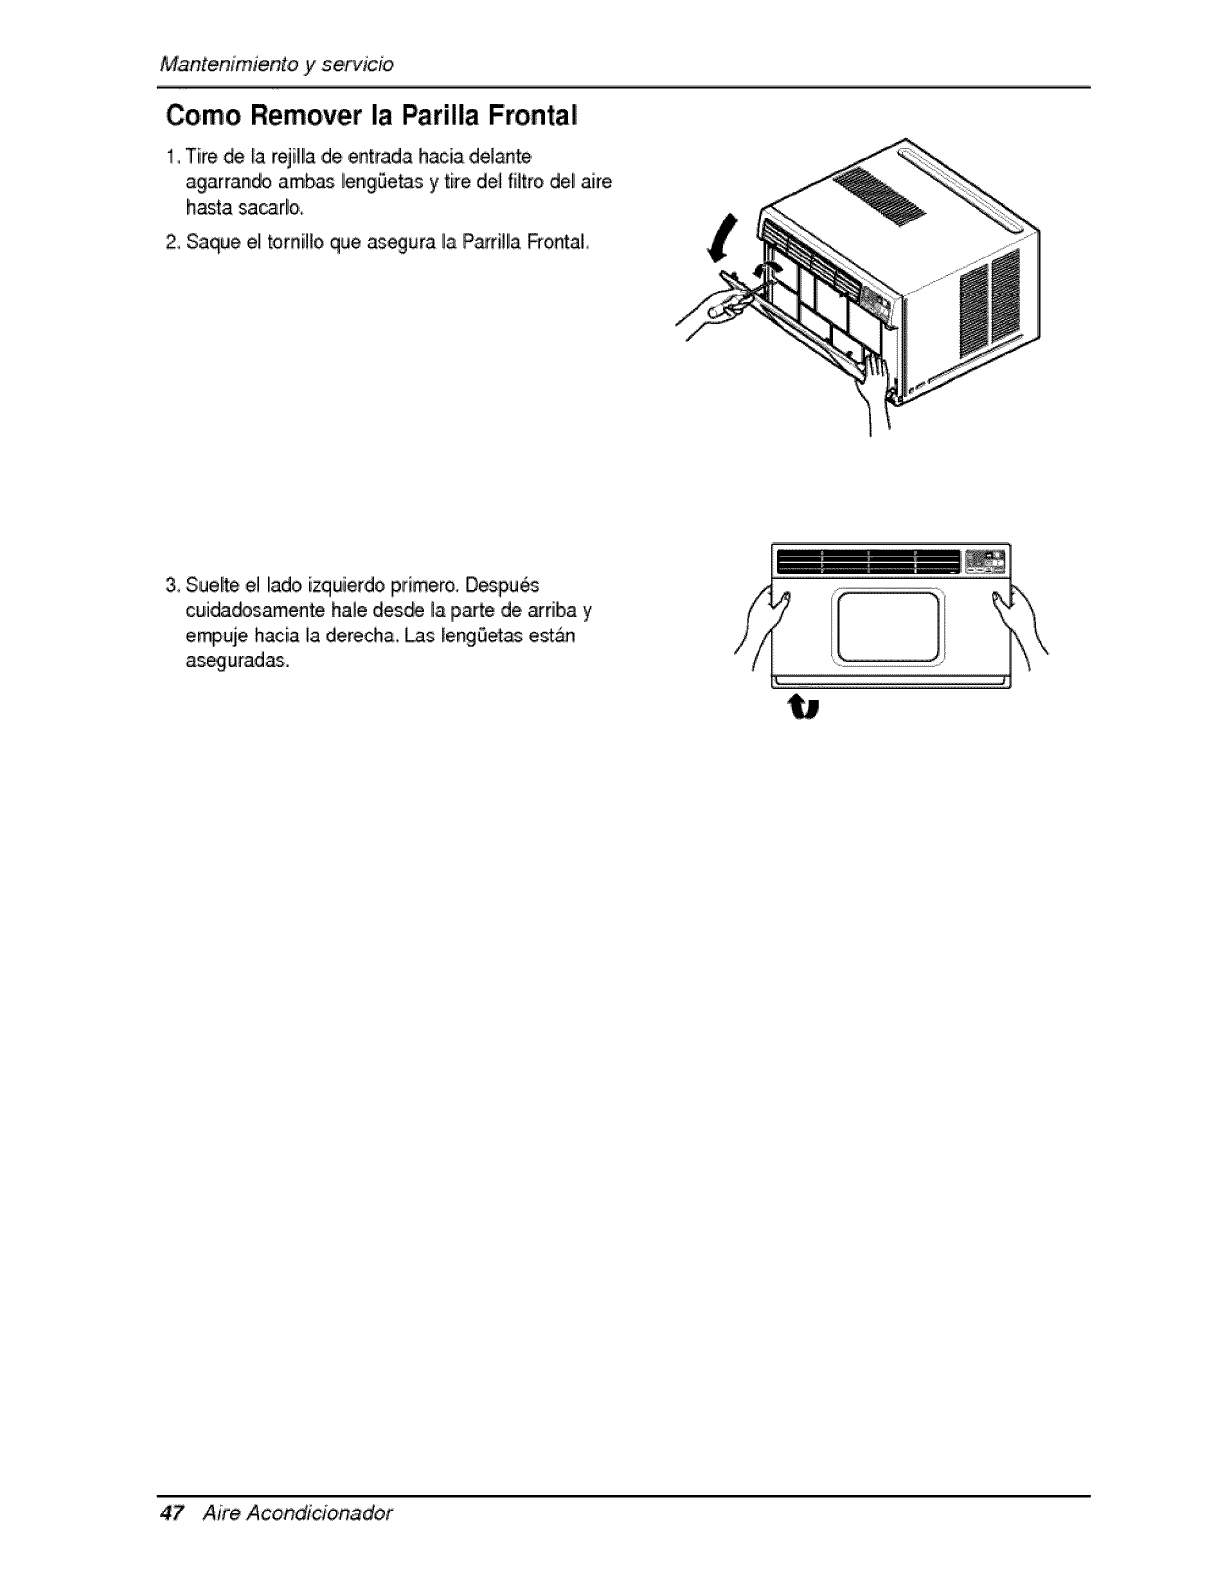
How to Remove the Front Grille
1 Pul_the inlet grille b_ard
2, Remove the, screw securing the Front GriHeo
3, Push the grille up from 'the,bottom _d p,uU_the t_
,ofthe grille away from the case, _ the top,t_s lift
o_ of their slots,
22 Room Air Conditioner
nance and Service
Before Cal|tng for _rvlce
ff you have problems with your air condffioner, read the following information and
try to solve the problem, if you cannot find a solution, turn off the air conditioner
and contact your dealer;
Air conditioner d_s n_ o_rate,
1. Ensure that the air condi_oner is plugged into aproper outlet.
2. Che_ the fuse or circuit breaker.
3. Che_ whether the voltage is unusually high or Low:
Air does not feel cold enough on the c_|tng setting
i. Ensure that the temperature settings are correct.
2. Che_ to see if the air filter is clogged with dust. If so, dean the filter.
3. Ensure that the air flow from the outside is not obstructed and that there is a
clearance of over 20" between the back of the air conditioner and the wall or
fence behind it.
4. Close all d_rs and windows and check for any source of heat in the room.
iLiii_iii_iiiiiiiii'_iiiiiiiiiiiii!
!iiii_iiii!iii[ii_i!!iiiiii[iiiiitiiiii¸
11!
Before _lHng for se_ice, please review the following list of common
problems and solutions,
The air con er is operating normatly when:
You hear a pinging noise. This. is caus_ by water being picked up _ the fan on
rainy days or in highly humid conditions. This featu_ is designed to help remove
moisture in the air and improve cooling efficiency.
See the se_ion on Slinger Fan, page 20,.
-You hear the thermostat cH_. This is caused by the compressor cycle starting
and stopping.
You see water dripping from the rear of the un_. Water may be coH_ed in the
base pan in highly humid conditions or on rainy days. _is water o_fflows and
drips from _e rear of the unit.
,, You hear the fan running while the compressor is silent. This is a normai
operationa_ feature.
Owner's Ma#uat
MaintenanceandService
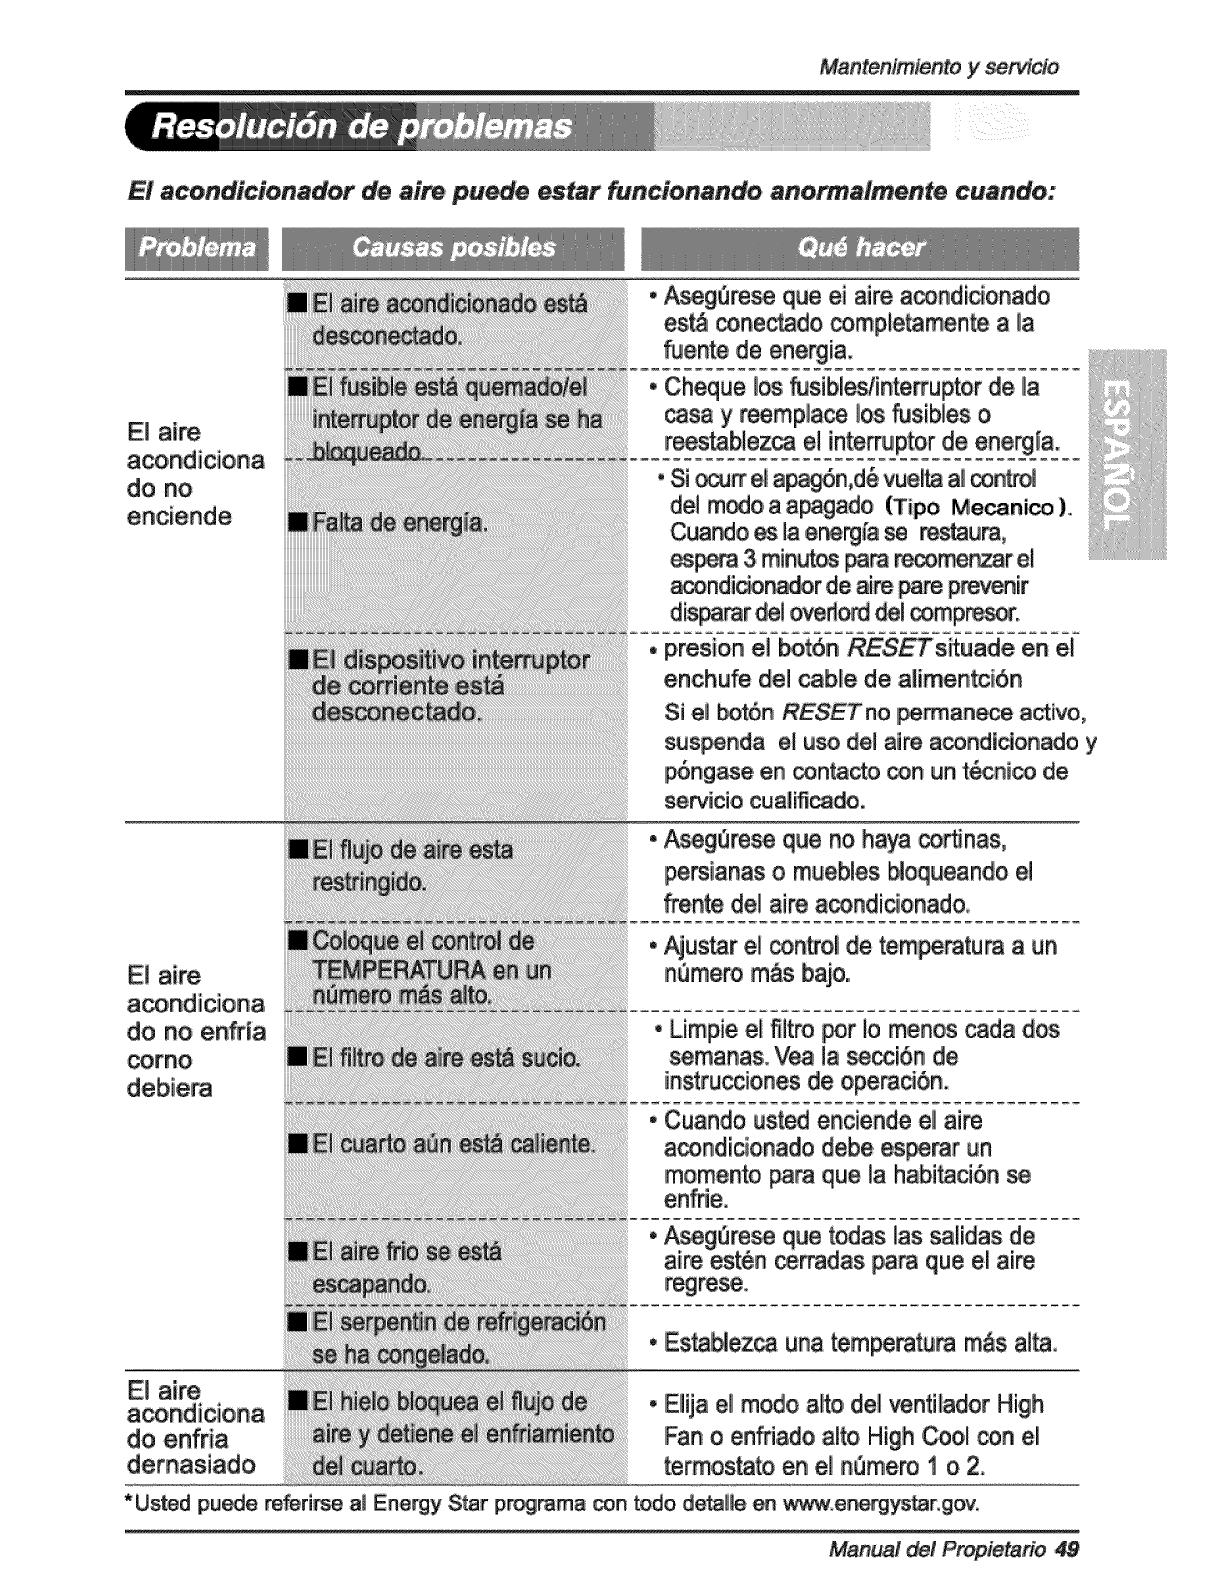
The air conditioner may be operating abnormal!_en:
conditioner
does not
!l_e air conditioner is • Make sure the air condiUoner p_ug is
pushed completely into the outlet.
[] The fuse is blown/d_it • Che_ the house fuse/circuit
breaker is _pped. breaker _ and replace the fuse
or reset the breaker.
•if _wer _ilure _urs, turn the
mode control to Off (Mechanical
Ty ).
does not
cool as iit:
to prevent tripping of the _mpressor
[] The current inte_pter ', Press the RESET b_on located
device is tripped, on the _wer cord
plug. If the RESET bu_on will not
discontinue use of the air
condiUoner and contact a quai_ed
service technician.
[] Ai_ow is res_cted. - Make sure there are no cu_ains,
blinds, or furniture bilking the
_ont of the air conditioner.
,Turn the knob to a higher num_r
be set high enough. The highe_ setting provides.
maximum cooling.
......................................................................................
iThe air ERer is dirty. ,, Clean the filter at least every 2
See the care and Maintenan_
[] The room m_ have been -When the air conditioner is first
turned on, you need to allow time
for the _m to cooi down.
[] Cold air is es_ping. - Che_ for open furnace floor
registers and cold air returns.
....................................................................................
[] _oling coils have iced up, . See Air Co nd_oner Freezing Up
[] ice blocks the air flow and
freezing up from _ling the morn.
* You can refer to the Ene_ Star program in detail at www.e_tar._.
Room Air er
-Set the mode con_I at High Fan
or High Cool with thermostat at 1
or 2.
_ner's Man_! 25

Memo
26 Room Air Conditioner
Pmca_ de Segud_ .........28
de _ner _ _a ...........
I_u_ .....................................33
SfmboiosWl_zad_ en
_e Man_| ....................................
c_cten'_ .............................33
Segud_ B_ .......................
LlsoTr_ _ un
Adaptador..........................................36
U_ Tem_ de un
C_ ALa_or ..........................
Ins_|6n ..................................... 37
C6_ inca la unidad ..................37
Requ_itos de la Venlana ............ 37
Contenidos @ _os co_Intos
oe H_s_n_acJ_on................................38
In_aci6n de! gabi_ .............. 39
Fu_onamlento .............................. 42
In_uccions _ Con_l
Con_l Remote ........................... 43
Ad_ionales eCa_--tedsUcas .......44
La Direcci6n _AJre ................ 44
C_rol de _ntJ_in ................
Tube _ Desa_fie ..................... 45
R_over_ de la Ventana ..........45
Ma_nim_ y Setvlcio............. 46
Fil_ _AJre ............................. 46
_io_do .......................... 46
_o _er la Parilla
Frontal ........................................ 47
P_le_ y _,l_
H_i_al_ ....................................... 48
Resot_n die pr_le_ ............. 49
PARA SUS ARCHIVOS
Escrib,aaqruiel modelo y n_m _ s_ie:
Mode_ n°:
_r_ n°:
_en_t I_ n_mems en _ et_ueta _ la parte
I,_eral del p=_uc_o.
Nom_ de| dl_id_
F_a _ _pm:
•_j_nte SUreci_ aesta pdgi_ _la g_ado_ para
el memento que Io n_,,esite _pro_r _ _ de su
adquislcl6n o p_.Ja_a_,_da_n de _ garantia,
LEA ESTE MANUAL
_ In_edor en_ muchos _ns_s Qtlies _re _a
u_itza_ y m_imlen_to _ su acon_'_ador de _re,
U_s _s cui_ados _,_ _ le pued_ aho_t
m_ho tlem_ y _i_eto _urante la vi_a de
En la _a _ consejos _ra la _lu_ _ida de
pr_rr-_s en_& mu_as respues_ a_s p_
rods hab_ua!es Si revisa primero nuestr_ Ta_ de
Co_ejos _a la s_i_ _a de p_as_ _ vez no
Manual de/Propietario 27
Preca,uc[ones de Seguridad
Para prevenir tanto ilesiones all usuarb u otras personas como daSos materiales, es preciso
s_uir estas instmcciones
[] La incorrecta operaci6n del aparato como consecuencia de ignorar ]as instrucciones
provocar& diahos o lesiones_
[] A cause del peso pesado del producto, se recomienda que usted tenga a un ayudante a
padicipa en ]a [nstalacion.
[] El significado de los simbobs utilizados en este, manual se iindi_ a conflnuaci6n.
iA_gorese de no hacerio. I
Asegorese de s_uir las instruiccioRes,i
[] Instalacion
• Un montaje o insta]aci6n de4ectu_o pu_e
provocar un funcionamie_o in_rrecto, incluyendoi
desgos de lesiones, incendios o
,, Puede _usar explosi6n o
•Pu_e _us_ incendio y d_carga el_tri,ca,
•Puede caus_ ,descarga e!6ctrica y f_!os,
Manual del Propietario 28
Precaucionesde,Seguridad
!I Funcionamiento
• De otro modo, causar& d_c_rga
e_ectrica o incendio,
,' Causar& d_rga eiedrica o
in_ndio
•Causar& _scarga el_dca o
incendJo, •, Causar& descarga eled:rica o
incendio,
• Causara _scarga ei_tdca o
incen,dio_
•Si no hay conexion a masa_ se
p,ue_ p,roducir aria ,descarga
electr_a
.' En caso que no, pu_e caus_
in_ndio y _ccidente de co,Ao
circuito,
Aire Acond_cionador
-Puede _us_ in_ndio y
accidente el6_rico, •Pu_e causar d_carga
el6_rica_
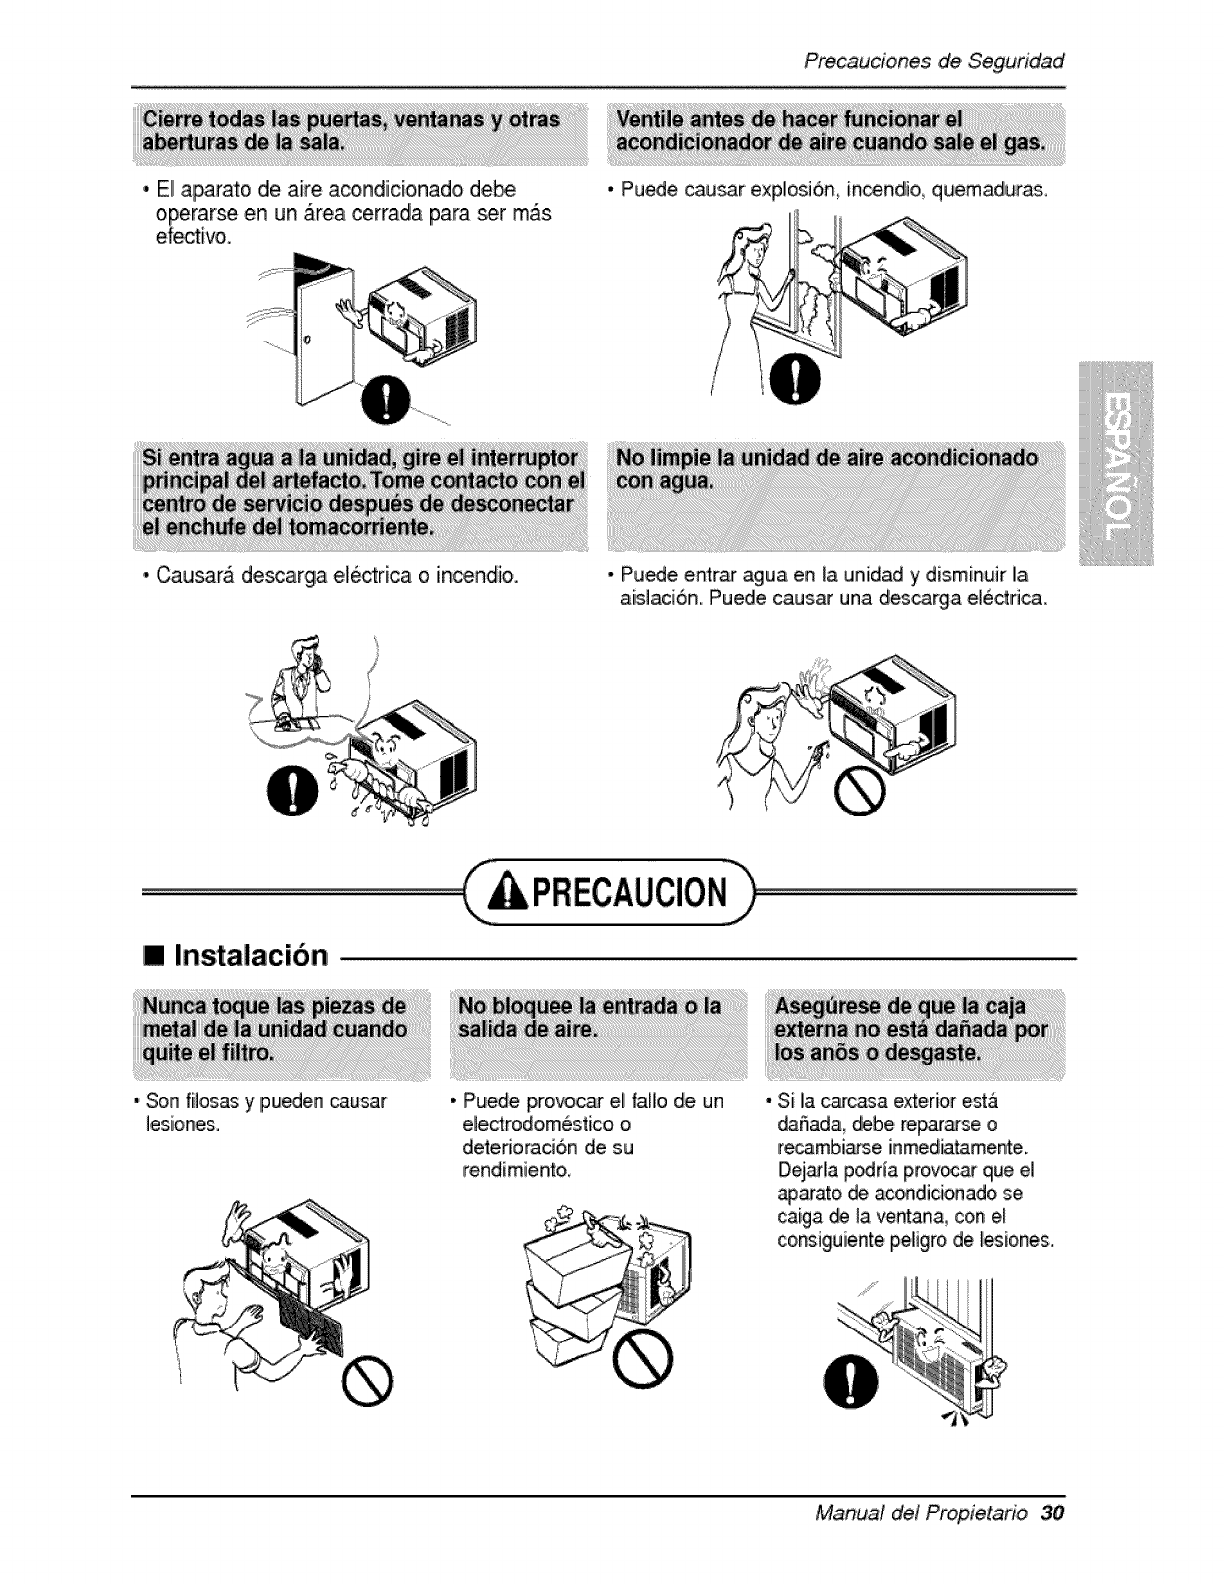
• El a_rato die aire a_ndicio, nado debe
Precauciones de Seguridad
operarse en un area cerrada para _r m&s
ef_tivo,
,Puede cau_r explosi6n_ in_ndio_ quemaduras..
• Causara descarga electrica o in_ndio.
[] Instalacion
• Son fiilosas y Ipu_en causar
lesiones.
•Pu_e entrar agua en la unidad y disminuir la
aislaci6n. Puede caus_ una descarga eiectrica.
• Puede pro_car ,el fallo de un
ele.ctrodom6stico o
delerioraci6n de su
rendimienlo.
, Si la _casa exterior esta
_5ada, debe repar_se o
re_mbiarse iinmediatamente.
D,ej_la p_da p_ovocar que el
_a.rato de .acondidonado se
caiga _ Ja ventan& con el
co,nsiguiente peligro de I_iones.
M_niua,! del Propietario 30
PrecaucionesdeSeguridad
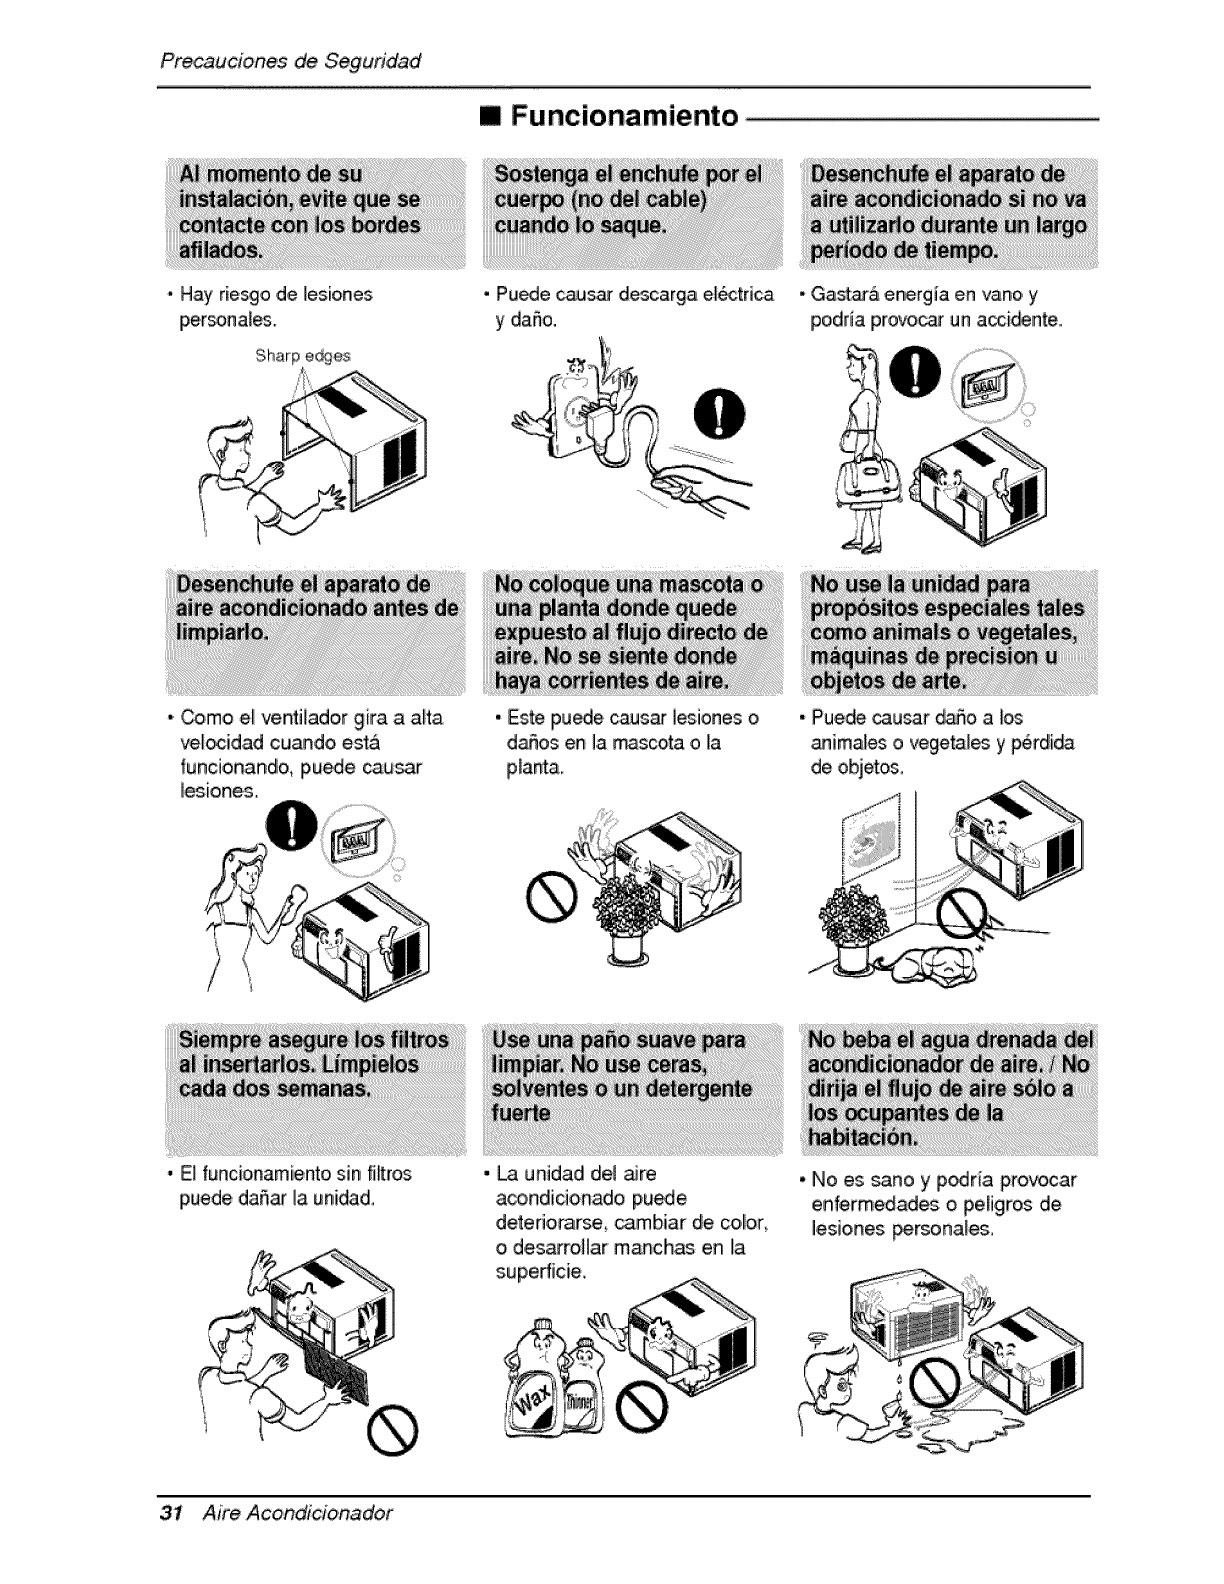
[] Funcionamiento
,Hay rie_o de lesiones
per_na_es.
Sharp edges
•Puede caus_ d_carga el6ctrica
y dalSo.
,Gasta_,_energla en vano y
podria provo_:r un a_i_n'te..
- Como el ventilador gira a alta
velocidad cuando est&
funcion.ando, puede cau_r
lesiones.
• E_funcionamie,nto sin fi_ms
puede daSJ_ la unidad,
• Este pu_e causar lesiones o
daSos en I.arrascota o la
p_anta,
• Puede _usar _o a i_
anim.a_eso vege_[_ y perdi_
de obj_os_
-La unidad de[ aire
aco,ndicionado pu_e
de_enorarse_ cambiar de color
o des_roHar manchas en Ila
•No es _no y p_ria provocar
erffermedad_ o peligros de
I,esiones _ona_,
31 Aire Acond}cionador

Pr_udones _Seguridad
1. _loque el enchain corr_amente.
2, Use un _nico circuito para este aparato. Recargar el dmu_o _dr{a provocar
un riesgo de incendios.
3. No _ili_ un alargador. Consulte la pdgina 36 para m_s detalles.
4. No a_que/detenga el fundonamlento enchufando/desenchufando el cable
de _mente electric.
5. Si el alargador estd dafiado yha de set re_mbiado, _licite a un t_cnico
autorizado que instale un re_mbio exacto.
!, Estar expuesto a! flujo directo de aire por un _rio_ la_o de tiempo pu_e
constituir un ries_ pare su salud. No exponga a I_ _onas, mascotas o
plan_as al fiujo dire,_o por per{odos largos de tiempo.
2. Debido a la posibilidad de fal_ de oxfgeno, ventile ia h_itaci6n cuando se
use _ mismo tiempo que estufas u otros dispositivos de calefa_ibn.
3. No use este acondicionador de aire para pro_sitos determinados no
especificados (por ej.: pre_rvar dispositivos de precisi6n0 alimentos,
cachorros, plan_ y objetos de arte). Tales usos puede dafiar los elementos.
4. El aparato de aire acondicionado es un aparato disefiado para el _nfort del
consumidor No es un sistema aclimatiza_r
1. No toque las pa_es de metal de la unidad cuando quite el filtro. Puede
lasUmarse cu_do manipule bordes filosos de metal.
2. No use agua para limpiar adentro dei a_ndicionador. La exposicibn al agua
puede destruir la aislacibn y esto a su vez provocar una des_rga ele_ri_.
3. Cuando Hmpie la urtidad, aseg_rese que la _mente y el intemJptor est_n
des_ne_dos. El ventiladior gira a muy alta velocidad cuando est_i
funcionando, Existe la posibilidad de lesiona_e si la energfa se conecta
accidentalmente cuando est_ limpiando las piezas internas de la unidad,
Para reparacionesy m_tenimiento, p6n_se en contacto con un _ntro de
servicio autori_do. Consulte la p&gina de garant{a o ilame al nQmem (800) 243-
0_0. Tenga su n5meor d emode!o y nOmem de serie a mano. Los en_ntmrA
en la p_gina 25 de este m_uaL
Aire Acon
UCtOnesde_guridad
Este sfmbolo _oadvierte de un _iigro de accidente pot corriente
ei_rica,
Este simbo|o |o adive_e de un pe|igro que pueda causar un da_o
de! vent|iadoro
Este sfrnbo|o signiftca cond_cciones espectal_,
ADVE_ENCIA : Este aparato deberfa in_alatse de acue_o con |as
normas de| C_igo E|_ctrico National,
Gula Su
D_e_or Vertica! de Aire
De_ector H_J de Aire
Rejil_aFmn_l
Fi_m de Aire
Salida de Ai_
Toma de Aire (Re_l_or de Aire)
Panel de Con_ol
Bandeja de Base
Control Remoto Cable eJ,6drica
Manual del Prop_etario 33

es de d
i i5V~ 2 V~
-¢
UtlUoe eEe_a#e de la _ _nsumo de _e_i[a
El _ble de a_imen_6n pu_e i_luir fun
di_osittvo tnte_ptor de _tente°
_rcasa dei _u_e _en'_ ,conun b_ de
p#ae_ y o_, de re_n_cto.Eli d_s_.t_vo, _
_mp_ba_e _d6d_m_nte presionando
pn_m el _t6n TEST y .d_u6s RESET. Si
el _t6n TEST no se des_n_a o _el _t6n
RESET _ permen_ _vo, sus_nda e|
e_ de_aire acondi_nado y _ga,se en
_n_cto _n an t_nico _ serv_io
cua_cado
S'_r_erd _V_ e_,e de 3
Uae_ de !5& !_V AC
_250V, en_u_ die3
L_n_ __5_i _OV AC
S_ird _V0 e_ufe de 3
Uneas de _A_ 2_V AC
_l_ un{us_ _I_P. o an
[_n_erru_rde iSAMP.,
8EGURIDAD E_CTRICA
__ES DE __ A_ER_ !__S'
El aire a_dicl_a_ _ene u_ _v_a deicone_n a tierra _ tres p.a_ en su ca_ de
sumin_ de e_rg{8, qum.ede_er& enchase en un toma_mente de pa_,_ de tres _s ,
c_e_ a tie_ ad_d_=ente para su p_otec_6n _re tin _ib_e iri_,o de ei_trocuci6n,.
34 Aim Acon
es de d
Este equi_ debe estar puesto a tierm debidamente,
E_cable de a]imentaciSn est_ equipado de una toma de tierra con tres pins. Pare
minimizar el peligro de una lesiSn per corriente e[6ctrica, utiJice una toma con
enchufe de tierra est,_ndar con tres contactos. Si el enchufe de pared no contiene
un _rne de tierra, antes de usar el vemi_ador haga cambiar el enchufe per un
electr[c[sta,=
Cambiar la toma sin realizar |os eatables de cableado apropiados
crear_ un estado el6ctrico inseguro que podria resultar en un incendio
o descarga el6ctrica° Para rode este ripe de trabajos, consu|te siempre ..................................................................................
con un electrtcista cualfficado°
__n _ _ _]i_r e_
No co_e nt quite el borne de tterra de la clavtja de altmen_ct6n
E] acop|amiento _! borne de tierra del a_ptador con el tornillo de la
cubierta del enchufe de pared no pondr_ el _uipo atierra, si e!
tornil!o de la cubie_ no es de m_a! y est_ atslado ye! enchufe
pared no est_ pueste a t_erra atde la red de |a ca_
En e! case de cualquier duda respecto ala correcta puesta a tierra
del ventilador, haga revisar el enchufe de pared ye| circu_o per un
eiectr|cis_ p |onaL
de! 35
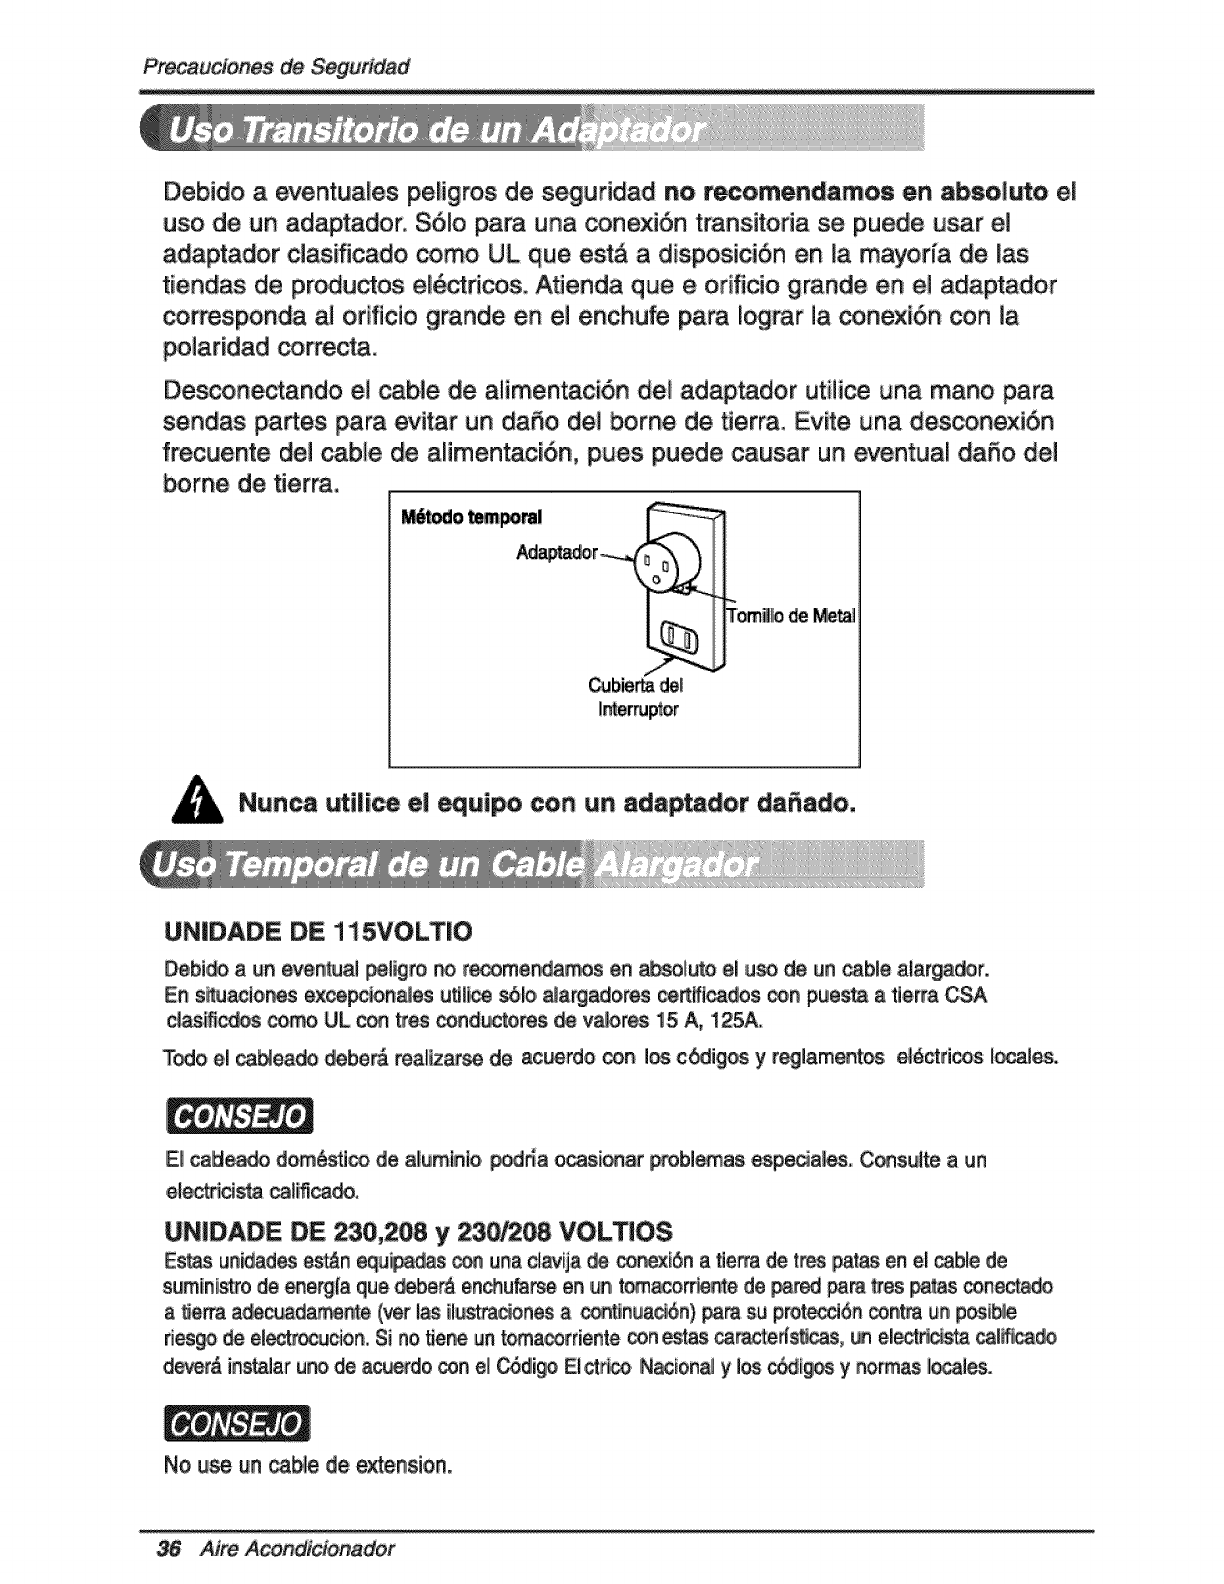
Preca de
Debido a eventuales perigros de s_uridad no recomendamos en absoiuto el
uso de un adaptador. S6lo para una conexi6n tmnsitoda se puede usar el
adaptader c[asificado _mo UL que est_ a disposicidn en [a mayorfa de [as
tiendae de productos el_tricos. Atienda que eoriflcio grande en e[ adaptador
corresponda aJ or_ficiogrande en el enchufe para Iograr la conexi6n con la
_laridad correcta.
Descone_ando ei cabte de alimentaci6n de_ adaptador utilice una mano para
sendas partes pare evitar un daSo del borne de tierra° Evite una. des_nexi6n
frecuente del cable de alimentaci6n, pues puede causar un eventual daffo del
borne de tierra.
T0m_liode Mien]
Cubie_ del
In_ptor
Nunca utiIice e| _uipo con un adaptador daffado,
UNIDADE DE 115VOLT[O
Debi,_ a un eventual _i_ro no r_me_ia_s en _solu_o el u_ de un _bie, alargador.
En s_u_io_s excepciona_es util_ s6lo, a_argadores c,e_tficados _n puesta atierra CSA
cl._ con UL c_ tres cond_tores die va_or_ 15 A, 125A.
Todo el _ea_ _ber& real_a_ de _rdo c._r_ 1_ c_igos y r_iam_tos _ctri_ i_les.
El caU,e_o dom_l_ _e aJ_umlnio._dffa o_si_ar _bi_as _pe_ll_. C_suite aun
UNIDADE DE 230,208 y230/208 VOLTIOS
Es_s u_i_ad_ est_n equi_ _ u_a c_viia _ _r_i_n atie_ de tree pat_ en el _le de
sumiinis_ode _qerg[a q!ue _be_ en_lu_ en,unf t_o_e de p_r_ par_ _es p_s _ne_
a_e_ a_c_am_n_e (vet I_s ii[_s_a,_nes a c_n_a_6n) _m su prot_16n _n_ _ posible
d_go _ eI_'_ucio_,. Si no _ene _n t_a,_riente _n _s _ted_s, _ el_s_a _l_c_
derek& instaia_uno de _do _n, el C_dligoE[_ir_. N_tonaJ y los _f_ y normas I_[es.
No use un ,ca_e de extension°
A_ A
lnstataci&n
P,araprevenit_ v_b_tSn, y_ nJido,_rese que
_PRE,CAUC_N: Todos !_ _!atera_ del gsblnm _ben permai_r exp_os _!a
exterior _I_ estru_u_,
Ingle la unidadunp_ i_lii_da pa_ qi_ _ partep_erio_ quedeligier_me_em_ baja qi_ _ f_er_
(_t_or de 1_'). _ forza#,al aguamndensa_ _ fluidhaciael exteri_.
In_e _ unidad _n el fon_ apro_m_m_ _°~_" por e_ma delnive__ _so,.
:Tod_ _p_ de _e deben_r _utad_ conma_era_de, n-_m_efia, o,metal
•Est_unid_ es_ di_Sada para_r i_d_ en ve_n_
_l_ ba_u|_tes mt&ndar m_ a_d de _um
*_s hojasinf_ot_ y _lPe_res _ _ _ta_ de_
_ _ _i_ papa_mitir una !_zve_ de I6 °
_e _a_ inf_ior de la _a super_ hastael _ento
Manual del Propietario 37
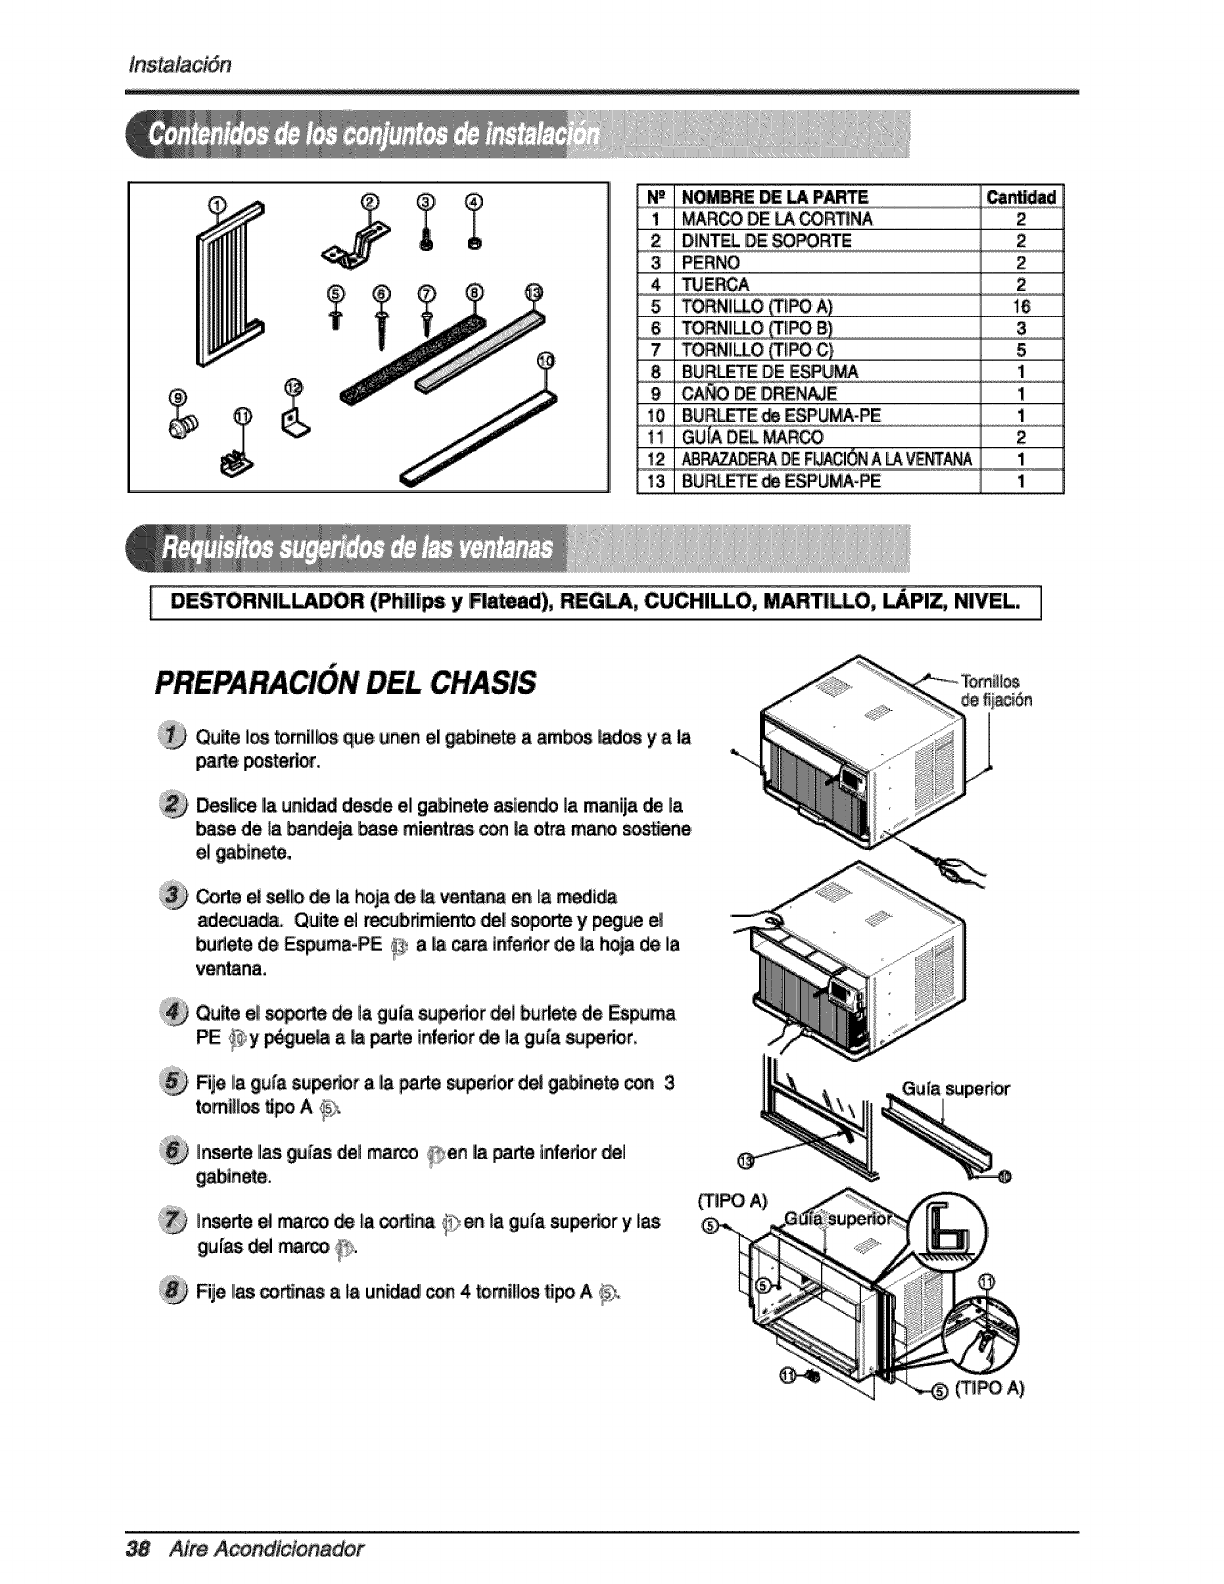
rN_ De_, PA_E _,_ ....
I
2
3
4
5
7
8
I0
1,2:
13,
I_R_ DE _ C_RTtNA
DINTELDE _PORTE
PERNO,
_E_A
T_NILLO <T_i_A)
BUIR_E DE E_
DE DREN_E
BURKE _ ESPU_-PE
2
2
2
2
16
3
5
1
1
1
_P_,ZAD_ _ F_iCION ALA_ANA i
BURLETE_ ESPUMiA-PE 1
IDESTORN!L_R (Phill_ y _d). REG.. CUCHILLO. MA_O., _P!Z, NIVEL. 1
PREPARACIONDEI. CHASIS
Qu_e I_ _rn,illlosque un=enel _bi_te aam_ _ iya la
_e iPOstedo_.
D_li_ Ilaunidad,de_e ellg_inete asiendlola manija ,dela
b_ de [a band_ b_e mi_ms con_o_ram_ sos_ne
e! _btF_te,,
Code _ _1io _ Ilahoja de fa _,_ntana_ fa _l_
ad_uada. Quite el r_blffmi_nto de|s_rte y pegi_ e|
bud_tie de _p_ma-PE _$_a_ _m ir_edor_e _ h_ de la
ven_na,
Qu_e e_'so_e _ la guia _dor _! budete de Espu_
PE _'_y _u_ a _ parteinfedorde ]agu(a su_dor,
Flje la gu_'asu_t a _ _rte _pedor' de| gabtne_ ,_ 3
tomllI_ i_po A_#
]n_rte I1_ __ del _ _en |a_rte in_,edor_]
]n_rte _ marco _ la _'ina ,i:__ la gul'asu_r y li_
gu|as_1 _ _>,.
Fije I1_ _nas ala un_ad con4 _mil]_ _ A_:_.
38 Aire Aco r
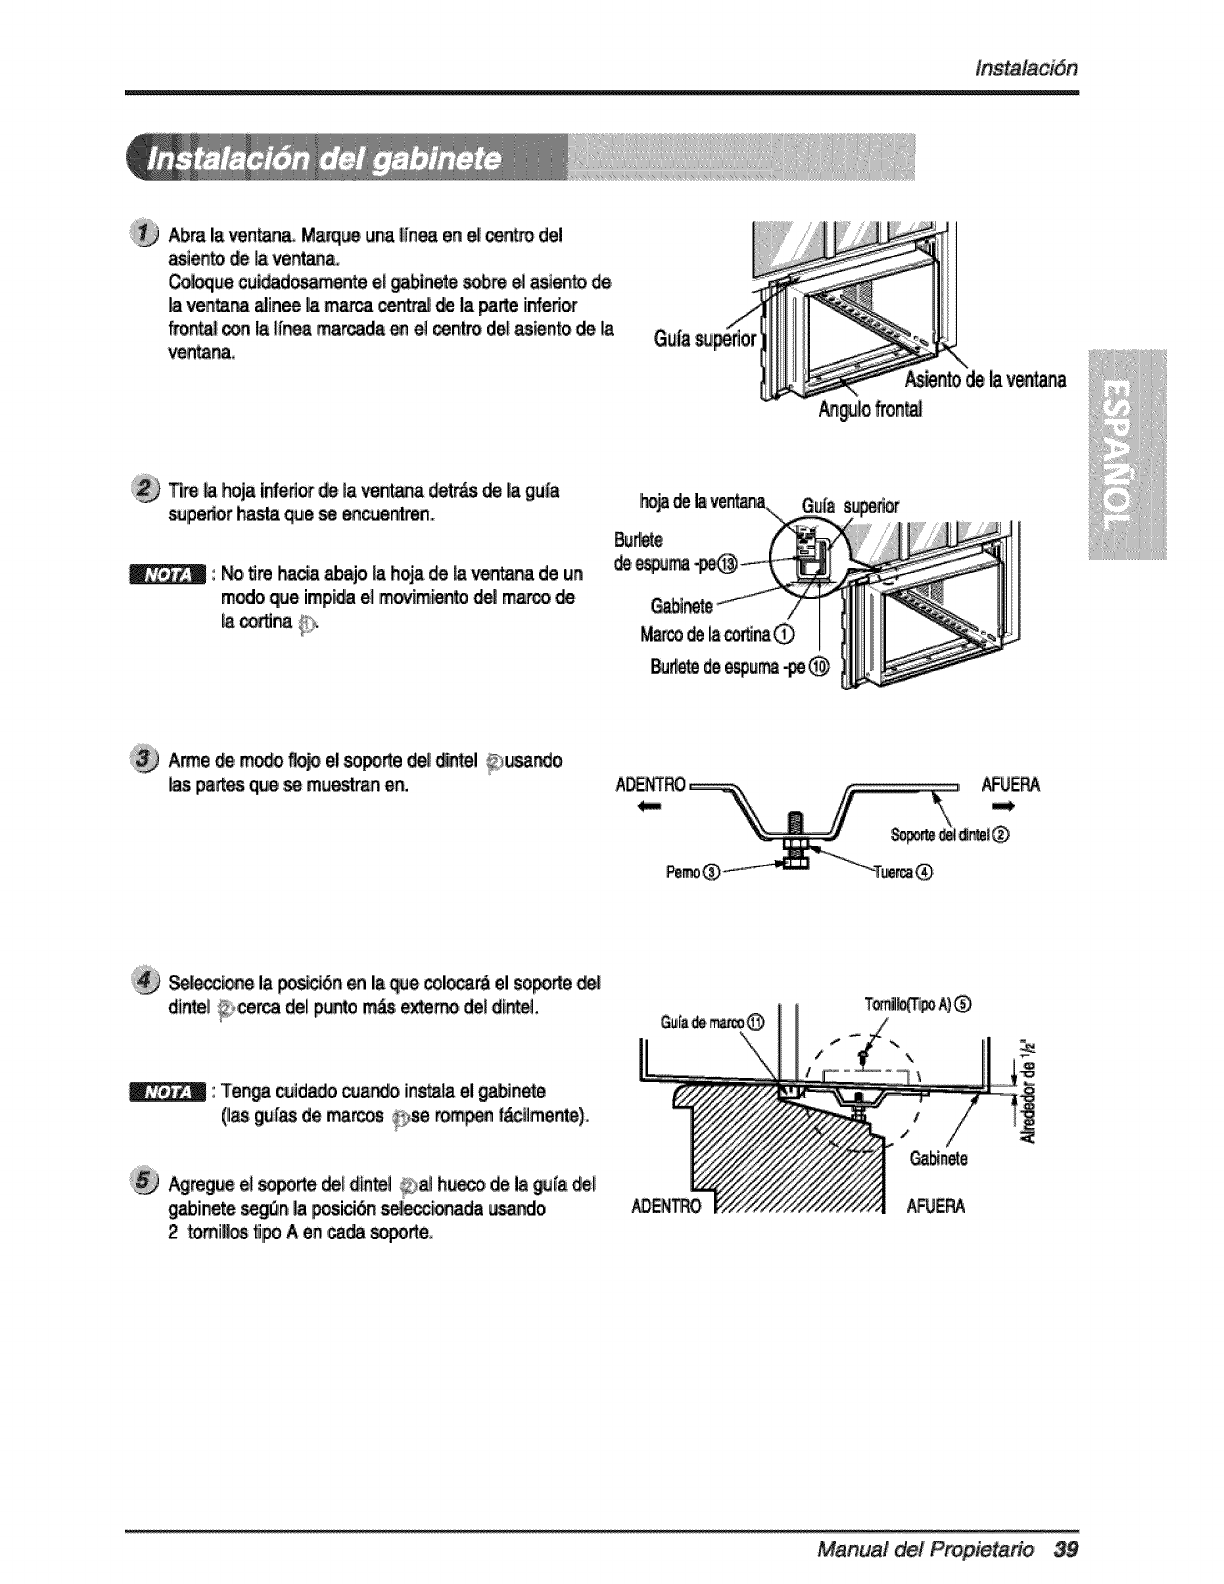
Abmla vent;aria,M_'q_ una|{n_ en e__de!
_enrto _ lave_'_8_
_ue cu_osam_e el _inete _ _ _ento de
v_ra _inee la rn_ c_tmJ _la _rte ir_en_
fronta_conla If_ marsala e_ el _ntro de_as_nto de la
v_r_°
Tire_ahoja il_ed_ _ la ve_a _r_ _/_ gu_a
_pe_r _ que_ e_en_ren°
:_, t_rehada _jo _ h_a _ _ _r_ de u!n
m_ _e imp_ e_mo_m_to d_ rna_ _,
Am_e,_, rn_ _el so.de _ _el _:_u_O AFU£_
_e ia p_ibn _I_ _e colocardel so_
dt_! _:_cer_ delp_ _exte_ deldln_.
_mg_ el _po_e _ d_n_el_>_ h_ de _ _ia_l
g_oi_ seg_ _posici_ __d_ _ndo
2tomi_ filPOAen ,ca_ so_r_e
Manual del Propietario 39
El _n_e ,_be set ins_la_ _n g_ it_
1ado.e_rno qu_e _ _jo _uste e__me yla
_rca del _rte aJdintel 0 _a _ul|l_r el
_inete.
Agr_ue ei g_inete a__n_ de _'ven_
coi_ i_ tomiH_ ® m_ B::_ 1_m _8 -
pul_ga_ - _) atm,_s d_ _ngulo fror_.a!en el
_i_o de la ven_na.
Ti_e _d_a m_ _ _ _€_ina ®_pl_nte _ta
_a _t_l! _, h_a de ver_anay re@_ el paso2.
_Agr_ _da mat_ _ la _na ®_ la hoia ,_
_la unii_d _t_ de_gabi_e0
_RECA_I_N: Pata pro_,_ _ _ut_ad,_n_l!e I_ _r_llos (T!_ A) a _ _d_ _i
ga_n_.
Tomillo _ipo A)
Corte _ butte de e_,u_ ®ea el ia_o ad_uado e
ins_a_ emmilaho_ s_t'_r de la vem_a y ,entah_,@
t_e_r de _ miisma.
Aim Acondiciona_r
:_ Agr_ue Ma_r_de_ _ flj_ 0' _n un,tomtlle
Ttpo C ® de_,ve_na @
Agr_ue la parr'l!_fr_l _ g_fnete i_o _s
_s_Sas en _ _r_lla dentro de i_ _stat_as de_
fren_ _1 giabil_. Empuje la Ip_ill_ hasta que,se _je
en e|lust.
Tire hacla ab_ ia paSHa _ _,tmda y a_g_rela _n
un _flo Ti_ A® a _rav_ de _ _r_fla frontal
V_ e_ DATOS DE ELE_iC|OAD _ _ir
Manua_ det tario 41
In nes de _ncionamiento
Los co,ntroles tienen este aspecto.
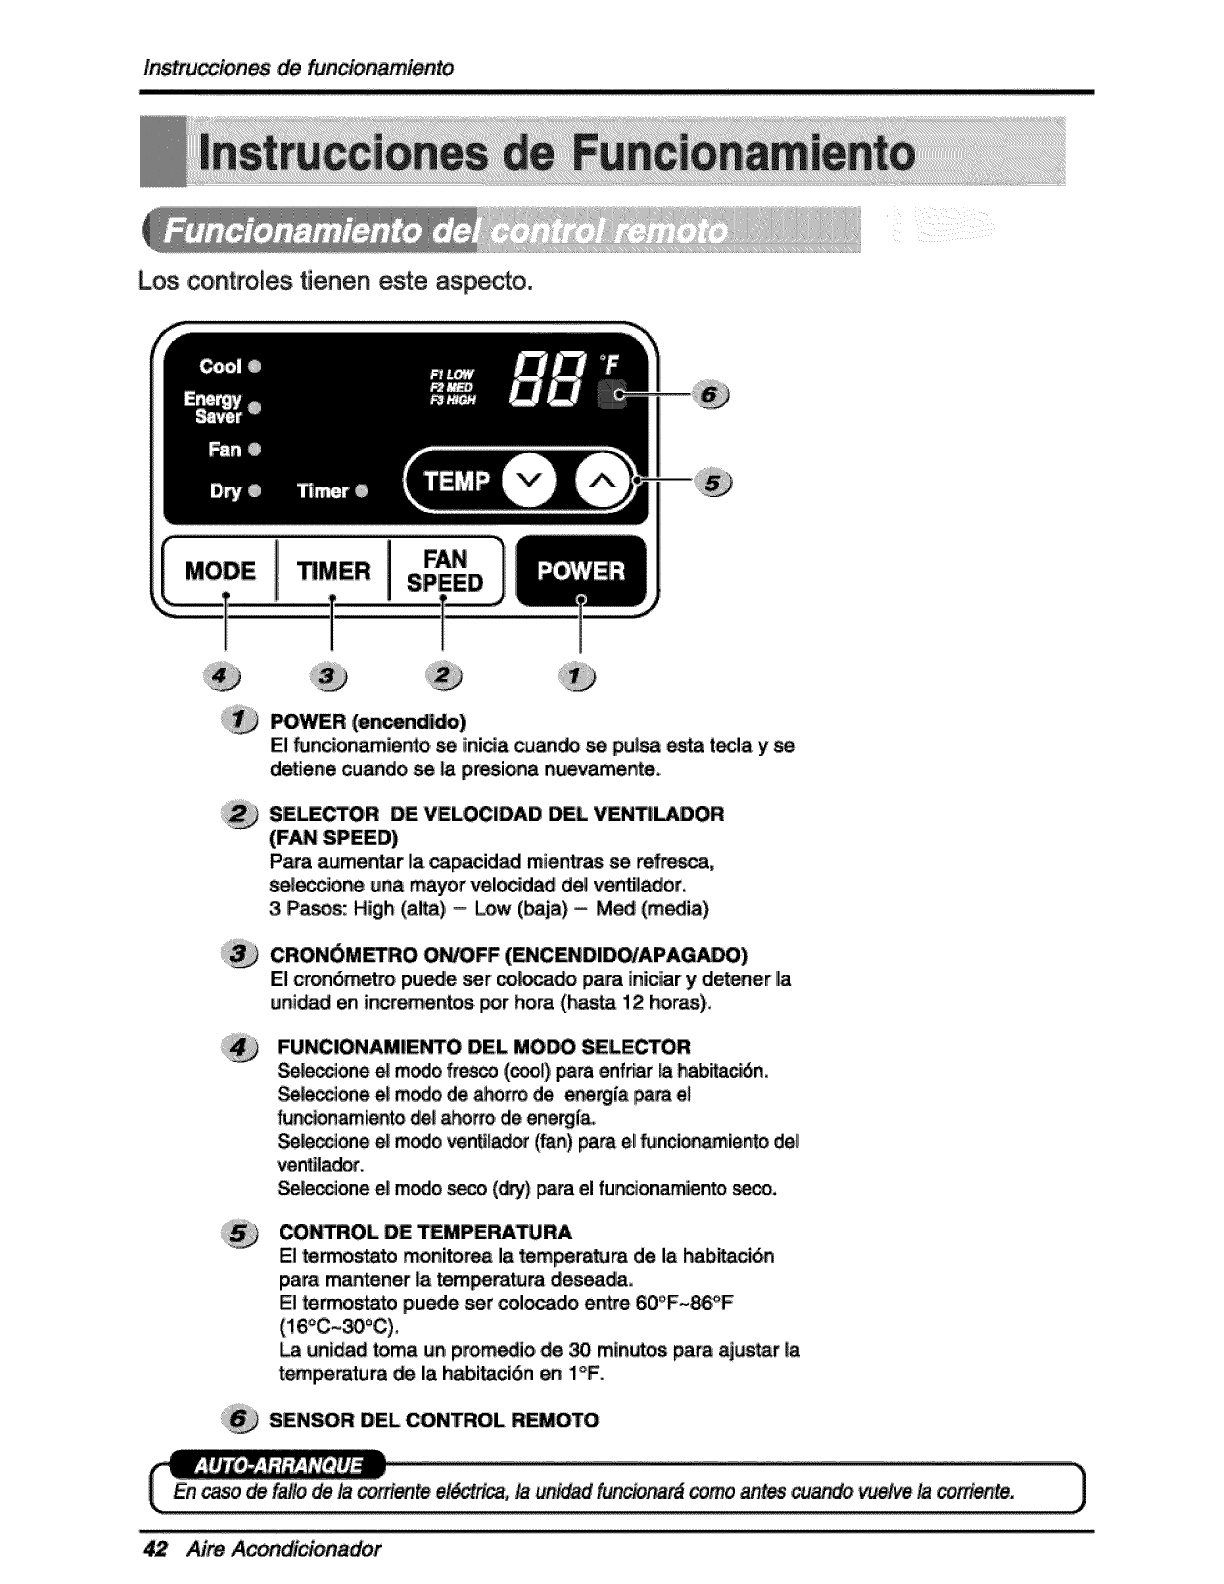
_WER (e_nd_)
El _nc_onamie_o se inida cu_ _pu_a _t_la yse
d_iene cu_do se _presi_a nuevamenteo
SIELE_,R DEiVELOCIDAD _L VEN_OR
(F_ SPEED)
P_a _mentar Ila_pacidad mien_as se refresca,
_ecci_ u_na_yor veloddad d_ v_l_or.
3 P_s: High (alta)- Low (baja) -M_ (m_ia),
CRON_M_O O_FF (_C_DIO_APAG_)
IEIcron_ pu_e ser _para inii_iar y detener I_
uni_d en ir_r_,entos _r hora (_ta 12 ho_),_
FUNCIONAMIENTO DEL MOI_ _LECTOR
S_one _m_o fresco (cool') para enf_ _ h_ita_n,
_cc_one _ m_o de _de _rgia _ el
fiJn_namlento dlel/a_rro, de ene_i_
Se_c_one _ modo _ntt_a_ (_) pare el fijnci_miento dei
ve_lad_.
Se_ccione el modo _o (_) _ta el funcionam_nto seco.
_ROL DE TEMiPEP,A_RA
El 'termostato _ni_rea la _em_ratura de la habitaci_
para ma,_ener _ tem_ratura _seada,
El termostato pu_e set colocado en_e 60°F~86°F
La unload toma un, p_m_io _ _ m_n,_tospara _r
t_peratuta _ la _bi_ci5n en I_F.
SENSOR IDEL CONTROL R_OTO
Aire a,dor
In_t_ciones de fun_onamiento
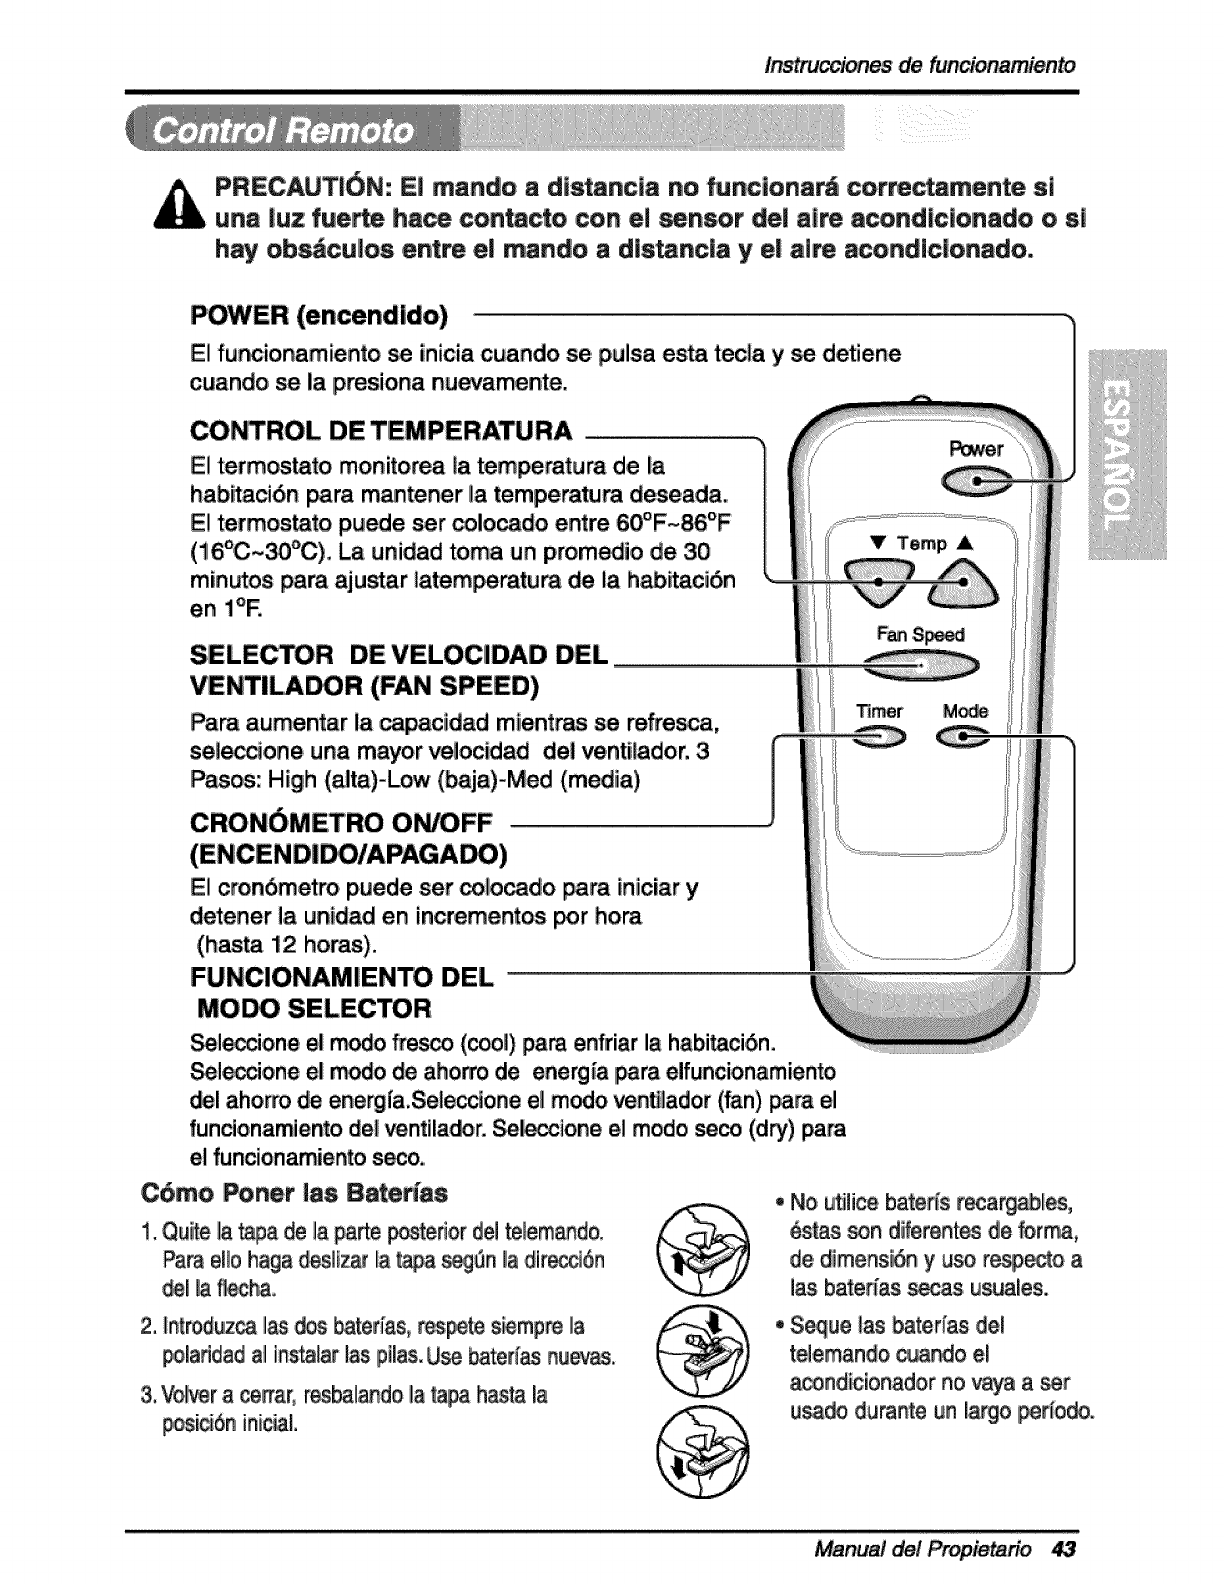
PRECAUT|6N:: El mando adi_ancla no _ncionard cor_m,ente si
una _uzfue=_ ha_ con_cto ,con el _nsor del aim acondic_onado o s|
hay ob_cuJos e,nt_ e| mando adis_ncJa y e| air'e acondicJonado.
POWER (encendido)
El fu_ionamiento _ inicia cuando se pulsa esta tecla y se detiene
cuando _ la pmsiona nuevamente,
CONTROL DE TEMPERATURA
El termcLstato monitorea la tempemtura de la
habitaci6n _ra m_tener Ila tempera_ra deseada.
El termostato puede ser coiocado entre 60°F~86°F
(i6°C~30°C). _ unidad toma un promedio de 30
minutes pare ajus'_ar latem_ratura de la h_itacibn
en l°E
DE VELOClDAD DEL
VENTILA_R (FAN SPEED),
Pare ,aumentar la ,ca_cidad mientms se refresca,
seJeccioneuna mayor velocidad del ventilador,3
Pasos: High (alta)-Low (baja)-Med (media),
CRON6METRO ON/OFF
El cronbmetm puede ser _lo_do para in'iciar y
detener la unidad en incrementos _r hem
(has_ i2 horas).
FUNCIONAMIENTO, DEL
MO_ SELECTOR
_l_ione el _do fresco (cooll) pare enfriar la habitaci6n.
_l_ione el _o de aho_ de energia para elfuncionamiento
_1 aho_o de energ{a.Se_e_one e_m_o ven_ador (fan) _ra el
funcionamiento del ventila_r. _lone e_mode seco (dry) _m
el funcionamiento seco.i
C6mo _net |as Baterfas
!. Qui=ieIlatapa de la _rte posterior de! telem_do.
Pa_ erie haga _sliz_ la t_ _n _adlrec,_6n
2. _n_zca I_ _s _ter_as,respe_ s_mpre la
_la_idad al in_alar las p_las.U_ _ter_as _¢_s.
3,V_ra cedar0res_la_dolat_a h_ta la
'V Temp
T_mer M_
,No u_licebater{s recarg_les,
_s son d_erent_ de _r_,
de d'imensi_ y u_ resp_o a
Iz_sba_e_ass_as usuales.
• S_ue t_ _t:er{as del
telemando _,_o el
acond_ionadornovaya a _r
usa_ du_nte un I_ge _r{o_.
Manual de/Prop_,ario
Instrucciones de funcionamiento
El flujo de aire puede ser aju_azto cambiando la dir_ciSn de
I_ reiillas de ve_i!_iSn d,elaco_dici,onador,de,re. Esto
puede tambien incr,ementar/a eficacia del acondicionador de
aire..
Ajustar la dir_cibn del fllujo de aire
Ajustar las reiil_as verticales hacia la izquierda y_recha
carnbiar,_ el flujo hodzont_.
Ajustar la dir_c:ibn del flujo de aire vertical
Ajustar el _&be horizonta_ hacia arriba y _,aj_amb, iara
el flujo de _re venice. El &l_e pued_er ajustado
mo,viendo la parte _sterio, r del &t_,ehacia ardba o
ab_o.
Ajustar el flujo de aire horizontal
OrientaciOn r,_omendada de las rejillas
Ajuste las rejill_ hacia .arriba para _levaral m_imo a
eficacia del fresco.
Ajustar e_flujo de aire vertical
Control de ventiiacibn
P_ra maxima ef[ciencia de fres_ra_ C]ERRE ]a ventiliad6n_ Esto permitir& la c[rculaci6n in_rna de aire.
ABRA la ventiiaci¢n para d_rgar el aire vicia_.
CERRADA _ VENT_LACION _ AB_ERTA
Manual del Propietario
Operating Instr u_ons
_bo de DesagOe
En cJimas hSmedos, es posibJe que la
Bandeja _dora se Benne de ague.
Pare qu{_r eJ ague acumu{ado, es
p_ciso _nectar el tube de desagQe.
Quite la Tape de_ DesagQe y conecte eJ
Tube a ta Bendeja Eveporadore.
Este aparato de eire econdicionado va
equipedo _n un venti_edor de
extra_i6no (V6ase la ilust:raci6n de
abe|o). EJ ventilador tiene un anil_o
extemo que gira en el ague que recoge
en la plancha base al entrar en
profundidado _ _nden_ci6n _a recoge
el ventHador y ta expuJsa a trav6s dei
condensado5 haciendo m&s eficiente ef
aparato de aire econdJcionado.
PRECAUTi6N: Tenga cuidado a| In te| tube _drenaje. A|_jaio de
|a area aguda para evttat e| des|ice y|esiones _t usted mJsmo,
Remevedo de |a Ven_na
Apague el aJre acondicionedo, des_necte e{ cord6n el6ctr_co del toma cordente,
remueva la cerradura deL marco y Jos tomiiEos instalados en Japarte superior e
inferior de los peneJes, y gu&rdelos pare reinstelaci6n. Cierre {os paneJes.
Manteniendo el eire acondicionado fuertemente, levante ei marco de la ventana, y
cuidadosamente, incline el aire acondicionado hecia arras, botando cue|quiet
ague condensada. Des{ice el aire acondicionado 1" ala derecha, Iuego _ev_nte_o
de la ventana y remu_vale le banda de_ marco de la ventana.
_egOrese de drenar TODO el condensado del aparato de aire acondicionado. Si
no Jo hece, podrie salirse mientras transporte el aparato, ensuciando, con el
consiguiente peHgro de resbaiones. Este stmpie paso te ahorrar& tJem_ de
{impieza y har_ de su Iugar un entorno m_s seguro.
Manual del Propietario 45
Mantenimie#toy servicio
Filtro de Aire
RevBe pot le menos dos _ces aJ mes si no es ne_sado limpiiar el filtro,de _re. _s iparticuias detenidad se
pue_n acumu_r en eI filtro imp,idiendo el fluio dei ake, ilimitando e_rendimiente de en_fdamientoy _usan_
ilaacumuliacion _ ihieloen el ev_orador. Pi"_edeir de [a Jimpieza de[ fi[#o de aire:
;_iiiiii[/[[/!iiii_i_ii!i
,ii,li IIl
1. Le,,ante Ilarejilla _ entrada
2. Saque e_filtro, de aire de la rejilla delantera sacandolo iigeramente hacia arriba.
3. Lave elifiltro con agua tibia de temperatura menor de .40_ (104_).
4, Escurra ligeramente el agua s_r_te ,del filtro y vuelva a insta!_lo_
Limpieza del Aire Acondicionado
pardBa frontal pu_e _r limpia_ con un t_apo hum_o
mojado en un d_tergente suave. El g_inete pue_ _r
[lava_ _n j_n suave o detergente y agua tibia,
entonc_ pulido Cera Uquida para ap_ato& Papa
asegura_se una eficiencia _nflnua, _asb_inas del
co,ndensado,r (del lado ,ex£u_to a[ exterior) de_ set
revisado y lavado peri_icamente _.a. _t que se tr_que
con b_ura o po,lvo de la atmosferico.
Manual del Propietario 46
Mantenimiento y servicio
Como Remover la Parilla Frontal
1 Tire de la rejiIla ,de ,entrad,ahacia de]ante
agarran_ ambas lengSetas y tire de] fiitro del aire
hasta sa_rlo
2 Saque ,e!tornilWo,que asegum la Parfi!la Frontal
/
3, Suelte el lado, [zquierdopdmero. D_pu_
cuida_samente hale des_ la parte de arriba y
empuje hacia la derecha_ Las lengSet_ est&n
asegurad_.
47 Aire Acond_cionador
Mante_imiento y _tv_"io
i
i
A_s de Llamat el _wicio de Asistencla T_cn|_
Si tiene problemas con su _nUlador, _ea las informaciones siguientes y trate de
resolver el problema, Si no puede encontmr la so_uc_n, detonate el ventilador
y dirqase a su sumlnistrador.
El ve_lador no funciona
1. Compruebe que el "¢enUladorest_ conecta_ en un enchufe _ecto.
2, Revise el fiJSible,
3. Compruebe que la tensi6n no sea demasiado al_ o _ja.
A! ajustar-_ e! enfriam_nto, e! aire no par,_ fr|o !o sufic!ente
i. Re'_se si los ajustes de la temperatura son correctos
2. Revise si el flltro de _re no estd ata_ado de polvo. En el _so de que sf,
cambie el filtro.
3. Compruebe que afuera no haya un obstdcu]io del flujo de aire y si entre la
parte trasem del ventilador y la pared o la barrera haya espacio libre de por Io
menos I mmro (20").
4. Cie_e todas las puertas y ven_nas y_mpruebe que no haya una fiJente de
calor en la habitaci6n.
Antes de Iiamar al sewicio, tenga a bien revisar la siguiente lista de
problemas y sus _luciones.
E! _aire est_i fun normalmente cuando:
• IEscu_a on sonido me_li_. Lo _usa eli agua que _coge e] _ndensador en
d{as I]iuviososo en condiciones de mucha humedad. Esta caracter{stica e_
diseSada para ayudar a quitar la humedad en el aire y mejlorar la _pacidad de
Consulte la secci6n del VenUlador de e_ra_i6n en ia pdgina 45.
•Oye un clic en e! termost3to. Lo _usa e! cic!o de! _mpresor que comienza y se
•Ve gotear agua de la parle po_erior de la gnidadi. El agua puede ser re_gida
en la bandeja de base en condiciones de mucha humedad o dfas de lluvia. Esta
agua desbo_a y gotea desde la parle po_erior de la unidad.
•Oye funcionar el ventilador mientras el _mpresor estg silencioso. Esto es una
_racterfstica operativa normal,
A/re
Mantenimientoy servicio
El acondicionador de mire p,u_e estar _ncionando ano_almente cuando: =
El mire
do no
El mire
a_,ndiiciona
do no enfrla
_rno
El mire
do enfria
ii_i____!__ii____!!!!__!__!____i__i__i_ii!iiii_!i!ii_!i!i__ii_i__!i!_i_!i!_i_!i!_i_!i_!i!_i!_i!!_i_ii_!i!!!i!!!i!i!i!!!ii__iii!i_!_i!__i____i_!_!_!_i_i_ii_ii_ii_i!_ii_ii_i!____!____!i!_i__!_!!_!!_!i__i__i_i_i_ii_ii_i!i!!ii!iiiiiiiiiiiiiiiiiiiiiiiiiiiiiiiiiiiiiiiiiiiiiiiiiiiiiiiiiiiiiiiiiiiiiiiiiiiiiiiiiii!i!_i_!!!!i!i!iiiiiiiiiiiiii!i_i_i_i!!!!!i!i!iiiiiii!i!_!_!_!_!_!_!_!_i_i_i_ii_ii_ii!!i!!!!!!!!i!!i_!_!!_!i!!i!!!!!!_!i__!__!_i!_!!_!i__!_!i!iii_ii_ii_!i!ii!ii!ii!ii!i!!!!!i!_i!iiiiiiiiiiiiiiiiiiiiiiiiii_iiiiiiiiiiiiiiiiiiiiiiiiiiiiiiiiiiiiiiiiiiiiiiiiii_i!i!ii!iiiiiiiiiiii!i!iii!i!!iiiiii!!!i!!!!i!!!!!i!i!i!!!!!!!_!!_!!!_!!iii!!!ii!_!__!_____!_!_!_i_i_i_ii_ii_!iiiii!i!iiiiiiiiiii!iiiii!iiiiiiiiiiii!i___
• Aseg_re_ que ei mire a_ndicionado
es_ _ne_do compietamente aia
fuente de energia.
• Cheque los _sibles/inte_uptor de _a
_sm y r_mplmce los _sibles. o
r_s_blez_ ei inte_ptor de energlao
del m_o, a a_gmdo (Tipo Me.nice ),.
Cuando _ la e_fa se _um,.
_ 3 minutes pare _n_r el
_ndicionador de ai_ _ p_enir
disparat!! ove_o_ del _mpm_.
,presion el _t61n RES_situade en el
enchufe del cable de aliimen_i61n
Se_iCjiO CU_ii_°
_gQre_ .q!ueno haya CO,haS,.
persianas o muebles _equeando e!
_en_, del mireacondidenado.
• _us_r e__n_ol de tem_mtura a un
n_mere m_is bajo..
• Limpie el _ltro per io m,en_ cada des
semanas.Vea Imse_i6n de
instruccionesde operad6no
Cuando usted enciende e_ai_
a_ndidonadlo debe _pemr un
memento _=m que I!ahabi_ci6n se
enfde.
, Esta_ez_ una tem_ratura m_s alta.
• IEIlijae_mode a_, del ventHmdorHigh
Fan oenfri.ado alto High _ol con el
term,estate en e_n_me_ i o 2.
* Usted puede _ferirse e_ Energy Star p_rama _,n todo, de_i_ an _ e_ya_r.gov.
Manual del Pr_ietario 49
Nota
50 Aire Acondicionador
LG E_ectr_lcs line, repara_6 o su_r'6, gratuffamente, su producto s[res_a defect_so en maCreda_eso mane de
obra _Jo cor_]c_on_ no,t_es _ u_ durante _ _r'_o die garan_a _nd_do m6s abajo, a _ff_r de
_a fecha de c_prai de[ producto original per par'te dell coiinsumldo, r, IE;_e garan_e II_ml,taida s6_o es v61[da para e_
comp, redot or_g_n_ de[ p_oducto, y efecflva s_ cuan,do este se utii]_oe dentfo de _ Estados Unities, incluyendo
AJaska, Hewer, y I_ t_#_ estad,ounl_nses,
__GARAH1JA:
_no _ _ 5 a_ _ ]a _ha
Pl_: 5 _ _ ]o _c_ de compra
_mpre_: 5, _ _ _o fec_ de
comma.
_me _ te_6f_o 1y _ecci_e _ o_n
_ecuada_ _ot f_, tenga _s_ble el t#o _ pred#cfo _#e
_ndicbnado). _rero _ mode_o, nQm_o de _, yc_go
La mane de o_a b_jo gar_n_a cub_e _ coste de la Asi_stenc[e
domic_[o _ toda_ _s p_za_, _nc_uyendo el com_ot.
_$TA GARA_f_A SE OTO_A !EINSUST|T_C!_N O _XCL_SI_N DE TODA OTIRA'GA_A_T_A, EXPR_SA,'0 _PL_C|TA,
|_LU_NDO $_ _MIT,_ CLIAL_i_R GA_A DE C_DAD 0|_E|DA_ CO_ UN __ _CR_O. E_
MEDiD'A_iNQ_ C_A&QUIiE_G'A_AN_[A I_PIJCITA ESO_LIGADA i_R iLA L_YoiF.STALiI_iTADA EN D_RAC|_N AL
_R[O_ DEGARA_A YA _ENCIO_DO, ILGNO SE_. I_SPONSA_ #E NI_NG_NDA_O _ICAN_, IND|_, O
DAiSes [_LT_$ O AC¢:|DENTALi_$__R LO _i£ _ _MiI_AC|O'NE$ O EXC_ _[_ONAD_ _[DEN NO
SER_J,_LES _ _ CASO,
ESTAGAR_A UMIrrADA NO SEA_CA
1Las 'v_s#es_ A_te#c_a a domldHo _ta entregat, recoger y/o _nsto]at el ptoducto, instruct o sustffu[r
f_b_es _ _ c_a o co_regir e_,ca_e(_do, o _l_co_r_ci_ de _rac#nes no aut_odas; y
2_
&
DaSos o problemas do func]onam[_fo pr,evocados per un use inadec_ado, abuse, fu,nc_onam_ento
f_era do e_peclficaciones amblenta_es o contrar_o a requisffos o precauciones on _a Gu[a de
func_onam_ento, acic_dent,e, fuego, _n_ndac_ones, hsta_actdn _nadec_ada, fuerza mayor,
modi_ic_[one_ o _eracio_ no au#or_zad_, co_rfente e_¢t_i,ca o te_,n linco_ecta, o use co,me_c_,
o u_ dls41ntosa iaque_4_ _ro I_ q_ flee, d_o,
N0_ _C_ |_VOS PA_ CUENTE$:
feche _ _slcl_ _ p_f_o.
Deber6 enffegar _na ooipi_ _ _J rec_b,.o_ C_pir_
en e__men!o en _e _ec_b_ _#_lo, ba_ g_ar#[e,
Uame ,al i-8_-_-O0_, 24 _as el dla, 1_as ele
_ana_
Select[one _o opci6n ade,cuodo de] menG, yt,e_go
di_o_ible su tf_ de producto (o[re econd_c[o_o),
nGmero de modelo, n0mero de _e, y c6_go _a_ o
v_ffe nue_o sJtio W_ _ I_/l'_.l__.¢Om
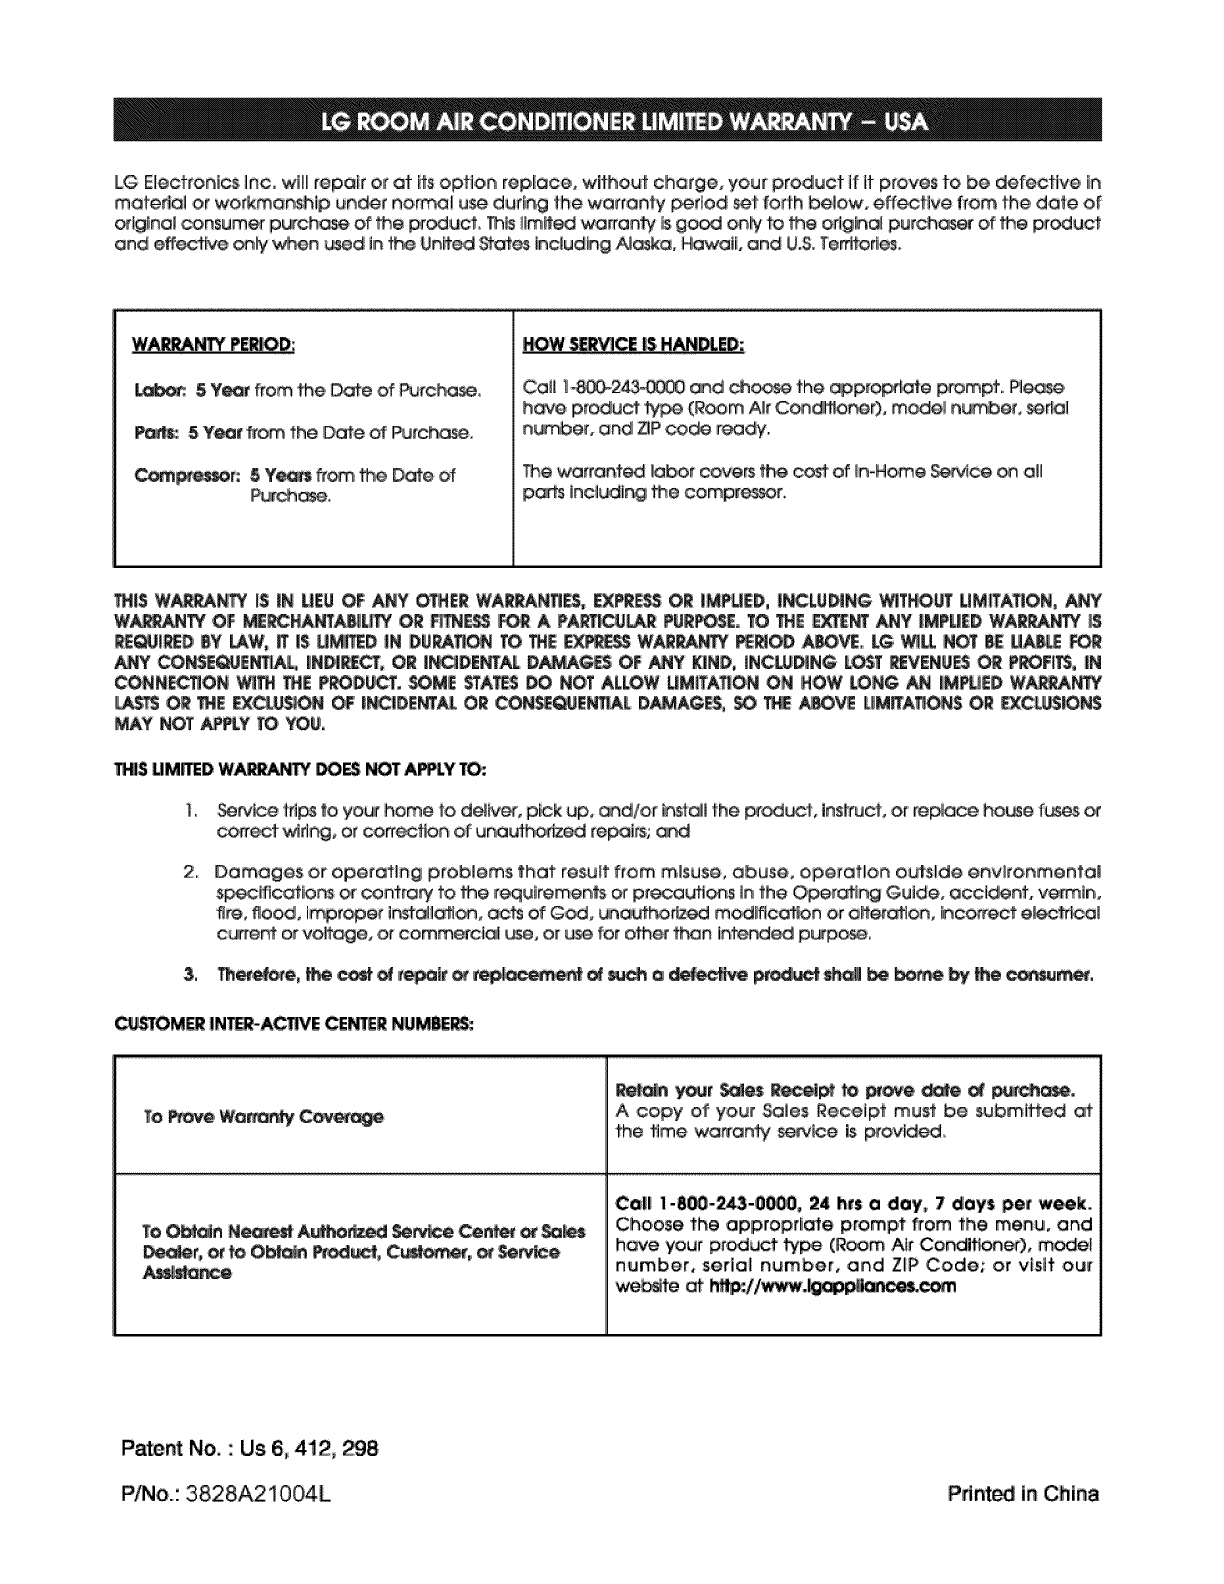
LG Elleotron_es_nc,wS]llrepair or at _bopt_Onl [ep,_QCe, without charge, your product _fit proves to be _tective lin
mate#el or workman_lp un_r norm_ u_ dudLngthe warren@ period _t forth below, effective from the date of
_g_no_ _nsum_ purch_ of Me _odu_, Thb_lml_ _rront¥ _sg_ oin#!to Me _tgh_ pur_a_er of Me _ioduet
and _lly _n _ed Jn_,,e Un_ed _ _nc_ud_gA_kao H,awa_Land U.S.Teetered.
W_TY PE_D:
!_ 5 Year from 'the _e of _rcha_,
_5Year _om the Oa_e of _rc_
_e_r: 5 Y_ from Me Da_e of
Call 11 _ _d _o_e the _prop,r_te _omp¢., iR_
h_¢e product _ (R_m A_r Con_r'_O, mode_ n_', _r_a_
n_er, and _P co_ _ea_/..
_e warranted _t cavern _,e ,_ _In*H_e _Ace o,n all
p_ _n_dlr_ Me comp_r.
_S UMrTEDW_ _NOT A_Y
_° Se_ td_ '1oyo_ home to d_b_ p#k up, _d/or [n_t_l the _d_,ct bs_rucL or rep_oce ho_e f_es
co_rect _d_, or cor_ec_n o,1'unau_d_ed ro_rs; a_
2_ Damages or operating problems, that resuff from mbuse, abuse, ope_ot!lon outside e_vl!toi_menta|
sp,_ficat_on_ o,r ¢o_a_ to Me _r_u_re_n_ or preexists _nthe O,_r_ng Guide, occident, v_m_n,
c_rent or voltage, .or commerci_ u_, or u_ for oth_ t_n inter_ed p_po_
_OM_ |N_ACTIVE CEN_E_ NUMBERS:
Te _ Wm_ C_ A copy of your Sales Receipt must be _bmifted
Me time warrant€ _v_e is provld_.
Cel! !-8_-243-0_, _4 h_se doy_ 7 days pet w_.
Choose the applropd_e promp# from the menu, and
hove your prod_ ty_ (Room Air Co_it_n_), mo_I
number, sedol number, and Z_P Cede; or vbit .ou_
w_te _ h,U_:/,_.__
Patent No." Us 6, 412, _8
PINe.: 3828A21004L PrinL_ in China
