LINKSYS RE9000 WiFi Tri band repeater User Manual 1
LINKSYS LLC WiFi Tri band repeater Users Manual 1
LINKSYS >
Contents
- 1. Users Manual-1
- 2. Users Manual-2
Users Manual-1
MAX-STREAM™
NEXT-GEN AC
TRIBAND AC WiFi
RANGE EXTENDER
extender.linksys.com
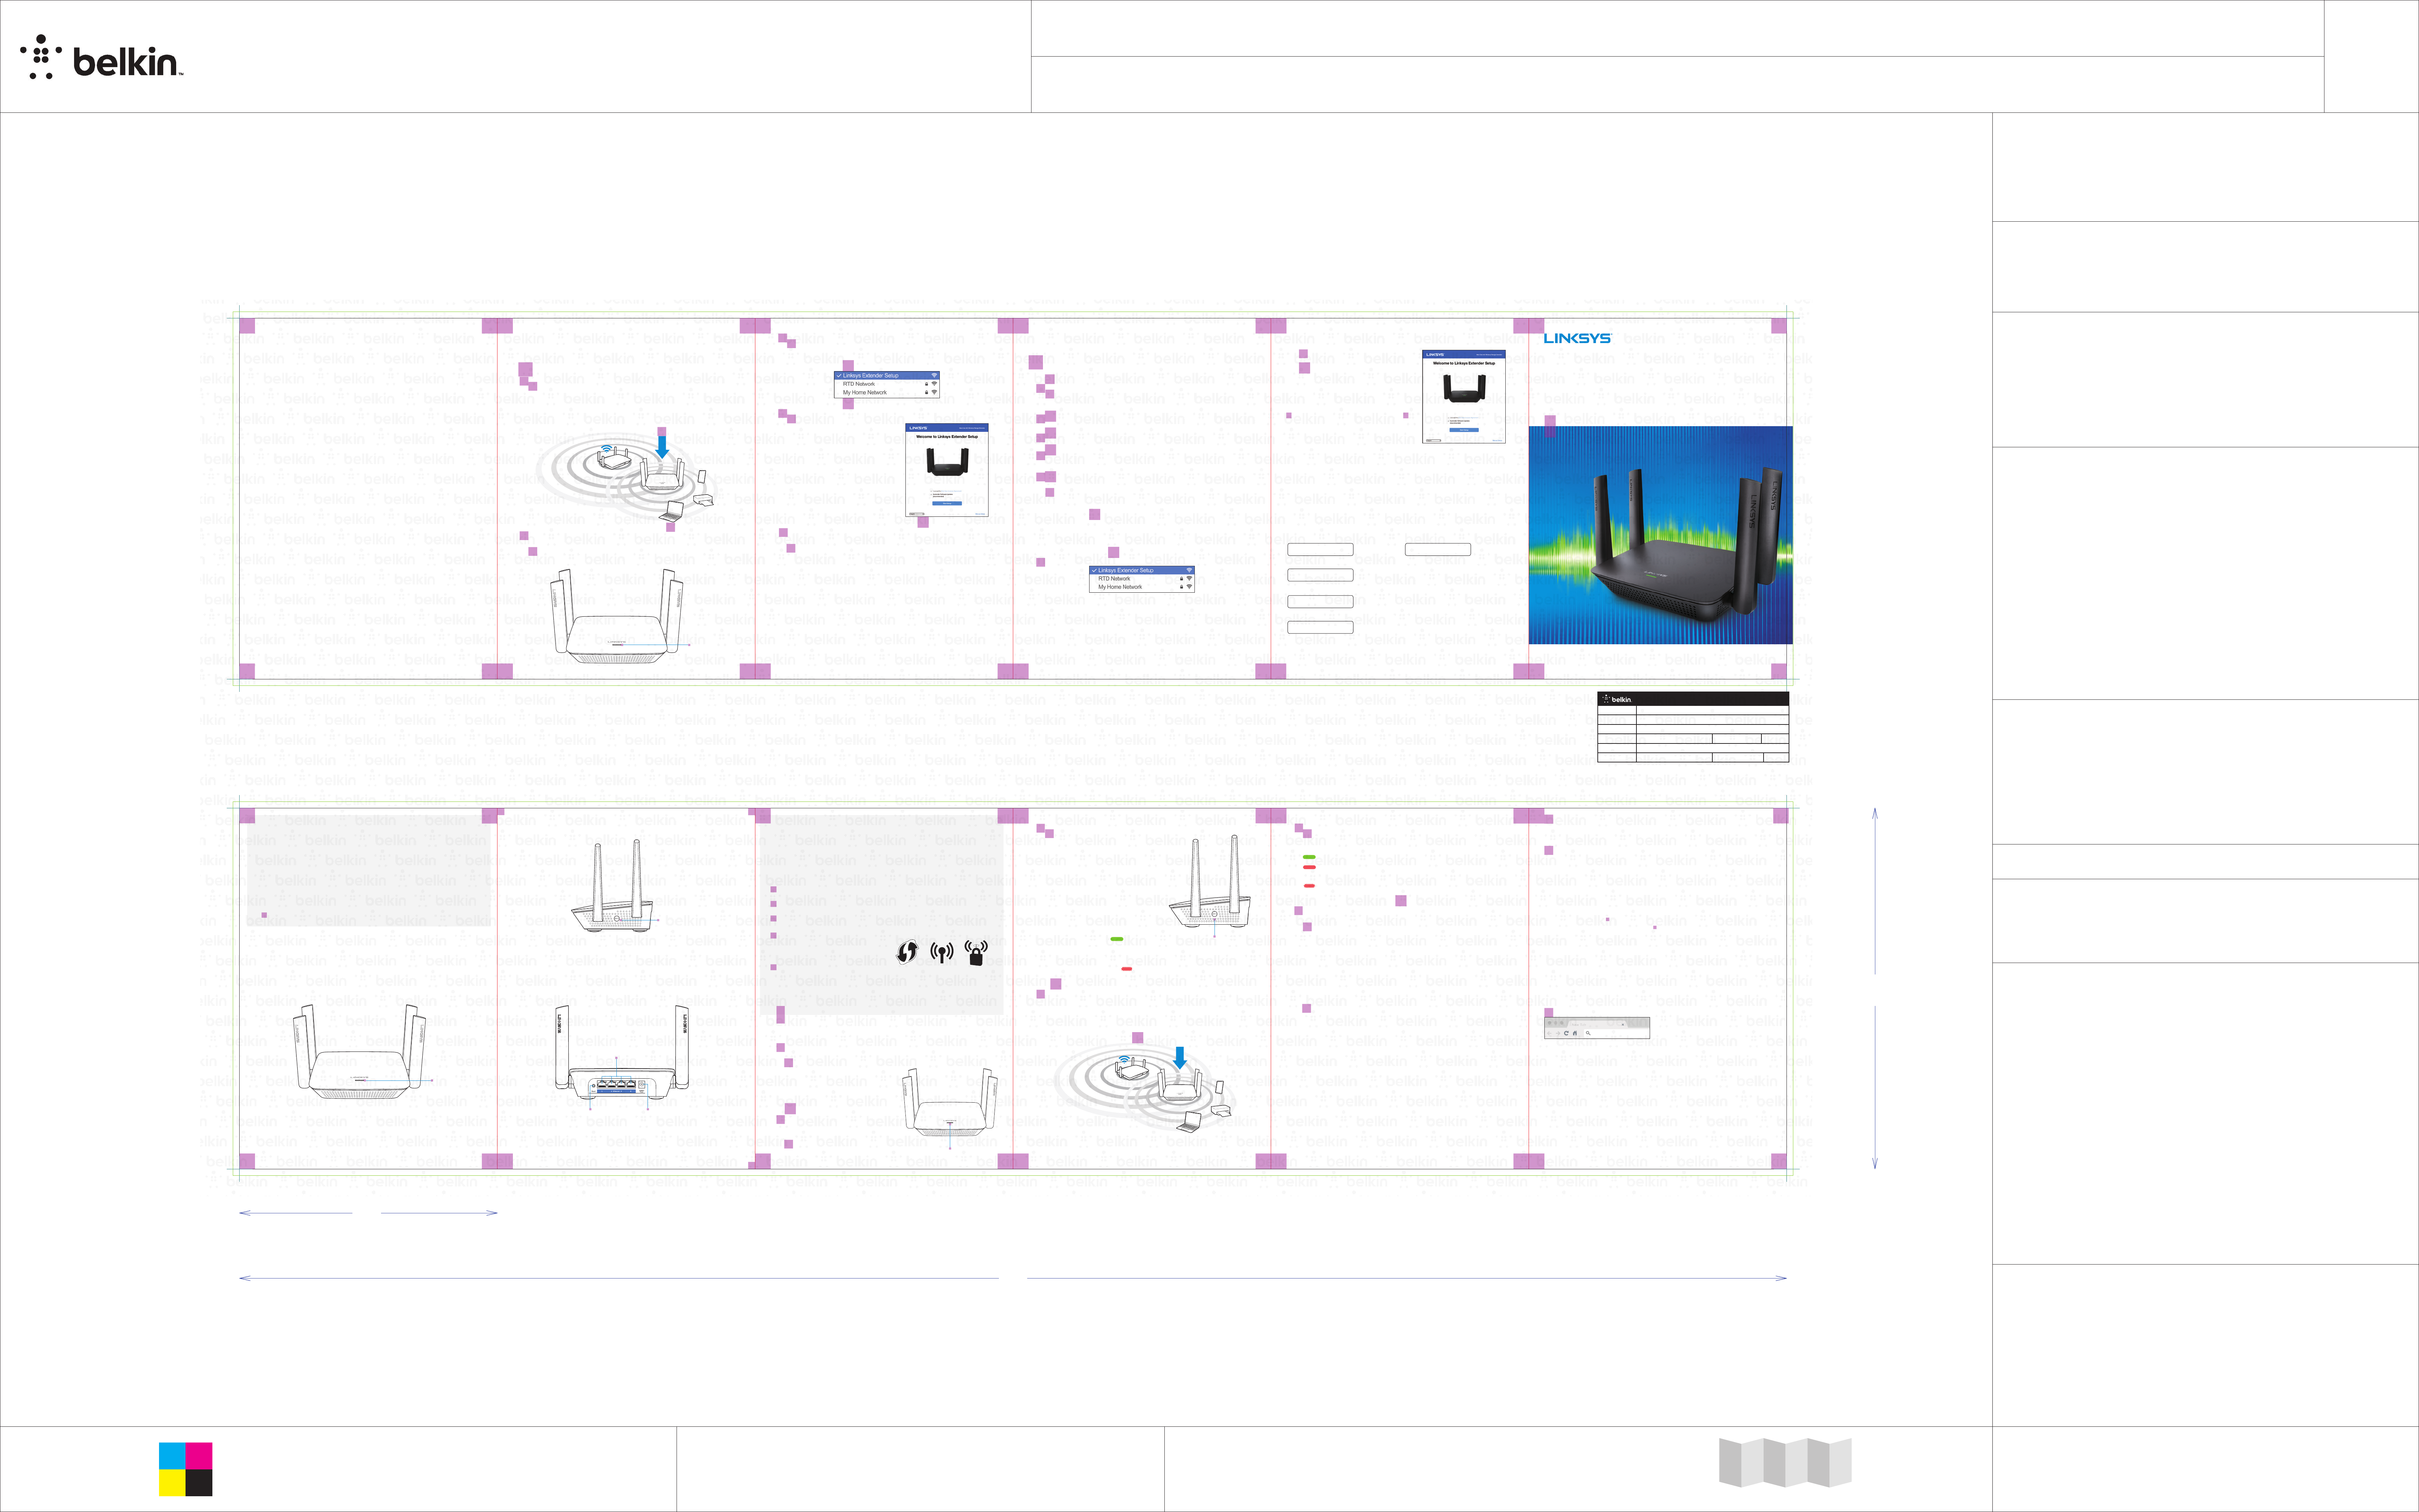
Plug the range extender into an
electrical outlet close to your router.
You can move the range extender
to an ideal location later in step 5.
After the range extender is plugged
in the indicator light on the top will
blink green for up to a minute.
Wi-Fi Protected Setup (WPS)
Setting up as a wireless range extender
Get started
There are two ways to use your Linksys extender: as a wireless range extender or as a wired
range extender (access point). Wireless range extenders boost Wi-Fi range for better coverage
and increased signal strength. Wired range extender (access points) create new Wi-Fi hotspots
when connected to a router with an Ethernet cable. Both scenarios require a router with a
working internet connection.
Before starting setup, decide whether you want to use your RE9000 as a wireless range
extender or as a wired range extender (access point). Instructions for both setups are in this guide.
• The light on the front of the range extender gives you information about power, updating and
signal strength.
2Wait for the light on the top of your range extender to
blink orange.
This can take up to a minute.
3
4
Connect to Linksys Extender Setup network.
On a computer, phone or tablet, connect to the Wi-Fi network:
Linksys Extender Setup.
Launch setup
Enter http://extender.linksys.com
(or try http://92.68..) in a browser
to complete setup. Follow the
on-screen instructions to select
your network to extend, customize
your extended network name and
password and find the best spot
using Spot Finder Technology.
Launch setup
Enter http://extender.linksys.com
(or try http://92.68..) in a browser
to complete setup. Be sure to choose
“As a wired range extender (access
point)” when asked how you want to
use your range extender. Follow the
on-screen instructions to create a
network name and password for
your access point.
Connect your Wi-Fi devices to the extended network you
just created.
Select the extended network on your device’s Wi-Fi manager.
Use this setup method if you don’t have a WPS button on your router, or if you don’t
want to use WPS to set up your RE9000.
Frequently asked questions (FAQ)
Why can I not find “Linksys Extender Setup” in my Wi-Fi list?
Make sure the light on the range extender is blinking orange. If you still can’t see the
setup network, move the device being used for setup closer to the range extender.
Wait for a blinking orange light and refresh the Wi-Fi list.
On browser-based setup, why do I not see the setup screen on http://extender.
linksys.com?
On your device’s Wi-Fi manager, make sure “Linksys Extender Setup” is selected, then
refresh your browser.
On browser-based setup, why can I not see my network name on the “Choose your
wireless” page?
Your range extender might be too far from the router. Move it closer and refresh the list.
I correctly entered my network password during browser-based setup. Why does
the “Enter your password” page still show an error?
The range extender likely is at the outside limit of the router's signal. The signal could
be getting interrupted before your password makes it to the router. Move your range
extender closer to the router.
Why can’t I connect my range extender with WPS?
There are a number of reasons that WPS could fail:
• Your router and range extender are too far apart
• The two-minute connection window expired
• The WPS button on either range extender or router did not depress all the way
• WPS is disabled on the router
• MAC filtering is enabled on the router
How do I reset the range extender to factory defaults?
Press the red reset button on the back of the range extender and hold until the light on
the top starts blinking green.
Why am I experiencing poor signal and slow speed on my range extender?
Be sure that you’ve placed your range extender in an ideal location, as indicated by
Spot Finder Technology. NOTE: When you move around your home, your wireless
devices may not disconnect from the router until they lose the Wi-Fi signal. This may
occur even if the Wi-Fi signal from the range extender signal is stronger (and vice
versa). If you are having connection issues, select the network with the stronger signal.
For advanced configuration, consult the user guide at linksys.com/support/RE9000.
8820-02636 Rev. A0
Write down the extended network
names and passwords you just created.
Extended network names
and passwords
2.4 GHz password
2.4 GHz network name
5 GHz network name
Range extender admin password
Write down your range extender admin
password. You'll need the range extender
admin password if you want to access
your range extender settings.
Admin password
Get Help
Internet: linksys.com/support
Twitter: @LinksysCares
Phone (US/Canada): 800-326-74
(complimentary support during your
warranty period)
Plug in the range extender.
Plug in the range extender midway between your router and the area
without Wi-Fi. Using your mobile device or laptop, be sure you have at least
two bars (around 50%) of your router’s Wi-Fi signal at that location. If you don’t
have two bars, move the range extender closer to the router. You can move the
range extender to an ideal location later using the setup software.
Browser-based setup
WPS is a simple way to connect Wi-Fi devices with Push Button Connect. Routers that support
WPS have a button that might look like one of these symbols:
NOTE — The WPS button will not work if
you have disabled WPS on your router, or
if you have chosen WEP as your network
security type. In either case, continue with
browser-based setup below.
Yes
Continue with Wi-Fi Protected
Setup (WPS) below
No (or not sure)
Continue with Browser-
based setup, also in this
Quick Start Guide
Wait for the light on the top of
your range extender to blink
orange before going to step 3.
This can take up to a minute.
Move your range extender to an ideal spot.
Unplug your range extender and plug it back in midway between your router
and the area without Wi-Fi. Using your mobile device or laptop, be sure you
have at least two bars (around 50%) of your router’s Wi-Fi signal at that location.
If you don’t have two bars, move the range extender closer to the router.
Accessing your range extender settings
after setup
What’s in this Guide
• Your Linksys extender
• Get started
• Setting up as a wireless range extender
• Setting up as a wired range extender (access point)
• FAQ
Your Linksys extender
Front view
Your range extender’s default admin password is “admin”. It is highly recommended that
you change this after WPS setup.
To change or view range extender settings, first connect to an extended network.
If your extended network has the same network name as your main network:
• On a computer that is not connected to a wireless network, use an ethernet
cable to connect directly to the range extender. Open a browser and go to
extender.linksys.com.
OR
• Connect to your range extender wirelessly. Depending on your operating system,
one of the following links will get you to the login page. Choose one and enter it in
your browser.
Android and Windows: http://RE9000
Mac OS X or iOS: http://RE9000.local
If your extended network has a different network name than your main network
(for example mywifi_EXT):
Connect to the extended network. In a browser, go to http://extender.linksys.com and
enter your admin password.
Extend your network.
a. Press the WPS button on your router.
Within the next two minutes press
the WPS button on the side of your
range extender.
The WPS button will light up and the
light on the top of your range extender
will blink green.
Watch the light on the top of your
range extender to verify whether the
connection was successful.
If it turns solid green ,
the connection was successful.
Move to step 4.
If it starts to blink orange , the connection failed. You may try again by
repeating step 3 or try browser-based setup.
• WPS™ button—Use Wi-Fi Protected Setup to automatically and securely add compatible
wireless devices to your network with Push Button Connect.
Side view
• Ethernet ports ()—Connect wired devices to these ports with ethernet cables.
• Reset button (2)—Press and hold until the light on the front of the range extender blinks to reset
extender to factory default settings.
• Power port (3)—Connect the included AC power adapter.
Back view
. Ethernet Ports
. Reset Button . Power Port
Does your router have a WPS button?
Your range extender is now set up. Enjoy your extended
Wi-Fi coverage.
If you have set up your range extender with a Linksys Max-Stream Router, you
don’t have to do anything. Max-Stream routers support seamless roaming, and
your extended Wi-Fi network shares the same network name and password
as your main 5 GHz band. Connected devices will select the main or extended
network as you move around the coverage area.
If you do not have a router with seamless roaming, select the extended network
on your device's Wi-Fi manager. Extended networks are identified by
“Ext”
added to the end of your main network name(s). Password(s) will be the
same as those for your main network(s).
For advanced configuration, consult user guide at linksys.com/support/RE9000.
How to connect your Wi-Fi devices to the extended network
you just created.
5 GHz password
How to connect your Wi-Fi devices to the extended network
you just created.
If you have set up your range extender with a Linksys Max-Stream Router, you
don’t have to do anything. Max-Stream routers support seamless roaming, and
your extended Wi-Fi network shares the same network name and password
as your 5 GHz Wi-Fi band. Connected devices will select the main or extended
network as you move around the coverage area.
If you do not have a router with seamless roaming, select the extended network
on your device's Wi-Fi manager. Extended networks are identified by "_Ext"
added to the end of your main network name(s). The password will be the
same as your main network.
Check light for connection quality.
It can take up to a minute for the ranger extender to boot up after moving it.
During this period you will see the blinking green light once again.
Solid green Ready to use.
Solid orange Weak connection to the router. Find an outlet closer
to your router.
Blinking orange Not connected to the router. Find an outlet closer
to your router.
Prepare for setup
Be sure your router has a working internet connection and you have an ethernet
cable long enough to connect the router to the range extender.
Note—Do not connect any devices other than your router to the range extender
until setup is complete.
Plug the range extender into a wall outlet.
Wait for the blinking light to change from green to orange.
Use an ethernet cable to connect the range extender to the
LAN port of your router.
Connect to the Linksys Extender Setup network.
On a computer, phone, or tablet, connect to the Wi-Fi network Linksys
Extender Setup.
Setting up as wired range extender
(access point)
Browser-based setup
Quick Start Guide
Model RE9000
WPS Button
Light
WPS Button
Light
Light
127.00 x 127.00 x 177.80
Business Unit:
Program Manager:
Packaging Engineer:
Material:
Blank Size (in):
Side Shown:
L x W x D (mm):
DIE LAYOUT
0
Unit:
Flute/Grain:
REV
Intermediate
PRINT SIDE
5 x 5 x 7
L x W x D (in):
127
[5]
177.8
[7]
762
[30]
105 GSM C2S ARTPAPER
BACK
FRONT
IN/MM
Drawing Scale 1:1
Retail Outside Dimension (Including Hang Tab)
DO NOT PRINT
DIE LINES, PRINTERS NOTES
PRINT SPECS:
DIE/MATERIAL SPECS:
762 x 177.800
30 x 7
Die Line File:
NET-Networking
Brian Byrd
Please refer to drawing
IDL_RE9000_US_CA_QIG
Color Plates: Notes:
Artwork File:
horizontal
00
RELEASE DATE: 07/27/2017
Tolerance:+/- 1/32" - 0.8mm
Blank Size (mm):
Finish:
DIELINE:
THIS DOCUMENT & THE INFORMATION
IN IT ARE THE CONFIDENTIAL PROPERTY
OF BELKIN INTERNATIONAL AND MUST
NOT BE COPIED, REPRODUCED OR USED
IN ANY MANNER WITHOUT THE WRITTEN
CONSENT OF BELKIN CORPORATION.
IT MUST BE RETURNED UPON REQUEST
This dieline works for following skus (if any):
.3"
.3"
.3"
.3"
.138"
.138"
.138"
.3"
.3"
.3"
.3"
.3"
.3"
.3"
.3"
.3"
.3"
.3"
.3"
.3"
.3"
.3"
.3"
.3"
.3"
.3"
.3"
.3"
.3"
.3"
.3"
.3"
.3"
.3"
.3"
.3"
.3"
.3"
.3"
.3"
.3"
.3"
.3"
.3"
.3"
.3"
.3"
.3"
FRONT COVER
QSG_RE9000_8820-02636_RevA01
C
Y
M
K
ACCORDION FOLD ALONG RED LINES
FRONT/OUTSIDE: ALL TEXT AND GRAPHIC ELEMENTS COLOR: CMYK
BACK/INSIDE: ALL TEXT AND GRAPHIC ELEMENTS COLOR: CMYK 6-Panel Accordion Fold
BACK COVER
FRONT COVER
ICG PRODUCTION
PR# 5737
FILE NAME QSG_RE9000_8820-02636_RevA01
SKU# RE9000
P# 8820-02636 REVISION A01
DESIGNER jonathan
DATE August 28, 2017 5:25 PM VERSION 04