LINKSYS WAP300N Selectable Dual-Band Wireless-N Access Point User Manual WAP300N UG for certificaionx
LINKSYS LLC Selectable Dual-Band Wireless-N Access Point WAP300N UG for certificaionx
LINKSYS >
Contents
- 1. User Manual
- 2. User Manual - Statements
User Manual
Overview
WAP300N is a highly flexible device which features four modes of operation:
• Access Point (AP) mode
• Wireless Media Connector (WMC) mode
• Wireless Range Extender (WRE) mode
• Wireless Bridge (WB) mode
WAP300N is a selectable dual-band Wireless-N (802.11n) device and, therefore, it can operate in either
2.4 GHz or 5.0 GHz radio band.
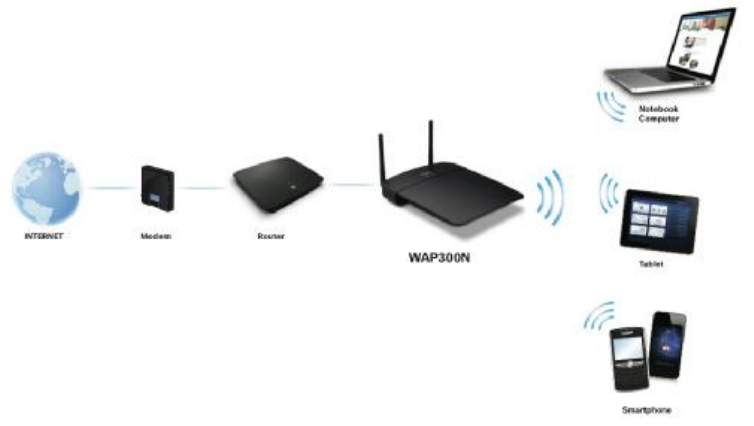
Access Point Mode
• If you have a wired network, this mode adds the ability to connect wireless devices (such as
notebook computers, tablets, and smartphones) to the network.
• If you have an older wireless network, for example, Wireless-A/B/G (802.11a/b/g), this mode adds
Wireless-N (802.11n) networking support to your network.
• If you have a Wireless-N (802.11n) 2.4 GHz-only network, this mode adds support for the 5 GHz
radio band.
• If your current wireless router has a limited wireless coverage and you have a wired network in your
house, this mode can extends the wireless coverage, by creating an additional wireless network, if
you connect this device to your wired network.
Access Point mode is the default operation mode in case the device is being reset to factory default
settings.
If you would like to use WAP300N in this mode,
Step 1: Proceed to Setup > Operation Mode and follow the instructions to set the device to this mode.
Step 2: Proceed to Wireless > Basic Wireless Settings and follow the instructions to configure the basic
wireless settings.
Step 3: Proceed to Wireless > Wireless Security and follow the instructions to configure the wireless
security.
Step 4: Use an Ethernet cable to connect WAP300N’s Ethernet port to the Ethernet/LAN port of your
existing router or your wired network.
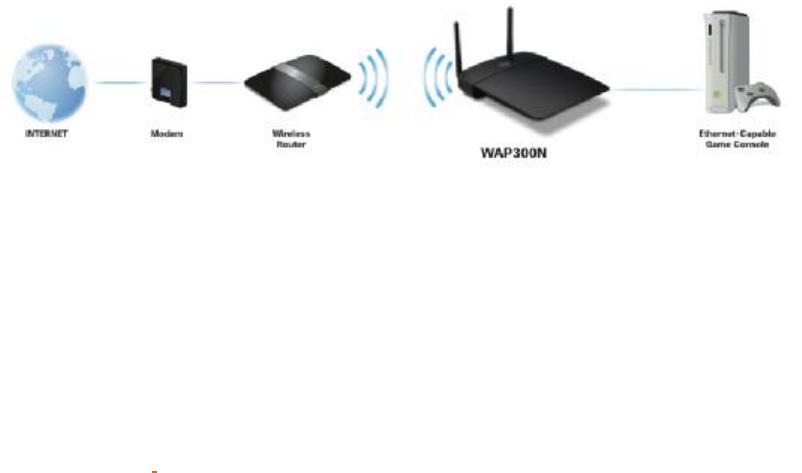
Wireless Media Connector Mode
In this mode, WAP300N adds wireless networking capability to any wired (Ethernet-capable) device (e.g.
game console, media player, DVR, smart TV or network access storage). If you have a wired network
device, connect it to this device for wireless network access.
If you would like to use WAP300N in this mode,
Step 1: Proceed to Setup > Operation Mode and follow the instructions to set the device to this mode.
Step 2: Proceed to Wireless > Wireless Network Site Survey (recommended) or Wireless > Basic
Wireless Settings , and follow the instructions to configure the basic wireless settings.
Step 3: Use an Ethernet cable to connect WAP300N’s Ethernet port to the Ethernet/LAN port of your
wired device that would like to access the wireless network.
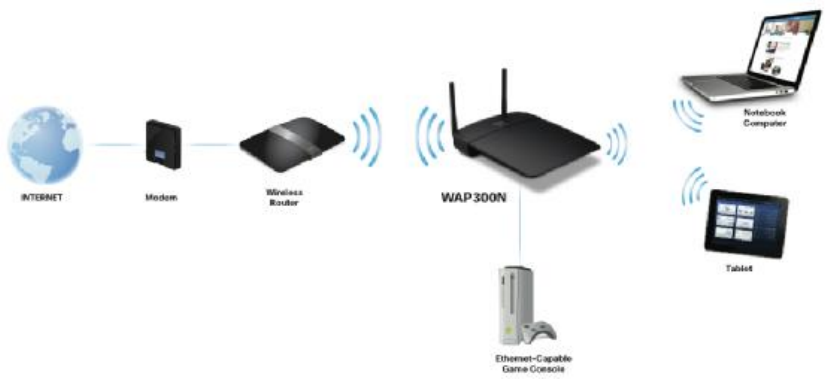
Wireless Range Extender Mode
In this mode, this device wirelessly extends the range of an existing wireless network. At the same time,
it also adds wireless networking capability to any wired (Ethernet-capable) device (e.g. game console,
media player, DVR, smart TV or network access storage).
If you would like to use WAP300N in this mode,
Step 1: Proceed to Setup > Operation Mode and follow the instructions to set the device to this mode.
Step 2: Proceed to Wireless > Wireless Network Site Survey (recommended) or Wireless > Basic
Wireless Settings, and follow the instructions to configure the basic wireless settings.
Step 3: Place WAP300N in between your existing wireless router and the wireless devices that originally
have difficulty of connecting to your wireless router due to weak wireless signal. For the best
positioning of WAP300N in Wireless Range Extender mode, you may need to test it in multiple locations.
Wireless Bridge Mode
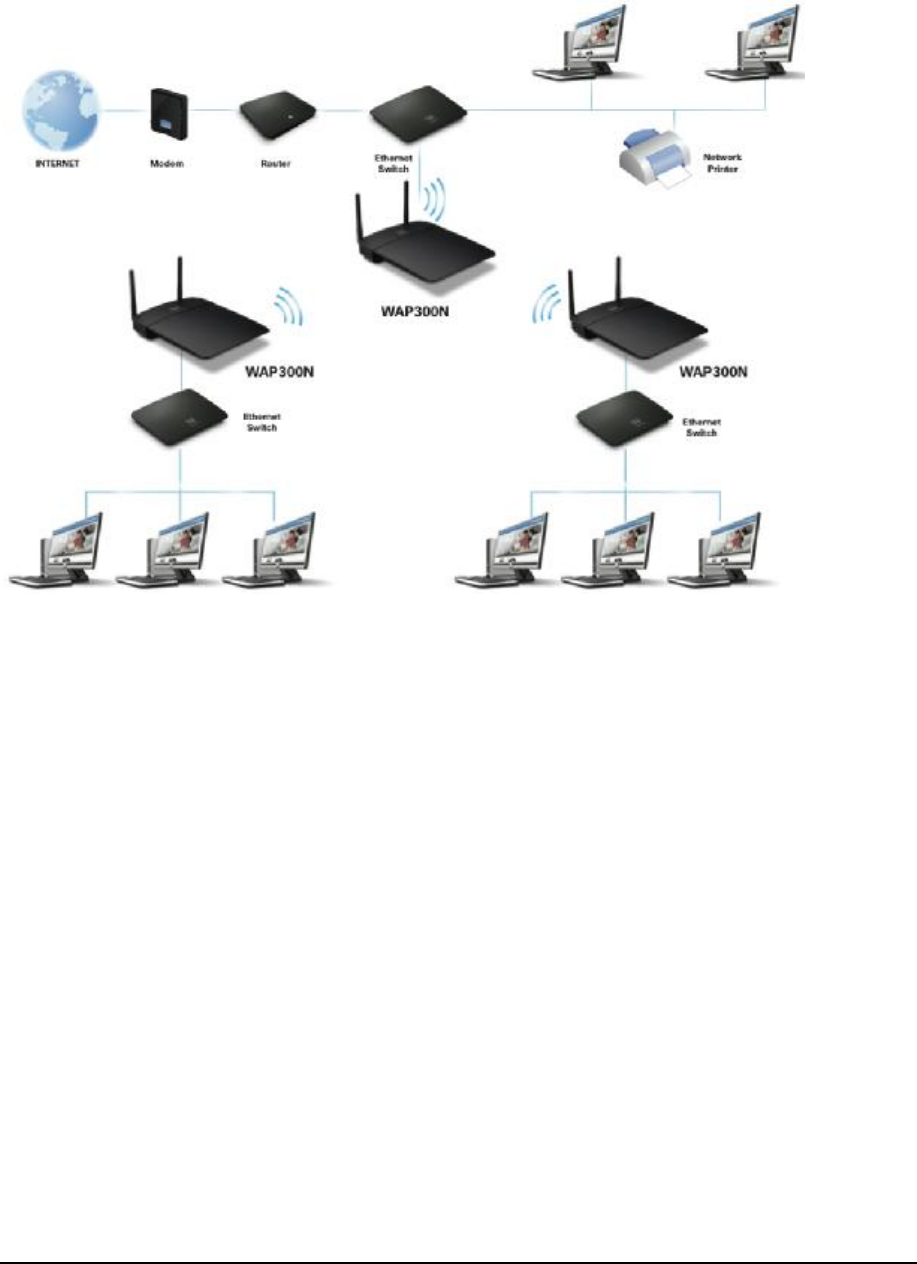
With multiple WAP300Ns operating in this mode, WAP300Ns can wirelessly connect two or more wired
networks together.
NOTE: When this device is set to Wireless Bridge mode, it will communicate only with other WAP300N(s)
that is/are also in Wireless Bridge mode. Therefore, you will need at least two WAP300Ns to make use
of this operation mode.
If you would like to use WAP300N in this mode,
Step 1: Proceed to Setup > Operation Mode and follow the instructions to set the device to this mode.
Step 2: Proceed to Wireless > Basic Wireless Settings and follow the instructions to configure the basic
wireless settings.
Step 3: Proceed to Wireless > Wireless Security and follow the instructions to configure the wireless
security.
Step 4: Connect WAP300N’s Ethernet port to one of your wired networks. Repeat step 1 to 3 on
additional WAP300Ns and install one WAP300N in each wired network that needs to be wirelessly
connected together.

LEDs, Ports and Buttons
LEDs
Wireless
In WMC and WRE mode, the Wireless LED lights (solid) up when there is a wireless connection to the
wireless router (or access point).
In WB mode, the Wireless LED lights (solid) up when there is a wireless connection to another WAP300N.
In all modes, the Wireless LED flashes when the device is actively sending or receiving data over its
wireless interface.
Wi-Fi Protected SetupTM
The LED flashes slowly for two minutes during Wi-Fi Protected Setup. It lights up when wireless security
is enabled. If there is an error during the Wi-Fi Protected Setup process, the LED would flashes quickly
for two minutes. Make sure the wireless client device or wireless router, that you want to connect to
WAP300N, supports Wi-Fi Protected Setup. Wait until the LED is off, and then try again.
Ethernet
The Ethernet LED lights up when there is a wired connection. The LED flashes when the Access Point is
actively sending or receiving data over the Ethernet port.
Power
The Power LED lights up when the device is powered on.
Ports
Ethernet
In AP and WB mode, the Ethernet port connects the device to a router or an existing wired network.
In WMC and WRE mode, the Ethernet port connects the device to the Ethernet-capable device that
would like to access the wireless network.
Power
The Power port connects the Access Point to the included power adapter.
Buttons
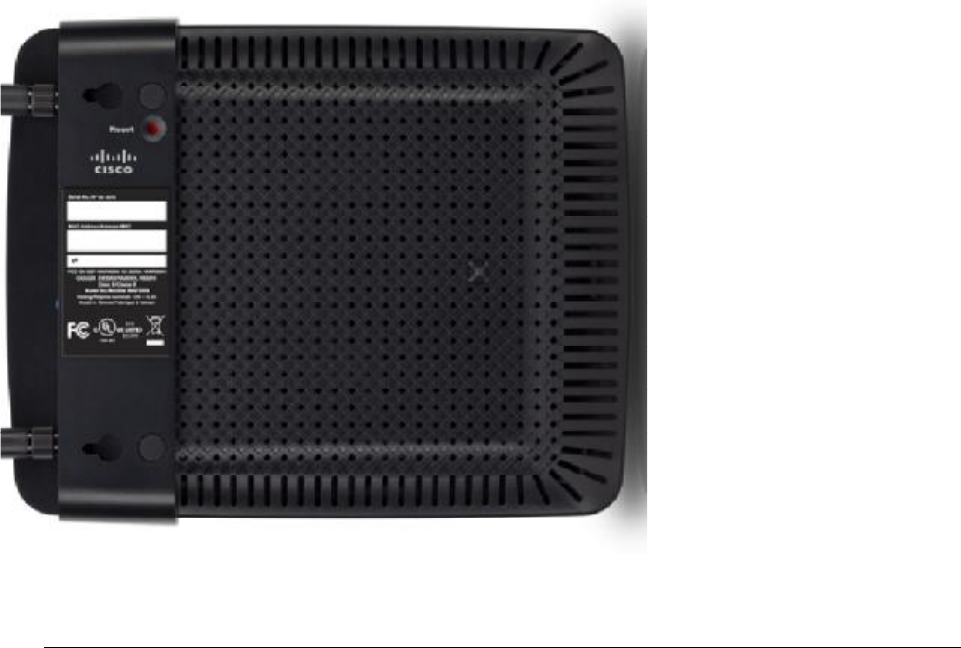
Reset
There are two ways to reset the Access Point to factory default settings. Either press and hold the Reset
button for approximately five seconds, or restore the defaults from the Administration > Factory
Defaults screen in the device’s browser-based utility.
Wi-Fi Protected SetupTM
If WAP300N is in AP mode and you have client devices, such as wireless adapters, that support Wi-Fi
Protected Setup, you can use this Wi-Fi Protected Setup button to connect your client devices to
WAP300N.
If WAP300N is in WMC mode and you have wireless router that supports Wi-Fi Protected SetupTM, you
can use this Wi-Fi Protected Setup button to connect WAP300N to your wireless router.
If WAP300N is in WRE mode and you have wireless router and wireless clients devices that support Wi-Fi
Protected Setup, you can use this Wi-Fi Protected Setup button first to connect WAP300N to your
wireless router and, once WAP300N is connected to your wireless router, you can then use the same
button to connect your wireless client devices to WAP300N.
NOTE: Wi-Fi Protected Setup is not supported when WAP300N is in WB mode.
How to access the browser-based utility
Use a web browser to access the browser-based utility for advanced configuration of this device.
Launch your web browser, and enter WAP300N’s IP address* (the default setting is 10.100.1.1) in the
Address field. Press Enter.
A password request screen appears (non-Windows 7 users will see a similar screen.) Leave the User
name field blank. Enter the password you have created. If you did not create a new password, use the
default password admin. (You can set a new password from the Administration > Management screen.)
Click OK to continue.
* NOTE:
• If the device is connected to a network with a DHCP server (usually the network router), then the
device will obtain its IP address from the DHCP server. In this case, find the device’s IP address in
the DHCP client table of your router (refer to the documentation for your router.)
• If there is no DHCP server (for example, if WAP300N is not wirelessly connected to any other device
and it is connected directly to a computer with an Ethernet cable), then the device will use its
default IP address, 10.100.1.1, until the device detects a DHCP server which will assign a dynamic IP
address to the device.
• If you have set a static IP address on this device through the browser-based utility, then enter the
static IP address instead. If you have set a static IP address on this device but have forgotten the IP
address, you can reset the device; press the Reset button on the device for approximately five
seconds using a straightened paper clip. This will reset the device back to the factory default settings.
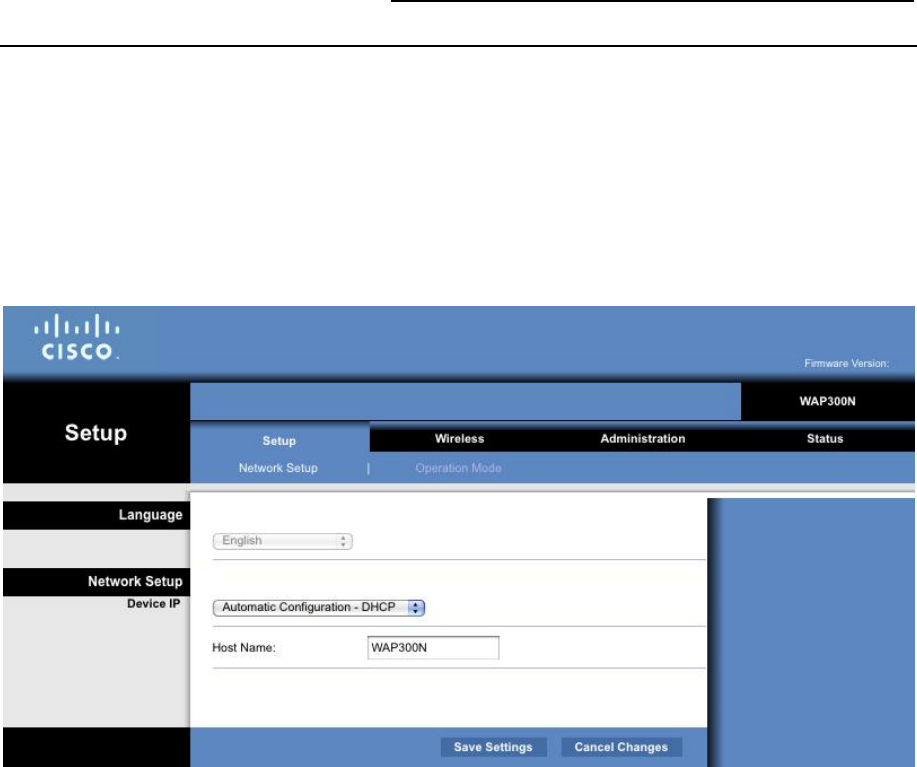
Setup > Basic Setup
The first screen that appears is the Basic Setup screen. Use this screen to change the browser-based
utility’s language, or to change the device’s wired Ethernet network settings.
Language

This is used to set the language displayed by the browser-based utility. Select the desired language from
the drop-down menu.
Device IP
This setting determines whether the device’s IP address is obtained automatically from a DHCP server,
such as your network router (Automatic Configuration - DHCP), or is set manually (Static IP).
If your network has a DHCP server (usually the network router) assigning IP addresses to your network
devices, then keep the default, Automatic Configuration - DHCP. The device will request an IP address
from the DHCP server. If no DHCP server is found, then the device will use its default static IP address,
10.100.1.1, until it has detected a DHCP server and is assigned a dynamic IP address.
For most home networks, leaving this setting Automatic Configuration - DHCP as is recommended.
If you want to set a permanent static IP address for this device, then select Static IP. If you select Static
IP, complete the following fields:
- IP Address
Enter a unique IP address that will be used to access the browser-based utility.
- Subnet Mask
Enter the subnet mask of your network.
- Default Gateway
Enter the IP address of the default gateway for your network (in most cases, this is your router).
Click Save Settings to apply your changes, or click Cancel Changes to cancel your changes.
Setup > Operation Mode
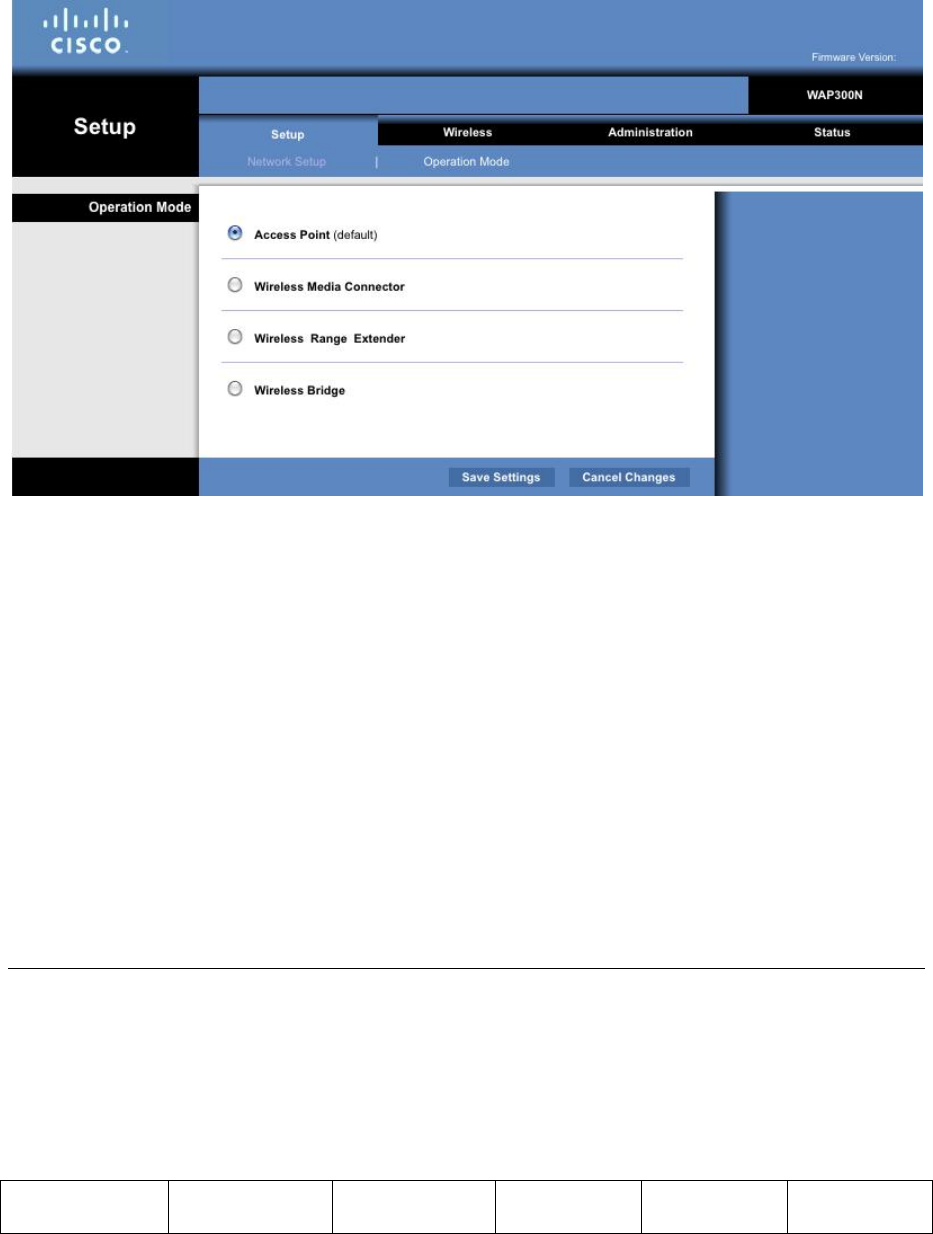
WAP300N supports four operation modes:
• Access Point (AP) mode
• Wireless Media Connector (WMC) mode
• Wireless Range Extender (WRE) mode
• Wireless Bridge (WB) mode
Select the desired operation mode and click Save Settings to apply your changes, or click Cancel
Changes to cancel your changes.
For information about each of these operation modes, please refer to Overview on page XXX.
Wireless
The screens available under the tab Wireless depend on the operation mode that you have selected.
Operation
Mode
Basic Wireless
Settings
Wireless
Security
Wireless
Network Site
Wireless MAC
Filter
QoS

Survey
Access Point
X
X
X
X
Wireless Media
Connector X X X
Wireless Range
Extender X X TBD
Wireless Bridge
X
X
In addition, the content of each screen under Wireless may also change depending on the operation
mode that you have selected.
Wireless > Basic Wireless Settings
(Access Point Mode)
Configuration View
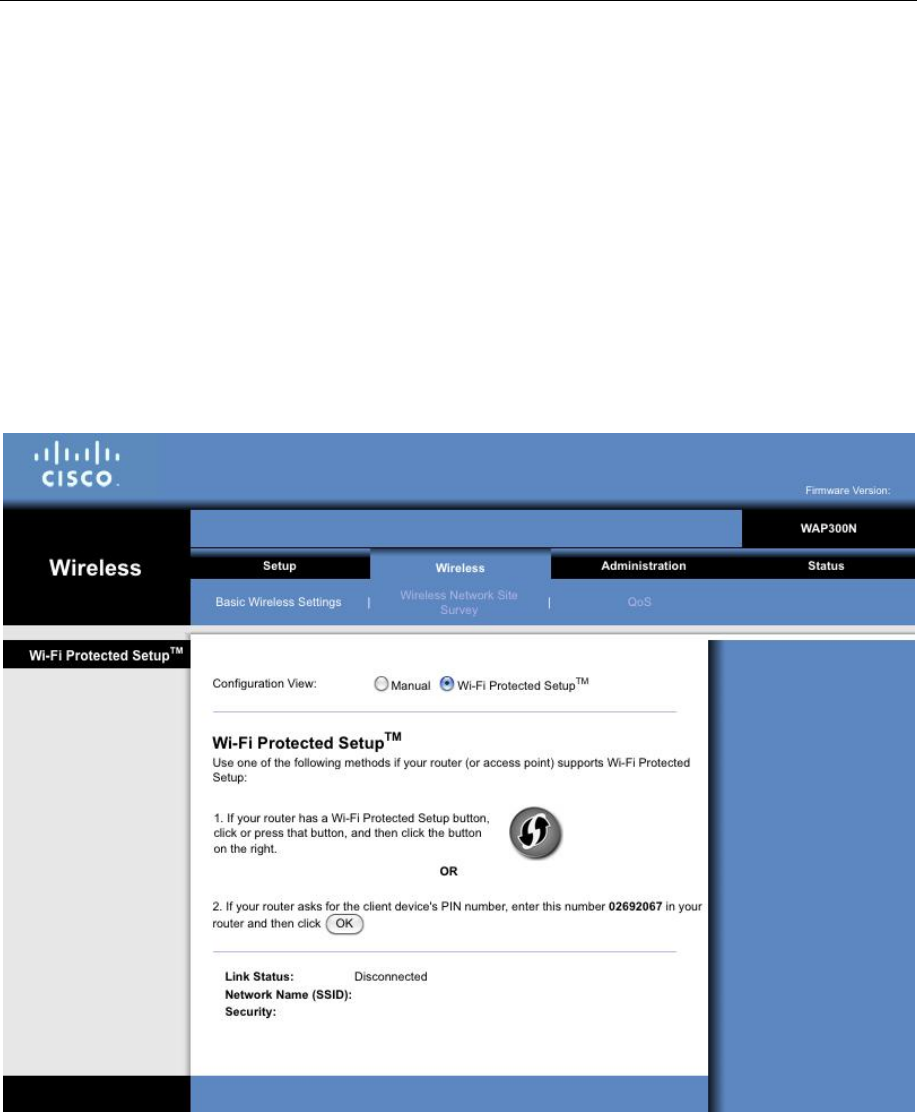
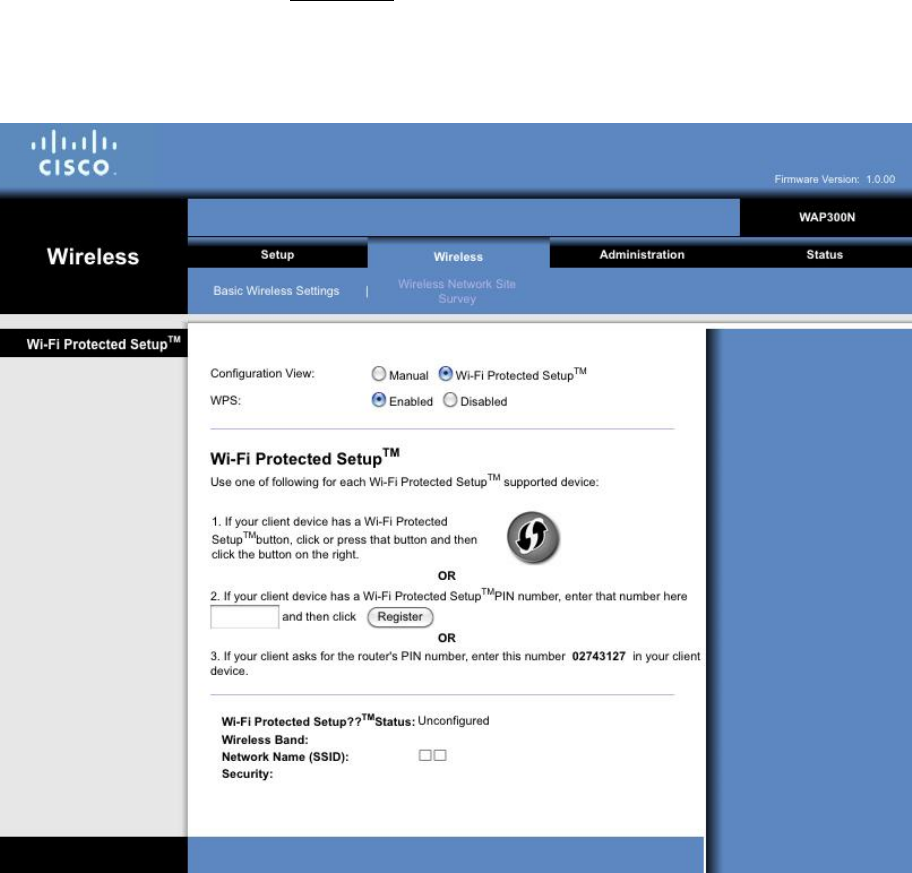
To use Wi-Fi Protected Setup, select Wi-Fi Protected Setup™. Then proceed to “Wi-Fi Protected Setup” .
To manually configure your wireless network, select Manual. Then proceed to “Manual Setup” on pag .
Wi-Fi Protected Setup™
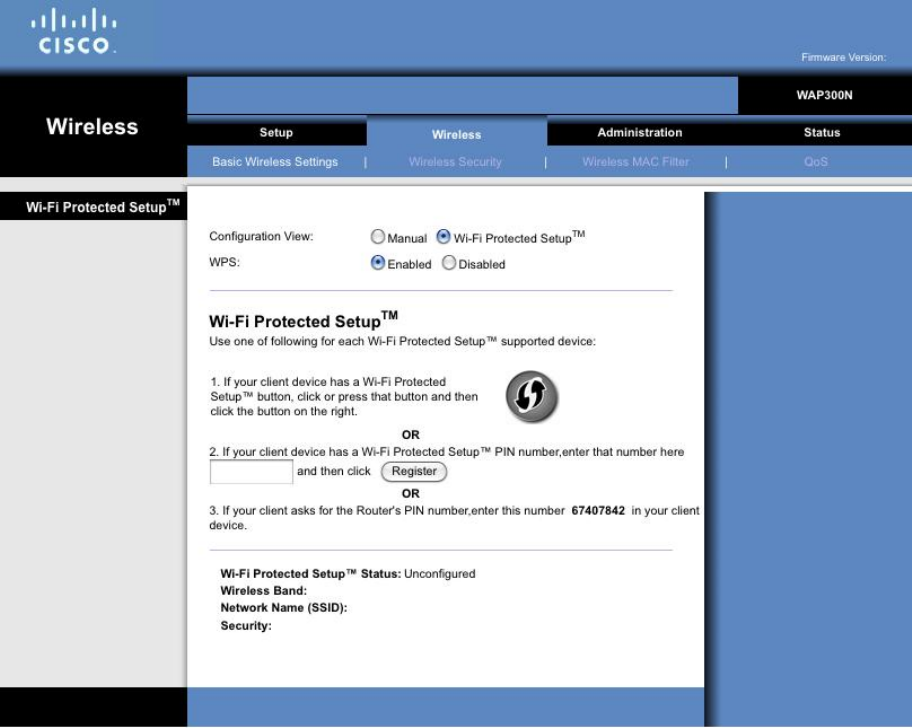
Wi-Fi Protected Setup™ is a feature that makes it easy to set up your wireless network. If you have client
devices, such as wireless adapters, that support Wi-Fi Protected Setup, then you can use Wi-Fi Protected
Setup to configure wireless security for your wireless network. Otherwise, use manual setup (refer to
“Manual Setup” ).
There are three methods available for Wi-Fi Protected Setup.
1. Use Wi-Fi Protected Setup Button
- Click or press the Wi-Fi Protected Setup button on the wireless client device.
- Within two minutes, click the Wi‑Fi Protected Setup button on the access point’s Wi-Fi Protected
Setup screen.
- After the client device has been configured, click Close.
2. Enter Wi-Fi Protected Setup PIN from the Client Device on WAP300N
- Enter the client’s PIN number in the field on this screen.
- Click Register.
- After the client device has been configured, click Close.
3. Enter Wi-Fi Protected Setup PIN from WAP300N on the Client Device
- On the client’s Wi-Fi Protected Setup screen, enter the PIN number listed on WAP300N’s Wi-Fi
Protected Setup screen. Then click Register or the appropriate button on the client device’s Wi-Fi
Protected Setup screen. (The PIN number is also listed on the label on the bottom of the Access Point.)
- After the client device has been configured, click Close.
Regardless which method was used, the Wi-Fi Protected Setup Status, Wireless Band, Network Name
(SSID), and Security mode are displayed at the bottom of the screen.
Manual Setup
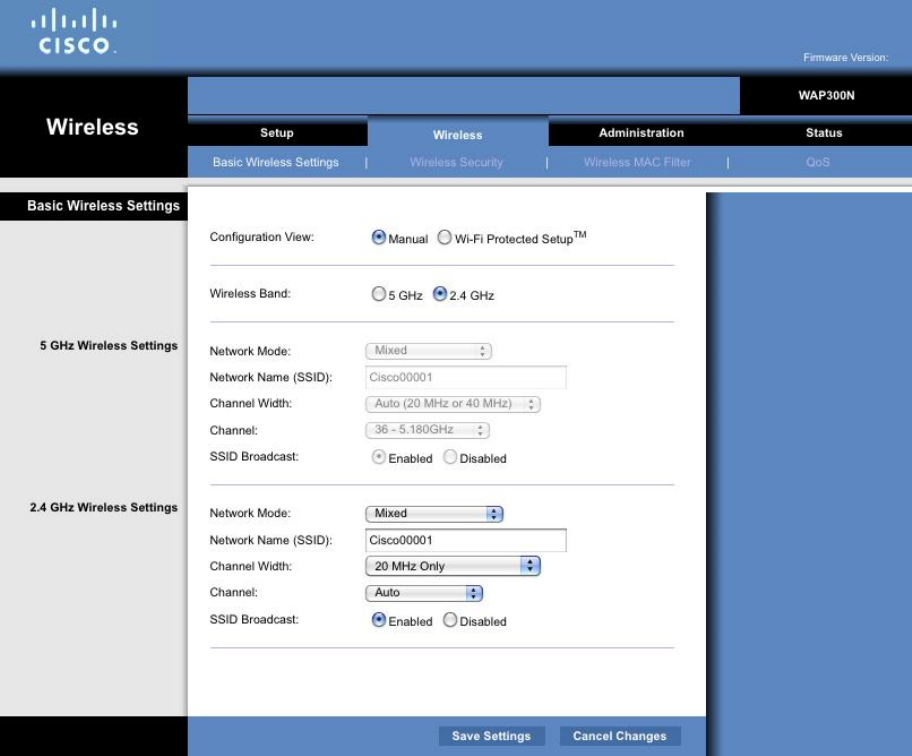
Wireless Band
This is used to select the 2.4 GHz or 5 GHz radio band. The 5 GHz band is much less crowded than the
2.4 GHz band, so it is more likely that you will have your own interference-free channel and, therefore, 5
GHz band is ideal for streaming multimedia. However, not all wireless client devices support 5 GHz radio
band.
Network Mode (5 GHz)
From this drop-down menu, you can select the wireless standards running on your network. If you have
both Wireless-N (802.11n) and Wireless-A (802.11a) devices in your network, keep the default setting,
Mixed. If you have only Wireless-N devices in your network, select Wireless-N Only. If you have only
Wireless-A devices in your network, select Wireless-A Only.
Network Mode (2.4 GHz)

From this drop-down menu, you can select the wireless standards running on your network. If you have
Wireless-N (802.11n), Wireless-G (802.11g), and Wireless-B (802.11b) devices in your network, keep the
default, Mixed. If you have only Wireless-N devices, select Wireless-N Only. If you have only Wireless-G
and Wireless-B devices in your network, select Wireless-B/G Only. If you have only Wireless-G devices,
select Wireless-G Only. If you have only Wireless-B devices, select Wireless-B Only.
Network Name (SSID)
The SSID is the name of your wireless network. A wireless device uses this name to identify which
wireless network it connects to. Therefore, this network name is shared among all the wireless devices
connected to your wireless network. SSID is case-sensitive and must not exceed 32 characters (use any
characters on the keyboard). For easy identification of your wireless network, it is recommended to
customize the SSID to a unique name instead of using the default name. However, do not include
sensitive information in a SSID (for example, social security number or date of birth). It is because SSID
is visible to everyone within the range of your wireless network.
When you connect your wireless device to the access point, make sure you specify the SSID you have set
here.
Channel Width
For best performance in a Wireless-N network, select 40MHz only (only available in 5 GHz radio band) or
Auto. In Auto mode, the access point and the network client devices automatically switch to the 40
MHz mode if:
• Your wireless client devices support the 40 MHz mode in which two 20 MHz channels are
bonded together for better performance.
• There is no adjacent interference.
Channel
Choose the operating channel for wireless network. Your access point will automatically select the
channel with the least amount of interference if you leave the default Auto setting. Keeping the default
setting Auto is recommended.
SSID Broadcast
When wireless client devices look for wireless networks to connect to, they detect the wireless network
name (SSID) broadcasted by the access point. To broadcast your access point’s SSID, keep the default
setting, Enabled. If you do not want to broadcast the access point’s SSID, select Disabled. Keeping the
default setting, Enabled, is recommended.
To apply your changes, click Save Settings at the bottom of the screen, or click Cancel Changes to cancel
your changes.
Wireless > Basic Wireless Settings
(Wireless Media Connector Mode)
Configuration View
To use Wi-Fi Protected Setup, select Wi-Fi Protected Setup™. Then proceed to “Wi-Fi Protected Setup” .
To manually configure your wireless network, select Manual. Then proceed to “Manual Setup”.
Wi-Fi Protected Setup™
Wi-Fi Protected Setup™ is a feature that makes it easy to set up your wireless network. If your wireless
router or access point supports Wi-Fi Protected Setup, then you can use Wi-Fi Protected Setup to
connect this device to your router or access point. Otherwise, use manual setup (refer to
“Manual Setup” ).
There are two methods available for Wi-Fi Protected Setup.
1. Use Wi-Fi Protected Setup Button
- Click or press the Wi-Fi Protected Setup button on the wireless router.
- Within two minutes, click the Wi‑Fi Protected Setup button on this device’s Wi-Fi Protected Setup
screen.
- After WAP300N has been configured, click Close.
2. Enter Wi-Fi Protected Setup PIN from WAP300N on the Router
- On the router’s Wi-Fi Protected Setup screen, enter the PIN number listed on WAP300N’s Wi-Fi
Protected Setup screen. Then click Register or the appropriate button on the router’s Wi-Fi Protected
Setup screen. (The PIN number is also listed on the label on the bottom of WAP300N.)
- On WAP300N’s Wi-Fi Protected Setup screen, click OK.
- After WAP300N has been configured, click Close.
Regardless which method was used, the Wi-Fi Protected Setup Status, Wireless Band, Network Name
(SSID), and Security mode are displayed at the bottom of the screen.
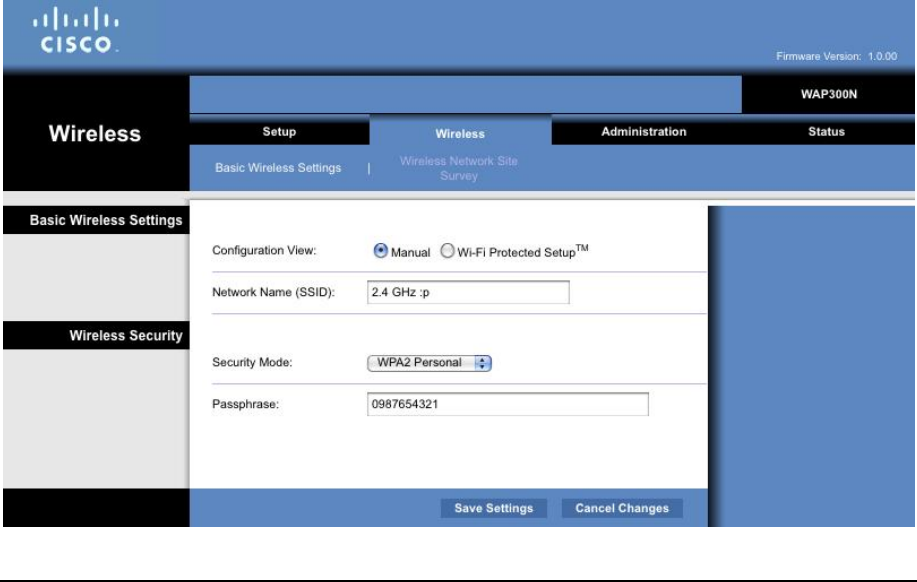
Manual Setup
On this screen, you manually enter the information of your wireless network to connect this device to
your network. Alternatively, you may use Wireless > Wireless Network Site Survey screen to establish
the wireless connection (recommended). To establish the connection using Wireless > Wireless
Network Site Survey screen.
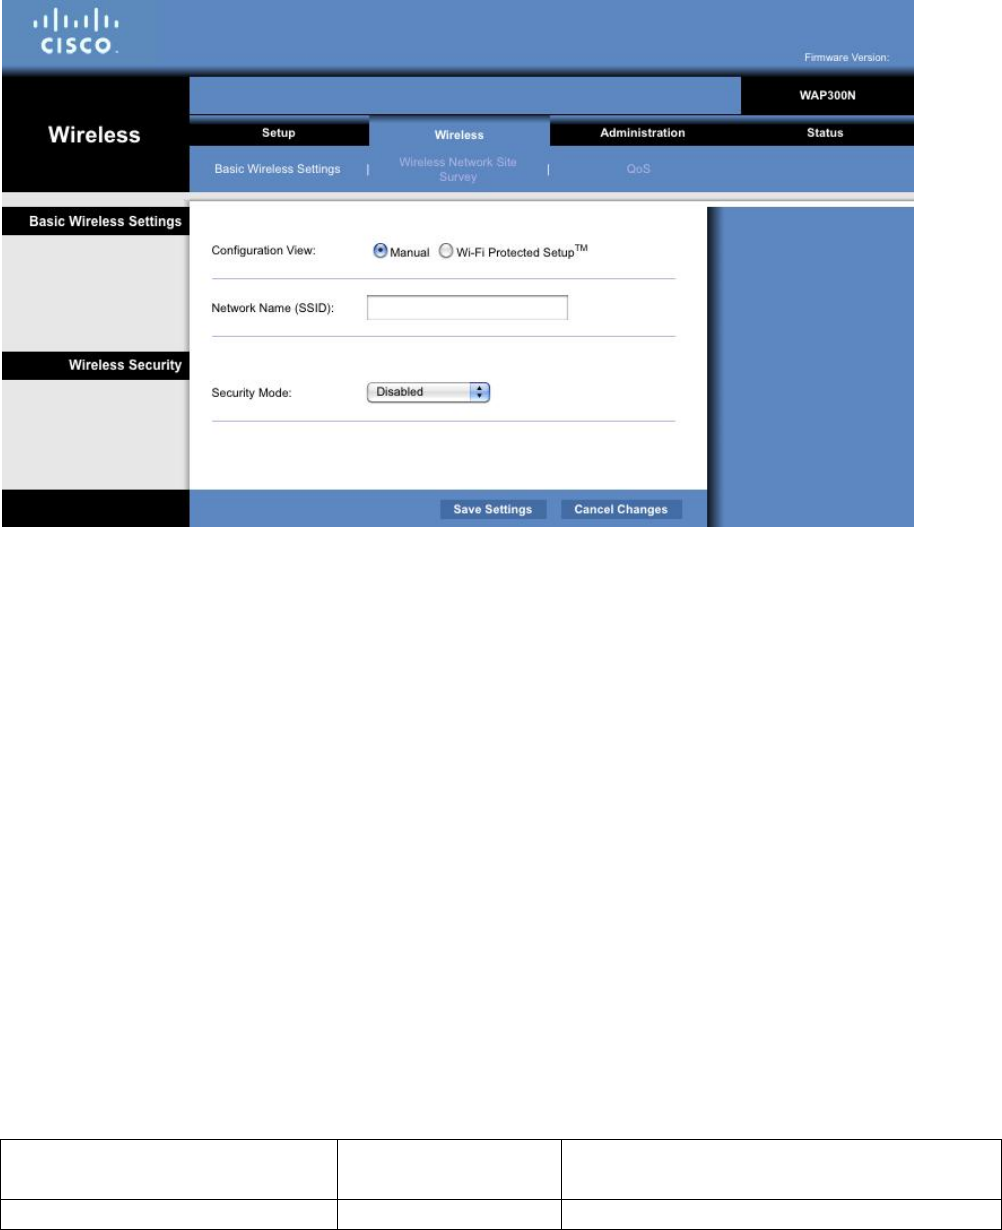
Network Name (SSID)
The SSID is the name of a wireless network. A wireless device uses this name to identify which wireless
network it connects to. Enter the SSID of your wireless network here. The SSID entered here must
match the SSID setting on your wireless router or access point. Otherwise, wireless connection to your
network cannot be established. SSID is case-sensitive and must not exceed 32 characters.
Security Mode
Select the security mode that matches the security setting on your wireless router or access point. If the
setting here does not match the setting on your wireless router or access point, wireless connection to
your network will fail and this device will not be able to access your network. If your wireless network
does not have security (not recommended), keep the default, Disabled.
Depending on the security mode you have selected, you will be asked to enter additional information
(refer to the following table). Once you have filled in all the required information, click Save Settings to
apply your changes, or click Cancel Changes to cancel your changes.
Security Mode Additional
Information Required
Description
WPA2 Personal, or Passphrase Enter the passphrase shared by this device and

WPA Personal
your
wireless router (or access point). It must
have 8-63 characters. Also support 64 hex.
WEP
Encryption Select a level of WEP encryption, 40 / 64-bit (10
hex digits) or 104 / 128-bit (26 hex digits).
Key 1 Enter the WEP key of your network. Key 1 is
the transmit key used by this device.
Authentication
The default is Auto, which allows either Open
system or Shared Key authentication to be
used. Select Open to use open system
authentication; the sender and recipient do not
use a WEP key for authentication. Select Shared
to use shared key authentication; the sender
and recipient use a WEP key for authentication.
No option for authentication change.
Wireless > Basic Wireless Settings
(Wireless Range Extender Mode)
In WRE mode, …
(1) Basic Wireless Settings page (both WPS view and Manual view) looks like what is in WMC mode if
WAP300N has not connected to a wireless router yet. Thus, you may re-use the text in WMC mode.
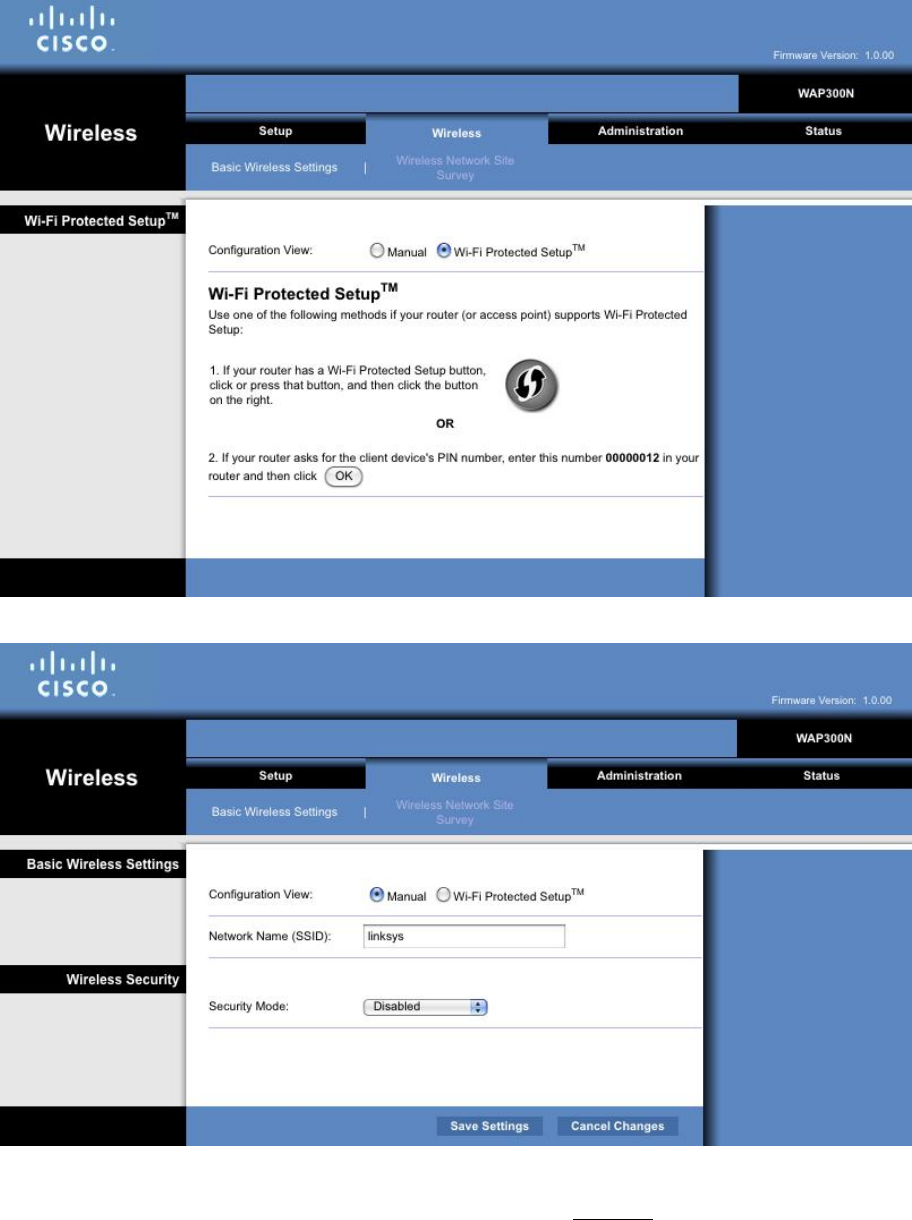
(2) Basic Wireless Settings page, in WPS view, looks like what is in AP mode if WAP300N has already
connected to a wireless router. Thus, you may re-use the text in AP mode.
Manual view looks like what is in WMC mode with the info from the wireless router (that WAP300N has
connected to) displayed. Thus, you may re-use the text in WUMC mode. If the user wants WAP300N to
connect to another wireless router, change these fields and click “Save Settings”.
Wireless > Basic Wireless Settings
(Wireless Bridge Mode)
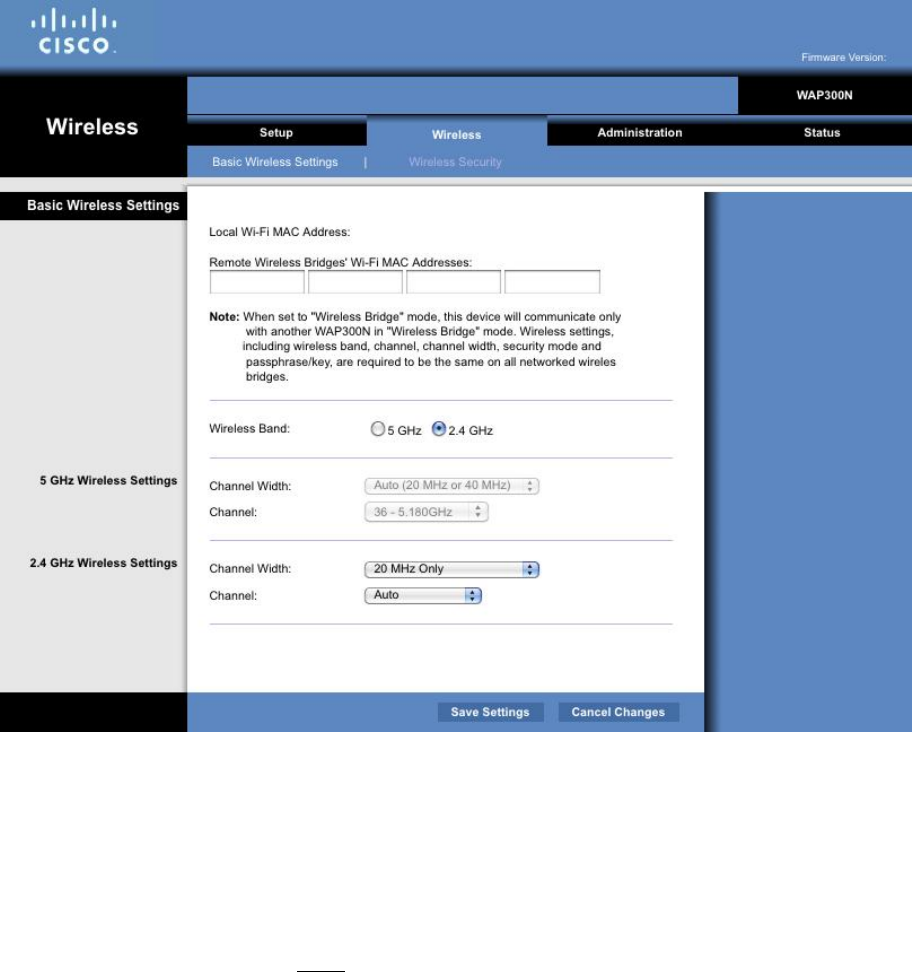
In RC1 firmware, there is no 5Ghz and 2.4Ghz wireless settings string in left side.
Local Wi-Fi MAC Address
The Wi-Fi MAC address of this device is displayed here.
Remote Wireless Bridge’ Wi-Fi MAC Addresses
Enter the Wi-Fi MAC addresses of other WAP300N units (also in Wireless Bridge mode) you want this
device connects to.
Wireless Band
This is used to select the 2.4 GHz or 5 GHz radio band. The 5 GHz band is much less crowded than the
2.4 GHz band, so it is more likely that you will have your own interference-free channel.
Channel Width

For best performance in a Wireless-N network, select 40MHz only (only available in 5 GHz radio band) or
Auto. In Auto mode, this device and other WAP300Ns connected to this device automatically switch to
the 40 MHz mode if there is no adjacent interference.
Channel
Choose the operating channel for your wireless network. This device will automatically select the
channel with the least amount of interference if you leave the default Auto setting. Keeping the default
setting Auto is recommended.
IMPORTANT: When WAP300N is set to Wireless Bridge mode, this device will communicate only with
other WAP300N unit(s) that is/are also in Wireless Bridge mode. In addition, all wireless settings,
including wireless band, channel, channel width, security mode and security passphrase/key, are also
required to be the same on all the networked WAP300N units.
Wireless > Wireless Security
This screen is only available when the device is in Access Point mode and Wireless Bridge mode.
(In Wireless Media Connector mode or Wireless Range Extender mode, wireless security is set up via
Wireless > Basic Wireless Settings.)
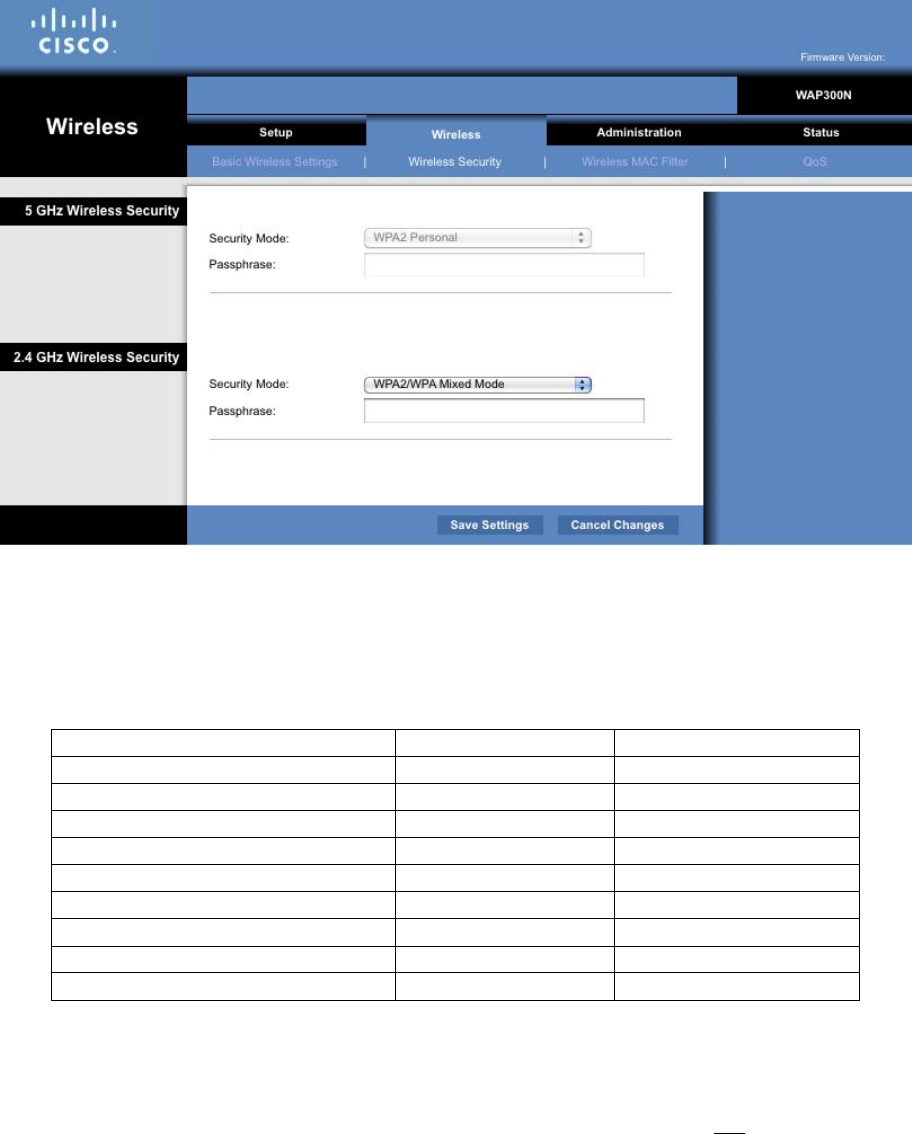
Security Mode
Select the security mode you would like your network to use. WAP300N supports the following wireless
security modes when it is set to Access Point mode or Wireless Bridge mode.
Access Point
Mode
Wireless Bridge Mode
WPA2/WPA Mixed Mode
X
WPA2 Personal
X
X
WPA
Personal
X
X
WPA2/WPA Enterprise Mixed Mode
X
WPA2 Enterprise
X
WPA Enterprise
X
WEP
X
X
RADIUS
X
Disabled
X
X
WEP is a basic encryption method, which is not as secure as WPA or WPA2. WPA is a security standard
stronger than WEP encryption. WPA2 is the most advanced and secure among these 3 options and,
therefore, WPA2 is the recommended security mode. Leaving security disabled is not recommended.
TIPS:
• Wireless-N networks should use the WPA2 security mode for the best performance.

• For most home networks, using WPA2 Personal security mode is recommended.
IMPORTANT: When WAP300Ns are networked in Wireless Bridge mode, all wireless settings, including
wireless band, channel, channel width, security mode and security passphrase/key, are required to be
the same on all the networked WAP300N units.
Depending on what security mode you have selected, you will be asked to enter additional information
to complete the settings. Once you have filled in all the required information, click Save Settings to
apply your changes, or click Cancel Changes to cancel your changes.
Security Mode Additional
Information Required
Description
WPA2/WPA Mixed Mode,
WPA2 Personal,
WPA Personal Passphrase Enter a passphrase of 8-63 characters.
Also support 64 hex.
WPA2/WPA Enterprise Mixed
Mode,
WPA2 Enterprise,
WPA Enterprise
RADIUS Server Enter the IP Address of the RADIUS server.
RADIUS Port Enter the port number of the RADIUS server.
The default is 1812.
Shared Key Enter the key shared between the Router and
the server.
WEP Encryption Select a level of WEP encryption, 40 / 64-bit (10
hex digits) or 104 / 128-bit (26 hex digits). The
default is 40 / 64-bit (10 hex digits).
Key 1 Enter the WEP key of your network. Key 1 is
the transmit key used by this device.
RADIUS
RADIUS Server Enter the IP Address of the RADIUS server.
RADIUS Port Enter the port number of the RADIUS server.
The default is 1812.
Shared Key Enter the key shared between the Router and
the server.
Encryption Select a level of WEP encryption, 40 / 64-bit (10
hex digits) or 104 / 128-bit (26 hex digits). The
default is 40 / 64-bit (10 hex digits).
Key 2
Enter the WEP key of your network.
Key 2
is
the transmit key used by this device.

Disabled (None) (None)
Wireless > Wireless MAC Filter
This screen is only available when the device is set to Access Point mode.
When the device serves as an access point, access to your wireless network can be filtered by specifying
the Wi-Fi MAC addresses of the wireless devices within range of your network.
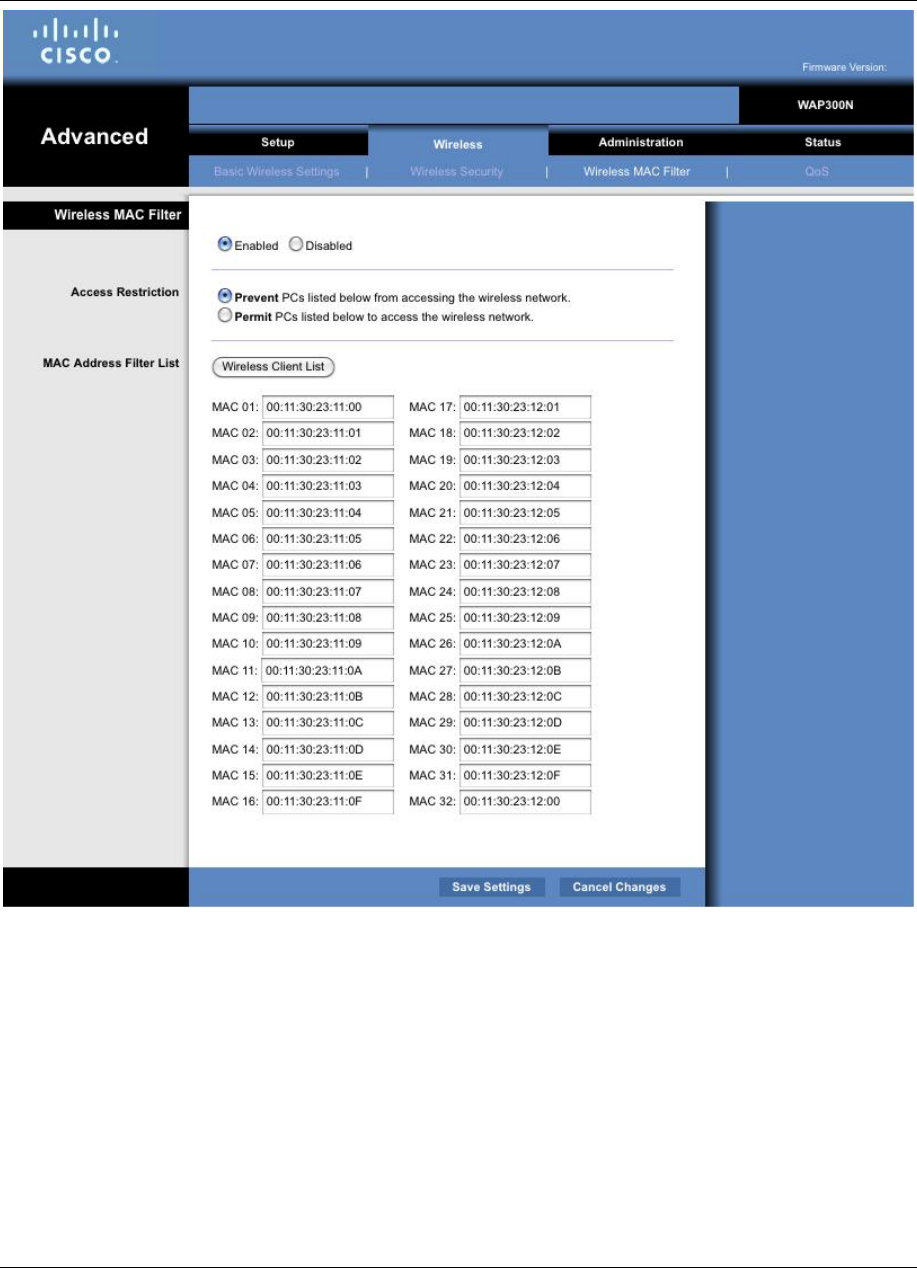
Wireless MAC Filter
To filter wireless users by MAC Address, either permitting or blocking access, select Enabled. If you do
not wish to filter users by MAC Address, keep the default setting, Disabled.
Access Restriction
To block wireless access by MAC Address, select Prevent. To allow wireless access by MAC Address,
select Permit.
Wireless Client List
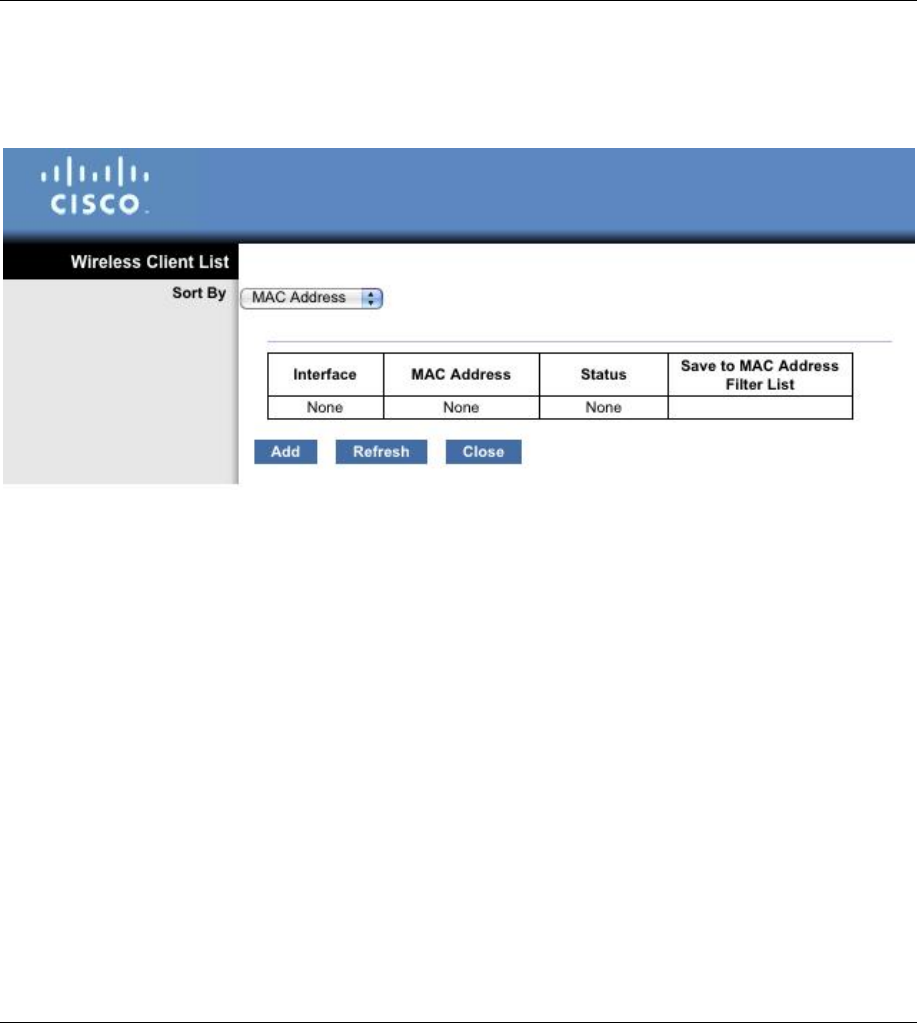
Click this button to open the Wireless Client List screen.
This screen shows computers and other devices on the wireless network. The list can be sorted by MAC
Address or by Status.
Select Save to MAC Address Filter List for any device you want to add to the MAC Address Filter List.
Then click Add.
To retrieve the most up-to-date information, click Refresh. To return to the Wireless MAC Filter screen,
click Close.
MAC 01-32
Enter the Wi-Fi MAC addresses of the devices whose wireless access you want to block or allow.
Click Save Settings to apply your changes, or click Cancel Changes to cancel your changes.
Wireless > Wireless Network Site Survey
This page is only available when the device is in Wireless Media Connector mode and Wireless Range
Extender mode. This screen provides an easy method of finding surrounding wireless networks hosted
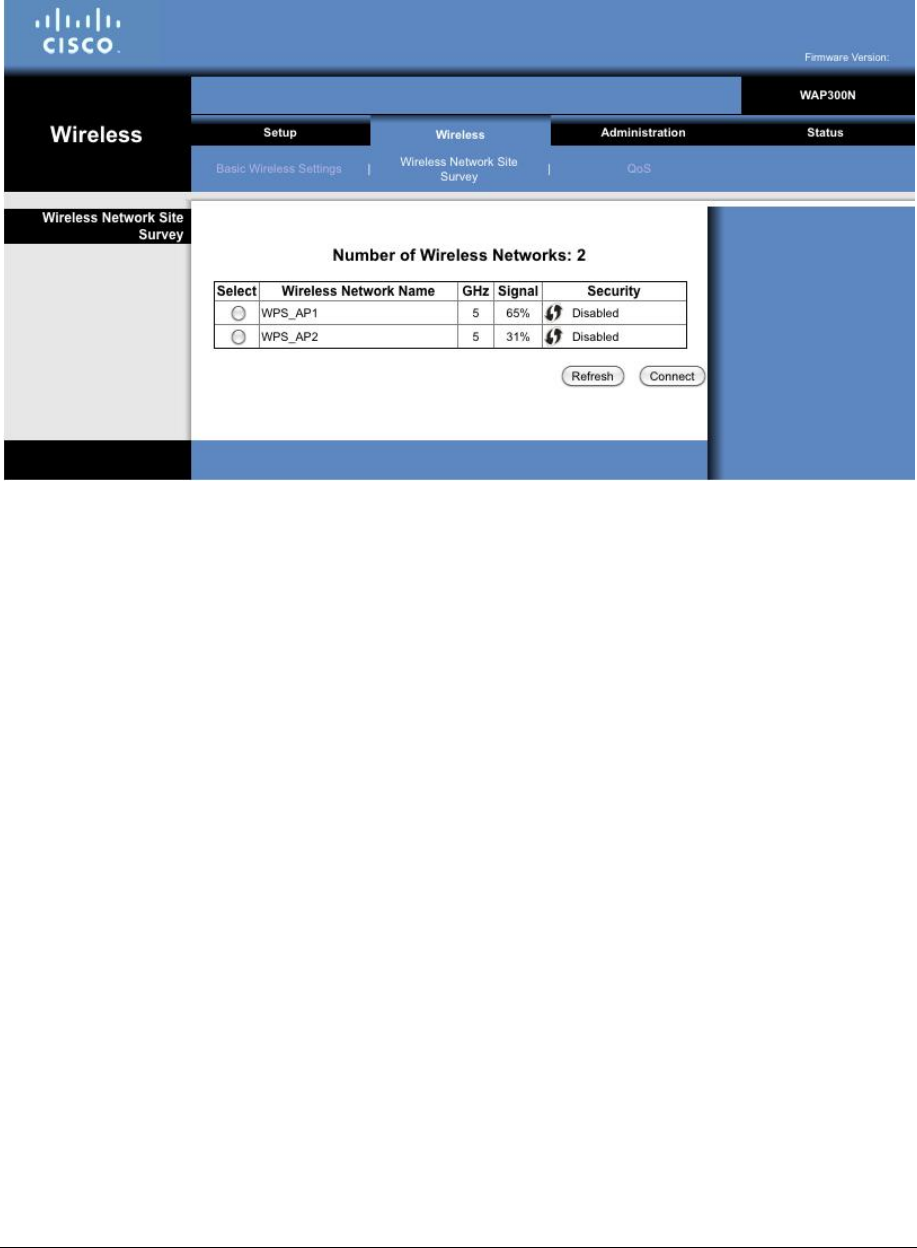
by routers and access points within the wireless range of WAP300N, so that you can easily select one of
them and connect WAP300N to it.
Number of Wireless Networks
The number of wireless networks detected by this device is displayed.
Select
To connect to a wireless network, click Select. Then click Connect.
Wireless Network Name
The network name, also known as SSID, of the wireless network is displayed.
Signal
The percentage of signal strength is displayed. 100% is the strongest signal strength possible; 0% is the
weakest possible.
Security
The security method used by the wireless network is displayed. If the network supports Wi‑Fi Protected
Setup, the Wi-Fi Protected Setup icon is also displayed.
Click Refresh if you want to update the on-screen information.

After you have selected a network, click Connect. A new screen appears. In the new screen, Network
Name (SSID) and Security Mode of the wireless network you have selected will automatically be
displayed. Depending on the security mode of the network, you will be asked to enter additional
information (see the following table). Once you have entered all the required information, click
Connect to connect to the network.
Security Mode Additional
Information Required
Description
WPA2 Personal, or
WPA Personal Passphrase
Enter the passphrase shared by this device and
your wireless router (or access point). It must
have 8-63 characters.
Also support 64 hex.
WEP
Encryption Select a level of WEP encryption, 40 / 64-bit (10
hex digits) or 104 / 128-bit (26 hex digits).
Key 1 Enter the WEP key of your network. Key 1 is
the transmit key used by this device.
Authentication
The default is Auto, which allows either Open
system or Shared Key authentication to be
used. Select Open to use open system
authentication; the sender and recipient do not
use a WEP key for authentication. Select Shared
to use shared key authentication; the sender
and recipient use a WEP key for authentication.
Wireless > QoS
This screen is available only when the device is set to Access Point mode and Wireless Media Connector
mode.
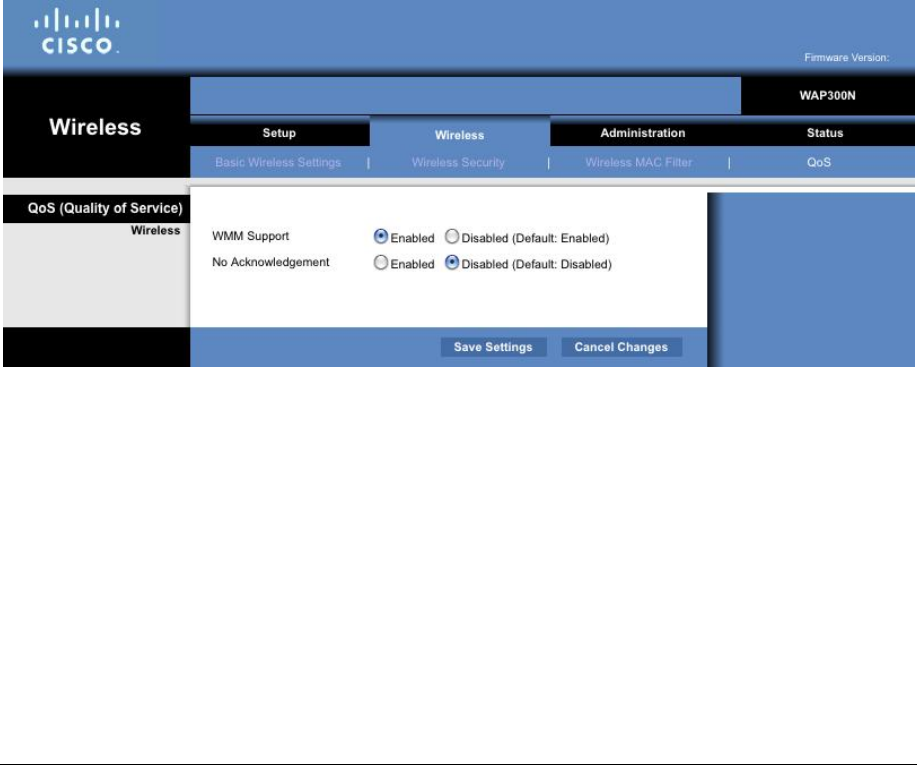
WMM Support
Wi-Fi Multimedia (WMM) is a wireless Quality of Service feature that improves quality for audio, video,
and voice applications by prioritizing wireless traffic. To take advantage of this feature, the other
wireless devices connected to WAP300N must also support WMM. To disable this option, select
Disabled. Otherwise, keep the default, Enabled.
No Acknowledgement
If you do not want the device to re-send data when an error occurs, select Enabled. Otherwise, keep
the default, Disabled.
Administration > Management
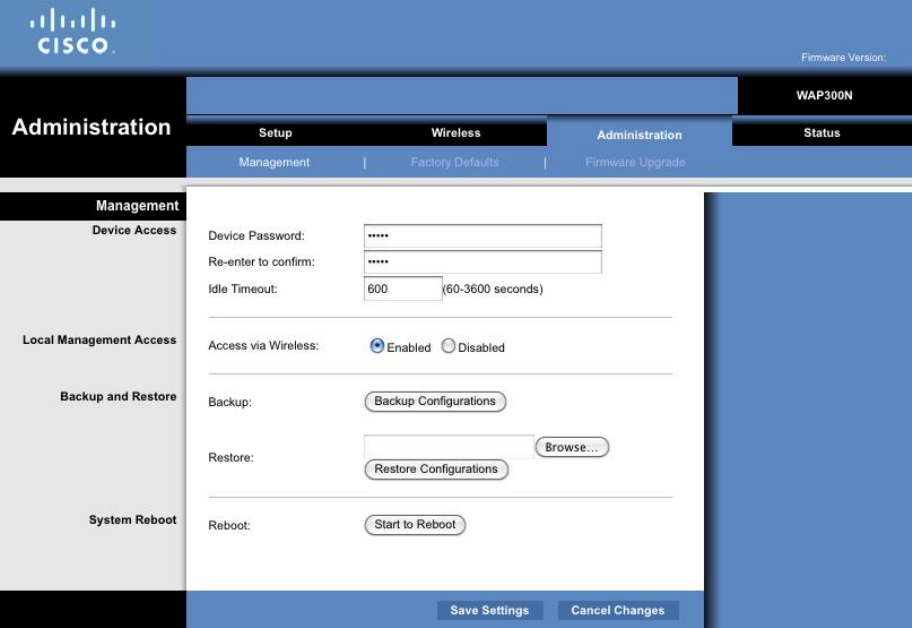
Device Password
Enter a unique password to prevent unauthorized access to the browser-based utility of this device.
Re-enter to confirm
Enter the password again to confirm.
Idle Timeout
The login times out after a period of inactivity that you specify. The range is 60 to 3600 seconds. The
default is 600.
Access via Wireless
If you are using this device in a public domain or you are giving wireless access of your network to your
guests, you can disable wireless access to this device’s browser-based utility. You will only be able to
access the browser-based utility via a wired connection if you disable the setting. Keep the default,
Enabled, to allow wireless access to the device’s browser-based utility, or select Disabled to block
wireless access to the utility.
Backup
To back up the device’s configuration file, click Backup Configurations. Then follow the on-screen
instructions.
Restore
Click Browse and select the configuration file. Then click Restore Configurations.
Reboot
To reboot or restart the device, click Start to Reboot.
Click Save Settings to apply your changes, or click Cancel Changes to cancel your changes.
Administration > Factory Defaults
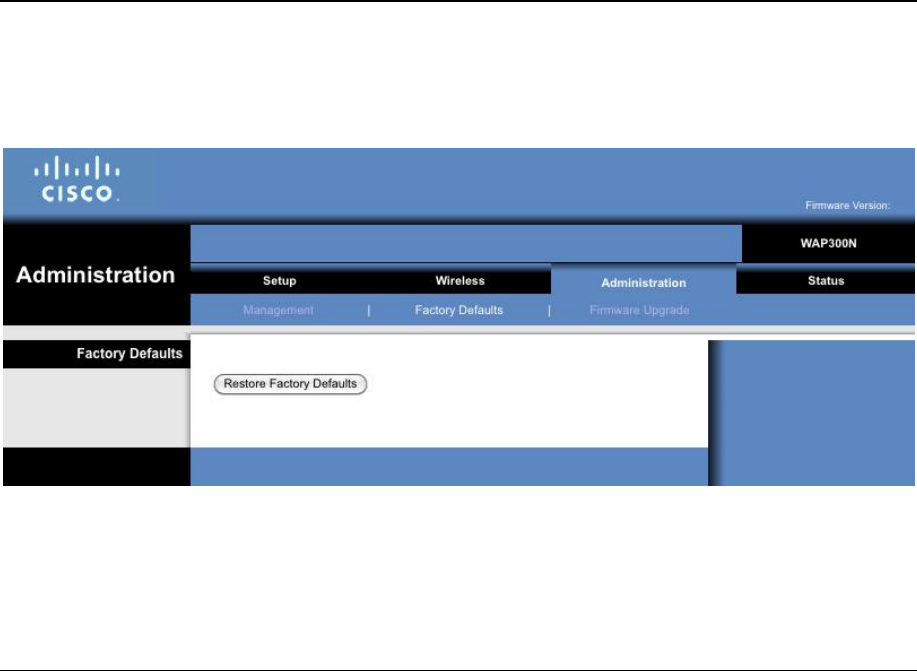
Restore Factory Defaults
To reset the device’s settings to the factory defaults, click Restore Factory Defaults. Any settings you
have saved previously will be lost when the default settings are restored.
Administration > Firmware Upgrade
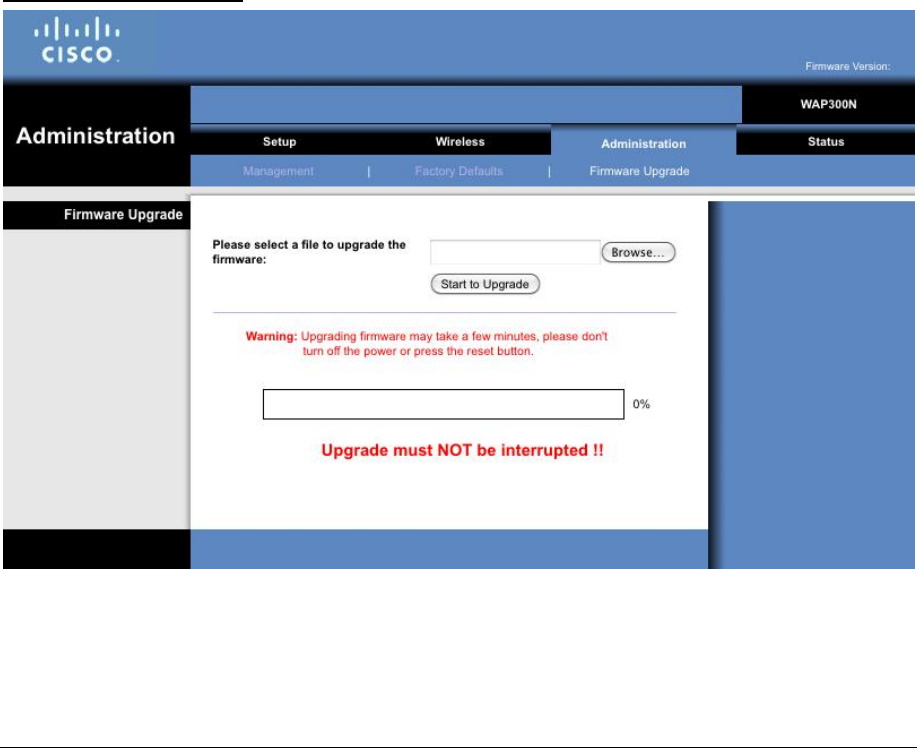
Use this screen to upgrade the device’s firmware. Do not upgrade the firmware unless you are
experiencing problems with the device or the new firmware has a feature you want to use. Before
upgrading the firmware, download the device’s firmware upgrade file from the Linksys website,
www.Linksys.com/support.
Please select a file to upgrade the firmware
Click Browse and select the firmware upgrade file. Then click Start to Upgrade and follow the on-screen
instructions.
Status > Device Info & Local Network
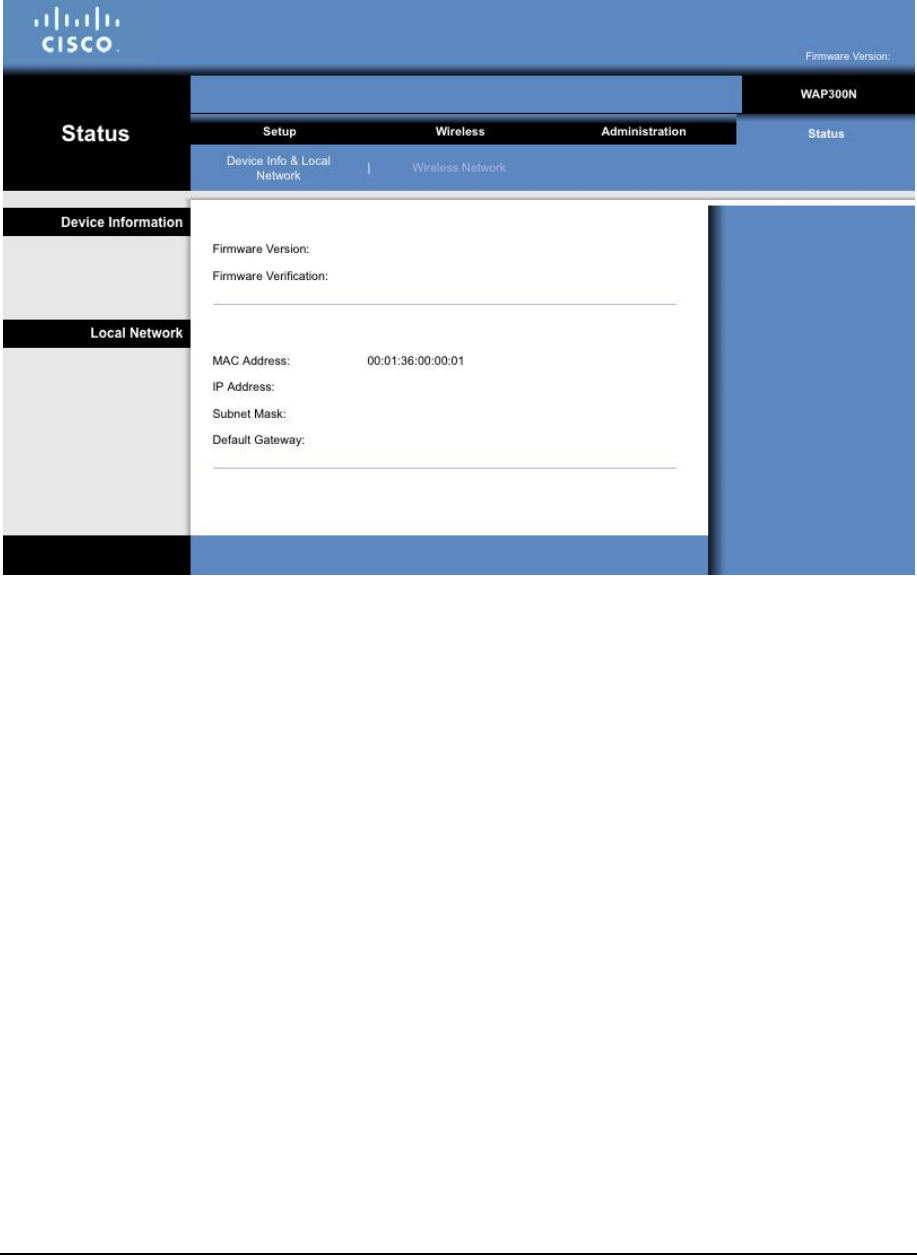
Firmware Version
The device’s current firmware version is displayed.
Firmware Verification
It is a number that is used by customer support to verify the firmware.
MAC Address
The device’s Ethernet port MAC Address is displayed.
IP Address
The device’s IP Address, as seen on your local network, is displayed.
Subnet Mask
The subnet mask configured for your local network is displayed.
Default Gateway
The default gateway configured for your local network is displayed.

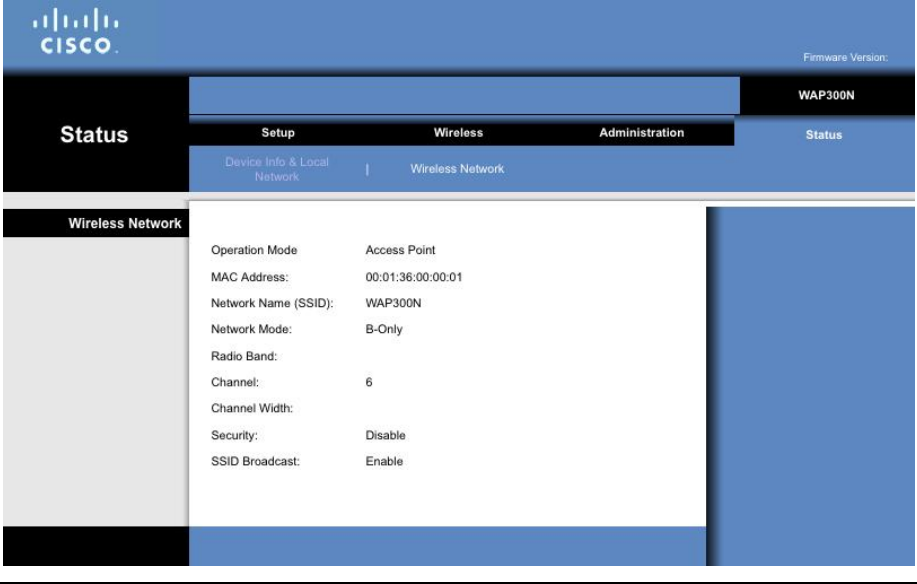
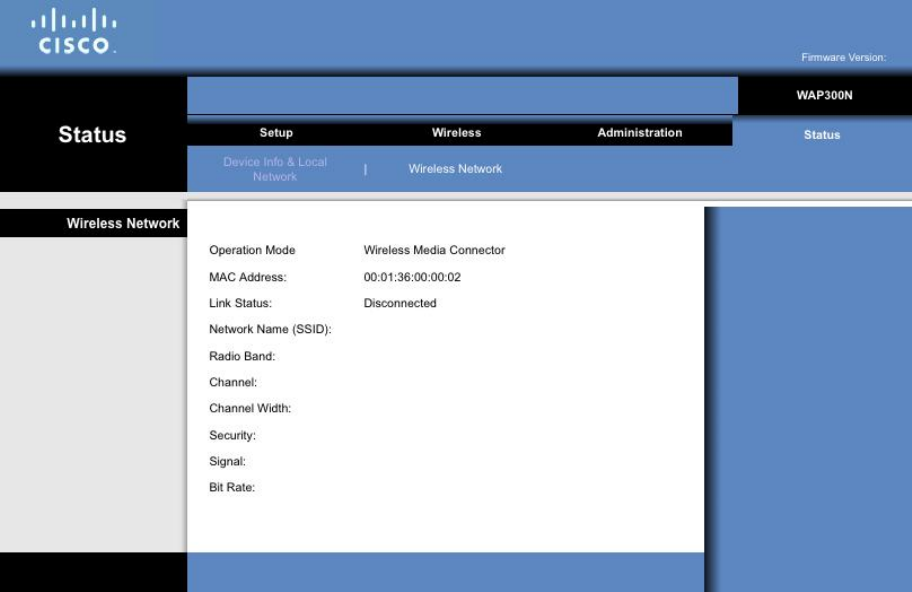
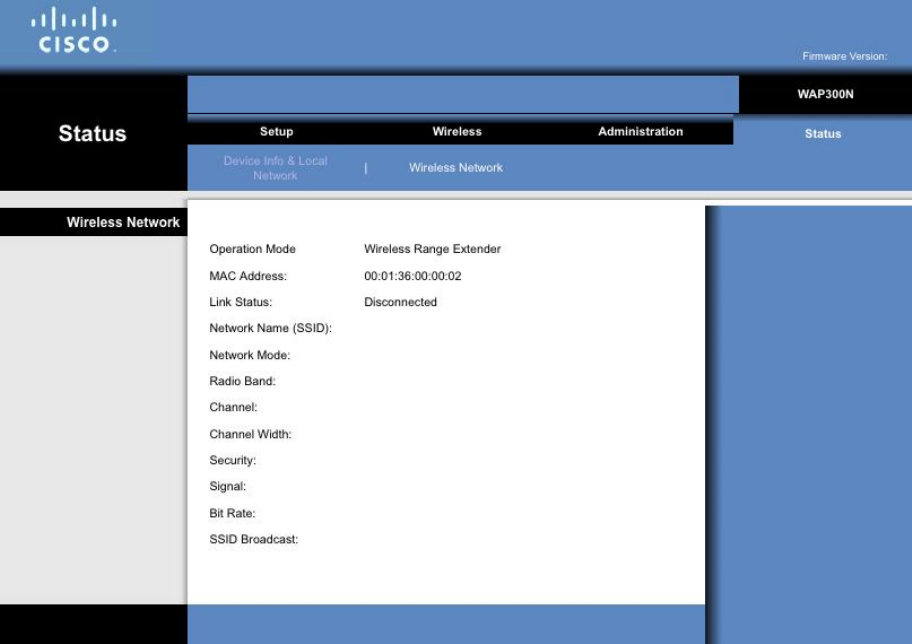
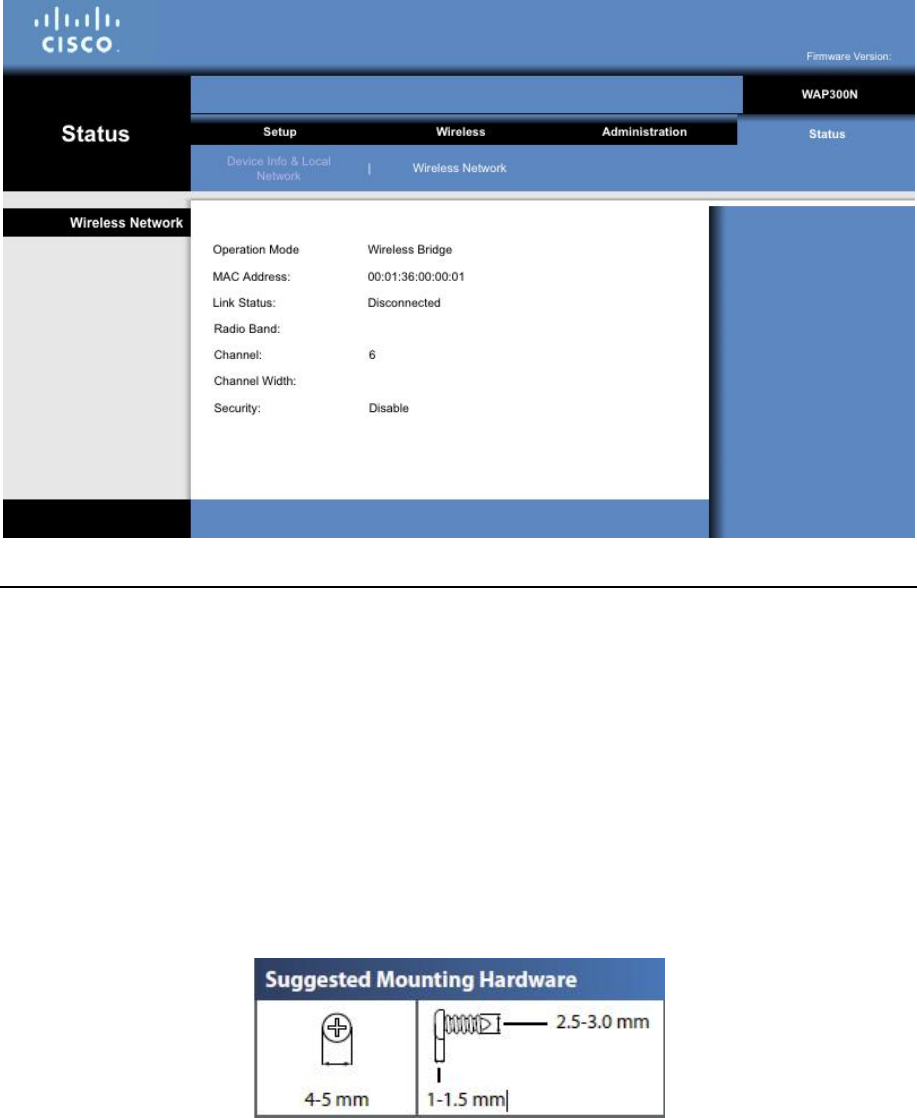
Status > Wireless Network
Information about your wireless network is displayed on this screen. However, the availability of
information depends on the operation mode that you have selected.
Access Point
Wireless Media
Connector
Wireless Range
Extender Wireless Bridge
Operation Mode X X X X
MAC Address X X X X
Link Status
X X X
Network Name
(SSID) X X X X
Network Mode X
X
Radio Band X X X X
Channel X X X X
Channel Width X X X X
Security X X X X
Signal
X X
Bit Rate
X X
SSID Broadcast X
X
Operation Mode
The current operation mode of this device is displayed.
MAC Address
The MAC Address of the device’s wireless (Wi-Fi) interface is displayed.
Link Status
The status of the connection to your wireless network is displayed.
Network Name (SSID)
The name of your wireless network (also known as SSID) is displayed.
Network Mode
The network mode used by your network is displayed.

Channel Width
The channel width (in MHz) used by your wireless network is displayed.
Radio Band
The radio band (in GHz) on which your wireless network resides is displayed.
Channel
The channel setting is displayed.
Security
The security mode of your wireless network is displayed.
Bit Rate
The data transmission rate is displayed.
Signal
The percentage of signal strength is displayed. 100% is the strongest signal strength possible, and 0% is
the weakest.
SSID Broadcast
The status of SSID broadcast (enabled or disabled) is displayed.
Access Point mode:
Wireless Media Connector Mode:
Wireless Range Extender Mode:
Wireless Bridge Mode:
Lack the Network Name (SSID)
Wall Mount
WAP300N has two wall-mount slots on the bottom panel. This article will guide you on mounting your WAP300N on
a wall.
For WAP300N, the distance between the slots is 135 mm. Two screws (not included) are needed to mount the
gateway.
NOTE: Cisco is not responsible for damages incurred by unsecured wall-mounting hardware.
Step 1:
Determine where you want to mount the WAP300N. Make sure that the wall you use is smooth, flat, dry,
and sturdy. In addition, make sure that the location is near an electrical outlet.
Step 2:
Drill two holes into the wall. Ensure that the holes are 135 mm apart.
Step 3:
Insert a screw into each hole, and leave 3 mm of its head exposed.
Step 4:
Position the WAP300N so the wall-mount slots line up with the two screws.
Step 5:
Place the wall-mount slots over the screws and slide the WAP300N down until the screws fit snugly into the
wall-mount slots.
Specifications
Model
WAP300N
Description
Linksys Wireless
-
N Access Point
Ethernet Port Speed
10/100 Mbps (Fast Ethernet)
Radio Frequency
2.4 or 5 GHz
Number of Antennas
2
Antenna Type
External dipole antenna with R
-
SMA connector
Detachable
Yes
Ports
Power, Ethernet
Buttons
Reset, Wi
-
Fi Protected Setup™
LEDs
Power, Wi
-
Fi Protected Setup, Ethernet, Wireless
Wireless Security Features
WEP, Wi
-
Fi Protected Access™ (WPA), Wi
-
Fi Protected Access™ 2
(WPA2), Wireless MAC Filtering
Security Key Bits
Up to 128
-
bit encryption
Dimensions
188.7 × 151.7 × 31.2 mm, without external antennas
(7.43” × 5.97” × 1.23”)
Power
12V, 0.5A
Certifications
FCC, UL/cUL, ICES
-
003, RSS210, CE, Wi
-
Fi (IEEE 802.11a/b/g/n),
WPA2™, WMM®, Wi-Fi Protected Setup™
Operating Temperature
0 to 40°C (32 to 104°F)
Storage Temperature
-
20 to 60°C (
-
4 to 140°F)
Operating Humidity
10 to 80% non
-
condensing
Storage Humidity
5 to 90% non
-
condensing