LINKSYS WPC54GSV11 Wireless 11g CardBus Card User Manual
LINKSYS LLC Wireless 11g CardBus Card Users Manual
LINKSYS >
Users Manual

A Division of Cisco Systems, Inc.
®
Model No.
Model No.
Wireless Quick Installation Guide
Wireless
1
Quick Installation Guide
Model No.
WPC54GS (EU/UK)
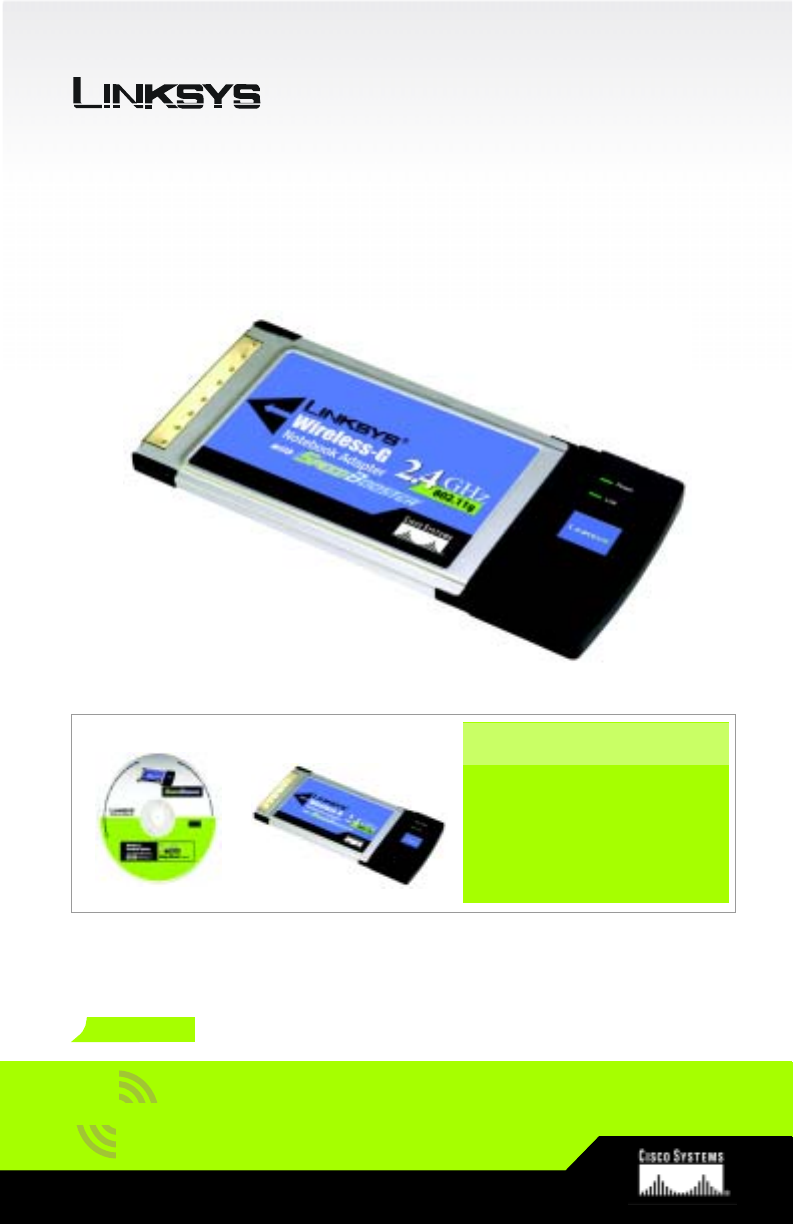
Notebook Adapter
Package Contents
• Wireless G Notebook Adapter
• Setup CD-ROM
• User Guide on CD-ROM
• Quick Installation
Wireless-G
with SpeedBooster
GHz
2802.11g
4
,
2
1
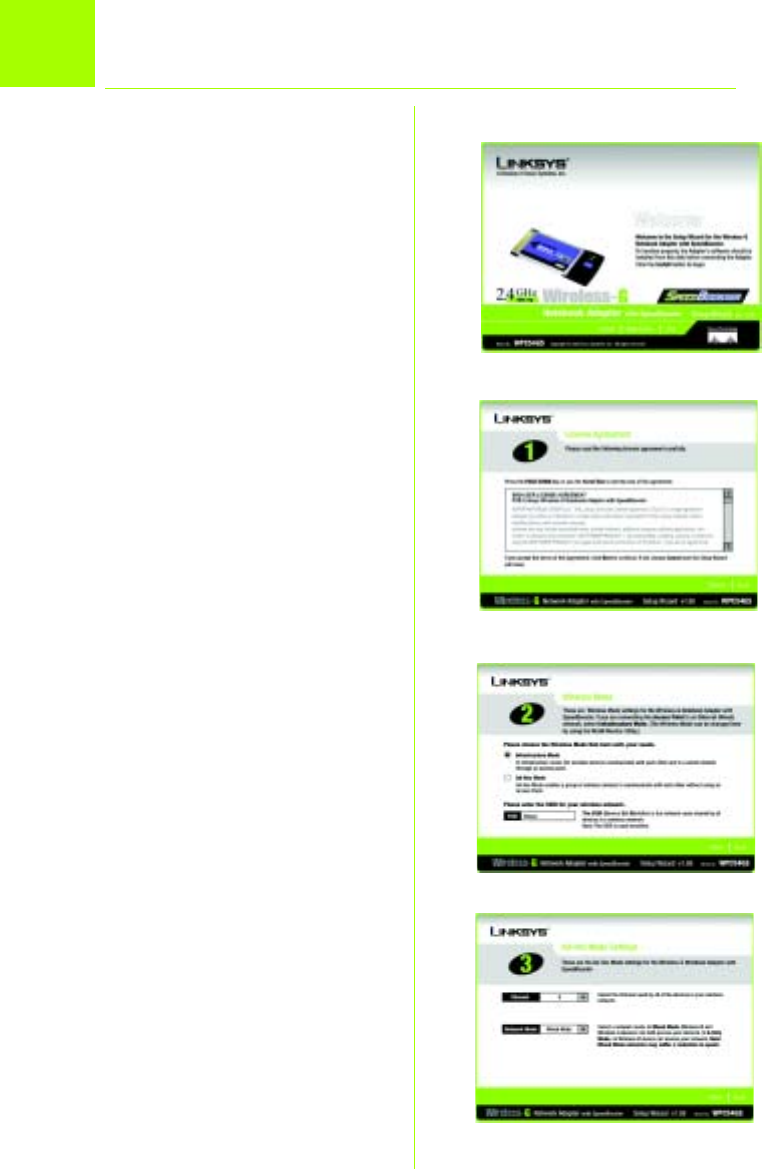
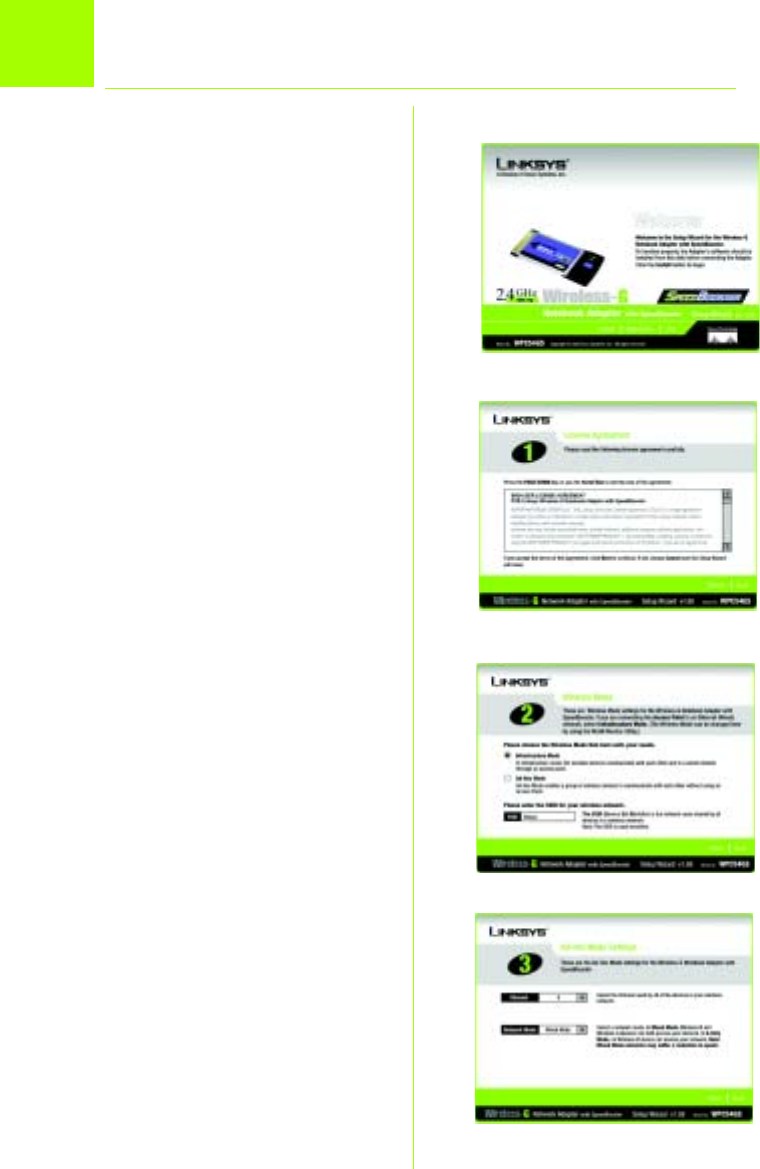
AInsert the Setup CD-ROM into your
CD-ROM drive. The Setup Wizard
should run automatically, and the
Welcome screen should appear.
If it does not, click Start and
choose Run. In the field that
appears, enter D:\setup.exe (if “D”
is the letter of your CD-ROM drive).
Click the Install button.
BAfter reading the License Agree-
ment, click Next to continue the
installation.
CNext you will choose a wireless
mode for your network. Click the
Infrastructure Mode radio button if
you want your wireless computers
to network with computers on your
wired network using an access
point. Click the Ad-Hoc Mode
radio button if you want multiple
wireless computers to network
directly with each other.
In the SSID field, enter the SSID of
your wireless network. The SSID
must be identical for all devices in
the network. The default setting is
linksys (all lowercase). Click Next.
DIf you chose Infrastructure Mode,
go to Step E now. If you chose Ad-
Hoc Mode, select the correct
operating channel for your net-
work.
If you have Wireless-G (802.11g)
and Wireless-B (802.11b) devices
in your network, then keep the
default Network Mode setting,
Mixed Mode. If you have only
A
Installing the Wireless-G
Notebook Adapter Software
B
C
D

3
Wireless-G devices, select G-Only
Mode. Click Next.
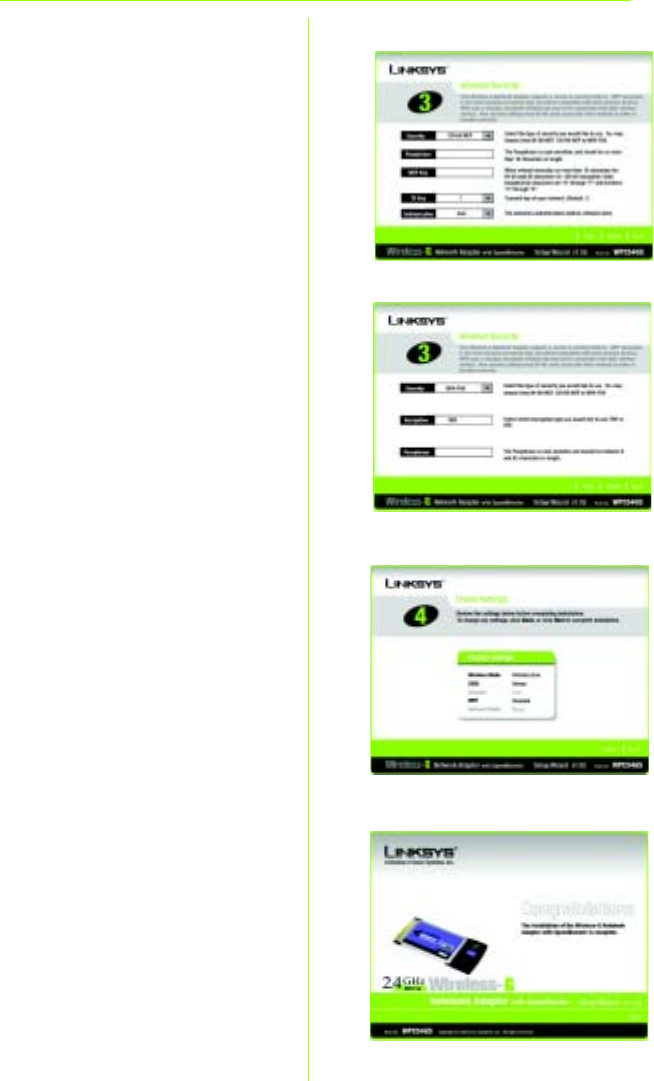
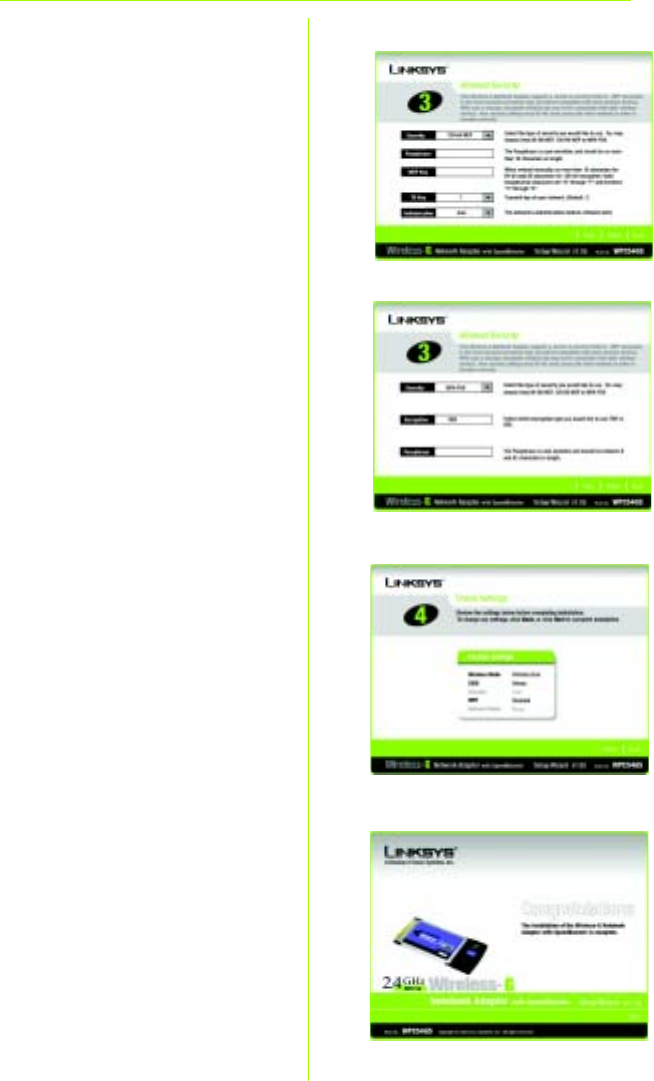
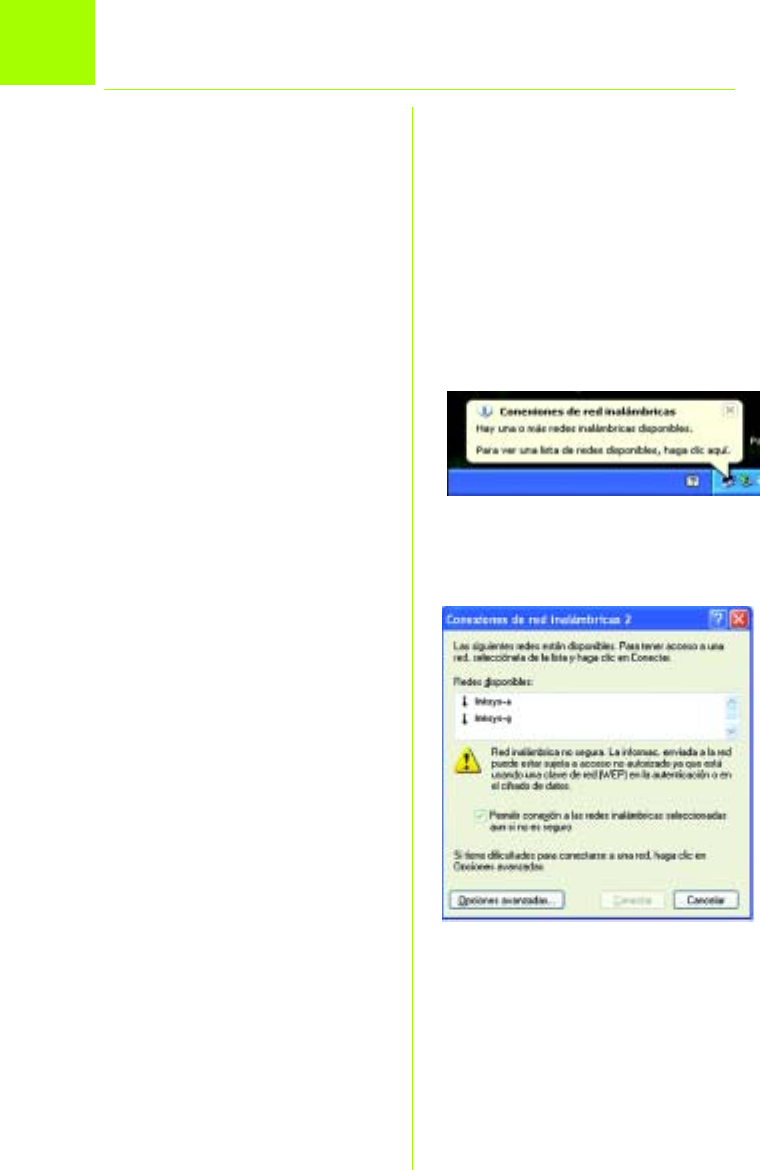
ESelect your type of security: 64-bit
WEP, 128-bit WEP, or WPA-PSK. All
devices in a network must use the
same type.
WEP
The Passphrase is used to gener-
ate one or more WEP keys. It is
case-sensitive and should not be
longer than 16 alphanumeric
characters.
If you are using 64-bit WEP encryp-
tion, then the key must be exactly
10 hexadecimal characters. If you
are using 128-bit WEP encryption,
then the key must be exactly 26
hexadecimal characters.
Select the TX key and Authentica-
tion method of your network.
WPA-PSK
Select TKIP or AES encryption.
Then, choose a passphrase
between 8-63 characters.
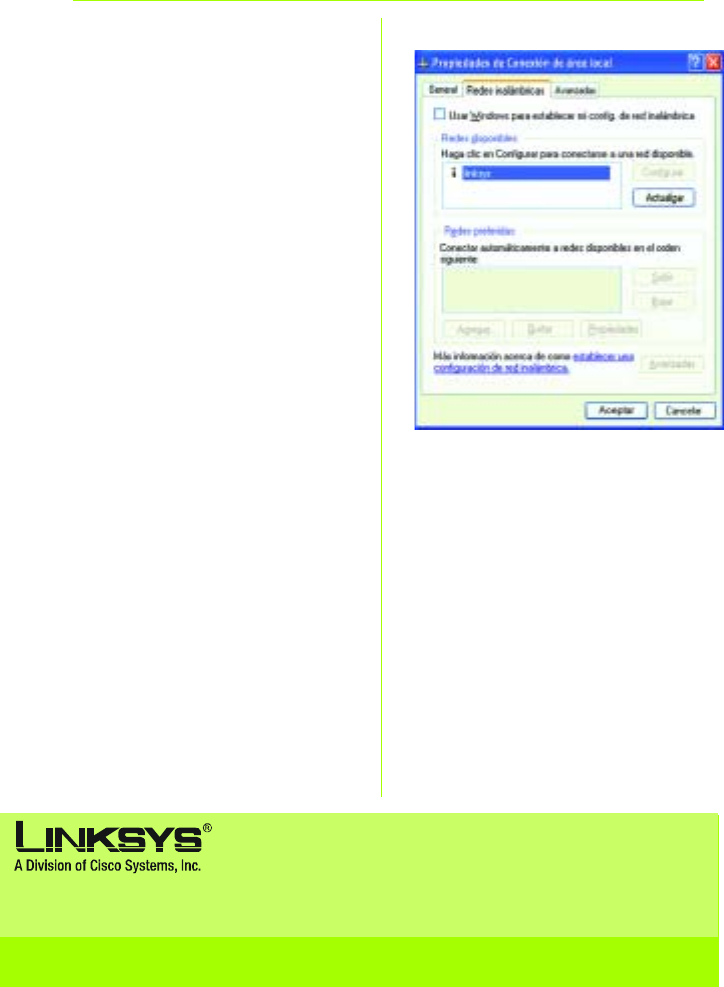
FThe Setup Wizard will ask you to
review your settings before it starts
to install files. Click Next if you are
satisfied with your settings, or click
Back to change any settings.
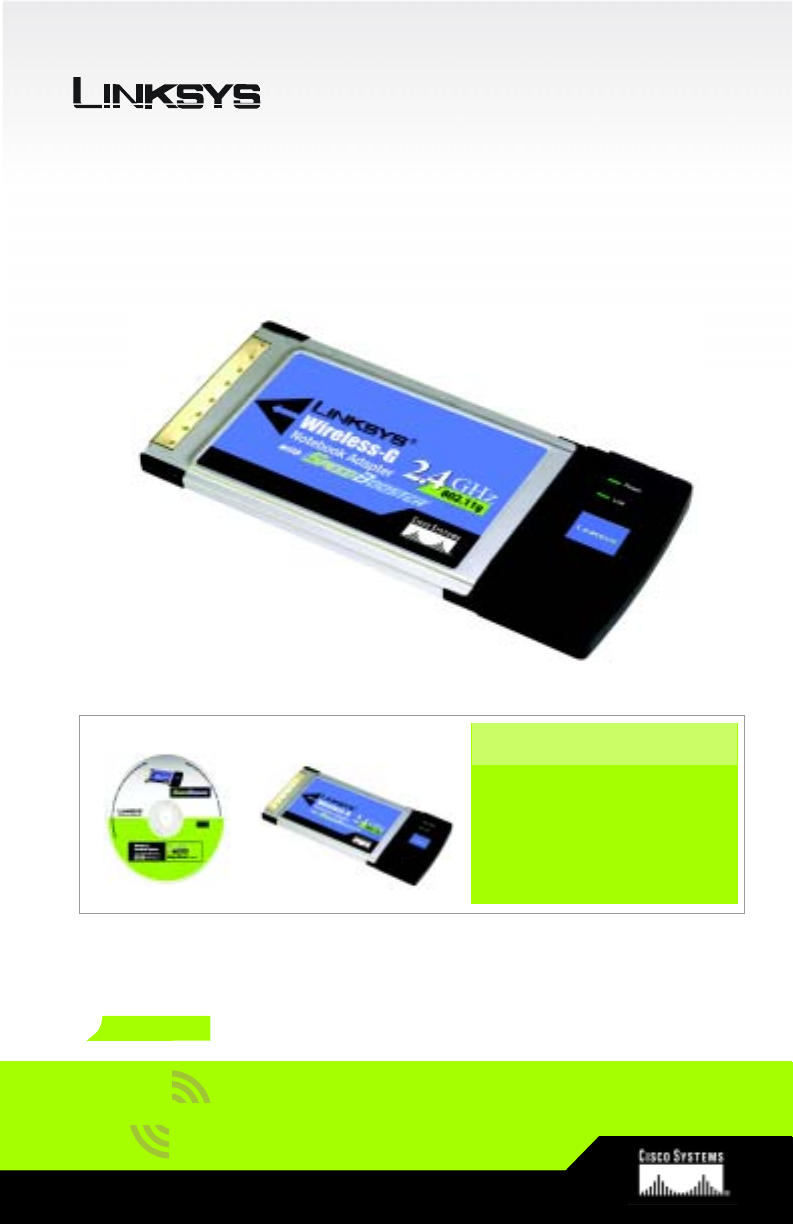
GAfter the software has been suc-
cessfully installed, click Exit.
E1
G
F
E2

4
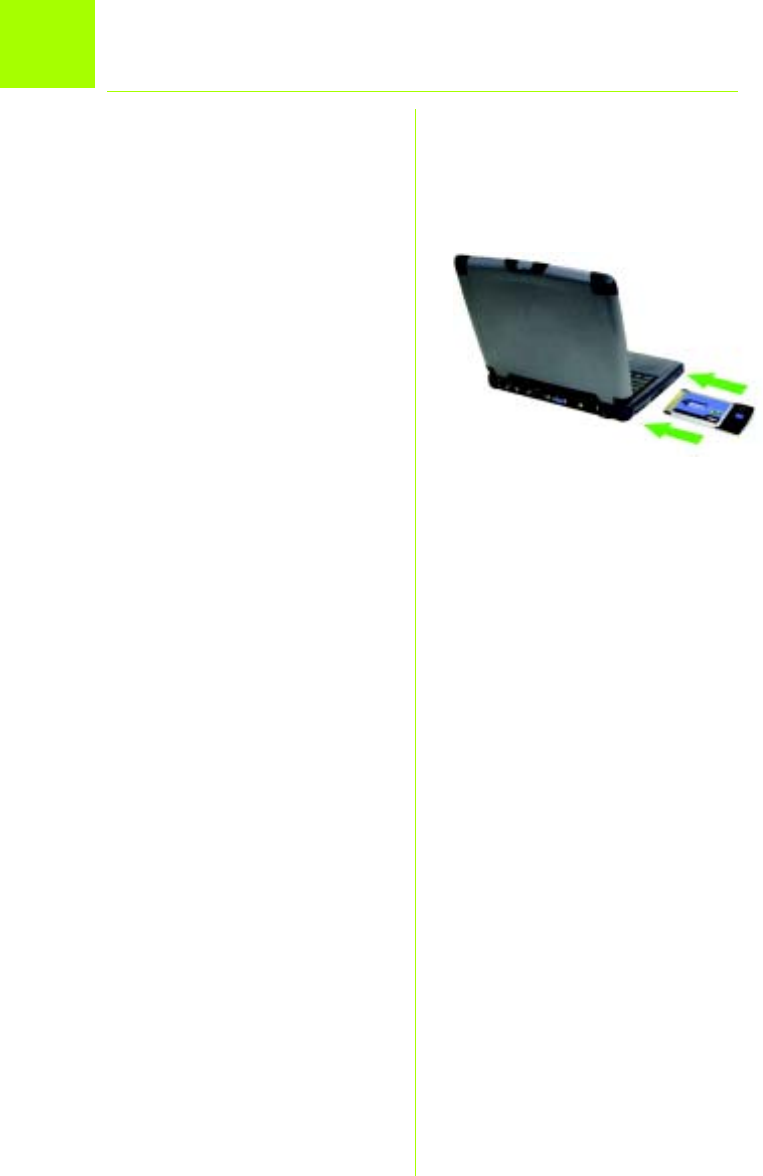
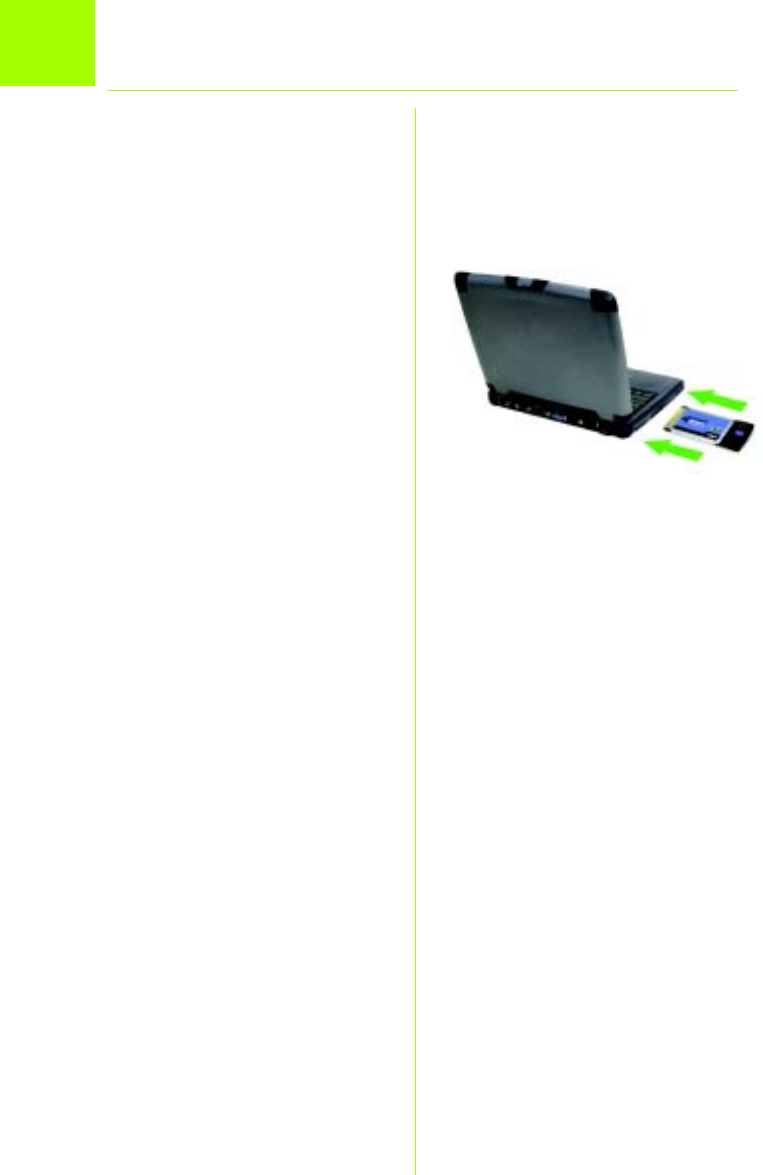
ATurn off your notebook PC.
BLocate an available PC card
slot on your notebook PC.
CWith the Adapter’s label fac-
ing up, as shown in Figure C,
slide it completely into the
CardBus slot.
DTurn on your notebook PC.
EWindows will begin copying
the driver files to your com-
puter. If Windows asks you for
the original Windows CD-ROM,
insert the CD-ROM, and direct
Windows to its location (e.g.,
D:\).
FAfter installing the Adapter, the
Wireless-G Notebook Adapter
Wireless Network Monitor icon
will appear in the system tray,
which is located at the bottom
right corner of your screen.
If you want to use the Wireless
Network Monitor to check the
link information, search for
available wireless networks, or
make additional configura-
tion changes, then double-
click the icon.
Windows XP users: Go to Step 3.
Windows 98, Me, and 2000 users:
Congratulations! The installation of
the Wireless-G Notebook Adapter
is complete.
2Installing the Wireless-G
Notebook Adapter into Your PC
C
5
Windows XP has a built-in configura-
tion tool. To configure the Adapter
using the Wireless Network Monitor,
you need to disable Windows XP
Wireless Zero Configuration. Follow
the instructions in Steps A-C.
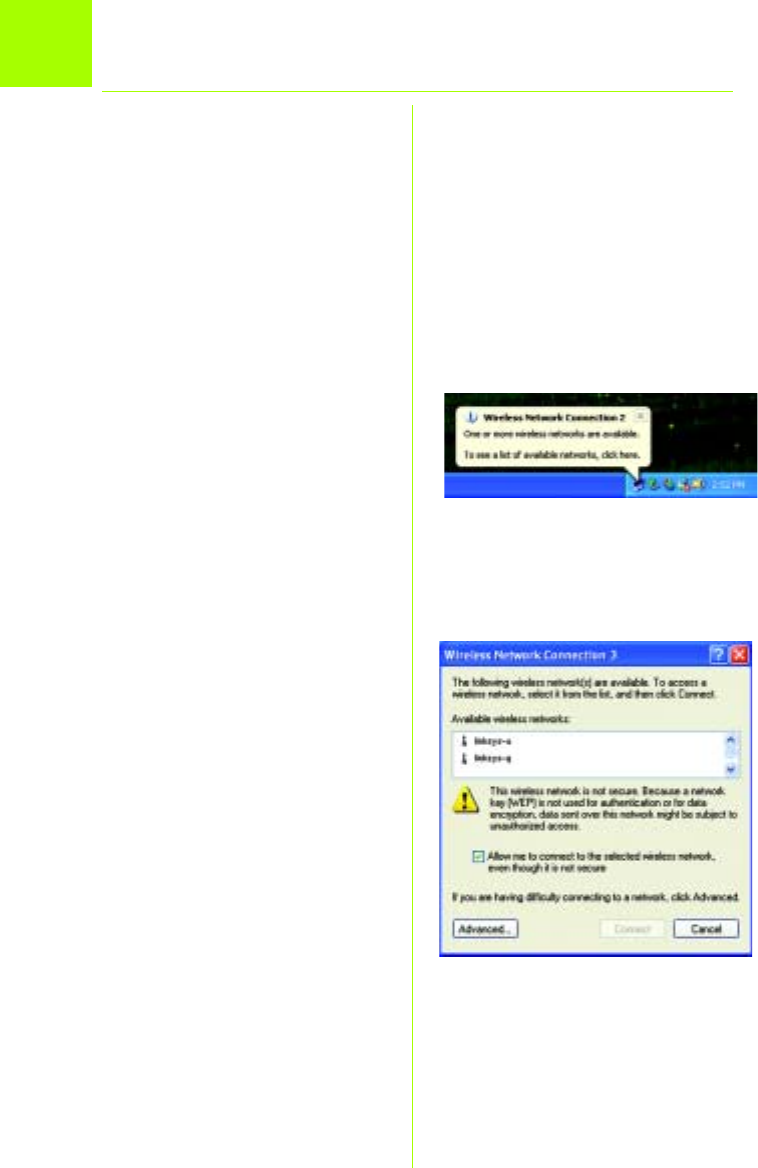
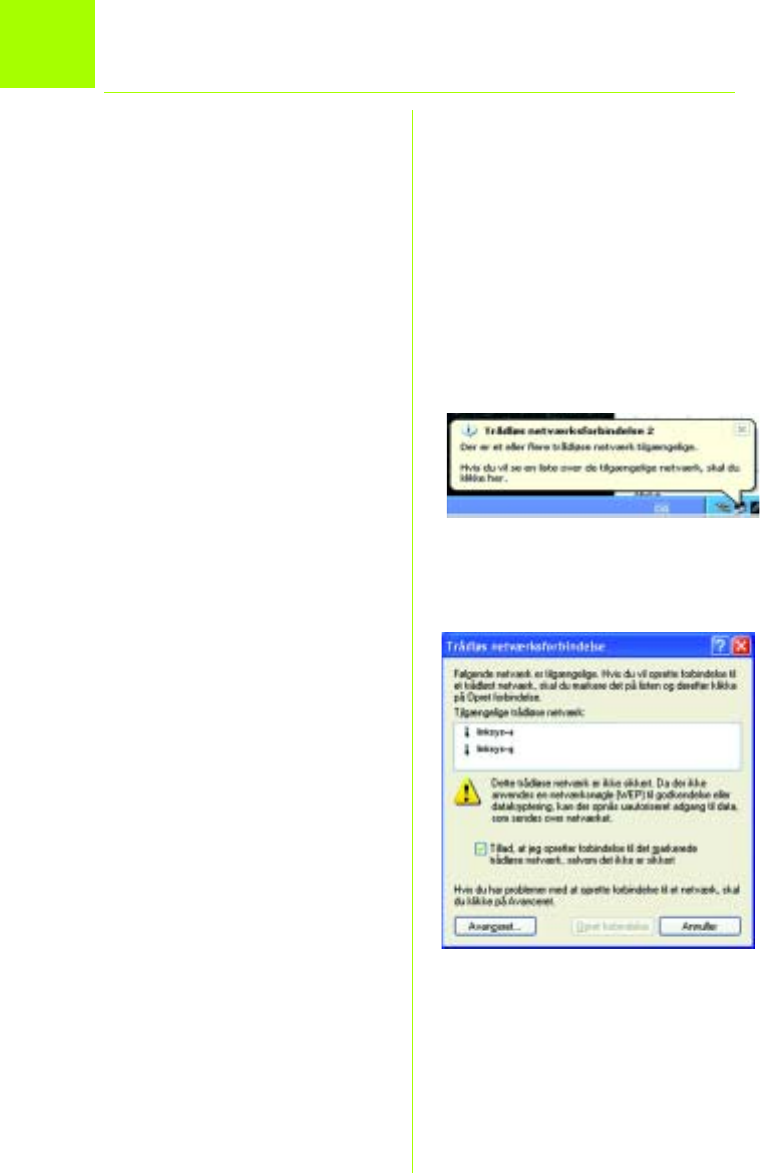
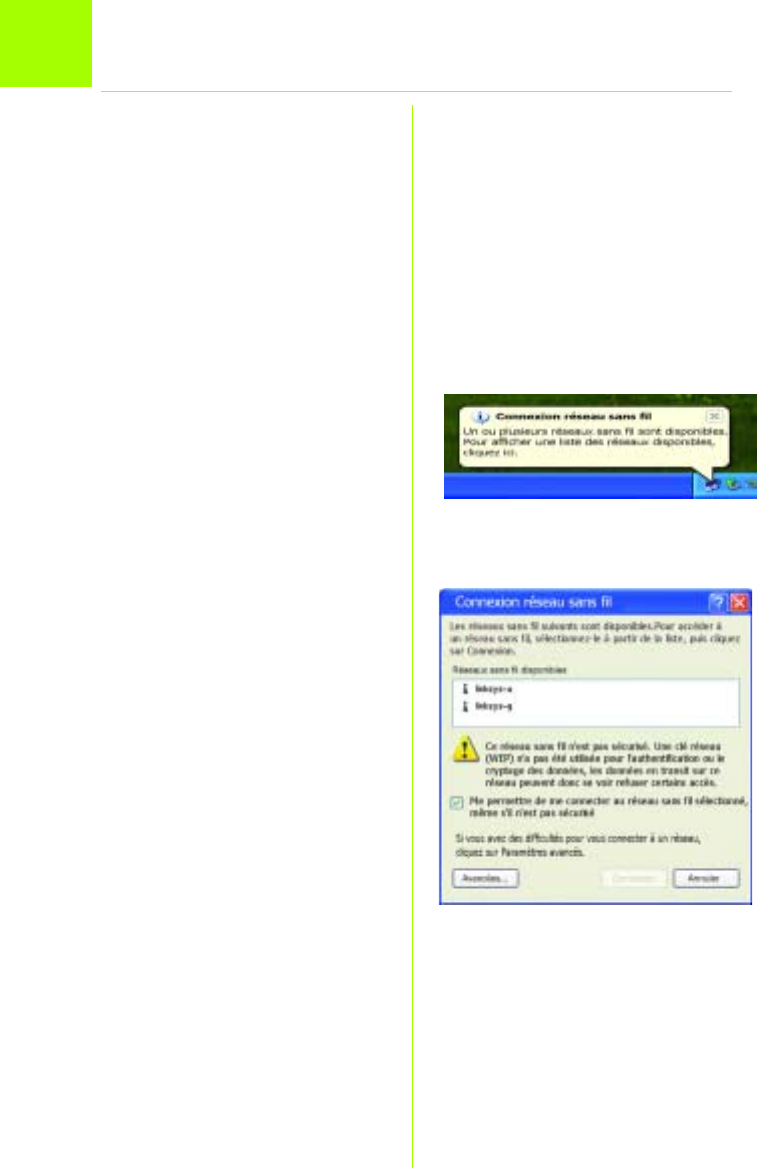
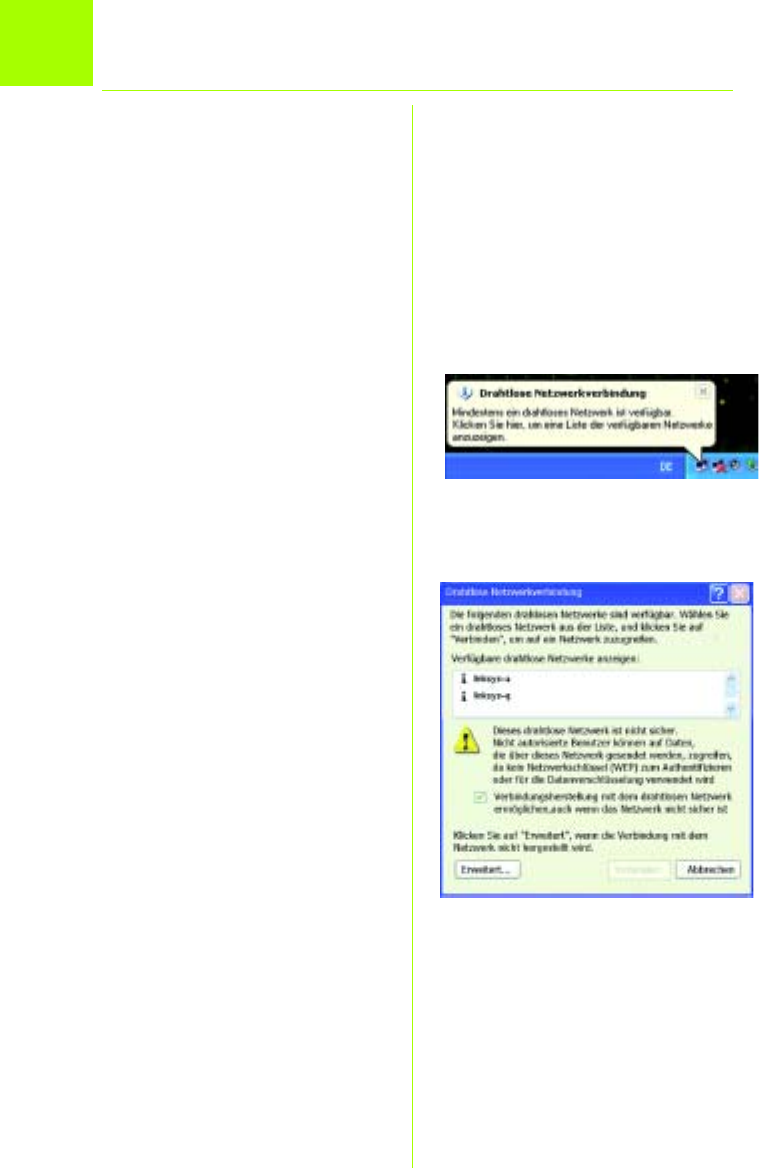
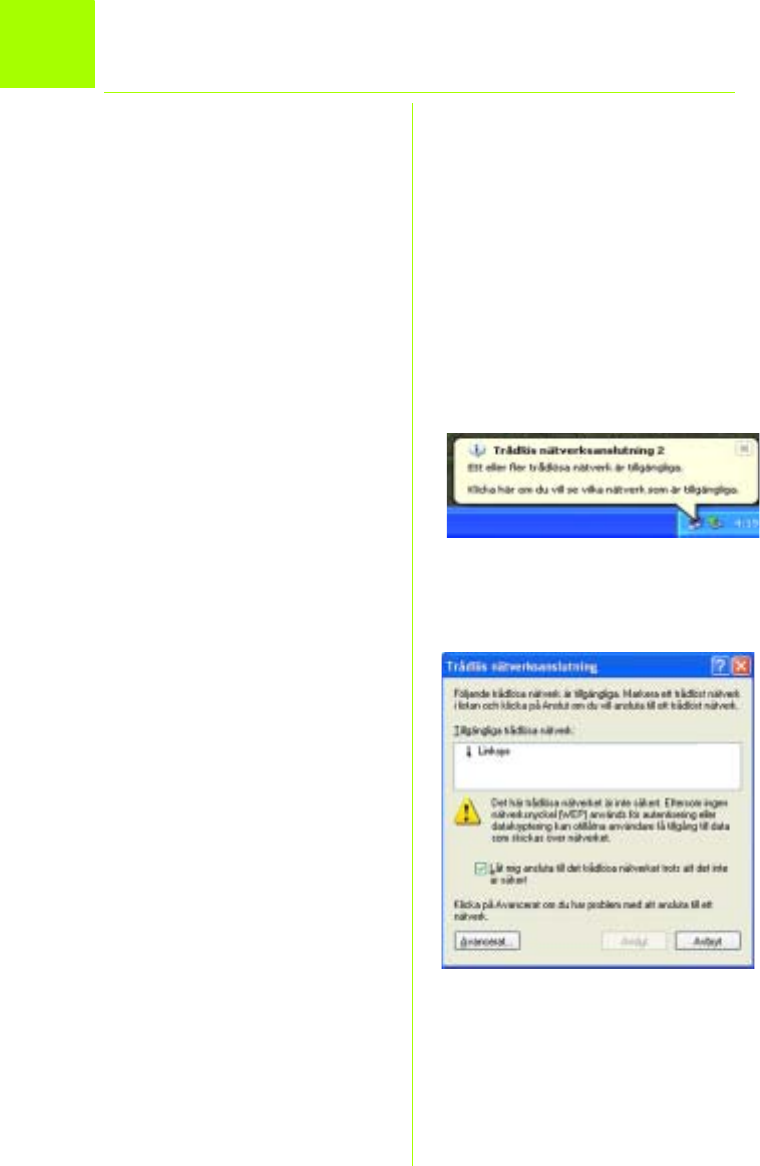
AThe Windows XP Wireless Zero
Configuration icon will appear
in your computer’s system tray.
Double-click the icon.
BThe screen that appears will
show any available wireless
network. Click Advanced.
3Disabling Windows XP
Wireless Zero Configuration
A
B
6
C
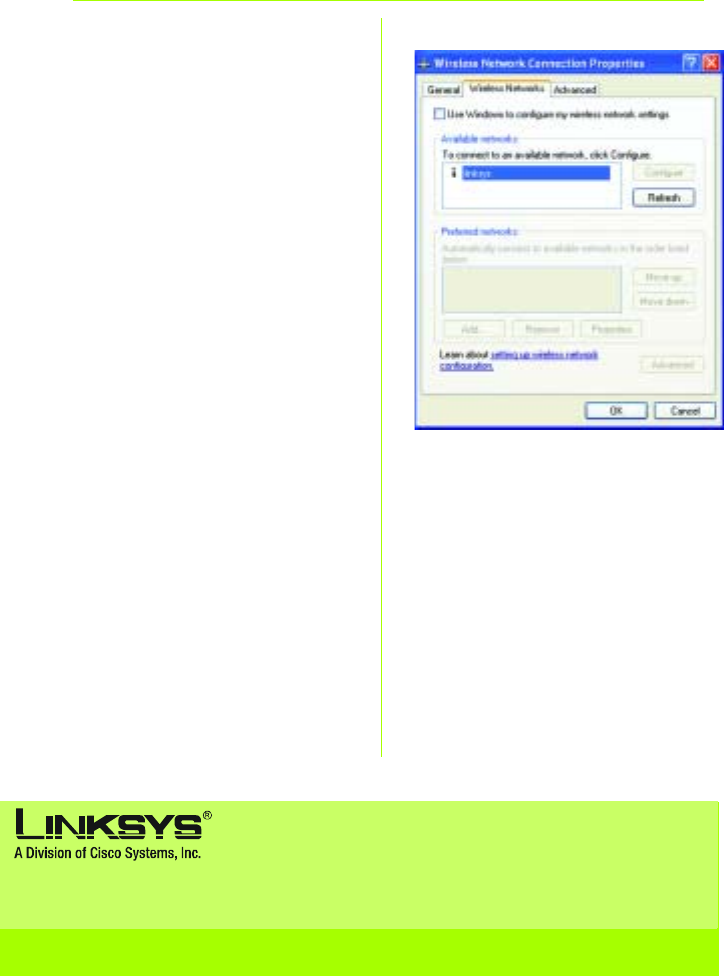
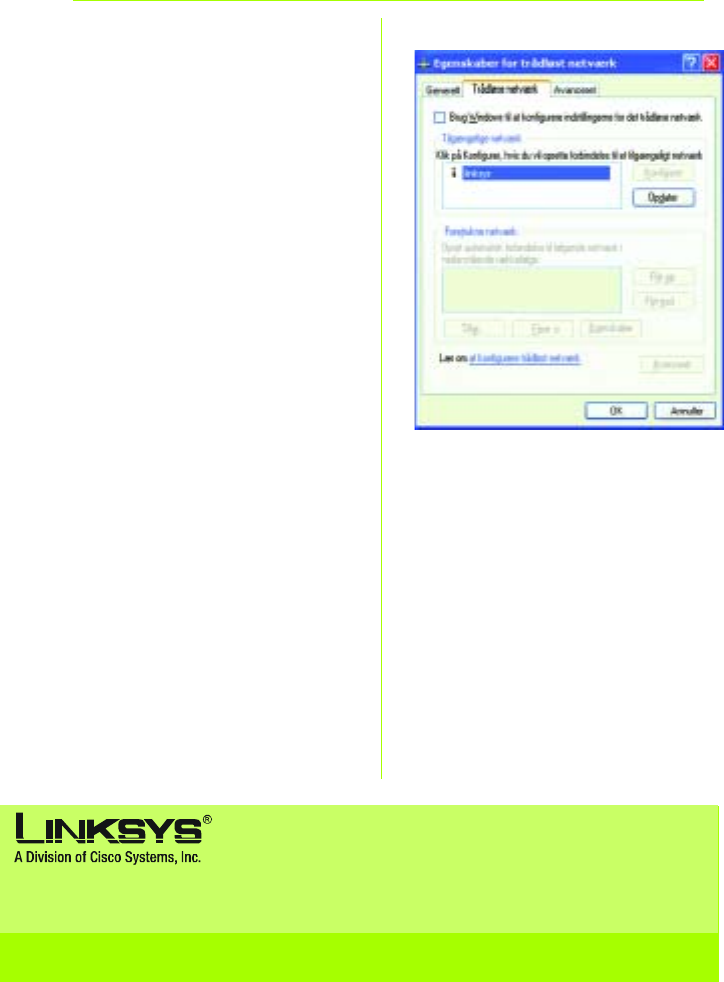
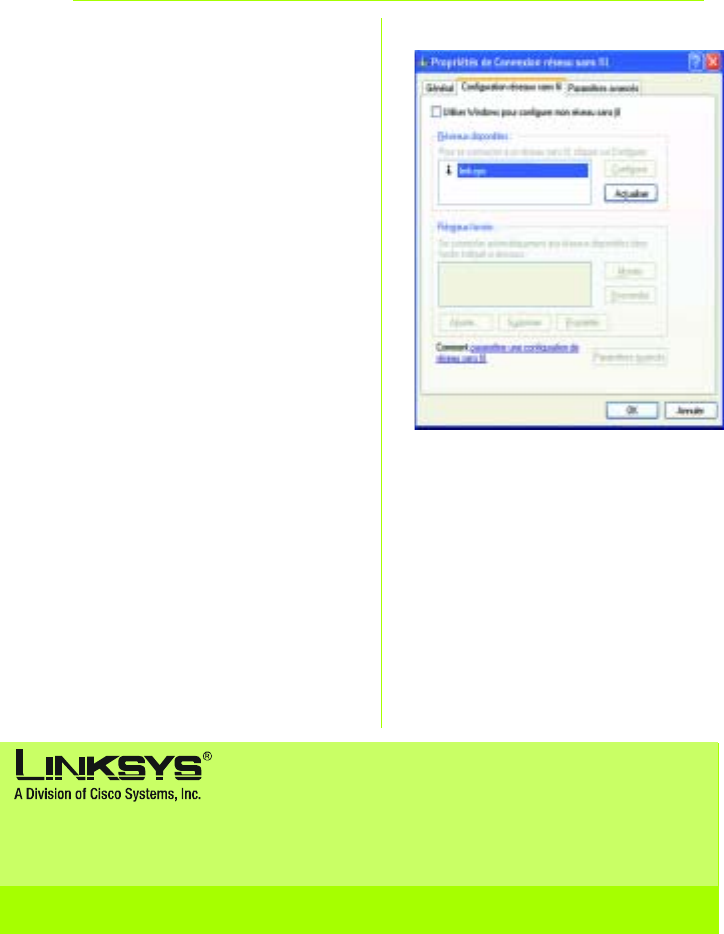
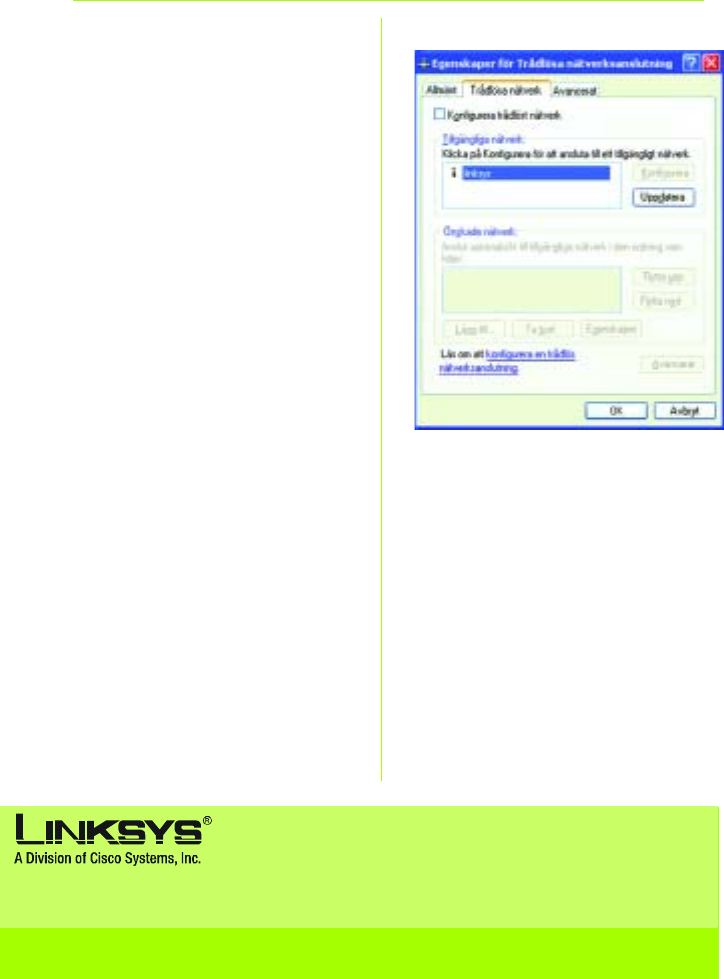
COn the Wireless Networks
screen, uncheck the box next
to Use Windows to configure
my wireless network settings.
Then click OK.
Windows XP Wireless Zero Configu-
ration users: Congratulations! The
installation of the Wireless-G
Notebook Adapter is complete.
WPC54GS-UK-EU-QIG-404014 JL
For additional information or troubleshooting help, refer to the User Guide on the CD-ROM or the
Technical Support Insert. You can also e-mail for further support.
Website http://www.linksys.com/international
Linksys is a registered trademark or trademark of Cisco Systems, Inc. and/or its affiliates in the U.S. and certain other
countries. Copyright © 2004 Cisco Systems, Inc. All rights reserved.

A Division of Cisco Systems, Inc.
®
Model No.
Model No.
Wireless Quick Installation Guide
Trådløs
1
Installationsvejledning
Modelnr.
WPC54GS (DK)
Notebook-adapter
Pakkens indhold
• Trådløs G Notebook-adapter
• Installations-cd-rom
• Brugervejledning på cd-rom
• Installationsvejledning
Trådløs-G
med SpeedBooster
GHz
2802.11g
4
,
2
1
APlacer installations-cd-rom'en i cd-
rom-drevet. Den guidede
konfiguration køres automatisk, og
skærmbilledet Welcome
(Velkommen) vises. Hvis det ikke er
tilfældet, skal du klikke på Start og
vælge Run (Kør). Indtast D:\setup.exe
i det felt, der vises (hvis "D" er
bogstavet for cd-rom-drevet).
Klik på knappen Install (Installer).
BKlik på Next (Næste), når du har læst
licensaftalen, for at fortsætte
installationen.
CDerefter skal du vælge en trådløs
tilstand for dit netværk. Klik på
alternativknappen Infrastructure Mode
(Infrastrukturtilstand), hvis dine trådløse
computere skal oprette
netværksforbindelse til computere i det
kabelbaserede netværk ved hjælp af et
access point. Klik på alternativknappen
Ad-Hoc Mode
(Ad-hoc-tilstand), hvis flere trådløse
computere skal oprette
netværksforbindelse direkte til hinanden.
Indtast SSID'et for det trådløse netværk i
feltet SSID. SSID'et skal være identisk for
alle enheder i det trådløse netværk.
Standardindstillingen er linksys (små
bogstaver). Klik på Next (Næste).
DHvis du vælger Infrastructure Mode
(Infrastrukturtilstand), skal du gå til trin
E nu. Hvis du vælger Ad-Hoc Mode
(Ad-hoc-tilstand), skal du vælge den
korrekte kanal til netværket.
Hvis du har trådløs-G- (802.11g) og
trådløs-B-enheder (802.11b) i
netværket, skal du beholde
standardindstillingen for Network
Mode (Netværkstilstand): Mixed Mode
(Blandet tilstand). Hvis du kun har
A
Installation af softwaren til Trådløs-G
Notebook-adapteren
B
C
D
3
trådløs-G-enheder, skal du vælge
G-Only Mode (Kun-G-tilstand). Klik
på Next (Næste).
EVælg sikkerhedstype: 64-bit WEP,
128-bit WEP eller WPA-PSK. Alle
enheder i et netværk skal være af
samme type.
WEP
Adgangsordet bruges til at generere
en eller flere WEP-nøgler. Der er forskel
på store og små bogstaver i ordet, og
det må ikke være længere end 16
alfanumeriske tegn.
Hvis du bruger 64-bit WEP-kryptering,
skal nøglen være præcis 10
hexadecimale tegn. Hvis du bruger
128-bit WEP-kryptering, skal nøglen
være præcis 26 hexadecimale tegn.
Vælg den TX-nøgle og
godkendelsesmetode, der bruges i dit
netværk.
WPA-PSK
Vælg TKIP- eller AES-kryptering. Vælg
derefter et adgangsord på 8-63 tegn.
FDen guidede konfiguration giver dig
mulighed for at gennemse dine
indstillinger, før filerne installeres. Klik
på Next (Næste), hvis du er tilfreds
med indstillingerne, eller på Back
(Tilbage) for at ændre indstillingerne.
GNår softwaren er installeret korrekt,
skal du klikke på Exit (Afslut).
E1
G
F
E2
4
2Installation af softwaren til Trådløs-G
Notebook-adapteren i pc'en
C
ASluk notebook-pc'en.
BFind et tilgængeligt PC Card-stik på
din notebook-pc.
CSkub adapteren helt ind i CardBus-
stikket med mærkatsiden opad, som
vist i figur C.
DTænd notebook-pc'en.
EWindows begynder at kopiere
driverfilerne til din computer. Hvis du
bliver bedt om at placere den
originale Windows-cd-rom i cd-rom-
drevet, skal du gøre dette og derefter
angive, hvor Windows kan finde filerne
(f.eks. D:\).
FNår du har installeret adapteren, vises
ikonet for overvågningsprogrammet til
trådløse netværk til Trådløs-G
Notebook-adapteren på proceslinjen
i nederste højre hjørne af skærmen.
Hvis du vil kontrollere linkoplysningerne,
søge efter tilgængelige trådløse
netværk eller foretage yderligere
konfigurationsændringer ved hjælp
af overvågningsprogrammet til
trådløse netværk, skal du
dobbeltklikke på ikonet.
Windows XP-brugere: Gå til trin 3.
Windows 98-, Me- og 2000-brugere:
Tillykke! Installationen af Trådløs-G
Notebook-adapteren er færdig.
5
Windows XP har et indbygget
konfigurationsværktøj. Hvis du vil konfigurere
adapteren ved hjælp af
overvågningsprogrammet til trådløse
netværk, skal du deaktivere Windows XP
Wireless Zero Configuration (Automatisk
konfiguration af trådløse enheder). Følg
instruktionerne i trin A-C.
AIkonet for Windows XP Wireless Zero
Configuration (Automatisk
konfiguration af trådløse enheder)
vises på computerens proceslinje.
Dobbeltklik på ikonet.
BI det skærmbillede, der vises, kan du
se alle tilgængelige trådløse netværk.
Klik på Advanced (Avanceret).
3Deaktivering af Windows XP
Wireless Zero Configuration
A
B
6
C
CI skærmbilledet for det trådløse
netværk skal du fjerne afkrydsningen i
feltet Use Windows to configure my
wireless network settings (Brug Windows
til at konfigurere indstillingerne for det
trådløse netværk).
Klik derefter på OK.
Windows XP Wireless Zero Configuration-
brugere (Automatisk konfiguration af
trådløse enheder): Tillykke! Installationen af
Trådløs-G Notebook-adapteren er færdig.
WPC54GS-DK-QIG-40415NC JL
Yderligere oplysninger eller hjælp til fejlfinding finder du i brugervejledningen på cd-rom'en eller ved
at kontakte Teknisk support (se arket om teknisk support).
Websted http://www.linksys.com/international
Linksys er et registreret varemærke tilhørende Cisco Systems, Inc. og/eller Cisco Systems associerede selskaber i
USA og visse andre lande. Copyright © 2004 Cisco Systems, Inc. Alle rettigheder forbeholdes.
A Division of Cisco Systems, Inc.
®
Model No.
Model No.
WirelessSans fil
1
Guide d’installation rapide
Modèle
WPC54GS (FR)
Carte pour ordinateur portable
Contenu de l'emballage
• Carte pour ordinateur portable sans
fil G
• CD-ROM d'installation
• Guide de l'utilisateur
sur CD-ROM
• Guide d'installation rapide
Sans fil G
avec SpeedBooster
24
,GHz
802.11g

2
1
AInsérez le CD-ROM d'installation dans le
lecteur de CD-ROM. L'Assistant de
configuration s'exécute
automatiquement et l'écran Welcome
(Bienvenue) s'affiche. Si ce n'est pas le
cas, cliquez sur Démarrer, puis sur
Exécuter. Dans le champ qui apparaît,
entrez D:\setup.exe (« D » représentant
votre lecteur de CD-ROM).
Cliquez sur le bouton Installer.
BAprès avoir pris connaissance de
l'accord de licence, cliquez sur le bouton
Next (Suivant) pour continuer l'installation.
CSélectionnez ensuite un mode de
communication sans fil pour votre
réseau. Cliquez sur la case d'option
Insfrastucture Mode (Mode
d'infrastructure) si vous voulez que vos
ordinateurs sans fil soient connectés
avec les ordinateurs de votre réseau
câblé à l'aide d'un point d'accès.
Cliquez sur la case d'option Ad-Hoc
Mode (Mode Ad-Hoc) si vous voulez
que plusieurs ordinateurs sans fil puissent
communiquer directement entre eux.
Dans le champ SSID (Nom SSID), entrez
le nom SSID de votre réseau sans fil. Le
nom SSID doit être identique pour tous
les périphériques du réseau. Le
paramètre par défaut est linksys
(entièrement en minuscules). Cliquez
sur Next (Suivant).
DSi vous sélectionnez Infrastructure
Mode (Mode infrastructure), passez
directement à l'Etape E. Si vous
avez sélectionné Ad-Hoc Mode
(Mode Ad hoc), sélectionnez le
canal de fonctionnement correct
pour votre réseau.
Si vous utilisez des périphériques sans
fil G (802.11g) et sans fil B (802.11b)
A
Installation de la carte pour
ordinateur portable
B
C
D

3
sur votre réseau, conservez la
configuration du mode réseau par
défaut, Mixed (Mixte). Si vous utilisez
uniquement des périphériques sans
fil G, sélectionnez G-Only Mode
(G uniquement). Cliquez sur Next
(Suivant).
ESélectionnez votre type de sécurité :
64-bit WEP (WEP 64 bits), 128-bit WEP
(WEP 128 bits) ou WPA-PSK. Dans un
réseau, tous les périphériques doivent
utiliser le même type.
WEP
La phrase mot de passe permet de
générer une ou plusieurs clés WEP. Elle
est sensible à la casse et ne doit pas
comporter plus de 16 caractères.
Si vous utilisez un cryptage WEP
64 bits, la clé doit être constituée de
10 caractères hexadécimaux. Si vous
utilisez un cryptage WEP 128 bits, la
clé doit être constituée de
26 caractères hexadécimaux.
Sélectionnez la clé TX et la méthode
d'authentification de votre réseau.
WPA-PSK
Sélectionnez le cryptage TKIP ou AES.
Puis, choisissez une phrase mot de
passe comportant 8 à 63 caractères.
FL'Assistant de configuration vous
demandera de vérifier vos
paramètres avant d'installer les
fichiers. Cliquez sur Next (Suivant) si les
paramètres vous conviennent ou sur
Back (Précédent) pour les modifier.
GUn fois que le logiciel a été
correctement installé, cliquez sur le
bouton Exit (Quitter).
E1
G
F
E2

4
AMettez votre ordinateur portable hors
tension.
BRepérez un connecteur PC Card sur
votre ordinateur portable.
CEnfoncez complètement la carte
dans le connecteur CardBus, la face
portant une étiquette tournée vers le
haut (voir Figure C).
DMettez votre ordinateur portable
sous tension.
EWindows commence à copier les
fichiers de pilotes sur votre
ordinateur. Si Windows vous
demande d'insérer le CD-ROM de
Windows d'origine, insérez celui-ci,
puis indiquez à Windows le chemin
d'accès approprié (par exemple
D:\).
FUne fois la carte installée, l'icône de
la fonction de contrôle du réseau
sans fil avec carte pour ordinateur
portable sans fil G apparaît dans la
barre d'état système, située dans le
coin inférieur droit de l'écran.
Si vous souhaitez utiliser la fonction de
contrôle du réseau sans fil pour vérifier
les données propres aux liens,
rechercher des réseaux sans fil
disponibles ou modifier d'autres
configurations, double-cliquez sur
cette icône.
Utilisateurs de Windows XP :
Passez à l'étape 3.
Utilisateurs de Windows 98, Me et 2000 :
Félicitations ! L'installation de la carte
pour ordinateur portable sans fil G est
terminée.
2Installation de la carte pour ordinateur
portable sans fil G sur votre ordinateur
C
5
Windows XP intègre un outil de
configuration. Pour configurer la carte au
moyen de la fonction de contrôle du
réseau, vous devez désactiver la
configuration automatique de réseau sans
fil de Windows XP. Suivez les instructions des
étapes A à C.
AL'icône de configuration sans fil sous
Windows XP apparaît dans la barre
d'état système de l'ordinateur.
Cliquez deux fois sur cette icône.
BL'écran qui apparaît indique tous les
réseaux sans fil disponibles. Cliquez
sur Paramètres avancés.
3Désactivation de la configuration
automatique de réseau sans fil de Windows XP
A
B
6
C
CDans l'écran Configuration réseaux
sans fil, désélectionnez la case en
regard de Utiliser Windows pour
configurer mon réseau sans fil.
Cliquez ensuite sur OK.
Utilisateurs de Configuration sans fil sous
Windows XP : Félicitations ! L'installation de
la carte pour ordinateur portable
sans fil G est terminée.
WPC54GS-FR-QIG-40415NC JL
Pour obtenir plus d'informations ou une aide technique, reportez-vous au Guide de l'utilisateur qui
figure sur le CD-ROM ; pour prendre contact avec le service d'assistance technique, reportez-vous à
la Fiche d'assistance technique.
Site Web http://www.linksys.com/international
Linksys est une marque déposée ou une marque commerciale de Cisco Systems, Inc. et/ou ses filiales aux Etats-Unis
et dans certains autres pays. Copyright © 2004 Cisco Systems, Inc. Tous droits réservés.

A Division of Cisco Systems, Inc.
®
Model No.
Model No.
WirelessWireless
1
Kurzanleitung
Modell
WPC54GS (DE)
Notebook-Adapter
Lieferumfang
• Wireless-G Notebook-Adapter
• Installations-CD-ROM
• Benutzerhandbuch
auf CD-ROM
• Kurzanleitung
Wireless-G
mit SpeedBooster
24
,GHz
802.11g

2
1
ALegen Sie die Installations-CD-ROM in Ihr
CD-ROM-Laufwerk ein. Der Setup-
Assistent sollte automatisch gestartet
und das Willkommensfenster angezeigt
werden. Wenn dies nicht der Fall ist,
klicken Sie auf Start und wählen Sie
Ausführen aus. Geben Sie im daraufhin
angezeigten Feld D:\setup.exe ein
(wobei „D“ für den Buchstaben Ihres
CD-ROM-Laufwerks steht).
Klicken Sie auf die Schaltfläche Install
(Installieren).
BLesen Sie die Lizenzvereinbarung und
klicken Sie auf Next (Weiter), um die
Installation fortzusetzen.
CNun wählen Sie einen drahtlosen Modus
für Ihr Netzwerk aus. Klicken Sie auf die
Optionsschaltfläche Infrastructure
Mode (Infrastrukturmodus), wenn Ihre
drahtlosen Computer mit Hilfe eines
drahtlosen Zugriffspunkts mit Computern
in einem verdrahteten Netzwerk vernetzt
werden sollen. Klicken Sie auf die
Optionsschaltfläche Ad-Hoc Mode
(Ad-Hoc-Modus), wenn mehrere
drahtlose Computer direkt miteinander
vernetzt werden sollen.
Geben Sie in das Feld SSID (SS-ID) die
SS-ID Ihres drahtlosen Netzwerks ein. Die
SS-ID muss für alle Geräte im Netzwerk
identisch sein. Die Standardeinstellung
ist linksys (Kleinbuchstaben). Klicken Sie
auf Next (Weiter).
DWenn Sie die Option Infrastructure
Mode (Infrastrukturmodus) ausgewählt
haben, fahren Sie jetzt mit Schritt E fort.
Wenn Sie die Option Ad-Hoc Mode
(Ad-Hoc-Modus) ausgewählt haben,
bestimmen Sie den richtigen
Betriebskanal für Ihr Netzwerk.
Wenn Ihr Netzwerk sowohl Wireless-G
(802.11g)- als auch Wireless-B (802.11b)-
Geräte umfasst, behalten Sie die
A
Installieren der Wireless-G
Notebook-Adapter-Software
B
C
D

3
Standardeinstellung für Network Mode
(Netzwerkmodus) bei, d. h. Mixed Mode
(Gemischter Modus). Wenn ausschließlich
Wireless-G-Geräte vorhanden sind,
wählen Sie den Modus G-Only (Nur G).
Klicken Sie auf Next (Weiter).
EWählen Sie einen Sicherheitstyp: 64-bit
WEP, 128-bit WEP oder WPA-PSK. Für alle
Geräte im Netzwerk muss der gleiche
Typ verwendet werden.
WEP
Mit der Passphrase können Sie
mindestens einen WEP-Schlüssel
erstellen. Hierbei wird zwischen Groß-
und Kleinschreibung unterschieden. Die
Länge von 16 alphanumerischen
Zeichen darf nicht überschritten werden.
Wenn Sie die 64-Bit-WEP-Verschlüsselung
verwenden, muss die Schlüssellänge
genau 10 hexadezimale Zeichen
betragen. Wenn Sie die 128-Bit-WEP-
Verschlüsselung verwenden, muss die
Schlüssellänge genau 26 hexadezimale
Zeichen betragen.
Wählen Sie den TX-Schlüssel und die
Authentifizierungsmethode des
Netzwerks aus.
WPA-PSK
Wählen Sie entweder die
Verschlüsselungsoption TKIP oder AES aus.
Wählen Sie anschließend eine Passphrase
mit einer Länge von 8 bis 63 Zeichen aus.
FDer Setup-Assistent fordert Sie auf, Ihre
Einstellungen zu überprüfen, bevor mit
dem Installieren von Dateien begonnen
wird. Wenn Sie mit der Auswahl der
Einstellungen zufrieden sind, klicken Sie
auf Next (Weiter). Andernfalls klicken Sie
auf Back (Zurück), um die Einstellungen
zu ändern.
GKlicken Sie nach erfolgreicher
Installation auf Exit (Beenden).
E1
G
F
E2

4
ASchalten Sie das Notebook aus.
BSuchen Sie nach einem verfügbaren
PC-Karten-Steckplatz auf dem
Notebook.
CSetzen Sie den Adapter vollständig in
den CardBus-Steckplatz ein, wobei die
Beschriftung nach oben zeigt (siehe
Abbildung C).
DSchalten Sie das Notebook ein.
EWindows beginnt mit dem Kopieren
der Treiberdateien auf den Computer.
Legen Sie bei Aufforderung die
Original-CD-ROM von Windows ein,
und geben Sie den entsprechenden
Speicherort an (z. B. D:\).
FNach der Installation des Adapters wird
das Symbol für den Wireless-G
Notebook-Adapter Wireless-Netzwerk-
Monitor in der Taskleiste in der unteren
rechten Ecke Ihres Bildschirms
angezeigt.
Doppelklicken Sie auf das Symbol,
wenn Sie mit Hilfe des Wireless-
Netzwerk-Monitors die
Verbindungsdaten überprüfen, nach
verfügbaren drahtlosen Netzwerken
suchen oder Änderungen in der
Konfiguration vornehmen möchten.
Benutzer von Windows XP: Fahren Sie mit
Schritt 3 fort.
Benutzer von Windows 98, ME und 2000:
Herzlichen Glückwunsch! Die Installation des
Wireless-G Notebook-Adapters ist hiermit
abgeschlossen.
2Einsetzen des Wireless-G
Notebook-Adapters in den PC
C
5
Windows XP verfügt über ein integriertes
Konfigurations-Tool. Sie müssen die
konfigurationsfreie drahtlose Verbindung unter
Windows XP deaktivieren, um den Adapter mit
dem Wireless-Netzwerk-Monitor konfigurieren
zu können. Folgen Sie den Anweisungen in
Schritt A-C.
ADas Symbol von Windows XP für die
konfigurationsfreie drahtlose
Verbindung wird in der Taskleiste des
Computers angezeigt. Doppelklicken
Sie auf das Symbol.
BIm folgenden Fenster werden alle
verfügbaren drahtlosen Netzwerke
angezeigt. Klicken Sie auf Erweitert.
3Deaktivieren der konfigurationsfreien
drahtlosen Verbindung unter Windows XP
A
B
6
C
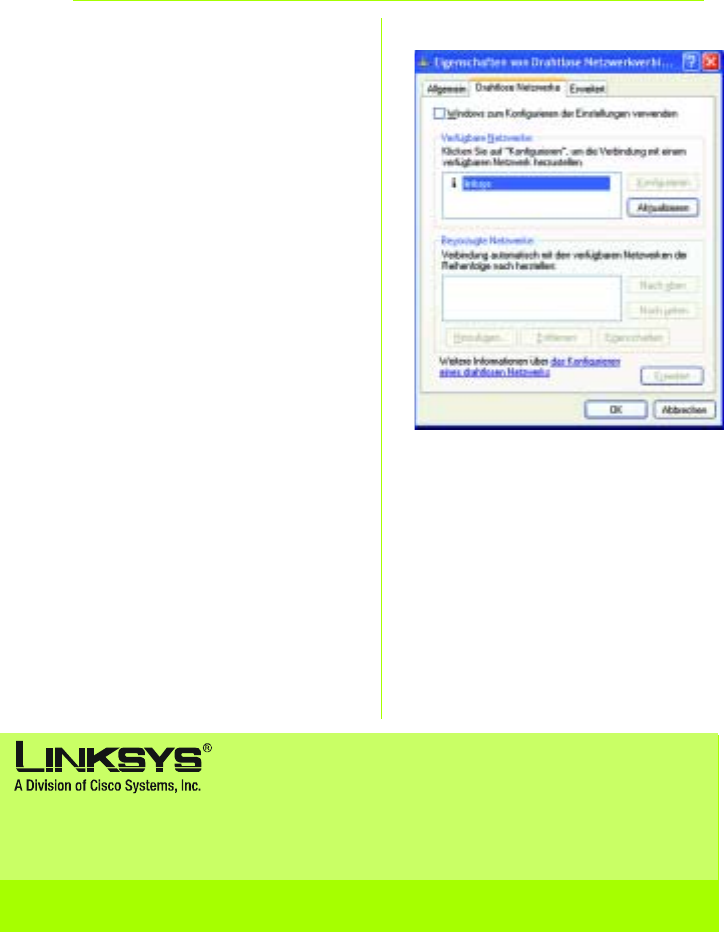
CDeaktivieren Sie im Fenster Eigenschaften
von Drahtlose Netzwerkverbindungen
das Kontrollkästchen neben Windows
zum Konfigurieren der Einstellungen
verwenden.
Klicken Sie anschließend auf OK.
Benutzer der konfigurationsfreien drahtlosen
Verbindung unter Windows XP: Herzlichen
Glückwunsch! Die Installation des Wireless-G
Notebook-Adapters ist abgeschlossen.
WPC54GS-DE-QIG-404015NC JL
Weitere Informationen und Anleitungen zur Fehlerbehebung finden Sie im Benutzerhandbuch auf der
Installations-CD-ROM. Informationen zur Kontaktaufnahme mit dem technischen Kundendienst
finden Sie in der technischen Support-Beilage.
http://www.linksys.com/international
Linksys ist eine eingetragene Marke bzw. eine Marke von Cisco Systems, Inc. und/oder deren Zweigunternehmen in
den USA und anderen Ländern. Copyright © 2004 Cisco Systems, Inc. Alle Rechte vorbehalten.

A Division of Cisco Systems, Inc.
®
Model No.
Model No.
Wireless Quick Installation Guide
Wireless
1
Guida di installazione rapida
Modello
WPC54GS (IT)
Adattatore per notebook
Contenuto della confezione
• Adattatore per notebook Wireless G
• Setup CD-ROM (CD per
l'installazione guidata)
• User Guide (Guida per l'utente) su
CD-ROM
• Guida di installazione rapida
Wireless-G
con SpeedBooster
24
,GHz
802.11g

2
1
AInserire il Setup Wizard CD-ROM (CD per
l'installazione guidata) nell'apposita
unità. L'installazione guidata dovrebbe
avviarsi automaticamente
visualizzando la schermata Welcome
(Benvenuti). In caso contrario, fare clic
sul pulsante Start e scegliere Esegui.
Immettere D:\setup.exe (dove "D" è la
lettera dell'unità CD-ROM) nel campo
visualizzato.
Fare clic sul pulsante Install (Installa).
BDopo aver letto il contratto di licenza,
fare clic su Next (Avanti) per
proseguire l'installazione.
CScegliere quindi una modalità wireless
per la rete. Fare clic sul pulsante di
opzione Infrastructure Mode (Modalità
infrastruttura) per collegare i computer
wireless ai computer connessi alla rete
via cavo usando un punto di accesso.
Fare clic sul pulsante di opzione Ad-Hoc
Mode (Modalità ad hoc) per collegare
direttamente più computer wireless tra
di loro.
Nel campo SSID, immettere l'SSID
della rete wireless che deve essere
identico per tutte le periferiche
installate nella rete. L'impostazione
predefinita è linksys (tutto in
minuscolo). Fare clic su Next (Avanti).
DSe si sceglie l'opzione Infrastructure
Mode (Modalità infrastruttura), passare
direttamente alla Fase E. Se si sceglie
l'opzione Ad-Hoc Mode (Modalità ad
hoc), selezionare il canale operativo
corretto per la propria rete.
Se nella rete sono presenti periferiche
Wireless-G (802.11g) e Wireless-B
(802.11b), mantenere l'impostazione
predefinita per Network Mode
A
Installazione del software
dell'adattore per notebook Wireless-G
B
C
D

3
(Modalità di rete), ovvero Mixed Mode
(Modalità mista). Se sono presenti solo
periferiche Wireless-G, selezionare
G-Only Mode (Modalità Solo G). Fare
clic su Next (Avanti).
ESelezionare il tipo di sicurezza
utilizzato: 64-bit WEP, 128-bit WEP o
WPA-PSK. Tutte le periferiche collegate
in rete devono utilizzare lo stesso tipo
di sicurezza.
WEP
La passphrase viene utilizzata per
generare una o più chiavi WEP. È
sensibile alla distinzione tra maiuscole
e minuscole e non deve essere più
lunga di 16 caratteri alfanumerici.
Se si utilizza una cifratura WEP a 64 bit,
la chiave deve essere composta
esattamente da 10 caratteri
esadecimali. Se si utilizza una cifratura
WEP a 128 bit, la chiave deve essere
composta esattamente da 26
caratteri esadecimali.
Selezionare la chiave TX e il metodo
di autenticazione della rete.
WPA-PSK
Selezionare la cifratura TKIP o AES.
Quindi, scegliere una passphrase
composta da un numero di caratteri
compreso tra 8 e 63.
FPrima di avviare l'installazione dei file,
l'installazione guidata chiederà di
confermare le impostazioni. Fare clic
su Next (Avanti) per confermare le
impostazioni oppure selezionare Back
(Indietro) per modificarle.
GSe l'installazione del software è stata
portata a termine correttamente, fare
clic su Exit (Esci).
E1
G
F
E2

4
ASpegnere il notebook.
BIndividuare uno slot per PC Card nel
notebook.
CInserire completamente l'adattatore
nello slot CardBus con l'etichetta
rivolta verso l'alto, come mostrato
nella figura C.
DAccendere il notebook.
EWindows inizia a copiare i file del
driver sul computer. Se richiesto,
inserire il CD-ROM originale di
Windows nell'unità CD-ROM e
specificarne la posizione (ad
esempio, D:\).
FQuando l'adattatore è stato installato,
nell'angolo inferiore destro dello
schermo, sulla barra delle
applicazioni, viene visualizzata l'icona
del monitor Wireless Network
dell'adattatore per notebook Wireless-
G.
Se si desidera utilizzare il monitor
Wireless Network per controllare le
informazioni relative alla
connessione, ricercare le reti wireless
disponibili oppure apportare ulteriori
modifiche alla configurazione, quindi
fare doppio clic sull'icona.
Per gli utenti di Windows XP: continuare
con la Fase 3.
Utenti di Windows 98, Me e 2000:
congratulazioni! L'installazione
dell'adattatore per notebook Wireless-G è
completata.
2Installazione dell'adattatore
per notebook Wireless-G sul PC
C
5
Windows XP dispone di uno strumento di
configurazione incorporato. Per
configurare l'adattatore utilizzando il
monitor Wireless Network, è necessario
disattivare il servizio Zero Configuration reti
senza fili di Windows XP. Attenersi alle
istruzioni riportate nelle Fasi A-C.
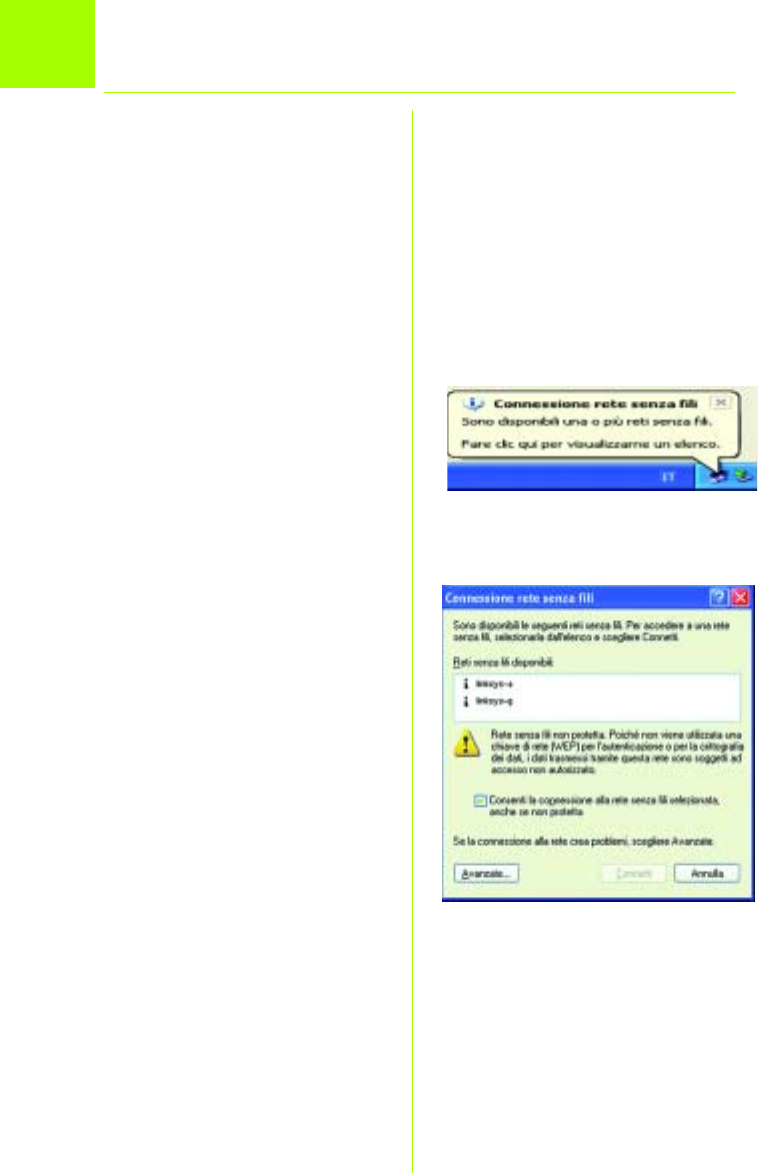
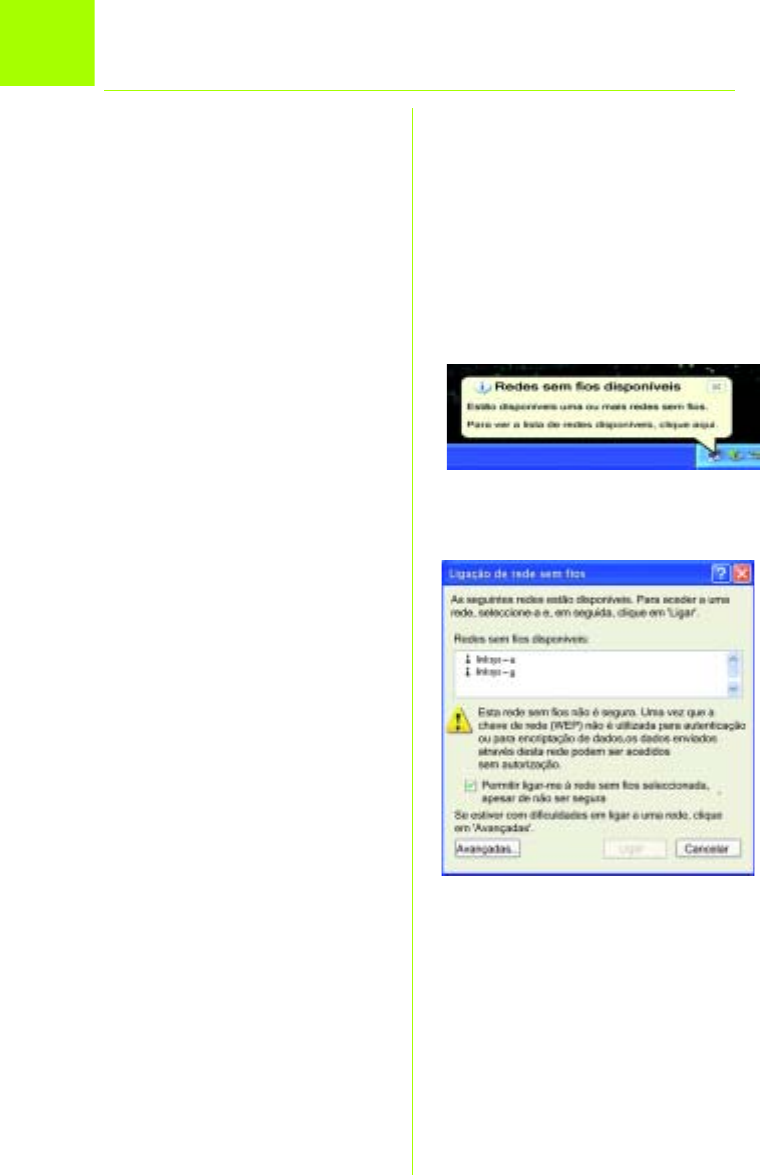
AL'icona Zero Configuration reti senza
fili di Windows XP appare nella barra
delle applicazioni del computer. Fare
doppio clic su questa icona.
BViene visualizzata una schermata
con le reti wireless disponibili. Fare
clic su Avanzate.
3Disattivazione del servizio Zero
Configuration reti senza fili di Windows XP
A
B

6
C
CNella schermata Reti senza fili,
deselezionare la casella visualizzata
accanto all'opzione Usa Windows per
configurare le impostazioni della rete
senza fili.
Fare clic su OK.
Utenti del servizio Zero Configuration reti
senza fili di Windows XP: congratulazioni!
L'installazione dell'adattatore per
notebook Wireless-G è completata.
WPC54GS-IT-QIG-40415NC JL
Per ulteriori informazioni o istruzioni relative alla risoluzione dei problemi, consultare la User Guide (Guida per
l'utente) contenuta nel CD-ROM o il Supplemento per l'assistenza tecnica per contattare l'Assistenza tecnica.
Sito Web http://www.linksys.com/international
Linksys è un marchio registrato o un marchio di Cisco Systems, Inc. e/o dei relativi affiliati negli Stati Uniti e in altri
paesi. Copyright © 2004 Cisco Systems, Inc. Tutti i diritti riservati.

A Division of Cisco Systems, Inc.
®
Model No.
Model No.
WirelessWireless
1
Instalação rápida
Modelo
WPC54GS (PT)
Placa para computador portát
il
Conteúdo da embalagem
• Placa sem fios G para computador
portátil
• CD-ROM de configuração
• Manual do Utilizador (disponível
apenas em inglês) em CD-ROM
• Instalação Rápida
Sem fios G
com SpeedBooster
24
,GHz
802.11g

2
1
AColoque o CD-ROM de configuração
na unidade de CD-ROM. O assistente
de configuração deverá ser
executado automaticamente e
deverá ser apresentado o ecrã
Welcome (Bem-vindo). Caso
contrário, clique em Iniciar e
seleccione Executar. No campo
apresentado, introduza D:\setup.exe
(se “D” corresponder à letra da
unidade de CD-ROM).
Clique no botão Install (Instalar).
BDepois de ler o Contrato de licença,
clique em Next (Seguinte) para
continuar a instalação.
CEm seguida, escolherá um modo
sem fios para a rede. Clique no
botão de opção Infrastructure Mode
(Modo de infra-estrutura) se pretender
que os computadores sem fios sejam
ligados a computadores da rede
com fios utilizando um ponto de
acesso. Clique no botão de opção
Ad-Hoc Mode (Modo ad hoc), se
pretender que vários computadores
sem fios sejam ligados directamente
uns aos outros.
No campo SSID, introduza o SSID da
rede sem fios. O SSID tem de ser
idêntico para todos os dispositivos na
rede. A predefinição é linksys (em
minúsculas). Clique em Next (Seguinte).
DSe escolher Infrastructure Mode
(Modo de infra-estrutura), vá para o
Passo E. Se escolher Ad-Hoc Mode
(Modo ad hoc), seleccione o canal
de funcionamento da rede correcto.
Se existirem dispositivos Sem fios G
(802.11g) e Sem fios B (802.11b) na
rede, mantenha a predefinição do
Network Mode (Modo de rede), Mixed
A
Instalar o software da Placa sem
fios G para computador portátil
B
C
D

3
Mode (Modo misto). Se existirem
apenas dispositivos Sem fios G,
seleccione G-Only Mode (Modo só G).
Clique em Next (Seguinte).
ESeleccione o tipo de segurança:
WEP de 64 bits, WEP de 128 bits ou
WPA-PSK. Todos os dispositivos na
rede têm de utilizar o mesmo tipo.
WEP
A Passphrase (Frase-passe) é utilizada
para gerar uma ou várias chaves
WEP. É sensível a maiúsculas e
minúsculas e não pode ter mais de
16 caracteres alfanuméricos.
Se estiver a utilizar encriptação WEP
de 64 bits, a chave tem de ter
exactamente 10 caracteres
hexadecimais. Se estiver a utilizar
encriptação WEP de 128 bits, a
chave tem de ter exactamente 26
caracteres hexadecimais.
Seleccione a chave TX e o método
de Autenticação da rede.
WPA-PSK
Seleccione encriptação TKIP ou AES.
Em seguida, escolha uma frase-
passe entre 8 e 63 caracteres.
FO Setup Wizard (Assistente de
configuração) solicitará que reveja as
definições antes de começar a
instalar os ficheiros. Clique em Next
(Seguinte) se estiver satisfeito com as
definições ou em Back (Anterior) para
alterar as definições.
GDepois de o software ter sido instalado
com êxito, clique em Exit (Sair).
E1
G
F
E2

4
ADesligue o computador portátil.
BLocalize uma ranhura PC Card
disponível no computador portátil.
CCom a etiqueta da Placa virada
para cima, conforme ilustrado na
Figura C, introduza-a totalmente na
ranhura CardBus.
DLigue o computador portátil.
EO Windows começará a copiar os
ficheiros do controlador para o
computador. Se o Windows solicitar
o CD-ROM original do Windows,
coloque o CD-ROM e indique ao
Windows a respectiva localização
(por exemplo, D:\).
FDepois de instalar a Placa, o ícone
Wireless Network Monitor (Monitor
de redes sem fios) da Placa sem
fios G para computador portátil
será apresentado no tabuleiro do
sistema, localizado no canto
inferior direito do ecrã.
Se pretender utilizar o Wireless
Network Monitor (Monitor de redes
sem fios) para verificar as
informações da ligação, procure as
redes sem fios disponíveis ou
efectue alterações adicionais à
configuração e, em seguida, faça
duplo clique no ícone.
Utilizadores do Windows XP:
Avançar para o Passo 3.
Utilizadores do Windows 98, Me e 2000:
Parabéns! A instalação da Placa sem fios-
G para computador portátil está
concluída.
2Instalar a Placa sem fios G para
computador portátil no computador
C
5
3Desactivar a Configuração nula
sem fios do Windows XP
A
B
O Windows XP tem uma ferramenta de
configuração incorporada. Para configurar
a Placa utilizando o Wireless Network
Monitor (Monitor de redes sem fios), é
necessário desactivar a Configuração nula
sem fios do Windows XP. Siga as instruções
dos Passos A a C.
AO ícone Configuração nula sem fios
do Windows XP será apresentado no
tabuleiro do sistema do computador.
Faça duplo clique no ícone.
BO ecrã apresentado mostrará as
redes sem fios disponíveis. Clique em
Avançadas.
6
C
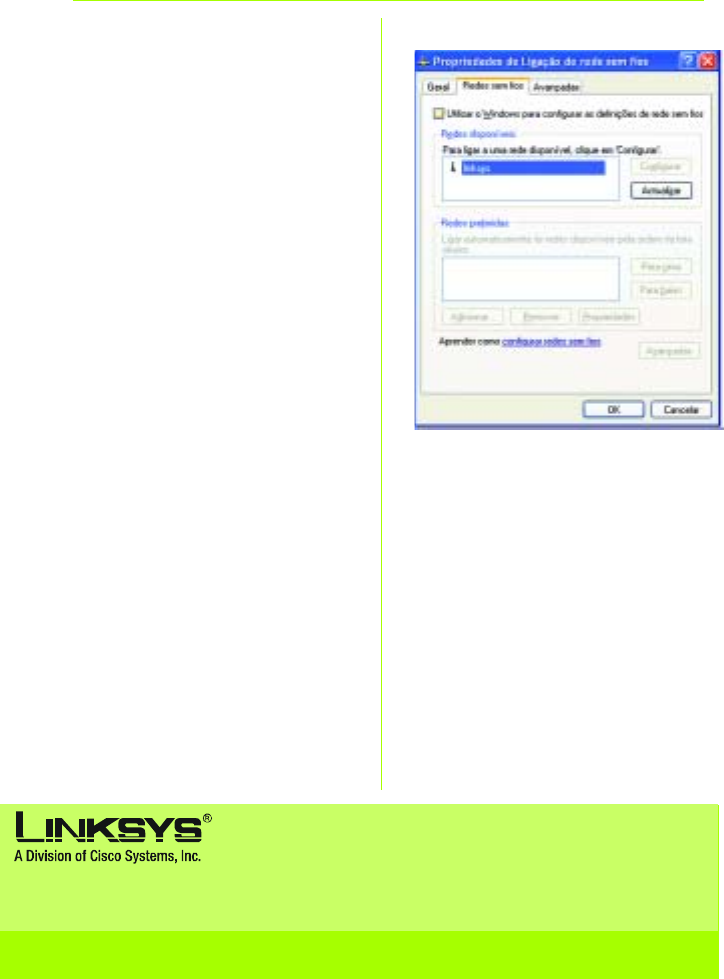
CNo ecrã Redes sem fios, desmarque
a caixa junto a Utilizar o Windows para
configurar as definições de rede sem
fios.
Em seguida, clique em OK
Utilizadores da Configuração nula sem fios
do Windows XP: Parabéns! A instalação da
Placa sem fios G
para computador portátil está concluída.
WPC54GS-PT-QIG-40415NC JL
Para obter informações adicionais ou ajuda para resolução de problemas, consulte o Manual do
Utilizador no CD-ROM, ou para contactar o Suporte técnico, consulte a Folha de suporte técnico.
Web site http://www.linksys.com/international
Linksys é uma marca registada ou marca comercial da Cisco Systems, Inc. e/ou das respectivas afiliadas nos E.U.A. e
noutros países. Copyright © 2004 Cisco Systems, Inc. Todos os direitos reservados.

A Division of Cisco Systems, Inc.
®
Model No.
Model No.
Quick Installation Guide
Wireless
1
Instalación rápida
Modelo
WPC54GS (ES)
Adaptador para ordenador portátil
Contenido del paquete
• Adaptador para ordenador portátil
Wireless-G
• CD-ROM de configuración
• Guía del usuario (sólo en inglés) en
CD-ROM
• Guía de instalación rápida
Wireless-G
con SpeedBooster
24
,GHz
802.11g

2
1
AInserte el CD-ROM de configuración
en la unidad de CD-ROM. El asistente
de configuración se debe ejecutar
de forma automática y debe
aparecer la pantalla Welcome
(pantalla de bienvenida). Si no es así,
haga clic en el botón Inicio y
seleccione Ejecutar. En el campo
que aparece, escriba D:\setup.exe
(donde “D” es la letra de la unidad de
CD-ROM).
Haga clic en el botón Install (Instalar).
BUna vez leído el acuerdo de licencia,
haga clic en Next (Siguiente) para
continuar la instalación.
CA continuación, seleccione el modo
inalámbrico de la red. Haga clic en
el botón de radio Infrastructure Mode
(Modo de infraestructura) si desea
conectar los ordenadores
inalámbricos a ordenadores de la
red con cables mediante un punto
de acceso. Haga clic en el botón de
radio Ad-Hoc Mode (Modo ad-hoc) si
desea conectar varios ordenadores
inalámbricos en red.
En el campo SSID, introduzca el SSID
(Identificador del conjunto de servicios)
de la red inalámbrica. Debe ser el
mismo para todos los dispositivos de la
red. El parámetro predeterminado es
linksys (todo minúsculas). Haga clic en
Next (Siguiente).
DSi selecciona Infrastructure Mode
(Modo de infraestructura), vaya al
paso E ahora. Si selecciona Ad-Hoc
Mode (Modo ad-hoc), elija el canal
operativo adecuado para la red.
Si dispone de dispositivos Wireless-G
(802.11g) y Wireless-B (802.11b) en la
red, mantenga Mixed Mode (Modo
A
Instalación del software del adaptador
para ordenador portátil Wireless-G
B
C
D
3
mixto), el parámetro predeterminado
de Network Mode (Modo de red). Si
sólo tiene dispositivos Wireless-G,
seleccione G-Only Mode (Modo sólo
G). Haga clic en Next (Siguiente).
ESeleccione el tipo de seguridad que
utilice: 64-bit WEP, 128-bit WEP o
WPA-PSK. Todos los dispositivos de la
red deben utilizar el mismo tipo.
WEP
La frase de paso se utiliza para
generar una o más claves WEP.
Distingue entre mayúsculas y
minúsculas y no debe tener una
longitud superior a los 16 caracteres.
Si utiliza encriptación WEP de 64 bits,
la clave debe contener exactamente
10 caracteres hexadecimales. Si
utiliza encriptación WEP de 128 bits, la
clave debe contener exactamente
26 caracteres hexadecimales.
Seleccione la clave TX (TX Key) y el
método de autenticación
(Authentication method) de la red.
WPA-PSK
Seleccione la encriptación TKIP o AES.
A continuación, seleccione una frase
de paso que contenga entre 8 y 63
caracteres.
FEl asistente de configuración le
solicita que revise los parámetros
antes de comenzar a instalar
archivos. Haga clic en Next
(Siguiente) si está satisfecho con los
parámetros o en Back (Atrás) para
cambiarlos.
GUna vez instalado correctamente el
software, haga clic en Exit (Salir).
E1
G
F
E2

4
AApague el ordenador portátil.
BLocalice una ranura de tarjeta PC
disponible en el ordenador portátil.
CIntroduzca el adaptador, con la
etiqueta hacia arriba (como
aparece en la figura C), hasta que
encaje completamente en la ranura
CardBus.
DEncienda el ordenador portátil.
EWindows comienza a copiar los
archivos del controlador en el
ordenador. Si Windows solicita el CD-
ROM original de Windows, insértelo e
indique al sistema operativo la
ubicación del mismo (por ejemplo,
D:\).
FUna vez instalado el adaptador,
aparece el icono del monitor de red
inalámbrico del adaptador para
ordenador portátil Wireless-G en la
bandeja del sistema, situada en la
parte inferior derecha de la pantalla.
Si desea utilizar el monitor de red
inalámbrico para comprobar la
información sobre enlaces, buscar
redes inalámbricas disponibles o
realizar cambios adicionales en la
configuración, haga doble clic en
el icono.
Usuarios de Windows XP: vaya al paso 3.
Usuarios de Windows 98, Me y 2000:
enhorabuena. Ha finalizado la instalación
del adaptador para ordenador portátil
Wireless-G.
2Instalación del software del adaptador
para ordenador portátil Wireless-G
C
5
Windows XP incorpora una herramienta de
configuración. Para configurar el
adaptador mediante el monitor de red
inalámbrico, debe desactivar la
configuración inalámbrica rápida de
Windows XP. Siga las instrucciones de los
pasos A-C.
AEl icono de configuración
inalámbrica rápida en Windows XP
aparece en la bandeja del sistema
del ordenador. Haga doble clic en
dicho icono.
BLa pantalla que aparece muestra
todas las redes inalámbricas
disponibles. Haga clic en Opciones
avanzadas.
3Desactivación de la configuración
inalámbrica rápida en Windows XP
A
B
6
C
CEn la pantalla Redes inalámbricas,
desactive la casilla que aparece
junto a Usar Windows para establecer
mi config. de red inalámbrica.
A continuación, haga clic en
Aceptar.
Usuarios de la configuración inalámbrica
rápida en Windows XP: Enhorabuena. La
instalación del adaptador para ordenador
portátil Wireless-G ha finalizado.
WPC54GS-ES-QIG-4015NC JL
Para obtener información adicional o ayuda sobre solución de problemas, consulte la guía del usuario en
CD-ROM o consulte el suplemento de asistencia técnica para obtener asistencia.
Página Web http://www.linksys.com/international
Linksys es una marca comercial registrada o marca comercial de Cisco Systems, Inc. y/o sus filiales de EE.UU. y otros
países. Copyright © 2004 Cisco Systems, Inc. Todos los derechos reservados.
A Division of Cisco Systems, Inc.
®
Model No.
Model No.
Wireless Quick Installation Guide
Trådlöst
1
Snabbinstallationshandbok
Modellnr WPC54GS (SE)
Adapter för bärbar dator
Innehåll i förpackningen
• Wireless G Adapter för bärbar dator
• Installations-cd
• Användarhandbok på cd-skiva
• Snabbinstallation
Wireless-G
med SpeedBooster
24
,GHz
802.11g

2
1
ASätt in installations-cd:n i cd-
enheten. Guiden startas och
skärmen Welcome (Välkommen)
visas automatiskt. Om skärmen
inte visas klickar du på knappen
Start och väljer Kör. I det fält som
visas anger du D:\setup.exe (om
"D" är cd-enhetens beteckning).
Klicka på Install (Installera).
BLäs igenom licensavtalet och
klicka på Next (Nästa) om du vill
fortsätta installationen.
CDu ska sedan välja ett trådlöst
läge för nätverket. Klicka på
Infrastructure Mode
(Infrastrukturläge) om du vill att de
trådlösa datorerna ska bilda
nätverk med datorer på det
trådanslutna nätverket med hjälp
av en accesspunkt. Klicka på
Ad-Hoc Mode (Ad-hoc-läge) om
du vill att flera trådlösa datorer ska
kopplas till varandra.
Skriv det trådlösa nätverkets SSID i
fältet SSID. SSID:t måste vara
identiskt för alla enheter i
nätverket. Standardinställningen är
linksys (med små bokstäver).
Klicka på Next (Nästa).
DOm du valde infrastrukturläget ska
du gå vidare till steg E. Om du
valde ad-hoc-läget ska du välja
korrekt driftskanal för nätverket.
Behåll standardinställningen Mixed
Mode (Blandat läge) för
nätverksläget om enheter av typen
Wireless-G (802.11g) och Wireless-B
A
Installera programvaran för
Wireless-G Adapter för bärbar dator
B
C
D

3
(802.11b) ingår i nätverket. Välj
G-Only Mode (Endast G-läge) om
alla enheter är av typen Wireless-G.
Klicka på Next (Nästa).
EVälj säkerhetstyp: 64-bit WEP,
128-bit WEP eller WPA-PSK.
Alla enheter i nätverket måste
använda samma typ.
WEP
Lösenordet används till att
generera en eller flera WEP-nycklar.
Lösenordet är skiftlägeskänsligt och
får inte överstiga 16 alfanumeriska
tecken.
Om du använder 64-bitars WEP-
kryptering måste nyckeln bestå av
exakt 10 hexadecimala tecken.
Om du använder 128-bitars WEP-
kryptering måste nyckeln bestå av
exakt 26 hexadecimala tecken.
Välj nätverkets TX-nyckel och
verifieringsmetod.
WPA-PSK
Välj TKIP- eller AES-kryptering. Välj
sedan ett lösenord med 8 – 63
tecken.
FI Installationsguiden blir du
ombedd att läsa igenom dina
inställningar innan filerna börjar
installeras. Klicka på Next (Nästa)
om du är nöjd med
inställningarna, eller på Back
(Tillbaka) om du vill ändra dem.
GNär programvaran har installerats
klickar du på Exit (Avsluta).
E1
G
F
E2
4
AStäng av den bärbara datorn.
BLeta rätt på en ledig PC Card-
kortplats på datorn.
CHåll adaptern med etikettsidan
upp, enligt bild C, och för in
den ordentligt i CardBus-
kortplatsen.
DStarta den bärbara datorn.
EDrivrutinsfilerna börjar kopieras
till datorn. Om du blir ombedd
att sätta in originalskivan för
Windows sätter du in cd-skivan
och anger sökvägen (till
exempel D:\).
FNär du har installerat adaptern
visas ikonen Wireless Network
Monitor (övervakare för trådlösa
nätverk) för Wireless-G Adapter
för bärbar dator.
Dubbelklicka på ikonen om du
vill använda Wireless Network
Monitor (övervakare för trådlösa
nätverk) för att kontrollera
länkinformation, söka efter
tillgängliga trådlösa nätverk
eller göra ytterligare ändringar i
konfigurationen.
Windows XP-användare: Gå till steg
3.
Användare av Windows 98, Me och
2000: Grattis! Installationen av
Wireless-G Adapter för bärbar dator
är klar.
2Installera programvaran för
Adapter för bärbar dator i datorn
C
5
Windows XP har ett inbyggt
konfigureringsverktyg. Om du vill
konfigurera adaptern genom att
använda Wireless Network Monitor
(övervakare för trådlösa nätverk)
måste du avaktivera Windows XP
Wireless Zero Configuration. Följ
instruktionerna i steg A-C.
AIkonen Windows XP Wireless Zero
Configuration visas i systemfältet
på skrivbordet. Dubbelklicka på
ikonen.
BAlla tillgängliga trådlösa nätverk
visas på skärmen. Klicka på
Avancerat.
3Avaktivera Windows XP
Wireless Zero Configuration
A
B
6
C
CPå skärmen för trådlösa nätverk
avmarkerar du rutan bredvid
Konfigurera trådlöst nätverk.
Klicka därefter på OK.
Användare av Windows XP Wireless
Zero Configuration: Grattis!
Installationen av Wireless-G
Adapter för bärbar dator är klar.
WPC54GS-SE-QIG-40415NC JL
Mer information och felsökningshjälp finns i användarhandboken på cd-skivan. Information om hur du
kontaktar vår tekniska supportavdelning finns i den särskilda bilagan.
Webbplats http://www.linksys.com /international
Linksys är ett registrerat varumärke eller ett varumärke som tillhör Cisco Systems, Inc. och/eller dess
samarbetspartner i USA och vissa andra länder. Copyright © 2004 Cisco Systems, Inc. Med ensamrätt.
A Division of Cisco Systems, Inc.
®
Model No.
Notebook Adapter
Wireless-G
WPC54GS
User Guide
WIRELESS with SpeedBooster
GHz
2
802.11g
4
,

Wireless-G Notebook Adapter with SpeedBooster
Copyright and Trademarks
Specifications are subject to change without notice. Linksys is a registered trademark or trademark of Cisco
Systems, Inc. and/or its affiliates in the U.S. and certain other countries. Copyright © 2004 Cisco Systems, Inc. All
rights reserved. Other brands and product names are trademarks or registered trademarks of their respective
holders.
This User Guide
The User Guide to the Wireless-G Notebook Adapter with SpeedBooster has been designed to make
understanding networking easier than ever. Look for the following items when reading this guide:
In addition to these symbols, there are definitions for technical terms that are presented like this:
Also, each figure (diagram, screenshot, or other image) is provided with a figure number and description, like
this:
Figure numbers and descriptions can also be found in the "List of Figures" section in the “Table of Contents”.
This exclamation point means there is a caution or
warning and is something that could damage your
property or the Adapter.
word: definition.
This checkmark means there is a note of interest and
is something you should pay special attention to while
using the Adapter.
This question mark provides you with a reminder about
something you might need to do while using the Adapter.
Figure 0-1: Sample Figure Description
WPC54GS-EU-UG-40410NC KL

Wireless-G Notebook Adapter with SpeedBooster
Chapter 1: Introduction 1
Welcome 1
What’s in this Guide? 2
Chapter 2: Planning your Wireless Network 4
Network Topology 4
Roaming 4
Network Layout 5
Chapter 3: Getting to Know the Wireless-G Notebook Adapter 6
The LED Indicators 6
Chapter 4: Software Installation and Configuration 7
The Installation Procedure 8
Chapter 5: Hardware Installation 12
Connecting the Adapter 12
Chapter 6: Using the Wireless Network Monitor 13
Accessing the WLAN Monitor 13
Link Information 13
Site Survey 16
Profiles 17
Creating a New Profile 18
Appendix A: Troubleshooting 30
Common Problems and Solutions 30
Frequently Asked Questions 31
Appendix B: Wireless Security 34
Security Precautions 34
Security Threats Facing Wireless Networks 34
Appendix C: Windows Help 37
Appendix D: Glossary 38
Appendix E: Specifications 45
Appendix F: Warranty Information 46
Appendix G: Regulatory Information 47
Appendix H: Contact Information 53

Wireless-G Notebook Adapter with SpeedBooster
Figure 3-1: Front Panel 6
Figure 4-1: The Setup Wizard’s Welcome Screen 7
Figure 4-2: The Setup Wizard’s License Agreement 8
Figure 4-3: The Setup Wizard’s Wireless Mode Screen 8
Figure 4-4: The Setup Wizard’s Ad-Hoc Mode Screen 9
Figure 4-5: The Setup Wizard’s WEP Screen 9
Figure 4-6: The Setup Wizard’s WPA-PSK Screen 10
Figure 4-7: The Setup Wizard’s Check Settings Screen 10
Figure 4-8: The Setup Wizard’s Congratulations Screen 11
Figure 5-1: How the Adapter installs into your notebook 12
Figure 6-1: Link Information 13
Figure 6-2: More Information-Network Settings 14
Figure 6-3: More Information-Network Statistics 15
Figure 6-4: Site Survey 16
Figure 6-5: Profiles 17
Figure 6-6: Importing a Profile 17
Figure 6-7: Exporting a Profile 17
Figure 6-8: Creating a New Profile 18
Figure 6-9: Enter Profile Name 18
Figure 6-10: Wireless Mode for New Profile 19
Figure 6-11: Ad-Hoc Mode Settings 19
Figure 6-12: Netowork Settings 20
Figure 6-13: Wireless Security for New Profile 21
Figure 6-14: WEP Setting for New Profile 21
Figure 6-15: WPA-PSK Settings 22
Figure 6-16: TKIP Settings 22
Figure 6-17: WPA RADIUS Settings 23
Figure 6-18: Encryption Type 23
Figure 6-19: EAP-TLS Authentication 24
Figure 6-20: EAP-TTLS Authentication 24
Figure 6-21: EAP-MD5 Authentication 25
Figure 6-22: EAP-PEAP Authentication 25
Figure 6-23: EAP-LEAP Authentication 25

Wireless-G Notebook Adapter with SpeedBooster
Figure 6-24: RADIUS Settings 26
Figure 6-25: EAP-TLS Authentication 26
Figure 6-26: EAP-TTLS Authentication 27
Figure 6-27: EAP-MD5 Authentication 27
Figure 6-28: EAP-PEAP Authentication 28
Figure 6-29: LEAP Authentication 28
Figure 6-30: TKIP Settings 29
Figure 6-31: EAP-TLS Authentication 29

1
Chapter 1: Introduction
Welcome
Wireless-G Notebook Adapter with SpeedBooster
Chapter 1: Introduction
Welcome
Thank you for choosing the Wireless-G Notebook Adapter with SpeedBooster. With this Adapter, your wireless
networking experience will be faster and easier than ever.
Like all wireless products, the Adapter allows for greater range and mobility within your wireless network. This
adapter communicates over the 54Mbps 802.11g wireless standard, which is almost five times faster than
802.11b. But since they share the same 2,4GHz radio band, the Adapter can also communicate with the widely
used 11Mbps 802.11b standard.
PCs equipped with wireless cards and adapters can communicate without cumbersome cables. By sharing the
same wireless settings, within their transmission radius, they form a wireless network.
The included Setup Wizard will walk you through configuring the adapter to your network's settings, step by step.
Then just slide it into your notebook's PC Card slot and enjoy network access with your notebook computer, while
retaining true mobility.
Once you're connected, you can keep in touch with your e-mail, access the Internet, and share files and other
resources such as printers and network storage with other computers on the network. At home, you can surf the
web or use instant messaging to chat with friends while sitting out on the patio. Your wireless connection is
protected by up to 128-bit WEP encryption.
You'll also be able to connect with any of the growing number of public wireless hotspots springing up in coffee
shops, airport lounges, hotels and convention centers. And as those hotspots upgrade to the new high-speed
Wireless-G standard, you'll be ready to take advantage of the increased speeds.
Get connected to current-standard 802.11b networks today, and be prepared for the future with the Wireless-G
Notebook Adapter with SpeedBooster from Linksys.
802.11b: an IEEE wireless networking standard
that specifies a maximum data transfer rate of
11Mbps and an operating frequency of 2,4GHz.
adapter: a device that adds network functionality
to your PC.
network: a series of computers or devices
connected for the purpose of data sharing,
storage, and/or transmission between users.
802.11g an IEEE wireless networking standard that
specifies a maximum data transfer rate of 54Mbps
and an operating frequency of 2,4GHz.

2
Chapter 1: Introduction
What’s in this Guide?
Wireless-G Notebook Adapter with SpeedBooster
What’s in this Guide?
This user guide covers the steps for setting up and using the Wireless-G Notebook Adapter with SpeedBooster.
• Chapter 1: Introduction
This chapter describes the Adapter’s applications and this User Guide.
• Chapter 2: Planning Your Wireless Network
This chapter discusses a few of the basics about wireless networking.
• Chapter 3: Getting to Know the Wireless-G Notebook Adapter
This chapter describes the physical features of the Adapter.
• Chapter 4: Software Installation and Configuration
This chapter instructs you on how to install the Adapter’s Setup Wizard and Configure the Adapter
• Chapter 5: Hardware Installation
This chapter shows you how to connect the Adapter to your PC.
• Chapter 6: Using the WLAN Monitor
This chapter show you how to use the Adapter’s WLAN Monitor.
• Appendix A: Troubleshooting
This appendix describes some problems and solutions, as well as frequently asked questions, regarding
installation and use of the Adapter.
• Appendix B: Wireless Security
This appendix discusses security issues regarding wireless networking and measures you can take to help
protect your wireless network.
• Appendix C: Windows Help
This appendix describes how you can use Windows Help for instructions about networking, such as installing
the TCP/IP protocol.
• Appendix D: Glossary
This appendix gives a brief glossary of terms frequently used in networking.
• Appendix E: Specifications
This appendix provides the Adapter’s technical specifications.
• Appendix F: Warranty Information
This appendix supplies the Adapter’s warranty information.

3
Chapter 1: Introduction
What’s in this Guide?
Wireless-G Notebook Adapter with SpeedBooster
• Appendix G: Regulatory Information
This appendix supplies the Adapter’s regulatory information.
• Appendix H: Contact Information
This appendix provides contact information for a variety of Linksys resources, including Technical Support.

4
Chapter 2: Planning your Wireless Network
Network Topology
Wireless-G Notebook Adapter with SpeedBooster
Chapter 2: Planning your Wireless Network
Network Topology
A wireless network is a group of computers, each equipped with one wireless adapter. Computers in a wireless
network must be configured to share the same radio channel. Several PCs equipped with wireless cards or
adapters can communicate with one another to form an ad-hoc network.
Linksys wireless adapters also provide users access to a wired network when using an access point or wireless
router. An integrated wireless and wired network is called an infrastructure network. Each wireless PC in an
infrastructure network can talk to any computer in a wired network infrastructure via the access point or wireless
router.
An infrastructure configuration extends the accessibility of a wireless PC to a wired network, and can double the
effective wireless transmission range for two wireless adapter PCs. Since an access point is able to forward data
within a network, the effective transmission range in an infrastructure network can be doubled.
Roaming
Infrastructure mode also supports roaming capabilities for mobile users. Roaming means that you can move your
wireless PC within your network and the access points will pick up the wireless PC's signal, providing that they
both share the same channel and SSID.
Before enabling you consider roaming, choose a feasible radio channel and optimum access point position.
Proper access point positioning combined with a clear radio signal will greatly enhance performance.
infrastructure: a wireless network that is
bridged to a wired network via an access point.
ad-hoc: a group of wireless devices
communicating directly with each other (peer-
to-peer) without the use of an access point.
roaming: the ability to take a wireless device
from one access point's range to another without
losing the connection.
ssid: your wireless network's name.
topology: the physical layout of a network.

5
Chapter 2: Planning your Wireless Network
Network Layout
Wireless-G Notebook Adapter with SpeedBooster
Network Layout
Linksys wireless access points and wireless routers have been designed for use with 802.11a, 802.11b, and
802.11g products. With 802.11g products communicating with the 802.11b standard and some products
incorporating both “a” and “g”, products using these standards can communicate with each other.
Access points and wireless routers are compatible with 802.11a, 802.11b and 802.11g adapters, such at the PC
Cards for your laptop computers, PCI Card for your desktop PC, and USB Adapters for when you want to enjoy
USB connectivity. Wireless products will also communicate with the wireless PrintServer.
When you wish to connect your wired network with your wireless network, network ports on access points and
wireless routers can be connected to any of Linksys's switches or routers.
With these, and many other, Linksys products, your networking options are limitless. Go to the Linksys website at
www.linksys.com/international for more information about wireless products.

6
Chapter 3: Getting to Know the Wireless-G Notebook Adapter
The LED Indicators
Wireless-G Notebook Adapter with SpeedBooster
Chapter 3: Getting to Know the Wireless-G Notebook
Adapter
The LED Indicators
The Network Adapter's LEDs display information about network activity.
Power Green. The Power LED lights up when the Adapter is powered on.
Link Green. The Link LED lights up when the Adapter has an active connection.
Figure 3-1: Front Panel

7
Chapter 4: Software Installation and Configuration
Wireless-G Notebook Adapter with SpeedBooster
Chapter 4: Software Installation and Configuration
The Wireless Wireless-G Notebook Adapter Setup Wizard will guide you through the installation procedure. The
Setup Wizard will install the WLAN Monitor and driver, as well as configure the Adapter.
Insert the Setup Wizard CD-ROM into your CD-ROM drive. The Setup Wizard should run automatically, and the
Welcome screen should appear. If it does not, click the Start button and choose Run. In the field that appears,
enter D:\setup.exe (if “D” is the letter of your CD-ROM drive).
On the Welcome screen, you have the following choices:
Install - Click the Install button to begin the software installation process.
User Guide - Click the User Guide button to open the PDF file of this User Guide.
Exit - Click the Exit button to exit the Setup Wizard.
NOTE: You must run the Setup Wizard to install the software before installing
the hardware. On the first screen you must choose a languge to continue.
Figure 4-1: The Setup Wizard’s Welcome Screen
8
Chapter 4: Software Installation and Configuration
The Installation Procedure
Wireless-G Notebook Adapter with SpeedBooster
The Installation Procedure
1. To install the Adapter, click the Install button on the Welcome screen.
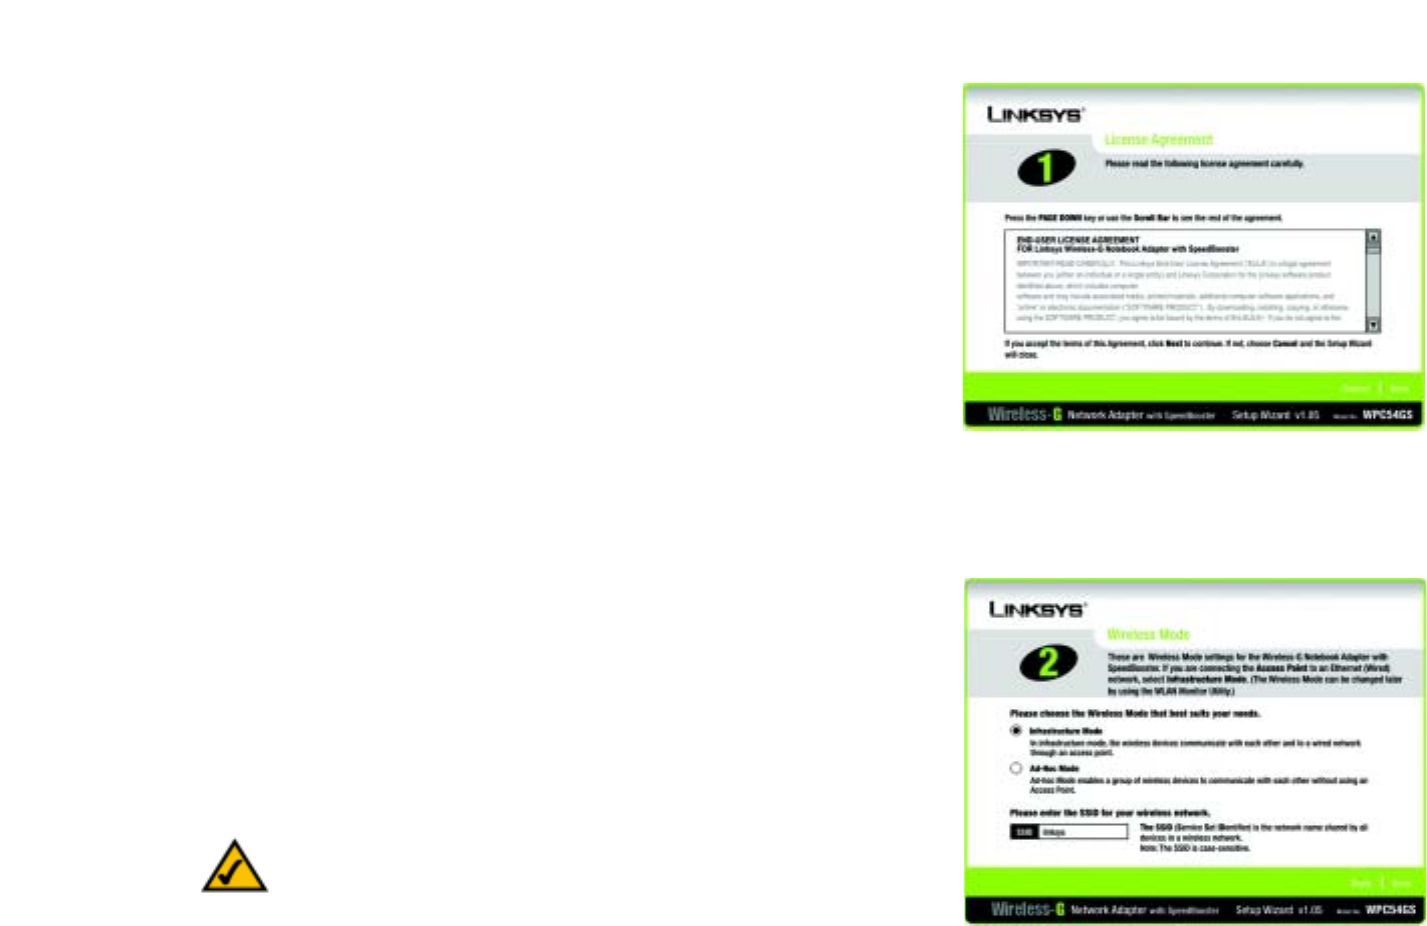
2. After reading the License Agreement, click the Next button if you agree, or click the Cancel button to end the
installation.
3. The Setup Wizard will ask you to choose a network mode. Click the Infrastructure Mode radio button if you
want your wireless computers to network with computers on your wired network using a wireless access
point. Click the Ad-Hoc Mode radio button if you want multiple wireless computers to network directly with
each other.
In the SSID field, enter the SSID of your wireless network. The SSID must be identical for all devices in the
network. The default setting is linksys (all lowercase). Click the Next button.
Figure 4-2: The Setup Wizard’s License Agreement
Figure 4-3: The Setup Wizard’s Wireless Mode Screen
NOTE: Network SSIDs should be unique to your network and identical for all
devices within the network.

9
Chapter 4: Software Installation and Configuration
The Installation Procedure
Wireless-G Notebook Adapter with SpeedBooster
4. If you chose Infrastructure Mode, go to Step 5 now. If you chose Ad-Hoc Mode, select the correct operating
channel for your network. Then, select the Network Mode from the drop-down menu. Click the Next button,
and go to Step 5. Click the Back button to change any settings.
Channel - The channel you choose should match the channel set on the other devices in your wireless
network. If you are unsure about which channel to use, select the default channel.
Network Mode - Select Mixed Mode, and both Wireless-G and Wireless-B computers will be allowed on the
network, but the speed will be reduced. Select G-Only Mode for maximum speed, but no Wireless-B users
will be allowed on the network.
5. Select the type of security you want to use: 64-bit WEP, 128-bit WEP, or WPA-PSK. All devices in a network
must use the same type.
WEP
WEP - To use WEP encryption, select 64-bits or 128-bit characters from the drop-down menu, and enter a
passphrase or WEP key.
Passphrase - Instead of manually entering a WEP key, you can enter a passphrase in the Passphrase field, so
a WEP key is automatically generated. It is case-sensitive and should not be longer than 16 alphanumeric
characters. This passphrase must match the passphrase of your other wireless network devices and is
compatible with Linksys wireless products only. (If you have any non-Linksys wireless products, enter the
WEP key manually on those products.)
WEP Key - The WEP key you enter must match the WEP key of your wireless network. If you are using 64-bit
WEP encryption, then the key must consist of exactly 10 hexadecimal characters. If you are using 128-bit
WEP encryption, then the key must consist of exactly 26 hexadecimal characters. Valid hexadecimal
characters are “0” to “9” and “A” to “F”.
Transmit Key - The default transmit key number is 1. If your network’s access point or wireless router uses
transmit key number 2, 3, or 4, select the appropriate number from the Transmit Key drop-down box.
Authentication -The default is set to Auto, where it auto-detects for Shared Key or Open system. Shared
Key is when both the sender and the recipient share a WEP key for authentication. Open key is when the
sender and the recipient do not share a WEP key for authentication. All points on your network must use the
same authentication type.
Figure 4-4: The Setup Wizard’s Ad-Hoc Mode Screen
Figure 4-5: The Setup Wizard’s WEP Screen

10
Chapter 4: Software Installation and Configuration
The Installation Procedure
Wireless-G Notebook Adapter with SpeedBooster
Click the Next button to continue.s. Click the Back button to return to the previous screen. Click the Help
button for more information.
WPA-PSK
WPA-PSK offers two encryption methods, TKIP and AES, with dynamic encryption keys.
Select the type of algorithm, TKIP or AES, for the Encryption Type. Enter a WPA Shared Key of 8-63 characters
in the Passphrase field..
Click the Next button to continue.s. Click the Back button to return to the previous screen. Click the Help
button for more information.
6. The Setup Wizard will ask you to review your settings before it starts to install files. Click Next if you are
satisfied with your settings, or click Back to change any settings.
Figure 4-6: The Setup Wizard’s WPA-PSK Screen
Figure 4-7: The Setup Wizard’s Check Settings Screen

11
Chapter 4: Software Installation and Configuration
The Installation Procedure
Wireless-G Notebook Adapter with SpeedBooster
7. After the software has been successfully installed, the Congratulations screen will appear. Click the Exit
button.
Proceed to “Chapter 5: Hardware Installation.”
Figure 4-8: The Setup Wizard’s Congratulations Screen

12
Chapter 5: Hardware Installation
Connecting the Adapter
Wireless-G Notebook Adapter with SpeedBooster
Chapter 5: Hardware Installation
Connecting the Adapter
1. Turn off your notebook PC.
2. Locate an available CardBus slot on your notebook PC.
3. With the connector pin end facing the CardBus slot and the label facing up, slide the Adapter into the CardBus
slot until it locks in place.
4. Restart your notebook PC. The Power LED should light up when the Adapter is installed correctly.
5. Windows will begin copying the driver files to your computer. If Windows asks you for the original Windows
CD-ROM, insert the CD-ROM, and direct Windows to its correct location (e.g., D:\).
The installation of the Wireless-G Notebook Adapter is complete.
If you want to check the link information, search for available wireless networks, or make additional
configuration changes, go to “Chapter 6: Using the Wireless Network Monitor.”
Figure 5-1: How the Adapter installs into your notebook
NOTE: You must run the Setup Wizard to install the software before installing
the hardware.

13
Chapter 6: Using the Wireless Network Monitor
Accessing the WLAN Monitor
Wireless-G Notebook Adapter with SpeedBooster
Chapter 6: Using the Wireless Network Monitor
Use the WLAN Monitor to check the link information, search for available wireless networks, or create profiles
that hold different configuration settings.
Accessing the WLAN Monitor
After installing the Adapter, the Wireless-G Notebook Adapter WLAN Monitor icon will appear in your system tray.
Double-click the icon.
The Link Information screen will appear. From this screen, you can find out how strong the current wireless signal
is and how good the connection’s quality is. You can also click the More Information button to view additional
status information about the current wireless connection. To search for available wireless networks, click the
Site Survey tab. To perform configuration changes, click the Profiles tab.
Link Information
The Link Information screen displays network mode, signal strength, and link quality information about the
current connection. It also provides a button to click for additional status information.
Ad-Hoc Mode or Infrastructure Mode - The screen indicates whether the Adapter is currently working in ad-
hoc or infrastructure mode.
Signal Strength - The Signal Strength bar indicates signal strength.
Link Quality - The Link Quality bar indicates the quality of the wireless network connection.
Click the More Information button to view additional information about the wireless network connection.
Figure 6-1: Link Information

14
Chapter 6: Using the Wireless Network Monitor
Link Information
Wireless-G Notebook Adapter with SpeedBooster
Clicking the More Information button displays more information about the Adapter’s connection, as shown
below:
Wireless Network Status
The Networks Settings screen provides information on your current network settings.
Wireless Network Status
Status - The status of the wireless network connection.
SSID - This is the unique name of the wireless network.
Wireless Mode - The mode of the wireless network currently in use is displayed here.
Transfer Rate - The data transfer rate of the current connection is shown here.
Channel - The channel to which the wireless network devices are set.
Encryption- The status of the security feature.
Authentication - This is your wireless network’s authentication method.
Network Mode - The wireless mode currently in use.
IP Address - The IP Address of the Adapter.
Subnet Mask - The Subnet Mask of the Adapter.
Default Gateway - The Default Gateway address of the Adapter.
DNS - The DNS address of the Adapter.
DHCP Client- This displays the status of the DHCP client.
MAC - The MAC address of the wireless network’s access point.
Signal Strength - The Signal Strength bar indicates the signal strength.
Link Quality - The Link Quality bar indicates the quality of the wireless network connection.
Figure 6-2: More Information-Network Settings

15
Chapter 6: Using the Wireless Network Monitor
Link Information
Wireless-G Notebook Adapter with SpeedBooster
Click the Statistics button to go to the Network Statistics screen. Click the Back button to return to the initial
Link Information screen. Click the Save to Profile button to save the currently active connection to a profile.
Wireless Network Statistics
The Networks Statistics screen provides statistics on your current network settings.
Transmit Rate - The data transfer rate of the current connection.(In Auto mode, the Adapter dynamically shifts to
the fastest data transfer rate possible at any given time.)
Receive Rate - The rate that data is received.
Packets Received - This shows the packets received by the Adapter, in real time, since connecting to the
Wireless Network or since the Refresh button was last pressed.
Packets Transmitted - This shows the packets transmitted from the Adapter, in real time, since connecting to
the Wireless Network or since the Refresh button was last pressed.
Bytes Received - This shows the bytes received by the Adapter, in real time, since connecting to the Wireless
Network or since the Refresh button was last pressed.
Bytes Transmitted - This shows the bytes transmitted from the Adapter, in real time, since connecting to the
Wireless Network or since the Refresh button was last pressed.
Noise Level - This is your wireless network’s authentication method.
Signal Strength - This shows the Adapter’s IP Address.
Driver Version - This shows the version of the Adapter’s driver.
Signal Strength - The Signal Strength bar indicates the signal strength.
Link Quality - The Link Quality bar indicates the quality of the wireless network connection.
Click the Back button to return to the initial Link Information screen. Click the Status button to go to the
Network Status screen. Click the Save to Profile button to save the currently active connection to a profile. Click
the Refresh Stats button to refresh the screen.
Figure 6-3: More Information-Network Statistics

16
Chapter 6: Using the Wireless Network Monitor
Site Survey
Wireless-G Notebook Adapter with SpeedBooster
Site Survey
The Site Survey screen displays a list of infrastructure and ad-hoc networks available for connection in the table
on the right. This table shows the network’s SSID, Channel, and the quality of the wireless signal the Adapter is
receiving. You may click SSID,CH (Channel), or Signal, to sort by that field.
SSID - The SSID or unique name of the wireless network.
CH - The channel upon which the network broadcasts.
Signal - The percentage of signal strength, from 0 to 100%.
Site Information
For each network selected, the following settings are listed:
SSID - The SSID or unique name of the wireless network.
Wireless Mode - The mode of the wireless network currently in use.
Channel - The channel to which the wireless network devices are set.
Encryption- The status of the encryption security feature.
MAC - The MAC address of the wireless network’s access point.
Refresh - Click the Refresh button to perform a new search for wireless devices.
Connect - To connect to one of the networks on the list, select the wireless network, and click the Connect
button.
Figure 6-4: Site Survey
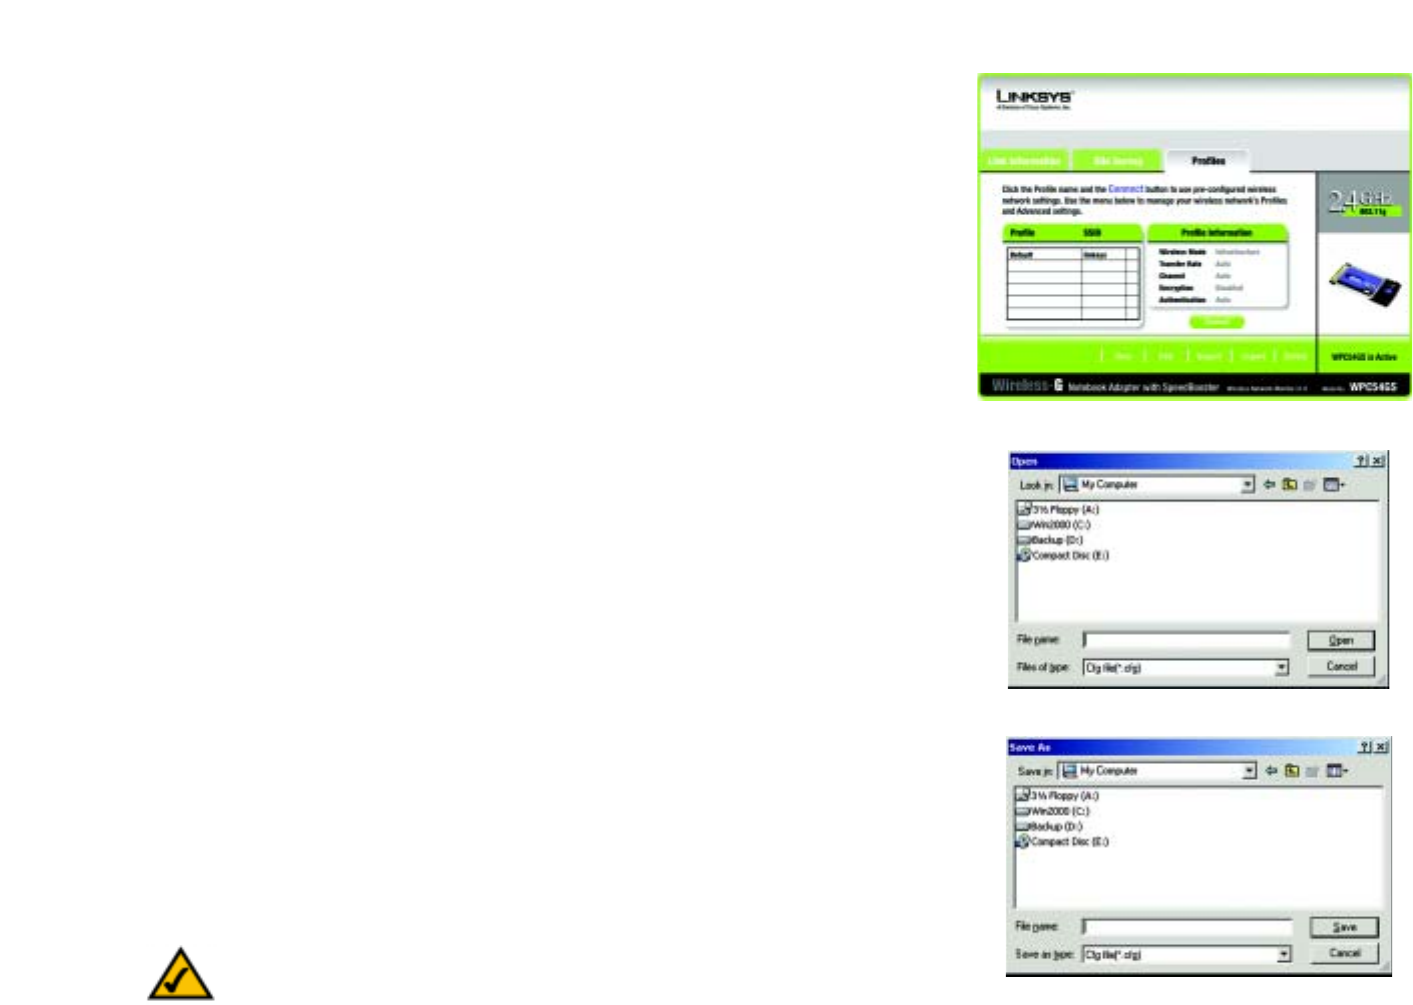
17
Chapter 6: Using the Wireless Network Monitor
Profiles
Wireless-G Notebook Adapter with SpeedBooster
Profiles
The Profiles screen lets you save different configuration profiles for different network setups. The table on the
right displays a list of infrastructure and ad-hoc networks available for connection This table shows the network’s
profile name and the wireless network’s SSID, as set in the connection profile.
Profile Information
For each profile selected, the following are listed:
Wireless Mode - The mode of the wireless network currently in use.
Transfer Rate - The Adapter is set to Auto mode, so it will dynamically shift to the fastest data transfer rate
possible at any given time.
Channel - The channel to which the wireless network devices are set.
Encryption- The status of the encryption security feature.
Authentication - The authentication setting for the network.
Connect - To connect to a wireless network using a specific profile, select the profile, and click the Connect
button.
New - Click the New button to create a new profile. See the next section, “Creating a New Profile,” for detailed
instructions.
Edit - Select a profile, and click the Edit button to change an existing profile.
Import - Click the Import button to import a profile that has been saved in another location. Select the
appropriate file, and click the Open button.
Export - Select the profile you want to save in a different location, and click the Export button. Direct Windows to
the appropriate folder, and click the OK button.
Delete - Click the Delete button to delete a profile.
Figure 6-5: Profiles
Figure 6-6: Importing a Profile
Figure 6-7: Exporting a Profile
NOTE: If you want to export more than one profile, you have to export them one at a time.
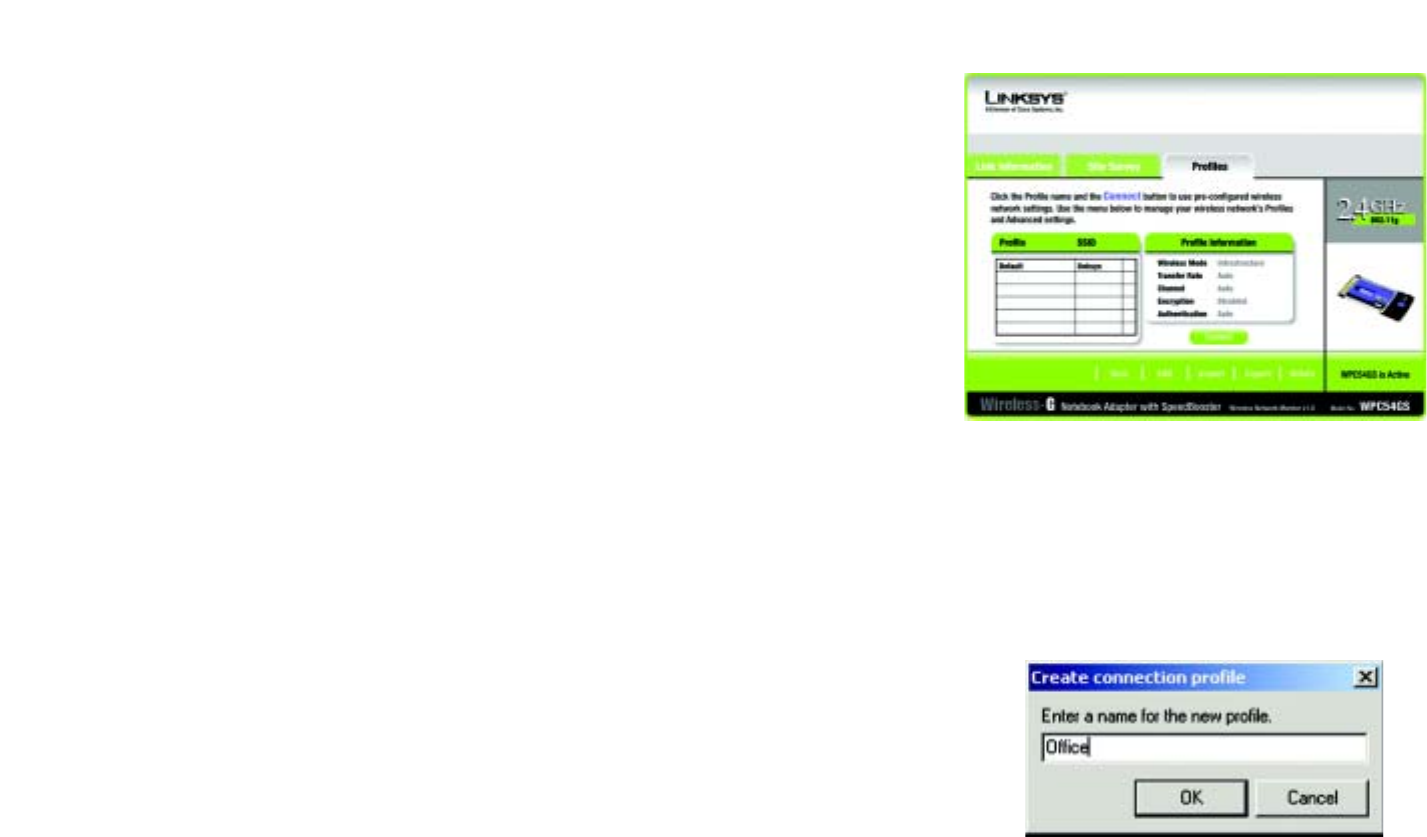
18
Chapter 6: Using the Wireless Network Monitor
Creating a New Profile
Wireless-G Notebook Adapter with SpeedBooster
Creating a New Profile
1. On the Profiles screen, click the New button to create a new profile.
2. Enter a name for the new profile, and click the OK button. Click the Cancel button to return to the Profiles
screen without entering a name.
Figure 6-8: Creating a New Profile
Figure 6-9: Enter Profile Name

19
Chapter 6: Using the Wireless Network Monitor
Creating a New Profile
Wireless-G Notebook Adapter with SpeedBooster
3. The Wireless Mode screen shows a choice of two wireless modes. Click the Infrastructure Mode radio
button if you want your wireless computers to communicate with computers on your wired network via a
wireless access point. Click the Ad-Hoc Mode radio button if you want multiple wireless computers to
communicate directly with each other. Enter the SSID for your network.
Click the Next button to continue or the Back button to return to the previous screen.
Infrastructure Mode - This mode allows wireless and wired networks to communicate through an access
point.
Ad-Hoc Mode - This mode allows wireless-equipped computers to communicate directly with each other. No
access point is used.
SSID - The network name. It must be used for all the devices in your wireless network. It is case sensitive. It
should be a unique name to help prevent others from entering your network.
4. The Ad-Hoc Mode Settings screen will appear. If you chose Infrastructure Mode, go to Step 5 now. If you
chose Ad-Hoc Mode, select the correct operating channel for your network from the Channel drop-down
menu. Then, select the Network Mode from the drop-down menu. Click the Next button, and go to Step 5.
Click the Back button to change any settings.
Channel - The channel you choose should match the channel set on the other devices in your wireless
network. If you are unsure about which channel to use, select the default channel.
Network Mode - Select Mixed Mode, and both Wireless-G and Wireless-B computers will be allowed on the
network, but the speed may be reduced. Select G-Only Mode for maximum speed, but no Wireless-B users
will be allowed on the network. Select B-Only Mode for Wireless-B users only.
Figure 6-11: Ad-Hoc Mode Settings
Figure 6-10: Wireless Mode for New Profile

20
Chapter 6: Using the Wireless Network Monitor
Creating a New Profile
Wireless-G Notebook Adapter with SpeedBooster
5. The Network Settings screen will appear next. If your network has a DHCP server, click the radio button next
to Obtain an IP address automatically (DHCP). Click the Next button to continue, or click the Cancel button
to return to the Profiles screen.
If your network does not have a DHCP server, click the radio button next to Specify the IP Setting. Enter an IP
Address, Subnet Mask, Default Gateway, and DNS appropriate for your network. You must specify the IP
Address and Subnet Mask on this screen. If you are unsure about the Default Gateway and DNS address,
leave these fields empty. Click the Next button to continue, or click the Cancel button to return to the Profiles
screen.
IP Address - This IP Address must be unique to your network.
Subnet Mask - The Adapter’s Subnet Mask must be the same as your wired network’s Subnet Mask.
Default Gateway - Enter the IP address of your network’s Gateway here.
DNS 1 and DNS 2 - Enter the DNS address of your (wired) Ethernet network here
Figure 6-12: Netowork Settings

21
Chapter 6: Using the Wireless Network Monitor
Creating a New Profile
Wireless-G Notebook Adapter with SpeedBooster
6. The Wireless Security screen will appear. Select WEP, WPA-PSK, WPA Radius, or Radius for the Encryption
Method. WEP stands for Wired Equivalent Privacy, WPA-PSK stands for Wi-Fi Protected Access Pre-Shared
Key, which is a security standard stronger than WEP encryption, and RADIUS stands for Remote
Authentication Dial-In User Service. If you don’t want to use encryption, select Disabled. Then, click the Next
button to continue or the Back button to return to the previous screen.
WEP
WEP - To use WEP encryption, select 64-bits or 128-bit characters from the drop-down menu, and enter a
passphrase or key.
Authentication -The default is set to Auto, where it auto-detects for Shared Key or Open system. Shared
Key is when both the sender and the recipient share a WEP key for authentication. Open key is when the
sender and the recipient do not share a WEP key for authentication. All points on your network must use the
same authentication type.
Passphrase - Instead of manually entering a WEP key, you can enter a passphrase in the Passphrase field,
so a WEP key is automatically generated. It is case-sensitive and should not be longer than 16 alphanumeric
characters. This passphrase must match the passphrase of your other wireless network devices and is
compatible with Linksys wireless products only. (If you have any non-Linksys wireless products, enter the
WEP key manually on those products.)
Transmit Key - The default transmit key number is 1. If your network’s access point or wireless router uses
transmit key number 2, 3, or 4, select the appropriate number from the Transmit Key drop-down box.
Key 1- The WEP key you enter must match the WEP key of your wireless network. If you are using 64-bit WEP
encryption, then the key must consist of exactly 10 hexadecimal characters. If you are using 128-bit WEP
encryption, then the key must consist of exactly 26 hexadecimal characters. Valid hexadecimal characters
are “0” to “9” and “A” to “F”.
Figure 6-14: WEP Setting for New Profile
Figure 6-13: Wireless Security for New Profile

22
Chapter 6: Using the Wireless Network Monitor
Creating a New Profile
Wireless-G Notebook Adapter with SpeedBooster
WPA-PSK
WPA-PSK offers two encryption methods, TKIP and AES, with dynamic encryption keys. Click the Next button
to continue . Click the Back button to return to the previous screen.
Select the type of algorithm, TKIP or AES, for the Encryption Type. Enter a WPA Shared Key of 8-63 characters
in the Passphrase field.
Figure 6-15: WPA-PSK Settings
Figure 6-16: TKIP Settings

23
Chapter 6: Using the Wireless Network Monitor
Creating a New Profile
Wireless-G Notebook Adapter with SpeedBooster
WPA RADIUS.
WPA RADIUS features WPA used in coordination with a RADIUS server. (This should only be used when a
RADIUS server is connected to the Router.) WPA Radius offers two encryption methods, TKIP and AES, with
dynamic encryption keys. It offers five authentication methods: EAP-TLS, EAP-TTLS, EAP-MD5, EAP-PEAP, and
LEAP.
Click the Next button to continue. Click the Back button to return to the previous screen.
Select the type of algorithm, TKIP or AES, for the Encryption Type.
Click the Next button to continue. Click the Back button to return to the previous screen.
Figure 6-17: WPA RADIUS Settings
Figure 6-18: Encryption Type
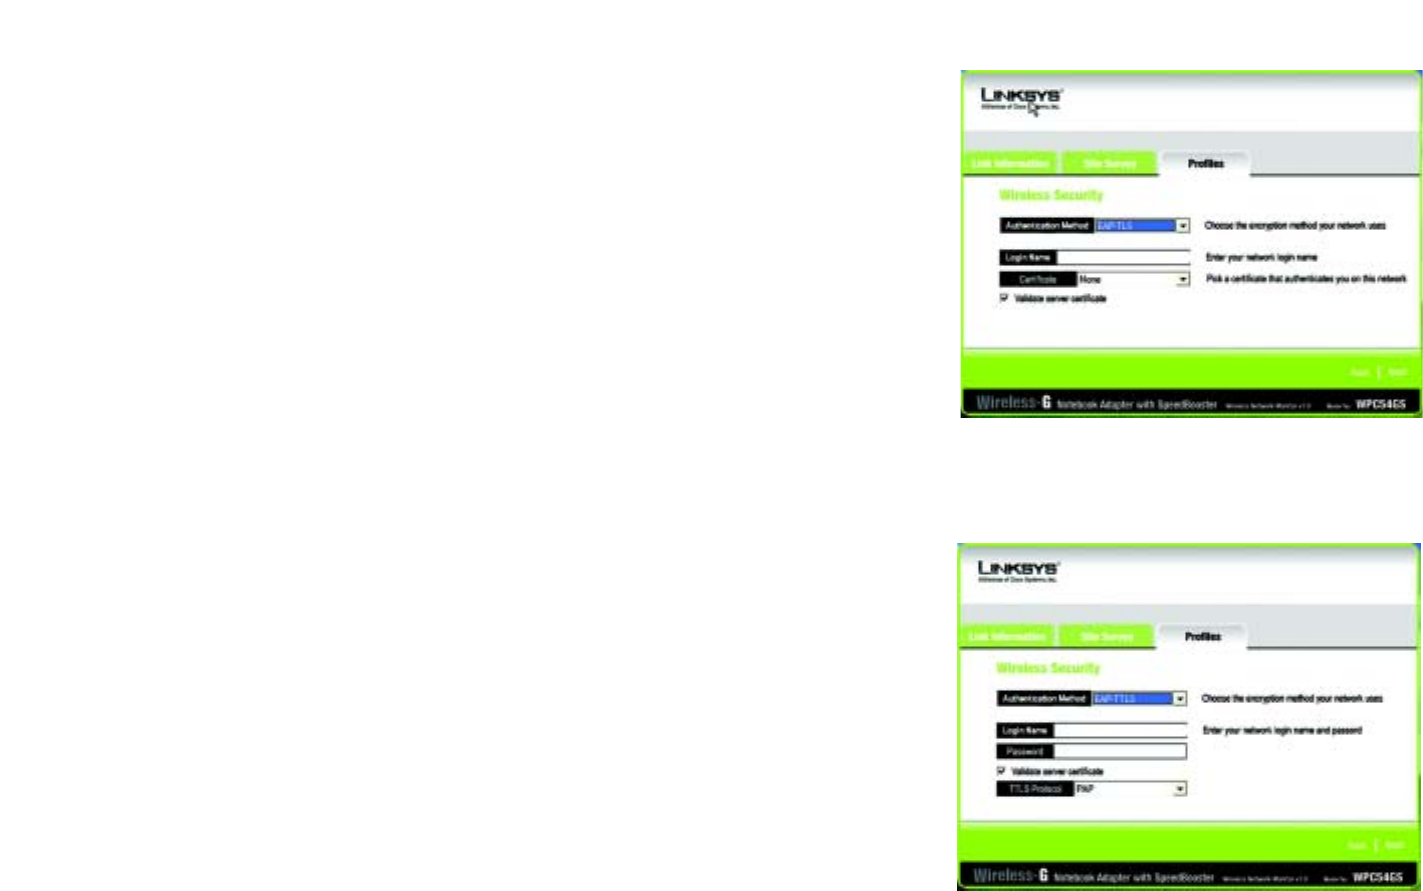
24
Chapter 6: Using the Wireless Network Monitor
Creating a New Profile
Wireless-G Notebook Adapter with SpeedBooster
Figure 6-19: EAP-TLS Authentication
Figure 6-20: EAP-TTLS Authentication
From the next screen, select the Authentication Method from the drop-down menu. The options are described
below.
EAP-TLS
Enter the Login name of your wireless network in the Login Name field. From the Certificate drop-down menu,
select the certificate you have installed to authenticate you on your wireless network. Select Validate server
cerificate to make sure that the certificate for the server is valid.
Click the Next button to continue. Click the Back button to return to the previous screen.
EAP-TTLS
Enter the Login name of your wireless network in the Login Name field. Enter the password of your wireless
network in the Password field. Select Validate server cerificate to make sure that the certificate for the
server is valid. Select the TTLS Protocol from the drop-down menu.
Click the Next button to continue. Click the Back button to return to the previous screen.

25
Chapter 6: Using the Wireless Network Monitor
Creating a New Profile
Wireless-G Notebook Adapter with SpeedBooster
EAP-MD5
Enter the Login name of your wireless network in the Login Name field. Enter the password of your wireless
network in the Password field.
Click the Next button to continue. Click the Back button to return to the previous screen.
EAP-PEAP
Enter the Login name of your wireless network in the Login Name field. Enter the password of your wireless
network in the Password field. Select Validate server cerificate to make sure that the certificate for the
server is valid. Then, select the Peap Inner EAP from the drop-down menu.
Click the Next button to continue. Click the Back button to return to the previous screen.
LEAP
Enter the Login name of your wireless network in the Login Name field. Enter the password of your wireless
network in the Password field.
Click the Next button to continue. Click the Back button to return to the previous screen.
Figure 6-21: EAP-MD5 Authentication
Figure 6-22: EAP-PEAP Authentication
Figure 6-23: EAP-LEAP Authentication

26
Chapter 6: Using the Wireless Network Monitor
Creating a New Profile
Wireless-G Notebook Adapter with SpeedBooster
RADIUS
RADIUS features WPA used in coordination with a RADIUS server. (This should only be used when a RADIUS
server is connected to the Router.) It offers five authentication methods: EAP-TLS, EAP-TTLS, EAP-MD5, EAP-
PEAP, and LEAP.
Click the Next button to continue. Click the Back button to return to the previous screen.
From the next screen, select the Authentication Method from the drop-down menu. The options are described
below.
EAP-TLS
Enter the Login name of your wireless network in the Login Name field. From the Certificate drop-down menu,
select the certificate you have installed to authenticate you on your wireless network. Select Validate server
cerificate to make sure that the certificate for the server is valid.
Click the Next button to continue. Click the Back button to return to the previous screen.
Figure 6-25: EAP-TLS Authentication
Figure 6-24: RADIUS Settings

27
Chapter 6: Using the Wireless Network Monitor
Creating a New Profile
Wireless-G Notebook Adapter with SpeedBooster
EAP-TTLS
Enter the Login name of your wireless network in the Login Name field. Enter the password of your wireless
network in the Password field. Select Validate server cerificate to make sure that the certificate for the
server is valid. Select the TTLS Protocol from the drop-down menu.
Click the Next button to continue. Click the Back button to return to the previous screen.
EAP-MD5
Enter the Login name of your wireless network in the Login Name field. Enter the password of your wireless
network in the Password field.
Click the Next button to continue. Click the Back button to return to the previous screen.
Figure 6-26: EAP-TTLS Authentication
Figure 6-27: EAP-MD5 Authentication

28
Chapter 6: Using the Wireless Network Monitor
Creating a New Profile
Wireless-G Notebook Adapter with SpeedBooster
EAP-PEAP
Enter the Login name of your wireless network in the Login Name field. Enter the password of your wireless
network in the Password field. Select Validate server cerificate to make sure that the certificate for the
server is valid. Then, select the Peap Inner EAP from the drop-down menu.
Click the Next button to continue. Click the Back button to return to the previous screen.
LEAP
Enter the Login name of your wireless network in the Login Name field. Enter the password of your wireless
network in the Password field.
Click the Next button to continue. Click the Back button to return to the previous screen.
Figure 6-28: EAP-PEAP Authentication
Figure 6-29: LEAP Authentication
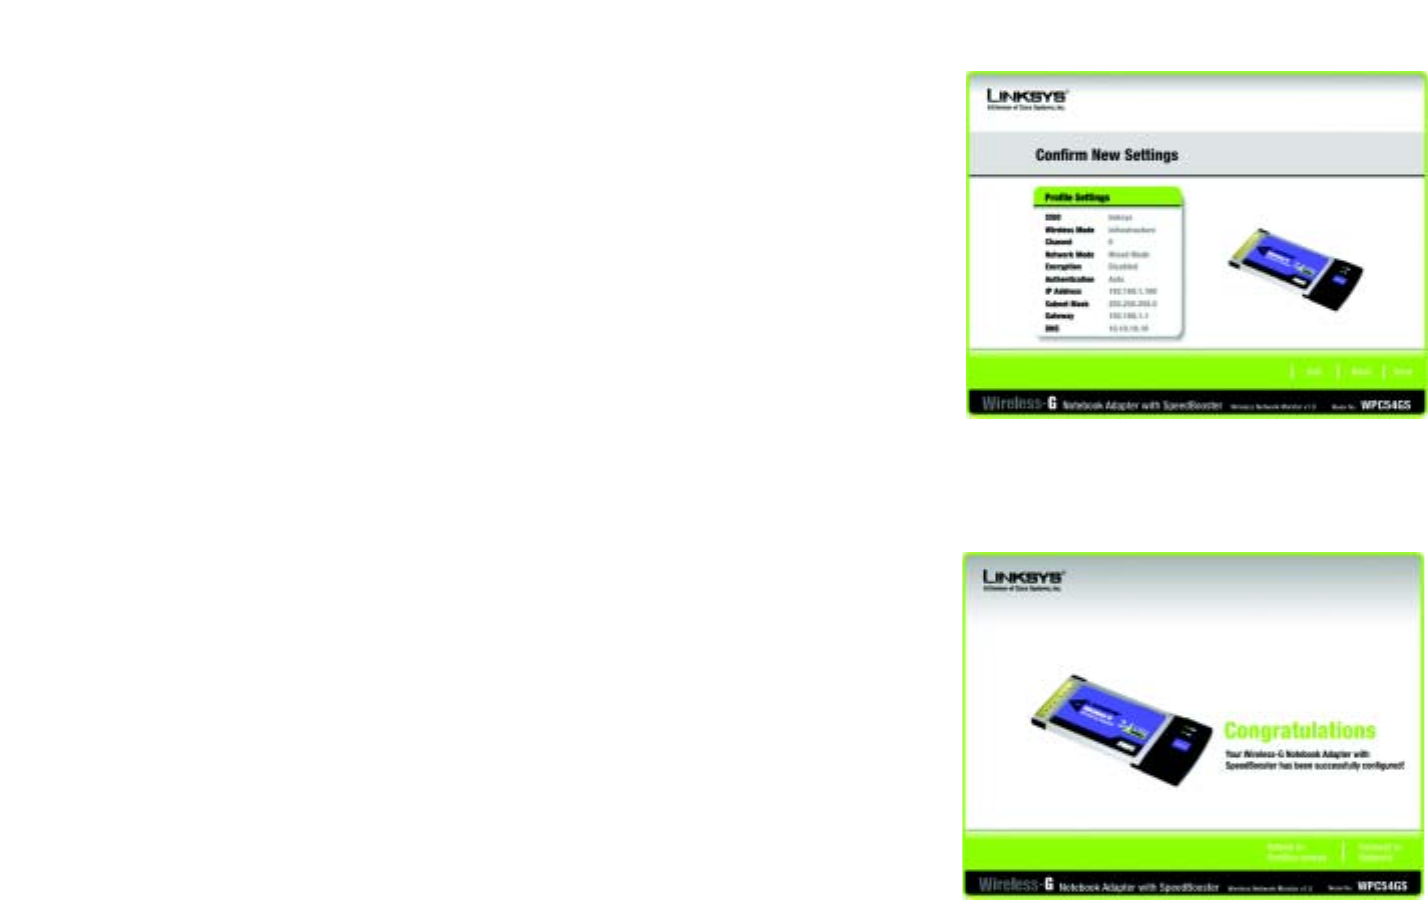
29
Chapter 6: Using the Wireless Network Monitor
Creating a New Profile
Wireless-G Notebook Adapter with SpeedBooster
7. The Confirm New Settings screen will appear next showing the new settings. To save the new settings, click
the Save button. To edit the new settings, click the Back button. To exit the Wireless Network Monitor, click
Exit.
8. The Congratulations screen will appear next. Click Activate new settings now to implement the new
settings immediately and return to the Link Information screen. Click Activate new settings later to keep
the current settings active and return to the Profiles screen.
You have successfully created a connection profile.
Figure 6-30: TKIP Settings
Figure 6-31: EAP-TLS Authentication

30
Appendix A: Troubleshooting
Common Problems and Solutions
Wireless-G Notebook Adapter with SpeedBooster
Appendix A: Troubleshooting
This appendix consists of two parts: “Common Problems and Solutions” and “Frequently Asked Questions.” This
appendix provides solutions to problems that may occur during the installation and operation of the Wireless-G
Notebook Adapter. Read the description below to solve your problems. If you can't find an answer here, check the
Linksys website at www.linksys.com/international or www.linksys.com.
Common Problems and Solutions
1. My computer does not recognize the Wireless-G Notebook Adapter.
Make sure that the Wireless-G Notebook Adapter is properly inserted into the PC Card slot.
2. The Wireless-G Notebook Adapter does not work properly.
Reinsert the Wireless-G Notebook Adapter into the notebook or desktop’s USB port.
For Windows 98SE or Me, right-click on My Computer, and select Properties. Select the Device Manager
tab, and click on the Network Adapter. You will find the Wireless-G Notebook Adapter if it is installed
successfully. If you see a yellow exclamation mark, the resources may be conflicting and you must follow the
steps below:
• Uninstall the driver software from your PC.
• Restart your PC and repeat the hardware and software installation as specified in this User Guide.
3. I cannot communicate with the other computers linked via Ethernet in the Infrastructure
configuration.
Make sure that the notebook or desktop is powered on.
Make sure that the Wireless-G Notebook Adapter is configured with the same SSID and security settings as
the other computers in the Infrastructure configuration.

31
Appendix A: Troubleshooting
Frequently Asked Questions
Wireless-G Notebook Adapter with SpeedBooster
Frequently Asked Questions
Can I run an application from a remote computer over the wireless network?
This will depend on whether or not the application is designed to be used over a network. Consult the
application’s user guide to determine if it supports operation over a network.
Can I play computer games with other members of the wireless network?
Yes, as long as the game supports multiple players over a LAN (local area network). Refer to the game’s user
guide for more information.
What is the IEEE 802.11b standard?
It is one of the IEEE standards for wireless networks. The 802.11b standard allows wireless networking hardware
from different manufacturers to communicate, provided that the hardware complies with the 802.11b standard.
The 802.11b standard states a maximum data transfer rate of 11Mbps and an operating frequency of 2,4GHz.
What is the IEEE 802.11g standard?
It is one of the IEEE standards for wireless networks. The 802.11g standard allows wireless networking hardware
from different manufacturers to communicate, provided that the hardware complies with the 802.11g standard.
The 802.11g standard states a maximum data transfer rate of 54Mbps and an operating frequency of 2,4GHz.
What IEEE 802.11b features are supported?
The product supports the following IEEE 802.11b functions:
• CSMA/CA plus Acknowledge protocol
• Multi-Channel Roaming
• Automatic Rate Selection
• RTS/CTS feature
• Fragmentation
• Power Management
What IEEE 802.11g features are supported?
The product supports the following IEEE 802.11g functions:
• CSMA/CA plus Acknowledge protocol
• OFDM protocol
• Multi-Channel Roaming
• Automatic Rate Selection
• RTS/CTS feature
• Fragmentation
• Power Management

32
Appendix A: Troubleshooting
Frequently Asked Questions
Wireless-G Notebook Adapter with SpeedBooster
What is ad-hoc mode?
When a wireless network is set to ad-hoc mode, the wireless-equipped computers are configured to
communicate directly with each other. The ad-hoc wireless network will not communicate with any wired
network.
What is infrastructure mode?
When a wireless network is set to infrastructure mode, the wireless network is configured to communicate with
a wired network through a wireless access point.
What is roaming?
Roaming is the ability of a portable computer user to communicate continuously while moving freely throughout
an area greater than that covered by a single access point. Before using the roaming function, the workstation
must make sure that it is the same channel number with the access point of dedicated coverage area.
To achieve true seamless connectivity, the wireless LAN must incorporate a number of different functions. Each
node and access point, for example, must always acknowledge receipt of each message. Each node must
maintain contact with the wireless network even when not actually transmitting data. Achieving these functions
simultaneously requires a dynamic RF networking technology that links access points and nodes. In such a
system, the user’s end node undertakes a search for the best possible access to the system. First, it evaluates
such factors as signal strength and quality, as well as the message load currently being carried by each access
point and the distance of each access point to the wired backbone. Based on that information, the node next
selects the right access point and registers its address. Communications between end node and host computer
can then be transmitted up and down the backbone.
As the user moves on, the end node’s RF transmitter regularly checks the system to determine whether it is in
touch with the original access point or whether it should seek a new one. When a node no longer receives
acknowledgment from its original access point, it undertakes a new search. Upon finding a new access point, it
then re-registers, and the communication process continues.
What is ISM band?
The FCC and their counterparts outside of the U.S. have set aside bandwidth for unlicensed use in the ISM
(Industrial, Scientific and Medical) band. Spectrum in the vicinity of 2,4 GHz, in particular, is being made available
worldwide. This presents a truly revolutionary opportunity to place convenient high-speed wireless capabilities in
the hands of users around the globe.
What is Spread Spectrum?
Spread Spectrum technology is a wideband radio frequency technique developed by the military for use in
reliable, secure, mission-critical communications systems. It is designed to trade off bandwidth efficiency for
reliability, integrity, and security. In other words, more bandwidth is consumed than in the case of narrowband
transmission, but the trade-off produces a signal that is, in effect, louder and thus easier to detect, provided that

33
Appendix A: Troubleshooting
Frequently Asked Questions
Wireless-G Notebook Adapter with SpeedBooster
the receiver knows the parameters of the spread-spectrum signal being broadcast. If a receiver is not tuned to
the right frequency, a spread-spectrum signal looks like background noise. There are two main alternatives,
Direct Sequence Spread Spectrum (DSSS) and Frequency Hopping Spread Spectrum (FHSS).
What is DSSS? What is FHSS? And what are their differences?
Frequency-Hopping Spread-Spectrum (FHSS) uses a narrowband carrier that changes frequency in a pattern that
is known to both transmitter and receiver. Properly synchronized, the net effect is to maintain a single logical
channel. To an unintended receiver, FHSS appears to be short-duration impulse noise. Direct-Sequence Spread-
Spectrum (DSSS) generates a redundant bit pattern for each bit to be transmitted. This bit pattern is called a chip
(or chipping code). The longer the chip, the greater the probability that the original data can be recovered. Even if
one or more bits in the chip are damaged during transmission, statistical techniques embedded in the radio can
recover the original data without the need for retransmission. To an unintended receiver, DSSS appears as low
power wideband noise and is rejected (ignored) by most narrowband receivers.
Would the information be intercepted while transmitting on air?
WLAN features two-fold protection in security. On the hardware side, as with Direct Sequence Spread Spectrum
technology, it has the inherent security feature of scrambling. On the software side, WLAN offers the encryption
function (WEP) to enhance security and access control.
What is WEP?
WEP is Wired Equivalent Privacy, a data privacy mechanism based on a shared key algorithm, as described in the
IEEE 802.11 standard.

34
Appendix B: Wireless Security
Security Precautions
Wireless-G Notebook Adapter with SpeedBooster
Appendix B: Wireless Security
Linksys wants to make wireless networking as safe and easy for you as possible. The current generation of
Linksys products provide several network security features, but they require specific action on your part for
implementation. So, keep the following in mind whenever you are setting up or using your wireless network.
Security Precautions
The following is a complete list of security precautions to take (at least steps 1 through 5 should be followed):
1. Change the default SSID.
2. Disable SSID Broadcast.
3. Change the default password for the Administrator account.
4. Enable MAC Address Filtering.
5. Change the SSID periodically.
6. Use the highest encryption algorithm possible. Use WPA if it is available. Please note that this may reduce
your network performance.
7. Change the WEP encryption keys periodically.
Security Threats Facing Wireless Networks
Wireless networks are easy to find. Hackers know that in order to join a wireless network, wireless networking
products first listen for “beacon messages”. These messages can be easily decrypted and contain much of the
network’s information, such as the network’s SSID (Service Set Identifier). Here are the steps you can take:
Change the administrator’s password regularly. With every wireless networking device you use, keep in
mind that network settings (SSID, WEP keys, etc.) are stored in its firmware. Your network administrator is the
only person who can change network settings. If a hacker gets a hold of the administrator’s password, he, too,
can change those settings. So, make it harder for a hacker to get that information. Change the administrator’s
password regularly.
SSID. There are several things to keep in mind about the SSID:
Note: Some of these security features are
available only through the network router or
access point. Refer to the router or access
point’s documentation for more information.

35
Appendix B: Wireless Security
Security Threats Facing Wireless Networks
Wireless-G Notebook Adapter with SpeedBooster
1. Disable Broadcast
2. Make it unique
3. Change it often
Most wireless networking devices will give you the option of broadcasting the SSID. While this option may be
more convenient, it allows anyone to log into your wireless network. This includes hackers. So, don’t broadcast
the SSID.
Wireless networking products come with a default SSID set by the factory. (The Linksys default SSID is “linksys”.)
Hackers know these defaults and can check these against your network. Change your SSID to something unique
and not something related to your company or the networking products you use.
Change your SSID regularly so that any hackers who have gained access to your wireless network will have to
start from the beginning in trying to break in.
MAC Addresses. Enable MAC Address filtering. MAC Address filtering will allow you to provide access to only
those wireless nodes with certain MAC Addresses. This makes it harder for a hacker to access your network with
a random MAC Address.
WEP Encryption. Wired Equivalent Privacy (WEP) is often looked upon as a cure-all for wireless security
concerns. This is overstating WEP’s ability. Again, this can only provide enough security to make a hacker’s job
more difficult.
There are several ways that WEP can be maximized:
1. Use the highest level of encryption possible
2. Use “Shared Key” authentication
3. Change your WEP key regularly
WPA. Wi-Fi Protected Access (WPA) is the newest and best available standard in Wi-Fi security. Three modes are
available: WPA-PSK, WPA Radius, and Radius. WPA-PSK gives you a choice of two encryption methods: TKIP
(Temporal Key Integrity Protocol), which utilizes a stronger encryption method and incorporates Message
Integrity Code (MIC) to provide protection against hackers, and AES (Advanced Encryption System), which utilizes
a symmetric 128-Bit block data encryption. WPA RADIUS offers two encryption methods, TKIP and AES, with
dynamic encryption keys. RADIUS (Remote Authentication Dial-In User Service) utilizes a RADIUS server for
authentication.
Important: Always remember that each
device in your wireless network MUST use
the same encryption method and encryption
key or your wireless network will not function
properly.

36
Appendix B: Wireless Security
Security Threats Facing Wireless Networks
Wireless-G Notebook Adapter with SpeedBooster
WPA-PSK. If you do not have a RADIUS server, Select the type of algorithm, TKIP or AES, and enter a
password in the Passphrase field of 8-63 characters.
WPA RADIUS. WPA used in coordination with a RADIUS server. (This should only be used when a RADIUS
server is connected to the Router or other device.) WPA Radius offers two encryption methods, TKIP and AES,
with dynamic encryption keys.
RADIUS. WEP used in coordination with a RADIUS server. (This should only be used when a RADIUS server is
connected to the Router or other device.)
Implementing encryption may have a negative impact on your network’s performance, but if you are transmitting
sensitive data over your network, encryption should be used.
These security recommendations should help keep your mind at ease while you are enjoying the most flexible
and convenient technology Linksys has to offer.

37
Appendix C: Windows Help
Wireless-G Notebook Adapter with SpeedBooster
Appendix C: Windows Help
All wireless products require Microsoft Windows. Windows is the most used operating system in the world and
comes with many features that help make networking easier. These features can be accessed through Windows
Help and are described in this appendix.
TCP/IP
Before a computer can communicate with an access point or wireless router, TCP/IP must be enabled. TCP/IP is a
set of instructions, or protocol, all PCs follow to communicate over a network. This is true for wireless networks
as well. Your PCs will not be able to utilize wireless networking without having TCP/IP enabled. Windows Help
provides complete instructions on enabling TCP/IP.
Shared Resources
If you wish to share printers, folder, or files over your network, Windows Help provides complete instructions on
utilizing shared resources.
Network Neighborhood/My Network Places
Other PCs on your network will appear under Network Neighborhood or My Network Places (depending upon the
version of Windows you're running). Windows Help provides complete instructions on adding PCs to your
network.

38
Appendix D: Glossary
Wireless-G Notebook Adapter with SpeedBooster
Appendix D: Glossary
802.11a - An IEEE wireless networking standard that specifies a maximum data transfer rate of 54Mbps and an
operating frequency of 5GHz.
802.11b - An IEEE wireless networking standard that specifies a maximum data transfer rate of 11Mbps and an
operating frequency of 2,4GHz.
802.11g - An IEEE wireless networking standard that specifies a maximum data transfer rate of 54Mbps, an
operating frequency of 2,4GHz, and backward compatibility with 802.11b devices.
Access Point - A device that allows wireless-equipped computers and other devices to communicate with a
wired network. Also used to expand the range of a wireless network.
Adapter - A device that adds network functionality to your PC.
Ad-hoc - A group of wireless devices communicating directly with each other (peer-to-peer) without the use of
an access point.
AES (Advanced Encryption Standard) - A method that uses up to 256-bit key encryption to secure data.
Backbone - The part of a network that connects most of the systems and networks together, and handles the
most data.
Bandwidth - The transmission capacity of a given device or network.
Beacon Interval - Data transmitted on your wireless network that keeps the network synchronized.
Bit - A binary digit.
Boot - To start a device and cause it to start executing instructions.
Bridge - A device that connects different networks.
Broadband - An always-on, fast Internet connection.
Browser - An application program that provides a way to look at and interact with all the information on the
World Wide Web.

39
Appendix D: Glossary
Wireless-G Notebook Adapter with SpeedBooster
Buffer - A shared or assigned memory area that is used to support and coordinate different computing and
networking activities so one isn't held up by the other.
Byte - A unit of data that is usually eight bits long
Cable Modem - A device that connects a computer to the cable television network, which in turn connects to the
Internet.
CSMA/CA (Carrier Sense Multiple Access/Collision Avoidance) - A method of data transfer that is used to prevent
data collisions.
CTS (Clear ToSend) - A signal sent by a wireless device, signifying that it is ready to receive data.
Daisy Chain - A method used to connect devices in a series, one after the other.
Database - A collection of data that is organized so that its contents can easily be accessed, managed, and
updated.
DDNS (Dynamic Domain Name System) - Allows the hosting of a website, FTP server, or e-mail server with a
fixed domain name (e.g., www.xyz.com) and a dynamic IP address.
Default Gateway - A device that forwards Internet traffic from your local area network.
DHCP (Dynamic Host Configuration Protocol) - A networking protocol that allows administrators to assign
temporary IP addresses to network computers by "leasing" an IP address to a user for a limited amount of time,
instead of assigning permanent IP addresses.
DMZ (Demilitarized Zone) - Removes the Router's firewall protection from one PC, allowing it to be "seen" from
the Internet.
DNS (Domain Name Server) - The IP address of your ISP's server, which translates the names of websites into IP
addresses.
Domain - A specific name for a network of computers.
Download - To receive a file transmitted over a network.
DSL (Digital Subscriber Line) - An always-on broadband connection over traditional phone lines.
DSSS (Direct-Sequence Spread-Spectrum) - Frequency transmission with a redundant bit pattern resulting in a
lower probability of information being lost in transit.

40
Appendix D: Glossary
Wireless-G Notebook Adapter with SpeedBooster
DTIM (Delivery Traffic Indication Message) - A message included in data packets that can increase wireless
efficiency.
Dynamic IP Address - A temporary IP address assigned by a DHCP server.
EAP (Extensible Authentication Protocol) - A general authentication protocol used to control network access.
Many specific authentication methods work within this framework.
EAP-PEAP (Extensible Authentication Protocol-Protected Extensible Authentication Protocol) - A mutual
authentication method that uses a combination of digital certificates and another system, such as passwords.
EAP-TLS (Extensible Authentication Protocol-Transport Layer Security) - A mutual authentication method that
uses digital certificates.
Encryption - Encoding data transmitted in a network.
Ethernet - IEEE standard network protocol that specifies how data is placed on and retrieved from a common
transmission medium.
Finger - A program that tells you the name associated with an e-mail address.
Firewall - A set of related programs located at a network gateway server that protects the resources of a
network from users from other networks.
Firmware - The programming code that runs a networking device.
Fragmentation -Breaking a packet into smaller units when transmitting over a network medium that cannot
support the original size of the packet.
FTP (File Transfer Protocol) - A protocol used to transfer files over a TCP/IP network.
Full Duplex - The ability of a networking device to receive and transmit data simultaneously.
Gateway - A device that interconnects networks with different, incompatible communications protocols.
Half Duplex - Data transmission that can occur in two directions over a single line, but only one direction at a
time.
Hardware - The physical aspect of computers, telecommunications, and other information technology devices.
HTTP (HyperText Transport Protocol) - The communications protocol used to connect to servers on the World
Wide Web.

41
Appendix D: Glossary
Wireless-G Notebook Adapter with SpeedBooster
IEEE (The Institute of Electrical and Electronics Engineers) - An independent institute that develops networking
standards.
Infrastructure - A wireless network that is bridged to a wired network via an access point.
IP (Internet Protocol) - A protocol used to send data over a network.
IP Address - The address used to identify a computer or device on a network.
IPCONFIG - A Windows 2000 and XP utility that displays the IP address for a particular networking device.
IPSec (Internet Protocol Security) - A VPN protocol used to implement secure exchange of packets at the IP layer.
ISM band - Radio bandwidth utilized in wireless transmissions.
ISP (Internet Service Provider) - A company that provides access to the Internet.
LAN - The computers and networking products that make up your local network.
LEAP (Lightweight Extensible Authentication Protocol) - A mutual authentication method that uses a username
and password system.
MAC (Media Access Control) Address - The unique address that a manufacturer assigns to each networking
device.
Mbps (MegaBits Per Second) - One million bits per second; a unit of measurement for data transmission.
mIRC - An Internet Relay Chat program that runs under Windows.
Multicasting - Sending data to a group of destinations at once.
NAT (Network Address Translation) - NAT technology translates IP addresses of a local area network to a different
IP address for the Internet.
Network - A series of computers or devices connected for the purpose of data sharing, storage, and/or
transmission between users.
NNTP (Network News Transfer Protocol) - The protocol used to connect to Usenet groups on the Internet.
Node - A network junction or connection point, typically a computer or work station.

42
Appendix D: Glossary
Wireless-G Notebook Adapter with SpeedBooster
OFDM (Orthogonal Frequency Division Multiplexing) - Frequency transmission that separates the data stream
into a number of lower-speed data streams, which are then transmitted in parallel to prevent information from
being lost in transit.
Packet - A unit of data sent over a network.
Passphrase - Used much like a password, a passphrase simplifies the WEP encryption process by automatically
generating the WEP encryption keys for Linksys products.
Ping (Packet INternet Groper) - An Internet utility used to determine whether a particular IP address is online.
POP3 (Post Office Protocol 3) - A standard mail server commonly used on the Internet.
Port - The connection point on a computer or networking device used for plugging in cables or adapters.
Power over Ethernet (PoE) - A technology enabling an Ethernet network cable to deliver both data and power.
PPPoE (Point to Point Protocol over Ethernet) - A type of broadband connection that provides authentication
(username and password) in addition to data transport.
PPTP (Point-to-Point Tunneling Protocol) - A VPN protocol that allows the Point to Point Protocol (PPP) to be
tunneled through an IP network. This protocol is also used as a type of broadband connection in Europe.
Preamble - Part of the wireless signal that synchronizes network traffic.
RADIUS (Remote Authentication Dial-InUser Service) - A protocol that uses an authentication server to control
network access.
RJ-45 (Registered Jack-45) - An Ethernet connector that holds up to eight wires.
Roaming - The ability to take a wireless device from one access point's range to another without losing the
connection.
Router - A networking device that connects multiple networks together.
RTS (Request ToSend) - A networking method of coordinating large packets through the RTS Threshold setting.
Server - Any computer whose function in a network is to provide user access to files, printing, communications,
and other services.
SMTP (Simple Mail Transfer Protocol) - The standard e-mail protocol on the Internet.
SNMP (Simple Network Management Protocol) - A widely used network monitoring and control protocol.

43
Appendix D: Glossary
Wireless-G Notebook Adapter with SpeedBooster
Software - Instructions for the computer. A series of instructions that performs a particular task is called a
"program".
SOHO (Small Office/Home Office) - Market segment of professionals who work at home or in small offices.
SPI (Stateful Packet Inspection) Firewall - A technology that inspects every incoming packet of information
before allowing it to enter the network.
Spread Spectrum - Wideband radio frequency technique used for more reliable and secure data transmission.
SSID (Service Set IDentifier) - Your wireless network's name.
Static IP Address - A fixed address assigned to a computer or device that is connected to a network.
Static Routing - Forwarding data in a network via a fixed path.
Subnet Mask - An address code that determines the size of the network.
Switch - 1. A data switch that connects computing devices to host computers, allowing a large number of
devices to share a limited number of ports. 2. A device for making, breaking, or changing the connections in an
electrical circuit.
TCP (Transmission Control Protocol) - A network protocol for transmitting data that requires acknowledgement
from the recipient of data sent.
TCP/IP (Transmission Control Protocol/Internet Protocol) - A set of instructions PCs use to communicate over a
network.
Telnet - A user command and TCP/IP protocol used for accessing remote PCs.
TFTP (Trivial File Transfer Protocol) - A version of the TCP/IP FTP protocol that has no directory or password
capability.
Throughput - The amount of data moved successfully from one node to another in a given time period.
TKIP (Temporal Key Integrity Protocol) - a wireless encryption protocol that provides dynamic encryption keys for
each packet transmitted.
Topology - The physical layout of a network.
TX Rate - Transmission Rate.

44
Appendix D: Glossary
Wireless-G Notebook Adapter with SpeedBooster
UDP (User Datagram Protocol) - A network protocol for transmitting data that does not require acknowledgement
from the recipient of the data that is sent.
Upgrade - To replace existing software or firmware with a newer version.
Upload - To transmit a file over a network.
URL (Uniform Resource Locator) - The address of a file located on the Internet.
VPN (Virtual Private Network) - A security measure to protect data as it leaves one network and goes to another
over the Internet.
WAN (Wide Area Network)- The Internet.
WEP (Wired Equivalent Privacy) - A method of encrypting network data transmitted on a wireless network for
greater security.
WINIPCFG - A Windows 98 and Me utility that displays the IP address for a particular networking device.
WLAN (Wireless Local Area Network) - A group of computers and associated devices that communicate with
each other wirelessly.
WPA (Wi-Fi Protected Access) - a wireless security protocol using TKIP (Temporal Key Integrity Protocol)
encryption, which can be used in conjunction with a RADIUS server.

45
Appendix E: Specifications
Wireless-G Notebook Adapter with SpeedBooster
Appendix E: Specifications
Standards IEEE 802.11g, IEEE 802.11b
Channels 11 Channels (most of Western Hemisphere)
13 Channels (most of Europe)
LEDs Power, Link
Transmit Power 18 dBm
Protocols 802.11b: CCK (11 Mbps), DQPSK (2 Mbps), DBPSK (1 Mbps); 802.11g: OFDM
Security Features WEP, AES, TKIP, 802.1x
WEP Key Bits 64, 128 Bit
Dimensions 115 mm x 54 mm x 7,5 mm
Unit Weight 0,047 kg.
Certifications FCC, IC-03, CE
Operating Temp. 0ºC to 55ºC
Storage Temp. -25ºC to 70ºC
Operating Humidity 5% to 95%, Non-Condensing
Storage Humidity 5% to 95%, Non-Condensing

46
Appendix F: Warranty Information
Wireless-G Notebook Adapter with SpeedBooster
Appendix F: Warranty Information
LIMITED WARRANTY
Linksys warrants to You that, for a period of three years (the “Warranty Period”), your Linksys Product will be substantially
free of defects in materials and workmanship under normal use. Your exclusive remedy and Linksys' entire liability under
this warranty will be for Linksys at its option to repair or replace the Product or refund Your purchase price less any rebates.
This limited warranty extends only to the original purchaser.
If the Product proves defective during the Warranty Period call Linksys Technical Support in order to obtain a Return
Authorization Number, if applicable. BE SURE TO HAVE YOUR PROOF OF PURCHASE ON HAND WHEN CALLING. If You are
requested to return the Product, mark the Return Authorization Number clearly on the outside of the package and include a
copy of your original proof of purchase. RETURN REQUESTS CANNOT BE PROCESSED WITHOUT PROOF OF PURCHASE. You
are responsible for shipping defective Products to Linksys. Linksys pays for UPS Ground shipping from Linksys back to You
only. Customers located outside of the United States of America and Canada are responsible for all shipping and handling
charges.
ALL IMPLIED WARRANTIES AND CONDITIONS OF MERCHANTABILITY OR FITNESS FOR A PARTICULAR PURPOSE ARE LIMITED
TO THE DURATION OF THE WARRANTY PERIOD. ALL OTHER EXPRESS OR IMPLIED CONDITIONS, REPRESENTATIONS AND
WARRANTIES, INCLUDING ANY IMPLIED WARRANTY OF NON-INFRINGEMENT, ARE DISCLAIMED. Some jurisdictions do not
allow limitations on how long an implied warranty lasts, so the above limitation may not apply to You. This warranty gives
You specific legal rights, and You may also have other rights which vary by jurisdiction.
This warranty does not apply if the Product (a) has been altered, except by Linksys, (b) has not been installed, operated,
repaired, or maintained in accordance with instructions supplied by Linksys, or (c) has been subjected to abnormal physical
or electrical stress, misuse, negligence, or accident. In addition, due to the continual development of new techniques for
intruding upon and attacking networks, Linksys does not warrant that the Product will be free of vulnerability to intrusion or
attack.
TO THE EXTENT NOT PROHIBITED BY LAW, IN NO EVENT WILL LINKSYS BE LIABLE FOR ANY LOST DATA, REVENUE OR PROFIT,
OR FOR SPECIAL, INDIRECT, CONSEQUENTIAL, INCIDENTAL OR PUNITIVE DAMAGES, REGARDLESS OF THE THEORY OF
LIABILITY (INCLUDING NEGLIGENCE), ARISING OUT OF OR RELATED TO THE USE OF OR INABILITY TO USE THE PRODUCT
(INCLUDING ANY SOFTWARE), EVEN IF LINKSYS HAS BEEN ADVISED OF THE POSSIBILITY OF SUCH DAMAGES. IN NO EVENT
WILL LINKSYS’ LIABILITY EXCEED THE AMOUNT PAID BY YOU FOR THE PRODUCT. The foregoing limitations will apply even if
any warranty or remedy provided under this Agreement fails of its essential purpose. Some jurisdictions do not allow the
exclusion or limitation of incidental or consequential damages, so the above limitation or exclusion may not apply to You.
This Warranty is valid and may be processed only in the country of purchase.
Please direct all inquiries to: Linksys, P.O. Box 18558, Irvine, CA 92623.

47
Appendix G: Regulatory Information
Wireless-G Notebook Adapter with SpeedBooster
Appendix G: Regulatory Information
FCC Statement
This product has been tested and complies with the specifications for a Class B digital device, pursuant to Part 15 of the
FCC Rules. These limits are designed to provide reasonable protection against harmful interference in a residential
installation. This equipment generates, uses, and can radiate radio frequency energy and, if not installed and used
according to the instructions, may cause harmful interference to radio communications. However, there is no guarantee
that interference will not occur in a particular installation. If this equipment does cause harmful interference to radio or
television reception, which is found by turning the equipment off and on, the user is encouraged to try to correct the
interference by one or more of the following measures:
• Reorient or relocate the receiving antenna
• Increase the separation between the equipment or devices
• Connect the equipment to an outlet other than the receiver's
• Consult a dealer or an experienced radio/TV technician for assistance
FCC Radiation Exposure Statement
This equipment complies with FCC radiation exposure limits set forth for an uncontrolled environment. This equipment
should be installed and operated with minimum distance 20cm between the radiator and your body.
Industry Canada (Canada)
This Class B digital apparatus complies with Canadian ICES-003.
Cet appareil numérique de la classe B est conforme à la norme NMB-003 du Canada.
The use of this device in a system operating either partially or completely outdoors may require the user to obtain a license
for the system according to the Canadian regulations.
•Federal Communication Commission Interference Statement
•This equipment has been tested and found to comply with the limits for a Class B digital device, pursuant to Part 15 of the FCC Rules.
These limits are designed to provide reasonable protection against harmful interference in a residential installation. This equipment
generates, uses and can radiate radio frequency energy and, if not installed and used in accordance with the instructions, may cause
harmful interference to radio communications. However, there is no guarantee that interference will not occur in a particular installation.
If this equipment does cause harmful interference to radio or television reception, which can be determined by turning the equipment off
and on, the user is encouraged to try to correct the interference by one of the following measures:
•-•Reorient or relocate the receiving antenna.
•-•Increase the separation between the equipment and receiver.
•-•Connect the equipment into an outlet on a circuit different from that
•to which the receiver is connected.
•-•Consult the dealer or an experienced radio/TV technician for help.
•This device complies with Part 15 of the FCC Rules. Operation is subject to the following two conditions: (1) This device may not cause
harmful interference, and (2) this device must accept any interference received, including interference that may cause undesired operation.
•FCC Caution: Any changes or modifications not expressly approved by the party responsible for compliance could void the user's
authority to operate this equipment.
•IMPORTANT NOTE:
•FCC Radiation Exposure Statement:
•This equipment complies with FCC radiation exposure limits set forth for an uncontrolled environment. End users must follow the
specific operating instructions for satisfying RF exposure compliance.
•
•This transmitter must not be co-located or operating in conjunction with any other antenna or transmitter.
FCC Statement
"Operation is subject to the following two conditions: (1) this device may not cause interference, and (2) this device must accept any
interference, including interference that may cause undesired operation of the device."
"To prevent radio interference to the licensed service, this device is intended to be operated indoors and away from windows to provide
maximum shielding. Equipment (or its transmit antenna) that is installed outdoors is subject to licensing."
IC Statement
Buffalo declared that WLI2-CB-G54L is limited in CH1~11 by specified firmware controlled in USA.

48
Appendix G: Regulatory Information
Wireless-G Notebook Adapter with SpeedBooster
Compliance Information for 2,4-GHz Wireless Products Relevant to the EU and Other Countries Following EU Directive 1999/
5/EC (R&TTE Directive)
Declaration of Conformity with Regard to the EU Directive 1995/5/EC (R&TTE Directive)
Deutsch
[German]:
Dieses Gerät entspricht den grundlegenden Anforderungen und den
weiteren entsprechenden Vorgaben der Richtlinie 1999/5/EU.
Dansk
[Danish]:
Dette udstyr er i overensstemmelse med de væsentlige krav og andre
relevante bestemmelser i Direktiv 1999/5/EF.
English: This equipment is in compliance with the essential requirements and other
relevant provisions of Directive 1999/5/EC.
Español
[Spanish]:
Este equipo cumple con los requisitos esenciales asi como con otras
disposiciones de la Directiva 1999/5/CE.
ǼȜȜȘȞȚțȒ
[Greek]:
ǹȣIJȩȢ Ƞ İȟȠʌȜȚıµȩȢ İȓȞĮȚ ıİ ıȣµµȩȡijȦıȘ µİ IJȚȢ ȠȣıȚȫįİȚȢ ĮʌĮȚIJȒıİȚȢ
țĮȚ ȐȜȜİȢ ıȤİIJȚțȑȢ įȚĮIJȐȟİȚȢ IJȘȢ ȅįȘȖȓĮȢ 1999/5/EC.
Français
[French]:
Cet appareil est conforme aux exigences essentielles et aux autres
dispositions pertinentes de la Directive 1999/5/EC.
Íslenska
[Icelandic]:
Þetta tæki er samkvæmt grunnkröfum og öðrum viðeigandi ákvæðum
Tilskipunar 1999/5/EC.
Italiano
[Italian]:
Questo apparato é conforme ai requisiti essenziali ed agli altri principi
sanciti dalla Direttiva 1999/5/CE.
Nederlands
[Dutch]:
Dit apparaat voldoet aan de essentiele eisen en andere van toepassing
zijnde bepalingen van de Richtlijn 1999/5/EC.
Norsk
[Norwegian]:
Dette utstyret er i samsvar med de grunnleggende krav og andre relevante
bestemmelser i EU-direktiv 1999/5/EF.
Português
[Portuguese]:
Este equipamento está em conformidade com os requisitos essenciais e
outras provisões relevantes da Directiva 1999/5/EC.
Suomi
[Finnish]:
Tämä laite täyttää direktiivin 1999/5/EY olennaiset vaatimukset ja on siinä
asetettujen muiden laitetta koskevien määräysten mukainen.
Svenska
[Swedish]:
Denna utrustning är i överensstämmelse med de väsentliga kraven och
andra relevanta bestämmelser i Direktiv 1999/5/EC.
NOTE: If you need any technical documentation, see the “How to Access Technical
Documents on www.linksys.com/international” section for more information.

49
Appendix G: Regulatory Information
Wireless-G Notebook Adapter with SpeedBooster
The following standards were applied during the assessment of the product against the requirements of the Directive
1999/5/EC:
• Radio: EN 300.328
• EMC: EN 301 489-1, EN 301 489-17
• Safety: EN 60950
CE Marking
For the Linksys Wireless-B and Wireless-G products, the following CE mark, notified body number (where applicable), and
class 2 identifier are added to the equipment.
Check the CE label on the product to find out which notified body was involved during the assessment.
National Restrictions
This product may be used in all EU countries (and other countries following the EU directive 1999/5/EC) without any
limitation except for the countries mentioned below:
Ce produit peut être utilisé dans tous les pays de l’UE (et dans tous les pays ayant transposés la directive 1999/5/CE) sans
aucune limitation, excepté pour les pays mentionnés ci-dessous:
Questo prodotto è utilizzabile in tutte i paesi EU (ed in tutti gli altri paesi che seguono le direttive EU 1999/5/EC) senza
nessuna limitazione, eccetto per i paesii menzionati di seguito:
Das Produkt kann in allen EU Staaten ohne Einschränkungen eingesetzt werden (sowie in anderen Staaten die der EU
Direktive 1995/5/CE folgen) mit Außnahme der folgenden aufgeführten Staaten:
Belgium
Outdoor wireless links with a range in excess of 300 meters need to be notified at the Belgian Institute for Postal Services
and Telecommunications (BIPT). Please check http://www.bipt.be for more details.
Draadloze verbindingen voor buitengebruik en met een reikwijdte van meer dan 300 meter dienen aangemeld te worden
bij het Belgisch Instituut voor postdiensten en telecommunicatie (BIPT). Zie
http://www.bipt.be voor meer gegevens.
or or

50
Appendix G: Regulatory Information
Wireless-G Notebook Adapter with SpeedBooster
Les liaisons sans fil pour une utilisation en extérieur d’une distance supérieure à 300 mètres doivent être noti-
fiées à l’Institut Belge des services Postaux et des Télécommunications (IBPT). Visitez
http://www.ibpt.be pour de plus amples détails.
France
In case the product is used outdoors, the output power is restricted in some parts of the band. See Table 1 or check http://
www.art-telecom.fr/ for more details.
Dans la cas d’une utilisation en extérieur, la puissance de sortie est limitée pour certaines parties de la bande. Reportez-
vous à la table 1 ou visitez http://www.art-telecom.fr/ pour de plus amples détails.
Italy
This product meets the National Radio Interface and the requirements specified in the National Frequency Allocation Table
for Italy. Unless operating within the boundaries of the owner’s property, the use of this 2,4 GHz Wireless LAN product
requires a ‘general authorization’. Please check with http://www.comunicazioni.it/it/ for more details.
Questo prodotto è conforme alla specifiche di Interfaccia Radio Nazionali e rispetta il Piano Nazionale di ripar-
tizione delle frequenze in Italia. Se non viene installato all’interno del proprio fondo, l’utilizzo di prodotti Wire-
less LAN a 2,4 GHz richiede una “Autorizzazione Generale”. Consultare
http://www.comunicazioni.it/it/ per maggiori dettagli.
Product Usage Restrictions
This product is designed for indoor usage only. Outdoor usage is not recommended.
This product is designed for use with the included integral or external (dedicated) antenna(s). Use of non-dedicated or
third-party antenna(s) is not recommended and is not supported by Linksys.
Table 1: Applicable Power Levels in France
Location Frequency Range (MHz) Power (EIRP)
Indoor (No restrictions) 2400-2483.5 100 mW (20 dBm)
Outdoor 2400-2454
2454-2483.5
100 mW (20 dBm)
10 mW (10 dBm)

51
Appendix G: Regulatory Information
Wireless-G Notebook Adapter with SpeedBooster
Power Output of Your Device
To comply with your country’s regulations, you may have to change the power output of your wireless device. Proceed to
the appropriate section for your device.
Wireless Adapters
Wireless adapters have the power output set to 100% by default. Maximum power output on each adapter does not exceed
20 dBm (100 mW); it is generally 18 dBm (64 mW) or below. If you need to alter your wireless adapter’s power output,
follow the appropriate instructions for your computer’s Windows operating system:
Windows XP
1. Double-click the Wireless icon in your desktop’s system tray.
2. Open the Wireless Network Connection window.
3. Click the Properties button.
4. Select the General tab, and click the Configure button.
5. In the Properties window, click the Advanced tab.
6. Select Power Output.
7. From the pull-down menu on the right, select the wireless adapter’s power output percentage.
Windows 2000
1. Open the Control Panel.
2. Double-click Network and Dial-Up Connections.
3. Select your current wireless connection, and select Properties.
4. From the Properties screen, click the Configure button.
5. Click the Advanced tab, and select Power Output.
6. From the pull-down menu on the right, select the wireless adapter’s power setting.
If your computer is running Windows Millennium or 98, then refer to Windows Help for instructions on how to access the
advanced settings of a network adapter.
Wireless Access Points, Routers, or Other Wireless Products
If you have a wireless access point, router or other wireless product, use its Web-based Utility to configure its power
output setting (refer to the product’s documentation for more information).
Note: The power output setting may not be available on all wireless products.
For more information, refer to the documentation on your product’s CD or at
http://www.linksys.com/international.

52
Appendix G: Regulatory Information
Wireless-G Notebook Adapter with SpeedBooster
Technical Documents on www.linksys.com/international
Follow these steps to access technical documents:
1. Browse to http://www.linksys.com/international.
2. Click the region in which you reside.
3. Click the name of the country in which you reside.
4. Click Products.
5. Click the appropriate product category.
6. Select a product.
7. Click the type of documentation you want. The document will automatically open in PDF format.
Note: If you have questions regarding the compliance of these products or you
cannot find the information you are looking for, please contact your local sales
office. Visit http://www.linksys.com/international for more details.

53
Appendix H: Contact Information
Wireless-G Notebook Adapter with SpeedBooster
Appendix H: Contact Information
Need to contact Linksys?
Visit us online for information on the latest products and updates to your existing products at:
http://www.linksys.com/international
If you experience problems with any Linksys product, you can e-mail us at:
In Europe E-mail Address
Austria support.at@linksys.com
Belgium support.be@linksys.com
Denmark support.dk@linksys.com
France support.fr@linksys.com
Germany support.de@linksys.com
Italy support.it@linksys.com
Netherlands support.nl@linksys.com
Norway support.no@linksys.com
Portugal support.pt@linksys.com
Spain support.es@linksys.com
Sweden support.se@linksys.com
Switzerland support.ch@linksys.com
United Kingdom & Ireland support.uk@linksys.com
Outside of Europe E-mail Address
Latin America support.la@linksys.com
U.S. and Canada support@linksys.com

A Division of Cisco Systems, Inc.
®
Modèle réf.
Carte pour ordinateur portable
Sans fil G
WPC54GS
Guide de
WIRELESS
avec SpeedBooster
GHz
2
802.11g
4
,
l'utilisateur

Carte pour ordinateur portable sans fil G avec SpeedBooster
Copyright et marques commerciales
Les spécifications peuvent être modifiées sans préavis. Linksys est une marque déposée ou une marque
commerciale de Cisco Systems, Inc. et/ou ses filiales aux Etats-Unis et dans certains autres pays.
Copyright © 2004 Cisco Systems, Inc. Tous droits réservés. Les autres noms de marque et de produit sont des
marques commerciales ou déposées de leur détenteur respectif.
Guide de l'utilisateur
Ce Guide de l'utilisateur a été rédigé pour faciliter au maximum votre compréhension de la mise en place d'une
infrastructure réseau avec la carte pour ordinateur portable sans fil G avec SpeedBooster. Les symboles suivants
sont contenus dans ce Guide de l'utilisateur :
Outre ces symboles, les définitions concernant des termes techniques sont présentées de la façon suivante :
Chaque figure (diagramme, capture d'écran ou toute autre image) est accompagnée d'un numéro et d'une
description, comme ceci :
Les numéros de figures et les descriptions sont également répertoriés dans la section « Liste des figures » de la
« Table des matières ».
Ce point d'exclamation indique un avertissement et
vous informe que votre installation ou votre carte peut
être endommagée.
mot : définition.
Cette coche indique un élément qui mérite une
attention plus particulière lors de l'utilisation de votre
carte.
Ce point d'interrogation indique le rappel d'une action que
vous êtes susceptible de devoir effectuer pour utiliser votre
Figure 0-1 : Exemple de description de figure
WPC54GS-FR-UG-40410NC KL

Carte pour ordinateur portable sans fil G avec SpeedBooster
Table des matières
Chapitre 1 : Introduction 1
Bienvenue 1
Contenu de ce guide 2
Chapitre 2 : Planification de votre réseau sans fil 4
Topologie réseau 4
Itinérance 4
Configuration du réseau 5
Chapitre 3 : Présentation de la carte réseau sans fil G pour ordinateur portable 6
Voyants 6
Chapitre 4 : Installation et configuration du logiciel 7
Procédure d'installation 8
Chapitre 5 : Installation du matériel 12
Connexion de la carte 12
Chapitre 6 : Utilisation de Wireless Network Monitor 13
Accès à WLAN Monitor 13
Informations de liaison 13
Recherche de site 16
Profils 17
Création d'un profil 18
Annexe A : Dépannage 30
Problèmes courants et solutions 30
Questions fréquemment posées 31
Annexe B : Sécurité sans fil 34
Mesures de sécurité 34
Menaces liées à la sécurité des réseaux sans fil 34
Annexe C : Aide de Microsoft Windows 37
Annexe D : Glossaire 38
Annexe E : Spécifications 45
Annexe F : Informations de garantie 46
Annexe G : Réglementation 47
Annexe H : Contacts 53

Carte pour ordinateur portable sans fil G avec SpeedBooster
Liste des figures
Figure 3-1 : Panneau avant 6
Figure 4-1 : Ecran Welcome (Bienvenue) de l'Assistant de configuration 7
Figure 4-2 : Accord de licence de l'Assistant de configuration 8
Figure 4-3 : Ecran Wireless Mode (Mode sans fil) de l'Assistant de
configuration 8
Figure 4-4 : Ecran Ad-Hoc Mode (Mode Ad-Hoc) de l'Assistant de
configuration 9
Figure 4-5 : Ecran WEP de l'Assistant de configuration 9
Figure 4-6 : Ecran WPA-PSK de l'Assistant de configuration 10
Figure 4-7 : Ecran Check Settings (Vérification des paramètres) de
l'Assistant de configuration 10
Figure 4-8 : Ecran Congratulations (Félicitations) de l'Assistant de
configuration 11
Figure 5-1 : Installation de la carte sur votre ordinateur portable 12
Figure 6-1 : Informations de liaison 13
Figure 6-2 : Plus d'informations - Paramètres réseau 14
Figure 6-3 : Plus d'informations - Statistiques du réseau 15
Figure 6-4 : Recherche de site 16
Figure 6-5 : Profils 17
Figure 6-6 : Importation d'un profil 17
Figure 6-7 : Exportation d'un profil 17
Figure 6-8 : Création d'un profil 18
Figure 6-9 : Saisie du nom de profil 18
Figure 6-10 : Mode sans fil du nouveau profil 19
Figure 6-11 : Paramètres du mode Ad hoc 19
Figure 6-12 : Paramètres réseau 20
Figure 6-13 : Sécurité sans fil du nouveau profil 21
Figure 6-14 : Paramètre WEP du nouveau profil 21
Figure 6-15 : Paramètres WPA-PSK 22
Figure 6-16 : Paramètres TKIP 22

Carte pour ordinateur portable sans fil G avec SpeedBooster
Figure 6-17 : Paramètres WPA RADIUS 23
Figure 6-18 : Type de cryptage 23
Figure 6-19 : Authentification EAP-TLS 24
Figure 6-20 : Authentification EAP-TTLS 24
Figure 6-21 : Authentification EAP-MD5 25
Figure 6-22 : Authentification EAP-PEAP 25
Figure 6-23 : Authentification EAP-LEAP 25
Figure 6-24 : Paramètres RADIUS 26
Figure 6-25 : Authentification EAP-TLS 26
Figure 6-26 : Authentification EAP-TTLS 27
Figure 6-27 : Authentification EAP-MD5 27
Figure 6-28 : Authentification EAP-PEAP 28
Figure 6-29 : Authentification LEAP 28
Figure 6-30 : Confirmation des nouveaux paramètres 29
Figure 6-31 : Félicitations 29

1
Chapitre 1 : Introduction
Bienvenue
Carte pour ordinateur portable sans fil G avec SpeedBooster
Chapitre 1 : Introduction
Bienvenue
Merci d'avoir choisi la carte pour ordinateur portable sans fil G avec SpeedBooster. Grâce à cette carte, votre
expérience de mise en réseau sans fil va être plus rapide et plus simple que jamais.
Comme tous les produits sans fil, la carte permet une plus grande portée et une plus grande mobilité au réseau
sans fil. La carte communique via la norme sans fil 802.11g de 54 Mbit/s qui est presque cinq fois plus rapide
que 802.11b. Ces deux normes utilisant la même bande de fréquences radio de 2,4 GHz, la carte peut également
communiquer avec la norme largement utilisée 802.11b de 11 Mbit/s.
Les ordinateurs équipés de cartes ou d'adaptateurs sans fil peuvent communiquer sans la présence de câbles
encombrants. En partageant les mêmes paramètres sans fil conformément à leur rayon de transmission, ils
forment un réseau sans fil.
L'assistant de configuration vous guide étape par étape pour configurer la carte suivant les paramètres de votre
réseau. Il vous suffit ensuite de l'insérer dans le connecteur de votre ordinateur portable pour profiter d'un accès
réseau à partir de votre ordinateur tout préservant votre mobilité.
Une fois connecté, vous pouvez consulter votre courrier électronique, accéder à Internet et partager des fichiers
et d'autres ressources telles que des imprimantes et des emplacements de stockage sur le réseau avec d'autres
ordinateurs du réseau. A votre domicile, vous pouvez surfer sur le Web ou utiliser une messagerie instantanée
pour discuter avec vos amis tout en profitant de votre terrasse. Votre connexion sans fil est protégée par le
cryptage WEP 128 bits.
Vous pouvez également vous connecter au réseau de l'un des nombreux lieux publics de connexion sans fil qui se
développent dans les cafés, les salles d'aéroport, les hôtels et les palais des congrès. En outre, dans les lieux
publics de connexion dotés de la technologie haut débit sans fil G, vous pourrez profiter de débits optimaux.
Profitez aujourd'hui d'une connexion réseau de norme 802.11b tout en vous préparant au passage à la carte pour
ordinateur portable sans fil G avec SpeedBooster de Linksys.
802.11b : norme de mise en réseau sans fil IEEE qui
spécifie un débit de transfert de données maximum de
11 Mbit/s et une fréquence de 2,4 GHz.
carte : périphérique ajoutant de nouvelles
fonctionnalités réseau à votre ordinateur.
réseau : plusieurs ordinateurs ou périphériques reliés entre
eux dans le but de partager et de stocker des données et/ou
de permettre la transmission de données entre plusieurs
utilisateurs.
802.11g norme de mise en réseau sans fil IEEE qui
spécifie un débit de transfert de données maximum
de 54 Mbit/s et une fréquence de 2,4 GHz.

2
Chapitre 1 : Introduction
Contenu de ce guide
Carte pour ordinateur portable sans fil G avec SpeedBooster
Contenu de ce guide
Ce guide de l'utilisateur présente les étapes inhérentes à l'installation et à l'utilisation de la carte pour ordinateur
portable sans fil G avec SpeedBooster.
• Chapitre 1 : Introduction
Ce chapitre présente les applications de la carte ainsi que le présent Guide de l'utilisateur.
• Chapitre 2 : Planification de votre réseau sans fil
Ce chapitre décrit les éléments de base sur la mise en place d'un réseau sans fil.
• Chapitre 3 : Présentation de la carte réseau sans fil G pour ordinateur portable
Ce chapitre décrit les caractéristiques physiques de la carte.
• Chapitre 4 : Installation et configuration du logiciel
Ce chapitre vous explique comment installer l'Assistant de configuration et configurer la carte.
• Chapitre 5 : Installation du matériel
Ce chapitre explique comment connecter la carte à votre ordinateur.
• Chapitre 6 : Utilisation du logiciel WLAN Monitor
Ce chapitre explique comment utiliser le logiciel WLAN Monitor.
• Annexe A : Dépannage
Cette annexe expose quelques problèmes et leurs solutions, ainsi que les questions fréquemment posées au
sujet de l'installation et de l'utilisation de la carte.
• Annexe B : Sécurité sans fil
Cette annexe concerne les questions de sécurité au sujet de la mise en réseau sans fil et des mesures à
prendre pour favoriser la protection de votre réseau sans fil.
• Annexe C : Aide de Microsoft Windows
Cette annexe explique comment utiliser l'aide de Windows et obtenir des instructions sur des opérations liées
aux réseaux, notamment l'installation du protocole TCP/IP.
• Annexe D : Glossaire
Cette annexe propose un glossaire sommaire des termes fréquemment utilisés dans le cadre des réseaux.
• Annexe E : Spécifications
Cette annexe contient les spécifications techniques de la carte.

3
Chapitre 1 : Introduction
Contenu de ce guide
Carte pour ordinateur portable sans fil G avec SpeedBooster
• Annexe F : Informations de garantie
Cette annexe contient des informations sur la garantie de la carte.
• Annexe G : Réglementation
Cette annexe contient des informations sur la réglementation de la carte.
• Annexe H : Contacts
Cette annexe fournit des informations sur diverses ressources Linksys que vous pouvez contacter,
notamment le Support technique.

4
Chapitre 2 : Planification de votre réseau sans fil
Topologie réseau
Carte pour ordinateur portable sans fil G avec SpeedBooster
Chapitre 2 : Planification de votre réseau sans fil
Topologie réseau
Un réseau sans fil est un groupe d'ordinateurs, équipés chacun d'un adaptateur sans fil. Les ordinateurs d'un
réseau sans fil doivent être configurés de façon à partager le même canal radio. Plusieurs ordinateurs équipés de
cartes ou d'adaptateurs sans fil peuvent communiquer entre eux et constituer ainsi un réseau point à point.
Les adaptateurs sans fil de Linksys permettent également aux utilisateurs d'accéder à un réseau câblé lors de
l'utilisation d'un point d'accès ou d'un routeur sans fil. Un réseau sans fil intégré et câblé s'appelle un réseau
d'infrastructure. Dans ce dernier, chaque ordinateur sans fil peut communiquer avec tous les ordinateurs d'une
infrastructure de réseau câblé via le point d'accès ou le routeur sans fil.
Une configuration d'infrastructure étend l'accessibilité d'un ordinateur sans fil à un réseau câblé et peut doubler
l'étendue de transmission sans fil réelle de deux ordinateurs dotés d'adaptateur sans fil. Etant donné qu'un point
d'accès peut transmettre des données dans un réseau, l'étendue de transmission réelle d'un réseau
d'infrastructure peut être doublée.
Itinérance
Le mode d'infrastructure prend également en charge les capacités d'itinérance des utilisateurs mobiles.
L'itinérance signifie que vous pouvez déplacer votre ordinateur sans fil au sein de votre réseau. Dans ce cas, les
points d'accès captent le signal de l'ordinateur sans fil, à condition qu'ils partagent tous deux le même canal et le
même SSID.
Avant d'utiliser l'itinérance, choisissez un canal radio exploitable et une position optimale de point d'accès. Les
performances seront considérablement améliorées en combinant le positionnement approprié du point d'accès à
un signal radio précis.
infrastructure : réseau sans fil relié à un réseau
câblé via un point d'accès.
point à point : groupe de périphériques sans fil
communiquant directement entre eux (point à
point) sans l'intervention d'un point d'accès.
itinérance : acte de faire passer un périphérique
sans fil d'un point d'accès à un autre sans perdre
la connexion.
ssid : nom de votre réseau sans fil.
topologie : configuration physique d'un réseau.

5
Chapitre 2 : Planification de votre réseau sans fil
Configuration du réseau
Carte pour ordinateur portable sans fil G avec SpeedBooster
Configuration du réseau
Les points d'accès et les routeurs sans fil de Linksys ont été conçus pour être utilisés avec les produits 802.11a,
802.11b et 802.11g. Les produits 802.11g qui communiquent avec la norme 802.11b et certains produits
incorporant « a » et « g » peuvent communiquer entre eux.
Les points d'accès et les routeurs sans fil sont compatibles avec les cartes 802.11a, 802.11b et 802.11g, comme
les cartes PC des ordinateurs portables, la carte PCI de votre ordinateur de bureau et les cartes USB lorsque vous
souhaitez bénéficier de la connectivité USB. Les produits sans fil communiquent également avec le serveur
d'impression sans fil.
Pour connecter votre réseau câblé à votre réseau sans fil, vous pouvez connecter les ports réseau des points
d'accès et des routeurs sans fil aux commutateurs ou aux routeurs Linksys.
Fortes de tous ces éléments et des nombreux autres produits Linksys, vos possibilités en matière de
développement réseau sont illimitées. Pour plus d'informations sur les produits sans fil, accédez au site Web de
Linksys (http://www.linksys.com/international).

6
Chapitre 3 : Présentation de la carte réseau sans fil G pour ordinateur portable
Voyants
Carte pour ordinateur portable sans fil G avec SpeedBooster
Chapitre 3 : Présentation de la carte réseau sans fil G
pour ordinateur portable
Voyants
Les voyants de la carte réseau fournissent des informations sur l'activité du réseau.
Power (Alimentation) Vert. Ce voyant s'allume lorsque la carte est sous tension.
Link (Liaison) Vert. Ce voyant s'allume lorsque la carte dispose d'une connexion active.
Figure 3-1 : Panneau avant
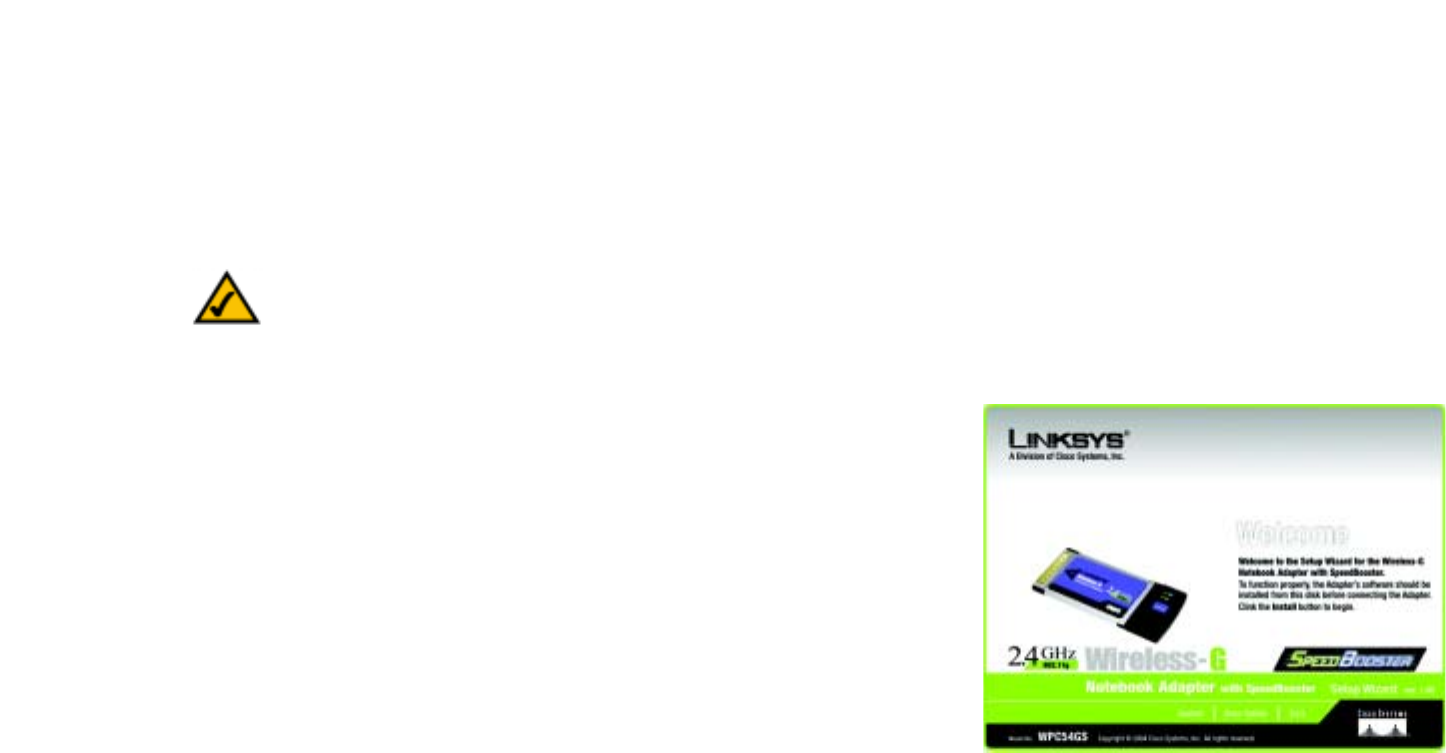
7
Chapitre 4 : Installation et configuration du logiciel
Carte pour ordinateur portable sans fil G avec SpeedBooster
Chapitre 4 : Installation et configuration du logiciel
L'Assistant de configuration de la carte réseau sans fil G pour ordinateur portable vous guidera tout au long de la
procédure d'installation. Il installera WLAN Monitor et le pilote, et configurera la carte.
Insérez le Setup Wizard CD-ROM (Assistant de configuration) dans le lecteur de CD-ROM. L'Assistant de
configuration s'exécute automatiquement et l'écran Welcome (Bienvenue) s'affiche. Si ce n'est pas le cas,
cliquez sur le bouton Démarrer, puis sur Exécuter. Dans le champ qui apparaît, entrez D:\setup.exe (« D »
représentant votre lecteur de CD-ROM). Dans le premier écran qui s'affiche, sélectionnez votre langue (Anglais,
Français ou Allemand) en cliquant sur l'option appropriée.
Dans l'écran Welcome (Bienvenue), vous avez le choix entre les options suivantes :
Install (Installer) : cliquez sur le bouton Install (Installer) pour commencer le processus d'installation du logiciel.
User Guide (Guide de l'utilisateur) : cliquez sur le bouton User Guide (Guide de l'utilisateur) pour ouvrir le Guide
de l'utilisateur au format PDF.
Exit (Quitter) : cliquez sur le bouton Exit (Quitter) pour quitter l'Assistant de configuration.
REMARQUE : Vous devez exécuter l'Assistant de configuration (Setup
Wizard) pour installer le logiciel avant d'installer le matériel.
Figure 4-1 : Ecran Welcome (Bienvenue) de l'Assistant de
configuration

8
Chapitre 4 : Installation et configuration du logiciel
Procédure d'installation
Carte pour ordinateur portable sans fil G avec SpeedBooster
Procédure d'installation
1. Pour installer la carte, cliquez sur le bouton Install (Installer) de l'écran Welcome (Bienvenue).
2. Après avoir lu l'accord de licence, cliquez sur Next (Suivant) si vous l'acceptez ou sur Cancel (Annuler) pour
interrompre l'installation.
3. L'Assistant de configuration vous demande de sélectionner le mode du réseau. Cliquez sur la case d'option
Infrastructure Mode (Mode d'infrastructure) si vous voulez que vos ordinateurs sans fil soient en réseau
avec les ordinateurs de votre réseau câblé à l'aide d'un point d'accès sans fil. Cliquez sur la case d'option
Ad-Hoc Mode (Mode Ad-Hoc) si vous voulez que plusieurs ordinateurs sans fil puissent communiquer
directement entre eux.
Dans le champ SSID (Nom SSID), entrez le nom SSID de votre réseau sans fil. Le nom SSID doit être identique
pour tous les périphériques du réseau. Le paramètre par défaut est linksys (minuscules). Cliquez sur le
bouton Next (Suivant).
Figure 4-2 : Accord de licence de l'Assistant de
configuration
Figure 4-3 : Ecran Wireless Mode (Mode sans fil) de
l'Assistant de configuration
REMARQUE : Les SSID de réseau doivent être uniques dans votre réseau et
être identiques pour tous les périphériques du réseau.

9
Chapitre 4 : Installation et configuration du logiciel
Procédure d'installation
Carte pour ordinateur portable sans fil G avec SpeedBooster
4. Si vous sélectionnez Infrastructure Mode (Mode infrastructure), passez directement à l'étape 5. Si vous
avez sélectionné Ad-Hoc Mode (Mode Ad hoc), sélectionnez le canal de fonctionnement correct pour votre
réseau. Ensuite, sélectionnez le mode du réseau dans le menu déroulant. Cliquez sur le bouton Next
(Suivant), puis passez à l'étape 5. Cliquez sur le bouton Back (Précédent) pour modifier les paramètres.
Canal : le canal que vous choisissez doit correspondre au canal défini pour les autres périphériques de votre
réseau sans fil. Si vous n'êtes pas certain du canal à utiliser, sélectionnez le canal par défaut.
Mode réseau : sélectionnez Mixed Mode (Mode mixte) pour que les deux ordinateurs sans fil G et sans fil B
soient autorisés sur le réseau. Cependant, la vitesse sera réduite. Sélectionnez G-Only Mode (Mode
G uniquement) pour obtenir la vitesse maximale, mais les utilisateurs sans fil B ne pourront pas accéder au
réseau.
5. Sélectionnez le type de sécurité que vous voulez utiliser : WEP 64 bits, WEP 128 bits ou WPA-PSK. Dans un
réseau, tous les périphériques doivent utiliser le même type.
WEP
WEP : pour utiliser le cryptage WEP, sélectionnez le cryptage 64 bits ou 128 bits dans le menu déroulant et
entrez une phrase mot de passe ou une clé WEP.
Passphrase (Phrase mot de passe) : au lieu d'entrer manuellement les clés WEP, vous pouvez entrer une
phrase mot de passe dans le champ correspondant. Ainsi, une clé WEP est générée automatiquement. Elle
est sensible à la casse et ne doit pas comporter plus de 16 caractères. Cette phrase mot de passe doit
correspondre à celle des autres périphériques sans fil du réseau et être compatible avec les produits sans fil
Linksys uniquement. (Si vos produits sans fil ne sont pas des produits Linksys, entrez la clé WEP
manuellement dans ces produits.)
WEP Key (Clé WEP) : la clé WEP que vous entrez doit correspondre à celle de votre réseau sans fil. Si vous
utilisez un cryptage WEP 64 bits, la clé doit être constituée de 10 caractères hexadécimaux. Si vous utilisez
un cryptage WEP 128 bits, la clé doit être constituée de 26 caractères hexadécimaux. Les caractères
hexadécimaux valides sont : « 0 à 9 » et « A à F ».
Transmit Key (Clé de transmission) : la clé de transmission par défaut est 1. Si le point d'accès ou le routeur
sans fil de votre réseau utilise la clé de transmission 2, 3 ou 4, sélectionnez le numéro approprié dans la
liste déroulante Clé de transmission.
Figure 4-4 : Ecran Ad-Hoc Mode (Mode Ad-Hoc) de
l'Assistant de configuration
Figure 4-5 : Ecran WEP de l'Assistant de configuration

10
Chapitre 4 : Installation et configuration du logiciel
Procédure d'installation
Carte pour ordinateur portable sans fil G avec SpeedBooster
Authentication (Authentification) : la valeur par défaut est Auto (Auto), ce qui signifie qu'un système Shared
(Partagé) ou Open (Ouvert) est détecté. Shared (Partagé) signifie que l'émetteur et le récepteur partagent la
même clé WEP pour l'authentification. Open (Ouvert) signifie que l'émetteur et le récepteur ne partagent pas
de clé WEP pour l'authentification. Tous les points du réseau doivent utiliser le même type d'authentification.
Cliquez sur Next (Suivant) pour continuer. Cliquez sur Back (Précédent) pour revenir à l'écran précédent. Pour
plus d'informations, cliquez sur Help (Aide).
WPA-PSK
Le système WPA-PSK vous propose deux méthodes de cryptage, TKIP et AES, associées à des clés de
cryptage dynamiques.
Sélectionnez le type d'algorithme, TKIP ou AES, comme Encryption Type (Type de cryptage). Entrez une clé
partagée WPA composée de 8 à 63 caractères dans le champ Passphrase (Phrase mot de passe).
Cliquez sur Next (Suivant) pour continuer. Cliquez sur Back (Précédent) pour revenir à l'écran précédent. Pour
plus d'informations, cliquez sur Help (Aide).
6. L'Assistant de configuration vous invite à vérifier vos paramètres avant d'installer les fichiers. Cliquez sur
Next (Suivant) si la configuration vous convient ou sur Back (Précédent) si vous souhaitez modifier des
paramètres.
Figure 4-6 : Ecran WPA-PSK de l'Assistant de configuration
Figure 4-7 : Ecran Check Settings (Vérification des
paramètres) de l'Assistant de configuration

11
Chapitre 4 : Installation et configuration du logiciel
Procédure d'installation
Carte pour ordinateur portable sans fil G avec SpeedBooster
7. Après l'installation réussie de ce logiciel, l'écran Congratulations (Félicitations) s'affiche. Cliquez sur le
bouton Exit (Quitter).
Passez directement au « Chapitre 5 : Installation du matériel ».
Figure 4-8 : Ecran Congratulations (Félicitations) de
l'Assistant de configuration

12
Chapitre 5 : Installation du matériel
Connexion de la carte
Carte pour ordinateur portable sans fil G avec SpeedBooster
Chapitre 5 : Installation du matériel
Connexion de la carte
1. Mettez votre ordinateur portable hors tension.
2. Localisez un connecteur CardBus disponible sur votre ordinateur portable.
3. Après avoir orienté l'extrémité des broches du connecteur face à l'emplacement CardBus et l'étiquette vers le
haut, faites glisser la carte dans l'emplacement CardBus jusqu'à ce qu'elle se bloque.
4. Redémarrez votre ordinateur portable. Le voyant d'alimentation doit s'allumer lorsque la carte est
correctement installée.
5. Windows commence à copier les fichiers de pilotes sur votre ordinateur. Si vous êtes invité à insérer le
CD-ROM Windows d'origine, insérez celui-ci, puis indiquez le chemin d'accès approprié (par exemple D:\).
L'installation de la carte pour ordinateur portable sans fil G est terminée.
Pour vérifier les informations de liaison, rechercher les réseaux sans fil disponibles ou modifier la
configuration, reportez-vous au « Chapitre 6 : Utilisation de Wireless Network Monitor ».
Figure 5-1 : Installation de la carte sur votre ordinateur
portable
REMARQUE : Vous devez exécuter l'Assistant de configuration (Setup
Wizard) pour installer le logiciel avant d'installer le matériel.

13
Chapitre 6 : Utilisation de Wireless Network Monitor
Accès à WLAN Monitor
Carte pour ordinateur portable sans fil G avec SpeedBooster
Chapitre 6 : Utilisation de Wireless Network Monitor
Le logiciel WLAN Monitor permet de vérifier les informations de liaison, de rechercher les réseaux sans fil
disponibles et de créer des profils contenant des paramètres de configuration différents.
Accès à WLAN Monitor
Lorsque la carte est installée, l'icône du logiciel WLAN Monitor de la carte pour ordinateur portable sans fil G
apparaît sur la barre d'état système. Cliquez deux fois sur cette icône.
L'écran Link Information (Informations de liaison) s'affiche. Dans cet écran, vous pouvez déterminer l'intensité du
signal sans fil et la qualité de la connexion. Vous pouvez également cliquer sur le bouton More Information (Plus
d'informations) afin d'afficher des renseignements supplémentaires sur l'état de la connexion sans fil en cours.
Pour rechercher les réseaux sans fil disponibles, cliquez sur l'onglet Site Survey (Recherche de site). Pour
modifier la configuration, cliquez sur l'onglet Profiles (Profils).
Informations de liaison
Cet écran affiche le mode réseau, l'intensité du signal et la qualité du signal de la connexion en cours. Il comporte
également un bouton permettant d'obtenir des informations d'état supplémentaires.
Ad-Hoc Mode (Mode Ad-Hoc) ou Infrastructure Mode (Mode Infrastructure) : cet écran indique si la carte
fonctionne en mode Ad-hoc ou en mode Infrastructure.
Signal Strength (Intensité du signal) : cette barre indique l'intensité du signal.
Link Quality (Qualité de la liaison) : cette barre indique la qualité de la connexion au réseau sans fil.
Cliquez sur More Information (Plus d'informations) pour afficher des informations supplémentaires sur la
connexion au réseau sans fil.
Figure 6-1 : Informations de liaison

14
Chapitre 6 : Utilisation de Wireless Network Monitor
Informations de liaison
Carte pour ordinateur portable sans fil G avec SpeedBooster
Le bouton More Information (Plus d'informations) permet d'obtenir des informations supplémentaires sur la
connexion à la carte, comme indiqué ci-dessous :
Etat du réseau sans fil
L'écran Networks Settings (Paramètres réseau) fournit des informations sur vos paramètres réseau.
Etat du réseau sans fil
Status (Etat) : état de la connexion au réseau sans fil.
SSID (Nom SSID) : nom unique du réseau sans fil.
Wireless Mode (Mode sans fil) : mode du réseau sans fil utilisé.
Transfer Rate (Débit de transfert) : débit de transfert des données de la connexion.
Channel (Canal) : canal pour lequel les périphériques de réseau sans fil sont configurés.
Encryption (Cryptage) : état de la fonction de sécurité.
Authentication (Authentification) : méthode d'authentification de votre réseau sans fil.
Network Mode (Mode réseau) : mode sans fil utilisé.
IP Address (Adresse IP) : adresse IP de la carte.
Subnet Mask (Masque de sous-réseau) : masque de sous-réseau de la carte.
Default Gateway (Passerelle par défaut) : passerelle par défaut de la carte.
DNS : adresse DNS de la carte.
DHCP Client (Client DHCP) : état du client DHCP.
MAC : adresse MAC du point d'accès du réseau sans fil.
Signal Strength (Intensité du signal) : cette barre indique l'intensité du signal.
Link Quality (Qualité de la liaison) : cette barre indique la qualité de la connexion au réseau sans fil.
Figure 6-2 : Plus d'informations - Paramètres réseau

15
Chapitre 6 : Utilisation de Wireless Network Monitor
Informations de liaison
Carte pour ordinateur portable sans fil G avec SpeedBooster
Cliquez sur le bouton Statistics (Statistiques) pour accéder à l'écran Network Statistics (Statistiques du réseau).
Cliquez sur Back (Précédent) pour revenir à l'écran initial Link Information (Informations de liaison). Cliquez sur
Save to Profile (Enregistrer dans profil) pour enregistrer la connexion active dans un profil.
Statistiques du réseau sans fil
L'écran Networks Statistics (Statistiques du réseau) fournit des informations sur vos paramètres réseau actuels.
Transmit Rate (Taux de transmission) : débit de transfert de données de la connexion actuelle. (En mode Auto, la
carte sélectionne à tout moment, de façon dynamique, le taux de transmission le plus rapide possible.)
Receive Rate (Taux de réception) : taux de réception des données.
Packets Received (Paquets reçus) : nombre de paquets reçus par la carte, en temps réel, depuis la connexion au
réseau sans fil ou depuis la dernière activation du bouton Refresh (Actualiser).
Packets Transmitted (Paquets transmis) : nombre de paquets transmis par la carte, en temps réel, depuis la
connexion au réseau sans fil ou depuis la dernière activation du bouton Refresh (Actualiser).
Bytes Received (Octets reçus) : nombre d'octets reçus par la carte, en temps réel, depuis la connexion au
réseau sans fil ou depuis la dernière activation du bouton Refresh (Actualiser).
Bytes Transmitted (Octets transmis) : nombre d'octets transmis par la carte, en temps réel, depuis la
connexion au réseau sans fil ou depuis la dernière activation du bouton Refresh (Actualiser).
Noise Level (Niveau de bruit) : indique le niveau de bruit de fond affectant le signal sans fil. Plus le niveau est
bas, meilleure est la qualité du signal.
Signal Strength (Intensité du signal) : indique l'intensité du signal sans fil reçu par la carte.
Driver Version (Version du pilote) : version du pilote de la carte.
Signal Strength (Intensité du signal) : cette barre indique l'intensité du signal.
Link Quality (Qualité de la liaison) : cette barre indique la qualité de la connexion au réseau sans fil.
Cliquez sur Back (Précédent) pour revenir à l'écran initial Link Information (Informations de liaison). Cliquez sur
le bouton Status (Etat) pour accéder à l'écran Network Status (Etat du réseau). Cliquez sur Save to Profile
(Enregistrer dans profil) pour enregistrer la connexion active dans un profil. Cliquez sur Refresh Stats (Actualiser
les statistiques) pour actualiser l'écran.
Figure 6-3 : Plus d'informations - Statistiques du réseau

16
Chapitre 6 : Utilisation de Wireless Network Monitor
Recherche de site
Carte pour ordinateur portable sans fil G avec SpeedBooster
Recherche de site
L'écran Site Survey (Recherche de site) répertorie, dans le tableau de droite, les réseaux en mode Infrastructure
et Ad-hoc disponibles pour la connexion. Ce tableau contient le SSID du réseau, le canal ainsi que la qualité du
signal sans fil reçu par la carte. Vous pouvez cliquer sur SSID,CH (Channel) (Canal) ou Signal pour effectuer un
tri selon le champ choisi.
SSID : SSID ou nom unique du réseau sans fil.
CH (Canal) : canal sur lequel le réseau diffuse les données.
Signal : pourcentage de l'intensité du signal entre 0 et 100 %.
Informations de site
Pour chaque réseau sélectionné, les paramètres suivants sont indiqués :
SSID : SSID ou nom unique du réseau sans fil.
Wireless Mode (Mode sans fil) : mode du réseau sans fil utilisé.
Channel (Canal) : canal pour lequel les périphériques de réseau sans fil sont configurés.
Encryption (Cryptage) : état de la fonction de sécurité par cryptage.
MAC : adresse MAC du point d'accès du réseau sans fil.
Refresh (Actualiser) : cliquez sur ce bouton pour lancer une nouvelle recherche de périphériques sans fil.
Connect (Connecter) : pour établir la connexion à l'un des réseaux de la liste, sélectionnez le réseau sans fil et
cliquez sur le bouton Connect (Connecter).
Figure 6-4 : Recherche de site
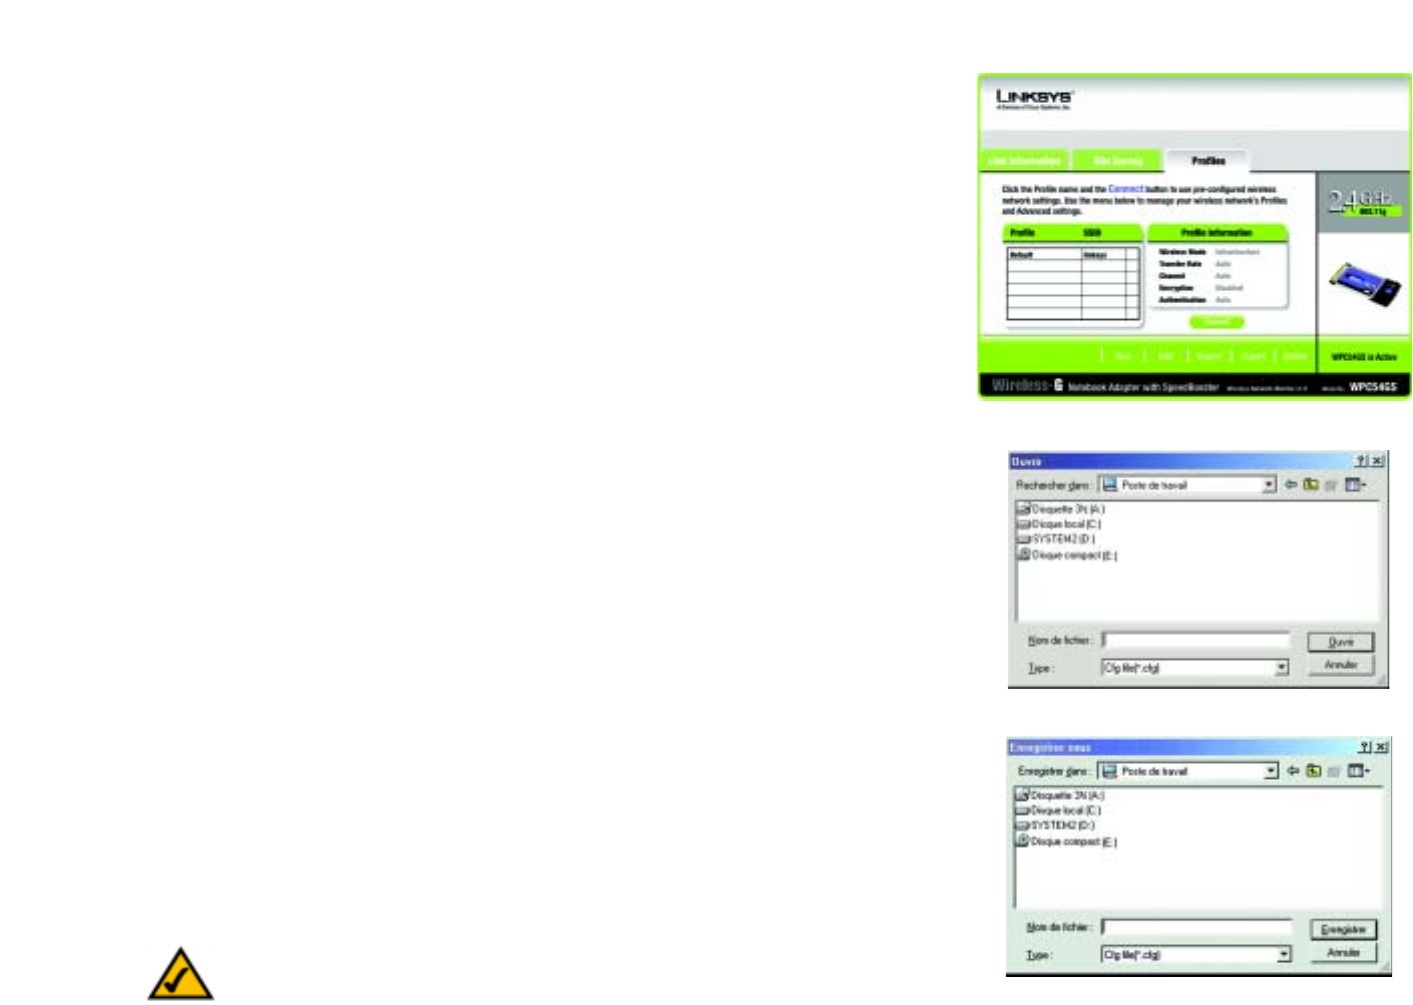
17
Chapitre 6 : Utilisation de Wireless Network Monitor
Profils
Carte pour ordinateur portable sans fil G avec SpeedBooster
Profils
L'écran Profiles (profils) permet d'enregistrer différents profils de configuration pour différentes installations
réseau. Le tableau de droite contient la liste des réseaux en mode Infrastructure et Ad-hoc disponibles pour la
connexion. Il contient le nom de profil du réseau et le SSID du réseau sans fil, définis dans le profil de connexion.
Informations sur le profil
Pour chaque réseau sélectionné, les paramètres suivants sont indiqués :
Wireless Mode (Mode sans fil) : mode du réseau sans fil utilisé.
Transfer Rate (Taux de transmission) : en mode Auto, la carte sélectionne à tout moment, de façon dynamique, le
taux de transmission le plus rapide possible.
Channel (Canal) : canal pour lequel les périphériques de réseau sans fil sont configurés.
Encryption (Cryptage) : état de la fonction de sécurité par cryptage.
Authentication (Authentification) : paramètres d'authentification du réseau.
Connect (Connecter) : pour connecter un réseau sans fil à l'aide d'un profil spécifique, sélectionnez ce dernier et
cliquez sur Connect (Connecter).
New (Nouveau) : cliquez sur ce bouton pour créer un profil. Pour en savoir plus, reportez-vous à la section
suivante « Création d'un profil ».
Edit (Modifier) : sélectionnez un profil et cliquez sur ce bouton pour modifier un profil existant.
Import (Importer) : cliquez sur le bouton Import (Importer) pour importer un profil enregistré dans un autre
emplacement. Sélectionnez le fichier approprié et cliquez sur Open (Ouvrir).
Export (Exporter) : sélectionnez le profil que vous voulez enregistrer dans un autre emplacement et cliquez sur
Export (Exporter). Indiquez l'emplacement approprié à Windows et cliquez sur Save (Enregistrer).
Delete (Supprimer) : cliquez sur le bouton Delete (Supprimer) pour supprimer un profil.
Figure 6-5 : Profils
Figure 6-6 : Importation d'un profil
Figure 6-7 : Exportation d'un profil
REMARQUE : Si vous souhaitez exporter des profils, exportez-les un par un.

18
Chapitre 6 : Utilisation de Wireless Network Monitor
Création d'un profil
Carte pour ordinateur portable sans fil G avec SpeedBooster
Création d'un profil
1. Dans l'écran Profiles (Profils), cliquez sur New (Nouveau) pour créer un profil.
2. Entrez le nom de ce profil et cliquez sur OK. Cliquez sur Cancel (Annuler) pour revenir à l'écran Profiles
(Profils) sans entrer de nom.
Figure 6-8 : Création d'un profil
Figure 6-9 : Saisie du nom de profil

19
Chapitre 6 : Utilisation de Wireless Network Monitor
Création d'un profil
Carte pour ordinateur portable sans fil G avec SpeedBooster
3. L'écran Wireless Mode (Mode sans fil) offre le choix entre deux modes sans fil. Cliquez sur la case d'option
Infrastructure Mode (Mode d'infrastructure) si vous voulez que vos ordinateurs sans fil soient en réseau
avec les ordinateurs de votre réseau câblé à l'aide d'un point d'accès sans fil. Cliquez sur la case d'option
Ad-Hoc Mode (Mode Ad hoc) si vous voulez que plusieurs ordinateurs sans fil puissent communiquer
directement entre eux. Entrez le SSID de votre réseau.
Cliquez sur le bouton Next (Suivant) pour continuer ou sur Back (Précédent) pour revenir à l'écran précédent.
Infrastructure Mode (Mode Infrastructure) : permet aux réseaux sans fil et câblés de communiquer à l'aide
d'un point d'accès.
Ad-Hoc Mode (Mode Ad-Hoc) : permet aux ordinateurs sans fil de communiquer directement entre eux. Aucun
point d'accès n'est utilisé.
SSID (Nom SSID) : nom du réseau. Il doit être utilisé pour tous les périphériques de votre réseau sans fil. Il est
sensible à la casse. Il doit être unique afin d'interdire aux autres utilisateurs d'accéder à votre réseau.
4. L'écran Ad-Hoc Mode Settings (Paramètres du mode Ad-Hoc) apparaît. Si vous sélectionnez Infrastructure
Mode (Mode infrastructure), passez directement à l'étape 5. Si vous avez sélectionné Ad-Hoc Mode (Mode
Ad hoc), sélectionnez le canal de fonctionnement correct pour votre réseau dans le menu déroulant Channel
(Canal). Ensuite, sélectionnez le mode du réseau dans le menu déroulant. Cliquez sur le bouton Next
(Suivant), puis passez à l'étape 5. Cliquez sur le bouton Back (Précédent) pour modifier les paramètres.
Channel (Canal) : le canal que vous choisissez doit correspondre au canal défini pour les autres périphériques
de votre réseau sans fil. Si vous n'êtes pas certain du canal à utiliser, sélectionnez le canal par défaut.
Network Mode (Mode réseau) : sélectionnez Mixed Mode (Mode Mixte) pour que les deux ordinateurs sans
fil G et sans fil B soient autorisés sur le réseau. Cependant, la vitesse sera réduite. Sélectionnez G-Only Mode
(Mode G uniquement) pour obtenir la vitesse maximale, mais les utilisateurs sans fil B ne seront pas acceptés
sur le réseau. Sélectionnez B-Only Mode (Mode B uniquement) pour les utilisateurs sans fil B uniquement.
Figure 6-11 : Paramètres du mode Ad hoc
Figure 6-10 : Mode sans fil du nouveau profil
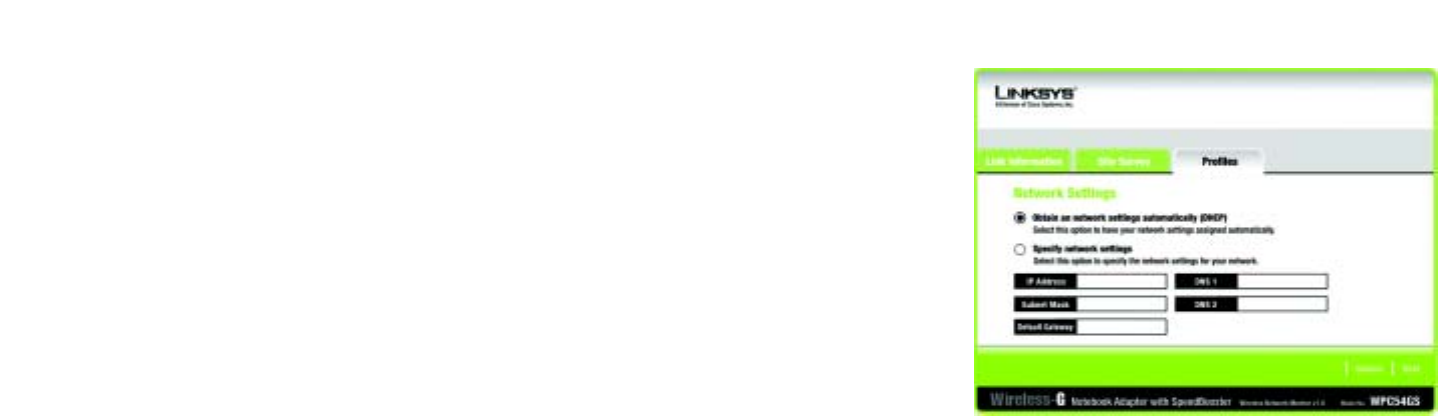
20
Chapitre 6 : Utilisation de Wireless Network Monitor
Création d'un profil
Carte pour ordinateur portable sans fil G avec SpeedBooster
5. L'écran Network Settings (Paramètres réseau) s'affiche. Si votre réseau utilise un serveur DHCP, cliquez sur la
case d'option Obtain an IP address automatically (DHCP) (Obtenir une adresse IP automatiquement
(DHCP)). Cliquez sur Next (Suivant) pour continuer ou sur Cancel (Annuler) pour revenir à l'écran Profiles
(Profils).
Si votre réseau n'utilise pas de serveur DHCP, cliquez sur la case d'option située en regard de Specify the IP
Setting (Spécifier l'adresse IP). Entrez une adresse IP, un masque de sous-réseau, une passerelle par défaut
et une adresse DNS appropriée à votre réseau. Vous devez définir l'adresse IP et le masque de sous-réseau
dans cet écran. Si vous n'êtes pas certain de la passerelle par défaut et de l'adresse DNS, laissez ces deux
champs vides. Cliquez sur Next (Suivant) pour continuer ou sur Cancel (Annuler) pour revenir à l'écran
Profiles (Profils).
IP Address (Adresse IP) : doit être unique dans votre réseau.
Subnet Mask (Masque de sous-réseau) : doit être identique au masque de sous-réseau de votre réseau câblé.
Default Gateway (Passerelle par défaut) : entrez l'adresse IP de la passerelle du réseau.
DNS 1 et DNS 2 : entrez l'adresse DNS de votre réseau Ethernet (câblé) Figure 6-12 : Paramètres réseau

21
Chapitre 6 : Utilisation de Wireless Network Monitor
Création d'un profil
Carte pour ordinateur portable sans fil G avec SpeedBooster
6. L'écran Wireless Security (Sécurité sans fil) s'affiche. Sélectionnez WEP, WPA-PSK, WPA Radius ou Radius
comme méthode de cryptage. WEP est l'acronyme de Wired Equivalent Privacy, WPA-PSK, acronyme de Wi-Fi
Protected Access Pre-Shared Key, désigne une norme de sécurité plus solide que le système de
cryptage WEP. RADIUS est l'acronyme de Remote Authentication Dial-In User Service. Si vous ne souhaitez
pas utiliser le cryptage, sélectionnez Disabled (Désactivé). Puis, cliquez sur le bouton Next (Suivant) pour
continuer ou sur Back (Précédent) pour revenir à l'écran précédent.
WEP
WEP : pour utiliser le cryptage WEP, sélectionnez le cryptage 64 bits ou 128 bits dans le menu déroulant et
entrez une phrase mot de passe ou une clé WEP.
Authentication (Authentification) : la valeur par défaut est Auto (Auto), ce qui signifie qu'un système Shared
(Partagé) ou Open (Ouvert) est détecté. Shared (Partagé) signifie que l'émetteur et le récepteur partagent la
même clé WEP pour l'authentification. Open (Ouvert) signifie que l'émetteur et le récepteur ne partagent pas
de clé WEP pour l'authentification. Tous les points du réseau doivent utiliser le même type
d'authentification.
Passphrase (Phrase mot de passe) : au lieu d'entrer manuellement les clés WEP, vous pouvez entrer une
phrase mot de passe dans le champ Passphrase (Phrase mot de passe). Ainsi, une clé WEP est générée
automatiquement. Elle est sensible à la casse et ne doit pas comporter plus de 16 caractères. Cette phrase
mot de passe doit correspondre à celle des autres périphériques sans fil du réseau et être compatible avec
les produits sans fil Linksys uniquement. (Si vos produits sans fil ne sont pas des produits Linksys, entrez la
clé WEP manuellement dans ces produits.)
Transmit Key (Clé de transmission) : la clé de transmission par défaut est 1. Si le point d'accès ou le routeur
sans fil de votre réseau utilise la clé de transmission 2, 3 ou 4, sélectionnez le numéro approprié dans la liste
déroulante Transmit Key (Clé de transmission).
Key 1 (Clé 1) : la clé WEP que vous entrez doit correspondre à celle de votre réseau sans fil. Si vous utilisez
un cryptage WEP 64 bits, la clé doit être constituée de 10 caractères hexadécimaux. Si vous utilisez un
cryptage WEP 128 bits, la clé doit être constituée de 26 caractères hexadécimaux. Les caractères
hexadécimaux valides sont : « 0 à 9 » et « A à F ».
Figure 6-14 : Paramètre WEP du nouveau profil
Figure 6-13 : Sécurité sans fil du nouveau profil

22
Chapitre 6 : Utilisation de Wireless Network Monitor
Création d'un profil
Carte pour ordinateur portable sans fil G avec SpeedBooster
WPA-PSK
Le système WPA-PSK vous propose deux méthodes de cryptage, TKIP et AES, associées à des clés de
cryptage dynamiques. Cliquez sur Next (Suivant) pour continuer. Cliquez sur Back (Précédent) pour revenir à
l'écran précédent.
Sélectionnez le type d'algorithme, TKIP ou AES, comme Encryption Type (Type de cryptage). Entrez une clé
partagée WPA de 8 à 63 caractères dans le champ Passphrase (Phrase mot de passe).
Figure 6-15 : Paramètres WPA-PSK
Figure 6-16 : Paramètres TKIP

23
Chapitre 6 : Utilisation de Wireless Network Monitor
Création d'un profil
Carte pour ordinateur portable sans fil G avec SpeedBooster
WPA RADIUS.
WPA RADIUS associe le système WPA à l'utilisation conjointe d'un serveur RADIUS. (Ne doit être utilisé que
lorsqu'un serveur RADIUS est connecté au routeur.) WPA Radius offre deux méthodes de cryptage : TKIP et
AES, avec des clés de cryptage dynamiques. Il offre cinq méthodes d'authentification : EAP-TLS, EAP-TTLS,
EAP-MD5, EAP-PEAP et LEAP.
Cliquez sur Next (Suivant) pour continuer. Cliquez sur Back (Précédent) pour revenir à l'écran précédent.
Sélectionnez le type d'algorithme, TKIP ou AES, comme Type de cryptage.
Cliquez sur Next (Suivant) pour continuer. Cliquez sur Back (Précédent) pour revenir à l'écran précédent.
Figure 6-17 : Paramètres WPA RADIUS
Figure 6-18 : Type de cryptage

24
Chapitre 6 : Utilisation de Wireless Network Monitor
Création d'un profil
Carte pour ordinateur portable sans fil G avec SpeedBooster
Figure 6-19 : Authentification EAP-TLS
Figure 6-20 : Authentification EAP-TTLS
Dans l'écran suivant, sélectionnez Authentication Method (Méthode d'authentification) dans le menu
déroulant. Les options sont décrites ci-dessous.
EAP-TLS
Entrez le nom de connexion de votre réseau sans fil dans le champ Login Name (Nom de connexion). Dans le
menu déroulant Certificate (Certificat), sélectionnez le certificat que vous avez installé pour vous authentifier
sur votre réseau sans fil. Sélectionnez Validate server certificate (Valider le certificat du serveur) afin de
vérifier la validité du certificat du serveur.
Cliquez sur Next (Suivant) pour continuer. Cliquez sur Back (Précédent) pour revenir à l'écran précédent.
EAP-TTLS
Entrez le nom de connexion de votre réseau sans fil dans le champ Login Name (Nom de connexion). Entrez le
mot de passe de votre réseau sans fil dans le champ Password (Mot de passe). Sélectionnez Validate server
certificate (Valider le certificat du serveur) afin de vérifier la validité du certificat du serveur. Sélectionnez le
Protocole TTLS dans le menu déroulant.
Cliquez sur Next (Suivant) pour continuer. Cliquez sur Back (Précédent) pour revenir à l'écran précédent.

25
Chapitre 6 : Utilisation de Wireless Network Monitor
Création d'un profil
Carte pour ordinateur portable sans fil G avec SpeedBooster
EAP-MD5
Entrez le nom de connexion de votre réseau sans fil dans le champ Login Name (Nom de connexion). Entrez le
mot de passe de votre réseau sans fil dans le champ Password (Mot de passe).
Cliquez sur Next (Suivant) pour continuer. Cliquez sur Back (Précédent) pour revenir à l'écran précédent.
EAP-PEAP
Entrez le nom de connexion de votre réseau sans fil dans le champ Login Name (Nom de connexion). Entrez le
mot de passe de votre réseau sans fil dans le champ Password (Mot de passe). Sélectionnez Validate server
certificate (Valider le certificat du serveur) afin de vérifier la validité du certificat du serveur. Puis,
sélectionnez Peap Inner EAP dans le menu déroulant.
Cliquez sur Next (Suivant) pour continuer. Cliquez sur Back (Précédent) pour revenir à l'écran précédent.
LEAP
Entrez le nom de connexion de votre réseau sans fil dans le champ Login Name (Nom de connexion). Entrez le
mot de passe de votre réseau sans fil dans le champ Password (Mot de passe).
Cliquez sur Next (Suivant) pour continuer. Cliquez sur Back (Précédent) pour revenir à l'écran précédent.
Figure 6-21 : Authentification EAP-MD5
Figure 6-22 : Authentification EAP-PEAP
Figure 6-23 : Authentification EAP-LEAP

26
Chapitre 6 : Utilisation de Wireless Network Monitor
Création d'un profil
Carte pour ordinateur portable sans fil G avec SpeedBooster
RADIUS
Cette option associe le système WPA à l'utilisation conjointe d'un serveur RADIUS (Ne doit être utilisé que
lorsqu'un serveur RADIUS est connecté au routeur.) Il offre cinq méthodes d'authentification : EAP-TLS, EAP-
TTLS, EAP-MD5, EAP-PEAP et LEAP.
Cliquez sur Next (Suivant) pour continuer. Cliquez sur Back (Précédent) pour revenir à l'écran précédent.
Dans l'écran suivant, sélectionnez Authentication Method (Méthode d'authentification) dans le menu
déroulant. Les options sont décrites ci-dessous.
EAP-TLS
Entrez le nom de connexion de votre réseau sans fil dans le champ Login Name (Nom de connexion). Dans le
menu déroulant Certificate (Certificat), sélectionnez le certificat que vous avez installé pour vous authentifier
sur votre réseau sans fil. Sélectionnez Validate server certificate (Valider le certificat du serveur) afin de
vérifier la validité du certificat du serveur.
Cliquez sur Next (Suivant) pour continuer. Cliquez sur Back (Précédent) pour revenir à l'écran précédent.
Figure 6-25 : Authentification EAP-TLS
Figure 6-24 : Paramètres RADIUS

27
Chapitre 6 : Utilisation de Wireless Network Monitor
Création d'un profil
Carte pour ordinateur portable sans fil G avec SpeedBooster
EAP-TTLS
Entrez le nom de connexion de votre réseau sans fil dans le champ Login Name (Nom de connexion). Entrez le
mot de passe de votre réseau sans fil dans le champ Password (Mot de passe). Sélectionnez Validate server
certificate (Valider le certificat du serveur) afin de vérifier la validité du certificat du serveur. Sélectionnez le
TTLS Protocol (Protocole TTLS) dans le menu déroulant.
Cliquez sur Next (Suivant) pour continuer. Cliquez sur Back (Précédent) pour revenir à l'écran précédent.
EAP-MD5
Entrez le nom de connexion de votre réseau sans fil dans le champ Login Name (Nom de connexion). Entrez le
mot de passe de votre réseau sans fil dans le champ Password (Mot de passe).
Cliquez sur Next (Suivant) pour continuer. Cliquez sur Back (Précédent) pour revenir à l'écran précédent.
Figure 6-26 : Authentification EAP-TTLS
Figure 6-27 : Authentification EAP-MD5

28
Chapitre 6 : Utilisation de Wireless Network Monitor
Création d'un profil
Carte pour ordinateur portable sans fil G avec SpeedBooster
EAP-PEAP
Entrez le nom de connexion de votre réseau sans fil dans le champ Login Name (Nom de connexion). Entrez le
mot de passe de votre réseau sans fil dans le champ Password (Mot de passe). Sélectionnez Validate server
certificate (Valider le certificat du serveur) afin de vérifier la validité du certificat du serveur. Puis,
sélectionnez Peap Inner EAP dans le menu déroulant.
Cliquez sur Next (Suivant) pour continuer. Cliquez sur Back (Précédent) pour revenir à l'écran précédent.
LEAP
Entrez le nom de connexion de votre réseau sans fil dans le champ Login Name (Nom de connexion). Entrez le
mot de passe de votre réseau sans fil dans le champ Password (Mot de passe).
Cliquez sur Next (Suivant) pour continuer. Cliquez sur Back (Précédent) pour revenir à l'écran précédent.
Figure 6-28 : Authentification EAP-PEAP
Figure 6-29 : Authentification LEAP

29
Chapitre 6 : Utilisation de Wireless Network Monitor
Création d'un profil
Carte pour ordinateur portable sans fil G avec SpeedBooster
7. L'écran Confirm New Settings (Confirmation des nouveaux paramètres) apparaît avec les nouveaux
paramètres. Pour enregistrer ces paramètres, cliquez sur Save (Enregistrer). Pour modifier les nouveaux
paramètres, cliquez sur Back (Précédent). Pour quitter Wireless Network Monitor, cliquez sur Exit (Quitter).
8. L'écran Congratulations (Félicitations) s'affiche. Cliquez sur Activate new settings now (Activer les
nouveaux paramètres maintenant) pour appliquer immédiatement les nouveaux paramètres et revenir à
l'écran Link Information (Informations de liaison). Cliquez sur Activate new settings later (Activer les
nouveaux paramètres plus tard) pour conserver les paramètres en cours et revenir à l'écran Profiles (Profils).
Vous avez créé un profil de connexion avec succès.
Figure 6-30 : Confirm New Settings
(Confirmation des nouveaux paramètres)
Figure 6-31 : Congratulations! (Félicitations)

30
Annexe A : Dépannage
Problèmes courants et solutions
Carte pour ordinateur portable sans fil G avec SpeedBooster
Annexe A : Dépannage
Cette annexe est composée de deux sections, l'une abordant les problèmes courants et les solutions à y apporter,
l'autre traitant des questions fréquemment posées. Cette annexe apporte des solutions pour les problèmes
susceptibles de se produire lors de l'installation et de l'exploitation de la carte pour ordinateur portable sans fil G.
Lisez la description ci-dessous pour résoudre vos problèmes. Si vous ne trouvez pas la réponse appropriée dans
cette section, visitez le site Web de Linksys à l'adresse suivante : www.linksys.com/international ou
www.linksys.com.
Problèmes courants et solutions
1. Mon ordinateur ne reconnaît pas la carte pour ordinateur portable sans fil G.
Vérifiez que la carte pour ordinateur portable sans fil G est insérée correctement dans le connecteur PC Card.
2. La carte pour ordinateur portable sans fil G ne fonctionne pas correctement.
Insérez une nouvelle fois la carte pour ordinateur portable sans fil G dans le port USB de l'ordinateur portable
ou de bureau.
Sous Windows 98SE ou Me, cliquez avec le bouton droit de la souris sur Poste de travail, puis sélectionnez
Propriétés. Sélectionnez l'onglet Gestionnaire de périphériques et cliquez sur Carte réseau. La carte pour
ordinateur portable sans fil G s'affiche à l'écran si l'installation est correcte. Si un point d'exclamation jaune
s'affiche, des conflits peuvent exister entre les ressources et vous devez suivre la procédure suivante :
• Désinstallez le pilote de votre PC.
• Redémarrez votre ordinateur et procédez à nouveau à l'installation matérielle et logicielle indiquée dans
le Guide de l'utilisateur.
3. Je ne peux pas communiquer avec d'autres ordinateurs connectés via Ethernet dans une
configuration en mode d'infrastructure.
Vérifiez que l'ordinateur portable ou de bureau est sous tension.
Vérifiez que la carte pour ordinateur portable sans fil G est configurée avec le même SSID et les mêmes
paramètres de sécurité que les autres ordinateurs de la configuration en mode d'infrastructure.

31
Annexe A : Dépannage
Questions fréquemment posées
Carte pour ordinateur portable sans fil G avec SpeedBooster
Questions fréquemment posées
Puis-je exécuter une application à partir d'un ordinateur distant via le réseau sans fil ?
Cela dépend si votre application est conçue ou non pour une utilisation via un réseau. Consultez la documentation
de l'application pour déterminer si elle prend en charge le fonctionnement en réseau.
Puis-je m'adonner à des jeux avec d'autres utilisateurs du réseau sans fil ?
Oui, si le jeu accepte plusieurs joueurs sur un réseau local (LAN). Pour plus de détails, consultez le Guide de
l'utilisateur du jeu en question.
Qu'est-ce que la norme IEEE 802.11b ?
Il s'agit de l'une des normes IEEE appliquées aux réseaux sans fil. La norme 802.11b permet à des appareils
réseau sans fil issus de différents fabricants de communiquer, pourvu qu'ils soient conformes à cette norme. La
norme 802.11b établit un taux de transfert de données maximal de 11 Mbit/s et une fréquence de
fonctionnement de 2,4 GHz.
Qu'est-ce que la norme IEEE 802.11g ?
Il s'agit de l'une des normes IEEE appliquées aux réseaux sans fil. La norme 802.11g permet à des appareils
réseau sans fil issus de différents fabricants de communiquer, pourvu qu'ils soient conformes à cette norme. La
norme 802.11g établit un taux de transfert de données maximal de 54 Mbit/s et une fréquence de
fonctionnement de 2,4 GHz.
Quelles sont les fonctionnalités IEEE 802.11b prises en charge ?
Le produit prend en charge les fonctionnalités IEEE 802.11b suivantes :
• Protocole CSMA/CA plus Acknowledge
• Itinérance multi-canaux
• Sélection de débit automatique
• Fonctionnalité RTS/CTS
• Fragmentation
• Gestion de l'alimentation
Quelles sont les fonctionnalités IEEE 802.11g prises en charge ?
Le produit prend en charge les fonctionnalités IEEE 802.11g suivantes :
• Protocole CSMA/CA plus Acknowledge
• Protocole OFDM
• Itinérance multi-canaux
• Sélection de débit automatique
• Fonctionnalité RTS/CTS
• Fragmentation
• Gestion de l'alimentation

32
Annexe A : Dépannage
Questions fréquemment posées
Carte pour ordinateur portable sans fil G avec SpeedBooster
Qu'est-ce que le mode Ad hoc ?
Lorsqu'un réseau sans fil est défini en mode Ad hoc, les ordinateurs sans fil qu'il accueille sont configurés de
telle sorte qu'ils puissent communiquer directement entre eux. Le réseau sans fil en mode Ad hoc ne peut pas
communiquer avec des réseaux câblés.
Qu'est-ce que le mode d'infrastructure ?
Lorsqu'un réseau sans fil est défini en mode d'infrastructure, il est configuré de telle sorte qu'il peut
communiquer avec un réseau câblé via un point d'accès sans fil.
Qu'est-ce que l'itinérance ?
L'itinérance est la capacité d'un utilisateur d'ordinateur portable à communiquer en continu tout en se déplaçant
dans une zone supérieure à la zone couverte par un point d'accès unique. Avant d'utiliser la fonction d'itinérance,
la station de travail doit s'assurer que le numéro de canal est identique au point d'accès de la zone de couverture
dédiée.
Pour garantir une connectivité parfaite et harmonieuse, le réseau local (LAN) sans fil doit incorporer différentes
fonctions. Chaque nœud et point d'accès, par exemple, doit toujours accuser réception de chaque message.
Chaque nœud doit maintenir le contact avec le réseau sans fil, même en l'absence de transmission de données.
L'application simultanée de ces fonctions requiert une technologie de mise en réseau RF dynamique qui relie les
points d'accès et les nœuds. Dans ce système, le nœud de l'utilisateur final recherche le meilleur accès possible
au système. Il évalue tout d'abord les facteurs tels que la longueur et la qualité du signal, le chargement du
message par chaque point d'accès et la distance entre chaque point d'accès et le réseau fédérateur câblé. Sur la
base de ces informations, le nœud sélectionne ensuite le point d'accès correct et enregistre son adresse. Les
communications entre le nœud final et l'ordinateur hôte peuvent alors être acheminées depuis ou vers le réseau
fédérateur.
Lorsque l'utilisateur se déplace, l'émetteur RF du nœud final contrôle régulièrement le système afin de
déterminer s'il est en contact avec le point d'accès d'origine ou s'il doit en rechercher un autre. Lorsqu'un nœud
ne reçoit plus de confirmation de son point d'accès d'origine, il entreprend une nouvelle recherche. Une fois le
nouveau point d'accès trouvé, il l'enregistre et le processus de communication se poursuit.
Qu'est-ce que la bande ISM ?
FCC et ses homologues internationaux ont défini une bande passante destinée à une utilisation hors licence : la
bande ISM (Industrial, Scientific and Medical). Le spectre spécifique d'environ 2,4 GHz est disponible dans le
monde entier. Il s'agit de la possibilité sans précédent de mettre à la disposition des utilisateurs du monde entier
un système haut débit sans fil.

33
Annexe A : Dépannage
Questions fréquemment posées
Carte pour ordinateur portable sans fil G avec SpeedBooster
Qu'est-ce que la technologie d'étalement du spectre ?
La technologie d'étalement du spectre est une fréquence radio large bande développée par l'armée pour disposer
d'un système fiable de transmission des communications jugées sensibles. Elle est conçue pour optimiser
l'efficacité de la bande passante pour plus de fiabilité, d'intégrité et de sécurité. En d'autres termes, ce système
utilise plus de bande passante que la transmission à bande étroite. Cependant, l'optimisation produit un signal
qui, dans les faits, est plus important et donc plus facile à détecter, pourvu que le récepteur connaisse les
paramètres du signal d'étalement du spectre transmis. Si un récepteur n'est pas défini à la bonne fréquence, le
signal d'étalement du spectre est perçu comme un bruit en arrière-plan. Il existe deux autres possibilités
principales avec les systèmes DSSS (Direct Sequence Spread Spectrum) et FHSS (Frequency Hopping Spread
Spectrum).
Qu'est-ce que DSSS ? Qu'est-ce que FHSS ? Et quelles sont leurs différences ?
Le système FHSS (Frequency-Hopping Spread-Spectrum) utilise une porteuse à bande étroite qui modifie la
fréquence en un modèle connu à la fois de l'émetteur et du récepteur. S'il est synchronisé correctement, l'effet
net est le maintien d'un canal logique unique. Pour un récepteur non concerné, le signal FHSS ressemble à un
bruit à impulsions courtes. Le système DSSS (Direct-Sequence Spread-Spectrum) génère un modèle de bit
redondant pour chaque bit transmis. Pour ce modèle de bit, on parlera alors de puce. Plus la puce est longue, plus
la probabilité de récupérer les données d'origine est grande. Même si un ou plusieurs bits de la puce sont
endommagés au cours de la transmission, les techniques statistiques intégrées à la radio peuvent restaurer les
données d'origine sans avoir à les retransmettre. Pour un récepteur non concerné, DSSS apparaît comme un
faible bruit de transmission à large bande et est rejeté (ignoré) par la plupart des récepteurs à bande étroite.
Les informations sont-elles interceptées lors de la transmission aérienne ?
Le WLAN offre deux types de protections. Au niveau matériel, le WLAN offre une sécurité inhérente de cryptage
via la technologie Direct Sequence Spread Spectrum. Au niveau logiciel, le WLAN offre une fonction de cryptage
(WEP) qui améliore la sécurité et le contrôle des accès.
Qu'est-ce que le WEP ?
WEP (Wired Equivalent Privacy) est un système de protection des données fondé sur un algorithme de clé
partagée, conforme à la norme IEEE 802.11.

34
Annexe B : Sécurité sans fil
Mesures de sécurité
Carte pour ordinateur portable sans fil G avec SpeedBooster
Annexe B : Sécurité sans fil
Linksys souhaite rendre la mise en réseau sans fil aussi fiable et facile que possible. La génération actuelle de
produits Linksys intègre plusieurs fonctions de sécurité réseau que vous devez cependant mettre en œuvre vous-
même. Tenez compte des points suivants lors de la configuration ou de l'installation de votre réseau sans fil.
Mesures de sécurité
Cette rubrique présente une liste exhaustive des mesures de sécurité à envisager (suivez au moins les
étapes 1 à 5) :
1. Modifiez le nom SSID par défaut.
2. Désactivez la fonctionnalité de Diffusion SSID.
3. Modifiez le mot de passe par défaut du compte de l'administrateur.
4. Activez la fonctionnalité de filtrage des adresses MAC.
5. Modifiez régulièrement le nom SSID.
6. Utilisez l'algorithme de cryptage le plus élevé possible. Utilisez la technologie WPA si elle est disponible.
Notez que son utilisation peut réduire les performances de votre réseau.
7. Modifiez les clés de cryptage WEP régulièrement.
Menaces liées à la sécurité des réseaux sans fil
Les réseaux sans fil sont faciles à trouver. Les pirates informatiques savent que pour se connecter à un réseau
sans fil, les produits réseau sans fil doivent d'abord écouter et détecter les « messages des balises ». Ces
messages sont faciles à décrypter et renferment la plupart des informations relatives au réseau, notamment son
nom SSID (Service Set Identifier). Voici la procédure de protection que vous pouvez mettre en place :
Modifiez régulièrement le mot de passe de l'administrateur. Il faut savoir que les paramètres de réseau
(SSID, clé WEP, etc.) des périphériques sans fil que vous utilisez sont stockés dans le micrologiciel.
L'administrateur réseau est la seule personne qui puisse modifier les paramètres de réseau. Si un pirate
informatique vient à connaître le mot de passe de l'administrateur, il a également la possibilité de modifier ces
paramètres à sa guise. Compliquez-lui alors la tâche et rendez cette information plus difficile à obtenir. Modifiez
régulièrement le mot de passe de l'administrateur.
Remarque : Certaines de ces fonctions de
sécurité sont disponibles uniquement via le
routeur ou le point d'accès réseau. Pour plus
d'informations, consultez la documentation du
routeur ou du point d'accès.

35
Annexe B : Sécurité sans fil
Menaces liées à la sécurité des réseaux sans fil
Carte pour ordinateur portable sans fil G avec SpeedBooster
SSID. Plusieurs éléments concernant le nom SSID sont à prendre en compte :
1. désactiver la diffusion ;
2. définir un SSID unique ;
3. le modifier régulièrement.
La plupart des périphériques sans fil vous donnent la possibilité de diffuser le SSID. Bien que cette option puisse
s'avérer pratique, elle permet à n'importe qui de se connecter à votre réseau sans fil, y compris les pirates
informatiques. Par conséquent, ne diffusez pas le nom SSID.
Les périphériques réseau sans fil possèdent un nom SSID par défaut, configuré en usine (celui de Linksys est
« linksys »). Les pirates informatiques connaissent ces noms par défaut et peuvent vérifier s'ils sont utilisés sur
votre réseau. Modifiez votre nom SSID, afin qu'il soit unique, tout en évitant d'en choisir un en relation avec votre
société ou les périphériques réseau que vous utilisez.
Modifiez régulièrement votre nom SSID pour contraindre les pirates ayant accès à votre réseau sans fil de
recommencer de zéro lors de toute tentative d'infiltration.
Adresses MAC Activez le filtrage des adresses MAC. La fonctionnalité de filtrage des adresses MAC vous permet
de réserver l'accès aux nœuds sans fil dotés de certaines adresses MAC. Le pirate informatique rencontre ainsi
plus de difficultés à accéder à votre réseau au moyen d'une adresse MAC choisie au hasard.
Cryptage WEP. Le cryptage WEP (Wired Equivalent Privacy) est souvent considéré comme la panacée en matière
de protection sans fil, ce qui n'est pas toujours vrai. Cette technique fournit seulement un niveau de sécurité
suffisant pour compliquer la tâche du pirate informatique.
Plusieurs moyens permettent d'optimiser l'efficacité du cryptage WEP :
1. Utilisez le niveau de cryptage le plus élevé.
2. Optez pour une authentification par clé partagée (Shared Key).
3. Modifiez vos clés WEP régulièrement.
Important : Gardez toujours à l'esprit que
chaque périphérique de votre réseau sans fil
DOIT utiliser la même méthode et la même
clé de cryptage, sans quoi votre réseau sans
fil ne fonctionnera pas correctement.

36
Annexe B : Sécurité sans fil
Menaces liées à la sécurité des réseaux sans fil
Carte pour ordinateur portable sans fil G avec SpeedBooster
WPA. Le système WPA (Wi-Fi Protected Access) offre le tout dernier et le meilleur choix standard disponible en
matière de sécurité Wi-Fi. Trois modes sont disponibles : WPA-PSK, WPA Radius et Radius. WPA-PSK (Clé WPA
pré-partagée) vous propose deux méthodes de cryptage : la méthode TKIP (Temporal Key Integrity Protocol) qui
fait appel à une méthode de cryptage renforcé et intègre un code MIC (Message Integrity Code) de protection
contre les pirates, et enfin la méthode AES (Advanced Encryption System) qui procède au cryptage symétrique
des données par blocs de 128 bits. Le système WPA RADIUS vous propose deux méthodes de cryptage, TKIP et
AES, associées à des clés de cryptage dynamiques. Le mode RADIUS (Remote Authentication Dial-In User
Service) utilise un serveur RADIUS pour authentification.
WPA-PSK. Si vous ne disposez pas d'un serveur RADIUS, sélectionnez le type d'algorithme (TKIP ou AES) et
entrez un mot de passe de 8 à 63 caractères.
WPA RADIUS. Technologie WPA utilisée conjointement avec un serveur RADIUS (à utiliser uniquement
lorsqu'un serveur RADIUS est connecté au routeur ou un autre périphérique). Le système WPA Radius vous
propose deux méthodes de cryptage, TKIP et AES, associées à des clés de cryptage dynamiques.
RADIUS. Système WEP utilisé conjointement avec un serveur RADIUS (à utiliser uniquement lorsqu'un
serveur RADIUS est connecté au routeur ou un autre périphérique).
La mise en place d'une méthode de cryptage peut avoir un impact néfaste sur les performances de votre réseau
mais reste conseillée si vous transmettez sur votre réseau des données que vous jugez sensibles.
Ces conseils de sécurité vous permettent de conserver votre tranquillité d'esprit tout en profitant de la
technologie la plus adaptée et la plus souple que Linksys vous propose.

37
Annexe C : Aide de Microsoft Windows
Carte pour ordinateur portable sans fil G avec SpeedBooster
Annexe C : Aide de Microsoft Windows
Tous les produits sans fil exigent l'utilisation de Microsoft Windows. Windows est le système d'exploitation le
plus répandu à l'échelle internationale. Il est accompagné d'un grand nombre de fonctionnalités qui facilitent
toutes les tâches d'exploitation en réseau. Vous pouvez accéder à ces fonctionnalités à partir de l'aide de
Windows. Elles sont décrites dans la présente annexe.
TCP/IP
Pour qu'un ordinateur puisse communiquer avec le point d'accès ou le routeur sans fil, vous devez au préalable
activer le protocole TCP/IP. TCP/IP désigne un ensemble d'instructions (ou protocole) que tous les ordinateurs
suivent pour communiquer sur un réseau. Il s'applique aussi dans le cadre des réseaux sans fil. Vos ordinateurs
ne pourront pas exploiter les capacités de votre réseau sans fil si le protocole TCP/IP n'est pas activé. L'aide de
Microsoft Windows fournit des instructions exhaustives sur l'activation du protocole TCP/IP.
Ressources partagées
Si vous souhaitez partager des imprimantes, un dossier ou des fichiers sur votre réseau, l'aide de Windows offre
également des instructions complètes sur l'utilisation des ressources partagées.
Voisinage réseau/Favoris réseau
En fonction de la version Windows que vous utilisez, d'autres ordinateurs de votre réseau peuvent apparaître
dans le Voisinage réseau ou dans les Favoris réseau. Là encore, l'aide de Windows fournit des instructions
expliquant comment ajouter des ordinateurs à votre réseau.

38
Annexe D : Glossaire
Carte pour ordinateur portable sans fil G avec SpeedBooster
Annexe D : Glossaire
802.11a : norme de mise en réseau sans fil IEEE qui spécifie un débit de transfert de données maximum de
54 Mbit/s et une fréquence de 5 GHz.
802.11b : norme de mise en réseau sans fil IEEE qui spécifie un débit de transfert de données maximum de
11 Mbit/s et une fréquence de 2,4 GHz.
802.11g : norme de mise en réseau sans fil IEEE qui spécifie un débit de transfert de données maximum de
54 Mbit/s, une fréquence de 2,4 GHz et une rétro-compatibilité avec les périphériques 802.11b.
Adresse IP : adresse utilisée pour l'identification d'un ordinateur ou d'un périphérique sur un réseau.
Adresse IP dynamique : adresse IP attribuée provisoirement par un serveur DHCP.
Adresse IP statique : adresse fixe attribuée à un ordinateur ou un périphérique connecté à un réseau.
Adresse MAC (Media Access Control) : adresse unique qu'un fabricant attribue à chaque périphérique d'un
réseau.
AES (Advanced Encryption Standard) :méthode utilisant un cryptage par clé pouvant atteindre 256 bits pour
sécuriser des données.
Bande ISM : bande radio utilisée lors de transmissions réseau sans fil.
Bande passante : capacité de transmission d'un périphérique ou d'un réseau donné.
Base de données : ensemble de données organisées pour faciliter l'accès, la gestion et la mise à jour de leur
contenu.
Bit : chiffre binaire.
Carte : périphérique ajoutant de nouvelles fonctionnalités réseau à votre ordinateur.
Commande Finger : programme indiquant le nom associé à une adresse de messagerie.

39
Annexe D : Glossaire
Carte pour ordinateur portable sans fil G avec SpeedBooster
Commutateur : 1. Commutateur de données qui relie les périphériques informatiques aux ordinateurs hôtes,
permettant ainsi à de nombreux périphériques de partager un nombre limité de ports. 2. Périphérique permettant
de produire, interrompre ou modifier les connexions au sein d'un circuit électrique.
Cryptage : codage de données transmises sur un réseau.
CSMA/CA (Carrier Sense Multiple Access/Collision Avoidance) : méthode de transfert des données adoptée pour
éviter les collisions de données sur un réseau.
CTS (Clear ToSend) : signal émis par un périphérique sans fil pour indiquer qu'il est prêt à recevoir des données.
DDNS (Dynamic Domain Name System) : autorise l'hébergement d'un site Web, d'un serveur FTP ou d'un serveur
de messagerie avec un nom de domaine fixe (par exemple www.xyz.com) et une adresse IP dynamique.
Débit : quantité de données déplacées avec succès d'un nœud à un autre dans un délai donné.
DHCP (Dynamic Host Configuration Protocol) : protocole réseau permettant aux administrateurs d'attribuer des
adresses IP temporaires aux ordinateurs du réseau en louant une adresse IP à un utilisateur pour une période
limitée, au lieu d'attribuer des adresses IP permanentes.
DNS (Domain Name Server) : adresse IP du serveur de votre fournisseur d'accès Internet (FAI). Le système DNS
permet de convertir des noms de sites Web en adresses IP.
Domaine : nom spécifique d'un réseau d'ordinateurs.
DSL (Digital Subscriber Line) : connexion haut débit toujours active par le biais des lignes téléphoniques stan-
dard.
DSSS (Direct-Sequence Spread-Spectrum) : transmission de fréquence qui introduit un modèle de bit redondant
pour diminuer les risques de perte de données lors d'une transmission.
DTIM (Delivery Traffic Indication Message) : message intégré aux paquets de données et capable d'accroître
l'efficacité des structures sans fil.
EAP (Extensible Authentication Protocol) : protocole d'authentification général utilisé pour contrôler l'accès au
réseau. De nombreuses méthodes d'authentification spécifiques fonctionnent ainsi.
EAP-PEAP (Extensible Authentication Protocol-Protected Extensible Authentication Protocol) : méthode
d'authentification mutuelle utilisant une combinaison de certificats numériques et un autre système, comme des
mots de passe.

40
Annexe D : Glossaire
Carte pour ordinateur portable sans fil G avec SpeedBooster
EAP-TLS (Extensible Authentication Protocol-Transport Layer Security) : méthode d'authentification mutuelle
utilisant des certificats numériques.
Etalement de spectre : technique de fréquence radio à large bande utilisée pour une transmission plus fiable et
sécurisée des données.
Ethernet : protocole réseau IEEE qui spécifie le mode de placement et d'extraction des données via un support
de transmission courant.
FAI (Fournisseur d'Accès Internet) : société offrant un accès à Internet.
Fragmentation : acte de scinder un paquet en unités plus petites lors d'une transmission sur un support réseau
inapte à prendre en charge la taille d'origine du paquet.
FTP (File Transfer Protocol) : protocole utilisé pour la transmission de fichiers sur un réseau TCP/IP.
Full Duplex : aptitude d'un périphérique réseau à recevoir et transmettre simultanément des données.
Guirlande : méthode utilisée pour connecter des périphériques en série, l'un après l'autre.
Haut débit : connexion Internet rapide et toujours active.
HTTP (HyperText Transport Protocol) : protocole de communication utilisé pour la connexion à des serveurs sur le
World Wide Web.
IEEE (The Institute of Electrical and Electronics Engineers) : institut indépendant chargé du développement des
normes réseau standard.
Infrastructure : réseau sans fil relié à un réseau câblé via un point d'accès.
Initialiser : démarrer un périphérique et lui demander d'exécuter des instructions.
Intervalle de transmission de balise : données transmises sur un réseau sans fil en vue de le synchroniser.
IP (Internet Protocol) : protocole utilisé pour transmettre des données sur un réseau.
IPCONFIG : utilitaire des systèmes Windows 2000 et XP qui affiche l'adresse IP d'un périphérique réseau spéci-
fique.
IPSec (Internet Protocol Security) : protocole VPN employé pour la mise en place d'un échange sécurisé des
paquets au niveau de la couche IP.
Itinérance : acte de faire passer un périphérique sans fil d'un point d'accès à un autre sans perdre la connexion.

41
Annexe D : Glossaire
Carte pour ordinateur portable sans fil G avec SpeedBooster
LAN : ordinateurs ou produits mis en réseau qui constituent votre réseau local.
LEAP (Lightweight Extensible Authentication Protocol) : méthode d'authentification mutuelle utilisant un système
avec nom d'utilisateur et mot de passe.
Logiciel : instructions destinées à l'ordinateur. Série d'instructions destinée à la réalisation d'une tâche donnée
appelée « programme ».
Masque de sous-réseau : code d'adresse qui détermine la taille du réseau.
Matériel : présentation physique des ordinateurs, des systèmes de télécommunication et d'autres périphériques
liés aux technologies de l'information.
Mbit/s (mégabits par seconde) : soit un million de bits par seconde ; unité de mesure de transmission des don-
nées.
Micrologiciel : code de programmation qui exécute un périphérique réseau.
mIRC : programme de clavardage IRC exécuté sous Windows.
Mise à niveau : acte de remplacer un logiciel ou micrologiciel existant par une nouvelle version.
Modem câble : périphérique qui relie un ordinateur au réseau de télévision câblé, ce réseau permettant à son
tour de se connecter à Internet.
Multidiffusion : envoi simultané de données à un groupe de destinataires.
NAT (Network Address Translation) : la technologie NAT permet de convertir les adresses IP d'un réseau local en
une adresse IP distincte sur Internet.
Navigateur : application offrant un mode d'affichage et de manipulation des informations sur le World Wide Web.
NNTP (Network News Transfer Protocol) : protocole utilisé pour connecter des groupes Usenet sur Internet.
Nœud : liaison ou point de connexion réseau (généralement, un ordinateur ou une station de travail).
Octets : unité de données généralement équivalente à huit bits.
OFDM (Orthogonal Frequency Division Multiplexing) : transmission de fréquence qui permet de séparer le flux de
données en un certain nombre de flux de données à moindre débit, transmis ensuite en parallèle pour diminuer
les risques de perte de données lors d'une transmission.
Paquet : unité de données transmises sur un réseau.

42
Annexe D : Glossaire
Carte pour ordinateur portable sans fil G avec SpeedBooster
Pare-feu : ensemble de programmes associés situés sur le serveur passerelle de réseau protégeant les ressou-
rces d'un réseau des utilisateurs provenant de d'autres réseaux.
Pare-feu SPI (Stateful Packet Inspection) : technologie inspectant tous les paquets d'informations entrants
avant de les autoriser à pénétrer le réseau.
Passerelle : périphérique permettant de relier entre eux des réseaux dotés de protocoles de communication
incompatibles.
Passerelle par défaut : périphérique utilisé pour transférer un trafic de données Internet depuis votre réseau
local.
Phrase mot de passe : utilisée comme un mot de passe, une phrase mot de passe simplifie le processus de
cryptage WEP en générant automatiquement les clés de cryptage WEP des produits Linksys.
Ping (Packet INternet Groper) : utilitaire Internet utilisé pour déterminer si une adresse IP particulière est en
ligne.
Point à point : groupe de périphériques sans fil communiquant directement entre eux (point à point) sans l'inter-
vention d'un point d'accès.
Point d'accès : périphérique permettant aux ordinateurs et aux autres périphériques sans fil de communiquer
avec un réseau câblé. Il sert également à étendre la portée d'un réseau sans fil.
Pont : périphérique reliant différents réseaux.
POP3 (Post Office Protocol 3) : serveur de messagerie standard couramment utilisé sur Internet.
Port : point de connexion sur un ordinateur ou un périphérique réseau utilisé pour le branchement à un câble ou
un adaptateur.
Power over Ethernet (PoE) : technologie permettant à un câble réseau Ethernet de transiter des données et l'ali-
mentation.
PPPoE (Point to Point Protocol over Ethernet) : type de connexion haut débit qui permet l'authentification (nom
d'utilisateur et mot de passe) et l'acheminement des données.
PPTP (Point-to-Point Tunneling Protocol) : protocole VPN qui permet au protocole PPP (Point to Point Protocol) de
traverser un réseau IP. Il est également utilisé comme type de connexion haut débit en Europe.
Préambule : partie du signal sans fil chargée de synchroniser le trafic réseau.

43
Annexe D : Glossaire
Carte pour ordinateur portable sans fil G avec SpeedBooster
RADIUS (Remote Authentication Dial-InUser Service) : protocole utilisant un serveur d'authentification pour con-
trôler l'accès au réseau.
Réseau : plusieurs ordinateurs ou périphériques reliés entre eux dans le but de partager et de stocker des don-
nées et/ou de permettre la transmission de données entre des utilisateurs.
Réseau fédérateur : partie d'un réseau qui permet de relier la plupart des systèmes et des réseaux entre eux et
de gérer la majorité des données.
RJ-45 (Registered Jack-45) : connecteur Ethernet pouvant accueillir jusqu'à huit broches.
Routage statique : transfert de données sur un réseau par une voie fixe.
Routeur : périphérique de mise en réseau qui relie entre eux plusieurs ordinateurs.
RTS (Request ToSend) : méthode de mise en réseau consistant à coordonner des paquets importants par le biais
du paramètre RTS Threshold (Seuil RTS).
Semi-duplex : transmission de données pouvant survenir dans deux directions sur une ligne unique, mais une
direction à la fois.
Serveur : tout ordinateur dont le rôle sur un réseau est de fournir aux utilisateurs un accès à des fichiers, des
imprimantes, des outils de communication et d'autres services.
SMTP (Simple Mail Transfer Protocol) : protocole de messagerie standard utilisé sur Internet.
SNMP (Simple Network Management Protocol) : protocole très répandu de contrôle et d'administration de
réseau.
SOHO (Small Office/Home Office) : segment de marché des professionnels qui travaillent à domicile ou dans des
petits bureaux.
SSID (Service Set IDentifier) : nom de votre réseau sans fil.
Tampon : zone de mémoire partagée ou affectée utilisée pour prendre en charge et coordonner plusieurs activ-
ités informatiques et réseau de façon à ce qu'une activité ne soit pas interrompue par une autre.
TCP (Transmission Control Protocol) : protocole réseau de transmission de données exigeant la validation de la
personne à qui elles sont destinées.
TCP/IP (Transmission Control Protocol/Internet Protocol) : désigne un ensemble d'instructions (ou protocole) que
tous les ordinateurs suivent pour communiquer sur un réseau.

44
Annexe D : Glossaire
Carte pour ordinateur portable sans fil G avec SpeedBooster
Téléchargement : réception d'un fichier transmis sur un réseau.
Téléchargement : transmission d'un fichier sur un réseau.
Telnet : commande utilisateur et protocole TCP/IP utilisés pour l'accès à des ordinateurs distants.
TFTP (Trivial File Transfer Protocol) : version du protocole FTP TCP/IP n'offrant aucune fonction de répertoire ou
de mot de passe.
TKIP (Temporal Key Integrity Protocol) : protocole de cryptage sans fil qui fournit des clés de cryptage
dynamiques pour chaque paquet transmis.
Topologie : configuration physique d'un réseau.
UDP (User Datagram Protocol) : protocole réseau de transmission de données n'exigeant aucune validation de la
personne à qui elles sont destinées.
URL (Uniform Resource Locator) : adresse d'un fichier situé sur Internet.
Vitesse de transmission : taux de transmission.
VPN (Virtual Private Network) : mesure de sécurité visant à protéger des données lorsqu'elles quittent un réseau
et s'acheminent vers un autre via Internet.
WAN (Wide Area Network) : Internet.
WEP (Wired Equivalent Privacy) : méthode permettant de crypter des données transmises sur un réseau sans fil
pour une sécurité accrue.
WINIPCFG : utilitaire Windows 98 et Windows Me qui affiche l'adresse IP d'un périphérique réseau spécifique.
WLAN (Wireless Local Area Network) : groupe d'ordinateurs et de périphériques associés qui communiquent
entre eux sans fil.
WPA (Wi-Fi Protected Access) : protocole de sécurité sans fil faisant appel au cryptage TKIP (Temporal Key Integ-
rity Protocol) et pouvant être utilisé en association avec un serveur RADIUS.
Zone DMZ (zone démilitarisée) : fonction qui supprime la protection pare-feu du routeur sur un ordinateur et le
rend visible sur Internet.

45
Annexe E : Spécifications
Carte pour ordinateur portable sans fil G avec SpeedBooster
Annexe E : Spécifications
Normes IEEE 802.11g, IEEE 802.11b
Canaux 11 canaux (utilisables dans la plupart des pays occidentaux)
13 canaux (utilisables dans la plupart des pays de l'Union
européenne)
Voyants Alimentation, Liaison
Puissance à l'émission 18 dBm
Protocoles 802.11b : CCK (11 Mbit/s), DQPSK (2 Mbit/s), DBPSK (1 Mbit/s) ;
802.11g : OFDM
Fonctions de sécurité WEP, AES, TKIP, 802.1x
Configuration binaire
de la clé WEP 64/128 bits
Dimensions 115 mm x 54 mm x 7,5 mm
Poids 0,047 kg.
Certifications FCC, IC-03, CE
Température en
fonctionnement 0º C à 50º C
Température de stockage -25º C à 70º C
Humidité en fonctionnement 5 % à 95 %, non condensée
Humidité de stockage 5 à 95 %, non condensée

46
Annexe F : Informations de garantie
Carte pour ordinateur portable sans fil G avec SpeedBooster
Annexe F : Informations de garantie
GARANTIE LIMITEE
Linksys garantit que vos produits Linksys seront, pour l'essentiel, exempts de vices matériels et de fabrication, sous réserve
d'une utilisation normale, pendant une période de trois années consécutives (« Période de garantie »). Votre unique recours
et l'entière responsabilité de Linksys seront limités, au choix de Linksys, soit à la réparation ou au remplacement du produit,
soit au remboursement du prix à l'achat moins les remises effectuées. Cette garantie limitée concerne uniquement l'acheteur
d'origine.
Si ce produit devait s'avérer défectueux pendant cette période de garantie, contactez le support technique de Linksys pour
obtenir, si besoin est, un numéro d'autorisation de retour. N'OUBLIEZ PAS DE CONSERVER VOTRE PREUVE D'ACHAT A PORTEE
DE MAIN LORS DE TOUT CONTACT TELEPHONIQUE. Si Linksys vous demande de retourner le produit, indiquez lisiblement le
numéro d'autorisation de retour à l'extérieur de l'emballage et joignez-y une copie de l'original de votre preuve d'achat.
TOUTE DEMANDE DE RETOUR NE PEUT ETRE TRAITEE EN L'ABSENCE D'UNE PREUVE D'ACHAT. Les frais d'expédition des
produits défectueux à Linksys sont à votre charge. Linksys prend uniquement en charge les envois via UPS Ground de Linksys
chez Vous. Les frais d'envoi restent à la charge des clients implantés en dehors des Etats-Unis et du Canada.
TOUTES LES GARANTIES IMPLICITES ET CONDITIONS DE VALEUR MARCHANDE OU D'ADEQUATION A UN USAGE PARTICULIER
SONT LIMITEES A LA DUREE DE LA PERIODE DE GARANTIE. TOUTES LES AUTRES CONDITIONS, DECLARATIONS ET GARANTIES
IMPLICITES OU EXPLICITES, Y COMPRIS TOUTE GARANTIE IMPLICITE DE NON CONTREFACON SONT DEMENTIES. Certaines
juridictions n'autorisent pas les restrictions relatives à la durée d'une garantie implicite. Par conséquent, la restriction
susmentionnée peut ne pas s'appliquer dans votre cas. Cette garantie vous accorde des droits spécifiques. Vous pouvez avoir
d'autres droits qui varient en fonction des juridictions.
Cette garantie ne s'applique pas si le produit (a) a été modifié, sauf si cette modification est le fait de Linksys, (b) n'a pas été
installé, exploité, réparé ou entretenu conformément aux instructions fournies pas Linksys ou (c) a été altéré suite à une
charge physique ou électrique anormale, un usage inadapté du produit, une négligence ou un accident. De plus, en raison du
développement permanent de nouvelles techniques visant à infiltrer et attaquer les réseaux, Linksys ne garantit pas que le
présent produit est protégé contre toute intrusion ou attaque dont vous feriez l'objet.
CONFORMEMENT A LA LOI ET INDEPENDAMMENT DE LA THEORIE SUR LES RESPONSABILITES, LINKSYS NE POURRA EN
AUCUN CAS ETRE TENU RESPONSABLE DES PERTES DE DONNEES, DE REVENUS OU DE BENEFICES OU DES DOMMAGES
SPECIAUX, INDIRECTS, CONSECUTIFS, ACCIDENTELS OU DISSUASIFS (Y COMPRIS LES ACTES DE NEGLIGENCE) LIES OU NON
LIES A L'UTILISATION OU A L'INCAPACITE A UTILISER LE PRODUIT (Y COMPRIS TOUS LES LOGICIELS), MEME SI LINKSYS A ETE
AVERTI DE LA POSSIBILITE DE TELS DOMMAGES. LA RESPONSABILITE DE LINKSYS NE DEPASSE EN AUCUN CAS LE MONTANT
REGLE PAR VOS SOINS POUR LE PRODUIT. Les restrictions susmentionnées s'appliqueront même si toutes les garanties ou les
recours stipulés dans le présent Contrat ne remplissent pas leur fonction principale. Certaines juridictions n'autorisent pas
l'exclusion ou la limitation des dommages accessoires ou fortuits, de telle sorte que la limitation ou l'exclusion
susmentionnée peut ne pas vous être applicable.
Cette garantie est valide et peut ne s'appliquer que dans le pays d'acquisition du produit.
Veuillez envoyer toutes vos demandes de renseignement à l'adresse suivante : Linksys, P.O. Box 18558, Irvine, CA 92623.

47
Annexe G : Réglementation
Carte pour ordinateur portable sans fil G avec SpeedBooster
Annexe G : Réglementation
Déclaration FCC
Ce produit a été testé et déclaré conforme aux normes des équipements numériques de catégorie B, conformément à la
section 15 des règlements FCC. L'objectif de ces normes est de fournir une protection raisonnable contre toute
interférence nuisible dans une installation résidentielle. Cet équipement génère, utilise et peut émettre de l'énergie radio
fréquence nuisible et, s'il n'est pas installé et utilisé selon le manuel d'instruction, peut provoquer une interférence
nuisible sur les communications radio. Le fonctionnement de cet équipement dans une zone résidentielle est susceptible
de provoquer des interférences nuisibles. Si cet équipement provoque des interférences nuisibles lors de la réception
radio ou télévision, détectables en mettant l'équipement hors tension puis sous tension, l'utilisateur peut tenter de
remédier à ces interférences en effectuant les opérations suivantes :
• Réorientation ou déplacement de l'antenne de réception
• Augmentation de la distance entre l'équipement ou les périphériques
• Branchement de l'équipement sur une prise autre que celle du récepteur
• Demande d'aide à un revendeur ou un technicien radio/télévision expérimenté
Déclaration FCC sur l'exposition aux radiations
Cet équipement est conforme aux normes FCC d'exposition en matière de radiations définies pour un environnement non
contrôlé. Cet équipement doit être installé et opérationnel à une distance minimale de 20 cm entre le radiateur et
vous-même.
Industrie Canada (Canada)
Cet appareil numérique de la classe B est conforme à la norme NMB-003 du Canada.
L'utilisation de ce périphérique sur un système fonctionnant partiellement ou complètement à l'extérieur peut requérir une
licence pour le système conformément aux réglementations en vigueur au Canada.

48
Annexe G : Réglementation
Carte pour ordinateur portable sans fil G avec SpeedBooster
Informations de conformité pour les produits sans fil 2,4-GHz concernant l'Union européenne et les autres pays suivant la
directive européenne 1999/5/EC (R&TTE)
Déclaration de conformité concernant la directive européenne 1995/5/EC (R&TTE)
Deutsch
[allemand] : Dieses Gerät entspricht den grundlegenden Anforderungen und den
weiteren entsprechenden Vorgaben der Richtlinie 1999/5/EU.
Dansk
[danois] : Dette udstyr er i overensstemmelse med de væsentlige krav og andre
relevante bestemmelser i Direktiv 1999/5/EF.
English
[anglais] : This equipment is in compliance with the essential requirements and other
relevant provisions of Directive 1999/5/EC.
Español
[espagnol] : Este equipo cumple con los requisitos esenciales Ȣasi como con otras
disposiciones de la Directiva 1999/5/CE.
ǼȜȜȘȞȚțȒ
[grec] : ǹȣIJȩȢ Ƞ İȟȠʌȜȚıµȩȢ İȓȞĮȚ ıİ ıȣµµȩȡijȦıȘ µİ IJȚȢ ȠȣıȚȫįİȚȢ
ĮʌĮȚIJȒıİȚȢ țĮȚ ȐȜȜİȢ ıȤİIJȚțȑȢ įȚĮIJȐȟİȚȢ IJȘȢ ȅįȘȖȓĮȢ 1999/5/EC.
Français : Cet appareil est conforme aux exigences essentielles et aux autres
dispositions pertinentes de la Directive 1999/5/EC.
Íslenska
[islandais] : Þetta tæki er samkvæmt grunnkröfum og öðrum viðeigandi ákvæðum
Tilskipunar 1999/5/EC.
Italiano
[italien] : Questo apparato é conforme ai requisiti essenziali ed agli altri principi
sanciti dalla Direttiva 1999/5/CE.
Nederlands
[néerlandais] : Dit apparaat voldoet aan de essentiele eisen en andere van toepassing
zijnde bepalingen van de Richtlijn 1999/5/EC.
Norsk
[norvégien] : Dette utstyret er i samsvar med de grunnleggende krav og andre relevante
bestemmelser i EU-direktiv 1999/5/EF.
Português
[portuguais] : Este equipamento está em conformidade com os requisitos essenciais e
outras provisões relevantes da Directiva 1999/5/EC.
Suomi
[finnois] : Tämä laite täyttää direktiivin 1999/5/EY olennaiset vaatimukset ja on siinä
asetettujen muiden laitetta koskevien määräysten mukainen.
Svenska
[suédois] : Denna utrustning är i överensstämmelse med de väsentliga kraven och
andra relevanta bestämmelser i Direktiv 1999/5/EC.
Remarque : Si vous avez besoin de documentation technique, reportez-vous à la
section « Comment accéder aux documents techniques depuis l'adresse
www.linksys.com/international » pour plus d'informations.

49
Annexe G : Réglementation
Carte pour ordinateur portable sans fil G avec SpeedBooster
Les normes suivantes ont été appliquées lors de l'appréciation du produit avec les normes de la directive 1999/5/EC :
• Radio : EN 300,328
• Compatibilité électromagnétique : EN 301 489-1, EN 301 489-17
• Sécurité : EN 60950
Marquage CE
Pour les produits Linksys sans fil B et G, le marquage CE, le numéro de l'organisme notifié (le cas échéant) et l'identifiant
de classe 2 suivants sont ajoutés à l'équipement.
Vérifiez l'étiquette CE sur le produit pour déterminer quel numéro d'organisme notifié a été pris en compte pendant
l'appréciation.
Restrictions nationales
Ce produit peut être utilisé dans tous les pays de l’UE (et dans tous les pays ayant transposés la directive 1999/5/CE) sans
aucune limitation, excepté pour les pays mentionnés ci-dessous:
Questo prodotto è utilizzabile in tutte i paesi EU (ed in tutti gli altri paesi che seguono le direttive EU 1999/5/EC) senza
nessuna limitazione, eccetto per i paesii menzionati di seguito:
Das Produkt kann in allen EU Staaten ohne Einschränkungen eingesetzt werden (sowie in anderen Staaten die der EU
Direktive 1995/5/CE folgen) mit Außnahme der folgenden aufgeführten Staaten:
Belgique
Draadloze verbindingen voor buitengebruik en met een reikwijdte van meer dan 300 meter dienen aangemeld te worden
bij het Belgisch Instituut voor postdiensten en telecommunicatie (BIPT). Zie http://www.bipt.be voor meer gegevens.
Les liaisons sans fil pour une utilisation en extérieur d’une distance supérieure à 300 mètres doivent être
notifiées à l’Institut Belge des services Postaux et des Télécommunications (IBPT).
Visitez http://www.ibpt.be pour de plus amples détails.
ou ou

50
Annexe G : Réglementation
Carte pour ordinateur portable sans fil G avec SpeedBooster
France
Dans le cas d’une utilisation en extérieur, la puissance de sortie est limitée pour certaines parties de la bande. Reportez-
vous à la table 1 ou visitez http://www.art-telecom.fr/ pour de plus amples détails.
Italie
Ce produit est conforme à National Radio Interface et aux recommandations définies dans la National Frequency Allocation
Table de l'Italie. L'utilisation de ce produit LAN 2,4 GHz est soumis à une autorisation générale, sauf s'il est utilisé dans les
limites de la propriété de l'utilisateur. Consultez le site http://www.comunicazioni.it/it/ pour de plus amples détails.
Questo prodotto è conforme alla specifiche di Interfaccia Radio Nazionali e rispetta il Piano Nazionale di
ripartizione delle frequenze in Italia. Se non viene installato all’interno del proprio fondo, l’utilizzo di prodotti
Wireless LAN a 2,4 GHz richiede una “Autorizzazione Generale”. Consultare
http://www.comunicazioni.it/it/ per maggiori dettagli.
Restrictions d'utilisation du produit
Ce produit est conçu pour une utilisation intérieure uniquement. L'utilisation extérieure n'est pas recommandée.
Ce produit est conçu pour une utilisation avec une ou plusieurs antennes intégrales ou externes (dédiées). L'utilisation
d'antennes non-dédiées ou tierces n'est pas recommandée et n'est pas prise en charge par Linksys.
Table 1: Niveaux de puissance en vigueur en France
Emplacement Bande de fréquences (Mhz) Puissance (PIRE)
Utilisation en intérieur
(pas de restrictions) 2400-2483.5 100 mW (20 dBm)
Utilisation en extérieur 2400-2454
2454-2483.5 100 mW (20 dBm)
10 mW (10 dBm)

51
Annexe G : Réglementation
Carte pour ordinateur portable sans fil G avec SpeedBooster
Sortie de votre périphérique
Afin de respecter les réglementations de votre pays, vous devrez peut-être modifier la sortie de votre périphérique sans fil.
Reportez-vous à la section appropriée à votre périphérique.
Cartes sans fil
Les cartes sans fil ont une sortie définie à 100 % par défaut. La sortie maximale sur chaque carte ne dépasse pas 20 dBm
(100 mW). Elle est généralement de 18 dBm (64 mW) ou inférieure. Si vous avez besoin de modifier la sortie de votre carte
sans fil, suivez les instructions correspondantes au système d'exploitation de votre ordinateur :
Windows XP
1. Cliquez deux fois sur l'icône Wireless (Sans fil) dans la barre d'état système de votre bureau.
2. Ouvrez la fenêtre Wireless Network Connection (Connexion réseau sans fil).
3. Cliquez sur le bouton Properties (Propriétés).
4. Sélectionnez l'onglet General (Général) et cliquez sur le bouton Configure (Configurer).
5. Dans la fenêtre Properties (Propriétés), cliquez sur l'onglet Advanced (Avancé).
6. Sélectionnez Power Output (Sortie).
7. A partir du menu déroulant à droite, sélectionnez le pourcentage de sortie de la carte sans fil.
Windows 2000
1. Ouvrez le Panneau de configuration.
2. Double-cliquez sur Connexions réseau et accès à distance.
3. Sélectionnez votre connexion sans fil actuelle et sélectionnez Propriétés.
4. Dans l'écran Propriétés, cliquez sur le bouton Configurer.
5. Cliquez sur l'onglet Avancé et sélectionnez Power Output (Sortie).
6. A partir du menu déroulant à droite, sélectionnez le paramètre de puissance de la carte sans fil.
Si vous exécutez Windows Millennium ou 98, reportez-vous à l'aide de Windows pour obtenir des instructions sur le mode
d'accès des paramètres avancés d'une carte réseau.
Points d'accès, routeurs ou autres produits sans fil
Si vous utilisez un point d'accès, un routeur ou un autre produit sans fil, utilisez son utilitaire Web pour configurer son
paramètre de sortie (reportez-vous à la documentation du produit pour obtenir davantage d'informations).
Remarque : Le paramètre de sortie n'est peut être pas disponible sur tous
les produits sans fil. Pour de plus amples informations, reportez-vous à la
documentation sur le CD du produit à l'adresse http://www.linksys.com/
international.

52
Annexe G : Réglementation
Carte pour ordinateur portable sans fil G avec SpeedBooster
Documents techniques disponibles sur le site www.linksys.com/international
Suivez la procédure suivante pour accéder aux documents techniques :
1. Allez à la page http://www.linksys.com/international.
2. Cliquez sur votre région de résidence.
3. Cliquez sur le nom du pays de votre résidence.
4. Cliquez sur Produits.
5. Cliquez sur la catégorie de produit appropriée.
6. Sélectionnez un produit.
7. Cliquez sur le type de documentation que vous souhaitez. Le document va s'ouvrir automatiquement au format PDF.
Remarque : Si vous avez des questions au sujet de la conformité de ces produits
ou que vous ne trouvez pas les informations que vous recherchez, contactez votre
bureau de vente local. Visitez le site http://www.linksys.com/international pour de
plus amples informations.

53
Annexe H : Contacts
Carte pour ordinateur portable sans fil G avec SpeedBooster
Annexe H : Contacts
Besoin de contacter Linksys ?
Consultez-nous en ligne pour obtenir des informations sur les derniers produits et les mises à jour
disponibles pour vos produits existants à l'adresse suivante : http://www.linksys.com/international
Si vous rencontrez des problèmes avec un produit Linksys, adressez-nous un courrier électronique et
envoyez-le au service Support technique du pays où vous résidez :
Europe Adresse électronique
Allemagne support.de@linksys.com
Autriche support.at@linksys.com
Belgique support.be@linksys.com
Danemark support.dk@linksys.com
Espagne support.es@linksys.com
France support.fr@linksys.com
Italie support.it@linksys.com
Norvège support.no@linksys.com
Pays-Bas support.nl@linksys.com
Portugal support.pt@linksys.com
Royaume-Uni et Irlande support.uk@linksys.com
Suède support.se@linksys.com
Suisse support.ch@linksys.com
Hors Europe Adresse électronique
Amérique Latine support.la@linksys.com
Etats-Unis et Canada support@linksys.com

A Division of Cisco Systems, Inc.
®
Modell-Nr.
Notebook-Adapter
Wireless-G
WPC54GS
Handbuch
WIRELESS mit SpeedBooster
GHz
2
802.11g
4
,

Wireless-G Notebook-Adapter mit SpeedBooster
Copyright und Marken
Technische Änderungen vorbehalten. Linksys ist eine eingetragene Marke bzw. eine Marke von Cisco Systems,
Inc. und/oder deren Zweigunternehmen in den USA und anderen Ländern. Copyright © 2004 Cisco Systems, Inc.
Alle Rechte vorbehalten. Andere Handelsmarken und Produktnamen sind Marken bzw. eingetragene Marken der
jeweiligen Inhaber.
Dieses Benutzerhandbuch
Ziel dieses Benutzerhandbuchs für den Wireless-G Notebook-Adapter mit SpeedBooster ist, Ihnen den Einstieg
in den Netzwerkbetrieb noch einfacher zu machen. Achten Sie beim Lesen dieses Benutzerhandbuchs auf
Folgendes:
Neben den Symbolen finden Sie Definitionen für technische Begriffe, die in folgender Form dargestellt werden:
Alle Abbildungen (Diagramme, Bildschirmdarstellungen und andere Bilder) sind mit einer Abbildungsnummer und
einer Kurzbeschreibung versehen (siehe folgendes Beispiel):
Die Abbildungsnummern und die zugehörigen Kurzbeschreibungen finden Sie auch im Inhalt unter
„Abbildungsverzeichnis“.
Dieses Ausrufezeichen kennzeichnet eine Warnung und weist
darauf hin, dass unter bestimmten Umständen Schäden an
Ihrem Eigentum oder am Adapter verursacht werden können.
Wort: Definition.
Dieses Häkchen kennzeichnet einen Hinweis, den Sie bei
Verwendung des Adapters besonders beachten sollten.
Dieses Fragezeichen dient als Erinnerung an bestimmte
Schritte, die bei Verwendung des Adapters durchzuführen sind.
Abbildung 0-1: Kurzbeschreibung der Abbildung
WPC54GS-DE-UG-40410NC KL

Wireless-G Notebook-Adapter mit SpeedBooster
Inhalt
Kapitel 1: Einführung 1
Willkommen 1
Der Inhalt dieses Handbuchs 2
Kapitel 2: Planen Ihres Wireless-Netzwerks 4
Netzwerktopologie 4
Roaming 4
Netzwerkanordnung 5
Kapitel 3: Beschreibung des Wireless-G Notebook-Adapters 6
Die LED-Anzeige 6
Kapitel 4: Software-Installation und -Konfiguration 7
Der Installationsvorgang 8
Kapitel 5: Hardware-Installation 12
Anschließen des Adapters 12
Kapitel 6: Verwendung des Wireless-Netzwerkmonitors 13
Zugriff auf den WLAN-Monitor 13
Verbindungsdaten 13
Site Survey (Netzwerksuche) 16
Profiles (Profile) 17
Erstellen eines neuen Profils 18
Appendix A: Fehlerbehebung 30
Behebung häufig auftretender Probleme 30
Häufig gestellte Fragen 31
Appendix B: Sicherheit im Wireless-Netzwerkbetrieb 34
Vorsichtsmaßnahmen 34
Sicherheitsrisiken für Wireless-Netzwerke 34
Appendix C: Windows-Hilfe 37
Appendix D: Glossar 38
Appendix E: Spezifikationen 45
Appendix F: Garantieinformationen 46
Appendix G: Zulassungsinformationen 48
Appendix H: Kontaktinformationen 54

Wireless-G Notebook-Adapter mit SpeedBooster
Abbildungen
Abbildung 3-1: Vorderseite 6
Abbildung 4-1: Das Willkommensfenster des Setup-Assistenten 7
Abbildung 4-2: Lizenzvereinbarung des Setup-Assistenten 8
Abbildung 4-3: Das Fenster „Wireless Mode“ (Wireless-Modus) des Setup-Assistenten 8
Abbildung 4-4: Das Fenster „Ad-Hoc Mode“ (Ad-Hoc-Modus) des Setup-Assistenten 9
Abbildung 4-5: Das Fenster „WEP“ des Setup-Assistenten 9
Abbildung 4-6: Das Fenster „WPA-PSK“ des Setup-Assistenten 10
Abbildung 4-7: Das Fenster „Check Settings“ (Überprüfen von Einstellungen)
des Setup-Assistenten 10
Abbildung 4-8: Das Fenster „Congratulations“ (Herzlichen Glückwunsch) des
Setup-Assistenten 11
Abbildung 5-1: So installieren Sie den Adapter in Ihrem Notebook 12
Abbildung 6-1: Link Information (Verbindungsdaten) 13
Abbildung 6-2: Weitere Informationen - Netzwerkeinstellungen 14
Abbildung 6-3: Weitere Informationen - Netzwerkstatistiken 15
Abbildung 6-4: Site Survey (Netzwerksuche) 16
Abbildung 6-5: Profiles (Profile) 17
Abbildung 6-6: Importieren eines Profils 17
Abbildung 6-7: Exportieren eines Profils 17
Abbildung 6-8: Erstellen eines neuen Profils 18
Abbildung 6-9: Profilnamen eingeben 18
Abbildung 6-10: Wireless-Modus für neues Profil 19
Abbildung 6-11: Ad-Hoc Mode Settings (Einstellungen für den Ad-Hoc-Modus) 19
Abbildung 6-12: Network Settings (Netzwerkeinstellungen) 20
Abbildung 6-13: Sicherheit im Wireless-Netzwerkbetrieb für neues Profil 21
Abbildung 6-14: WEP-Einstellung für neues Profil 21
Abbildung 6-15: WPA-PSK-Einstellungen 22
Abbildung 6-16: TKIP-Einstellungen 22
Abbildung 6-17: WPA RADIUS-Einstellungen 23
Abbildung 6-18: Verschlüsselungstyp 23

Wireless-G Notebook-Adapter mit SpeedBooster
Abbildung 6-19: EAP-TLS-Authentifizierung 24
Abbildung 6-20: EAP-TTLS-Authentifizierung 24
Abbildung 6-21: EAP-MD5-Authentifizierung 25
Abbildung 6-22: EAP-PEAP-Authentifizierung 25
Abbildung 6-23: EAP-LEAP-Authentifizierung 25
Abbildung 6-24: RADIUS-Einstellungen 26
Abbildung 6-25: EAP-TLS-Authentifizierung 26
Abbildung 6-26: EAP-TTLS-Authentifizierung 27
Abbildung 6-27: EAP-MD5-Authentifizierung 27
Abbildung 6-28: EAP-PEAP-Authentifizierung 28
Abbildung 6-29: LEAP-Authentifizierung 28
Abbildung 6-30: Confirm New Settings (Bestätigen neuer Einstellungen) 29
Abbildung 6-31: Congratulations! (Herzlichen Glückwunsch!) 29

1
Kapitel 1: Einführung
Willkommen
Wireless-G Notebook-Adapter mit SpeedBooster
Kapitel 1: Einführung
Willkommen
Vielen Dank, dass Sie sich für einen Wireless-G Notebook-Adapter mit SpeedBooster entschieden haben.
Mit diesem Adapter wird Ihr Wireless-Netzwerk noch schneller und einfacher als je zuvor.
Wie alle Wireless-Produkte ermöglicht dieser Adapter größere Reichweiten und mehr Mobilität in Ihrem Wireless-
Netzwerk. Der Adapter kommuniziert über den 54 MBit/s-Wireless-Standard 802.11g, der nahezu fünfmal
schneller ist als 802.11b. Da jedoch das gleiche 2,4-GHz-Frequenzband verwendet wird, kann der Adapter auch
mit dem häufig eingesetzten 11 MBit/s-Standard 802.11b kommunizieren.
Mit Wireless-Karten und -Adaptern ausgerüstete PCs können ganz ohne lästige Kabel kommunizieren. Indem
sie innerhalb ihres Übertragungsradius dieselben Wireless-Einstellungen verwenden, bilden sie ein Wireless-
Netzwerk.
Der Setup-Assistent führt Sie Schritt für Schritt durch die Konfiguration des Adapters auf die Einstellungen Ihres
Netzwerks. Stecken Sie den Adapter nun einfach in den PC-Kartensteckplatz des Notebooks, und schon haben
Sie von Ihrem Notebook-Computer aus Zugriff auf das Netzwerk - und Sie bleiben dabei uneingeschränkt mobil.
Sobald Sie angeschlossen sind, können Sie auf Ihre E-Mails und das Internet zugreifen und Dateien und andere
Ressourcen wie beispielsweise Drucker und Netzwerkspeicherplatz mit anderen Computern im Netzwerk
gemeinsam nutzen. Und zu Hause auf der Terrasse steht Ihnen das Internet und Instant Messaging zum Chatten
mit Freunden zur Verfügung. Ihre Wireless-Verbindung wird durch WEP-Verschlüsselung mit bis zu 128 Bit
geschützt.
Sie können sich auch mit einem der zahlreichen öffentlichen „Wireless Hotspots“ verbinden, von denen immer
mehr in Cafés, auf Flughäfen, in Hotels und in Konferenzzentren eingerichtet werden. Und da diese „Hotspots“
den neuen äußerst leistungsfähigen Wireless-G-Standard verwenden, stehen Ihnen die Vorteile der höheren
Übertragungsraten zur Verfügung.
Schließen Sie sich mit dem Wireless-G Notebook-Adapter mit SpeedBooster von Linksys an die heutigen
standardmäßigen 802.11b-Netzwerke an, und Sie sind für die Zukunft gerüstet.
802.11b: IEEE-Standard für den Wireless-
Netzwerkbetrieb, der eine maximale
Datenübertragungsrate von 11 MBit/s sowie
eine Betriebsfrequenz von 2,4 GHz festlegt.
Adapter: Ein Gerät, mit dem Ihr Computer
Netzwerkfunktionalität erhält.
Netzwerk: Mehrere Computer oder Geräte, die
miteinander verbunden sind, damit Benutzer
Daten gemeinsam nutzen, speichern und
untereinander übertragen können.
802.11b: IEEE-Standard für den Wireless-
Netzwerkbetrieb, der eine maximale
Datenübertragungsrate von 11 MBit/s sowie
eine Betriebsfrequenz von 2,4 GHz festlegt.

2
Kapitel 1: Einführung
Der Inhalt dieses Handbuchs
Wireless-G Notebook-Adapter mit SpeedBooster
Der Inhalt dieses Handbuchs
In diesem Benutzerhandbuch sind die zur Installation und Verwendung des Wireless-G Notebook-Adapters mit
SpeedBooster erforderlichen Schritte aufgeführt.
• Kapitel 1: Einführung
In diesem Kapitel werden die Anwendungen des Adapters sowie dieses Benutzerhandbuch beschrieben.
• Kapitel 2: Planen Ihres Wireless-Netzwerks
In diesem Kapitel werden einige der Grundlagen des Wireless-Netzwerkbetriebs erläutert.
• Kapitel 3: Beschreibung des Wireless-G Notebook-Adapters
In diesem Kapitel werden die physischen Merkmale des Adapters beschrieben.
• Kapitel 4: Software-Installation und -Konfiguration
In diesem Kapitel finden Sie Anleitungen zum Installieren des Setup-Assistenten des Adapters sowie zum
Konfigurieren des Adapters
• Kapitel 5: Hardware-Installation
In diesem Kapitel finden Sie Anleitungen zum Anschließen des Adapters an Ihren PC.
• Kapitel 6: Verwendung des WLAN-Monitors
In diesem Kapitel wird die Verwendung des WLAN-Monitors des Adapters beschrieben.
• Anhang A: Fehlerbehebung
In diesem Anhang werden einige Probleme und Lösungsansätze sowie häufig gestellte Fragen im
Zusammenhang mit der Installation und Verwendung des Adapters erörtert.
• Anhang B: Sicherheit im Wireless-Netzwerkbetrieb
In diesem Anhang werden Sicherheitsfragen erläutert, die den Wireless-Netzwerkbetrieb betreffen, sowie
Maßnahmen aufgezeigt, mit denen Sie Ihr Wireless-Netzwerk schützen können.
• Anhang C: Windows-Hilfe
In diesem Anhang wird beschrieben, wie Sie in der Windows-Hilfe Anleitungen und Informationen zum
Netzwerkbetrieb, wie beispielsweise zur Installation des TCP/IP-Protokolls, finden.
• Anhang D: Glossar
In diesem Anhang finden Sie ein kurzes Glossar mit häufig verwendeten Begriffen aus dem Bereich
Netzwerkbetrieb.
• Anhang E: Spezifikationen
In diesem Anhang sind die technischen Spezifikationen des Adapters aufgeführt.

3
Kapitel 1: Einführung
Der Inhalt dieses Handbuchs
Wireless-G Notebook-Adapter mit SpeedBooster
• Anhang F: Garantieinformationen
Dieser Anhang enthält die Garantieinformationen für den Adapter.
• Anhang G: Zulassungsinformationen
In diesem Anhang sind die für den Adapter geltenden Zulassungsinformationen aufgeführt.
• Anhang H: Kontaktinformationen
In diesem Anhang finden Sie Kontaktinformationen zu einer Reihe von Linksys Ressourcen, darunter der
Kundendienst.

4
Kapitel 2: Planen Ihres Wireless-Netzwerks
Netzwerktopologie
Wireless-G Notebook-Adapter mit SpeedBooster
Kapitel 2: Planen Ihres Wireless-Netzwerks
Netzwerktopologie
Bei einem Wireless-Netzwerk handelt es sich um eine Gruppe von Computern, die jeweils über einen Wireless-
Adapter verfügen. Computer in einem Wireless-Netzwerk müssen so konfiguriert sein, dass sie den gleichen
Funkkanal verwenden. Es können mehrere PCs, die über Wireless-Karten oder -Adapter verfügen, miteinander
kommunizieren und so ein Ad-Hoc-Netzwerk bilden.
Mit Wireless-Adaptern von Linksys erhalten Benutzer bei Verwendung eines Access Point oder eines Wireless-
Routers außerdem Zugang zu verdrahteten Netzwerken erhalten. Ein integriertes drahtloses und verdrahtetes
Netzwerk wird als Infrastruktur-Netzwerk bezeichnet. Wireless-PCs können in einem Infrastruktur-Netzwerk über
einen Access Point oder einen Wireless-Router mit jedem beliebigen Computer in einer verdrahteten Netzwerk-
Infrastruktur kommunizieren.
Mit einer Infrastruktur-Konfiguration erweitern Sie nicht nur die Zugriffsmöglichkeiten von Funk-PCs auf
verdrahtete Netzwerke, Sie können den effektiven Wireless-Übertragungsbereich außerdem durch zwei drahtlose
Adapter-PCs verdoppeln. Da mit einem Access Point Daten innerhalb eines Netzwerks weitergeleitet werden
können, kann der Übertragungsbereich in einem Infrastruktur-Netzwerk verdoppelt werden.
Roaming
Der Infrastruktur-Modus unterstützt auch Roaming-Funktionen für mobile Benutzer. Roaming bedeutet, dass Sie
Ihren Wireless-PC innerhalb Ihres Netzwerkes verschieben können und der Access Point das Signal des Wireless-
PCs aufnimmt, vorausgesetzt, beide verwenden die gleichen Kanäle und SSIDs.
Bevor Sie die Roaming-Funktion aktivieren, wählen Sie einen geeigneten Funkkanal sowie einen optimalen
Standort für Ihren Access Point aus. Mit einer geeigneten Positionierung des Access Point und einem klaren
Funksignal erreichen Sie eine erhebliche Leistungssteigerung.
Infrastruktur: Ein Wireless-Netzwerk, das über
einen Access Point mit einem verdrahteten
Netzwerk verbunden ist.
Ad-Hoc: Eine Gruppe von Wireless-Geräten,
die direkt und ohne Access Point miteinander
kommunizieren (Peer-to-Peer).
Roaming: Die Möglichkeit, mit einem Wireless-
Gerät aus einem Access Point-Bereich in einen
anderen zu wechseln, ohne die Verbindung zu
unterbrechen.
SSID: Der Name Ihres Wireless-Netzwerks.
Topologie: Die physische Anordnung eines
Netzwerks.

5
Kapitel 2: Planen Ihres Wireless-Netzwerks
Netzwerkanordnung
Wireless-G Notebook-Adapter mit SpeedBooster
Netzwerkanordnung
Die Wireless Access Points und Wireless-Router von Linksys wurden zur Verwendung mit 802.11a-, 802.11b- und
802.11g-Produkten entwickelt. Da 802.11g-Produkte mit dem 802.11b-Standard kommunizieren können und
einige Produkte sowohl „a“ als auch „g“ verkörpern, können Produkte, die diese Standards verwenden,
miteinander kommunizieren.
Access Points und Wireless-Router sind mit 802.11a-, 802.11b- und 802.11g-Adaptern kompatibel, z. B. den
PC-Karten für Ihren Laptop, der PCI-Karte für Ihren Desktop-PC und USB-Adaptern, wenn Sie den Komfort der
USB-Konnektivität genießen möchten. Wireless-Produkte kommunizieren auch mit dem Wireless-Druckserver.
Wenn Sie Ihr Wireless-Netzwerk mit Ihrem verdrahteten Netzwerk verbinden möchten, können Sie die Netzwerk-
Ports der Access Points und der Wireless-Router mit jedem beliebigen Switch oder Router von Linksys verbinden.
Mit diesen Produkten, wie mit vielen weiteren Linksys Produkten auch, stehen Ihnen grenzenlose
Netzwerkbetriebsoptionen offen. Weitere Informationen zu Wireless-Produkten finden Sie auf der Website von
Linksys unter www.linksys.com/international.
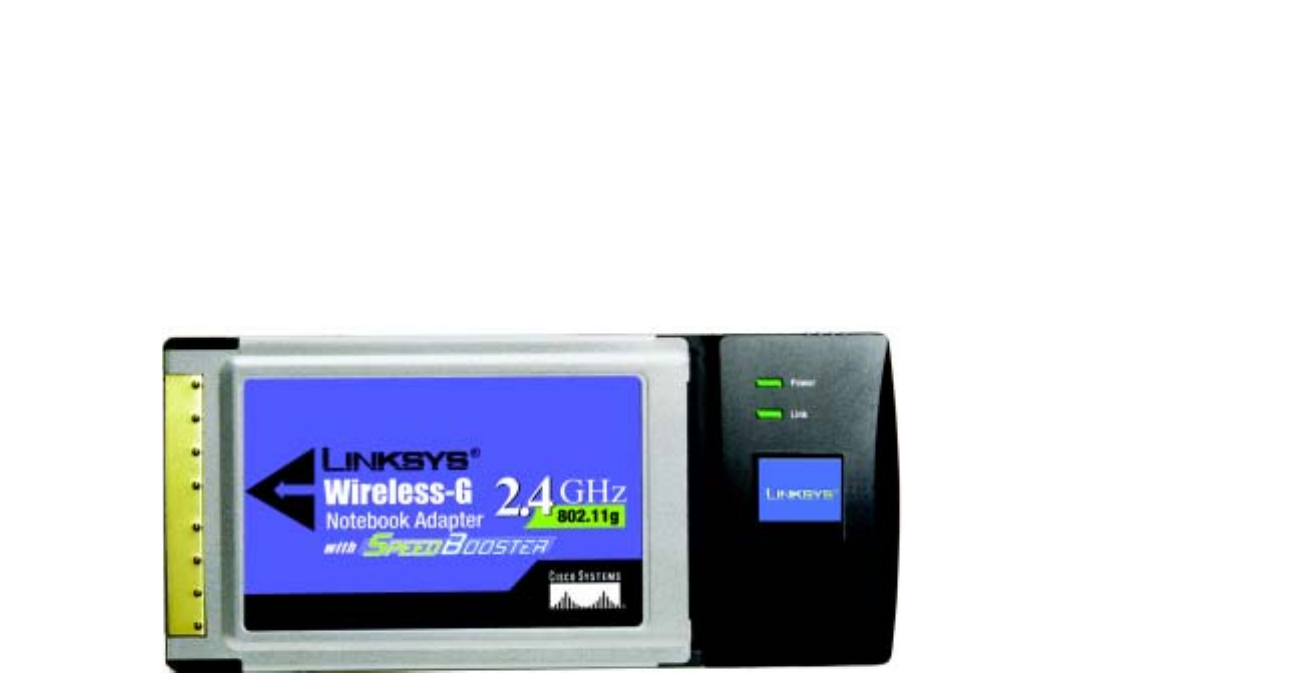
6
Kapitel 3: Beschreibung des Wireless-G Notebook-Adapters
Die LED-Anzeige
Wireless-G Notebook-Adapter mit SpeedBooster
Kapitel 3: Beschreibung des Wireless-G
Notebook-Adapters
Die LED-Anzeige
Auf den LEDs werden Informationen über die Netzwerkaktivität des Netzwerk-Adapters angezeigt.
Power (Netzstrom) Grün. Die LED für den Netzstrom leuchtet auf, wenn der Adapter eingeschaltet wird.
Link (Verbindung) Grün. Die LED für die Verbindung leuchtet auf, wenn der Adapter über eine aktive Verbindung
verfügt.
Abbildung 3-1: Vorderseite

7
Kapitel 4: Software-Installation und -Konfiguration
Wireless-G Notebook-Adapter mit SpeedBooster
Kapitel 4: Software-Installation und -Konfiguration
Der Setup-Assistent für den Wireless-G Notebook-Adapter führt Sie durch den Installationsvorgang.
Der Setup-Assistent installiert den WLAN-Monitor sowie den Treiber und konfiguriert den Adapter.
Legen Sie die Setup Wizard CD-ROM (Setup-Assistenten-CD-ROM) in Ihr CD-ROM-Laufwerk ein. Der Setup-
Assistent sollte automatisch gestartet und das Willkommensfenster angezeigt werden. Wenn dies nicht der Fall
ist, klicken Sie auf die Schaltfläche Start und wählen Sie Ausführen aus. Geben Sie im daraufhin angezeigten
Feld D:\setup.exe ein (wobei „D“ für den Buchstaben des CD-ROM-Laufwerks steht). Wählen Sie die gewünschte
Sprache (Englisch, Französisch oder Deutsch) aus, indem Sie in dem zuerst angezeigten Fenster auf die
entsprechende Fahne klicken.
Im Willkommensfenster stehen Ihnen folgende Optionen zur Verfügung:
Install (Installieren) - Klicken Sie auf die Schaltfläche Install (Installieren), um den Installationsvorgang für die
Software zu starten.
User Guide (Handbuch) - Klicken Sie auf die Schaltfläche User Guide (Handbuch), um das Benutzerhandbuch als
PDF-Datei zu öffnen.
Exit (Beenden) - Klicken Sie auf die Schaltfläche Exit (Beenden), um den Setup-Assistenten zu beenden.
HINWEIS: Sie müssen den Setup-Assistenten ausführen, um die Software zu
installieren, bevor Sie die Hardware installieren können.
Abbildung 4-1: Das Willkommensfenster des
Setup-Assistenten
8
Kapitel 4: Software-Installation und -Konfiguration
Der Installationsvorgang
Wireless-G Notebook-Adapter mit SpeedBooster
Der Installationsvorgang
1. Um den Adapter zu installieren, klicken Sie im Willkommensfenster auf die Schaltfläche Install (Installieren).
2. Klicken Sie nach Lesen der Lizenzvereinbarung auf die Schaltfläche Next (Weiter), wenn Sie diese
akzeptieren bzw. auf Cancel (Abbrechen), um den Installationsvorgang zu beenden.
3. Der Setup-Assistent fordert Sie auf, einen Netzwerkmodus auszuwählen. Klicken Sie auf die Schaltfläche
Infrastructure Mode (Infrastrukturmodus), wenn Ihre drahtlosen Computer mit Hilfe eines drahtlosen
Zugriffspunkts mit Computern auf einem verdrahteten Netzwerk vernetzt werden sollen. Klicken Sie auf die
Optionsschaltfläche Ad-Hoc Mode (Ad-Hoc-Modus), wenn mehrere drahtlose Computer direkt miteinander
vernetzt werden sollen.
Geben Sie in das Feld SSID (SS-ID) die SS-ID Ihres drahtlosen Netzwerks ein. Die SSID muss für alle Geräte im
Netzwerk identisch sein. Die Standardeinstellung ist linksys (Kleinbuchstaben). Klicken Sie auf Next (Weiter).
Abbildung 4-2: Lizenzvereinbarung des Setup-Assistenten
Abbildung 4-3: Das Fenster „Wireless Mode“
(Wireless-Modus) des Setup-Assistenten
HINWEIS: Die SSIDs des Netzwerks müssen im Netzwerk eindeutig sein und
innerhalb des Netzwerks bei allen Geräten identisch sein.

9
Kapitel 4: Software-Installation und -Konfiguration
Der Installationsvorgang
Wireless-G Notebook-Adapter mit SpeedBooster
4. Wenn Sie die Option Infrastructure Mode (Infrastrukturmodus) ausgewählt haben, fahren Sie jetzt mit
Schritt 5 fort. Wenn Sie die Option Ad-Hoc Mode (Ad-Hoc-Modus) ausgewählt haben, bestimmen Sie den
richtigen Betriebskanal für Ihr Netzwerk. Wählen Sie aus dem Dropdown-Menü den Netzwerkmodus aus.
Klicken Sie auf Next (Weiter), und fahren Sie mit Schritt 5 fort. Klicken Sie auf die Schaltfläche Back (Zurück),
falls Sie die vorgenommenen Einstellungen noch ändern möchten.
Channel (Kanal) - Der von Ihnen angegebene Kanal muss mit dem Kanal übereinstimmen, den Sie auf den
anderen Geräten Ihres drahtlosen Netzwerks eingestellt haben. Wenn Sie nicht sicher sind, welchen Kanal Sie
verwenden sollen, wählen Sie den Standardkanal aus.
Network Mode (Netzwerkmodus) - Wenn Sie Mixed Mode (Gemischter Modus) auswählen, werden sowohl
Wireless-G- als auch Wireless-B-Computer auf dem Netzwerk zugelassen, wobei jedoch die Geschwindigkeit
beeinträchtigt sein kann. Die maximale Geschwindigkeit erhalten Sie, wenn Sie den G-Only Mode (Nur
G-Modus) auswählen, aber es werden dann keine Wireless-B-Benutzer auf dem Netzwerk zugelassen.
5. Wählen Sie den Sicherheitstyp aus, den Sie verwenden möchten: 64-Bit WEP,128-Bit WEP oder WPA-PSK.
Für alle Geräte im Netzwerk muss der gleiche Typ verwendet werden.
WEP
WEP - Um die WEP-Verschlüsselung zu verwenden, wählen Sie aus dem Dropdown-Menü 64 Bit- oder
128 Bit-Zeichen aus, und geben Sie eine Passphrase oder einen Schlüssel ein.
Passphrase - Anstatt den WEP-Schlüssel manuell einzugeben, können Sie eine Passphrase in das Feld
Passphrase eingeben, so dass der WEP-Schlüssel automatisch generiert wird. Hierbei wird zwischen Groß-
und Kleinschreibung unterschieden. Die Länge von 16 alphanumerischen Zeichen darf nicht überschritten
werden. Diese Passphrase muss mit den Passphrasen Ihrer anderen Wireless-Netzwerk-Geräte
übereinstimmen und ist nur mit Wireless-Produkten von Linksys kompatibel. (Wenn Sie Wireless-Produkte
anderer Anbieter verwenden, geben Sie den WEP-Schlüssel manuell bei den entsprechenden Produkten ein.)
WEP Key (WEP-Schlüssel) - Der eingegebene WEP-Schlüssel muss mit dem WEP-Schlüssel Ihres Wireless-
Netzwerks übereinstimmen. Wenn Sie die 64-Bit-WEP-Verschlüsselung verwenden, muss die Schlüssellänge
genau 10 hexadezimale Zeichen betragen. Wenn Sie die 128-Bit-WEP-Verschlüsselung verwenden, muss die
Schlüssellänge genau 26 hexadezimale Zeichen betragen. Gültige hexadezimale Zeichen sind Zeichen von ‚0‘
bis ‚9‘ und von ‚A‘ bis ‚F‘.
Transmit Key (Übertragungsschlüssel) - Die Standardnummer des Übertragungsschlüssels ist 1. Wenn der
Access Point bzw. der Wireless Router Ihres Netzwerks die Nummern 2, 3 oder 4 als Übertragungsschlüssel
verwendet, wählen Sie die entsprechende Nummer aus dem Dropdown-Menü Transmit Key
(Übertragungsschlüssel) aus.
Abbildung 4-4: Das Fenster „Ad-Hoc Mode“ (Ad-Hoc-Modus)
des Setup-Assistenten
Abbildung 4-5: Das Fenster „WEP“ des Setup-Assistenten

10
Kapitel 4: Software-Installation und -Konfiguration
Der Installationsvorgang
Wireless-G Notebook-Adapter mit SpeedBooster
Authentication (Authentifizierung) - Standardmäßig ist die Option Auto ausgewählt, wobei Shared Key
(Freigebener Schlüssel) bzw. Open system (Offenes System) automatisch erkannt werden. Shared Key
(Freigegebener Schlüssel) bedeutet, dass der Absender und der Empfänger einen gemeinsamen WEP-
Schlüssel zur Authentifizierung verwenden. Open system (Offenes System) bedeutet, dass der Absender und
der Empfänger keinen gemeinsamen WEP-Schlüssel zur Authentifizierung verwenden. Alle Points in Ihrem
Netzwerk müssen denselben Authentifizierungstyp verwenden.
Klicken Sie auf die Schaltfläche Next (Weiter), um fortzufahren. Klicken Sie auf die Schaltfläche Back
(Zurück), um zum vorherigen Fenster zurückzukehren. Klicken Sie auf die Schaltfläche Help (Hilfe), um
weitere Informationen zu erhalten.
WPA-PSK
Für WPA-PSK stehen Ihnen zwei Verschlüsselungsmethoden (TKIP und AES) mit dynamischen
Verschlüsselungsschlüsseln zur Verfügung.
Wählen Sie den Algorithmus TKIP oder AES als Verschlüsselungstyp aus. Geben Sie einen gemeinsamen
WPA-Schlüssel von 8 bis 63 Zeichen in das Feld Passphrase ein.
Klicken Sie auf die Schaltfläche Next (Weiter), um fortzufahren. Klicken Sie auf die Schaltfläche Back
(Zurück), um zum vorherigen Fenster zurückzukehren. Klicken Sie auf die Schaltfläche Help (Hilfe), um
weitere Informationen zu erhalten.
6. Der Setup-Assistent fordert Sie auf, Ihre Einstellungen zu überprüfen, bevor mit dem Installieren von Dateien
begonnen wird. Wenn Sie mit der Auswahl der Einstellungen zufrieden sind, klicken Sie auf Next (Weiter).
Andernfalls klicken Sie auf Back (Zurück), um die Einstellungen zu ändern.
Abbildung 4-6: Das Fenster „WPA-PSK“ des
Setup-Assistenten
Abbildung 4-7: Das Fenster „Check Settings“ (Überprüfen
von Einstellungen) des Setup-Assistenten

11
Kapitel 4: Software-Installation und -Konfiguration
Der Installationsvorgang
Wireless-G Notebook-Adapter mit SpeedBooster
7. Nach erfolgreicher Installation der Software wird das Fenster Congratulations (Herzlichen Glückwunsch)
angezeigt. Klicken Sie auf Exit (Beenden).
Fahren Sie mit Kapitel 5 „Hardware-Installation“ fort.
Abbildung 4-8: Das Fenster „Congratulations“ (Herzlichen
Glückwunsch) des Setup-Assistenten
12
Kapitel 5: Hardware-Installation
Anschließen des Adapters
Wireless-G Notebook-Adapter mit SpeedBooster
Kapitel 5: Hardware-Installation
Anschließen des Adapters
1. Schalten Sie das Notebook aus.
2. Suchen Sie nach einem verfügbaren CardBus-Steckplatz auf Ihrem Notebook.
3. Stecken Sie den Adapter mit der Pin-Seite des Steckers (Etikett nach oben) in den CardBus-Steckplatz,
bis er einrastet.
4. Starten Sie das Notebook neu. Sobald der Adapter korrekt installiert ist, sollte die Netz-LED leuchten.
5. Windows beginnt mit dem Kopieren der Treiberdateien auf den Computer. Legen Sie bei Aufforderung
die Original-Windows-CD-ROM ein, und geben Sie den entsprechenden Speicherort an (z. B. D:\).
Die Installation des Wireless-G Notebook-Adapters ist hiermit abgeschlossen.
Wenn Sie die Verbindungsdaten überprüfen, nach drahtlosen Netzwerken suchen oder
weitere Änderungen in der Konfiguration vornehmen möchten, konsultieren Sie
„Kapitel 6: Verwendung des Wireless-Netzwerkmonitors“.
Abbildung 5-1: So installieren Sie den Adapter
in Ihrem Notebook
HINWEIS: Sie müssen den Setup-Assistenten ausführen, um die Software zu
installieren, bevor Sie die Hardware installieren können.

13
Kapitel 6: Verwendung des Wireless-Netzwerkmonitors
Zugriff auf den WLAN-Monitor
Wireless-G Notebook-Adapter mit SpeedBooster
Kapitel 6: Verwendung des Wireless-Netzwerkmonitors
Verwenden Sie den WLAN-Monitor, um die Verbindungsdaten zu überprüfen, nach verfügbaren drahtlosen
Netzwerken zu suchen oder Profile zu erstellen, die verschiedene Konfigurationseinstellungen enthalten.
Zugriff auf den WLAN-Monitor
Nach der Installation des Adapters wird das Symbol Wireless-G Notebook-Adapter WLAN Monitor in Ihrer
Taskleiste angezeigt. Doppelklicken Sie auf das Symbol.
Das Fenster Link Information (Verbindungsdaten) wird angezeigt. In diesem Fenster wird Ihnen die Stärke des
aktuellen Wireless-Signals sowie die Qualität der Verbindung angezeigt. Sie können auch auf die Schaltfläche
More Information (Weitere Informationen) klicken, um zusätzliche Statusinformationen zu der aktuellen
Wireless-Verbindung anzuzeigen. Um nach verfügbaren Wireless-Netzwerken zu suchen, klicken Sie auf die
Registerkarte Site Survey (Netzwerksuche). Um Änderungen in der Konfiguration vorzunehmen, klicken Sie auf
die Registerkarte Profiles (Profile).
Verbindungsdaten
Im Fenster Link Information (Verbindungsdaten) werden der Netzwerkmodus, die Signalstärke und Informationen
zur Verbindungsqualität der aktuellen Verbindung angezeigt. Es enthält auch eine Schaltfläche für zusätzliche
Statusinformationen.
Ad-Hoc Mode (Ad-Hoc-Modus) oder Infrastructure Mode (Infrastrukturmodus) - In diesem Fenster wird
angezeigt, ob sich der Adapter momentan in Ad-Hoc-Modus oder Infrastrukturmodus befindet.
Signal Strength (Signalstärke) - In dieser Leiste wird die Signalstärke angezeigt.
Link Quality (Verbindungsqualität) - In dieser Leiste wird die Qualität der Wireless-Netzwerk-Verbindung
angezeigt.
Klicken Sie auf die Schaltfläche More Information (Weitere Informationen), um zusätzliche Informationen zur
Wireless-Netzwerk-Verbindung anzuzeigen.
Abbildung 6-1: Link Information (Verbindungsdaten)

14
Kapitel 6: Verwendung des Wireless-Netzwerkmonitors
Verbindungsdaten
Wireless-G Notebook-Adapter mit SpeedBooster
Wenn Sie auf die Schaltfläche More Information (Weitere Informationen) klicken, werden die nachfolgenden
Informationen zur Verbindung des Adapters angezeigt:
Status des Wireless-Netzwerks
Das Fenster Networks Settings (Netzwerkeinstellungen) enthält Informationen zu Ihren aktuellen
Netzwerkeinstellungen.
Wireless Network Status (Status des Wireless-Netzwerks)
Status - Der Status der Wireless-Netzwerk-Verbindung.
SSID - Dies ist der individuelle Name des Wireless-Netzwerks.
Wireless Mode (Wireless-Modus) - Der momentan verwendete Modus des Wireless-Netzwerks wird hier
angezeigt.
Transfer Rate (Übertragungsrate) - Hier wird die Datenübertragungsrate der aktuellen Verbindung angezeigt.
Channel (Kanal) - Der Kanal, auf den die Wireless-Netzwerk-Geräte eingestellt sind.
Encryption (Verschlüsselung) - Der Status der Sicherheitsfunktion.
Authentification (Authentifizierung) - Dies ist die Methode zur Authentifizierung des Wireless-Netzwerks.
Network Mode (Netzwerkmodus) - Der momentan verwendete Wireless-Modus.
IP Address (IP-Adresse) - Die IP-Adresse des Adapters.
Subnet Mask (Subnetzmaske) - Die Subnetzmaske des Adapters.
Default Gateway (Standard-Gateway) - Die Standard-Gateway-Adresse des Adapters.
DNS - Die DNS-Adresse des Adapters.
DHCP Client (DHCP-Client) - Hier wird der Status des DHCP-Client angezeigt.
MAC - Die MAC-Adresse des Access Point des Wireless-Netzwerks.
Signal Strength (Signalstärke) - In der Leiste Signal Strength (Signalstärke) wird die Signalstärke angezeigt.
Link Quality (Verbindungsqualität) - In dieser Leiste wird die Qualität der Wireless-Netzwerk-Verbindung
angezeigt.
Abbildung 6-2: Weitere Informationen -
Netzwerkeinstellungen

15
Kapitel 6: Verwendung des Wireless-Netzwerkmonitors
Verbindungsdaten
Wireless-G Notebook-Adapter mit SpeedBooster
Klicken Sie auf die Schaltfläche Statistics (Statistiken), um zu dem Fenster Network Statistics
(Netzwerkstatistiken) zu gelangen. Klicken Sie auf die Schaltfläche Back (Zurück), um zu dem ursprünglichen
Fenster Link Information (Verbindungsdaten) zurückzukehren. Klicken Sie auf die Schaltfläche Save to Profile
(Im Profil speichern), um die momentan aktive Verbindung mit einem Profil zu speichern.
Statistiken für das Wireless-Netzwerk
Das Fenster Networks Statistics (Netzwerkstatistiken) enthält Statistiken für Ihre aktuellen
Netzwerkeinstellungen.
Transmit Rate (Übertragungsrate) - Die Datenübertragungsrate der momentanen Verbindung. (Im Auto-Modus
wechselt der Adapter dynamisch zur schnellstmöglichen Datenübertragungsrate.)
Receive Rate (Empfangsrate) - Die Rate, mit der Daten empfangen werden.
Packets Received (Empfangene Datenpakete) - Hier werden die Datenpakete angezeigt, die in Echtzeit von dem
Adapter empfangen wurden, seit die Verbindung zum Wireless-Netzwerk hergestellt wurde oder seit zuletzt auf
die Schaltfläche Refresh (Aktualisieren) geklickt wurde.
Packets Transmitted (Übertragene Datenpakete) - Hier werden die Datenpakete angezeigt, die in Echtzeit von
dem Adapter übertragen wurden, seit die Verbindung zum Wireless-Netzwerk hergestellt wurde oder seit zuletzt
auf die Schaltfläche Refresh (Aktualisieren) geklickt wurde.
Empfangene Bytes - Hier werden die Bytes angezeigt, die in Echtzeit von dem Adapter empfangen wurden,
seit die Verbindung zum Wireless-Netzwerk hergestellt wurde oder seit zuletzt auf die Schaltfläche Refresh
(Aktualisieren) geklickt wurde.
Bytes Transmitted (Übertragene Bytes) - Hier werden die Bytes angezeigt, die in Echtzeit von dem Adapter
übertragen wurden, seit die Verbindung zum Wireless-Netzwerk hergestellt wurde oder seit zuletzt auf die
Schaltfläche Refresh (Aktualisieren) geklickt wurde.
Noise Level (Rauschpegel)- Hier wird der Pegel der Hintergrundgeräusche angezeigt, die das Wireless-Signal
beeinträchtigen. Eine niedrigere Zahl wird in ein Signal höherer Qualität übersetzt.
Signal Strength (Signalstärke)- Hier wird die Stärke des von der Karte empfangenen Signals angezeigt.
Driver Version (Treiberversion) - Hier wird die Treiberversion des Adapters angezeigt.
Signal Strength (Signalstärke) - In der Leiste Signal Strength (Signalstärke) wird die Signalstärke angezeigt.
Link Quality (Verbindungsqualität) - In dieser Leiste wird die Qualität der Wireless-Netzwerk-Verbindung angezeigt.
Abbildung 6-3: Weitere Informationen - Netzwerkstatistiken

16
Kapitel 6: Verwendung des Wireless-Netzwerkmonitors
Site Survey (Netzwerksuche)
Wireless-G Notebook-Adapter mit SpeedBooster
Klicken Sie auf die Schaltfläche Back (Zurück), um zu dem ursprünglichen Fenster Link Information
(Verbindungsdaten) zurückzukehren. Klicken Sie auf die Schaltfläche Status, um zu dem Fenster Network Status
(Status des Wireless-Netzwerks) zu gelangen. Klicken Sie auf die Schaltfläche Save to Profile (Im Profil
speichern), um die momentan aktive Verbindung mit einem Profil zu speichern. Klicken Sie auf die Schaltfläche
Refresh Stats (Statistiken akt.), um das Fenster zu aktualisieren.
Site Survey (Netzwerksuche)
Im Fenster Site Survey (Netzwerksuche) wird rechts in der Tabelle eine Liste von Infrastruktur- und Ad-Hoc-
Netzwerken angezeigt, die für Verbindungen verfügbar sind. In dieser Tabelle werden die SSID des Netzwerks,
der Kanal und die Qualität des Wireless-Signals, das der Adapter empfängt, dargestellt. Sie können auf SSID,
CH (Channel) [Kanal] oder Signal klicken, um nach dem entsprechenden Feld zu sortieren.
SSID - Die SSID, d. h. der individuelle Name des Wireless-Netzwerks.
CH - Der Kanal, auf dem das Netzwerk sendet.
Signal - Der Prozentsatz der Signalstärke, von 0 bis 100 %.
Site Information (Netzwerkinformationen)
Für jedes ausgewählte Netzwerk werden folgende Einstellungen aufgeführt:
SSID - Die SSID, d. h. der individuelle Name des Wireless-Netzwerks.
Wireless Mode (Wireless-Modus) - Der momentan verwendete Modus des Wireless-Netzwerks.
Channel (Kanal) - Der Kanal, auf den die Wireless-Netzwerk-Geräte eingestellt sind.
Encryption (Verschlüsselung) - Der Status der Sicherheitsfunktion.
MAC - Die MAC-Adresse des Access Point des Wireless-Netzwerks.
Refresh (Aktualisieren) - Klicken Sie auf die Schaltfläche Refresh (Aktualisieren), um eine neue Suche nach
Wireless-Geräten durchzuführen.
Connect (Verbinden) - Um eine Verbindung zu einem der Netzwerke auf der Liste zu erstellen, wählen Sie das
Wireless-Netzwerk aus, und klicken Sie auf die Schaltfläche Connect (Verbinden).
Abbildung 6-4: Site Survey (Netzwerksuche)
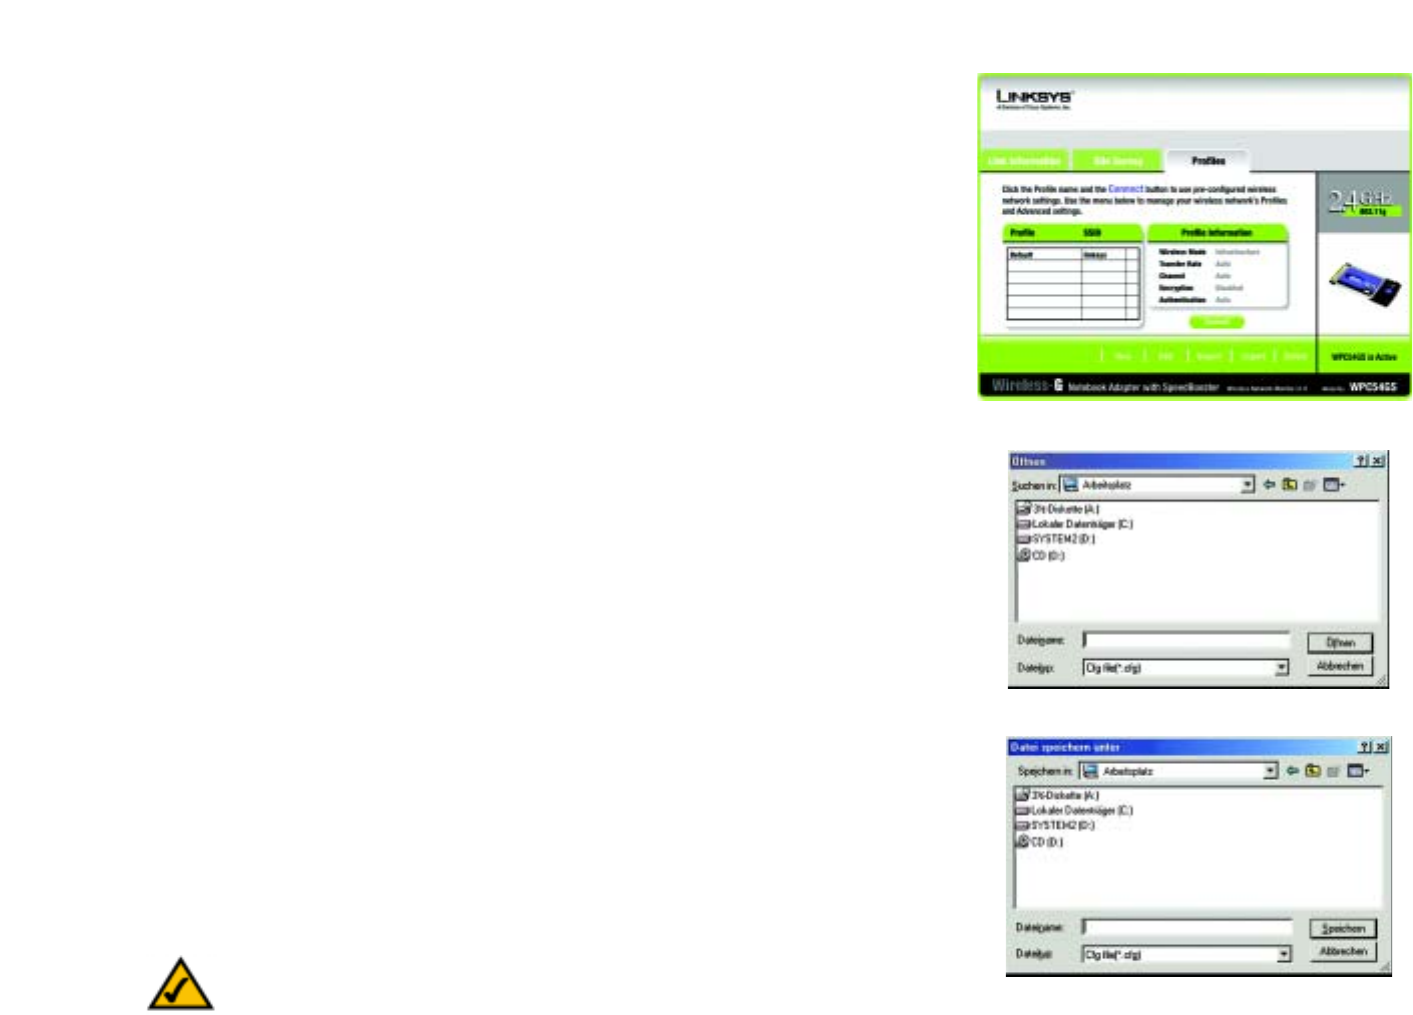
17
Kapitel 6: Verwendung des Wireless-Netzwerkmonitors
Profiles (Profile)
Wireless-G Notebook-Adapter mit SpeedBooster
Profiles (Profile)
Im Fenster Profiles (Profile) können Sie verschiedene Konfigurationsprofile für verschiedene
Netzwerkeinrichtungen speichern. In der Tabelle rechts wird eine Liste von Infrastruktur- und Ad-Hoc-
Netzwerken angezeigt, die für Verbindungen verfügbar sind. In dieser Tabelle werden der Profilname des
Netzwerks und die SSID des Wireless-Netzwerks entsprechend den Angaben des Verbindungsprofils dargestellt.
Profile Information (Profilinformationen)
Für jedes ausgewählte Profil wird Folgendes aufgeführt:
Wireless Mode (Wireless-Modus) - Der momentan verwendete Modus des Wireless-Netzwerks.
Transfer Rate (Übertragungsrate) - Der Adapter ist auf Auto-Modus eingestellt, so dass er dynamisch in die
jeweils schnellstmögliche Übertragungsmodusrate wechselt.
Channel (Kanal) - Der Kanal, auf den die Wireless-Netzwerk-Geräte eingestellt sind.
Encryption (Verschlüsselung) - Der Status der Sicherheitsfunktion.
Authentication (Authentifizierung) - Die Authentifizierungseinstellung für das Netzwerk.
Connect (Verbinden) - Um eine Verbindung zu einem Wireless-Netzwerk mit einem bestimmten Profil zu
erstellen, wählen Sie das Profil aus, und klicken Sie auf die Schaltfläche Connect (Verbinden).
New (Neu) - Klicken Sie auf die Schaltfläche New (Neu), um ein neues Profil zu erstellen. Detaillierte
Anweisungen finden Sie im nächsten Abschnitt „Erstellen eines neuen Profils“.
Edit (Bearbeiten) - Wählen Sie ein Profil aus, und klicken Sie auf die Schaltfläche Edit (Bearbeiten) um ein bereits
vorhandenes Profil zu ändern.
Import (Importieren) - Klicken Sie auf die Schaltfläche Import (Importieren), um ein Profil zu importieren, das in
einem anderen Speicherort gespeichert wurde. Wählen Sie die gewünschte Datei aus, und klicken Sie auf die
Schaltfläche Öffnen.
Export (Exportieren) - Wählen Sie das Profil aus, das Sie in einem anderen Speicherort speichern möchten, und
klicken Sie auf die Schaltfläche Export (Exportieren). Geben Sie den entsprechenden Ordner an, und klicken Sie
auf die Schaltfläche Speichern.
Delete (Löschen) - Klicken Sie auf die Schaltfläche Delete (Löschen), um ein Profil zu löschen.
Abbildung 6-5: Profiles (Profile)
Abbildung 6-6: Importieren eines Profils
Abbildung 6-7: Exportieren eines Profils
HINWEIS: Wenn Sie mehr als ein Profil exportieren möchten, müssen Sie sie
nacheinander exportieren.

18
Kapitel 6: Verwendung des Wireless-Netzwerkmonitors
Erstellen eines neuen Profils
Wireless-G Notebook-Adapter mit SpeedBooster
Erstellen eines neuen Profils
1. Klicken Sie im Fenster Profiles (Profile) auf die Schaltfläche New (Neu), um ein neues Profil zu erstellen.
2. Geben Sie einen Namen für das neue Profil ein, und klicken Sie auf die Schaltfläche OK. Klicken Sie auf die
Schaltfläche Abbrechen, um zum Fenster Profiles (Profile) zurückzukehren, ohne einen Namen einzugeben.
Abbildung 6-8: Erstellen eines neuen Profils
Abbildung 6-9: Profilnamen eingeben

19
Kapitel 6: Verwendung des Wireless-Netzwerkmonitors
Erstellen eines neuen Profils
Wireless-G Notebook-Adapter mit SpeedBooster
3. Im Fenster Wireless Mode (Wireless-Modus) stehen zwei Modi für den drahtlosen Betrieb zur Auswahl.
Klicken Sie auf die Optionsschaltfläche Infrastructure Mode (Infrastrukturmodus) wenn Ihre drahtlosen
Computer mit Hilfe eines Wireless Access Point mit Computern auf einem verdrahteten Netzwerk
kommunizieren sollen. Klicken Sie auf die Optionsschaltfläche Ad-Hoc-Modus, wenn mehrere drahtlose
Computer direkt miteinander kommunizieren sollen. Geben Sie die SSID für Ihr Netzwerk ein.
Klicken Sie auf die Schaltfläche Next (Weiter) um fortzufahren, oder klicken Sie auf die Schaltfläche Back
(Zurück), um zum vorherigen Fenster zurückzukehren.
Infrastructure Mode (Infrastruktur-Modus) - In diesem Modus können drahtlose und verdrahtete Netzwerke
über einen Access Point miteinander kommunizieren.
Ad-Hoc Mode (Ad-Hoc-Modus) - In diesem Modus können Wireless-fähige Computer direkt miteinander
kommunizieren. Es wird kein Access Point verwendet.
SSID - Der Name des Netzwerks. Die SSID muss für alle Geräte in Ihrem Wireless-Netzwerk verwendet
werden. Die Groß- und Kleinschreibung ist zu beachten. Der Name sollte eindeutig sein, um zu vermeiden,
dass andere auf Ihr Netzwerk zugreifen können.
4. Das Fenster Ad-Hoc Mode Settings (Einstellungen für den Ad-Hoc-Modus) wird angezeigt. Wenn Sie die
Option Infrastructure Mode (Infrastrukturmodus) ausgewählt haben, fahren Sie jetzt mit Schritt 5 fort. Wenn
Sie die Option Ad-Hoc Mode (Ad-Hoc-Modus) ausgewählt haben, wählen Sie im Dropdown-Menü Channel
(Kanal) den richtigen Betriebskanal für Ihr Netzwerk aus. Wählen Sie dann aus dem Dropdown-Menü den
Network Mode (Netzwerkmodus) aus. Klicken Sie auf Next (Weiter), und fahren Sie mit Schritt 5 fort. Klicken
Sie auf die Schaltfläche Back (Zurück), falls Sie die vorgenommenen Einstellungen noch ändern möchten.
Channel (Kanal) - Der von Ihnen angegebene Kanal muss mit dem Kanal übereinstimmen, den Sie auf den
anderen Geräten Ihres drahtlosen Netzwerks eingestellt haben. Wenn Sie nicht sicher sind, welchen Kanal Sie
verwenden sollen, wählen Sie den Standardkanal aus.
Network Mode (Netzwerkmodus) - Wenn Sie Mixed Mode (Gemischter Modus) auswählen, werden sowohl
Wireless-G- als auch Wireless-B-Computer auf dem Netzwerk zugelassen, wobei jedoch die Geschwindigkeit
beeinträchtigt sein kann. Die maximale Geschwindigkeit erhalten Sie, wenn Sie den G-Only Mode (Nur
G-Modus) auswählen, aber es werden dann keine Wireless-B-Benutzer auf dem Netzwerk zugelassen.
Wählen Sie B-Only Mode (Nur B-Modus) aus, wenn nur Wireless-B-Benutzer vorhanden sind. Abbildung 6-11: Ad-Hoc Mode Settings
(Einstellungen für den Ad-Hoc-Modus)
Abbildung 6-10: Wireless-Modus für neues Profil

20
Kapitel 6: Verwendung des Wireless-Netzwerkmonitors
Erstellen eines neuen Profils
Wireless-G Notebook-Adapter mit SpeedBooster
5. Das Fenster Network Settings (Netzwerkeinstellungen) wird als nächstes angezeigt. Wenn Ihr Netzwerk einen
DHCP-Server enthält, klicken Sie auf die Optionsschaltfläche neben Obtain an IP address automatically
(DHCP) [IP-Adresse automatisch beziehen (DHCP)]. Klicken Sie auf die Schaltfläche Next (Weiter), um
fortzufahren, oder klicken Sie auf die Schaltfläche Cancel, (Abbrechen), um zu dem Fenster Profiles (Profile)
zurückzukehren.
Wenn Ihr Netzwerk keinen DHCP-Server enthält, klicken Sie auf die Optionsschaltfläche neben Specify the
IP Setting (IP-Einstellung angeben). Geben Sie eine IP-Adresse, eine Subnetzmaske, Standard-Gateway und
DNS ein, die für Ihr Netzwerk geeignet sind. Geben Sie in diesem Fenster die IP Address (IP-Adresse) und
Subnet Mask (Subnetzmaske) ein. Wenn Sie sich nicht sicher sind, welches die korrekten Einstellungen
für das Standard-Gateway und die DNS-Adresse sind, lassen Sie diese Felder leer. Klicken Sie auf die
Schaltfläche Next (Weiter), um fortzufahren, oder klicken Sie auf die Schaltfläche Cancel, (Abbrechen),
um zu dem Fenster Profiles (Profile) zurückzukehren.
IP Address (IP-Adresse) - Diese IP-Adresse muss im Netzwerk eindeutig sein.
Subnet Mask (Subnetzmaske) - Die Subnetzmaske des Adapters muss mit der Subnetzmaske Ihres
verdrahteten Netzwerks übereinstimmen.
Default Gateway (Standard-Gateway) - Geben Sie die IP-Adresse des Gateway Ihres Netzwerks hier ein.
DNS 1 und DNS 2 - Geben Sie die DNS-Adresse Ihres (verdrahteten) Ethernet-Netzwerks hier ein.
Abbildung 6-12: Network Settings (Netzwerkeinstellungen)

21
Kapitel 6: Verwendung des Wireless-Netzwerkmonitors
Erstellen eines neuen Profils
Wireless-G Notebook-Adapter mit SpeedBooster
6. Das Fenster Wireless Security (Sicherheit im Wireless-Netzwerkbetrieb) wird angezeigt. Wählen Sie als
Encryption Method (Verschlüsselungsmethode) WEP,WPA-PSK,WPA Radius oder Radius aus. WEP steht
für Wired Equivalent Privacy, WPA-PSK steht für Wi-Fi Protected Access Pre-Shared Key (WPA Vorläufiger
gemeinsamer Schlüssel); dies ist ein höherer Sicherheitsstandard als die WEP-Verschlüsselung; und RADIUS
steht für Remote Authentication Dial-In User Service. Wenn Sie keine Verschlüsselung verwenden möchten,
wählen Sie Disabled (Deaktiviert) aus. Klicken Sie dann auf die Schaltfläche Next (Weiter), um fortzufahren,
oder klicken Sie auf die Schaltfläche Back (Zurück), um zum vorherigen Fenster zurückzukehren.
WEP
WEP - Um die WEP-Verschlüsselung zu verwenden, wählen Sie 64 Bit- oder 128 Bit-Zeichen aus dem
Dropdown-Menü aus, und geben Sie eine Passphrase oder einen Schlüssel ein.
Authentication (Authentifizierung) - Standardmäßig ist die Option Auto ausgewählt, wobei Shared Key
(Freigebener Schlüssel) bzw. Open system (Offenes System) automatisch erkannt werden. Shared Key
(Freigegebener Schlüssel) bedeutet, dass der Absender und der Empfänger einen gemeinsamen WEP-
Schlüssel zur Authentifizierung verwenden. Open system (Offenes System) bedeutet, dass der Absender
und der Empfänger keinen gemeinsamen WEP-Schlüssel zur Authentifizierung verwenden. Alle Points in
Ihrem Netzwerk müssen denselben Authentifizierungstyp verwenden
Passphrase - Anstatt manuell einen WEP-Schlüssel einzugeben, können Sie eine Passphrase in das Feld
Passphrase eingeben, so dass ein WEP-Schlüssel automatisch generiert wird. Hierbei wird zwischen Groß-
und Kleinschreibung unterschieden. Die Länge von 16 alphanumerischen Zeichen darf nicht überschritten
werden. Diese Passphrase muss mit den Passphrasen Ihrer anderen Wireless-Netzwerk-Geräte
übereinstimmen und ist nur mit Wireless-Produkten von Linksys kompatibel. (Wenn Sie Wireless-Produkte
anderer Anbieter verwenden, geben Sie den WEP-Schlüssel manuell bei den entsprechenden Produkten ein.)
Transmit Key (Übertragungsschlüssel) - Die Standardnummer des Übertragungsschlüssel ist 1. Wenn der
Access Point bzw. Wireless Router die Nummern 2, 3 oder 4 als Übertragungsschlüssel verwendet, wählen
Sie die geeignete Nummer aus dem Dropdown-Menü Transmit Key (Übertragungsschlüssel) aus.
Key 1 (Schlüssel 1) - Der eingegebene WEP-Schlüssel muss mit dem WEP-Schlüssel Ihres Wireless-
Netzwerks übereinstimmen. Wenn Sie die 64-Bit-WEP-Verschlüsselung verwenden, muss die Schlüssellänge
genau 10 hexadezimale Zeichen betragen. Wenn Sie die 128-Bit-WEP-Verschlüsselung verwenden, muss die
Schlüssellänge genau 26 hexadezimale Zeichen betragen. Gültige hexadezimale Zeichen sind Zeichen von ‚0‘
bis ‚9‘ und von ‚A‘ bis ‚F‘. Abbildung 6-14: WEP-Einstellung für neues Profil
Abbildung 6-13: Sicherheit im Wireless-Netzwerkbetrieb
für neues Profil

22
Kapitel 6: Verwendung des Wireless-Netzwerkmonitors
Erstellen eines neuen Profils
Wireless-G Notebook-Adapter mit SpeedBooster
WPA-PSK
Für WPA-PSK stehen Ihnen zwei Verschlüsselungsmethoden (TKIP und AES) mit dynamischen
Verschlüsselungsschlüsseln zur Verfügung. Klicken Sie auf die Schaltfläche Next (Weiter), um fortzufahren.
Klicken Sie auf die Schaltfläche Back (Zurück), um zum vorherigen Fenster zurückzukehren.
Wählen Sie als Verschlüsselungstyp den Algorithmus TKIP oder AES aus. Geben Sie einen gemeinsamen
WPA-Schlüssel von 8 bis 63 Zeichen in das Feld Passphrase ein.
Abbildung 6-15: WPA-PSK-Einstellungen
Abbildung 6-16: TKIP-Einstellungen

23
Kapitel 6: Verwendung des Wireless-Netzwerkmonitors
Erstellen eines neuen Profils
Wireless-G Notebook-Adapter mit SpeedBooster
WPA RADIUS
Bei der Verschlüsselungsmethode WPA RADIUS wird WPA in Kombination mit einem RADIUS-Server
verwendet. (Diese Methode sollte nur verwendet werden, wenn ein RADIUS-Server mit dem Router
verbunden ist.) WPA RADIUS bietet zwei Verschlüsselungsmethoden (TKIP und AES) mit dynamischen
Verschlüsselungsschlüsseln. Hierbei stehen fünf Authentifizierungsmethoden zur Verfügung: EAP-TLS,
EAP-TTLS, EAP-MD5, EAP-PEAP und LEAP.
Klicken Sie auf die Schaltfläche Next (Weiter), um fortzufahren. Klicken Sie auf die Schaltfläche Back
(Zurück) um zum vorherigen Fenster zurückzukehren.
Wählen Sie als Verschlüsselungstyp den Algorithmus TKIP oder AES aus.
Klicken Sie auf die Schaltfläche Next (Weiter), um fortzufahren. Klicken Sie auf die Schaltfläche Back
(Zurück), um zum vorherigen Fenster zurückzukehren.
Abbildung 6-17: WPA RADIUS-Einstellungen
Abbildung 6-18: Verschlüsselungstyp

24
Kapitel 6: Verwendung des Wireless-Netzwerkmonitors
Erstellen eines neuen Profils
Wireless-G Notebook-Adapter mit SpeedBooster
Abbildung 6-19: EAP-TLS-Authentifizierung
Abbildung 6-20: EAP-TTLS-Authentifizierung
Wählen Sie im nächsten Fenster die Authentifizierungsmethode aus dem Dropdown-Menü aus. Die Optionen
werden im Folgenden beschrieben.
EAP-TLS
Geben Sie den Anmeldenamen Ihres Wireless-Netzwerks in das Feld Login Name (Anmeldename) ein.
Wählen Sie aus dem Dropdown-Menü Certificate (Zertifikat) das Zertifikat aus, das Sie installiert haben,
um Sie selbst in Ihrem Wireless-Netzwerk zu authentifizieren. Wählen Sie Validate server cerificate
(Server-Zertifikat überprüfen), um sicherzustellen, dass das Zertifikat für den Server gültig ist.
Klicken Sie auf die Schaltfläche Next (Weiter), um fortzufahren. Klicken Sie auf die Schaltfläche Zurück, um
zum vorherigen Fenster zurückzukehren.
EAP-TTLS
Geben Sie den Anmeldenamen Ihres Wireless-Netzwerks in das Feld Login Name (Anmeldename) ein. Geben
Sie das Kennwort Ihres Wireless-Netzwerks in das Feld Password (Kennwort) ein. Wählen Sie Validate
server cerificate (Server-Zertifikat überprüfen), um sicherzustellen, dass das Zertifikat für den Server gültig
ist. Wählen Sie aus dem Dropdown-Menü das TTLS-Protokoll aus.
Klicken Sie auf die Schaltfläche Next (Weiter), um fortzufahren. Klicken Sie auf die Schaltfläche Back
(Zurück), um zum vorherigen Fenster zurückzukehren.

25
Kapitel 6: Verwendung des Wireless-Netzwerkmonitors
Erstellen eines neuen Profils
Wireless-G Notebook-Adapter mit SpeedBooster
EAP-MD5
Geben Sie den Anmeldenamen Ihres Wireless-Netzwerks in das Feld Login Name (Anmeldename) ein. Geben
Sie das Kennwort Ihres Wireless-Netzwerks in das Feld Password (Kennwort) ein.
Klicken Sie auf die Schaltfläche Next (Weiter), um fortzufahren. Klicken Sie auf die Schaltfläche Back
(Zurück), um zum vorherigen Fenster zurückzukehren.
EAP-PEAP
Geben Sie den Anmeldenamen Ihres Wireless-Netzwerks in das Feld Login Name (Anmeldename) ein. Geben
Sie das Kennwort Ihres Wireless-Netzwerks in das Feld Password (Kennwort) ein. Wählen Sie Validate
server cerificate (Server-Zertifikat überprüfen), um sicherzustellen, dass das Zertifikat für den Server gültig
ist. Dann wählen Sie Peap Inner EAP aus dem Dropdown-Menü aus.
Klicken Sie auf die Schaltfläche Next (Weiter), um fortzufahren. Klicken Sie auf die Schaltfläche Back
(Zurück), um zum vorherigen Fenster zurückzukehren.
LEAP
Geben Sie den Anmeldenamen Ihres Wireless-Netzwerks in das Feld Login Name (Anmeldename) ein. Geben
Sie das Kennwort Ihres Wireless-Netzwerks in das Feld Password (Kennwort) ein.
Klicken Sie auf die Schaltfläche Next (Weiter), um fortzufahren. Klicken Sie auf die Schaltfläche Back
(Zurück), um zum vorherigen Fenster zurückzukehren.
Abbildung 6-21: EAP-MD5-Authentifizierung
Abbildung 6-22: EAP-PEAP-Authentifizierung
Abbildung 6-23: EAP-LEAP-Authentifizierung

26
Kapitel 6: Verwendung des Wireless-Netzwerkmonitors
Erstellen eines neuen Profils
Wireless-G Notebook-Adapter mit SpeedBooster
RADIUS
Bei der Verschlüsselungsmethode RADIUS wird WPA in Kombination mit einem RADIUS-Server verwendet.
(Diese Vorgehensweise sollte nur verwendet werden, wenn ein RADIUS-Server mit einem Router verbunden
ist.) Hierbei stehen fünf Authentifizierungsmethoden zur Verfügung: EAP-TLS, EAP-TTLS, EAP-MD5, EAP-PEAP
und LEAP.
Klicken Sie auf die Schaltfläche Next (Weiter), um fortzufahren. Klicken Sie auf die Schaltfläche Back
(Zurück), um zum vorherigen Fenster zurückzukehren.
Wählen Sie im nächsten Fenster die Authentifizierungsmethode aus dem Dropdown-Menü aus. Die Optionen
werden im Folgenden beschrieben.
EAP-TLS
Geben Sie den Anmeldenamen Ihres Wireless-Netzwerks in das Feld Login Name (Anmeldename) ein.
Wählen Sie aus dem Dropdown-Menü Certificate (Zertifikat) das Zertifikat aus, das Sie installiert haben, um
Sie selbst in Ihrem Wireless-Netzwerk zu authentifizieren. Wählen Sie Validate server cerificate (Server-
Zertifikat überprüfen), um sicherzustellen, dass das Zertifikat für den Server gültig ist.
Klicken Sie auf die Schaltfläche Next (Weiter), um fortzufahren. Klicken Sie auf die Schaltfläche Back
(Zurück), um zum vorherigen Fenster zurückzukehren.
Abbildung 6-25: EAP-TLS-Authentifizierung
Abbildung 6-24: RADIUS-Einstellungen

27
Kapitel 6: Verwendung des Wireless-Netzwerkmonitors
Erstellen eines neuen Profils
Wireless-G Notebook-Adapter mit SpeedBooster
EAP-TTLS
Geben Sie den Anmeldenamen Ihres Wireless-Netzwerks in das Feld Login Name (Anmeldename) ein. Geben
Sie das Kennwort Ihres Wireless-Netzwerks in das Feld Password (Kennwort) ein. Wählen Sie Validate
server cerificate (Server-Zertifikat überprüfen), um sicherzustellen, dass das Zertifikat für den Server gültig
ist. Wählen Sie aus dem Dropdown-Menü das TTLS-Protokoll aus.
Klicken Sie auf die Schaltfläche Next (Weiter), um fortzufahren. Klicken Sie auf die Schaltfläche Back
(Zurück), um zum vorherigen Fenster zurückzukehren.
EAP-MD5
Geben Sie den Anmeldenamen Ihres Wireless-Netzwerks in das Feld Login Name (Anmeldename) ein. Geben
Sie das Kennwort Ihres Wireless-Netzwerks in das Feld Password (Kennwort) ein.
Klicken Sie auf die Schaltfläche Next (Weiter), um fortzufahren. Klicken Sie auf die Schaltfläche Back
(Zurück), um zum vorherigen Fenster zurückzukehren.
Abbildung 6-26: EAP-TTLS-Authentifizierung
Abbildung 6-27: EAP-MD5-Authentifizierung

28
Kapitel 6: Verwendung des Wireless-Netzwerkmonitors
Erstellen eines neuen Profils
Wireless-G Notebook-Adapter mit SpeedBooster
EAP-PEAP
Geben Sie den Anmeldenamen Ihres Wireless-Netzwerks in das Feld Login Name (Anmeldename) ein. Geben
Sie das Kennwort Ihres Wireless-Netzwerks in das Feld Password (Kennwort) ein. Wählen Sie Validate
server cerificate (Server-Zertifikat überprüfen), um sicherzustellen, dass das Zertifikat für den Server gültig
ist. Dann wählen Sie Peap Inner EAP aus dem Dropdown-Menü aus.
Klicken Sie auf die Schaltfläche Next (Weiter), um fortzufahren. Klicken Sie auf die Schaltfläche Back
(Zurück), um zum vorherigen Fenster zurückzukehren.
LEAP
Geben Sie den Anmeldenamen Ihres Wireless-Netzwerks in das Feld Login Name (Anmeldename) ein. Geben
Sie das Kennwort Ihres Wireless-Netzwerks in das Feld Password (Kennwort) ein.
Klicken Sie auf die Schaltfläche Next (Weiter), um fortzufahren. Klicken Sie auf die Schaltfläche Back
(Zurück), um zum vorherigen Fenster zurückzukehren.
Abbildung 6-28: EAP-PEAP-Authentifizierung
Abbildung 6-29: LEAP-Authentifizierung

29
Kapitel 6: Verwendung des Wireless-Netzwerkmonitors
Erstellen eines neuen Profils
Wireless-G Notebook-Adapter mit SpeedBooster
7. Das Fenster Confirm New Settings (Bestätigen neuer Einstellungen) wird als nächstes geöffnet und zeigt
die neuen Einstellungen an. Zum Speichern der neuen Einstellungen klicken Sie auf die Schaltfläche Save
(Speichern). Zum Bearbeiten der neuen Einstellungen klicken Sie auf die Schaltfläche Back (Zurück). Um den
Wireless-Netzwerkmonitor zu beenden, klicken Sie auf Exit (Beenden).
8. Das Fenster Congratulations (Herzlichen Glückwunsch) wird als nächstes angezeigt. Klicken Sie auf
Activate new settings now (Neue Einstellungen jetzt aktivieren), um die neuen Einstellungen sofort zu
implementieren und zum Fenster Link Information (Verbindungsdaten) zurückzukehren. Klicken Sie auf
Activate new settings later (Neue Einstellungen später aktivieren), damit die aktuellen Einstellungen aktiv
bleiben und um zum Fenster Profiles (Profile) zurückzukehren.
Sie haben erfolgreich ein Verbindungsprofil erstellt.
Abbildung 6-30: Confirm New Settings
(Bestätigen neuer Einstellungen)
Abbildung 6-31: Congratulations!
(Herzlichen Glückwunsch!)

30
Anhang A: Fehlerbehebung
Behebung häufig auftretender Probleme
Wireless-G Notebook-Adapter mit SpeedBooster
Anhang A: Fehlerbehebung
Dieser Anhang besteht aus zwei Teilen: „Behebung häufig auftretender Probleme“ und „Häufig gestellte Fragen“.
Er enthält Lösungsvorschläge zu Problemen, die während der Installation und des Betriebs des Wireless-G
Notebook-Adapters auftreten können. Lesen Sie sich zur Fehlerbehebung die unten aufgeführte Beschreibung
durch. Wenn hier kein Lösungsvorschlag zu Ihrem Problem aufgeführt ist, finden Sie weitere Informationen auf
der Linksys-Website unter www.linksys.com/international oder unter www.linksys.com.
Behebung häufig auftretender Probleme
1. Mein Computer erkennt den Wireless-G Notebook-Adapter nicht.
Stellen Sie sicher, dass der Wireless-G Notebook-Adapter ordnungsgemäß über den PC-Kartensteckplatz
angeschlossen ist.
2. Der Wireless-G Notebook-Adapter funktioniert nicht ordnungsgemäß.
Stecken Sie den Wireless-G Notebook-Adapter erneut an den USB-Port Ihres Notebooks oder Desktops ein.
Klicken Sie unter Windows 98 SE und ME mit der rechten Maustaste auf Arbeitsplatz, und wählen
Sie Eigenschaften aus. Wählen Sie die Registerkarte Geräte-Manager aus, und klicken Sie auf
Netzwerkadapter. Hier finden Sie den Wireless-G Notebook-Adapter, wenn dieser erfolgreich installiert
wurde. Wenn ein gelbes Ausrufezeichen angezeigt wird, besteht zwischen den Ressourcen möglicherweise
ein Konflikt, und Sie müssen folgende Schritte ausführen:
• Deinstallieren Sie die Treiber-Software von Ihrem PC.
• Starten Sie Ihren PC neu, und wiederholen Sie die Installation von Hard- und Software entsprechend den
Anweisungen in diesem Benutzerhandbuch.
3. Mit den anderen Computern, die über Ethernet in der Infrastrukturmodus-Konfiguration verbunden
sind, ist kein Datenaustausch möglich.
Stellen Sie sicher, dass Ihr Notebook bzw. Desktop-Computer eingeschaltet ist.
Stellen Sie sicher, dass der Wireless-G Notebook-Adapter mit den gleichen SSID- und
Sicherheitseinstellungen konfiguriert wurde wie die anderen Computer in der Infrastrukturmodus-
Konfiguration.

31
Anhang A: Fehlerbehebung
Häufig gestellte Fragen
Wireless-G Notebook-Adapter mit SpeedBooster
Häufig gestellte Fragen
Kann ich eine Anwendung von einem standortfernen Computer aus über das Wireless-Netzwerk
ausführen?
Dies ist abhängig davon, ob die Anwendung zur Verwendung in einem Netzwerk entwickelt wurde. Weitere
Informationen dazu, ob die Anwendung in einem Netzwerk verwendet werden kann, finden Sie im
Benutzerhandbuch zur Anwendung.
Kann ich mit anderen Mitgliedern des Wireless-Netzwerks Computerspiele spielen?
Ja, wenn das Spiel mehrere Spieler über ein LAN (Local Area Network; lokales Netzwerk) unterstützt. Weitere
Informationen hierzu finden Sie im Benutzerhandbuch des entsprechenden Spiels.
Was ist der IEEE 802.11b-Standard?
Dies ist ein IEEE-Standard für Wireless-Netzwerke. Mit dem 802.11b-Standard können Geräte von
unterschiedlichen Herstellern im Wireless-Netzwerk miteinander kommunizieren, jedoch nur unter der
Voraussetzung, dass die Geräte mit dem 802.11b-Standard kompatibel sind. Durch den 802.11b-Standard ist eine
maximale Datenübertragungsrate von 11 MBit/s und eine Betriebsfrequenz von 2,4 GHz vorgegeben.
Was ist der IEEE 802.11g-Standard?
Dies ist ein IEEE-Standard für Wireless-Netzwerke. Mit dem 802.11g-Standard können Geräte von
unterschiedlichen Herstellern im Wireless-Netzwerk miteinander kommunizieren, jedoch nur unter der
Voraussetzung, dass die Geräte mit dem 802.11g-Standard kompatibel sind. Durch den 802.11g-Standard ist eine
maximale Datenübertragungsrate von 54 MBit/s und eine Betriebsfrequenz von 2,4 GHz vorgegeben.
Welche IEEE 802.11b-Funktionen werden unterstützt?
Das Gerät unterstützt die folgenden IEEE 802.11b-Funktionen:
• CSMA/CA sowie das Acknowledge-Protokoll
• Multi-Kanal-Roaming
• Automatische Ratenauswahl
• RTS/CTS
• Paketauftrennung
• Energieverwaltung
Welche IEEE 802.11g-Funktionen werden unterstützt?
Das Gerät unterstützt die folgenden IEEE 802.11g-Funktionen:
• CSMA/CA sowie das Acknowledge-Protokoll
• OFDM-Protokoll
• Multi-Kanal-Roaming
• Automatische Ratenauswahl
• RTS/CTS
• Paketauftrennung
• Energieverwaltung

32
Anhang A: Fehlerbehebung
Häufig gestellte Fragen
Wireless-G Notebook-Adapter mit SpeedBooster
Was bedeutet Ad-Hoc-Modus?
Wenn für ein Wireless-Netzwerk der Ad-Hoc-Modus festgelegt ist, sind die Wireless-fähigen Computer so
konfiguriert, dass sie direkt miteinander kommunizieren. Zwischen dem Ad-Hoc-Wireless-Netzwerk und
verdrahteten Netzwerken ist keine Kommunikation möglich.
Was bedeutet Infrastrukturmodus?
Ist für ein Wireless-Netzwerk der Infrastrukturmodus festgelegt, ist es so konfiguriert, dass es mit einem
verdrahteten Netzwerk über einen drahtlosen Zugriffspunkt kommuniziert.
Was ist Roaming?
Roaming bezeichnet die Möglichkeit, bei Verwendung von tragbaren Computern kontinuierlich über eine größere
Distanz hinweg zu kommunizieren, als durch einen einzigen Zugriffspunkt abgedeckt werden kann. Vor
Verwendung des Roaming muss der Computer auf die gleiche Kanalnummer wie der Zugriffspunkt des
dedizierten Empfangsbereichs gesetzt werden.
Um eine dauerhafte nahtlose Verbindung zu erzielen, muss das Wireless-LAN eine Reihe an unterschiedlichen
Funktionen besitzen. So müssen z. B. alle Nachrichten von jedem Knoten und jedem Zugriffspunkt bestätigt
werden. Jeder Knoten muss den Kontakt mit dem Wireless-Netzwerk aufrechterhalten, auch wenn keine
Datenübertragung stattfindet. Um diese Funktionen gleichzeitig verwenden zu können, ist eine dynamische
Funkfrequenz-Netzwerktechnologie erforderlich, durch die Zugriffspunkte und Knoten miteinander verknüpft
werden. In solchen Systemen sucht der Endknoten des Benutzers nach dem jeweils besten Zugriff auf das
System. Zunächst werden Faktoren wie Signalstärke und -qualität, die aktuelle Nachrichtenmenge, die von
jedem Zugriffspunkt verarbeitet wird, und die Entfernung zwischen jedem Zugriffspunkt zum verdrahteten
Backbone ausgewertet. Anschließend ermittelt der Knoten auf Grundlage dieser Informationen den geeigneten
Zugriffspunkt und registriert dessen Adresse. Die Kommunikation zwischen Knoten und Host-Computer kann in
beide Richtungen des Backbones verlaufen.
Bei fortschreitender Kommunikation prüft der Funkfrequenz-Sender des Endknotens in regelmäßigen Abständen,
ob eine Verbindung mit dem Original-Zugriffspunkt vorliegt oder ob ein neuer Zugriffspunkt gesucht werden soll.
Wenn ein Knoten keine Bestätigung des Original-Zugriffspunkts mehr erhält, wird eine neue Verbindungssuche
gestartet. Wenn ein neuer Zugriffspunkt gefunden wurde, wird dessen Adresse registriert und die Kommunikation
fortgesetzt.
Was bedeutet ISM-Band?
Die FCC-Behörde und die jeweiligen Behörden außerhalb der USA haben Bestimmungen hinsichtlich der
Bandbreite für eine nicht durch Lizenzen abgedeckte Verwendung im ISM-Band erlassen. Die Frequenz liegt bei
ca. 2,4 GHz und kann weltweit genutzt werden. Mit dieser wahrlich revolutionären Maßnahme können nun
problemlos High-Speed-Wireless-Funktionen von Benutzern weltweit genutzt werden.

33
Anhang A: Fehlerbehebung
Häufig gestellte Fragen
Wireless-G Notebook-Adapter mit SpeedBooster
Was bedeutet Bandspreizung?
Die Technologie der Bandspreizung (Spread Spectrum Technology) ist eine vom Militär entwickelte Breitband-
Funkfrequenz-Technologie, die für zuverlässige, sichere und störresistente Kommunikationssysteme eingesetzt
werden kann. Bei dieser Technologie werden gewisse Abstriche bei der Bandbreiteneffizienz hingenommen, um
eine höhere Zuverlässigkeit, Integrität und Sicherheit zu erreichen. Es wird hier also eine größere Bandbreite
als bei der Schmalbandübertragung verwendet. Im Gegenzug wird jedoch ein Signal erreicht, das lauter und
einfacher zu lokalisieren ist, allerdings unter der Voraussetzung, dass der Empfänger die Parameter des mittels
Bandspreizung übertragenen Signals kennt. Wenn ein Empfänger nicht auf die richtige Frequenz eingestellt ist,
scheint ein mittels Bandspreizung übertragenes Signal nichts anderes als ein Hintergrundgeräusch zu sein. Es
stehen zwei unterschiedliche Verfahren für die Bandspreizung zur Verfügung: DSSS (Direct Sequence Spread
Spectrum, Direkte Bandspreizung) und FHSS (Frequency Hopping Spread Spectrum, Frequenzsprungverfahren).
Was ist DSSS? Was ist FHSS? Worin liegt der Unterschied?
Bei FHSS wird ein Schmalbandträger verwendet, der nach einem für Sender und Empfänger bekannten
Muster die Frequenz ändert. Bei ordnungsgemäßer Synchronisation wird jeweils ein einziger logischer Kanal
aufrechterhalten. Unerwünschten Empfängern erscheint das FHSS-Signal als kurzzeitiges Impulsrauschen.
DSSS generiert ein redundantes Bitmuster für jedes zu übertragende Bit. Dieses Bitmuster wird „Chip“ oder
„Chipping Code“ genannt. Je länger der Chip ist, desto größer ist die Wahrscheinlichkeit, dass die ursprüngliche
Information wieder generiert werden kann. Auch wenn ein oder mehrere Bits im Chip während der Übertragung
beschädigt wurden, können diese durch eine statistische Technik im Empfänger regeneriert werden und
müssen daher nicht nochmals übertragen werden. Unerwünschten Empfängern erscheint das DSSS-Signal als
schwaches Breitbandrauschen und wird von den meisten Schmalbandempfängern ignoriert.
Können die Daten bei der Funkübertragung abgefangen werden?
WLAN verfügt über zweifachen Schutz im Sicherheitsbereich. Im Hardwarebereich sorgt DSSS-Technologie
(Direct Sequence Spread Spectrum; direkte Bandspreizung) für die integrierte Sicherheitsfunktion der
Verschlüsselung. Im Softwarebereich bietet WLAN die WEP-Verschlüsselungsfunktion, um die Sicherheit zu
erhöhen und die Zugriffssteuerung zu verbessern.
Was ist WEP?
WEP ist die Abkürzung für Wired Equivalent Privacy. Hierbei handelt es sich um einen Datenschutzmechanismus,
der auf einem Algorithmus mit gemeinsam verwendetem Schlüssel basiert und im IEEE 802.11-Standard
festgelegt ist.

34
Anhang B: Sicherheit im Wireless-Netzwerkbetrieb
Vorsichtsmaßnahmen
Wireless-G Notebook-Adapter mit SpeedBooster
Anhang B: Sicherheit im Wireless-Netzwerkbetrieb
Linksys hat es sich zum Ziel gesetzt, den Wireless-Netzwerkbetrieb für Sie so sicher und einfach wie möglich
zu gestalten. Die aktuellen Produkte von Linksys bieten verschiedene Netzwerksicherheitsfunktionen, die ein
Eingreifen Ihrerseits erfordern, um diese umsetzen zu können. Beachten Sie daher Folgendes beim Einrichten
bzw. Verwenden Ihres Wireless-Netzwerks.
Vorsichtsmaßnahmen
Bei der folgenden Liste handelt es sich um eine Auflistung aller möglichen Vorsichtsmaßnahmen. Die Schritte 1
bis 5 sollten Sie unbedingt durchführen:
1. Ändern Sie die Standard-SSID.
2. Deaktivieren Sie die SSID-Übertragung.
3. Ändern Sie das Standardkennwort für das Administrator-Konto.
4. Aktivieren Sie die MAC-Adressfilterung.
5. Ändern Sie die SSID regelmäßig.
6. Verwenden Sie den höchsten verfügbaren Verschlüsselungsalgorithmus. Verwenden Sie WPA (falls
verfügbar). Beachten Sie, dass die Netzwerkleistung hierdurch verringert werden kann.
7. Ändern Sie die WEP-Verschlüsselungsschlüssel regelmäßig.
Sicherheitsrisiken für Wireless-Netzwerke
Wireless-Netzwerke sind einfach zu finden. Hacker wissen, dass Geräte für den Wireless-Netzwerkbetrieb nach
so genannten Beacon-Meldungen suchen, bevor sie sich in ein Wireless-Netzwerk einklinken. Diese Meldungen,
die umfassende Netzwerkinformationen wie beispielsweise die SSID (Service Set Identifier) des Netzwerks
enthalten, lassen sich leicht entschlüsseln. Dagegen können Sie sich folgendermaßen schützen:
Ändern Sie das Administratorkennwort regelmäßig. Bedenken Sie, dass bei jedem im Wireless-
Netzwerkbetrieb verwendeten Gerät die Netzwerkeinstellungen (SSID, WEP-Schlüssel usw.) in der Firmware
gespeichert sind. Die Netzwerkeinstellungen können nur vom Netzwerkadministrator geändert werden. Wenn
einem Hacker das Administratorkennwort bekannt wird, kann auch er diese Einstellungen ändern. Deshalb
Hinweis: Einige dieser Sicherheitsfunktionen
sind nur über den Netzwerk-Router oder den
Access Point verfügbar. Weitere Informationen
finden Sie in der Dokumentation zu Ihrem Router
bzw. Access Point.

35
Anhang B: Sicherheit im Wireless-Netzwerkbetrieb
Sicherheitsrisiken für Wireless-Netzwerke
Wireless-G Notebook-Adapter mit SpeedBooster
sollten Sie es ihm so schwer wie möglich machen, an diese Informationen zu gelangen. Ändern Sie das
Administratorkennwort regelmäßig.
SSID: Im Zusammenhang mit der SSID ist Folgendes zu beachten:
1. Deaktivieren Sie die Übertragung.
2. Wählen Sie eine individuelle SSID.
3. Ändern Sie sie regelmäßig.
Bei den meisten Geräten für den Wireless-Netzwerkbetrieb gibt es die Option, die SSID zu übertragen. Diese
Option ist zwar recht praktisch, bedeutet jedoch, dass sich jeder in Ihr Wireless-Netzwerk einklinken kann. Jeder,
auch Hacker. Daher sollten Sie die SSID nicht übertragen.
Geräte für den Wireless-Netzwerkbetrieb sind ab Werk auf eine Standard-SSID eingestellt. (Die Standard-SSID
von Linksys lautet „linksys“.) Hacker kennen diese Standardeinstellungen und können Ihr Netzwerk darauf
überprüfen. Ändern Sie Ihre SSID zu einer individuellen Angabe, die keinerlei Bezug zu Ihrem Unternehmen oder
zu den von Ihnen verwendeten Netzwerkprodukten hat.
Ändern Sie Ihre SSID regelmäßig, damit Hacker, die sich Zugriff auf Ihr Wireless-Netzwerk verschafft haben,
erneut das Kennwort knacken müssen.
MAC-Adressen: Aktivieren Sie die MAC-Adressfilterung. Durch die MAC-Adressfilterung wird nur drahtlosen
Knoten mit bestimmten MAC-Adressen der Zugriff auf das Netzwerk ermöglicht. Dies erschwert es den Hackern,
mit einer zufällig gewählten MAC-Adresse auf Ihr Netzwerk zuzugreifen.
WEP-Verschlüsselung: WEP (Wired Equivalent Privacy) wird oft als eine Art Allheilmittel gegen
Sicherheitsrisiken bei Wireless-Geräten gesehen. Damit werden die Fähigkeiten von WEP jedoch überschätzt.
Auch WEP kann nur soweit zur Sicherheit beitragen, dass es dem Hacker das Eindringen erschwert.
Es gibt mehrere Methoden, um die Wirksamkeit von WEP zu optimieren:
1. Verwenden Sie die höchste Verschlüsselungsebene.
2. Verwenden Sie die Authentifizierung mit einem freigegebenen Schlüssel.
3. Ändern Sie Ihre WEP-Schlüssel regelmäßig. Wichtig: Jedes Gerät im Wireless-Netzwerk
MUSS das gleiche Verschlüsselungsverfahren
und den gleichen Verschlüsselungsschlüssel
verwenden, damit das Wireless-Netzwerk
ordnungsgemäß funktioniert.

36
Anhang B: Sicherheit im Wireless-Netzwerkbetrieb
Sicherheitsrisiken für Wireless-Netzwerke
Wireless-G Notebook-Adapter mit SpeedBooster
WPA: Bei WPA (Wi-Fi Protected Access) handelt es sich um den neuesten und besten verfügbaren Standard für
Wi-Fi-Sicherheit. Es stehen drei Modi zur Verfügung: WPA-PSK, WPA RADIUS und RADIUS. Im Modus WPA-PSK
stehen Ihnen zwei Verschlüsselungsverfahren zur Verfügung: TKIP (Temporal Key Integrity Protocol) und AES
(Advanced Encryption System). TKIP verwendet eine leistungsfähigere Verschlüsselungsmethode sowie MIC
(Message Integrity Code), um das System gegen Hacker zu schützen. AES arbeitet mit einer symmetrischen
Datenverschlüsselung mit 128-Bit-Blocks. WPA RADIUS bietet zwei Verschlüsselungsmethoden (TKIP und AES)
mit dynamischen Verschlüsselungsschlüsseln. RADIUS (Remote Authentication Dial-In User Service) verwendet
einen RADIUS-Server für die Authentifizierung.
WPA-PSK: Wenn Sie nicht über einen RADIUS-Server verfügen, wählen Sie den gewünschten Algorithmus
(TKIP oder AES) aus, und geben Sie in das Feld für die Passphrase ein Kennwort mit einer Länge von 8 bis
63 Zeichen ein.
WPA RADIUS: Wenn Sie WPA in Verbindung mit einem RADIUS-Server verwenden: (Diese Vorgehensweise
sollte nur verwendet werden, wenn ein RADIUS-Server mit einem Router oder einem anderen Gerät
verbunden ist.) WPA RADIUS bietet zwei Verschlüsselungsmethoden (TKIP und AES) mit dynamischen
Verschlüsselungsschlüsseln.
RADIUS: Wenn Sie WEP in Verbindung mit einem RADIUS-Server verwenden: (Diese Vorgehensweise sollte
nur verwendet werden, wenn ein RADIUS-Server mit einem Router oder einem anderen Gerät verbunden ist.)
Die Verwendung von Verschlüsselungsfunktionen kann sich negativ auf die Netzwerkleistung auswirken; wenn
Sie jedoch sensible Daten über das Netzwerk senden, sollten Sie diese verschlüsseln.
Durch die Einhaltung dieser Sicherheitsempfehlungen können Sie ganz beruhigt arbeiten und die flexible und
praktische Technologie von Linksys bedenkenlos nutzen.

37
Anhang C: Windows-Hilfe
Wireless-G Notebook-Adapter mit SpeedBooster
Anhang C: Windows-Hilfe
Für alle Wireless-Produkte ist Microsoft Windows erforderlich. Windows ist das weltweit am häufigsten
verwendete Betriebssystem und bietet zahlreiche Funktionen, die den Netzwerkbetrieb vereinfachen. Diese
Funktionen können über die Windows-Hilfe aufgerufen werden und werden im vorliegenden Anhang erläutert.
TCP/IP
Ein Computer kann nur dann mit einem Access Point oder einem Wireless Router kommunizieren, wenn TCP/IP
aktiviert ist. Bei TCP/IP handelt es sich um einen Satz Anweisungen (auch als Protokoll bezeichnet), den alle PCs
für die Kommunikation über ein Netzwerk verwenden. Dies gilt auch für Wireless-Netzwerke. Ihre PCs können nur
dann im Wireless-Netzwerkbetrieb eingesetzt werden, wenn TCP/IP aktiviert ist. Detaillierte Anweisungen zum
Aktivieren von TCP/IP finden Sie in der Windows-Hilfe.
Freigegebene Ressourcen
Wenn Sie Drucker, Ordner oder Dateien gemeinsam mit weiteren Benutzern im Netzwerk verwenden möchten,
finden Sie in der Windows-Hilfe detaillierte Anweisungen zur Verwendung freigegebener Ressourcen.
Netzwerkumgebung
Wenn Sie auf Netzwerkumgebung klicken, werden weitere PCs in Ihrem Netzwerk angezeigt. Detaillierte
Anweisungen zum Hinzufügen von PCs zu Ihrem Netzwerk finden Sie in der Windows-Hilfe.

38
Anhang D: Glossar
Wireless-G Notebook-Adapter mit SpeedBooster
Anhang D: Glossar
802.11a - IEEE-Standard für den Wireless-Netzwerkbetrieb, der eine maximale Datenübertragungsrate von
54 MBit/s sowie eine Betriebsfrequenz von 5 GHz festlegt.
802.11b - IEEE-Standard für den Wireless-Netzwerkbetrieb, der eine maximale Datenübertragungsrate von
11 MBit/s sowie eine Betriebsfrequenz von 2,4 GHz festlegt.
802.11g - IEEE-Standard für den Wireless-Netzwerkbetrieb, der eine maximale Datenübertragungsrate von
54 MBit/s und eine Betriebsfrequenz von 2,4 GHz festlegt sowie Abwärtskompatibilität mit Geräten garantiert,
die dem 802.11b-Standard entsprechen.
Access Point - Ein Gerät, über das Computer und andere Geräte mit Wireless-Funktionalität mit einem
verdrahteten Netzwerk kommunizieren können. Wird auch verwendet, um die Reichweite eines Wireless-
Netzwerks zu erweitern.
Adapter - Ein Gerät, mit dem Ihr Computer Netzwerkfunktionalität erhalten kann.
Ad-hoc - Eine Gruppe von Wireless-Geräten, die direkt miteinander kommunizieren (Peer-to-Peer) statt über
einen Access Point.
AES (Advanced Encryption Standard) - Ein Verschlüsselungsstandard, bei dem ein Verschlüsselungsschlüssel
mit bis zu 256 Bit zur Datensicherung verwendet wird.
Aktualisierung - Das Ersetzen vorhandener Software oder Firmware durch eine neuere Version.
Backbone - Der Teil des Netzwerks, der die meisten Systeme und Netzwerke miteinander verbindet und die
meisten Daten verarbeitet.
Bandbreite - Die Übertragungskapazität eines bestimmen Geräts oder Netzwerks.
Beacon-Intervall - Im Wireless-Netzwerk übertragene Daten zur Synchronisierung des Netzwerks.
Bit - Eine Informationseinheit.
Breitband - Eine stets aktive, schnelle Internetverbindung.
Bridge - Ein Gerät, das verschiedene Netzwerke miteinander verbindet.

39
Anhang D: Glossar
Wireless-G Notebook-Adapter mit SpeedBooster
Browser - Eine Anwendung, mit der auf alle im World Wide Web enthaltenen Informationen zugegriffen werden
kann.
Byte - Eine Dateneinheit, die üblicherweise aus acht Bits besteht.
CSMA/CA (Carrier Sense Multiple Access/Collision Avoidance) - Eine Datenübertragungsmethode, die
verwendet wird, um Datenkollisionen zu verhindern.
CTS (Clear To Send) - Ein von einem Wireless-Gerät gesendetes Signal, das angibt, dass das Gerät für Daten
empfangsbereit ist.
Daisy Chain (Verkettung) - Eine Methode, bei der Geräte in Reihe (in einer Kette) miteinander verbunden werden.
Datenbank - Eine Datensammlung, die so organisiert ist, dass die enthaltenen Daten schnell und einfach
verwaltet und aktualisiert werden können sowie problemlos abrufbar sind.
DDNS (Dynamic Domain Name System) - Ein System, in dem eine Website, ein FTP-Server oder ein E-Mail-
Server mit einem festen Domänennamen (z. B. www.xyz.com) eine dynamische IP-Adresse verwenden kann.
DHCP (Dynamic Host Configuration Protocol) - Ein Netzwerkprotokoll, mit dem Administratoren
Netzwerkcomputern temporäre IP-Adressen zuweisen können, indem sie Benutzern eine IP-Adresse für einen
bestimmten Zeitraum „vermieten“ anstatt ihnen eine permanente IP-Adresse zuzuweisen.
DMZ (Demilitarized Zone) - Hebt den Firewall-Schutz des Routers für einen PC auf, so dass dieser im Internet
„sichtbar“ wird.
DNS (Domain Name Server) - Die IP-Adresse des Servers Ihres Internetdienstanbieters, der die Namen von
Websites in IP-Adressen übersetzt.
Domäne - Ein spezifischer Name für ein Netzwerk aus mehreren Computern.
DSL (Digital Subscriber Line) - Eine stets aktive Breitbandverbindung über herkömmliche Telefonleitungen.
DSSS (Direct-Sequence Spread-Spectrum) - Eine Frequenzübertragungstechnologie, die ein redundantes Bit-
Muster verwendet, um die Wahrscheinlichkeit von Datenverlusten bei der Übertragung zu senken.
DTIM (Delivery Traffic Indication Message) - Eine in Datenpaketen enthaltene Nachricht, die zur Verbesserung
der Effizienz von Wireless-Verbindungen beitragen kann.
Durchsatz - Die Datenmenge, die in einem bestimmten Zeitraum erfolgreich von einem Knoten an einen anderen
übertragen werden kann.
Dynamische IP-Adresse - Eine von einem DHCP-Server zugewiesene temporäre IP-Adresse.

40
Anhang D: Glossar
Wireless-G Notebook-Adapter mit SpeedBooster
EAP (Extensible Authentication Protocol) - Ein allgemeines Authentifizierungsprotokoll zur Steuerung des
Netzwerkzugriffs. Dieses System unterstützt viele spezielle Authentifizierungsmethoden.
EAP-PEAP (Extensible Authentication Protocol-Protected Extensible Authentication Protocol) - Eine gegenseitige
Authentifzierungsmethode, bei der eine Kombination von digitalen Zertifikaten sowie ein anderes System, z. B.
Kennwörter, verwendet werden.
EAP-TLS (Extensible Authentication Protocol-Transport Layer Security) - Eine gegenseitige
Authentifizierungsmethode, bei der digitale Zertifikate verwendet werden.
Ethernet - IEEE-Standardnetzwerkprotokoll, mit dem festgelegt wird, wie Daten auf gängigen
Übertragungsmedien gespeichert und von dort abgerufen werden.
Finger - Ein Programm, das Ihnen den Namen angibt, der einer E-Mail-Adresse zugewiesen ist.
Firewall - Eine Gruppe von Programmen, die auf einem Netzwerk-Gateway-Server arbeitet und die Ressourcen
eines Netzwerks vor unberechtigten Benutzern schützt.
Firmware - Der für ein Netzwerkgerät verwendete Programmiercode.
Fragmentierung - Das Aufteilen von Paketen in kleinere Einheiten bei der Übertragung über ein
Netzwerkmedium, das die ursprüngliche Größe des Pakets nicht unterstützt.
FTP (File Transfer Protocol) - Ein Protokoll für die Übertragung von Dateien über ein TCP/IP-Netzwerk.
Gateway - Ein Gerät zur Verbindung von Netzwerken mit unterschiedlichen, inkompatiblen
Kommunikationsprotokollen.
Halbduplex - Datenübertragung, die über eine Leitung in beide Richtungen erfolgt, jedoch entweder in die eine
oder die andere Richtung, nicht gleichzeitig in beide.
Hardware - Als Hardware bezeichnet man die physischen Geräte im Bereich Computer und Telekommunikation
sowie andere Informationstechnologiegeräte.
Herunterladen - Das Empfangen einer Datei, die über ein Netzwerk übertragen wurde.
Hochfahren - Starten des Computers, so dass dieser Befehle ausführt.
HTTP (HyperText Transport Protocol) - Kommunikationsprotokoll, das zum Anschließen von Servern an das World
Wide Web verwendet wird.
IEEE (The Institute of Electrical and Electronics Engineers) - Unabhängiges Institut, das Standards für den
Netzwerkbetrieb entwickelt.

41
Anhang D: Glossar
Wireless-G Notebook-Adapter mit SpeedBooster
Infrastruktur - Ein Wireless-Netzwerk, das über einen Access Point mit einem verdrahteten Netzwerk verbunden
ist.
IP (Internet Protocol) - Ein zum Senden von Daten über das Netzwerk verwendetes Protokoll.
IP-Adresse - Die Adresse, anhand der ein Computer oder ein Gerät im Netzwerk identifiziert werden kann.
IPCONFIG - Ein Dienstprogramm für Windows 2000 und Windows XP, das die IP-Adresse eines bestimmten
Geräts im Netzwerk anzeigt.
IPSec (Internet Protocol Security) - Ein VPN-Protokoll, das für den sicheren Austausch von Paketen auf der IP-
Ebene verwendet wird.
ISM-Band - Bei Übertragungen im Wireless-Netzwerkbetrieb verwendete Funkbandbreite.
ISP (Internet Service Provider) - Internetdienstanbieter; ein Anbieter, über den auf das Internet zugegriffen
werden kann.
Kabelmodem - Ein Gerät, über das ein Computer mit dem Kabelfernsehnetzwerk verbunden wird, das wiederum
eine Verbindung zum Internet herstellt.
Knoten - Ein Netzwerkknotenpunkt bzw. -verbindungspunkt, üblicherweise ein Computer oder eine
Arbeitsstation.
Laden - Das Übertragen einer Datei über das Netzwerk.
LAN - Die Computer und Netzwerkbetriebsprodukte, aus denen sich Ihr lokales Netzwerk zusammensetzt.
LEAP (Lightweight Extensible Authentication Protocol) - Eine gegenseitige Authentifizierungsmethode, bei der
ein Benutzername- und Kennwortsystem verwendet wird.
MAC-Adresse (Media Access Control) - Die eindeutige Adresse, die ein Hersteller einem jeden
Netzwerkbetriebsgerät zuweist.
MBit/s (Megabit pro Sekunde) - Eine Million Bit pro Sekunde. Maßeinheit für die Datenübertragung.
mIRC - Ein unter Windows verwendetes Internet Relay Chat-Programm.
Multicasting - Das gleichzeitige Senden von Daten an mehrere Ziele.
NAT (Network Address Translation) - Die NAT-Technologie übersetzt IP-Adressen von lokalen Netzwerken in eine
andere IP-Adresse für das Internet.

42
Anhang D: Glossar
Wireless-G Notebook-Adapter mit SpeedBooster
Netzwerk - Mehrere Computer oder Geräte, die miteinander verbunden sind, damit Benutzer Daten gemeinsam
nutzen, speichern und untereinander übertragen können.
NNTP (Network News Transfer Protocol) - Das Protokoll, mit dem eine Verbindung zu Usenet-Gruppen im Internet
hergestellt wird.
OFDM (Orthogonal Frequency Division Multiplexing) - Eine Frequenzübertragungstechnologie, die den
Datenstrom in mehrere Datenströme von geringerer Geschwindigkeit aufteilt, die dann parallel übertragen
werden, um zu verhindern, dass Informationen während der Übertragung verloren gehen.
Paket - Eine Dateneinheit, die über ein Netzwerk gesendet wird.
Passphrase - Wird wie ein Kennwort verwendet und erleichtert die WEP-Verschlüsselung, indem für Linksys
Produkte automatisch WEP-Verschlüsselungsschlüssel erstellt werden.
Ping (Packet INternet Groper) - Ein Internetdienstprogramm, mit dem bestimmt werden kann, ob eine bestimmte
IP-Adresse online ist.
POP3 (Post Office Protocol 3) - Ein im Internet verwendeter Standard-Mail-Server.
Port - Der Anschlusspunkt an einem Computer oder Netzwerkbetriebsgerät, an dem Kabel oder Adapter
angeschlossen werden.
Power over Ethernet (PoE) - Eine Technologie, mit der ein Ethernet-Netzwerkkabel sowohl Daten als auch Strom
liefern kann.
PPPoE (Point to Point Protocol over Ethernet) - Eine Art Breitbandverbindung, die neben der Datenübertragung
eine Authentifizierungsmöglichkeit (Benutzername und Kennwort) bietet.
PPTP (Point-to-Point Tunneling Protocol) - VPN-Protokoll, mit dem das Point-to-Point-Protokoll (PPP) über einen
Tunnel durch das IP-Netzwerk geleitet werden kann. Dieses Protokoll wird darüber hinaus in Europa als eine Art
Breitbandverbindung verwendet.
Präambel - Teil des Wireless-Signals, mit dem der Netzwerkdatenverkehr synchronisiert wird.
Puffer - Puffer sind freigegebene oder zugewiesene Speicherbereiche zur Unterstützung und Koordinierung von
verschiedenen Computer- und Netzwerkaktivitäten, damit diese sich nicht gegenseitig behindern oder aufhalten.
RADIUS (Remote Authentication Dial-In User Service) - Ein Protokoll zur Überwachung des Netzwerkzugriffs mit
Hilfe eines Authentifizierungsservers.
RJ-45 (Registered Jack-45) - Ethernet-Anschluss für bis zu acht Drähte.

43
Anhang D: Glossar
Wireless-G Notebook-Adapter mit SpeedBooster
Roaming - Die Möglichkeit, mit einem Wireless-Gerät aus einem Access Point-Bereich in einen anderen zu
wechseln, ohne die Verbindung zu unterbrechen.
Router - Ein Netzwerkgerät, mit dem mehrere Netzwerke miteinander verbunden werden.
RTS (Request To Send) - Eine Methode zur Koordination von großen Datenpaketen in einem Netzwerk mit Hilfe
der RTS-Schwelle.
Server - Ein beliebiger Computer, der innerhalb eines Netzwerks dafür sorgt, dass Benutzer auf Dateien
zugreifen, kommunizieren sowie Druckvorgänge und andere Aktionen ausführen können.
SMTP (Simple Mail Transfer Protocol) - Das standardmäßige E-Mail-Protokoll im Internet.
SNMP (Simple Network Management Protocol) - Ein weit verbreitetes und häufig verwendetes Protokoll zur
Netzwerküberwachung und -steuerung.
Software - Befehle für den Computer. Ein Satz an Befehlen, mit denen eine bestimmte Aufgabe ausgeführt wird,
bezeichnet man als „Programm“.
SOHO (Small Office/Home Office) - Marktsegment der kleineren Geschäftkunden, die zu Hause oder in kleineren
Büros arbeiten.
SPI-Firewall (Stateful Packet Inspection) - Eine Technologie zur Überprüfung aller eingehenden Datenpakete,
bevor diese an das Netzwerk weitergeleitet werden.
SSID (Service Set IDentifier) - Der Name Ihres Wireless-Netzwerks.
Standard-Gateway - Ein Gerät, über das der Internetdatenverkehr von Ihrem LAN weitergeleitet wird.
Statische IP-Adresse - Eine feste Adresse, die einem in ein Netzwerk eingebundenen Computer oder Gerät
zugewiesen ist.
Statisches Routing - Das Weiterleiten von Daten in einem Netzwerk über einen festen Pfad.
Streuspektrum - Weitband-Funkfrequenzmethode, die für eine zuverlässigere und sicherere Datenübertragung
verwendet wird.
Subnetzmaske - Ein Adressencode, der die Größe des Netzwerks festlegt.
Switch - 1. Ein Daten-Switch, der einen Rechner mit Host-Computern verbindet, wodurch eine begrenzte Anzahl
von Ports von mehreren Geräten gemeinsam genutzt werden kann. 2. Ein Gerät zum Herstellen, Trennen und
Ändern der Verbindungen innerhalb von elektrischen Schaltkreisen.

44
Anhang D: Glossar
Wireless-G Notebook-Adapter mit SpeedBooster
TCP (Transmission Control Protocol) - Ein Netzwerkprotokoll zur Datenübertragung, bei dem eine Bestätigung
des Empfängers der gesendeten Daten erforderlich ist.
TCP/IP (Transmission Control Protocol/Internet Protocol) - Ein Satz von Anweisungen, den alle PCs für die
Kommunikation über ein Netzwerk verwenden.
Telnet - Benutzerbefehl und TCP/IP-Protokoll zum Zugriff auf entfernte PCs.
TFTP (Trivial File Transfer Protocol) - Eine Version des TCP/IP-FTP-Protokolls, das über keinerlei Verzeichnis-
oder Kennwortfunktionalitäten verfügt.
TKIP (Temporal Key Integrity Protocol) - Eine Wireless-Verschlüsselungsmethode, mit der für jedes übertragene
Datenpaket dynamische Verschlüsselungsschlüssel zur Verfügung stehen.
Topologie - Die physische Anordnung eines Netzwerks.
TX-Rate - Übertragungsrate.
UDP (User Datagram Protocol) - Ein Netzwerkprotokoll zur Datenübertragung, bei dem keine Bestätigung vom
Empfänger der gesendeten Daten erforderlich ist.
URL (Uniform Resource Locator) - Die Adresse einer sich im Internet befindlichen Datei.
Verschlüsselung - Die Kodierung von Daten, die über ein Netzwerk übertragen werden.
Vollduplex - Die Fähigkeit eines Netzwerkgeräts, Daten gleichzeitig empfangen und übertragen zu können.
VPN (Virtual Private Network) - Eine Sicherheitsmaßnahme zum Schutz von Daten im Internet zwischen dem
Verlassen eines Netzwerks und dem Eingehen bei einem anderen.
WAN (Wide Area Network) - Das Internet.
WEP (Wired Equivalent Privacy) - Eine hochgradig sichere Methode zum Verschlüsseln von Netzwerkdaten, die in
einem Wireless-Netzwerk übertragen werden.
WINIPCFG - Ein Dienstprogramm für Windows 98 und Windows ME, das die IP-Adresse für ein bestimmtes
Netzwerkbetriebsgerät anzeigt.
WLAN (Wireless Local Area Network) - Eine Reihe von Computern und Geräten, die über Funkverbindungen
miteinander kommunizieren.
WPA (Wi-Fi Protected Access) - Ein Wireless-Sicherheitsprotokoll, bei dem eine TKIP-Verschlüsselung (Temporal
Key Integrity Protocol) verwendet wird, die zusammen mit einem RADIUS-Server eingesetzt werden kann.

45
Anhang E: Spezifikationen
Wireless-G Notebook-Adapter mit SpeedBooster
Anhang E: Spezifikationen
Standards IEEE 802.11g, IEEE 802.11b
Kanäle 11 Kanäle (der größte Teil der westlichen Hemisphäre)
13 Kanäle (in den meisten Teilen Europas)
LEDs Power (Netzstrom), Link (Verbindung)
Übertragungsleistung 18 dBm
Protokolle 802.11b: CCK (11 MBit/s), DQPSK (2 MBit/s), DBPSK (1 MBit/s);
802.11g: OFDM
Sicherheitsmerkmale WEP, AES, TKIP, 802.1x
WEP-Schlüssel/Bits: 64-/128-Bit
Abmessungen (115 mm x 54 mm x 7,5 mm)
Gewicht 0,047 kg
Zertifizierungen FCC, IC-03, CE
Betriebstemperatur 0 ºC bis 55 ºC
Lagertemperatur -25 ºC bis 70 ºC
Betriebsfeuchtigkeit 5 % bis 95 %, nicht kondensierend
Luftfeuchtigkeit bei Lagerung 5 % bis 95 %, nicht kondensierend

46
Anhang F: Garantieinformationen
Wireless-G Notebook-Adapter mit SpeedBooster
Anhang F: Garantieinformationen
EINGESCHRÄNKTE GEWÄHRLEISTUNG
Linksys sichert Ihnen für einen Zeitraum von drei Jahren (die „Gewährleistungsfrist“) zu, dass dieses Linksys Produkt bei
normaler Verwendung keine Material- oder Verarbeitungsfehler aufweist. Im Rahmen dieser Gewährleistung beschränken
sich Ihre Rechtsmittel und der Haftungsumfang von Linksys wie folgt: Linksys kann nach eigenem Ermessen das Produkt
reparieren oder austauschen oder Ihnen den Kaufpreis abzüglich etwaiger Nachlässe zurückerstatten. Diese eingeschränkte
Gewährleistung gilt nur für den ursprünglichen Käufer.
Sollte sich das Produkt während der Gewährleistungsfrist als fehlerhaft erweisen, wenden Sie sich an den technischen
Kundendienst von Linksys, um eine so genannte Return Authorization Number (Nummer zur berechtigten Rücksendung)
zu erhalten. WENN SIE SICH AN DEN TECHNISCHEN KUNDENDIENST WENDEN, SOLLTEN SIE IHREN KAUFBELEG ZUR HAND
HABEN. Wenn Sie gebeten werden, das Produkt einzuschicken, geben Sie die Nummer zur berechtigten Rücksendung gut
sichtbar auf der Verpackung an und legen Sie eine Kopie des Originalkaufbelegs bei. RÜCKSENDEANFRAGEN KÖNNEN
NICHT OHNE DEN KAUFBELEG BEARBEITET WERDEN. Der Versand fehlerhafter Produkte an Linksys erfolgt auf Ihre eigene
Verantwortung. Linksys kommt nur für Versandkosten von Linksys zu Ihrem Standort per UPS auf dem Landweg auf. Bei
Kunden außerhalb der USA und Kanada sind sämtliche Versand- und Abfertigungskosten durch die Kunden selbst zu tragen.
ALLE GEWÄHRLEISTUNGEN UND BEDINGUNGEN STILLSCHWEIGENDER ART HINSICHTLICH DER MARKTÜBLICHEN QUALITÄT
ODER DER EIGNUNG FÜR EINEN BESTIMMTEN ZWECK SIND AUF DIE DAUER DER GEWÄHRLEISTUNGSFRIST BESCHRÄNKT.
JEGLICHE WEITEREN BEDINGUNGEN, ZUSICHERUNGEN UND GEWÄHRLEISTUNGEN SOWOHL AUSDRÜCKLICHER ALS AUCH
STILLSCHWEIGENDER ART, EINSCHLIESSLICH JEGLICHER STILLSCHWEIGENDER GEWÄHRLEISTUNG DER NICHTVERLETZUNG,
WERDEN AUSGESCHLOSSEN. Einige Gerichtsbarkeiten gestatten keine Beschränkungen hinsichtlich der Gültigkeitsdauer
einer stillschweigenden Gewährleistung; die oben genannte Beschränkung findet daher unter Umständen auf Sie keine
Anwendung. Die vorliegende Gewährleistung sichert Ihnen bestimmte gesetzlich verankerte Rechte zu. Darüber hinaus
stehen Ihnen je nach Gerichtsbarkeit unter Umständen weitere Rechte zu.
Diese Gewährleistung gilt nicht, wenn das Produkt (a) von einer anderen Partei als Linksys verändert wurde, (b) nicht gemäß
den von Linksys bereitgestellten Anweisungen installiert, betrieben, repariert oder gewartet wurde oder (c) unüblichen
physischen oder elektrischen Belastungen, Missbrauch, Nachlässigkeit oder Unfällen ausgesetzt wurde. Darüber hinaus kann
Linksys angesichts der ständigen Weiterentwicklung neuer Methoden zum unerlaubten Zugriff und Angriff auf Netzwerke
nicht gewährleisten, dass das Produkt keinerlei Schwachstellen für unerlaubte Zugriffe oder Angriffe bietet.
SOWEIT NICHT GESETZLICH UNTERSAGT, SCHLIESST LINKSYS JEGLICHE HAFTUNG FÜR VERLOREN GEGANGENE DATEN,
ENTGANGENE EINNAHMEN, ENTGANGENE GEWINNE ODER SONSTIGE SCHÄDEN BESONDERER, INDIREKTER, MITTELBARER,
ZUFÄLLIGER ODER BESTRAFENDER ART AUS, DIE SICH AUS DER VERWENDUNG BZW. DER NICHTVERWENDBARKEIT
DES PRODUKTS (AUCH DER SOFTWARE) ERGEBEN ODER MIT DIESER ZUSAMMENHÄNGEN, UNABHÄNGIG VON DER
HAFTUNGSTHEORIE (EINSCHLIESSLICH NACHLÄSSIGKEIT), AUCH WENN LINKSYS ÜBER DIE MÖGLICHKEIT SOLCHER SCHÄDEN
INFORMIERT WURDE. DIE HAFTUNG VON LINKSYS IST STETS AUF DEN FÜR DAS PRODUKT GEZAHLTEN BETRAG BESCHRÄNKT.
Die oben genannten Beschränkungen kommen auch dann zur Anwendung, wenn eine in diesem Abschnitt aufgeführte

47
Anhang F: Garantieinformationen
Wireless-G Notebook-Adapter mit SpeedBooster
Gewährleistung oder Zusicherung ihren wesentlichen Zweck verfehlt. Einige Gerichtsbarkeiten gestatten keinen Ausschluss
von bzw. keine Beschränkungen auf zufällige oder Folgeschäden; die oben genannte Beschränkung oder der oben genannte
Ausschluss finden daher unter Umständen auf Sie keine Anwendung.
Die vorliegende Gewährleistung ist nur in dem Land gültig bzw. kann nur in dem Land verarbeitet werden, in dem
das Produkt erworben wurde.
Richten Sie alle Anfragen direkt an: Linksys, P.O. Box 18558, Irvine, CA 92623, USA

48
Anhang G: Zulassungsinformationen
Wireless-G Notebook-Adapter mit SpeedBooster
Anhang G: Zulassungsinformationen
FCC-Bestimmungen
Dieses Gerät wurde geprüft und entspricht den Bestimmungen für ein digitales Gerät der Klasse B gemäß Teil 15 der
FCC-Bestimmungen. Die Grenzwerte wurden so festgelegt, dass ein angemessener Schutz gegen Störungen in einer
Wohngegend gewährleistet ist. Dieses Gerät erzeugt und verwendet Hochfrequenzenergie und kann diese abstrahlen.
Wird es nicht gemäß den Angaben des Herstellers installiert und betrieben, kann es sich störend auf den Rundfunk- und
Fernsehempfang auswirken. Es besteht jedoch keine Gewähr, dass bei einer bestimmten Installation keine Störungen
auftreten. Sollte dieses Gerät Störungen des Radio- und Fernsehempfangs verursachen (was durch Ein- und Ausschalten
des Geräts feststellbar ist), wird der Benutzer aufgefordert, die Störungen durch eine oder mehrere der folgenden
Maßnahmen zu beheben:
• Richten Sie die Empfangsantenne neu aus, oder stellen Sie sie an einem anderen Ort auf.
• Erhöhen Sie den Abstand zwischen der Ausrüstung oder den Geräten.
• Schließen Sie das Gerät an eine andere Buchse als die des Empfängers an.
• Wenden Sie sich bei Fragen an Ihren Händler oder an einen erfahrenen Funk-/Fernsehtechniker.
FCC-Bestimmungen zur Freisetzung gefährlicher Strahlung
Dieses Gerät erfüllt die FCC-Bestimmungen zur Freisetzung gefährlicher Strahlung in einer nicht gesteuerten Umgebung.
Dieses Gerät sollte in einem Mindestabstand von 20 cm zwischen dem Heizer und Ihrem Körper installiert und betrieben
werden.
Kanadische Industriebestimmungen
Dieses digitale Gerät der Klasse B erfüllt die kanadischen Bestimmungen der Richtlinie ICES-003.
Bei der Verwendung dieses Geräts innerhalb eines Systems, das teilweise oder vollständig im Freien betrieben wird, ist es
möglicherweise gemäß kanadischen Bestimmungen erforderlich, eine Genehmigung für das System zu beantragen.

49
Anhang G: Zulassungsinformationen
Wireless-G Notebook-Adapter mit SpeedBooster
Informationen zur Einhaltung gesetzlicher Vorschriften bei 2,4-GHz-Wireless-Produkten für den Bereich der EU und
anderer Länder gemäß EU-Richtlinie 1999/5/EG (R&TTE-Richtlinie)
Konformitätserklärung in Bezug auf EU-Richtlinie 1995/5/EG (R&TTE-Richtlinie)
Deutsch
[German]: Dieses Gerät entspricht den grundlegenden Anforderungen und den
weiteren entsprechenden Vorgaben der Richtlinie 1999/5/EG.
Dansk
[Danish]: Dette udstyr er i overensstemmelse med de væsentlige krav og andre
relevante bestemmelser i Direktiv 1999/5/EF.
English: This equipment is in compliance with the essential requirements and other
relevant provisions of Directive 1999/5/EC.
Español
[Spanish]: Este equipo cumple con los requisitos esenciales asi como con otras
disposiciones de la Directiva 1999/5/CE.
ǼȜȜȘȞȚțȒ
[Greek]: ǹȣIJȩȢ Ƞ İȟȠʌȜȚıµȩȢ İȓȞĮȚ ıİ ıȣµµȩȡijȦıȘ µİ IJȚȢ ȠȣıȚȫįİȚȢ
ĮʌĮȚIJȒıİȚȢ țĮȚ ȐȜȜİȢ ıȤİIJȚțȑȢ įȚĮIJȐȟİȚȢ IJȘȢ ȅįȘȖȓĮȢ 1999/5/EC.
Français
[French]: Cet appareil est conforme aux exigences essentielles et aux autres
dispositions pertinentes de la Directive 1999/5/EC.
Íslenska
[Icelandic]: Þetta tæki er samkvæmt grunnkröfum og öðrum viðeigandi ákvæðum
Tilskipunar 1999/5/EC.
Italiano
[Italian]: Questo apparato é conforme ai requisiti essenziali ed agli altri principi
sanciti dalla Direttiva 1999/5/CE.
Nederlands
[Dutch]: Dit apparaat voldoet aan de essentiele eisen en andere van toepassing
zijnde bepalingen van de Richtlijn 1999/5/EC.
Norsk
[Norwegian]: Dette utstyret er i samsvar med de grunnleggende krav og andre relevante
bestemmelser i EU-direktiv 1999/5/EF.
Português
[Portuguese]: Este equipamento está em conformidade com os requisitos essenciais e
outras provisões relevantes da Directiva 1999/5/EC.
Suomi
[Finnish]: Tämä laite täyttää direktiivin 1999/5/EY olennaiset vaatimukset ja on siinä
asetettujen muiden laitetta koskevien määräysten mukainen.
Svenska
[Swedish]: Denna utrustning är i överensstämmelse med de väsentliga kraven och
andra relevanta bestämmelser i Direktiv 1999/5/EC.
HINWEIS: Wenn Sie technische Dokumente benötigen, finden Sie im Abschnitt
„Technische Dokumente unter www.linksys.com/international“ weitere
Informationen.

50
Anhang G: Zulassungsinformationen
Wireless-G Notebook-Adapter mit SpeedBooster
Bei der Bewertung des Produkts hinsichtlich der Anforderung der Richtlinie 1999/5/EG kamen die folgenden Standards zur
Anwendung:
• Funkausrüstung: EN 300.328
• EMV: EN 301 489-1, EN 301 489-17
• Sicherheit: EN 60950
CE-Kennzeichnung
Die Wireless-B- und Wireless-G-Produkte von Linksys sind mit der folgenden CE-Kennzeichnung, der Nummer der
Überwachungs- und Zertifizierungsstelle (sofern zutreffend) und der Kennung der Klasse 2 versehen.
Überprüfen Sie das CE-Etikett auf dem Produkt, um die Überwachungs- und Zertifizierungsstelle zu ermitteln, die in die
Bewertung einbezogen wurde.
Nationale Beschränkungen
Ce produit peut être utilisé dans tous les pays de l’UE (et dans tous les pays ayant transposés la directive 1999/5/CE) sans
aucune limitation, excepté pour les pays mentionnés ci-dessous:
Questo prodotto è utilizzabile in tutte i paesi EU (ed in tutti gli altri paesi che seguono le direttive EU 1999/5/EC) senza
nessuna limitazione, eccetto per i paesii menzionati di seguito:
Das Produkt kann in allen EU-Staaten ohne Einschränkungen eingesetzt werden (sowie in anderen Staaten, die der
EU-Richtlinie 1999/5/EG folgen), mit Ausnahme der folgenden Staaten:
Belgien
Drahtlose Verbindungen im Freien mit einer Reichweite über 300 m müssen beim Belgischen Institut für Postdienste und
Telekommunikation (BIPT) angemeldet werden. Weitere Informationen finden Sie unter http://www.bipt.be.
Draadloze verbindingen voor buitengebruik en met een reikwijdte van meer dan 300 meter dienen aangemeld te worden
bij het Belgisch Instituut voor postdiensten en telecommunicatie (BIPT). Zie
http://www.bipt.be voor meer gegevens.
oder oder

51
Anhang G: Zulassungsinformationen
Wireless-G Notebook-Adapter mit SpeedBooster
Les liaisons sans fil pour une utilisation en extérieur d’une distance supérieure à 300 mètres doivent être
notifiées à l’Institut Belge des services Postaux et des Télécommunications (IBPT). Visitez
http://www.ibpt.be pour de plus amples détails.
Frankreich
Bei Verwendung des Produkts im Freien gelten für die Ausgabeleistung in bestimmten Bandbereichen Beschränkungen.
Weitere Informationen finden Sie in Tabelle 1 oder unter http://www.art-telecom.fr/.
Dans la cas d’une utilisation en extérieur, la puissance de sortie est limitée pour certaines parties de la bande. Reportez-
vous à la table 1 ou visitez http://www.art-telecom.fr/ pour de plus amples détails.
Italien
Dieses Produkt entspricht den nationalen Vorschriften für Funkschnittstellen und den in der nationalen
Frequenzzuweisungstabelle für Italien aufgeführten Anforderungen. Für den Betrieb dieses 2,4-GHz-Wireless-LAN-
Produkts außerhalb der Grundstücksgrenzen des Eigentümers ist eine allgemeine Genehmigung erforderlich. Weitere
Informationen finden Sie unter http://www.comunicazioni.it/it/.
Questo prodotto è conforme alla specifiche di Interfaccia Radio Nazionali e rispetta il Piano Nazionale di
ripartizione delle frequenze in Italia. Se non viene installato all’interno del proprio fondo, l’utilizzo di prodotti
Wireless LAN a 2.4 GHz richiede una “Autorizzazione Generale”. Consultare
http://www.comunicazioni.it/it/ per maggiori dettagli.
Beschränkungen hinsichtlich der Verwendung des Produkts
Dieses Produkt wurde ausschließlich für die Verwendung in Gebäuden entwickelt. Die Verwendung im Freien wird nicht
empfohlen.
Tabelle 1: In Frankreich zulässige Leistungspegel
Standort Frequenzbereich (MHz) Leistung (EIRP; Effective Isotropic Radiated Power)
In Gebäuden (keine
Beschränkungen) 2400-2483,5 100 mW (20 dBm)
Im Freien 2400-2454
2454-2483,5 100 mW (20 dBm)
10 mW (10 dBm)

52
Anhang G: Zulassungsinformationen
Wireless-G Notebook-Adapter mit SpeedBooster
Dieses Produkt wurde für die Verwendung mit der im Lieferumfang enthaltenen integrierten bzw. externen (speziell für
diesen Zweck vorgesehenen) Antenne entwickelt. Die Verwendung von nicht speziell für diesen Zweck vorgesehenen
Antennen wie auch die Verwendung von Drittanbieter-Antennen wird nicht empfohlen und von Linksys nicht unterstützt.
Ausgangsleistung des Geräts
Zur Einhaltung der jeweiligen nationalen Vorschriften müssen Sie u. U. die Ausgangsleistung Ihres drahtlosen Geräts
anpassen. Fahren Sie mit dem entsprechenden Abschnitt für Ihr Gerät fort.
Wireless-Adapter
Bei Wireless-Adaptern ist die Ausgangsleistung standardmäßig auf 100 % eingestellt. Die Ausgangsleistung der einzelnen
Adapter beträgt maximal 20 dBm (100 mW), liegt aber gewöhnlich bei 18 dBm (64 mW) oder darunter. Wenn Sie die
Ausgangsleistung Ihres Wireless-Adapters anpassen müssen, befolgen Sie die entsprechenden Anweisungen für das
Windows-Betriebssystem Ihres Computers.
Windows XP
1. Doppelklicken Sie auf dem Desktop in der Taskleiste auf das Symbol Drahtlose Verbindung.
2. Öffnen Sie das Fenster Drahtlose Netzwerkverbindung.
3. Klicken Sie auf die Schaltfläche Eigenschaften.
4. Klicken Sie auf die Registerkarte Allgemein und dann auf die Schaltfläche Konfigurieren.
5. Klicken Sie im Fenster Eigenschaften auf die Registerkarte Erweitert.
6. Wählen Sie Power Output.
7. Wählen Sie aus dem rechts angezeigten Pulldown-Menü den Prozentsatz für die Ausgabeleistung des Wireless-
Adapters aus.
Windows 2000
1. Öffnen Sie das Fenster Systemsteuerung.
2. Doppelklicken Sie auf Netzwerk- und DFÜ-Verbindungen.
3. Wählen Sie Ihre aktuelle Wireless-Verbindung aus, und wählen Sie dann Eigenschaften.
4. Klicken Sie im Fenster Eigenschaften auf die Schaltfläche Konfigurieren.
5. Klicken Sie auf die Registerkarte Erweitert, und wählen Sie Power Output.
6. Wählen Sie aus dem rechts angezeigten Pulldown-Menü die Leistungseinstellung für den Wireless-Adapter aus.
Hinweis: Die Einstellungen für die Ausgabeleistung sind u. U. nicht für alle
Wireless-Produkte verfügbar. Weitere Informationen finden Sie in der
Dokumentation auf der Produkt-CD oder unter http://www.linksys.com/
international.

53
Anhang G: Zulassungsinformationen
Wireless-G Notebook-Adapter mit SpeedBooster
Wenn auf Ihrem Computer Windows ME oder Windows 98 ausgeführt wird, finden Sie in der Windows-Hilfe Anweisungen
zum Aufrufen der erweiterten Einstellungen eines Netzwerkadapters.
Wireless Access Points, Router und andere Wireless-Produkte
Wenn Sie über einen Wireless Access Point, einen Router oder ein anderes Wireless-Produkt verfügen, verwenden Sie das
zugehörige webbasierte Dienstprogramm, um die Einstellungen für die Ausgangsleistung zu konfigurieren (weitere
Informationen finden Sie in der Dokumentation zum jeweiligen Produkt).
Technische Dokumente unter www.linksys.com/international
Führen Sie die folgenden Schritte aus, um auf die gewünschten technischen Dokumente zuzugreifen:
1. Navigieren Sie mit dem Browser zur Website http://www.linksys.com/international.
2. Klicken Sie auf Ihre Region.
3. Klicken Sie auf den Namen Ihres Landes.
4. Klicken Sie auf Products (Produkte).
5. Klicken Sie auf die entsprechende Produktkategorie.
6. Wählen Sie ein Produkt aus.
7. Klicken Sie auf den gewünschten Dokumentationstyp. Das Dokument wird automatisch im PDF-Format geöffnet.
Hinweis: Wenn Sie Fragen zur Einhaltung gesetzlicher Vorschriften bei diesen
Produkten haben oder die gewünschten Informationen nicht finden können,
wenden Sie sich an die Vertriebsniederlassung vor Ort. Weitere Informationen
finden Sie unter http://www.linksys.com/international.

54
Anhang H: Kontaktinformationen
Wireless-G Notebook-Adapter mit SpeedBooster
Anhang H: Kontaktinformationen
Möchten Sie sich persönlich an Linksys wenden?
Informationen zu den aktuellen Produkten und Aktualisierungen für bereits installierte Produkte finden
Sie online unter: http://www.linksys.com/international
Wenn Sie im Zusammenhang mit Linksys Produkten auf Probleme stoßen, können Sie uns unter
folgenden Adressen eine E-Mail senden:
In Europa E-Mail-Adresse
Belgien support.be@linksys.com
Dänemark support.dk@linksys.com
Deutschland support.de@linksys.com
Frankreich support.fr@linksys.com
Großbritannien & Irland support.uk@linksys.com
Italien support.it@linksys.com
Niederlande support.nl@linksys.com
Norwegen support.no@linksys.com
Österreich support.at@linksys.com
Portugal support.pt@linksys.com
Schweden support.se@linksys.com
Schweiz support.ch@linksys.com
Spanien support.es@linksys.com
Außerhalb von Europa E-Mail-Adresse
Lateinamerika support.la@linksys.com
USA und Kanada support@linksys.com