LINKSYS WPSM54GV11 Wireless-G PrintServer User Manual Book
LINKSYS LLC Wireless-G PrintServer Book
LINKSYS >
Contents
- 1. Manual 1
- 2. Manual 2
Manual 1
Model No.
PrintServer with
Wireless-G
WPSM54G V1.1
User Guide
WIRELESS
GHz
2.4
802.11g
Multifunction Printer Support
Wireless-G PrintServer with Multifunction Printer Support
Copyright and Trademarks
Specifications are subject to change without notice. Linksys is a registered trademark or trademark of Cisco
Systems, Inc. and/or its affiliates in the U.S. and certain other countries. Copyright © 2006 Cisco Systems, Inc. All
rights reserved. Other brands and product names are trademarks or registered trademarks of their respective
holders.
How to Use this User Guide
The user guide to the Wireless-G PrintServer with Multifunction Printer Support has been designed to make
understanding networking with the PrintServer easier than ever. Look for the following items when reading this
User Guide:
In addition to these symbols, there are definitions for technical terms that are presented like this:
Also, each figure (diagram, screenshot, or other image) is provided with a figure number and description, like
this:
Figure numbers and descriptions can also be found in the “List of Figures” section.
This exclamation point means there is a caution or
warning and is something that could damage your
property or the PrintServer.
word: definition.
This checkmark means there is a note of interest and
is something you should pay special attention to while
using the PrintServer.
This question mark provides you with a reminder about
something you might need to do while using the PrintServer.
Figure 0-1: Sample Figure Description
WPSM54G-UG-60801NC JL
WARNING: This product contains chemicals, including lead, known
to the State of California to cause cancer, and birth defects or other
reproductive harm. Wash hands after handling.

Wireless-G PrintServer with Multifunction Printer Support
Table of Contents
Chapter 1: Introduction 1
Welcome 1
What’s in this Guide? 2
Chapter 2: Getting to Know the PrintServer 4
The Bottom Panel 4
The Front Panel 5
Chapter 3: Connecting the PrintServer 6
Overview 6
Connecting the PrintServer to Your Network 6
Placement Options 7
Chapter 4: Configuring the PrintServer Using the Setup Wizard 8
Installation 8
Chapter 5: Windows Driver Installation 20
Overview 20
Installation 20
Configuration of the PrintServer Driver 22
Chapter 6: Configuring the PrintServer Using the Web-based Utility 25
Overview 25
The Setup Tab 26
The Protocol Tab - TCP/IP 27
The Protocol Tab - AppleTalk 28
The Protocol Tab - NetBEUI 29
The Protocol Tab - SNMP 30
The Wireless Tab - Basic 31
The Wireless Tab - Security 32
The Printer Tab - Internet Printing 33
The Printer Tab - Logical Port 34
The Status Tab - Device 35
The Status Tab - Printer 36
The Status Tab - Wireless 36
The Exit Tab 36

Wireless-G PrintServer with Multifunction Printer Support
Chapter 7: Bi-Admin Management 37
Overview 37
Bi-Admin Installation 37
Starting the Bi-Admin Management Utility 39
The Bi-Admin Management Utility 40
Chapter 8: Internet Printing Protocol (IPP) 51
Overview 51
Windows IPP Client Setup 51
Appendix A: Troubleshooting 56
Common Problems and Solutions 56
Appendix B: Wireless Security 58
Security Precautions 58
Security Threats Facing Wireless Networks 58
Appendix C: About Bi-Directional Printing 61
Appendix D: Upgrading Firmware 62
Appendix E: Windows Help 63
Appendix F: Glossary 64
Appendix G: Specifications 69
Appendix H: Warranty Information 70
Appendix I: Regulatory Information 71
Appendix J: Contact Information 73

Wireless-G PrintServer with Multifunction Printer Support
List of Figures
Figure 2-1: PrintServer’s Bottom Panel 4
Figure 2-2: PrintServer’s Front Panel 5
Figure 3-1: Connect to the USB Port 6
Figure 3-2: Connect to the Ethernet Port 6
Figure 3-3: Desktop Placement 7
Figure 4-1: Welcome 8
Figure 4-2: Set up PrintServer 8
Figure 4-3: Disconnect the USB Printer cable and power 9
Figure 4-4: Connect the PrintServer to the Printer 9
Figure 4-5: Connect the PrintServer 10
Figure 4-6: Connect the PrintServer 10
Figure 4-7: Reconnect the Printer 11
Figure 4-8: Choose PrintServer 11
Figure 4-9: Password 12
Figure 4-10: Configure IP Settings 12
Figure 4-11: Set PrintServer Password 13
Figure 4-12: Select Wireless Network 13
Figure 4-13: Configure Wireless Settings - SSID 14
Figure 4-14: Select Wireless Network 14
Figure 4-15: Wireless Security Settings - Disabled 15
Figure 4-16: Wireless Security - WEP 15
Figure 4-17: Wireless Security - WPA-Pre-Shared 16
Figure 4-18: Confirm New Settings 16
Figure 4-19: Disconnect power to the PrintServer 17
Figure 4-20: Disconnect Network 17
Figure 4-21: Reconnect the PrintServer 18
Figure 4-22: PrintServer connection complete 18
Figure 4-23: Continue to Set up Computer 19
Figure 5-1: Welcome 21
Figure 5-2: Set up Computer 21
Figure 5-3: Select Printer 22

Wireless-G PrintServer with Multifunction Printer Support
Figure 5-4: Check Print Driver 22
Figure 5-5: Wireless-G PrintServer Diagnostic - Check Printer
Driver Installation 23
Figure 5-6: Printer Driver Not Installed 23
Figure 5-7: Print Test Page 23
Figure 5-8: PrintServer Diagnostic Icon 24
Figure 5-9: PrintServer Info 24
Figure 5-10: Right-click Icon 24
Figure 6-1: Setup Tab 26
Figure 6-2: Protocol Tab - TCP/IP 27
Figure 6-3: Protocol Tab - AppleTalk 28
Figure 6-4: Protocol Tab - NetBEUI 29
Figure 6-5: Protocol Tab - SNMP 30
Figure 6-6: Wireless Tab - Basic 31
Figure 6-7: Wireless Tab - Security (WEP) 32
Figure 6-8: Wireless Tab - Security (WPA) 32
Figure 6-9: Printer - Internet Printing 33
Figure 6-10: Printer - Logical Port 34
Figure 6-11: Status Tab - Device 35
Figure 6-12: Firmware Upgrade 35
Figure 6-13: Status Tab - Printer 36
Figure 6-14: Status Tab - Wireless 36
Figure 6-15: Exit 36
Figure 7-1: Welcome 37
Figure 7-2: Bi-Admin Setup Welcome 37
Figure 7-3: Choose Destination Location 38
Figure 7-4: Select Program Folder 38
Figure 7-5: Connected Protocol 39
Figure 7-6: Searching for Device 39
Figure 7-7: Bi-Admin Management Utility 40
Figure 7-8: Device Information 40
Figure 7-9: Printer Status 41
Figure 7-10: Configuration - System 42
Figure 7-11: Configuration - TCP/IP 43

Wireless-G PrintServer with Multifunction Printer Support
Figure 7-12: Configuration - AppleTalk 44
Figure 7-13: Configuration - NetBEUI 45
Figure 7-14: Configuration - Internet Printing 46
Figure 7-15: Configuration - Port 47
Figure 7-16: Configuration - Wireless 48
Figure 7-17: Configuration - SNMP 49
Figure 7-18: Upgrade 50
Figure 7-19: Detected LAN Cards 50
Figure 7-20: BIN File Information 50
Figure 7-21: Add Cross Segment PrintServer 50
Figure 8-1: Windows XP - Local or Network Printer 53
Figure 8-2: Windows XP - Specify a Printer 54
Figure 8-3: Windows 2000 - Locate Your Printer 54
Figure D-1: Status Tab - Device 62
Figure D-2: Firmware Upgrade 62

1
Chapter 1: Introduction
Welcome
Wireless-G PrintServer with Multifunction Printer Support
Chapter 1: Introduction
Welcome
Thank you for choosing the Linksys Wireless-G PrintServer with Multifunction Printer Support. The PrintServer
lets you connect a USB printer directly to your network, eliminating the need to dedicate a PC to print sharing
chores. Using a PrintServer frees up your “print share PC” so you don’t have to leave it on all the time. It also
removes the printing bottleneck, and sets your PC free to do more useful work.
The USB port is compatible with USB 1.1 printers, as well as printers that support the new high-speed USB 2.0
specification for even faster throughput.
How does the PrintServer do all of this? A print server is a device that allows multiple computers to share a
printer over a network. You can connect the PrintServer directly to your network using an Ethernet network cable,
or you can connect the PrintServer over Wireless-G (802.11g) at up to 54Mbps. The wireless option lets you put
your printer wherever you want to, without having to run a cable. Whichever way the PrintServer is attached to
your network, both your wireless and wired PCs will have access to it and its USB printer.
But what does all of this mean?
Networks are useful tools for sharing Internet access and computer resources. Multiple computers can share
Internet access, so you don’t need more than one high-speed Internet connection. Using the PrintServer, you can
access one printer from different computers. Plus, you can access data located on another computer’s hard drive
and play multi-player video games. So, networks not only are useful in homes and offices, but also can be fun.
PCs on a wired network create a LAN, or Local Area Network. They are connected with Ethernet cables, which is
why the network is called “wired”.
PCs equipped with wireless cards or adapters can communicate without cumbersome cables. By sharing the
same wireless settings, within their transmission radius, they form a wireless network. This is sometimes called
a WLAN, or Wireless Local Area Network. Your network router bridges wireless networks of both 802.11b and
802.11g standards and wired networks, allowing them to communicate with each other.
To guide you through the process of installing the PrintServer, run the Setup Wizard on the Setup CD-ROM (you
can use the instructions in the Quick Installation or User Guide to help you). After you have installed the
PrintServer, you can change its settings using its browser-based utility, which is described in this User Guide.
These instructions should be all you need to get the most out of the Wireless-G PrintServer.
ethernet: an IEEE standard network protocol that
specifies how data is placed on and retrieved from
a common transmission medium
lan (local area network): the computers and
networking products that make up the network
in your home or office
802.11b: an IEEE wireless networking standard
that specifies a maximum data transfer rate of
11Mbps and an operating frequency of 2.4GHz
802.11g: an IEEE wireless networking standard
that specifies a maximum data transfer rate of
54Mbps, an operating frequency of 2.4GHz, and
backward compatibility with 802.11b devices
browser: an application program that
provides a way to look at and interact with all
the information on the World Wide Web
mbps: one million bits per second; a unit of
measurement for data transmission

2
Chapter 1: Introduction
What’s in this Guide?
Wireless-G PrintServer with Multifunction Printer Support
What’s in this Guide?
This user guide covers the steps for setting up and using the PrintServer.
• Chapter 1: Introduction
This chapter describes the PrintServer’s applications and this User Guide.
• Chapter 2: Getting to Know the PrintServer
This chapter describes the physical features of the PrintServer.
• Chapter 3: Connecting the PrintServer
This chapter instructs you on how to connect the PrintServer to your network.
• Chapter 4: Configuring the PrintServer using the Setup Wizard
This chapter instructs you on how to use the Setup Wizard to install your PrintServer.
• Chapter 5: Windows Driver Installation
This chapter explains how to install the Windows driver for the PrintServer.
• Chapter 6: Configuring the PrintServer Using the Web-based Utility
This chapter explains use the web-based utility to change the PrintServer’s settings.
• Chapter 7: Bi-Admin Management
This chapter explains how to use the Bi-Admin Management utility, which is for advanced users only.
• Chapter 8: Internet Printing Protocol (IPP)
This chapter instruct you on how to use the PrintServer as an IPP server so you can run remote print jobs.
• Appendix A: Troubleshooting
This appendix describes some potential problems and solutions regarding use of the PrintServer.
• Appendix B: Wireless Security
This appendix explains the security risks in wireless networking and how you can help protect your network
• Appendix C: About Bi-Directional Printing
This appendix describes bi-directional printing.
• Appendix D: Upgrading Firmware
This appendix instructs you on how to upgrade the firmware on the PrintServer should you need to do so.

3
Chapter 1: Introduction
What’s in this Guide?
Wireless-G PrintServer with Multifunction Printer Support
• Appendix E: Windows Help
This appendix describes how you can use Windows Help for instructions about networking, such as installing
the TCP/IP protocol.
• Appendix F: Glossary
This appendix gives a brief glossary of terms frequently used in networking.
• Appendix G: Specifications
This appendix provides the technical specifications for the PrintServer.
• Appendix H: Warranty Information
This appendix supplies the warranty information for the PrintServer.
• Appendix I: Regulatory Information
This appendix supplies the regulatory information regarding the PrintServer.
• Appendix J: Contact Information
This appendix provides contact information for a variety of Linksys resources, including Technical Support.
4
Chapter 2: Getting to Know the PrintServer
The Bottom Panel
Wireless-G PrintServer with Multifunction Printer Support
Chapter 2: Getting to Know the PrintServer
The Bottom Panel
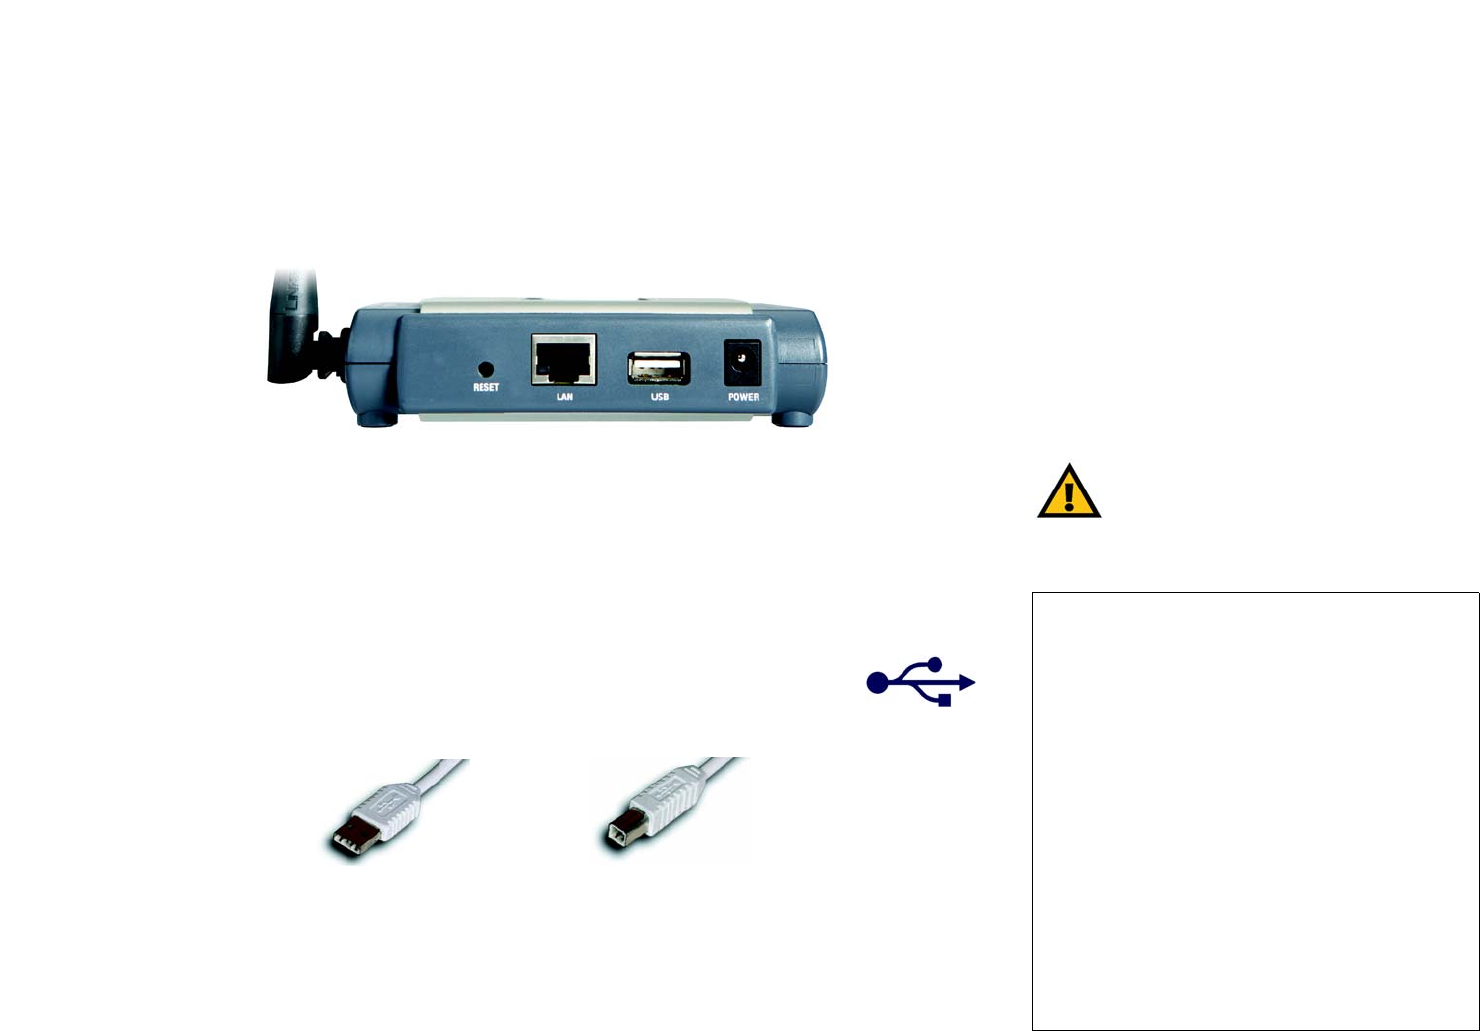
The PrintServer’s ports and Reset button are located on the bottom panel.
Power The Power port is where you will connect the power adapter.
Ethernet The Ethernet port is where you will connect the PrintServer to your wired network. (This is
optional.)
USB Printer The USB Printer port is where you will connect the USB printer to the PrintServer.
The USB icon (right) designates a USB port. The PrintServer comes with a USB
cable. One end has a rectangular connector called Type A. The other end has a
square connector called Type B. The USB cable’s Type A end connects to the
PrintServer, and the Type B end connects to the printer.
Reset Button Use the Reset Button to reset the PrintServer to its factory defaults or print a test page. The
instructions are provided on the right side of this page.
IMPORTANT: Resetting the PrintServer will
delete all of your settings and replace them
with the factory defaults. Do not reset the
PrintServer if you want to retain the settings.
Figure 2-1: PrintServer’s Bottom Panel
To reset the factory default settings
1. Unplug the PrintServer.
2. Press and hold the Reset button. While pressing the
button, plug in the PrintServer.
3. If you continue pressing the button for 10 seconds,
the PrintServer will be reset to factory defaults.
To generate a diagnostic print-out
1. Ensure that both the PrintServer and the printer
attached to the Printer port are ON.
2. Press the Reset button, and hold it in for 2 seconds.
3. The test page, which lists the current settings, will
be printed.
PostScript printers are unable to print this page. If you
have a PostScript printer on the USB Printer port, the
test page will not be printed.
USB Connector-Type A USB Connector-Type B

5
Chapter 2: Getting to Know the PrintServer
The Front Panel
Wireless-G PrintServer with Multifunction Printer Support
The Front Panel
The PrintServer’s LEDs are located on the front panel.
USB Green/Orange. The USB LED lights up green when there is a printer connected to the USB port.
The LED flashes green when the PrintServer is sending data through the USB port. It lights up
orange when there is a problem with the USB printer.
Wireless Green. The Wireless LED serves two purposes. If the LED is continuously lit, the PrintServer is
successfully connected to the wireless network. If the LED is flashing, the PrintServer is
actively sending or receiving data from the wireless network.
Ethernet Green/Orange. If the Ethernet LED is continuously lit green, the PrintServer is successfully
connected to a device through the Ethernet port. The LED flashes green when the PrintServer
is actively sending or receiving data from the wired network. It flashes orange when there are
collisions detected on the Ethernet port.
Power Green/Orange. If the Power LED is continuously lit green, then the PrintServer is ready for use.
The LED flashes green when the PrintServer is booting up, a system self-test is running, or the
firmware is being upgraded. It lights up orange when there is an error.
Figure 2-2: PrintServer’s Front Panel
6
Chapter 3: Connecting the PrintServer
Overview
Wireless-G PrintServer with Multifunction Printer Support
Chapter 3: Connecting the PrintServer
Overview
Before starting the physical installation, note the PrintServer’s default name, which starts with “LK” (for example,
LK71107). The default name is shown in the Server field on the PrintServer’s sticker, which is located on the
PrintServer’s back panel. During the PrintServer driver installation, this name is used to identify the PrintServer
you are currently installing.
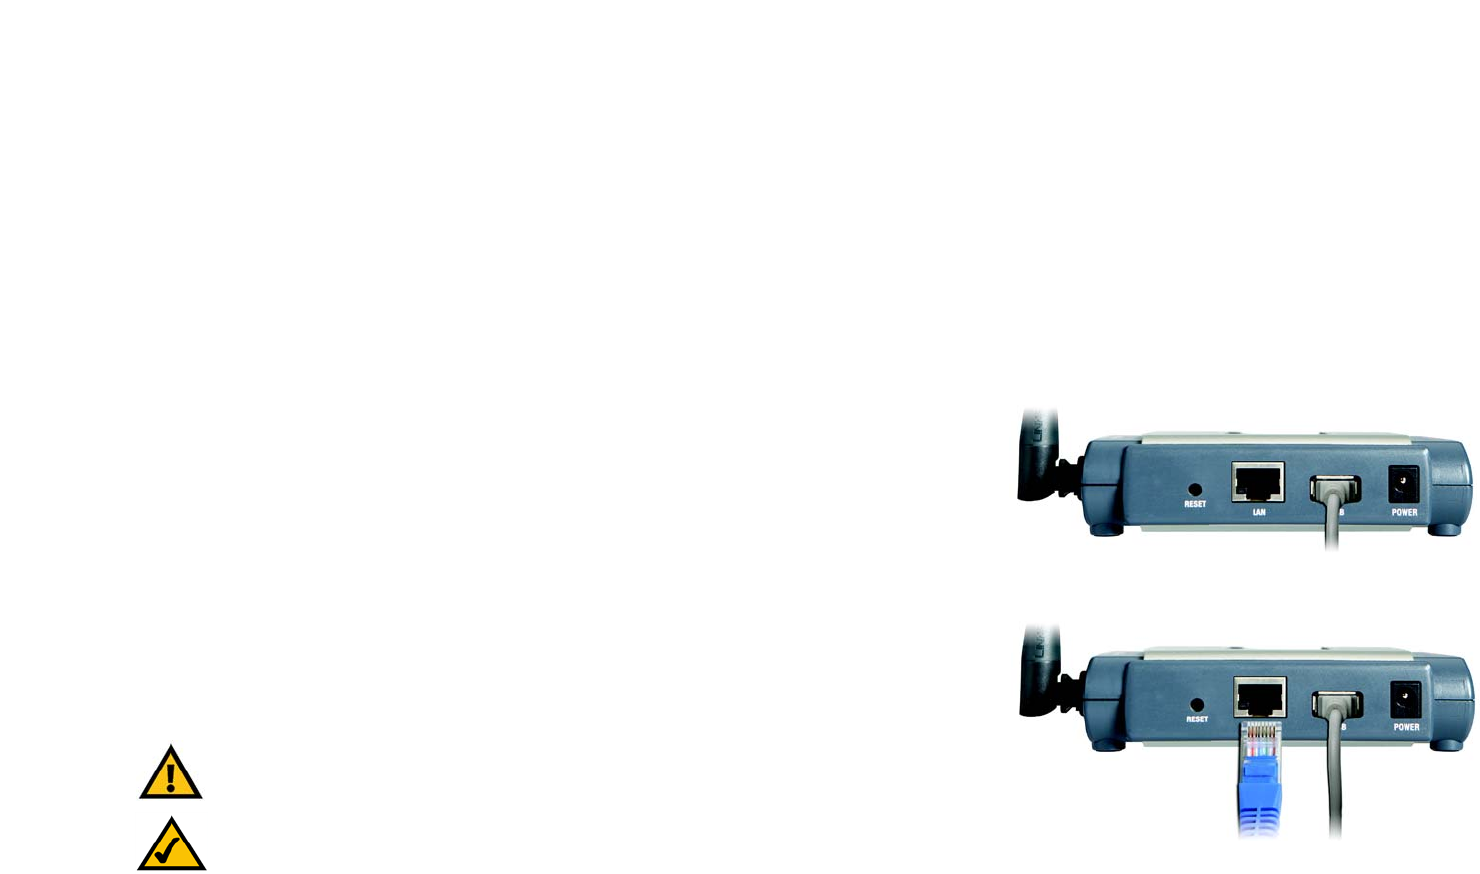
Connecting the PrintServer to Your Network
1. Use the USB cable to connect your USB printer to the PrintServer’s USB Printer port. Plug the Type A
connector end into the PrintServer and the Type B connector end into the printer.
2. If you are connecting the PrintServer to your wired network, then plug one end of the Ethernet network cable
into the PrintServer’s Ethernet port.
Then connect the other end of the cable to your router or switch. The distance between the PrintServer and
the other device should not exceed 328 feet (100 meters).
3. Power on your printer.
4. Plug the power adapter into the PrintServer’s Power port.
Then plug the other end into an electrical outlet.
Proceed to the next section, “Placement Options.”
Figure 3-1: Connect to the USB Port
NOTE: The PrintServer does not have an on/off power switch. Whenever its power adapter is
plugged into a power supply, the PrintServer is powered on. The PrintServer can be powered on
before, during, or after your network is powered on. Figure 3-2: Connect to the Ethernet Port
IMPORTANT: Make sure you use the power adapter supplied with the PrintServer. Use of a
different power adapter could damage the PrintServer.
7
Chapter 3: Connecting the PrintServer
Placement Options
Wireless-G PrintServer with Multifunction Printer Support
Placement Options
There are different ways to place the PrintServer. The first way is to place the PrintServer horizontally on a
surface, so it sits on four small rubber pads. You can also use the included velcro to mount the PrintServer on a
wall or underneath a shelf. To use the velcro, follow these instructions:
1. Separate the included velcro into its two sides, the hook side and the loop side. You will use the tape on the
backs of the velcro sides to attach them to the PrintServer and surface you want to use.
2. For the first velcro side, peel off the cover protecting the tape, and attach it to the recessed area on the back
panel of the PrintServer.
3. For the other velcro side, peel off the cover, and attach it to the location you have chosen for the PrintServer.
4. Attach the velcro sides to each other, and make sure the PrintServer is securely mounted on the wall or
underneath the shelf.
5. Adjust the position of the antenna so that it is positioned as high as possible. Usually, the higher you place the
antenna, the better the performance and range will be.
The physical installation of the Wireless-G PrintServer with Multifunction Printer Support is complete.
Proceed to “Chapter 4: Configuring the PrintServer Using the Setup Wizard.”
Figure 3-3: Desktop Placement
8
Chapter 4: Configuring the PrintServer Using the Setup Wizard
Installation
Wireless-G PrintServer with Multifunction Printer Support
Chapter 4: Configuring the PrintServer Using the Setup
Wizard
Installation
To install the PrintServer, you will use the Setup CD-ROM to run the Setup Wizard. It is highly recommended that
you use a computer on the wired network to set up the PrintServer. However, if you only have a wireless network,
then you can use a computer on the wireless network to set up the PrintServer.
1. Insert the Setup CD-ROM into the computer’s CD-ROM drive. The Setup Wizard should run automatically. If it
does not, click the Start button and choose Run. In the box that appears, enter D:\setupWizard.exe (if “D” is
the letter of your CD-ROM drive).
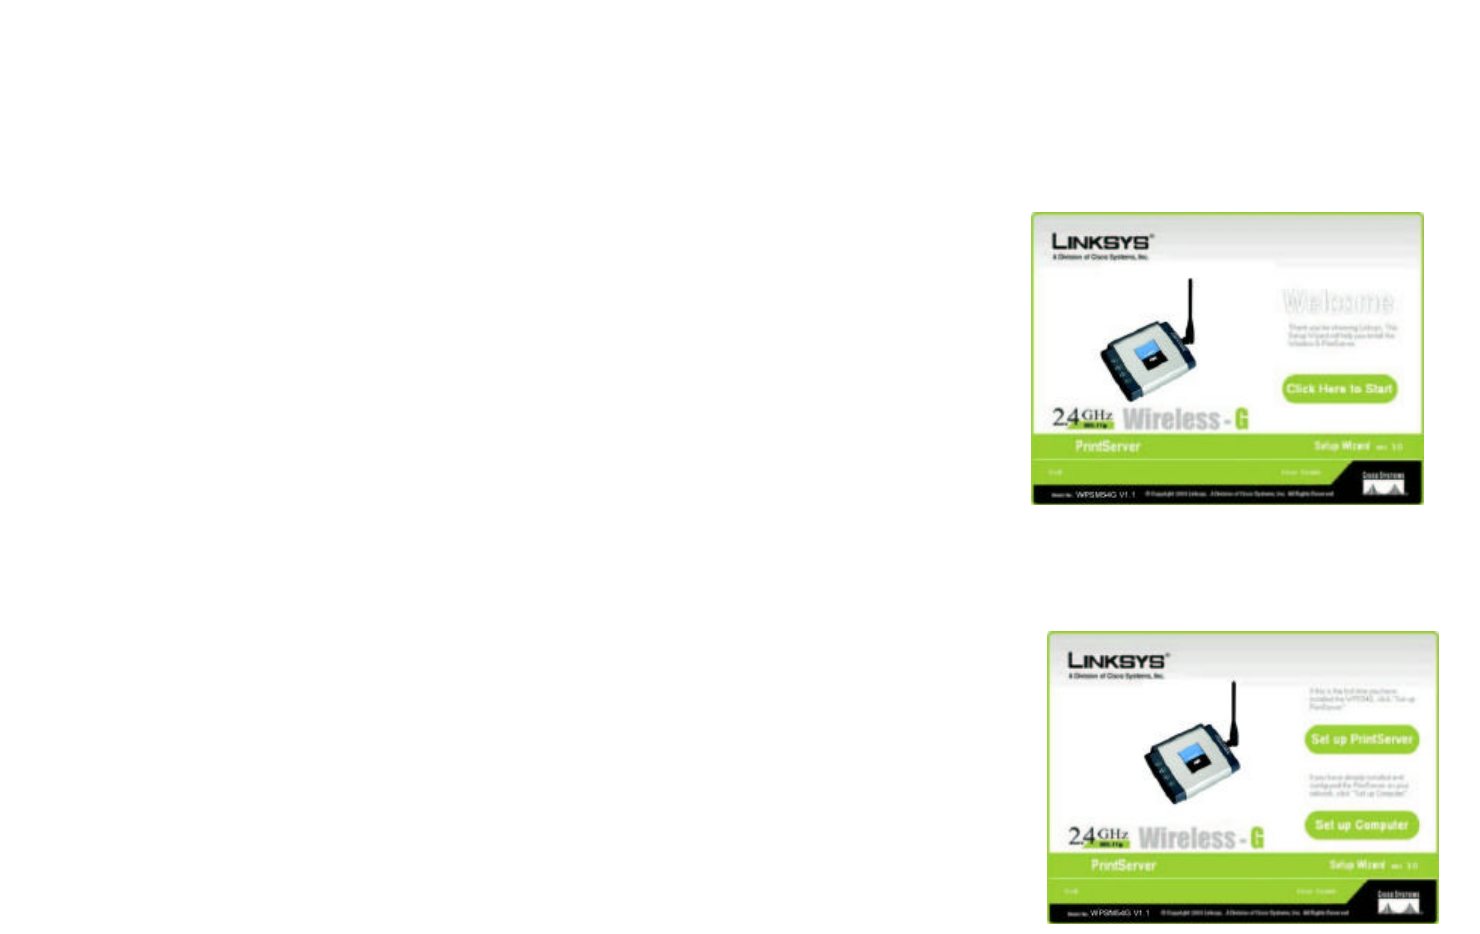
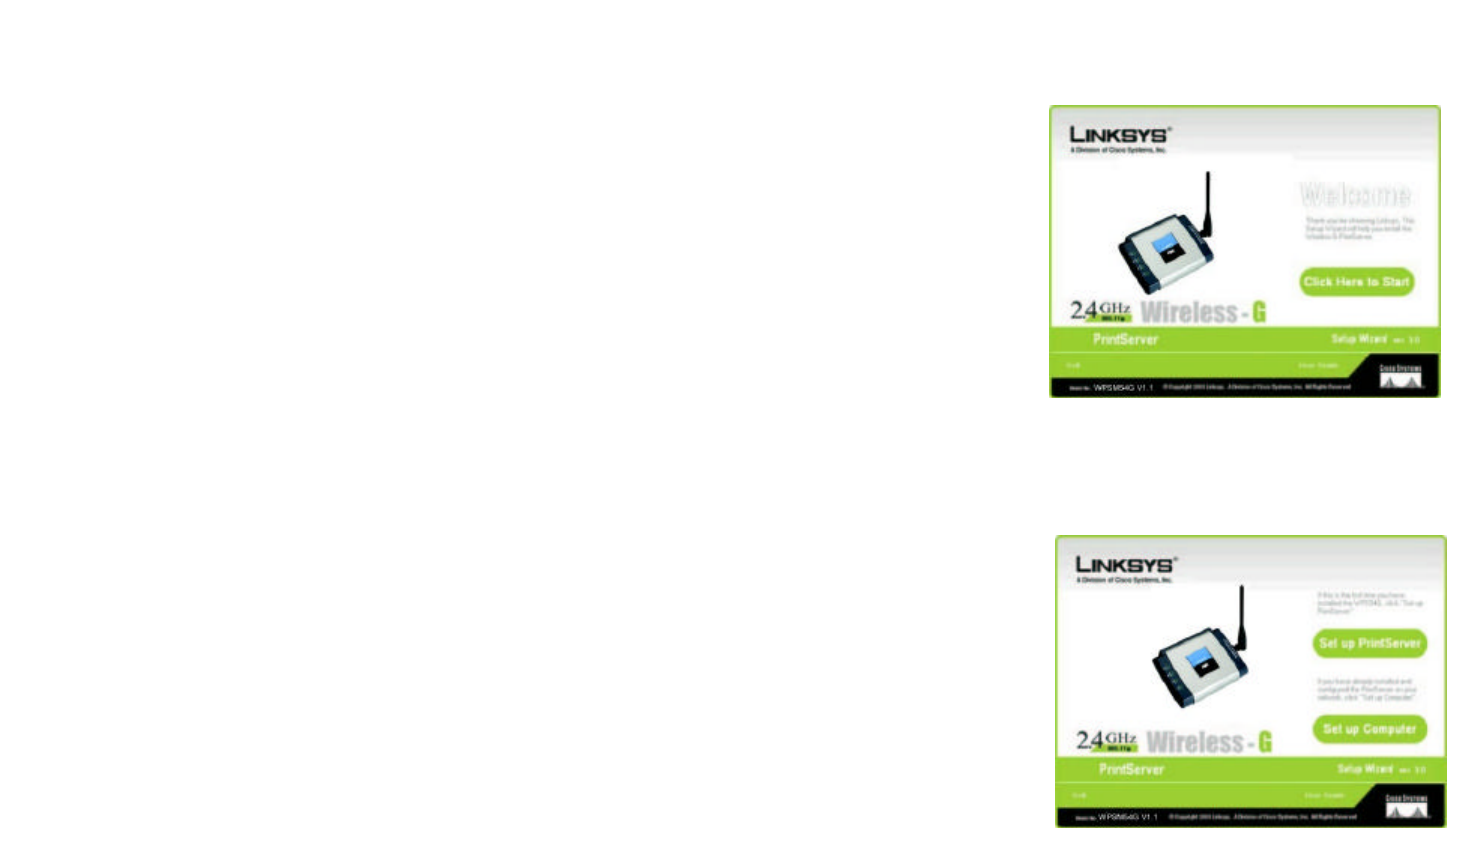
2. When you see the Welcome screen, click Setup Wizard to continue. Click Exit to end the installation. Click
User Guide button to view the User Guide.
3. If this is the first time you have installed the PrintServer, click Set up PrintServer. If you have already
installed and configured the PrintServer, click Set up Computer and proceed to Chapter 5: Windows Driver
Installation.
Figure 4-1: Welcome
Figure 4-2: Set up PrintServer
9
Chapter 4: Configuring the PrintServer Using the Setup Wizard
Installation
Wireless-G PrintServer with Multifunction Printer Support
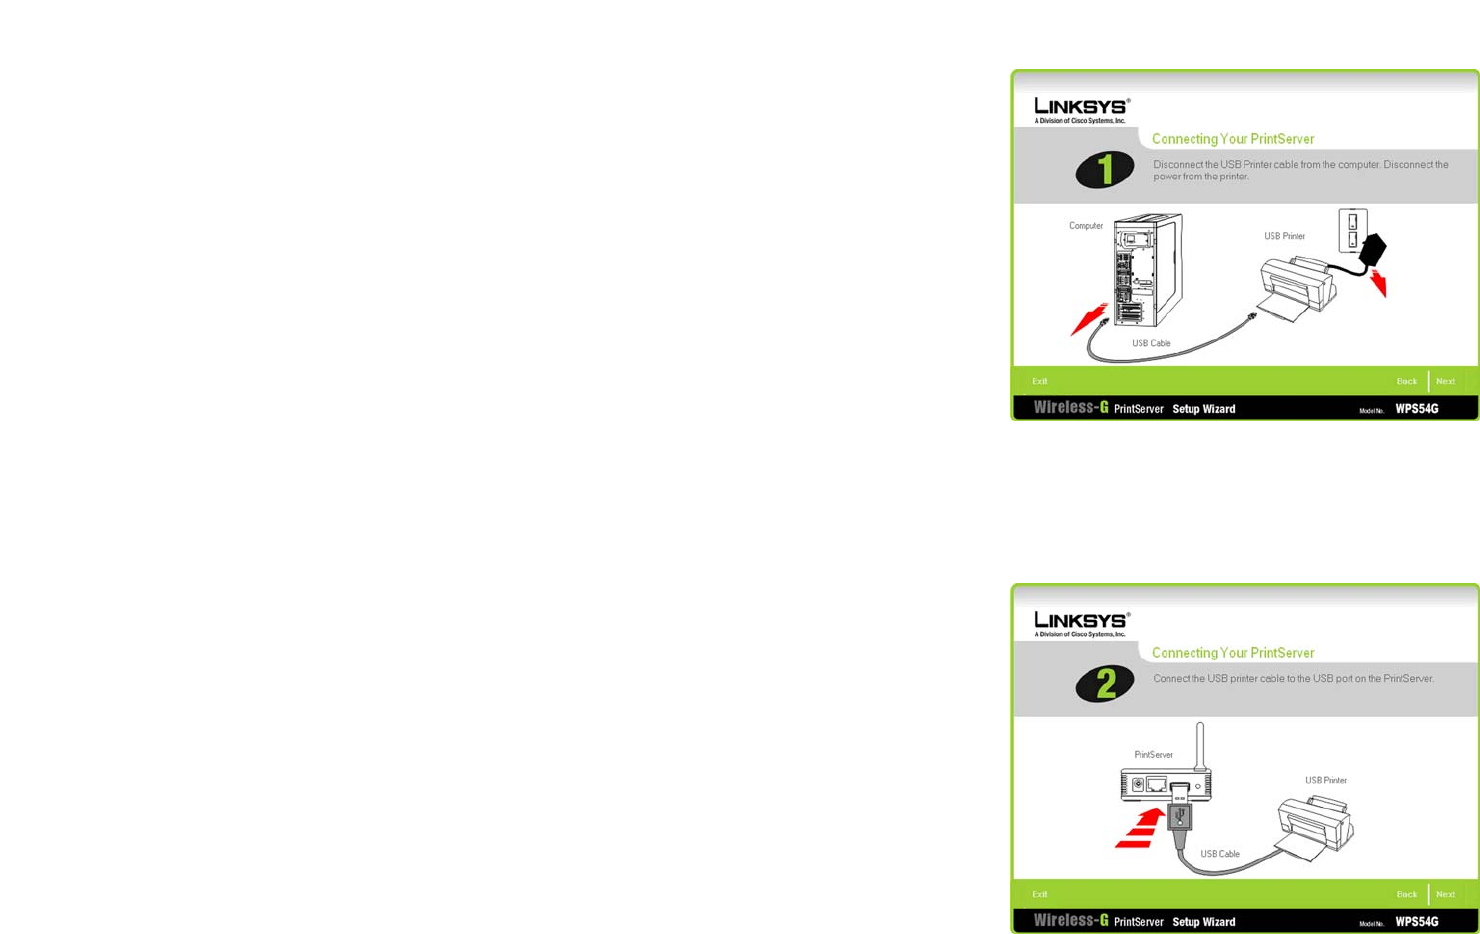
4. You will need to first disconnect the USB Printer cable from the computer and disconnect the power from the
printer. Click Next when finished.
5. In Step 2, you will connect the USB printer cable to the USB port on the Print Server. Click Next.
Figure 4-3: Disconnect the USB Printer cable and power
Figure 4-4: Connect the PrintServer to the Printer
10
Chapter 4: Configuring the PrintServer Using the Setup Wizard
Installation
Wireless-G PrintServer with Multifunction Printer Support
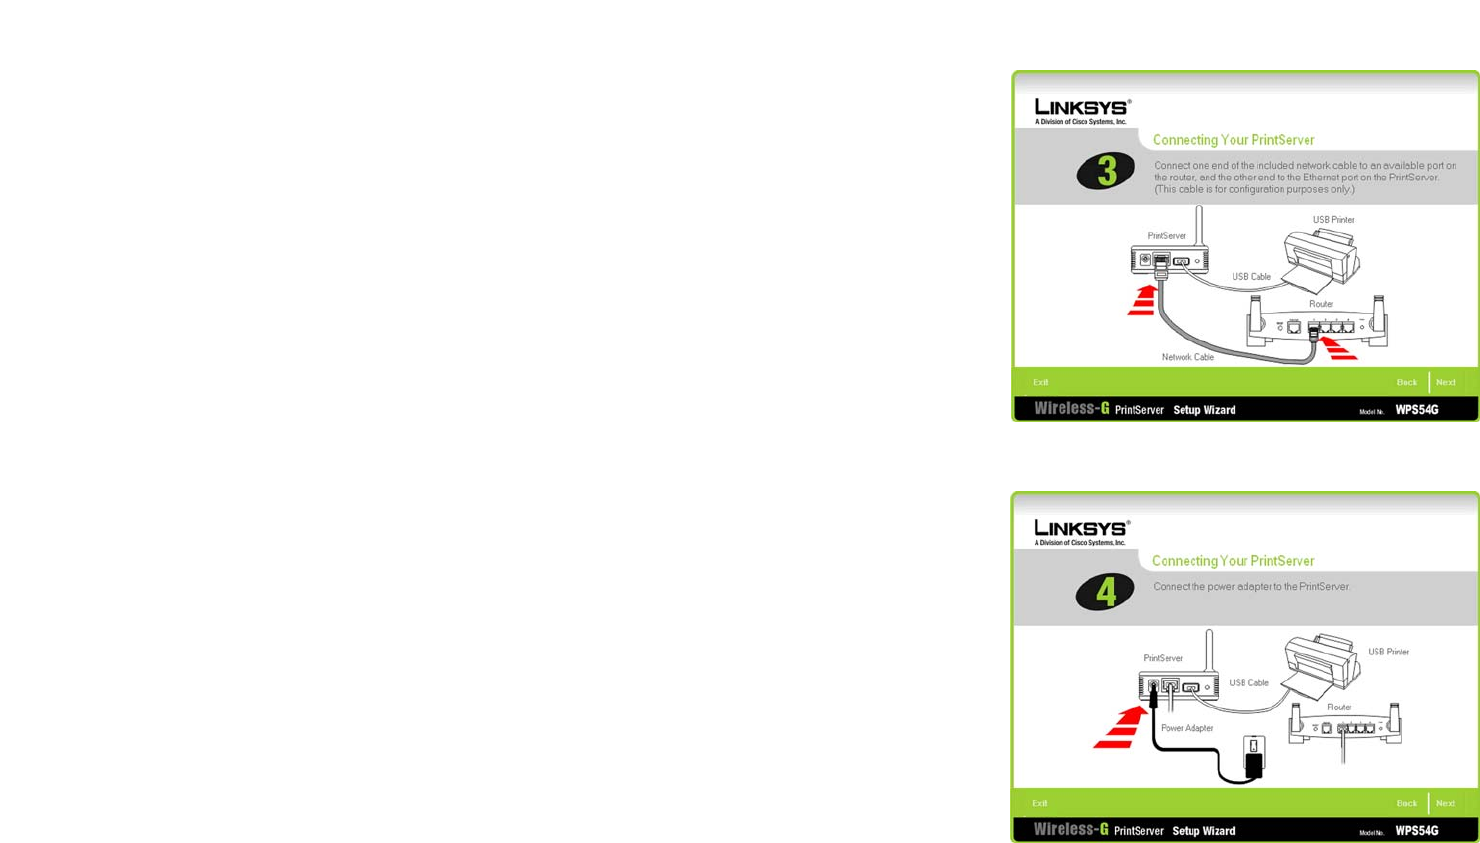
6. From the Connecting Your PrintServer screen, you will connect your Ethernet port.
The Ethernet connection is for configuration purposes only. Later in this installation, you will need to
disconnect the ethernet cable and reconnect your PrintServer, printer, and router.
Click Next to continue. Click Back to return to the previous screen.
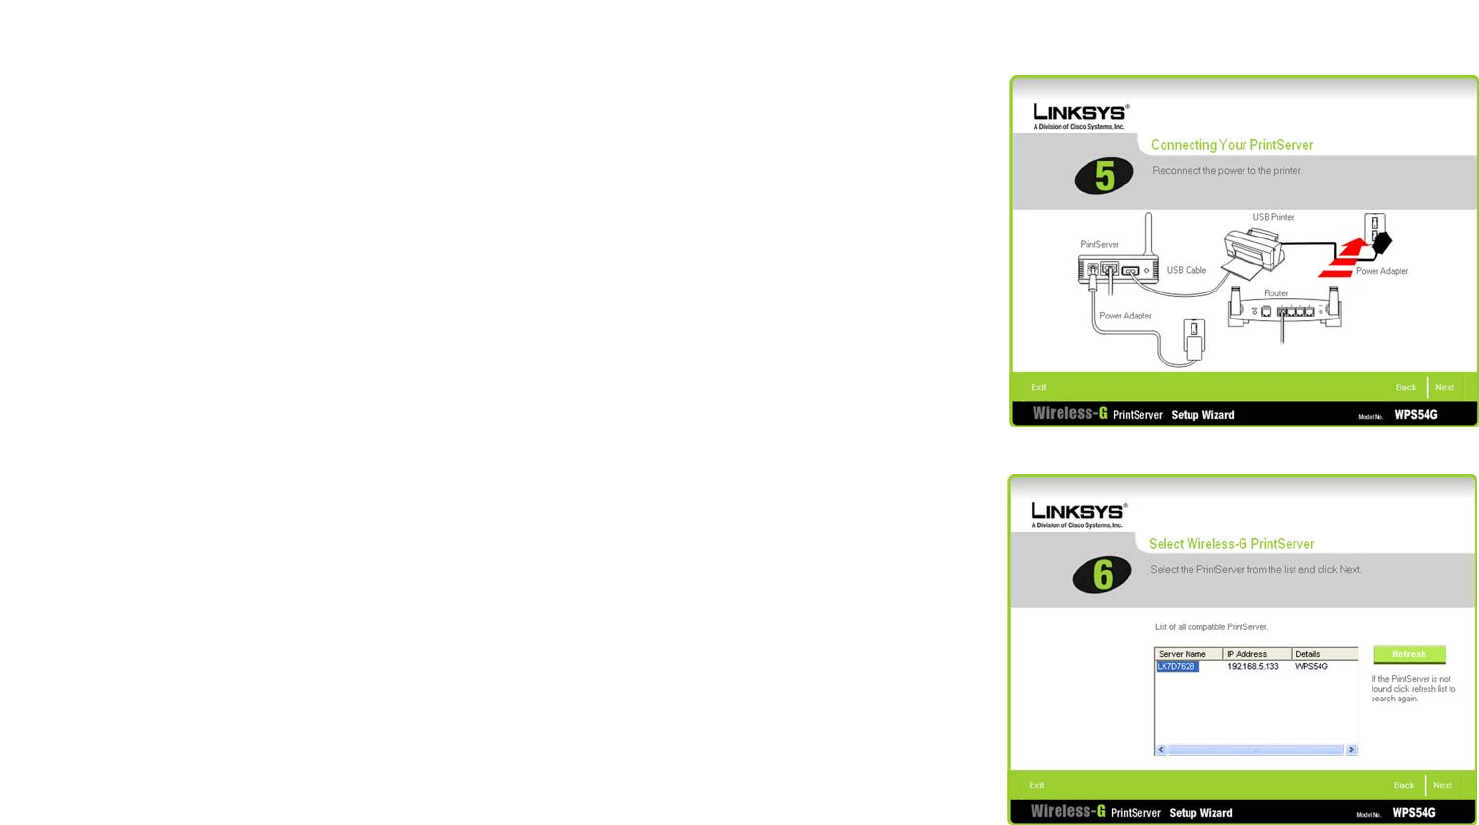
7. Connect the Power Adapter to the PrintServer and click Next.
Figure 4-5: Connect the PrintServer
Figure 4-6: Connect the PrintServer
11
Chapter 4: Configuring the PrintServer Using the Setup Wizard
Installation
Wireless-G PrintServer with Multifunction Printer Support
8. Reconnect the power adapter to the printer. Plug the power into the wall outlet.
Click Next to continue, or click Back to return to the previous screen.
Wait a few moments while the system searches for the PrintServer.
9. Select the proper PrintServer. If you can not find the PrintServer, click Refresh.
Click Next.
Figure 4-7: Reconnect the Printer
Figure 4-8: Choose PrintServer
12
Chapter 4: Configuring the PrintServer Using the Setup Wizard
Installation
Wireless-G PrintServer with Multifunction Printer Support
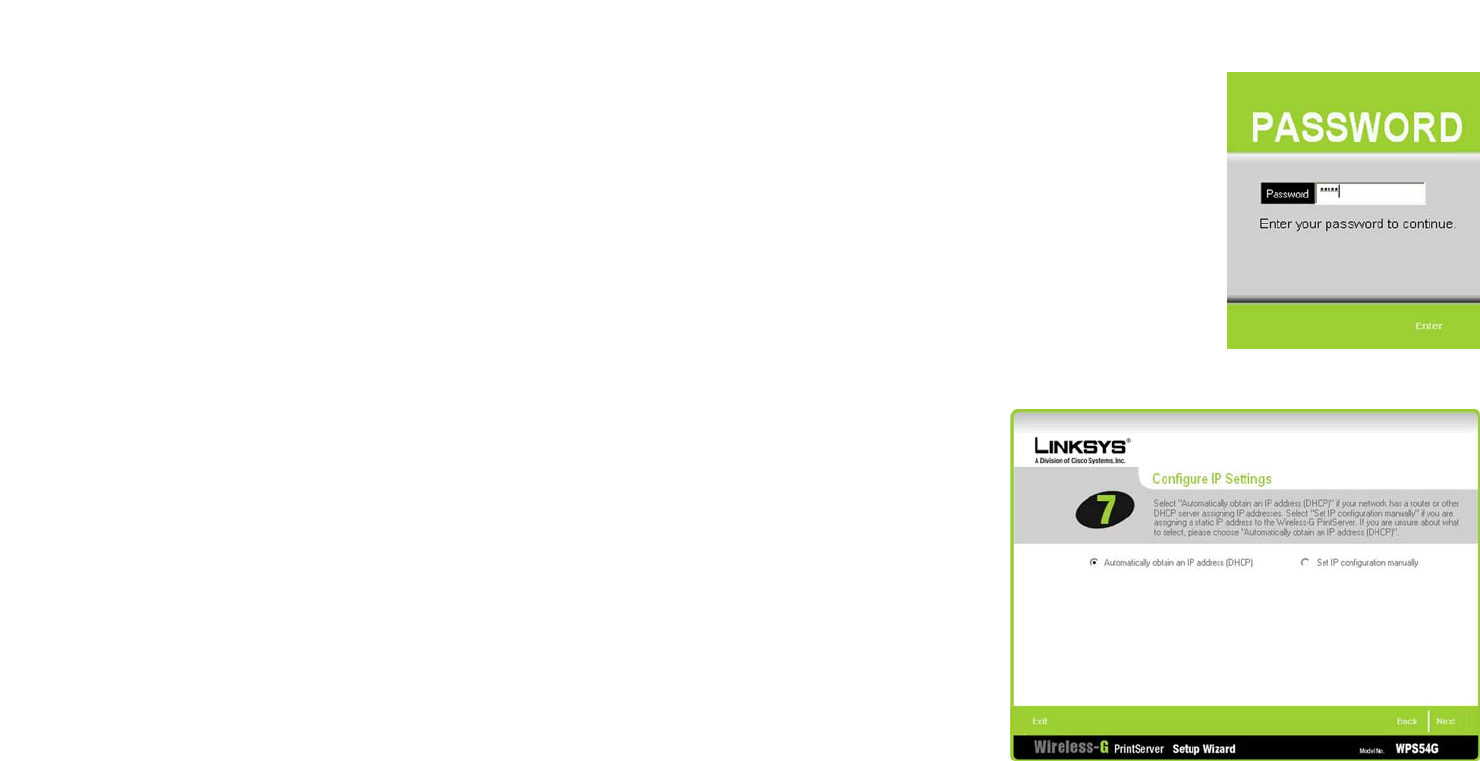
10. If you have changed the default password previously, the password dialog opens and you are prompted for
your password. Otherwise, the installation will continue.
If you have forgotten your password, hold the reset button on the side of the PrintServer for 10 seconds. This
will reset the device to factory default. The default password is admin.
11. The Configure IP Settings screen appears. If your network uses a router with a DHCP setting that
automatically assigns IP addresses, select Automatically obtain an IP address (DHCP). If your network
uses a static IP address, select Set IP configuration manually, and enter the IP Address, Subnet Mask, and
Gateway in the fields provided.
Click Next to continue, or click Back to return to the previous screen.
Figure 4-9: Password
Figure 4-10: Configure IP Settings
static ip address: a fixed address assigned to
a computer or device connected to a network.
ip (internet protocol): a protocol
used to send data over a network
ip address: the address used to identify
a computer or device on a network
13
Chapter 4: Configuring the PrintServer Using the Setup Wizard
Installation
Wireless-G PrintServer with Multifunction Printer Support
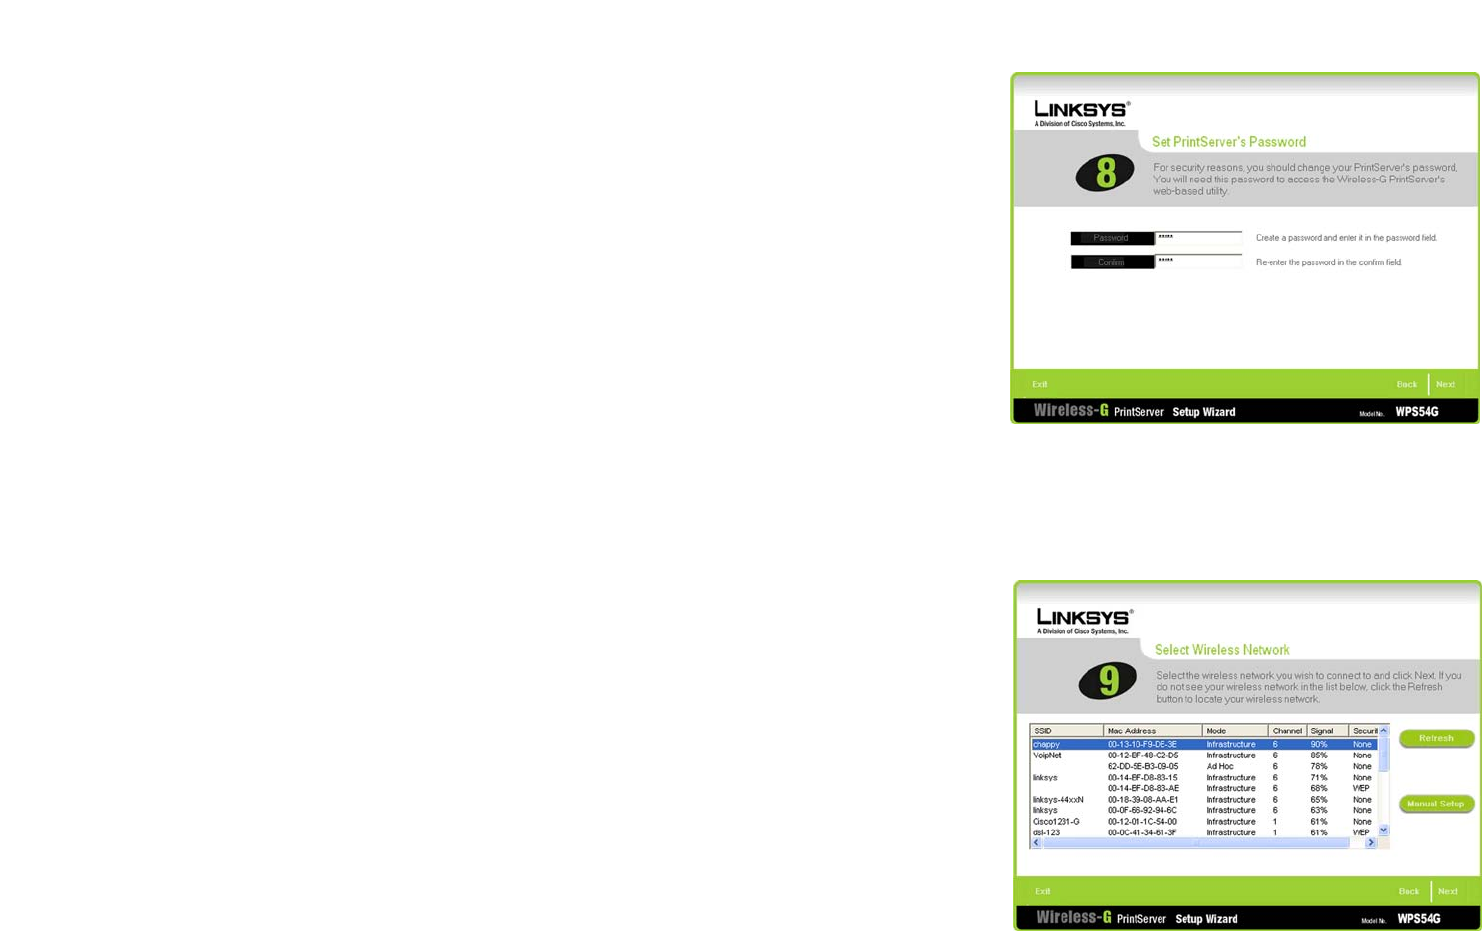
12. The Set PrintServer’s Password screen appears. If you want to change your password, enter your current
password in the Password field. Enter the new password in the Confirm field.
Click Next to continue, or click Back to return to the previous screen.
13. Locate and select the wireless network you want to connect to. If you do not see the wireless network you
wish to use, click Refresh and locate the network.
Click Next to continue, or click Back to return to the previous screen.
Figure 4-11: Set PrintServer Password
Figure 4-12: Select Wireless Network
14
Chapter 4: Configuring the PrintServer Using the Setup Wizard
Installation
Wireless-G PrintServer with Multifunction Printer Support
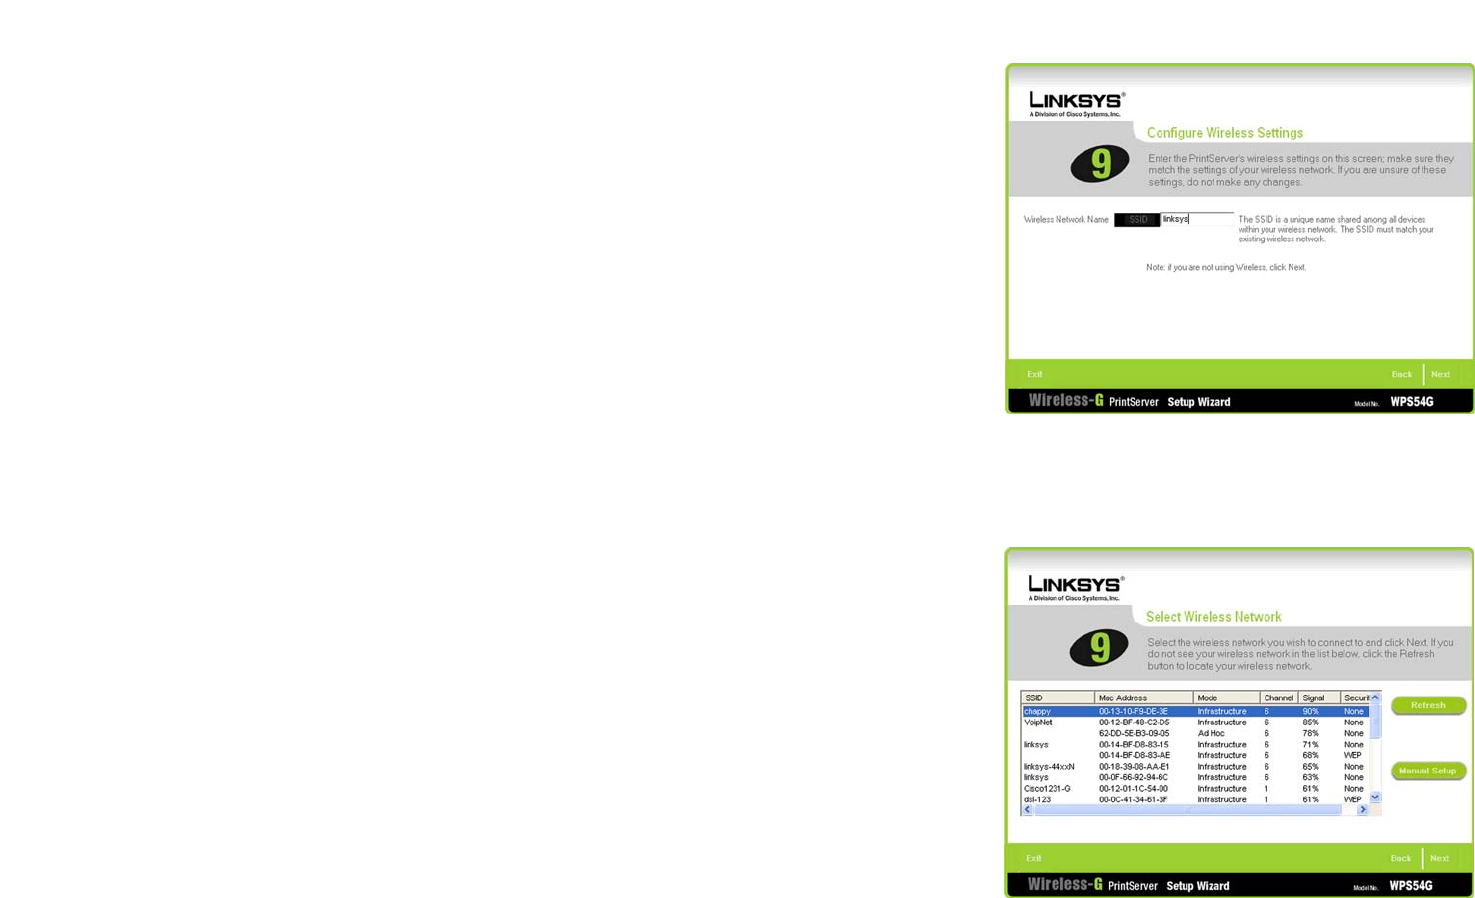
14. If you clicked Manual Setup, the Configure Wireless Settings screen appears with the SSID field. Enter your
wireless network’s SSID or name. This is the unique name shared by all devices in a wireless network. The
SSID is case-sensitive and should have 32 characters or fewer.
Click Next to continue, or click Back to return to the previous screen.
If you click Refresh and select the network, the setup wizard automatically detects what kind of security
network your computer has.
Figure 4-14: Select Wireless Network
Figure 4-13: Configure Wireless Settings - SSID

15
Chapter 4: Configuring the PrintServer Using the Setup Wizard
Installation
Wireless-G PrintServer with Multifunction Printer Support
15. If your network uses wireless security, you will prompted to enter the correct information.
If you enter a Passphrase, you will see the automatically generated WEP key on the following screen.
Otherwise, enter the WEP key manually in the field provided. If you are using 64-bit WEP encryption, then the
key must consist of exactly 10 hexadecimal characters. If you are using 128-bit WEP encryption, then the key
must consist of exactly 26 hexadecimal characters. Valid hexadecimal characters are “0”-“9” and “A”-“F”.
Click Next to continue, or click Back to return to the previous screen.
Figure 4-15: Wireless Security Settings - Disabled
Figure 4-16: Wireless Security - WEP
16
Chapter 4: Configuring the PrintServer Using the Setup Wizard
Installation
Wireless-G PrintServer with Multifunction Printer Support
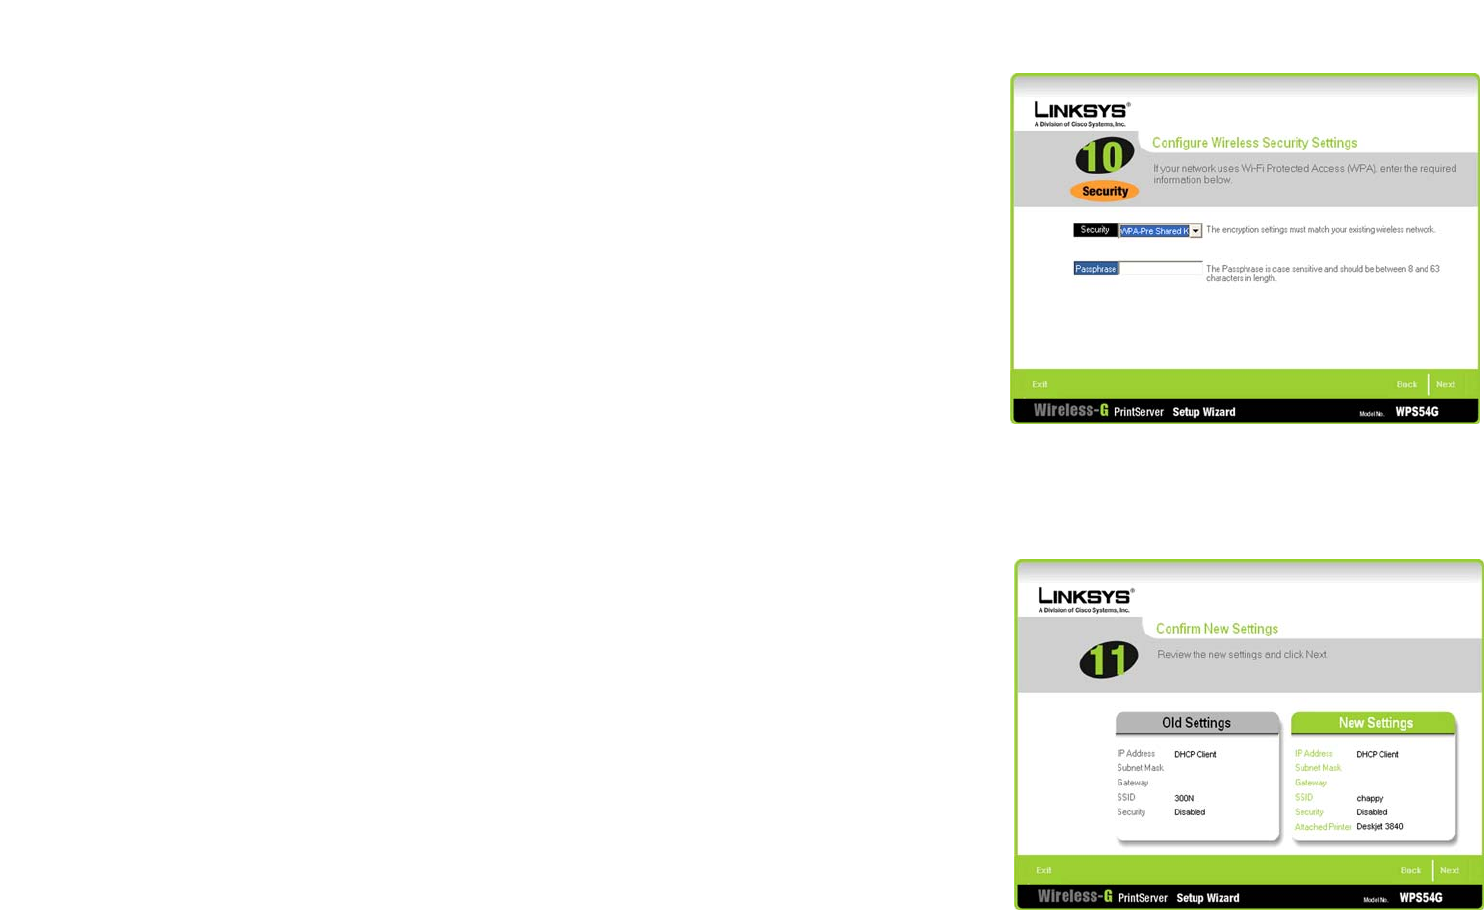
WPA-Pre-Shared Key
Enter a Pre-Shared Key that is 8-63 characters in length. Click Next to continue, or click Back to return to the
previous screen.
16. The Confirmation screen will appear. Your old and new settings will be displayed. If you want to save the new
settings, click Next. If you want to make a change, click Back to make changes.
Please wait a few moments while the system changes the PrintServer’s settings.
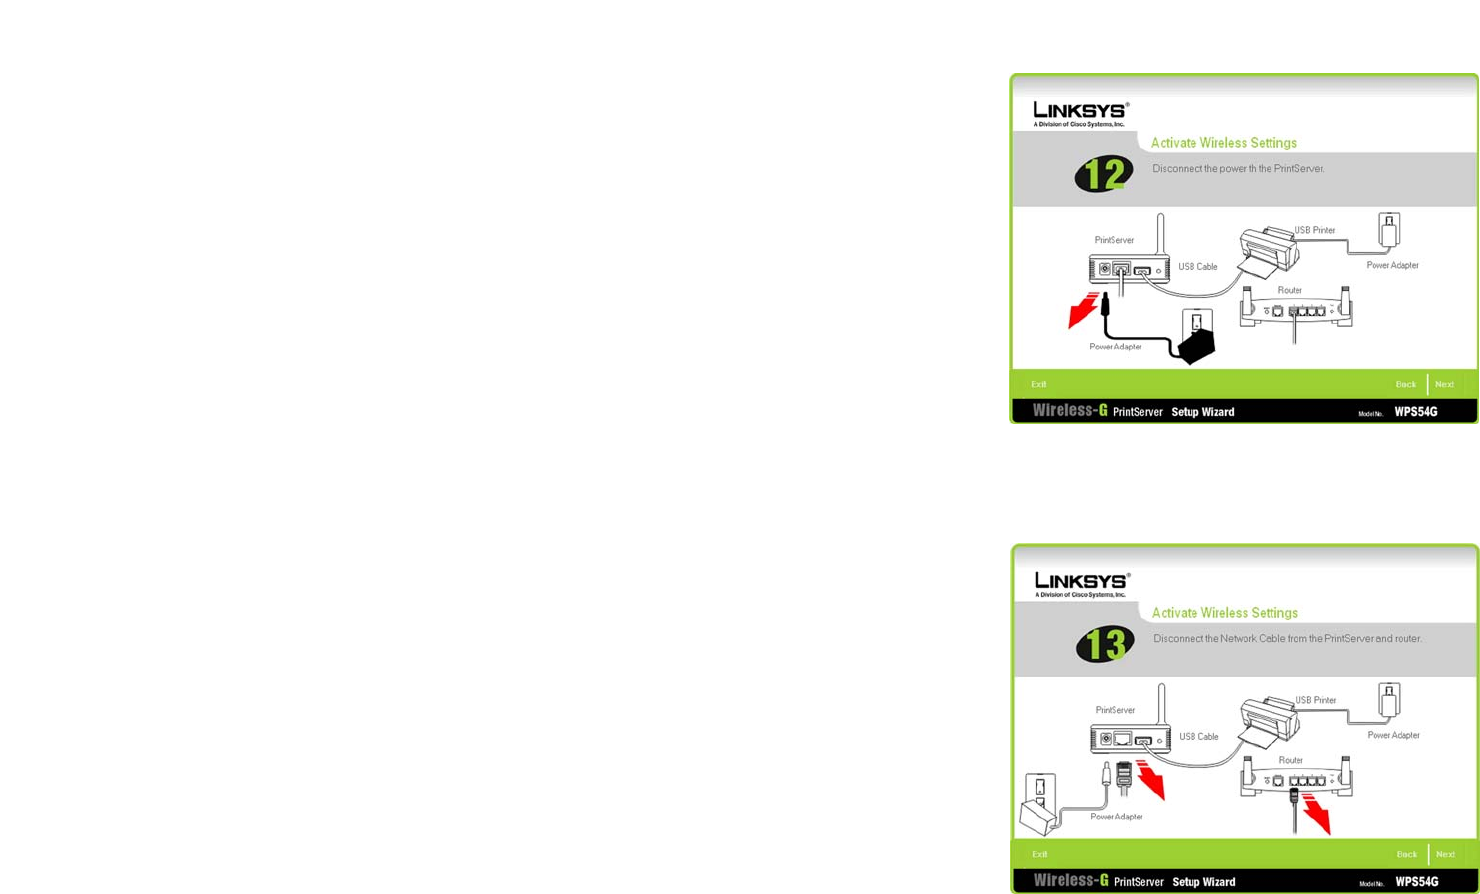
NOTE: In the next few screens, you will need to disconnect and reconnect your PrintServer. Proceed in the order
specified to avoid any networking conflicts.
Figure 4-17: Wireless Security - WPA-Pre-Shared
Figure 4-18: Confirm New Settings
17
Chapter 4: Configuring the PrintServer Using the Setup Wizard
Installation
Wireless-G PrintServer with Multifunction Printer Support
17. Disconnect the power to the PrintServer. Click Next.
18. Disconnect the Network Cable from the PrintServer and router.
Figure 4-19: Disconnect power to the PrintServer
Figure 4-20: Disconnect Network
18
Chapter 4: Configuring the PrintServer Using the Setup Wizard
Installation
Wireless-G PrintServer with Multifunction Printer Support
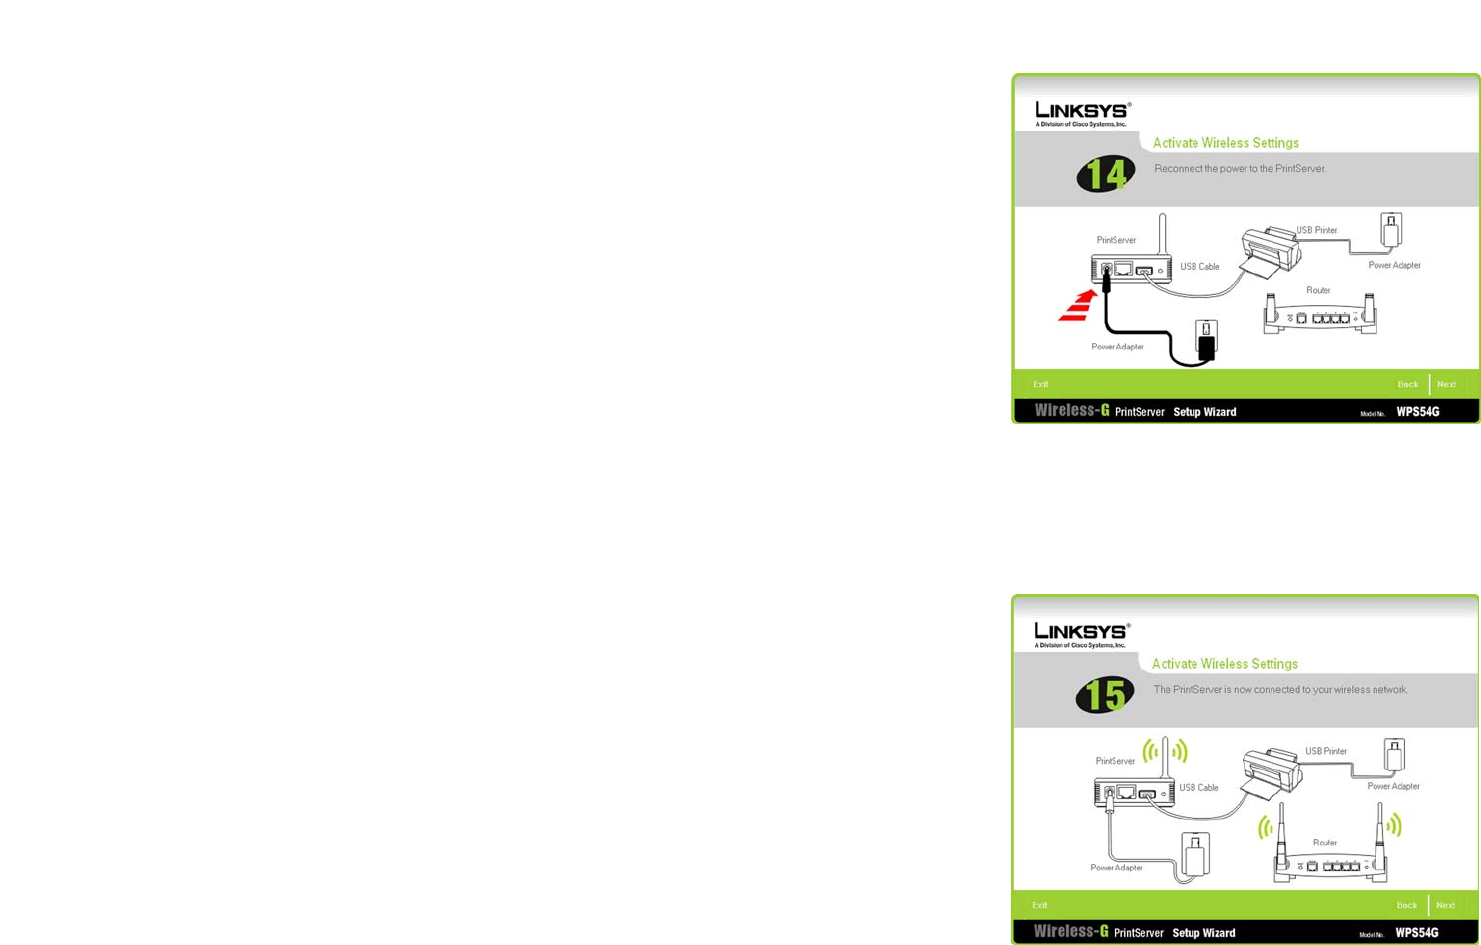
19. Reconnect the power to the PrintServer and click Next.
Wait a few moments while the system checks for the network.
20. The PrintServer is now connected to your wireless network properly.
The order used in reconnecting your PrintServer, router, and printer is very important. If you may have
reconnected improperly, please click Back and review your processes.
Figure 4-21: Reconnect the PrintServer
Figure 4-22: PrintServer connection complete
19
Chapter 4: Configuring the PrintServer Using the Setup Wizard
Installation
Wireless-G PrintServer with Multifunction Printer Support
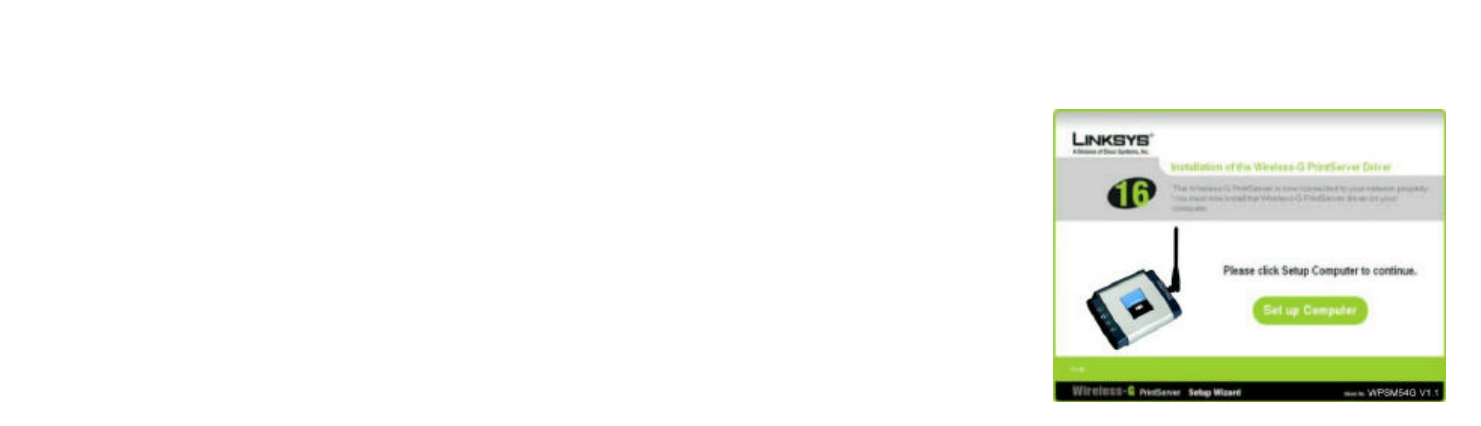
21. Now you have finished the initial setup..
You will need to install the driver next. Click Set up Computer at the bottom of this, and go to “Chapter 5:
Windows Driver Installation” of this user guide.
Figure 4-23: Continue to Set up Computer

20
Chapter 5: Windows Driver Installation
Overview
Wireless-G PrintServer with Multifunction Printer Support
Chapter 5: Windows Driver Installation
Overview
This section installs the PrintServer’s software on your Windows 98, Me, 2000, or XP computers so they can use
the PrintServer for print jobs. (The PrintServer is fully compatible with Windows 98, Me, 2000, and XP.)
At this point, you must have the following:
• the PrintServer hardware installed on your network. If not, see “Chapter 3: Connecting the PrintServer.”
• TCP/IP installed on each of your computers.
• an IP address assigned to each of the computers on your network.
• an IP address assigned to the PrintServer by you or your network router. By default the PrintServer has DHCP
enabled so the network router will automatically assign an IP address. If you need to manually assign an IP
address, run the Setup Wizard on the Setup CD-ROM or go to “Chapter 7: Bi-Admin Management.”
It is assumed that your CD-ROM drive’s letter name is designated as “D”. If your CD-ROM drive is named another
letter, replace all instances of “D” with the appropriate letter.
If you need to install the PrintServer’s driver on computers without a CD-ROM drive, you can create a setup disk
by using a computer with a CD-ROM drive to copy the contents of D:\Driver\PTP onto a floppy disk.
Installation
1. Make sure you have no programs or applications running on your computer.
2. If you haven’t already done so, insert the Setup CD-ROM into the computer’s CD-ROM drive. The Setup CD-
ROM should run automatically. If it does not, click the Start button and choose Run. In the field that appears,
enter D:\setupWizard.exe (if “D” is the letter of your CD-ROM drive).
HAVE YOU: already set up your printer? Linksys
recommends that you set up your printer and
install your printer’s driver before you install the
PrintServer’s driver.
21
Chapter 5: Windows Driver Installation
Installation
Wireless-G PrintServer with Multifunction Printer Support
3. When you see the Welcome screen, click Click Here to Start to continue. Click Exit to end the installation.
4. Click Set up Computer.
Configuration of the PrintServer Driver
Figure 5-2: Set up Computer
Figure 5-1: Welcome
22
Chapter 5: Windows Driver Installation
Configuration of the PrintServer Driver
Wireless-G PrintServer with Multifunction Printer Support
Configuration of the PrintServer Driver
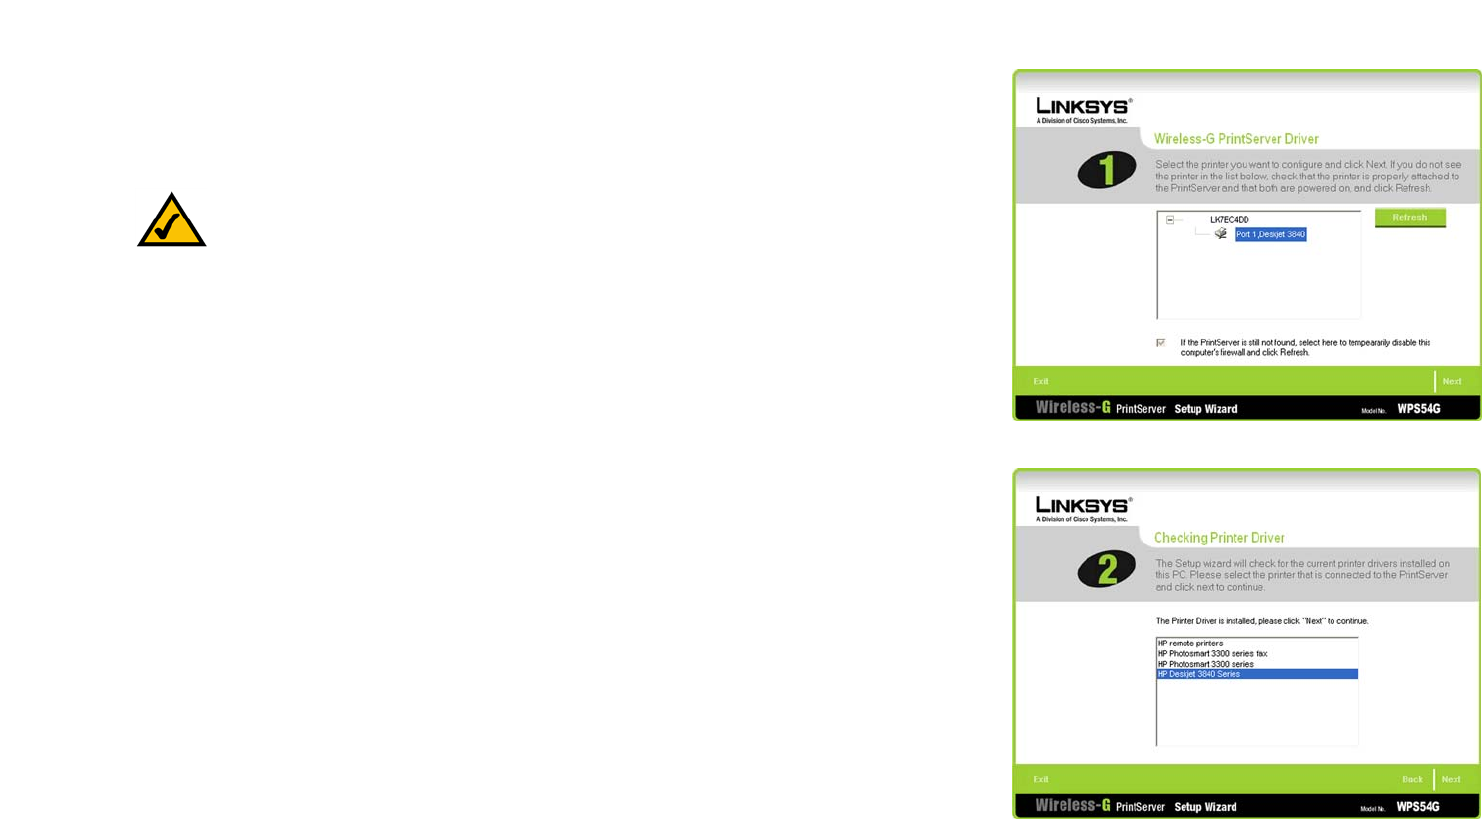
1. The Wireless-G PrintServer Driver screen automatically appears. Select the PrintServer you are installing.
Then click Next.
2. The Checking Printer Driver screen appears. Select the driver for your printer, and click Next to continue.
If the driver for your printer is not installed, you will see a new window pop up. The message will ask you to
exit the Wizard and install the driver for your printer. Click OK and install the driver. After the driver has been
installed, run the Setup Wizard and click Driver Install on the Welcome screen.
Figure 5-4: Check Print Driver
Figure 5-3: Select Printer
NOTE: If the PrintServer is not listed, then click Refresh. If the PrintServer cannot be found, then
select to temporarily disable the firewall and click Refresh again.
23
Chapter 5: Windows Driver Installation
Configuration of the PrintServer Driver
Wireless-G PrintServer with Multifunction Printer Support
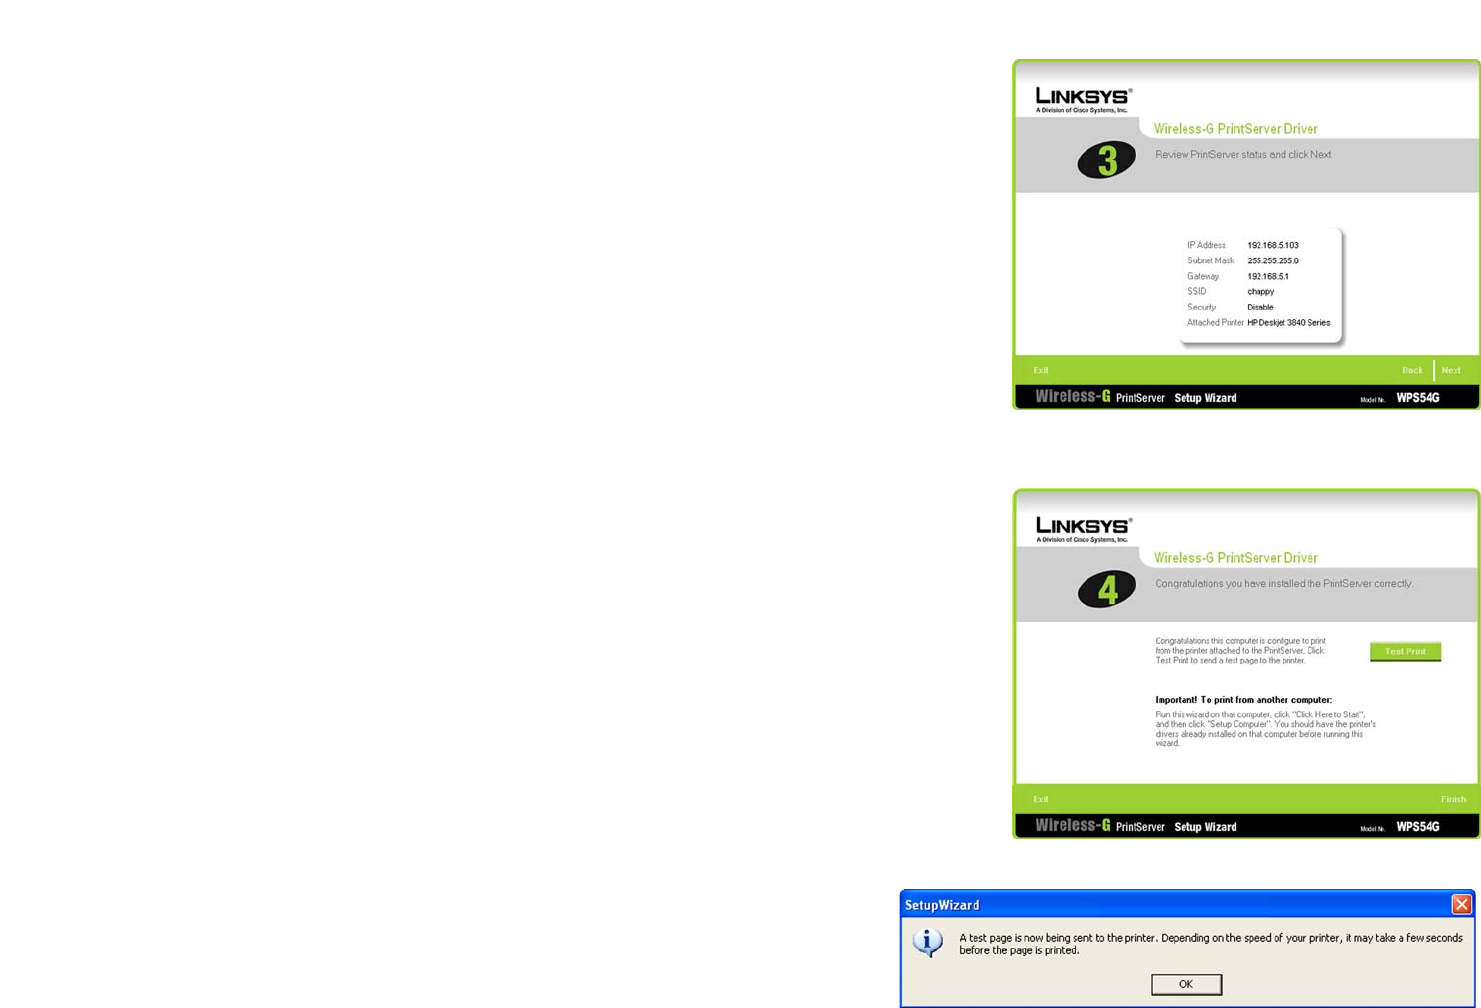
3. The Wireless-G PrintServer Driver screen appears. Review the PrintServer status and then click Next.
4. The Wireless-G PrintServer Driver screen appears. If you want to print a test page, click Test Print. Then click
Finish.
5. If you’ve chosen to print a test page, the test page dialog appears. Click OK.
Figure 5-5: Wireless-G PrintServer Diagnostic - Check
Printer Driver Installation
Figure 5-6: Printer Driver Not Installed
Figure 5-7: Print Test Page
24
Chapter 5: Windows Driver Installation
Configuration of the PrintServer Driver
Wireless-G PrintServer with Multifunction Printer Support
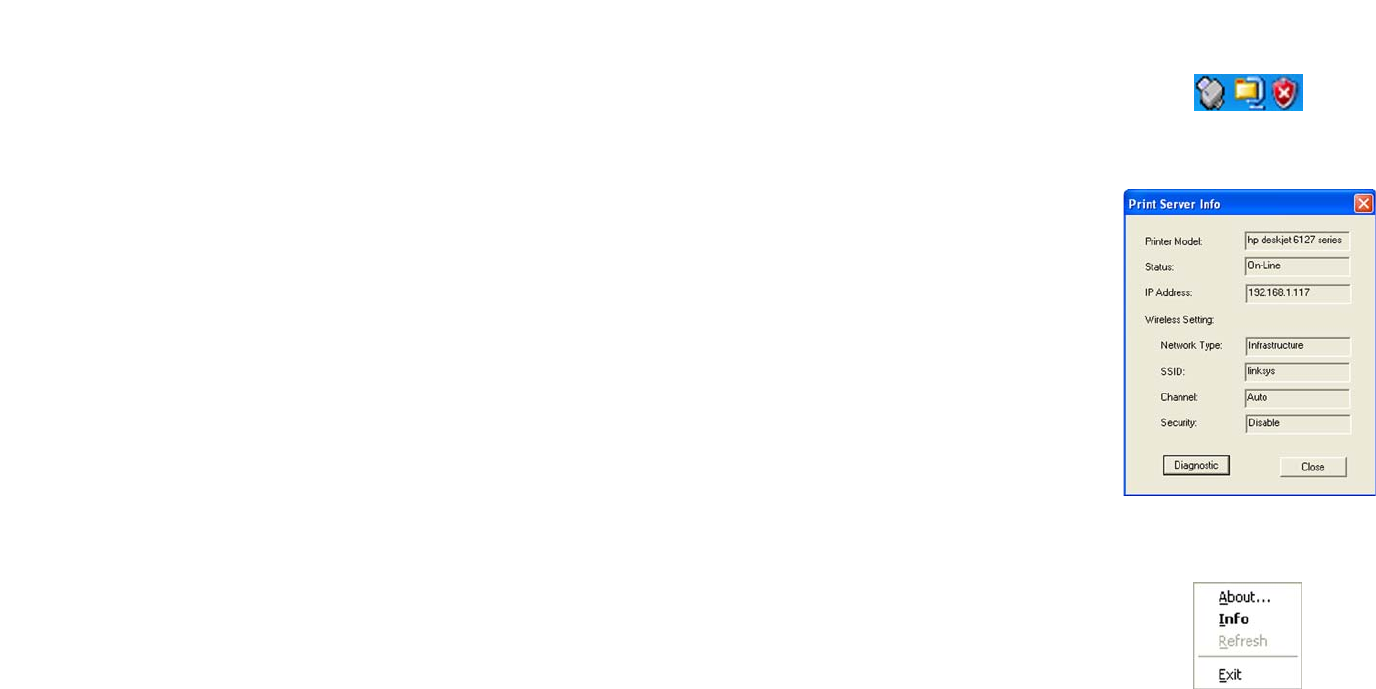
6. The Print Server diagnostic icon will appear in the system tray of your desktop. When you double-click the
icon, you will see the PrintServer Info screen.
If you want to run the wizard that configures the printer driver, click the Diagnostics button.
To close the PrintServer Info screen, click the Close button.
When you right-click the Print Server diagnostic icon, you will see a menu. To see the version number of the
Print Server Utility, click About. To see the PrintServer Info screen, click Info. To close the Utility, click Exit.
The driver installation and configuration is complete. You can now use the PrintServer.
If you would like to change the PrintServer’s settings, use the PrintServer’s web-based utility. For
more information, refer to “Chapter 6: Configuring the PrintServer Using the Web-based Utility.”
Figure 5-8: PrintServer Diagnostic Icon
Figure 5-9: PrintServer Info
Figure 5-10: Right-click Icon

25
Chapter 6: Configuring the PrintServer Using the Web-based Utility
Overview
Wireless-G PrintServer with Multifunction Printer Support
Chapter 6: Configuring the PrintServer Using the
Web-based Utility
Overview
After setting up the PrintServer with the Setup Wizard, the PrintServer will be ready for use. However, if you’d like
to change its settings, use the PrintServer’s web-based utility. This chapter will describe each web page of the
utility and each page’s key functions. The utility can be accessed via your web browser through the use of a
networked computer.
There are six main tabs: Setup, Protocol, Wireless, Printer, Status, and Exit. Additional tabs will be available after
you click one of the main tabs, except for the Setup tab.
To access the web-based utility, launch Internet Explorer or Netscape Navigator, and enter the PrintServer’s IP
address in the Address field. Then press Enter.
NOTE: Use the PrintServer’s IP address that you noted when you ran the Setup Wizard. Otherwise,
insert the Setup CD-ROM, and when the Welcome screen appears, click Setup Wizard. Follow the
instructions until you reach the Wireless-G PrintServer Setup screen. Note the IP address, and then
click Back until you reach the Welcome screen. Click Exit.
26
Chapter 6: Configuring the PrintServer Using the Web-based Utility
The Setup Tab
Wireless-G PrintServer with Multifunction Printer Support
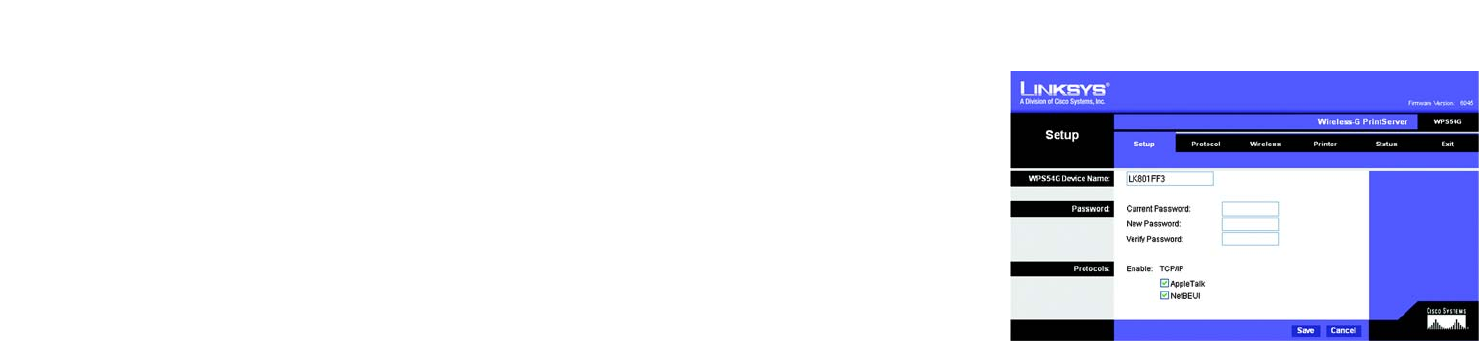
The Setup Tab
The first screen that appears is the Setup tab and allows you to change the PrintServer’s general settings.
WPS54G Device Name
Enter the PrintServer’s name in the field provided. The name is located on a sticker on the bottom of the
PrintServer.
Password
Current Password. To change the PrintServer’s password, enter the current password in the Current Password
field.
New Password and Verify Password. Enter the new password in the New Password field, and then enter the
new password again in the Verify Password field.
Protocols
The TCP/IP protocol is enabled by default.
Enable: Apple Talk or NetBEUI. Check the box(es) for AppleTalk or NetBEUI, if they are used by your network.
Click the Save button to apply your changes, or click Cancel to cancel your changes.
Figure 6-1: Setup Tab
27
Chapter 6: Configuring the PrintServer Using the Web-based Utility
The Protocol Tab - TCP/IP
Wireless-G PrintServer with Multifunction Printer Support
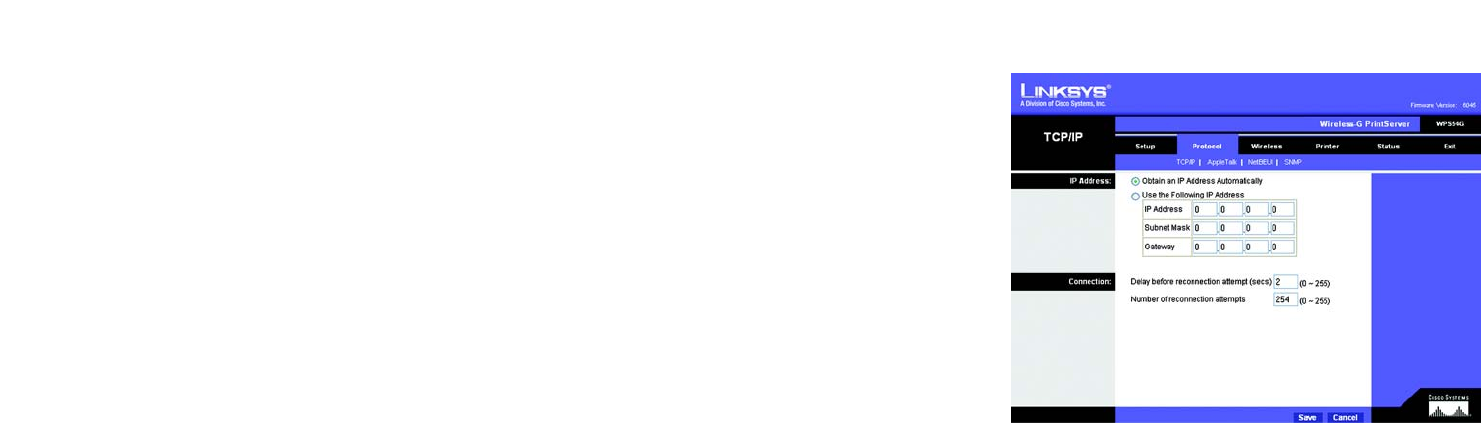
The Protocol Tab - TCP/IP
Click the TCP/IP tab to view or change the TCP/IP values of the PrintServer.
IP Address
Obtain an IP Address Automatically. If your network router is using DHCP to assign IP addresses, select Obtain
an IP Address Automatically. By default, Obtain an IP Address Automatically is enabled.
Use the Following IP Address. If you need to assign the PrintServer a fixed IP address (also known as static IP
address), select Use the Following IP Address, and enter the appropriate values under IP Address, Subnet
Mask, and Gateway. Make sure the IP Address and Subnet Mask are appropriate for your network. If you change
the PrintServer’s IP address, make sure you that you reconnect to the PrintServer using that new IP address.
Otherwise, you will not be communicating with the PrintServer. In most cases, the Gateway IP address is the IP
address of your router, and you should complete the Gateway field if you will use the PrintServer for Internet
printing. (To find out your router’s IP address, consult your router’s documentation.)
Connection
Delay before reconnection attempt. Set how long you want the PrintServer to wait between attempts.
Number of reconnection attempts. Specify the number of times that the PrintServer will attempt to connect to
the network.
Click the Save button to apply your changes, or click Cancel to cancel your changes.
Figure 6-2: Protocol Tab - TCP/IP

28
Chapter 6: Configuring the PrintServer Using the Web-based Utility
The Protocol Tab - AppleTalk
Wireless-G PrintServer with Multifunction Printer Support
The Protocol Tab - AppleTalk
AppleTalk is a network communications protocol that allows computers to talk to each other using Ethernet.
Typically only Macintoshes use AppleTalk, although other platforms can use it if they have the necessary, third-
party software.
Communication
Printer Object Type. The Printer Object Type can be obtained from the manufacturer of the printer. Enter the type
of printer in the field provided. For each printer connected to the PrintServer, you will choose the Communications
Protocol that allows the devices on the network to communicate.
Communication Protocol. Select the type of Communication Protocol you will use, ASCII or Binary for each
printer, according to the recommendation of the printer’s manufacturer. For more information, refer to the
printer’s documentation.
Click the Save button to apply your changes, or click Cancel to cancel your changes.
Figure 6-3: Protocol Tab - AppleTalk

29
Chapter 6: Configuring the PrintServer Using the Web-based Utility
The Protocol Tab - NetBEUI
Wireless-G PrintServer with Multifunction Printer Support
The Protocol Tab - NetBEUI
NetBEUI connection settings of the PrintServer
are available on this tab.
Domain Name
Enter the name of the domain that you want the PrintServer associated with in the Domain Name field.
If you are unsure of the Domain Name, you can find it out by looking on any computer already on the network. In
Windows 98, right-click
Network Neighborhood
and select
Properties
. Under the Identification tab, there will be
listed that computer’s name, and the Domain to which it is connected. For Windows Me, 2000, or XP, right-click
My
Network Places
. In Windows Me, choose
Properties
from the menu that appears. In Windows 2000 or XP, choose
Properties
from the menu that appears. Then, right-click
Local Area Connection
and choose
Properties
. The
Domain name will appear. If you want the PrintServer to be connected to that same Domain, enter that Domain
name here. If no Domain name exists there, you will use the Workgroup name from that window.
Options
Response Time
. You can specify the Response Time that you prefer for the PrintServer. This is the amount of time
(measured in seconds) that the PrintServer will wait for a response from the network before “timing out.”
Abort Print Job if Error
. You also have the option to use this feature, Abort Print Job if Error. Selecting Yes here will
terminate the printing if there is an error of any kind. If you select No, print jobs that have errors will be sent to the
printer, but might not print properly.
Click the Save button to apply your changes, or click Cancel to cancel your changes.
Figure 6-4: Protocol Tab - NetBEUI
30
Chapter 6: Configuring the PrintServer Using the Web-based Utility
The Protocol Tab - SNMP
Wireless-G PrintServer with Multifunction Printer Support
The Protocol Tab - SNMP
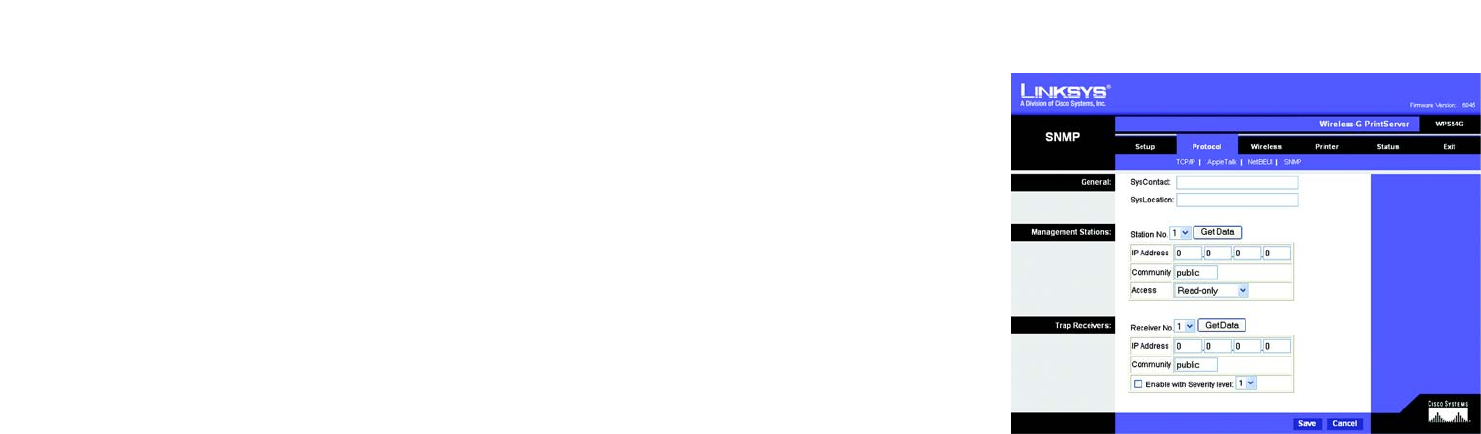
Use this screen to view or change the PrintServer’s SNMP (Simple Network Management Protocol) settings.
The PrintServer supports SNMP, which allows network administrators to monitor and control the PrintServer
through the use of network management platforms, such as HP OpenView.
The appropriate MIB file must be imported into your SNMP management program using the Import-Compile
command. Check your program’s documentation for details on this procedure. The MIB file is named Mib2p.mib
and is provided in the MiB folder on the Setup CD-ROM.
General
SysContact. Enter the name of the contact person in the SysContact field.
SysLocation. Enter the location of the contact person in the SysLocation field.
Management Stations
Station No. Select the number of the management station from the Station No. drop-down menu (1-4). Click the
Get Data button to display the information for the selected station.
IP Address. Enter the IP address of the management station running the SNMP program.
Community. Enter the name of the SNMP community, which is usually public or private.
Access. Select the level of access for this management station, Not Accessible, Read-only, or Read/Write.
Trap Receivers
Receiver No. Select the number of the trap receiver from the Receiver No. drop-down menu (1-4). Click the Get
Data button to display the information for the selected trap receiver.
IP Address. Enter the IP address of the trap receiver that will be sent the trap messages or notifications.
Community. In the Community field, enter the name of the SNMP community, which is usually public or private.
Enable with Severity level. To designate a severity level, click the checkbox next to Enable with Severity level.
From the following drop-down menu, select the desired level of severity, with 1 meaning least severe.
Click the Save button to apply your changes, or click Cancel to cancel your changes.
Figure 6-5: Protocol Tab - SNMP
31
Chapter 6: Configuring the PrintServer Using the Web-based Utility
The Wireless Tab - Basic
Wireless-G PrintServer with Multifunction Printer Support
The Wireless Tab - Basic
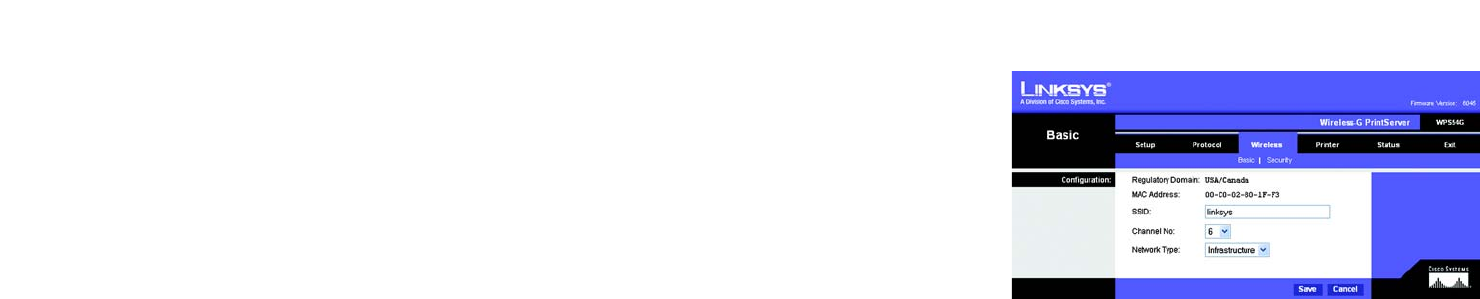
This screen allows you to change the PrintServer’s basic wireless settings.
Configuration
Regulatory Domain and MAC Address. The PrintServer’s Regulatory Domain and MAC Address are listed and
cannot be changed.
SSID. In the SSID field, enter the name of your wireless network. This is the unique name shared by all devices in
a wireless network. The SSID is case-sensitive and should have 32 characters or fewer.
Channel No. If your network is set to ad-hoc mode, select your network’s channel setting from the Channel No.
drop-down menu.
Network Type. The Network Type setting shows a choice of two wireless modes. Select Infrastructure if you
want the PrintServer to communicate using an access point or wireless router. Select Ad-Hoc if you want the
PrintServer to communicate without using an access point or wireless router.
Click the Save button to apply your changes, or click Cancel to cancel your changes.
Figure 6-6: Wireless Tab - Basic
32
Chapter 6: Configuring the PrintServer Using the Web-based Utility
The Wireless Tab - Security
Wireless-G PrintServer with Multifunction Printer Support
The Wireless Tab - Security
Configure the security of your wireless network on this screen. Wi-Fi Protected Access (WPA) and two levels of
Wired Equivalent Privacy (WEP) encryption are available. If you do not want to use wireless security, select None
from the Security Mode drop-down menu.
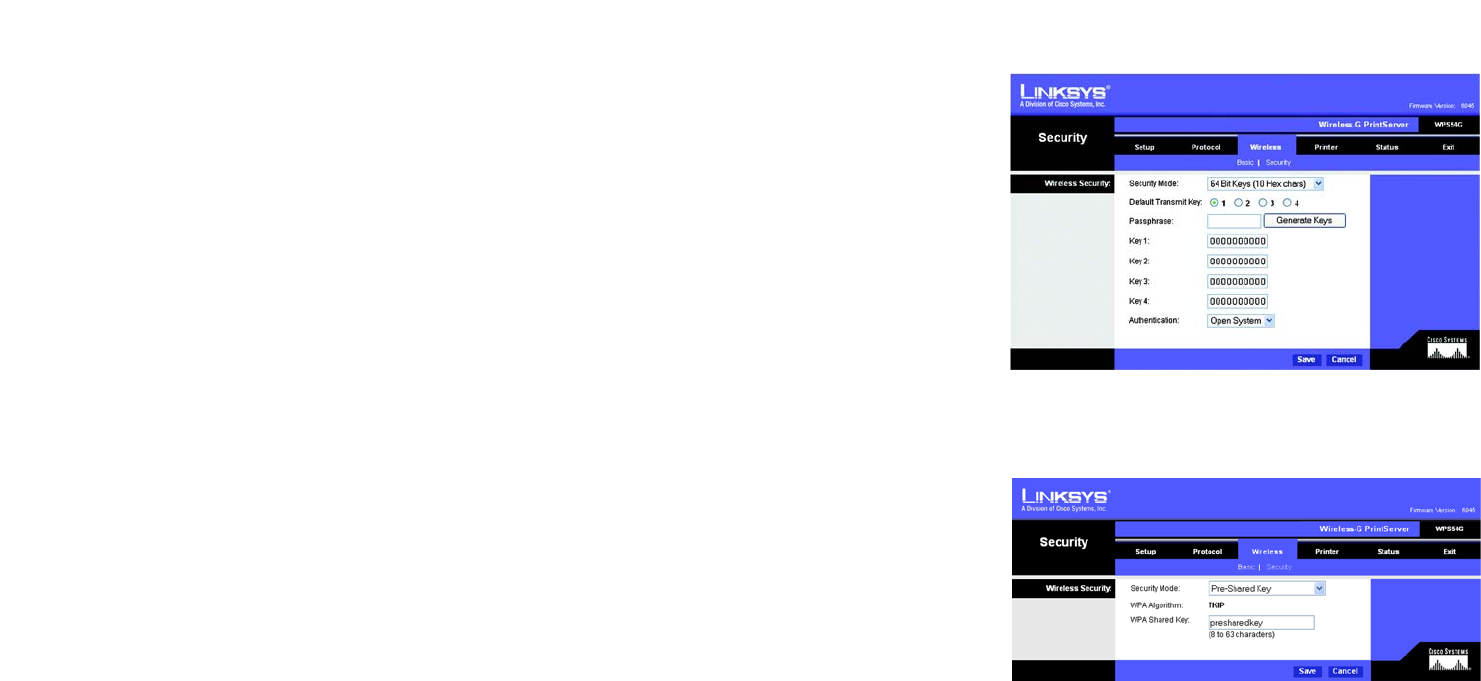
Wireless Security
Security Mode. To use WPA, select Pre-Shared Key. To use WEP, select the level of WEP encryption you want to
use, 64 Bit Keys (10 Hex chars) or 128 Bit Keys (26 Hex chars). Then proceed to the instructions for your
security method.
WEP
Default Transmit Key. Select the Default Transmit Key used by your wireless network. This indicates which WEP
key your network uses for WEP encryption.
Passphrase. Enter a Passphrase and click the Generate Keys button to automatically generate WEP Keys 1-4.
The Passphrase is case-sensitive and should have no more than 16 alphanumeric characters. It must match your
wireless network’s passphrase and is compatible with Linksys wireless products only. (Enter the WEP key(s)
manually on any non-Linksys wireless products.)
Key 1 to Key 4. To enter the WEP keys manually, leave the Passphrase field blank and enter your WEP key(s). For
64-bit WEP encryption, each key must have 10 hexadecimal characters, while for 128-bit WEP encryption, the
key must have 26 hexadecimal characters. Valid hexadecimal characters are “0”-“9” and “A”-“F”.
Authentication. Select your wireless network’s authentication type. The default is Open System, for which the
sender and the recipient do NOT use a WEP key for authentication. You can also choose Shared Key, for which
the sender and recipient use a WEP key for authentication.
Click the Save button to apply your changes, or click Cancel to cancel your changes.
Pre-Shared Key (WPA)
WPA Algorithm. TKIP is the default algorithm.
WPA Shared Key. Enter your Pre-Shared Key, which must have 8-63 characters in length.
Click the Save button to apply your changes, or click Cancel to cancel your changes.
Figure 6-7: Wireless Tab - Security (WEP)
Figure 6-8: Wireless Tab - Security (WPA)
33
Chapter 6: Configuring the PrintServer Using the Web-based Utility
The Printer Tab - Internet Printing
Wireless-G PrintServer with Multifunction Printer Support
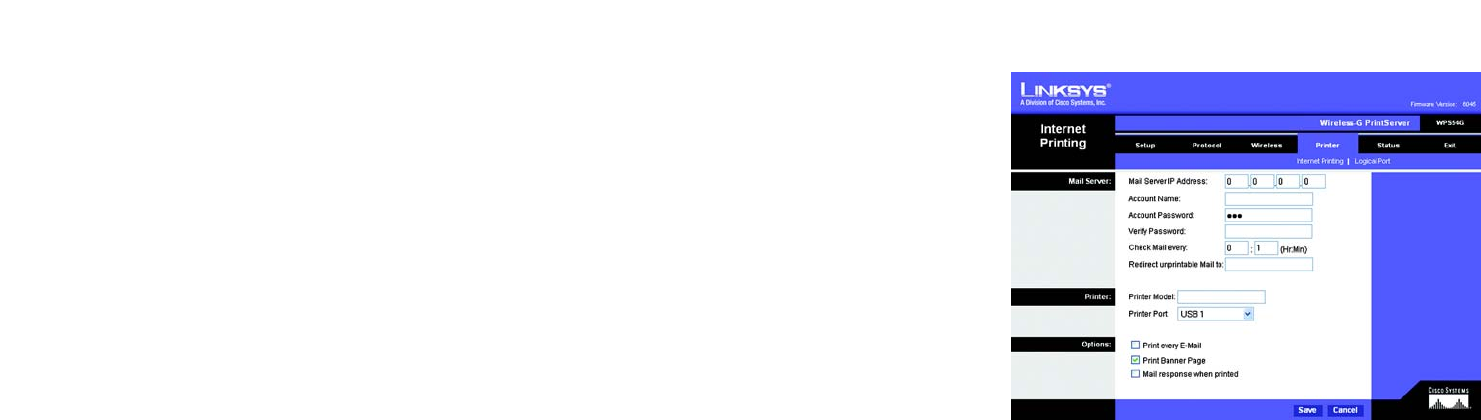
The Printer Tab - Internet Printing
Internet Printing allows you to automatically print any e-mails that are sent to a specific e-mail account on your
network. This is especially useful for printing information when you are not connected to the network. You can
print from any location where you can access e-mail.
Mail Server
Mail Server IP Address. Enter the address of your mail server. (This value must be a fixed IP address.)
Account Name and Password. Enter the Account Name and Account Password.
Verify Password. Enter the password again in the Verify Password field.
Check Mail every. Specify how often you want the PrintServer to check for e-mail to be printed.
Redirect unprintable Mail to. Specify an e-mail address to which e-mails that cannot be printed are routed; this
is useful for both graphic-intensive e-mails and for troubleshooting purposes.
Printer
Printer Model. Enter the Printer Model in the field provided. You can find this in the Device Manager.
Printer Port. Choose the appropriate Printer Port from the drop-down menu: USB, the PrintServer’s USB port, or
Logical Printer 1-3. The PrintServer has three logical or virtual printer ports. For example, you can have three
different configurations for your USB printer: Logical Printer 1 for landscape orientation, Logical Printer 2 for
double-sided copies, and Logical Printer 3 for manual feed. Then configure the Logical Printers on the Logical
Port tab, so Logical Printers 1, 2, and 3 will be mapped to the physical printer on the PrintServer’s USB port.
Options
Print every E-Mail. Click this checkbox if you want to print every e-mail message.
Print Banner Page. Enabled by default, this feature tells the PrintServer to print a banner page for every print job
(the banner page describes the print job). Click the checkbox to remove the checkmark and disable this feature.
Mail response when printed. Click this checkbox if you want an e-mail sent when a print job is complete.
Click the Save button to apply your changes, or click Cancel to cancel your changes.
Figure 6-9: Printer - Internet Printing