LINKSYS WVC54GCA Wireless-G Internet Home Monitoring Camera User Manual Users manual 1
LINKSYS LLC Wireless-G Internet Home Monitoring Camera Users manual 1
LINKSYS >
Contents
- 1. Users manual 1
- 2. Users manual 2
Users manual 1
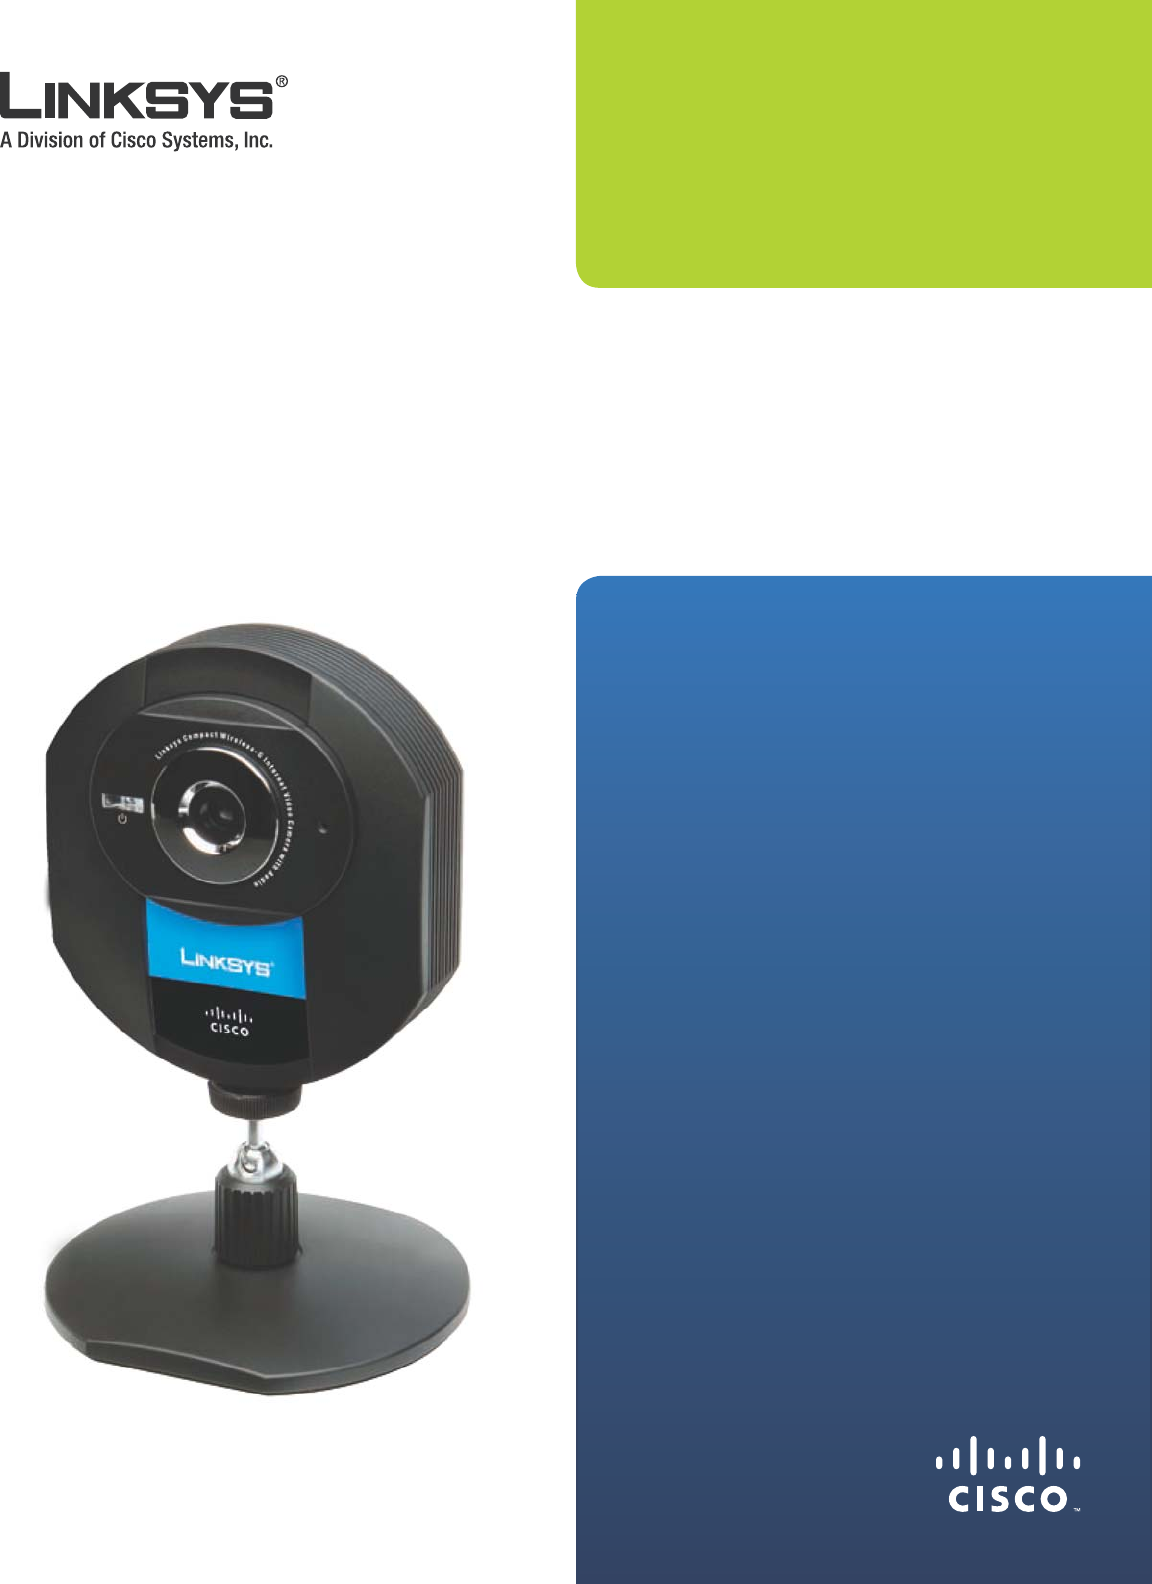
USER GUIDE
Wireless-G Internet
Home Monitoring
Camera
Model: WVC54GCA
About This Guide
i
Wireless-G Internet Home Monitoring Camera
A
b
out T
h
i
s
Gu
i
de
Icon Descr
i
pt
i
on
s
W
h
i
l
e rea
d
ing t
h
roug
h
t
h
e User Gui
d
e you may see
various icons that call attention to speci
f
ic items. Below is
a description o
f
these icons:
N
O
TE
:
T
h
is c
h
ec
k
mar
k
in
d
icates t
h
at t
h
ere is
a note o
f
interest and is something that you
s
h
ou
ld
pay specia
l
attention to w
h
i
l
e using t
h
e
pro
d
uct
.
WARNIN
G
: T
h
is exc
l
amation point in
d
icates
t
h
at t
h
ere is a caution or warning an
d
it is
somet
h
ing t
h
at cou
ld
d
amage your property or
pro
d
uct
.
WE
B:
T
h
is g
l
o
b
e icon in
d
icates a notewort
h
y
we
b
site a
dd
ress or e-mai
l
a
dd
ress
.
On
l
ine Resource
s
We
b
site a
dd
resses in t
h
is
d
ocument are
l
iste
d
wit
h
out
h
ttp:/
/
in
f
ront o
f
the address because most current web
browsers do not require it. I
f
you use an older web browser,
you may
h
ave to a
dd
h
ttp:/
/
in
f
ront o
f
the web address
.
Resource Website
Lin
k
sy
s
www.
l
in
k
sys.co
m
Lin
k
sys Internationa
l
www.
l
in
k
sys.com/internationa
l
G
l
ossar
y
www.
l
in
k
sys.com/g
l
ossary
Networ
k
Securit
y
www.
l
in
k
sys.com/securit
y
Copyrig
h
t an
d
Tra
d
emar
ks
Speci
f
ications are subject to change without notice.
Linksys is a registered trademark or trademark o
f
Cisco
Systems, Inc. and/or its a
ff
iliates in the U.S. and certain
ot
h
er countries. Copyrig
h
t © 2007 Cisco Systems, Inc. A
ll
rig
h
ts reserve
d
. Ot
h
er
b
ran
d
s an
d
pro
d
uct names are
trademarks or registered trademarks o
f
their respective
h
o
ld
ers
.

Table of Contents
ii
Wireless-G Internet Home Monitoring Camera
Chapter 1: Product Overview 4
Front Panel.................................................. 4
Back Panel . . . . . . . . . . . . . . . . . . . . . . . . . . . . . . . . . . . . . . . . . . . . . . . . . . 4
Bottom Panel . . . . . . . . . . . . . . . . . . . . . . . . . . . . . . . . . . . . . . . . . . . . . . . . 4
Chapter 2: Setting up and Mounting the Camera 5
Setup Wizard . . . . . . . . . . . . . . . . . . . . . . . . . . . . . . . . . . . . . . . . . . . . . . . . 5
Placement Options . . . . . . . . . . . . . . . . . . . . . . . . . . . . . . . . . . . . . . . . . . . . 9
Chapter 2: Installing and Using the Camera Utility 11
Overview...................................................11
Installing the Camera Utility .......................................11
Using the Camera Utility . . . . . . . . . . . . . . . . . . . . . . . . . . . . . . . . . . . . . . . . .13
Main Screen . . . . . . . . . . . . . . . . . . . . . . . . . . . . . . . . . . . . . . . . . . . . . . . . .13
Chapter 4: Advanced Conguration with the Web-based Utility 20
Overview...................................................20
How to Access the Web-based Utility . . . . . . . . . . . . . . . . . . . . . . . . . . . . . . . . .20
View Video ..................................................20
Setup > Basic . . . . . . . . . . . . . . . . . . . . . . . . . . . . . . . . . . . . . . . . . . . . . . . .21
Setup > Image . . . . . . . . . . . . . . . . . . . . . . . . . . . . . . . . . . . . . . . . . . . . . . .22
Setup > Maintenance . . . . . . . . . . . . . . . . . . . . . . . . . . . . . . . . . . . . . . . . . . .23
Setup > Users . . . . . . . . . . . . . . . . . . . . . . . . . . . . . . . . . . . . . . . . . . . . . . . .23
Setup > DDNS................................................24
Setup > FTP Upload . . . . . . . . . . . . . . . . . . . . . . . . . . . . . . . . . . . . . . . . . . . .25
Setup > Options . . . . . . . . . . . . . . . . . . . . . . . . . . . . . . . . . . . . . . . . . . . . . .26
Setup > Pan/Tilt . . . . . . . . . . . . . . . . . . . . . . . . . . . . . . . . . . . . . . . . . . . . . .27
Setup > Status . . . . . . . . . . . . . . . . . . . . . . . . . . . . . . . . . . . . . . . . . . . . . . .27
Help . . . . . . . . . . . . . . . . . . . . . . . . . . . . . . . . . . . . . . . . . . . . . . . . . . . . . .28
Appendix A: Troubleshooting 29
Common Problems and Solutions . . . . . . . . . . . . . . . . . . . . . . . . . . . . . . . . . . .29
Frequently Asked Questions.......................................30
Appendix B: Wireless Security Checklist 32
General Network Security Guidelines .................................32
Additional Security Tips . . . . . . . . . . . . . . . . . . . . . . . . . . . . . . . . . . . . . . . . .32
Appendix C: Specications 33
Appendix D: Warranty Information 34
Appendix E: Regulatory Information 35
FCC Statement . . . . . . . . . . . . . . . . . . . . . . . . . . . . . . . . . . . . . . . . . . . . . . .35
FCC Radiation Exposure Statement . . . . . . . . . . . . . . . . . . . . . . . . . . . . . . . . . .35
Safety Notices................................................35

Table of Contents
iii
Wireless-G Internet Home Monitoring Camera
Industry Canada Statement . . . . . . . . . . . . . . . . . . . . . . . . . . . . . . . . . . . . . . .35
Avis d’Industrie Canada..........................................36
Wireless Disclaimer . . . . . . . . . . . . . . . . . . . . . . . . . . . . . . . . . . . . . . . . . . . .36
Avis de non-responsabilité concernant les appareils sans l . . . . . . . . . . . . . . . . . .36
User Information for Consumer Products Covered by EU Directive 2002/96/EC on Waste
Electric and Electronic Equipment (WEEE) ..............................37
Chapter 1 Product Overview
4
Wireless-G Internet Home Monitoring Camera
C
h
apter 1:
Pro
d
uct Over
v
i
ew
Thank you
f
or choosing the Linksys Wireless-G Internet
Home Monitoring Camera. T
h
e Camera sen
d
s
l
ive vi
d
eo
t
h
roug
h
t
h
e Internet to a we
b
b
rowser anyw
h
ere in t
h
e
world! This compact, sel
f
-contained unit lets you keep an
eye on your
h
ome, your
k
i
d
s, your wor
k
p
l
ace—w
h
atever’s
i
mportant to you.
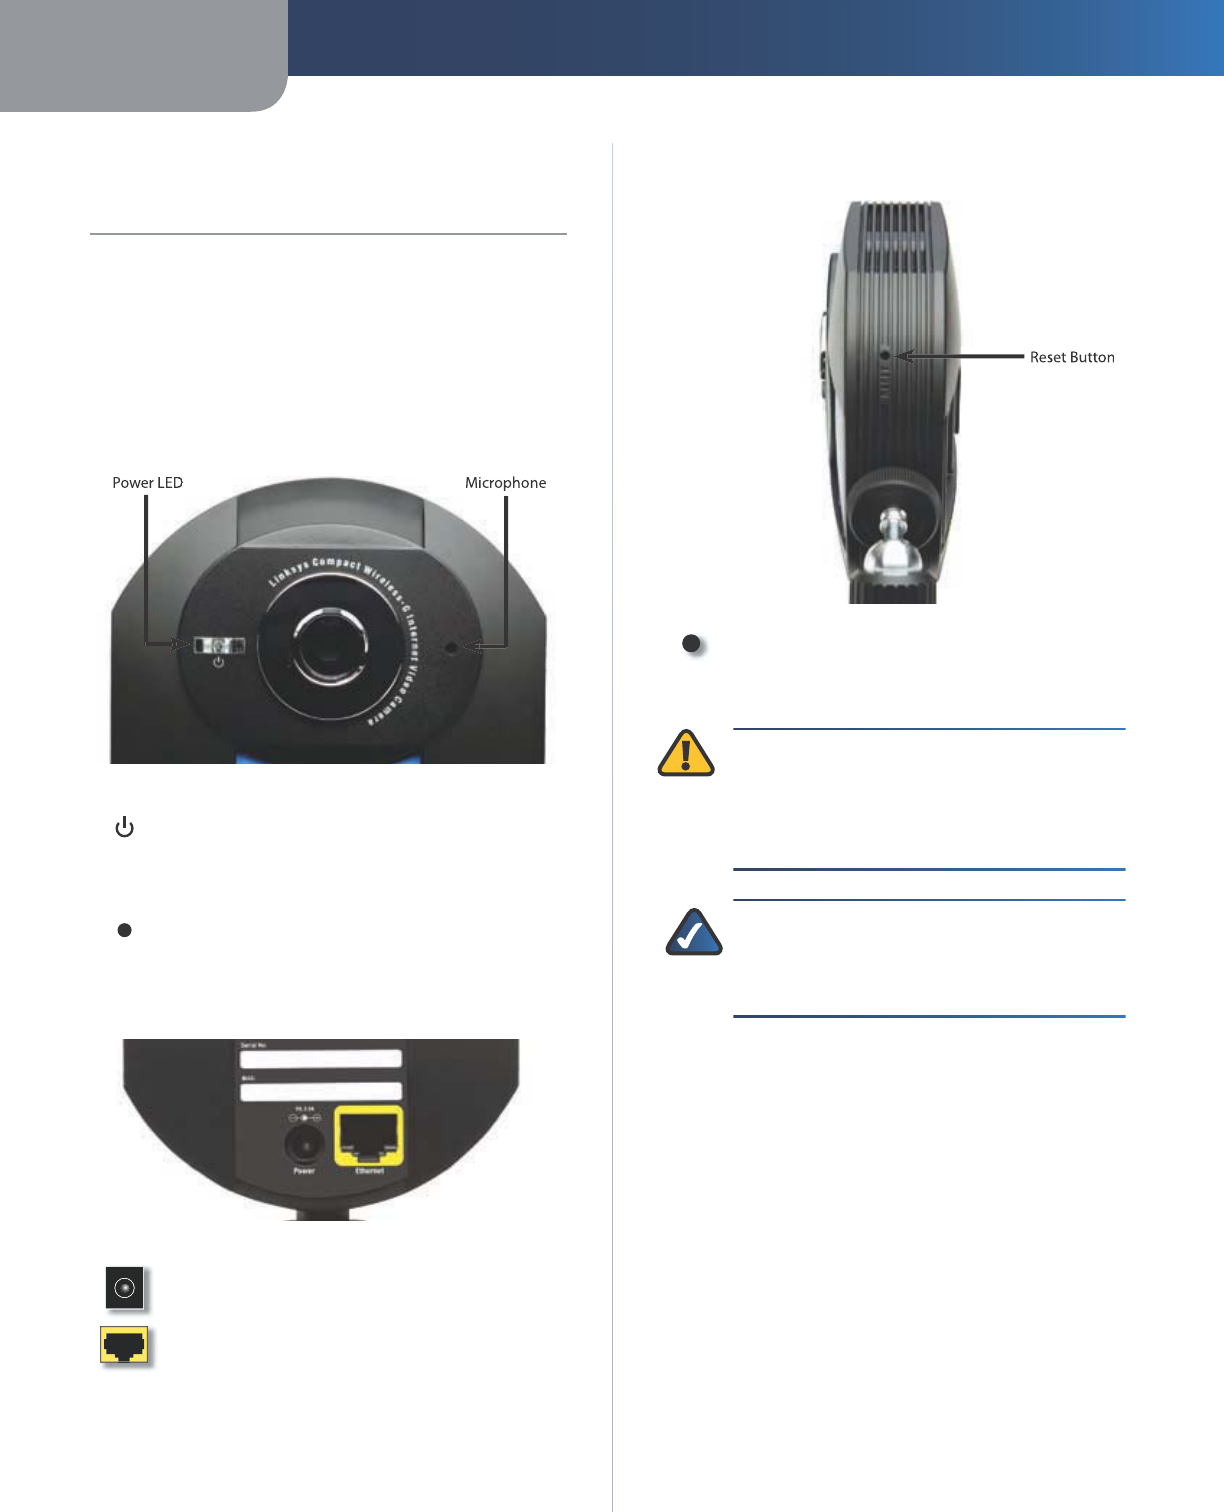
Front Pane
l
Power (B
l
ue) T
h
is LED
l
ig
h
ts up w
h
en t
h
e
Camera is powered on. It
f
lashes while the
Camera is
b
ooting up an
d
remains
l
it w
h
en t
h
e
Camera is ready
f
or use.
M
i
crop
h
on
e
T
h
e microp
h
one is use
d
to recor
d
t
h
e am
b
ient soun
d
.
Bac
k
Pane
l
P
owe
r
T
h
e Power port is w
h
ere you wi
ll
connect t
h
e power a
d
apter
.
Et
h
erne
t
T
h
e Et
h
ernet port is w
h
ere you
connect t
h
e Et
h
ernet networ
k
ca
bl
e.
Bottom Pane
l
R
ese
t
T
h
is
b
utton is use
d
to reset t
h
e Camera.
Insert a paper c
l
ip into t
h
e opening. T
h
en press
the button and hold it in
f
or
f
ive seconds.
WARNIN
G
: Resetting t
h
e Camera wi
ll
erase a
ll
o
f
y
our settings, such as encr
y
ption in
f
ormation,
and replace them with the
f
actory de
f
aults. Do
not reset the Camera i
f
you want to retain your
y
our sett
i
ngs
.
N
O
TE
:
The Camera’s
f
actory de
f
ault settings are.
de
f
ault IP address: 1
92
.16
8
.1.
1
00
user
name:
adm
i
n
passwor
d
:a
dm
i
n
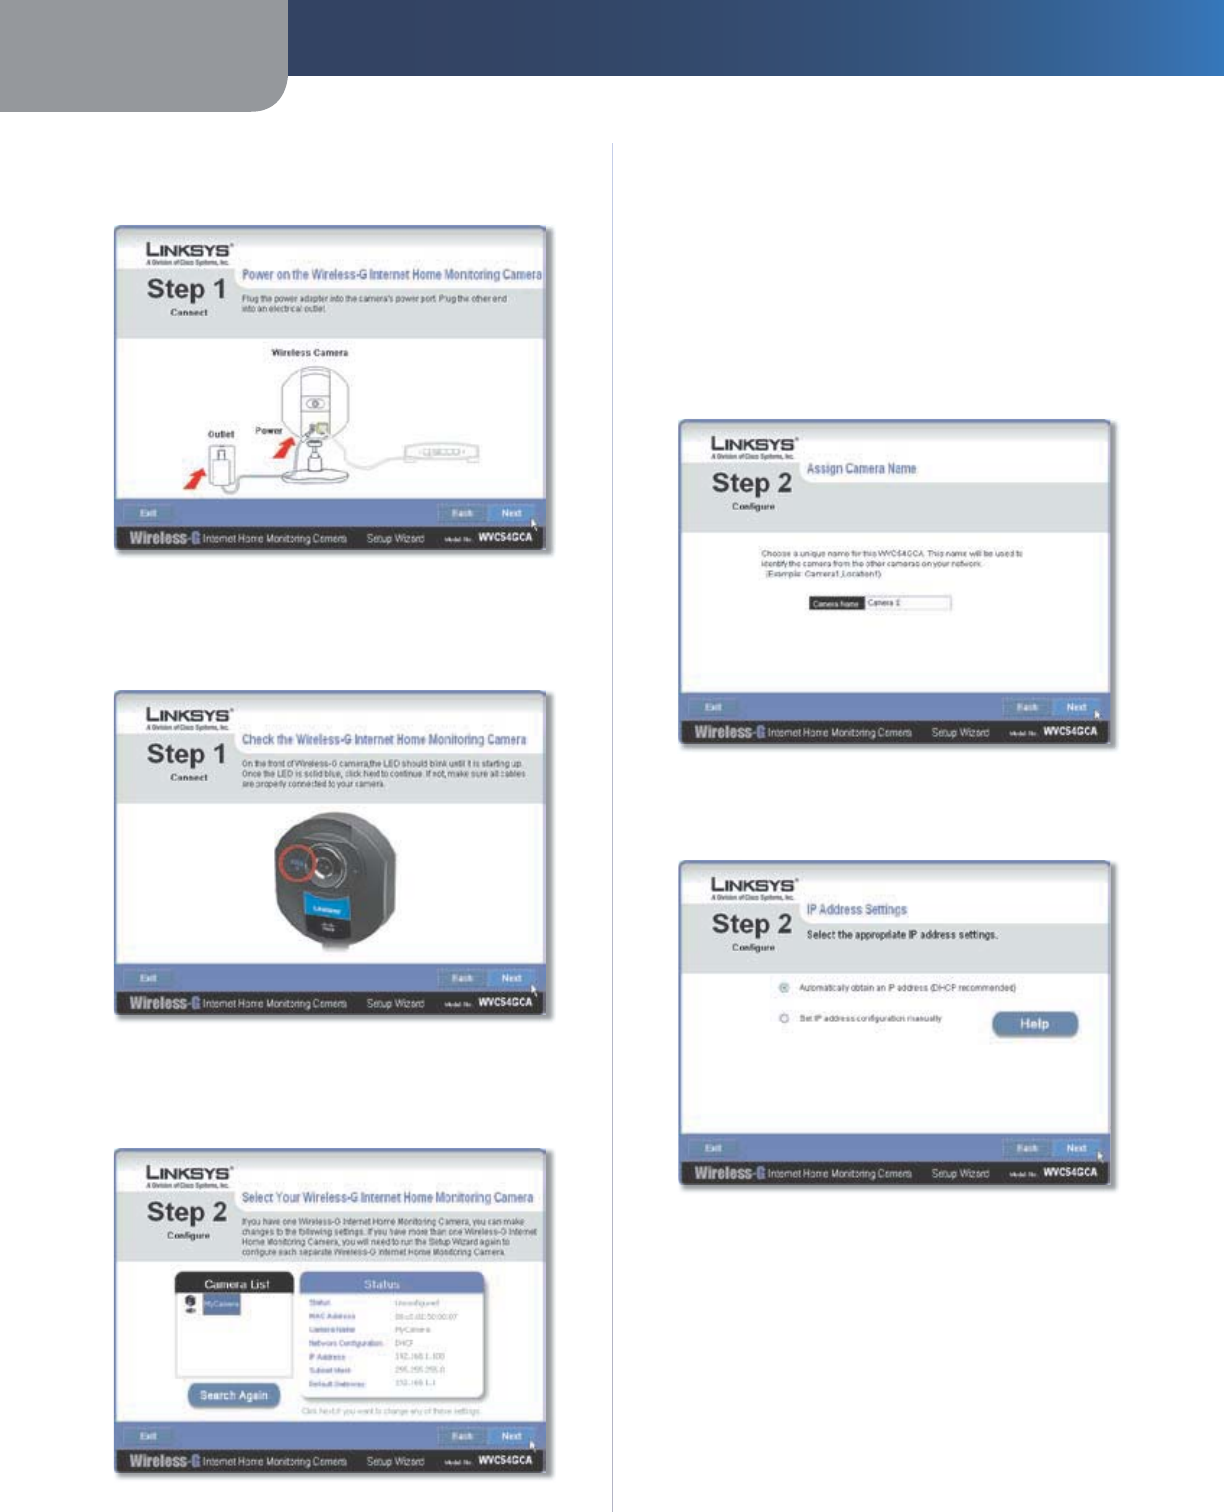
Chapter 2 Setting Up and Mounting the Camera
5
Wireless-G Internet Home Monitoring Camera
C
h
apter 2:
S
et
t
i
ng up an
d
Moun
t
i
ng
t
h
e Camer
a
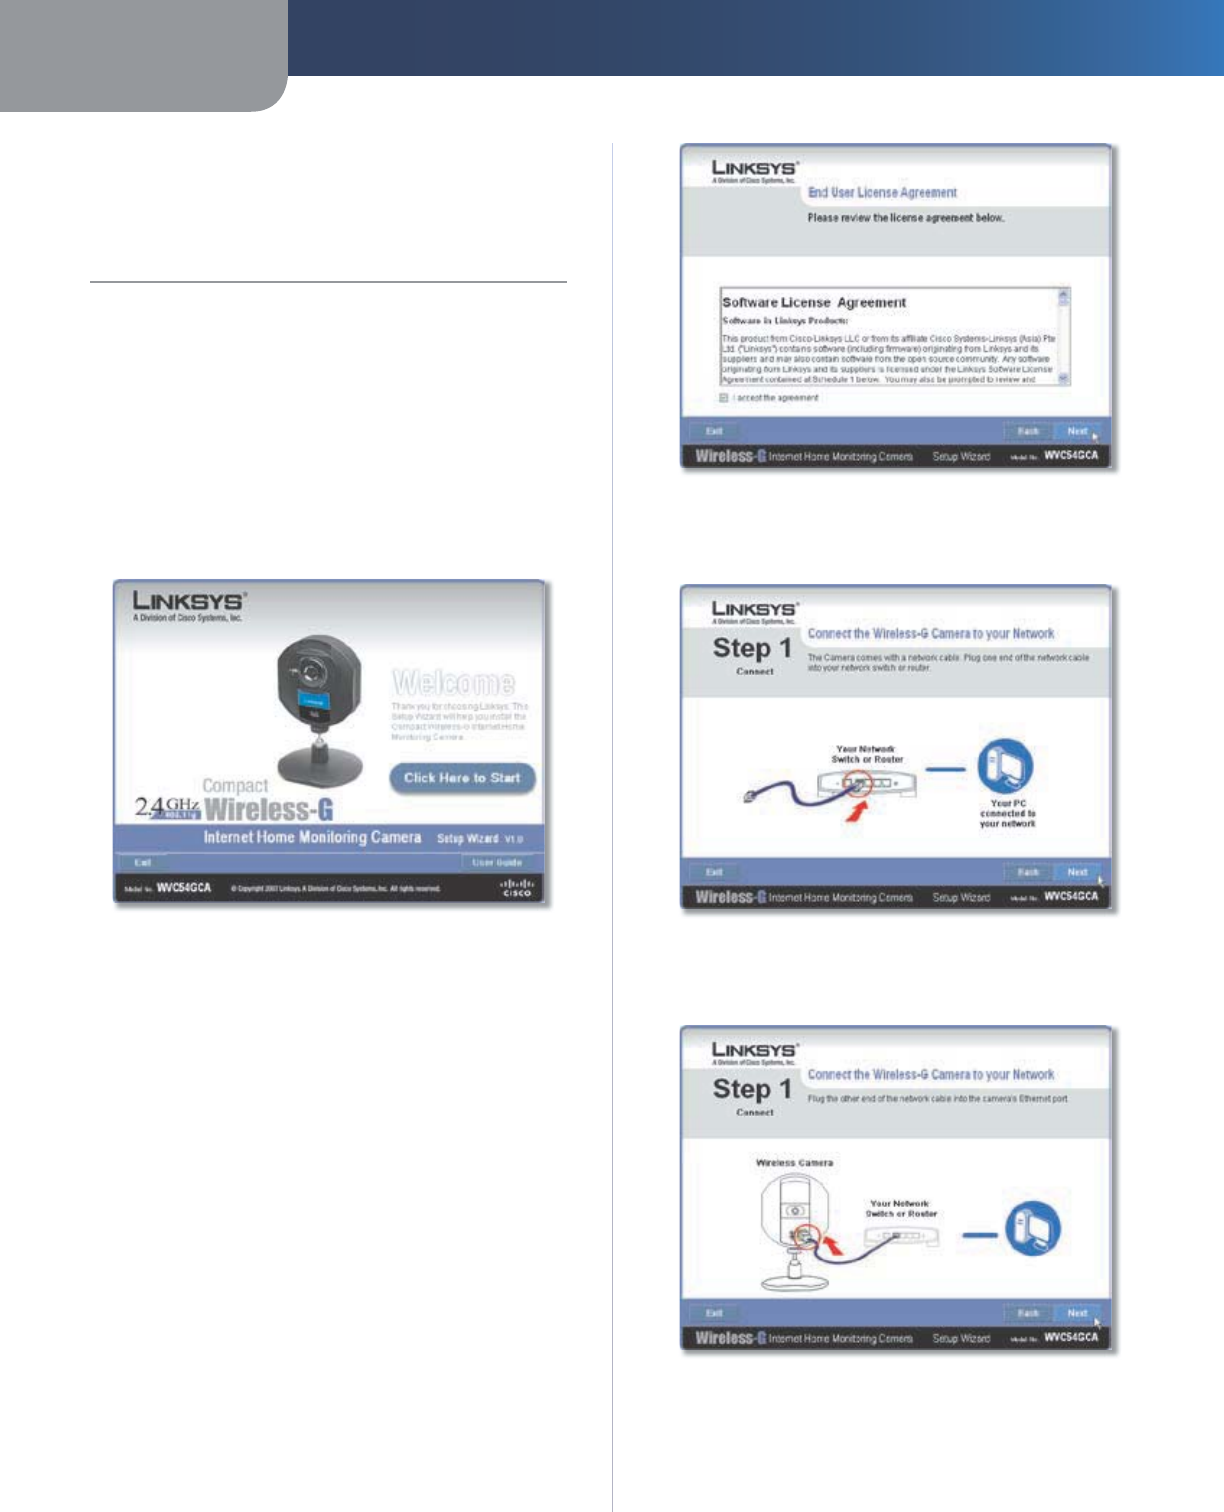
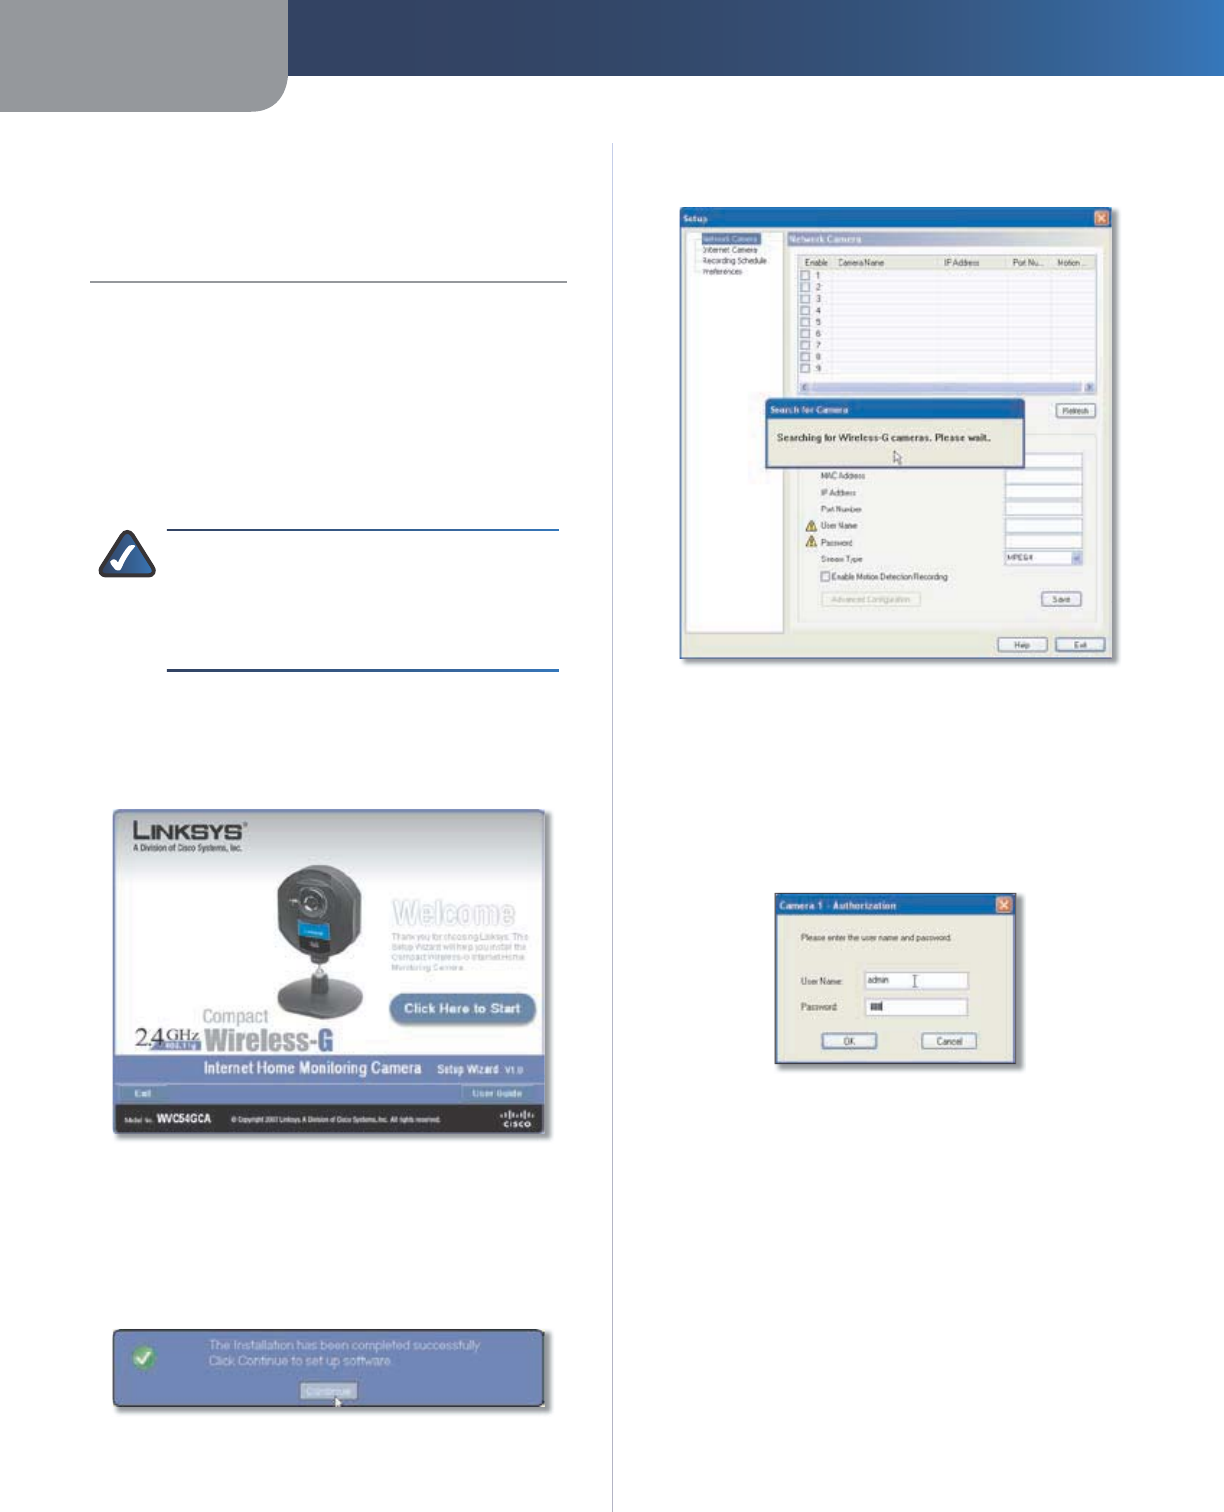
Setup Wizar
d
T
h
e Wire
l
ess-G Internet Home Monitoring Camera Setup
Wizar
d
wi
ll
gui
d
e you t
h
roug
h
t
h
e insta
ll
ation an
d
con
f
iguration procedure
.
Insert t
h
e Setup CD-ROM into your CD-ROM
d
rive.
T
h
e Setup Wizar
d
s
h
ou
ld
run automatica
ll
y, an
d
t
h
e
We
l
come screen should appear. I
f
not, clic
k
S
tar
t
,
se
l
ect
R
u
n
, and in the
f
ield provided, enter D:
\
wvc5
4
gca
.
e
x
e
(i
f
“D” is the letter o
f
your CD-ROM drive).
Setup Wizar
d
- We
l
come Scree
n
C
l
ic
k
C
l
i
c
k
Here to Star
t
to cont
i
nue
.
The Setup Wizard displays the
f
ollowing options.
Setup Camer
a
C
l
ic
k
t
h
is to
b
egin t
h
e insta
ll
ation
pro
c
ess.
Install Camera Utili
ty
C
l
ic
k
t
h
is to insta
ll
t
h
e Camera
Uti
l
ity on your PC
.
User
Gu
i
de
Click this to open the PDF
f
ile o
f
this User
Gui
d
e
.
Ex
i
t
C
l
ic
k
t
h
is to exit t
h
e Setup Wizar
d
.
To insta
ll
t
h
e Camera, c
l
ic
k
S
etup
C
amer
a
.
On t
h
e
End User License Agreement
screen, check the
t
b
ox next to I accept t
h
e agreement an
d
c
l
ic
k
N
ext
i
f
you agree and want to continue the installation, or
c
l
ic
k
Ex
i
t
to en
d
t
h
e insta
ll
ation
.
1.
2.
•
•
•
•
3.
En
d
User LIcense Agreemen
t
Connect t
h
e inc
l
u
d
e
d
networ
k
ca
bl
e to your networ
k
router or switc
h
. C
l
ic
k
N
ex
t
.
Connect Networ
k
Ca
bl
e to t
h
e Switc
h
or Route
r
Connect the other end o
f
the network cable to the
Camera’s Et
h
ernet port. C
l
ic
k
N
ex
t
.
Connect Networ
k
Ca
bl
e to t
h
e Camer
a
4.
5.
Chapter 2 Setting Up and Mounting the Camera
6
Wireless-G Internet Home Monitoring Camera
P
l
ug t
h
e inc
l
u
d
e
d
power a
d
apter into t
h
e Camera’s
Power port. P
l
ug t
h
e ot
h
er en
d
into an e
l
ectrica
l
out
l
et.
C
l
ic
k
N
ex
t
.
Power On t
h
e Camer
a
Make sure the LED is lit on the Camera’s
f
ront panel. I
f
it
is not
l
it, ma
k
e sure t
h
e ca
bl
es are proper
l
y connecte
d
to t
h
e Camera. C
l
ic
k
N
ex
t
.
C
h
ec
k
t
h
e LE
D
The Wizard searches
f
or the Wireless-G Internet Home
Monitoring Cameras on your networ
k
, t
h
en
d
isp
l
ays
the Camera
f
ound along with status in
f
ormation.
Camera Foun
d
on Networ
k
6.
7.
8.
I
f
the Camera
y
ou want is not displa
y
ed, clic
k
Searc
h
Aga
i
n
to
r
u
n
a
n
e
w
sea
r
c
h
fo
r
Ca
m
e
r
as.
Ot
h
erwise, in t
h
e Camera Lis
t
box, click the name of the
t
Camera
y
ou are current
ly
insta
ll
ing. Write
d
own t
h
e IP
address o
f
the Camera, so you can use it to access the
We
b
-
b
ase
d
Uti
l
ity
l
ater. C
l
ic
k
N
ex
t
.
Enter a name
f
or the Camera. Memora
bl
e names are
help
f
ul, especially i
f
you are using multiple Cameras
on t
h
e same networ
k
. It s
h
ou
ld
h
ave 15 c
h
aracters or
f
ewer
.
A
f
ter you have entered the name, clic
k
N
ex
t
.
Assign t
h
e Camera Nam
e
Select how to assign an IP Address to the Camera,
eit
h
er automatica
ll
y or manua
ll
y. T
h
en c
l
ic
k
N
ex
t
.
IP A
dd
ress Settin
gs
A
utoma
t
i
ca
ll
y o
b
t
a
i
n an IP A
dd
res
s
Se
l
ect t
h
is
option i
f
you want to automatically assign an IP address
to t
h
e Camera using DHCP
.
I
f
you are not sure which option to choose, Linksys
recommen
d
s t
h
is option
.
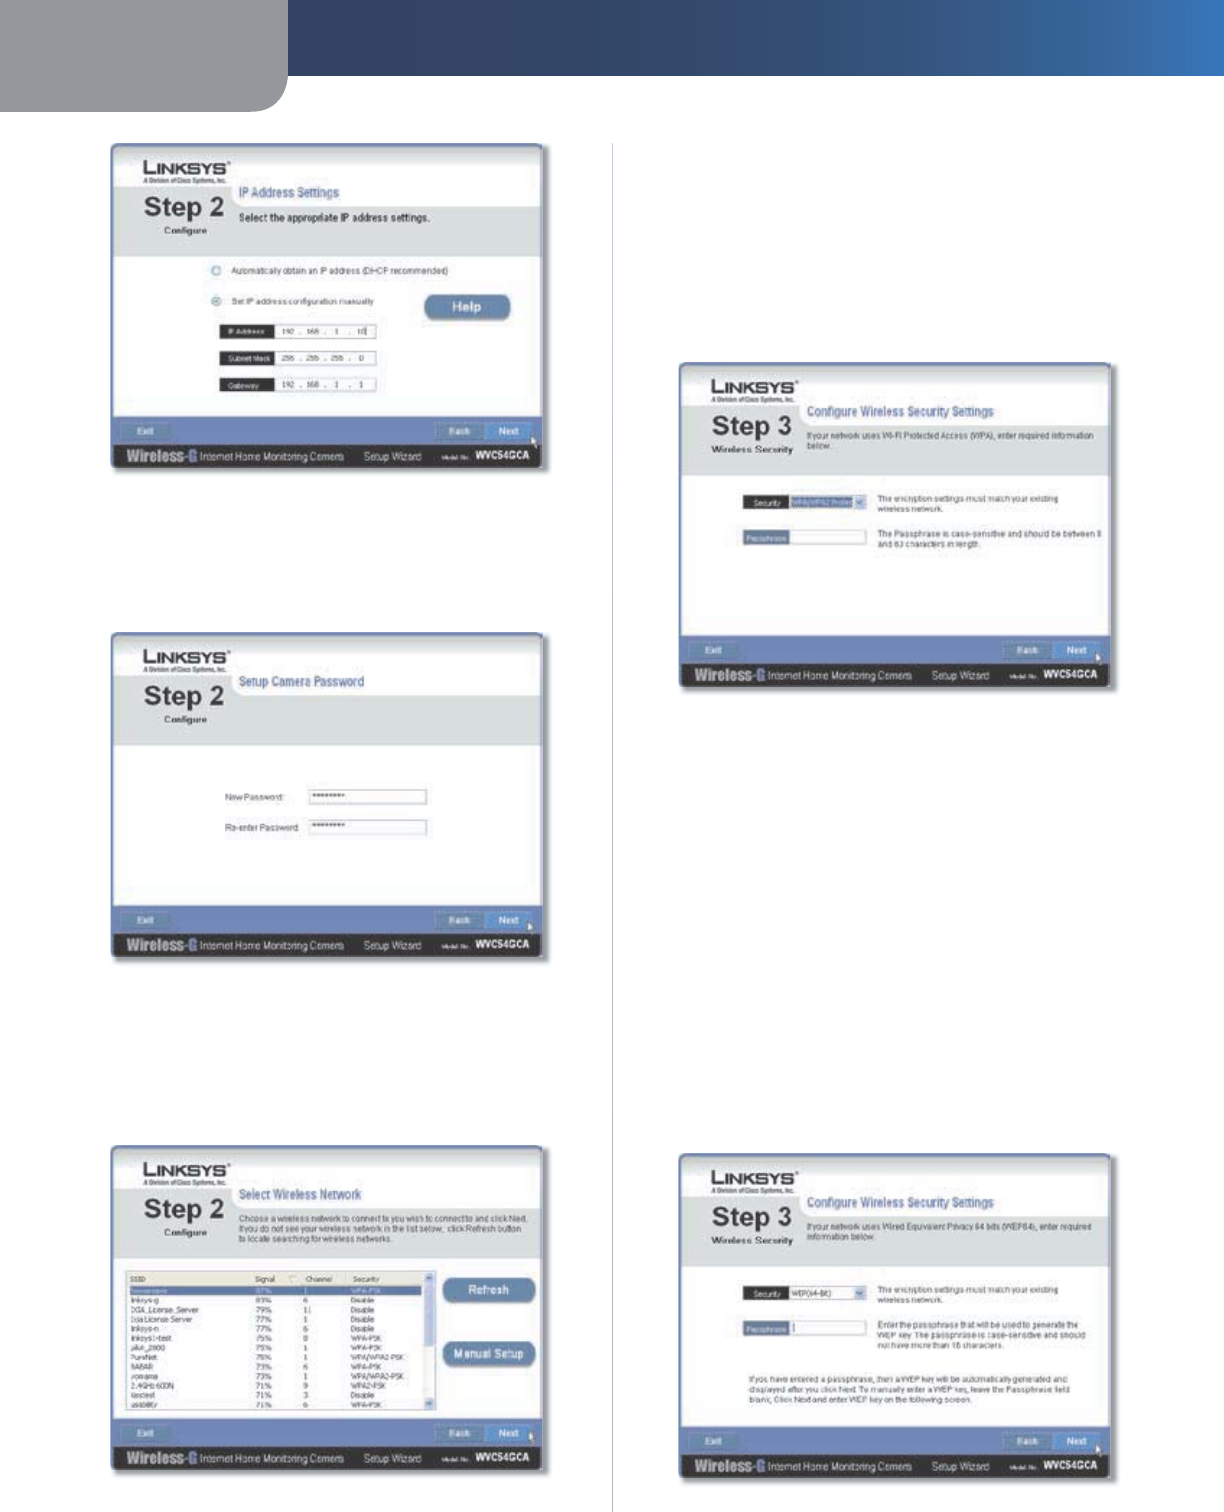
Set IP address con
f
i
gura
t
i
on manua
ll
ySe
l
ect
this option i
f
you want to manually assign a static IP
a
dd
ress to t
h
e Camera
.
I
f
you select this option,
f
ill in the IP A
dd
res
s
,
Su
b
ne
t
Mas
k
, and
k
Gateway
fields.
y
9.
1
0.
•
•
Chapter 2 Setting Up and Mounting the Camera
7
Wireless-G Internet Home Monitoring Camera
Enter t
h
e Static IP A
dd
res
s
I
f
you want to keep the Camera’s de
f
ault password
(
a
dm
i
n
), leave the
f
ields unchanged and clic
k
N
ex
t
.
I
f
you want to change the password, enter the new
password, re-enter to con
f
irm, then click
N
ex
t
.
Enter t
h
e Camera Passwor
d
The Wizard will search
f
or wireless networks, then list
the wireless networks
f
ound. I
f
the wireless network
you want to connect to is not
l
iste
d
, c
l
ic
k
Re
f
res
h
t
o
up
d
ate t
h
e
l
ist. Se
l
ect t
h
e wire
l
ess networ
k
t
h
at you
want to connect t
h
e Camera to, t
h
en c
l
ic
k
N
ex
t
.
Se
l
ect Wire
l
ess Networ
k
11.
1
2.
T
h
e Wizar
d
d
isp
l
ays t
h
e wire
l
ess security met
h
o
d
t
h
at
your networ
k
is using: WPA/WPA2-Persona
l
,
WE
P
(
128-
B
i
t
)
,
or
WEP
(6
4
-
B
i
t
)
. Fo
ll
ow t
h
e appropriate
instructions below. I
f
you are not using wireless
security, se
l
ect
D
i
sa
bl
e
d
an
d
go to step 14.
WPA/WPA2-Persona
l
Enter a passp
h
rase in t
h
e
Passp
h
ras
e
f
ield and clic
k
N
ex
t
. T
h
e passp
h
rase is case
-
sensitive and must be
f
rom 8 to 63 characters in length.
Security Settings - WPA/WPA2-Persona
l
WEP (64-Bit
)
or WEP
(
128-B
i
t
)
To generate t
h
e WEP
k
ey automatica
ll
y, enter a passp
h
rase in t
h
ePassp
h
ras
e
f
ield and clic
k
N
ex
t
. T
h
e passp
h
rase is case-sensitive an
d
s
h
ou
ld
not
b
e
l
onger t
h
an 16 c
h
aracters. It must matc
h
the passphrase o
f
your other wireless network devices
an
d
is compati
bl
e wit
h
Lin
k
sys wire
l
ess pro
d
ucts on
l
y.
(I
f
you have any non-Linksys wireless products, enter
t
h
e WEP
k
ey manua
ll
y on t
h
ose pro
d
ucts.)
To manua
ll
y enter a WEP
k
ey,
l
eave t
h
e Passp
h
ras
e
f
ield
bl
an
k
, c
l
ic
k
N
ex
t
, an
d
enter t
h
e WEP
k
ey on t
h
e next
screen. This WEP key must match the WEP key o
f
your
wire
l
ess networ
k
. For 64-
b
it WEP encryption, enter
exact
l
y 10
h
exa
d
ecima
l
c
h
aracters. For 128-
b
it WEP
encryption, enter exact
l
y 26
h
exa
d
ecima
l
c
h
aracters.
Va
l
i
d
h
exa
d
ecima
l
c
h
aracters are “0” to “9” an
d
“A” to “F”.
A
f
ter you have entered the WEP key, clic
k
N
ex
t
.
Security Settings - WEP
(
64-Bit
)
or WEP
(
128-Bit
)
1
3.
•
•
Chapter 2 Setting Up and Mounting the Camera
8
Wireless-G Internet Home Monitoring Camera
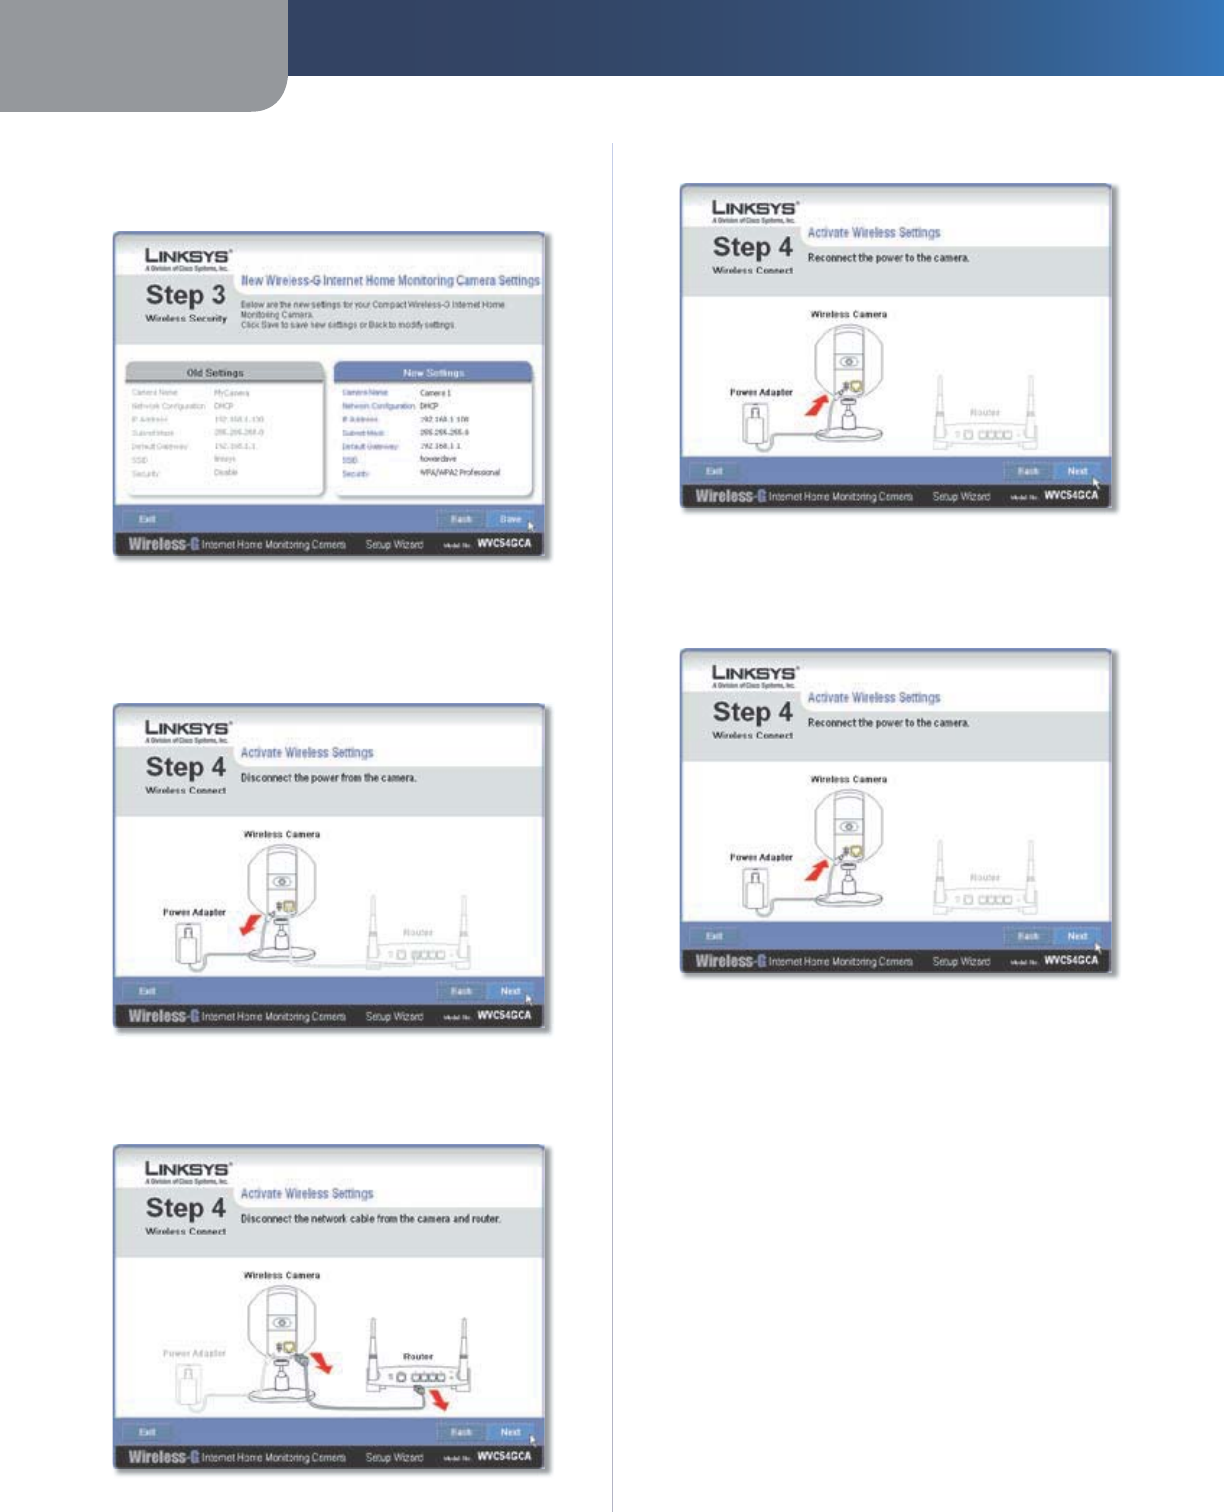
Review t
h
e Camera’s settings. To ma
k
e c
h
anges to t
h
e
settings, c
l
ic
k
Bac
k
to go back to the previous screen.
k
I
f
the settings are correct, clic
k
S
av
e
to cont
i
nue.
Save t
h
e Camera Setting
s
When the Wizard in
f
orms you that the new Camera
settings
h
ave
b
een save
d
, c
l
ic
k
C
on
t
i
n
u
e
.
Disconnect the power
f
rom the camera. Click
N
ex
t
.
Disconnect t
h
e Powe
r
Disconnect the network cable
f
rom the Camera and
f
rom your switch or router. Clic
k
N
ex
t
.
Disconnect t
h
e Networ
k
Ca
ble
14.
15.
1
6.
17.
Reconnect t
h
e power to t
h
e Camera. C
l
ic
k
N
ext
.
Reconnect t
h
e Powe
r
W
h
en t
h
e Setup Wizar
d
d
isp
l
ays Camera success
f
ully
connecte
d
to networ
k
, c
l
ic
k
Con
t
i
n
u
e
, t
h
en c
l
ic
k
N
ex
t
.
Reconnect t
h
e Powe
r
T
he
Con
g
ratu
l
ation
s
s
c
reen
appears
.
Insta
ll
Camera Utili
ty
C
l
ic
k
t
h
is to insta
ll
t
h
e Camera’s
Uti
l
ity
.
On
l
i
ne
R
e
g
i
stration C
l
ic
k
t
h
is to register your Camera
on
l
ine
.
Exi
t
C
l
ic
k
t
h
is to insta
ll
t
h
e Camera’s uti
l
ity
l
ater.
Go to t
h
e “P
l
acement Op
t
i
ons
”
sec
t
i
on.
1
8.
1
9.
20.
•
•
•
Chapter 2 Setting Up and Mounting the Camera
9
Wireless-G Internet Home Monitoring Camera
P
l
acement Option
s
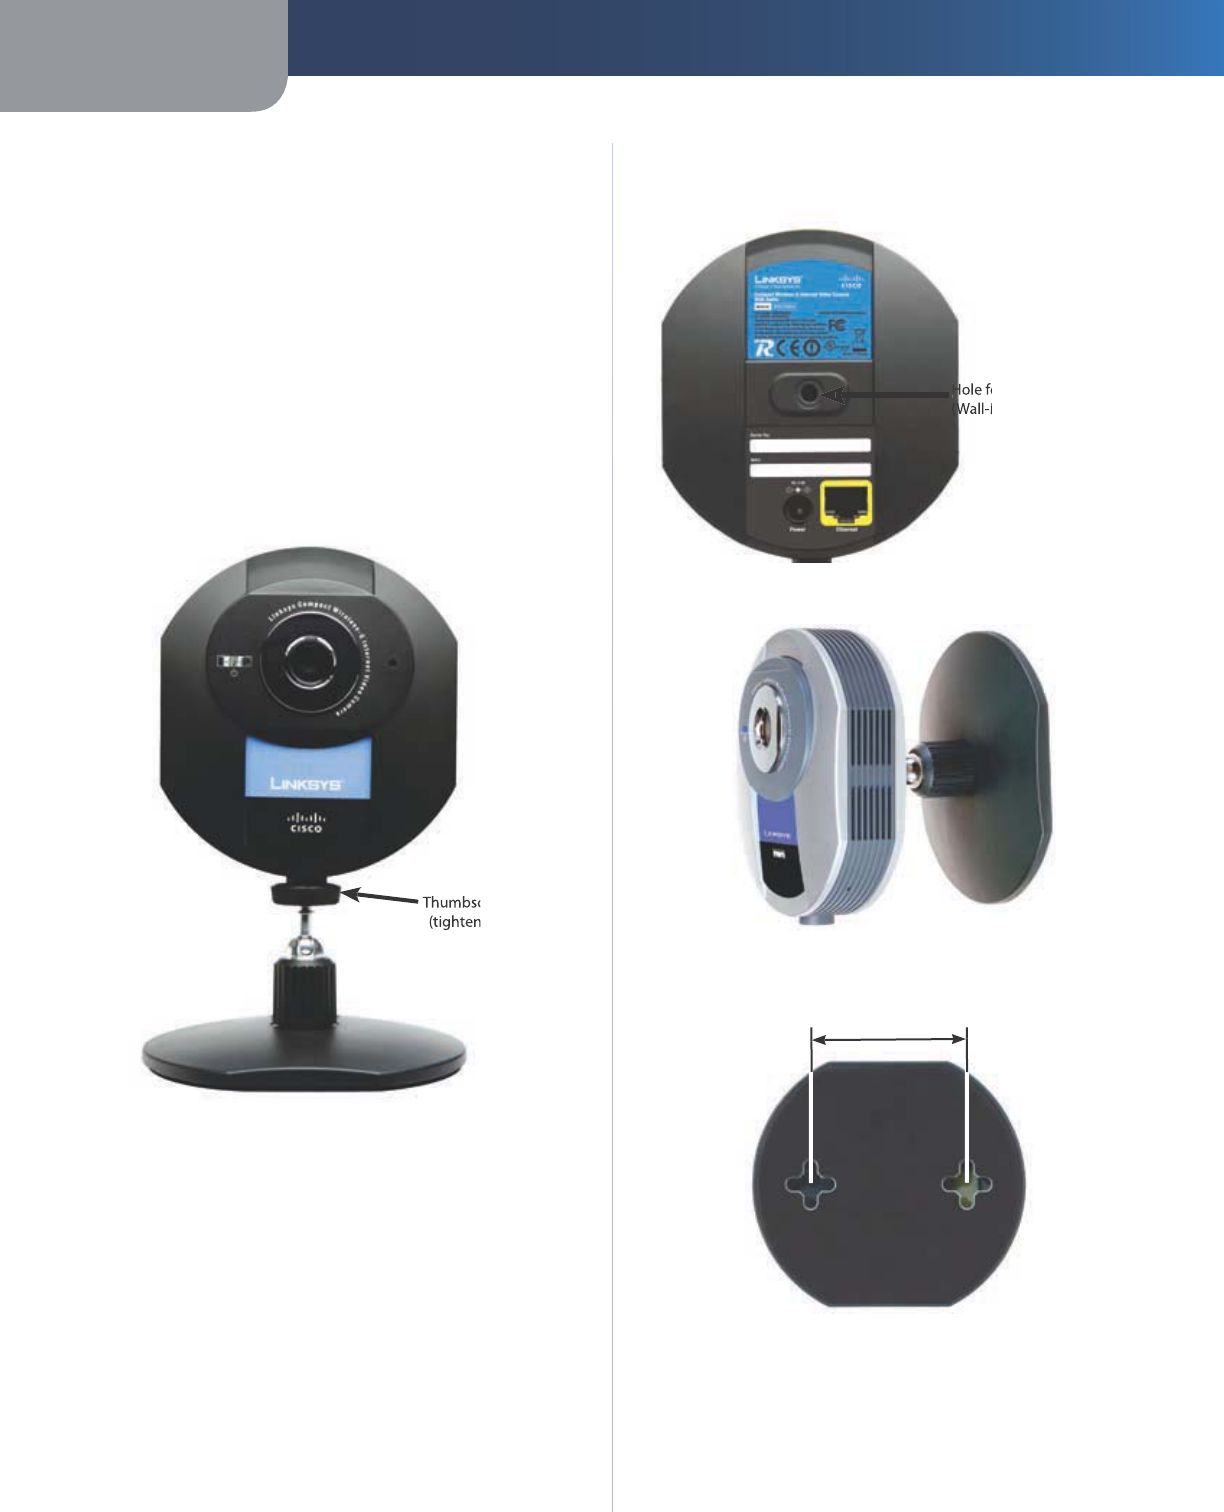
The Camera can stand on a sur
f
ace or be mounted on a
wa
ll
. Depen
d
ing on t
h
e positioning you want, you attac
h
the Camera head to its stand at two di
ff
erent points.
Stan
d
Optio
n
Follow these steps to stand the Camera on a sur
f
ace.
Insert the screw end o
f
the stand into the hole on the
b
ottom pane
l.
Tig
h
ten t
h
e screw an
d
t
h
en t
h
e t
h
um
b
screw.
Place the Camera, and adjust the tilt o
f
its head
accor
d
ing
l
y, as
d
escri
b
e
d
b
e
l
ow in section “Camera
Hea
d
Ti
l
ting” v
.
c
rew
n
e
d)
Camera in Stan
d
ing Positio
n
Wa
ll
Mount Optio
n
You use t
h
e Camera’s stan
d
to mount t
h
e Camera on a
wa
ll
. T
h
e stan
d
h
as two wa
ll
-mount s
l
ots t
h
at are space
d
5
8
mm (2.28 inc
h
es) apart.
Insert the screw end o
f
the stand into the hole on the
b
ac
k
pane
l.
Tig
h
ten t
h
e screw en
d
an
d
t
h
en t
h
e t
h
um
b
screw.
Determine w
h
ere you want to mount t
h
e Camera.
Attac
h
two screws to t
h
e wa
ll
, so t
h
at t
h
e Camera’s
wa
ll
-mount s
l
ots
l
ine up wit
h
t
h
e two screws.
Maneuver t
h
e Camera so t
h
e screws are inserte
d
into
t
h
e two s
l
ots
.
1.
2.
3.
1.
2.
3.
4.
Adjust the tilt o
f
its head accordingly, as described
b
e
l
ow in section “Camera Hea
d
Ti
l
ting”.
o
r Attaching Stand
M
ount Option
)
Wa
ll
Mount Optio
n
Camera in Wa
ll
-Mounting Positio
n
5
8
m
m
(2.28 inc
h
es
)
v
Wa
ll
-Mount S
l
ot
s
Camera Hea
d
Ti
l
tin
g
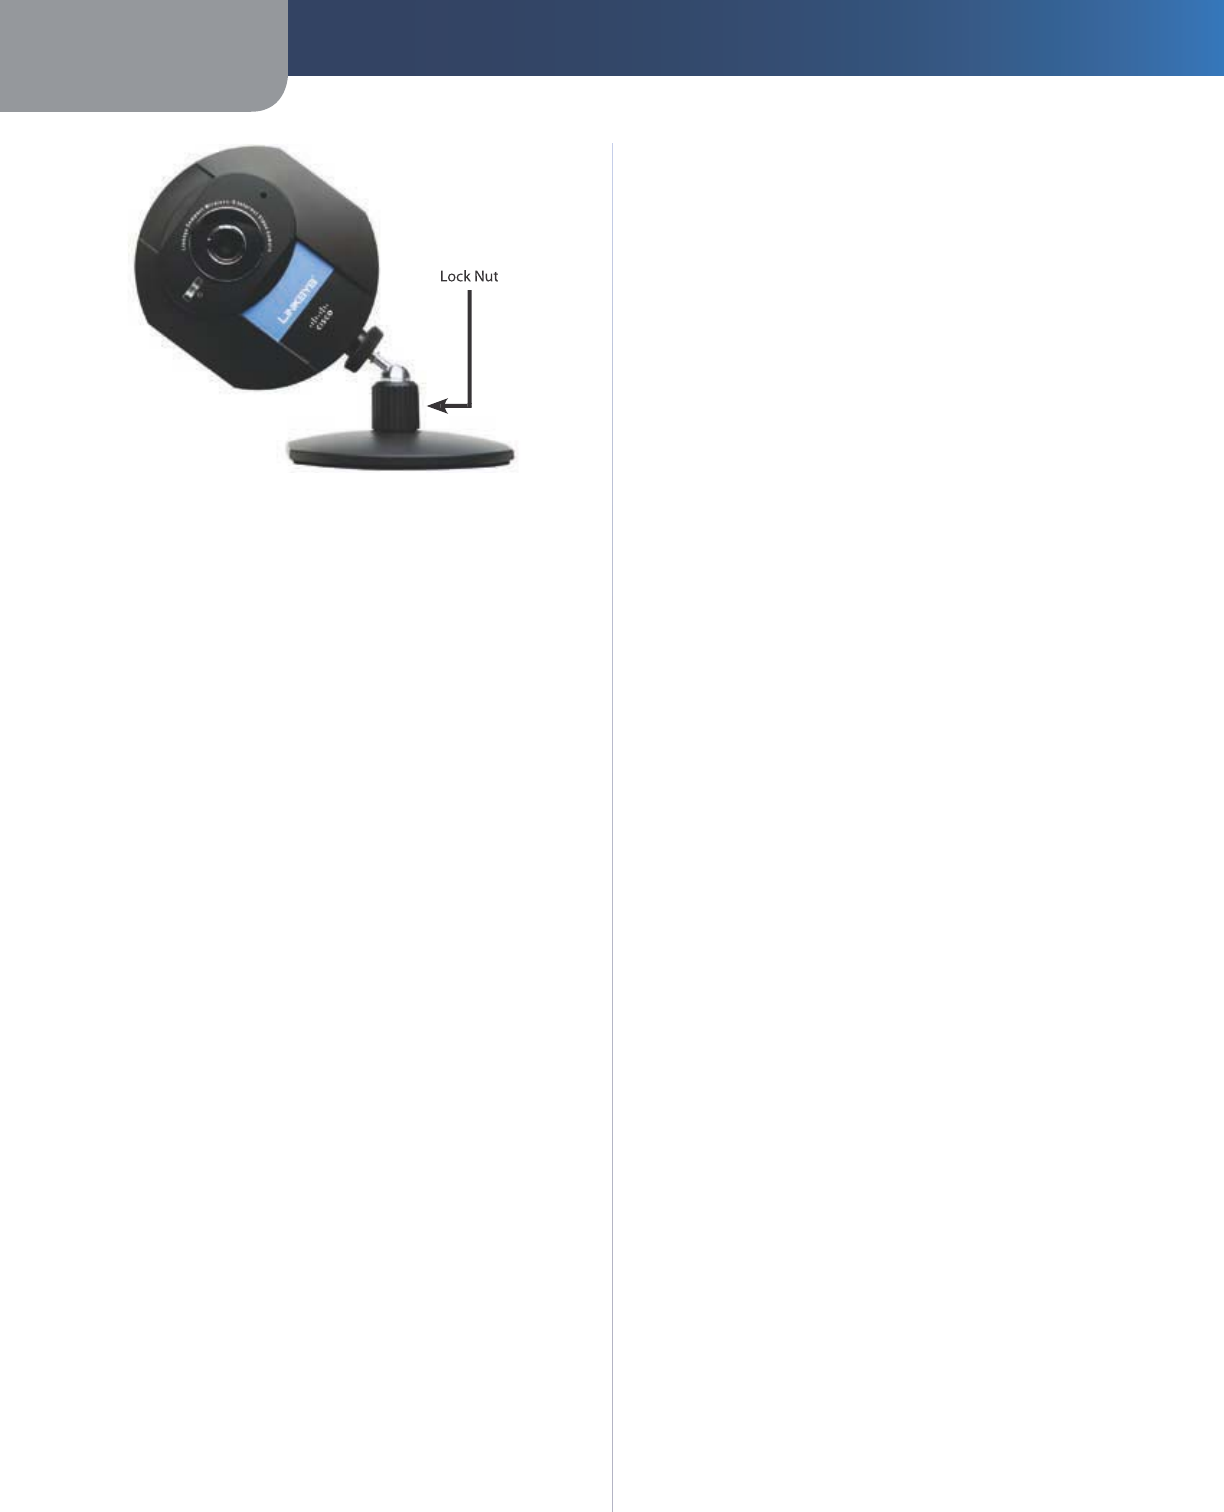
A
f
ter the Camera is assembled, you can tilt the Camera
h
ea
d
on its
b
a
ll
joint using t
h
e
l
oc
k
nut on t
h
e camera
stan
d
. Loosen t
h
e
l
oc
k
nut, ti
l
t t
h
e camera
h
ea
d
as
d
esire
d
,
t
h
en tig
h
ten t
h
e
l
oc
k
nut to secure t
h
e position.
5.
Chapter 2 Setting Up and Mounting the Camera
10
Wireless-G Internet Home Monitoring Camera
Camera Ti
l
ting Feature wit
h
Stan
d
Optio
n
T
he
i
n
stallat
i
o
n
of
t
h
e
W
i
r
eless
-G In
te
rn
et
H
o
m
e
M
o
n
i
t
o
r
i
ng Camera
i
s comp
l
ete. Go to “C
h
apter 3:
Insta
ll
i
ng an
d
U
s
i
ng t
h
e Camera Ut
i
l
i
t
y
.
”
Fo
r
i
n
fo
rm
at
i
o
n
about
ad
v
a
n
ced
co
n
f
i
gura
t
i
on
us
i
ng
t
h
e Camera’s We
b
-
b
ase
d
Ut
i
l
i
ty, go to “C
h
apter
4
:
Advanced Con
f
i
gura
t
i
on
w
i
t
h
t
h
e We
b
-Base
d
Ut
i
l
i
ty.
”
Chapter 2 Installing and Using the Camera Utility
11
Wireless-G Internet Home Monitoring Camera
C
h
apter 2:
Insta
ll
i
ng an
d
U
s
i
ng t
h
e
C
amera U
t
i
l
i
ty
Overv
i
e
w
T
h
is c
h
apter wi
ll
instruct you on
h
ow to insta
ll
an
d
use t
h
e
Camera Uti
l
ity on your PC. T
h
e Uti
l
ity a
ll
ows you to easi
l
y
view an
d
recor
d
t
h
e Camera’s vi
d
eo
.
I
f
another Wireless-B or Wireless-G Internet Camera Utility
is a
l
rea
d
y insta
ll
e
d
on your PC, Lin
k
sys recommen
d
s t
h
at
you uninstall it be
f
ore installing this Camera Utility.
N
O
TE
:
To view vi
d
eo using a we
b
b
rowser, you
must use Internet Exp
l
orer version 5.5 or
h
ig
h
er.
The View Video
f
eature will not work with
other web browsers. I
f
you do not use Internet
Exp
l
orer v5.5, use t
h
e Camera Uti
l
ity instea
d
.
Insta
ll
ing t
h
e Camera Uti
l
it
y
On t
h
eWe
l
com
e
or
Congratu
l
ation
s
screen o
f
the Setup
Wizar
d
, c
l
ic
k
Insta
ll
Camera U
t
i
l
i
ty
.
Insta
ll
Viewer & Recor
d
er Uti
l
ity Scree
n
T
h
e Setup Wizar
d
b
egins to insta
ll
t
h
e Camera Uti
l
ity.
The progress o
f
the installation is displayed.
When the Setup Wizard in
f
orms you that the
insta
ll
ation is comp
l
ete, c
l
ic
k
C
on
t
i
n
u
e
. T
h
e Uti
l
ity wi
ll
automatica
ll
y start up
.
Camera Uti
l
ity Insta
ll
ation Comp
l
ete
d
1.
2.
3.
T
h
e Camera Uti
l
ity
d
isp
l
ays t
h
e
S
etup screen an
d
searches
f
or your Wireless-G Camera
.
Setup Screen - Searching
f
or Camer
a
Enter your User Name an
d
Passwor
d:
U
ser
N
ame
E
nter a
dm
i
n
in this
f
ield.
Passwor
d
I
f
you did NOT change the password
in Step 11 o
f
section “Setup Wizard” in “Chapter 2:
Setting Up an
d
Mounting t
h
e Camera,” enter a
dm
i
n
in this
f
ield. Otherwise, enter the new password
.
Aut
h
orization Scree
n
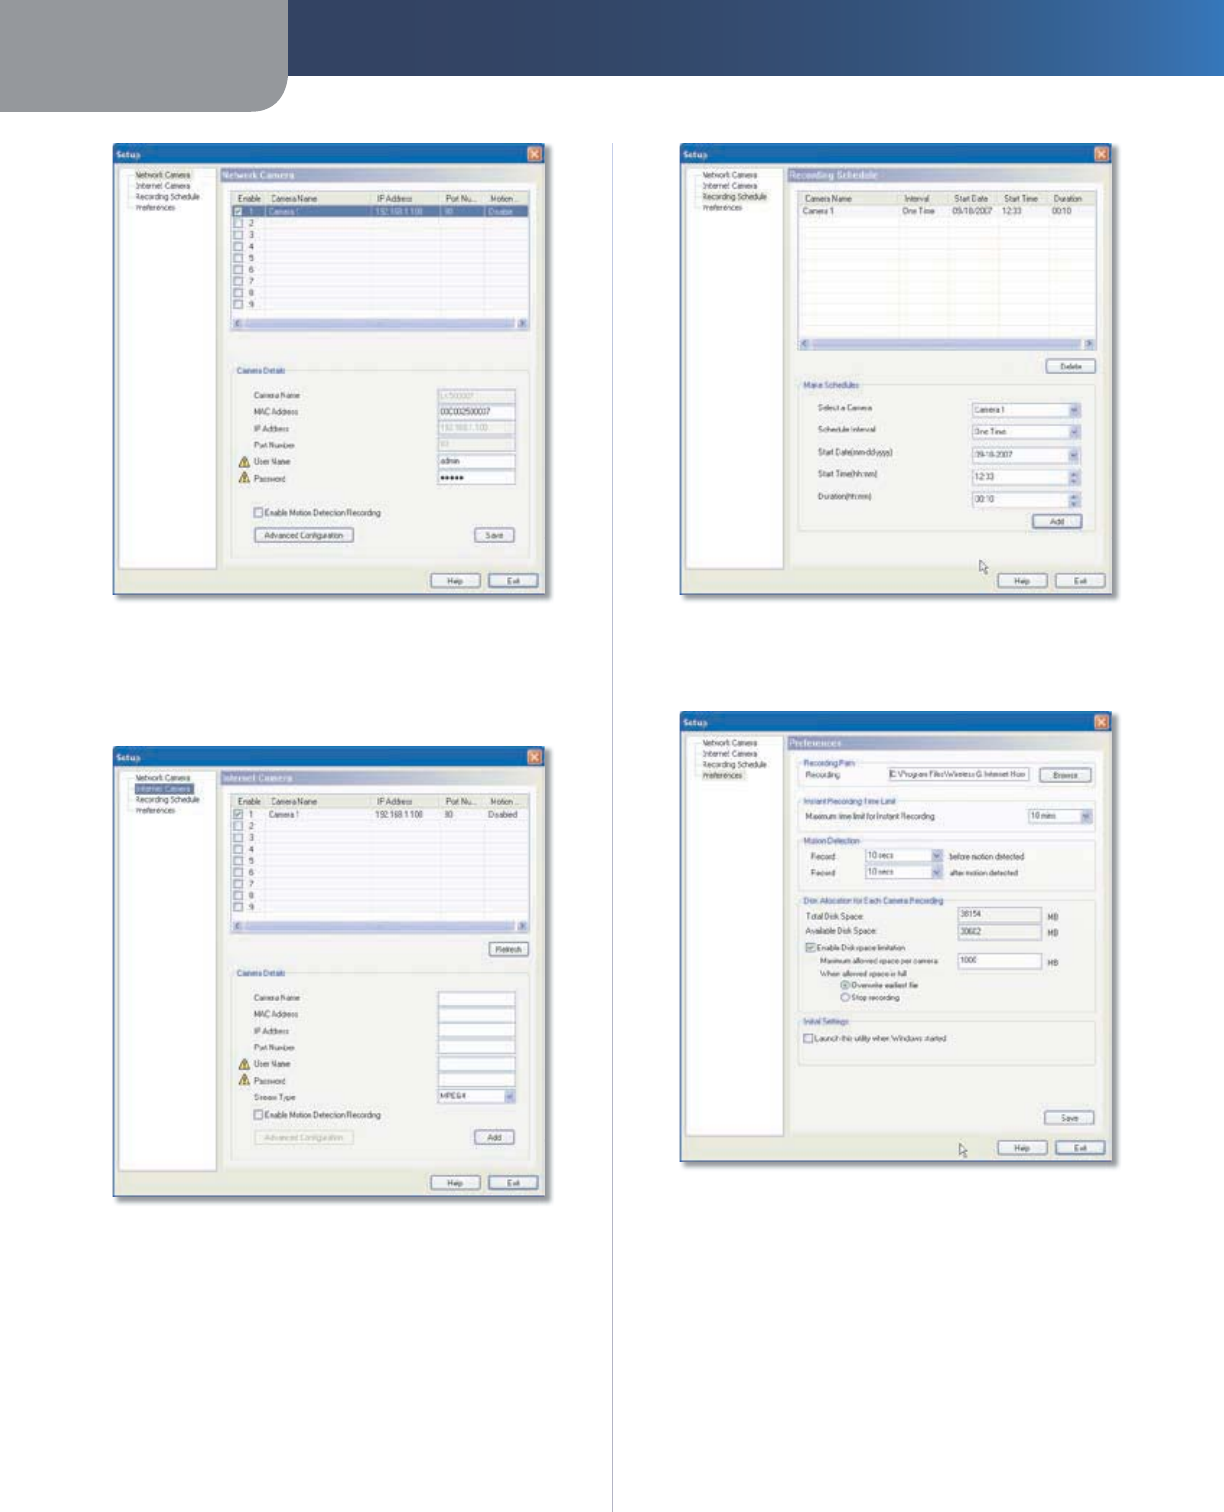
T
h
eSetup > Networ
k
Camera screen appears. T
h
is screen
displays the
f
ollowing in
f
ormation on the Camera:
Ena
ble
This is checked i
f
the Camera is enabled.
C
amera Name Displays the name o
f
the Camera.
IP A
dd
res
s
Disp
l
ays t
h
e Camera’s IP a
dd
ress
.
Port Num
b
e
r
Disp
l
ays t
h
e Camera’s port num
b
er
.
M
o
t
i
on
D
etec
t
i
on Recor
d
i
ng
Indicates i
f
motion
d
etection recor
d
ing is ena
bl
e
d
or
d
isa
bl
e
d
using t
h
e
Ena
bl
e Mo
t
i
on
D
etect
i
on Recor
d
i
ng
c
h
ec
kb
ox.
MAC A
dd
ress
Disp
l
ays t
h
e Camera’s MAC a
dd
ress
.
User Name an
d
Passwor
d
Disp
l
ays t
h
e user
name. T
h
e passwor
d
is
d
isp
l
aye
d
as “
•••••
“
f
or
secur
i
ty reasons
.
2.
3.
•
•
4.
•
•
•
•
•
•
•
Chapter 2 Installing and Using the Camera Utility
12
Wireless-G Internet Home Monitoring Camera
Setup > Networ
k
Camer
a
C
l
ic
k
S
av
e
, t
h
en
Y
e
s
to save t
h
e Camera’s settings.
To set up a Camera t
h
at is
l
ocate
d
on t
h
e Internet, c
l
ic
k
t
he
Internet
C
amer
a
ta
b.
S
etup > Internet
C
amer
a
To set up a recording schedule
f
or a Camera, click the
Recor
d
i
ng Sc
h
e
d
u
le
ta
b.
5.
6.
Setup > Recor
d
ing Sc
h
e
d
u
le
To con
f
igure the Camera’s pre
f
erence settings, click
t
he
Pre
f
erences ta
b.
S
etup > Internet
C
amer
a
To
l
earn
h
ow to use t
h
e Camera Ut
i
l
i
ty, go to
“
Us
i
ng
t
h
e Camera U
t
i
l
i
ty.
”
Advanced users: I
f
you want to use the Camera’s Web
-
b
ase
d
U
t
i
l
i
ty, go to “C
h
apter
4
: Advanced Con
f
i
gura
t
i
on
w
i
t
h
t
h
e We
b
-Base
d
U
t
i
l
i
t
y.
”
7.
Chapter 2 Installing and Using the Camera Utility
13
Wireless-G Internet Home Monitoring Camera
Using t
h
e Camera Uti
l
it
y
A
f
ter the Camera Utility has been installed, its icon will be
d
isp
l
aye
d
in two
l
ocations, one on your
d
es
k
top an
d
one
in the system tray o
f
your desktop’s taskbar.
N
O
TE
:
T
h
is Camera Uti
l
ity is
b
ac
k
war
d-
compati
bl
e wit
h
t
h
e Wire
l
ess-B Internet Vi
d
eo
Camera, so you can use t
h
is Uti
l
ity to contro
l
Wire
l
ess-G an
d
Wire
l
ess-B Internet Vi
d
eo
Cameras on your networ
k.
T
h
ere are two ways to open t
h
e Camera Uti
l
ity:
Dou
bl
e-c
l
ic
k
t
h
e icon on your
d
es
k
top (t
h
e icon acts
as a s
h
ortcut)
Rig
h
t-c
l
ic
k
t
h
e icon in t
h
e system tray, an
d
t
h
en c
l
ic
k
Ma
i
n
P
rogra
m
.
Camera Uti
l
ity Icon on Des
k
to
p
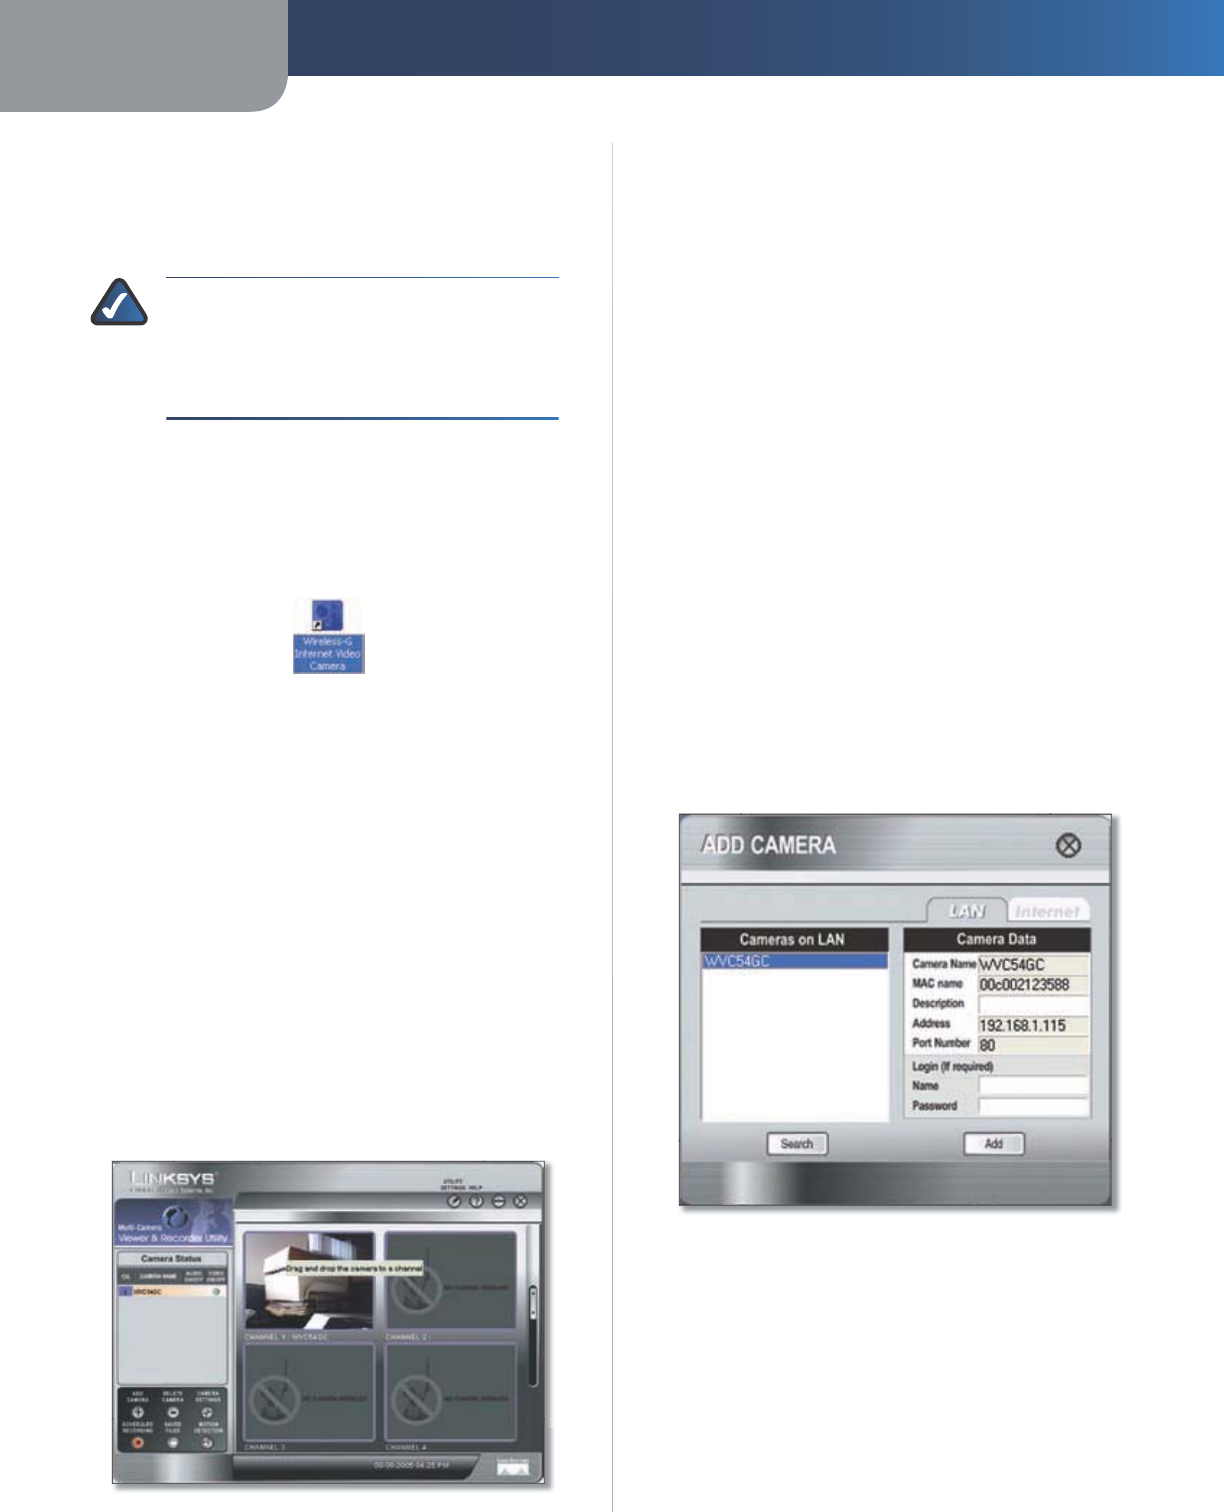
M
ai
n Scree
n
A
f
ter you open the Utility, the Main screen is displayed. The
Main screen is
d
ivi
d
e
d
into t
h
ree sections,
C
amera
S
tatu
s
,
Camera
f
unctions, and viewin
g
windows
f
or Channels 1-8
o
f
the Utility. (To view di
ff
erent windows, use the scroll bar
on t
h
e rig
h
t
.
Camera
f
unctions include
f
inding or deleting Cameras,
c
h
anging Camera settings, sc
h
e
d
u
l
ing recor
d
ings,
accessing saved
f
iles, and con
f
iguring the motion
d
etection settings
.
To con
f
igure the Utility settings, clic
k
Ut
i
l
i
ty
S
et
t
i
ngs
.
T
o
get help in
f
ormation, click the
?
b
utton in t
h
e upper rig
h
t-
h
an
d
corner. To minimize t
h
e Uti
l
ity, c
l
ic
k
t
h
e
–
butto
n in
t
h
e upper rig
h
t-
h
an
d
corner. To exit t
h
e Uti
l
ity, c
l
ic
k
t
h
e
X
b
utton in t
h
e upper rig
h
t-
h
an
d
corner.
Main
S
cree
n
•
•
C
amera
S
tatu
s
This section o
f
the Main screen lists all o
f
the Cameras
the Utility has detected. To view the video o
f
a speci
f
ic
Camera, se
l
ect a Camera, t
h
en
d
rag-an
d
-
d
rop t
h
e Camera
to a viewing win
d
ow
.
CH
T
h
is is t
h
e C
h
anne
l
use
d
b
y t
h
e Camera wit
h
in t
h
e
Utility. (The Utility o
ff
ers up to eight channels.
)
C
amera Name T
h
is is t
h
e name you gave to t
h
e Camera.
AUDI
O
O
N
/O
FF T
h
e Compact Wire
l
ess-G Internet Vi
d
eo
Camera does not
f
eature audio; however, other Cameras
do. This displays he status o
f
their audio transmissions.
VIDE
O
O
N
/O
FF This indicates the status o
f
the Camera’s
vi
d
eo transmissions.
Main > A
dd
Camer
a
To a
dd
a Camera on your
l
oca
l
networ
k
or t
h
e Internet,
c
l
ic
k
A
dd
Camer
a
on t
h
e Main screen.
T
h
eA
dd
Camer
a
screen wi
ll
appear. T
h
ere wi
ll
b
e two ta
b
s
avai
l
a
bl
e, LAN an
d
Internet
.
LAN
T
h
e
LAN
screen shows the Cameras found on your local area
N
network, along with each Camera’s status in
f
ormation.
Main > A
dd
Camera > LA
N
C
ameras on LA
N
The Utility will search
f
or Cameras on the local area
networ
k
an
d
d
isp
l
ay a
l
ist in t
h
e
Cameras on LAN
box. To
N
run a new searc
h
, c
l
ic
k
t
h
e Searc
h
b
utton.
C
amera Dat
a
For t
h
e Camera w
h
ose name is current
l
y se
l
ecte
d
in t
h
e
C
ameras on LA
N
box, the following information will be
N
d
isp
l
aye
d
in t
h
e
C
amera Dat
a
b
ox
:

Chapter 2 Installing and Using the Camera Utility
14
Wireless-G Internet Home Monitoring Camera
C
amera Name T
h
is is t
h
e name you gave to t
h
e Camera.
MA
C
Nam
e
Displayed here is the MAC address o
f
the
C
amera
.
D
esc
r
i
p
t
i
on
This is the in
f
ormation about the Camera
t
h
at you entere
d.
A
dd
res
s
S
h
own
h
ere is t
h
e Camera’s IP a
dd
ress
.
Port Num
b
e
r
T
h
is is t
h
e port num
b
er t
h
e Camera uses
f
or communication
.
L
o
g
i
n
I
f
you set up the Camera with a name and password,
t
h
en you wi
ll
nee
d
to enter t
h
em
h
ere in or
d
er to access
t
h
e Camera
.
N
am
e
Enter t
h
e
l
ogin Name
.
Passwor
d
Enter t
h
e
l
ogin Passwor
d.
To a
dd
a Camera to t
h
e Uti
l
ity’s
l
ist, se
l
ect t
h
e Camera you
wis
h
to a
dd
b
y c
l
ic
k
ing its name in t
h
e
C
ameras on LA
N
b
ox. T
h
en c
l
ic
k
t
h
e A
dd
button. You will be noti
f
ied when
t
h
e Camera
h
as
b
een a
dd
e
d
. C
l
ic
k
t
h
e
OK
button.
K
To c
l
ose t
h
is screen, c
l
ic
k
t
h
e
X
b
utton in t
h
e upper rig
h
t
-
h
an
d
corner
.
I
nterne
t
T
h
e
Internet
screen shows the Camera found on the
t
Internet, along with the Camera’s status in
f
ormation.
Main > A
dd
Camera > Interne
t
Test Resu
l
t
s
First, go to t
h
e Camera Data section. Enter t
h
e Camera’s IP
Address, Port Number, and login in
f
ormation (i
f
required).
T
h
en c
l
ic
k
t
h
e
C
onnect button to
f
ind the Camera. The
f
ollowing in
f
ormation will be displayed:
C
amera Dat
a
C
amera Name T
h
is is t
h
e name you gave to t
h
e Camera.
MA
C
Nam
e
Displayed here is the MAC address o
f
the
C
amera
.
D
esc
r
i
p
t
i
on
This is the in
f
ormation about the Camera
t
h
at you entere
d.
A
dd
res
s
S
h
own
h
ere is t
h
e Camera’s IP a
dd
ress or
So
l
oLin
k
DDNS a
dd
ress.
Port Num
b
e
r
T
h
is is t
h
e port num
b
er t
h
e Camera uses
f
or communication
.
L
o
g
i
n
I
f
you set up the Camera with a name and password,
t
h
en you wi
ll
nee
d
to enter t
h
em
h
ere in or
d
er to access
t
h
e Camera
.
Name Enter t
h
e
l
ogin Name
.
Passwor
d
Enter t
h
e
l
ogin Passwor
d.
To a
dd
t
h
e Camera to t
h
e Uti
l
ity’s
l
ist, c
l
ic
k
t
h
e A
dd
b
utton.
I
f
you wish to clear a Camera, click the C
l
ea
r
b
utton
.
To c
l
ose t
h
is screen
,
c
l
ic
k
t
h
e
X
b
utton in t
h
e upper rig
h
t
-
h
an
d
corner
.
View Vi
d
e
o
T
h
e
C
amera
S
tatu
s
section
l
ists a
ll
t
h
e Cameras
d
etecte
d
by the Utility. To view a speci
f
ic Camera’s video, select it
f
rom the list and drag-and-drop it on a Channel (viewing)
win
d
ow
.
Dou
bl
e-c
l
ic
k
t
h
e Camera’s viewing win
d
ow to
b
ring up
t
he
View Vi
d
eo screen. T
h
is screen
d
isp
l
ays t
h
e se
l
ecte
d
Camera’s video at
f
ull size, and provides icons that you
can use to recor
d
, p
l
ay, stop, ta
k
e pictures, zoom, a
d
just
t
h
e au
d
io, or
d
ou
bl
e t
h
e win
d
ow’s size. T
h
ese icons are
d
escri
b
e
d
b
e
l
ow
.
To c
l
ose t
h
e View VI
d
eo screen, c
l
ic
k
X
in t
h
e upper rig
h
t
-
h
an
d
corner
.
Main > View Vi
d
e
o
Chapter 2 Installing and Using the Camera Utility
15
Wireless-G Internet Home Monitoring Camera
Icon
F
unc
t
i
on
I
f
you want to record the current video,
c
l
ic
k
t
h
is icon
.
I
f
you want to play the current video,
c
l
ic
k
t
h
is icon
.
I
f
you want to
f
reeze the current
f
rame o
f
vi
d
eo or stop recor
d
ing, c
l
ic
k
t
h
is icon
.
To take a snapshot o
f
the current
f
rame
o
f
video, click this icon.
To zoom in on a section o
f
the window,
c
l
ic
k
t
h
is icon. T
h
en use
y
our mouse to
select the section to magni
f
y. Click the
icon again to disable the zoom
f
eature.
Click this icon to turn audio on or o
ff
.
C
l
ic
k
t
h
is
b
ar an
d
move its en
d
point to
raise or
l
ower t
h
e vo
l
ume
.
T
h
is
d
isp
l
ays t
h
e Camera’s C
h
anne
l
.
(T
h
is icon cannot
b
e use
d
to c
h
ange t
h
e
Camera’s C
h
anne
l
. To
d
o t
h
at,
y
ou must
g
o to t
h
e Main screen an
d
d
ra
g
an
d
d
rop
t
h
e Camera to t
h
e new c
h
anne
l
’s viewing
win
d
ow.
)
I
f
you want to make the viewing window
twice as
l
arge, c
l
ic
k
t
h
is icon
.
De
l
ete Camer
a
To
d
e
l
ete a Camera, se
l
ect its name in t
h
e
C
amera
S
tatus
section, an
d
c
l
ic
k
De
l
ete Camer
a
. W
h
en you are as
k
e
d
to
con
f
irm the deletion, click the
OK
button.
K
Main > De
l
ete Camer
a
Ma
i
n > Camera Sett
i
ng
s
To modi
f
y a Camera’s settings, select its name in the
C
amera
S
tatu
s
section o
f
the Ma
in
screen
,
an
d
c
l
ic
k
C
h
ange Set
t
i
ngs
. T
h
eC
h
ange Setting
s
s
c
reen
appears
.
Main > C
h
ange Setting
s
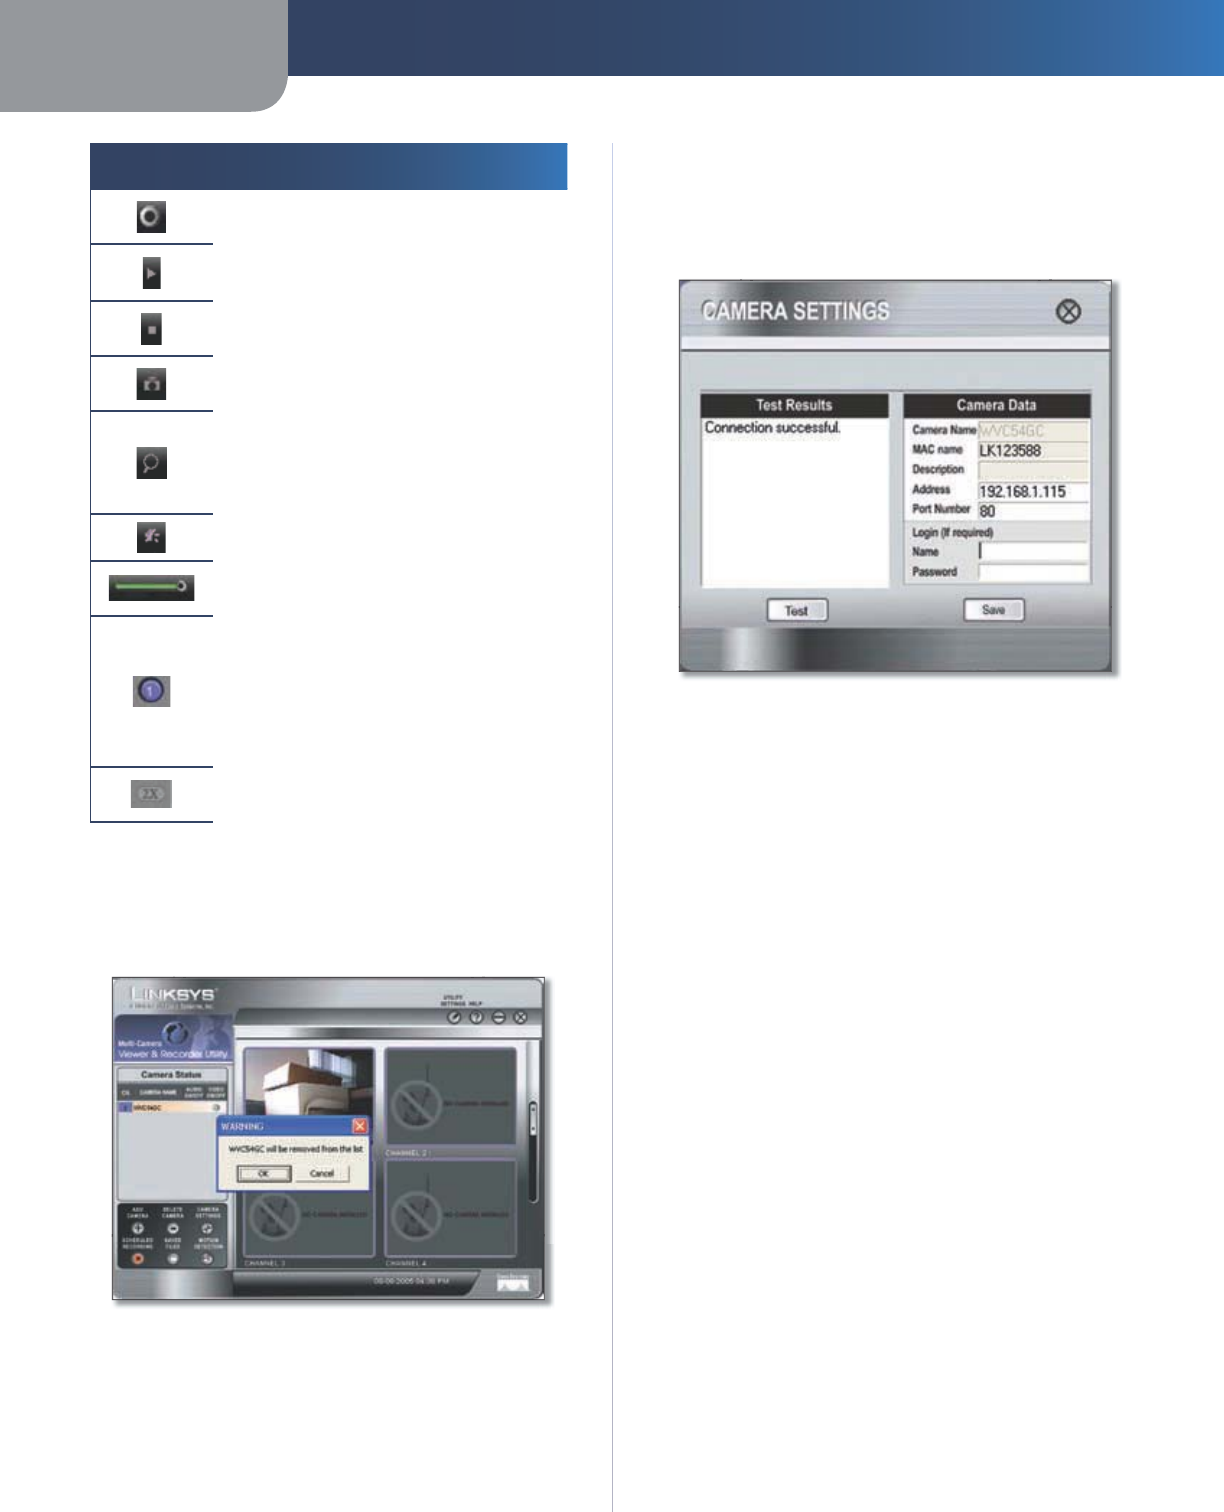
Test Resu
l
t
s
C
l
ic
k
t
h
e
T
est
b
utton to c
h
ec
k
t
h
e connection. T
h
e resu
l
ts
will be displayed. I
f
you need to change the Camera’s
network settings or login in
f
ormation, you can do so on
t
h
is screen
.
C
amera Dat
a
C
amera Name T
h
is is t
h
e name you gave to t
h
e Camera.
MA
C
Nam
e
Displayed here is the MAC address o
f
the
C
amera
.
Descrip
t
i
on
This is the in
f
ormation about the Camera
t
h
at you entere
d.
A
dd
res
s
Enter t
h
e Camera’s new IP a
dd
ress or So
l
oLin
k
DDNS a
dd
ress
.
Port Num
b
e
r
Enter t
h
e new port num
b
er t
h
at t
h
e Camera
uses
f
or communication
.
L
o
g
i
n
I
f
you set up the Camera with a name and password,
t
h
en you can c
h
ange t
h
em
h
ere
.
Name Enter t
h
e new
l
ogin Name.
Passwor
d
Enter t
h
e new
l
ogin Passwor
d
.
C
l
ic
k
S
av
e
to save t
h
e new settings
.
To c
l
ose t
h
is screen, c
l
ic
k
X
in t
h
e upper-rig
h
t corner
.
Chapter 2 Installing and Using the Camera Utility
16
Wireless-G Internet Home Monitoring Camera
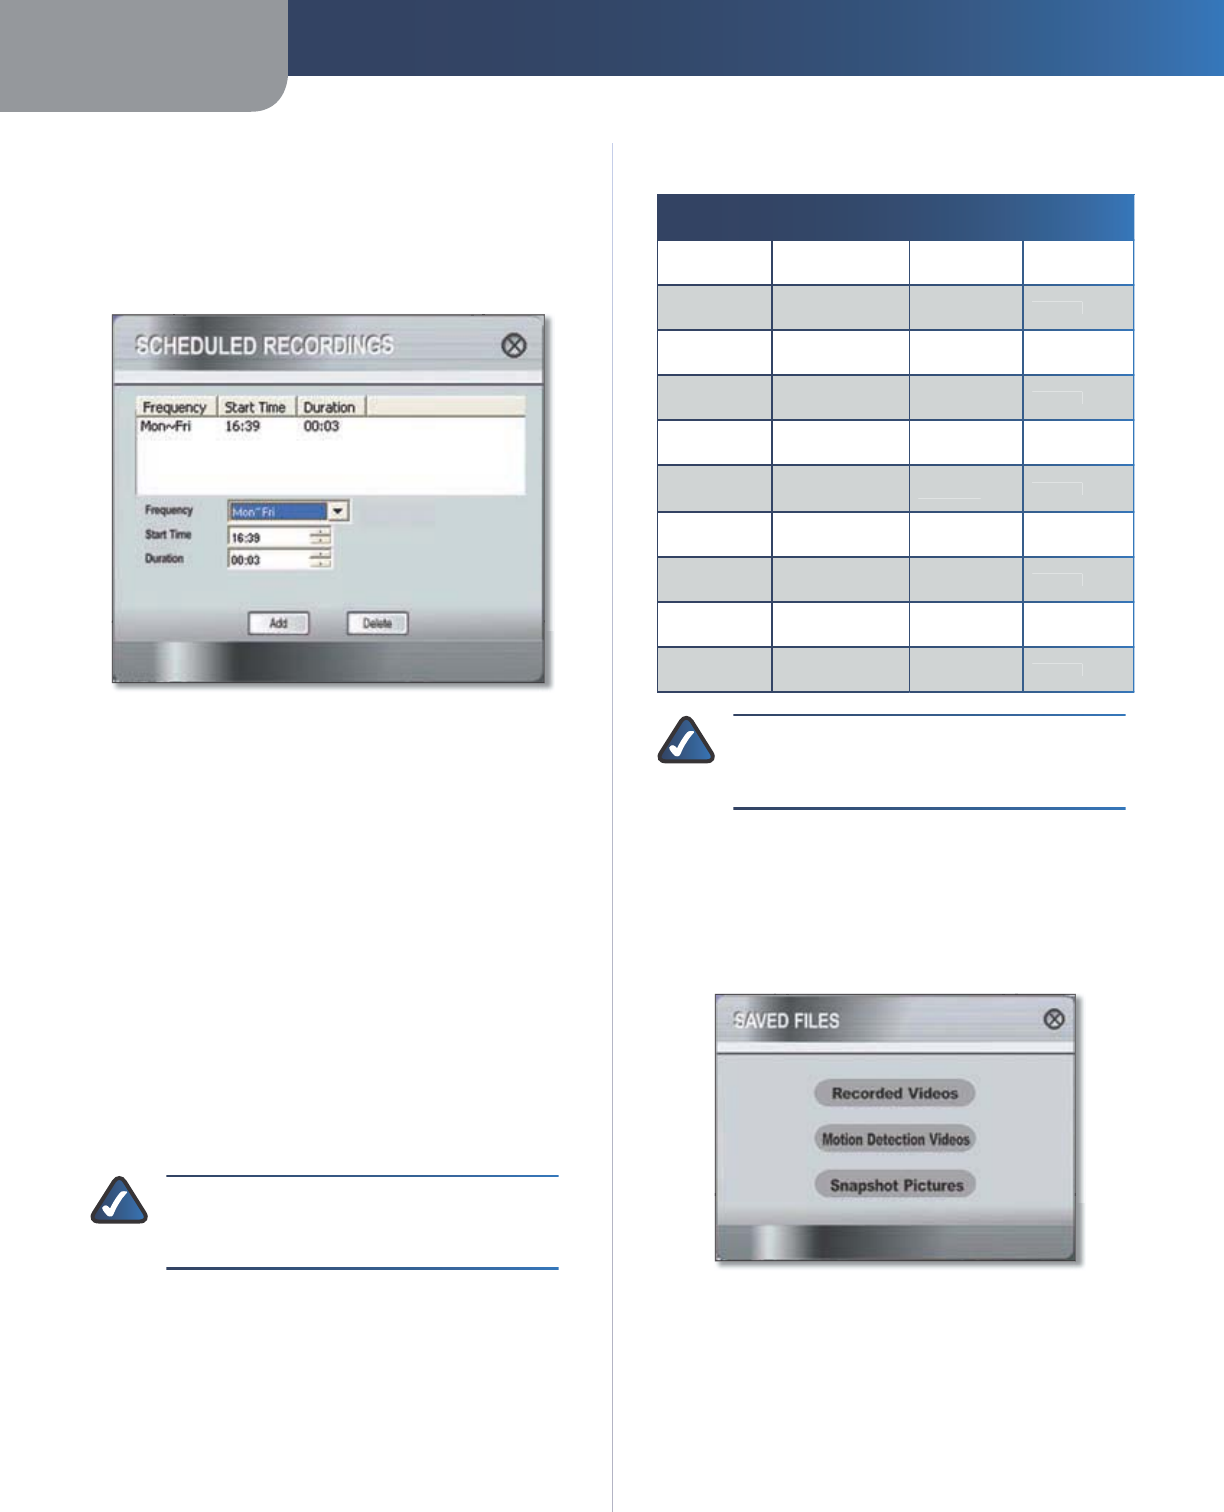
Main > Sc
h
e
d
u
l
e
d
Recor
d
ing
s
To schedule recordings
f
or a Camera, select its name in
t
he
C
amera
S
tatu
s
section o
f
the Ma
in
screen
,
an
d
c
l
ic
k
Sc
h
e
d
u
l
e
d
Recor
d
i
ng
.
A list o
f
scheduled recordings will appear.
Main > Sc
h
e
d
u
l
e
d
Recor
d
ing
s
F
requenc
y
Deci
d
e w
h
ic
h
d
ays you want t
h
e Camera to
record. Select the appropriate Frequency
f
rom the drop-
d
own menu.
S
tart
T
i
me
Se
l
ect t
h
e time you want t
h
e recor
d
ing to
b
egin
.
Durati
on
Se
l
ect
h
ow
l
ong you want t
h
e recor
d
ing to
b
e
.
A
f
ter you have made your selections, click A
dd
to save t
h
e
new sc
h
e
d
u
l
e
d
recor
d
ing
.
To delete a scheduled recording, select the recording
f
rom
t
h
e
l
ist, an
d
c
l
ic
k
De
l
et
e
.
To c
l
ose t
h
is screen, c
l
ic
k
X
in t
h
e upper-rig
h
t corner
.
You may
f
ind it help
f
ul to know how much memory is
required to hold a video recording. The
f
ollowing table
lists estimated bit rates and
f
ile sizes
f
or a typical video
recor
d
ing at eac
h
avai
l
a
bl
e reso
l
ution an
d
vi
d
eo.
N
O
TE
:
In order
f
or the scheduled recordings
to occur, t
h
e Mu
l
ti-Camera Viewer & Recor
d
er
Uti
l
ity must
b
e running on a networ
k
e
d
PC.
E
s
t
i
mate
d
Har
d
-Dr
i
v
e Memory
S
pace Req
u
i
red
f
or
V
i
d
e
o
Recor
d
i
ng per
H
our
Reso
l
u
t
i
on
Qua
l
i
ty Leve
l
B
i
t
R
at
e
F
i
l
e
S
i
z
e
320
x
2
4
0
Very Hig
h
900
kb
p
s
430M
B
320
x
2
4
0
Hig
h
500
kb
p
s
330M
B
320
x
2
4
0
Norma
l
300
kb
p
s
240M
B
320
x
2
4
0
L
o
w
120
kb
p
s
230M
B
320
x
2
4
0
V
ery
L
o
w
40
kb
p
s
225M
B
16
0
x 1
20
Very Hig
h
800
kb
p
s
380M
B
16
0
x 1
20
Hig
h
400
kb
p
s
270M
B
16
0
x 1
20
Norma
l
200
kb
p
s
230M
B
16
0
x 1
20
L
o
w
100
kb
p
s
220M
B
16
0
x 1
20
V
ery
L
o
w
40
kb
p
s
210M
B
N
O
TE
:
The maximum length o
f
a recording
f
ile
is one hour. I
f
a recording is more than one hour
long, then multiple
f
iles will be saved.
Main > Save
d
Fi
l
e
s
To access the saved
f
iles o
f
a Camera, select its name in the
C
amera
S
tatu
s
section o
f
the Ma
in
screen, an
d
c
l
ic
k
Save
d
F
i
l
e
s
. You have three types o
f
f
iles available: Recorded
Vi
d
eos, Motion Detection Vi
d
eos, an
d
Snaps
h
ot Pictures.
M
a
in >
Sa
v
ed
Fi
les
To c
l
ose t
h
is screen, c
l
ic
k
X
in t
h
e upper-rig
h
t corner
.
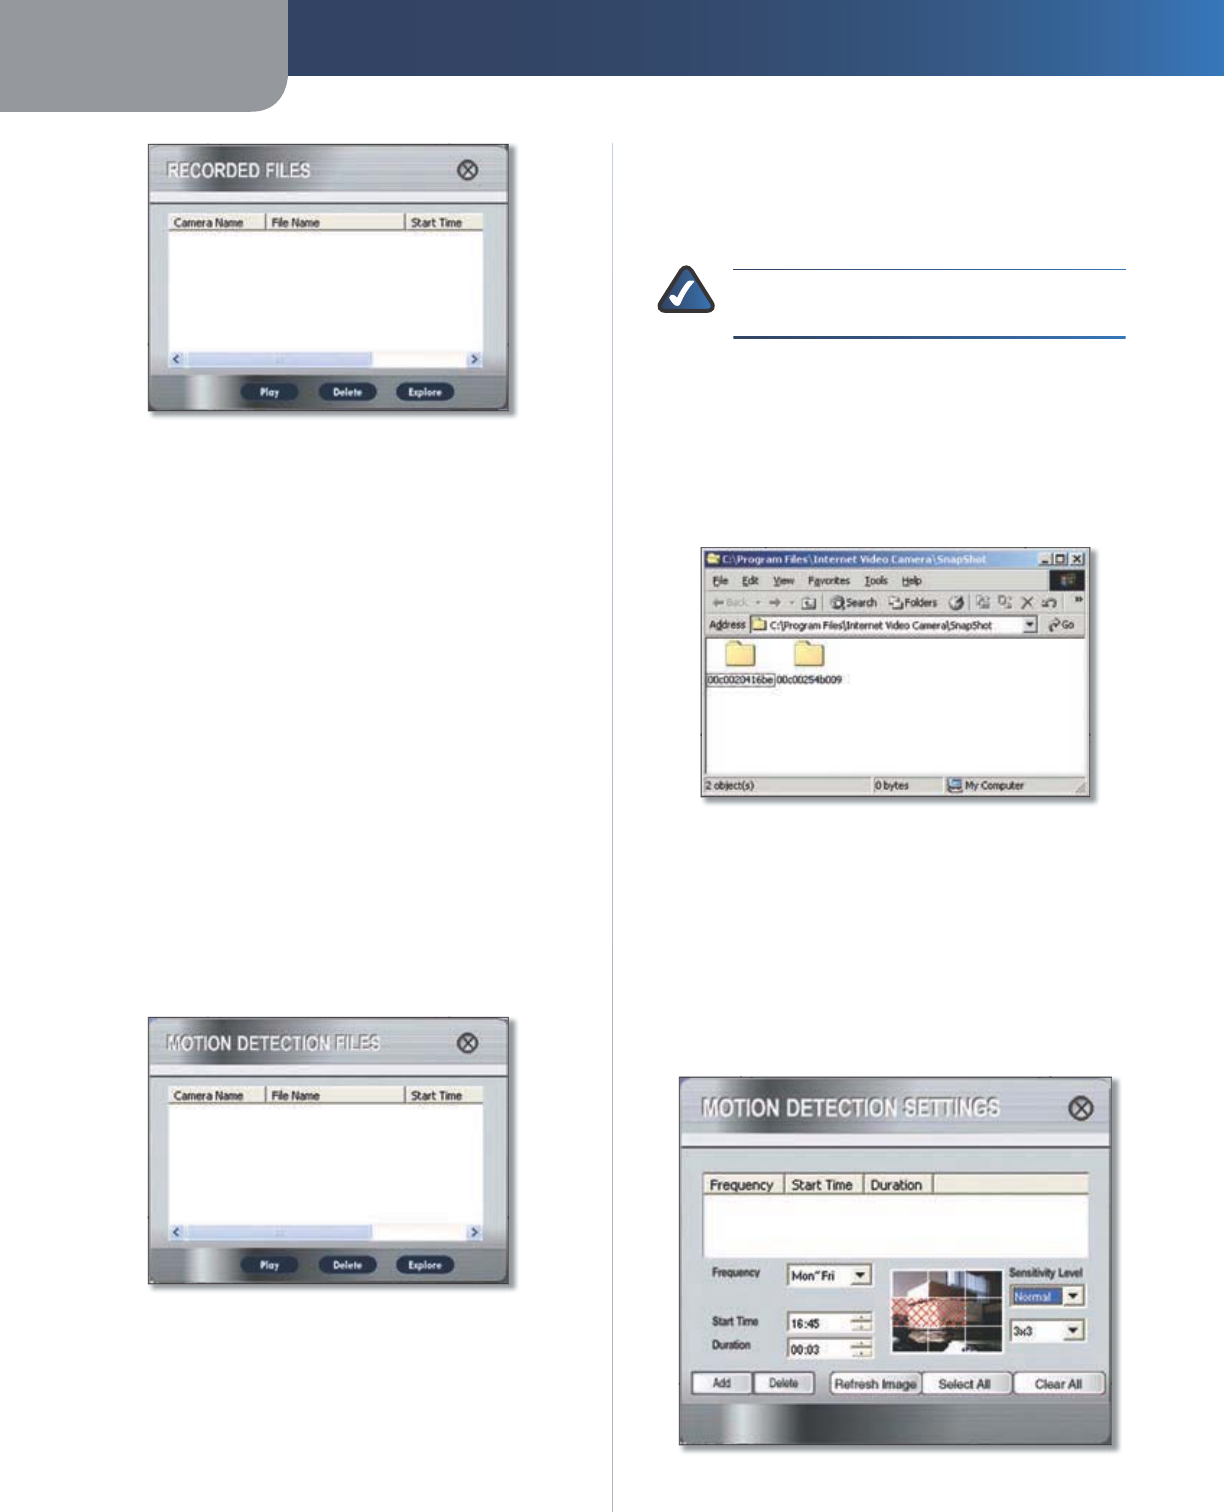
Recor
d
e
d
Fi
l
e
s
C
l
ic
k
Recor
d
e
d
V
i
d
eo
s
, an
d
t
h
eRecor
d
e
d
Fi
l
e
s
s
c
reen
appears and displays a list o
f
f
iles, organized by Camera
Name, Fi
l
e Name, an
d
Start Time
.
Chapter 2 Installing and Using the Camera Utility
17
Wireless-G Internet Home Monitoring Camera
M
a
in >
Sa
v
ed
Fi
les
> R
eco
r
ded
Fi
les
C
amera Nam
e
This is the name o
f
the Camera that was
use
d.
F
i
l
e Nam
e
Displayed here is the name o
f
the
f
ile. I
f
it
was an instant recording, the
f
ilename
f
ormat is “LAN_
R_(date)_(end time)”. I
f
it was a scheduled recording, the
f
ilename
f
ormat is “LAN_(date)_(end time)”.
S
tart
T
i
m
e
T
h
is is t
h
e time t
h
e recor
d
ing
b
egan.
To play a recording, select the appropriate
f
ile and clic
k
P
l
a
y
. To delete a recording, select the appropriate
f
ile and
c
l
ic
k
De
l
ete. I
f
the recorded
f
ile you want is not listed, clic
k
Exp
l
or
e
to
f
ind it. To rename a recorded
f
ile, click Exp
l
or
e
.
A
f
ter you have
f
ound the
f
ile, you can rename it.
To c
l
ose t
h
is screen, c
l
ic
k
X
in t
h
e upper-rig
h
t corner
.
Motion Detection Fi
l
e
s
C
l
ic
k
M
o
t
i
on
D
etec
t
i
on
V
i
d
eos, an
d
t
h
eMotion
D
etection
Fi
l
e
s
screen appears and displays a list o
f
f
iles, organized by
Camera Name, File Name, and Start Time. (Do not con
f
use
t
h
is wit
h
t
h
eMa
in
screen
’
s
M
o
t
i
on
D
etec
t
i
on
opt
i
on,
w
h
ic
h
accesses t
h
e Motion Detection
S
ettings screen.
)
Main > Save
d
Fi
l
es > Motion Detection Fi
l
e
s
C
amera Nam
e
This is the name o
f
the Camera that was
use
d.
Fi
l
e Nam
e
Displayed here is the name o
f
the
f
ile.
S
tart
T
i
m
e
T
h
is is t
h
e time t
h
e recor
d
ing
b
egan.
To play a video, select the appropriate
f
ile and clic
k
P
l
a
y
.
To delete a
f
ile, select the appropriate
f
ile and click De
l
et
e
.
I
f
the
f
ile you want is not listed, clic
k
Exp
l
or
e
to
f
ind it. To
rename a
f
ile, clic
k
Exp
l
or
e
. A
f
ter you have
f
ound the
f
ile,
you can rename
i
t
.
To c
l
ose t
h
is screen, c
l
ic
k
X
in t
h
e upper-rig
h
t corner
.
N
O
TE
:
Use Win
d
ows Me
d
ia P
l
ayer 7 or
h
ig
h
er to
view your recor
d
ings
.
Snaps
h
ot
s
Cl
i
ck
Snaps
h
ot
P
i
ctu
r
es
, an
d
a Win
d
ows Exp
l
orer win
d
ow
appears and displays the available SnapShot
f
olders. The
name o
f
each
f
older is the MAC address o
f
the Camera that
took the snapshots in the
f
older. Double-click a
f
older to
see a list o
f
its images
.
Win
d
ow S
h
owing Snaps
h
ot Fo
ld
er
s
Ma
i
n > Mot
i
on Detect
i
o
n
You can
h
ave vi
d
eo recor
d
e
d
w
h
en t
h
e Uti
l
ity
d
etects
motion in a Camera’s
f
ield o
f
view. To con
f
igure these
settings, se
l
ect its name in t
h
e
C
amera
S
tatus section o
f
t
he
Ma
in
screen, an
d
c
l
ic
k
M
o
t
i
on
D
etec
t
i
on
.
A list o
f
scheduled motion detection recordings will
appear.
Main > Motion Detection
S
etting
s
Chapter 2 Installing and Using the Camera Utility
18
Wireless-G Internet Home Monitoring Camera
F
requenc
y
Deci
d
e w
h
ic
h
d
ays you want t
h
e Camera to
monitor its
f
ield o
f
view
f
or motion. Select the appropriate
Frequency
f
rom the drop-down menu.
S
tart
T
i
me
Deci
d
e w
h
at time you want t
h
e Camera to
begin monitoring
f
or motion. Select the time you want
t
h
e vi
d
eo recor
d
ing to
b
egin.
D
ura
t
i
on
Se
l
ect
h
ow
l
ong you want t
h
e Camera to
monitor
f
or motion
.
S
ens
i
t
i
v
i
ty Leve
l
You have a choice o
f
motion sensitivity
levels
f
or the Camera. Select the appropriate level
f
rom
t
h
e
d
rop-
d
own menu
.
3 x 3 (de
f
ault
)
By de
f
ault, the Camera’s
f
ield o
f
view is
split into nine sections (see the on-screen image). I
f
you
want it split into 16 sections, select 4 x 4. I
f
you want it split
into 25 sections, se
l
ect 5 x 5.
On the on-screen image depicting the Camera’s
f
ield o
f
view, c
l
ic
k
t
h
e sections you want monitore
d
. T
h
e se
l
ecte
d
sections will be marked by a crisscross pattern. I
f
you want
to se
l
ect a
ll
sections, c
l
ic
k
Se
l
ect A
ll
. I
f
you want to de-
se
l
ect a
ll
sections, c
l
ic
k
C
l
ear A
ll
.
To re
f
resh the current
image, c
l
ic
k
Re
f
resh Imag
e
.
A
f
ter you have made your selections, click A
dd
to save t
h
e
new sc
h
e
d
u
l
e
d
motion
d
etection vi
d
eo.
To
d
e
l
ete a sc
h
e
d
u
l
e
d
motion
d
etection vi
d
eo, se
l
ect t
h
e
video
f
rom the list, and click De
l
et
e
.
To c
l
ose t
h
is screen, c
l
ic
k
X
in t
h
e upper-rig
h
t corner.
N
O
TE: To speci
f
y the maximum length
f
or a
sing
l
e motion
d
etection vi
d
eo recor
d
ing, c
l
ic
k
Ut
i
l
i
t
y
S
et
t
i
ng
s
on t
h
eMa
in
s
c
reen.
N
O
TE: In order
f
or the motion detection
f
eature
an
d
its recor
d
ings to occur, t
h
e Mu
l
ti-Camera
Viewer & Recor
d
er Uti
l
ity must
b
e running on a
networ
k
e
d
PC.
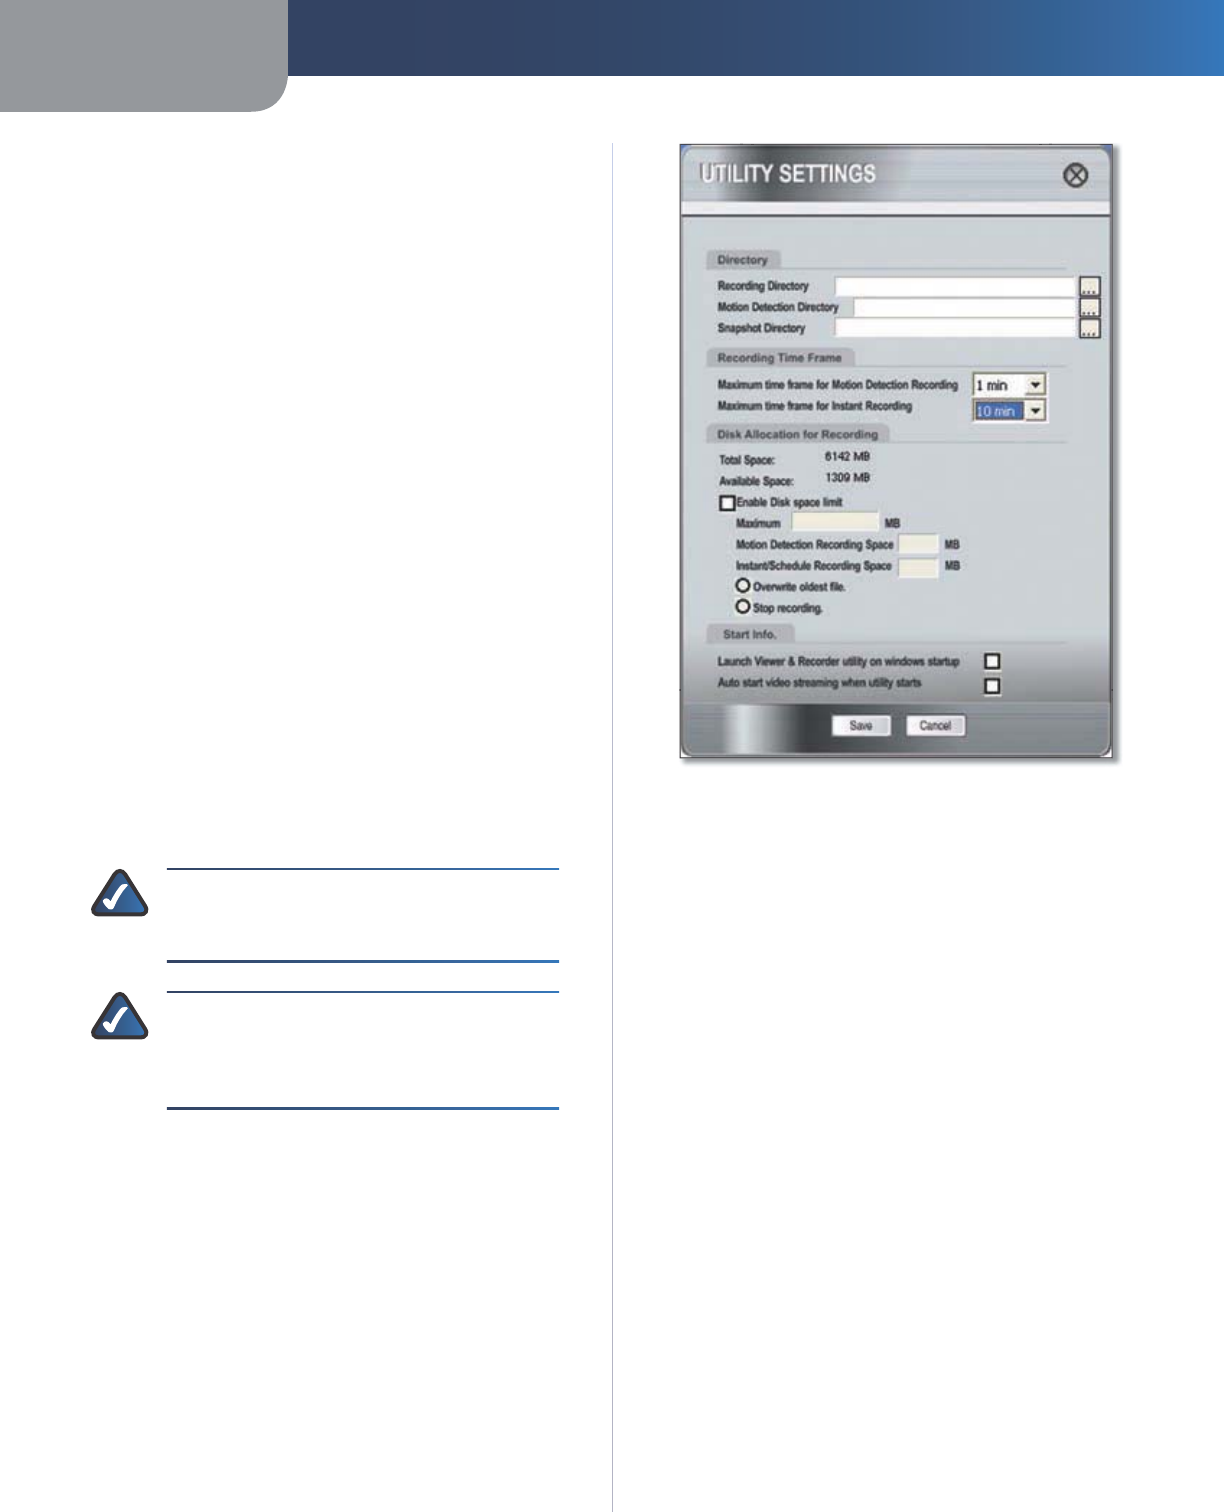
Main > Uti
l
ity Setting
s
To con
f
igure the settings o
f
the Multi-Camera Viewer &
Recor
d
er Uti
l
ity, c
l
ic
k
Ut
i
l
i
ty
S
et
t
i
ng
s
on t
h
eMa
in
s
c
reen
.
T
h
eUti
l
ity Settings screen wi
ll
appear. You can c
h
ange
the Directory, Recording Time Frame, Disk Allocation
f
or
Recording, and Start In
f
o settings on this screen.
Main > Uti
l
ity Setting
s
D
irector
y
You can speci
f
y the directories where the recordings,
motion
d
etection vi
d
eos, an
d
snaps
h
ots wi
ll
b
e save
d
.
Recor
d
i
ng
D
i
rec
t
or
y
Instant an
d
sc
h
e
d
u
l
e
d
recor
d
ings
will be saved in this directory. The de
f
ault directory
is
C
:
\
Program
F
i
l
es\
L
i
n
k
sys\
W
i
re
l
ess-G Internet
V
i
d
eo Camera\Recor
d
. C
l
ic
k
...
to designate a di
ff
erent
d
irectory
.
M
o
t
i
o
n
D
etec
t
i
on
D
i
rec
t
or
y
Motion
d
etection vi
d
eo
recordings will be saved in this directory. The de
f
ault
is
C
:
\
Program
F
i
l
es\
L
i
n
k
sys\
W
i
re
l
ess-G Internet
V
i
d
eo Camera\Mo
t
i
on
. C
l
ic
k
...
to designate a di
ff
erent
d
irectory
.
Snaps
h
ot
D
i
rec
t
or
y
Snaps
h
ots wi
ll
b
e save
d
in t
h
is
directory. The de
f
ault directory is
C
:
\
Program
F
i
l
es
\
L
i
n
k
sys\
W
i
re
l
ess-G Internet
V
i
d
eo Camera\Snaps
h
o
t
.
C
l
ic
k
...
to designate a di
ff
erent directory
.
Recor
d
ing Time Fram
e
You can speci
f
y the maximum length o
f
motion detection
an
d
instant recor
d
ings.

Chapter 2 Installing and Using the Camera Utility
19
Wireless-G Internet Home Monitoring Camera
M
a
x
i
mum
t
i
me
f
rame
f
or Mo
t
i
on
D
etec
t
i
on
Recor
d
i
ng
This is the maximum length o
f
time the Utility
will record when motion is detected. (To con
f
igure the
Motion Detection settings, c
l
ic
k
Motion Detection on t
h
e
main menu.) The de
f
ault is 1 min. To change the de
f
ault,
select the maximum length o
f
time you want
f
rom the
d
rop-
d
own menu.
M
a
x
i
mum
t
i
me
f
rame
f
or Instant Record
i
ng
T
h
is is t
h
e
maximum length o
f
time the Utility will record when you
c
l
ic
k
t
h
e Instant Recor
d
ing icon on t
h
e viewing win
d
ow
o
f
a Camera. The de
f
ault is 10 min. To change the de
f
ault,
select the maximum length o
f
time you want
f
rom the
d
rop-
d
own menu.
Disk Allocation
f
or Recordin
g
You can
d
esignate
h
ow muc
h
h
ar
d
d
is
k
space you want to
use
f
or recording.
Tota
l
Spac
e
This is the total amount o
f
space available on
the hard drive o
f
the PC running this Utility.
Tota
l
Space an
d
Av
a
i
l
a
bl
e Space This is the amount o
f
space available
f
or recording
.
Ena
bl
e
D
i
s
k
space
l
i
m
i
t
I
f
you want to limit the amount
o
f
disk space available
f
or recording, click the checkbox.
Enter the maximum number o
f
megabytes in the Max
i
mu
m
f
ield.
O
f
the total amount o
f
disk space available
f
or recording,
you can designate the amount o
f
space available
f
or
motion
d
etection recor
d
ings. Enter t
h
e maximum num
b
er
o
f
megabytes in the Motion Detection Recor
d
ing Spac
e
f
ield
.
O
f
the total amount o
f
disk space available
f
or recording,
you can designate the amount o
f
space available
f
or
instant an
d
sc
h
e
d
u
l
e
d
recor
d
ings, enter t
h
e maximum
number o
f
megabytes in the Instant/Sc
h
e
d
u
l
e
d
Recor
d
ing
Sp
ac
e
f
ield
.
I
f
the hard drive runs out o
f
space, the Utility has two
options: it can overwrite the oldest
f
iles or stop recording.
Se
l
ect t
h
e option you want,
O
verw
r
i
te oldest
f
i
le
or
S
top
recor
d
i
ng
.
Start In
fo
You can
d
esignate w
h
en an
d
h
ow you want t
h
e Uti
l
ity to
l
aunc
h
.
Launc
h
V
i
ewer & Recor
d
er u
t
i
l
i
ty on
W
i
n
d
ows startu
p
I
f
you want t
h
e Uti
l
ity to
l
aunc
h
w
h
en Win
d
ows starts up,
c
l
ic
k
t
h
e c
h
ec
kb
ox
.
A
uto start
v
i
d
eo strea
m
i
ng w
h
en u
t
i
l
i
t
y s
t
ar
ts
I
f
you
want vi
d
eo to automatica
ll
y
b
egin streaming w
h
en t
h
e
Uti
l
ity
l
aunc
h
es, c
l
ic
k
t
h
e c
h
ec
kb
ox
.
A
f
ter you have made your changes, clic
k
S
ave to save t
h
e
new sett
i
ngs
.
To cance
l
your c
h
anges, c
l
ic
k
Cance
l
.
To c
l
ose t
h
is screen, c
l
ic
k
X
in t
h
e upper-rig
h
t corner
.
To set up t
h
e L
i
n
k
sys So
l
o
L
i
n
k
Ser
v
i
ce, go to “C
h
apter
3:
S
et
t
i
ng up t
h
e
L
i
n
k
sys So
l
o
L
i
n
k
DDNS Ser
v
i
ce.
”
I
f
you want to use the Camera’s Web-based Ut
i
l
i
t
y, go
to “C
h
apter
4
: Advanced Con
f
i
gura
t
i
on
w
i
t
h
t
h
e We
b-
Base
d
U
t
i
l
i
ty.
”
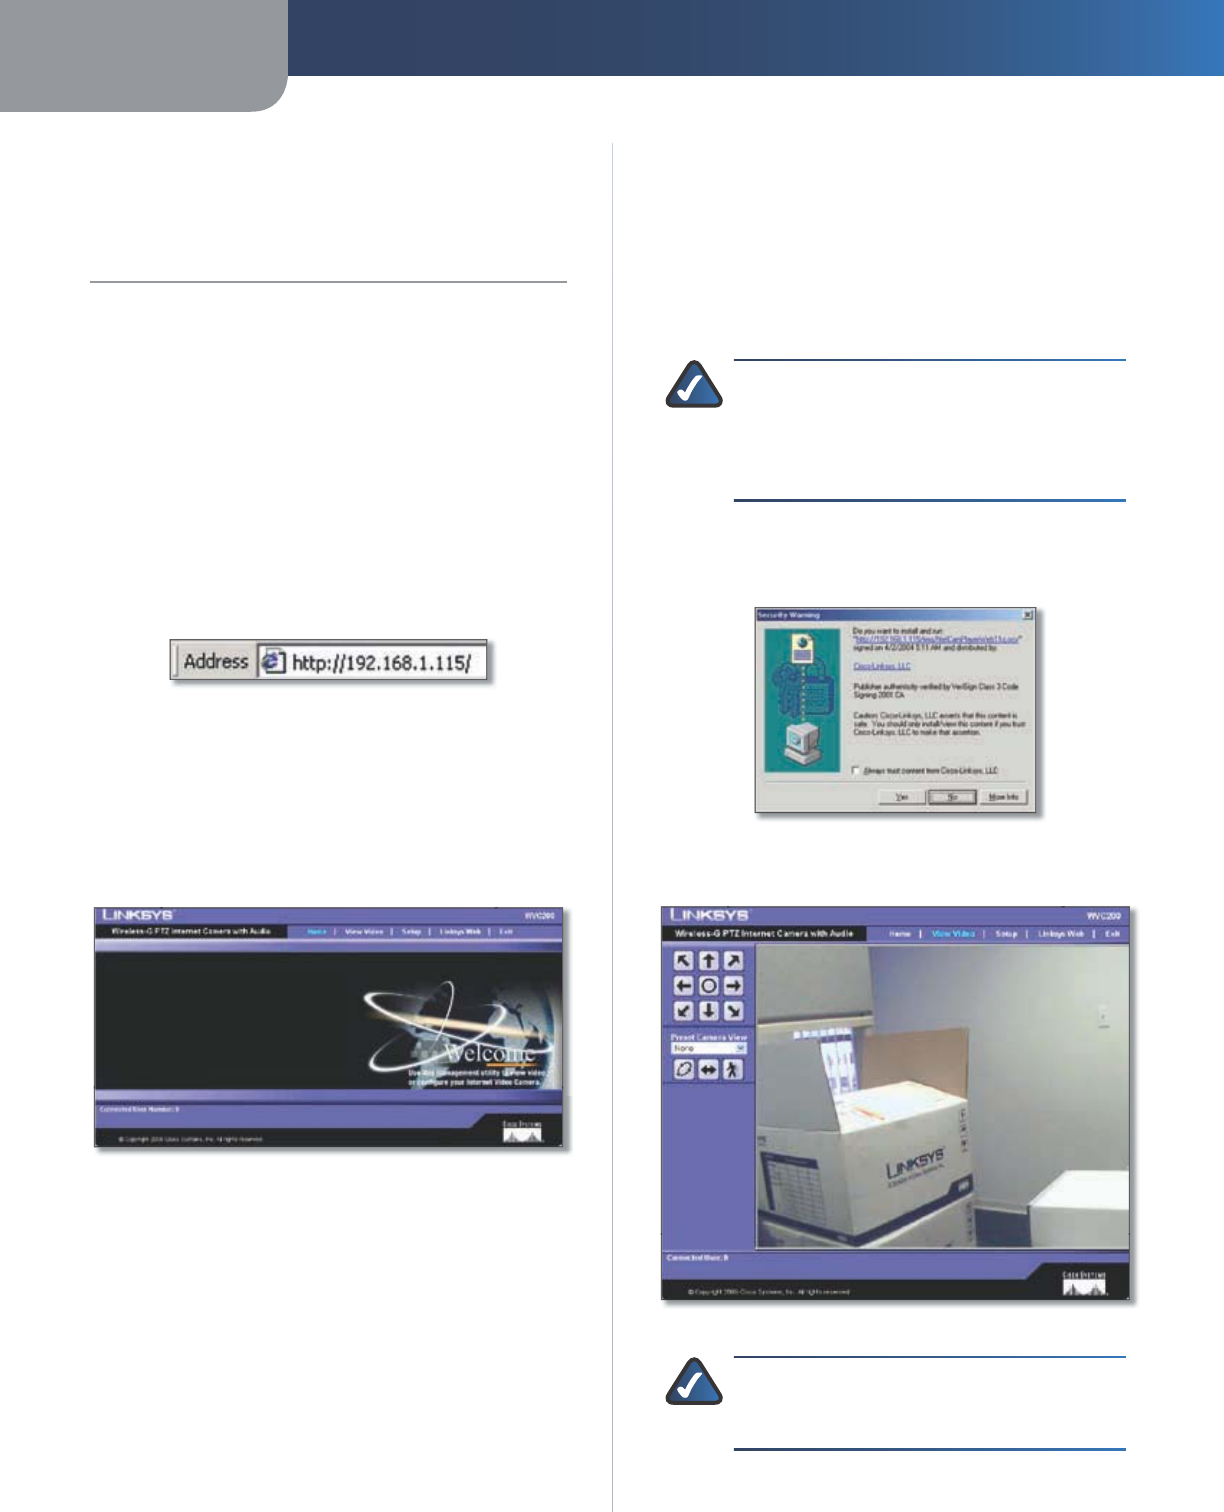
Chapter 4 Advanced Configuration with the Web-based Utility
20
Wireless-G Internet Home Monitoring Camera
C
h
apter
4
:
Advanced Con
f
i
gura
t
i
on
w
i
t
h
t
h
e We
b
-
b
ase
d
U
t
i
l
i
ty
Overv
i
e
w
Use t
h
e Camera’s We
b
-
b
ase
d
Uti
l
ity to access an
d
a
l
ter its
settings. T
h
is c
h
apter wi
ll
d
escri
b
e eac
h
we
b
page in t
h
e
Utility and its
f
eatures. The Utility can be accessed via the
web browser o
f
a computer connected to the Camera.
How to Access t
h
e We
b
-
b
ase
d
Uti
l
it
y
To access t
h
e Uti
l
ity,
l
aunc
h
Internet Exp
l
orer, an
d
enter
t
h
e Camera’s IP a
dd
ress in t
h
eA
dd
ress
f
ield. (I
f
there are no
DHCP servers available, the camera automatically de
f
aults
to 1
92
.16
8
.1.1
00
.) T
h
en, press
E
nte
r
.
Camera’s De
f
ault IP Addres
s
To ensure security, you wi
ll
b
e as
k
e
d
to enter a user name
and password be
f
ore you can access the Camera. I
f
you
h
ave not c
h
ange
d
t
h
e Camera’s user name an
d
passwor
d
,
t
h
en enter a
dm
i
n
in t
h
e
U
ser nam
e
an
d
Password
fields
d
(
a
dm
i
n
is the de
f
ault). Then, click
OK
.
T
h
eWe
l
com
e
screen o
f
the Web-Based Utility will appear.
We
b
-Base
d
Uti
l
ity We
l
com
e
Scree
n
There are six tabs across the top o
f
the We
l
com
e
s
c
reen
:
H
om
e
,
V
i
ew
V
i
d
e
o
,
S
etu
p
,
L
i
n
k
sys We
b
,
He
lp
, an
d
E
x
i
t
.
Hom
e
– Select this tab to return to the Welcom
e
s
c
reen.
V
i
ew
V
i
d
e
o
– Se
l
ect t
h
is ta
b
to view t
h
e Camera’s vi
d
eo.
Go to the “View Video” section
f
or more in
f
ormation.
S
etu
p
– Se
l
ect t
h
is ta
b
to a
l
ter t
h
e Camera’s settings.
Go to the “Setup” sections
f
or more in
f
ormation.
L
i
n
k
sys We
b
– Se
l
ect t
h
is ta
b
to go to t
h
e Lin
k
sys
we
b
site, www.
l
i
n
k
sys.co
m
.
•
•
•
•
He
lp
– Se
l
ect t
h
is ta
b
to
d
isp
l
ay t
h
eHe
lp
screen.
G
o to
the “Help” section
f
or more in
f
ormation.
Ex
i
t
– Se
l
ect t
h
is ta
b
to c
l
ose t
h
e Uti
l
ity
.
View Vi
d
e
o
Fo
ll
ow t
h
ese instructions to view t
h
e Camera’s vi
d
eo.
C
l
ic
k
t
h
e
V
i
ew
V
i
d
e
o
ta
b
on t
h
eWe
l
come
s
c
reen
.
N
O
TE
:
To view vi
d
eo using a we
b
b
rowser,
you must use Internet Exp
l
orer version 5.5 or
higher. The View Video
f
eature will not work
wit
h
Netscape. Netscape users s
h
ou
ld
use t
h
e
Camera Uti
l
ity instea
d
.
A
S
ecurity Warning screen a
b
out an OCX p
l
ug-in may
appear. To ena
bl
e your computer to see t
h
e Camera’s
vi
d
eo, c
l
ic
k
Y
e
s
.
S
ecurity Warnin
g
S
creen
A screen appears showing the video
f
rom the Camera.
View Vi
d
e
o
S
cree
n
N
O
TE
:
For a
dd
e
d
security, you s
h
ou
ld
a
l
ways
c
h
ange t
h
e Login Name an
d
Passwor
d
t
h
roug
h
t
h
e Uti
l
ity’s
S
etup > User
s
s
c
reen
.
•
•
1.
2.
3.