LITE ON TECHNOLOGY DP803AH HP SMART WI-FI DISPLAY User Manual Manual
LITE-ON Technology Corp. HP SMART WI-FI DISPLAY Manual
Users Manual

HP Smart Wi-Fi Display
User Manual
Revision 0.5
FCC Compliance Statement..........................................................4
What’s in the Box......................................................................5
Getting Started .........................................................................6
Remote Control .........................................................................7
Description of Buttons ............................................8
General Navigation ............................................10
Rotating Pictures .................................................10
Quadrant Display............................................... 10
Single Display ................................................... 11
Standby ........................................................... 11
Picture Frame ......................................................................... 12
Top View .......................................................... 12
Left Side........................................................... 12
Right Side......................................................... 13
Back ............................................................... 13
Initial Frame Setup...................................................................14
Clock Info......................................................... 14
Setup Wizard ....................................................14
Running the Wireless Network Configuration Wizard on
your Computer (optional) ......................................16
Local Settings .................................................... 18
Description of Main Menu ......................................................... 19
Frame Content ................................................... 19
Internet Content.................................................. 19
Home Network ..................................................20
Favorites ..........................................................20
Time................................................................21
Network Signal Icon............................................21
Viewing Photos .......................................................................22
Photo/Picture Slide Show......................................22
Printing a Photo..................................................23
Configuring Access to Online Content...........................................24
Setting Up your www.hpframe.com Account ..............24
Adding Another Frame to your www.hpframe.com
Account ...........................................................27
Managing your www.hpframe.com Account ..............28
Online Services..................................................29
Recent Updates ..................................................33
Streaming Media from your PC to your HP Smart Wi-Fi Display ...........34
Enabling Windows Media Player 11 UPnP.................34
Connecting your HP Smart-WiFi Display to your Computer with the USB
Cable ..................................................................................38
Using Headphones or Speakers with your HP Smart Wi-Fi Display........38
Resetting the Frame..................................................................39
Cleaning and Care Tips ............................................................40
Cleaning the screen ............................................40
Cleaning the frame and backing ............................40
Feedback ..............................................................................40
Feedback about this User Manual ...........................40
Getting Help..........................................................................40
Specifications .........................................................................42
Frequently Asked Questions .......................................................43
Troubleshooting ......................................................................45
4
FCC Compliance Statement
Note: This equipment has been tested and found to comply with the limits for a
Class B digital device, pursuant to Part 15 of the FCC Rules. These limits are
designed to provide reasonable protection against harmful interference in a
residential installation. This equipment generates, uses, and can radiate radio
frequency energy and, if not installed and used in accordance with the instructions,
may cause harmful interference to radio communications. However, there is no
guarantee that interference will not occur in a particular installation.
If this equipment does cause harmful interference to radio or television reception,
which can be determined by turning the equipment off and on, the user is
encouraged to try to correct the interference by one of the following measures:
•Reorient or relocate the receiving antenna.
•Increase the separation between the equipment and receiver.
•Connect the equipment into an outlet on a circuit different from that to which the
receiver is connected.
•Consult the dealer or an experienced radio/TV technician for help.
FCC Caution: To assure continued compliance, use only shielded interface cables
when connecting to computer or peripheral devices. Any changes or modifications
not expressly approved by the party responsible for compliance could void the
user’s authority to operate this equipment.
This device complies with Part 15 of the FCC Rules. Operation is subject to the
following two conditions: (1) this device may not cause harmful interference, and
(2) this device must accept any interference received, including interference that
may cause undesired operation.
5
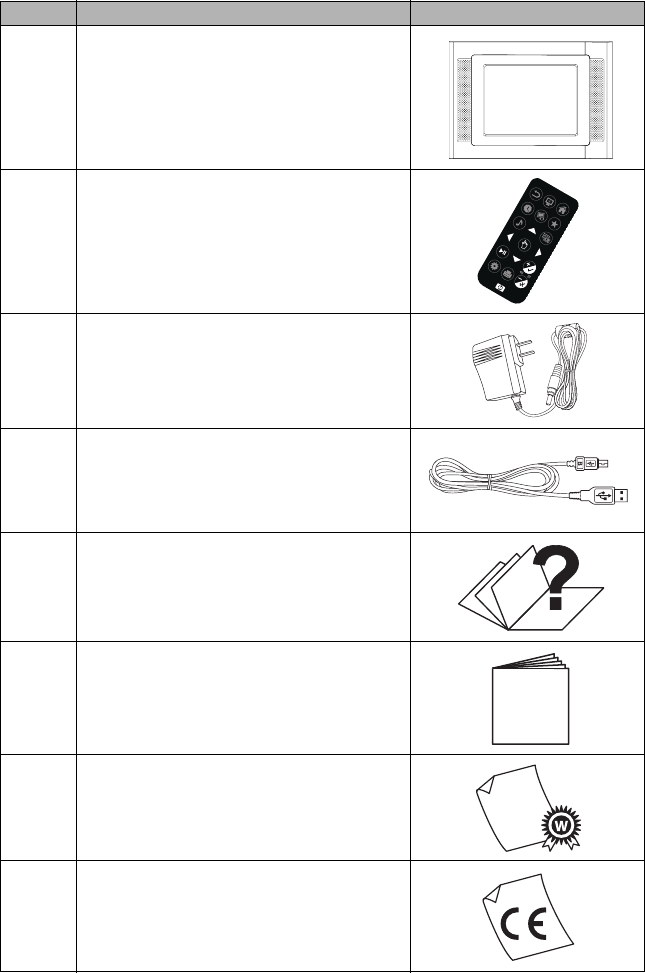
What’s in the Box
Qty Item Image
1HP Smart Wi-Fi Display
1Remote Control
(Replacement Battery = CR2025)
1Universal Power Adapter
1USB 2.0 Cable
1User Manual
1Quick Start Guide
1Warranty Document
1 Declaration of Conformity
6
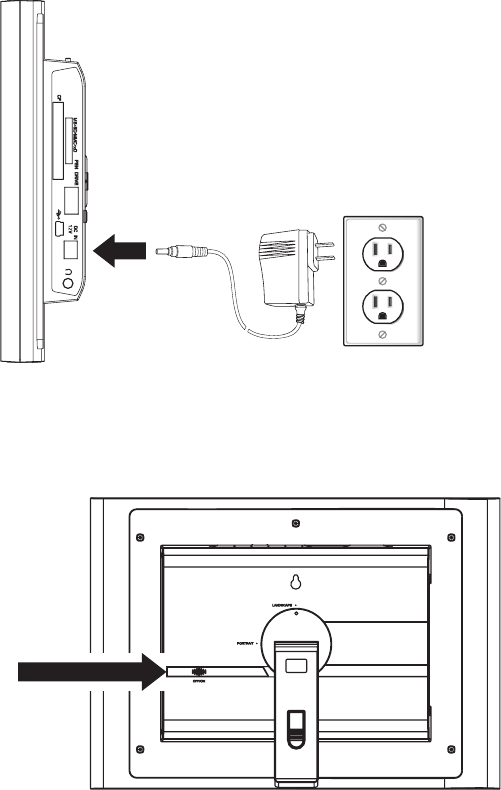
Getting Started
1. Connect the power cord into the DC input of the HP Smart Wi-Fi Display and
plug the adapter into a power outlet.
2. Unfold the attached stand to its extended position and rotate 90°, then slide the
Power switch on the back of the HP Smart Wi-Fi Display to the ON position.

7
Remote Control
Before you start, pull the tab from the remote control to activate it.
Note: If a replacement battery is required, purchase battery #CR2025.
8
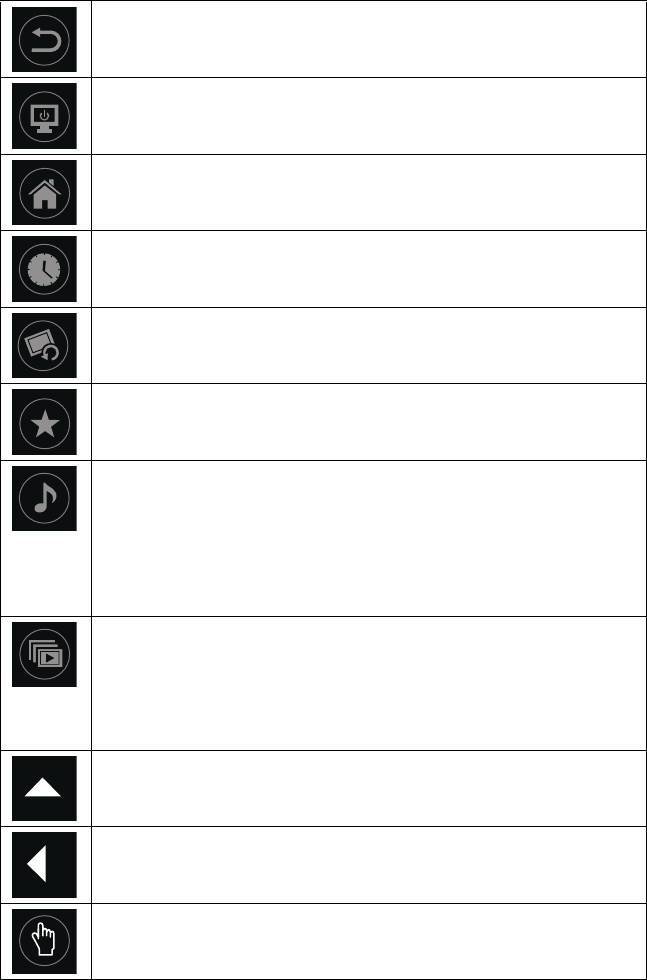
Description of Buttons
Back: Press to return to previous menu screen.
Standby: Press to put the display into standby mode or take it out
of standby mode.
Home: Press to return to Main Menu.
Time: Press to display Time menu.
Photo Rotate: Press to rotate photo 90° counter clockwise.
Favorites: Press to display Favorites menu.
Music: Toggles between different selections, as follows.
Press once: shows ”now playing” (if something is playing)
Press again: goes to local frame content
Press again: goes to Internet radio menu
Press again: goes to home network music menu
Note: Internet radio and home network music will not be accessed
if the frame is not connected to the network.
Slideshow: Toggles between different selections, as follows.
Press once: shows local frame content
Press again: goes to Internet photos menu
Press again: goes to home network photos menu
Note: Internet photos and home network photos will not be
accessed if the frame is not connected to the network.
Up: Press to move up.
Left: Press to move left.
Select: Press to select highlighted item.

9
Right: Press to move right.
Down: Press to move down.
Play/Pause: Press to play or pause music, video or slide shows.
Volume Up/Mark: Press to increase volume, or, depending on
screen, to mark a menu item.
Options: Press to display available options.
Print: Press to print photo to compatible printer.
Volume Down/Unmark: Press to decrease volume, or,
depending on screen, to unmark a menu item.
10
General Navigation
In most cases you can use the navigation buttons (Up, Down, Left, Right) and the
Select button to navigate through the different menus. Sometimes, however, it may
be quicker to use one of the specific menu buttons, such as the Home, Favorites,
or Music buttons, which take you to the menu you want with a single press.
Note that, as the HP Smart Wi-Fi Display has to communicate with 3rd party
websites, as well as hpframe.com, there are times when the frame is busy with this
communication, and it can cause delays in responding to the remote control.
Rotating Pictures
To rotate pictures, press the Photo Rotate button.
Quadrant Display
When viewing a slide show, you can either choose to view photos one at a time or
in a Quadrant display.
There are two ways to enable the Quadrant display:
1. From the Setup menu, choose Local Settings, then change Slideshow
Mode to Quadrant. For more information, see “Local Settings” on page 18.
2. During slide show playback, press the Options button on the remote, and
change Slideshow Mode to Quadrant.
3. Press the Back button to return to the slide show.
When the Quadrant option is chosen, the screen is divided into four, and the top
two quarters display images in a slide show fashion, while the bottom two quarters
display the clock and calendar.
You can navigate the quadrants using the remote, as follows:
1. Press the Select button on the remote control. This will highlight the upper-left
quadrant.
2. Use the navigation buttons to select one of the four quadrants.
3. Press the Select button again to display a list of items that can be displayed in
that quadrant. Choose which item you wish to be displayed, and press Select
again.
Note: If you wish to keep this setup for next time, press the Options button
and choose Save Quadrant Setup.
11
Single Display
By default, the HP Smart Wi-Fi Display will show photos in Single display mode,
meaning that the slide show will display one photo at a time. If you have changed
to Quadrant display and would now like to return to viewing one photo at a time,
then you can return to Single display.
There are two ways to enable Single display:
1. From the Setup menu, choose Local Settings, then change Slideshow
Mode to Single. For more information, see “Local Settings” on page 18.
2. During slide show playback, press the Options button on the remote, and
change Slideshow Mode to Single.
3. Press the Back button to return to the slide show.
Standby
To stop the current frame function and turn off the display, simply press the
Standby button. To turn off the HP Smart Wi-Fi Display completely, you must use
the power switch on the back of the display.
12
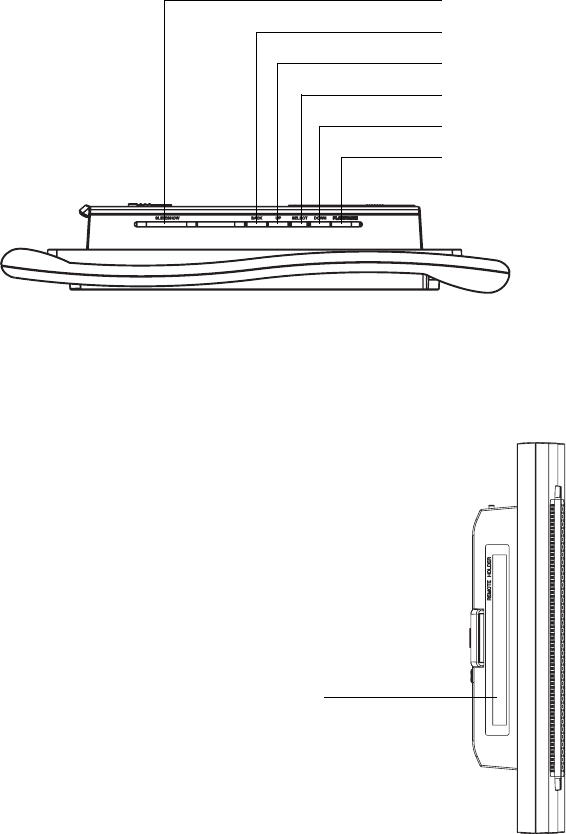
Picture Frame
Top View
Left Side
Slideshow
Back
Up
Select
Down
Play/Pause
Remote control holder
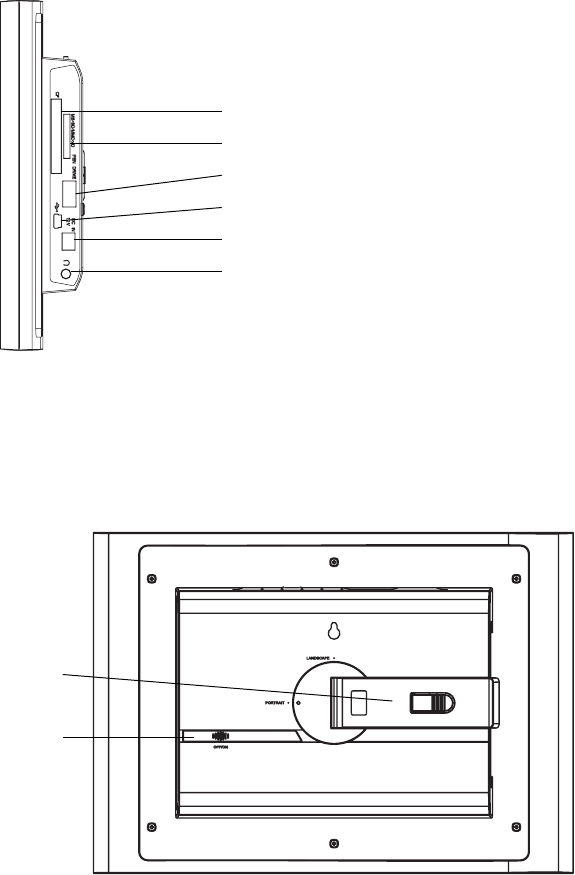
13
Right Side
Back
Headphone jack
Mini-USB connector
USB connector
Power Input
CF Card Slot
MS/SD/MMC/xD Card Slot
Stand
Power switch
14
Initial Frame Setup
The following instructions are shown using the remote control unit. Some of these
functions can also be accessed via the control keys located on the back of the HP
Smart Wi-Fi Display.
Clock Info
The date and time are automatically set when your HP Smart Wi-Fi Display connects
to the Internet.
The time zone, and daylight savings options are derived from the ZIP Code that you
enter when setting up your www.hpframe.com account.
You can also manually adjust the time. See “Manually setting the date and time” on
page 21 for more information.
Setup Wizard
The Setup Wizard helps you get your HP Smart Wi-Fi Display up and running
and will run automatically when the frame is powered on for the first time, or if the
frame has been reset to factory default settings. In this case, you can skip to step 2
below.
1. From the Setup menu, navigate to Setup Wizard and press the Select
button.
2. The welcome screen appears, which will guide you through the setup
procedure.
Note: At any stage, press the Select button to go to the next screen.
3. The tutorial begins, and explains the buttons on the remote control. Follow the
on-screen instructions to learn about the remote control buttons and their
functions.
4. The Network Setup now appears.
5. Use the Up or Down buttons to highlight your wireless network name (note that
you may need to scroll down if more networks are available than fit on the
screen), then press the Select button to select.
Note: If you are connecting to a non-broadcasting wireless network, then
choose Setup Hidden Network WEP, Setup Hidden Network WPA,
or Setup Hidden Network Open, depending on which security is used by
your network. If necessary, you will then be offered the chance to enter the
network SSID manually by using the remote control to move through the letters
on the virtual keyboard. If required, use the Mark button to cycle through the
virtual keyboards.
15
Note: Alternatively, you can configure your HP Smart Wi-Fi Display using
Windows Connect Now (WCN) technology. To do so, run the Wireless
Network Configuration Wizard on your computer and insert the WCN
USB flash disk into the HP Smart Wi-Fi Display once the wizard is complete. For
more information on running the Wireless Network Configuration
Wizard on your computer, see “Running the Wireless Network Configuration
Wizard on your Computer (optional)” on page 16.
6. If required, enter security details, such as the password, using the remote control
to move through the letters on the virtual keyboard. If required, use the Mark
button to cycle through the virtual keyboards. This step is not necessary if the
wireless network does not have security.
Note: You can exit Network Setup by pressing the Home button. Your HP
Smart Wi-Fi Display will still work, but you will not have network/Internet access
until you go through Network Setup again.
7. When finished, press the Play/Pause button to enter the password.
8. You will now see a screen with information required to complete the setup
process online. This information includes the website address you should visit
from your computer, your Device ID and your Authorization Code. Keep a
note of these details, as you will need them to set up your www.hpframe.com
account. For more information on the online setup process, see “Setting Up your
www.hpframe.com Account” on page 24.
Note: The authorization code changes over time, or if you go through the
Setup Wizard again. The current code can always be found by going to
Setup > System Information.
16
Running the Wireless Network Configuration Wizard on
your Computer (optional)
As an alternative to manually entering Wi-Fi details into your HP Smart Wi-Fi
Display, you can use the Wireless Network Configuration Wizard on your
computer.
Windows XP (Service Pack 2 or later)
1. On your computer, click Start > Control Panel
2. Double-click Wireless Network Setup Wizard.
3. The Wireless Network Setup Wizard begins. Click Next.
4. If the wireless network you wish to connect to has not previously been set up on
your computer, check the check box beside Set up a new wireless
network. Click Next.
Alternatively, if the wireless network you wish to connect to has previously been
set up on your computer, check the check box beside Add new computers
or devices to the **** network, where “****” refers to the name of your
wireless network. Click Next.
5. If you have chosen Set up a new wireless network in the previous step,
you will now be asked to enter the Network name (SSID), choose whether to
have Windows assign a network key automatically (check the box beside
“Automatically assign a network key”), or enter one manually (check the box
beside “Manually assign a network key”), and finally choose whether to check
the box beside “Use WPA encryption instead of WEP” depending on which
type of security your network uses. Click Next.
6. If you have chosen to enter the network key manually in the previous step, you
will be asked to do so now (then click Next). If you have chosen to have
Windows assign a network key automatically, then this step is skipped.
7. Check the check box beside Use a USB flash drive (recommended).
Click Next.
8. Plug your USB flash drive into any USB port on your computer and then wait for
the drive letter to appear in the “Flash drive” field. Click Next.
9. When advised to do so, remove the USB flash drive and plug it into your HP
Smart Wi-Fi Display to finish the set up of the Wi-Fi connection.
10. Once the Smart Wi-Fi Display Wi-Fi connection is set up, unplug the USB flash
drive and plug it back into your computer. Click Next.
11. Click Finish.
17
Windows Vista
1. On your computer, click Start > Network. The Network folder opens.
2. Click Add a wireless device. The Add a wireless device to the
Network screen is displayed.
3. Click I want to add a wireless device or computer that is not on the
list, using a USB flash drive.
4. Click Add the device or computer using a USB flash drive.
5. From the list that appears, select your network name (SSID), then click Next.
6. If the User Account Control screen appears, click Continue (you may need
to repeat this).
7. Connect your USB flash drive to the computer, confirm that the drive name is
displayed, then click Next.
8. Once this step is complete, remove the USB flash drive from the computer, then
click Close.
9. Plug the USB flash drive into your HP Smart Wi-Fi Display to finish the set up of
the Wi-Fi connection.
18
Local Settings
The Local Settings menu lets you configure various settings on your HP Smart Wi-
Fi Display.
From the Setup menu, navigate to Local Settings and press the Select button.
The following options are displayed. Use the navigation buttons to highlight the
option you wish to change, then use the Select button to change the setting.
•Set Wake/Sleep/Alarm - Set the wake time, sleep time, or alarm. See
“Setting Wake/Sleep/Alarm times” on page 21 for more information.
•Slideshow Mode - Choose between [Single] or [Quadrant]. [Quadrant]
divides the screen into four, and shows photos in the top too quadrants and the
clock and calendar in the bottom two during slide shows. You can also
customize what is displayed in Quadrant mode. See “Quadrant Display” on
page 10 for more details.
•Slideshow Shuffle - Displays photos in random order during slide show.
•Slideshow Repeat - Repeats the slide show once the last photo is displayed.
•Slideshow Interval - Lets you set the amount of time each photo is displayed
during slide shows.
•Music Shuffle - Plays music in random order
•Music Repeat - Repeats music once the last track is finished.
•Music Autoplay - Automatically plays music during slide shows when music
files are present in the same folder at the photo files.
•Photo Autoplay - Automatically starts a slide show when the HP Smart Wi-Fi
Display is switched on and a memory card or USB storage device is inserted.
•USB Mode - Choose whether to use the mini-USB port to connect to a computer
or a printer (using the included mini-USB to USB cable).
•Photo Mode - Choose whether to see photos at an optimized size [Optimal]
or in its original size [Original]. When [Optimal] is chosen, the photo size may
be increased to fit the height or width of the screen.
•Photo Effect - Choose to see your photos in their original color [Normal],
Black & White [Black & White], or with an old-fashioned look [Old-Fashioned].
•Photo Auto-Compress - Choose whether or not to automatically compress
the photo file size.
19
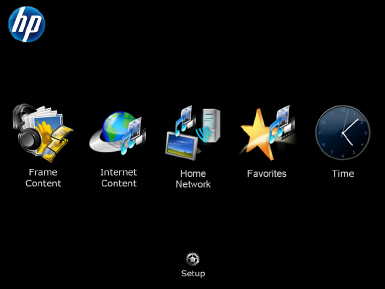
Description of Main Menu
The Main Menu can be accessed by pressing the Home button on the remote
control.
To navigate through the menu, use the directional buttons on the remote control,
then press the Select button to choose the highlighted item.
The Main Menu has six main icons: Frame Content, Internet Content,
Home Network, Favorites, Time, and Setup.
Other icons sometimes appear on this screen, such as the network signal icon in the
top right corner (see “Network Signal Icon” on page 21 for more information) and
the recent updated icons in the bottom right corner (see “Recent Updates” on
page 33 for more information).
Frame Content
Frame Content describes the content which is available on the HP Smart Wi-Fi
Display itself, including any connected memory cards/USB flash drives. You can
access lists of available photos, music, or videos, or browse manually by folder.
Internet Content
Internet Content describes the content which is available to you through the
Internet. Before you use the Internet Content features on your HP Smart Wi-Fi
Display, you should set up your www.hpframe.com account. For more information
see “Setting Up your www.hpframe.com Account” on page 24.
On your HP Smart Wi-Fi Display, from the Main Menu, navigate to Internet
Content and press the Select button. The Internet Content menu appears, with
a list of the content you have set up online, such as Internet radio, photo hosting
20
sites or gadgets like the weather forecast. Any time you change this list online, the
Internet Content list will automatically update soon after. Navigate to the item
you are interested in and then press the Select button.
Home Network
Home Network refers to the computers or home servers on the same network as
your HP Smart Wi-Fi Display that are set up to share photos, music and video with
your device. Before you use the Home Network features on your HP Smart Wi-Fi
Display, you should set up your computer(s) to share media content. For more
information, see “Streaming Media from your PC to your HP Smart Wi-Fi Display”
on page 34.
On your HP Smart Wi-Fi Display, from the Main Menu, navigate to Home
Network and press the Select button. A list of available computers/servers
appears. Navigate to the server you are interested in and then press the Select
button. A list of available shared content is displayed. Navigate to the item you are
interested in and then press the Select button.
Favorites
The Favorites menu lists the HP Smart Wi-Fi Display features you use most. Often
it is quicker to go to the Favorites than to navigate through several menus. You can
add items to the Favorites list by highlighting an item, pressing the Options
button, and then choosing Add to Favorites.
See below for an example of adding a photo from an inserted USB flash drive to
favorites:
1. From the Main Menu, select Frame Content.
2. Select Photos.
3. Select USB Card.
4. Select All Photos.
5. Navigate to the photo you would like to add to favorites and press the Options
button on the remote control.
6. Select Add to Favorites.
You can now access this photo directly by going to Main Menu > Favorites >
Photos, where you will find a direct link to the photo.

21
Time
The Time menu lists several time and date options.
Automatically setting the date and time
By default, when you connect to the Internet, your HP Smart Wi-Fi Display
configures the time and date according to the ZIP Code that you entered when you
set up your www.hpframe.com account.
Manually setting the date and time
To adjust the date or time manually, select Set Date/Time from the Clock menu.
Use the navigation buttons and Select to change the values.
Note: This option is only available when you are not connected to the network.
Setting Wake/Sleep/Alarm times
You can program your HP Smart Wi-Fi Display to turn itself on and off at times you
pick during the day. You can also set up your HP Smart Wi-Fi Display to alert you
with an alarm. To set up these three options, choose Set Wake/Sleep/Alarm
from the Clock menu. Use the navigation buttons and Select to change the values.
Note: The volume of the alarm is based on the HP Smart Wi-Fi Display’s current
volume settings. Therefore, be sure that this is set to a suitable level.
Displaying the clock
To display the clock, from the Clock menu, select Current Time.
Displaying the calendar
To display the calendar, from the Clock menu, select Calendar.
Network Signal Icon
When you have access to a wireless network, the network signal icon appears in
the top right corner of the Main Menu and is shown below.
It consists of three bars, each of which can be gray or blue. The more blue bars
appear, the stronger the signal, so three blue bars would indicate a strong signal.
22
Viewing Photos
Photo/Picture Slide Show
Slide show modes
Slide show mode will begin automatically a few seconds after the HP Smart Wi-Fi
Display is powered on if an external memory card/USB flash drive is inserted. If
more than one memory card or USB flash disk is inserted, then the contents of the
most recently inserted one will be shown. There are two slide show modes, one with
background music and the other without.
•Slide show with music – This is possible with photos/pictures and music
files on an external memory card or USB flash drive. The default setting is for the
HP Smart Wi-Fi Display to play music during the slide show. You can change
this preference in settings.
You can also manually start music playback and then navigate to (and start)
photo playback. This works for local, UPnP, and Internet content. For example,
you can listen to music from a USB flash drive while viewing photos from an
online photo host, such as Facebook, as follows:
1. Navigate to Frame Content > Music > USB Card > Tracks, and
choose a song to play.
2. While the song is playing, press the Home button on the remote.
3. Navigate to Internet Content > Photos > Facebook, and choose an
album for the slide show.
•Slide show without music – This is possible with photos/pictures on either
internal or external memory sources.
You can also choose to start a slide show manually at any time. To do so, go to
Frame Content, Internet Content, or Home Network then navigate to start
photo playback.
There are two ways to choose photo viewing options:
•Setup menu
Navigate to the Setup menu and then Local Settings. For more information,
see “Local Settings” on page 18.
•Options button
Press the Options button while viewing photos. You will be given most of the
same options as in Local Settings, with the addition of Copy File. This
function allows you to copy a photo from a memory card and paste it to internal
memory, for example. After choosing Copy File, you will be given a list of
destinations. Simply choose the destination you prefer and the file will be pasted
there.
23
Printing a Photo
You can print a photo to any PictBridge-compatible printer.
First make sure that you have connected a PictBridge-compatible printer to your HP
Smart Wi-Fi display using the supplied USB to mini-USB connector. The USB
connector should be attached to the printer, and the mini-USB connector should be
attached to your HP Smart Wi-Fi Display.
Note: Make sure that USB Mode is set to Printer, according to the instructions in
“Local Settings” on page 18.
While viewing a photo that you would like to print, press the Print button on the
remote control. You will be asked to confirm that you want to print the photo.
Navigate to Yes and press the Select button.
24
Configuring Access to Online Content
The HP Smart Wi-Fi Display can stream media from the Internet, including photos
from various photo hosting sites, video from YouTube, music from Internet radio,
the weather, or Tweets from Twitter.
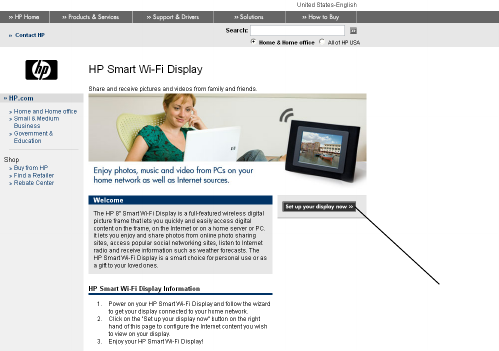
Setting Up your www.hpframe.com Account
To view Internet content on your HP Smart Wi-Fi Display, you must first set up an
account via the http://www.hpframe.com website, as follows:
1. On your computer, go to http://www.hpframe.com.
You will see a web page similar to the following:
click here to proceed
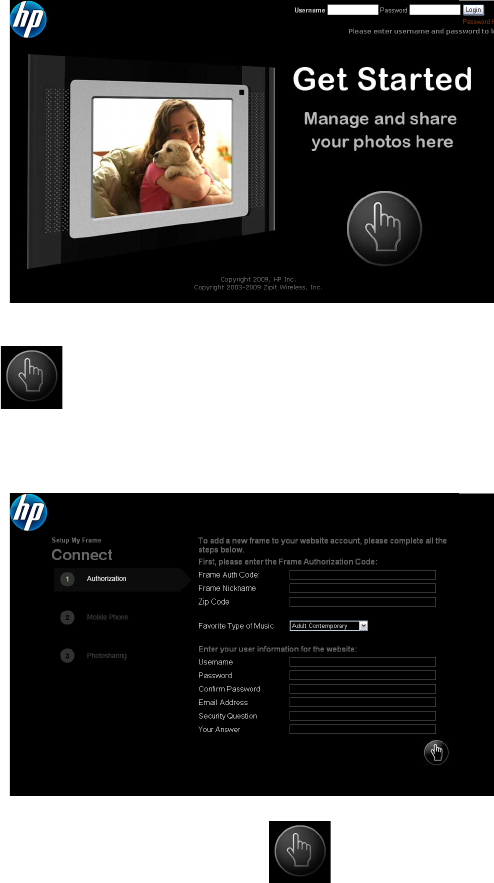
25
2. Click Set up your display now to proceed. You will now see the following
screen:
3. Click to continue.
4. The following screen appears:
5. Fill in the required information and click to continue.
Note: One item you will need to enter on this page is the Frame
Authorization Code. This is displayed when you complete the Setup
Wizard on your HP Smart Wi-Fi Display. See “Setup Wizard” on page 14 for
26
more details. If you have misplaced this code, then you can go to Setup >
System Information to see it again.
Also note that the authorization code changes over time, or if you go through
the Setup Wizard again, so it is worth checking System Information to
make sure that you have the latest code.
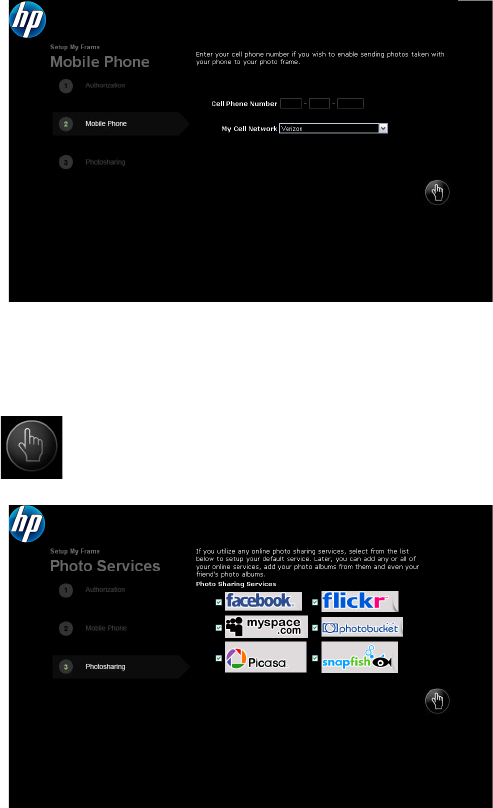
6. The following screen appears:
7. To send photos from your cell phone to your HP Smart Wi-Fi Display enter your
cell phone number. If you do not wish to use this feature, leave it blank.
8. Click to continue. The following screen appears:

27
9. Choose the online photo sharing services you use and would like to view on
your HP Smart Wi-Fi Display. You can change this list after your
www.hpframe.com account is set up.
10. Click to continue. Your www.hpframe.com account is now set up.
Adding Another Frame to your www.hpframe.com
Account
You can set up more than one HP Smart Wi-Fi Display on the same
www.hpframe.com account. After the first one is set up, simply click on Add New
Frame (at the top of the web page) and enter the new frame’s details.
28
Managing your www.hpframe.com Account
You can manage your www.hpframe.com account via a computer at any time by
going to http://www.myframemanager.com and logging in using the user name
and password you specified when setting up your www.hpframe.com account.
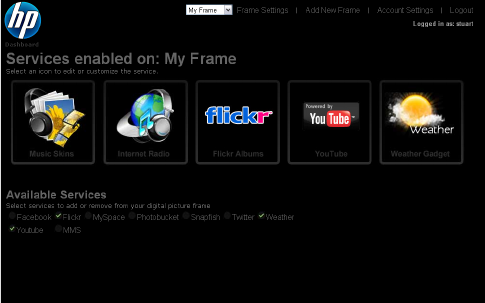
Once logged in, you will see a screen similar to the following:
In the upper portion of the screen, you will see which services you have already
selected. You may need to configure or customize these further before they appear
on your HP Smart Wi-Fi Display. Click on the icons to configure or customize the
service(s) you have chosen. For more information, see “Online Services” on
page 29.
In the lower portion of the screen, you will see the list of additional services
available. To add any of these services, check the box beside the one(s) you want.
Similarly, if you wish to remove any services, simply uncheck the box in this portion
of the screen.

29
Online Services
Music Skins
To customize the look of the music player on your HP Smart Wi-Fi Display, click on
Music Skins in your www.hpframe.com account. You will see various different
styles available. Click add below the one you prefer and in a few moments the
look of your HP Smart Wi-Fi Display’s music player will be updated. Note that you
can only choose one skin at a time, but you can change it as often as you need.
Internet Photos
You can stream photo albums from photo hosting sites such as Snapfish, Picasa,
Flickr, Photobucket, Facebook, and MySpace to your HP Smart Wi-Fi
Display. Simply add the sites you would like to use, via your www.hpframe.com
account. For more information on adding photo sharing sites to your
www.hpframe.com account, see “Managing your www.hpframe.com Account” on
page 28.
Note that you need to have already set up an account at any photo hosting sites
you wish to add.
Once added and configured via your www.hpframe.com account, you can view
online photos on your HP Smart Wi-Fi Display by navigating to Internet Content
> Photos.
Internet Radio
You can stream online radio to your HP Smart Wi-Fi Display, as follows:
1. Click on the Internet Radio icon in your www.hpframe.com account, as
shown below:
2. A new screen will appear. On the left of the screen you will see a list of
available radio stations. Above this list are drop-down menus to change the
Country, City, Genre and Language, which will change the list of radio
stations offered to you. On the right of the screen you will see which stations
have already been added to your HP Smart Wi-Fi Display’s playlist.

30
3. To add a station, simply click add beside the station(s) you like. The station(s)
will be added to the playlist on the right of the screen, and a few moments later
the list of radio stations will be updated on your HP Smart Wi-Fi Display.
Note: To listen to Internet radio on your HP Smart Wi-Fi Display navigate to
Internet Content > Radio.
Internet Video (YouTube)
If you have an account with YouTube, you can stream videos to your HP Smart
Wi-Fi Display, as follows:
1. Ensure that you have added YouTube to your list of enabled services (see
“Managing your www.hpframe.com Account” on page 28 for more
information).
2. Once the YouTube service appears in your list of enabled services, click on its
icon, which is shown below:
3. On the page which appears, log into your YouTube account.
4. Once logged in, click Allow Access.
Note: To access YouTube videos on your HP Smart Wi-Fi Display, navigate to
Internet Content and choose Videos, then YouTube.
31
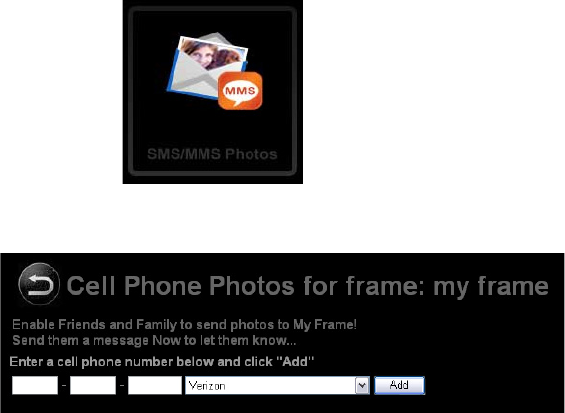
Allowing specific cell phones to send you pictures
You can receive pictures from specific cell phones on your HP Smart Wi-Fi Display.
To set up the SMS/MMS photo service, click the SMS/MMS Photos icon in your
www.hpframe.com account, as shown below:
You will then see the following screen:
Enter the cell phone number of the cell phone you wish to have permission to send
photos to your HP Smart Wi-Fi Display, choose the cell phone provider from the
pull-down selection, and click Add. The cell phone details will then appear in a list
below. The cell phone can be removed at any time by clicking Delete, which is
found to the left of the phone number. Note that you can add more than one phone
number to the list.
A message will be sent to the phone number(s) you have added, with a message
similar to the following:
“Congrats! U can now send ur pics to username’s HP Smart Wi-Fi Display! Send to:
username-ID@dpfmms.com”.
When a photo is sent to your HP Smart Wi-Fi Display, you will see an SMS/MMS
icon in the bottom right of the Main Menu. To see the new photo, navigate to
Internet Content > Recent Updates, or Internet Content > Photos
thereafter.

32
Internet Gadgets
You can add gadgets, such as the weather, to your HP Smart Wi-Fi Display.
Weather Gadget
To set up the weather gadget, click the Weather icon in your www.hpframe.com
account, as shown below:
You can enter up to three ZIP Codes and choose whether to display temperatures in
Fahrenheit or Celcius.
To view the Weather gadget on your HP Smart Wi-Fi Display, navigate to Internet
Content > Gadgets > Weather.
Note: If you have entered more than one ZIP Code, then the HP Smart Wi-Fi
Display will show the weather for the first one for approximately one minute before
moving on to the next one. To change between the screens instantly, click the Right
or Left buttons on the remote control.

33
Twitter
If you have an account with Twitter, you can stream Tweets to your HP Smart
Wi-Fi Display, as follows:
1. Ensure that you have added Twitter to your list of enabled services (see
“Managing your www.hpframe.com Account” on page 28 for more
information).
2. Once the Twitter service appears in your list of enabled services, click on its
icon, which is shown below:
3. On the page which appears, log into your Twitter account and click Allow to
allow access.
Note: To view Twitter on your HP Smart Wi-Fi Display, navigate to Internet
Content > Gadgets > Twitter.
Recent Updates
Any time you make updates to your www.hpframe.com account, or new content is
available, you will see an icon in the bottom right-hand corner of your HP Smart Wi-
Fi Display. This icon is usually in the form of the feature which has been updated.
For example, if you have just added the Facebook feature, then a small Facebook
icon will appear in the bottom right corner of the Main Menu a few moments
later. You can then navigate to Internet Content and then Recent Updates to
see what has been updated. Once you have opened the items on this list, the small
icons will disappear from the bottom right of the Main Menu.
34
Streaming Media from your PC to your HP
Smart Wi-Fi Display
Your HP Smart Wi-Fi Display can play the media files (photos, music, and video)
stored on your PC or network attached storage device. The HP Smart Wi-Fi Display
uses the Universal Plug and Play (UPnP) A/V streaming protocol to automatically
find your PCs and servers, and will coordinate the streaming process between your
PC/server and the HP Smart Wi-Fi Display.
Media streaming on your home network requires four conditions:
•Your must have a PC or network attached storage device that provides a
Universal Plug and Play (UPnP) A/V media server. For example, a Windows PC
running Windows Media Player 11, or an HP MediaSmart Server will provide
this media server functionality.
•Only media files are available for media streaming. The types of files that are
considered "media" are: photographs, music (audio), and video. Non-media
files, such as Microsoft Word documents, are not available for streaming.
•The media files stored on the PC or server must be of a type supported by the HP
Smart Wi-Fi Display.
Note: For the types of media files that are supported by the HP Smart Wi-Fi
Display, see “Specifications” on page 42
•The UPnP A/V streaming method supports streaming of unprotected media files.
Some files may be protected by a Digital Rights Management system, which
may prevent the streaming of those files. Media files purchased and
downloaded from an online Internet store are most likely protected.
Enabling Windows Media Player 11 UPnP
Note: The following section applies to Windows Media Player version 11.
Windows Media Player is bundled with Microsoft Windows Vista and is also
available as a Microsoft Windows XP update.
The HP Smart Wi-Fi Display supports media streaming from a PC on the same home
network with Windows Media Player 11 installed. Once you have installed
Windows Media Player 11 on the PC, you need to have media (photos, music,
video) in the library. You then need to configure Windows Media Player 11 to
share media from the Tools/Options menu by following the following screens.
35
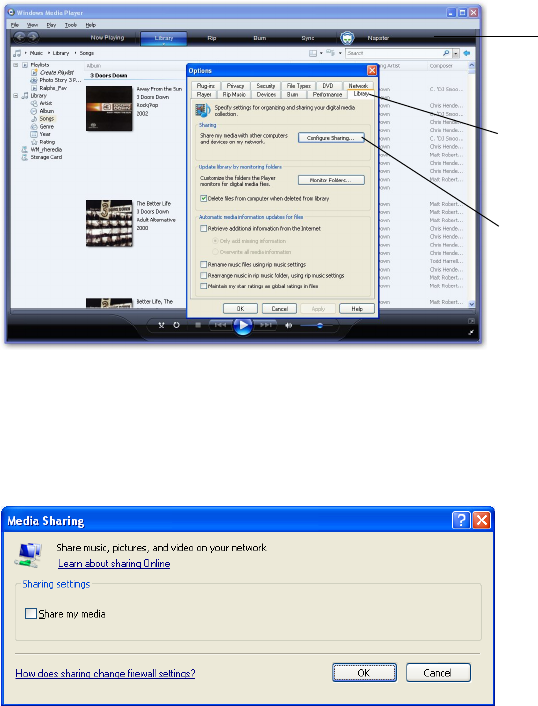
In Windows Media Player 11, select Tools from the menu bar and then select
Options from the Tools menu.
Note: If the menu bar is not visible, right-click on a blank area of the options menu
and choose Tools, then Options from there.
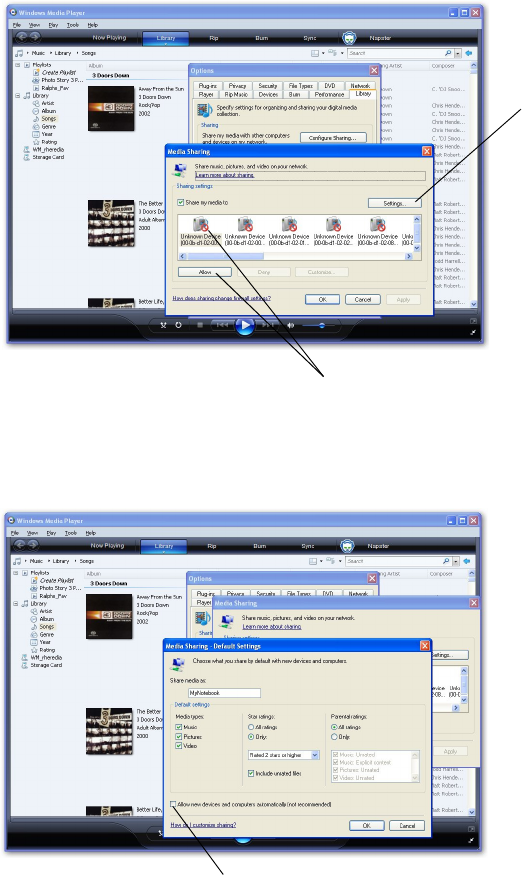
Select the Library tab and then select Configure Sharing.
If this is the first time that you have used this option, the following screen should be
displayed when you select Configure Settings.
Select the Library
Select Configure
tab
Sharing
options menu
36
Click to place a checkmark next to Share my media, then click OK. You will
now see the following screen.
Note: If Windows Media Player has detected the HP Smart Wi-Fi Display, it may
list it as an unknown device.
Selecting Settings from the above screen will then open up the Default Settings
for Windows Media Player 11.
Select Settings
You may have to select the device and then
click the Allow button on the screen
Selecting this box will enable Windows Media Player
to share media with all new devices.
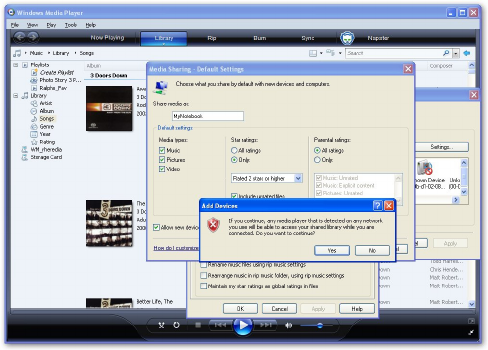
37
If you have multiple HP Smart Wi-Fi Display devices, you can enable Windows
Media Player 11 to automatically share the music with all of them or you can
enable it to share the music individually. If you select the Allow new devices...
tab, the following message will be displayed. Click Yes.
Your HP Smart Wi-Fi Display will now discover the photos in the Home Network
menu.
38
Connecting your HP Smart-WiFi Display to
your Computer with the USB Cable
You can connect your HP Smart Wi-Fi Display to your computer with the mini-USB to
USB cable, as follows.
1. Ensure that the HP Smart Wi-Fi Display is correctly configured for PC connection
by going to Setup > Local Settings > USB Mode, and setting it to PC. For
more information on this setting, see “Local Settings” on page 18.
2. Connect the mini-USB end of the cable to the mini-USB connector on the HP
Smart Wi-Fi Display.
3. Connect the USB end of the USB cable to an available USB connector on your
computer. The computer will recognize the HP Smart Wi-Fi Display and any
connected memory cards or USB flash memory drives and they will appear in
the My Computer directory on your computer. You can now copy and paste
files to or from these drives just like you would with any other external memory.
Using Headphones or Speakers with your
HP Smart Wi-Fi Display
To use headphones or external speakers, plug them into the headphone jack on the
right side of the HP Smart Wi-Fi Display. For the exact location of the headphone
jack, see “Right Side” on page 13. The internal speakers are disabled while the
headphone jack is in use.
39
Resetting the Frame
You can reset your HP Smart Wi-Fi Display to factory default settings, as follows:
1. From the Main Menu, navigate to Setup and press the Select button.
2. Navigate to Factory Defaults and press the Select button.
3. You will be asked to confirm that you want to reset your HP Smart Wi-Fi Display.
Select Yes.
4. The frame will reboot once it is reset.
WARNING: Setting your HP Smart Wi-Fi Display to factory default settings will
delete all media files on the internal memory. Your frame will also be removed from
the website, and you will need to add the frame again with the new authorization
code that you will see after going through the setup wizard. For more information
on the setup wizard, see “Setup Wizard” on page 14. For information on adding a
new frame, see “Adding Another Frame to your www.hpframe.com Account” on
page 27.
40
Cleaning and Care Tips
Please power off the HP Smart Wi-Fi Display before cleaning.
DO NOT push on the screen too firmly.
DO NOT spray or pour liquid cleaning agents directly on the screen or frame.
DO NOT use ammonia, alcohol, or abrasive detergent cleaning agents.
Cleaning the screen
1. Wipe screen with a clean, soft, lint-free cloth to remove dust and loose particles.
2. If further cleaning is required, apply an appropriate cleaning agent (approved
for LCD displays) to a clean, soft, lint-free cloth and wipe the screen.
Note: Do not apply too much pressure on the screen to avoid damaging it.
Cleaning the frame and backing
1. Use a clean, soft, lint-free cloth to remove dust and loose particles.
2. If desired, apply an appropriate cleaning agent to a clean, soft, lint-free cloth
and wipe the appropriate surfaces.
Feedback
Feedback about this User Manual
If you find an error in this user manual or just have a suggestion, send an e-mail to
manuals@hp.com. The information you send is used to help to develop future
revisions of this manual. You will not get a response to your e-mail. If you require
customer support, go to the website www.hp.com/support.
Getting Help
Should you have a technical support question or your HP Digital Picture frame
require service within the warranty period, please contact the original point of
purchase or an authorized HP reseller in your country. If service is not available at
those locations, please contact an HP Branded Product warranty agent from the
support contact list provided below. A service agent will work with you to
troubleshoot your issue and if necessary, issue a Return Material Authorization
(RMA) number in order to replace your HP Branded Product. For warranty claims,
you will be required to provide a copy of your original dated sales receipt as proof
of purchase and the issued RMA number. You will be responsible for shipping
41
charges when shipping the product to the service center. The service agent will
provide you with an address and you will also be responsible for any shipping
charges to the warranty service center. Once your product is received by this
service center, a replacement unit will be shipped back to you typically within 5
business days.
Email Support:
Language Email Address
Dutch hollands@hpodd.com
Chinese simp.chinese@hpodd.com
trad.chinese@hpodd.com
English english@hpodd.com
Français francais@hpodd.com
Deutsch deutsch@hpodd.com
Italiano italiano@hpodd.com
Japanese nippon@hpodd.com
Korean korean@hpodd.com
Portuguese portugues@hpodd.com
Español espanol@hpodd.com
Svenska svensk@hpodd.com
Contact/phone Support:
Country Language Number
Europe Region (EMEA)
België Dutch and German + 32 2700 1724
FRANCE French + 33 171230454
DEUTSCHLAND German + 49 6950073896
IRELAND English + 353 1850882016
ITALIA Italian + 39 269682189
NETHERLANDS Dutch + 31 202015093
ESPAÑA Spanish + 34 914533458
SWITZERLAND German/French/
Italian
+ 41 18009686
UK English + 44 2073652400
North America
United States English 1.866.694.7633
Canada English and French 1.866.694.7633

42
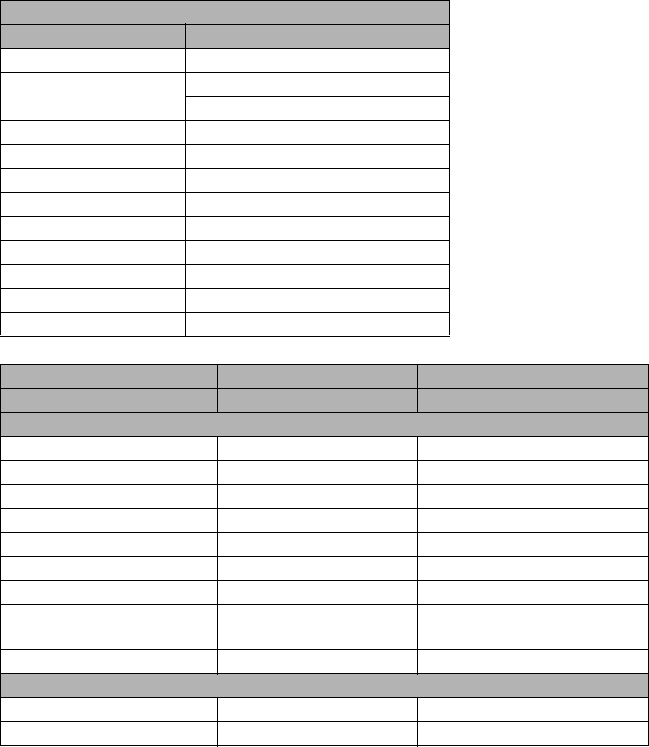
Specifications
Panel Specification
Size 8”
Aspect ratio 4:3
Resolution 800x600 pixels
Contrast ratio 400:1
Power
External Power Adapter 12V, 1.2A
Audio
Internal speakers Stereo
External headphone/speaker connector 3.5 mm stereo jack
Connectivity
USB Ports 2 (STD 2.0 Host, Mini B Device)
Storage/Media
Internal memory 512 MB
Memory cards supported:
CF – CompactFlash®Yes
MS – Memory Stick Pro™ Yes
MMC – MultiMedia Card Yes
SDTM – Secure Digital Yes
SDHC™ – High Capacity Secure Digital Yes
xD – xD Picture Card™ Yes
Memory cards slot 1 SD/MMC/MS/xD
Memory cards slot 2 CF
Media Files Supported:
Video file formats MP4 (ISO MP4 SP/ASP ; .mp4,
.avi, xVid), MJPEG.
Photo file formats JPEG - (Baseline, extended-
sequential and progressive JPEG)
Audio file formats MP3, WMA
User Interface/Control
Buttons at the Top of Smart Wi-Fi Display Yes
Remote control Yes

43
Frequently Asked Questions
Question Answer
How far away can I use the remote
control?
2.5 meters
Why can’t I display some of my
Photos?
Some photo/image file formats are
not supported. Please refer to the
specifications.
Why can’t I play some of my music
tracks?
Some music file formats are not
supported. Please refer to the
specifications.
Why can’t I play some of my video
clips?
Some video file formats are not
supported. Please refer to the
specifications.
Can I delete photos from external
memory cards, flash drives, or internal
memory?
Yes, you can. With the photo file
name highlighted, press the Options
button on the remote, and choose
Delete Photo.
How can I switch to the internal
memory?
If multiple memory types are
available, the HP Smart Wi-Fi Display
will ask you to specify the memory
source. Choose Internal.
I have lost or damaged my remote
and/or power adapter. Can I order
replacements?
Yes. Visit www.hp.com/support for
more details.
How can I find the latest information/
FAQs about my HP Smart Wi-Fi
Display?
Visit www.hp.com/support for more
details and the latest information.
How to I display photos and listen to
music at the same time?
1. Start the music playing first
(Internet radio, home network
content, frame content).
2. Navigate to the photo(s) you want
to view (local, home network,
Internet) and start a slideshow.

44
Some .DB and .BAK files have
appeared on the memory card I
inserted into my HP Smart Wi-Fi
Display that weren’t there previously.
What are these?
When you insert a memory card or
USB flash drive into your HP Smart
Wi-Fi Display, it will create database
(.DB) files and backup database files
(.BAK). These are nothing to be
worried about and should not be
deleted. However, if they are deleted
by accident, don’t worry. The HP
Smart Wi-Fi Display will simply
recreate them next time.
Note: If the card has very little free
space, it may not be able to fully
create the database, which can lead
to some functions not working
correctly (e.g. the ability to view
photos based on date taken, etc.)
When I insert a memory card or USB
flash drive into the HP Smart Wi-Fi
Display, it sometimes takes a long time
before I can view any photos or listen
to music. Why is this?
When you insert a memory card or
USB flash drive, the HP Smart Wi-Fi
Display needs to build its internal
database. For example, it may take 2
or 3 minutes to build a database for
an SD card with 400 pictures. During
that time, you won’t be able view any
photos.
45
Troubleshooting
I can’t switch my HP Smart Wi-Fi Display on
The power supply may not be correctly connected. Ensure that it is connected to a
working power outlet, and that the other end is connected to the DC-in connector on
the HP Smart Wi-Fi Display.
The HP Smart Wi-Fi Display power switch might be in the off position. Ensure that
this switch is in the on position.
I can't play certain photos/music/video files
The HP Smart Wi-Fi Display can only access files that are stored using a FAT/
FAT32 file system. Some drives are formatted using the Windows NTFS file system,
and cannot be accessed by the display.
My HP Smart Wi-Fi Display cannot print images
The printer cable may not be correctly connected. Ensure that the printer cable is
connected to the mini-USB port on your HP Smart Wi-Fi Display and the USB port on
the printer.
The printer may not be PictBridge compatible. If this is the case, then it will not be
possible to print images from the HP Smart Wi-Fi Display.
The mini-USB port may not be correctly configured on your HP Smart Wi-Fi Display.
Ensure that USB Mode is set to Printer in Local Settings. See “Local Settings”
on page 18 for more information.
When I connect my frame to my PC, the PC doesn’t show any drive letters
Make sure that the frame is configured for a PC connection (instead of a PictBridge
printer connection). Go to the Main Menu of the frame, select Setup, then Local
Settings. Make sure that the USB Mode is set to PC and not Printer.
46
My wireless network doesn’t appear on the list of available networks
The wireless network access point may not be working correctly or may not be
properly configured. Ensure that other devices can connect to the network to rule
out this possibility.
The signal from the wireless network may not be strong enough. Try moving the
location of the access point or the HP Smart Wi-Fi Display for better signal
reception.
Your network’s SSID may not be broadcasting. In this case, use the Setup Hidden
Network WEP, Setup Hidden Network WPA or Setup Hidden
Network Open option on the list of available networks.
I can’t access my Internet Content
Your wireless network connection may not be working correctly. Ensure that you are
connected to the wireless network and that it has access to the Internet.
I can’t remember the settings for my wireless router
Consult your router documentation on how to access your router’s configuration
parameters. As a last resort, most routers have a mechanism to reset itself back to
factory defaults.
I can’t remember the password for my wireless network
Consult your router documentation to determine how to find the network name and
password.
I am using an ASCII key for WEP security on my wireless network
The HP Smart Wi-Fi Display only supports WEP key entry as hex digits (0 through 9,
A through F). If you entered an ASCII passphrase in your router, consult your router
documentation to access its configuration pages. From there, find the router
configuration for WEP keys, and try temporarily changing the setting from “ASCII”
to “Hex”. The router should then display your ASCII key as a hex value. Write
down this value and use it on the HP Smart Wi-Fi Display, and then you can switch
the router setting back to ASCII mode.
47
The frame sometimes has delays when responding to remote control buttons
The HP Smart Wi-Fi Display has to communicate with 3rd party websites as well as
hpframe.com. There are times when the frame is busy with this communication,
and it can cause delays in responding to the remote control.
RF exposure warning ·
This equipment must be installed and operated in accordance with provided instructions
and the antenna(s) used for this transmitter must be installed to provide a separation
distance of at least 20 cm from all persons and must not be co-located or operating in
conjunction with any other antenna or transmitter. End-users and installers must be
provide with antenna installation instructions and transmitter operating conditions for
satisfying RF exposure compliance.
Canada Warning
"Industry Canada regulatory information Operation is subject to the following two conditions:
(1) this device may not cause interference, and (2) this device must accept any interference,
including interference that may cause undesired operation of the device. ""The user is
cautioned that this device should be used only as specified within this manual to meet RF
exposure requirements. Use of this device in a manner inconsistent with this manual could
lead to excessive RF exposure conditions."