LITE ON TECHNOLOGY DSD500 SPEAKER DOCK User Manual Unlocked
LITE-ON Technology Corp. SPEAKER DOCK Unlocked
manual

DSD-500
SPEAKER DOCK
Owner’s Manual
Preparations
Operations
Informations
I
n SAFETY PRECAUTIONS
CAUTION
RISK OF ELECTRIC SHOCK
DO NOT OPEN
CAUTION:
TO REDUCE THE RISK OF ELECTRIC SHOCK, DO NOT REMOVE
COVER (OR BACK). NO USER-SERVICEABLE PARTS INSIDE.
REFER SERVICING TO QUALIFIED SERVICE PERSONNEL.
The lightning flash with arrowhead symbol, within an equilateral
triangle, is intended to alert the user to the presence of
uninsulated “dangerous voltage” within the product’s enclosure
that may be of sufficient magnitude to constitute a risk of
electric shock to persons.
The exclamation point within an equilateral triangle is intended
to alert the user to the presence of important operating
and maintenance (servicing) instructions in the literature
accompanying the appliance.
WARNING:
TO REDUCE THE RISK OF FIRE OR ELECTRIC SHOCK, DO NOT
EXPOSE THIS APPLIANCE TO RAIN OR MOISTURE.
CAUTION:
To completely disconnect this product from the mains, disconnect the plug
from the wall socket outlet.
The mains plug is used to completely interrupt the power supply to the unit
and must be within easy access by the user.
IMPORTANT SAFETY
INSTRUCTIONS
1. Read these instructions.
2. Keep these instructions.
3. Heed all warnings.
4. Follow all instructions.
5. Do not use this apparatus near water.
6. Clean only with dry cloth.
7. Do not block any ventilation openings.
Install in accordance with the manufacturer’s instructions.
8. Do not install near any heat sources such as radiators, heat registers,
stoves, or other apparatus (including amplifiers) that produce heat.
9. Do not defeat the safety purpose of the polarized or grounding-type plug. A
polarized plug has two blades with one wider than the other. A grounding
type plug has two blades and a third grounding prong. The wide blade or the
third prong are provided for your safety. If the provided plug does not fit into
your outlet, consult an electrician for replacement of the obsolete outlet.
10. Protect the power cord from being walked on or pinched particularly at
plugs, convenience receptacles, and the point where they exit from the
apparatus.
11. Only use attachments/accessories specified by the manufacturer.
12. Use only with the cart, stand, tripod, bracket, or table
specified by the manufacturer, or sold with the apparatus.
When a cart is used, use caution when moving the cart/
apparatus combination to avoid injury from tip-over.
13. Unplug this apparatus during lightning storms or when
unused for long periods of time.
14. Refer all servicing to qualified service personnel.
Servicing is required when the apparatus has been damaged in any way,
such as power-supply cord or plug is damaged, liquid has been spilled or
objects have fallen into the apparatus, the apparatus has been exposed to
rain or moisture, does not operate normally, or has been dropped.
15. Batteries shall not be exposed to excessive heat such as sunshine, fire or
the like.
FCC Information (For US customers)
1. COMPLIANCE INFORMATION
Product Name: Speaker Dock
Model Number: DSD-500
This product contains FCC ID: PPQ-DSD500.
This product complies with Part 15 of the FCC Rules. Operation is subject
to the following two conditions: (1) this product may not cause harmful
interference, and (2) this product must accept any interference received,
including interference that may cause undesired operation.
Denon Electronics (USA), LLC
(a D&M Holdings Company)
100 Corporate Drive
Mahwah, NJ 07430-2041
Tel. (800) 497-8921
2. IMPORTANT NOTICE: DO NOT MODIFY THIS PRODUCT
This product, when installed as indicated in the instructions contained
in this manual, meets FCC requirements. Modification not expressly
approved by DENON may void your authority, granted by the FCC, to use
the product.
3. CAUTION
•TocomplywithFCCRFexposurecompliancerequirement,separation
distance of at least 20 cm must be maintained between this product
and all persons.
•This product and its antenna must not be co-located or operating in
conjunction with any other antenna or transmitter.
4. NOTE
This product has been tested and found to comply with the limits for
a Class B digital device, pursuant to Part 15 of the FCC Rules. These
limits are designed to provide reasonable protection against harmful
interference in a residential installation.
This product generates, uses and can radiate radio frequency energy and,
if not installed and used in accordance with the instructions, may cause
harmful interference to radio communications. However, there is no
guarantee that interference will not occur in a particular installation. If this
product does cause harmful interference to radio or television reception,
which can be determined by turning the product OFF and ON, the user
is encouraged to try to correct the interference by one or more of the
following measures:
•Reorientorrelocatethereceivingantenna.
•Increasetheseparationbetweentheequipmentandreceiver.
•Connect the product into an outlet on a circuit different from that to
which the receiver is connected.
•Consultthelocalretailerauthorizedtodistributethistypeofproductor
an experienced radio/TV technician for help.
Preparations
Operations
Informations

II
n NOTES ON USE
WARNINGS
•Avoid high temperatures.
Allow for sufficient heat dispersion when installed in a rack.
•Handle the power cord carefully.
Hold the plug when unplugging the cord.
•Keep the unit free from moisture, water, and dust.
•Unplug the power cord when not using the unit for long periods of time.
•Do not obstruct the ventilation holes.
•Do not let foreign objects into the unit.
•Do not let insecticides, benzene, and thinner come in contact with the unit.
•Never disassemble or modify the unit in any way.
•Ventilation should not be impeded by covering the ventilation openings
with items, such as newspapers, tablecloths or curtains.
•Naked flame sources such as lighted candles should not be placed on
the unit.
•Observe and follow local regulations regarding battery disposal.
•Do not expose the unit to dripping or splashing fluids.
•Do not place objects filled with liquids, such as vases, on the unit.
•Do not handle the mains cord with wet hands.
•When the switch is in the OFF (STANDBY) position, the equipment is not
completely switched off from MAINS.
•The equipment shall be installed near the power supply so that the power
supply is easily accessible.
•Do not keep the battery in a place exposed to direct sunlight or in places
with extremely high temperatures, such as near a heater.
n CAUTIONS ON INSTALLATION
z z
z
Wall
z
z For proper heat dispersal, do not install this unit in a confined
space, such as a bookcase or similar enclosure.
•More than 12 in. (0.3 m) is recommended.
•Do not place any other equipment on this unit.
IC Information (For Canadian customers)
1. PRODUCT
This product contains IC 4491A-DSD500.
This product complies with RSS-210 of Industry Canada. Operation is
subject to the following two conditions: (1) this product may not cause
harmful interference, and (2) this product must accept any interference
received, including interference that may cause undesired operation.
This Class B digital apparatus complies with Canadian ICES-003.
2. CAUTION
To reduce potential radio interference to other users, the antenna
type and its gain should be so chosen that the equivalent isotropically
radiated power (e.i.r.p.) is not more than that permitted for successful
communication.
For Canadian customers:
This Class B digital apparatus complies with Canadian ICES-003.
Preparations
Operations
Informations
1
Thank you for purchasing this DENON product. To ensure proper operation, please read this owner’s manual carefully before using the product.
After reading them, be sure to keep them for future reference.
Getting started
Preparations ·············································································4
Connections ··················································································· 5
Connecting the power cord ··························································5
Connecting a USB memory device ···············································5
Connecting a portable player ························································5
Connecting an iOS device·····························································6
Connecting to a home network (LAN) ········································7
Required system···········································································7
Network connections and settings ··············································· 8
Operations ··············································································12
Playback ·······················································································13
Preparations ················································································13
Operations possible during playback ··········································13
Various memory functions ··························································14
Playing an iOS device ·································································14
AirPlay function ···········································································15
Listening to internet radio ···························································17
Playing a USB memory device ····················································18
Playing a portable player ····························································· 19
Playing back files stored on PC or NAS with Cocoon App
(Music server) ············································································· 20
How to make detailed settings ··················································22
Menu map ··················································································22
Setting the language (Language) ················································23
Setting the clock (Clock) ·····························································23
Setting the volume limit (Max Vol Level) ···································· 25
Setting the network (Network Info.) ··········································· 25
Informations···········································································27
Part names and functions···························································28
Front panel ··················································································28
Rear panel ···················································································28
Remote control unit ···································································· 29
Other information ·······································································30
Trademark information ································································30
Explanation of terms ···································································31
Troubleshooting ·········································································· 33
Resetting the microprocessor ····················································35
Specifications ··············································································36
Getting started ··············································································1
Accessories ··················································································1
Features ························································································2
Cautions on handling ····································································2
Remote operation ········································································· 3
Contents Accessories
Check that the following parts are supplied with the product.
q Quick Setup Guide .................................................................. 1
w CD-ROM (Owner’s manual) .................................................... 1
e Safety Instructions .................................................................. 1
r Warranty (for North America model only) ................................ 1
t Service network list ................................................................. 1
y Power cord .............................................................................. 1
u Remote control unit ................................................................. 1
i R03/AAA batteries ................................................................... 2
o Ethernet cable (CAT-5) ............................................................ 1
uy o
Preparations
Operations
Informations

2
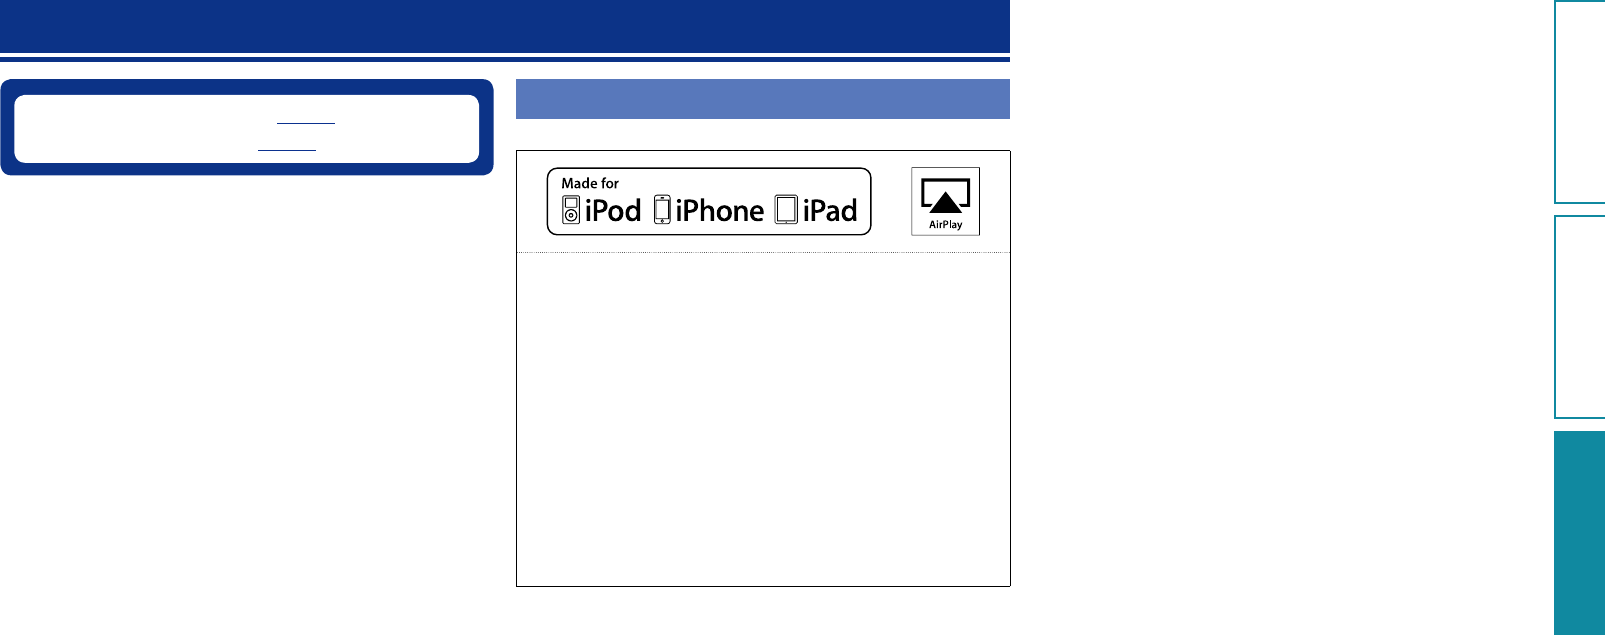
Features
Equipped with a Dock that supports iPhone®,
iPod touch® and iPad® (vpage6)
This unit employs a slide type Dock that comes out when you push
its front. By storing the Dock within this unit when you do not use
it, this unit becomes compact.
You can charge iPhone, iPod touch, or iPad at the same time while
playing back music.
Compatible with the AirPlay® function
(vpage15)
You can enjoy comfortable streaming playback of music from
iPhone, iPod touch and iPad.
Received song and artist names appear on the display.
Compatible with “Cocoon App” for performing
basic operations of the unit with an iPhone, iPod
touch and iPad (vpage3)
Equipped with Wi-Fi capabilities including Wi-Fi
Protected Setup (WPS) (vpage9)
Compatible with the Internet radio (vpage17)
Also equipped with the Music Server function
that plays back audio content on the network
(vpage20)
In addition to music files stored on PC and music servers on the
network, you can enjoy various audio sources on the Internet such
as the Internet radio.
Equipped with an organic EL display with great
visibility
High contrast with low power can be achieved. Song and artist
names are clearly displayed.
Cautions on handling
•Before turning the power on
Check once again that all connections are correct and that there are
no problems with the connection cables.
•Power is supplied to some of the circuitry even when the unit is
set to the standby mode. When going on vacation or leaving home
for long periods of time, be sure to unplug the power cord from the
power outlet.
•About condensation
If there is a major difference in temperature between the inside of
the unit and the surroundings, condensation (dew) may form on
the operating parts inside the unit, causing the unit not to operate
properly.
If this happens, let the unit sit for an hour or two with the power
turned off and wait until there is little difference in temperature
before using the unit.
•Cautions on using mobile phones
Using a mobile phone near this unit may result in noise. If that
occurs, move the mobile phone away from this unit when it is in use.
•Moving the unit
Turn off the power and unplug the power cord from the power
outlet. Next, disconnect the connection cables to other system units
before moving the unit.
•About care
•Wipe the cabinet and control panel clean with a soft cloth.
•Follow the instructions when using a chemical cleaner.
•Benzene, paint thinner or other organic solvents as well as
insecticide may cause material changes and discoloration if brought
into contact with the unit, and should therefore not be used.
Preparations
Operations
Informations
3
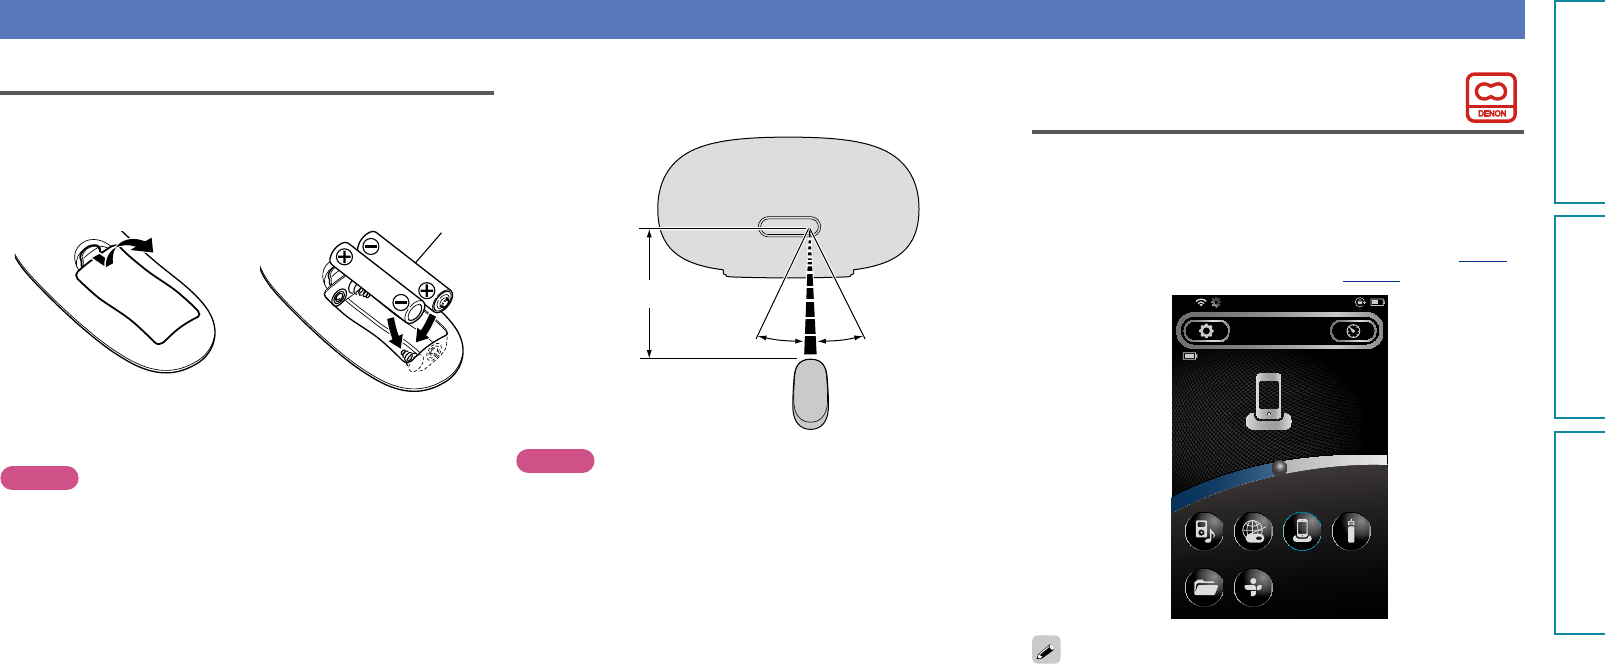
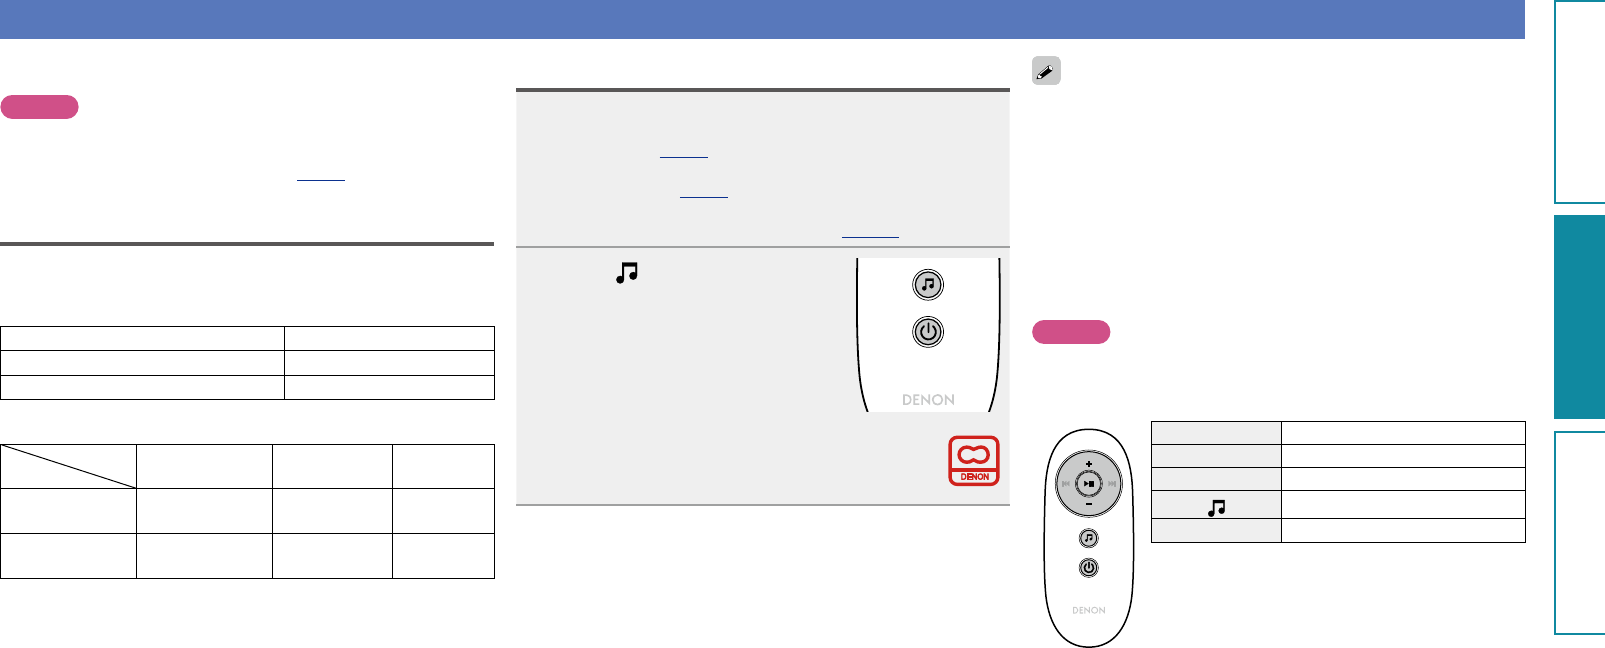
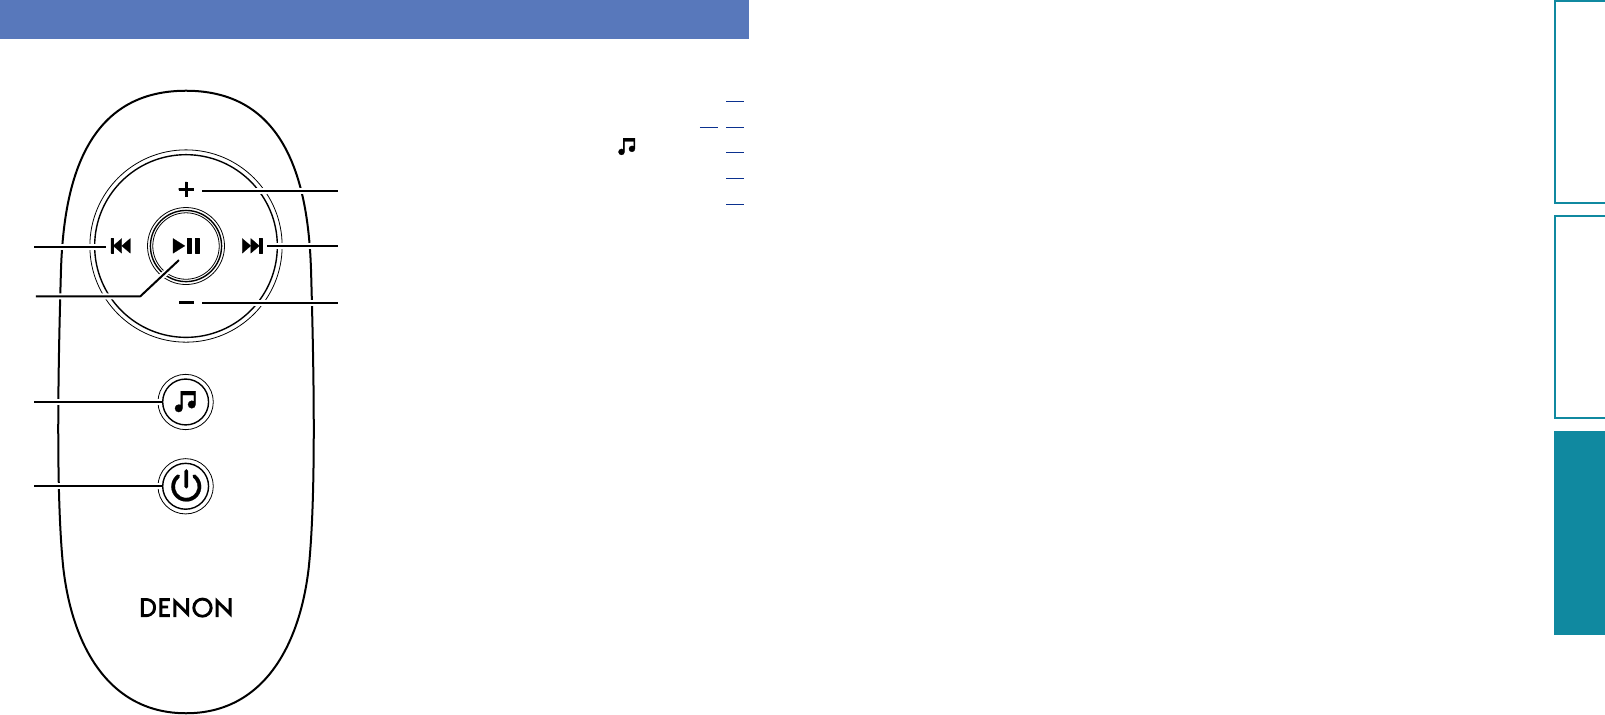
Remote operation
About the remote control unit
nInserting the batteries
q Remove the rear lid in the
direction of the arrow and
remove it.
w Load the two batteries properly
as indicated by the marks in the
battery compartment.
R03/AAA
e Put the rear cover back on.
NOTE
•Insert the specified batteries in the remote control unit.
•Replace the batteries with new ones if the set does not operate
even when the remote control unit is operated close to the unit. (The
supplied batteries are only for verifying operation. Replace them
with new batteries at an early date.)
•When inserting the batteries, be sure to do so in the proper direction,
following the q and w marks in the battery compartment.
•To prevent damage or leakage of battery fluid:
•Do not use a new battery together with an old one.
•Do not use two different types of batteries.
•Do not attempt to charge dry batteries.
•Do not short-circuit, disassemble, heat or dispose of batteries in
flames.
•Do not keep the battery in a place exposed to direct sunlight or in
places with extremely high temperatures, such as near a heater.
•If the battery fluid should leak, carefully wipe the fluid off the inside
of the battery compartment and insert new batteries.
•Remove the batteries from the remote control unit if it will not be in
use for long periods.
•Used batteries should be disposed of in accordance with the local
regulations regarding battery disposal.
•The remote control unit may function improperly if rechargeable
batteries are used.
nOperating range of the remote control unit
Point the remote control unit at the remote sensor when operating
it.
30°30°
Approx. 23 ft/7 m
NOTE
•The set may function improperly or the remote control unit may not
operate if the remote control sensor is exposed to direct sunlight,
strong artificial light from an inverter type fluorescent lamp or
infrared light.
•When using 3D video devices that transmit radio communication
signals (such as infrared signals etc) between the various units (such
as the monitor, 3D glasses, 3D transmitter unit etc), the remote
control unit may not operate due to interference from those radio
communication signals. If this occurs, adjust the direction and
distance of the 3D communication for each unit, and check that the
remote control unit operation is not affected by these signals.
Cocoon App
Cocoon App is DENON’s proprietary application developed for iPhone,
iPod touch and iPad.
With Cocoon App, you can use iPhone, iPod touch and iPad to:
•Operate this unit
•Manually make the wireless LAN settings on this unit (vpage9)
•Change preset Internet radio stations (vpage17)
Cocoon 1
SLEEP TIMER
00:29 min
iDevice
15:05iPod
AUXiDeviceInternet RadioMusic Player
TunelnMusic Server
•Bidirectional communication is performed.
•The Cocoon App can be downloaded for free from the App Store.
Preparations
Operations
Informations

5
NOTE
•Do not plug in the power cord until all connections have been
completed.
•When making connections, also refer to the owner’s manual of the
other components.
•Do not bundle power supply cords together with connection cables.
Doing so can result in humming or noise.
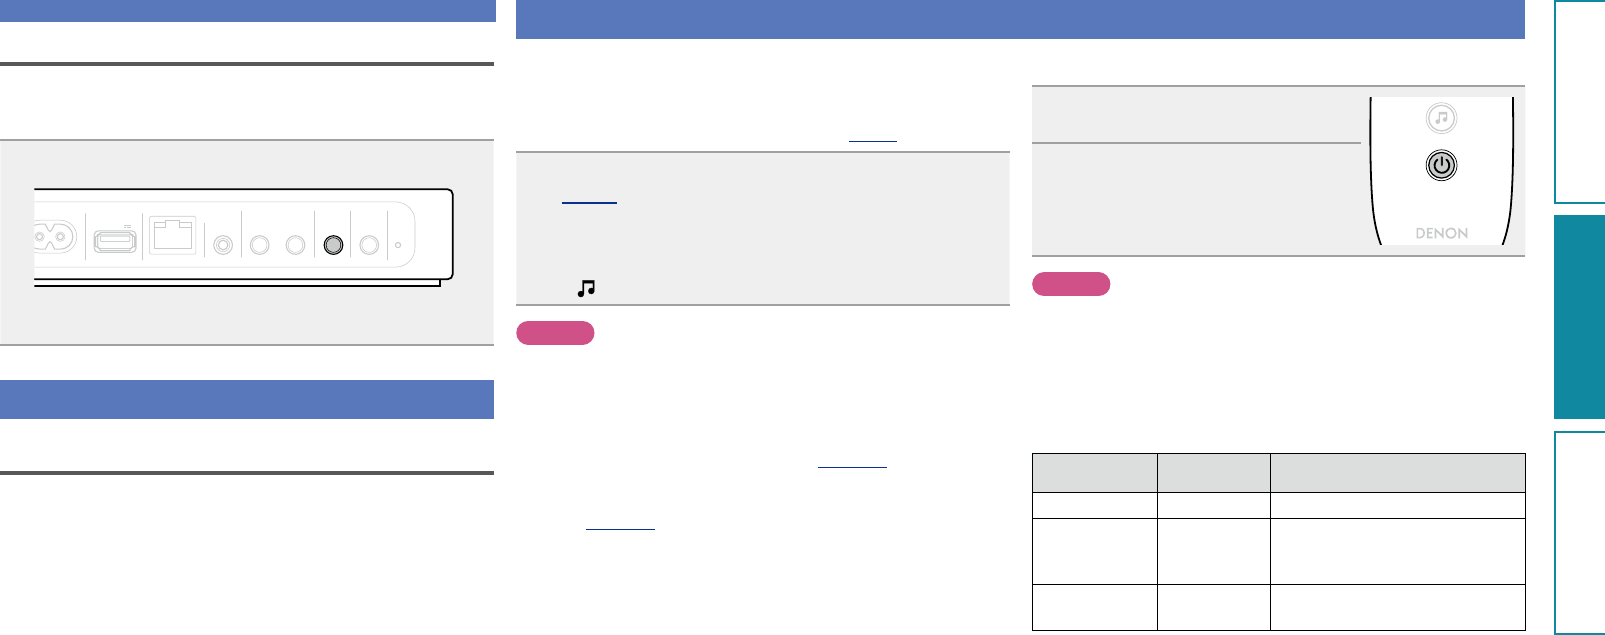
Connecting the power cord
When all of the connections are completed, insert the power plug into
the power outlet.
AC IN USB NETWORK WIRELESS LAN LOUDNESS
ON
/
STANDBY
AUX IN NETLINK WPS
5V 0.5A
Power cord
(Supplied)
To household power outlet
(AC 120 V, 60 Hz)
NOTE
•Only use the supplied power cord.
•Be sure the power cord is unplugged from the power outlet before
connecting or disconnecting it to the AC inlet.
Connections
Connecting a USB memory device
•You can enjoy music stored on a USB memory device.
•For operating instructions see “Playing a USB memory device”
(vpage18).
AC IN USB NETWORK
WIRELESS LAN
AUX IN
NETLINK
5V 0.5A
USB
memory
device
•If the USB memory device is divided into multiple partitions, only the
top partition can be selected.
•This unit is compatible with MP3 files conforming to “MPEG-1 Audio
Layer-3” standards.
•DENON does not guarantee that all USB memory devices will
operate or receive power. When using a portable USB connection
type HDD of the kind to which an AC adapter can be connected to
supply power, use the AC adapter.
NOTE
•Note that DENON will accept no responsibility whatsoever for any
problems arising with the data on a USB memory device when using
this unit in conjunction with the USB memory device.
•USB memory devices will not work via a USB hub.
•It is not possible to use this unit by connecting the unit’s USB port
to a PC via a USB cable.
•Do not use an extension cable when connecting a USB memory
device. This may cause radio interference with other devices.
Connecting a portable player
•If a portable player is connected via the AUX IN jack of the unit,
music from the portable player can be played.
•For operating instructions see “Playing a portable player”
(vpage19).
Cables used for connections
Audio cable (sold separately)
Stereo mini
plug cable
AC IN USB NETWORK
WIRELESS LAN
AUX IN NETLINK
5V 0.5A
HEADPHONE
Portable
Audio
Preparations
Operations
Informations
Preparations
6
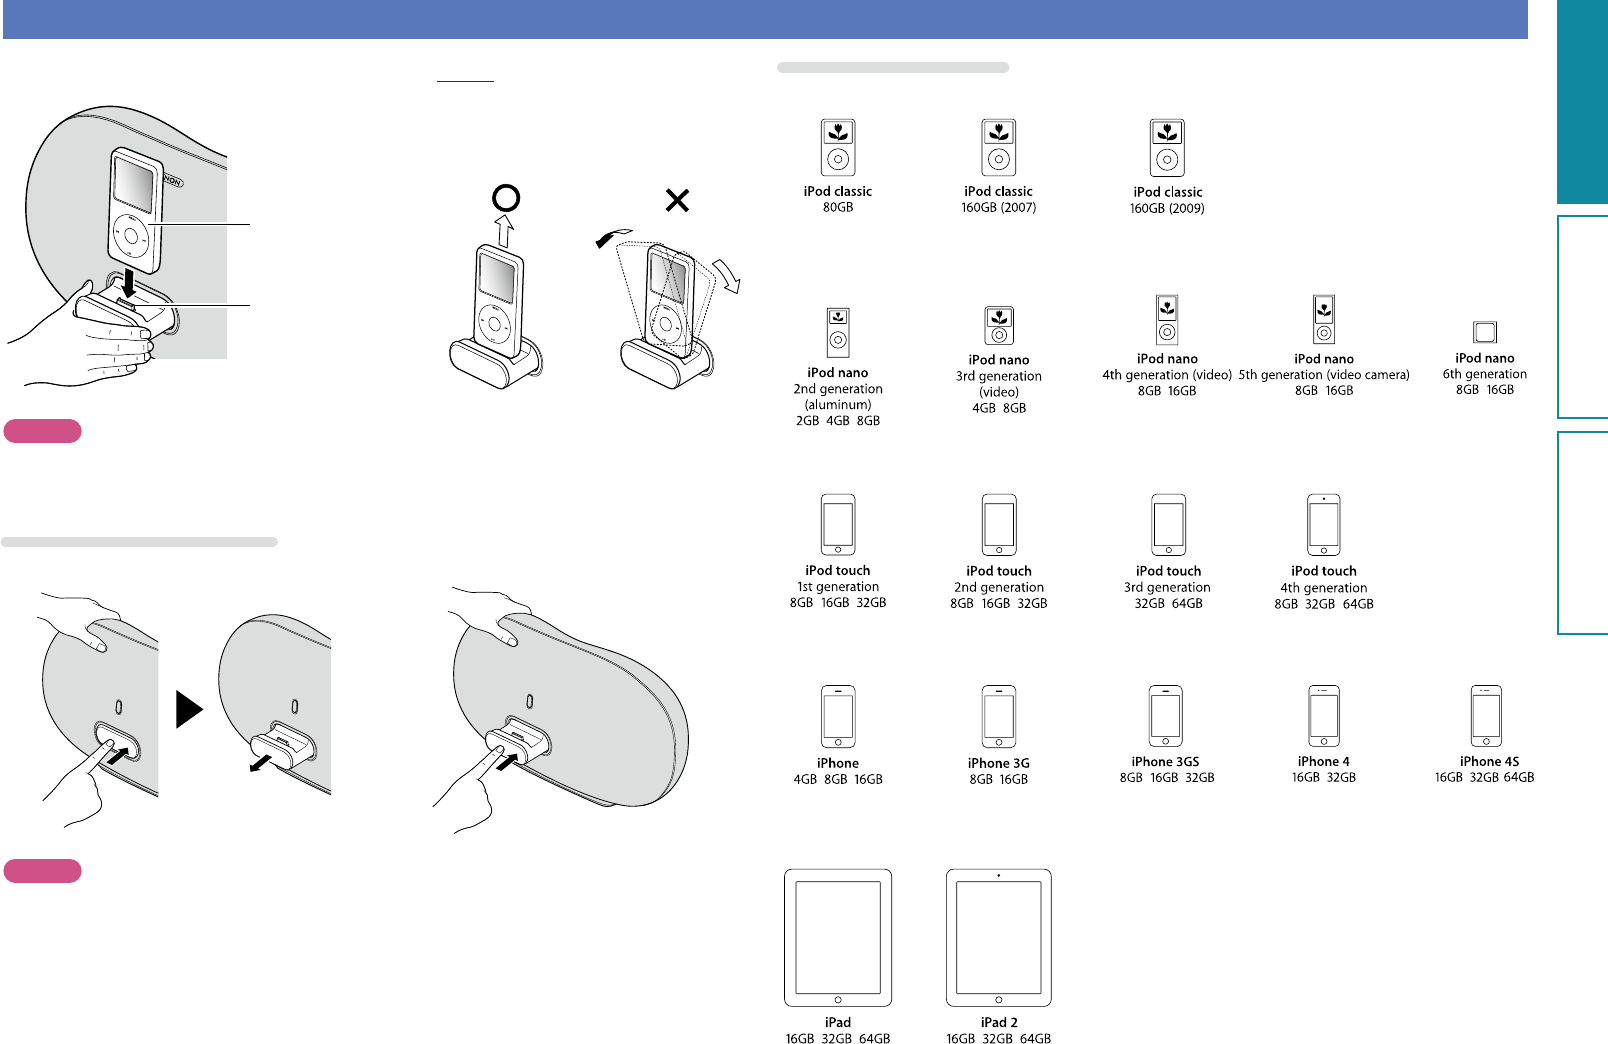
Connecting an iOS device
•You can enjoy music stored on an iOS device.
•For operating instructions see “Playing an iOS device” (vpage14)
iPod
Dock connector
Dismantling
NOTE
•Depending on the type of iOS device and the software version, some functions may not operate.
•Note that DENON will accept no responsibility whatsoever for any problems arising with the data on an
iOS device when using this unit in conjunction with the iOS device.
How to eject/store the Dock
q Push the front of the Dock, and it comes out. w Push it again to store within this unit.
NOTE
•When ejecting/storing the Dock, hold the upper part of this unit with your hand to prevent this unit from
moving or tipping over.
•When iPhone or iPod touch is not connected to this unit, store the Dock within this unit.
Supported iPod models
•iPod / iPod classic
•iPod nano
•iPod touch
•iPhone
•iPad
(as of July 2012)
•iPad
Preparations
Operations
Informations
Preparations

7
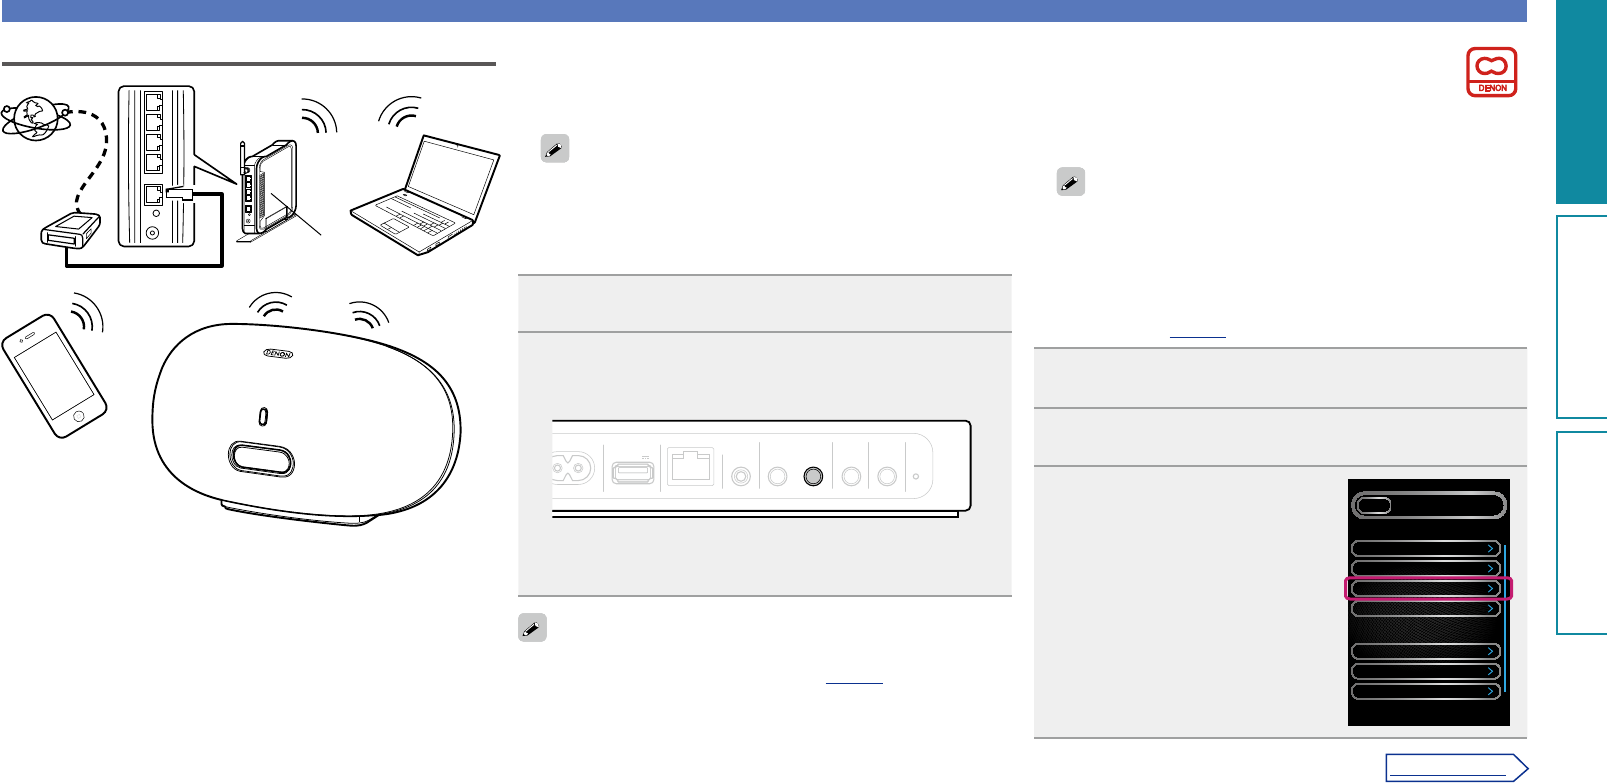
Connecting to a home network (LAN)
When this unit is connected to your home network (LAN), you can
enjoy various audio sources via the network.
•Streaming playback from iPhone, iPod touch or iPad with AirPlay
•Internet radio
•Music files on music servers
Furthermore, you can operate this unit by using Cocoon App on
iPhone, iPod touch or iPad.
To check for any firmware update available for improving this unit,
etc., see “Firmware Update” (vpage26) in the menu.
Required system
nBroadband internet connection
nModem
Device that connects to the broadband circuit and conducts
communications on the Internet.
A type that is integrated with a router is also available.
nRouter
When using this unit, we recommend you use a router equipped
with the following functions:
•Built-in DHCP server
This function automatically assigns IP addresses on the LAN.
•Built-in 100BASE-TX switch
When connecting multiple devices, we recommend a switching
hub with a speed of 100 Mbps or greater.
•When using with a wireless LAN, prepare a broadband router
with built-in access point.
nEthernet cable (supplied)
(CAT-5 or greater recommended)
•Use only a shielded STP or ScTP LAN cable which is available at
retailer.
•The normal shielded-type Ethernet cable is recommended. If a
flat-type cable or unshielded-type cable is used, other devices
could be affected by noise.
•If you have an Internet provider contract for a line on which network
settings are made manually, make the settings at “When “DHCP” is
set to “Off” on your router” (vpage10).
•With this unit, it is possible to use the DHCP and Auto IP functions
to make the network settings automatically.
•When using this unit with the broadband router’s DHCP function
enabled, this unit automatically performs the IP address setting and
other settings.
When using this unit connected to a network with no DHCP function,
make the settings for the IP address, etc., at “When “DHCP” is set
to “Off” on your router” (vpage10).
•When setting manually, check the setting contents with the network
administrator.
NOTE
•A contract with an ISP is required to connect to the Internet.
No additional contract is needed if you already have a broadband
connection to the Internet.
•The types of routers that can be used depend on the ISP. Contact an
ISP or a computer shop for details.
•DENON assumes no responsibility whatsoever for any
communication errors or troubles resulting from customer’s network
environment or connected devices.
•This unit is not compatible with PPPoE. A PPPoE-compatible router
is required if you have a contract for a type of line set by PPPoE.
•Do not connect an NETWORK connector directly to the LAN port/
Ethernet connector on your computer.
•To listen to audio streaming, use a router that supports audio
streaming.
Preparations
Operations
Informations
Preparations
8
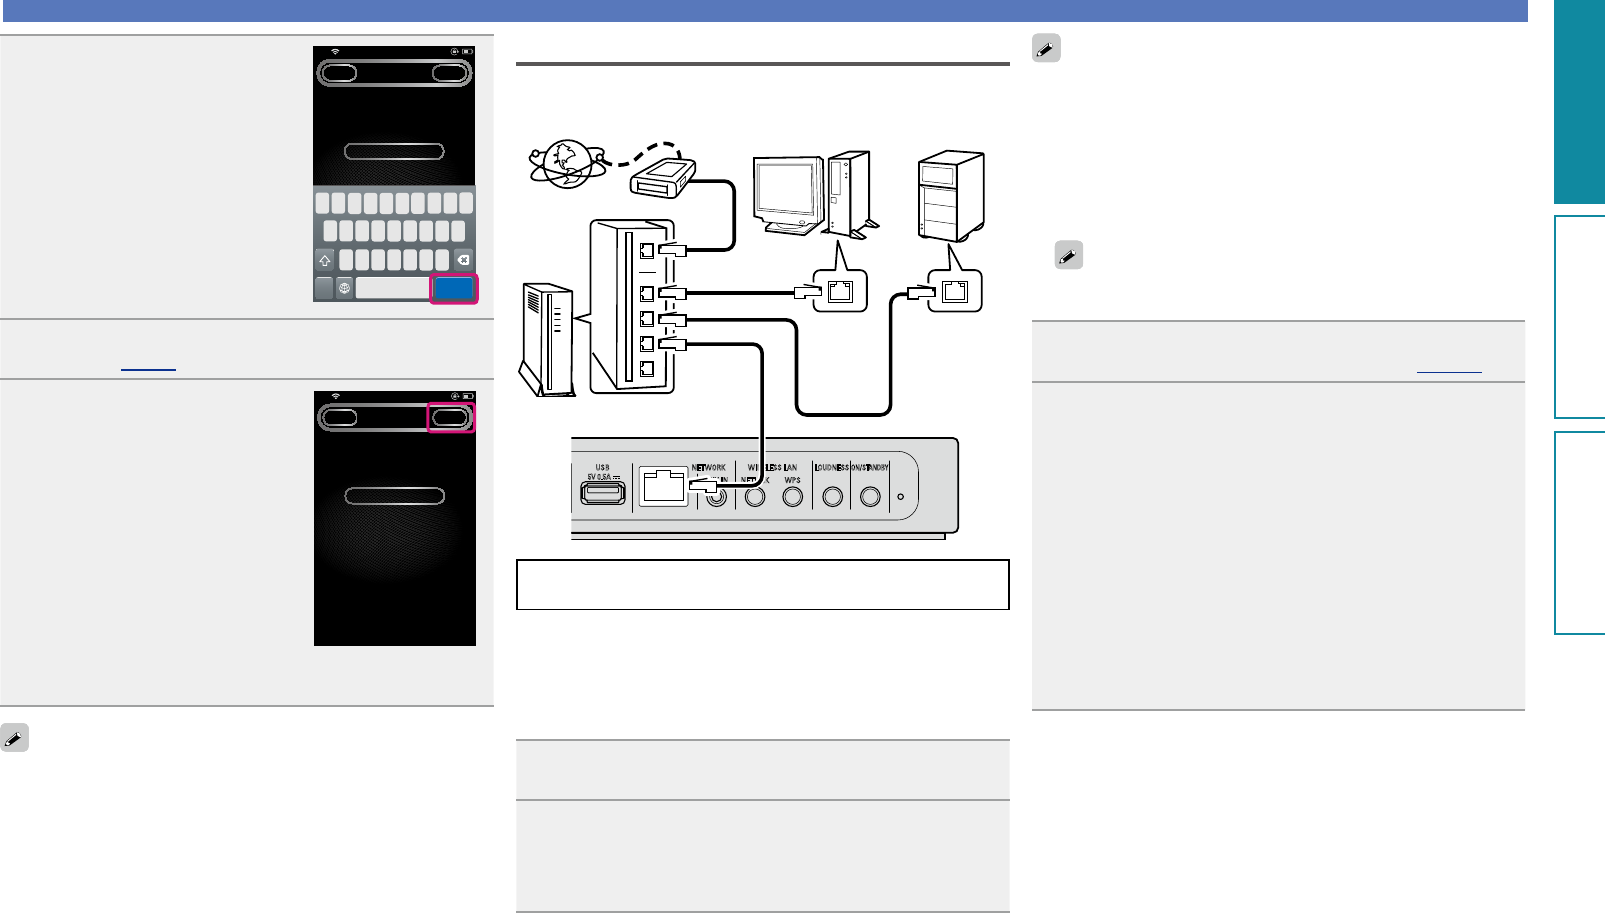
Network connections and settings
There are two types of network connections available – wired and wireless. Select either of them according to your router functions and operating environment.
Using a router equipped with the wireless LAN
function
Connect this unit to your router wirelessly. Connection procedures
differ according to the type of your router.
nWhen your router is equipped with a WPS button
(vpage9)
nWhen your router is not equipped with a WPS
button and you are using iPhone, iPod touch or iPad
(vpage9)
Using a router that is not equipped with the
wireless LAN function
Connect this unit to your router with an Ethernet cable. Connection
procedures differ according to your router settings.
nWhen “DHCP” is set to “On” on your router
(vpage10)
nWhen “DHCP” is set to “Off” on your router
(vpage10)
Using PC to make network settings of this unit
You can also use your PC to make network settings of this unit without
iPhone, iPod touch or iPad.
nWhen this unit is connected to your PC through
wireless LAN (vpage11)
“WPS” stands for Wi-Fi Protected Setup, a standard for making it
easy to make security settings required when connecting wireless
LAN devices.
Preparations
Operations
Informations
Preparations
9
Network connections and settings
nWhen your router is equipped with a WPS
button
By just pressing the WPS button on your router and this unit, the
wireless LAN connection settings are made.
•Before turning this unit on, make sure that an Ethernet cable is
not connected to this unit. If a cable is connected, have this unit
enter the power standby mode and disconnect the cable.
•After the unit is turned on, it takes approximately 30 seconds for
the WPS button on this unit to be available.
1Press the WPS button of the router.
2Press WPS on the rear panel.
“Connecting” is displayed, and the unit starts connecting to
the LAN.
AC IN USB NETWORK WIRELESS LAN LOUDNESS
ON
/
STANDBY
AUX IN NETLINK WPS
5V 0.5A
•When the connection is made successfully, “Succeeded” appears.
•If the connection cannot be established, “Connection Failed” is
displayed. Perform steps 1 – 2 again.
•If this unit is still not connected to the network after this procedure,
manually enter the PIN code of WPS (vpage25).
nWhen your router is not equipped with
a WPS button and you are using iPhone,
iPod touch or iPad
Use the DENON application “Cocoon App” to make the wireless
LAN connection settings.
•“Cocoon App” is free.
•Before turning this unit on, make sure that an Ethernet cable is
not connected to this unit. If a cable is connected, have this unit
enter the power standby mode and disconnect the cable.
•To make the connection settings by using PC without iPhone,
iPod touch or iPad, see “Using PC to make network settings of
this unit” (vpage11).
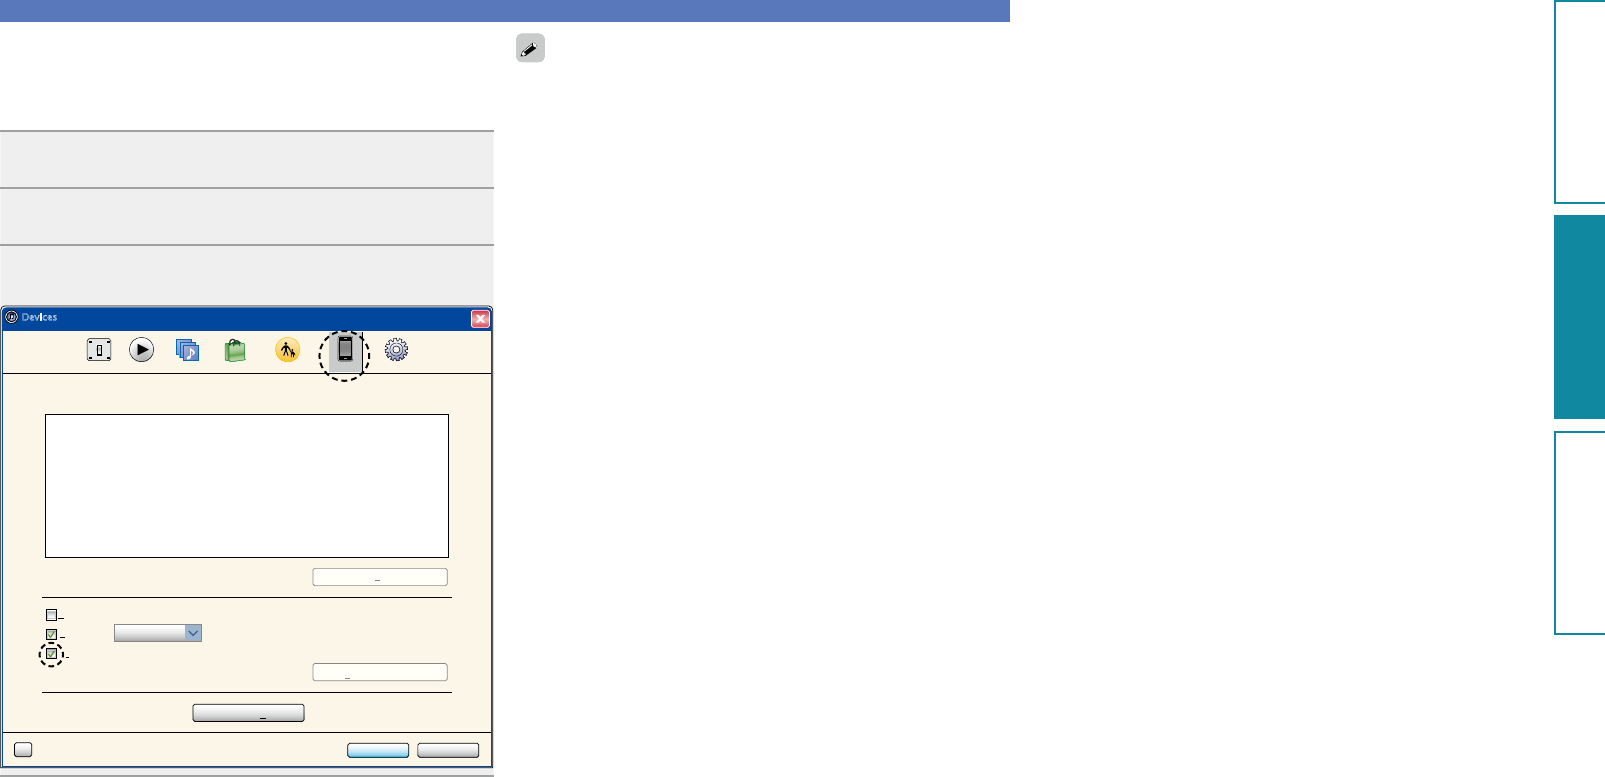
1Download “Cocoon App” to your iPhone, iPod touch
or iPad from App Store.
2Start the application.
3When the “SETUP” screen is
displayed, tap “NetLink”.
•“Scanning network for devices”
is displayed.
SETUPBACK
Device DSD500 Bed Room
Theme
NetLink
Language English
Clock
App Setting
DSD500 Bed Room Setting
Auto
Network Settings
Volume Settings
Wireless LAN
iPhone, iPod touch
and iPad
To WAN side
PC
Internet
Modem
Router with
access point
Preparations
Operations
Informations
Preparations
v See overleaf
10
Network connections and settings
Wired LAN
AC IN
USB NETWORK WIRELESS LAN LOUDNESS
ON
/
STANDBY
AUX IN NETLINK WPS
5V 0.5A
Internet
To WAN side
Router
To LAN port
To LAN port LAN port/
Ethernet
connector
LAN port/
Ethernet
connector
PC
NAS
(Network Attached
Storage)
Modem
Ethernet cable
(Supplied)
For connections to the Internet, contact an ISP (Internet
Service Provider) or a computer shop.
nWhen “DHCP” is set to “On” on your router
When using this unit with the broadband router’s DHCP function
enabled, this unit automatically performs the IP address setting
and other settings.
1Connect the supplied Ethernet cable by referring to
2Press X to turn on power to the main unit.
•When this unit could not connect to the network, perform steps 1
and 2 again.
You may need to set the network connection manually, depending on
the provider you use. To set the connection manually, use the setting
procedure of “When “DHCP” is set to “Off” on your router”.
nWhen “DHCP” is set to “Off” on your router
This section explains the settings when connecting this unit to a
network that does not have a DHCP function.
To configure the settings manually, check the setting details with
your network administrator.
1Complete steps 1 – 4 in “When this unit is connected
to your PC through wireless LAN” (vpage 11).
2On the page that appears, set the information
necessary for the network connection.
q Click “Profile Configuration” on the upper left part of the
page.
w Click “ADVANCE SETTING”.
e Enter required items.
r When settings are completed, click “Apply”.
t Connect the Ethernet cable.
•“Connecting” is displayed, and the unit starts connecting to the
LAN.
•When the connection is made successfully, “Succeeded” appears.
•If the connection cannot be established, “Connection Failed” is
displayed. Turn this unit off and on.
If this unit is still not connected to the network after this procedure,
complete steps 1 – 2 again.
4Enter the encryption key.
q Enter the encryption key of your
router that is connected to your
iPod, iPhone or iPad.
w Tap “Join”.
Cocoon
NETLINKBACK JOIN
Access Point
Enter Password
21:12iPod
A
Join123 space
MQ E R T Y U I O P
S D F G H J K L
Z X C V B N M
5Place your iPod, iPhone or iPad in the dock of this
unit (vpage 6).
6Tap “JOIN”.
The network settings are copied to
this unit from your iPod, iPhone or
iPad and this unit is connected to
the network.
Cocoon
NETLINKBACK JOIN
Access Point
Enter Password
15:10iPod
•When this unit could not connect to the network, the application
displays an error message. Perform steps 1 – 6 again.
The wireless network name (SSID) and encryption method used for
this unit are the same as those set for the connected iPod, iPhone
or iPad.
Preparations
Operations
Informations
Preparations

11
Using PC to make network settings of this
unit
nWhen this unit is connected to your PC through
wireless LAN
Before turning this unit on, make sure that an Ethernet cable is not
connected to this unit. If a cable is connected, have this unit enter
the power standby mode and disconnect the cable.
1Press X to turn on power to the main unit.
It takes approximately 30 seconds for this unit to start.
2Press NETLINK on the rear panel.
This unit restarts and “NetLink” appears on the display.
3Connect to “Cocoon_Setup” in the wireless network
settings on your PC.
•If “Cocoon_Setup” is not displayed, refresh the network.
•It may take up to two minutes to establish the connection.
4Launch the browser on the PC connected to this unit,
and enter the address “http://169.254.1.1”.
5On the page that appears, set the information
necessary for the network connection.
q Click “Profile Configuration” on the upper left part of the
page.
w From the “Digital Media Player Wireless LAN Settings”
dropdown list, select the SSID (Service Set ID) of your
router.
e Enter the password.
r When settings are completed, click “Apply”.
•“Connecting” is displayed, and the unit starts connecting to the
LAN.
•When the connection is made successfully, “Succeeded” appears.
•If the connection cannot be established, “Connection Failed” is
displayed. Perform steps 1 – 5 again.
•It may take 120 seconds to establish the network connection.
Network connections and settings
•Enter the name in the “Friendly Name” box and click “Set” to
change the friendly name. A friendly name is the name of this unit
that is presented to the network.
•In “ADVANCE SETTING”, you can manually make settings such as
the IP address.
NOTE
NETLINK does not support proxy servers.
Preparations
Operations
Informations
Preparations
13
Playback
This section provides how to play back music with this unit.
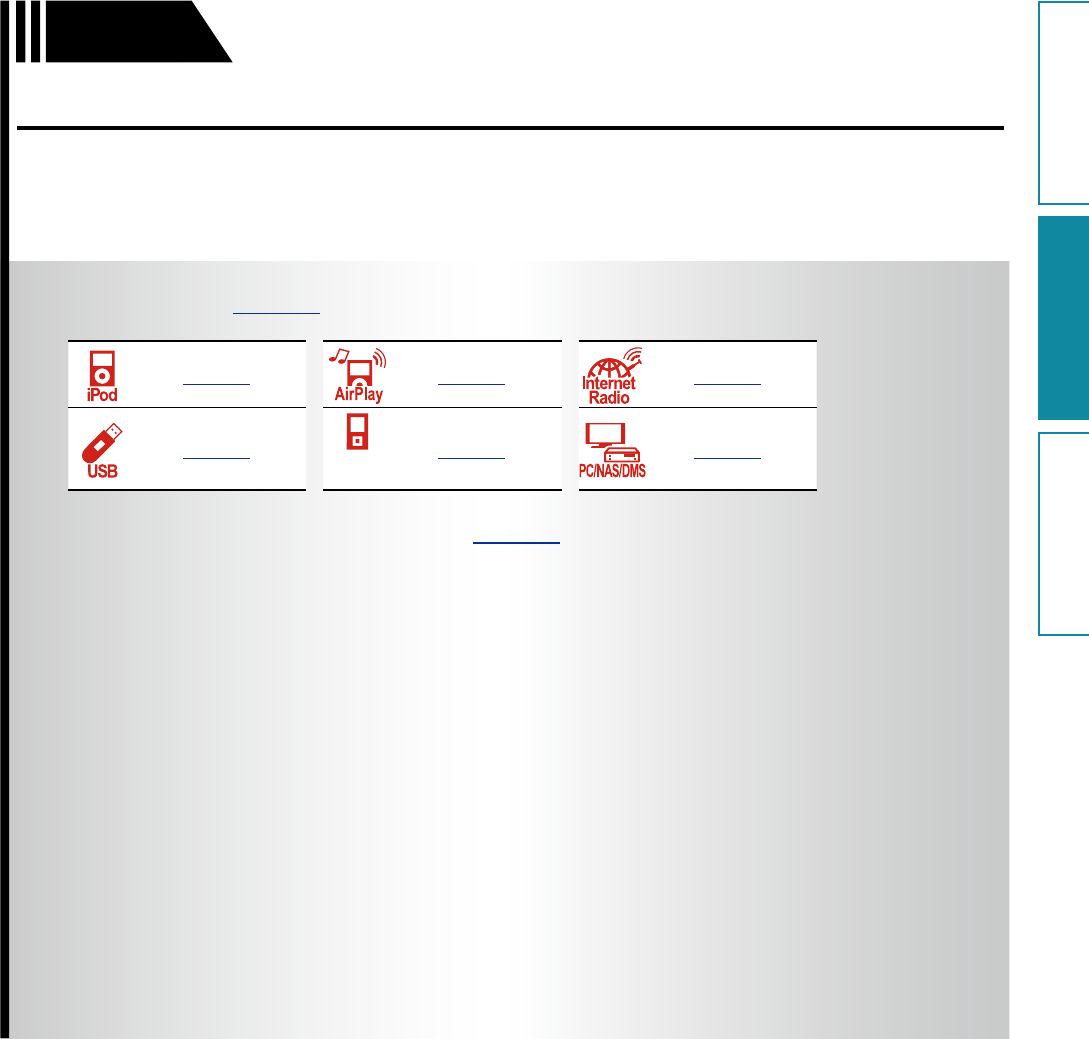
This unit can play back music from the following devices (media).
•iPhone, iPod and iPad
When connected to this unit (vpage14)
When using AirPlay (vpage15)
•Internet radio (vpage17)
•Music files on USB flash memories (vpage18)
•Portable player (vpage19)
•Music server (PC on the network) (vpage20)
Preparations
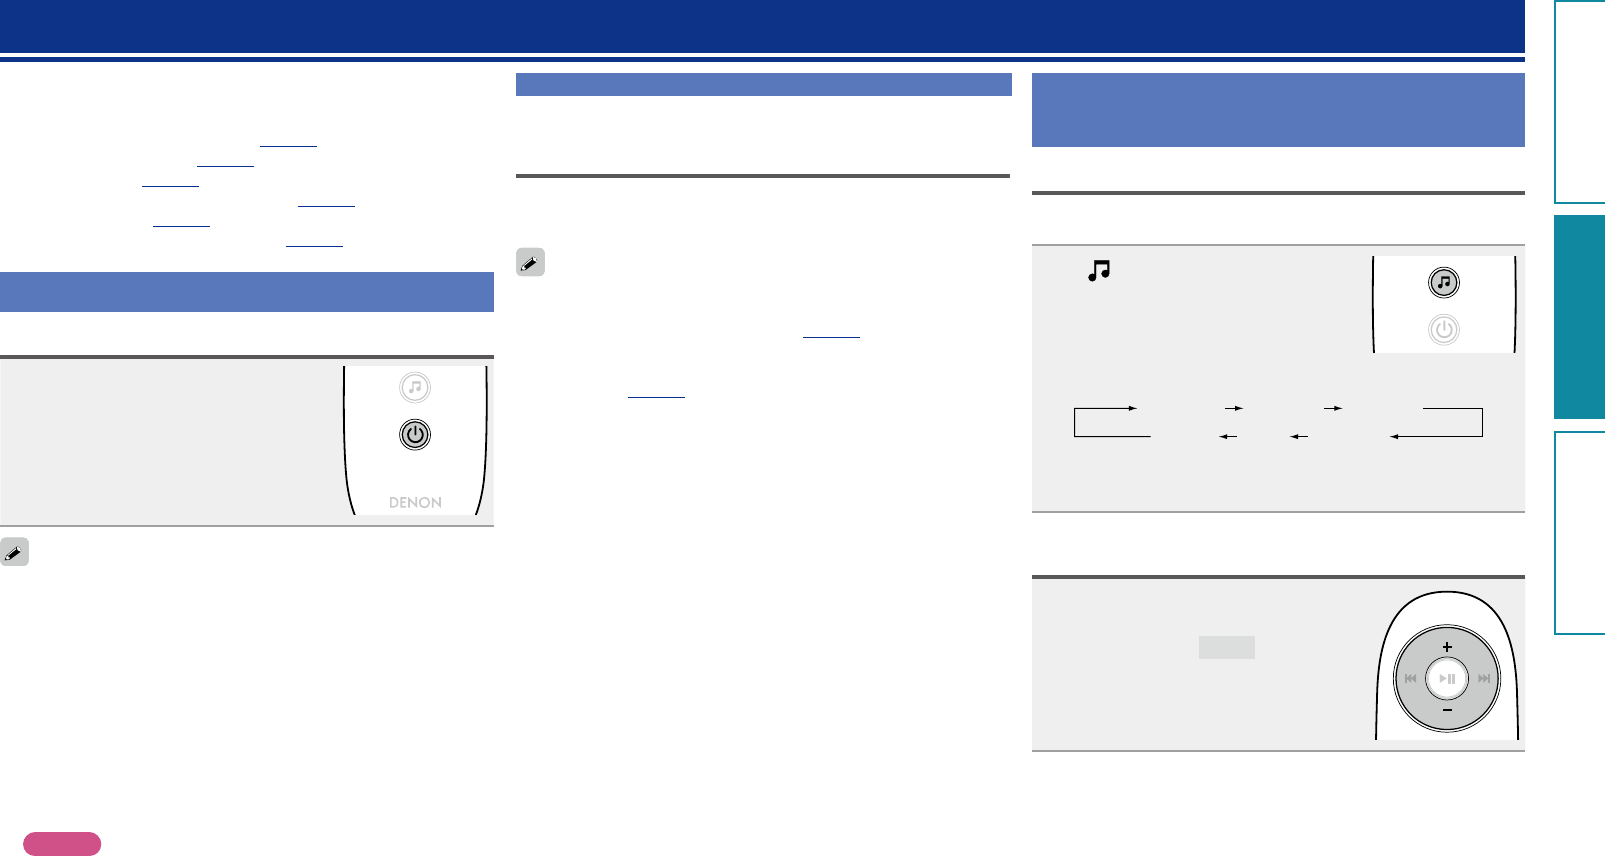
Turning the power on
Press X to turn on power to the unit.
This unit is turned on and the operation
button on top lights.
You can also switch the power to standby by pressing ON/STANDBY
on the main unit.
nWhen power is switched to standby
Press X.
•The operation button on top lights off and this unit enters the
standby mode.
nCompletely turning off the power
Power continues to be supplied to some of the circuitry even when
the power is in the standby mode. When leaving home for long
periods of time, unplug the power cord from the power outlet.
NOTE
The settings made for the various functions may be cleared if the
power cord is left unplugged from a power outlet for an extended
period of time.
Setting the current time (Auto Adjust) (12-
Hour Display)
When this unit is connected to the network, the current time is
automatically set.
•The default time zone of this unit is set to Eastern Standard Time.
To change the Time Zone and Summer Time, see “Adjusting the
clock automatically (Auto Adjust)” (vpage23).
•When this unit is not connected to the network, set the time
manually. See “Setting the current time (Manual Adjust) (12-Hour
Display)” (vpage24).
Preparations Operations possible during
playback
Selecting the input source
You can select the device for which this unit outputs the audio that is
connected to this unit.
Press .
•The input source is switched each time the button is pressed.
Preset 2Preset 1
USB
AUXz
iDevicez
Preset 3
zThese items are displayed if a relevant device is connected
to this unit.
Adjusting the master volume
Press + or –.
The volume level is displayed.
GAdjustable rangeH 0 – 50
Preparations
Operations
Informations
Operations
14
Playing an iOS device
With this unit, you can listen to music on an iOS device. It is also
possible to operate the iOS device from the main unit or remote
control.
For information on the iOS device models that can be played back with
this unit, see “Connecting an iOS device” (vpage6).
Load the iOS device onto the Dock of this unit
(vpage 6 “Connecting an iOS device”).
When the iOS device is loaded to the dock tray on this unit, the input
source automatically switches to “iDevice”.
•During AirPlay, the input source does not switch automatically.
Press to switch the input source to “iDevice”.
NOTE
This function is activated around 30 seconds after the power is turned
on.
nStreaming music stored in iPhone, iPod touch or
iPad directly to the unit (vpage15)
nPlaying iTunes music with this unit
(vpage15)
nDisconnecting the iOS device
1Press X to set the standby mode.
2Remove the iOS device from the
Dock of this unit.
NOTE
•Depending on the type of iOS device and the software version,
some functions may not operate.
•Note that DENON will accept no responsibility whatsoever for any
problems arising with the data on an iOS device when using this unit
in conjunction with the iOS device.
nRemote control and iOS device button relations
Remote control
buttons
iOS device
buttons Operation on this unit
13 13 Play the track / Pause the track.
8, 9
(Press and release)
8, 9
(Press and
release)
Play the track from the beginning/
Play the next track.
8, 9
(Press and hold)
8, 9
(Press and hold)
Fast-reverse the track/
Fast-forward the track.
Adjusting the tone (LOUDNESS)
When you press LOUDNESS to the “On” (h) state, bass and treble
sounds, which are hard to hear at a low volume level, are enhanced for
a more natural audio quality.
Press LOUDNESS on the main unit.
AC IN USB NETWORK WIRELESS LAN LOUDNESS
ON
/
STANDBY
AUX IN NETLINK WPS
5V 0.5A
•Press the button again to the “Off” (j) state to return to the
original audio quality.
Operations possible during playback
Various memory functions
Last function memory
This function stores the settings which were made before going into
the standby mode.
When the power is turned back on, the settings are restored.
Preparations
Operations
Informations
Operations
15
AirPlay function
Enjoy music from your iTunes library with high quality sound anywhere
in your home.
Use the Apple Remote appz for iPhone, iPod touch and iPad to control
iTunes from any room in your home.
zAvailable as a free download from the App Store.
NOTE
•Before using the AirPlay function, this unit must be connected to the
network. For how to connect this unit to the network, see “Network
connections and settings” (vpage8).
•To use the AirPlay function, you must update iPhone, iPod touch or
iPad to iOS 4.2.1 or higher.
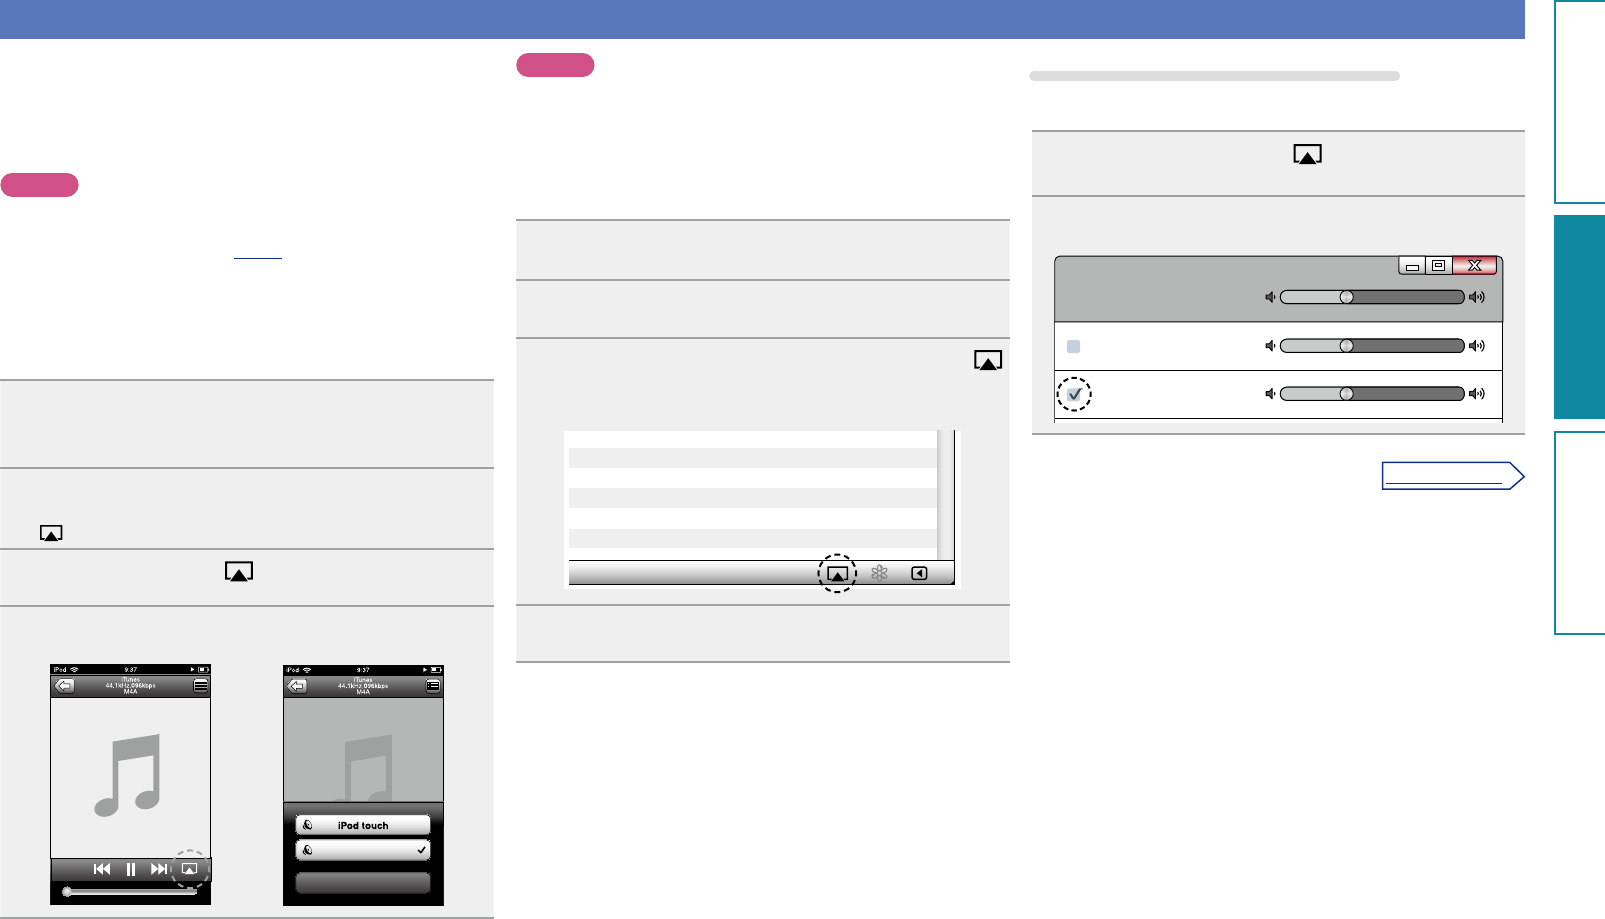
nStreaming music stored in iPhone, iPod touch or
iPad directly to the unit
1Make the Wi-Fi settings for iPhone, iPod touch or
iPad.
•For details, see your device’s manual.
2Startup iPhone, iPod touch, or iPad music or iPod
app.
is displayed on the iPhone, iPod touch or iPad screen.
3Tap the AirPlay icon .
4Select the speaker you want to use.
Cancel
Cocoon 1
NOTE
When the AirPlay function is used, this unit plays back at the volume
level set on iPhone, iPod touch, iPad, or iTunes.
First minimize the volume level on iPhone, iPod touch, iPad, or iTunes
before playback. Then, start playback and adjust the volume to the
desired level.
nPlaying iTunes music with this unit
1Install iTunes 10, or later, on a Mac or Windows PC
that is connected to the same network as this unit.
2Turn this unit ON.
3Launch iTunes and click the AirPlay icon
displayed in the lower right of the window and select
this unit from the list.
4Choose a song and click play in iTunes.
The music will stream to this unit.
Selecting multiple speakers (devices)
It is possible to play iTunes songs on your home’s AirPlay compatible
speakers (devices) other than those of this unit.
1Click the AirPlay icon and select “Multiple
Speakers” from the list.
2Check the speakers you want to use.
Master Volume
Multiple Speakers
My Computer
This Computer
Cocoon 1
AirPlay Device
Preparations
Operations
Informations
Operations
v See overleaf
16
nPerform iTunes playback operations with the
remote control unit of this unit
With this unit’s remote control unit, you can perform iTunes song
play, pause, and auto search (cue) operations.
1Select “Edit” – “Preferences...” on the menu.
2Select “Devices” in the iTunes setting window.
3Check “Allow iTunes control from remote speakers”,
and then click “OK”.
OK Cancel
?
Devices
General Playback Sharing Store Parental Advanced
iTunes is not paired with any Remotes
more than 5%Warn when
Delete Backup ...
Device backups:
Forget All Remotes
Reset Sync History
of the data on this computer will be changed
Prevent iPods, iPhones, and iPads from syncing automatically
Allow iTunes control from remote speakers
Devices
•Source input will be switched to “AirPlay” when AirPlay playback
is started.
•You can stop AirPlay playback by choosing other input source.
•For information about how to use iTunes, also see the Help for
iTunes.
•The screen may differ depending on the OS and software versions.
AirPlay function
Preparations
Operations
Informations
Operations
17
Listening to internet radio
Internet radio refers to radio broadcasts distributed over the Internet.
Internet radio stations from around the world can be received.
NOTE
Before playing back the Internet radio, this unit must be connected
to the network. For how to connect this unit to the network, see
“Network connections and settings” (vpage8).
Important information
The broad cast station types and specifications supported by this unit
for playback are as follows.
GPlayable broadcast station typesH
Supported file types Internet radio
WMA (Windows Media Audio) P
MP3 (MPEG-1 Audio Layer-3) P
GPlayable broadcast station specificationsH
Sampling
frequency Bit rate Extension
WMA (Windows
Media Audio) 32/44.1/48 kHz 48 – 192 kbps .wma
MP3 (MPEG-1
Audio Layer-3) 32/44.1/48 kHz 32 – 320 kbps .mp3
Listening to preset Internet radio stations
1Prepare for playback.
q Check the network environment, then turn on this unit’s
power (vpage8 “Network connections and settings”).
w If settings are required, make the “Network connections and
settings” (vpage8).
e If settings are required, make the “Setting the current time
(Auto Adjust) (24-Hour Display)” (vpage13).
2Press to switch the input
source to “Preset 1”, “Preset 2”
or “Preset 3”.
Playback starts.
•Use Cocoon App to change preset details.
•There are many Internet radio stations on the Internet, and the
quality of the programs they broadcast as well as the bit rate of the
tracks varies widely.
Generally, the higher the bit rate, the higher the sound quality, but
depending on the communication lines and server traffic, the music
or audio signals being streamed may be interrupted. Inversely, lower
bit rates mean a lower sound quality but less tendency for the sound
to be interrupted.
•“Server Full” or “Connection Down”is displayed if the station is
busy or not broadcasting.
•The Internet radio station name appears on the display of this unit.
NOTE
The radio station database service may be suspended without notice.
nInternet radio operation buttons
Operation buttons Function
+, –Volume up / down
13 Mute On/Off
Switching the input source
XPower on/standby
Preparations
Operations
Informations
Operations
18
Playing a USB memory device
A USB memory device can be connected to the USB port of this unit to play music files stored on the USB
memory device.
Important information
•Only USB memory devices conforming to mass storage class and MTP (Media Transfer Protocol)
standards can be played on this unit.
•This unit is compatible with USB memory devices in “FAT16” or “FAT32” format.
•This unit is compatible with MP3 files conforming to “MPEG-1 Audio Layer-3” standards.
•File types that this unit can play back and specifications are shown below.
GSupported file typesH
Supported file types USB memory devices z1
WMA (Windows Media Audio) Pz2
MP3 (MPEG-1 Audio Layer-3) P
WAV P
MPEG-4 AAC Pz3
FLAC (Free Lossless Audio Codec) P
z1 USB memory device
•This unit is compatible with MP3 ID3-Tag (Ver. 2) standard.
•This unit is compatible with WMA META tags.
•If the image size (pixels) of an album artwork exceeds 500 × 500 (WMA/MP3/WAV/FLAC) or 349 ×
349 (MPEG-4 AAC), then music may not be played back properly.
z2 Copyright-protected files can be played on certain portable players compatible with MTP.
z3 Only files that are not protected by copyright can be played on this unit.
Content downloaded from pay sites on the Internet are copyright protected. Also, files encoded in
WMA format when ripped from a CD, etc. on a computer may be copyright protected, depending on
the computer’s settings.
If the number of files stored in a USB memory device exceeds 1,000, the access speed may become
slower.
NOTE
File types that this unit does not support are not displayed.
GCompatible formatsH
Sampling frequency Bit rate Extension
WMA (Windows Media Audio) 32/44.1/48 kHz 48 – 192 kbps .wma
MP3 (MPEG-1 Audio Layer-3) 32/44.1/48 kHz 32 – 320 kbps .mp3
WAV 32/44.1/48 kHz – .wav
MPEG-4 AAC 32/44.1/48 kHz 16 – 320 kbps
.aac/
.m4a/
.mp4
FLAC (Free Lossless Audio Codec) 32/44.1/48/88.2/96 kHz – .flac
nMaximum Number of Playable Files and Forder
The limits on the number of folders and files that can be displayed by this unit are as follows.
Media
Item USB memory devices
Memory capacity FAT16 : 2 GB, FAT32 : 2 TB
Number of folders FAT16 or FAT32 format 500
Number of files z5000
z The allowable number of files may differ according to the USB memory device capacity and the file size.
nFolder playback sequence
You can only play back files stored in the top level folder (root).
Preparations
Operations
Informations
Operations
19
Removing the USB memory device
1Press X to set the standby mode.
2Check that the communication
indicator on the USB memory
out the USB memory device.
NOTE
Do not remove the USB memory device from the unit when the USB
memory communication indicator is flashing. Doing so may damage
the USB memory device, or may corrupt the files recorded on the USB
memory device.
nUSB memory device operation buttons
Operation buttons Function
+, –Volume up / down
8 9 Auto search (cue)
13 Playback / Pause
Switching the input source
XPower on/standby
Playing a USB memory device Playing a portable player
The following describes the procedure for playing portable player.
1Connect the portable player to this unit
(vpage 5 “Connecting a portable player”).
2Press X to turn on power to the
main unit.
3Press to switch the input
source to “AUX”.
4Play the component connected to
this unit.
Playing files stored on USB memory
devices
1Connect the USB memory device to the USB port
(vpage 5 “Connecting a USB memory device”).
2Press to switch the input
source to “USB”.
Playback starts.
•If the USB memory device is divided into multiple partitions, only the
top partition can be selected.
•This unit is compatible with MP3 files conforming to “MPEG-1 Audio
Layer-3” standards.
•DENON does not guarantee that all USB memory devices will
operate or receive power. When using a portable USB connection
type HDD of the kind to which an AC adapter can be connected to
supply power, use the AC adapter.
NOTE
•Note that DENON will accept no responsibility whatsoever for any
problems arising with the data on a USB memory device when using
this unit in conjunction with the USB memory device.
•USB memory devices will not work via a USB hub.
•It is not possible to connect and use a computer via the USB port of
this unit using a USB cable.
•Do not use an extension cable when connecting a USB memory
device. This may cause radio interference with other devices.
Preparations
Operations
Informations
Operations

20
Playing back files stored on PC or NAS with Cocoon App (Music Server)
This unit can play back music files and playlists (m3u, wpl) stored on
a PC, Digital Media Server (DMS) and on Network Attached Storage
(NAS) that supports DLNA.
NOTE
•Before playing back music files on music servers, this unit must be
connected to the network. For how to connect this unit to the network,
see “Connecting to a home network (LAN)” (vpage7).
For playable file formats and restrictions, see“Important information”
(vpage21).
Applying media sharing settings
Here, we apply the settings to share music files stored on a PC and
NAS on the network.
nSharing media stored in PC
If you are using a media server, be sure to apply this setting first.
•While this unit is operated by a media control device, “Music Server”
appears on the display of this unit.
•When selecting this unit from the media control device, the name of
this unit is displayed as its friendly name.
•To check the friendly name, see “Checking the network information”
(vpage25).
Settings for playing back with Windows Media
Player 12 (Windows 7)
NOTE
Perform this procedure after changing the control panel display to
“Category”.
1In the PC’s “Control Panel”, select “Network
and Internet” - “Choose homegroup and sharing
options”.
2Select the “Stream my pictures, music, and videos
to all devices on my home network” check box and
select “Choose media streaming options”.
3Select “Allowed” in the drop-down list for “Cocoon
1”.
4Select “Allowed” in the drop-down list for “Media
programs on this PC and remote connections...”.
5
Settings for playing back with Windows Media
Player 11
1Start up Windows Media Player 11 on the PC.
2Select “Media Sharing” in the “Library”.
3Click the “Share my media” check box, select
“Cocoon 1”, and then click “Allow”.
4As you did in step 3, select the icon of the device
(other PCs and mobile devices) you want to use as a
media controller, and then click “Allow”.
5
Sharing media stored in NAS
Change settings on the NAS to allow this unit and other devices (PCs
and mobile devices) used as media controllers to access the NAS. For
details, see the owner’s manual that came with the NAS.
Preparations
Operations
Informations
Operations
21
Playing back files stored on PC or NAS with Cocoon App (Music Server)
About playback
When you start playback on PC, NAS, or DMS, the input source for
this unit automatically switches to “Music Server”, and audio is output
from this unit.
The name of the currently played back track and its artist name appear
on the display of this unit.
When this unit is operating, you can perform operations such as
playing back and stopping files through DMC operations. You can also
adjust or mute the volume.
Pressing while this unit is playing back stops the playback on this
unit and switches to “Preset 1”.
•When using a server that supports transcoding such as Windows
Media Player (version 11 or higher), you can play back WMA
Lossless files.
•Depending on the played back file, the track name or artist name
may not be displayed.
NOTE
The music display order depends on the specifications of your PC,
NAS, or DMS.
nMusic Server operation buttons
Operation buttons Function
+, –Volume up / down
13 Mute On/Off
Switching the input source
XPower on/standby
Important information
•The network audio playback function of this unit connects to the server using technologies shown below.
•Windows Media Player Network Sharing Service
•File types that this unit can play back and specifications are shown below.
GSupported file typesH
Supported file types Music Server z1
WMA (Windows Media Audio) P
MP3 (MPEG-1 Audio Layer-3) P
WAV P
MPEG-4 AAC Pz2
FLAC (Free Lossless Audio Codec) P
A server or server software compatible with distribution in the corresponding formats is required to play
music files via a network.
z1 Music Server
•This unit is compatible with MP3 ID3-Tag (Ver. 2) standard.
•This unit is compatible with WMA META tags.
z2 Only files that are not protected by copyright can be played on this unit.
Content downloaded from pay sites on the Internet are copyright protected. Also, files encoded in
WMA format when ripped from a CD, etc. on a computer may be copyright protected, depending on
the computer’s settings.
NOTE
File types that this unit does not support are not displayed.
GSpecifications of supported filesH
Sampling frequency Bit rate Extension
WMA (Windows Media Audio) 32/44.1/48 kHz 48 – 192 kbps .wma
MP3 (MPEG-1 Audio Layer-3) 32/44.1/48 kHz 32 – 320 kbps .mp3
WAV 32/44.1/48 kHz – .wav
MPEG-4 AAC 32/44.1/48 kHz 16 – 320 kbps
.aac/
.m4a/
.mp4
FLAC (Free Lossless Audio Codec) 32/44.1/48/88.2/96 kHz – .flac
Preparations
Operations
Informations
Operations
22
Menu map
Setting items Detailed items Description Page
Language
Language Sets the language for display the menu.
23
Clock
Clock
Auto Adjust(On) Automatically performs the clock setting from the time information on
the Internet.
23
Time Zone(+12H) Sets your local time zone (for Auto Adjust). 23
Summer Time(Off) Sets the Summer Time information (for Auto Adjust). 24
Auto Adjust Now Obtains the current time. 24
Manual Adjust Adjusts the clock manually. 24
Max Vol Level
Max Vol Level Make a setting for maximum volume.
25
Network Info.
Network Info.
Display network information.
Friendly Name / DHCP=On or Off / IP Address / Primary DNS /
Secondary DNS / MAC Address
25
WPS
WPS(PIN) Sets the wireless connection using WPS (PIN code method).
25
Firmware Update
Firmware Update Starts the firmware update.
26
Factory Reset
Factory Reset Reset to the defaults. –
Exit
Exit To exit the menu, select “Exit”.
–
How to make detailed settings
Menu operation
NOTE
Use buttons on this unit for menu operations. Buttons on the remote
control do not work.
1Press + and – at the same time.
Menu
Language
•The selected item appears on the display.
2Press + or – to select the menu to be set.
3Press 13 to enter the setting.
•To return to the previous item, use + or – to select “Exit”, and
press 13.
•To exit the menu, select “Exit” in the top menu, and press 13.
The menu disappears.
Preparations
Operations
Informations
Operations
23
Setting the language (Language)
Sets the language for display the menu.
•The factory default setting is “English”.
1Press + and – at the same time.
Turns on the menu settings mode and the menu appears on the
display (vpage22 “Menu map”).
Menu
Language
2Press 13, then press + or – to select the language
you want to set.
English / Français / Español / (EXIT)
3Press 13 to enter the setting
The top menu is displayed again.
Setting the clock (Clock)
You can automatically adjust the clock of this unit using the Internet.
To use this function, the unit must be connected to the Internet.
Adjusting the clock automatically (Auto
Adjust)
Use the following procedure to automatically adjust the clock.
1Press + and – at the same time.
Turns on the menu settings mode and the menu appears on the
display (vpage22 “Menu map”).
Menu
Language
2Press + or – to select “Clock”, then press 13.
3Press + or – to select “Auto Adjust(On)”, then press
13.
4Press + or – to select “On” or “Off”.
The operation to receive the current time starts.
On Automatically adjust the clock.
Off Does not automatically adjust the clock.
5Press 13 to enter the setting
The “Clock” menu is displayed again.
Setting the Time Zone
(Time Zone)
Use the following procedure to select your local standard time (time
zone).
1Press + and – at the same time.
Turns on the menu settings mode and the menu appears on the
display (vpage22 “Menu map”).
Menu
Language
2Press + or – to select “Clock”, then press 13.
“Auto Adjust(On)” is displayed.
3Press + or – to select “Time Zone(–5H)”, then press
13.
“–5H(Eastern Standard Time)” is displayed.
4Press + or – to select your local standard time (time
zone) in your lives, then press 13.
The “Clock” menu is displayed again.
Preparations
Operations
Informations
Operations
24
Setting the clock (Clock)
Setting the Summer Time
(Summer Time)
Use the following procedure to set Summer time if the Summer time
system is used in your country.
1Press + and – at the same time.
Turns on the menu settings mode and the menu appears on the
display (vpage22 “Menu map”).
Menu
Language
2Press + or – to select “Clock”, then press 13.
“Auto Adjust(On)” is displayed.
3Press + or – to select “Summer Time(Off)”, then
press 13.
4Press + or – to select “Off(0H)” or “On(+1H)”, then
press 13.
The “Clock” menu is displayed again.
Setting the current time
(Auto Adjust Now)
When the unit is connected to the Internet, the current time is set
automatically.
1Press + and – at the same time.
Turns on the menu settings mode and the menu appears on the
display (vpage22 “Menu map”).
Menu
Language
2Press + or – to select “Clock”, then press 13.
“Auto Adjust(On)” is displayed.
3Press + or – to select “Auto Adjust Now”, then press
13.
The operation to receive the current time starts.
•The current time is displayed for several seconds when it is
received successfully.
•If the current time is not received successfully, “Connection
Failed” appears.
Setting the current time (Manual Adjust)
(12-Hour Display)
When the unit is not connected to the Internet, set the current time
manually.
1Press + and – at the same time.
Turns on the menu settings mode and the menu appears on the
display (vpage22 “Menu map”).
Menu
Language
2Press + or – to select “Clock”, then press 13.
“Auto Adjust(On)” is displayed.
3Press + or – to select “Manual Adjust”, then press
13.
4Press + or – to set the “hours”, then press 13.
5Press + or – to set the “minutes”, then press 13.
The current time is set.
If you use “Manual Adjust” to set the time, “Auto Adjust” is set to
“Off”.
Preparations
Operations
Informations
Operations
25
Setting the volume limit
(Max Vol Level)
Make a setting for maximum volume.
•The factory default setting is “50”.
1Press + and – at the same time.
Turns on the menu settings mode and the menu appears on the
display (vpage22 “Menu map”).
Menu
Language
2Press + or – to select “Max Vol Level”, then press
13.
“Max Volume” menu appears.
3Press + or – to select the volume “0 – 50”, then press
13.
The top menu is displayed again.
Setting the network (Network Info.)
Checking the network information
1Press + and – at the same time.
Turns on the menu settings mode and the menu appears on the
display (vpage22 “Menu map”).
Menu
Language
2Press + or – to select “Network Info.”, then press
13.
3Press + or – to select the item you want to check.
•Select “Exit” and press 13 to return to the top menu.
WPS Settings (PIN code method)
Use this procedure to configure the wireless LAN settings.
Before turning this unit on, make sure that an Ethernet cable is not
connected to this unit. If a cable is connected, have this unit enter the
power standby mode and disconnect the cable.
1Press + and – at the same time.
Turns on the menu settings mode and the menu appears on the
display (vpage22 “Menu map”).
2Press + or – to select “WPS(PIN)”, then press 13.
“Searching” is displayed, and the access point you have set is
displayed.
3Press + or – to select the access point whose PIN code
you want to display, and press 13.
PIN code number is displayed.
4Set this PIN code to the register.
When connection is established with access point, “Succeeded”
is displayed.
•For how to register the PIN code, see the owner’s manual of your
router with access point.
Preparations
Operations
Informations
Operations
26
nNotes concerning use of “Firmware Update”
•Do not turn off the power until updating or upgrading is completed.
•Even with a broadband connection to the Internet, approximately
20 minutes is required for the updating procedure to be
completed.
•Once updating starts, normal operations on this unit cannot be
performed until updating is completed. Furthermore, updating
the firmware may reset the backup data for the parameters, etc.
set for this unit.
•If the update fails, remove and re-insert the power cord. “Update
Retry” appears on the display and update restarts from the point
at which update failed. If the error continues despite this, check
the network environment.
See the DENON website for details about updates.
Setting the network (Network Info.)
Firmware Update
•In order to update the firmware, the environment and settings
required for connecting to broadband internet are needed
(vpage8)
•Perform the firmware update operation after at least 2 minutes has
elapsed since turning this unit’s power ON.
1Press + and – at the same time.
Turns on the menu settings mode and the menu appears on the
display (vpage22 “Menu map”).
2Press + or – to select “Firmware Update”, then press
13.
3Press + or – to select “Check for Update” or “Start”,
then press 13.
Check for Update Check for firmware updates.
Use + or – to select the item, and press 13.
•Up to Date: It is already the latest firmware.
•Available Yes: Updates to the latest firmware.
•Available No: Does not update to the latest firmware.
Start Determines whether to update or not.
Use + or – to select the item, and press 13.
•Yes: Performs update.
•No: Does not perform update.
•If updating fails, the set automatically retries, but if updating is still
not possible, one of the messages shown below is displayed. If
the display reads as shown below, check the settings and network
environment, then update again.
Display Description
Updating fail Updating failed.
Login failed Failure to log into server.
Server is busy Server is busy. Wait a while then try again.
Connection fail Failure in connecting to server.
Download fail Downloading of the firmware has failed.
Auto standby
With the Auto Standby ON, this unit will automatically enter the
standby mode after about 30 continuous minutes of stop mode with
no operation.
•The default setting for the Auto Standby mode is “On”.
1Insert the power plug into the
power outlet and press X.
“Always Display Clock?” is displayed.
2Press + or – to select “Yes” or
“No”, then press 13.
Yes
(Auto Satandby Off) The unit does not go into standby automatically.
No
(Auto Satandby On) The unit goes into standby after 30 minutes.
NOTE
In the following situations, the Auto standby function does not operate.
•When iPod, iPhone or iPad is connected to the Dock connector on
this unit.
•When the input source is “AUX” and a devices connected to the
AUX IN jack.
•When the input source being played is “Internet Radio”or “Music
Server”.
Preparations
Operations
Informations
Operations
28
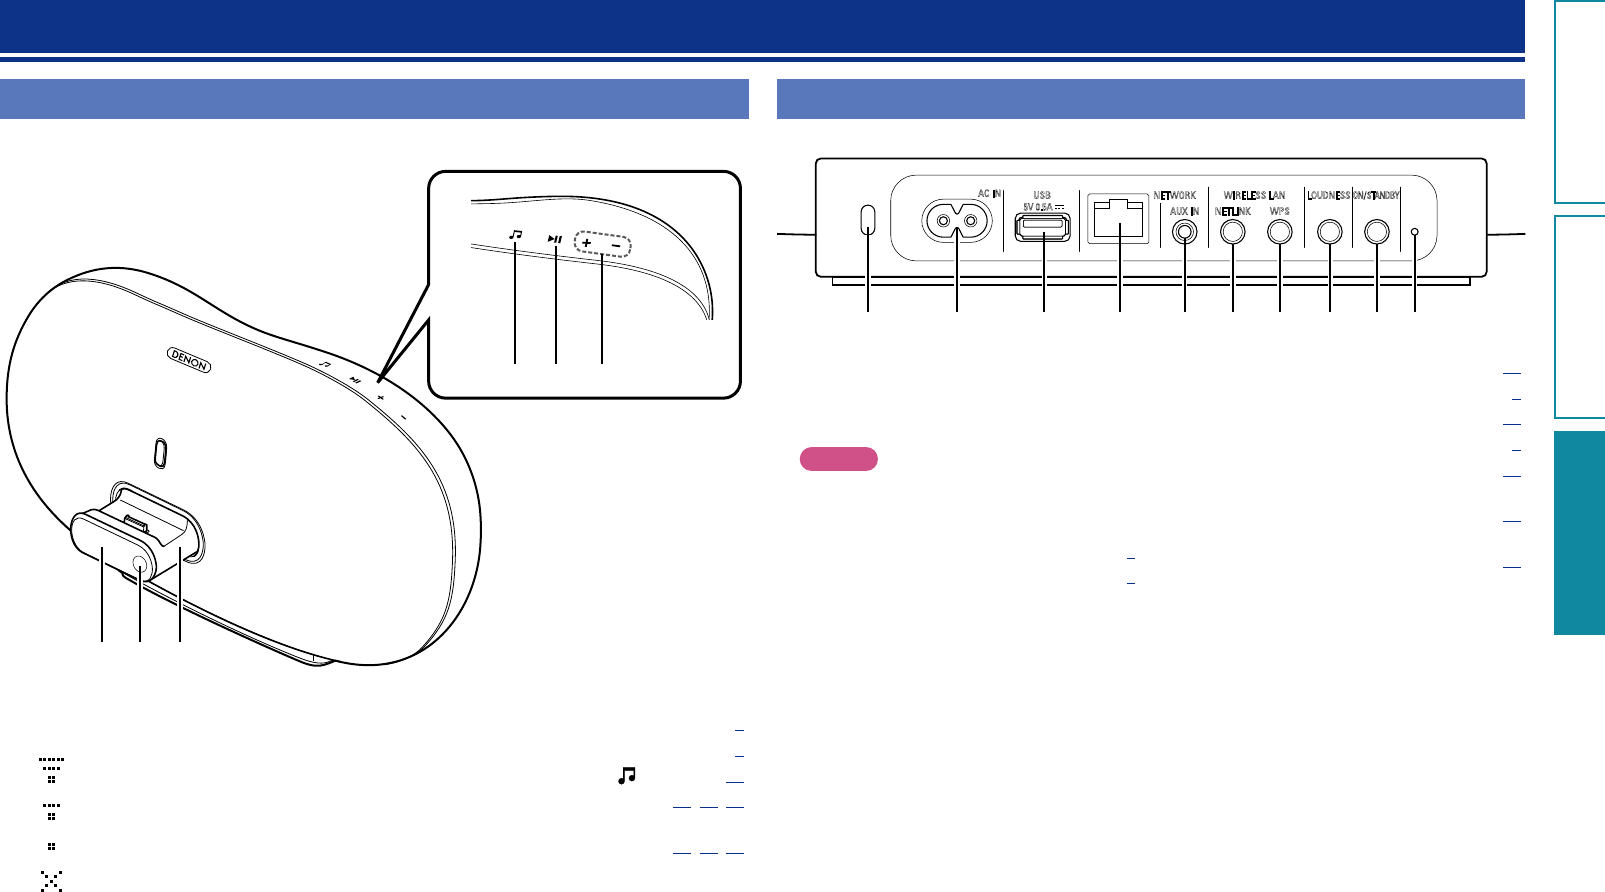
Front panel
For buttons not explained here, see the page indicated in parentheses ( ).
q ew
r t y
q Display
GWireless LAN signal strengthH
: Strong
: Medium
: Weak
: Not connected
Part names and functions
Rear panel
See the page indicated in parentheses ( ).
AC IN USB NETWORK WIRELESS LAN LOUDNESS
ON
/
STANDBY
AUX IN NETLINK WPS
5V 0.5A
wq e r t y u i o Q0
q Security slot
You can attach a security cable to deter theft.
Use a security cable that is compatible with this
unit. For details, contact your dealer.
NOTE
Security cables have deterrent effects, but do
not completely prevent theft or misuse of this
unit.
w AC inlet (AC IN) ············································· (5)
e USB port ························································ (5)
r Network connector (NETWORK) ·············· (10)
t AUX IN jack ··················································· (5)
y NETLINK button ········································· (11)
u WPS button ··················································· (9)
i LOUDNESS button ····································· (14)
o Power operation button
(ON/STANDBY) ·········································· (13)
Turns power to this unit on and off (standby).
Q0 Reset hole ··················································· (35)
w Remote control sensor ································ (3)
e Dock ······························································· (6)
r Input source select button ( ) ················· (13)
t Play/Pause button (13) ················ (14, 22, 35)
y Volume control buttons
(+, – ) ················································ (13, 22, 35)
Preparations
Operations
InformationsInformations
29
Remote control unit
For buttons not explained here, see the page indicated in parentheses ( ).
q Skip buttons (8, 9) ··························· (14)
w Play/Pause button (13) ······················ (14, 19)
e Input source select button ( ) ················· (13)
r Power operation button (X) ······················ (13)
t Volume control buttons (+, – ) ·················· (13)
e
q
r
w
q
t
t
Preparations
Operations
InformationsInformations
30
Other information
nTrademark information (vpage30)
nExplanation of terms (vpage31)
Trademark information
This product uses the following technologies (Random order):
“Made for iPod”, “Made for iPhone” and “Made for iPad” mean that
an electronic accessory has been designed to connect specifically
to iPod, iPhone or iPad, respectively, and has been certified by the
developer to meet Apple performance standards.
Apple is not responsible for the operation of this device or its
compliance with safety and regulatory standards. Please note that
the use of this accessory with iPod, iPhone or iPad, may affect
wireless performance.
AirPlay, the AirPlay logo, iPad, iPhone, iPod, iPod classic, iPod nano,
iPod shuffle and iPod touch are trademarks of Apple Inc., registered
in the U.S. and other countries.
•Individual users are permitted to use iPad, iPhone, iPod, iPod
classic, iPod nano, iPod shuffle, and iPod touch for private copy
and playback of non-copyrighted contents and contents whose
copy and playback is permitted by law. Copyright infringement is
prohibited by law.
Preparations
Operations
InformationsInformations

31
Explanation of terms
A
AES (Advanced Encryption Standard)
This is a next generation standard encryption
method replacing the current DES and 3DES, and
because of its high security it is expected to be
applied widely to wireless LANs in the future. It
uses the “Rijndael” algorithm developed by two
Belgian cryptographers to divide the data into
blocks of fixed lengths and encrypt each block.
It supports data lengths of 128, 192 and 256 bits
and key lengths of 128, 192 and 256 bits as well,
offering extremely high encryption security.
AirPlay
AirPlay sends (plays) contents recorded in iTunes
or on an iPhone/iPod touch/iPad to a compatible
device via the network.
App Store
App Store is a site that sells application software
for such devices as the iPhone or iPod Touch, and
is operated by Apple Inc.
B
Bit rate
This expresses the read amount per 1 second of
video/audio data recorded in a disc. A larger number
means higher sound quality, but also means a larger
file size.
D
DLNA
DLNA and DLNA CERTIFIED are trademarks and/
or service marks of Digital Living Network Alliance.
Some contents may not be compatible with other
DLNA CERTIFIED™ products.
F
FLAC
FLAC stands for Free lossless Audio Codec, and is a
lossless free audio file format. Lossless means that
the audio is compressed without any loss in quality.
The FLAC license is as shown below.
Copyright (C) 2000,2001,2002,2003,2004,2005,200
6,2007,2008,2009 Josh Coalson
Redistribution and use in source and binary forms,
with or without modification, are permitted provided
that the following conditions are met:
•Redistributions of source code must retain the
above copyright notice, this list of conditions and
the following disclaimer.
•Redistributions in binary form must reproduce the
above copyright notice, this list of conditions and
the following disclaimer in the documentation and/
or other materials provided with the distribution.
•Neither the name of the Xiph.org Foundation nor
the names of its contributors may be used to
endorse or promote products derived from this
software without specific prior written permission.
THIS SOFTWARE IS PROVIDED BY THE
COPYRIGHT HOLDERS AND CONTRIBUTORS “AS
IS” AND ANY EXPRESS OR IMPLIED WARRANTIES,
INCLUDING, BUT NOT LIMITED TO, THE
IMPLIED WARRANTIES OF MERCHANTABILITY
AND FITNESS FOR A PARTICULAR PURPOSE
ARE DISCLAIMED. IN NO EVENT SHALL THE
FOUNDATION OR CONTRIBUTORS BE LIABLE
FOR ANY DIRECT, INDIRECT, INCIDENTAL,
SPECIAL, EXEMPLARY, OR CONSEQUENTIAL
DAMAGES (INCLUDING, BUT NOT LIMITED TO,
PROCUREMENT OF SUBSTITUTE GOODS OR
SERVICES; LOSS OF USE, DATA, OR PROFITS; OR
BUSINESS INTERRUPTION) HOWEVER CAUSED
AND ON ANY THEORY OF LIABILITY, WHETHER
IN CONTRACT, STRICT LIABILITY, OR TORT
(INCLUDING NEGLIGENCE OR OTHERWISE)
ARISING IN ANY WAY OUT OF THE USE OF
THIS SOFTWARE, EVEN IF ADVISED OF THE
POSSIBILITY OF SUCH DAMAGE.
I
IEEE 802.11b
This is one wireless LAN standard set by the 802
working group that establishes LAN technology
standards at the IEEE (Institute of Electrical and
Electronics Engineers) of the United States. It
uses the 2.4 GHz band usable freely without
a radio frequency license (ISM band), enabling
communications at a maximum speed of 11 Mbps.
•The value indicated above is the maximum
theoretical value for the wireless LAN standard,
and does not indicate the actual data transfer rate.
IEEE 802.11g
This is another wireless LAN standard set by the
802 working group that establishes LAN technology
standards at the IEEE (Institute of Electrical and
Electronics Engineers) of the United States, and
is compatible with IEEE 802.11b. It also uses the
2.4 GHz band, but enables communications at a
maximum speed of 54 Mbps.
•The value indicated above is the maximum
theoretical value for the wireless LAN standard,
and does not indicate the actual data transfer rate.
iTunes
iTunes is the name of the multimedia player
provided by Apple Inc. It enables management
and playback of multimedia contents including
music and movies. iTunes supports many main file
formats including AAC, WAV, and MP3.
M
MP3 (MPEG Audio Layer-3)
This is an internationally standardized audio data
compression scheme, using the “MPEG-1” video
compression standard. It compresses the data
volume to about one eleventh its original size while
maintaining sound quality equivalent to a music CD.
MPEG (Moving Picture Experts Group),
MPEG-2, MPEG-4
These are the names for digital compression format
standards used for the encoding of video and audio.
Video standards include “MPEG-1 Video”, “MPEG-
2 Video”, “MPEG-4 Visual”, “MPEG-4 AVC”. Audio
standards include “MPEG-1 Audio”, “MPEG-2
Audio”, “MPEG-4 AAC”.
N
Network Names
(SSID: Security Set Identifier)
When forming wireless LAN networks, groups are
formed to prevent interference, data theft, etc.
This grouping is done by “SSID” or “Security Set
Identifiers”. For further security, a WEP key is set
and signal transfer is not possible unless the SSID
and WEP key match.
P
Protection Circuit
This is a function to prevent damage to devices
within the power supply when an abnormality
such as an overload, excess voltage occurs or
temperature for any reason.
In this unit, the power indicator blinks and the unit
enters standby mode when an abnormality occurs.
S
Sampling frequency
Sampling involves taking a reading of a sound wave
(analog signal) at regular intervals and expressing
the height of the wave at each reading in digitized
format (producing a digital signal).
The number of readings taken in one second is
called the “sampling frequency”. The larger the
value, the closer the reproduced sound is to the
original.
T
TKIP (Temporal Key Integrity Protocol)
This is a network key used for WPA. The encryption
algorithm is RC4, the same as for WEP, but the
security level is increased by changing the network
key used for encryption for each packet.
Preparations
Operations
InformationsInformations

32
V
vTuner
This is a free online content server for Internet
radio. Note that usage fees are included in upgrade
costs.
For inquiries about this service, visit the vTuner site
below.
vTuner website: http://www.radiodenon.com
This product is protected by certain intellectual
property rights of Nothing Else Matters Software
and BridgeCo. Use or distribution of such technology
outside of this product is prohibited without a
license from Nothing Else Matters Software and
BridgeCo or an authorized subsidiary.
W
WEP Key (Network Key)
This is key information used for encrypting data
when conducting data transfer. On this unit, the
same WEP key is used for data encryption and
decryption, so the same WEP key must be set on
both devices in order for communications to be
established between them.
Wi-Fi®
Wi-Fi Certification assures tested and proven
interoperability by the Wi-Fi Alliance, a group
certifying interoperability among wireless LAN
devices.
Explanation of terms
Windows Media DRM
This is a copyright protection technology developed
by Microsoft.
Content providers are using the digital rights
management technology for Windows Media
contained in this device (WM-DRM) to protect
the integrity of their content (Secure Content) so
that their intellectual property, including copyright,
in such content is not misappropriated. This
device uses WM-DRM software to play Secure
Content (WM-DRM Software). If the security of
the WM-DRM Software in this device has been
compromised, owners of Secure Content (Secure
Content Owners) may request that Microsoft
revoke the WM-DRM Software’s right to acquire
new licenses to copy, display and/or play Secure
Content. Revocation does not alter the WM-DRM
Software’s ability to play unprotected content.
A list of revoked WM-DRM Software is sent to
your device whenever you download a license for
Secure Content from the Internet or from a PC.
Microsoft may, in conjunction with such license,
also download revocation list onto your device on
behalf of Secure Content Owners.
Windows Media Player Ver.11 or later
This is a media player distributed free of charge by
Microsoft Corporation.
It can play playlists created with Ver.11 or later of
Windows Media Player, as well as WMA, DRM
WMA, WAV, and other files.
WMA (Windows Media Audio)
This is audio compression technology developed by
Microsoft Corporation.
WMA data can be encoded using Windows
Media® Player Ver.7, 7.1, Windows Media® Player
for Windows® XP and Windows Media® Player 9
Series.
To encode WMA files, only use applications
authorized by Microsoft Corporation. If you use
an unauthorized application, the file may not work
properly.
WPA (Wi-Fi Protected Access)
This is a security standard established by the Wi-Fi
Alliance. In addition to the conventional SSID
(network name) and WEP key (network key), it also
uses a user identification function and encrypting
protocol for stronger security.
WPA2 (Wi-Fi Protected Access 2)
This is a new version of the WPA established by the
Wi-Fi Alliance, compatible with more secure AES
encryption.
WPA-PSK/WPA2-PSK (Pre-shared Key)
This is a simple authentication system for mutual
authentication when a preset character string
matches on the wireless LAN access point and
client.
WPS (Wi-Fi Protected Setup)
This is a standard drawn up by the Wi-Fi Alliance
to ease the task of setting up wireless LAN
connections and configuring security.
There are two methods: push-button and PIN
(Personal Identification Number) code.
Preparations
Operations
InformationsInformations
33
Troubleshooting
If a problem should arise, first check the following:
1. Are the connections correct?
2. Is the set being operated as described in the owner’s manual?
3. Are the other devices operating properly?
If this unit does not operate properly, check the items listed in the table below. Should the problem persist,
there may be a malfunction.
In this case, disconnect the power immediately and contact your store of purchase.
GGeneralH
Symptom Cause/Solution Page
Power does not turn
on.
•Check whether the power plug is correctly inserted into the power
outlet.
5
The operation
buttons on the upper
part of this unit flash
white approximately
every 2 seconds.
•The protection circuit has been activated by a rise in the humidity
inside the unit. Please turn off power once, and re-apply the power
after the temperature has fallen sufficiently.
•Please re-install this unit in a place having good ventilation.
31
–
The operation
buttons on the upper
part of this unit flash
white approximately
every 0.5 seconds.
•This unit amplifier circuit has failed. Turn off the power and please
contact the DENON service adviser.
–
Set does not operate
properly.
•Reset the microprocessor. 35
GAudioH
Symptom Cause/Solution Page
Audio is not output. •Check the connections for all devices.
•Check whether the audio device power is turned on.
•Adjust the master volume.
•Check the connection with the playback device and select the
proper input source.
5,6,9,10
–
13
13
GiPod / USB memory device / Internet radio / Music Server H
Symptom Cause/Solution Page
iOS device cannot be
played.
•Some iOS devices do not support being used connected directly
to the Dock connector.
6
The file names
are not displayed
properly (“...”, etc.).
•Characters that cannot be displayed are used. This is not a
malfunction. On this unit, characters that cannot be displayed are
replaced with a “.” (period).
•The USB cable connecting the USB memory device and the unit
uses incompatible tags. Use USB memory devices with tags
supported by the unit.
–
18
When a USB
memory device is
connected, “USB” is
not displayed on the
menu.
•The set cannot recognize a USB memory device. Check the
connection.
•This unit supports mass storage class and MTP-compatible USB
memory devices. It will not recognize other USB memory devices.
•A USB memory device that the set cannot recognize is connected.
This is not a malfunction. DENON does not guarantee that all USB
memory devices will operate or receive power.
•USB memory device is connected via USB hub. Connect the USB
memory device directly to the USB port.
•The unit supports file structures with up to 8 levels and a total
maximum of 5000 subfolders and files per 1 folder. Change the
file structure of the USB memory device if necessary.
5
–
–
–
18
Files on a USB
memory device
cannot be played.
•The USB memory device format should be set to FAT16 or
FAT32. For details, refer to the USB memory device’s operating
instructions.
•If the USB memory device is divided into multiple partitions, only
files in partition one can be played.
•Files are stored in a non-compatible format. Record the files in a
compatible format.
•You are attempting to play a file that is copyright protected. Files
that are copyright protected cannot be played on this unit.
–
–
18
18
Preparations
Operations
InformationsInformations
v See overleaf
34
Symptom Cause/Solution Page
Internet radio cannot
be played.
•Ethernet cable is not properly connected or network is
disconnected. Check the connection status.
•Program is being broadcast in non-compatible format. Only
Internet radio programs in MP3 and WMA can be played on this
unit.
•The firewall of the PC or router has been activated. Check the
firewall settings of the connected PC or router.
•Radio station is not currently broadcasting. Choose a radio station
that is currently broadcasting.
•IP address is wrong. Check the set’s IP address.
•Some radio stations may go silent at certain times of the day. In
this case, no audio is output even when a station is received. Try
again later, or switch to another radio station.
9,10
17
–
–
25
–
Files stored on a
computer cannot be
played.
•Files are stored in a non-compatible format. Record in a compatible
format.
•You are attempting to play a file that is copyright protected. Files
that are copyright protected cannot be played on this unit.
•Set and computer are connected by USB cable. The set’s USB
port cannot be used for connection to a computer.
•Media sharing settings are not correct. Change media sharing
settings so that the unit can access the folders on your computer.
21
21
–
20
Music stored on
a NAS cannot be
played.
•If you use a NAS in conformity with the DLNA standard, enable
the DLNA server function in the NAS setting.
•If you use a NAS that does not conform with the DLNA standard,
play the music via a PC. Set Windows Media Player’s media
sharing function and add NAS to the selected play folder.
•If connection is restricted, set audio equipment as the connection
target.
–
20
–
Server is not found,
or it is not possible
to connect to the
server.
•The computer’s or router’s firewall is activated. Check the
computer’s or router’s firewall settings.
•Computer’s power is not turned on. Turn on the power.
•Server is not running. Launch the server.
•Set’s IP address is wrong. Check the set’s IP address.
–
–
–
25
Cannot connect to
preset radio stations.
•Radio station is not currently broadcasting. Wait a while before
trying again.
•Radio station is not currently in service. It is not possible to
connect to radio stations that are no longer in service.
–
–
Symptom Cause/Solution Page
For some radio
stations, “Radio
station server full” or
“Connection down”
is displayed and
station cannot be
connected to.
•Station is congested or not currently broadcasting. Wait a while
before trying again.
–
Sound is broken
during playback.
•Network or USB memory device’s signal transfer speed is slow
or communications lines or radio station is congested. This is not
a malfunction. When playing broadcast data with a high bit rate,
the sound may be broken, depending on the communications
conditions.
–
Sound quality is poor
or noise is heard
during play.
•File being played has a low bit rate. This is not a malfunction. –
GAirPlayH
Symptom Cause/Solution Page
The AirPlay icon
is not displayed
in iTunes or on the
iPhone/iPod touch/
iPad.
•This unit and the computer or iPhone/iPod touch/iPad are not
connected to the same network (LAN). Connect the computer or
iPhone/iPod touch/iPad to the same network as this unit.
•iTunes or the iPhone/iPod touch/iPad do not have firmware that
supports AirPlay installed. Update to the latest firmware.
9,10
26
No sound. •The volume in iTunes or on the iPhone/iPod touch/iPad is set to
the minimum setting. Adjust the volume to the optimum level.
•This unit is not selected in the screen that is displayed when
iTunes or the iPhone/iPod touch/iPad is started. Start iTunes or
switch on the iPhone/iPod touch/iPad, click the AirPlay icon in
the displayed screen, and select this unit.
•AirPlay playback has not started. Click the 1 button in iTunes or
press the 1 button on the iPhone/iPod touch/iPod.
–
15
–
When using AirPlay
with the iPhone/
iPod touch, the
sound suffers from
intermittent breaks
or AirPlay does not
function.
•Quit the application running in the background of the iPhone/iPod
touch, and then play using AirPlay.
•When playing via a wireless connection, outside conditions may
affect the unit. To remedy this, change the network environment,
e.g. shorten the distance to the wireless LAN access point.
•Update the iPhone/iPod touch application or iTunes to the latest
version.
–
–
–
Preparations
Operations
InformationsInformations
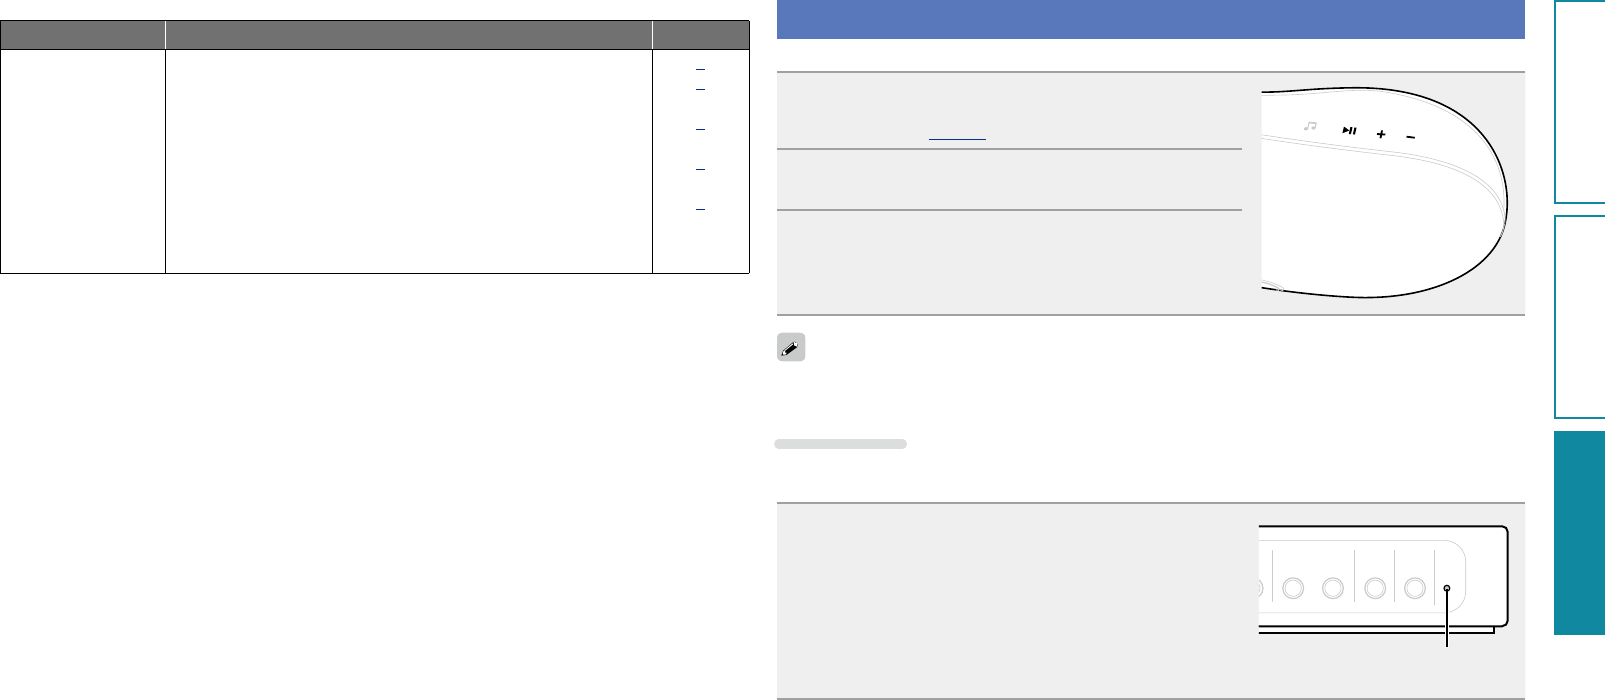
35
GRemote control unitH
Symptom Cause/Solution Page
The set cannot be
operated with the
remote control unit.
•Batteries are worn out. Replace with new batteries.
•Operate the remote control unit within a distance of about
23 ft/7 m from this unit and at an angle of within 30°.
•Remove any obstacle between this unit and the remote control
unit.
•Insert the batteries in the proper direction, checking the q and
w marks.
•The set’s remote control sensor is exposed to strong light (direct
sunlight, inverter type fluorescent bulb light, etc.). Move the set
to a place in which the remote control sensor will not be exposed
to strong light.
3
3
3
3
3
Resetting the microprocessor
When the microprocessor is reset, all the settings are reset to their default values.
1Press + and – at the same time.
Turns on the menu settings mode and the menu appears on
the display (vpage22 “Menu map”).
2Press + or – to select “Factory Reset”, then press
13.
3Press + or – to select “Reset? Yes”, then press
13.
“Initialized” is displayed and the default settings are
restored.
If “Initialized” does not display in step 3, start over from step 1.
How to reset
“Reset” is an operation that restarts this unit.
Perform this procedure if the display is abnormal or if operations cannot be performed.
When the power of this unit is on, insert a thin stick
(z2) into the reset hole (z1), and press the reset
button within this unit.
This unit automatically restarts.
•Prepare a thin stick (such as a toothpick and straightened paper
clip) for pressing the reset button within this unit.
z1 Thickness (dia.): 0.5 mm – 1.5 mm
z2 Length: 30 mm or longer
NETWORK
WIRELESS LAN LOUDNESS
ON
/
STANDBY
AUX IN
NETLINK WPS
z
1
Preparations
Operations
InformationsInformations

36
Specifications
nAudio section
•Amplifiers: 4 x 25 W ClassD
•Drivers: 2 x 40 mm Tweeter
2 x 100 mm Woofer
nClock
•Clock method: Within 1 – 2 minutes per month
nWireless LAN
Network type
(wireless LAN standards):
Conforming to IEEE 802.11b
Conforming to IEEE 802.11g (Conforming to Wi-Fi®)z
Transfer rate: DS-SS: 11 / 5.5 / 1 Mbps (Automatic switching)
OFDM: 54 / 48 / 36 / 24 / 18 / 12 / 9 / 6 Mbps (Automatic switching)
Security: SSID (Network name)
WEP key (network key) (64/128 bits)
WPA-PSK (TKIP/AES)
WPA2-PSK (TKIP/AES)
Used frequency range: 2.412 MHz – 2.462 MHz
No. of channels: Conforming to IEEE 802.11b : 11 ch (DS-SS) (Of which 1 channel used)
Conforming to IEEE 802.11g : 11 ch (OFDM) (Of which 1 channel used)
nGeneral
Power supply: AC 120 V, 60 Hz
Power consumption: 50 W
0.5 W (Standby)
z Wi-Fi® conformity indicates tested and proven interoperability by the “Wi-Fi Alliance”, a group certifying
interoperability among wireless LAN devices.
For purposes of improvement, specifications and design are subject to change without notice.
Preparations
Operations
InformationsInformations

37
vA
Accessories ·························································· 1
Adjusting the master volume ····························· 13
Adjusting the tone ·············································· 14
AES ···································································· 31
AirPlay ·························································· 15, 31
App Store ················································· 3, 15, 31
Auto Adjust ························································ 23
Auto Adjust Now ················································ 24
Auto standby ······················································ 26
vB
Bit rate ································································ 31
vC
Cable
Ethernet cable·················································· 10
Power cord ························································ 5
Stereo mini plug cable ······································· 5
Clock
Auto Adjust ······················································ 23
Auto Adjust Now ············································· 24
Manual Adjust ·················································· 24
Summer Time ·················································· 24
Time Zone ························································ 23
Cocoon App ·············································· 3, 17, 20
Condensation ······················································· 2
Connection
Home network (LAN) ········································· 7
iOS device·························································· 6
Portable player ··················································· 5
Power cord ························································ 5
USB memory device ·········································· 5
Wired LAN ······················································· 10
Wireless LAN ····················································· 9
vD
DHCP ································································· 10
Display ································································ 28
DLNA ···························································· 20, 31
vF
Firmware Update ··············································· 26
FLAC ······················································ 18, 21, 31
Front Panel ························································· 28
vH
How to eject/store the Dock ································ 6
How to reset ······················································ 35
vI
IEEE 802.11b ······················································ 31
IEEE 802.11g ······················································ 31
Inputting characters ··········································· 25
iTunes ··························································· 15, 31
vL
Language ···························································· 23
vM
Manual Adjust ···················································· 24
Max Vol Level ····················································· 25
Menu map ·························································· 22
Menu operation ·················································· 22
MP3 ·················································· 17, 18, 21, 31
MPEG ····················································· 18, 21, 31
vN
NETLINK ····························································· 11
Network Info ······················································ 25
Network Info.
Firmware Update ············································· 26
PIN code method ············································· 25
Network Names ················································· 31
vO
Operation Mode ················································· 14
vP
Playback
AirPlay function ················································ 15
FLAC ·························································· 18, 21
Internet radio ··················································· 17
iOS device························································ 14
MP3 ····················································· 17, 18, 21
MPEG-4 AAC ············································· 18, 21
Music server ···················································· 20
NAS·································································· 20
PC ···································································· 20
Portable player ················································· 19
USB memory device ········································ 18
WAV··························································· 18, 21
WMA ··················································· 17, 18, 21
Progressive ························································ 31
Protection circuit ················································ 31
vR
Rear panel ·························································· 28
Remote control unit ··········································· 29
Inserting the batteries········································ 3
Resetting the microprocessor ···························· 35
vS
Sampling frequency ························· 17, 18, 21, 31
Security slot ······················································· 28
Selecting the input source ································· 13
Setting the current time ····································· 13
Setting the volume limit
(Max Vol Level) ··················································· 25
Summer Time ···················································· 24
Supported iPod models ········································ 6
vT
Time Zone ·························································· 23
TKIP ···································································· 31
Trademark ·························································· 30
Troubleshooting ················································· 33
Turning the power on ········································· 13
vV
vTuner ································································ 32
vW
WAV ····························································· 18, 21
WEP Key ···························································· 32
Wi-Fi ··································································· 32
Windows Media DRM ········································ 32
Windows Media Player ································ 20, 32
WMA ················································ 17, 18, 21, 32
WPA ··································································· 32
WPA2 ································································· 32
WPA-PSK/WPA2-PSK ········································· 32
WPS ························································· 9, 25, 32
Index
Preparations
Operations
InformationsInformations
38
Dimensions
Unit : in. (mm)
9 19/64 (236.0)
17 3/4 (451.0) 1 1/16
(27.0)
6 11/16 (170.0)
Weight : 11 lbs 14.5 oz (5.4 kg)
Preparations
Operations
InformationsInformations

D&M Holdings Inc.
3520 10119 00AD
V00
www.denon.com
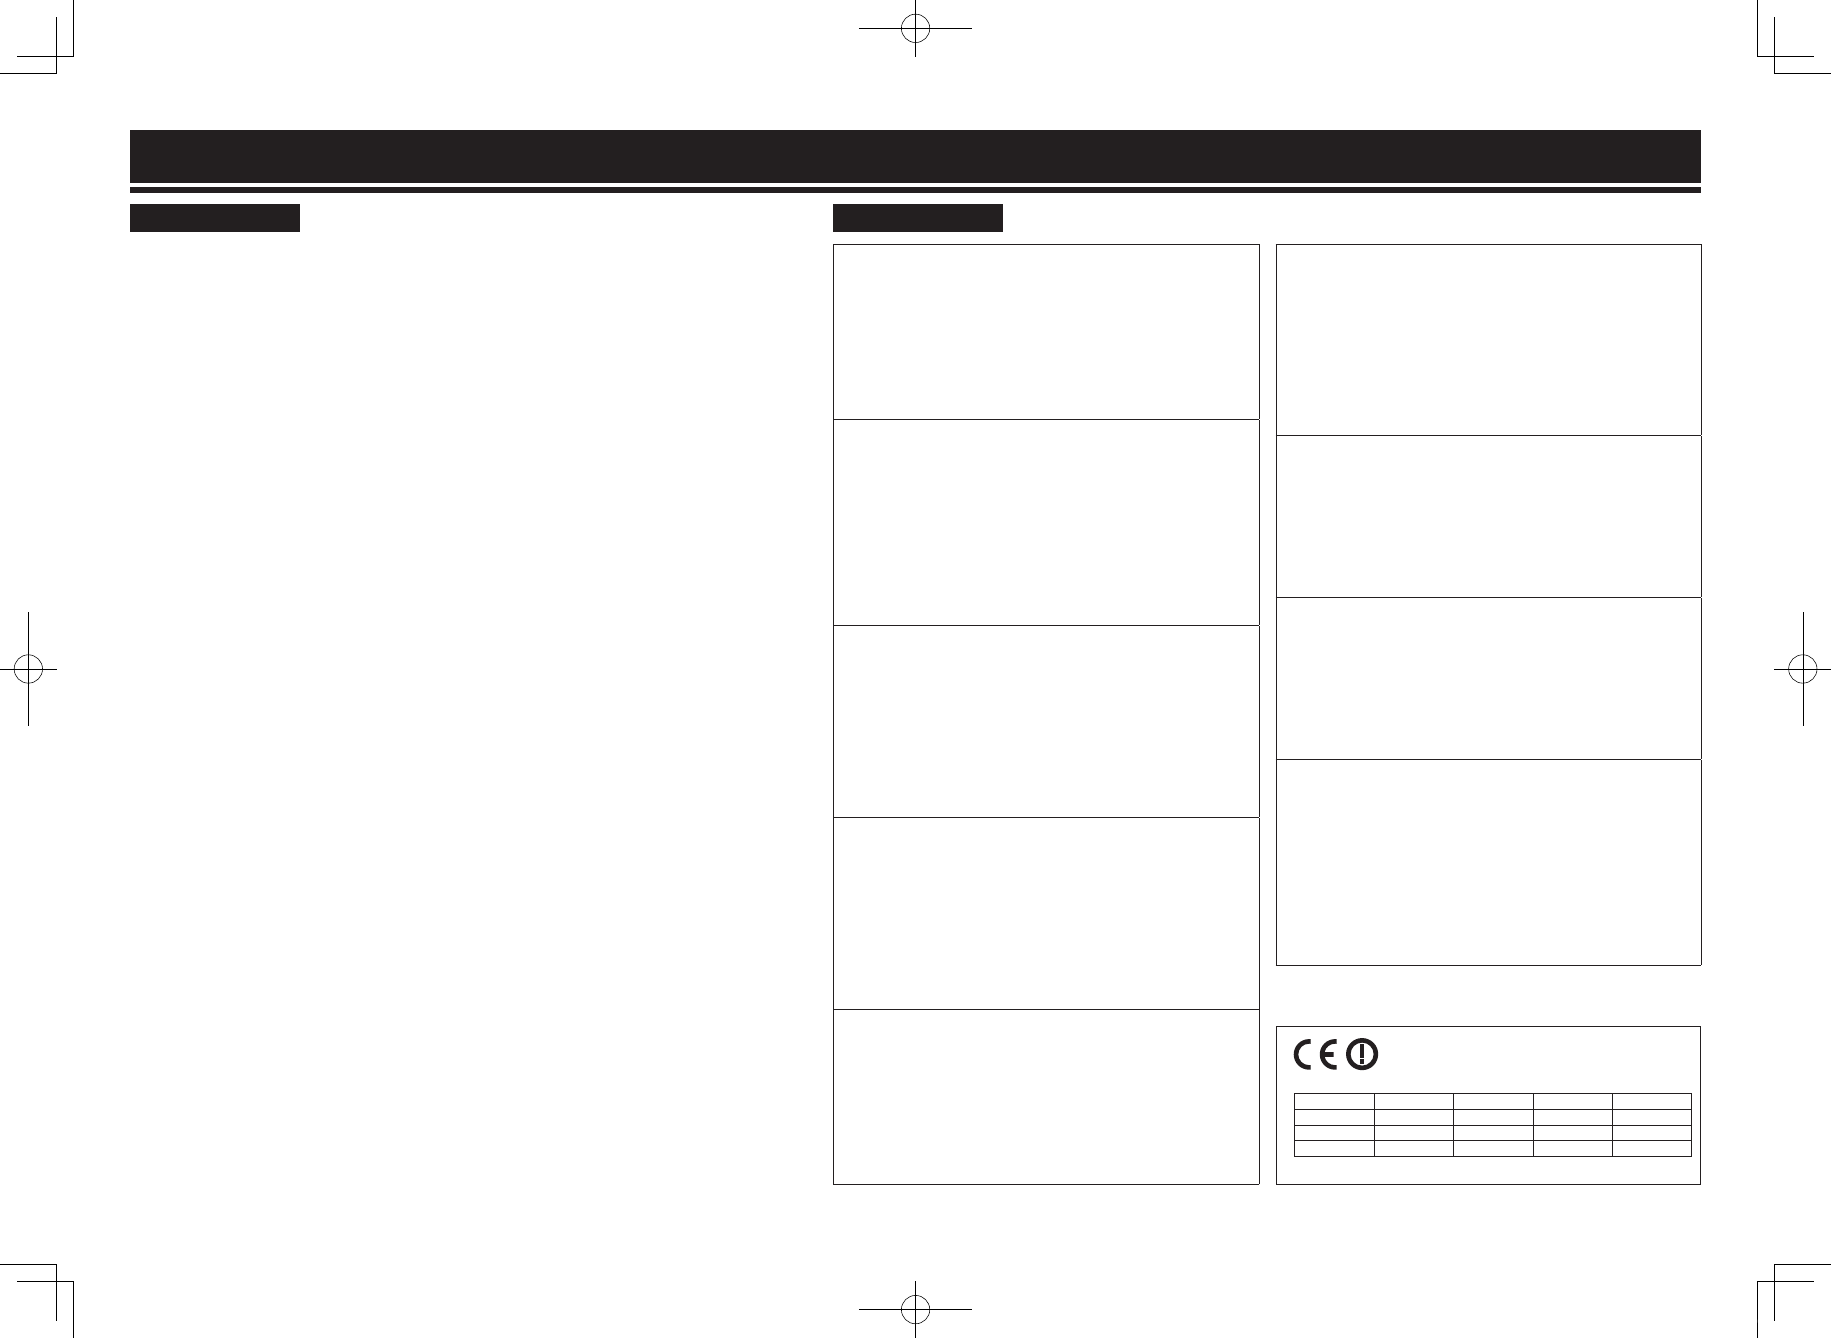
USA CANADA
nFCC Information
(For US customers)
1. IMPORTANT NOTICE :
DO NOT MODIFY THIS PRODUCT
Any changes or modifications not expressly approved
by the grantee of this device could void the user’s
authority to operate the equipment.
2. CAUTION
This equipment must be installed and operated
in accordance with provided instructions and the
antenna(s) used for this transmitter must be installed
to provide a separation distance of at least 20 cm from
all persons and must not be co-located or operating
in conjunction with any other antenna or transmitter.
End-users and installers must be provide with antenna
installation instructions and transmitter operating
conditions for satisfying RF exposure compliance.
3. COMPLIANCE INFORMATION
Product Name :
Wireless headphones
This device complies with Part 15 of the FCC Rules.
Operation is subject to the following two conditions:
(1) this device may not cause harmful interference,
and (2) this device must accept any interference
received, including interference that may cause
undesired operation.
Denon Electronics (USA), LLC
(a D & M Holdings Company)
100 Corporate Drive
Mahwah, NJ 07430-2041
Tel. (800) 497-892
4. NOTE
This equipment has been tested and found to
comply with the limits for a Class B digital device,
pursuant to part 15 of the FCC Rules. These limits
are designed to provide reasonable protection against
harmful interference in a residential installation. This
equipment generates, uses and can radiate radio
frequency energy and, if not installed and used in
accordance with the instructions, may cause harmful
interference to radio communications. However,
there is no guarantee that interference will not occur
in a particular installation. If this equipment does
cause harmful interference to radio or television
reception, which can be determined by turning the
equipment off and on, the user is encouraged to try
to correct the interference by one or more of the
following measures:
•Reorient or relocate the receiving antenna.
•Increase the separation between the equipment
and receiver.
•Connect the equipment into an outlet on a circuit
different from that to which the receiver is
connected.
•Consult the dealer or an experienced radio/ TV
technician for help.
nIC Information
(For Canadian customers)
CAUTION
To reduce potential radio interference to other users,
the antenna type and its gain should be so chosen
that the equivalent isotropically radiated power
(e.i.r.p.) is not more than that permitted for successful
communication.
ATTENTION
Afin de reduire le risque d’interference aux autres
utilisateurs, il faut choisir le type d’antenne et son
gain de facon a ce que la puissance isotrope rayonnee
equivalente (p.i.r.e.) ne soit pas superieure au
niveau requis pour l’obtention d’une communication
satisfaisante.
This equipment complies with FCC/IC radiation
exposure limits set forth for an uncontrolled
environment and meets the FCC radio frequency
(RF) Exposure Guidelines in Supplement C to OET65
and RSS-102 of the IC radio frequency (RF) Exposure
rules. This equipment has very low levels of RF
energy that are deemed to comply without testing of
specific absorption ratio (SAR).
For Canadian customers:
This Class B digital apparatus complies with Canadian
ICES-003 and RSS-210.
Operation is subject to the following two conditions:
(1) this device may not cause interference, and (2)
this device must accept any interference, including
interference that may cause undesired operation of
the device.
The radiated output power of the Wireless Device
is below the Industry Canada (IC) radio frequency
exposure limits. The Wireless Device should be used
in such a manner such that the potential for human
contact during normal operation is minimized.
This device has also been evaluated and shown
compliant with the IC RF Exposure limits under
mobile exposure conditions. (antennas are greater
than 20 cm from a person’s body).
APPAREIL
Cet appareil numérique de classe B est conforme aux
normes canadiennes ICES-003 et RSS-210.
Son fonctionnement est soumis aux deux conditions
suivantes : (1) cet appareil ne doit pas causer
d’interférence et (2) cet appareil doit accepter toute
interférence, notamment les interférences qui
peuvent affecter son fonctionnement.
La puissance de sortie émise par l’appareil de sans fil
est inférieure à la limite d’exposition aux fréquences
radio d’Industry Canada (IC). Utilisez l’appareil de sans
fil de façon à minimiser les contacts humains lors du
fonctionnement normal.
Ce périphérique a également été évalué et démontré
conforme aux limites d’exposition aux RF d’IC dans
des conditions d’exposition à des appareils mobiles
(les antennes se situent à moins de 20 cm du corps
d’une personne).
EU
Notes on radio
[ENGLISH]
1. IMPORTANT NOTICE: DO NOT MODIFY THIS PRODUCT
This product, when installed as indicated in the instructions
contained in this manual, meets R&TTE directive
requirements. Modication of the product could result in
hazardous Radio and EMC radiation.
2. CAUTION
Separation distance of at least 20 cm must be maintained
between this product and all persons.
This product and its antenna must not be co-located
or operating in conjunction with any other antenna or
transmitter.
[DEUTSCH]
1. WICHTIGER HINWEIS: NEHMEN SIE KEINE
VERÄNDERUNGEN AN DIESEM PRODUKT VOR
Wenn dieses Produkt entsprechend dieser
Bedienungsanleitung aufgebaut wird, entspricht es den
Anforderungen der
R&TTE
-Richtlinie. Veränderungen am
Produkt können zu gefährlicher Funk- und EMV-Strahlung
führen.
2. VORSICHT
Zwischen dieses Produkts und Personen muss ein
Schutzabstand von 20 cm eingehalten werden.
Dieses Produkt und seine Antenne dürfen nicht neben
anderen Antennen oder Sendern aufgestellt oder zusammen
mit ihnen verwendet werden.
[FRANÇAIS]
1. MISE EN GARDE IMPORTANTE : NE JAMAIS MODIFIER CE
PRODUIT
Si toutes les consignes indiquées dans ce mode ont été
respectées pendant son installation, ce produit est conforme
aux directives R&TTE. Toute modication du produit
risquerait alors de générer des radiations radio et EMC
dangereuses.
2. ATTENTION
L’appareil devra être située à une distance de 20 cm au
moins des personnes.
Ce produit ainsi que son antenne ne devront en aucun cas
être utilisés à proximité d’une autre antenne ou transmetteur.
[ITALIANO]
1. AVVERTENZA IMPORTANTE: NON MODIFICARE QUESTO
PRODOTTO
Se installato come indicato nelle istruzioni del presente
manuale, questo prodotto soddisfa i requisiti della direttiva
R&TTE
. Eventuali modiche apportate al prodotto potrebbero
causare pericolose radiazioni radio ed EMC.
2. ATTENZIONE
È necessario mantenere una distanza minima di 20 cm tra
questo prodotto e le persone.
Questo prodotto e la relativa antenna non devono essere
posizionati in prossimità di altre antenne o trasmettitori e
non devono essere utilizzati congiuntamente a questi ultimi.
[ESPAÑOL]
1. NOTA IMPORTANTE: NO MODIFIQUE ESTE PRODUCTO
Este producto, si es instalado de acuerdo con las
instrucciones contenidas en este manual, cumple los
requisitos de la directiva R&TTE. La modicación del
producto puede producir radiación de Radio y EMC
peligrosa.
2. PRECAUCIÓN
Se debe mantener una separación de al menos 20 cm del
producto y las personas.
Este producto y su antena no debe instalarse ni utilizarse
conjuntamente con otra antena o transmisor.
R&TTE Directive 1999/5/EC
This product may be operated in the following countries;
AT BE CZ DK FI
FR DE GR HU IE
IT NL PL PT SK
ES SE GB NO CH
Indoor use only.
[NEDERLANDS]
1. BELANGRIJKE MEDEDELING: BRENG AAN DIT PRODUCT
GEEN AANPASSINGEN AAN
Dit product, indien geïnstalleerd volgens de aanwijzingen in
deze gebruiksaanwijzing, voldoet aan de vereisten van de
R&TTE-richtlijn. Aanpassing van dit product kan gevaarlijke
radio- en EMC-straling tot gevolg hebben.
2. LET OP
Houd tussen en personen altijd een afstand van tenminste
20 cm aan.
Dit product en zijn antenne mogen niet in de buurt van een
andere antenne of zender worden geplaatst of in combinatie
daarmee worden gebruikt.
[SVENSKA]
1. VIKTIGT: APPARATEN FÅR INTE MODIFIERAS
Under förutsättning att apparaten installeras enligt
anvisningarna i denna bruksanvisning, uppfyller denna
kraven i
R&TTE
-direktivet. Ev. modiering av apparaten kan
resultera i farlig radio- och elektromagnetisk strålning.
2. FÖRSIKTIGT
Se till att det nns ett avstånd på minst 20 cm mellan
apparatens och personer i omgivningen.
Apparaten och dess antenn får inte placeras eller användas i
närheten av andra antenner eller sändare.
[РУССКИЙ]
1.ВАЖНО!НЕИЗМЕНЯЙТЕДАННЫЙПРОДУКТ
Продукт, установленный согласно инструкциям в
настоящем руководстве, отвечает требованиям директивы
R&TTE
. Изменение продукта может привести к появлению
опасного электромагнитного излучения.
2.ПРЕДУПРЕЖДЕНИЕ
Не приближайтесь к данного изделия ближе, чем на 20
см.
Запрещается использовать данный продукт и антенну с
другой антенной или передатчиком.
[POLSKI]
1.UWAGA: MODYFIKACJA TEGO URZĄDZENIA JEST
ZABRONIONA
Po zainstalowaniu zgodnie z instrukcjami zawartymi w
niniejszej instrukcji obsługi urządzenie to będzie spełniać
wymogi dyrektywy R&TTE. Wprowadzanie modykacji
do tego urządzenia może skutkować powstaniem
niebezpiecznego promieniowania elektromagnetycznego
oraz radiowego.
2.OSTRZEŻENIE
Między tego produktu i wszelkimi osobami musi być
zachowana odległość przynajmniej 20 cm.
Urządzenia wraz z anteną nie można instalować w połączeniu
z inną anteną lub nadajnikiem.
DSD500_E2E3_Notes on radio_120723.indd 1 2012/07/23 17:46:39
日本
n電波に関するご注意
本機は電波法に基づく工事設計認証を取得した小電力
データ通信システムの無線局設備を内蔵しています。
•本機を使用するときに無線局の免許は必要ありません。
※ 以下のことをおこなうと法律で罰せられることがあり
ます。
•内蔵する小電力データ通信システムの無線局設備を分
解 / 改造すること
•内蔵する小電力データ通信システムの無線局設備に
貼ってある証明ラベルをはがすことこの機器の使用周
波数帯(2.4GHz)では、電子レンジ等の産業・科学・
医療用機器のほか、工場の製造ライン等で使用され
ている移動体識別用の構内無線局(免許を要する無線
局)、特定小電力無線局(免許を要しない無線局)、お
よびアマチュア無線局(免許を要する無線局)が運用さ
れています。
1. この機器を使用する前に、近くで移動体識別用の構
内無線局、特定小電力無線局およびアマチュア無線
局が運用されていないことを確認してください。
2. 万が一、この機器から移動体識別用の構内無線局に
対して有害な電波干渉の事例が発生した場合には、
速やかに使用周波数を変更するか、または電波の発
射を停止した上、下記連絡先にご連絡いただき、混
信回避のための処置等についてご相談してください。
3. その他、この機器から移動体識別用の特定小電力無
線局またはアマチュア無線局に対して有害な電波干渉
の事例が発生した場合など、何かお困りのことが起き
たときには、次の連絡先へお問い合わせください。
連絡先:
株式会社ディーアンドエムホールディングス
お客様相談センター
044(670)5555
http://denon.jp/jp/support/pages/servicecenter.aspx
◎本機では、2.4GHz の周波数帯の電波を利用している
関係で、下記機器と干渉し、音が途切れたり、雑音
が発生したりする可能性があります。
【2.4GHzの周波数帯を使用している主な機器】
•電子レンジ
•無線 LANを利用した機器
(ノートパソコン、無線ルーター、無線 LAN 対応
AV機器等)
•コードレスフォン
•Bluetooth対応機器
• ワイヤレス対応 AV機器
•ワイヤレスコントローラー
※音が途切れたり雑音が発生したりする場合には、下記
の方法で改善する可能性があります。
1.干渉している機器との距離を離す。
2.干渉している機器の電源を切る。
◎ペースメーカ-等の医療用電気機器をご使用の場合
には、各医療用電気機器メーカ-または販売店に電
波による影響をご確認の上ご使用ください。
◎人ごみの中で使用したり、本機の間に鉄筋コンクリー
トの壁や家具などの障害物があると、通信状態が悪
くなり音が途切れたり、雑音が発生したりすることが
あります。音が途切れたり、雑音が発生したりする場
合には、見通しの良い場所に設置し直して下さい。
◎設置の距離や障害物がない場合でも、電波の反射等
により受信がうまくいかない場合があります。その場
合には本機の向きや位置を変えると改善することがあ
ります。
◎ラジオやテレビ、BS/CS チューナーなどの電波を利
用した機器のそばで使用すると、ノイズを発生するこ
とがあります。その場合には機器から遠ざけて設置し
てください。
◎本機は盗聴防止機能を搭載しておりますが、第三者
が故意または偶然に受信する可能性があります。
◎本機はご家庭内での音楽、映画等の再生を目的にし
たホームエンターテイメントシステムです。他の環境、
目的での使用はおやめください。
KOREA
해당 무선설비는 전파혼신 가능성이 있으므로 인명안전과 관련된 서비스는 할 수 없습니다
B 급 기기 ( 가정용 방송통신기자재 )
이 기기는 가정용 (B 급 ) 전자파적합기기로서 주로
가정에서 사용하는 것을 목적으로 하며 , 모든
지역에서 사용할 수 있습니
해당 무선설비는 운용 중 전파혼신 가능성이 있으므로 인명안전과 관련된 서비스는 할 수
없습니다 .
臺灣
第十二條
經型式認證合格之低功率射頻電機,非經許可,公司、商號或使用者均不得擅自變更頻率、
加大功率或變更原設計之特性及功能。
第十四條
低功率射頻電機之使用不得影響飛航安全及干擾合法通信;經發現有干擾現象時,應立即停
用,並改善至無干擾時方得繼續使用。
前項合法通信,指依電信法規定作業之無線電通信。
低功率射頻電機須忍受合法通信或工業、科學及醫療用電波輻射性電機設備之干擾。
中国
第十三条
1.•使用频率 :2.4 - 2.4835 GHz
•等效全向辐射功率 (EIRP) :
天线增益< 10dBi 时 :≤ 100 mW 或≤ 20 dBm ①
天线增益≥ 10dBi 时 :≤ 500 mW 或≤ 27 dBm ②
•最大功率谱密度 :
天线增益< 10dBi 时 :≤ 20 dBm / MHz(EIRP) ①
天线增益≥ 10dBi 时 :≤ 27 dBm / MHz(EIRP) ②
•载频容限 :20 ppm
•外发射功率 ( 在 2.4-2.4835GHz 頻段以外 )
≤ -80 dBm / Hz (EIRP)
•杂散发射 ( 辐射 ) 功率 ( 对应载波 ±2.5 倍信道带宽以外 ) :
≤ -36 dBm / 100 kHz (30 - 1000 MHz)
≤ -33 dBm / 100 kHz (2.4 - 2.4835 GHz)
≤ -40 dBm / 1 MHz (3.4 - 3.53 GHz)
≤ -40 dBm / 1 MHz (5.725 - 5.85 GHz)
≤ -30 dBm / 1 MHz ( 其它 1 - 12.75 GHz)
2. 不得擅自更改发射频率、加大发射功率 ( 包括额外加装射频功率放大器 ),不得擅自外接
天线或改用其它发射天线 ;
3. 使用时不得对各种合法的无线电通信业务产生有害干扰 ;一旦发现有干扰现象时,应立即
停止使用,并采取措施消除干扰后方可继续使用 ;
4. 使用微功率无线电设备,必须忍受各种无线电业务的干扰或工业、科学及医疗应用设备的
辐射干扰 ;
5. 不得在飞机和机场附近使用。
Printed in China 5431 10209 00AD
◎現品表示について
2.4 DS/OF 4
2.4:
2.4Ghz 帯を使用する無線設備を表します。
DS/OF : 変調方式を表します。
4:
移動体識別装置の構内無線局に対して想定される与干渉距離を表します(約 40 m)。
: 2.4GHz 帯の全帯域を使用し、かつ移動体識別装置の帯域を回避可能であることを意味します。
DSD500_E2E3_Notes on radio_120723.indd 2 2012/07/23 17:46:39