LITE ON TECHNOLOGY O90 Access Point/Sensor User Manual
LITE-ON Technology Corp. Access Point/Sensor
UserManual.wiki
>
LITE ON TECHNOLOGY
>
O90 User Manual
User Manual
Navigation menu
Upload a User Manual
Namespaces
Wiki Guide
HTML
PDF
Info
Views
User Manual
Discussion / Help
Navigation

![TroubleshootingAfter the O-90 is powered ON and connected to Ethernet, if the statusof Power (PWR) LED is not Solid Green, it indicates that the AP is not able to functionnormally. The following guidelines may help you to quickly diagnose and x the problem.LED StatusWhat does it mean?Power (PWR) 2.4G/ 5GLAN2 LAN1 (PoE)O O O O Not powered on or it is in the process of starting upSolid Orange Any On/ O Solid Green No active Ethernet link1Solid Orange Any On/ O Fast Blink GreenDid not receive a valid IP address via DHCP2Solid Orange Any On/ O Slow Blink GreenUnable to connect to the AirTight Cloud Services or AirTight Server3 1. Make sure that the Ethernet cable is correctly plugged into the LAN1 (POE) port on the O-90 and the other end of the cable is plugged into an Ethernet jack or a port on a switch that is turned ON.2. If the O-90 did not receive a valid IP address from the DHCP server, make sure that a DHCP server is ON and available on the VLAN/subnet to which the AP is connected. If the AP still fails to get a valid IP address, you can reboot it once to see if that resolves the problem.3. If you are using AirTight Cloud Services, make sure that Internet connectivity is available from the VLAN/subnet to which the AP is connected. Check if the required ports for AP and Server communication – UDP 3851 and default HTTP (TCP port 80) – are open on the Firewall. If you are using a Proxy, Web accelerator or URL content ltering, make sure the settings allow communication between the AP and AirTight Cloud Services.After following these guidelines, if you are still unable to resolve the problem, contact thelocal AirTight Sales Engineer or 24/7 AirTight Technical Support.Tel: +1 (650) 641 0027 Email: support@airtightnetworks.comAirTight Networks, Inc. 339 N. Bernardo Avenue #200, Mountain View, CA 94043T +1.877.424.7844 T 650.961.1111 F 650.961.1169 www.airtightnetworks.com info@airtightnetworks.comAirTight O-90 Quick Setup Guide [Doc ID: ATN-QS-0315-001-00-EN] © 2014 AirTight Networks, Inc. All rights reserved. AirTight Networks and the AirTight Networks logo are trademarks, and AirTight is a registered trademark of AirTight Networks, Inc. All other trademarks mentioned herein are properties of their respective owners. Specications are subject to change without notice.Comprehensive Cloud-Managed Wi-Fi](https://usermanual.wiki/LITE-ON-TECHNOLOGY/O90/User-Guide-2645643-Page-4.png)
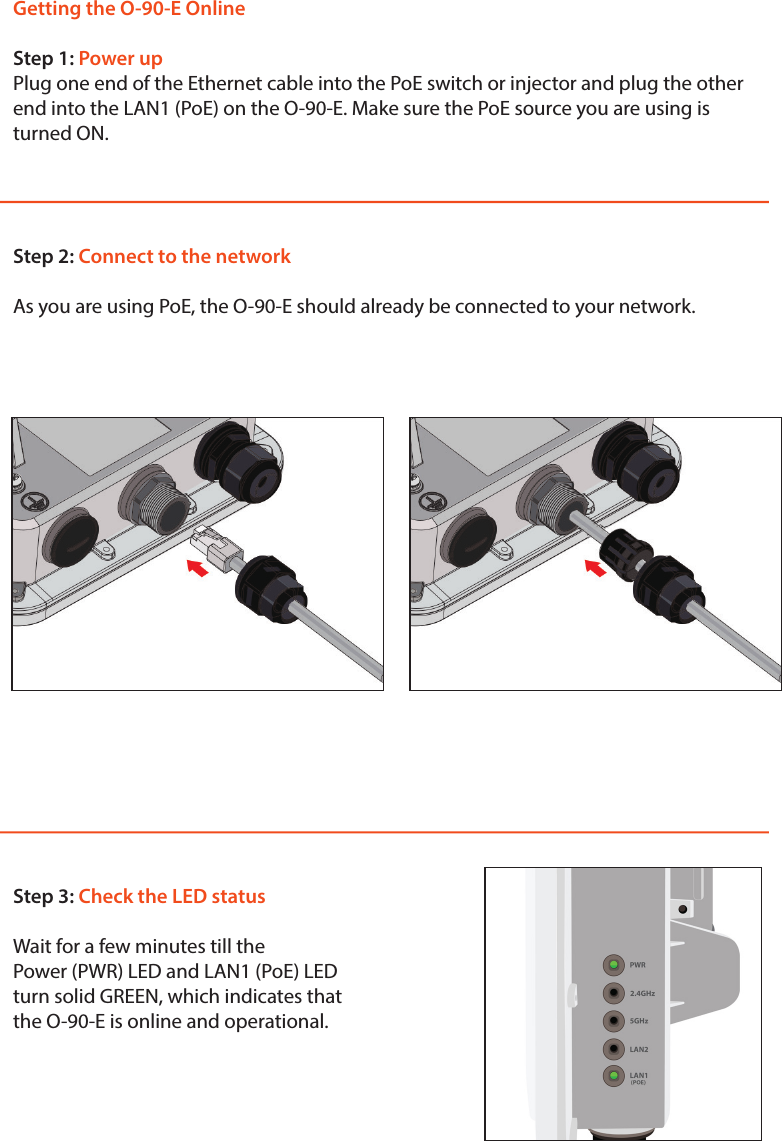
![TroubleshootingAfter the O-90-E is powered ON and connected to Ethernet, if the statusof Power (PWR) LED is not Solid Green, it indicates that the AP is not able to functionnormally. The following guidelines may help you to quickly diagnose and x the problem.LED StatusWhat does it mean?Power (PWR) 2.4G/ 5GLAN2 LAN1 (PoE)O O O O Not powered on or it is in the process of starting upSolid Orange Any On/ O Solid Green No active Ethernet link1Solid Orange Any On/ O Fast Blink GreenDid not receive a valid IP address via DHCP2Solid Orange Any On/ O Slow Blink GreenUnable to connect to the AirTight Cloud Services or AirTight Server3 1. Make sure that the Ethernet cable is correctly plugged into the LAN1 (POE) port on the O-90-E and the other end of the cable is plugged into an Ethernet jack or a port on a switch that is turned ON.2. If the O-90-E did not receive a valid IP address from the DHCP server, make sure that a DHCP server is ON and available on the VLAN/subnet to which the AP is connected. If the AP still fails to get a valid IP address, you can reboot it once to see if that resolves the problem.3. If you are using AirTight Cloud Services, make sure that Internet connectivity is available from the VLAN/subnet to which the AP is connected. Check if the required ports for AP and Server communication – UDP 3851 and default HTTP (TCP port 80) – are open on the Firewall. If you are using a Proxy, Web accelerator or URL content ltering, make sure the settings allow communication between the AP and AirTight Cloud Services.After following these guidelines, if you are still unable to resolve the problem, contact thelocal AirTight Sales Engineer or 24/7 AirTight Technical Support.Tel: +1 (650) 641 0027 Email: support@airtightnetworks.comAirTight Networks, Inc. 339 N. Bernardo Avenue #200, Mountain View, CA 94043T +1.877.424.7844 T 650.961.1111 F 650.961.1169 www.airtightnetworks.com info@airtightnetworks.comAirTight O-90 Quick Setup Guide [Doc ID: ATN-QS-0315-002-00-EN] © 2014 AirTight Networks, Inc. All rights reserved. AirTight Networks and the AirTight Networks logo are trademarks, and AirTight is a registered trademark of AirTight Networks, Inc. All other trademarks mentioned herein are properties of their respective owners. Specications are subject to change without notice.Comprehensive Cloud-Managed Wi-Fi](https://usermanual.wiki/LITE-ON-TECHNOLOGY/O90/User-Guide-2645643-Page-8.png)