LOFTYNN INTELLIGENCE 600T Baby Monitor User Manual E600 Instruction Manual 20April2017
SHENZHEN LOFTYNN INTELLIGENCE TECHNOLOGY CO., LTD. Baby Monitor E600 Instruction Manual 20April2017
User manual
Model-E600
Get to know us at: www.axvue.com
INSTRUCTION MANUAL
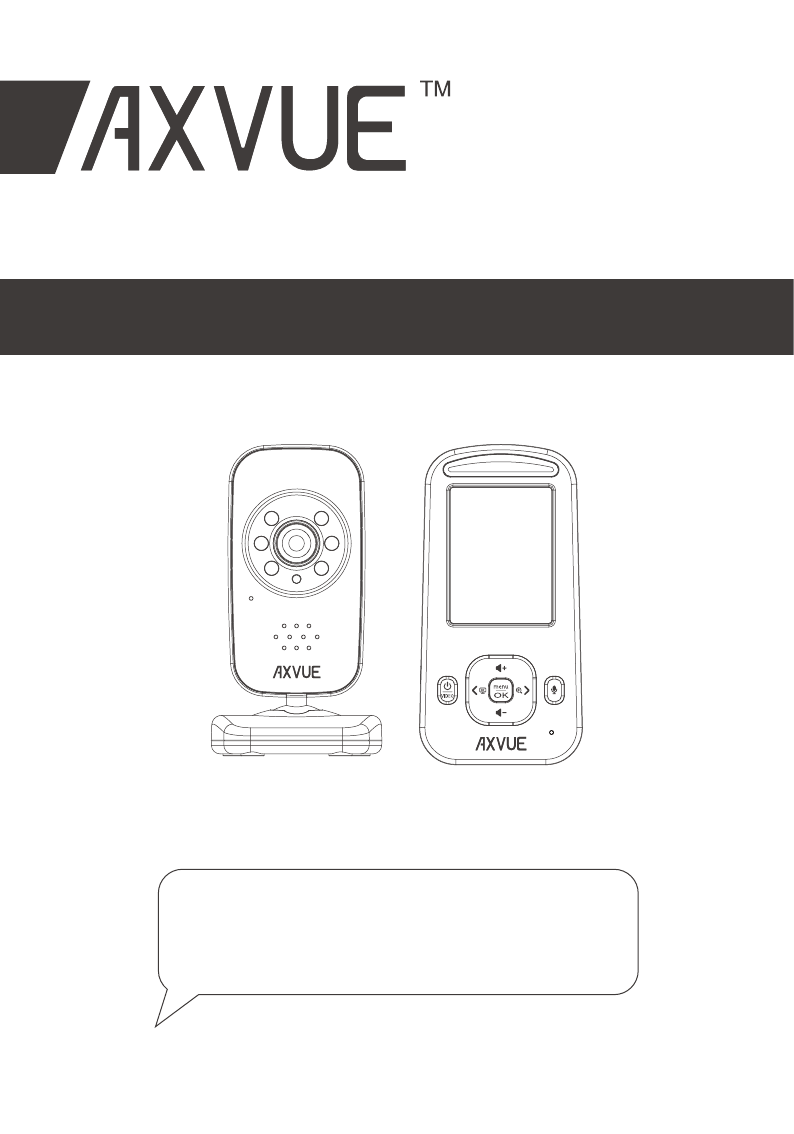
AXVUE E600 VIDEO BABY MONITOR
WITH 2.4" LCD SCREEN AND NIGHT VISION
Tools required for wall mount: Screwdriver and drill (not included)
Keep this instrucon manual for future reference.
For technical support see FAQ page.
For adult use only.
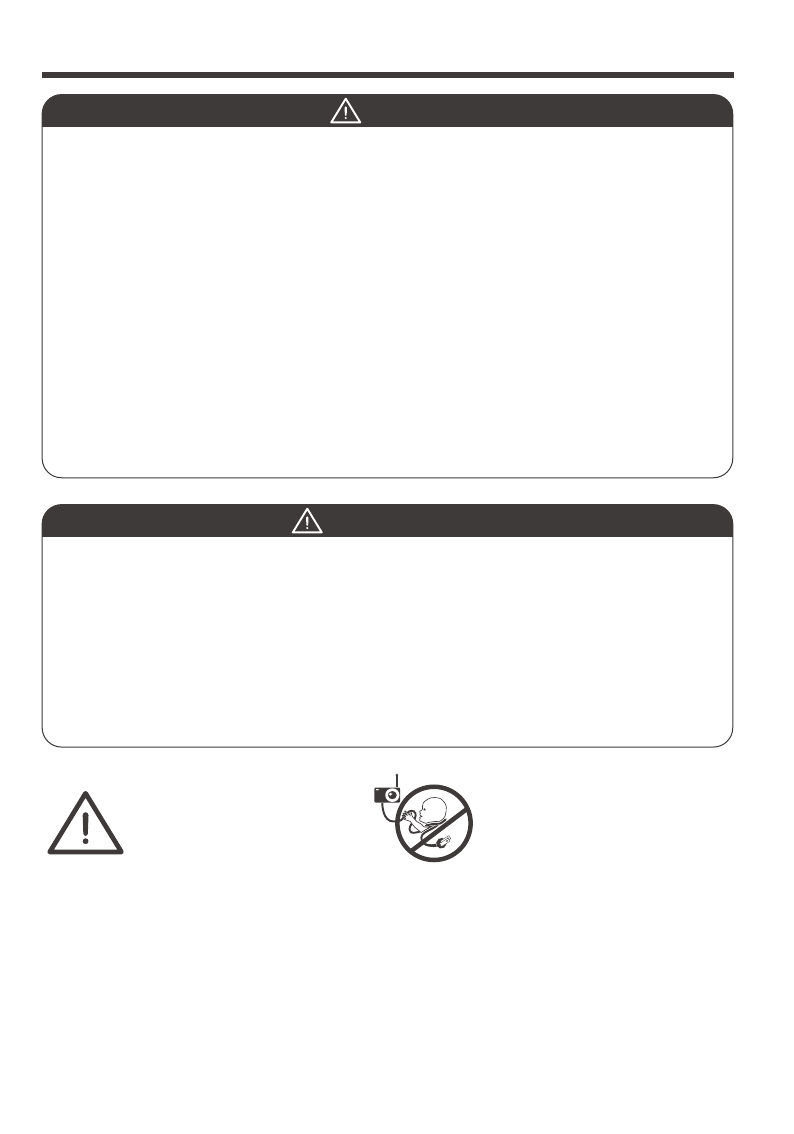
Please read the following instrucons and warnings carefully
PAGE 1
-Strangulaon Hazard - Children have STRANGLED in cords. Keep this cord out
of reach of children (more than 3 feet (0.9m) away from the crib). Use
enclosed Security Clips to help secure cord away from baby’s reach. Never use
extension cords with AC Adapters. Only use the AC Adapter provided.
-When an Adapter is plugged into an electrical outlet, do not touch the exposed
end.
-Test monitor before first use, periodically, and when changing locaon of the
Camera.
-Do not use monitor near water (such as bathtub, sink, etc.).
-Keep monitor away from heat sources (such as stoves, radiators, etc).
Make sure there is proper venlaon around all monitor components. Do not
place on sofas, cushions, beds, etc. which may block venlaon.
-This product is not a toy. Do not allow children to play with it. This product
contains small parts. Adult assembly required. Exercise care when unpacking
and assembling the product.
THIS PRODUCT CANNOT REPLACE RESPONSIBLE ADULT SUPERVISION.
STRANGULATION HAZARD - Children have STRANGLED in cords. Keep this cord
out of reach of children (more than 3 feet (0.9 m) away from the crib). Use
enclosed Security Clips to help secure cord away from baby’s reach. Never use
extension cords with AC Adapters. Only use the AC Adapters provided.
WARNING:
WARNING
-Use only the original rechargeable baery provided. Please contact Axvue Inc.
for replacement baery. Contact informaon can be found on last page of these
instrucons.
-Clean baery and product contacts prior to baery installaon.
-Do not short-circuit supply terminals.
-Remove baery when product is stored for long periods of me or when baery
is exhausted.
-Keep all baeries away from children.
-Dispose of exhausted baery properly.
WARNING
BATTERY WARNING
PAGE 2
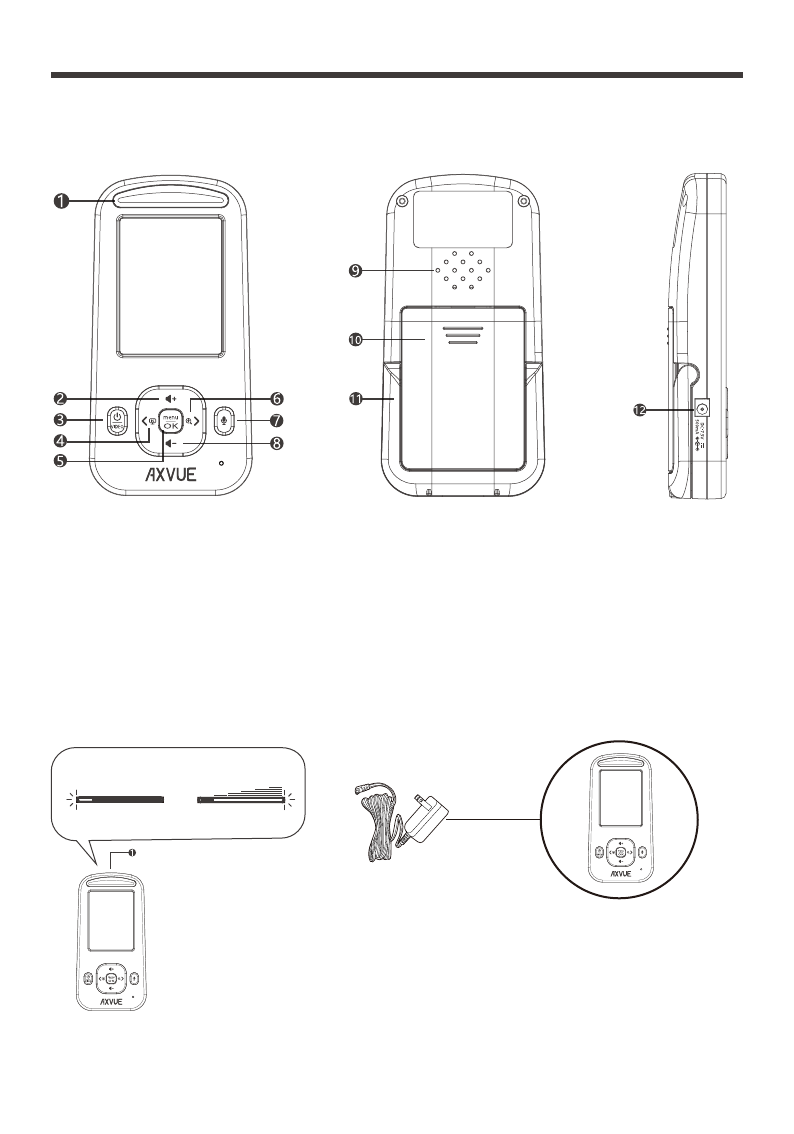
Features and components
1 LED*
2 Up / Volume Up
3 Power / Video
4 Le/Temperature mode
5 OK / menu
6 Right/Zoom In
7 Talk Back
8 Down / Volume Down
9 Speaker
10 Baery Compartment
11 Kickstand
12 DC Jack
Adapter for monitor:
Power & Low Baery Sound Lights
*LED
PAGE 3
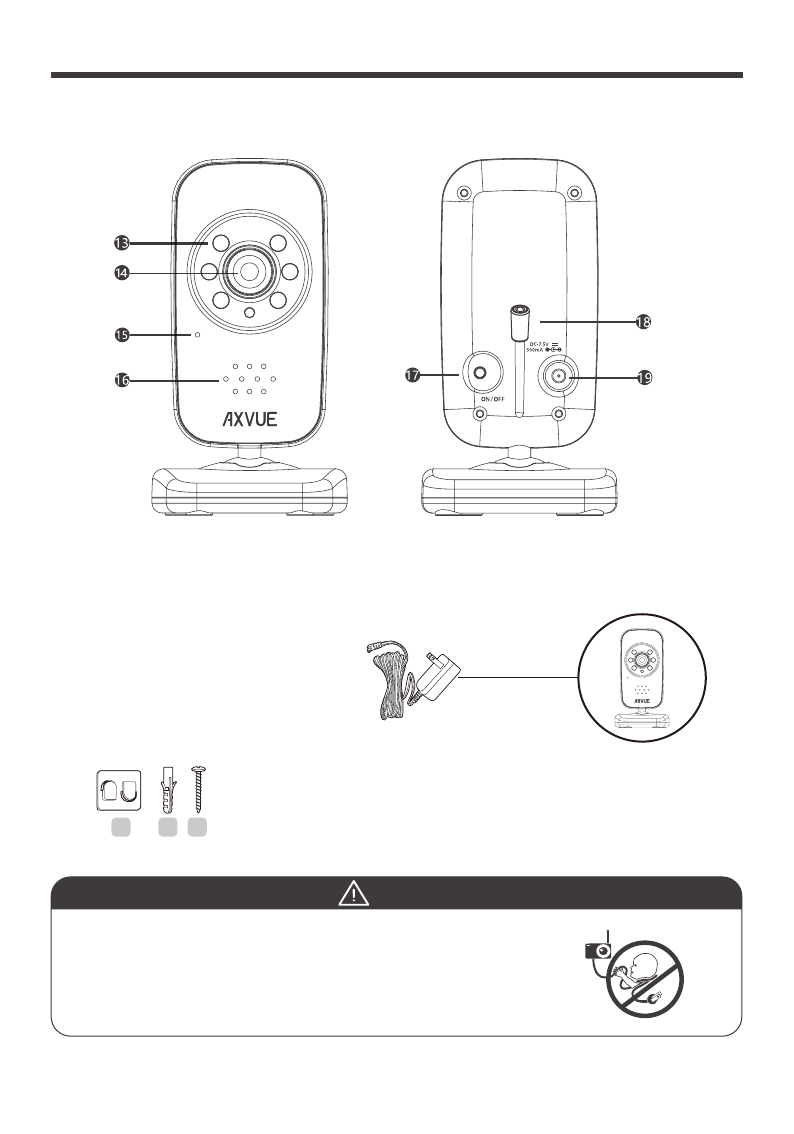
Features and components (continued)
13 Nighme LEDs
14 Lens
15 Microphone
16 Speaker
17 Power On / Off Switch
18 Temperature sensor
19 DC Jack
x1 x1 x6
Adapter for camera:
STRANGULATION HAZARD - Children have STRANGLED in cords.
Keep this cord out of reach of children (more than 3 feet (0.9 m)
away from the crib). Use enclosed Security Clips to help secure
cord away from baby’s reach. Never use extension cords with AC
Adapters. Only use the AC Adapters provided.
WARNING
PAGE 4
Features and components
WARNING
STRANGULATION HAZARD - Children have STRANGLED in cord out of reach of children, (more than
3 feet away from the crib). Use enclosed Security Clips to help secure cord away from baby’s reach.
Never use extension cords with Adapters. Only use the Adapters provided.
TESTING INITIAL SETUP
Step1: To test recepon, determine a locaon for the
camera that will provide the best view of your baby in
the crib (note: do not mount camera in permanent
locaon unl inial set up test completed). Plug
Adapter into wall outlet and turn camera power on.
Step2: Press and hold ‘POWER/MENU’ buon on
monitor for 5-seconds unl the AXVUE showed on the
screen.Video should immediately appear on screen.
If video does not appear, go to page 5 ‘To pair
monitor and camera’. If video appears, the inial set
up test is complete,and you can install camera,
instrucons below.
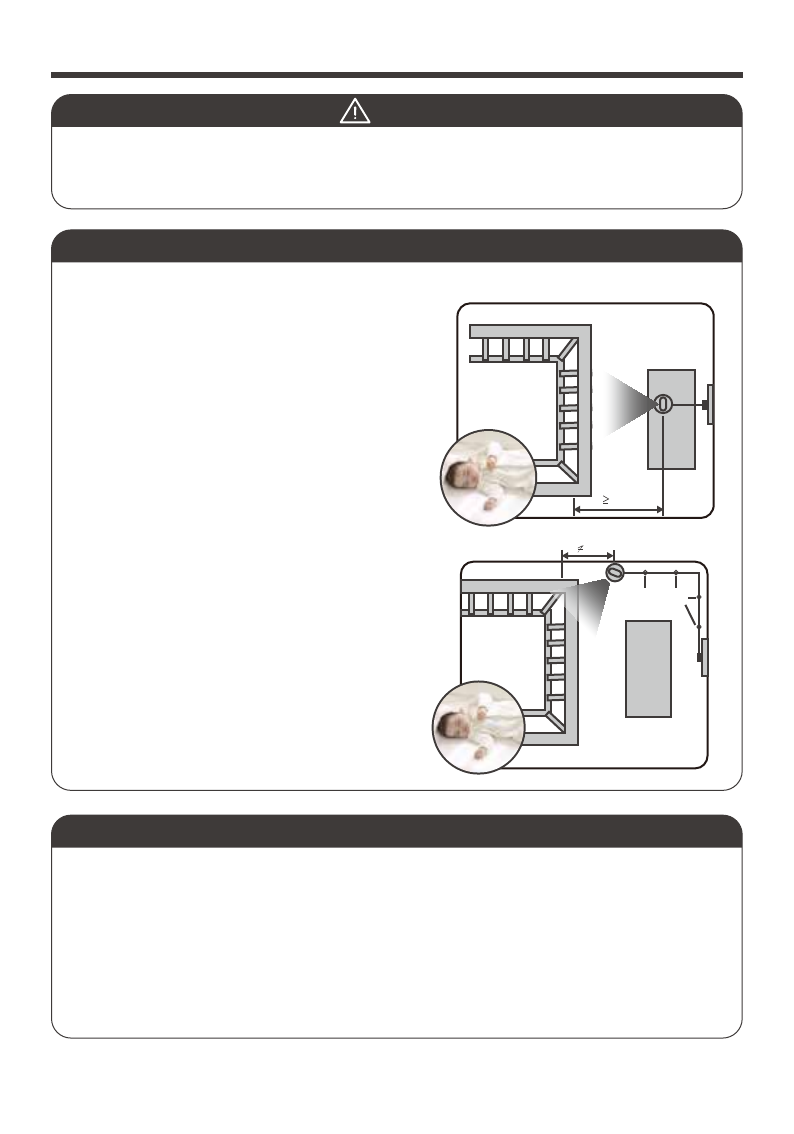
Installaon Camera: Place the camera on a flat
surface, such as a bureau or shelf (Figure1) or mount
the camera on a wall (Figure 2). For example: On the
desk or cabinet or fixed to the wall, make sure that at
least 3 feet from the crib, power lines should be
placed above or behind the camera, adjust the
camera angle, unl the display see the enre crib, or
do you think the best line of sight.
Before using the monitor, charge the baery for 6-8 hours.
WALL-MOUNT
1. Pre-drill a hole in the wall, a 3/16” (4.8mm) drill bit.
2. Insert the wall anchor into the hole and with a hammer, tap gently on the end unl the wall
anchor is flush with the wall.
3. Tighten screw unl only 1/4” (6.2mm) of the screw is exposed.
4. Insert camera Adapter into the camera’s adapter jack.
5. Slide the back of the camera down onto the screw unl the camera is secure to the wall.
6. Plug the Adapter into a standard electrical outlet.
7. Secure the cord to the wall using the security clips to keep cord away from baby’s reach.
1m
Figure 1
Fixing cable
with clip
1m
Figure 2

PAGE 5
Setup & use (continued)
TO USE PLUGGED-IN
Step 1: Place the monitors in the rooms from which you want to monitor your baby (ie., living room
or bedroom). Plug the monitor AC adapters into the AC adapter jacks and other ends into
standard electrical outlets.
Step 2: Press and hold POWER/MENU buon for 5-seconds to power up unl the AXVUE logo or
video appears on screen.
Step 3: For audio and no video, press the VIDEO ON/OFF buon top of the unit.
Step 4: To turn the monitor off completely, press and hold the POWER/MENU buon for 5-seconds.
TO USE PORTABLE / BATTERY MODE
Step 1: Charge the baery for 4 hours at least, before using the monitor in portable mode.
Step 2: Make sure the monitor adapter is plugged into the monitor, camera adapter is plugged into
the camera, as they are shown on the body.
Step 3: The baery life can be up to 6-hours if charged overnight.
Before using the monitor, charge the baery for 6-8 hours.
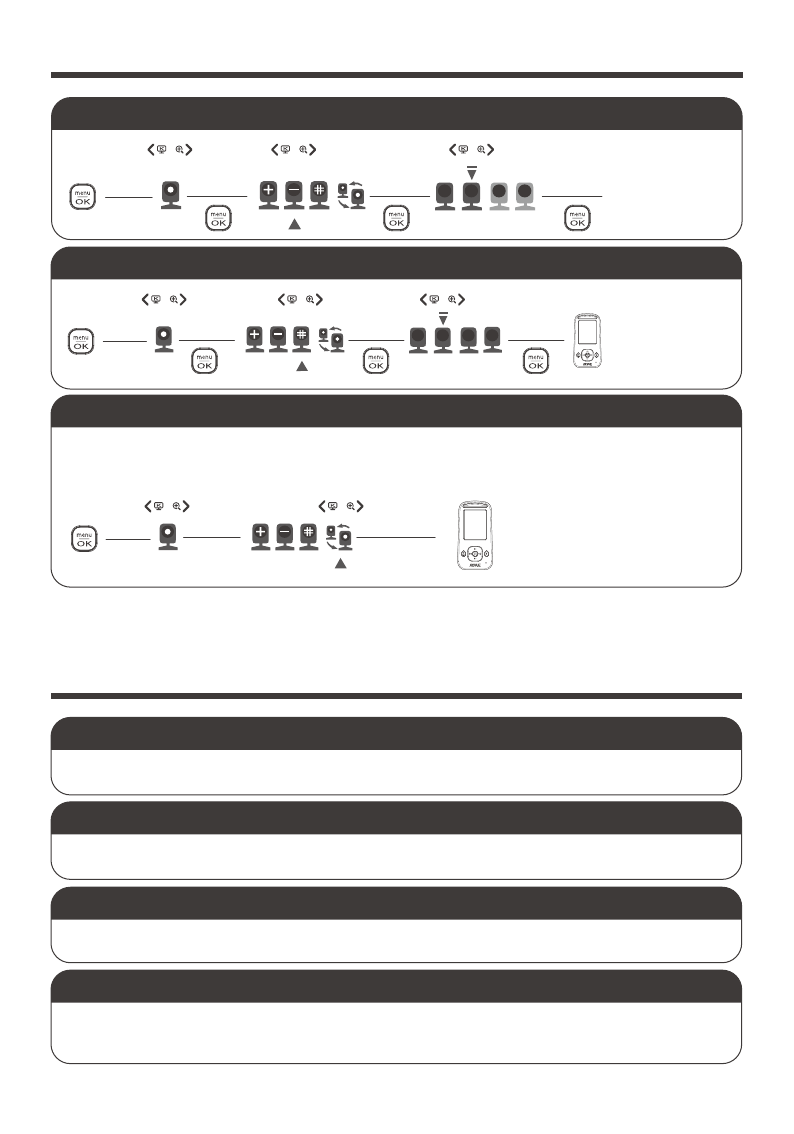
TO PAIR MONITOR AND CAMERA ( ADD A CAMERA )
Step 1: Make sure the monitor is at the same area as the camera.
Step 2: Keep the camera powered off.
Step 3: Press Power/VIDEO buon for 5 second to power on the monitor. Then press
OK/Menu buon , highlight camera opon by using Left/Temperature mode or
Right/Zoom In buon, press the OK/menu buon to enter the camera opons menu
which is show as below . Select ADD CAM icon , press OK/menu buon to camera list, select
an availabe number and press OK/menu buon to start pairing, the red LED will flash and
wireless connecng icon is shown.
Step 4: Power on the camera within 8 seconds.
Step 5: Wait 3 seconds, the red LED will stop flashing once paired successfully, and video will appear.
The monitor and the camera are paired prior to the shipment. If the monitor
and camera are found not paired for some reason, follow steps below:
Baery life will be weaken if recharging constantly. Charge the baery aer the indicator is shown.
Remove baery if long me of non-use, or exhausted.
ON
OFF
1 2 3 4
Press 5 second
to power on.
Red LED will flash
PAGE 6
Setup & use (continued)
Favorite features (continued)
TO DELETE A CAMERA
TO SELECT A CAMERA
TO SCAN ALL CAMERAS (AUTO-SCAN)
DIGITAL ZOOM
The zoom opon enables you to get a closer view on screen. Press the ZOOM IN/OUT buon once
will move the image on the monitor screen to 2x view, press again to return the normal view.
TWO WAY COMMUNICATION
Your baby is alway eager to your voice when crying. Press and hold the TALK BACK buon on the
monitor to acvate two-way communicaon.
NIGHT VISION
The LEDs around the len, is funconing to the night vision, which will be enabled automacally. It is
appearing black and white image on the screen, when the camera is in a low-light and dark room.
23 4
1Camera Deleted
23 4
1Selected camera will
appear on the screen
This product accepts up to 4 cameras and operates on audio and video auto-scan to
view each camera on an 8-second rotation.
All cameras can be auto-scanned
to view on an 8-second rotaon.
The SCAN, DELETE, ADD, VIEW CAMERA menu options are used with addtional cameras
only. Order the extra camera by visiting us at http://www.axvue.com .
SOUND LIGHTS
The 5 sound acvated LED lights illuminate based on the level of baby’s sounds. If baby is just
cooing, green to amber lights will illuminate and if baby is crying, amber to red lights will illuminate.
This feature is parcularly helpful for parents if they are in crowded or noisy rooms.
PAGE 7
Favorite features (continued)
ADJUSTABLE VOLUME AND BRIGHTNESS
Volume adjustments allow higher volume sengs for parents who want to hear every lile sound
from baby, like cooing, and lower volume sengs to monitor louder sounds and cries from baby.
Easily adjust the volume based on your preferences and the level of other sounds in the home.
Brightness can be adjusted, as well, to accommodate the level of light in the room. Using the
brightness control feature enables lighter or darker video, depending on room viewing condions.
Use the UP and DOWN arrows to adjust the brightness.
POWER-SAVE MODE
While operang on baery power, the video screen will go to sleep, to conserve baery power.
Audio and sound lights connue to funcon normally. Video sleep mode is not available when
using AC adapter.
VIDEO ON-OFF BUTTON
This buon turns the video mode on from video sleep mode. It is ideal for a quick view of baby in
the middle of the night. To monitor in audio only mode, simply press the VIDEO ON/OFF again to
turn the video screen off.
FAQ
PICTURE BUT NO SOUND
-Power the monitor completely off, remove and re-insert the baery, then turn monitor back on.
-Turn up the volume using Volume Control
-Make sure the camera and handheld monitor unit are paired.
SQUEALING SOUND COMING FROM SPEAKER ON MONITOR
-Move the monitor and camera further away from each other
-Turn the volume down using Volume Control
-Power the monitor completely off, remove and re-insert the baery, then turn the monitor on again.
PICTURE NOT CLEAR
-Posion the monitor closer to the camera, but not adjacent.
-Move the monitor away from other electronic devices, WiFi router, etc.
-Adjust the brightness using Brightness Control
-Test recepon by moving the monitor and/or camera to different locaons
NO PICTURE OR SOUND
-Make sure the camera and handheld monitor unit are paired (see page 5 )
-Make sure the camera and handheld monitor unit are both turned on
-Make sure the AC adapters are plugged in
-Make sure the outlets are working
-Make sure the baery is charged before working as portable mode
-Keep the camera and monitor out of WiFi router (more than 10 feet ) off.
SOUND BUT NO PICTURE
-Press the VIDEO ON/OFF buon once to turn on video mode
-Check to make sure nothing is blocking the camera
-Test recepon by moving the monitor and/or camera to different locaons
-Pair the camera and monitor again

PAGE 8
IMPORTANT SAFETY INSTRUCTIONS
-Read safety and operang instrucons before the product is operated.
-Retain instrucons for future reference.
-Heed warnings on the product and in the operang instrucons.
-Follow instrucons and operate properly.
-Cleaning aer unplugging this product from the wall outlet. And use a damp cloth for cleaning.
-Use product manufacturer recommended aachments to avoid possible hazards.
-Do not use this product near humid place, for example, bath tub, wash bowl, kitchen sink, laundry
tub, wet basement, swimming pool and the like.
-Ensure this product is installed securely on a stable cart, stand, tripod, bracket, or table. -Otherwise,
The falling product may cause serious injury to a child or adult, and serious damage to -the product.
- Use manufacture recommended cart, stand, tripod, bracket, or table. Follow the manufacturer's
instrucons strictly and use recommended mounng kits to mount the product.
-The slots and openings in the cabinet are provided for venlaon and to ensure reliable operaon
of the product and to protect it from overheang, and keep these openings not blocked or covered.
-The openings should never be blocked by placing the product on a bed, sofa, rug, or other similar
surfaces. This product should not be placed in a built-in installaon such as a bookcase or rack
unless proper venlaon is provided or the manufacturer's instrucons have been adhered to.
-This product should be operated only from the type of power source indicated on the marking
label. If you are not sure of the type of power supply to your home, consult your product dealer or
local power company. For products intended to operate from baery power, or other sources, refer
to the operang instrucons.
-Power-supply cords should be routed so that they are not likely to be walked on or pinched by
items placed upon or against them, paying parcular aenon to cords at plugs, convenience
receptacles, and the point where they exit from the product.
-An outside antenna system should not be located in the vicinity of overhead power lines or other
electric light or power circuits, or where it can fall into such power lines or circuits. When installing
an outside antenna system, extreme care should be taken to keep from touching such power lines
or circuits as contact with them might be fatal.
-Do not overload wall outlets, extension cords, or integral convenience receptacles as this can result
in a risk of fire or electric shock.
DO NOT EXPOSE TO RAIN OR MOISTURE
CAUTION RISK OF ELECTRIC SHOCK
DO NOT OPEN

PAGE 9
IMPORTANT SAFETY INSTRUCTIONS
-Never push objects of any kind into this product through openings as they may touch dangerous
voltage points or short-out parts that could result in a fire or electric shock. Never spill liquid of any
kind on the product.
-Do not aempt to service this product yourself as opening or removing covers may expose you to
dangerous voltage or other hazards. Refer all servicing to qualified service personnel.
-Unplug this product from the wall outlet and refer servicing to qualified service personnel under
the following condions:
*When the power-supply cord or plug is damaged.
*If liquid has been spilled, or objects have fallen into the product.
*If the product has been exposed to rain or water.
*If the product does not operate normally by following the operang instrucons. Adjusng only
those controls that are covered by the operang instrucons as an improper adjustment of other
controls may result in damage and will oen require extensive work by a qualified technician to
restore the product to its normal operaon.
*If the product has been dropped or damaged in any way, or when the product exhibits a disnct
change in performance - this indicated a need for service.
-Replacement Parts - When replacement parts are required, be sure the service technician has used
replacement parts specified by the manufacturer or have the same characteriscs as the original
part. Unauthorized substuons may result in fire, electric shock, or other hazards.
-Safety Check - Upon compleon of any service or repairs to this product, ask the service technician
to perform safety checks to determine that the product is in proper operang condion.
-The product should be mounted to a wall or ceiling only as recommended by the manufacturer.
-The product should be situated away from heat sources such as radiators, heat registers, stoves,
or other products (including amplifiers) that produce heat.
DO NOT EXPOSE TO RAIN OR MOISTURE
CAUTION RISK OF ELECTRIC SHOCK
DO NOT OPEN
Get to know us at: www.axvue.com
PAGE 10
FCC Information
CAUTION
Changes or modifications not expressly approved by the party responsible for compliance
could void the user's authority to operate the equipment.
CAUTION
1. To comply with FCC RF exposure compliance requirements, a separaon distance of at least 20
cm must be maintained between the antenna of this device and all persons.
2. This transmier must not be co-located or operang in conjuncon with any other antenna or
transmier.
NOTE
This equipment has been tested and found to comply with the limits for a Class B digital device,
pursuant to Part 15 of the FCC Rules. These limits are designed to provide reasonable protecon
against harmful interference in a residenal installaon. This equipment generates, uses and can
radiate radio frequency energy and, if not installed and used in accordance with the instrucons,
may cause harmful interference to radio communicaons. However, there is no guarantee that
interference will not occur in a parcular installaon. If this equipment does cause harmful
interference to radio or television recepon, which can be determined by turning the equipment
off and on, the user is encouraged to try to correct the interference by one or more of the following
measures:
- Reorient or relocate the receiving antenna.
- Increase the separaon between the equipment and receiver.
- Connect the equipment into an outlet on a circuit different from that to which the receiver is
connected.
- Consult the dealer or an experienced radio / TV technician for help.
This device complies with part 15 of the FCC Rules. Operaon is subject to the
following two condions: (1) This device may not cause harmful interference, and
(2) This device must accept any interference received, including interference that
may cause undesired operaon.
Get to know us at: www.axvue.com
Colors and styles may vary.
Please retain informaon for future reference.

connect with us:
AXVUE stands behind all of its products.
If you are not completely sasfied or have any
quesons,
please contact us at hp://www.axvue.com
MADE IN CHINA
AXVUE INC.
19 W 34TH STREET SUITE 1018
NEW YORK, NY 10001
All rights Reserved.