LPS Device LPS-190M LCD MONITOR User Manual USERS MANUAL
LPS Device Co., Ltd. LCD MONITOR USERS MANUAL
USERS MANUAL

Page 1
19 inch SXGA TFT LCD Color Monitor
Advanced Color TFT LCD Monitor
USER’S MANUAL
19 inch SXGA TFTLCD Color Monitor
FCC NOTE
:This equipment has been tested and found to comply with the limits for a Class
B digital device, pursuant to Part 15 of the FCC Rules. These limits are
designed to provide reasonable protection against harmful interference in a
residential installation. This equipment generates, uses and can radiate radio
frequency energy and, if not installed and used in accordance with the
instructions, may cause harmful interference to radio communications.
However, there is no guarantee that interference will not occur in a particular
installation. If this equipment does cause harmful interference to radio or
television reception, which can be determined by turning the equipment off and
on, the user is encouraged to try to correct the interference by one or more of
the following measures:
-- Reorient or relocate the receiving antenna.
-- Increase the separation between the equipment and receiver.
-- Connect the equipment into an outlet on a circuit different from that to which
the receiver is connected.
-- Consult the dealer or an experienced radio/TV technician for help.
THIS DEVICE COMPLIES WITH PART 15 OF THE FCC RULES.
OPERATION IS SUBJECT TO THE FOLLOWING TWO CONDITIONS:
(1) THIS DEVICE MAY NOT CAUSE HARMFUL INTERFERENCE, AND
(2) THIS DEVICE MUST ACCEPT ANY INTERFERENCE RECEIVED,
INCLUDING INTERFERENCE THAT MAY CAUSE UNDESIRED OPERATION
THE MANUFACTURER IS NOT RESPONSIBLE FOR ANY RADIO OR TV
INTERFERENCE CAUSED UNAUTHORIZED MODIFICATIONS TO THIS
EQUIPMENT. SUCH MODIFICATIONS COULD VOID THE USER'S
AUTHORITY TO OPERATE THE EQUIPMENT.
Page 2
19 inch SXGA TFT LCD Color Monitor
CONTENTS
0. Connections 3
1. Quick Start 4
2. Product Overview 4
3. Plug & Play 4
4. Usage Notice 5
5. Package Checklist 6
6. Front Button & Function 7
7. OSD Operation 8
8. Troubleshooting 14
9. Specifications 15
10. Video Mode Support 16
LIFE SUPPORT APPLICATIONS
These products are not designed for use in life support appliances, devices, or systems where
malfunction of these products can reasonably be expected to result in personal injury.
Customers using or selling these products for use in such applications do so at their own risk and
agree to fully indemnify for any damage resulting from such improper use or sale.
The information presented in this document may form a part of quotation or contract under the
agreement of both parties. Otherwise, this datasheet is subjected to be changed without notice.
Page 3
19 inch SXGA TFT LCD Color Monitor
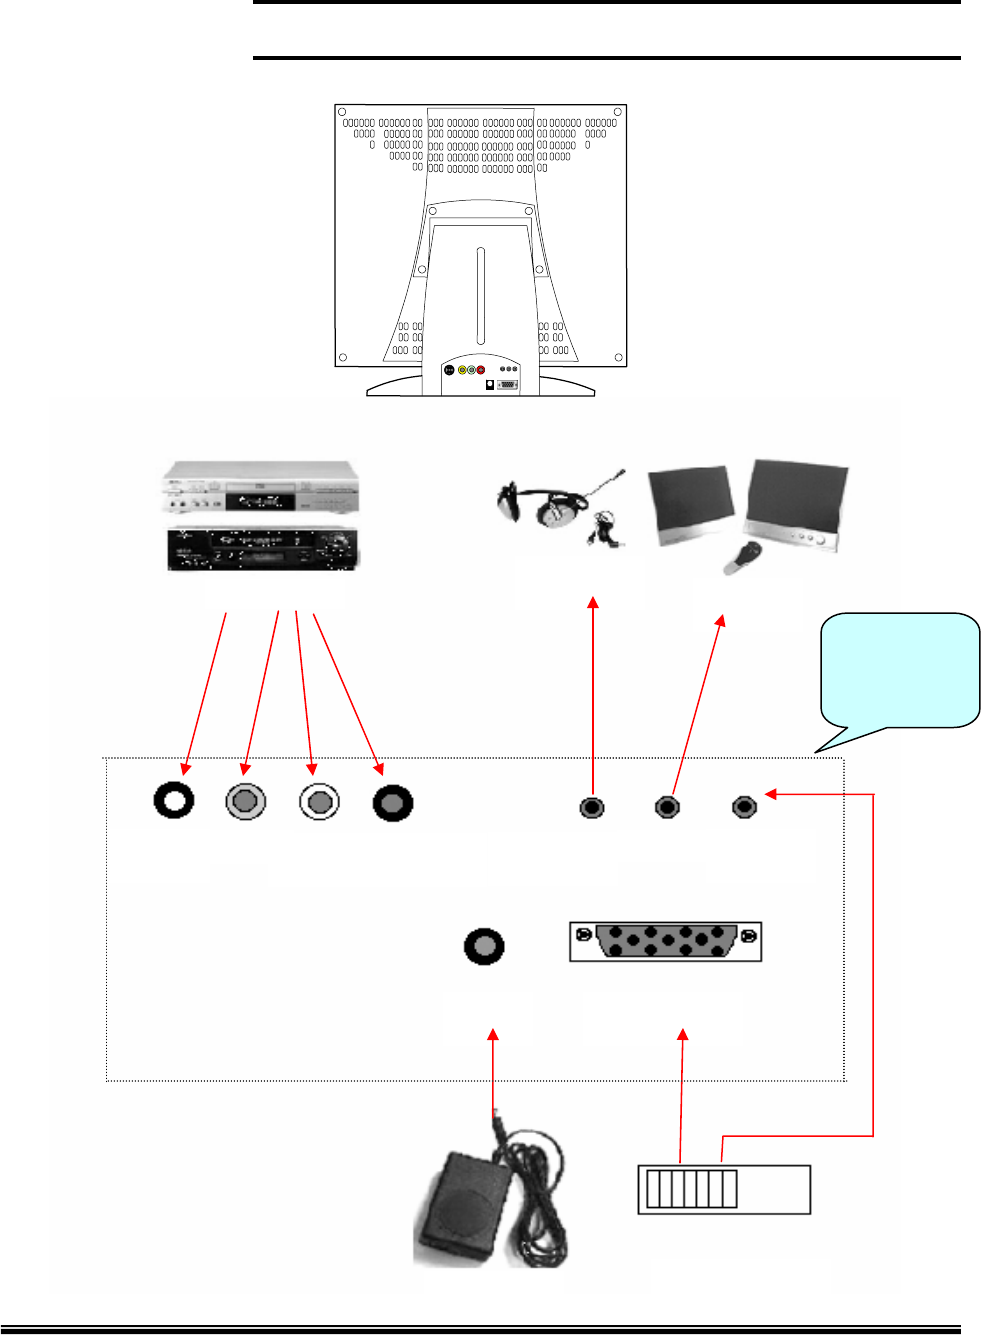
0. CONNECTIONS
DVD / VCR Headphone Speaker
S-VHS VIDEO AUDIO-L AUDIO-R Headphone Line out Stereo in
DC in Analog RGB
12V Adapter PC
VGA/Sound
Input/Output
port of the
Monitor

Page 4
19 inch SXGA TFT LCD Color Monitor
1. QUICK START
• Connect the 15-pin D-sub connector to the VGA port of PC.
• Connect the opposite side of VGA cable to TFT LCD monitor.
• Plug in the Audio cables to the proper connecter of your monitor.
• Plug in the power cord to AC/DC adapter power inlet and 110V / 220V consent.
• Plug in the 12V DC output to TFT LCD monitor.
• Turn on PC and TFT LCD monitor.
• Adjust the display. (SXGA, 1280x1024 pixels, 24 bit color)
2. PRODUCT OVERVIEW
This 19” SXGA TFT LCD Monitor, accepts standard analog RGB signal.
This monitor supports SXGA and lower resolutions at the frame frequency up to 75Hz.
Lower resolution modes can be expanded to full screen through the expansion
algorithm. The user interface includes Audio, Display, Scaling, Control, Auto Adjust,
and additional features.
This monitor contains high-end LCD controller, which have high performance and user
friendly interfaces. Fancy design monitor makes your desk simple and luxury.
The LCD monitor neither emits harmful rays nor requires space. Moreover, it
conforms to VESA DPMS (Display Power Management Signaling) requirement,
therefore energy consumption is remarkably little. Actual power consumption of LCD
monitor is less than 48 watts during the operation, in contrast CRT monitor. These
features guarantee you with safe, clean, and healthy environment.
3. PLUG & PLAY
This monitor supports VESA DDC 1/2B requirements, therefore it is truly Plug-and-
Play for all PCs. No hardware or software change needed. It finds optimum setting
value automatically without any diskette installation by DDC process.
• DDC Process
Abbreviation of ‘Display Data Channel’.
The format of data exchange between Monitor & VGA Card.

Page 5
19 inch SXGA TFT LCD Color Monitor
4. USAGE NOTICE
Warning
Please do not open or disassemble the products, because it may cause electric shock.
Please be advised all the warnings, precautions, and maintenance advice as
recommended in this user’s manual in order to maximize the life of your monitor.
Do:
• Turn off the monitor before cleaning its surface.
• Periodically wipe its surface with a soft and dry cloth.
• Use the quality and safety-approved AD/DC adapter.
• Disconnect the power plug from the AC outlet when the product is not in use for
long time.
Do not expose the monitor to:
• Extremely hot, cold, and humid environments during operation.
• Area susceptible to dust.
• Direct sunlight
• Abrasive cleaners, waxes, and solvents

Page 6
19 inch SXGA TFT LCD Color Monitor
5. PACKAGE CHECKLIST
* After open the box, check if all the package is included. If there is missing package, contact
the purchase Shop.
19” TFT LCD MONITOR
AC/DC Adaptor Power Cord
VGA Cable
Audio Cable
RCA Cable S-VHS Cable
User’s Manual
Page 7
19 inch SXGA TFT LCD Color Monitor
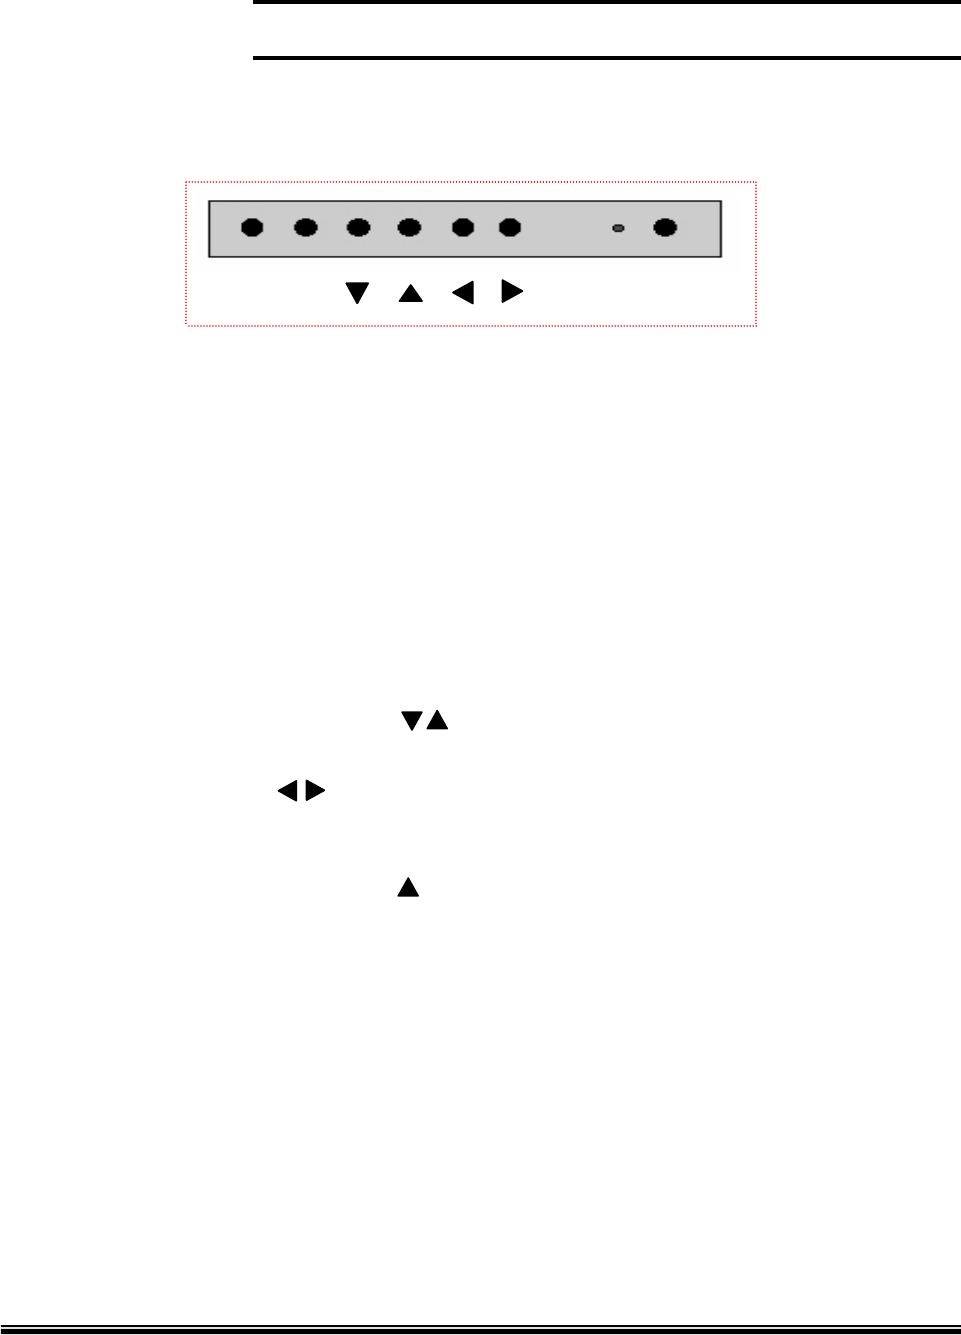
6. FRONT BUTTON & FUNCTION
Source Menu LED Power
Menu
(1) POWER
Turn On/ Turn Off the Monitor
(2) LED
Operation Status of the Monitor. (Green : ON / Red : No Signal)
Orange (Flickering) : Suspend Mode or Disconnect of VGA Cable
(3) SOURCE
Rotate signal source (Analog RGB/S-Video/Composite Video)
(4) MENU
Activate OSD Menu
Select OSD Menu/ Save the changed value
(5) CHANNEL(DOWN/UP) ( )
Move menu (OSD Menu)
(6) VOLUME ( )
Decrease/ Increase Menu value (OSD Menu)
Volume Control Hot Key
(7) Auto Adjust Hot Key ( )
Page 8
19 inch SXGA TFT LCD Color Monitor
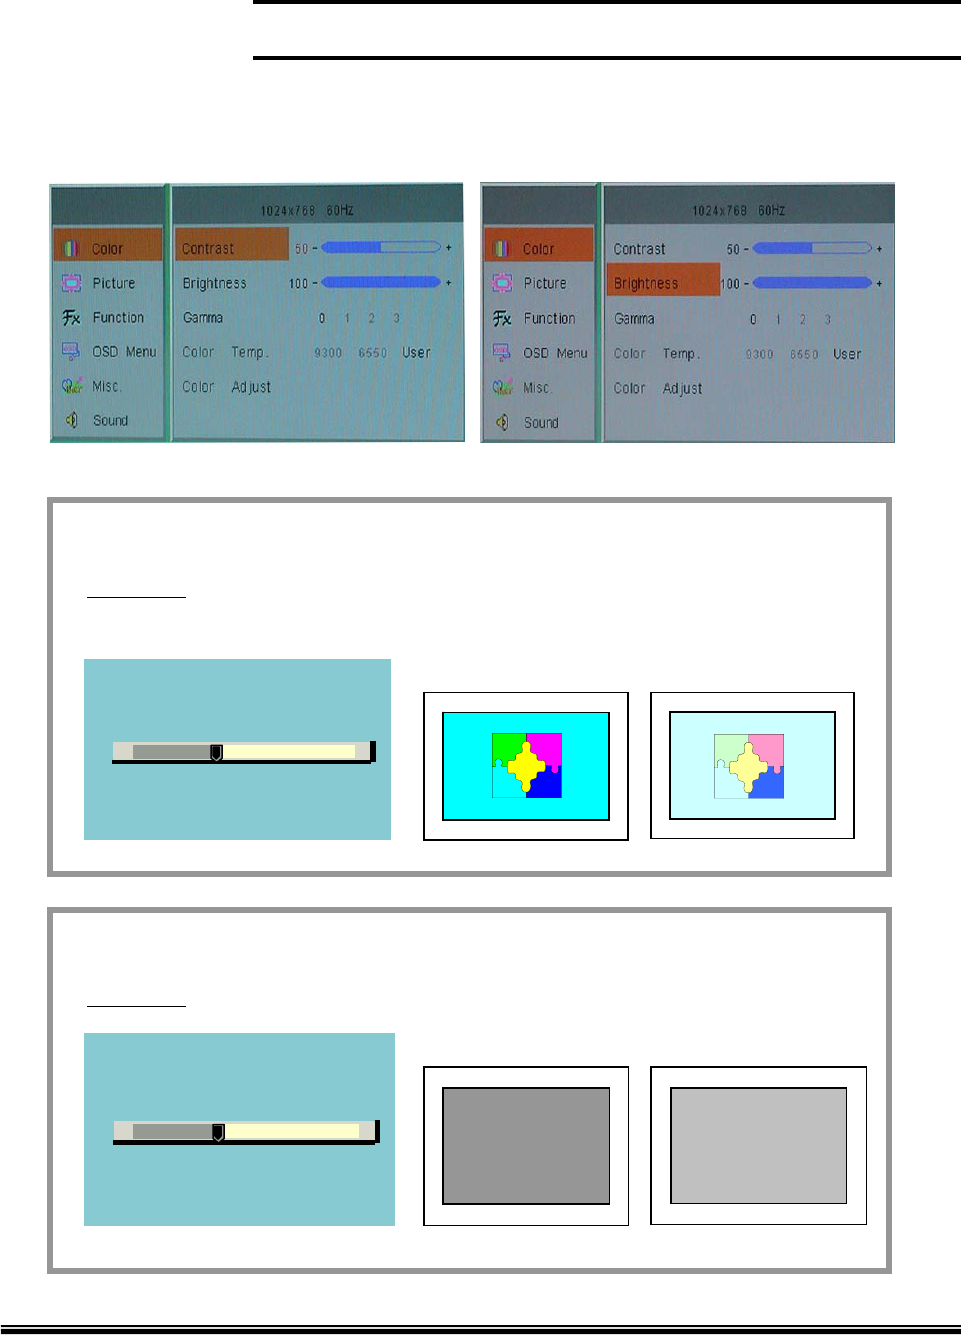
7. OSD OPERATION
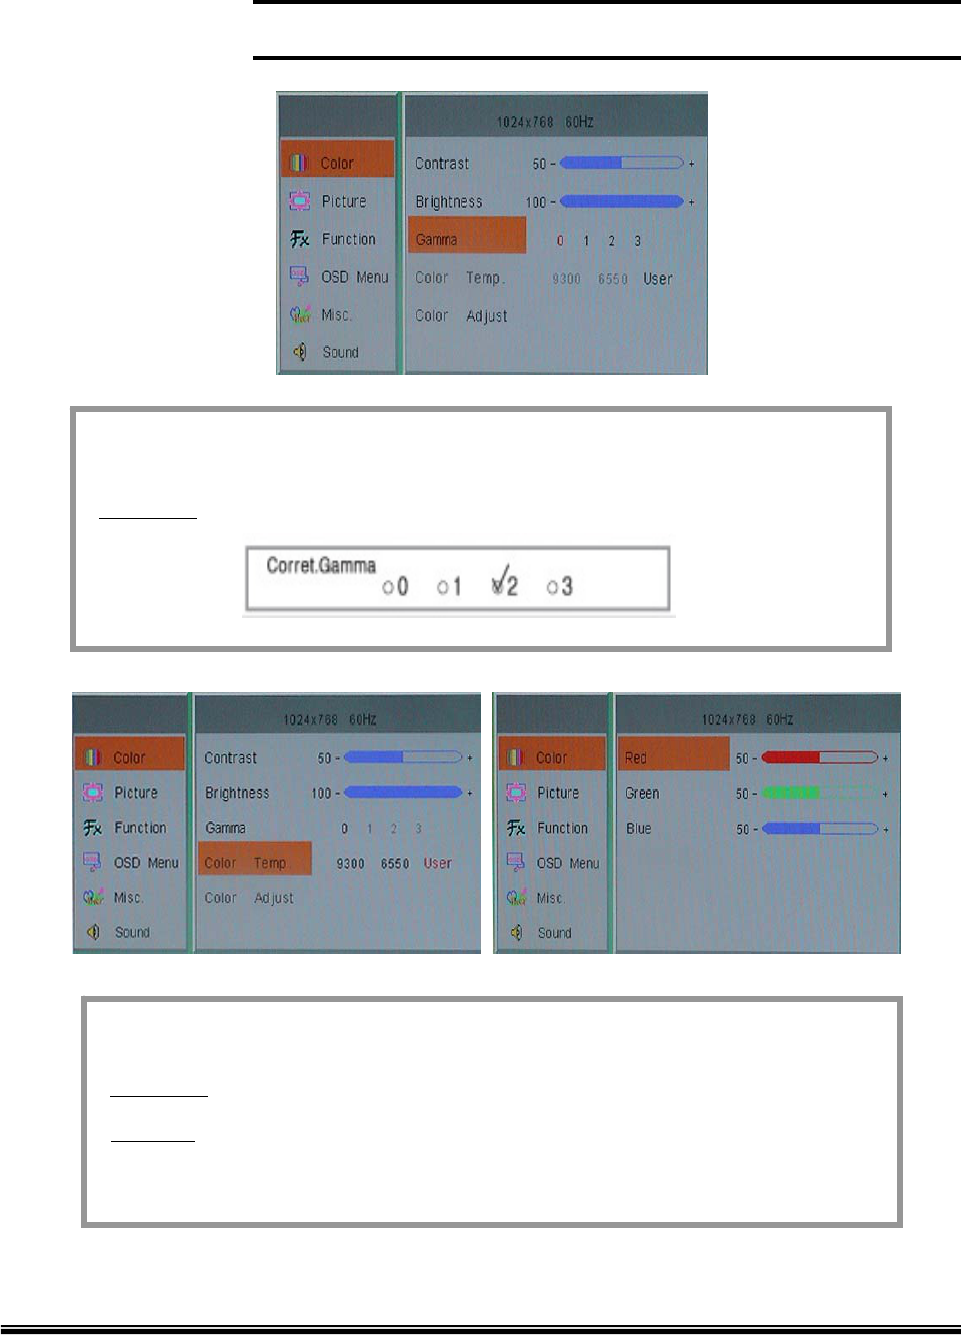
7.1 Color Control
This control allows you to make adjustment to Contrast & brightness of the display screen
Contrast (Common)
Procedure Menu > Menu > Menu (select) > ◀ ▶ (Increase/Decrease Value) >
Menu (Save the Value)
◀Distinct ▶Vague
Contrast
+-
Brightness (Common)
Procedure Menu > Menu > ▼ > Menu(Select) > ◀ ▶ > Menu (Save the Value)
◀Dark ▶Bright
Brightness
+-
Page 9
19 inch SXGA TFT LCD Color Monitor
Gamma Correct.
Procedure Menu > Menu > ▼ ▼ > Menu (Select) > ◀ ▶ > Menu (Save)
+
Color Temp. & Adjust
Procedure Menu > Menu > ▼ ▼ ▼ > Menu (Select) > ◀ ▶ > Menu (Save)
Function Select this control menu, then move to the desired color temperature
among 9300K, 6500K or USER for custom setting. In User Mode,
adjust R,G,B color control.
Page 10
19 inch SXGA TFT LCD Color Monitor
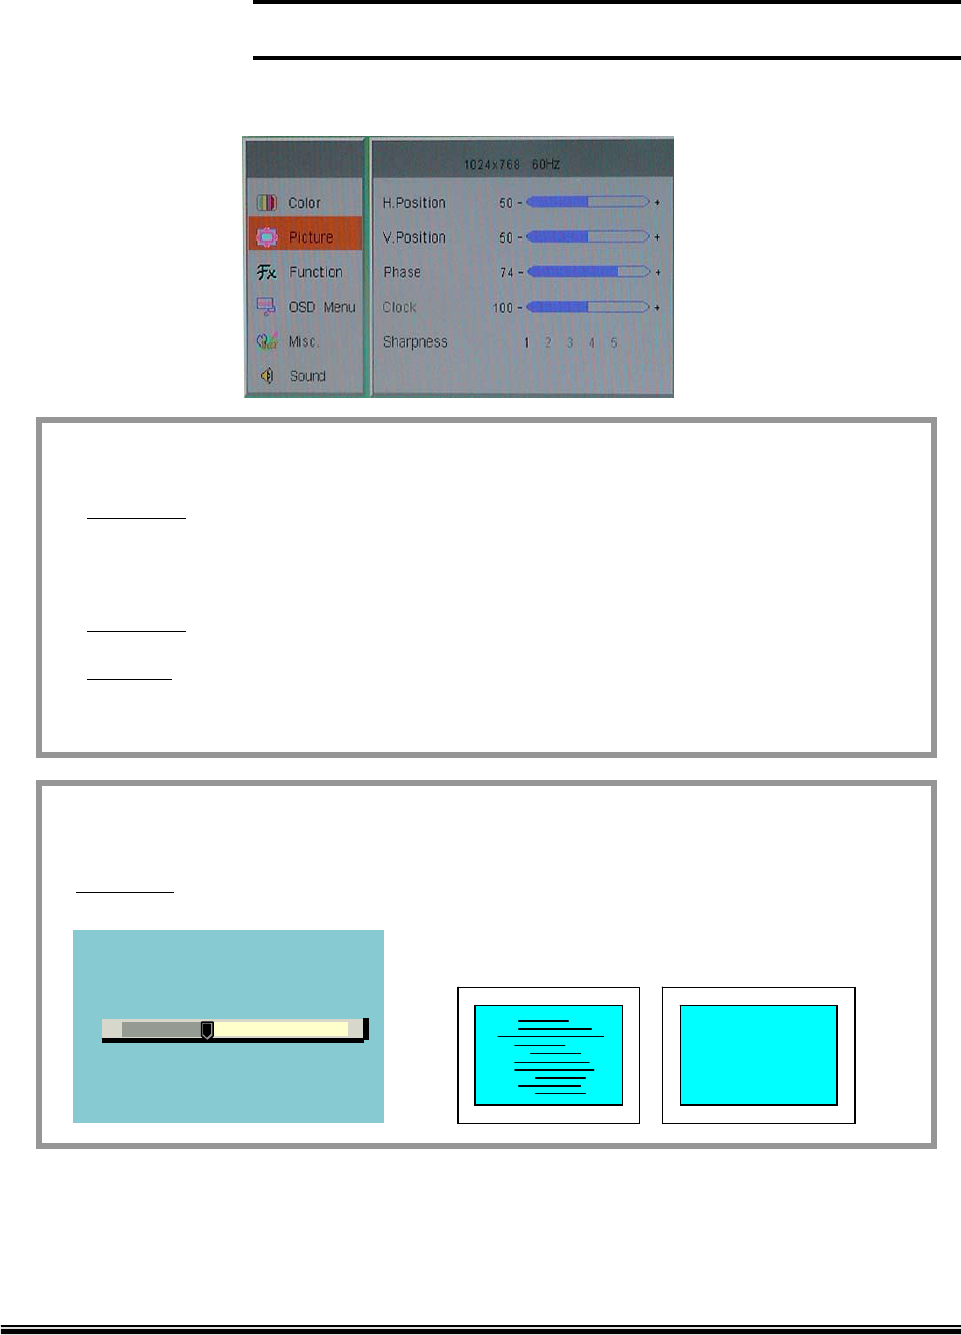
7.2 Picture
H.Position
Procedure Menu > ▼> Menu > Menu (Select) > ◀ ▶ > Menu (Save)
V.Position
Procedure Menu > ▼> Menu > ▼ > Menu (Select) > ◀ ▶ > Menu (Save)
Function Select this control menu, and then use ◀and ▶buttons to center
the image horizontally on the screen.
Phase
+-
Mismatch Match
Phase
Procedure Menu > ▼> Menu > ▼ ▼ > Menu (Select) > ◀ ▶ > Menu (Save)

Page 11
19 inch SXGA TFT LCD Color Monitor
Colck
Procedure Menu > ▼ > Menu > ▼ ▼ ▼ > Menu (Select) > ◀ ▶ > Menu (Save)
Function Select this control menu, and then use ◀and ▶buttons to optimize screen
quality by removing noise.
Sharpness
Procedure Menu > ▼ > Menu> ▼ ▼ ▼ ▼ > Menu (Select) > ◀ ▶ > Menu (Save)
Sharpness
1 2 3 4 5
7.3 Function
Auto Adjust & Auto Color
Procedure Menu > ▼▼>Menu > Menu (Select) > ◀ ▶ Yes > Menu
Function This control will automatically make adjustments to the horizontal and vertical
size, horizontal and vertical position, phase and color.
•Hot Key Auto Adjust can be operated by ▲button.
Page 12
19 inch SXGA TFT LCD Color Monitor
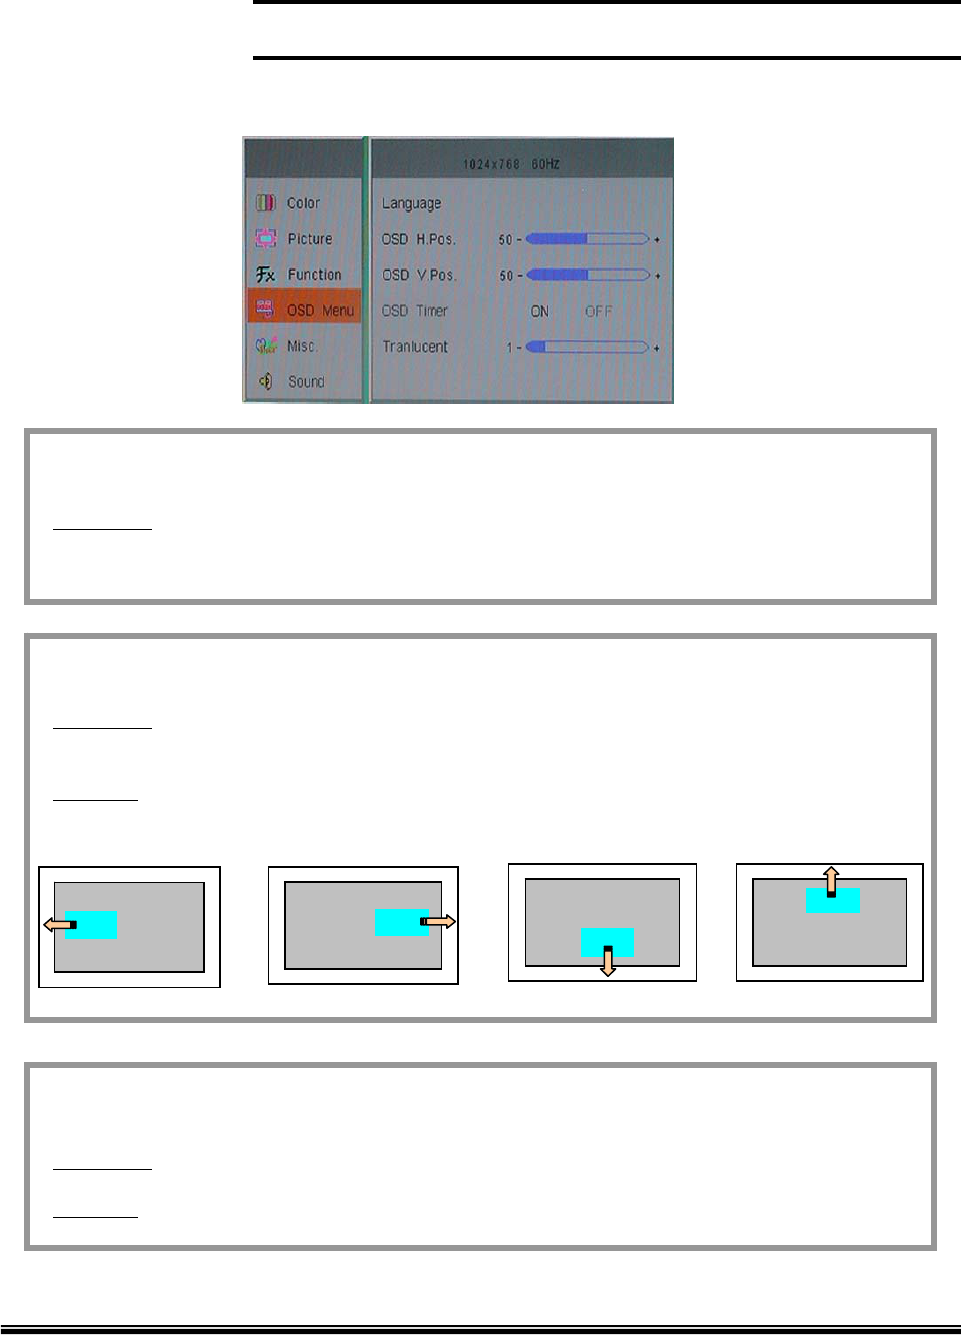
7.4 OSD Menu
Language
Procedure Menu > ▼▼▼>Menu > Menu (Select) > ◀ ▶ choose from English,
Spanish (ESPAÑOL), German (DEUTSCH), Italian (ITALIANO), French
(FRANÇAIS) > Menu
OSD H.V. Position
Procedure Menu > ▼▼▼>Menu > ▼>Menu (Select) > ◀ ▶ >Menu (OSD H.Position)
Menu > ▼ ▼ ▼ > Menu > ▼ ▼ > Menu (Select) > ◀▶> Menu
(OSD V.Position)
Function Moves the OSD window location
◀▶◀▶
Translucent
Procedure Menu > ▼▼▼>Menu > ▼▼▼▼> Menu (Select) > ◀▶>Menu (Save)
Function Changes the background color of OSD window. (Translucent / Opaque)
Page 13
19 inch SXGA TFT LCD Color Monitor
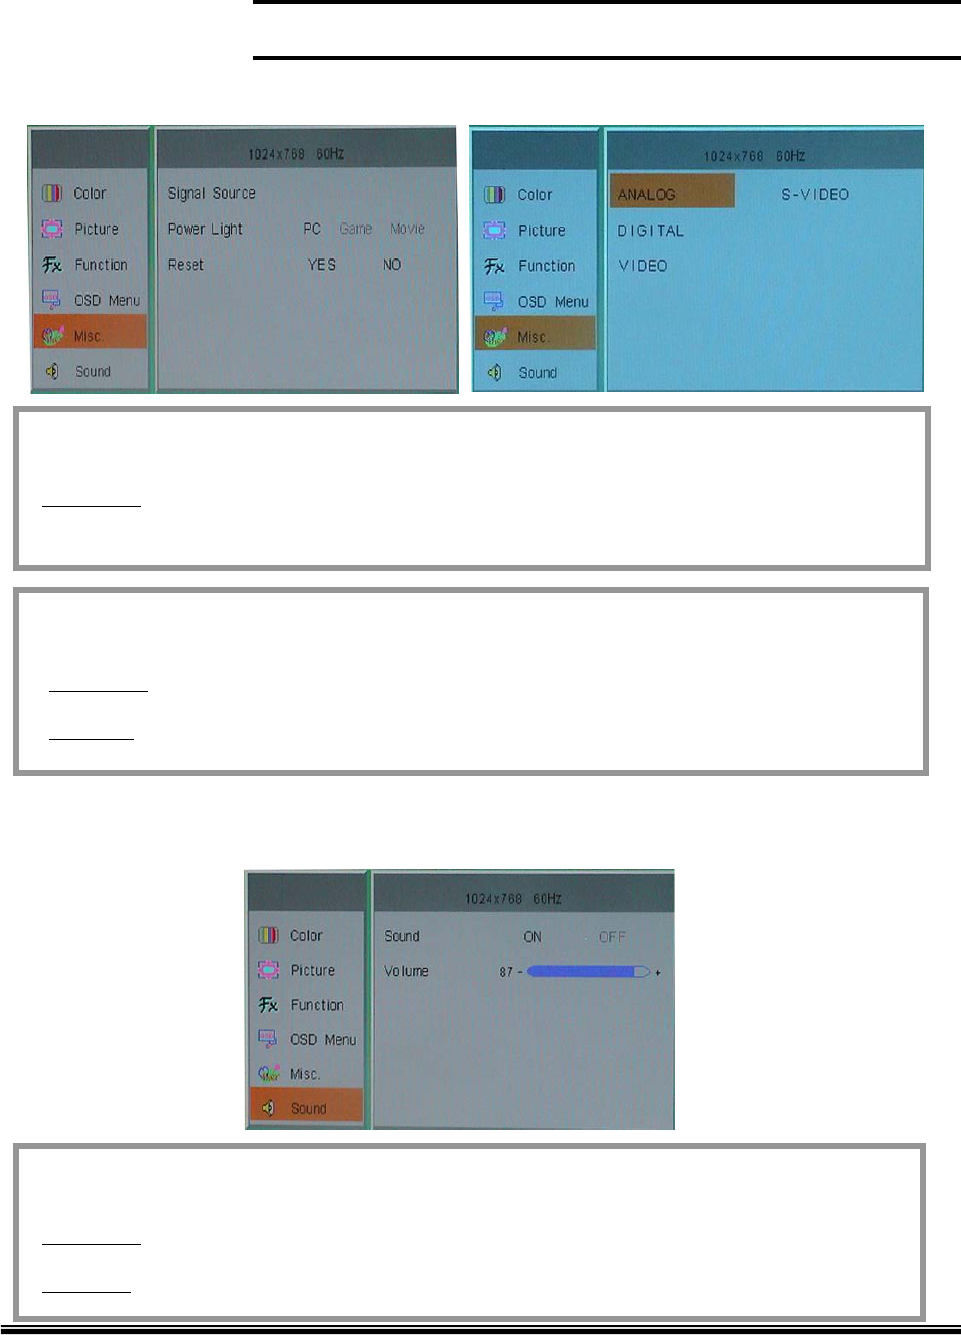
7.5. Miscellaneous
Signal Source
Procedure Menu > ▼▼▼▼>Menu > Menu (Select) > Choose from Analog D-Sub, Video,
S-Video > Menu
Reset
Procedure Menu > ▼▼▼▼>Menu > ▼▼>Menu (Select) > ◀▶Yes > Menu
Function User setting becomes invalid, and return to factory default setting.
7.6. Sound
Volume
Procedure Menu > ▼▼▼▼▼>Menu > ▼>Menu (Select) > ◀▶> Menu (Save)
* Hot Key Volume can be controlled directly by ◀▶button
Page 14
19 inch SXGA TFT LCD Color Monitor
8. Troubleshooting
Warning
Please do not open the monitor, because it may cause electric shock to the
customer. Also, the warranty program may not support the damages,
which user causes. When problem persists in spite of trying the following
troubleshooting advice, please contact dealer or the repair center listed in
the back side of this manual.
Trouble and countermeasure
LED doesn’t lit / No image
Check if the display is in power saving mode.
Check if the display is switched on or the power cable is properly connected.
Image is unstable (Flicker, Interference, Noise, etc.)
Check if signal cable is secured
Check if frame (vertical) frequency of video signal is lower than 75Hz because
this monitor can not run over 75Hz. In this case, please change the setting of
Display Control Panel’ of Windows to 60Hz, that displays the best performance.
Dull image
Adjust the Frequency or Phase.
Adjust the frame (vertical) frequency to 60Hz.
Remove any video signal distributor.
Dark or saturated image
Adjust the Brightness or Contrast.

Page 15
19 inch SXGA TFT LCD Color Monitor
9. Specifications
Model 19 inch SXGA TFTLCD Color Monitor
Display
Type 19” Color Active Matrix TFT LCD
Color 16.7Million (8 bit/color)
Pitch 0.294 x 0.294 mm
Resolution (max.) 1280 x 1024(SXGA) at 60 to 75Hz (Optimum 60Hz)
Contrast ratio 500:1
Brightness 300 cd/m2
Video
Sync frequency Vertical: 56 ~ 75Hz (Optimum 60Hz)
Horizontal: 31.5 ~ 80KHz
Input signal Analog RGB 0.714 VP-P, 15 Pin D-sub type
Viewing angle Up/Down: 170º
Right/Left: 170º
Audio
Speaker 2W x 2
Compatibility
Plug & Play VESA DDC 1/2B
Compatibility VESA / IBM / MAC
Power Management VESA Standard, DPMS
Operating Conditions
Power Consumption Operating: 48 watt max.
Stand-by: 4.8 watt max.
Temperature Operating: 0 ºC ~ 40 ºC
Storage: -20 ºC ~ 60 ºC
Humidity Operating: 10% ~ 85% R.H.
Non-Operating: 90% R.H. Max.
User control
OSD Souce/ Menu/ Down/ Up/ Left/ Right/ etc.
Mechanical
Size Packed : 520 (W) x 268 (D) x 520 (H) mm
Weight 9.9 kgs
Page 16
19 inch SXGA TFT LCD Color Monitor
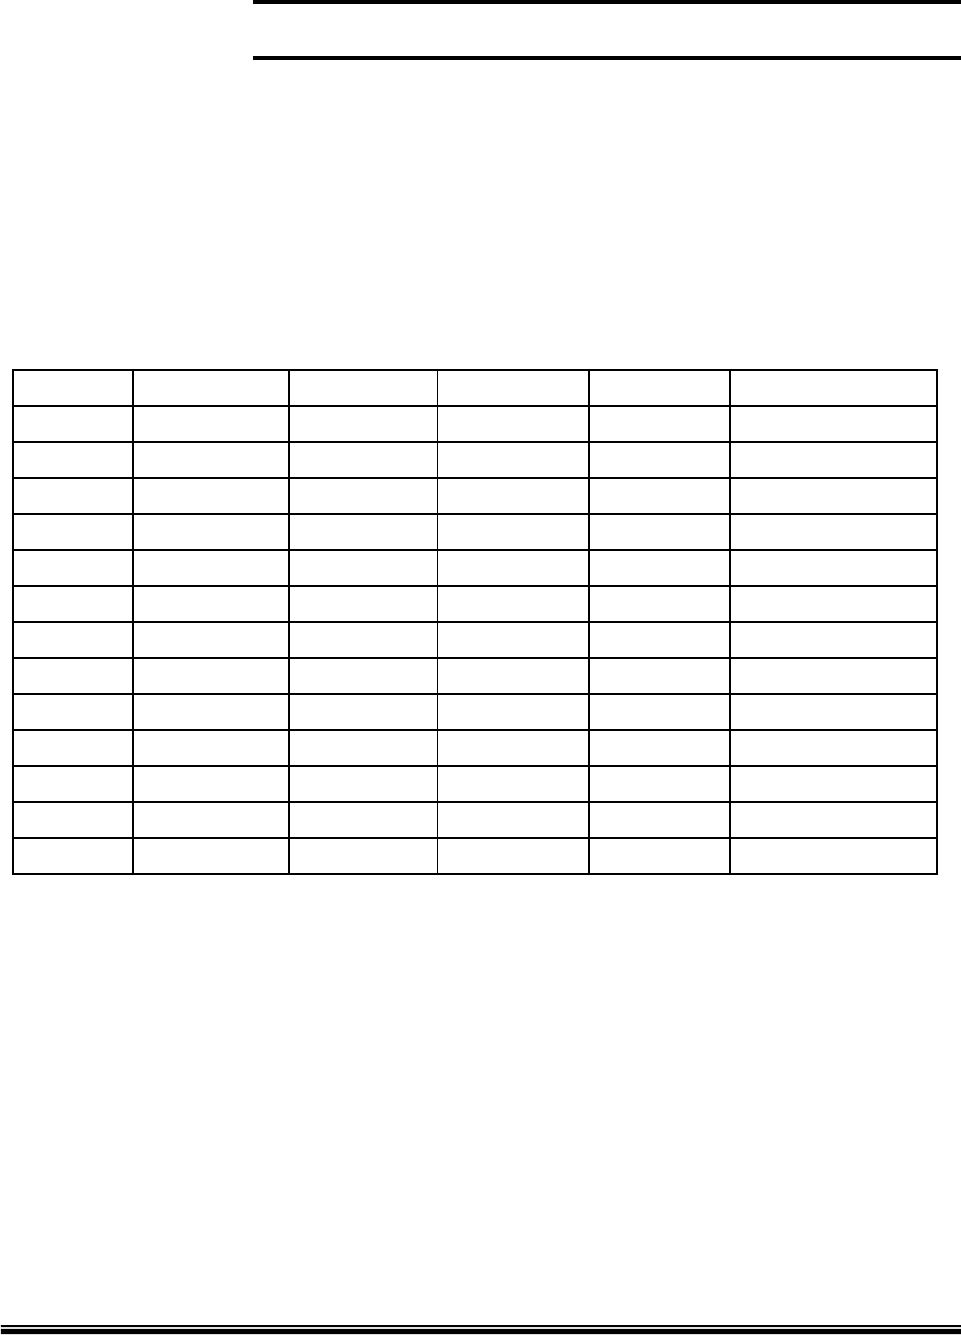
10. VIDEO MODE SUPPORT
The modes are detected when presented to the input and previous alignments for setup are
automatically recalled. A true multi-sync monitor emulation is implemented.
The factory preset supported modes include:
VESA Standard
Mode*1 Pixel freq.Resolution
640 x 350
Industry Standard
VESA Standard
IBM VGA 3H720 x 400
640 x 480
640 x 480
VESA Standard
VESA Guidelines
640 x 480
800 x 600
VESA Standard
VESA Standard800 x 600
800 x 600
Refresh rate H-freq.
VESA Guidelines1024 x 768
VESA Standard
VESA Standard1024 x 768
1024 x 768 60KHZ
56.5KHz
VGA
VGA
VGA
VGA
VGA
SVGA
SVGA
SVGA
XGA
XGA
XGA
48.4KHz
46.9KHZ
48.1KHz
37.9KHz
37.5KHZ
37.9KHz
31.5KHz
31.469KHZ
31.47KHz
75HZ
70Hz
60Hz
75HZ
72Hz
60Hz
75HZ
72Hz
60Hz
59.940HZ
70Hz
78.750MHZ
75.000MHz
65.000MHz
49.500MHZ
50.000MHz
40.000MHz
31.500MHZ
31.500MHz
25.175MHz
25.175MHZ
25.175MHz
Remarks*1
VESA Standard
VESA Standard1280 x 1024
1280 x 1024 80KHZ
64.0KHz
SXGA
SXGA
75HZ
60Hz
135.000MHZ
108.000MHz
Notes:
1. All mentioned modes are non-interlaced. The maximum and minimum frame rates are determined by the TFTLCD.
2. Factory preset modes are overwritten by additional user alignments for automatic recall. At all times it remains
possible to recall the initial factory presets.