LRE Medical Esterline 8048000 RFID Reader User Manual
LRE Medical GmbH Esterline Corporation RFID Reader
UserManual.wiki
>
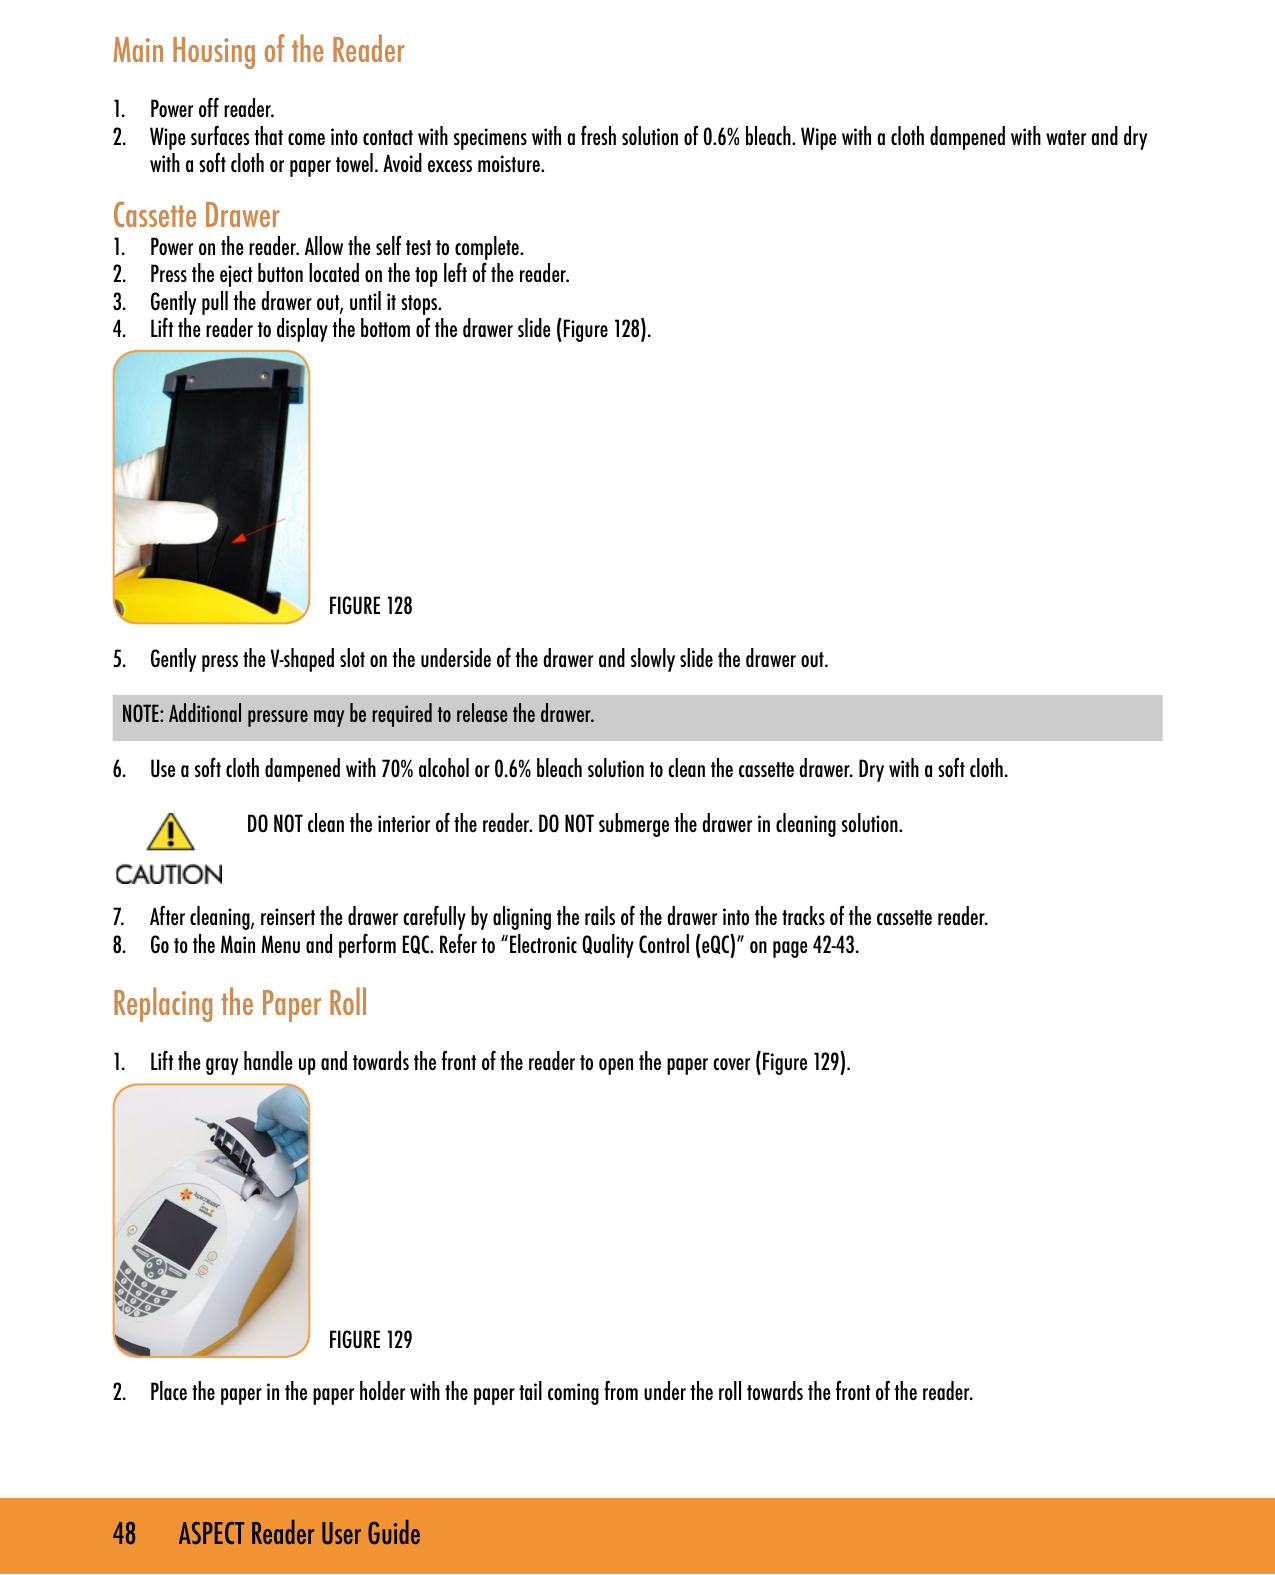
LRE Medical Esterline
>
8048000 User Manual
user manual
Navigation menu
Upload a User Manual
Namespaces
Wiki Guide
HTML
PDF
Info
Views
User Manual
Discussion / Help
Navigation

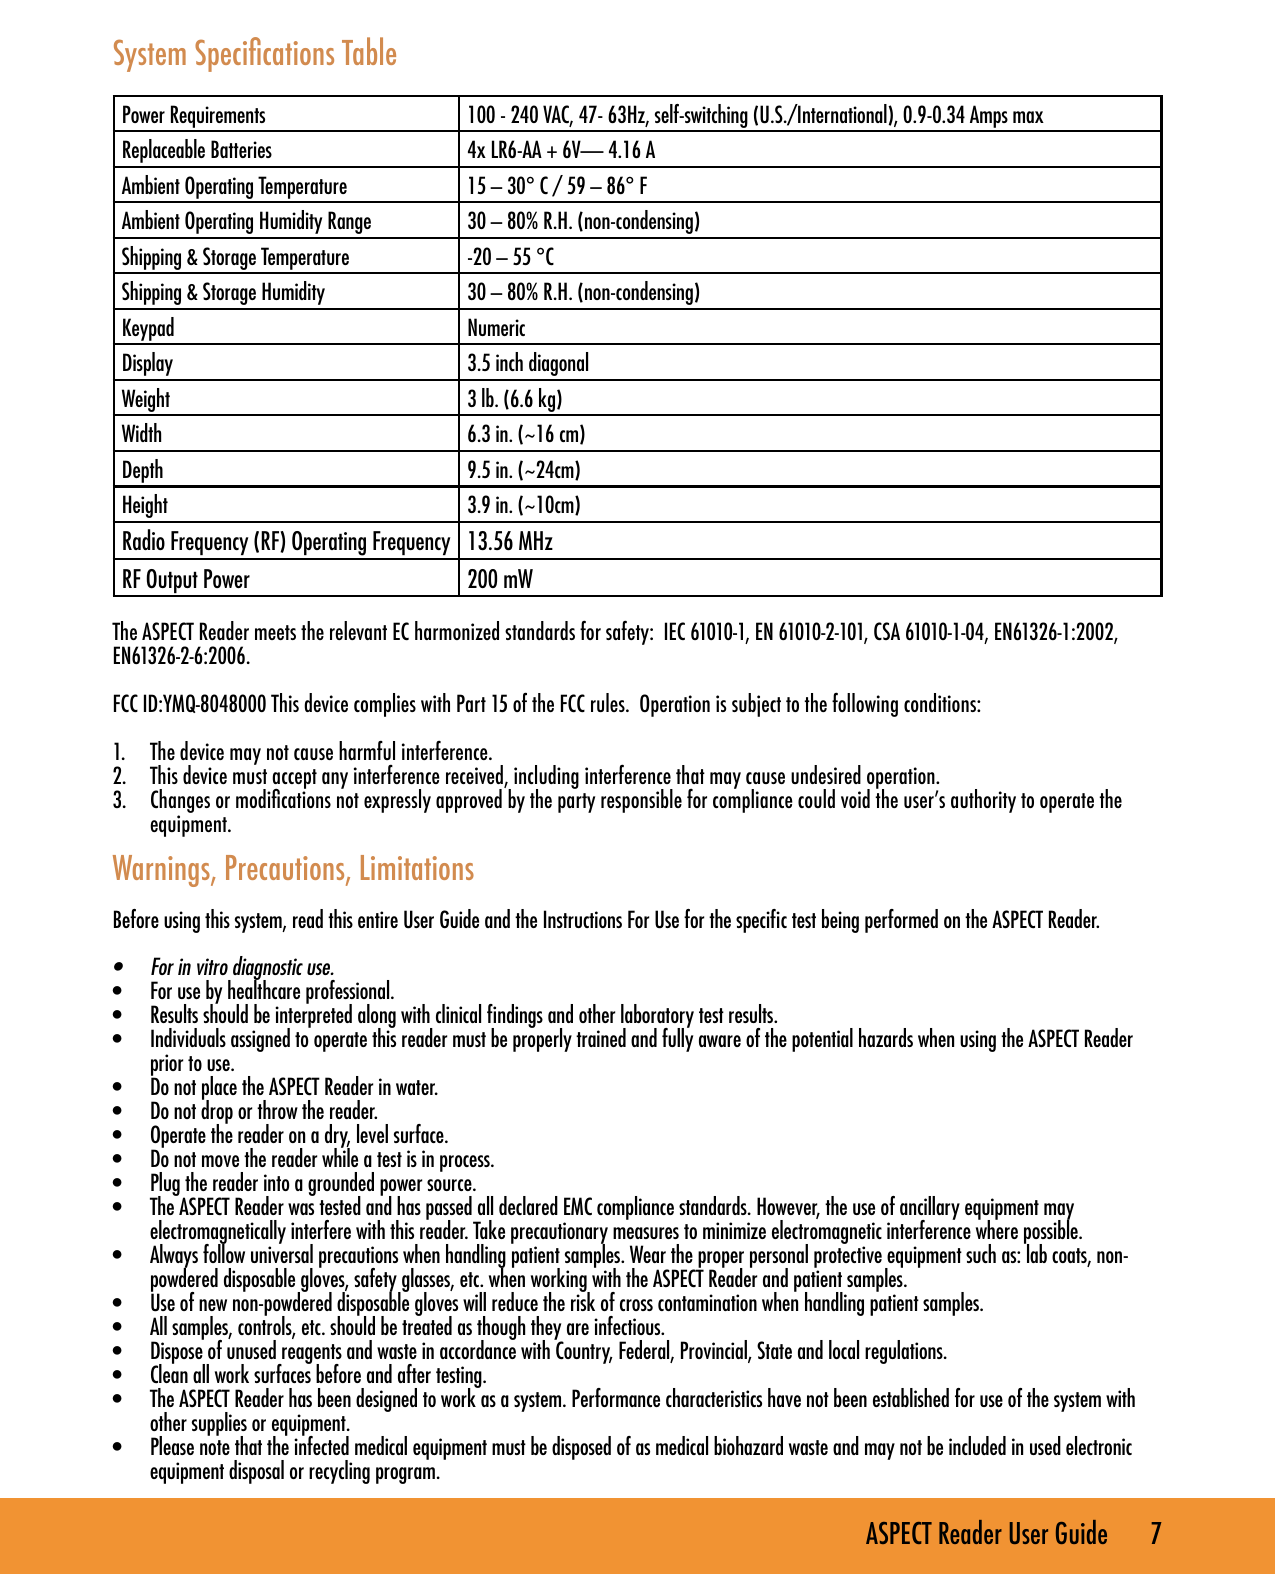
![6 ASPECT Reader User GuideINTRODUCTIONWelcomeCongratulations on the decision to test with the ASPECT Reader System by Critical Diagnostics. This user guide will provide useful information on performing tests with this system.System OverviewThe ASPECT Reader System is a semi-automated bench- top reader intended for use with cassette-based immunouorescent in-vitro diagnostic assays. Utilizing the principles of rapid lateral ow immunoassay technology, samples are analyzed using a test cassette. The test cassette contains a Radio Frequency ID (RFID) tag that identies parameters such as test name, calibration coefcients, expiry date, Sample/Reagent Assembly (SRA) type. After the test cassette is loaded with a specimen it is inserted into the reader. An internal scanner reads the RFID tag and automatically processes the test. Internal software interprets and reports the test results which are displayed on the screen, where they can be printed and/or electronically exported.Test specic information is stored on the RFID tag. No upload of any test-related information is required prior to performing a test.Intended UseThe ASPECT Reader is a benchtop instrument intended to be used with cassette-based immunouorescent in vitro diagnostic assays manufactured by Critical Diagnostics. The ASPECT Reader is used in the professional laboratory environment. After the patient sample has been added to the Test cassette, the cassette is placed inside of the ASPECT Reader to be analyzed. The ASPECT Reader will scan the test strip and measure the uorescent signal by processing the results using method-specic algorithms. The ASPECT Reader will display the test results. Refer to assay-specic package insert for details on specic tests. Principles of MeasurementThe ASPECT Reader detects a uorescent-label (TF5: Excitation 650nm; Emission 670nm) in a lateral ow immunoassay (LFI) test format. A pre-determined amount of test specimen is pipetted into the sample well of the test cassette. A buffer solution is pipetted into the second well. The test cassette (called cartridge in the software) is then immediately inserted into the ASPECT Reader for analysis. The reader assembly excites the uorescent label area of the test cassette then measures the uorescent signal to generate a quantitative result when processed through the calibration curve algorithm. The analyte result is displayed on the screen where it can be printed and/or exported to a LIS system.Data Entry FieldsData entry elds are areas in a screen in which information is entered. One screen can have several data entry elds, but only one eld can be selected and active for entering data at a time. Pressing a numeric key will input that character into the data entry eld. If the number of characters in a eld is exceeded, no additional characters may be entered unless others have been deleted.To select a data entry eld, move the cursor via the [↑] or [↓] keys to move up and down in the screen. To move back and forth between left and right text elds, use the [→] or [←] keys. The content of the eld is highlighted to show it is selected or active.To delete characters from a data eld, select the eld using the reader’s [↑] or [↓] keys, then press the [⇐] Delete key at the bottom of the numeric keys. The last character in the eld will be deleted.~ ~](https://usermanual.wiki/LRE-Medical-Esterline/8048000/User-Guide-2437260-Page-6.png)

![14 ASPECT Reader User Guide1. Using the [→] or [←] and the [↑] or [↓] keys, select the Supervisor Menu icon from the Main Menu screen (Figure 4).The Supervisor screen is displayed (Figure 5). The Supervisor screen allows the supervisor to:• set general reader settings, such as time, date, language, QC settings, i.e. QC intervals and Time-out setup.• add or delete users and edit existing users• view reader information, i.e. relevant network information• update rmware or languages• view and print both instrument and handling error logs General Reader Settings1. Using the right soft key, select General Reader Settings. The General Settings screen is displayed (Figure 6).The General Settings screen allows the supervisor to:• set default reader settings, such as time, date, language, QC settings, i.e. QC intervals, and reader Time- out.• select Test Mode settings• set up LIS settings such as LIS availability, IP Address, Time-out, etc.• set up Network settings such as IP Address and Port• set up Printer settings such as auto print and facility information Language1. Use the [↓] key to cursor down to the Language menu item. Press the right soft key to select it. The Language screen is displayed (Figure 7).FIGURE 5FIGURE 6FIGURE 4](https://usermanual.wiki/LRE-Medical-Esterline/8048000/User-Guide-2437260-Page-14.png)
![ASPECT Reader User Guide 15 2. Use the [↑] or [↓] keys to toggle through the available languages listed:• English• German• French• Spanish• Italian3. Select the desired language, then press the right soft key to accept the changes or the left soft key to discard any changes. Either returns the user to the previous menu (Figure 8). Default Settings Time & Time Format 1. Press the right soft key to select Time & Time Format. The Set Time & Time Format screen is displayed (Figure 10). 2. To set the time format, use the [←] or [→] keys to select the desired format, either 12 hour or 24 hour.3. To set the current time, use the [↓] key to access the Hours: and Minutes: text elds, then use the numeric keys to enter the desired time.4. To set either AM or PM, use the [←] or [→] keys to select the desired format.5. Press the right soft key to Accept the changes to the time and time format, or press the left soft key to Dis- card the changes. Either selection returns the user to the previous screen (Figure 11).FIGURE 10FIGURE 9The General Settings screen defaults to the Default Settings menu item. Press the right soft key to select it. The Default Settings screen is displayed (Figure 9).FIGURE 7FIGURE 8](https://usermanual.wiki/LRE-Medical-Esterline/8048000/User-Guide-2437260-Page-15.png)
![16 ASPECT Reader User Guide Date & Date Format 1. Use the [↓] key to cursor down to the Date & Date Format menu item. Press the right soft key to select it. The Date & Date Format screen is displayed (Figure 12).2. Use the [←] or [→] keys to toggle through the available date formats listed:• mm/dd/yyyy• dd/mm/yyyy3. Select the desired format, then use the [↓] key to cursor down to the Day:, Month: and Year: text elds.4. Using the numeric keypad, enter the desired information into the text elds, then press the right soft key to accept the changes made, or the left soft key to discard any changes. Either returns the user to the previous menu (Figure 13). QC SettingsThe QC Settings screen allows the supervisor to enter QC intervals for Liquid QC testing in days, and QC intervals for electronic QC (EQC) testing in hours. Zeros can also be entered into the text elds to set the QC settings to off.1. Use the [↓] key to cursor down to the QC Settings menu item.2. Press the right soft key to select it. The QC Settings (Figure 14) FIGURE 14FIGURE 11FIGURE 12FIGURE 13](https://usermanual.wiki/LRE-Medical-Esterline/8048000/User-Guide-2437260-Page-16.png)
![ASPECT Reader User Guide 17 3. Enter the desired numbers in the text elds using the numeric keys on the reader, then press the right soft key to accept the changes made, or select the left soft key to discard any changes made to the time selections. Either selection will return the user to the previous menu (Figure 15). Time-out SetupThe Time-out Setup screen allows the supervisor to switch the battery on or off, or set a time limit for switching the battery off. Also available is the Switch Off Time Mains option. It can be set to off, or a time limit can be set for switching it off. These time-out options force the reader to power down after the selected time interval, in minutes, after a period of inactivity on the reader, i.e., no key strokes, no measurement, etc.1. Use the [↓] key to cursor down to the Time-out Setup menu item.2. Press the right soft key to select it. The Time-out Setup screen is displayed (Figure 16). 1. Enter the desired times in the text elds using the numeric keys on the reader, then press the right soft key to accept the changes made to the timing, or select the left soft key to discard any changes made to the time selections. Either selection will return the user to the previous menu (Figure 17). 2. Press the left soft key to return to the General Settings screen (Figure 18). Test ModeThe Test Mode screen allows the supervisor to select the default mode of the reader. Need more info here.FIGURE 15FIGURE 16FIGURE 18FIGURE 17](https://usermanual.wiki/LRE-Medical-Esterline/8048000/User-Guide-2437260-Page-17.png)
![18 ASPECT Reader User Guide1. Under the General Settings menu, use the [↓] key to select/highlight the Test Mode menu item.2. Press the right soft key to select it. The Test Mode Settings screen is displayed (Figure 19). 3. Use the [←] or [→] keys to check the desired Default Mode option and the Temporary mode allowed option.4. Once all information has been entered, select the right soft key to accept the information, or the left soft key to discard any changes made. Either selection will return the user to the previous menu (Figure 20). LIS SettingsThe LIS Settings screen allows the supervisor to set LIS information, such as whether a LIS system is available, if the system should auto-transmit the data and enter the LIS IP Address, Port Number and Time-out (in seconds).1. Under the General Settings menu, use the [↓] key to select/highlight the LIS Settings menu item.2. Press the right soft key to select it. The LIS Settings screen is displayed (Figure 21).3. Enter the desired information using the numeric keys on the reader.4. Use the [←] or [→] keys to check the Auto Transmit option and the LIS available option.5. Once all information has been entered, select the right soft key to accept the information, or the left soft key to discard any changes made. Either selection will return the user to the previous menu (Figure 22). Network SettingsThe Network Settings screen allows the supervisor to set network information, such as IP Setup, IP Address and Port Number.FIGURE 19FIGURE 20FIGURE 22FIGURE 21](https://usermanual.wiki/LRE-Medical-Esterline/8048000/User-Guide-2437260-Page-18.png)
![ASPECT Reader User Guide 19 1. Under the General Settings menu, use the [↓] key to select/highlight the Network Settings menu item.2. Press the right soft key to select it. The Network Settings screen is displayed (Figure 23).3. Use the [←] or [→] keys to check the IP Setup option.4. Enter the desired information using the numeric keys on the reader.5. Once all information has been entered, press the right soft key to accept the information, or the left soft key to discard any changes made. Either selection will return the user to the previous menu (Figure 24).Printer SettingsThe Printer Settings screen allows the supervisor to set printer information, such as Auto Print, and information to be displayed on the result print out. A standard keyboard with a USB connector will be required (not supplied).1. Under the General Settings menu, use the [↓] key to select/highlight the Printer Settings menu item.2. Press the right soft key to select it. The Printer Settings screen is displayed (Figure 25). 3. Use the [←] or [→] keys to check the Auto Print option.4. Using an external keyboard enter the desired information into each text eld. Use the [↓] key to cursor down to the desired text eld.5. Once all information has been entered, press the right soft key to accept the information, or the left soft key to discard any changes made. Either selection will return the user to the previous menu (Figure 26).6. Press the left soft key to return to the Supervisor screen.FIGURE 23FIGURE 26FIGURE 25FIGURE 24](https://usermanual.wiki/LRE-Medical-Esterline/8048000/User-Guide-2437260-Page-19.png)
![20 ASPECT Reader User GuideManage UsersUnder the Manage Users menu item, the supervisor is able to:• view list of existing users by ID number, name and access mode• edit existing users• delete users• add new users1. Using the [→] or [←] and the [↑] or [↓] keys, select the Supervisor Menu icon from the Main Menu screen (Figure 27).The Supervisor screen is displayed (Figure 28).1. Use the [↓] key to cursor down to the Manage Users menu item. Press the right soft key to select it. The Existing User List screen is displayed (Figure 29).FIGURE 27FIGURE 28FIGURE 29](https://usermanual.wiki/LRE-Medical-Esterline/8048000/User-Guide-2437260-Page-20.png)
![ASPECT Reader User Guide 21 Edit User1. Select the desired user. Press the right soft key to access the Options menu (Figure 30).2. The Edit User menu item is already selected. Press the right soft key. The Change User screen is displayed (Figure 31). 3. Make the desired changes to the existing user information using the numeric keypad or keyboard. NOTE: Use a standard keyboard with a USB connector. 4. Then press the right soft key to accept the changes made, or the left soft key to discard any changes. The Existing User List screen is displayed (Figure 32).Delete Selected User1. Select/highlight the user to be deleted from the existing user list.2. Press the right soft key to access the Options menu. Using the [↓] key cursor to the Del. Selected menu item and press the right soft key to select it. The Delete User screen is displayed (Figure 33).3. The Delete User is a conrmation window asking if the user listed in the screen is to be deleted. If the answer is yes, press the left soft key to delete the user. If the answer is no, press the right soft key to cancel the deletion and return to the previous menu. Use the [←] or [→] keys to check the Auto Print option.FIGURE 30FIGURE 31FIGURE 32FIGURE 33](https://usermanual.wiki/LRE-Medical-Esterline/8048000/User-Guide-2437260-Page-21.png)
![22 ASPECT Reader User GuideOPERATIONIn this section you will learn how to: • log on and off the reader as Operator• run a sample • insert cassette• remove cassette • view results• transmit results• print results• view Operator settings • view error logs Log in Add UserNOTE: A standard keyboard with a USB connector will be required (not supplied). From the Existing User screen, press the right soft key to access the Options menu.1. Using the [↓] key cursor to the Add User menu item and press the right soft key to select it. The Create New User screen is displayed (Figure 34). 2. Select whether the user will have supervisor or operator access mode by using the [→] or [←] keys.3. Using the [↓] key cursor to the next text elds and enter the information needed using a keyboard. NOTE: The User ID and Passwords are numeric. These text elds will not accept alphabetic characters, unless a keyboard is connected.4. When all information has been entered, press the right soft key to accept the information. The new user will be displayed on the Existing User List screen.5. If no changes are desired, press the left soft key to discard any changes made and return to the previous screen.FIGURE 34FIGURE 35](https://usermanual.wiki/LRE-Medical-Esterline/8048000/User-Guide-2437260-Page-22.png)
![ASPECT Reader User Guide 23 1. Enter the desired User ID number using the numeric keypad, then cursor down using the [↓] arrow to the next text eldNOTE: Initial set-up User ID and Password will be 1234 for both entries. It is recommended that a new User ID and Password be established for Supervisor after initial set-up.2. Enter the desired password, then press the right soft key to select Login. The Main Menu will be displayed (Figure 36). Running a SampleNOTE: Prior to running any sample, it is recommended that an EQC (Electronic Quality Control) cassette be run to verify the performance of the reader. Refer to “Electronic Quality Control (EQC)” on page 42-43.Once EQC has been successfully performed, select the Run Patient icon on the Main Menu.1. Press the right soft key to select the Run Patient icon. The Run Patient screen will be displayed (Figure 37).The latest sequence number will be displayed, as well as the Operator ID of the person logged into the reader. The Patient ID text eld is selected.2. Enter the Patient ID using the numeric keys, then select the right soft key. The Insert Cartridge screen will be displayed (Figure 38).FIGURE 36FIGURE 37FIGURE 38](https://usermanual.wiki/LRE-Medical-Esterline/8048000/User-Guide-2437260-Page-23.png)
![ASPECT Reader User Guide 25 The ASPECT Reader measures the test automatically and the result is displayed on the screen in ng/mL (Figure 43).Removing Cassette1. To open the cassette drawer, press the eject button. The reader will automatically open the cassette drawer to allow removal of the cassette.2. Dispose of cassette according to Country, Federal, Provincial, State and local regulations. Printing Results1. To print patient results, press the right soft key to select Options. The Option menu will be displayed (Figure 44).2. The Print option is selected. Press the right soft key to print patient results. Printing will appear at the bottom of the Pat. ID screen, and the reader will print out the result.NOTE: Auto print may be selected by the Supervisor under “Printer Settings” on page 106 to automatically print any patient results once testing is nished.3. To run another test, use the [↓] key to Next Patient menu item. Press the right soft key to select it. The Run Patient screen will be displayed, ready for the next Patient ID number to be entered (Figure 45). Transmitting ResultsPatient results may be transmitted to a LIS system if desired. Refer to “LIS Settings” on page 18 of the Supervisor chapter. FIGURE 43FIGURE 44FIGURE 45](https://usermanual.wiki/LRE-Medical-Esterline/8048000/User-Guide-2437260-Page-25.png)
![26 ASPECT Reader User GuideREVIEW DATA AND ERROR LOGIn this chapter you will learn how to: • review patient results • review Liquid QC results (LQC)• review Electronic QC results (EQC) • reviewing Error Log• send results to LIS1. Using the [→] or [←] keys, select the Review Data icon from the Main Menu screen (Figure 46).The Review Results screen is displayed (Figure 47).The Review Results screen allows the user to:• review patient results by either start and end date, start and end sequence numbers, patient ID or operator ID.• review Liquid QC (LQC) results by start and end date• review electronic QC (EQC) by start and end date• send results to a LIS systemReview Patient Results by Date1. Using the right soft key, select Patient Results. The Patient Results screen is displayed (Figure 48).2. To view desired results by date, enter a start date using the numeric keys on the keypad in the format shown.3. Use the [↓] key to cursor to the next text eld.FIGURE 46FIGURE 47FIGURE 48](https://usermanual.wiki/LRE-Medical-Esterline/8048000/User-Guide-2437260-Page-26.png)

![28 ASPECT Reader User GuidePrint List Option1. From the Patient Results screen, press the right soft key to display the Option menu (Figure 53).2. Use the [↓] key to cursor down to the Print List option. Press the right soft key to select it. A screen will appear stating that the list is printing, please wait.3. Once the list has been printed, press the left soft key to return to the previous menu.Review Patient Results by Sequence #1. From the Main Menu, select the Review Data icon by using the [↓] or [↑] or [←] or [→] keys to highlight/select it (Figure 54).2. Press the right soft key to select it. The Patient Results screen is displayed (Figure 55).3. Using the [↓] key, cursor to the Start Seq# text eld. Enter the desired Start Seq# in the text eld using the numeric keypad (Figure 56).4. Using the [↓] key, cursor to the End Seq# text eld. Enter the desired End Seq# in the text eld using the numeric keypad.FIGURE 53FIGURE 54FIGURE 55FIGURE 56](https://usermanual.wiki/LRE-Medical-Esterline/8048000/User-Guide-2437260-Page-28.png)
![ASPECT Reader User Guide 29 5. Press the right soft key to select to view the patient results by sequence number (Figure 57).6. Press the right soft key to select to view the desired results. The Patient Results screen will be displayed with the patient’s sequence number, date, lot number and result.Show Details Option1. Press the right soft key to view options available under the Patient Results screen. The Options menu is displayed (Figure 58).2. Using the [↓] key, select the desired result line. Use the right soft key on the keypad to select Show Details. The date and time the result was obtained is displayed, along with the sequence number, the operator, test number, test lot, control result?? and patient result (Figure 59).NOTE: The Patient ID screen may be printed by pressing the right soft key. A screen will appear stating that the Patient ID information is printing, please wait.3. Press the left soft key to return to the previous menu.Print List Option1. From the Patient Results screen, press the right soft key to display the Options menu (Figure 60).FIGURE 57FIGURE 58FIGURE 59FIGURE 60](https://usermanual.wiki/LRE-Medical-Esterline/8048000/User-Guide-2437260-Page-29.png)
![30 ASPECT Reader User Guide2. Use the [↓] key to cursor down to the Print List option. Press the right soft key to select it. A screen will appear stating that the list is printing, please wait.3. Once the list has been printed, press the left soft key to return to the previous menu.Review Patient Results by Patient ID1. From the Main Menu, select the Review Data icon by using the [↓] or [↑] or [←] or [→] keys to highlight/select it (Figure 61).2. Press the right soft key to select it. The Patient Results screen is displayed (Figure 62).3. Using the [↓] key, cursor to the Patient ID text eld. Enter the desired ID number in the text eld using the numeric keypad (Figure 63).4. Press the right soft key to select to view the patient results by Patient ID (Figure 64). FIGURE 61FIGURE 63FIGURE 64FIGURE 62](https://usermanual.wiki/LRE-Medical-Esterline/8048000/User-Guide-2437260-Page-30.png)
![ASPECT Reader User Guide 31 Show Details Option1. Press the right soft key to view options available under the Patient Results screen. The Options menu is displayed (Figure 65).2. Use the right soft key on the keypad to select Show Details. The date and time the result was obtained is displayed, along with the sequence number, the operator, test number, test lot, control result and patient result (Figure 66).NOTE: The Patient ID screen may be printed by pressing the right soft key. A screen will appear stating that the Patient ID information is printing, please wait.3. Press the left soft key to return to the previous menu.Print List Option1. From the Patient Results screen, press the right soft key to display the Options menu (Figure 67).2. Use the [↓] key to cursor down to the Print List option. Press the right soft key to select it. A screen will appear stating that the list is printing, please wait.3. Once the list has been printed, press the left soft key to return to the previous menu.FIGURE 65FIGURE 66FIGURE 67](https://usermanual.wiki/LRE-Medical-Esterline/8048000/User-Guide-2437260-Page-31.png)
![32 ASPECT Reader User GuideReview Patient Results by Operator ID1. From the Main Menu, select the Review Data icon by using the [↓] or [↑] or [←] or [→] keys to highlight/select it (Figure 68). 2. Press the right soft key to select it. The Patient Results screen is displayed (Figure 69).3. Using the [↓] key, cursor to the Operator ID text eld. Enter the desired ID number in the text eld using the numeric keypad (Figure 70).4. Press the right soft key to select to view the patient results by Operator ID (Figure 71). Show Details Option1. Press the right soft key to view options available under the Patient Results screen. The Options menu is displayed (Figure 72). FIGURE 71FIGURE 70FIGURE 69FIGURE 72FIGURE 68](https://usermanual.wiki/LRE-Medical-Esterline/8048000/User-Guide-2437260-Page-32.png)
![ASPECT Reader User Guide 33 2. Using the [↓] key, select the desired result line. Use the right soft key on the keypad to select Show Details. The date and time the result was obtained is displayed, along with the sequence number, the operator, test number, test lot, control result and patient result (Figure 73).NOTE: The Patient ID screen may be printed by pressing the right soft key. A screen will appear stating that the Patient ID information is printing, please wait.3. Press the left soft key to return to the previous menu.Print List Option1. From the Patient Results screen, press the right soft key to display the Options menu (Figure 74).2. Use the [↓] key to cursor down to the Print List option. Press the right soft key to select it. A screen will appear stating that the list is printing, please wait.3. Once the list has been printed, press the left soft key to return to the previous menu.Review Liquid QC (LQC) Results1. Using the [→] or [←] keys, select the Review Data icon from the Main Menu screen (Figure 75). The Review Results screen is displayed (Figure 76).FIGURE 73FIGURE 74FIGURE 75FIGURE 76](https://usermanual.wiki/LRE-Medical-Esterline/8048000/User-Guide-2437260-Page-33.png)
![34 ASPECT Reader User Guide2. Using the [↓] key, cursor to the Liquid QC Results text eld, then press the right soft key to select it. The Review LQC Results screen is displayed (Figure 77).3. Enter a start date using the numeric keys on the keypad in the format shown.4. Use the [↓] key to cursor to the next text eld.5. Enter an end date using the format shown (Figure 78).The LQC Result List screen is displayed (Figure 79).Show Details Option1. Press the right soft key to view options available under the LQC Result List screen. The Options menu is displayed (Figure 80).2. Use the right soft key on the keypad to select Show Details. The date and time the QC result was obtained is displayed, along with the sequence number, the operator, test and lot number, as well as the control result and if the result passed or failed (Figure 81).FIGURE 79FIGURE 78FIGURE 77FIGURE 80FIGURE 81](https://usermanual.wiki/LRE-Medical-Esterline/8048000/User-Guide-2437260-Page-34.png)
![ASPECT Reader User Guide 35 NOTE: The LQC: screen may be printed by pressing the right soft key. A screen will appear stating that the LQC information is printing, please wait. 3. Press the left soft key to return to the previous menu.Print List Option1. From the LQC Result List screen, press the right soft key to display the Options menu (Figure 82).2. Use the [↓] key to cursor down to the Print List option. Press the right soft key to select it. A screen will appear stating that the list is printing, please wait.3. Once the list has been printed, press the left soft key to return to the previous menu.Review Electronic QC (EQC) Results1. Using the [→] or [←] keys, select the Review Data icon from the Main Menu screen (Figure 83).The Review Results screen is displayed (Figure 84).2. Using the [↓] key, cursor to the Electronic QC Results text eld, then press the right soft key to select it. The Review eQC Results screen is displayed (Figure 85).FIGURE 84FIGURE 82FIGURE 85FIGURE 83](https://usermanual.wiki/LRE-Medical-Esterline/8048000/User-Guide-2437260-Page-35.png)
![36 ASPECT Reader User Guide3. Enter a start date using the numeric keys on the keypad in the format shown.4. Use the [↓] key to cursor to the next text eld.5. Enter an end date using the format shown.6. Press the right soft key to select the entered dates. The EQC Result List screen is displayed (Figure 86). Show Details Option1. Press the right soft key to view options available under the eQC Result List screen. The Options menu is displayed (Figure 87).2. Use the right soft key on the keypad to select Show Details. The date and time the QC result was obtained is displayed, along with the sequence number, the operator, test and lot number, as well as the control result and if the result passed or failed (Figure 89).NOTE: The EQC screen may be printed by pressing the right soft key. A screen will appear stating that the LQC information is printing, please wait. 3. Press the left soft key to return to the previous menu.Print List Option1. From the EQC Result List screen, press the right soft key to display the Options menu (Figure 90). FIGURE 86FIGURE 88FIGURE 89FIGURE 90](https://usermanual.wiki/LRE-Medical-Esterline/8048000/User-Guide-2437260-Page-36.png)
![ASPECT Reader User Guide 37 2. Use the [↓] key to cursor down to the Print List option. Press the right soft key to select it. A screen will appear stating that the list is printing, please wait (Figure 91).3. Once the list has been printed, press the left soft key to return to the previous menu.Send Results to LIS1. Using the [→] or [←] keys, select the Review Data icon from the Main Menu screen (Figure 92).The Review Results screen is displayed (Figure 93).2. Using the [↓] key, cursor to the Send Results (LIS) text eld, then press the right soft key to select it. The Send Results to LIS screen is displayed (Figure 94).3. Under the Send Results to LIS screen, the user can select one of several options:• Send all patient results• Send all unsent patient results• Send all Liquid QC (LQC) results• Send all unsent Liquid QC (LQC) results• Send all electronic QC (EQC) results• Send all unsent electronic QC (EQC) results FIGURE 93FIGURE 94FIGURE 92FIGURE 91](https://usermanual.wiki/LRE-Medical-Esterline/8048000/User-Guide-2437260-Page-37.png)
![38 ASPECT Reader User Guide4. Using the [↓] key, select the desired option, then press the right soft key. A screen will appear stating that the reader is sending the results to LIS (Figure 95).5. Press the right soft key to cancel the send request.6. Press the left soft key to return to the previous menu. View Error LogThe ASPECT Reader will display Instrument Errors and Handling Errors. Instrument Errors are errors that are directly associated with the reader’s hardware, software, and/or rmware. Instrument Errors often require contacting Technical Support to resolve. Handling Errors are errors that are associated with sample or pre-analytical handling and preparation of the test cassette. 7. From the Operator screen, use the [↓] key to cursor down to the View Error Log text eld (Figure 96). 8. Press the right soft key to select it. The Error Log screen is displayed (Figure 97). Instrument Errors Log1. Press the right soft key to select Instrument Errors. The Instrument Errors Log screen is displayed (Figure 98). FIGURE 95FIGURE 96FIGURE 98FIGURE 97](https://usermanual.wiki/LRE-Medical-Esterline/8048000/User-Guide-2437260-Page-38.png)
![ASPECT Reader User Guide 39 The Instrument Errors Log displays instrument errors by error code, date and time. Refer to “Troubleshooting/Error Codes” on page 51 for more details about the errors.2. Press the right soft key to print the Instrument Errors List. A screen will appear stating that the list is “Printing Please Wait”.3. Once the error list is printed, the screen returns to the Instrument Errors Log screen.4. To cancel the print request, press the left soft key once. Wait a few seconds for the reader to stop printing and` return to the previous screen.5. Press the left soft key to return to the Error Log screen.Handling Errors Log1. Use the [↓] key to cursor down to the Handling Errors text eld from the Error Log screen (under Operator→ View Error Log) (Figure 99).2. Press the right soft key to select Handling Errors. The Handling Error Log screen is displayed (Figure 100).The Handling Errors Log displays handling errors by error code, date and time. Refer to “Troubleshooting/Error Codes” on page 51 for more details about the errors.3. Press the right soft key to print the Handling Errors List. A screen will appear stating that the list is printing, to please wait. Once the error list is printed, the screen returns to the Handling Errors Log screen.4. You may cancel the print request by pressing the left soft key once. It will take a few seconds for the reader to stop printing, then return to the previous screen.5. Press the left soft key to return to the Error Log screen.CONTROLSQuality Control is important to ensure the integrity of the reader. Provided separately from the reader is the EQC cassettes (Electronic Quality Control), which checks the internal reader optics and systems. If the EQC result is outside of the specied range, the reader will display the test as Failed and must be repeated. If the EQC is within the specied range, the test result is valid and conrms that the reader is performing within specications. If the repeated EQC tests fails a second time, please call Technical Support.Also available, but not provided with the reader are liquid quality controls (LQC) which can be set up to be run at the discretion of the laboratory. These controls will test the performance of the cassette, reader and also the testing technique used.FIGURE 99FIGURE 100](https://usermanual.wiki/LRE-Medical-Esterline/8048000/User-Guide-2437260-Page-39.png)
![40 ASPECT Reader User GuideIn this section you will learn how to: • run liquid controls (LQC)• run electronic controls (EQC)Running Liquid Quality ControlsExternal high and low Liquid Quality Controls (LQC) should be tested to demonstrate that the test reagents, cassettes and test procedures are performing properly. Refer to the Instructions For Use for specic details on performing the LQC test. Good Laboratory Practice suggests that external controls should be tested with each new lot or shipment of test materials, or every 30 days, and as otherwise required by your laboratory’s standard quality control procedures. Controls should be tested in the same manner as if testing patient specimens. When running patient specimens or external controls, if an analyte fails for any reason (built-in control failure or an external control out of range) no patient results will be reported.NOTE: Users should follow government guidelines (for example, federal, state or local) and/or accreditation requirements for quality control.6. Using the [→] or [←] keys, select the Liquid Control icon from the Main Menu screen (Figure 101). 7. Press the right soft key to select Run LQC (Figure 102). 8. Scan the LQC RFID card included with the control kit by placing it over the keypad of the reader.9. Select HI or LO control. NOTE: Ensure that the correct control level is performed after selecting HI or LO from Step 9. 10. Prepare the controls as outlined in the Instructions For Use.11. When preparing to test, follow the Instructions For Use included with the specic test being performed, and perform the control testing as if is a patient specimen.12. The Insert Cartridge screen will be displayed (Figure 103).FIGURE 101FIGURE 102FIGURE 103](https://usermanual.wiki/LRE-Medical-Esterline/8048000/User-Guide-2437260-Page-40.png)
![ASPECT Reader User Guide 41 13. Immediately insert the cassette into the drawer as instructed, then close the drawer. The reader will automatically start the LQC testing and a Run LQC screen will be displayed (Figure 104). 14. Once completed the reader will display the results (Figure 105). 15. Press the eject button to remove the cassette once the test is nished.16. Dispose of cassette according to Country, Federal, Provincial, State and local regulations.17. Repeat Steps 6 through 14 if a second level control is required. Printing Liquid Control Results1. To print control results, press the right soft key to select Options. The Option menu will be displayed (Figure 106). 2. The Print option is selected. Press the right soft key to print control results.Auto print may be selected by the Supervisor under “Printer Settings” on page 106 to automatically print any control results once testing is nished.3. To run another liquid control, use the [↓] key to Next Control menu item. Press the right soft key to select it. The Prepare to Perform QC Tests screen will be displayed, ready for the next QC Barcode number to be scanned (Figure 107). FIGURE 104FIGURE 105FIGURE 106FIGURE 107](https://usermanual.wiki/LRE-Medical-Esterline/8048000/User-Guide-2437260-Page-41.png)
![42 ASPECT Reader User Guide4. Once all desired controls have been run, press the left soft key to return to the Main Menu. Electronic Quality Control (EQC)Electronic Quality Control ensures the proper function of the ASPECT Reader.The EQC cassette is light sensitive. Be sure to store the EQC cassette in the provided foil pouch to ensure accurate test results.EQC should be performed:• on initial setup of the reader• if the reader is transported or moved• whenever required by your laboratory’s quality control requirements• whenever there is a question concerning the performance of the ASPECT ReaderNOTE: If an EQC interval has been entered into the ASPECT Reader by a supervisor and the interval has elapsed, a passed EQC result is required before any patient testing is permitted. The following screen will be displayed (Figure 108). Perform the EQC1. Using the [→] or [←] and[↓] or [↑] keys, select the EQC icon from the Main Menu screen (Figure 109). 2. Press the right soft key to select Run eQC. The Insert eQC Device screen is displayed (Figure 110). 3. Remove the EQC cassette from foil pouch. 4. Insert the cassette into the reader drawer.5. Close the drawer. The reader will automatically start the EQC testing (Figure 111). FIGURE 108FIGURE 109FIGURE 110](https://usermanual.wiki/LRE-Medical-Esterline/8048000/User-Guide-2437260-Page-42.png)
![44 ASPECT Reader User Guide3. Press the left soft key to return to the Main Menu. UPDATING READERReader Info displays the current network conguration of the reader and current version numbers for the hardware, rmware and bootware, as well as the reader’s serial number and current IP address.1. From the Supervisor screen, use the [↓] key to cursor down to the Reader Info menu item. Press the right soft key to select it. The Reader Information screen is displayed (Figure 116). 2. Press the left soft key to return to the Supervisor screen. UpdateThe Update screen allows the user to upload new rmware to the reader, using a USB stick. 1. From the Supervisor screen, use the [↓] key to cursor down to the Update text eld.2. Press the right soft key to select it. The Update screen is displayed (Figure 117). Update Firmware 1. The Update screen defaults to the Update Firmware text eld. Press the right soft key to select it.2. The Firmware Upgrade screen is displayed (Figure 118). 3. Insert the USB stick containing the new rmware into a USB Port on the back of the reader (Figure 119). FIGURE 116FIGURE 117FIGURE 118](https://usermanual.wiki/LRE-Medical-Esterline/8048000/User-Guide-2437260-Page-44.png)
![ASPECT Reader User Guide 45 4. Press the right soft key to select OK to download the new rmware.5. Once the new rmware has been downloaded, the...6. Press the left soft key to return to the Update screen. EXPORT LOGSUnder the Export Logs screen, the supervisor is able to export patient results, liquid QC results, EQC results, users, and raw scans to a USB stick. NOTE: Insert a USB stick in a USB port on the back of the reader. Refer to picture of “Back of Reader” on page 11. 1. From the Supervisor screen, use the [↓] key to cursor down to the Export Logs text eld (Figure 120). 2. Press the right soft key to select it. The Export Logs screen is displayed (Figure 121). Patient Results 1. Press the right soft key to select Patient Results. A window conrming that the data has been successfully saved to a USB stick is displayed (Figure 122). FIGURE 119FIGURE 120FIGURE 121FIGURE 122](https://usermanual.wiki/LRE-Medical-Esterline/8048000/User-Guide-2437260-Page-45.png)
![46 ASPECT Reader User Guide2. Press the right soft key to select OK and return to the Export Logs screen.3. Remove the USB stick from the back of the reader. Liquid QC Results 1. Insert the desired USB stick into a USB port on the back of the reader.2. Use the [↓] key to cursor down to the Liquid QC Results menu item from the Export Logs screen (under Supervisor→ Export Logs) Press the right soft key to select Liquid QC Results.3. A window conrming that the data has been successfully saved to a USB stick is displayed (Figure 123). 4. Press the right soft key to select OK and return to the Export Logs screen.5. Remove the USB stick from the back of the reader. EQC Results1. Insert the desired USB stick into a USB port on the back of the reader.2. Use the [↓] key to cursor down to the EQC Results menu item from the Export Logs screen (under Supervisor→ Export Logs) Press the right soft key to select EQC Results.3. A window conrming that the data has been success- fully saved to a USB stick is displayed (Figure 124). 4. Press the right soft key to select OK and return to the Export Logs screen.5. Remove the USB stick from the back of the reader. Users1. Insert the desired USB stick into a USB port on the back of the reader.2. Use the [↓] key to cursor down to the Users menu item from the Export Logs screen (under Supervisor→ Export Logs) (Figure 125). FIGURE 123FIGURE 124FIGURE 125](https://usermanual.wiki/LRE-Medical-Esterline/8048000/User-Guide-2437260-Page-46.png)
![ASPECT Reader User Guide 47 3. Press the right soft key to select Users.4. A window conrming that the data has been successfully saved to a USB stick is displayed (Figure 126). 5. Press the right soft key to select OK and return to the Export Logs screen.6. Remove the USB stick from the back of the reader. Raw Scans 1. Insert the desired USB stick into a USB port on the back of the reader.2. Use the [↓] key to cursor down to the Raw Scans menu item from the Export Logs screen (under Supervisor→ Export Logs) Press the right soft key to select Raw Scans.3. A window conrming that the data has been success- fully saved to a USB stick is displayed (Figure 127). 4. Insert the USB stick containing the new rmware into a USB Port on the back of the reader.5. Remove the USB stick from the back of the reader. MAINTENANCE System Shipping and StorageEnvironmental Conditions for ASPECT Reader Shipping and Storage:• Humidity: 10 - 85% (non-condensing)• Temperature: -25°C to 45°CRecommended Maintenance & CleaningThe reader parts that may be cleaned or disinfected:• main housing of the reader• cassette drawerDo not wash or rinse LCD display screen, electrical or computer connections.FIGURE 126FIGURE 127](https://usermanual.wiki/LRE-Medical-Esterline/8048000/User-Guide-2437260-Page-47.png)