Latitude 571-572 2.4 GHz Chest Strap User Manual appendix 8
Latitude Limited 2.4 GHz Chest Strap appendix 8
Latitude >
User Manual

www.tuv.com
Report No.
14020770 001
Appendix 8:
User Manual
FCCID:WM4571-572
IC:8194A-571572
(Total: 47 pages, include this page)
130 mm
140 mm
130 mm
140 mm
WATCH: D92G500 (RECEIVER)
CHEST STRAP: TD00200 (TRANSMITTER)
1.0 Welcome
Congratulations for your purchase of this heart rate monitor. It is designed for ease of
use during sport activities.
In order to learn and apply the various functions of your new heart rate monitor, please
read this user manual carefully.
1.1 General
It is important for you to understand Estimated Maximum Heart Rate (EMHR), training
zone, upper heart rate limit and lower heart rate limit before you begin. This information
helps you to achieve the maximum health benefits out of your workout.
We recommend user to consult the medical practitioner or registered physician before
setting your personal training-schedule and target. Or you can set your own upper and
lower limit using the EMHR as a reference guide. You may estimate your EMHR using
the following formula:
220 – age = EMHR.
WARNING ! Care and Maintenance
!This product set, like most electronic or
mag n e ti c de vi c es , ma y in t e rf er e wi th
pacemakers. We recommend patients with
pacemakers to consult with their doctor before
using this product set.
!Make sure that you fully understand the
functions and limitations of this product set
before using it.
!This product set is a supplementary device for
measuring heart rate; it is NOT a substitute for
any medical devices. You should periodically
compare the heart rate reading provided by
this product set with the reading from a doctor.
!
!
!
!
Avoid rough usage or severe
impacts to this product set.
Store this product set in a dry
place when it is not in use.
C l e a n y o u r p r o d u c t s e t
o c c a s i o n a l l y w i t h a s o f t
moistened cloth.
DO NOT expose this product
s e t t o c h e m i ca l s su c h as
gasoline and alcohol; these
ch e m icals will d amage this
product set.

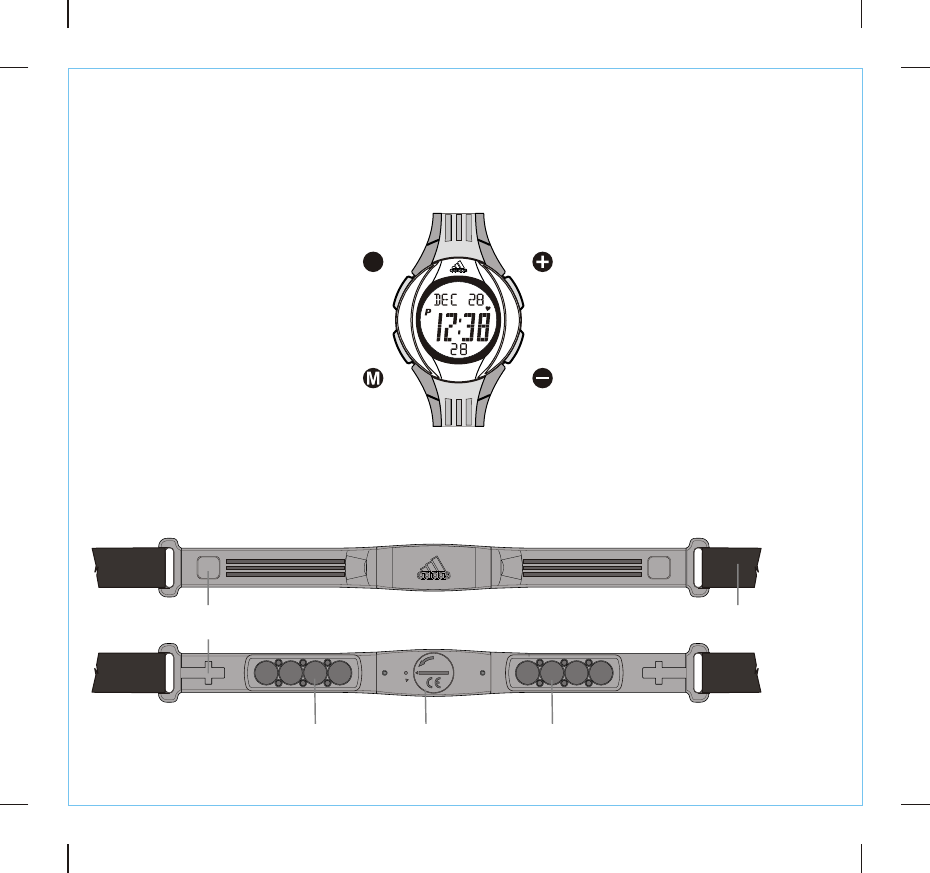
(+)
!
!
!
!To view the daily alarm time.
Hold down the button to enter daily
alarm setting mode.
To take a lap time in exercise
stopwatch mode.
To change the setting value under
setting mode.
(L)
To turn ON the Backlight for
few seconds.
!
(-)
!
!
!To change modes among different
exercise sub-modes.
Hold down the button to pop the
exercise mode function menu.
To change the setting value under
setting mode.
(M)
To change modes among the
d i ff er en t ma in fu nc ti on
modes.
Hold down the button to
enter/exit a setting mode.
To change modes among
different setting sub-modes.
!
!
!
2.0 Functions of the Operating Keys
3.0 Functions of the chest strap
Front
Elastic Band
L
N
E
P
O
Battery coverContact
Back
(contact with skin)
Contact
Connector

IMPORTANT: This Chest strap must be worn directly on your skin. DO NOT wear the chest strap on the top of
your clothes. Otherwise, the chest strap CANNOT get the heart rate signal.
NOTE: In dry seasons, wet the contacts with water to make the signal transmission normal.
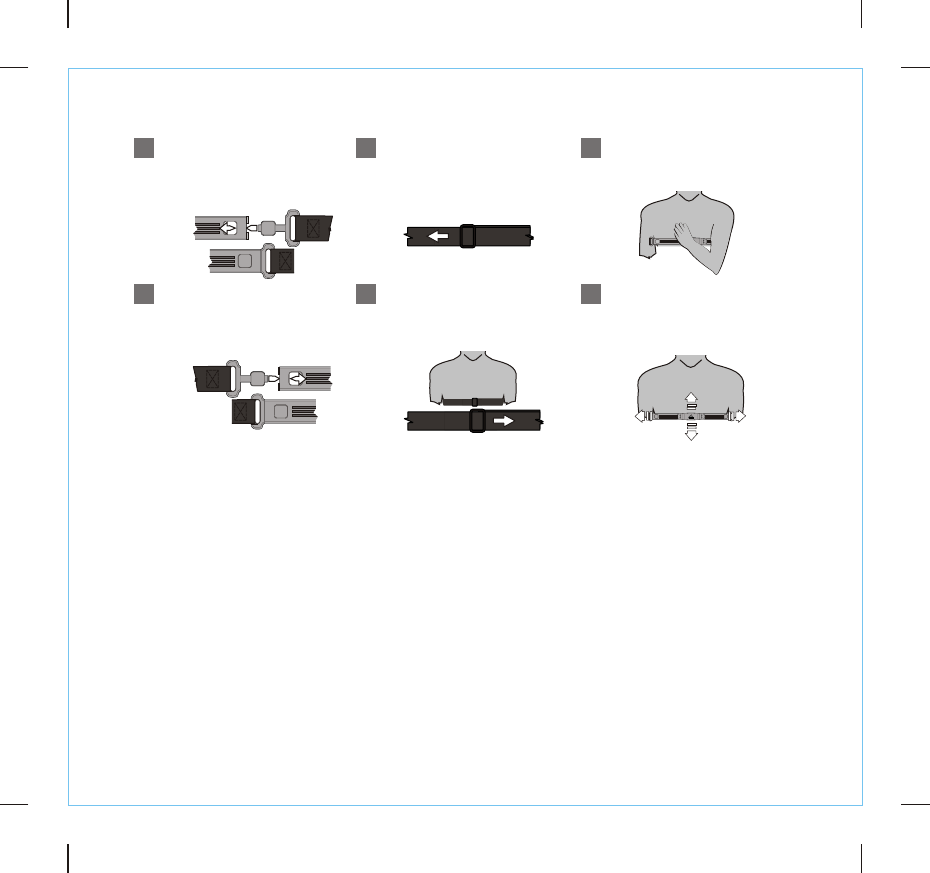
1 2 3
6
45
Extend the elastic band for
allowing loose fitting the
chest strap on your chest.
C o n n e c t t h e o p p o s i t e
connector to the chest strap
with another hand.
Connect one connector with
the chest strap. Ensure that
the connector is completely
lodged into the chest strap.
Fasten the elastic band until
it is fitted on your chest
comfortably.
Fit the chest strap on your
chest with one hand.
Move the chest strap until
the two contacts are firmly
contacted with the skin of
your chest.
4.0 Wear the Chest Strap
Precautions / Tips
+
+
+
+
+
+
+
+
There are two contacts located on the back of the Chest strap. These two contacts MUST
make firm contact with the user's skin during measurement.
DO NOT take heart rate measurement when diving or under water.
Clean the contacts occasionally by applying a few drops of water, and wipe it dry with a
paper towel to remove any residual grease.
DO NOT use body cream; it will insulate the signal between the skin and the contacts.
Clean your skin with soap and water for a better signal transmission.
For those with extremely dry skin, apply some conductive gel or water to increase
conductivity.
Adjust the chest strap with the supplied elastic band until it holds on your chest firmly to
avoid loose when exercise.
Avoid doing any awkward motion during measurement, it will create an inaccurate heart rate
reading.

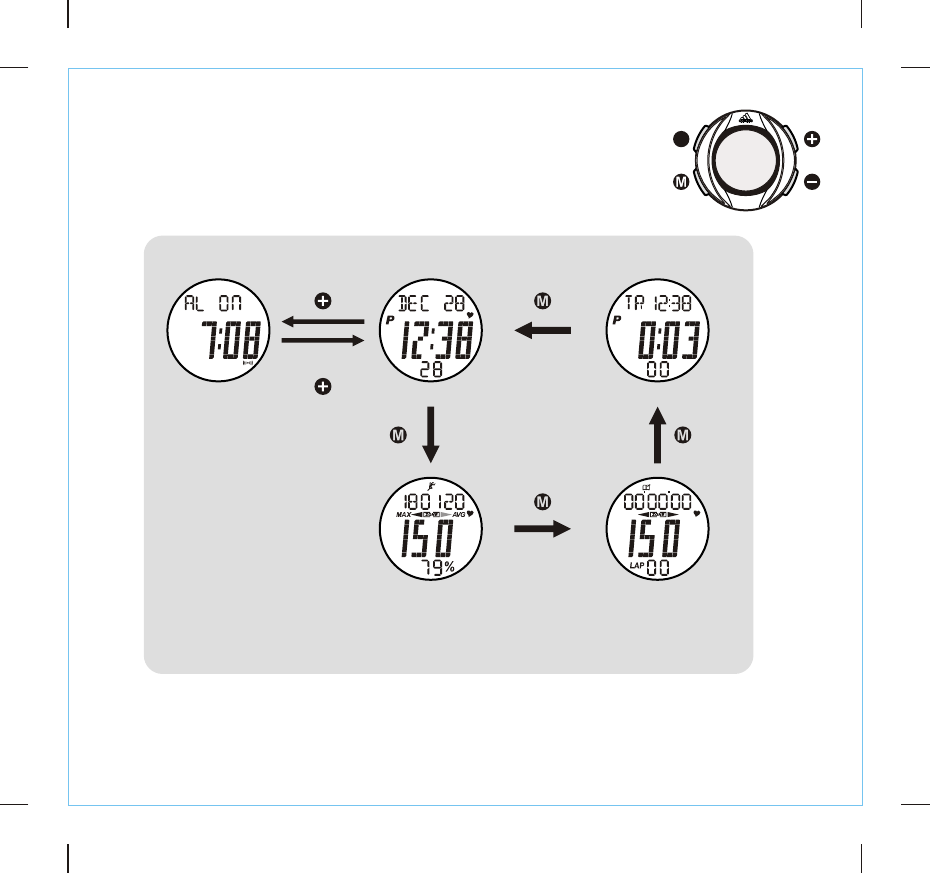
!Press (M) to navigate among different main function modes
following the below diagram.
5.0 Main Functions Mode
Normal Time ModeDaily Alarm Mode
hold
release
Exercise Mode
Key Operations Between Main Function Modes
Lap Recall Mode
Countdown Timer Mode
L
L
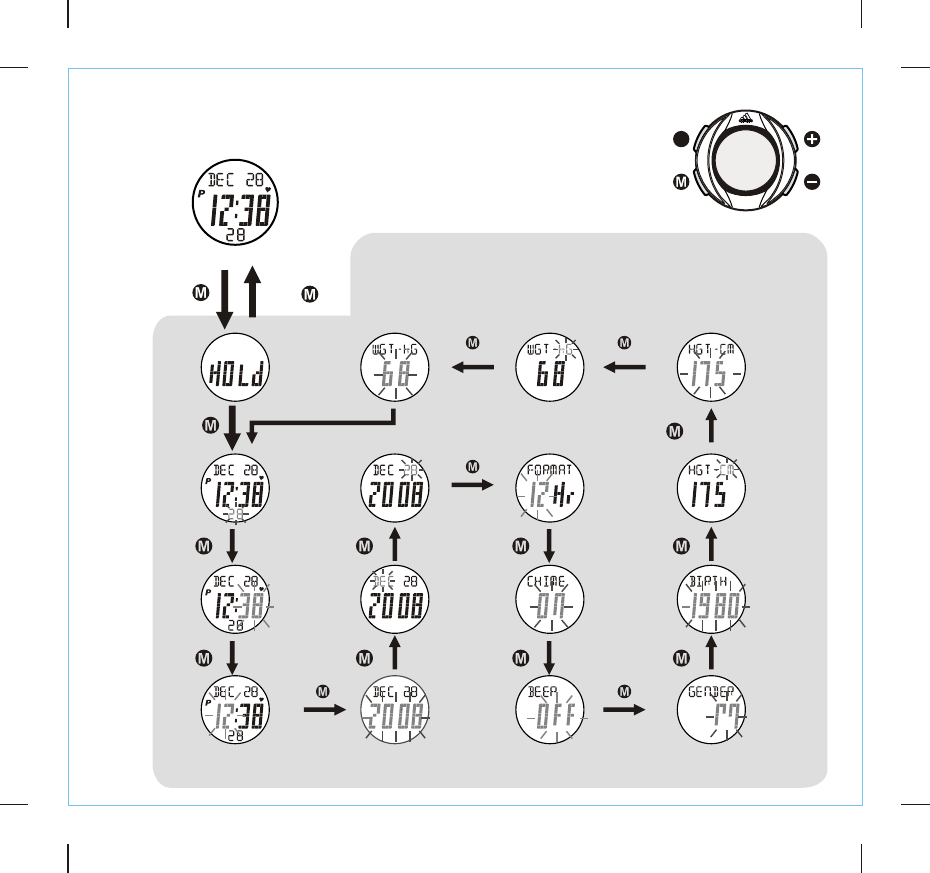
!Holding down (M) in Normal Time Mode to enter/exit Setting Display.
* Press the (+) or (-) to change the setting. Hold down
the button will change at a faster pace for
.
some
settings
6.0 Setting Normal Time and User Personal Data
Normal Time and User Personal Data Setting
Reset
Second Set
Day*
Set
Weight*
Set 12/24
format*
Set Weight
Unit (kg/lb)*
Set Height
Unit (cm/inch)*
Set
Height*
Set
Minute* Set
Month* Set Chime
ON/OFF*
Set Birth
year*
Set
Hour* Set
Year* Set Key tone
ON/OFF* Set Gender
Male/Female*
Normal Time Mode
hold hold
hold
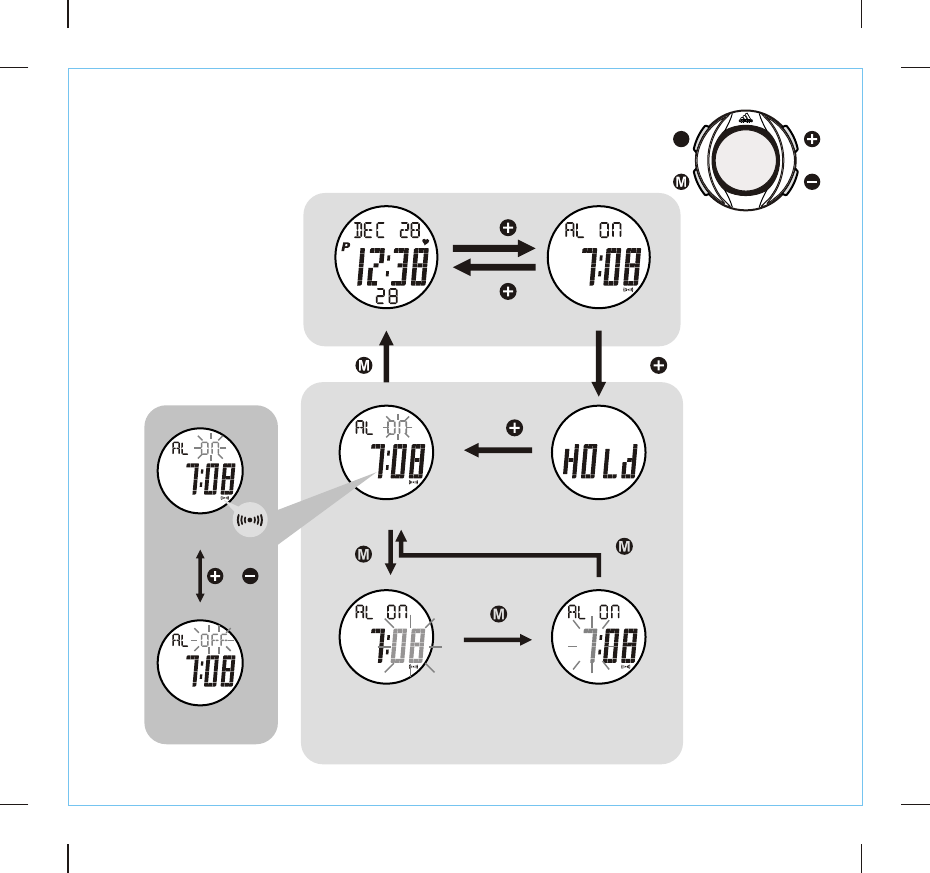
!view Daily Alarm Mode.
! (+) until 'AL ON' or to set daily alarm.
Holding down (+) in Normal Time Mode to
Keep holding down 'AL OFF' appears
* Press the (+) or (-) to change the setting. Hold down
the button will change at a faster pace.
7.0 Daily Alarm Mode - Alarm ON/OFF and Setting
Daily Alarm Mode
Daily Alarm Setting
Set ON/OFF
Set Minute* Set Hour*
Normal Time Mode
hold
hold
hold
hold
release
Alarm ON
Alarm OFF
or
L

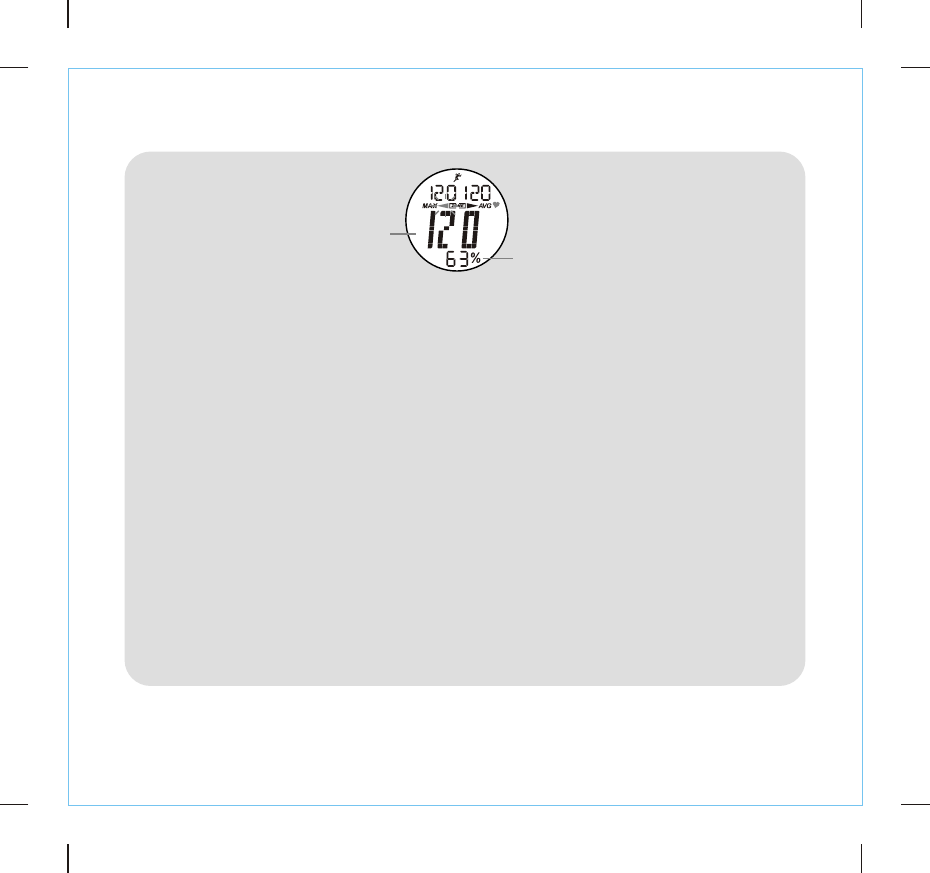
Maximum/Average
Heart Rate Display
(Deactivated)
8 Seconds
%EMHR
Heart rate
(bpm)
heart
rate
acquired
or
Exercise Mode
Maximum/Average
Heart Rate Display
(Activated)
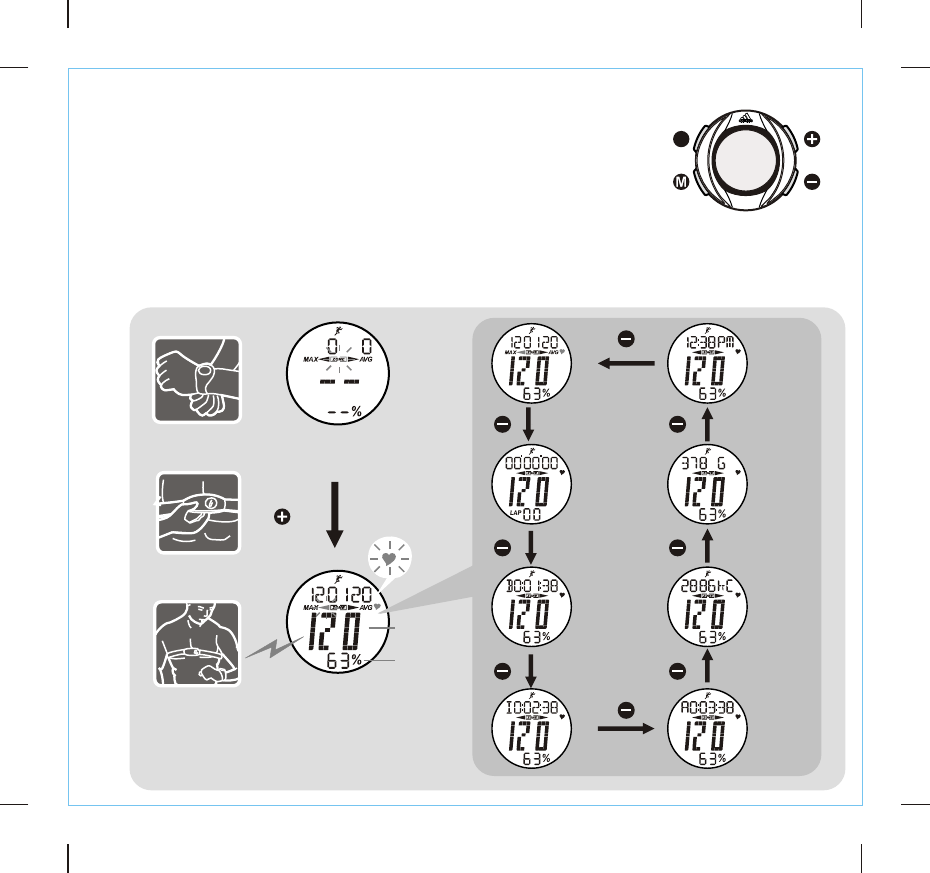
1.
!When Exercise Mode is selected, the Exercise function will be activated
automatically, OR press (+) to activate the function immediately.
NOTE:
!) The Chest strap MUST be paired with the Watch in advance. See 8.6 for the
detailed pairing operations.
2) The Chest strap MUST be worn on the user's chest properly before using
the Exercise Mode. See 4.0 for the details.
3) If NO heart rate reading or long response time, See 8.7 for the resolutions.
4) The Heart Rate measurement will keep monitoring if not losing heart rate
signal for 1 min. This can be resumed by re-entering this exercise mode.
8.0 Exercise Mode
Put on the
Watch
Put on the
chest strap
2.
Get your
heart rate
3.
Stand-alone
Exercise Time
Maximum/
Average
Heart Rate
Fat Burn
Normal
Time
Below
Zone Time
Calorie
Expenditure
In Zone
Time Above
Zone Time
L
EMHR and % EMHR:
!EMHR = 220 - user age.
!Example: What is the EMHR for Tom at his 53? EMHR = 220-53 = 167.
!Percentage of Estimated Maximum Heart rate (% EMHR)
% EMHR = Acquired heart rate 4 EMHR X 100%
!Example: What is if has acqu r a heart rate
the % EMHR for Tom he i ed of 100?
%EMHR =1004167 X 100% = 60%
The Application of % EMHR
!% EMHR is a useful figure for analyzing the cardio-fitness of a person.
!% EMHR can be used to define the upper and low limit of a target zone for training.
How this Watch Assists your Training Program
!% EMHR auto calculation function:
!This watch displays the % EMHR of the current heart rate immediately once a heart
rate is acquired.
NOTE: The user MUST set his/her gender, birth year, height and weight into the
8.1 Exercise Mode - Estimated Maximum Heart Rate (EMHR) and % EMHR
%EMHR
Heart rate
(bpm)
Exercise Mode

Audible & Visual
Indication (Alert ON) Audible & Visual
Indication (Alert OFF)
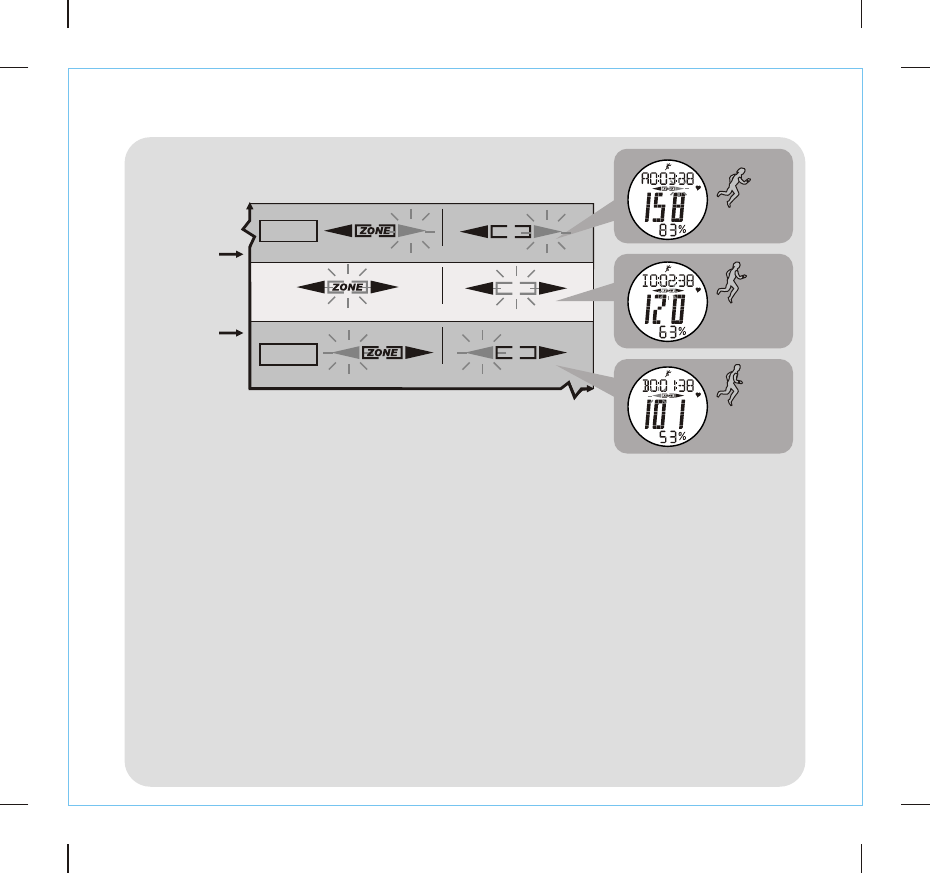
8.2 Exercise Mode - Heart Rate Zone and Zone Timer
Below Zone
Heart Rate Zone
Heart Rate /
%EMHR
In-Zone (Target zone for a particular objective)
Above Zone
Upper Limit
(e.g., 75% EMHR)
Lower Limit
(e.g., 55% EMHR)
The Heart Rate Alert function:
!In general, keeping the heart rate at a particular zone (the upper and low limit of the
zone are defined by certain % EMHR) can achieve one’s training goal.
!See 8.6 to select a Zone Type or set the upper and lower limit for the target zone.
!See 8.4 to turn ON or OFF the Zone Alert Function. The 'ZONE' indicator will appear
on the display if the Zone Alert Function is ON.
!When this function is set, it indicates (audible and visual Indication) the current heart
rate either above, within or below the target heart rate Zone to the user.
WARNING: Overloading your heart causes severe impacts to your health and even
death, consult your doctor for getting more information about your heart condition
before setting a target zone for your training.
Zone Timer:
!Below Zone Timer: The timer will count if the current heart rate is below the target
zone (e.g. below 55% EMHR).
!In Zone Timer: The timer will count if the current heart rate is within the target zone
(e.g., between 55% and 75% EMHR).
!Below Zone Timer: The timer will count if the current heart rate is above the target
zone (e.g., above 75% EMHR).
In Zone
Time
Above
Zone Time
Below
Zone Time
'Beep'
'Beep'

8.3 Exercise Mode - Calorie Expenditure and Fat Burn
The Calorie Expenditure and Fat Burn Estimation:
!The Exercise Mode estimates the calorie expenditure and Fat Burn of the user for
an exercise by the acquired heart rate, exercise intensive and the user’s personal
data (i.e., age, gender, height and weight)
NOTE: The user MUST set his/her gender, birth year, height and weight into the
Watch before the measurement, otherwise these estimations are not correct. See 6.0
for the setting details.
Fat Burn
Calorie Expenditure
Fat burn
Calorie
expenditure

release
release
release
Stand-a-alone
Exercise Time
Maximum/ Average
Heart Rate
Fat Burn
Normal Time*
Below
Zone Time Calorie
Expenditure
In Zone
Time
Above
Zone Time
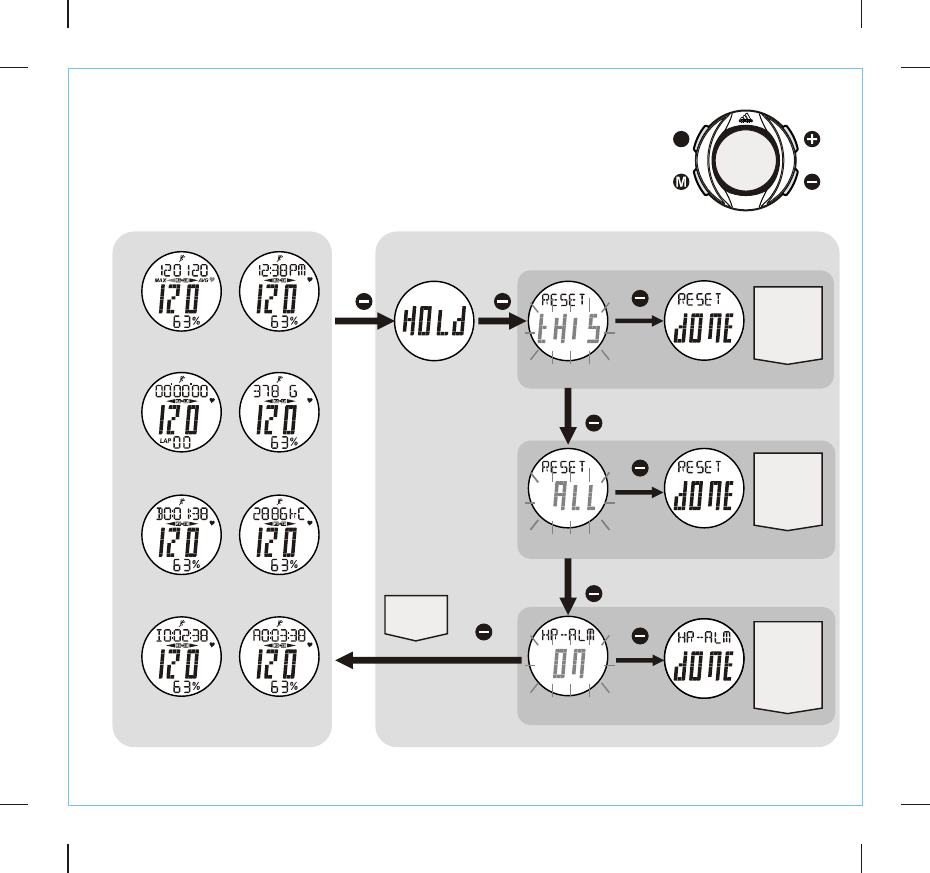
!Hold down (-) until 'RESET THIS' or 'RESET ALL ‘ is displayed, release (-)
to reset the Exercise Mode for the current screen or all screens.
!Hold down (-) until 'HR-ALM ON/OFF' is displayed, release (-) to turn ON
or OFF the Heart Rate Zone Alert function. If Heart Rate Zone Alert function
is ON, a 'ZONE' indicator will be appeared. See 8.2 for the details of Heart
Rate Zone Alert.
8.4 Exercise Mode - Reset Exercise Screens and Turn ON/OFF Zone
hold hold
hold
hold
hold
NOT
Reset
The
current
screen
reset
to zero
Reset the Current Screen
Reset ALL Screens
Set Zone Alert ON/OFF
The Zone
Alert is
set ON
(a 'ZONE'
indicator
appeared)
or OFF
All
screens
reset
to zero
*Reset ALL only
L
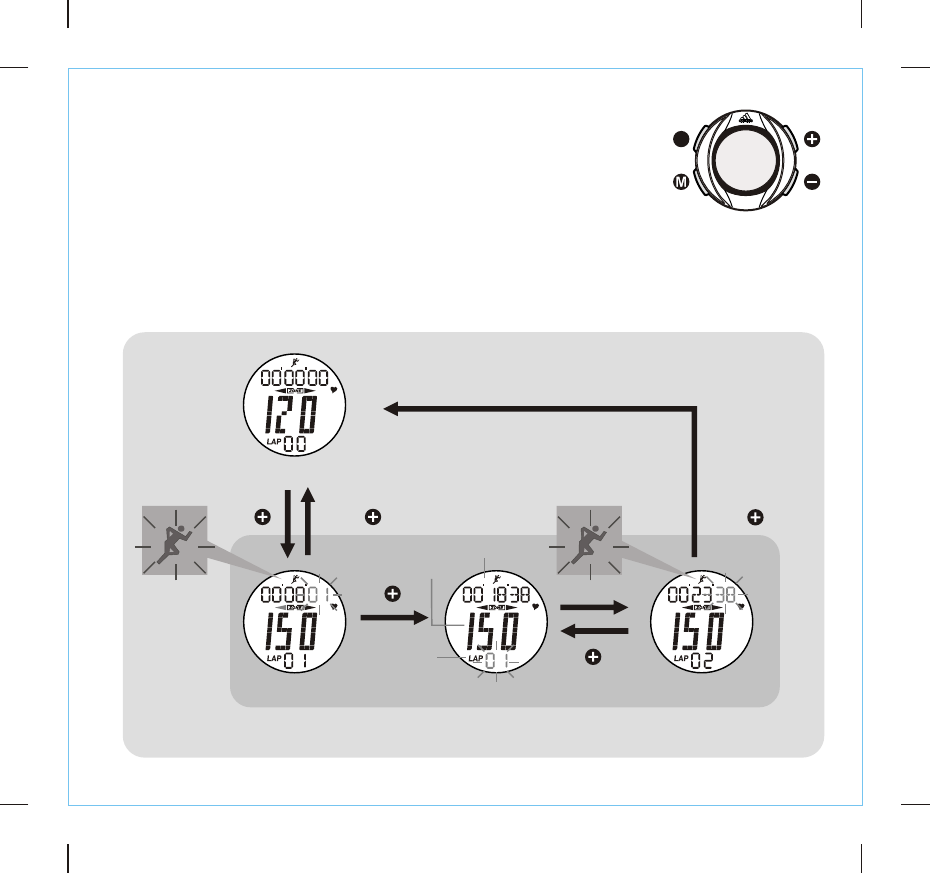
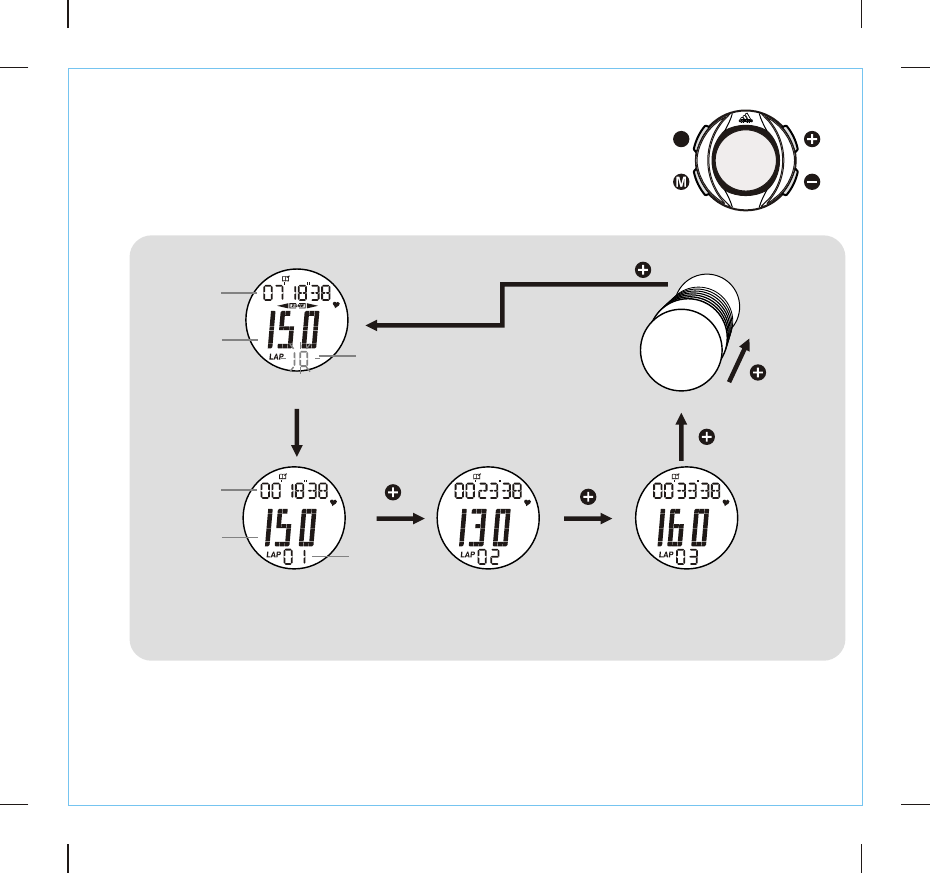
Take Lap Time*
* This watch can record up to 25 laps.
** The Maximum counting range is up to
9 hours 59 minutes and 59 seconds.
Stop Counting
Counting Counting
lap time**
5 Seconds
hold hold
Lap
no.
lap
heart
rate
Stand-alone Exercise Timer
!Press (+) to start the stand-alone timer for timing your exercise.
!During counting, press (+) to view and record a lap time with lap heart rate or
hold down (+) to stop the timer.
!Hold down (-) until 'RESET THIS' is displayed, release (-) to reset the timer.
NOTE:
1)The recorded Lap Times and Lap Heart Rates can be reviewed from the Lap
Recall Mode.
2) Resetting the timer will clear ALL Lap Time and Lap Heart Rate records.
8.5 Exercise Mode - The Stand-alone Timer
L

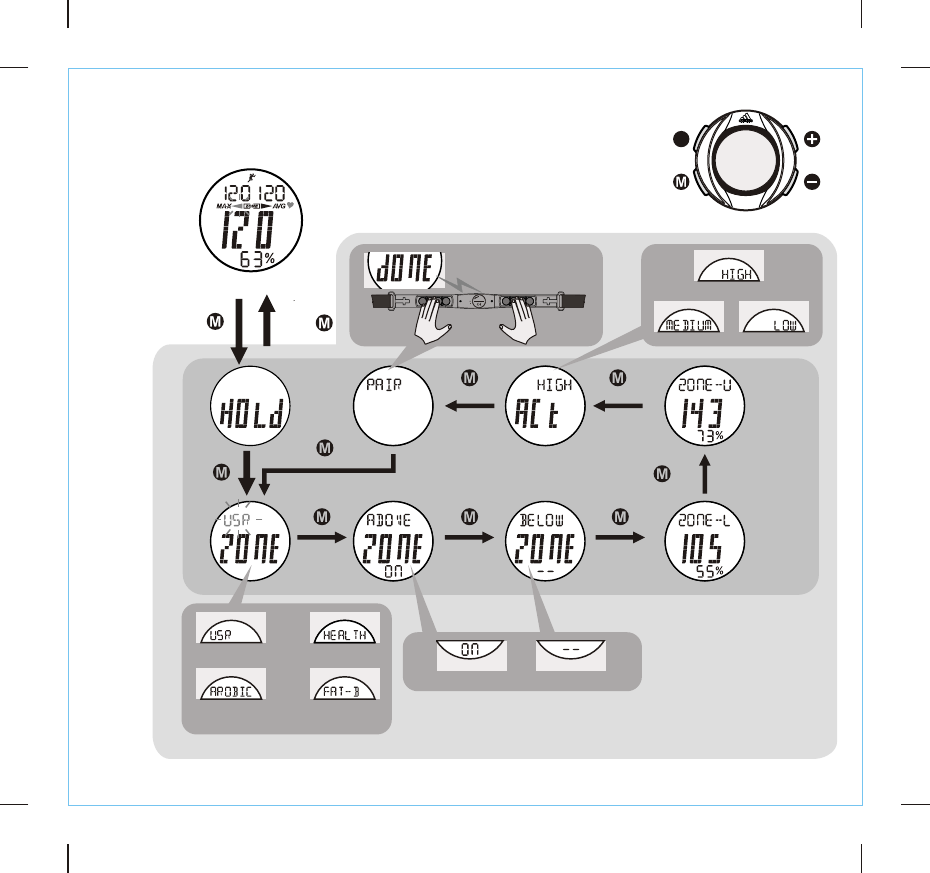
8.6 Exercise Mode - Exercise Mode Setting
!Hold down (M) in Exercise Mode to enter/exit Setting Display.
* Press the (+) or (-) to
ch ange t he settin g.
Hold down the button
will change at a faster
pace for some settings.
Aerobic
(65-80%EMHR)
User Defined
Fat Burn
(55-75%EMHR)
Health
(50-65%EMHR)
Exercise Mode Setting Display
Zone
Type* Above Zone
ON/OFF* Below Zone
ON/OFF*
Pair the
chest strap
with the Watch
Set Exercise
Intensity*
Set Lower
Limit*
Set Upper
Limit*
hold hold
hold
Exercise Mode High
Paired
Medium Low
N
E
P
O
Alert ON Alert OFF
L

1) Cause: Dry Skin.
Solution: Apply conductive gel or water thoroughly to chest area. (Even saliva will
help if conductive gel is not available).
2) Cause: The Chest strap is not placed firmly over the chest.
Solution: Make sure the Chest strap is placed firmly over the chest by tightening
elastic band.
3) Cause: Muscle tremors caused by holding the Chest strap too hard on your
chest.
Solution:
This will ensure a good and consistent reading even walking or
jogging with arms swing naturally.
4) Cause: Dead skin on the chest.
Solution: Usually rubbing your chest with a towel will help.
5)Cause: A thin layer of body grease can insulate the ECG signal-basically
prevents the back sensor on the Chest strap from picking up one's ECG.
Solution: Wipe chest and the contacts on the back of Chest strap with a tissue or soft
towel.
6) Cause: Hairy chest.
Solution: Apply conductive gel to chest area.
7)Cause: Irregular heartbeats.
Solution: N/A. It is difficult to consistently pick up a reading for those with irregular
heart beats. Inconsistent response times are expected for those with arrhythmia.
8)Cause: Low Battery.
Solution: It might be due to the battery level of the Chest strap is low. Replace the
battery of the Chest strap.
The contacts must make firm contact (NOT too hard) with the user's skin
during measurement.
8.7 Exercise Mode - Potential Causes for NO Heart Rate Reading or Long Response Time

Lap Recall Mode
!Press (+) or (-) to review the lap time with heart rate (average heart rate or
lap heart rate) for all laps or an individual lap recorded from the Stand-alone
timer in the Exercise Mode.
!To reset the record, see 8.5 for the detailed operations.
9.0 Lap Recall Mode
Lap 2 Lap 3
Lap 4
next
lap
Lap 1
Total Lap Display
lap
time
total
lap time
total number
of laps
Lap
no.
lap
heart
rate
average
heart
rate
* Press (-) to change review in the reverse direction.
L

* Press (+) or (-) to change the setting. Hold down the
button will change at a faster pace.
** The Target Time of the timer can set up to 9 hours 59
minutes and 59 seconds.
10. Countdown Timer Mode - Setting Countdown Timer (Target Time)
Countdown Timer Setting
Set Hour
Set Minute* Set Second*
hold
hold
hold
Countdown Timer Mode
PM
indicator of
current time
Current
time
Target
time**
!Holding down (M) in Countdown Timer Mode to enter/exit Setting
Display.
L

Counting Stop Counting
Counting
Countdown to Zero
hold
hold
hold
release
Countdown Timer
Mode
!Press (+) to start/stop the countdown timer.
!Hold down (-) until 'RESET THIS' is displayed, release (-) then to reset the
countdown timer.
10.1 Countdown Timer Mode - To Use/reset the Countdown Timer
Countdown Timer Mode
Reset the Current Screen
NOT
Reset
The
screen
reset
to target
time
L
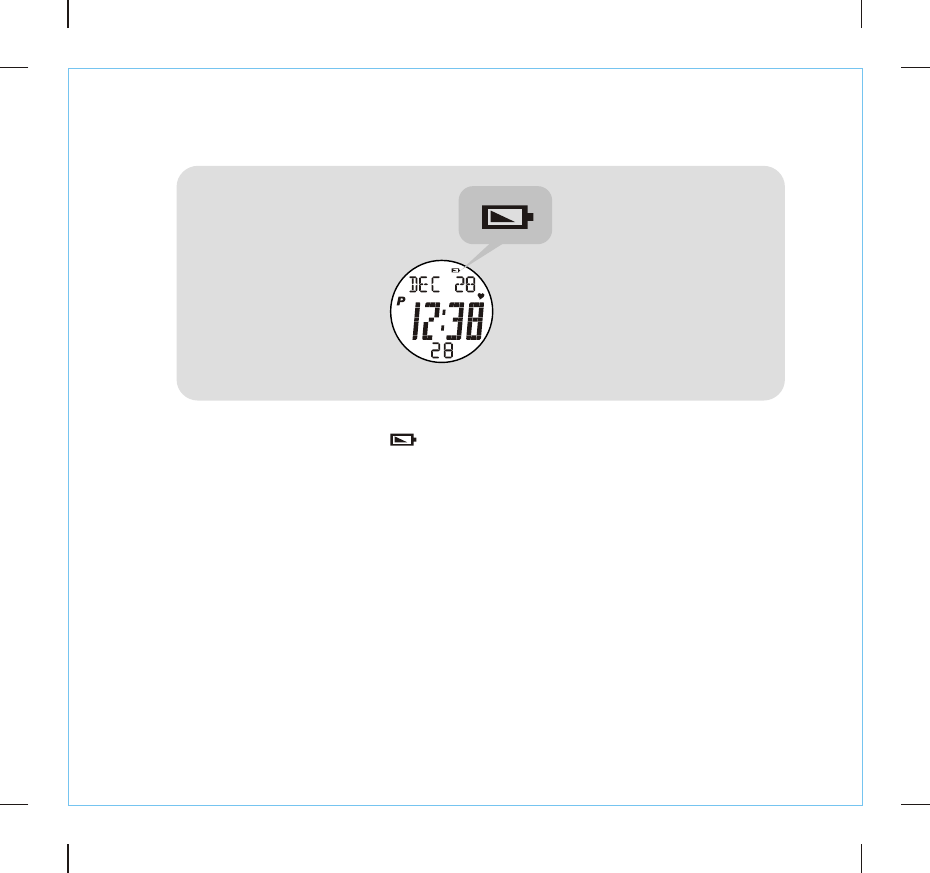
11.0 Low Battery Indication
Low Battery for the Watch
+If the Low battery indicator ' ' is appeared on any mode, the battery level of the
Watch is low.
Note:
(1) It is recommended to replace the battery by a certified agency. This ensures the
quality level of the watch unchanged.
(2) Pair the chest strap with the Watch again once the battery of Watch has been
replaced.
Any Mode
Low Battery
Indicator

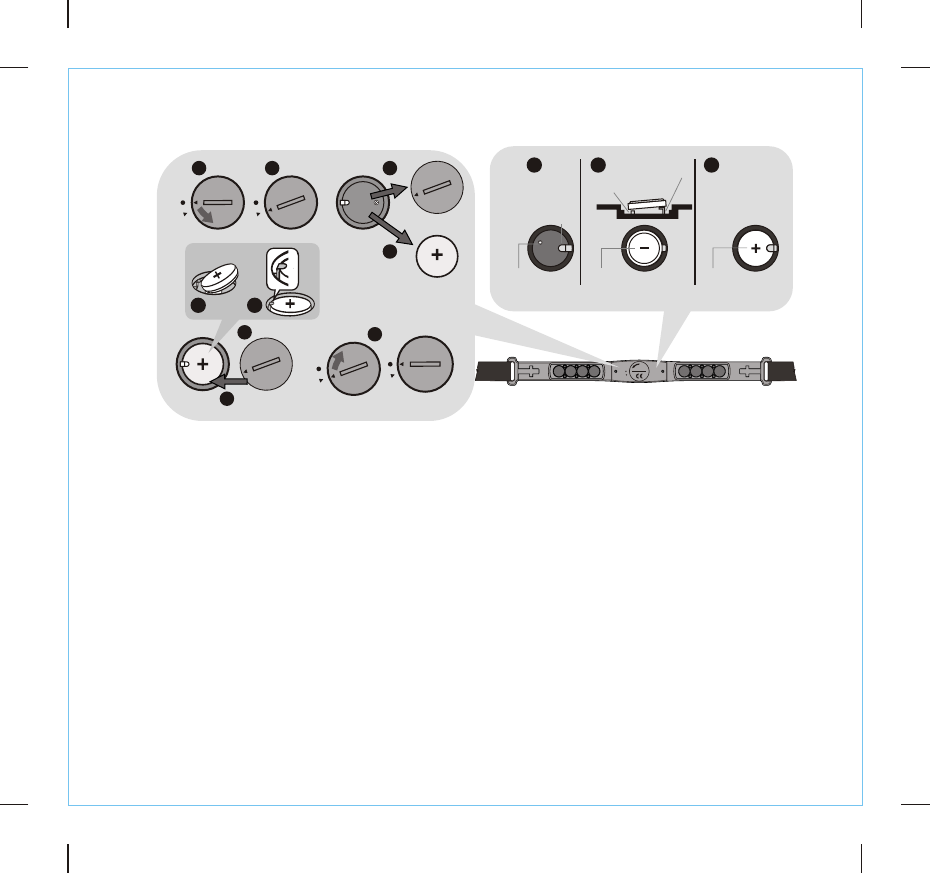
11.1 Battery Replacement for the Chest Strap
N
E
P
O
How to Replace the Battery for the Chest Strap
!User can replace the battery by the following steps:
1.Turn the cover with a coin counter-clockwise so that the arrow on the cover turns from
pointing at 'Dot' to 'Arrow'.
2.Turn the cover further gently to pop it out.
3.Put aside the battery cover.
4.Remove the exhausted battery.
5.Insert a new battery with the (+) side of the battery upward.
6.IMPORTANT: Make sure that the sealing rubber (o-ring) is placed correctly in its slot (on
the side of the cover) before the battery cover is replaced.
7.Put the battery cover back with the arrow on the cover pointing at 'Arrow', and then press
the cover down gently until it is on the same level with the case's surface.
8.Turn the cover with the coin clockwise so that the arrow on the cover turns from poniting at
'Arrow' to 'Dot'.
Note: Pair the chest strap with the Watch again once the battery has been replaced.
Tips: In case the chest strap CANNOT properly reset (NO signal transmission), resolve
this problem with the following steps: A) Remove the battery, B) Short the (+) and (-)
battery contacts of the chest strap with the metal shell (+ ve) of the battery, C) Reinstall
the battery as the above steps for normal operations.
1 2
8
CR203 2
3
6
7
4
5A5B
CR2032
CR203 2
A B C
(-) contact
(-) contact
Chest Strap Reset
Battery Replacement
battery (- ve) battery (+ ve)
(+) contact
(+) contact
CR2 032 C R20 32
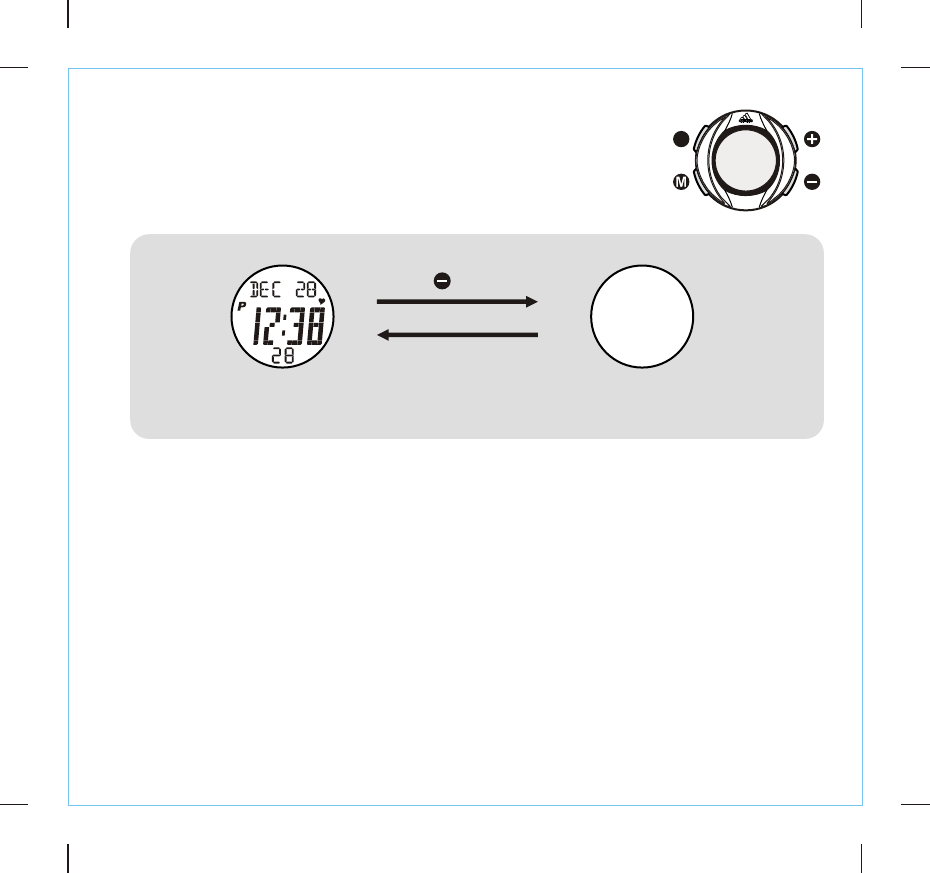
!Hold (-) for more than 5 seconds to enter Power Saving Mode.
!Press any button to resume to normal while in Power Saving Mode.
12.0 Power Saving Mode
Normal Time Mode
hold For 5 sec.
Any button
Power Saving Mode
(LCD display turned off)
L
Power Saving Mode
+This Watch includes a Power Saving Function which can turn off the LCD display
so that the battery can last longer.
+While in the Power Saving Mode, the watch function is still worked normally. (I.e.,
The timekeeping function is still running during Power Saving Mode.)

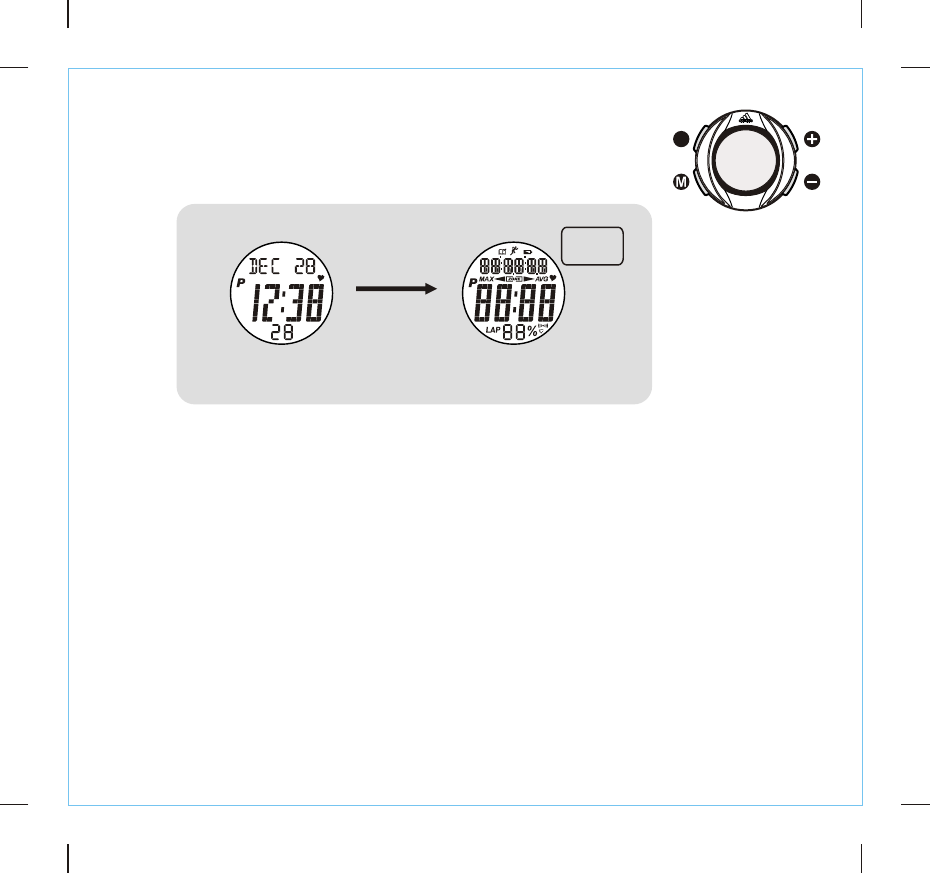
12.1 Reset the Watch
Reset the Watch
+When the battery of the watch is replaced, the watch will be reset automatically.
+User can also reset the watch manually by Holding All Keys for about 5 seconds in
any function modes.
+When the watch is reset, full segments of the LCD will be displayed and a “beep-
beep” sound will be given out for about 5 seconds. After then, a version code will be
displayed on the LCD.
Note:
(1) All the personal data and records stored in the watch will be erased after reset.
(2) Pair the chest strap with the Watch again once the Watch has been reset.
Any Mode The Watch is Reset
Hold All Keys
for 5 sec.
' Beep ‘
' Beep ‘
L

CAUTION
Risk of explosion if battery is replaced
by an incorrect type
Dispose of used batteries according to
the instructions
FCC Compliance Statement -
NOTE: This equipment has been tested and found to comply with the limits for a Class B digital
device, pursuant to Part 15 of the FCC Rules. These limits are designed to provide reasonable
protection against harmful interference in a residential installation. This equipment generates, uses
and can radiate radio frequency energy and, if not installed and used in accordance with the
instructions, may cause harmful interference to radio communications. However, there is no
guarantee that interference will not occur in a particular installation.
If this equipment does cause harmful interference to radio or television reception, which can be
determined by turning the equipment off and on, the user is encouraged to try to correct the
interference by one or more of the following measures:
- Reorient or relocate the receiving antenna.
- Increase the separation between the equipment and receiver.
- Connect the equipment into an outlet on a circuit different from that to which the receiver is
connected.
- Consult the dealer or an experienced radio/TV technician for help.
This device complies with Part 15 of the FCC Rules.
Operation is subject to the following two conditions:
(1) this device may not cause harmful interference, and
(2) this device must accept any interference received,
including interference that may cause undesired operation.
Changes or modifications not expressly approved by the party responsible for compliance could
void the user's authority to operate the equipment
Canadian Compliance Statement - IC ID: 8194A-571572 (For Chest Strap)
This Class B digital apparatus complies with Canadian ICES-003.
Cet appareil numérique de la classe B est conforme à la norme NMB-003 du Canada.
This Category II radio communication device complies with Industry Canada Standard RSS-310.
Ce dispositif de radiocommunication de catégorie II respecte la norme CNR-310 d'Industrie
Canada.
European Union Regulatory Conformance
Radio:
EN300440-2 V1.2.1:2008
Electromagnetic Compatibility:
EN301489-1 V1.8.1:2008
EN301489-3 V1.4.1:2002
Human Exposure to Electromagnetic Fields:
EN50371:2002
Electrical Safety:
EN60950-1:2006
FCC ID: WM4571-572 ( For Chest Strap )
Dispose of batteries
according to local
regulations.
Do not dispose as
household waste.

130 mm
140 mm
130 mm
140 mm
WATCH: ADP3009 (RECEIVER)
CHEST STRAP: ADP3009C (TRANSMITTER)

1.0 Welcome
Congratulations for your purchase of this heart rate monitor. It is designed for ease of
use during sport activities.
In order to learn and apply the various functions of your new heart rate monitor, please
read this user manual carefully.
1.1 General
It is important for you to understand Estimated Maximum Heart Rate (EMHR), training
zone, upper heart rate limit and lower heart rate limit before you begin. This information
helps you to achieve the maximum health benefits out of your workout.
We recommend user to consult the medical practitioner or registered physician before
setting your personal training-schedule and target. Or you can set your own upper and
lower limit using the EMHR as a reference guide. You may estimate your EMHR using
the following formula:
220 – age = EMHR.
WARNING ! Care and Maintenance
!This product set, like most electronic or
mag n e ti c de vi c es , m a y i n t er fe r e w i th
pacemakers. We recommend patients with
pacemakers to consult with their doctor before
using this product set.
!Make sure that you fully understand the
functions and limitations of this product set
before using it.
!This product set is a supplementary device for
measuring heart rate; it is NOT a substitute for
any medical devices. You should periodically
compare the heart rate reading provided by
this product set with the reading from a doctor.
!
!
!
!
Avoid rough usage or severe
impacts to this product set.
Store this product set in a dry
place when it is not in use.
C l e a n y o u r p r o d u c t s e t
o c c a s i o n a l l y w i t h a s o f t
moistened cloth.
DO NOT expose this product
s e t t o c h e m i ca l s su c h as
gasoline and alcohol; these
ch e m icals will d amage this
product set.
(+)
!
!
!
!To view the daily alarm time.
Hold down the button to enter daily
alarm setting mode.
To take a lap time in exercise
stopwatch mode.
To change the setting value under
setting mode.
(L)
To turn ON the Backlight for
few seconds.
!
(-)
!
!
!To change modes among different
exercise sub-modes.
Hold down the button to pop the
exercise mode function menu.
To change the setting value under
setting mode.
(M)
To change modes among the
d i ff er en t ma in fu nc ti on
modes.
Hold down the button to
enter/exit a setting mode.
To change modes among
different setting sub-modes.
!
!
!
2.0 Functions of the Operating Keys
3.0 Functions of the chest strap
Front
Elastic Band
L
N
E
P
O
Battery coverContact
Back
(contact with skin)
Contact
Connector
IMPORTANT: This Chest strap must be worn directly on your skin. DO NOT wear the chest strap on the top of
your clothes. Otherwise, the chest strap CANNOT get the heart rate signal.
NOTE: In dry seasons, wet the contacts with water to make the signal transmission normal.
1 2 3
6
45
Extend the elastic band for
allowing loose fitting the
chest strap on your chest.
C o n n e c t t h e o p p o s i t e
connector to the chest strap
with another hand.
Connect one connector with
the chest strap. Ensure that
the connector is completely
lodged into the chest strap.
Fasten the elastic band until
it is fitted on your chest
comfortably.
Fit the chest strap on your
chest with one hand.
Move the chest strap until
the two contacts are firmly
contacted with the skin of
your chest.
4.0 Wear the Chest Strap
Precautions / Tips
+
+
+
+
+
+
+
+
There are two contacts located on the back of the Chest strap. These two contacts MUST
make firm contact with the user's skin during measurement.
DO NOT take heart rate measurement when diving or under water.
Clean the contacts occasionally by applying a few drops of water, and wipe it dry with a
paper towel to remove any residual grease.
DO NOT use body cream; it will insulate the signal between the skin and the contacts.
Clean your skin with soap and water for a better signal transmission.
For those with extremely dry skin, apply some conductive gel or water to increase
conductivity.
Adjust the chest strap with the supplied elastic band until it holds on your chest firmly to
avoid loose when exercise.
Avoid doing any awkward motion during measurement, it will create an inaccurate heart rate
reading.
!Press (M) to navigate among different main function modes
following the below diagram.
5.0 Main Functions Mode
Normal Time ModeDaily Alarm Mode
hold
release
Exercise Mode
Key Operations Between Main Function Modes
Lap Recall Mode
Countdown Timer Mode
L

L
!Holding down (M) in Normal Time Mode to enter/exit Setting Display.
* Press the (+) or (-) to change the setting. Hold down
the button will change at a faster pace for
.
some
settings
6.0 Setting Normal Time and User Personal Data
Normal Time and User Personal Data Setting
Reset
Second Set
Day*
Set
Weight*
Set 12/24
format*
Set Weight
Unit (kg/lb)*
Set Height
Unit (cm/inch)*
Set
Height*
Set
Minute* Set
Month* Set Chime
ON/OFF*
Set Birth
year*
Set
Hour* Set
Year* Set Key tone
ON/OFF* Set Gender
Male/Female*
Normal Time Mode
hold hold
hold

!view Daily Alarm Mode.
! (+) until 'AL ON' or to set daily alarm.
Holding down (+) in Normal Time Mode to
Keep holding down 'AL OFF' appears
* Press the (+) or (-) to change the setting. Hold down
the button will change at a faster pace.
7.0 Daily Alarm Mode - Alarm ON/OFF and Setting
Daily Alarm Mode
Daily Alarm Setting
Set ON/OFF
Set Minute* Set Hour*
Normal Time Mode
hold
hold
hold
hold
release
Alarm ON
Alarm OFF
or
L
Maximum/Average
Heart Rate Display
(Deactivated)
8 Seconds
%EMHR
Heart rate
(bpm)
heart
rate
acquired
or
Exercise Mode
Maximum/Average
Heart Rate Display
(Activated)
1.
!When Exercise Mode is selected, the Exercise function will be activated
automatically, OR press (+) to activate the function immediately.
NOTE:
!) The Chest strap MUST be paired with the Watch in advance. See 8.6 for the
detailed pairing operations.
2) The Chest strap MUST be worn on the user's chest properly before using
the Exercise Mode. See 4.0 for the details.
3) If NO heart rate reading or long response time, See 8.7 for the resolutions.
4) The Heart Rate measurement will keep monitoring if not losing heart rate
signal for 1 min. This can be resumed by re-entering this exercise mode.
8.0 Exercise Mode
Put on the
Watch
Put on the
chest strap
2.
Get your
heart rate
3.
Stand-alone
Exercise Time
Maximum/
Average
Heart Rate
Fat Burn
Normal
Time
Below
Zone Time
Calorie
Expenditure
In Zone
Time Above
Zone Time
L

EMHR and % EMHR:
!EMHR = 220 - user age.
!Example: What is the EMHR for Tom at his 53? EMHR = 220-53 = 167.
!Percentage of Estimated Maximum Heart rate (% EMHR)
% EMHR = Acquired heart rate 4 EMHR X 100%
!Example: What is if has acqu r a heart rate
the % EMHR for Tom he i ed of 100?
%EMHR =1004167 X 100% = 60%
The Application of % EMHR
!% EMHR is a useful figure for analyzing the cardio-fitness of a person.
!% EMHR can be used to define the upper and low limit of a target zone for training.
How this Watch Assists your Training Program
!% EMHR auto calculation function:
!This watch displays the % EMHR of the current heart rate immediately once a heart
rate is acquired.
NOTE: The user MUST set his/her gender, birth year, height and weight into the
8.1 Exercise Mode - Estimated Maximum Heart Rate (EMHR) and % EMHR
%EMHR
Heart rate
(bpm)
Exercise Mode
Audible & Visual
Indication (Alert ON) Audible & Visual
Indication (Alert OFF)
8.2 Exercise Mode - Heart Rate Zone and Zone Timer
Below Zone
Heart Rate Zone
Heart Rate /
%EMHR
In-Zone (Target zone for a particular objective)
Above Zone
Upper Limit
(e.g., 75% EMHR)
Lower Limit
(e.g., 55% EMHR)
The Heart Rate Alert function:
!In general, keeping the heart rate at a particular zone (the upper and low limit of the
zone are defined by certain % EMHR) can achieve one’s training goal.
!See 8.6 to select a Zone Type or set the upper and lower limit for the target zone.
!See 8.4 to turn ON or OFF the Zone Alert Function. The 'ZONE' indicator will appear
on the display if the Zone Alert Function is ON.
!When this function is set, it indicates (audible and visual Indication) the current heart
rate either above, within or below the target heart rate Zone to the user.
WARNING: Overloading your heart causes severe impacts to your health and even
death, consult your doctor for getting more information about your heart condition
before setting a target zone for your training.
Zone Timer:
!Below Zone Timer: The timer will count if the current heart rate is below the target
zone (e.g. below 55% EMHR).
!In Zone Timer: The timer will count if the current heart rate is within the target zone
(e.g., between 55% and 75% EMHR).
!Below Zone Timer: The timer will count if the current heart rate is above the target
zone (e.g., above 75% EMHR).
In Zone
Time
Above
Zone Time
Below
Zone Time
'Beep'
'Beep'

8.3 Exercise Mode - Calorie Expenditure and Fat Burn
The Calorie Expenditure and Fat Burn Estimation:
!The Exercise Mode estimates the calorie expenditure and Fat Burn of the user for
an exercise by the acquired heart rate, exercise intensive and the user’s personal
data (i.e., age, gender, height and weight)
NOTE: The user MUST set his/her gender, birth year, height and weight into the
Watch before the measurement, otherwise these estimations are not correct. See 6.0
for the setting details.
Fat Burn
Calorie Expenditure
Fat burn
Calorie
expenditure
release
release
release
Stand-a-alone
Exercise Time
Maximum/ Average
Heart Rate
Fat Burn
Normal Time*
Below
Zone Time Calorie
Expenditure
In Zone
Time
Above
Zone Time
!Hold down (-) until 'RESET THIS' or 'RESET ALL ‘ is displayed, release (-)
to reset the Exercise Mode for the current screen or all screens.
!Hold down (-) until 'HR-ALM ON/OFF' is displayed, release (-) to turn ON
or OFF the Heart Rate Zone Alert function. If Heart Rate Zone Alert function
is ON, a 'ZONE' indicator will be appeared. See 8.2 for the details of Heart
Rate Zone Alert.
8.4 Exercise Mode - Reset Exercise Screens and Turn ON/OFF Zone
hold hold
hold
hold
hold
NOT
Reset
The
current
screen
reset
to zero
Reset the Current Screen
Reset ALL Screens
Set Zone Alert ON/OFF
The Zone
Alert is
set ON
(a 'ZONE'
indicator
appeared)
or OFF
All
screens
reset
to zero
*Reset ALL only
L

Take Lap Time*
* This watch can record up to 25 laps.
** The Maximum counting range is up to
9 hours 59 minutes and 59 seconds.
Stop Counting
Counting Counting
lap time**
5 Seconds
hold hold
Lap
no.
lap
heart
rate
Stand-alone Exercise Timer
!Press (+) to start the stand-alone timer for timing your exercise.
!During counting, press (+) to view and record a lap time with lap heart rate or
hold down (+) to stop the timer.
!Hold down (-) until 'RESET THIS' is displayed, release (-) to reset the timer.
NOTE:
1)The recorded Lap Times and Lap Heart Rates can be reviewed from the Lap
Recall Mode.
2) Resetting the timer will clear ALL Lap Time and Lap Heart Rate records.
8.5 Exercise Mode - The Stand-alone Timer
L
8.6 Exercise Mode - Exercise Mode Setting
!Hold down (M) in Exercise Mode to enter/exit Setting Display.
* Press the (+) or (-) to
ch ange t he settin g.
Hold down the button
will change at a faster
pace for some settings.
Aerobic
(65-80%EMHR)
User Defined
Fat Burn
(55-75%EMHR)
Health
(50-65%EMHR)
Exercise Mode Setting Display
Zone
Type* Above Zone
ON/OFF* Below Zone
ON/OFF*
Pair the
chest strap
with the Watch
Set Exercise
Intensity*
Set Lower
Limit*
Set Upper
Limit*
hold hold
hold
Exercise Mode High
Paired
Medium Low
N
E
P
O
Alert ON Alert OFF
L

1) Cause: Dry Skin.
Solution: Apply conductive gel or water thoroughly to chest area. (Even saliva will
help if conductive gel is not available).
2) Cause: The Chest strap is not placed firmly over the chest.
Solution: Make sure the Chest strap is placed firmly over the chest by tightening
elastic band.
3) Cause: Muscle tremors caused by holding the Chest strap too hard on your
chest.
Solution:
This will ensure a good and consistent reading even walking or
jogging with arms swing naturally.
4) Cause: Dead skin on the chest.
Solution: Usually rubbing your chest with a towel will help.
5)Cause: A thin layer of body grease can insulate the ECG signal-basically
prevents the back sensor on the Chest strap from picking up one's ECG.
Solution: Wipe chest and the contacts on the back of Chest strap with a tissue or soft
towel.
6) Cause: Hairy chest.
Solution: Apply conductive gel to chest area.
7)Cause: Irregular heartbeats.
Solution: N/A. It is difficult to consistently pick up a reading for those with irregular
heart beats. Inconsistent response times are expected for those with arrhythmia.
8)Cause: Low Battery.
Solution: It might be due to the battery level of the Chest strap is low. Replace the
battery of the Chest strap.
The contacts must make firm contact (NOT too hard) with the user's skin
during measurement.
8.7 Exercise Mode - Potential Causes for NO Heart Rate Reading or Long Response Time
Lap Recall Mode
!Press (+) or (-) to review the lap time with heart rate (average heart rate or
lap heart rate) for all laps or an individual lap recorded from the Stand-alone
timer in the Exercise Mode.
!To reset the record, see 8.5 for the detailed operations.
9.0 Lap Recall Mode
Lap 2 Lap 3
Lap 4
next
lap
Lap 1
Total Lap Display
lap
time
total
lap time
total number
of laps
Lap
no.
lap
heart
rate
average
heart
rate
* Press (-) to change review in the reverse direction.
L

* Press (+) or (-) to change the setting. Hold down the
button will change at a faster pace.
** The Target Time of the timer can set up to 9 hours 59
minutes and 59 seconds.
10. Countdown Timer Mode - Setting Countdown Timer (Target Time)
Countdown Timer Setting
Set Hour
Set Minute* Set Second*
hold
hold
hold
Countdown Timer Mode
PM
indicator of
current time
Current
time
Target
time**
!Holding down (M) in Countdown Timer Mode to enter/exit Setting
Display.
L

Counting Stop Counting
Counting
Countdown to Zero
hold
hold
hold
release
Countdown Timer
Mode
!Press (+) to start/stop the countdown timer.
!Hold down (-) until 'RESET THIS' is displayed, release (-) then to reset the
countdown timer.
10.1 Countdown Timer Mode - To Use/reset the Countdown Timer
Countdown Timer Mode
Reset the Current Screen
NOT
Reset
The
screen
reset
to target
time
L

11.0 Low Battery Indication
Low Battery for the Watch
+If the Low battery indicator ' ' is appeared on any mode, the battery level of the
Watch is low.
Note:
(1) It is recommended to replace the battery by a certified agency. This ensures the
quality level of the watch unchanged.
(2) Pair the chest strap with the Watch again once the battery of Watch has been
replaced.
Any Mode
Low Battery
Indicator
11.1 Battery Replacement for the Chest Strap
N
E
P
O
How to Replace the Battery for the Chest Strap
!User can replace the battery by the following steps:
1.Turn the cover with a coin counter-clockwise so that the arrow on the cover turns from
pointing at 'Dot' to 'Arrow'.
2.Turn the cover further gently to pop it out.
3.Put aside the battery cover.
4.Remove the exhausted battery.
5.Insert a new battery with the (+) side of the battery upward.
6.IMPORTANT: Make sure that the sealing rubber (o-ring) is placed correctly in its slot (on
the side of the cover) before the battery cover is replaced.
7.Put the battery cover back with the arrow on the cover pointing at 'Arrow', and then press
the cover down gently until it is on the same level with the case's surface.
8.Turn the cover with the coin clockwise so that the arrow on the cover turns from poniting at
'Arrow' to 'Dot'.
Note: Pair the chest strap with the Watch again once the battery has been replaced.
Tips: In case the chest strap CANNOT properly reset (NO signal transmission), resolve
this problem with the following steps: A) Remove the battery, B) Short the (+) and (-)
battery contacts of the chest strap with the metal shell (+ ve) of the battery, C) Reinstall
the battery as the above steps for normal operations.
1 2
8
CR203 2
3
6
7
4
5A5B
CR2032
CR203 2
A B C
(-) contact
(-) contact
Chest Strap Reset
Battery Replacement
battery (- ve) battery (+ ve)
(+) contact
(+) contact
CR2 032 C R20 32

!Hold (-) for more than 5 seconds to enter Power Saving Mode.
!Press any button to resume to normal while in Power Saving Mode.
12.0 Power Saving Mode
Normal Time Mode
hold For 5 sec.
Any button
Power Saving Mode
(LCD display turned off)
L
Power Saving Mode
+This Watch includes a Power Saving Function which can turn off the LCD display
so that the battery can last longer.
+While in the Power Saving Mode, the watch function is still worked normally. (I.e.,
The timekeeping function is still running during Power Saving Mode.)
12.1 Reset the Watch
Reset the Watch
+When the battery of the watch is replaced, the watch will be reset automatically.
+User can also reset the watch manually by Holding All Keys for about 5 seconds in
any function modes.
+When the watch is reset, full segments of the LCD will be displayed and a “beep-
beep” sound will be given out for about 5 seconds. After then, a version code will be
displayed on the LCD.
Note:
(1) All the personal data and records stored in the watch will be erased after reset.
(2) Pair the chest strap with the Watch again once the Watch has been reset.
Any Mode The Watch is Reset
Hold All Keys
for 5 sec.
' Beep ‘
' Beep ‘
L
CAUTION
Risk of explosion if battery is replaced
by an incorrect type
Dispose of used batteries according to
the instructions
FCC Compliance Statement -
NOTE: This equipment has been tested and found to comply with the limits for a Class B digital
device, pursuant to Part 15 of the FCC Rules. These limits are designed to provide reasonable
protection against harmful interference in a residential installation. This equipment generates, uses
and can radiate radio frequency energy and, if not installed and used in accordance with the
instructions, may cause harmful interference to radio communications. However, there is no
guarantee that interference will not occur in a particular installation.
If this equipment does cause harmful interference to radio or television reception, which can be
determined by turning the equipment off and on, the user is encouraged to try to correct the
interference by one or more of the following measures:
- Reorient or relocate the receiving antenna.
- Increase the separation between the equipment and receiver.
- Connect the equipment into an outlet on a circuit different from that to which the receiver is
connected.
- Consult the dealer or an experienced radio/TV technician for help.
This device complies with Part 15 of the FCC Rules.
Operation is subject to the following two conditions:
(1) this device may not cause harmful interference, and
(2) this device must accept any interference received,
including interference that may cause undesired operation.
Changes or modifications not expressly approved by the party responsible for compliance could
void the user's authority to operate the equipment
Canadian Compliance Statement - IC ID: 8194A-571572 (For Chest Strap)
This Class B digital apparatus complies with Canadian ICES-003.
Cet appareil numérique de la classe B est conforme à la norme NMB-003 du Canada.
This Category II radio communication device complies with Industry Canada Standard RSS-310.
Ce dispositif de radiocommunication de catégorie II respecte la norme CNR-310 d'Industrie
Canada.
European Union Regulatory Conformance
Radio:
EN300440-2 V1.2.1:2008
Electromagnetic Compatibility:
EN301489-1 V1.8.1:2008
EN301489-3 V1.4.1:2002
Human Exposure to Electromagnetic Fields:
EN50371:2002
Electrical Safety:
EN60950-1:2006
FCC ID: WM4571-572 ( For Chest Strap )
Dispose of batteries
according to local
regulations.
Do not dispose as
household waste.