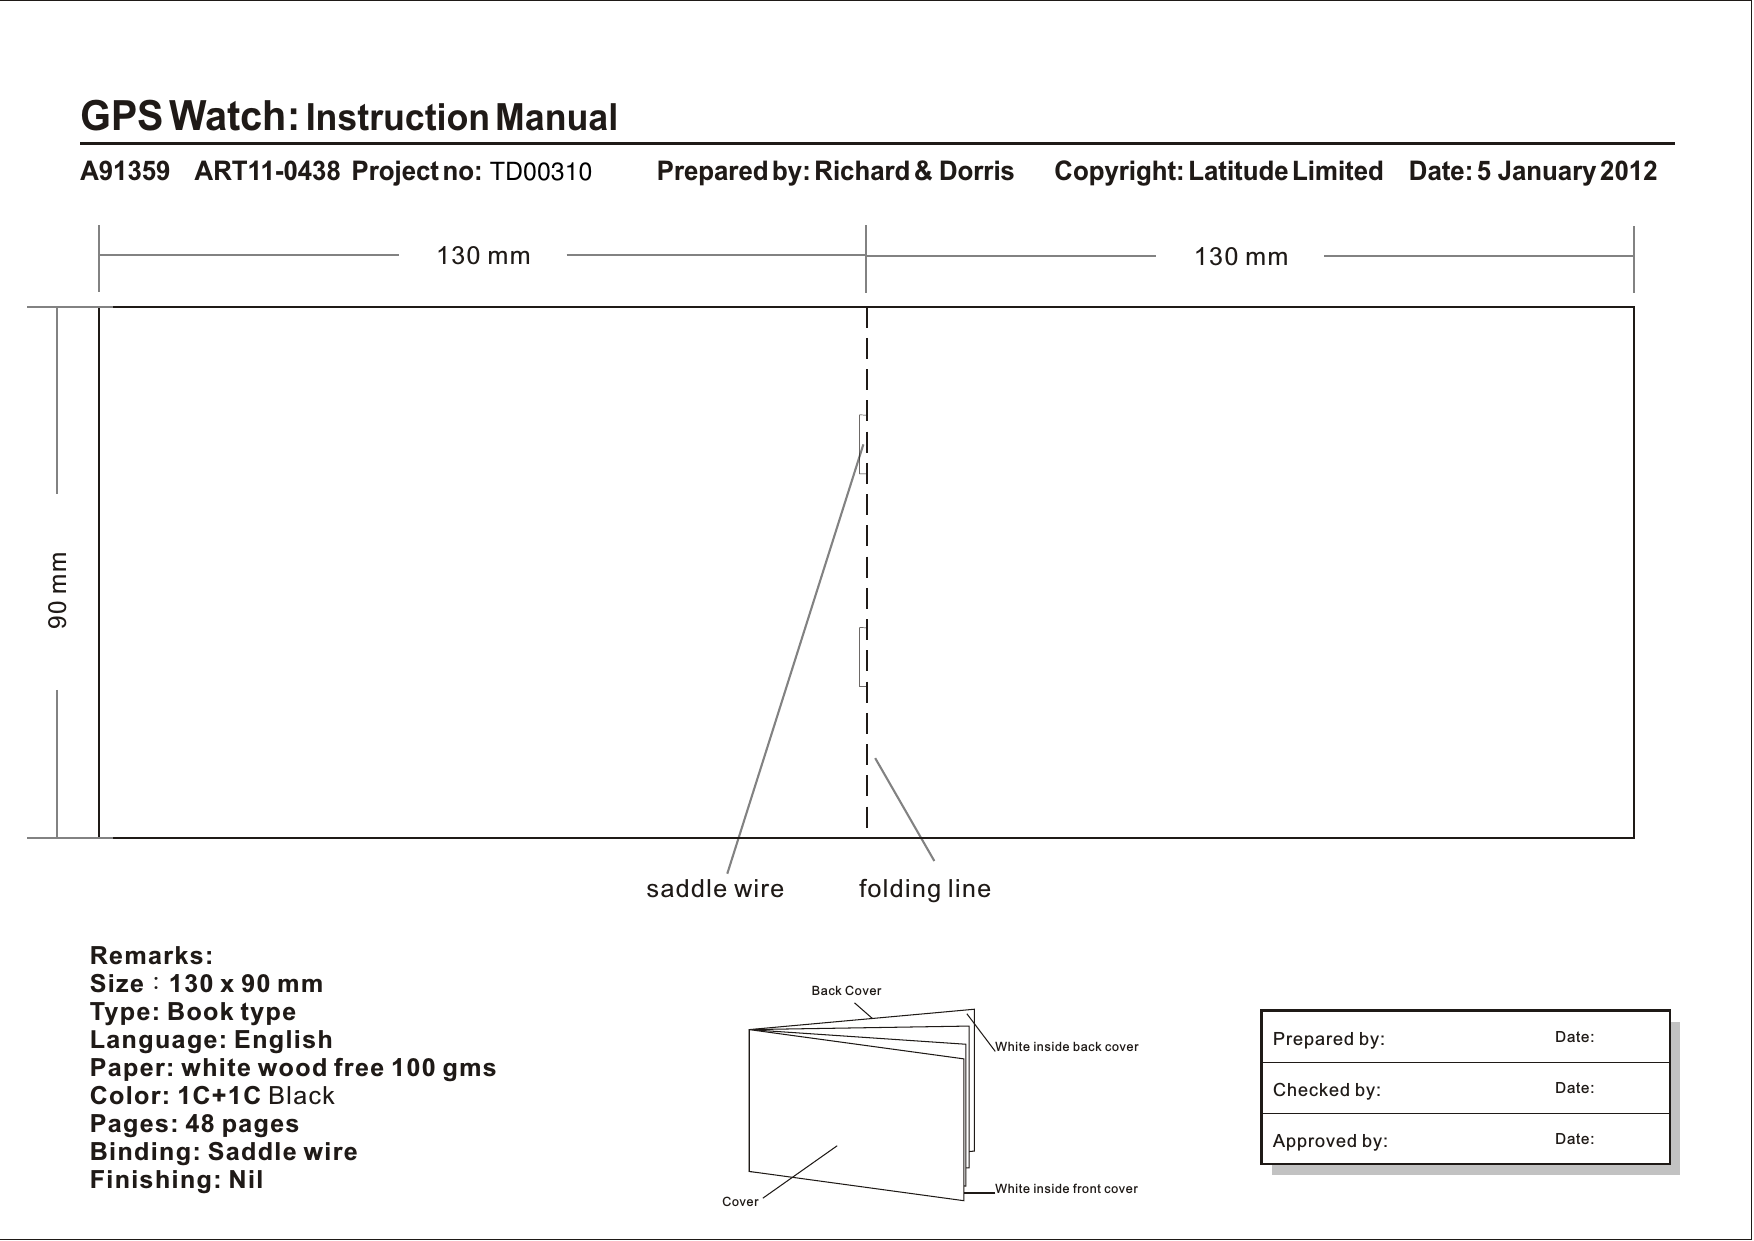
Latitude 735 2.4 GHz Heart Rate Chest Strap User Manual NAVm manu ver a91359 v1 5
Latitude Limited 2.4 GHz Heart Rate Chest Strap NAVm manu ver a91359 v1 5
UserManual.wiki
>
Latitude
>
735 User Manual
Users Manual
Navigation menu
Upload a User Manual
Namespaces
Wiki Guide
HTML
PDF
Info
Views
User Manual
Discussion / Help
Navigation
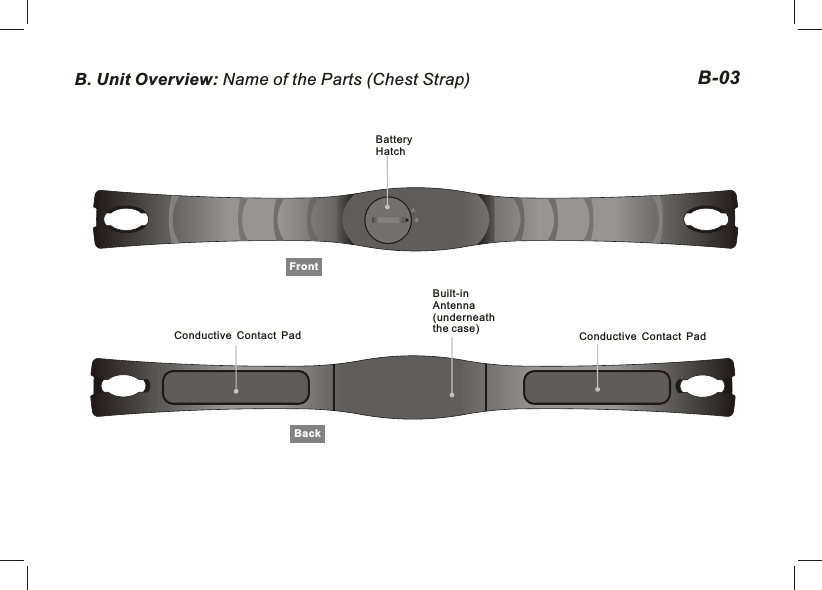
![B. Unit Overview: Name of the Parts (Watch) B-02Front[ tart/ top] S S [S/S]Button[ ]ViewButtonClip GuidingNotchLCD Display[Lap/Reset] Button [L/R]BackUSB CableContact points[EL]LightButton[ ]ModeButtonGPS antenna location – always direct antenna towards sky for best GPS reception[ ]M[ ]V](https://usermanual.wiki/Latitude/735/User-Guide-1928336-Page-8.png)
![Strap PairingC. Heart rate Monitor Function: Strap Pairing C-03Strap Pairing Every Chest Strap (HRM) is assigned a unique ID when it was manufactured in the factory. The watch has to be paired up with it before use. This is to avoid interference with other users who are using the same equipment. Pairing has been done in the factory. Should you replace the HRM with a new one, you have to pair the new strap again. To do the pairing, Hold [M] to go to Menu --> HRM--> Pairing. Then touch and hold the 2 conductive pads on the Chest Strap for a few seconds. If the pairing is successful, the message “DONE!” will be displayed on the watch.Home time modeHold [M] [M]Menu:WorkoutHRM [V]HRM:On/OffPairingParingChestStrap.....DONE!FAILorTouch the contacts with both hand](https://usermanual.wiki/Latitude/735/User-Guide-1928336-Page-13.png)
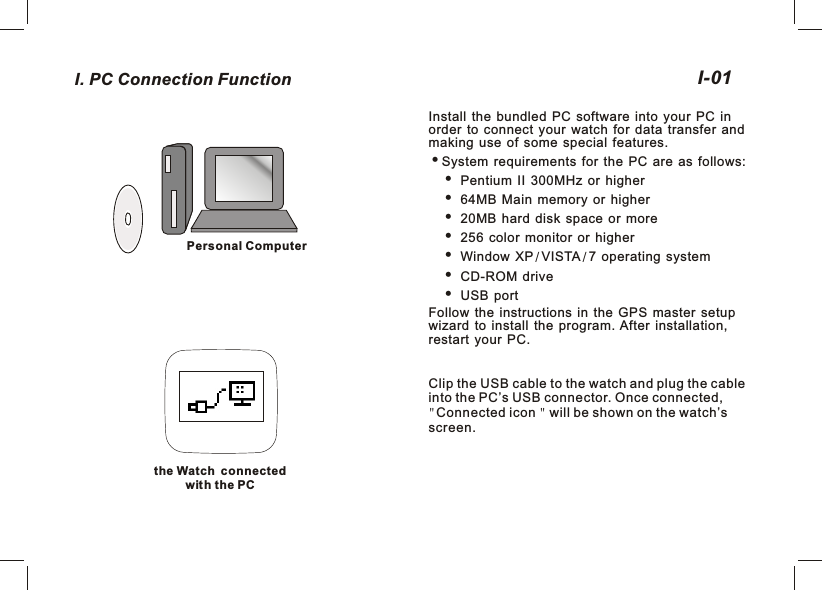
![C. Charge the Battery C-04The watch has a built-in rechargeable lithium polymer battery. Charge it for at least 3 hours when it is going to be used for the first time. When the battery is empty, the charging cycle will be completed in less than 2 hours. When the battery is not empty, the charging time will be shorter.The performance of the battery with a single charge depends upon its usage. If the GPS is not activated, it can run for approximately one year. This rechargeable battery is good for at least 500 charging cycles. Battery gauge function is provided. The approximate remaining time left, when working with GPS, is calculated by pushing the [V] button once in the TIME mode. This can only serve as a rough estimation. The actual life may vary with change of the operating conditions. If the battery level is nearly empty, GPS function will be disabled automatically. At this stage, the watch can still run for another 2 weeks with normal time keeping functions.To charge the battery:1) Align the clip guide and pins with the notch and contacts at the bottom of the watch2) Make sure the clip is secured 3) Plug the other end of the USB cable into one of the PC’s USB connectorsBackUSB CableContacts pointBackFront](https://usermanual.wiki/Latitude/735/User-Guide-1928336-Page-14.png)

![D. Getting Start: Main Function Modes D-04Main Function ModesTime modeNavigationCompassWorkout mode[M][M][M][M]](https://usermanual.wiki/Latitude/735/User-Guide-1928336-Page-18.png)
![E. Workout Mode How to start the Workout Mode Press [M] in the Time mode to enter the Workout mode Pres s [S/S] to Start /Stop the Workout. GPS is turned on automatically at start when they have not been turned on manually.Mark Laps Press [L/R] to take Laps. The maximum number of laps for a single workout session is 99.Reset Workout / Navigation When workout has been stopped, hold [L/R] until you see the RESET popup message to reset workout/navigation. This clears the current session of workout data and prepares you to start another new workout. Workout data are recorded and stored automatically in the memory at reset. If you don’ t want to keep it, you have to erase it manually. Here is the key sequence: Hold [M] > Menu > Workout > Delete > Del Last. Summary of workout history can be viewed from: Hold [M] > Menu > Workout > History.How to change the Workout view Press [V] to select among the 3 preset displays. These 3 displays will be shown in sequence when the ViewScan function has been turned on. Each display stays for about 3 seconds. To set/reset the ViewScan: Hold [M] > Menu > Workout > ViewScan > On/OffNote: See next chapter to select the Workout profiles, customize the data display and review the workout history.E-02Workout mode](https://usermanual.wiki/Latitude/735/User-Guide-1928336-Page-20.png)
![E. Workout Mode - GPS E-03Workout modeHold[V]Fixing withGPS GPS FixedHow to turn ON the GPS manually:If GPS receiver has been stopped for a long time, say more than 2 hours, it is recommended to start the GPS manually, especially when you want to have track logging done at the beginning of workout. It is because the GPS cold start time is long. Usually it takes approximate 30 seconds. During the cold start period, track information is not available. You should have the GPS position updated in advance. To do this, you can do either of the followings:a) Hold [M] > Menu> GPS> GPS ON or OFF (turn GPS ON); or Simply hold [V] for 2 seconds at Workout / Navigation modes to toggle GPS either ON or OFF. b) Hold [M] > Menu> GPS> Timeout Either 5 or 30 minutes can be chosen. When GPS is lost and 30 minutes timeout is selected, the watch will try to re-locate its position via satellites in 30 minutes.GPS status indicator- When GPS is collecting satellite information, an “ANTENNA” icon is flashing at the top left for most of the workout views. - If the GPS has a 2D location located, a “GPS fixed” message will pop-up and it will last for a few seconds. An Icon at the top left is as shown here. - If more than one satellite are captured, the GPS has a 3D location located. An Icon will be like this. - If the GPS loses contact with satellites and cannot fix its position, a pop-up “GPS Lost” message will appear. It stays on the LCD until a button is pressed.](https://usermanual.wiki/Latitude/735/User-Guide-1928336-Page-21.png)
![E. Workout Mode - Workout Profile E-04Workout modeLine 1Line 2Line 3[V][V]How to select Workout Profileh Hold [M] under any mode to enter Menu > Workout > Profiles > Select; press [V] to confirm.h Press [S/S] or [L/R] to select the desirable profile and then Press [V] to confirm.How to customize the Workout view datahHold [M] under any mode to enter Menu > Workout > Profiles > Customize > Select the desirable profile > Select Views 1 to 3; Line 1-3 show the corresponding data according to the table below. Pess [S/S] or [L/R] to select the desirable data to be shown on the watch.How to reset to default settingh Hold [M] under any mode to enter Menu > Workout > Profiles > Reset; press [V] to confirm.- Altitude- Calories- Distance- Heading- Average Heart Rate- Max Heart Rate - Min Heart Rate - Current Heart Rate- Above target zone time- Below target zone time- Within target zone time- Lap distance- Lap number- Lap Time- Average Pace - Maximum Pace- Current Pace - Average Speed - Maximum Speed - Current Speed- Time of Day- Workout Time- Distance- Current heart rate- Lap distance- Latitude & Longitude- Average Pace - Average Speed - Current Speed- Time of Day- Workout TimeLine 1 and 3Line 2](https://usermanual.wiki/Latitude/735/User-Guide-1928336-Page-22.png)
![E. Workout Mode - Workout History How to Delete the last or All records Hold [M] under any mode to enter Menu > Workout > Delete last / Delete all. Press [V] to confirmNote: The total number of Records depends on the size of the Memory.E-05How to review Workout History from the watch Hold [M] under any mode to enter Menu > Workout > History; press [V] to confirm. The summary of the latest record will be shown. View Workout Summary: Workout data summary has 3 pages. At the Top right corner of first page is the record number. Change the record number by pressing [S/S] or [L/R] button. The 2nd and 3rd lines are date and time of the record. The last line is the total number of laps for this workout. This page stays for 5 seconds. Then it is replaced by the next one. Pages 1, 2, and 3 are shown once at a time for 5 seconds sequentially. The 2nd page shows workout time, distance, and average pace. The 3rd page shows calorie consumption, average heart rate and average speed. After several cycles of displays, it will go back to the Time mode automatically. If you want to take a look at the details of individual laps, press [V] to go to the Lap Summary display. When you finish, press [M] to go back to the previous menu or hold [M] to go back to the Time mode directly.View Lap Summary: Lap summary consists of 2 pages. Record number is at the top left while current lap number is at the top right corner .Change the lap number by pressing [S/S] or [L/R] button. Like the data summary, these pages are shown alternatively. Page 1 shows lap time, lap distance, and lap average pace. Page 2 shows the split time (elapse time from starting to this lap), average heart rate for this lap and the lap speed. Press [V] to switch between Workout Summary and Lap Summary displays. When you finish, press [M] to go back to the Workout menu or hold [M] to go back to the Time mode directly.](https://usermanual.wiki/Latitude/735/User-Guide-1928336-Page-23.png)
![E. Workout Mode - Smart Lap 06E-Smart Lap is a concept of marking laps or waypoints automatically. You can make use of Smart Lap to achieve the following functions:Lap-By-Distance (LBD): Hold [M] to enter the Menu>Workout>SmartLap>ByDist When this function is turned ON, you can specify a fixed distance such that a new lap is marked automatically whenever the lap distance is reached with the preset target. You just focus on your workout. It is no need for you to push the lap button anymore. You are free to mark any new laps manually in between the Lap-By-Distance period.* When the Alert function is switched ON, a single beep will sound once when a new lap is marked. Lap-To-Waypoint (L2WP) : Hole [M] to enter the Menu>Workout>SmartLap>”Lap->WP” This is a very useful feature to create a PATH by the watch alone. One of the 10 PATHs has to be dedicated for this purpose. This path is specified in the Lap->WP setting screen. If this function is turned ON, the selected path is cleared at the beginning of Workout/Navigation. After that, whenever a new lap is created, disregarding whether it is added by Lap-By-Distance or by pushing lap button manually, the current location is added as the latest waypoint of the dedicated path. The number of waypoints allowed is the same as that defined in the regular paths.](https://usermanual.wiki/Latitude/735/User-Guide-1928336-Page-24.png)
![E. Workout Mode - Application example - Backward tracking 07E-A typical application for this is backward tracking. If you are going to explore the wilderness without planning and want to return on the same path, you may: - Set LBD to, say 200 meters, and turn it ON: Hold [M] to enter Menu>Workout>SmartLap>ByDist>[ON, 200]. Remember that the maximum number of waypoints for a path is limited to 99. Set minimum LBD distance accordingly and yet it will not exceed the limit. Waypoints beyond the path limit are ignored. - Set L2WP path to Path9, and turn it ON: Hold [M] to enter Menu>Workout>SmartLap>"Lap->WP">[ON, Path9] - Start Workout/Navigation trip: Navigation [S/S] - If you want to stop and return, then press [S/S] to stop and hold [L/R] to reset and then you are ready to return on the same path. - Turn OFF L2WP: Hold [M] to enter Menu>Workout>SmartLap>"Lap->WP”>[OFF] - Select Path9 as the current path for navigation. Hold [M] to enter Menu>Navigation>SelPath>Path9 - Set navigation mode to backward. Hold [M] to enter Menu>Navigation>NavMode>Backward - On the Navigation-Goto screen, select the last waypoint of Path9 as the current waypoint - Start Navigation, follow the Heading Pointer. The watch will guide you from the last waypoint to the starting point precisely.](https://usermanual.wiki/Latitude/735/User-Guide-1928336-Page-25.png)
![Tips for using the watch at Triathlon Race:1) Start ( before start to swim): Secures the watch firmly around goggles straps, with watch antenna direction pointing to the sky. 2) At T1 (swim to bike): take off the watch from the goggles and wear it around wrist, or mount it on top of bike mount3) At T2 (bike to run): after putting on the watch around wrist, exit (not stop) Workout Mode and re-enter it by pressing key [M]: Workout Mode -> Navigation -> Compass -> Time -> Workout ModeThe reason for doing this is that our watch has Biking and Running Modes. They have different methods for speed / distance calculations. Re-entry Workout Mode can reset the Mode to Running.E. Workout Mode - Application example - Triathlon Race 08E-Antenna locationAntennaDirection](https://usermanual.wiki/Latitude/735/User-Guide-1928336-Page-26.png)
![E. Workout Mode - TrackLog interval 09E-Nav Master records your track continuously. The sampling interval is specified by the value in the TrackLog setting. The Default is 4 seconds. It can be set from 1 second to 10 minutes.How to set the TrackLog time Under any mode, Hold [M] Menu > Workout > Tracklog Press [S/S] or [L/R] to set the time12345PathTrack Log10Min10Min10Min10MinExample: TrackLog has been set at 10Min0](https://usermanual.wiki/Latitude/735/User-Guide-1928336-Page-27.png)
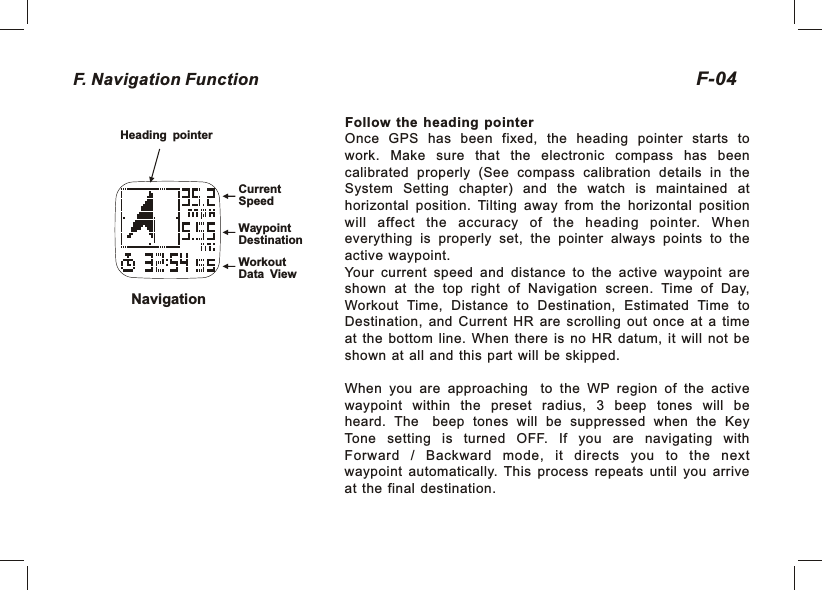
![F. Navigation Function - How to navigate 03F-NavigationHow to setup the path and navigation mode as described before. Turn ON GPS by Holding [V]. Or if you want to have workout logged, just press [S/S] to start workout. Then wait for GPS to be fixed. At the same time, you can pick the active waypoint by pressing [V] to switch to the Goto screen. Set Active WaypointOn the Goto screen, browse the waypoints up or down on the current path with [S/S] and [L/R] buttons. The sequence number of the waypoint is shown at the top right. The Path name is in th e 2nd line. Other details of the waypoint are shown consecutively in lines 3 and 4 across 3 pages. - Page 1 shows the time, date, and name of a waypoint. The name of the waypoint is limited to 10 characters long. Editing of the waypoint name can only be done in the GPS Master. A D e f a u l t n a m e “ W a y p t X X ” i s a s s i g n e d t o a w a y p o i n t automatically by the watch when it is marked manually or created by Smart Lap. Where XX is a sequence number going from 01 to 99.- Page 2 shows the distance between the current position and the heading to this waypoint when GPS has been fixed. - Page 3 shows the latitude and longitude of this waypointPress [V] once again to go back to Navigation after the active waypoint has been selected.DirectionCurrentSpeedWaypointDestinationWorkoutData View[V]Path NameWaypoint No.NavigationdataWaypoint Data ViewHold[V]Fixing with GPS GPS Fixed](https://usermanual.wiki/Latitude/735/User-Guide-1928336-Page-30.png)
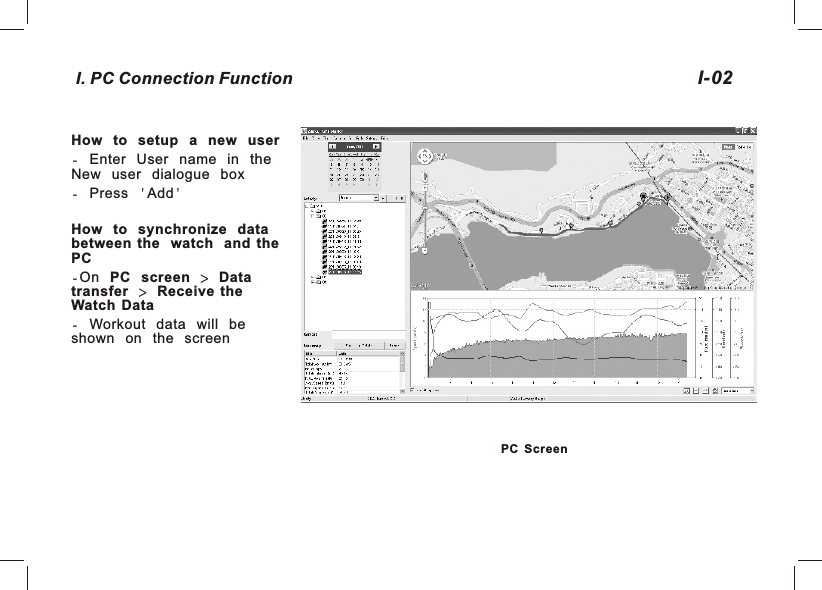
![How to create Waypoints or a path in the PCNote: You should have GPS Master installed in the PC first. See the GPS Master installation and user’s manual for details. Run GPS Master Activate the Path Manager ( Path-->Path Manager) Click NEW on the Current Path Locate the desired position in the embedded Google Maps (GMAP) and left click the mouse button. A new waypoint is just created. It is assigned to a default name. If you want to change this name, double click the waypoint place mark. A dialogue box will appear. You can input a meaningful name there. The name of waypoints is limited to 10 characters long. Add as many points as you want. Waypoints are linked sequentially. Click Save Path as you finish adding waypoints. They will be saved into the Current Path table. Clip the watch and plug in the USB cable. Then Click the “PC->Watch” button in GPS Master. Path(s) in the Current Path table will be transferred to the watch in seconds.How to Save waypoint while navigating Once GPS has been fixed, hold [L/R] to save the waypointThe waypoint will be saved to the current path How to Start/Stop Workout session and Take Laps while navigating Press [S/S] to Start Workout. Push [S/S] again to Stop Workout Press [L/R] to take LapF. Navigation Function 05F-Navigation](https://usermanual.wiki/Latitude/735/User-Guide-1928336-Page-32.png)
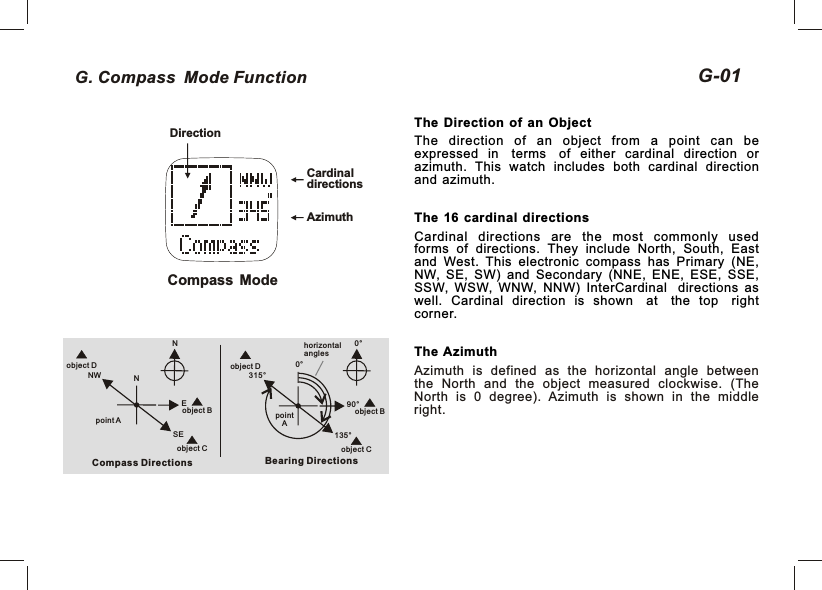
![G. Compass Function - Setting 02G-How to calibrate the compassHow to set the magnetic declination of the compass Hold [M] under any mode to enter the main menu: Menu > Settings > System > Compass > Declinate Press [S/S] or [L/R] to change the value Press [V] to confirmNote: Consult the websites below for determining the declination at your location.Http://www.magnetic-declination.com/http://www.ngdc.noaa.gov/geomagmodels/Declination.jsphttp://geomag.nrcan.gc.ca/apps/mdcal-eng.php Hold [M] under any mode to enter the main menu: Menu > Settings > System > Compass > Calibrate While calibrating, turn the watch 360 degree horizontally. You will see the trace of dots forming the outline of a rectangular box when the watch is rotating. Calibration is done when the outline is filled completely.Note: Press any key to exit the calibration without any changes](https://usermanual.wiki/Latitude/735/User-Guide-1928336-Page-34.png)
![H. Heart rate Monitor Function 01H-How to Use Heart rate Monitor (HRM) Working with the HRM is simple. Wear the chest strap as mentioned earlier. The strap should be turned ON by itself. At the watch, press [S/S] in Workout mode. The watch will display an icon “HR” with the chest strap in a couple of seconds. During your workout, the HR is stored at the rate as defined in the TrackLog. Press [S/S] again to stop when you finish workout. How to start the Heart Rate Monitor There are 2 ways to activate the Heart Rate Monitor function:1) Under Workout mode, the Heart Rate Monitor will start automatically when Workout starts.2) Hold [M] under any mode to enter the Setting mode: Menu > HRM > On/OffHeart Rate DataHeart Rate Data](https://usermanual.wiki/Latitude/735/User-Guide-1928336-Page-35.png)
![02H-% EMHRLower LimitUpperLimitHeart Rate ZoneHealth FatBurn Aerobics User50% 55% 65%65% 75% 80%UserdefinedIn ZoneAbove ZoneBelow ZoneHow to Use Target Heart Rate ZoneSetting target HR zone is very important for your personal training plan. If you are not working in the target zone, alert beeps will sound. You can adjust your pace of exercise to maintain your HR in the target zone limits. There are 4 target zone levels: Health, Fat Burn, Aerobics and User. The limits of these zones are shown on the left table. If they do not fit your training scheme, you are free to set your own target zone limits in any of these settings. How to select Heart Rate ZoneHold [M] under any mode to enter Menu > HRM > HR Zone >SelectSelect among Health / Fat burn / Aerobics / User Press [V] to confirm > “Done” will be shownHow to set the HR Zone LimitsHold [M] under any mode to enter Menu > HRM > HR Zone >CustomizeSelect among Health / Fat burn / Aerobics / User Set the value by pressing [S/S] or [L/R]Press [V] to confirmHow to reset all Heart Rate ZonesHold [M] under any mode to enter Setting Menu > HRM > HR Zone > ResetALL; press [V] to confirm.H. Heart Rate(HR) Zone](https://usermanual.wiki/Latitude/735/User-Guide-1928336-Page-36.png)
![J. Home Time Function 01J-How to set Time Of Day Nav Master is able to synchronize its clock with the satellite's atomic clock automatically. This is done whenever the GPS fixes its position. Auto time zone is another cool feature. It tries to set your current time zone according to the longitude. In other words, when there is a satellite and the GPS is turned on occasionally. The time is synchronized with the satellite’s clock. You don’t need to bother to adjust the watch. The time is always accurate. When there is no satellite coverage, manual time setting is also available. Hold [M] under any mode to enter Menu > Settings > Time Date Select Home Time/ Dual Time or FormatTime of Day SettingGPS Update - Menu > Settings > TimeDate > HomeTime > GPS Upd; select on/off.When this option has been turned ON, the Nav Master will synchronize the time with the satellite atomic clock whenever a GPS is fixed . Home time modeDate Current timeDay of weekMonth](https://usermanual.wiki/Latitude/735/User-Guide-1928336-Page-39.png)
![J. Home Time Function 02J-Time Zone Menu > Settings > TimeDate > HomeTime > TimeZoneSet time zone according to your current location. It can be adjusted from +12:00 to -12:00 hours from GMT at 0.5 hour step. Alternatively, it can be set automatically by GPS. When this option is activated, GPS sets your time zone according to the longitude. It should work most of the time, but there are exceptions because of Daylight-Saving Time (DST) or other reasons. When the time zone set by GPS does not reflect your local time correctly, adjust the time manually.Manual time settingMenu > Settings > TimeDate > HomeTime > ManualSet time and date in the following sequence:Second > Minute > Hour > Year > Month > DayPress [S/S] or [L/R] to change the value Dual Time SettingMenu > Settings > TimeDate > DualTimePress [S/S] or [L/R] to change the value at 30 min increment.Format Menu > Settings > TimeDate > FormatPress [S/S] or [L/R] to choose 12 / 24 Hour Format](https://usermanual.wiki/Latitude/735/User-Guide-1928336-Page-40.png)
![Battery Life TimeGPSRemaininghoursK. Battery life - remaining power 01K-Check Battery life - remaining power Press [V] in the Home time mode > Battery Battery life remaining hours for GPS will be shown](https://usermanual.wiki/Latitude/735/User-Guide-1928336-Page-41.png)
![L. Timer Function 01L-How to use the TimeriPress [V] in the Home time mode > Battery > Timeri Press [S/S] to start or stop.iPress [L/R] to reset to the preset time.iBeep sound will be heard in the last 10 seconds.iLong beep will be heard once reaching 0:00:00; press any key to stop the beep. How to set the Timer Hold [M] under any mode to enter Menu > Settings > Timer Press [S/S] or [L/R] to change the value: Press [V] to change Hour > Minute > SecondTimer modeCurrent timeTimer time](https://usermanual.wiki/Latitude/735/User-Guide-1928336-Page-42.png)
![M. Alarm Function 01M How to use the Alarm Press [V] in the Home time mode > Battery > Timer > Alarm Pres s [S/S] to select 1 - 5Alarms Press [L/R] to turn the alarm On/ Off How to set the Alarm Hold [M] under any mode to enter Menu > Settings > Alarms Alarm no. > Hour > minutes > On/Off > Daily/Sun-Sat/Mon-Fri Press [S/S] or [L/R] to change the valueAlarm modeAlarm DayAlarmtimeAlarm No.-](https://usermanual.wiki/Latitude/735/User-Guide-1928336-Page-43.png)
![N. Dual Time Mode 01N Dual Time modeHome TimeDual TimeHow to use Dual Time Press [V] in the Home time mode > Battery > Timer > Alarm > Dual TimeHow to set Dual Time Hold [M] under any mode to enter Menu > Settings > Time Date > Dual Time Press [V] to select Dual Time Press [S/S] or [L/R] to change the value at 30 min increment.-](https://usermanual.wiki/Latitude/735/User-Guide-1928336-Page-44.png)
![O. User settings 01O-To get the accurate workout data, the user’s data setup is important. Hold [M] under any mode to enter Menu > Settings > User Gender or BirthDate or WeightGender Press [S/S] or [L/R] to select Male or female Press [M] to confirmDate of Birth Press [S/S] or [L/R] to change the value Press [V] to confirm and set the following data Year > Month > Day Press [M] to confirmWeight Press [S/S] or [L/R] to change the value. Hold the button to change the value faster Press [M] to confirmNote: To change the Unit, see the subsequent chapter](https://usermanual.wiki/Latitude/735/User-Guide-1928336-Page-45.png)
![P. System settings 01P-For system setting Hold [M] under any mode to enter Menu > Settings > System Sound o r C o n t r a s t o r U n i t s o r Compass or Language or System ResetSound Select Key Tone / Chime Turn On/ Off Press [M] to confirmContrast Select from level 3 Lighter to 16 Darker Press [M] to confirmUnits Select General / Latlong General > kg/M/ Km or lb/ft/mi Bearing > Min'sec" or DecimalCompass Refer to the chapter - Compass function mode settingsLanguage Select languages Press [V] to confirmSystem Reset Select No/Yes Press [V] to confirmNOTE: This will reset the watch to the factory default settings.All data will be cleared.](https://usermanual.wiki/Latitude/735/User-Guide-1928336-Page-46.png)
![Q. Memory Usage 01Q-Memory UsageDisplayHow to check the Memory Usage Hold [M] under any mode to enter Menu > Memory](https://usermanual.wiki/Latitude/735/User-Guide-1928336-Page-47.png)
![R. Power Saving Mode 01R-Home time modePower Saving Mode This Watch has a Power Saving Function which can turn off the LCD display so that the battery can last longer.In the Power Saving Mode, the watch function is still working normally. (i.e. The timekeeping function is still running in the Power Saving Mode.)How to activate/exit the Power Saving ModeTo activate the Power Saving Mode, hold the [L/R] button in the Home Time Mode for about 5 seconds and the LCD display will be turned off.Hold [L/R] button in the Power Saving Mode to resume the LCD display.Power Saving Mode(LCD display is turned off)Hold [L/R]5 secondHold [L/R]5 second](https://usermanual.wiki/Latitude/735/User-Guide-1928336-Page-48.png)