Launch Tech CR971 TPMS Activation and Diagnostic Tool User Manual
Launch Tech Co., Ltd. TPMS Activation and Diagnostic Tool Users Manual
Users Manual
V1.00.000
2017-09-11
Creader 971

LAUNCH Creader 971 User’s Manual
1
Copyright reserved!
Without written agreement from Launch Tech Co., Ltd (Hereinafter refer to "LAUNCH"), any company or person is not allowed to
copy and duplicate this user manual in any format (electronic, mechanical, video, record or other formats).
The user manual is designed only for LAUNCH products. Any consequence caused by using this user manual to guide other
device operation is not under the responsibility of LAUNCH. All examples in this user manual are subject to change without
notice.
LAUNCH and its branches do not bear any responsibility for the fees and expenses of the device damage and loss due to
personal or third party accident, misuse and abuse of the device, unauthorized change and repair, or any operation and
maintenance not following LAUNCH standard.
LAUNCH is not responsible for the device damage or problem due to the usage of any optional parts or consumables instead of
LAUNCH original products or LAUNCH recognized products.
Formal statement:
Other product names mentioned in this user manual are aimed to describe the device usage. The registered trademarks still
belong to the original company.
Registered trademark
LAUNCH has registered its trademark in China and a number of other countries, logo is LAUNCH. In those countries where
LAUNCH trademark, service mark, domain name, icon and company name are not yet registered, LAUNCH claims the
ownership of unregistered trademark, service mark, domain name, icon and company name. Trademarks of the other products
and company names mentioned in this user manual still belong to original registered company. Without written agreement from
the owner, no person is allowed to use the trademark, service mark, domain name, icon and company name of LAUNCH or of
other mentioned companies. You can visit http://www.x431.com to learn LAUNCH products; Or visit
http://www.cnaluanch.com or write to Customer Service Center of LAUNCH TECH CO., LTD at Launch Industrial Park, North
of Wuhe Avenue, Banxuegang, Longgang District, Shenzhen, P.R.China, to get contact with LAUNCH for the written agreement
on the usage of the User Manual.
Attentions for ECU Operations
When ignition is on, do not disconnect the vehicle internal electric device, to avoid damage to the ECU or to the device.
Do not place magnetic objects near the ECU, to avoid failures of the circuit and components in the ECU.
Disconnect the ECU system before any welding operation.
Be careful for the operation near the ECU or sensor, to avoid damage to the ECU and sensor.
Properly connect the ECU harness connector, to avoid damage to the electronic components inside the ECU, such as the
integrated circuit.
Attentions for Device Usage
This device is a precision electronic instrument. Be sure no impact during using.
Take the device carefully, to avoid collision.
Turn the ignition to OFF position when insert or remove the OBD connector.
If the vehicle is not going to be used for a week or more, to ensure that the battery holds its charge well, it is recommended to
unplug the connector.
In the use of the product, it is not recommended to use communication functions, such as telephone and SMS, which may

LAUNCH Creader 971 User’s Manual
2
lead to interruption of program data communication. If this occurs, please operate the related functions again.
Packing list
USB cable*1
Charger*1
SD card*1
OBDII cable*1
User Manual*1
Magnet*1
Suitcase*1
Card reader*1
OBD extension cable*1 (optional, contact LAUNCH and dealers for the purchase)

LAUNCH Creader 971 User’s Manual
3
Table of Contents
I. Product Overview .............................................................................................................................................. 4
II. Creader 971 Function Key Guide .................................................................................................................... 4
III. Product Specification ....................................................................................................................................... 4
IV. Features .......................................................................................................................................................... 5
V. Main Menu Function Introduction..................................................................................................................... 5
VI. Charge and Boot ........................................................................................................................................... 15
VII. Register and Upgrade .................................................................................................................................. 16
LAUNCH Creader 971 User’s Manual
4
I. Product Overview
Creader 971 integrates diagnostic functions of a variety of car models, with TPMS trouble light reset, sensor ID, battery status,
tire pressure and temperature read, TPMS sensor activation and matching as well. It better meets the needs of auto repair shop,
tire assembly line, individual owner and tire repair shop to diagnose, activate and match the TPMS system and the tire pressure
sensors.
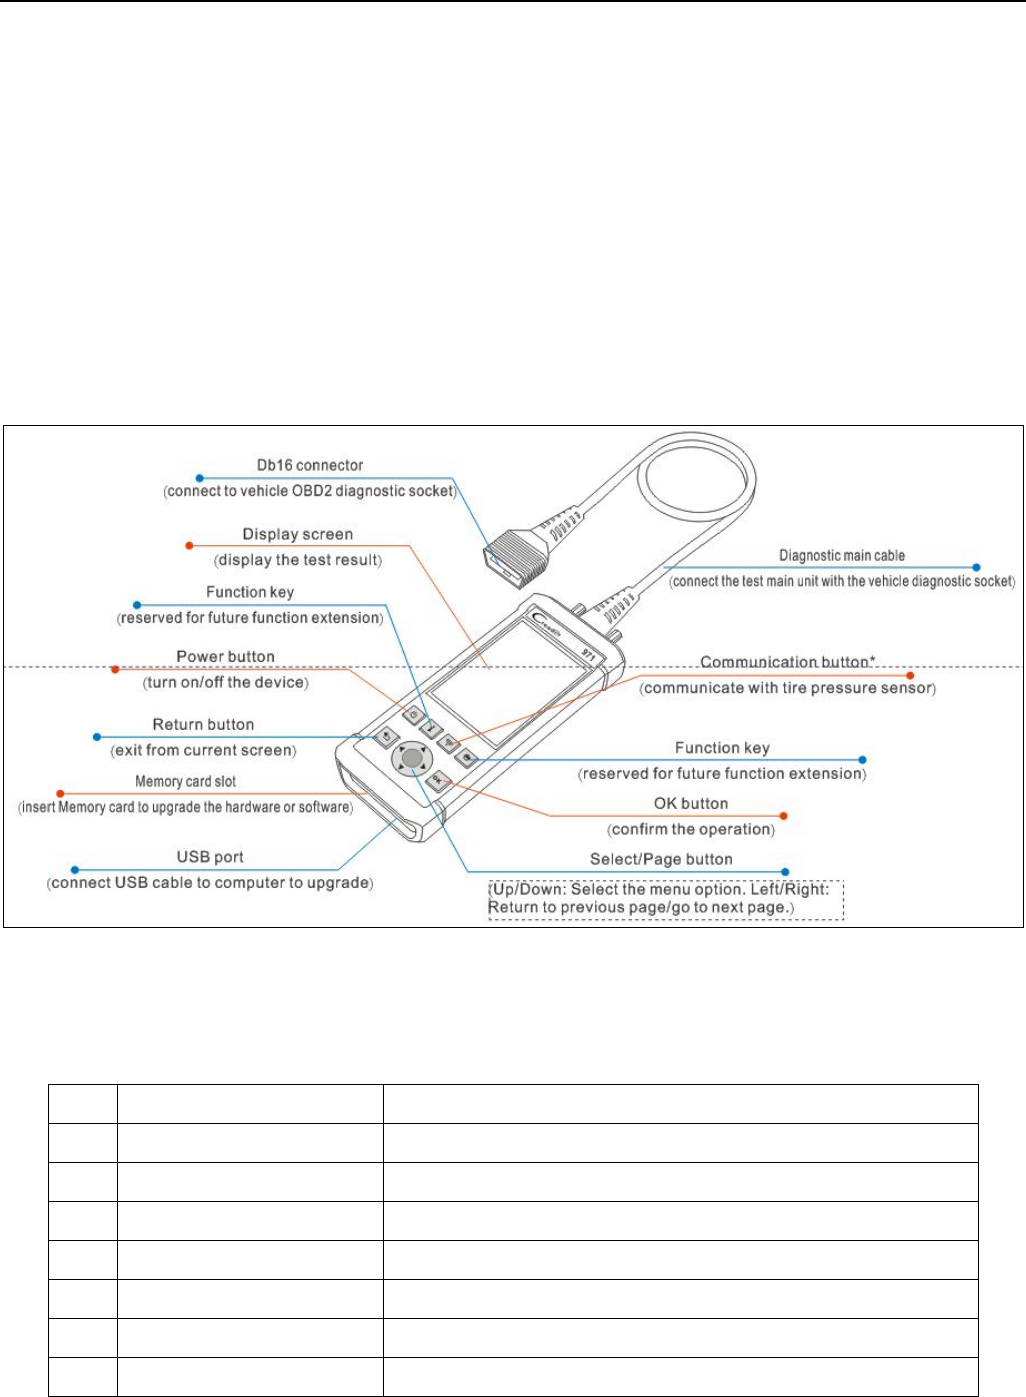
II. Creader 971 Function Key Guide
III. Product Specification
No.
Item Range
1 Display screen
4inch TFT screen, resolution 320*480
2 OBD supply voltage
9-18V
3 USB supply voltage 5V
4 Battery
Lithium-ion battery, 3100mAh, 3.7V
5 Activate sensor frequency
125KHz
6 Receive sensor frequency
315MHz/433MHz
7 Working temperature -10 to 50℃

LAUNCH Creader 971 User’s Manual
5
8 Storage temperature
-20 to 70℃
9 Storage humidity 10%~93%
10 Dimension
195x86x32mm
11 Weight
<460g
12 Drop
It won't be damaged in case of falling from 1 meter high.
13 Boot time <5s, time from pressing power button to the main menu
14 Button response
1 second
15 Working hour A year and a half in power off state.
5.5 hours in working condition.
IV. Features
Activate the sensors from OEM and aftermarket major brands
Read tire pressure, temperature sensor ID and battery level
Duplicate or generate the new sensor ID after sensor replacement
Rewrite the sensor position into the ECU after sensor rotation
Help guide and software update subscription
Search by make-mode-year
Programmed sensor history query
Read and clear TPMS fault code
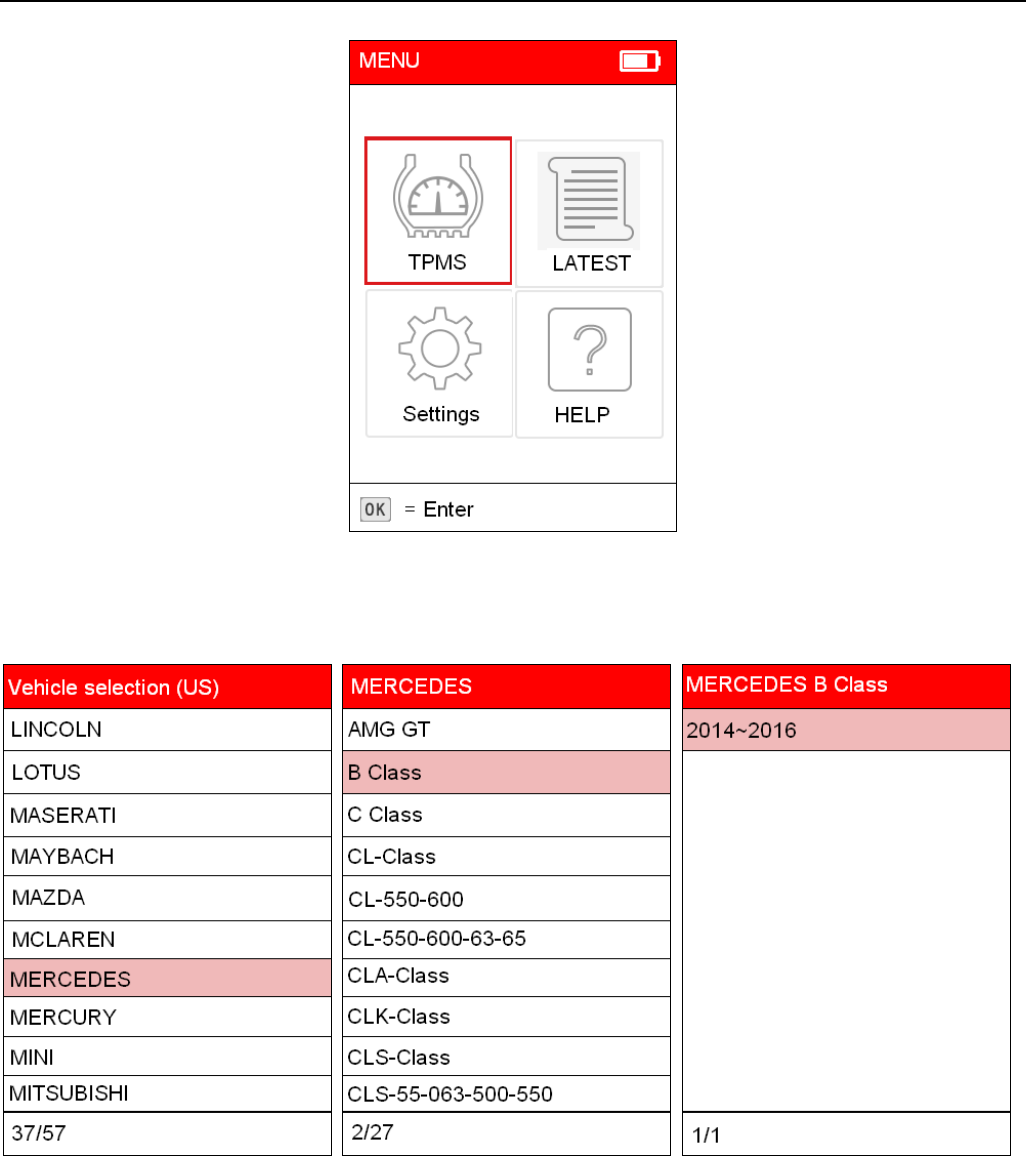
V. Main Menu Function Introduction
Boot into the main interface.
There are four sections: TPMS, Latest, Settings, Help.
"TPMS" is the main function of the device, including check sensor, communicate with ECU via OBD.
"Latest" means the latest test records. Users can fast access the last test.
"Settings" is to set up the system parameters, such as pressure unit, temperature unit.
"Help" covers information on diagnostic socket, device, etc.
Switch the options via the four arrow keys .Enter the selected option by the confirm button .
Battery level is displayed in the upper right corner. Charging .
LAUNCH Creader 971 User’s Manual
6
Picture 1: Main Interface
Car model selection
After entering TPMS, it is necessary to select the make/model.
Picture 2: Car Model Selection
Use UP&DOWN keys to toggle each option successively. Use LEFT&RIGHT keys to toggle the options by
page.
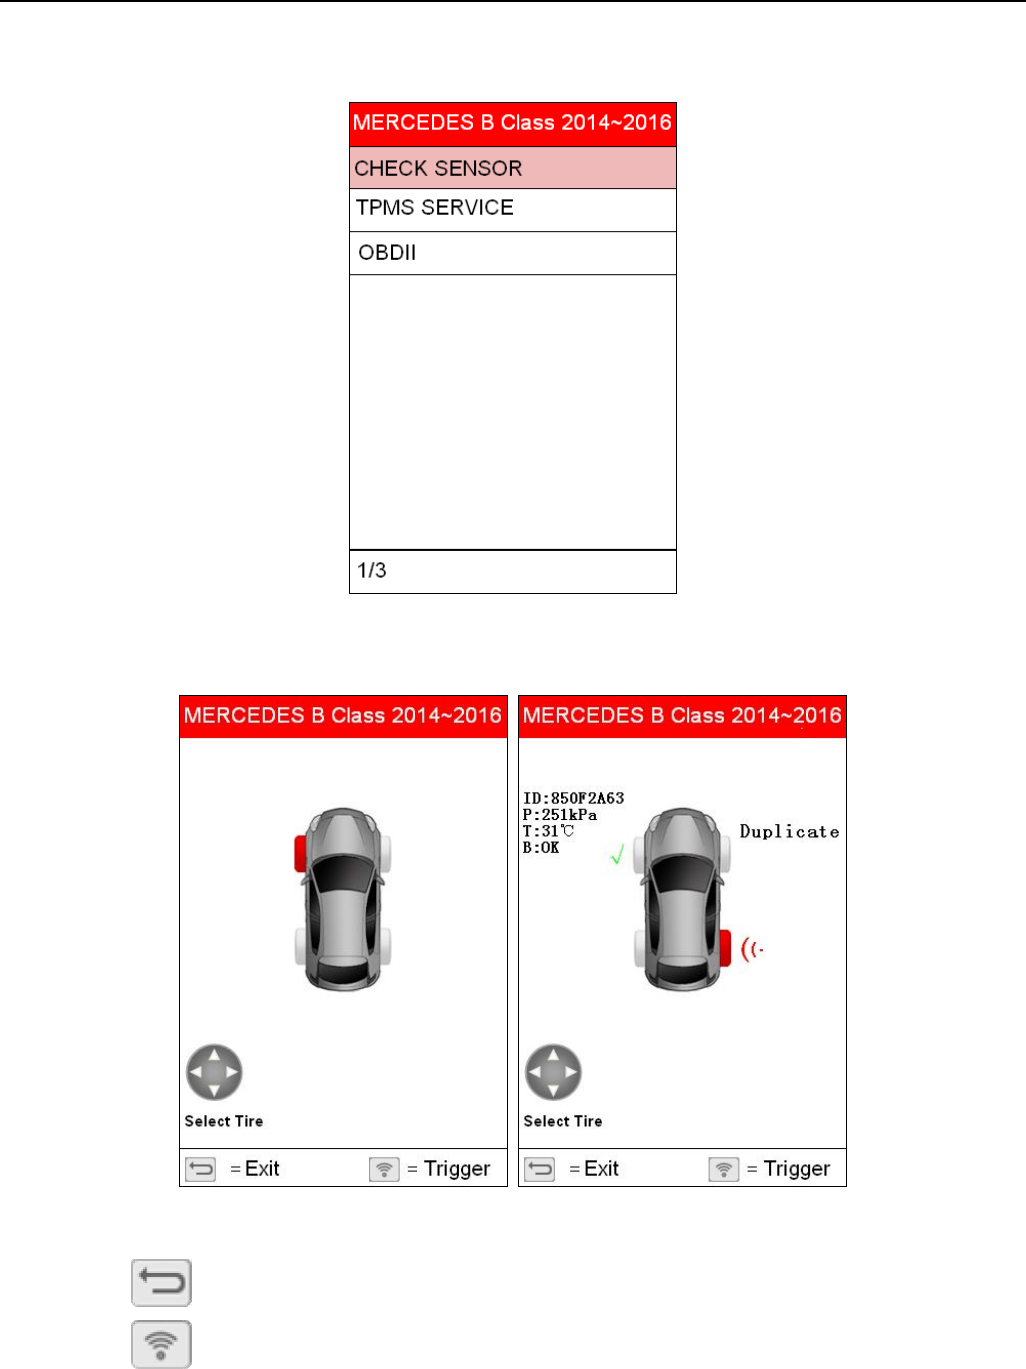
Select make, model and year followed by function menu.
After car model selection, there are options of "Check Sensor" and "OBDII".
Check Sensor: Communicate with tire pressure sensor. If check succeeded, corresponding ID, pressure and
temperature will be displayed.
LAUNCH Creader 971 User’s Manual
7
OBDII: Use the OBD cable to connect the device with the vehicle OBD connector. After entry, users can view
the sensor ID stored in the ECU. The sensor ID will be written into the ECU via learning.
Picture 3: Function Options
Check Sensor
Picture 4: Check Sensor Interface
Press button to exit.
Press button to trigger the sensor.
LAUNCH Creader 971 User’s Manual
8
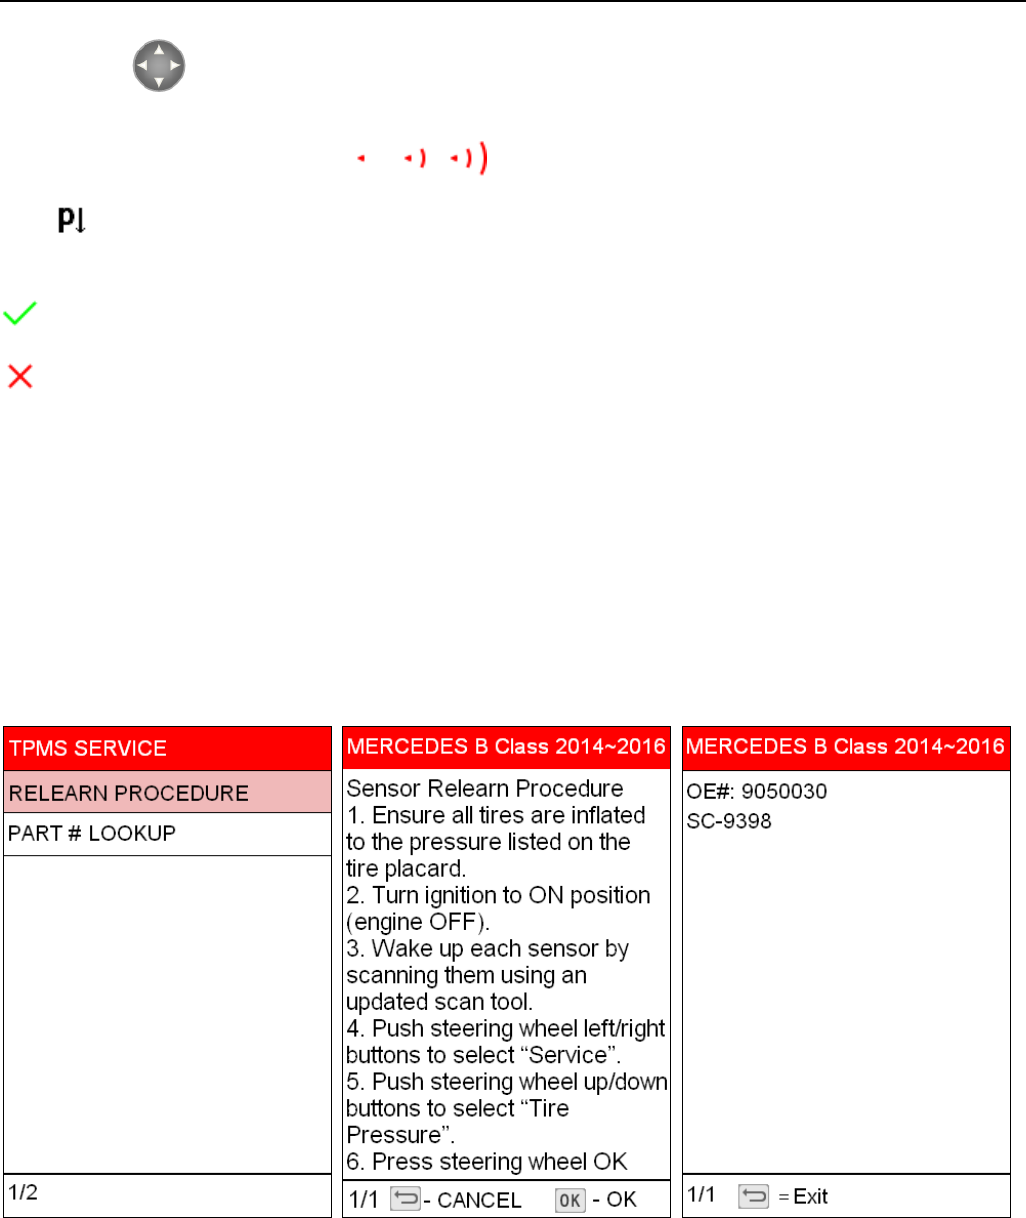
Press button to toggle between tires.
During activation, there are icons like beside the tire, which indicates it is activating.
Icon beside the tire means deflation is required.
Activation result:
:Activation succeeded.
:Activation failed.
Duplicate: Sensor with repeated ID.
After successful activation, it displays the sensor ID, pressure, temperature and battery level, etc.
ID: Means the ID of this sensor.
P: Means the measured pressure of this sensor.
T: Means the tested temperature of this sensor.
B: Means the battery level of this sensor.
Tire pressure service data
RELEARN PROCEDURE: Description of the self-learning process.
PART # LOOKUP: Sensor OEM information.
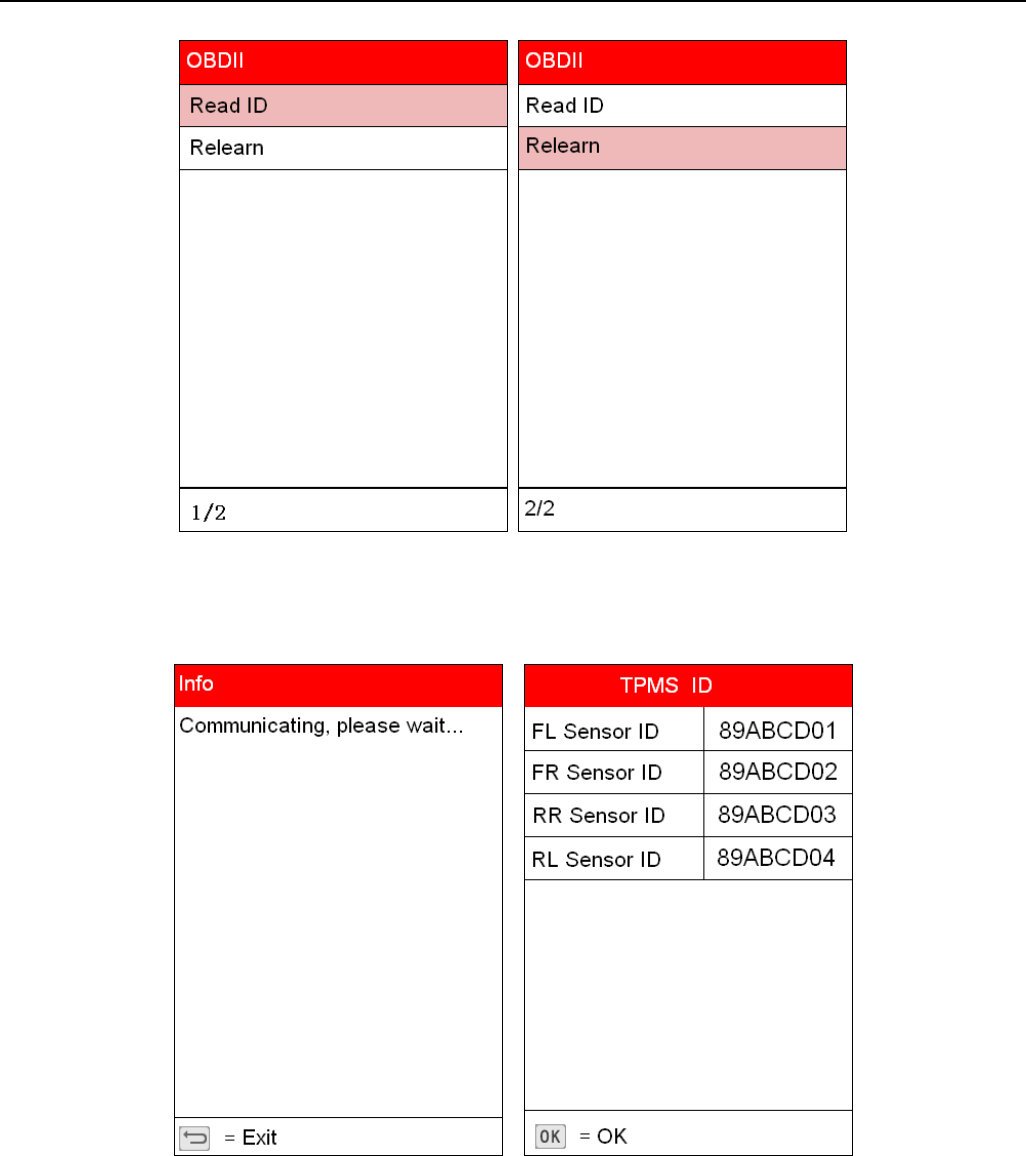
Tire pressure related OBD diagnostic function.
Read ECU ID: Read the stored sensor ID from ECU via the OBD connection.
Learn sensor: Save the sensor ID to the corresponding position of the ECU via the OBD connection.
LAUNCH Creader 971 User’s Manual
9
Picture 5: OBDII Interface
OBD—Read ID
Read the sensor ID from the ECU.
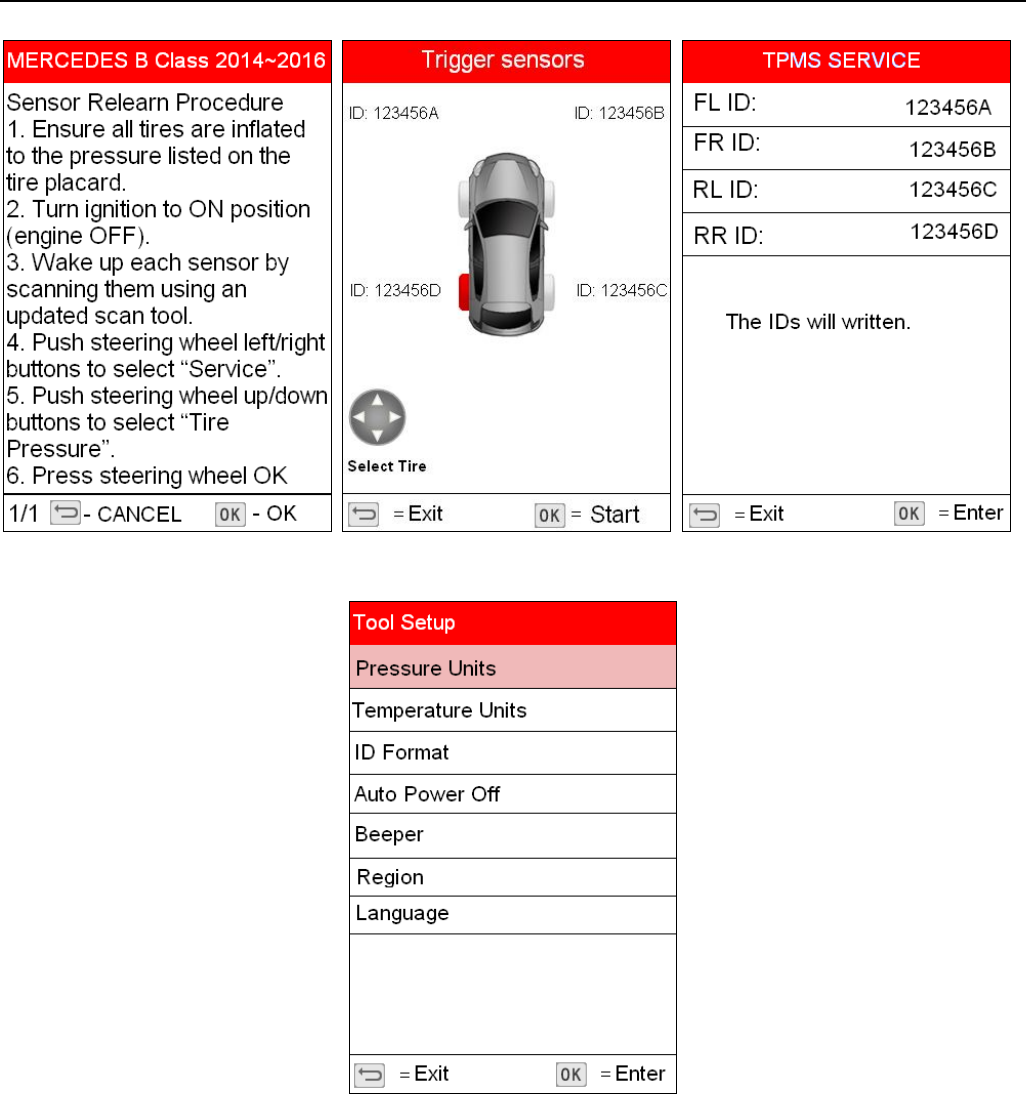
OBD—Relearn
LAUNCH Creader 971 User’s Manual
10
Settings
Picture 6: Settings Interface
LAUNCH Creader 971 User’s Manual
11
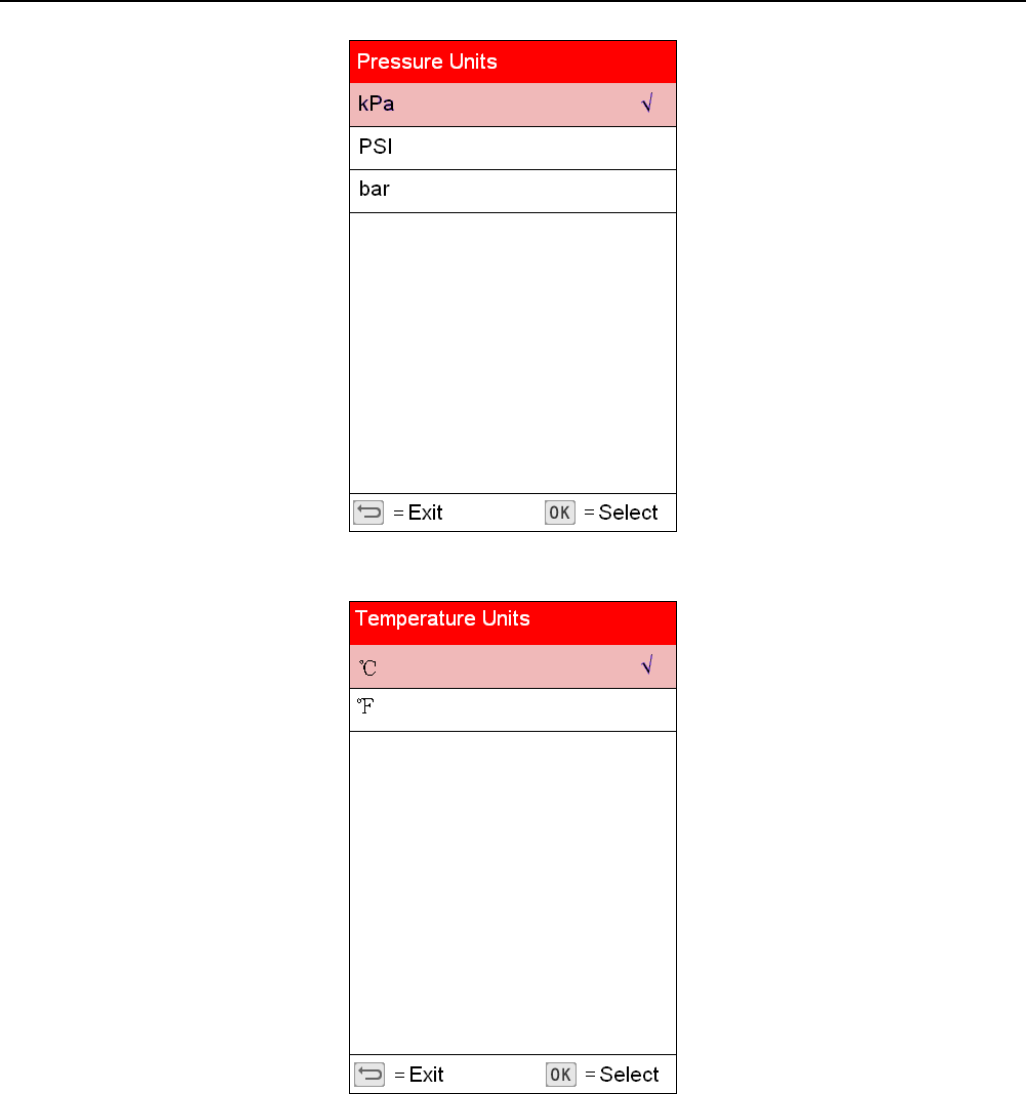
Picture 7: Pressure Units Interface
Picture 8: Temperature Units Interface
LAUNCH Creader 971 User’s Manual
12
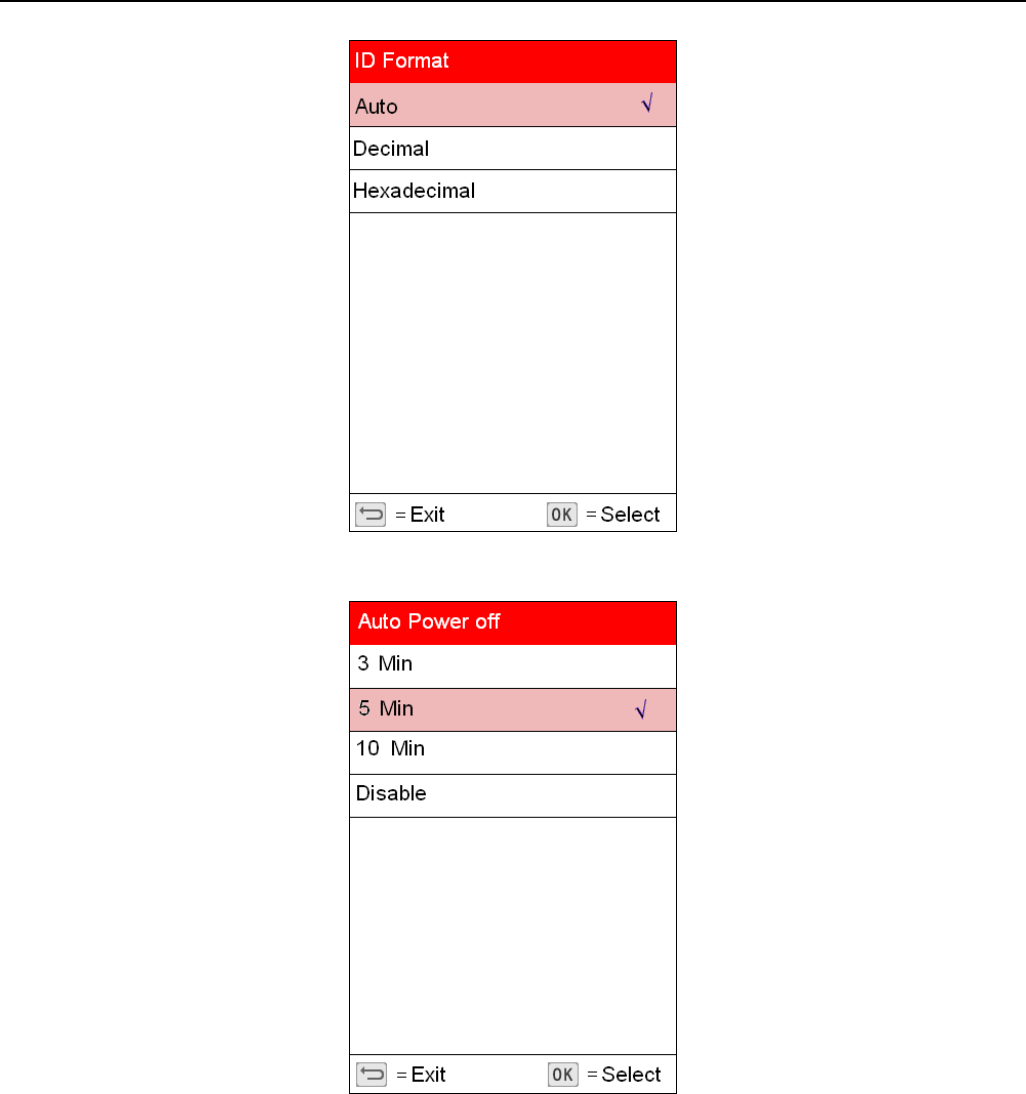
Picture 9: ID Format Interface
Picture 10: Auto Power Off Interface
LAUNCH Creader 971 User’s Manual
13
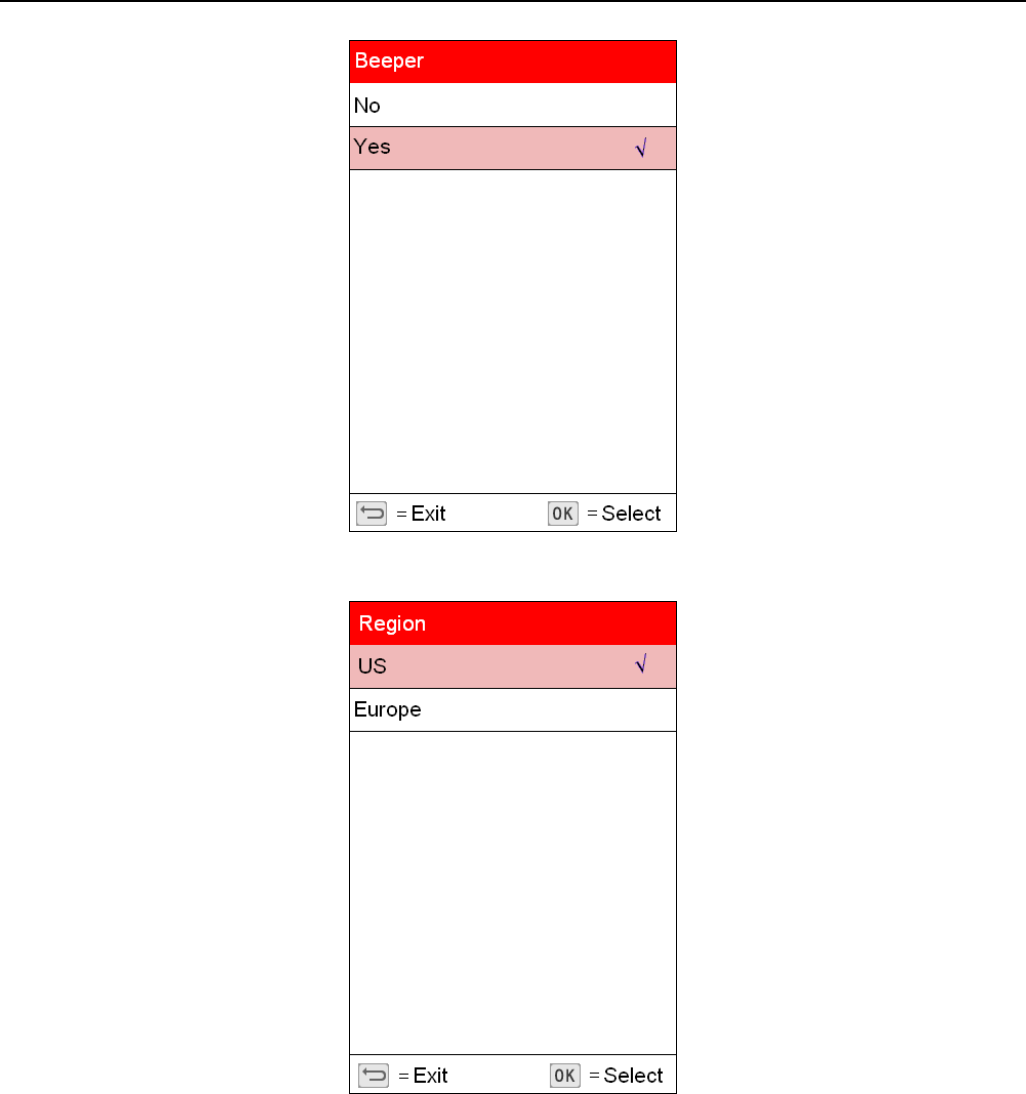
Picture 11: Beeper Interface
Picture 12: Region Interface
LAUNCH Creader 971 User’s Manual
14
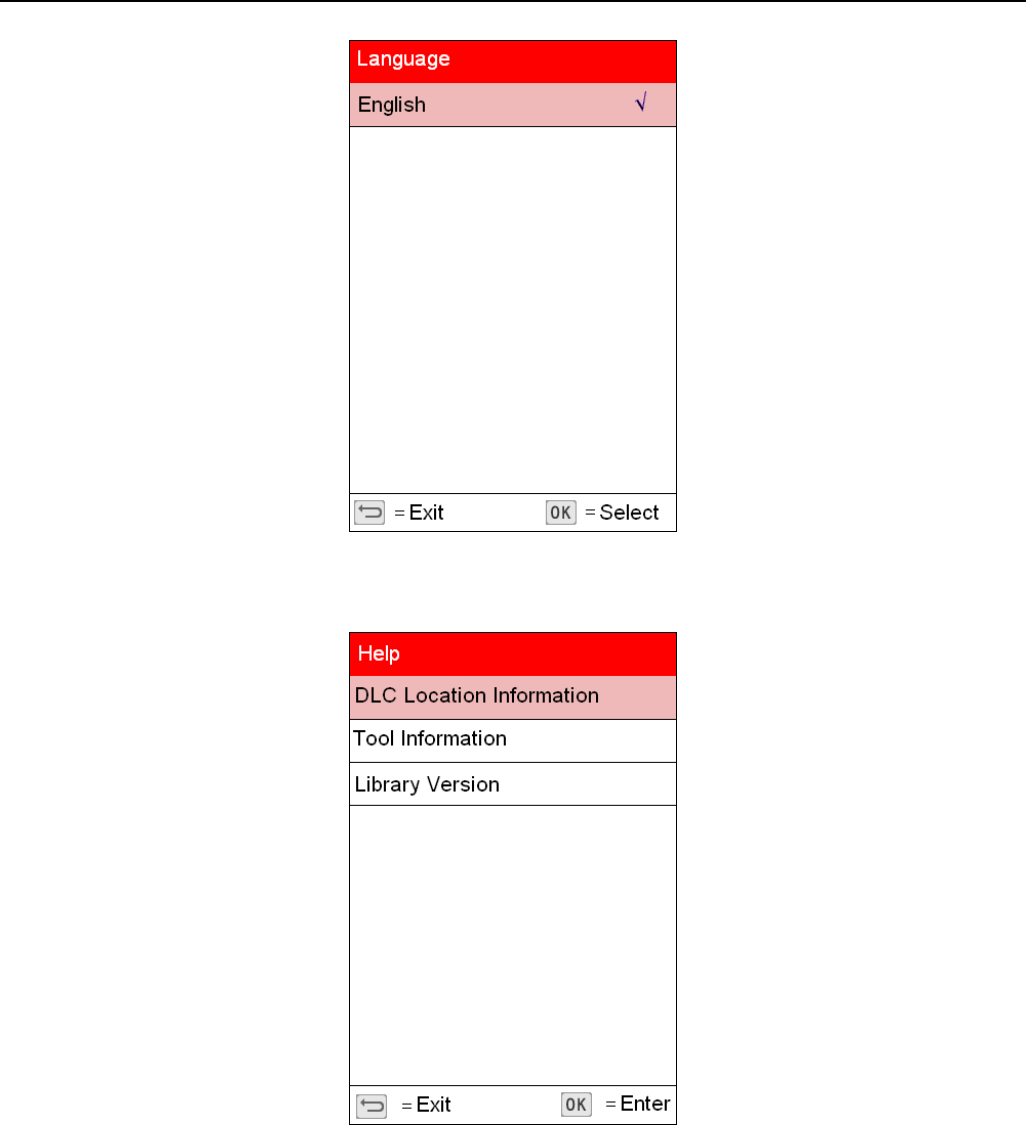
Picture 13: Language Selection Interface
Help
Picture 14: Help Menu Interface

LAUNCH Creader 971 User’s Manual
15
Picture 15: Tool Information Interface
Picture 16: Library Version Interface
VI. Charge and Boot
Charge and Boot
This TPMS diagnostic tool is equipped with 3100mAh lithium-ion polymer battery. There are 2 charging
methods:
1. By the power adaptor
LAUNCH Creader 971 User’s Manual
16
1) Locate the device USB port.
2) Use the power adaptor to connect the device with the power supply.
2. By the USB cable
1) Locate the device USB port.
2) Use the USB cable to connect the device with the computer.
Note: To get a best device performance, please keep the device fully charged. Charge the device at least 2
hours before first use.
3) After charging, press the power button to start the device.
Power supplied by DLC
This TPMS diagnostic tool can be powered by vehicle DLC (Data Link Connector) in addition to the
rechargeable battery. Follow the steps to start the device:
1. Connect one end of the diagnostic main cable to the diagnostic interface of the device and tighten the screw.
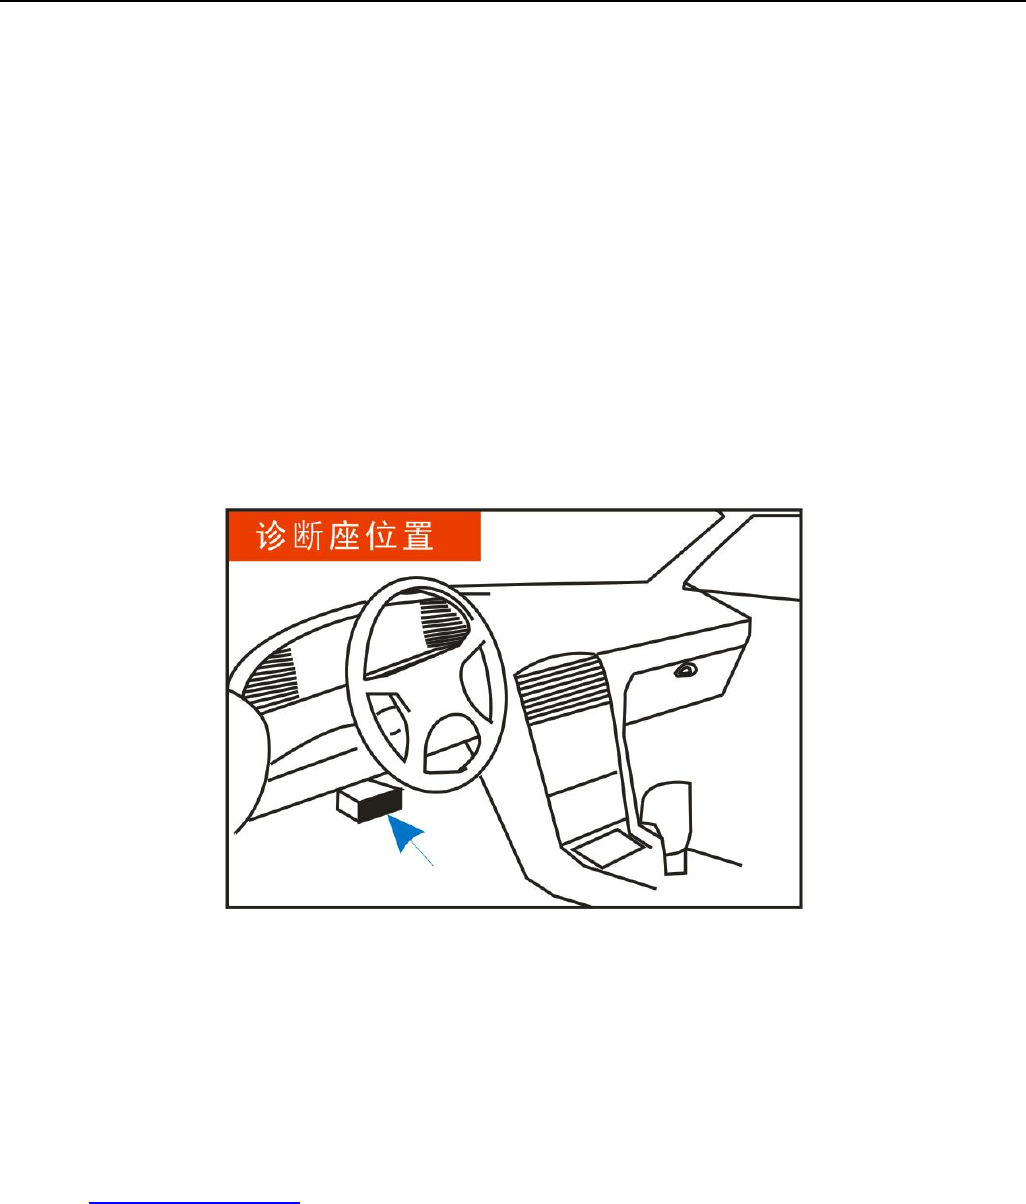
2. Locate the vehicle DLC position. The DLC is usually a standard 16 pin connector. It is an interactive
interface between the diagnostic tool and the onboard computer. In most vehicles, the DLC is installed on the
driver side, 12inch under the instrument, see below picture.
3. Insert one end of the diagnostic main cable to the vehicle DLC.
4. Press the power button to start the device and wait for the main menu.
VII. Register and Upgrade
Register and Upgrade
Requirement:
1. Log in http://www.dbscar.com to download the upgrade tool and install it to the computer.
2. Compatible operation systems: Windows XP, 7, 8 or Windows 10.
This TPMS diagnostic tool supports 2 upgrade methods. Select any one of them to upgrade:
Method 1: Via Memory card (recommended)
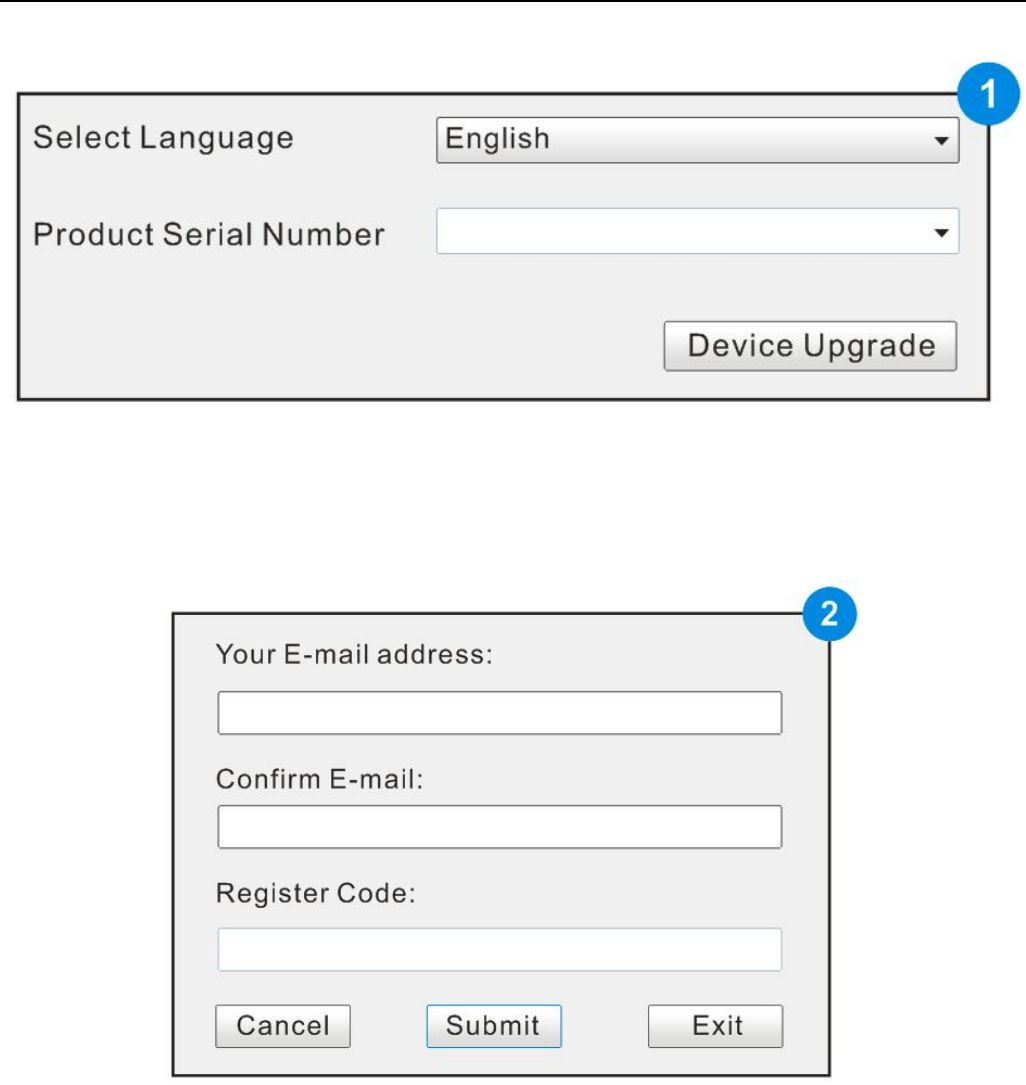
1. Start the upgrade tool, screen displays as shown in the below picture:
LAUNCH Creader 971 User’s Manual
17
2. Input the product serial number (can be found in the back of the device).
Note: After inputting the product serial number, "Reset system" function will be activated. This option is for
the system reset after the replacement of Memory card.
3. Click [Device Upgrade] to enter the registration page. Input the email address and registration code, then
click [OK], see picture 2.
(Refer to Step 4-7 to get the registration code.)
(Skip to Step 8 if already have the registration code.))
4. The registration code can be found in the diagnostic tool. Press power button to start the device.
5. In the main menu, use arrow keys to select 'Help', then click [OK].
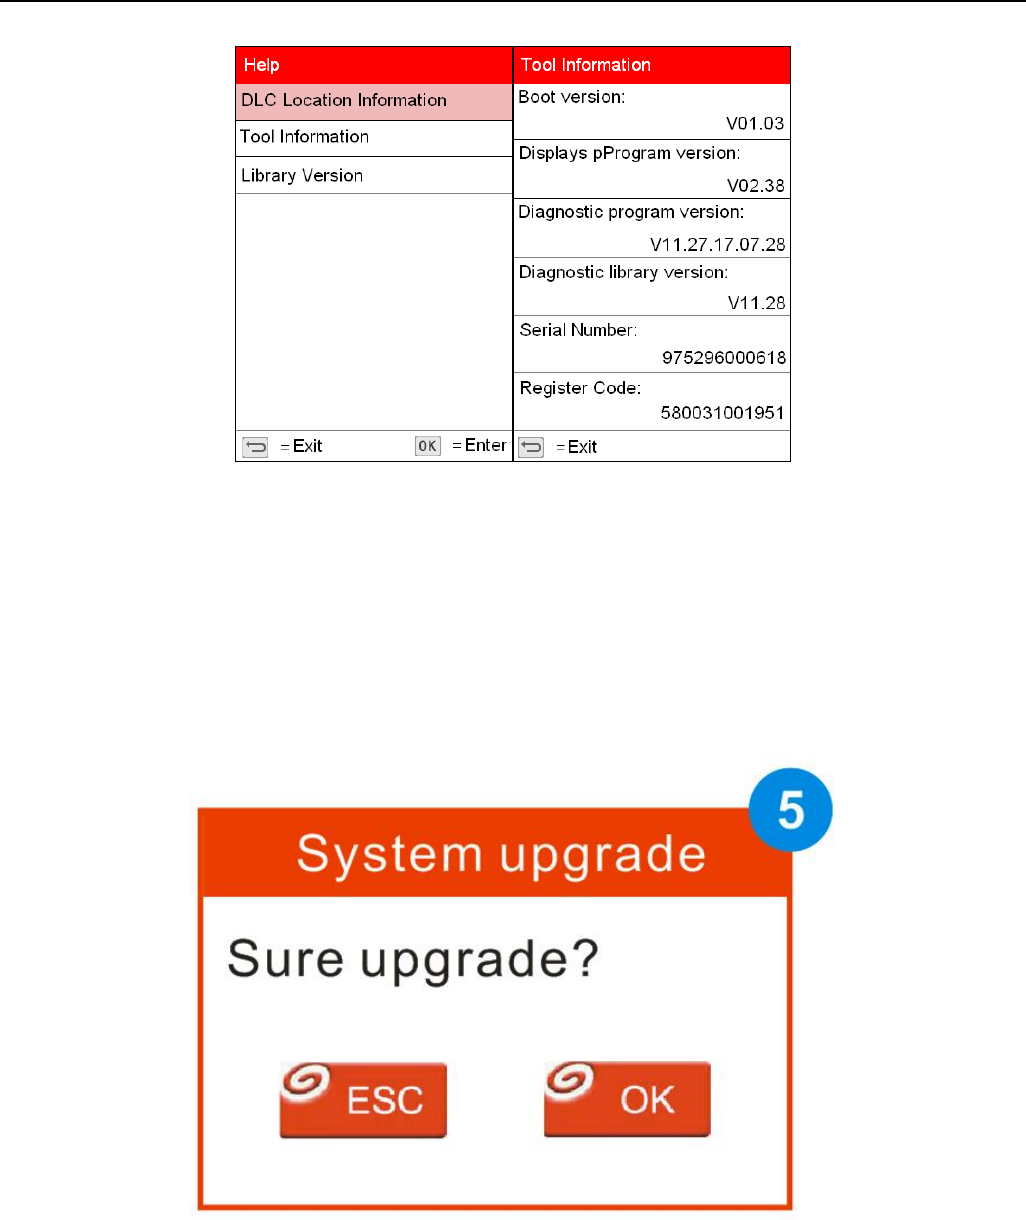
6. In picture 3, select "Tool Information" and click [OK] to enter picture 4.
7. The registration code displayed in picture 4 is the one required in Step 3.
(Back to Step 3 and input the registration code, then continue.)
LAUNCH Creader 971 User’s Manual
18
(picture 3&4)
8. Remove the Memory card from the device and insert it to the included card reader, then insert the card
reader to the computer's USB port.
9. Restart the upgrade tool. Select the item to be updated or click "All", then click [Download] to download.
10. After above steps, remove the Memory card from the card reader and insert it back to the device.
Press the power button to start the device. It prompts an upgrade dialog box (see Picture 5)(Note: This dialog
box will not appear if only latest diagnostic software is available but no firmware package to be downloaded).
Click [OK] to confirm the upgrade.
11. Registration and upgrade steps are complete. The device can be used now.
Method 2: Via USB cable
Note: When use this method to upgrade, please ensure the network is normal.
1. Connect one end of the USB cable to the device, the other end to the computer's USB port.
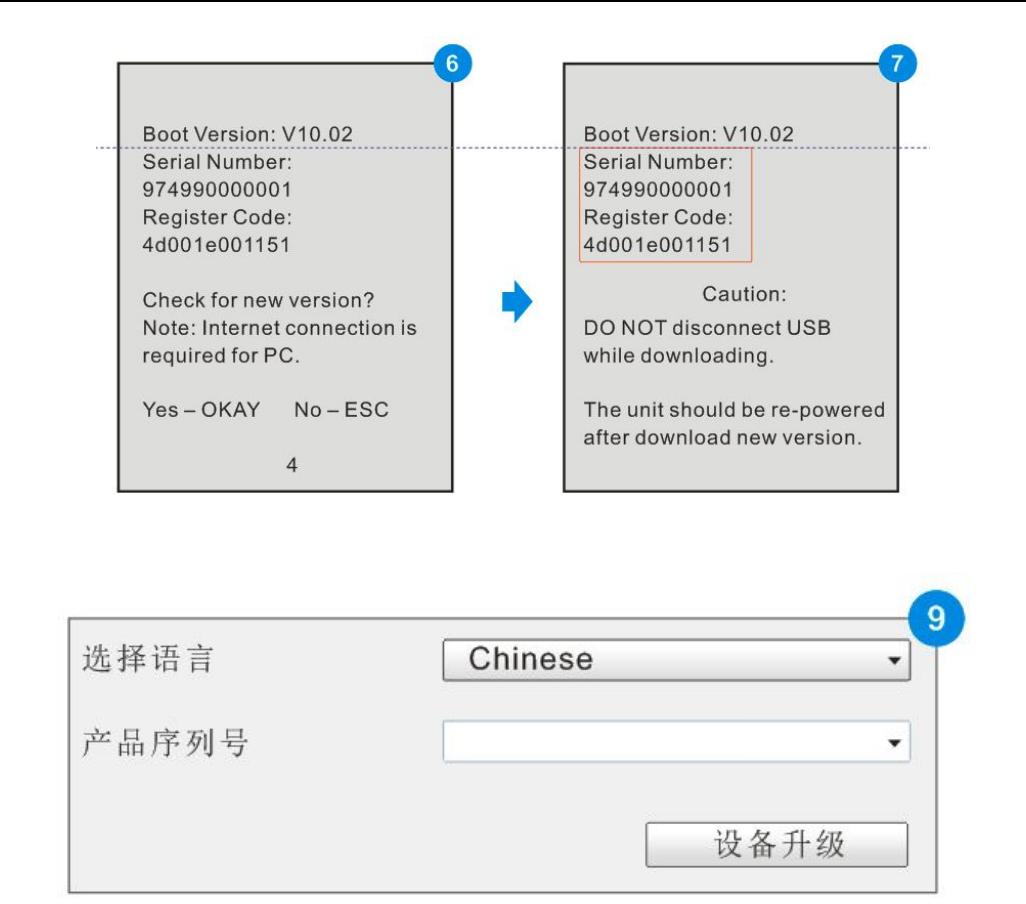
2. If a new version has been found, the screen will display as shown in the Picture 6.
3. Click [OK] button to set the device as USB device, see Picture 7.
LAUNCH Creader 971 User’s Manual
19
(Note: The serial number and registration code displayed in this picture are the ones required in Step 4-6.)
4. Start the upgrade tool, screen displays as shown in the Picture 9.
5. Input the product serial number, click [Device Upgrade] to enter the registration page. Input the email
address and registration code, then click [OK] to enter the upgrade page.
6. Select the item to be updated or click "All", then click [Download] to download.
7. After above steps, restart the device. The system will prompt an upgrade dialog box, click [OK] to upgrade.
8. Registration and upgrade steps are complete. The device can be used now.

LAUNCH Creader 971 User’s Manual
20
Warranty
This warranty applies only to users and distributors who purchase LAUNCH products through normal procedures.
LAUNCH electronic products are warranted against defects in material and workmanship for one year from date of delivery to the
user. This warranty does not cover device or parts damage due to abuse, unauthorized change, use for a purpose other than for
which it is intended, or use in a manner inconsistent with the methods described in the manual.
The above warranty can substitute any other forms of the warranty.
Purchase Order
Replaceable and optional parts can be ordered directly from LAUNCH authorized suppliers. Your order should include the
following information:
Order quantity
Part number
Part name
Customer Service Center
For any questions met during the operation, please call 4000666666.
For maintenance and repair, please send the device back to LAUNCH with a copy of the purchase invoice and a note describing
the problem. If the device is determined to be in warranty, it will be repaired at no charge. If the device is determined to be out of
warranty, it will be repaired at a service charge plus return freight.
LAUNCH address:
Customer Service Center, Launch Tech. Co., Ltd, Launch Industrial Park, North of Wuhe Avenue, Banxuegang, Longgang District,
Shenzhen, 518129, P.R.China
FCC Statement
15.19
1. This device complies with Part 15 of the FCC Rules. Operation is subject to the following two
conditions:
(1) This device may not cause harmful interference.
(2) This device must accept any interference received, including interference that may cause
undesired operation.
15.21
Note: The grantee is not responsible for any changes or modifications not expressly approved by
the party responsible for compliance. Such modifications could void the user’s authority to operate
the equipment.
15.105(b)
NOTE: This equipment has been tested and found to comply with the limits for a Class B digital
device, pursuant to part 15 of the FCC Rules. These limits are designed to provide reasonable
protection against harmful interference in a residential installation.
This equipment generates uses and can radiate radio frequency energy and, if not installed and
used in accordance with the instructions, may cause harmful interference to radio communications.
However, there is no guarantee that interference will not occur in a particular installation. If this
equipment does cause harmful interference to radio or television reception, which can be
determined by turning the equipment off and on, the user is encouraged to try to correct the
interference by one or more of the following measures:
- Reorient or relocate the receiving antenna.
- Increase the separation between the equipment and receiver.
-Connect the equipment into an outlet on a circuit different from that to which the receiver is
connected.
-Consult the dealer or an experienced radio/TV technician for help