Leadtek Research 8A10 Portable Videophone User Manual manual indd
Leadtek Research Inc Portable Videophone manual indd
User Manual
MVP User’s Guide
mobile video phone
Congratulations!
Your new Mobile Video Phone (MVP) from
Hands On Video Relay Services will bring you
into a totally different world – one of increased
flexibility and freedom.
The MVP, the most portable and state-of-the-art
videophone anywhere, allows you to take conversations
with the hearing world anywhere there is an internet
connection. It is also the first videophone designed by
deaf people. We’ve put
a lot of thought in this product, and it shows.
The MVP allows you to make calls involving
face-to-face conversation with ease – you’ll feel
life was much harder without it.
i
Do the Following:
Take it With You
With a wireless router, you can make or receive VRS
and point-to-point calls wherever you choose: in any
room in your home, your office, or wherever you travel.
The MVP’s built-in touch screen and battery make truly
portable video calls quick and easy.
Stay at Home
The MVP also works great as a TV set-top videophone.
Plug it into any TV and make your calls from your living
or hotel room.
Wired or Wireless
Connect over an ethernet broadband connection or
wherever you have wireless access. Why be tied down?
Meetings Made Simple
Have an ASL conversation with up to eight other people
at once! MVP makes it easy to set up multi-point
conferencing.
Video Messages Find You
When it’s not convenient to take a call, callers to your
Purple Number can leave a Purple mail messages. Your
messages can be accessed with a tap on the touch
screen, or through the web on your Purple account.
ii
Easy (and Fun) To Use
The MVP’s built-in touch screen makes calling anyone
a snap. Make calls, add contacts with the touch screen
keyboard, or set up a conference call. Only MVP lets
you tap your way to fast, mobile communication in ASL.
Made For The Road
The MVP’s built-in Smart Dialing feature and Address
Book lets you keep all your contacts handy and easily
dial any number (voice phone number, IP address, or
DNS number). You’re just one touch-screen tap away
from your friends, family and business associates.
Mobile VCO Inside
Want to use your voice for calls? The MVP has voice
carry over (VCO) audio capability so you can choose to
use your voice when making or receiving calls.
Interoperability
The MVP is interoperable with other videophone
devices. The MVP’s smart dial field makes it easy for
you: you can enter a Purple Number, IP number, or DNS
address and tap on “dial”.
Thank you for choosing Hands On Video Relay Services.
We know you’ll enjoy the MVP!
iii
Table of Contents (Pages To Be Determined)
1.0 Setting Up
1. 1 Requirements and Contents
1.1.1 Internet Connection Requirements
1.1.2 Package Contents
1.2 Choosing a Location for the MVP
1.2.1 Common home bases for the MVP
1.3 Charging and turning the MVP on
1.3.1 Powering and/or Charging the MVP
1.3.2 Sleep Mode
1.3.3 Removing and Inserting the MVP into its cradle
1.3.4 Turning the MVP on
1.3.5 Turning the MVP off
1.4 Connecting the MVP
1.4.1 Connecting the MVP to the Internet
1.4.2 Installing a Router
1.4.3 Connect the MVP to your router
1.4.4 Internet Setup
1.5 Activating your MVP
1.5.1 Activating your Purple account
1.6 Getting to Know the MVP
1.6.1 The MVP unit
1.6.2 The Cradle
1.6.2.1 Functions of the Cradle
1.6.2.2 More about the Cradle
1.6.2.3 Cradle Settings
iv
1.7 Navigating and Entering Information
1.7.1 The touch screen
1.7.2 The navigational toggle
1.7.3 The remote control
1.7.3.1 Numeric buttons on the remote
1.7.3.2 Five-way navigation keypad
1.7.3.3 Installation and removal of the batteries
1.7.4 Touch Keyboard
1.7.5 Types of inputs
2.0 Using the MVP
2.1 Login screen
2.1.1 Signing up for an username
2.1.2 Logging in
2.1.3 The “Remember me” checkbox
2.1.4 The “Remember my password” checkbox
2.1.5 Auto login
2.1.6 Customer Care Button
2.1.7 Logging out
2.2 The Home Screen (Diagram)
2.3 Settings Tab
2.3.1 General settings tab
2.3.2 Video settings:
2.3.3 Personal settings tab
2.3.4 Device Settings tab
2.3.5 Network
2.3.6 Purple List Settings
v
2.4 Making and Receiving Calls
2.4.1 Dialing
2.4.2 The Smart Dial Box
2.4.3 Making VRS Calls
2.4.4 Making P2P Calls
2.5 The Call Screen
2.5.1 Changing the settings during a call
2.6 Receiving a call
2.6.1 Customizing ringtones
3.0 Speed Dial, the Call Log, and the Address Book
3.1 The Speed Dial page
3.1.1 Adding a new contact or replacing an existing
contact to the Speed Dial list
3.1.2 Making a call using Speed Dial
3.2. Call Log Screen
3.2.1 Tabs and symbols on the Call Log Screen
3.2.2 To delete a single call log entry
3.2.3 To add a number from the call log to your
address book
3.2.4 Making and reviewing calls through the call log
3.3 Address Book
3.3.1 Navigating the Address Book
3.3.2 Adding contacts and contact information
3.3.3 Contact pages
3.3.4 Editing contact information
vi
3.3.5 Deleting a single phone number on a personal
profile
3.3.6 Deleting contacts
3.3.7 Searching for a contact
3.3.8 Groups
3.3.8.1 Adding Groups
3.3.8.2 Adding Contacts to Groups
3.3.9 Making a call through the address book
4.0 Purple Mail, your Purple account, and Video
Meetings
4.1 Purple Mail
4.1.1 Leaving a video mail message
4.1.2 Checking your Purple Mail messages
4.2 Integration with Purple Acccount
4.3 Video Meetings
4.3.1 About Video Meetings
4.3.2 To host a Video Meeting Call
4.3.3 To join a Video Meeting Call
4.4 Battery removal/installation
4.5 Add-ons
vii
1.0 Setting Up
1.1.1 Internet Connection Requirements:
A high speed Internet connection (Cable Modem
or DSL connection) with an internet router, and/or
a wireless connection is required for using the MVP.
You may access wireless hotspots at places like the
library or the local coffee house.
The internet speed may vary from location to location.
For best picture quality, a minimum 256kbps upload
speed works best for videophone calls.
You may also install a wireless router at home so
you can use the MVP from any room in your house.
For installation help, please contact the Hands On VRS
customer care department.
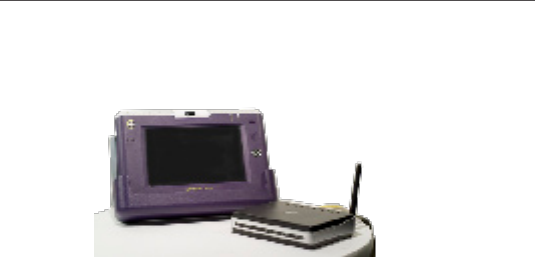
1.1.2 Package Contents
1. MVP
2. Cradle
3. Power cord
4. Battery pack
5. Ethernet/ Network cable
6.User Manuals
1
1.1 Requirements and Contents

1.0 Setting Up
The MVP is portable and wireless, but it helps to
choose a home base for the MVP.
1.2.1 Common home bases for the MVP:
• Near an internet router and/or an electrical source.
2
1.2 Choosing a Location for the MVP
The MVP and its cradle both have ports for an
ethernet cord that allows it to connect directly
to the internet. The MVP also has wireless
capability. Because wireless coverage decreases
the further the MVP gets from the wireless router,
it is best to set up the internet router in a central
location in your home or office for maximum
roaming range.
The MVP may be charged through its cradle
or directly. It is important to charge the MVP
frequently, so that it has longer battery life when
it is used outside of the cradle.
•
•

• On top of a television
• In a well-lit area
The MVP cradle has RCA jacks that allow the
signal to be viewed on a television screen.
The cradle may be placed atop the television,
and the MVP may be taken out of the cradle to
use in any area of the home or office.
Because it is important for the caller to see your
signing and facial expressions, the MVP should
be positioned so that it captures the caller in
a good light. Avoid locations where the light
source is directly above you or behind you. A
location where the light shines on your hands and
face works best.
1.0 Setting Up
3
•
•
The MVP runs on battery power. The battery life
is approximately 90 minutes long when in use,
or 6 hours in standby. For this reason, it is best to
leave the MVP in its cradle when it is not in use.
•
1.0 Setting Up
1.3.1 Powering and/or Charging the MVP
1. Plug the power cord into an electrical outlet.
2. Plug the power connector of the Power Block
into the 12V port on the back of the MVP.
4
1.3 Charing and Turning the MVP on
1.0 Setting Up
5
1.3.2 Sleep Mode
The sleep mode will initiate after five minutes
of inactive use. Pressing the touch screen or any key
on the remote will reactivate the display.
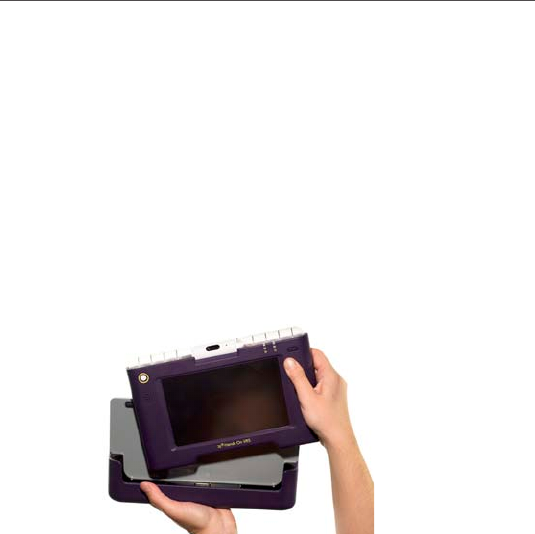
1.3.3 Removing and Inserting the MVP into its cradle
1. To remove the MVP, gently pull on the unit
and separate it from the cradle.
2. To insert the MVP into the cradle, make sure that
the MVP is face-up and that the cradle’s port is fully
inserted into the MVP. If it is not fully inserted, the
MVP’s battery will not charge.
The screen display indicates the battery status
in the upper right corner with the battery icon.
When the MVP is fully charged, the battery will
appear full. When there is one bar or zero bars
left on the battery, it is time to recharge the MVP.
•
1.0 Setting Up
1.3.4 Turning the MVP on
1. Click on the power button (key on the top right)
for two seconds to turn the device on.
2. The MVP will take a few seconds to load.
3. Do not do anything until the login screen appears.
• If a problem is identied on screen,
contact HOVRS Customer Care.
1.3.5 Turning the MVP off
To turn the device off, click and hold the power button
for two seconds.
6
1.0 Setting Up
7
1.4.1 Connecting the MVP to the Internet
Diagrams of Connection possibilities:
Cable Modem- Router- MVP cradle
Cable Modem- Wireless Router- MVP unit
Cable Modem- Wireless Router- MVP cradle
Cable Modem- Router- Television (RCA cables)- Phone
(RJ-11) Jack
1.4 Connecting the MVP

1.0 Setting Up
The MVP works only with a high-speed internet
connection (such as Ethernet or DSL). For more
information about acquiring a high-speed internet
connection for your home or office, contact your local
telephone or Cable Company.
For more help with installing an internet connection
with your MVP, contact the Hands On VRS Customer
Care department. To contact Customer Care, email
help@hovrs.com, dial help.hovrs.tv through your
videophone or MVP, call Voice (877) 885- 3172,
or call TTY at (877) 885-4976.
1.4.2 Installing a Router
Install your router in accordance with its documentation.
Ensure your broadband connection is working through
your router by connecting an ethernet cord from the
router to your MVP. If the orange LED light lights up on
the MVP, your internet is working.
For the MVP to work wirelessly, your router must be a
wireless router. The MVP supports the 802.11a, 802.11b,
and 802.11g standards.
8
1.4.3 Connect the MVP to your router
Plug one end of the Ethernet cable into the router,
and one end into the back of the MVP (see diagram)
or into the back of the cradle.
1.0 Setting Up
9
1.0 Setting Up
10
1.4.4 Internet Setup
The MVP will search for an Ethernet connection first.
If there is no Ethernet connection, it will search for a
wireless connection.
A window will ask if you wish to proceed with a
wireless connection. If the wireless connection
is password protected, you will have to provide a
password. To learn more about inputting a password
on the MVP touch keyboard or on the remote,
go to page < >.
When the MVP detects an internet connection, the
Orange LED light will turn on, indicating that there is
an active network connection. The network icon will
appear in the upper right hand corner of the screen.
If you have difficulty making the MVP detect
the internet connection, contact Hands On VRS
Customer Care.
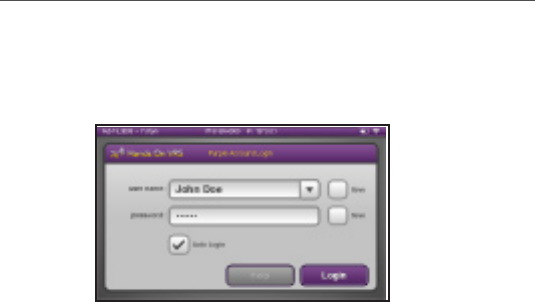
The first thing you’ll see when turning on the MVP
is the login screen.
You must have a Purple account to use the MVP.
If you have received a MVP through Hands On VRS,
you already have a Purple account.
Enter your username and password into the screen.
To learn more about how to input information into
the text fields, go to < >.
After you’ve logged in, the start-up sequence
will begin.
1.5.1 Activating your Purple account
1.0 Setting Up
11
1.5 Activating your MVP
1.
2.
3.
4.
1.0 Setting Up
12
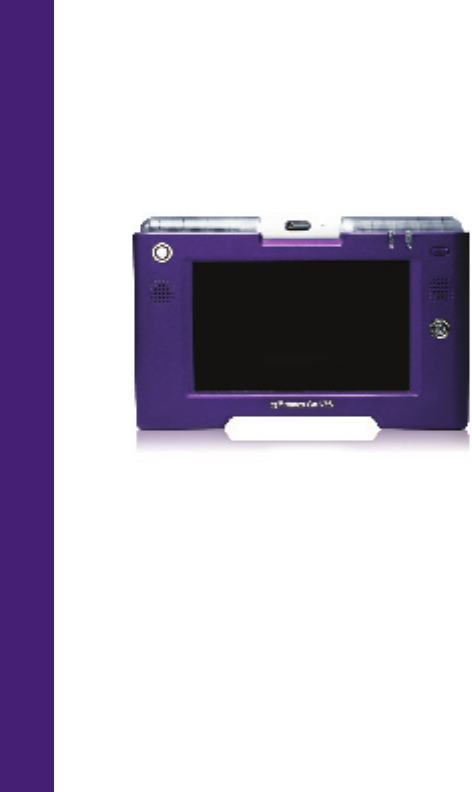
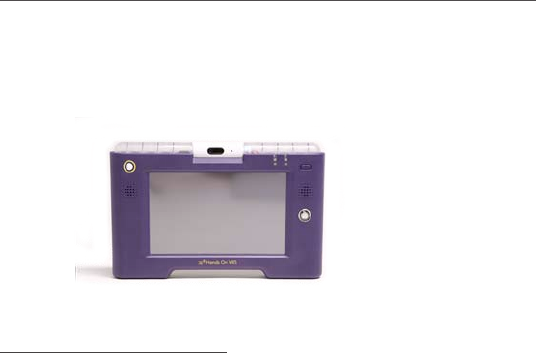
1.6.1 The MVP unit
THE FRONT OF THE UNIT:
External Buttons
1. Home Button (top left):
This button takes the MVP to the home
screen anytime.
2. Power button (top right):
This button turns the unit on and off.
1.6 Getting to know your MVP

Inputs to the MVP:
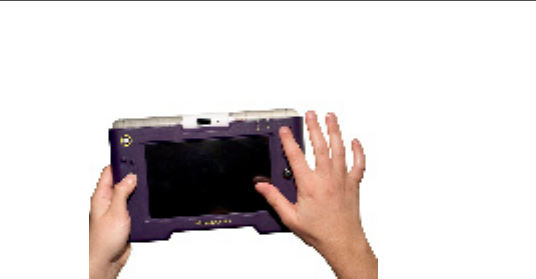
1. Touch Screen
The touch screen allows you to input directly
into the MVP when holding the product.
A single tap on the screen will “click” a
button or the touch keypad.
2. Navigational Toggle (at the middle right of the MVP)
The toggle functions much like a pointer
or a mouse. It can navigate from field to
field. It can navigate in five ways: up, down,
left, right, and press-down (pressing directly
onto the toggle). Pressing down on the
toggle will select a field or button.
3. Remote control
If you are using the MVP as a set top
videophone atop your television, the remote
is useful for navigating from your couch.
1.0 Setting Up
13

1.0 Setting Up
14
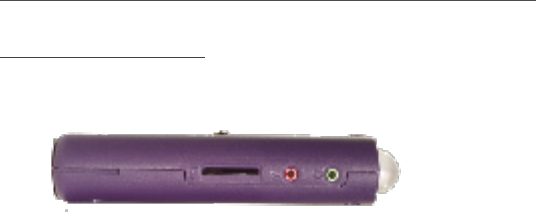
Elements:
1. Light notification ringer
The top of the MVP flashes whenever it
receives a call. You can assign up to nine
ringtones to callers in your Address Book so
you may know who is calling based on the ring
pattern. Ringing calls will terminate after 30
seconds of flashing.
2. Speaker
The output audio is transmitted through
the speaker. The speaker volume may be
customized through the settings menu.
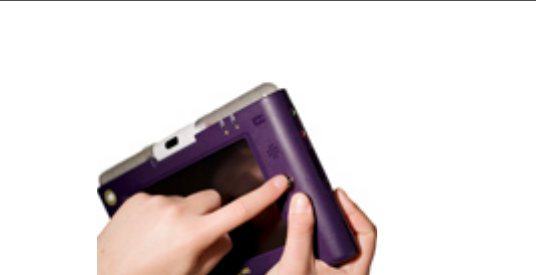
3. Digital Camera
The camera may be tilted at a 135 degree
radius, which is adjusted by holding the camera
with the forefinger and thumb and rotating
it up or down to customize the position.
It may be necessary to adjust the position
when moving it from cradle position to stand-
alone position, and to portable positions.

1.0 Setting Up
15
4. Light indicators
Power LED (indicated by a power on-off symbol):
If the light indicates the following:
• Green – The power is on
• Flashing green – The battery is being
recharged
• Red – The battery level is low
• Off – The unit is off
Service LED (indicated by a check within a circle):
• Orange – Working internet connection
• Blue – The unit is connected to the
Hands On VRS Service.
• Off – The unit is not connected to the
Hands On VRS Service.
There must be a Purple Account activated in order to
make the MVP connect to the internet.

1.0 Setting Up
16
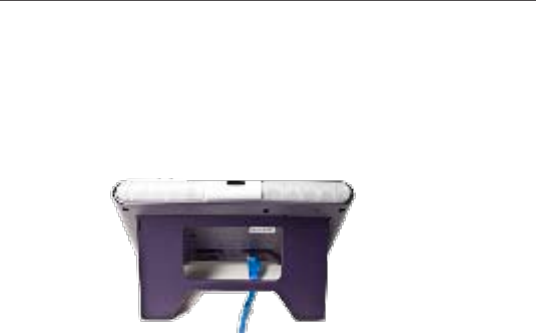
THE REAR OF THE UNIT:
Connection Ports
1. Ethernet port
Insert a RJ-11 cord into the jack to connect
the unit directly to the internet.
2. Stand
Gently ease the bottom of the stand to extend
the stand to a 45-degree angle so the MVP
may stand on its own.

1.0 Setting Up
17
3. Internal Battery
The internal battery will support two hours
of live video streaming. The battery will also
support six hours of stand by.
When the battery has 15 minutes of video
session or 1 hour of stand by remaining,
the red (power LED light) indicator light will
flash prompting the user that they need to
connect to an external power supply or
recharge the battery. When the AC adapter
is connected to the device, the battery
automatically starts recharging.
4. 12 Volt input
Insert the 12-volt cord into the input
to recharge the MVP. The 12-volt cord
may also be used to power the MVP through
the cradle.
1.0 Setting Up
18
THE SIDE OF THE UNIT:
1. Flash card slot
A SDM card slot can be used to add memory
or input to the MVP device.
2. Headphone/ Microphone connector
Compatible with most standard headphone
and microphone units.
3. USB connector
May be used with USB keyboards
or USB-based EVDO networking devices.
1.0 Setting Up
19
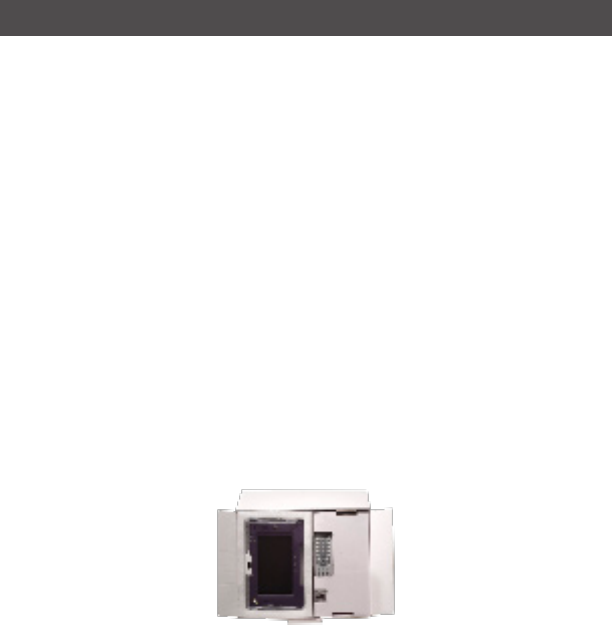
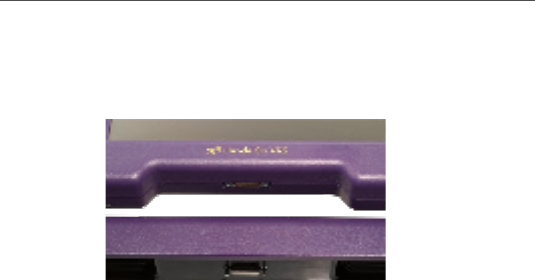
1.6.2 The Cradle
Getting to know the cradle:
The MVP is inserted face-up (screen facing away
from the cradle) into the niche of the cradle.
There is a “male” port at the bottom of the niche.
The MVP is inserted so that the port on the cradle
matches up with the “female” port on the MVP.
1. Port
If the 12-volt cord is connected to the cradle,
the MVP may recharge through this port.
The port also transmits internet, RCA/AV
connector, and telephone signals to the MVP.

1.0 Setting Up
20
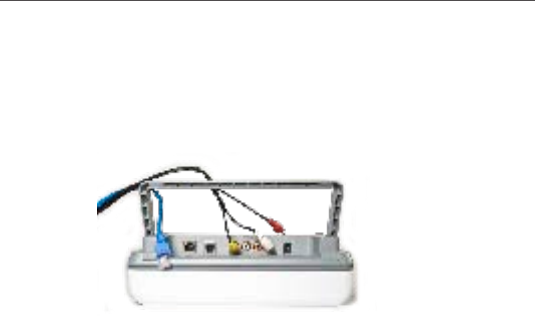
THE REAR OF THE CRADLE:
1. RCA/AV connectors
Used to connect to the Audio/Video Input/
Output Jacks on a television.
2. Ethernet port
Insert a RJ-11 cord into the jack to connect
the unit directly to the internet.
3. Telephone jack
Insert a telephone cord connected to the MVP
to connect it to home alerting light systems.
4. 12 Volt input
Insert the 12-volt cord into the input to
recharge the MVP. The 12-volt cord may also
be used to power the MVP through the cradle.
5. Stand
Gently ease the bottom of the stand to extend
the stand to a 45-degree angle so the cradle
may stand on its own.
6. Recessed hanging slots
May be used to hang the cradle from a wall.
Make sure the cradle is properly secured.

1.0 Setting Up
21
1.6.2.1 Functions of the Cradle:
The cradle is used for the following reasons:
To be able to install and remove the MVP from
a power source quickly and conveniently.
The MVP can be connected to the power
source directly as well.
To connect, via RCA cables (yellow, red, and
white) to an external unit such as a television.
To connect to the internet through the
ethernet slot. (The MVP unit may be connected
directly to the ethernet, as well).
To connect to a phone jack. The MVP will light
up if there is land lines, and will tell you if the
phone is ringing (via flashing lights).
1.6.2.2 More about the Cradle:
An ideal location for the cradle may be on top of a
television unit. The MVP unit and cradle may be placed
flat, as to take minimal space up. The camera will now
operate upside-down. To rotate the camera image, go
to the preferences menu and tap on camera settings.
If the MVP unit is inserted into a cradle, it will detect
if the cradle is connected to an external source such
as a television. If it is connected to an external source,
an input screen will appear on the MVP, asking if you
wish to switch the video to the external unit.
If a videophone call is begun while the MVP is in the
•
•
•
•

1.0 Setting Up
22
cradle and connected to the internet via an ethernet
cord, the MVP will not be able to remain connected to
the videophone conversation if it is taken out of the
cradle. The call will have to be restarted.
But if a conversation is begun while the MVP is outside
of the cradle, and the MVP is placed into the cradle in
order to power it up or recharge it, the conversation
will not be interrupted.
1.6.2.3 Cradle Settings
When the MVP connects to the cradle the following
will automatically occur:
If an ethernet connection is detected,
the wireless connection will automatically
terminate. The ethernet connection will engage
and connect to the device.
The power supply will automatically divert
from battery to AC (plug in).
If the Audio/Video input RCA jacks are connected to
the cradle, the video stream will divert from the MVP
screen to the external video source.
If the RCA jacks are not connected, the video/audio
stream will remain on the screen.
1.0 Setting Up
23
There are three main ways to navigate the MVP:
1. touch screen
2. navigational toggle
3. the remote
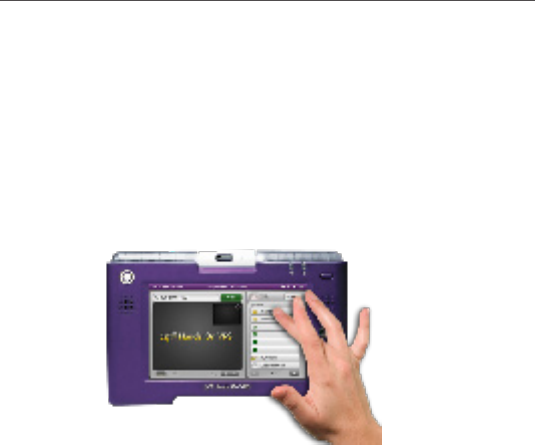
1.7.1 The touch screen
The touch screen allows you to tap input directly
into the screen. Tap input buttons as you interact
with the MVP. When you tap a text field, a keyboard
will automatically appear. Tap away from the keyboard
and the text fields to make the keyboard disappear.
You may activate the MVP from standby mode at
any time by tapping on the touch screen.
1.7 Navigating and Entering Information
1.0 Setting Up
24
1.7.2 The navigational toggle
The toggle functions much like a pointer or a mouse.
The navigational toggle can navigate the pointer from
field to field.
It can navigate in five ways: up, down, left, right, and
clicking (pressing directly onto the toggle).
Clicking on the toggle will select a field or button.
Clicking on a text field will make the screen keyboard
appear.
You may select letters from the keys by navigating the
pointer among the letters with the toggle and clicking
on it to select a single letter.
You may activate the MVP from standby mode anytime
by clicking on the toggle.
1.0 Setting Up
25
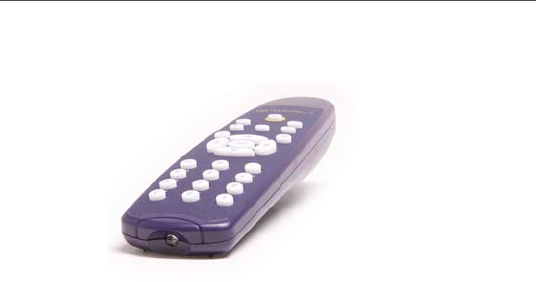
1.7.3 The remote control
You may control the MVP from a distance with the
remote. Usually, the top-most option on a screen
is selected by default.
You can highlight any of the buttons on the MVP screen
with the five-way keypad on the remote, which can
navigate in five ways: up, down, left, right, and OK
(selecting the button or the field).
Selecting a text field will make the screen
keyboard appear.
You may select letters from the keys by navigating
the pointer among the letters with the remote
and clicking “OK” to select a single letter.
You may activate the MVP from standby mode
at anytime by pressing any key on the remote.
1.0 Setting Up
26
1.7.3.1 Numeric buttons on the remote:
Use the numeric buttons to input any numbers.
Underneath the buttons are three letters, similar to that
of a phone keypad (plus CAP, space, and # on the last
row under “.”, “0”, and “@”). You can use the letters
to input any text such as dialing up a text based IP
number.
The first tap on a keypad is numeric. The second to
fourth click on a keypad is alphabetic. For instance, if
you want to type “B”, press the key “2” three times.
1.7.3.2 Five-way navigation keypad
Use the arrows to navigate between buttons on the
MVP screen. To select a button, press the “OK” button.
Zoom button
Pan button Speed Dial button
1.0 Setting Up
27
Call log button – press to access the call log
Privacy button – press to access privacy options
Audio button – press to turn the audio on or off
View button – press to change the view options
while making a videophone call.
Home button – press anytime to access the home
screen.

1.0 Setting Up
28
1.7.3.3 Installation and removal of the batteries
The remote requires two AAA batteries.
From the rear of the remote, gently lift the latch
of the battery cover and remove the batteries.
Install the batteries and replace the notch by inserting
it in the same position.
1.7.4 Touch Keyboard
The keyboard will automatically appear any time
that a text box is selected.
It functions like a regular keyboard, with alphabetic
and numeric keys.

1.0 Setting Up
29
1.7.5 Types of inputs
The MVP has three main types of input fields:
Switch buttons:
These button switches status
from one another
(eg.: On/Off).
Adjust buttons: (for example: - +)
These buttons change settings
on a sliding scale.
Text fields:
When clicked, the keyboard
automatically appears on screen.
To get out of the keyboard, simply
press elsewhere on the screen
or on the “Done” button.

30
2.0 Using the MVP
The first thing you see when you turn the MVP on for
the first time will be the Purple Account login screen.
You will be asked for your username and password.
This features enables you to keep your call log and
address book private from others. When you log in
from other MVPs, you will be able to call up your call
log and address book.
A Purple account username and password is required to
use the MVP.
If you have any questions about your username or
password, you can press the customer care button on
the login page.
Various members of the same household may have
different Purple accounts. But the MVP will only be able
to receive calls directed to the Purple account that is
logged in.
2.1.1 Signing up for an username
Go to the Hands On VRS website
at www.hovrs.com/purple.
Click on the “New User” link, and follow the steps
to register.
2.1 Login screen

2.0 Setting Up
31
2.1.2 Logging in
Touch the username field. This will activate the keyboard.
Enter your username by typing on the keyboard.
Touch the password field.
Touch on the [Done] button to finish. This will make
the keyboard disappear.
Click on “Login”.
2.1.3 The “Remember me” checkbox
Check the option box to have the MVP remember
your Purple name, but not your password.
2.1.4 The “Remember my password” checkbox
Check the option box to have the MVP remember
your Purple name and your password, but not to take
you directly to the login screen.
Do not keep this box checked if you want to keep
your call log and address book private from others
who may use the MVP.

32
2.0 Using the MVP
2.1.5 Auto login
If you use your MVP at home or in a private location
and do not want to log in each time you use the MVP,
click on the checkbox next to “Auto login”. Each time
you turn on the MVP, you will be taken directly to the
main page. Do not keep this box checked if you want
to keep your call log and address book private from
others who may use the MVP.
2.1.6 Customer Care Button
If you have difficulty or trouble
logging in and you have a working
internet connection, tapping this
button will take you directly to a
videophone connection with one of
our Customer Care Representatives,
who will be able to help you with your
login issues.
2.1.7 Logging out
When you want to log out or to switch to another user
account, click on the Log out button on top of the main
screen at any time. This button will take you to the
login page, where another username and password
2.0 Setting Up

The home screen is the first screen that appears after
logging in.
THE TOP ROW
1.
2.0 Setting Up
33
2.2 The Home Screen
The home button
Visible from every screen in the MVP,
this takes you back to the main page.
If there is a live video session and
you press the home button, the video
session will terminate and you will
be directed to the menu page.

34
2.0 Using the MVP
2. Time and Date display
3. IP address
This is an useful resource that allows you
to give your contact information to videophone
users as you travel from internet source to
internet source.
4. The missed call icon
This tells you how many missed calls you have.
To view the missed calls, click on the icon
through to the missed call window.
5. Purple number
This is the purple number associated
with the account that you are using.
6. Purple mail button
Tap this button to view the
Purple mail video messages
that have been left. This icon
also indicates how many Purple
mail messages you have.
7. Missed call button
This button tells you how many
missed calls you have. To view
the missed calls, tap on the
icon to go to the missed calls
tab in the call log.
2.0 Setting Up

2.0 Setting Up
35
8. Battery icon
This icon indicates how much battery power
the unit has left.
9. Internet coverage indicator icon
This icon indicates the strength of the internet
connection. The weaker the connection,
the more likely the video signal will become
interrupted or fuzzy.
10. Return button
Tap this button to return to
the home screen at any time
from the various screens of
the MVP.
CALL FUNCTIONS
1. Smart Dial Box
This is an all-in-one field. As you input
information about the person you wish to call,
it will recognize whether the number you input
is a VRS call, a Purple number, IP number,
or DNS. You may also enter partial or full
names of people from your address book,
and a pop-up screen will appear beneath the
box, allowing you to select the desired contact.

36
2.0 Using the MVP
2. Video Screen
The video screen will go blank when it is not
in use. In order to turn the camera on to test
your location, tap on the “Camera” button
near the lower right.
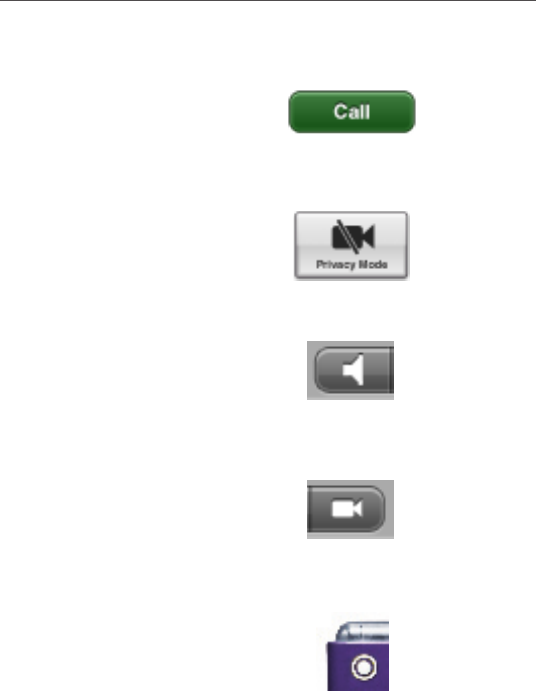
3. Call Button
After you have entered
a phone number, Purple
number, IP address, or
contact name in the smart
dial, tap this field.
THE FUNCTION BUTTONS AT THE LOWER RIGHT
1. Address Book
Tap to access the address book.
2. Call Log
Tap to access the call log.
3. Purple Mail
Tap to access your Purple mail video messages.
4. Speed Dial
Tap to access the speed dial screen.
2.0 Setting Up

2.0 Setting Up
37
5. Video Meeting
Tap to access multi-point
conferencing features.
6. Settings
Tap to access the settings menu.
7. Audio Settings
To adjust the volume, tap on the button,
then click on the left and right arrows on
the pop-up screen in order to decrease
or increase the volume.
8. Camera
Turns the camera on or off. This is useful
when you want to test your position
or lighting conditions.
9. Log out
Tap out to log out of your Purple account.

38
2.0 Using the MVP
2.3.1 General settings tab
1. Outbound video mail
(no information given)
2. Inbound video mail
This feature allows you to be notified via email
of any Purple Mail messages that have arrived
onto your MVP.
To edit your personal information, tap on the
field to select it. An “edit” button will appear.
Tap the edit button, and the input screen
will appear. Input your phone number into
the email address in the mail field.
2.0 Setting Up
2.3 Settings Tab

2.0 Setting Up
39
3. Inbound call notification
This feature allows you to be notified via email
of any incoming calls that have arrived onto
your MVP.
To edit your personal information, tap on the
field to select it. An “edit” button will appear.
Tap the edit button, and the input screen will
appear. Input your phone number into the
email address in the mail field.
4. HOVRS Account:
Voice to video (V2V):

40
2.0 Using the MVP
2.3.2 Video settings:
Your MVP comes with auto video settings preset.
If you wish to modify it, tap on the button to change
it to manual.
At the manual prompt, you will be able to modify
settings.
1. Brightness:
This option controls the brightness of the video
picture on the MVP. The brighter it is, the
quicker the battery life will run out. To increase
the brightness, tap “+” next to the sliding scale
or “-” to decrease the brightness.
2.0 Setting Up

2.0 Setting Up
41
2. Saturation
This option controls the brightness of the
colors on the video output. To increase the
saturation, tap “+” next to the sliding scale
or “-” to decrease the saturation.
3. Contrast:
This option controls the difference between
dark and light colors on the video output.
To increase the contrast, tap “+” next to the
sliding scale or “-” to decrease the contrast.
2.3.3 Personal settings tab:
1. General Info
Tap on the field to edit your general
information settings.

42
2.0 Using the MVP
2. Self-view placement:
You may change the self-view placement within
the video window during a call. Or, you may
change it here. The default self view is in the
upper right corner. To change the default view,
tap on “edit”.
You will see the following screen with four
options: Self-view in upper left corner, upper
right corner, bottom right corner, or bottom
left corner. Select the option you prefer,
then tap on the return tab in the upper
right corner.
3. Video privacy:
You may alter your video privacy settings
during a call. Or, you may change it here.
You can set the camera not to turn on the
next time you receive a call. To turn video
privacy, tap on “Turn on” next to the field.
To turn video privacy off so the caller can
view you during a call, tap on “Turn off”
next to the field.
4. Audio privacy:
You can set the microphone not to record
during a call. To turn audio privacy, tap on
the “Turn on” next to the field. To turn audio
privacy off so you can use the microphone
during a call again, tap on “Turn off” next
to the field.
2.0 Setting Up

2.0 Setting Up
43
2.3.4 Device Settings tab:
1. MAC address:
Your MVP has an unique MAC address.
This field is locked.
2. Time Zone:
You may set the time zone on your MVP to
determine the time on the MVP. There are four
options: Pacific, Mountain, Central, and
Eastern. Tap on the Time Zone button, and tap
on the left arrow to move the time zone
westward. Tap on the right arrow to move
the time zone westward. When you have made
your selection, tap on “OK”.
3. Screen Flash:
(Brent: TBD)

44
2.0 Using the MVP
4. Microphone Volume:
To set the microphone volume, tap on the
microphone button. To decrease the volume,
tap the left arrow until you reach the desired
level. To increase the volume, tap the right
arrow until you reach the desired level.
5. Speaker Volume:
To set the speaker volume, tap on the speaker
button. To decrease the volume, tap the left
arrow until you reach the desired level.
To increase the volume, tap the right arrow
until you reach the desired level.
2.3.5 Network
Network Settings tab
2.0 Setting Up

2.0 Setting Up
45
These settings should be modified only if there
is trouble connecting the MVP to the internet.
If you have no past experience modifying these
settings, you might want to contact the Hands On VRS
Customer Care service.
1. Connection Type:
The three options are: DHCP, Fixed IP, PPPoE.
• DHCP
DHCP is the default connection type.
• Fixed IP
If your router doesn’t support static
DCHP, you will have to set the MVP
to use a static IP address. Select the
Fixed IP option. You will need to enter
your Subnet Mask, Default Gateway,
and DNS Servers.
•PPoE
PPoE is used by most DSL providers,
and requires a username and
password. This information may
be received by the DSL provider.
Enter the username and password
to set PPoE up.
2. IP address/ Subnet mask/ Default Gateway:
These are text edit boxes. Tap on them
once change the settings.

46
2.0 Using the MVP
3. Primary DNS/ Secondary DNS:
These are text edit boxes. Tap on them once
to change the settings.
4. Upload and download speed tabs:
2.0 Setting Up
The MVP is designed to work in as many
home and office networks as possible.
If your network contains additional devices
(computers, gaming systems, etc.), you may
need to make certain adjustments to the
upload and download speed settings on the
MVP.
For example, if you are using the internet
to play games during a call on the MVP, the
person you are calling may experience poor
video quality, as you no longer have the
upstream bandwidth required to generate a
clear, crisp picture on the MVP. You may adjust
your bandwidth to accommodate the upload
speeds.
The default upload speed is 64 kbps.
You may change it to 128, 256, or 512 kbps.
Lower speeds will result in decreased picture
quality, but the images will not be as choppy.

2.0 Setting Up
47
The default download speed is 64 kbps. You
may change it to 128, 256, or 384 kbps.
The MVP also has an auto set function that will
detect the best possible upload and download
speeds for your home network.
5. Public IP
You may use the Auto Detect setting
to determine your Public IP, or you may modify
it for compatibility with your DHCP settings.
To change the Public IP, tap on the box to
switch it to DHCP. A text input box will appear.
Tap on the box to edit the Public IP address.
6. Wireless Connection Settings
There are various wireless standards.
The MVP is designed to detect the wireless
connection with the strongest signal. It has
an auto-detect function.
However, you may also select specific wireless
standards to use the MVP with (802.11a,
802.11b, or 802.11g). You may use the drop-
down fields next to “A”, “B”, and “G” to
determine the settings for each preference.

48
2.0 Using the MVP
2.3.6 Purple List Settings
The MVP stores your calling preferences for each time
you place a VRS call. This tab allows you to change
these preferences.
1. Auto Login setting
Tap to enable or disable auto login from
the login screen.
2. VRS Call language
Select your preferred language (English
or Espanol).
3. VRS Call Announcing
This button allows you to select announcing
preferences. If you would like for the operator
to announce the VRS call, tap “Yes”. If you do
not wish for the operator to announce the VRS
call, tap “No”.
2.0 Setting Up

2.0 Setting Up
49
4. VCO Number List
If you use VCO, enter the numbers you would
like the operator to call. You may enter multiple
numbers (work, home, mobile). You may also
select a default VCO number.
5. Account ID settings
Enter information using the keypad in the
following fields about your account to be
stored in your Purple account:
Account ID:
First and last name:
Purple password:
Date of Birth:
Street 1:
Street 2:
City:
State:
Time Zone:
Zip:
Email ID:
•
•
•
•
•
•
•
•
•
•
•
2.4 Making and Receiving Calls
2.4.1 Dialing
There are two different kinds of calls that can be
made from the MVP: VRS and Person to Person (P2P).
Both types of calls require an active Purple account
with a Purple number.

50
2.0 Using the MVP
2.0 Setting Up
2.4.2 The Smart Dial Box
Use the smart dial box to make all of your calls.
The smart dial box is able to differentiate between
voice numbers to be called through VRS, Purple
numbers, IP addresses, DNS numbers, and contacts in
the address book. In addition, the MVP will remember
previous numbers that you have dialed. The MVP will
attempt to auto-complete these numbers after you’ve
tapped out the first few numbers or letters.
These numbers will appear in a drop-down box beneath
the smart dial box.
To select the contact information you wish to dial,
simply tap on it and tap “Call” to start dialing.
2.4.3 Making VRS Calls
You may modify your Purple account settings
(Language, Announce VRS, and VCO) in the settings tab
or by logging onto your Purple account on the web.
Tap on the smart dial box. The keyboard will appear.
Input the voice number you wish to call into the box
using the keypad or your remote control.
Tap on the red “Call” button on the right side.
The MVP will indicate that it is dialing. During the
dial screen, you may tap “cancel” at any time.

2.0 Setting Up
51
The Purple database will determine that it is a voice
number (not a Purple number) and a Hands On VRS
Video Interpreter will appear on the MVP screen.
The call will proceed.
To end the call, tap on “Hang Up”.
2.4.4 Making P2P Calls
P2P Calls may be made by entering a 10-digit Purple
Number, a numeric IP, or a DNS number into the smart
dial box.
Tap on the keyboard activation icon to make the
keyboard appear.
Input the Purple number, address, or DNS you wish
to call with the keyboard or your remote control.
The text will appear in the entry box.
Tap on the red “Call” button on the right side.
The MVP will indicate that it is dialing. During the
dial screen, you may tap “cancel” at any time.
The Purple database will determine which type of
information (Purple Number, a numeric IP, or DNS
number) you have just dialed and begin calling.
The call will proceed.
To end the call, tap on “Hang Up”.

52
2.0 Using the MVP
2.0 Setting Up
2.5 The Call Screen
2.5.1 Changing the settings during a call
1. Privacy
To turn on audio and video privacy on during
a conversation, simply tap the lock symbol
on the right keypad. To turn off audio
and video privacy, tap on the button again.
2. Views
From the call screen, you will be able
to change the view mode.

2.0 Setting Up
53
3. Self-View Position (button on bottom left)
Tap on the “View button” to change the settings
of the view. The button will cycle between
the subsequent views.
Mode 1: Self-view at top right corner.
Mode 2: Self view moves to bottom-right corner.
Mode 3: Self view moves to the bottom-left corner.
Mode 4: Self view moves to the top-left corner.
Mode 5: Self view disappears. You will only see
the remote view.
Mode 6: Remote view disappears. You will only see
your own view.
4. Self-View Screen Size (button on bottom right)
This button controls the self-view size.
There are three settings (small, medium,
and large). Tap on the button until you reach
your desired size.
•
•
•
•
•
•

54
2.0 Using the MVP
2.0 Setting Up
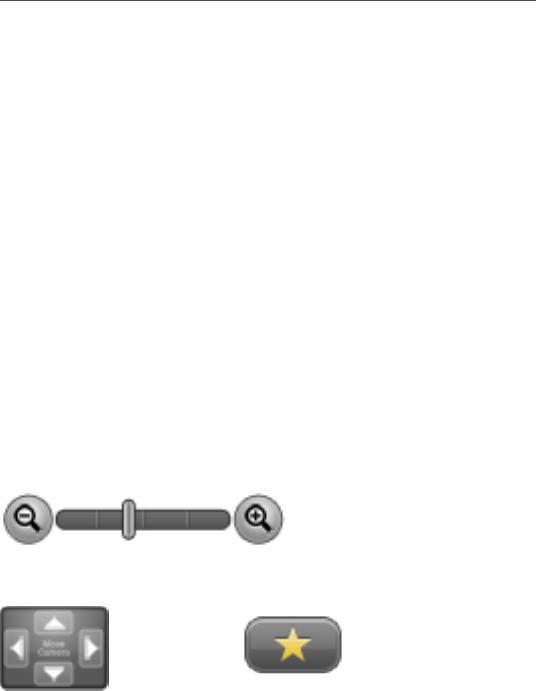
5. Pan and Zoom feature
Tap on the pan and zoom button. You will see
a full-screen icon with two settings: the pan
setting and the zoom setting.
The pan setting has up, down, left, and right
arrows. Tap on any of the arrow buttons to
control the direction of the camera.
The zoom setting has left and right arrows.
To zoom in closer, tap on the “+” button.
To zoom out, tap on the “-” button.
6. Volume button
At any time during a
conversation, you can
adjust the audio levels by
tapping on the volume button.
A pop-up screen will appear. To increase
the volume, tap on the “+” button.
To zoom out, tap on the “-“ button.
7. To return to the original screen
Click on the “Return” button in the top right
corner anytime to return to the home screen.

2.0 Setting Up
55
2.6 Receiving a call
1. When you receive a call, the MVP will flash its lights.
2. Tap on “answer” to pick up the call.
3. Tap on “decline” to reject the call.
4. If you reject the call or if the call is missed, the caller
will be redirected to the Purple Mail. The caller may
choose or choose not to leave a message with your
Purple Mail.

56
2.0 Using the MVP
2.0 Setting Up
2.6.1 Customizing ringtones
The flashing lights will light up in nine specific ringtone
patterns. You may assign specific ringtones to the
people on your speed dial list. This way, you will be
able to know who is calling just by looking at the
flashing lights.
To customize the ringtones: (missing info)

57
3.1 Speed Dial, the Call Log, and the Address Book
The speed dial page is accessed by tapping the
Speed Dial button from the home screen.
Hands On Video Relay Services, Customer care,
and 911 are default buttons on the speed dial page.
You may add up to 10 new contacts.
3.1.1 Adding a new contact or replacing an existing
contact to the Speed Dial list
1. To add a contact to the Speed Dial page, tap on
“Edit” in the upper right corner.
2. Click on an empty entry or entry that you wish
to change on the speed dial page.
3. You will be taken to the address book. Select
the contact to be assigned to the speed dial list.
4. Select the specific phone number to be added to list.
3.0 Speed Dial, the Call Log, and the Address Book

58
2.0 Using the MVP
3.0 Speed Dial, the Call Log, and the Address Book
3.1.2 Making a call using Speed Dial:
From the home screen, tap on the Speed Dial box.
This will take you to the Speed Dial page.
Tap on the contact that you wish to dial.
It only takes one click.
The contact will be dialed automatically.
To cancel the call, tap on “Cancel” in the bottom
right corner of the screen.
3.2. Call Log Screen
(missing info)

59
3.2.1 Tabs and symbols on the Call Log Screen
The Call log screen has three tabs:
All, Received Calls, and Dialed Calls.
1. All: Previous calls that you have received
and called using the MVP.
2. Received Calls: Calls that the MVP received.
3. Dialed Calls: Previous calls that you have
made using the MVP.
The Calls are logged with icons on the left side
of the screen that mean the following:
Received
Dialed
Received and connected
Received, but missed
Dialed and connected
Dialed, but failed
3.0 Speed Dial, the Call Log, and the
no mention of image placeholders?
3.0 Speed Dial, the Call Log, and the Address Book

60
2.0 Using the MVP
3.0 Speed Dial, the Call Log, and the Address Book
3.2.2 To delete a single call log entry:
From the call log page, tap on the call
entry that you wish to delete.
You will see a “call” button, a “delete” button,
and an “add to the address book” button.
Tap on the delete button. You will be asked for
confirmation. Tap on “yes” to confirm the delete.
3.2.3 To add a number from the call
log to your address book:
From the call log page, tap on the call
entry that you wish to add to your address book.
You will see a “call” button, a “delete” button,
and an “add to the address book” button.
Tap on the “add to address book” button.
You will be asked for confirmation. Tap on “yes”
to confirm the addition to the address book.
You will be taken to the phone number edit page.
You may select the phone type and change any
information before pressing the “Done” button.mation

61
3.0 Speed Dial, the Call Log, and the Address Book
Then you will be taken to the name entry page.
Enter any relevant information and then click on “Done”
to finish. You will be then taken back to the to the Call
Log page.
3.2.4 Making and reviewing calls through the call log:
Tap on the Call log box – this takes you to the Call Log.
There are three tabs: All, Received Calls, and Dialed
Numbers. You may tap on any of the tabs to find the
contact you wish to dial.
When you find the contact you want to dial,
press anywhere on the contact line. You will see three
buttons: Call, Delete, and Add to Address Book.
Tap on “Call”.

62
2.0 Using the MVP
3.0 Speed Dial, the Call Log, and the Address Book
3.3 Address Book
To view the address book at any time, tap on the
Address Book tab from the Main screen.

63
3.0 Speed Dial, the Call Log, and the Address Book
3.3.1 Navigating the Address Book:
Contacts and groups are are listed alphabetically.
To navigate to the next page of contacts, tap on the
right arrow on the bottom right of the screen. If there is
more than one page of contacts, you can also navigate
to the next page by tapping on the right arrow below
the Group window.

3.3.2 Adding contacts and contact information:
To add a contact, Tap on the “Add Contact” icon.
The First Name and Last Name fields will appear.
Tap each of the text fields to enter the first and last
names through the keyboard. Press the “Done” button
to complete this step.
The next screen will appear. Tap on “Select” to select
the type of phone number to enter: land line, cellular,
or Purple number.
Then tap on the phone number field to enter the phone
number through the keyboard, and tap on “Done”.
This will take you back to the Contact profile page.
To add another phone number, tap on “Add number”.
64
2.0 Using the MVP
3.0 Speed Dial, the Call Log, and the Address Book

65
3.0 Speed Dial, the Call Log, and the Address Book
This will take you to the same phone screen that you
saw earlier.
To add personal information, click on the “Profile” tab.
In this tab, you may enter information into the City,
State, and Zip fields.
3.3.3 Contact pages
There are two pages to a person’s profile, separated
by tabs. The “number” tab stores all of the contact
information associated with the contact. The Profile
stores location information about this contact.

3.3.4 Editing contact information:
From the home screen, tap on the Address Book
button.
Click on “Edit” in the upper right corner of the screen.
This will switch your address book into edit mode.
Tap on the contact whose information you wish to
change.
To change a phone number or a Purple number, click on
the phone number in the contact number page. You will
be taken to the edit screen. You can use the keyboard
to edit the number.
When you are finished, tap on “Done” in the upper
right corner to exit edit mode.
66
2.0 Using the MVP
3.0 Speed Dial, the Call Log, and the Address Book

67
3.0 Speed Dial, the Call Log, and the Address Book
3.3.5 Deleting a single phone number on a
personal profile:
From the home screen, tap on the Address Book
button.
From the Address Book, tap on the contact whose
information you wish to change.
From the contact page, press “Edit”.
Tap the “X” button to the right of the phone number.
You will be asked for confirmation. Click on “yes”
to delete the single entry.

3.3.6 Deleting contacts:
From the home screen, tap on the Address
Book button.
Tap on the contact you wish to delete.
Click on the Delete tab in the upper right corner
of the screen.
You will be asked for confirmation. Click on “yes”
to delete the single entry.
68
2.0 Using the MVP
3.0 Speed Dial, the Call Log, and the Address Book

69
3.0 Speed Dial, the Call Log, and the Address Book
3.3.7 Searching for a contact:
From the home screen, tap on the Address
Book button.
Enter a search term in the Keyword Search box
near the upper right corner.
You will see a list of contacts that match the search
terms that you have entered.

3.3.8 Groups:
The address book allows you to organize your contacts
into groups for easy reference. To access the group
page, tap on the group tab on the top, and the contacts
in the group will appear in the contacts window.
3.3.8.1 Adding Groups
To add a group, tap on the “Add Group” icon.
You will be asked to enter the group name.
Tap the group name out.
To get out of a group page view, tap on “All” at the top
of the group window. This will take you back to a view
with all of the contacts stored in your MVP.
70
2.0 Using the MVP
3.0 Speed Dial, the Call Log, and the Address Book

71
3.0 Speed Dial, the Call Log, and the Address Book
3.3.8.2 Adding Contacts to Groups:
Inside a group page, tap on “Edit”.
Tap on “Add”.
This will take you to the contacts page.
Add a contact you wish to add to the group.
Tap on “Add”. Add another contact you wish
to add to the group.
Repeat the process until everyone has been
selected for the group.
Tap on “Done”.

3.3.9 Making a call through the address book:
Tap the Address book icon on the right
of the main screen.
Tap on a name from the address book.
This will take you into the contact’s address book page.
Tap on the phone number within the contact page
to dial that number.
The number will be then dialed.
72
2.0 Using the MVP
3.0 Speed Dial, the Call Log, and the Address Book

If you are already in possession of a MVP and a Purple
account, you will also have received a 10-digit Purple
Number that hearing callers or MVP users can call
anytime to reach you on your MVP or VideoSign 3.0.
If you are not logged in, you will be able to receive
Purple mail messages from the 10-digit purple number;
you can check this either through your MVP or through
the internet or through your VideoSign 3.0 account.
4.1.1 Leaving a video mail message
If you call another Purple (MVP or VideoSign 3.0) user,
you will be able to leave a video mail message if the
other person does not pick up.
73
4.1 Purple Mail
4.0 Purple Mail, your Purple account, and Video Meetings

You will see a popup screen: “Leave a message?”
Select “Yes” and then wait until the screen gives
you the go-ahead.
Then leave your message by signing or speaking
directly to the camera.
When you are done, tap the “Hang up” button.
4.1.2 Checking your Purple Mail messages
Tap on the Purple Mail button.
You will see up to 10 video mail messages.
To view each message, tap on each of the messages.
74
2.0 Using the MVP
4.0 Purple Mail, your Purple Account, and Video Meetings

After viewing, you may choose to save or delete the
message.
To delete a Purple Mail message, tap on the message,
and tap on “Delete”.
• You may also check your Purple Mail messages
through the internet on your personal computer.
Go to the hyperlink: http://www.hovrs.com
Enter your username and password in the
upper right corner, and you will be taken
to your Purple page.
Click on Purple Mail to view your messages.
75
4.0 Purple Mail, your Purple Account, and Video Meetings

When you log into your Purple account on
your personal computer at http://www.hovrs.com,
you will be able to do the following:
1. Add and edit contacts in your address book.
2. Add and edit contacts in your speed dial list
3. Review your Purple mail messages.
76
2.0 Using the MVP
4.0 Purple Mail, your Purple Account, and Video Meetings
4.3 Integration with Purple Account

4.3.1 About Video Meetings:
Video meetings allow you to connect to eight other
users at once. These users may be using the MVP or
VideoSign 3.0, or connecting to your conversation
through a Video Interpreter.
You may invite others to participate in your VRS call,
or hold a conference call with up to eight users, either
hearing individuals who are connecting through VRS or
P2P (person to person users of a MVP or VideoSign 3.0).
If you are in a P2P call and wish to initiate a Video
Meeting call involving other individuals in the
conversation, you will have to end the call and select
the Video Meeting option from the home screen.
77
4.0 Purple Mail, your Purple Account, and Video Meetings
4.3 Video Meetings

When you log into your Purple account on
your personal computer at http://www.hovrs.com,
you will be able to do the following:
1. Add and edit contacts in your address book.
2. Add and edit contacts in your speed dial list
3. Review your Purple mail messages.
78
2.0 Using the MVP
4.0 Purple Mail, your Purple Account, and Video Meetings
4.3 Integration with Purple Account

4.3.1 About Video Meetings:
Video meetings allow you to connect to eight other
users at once. These users may be using the MVP or
VideoSign 3.0, or connecting to your conversation
through a Video Interpreter.
You may invite others to participate in your VRS call,
or hold a conference call with up to eight users, either
hearing individuals who are connecting through VRS or
P2P (person to person users of a MVP or VideoSign 3.0).
If you are in a P2P call and wish to initiate a Video
Meeting call involving other individuals in the
conversation, you will have to end the call and select
the Video Meeting option from the home screen.
79
4.0 Purple Mail, your Purple Account, and Video Meetings
4.3 Video Meetings

4.3.2 To host a Video Meeting Call:
The person who invites everyone is called the Host.
The rest of the conference participants will then join
in, and the Video Meeting screen will show all of the
participants.
If you are the host:
• Tap on the Video Meeting Button.
• Tap on the smart search box to invite
people from your address book
and/or new addresses.
• Once you have added all of the names to the
conversation, then tap on “Call all”.
80
2.0 Using the MVP
4.0 Purple Mail, your Purple Account, and Video Meetings

4.3.3 To join a Video Meeting Call:
Tap on “accept call.”
There is no difference between answering a Video
Meeting call or a normal call on the MVP.
81
4.0 Purple Mail, your Purple Account, and Video Meetings

82
2.0 Using the MVP
4.0 Purple Mail, your Purple Account, and Video Meetings
The MVP comes with a pre-installed battery in the back
of the unit.
To replace the battery, unplug the unit from any power
source.
Find the battery case in the rear of the MVP.
4.4 Battery removal/installation

Open the battery case with a Phillips screwdriver.
Gently remove the battery and detach the white insert
from the MVP.
Place the replacement battery within the slot
and replace the white insert in the battery slot.
Make sure that the white insert is fully inserted
into the space, and that the thread lines match up.
Once the battery is fully inserted, replace the cover
and reinsert the single screw, making sure that the
cover is secured and completely shut.
SDM (additional flash memory)
Certain applications will be available
with the MVP. The user will use the pointer
or touch screen to select the application
to download.
Compatible applications will appear on
the device. You will be required to select,
using the remote or the touch screen,
the application that you desire to download
onto the MVP.
83
4.0 Purple Mail, your Purple Account, and Video Meetings
4.5 Add-ons

84
2.0 Using the MVP
4.0 Purple Mail, your Purple Account, and Video Meetings
The USB Port
You may add thumb drives and keyboards
to the MVP device through the USB drive.
Internal light device
You can turn the flashing light notifications
on or off from the settings menu by:
Accessories
You may go to the HOVRS online store
(insert URL here) to purchase the following
accessories:
• AC power adaptor
• Cradle
• Remote Control
• Lighter AC power adaptor
• MVP case
• External Battery

Mobile Video Phone Frequently Asked Questions
How can I get a MVP?
Go to http://www.hovrs.com/mvp and learn
how you can sign up for your MVP.
How much does the MVP cost?
It is free to deaf and hard of hearing users of Video
Relay Service who sign up for the Power of 8.
Hands On VRS will also sell the MVP for hearing users.
To learn more about purchasing a MVP,
go to http://www.hovrs.com/mvp
Can Deaf or Hard of Hearing people get a free MVP?
Yes. The mission of Hands On VRS is to break down
barriers. The MVP is also available for a nominal
purchase price to hearing users or users who do not
make it through the Purple activation process.
What is the projected release date of the MVP? How
long will it take for me to receive my MVP?
The MVP is currently in its testing stage. It is expected
to become available widely in the summer. Due to the
projected high demand, it may take a few weeks to
receive the MVP.
Will I have to install the MVP myself?
No. Hands On VRS will gladly send a Outreach
representative to your residence or office to install
the MVP.
85
MVP FAQ

86
2.0 Using the MVP
Is the MVP interoperable with other
videophone devices?
Yes, it is. It uses SIP and H.323 communication
protocols that are interoperable with other videophone
devices on the market.
What kind of internet connection is required
to use the MVP?
A high-speed internet connection (broadband)
with a minimum upload speed of 256 kbps and router
is required. A wireless router, optional but not
required, will allow the MVP to make videophone
calls outside of its cradle.
How can friends and family call me through my MVP?
Hearing people and MVP users may contact you
through your Purple Number. Users of other
videophone devices may call you using your IP address.
What is the Purple Number? How can I call
other MVP users? How can hearing people call
me through my MVP?
After the registration process, you will receive a 10-digit
Purple Number with which other MVP users and hearing
people can call you. You will be able to receive both
voice and videophone calls through the Purple Number
to your MVP.
MVP FAQ

Can others call my MVP using my Sorenson VP-100 or
VP-200 telephone number?
Because your Purple Number will be a unique voice
phone number, it cannot be the same as your existing
Sorenson or Ojo phone number. For this reason, the
Purple Number cannot be the same as your Sorenson
telephone number.
Does the MVP allow more than three people
to participate in a conversation?
Yes, the MVP allows conversations with up to eight
of your co-workers or friends. The multi-point
conferencing capability extends to users of the MVP
and VideoSign 3.0, a PC- and Mac-based product.
Will I be able to receive video messages
if my MVP is not with me?
Yes, your Purple Mail video messages may be checked
online through any personal computer through your
Purple account at http://www.hovrs.com/mvp
Can I take the MVP with me when I travel?
Yes. The MVP was designed with travel and portability
in mind. It can detect wireless connections to connect
to the internet.
87
MVP FAQ

88
2.0 Using the MVP
Can I connect the MVP to my television? Can I make
videophone calls on my television?
Yes, the cradle has RCA Audio/Video In/Out jacks that
may be connected to a television. The MVP may be
placed into its cradle atop the television anytime to
initiate a videophone call on the television.
Why does the MVP need a cradle?
The cradle contains RCA jacks and RJ-11 ports
for even more interoperability. The cradle is an
optional yet essential asset to the functionality
of the MVP
What are the three ways I can input information
into the MVP?
1. Touch screen: The touch buttons and touch keyboard
functions allow you to tap input into the MVP
with ease.
2. Remote control: The remote control included
with the device allows you to control the MVP
from a distance.
3. Device toggle: The five-way clicker immediately
to the right of the screen allows you to navigate
through the functions of the MVP.
Does the MVP come with an internal battery?
Yes, the internal battery will support 90 minutes
of live video streaming and six hours of standby power.
The battery may be recharged anytime by connecting
the MVP to the MVP cradle or connecting an electrical
source to the 12V port on the MVP.
MVP FAQ

Does the MVP function like a personal computer?
Will I be able to use it like a laptop?
Although the MVP runs on a Linux-based system,
it is primarily concerned with making videophone
calls and does not offer personal computing capability
at this time.
What wireless standards are the MVP compatible with?
It is compatible with 802.11b, and 802.11g standards.
Does the MVP work with my EVDO USB
networking device?
Not at this time.
The MVP has port connectors for a headset
and microphone. Does the MVP come with
a headset or microphone?
The MVP has a audio and mic jack, however the audio
and mic device does not come with the unit.
Why does the MVP have a USB 2.0 port?
There are a wide variety of products that may be used
with the USB 2.0 slot. They include external keyboards
that can be used to input information into the MVP.
Why does the MVP have a SDM card port?
Currently the SDM card slot has limited use.
The SDM card slot will be used to add flash memory
to the device. For instance, users may turn the MVP
into a digital photo frame by rotating pictures from
a SDM card.
89
MVP FAQ

90
2.0 Using the MVP
What are the specifications of the MVP?
User Functions
Two-way high quality video conferencing, smooth
full-motion video, touch screen, address book, smart
calling, speed dial list, call history, light alerting
Standards:
SIP & H.323 Compliant; H.323 Gatekeeper functionality;
H.323/SIP GW Protocol
Hardware Features:
Wireless functionality, USB, internal battery, SDM card
(additional flash memory), touch screen.
Port Connectors:
RJ-11, Power 12V DC, Ethernet, Audio/Video In/Out,
USB 2.0, SD Card, Headset, Microphone,
Accessories:
Cradle, remote control, external battery, AC Power
Adapter, Ethernet Cable, Setup guide
MVP FAQ

91
MVP FAQ
Federal Communication Commission Interference Statement
This equipment has been tested and found to comply with the limits for a Class B digital device, pursuant to Part 15
of the FCC Rules. These limits are designed to provide reasonable protection against harmful interference in a
residential installation. This equipment generates, uses and can radiate radio frequency energy and, if not installed
and used in accordance with the instructions, may cause harmful interference to radio communications. However,
there is no guarantee that interference will not occur in a particular installation. If this equipment does cause
harmful interference to radio or television reception, which can be determined by turning the equipment off and on,
the user is encouraged to try to correct the interference by one of the following measures:
Reorient or relocate the receiving antenna.
Increase the separation between the equipment and receiver.
Connect the equipment into an outlet on a circuit different from that to which the receiver is connected.
Consult the dealer or an experienced radio/TV technician for help.
FCC Caution: Any changes or modifications not expressly approved by the party responsible for compliance could
void the user's authority to operate this equipment.
This device complies with Part 15 of the FCC Rules. Operation is subject to the following two conditions: (1) This
device may not cause harmful interference, and (2) this device must accept any interference received, including
interference that may cause undesired operation.
This device and its antenna(s) must not be co-located or operating in conjunction with any other antenna or
transmitter.
IMPORTANT NOTE:
Federal Communication Commission (FCC) Radiation Exposure Statement
This EUT is compliance with SAR for general population/uncontrolled exposure limits in ANSI/IEEE C95.1-1999 and
had been tested in accordance with the measurement methods and procedures specified in OET Bulletin 65
Supplement C.