Leetac Electronics Technology LEETACE5208 CD SHELF SYSTEM User Manual ITCDS 5000 Manual 073113 lorez
Zhongshan Leetac Electronics Co., Ltd. CD SHELF SYSTEM ITCDS 5000 Manual 073113 lorez
UserManual.wiki
>
Leetac Electronics Technology
>
LEETACE5208 User Manual
User Manual.pdf
Navigation menu
Upload a User Manual
Namespaces
Wiki Guide
HTML
PDF
Info
Views
User Manual
Discussion / Help
Navigation
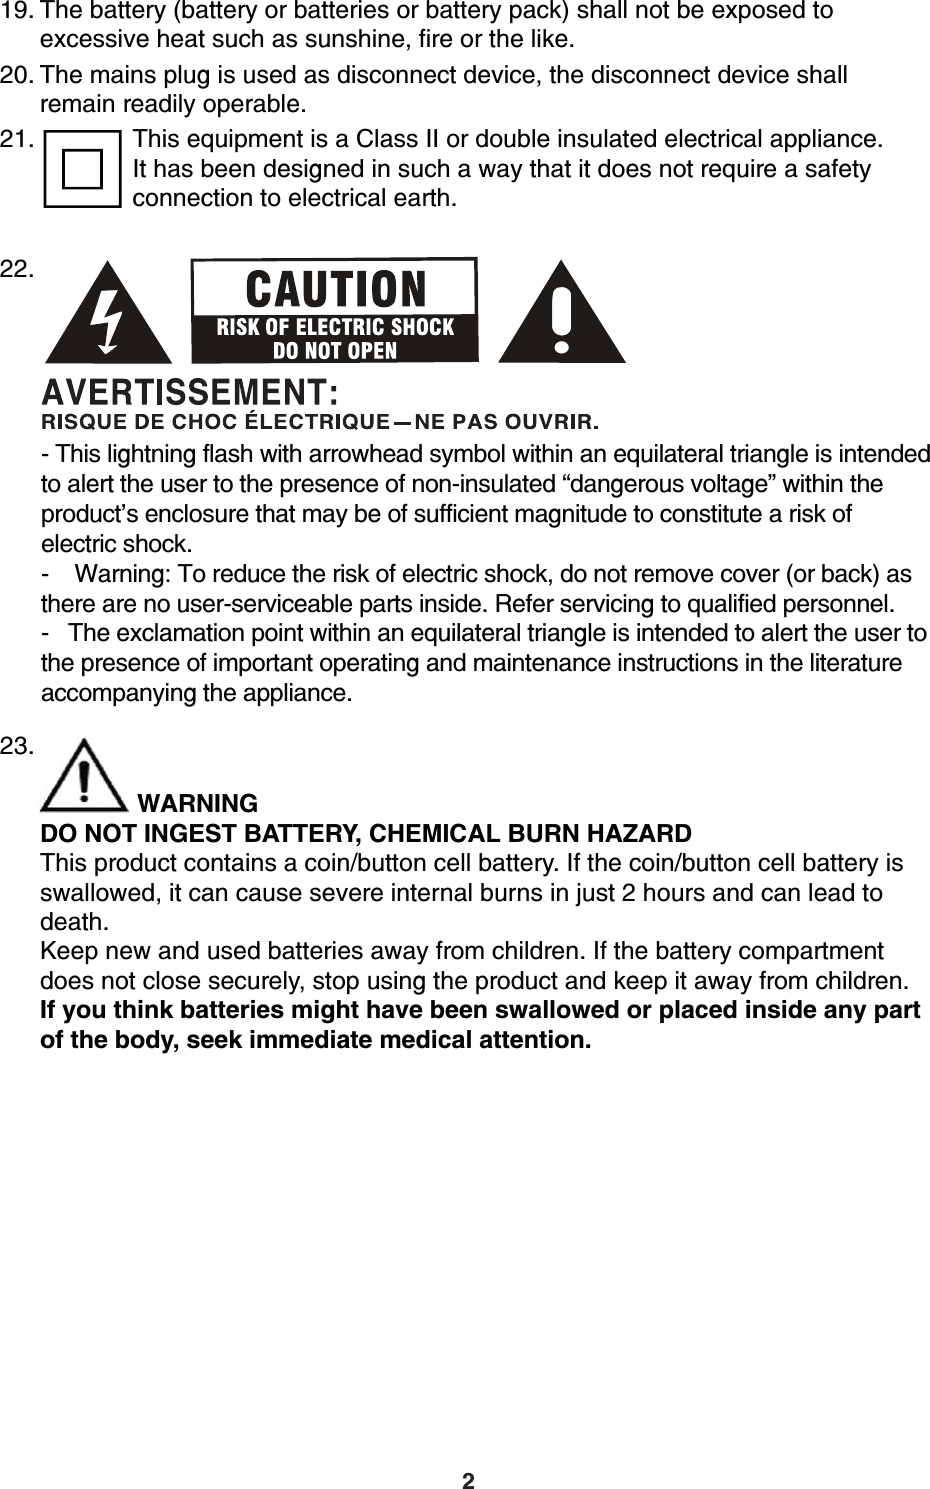
![IMPORTANT SAFETY INSTRUCTIONS1. Read these instructions – All the safety and operating instructions should b e read b efore this product is operated. 2. Keep these instructions – The safety and operating instructions should b e retained f or future r eference. 3. Heed a ll warnings – All warnings on the appliance and in the operating instructions should b e a dhered t o. 4. Follow all instructions – All operating and use instructions should b e f ollowed. 5. Do n ot use this apparatus near water – The appliance should n ot be used n ear water or moisture – for example, in a wet basement or near a swimming pool, and the like.6. Clean only with a dry cloth.7. Do n ot block any ventilation openings. Install in accordance with the manufacturer’s instructions.8. Do n ot install n ear any heat sources such as radiators, heat registers, stoves, or V[OLYHWWHYH[\ZPUJS\KPUNHTWSPÄLYZ[OH[WYVK\JLOLH[9. Do n ot defeat the safety purpose of the p olarized or grounding plug. A p olarized plug has two b lades with one wider than the other. A grounding plug has two blades and a third grounding prong. The wide b lade or the third prong is WYV]PKLKMVY`V\YZHML[`0M[OLWYV]PKLKWS\NKVLZUV[Ä[PU[V`V\YV\[SL[JVUZ\S[an electrician for replacement of the obsolete outlet.10. Protect the p ower cord from being walked on or pinched particularly at the plugs, convenience r eceptacles, and at the p oint where they exit from the apparatus.6US`\ZLH[[HJOTLU[ZHJJLZZVYPLZZWLJPÄLKI`[OLTHU\MHJ[\YLY<ZLVUS`^P[O[OLJHY[Z[HUK[YPWVKIYHJRL[VY[HISLZWLJPÄLKI`the manufacturer, or sold with the apparatus. When a cart or rack isused, use caution when moving the cart/apparatus combination toavoid injury from tip-over.13. Unplug the apparatus during lightning storms or when unused f or long periods of time.9LMLYHSSZLY]PJPUN[VX\HSPÄLKWLYZVUULS:LY]PJPUNPZYLX\PYLK^OLU[OLapparatus has been damaged in any way, such as power supply cord or plug is damaged, liquid has been spilled or objects have fallen into the apparatus, the apparatus has been exposed t o rain or moisture, does not operate n ormally, or has been dropped.15. Please k eep the unit in a well v entilated environment.6US`\ZLH[[HJOTLU[ZHJJLZZVYPLZZWLJPÄLKVYWYV]PKLKI`[OLTHU\MHJ[\YLY;VYLK\JL[OLYPZRVMÄYLVYLSLJ[YPJZOVJRKVUV[L_WVZL[OPZHWWHYH[\Z[VYHPUor moisture. The apparatus shall n ot be exposed t o dripping or splashing and n o VIQLJ[ZÄSSLK^P[OSPX\PKZZ\JOHZ]HZLZZOHSSUV[ILWSHJLKVUHWWHYH[\Z18. CAUTION: Danger of explosion if battery is incorrectly replaced. Replace only with the same or equivalent type. Danger d'explosion si la batterie est remplacée de façon incorrecte. Remplacez-la uniquement avec le même type ou équivalent1](https://usermanual.wiki/Leetac-Electronics-Technology/LEETACE5208/User-Guide-2493113-Page-3.png)
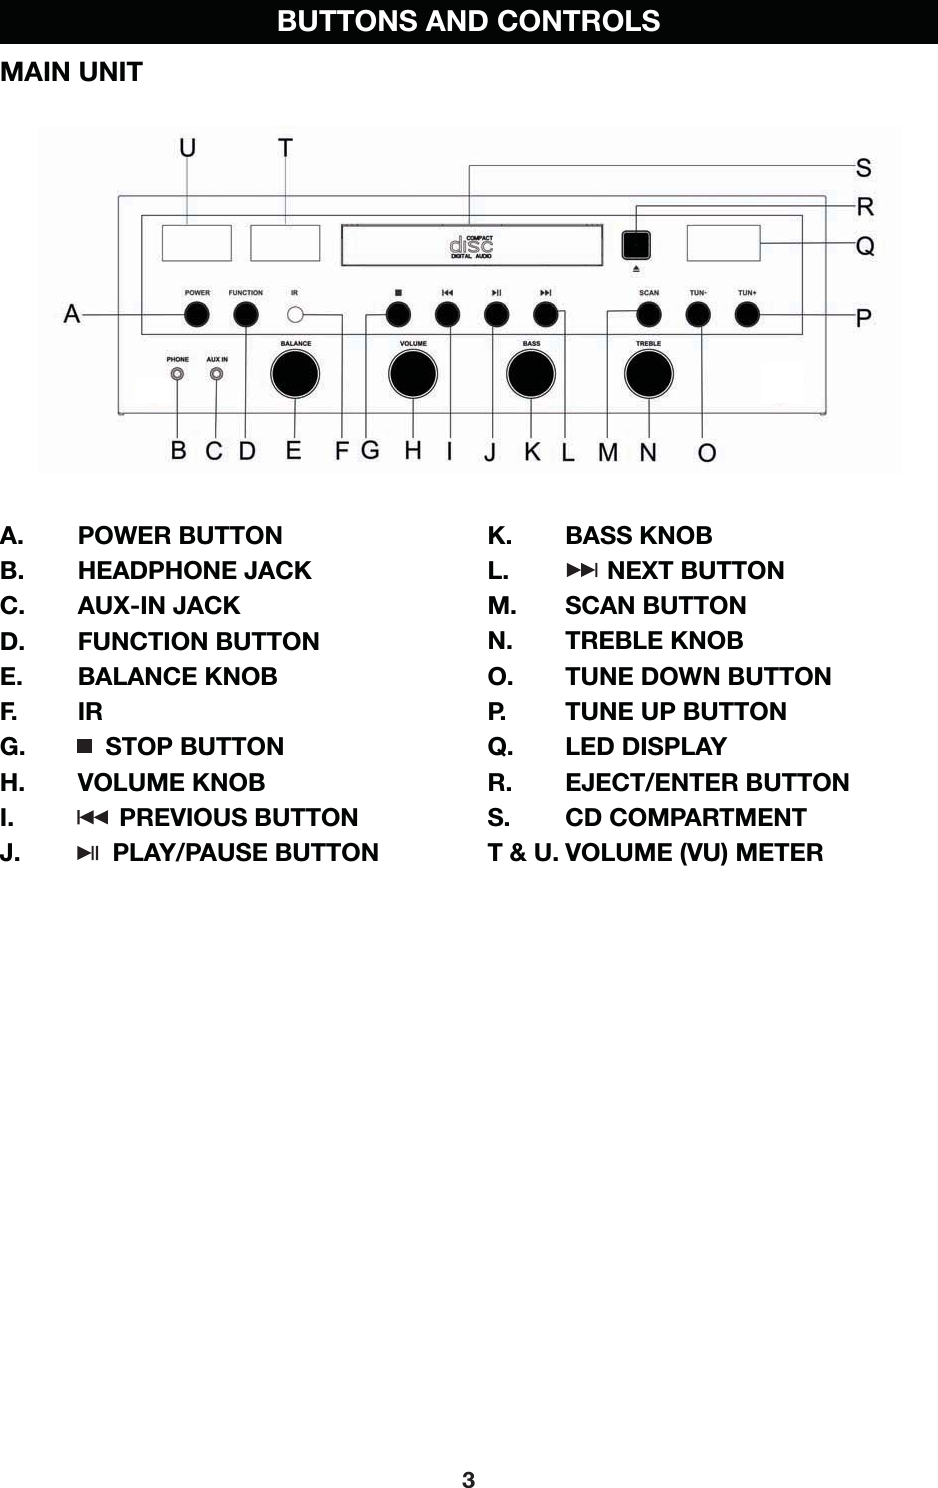
![GETTING STARTEDCONNECTING THE EXTERNAL SPEAKERSThe speaker input sockets are located at the back of the main unit. <U^YHW[OLZWLHRLY^PYLMYVT[OLSLM[ZWLHRLYHUKWS\NP[PU[V[OLSLM[3speaker socket on the main unit. <U^YHW[OLZWLHRLY^PYLMYVT[OLYPNO[ZWLHRLYHUKWS\NP[PU[V[OLYPNO[9speaker socket on the main unit.3. Make sure the speaker cables are n ot run in areas where they could cause danger.PRELIMINARYBefore using your audio system, the protective packing should b e r emoved from the CD c ompartment. To r emove the protective packing:1. Press the EJECT/ENTER button to the right of the CD door to open the CD door.2. Remove the protective packing from the CD c ompartment.3. Close the CD door by pressing the EJECT/ENTER button again.FM A ntennaUnwrap the FM antenna and extend it fully. Yo u may need t o a djust the p osition of the antenna to g et optimum reception.Connecting to a P ower Source1. Check that the mains voltage on the rating plate on the back of the main unit is the same as the v oltage in your area.2. Plug the electric plug into the wall s ocket. The CD Stereo System is now ready for use.Standby ControlPress the POWER button to turn the unit ON. Press again to turn the unit OFF.56;,!>OLUSLH]PUN[OL\UP[\UH[[LUKLKMVYSVUNWLYPVKZZ\JOHZ]HJH[PVUZplease disconnect the p ower plug from the mains supply.LISTENING TO THE RADIO1. Press the FUNCTION BUTTON t o switch to the FM RADIO. The display will show a radio station: “87.5”.2. Tune t o a desired radio station. The frequency is indicated on the display. MANUAL TUNING: Press the TUN+ or TUN-I\[[VUIYPLÅ`HUK[OLMYLX\LUJ`will tune up or down. AUTO SEARCHING: Press the TUN+ or TUN- button for more than 2 seconds, the radio frequency will start to change on the display. Once a station is found, the radio will stop searching and start to broadcast immediately.3. Re-position the antenna if necessary.5](https://usermanual.wiki/Leetac-Electronics-Technology/LEETACE5208/User-Guide-2493113-Page-7.png)
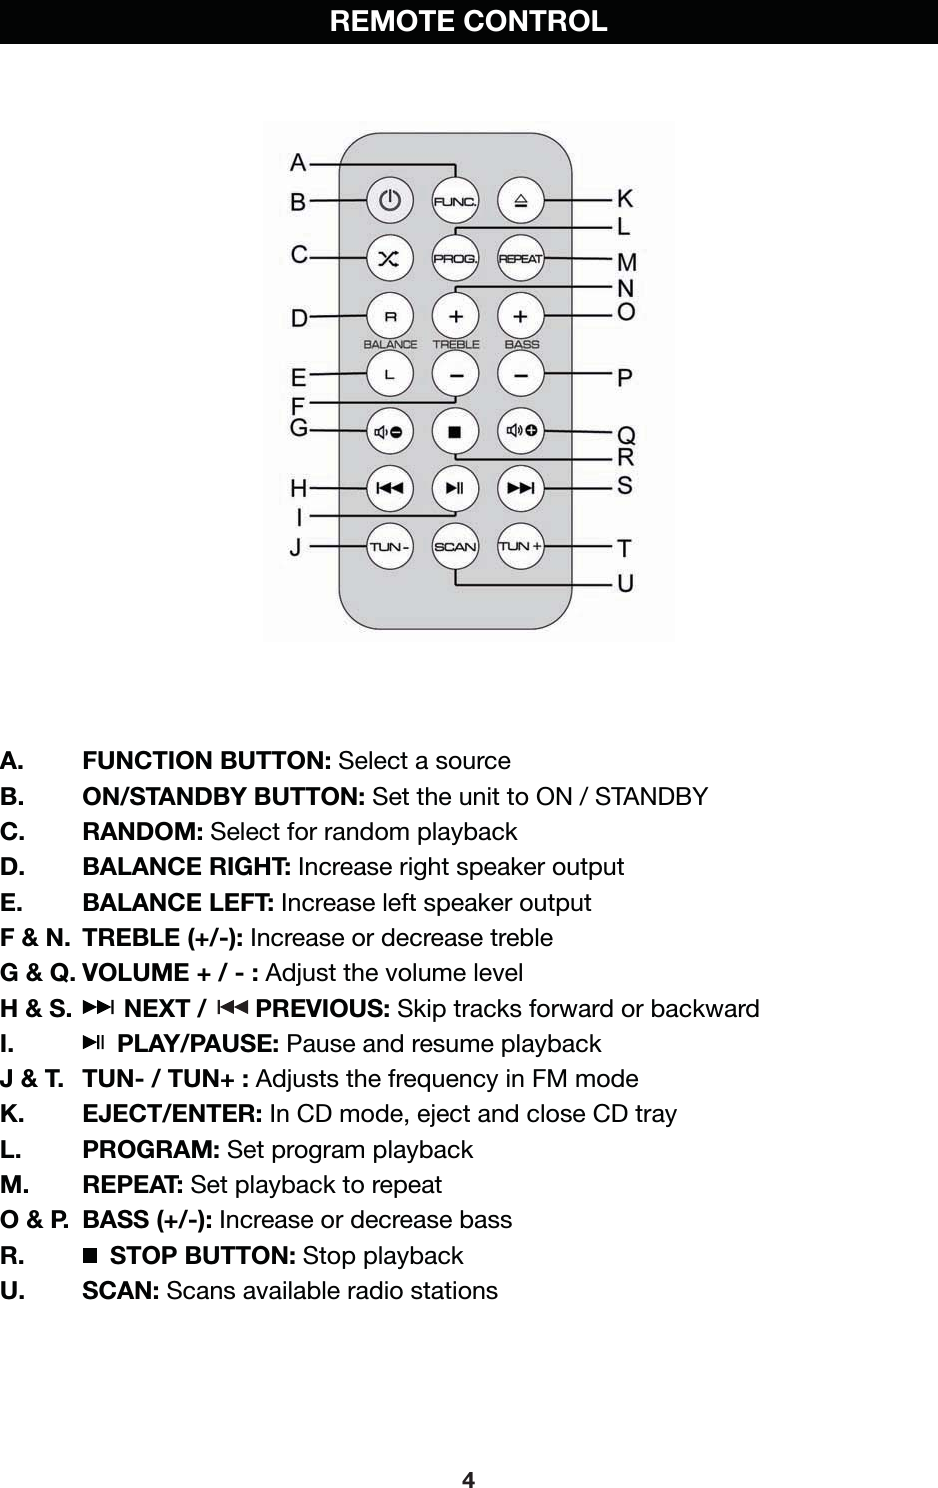
![SETTING FM RADIO PRESETSThe CD Stereo System can store up to 2 0 radio station presets.To Manually Set P resets1. Find the radio station you would like t o save.2. Press the PROGRAM button on the r emote c ontrol.3.Press NEXT BUTTON / PREVIOUS BUTTON t o s elect the preferred Preset Number. The display will show “77L[J”4. Press the PROGRAM button again to save the station. 9LWLH[Z[LWZ\U[PS`V\OH]LÄUPZOLKZH]PUN`V\YWYLZL[Z6. To navigate through the stored presets, press the PREVIOUS BUTTON orNEXT BUTTONNOTE: If you press and h old the SCAN button, it will delete a ll of the previous presets you have stored and automatically reprogram all 2 0 presets.To A utomatically Save P resetsUsing the SCAN MLH[\YL[OL*+:[LYLV:`Z[LTJHUH\[VTH[PJHSS`ÄUKHUKZH]Lyour presets.1. Press and h old the SCAN button. The unit will b egin searching for radio staions with clear reception.2. Once a station is found the unit will save it as a preset. The unit will c ontinue ZLHYJOPUNMVYHUKZH]LZ[H[PVUZ\U[PSHSSWYLZL[ZOH]LILLUÄSSLK3. To navigate through the stored presets, press the PREVIOUS BUTTON orNEXT BUTTONNOTE: If you press and h old the SCAN button, it will delete a ll of the previous presets you have stored and automatically reprogram all 2 0 presets.ADJUSTING THE VOLUMEVOLUME ADJUSTMENTTwist the VOLUME KNOB t o a djust the v olume. The v olume level will b e shown in the LED Display in the t op right corner of the unit. NOTE: Depending on the type of music/audio output from the CD Stereo System, [OL=VS\TL=<4L[LYZTPNO[UV[TV]LH[SV^LY]VS\TLZ0UZVTLJHZLZ[OLvolume must be around “#20 or higher” to s ee v ery active m ovement.BALANCETwist the BALANCE KNOB t o a djust the v olume b etween the left speaker and the right speaker. The v olume of the left speaker and right speaker is equal when the LED display shows “00”.TREBLE AND BASSTwist the TREBLE KNOB and BASS KNOB t o a djust the treble and bass levels from “-3” to “3”.6](https://usermanual.wiki/Leetac-Electronics-Technology/LEETACE5208/User-Guide-2493113-Page-8.png)
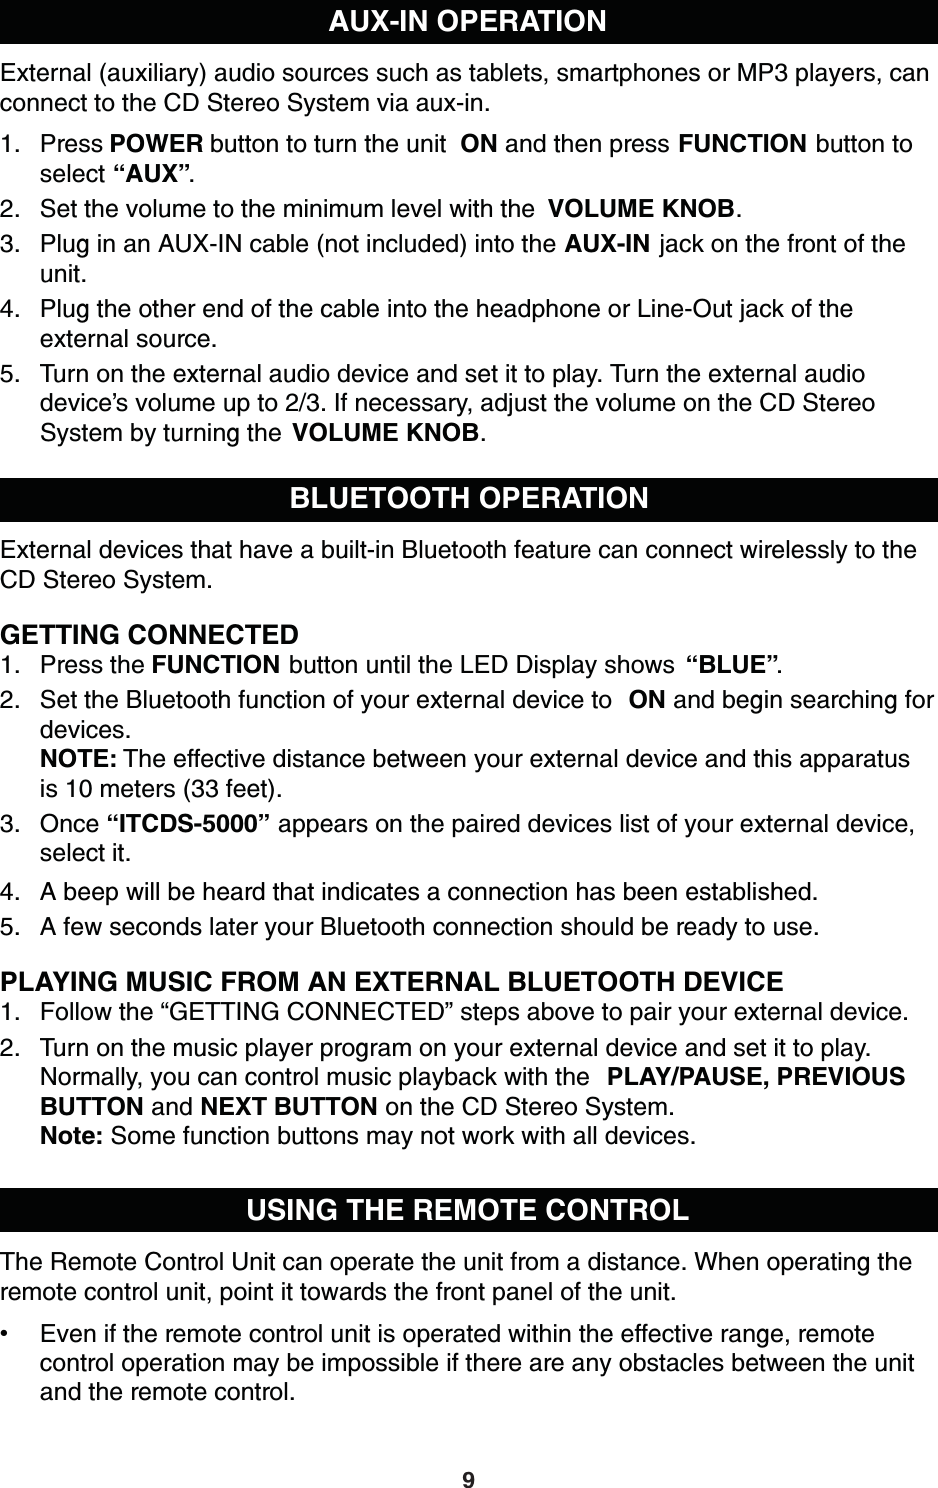
![LISTENING TO A CD1. Press FUNCTION button until the display reads “CD”.2. Press the EJECT/ENTER button to open the CD door, put a CD onto the CD [YH`^P[O[OLWYPU[LKSHILSMHJPUN\W[V^HYKZ`V\To c lose the CD door, press EJECT/ENTER button again.Note: Remember[VYLTV]L[OL*+^OLU`V\HYLÄUPZOLKSPZ[LUPUNTo P lay a CD W hen Stopped: Press the PLAY/PAUSE button. The disc will p lay from track 1.To P ause a CD W hile P laying: Press the PLAY/PAUSE button. The disc will pause and pause indicator appears on the display. Press the PLAY/PAUSE button again to resume p layback.To Stop a CD W hile P laying: Press the STOP button.To Change T racks: Press PREVIOUS BUTTON or NEXT BUTTON.To Search During Playblack: Press and h old the PREVIOUS BUTTON or NEXTBUTTON until the desired s ection is located. While s earching, sound will b e p layed at a distorted speed. Playback returns to n ormal when the button is released.REPEATING/RANDOM PLAYBACK OF A TRACK OR A CDPress the REPEAT button on the r emote c ontrol t o circle the p lay mode: 9LWLH[7YLZZ[OLREPEAT button on the r emote c ontrol once and the current track will b e p layed c ontinuously 9LWLH[(SS7YLZZ[OLREPEAT button again and ALL tracks on the current disc will b e p layed c ontinuously. 5VYTHSWSH`IHJR7YLZZREPEAT button again to r esume n ormal p layback.Note: Pressing the STOP button will stop playback and the p lay mode will b e cleared.PROGRAM PLAYProgram play must be s et when the CD is stopped. Yo u can program up to 2 0 tracks in any order.1. Press STOP button and then press PROGRAM button on the r emote c ontrol.2. Press NEXT BUTTON / PREVIOUS BUTTON t o s elect a track. The display shows the s elected track.3. Press the PROGRAM button on the r emote c ontrol t o a dd the track into the program list.4. Repeat steps 2 and 3 until y ou complete the programming. Yo u can program up to 2 0 tracks.To Start the P rogram P lay: Press PLAY/PAUSE button.To P ause or Stop a P rogram P lay: Press PLAY/PAUSE or STOP button. To R eplay a P rogram: Press PLAY/PAUSE button.To R eview the Content of a P rogram: Press STOP button then keep pressing the PROGRAM button to r eview the programmed tracks.To Clear the P rogram: Press STOP button twice or open and c lose the CD door.7](https://usermanual.wiki/Leetac-Electronics-Technology/LEETACE5208/User-Guide-2493113-Page-9.png)
![DISC MAINTENANCEDepending on the quality of the disc, and the c ondition of the r ecording, some CD-R/CD-RW discs may not be p layable.1. Always place the c ompact disc in the disc tray with the label facing upward. *VTWHJ[KPZJZJHUILWSH`LKVUS`VUVULZPKL2. To m ove a disc from its storage case, press down on the c enter of the case and lift the disc out, holding it carefully by the edges.3. If the disc becomes dirty, wipe the surface from the c enter hole outward t owards the outer edge with a soft, dry cloth. 5L]LY\ZLZ\JOJOLTPJHSZHZYLJVYKZWYH`HU[PZ[H[PJZWYH`ZVYÅ\PKILUaPULVYthinner to c lean the discs. Such chemicals will do irreparable damage t o the disc's plastic surface.5. Discs should b e r eturned t o their cases after use t o avoid s erious scratches that could cause the laser pick up to skip.6. Do n ot expose discs to direct sunlight or high humidity and t emperature f or extended p eriods. Long exposure t o high temperatures will warp the discs.7. Printable CD-R and CD-RW discs are n ot recommended, as the label side might be sticky and damage the unit. 8. Use a soft oil-based f elt-tipped p en to write the information on the label side. Never use a ball-point or hard-tipped p en, as this may cause damage t o the recorded side.9. Do n ot use CDs with an irregular shape ( octagonal, heart-shaped, business card ZPaLL[J*+ZVM[OPZZVY[JHUKHTHNL[OL\UP[10. If you have any doubts of using CD-R/CD-RW disc, read the precautions supplied with the disc, or contact the disc manufacturer directly.8How to r emove the disc How to h old the disc How to c lean the disc](https://usermanual.wiki/Leetac-Electronics-Technology/LEETACE5208/User-Guide-2493113-Page-10.png)
![ 0M[OLYLTV[LJVU[YVS\UP[PZVWLYH[LKULHYV[OLYHWWSPHUJLZ^OPJONLULYH[Linfrared rays, or if other remote c ontrol devices using infrared rays are used n ear the unit, it may operate incorrectly. Conversely, the other appliances may operate incorrectly.TO ACTIVATE THE REMOTE CONRTOLThe r emote c ontrol c omes with a cell battery alreadyinstalled. To activate the battery, remove the transparenttab at the b ottom of the r emote c ontrol. The r emotecontrol is now ready to use.BATTERY REPLACEMENTIf the distance r equired b etween the r emote c ontrol unit and main unit decreases, the battery is exhausted. In this case, please r eplace the battery with a new one.To R eplace W ith a N ew Battery1. Remove the battery compartment cover as per theillustration on the right.2. Observe the c orrect polarity and install a 3Vdc lithiumIH[[LY`*93. Close the c over.BATTERY PRECAUTIONS )LZ\YL[VPUZLY[[OLIH[[LY`^P[OJVYYLJ[WVZP[P]LHUKULNH[P]LWVSHYP[PLZ 9LMLY[V[OLWYLJH\[PVUZVU[OLIH[[LY`SHILSZ >OLU[OLYLTV[LJVU[YVS\UP[PZUV[[VIL\ZLKMVYSVUNWLYPVKZVM[PTLTVYL[OHUHTVU[OYLTV]L[OLIH[[LY`MYVT[OLYLTV[LJVU[YVS\UP[[VWYL]LU[P[MYVTleaking. If it leaks, carefully wipe away the liquid inside the battery compartment and r eplace the battery with a new one. +VUV[OLH[VYKPZHZZLTISLIH[[LYPLZHUKUL]LYKPZWVZLVMVSKIH[[LYPLZI`[OYV^PUN[OLTPU[VHÄYL10](https://usermanual.wiki/Leetac-Electronics-Technology/LEETACE5208/User-Guide-2493113-Page-12.png)
![TROUBLESHOOTING GUIDEIn case of trouble with the unit, please look through the problems below and s ee if you can solve them yourself before calling your dealer.CD PLAYER RADIO UNIT WHOLE UNITPROBLEMCAUSESOLUTIONUnit does not turn ON when POWER is pressed.<UP[PZ\UWS\NNLK *VUULJ[\UP[[V(*WV^LYsupplyNo s ound c omes out of the speakers.;OLL_[LYUHSZWLHRLYZHYLdisconnected.;OL]VS\TLPZ[\YULKKV^U[V405;OLPUW\[ZLSLJ[VYKVLZUV[match the p layback source.*VUULJ[[OLL_[LYUHSspeakers.(KQ\Z[[OL]VS\TL9LZLSLJ[[OLKLZPYLKPUW\[source.The s ound is noisy.;OL\UP[PZ[VVJSVZL[VH;=set or another similar appliance.;\YUVMM[OL;=VYV[OLYappliance, and r elocate the unit.The unit does not act as expected, or respond.,_[LYUHSMHJ[VYZZ\JOHZESD ( Electro-static KPZJOHYNLHMMLJ[[OL\UP[9LTV]L[OLWV^LYJVYKHUKall p ower supply devices. Then re-plug the unit after one minute.Cannot listen to any station, or signal appears weak.;OLZ[H[PVUPZUV[[\ULKPUproperly.(;=ZL[PZILPUN\ZLKnearby and is interfering with the radio r eception.7YVWLYS`[\ULPU[OLKLZPYLKstation.;\YUVMM[OLPU[LYMLYPUN;=set.The s ound is distorted.;OLHU[LUUHPZUV[positioned properly.9LWVZP[PVU[OLHU[LUUHuntil r eception improves.CD stops immediately after starting, or unit pauses or stops during play.;OL*+PZPUZLY[LK\WZPKLdown.;OL*+PZK\Z[`VYKPY[`VYthere is condensation on the CD.0UZLY[[OL*+^P[O[OLprinted side right-side up.*HYLM\SS`JSLHUHUKKY`[OLCD.No s ound. ;OL*+WSH`LYPZWH\ZLK 7YLZZ[OL73(@7(<:,button.:WLJPÄJ*+PZnoisy, or playback stops or skips.;OL*+PZZJYH[JOLKdamaged or warped. ;OLKPZJPZ]LY`KPY[`;OL*+ZOV\SKILJOHUNLK*HYLM\SS`JSLHU[OL*+11](https://usermanual.wiki/Leetac-Electronics-Technology/LEETACE5208/User-Guide-2493113-Page-13.png)