Leica Camera 1222 Flash Commander User Manual Air10s quick manual v4
Leica Camera AG Flash Commander Air10s quick manual v4
user_manual

LEICA SF C1
The comprehensive instructions can be found under:
https://de.leica-camera.com/Service-Support/Support/Downloads

Disposal of electrical and electronic equipment
(Applies within the EU, and other European countries with segregated waste collection systems)
This device contains electrical and/or electronic components and must therefore not be disposed of in general
household waste! Instead, it should be disposed of at a recycling collection point provided by the local authority.
This costs you nothing. If the device contains standard or rechargeable batteries, these must be removed first
and also be disposed of in line with relevant regulations. Further information on the subject is available from your
local administration, your local waste collection company, or in the store where you purchased this device.
Declaration of Conformity (DoC)
Hereby, “Leica Camera AG” declares that this product is in compliance
with the essential requirements and other relevant provisions of Direc-
tive 2014/53/EU. Customers can download a copy of the original DoC
to our RE products from our DoC server: www.cert.leica-camera.com
In case of further questions, please contact:
Leica Camera AG, Am Leitz-Park 5, 35578 Wetzlar, Germany
Wireless Transmitter:
Frequency range used: 2412 MHz to 2462 MHz (Central frequency
WLAN)
Max. output power: 13dBM (EIRP)
The CE identification of our products documents
compliance with the fundamental requirements
of the applicable EU directives.
For United Arab Emirates only:
TRA
REGISTERED No:
ERxxxxx/yy
DEALER No:
DA0112968/13
For US and Canada only:
A recyclable lithium ion/polymer battery powers
this camera. Please call 1-800-8-BATTERY for
information on how to recycle this battery.
This is a Class B product based on the standard of the Voluntary Control Council for Interference from Information
Technology Equipment (VCCI). If this is used near a radio or television receiver in a domestic environment, it may cause
radio interference. Install and use the equipment according to the instruction manual.
FCC Note:
This equipment has been tested and found to comply with the limits for a Class B digital device, pursuant to Part
15 of the FCC Rules. These limits are designed to provide reasonable protection against harmful interfer ence in a
residential installation. This equipment generates, uses, and can radiate radio frequency energy and, if not installed
and used in accordance with the instructions, may cause harmful interference to radio communications. However,
there is no guar antee that interference will not occur in a particular installation. If this equipment does cause
harmful interference to radio or television reception, which can be determined by turning the equipment off and
on, the user is encouraged to try to correct the interference by one or more of the following measures:
• Reorient or relocate the receiving antenna.
• Increase the separation between the equipment and receiver.
• Connect the equipment into an outlet on a circuit
different from that to which the receiver is connected.
• Consult the dealer or an experienced radio/TV technician for help.

FCC Caution:
To assure continued compliance, follow the attached installation instructions and use only shielded inter face
cables with ferrite core when connecting to com put er or peripheral devices. Any changes or modifications not
expressly approved by the party responsible for compliance could void the user’s authority to operate this equip-
ment.
Trade Name: LEICA
Type No. 1222
Responsible party/Support contact: Leica Camera Inc.
1 Pearl Count, Unit A, Allendale, New Jersey 07401
Tel.: +1 201 995 0051/ Fax: +1 201 995 1684
technicalinfo@leicacamerausa.com
This device complies with Part 15 of the FCC Rules. Operation is subject to the following two conditions: (1) This
device may not cause harmful interference, and (2) this device must accept any interference received, including
interference that may cause undesired operation.
Type No.: 1222
Tested To Comply
With FCC Standards
FOR HOME OR OFFICE USE
FCC ID: N5A1222
This transmitter must not be co-located or operated in conjunction with any other antenna or transmitter. This
equipment complies with FCC radiation exposure limits set forth for an uncontrolled environment and meets the FCC
radio frequency (RF) Exposure Guidelines. This equipment has very low levels of RF energy that are deemed to comply
without testing of specific absorption ratio (SAR).
For Canada only:
CAN ICES-3 (B)/NMB-3(B)
This device complies with RSS-210 of the IC Rules.Operation is subject to the following two conditions:
(1) This device may not cause harmful interference,
(2) This device must accept any interference received, including interference that may cause undesired operation
of the device. This equipment complies with IC radiation exposure limits set forth for an uncontrolled environment
and meets RSS-102 of the IC radio frequency (RF) Exposure rules. This equipment has very low levels of RF energy
that are deemed to comply without testing of specific absorption ratio (SAR).
For Singapore only
Complies with
IDA Standards
DA106734

Pairing
Before the pairing begins, make sure your NAS flashgun(s) are
set to Auto Channel mode(2). Turn off both flashgun(s) and the Air 10s.
1OFF
Hold Mode button for 1 second for open mode. Users need to turn off if
they are using NAS flashgun(s) that do not support the Open mode.
1OPEN Mode
to Press the group selection button
A B /C/
D/A B C D
select a different group and press the same button again to end.
Turn off the group by pressing when the group is blinking. Only
MG10 supports the mix of TTL and M in advance group.
2
Press and hold
Advance Group
A B C D
1 sec. to change to the advance group
Basic Group
A B C D &
A B C D
/
Press to enable or disable the modeling light on flash.
3
Rotate the dial to adjust the Power of M mode / Flash exposure
compensation of TTL mode when the group is blinking.
Adjust power & TTL
Press and hold to change zoom position when the group is blinking
or rotate the dial to adjust manually.
4Flash exposure
For the basic group A B
s :
C D
All groups work in the same mode. To change different mode by
pressing M/TTL mode button.
For the advanced groups of :
TTL and M mode can work in 4 advanced groups. To change mode between
M and TTL of a selected group, press “M/TTL” button when the group blinks.
A B
C D
Hold the dedicated buttons(2) on your NAS flashgun(s) for 3 seconds
until you hear the beeping sound.
2HOLD
3 Sec.
Hold both Panel Lock button and Power on/off button for 3 seconds
until the Pilot light is blinking in orange colour.
3Blink!
4Memorized!
NAS flashgun(s) and Air 10s stop beeping and blinking after the
pairing is done. Pairing setting remains unchanged even when both
devices are powered off. Do not operate until the process finished.
Control

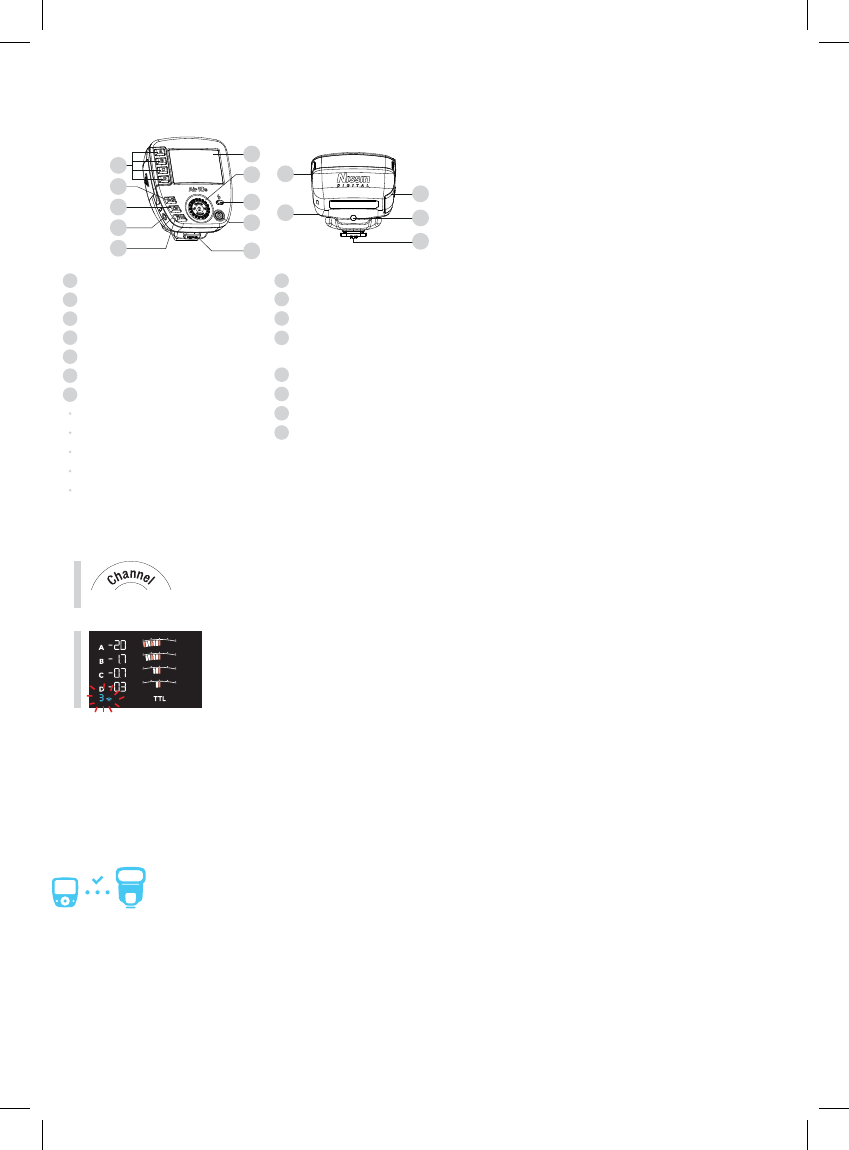
Nomenclature
1 Group selection button
2 Group on/off button
3 Modeling light button
4 Shutter cable socket (2.5mm)
5 Mode Button
6 LCD panel
7 Select dial with buttons
Channel button
HSS button
Beep on/off button
M.Zoom button
Panel Lock/Unlock button (hold 1sec.)
8 Pilot button (Test flash button)
9 Power On/Off switch
10 Unlock button
11 Micro SD card slot
(for firmware update)
12 Strap hole
13 Battery compartment door
14 AF-assist light (1)
15 Hotshoe contacts
6
1
10
4
13
8
9
5
3
27
14
15
11
12
Hold the Channel button for 1 second to change wireless channel.
Rotate the dial to select Channels 1(3) - 8.
(i60A, Di700A and Air R do not support Channel 1. Set all items to
same channel between Channels 2 - 8 for pairing and shooting.)
Hold the Channel button for 1 second again to confirm.
Change the Channel setting of NAS flashgun(s) same as Air 10s.
For details, please refer to the specific user manual(2).
Channels 1(3)- 8
Channel Setting
1
2
HOLD 1 Sec.
Auto Channel
When NAS flashgun(s) are set to Auto Channel mode, it automatically follows the
Channel setting of Air 10s when the users are changing the flashgun(s).
When NAS flashgun is set and fix the Channel setting in Channels 1(3) - 8 , they
do not automatically follow the Channel setting of Air 10s. User has to set NAS
flashgun manually in the same channel as Air 10s to keep the pairing.

Important notice
Memory
The pairing setting is memorized and remains unchanged when power on/ off.
Energy saving
The display dims in 30 seconds. Automatically sleep in 2 minutes when
Air 10s and camera are not in use. Press any button on Air 10s or the camera
shutter to cancel the energy saving mode. Air 10s completely turns off in
60 minutes automatically when it is not in use.
To turn on again press the on/off button.
Turn on/off
To turn off the Air 10s manually, press on/ off switch and hold it for 1 second.