Lennox Hearth Adk22Cmbs Users Manual
ADK45CPB to the manual bd91f999-8b88-46cd-b5b9-3a73174d37cc
2015-02-04
: Lennox-Hearth Lennox-Hearth-Adk22Cmbs-Users-Manual-371137 lennox-hearth-adk22cmbs-users-manual-371137 lennox-hearth pdf
Open the PDF directly: View PDF ![]() .
.
Page Count: 2
GENERAL INFORMATION
ARCH DOOR KITS WITH BRASS OR
BRUSHED STAINLESS STEEL TRIM
These arch door kits may be used with gas fireplace models listed in
Tables 1 & 2.
INSTALLATION INSTRUCTIONS FOR ARCH DOOR KITS WITH BRASS OR BRUSHED STAINLESS STEEL TRIM
FOR USE WITH MERIT™, MERIT PLUS™, OR ELITE® SERIES GAS FIREPLACES
INSTALLATION INSTRUCTIONS
Part A: Elite Series Fireplaces
Step 1.
Slightly lift and pull the existing top radiant panel/hood assembly
away from the fireplace, or pull hood and slightly lift and pull the
existing louver assembly away from the fireplace.
Step 2. Lift and pull the existing top and bottom bustle away from the
fireplace.
Step 3. Open the bottom compartment door (either a radiant panel or
louver assembly) by pushing in simultaneously the left and right
top corners of the door (the door is hinged at the bottom).
Step 4. Remove the bottom compartment door by sliding the hinge pin,
located at the door’s left side, to the right until it disengages from
the left corner post hole. Pull the door diagonally to the left, away
from the fireplace.
Step 5. Remove the modesty panel as follows: lift the modesty panel by the
tab on the panel’s right end, pull the right end of the panel away from
cabinet and then pull the panel diagonally out of the corner post slots
on the left side of the unit. Remove the modesty panel carefully, so
that none of the wires become loose or disconnected.
P/N 750,021M
REV. E 03/2008
NOTE: DIAGRAMS & ILLUSTRATIONS NOT TO SCALE.
Figure 1
CAT. NO. MODEL WHERE USED
81L34 ADK35CPB EDV3530, ED3530
81L35 ADK40CPB EDV4035, ED4035-2, LMDV-4035,
SSDV-4035, MPD4035, EDVST, EDST-2,
EDVPF, EDPF-2, EDVCR, EDCR-2, EDVCL,
EDCL-2, EBST-2, EBVPF, EBPF-2, EBVCR,
EBCR-2, EBVCL, EBCL-2
81L36 ADK45CPB EDV4540, ED4540-2, MPD4540
81L37 ADK24CPB EDVPF, EDPF-2, EDVCR, EDCR-2, EDVCL,
EDCL-2, EBVPF, EBPF-2, EBVCR, EBCR-2,
EBVCL, EBCL-2
98L05 ADK33CPB MDR3328, MDT3328, MPDT3328,
MPDR3328, LMDVR-3328
26M43 ADK35CMPB MPD3530, MPD35ST, MPD35PF, MPB35ST,
LMDV-3530, SSDV-3530
H7026 ADK22CMPB MPD35PF
Table 1 - Arch Door Kit with Brass Trim
CAT. NO. MODEL WHERE USED
98L68 ADK35CBS EDV3530, ED3530
98L69 ADK40CBS EDV4035, ED4035-2, LMDV-4035,
SSDV-4035, MPD4035, EDVST, EDST-2,
EDVPF, EDPF-2, EDVCR, EDCR-2, EDVCL,
EDCL-2, EBST-2, EBVPF, EBPF-2, EBVCR,
EBCR-2, EBVCL, EBCL-2
98L70 ADK45CBS EDV4540, ED4540-2, MPD4540
98L71 ADK24CBS EDVPF, EDPF-2, EDVCR, EDCR-2, EDVCL,
EDCL-2, EBVPF, EBPF-2, EBVCR, EBCR-2,
EBVCL, EBCL-2
98L62 ADK33CBS MDR3328, MDT3328, MPDT3328,
MPDR3328, LMDVT-3328, LMDVR-3328
26M44 ADK35CMBS MPD3530, MPD35ST, MPD35PF, MPB35ST,
LMDV-3530, SSDV-3530
H7027 ADK22CMBS MPD35PF
Table 2 - Arch Door Kit with Brushed Stainless Steel Trim
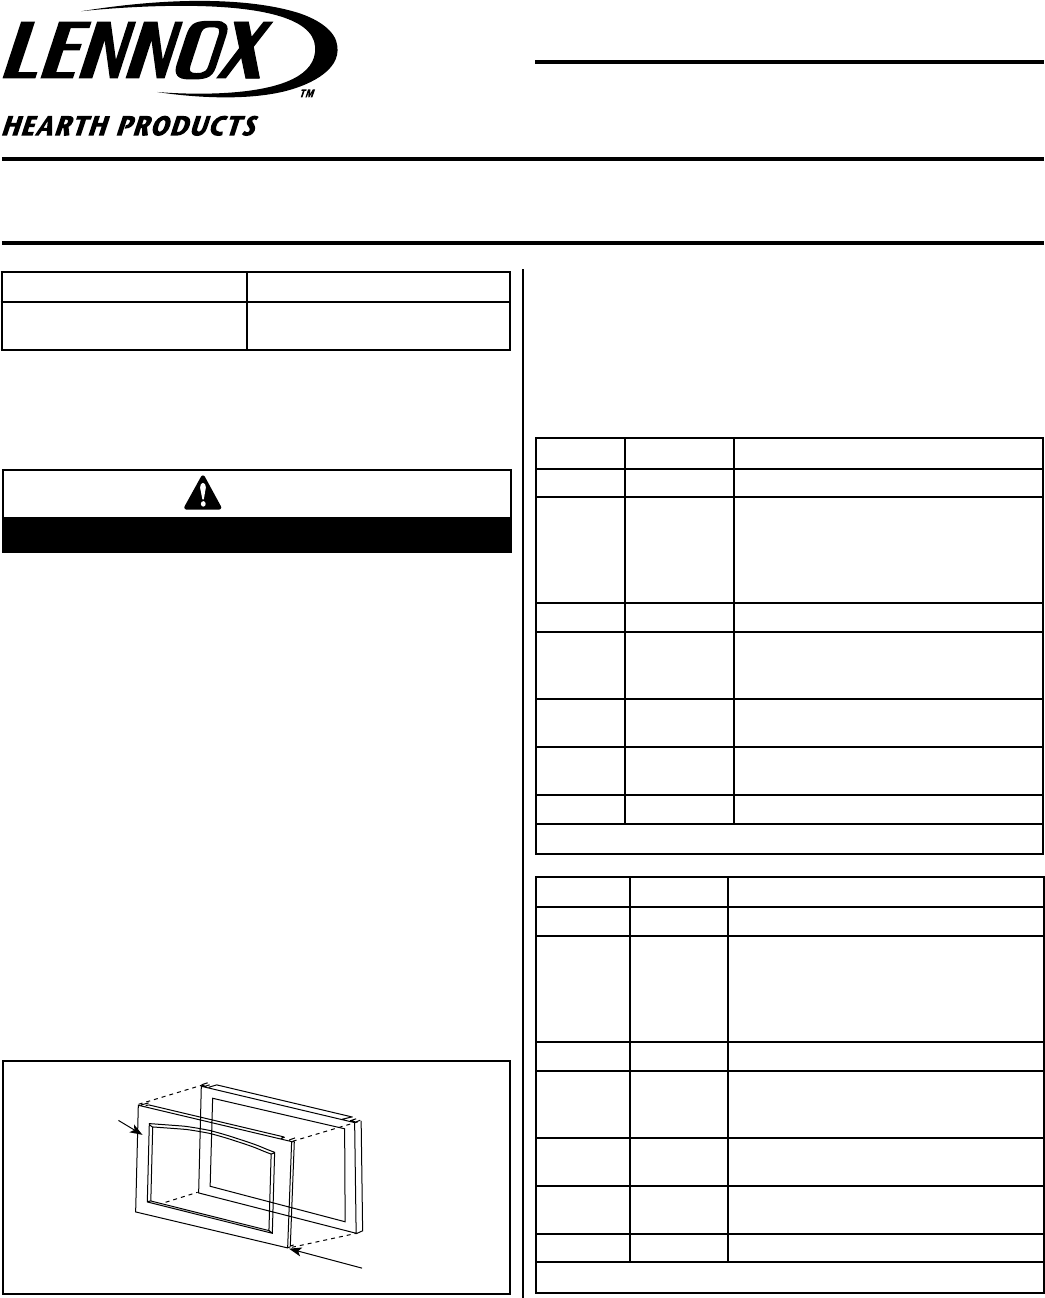
KIT CONTENTS: TOOLS REQUIRED:
1 ea. Arched Door
1 ea. Instruction Sheet
None
Glass
Frame
Arched Door
Corner Tabs- At
The Four Corners
CAUTION
INSTALL ONLY WHEN THE FIREPLACE IS OFF AND COLD!
LENNOX HEARTH PRODUCTS
KITS AND ACCESSORIES
Step 6. Open the glass door latche(s) located underneath the firebox.
Step 7.
Remove the door from the fireplace by swinging the bottom of
the door outward and lifting it up and away.
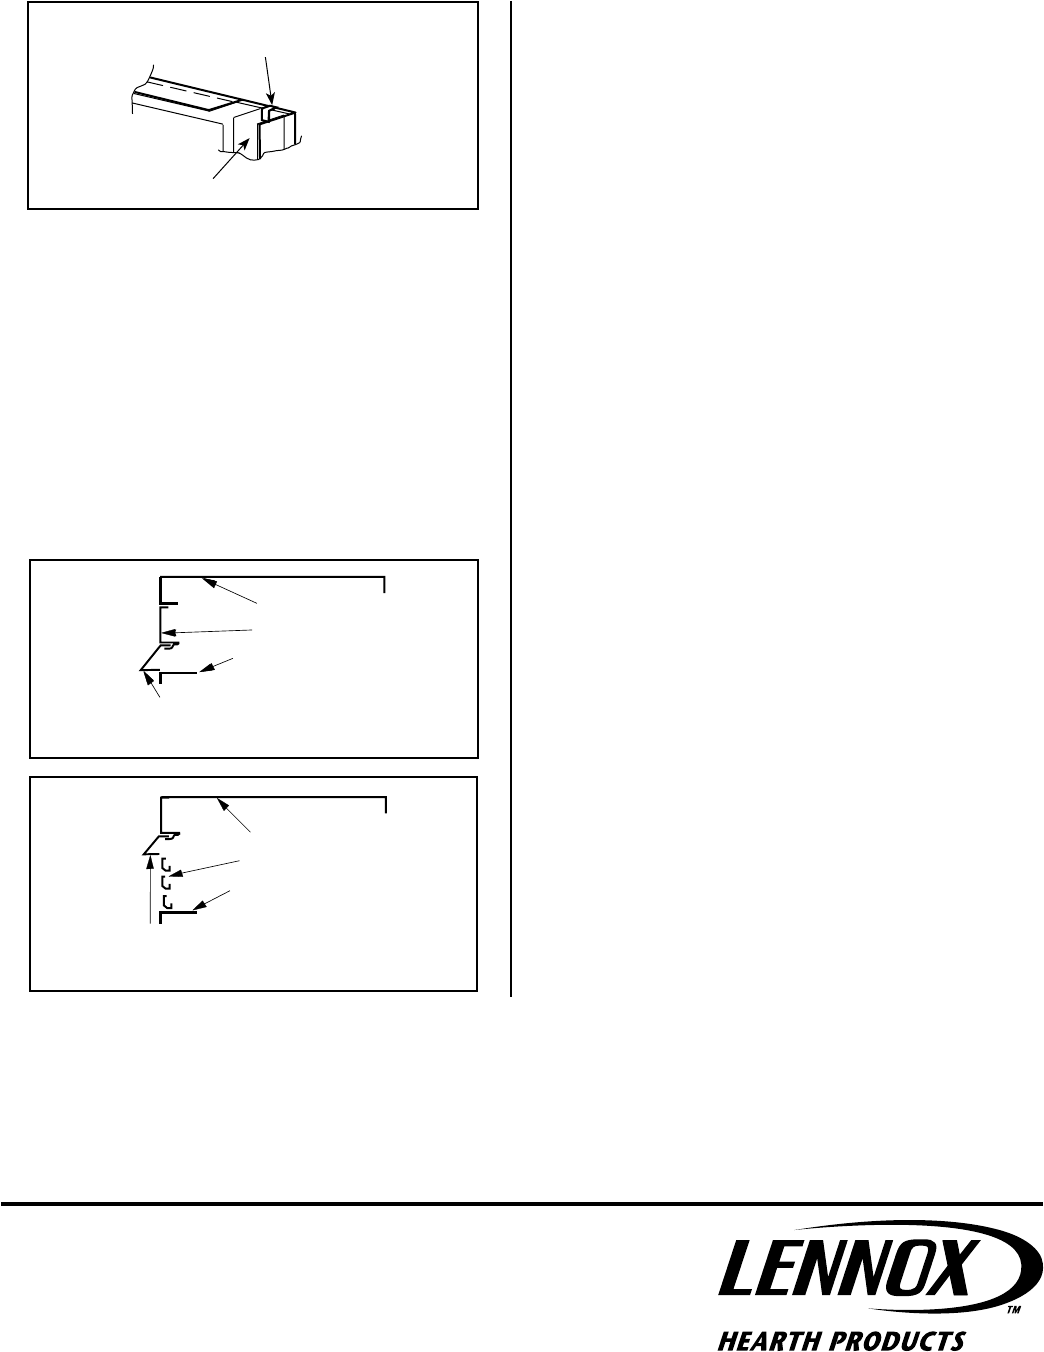
Step 8. Center the arch door over the glass frame as shown in Figure 1.
Press the arch door onto the glass frame and bend the four corner
tabs into the frame’s U-channel as shown in Figure 2.
Step 1. Slightly lift and pull the existing top radiant panel/hood assembly
away from the fireplace, or pull hood and slightly lift and pull the
existing louver assembly away from the fireplace.
Step 2. Open the bottom compartment door (either a radiant panel or
louver assembly) by pushing in simultaneously the left and right
top corners of the door. (The door is hinged at the bottom.)
Step 3. Open the two glass door latches located underneath the firebox.
Step 4. Remove the door from the fireplace by swinging the bottom of
the door outward and lifting it up and away.
Step 5. Center the arch door over the glass frame as shown in Figure 1.
Press the arch door onto the glass frame and bend the four corner
tabs into the frame’s U-channel as shown in Figure 2.
Step 6. Position the glass door and arch assembly in front of the firebox
opening with the bottom of the door held away from the fireplace.
Hook the top flange of the door frame over the top of the firebox
frame. Let the bottom of the door frame swing gently in towards
the fireplace ensuring that the gasket seats evenly as the door
frame draws shut. Fasten the two latches located underneath
the firebox floor to the door’s vee-flange. Close both the latches
securely.
Step 7. Reinstall the top radiant panel/hood assembly or hood and louver
assembly. Make certain that the hood is installed as shown in
Figure 3 (clean face models) or Figure 4 (louvered models).
The fireplace must not be operated without the hood installed as
shown in these figures.
Step 8. Close the bottom radiant panel or louver assembly.
Printed in U.S.A. © 2001 LENNOX HEARTH PRODUCTS
P/N 750,021M REV. E 03/2008
NOTE: DIAGRAMS & ILLUSTRATIONS NOT TO SCALE.
1110 West Taft Avenue • Orange, CA 92865
Step 13. Reinstall the top radiant panel/hood assembly, or hood and lou-
ver assembly. Make certain that the hood is installed as shown
in Figure 3 (clean face models) or Figure 4 (louvered models).
The fireplace must not be operated without the hood installed as
shown in these figures.
Note - Do not reinstall the top and bottom bustle with this arch door kit
installation. Keep them for any possible future re-decorating.
Part B - Merit, Merit Plus & SSDV Series Fireplaces
Step 9. Position the glass door and arch assembly in front of the fire-
box opening with the bottom of the door held away from the
fireplace. Hook the top flange of the door frame over the top
of the firebox frame. Let the bottom of the door frame swing
gently in towards the fireplace ensuring that the gasket seats
evenly as the door frame draws shut. Fasten the two latches
located underneath the firebox floor to the door’s vee-flange.
Close both the latches securely.
Step 10. Reinstall the modesty panel.
Step 11. Reinstall the bottom compartment door.
Step 12. Close the bottom radiant panel or louver assembly.
Hood must be installed as shown.
Hood must be installed as shown.
Top of Appliance
Top of Appliance
Louver Assembly
Top Radiant Panel
Top of Door Frame
Top of Door Frame
Figure 3 - Clean Face
Figure 4 - Louvered Face
Lennox Hearth Products reserves the right to make changes at any time, without notice, in
design, materials, specifications, prices and the discontinuance of colors, styles and products.
Consult your local distributor for fireplace code information.
Figure 2
Bend The Arch Tab 90 Degrees
Into The Glass Frame U-channel
Glass Frame U-Channel
Inside Top Corner View
of Glass and Arch
