Lenovo M700 Sff Ug En User Guide Manual (English) (Small Form Factor) Think Centre Type (10GS, 10GT, 10KN, 10KQ) Desktop (Think Centre) 10JQ
2016-09-09
User Manual: Lenovo M700 Sff Ug En (English) User Guide - (Small Form Factor) ThinkCentre M700 Type (10GS, 10GT, 10KN, 10KQ) M700 Desktop (ThinkCentre) - Type 10JQ ThinkCentre M700 (type 10JQ)
Open the PDF directly: View PDF ![]() .
.
Page Count: 108 [warning: Documents this large are best viewed by clicking the View PDF Link!]
- Read this first: Important safety information
- Chapter 1. Product overview
- Chapter 2. Using your computer
- Chapter 3. You and your computer
- Chapter 4. Security
- Locking the computer
- Viewing and changing security settings in the Setup Utility program
- Preventing unauthorized access to the computer
- Using fingerprint authentication
- Using the cover presence switch
- Using and understanding firewalls
- Protecting data against viruses
- Computrace Agent software embedded in firmware
- Trusted Platform Module (TPM)
- Chapter 5. Advanced configuration
- Using the Setup Utility program
- Starting the Setup Utility program
- Enabling or disabling a device
- Enabling or disabling the Automatic Power On features
- Enabling or disabling the ErP LPS compliance mode
- Enabling or disabling the Configuration Change Detection feature
- Using BIOS passwords
- Selecting a startup device
- Exiting the Setup Utility program
- Updating the BIOS
- Using the Setup Utility program
- Chapter 6. Troubleshooting, diagnostics, and recovery
- Chapter 7. Installing or replacing hardware
- Handling static-sensitive devices
- Installing or replacing hardware
- Installing external options
- Removing the computer cover
- Replacing the front bezel
- Replacing the optical drive
- Pivoting the drive bay assembly upward and downward
- Replacing the storage drive
- Replacing a PCI Express card
- Replacing the heat sink and fan assembly
- Replacing a memory module
- Replacing the coin-cell battery
- Replacing the power supply assembly
- Completing the parts replacement
- Chapter 8. Getting information, help, and service
- Appendix A. Regulatory information
- Appendix B. WEEE and recycling information
- Appendix C. Restriction of Hazardous Substances (RoHS) Directive
- Appendix D. China Energy Label
- Appendix E. ENERGY STAR model information
- Appendix F. Notices

ThinkCentreM700
UserGuide
MachineTypes:10GS,10GT,10KN,and10KQ

Note:Beforeusingthisinformationandtheproductitsupports,besuretoreadandunderstandthe“Read
thisfirst:Importantsafetyinformation”onpageiiiandAppendixF“Notices”onpage95.
FifthEdition(May2016)
©CopyrightLenovo2016.
LIMITEDANDRESTRICTEDRIGHTSNOTICE:IfdataorsoftwareisdeliveredpursuanttoaGeneralServices
Administration“GSA”contract,use,reproduction,ordisclosureissubjecttorestrictionssetforthinContractNo.
GS-35F-05925.

Contents
Readthisfirst:Importantsafety
information..............iii
Beforeusingthismanual............iii
Serviceandupgrades.............iii
Staticelectricityprevention...........iv
Powercordsandpoweradapters........iv
Extensioncordsandrelateddevices.......v
Plugsandoutlets...............v
Externaldevices...............v
Heatandproductventilation..........v
Operatingenvironment............vi
Lasercompliancestatement..........vi
Powersupplystatement...........vii
Cleaningandmaintenance..........vii
Chapter1.Productoverview......1
Hardwarelocations..............1
Frontview................1
Rearview................3
Computercomponents..........6
Partsonthesystemboard.........8
Machinetypeandmodellabel........9
Features..................9
Specifications...............12
Programs.................12
Accessingaprogramonthecomputer...12
Installingaprogramthatisreadytobe
installed...............13
AnintroductiontoLenovoprograms....13
Chapter2.Usingyourcomputer...15
Registeringthecomputer..........15
Settingthecomputervolume.........15
AddinganicontotheWindowsnotificationarea.15
Usingadisc................15
Guidelinesaboutusingtheopticaldrive...16
Handlingandstoringadisc........16
Playingandremovingadisc.......16
Recordingadisc............17
Connectingtoanetwork...........17
ConnectingtoanEthernetLAN......17
ConnectingtoawirelessLAN.......18
ConnectingtoaBluetooth-enableddevice..18
Chapter3.Youandyourcomputer..19
Arrangingyourworkspace..........19
Glareandlighting............19
Aircirculation.............19
Electricaloutletlocationsandcablelengths.19
Comfort...............19
Accessibilityinformation...........20
Cleaningthecomputer...........23
Maintenance...............23
Basicmaintenancetips.........23
Goodmaintenancepractices.......23
Keepingthecomputercurrent.......24
Movingthecomputer............25
Chapter4.Security..........27
Lockingthecomputer............27
Lockingthecomputercover.......28
AttachingaKensington-stylecablelock...29
Attachingacablelock..........30
Viewingandchangingsecuritysettingsinthe
SetupUtilityprogram............30
Preventingunauthorizedaccesstothecomputer.31
Usingfingerprintauthentication........31
Usingthecoverpresenceswitch.......31
Usingandunderstandingfirewalls.......32
Protectingdataagainstviruses........32
ComputraceAgentsoftwareembeddedin
firmware.................32
TrustedPlatformModule(TPM)........32
Chapter5.Advancedconfiguration..33
UsingtheSetupUtilityprogram........33
StartingtheSetupUtilityprogram.....33
Enablingordisablingadevice.......33
EnablingordisablingtheAutomaticPowerOn
features...............33
EnablingordisablingtheErPLPScompliance
mode................34
EnablingordisablingtheConfiguration
ChangeDetectionfeature........34
UsingBIOSpasswords.........35
Selectingastartupdevice........36
ExitingtheSetupUtilityprogram......36
UpdatingtheBIOS.............37
Chapter6.Troubleshooting,
diagnostics,andrecovery......39
Basicprocedureforresolvingcomputer
problems.................39
Troubleshooting..............39
Startupproblems............39
©CopyrightLenovo2016i

Audioproblems............40
CDproblems.............41
DVDproblems.............41
Intermittentproblems..........42
Storagedriveproblems.........42
Networkingproblems..........43
Performanceproblems..........45
Serialconnectorcannotbeaccessed....46
USBdeviceproblems..........46
Softwareanddriverproblems.......46
Diagnostics................47
LenovoSolutionCenter.........47
Recoveryinformation............47
RecoveryinformationforWindows7....47
RecoveryinformationforWindows10....48
Chapter7.Installingorreplacing
hardware...............51
Handlingstatic-sensitivedevices.......51
Installingorreplacinghardware........51
Installingexternaloptions........51
Removingthecomputercover.......52
Replacingthefrontbezel.........52
Replacingtheopticaldrive........55
Pivotingthedrivebayassemblyupwardand
downward..............57
Replacingthestoragedrive........59
ReplacingaPCIExpresscard.......66
Replacingtheheatsinkandfanassembly..68
Replacingamemorymodule.......70
Replacingthecoin-cellbattery......72
Replacingthepowersupplyassembly...73
Completingthepartsreplacement.....74
Chapter8.Gettinginformation,help,
andservice..............77
Informationresources............77
Accessingtheuserguideinvarious
languages...............77
Windowshelpsystem..........77
Safetyandwarranty...........77
LenovoWebsite............77
LenovoSupportWebsite.........78
Frequentlyaskedquestions........78
Helpandservice..............78
Callingforservice............78
Usingotherservices..........79
Purchasingadditionalservices......79
AppendixA.Regulatory
information..............81
Exportclassificationnotice..........81
Electronicemissionsnotices.........81
FederalCommunicationsCommission
DeclarationofConformity........81
Eurasiancompliancemark..........83
Brazilaudionotice.............83
Mexicowireless-radiocomplianceinformation..83
Additionalregulatoryinformation.......84
AppendixB.WEEEandrecycling
information..............85
ImportantWEEEinformation.........85
RecyclinginformationforJapan........85
RecyclinginformationforBrazil........86
BatteryrecyclinginformationforTaiwan.....86
BatteryrecyclinginformationfortheEuropean
Union..................87
AppendixC.RestrictionofHazardous
Substances(RoHS)Directive.....89
EuropeanUnionRoHS...........89
TurkishRoHS...............89
UkraineRoHS...............89
IndiaRoHS................89
ChinaRoHS................90
TaiwanRoHS...............90
AppendixD.ChinaEnergyLabel...91
AppendixE.ENERGYSTARmodel
information..............93
AppendixF .Notices..........95
Trademarks................96
iiThinkCentreM700UserGuide
Readthisfirst:Importantsafetyinformation
CAUTION:
Beforeusingthecomputer,besuretoreadandunderstandalltherelatedsafetyinformationforthis
product.RefertothesafetyinformationinthissectionandintheSafetyandWarrantyGuidethatyou
receivedwiththisproduct.Readingandunderstandingallthesafetyinformationreducestheriskof
personalinjuryanddamagetoyourproduct.IfyounolongerhaveacopyoftheSafetyandWarranty
Guide,youcanobtainaPortableDocumentFormat(PDF)versionfromtheLenovo®SupportWeb
siteathttp://www.lenovo.com/UserManuals.
Beforeusingthismanual
CAUTION:
Beforeusingthismanual,besuretoreadandunderstandalltherelatedsafetyinformationforthis
product.RefertotheinformationinthissectionandthesafetyinformationintheSafetyandWarranty
Guidethatyoureceivedwiththisproduct.Readingandunderstandingthissafetyinformationreduces
theriskofpersonalinjuryanddamagetoyourproduct.
IfyounolongerhaveacopyoftheSafetyandWarrantyGuide,youcanobtainaPortableDocumentFormat
(PDF)versionfromtheLenovo®SupportWebsiteathttp://www.lenovo.com/UserManuals.
Serviceandupgrades
DonotattempttoserviceaproductyourselfunlessinstructedtodosobytheCustomerSupportCenteror
yourdocumentation.OnlyuseaServiceProviderwhoisapprovedtorepairyourparticularproduct.
Note:Somecomputerpartscanbeupgradedorreplacedbythecustomer.Upgradestypicallyare
referredtoasoptions.ReplacementpartsapprovedforcustomerinstallationarereferredtoasCustomer
ReplaceableUnits,orCRUs.Lenovoprovidesdocumentationwithinstructionswhenitisappropriatefor
customerstoinstalloptionsorreplaceCRUs.Youmustcloselyfollowallinstructionswheninstallingor
replacingparts.TheOffstateofapowerindicatordoesnotnecessarilymeanthatvoltagelevelsinsidea
productarezero.Beforeyouremovethecoversfromaproductequippedwithapowercord,alwaysensure
thatthepoweristurnedoffandthattheproductisunpluggedfromanypowersource.Ifyouhaveany
questionsorconcerns,contacttheCustomerSupportCenter.
Althoughtherearenomovingpartsinthecomputerafterthepowercordhasbeendisconnected,the
followingwarningsarerequiredforyoursafety.
CAUTION:
Hazardousmovingparts.Keepfingersandotherbodypartsaway.
CAUTION:
©CopyrightLenovo2016iii

Beforeyouopenthecomputercover,turnoffthecomputerandwaitseveralminutesuntilthe
computeriscool.
Staticelectricityprevention
Staticelectricity,althoughharmlesstoyou,canseriouslydamagecomputercomponentsandoptions.
Improperhandlingofstatic-sensitivepartscancausedamagetothepart.Whenyouunpackanoption
orCRU,donotopenthestatic-protectivepackagecontainingthepartuntiltheinstructionsdirectyou
toinstallit.
WhenyouhandleoptionsorCRUs,orperformanyworkinsidethecomputer,takethefollowingprecautions
toavoidstatic-electricitydamage:
•Limityourmovement.Movementcancausestaticelectricitytobuilduparoundyou.
•Alwayshandlecomponentscarefully.Handleadapters,memorymodules,andothercircuitboardsbythe
edges.Nevertouchexposedcircuitry.
•Preventothersfromtouchingcomponents.
•Whenyouinstallastatic-sensitiveoptionorCRU,touchthestatic-protectivepackagecontainingthe
parttoametalexpansion-slotcoverorotherunpaintedmetalsurfaceonthecomputerforatleasttwo
seconds.Thisreducesstaticelectricityinthepackageandyourbody.
•Whenpossible,removethestatic-sensitivepartfromthestatic-protectivepackagingandinstallthepart
withoutsettingitdown.Whenthisisnotpossible,placethestatic-protectivepackagingonasmooth,
levelsurfaceandplacethepartonit.
•Donotplacethepartonthecomputercoverorothermetalsurface.
Powercordsandpoweradapters
Useonlythepowercordsandpoweradapterssuppliedbytheproductmanufacturer.Donotusetheac
powercordforotherdevices.
Thepowercordsshallbesafetyapproved.ForGermany,itshallbeH03VV-F,3G,0.75mm2(thepowercord
connectedtothepoweradapter),H05VV-F,3G,0.75mm2(thepowercordconnectedtotheinternalpower
supplyassembly),orbetter.Forothercountries,thesuitabletypesshallbeusedaccordingly.
Neverwrapapowercordaroundapoweradapterorotherobject.Doingsocanstressthecordinwaysthat
cancausethecordtofray,crack,orcrimp.Thiscanpresentasafetyhazard.
Alwaysroutepowercordssothattheywillnotbewalkedon,trippedover,orpinchedbyobjects.
Protectpowercordandpoweradaptersfromliquids.Forinstance,donotleaveyourpowercordorpower
adapternearsinks,tubs,toilets,oronfloorsthatarecleanedwithliquidcleansers.Liquidscancausea
shortcircuit,particularlyifthepowercordorpoweradapterhasbeenstressedbymisuse.Liquidsalsocan
causegradualcorrosionofpowercordterminalsand/ortheconnectorterminalsonapoweradapter,
whichcaneventuallyresultinoverheating.
Ensurethatallpowercordconnectorsaresecurelyandcompletelypluggedintoreceptacles.
Donotuseanypoweradapterthatshowscorrosionattheacinputpinsorshowssignsofoverheating(such
asdeformedplastic)attheacinputoranywhereonthepoweradapter.
Donotuseanypowercordswheretheelectricalcontactsoneitherendshowsignsofcorrosionor
overheatingorwherethepowercordappearstohavebeendamagedinanyway.
ivThinkCentreM700UserGuide

Extensioncordsandrelateddevices
Ensurethatextensioncords,surgeprotectors,uninterruptiblepowersupplies,andpowerstripsthatyouuse
areratedtohandletheelectricalrequirementsoftheproduct.Neveroverloadthesedevices.Ifpowerstrips
areused,theloadshouldnotexceedthepowerstripinputrating.Consultanelectricianformoreinformation
ifyouhavequestionsaboutpowerloads,powerrequirements,andinputratings.
Plugsandoutlets
Ifareceptacle(poweroutlet)thatyouintendtousewiththecomputerequipmentappearstobedamagedor
corroded,donotusetheoutletuntilitisreplacedbyaqualifiedelectrician.
Donotbendormodifytheplug.Iftheplugisdamaged,contactthemanufacturertoobtainareplacement.
Donotshareanelectricaloutletwithotherhomeorcommercialappliancesthatdrawlargeamountsof
electricity;otherwise,unstablevoltagemightdamagethecomputer,data,orconnecteddevices.
Someproductsareequippedwithathree-prongedplug.Thisplugfitsonlyintoagroundedelectricaloutlet.
Thisisasafetyfeature.Donotdefeatthissafetyfeaturebytryingtoinsertitintoanon-groundedoutlet.If
youcannotinserttheplugintotheoutlet,contactanelectricianforanapprovedoutletadapterortoreplace
theoutletwithonethatenablesthissafetyfeature.Neveroverloadanelectricaloutlet.Theoverallsystem
loadshouldnotexceed80percentofthebranchcircuitrating.Consultanelectricianformoreinformation
ifyouhavequestionsaboutpowerloadsandbranchcircuitratings.
Besurethatthepoweroutletyouareusingisproperlywired,easilyaccessible,andlocatedclosetothe
equipment.Donotfullyextendpowercordsinawaythatwillstressthecords.
Besurethatthepoweroutletprovidesthecorrectvoltageandcurrentfortheproductyouareinstalling.
Carefullyconnectanddisconnecttheequipmentfromtheelectricaloutlet.
Externaldevices
DonotconnectordisconnectanyexternaldevicecablesotherthanUniversalSerialBus(USB)cableswhile
thecomputerpowerison;otherwise,youmightdamagethecomputer.Toavoidpossibledamageto
connecteddevices,waitatleastfivesecondsafterthecomputerisshutdowntodisconnectexternaldevices.
Heatandproductventilation
Computers,poweradapters,andmanyaccessoriescangenerateheatwhenturnedonandwhenbatteries
arecharging.Alwaysfollowthesebasicprecautions:
•Donotleavethecomputer,poweradapter,oraccessoriesincontactwithyourlaporanypartofyour
bodyforanextendedperiodwhentheproductsarefunctioningorwhenthebatteryischarging.The
computer,poweradapter,andmanyaccessoriesproducesomeheatduringnormaloperation.Extended
contactwiththebodycouldcausediscomfortor,potentially,askinburn.
•Donotchargethebatteryoroperatethecomputer,poweradapter,oraccessoriesnearflammable
materialsorinexplosiveenvironments.
•Ventilationslots,fans,andheatsinksareprovidedwiththeproductforsafety,comfort,andreliable
operation.Thesefeaturesmightinadvertentlybecomeblockedbyplacingtheproductonabed,sofa,
carpet,orotherflexiblesurface.Neverblock,cover,ordisablethesefeatures.
©CopyrightLenovo2016v

Inspectyourdesktopcomputerfordustaccumulationatleastonceeverythreemonths.Beforeinspecting
thecomputer,turnoffthepowerandunplugthecomputer'spowercordfromtheelectricaloutlet;then
removeanydustfromventsandperforationsinthebezel.Ifyounoticeexternaldustaccumulation,then
examineandremovedustfromtheinsideofthecomputerincludingheatsinkinletfins,powersupplyvents,
andfans.Alwaysturnoffandunplugthecomputerbeforeopeningthecover.Ifpossible,avoidoperatingthe
computerwithintwofeetofhigh-trafficareas.Ifyoumustoperatethecomputerinornearahigh-traffic
area,inspectand,ifnecessary,cleanthecomputermorefrequently.
Foryoursafetyandtomaintainoptimumcomputerperformance,alwaysfollowthesebasicprecautions
withyourdesktopcomputer:
•Keepthecoverclosedwheneverthecomputerispluggedin.
•Regularlyinspecttheoutsideofthecomputerfordustaccumulation.
•Removedustfromventsandanyperforationsinthebezel.Morefrequentcleaningsmightberequiredfor
computersindustyorhigh-trafficareas.
•Donotrestrictorblockanyventilationopenings.
•Donotstoreoroperatethecomputerinsidefurniture,asthismightincreasetheriskofoverheating.
•Airflowtemperaturesintothecomputershouldnotexceed35°C(95°F).
•Donotinstallairfiltrationdevices.Theymayinterferewithpropercooling.
Operatingenvironment
Theoptimalenvironmentinwhichtousethecomputeris10°C–35°C(50°F–95°F)withhumidityranging
between35%and80%.Ifthecomputerisstoredortransportedintemperatureslessthan10°C(50°F),allow
thecoldcomputertoriseslowlytoanoptimaloperatingtemperatureof10°C–35°C(50°F–95°F)beforeuse.
Thisprocesscouldtaketwohoursinextremeconditions.Failuretoallowthecomputertorisetoanoptimal
operatingtemperaturebeforeusecouldresultinirreparabledamagetothecomputer.
Ifpossible,placethecomputerinawell-ventilatedanddryareawithoutdirectexposuretosunshine.
Keepelectricalappliancessuchasanelectricfan,radio,high-poweredspeakers,airconditioner,and
microwaveovenawayfromthecomputerbecausethestrongmagneticfieldsgeneratedbytheseappliances
candamagethemonitoranddataonthestoragedrive.
Donotplaceanybeveragesontopoforbesidethecomputerorotherconnecteddevices.Ifliquidisspilled
onorinthecomputeroraconnecteddevice,ashortcircuitorotherdamagemightoccur.
Donoteatorsmokeoveryourkeyboard.Particlesthatfallintoyourkeyboardcancausedamage.
Lasercompliancestatement
CAUTION:
Whenlaserproducts(suchasCD-ROMs,DVDdrives,fiberopticdevices,ortransmitters)are
installed,notethefollowing:
•Donotremovethecovers.Removingthecoversofthelaserproductcouldresultinexposureto
hazardouslaserradiation.Therearenoserviceablepartsinsidethedevice.
•Useofcontrolsoradjustmentsorperformanceofproceduresotherthanthosespecifiedherein
mightresultinhazardousradiationexposure.
viThinkCentreM700UserGuide
DANGER
SomelaserproductscontainanembeddedClass3AorClass3Blaserdiode.Notethefollowing:
Laserradiationwhenopen.Donotstareintothebeam,donotviewdirectlywithoptical
instruments,andavoiddirectexposuretothebeam.
Powersupplystatement
Neverremovethecoveronapowersupplyoranypartthathasthefollowinglabelattached.
Hazardousvoltage,current,andenergylevelsarepresentinsideanycomponentthathasthislabelattached.
Therearenoserviceablepartsinsidethesecomponents.Ifyoususpectaproblemwithoneoftheseparts,
contactaservicetechnician.
Cleaningandmaintenance
Keepthecomputerandworkspaceclean.Shutdownthecomputerandthendisconnectthepower
cordbeforecleaningthecomputer.Donotsprayanyliquiddetergentdirectlyonthecomputeroruse
anydetergentcontainingflammablematerialtocleanthecomputer.Spraythedetergentonasoftcloth
andthenwipethecomputersurfaces.
©CopyrightLenovo2016vii

viiiThinkCentreM700UserGuide
Chapter1.Productoverview
Thischapterprovidesinformationaboutthefollowingtopics:
•“Hardwarelocations”onpage1
•“Features”onpage9
•“Specifications”onpage12
•“Programs”onpage12
Hardwarelocations
Thissectionprovidesinformationaboutthelocationsofthecomputerhardware.
Note:Thecomputerhardwaremightlookslightlydifferentfromtheillustrations.
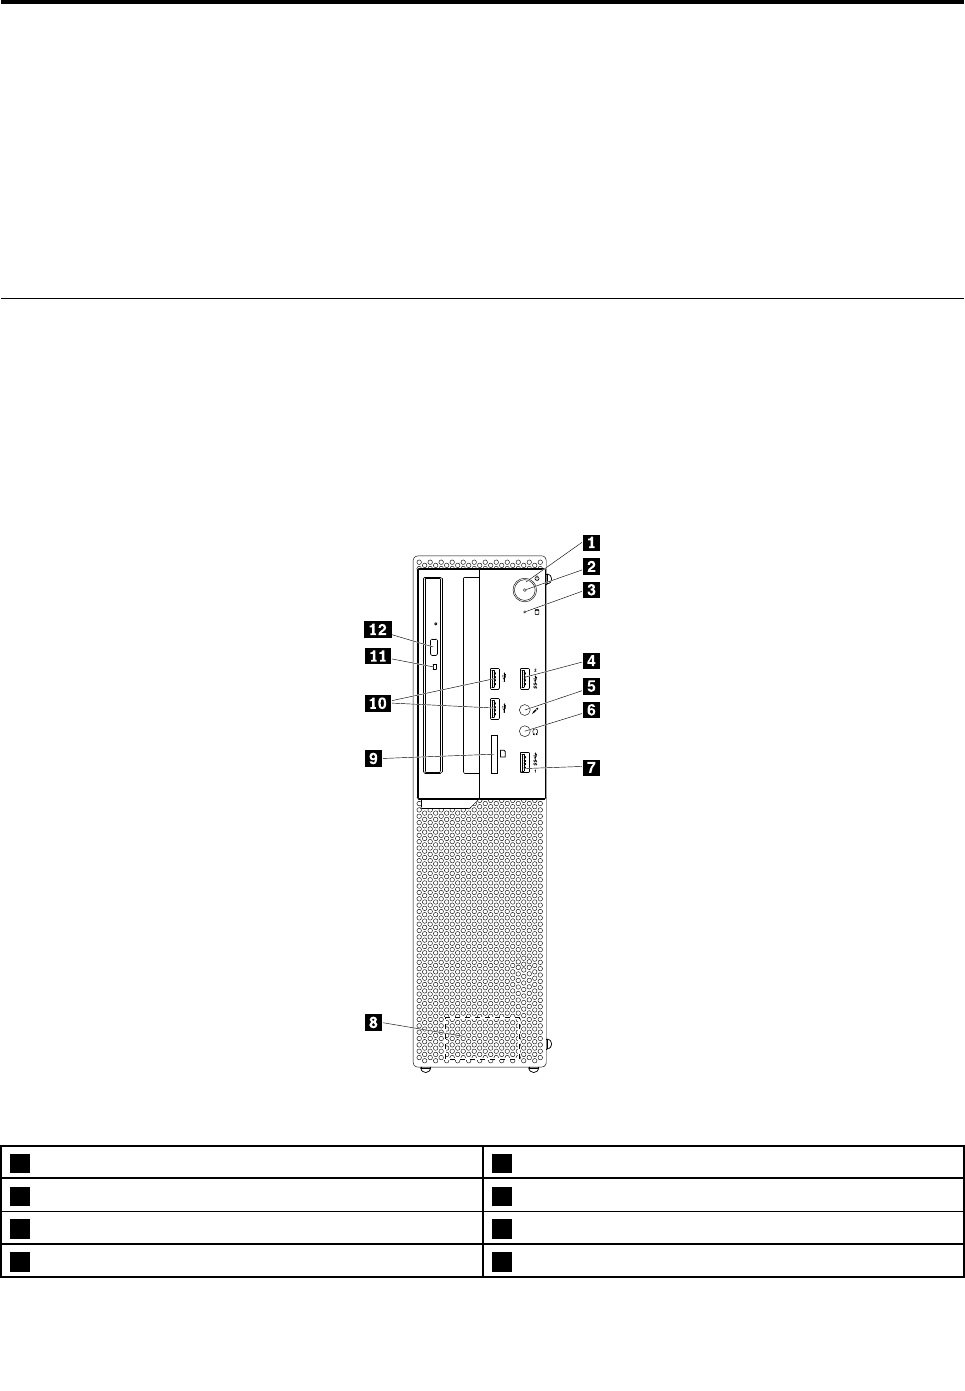
Frontview
Figure1.Frontview
1Powerbutton2Powerindicator
3Storagedriveactivityindicator4USB3.0connector
5Microphoneconnector6Headphoneconnector
7USB3.0connector8Internalspeaker(somemodels)
©CopyrightLenovo20161

9Cardreaderslot(somemodels)10USB2.0connectors(2)(somemodels)
11Opticaldriveactivityindicator12Opticaldriveeject/closebutton
•Cardreaderslot
Usedtoholdacard-shapedstoragemediumsothatthecardreadercanreadthedataonthestorage
medium.
•Headphoneconnector
Usedtoconnectheadphonestoyourcomputer.
•Internalspeaker
Usedtolistentothesoundsfromyourcomputerwithoutusingaheadsetorheadphones.
•Microphoneconnector
Usedtoconnectamicrophonetoyourcomputer.Youcanusethemicrophonetorecordsoundsoruse
speech-recognitionsoftware.
•Opticaldriveactivityindicator
Whentheopticaldriveactivityindicatorison,theopticaldriveisinuse.
•Opticaldriveeject/closebutton
Usedtoejectthetrayoftheopticaldrivefromthedrive.Afteryouinsertadiscintothetray,press
theeject/closebuttontoclosethetray.
•Powerbutton
Usedtoturnonyourcomputer.Youalsocanusethepowerbuttontoturnoffyourcomputeronlywhen
youcannotuseanyMicrosoft®Windows®shutdownproceduretoturnoffyourcomputer.
•Powerindicator
Whenthepowerindicatorison,thecomputerison.
•Storagedriveactivityindicator
Whenthestoragedriveactivityindicatorison,thestoragedriveisinuse.
•USB2.0connector
UsedtoconnectadevicethatrequiresaUSB2.0connection,suchasakeyboard,amouse,ascanner,a
printer,orapersonaldigitalassistant(PDA).
•USB3.0connector
UsedtoconnectadevicethatrequiresaUSB2.0orUSB3.0connection,suchasakeyboard,amouse,a
scanner,aprinter,oraPDA.
2ThinkCentreM700UserGuide
Rearview
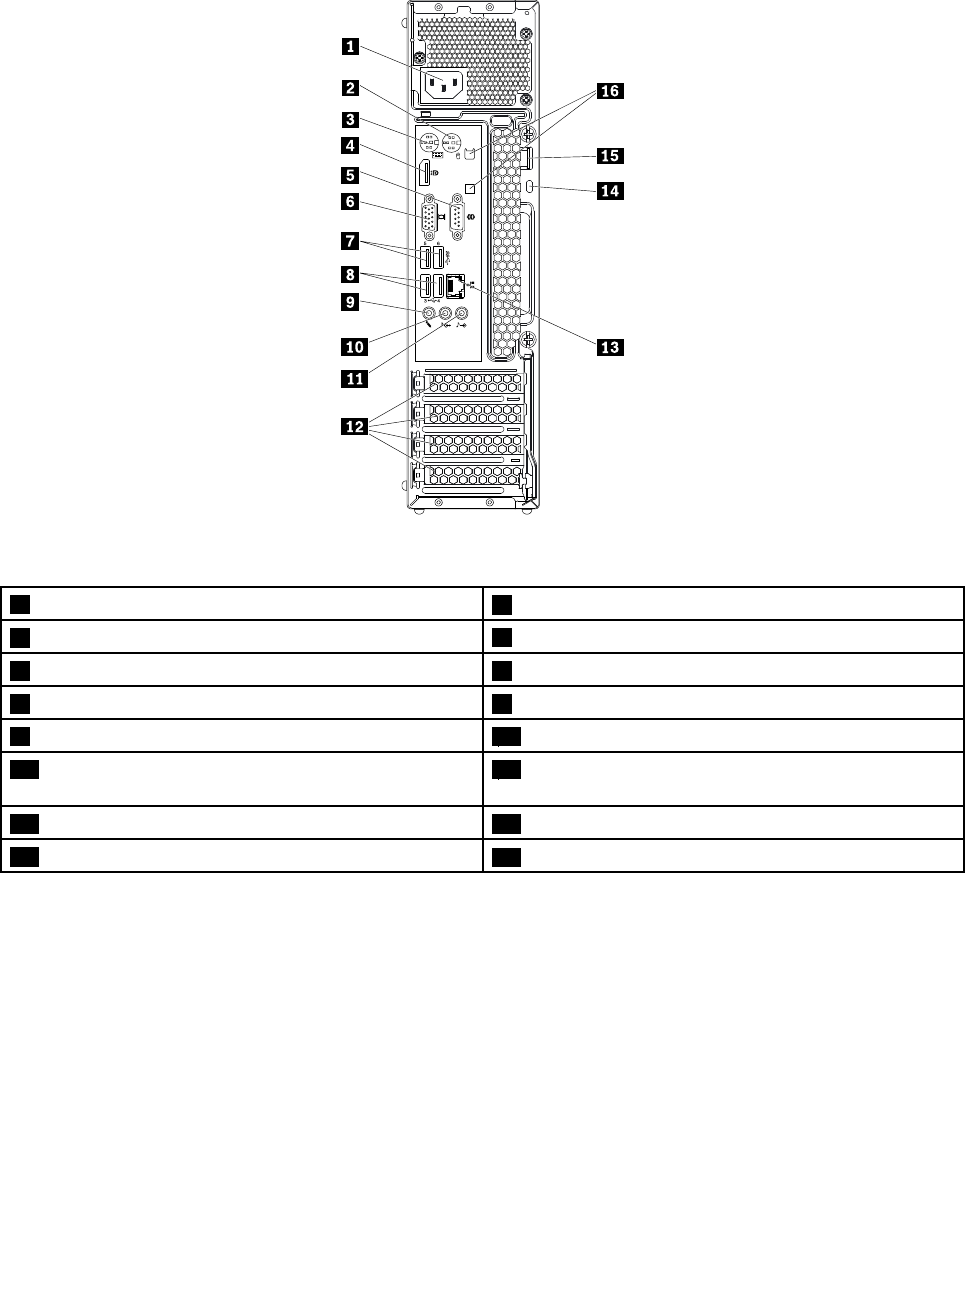
Figure2.Rearview
1Powercordconnector2PS/2mouseconnector
3PS/2keyboardconnector4DisplayPort®-outconnector
5Serialconnector6VGA-outconnector
7USB3.0connectors(2)8USB2.0connectors(2)
9Microphoneconnector10Audioline-outconnector
11Audioline-inconnector12PCIExpresscardarea(differentcardsprovide
differentconnectors)
13Ethernetconnector14Security-lockslot
15Padlockloop16Cablelockslots(2)
Note:Adiscretegraphicscard,networkinterfacecard,oraudiocardmightbeinstalledinthePeripheral
ComponentInterconnect(PCI)Expresscardarea.Ifsuchacardisinstalled,ensurethatyouusethe
connectorsonthecardinsteadofthecorrespondingconnectorsonthecomputer.
•Audioline-inconnector
Usedtoreceiveaudiosignalsfromanexternalaudiodevice,suchasastereosystem.Whenyouattach
anexternalaudiodevice,acableisconnectedbetweentheaudioline-outconnectorofthedevice
andtheaudioline-inconnectorofthecomputer.
Chapter1.Productoverview3

•Audioline-outconnector
Usedtosendaudiosignalsfromthecomputertoexternaldevices,suchaspoweredstereospeakers,
headphones,ormultimediakeyboards.Toattachastereosystemorotherexternalrecordingdevice,a
cableisconnectedbetweentheaudioline-inconnectorofthedeviceandtheaudioline-outconnector
ofthecomputer.
Note:Ifyourcomputerhasbothanaudioline-outconnectorandaheadsetconnectororheadphone
connector,alwaysusetheheadsetconnectororheadphoneconnectorforearphones,headphones,ora
headset.However,aheadphoneconnectordoesnotsupportthemicrophoneofaheadset.
•Cable-lockslots(2)
Usedtosecureacablelock.Formoreinformation,see“Attachingacablelock”onpage30.
•DisplayPort-outconnector
Usedtosendaudioandvideosignalsfromyourcomputertoanotheraudioorvideodevice,suchas
ahigh-performancemonitor.
•Ethernetconnector
UsedtoconnectanEthernetcableforalocalareanetwork(LAN).
Note:TooperatethecomputerwithinFederalCommunicationsCommission(FCC)ClassBlimits,usea
Category5eorbetterEthernetcable.
•Microphoneconnector
Usedtoconnectamicrophonetoyourcomputerwhenyouwanttorecordsoundorifyouuse
speech-recognitionsoftware.
•Padlockloop
Usedtosecureapadlock.Formoreinformation,see“Lockingthecomputercover”onpage28.
•PCIExpresscardarea(differentcardsprovidedifferentconnectors)
Toimprovetheoperatingperformanceofyourcomputer,youcanconnectPCIExpresscardsintothis
area.Dependingonyourcomputermodel,theconnectorsinthisareamightvary.
•Powercordconnector
Usedtoconnectthepowercordtoyourcomputerforpowersupply.
•PS/2keyboardconnector
UsedtoconnectakeyboardthatusesaPersonalSystem/2(PS/2)keyboardconnector.
•PS/2mouseconnector
Usedtoconnectamouse,atrackball,orotherpointingdevicesthatuseaPS/2mouseconnector.
•Serialconnector
Usedtoconnectanexternalmodem,aserialprinter,orotherdevicesthatuseaserialconnector.
•Security-lockslot
UsedtosecureaKensington-stylecablelock.Formoreinformation,see“AttachingaKensington-style
cablelock”onpage29.
•USB2.0connector
UsedtoconnectadevicethatrequiresaUSB2.0connection,suchasakeyboard,amouse,ascanner,a
printer,orapersonaldigitalassistant(PDA).
•USB3.0connector
UsedtoconnectadevicethatrequiresaUSB2.0orUSB3.0connection,suchasakeyboard,amouse,a
scanner,aprinter,oraPDA.
4ThinkCentreM700UserGuide

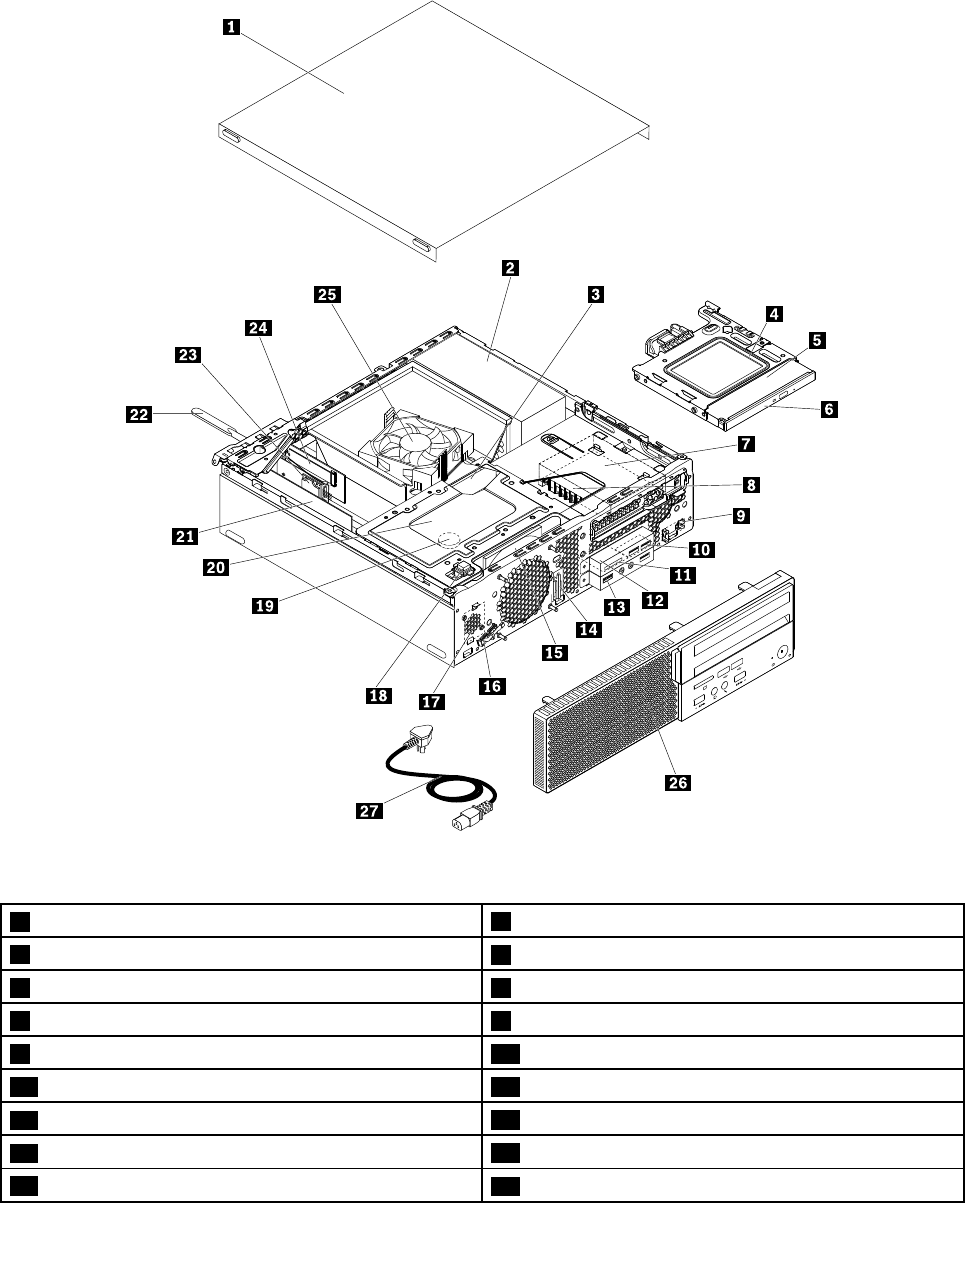
Computercomponents
Note:Dependingonyourcomputermodel,someofthefollowingcomponentsmightnotbeavailable.
Figure3.Computercomponents
1Computercover2Powersupplyassembly
3Memorymodule4Opticaldrivebracket
5Opticaldrive6Opticaldrivebezel
7Secondarystoragedrive(a2.5-inchstoragedrive)8Secondarystoragedrivebracket
9Powerbuttonboard10USB2.0assembly
11Cardreader12CardreaderandUSB2.0assemblybracket
13FrontaudioandUSB3.0assembly14FrontWi-Fiantenna
15Systemfan16Thermalsensor
17Internalspeaker18Coverpresenceswitch(alsocalledintrusionswitch)
6ThinkCentreM700UserGuide

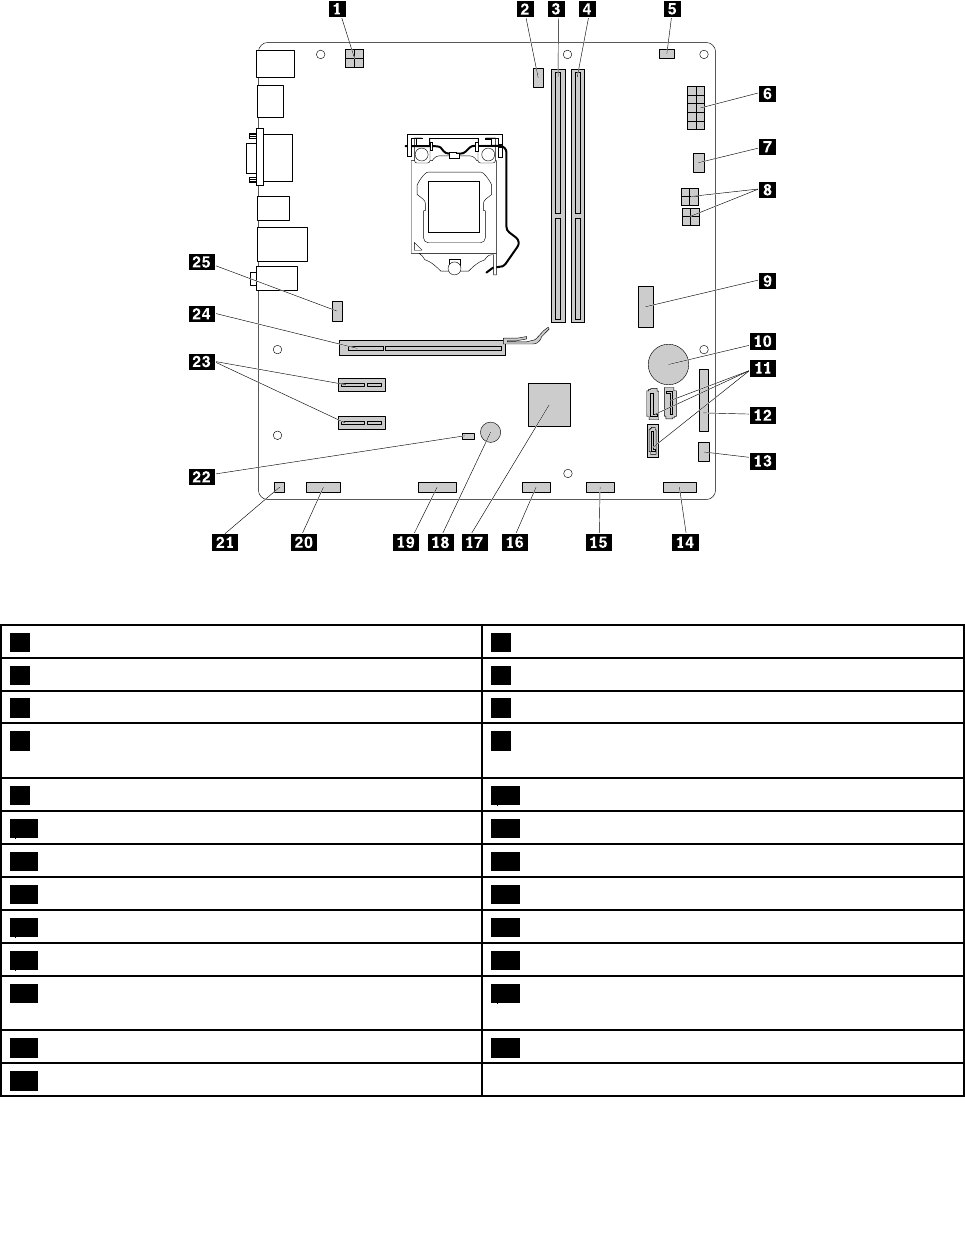
Partsonthesystemboard
Note:Forthepartsthataredisplayedonthefollowingfigurebutnotintroducedinthefollowingtable,see
“Frontview”onpage1and“Rearview”onpage3.
Figure4.Partsonthesystemboard
14-pinpowerconnector2Microprocessorfanconnector
3Memoryslot(DIMM1)4Memoryslot(DIMM2)
5Thermalsensorconnector610-pinpowerconnector
7Auxiliaryfanconnector2(forconnectingthefanonthe
secondarystoragedrivebracket)
8SATApowerconnectors(2)
9FrontUSB3.0connector10Coin-cellbattery
11SATA3.0connectors(3)12Parallelconnector
13Auxiliaryfanconnector114Powerbuttonboardconnector
15Cardreaderconnector16FrontUSB2.0connector
17PCH18Buzzer
19Serial(COM2)connector20Frontaudioconnector
21Internalspeakerconnector22Coverpresenceswitchconnector(Intrusionswitch
connector)
23PCIExpressx1cardslot(2)24PCIExpressx16graphicscardslot
25Systemfanconnector
8ThinkCentreM700UserGuide
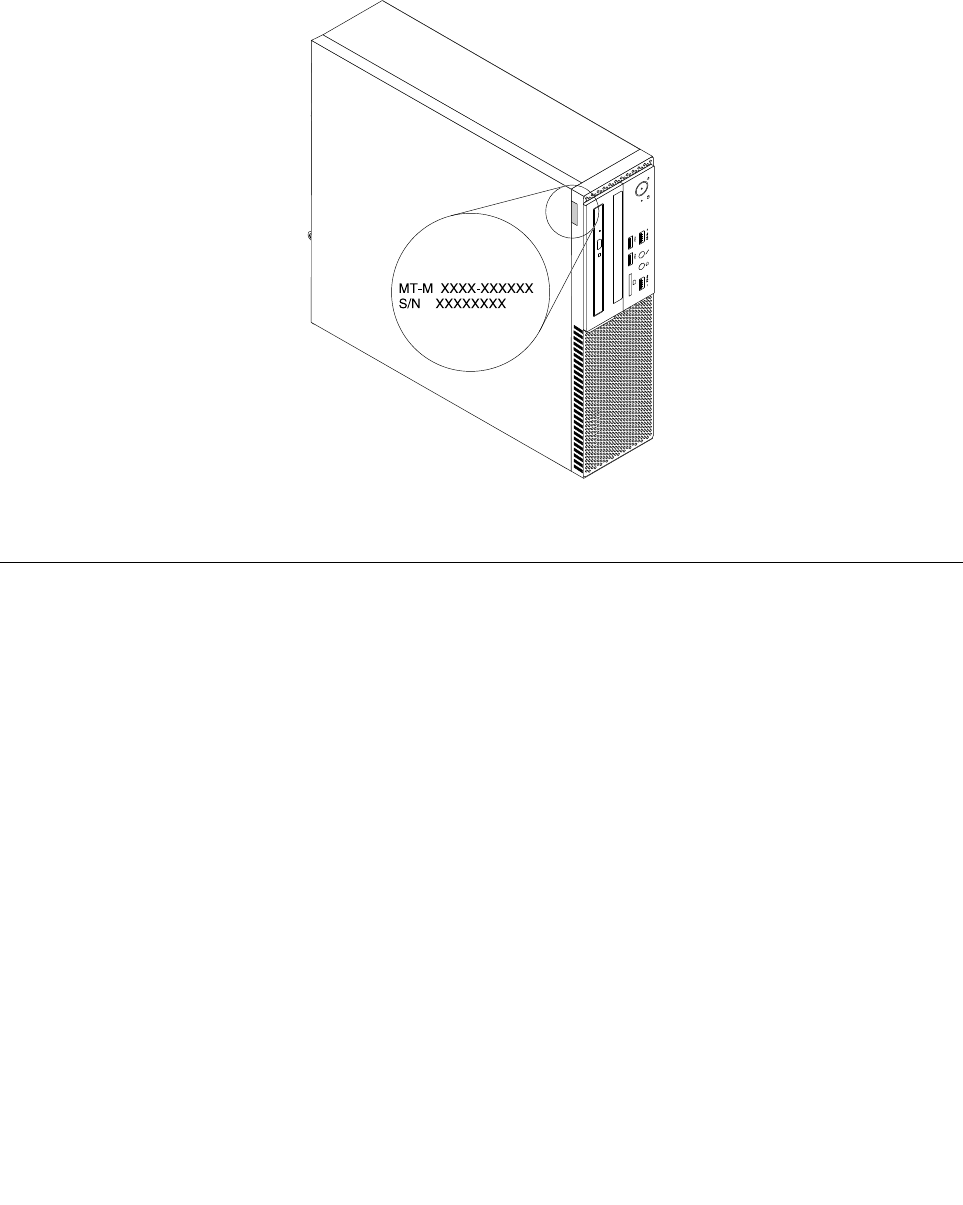
Machinetypeandmodellabel
Themachinetypeandmodellabelidentifiesyourcomputer.WhenyoucontactLenovoforhelp,themachine
typeandmodelinformationhelpssupporttechnicianstoidentifyyourcomputerandprovidefasterservice.
Themachinetypeandmodellabelisattachedonthesideofyourcomputerasshown.
Figure5.Machinetypeandmodellabel
Features
Thecomputerfeaturesintroducedinthissectionapplytovariousmodels.
Informationaboutyourcomputer
•Toviewbasicinformation(suchasmicroprocessorandmemoryinformation)aboutyourcomputer,
dothefollowing:
1.ClicktheStartbuttontoopentheStartmenu.
2.DependingonyourWindowsversion,dooneofthefollowing:
–ForWindows7:Right-clickComputer,andthenclickProperties.
–ForWindows10:ClickSettings➙System➙About.
•Toviewdetailedinformationaboutthedevices(suchastheopticaldriveandnetworkadapters)onyour
computer,dothefollowing:
1.DependingonyourWindowsversion,dooneofthefollowing:
–ForWindows7:ClicktheStartbuttontoopentheStartmenu.Right-clickComputer,andthen
clickProperties.
–ForWindows10:Right-clicktheStartbuttontoopentheStartcontextmenu.
2.ClickDeviceManager.Typetheadministratorpasswordorprovideconfirmationifprompted.
Chapter1.Productoverview9

Preinstalledoperatingsystem
YourcomputerispreinstalledwithWindows7orWindows10operatingsystem.Additionaloperating
systemsmightbeidentifiedbyLenovoascompatiblewithyourcomputer.Todetermineifanoperating
systemhasbeencertifiedortestedforcompatibility,checktheWebsiteoftheoperatingsystemprovider.
Powersupply
•180-wattautomaticvoltage-sensingpowersupply
•210-wattautomaticvoltage-sensingpowersupply
Storagedrives
Yourcomputersupportsuptotwostoragedrives.
Toviewtheamountofstoragedrivespace,dothefollowing:
1.DependingonyourWindowsversion,dooneofthefollowing:
•ForWindows7:ClicktheStartbuttontoopentheStartmenu.Right-clickComputer,andthenclick
Manage.
•ForWindows10:Right-clicktheStartbuttontoopentheStartcontextmenu.
2.ClickDiskManagement.
Videofeatures
•Theintegratedgraphicscardsupportsthefollowingdisplayconnectorsonyourcomputer:
–DisplayPort-outconnector
–VGA-outconnector
•Thediscretegraphicscard,whichisavailableonsomemodels,providesenhanceddisplaycapability
andexperience.
Audiofeatures
•Theintegratedaudiocardsupportsthefollowingaudioconnectorsanddevicesonyourcomputer:
–Audioline-inconnector
–Audioline-outconnector
–Headphoneconnector
–Internalspeaker(availableonsomemodels)
–Microphoneconnector
•Thediscreteaudiocard,whichisavailableonsomemodels,providesenhancedaudiocapabilityand
experience.
Input/Output(I/O)features
•Audioconnectors(audioline-inconnector,audioline-outconnector,headphoneconnector,and
microphoneconnector)
•Cardreaderslot(availableonsomemodels)
•Displayconnectors(DisplayPort-outconnectorandVGA-outconnector)
•Ethernetconnector
•PS/2keyboardconnector(availableonsomemodels)
•PS/2mouseconnector(availableonsomemodels)
•Serialconnector
10ThinkCentreM700UserGuide

•USBconnector
Expansion
•Cardreader(availableonsomemodels)
•Memoryslot
•Opticaldrive
•PCIExpressx1cardslot
•PCIExpressx16graphicscardslot
•Storagedrivebay
Networkfeatures
•EthernetLAN
–TheintegratednetworkinterfacecardsupportstheEthernetconnectoronyourcomputer.
–Thediscretenetworkinterfacecard,whichisavailableonsomemodels,providesanadditional
Ethernetconnector.
•WirelessLAN(availableonsomemodels)
•Bluetooth(availableonsomemodels)
Securityfeatures
Formoreinformation,seeChapter4“Security”onpage27.
Systemmanagementfeatures
•Abilitytostorepower-onself-test(POST)hardwaretestresults
•DesktopManagementInterface(DMI)
DesktopManagementInterfaceprovidesacommonpathforuserstoaccessinformationaboutall
aspectsofacomputer.Theinformationincludesprocessortype,installationdate,connectedprintersand
otherperipherals,powersources,maintenancehistory,andsoon.
•ErPLPScompliancemode
Theenergy-relatedproductsdirective(ErP)lowestpowerstate(LPS)compliancemodereducesthe
consumptionofelectricitywhenyourcomputerisinsleeporoffmode.Formoreinformation,see
“EnablingordisablingtheErPLPScompliancemode”onpage34.
•Intel®StandardManageability
IntelStandardManageabilityishardware-andfirmware-basedtechnologythatmakescomputerseasier
andlessexpensiveforbusinessestomonitor,maintain,update,upgrade,andrepair.
•IntelActiveManagementTechnology(AMT)(availableonsomemodels)
IntelActiveManagementTechnologyishardware-andfirmware-basedtechnologythatmakescomputers
easierandlessexpensiveforbusinessestomonitor,maintain,update,upgrade,andrepair.
•PrebootExecutionEnvironment(PXE)
PrebootExecutionEnvironmentenablescomputerstostartthroughanetworkinterfaceindependentof
datastoragedrives(suchasharddiskdrives)orinstalledoperatingsystems.
•SystemManagement(SM)BasicInput/OutputSystem(BIOS)andSMsoftware
TheSMBIOSspecificationdefinesdatastructuresandaccessmethodsthatcanbeusedtoread
managementdatastoredintheBIOSofacomputer.
Chapter1.Productoverview11

•WakeonLAN
WakeonLANisanEthernetcomputernetworkingstandardthatallowsacomputertobeturnedon
orwokenupbyanetworkmessage.Themessageusuallyissentbyaprogramrunningonanother
computeronthesameLAN.
•WakeonRing
WakeonRing,sometimesreferredtoasWakeonModem,isaspecificationthatallowssupported
computersanddevicestoresumefromsleeporhibernationmode.
•WindowsManagementInstrumentation(WMI)
WindowsManagementInstrumentationisasetofextensionstotheWindowsDriverModel.Itprovidesan
operatingsysteminterfacethroughwhichinstrumentedcomponentsprovideinformationandnotification.
Specifications
Thissectionliststhephysicalspecificationsforyourcomputer.
Dimensions
Width:92.8mm(3.7inches)
Height:342.8mm(13.5inches)
Depth:363.7mm(14.3inches)
Weight(withoutthepackage)
Maximumconfigurationasshipped:5.6kg(12.3lb)
Environment
•Airtemperature:
Operating:From10°C(50°F)to35°C(95°F)
Storageinoriginalshippingpackage:From-40°C(-40°F)to60°C(140°F)
Storagewithoutpackage:From-10°C(14°F)to60°C(140°F)
•Humidity:
Operating:20%–80%(non-condensing)
Storage:20%–90%(non-condensing)
•Altitude:
Operating:From-15.2m(-50ft)to3048m(10000ft)
Storage:From-15.2m(-50ft)to10668m(35000ft)
Electricalinput
Inputvoltage:From100Vacto240Vac
Inputfrequency:50/60Hz
Programs
Thissectionprovidesinformationabouttheprogramsonthecomputer.
Accessingaprogramonthecomputer
Toaccessaprogramonthecomputer,dooneofthefollowing:
•FromWindows®Search:
1.DependingonyourWindowsversion,dooneofthefollowing:
12ThinkCentreM700UserGuide

–ForMicrosoft®Windows7:ClicktheStartbuttontoopentheStartmenu,andthentypethe
programnameintothesearchbox.
–ForWindows10:TypetheprogramnameintothesearchboxnexttotheStartbutton.
2.Inthesearchresults,clickthenameofthedesiredprogramtolaunchtheprogram.
•FromtheStartmenuorControlPanel:
1.ClicktheStartbuttontoopentheStartmenu.Then,clickthenameofthedesiredprogramto
launchtheprogram.
2.Iftheprogramnameisnotdisplayed,clickAllProgramsforWindows7orAllappsforWindows
10todisplaytheprogramlist.Fromthelistorafolderinthelist,clickthenameofthedesired
programtolaunchtheprogram.
3.IftheprogramnameisnotdisplayedontheStartmenu,accesstheprogramfromControlPanel.
a.DependingonyourWindowsversion,dooneofthefollowing:
–ForWindows7:ClickControlPanelontheStartmenu.
–ForWindows10:Right-clicktheStartbuttontoopentheStartcontextmenu,andthenclick
ControlPanel.
b.ViewControlPanelusingLargeiconsorSmallicons,andthenclickthenameofthedesired
programtolaunchtheprogram.
Installingaprogramthatisreadytobeinstalled
Note:ForWindows7,dependingonthecomputermodel,someoftheLenovoprogramsmightbereadyto
beinstalled,soyouneedtoinstallthemmanually.Then,youcanaccessandusetheseprograms.
Toinstallaprogramthatisreadytobeinstalled,dothefollowing:
1.OpentheLenovoThinkVantage®Toolsprogram.See“Accessingaprogramonthecomputer”on
page12.
2.ViewtheprogramiconsusingTiles.
3.Followtheinstructionsundergreyed-outiconstolocatetheiconforthedesiredprogram.Then,
double-clicktheicontoinstalltheprogram.
AnintroductiontoLenovoprograms
ThissectionprovidesinformationaboutthemajorLenovoprogramsavailableonyouroperatingsystem.
Note:Dependingonyourcomputermodel,someofthefollowingprogramsmightnotbeavailable.
•ForWindows7only:
–CreateRecoveryMedia
TheCreateRecoveryMediaprogramenablesyoutorestoreonlytheCdriveortheentirestorage
drivetothefactory-defaultsettings.
–FingerprintManagerProorThinkVantageFingerprintSoftware
TheFingerprintManagerProorThinkVantageFingerprintSoftwareprogramenablesyoutousea
fingerprintreader.Theintegratedfingerprintreaderprovidedonsomekeyboardsenablesyoutoenroll
yourfingerprintandassociateitwithyourpower-onpassword,harddiskpassword,andWindows
password.Asaresult,fingerprintauthenticationcanreplacepasswordsandenablesimpleandsecure
useraccess.
–LenovoPowerENGAGE
TheLenovoPowerENGAGEprogramenablesyoutoregisteryourcomputerwithLenovo.
Chapter1.Productoverview13

–PasswordManager
ThePasswordManagerprogramautomaticallycapturesandfillsinauthenticationinformationfor
WindowsprogramsandWebsites.
–RescueandRecovery®
TheRescueandRecoveryprogramisaone-buttonrecoveryandrestoresolution.Itincludesaset
ofself-recoverytoolstohelpyoudiagnosecomputerproblems,gethelp,andrecoverfromsystem
crashes,evenifyoucannotstarttheWindowsoperatingsystem.
–SystemUpdate
TheSystemUpdateprogramprovidesregularaccesstothesystemupdatesforyourcomputer,such
asdevicedriverupdates,softwareupdates,andBIOSupdates.Theprogramgathersinformationfrom
theLenovoHelpCenteraboutnewupdatesforyourcomputer,thensortsanddisplaystheupdatesfor
downloadandinstallation.Youhavecompletecontrolofwhichupdatestodownloadandinstall.
•ForWindows10only:
–LenovoCompanion
Yourcomputer’sbestfeaturesandcapabilitiesshouldbeeasytoaccessandunderstand.WithLenovo
Companion,theyare.UseLenovoCompaniontodothefollowing:
–Optimizeyourcomputer’sperformance,monitoryourcomputer’shealth,andmanageupdates.
–Accessyouruserguide,checkwarrantystatus,andviewaccessoriescustomizedforyourcomputer.
–Readhow-toarticles,exploreLenovoforums,andstayup-to-dateontechnologynewswitharticles
andblogsfromtrustedsources.
LenovoCompanionisfilledwithexclusiveLenovocontenttohelpyoulearnmoreaboutwhatyou
candowithyourcomputer.
–LenovoID
TheLenovoIDprogramenablesyoutocreateyourLenovoIDandaccessallsupportedLenovo
programsandwebportalswithsinglesign-on.
•ForWindows7andWindows10:
–LenovoBluetoothLock
TheLenovoBluetoothLockprogramenablesyoutouseaBluetoothdevice(suchasyoursmartphone)
asaproximity-basedunitforlockingorunlockingyourcomputerautomatically.Bydetectingthe
distancebetweenyourcomputerandthepredefinedBluetoothdevicethatyouarecarrying,theLenovo
BluetoothLockprogramautomaticallylocksyourcomputerwhenyouwalkawayandunlocksyour
computerwhenyoucomeback.Thisisasimplewaytoprotectyourcomputeragainstunauthorized
accessincasethatyouforgettolockyourcomputer.
–LenovoDeviceExperienceorLenovoPCExperience
TheLenovoDeviceExperienceorLenovoPCExperienceprogramhelpsyouworkmoreeasilyand
securely.TheprogramprovideseasyaccesstoLenovoThinkVantageToolsorLenovoTools,important
settingsandinformationaboutyourcomputer,theLenovoSupportWebsite,andsoon.
–LenovoSolutionCenter
TheLenovoSolutionCenterprogramenablesyoutotroubleshootandresolvecomputerproblems.It
combinesdiagnostictests,systeminformationcollection,securitystatus,andsupportinformation,
alongwithhintsandtipsformaximumsystemperformance.
–PowerManager
ThePowerManagerprogramprovidesconvenient,flexible,andcompletepowermanagementfor
yourcomputer.Itenablesyoutoadjustyourcomputerpowersettingstoachievethebestbalance
betweenperformanceandpowersaving.
14ThinkCentreM700UserGuide

Chapter2.Usingyourcomputer
Thischaptercontainsthefollowingtopics:
•“Registeringthecomputer”onpage15
•“Settingthecomputervolume”onpage15
•“AddinganicontotheWindowsnotificationarea”onpage15
•“Usingadisc”onpage15
•“Connectingtoanetwork”onpage17
Registeringthecomputer
WhenyouregisterthecomputerwithLenovo,youenterrequiredinformationintoaLenovodatabase.The
informationenablesLenovotocontactyouwhenthereisarecallorothersevereproblemandprovide
quickerservicewhenyoucallLenovoforhelp.Inaddition,somelocationsofferextendedprivilegesand
servicestoregisteredusers.
ToregisterthecomputerwithLenovo,ensurethatthecomputerisconnectedtotheInternet.Then,goto
http://www.lenovo.com/registerandfollowtheinstructionsonthescreen.
Settingthecomputervolume
Tosetthecomputervolume,dothefollowing:
1.ClickthevolumeiconintheWindowsnotificationareaonthetaskbar.
Note:IfthevolumeiconisnotdisplayedintheWindowsnotificationarea,addtheicontothe
notificationarea.See“AddinganicontotheWindowsnotificationarea”onpage15.
2.Followtheinstructionsonthescreentoadjustthevolume.Clickthespeakericontomutetheaudio.
AddinganicontotheWindowsnotificationarea
ToaddanicontotheWindowsnotificationarea,dothefollowing:
1.Clickthearrownexttothenotificationareatoviewhiddenicons.Then,clickthedesirediconand
dragittothenotificationarea.
2.Iftheiconisnotdisplayed,turnontheicon.
a.ClicktheStartbuttontoopentheStartmenu.
b.DependingonyourWindowsversion,dooneofthefollowing:
•ForWindows7:ClickControlPanel.ViewControlPanelusingLargeiconsorSmallicons,and
thenclickNotificationAreaIcons➙Turnsystemiconsonoroff.
•ForWindows10:ClickSettings➙System➙Notifications&actions➙Turnsystemicons
onoroff.
c.Turnonthedesiredicon.
3.IftheiconisstillnotdisplayedintheWindowsnotificationarea,repeatstep1.
Usingadisc
Thissectionprovidesinformationaboutusingadiscandtheopticaldrive.
©CopyrightLenovo201615

Guidelinesaboutusingtheopticaldrive
Whenusingtheopticaldrive,followtheseguidelines:
•Donotplacethecomputerinalocationwherethedriveisexposedtoanyofthefollowingconditions:
–Hightemperature
–Highhumidity
–Excessivedust
–Excessivevibrationorsuddenshock
–Aninclinedsurface
–Directsunlight
•Donotinsertanyobjectotherthanadiscintothedrive.
•Donotinsertdamageddiscsintothedrive.Warped,scratched,ordirtydiscscandamagethedrive.
•Beforemovingthecomputer,removethediscfromthedrive.
Handlingandstoringadisc
Whenhandlingandstoringadisc,followtheseguidelines:
•Holdthediscbyitsedges.Donottouchthesurfaceofthesidethatisnotlabeled.
•Toremovedustorfingerprints,wipethediscwithaclean,softclothfromthecentertotheoutside.Wiping
thediscinacirculardirectionmightcauselossofdata.
•Donotwriteorstickpaperonthedisc.
•Donotscratchormarkthedisc.
•Donotplaceorstorethediscindirectsunlight.
•Donotusebenzene,thinners,orothercleanerstocleanthedisc.
•Donotdroporbendthedisc.
Playingandremovingadisc
Toplayadisc,dothefollowing:
1.Withthecomputeron,presstheeject/closebuttononthefrontoftheopticaldrive.Thetrayslides
outofthedrive.
2.Insertadiscintothetray.Someopticaldrivehasasnaphubinthecenterofthetray.Ifyourdrivehasa
snaphub,supportthetraywithonehandandthenpushcenterofthediscuntilitsnapsintoplace.
3.Presstheeject/closebuttonagainorgentlypushthetrayforwardtoclosethetray.Thediscplayer
programstartsautomatically.Formoreinformation,refertothehelpsystemofthediscplayerprogram.
Toremoveadiscfromtheopticaldrive,dothefollowing:
1.Withthecomputeron,presstheeject/closebuttononthefrontoftheopticaldrive.Thetrayslides
outofthedrive.
2.Carefullyremovethediscfromthetray.
3.Presstheeject/closebuttonagainorgentlypushthetrayforwardtoclosethetray.
Note:Ifthetraydoesnotslideoutofthedrivewhenyoupresstheeject/closebutton,turnoffthecomputer.
Then,insertastraightenedpaperclipintotheemergency-ejectholeadjacenttotheeject/closebutton.
Usetheemergencyejectonlyinanemergency.
16ThinkCentreM700UserGuide
Recordingadisc
Ifyouropticaldrivesupportsrecording,youcanrecordadisc.
RecordingadiscusingWindowstools
TorecordadiscusingWindowstools,dooneofthefollowing:
•BurnadiscusingtheAutoPlaywindow.
1.Ensurethatthediscisplayedautomatically.
a.ClicktheStartbuttontoopentheStartmenu.
b.DependingonyourWindowsversion,dooneofthefollowing:
–ForWindows7:ClickControlPanel.ViewControlPanelusingLargeiconsorSmallicons,
andthenclickAutoPlay.
–ForWindows10:ClickSettings➙Devices➙AutoPlay.
c.SelectorturnonUseAutoPlayforallmediaanddevices.
2.Insertarecordablediscintotheopticaldrivethatsupportsrecording.TheAutoPlaywindowopens.
3.Followtheinstructionsonthescreen.
•BurnadiscusingWindowsMedia®Player.
1.Insertarecordablediscintotheopticaldrivethatsupportsrecording.
2.OpenWindowsMediaPlayer.See“Accessingaprogramonthecomputer”onpage12.
3.Followtheinstructionsonthescreen.
•BurnadiscfromanISOfile.
1.Insertarecordablediscintotheopticaldrivethatsupportsrecording.
2.Double-clicktheISOfile.
3.Followtheinstructionsonthescreen.
Recordingadiscusingpreinstalledprograms
Torecordadiscusingpreinstalledprograms,dothefollowing:
1.Insertarecordablediscintotheopticaldrivethatsupportsrecording.
2.OpenthePowerDVDCreate,PowerProducer,orPower2Goprogram.See“Accessingaprogramon
thecomputer”onpage12.
3.Followtheinstructionsonthescreen.
Connectingtoanetwork
Thissectionprovidesinformationaboutconnectingtoanetwork.Ifyoucannotconnectthecomputertoa
network,see“Networkingproblems”onpage43.
ConnectingtoanEthernetLAN
YoucanconnectthecomputertoanEthernetLANbyconnectinganEthernetcabletotheEthernetconnector.
DANGER
Toavoidtheriskofelectricalshock,donotconnectthetelephonecabletotheEthernetconnector.
Chapter2.Usingyourcomputer17

ConnectingtoawirelessLAN
YoucanconnectthecomputertoawirelessLANwithouttheuseofanEthernetcablebutbymeansof
radiowavesonly.
Note:ThewirelessLANfeatureisoptional.
Toestablishawireless-LANconnection,dothefollowing:
1.EnsurethatawirelessLANisavailableandthewirelessLANfeatureonthecomputerisworking.
2.Clickthewireless-network-connection-statusiconintheWindowsnotificationareatodisplayavailable
wirelessnetworks.
Note:Ifthewireless-network-connection-statusiconisnotdisplayedintheWindowsnotificationarea,
addtheicontothenotificationarea.See“AddinganicontotheWindowsnotificationarea”onpage15.
3.ClickawirelessLAN,andthenclickConnecttoconnectthecomputertoit.Providerequired
informationifneeded.
ConnectingtoaBluetooth-enableddevice
Bluetoothisashort-rangewirelesscommunicationstechnology.UseBluetoothtoestablishawireless
connectionbetweenthecomputerandanotherBluetooth-enableddevicewithinadistanceofabout10
m(32.8ft).
Note:TheBluetoothfeatureisoptional.
ToconnecttoaBluetooth-enableddevice,dothefollowing:
1.EnsurethattheBluetoothfeatureonthecomputerisworkingandtheBluetooth-enableddeviceis
locatedwithinadistanceofabout10m(32.8ft)fromthecomputer.
2.ClicktheBluetoothiconintheWindowsnotificationareaonthetaskbar.Then,clickAddaDeviceand
followtheinstructionsonthescreen.
Note:IftheBluetoothiconisnotdisplayedintheWindowsnotificationarea,addtheicontothe
notificationarea.See“AddinganicontotheWindowsnotificationarea”onpage15.
18ThinkCentreM700UserGuide

Chapter3.Youandyourcomputer
Thischaptercontainsthefollowingtopics:
•“Arrangingyourworkspace”onpage19
•“Accessibilityinformation”onpage20
•“Cleaningthecomputer”onpage23
•“Maintenance”onpage23
•“Movingthecomputer”onpage25
Arrangingyourworkspace
Arrangeyourworkspacetosuityourneedsandthekindofworkyoudo.Thissectionprovidesinformation
aboutthefactorsthataffectthewayyouarrangeyourworkspace.
Glareandlighting
Positionthemonitortominimizeglareandreflectionsfromoverheadlights,windows,andotherlightsources.
Reflectedlightfromshinysurfacescancauseannoyingreflectionsonyourscreen.Whenpossible,place
themonitoratrightanglestowindowsandotherlightsources.Ifnecessary,reduceoverheadlighting
byturningofflightsorusinglowerwattagebulbs.Ifyouinstallthemonitornearawindow,usecurtains
orblindstoblockthesunlight.Youcanadjustthebrightnessandcontrastcontrolsonthemonitorasthe
roomlightingchangesthroughouttheday.
Whereitisimpossibletoavoidreflectionsortoadjustthelighting,anantiglarefilterplacedoverthescreen
mightbehelpful.However,thesefiltersmightaffecttheclarityoftheimageonthescreen;trythemonlyafter
youhaveexhaustedothermethodsofreducingglare.
Aircirculation
Thecomputerproducesheat.Thecomputerhasafanthatpullsinfreshairandforcesouthotairthrough
theairvents.Blockingtheairventscancauseoverheating,whichmightresultinamalfunctionordamage.
Positionthecomputersothatnothingblockstheairvents;usually,51mm(2inches)ofairspaceissufficient.
Ensurethattheventedairisnotblowingonpeople.
Electricaloutletlocationsandcablelengths
Thefollowingfactorsmightdeterminethefinalplacementofthecomputer:
•Locationsofelectricaloutlets
•Lengthofpowercordsorpoweradapters
•Lengthofthecablesthatareconnectedtootherdevices
Formoreinformationaboutpowercordsorpoweradapters,see“Powercordsandpoweradapters”on
pageiv.
Comfort
Althoughnosingleworkingpositionisidealforeveryone,hereareafewguidelinestohelpyoufindaposition
thatsuitsyoubest.Thefollowingfiguresetsanexampleforyourreference.
©CopyrightLenovo201619
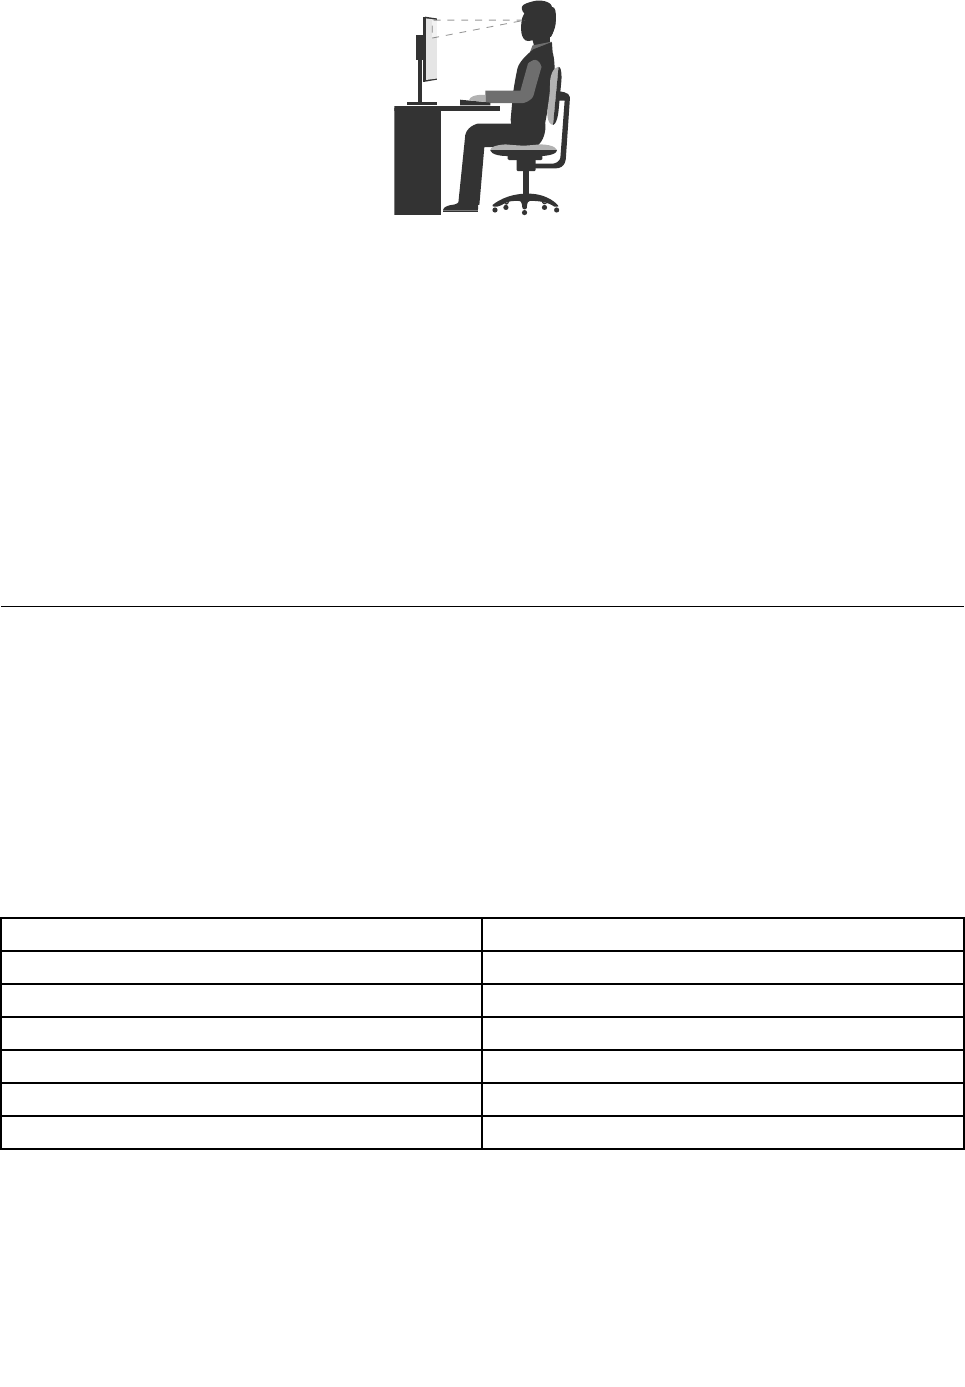
•Screenposition:Keepthescreenatacomfortableviewingdistance,usually51-61cm(20-24inches).
Then,adjustthescreensothatthetopofthescreenisatorslightlybeloweyelevelandyoucanviewit
withouttwistingyourbody.
•Chairposition:Useachairthatgivesyougoodbacksupportandseatheightadjustment.Usechair
adjustmentstobestsuityourdesiredposture.
•Headposition:Keepyourheadandneckinacomfortableandneutral(verticalorupright)position.
•Armandhandpositions:Keepyourforearms,wrists,andhandsinarelaxedandneutral(horizontal)
position.Typewithasofttouchwithoutpoundingthekeys.
•Legposition:Keepyourthighsparalleltothefloorandyourfeetflatonthefloororonafootrest.
Makeminormodificationsinyourworkingposturetodetertheonsetofdiscomfortcausedbylongperiodsof
workinginthesameposition.Frequent,shortbreaksfromyourworkalsohelptopreventminordiscomfort
associatedwithyourworkingposture.
Accessibilityinformation
Lenovoiscommittedtoprovidinguserswhohavehearing,vision,andmobilitylimitationswithgreater
accesstoinformationandtechnology.Thissectionprovidesinformationaboutthewaystheseuserscanget
themostoutoftheircomputerexperience.Youalsocangetthemostup-to-dateaccessibilityinformation
fromthefollowingWebsite:
http://www.lenovo.com/accessibility
Keyboardshortcuts
Thefollowingtablecontainskeyboardshortcutsthatcanhelpmakethecomputereasiertouse.
Note:Dependingonyourkeyboard,someofthefollowingkeyboardshortcutsmightnotbeavailable.
KeyboardshortcutFunction
Windowslogokey+UOpenEaseofAccessCenter
RightShiftforeightsecondsTurnonorturnoffFilterKeys
ShiftfivetimesTurnonorturnoffStickyKeys
NumLockforfivesecondsTurnonorturnoffToggleKeys
LeftAlt+LeftShift+NumLockTurnonorturnoffMouseKeys
LeftAlt+LeftShift+PrtScn(orPrtSc)TurnonorturnoffHighContrast
Formoreinformation,gotohttp://windows.microsoft.com/,andthenperformasearchusinganyofthe
followingkeywords:keyboardshortcuts,keycombinations,shortcutkeys.
20ThinkCentreM700UserGuide

EaseofAccessCenter
EaseofAccessCenterontheWindowsoperatingsystemenablesuserstoconfiguretheircomputersto
suittheirphysicalandcognitiveneeds.
TouseEaseofAccessCenter,dothefollowing:
1.ClicktheStartbuttontoopentheStartmenu.
2.DependingonyourWindowsversion,dooneofthefollowing:
•ForWindows7:ClickControlPanel.ViewControlPanelusingLargeiconsorSmallicons,and
thenclickEaseofAccessCenter.
•ForWindows10:ClickSettings➙EaseofAccess.
3.Choosetheappropriatetoolbyfollowingtheinstructionsonthescreen.
EaseofAccessCentermainlyincludesthefollowingtools:
•Magnifier
Magnifierisausefulutilitythatenlargestheentirescreenorpartofthescreensothatyoucansee
theitemsbetter.
•Narrator
Narratorisascreenreaderthatreadsaloudwhatisdisplayedonthescreenanddescribeseventssuchas
errormessages.
•On-ScreenKeyboard
Ifyouprefertotypeorenterdataintothecomputerusingamouse,joystick,orotherpointingdevice
insteadofaphysicalkeyboard,youcanuseOn-ScreenKeyboard.On-ScreenKeyboarddisplaysavisual
keyboardwithallthestandardkeys.
•HighContrast
HighContrastisafeaturethatheightensthecolorcontrastofsometextandimagesonyourscreen.Asa
result,thoseitemsaremoredistinctandeasiertoidentify.
•Personalizedkeyboard
Adjustkeyboardsettingstomakeyourkeyboardeasiertouse.Forexample,youcanuseyourkeyboard
tocontrolthepointerandtypecertainkeycombinationseasier.
•Personalizedmouse
Adjustmousesettingstomakeyourmouseeasiertouse.Forexample,youcanchangethepointer
appearanceandmakeiteasiertomanagewindowswiththemouse.
SpeechRecognition
SpeechRecognitionenablesyoutocontrolthecomputerbyvoice.
Usingonlyyourvoice,youcanstartprograms,openmenus,clickobjectsonthescreen,dictatetextinto
documents,andwriteandsende-mails.Everythingyoudowiththekeyboardandmousecanbedonewith
onlyyourvoice.
TouseSpeechRecognition,dothefollowing:
1.DependingonyourWindowsversion,dooneofthefollowing:
•ForWindows7:ClicktheStartbuttontoopentheStartmenu.
•ForWindows10:Right-clicktheStartbuttontoopentheStartcontextmenu.
2.ClickControlPanel.ViewControlPanelusingLargeiconsorSmallicons,andthenclickSpeech
Recognition.
Chapter3.Youandyourcomputer21

3.Followtheinstructionsonthescreen.
Screen-readertechnologies
Screen-readertechnologiesareprimarilyfocusedonsoftwareprograminterfaces,helpinformationsystems,
andvariousonlinedocuments.Foradditionalinformationaboutscreenreaders,seethefollowing:
•UsingPDFswithscreenreaders:
http://www.adobe.com/accessibility.html?promoid=DJGVE
•UsingtheJAWSscreenreader:
http://www.freedomscientific.com/jaws-hq.asp
•UsingtheNVDAscreenreader:
http://www.nvaccess.org/
Screenresolution
Youcanmakethetextandimagesonyourscreeneasiertoreadbyadjustingthescreenresolutionofthe
computer.
Toadjustthescreenresolution,dothefollowing:
1.Right-clickablankareaonthedesktop.
2.DependingonyourWindowsversion,dooneofthefollowing:
•ForWindows7:ClickScreenresolution.
•ForWindows10:ClickDisplaysettings.OntheDisplaytab,clickAdvanceddisplaysettings.
3.Followtheinstructionsonthescreen.
Note:Settingtheresolutiontoolowmightpreventsomeitemsfromfittingonthescreen.
Customizableitemsize
Youcanmaketheitemsonyourscreeneasiertoreadbychangingtheitemsize.
•Tochangetheitemsizetemporarily,usetheMagnifiertoolinEaseofAccessCenter.See“Easeof
AccessCenter”onpage21.
•Tochangetheitemsizepermanently,dothefollowing:
–Changethesizeofalltheitemsonyourscreen.
1.Right-clickablankareaonthedesktop.
2.DependingonyourWindowsversion,dooneofthefollowing:
–ForWindows7:ClickScreenresolution➙Maketextandotheritemslargerorsmaller.
–ForWindows10:ClickDisplaysettings.
3.Changetheitemsizebyfollowingtheinstructionsonthescreen.
4.ClickApply.Thischangewilltakeeffectthenexttimeyoulogintotheoperatingsystem.
–ChangethesizeoftheitemsonaWebpage.
PressandholdCtrl,andthenpresstheplus-signkey(+)toenlargeortheminus-signkey(-)to
reducethetextsize.
–Changethesizeoftheitemsonthedesktoporawindow.
Note:Thisfunctionmightnotworkonsomewindows.
Ifyourmousehasawheel,pressandholdCtrl,andthenscrollthewheeltochangetheitemsize.
22ThinkCentreM700UserGuide

Industry-standardconnectors
Thecomputerprovidesindustry-standardconnectorsthatenableyoutoconnectassistivedevices.
TTY/TDDconversionmodem
Thecomputersupportstheuseofatexttelephone(TTY)orthetelecommunicationsdeviceforthedeaf(TDD)
conversionmodem.ThemodemmustbeconnectedbetweenthecomputerandaTTY/TDDtelephone.
Then,youcantypeamessageonthecomputerandsendittothetelephone.
Documentationinaccessibleformats
Lenovoprovideselectronicdocumentationinaccessibleformats,suchasproperlytaggedPDFfilesor
HyperTextMarkupLanguage(HTML)files.Lenovoelectronicdocumentationisdevelopedtoensure
thatvisuallyimpaireduserscanreadthedocumentationthroughascreenreader.Eachimageinthe
documentationalsoincludesadequatealternativetextsothatvisuallyimpaireduserscanunderstandthe
imagewhentheyuseascreenreader.
Cleaningthecomputer
CAUTION:
Removeanymediafromthedrivesandturnoffallconnecteddevicesandthecomputer.Then,
disconnectallpowercordsfromelectricaloutletsanddisconnectallcablesthatareconnected
tothecomputer.
Itisagoodpracticetocleanthecomputerperiodicallytoprotectthesurfacesandensuretrouble-free
operation.Useonlymildcleaningsolutionsandadampclothtocleanthepaintedsurfacesofthecomputer.
Dustbuildupcompoundsproblemsassociatedwithglare,soremembertocleanthescreenperiodically.
Wipethescreensurfacegentlywithasoft,drycloth,orblowonthescreentoremovegritandotherloose
particles.Dependingonthetypeofthescreen,moistenasoft,lint-freeclothwithanLCDcleanerorliquid
glasscleanerandthenwipethescreensurface.
Maintenance
Withappropriatecareandmaintenance,thecomputerwillserveyoureliably.Thissectionprovides
informationaboutmaintainingthecomputersothatitcankeepworkingintoporder.
Basicmaintenancetips
Herearesomebasicpointsaboutkeepingthecomputerfunctioningproperly:
•Keepthecomputerinaclean,dryenvironment.Ensurethatthecomputerrestsonaflat,steadysurface.
•Donotcoveranyofairvents.Theseairventsprovideairflowtokeepthecomputerfromoverheating.
•Keepfoodanddrinksawayfromallpartsofthecomputer.Foodparticlesandspillsmightmakethe
keyboardandmousestickandunusable.
•Donotgetthepowerswitchesorothercontrolswet.Moisturecandamagethesepartsandcausean
electricalhazard.
•Alwaysdisconnectapowercordbygraspingthepluginsteadofthecord.
Goodmaintenancepractices
Byperformingafewgoodmaintenancepractices,youcanmaintaingoodcomputerperformance,protect
yourdata,andbepreparedincaseofacomputerfailure.
Chapter3.Youandyourcomputer23

•Keepthecomputersoftware,devicedrivers,andoperatingsystemup-to-date.See“Keepingthe
computercurrent”onpage24.
•Emptyyourrecyclebinonaregularbasis.
•CleanoutyourInbox,SentItems,andDeletedItemsfoldersinyoure-mailapplicationonaregularbasis.
•Cleanupfilesandfreeupstoragedrivespaceandmemoryspaceoccasionallytopreventperformance
problems.See“Performanceproblems”onpage45.
•Keepalogbook.Entriesmightincludemajorsoftwareorhardwarechanges,device-driverupdates,
intermittentproblemsandwhatyoudidtoresolvethem,andotherissuesyoumighthaveexperienced.
Thecauseofaproblemmightbechangeinhardware,changeinsoftware,oranyotheractionsthatmight
havetakenplace.AlogbookcanhelpyouoraLenovotechniciandeterminethecauseofaproblem.
•Backupyourdataonthestoragedriveregularly.Youcanrestorethestoragedrivefromabackup.
Tobackupyourdata,dooneofthefollowing:
–ForWindows7:OpentheRescueandRecoveryprogram.See“Accessingaprogramonthecomputer”
onpage12.Formoreinformationaboutbackingupyourdata,refertothehelpsystemoftheprogram.
–ForWindows10:Right-clicktheStartbuttontoopentheStartcontextmenu,andthenclickControl
Panel.ViewControlPanelusingLargeiconsorSmallicons,andthenclickFileHistory.Followthe
instructionsonthescreen.
•Createarecoverymediumasearlyaspossible.Youcanusetherecoverymediumtorecoveryour
operatingsystemevenifWindowsfailstostartup.
Tocreatearecoverymedium,dooneofthefollowing:
–ForWindows7:OpentheCreateRecoveryMediaprogram.See“Accessingaprogramonthe
computer”onpage12.Formoreinformationaboutcreatingarecoverymedium,refertothehelp
systemoftheprogram.
–ForWindows10:Right-clicktheStartbuttontoopentheStartcontextmenu,andthenclickControl
Panel.ViewControlPanelusingLargeiconsorSmallicons,andthenclickRecovery.Followthe
instructionsonthescreen.
•ForWindows7,createarescuemediumasearlyaspossible.Youcanusetherescuemediumto
recoverfromfailuresthatpreventyoufromgainingaccesstotheRescueandRecoveryworkspace
onyourstoragedrive.
Tocreatearescuemedium,opentheRescueandRecoveryprogram.See“Accessingaprogramonthe
computer”onpage12.Formoreinformationaboutcreatingarescuemedium,refertothehelpsystem
oftheprogram.
Keepingthecomputercurrent
Inmostcases,itisagoodpracticetohavethemostup-to-dateoperatingsystemupdatepatches,software
programs,anddevicedrivers.Thissectionprovidesinformationabouthowtogetthelatestupdatesforthe
computer.
Gettingthelatestdevicedrivers
Attention:Reinstallingdevicedriverswillchangethecurrentconfigurationofthecomputer.
Togetthelatestdevicedriversforthecomputer,dooneofthefollowing:
•Downloadthedevicedriversthatarepreinstalledonthecomputer.Gotohttp://www.lenovo.com/drivers.
•UsetheLenovoprogramorWindowsUpdate.See“Gettingthelatestsystemupdates”onpage25.
Note:ThedevicedriversprovidedbyWindowsUpdatemightnotbetestedbyLenovo.Itisrecommended
thatyougetdevicedriversfromLenovo.
24ThinkCentreM700UserGuide

Gettingthelatestsystemupdates
Togetthelatestsystemupdatesforthecomputer,ensurethatthecomputerisconnectedtotheInternet
anddooneofthefollowing:
•UseoneofthefollowingLenovoprogramstogetthesystemupdates,suchasdevicedriverupdates,
softwareupdates,andBIOSupdates:
–ForWindows7:UsetheSystemUpdateprogram.
–ForWindows10:UsetheLenovoCompanionprogram.
ToopentheSystemUpdateorLenovoCompanionprogram,see“Accessingaprogramonthecomputer”
onpage12.Formoreinformationaboutusingtheprogram,refertothehelpsystemoftheprogram.
•UseWindowsUpdatetogetthesystemupdates,suchassecurityfixes,newversionsofWindows
components,anddevicedriverupdates.
1.ClicktheStartbuttontoopentheStartmenu.
2.DependingonyourWindowsversion,dooneofthefollowing:
–ForWindows7:ClickControlPanel.ViewControlPanelusingLargeiconsorSmallicons,and
thenclickWindowsUpdate.
–ForWindows10:ClickSettings➙Update&security➙WindowsUpdate.
3.Followtheinstructionsonthescreen.
Movingthecomputer
Beforemovingthecomputer,takethefollowingprecautions:
1.Backupyourdataonthestoragedrive.See“Goodmaintenancepractices”onpage23.
2.Removeanymediafromthedrivesandturnoffallconnecteddevicesandthecomputer.Then,
disconnectallpowercordsfromelectricaloutletsanddisconnectallcablesthatareconnectedtothe
computer.
3.Ifyousavedtheoriginalshippingcartonsandpackingmaterials,usethemtopacktheunits.Ifyouare
usingdifferentcartons,cushiontheunitstoavoiddamage.
Movingthecomputertoanothercountryorregion
Whenyoumovethecomputertoanothercountryorregion,youmusttakelocalelectricalstandardsinto
consideration.Ifthelocalelectricaloutletstyleisdifferentfromthetypeyouarecurrentlyusing,contactthe
LenovoCustomerSupportCentertopurchaseeitheranelectricalplugadapteroranewpowercord.Fora
listofLenovoSupportphonenumbers,gotohttp://www.lenovo.com/support/phone.Ifyoucannotfindthe
supporttelephonenumberforyourcountryorregion,contactyourLenovoreseller.
Chapter3.Youandyourcomputer25

26ThinkCentreM700UserGuide

Chapter4.Security
Thischaptercontainsthefollowingtopics:
•“Lockingthecomputer”onpage27
•“ViewingandchangingsecuritysettingsintheSetupUtilityprogram”onpage30
•“Preventingunauthorizedaccesstothecomputer”onpage31
•“Usingfingerprintauthentication”onpage31
•“Usingthecoverpresenceswitch”onpage31
•“Usingandunderstandingfirewalls”onpage32
•“Protectingdataagainstviruses”onpage32
•“ComputraceAgentsoftwareembeddedinfirmware”onpage32
•“TrustedPlatformModule(TPM)”onpage32
Lockingthecomputer
Thissectionprovidesinformationaboutlockingthecomputerwiththelockingdevicestokeepthecomputer
safe.
©CopyrightLenovo201627
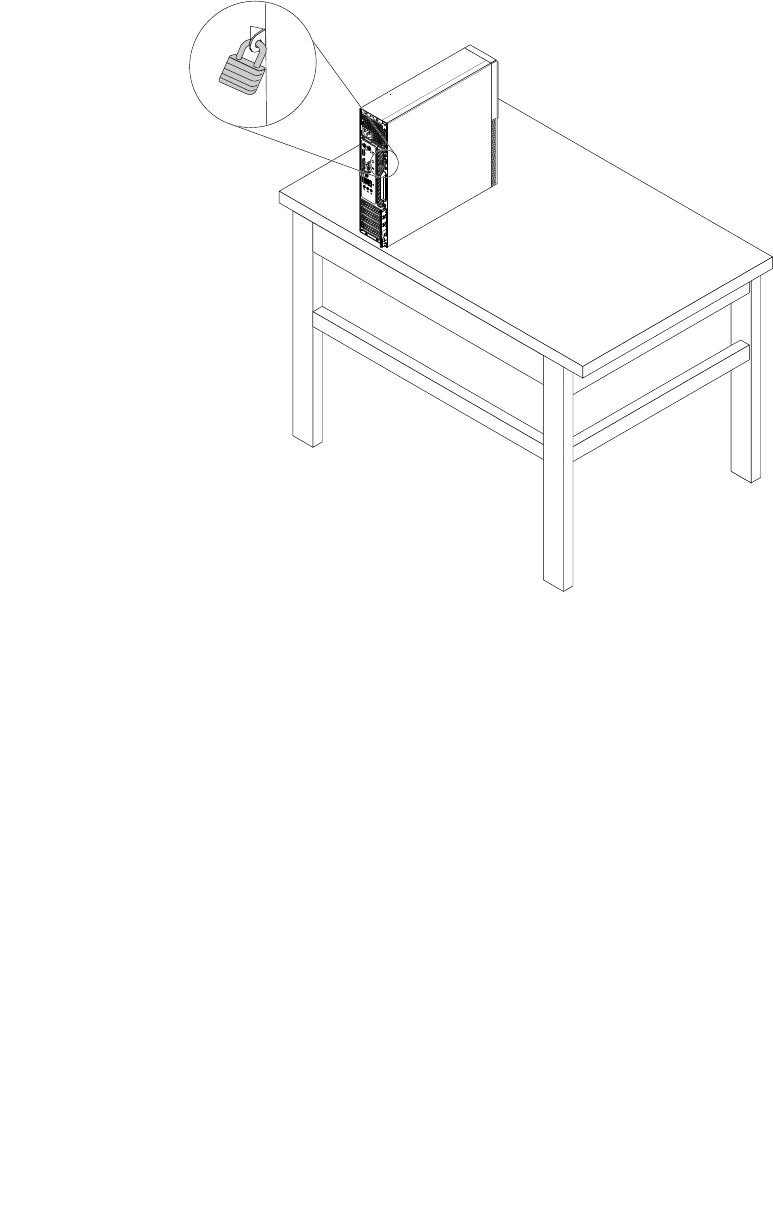
Lockingthecomputercover
Lockingthecomputercoverhelpspreventunauthorizedpeoplefromgainingaccesstotheinsideofyour
computer.Yourcomputercomeswithapadlockloopsothatthecomputercovercannotberemoved
whenapadlockisinstalled.
Figure6.Installingapadlock
28ThinkCentreM700UserGuide
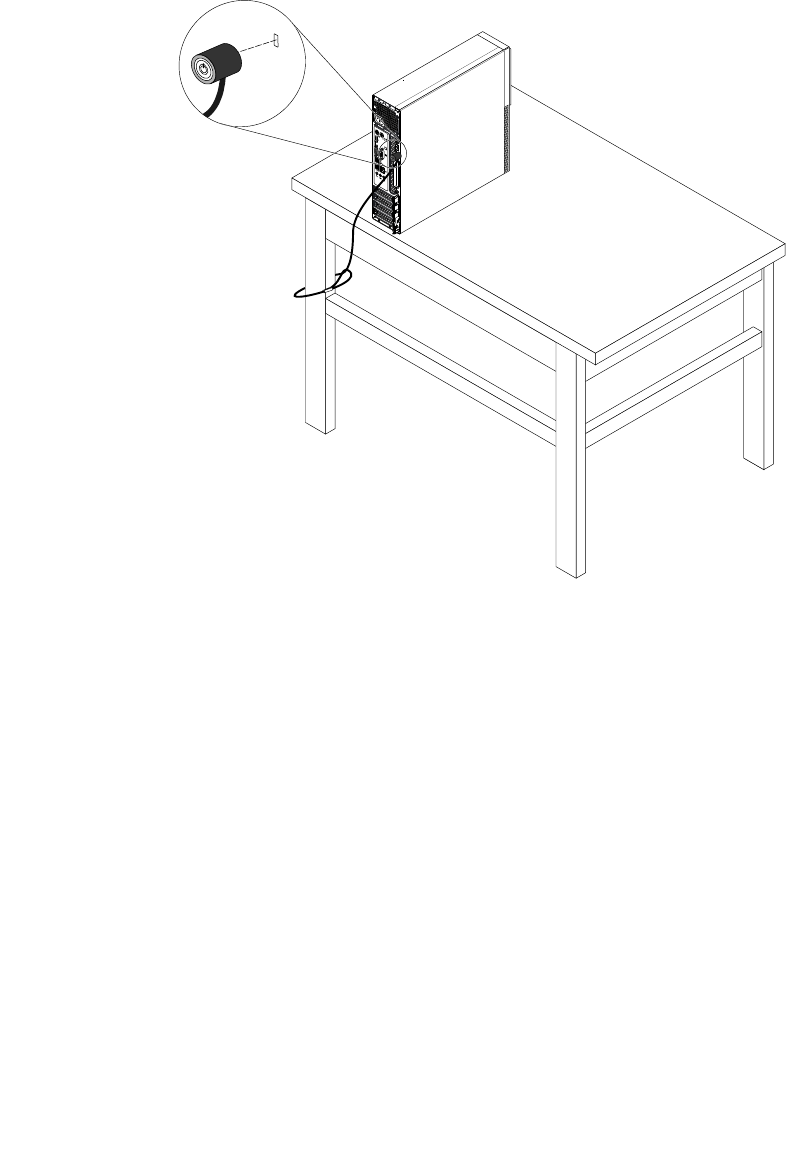
AttachingaKensington-stylecablelock
YoucanuseaKensington-stylecablelocktosecureyourcomputertoadesk,table,orothernon-permanent
fixture.Thecablelockconnectstothesecurity-lockslotattherearofyourcomputer.Dependingonthetype
selected,thecablelockcanbeoperatedwithakeyorcombination.Thecablelockalsolocksthebuttons
usedtoopenthecomputercover.Thisisthesametypeoflockusedwithmanynotebookcomputers.You
canordersuchacablelockdirectlyfromLenovobysearchingforKensingtonat:
http://www.lenovo.com/support
Figure7.Kensington-stylecablelock
Chapter4.Security29
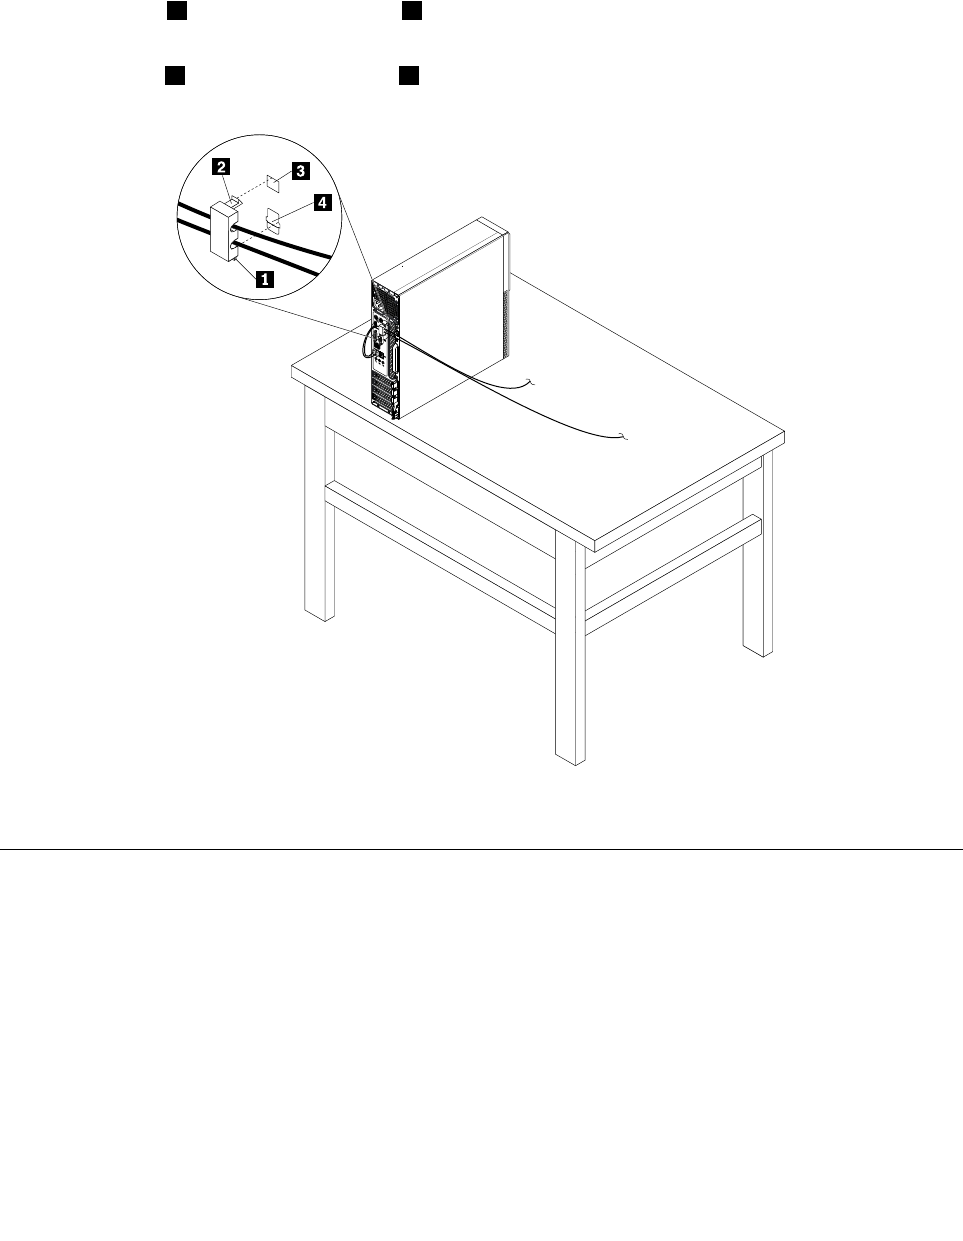
Attachingacablelock
Acablelockcanbeusedtosecuredevices,suchasthekeyboardandthemouse,bylockingthedevice
cablestoyourcomputer.Thecablelockconnectstothecable-lockslotsontherearofyourcomputer.
Toinstallacablelock,dothefollowing:
1.Inserttheclip1intothecable-lockslot4.
2.Pullthecablesyouwanttolockthroughthedentsinthecablelock.
3.Presstheclip2intothecable-lockslot3untilitsnapsintoposition.
Figure8.Installingacablelock
ViewingandchangingsecuritysettingsintheSetupUtilityprogram
ToviewandchangesecuritysettingsintheSetupUtilityprogram,dothefollowing:
1.StarttheSetupUtilityprogram.See“StartingtheSetupUtilityprogram”onpage33.
2.SelectSecurity.
3.Followtheinstructionsontherightsideofthescreentoviewandchangesecuritysettings.Youcan
referto“UsingtheSetupUtilityprogram”onpage33togetbasicinformationaboutsomemajor
securitysettings.
4.ExittheSetupUtilityprogram.See“ExitingtheSetupUtilityprogram”onpage36.
30ThinkCentreM700UserGuide

Preventingunauthorizedaccesstothecomputer
YoucanuseBIOSpasswordsandWindowsaccountstopreventunauthorizedaccesstothecomputerand
data.
•TouseBIOSpasswords,see“UsingBIOSpasswords”onpage35.
•TouseWindowsaccounts,dothefollowing:
1.ClicktheStartbuttontoopentheStartmenu.
2.DependingonyourWindowsversion,dooneofthefollowing:
–ForWindows7:ClickControlPanel➙UserAccounts.
–ForWindows10:ClickSettings➙Accounts.
3.Followtheinstructionsonthescreen.
Usingfingerprintauthentication
Ifyourkeyboardhasafingerprintreader,youcanusefingerprintauthenticationtoreplacepasswordsfor
simpleandsecureuseraccess.Tousefingerprintauthentication,firstenrollyourfingerprintsandassociate
themwithyourpasswords(suchasthepower-onpassword,harddiskpassword,andWindowspassword).
Usethefingerprintreaderandthefingerprintprogramtocompletethisprocedure.
Tousefingerprintauthentication,dooneofthefollowing:
•ForWindows7:OpentheFingerprintManagerProorThinkVantageFingerprintSoftwareprogram
providedbyLenovo.See“Accessingaprogramonthecomputer”onpage12.Formoreinformation
aboutusingtheprogram,refertothehelpsystemoftheprogram.
•ForWindows10:ClicktheStartbuttontoopentheStartmenu,andthenclickSettings➙Accounts➙
Sign-inoptions.Followtheinstructionsonthescreen.
Tousethefingerprintreader,refertothedocumentationshippedwiththefingerprintkeyboardorlocatedon
theLenovoSupportWebsiteathttp://www.lenovo.com/support/keyboards.
Usingthecoverpresenceswitch
Thecoverpresenceswitchpreventsthecomputerfromloggingintotheoperatingsystemwhenthe
computercoverisnotproperlyinstalledorclosed.
Toenablethecover-presence-switchconnectoronthesystemboard,dothefollowing:
1.StarttheSetupUtilityprogram.See“StartingtheSetupUtilityprogram”onpage33.
2.SelectSecurity➙ChassisIntrusionDetectionandpressEnter.
3.SelectEnabledandpressEnter.
4.ExittheSetupUtilityprogram.See“ExitingtheSetupUtilityprogram”onpage36.
Whenthecover-presence-switchconnectoronthesystemboardisenabled,ifthecoverpresenceswitch
detectsthatthecomputercoverisnotcorrectlyinstalledorclosed,anerrormessagewillbedisplayedwhen
youturnonthecomputer.Tobypasstheerrormessageandlogintotheoperatingsystem,dothefollowing:
1.Properlyinstallorclosethecomputercover.
2.StartandthenexittheSetupUtilityprogram.See“StartingtheSetupUtilityprogram”onpage33and
“ExitingtheSetupUtilityprogram”onpage36.
Chapter4.Security31

Usingandunderstandingfirewalls
Afirewallcanbehardware,software,oracombinationofbothdependingonthelevelofsecurityrequired.
Firewallsworkonasetofrulestodeterminewhichinboundandoutboundconnectionsareauthorized.Ifthe
computerispreinstalledwithafirewallprogram,ithelpsprotectagainstcomputerInternetsecuritythreats,
unauthorizedaccess,intrusions,andInternetattacks.Italsoprotectsyourprivacy.Formoreinformation
abouthowtousethefirewallprogram,refertothehelpsystemofyourfirewallprogram.
TouseWindowsFirewall,dothefollowing
1.DependingonyourWindowsversion,dooneofthefollowing:
•ForWindows7:ClicktheStartbuttontoopentheStartmenu.
•ForWindows10:Right-clicktheStartbuttontoopentheStartcontextmenu.
2.ClickControlPanel.ViewControlPanelusingLargeiconsorSmallicons,andthenclickWindows
Firewall.
3.Followtheinstructionsonthescreen.
Protectingdataagainstviruses
Thecomputerispreinstalledwithanantivirusprogramtohelpyouguardagainst,detect,andeliminate
viruses.
Lenovoprovidesafullversionofantivirussoftwareonthecomputerwithafree30-daysubscription.After30
days,youmustrenewthelicensetocontinuereceivingtheantivirussoftwareupdates.
Note:Virusdefinitionfilesmustbekeptup-to-datetoguardagainstnewviruses.
Formoreinformationabouthowtouseyourantivirussoftware,refertothehelpsystemofyourantivirus
software.
ComputraceAgentsoftwareembeddedinfirmware
TheComputraceAgentsoftwareisanITassetmanagementandcomputertheftrecoverysolution.The
softwaredetectsifchangeshavebeenmadeonthecomputer,suchashardware,software,orthecomputer
call-inlocation.YoumighthavetopurchaseasubscriptiontoactivatetheComputraceAgentsoftware.
TrustedPlatformModule(TPM)
TPMisasecurecryptoprocessorthatcanstorecryptographickeysthatprotectinformationstoredinthe
computer.
32ThinkCentreM700UserGuide

Chapter5.Advancedconfiguration
Thischaptercontainsthefollowingtopics:
•“UsingtheSetupUtilityprogram”onpage33
•“UpdatingtheBIOS”onpage37
UsingtheSetupUtilityprogram
TheSetupUtilityprogramisusedtoviewandchangetheconfigurationsettingsofthecomputer.This
sectionprovidesinformationaboutonlythemajorconfigurationsettingsavailableintheprogram.
Note:TheoperatingsystemsettingsmightoverrideanysimilarsettingsintheSetupUtilityprogram.
StartingtheSetupUtilityprogram
TostarttheSetupUtilityprogram,dothefollowing:
1.Turnonorrestartthecomputer.
2.BeforeWindowsstartsup,repeatedlypressandreleasetheF1keyuntiltheSetupUtilityprogram
opens.IfaBIOSpasswordhasbeenset,theSetupUtilityprogramwillnotopenuntilyouenterthe
correctpassword.Formoreinformation,see“UsingBIOSpasswords”onpage35.
Note:Forsomekeyboards,youmightneedtopressFn+F1toopentheSetupUtilityprogram.
Toviewandchangetheconfigurationsettings,followtheinstructionsontherightsideofthescreen.The
keysusedtoperformvarioustasksaredisplayedatthebottomofthescreen.
Enablingordisablingadevice
Thissectionprovidesinformationabouthowtoenableordisableuseraccesstohardwaredevices(such
asUSBconnectorsorstoragedrives).
Toenableordisableadevice,dothefollowing:
1.StarttheSetupUtilityprogram.See“StartingtheSetupUtilityprogram”onpage33.
2.SelectDevices.
3.SelectthedeviceyouwanttoenableordisableandpressEnter.
4.SelectthedesiredsettingandpressEnter.
5.ExittheSetupUtilityprogram.See“ExitingtheSetupUtilityprogram”onpage36.
EnablingordisablingtheAutomaticPowerOnfeatures
IfyouenabletheAutomaticPowerOnfeatures,thecomputerwillstartupautomatically.
ToenableordisabletheAutomaticPowerOnfeatures,dothefollowing:
1.StarttheSetupUtilityprogram.See“StartingtheSetupUtilityprogram”onpage33.
2.SelectPower➙AutomaticPowerOnandpressEnter.
3.SelectthefeatureyouwanttoenableordisableandpressEnter.
4.SelectthedesiredsettingandpressEnter.
5.ExittheSetupUtilityprogram.See“ExitingtheSetupUtilityprogram”onpage36.
©CopyrightLenovo201633

EnablingordisablingtheErPLPScompliancemode
Lenovocomputersmeettheeco-designrequirementsoftheErPLot3regulation.Formoreinformation,go
to:
http://www.lenovo.com/ecodeclaration
YoucanenabletheErPLPScompliancemodeintheSetupUtilityprogramtoreducetheconsumptionof
electricitywhenthecomputerisofforinsleepmode.
ToenableordisabletheErPLPScompliancemode,dothefollowing:
1.StarttheSetupUtilityprogram.See“StartingtheSetupUtilityprogram”onpage33.
2.SelectPower➙EnhancedPowerSavingModeandpressEnter.
3.DependingonwhetheryouselectEnabledorDisabled,dooneofthefollowing:
•IfyouselectEnabled,pressEnter.Then,disabletheWakeonLANfeature.See“Enablingor
disablingtheAutomaticPowerOnfeatures”onpage33.
•IfyouselectDisabled,pressEnter.Then,gotothenextstep.
4.ExittheSetupUtilityprogram.See“ExitingtheSetupUtilityprogram”onpage36.
WhentheErPLPScompliancemodeisenabled,youcanwakeupthecomputerbydoingoneofthe
following:
•Pressthepowerbutton.
•EnabletheWakeUponAlarmfeaturetomakethecomputerwakeupatasettime.See“Enablingor
disablingtheAutomaticPowerOnfeatures”onpage33.
•EnabletheAfterPowerLossfeaturetomakethecomputerwakeupwhenthepowersupplyresumesafter
asuddenlossofelectricity.
1.StarttheSetupUtilityprogram.See“StartingtheSetupUtilityprogram”onpage33.
2.SelectPower➙AfterPowerLossandpressEnter.
3.SelectPowerOnandpressEnter.
4.ExittheSetupUtilityprogram.See“ExitingtheSetupUtilityprogram”onpage36.
EnablingordisablingtheConfigurationChangeDetectionfeature
IfyouenabletheConfigurationChangeDetectionfeature,whenthePOSTdetectstheconfigurationchanges
ofsomehardwaredevices(suchasstoragedrivesormemorymodules),anerrormessagewillbedisplayed
whenyouturnonthecomputer.
ToenableordisabletheConfigurationChangeDetectionfeature,dothefollowing:
1.StarttheSetupUtilityprogram.See“StartingtheSetupUtilityprogram”onpage33.
2.SelectSecurity➙ConfigurationChangeDetectionandpressEnter.
3.SelectthedesiredsettingandpressEnter.
4.ExittheSetupUtilityprogram.See“ExitingtheSetupUtilityprogram”onpage36.
Tobypasstheerrormessageandlogintotheoperatingsystem,dooneofthefollowing:
•PresstheF2key.
Note:Forsomekeyboards,youmightneedtopressFn+F2tobypasstheerrormessage.
•StartandthenexittheSetupUtilityprogram.See“StartingtheSetupUtilityprogram”onpage33and
“ExitingtheSetupUtilityprogram”onpage36.
34ThinkCentreM700UserGuide

UsingBIOSpasswords
ByusingtheSetupUtilityprogram,youcansetpasswordstopreventunauthorizedaccesstothecomputer
anddata.
Youdonothavetosetanypasswordstousethecomputer.However,usingpasswordsimprovescomputer
security.Ifyoudecidetosetanypasswords,readthefollowingtopics.
SetupUtilityprogrampasswordtypes
Thefollowingtypesofpasswordsareavailable:
•Power-onpassword
Whenapower-onpasswordisset,youarepromptedtoenteravalidpasswordeachtimethecomputeris
turnedon.Thecomputercannotbeuseduntilthevalidpasswordisentered.
•Administratorpassword
Settinganadministratorpassworddetersunauthorizedusersfromchangingconfigurationsettings.Ifyou
areresponsibleformaintainingtheconfigurationsettingsofseveralcomputers,youmightwanttoset
anadministratorpassword.
Whenanadministratorpasswordisset,youarepromptedtoenteravalidpasswordeachtimeyou
trytoaccesstheSetupUtilityprogram.TheSetupUtilityprogramcannotbeaccesseduntilavalid
passwordisentered.
Ifboththepower-onpasswordandadministratorpasswordareset,youcanentereitherpassword.
However,youmustuseyouradministratorpasswordtochangeanyconfigurationsettings.
•Harddiskpassword
Settingaharddiskpasswordpreventsunauthorizedaccesstothedataonthestoragedrive.Whena
harddiskpasswordisset,youarepromptedtoenteravalidpasswordeachtimeyoutrytoaccess
thestoragedrive.
Notes:
–Afteryousetaharddiskpassword,yourdataonthestoragedriveisprotectedevenifthestoragedrive
isremovedfromonecomputerandinstalledinanother.
–Iftheharddiskpasswordisforgotten,thereisnowaytoresetthepasswordorrecoverdatafrom
thestoragedrive.
Passwordconsiderations
Apasswordcanbeanycombinationofupto64alphabeticandnumericcharacters.Forsecurityreasons,it
isrecommendedtouseastrongpasswordthatcannotbeeasilycompromised.
Note:TheSetupUtilityprogrampasswordsarenotcasesensitive.
Tosetastrongpassword,considerthefollowingguidelines:
•Haveatleasteightcharactersinlength
•Containatleastonealphabeticcharacterandonenumericcharacter
•Notbeyournameoryourusername
•Notbeacommonwordoracommonname
•Besignificantlydifferentfromyourpreviouspasswords
Setting,changing,anddeletingapassword
Toset,change,ordeleteapassword,dothefollowing:
1.StarttheSetupUtilityprogram.See“StartingtheSetupUtilityprogram”onpage33.
2.SelectSecurity.
Chapter5.Advancedconfiguration35

3.Dependingonthepasswordtype,selectSetPower-OnPassword,SetAdministratorPassword,or
HardDiskPasswordandpressEnter.
4.Followtheinstructionsontherightsideofthescreentoset,change,ordeleteapassword.
Note:Apasswordcanbeanycombinationofupto64alphabeticandnumericcharacters.Formore
information,see“Passwordconsiderations”onpage35.
5.ExittheSetupUtilityprogram.See“ExitingtheSetupUtilityprogram”onpage36.
Selectingastartupdevice
Ifthecomputerdoesnotstartupfromadeviceasexpected,youcanchoosetochangethestartupdevice
sequencepermanentlyorselectatemporarystartupdevice.
Changingthestartupdevicesequencepermanently
Tochangethestartupdevicesequencepermanently,dothefollowing:
1.Dependingonthetypeofthestoragedevice,dooneofthefollowing:
•Ifthestoragedeviceisinternal,gotostep2.
•Ifthestoragedeviceisadisc,ensurethatthecomputerisonorturnonthecomputer.Then,insert
thediscintotheopticaldrive.
•Ifthestoragedeviceisanexternaldeviceotherthanadisc,connectthestoragedevicetothe
computer.
2.StarttheSetupUtilityprogram.See“StartingtheSetupUtilityprogram”onpage33.
3.SelectStartup.
4.Followtheinstructionsontherightsideofthescreentochangethestartupdevicesequence.
5.ExittheSetupUtilityprogram.See“ExitingtheSetupUtilityprogram”onpage36.
Selectingatemporarystartupdevice
Note:Notalldiscsandstoragedrivesarebootable.
Toselectatemporarystartupdevice,dothefollowing:
1.Dependingonthetypeofthestoragedevice,dooneofthefollowing:
•Ifthestoragedeviceisinternal,gotostep2.
•Ifthestoragedeviceisadisc,ensurethatthecomputerisonorturnonthecomputer.Then,insert
thediscintotheopticaldrive.
•Ifthestoragedeviceisanexternaldeviceotherthanadisc,connectthestoragedevicetothe
computer.
2.Turnonorrestartthecomputer.BeforeWindowsstartsup,repeatedlypressandreleasetheF12key
untilStartupDeviceMenuisdisplayed.
Note:Forsomekeyboards,youmightneedtopressFn+F12todisplayStartupDeviceMenu.
3.SelectthedesiredstoragedeviceandpressEnter.Thecomputerwillstartupfromthedeviceyouselect.
Ifyouwanttoselectapermanentstartupdevice,selectEnterSetuponStartupDeviceMenuandpress
EntertostarttheSetupUtilityprogram.Formoreinformationabouthowtoselectapermanentstartup
device,see“Changingthestartupdevicesequencepermanently”onpage36.
ExitingtheSetupUtilityprogram
ToexittheSetupUtilityprogram,dooneofthefollowing:
36ThinkCentreM700UserGuide

•Ifyouwanttosavethenewsettings,presstheF10key.Then,selectYesinthewindowdisplayed
andpressEnter.
Note:Forsomekeyboards,youmightneedtopressFn+F10toexittheSetupUtilityprogram.
•Ifyoudonotwanttosavethenewsettings,selectExit➙DiscardChangesandExitandpressEnter.
Then,selectYesinthewindowdisplayedandpressEnter.
UpdatingtheBIOS
Whenyouinstallanewprogram,hardwaredevice,ordevicedriver,youmightbeinformedtoupdate
theBIOS.YoucanupdatetheBIOSfromyouroperatingsystemoraflashupdatedisc(supportedonly
onsomemodels).
ToupdatetheBIOS,dothefollowing:
1.Gotohttp://www.lenovo.com/drivers.
2.DownloadtheflashBIOSupdatedriverfortheoperatingsystemversionortheISOimageversion(used
tocreateaflashupdatedisc).Then,downloadtheinstallationinstructionsfortheflashBIOSupdate
driveryoudownload.
3.PrinttheinstallationinstructionsyoudownloadandfollowtheinstructionstoupdatetheBIOS.
Note:IfyouwanttoupdatetheBIOSfromaflashupdatedisc,theinstallationinstructionsmightnotprovide
theinformationabouthowtorecordtheupdatedisc.See“Usingadisc”onpage15.
Chapter5.Advancedconfiguration37

38ThinkCentreM700UserGuide

Chapter6.Troubleshooting,diagnostics,andrecovery
Thischapterprovidessolutionstoresolvethecomputerproblems.Followthestepsinthebasicprocedure
forresolvingcomputerproblems,whichhelpsyoumakegooduseofthetroubleshooting,diagnostics,
andrecoveryinformation.
•“Basicprocedureforresolvingcomputerproblems”onpage39
•“Troubleshooting”onpage39
•“Diagnostics”onpage47
•“Recoveryinformation”onpage47
Basicprocedureforresolvingcomputerproblems
Itisrecommendedthatyouusethefollowingproceduretoresolvecomputerproblemsyouareexperiencing:
1.Ensurethat:
a.Thecablesforallconnecteddevicesareconnectedcorrectlyandsecurely.
b.Allconnecteddevicesthatrequireacpowerareconnectedtoproperlygrounded,functioning
electricaloutlets.
c.AllconnecteddevicesareenabledintheBIOSsettingsofthecomputer.See“Enablingordisabling
adevice”onpage33.
Iftheseactionsdonotresolveyourproblem,continuewiththenextstep.
2.Useanantivirusprogramtoseeifthecomputerhasbeeninfectedbyavirus.Iftheprogramdetects
avirus,removethevirus.Iftheantivirusprogramdoesnotresolveyourproblem,continuewiththe
nextstep.
3.Goto“Troubleshooting”onpage39andfollowtheinstructionsforthetypeofproblemyouare
experiencing.Ifthesetroubleshootinginstructionsdonotresolveyourproblem,continuewiththe
nextstep.
4.Runthediagnosticprogram.See“Diagnostics”onpage47.Ifthediagnosticprogramdoesnotresolve
yourproblem,continuewiththenextstep.
5.Recoveryouroperatingsystem.See“Recoveryinformation”onpage47.
6.Ifnoneoftheseactionssolveyourproblem,contacttheLenovoCustomerSupportCenter.Foralistof
LenovoSupportphonenumbers,gotohttp://www.lenovo.com/support/phone.Formoreinformation
abouthelp,service,andtechnicalassistance,seeChapter8“Gettinginformation,help,andservice”
onpage77.
Troubleshooting
Attention:Donotopenthecomputerorattemptanyrepairbeforereadingandunderstanding“Readthis
first:Importantsafetyinformation”inthisdocument.
Usethetroubleshootinginformationtofindsolutionstoproblemsthathavedefinitesymptoms.
Startupproblems
Thissectionprovidessolutionstostartup-relatedproblems.
Thecomputerdoesnotstartupwhenyoupressthepowerbutton
Solutions:Ensurethat:
•Thepowercordiscorrectlyconnectedtotherearofthecomputerandtoaworkingelectricaloutlet.
©CopyrightLenovo201639

•Ifthecomputerhasasecondarypowerswitchontherearofthecomputer,ensurethatitisswitchedon.
•Thepowerindicatoronthefrontofthecomputerison.
•Thecomputervoltagematchesthevoltageavailableattheelectricaloutletforyourcountryorregion.
Theoperatingsystemfailstostartup
Solution:Ensurethatthestartupsequenceincludesthedevicewheretheoperatingsystemresides.Usually,
theoperatingsystemisonthestoragedrive.Formoreinformation,see“Changingthestartupdevice
sequencepermanently”onpage36.
Thecomputerbeepsmultipletimesbeforetheoperatingsystemstartsup
Solution:Ensurethatnokeysarestuck.
Audioproblems
Thissectionprovidessolutionstoaudio-relatedproblems.
NoaudioinWindows
Solutions:
•IfyouareusingpoweredexternalspeakersthathaveanOn/Offcontrol,ensurethat:
–TheOn/OffcontrolissettotheOnposition.
–Thespeakerpowercableisconnectedtoaproperlygrounded,functionalacelectricaloutlet.
•Ifyourexternalspeakershaveavolumecontrol,ensurethatthevolumeisnotsettoolow.
•ClickthevolumeiconintheWindowsnotificationareaonthetaskbar.Ensurethatthemutespeakers
settingsarenotselectedandnoneofthevolumesettingsissettoolow.
Note:IfthevolumeiconisnotdisplayedintheWindowsnotificationarea,addtheicontothenotification
area.See“AddinganicontotheWindowsnotificationarea”onpage15.
•Somemodelshaveafrontaudiopanelyoucanusetoadjustvolume.Ifyouhaveafrontaudiopanel,
ensurethatthevolumeisnotsettoolow.
•Ensurethatyourexternalspeakers(andheadphones,ifused)areconnectedtothecorrectaudio
connectoronthecomputer.Mostspeakercablesarecolor-codedtomatchtheconnector.
Note:Whenexternal-speakerorheadphonecablesareconnectedtotheaudioconnector,theinternal
speaker,ifpresent,isdisabled.Inmostcases,ifanaudioadapterisinstalledinoneoftheexpansion
slots,theaudiofunctionbuiltintothesystemboardisdisabled.Therefore,youmustusetheaudio
connectorsontheaudioadapter.
•EnsurethattheprogramyouarerunningisdesignedforuseintheMicrosoftWindowsoperatingsystem.
IftheprogramisdesignedtoruninDOS,theprogramdoesnotusetheWindowssoundfeature.The
programmustbeconfiguredtouseSoundBlasterProorSoundBlasteremulation.
•Ensurethattheaudiodevicedriversarecorrectlyinstalled.
Soundcomesonlyfromoneexternalspeaker
Solutions:
•Ensurethatthespeakercableisinsertedcompletelyintotheconnectoronthecomputer.
•Ensurethatthecablethatconnectstheleftspeakertotherightspeakerissecurelyconnected.
•ClickthevolumeiconintheWindowsnotificationareaonthetaskbar.Then,clickthespeakericonontop
ofthevolumecontrol.ClicktheLevelstabandensurethattheBalancesettingsaresetcorrectly.
40ThinkCentreM700UserGuide

Note:IfthevolumeiconisnotdisplayedintheWindowsnotificationarea,addtheicontothenotification
area.See“AddinganicontotheWindowsnotificationarea”onpage15.
CDproblems
ThissectionprovidessolutionstoCD-relatedproblems.
ACDorDVDdoesnotwork
Solutions:
•IfyouhavemultipleCDorDVDdrivesinstalled(oracombinationofCDandDVDdrives),tryinsertingthe
discintotheotherdrive.Insomecases,onlyoneofthedrivesisconnectedtotheaudiosubsystem.
•Ensurethatthediscisinsertedcorrectly,withitslabelup.
•Ensurethatthediscyouareusingisclean.Toremovedustorfingerprints,wipethedisccleanwithasoft
clothfromthecentertotheoutside.Wipingadiscinacircularmotionmightcauselossofdata.
•Ensurethatthediscyouareusingisnotscratchedordamaged.Tryinsertinganotherdiscthatyou
knowisgood.Ifyoucannotreadfromaknown-gooddisc,youmighthaveaproblemwithyouroptical
driveorthecablingtoyouropticaldrive.Ensurethatthepowercableandsignalcablearesecurely
connectedtothedrive.
Unabletouseabootablerecoverymedium,suchastheProductRecoveryCD,to
startthecomputer
Solution:EnsurethattheCDorDVDdriveisinthestartupsequencebeforethestoragedrive.Referto
“Selectingatemporarystartupdevice”onpage36forinformationonviewingandchangingthestartup
sequence.Notethatonsomemodelsthestartupsequenceispermanentlysetandcannotbechanged.
DVDproblems
ThissectionprovidessolutionstoDVD-relatedproblems.
BlackscreeninsteadofDVDvideo
Solutions:
•RestarttheDVDplayerprogram.
•Tryalowerscreenresolutionorcolordepth.
•Closeanyopenfiles,andthenrestartthecomputer.
DVDmoviedoesnotplay
Solutions:
•Ensurethatthediscsurfaceiscleanandnotscratched.
•Checkthediscorpackageforregionalcoding.Youmightneedtopurchaseadiscwithcodingforthe
regionwhereyouareusingthecomputer.
NoaudioorintermittentaudiowhileplayingaDVDmovie
Solutions:
•Checkthevolumecontrolsettingsonthecomputerandonyourspeakers.
•Ensurethatthediscsurfaceiscleanandnotscratched.
•Checkallcableconnectionstoandfromthespeakers.
•UsetheDVDmenuforthevideotoselectadifferentaudiotrack.
Chapter6.Troubleshooting,diagnostics,andrecovery41

Playbackissloworchoppy
Solutions:
•Disableanybackgroundprograms,suchasAntiVirusorDesktopThemes.
•Ensurethatvideoresolutionissettolessthan1152x864pixels.
Invaliddiscornodiscfoundmessage
Solutions:
•EnsurethataDVDdiscisinthedrivewiththeshinysideofthediscfacingdown.
•Ensurethatvideoresolutionissettolessthan1152x864pixels.
•OncomputersthathaveaCD-ROMorCD-RWdriveinadditiontoaDVD-ROMdrive,ensurethatthe
DVDdiscisinthedrivelabeled“DVD”.
Intermittentproblems
Someproblemsoccuronlyoccasionallyandaredifficulttorepeat.
Solutions:
•Ensurethatallcablesandcordsaresecurelyconnectedtothecomputerandconnecteddevices.
•Ensurethatwhenthecomputerison,thefangrillisnotblocked(thereisairflowaroundthegrill),andthe
fansareworking.Ifairflowisblockedorthefansarenotworking,thecomputermightoverheat.
•IfSmallComputerSystemInterface(SCSI)devicesareinstalled,ensurethatthelastexternaldevicein
eachSCSIchainisterminatedcorrectly.Formoreinformation,seeyourSCSIdocumentation.
Storagedriveproblems
Selectyoursymptomfromthefollowinglist:
•“SomeorallstoragedrivesmissingfromtheSetupUtilityprogram”onpage42
•“"NoOperatingSystemFound"messageorthesystemnotstartingupfromthecorrectstoragedrive”
onpage42
SomeorallstoragedrivesmissingfromtheSetupUtilityprogram
Symptom:SomeorallstoragedrivesmissingfromtheSetupUtilityprogram
Solutions:
•Ensurethatallstoragedrivesignalcablesandpowercablesareconnectedcorrectly.
•Ensurethatthecomputerisconfiguredcorrectlytosupportthestoragedrives.
–IfthecomputerisinstalledwithfiveSATAstoragedrives,ensurethattheSATAstoragedrive
enablementmodule(onetofivestoragedrives)isinstalled.
–IfthecomputerisinstalledwithSASstoragedrives,ensurethattheSASstoragedriveenablement
module(onetofivestoragedrives)ortheLSIMegaRAIDSASadapterisinstalled.
"NoOperatingSystemFound"messageorthesystemnotstartingupfromthe
correctstoragedrive
Symptom:"NoOperatingSystemFound"messageorthesystemnotstartingupfromthecorrectstorage
drive
Solutions:
•Ensurethatallstoragedrivesignalcablesandpowercablesareconnectedcorrectly.
42ThinkCentreM700UserGuide

•EnsurethatthestoragedrivethecomputerstartsupfromislistedasthefirststartupdeviceintheSetup
Utilityprogram.Referto“Changingthestartupdevicesequencepermanently”onpage36.
Note:Inrarecases,thestoragedrivewiththeoperatingsystemmightgetcorruptedordamaged.Insuch
cases,youmightneedtoreplacethestoragedrive.
Networkingproblems
Thissectionprovidessolutionstonetworking-relatedproblems.
EthernetLANproblems
MycomputercannotbeconnectedtoanEthernetLAN
Solutions:
•ConnectthecablefromtheEthernetconnectortotheRJ45connectorofthehub.
•EnabletheEthernetLANfeatureintheSetupUtilityprogram.See“StartingtheSetupUtilityprogram”on
page33.Then,followtheinstructionsonthescreen.
•EnabletheEthernetLANadapter.
1.DependingonyourWindowsversion,dooneofthefollowing:
–ForWindows7:ClicktheStartbuttontoopentheStartmenu.
–ForWindows10:Right-clicktheStartbuttontoopentheStartcontextmenu.
2.ClickControlPanel.ViewControlPanelusingLargeiconsorSmallicons,andthenclickNetwork
andSharingCenter➙Changeadaptersettings.
3.Right-clicktheEthernetLANadaptericonandclickEnable.
•UpdateorreinstalltheEthernetLANdriver.See“Keepingthecomputercurrent”onpage24.
•Installallnetworkingsoftwarethatisnecessaryforyournetworkenvironment.CheckwithyourLAN
administratorforthenecessarynetworkingsoftware.
•Setthesameduplexfortheswitchportandtheadapter.Ifyouconfiguredtheadapterforfullduplex,
ensurethattheswitchportisalsoconfiguredforfullduplex.Settingthewrongduplexmodemight
degradeperformance,causedataloss,orresultinlostconnections.
MycomputerisaGigabitEthernetmodelandIuseaspeedof1000Mbps,buttheconnectionfails
orerrorsoccur
Solution:ConnectthenetworkcabletotheEthernetconnectorusingCategory5wiringanda100BASE-T
hub/switch(not100BASE-X).
MycomputerisaGigabitEthernetmodel,butitcannotbeconnectedtothenetworkat1000Mbps,
butatonly100Mbps
Solutions:
•Tryanothercable.
•Setthelinkpartnertoauto-negotiate.
•Settheswitchtobe802.3ab-compliant(gigabitovercopper).
TheWakeOnLANfeaturedoesnotwork
Solution:EnabletheWakeOnLAN(WOL)featureintheSetupUtilityprogram.See“StartingtheSetupUtility
program”onpage33.Then,followtheinstructionsonthescreen.
WirelessLANproblem
Note:ThewirelessLANfeatureisoptional.
Chapter6.Troubleshooting,diagnostics,andrecovery43

ThewirelessLANfeaturedoesnotwork
Solutions:
•EnablethewirelessLANfeatureintheSetupUtilityprogram.See“StartingtheSetupUtilityprogram”on
page33.Then,followtheinstructionsonthescreen.
•ForWindows10,enablethewirelessLANfeatureinWindowsSettings.ClicktheStartbuttontoopenthe
Startmenu,andthenclickSettings➙Network&Internet➙Wi-Fi.TurnontheWi-Fifeature.
•EnablethewirelessLANadapter.
1.DependingonyourWindowsversion,dooneofthefollowing:
–ForWindows7:ClicktheStartbuttontoopentheStartmenu.
–ForWindows10:Right-clicktheStartbuttontoopentheStartcontextmenu.
2.ClickControlPanel.ViewControlPanelusingLargeiconsorSmallicons,andthenclickNetwork
andSharingCenter➙Changeadaptersettings.
3.Right-clickthewirelessLANadaptericonandclickEnable.
•UpdateorreinstallthewirelessLANdriver.See“Keepingthecomputercurrent”onpage24.
Bluetoothproblems
Note:TheBluetoothfeatureisoptional.
TheBluetoothfeaturedoesnotwork
Solutions:
•EnabletheBluetoothfeatureintheSetupUtilityprogram.See“StartingtheSetupUtilityprogram”on
page33.Then,followtheinstructionsonthescreen.
•TurnontheBluetoothradios.
1.DependingonyourWindowsversion,dooneofthefollowing:
–ForWindows7:ClicktheStartbuttontoopentheStartmenu.Right-clickComputer,andthen
clickProperties.
–ForWindows10:Right-clicktheStartbuttontoopentheStartcontextmenu.
2.ClickDeviceManager.Typetheadministratorpasswordorprovideconfirmationifprompted.
3.Right-clicktheBluetoothradiosunderBluetoothRadiosandclickEnable.
•EnabletheBluetoothadapter.
1.DependingonyourWindowsversion,dooneofthefollowing:
–ForWindows7:ClicktheStartbuttontoopentheStartmenu.
–ForWindows10:Right-clicktheStartbuttontoopentheStartcontextmenu.
2.ClickControlPanel.ViewControlPanelusingLargeiconsorSmallicons,andthenclickNetwork
andSharingCenter➙Changeadaptersettings.
3.Right-clicktheBluetoothadaptericonandclickEnable.
•UpdateorreinstalltheBluetoothdriver.See“Keepingthecomputercurrent”onpage24.
SounddoesnotcomefromtheBluetoothheadsetorheadphones
Solution:SettheBluetoothheadsetorheadphonesasthedefaultdevice.
1.Exittheapplicationthatusesthesounddevice(forexample,WindowsMediaPlayer).
2.Right-clickthevolumeiconintheWindowsnotificationareaonthetaskbar.
Note:IfthevolumeiconisnotdisplayedintheWindowsnotificationarea,addtheicontothe
notificationarea.See“AddinganicontotheWindowsnotificationarea”onpage15.
44ThinkCentreM700UserGuide

3.ClickPlaybackdevices.
4.IfyouareusingtheHeadsetprofile,selectBluetoothHands-freeAudio,andthenclickSetDefault.If
youareusingtheAVprofile,selectStereoAudio,andthenclickSetDefault.
5.ClickOK.
Performanceproblems
Thissectionprovidessolutionstoperformance-relatedproblemsofthecomputer.
Excessivenumberoffragmentedfiles
Solution:UsetheWindowsdiskdefragmentationordiskoptimizationfeaturetocleanupthefiles.
Note:Dependingonthevolumeofthestoragedrivesandamountofdatastoredonthestoragedrives,the
disk-defragmentationprocessmighttakeuptoseveralhours.
1.Closeanyopenprogramsandwindows.
2.ClicktheStartbuttontoopentheStartmenu.
3.DependingonyourWindowsversion,dooneofthefollowing:
•ForWindows7:ClickComputer.
•ForWindows10:ClickFileExplorer➙ThisPC.
4.Right-clickyourCdriveandthenclickProperties.
5.ClicktheT oolstab.
6.DependingonyourWindowsversion,dooneofthefollowing:
•ForWindows7:ClickDefragmentnow.
•ForWindows10:ClickOptimize.Selectthedesireddrive,andthenclickOptimize.
7.Followtheinstructionsonthescreen.
Insufficientfreestoragedrivespace
Solutions:Freeupstoragedrivespace.
•CleanoutyourInbox,SentItems,andDeletedItemsfoldersfromyoure-mailapplication.
•CleanupyourCdrive.
1.ClicktheStartbuttontoopentheStartmenu.
2.DependingonyourWindowsversion,dooneofthefollowing:
–ForWindows7:ClickComputer.
–ForWindows10:ClickFileExplorer➙ThisPC.
3.Right-clickyourCdriveandthenclickProperties.
4.Checktheamountoffreespace,andthenclickDiskCleanup.
5.Alistofunnecessaryfilecategoriesisdisplayed.Selecteachfilecategoryyouwanttodelete,
andthenclickOK.
•TurnsomeWindowsfeaturesofforremovesomeunnecessaryprograms.
1.DependingonyourWindowsversion,dooneofthefollowing:
–ForWindows7:ClicktheStartbuttontoopentheStartmenu.
–ForWindows10:Right-clicktheStartbuttontoopentheStartcontextmenu.
2.ClickControlPanel.ViewControlPanelusingLargeiconsorSmallicons,andthenclickPrograms
andFeatures.
3.Dooneofthefollowing:
Chapter6.Troubleshooting,diagnostics,andrecovery45

–ToturnsomeWindowsfeaturesoff,clickTurnWindowsfeaturesonoroff.Followthe
instructionsonthescreen.
–Toremovesomeunnecessaryprograms,selecttheprogramyouwanttoremove,andthenclick
Uninstall/ChangeorUninstall.
Insufficientfreememoryspace
Solutions:
•Right-clickablankareaonthetaskbarandopenTaskManager.Then,endsometasksyouarenot
performing.
•Installadditionalmemorymodules.Topurchasememorymodules,goto
http://www.lenovo.com.
Serialconnectorcannotbeaccessed
Solutions:
•Connecttheserialcabletotheserialconnectoronthecomputerandtotheserialdevice.Iftheserial
devicehasitsownpowercord,connectthepowercordtoagroundedelectricaloutlet.
•Turnontheserialdeviceandkeepthedeviceonline.
•Installanyapplicationprogramssuppliedwiththeserialdevice.Refertothedocumentationthatcomes
withtheserialdeviceformoreinformation.
•Ifyouaddedoneserial-connectoradapter,installtheadaptercorrectly.
USBdeviceproblems
ThissectionprovidessolutionstoUSBdevice-relatedproblems.
MyUSBdevicecannotbeaccessed
Solutions:
•ConnecttheUSBcablefromtheUSBconnectortotheUSBdevice.IftheUSBdevicehasitsownpower
cord,connectthepowercordtoagroundedelectricaloutlet.
•TurnontheUSBdeviceandkeepthedeviceonline.
•InstallanydevicedriversorapplicationprogramssuppliedwiththeUSBdevice.Refertothe
documentationthatcomeswiththeUSBdeviceformoreinformation.
•DetachandreconnecttheUSBconnectortoresettheUSBdevice.
IcannotinstalltheWindows7operatingsystemusinganexternalUSBdevice
Solution:Gotohttp://www.lenovo.com/supporttodownloadandinstallUSBdrivers.
Softwareanddriverproblems
Thissectionprovidessolutionstosoftware-anddriver-relatedproblems.
Forsomeprograms,datescannotbesortedincorrectorder
Solution:Someprogramsdevelopedbeforetheyear2000useonlythelasttwodigitsofayeartosortdates,
assumingthefirsttwodigitsare19.Consequently,datescannotbesortedincorrectordernowadays.
Checkwithyoursoftwaremanufacturertoseeifanyupdatesareavailable.Manysoftwaremanufacturers
makeupdatesavailablefromtheWorldWideWeb.
46ThinkCentreM700UserGuide

Someapplicationprogramsdonotworkasexpected
Solutions:
1.Checkwhethertheproblemiscausedbyanapplicationprogram.
a.Ensurethatthesoftwareiscompatiblewiththecomputer.Refertotheinformationsuppliedwith
thesoftwareformoreinformation.
b.Verifythatothersoftwareworkscorrectlyonthecomputer.
c.Verifythatthesoftwareyouareusingworksonanothercomputer.
2.Iftheproblemiscausedbyanapplicationprogram:
•Refertotheprinteddocumentationthatcomeswiththeprogramorthehelpsystemoftheprogram.
•Updatetheprogram.See“Keepingthecomputercurrent”onpage24.
•Uninstalltheprogramandthenreinstallit.Todownloadaprogramthatispreinstalledonthe
computer,gotohttp://www.lenovo.com/supportandfollowtheinstructionsonthescreen.
Adevicedoesnotworknormallyduetodevicedriverproblems
Solution:Updatethedevicedriver.See“Keepingthecomputercurrent”onpage24.
Diagnostics
Note:IfyouareusingaWindowsoperatingsystemotherthanWindows7orWindows10,goto
http://www.lenovo.com/diagsforthediagnosticsinformationforthecomputer.
Thediagnosticprogramisusedtotesthardwarecomponentsofthecomputer.Thediagnosticprogramalso
canreportoperating-system-controlledsettingsthatinterferewiththecorrectoperationofthecomputer.
LenovoSolutionCenter
TheLenovoSolutionCenterprogramisthediagnosticprogrampreinstalledonthecomputer.Theprogram
enablesyoutotroubleshootandresolvecomputerproblems.Itcombinesdiagnostictests,system
informationcollection,securitystatus,andsupportinformation,alongwithhintsandtipsformaximum
systemperformance.
ToopentheLenovoSolutionCenterprogram,see“Accessingaprogramonthecomputer”onpage12.For
moreinformationaboutusingtheprogram,refertothehelpsystemoftheprogram.
IfyouareunabletoisolateandrepairtheproblemyourselfafterrunningLenovoSolutionCenter,save
andprintthelogfilescreatedbytheprogram.YoumightneedthelogfileswhenyouspeaktoaLenovo
technicalsupportrepresentative.
Recoveryinformation
Thissectionprovidesinstructionsabouthowtorecoveryouroperatingsystem.
Note:Ifadevicedoesnotworknormallyafterrecoveringtheoperatingsystem,updatethedevicedriver.
See“Keepingthecomputercurrent”onpage24.
RecoveryinformationforWindows7
TorecoveryourWindows7operatingsystem,usethefollowingsolutions:
•UseWindowsrecoverysolutions.
–UseSystemRestoretorestoresystemfilesandsettingstoanearlierpoint.
1.ClicktheStartbuttontoopentheStartmenu.
Chapter6.Troubleshooting,diagnostics,andrecovery47

2.ClickControlPanel.ViewControlPanelusingLargeiconsorSmallicons,andthenclick
Recovery➙OpenSystemRestore.
3.Followtheinstructionsonthescreen.
–UsetheWindowsrecoveryenvironmentbydoingoneofthefollowing:
–Afterseveralconsecutivefailedbootattempts,theWindowsrecoveryenvironmentmightstart
automatically.Followtheinstructionsonthescreentochoosetheappropriaterecoverysolution.
–Turnonorrestartthecomputer.Then,repeatedlypressandreleasetheF8keyuntiltheAdvanced
BootOptionswindowopens.SelectRepairYourComputer,pressEnter,andfollowtheinstructions
onthescreentochoosetheappropriaterecoverysolution.
Note:Forsomekeyboards,youmightneedtopressFn+F8toopentheAdvancedBootOptions
window.
•UsetheRescueandRecoveryprogramtorestorethestoragedrivefromabackup,orrestoretheC
drivetothefactory-defaultsettings.
Notes:
–Dependingonthecomputermodel,theRescueandRecoveryprogrammightnotbepreinstalled.You
needtoinstalleditmanuallyearlier.
–IfyouusetheRescueandRecoveryprogramtorestorethestoragedrivefromabackup,ensurethat
youbackedupyourdataearlierwiththeprogram.
TousetheRescueandRecoveryprogram,dooneofthefollowing:
–OpentheRescueandRecoveryprogram.See“Accessingaprogramonthecomputer”onpage12.
Formoreinformationaboutusingtheprogram,refertothehelpsystemoftheprogram.
–OpentheRescueandRecoveryworkspace.
1.Turnoffthecomputer.PressandholdtheEnterkeyandthenturnonthecomputer.Releasethe
EnterkeywhenStartupInterruptMenuisdisplayed.Then,pressF11toopentheRescueand
Recoveryworkspace.
2.IftheRescueandRecoveryworkspacefailstoopen,usetherescuemediumyoucreatedearlierto
resolvetheproblem.Selecttherescuemediumasthestartupdevice.See“Selectingatemporary
startupdevice”onpage36.Whentherescuemediumstarts,theRescueandRecoveryworkspace
opens.Followtheinstructionsonthescreen.
•UsetherecoverymediumyoucreatedearlierwiththeCreateRecoveryMediaprogramtorestoreonly
theCdriveortheentirestoragedrivetothefactory-defaultsettings.
Note:Tocreatearecoverymedium,see“Goodmaintenancepractices”onpage23.
1.Selecttherecoverymediumasthestartupdevice.See“Selectingatemporarystartupdevice”
onpage36.
2.Followtheinstructionsonthescreentochoosetheappropriaterecoverysolution.
•UsetherecoverydiscsetprovidedbyLenovotorestoretheentirestoragedrivetothefactory-default
settings.
–Ifthecomputercomeswiththerecoverydiscset,followtheinstructionsshippedwiththediscset.
–Ifthecomputerdoesnotcomewiththerecoverydiscset,contacttheLenovoCustomerSupport
Centertoorderarecoverydiscset.See“Callingforservice”onpage78.
RecoveryinformationforWindows10
TorecoveryourWindows10operatingsystem,usethefollowingsolutions:
•UseWindowsrecoverysolutions.
48ThinkCentreM700UserGuide

–UserecoverysolutionsinWindowsSettings.
1.ClicktheStartbuttontoopentheStartmenu.
2.ClickSettings➙Update&security➙Recovery.
3.Choosetheappropriaterecoverysolutionbyfollowingtheinstructionsonthescreen.
–UseSystemRestoretorestoresystemfilesandsettingstoanearlierpoint.
1.Right-clicktheStartbuttontoopentheStartcontextmenu.
2.ClickControlPanel.ViewControlPanelusingLargeiconsorSmallicons,andthenclick
Recovery➙OpenSystemRestore.
3.Followtheinstructionsonthescreen.
–UsetheFileHistorytooltorestoreyourfilesfromabackup.
Note:IfyouusetheFileHistorytooltorestoreyourfilesfromabackup,ensurethatyoubackedup
yourdataearlierwiththetool.
1.Right-clicktheStartbuttontoopentheStartcontextmenu.
2.ClickControlPanel.ViewControlPanelusingLargeiconsorSmallicons,andthenclickFile
History➙Restorepersonalfiles.
3.Followtheinstructionsonthescreen.
–UsetheWindowsrecoveryenvironmentbydoingoneofthefollowing:
–Afterseveralconsecutivefailedbootattempts,theWindowsrecoveryenvironmentmightstart
automatically.Followtheinstructionsonthescreentochoosetheappropriaterecoverysolution.
–SelecttherecoverymediumyoucreatedearlierwiththeWindowstoolasthestartupdevice.See
“Selectingatemporarystartupdevice”onpage36.Then,followtheinstructionsonthescreen
tochoosetheappropriaterecoverysolution.
Note:Tocreatearecoverymedium,see“Goodmaintenancepractices”onpage23.
•UsetherecoveryUSBkeyprovidedbyLenovotorestoretheentirestoragedrivetothefactory-default
settings.
–IfthecomputercomeswiththerecoveryUSBkey,followtheinstructionsshippedwiththeUSBkey.
–IfthecomputerdoesnotcomewiththerecoveryUSBkey,contacttheLenovoCustomerSupport
CentertoorderarecoveryUSBkey.See“Callingforservice”onpage78.
Chapter6.Troubleshooting,diagnostics,andrecovery49

50ThinkCentreM700UserGuide

Chapter7.Installingorreplacinghardware
Thischaptercontainsthefollowingtopics:
•“Handlingstatic-sensitivedevices”onpage51
•“Installingorreplacinghardware”onpage51
Handlingstatic-sensitivedevices
Donotopenthestatic-protectivepackagecontainingthenewpartuntilthedefectiveparthasbeenremoved
andyouarereadytoinstallthenewpart.Staticelectricity,althoughharmlesstoyou,canseriouslydamage
computercomponentsandparts.
Whenyouhandlepartsandothercomputercomponents,taketheseprecautionstoavoidstatic-electricity
damage:
•Limityourmovement.Movementcancausestaticelectricitytobuilduparoundyou.
•Alwayshandlepartsandothercomputercomponentscarefully.HandlePCI/PCI-Expresscards,memory
modules,systemboards,andmicroprocessorsbytheedges.Nevertouchanyexposedcircuitry.
•Preventothersfromtouchingthepartsandothercomputercomponents.
•Touchthestatic-protectivepackagecontainingtheparttoametalexpansion-slotcoverorother
unpaintedmetalsurfaceonthecomputerforatleasttwoseconds.Thisreducesstaticelectricityfrom
thepackageandyourbodybeforeyouinstallorreplaceanewpart.
•Whenpossible,removethenewpartfromthestatic-protectivepackage,andinstallitdirectlyinthe
computerwithoutsettingthepartdown.Whenthisisnotpossible,placethestatic-protectivepackage
thatthepartcameinonasmooth,levelsurfaceandplacethepartonthepackage.
•Donotplacethepartonthecomputercoverorothermetalsurface.
Installingorreplacinghardware
Thissectionprovidesinstructionsonhowtoinstallorreplacehardwareforthecomputer.Youcanexpand
thecapabilitiesofthecomputerandmaintainthecomputerbyinstallingorreplacinghardware.
Attention:Donotopenthecomputerorattemptanyrepairbeforereadingandunderstandingthe“Read
thisfirst:Importantsafetyinformation”onpageiii.
Notes:
•Someofthehardwarepartsinthissectionareoptional.
•UsecomputerpartsprovidedonlybyLenovo.
•Wheninstallingorreplacinganoption,usetheappropriateinstructionsinthissectionalongwiththe
instructionsthatcomewiththeoption.
•Inmostareasoftheworld,LenovorequiresthereturnofthedefectiveCRU.Informationaboutthiswill
comewiththeCRUorwillcomeafewdaysaftertheCRUarrives.
Installingexternaloptions
Youcanconnectexternaloptionstothecomputer,suchasexternalspeakers,aprinter,orascanner.For
someexternaloptions,youmustinstalladditionalsoftwareinadditiontomakingthephysicalconnection.
Wheninstallinganexternaloption,see“Hardwarelocations”onpage1toidentifytherequiredconnector.
©CopyrightLenovo201651
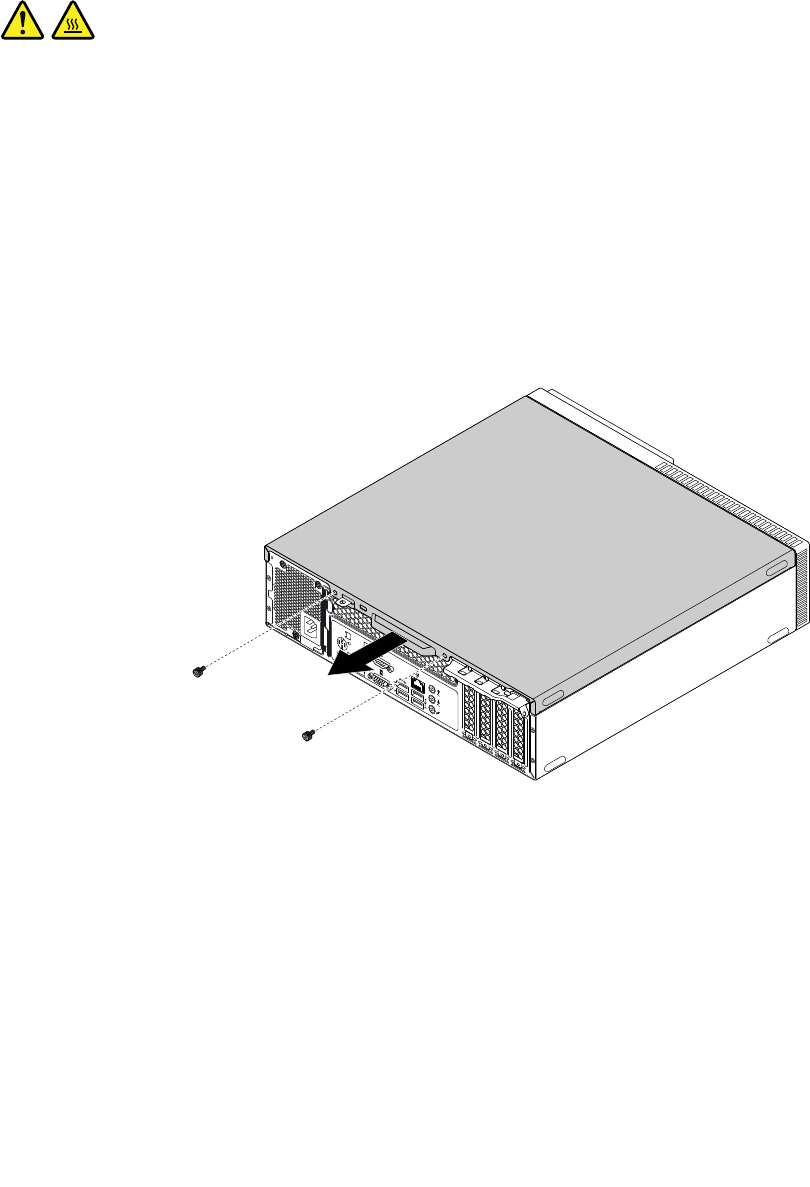
Usetheinstructionsshippedwiththeoptiontohelpyoumaketheconnectionandinstallanysoftware
ordevicedriversthatarerequiredfortheoption.
Removingthecomputercover
Attention:Donotopenyourcomputerorattemptanyrepairbeforereadingandunderstandingthe“Read
thisfirst:Importantsafetyinformation”onpageiii.
CAUTION:
Beforeyouopenthecomputercover,turnoffthecomputerandwaitseveralminutesuntilthe
computeriscool.
Toremovethecomputercover,dothefollowing:
1.Removeanymediafromthedrivesandturnoffallconnecteddevicesandthecomputer.Then,
disconnectallpowercordsfromelectricaloutletsanddisconnectallcablesthatareconnectedtothe
computer.
2.Unlockanylockingdevicethatsecuresthecomputercover.
3.Holdthesidesofyourcomputerandgentlylayitdownsothatthecomputercoverisfacingup.
4.Removethetwoscrewsthatsecurethecomputercoverandslidethecomputercovertotherearto
removeit.
Figure9.Removingthecomputercover
Replacingthefrontbezel
Attention:Donotopenyourcomputerorattemptanyrepairbeforereadingandunderstandingthe“Read
thisfirst:Importantsafetyinformation”onpageiii.
Toreplacethefrontbezel,dothefollowing:
1.Removeanymediafromthedrivesandturnoffallconnecteddevicesandthecomputer.Then,
disconnectallpowercordsfromelectricaloutletsanddisconnectallcablesthatareconnectedtothe
computer.
2.Removethecomputercover.See“Removingthecomputercover”onpage52.
52ThinkCentreM700UserGuide
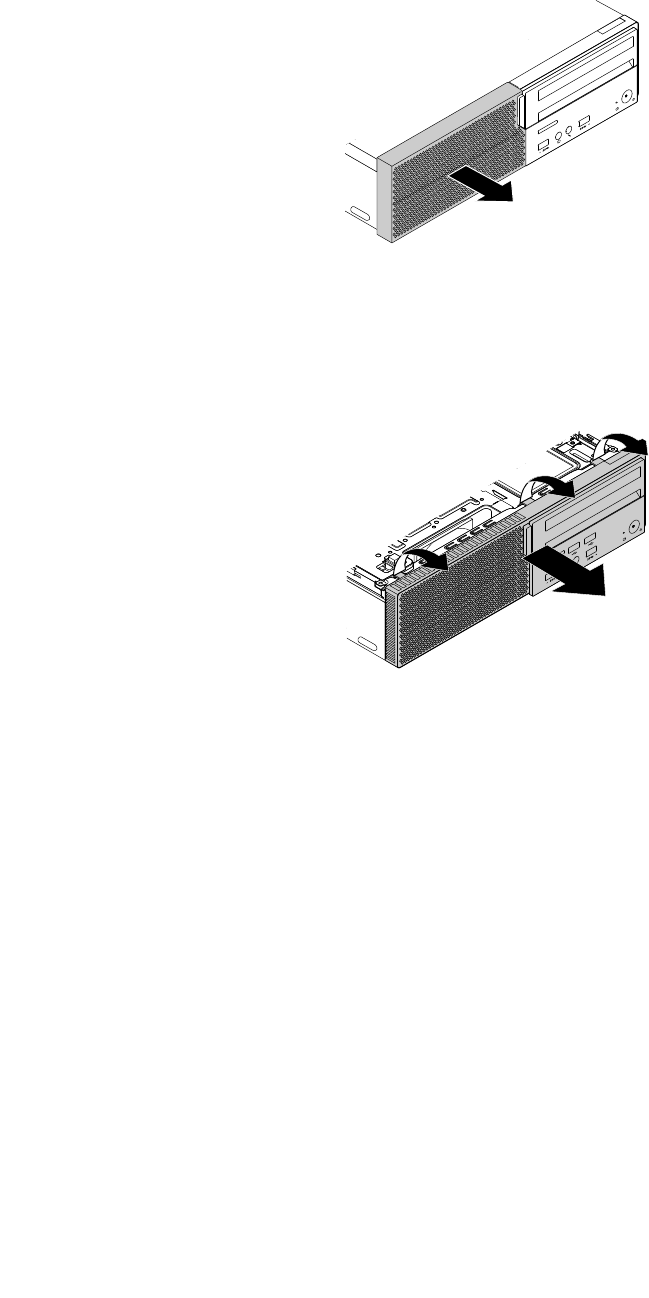
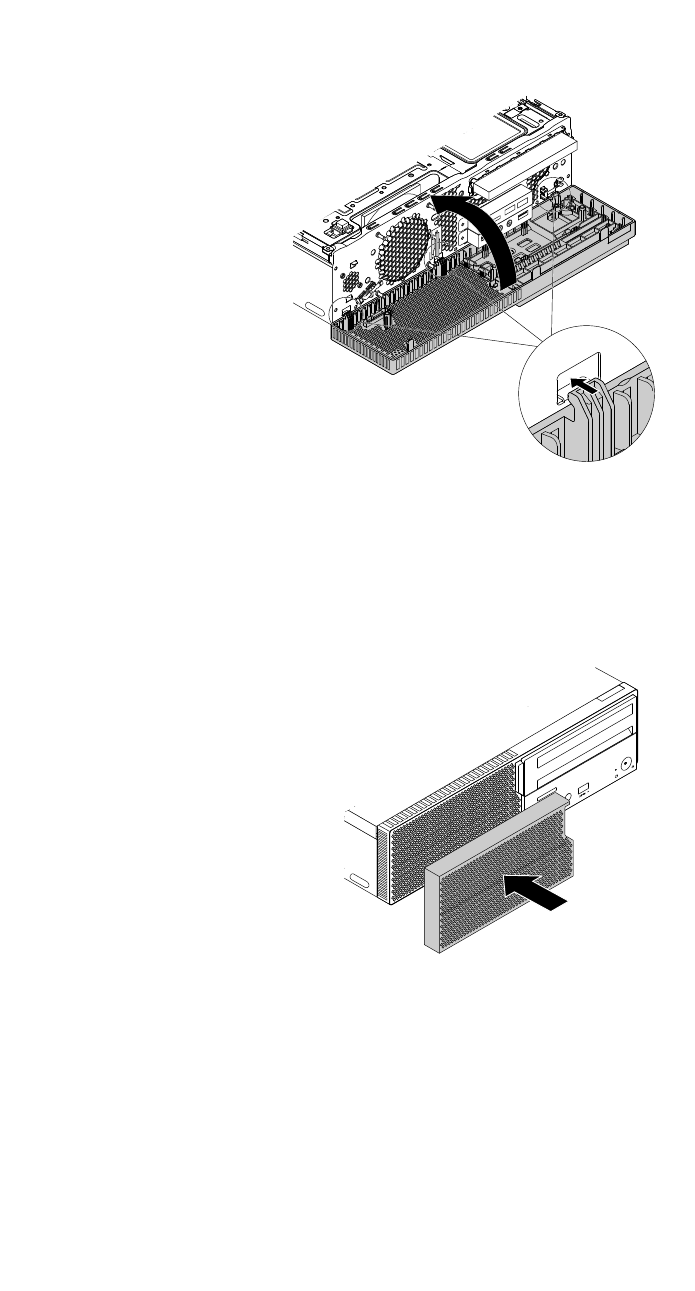
5.Alignthethreeplastictabsonthebottomofthenewfrontbezelwiththecorrespondingholesinthe
chassis.Then,pivotthefrontbezelupwarduntilitsnapsintoposition.
Figure12.Installingthefrontbezel
6.Reinstallthedustshieldifyouhaveremovedit.Aligntheedgesofthedustshieldwiththeedgesofthe
frontbezel.Then,pressthedustshieldinwarduntilitsnapsintoposition.
Figure13.Installingthedustshield
Whattodonext:
•Toworkwithanotherpieceofhardware,gototheappropriatesection.
•Tocompletetheinstallationorreplacement,goto“Completingthepartsreplacement”onpage74.
54ThinkCentreM700UserGuide
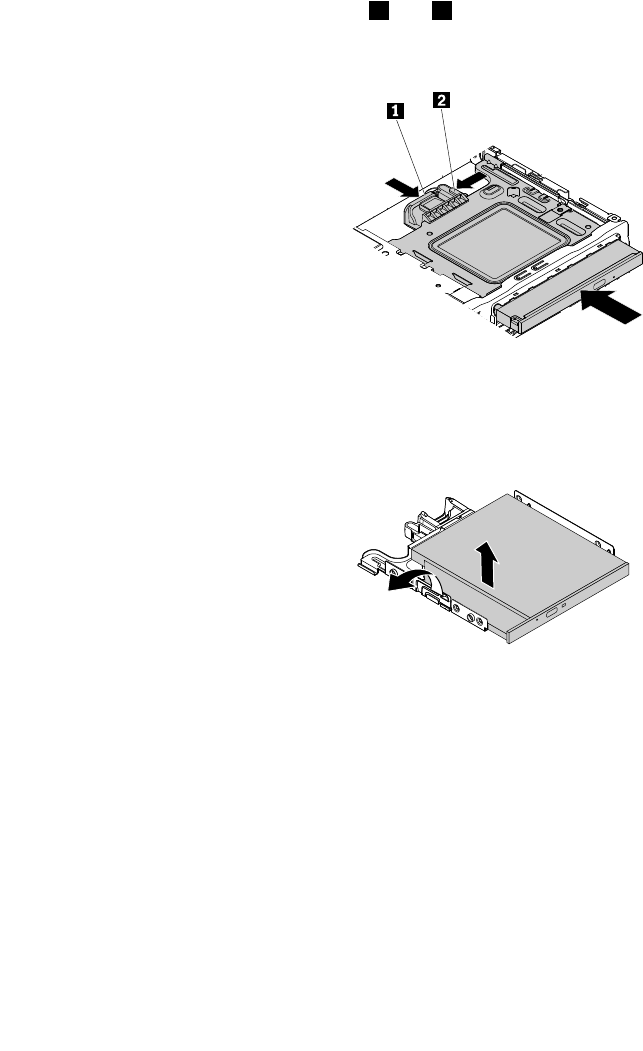
Replacingtheopticaldrive
Attention:Donotopenyourcomputerorattemptanyrepairbeforereadingandunderstandingthe“Read
thisfirst:Importantsafetyinformation”onpageiii.
Toreplacetheopticaldrive,dothefollowing:
1.Removeanymediafromthedrivesandturnoffallconnecteddevicesandthecomputer.Then,
disconnectallpowercordsfromelectricaloutletsanddisconnectallcablesthatareconnectedtothe
computer.
2.Removethecomputercover.See“Removingthecomputercover”onpage52.
3.Removethefrontbezel.See“Replacingthefrontbezel”onpage52.
4.Locatetheopticaldrive.See“Computercomponents”onpage6.
5.Disconnectthesignalcableandthepowercablefromtherearoftheopticaldrive.
6.Pressandholdthebluereleasetabs1and2ontheopticaldrivebracketasshown.Pushtheoptical
drivetowardtherearofthecomputertoremovetheopticaldrivewiththebracketfromthechassis.
Figure14.Removingtheopticaldrivewiththebracket
7.Flextheopticaldrivebracketasshowntoremovetheopticaldrivefromthebracket.
Figure15.Removingtheopticaldrivefromthebracket
Chapter7.Installingorreplacinghardware55

8.Insertastraightenedpaperclipintotheemergency-ejecthole1adjacenttotheeject/closebutton
sothatthetrayslidesoutoftheopticaldrive.Then,removetheopticaldrivebezelfromtheoptical
driveasshown.
Figure16.Removingtheopticaldrivebezelfromtheopticaldrive
9.Insertthetab1ontheopticaldrivebezelintothecorrespondingholeinthenewopticaldrive.Then,
inserttheotherthreetabs2intothecorrespondingholesintheopticaldrive.Gentlypushthetray
forwardtoclosethetray.
Figure17.Installingtheopticaldrivebezeltotheopticaldrive
10.Flextheopticaldrivebracketandinsertthetwopinsonthebracketintothecorrespondingholesinthe
opticaldrive.Then,pivottheopticaldrivedownwarduntilitsnapsintoposition.
Figure18.Installingtheopticaldriveintothebracket
56ThinkCentreM700UserGuide
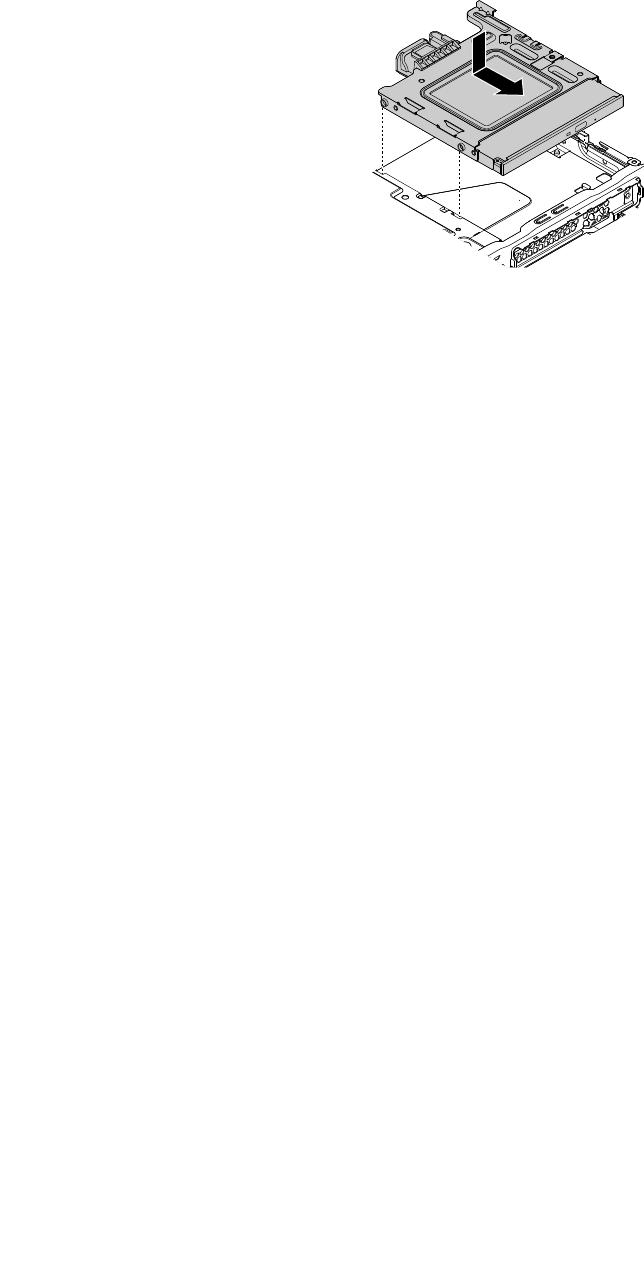
11.Alignthemountingstudsonthebracketwiththecorrespondingholesinthechassis,andtheninstallthe
opticaldrivewiththebracketintothedrivebayassembly.Slidetheopticaldrivewiththebrackettothe
frontofthecomputeruntilitsnapsintoposition.
Figure19.Installingtheopticaldrivewiththebracket
12.Connectthesignalcableandthepowercabletotheopticaldrive.
13.Reinstallthefrontbezel.See“Replacingthefrontbezel”onpage52.
Whattodonext:
•Toworkwithanotherpieceofhardware,gototheappropriatesection.
•Tocompletetheinstallationorreplacement,goto“Completingthepartsreplacement”onpage74.
Pivotingthedrivebayassemblyupwardanddownward
Attention:Donotopenyourcomputerorattemptanyrepairbeforereadingandunderstandingthe“Read
thisfirst:Importantsafetyinformation”onpageiii.
Topivotthedrivebayassemblyupwardanddownward,dothefollowing:
1.Removeanymediafromthedrivesandturnoffallconnecteddevicesandthecomputer.Then,
disconnectallpowercordsfromelectricaloutletsanddisconnectallcablesthatareconnectedtothe
computer.
2.Removethecomputercover.See“Removingthecomputercover”onpage52.
3.Removethefrontbezel.See“Replacingthefrontbezel”onpage52.
4.Removetheopticaldrive.See“Replacingtheopticaldrive”onpage55.
Chapter7.Installingorreplacinghardware57
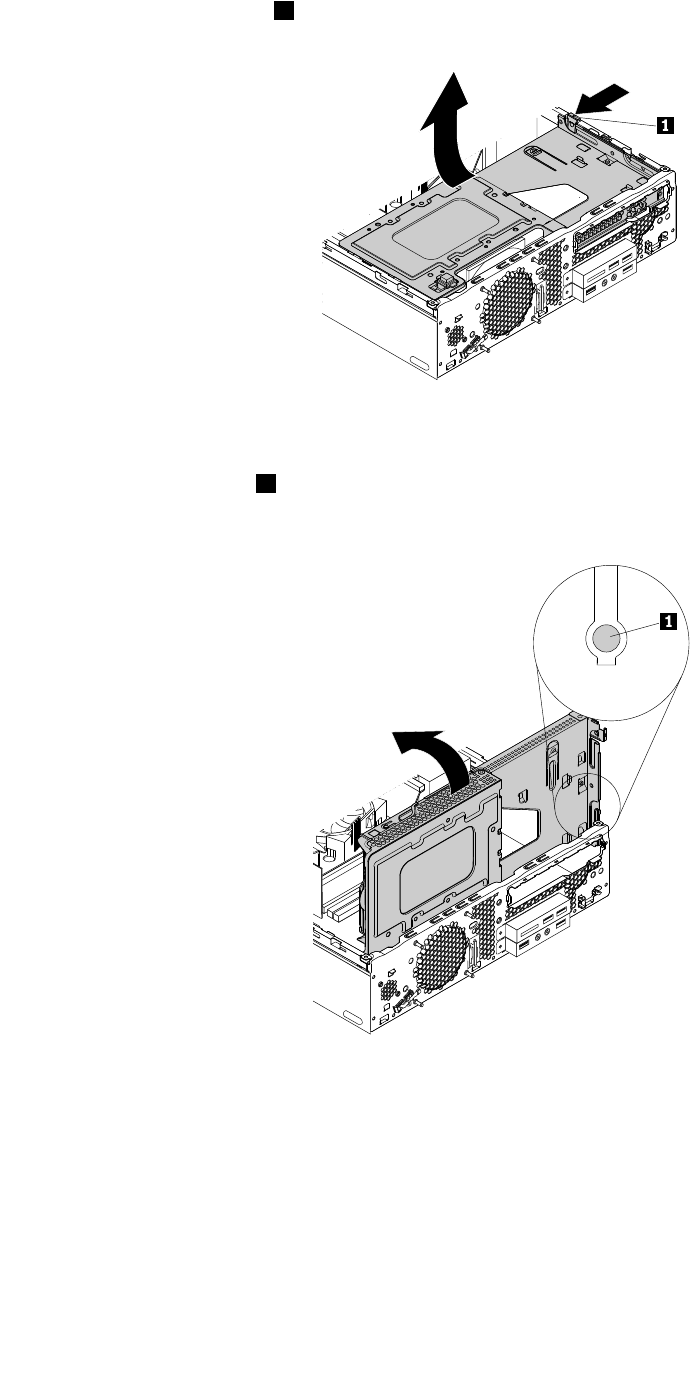
5.Pressingtheretainingclip1asshown,pivotthedrivebayassemblyupward.
Figure20.Pivotingthedrivebayassemblyupward
6.Pressingthereleasetab1onthedrivebayassemblyasshown,pivotthedrivebayassemblydownward
untilitsnapsintoposition.
Figure21.Pivotingthedrivebayassemblydownward
7.Reinstalltheopticaldrive.See“Replacingtheopticaldrive”onpage55.
8.Reinstallthefrontbezel.See“Replacingthefrontbezel”onpage52.
Whattodonext:
•Toworkwithanotherpieceofhardware,gototheappropriatesection.
•Tocompletetheinstallationorreplacement,goto“Completingthepartsreplacement”onpage74.
58ThinkCentreM700UserGuide
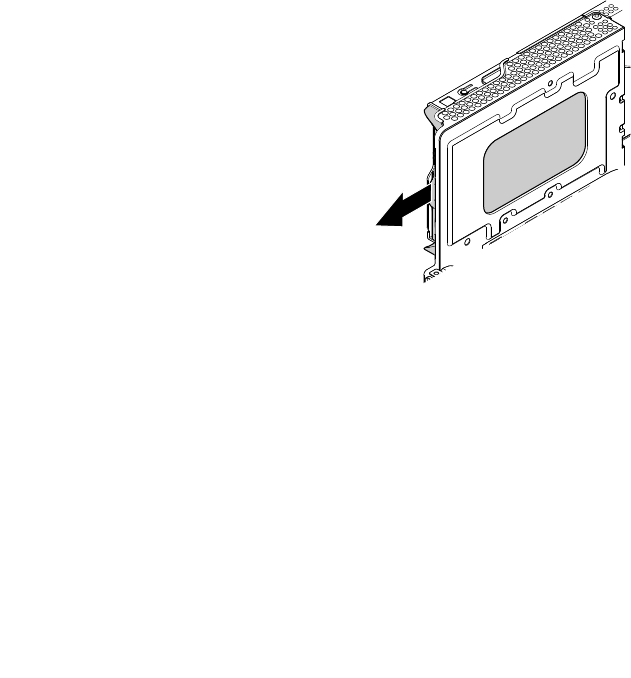
Replacingthestoragedrive
Attention:Donotopenyourcomputerorattemptanyrepairbeforereadingandunderstandingthe“Read
thisfirst:Importantsafetyinformation”onpageiii.
Toreplacethestoragedrive,refertooneofthefollowingtopics:
•“Replacingthe3.5-inchprimarystoragedrive”onpage59
•“Replacingthe2.5-inchprimarystoragedrive”onpage61
•“Replacingthe2.5-inchsecondarystoragedrive”onpage63
•“ReplacingtheM.2solid-statedrive”onpage65
Replacingthe3.5-inchprimarystoragedrive
Toreplacethe3.5-inchprimarystoragedrive,dothefollowing:
1.Removeanymediafromthedrivesandturnoffallconnecteddevicesandthecomputer.Then,
disconnectallpowercordsfromelectricaloutletsanddisconnectallcablesthatareconnectedtothe
computer.
2.Removethecomputercover.See“Removingthecomputercover”onpage52.
3.Removethefrontbezel.See“Replacingthefrontbezel”onpage52.
4.Removetheopticaldrive.See“Replacingtheopticaldrive”onpage55.
5.Pivotthedrivebayassemblyupward.See“Pivotingthedrivebayassemblyupwardanddownward”
onpage57.
6.Locatethe3.5-inchprimarystoragedrive.See“Computercomponents”onpage6.
7.Disconnectthesignalcableandthepowercablefromthe3.5-inchstoragedrive.
8.Pullthestoragedrivebracketwiththe3.5-inchstoragedriveoutofthechassis.
Figure22.Removingthebracketwiththe3.5-inchprimarystoragedrive
Chapter7.Installingorreplacinghardware59
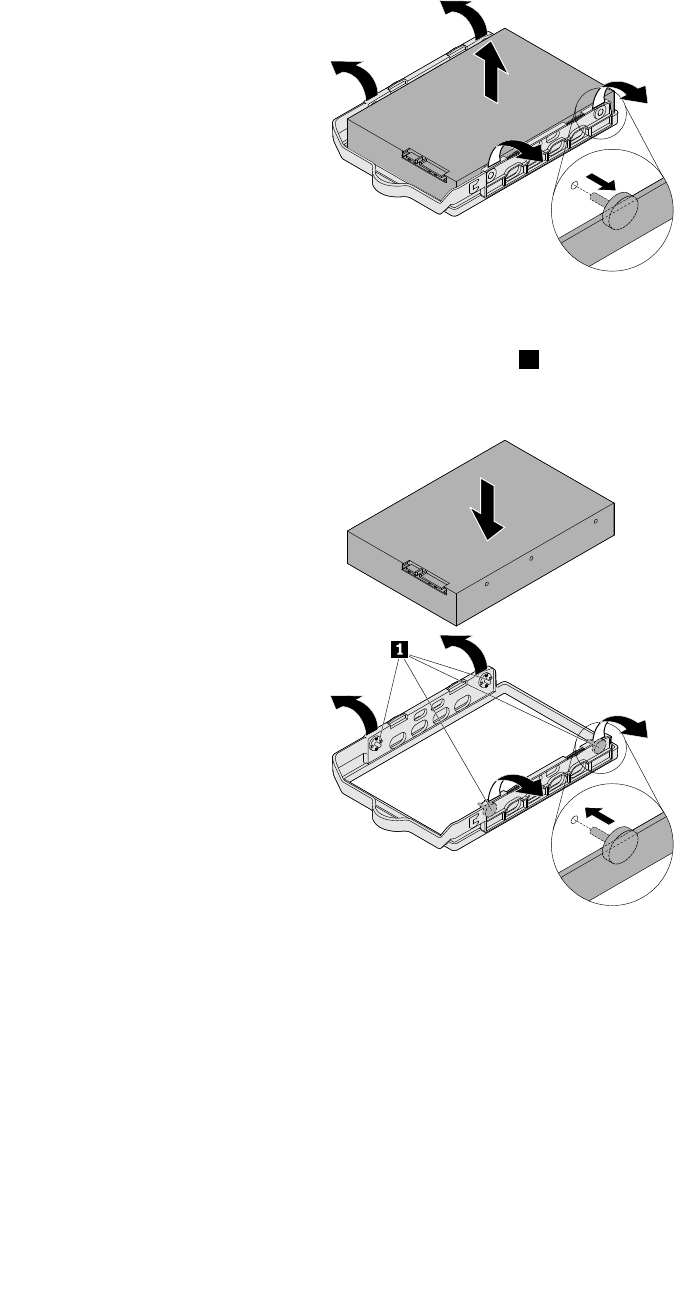
9.Flexthestoragedrivebrackettoremovethe3.5-inchstoragedrivefromthebracket.
Figure23.Removingthe3.5-inchprimarystoragedrivefromthebracket
10.Flexthestoragedrivebracketandinsertthefourpins1onthebracketintothecorrespondingholesin
thenew3.5-inchstoragedrive.
Figure24.Installingthe3.5-inchprimarystoragedriveintothebracket
60ThinkCentreM700UserGuide
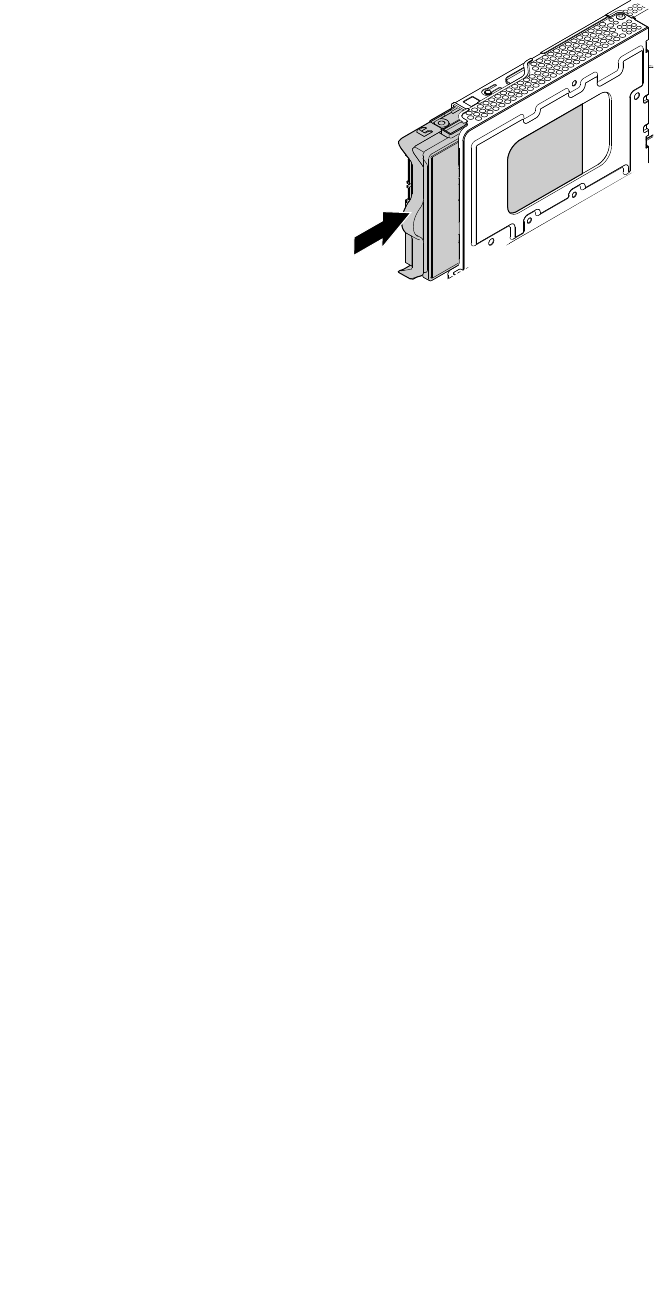
11.Slidethebracketwiththe3.5-inchstoragedriveintothestoragedrivebayuntilitsnapsintoposition.
Figure25.Installingthebracketwiththe3.5-inchprimarystoragedrive
12.Connectthesignalcableandthepowercabletothe3.5-inchstoragedrive.
13.Pivotthedrivebayassemblydownward.See“Pivotingthedrivebayassemblyupwardanddownward”
onpage57.
14.Reinstalltheopticaldrive.See“Replacingtheopticaldrive”onpage55.
15.Reinstallthefrontbezel.See“Replacingthefrontbezel”onpage52.
Whattodonext:
•Toworkwithanotherpieceofhardware,gototheappropriatesection.
•Tocompletetheinstallationorreplacement,goto“Completingthepartsreplacement”onpage74.
Replacingthe2.5-inchprimarystoragedrive
Toreplacethe2.5-inchprimarystoragedrive,dothefollowing:
1.Removeanymediafromthedrivesandturnoffallconnecteddevicesandthecomputer.Then,
disconnectallpowercordsfromelectricaloutletsanddisconnectallcablesthatareconnectedtothe
computer.
2.Removethecomputercover.See“Removingthecomputercover”onpage52.
3.Removethefrontbezel.See“Replacingthefrontbezel”onpage52.
4.Removetheopticaldrive.See“Replacingtheopticaldrive”onpage55.
5.Pivotthedrivebayassemblyupward.See“Pivotingthedrivebayassemblyupwardanddownward”
onpage57.
6.Locatethe2.5-inchprimarystoragedrive.See“Computercomponents”onpage6.
7.Disconnectthesignalcableandthepowercablefromthe2.5-inchstoragedrive.
8.Removethestorageconverterwiththe2.5-inchstoragedrive.See“Replacingthe3.5-inchprimary
storagedrive”onpage59.
Chapter7.Installingorreplacinghardware61
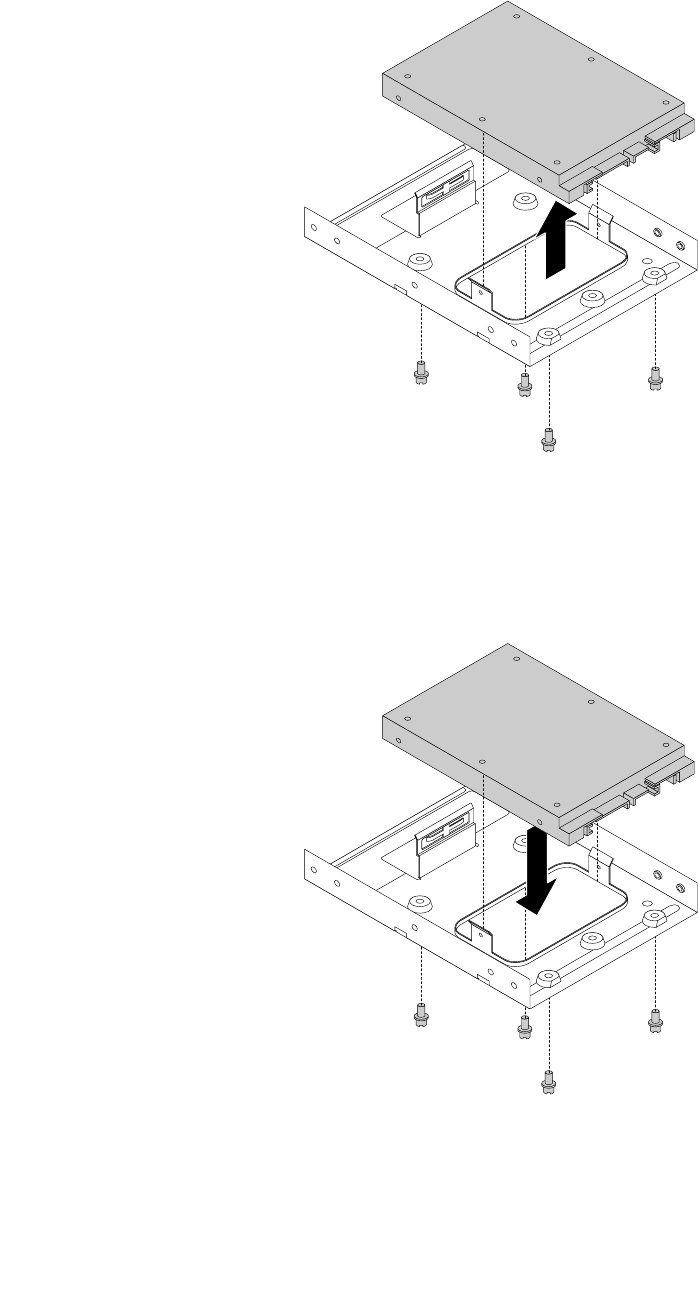
9.Removethefourscrewsthatsecurethe2.5-inchstoragedrivetothestorageconverter.Then,remove
the2.5-inchstoragedrivefromtheconverterasshown.
Figure26.Removingthe2.5-inchprimarystoragedrivefromthestorageconverter
10.Positionthenew2.5-inchstoragedriveintothestorageconvertersothattheholesinthestoragedrive
arealignedwiththecorrespondingholesintheconverter.Then,installthefourscrewstosecurethe
2.5-inchstoragedrivetotheconverter.
Figure27.Installingthe2.5-inchprimarystoragedriveintothestorageconverter
11.Installthestorageconverterwiththe2.5-inchstoragedrive.See“Replacingthe3.5-inchprimary
storagedrive”onpage59.
62ThinkCentreM700UserGuide
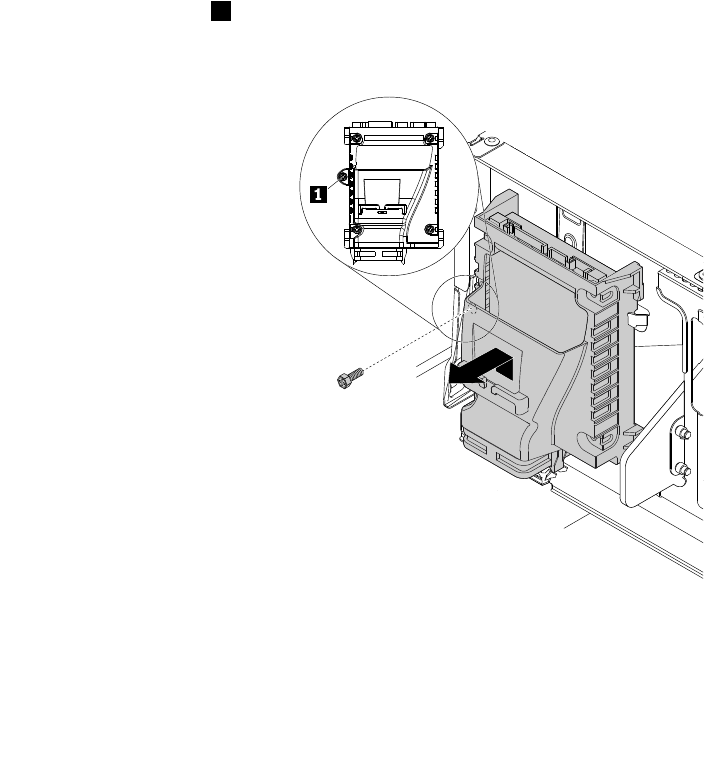
12.Connectthesignalcableandthepowercabletothe2.5-inchstoragedrive.
13.Pivotthedrivebayassemblydownward.See“Pivotingthedrivebayassemblyupwardanddownward”
onpage57.
14.Reinstalltheopticaldrive.See“Replacingtheopticaldrive”onpage55.
15.Reinstallthefrontbezel.See“Replacingthefrontbezel”onpage52.
Whattodonext:
•Toworkwithanotherpieceofhardware,gototheappropriatesection.
•Tocompletetheinstallationorreplacement,goto“Completingthepartsreplacement”onpage74.
Replacingthe2.5-inchsecondarystoragedrive
Toreplacethe2.5-inchsecondarystoragedrive,dothefollowing:
1.Removeanymediafromthedrivesandturnoffallconnecteddevicesandthecomputer.Then,
disconnectallpowercordsfromelectricaloutletsanddisconnectallcablesthatareconnectedtothe
computer.
2.Removethecomputercover.See“Removingthecomputercover”onpage52.
3.Removethefrontbezel.See“Replacingthefrontbezel”onpage52.
4.Removetheopticaldrive.See“Replacingtheopticaldrive”onpage55.
5.Pivotthedrivebayassemblyupward.See“Pivotingthedrivebayassemblyupwardanddownward”
onpage57.
6.Locatethe2.5-inchsecondarystoragedrive.See“Computercomponents”onpage6.
7.Disconnectthesignalcableandthepowercablefromthe2.5-inchstoragedrive.
8.Removethescrew1thatsecuresthestoragedrivebracket.Then,slidethebracketwiththe2.5-inch
storagedriveupwardandremoveitfromthechassisasshown.
Figure28.Removingthebracketwiththe2.5-inchsecondarystoragedrive
Chapter7.Installingorreplacinghardware63
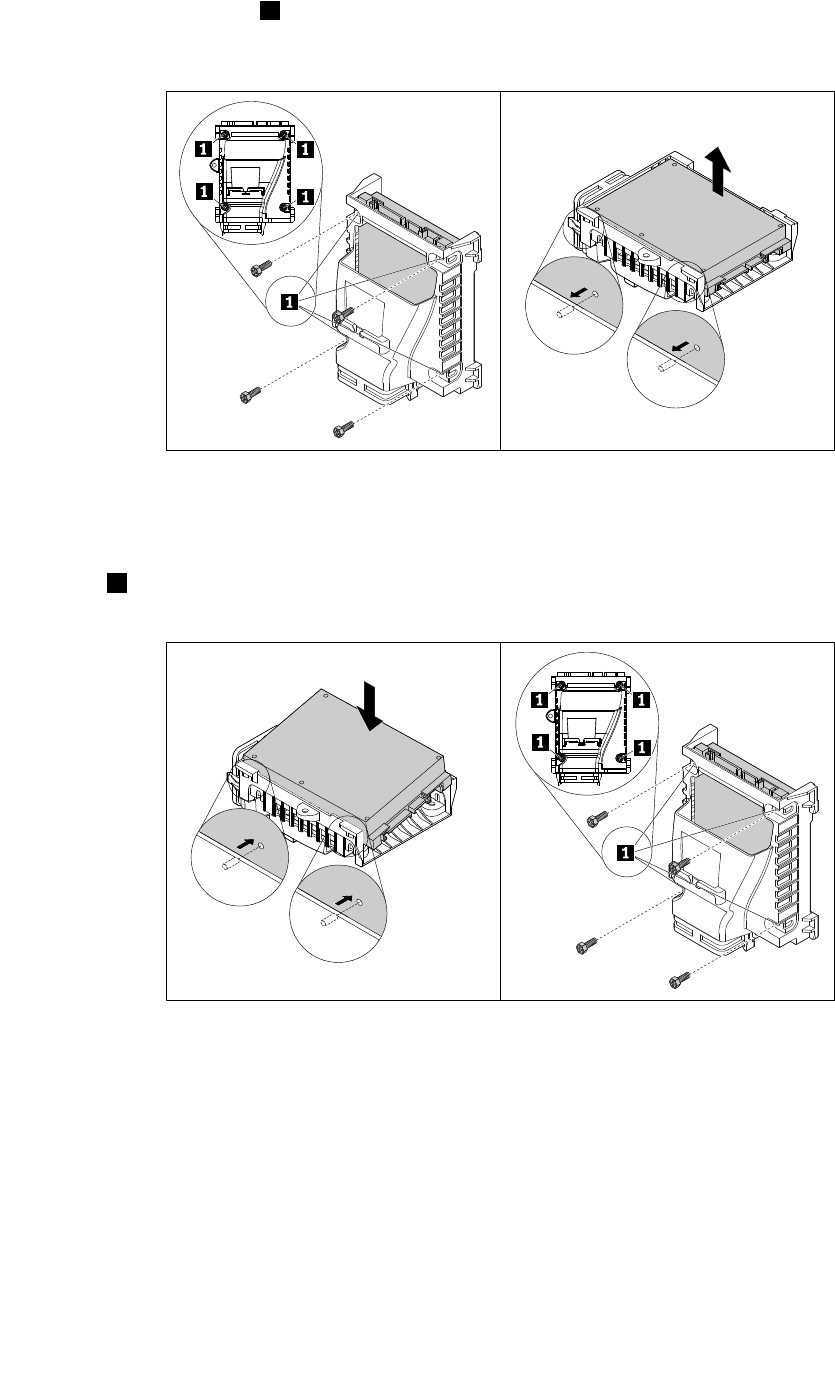
9.Removethefourscrews1thatsecurethe2.5-inchstoragedrivetothebracket.Then,flexthestorage
drivebrackettoremovethe2.5-inchstoragedrive.
Figure29.Removingthe2.5-inchsecondarystoragedrivefromthebracket
10.Insertthetwopinsonthestoragedrivebracketwiththecorrespondingholesinthenew2.5-inch
storagedrive.Then,pivotthestoragedrivedownwarduntilitsnapsintoposition.Installthefours
screws1tosecurethe2.5-inchstoragedrive.
Figure30.Installingthe2.5-inchsecondarystoragedriveintothebracket
64ThinkCentreM700UserGuide
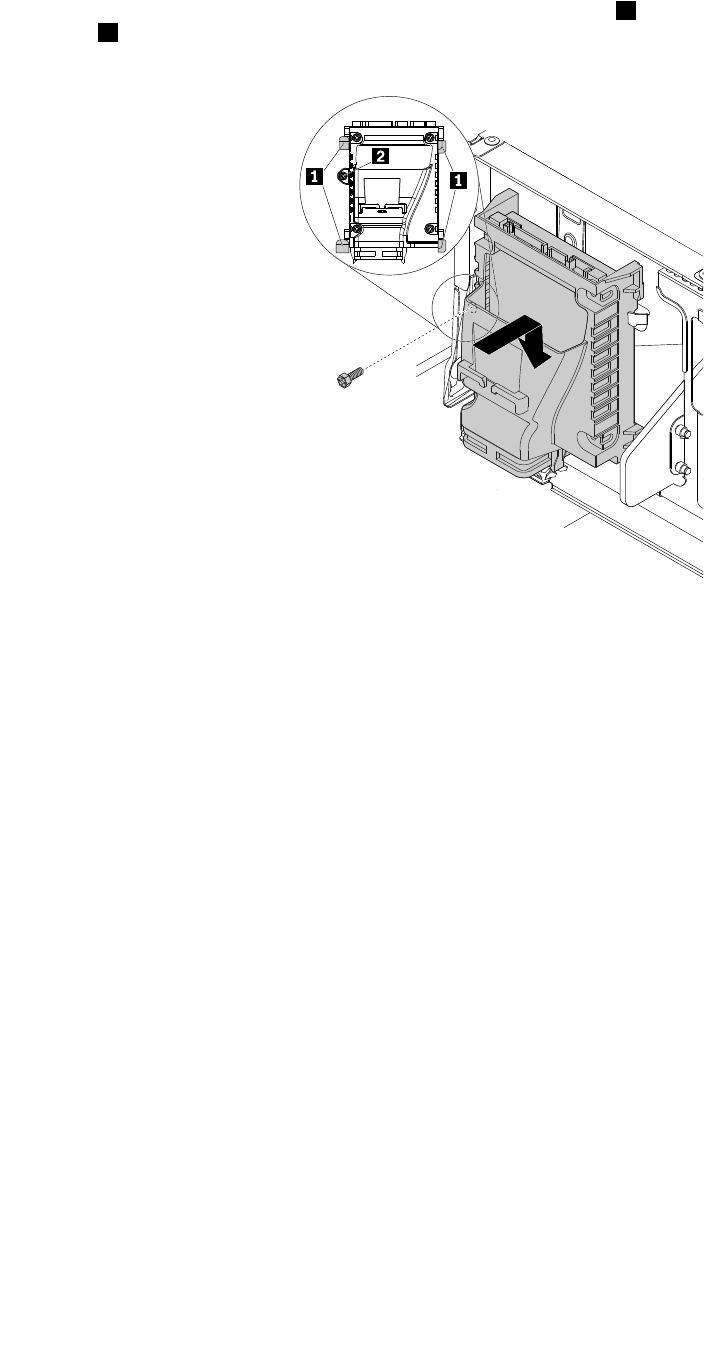
11.Positionthebracketwiththe2.5-inchstoragedriveinthesecondarystoragedrivebay,andthenslideit
downwarduntilthebracketissecuredbythefourretainingclips1inthestoragedrivebay.Installthe
screw2tosecurethebracket.
Figure31.Installingthebracketwiththe2.5-inchsecondarystoragedrive
12.Connectthesignalcableandthepowercabletothe2.5-inchstoragedrive.
13.Pivotthedrivebayassemblydownward.See“Pivotingthedrivebayassemblyupwardanddownward”
onpage57.
14.Reinstalltheopticaldrive.See“Replacingtheopticaldrive”onpage55.
15.Reinstallthefrontbezel.See“Replacingthefrontbezel”onpage52.
Whattodonext:
•Toworkwithanotherpieceofhardware,gototheappropriatesection.
•Tocompletetheinstallationorreplacement,goto“Completingthepartsreplacement”onpage74.
ReplacingtheM.2solid-statedrive
ToreplacetheM.2solid-statedrive,dothefollowing:
1.Removeanymediafromthedrivesandturnoffallconnecteddevicesandthecomputer.Then,
disconnectallpowercordsfromelectricaloutletsanddisconnectallcablesthatareconnectedtothe
computer.
2.Removethecomputercover.See“Removingthecomputercover”onpage52.
3.LocatetheM.2solid-statedrive.See“Computercomponents”onpage6.
4.RemovetheM.2solid-statedriveadapter.See“ReplacingaPCIExpresscard”onpage66.
Chapter7.Installingorreplacinghardware65
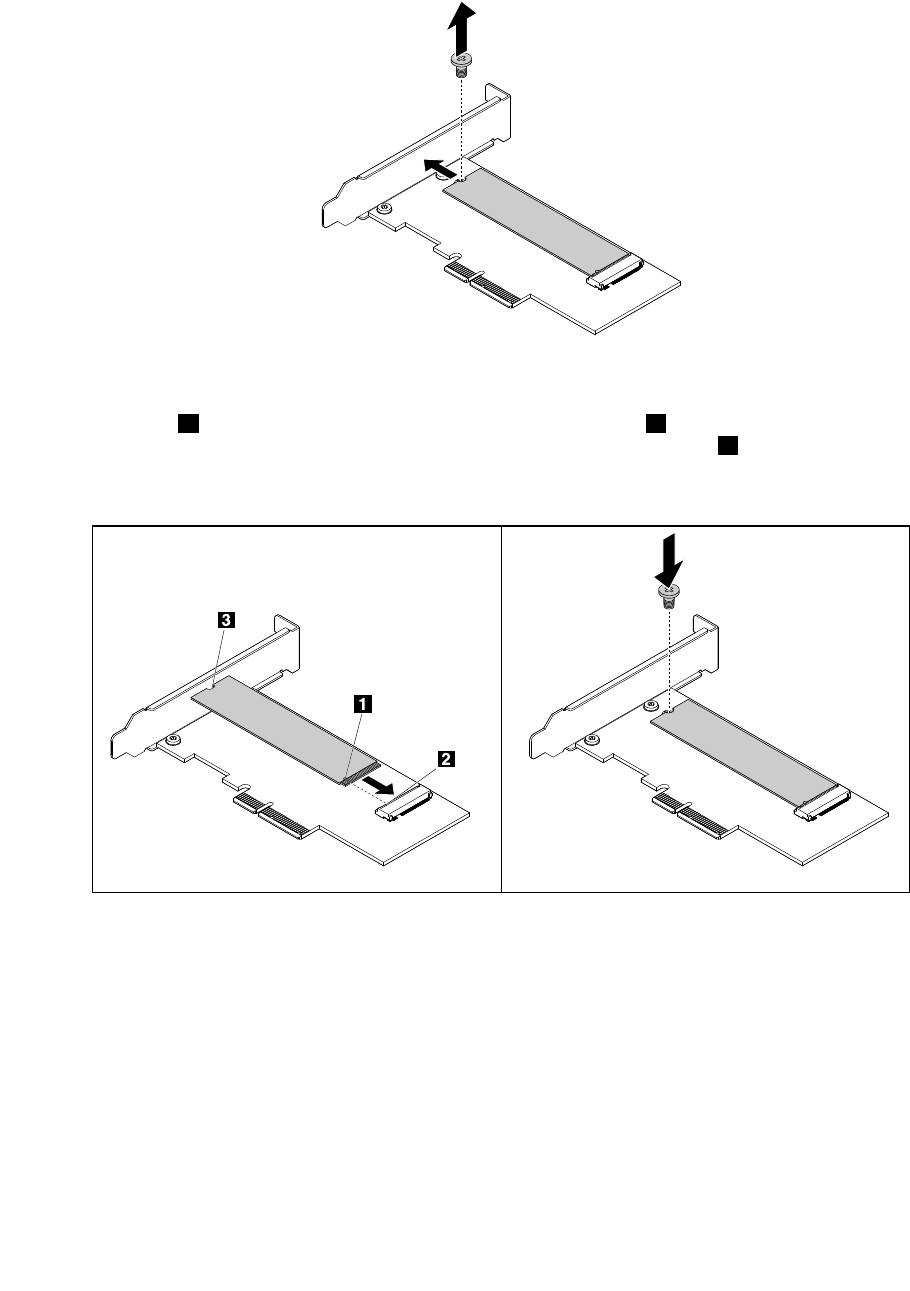
5.RemovethescrewthatsecurestheM.2solid-statedrive.Then,gentlypullthesolid-statedriveout
oftheM.2slot.
Figure32.RemovingtheM.2solid-statedrive
6.Alignthenotch1onthenewM.2solid-statedrivewiththeslotkey2intheM.2slot.Then,insertthe
solid-statedriveintotheM.2slotuntilitissecuredtightlysothatthenotch3isalignedwiththe
correspondingscrewholeintheadapter.Installthescrewtosecurethesolid-statedrive.
Figure33.InstallingtheM.2solid-statedrive
7.ReinstalltheM.2solid-statedriveadapter.See“ReplacingaPCIExpresscard”onpage66.
Whattodonext:
•Toworkwithanotherpieceofhardware,gototheappropriatesection.
•Tocompletetheinstallationorreplacement,goto“Completingthepartsreplacement”onpage74.
ReplacingaPCIExpresscard
Attention:Donotopenyourcomputerorattemptanyrepairbeforereadingandunderstandingthe“Read
thisfirst:Importantsafetyinformation”onpageiii.
66ThinkCentreM700UserGuide
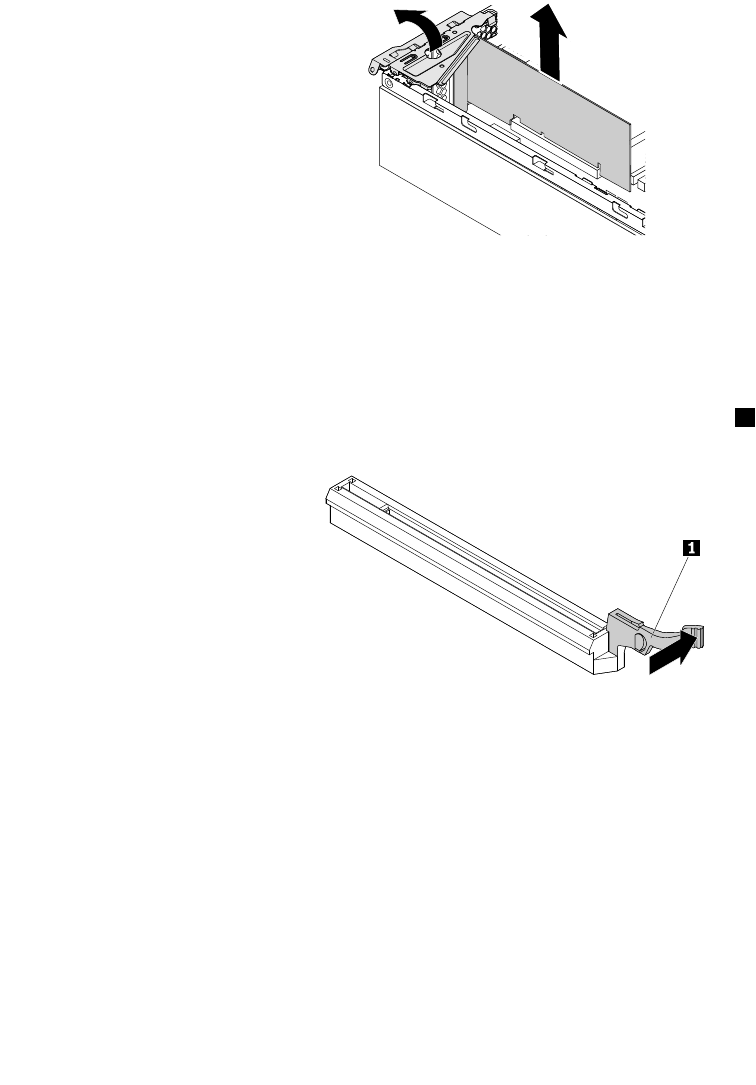
ToreplaceaPCIExpresscard,dothefollowing:
1.Removeanymediafromthedrivesandturnoffallconnecteddevicesandthecomputer.Then,
disconnectallpowercordsfromelectricaloutletsanddisconnectallcablesthatareconnectedtothe
computer.
2.Removethecomputercover.See“Removingthecomputercover”onpage52.
3.LocatethePCIExpresscardyouwanttoreplace.ThePCIExpresscardsareinstalledinthePCI
Expresscardslotsonthesystemboard.See“Partsonthesystemboard”onpage8.
4.Pivotthecardlatchoutwardtoopenthelatch.Then,graspthePCIExpresscardandgentlypull
itoutoftheslot.
Figure34.RemovingaPCIExpresscard
Notes:
•Thecardfitstightlyintothecardslot.Ifnecessary,alternatemovingeachsideofthecardasmall
amountuntilitisremovedfromthecardslot.
•Ifthecardisheldinplacebyaretaininglatch,pressthecardretaininglatch1asshowntodisengage
thelatch.Graspthecardandgentlypullitoutoftheslot.
5.InsertthenewPCIExpresscardintotheappropriatePCIExpresscardslotonthesystemboard.See
“Partsonthesystemboard”onpage8.
Note:IfyouareinstallingaPCIExpressx16graphicscard,ensurethatthememoryslotretainingclips
areclosedbeforeyouinstallthegraphicscard.
6.Pivotthecardlatchtotheclosedposition.
Whattodonext:
•Toworkwithanotherpieceofhardware,gototheappropriatesection.
•Tocompletetheinstallationorreplacement,goto“Completingthepartsreplacement”onpage74.
Chapter7.Installingorreplacinghardware67
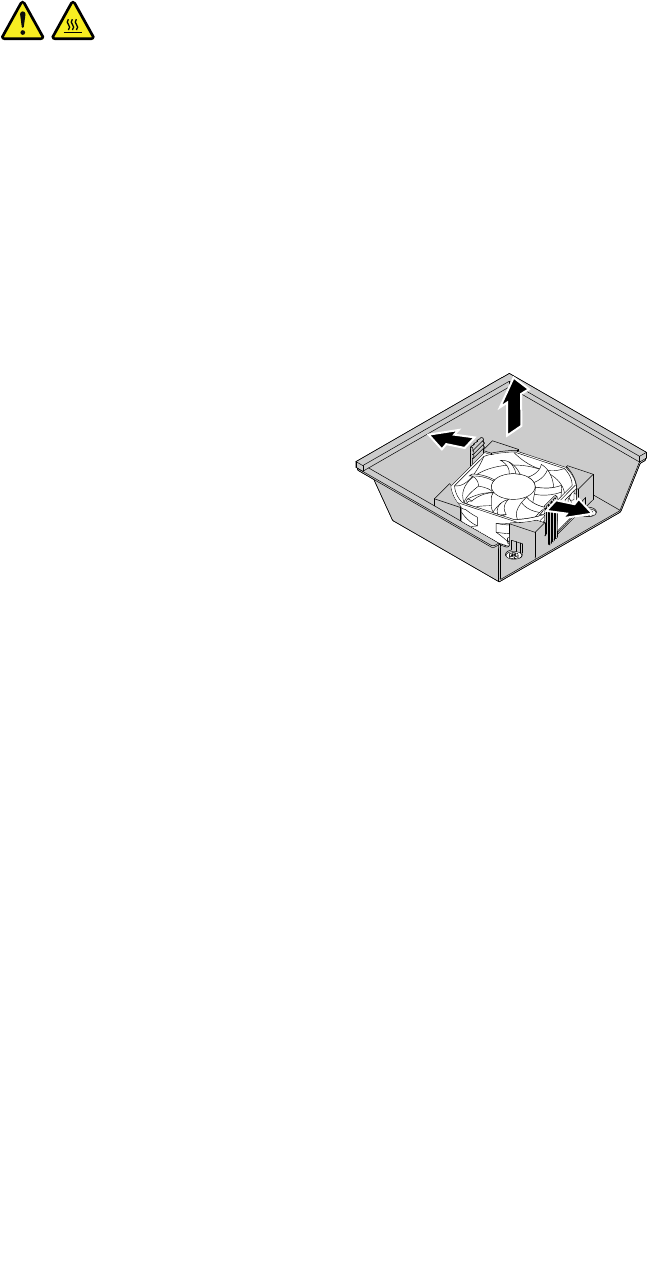
Replacingtheheatsinkandfanassembly
Attention:Donotopenyourcomputerorattemptanyrepairbeforereadingandunderstandingthe“Read
thisfirst:Importantsafetyinformation”onpageiii.
CAUTION:
Theheatsinkandfanassemblymightbeveryhot.Beforeyouopenthecomputercover,turnoffthe
computerandwaitseveralminutesuntilthecomputeriscool.
Toreplacetheheatsinkandfanassembly,dothefollowing:
1.Removeanymediafromthedrivesandturnoffallconnecteddevicesandthecomputer.Then,
disconnectallpowercordsfromelectricaloutletsanddisconnectallcablesthatareconnectedtothe
computer.
2.Removethecomputercover.See“Removingthecomputercover”onpage52.
3.Locatetheheatsinkandfanassembly.See“Computercomponents”onpage6.
4.Pivotingthetwoplasticretainingclipsthatsecuretheheatsinkfanductoutward,lifttheheatsink
fanductoutofthechassis.
Figure35.Removingtheheatsinkfanduct
5.Disconnecttheheatsinkandfanassemblycablefromthesystemboard.
68ThinkCentreM700UserGuide
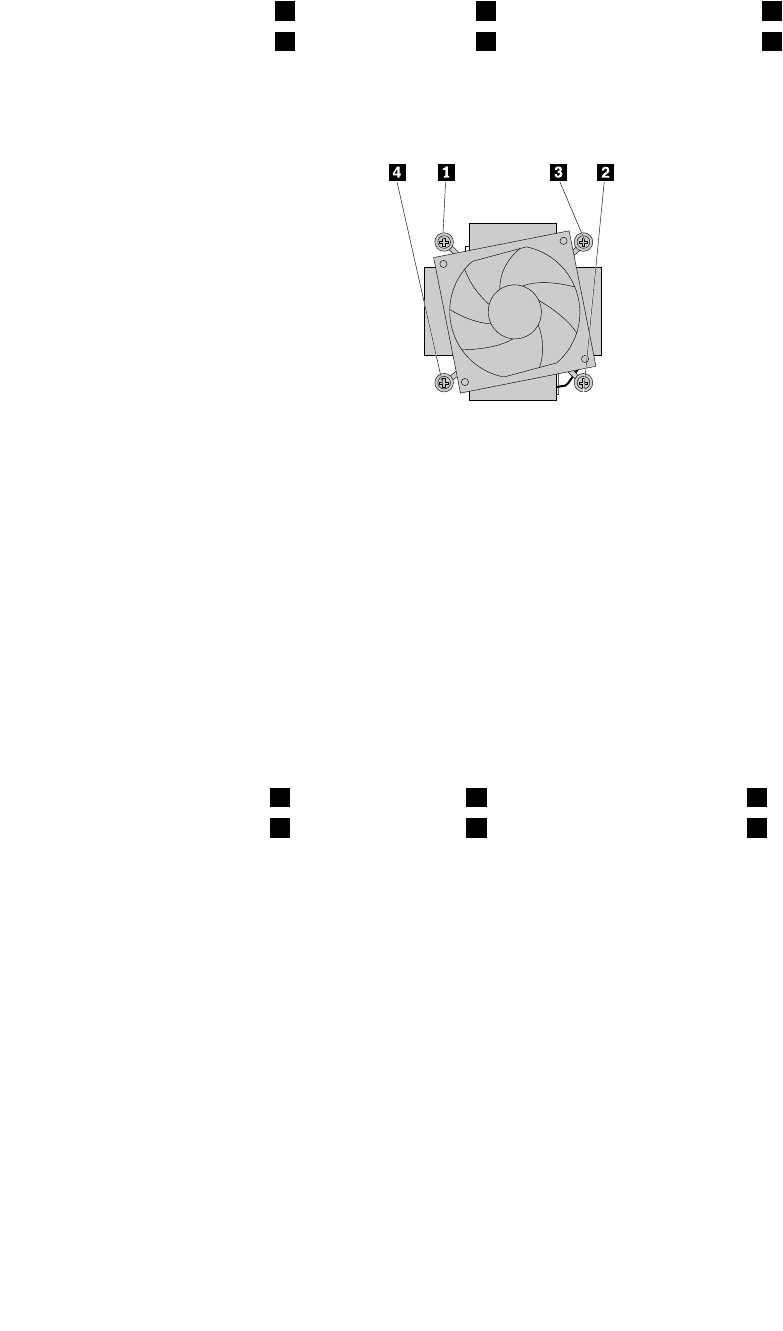
6.Loosenthefourscrewsthatsecuretheheatsinkandfanassemblytothesystemboardinthefollowing
sequence:
a.Partiallyremovescrew1,fullyremovescrew2,andthenfullyremovescrew1.
b.Partiallyremovescrew3,fullyremovescrew4,andthenfullyremovescrew3.
Note:Carefullyremovethefourscrewsfromthesystemboardtoavoidanypossibledamagetothe
systemboard.Thefourscrewscannotberemovedfromtheheatsinkandfanassembly.
Figure36.Removingtheheatsinkandfanassembly
7.Lifttheheatsinkandfanassemblyoffthesystemboard.
Notes:
•Youmighthavetogentlytwisttheheatsinkandfanassemblytofreeitfromthemicroprocessor.
•Donottouchthethermalgreasewhilehandlingtheheatsinkandfanassembly.
8.Positionthenewheatsinkandfanassemblyonthesystemboardsothatthefourscrewsarealigned
withtheholesinthesystemboard.Ensurethattheheatsinkandfanassemblycablefacestowardthe
microprocessorfanconnectoronthesystemboard.
9.Tightenthefourscrewstosecurethenewheatsinkandfanassemblyinthefollowingsequence.Do
notover-tightenthescrews.
a.Partiallytightenscrew1,fullytightenscrew2,andthenfullytightenscrew1.
b.Partiallytightenscrew3,fullytightenscrew4,andthenfullytightenscrew3.
10.Connecttheheatsinkandfanassemblycabletothemicroprocessorfanconnectoronthesystem
board.See“Partsonthesystemboard”onpage8.
Chapter7.Installingorreplacinghardware69
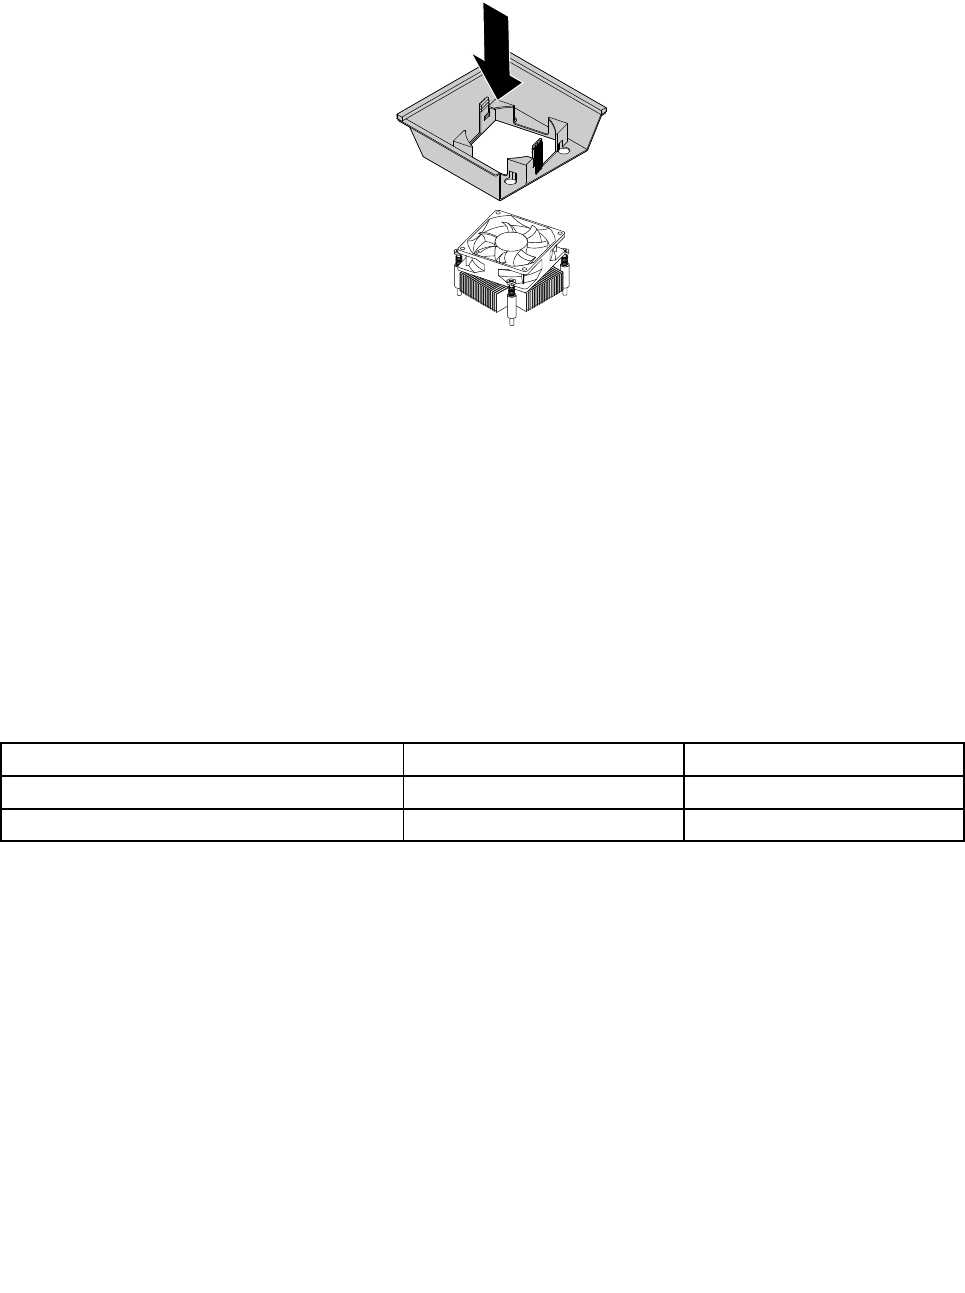
11.Positiontheheatsinkfanductoverthenewheatsinkandfanassembly.Then,presstheheatsinkfan
ductstraightdownuntilitsnapsintoposition.
Figure37.Installingtheheatsinkfanduct
Whattodonext:
•Toworkwithanotherpieceofhardware,gototheappropriatesection.
•Tocompletetheinstallationorreplacement,goto“Completingthepartsreplacement”onpage74.
Replacingamemorymodule
Attention:Donotopenyourcomputerorattemptanyrepairbeforereadingandunderstandingthe“Read
thisfirst:Importantsafetyinformation”onpageiii.
Thefollowingtableprovidesinformationaboutthememorymoduleinstallationrules.The“X”markindicates
thememoryslot(s)intowhichthememorymodule(s)shouldbeinstalledindifferentsituations.Thenumbers
1,2,3,and4indicatetheinstallationsequence.Tolocatethememorymoduleslots,see“Partsonthe
systemboard”onpage8.
MemorymodulesDIMM1DIMM2
OnememorymoduleX
TwomemorymodulesXX
Toreplaceamemorymodule,dothefollowing:
1.Removeanymediafromthedrivesandturnoffallconnecteddevicesandthecomputer.Then,
disconnectallpowercordsfromelectricaloutletsanddisconnectallcablesthatareconnectedtothe
computer.
2.Removethecomputercover.See“Removingthecomputercover”onpage52.
3.Removethefrontbezel.See“Replacingthefrontbezel”onpage52.
4.Removetheopticaldrive.See“Replacingtheopticaldrive”onpage55.
5.Pivotthedrivebayassemblyupward.See“Pivotingthedrivebayassemblyupwardanddownward”
onpage57.
6.Locatethememorymoduleyouwanttoreplace.Thememorymodulesareinstalledinthememoryslots
onthesystemboard.See“Partsonthesystemboard”onpage8.
70ThinkCentreM700UserGuide
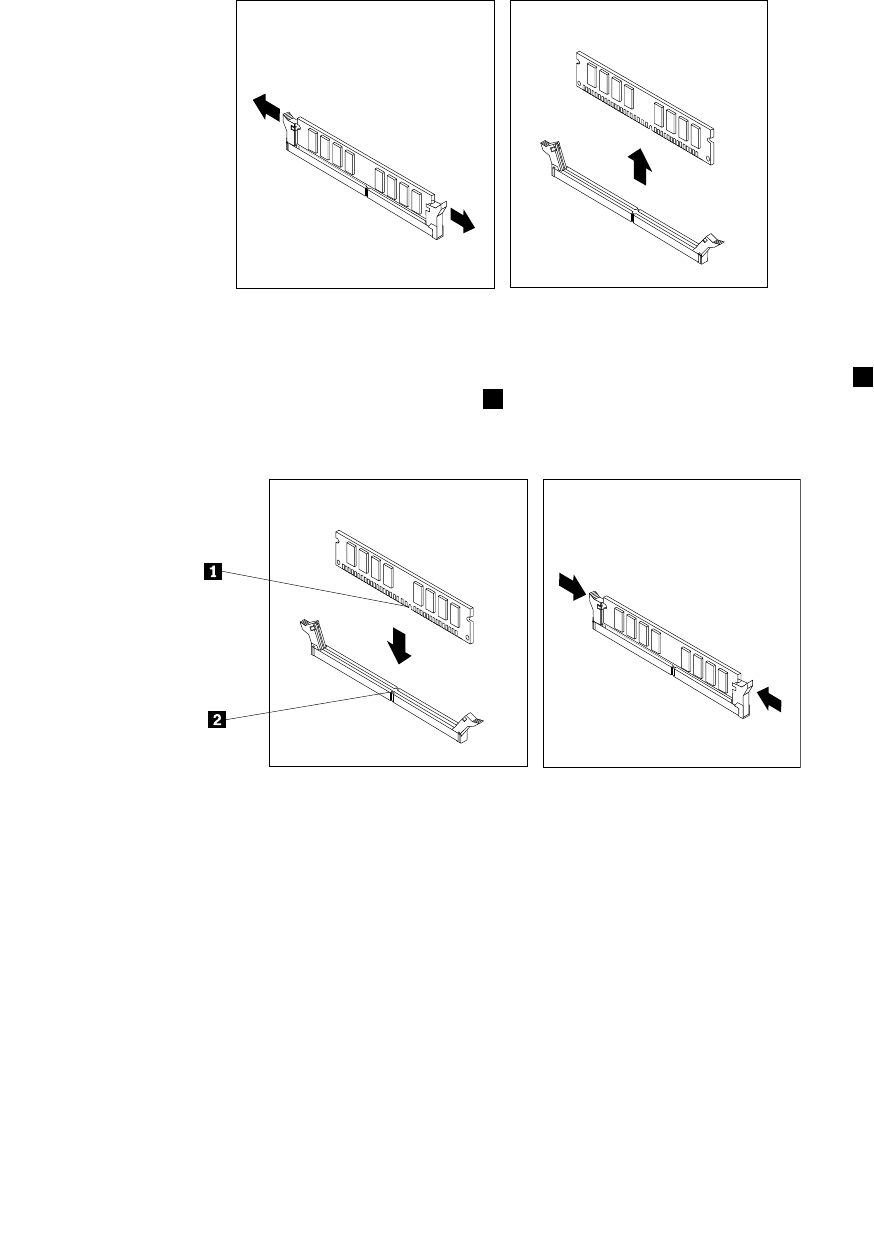
7.Removeanypartsthatmightpreventyouraccesstothememorymodule.Dependingonyourcomputer
model,youmightneedtoremovethePCIExpressx16graphicscardforeasieraccesstothememory
module.See“ReplacingaPCIExpresscard”onpage66.
8.Opentheretainingclipsandgentlypullthememorymoduleoutofthememoryslot.
Figure38.Removingamemorymodule
9.Positionthenewmemorymoduleovertheappropriatememoryslot.Ensurethatthenotch1onthe
memorymodulealignscorrectlywiththeslotkey2onthesystemboard.Pushthememorymodule
straightdownintotheslotuntiltheretainingclipsclose.
Figure39.Installingamemorymodule
10.ReinstallthePCIExpressx16graphicscardifyouhaveremovedit.See“ReplacingaPCIExpress
card”onpage66.
11.Pivotthedrivebayassemblydownward.See“Pivotingthedrivebayassemblyupwardanddownward”
onpage57.
12.Reinstalltheopticaldrive.See“Replacingtheopticaldrive”onpage55.
13.Reinstallthefrontbezel.See“Replacingthefrontbezel”onpage52.
Whattodonext:
•Toworkwithanotherpieceofhardware,gototheappropriatesection.
•Tocompletetheinstallationorreplacement,goto“Completingthepartsreplacement”onpage74.
Chapter7.Installingorreplacinghardware71
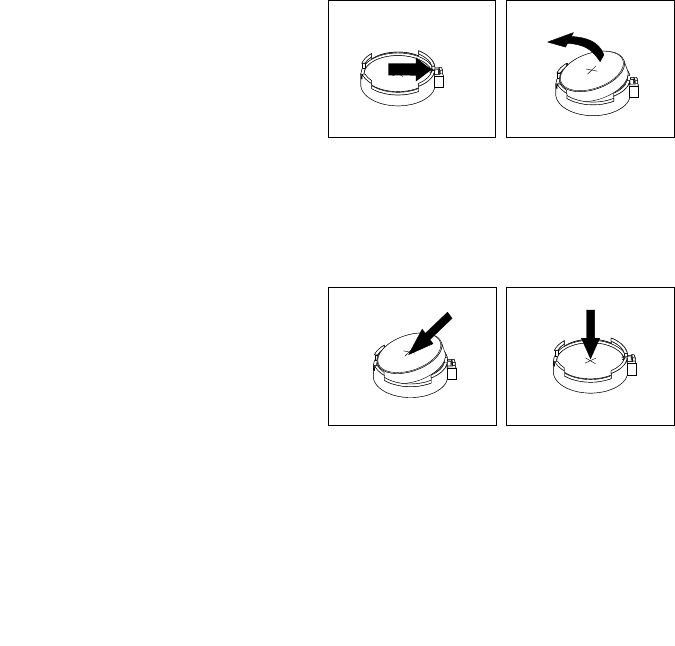
Replacingthecoin-cellbattery
Attention:Donotopenyourcomputerorattemptanyrepairbeforereadingandunderstandingthe“Read
thisfirst:Importantsafetyinformation”onpageiii.
Yourcomputerhasaspecialtypeofmemorythatmaintainsthedate,time,andsettingsforbuilt-infeatures,
suchasparallel-connectorassignments(configuration).Acoin-cellbatterykeepsthisinformationactive
whenyouturnoffthecomputer.
Thecoin-cellbatterynormallyrequiresnochargingormaintenancethroughoutitslife;however,nocoin-cell
batterylastsforever.Ifthecoin-cellbatteryfails,thedate,time,andconfigurationinformation(including
passwords)arelost.Anerrormessageisdisplayedwhenyouturnonthecomputer.
Refertothe“Lithiumcoin-cellbatterynotice”intheSafetyandWarrantyGuideforinformationabout
replacinganddisposingofthecoin-cellbattery.
Toreplacethecoin-cellbattery,dothefollowing:
1.Removeanymediafromthedrivesandturnoffallconnecteddevicesandthecomputer.Then,
disconnectallpowercordsfromelectricaloutletsanddisconnectallcablesthatareconnectedtothe
computer.
2.Removethecomputercover.See“Removingthecomputercover”onpage52.
3.Removethefrontbezel.See“Replacingthefrontbezel”onpage52.
4.Removetheopticaldrive.See“Replacingtheopticaldrive”onpage55.
5.Pivotthedrivebayassemblyupward.See“Pivotingthedrivebayassemblyupwardanddownward”
onpage57.
6.Locatethecoin-cellbattery.See“Computercomponents”onpage6.
7.Removethecoin-cellbatteryasshown.
Figure40.Removingthecoin-cellbattery
8.Installthenewcoin-cellbatteryasshown.
Figure41.Installingthecoin-cellbattery
9.Pivotthedrivebayassemblydownward.See“Pivotingthedrivebayassemblyupwardanddownward”
onpage57.
10.Reinstalltheopticaldrive.See“Replacingtheopticaldrive”onpage55.
72ThinkCentreM700UserGuide
11.Reinstallthefrontbezel.See“Replacingthefrontbezel”onpage52.
12.Reinstallthecomputercoverandconnectthecables.See“Completingthepartsreplacement”on
page74.
13.Turnonthecomputerandallconnecteddevices.
Note:Whenthecomputeristurnedonforthefirsttimeafterreplacingthecoin-cellbattery,anerror
messagemightbedisplayed.Thisisnormalafterreplacingthecoin-cellbattery.
14.UsetheSetupUtilityprogramtosetthedate,time,andanypasswords.See“UsingtheSetupUtility
program”onpage33.
Replacingthepowersupplyassembly
Attention:Donotopenyourcomputerorattemptanyrepairbeforereadingandunderstandingthe“Read
thisfirst:Importantsafetyinformation”onpageiii.
Althoughtherearenomovingpartsinyourcomputerafterthepowercordhasbeendisconnected,the
followingwarningsarerequiredforyoursafetyandproperUnderwritersLaboratories(UL)certification.
CAUTION:
Hazardousmovingparts.Keepfingersandotherbodypartsaway.
CAUTION:
Neverremovethecoveronapowersupplyoranypartthathasthefollowinglabelattached.
Hazardousvoltage,current,andenergylevelsarepresentinsideanycomponentthathasthislabel
attached.Therearenoserviceablepartsinsidethesecomponents.Ifyoususpectaproblemwith
oneoftheseparts,contactaservicetechnician.
Toreplacethepowersupplyassembly,dothefollowing:
1.Removeanymediafromthedrivesandturnoffallconnecteddevicesandthecomputer.Then,
disconnectallpowercordsfromelectricaloutletsanddisconnectallcablesthatareconnectedtothe
computer.
2.Removethecomputercover.See“Removingthecomputercover”onpage52.
3.Removethefrontbezel.See“Replacingthefrontbezel”onpage52.
4.Removetheopticaldrive.See“Replacingtheopticaldrive”onpage55.
Chapter7.Installingorreplacinghardware73
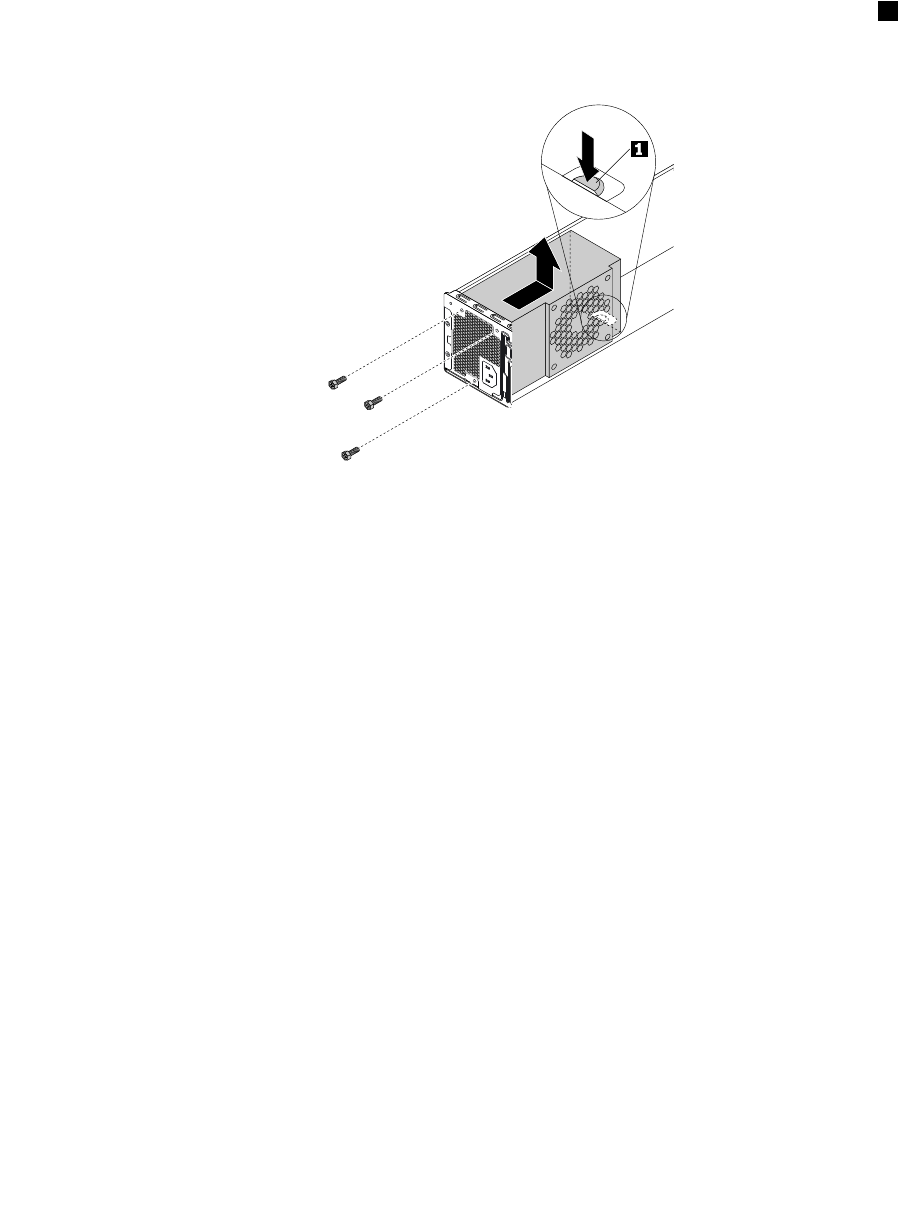
5.Pivotthedrivebayassemblyupward.See“Pivotingthedrivebayassemblyupwardanddownward”
onpage57.
6.Removetheheatsinkfanduct.See“Replacingtheheatsinkandfanassembly”onpage68.
7.Locatethepowersupplyassembly.See“Computercomponents”onpage6.
8.Disconnectthepowersupplyassemblycablesfromthesystemboard.
9.Removethethreescrewsthatsecurethepowersupplyassembly.Pressingtheretainingclip1
downward,slidethepowersupplyassemblytothefrontofthecomputerandliftitoutofthechassis.
Figure42.Removingthepowersupplyassembly
10.Positionthenewpowersupplyassemblyinthechassissothatthethreescrewholesinthepower
supplyassemblyalignwiththoseinthechassis.Then,installthethreescrewstosecurethepower
supplyassembly.
11.Connectthepowersupplyassemblycablestothesystemboard.See“Partsonthesystemboard”
onpage8.
12.Reinstalltheheatsinkfanduct.See“Replacingtheheatsinkandfanassembly”onpage68.
13.Pivotthedrivebayassemblydownward.See“Pivotingthedrivebayassemblyupwardanddownward”
onpage57.
14.Reinstalltheopticaldrive.See“Replacingtheopticaldrive”onpage55.
15.Reinstallthefrontbezel.See“Replacingthefrontbezel”onpage52.
Whattodonext:
•Toworkwithanotherpieceofhardware,gototheappropriatesection.
•Tocompletetheinstallationorreplacement,goto“Completingthepartsreplacement”onpage74.
Completingthepartsreplacement
Aftercompletingtheinstallationorreplacementforallparts,reinstallthecomputercoverandreconnect
cables.Dependingonthepartsyouinstalledorreplaced,youmightneedtoconfirmtheupdatedinformation
intheSetupUtilityprogram.Referto“UsingtheSetupUtilityprogram”onpage33.
Toreinstallthecomputercoverandreconnectcablestoyourcomputer,dothefollowing:
74ThinkCentreM700UserGuide
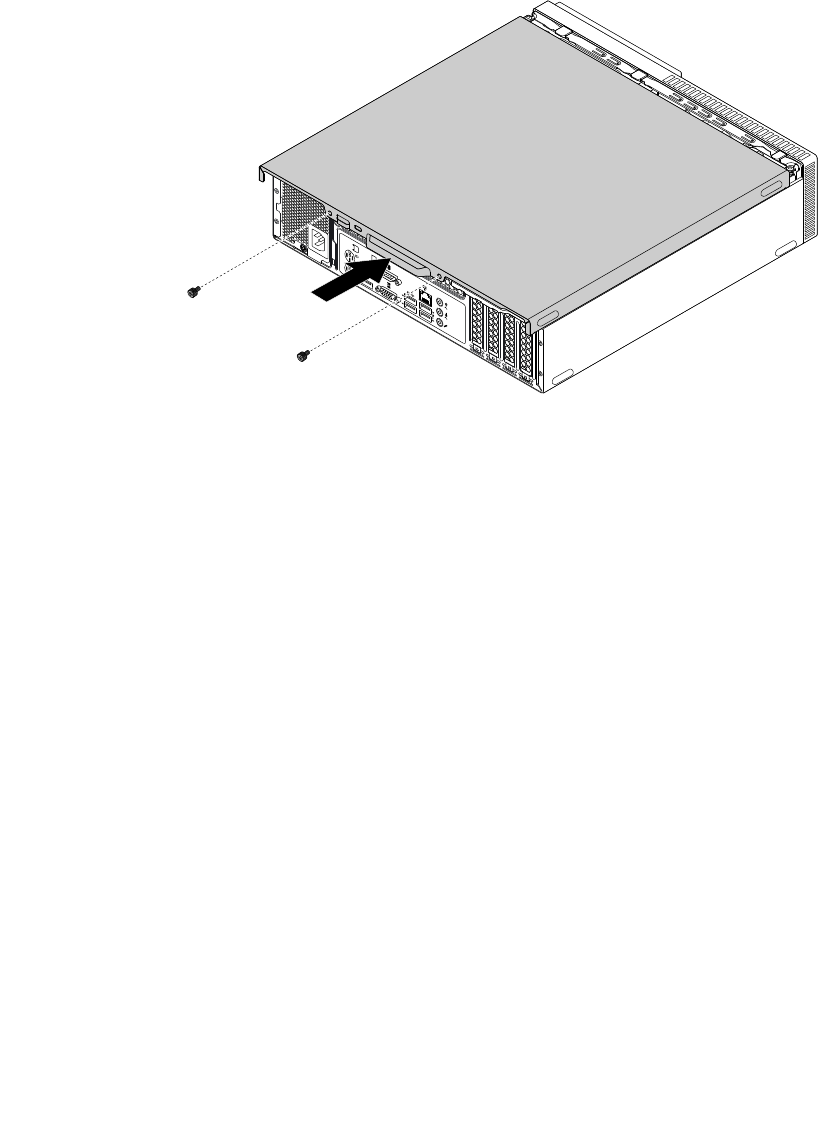
1.Ensurethatallcomponentshavebeenreassembledcorrectlyandthatnotoolsorloosescrewsareleft
insideyourcomputer.See“Computercomponents”onpage6forthelocationsofvariouscomponents
inyourcomputer.
2.Ensurethatthecablesareroutedcorrectlybeforereinstallingthecomputercover.Keepcablesclearof
thehingesandsidesofthecomputerchassistoavoidinterferencewithreinstallingthecomputercover.
3.Positionthecomputercoveronthechassissothattherailguidesonthebottomofthecomputercover
engagetherailsonthechassis.Then,pushthecovertothefrontofthecomputeruntilitsnapsinto
position.Installthetwoscrewstosecurethecomputercover.
Figure43.Installingthecomputercover
4.Placethecomputerinanuprightposition.
5.Ifalockingdeviceisavailable,useittolockthecomputer.See“Lockingthecomputer”onpage27.
6.Reconnecttheexternalcablesandpowercordstothecorrespondingconnectorsonthecomputer.
See“Hardwarelocations”onpage1.
7.Updateyourconfiguration.See“UsingtheSetupUtilityprogram”onpage33.
8.Ifanewlyinstalledhardwarecomponentdoesnotworknormally,updatethedevicedriver.See
“Keepingthecomputercurrent”onpage24.
Chapter7.Installingorreplacinghardware75

76ThinkCentreM700UserGuide

Chapter8.Gettinginformation,help,andservice
Thischaptercontainsthefollowingtopics:
•“Informationresources”onpage77
•“Helpandservice”onpage78
Informationresources
Youcanusetheinformationinthissectiontoaccessusefulresourcesrelatingtoyourcomputingneeds.
Accessingtheuserguideinvariouslanguages
Toaccesstheuserguideinvariouslanguages,goto:
http://www.lenovo.com/UserManuals
Windowshelpsystem
Note:IfyouusetheonlinehelpforWindows7orthehelpforWindows10,ensurethatthecomputer
isconnectedtotheInternet.
TheWindowshelpsystemprovidesyouwithdetailedinformationaboutusingtheWindowsoperatingsystem.
ToaccesstheWindowshelpsystem,dothefollowing:
1.ClicktheStartbuttontoopentheStartmenu.
2.DependingonyourWindowsversion,dooneofthefollowing:
•ForWindows7:ClickHelpandSupport.Youcanchoosetousetheonlineorofflinehelpatthe
bottomofthescreen.
•ForWindows10:ClickGetstarted.
Safetyandwarranty
•TheSafetyandWarrantyGuideprovidedwiththecomputercontainsimportantsafetyinformation,
productwarrantyterms,andlegalnotices.
•Theprefaceinthisdocumentcontainsadditionalsafetyinformationthatappliestotopicsandtasks
describedinthisdocument.
Ensurethatyoureadandunderstandallsafetyinformationbeforeusingthecomputer.
LenovoWebsite
TheLenovoWebsite(http://www.lenovo.com)providesup-to-dateinformationandservicestohelpyoubuy,
upgrade,andmaintainthecomputer.Youalsocandothefollowing:
•Shopfordesktopandnotebookcomputers,monitors,projectors,upgradesandaccessoriesforthe
computer,andspecialoffers.
•Purchaseadditionalservices,suchassupportforhardware,operatingsystems,applicationprograms,
networksetupandconfiguration,andcustominstallations.
•Purchaseupgradesandextendedhardwarerepairservices.
•Accesstroubleshootingandsupportinformationforthecomputermodelandothersupportedproducts.
©CopyrightLenovo201677

•FindaServiceProviderlocatednearyou.
LenovoSupportWebsite
TechnicalsupportinformationisavailableontheLenovoSupportWebsiteat:
http://www.lenovo.com/support
ThisWebsiteisupdatedwiththelatestsupportinformationsuchasthefollowing:
•Diagnosticsolutions
•Driversandsoftware
•Knowledgebaseandfrequentlyaskedquestions
•Latestelectronicmanuals
•LenovoSupportphonenumbers
•Productandpartsdetails
•Productandservicewarranty
Frequentlyaskedquestions
Fortheanswerstofrequentlyaskedquestionsaboutthecomputer,goto:
http://www.lenovo.com/support/faq
Helpandservice
Thissectionprovidesinformationaboutobtaininghelpandservice.
Callingforservice
Duringthewarrantyperiod,youcangethelpandinformationbytelephonethroughtheCustomerSupport
Center.Forthewarrantyperiodofthecomputer,gotohttp://www.lenovo.com/warranty-status.Foralistof
LenovoSupportphonenumbers,gotohttp://www.lenovo.com/support/phone.
Note:Phonenumbersaresubjecttochangewithoutnotice.Ifthenumberforyourcountryorregionisnot
provided,contactyourLenovoresellerorLenovomarketingrepresentative.
Thefollowingservicesareavailableduringthewarrantyperiod:
•Problemdetermination-Trainedservicepersonnelareavailabletoassistyouwithdetermininga
hardwareproblemanddecidingwhatactionisnecessarytofixtheproblem.
•Hardwarerepair-Iftheproblemiscausedbyhardwareunderwarranty,trainedservicepersonnelare
availabletoprovidetheapplicablelevelofservice.
•EngineeringChangemanagement-Theremightbechangesthatarerequiredafteraproducthas
beensold.LenovooryourresellerwillmakeselectedEngineeringChanges(ECs)thatapplytoyour
hardwareavailable.
Theseitemsarenotcoveredbythewarranty:
•ReplacementoruseofpartsnotmanufacturedfororbyLenovoornon-warrantedLenovoparts
•Identificationofsoftwareproblemsources
•ConfigurationofBIOSaspartofaninstallationorupgrade
•Changes,modifications,orupgradestodevicedrivers
•Installationandmaintenanceofnetworkoperatingsystems(NOS)
•Installationandmaintenanceofapplicationprograms
Ifpossible,beatthecomputerwhenyoucall.Havethefollowinginformationavailable:
78ThinkCentreM700UserGuide

•Machinetypeandmodel
•Serialnumbersofyourhardwareproducts
•Descriptionoftheproblem
•Exactwordingofanyerrormessages
•Hardwareandsoftwareconfigurationinformation
Usingotherservices
Youmighttravelwiththecomputerorrelocateittoacountryorregionwherethemachinetypeforyour
desktopornotebookcomputerissold.Insuchasituation,thecomputermightbeeligibleforInternational
WarrantyService,whichautomaticallyentitlesyoutoobtainwarrantyservicethroughoutthewarrantyperiod.
Servicewillbeperformedbyserviceprovidersauthorizedtoperformwarrantyservice.
Servicemethodsandproceduresvarybycountry,andsomeservicesmightnotbeavailableinallcountries.
InternationalWarrantyServiceisdeliveredthroughthemethodofservice(suchasdepot,carry-in,or
on-siteservice)thatisprovidedintheservicingcountry.Servicecentersincertaincountriesmightnotbe
abletoserviceallmodelsofaparticularmachinetype.Insomecountries,feesandrestrictionsmight
applyatthetimeofservice.
TodeterminewhetherthecomputeriseligibleforInternationalWarrantyServiceandtoviewalistofthe
countriesorregionswhereserviceisavailable,gotohttp://www.lenovo.com/support.
FortechnicalassistancewiththeinstallationoforquestionsrelatedtoServicePacksforyourpreinstalled
MicrosoftWindowsproduct,gototheMicrosoftProductSupportWebsiteathttp://support.microsoft.com.
YoualsocancontacttheLenovoCustomerSupportCenterforhelp.Somefeesmightapply.
Purchasingadditionalservices
Duringandafterthewarrantyperiod,youcanpurchaseadditionalservices.Examplesoftheseadditional
servicesinclude:
•Supportforhardware,operatingsystems,andapplicationprograms
•Networksetupandconfigurationservices
•Upgradedorextendedhardwarerepairservices
•Custominstallationservices
Serviceavailabilityandservicenamemightvarybycountryorregion.Formoreinformationaboutthese
services,gototheLenovoWebsiteat:
http://www.lenovo.com
Chapter8.Gettinginformation,help,andservice79

80ThinkCentreM700UserGuide

AppendixA.Regulatoryinformation
Thelatestcomplianceinformationisavailableathttp://www.lenovo.com/compliance.
Exportclassificationnotice
ThisproductissubjecttotheUnitedStatesExportAdministrationRegulations(EAR)andhasanExport
ClassificationControlNumber(ECCN)of5A992.c.Itcanbere-exportedexcepttoanyoftheembargoed
countriesintheEARE1countrylist.
Electronicemissionsnotices
ThefollowinginformationreferstoLenovopersonalcomputermachinetypes10GS,10GT,10KN,and10KQ.
FederalCommunicationsCommissionDeclarationofConformity
ThisequipmenthasbeentestedandfoundtocomplywiththelimitsforaClassBdigitaldevice,pursuant
toPart15oftheFCCRules.Theselimitsaredesignedtoprovidereasonableprotectionagainstharmful
interferenceinaresidentialinstallation.Thisequipmentgenerates,uses,andcanradiateradiofrequency
energyand,ifnotinstalledandusedinaccordancewiththeinstructions,maycauseharmfulinterference
toradiocommunications.However,thereisnoguaranteethatinterferencewillnotoccurinaparticular
installation.Ifthisequipmentdoescauseharmfulinterferencetoradioortelevisionreception,whichcanbe
determinedbyturningtheequipmentoffandon,theuserisencouragedtotrytocorrecttheinterferenceby
oneormoreofthefollowingmeasures:
•Reorientorrelocatethereceivingantenna.
•Increasetheseparationbetweentheequipmentandreceiver.
•Connecttheequipmentintoanoutletonacircuitdifferentfromthattowhichthereceiverisconnected.
•Consultanauthorizeddealerorservicerepresentativeforhelp.
Lenovoisnotresponsibleforanyradioortelevisioninterferencecausedbyusingotherthanspecifiedor
recommendedcablesandconnectorsorbyunauthorizedchangesormodificationstothisequipment.
Unauthorizedchangesormodificationscouldvoidtheuser'sauthoritytooperatetheequipment.
ThisdevicecomplieswithPart15oftheFCCRules.Operationissubjecttothefollowingtwoconditions:(1)
thisdevicemaynotcauseharmfulinterference,and(2)thisdevicemustacceptanyinterferencereceived,
includinginterferencethatmaycauseundesiredoperation.
ResponsibleParty:
Lenovo(UnitedStates)Incorporated
1009ThinkPlace-BuildingOne
Morrisville,NC27560
PhoneNumber:919-294-5900
IndustryCanadaClassBemissioncompliancestatement
CANICES-3(B)/NMB-3(B)
EuropeanUnion-CompliancetoDirectivesforITE(InformationT echnologyEquipment)andRadio
Equipment
©CopyrightLenovo201681

Modelswithoutaradiodevice:ThisproductisinconformitywiththeprotectionrequirementsofEUCouncil
Directive2004/108/EC(until19April,2016)andCouncilDirective2014/30/EU(from20April,2016)onthe
approximationofthelawsoftheMemberStatesrelatingtoelectromagneticcompatibility.
Modelswitharadiodevice:Thisproductisinconformitywithalltherequirementsandessentialnormsthat
applytoEUCouncilR&TTEDirective1999/5/EContheapproximationofthelawsoftheMemberStates
relatingtoradioequipment.
Lenovocannotacceptresponsibilityforanyfailuretosatisfytheprotectionrequirementsresultingfrom
anon-recommendedmodificationoftheproduct,includingtheinstallationofoptioncardsfromother
manufacturers.ThisproducthasbeentestedandfoundtocomplywiththelimitsforClassBequipment
accordingtoEuropeanStandardsharmonizedintheDirectivesincompliance.ThelimitsforClassB
equipmentwerederivedfortypicalresidentialenvironmentstoprovidereasonableprotectionagainst
interferencewithlicensedcommunicationdevices.
Lenovo,Einsteinova21,85101Bratislava,Slovakia
GermanClassBcompliancestatement
DeutschsprachigerEUHinweis:
HinweisfürGerätederKlasseBEURichtliniezurElektromagnetischenVerträglichkeit
DiesesProduktentsprichtdenSchutzanforderungenderEURichtlinie2014/30/EU(früher2004/108/EC)zur
AngleichungderRechtsvorschriftenüberdieelektromagnetischeVerträglichkeitindenEU-Mitgliedsstaaten
undhältdieGrenzwertederKlasseBderNormgemäßRichtlinie.
Umdiesessicherzustellen,sinddieGerätewieindenHandbüchernbeschriebenzuinstallierenundzu
betreiben.DesWeiterendürfenauchnurvonderLenovoempfohleneKabelangeschlossenwerden.
LenovoübernimmtkeineVerantwortungfürdieEinhaltungderSchutzanforderungen,wenndasProdukt
ohneZustimmungderLenovoverändertbzw.wennErweiterungskomponentenvonFremdherstellernohne
EmpfehlungderLenovogesteckt/eingebautwerden.
Deutschland:
Einhaltung des Gesetzes über die elektromagnetische Verträglichkeit von Betriebsmitteln
Dieses Produkt entspricht dem „Gesetz über die elektromagnetische Verträglichkeit von Betriebsmitteln“
EMVG (früher „Gesetz über die elektromagnetische Verträglichkeit von Geräten“). Dies ist die Umsetzung der
EMV EU Richtlinie 2014/30/EU (früher 2004/108/EWG) in der Bundesrepublik Deutschland.
ZulassungsbescheinigunglautdemDeutschenGesetzüberdieelektromagnetischeVerträglichkeit
vonBetriebsmitteln,EMVGvom20.Juli2007(früherGesetzüberdieelektromagnetische
VerträglichkeitvonGeräten),bzw.derEMVEURichtlinie2014/30/EU(früher2004/108/EC),für
GerätederKlasseB.
DiesesGerätistberechtigt,inÜbereinstimmungmitdemDeutschenEMVGdasEG-Konformitätszeichen
-CE-zuführen.VerantwortlichfürdieKonformitätserklärungnachParagraf5desEMVGistdieLenovo
(Deutschland)GmbH,Meitnerstr.9,D-70563Stuttgart.
InformationeninHinsichtEMVGParagraf4Abs.(1)4:
DasGeräterfülltdieSchutzanforderungennachEN55024undEN55022KlasseB.
82ThinkCentreM700UserGuide
KoreaClassBcompliancestatement
JapanVCCIClassBcompliancestatement
Japancompliancestatementforproductswhichconnecttothepowermainswithratedcurrent
lessthanorequalto20Aperphase
Japannoticeforacpowercord
Theacpowercordshippedwithyourproductcanbeusedonlyforthisspecificproduct.Donotusetheac
powercordforotherdevices.
LenovoproductserviceinformationforTaiwan
KeyboardandmousecompliancestatementforTaiwan
Eurasiancompliancemark
Brazilaudionotice
Ouvirsonscommaisde85decibéisporlongosperíodospodeprovocardanosaosistemaauditivo.
Mexicowireless-radiocomplianceinformation
Advertencia:EnMexicolaoperacióndeesteequipoestásujetaalassiguientesdoscondiciones:(1)es
posiblequeesteequipoodispositivonocauseinterferenciaperjudicialy(2)esteequipoodispositivodebe
aceptarcualquierinterferencia,incluyendolaquepuedacausarsuoperaciónnodeseada.
AppendixA.Regulatoryinformation83

Additionalregulatoryinformation
Foradditionalregulatoryinformation,refertotheRegulatoryNoticeshippedwiththecomputer.Depending
ontheconfigurationofthecomputerandthecountryorregionwherethecomputerwaspurchased,you
mighthavereceivedadditionalprintedregulatorynotices.Allregulatorynoticesareavailableonthe
LenovoSupportWebsiteinelectronicformat.Toaccesselectroniccopiesofthedocumentation,goto
http://www.lenovo.com/UserManuals.
84ThinkCentreM700UserGuide
AppendixB.WEEEandrecyclinginformation
Lenovoencouragesownersofinformationtechnology(IT)equipmenttoresponsiblyrecycletheir
equipmentwhenitisnolongerneeded.Lenovooffersavarietyofprogramsandservicestoassist
equipmentownersinrecyclingtheirITproducts.ForinformationonrecyclingLenovoproducts,goto
http://www.lenovo.com/recycling.Thelatestenvironmentalinformationaboutourproductsisavailableat
http://www.lenovo.com/ecodeclaration.
ImportantWEEEinformation
TheWEEEmarkingonLenovoproductsappliestocountrieswithWEEEande-wasteregulations(for
example,theEuropeanWEEEDirective,IndiaE-WasteManagement&HandlingRules,2011).Appliancesare
labeledinaccordancewithlocalregulationsconcerningwasteelectricalandelectronicequipment(WEEE).
Theseregulationsdeterminetheframeworkforthereturnandrecyclingofusedappliancesasapplicable
withineachgeography.Thislabelisappliedtovariousproductstoindicatethattheproductisnottobe
thrownaway,butratherputintheestablishedcollectionsystemsforreclaimingtheseendoflifeproducts.
Usersofelectricalandelectronicequipment(EEE)withtheWEEEmarkingmustnotdisposeofendoflife
EEEasunsortedmunicipalwaste,butusethecollectionframeworkavailabletothemforthereturn,recycle,
andrecoveryofWEEEandtominimizeanypotentialeffectsofEEEontheenvironmentandhumanhealth
duetothepresenceofhazardoussubstances.Lenovoelectricalandelectronicequipment(EEE)maycontain
partsandcomponents,whichatend-of-lifemightqualifyashazardouswaste.
EEEandwasteelectricalandelectronicequipment(WEEE)canbedeliveredfreeofchargetotheplaceof
saleoranydistributorthatsellselectricalandelectronicequipmentofthesamenatureandfunctionas
theusedEEEorWEEE.
ForadditionalWEEEinformation,goto:
http://www.lenovo.com/recycling
WEEEinformationforHungary
Lenovo,asaproducer,bearsthecostincurredinconnectionwiththefulfillmentofLenovo’sobligations
underHungaryLawNo.197/2014(VIII.1.)subsections(1)-(5)ofsection12.
RecyclinginformationforJapan
CollectingandrecyclingadisusedLenovocomputerormonitor
IfyouareacompanyemployeeandneedtodisposeofaLenovocomputerormonitorthatistheproperty
ofthecompany,youmustdosoinaccordancewiththeLawforPromotionofEffectiveUtilizationof
Resources.Computersandmonitorsarecategorizedasindustrialwasteandshouldbeproperlydisposed
ofbyanindustrialwastedisposalcontractorcertifiedbyalocalgovernment.InaccordancewiththeLaw
©CopyrightLenovo201685
forPromotionofEffectiveUtilizationofResources,LenovoJapanprovides,throughitsPCCollecting
andRecyclingServices,forthecollecting,reuse,andrecyclingofdisusedcomputersandmonitors.For
details,visittheLenovoWebsiteathttp://www.lenovo.com/recycling/japan.PursuanttotheLawfor
PromotionofEffectiveUtilizationofResources,thecollectingandrecyclingofhome-usedcomputers
andmonitorsbythemanufacturerwasbegunonOctober1,2003.Thisserviceisprovidedfreeof
chargeforhome-usedcomputerssoldafterOctober1,2003.Fordetails,visittheLenovoWebsiteat
http://www.lenovo.com/recycling/japan.
DisposingofLenovocomputercomponents
SomeLenovocomputerproductssoldinJapanmayhavecomponentsthatcontainheavymetalsorother
environmentalsensitivesubstances.Toproperlydisposeofdisusedcomponents,suchasaprintedcircuit
boardordrive,usethemethodsdescribedaboveforcollectingandrecyclingadisusedcomputerormonitor.
DisposingofdisusedlithiumbatteriesfromLenovocomputers
Abutton-shapedlithiumbatteryisinstalledinsideyourLenovocomputertoprovidepowertothecomputer
clockwhilethecomputerisoffordisconnectedfromthemainpowersource.Ifyouneedtoreplaceitwitha
newone,contactyourplaceofpurchaseorcontactLenovoforservice.Ifyouneedtodisposeofadisused
lithiumbattery,insulateitwithvinyltape,contactyourplaceofpurchaseoranindustrial-waste-disposal
operator,andfollowtheirinstructions.Disposalofalithiumbatterymustcomplywithlocalordinances
andregulations.
RecyclinginformationforBrazil
DeclaraçõesdeReciclagemnoBrasil
DescartedeumProdutoLenovoForadeUso
Equipamentoselétricoseeletrônicosnãodevemserdescartadosemlixocomum,masenviadosàpontosde
coleta,autorizadospelofabricantedoprodutoparaquesejamencaminhadoseprocessadosporempresas
especializadasnomanuseioderesíduosindustriais,devidamentecertificadaspelosorgãosambientais,de
acordocomalegislaçãolocal.
ALenovopossuiumcanalespecíficoparaauxiliá-lonodescartedessesprodutos.Casovocêpossua
umprodutoLenovoemsituaçãodedescarte,ligueparaonossoSACouencaminheume-mailpara:
reciclar@lenovo.com,informandoomodelo,númerodesérieecidade,afimdeenviarmosasinstruções
paraocorretodescartedoseuprodutoLenovo.
BatteryrecyclinginformationforTaiwan
86ThinkCentreM700UserGuide

BatteryrecyclinginformationfortheEuropeanUnion
Notice:ThismarkappliesonlytocountrieswithintheEuropeanUnion(EU).
BatteriesorpackagingforbatteriesarelabeledinaccordancewithEuropeanDirective2006/66/EC
concerningbatteriesandaccumulatorsandwastebatteriesandaccumulators.TheDirectivedeterminesthe
frameworkforthereturnandrecyclingofusedbatteriesandaccumulatorsasapplicablethroughoutthe
EuropeanUnion.Thislabelisappliedtovariousbatteriestoindicatethatthebatteryisnottobethrown
away,butratherreclaimeduponendoflifeperthisDirective.
InaccordancewiththeEuropeanDirective2006/66/EC,batteriesandaccumulatorsarelabeledtoindicate
thattheyaretobecollectedseparatelyandrecycledatendoflife.Thelabelonthebatterymayalso
includeachemicalsymbolforthemetalconcernedinthebattery(Pbforlead,Hgformercury,andCdfor
cadmium).Usersofbatteriesandaccumulatorsmustnotdisposeofbatteriesandaccumulatorsasunsorted
municipalwaste,butusethecollectionframeworkavailabletocustomersforthereturn,recycling,and
treatmentofbatteriesandaccumulators.Customerparticipationisimportanttominimizeanypotential
effectsofbatteriesandaccumulatorsontheenvironmentandhumanhealthduetothepotentialpresenceof
hazardoussubstances.
Beforeplacingelectricalandelectronicequipment(EEE)inthewastecollectionstreamorinwastecollection
facilities,theenduserofequipmentcontainingbatteriesand/oraccumulatorsmustremovethosebatteries
andaccumulatorsforseparatecollection.
DisposingoflithiumbatteriesandbatterypacksfromLenovoproducts
Acoin-celltypelithiumbatterymightbeinstalledinsideyourLenovoproduct.Youcanfinddetailsaboutthe
batteryintheproductdocumentation.Ifthebatteryneedstobereplaced,contactyourplaceofpurchaseor
contactLenovoforservice.Ifyouneedtodisposeofalithiumbattery,insulateitwithvinyltape,contact
yourplaceofpurchaseorawaste-disposaloperator,andfollowtheirinstructions.
DisposingofbatterypacksfromLenovoproducts
YourLenovodevicemightcontainalithium-ionbatterypackoranickelmetalhydridebatterypack.Youcan
finddetailsonthebatterypackintheproductdocumentation.Ifyouneedtodisposeofabatterypack,
insulateitwithvinyltape,contactLenovosales,service,oryourplaceofpurchase,orawaste-disposal
operator,andfollowtheirinstructions.Youalsocanrefertotheinstructionsprovidedinthemanualsfor
yourproduct.
Forpropercollectionandtreatment,goto:
http://www.lenovo.com/lenovo/environment
AppendixB.WEEEandrecyclinginformation87

88ThinkCentreM700UserGuide
AppendixC.RestrictionofHazardousSubstances(RoHS)
Directive
Thelatestenvironmentalinformationisavailableathttp://www.lenovo.com/ecodeclaration.
EuropeanUnionRoHS
ThisLenovoproduct,withincludedparts(cables,cords,andsoon)meetstherequirementsofDirective
2011/65/EUontherestrictionoftheuseofcertainhazardoussubstancesinelectricalandelectronic
equipment(“RoHSrecast”or“RoHS2”).
FormoreinformationaboutLenovoworldwidecomplianceonRoHS,goto:
http://www.lenovo.com/social_responsibility/us/en/RoHS_Communication.pdf
TurkishRoHS
TheLenovoproductmeetstherequirementsoftheRepublicofTurkeyDirectiveontheRestrictionoftheUse
ofCertainHazardousSubstancesinWasteElectricalandElectronicEquipment(WEEE).
UkraineRoHS
IndiaRoHS
RoHScompliantasperE-Waste(Management&Handling)Rules,2011.
©CopyrightLenovo201689
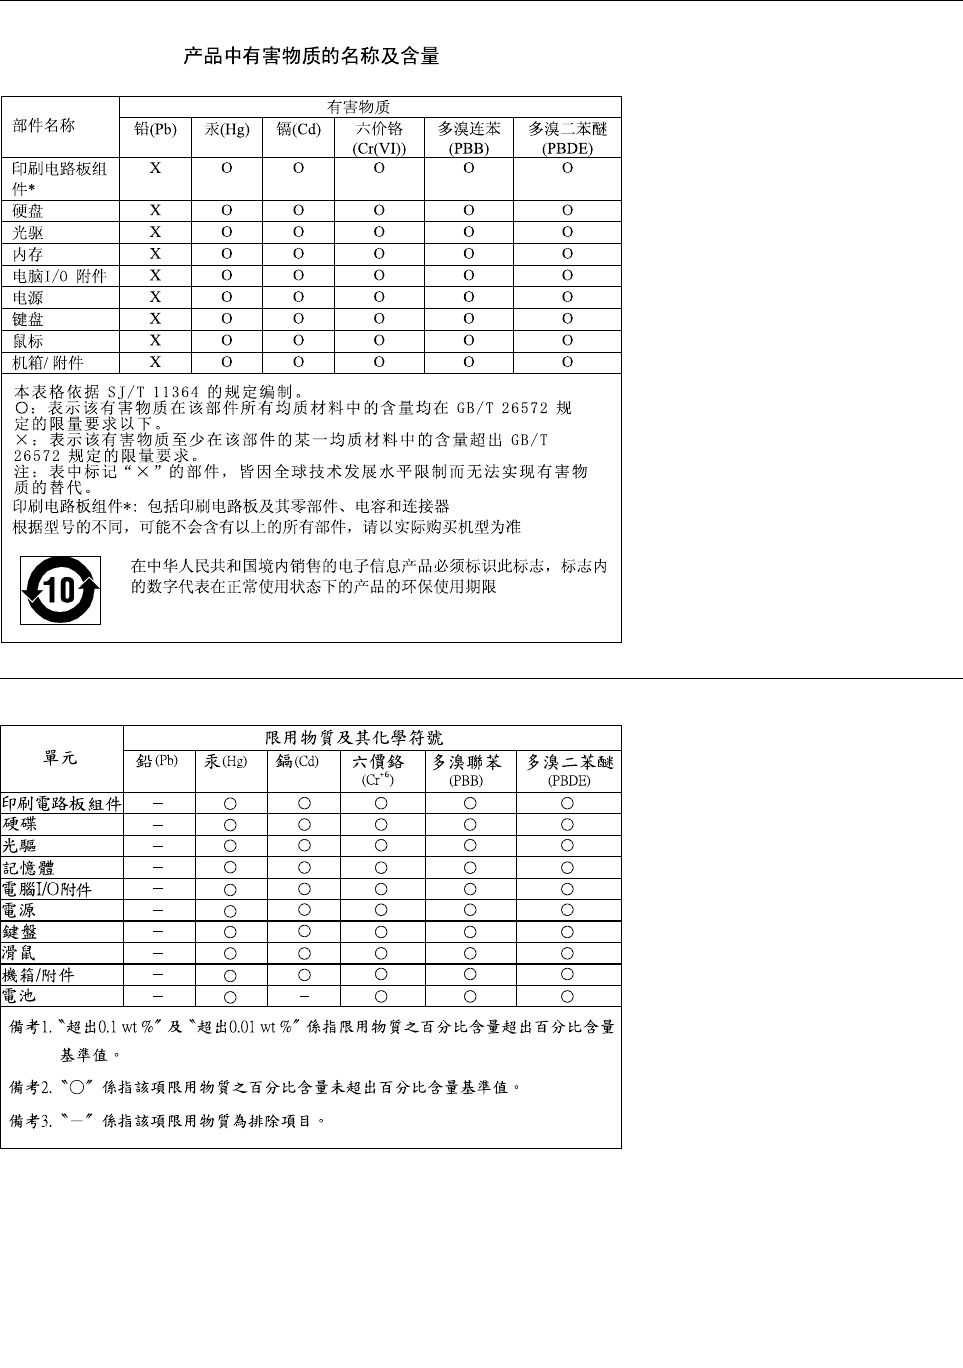
ChinaRoHS
TaiwanRoHS
90ThinkCentreM700UserGuide
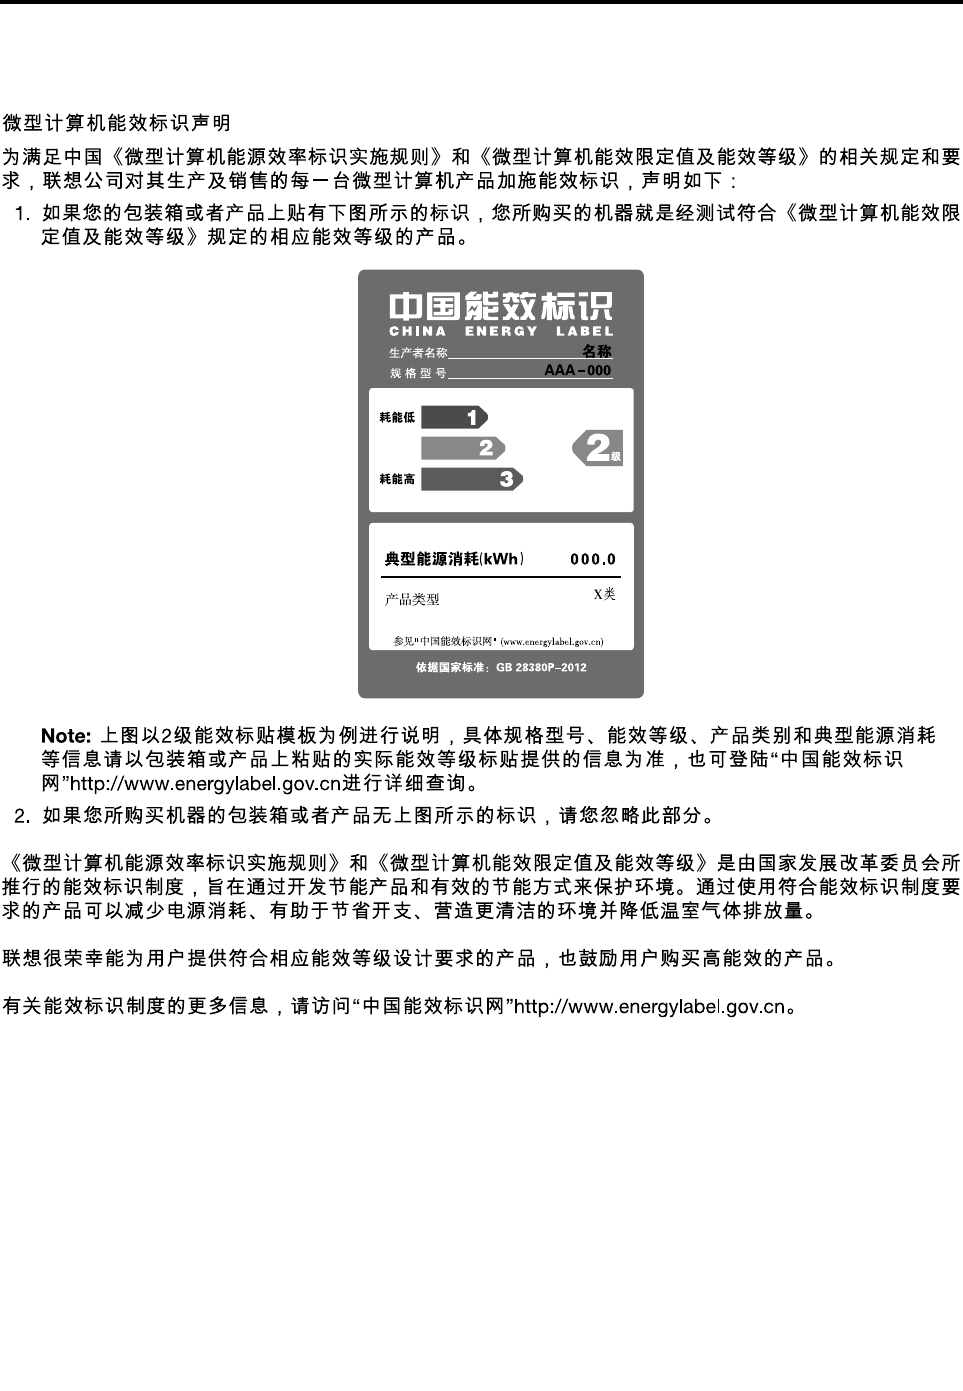
AppendixD.ChinaEnergyLabel
©CopyrightLenovo201691

92ThinkCentreM700UserGuide

AppendixE.ENERGYSTARmodelinformation
ENERGYSTAR®isajointprogramoftheU.S.EnvironmentalProtectionAgencyandtheU.S.Department
ofEnergyaimedatsavingmoneyandprotectingtheenvironmentthroughenergyefficientproductsand
practices.
LenovoisproudtoofferourcustomersproductswithanENERGYSTARcompliantdesignation.Some
modelsofthefollowingmachinetypeshavebeendesignedandtestedtoconformtotheENERGYSTAR
programrequirementforcomputersatthetimeofmanufacture:10GS,10GT,10KN,and10KQ.Formore
informationaboutENERGYSTARratingsforLenovocomputers,gotohttp://www.lenovo.com.
ByusingENERGYSTARcompliantproductsandtakingadvantageofthepower-managementfeaturesof
yourcomputer,youreducetheconsumptionofelectricity.Reducedelectricalconsumptioncontributesto
potentialfinancialsavings,acleanerenvironment,andthereductionofgreenhousegasemissions.
FormoreinformationaboutENERGYSTAR,goto:
http://www.energystar.gov
Lenovoencouragesyoutomakeefficientuseofenergyanintegralpartofyourday-to-dayoperations.To
helpinthisendeavor,setthefollowingpower-managementfeaturestotakeeffectwhenyourcomputerhas
beeninactiveforaspecifiedduration:
Table1.ENERGYSTARpower-managementfeatures
Windows7orWindows10operatingsystem
Powerplan:Default
•Turnoffthedisplay:After10minutes
•Putthecomputertosleep:After25minutes
•Advancedpowersettings:
–Turnoffharddiskdrives:After20minutes
–Hibernate:Never
ToawakenyourcomputerfromaSleepmode,pressanykeyonyourkeyboard.
Tochangepowersettings,dothefollowing:
1.OpenControlPanelbydoingoneofthefollowing:
•ForWindows7:ClicktheStartbuttontoopentheStartmenu.
•ForWindows10:Right-clicktheStartbuttontoopentheStartcontextmenu.
2.ClickControlPanel.ViewControlPanelusingLargeiconsorSmallicons,andthenclickPower
Options.
3.Followtheinstructionsonthescreen.
©CopyrightLenovo201693

94ThinkCentreM700UserGuide

AppendixF.Notices
Lenovomaynotoffertheproducts,services,orfeaturesdiscussedinthisdocumentinallcountries.Consult
yourlocalLenovorepresentativeforinformationontheproductsandservicescurrentlyavailableinyour
area.AnyreferencetoaLenovoproduct,program,orserviceisnotintendedtostateorimplythatonlythat
Lenovoproduct,program,orservicemaybeused.Anyfunctionallyequivalentproduct,program,orservice
thatdoesnotinfringeanyLenovointellectualpropertyrightmaybeusedinstead.However,itistheuser's
responsibilitytoevaluateandverifytheoperationofanyotherproduct,program,orservice.
Lenovomayhavepatentsorpendingpatentapplicationscoveringsubjectmatterdescribedinthis
document.Thefurnishingofthisdocumentdoesnotgiveyouanylicensetothesepatents.Youcansend
licenseinquiries,inwriting,to:
Lenovo(UnitedStates),Inc.
1009ThinkPlace-BuildingOne
Morrisville,NC27560
U.S.A.
Attention:LenovoDirectorofLicensing
LENOVOPROVIDESTHISPUBLICATION“ASIS”WITHOUTWARRANTYOFANYKIND,EITHEREXPRESS
ORIMPLIED,INCLUDING,BUTNOTLIMITEDTO,THEIMPLIEDWARRANTIESOFNON-INFRINGEMENT,
MERCHANTABILITYORFITNESSFORAPARTICULARPURPOSE.Somejurisdictionsdonotallow
disclaimerofexpressorimpliedwarrantiesincertaintransactions,therefore,thisstatementmaynotapply
toyou.
Thisinformationcouldincludetechnicalinaccuraciesortypographicalerrors.Changesareperiodically
madetotheinformationherein;thesechangeswillbeincorporatedinneweditionsofthepublication.
Lenovomaymakeimprovementsand/orchangesintheproduct(s)and/ortheprogram(s)describedinthis
publicationatanytimewithoutnotice.
Theproductsdescribedinthisdocumentarenotintendedforuseinimplantationorotherlifesupport
applicationswheremalfunctionmayresultininjuryordeathtopersons.Theinformationcontainedinthis
documentdoesnotaffectorchangeLenovoproductspecificationsorwarranties.Nothinginthisdocument
shalloperateasanexpressorimpliedlicenseorindemnityundertheintellectualpropertyrightsofLenovo
orthirdparties.Allinformationcontainedinthisdocumentwasobtainedinspecificenvironmentsandis
presentedasanillustration.Theresultobtainedinotheroperatingenvironmentsmayvary.
Lenovomayuseordistributeanyoftheinformationyousupplyinanywayitbelievesappropriatewithout
incurringanyobligationtoyou.
Anyreferencesinthispublicationtonon-LenovoWebsitesareprovidedforconvenienceonlyanddonotin
anymannerserveasanendorsementofthoseWebsites.ThematerialsatthoseWebsitesarenotpartof
thematerialsforthisLenovoproduct,anduseofthoseWebsitesisatyourownrisk.
Anyperformancedatacontainedhereinwasdeterminedinacontrolledenvironment.Therefore,theresult
obtainedinotheroperatingenvironmentsmayvarysignificantly.Somemeasurementsmayhavebeen
madeondevelopment-levelsystemsandthereisnoguaranteethatthesemeasurementswillbethesame
ongenerallyavailablesystems.Furthermore,somemeasurementsmayhavebeenestimatedthrough
extrapolation.Actualresultsmayvary.Usersofthisdocumentshouldverifytheapplicabledatafortheir
specificenvironment.
©CopyrightLenovo201695

Trademarks
ThefollowingtermsaretrademarksofLenovointheUnitedStates,othercountries,orboth:
Lenovo
TheLenovologo
ThinkCentre
TheThinkCentrelogo
RescueandRecovery
ThinkVantage
Microsoft,Windows,andWindowsMediaaretrademarksoftheMicrosoftgroupofcompanies.
IntelisatrademarkofIntelCorporationintheU.S.and/orothercountries.
DisplayPortisatrademarkoftheVideoElectronicsStandardsAssociation.
Othercompany,product,orservicenamesmaybetrademarksorservicemarksofothers.
96ThinkCentreM700UserGuide