Lenovo P410 Ug En User Manual (English) Guide (Tower Form Factor) Think Station (type 30B2 And 30B3) Workstation (Think Station) Type
2017-07-24
User Manual: Lenovo P410 Ug En (English) User guide - (Tower Form Factor) ThinkStation P410 (type 30B2 and 30B3) P410 Workstation (ThinkStation) - Type 30B2 ThinkStation P410 (type 30B2)
Open the PDF directly: View PDF ![]() .
.
Page Count: 136 [warning: Documents this large are best viewed by clicking the View PDF Link!]
- Read this first: Important safety information
- Chapter 1. Product overview
- Chapter 2. Using your computer
- Chapter 3. You and your computer
- Chapter 4. Security
- Locking your computer
- Viewing and changing security settings in the Setup Utility program
- Using passwords and Windows accounts
- Using fingerprint authentication
- Using the cover presence switch
- Using firewalls
- Protecting data against viruses
- Computrace Agent software embedded in firmware
- Trusted Platform Module (TPM)
- Intel BIOS guard
- Chapter 5. Advanced configuration
- Using the Setup Utility program
- Starting the Setup Utility program
- Changing the display mode of the Setup Utility program
- Changing the display language of the Setup Utility program
- Enabling or disabling a device
- Enabling or disabling the automatic power-on of your computer
- Enabling or disabling the ErP LPS compliance mode
- Enabling or disabling the configuration change detection
- Changing the BIOS settings before installing a new operating system
- Using BIOS passwords
- Selecting a startup device
- Changing the fan speed level
- Exiting the Setup Utility program
- Updating and recovering the BIOS
- Configuring RAID
- Using the Setup Utility program
- Chapter 6. Troubleshooting, diagnostics, and recovery
- Chapter 7. Installing or replacing hardware
- Handling static-sensitive devices
- Preparing your computer and removing the computer cover
- Installing or replacing hardware
- External options
- Front bezel
- Power button
- PCI Express card
- Full-length PCI Express card
- M.2 solid-state drive
- Memory module
- Optical drive
- Storage drive in the front-access storage enclosure
- Device in the optical/storage combination enclosure
- Battery
- Cover presence switch
- Power supply assembly
- Heat sink and fan assembly
- Primary hard disk drive
- Secondary hard disk drive
- Solid-state drive
- Completing the parts replacement
- Chapter 8. Getting information, help, and service
- Appendix A. System memory speed
- Appendix B. Supplemental information about the Ubuntu operating system
- Appendix C. Regulatory information
- Appendix D. WEEE and recycling information
- Appendix E. Restriction of Hazardous Substances Directive (RoHS)
- Appendix F. ENERGY STAR model information
- Appendix G. Notices

ThinkStationP410
UserGuide
MachineTypes:30B2and30B3

Note:Beforeusingthisinformationandtheproductitsupports,besuretoreadandunderstandthe“Read
thisfirst:Importantsafetyinformation”onpagevandAppendixG“Notices”onpage121.
FifthEdition(July2017)
©CopyrightLenovo2016,2017.
LIMITEDANDRESTRICTEDRIGHTSNOTICE:IfdataorsoftwareisdeliveredpursuanttoaGeneralServices
Administration“GSA”contract,use,reproduction,ordisclosureissubjecttorestrictionssetforthinContractNo.
GS-35F-05925.

Contents
Readthisfirst:Importantsafety
information...............v
Beforeusingthismanual............v
Serviceandupgrades.............v
Staticelectricityprevention...........vi
Powercordsandpoweradapters........vi
Extensioncordsandrelateddevices.......vi
Plugsandoutlets..............vii
Externaldevices..............vii
Heatandproductventilation.........vii
Operatingenvironment...........viii
Lasercompliancestatement.........viii
Powersupplystatement............ix
Cleaningandmaintenance...........ix
Chapter1.Productoverview......1
Hardwarelocations..............1
Frontview................1
Rearview................3
Computercomponents..........5
Partsonthesystemboard.........5
Internaldrives..............7
Machinetypeandmodellabel........8
Computerfeatures..............8
Computerspecifications...........12
Programs.................12
Accessingaprogramonyourcomputer...12
Installingaprogramthatisreadytobe
installed(Windows7only)........13
AnintroductiontoLenovoprograms....13
Chapter2.Usingyourcomputer...15
Registeringyourcomputer..........15
Settingthecomputervolume.........15
Usingadisc................15
Guidelinesaboutusingtheopticaldrive...15
Handlingandstoringadisc........16
Playingandremovingadisc.......16
Recordingadisc............16
Connectingtoanetwork...........17
ConnectingtoanEthernetLAN......17
ConnectingtoawirelessLAN.......17
ConnectingtoaBluetooth-enableddevice..18
Chapter3.Youandyourcomputer..19
Arrangingyourworkspace..........19
Glareandlighting............19
Aircirculation.............19
Electricaloutletlocationsandcablelengths.19
Comfort...............19
Accessibilityinformation...........20
Cleaningyourcomputer...........23
Maintenance...............23
Basicmaintenancetips.........23
Goodmaintenancepractices.......24
Keepingyourcomputercurrent......24
Movingyourcomputer...........25
Chapter4.Security..........27
Lockingyourcomputer...........27
Lockingthecomputercover.......28
AttachingaKensington-stylecablelock...29
Attachingacablelock..........30
Viewingandchangingsecuritysettingsinthe
SetupUtilityprogram............30
UsingpasswordsandWindowsaccounts....30
Usingfingerprintauthentication........31
Usingthecoverpresenceswitch.......31
Usingfirewalls...............32
Protectingdataagainstviruses........32
ComputraceAgentsoftwareembeddedin
firmware.................32
TrustedPlatformModule(TPM)........32
IntelBIOSguard..............32
Chapter5.Advancedconfiguration..33
UsingtheSetupUtilityprogram........33
StartingtheSetupUtilityprogram.....33
ChangingthedisplaymodeoftheSetupUtility
program...............33
ChangingthedisplaylanguageoftheSetup
Utilityprogram.............33
Enablingordisablingadevice.......34
Enablingordisablingtheautomaticpower-on
ofyourcomputer............34
EnablingordisablingtheErPLPScompliance
mode................34
Enablingordisablingtheconfigurationchange
detection...............35
ChangingtheBIOSsettingsbeforeinstallinga
newoperatingsystem..........35
UsingBIOSpasswords.........35
Selectingastartupdevice........37
Changingthefanspeedlevel.......38
ExitingtheSetupUtilityprogram......38
©CopyrightLenovo2016,2017i

UpdatingandrecoveringtheBIOS.......38
UpdatingtheBIOS...........38
RecoveringfromaBIOSupdatefailure...39
ConfiguringRAID..............39
ConfiguringRAIDwithIntelRSTe......39
QuickRAIDsetupusingtheAVAGOMegaRAID
BIOSconfigurationutility........42
Chapter6.Troubleshooting,
diagnostics,andrecovery......45
Basicprocedureforresolvingcomputer
problems.................45
Troubleshooting..............45
Startupproblems............45
Audioproblems............46
CDorDVDproblems..........47
Intermittentproblems..........48
Storagedriveproblems.........48
EthernetLANproblems.........49
WirelessLANproblem..........49
Bluetoothproblems...........50
Performanceproblems..........51
Serialconnectorproblem.........52
USBdeviceproblems..........52
Softwareanddriverproblems.......53
Diagnosingproblems............53
Recoveryinformation............55
RecoveryinformationforWindows7....55
RecoveryinformationforWindows10....56
Chapter7.Installingorreplacing
hardware...............57
Handlingstatic-sensitivedevices.......57
Preparingyourcomputerandremovingthe
computercover..............57
Installingorreplacinghardware........58
Externaloptions............58
Frontbezel..............59
Powerbutton.............59
PCIExpresscard............61
Full-lengthPCIExpresscard.......63
M.2solid-statedrive..........67
Memorymodule............70
Opticaldrive..............73
Storagedriveinthefront-accessstorage
enclosure...............76
Deviceintheoptical/storagecombination
enclosure...............82
Battery................86
Coverpresenceswitch.........87
Powersupplyassembly.........88
Heatsinkandfanassembly........90
Primaryharddiskdrive.........91
Secondaryharddiskdrive........92
Solid-statedrive............94
Completingthepartsreplacement.......98
Chapter8.Gettinginformation,help,
andservice.............101
Informationresources............101
Accessingtheuserguideinvarious
languages...............101
Windowshelpsystem..........101
Safetyandwarranty...........101
LenovoWebsite............101
LenovoSupportWebsite.........102
Frequentlyaskedquestions........102
Helpandservice..............102
Callingforservice............102
Usingotherservices..........103
Purchasingadditionalservices......103
AppendixA.Systemmemory
speed................105
AppendixB.Supplemental
informationabouttheUbuntu
operatingsystem..........107
AppendixC.Regulatory
information.............109
Exportclassificationnotice..........109
Electronicemissionsnotices.........109
FederalCommunicationsCommission
DeclarationofConformity........109
Eurasiancompliancemark..........111
Brazilaudionotice.............111
Mexicowireless-radiocomplianceinformation..111
Additionalregulatoryinformation.......112
AppendixD.WEEEandrecycling
information.............113
ImportantWEEEinformation.........113
RecyclinginformationforJapan........113
RecyclinginformationforBrazil........114
BatteryrecyclinginformationforTaiwan.....114
BatteryrecyclinginformationfortheEuropean
Union..................115
AppendixE.RestrictionofHazardous
SubstancesDirective(RoHS)....117
EuropeanUnionRoHS...........117
ChinaRoHS................117
TurkishRoHS...............117
iiThinkStationP410UserGuide


ivThinkStationP410UserGuide

Readthisfirst:Importantsafetyinformation
Thischaptercontainsthesafetyinformationthatyoumustbefamiliarwith.
Beforeusingthismanual
CAUTION:
Beforeusingthismanual,besuretoreadandunderstandalltherelatedsafetyinformationforthis
product.RefertotheinformationinthissectionandthesafetyinformationintheSafety,Warranty,and
SetupGuidethatyoureceivedwiththisproduct.Readingandunderstandingthissafetyinformation
reducestheriskofpersonalinjuryanddamagetoyourproduct.
IfyounolongerhaveacopyoftheSafety,Warranty,andSetupGuide,youcanobtainaPortableDocument
Format(PDF)versionfromtheLenovo®SupportWebsiteathttp://www.lenovo.com/support.TheLenovo
SupportWebsitealsoprovidestheSafety,Warranty,andSetupGuideandthisUserGuideinadditional
languages.
Serviceandupgrades
DonotattempttoserviceaproductyourselfunlessinstructedtodosobytheCustomerSupportCenteror
yourdocumentation.OnlyuseaServiceProviderwhoisapprovedtorepairyourparticularproduct.
Note:Somecomputerpartscanbeupgradedorreplacedbythecustomer.Upgradestypicallyare
referredtoasoptions.ReplacementpartsapprovedforcustomerinstallationarereferredtoasCustomer
ReplaceableUnits,orCRUs.Lenovoprovidesdocumentationwithinstructionswhenitisappropriatefor
customerstoinstalloptionsorreplaceCRUs.Youmustcloselyfollowallinstructionswheninstallingor
replacingparts.TheOffstateofapowerindicatordoesnotnecessarilymeanthatvoltagelevelsinsidea
productarezero.Beforeyouremovethecoversfromaproductequippedwithapowercord,alwaysensure
thatthepoweristurnedoffandthattheproductisunpluggedfromanypowersource.Formoreinformation
aboutCRUs,refertoChapter7“Installingorreplacinghardware”onpage57.Ifyouhaveanyquestionsor
concerns,contacttheCustomerSupportCenter.
Althoughtherearenomovingpartsinyourcomputerafterthepowercordhasbeendisconnected,the
followingwarningsarerequiredforyoursafety.
CAUTION:
Hazardousmovingparts.Keepfingersandotherbodypartsaway.
CAUTION:
Beforeyouopenthecomputercover,turnoffthecomputerandwaitseveralminutesuntilthe
computeriscool.
©CopyrightLenovo2016,2017v

Staticelectricityprevention
Staticelectricity,althoughharmlesstoyou,canseriouslydamagecomputercomponentsandoptions.
Improperhandlingofstatic-sensitivepartscandamagethepart.WhenyouunpackanoptionorCRU,do
notopenthestatic-protectivepackagecontainingthepartuntiltheinstructionsdirectyoutoinstallit.
WhenyouhandleoptionsorCRUs,orperformanyworkinsidethecomputer,takethefollowingprecautions
toavoidstatic-electricitydamage:
•Limityourmovement.Movementcancausestaticelectricitytobuilduparoundyou.
•Alwayshandlecomponentscarefully.Handleadapters,memorymodules,andothercircuitboardsbythe
edges.Nevertouchexposedcircuitry.
•Preventothersfromtouchingcomponents.
•Whenyouinstallastatic-sensitiveoptionorCRU,touchthestatic-protectivepackagecontainingthe
parttoametalexpansion-slotcoverorotherunpaintedmetalsurfaceonthecomputerforatleasttwo
seconds.Thisreducesstaticelectricityinthepackageandyourbody.
•Whenpossible,removethestatic-sensitivepartfromthestatic-protectivepackagingandinstallthepart
withoutsettingitdown.Whenthisisnotpossible,placethestatic-protectivepackagingonasmooth,
levelsurfaceandplacethepartonit.
•Donotplacethepartonthecomputercoverorothermetalsurface.
Powercordsandpoweradapters
Useonlythepowercordsandpoweradapterssuppliedbytheproductmanufacturer.Donotusetheac
powercordforotherdevices.
Thepowercordsshallbesafetyapproved.ForGermany,itshallbeH05VV-F,3G,0.75mm2,orbetter.For
othercountries,thesuitabletypesshallbeusedaccordingly.
Neverwrapapowercordaroundapoweradapterorotherobject.Doingsocanstressthecordinwaysthat
cancausethecordtofray,crack,orcrimp.Thiscanpresentasafetyhazard.
Alwaysroutepowercordssothattheywillnotbewalkedon,trippedover,orpinchedbyobjects.
Protectpowercordandpoweradaptersfromliquids.Forinstance,donotleaveyourpowercordorpower
adapternearsinks,tubs,toilets,oronfloorsthatarecleanedwithliquidcleansers.Liquidscancausea
shortcircuit,particularlyifthepowercordorpoweradapterhasbeenstressedbymisuse.Liquidsalsocan
causegradualcorrosionofpowercordterminalsand/ortheconnectorterminalsonapoweradapter,
whichcaneventuallyresultinoverheating.
Ensurethatallpowercordconnectorsaresecurelyandcompletelypluggedintoreceptacles.
Donotuseanypoweradapterthatshowscorrosionattheacinputpinsorshowssignsofoverheating(such
asdeformedplastic)attheacinputoranywhereonthepoweradapter.
Donotuseanypowercordswheretheelectricalcontactsoneitherendshowsignsofcorrosionor
overheatingorwherethepowercordappearstohavebeendamagedinanyway.
Extensioncordsandrelateddevices
Ensurethatextensioncords,surgeprotectors,uninterruptiblepowersupplies,andpowerstripsthatyouuse
areratedtohandletheelectricalrequirementsoftheproduct.Neveroverloadthesedevices.Ifpowerstrips
viThinkStationP410UserGuide

areused,theloadshouldnotexceedthepowerstripinputrating.Consultanelectricianformoreinformation
ifyouhavequestionsaboutpowerloads,powerrequirements,andinputratings.
Plugsandoutlets
Ifareceptacle(poweroutlet)thatyouintendtousewithyourcomputerequipmentappearstobedamaged
orcorroded,donotusetheoutletuntilitisreplacedbyaqualifiedelectrician.
Donotbendormodifytheplug.Iftheplugisdamaged,contactthemanufacturertoobtainareplacement.
Donotshareanelectricaloutletwithotherhomeorcommercialappliancesthatdrawlargeamountsof
electricity.Otherwise,unstablevoltagemightdamageyourcomputer,data,orconnecteddevices.
Someproductsareequippedwithathree-prongedplug.Thisplugfitsonlyintoagroundedelectricaloutlet.
Thisisasafetyfeature.Donotdefeatthissafetyfeaturebytryingtoinsertitintoanon-groundedoutlet.If
youcannotinserttheplugintotheoutlet,contactanelectricianforanapprovedoutletadapterortoreplace
theoutletwithonethatenablesthissafetyfeature.Neveroverloadanelectricaloutlet.Theoverallsystem
loadshouldnotexceed80percentofthebranchcircuitrating.Consultanelectricianformoreinformation
ifyouhavequestionsaboutpowerloadsandbranchcircuitratings.
Besurethatthepoweroutletyouareusingisproperlywired,easilyaccessible,andlocatedclosetothe
equipment.Donotfullyextendpowercordsinawaythatwillstressthecords.
Besurethatthepoweroutletprovidesthecorrectvoltageandcurrentfortheproductyouareinstalling.
Carefullyconnectanddisconnecttheequipmentfromtheelectricaloutlet.
Externaldevices
DonotconnectordisconnectanyexternaldevicecablesotherthanUniversalSerialBus(USB)cableswhile
thecomputerpowerison;otherwise,youmightdamageyourcomputer.Toavoidpossibledamageto
connecteddevices,waitatleastfivesecondsafterthecomputerisshutdowntodisconnectexternaldevices.
Heatandproductventilation
Computers,poweradapters,andmanyaccessoriescangenerateheatwhenturnedonandwhenbatteries
arecharging.Alwaysfollowthesebasicprecautions:
•Donotleaveyourcomputer,poweradapter,oraccessoriesincontactwithyourlaporanypartofyour
bodyforanextendedperiodwhentheproductsarefunctioningorwhenthebatteryischarging.Your
computer,poweradapter,andmanyaccessoriesproducesomeheatduringnormaloperation.Extended
contactwiththebodycouldcausediscomfortor,potentially,askinburn.
•Donotchargethebatteryoroperateyourcomputer,poweradapter,oraccessoriesnearflammable
materialsorinexplosiveenvironments.
•Ventilationslots,fans,andheatsinksareprovidedwiththeproductforsafety,comfort,andreliable
operation.Thesefeaturesmightinadvertentlybecomeblockedbyplacingtheproductonabed,sofa,
carpet,orotherflexiblesurface.Neverblock,cover,ordisablethesefeatures.
Inspectyourdesktopcomputerfordustaccumulationatleastonceeverythreemonths.Beforeinspecting
yourcomputer,turnoffthepowerandunplugthecomputer'spowercordfromtheelectricaloutlet;then
removeanydustfromventsandperforationsinthebezel.Ifyounoticeexternaldustaccumulation,then
examineandremovedustfromtheinsideofthecomputerincludingheatsinkinletfins,powersupplyvents,
andfans.Alwaysturnoffandunplugthecomputerbeforeopeningthecover.Ifpossible,avoidoperating
©CopyrightLenovo2016,2017vii

yourcomputerwithintwofeetofhigh-trafficareas.Ifyoumustoperateyourcomputerinornearahigh-traffic
area,inspectand,ifnecessary,cleanyourcomputermorefrequently.
Foryoursafetyandtomaintainoptimumcomputerperformance,alwaysfollowthesebasicprecautions
withyourdesktopcomputer:
•Keepthecoverclosedwheneverthecomputerispluggedin.
•Regularlyinspecttheoutsideofthecomputerfordustaccumulation.
•Removedustfromventsandanyperforationsinthebezel.Morefrequentcleaningsmightberequiredfor
computersindustyorhigh-trafficareas.
•Donotrestrictorblockanyventilationopenings.
•Donotstoreoroperateyourcomputerinsidefurniture,asthismightincreasetheriskofoverheating.
•Airflowtemperaturesintothecomputershouldnotexceed35°C(95°F).
•Donotinstallairfiltrationdevices.Theymayinterferewithpropercooling.
Operatingenvironment
Theoptimalenvironmentinwhichtouseyourcomputeris10°C–35°C(50°F–95°F)withhumidityranging
between35%and80%.Ifyourcomputerisstoredortransportedintemperatureslessthan10°C(50°F),
allowthecoldcomputertoriseslowlytoanoptimaloperatingtemperatureof10°C–35°C(50°F–95°F)before
use.Thisprocesscouldtaketwohoursinextremeconditions.Failuretoallowyourcomputertorisetoan
optimaloperatingtemperaturebeforeusecouldresultinirreparabledamagetoyourcomputer.
Ifpossible,placeyourcomputerinawell-ventilatedanddryareawithoutdirectexposuretosunshine.
Keepelectricalappliancessuchasanelectricfan,radio,high-poweredspeakers,airconditioner,and
microwaveovenawayfromyourcomputerbecausethestrongmagneticfieldsgeneratedbythese
appliancescandamagethemonitoranddataonthestoragedrive.
Donotplaceanybeveragesontopoforbesidethecomputerorotherconnecteddevices.Ifliquidisspilled
onorinthecomputeroraconnecteddevice,ashortcircuitorotherdamagemightoccur.
Donoteatorsmokeoveryourkeyboard.Particlesthatfallintoyourkeyboardcancausedamage.
Lasercompliancestatement
CAUTION:
Whenlaserproducts(suchasCD-ROMs,DVDdrives,fiberopticdevices,ortransmitters)are
installed,notethefollowing:
•Donotremovethecovers.Removingthecoversofthelaserproductcouldresultinexposureto
hazardouslaserradiation.Therearenoserviceablepartsinsidethedevice.
•Useofcontrolsoradjustmentsorperformanceofproceduresotherthanthosespecifiedherein
mightresultinhazardousradiationexposure.
viiiThinkStationP410UserGuide
DANGER
SomelaserproductscontainanembeddedClass3AorClass3Blaserdiode.Notethefollowing:
Laserradiationwhenopen.Donotstareintothebeam,donotviewdirectlywithoptical
instruments,andavoiddirectexposuretothebeam.
Powersupplystatement
Neverremovethecoveronapowersupplyoranypartthathasthefollowinglabelattached.
Hazardousvoltage,current,andenergylevelsarepresentinsideanycomponentthathasthislabelattached.
Therearenoserviceablepartsinsidethesecomponents.Ifyoususpectaproblemwithoneoftheseparts,
contactaservicetechnician.
Cleaningandmaintenance
Keepyourcomputerandworkspaceclean.Shutdownthecomputerandthendisconnectthepower
cordbeforecleaningthecomputer.Donotsprayanyliquiddetergentdirectlyonthecomputeroruse
anydetergentcontainingflammablematerialtocleanthecomputer.Spraythedetergentonasoftcloth
andthenwipethecomputersurfaces.
©CopyrightLenovo2016,2017ix

xThinkStationP410UserGuide
Chapter1.Productoverview
Thischapterprovidesinformationaboutthefollowingtopics:
•“Hardwarelocations”onpage1
•“Computerfeatures”onpage8
•“Computerspecifications”onpage12
•“Programs”onpage12
Hardwarelocations
Thissectionprovidesinformationaboutthelocationsofyourcomputerhardware.
Note:Thecomputerhardwaremightlookslightlydifferentfromtheillustrations.
Frontview
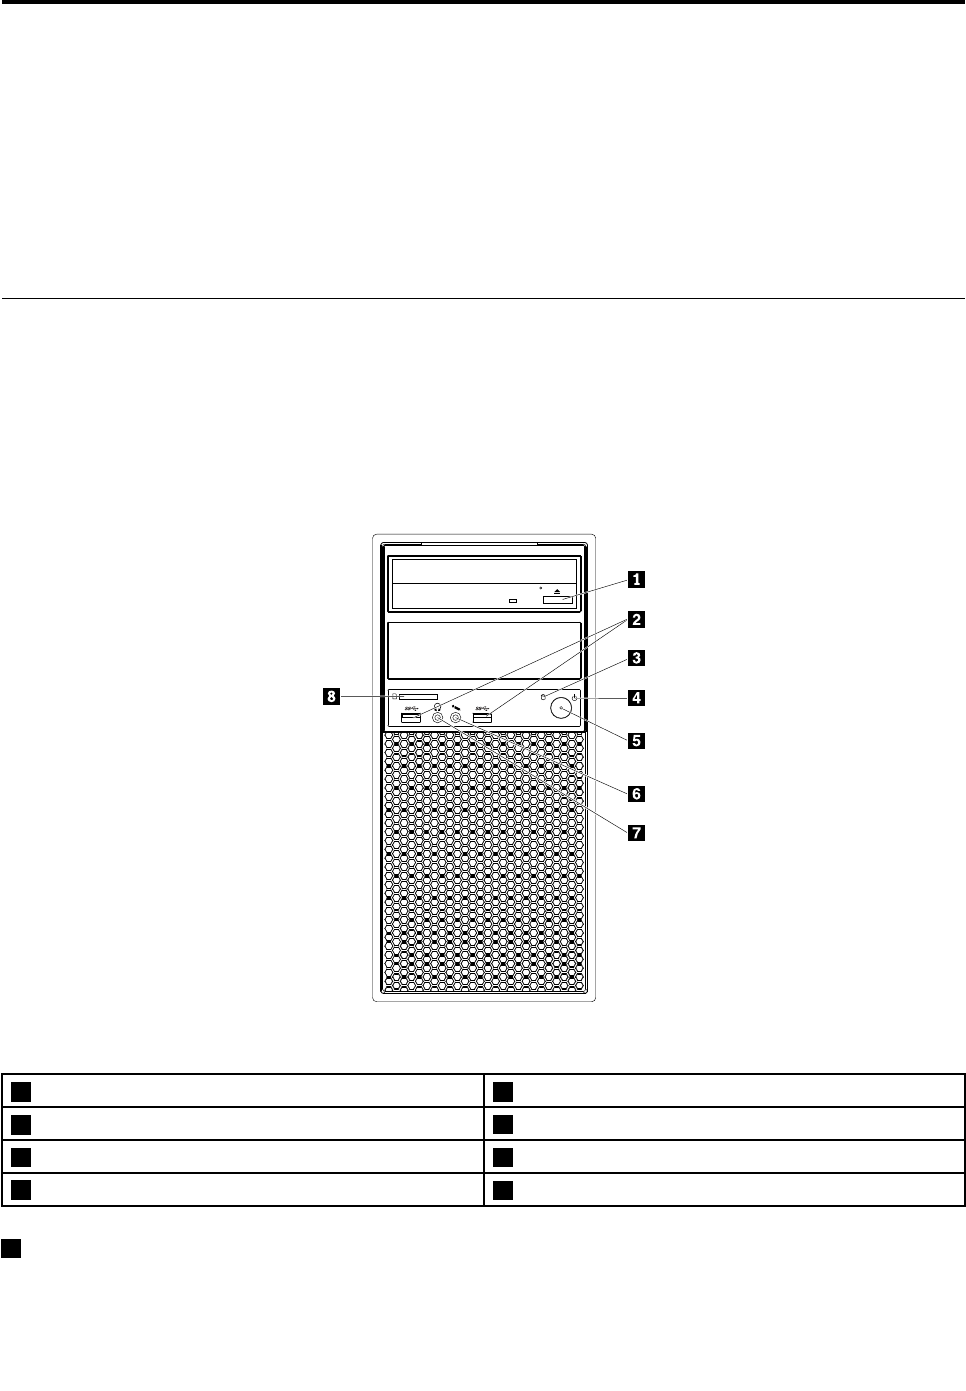
Figure1.Frontconnectors,controls,andindicators
1Optical-driveeject/closebutton2USB3.0connectors(2)
3Storagedriveactivityindicator4Powerindicator
5Powerbutton6Microphoneconnector
7Headphoneconnector8SDcardslot
1Optical-driveeject/closebutton
Pressthebuttontoejectorclosethetrayoftheopticaldrive.
©CopyrightLenovo2016,20171

2USB3.0connector
ConnectaUSB-compatibledevice,suchasaUSBkeyboard,mouse,storagedrive,orprinter,tothis
connector.
3Storagedriveactivityindicator
Thisindicatorshowsthestatusoftheinternalstoragedrives(suchasharddiskdrivesorsolid-statedrives).
On:Thestoragedrivesareactiveanddataisbeingtransferred.
Off(whenthecomputerispoweredon):Nodataisbeingtransferredorthestoragedrivesarenotinuse.
4Powerindicator
Whenthepowerindicatorison,thecomputeristurnedon.
5Powerbutton
Pressthepowerbuttontoturnonyourcomputer.Ifyourcomputerisunresponsive,youcanturnoffthe
computerbypressingandholdingthepowerbuttonforfourormoreseconds.
6Microphoneconnector
Connectthemicrophonetoyourcomputerthroughthemicrophoneconnector.
7Headphoneconnector
Connecttheheadphonetoyourcomputerthroughtheheadphoneconnector.
8SDcardslot
Insertasecuredigital(SD)cardintotheslotsothatthedataonthecardcanbeaccessedandread.
2ThinkStationP410UserGuide
Rearview
56 7 8
4
3
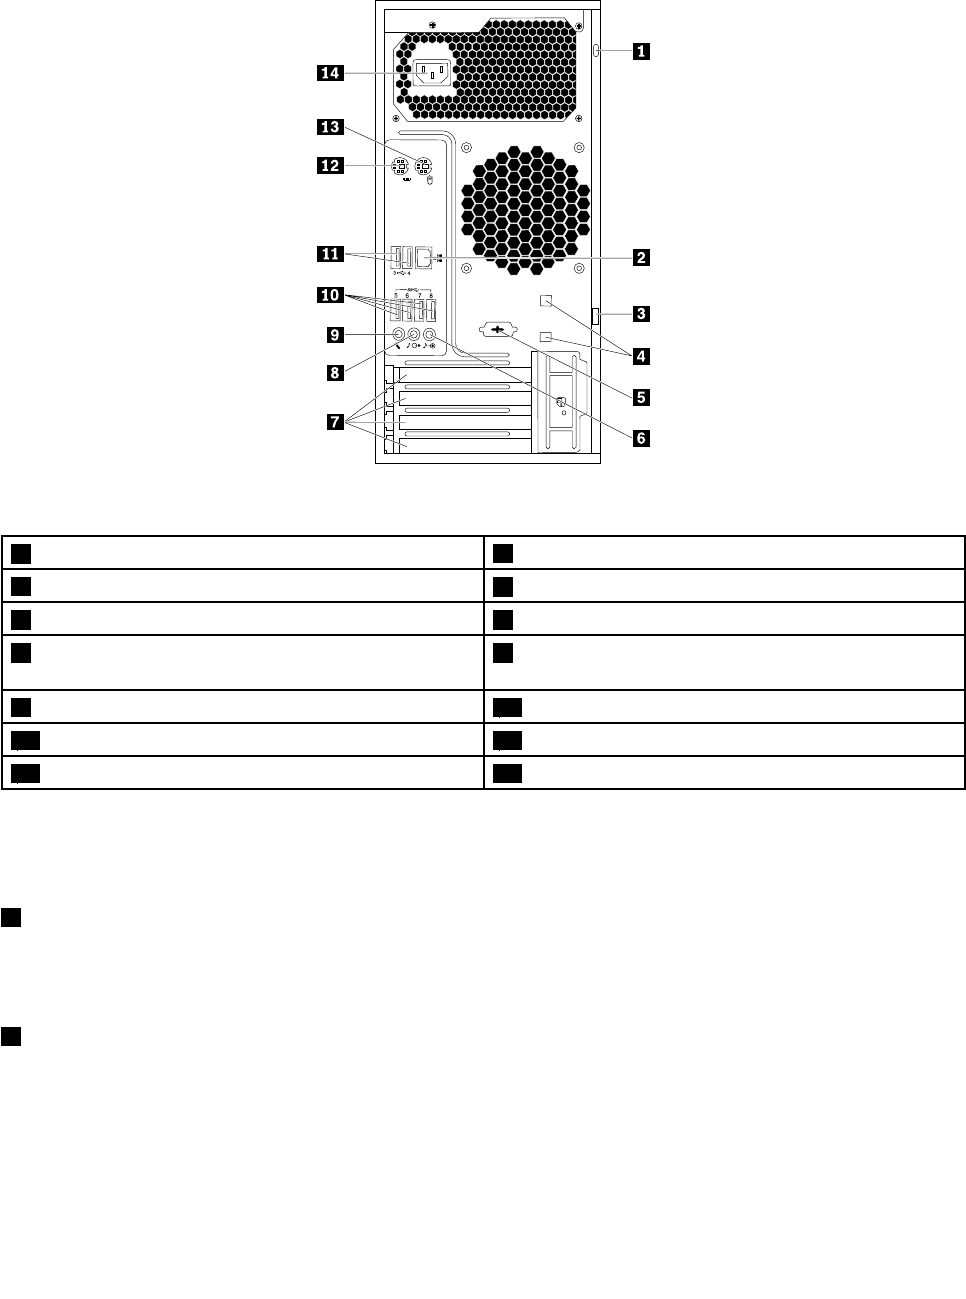
Figure2.Rearview
1Security-lockslot2Ethernetconnector
3Padlockloop4Cable-lockslots(2)
5Serialconnector(somemodels)6Audioline-inconnector
7PCIExpresscardarea(differentcardsprovidedifferent
connectors)
8Audioline-outconnector
9Microphoneconnector10USB3.0connectors(4)
11USB2.0connectors(2)12PS/2keyboardconnector
13PS/2mouseconnector14Power-cordconnector
Note:AdiscretegraphicscardorEthernetcardmightbeinstalledinthePeripheralComponentInterconnect
(PCI)Expresscardarea.Ifsuchacardisinstalled,ensurethatyouusetheconnectorsonthecardinsteadof
thecorrespondingconnectorsonthecomputer.
1Security-lockslot
AttachaKensington-stylecablelocktothesecurity-lockslottosecureyourcomputer.Formoreinformation,
see“AttachingaKensington-stylecablelock”onpage29.
2Ethernetconnector
AttachanEthernetcableforalocalareanetwork(LAN).
Note:TooperatethecomputerwithinFederalCommunicationsCommission(FCC)ClassBlimits,use
aCategory5Ethernetcable.
Chapter1.Productoverview3

3Padlockloop
Attachapadlocktosecureyourcomputer.Formoreinformation,see“Lockingthecomputercover”on
page28.
4Cable-lockslot
Thecable-lockslotsareusedtosecureacablelock.Formoreinformation,see“Attachingacablelock”
onpage30.
5Serialconnector
Connectanexternalmodem,aserialprinter,orotherdevicesthatusea9-pinserialconnectortothe
serialconnector.
6Audioline-inconnector
Theaudioline-inconnectorisusedtoreceiveaudiosignalsfromanexternalaudiodevice,suchasastereo
system.Whenyouattachanexternalaudiodevice,acableconnectionisestablishedbetweentheaudio
line-outconnectorofthedeviceandtheaudioline-inconnectorofthecomputer.
7PCIExpresscardarea(differentcardsprovidedifferentconnectors)
Toimprovetheoperatingperformanceofyourcomputer,youcaninstallPCIExpresscardsintothisarea.
Dependingonyourcomputermodel,thecardsalreadyinstalledinthisareamightvary.
8Audioline-outconnector
Theaudioline-outconnectorisusedtosendaudiosignalsfromthecomputertoexternaldevices,such
asheadphones.
9Microphoneconnector
Attachamicrophonetoyourcomputerthroughthemicrophoneconnectorwhenyouwanttorecordsound
orifyouusespeech-recognitionsoftware.
10USB3.0connector
ConnectaUSB-compatibledevice,suchasaUSBkeyboard,mouse,storagedrive,orprinter,tothis
connector.
11USB2.0connector
ConnectaUSB-compatibledevice,suchasaUSBkeyboard,mouse,storagedrive,orprinter,tothis
connector.
12PS/2keyboardconnector
AttachaPersonalSystem/2(PS/2)keyboardtothePS/2keyboardconnector.
13PS/2mouseconnector
AttachaPS/2mouse,atrackball,orotherpointingdevicesthatuseaPS/2mouseconnector.
4ThinkStationP410UserGuide
14Power-cordconnector
Connectthepowercordtoyourcomputerforpowersupply.
Computercomponents
Notes:
•Dependingonthemodel,yourcomputermightlookslightlydifferentfromtheillustration.
•Toremovethecomputercover,see“Preparingyourcomputerandremovingthecomputercover”on
page57.
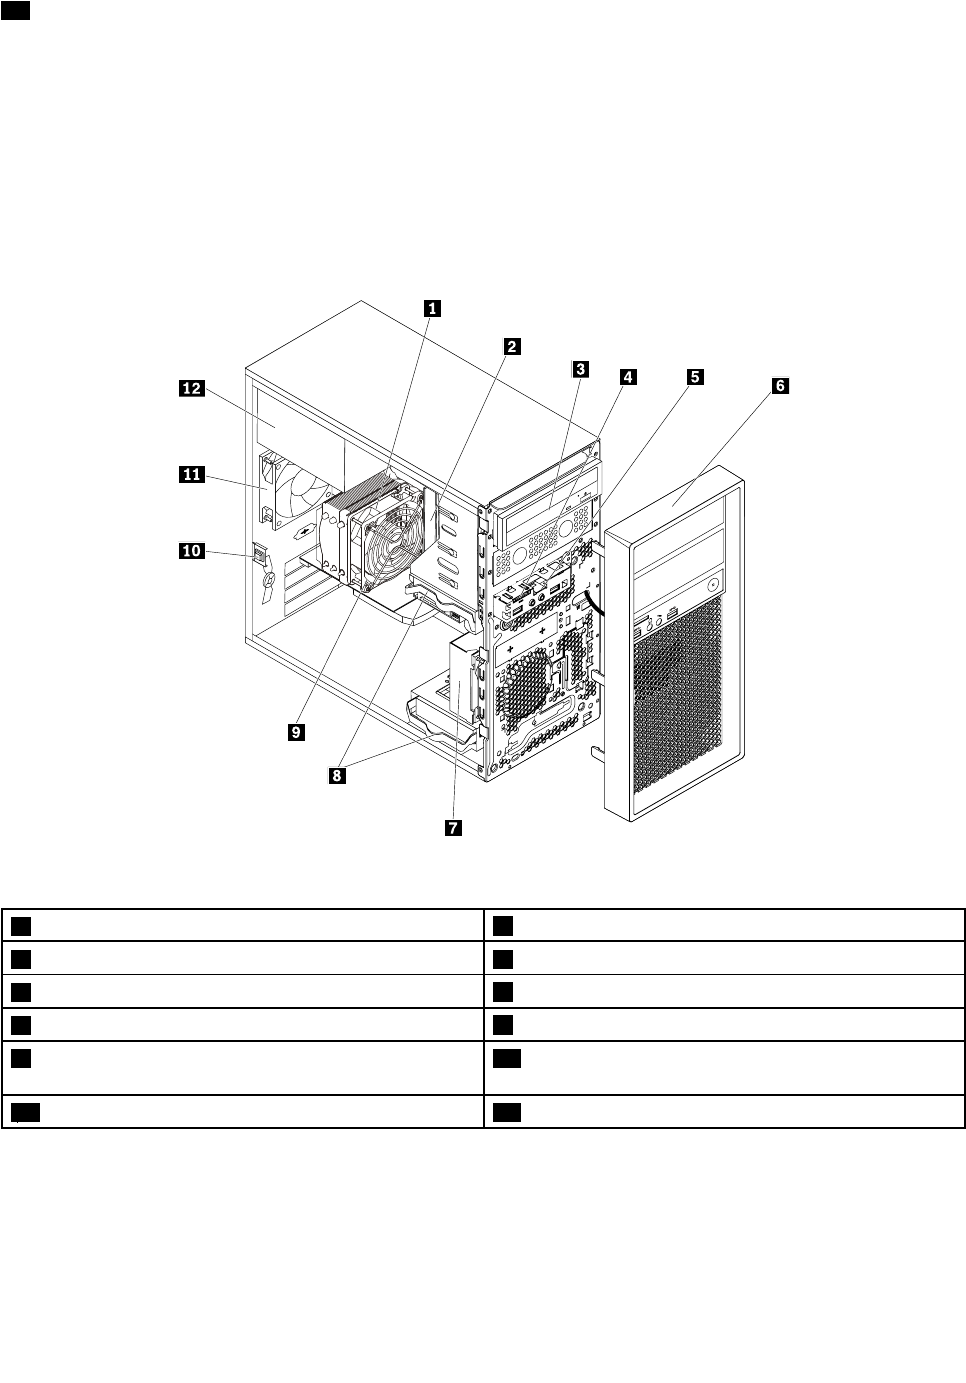
Figure3.Componentlocations
1Heatsinkandfanassembly2Memorymodule
3Opticaldrive(somemodels)4Cardreader
5FrontaudioandUSBassembly6Frontbezel
7Frontfanassembly(somemodels)8Harddiskdrives
9Graphicscard(somemodels)10Coverpresenceswitch(alsocalledintrusionswitch)
(somemodels)
11Rearfanassembly12Powersupplyassembly
Partsonthesystemboard
Thefollowingillustrationshowsthelocationsofthepartsonthesystemboard.
Chapter1.Productoverview5
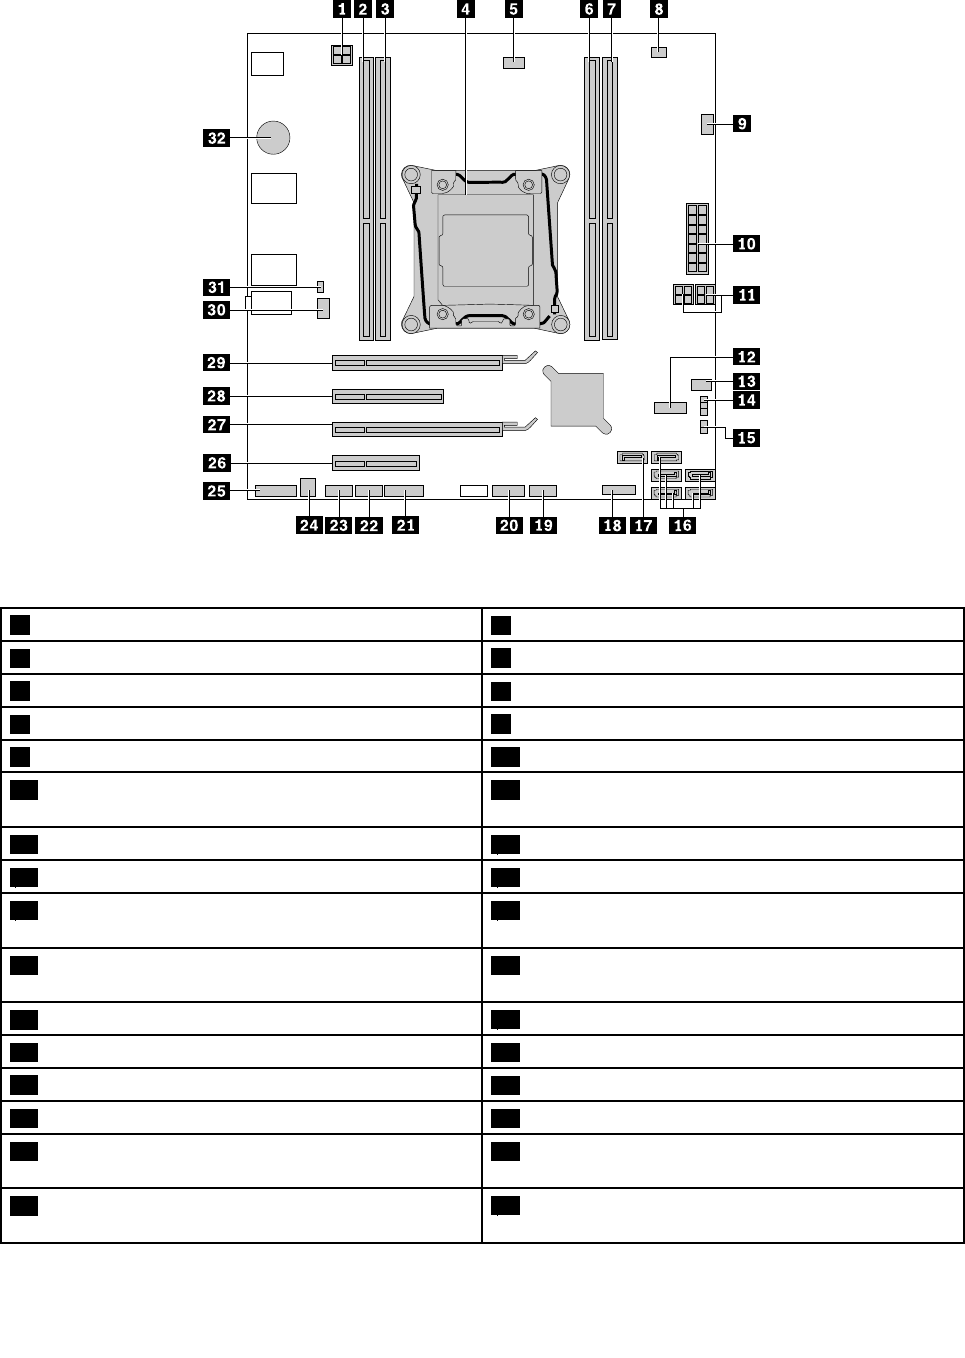
Figure4.Systemboardpartlocations
14-pinpowerconnector2Memoryslot1(DIMM1)
3Memoryslot2(DIMM2)4Microprocessor
5Microprocessorfanconnector6Memoryslot4(DIMM4)
7Memoryslot3(DIMM3)8Thermalsensorconnector
9Hard-disk-drivefanconnector1014-pinpowerconnector
114-pinSATApowerconnectors12USB2.0connectors(forconnectingthefrontUSB2.0
connector,cardreaderconnector,orBluetoothconnector)
13Frontfanconnector14ClearCMOS/Recoveryjumper
15SAS/SATAdriveLEDconnector16SATAconnectors
17eSATAconnector18FrontUSB3.0connector(forconnectingUSB
connectorsonthefrontpanel)
19USB2.0connector(forconnectingtheWi-Fi
connectoror29–in-1cardreaderconnector)
20Frontbezelconnector(forconnectingLEDindicators
andthepowerbutton)
21Serial(COM)connector22Thunderbolt™connector
23Four-digitdiagnosticdisplayconnector24Internal-speakerconnector
25Frontaudioconnector26PCIExpressx4cardslot
27PCIExpressx16cardslot28PCIExpressx8cardslot
29PCIExpressx16cardslot(graphicscardavailable
onsomemodels)
30Rearfanconnector
31Coverpresenceswitchconnector(intrusionswitch
connector)
32Battery
6ThinkStationP410UserGuide
Internaldrives
Internaldrivesaredevicesthatyourcomputerusestoreadandstoredata.Youcanadddrivestoyour
computertoincreasestoragecapacityandenableyourcomputertoreadothertypesofmedia.Internal
drivesareinstalledinbays.
Whenyouinstallorreplaceaninternaldrive,notethetypeandsizeofthedrivethateachbaysupportsand
correctlyconnecttherequiredcables.RefertotheappropriatesectioninChapter7“Installingorreplacing
hardware”onpage57forinstructionsonhowtoinstallorreplaceinternaldrivesforyourcomputer.
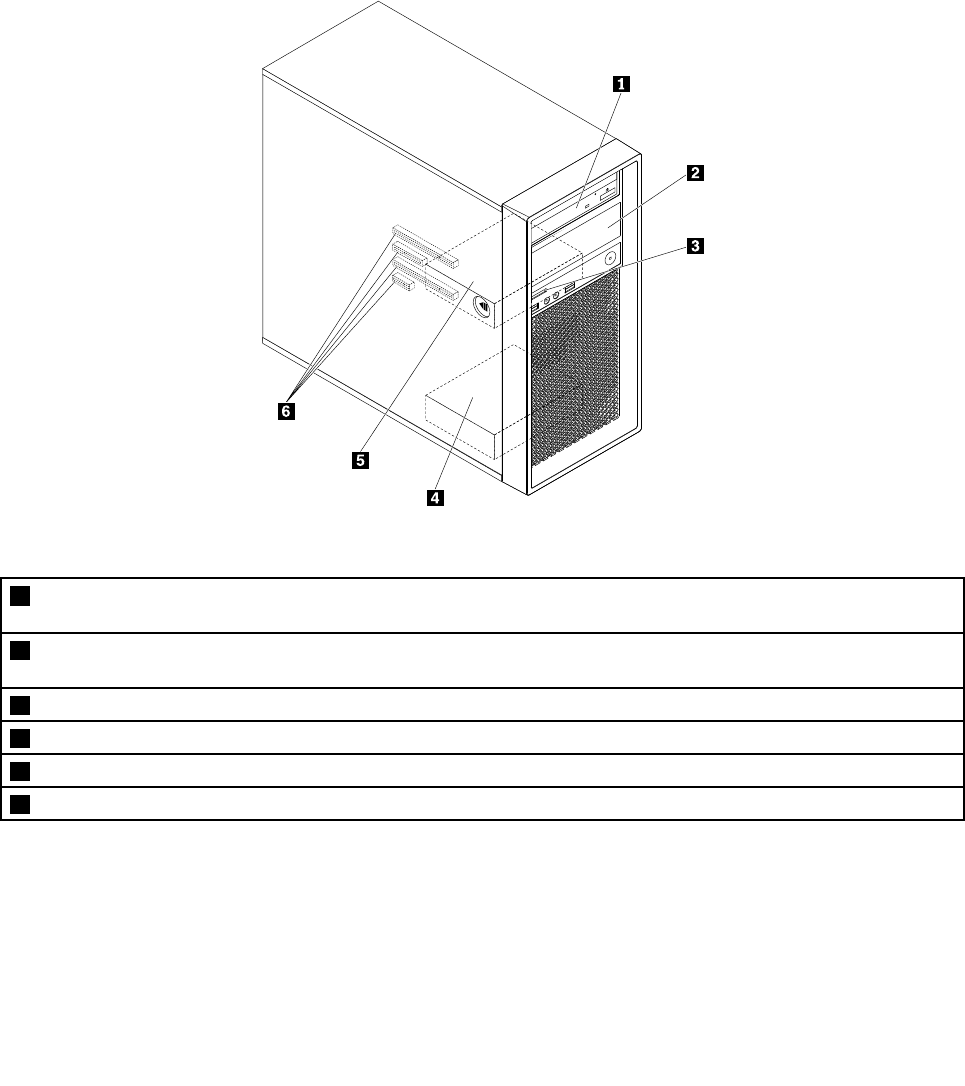
Thefollowingillustrationshowsthelocationsofthedrivebays.
Figure5.Drivebaylocations
1Primaryoptical-drivebay(withanopticaldrive,aflexmodule,aflexstorageenclosure,afront-accessstorage
enclosure,oranoptical/storagecombinationenclosureinstalledinsomemodels)
2Secondaryoptical-drivebay(withanopticaldrive,aflexmodule,aflexstorageenclosure,afront-accessstorage
enclosure,oranoptical/storagecombinationenclosureinstalledinsomemodels)
3SDcardslot(withanSDcardinstalledinsomemodels)
4Secondarystoragedrivebay(withaharddiskdrive,solid-statedrive,orhybriddriveinstalledinsomemodels)
5Primarystoragedrivebay(withaharddiskdrive,solid-statedrive,orhybriddriveinstalledinsomemodels)
6PCIExpresscardslots(withPCIExpresssolid-statedrivesorotherPCIcardsinstalledinsomemodels)
Chapter1.Productoverview7
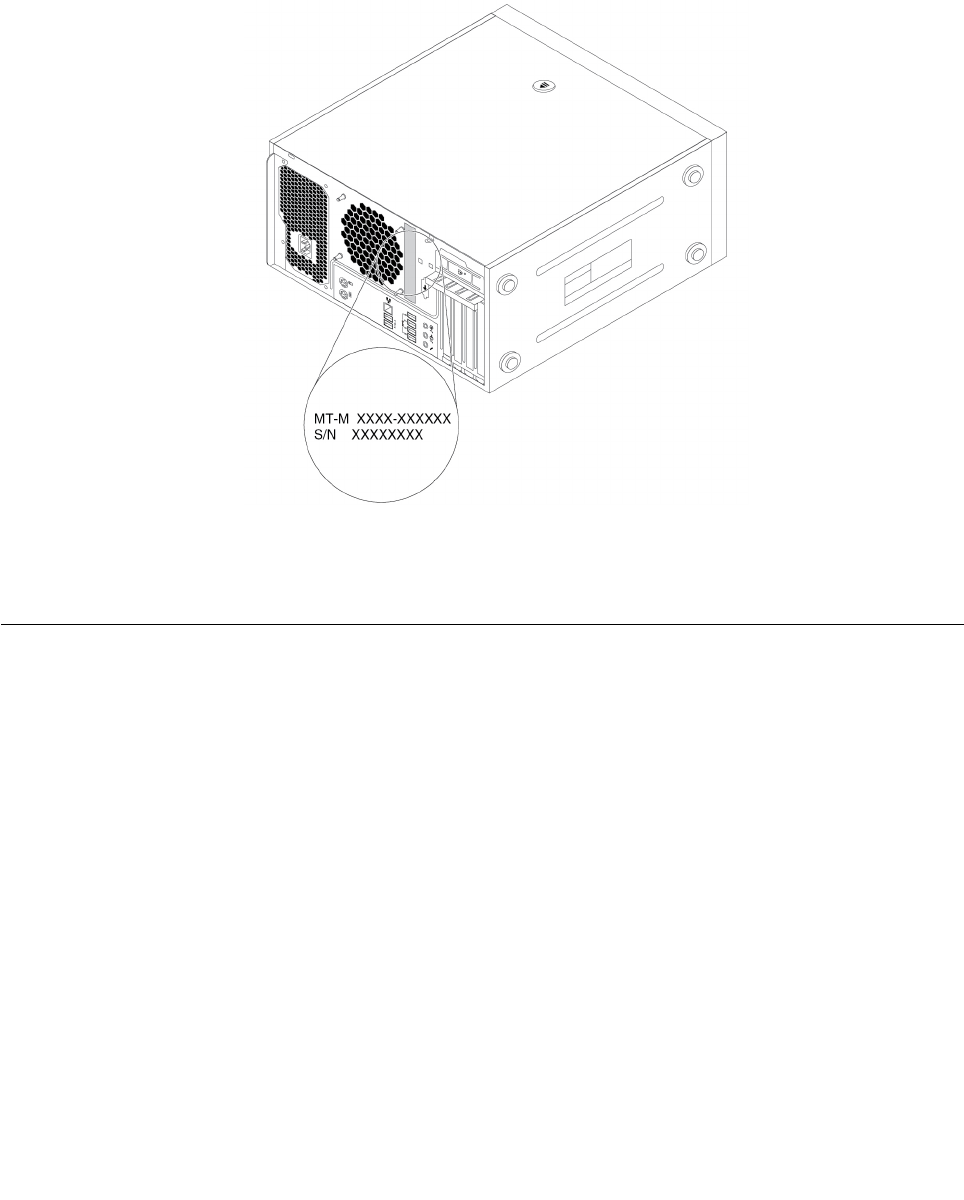
Machinetypeandmodellabel
Themachinetypeandmodellabelidentifiesyourcomputer.WhenyoucontactLenovoforhelp,themachine
typeandmodelinformationhelpssupporttechnicianstoidentifyyourcomputerandprovidefasterservice.
Thefollowingisasampleofthemachinetypeandmodellabel.
Figure6.Machinetypeandmodellabel
Computerfeatures
Foryourspecificcomputermodel,somefeaturesmightvaryornotapply.
Informationaboutyourcomputer
•Toviewbasicinformation(suchasmicroprocessorandmemoryinformation)aboutyourcomputer,
dothefollowing:
1.ClicktheStartbuttontoopentheStartmenu.
2.DependingonyourMicrosoft®Windows®operatingsystemversion,dooneofthefollowing:
–ForWindows7:Right-clickComputer,andthenclickProperties.
–ForWindows10:ClickSettings➙S
ystem➙About.
•Toviewdetailedinformationaboutthedevices(suchastheopticaldriveandnetworkadapters)onyour
computer,dothefollowing:
1.DependingonyourWindowsversion,dooneofthefollowing:
–ForWindows7:ClicktheStartbuttontoopentheStartmenu.Right-clickComputer,andthen
clickProperties.
–ForWindows10:Right-clicktheStartbuttontoopentheStartcontextmenu.
8ThinkStationP410UserGuide

2.ClickDeviceManager.
3.Locateanddouble-clickyourdeviceinDeviceManagertoviewdeviceproperties.Typethe
administratorpasswordorprovideconfirmationifprompted.
Memory
Yourcomputersupportsuptofourdoubledatarate4(DDR4)errorcorrectioncode(ECC)unbuffereddual
inlinememorymodules(UDIMMs)andDDR4ECCregisteredDIMMs(RDIMMs).
Formoreinformation,see“Memorymodule”onpage70.
Storagedrives
Yourcomputersupportsthefollowingstoragedrives:
•SDcard
•Opticaldrive(availableonsomemodels)
•SerialAdvancedTechnologyAttachment(SATA)harddiskdrive
•SATAhybriddrive(availableonsomemodels)
•SATAsolid-statedrive(availableonsomemodels)
•PCIExpresssolid-statedrive(M.2solid-statedrive)(availableonsomemodels)
Toviewtheamountofstoragedrivespace,dothefollowing:
1.DependingonyourWindowsversion,dooneofthefollowing:
•ForWindows7:ClicktheStartbuttontoopentheStartmenu.Right-clickComputer,andthenclick
Manage.
•ForWindows10:Right-clicktheStartbuttontoopentheStartcontextmenu.
2.ClickDiskManagementandfollowtheinstructionsonthescreen.
Videofeatures
•PCIExpressx16graphicscardslotsonthesystemboardforadiscretegraphicscard
•Videoconnectorsonadiscretegraphicscard:
–DigitalVisualInterface(DVI)connector(availableonsomemodels)
–DisplayPort®connector(availableonsomemodels)
–MiniDisplayPort®connector(availableonsomemodels)
Audiofeatures
Integratedaudiocontrollersupportsthefollowingconnectorsanddevicesonyourcomputer:
•Audioline-inconnector
•Audioline-outconnector
•Headphoneconnector
•Internalspeaker
•Microphoneconnectors
Input/Output(I/O)features
•100/1000MbpsEthernetconnector
•Serialconnector
Chapter1.Productoverview9

•Audioconnectors(audioline-inconnector,audioline-outconnector,microphoneconnector,and
headphoneconnector)
•Displayconnectors(DisplayPortconnector,DVIconnector,andMiniDisplayPortconnector)(varyby
graphicscard)
•eSATAconnector(availableonsomemodels)
•InstituteofElectricalandElectronicsEngineer(IEEE)1394connector(availableonsomemodels)
•PS/2keyboardconnector
•PS/2mouseconnector
•USBconnectors
Formoreinformation,see“Frontview”onpage1and“Rearview”onpage3.
Expansion
•Storagedrivebays
•Memoryslots
•Optical-drivebays
•PCIExpressx4cardslot
•PCIExpressx8cardslot
•PCIExpressx16cardslots(graphicscardavailableonsomemodels)
•SDcardslot
Formoreinformation,see“Internaldrives”onpage7and“Partsonthesystemboard”onpage5.
Powersupply
450-wattautomatic92%voltage-sensingpowersupply
Wirelessfeatures
Dependingonyourcomputermodel,thefollowingwirelessfeaturesaresupported:
•WirelessLAN
•Bluetooth
Systemmanagementfeatures
•Abilitytostorepower-onself-test(POST)hardwaretestresults
•DesktopManagementInterface(DMI)
DesktopManagementInterfaceprovidesacommonpathforuserstoaccessinformationaboutall
aspectsofacomputer.Theinformationincludestheprocessortype,installationdate,attachedprinters
andotherperipherals,powersources,andmaintenancehistory.
•ErPLPScompliancemode
Theenergy-relatedproductsdirective(ErP)lowestpowerstate(LPS)compliancemodereducesthe
consumptionofelectricitywhenyourcomputerisinsleeporoffmode.Formoreinformation,see
“EnablingordisablingtheErPLPScompliancemode”onpage34.
•Intel®StandardManageability(ISM)
IntelStandardManageabilityishardwareandfirmwaretechnologythatbuildscertainfunctionality
intocomputersinordertomakethemeasierandlessexpensiveforbusinessestomonitor,maintain,
update,upgrade,andrepair.
10ThinkStationP410UserGuide

•IntelActiveManagementTechnology(AMT)
IntelActiveManagementTechnologyishardware-andfirmware-basedtechnologythatmakescomputers
easierandlessexpensiveforbusinessestomonitor,maintain,update,upgrade,andrepair.
•IntelRapidStorageTechnologyenterprise(RSTe)
TheIntelRSTeconfigurationutilityenablesyoutoconfigureRedundantArrayofIndependentDisks(RAID)
forcomputerswithspecificIntelchipsetsystemboards.ItsupportsRAIDlevels0,1,5,and10on
computersinstalledwithSerialAdvancedTechnologyAttachment(SATA)devices.
•IntelMatrixStorageManager
IntelMatrixStorageManagerisadevicedriverthatprovidessupportforSATARAID5arraysandSATA
RAID10arraysonspecificIntelchipsetsystemboardstoenhanceharddiskperformance.
•PrebootExecutionEnvironment(PXE)
ThePrebootExecutionEnvironmentisanenvironmenttostartcomputersusinganetworkinterface
independentofdatastoragedevices(suchastheharddiskdrive)orinstalledoperatingsystems.
•SystemManagement(SM)basicinput/outputsystem(BIOS)andSMsoftware
TheSMBIOSspecificationdefinesdatastructuresandaccessmethodsinaBIOSthatallowsauseror
applicationtostoreandretrieveinformationspecificaboutthecomputerinquestion.
•WakeonLAN(WOL)
WakeonLANisanEthernetcomputernetworkingstandardthatallowsacomputertobeturnedon
orwokenupbyanetworkmessage.Themessageisusuallysentbyaprogramrunningonanother
computeronthesamelocalareanetwork.
•WindowsManagementInstrumentation(WMI)
WindowsManagementInstrumentationisasetofextensionstotheWindowsDriverModel.Itprovidesan
operatingsysteminterfacethroughwhichinstrumentedcomponentsprovideinformationandnotification.
Securityfeatures
•Abilitytoenableanddisableadevice
•AbilitytoenableanddisableUSBconnectorsindividually
•Antivirusprogram
•ComputraceAgentsoftwareembeddedinfirmware
•Coverpresenceswitch(alsocalledintrusionswitch)
•BIOSpasswordsandWindowsaccountstodeterunauthorizeduseofyourcomputer
•BIOSguard
•Fingerauthentication(availableonsomemodels)
•Firewalls
•Startupsequencecontrol
•Startupwithoutakeyboardormouse
•Supportforacomputercoverlock
•SupportforaKensington-stylecablelock
•Supportforapadlock
•TrustedPlatformModule(TPM)
Formoreinformation,seeChapter4“Security”onpage27.
Chapter1.Productoverview11

Preinstalledoperatingsystem
YourcomputerispreinstalledwithWindows7orWindows10operatingsystem.Additionaloperating
systemsmightbeidentifiedbyLenovoascompatiblewithyourcomputer.Todetermineifanoperating
systemhasbeencertifiedortestedforcompatibility,checktheWebsiteoftheoperatingsystemprovider.
Computerspecifications
Thissectionliststhephysicalspecificationsforyourcomputer.
Dimensions
Width:175mm(6.89inches)
Height:376mm(14.80inches)
Depth:426mm(16.77inches)
Weight
Maximumconfigurationasshipped:15.5kg(34.17lb)
Environment
•Airtemperature:
Operating:From10°C(50°F)to35°C(95°F)
Storageinoriginalshippingpackage:From-40°C(-40°F)to60°C(140°F)
Storagewithoutpackage:From-10°C(14°F)to60°C(140°F)
•Humidity:
Operating:10%–80%(non-condensing)
Storage:10%–90%(non-condensing)
•Altitude:
Operating:From-15.2m(-50ft)to3048m(10000ft)
Storage:From-15.2m(-50ft)to10668m(35000ft)
Electricalinput
Inputvoltage:From100Vacto240Vac
Inputfrequency:50/60Hz
Programs
Thissectionprovidesinformationabouttheprogramsonyourcomputer.
Accessingaprogramonyourcomputer
Note:ForWindows7,dependingonyourcomputermodel,someoftheLenovoprogramsmightbereadyto
beinstalled,soyoumustinstallthemmanually.Then,youcanaccessandusetheseprograms.
Toaccessaprogramonyourcomputer,dooneofthefollowing:
•FromWindowsSearch:
1.DependingonyourWindowsversion,dooneofthefollowing:
–ForWindows7:ClicktheStartbuttontoopentheStartmenu,andthentypetheprogramname
intothesearchbox.
–ForWindows10:TypetheprogramnameintothesearchboxnexttotheStartbutton.
2.Inthesearchresults,clickthenameofthedesiredprogramtolaunchtheprogram.
12ThinkStationP410UserGuide

•FromtheStartmenuorControlPanel:
1.DependingonyourWindowsversion,dooneofthefollowing:
–ForWindows7:ClicktheStartbuttontoopentheStartmenu.Iftheprogramnameisnot
displayed,clickAllProgramstodisplaytheprogramlist.Then,clickthenameofthedesired
programtolaunchtheprogram.
–ForWindows10:ClicktheStartbuttontoopentheStartmenu.Then,clickthenameofthe
desiredprogramtolaunchtheprogram.
2.IftheprogramnameisnotdisplayedontheStartmenu,accesstheprogramfromControlPanel.
a.DependingonyourWindowsversion,dooneofthefollowing:
–ForWindows7:ClickControlPanel.
–ForWindows10:ClickWindowsSystem➙ControlPanel.
b.ViewControlPanelbyLargeiconsorSmallicons,andthenclickthenameofthedesiredprogram
tolaunchtheprogram.
Installingaprogramthatisreadytobeinstalled(Windows7only)
OntheWindows7operatingsystem,toinstallaprogramthatisreadytobeinstalled,dothefollowing:
1.OpentheLenovoThinkVantage®Toolsprogram.See“Accessingaprogramonyourcomputer”on
page12.
2.ClickView➙Tilestoviewtheprogramicons.
3.Followtheinstructionsundergrayed-outiconstolocatetheiconforthedesiredprogram.Then,
double-clicktheicontoinstalltheprogram.
AnintroductiontoLenovoprograms
ThissectionprovidesinformationaboutthemajorLenovoprogramsavailableonyouroperatingsystem.
Note:Dependingonyourcomputermodel,someofthefollowingprogramsmightnotbeavailable.
FingerprintManagerProor
ThinkVantageFingerprintSoftware
(Windows7)
TheFingerprintManagerProorThinkVantageFingerprintSoftwareprogram
enablesyoutouseafingerprintreader.Theintegratedfingerprintreader
providedonsomekeyboardsenablesyoutoenrollyourfingerprintand
associateitwithyourpower-onpassword,harddiskpassword,andWindows
password.Asaresult,fingerprintauthenticationcanreplacepasswordsand
enablesimpleandsecureuseraccess.
LenovoCompanion
(Windows10)
Yourcomputer’sbestfeaturesandcapabilitiesshouldbeeasytoaccessand
understand.WithLenovoCompanion,theyare.UseLenovoCompanionto
dothefollowing:
•Optimizeyourcomputer’sperformance,monitoryourcomputer’shealth,
andmanageupdates.
•Accessyouruserguide,checkwarrantystatus,andviewaccessories
customizedforyourcomputer.
•Readhow-toarticles,exploreLenovoforums,andstayup-to-dateon
technologynewswitharticlesandblogsfromtrustedsources.
LenovoCompanionisfilledwithexclusiveLenovocontenttohelpyoulearn
moreaboutwhatyoucandowithyourcomputer.
Chapter1.Productoverview13

LenovoPCExperience
(Windows7)
Thisprogramhelpsyouworkeasilyandsecurelybyprovidingeasyaccess
tovariousprograms.
Note:Thisprogramcannotbefoundfromtheallprogramlistorsearch
box.Toaccessthisprogram,gotoControlPanel.ViewControlPanelby
Category,clickHardwareandSound➙DevicesandPrinters,andthen
double-clickthedevicewithyourcomputername.
LenovoID
(Windows10)
TheLenovoIDprogramenablesyoutocreateandmanageyourLenovoID.
WithaLenovoID,youcanconnecttoeverythingLenovothroughasingle
account.UseyourLenovoIDforquickandsimpleauthenticationandthen
enjoythevariousservicesprovidedbyLenovo.Suchservicesincludeonline
shopping,appdownload,personalizeddevicesupport,specialpromotional
offers,Lenovoforums,andsoon.
LenovoPowerENGAGE
(Windows7)
TheLenovoPowerENGAGEprogramprovidespowermanagementfunction.
LenovoSolutionCenter
(Windows7andWindows10)
TheLenovoSolutionCenterprogramenablesyoutotroubleshootand
resolvecomputerproblems.Itcombinesdiagnostictests,systeminformation
collection,securitystatus,andsupportinformation,alongwithhintsandtips
formaximumsystemperformance.
LenovoThinkVantageTools
(Windows7)
TheLenovoThinkVantageToolsprogramprovideseasyaccesstovarious
toolstohelpyourworkmoreeasilyandsecurely.
RecoveryMedia
(Windows7)
TheRecoveryMediaprogramenablesyoutorestorethecontentsofthehard
diskdrivetothefactory-defaultsettings.
SystemUpdate
(Windows7)
TheSystemUpdateprogramprovidesregularaccesstothesystemupdates
foryourcomputer,suchasdevicedriverupdates,softwareupdates,and
BIOSupdates.TheprogramgathersinformationfromtheLenovoHelp
Centeraboutnewupdatesforyourcomputer,andthensortsanddisplays
theupdatesfordownloadandinstallation.Youhavecompletecontrolof
whichupdatestodownloadandinstall.
ThinkStationDiagnostics
(Windows7andWindows10)
TheThinkStationDiagnosticsprogramenablesyoutotroubleshootand
resolvecomputerproblems.Theprogramnotifiesyouofanyissuesdetected
bythereal-timehardwarediagnosticmonitoringfunction.Theprogramalso
providesthedetailsoftheissue,analyzespossiblecauses,andprovides
solutions.
14ThinkStationP410UserGuide

Chapter2.Usingyourcomputer
Thischaptercontainsthefollowingtopics:
•“Registeringyourcomputer”onpage15
•“Settingthecomputervolume”onpage15
•“Usingadisc”onpage15
•“Connectingtoanetwork”onpage17
Registeringyourcomputer
WhenyouregisteryourcomputerwithLenovo,youenterrequiredinformationintoaLenovodatabase.The
informationenablesLenovotocontactyouwhenthereisarecallorothersevereproblemandprovide
quickerservicewhenyoucallLenovoforhelp.Inaddition,somelocationsofferextendedprivilegesand
servicestoregisteredusers.
ToregisteryourcomputerwithLenovo,gotohttp://www.lenovo.com/registerandfollowtheinstructionson
thescreen.
Settingthecomputervolume
Tosetthecomputervolume,dothefollowing:
1.ClickthevolumeiconintheWindowsnotificationareaonthetaskbar.
Note:IfthevolumeiconisnotdisplayedintheWindowsnotificationarea,addtheicontothe
notificationarea.SeetheWindowshelpsystem.
2.Followtheinstructionsonthescreenandthehovertexttoadjustthevolume,mutethespeaker,or
unmutethespeaker.
Usingadisc
Thissectionprovidesinformationaboutusingadiscandtheopticaldrive.
Guidelinesaboutusingtheopticaldrive
Whenusingtheopticaldrive,followtheseguidelines:
•Donotplacethecomputerinalocationwherethedriveisexposedtoanyofthefollowingconditions:
–Hightemperature
–Highhumidity
–Excessivedust
–Excessivevibrationorsuddenshock
–Aninclinedsurface
–Directsunlight
•Donotinsertanyobjectotherthanadiscintothedrive.
•Donotinsertdamageddiscsintothedrive.Warped,scratched,ordirtydiscscandamagethedrive.
•Beforemovingthecomputer,removethediscfromthedrive.
©CopyrightLenovo2016,201715

Handlingandstoringadisc
Whenhandlingandstoringadisc,followtheseguidelines:
•Holdthediscbyitsedges.Donottouchthesurfaceofthesidethatisnotlabeled.
•Toremovedustorfingerprints,wipethediscwithaclean,softclothfromthecentertotheoutside.Wiping
thediscinacirculardirectionmightcauselossofdata.
•Donotwriteorstickpaperonthedisc.
•Donotscratchormarkthedisc.
•Donotplaceorstorethediscindirectsunlight.
•Donotusebenzene,thinners,orothercleanerstocleanthedisc.
•Donotdroporbendthedisc.
Playingandremovingadisc
Toplayadisc,dothefollowing:
1.Withthecomputeron,presstheeject/closebuttononthefrontoftheopticaldrive.Thetrayslides
outofthedrive.
2.Insertadiscintothetray.Someopticaldrivehasasnaphubinthecenterofthetray.Ifyourdrivehasa
snaphub,supportthetraywithonehandandthenpushthecenterofthediscuntilitsnapsintoplace.
3.Presstheeject/closebuttonagainorgentlypushthetrayforwardtoclosethetray.Thediscplayer
programstartsautomatically.Formoreinformation,refertothehelpsystemofthediscplayerprogram.
Toremoveadiscfromtheopticaldrive,dothefollowing:
1.Withthecomputeron,presstheeject/closebuttononthefrontoftheopticaldrive.Thetrayslides
outofthedrive.
2.Carefullyremovethediscfromthetray.
3.Presstheeject/closebuttonagainorgentlypushthetrayforwardtoclosethetray.
Note:Ifthetraydoesnotslideoutofthedrivewhenyoupresstheeject/closebutton,turnoffyourcomputer.
Then,insertastraightenedpaperclipintotheemergency-ejectholeadjacenttotheeject/closebutton.
Usetheemergencyejectonlyinanemergency.
Recordingadisc
Ifyouropticaldrivesupportsrecording,youcanrecordadisc.
RecordingadiscusingWindowstools
TorecordadiscusingWindowstools,dooneofthefollowing:
•BurnadiscusingtheAutoPlaywindow.
1.Ensurethatthediscisplayedautomatically.
a.ClicktheStartbuttontoopentheStartmenu.
b.DependingonyourWindowsversion,dooneofthefollowing:
–ForWindows7:ClickControlPanel.ViewControlPanelbyLargeiconsorSmallicons,and
thenclickAutoPlay.
–ForWindows10:ClickSettings➙Devices➙AutoPlay.
c.SelectorturnonUseAutoPlayforallmediaanddevices.
2.Insertarecordablediscintotheopticaldrivethatsupportsrecording.TheAutoPlaywindowopens.
3.Followtheinstructionsonthescreen.
16ThinkStationP410UserGuide

•BurnadiscusingWindowsMedia®Player.
1.Insertarecordablediscintotheopticaldrivethatsupportsrecording.
2.OpenWindowsMediaPlayer.See“Accessingaprogramonyourcomputer”onpage12.
3.Followtheinstructionsonthescreen.
•BurnadiscfromanISOfile.
1.Insertarecordablediscintotheopticaldrivethatsupportsrecording.
2.Double-clicktheISOfile.
3.Followtheinstructionsonthescreen.
Recordingadiscusingpreinstalledprograms
Torecordadiscusingpreinstalledprograms,dothefollowing:
1.Insertarecordablediscintotheopticaldrivethatsupportsrecording.
2.OpenthePowerDVDCreate,PowerProducer,orPower2Goprogram.See“Accessingaprogramon
yourcomputer”onpage12.
3.Followtheinstructionsonthescreen.
Connectingtoanetwork
Thissectionprovidesinformationaboutconnectingtoanetwork.Ifyoucannotconnectyourcomputertoa
network,see“EthernetLANproblems”onpage49.
ConnectingtoanEthernetLAN
YoucanconnectyourcomputertoanEthernetLANbyconnectinganEthernetcabletotheEthernet
connector.
DANGER
Toavoidtheriskofelectricalshock,donotconnectthetelephonecabletotheEthernetconnector.
ConnectingtoawirelessLAN
YoucanconnectyourcomputertoawirelessLANwithouttheuseofanEthernetcablebutbymeansof
radiowavesonly.
Note:ThewirelessLANfeatureisavailableonlyonsomemodels.
Toestablishawireless-LANconnection,dothefollowing:
1.EnsurethatawirelessLANisavailableandthewirelessLANfeatureonyourcomputerisworking.
2.Clickthewireless-network-connection-statusiconintheWindowsnotificationareatodisplayavailable
wirelessnetworks.
Note:Ifthewireless-network-connection-statusiconisnotdisplayedintheWindowsnotificationarea,
addtheicontothenotificationarea.SeetheWindowshelpsystem.
3.ClickawirelessLAN,andthenclickConnecttoconnectyourcomputertoit.Providerequired
informationifneeded.
Chapter2.Usingyourcomputer17

ConnectingtoaBluetooth-enableddevice
Bluetoothisashort-rangewirelesscommunicationstechnology.UseBluetoothtoestablishawireless
connectionbetweenyourcomputerandanotherBluetooth-enableddevicewithinadistanceofabout10
m(32.8ft).
Note:TheBluetoothfeatureisavailableonlyonsomemodels.
ToconnecttoaBluetooth-enableddevice,dothefollowing:
1.EnsurethattheBluetoothfeatureonyourcomputerisworkingandtheBluetooth-enableddeviceis
locatedwithinadistanceofabout10m(32.8ft)fromyourcomputer.
2.ClicktheBluetoothiconintheWindowsnotificationareaonthetaskbar.
Note:IftheBluetoothiconisnotdisplayedintheWindowsnotificationarea,addtheicontothe
notificationarea.SeetheWindowshelpsystem.
3.DependingonyourWindowsversion,dooneofthefollowing:
•ForWindows7:ClickAddaDeviceandfollowtheinstructionsonthescreen.
•ForWindows10:ClickAddaBluetoothDeviceandfollowtheinstructionsonthescreen.
18ThinkStationP410UserGuide

Chapter3.Youandyourcomputer
Thischaptercontainsthefollowingtopics:
•“Arrangingyourworkspace”onpage19
•“Accessibilityinformation”onpage20
•“Cleaningyourcomputer”onpage23
•“Maintenance”onpage23
•“Movingyourcomputer”onpage25
Arrangingyourworkspace
Arrangeyourworkspacetosuityourneedsandthekindofworkyoudo.Thissectionprovidesinformation
aboutthefactorsthataffectthewayyouarrangeyourworkspace.
Glareandlighting
Positionthemonitortominimizeglareandreflectionsfromoverheadlights,windows,andotherlightsources.
Reflectedlightfromshinysurfacescancauseannoyingreflectionsonyourscreen.Whenpossible,place
themonitoratrightanglestowindowsandotherlightsources.Ifnecessary,reduceoverheadlighting
byturningofflightsorusinglowerwattagebulbs.Ifyouinstallthemonitornearawindow,usecurtains
orblindstoblockthesunlight.Youcanadjustthebrightnessandcontrastcontrolsonthemonitorasthe
roomlightingchangesthroughouttheday.
Whereitisimpossibletoavoidreflectionsortoadjustthelighting,anantiglarefilterplacedoverthescreen
mightbehelpful.However,thesefiltersmightaffecttheclarityoftheimageonthescreen;trythemonlyafter
youhaveexhaustedothermethodsofreducingglare.
Aircirculation
Yourcomputerproducesheat.Thecomputerhasafanthatpullsinfreshairandforcesouthotairthrough
theairvents.Blockingtheairventscancauseoverheating,whichmightresultinamalfunctionordamage.
Positionthecomputersothatnothingblockstheairvents;usually,51mm(2inches)ofairspaceissufficient.
Ensurethattheventedairisnotblowingonpeople.
Electricaloutletlocationsandcablelengths
Thefollowingfactorsmightdeterminethefinalplacementofyourcomputer:
•Locationsofelectricaloutlets
•Lengthofpowercordsorpoweradapters
•Lengthofthecablesthatareconnectedtootherdevices
Formoreinformationaboutpowercordsorpoweradapters,see“Powercordsandpoweradapters”on
pagevi.
Comfort
Althoughnosingleworkingpositionisidealforeveryone,hereareafewguidelinestohelpyoufindaposition
thatsuitsyoubest.Thefollowingfiguresetsanexampleforyourreference.
©CopyrightLenovo2016,201719

•Screenposition:Keepthescreenatacomfortableviewingdistance,usually51–61cm(20–24inches).
Then,adjustthescreensothatthetopofthescreenisatorslightlybeloweyelevelandyoucanviewit
withouttwistingyourbody.
•Chairposition:Useachairthatgivesyougoodbacksupportandseatheightadjustment.Usechair
adjustmentstobestsuityourdesiredposture.
•Headposition:Keepyourheadandneckinacomfortableandneutral(verticalorupright)position.
•Armandhandpositions:Keepyourforearms,wrists,andhandsinarelaxedandneutral(horizontal)
position.Typewithasofttouchwithoutpoundingthekeys.
•Legposition:Keepyourthighsparalleltothefloorandyourfeetflatonthefloororonafootrest.
Makeminormodificationsinyourworkingposturetodetertheonsetofdiscomfortcausedbylongperiods
ofworkinginthesameposition.Frequentshortbreaksfromyourworkalsohelptopreventminordiscomfort
associatedwithyourworkingposture.
Accessibilityinformation
Lenovoiscommittedtoprovidinguserswhohavehearing,vision,andmobilitylimitationswithgreater
accesstoinformationandtechnology.Thissectionprovidesinformationaboutthewaystheseuserscanget
themostoutoftheircomputerexperience.Youalsocangetthemostup-to-dateaccessibilityinformation
fromthefollowingWebsite:
http://www.lenovo.com/accessibility
Keyboardshortcuts
Thefollowingtablecontainskeyboardshortcutsthatcanhelpmakeyourcomputereasiertouse.
Note:Dependingonyourkeyboard,someofthefollowingkeyboardshortcutsmightnotbeavailable.
KeyboardshortcutFunction
Windowslogokey+UOpenEaseofAccessCenter
RightShiftforeightsecondsTurnonorturnoffFilterKeys
ShiftfivetimesTurnonorturnoffStickyKeys
NumLockforfivesecondsTurnonorturnoffToggleKeys
LeftAlt+LeftShift+NumLockTurnonorturnoffMouseKeys
LeftAlt+LeftShift+PrtScn(orPrtSc)TurnonorturnoffHighContrast
Formoreinformation,gotohttp://windows.microsoft.com/,andthenperformasearchusinganyofthe
followingkeywords:keyboardshortcuts,keycombinations,shortcutkeys.
20ThinkStationP410UserGuide

EaseofAccessCenter
EaseofAccessCenterontheWindowsoperatingsystemenablesuserstoconfiguretheircomputersto
suittheirphysicalandcognitiveneeds.
TouseEaseofAccessCenter,dothefollowing:
1.ClicktheStartbuttontoopentheStartmenu.
2.DependingonyourWindowsversion,dooneofthefollowing:
•ForWindows7:ClickControlPanel.ViewControlPanelbyLargeiconsorSmallicons,andthen
clickEaseofAccessCenter.
•ForWindows10:ClickSettings➙EaseofAccess.
3.Choosetheappropriatetoolbyfollowingtheinstructionsonthescreen.
EaseofAccessCentermainlyincludesthefollowingtools:
•Magnifier
Magnifierisausefulutilitythatenlargestheentirescreenorpartofthescreensothatyoucansee
theitemsbetter.
•Narrator
Narratorisascreenreaderthatreadsaloudwhatisdisplayedonthescreenanddescribeseventssuchas
errormessages.
•On-ScreenKeyboard
Ifyouprefertotypeorenterdataintoyourcomputerusingamouse,joystick,orotherpointingdevice
insteadofaphysicalkeyboard,youcanuseOn-ScreenKeyboard.On-ScreenKeyboarddisplaysavisual
keyboardwithallthestandardkeys.
•HighContrast
HighContrastisafeaturethatheightensthecolorcontrastofsometextandimagesonyourscreen.Asa
result,thoseitemsaremoredistinctandeasiertoidentify.
•Personalizedkeyboard
Adjustkeyboardsettingstomakeyourkeyboardeasiertouse.Forexample,youcanuseyourkeyboard
tocontrolthepointerandtypecertainkeycombinationseasier.
•Personalizedmouse
Adjustmousesettingstomakeyourmouseeasiertouse.Forexample,youcanchangethepointer
appearanceandmakeiteasiertomanagewindowswiththemouse.
SpeechRecognition
SpeechRecognitionenablesyoutocontrolyourcomputerbyvoice.
Usingonlyyourvoice,youcanstartprograms,openmenus,clickobjectsonthescreen,dictatetextinto
documents,andwriteandsende-mails.Everythingyoudowiththekeyboardandmousecanbedonewith
onlyyourvoice.
TouseSpeechRecognition,dothefollowing:
1.ClicktheStartbuttontoopentheStartmenu.
2.DependingonyourWindowsversion,dooneofthefollowing:
•ForWindows7:ClickControlPanel.
•ForWindows10:ClickWindowsSystem➙ControlPanel.
3.ViewControlPanelbyLargeiconsorSmallicons,andthenclickSpeechRecognition.
Chapter3.Youandyourcomputer21

4.Followtheinstructionsonthescreen.
Screen-readertechnologies
Screen-readertechnologiesareprimarilyfocusedonsoftwareprograminterfaces,helpinformationsystems,
andvariousonlinedocuments.Foradditionalinformationaboutscreenreaders,seethefollowing:
•UsingPDFswithscreenreaders:
http://www.adobe.com/accessibility.html?promoid=DJGVE
•UsingtheJAWSscreenreader:
http://www.freedomscientific.com/jaws-hq.asp
•UsingtheNVDAscreenreader:
http://www.nvaccess.org/
Screenresolution
Youcanmakethetextandimagesonyourscreeneasiertoreadbyadjustingthescreenresolutionofyour
computer.
Toadjustthescreenresolution,dothefollowing:
1.Right-clickablankareaonthedesktop.
2.DependingonyourWindowsversion,dooneofthefollowing:
•ForWindows7:ClickScreenresolution.
•ForWindows10:ClickDisplaysettings➙Display.
3.Followtheinstructionsonthescreen.
Note:Settingtheresolutiontoolowmightpreventsomeitemsfromfittingonthescreen.
Customizableitemsize
Youcanmaketheitemsonyourscreeneasiertoreadbychangingtheitemsize.
•Tochangetheitemsizetemporarily,usetheMagnifiertoolinEaseofAccessCenter.See“Easeof
AccessCenter”onpage21.
•Tochangetheitemsizepermanently,dothefollowing:
–Changethesizeofalltheitemsonyourscreen.
–ForWindows7:
1.Right-clickablankareaonthedesktop.
2.ClickScreenresolution➙Maketextandotheritemslargerorsmaller.
3.Followtheon-screeninstructionstochangetheitemsize.
4.ClickApply.Thischangewilltakeeffectthenexttimeyoulogintotheoperatingsystem.
–ForWindows10:
1.Right-clickablankareaonthedesktop.
2.ClickDisplaysettings➙Display.
3.Followtheon-screeninstructionstochangetheitemsize.Forsomeapps,yourconfiguration
mightnottakeeffectuntilyousignoutandthensighinagain.
–ChangethesizeoftheitemsonaWebpage.
PressandholdCtrl,andthenpresstheplus-signkey(+)toenlargeortheminus-signkey(-)to
reducethetextsize.
–Changethesizeoftheitemsonthedesktoporawindow.
22ThinkStationP410UserGuide

Note:Thisfunctionmightnotworkonsomewindows.
Ifyourmousehasawheel,pressandholdCtrl,andthenscrollthewheeltochangetheitemsize.
Industry-standardconnectors
Yourcomputerprovidesindustry-standardconnectorsthatenableyoutoconnectassistivedevices.
Formoreinformationaboutthelocationandfunctionofeachconnector,see“Hardwarelocations”onpage1.
TTY/TDDconversionmodem
Yourcomputersupportstheuseofatexttelephone(TTY)orthetelecommunicationsdeviceforthedeaf
(TDD)conversionmodem.ThemodemmustbeconnectedbetweenyourcomputerandaTTY/TDD
telephone.Then,youcantypeamessageonyourcomputerandsendittothetelephone.
Documentationinaccessibleformats
Lenovoprovideselectronicdocumentationinaccessibleformats,suchasproperlytaggedPDFfilesor
HyperTextMarkupLanguage(HTML)files.Lenovoelectronicdocumentationisdevelopedtoensure
thatvisuallyimpaireduserscanreadthedocumentationthroughascreenreader.Eachimageinthe
documentationalsoincludesadequatealternativetextsothatvisuallyimpaireduserscanunderstandthe
imagewhentheyuseascreenreader.
Cleaningyourcomputer
CAUTION:
Removeanymediafromthedrivesandturnoffallconnecteddevicesandthecomputer.Then,
disconnectallpowercordsfromelectricaloutletsanddisconnectallcablesthatareconnected
tothecomputer.
Itisagoodpracticetocleanyourcomputerperiodicallytoprotectthesurfacesandensuretrouble-free
operation.Useonlymildcleaningsolutionsandadampclothtocleanthepaintedsurfacesofthecomputer.
Dustbuildupcompoundsproblemsassociatedwithglare,soremembertocleanthescreenperiodically.
Wipethescreensurfacegentlywithasoft,drycloth,orblowonthescreentoremovegritandotherloose
particles.Dependingonthetypeofthescreen,moistenasoft,lint-freeclothwithanLCDcleanerorliquid
glasscleanerandthenwipethescreensurface.
Maintenance
Withappropriatecareandmaintenance,yourcomputerwillserveyoureliably.Thissectionprovides
informationaboutmaintainingyourcomputersothatitcankeepworkinginbettercondition.
Basicmaintenancetips
Herearesomebasicpointsaboutkeepingyourcomputerfunctioningproperly:
•Keepyourcomputerinaclean,dryenvironment.Ensurethatthecomputerrestsonaflat,steadysurface.
•Donotcoveranyofairvents.Theseairventsprovideairflowtokeepyourcomputerfromoverheating.
•Keepfoodanddrinksawayfromallpartsofyourcomputer.Foodparticlesandspillsmightmakethe
keyboardandmousestickandunusable.
•Donotgetthepowerswitchesorothercontrolswet.Moisturecandamagethesepartsandcausean
electricalhazard.
•Alwaysdisconnectapowercordbygraspingthepluginsteadofthecord.
Chapter3.Youandyourcomputer23

Goodmaintenancepractices
Byperformingafewgoodmaintenancepractices,youcanmaintaingoodcomputerperformance,protect
yourdata,andbepreparedincaseofacomputerfailure.
•Emptyyourrecyclebinonaregularbasis.
•Usethediskdefragmentationordiskoptimizationfeatureofyouroperatingsystemoccasionallyto
preventperformanceproblemscausedbyanexcessivenumberoffragmentedfiles.
•CleanoutyourInbox,SentItems,andDeletedItemsfoldersinyoure-mailapplicationonaregularbasis.
•Backupcriticaldataregularlyonremovablemediamemory,suchasdiscsandUSBstoragedevices,
andstoretheremovablemediainasafelocation.Thefrequencyofmakingbackupcopiesdependson
howcriticalthedataistoyouoryourbusiness.
•Backupyourdataonthestoragedriveregularly.See“Recoveryinformation”onpage55.
•Keepyourcomputersoftware,devicedrivers,andoperatingsystemup-to-date.See“Keepingyour
computercurrent”onpage24.
•Keepalogbook.Entriesmightincludemajorsoftwareorhardwarechanges,device-driverupdates,
intermittentproblemsandwhatyoudidtoresolvethem,andotherissuesyoumighthaveexperienced.
Thecauseofaproblemmightbechangeinhardware,changeinsoftware,oranyotheractionsthatmight
havetakenplace.AlogbookcanhelpyouoraLenovotechniciandeterminesthecauseofaproblem.
•CreateProductRecoverydiscs.See“Recoveryinformation”onpage55formoreinformationaboutusing
ProductRecoverydiscstorestoretheharddiskdrivetothefactory-defaultsettings.
Keepingyourcomputercurrent
Inmostcases,itisagoodpracticetohavethemostup-to-dateoperatingsystemupdatepatches,software
programs,anddevicedrivers.Thissectionprovidesinformationabouthowtogetthelatestupdatesforyour
computer.
Gettingthelatestsystemupdates
Togetthelatestsystemupdatesforyourcomputer,ensurethatyourcomputerisconnectedtotheInternet
anddooneofthefollowing:
•UsethecorrespondingLenovoprogramtogetthesystemupdates,suchasdevicedriverupdates,
softwareupdates,andBIOSupdates:
–ForWindows7:UsetheSystemUpdateprogram.
–ForWindows10:UsetheLenovoCompanionprogram.
ToopentheSystemUpdateorLenovoCompanionprogram,see“Accessingaprogramonyourcomputer”
onpage12.Formoreinformationaboutusingtheprogram,refertothehelpsystemoftheprogram.
•UseWindowsUpdatetogetthesystemupdates,suchassecurityfixes,newversionsofWindows
components,anddevicedriverupdates.
1.ClicktheStartbuttontoopentheStartmenu.
2.DependingonyourWindowsversion,dooneofthefollowing:
–ForWindows7:ClickControlPanel.ViewControlPanelbyLargeiconsorSmallicons,and
thenclickWindowsUpdate.
–ForWindows10:ClickSettings➙Update&security➙WindowsUpdate.
3.Followtheinstructionsonthescreen.
Note:ThedevicedriversprovidedbyWindowsUpdatemightnotbetestedbyLenovo.Itis
recommendedthatyougetdevicedriversbyusingLenovoprogramsorfromtheLenovoWebsiteat
http://www.lenovo.com/support.
24ThinkStationP410UserGuide

Movingyourcomputer
Beforemovingyourcomputer,takethefollowingprecautions:
1.Backupyourdataonthestoragedrive.See“Goodmaintenancepractices”onpage24.
2.Removeanymediafromthedrivesandturnoffallconnecteddevicesandthecomputer.Then,
disconnectallpowercordsfromelectricaloutletsanddisconnectallcablesthatareconnectedtothe
computer.
3.Ifyousavedtheoriginalshippingcartonsandpackingmaterials,usethemtopacktheunits.Ifyouare
usingdifferentcartons,cushiontheunitstoavoiddamage.
Movingyourcomputertoanothercountryorregion
Whenyoumoveyourcomputertoanothercountryorregion,youmusttakelocalelectricalstandardsinto
consideration.Ifthelocalelectricaloutletstyleisdifferentfromthetypeyouarecurrentlyusing,contactthe
LenovoCustomerSupportCentertopurchaseeitheranelectricalplugadapteroranewpowercord.Fora
listofLenovoSupportphonenumbers,gotohttp://www.lenovo.com/support/phone.Ifyoucannotfindthe
supporttelephonenumberforyourcountryorregion,contactyourLenovoreseller.
Chapter3.Youandyourcomputer25

26ThinkStationP410UserGuide

Chapter4.Security
Thischaptercontainsthefollowingtopics:
•“Lockingyourcomputer”onpage27
•“ViewingandchangingsecuritysettingsintheSetupUtilityprogram”onpage30
•“UsingpasswordsandWindowsaccounts”onpage30
•“Usingfingerprintauthentication”onpage31
•“Usingthecoverpresenceswitch”onpage31
•“Usingfirewalls”onpage32
•“Protectingdataagainstviruses”onpage32
•“ComputraceAgentsoftwareembeddedinfirmware”onpage32
•“TrustedPlatformModule(TPM)”onpage32
•“IntelBIOSguard”onpage32
Lockingyourcomputer
Thissectionprovidesinformationaboutlockingyourcomputerwiththelockingdevicestokeepyour
computersafe.
©CopyrightLenovo2016,201727
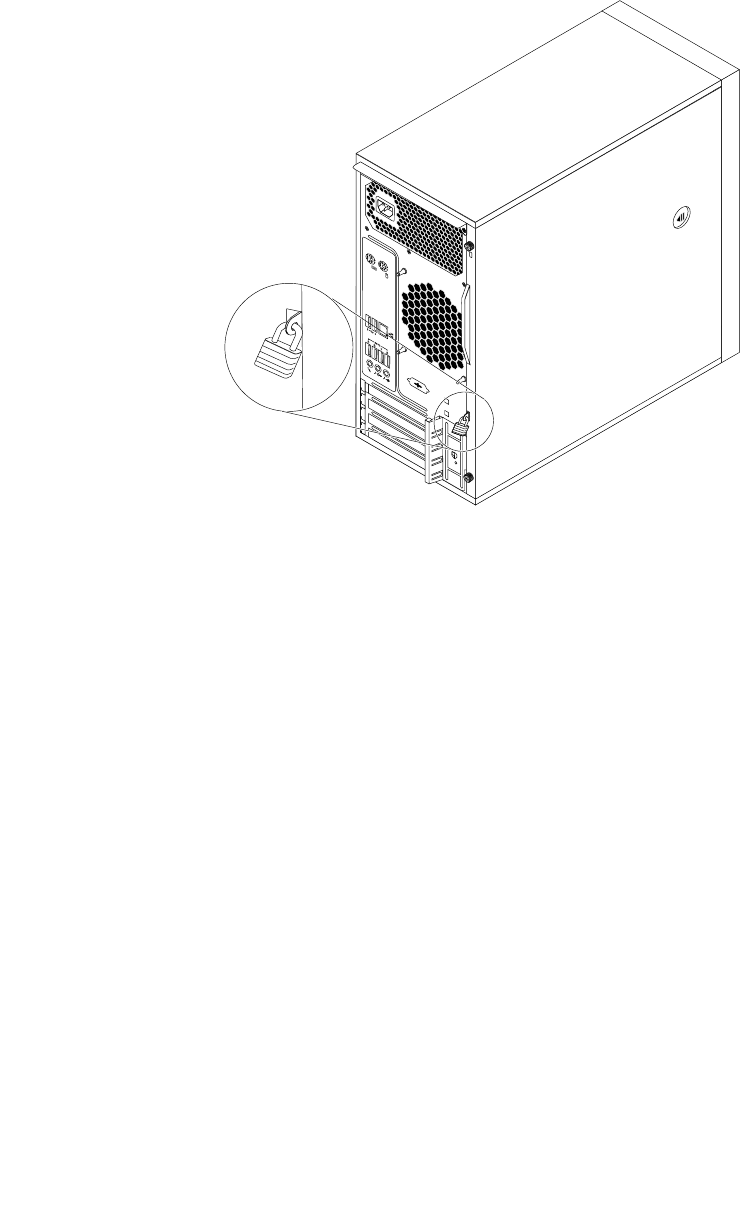
Lockingthecomputercover
Lockingthecomputercoverhelpspreventunauthorizedpeoplefromgainingaccesstotheinsideofyour
computer.Yourcomputercomeswithapadlockloopsothatthecomputercovercannotberemoved
whenapadlockisinstalled.
Figure7.Installingapadlock
28ThinkStationP410UserGuide
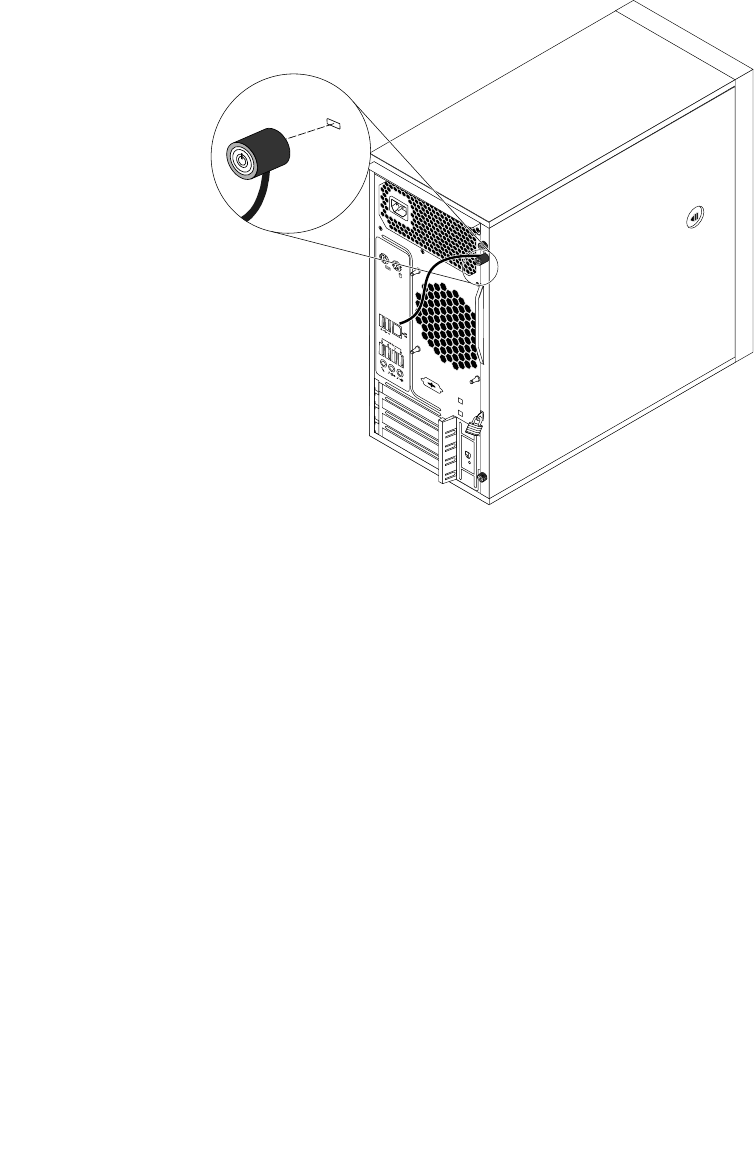
AttachingaKensington-stylecablelock
YoucanuseaKensington-stylecablelocktosecureyourcomputertoadesk,table,orothernon-permanent
fixture.Thecablelockattachestothesecurity-lockslotattherearofyourcomputer.Dependingonthetype
selected,thecablelockcanbeoperatedwithakeyorcombination.Thecablelockalsolocksthebuttons
usedtoopenthecomputercover.Thisisthesametypeoflockusedwithmanynotebookcomputers.You
canordersuchacablelockdirectlyfromLenovobysearchingforKensingtonat:
http://www.lenovo.com/support
Figure8.Kensington-stylecablelock
Chapter4.Security29
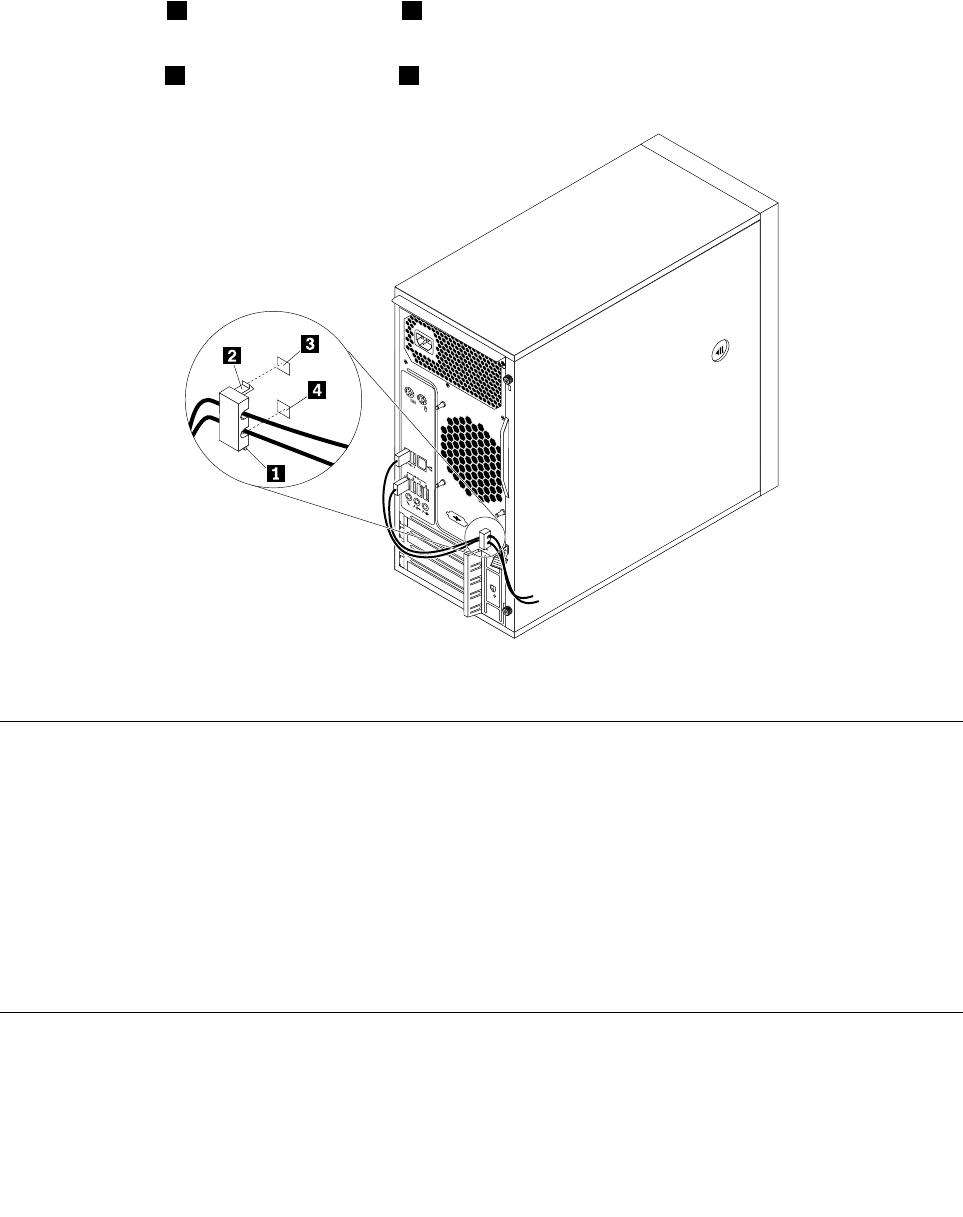
Attachingacablelock
Acablelockcanbeusedtosecuredevices,suchasthekeyboardandthemouse,bylockingthedevice
cablestoyourcomputer.Thecablelockattachestothecable-lockslotsontherearofyourcomputer.
See“Rearview”onpage3.
Toattachacablelock,dothefollowing:
1.Inserttheclip1intothecable-lockslot4.
2.Pullthecablesyouwanttolockthroughthedentsinthecablelock.
3.Presstheclip2intothecable-lockslot3untilitsnapsintoposition.
Figure9.Installingacablelock
ViewingandchangingsecuritysettingsintheSetupUtilityprogram
ToviewandchangesecuritysettingsintheSetupUtilityprogram,dothefollowing:
1.StarttheSetupUtilityprogram.See“StartingtheSetupUtilityprogram”onpage33.
2.SelectSecurity.
3.Followtheinstructionsontherightsideofthescreentoviewandchangesecuritysettings.Youcan
referto“UsingtheSetupUtilityprogram”onpage33togetbasicinformationaboutsomemajor
securitysettings.
4.TosavesettingsandexittheSetupUtilityprogram,pressF10orFn+F10(dependingonthekeyboard),
selectYesinthewindowdisplayed,andpressEnter.
UsingpasswordsandWindowsaccounts
YoucanuseBIOSpasswordsandWindowsaccountstopreventunauthorizedaccesstoyourcomputerand
data.
•TouseBIOSpasswords,see“UsingBIOSpasswords”onpage35.
30ThinkStationP410UserGuide

•TouseWindowsaccounts,dothefollowing:
1.ClicktheStartbuttontoopentheStartmenu.
2.DependingonyourWindowsversion,dooneofthefollowing:
–ForWindows7:ClickControlPanel➙UserAccounts.
–ForWindows10:ClickSettings➙Accounts.
3.Followtheinstructionsonthescreen.
Usingfingerprintauthentication
Ifyourkeyboardhasafingerprintreader,youcanusefingerprintauthenticationtoreplacepasswordsfor
simpleandsecureuseraccess.Tousefingerprintauthentication,firstenrollyourfingerprintsandassociate
themwithyourpasswords(suchasthepower-onpassword,harddiskpassword,andWindowspassword).
Usethefingerprintreaderandthefingerprintprogramtocompletethisprocedure.
Tousefingerprintauthentication,dooneofthefollowing:
•ForWindows7:UsetheFingerprintManagerProorThinkVantageFingerprintSoftwareprogramprovided
byLenovo.Toopentheprogram,see“Accessingaprogramonyourcomputer”onpage12.Formore
informationaboutusingtheprogram,refertothehelpsystemoftheprogram.
•ForWindows10:UsethefingerprinttoolprovidedbytheWindowsoperatingsystem.ClicktheStart
buttontoopentheStartmenu,andthenclickSettings➙Accounts➙Sign-inoptions.Followthe
instructionsonthescreen.
Tousethefingerprintreader,refertothedocumentationshippedwiththefingerprintkeyboardorlocatedon
theLenovoSupportWebsiteathttp://www.lenovo.com/support/keyboards.
Usingthecoverpresenceswitch
Thecoverpresenceswitchpreventsyourcomputerfromloggingintotheoperatingsystemwhenthe
computercoverisnotproperlyinstalledorclosed.
Tousethecoverpresenceswitch,enablethecover-presence-switchconnectoronthesystemboard
first.Toachievethis,dothefollowing:
1.StarttheSetupUtilityprogram.See“StartingtheSetupUtilityprogram”onpage33.
2.SelectSecurity➙ChassisIntrusionDetectionandpressEnter.
3.SelectEnabledandpressEnter.
4.TosavesettingsandexittheSetupUtilityprogram,pressF10orFn+F10(dependingonthekeyboard),
selectYesinthewindowdisplayed,andpressEnter.
Thecoverpresenceswitchstartsfunctioning.Iftheswitchdetectsthatthecomputercoverisnotcorrectly
installedorclosed,anerrormessagewillbedisplayedwhenyouturnonthecomputer.Tofixtheerrorand
logintotheoperatingsystem,dothefollowing:
1.Properlyinstallorcloseyourcomputercover.SeeChapter7“Installingorreplacinghardware”on
page57.
2.StartandthenexittheSetupUtilityprogram.See“StartingtheSetupUtilityprogram”onpage33and
“ExitingtheSetupUtilityprogram”onpage38.
Chapter4.Security31

Usingfirewalls
Afirewallcanbehardware,software,oracombinationofbothdependingonthelevelofsecurityrequired.
Firewallsworkonasetofrulestodeterminewhichinboundandoutboundconnectionsareauthorized.If
yourcomputerispreinstalledwithafirewallprogram,ithelpsprotectagainstcomputerInternetsecurity
threats,unauthorizedaccess,intrusions,andInternetattacks.Italsoprotectsyourprivacy.Formore
informationabouthowtousethefirewallprogram,refertothehelpsystemofyourfirewallprogram.
TouseWindowsFirewall,dothefollowing:
1.ClicktheStartbuttontoopentheStartmenu.
2.DependingonyourWindowsversion,dooneofthefollowing:
•ForWindows7:ClickControlPanel.
•ForWindows10:ClickWindowsSystem➙ControlPanel.
3.ViewControlPanelbyLargeiconsorSmallicons,andthenclickWindowsFirewall.
4.Followtheinstructionsonthescreen.
Protectingdataagainstviruses
Yourcomputerispreinstalledwithanantivirusprogramtohelpyouguardagainst,detect,andeliminate
viruses.
Lenovoprovidesafullversionofantivirussoftwareonyourcomputerwithafree30-daysubscription.After
30days,youmustrenewthelicensetocontinuereceivingtheantivirussoftwareupdates.
Note:Virusdefinitionfilesmustbekeptup-to-datetoguardagainstnewviruses.
Formoreinformationabouthowtouseyourantivirussoftware,refertothehelpsystemofyourantivirus
software.
ComputraceAgentsoftwareembeddedinfirmware
TheComputraceAgentsoftwareisanITassetmanagementandcomputertheftrecoverysolution.The
softwaredetectsifchangeshavebeenmadeonthecomputer,suchashardware,software,orthecomputer
call-inlocation.YoumighthavetopurchaseasubscriptiontoactivatetheComputraceAgentsoftware.
TrustedPlatformModule(TPM)
TPMisasecurecryptoprocessorthatstorescryptographickeys,whichinturnprotectsinformationstored
inyourcomputer.
IntelBIOSguard
TheBIOSguardmodulecryptographicallyverifiesalltheBIOSupdatestothesystemBIOSflash.Therefore,
themalwareisblockedfromattackingtheBIOS.
32ThinkStationP410UserGuide

Chapter5.Advancedconfiguration
Thischaptercontainsthefollowingtopics:
•“UsingtheSetupUtilityprogram”onpage33
•“UpdatingandrecoveringtheBIOS”onpage38
•“ConfiguringRAID”onpage39
UsingtheSetupUtilityprogram
TheSetupUtilityprogramenablesyoutoviewandchangevariousconfigurationsettingsofyourcomputer.
ThissectionprovidesinstructionsonhowtoconfiguresomemajorsettingsthroughtheSetupUtilityprogram.
Note:TheoperatingsystemsettingsmightoverrideanysimilarsettingsintheSetupUtilityprogram.
StartingtheSetupUtilityprogram
TostarttheSetupUtilityprogram,dothefollowing:
1.Turnonorrestartyourcomputer.
2.Beforetheoperatingsystemstartsup,repeatedlypressandreleaseF1orFn+F1(dependingonthe
keyboard).BasedontheSetupUtilitydisplaymodesetting,oneofthefollowingsituationsoccurs:
•Textmode:TheSetupUtilityprogramopens.
•Graphicmode:Thestartscreenisdisplayed.Then,selectSetuptoopentheSetupUtilityprogram.
Note:IfaBIOSpasswordhasbeenset,theSetupUtilityprogramwillnotopenuntilyouenterthe
correctpassword.Formoreinformation,see“UsingBIOSpasswords”onpage35.
Toviewandchangetheconfigurationsettings,followtheinstructionsonthescreen.
ChangingthedisplaymodeoftheSetupUtilityprogram
YoucanusetheSetupUtilityprograminthegraphicmodeorthetextmodeaccordingtoyourneeds.
•Textmode:Youcanuseonlythekeyboardtomakeselections.Thekeysusedtoperformvarioustasks
aredisplayedatthebottomofthescreen.
•Graphicmode:Inadditiontothekeyboard,youalsocanusethemousetomakeselections.
Note:TheSerialPortConsoleRedirectionitemisavailableonlyinthetextmode.
TochangethedisplaymodeoftheSetupUtilityprogram,dothefollowing:
1.StarttheSetupUtilityprogram.See“StartingtheSetupUtilityprogram”onpage33.
2.Fromthemaininterface,locateSetupmodeselect,andselectGraphicorText.
3.TosavesettingsandexittheSetupUtilityprogram,pressF10orFn+F10(dependingonthekeyboard),
selectYesinthewindowdisplayed,andpressEnter.
ChangingthedisplaylanguageoftheSetupUtilityprogram
TheSetupUtilityprogramsupportsthreedisplaylanguages:English,French,andsimplifiedChinese.
TochangethedisplaylanguageoftheSetupUtilityprogram,dothefollowing:
©CopyrightLenovo2016,201733

1.StarttheSetupUtilityprogram.See“StartingtheSetupUtilityprogram”onpage33.
2.Fromthemaininterface,locateSystemLanguage,andselectthedisplaylanguageaccordingto
yourneeds.
Enablingordisablingadevice
Thissectionprovidesinformationabouthowtoenableordisableuseraccesstohardwaredevices(such
asUSBconnectorsorstoragedrives).
Toenableordisableadevice,dothefollowing:
1.StarttheSetupUtilityprogram.See“StartingtheSetupUtilityprogram”onpage33.
2.SelectDevices.
3.SelectthedeviceyouwanttoenableordisableandpressEnter.
4.SelectthedesiredsettingandpressEnter.
5.TosavesettingsandexittheSetupUtilityprogram,pressF10orFn+F10(dependingonthekeyboard),
selectYesinthewindowdisplayed,andpressEnter.
Enablingordisablingtheautomaticpower-onofyourcomputer
TheAutomaticPowerOnitemintheSetupUtilityprogramprovidesvariousoptionsforyoutomakeyour
computerstartupautomatically.
ToenableordisabletheAutomaticPowerOnfeatures,dothefollowing:
1.StarttheSetupUtilityprogram.See“StartingtheSetupUtilityprogram”onpage33.
2.SelectPower➙AutomaticPowerOnandpressEnter.
3.SelectthefeatureyouwanttoenableordisableandpressEnter.
4.SelectthedesiredsettingandpressEnter.
5.TosavesettingsandexittheSetupUtilityprogram,pressF10orFn+F10(dependingonthekeyboard),
selectYesinthewindowdisplayed,andpressEnter.
EnablingordisablingtheErPLPScompliancemode
Lenovocomputersmeettheeco-designrequirementsoftheErPLot3regulation.Formoreinformation,go
to:
http://www.lenovo.com/ecodeclaration
YoucanenabletheErPLPScompliancemodeintheSetupUtilityprogramtoreducetheconsumptionof
electricitywhenyourcomputerisofforinsleepmode.
ToenableordisabletheErPLPScompliancemode,dothefollowing:
1.StarttheSetupUtilityprogram.See“StartingtheSetupUtilityprogram”onpage33.
2.SelectPower➙EnhancedPowerSavingModeandpressEnter.
3.SelectEnabledorDisableddependingonyourneeds,andthenpressEnter.IfyouselectEnabled,you
alsoneedtodisabletheWakeonLANfeature.See“Enablingordisablingtheautomaticpower-onof
yourcomputer”onpage34.
4.TosavesettingsandexittheSetupUtilityprogram,pressF10orFn+F10(dependingonthekeyboard),
selectYesinthewindowdisplayed,andpressEnter.
WhentheErPLPScompliancemodeisenabled,youcanwakeupyourcomputerbydoingoneofthe
following:
•Pressthepowerbutton.
34ThinkStationP410UserGuide

•EnabletheWakeUponAlarmfeaturetomakeyourcomputerwakeupatasettime.See“Enablingor
disablingtheautomaticpower-onofyourcomputer”onpage34.
•EnabletheAfterPowerLossfeaturetomakeyourcomputerwakeupwhenthepowersupplyresumes
afterasuddenlossofelectricity.
ToenabletheAfterPowerLossfeature,dothefollowing:
1.StarttheSetupUtilityprogram.See“StartingtheSetupUtilityprogram”onpage33.
2.SelectPower➙AfterPowerLossandpressEnter.
3.SelectPowerOnandpressEnter.
4.TosavesettingsandexittheSetupUtilityprogram,pressF10orFn+F10(dependingonthe
keyboard),selectYesinthewindowdisplayed,andpressEnter.
Enablingordisablingtheconfigurationchangedetection
Whentheconfigurationchangedetectionisenabled,ifthePOSTdetectsconfigurationchangesofsome
hardwaredevices(suchasstoragedrivesormemorymodules),anerrormessageisdisplayed.
Toenableordisabletheconfigurationchangedetection,dothefollowing:
1.StarttheSetupUtilityprogram.See“StartingtheSetupUtilityprogram”onpage33.
2.SelectSecurity➙ConfigurationChangeDetectionandpressEnter.
3.SelectthedesiredsettingandpressEnter.
4.TosavesettingsandexittheSetupUtilityprogram,pressF10orFn+F10(dependingonthekeyboard),
selectYesinthewindowdisplayed,andpressEnter.
Tobypasstheerrormessageandlogintotheoperatingsystem,dooneofthefollowing:
•PressF2orFn+F2(dependingonthekeyboard).
•StartandthenexittheSetupUtilityprogram.See“StartingtheSetupUtilityprogram”onpage33and
“ExitingtheSetupUtilityprogram”onpage38.
ChangingtheBIOSsettingsbeforeinstallinganewoperatingsystem
BIOSsettingsvarybyoperatingsystem.ChangetheBIOSsettingsbeforeinstallinganewoperatingsystem.
TochangetheBIOSsettings,dothefollowing:
1.StarttheSetupUtilityprogram.See“StartingtheSetupUtilityprogram”onpage33.
2.FromtheSetupUtilityprogrammainmenu,selectExit➙OSOptimizedDefault.
3.Dependingontheoperatingsystemtobeinstalled,dooneofthefollowing:
•ToinstalltheWindows10(64-bit)operatingsystem,selectEnabled.
•ToinstallanoperatingsystemotherthanWindows10(64-bit),selectDisabled.
4.SelectYesinthewindowdisplayedandpressEntertoconfirmyourselection.
5.TosavesettingsandexittheSetupUtilityprogram,pressF10orFn+F10(dependingonthekeyboard),
selectYesinthewindowdisplayed,andpressEnter.
UsingBIOSpasswords
ByusingtheSetupUtilityprogram,youcansetpasswordstopreventunauthorizedaccesstoyourcomputer
anddata.
Youdonothavetosetanypasswordstouseyourcomputer.However,usingpasswordsimprovescomputer
security.Ifyoudecidetosetanypasswords,readthefollowingtopics.
Chapter5.Advancedconfiguration35

Passwordtypes
ThefollowingtypesofpasswordsareavailableintheSetupUtilityprogram:
•Power-onpassword
Whenapower-onpasswordisset,youarepromptedtoenteravalidpasswordeachtimethecomputeris
turnedon.Thecomputercannotbeuseduntilthevalidpasswordisentered.
•Administratorpassword
Settinganadministratorpassworddetersunauthorizedusersfromchangingconfigurationsettings.Ifyou
areresponsibleformaintainingtheconfigurationsettingsofseveralcomputers,youmightwanttoset
anadministratorpassword.
Whenanadministratorpasswordisset,youarepromptedtoenteravalidpasswordeachtimeyou
trytoaccesstheSetupUtilityprogram.TheSetupUtilityprogramcannotbeaccesseduntilavalid
passwordisentered.
Ifboththepower-onpasswordandadministratorpasswordareset,youcanentereitherpassword.
However,youmustuseyouradministratorpasswordtochangeanyconfigurationsettings.
•Harddiskpassword
Settingaharddiskpasswordpreventsunauthorizedaccesstothedataontheinternalstoragedrive(such
asaharddiskdrive).Whenaharddiskpasswordisset,youarepromptedtoenteravalidpasswordeach
timeyoutrytoaccessthestoragedrive.
Notes:
–Afteryousetaharddiskpassword,yourdataonthestoragedriveisprotectedevenifthestoragedrive
isremovedfromonecomputerandinstalledinanother.
–Iftheharddiskpasswordisforgotten,thereisnowaytoresetthepasswordorrecoverdatafrom
thestoragedrive.
Passwordconsiderations
Apasswordcanbeanycombinationofupto64alphabeticandnumericcharacters.Forsecurityreasons,it
isrecommendedtouseastrongpasswordthatcannotbeeasilycompromised.
Note:TheSetupUtilityprogrampasswordsarenotcase-sensitive.
Tosetastrongpassword,considerthefollowingguidelines:
•Haveatleasteightcharactersinlength
•Containatleastonealphabeticcharacterandonenumericcharacter
•Notbeyournameoryourusername
•Notbeacommonwordoracommonname
•Besignificantlydifferentfromyourpreviouspasswords
Setting,changing,anddeletingapassword
Toset,change,ordeleteapassword,dothefollowing:
1.StarttheSetupUtilityprogram.See“StartingtheSetupUtilityprogram”onpage33.
2.SelectSecurity.
3.Dependingonthepasswordtype,selectSetPower-OnPassword,SetAdministratorPassword,or
HardDiskPasswordandpressEnter.
4.Followtheinstructionsontherightsideofthescreentoset,change,ordeleteapassword.
Note:Apasswordcanbeanycombinationofupto64alphabeticandnumericcharacters.Formore
information,see“Passwordconsiderations”onpage36.
36ThinkStationP410UserGuide

5.TosavesettingsandexittheSetupUtilityprogram,pressF10orFn+F10(dependingonthekeyboard),
selectYesinthewindowdisplayed,andpressEnter.
Erasinglostorforgottenpasswords(clearingCMOS)
Thissectionprovidesinstructionsonhowtoeraselostorforgottenpasswords,suchasauserpassword.
Toerasealostorforgottenpassword,dothefollowing:
1.Prepareyourcomputer.See“Preparingyourcomputerandremovingthecomputercover”onpage57.
2.LocatetheComplementaryMetalOxideSemiconductor(ClearCMOS)/Recoveryjumperonthesystem
board.See“Partsonthesystemboard”onpage5.
3.Movethejumperfromthestandardposition(pin1andpin2)tothemaintenanceposition(pin2and
pin3).
4.Reinstallthecomputercoverandconnectthepowercord.SeeChapter7“Installingorreplacing
hardware”onpage57.
5.Turnonthecomputerandleaveitonforapproximately10seconds.Then,turnoffthecomputerby
holdingthepowerbuttonforapproximatelyfiveseconds.
6.Repeatstep1andstep2.
7.MovetheClearCMOS/Recoveryjumperbacktothestandardposition(pin1andpin2).
8.Reinstallthecomputercoverandconnectthepowercord.
Selectingastartupdevice
Ifyourcomputerdoesnotstartupfromadeviceasexpected,youcanchoosetochangethestartupdevice
sequencepermanentlyorselectatemporarystartupdevice.
Changingthestartupdevicesequencepermanently
Tochangethestartupdevicesequencepermanently,dothefollowing:
1.Dependingonthetypeofthestoragedevice,dooneofthefollowing:
•Ifthestoragedeviceisinternal,gotostep2.
•Ifthestoragedeviceisadisc,ensurethatyourcomputeristurnedon.Then,insertthediscinto
theopticaldrive.
•Ifthestoragedeviceisanexternaldeviceotherthanadisc,connectthestoragedevicetothe
computer.
2.StarttheSetupUtilityprogram.See“StartingtheSetupUtilityprogram”onpage33.
3.SelectStartup.
4.Followtheinstructionsontherightsideofthescreentochangethestartupdevicesequence.
5.TosavesettingsandexittheSetupUtilityprogram,pressF10orFn+F10(dependingonthekeyboard),
selectYesinthewindowdisplayed,andpressEnter.
Selectingatemporarystartupdevice
Note:Notalldiscsandstoragedrivesarebootable.
Toselectatemporarystartupdevice,dothefollowing:
1.Dependingonthetypeofthestoragedevice,dooneofthefollowing:
•Ifthestoragedeviceisinternal,gotostep2.
•Ifthestoragedeviceisadisc,ensurethatyourcomputeristurnedon.Then,insertthediscinto
theopticaldrive.
Chapter5.Advancedconfiguration37

•Ifthestoragedeviceisanexternaldeviceotherthanadisc,connectthestoragedevicetothe
computer.
2.Turnonorrestartthecomputer.BeforeWindowsstartsup,repeatedlypressandreleaseF12orFn+F12
(dependingonthekeyboard)untilBootMenuisdisplayed.
3.SelectthedesiredstoragedeviceandpressEnter.Thecomputerthenstartsupfromthedeviceyou
select.
Ifyouwanttoselectapermanentstartupdevice,selectEnterSetuponBootMenuandpressEntertostart
theSetupUtilityprogram.Formoreinformationabouthowtoselectapermanentstartupdevice,see
“Changingthestartupdevicesequencepermanently”onpage37.
Changingthefanspeedlevel
TheFanControlSteppingitemenablesyoutoadjustthethermalperformanceofyourcomputer.Fromlevel
1tolevel7,ahigherfanspeedlevelindicatesbetterthermalperformancewithmorenoise.
Tochangethefanspeedlevel,dothefollowing:
1.StarttheSetupUtilityprogram.See“StartingtheSetupUtilityprogram”onpage33.
2.SelectPower➙FanControlSteppingandpressEnter.
3.SelectafanspeedlevelandpressEnter.
4.TosavesettingsandexittheSetupUtilityprogram,pressF10orFn+F10(dependingonthekeyboard),
selectYesinthewindowdisplayed,andpressEnter.
ExitingtheSetupUtilityprogram
ToexittheSetupUtilityprogram,dooneofthefollowing:
•Ifyouwanttosavethenewsettings,pressF10orFn+F10(dependingonthekeyboard),selectYesin
thewindowdisplayed,andpressEnter.
•Ifyoudonotwanttosavethenewsettings,selectExit➙DiscardChangesandExitandpressEnter.
Then,selectYesinthewindowdisplayedandpressEnter.
UpdatingandrecoveringtheBIOS
TheBIOSisthefirstprogramthatthecomputerrunswhenyouturnonthecomputer.TheBIOSinitializesthe
hardwarecomponentsandloadstheoperatingsystemandotherprograms.
UpdatingtheBIOS
Whenyouinstallanewprogram,hardwaredevice,ordevicedriver,youmightbeinformedtoupdate
theBIOS.YoucanupdatetheBIOSfromyouroperatingsystemoraflashupdatedisc(availableonly
onsomemodels).
ToupdatetheBIOS,dothefollowing:
1.Gotohttp://www.lenovo.com/support.
2.ToupdatetheBIOSfromyouroperatingsystem,downloadtheflashBIOSupdatedriveraccordingto
youroperatingsystemversion.ToupdatetheBIOSfromaflashupdatedisc,downloadtheISOimage
version(usedtocreateaflashupdatedisc).Then,downloadtheinstallationinstructionsfortheflash
BIOSupdatedriver.
3.PrinttheinstallationinstructionsyoudownloadandfollowtheinstructionstoupdatetheBIOS.
Note:IfyouwanttoupdatetheBIOSfromaflashupdatedisc,theinstallationinstructionsmightnotprovide
theinformationabouthowtorecordtheupdatedisc.See“Recordingadisc”onpage16.
38ThinkStationP410UserGuide

RecoveringfromaBIOSupdatefailure
TorecoverfromaBIOSupdatefailure,dothefollowing:
1.Prepareyourcomputer.See“Preparingyourcomputerandremovingthecomputercover”onpage57.
2.LocatetheClearCMOS/Recoveryjumperonthesystemboard.See“Hardwarelocations”onpage1.
3.RemoveanypartsandcablesthatimpedeyouraccesstotheClearCMOS/Recoveryjumper.
4.Movethejumperfromthestandardposition(pin1andpin2)tothemaintenanceposition(pin2and
pin3).
5.Reinstallthepartsandcablesthatwereremoved.
6.Reinstallthecomputercoverandreconnectanycablesthatweredisconnected.SeeChapter7
“Installingorreplacinghardware”onpage57.
7.TurnonthecomputerandinserttheBIOSupdatediscintotheopticaldrive.Waitafewminutes.The
recoveryprocessbegins.Aftertherecoveryprocessiscompleted,yourcomputerwillshutdown
automatically.
Note:Ifthecomputerdoesnotstartupfromthedisc,selectthediscasthestartupdevice.See
“Selectingatemporarystartupdevice”onpage37.
8.Repeatsteps1–3.
9.MovetheClearCMOS/Recoveryjumperbacktothestandardposition(pin1andpin2).
10.Repeatsteps5–6.Then,turnonyourcomputer.
ConfiguringRAID
ThischapterprovidesinstructionsonhowtoinstallharddiskdrivesandconfigureRAIDforyourcomputer.
Dependingonyourcomputermodel,RAIDcanbeenabledbyIntelRapidStorageTechnologyenterprise
(RSTe)ortheAVAGOMegaRAIDBIOS.
Note:TheRAIDconfigurationinformationdescribedinthischapterisonlyapplicableintheWindows
environment.ForinformationaboutconfiguringRAIDintheLinux®environment,contactyourLinux
softwareprovider.
Thischapterprovidesinformationaboutthefollowingtopics:
•“ConfiguringRAIDwithIntelRSTe”onpage39
•“QuickRAIDsetupusingtheAVAGOMegaRAIDBIOSconfigurationutility”onpage42
ConfiguringRAIDwithIntelRSTe
IfyourcomputercomeswithIntelRSTe,youcanfollowthesectionsbelowtoconfigureRAIDwithIntelRSTe.
Thissectionprovidesinformationaboutthefollowingtopics:
•“InstallingSATAharddiskdrives”onpage39
•“ConfiguringSATARAIDfunctionalitywiththeIntelRSTeconfigurationutility”onpage40
InstallingSATAharddiskdrives
EnsurethatyourcomputerhastheminimumnumberofSATAharddiskdrivesinstalledforthefollowing
supportedlevelsofRAID:
•RAIDLevel0-Stripeddiskarray
–ARAIDLevel0harddiskdrivegroupconsistingofatleasttwoharddiskdrives
–Supportedstripsize:4KB,8KB,16KB,32KB,64KB,or128KB
–Betterperformancewithoutfaulttolerance
Chapter5.Advancedconfiguration39

•RAIDLevel1-Mirroreddiskarray
–ARAIDLevel1harddiskdrivegroupconsistingoftwoharddiskdrives
–Improvedreadingperformanceand100%redundancy
•RAIDLevel10-Stripedandmirroreddiskarray(acombinationofRAIDLevel0andRAIDLevel1)
–ARAIDLevel10harddiskdrivegroupconsistingoffourharddiskdrives
–Supportedstripsize:4KB,8KB,16KB,32KB,or64KB
•RAIDLevel5-Block-levelstripeddiskarraywithdistributedparity
–ARAIDLevel5harddiskdrivegroupconsistingofatleastthreeharddiskdrives
–Supportedstripsize:4KB,8KB,16KB,32KB,or64KB
–Betterperformanceandfaulttolerance
ConfiguringSATARAIDfunctionalitywiththeIntelRSTeconfigurationutility
ThissectiondescribestheinformationaboutconfiguringSATARAIDfunctionalitywiththeIntelRSTe
configurationutility.
Note:TheIntelRSTeconfigurationutilityassumesthatyourcomputerisinstalledwithmorethanonehard
diskdrive.Therefore,ifonlyoneharddiskdriveisinstalledinyourcomputer,thefollowinginformation
doesnotapply.
Thissectionprovidesinformationaboutthefollowingtopics:
•“EnteringtheIntelRSTeconfigurationutility”onpage40
•“CreatingRAIDvolumesusingtheIntelRSTeconfigurationutility”onpage40
•“DeletingRAIDvolumesusingtheIntelRSTeconfigurationutility”onpage41
•“Resettingharddiskdrivestonon-RAID”onpage41
EnteringtheIntelRSTeconfigurationutility
ThissectionprovidesinstructionsonhowtoentertheIntelRSTeconfigurationutility.
Duringthecomputerstartup,followtheinstructionsonthescreen.PressCtrl+ItoentertheIntelRSTe
configurationutility.
ThefollowingfouroptionsaredisplayedafteryouentertheIntelRSTeconfigurationutility:
1.CreateRAIDVolume
2.DeleteRAIDVolume
3.ResetDiskstoNon‐RAID
4.Exit
Presstheupanddownarrowkeystoselectanoption.PressEntertoenterthemenufortheselected
option.PressEsctoexittheIntelRSTeconfigurationutility,orselectExit,andthenpressEntertoexitthe
IntelRSTeconfigurationutility.
CreatingRAIDvolumesusingtheIntelRSTeconfigurationutility
ThissectionprovidesinstructionsonhowtousetheIntelRSTeconfigurationutilitytocreateRAIDvolumes.
TocreateaRAIDvolume,dothefollowing:
1.EntertheIntelRSTeconfigurationutility.See“EnteringtheIntelRSTeconfigurationutility”onpage40.
2.PresstheupanddownarrowkeystoselectCreateRAIDVolume,andthenpressEntertoviewthe
CREATEVOLUMEMENUwindow.
40ThinkStationP410UserGuide

3.Thefollowingfiveoptionsaredisplayed.Presstheupanddownarrowkeystoselectanoption.After
youconfigureanoption,pressTaborEntertogotothenextoption.
a.Name:Volumename.Youcanusethedefaultnameortypeapreferredname.
b.RAIDLevel:YoucanchangetheRAIDLeveltooneofthefollowing:
•RAIDLevel0
•RAIDLevel1
•RAIDLevel10
•RAIDLevel5
c.Disks:PressEntertoentertheSELECTDISKSMENUwindow.Followtheinstructionsatthebottom
ofthemenutoselectharddiskdrives,andthenpressEntertocompletetheconfiguration.
d.StripSize:Presstheupanddownarrowkeystoselectastripsize.
e.Capacity:CustomizethecapacityoftheRAIDvolume.ThedefaultRAIDvolumeisthelargestvalue.
4.PressEntertofinishconfiguringallthefiveoptions.Whenprompted,pressYtoconfirmthecreationof
thenewRAIDvolume.
5.AfterthenewRAIDvolumeiscreated,theinformationabouttheRAIDvolumewillbedisplayedunder
DISK/VOLUMEINFORMATION.TheinformationincludestheIDnumber,name,RAIDlevel,stripsize,
volumesize,status,andwhetheritisabootablevolume.
DeletingRAIDvolumesusingtheIntelRSTeconfigurationutility
ThissectionprovidesinstructionsonhowtousetheIntelRSTeconfigurationutilitytodeleteRAIDvolumes.
TodeleteaRAIDvolume,dothefollowing:
1.EntertheIntelRSTeconfigurationutility.See“EnteringtheIntelRSTeconfigurationutility”onpage40.
2.PresstheupanddownarrowkeystoselectDeleteRAIDVolume.PressEntertoentertheDELETE
VOLUMEMENUwindow.
3.PresstheupanddownarrowkeystoselecttheRAIDvolumethatisnotneeded.PressDeltodeleteit
fromtheRAIDVolumeslist.
4.Whenprompted,pressYtoconfirmthedeletionoftheselectedRAIDvolume.
Resettingharddiskdrivestonon-RAID
Thissectionprovidesinstructionsonhowtoresetharddiskdrivestonon-RAID.
Toresetharddiskdrivestonon-RAID,dothefollowing:
1.EntertheIntelRSTeconfigurationutility.See“EnteringtheIntelRSTeconfigurationutility”onpage40.
2.PresstheupanddownarrowkeystoselectResetDiskstoNon-RAID.PressEntertoenterthe
RESETRAIDDATAwindow.
3.Usetheupanddownarrowkeysandthespacekeytomarkanindividualharddiskdrivetobereset,
andthenpressEntertocompletetheselection.
4.Whenprompted,pressYtoconfirmtheresetaction.
5.IftheharddiskdriveyouresetispartofaRAIDvolume,thecomputermightdetectthattheRAIDvolume
isdegraded.Inthiscase,youarepromptedtoselectaharddiskdrivetoinitiatearebuildprocess.
6.Selectanavailableharddiskdrive,andthenpressEntertoinitiatetherebuildprocess.
Note:PressEsctocancelarebuildprocessandkeeptheRAIDvolumeinthedegradedstatus.Inthe
MainMenuwindowunderDISK/VOLUMEINFORMATION,youwillseethestatusoftheRAIDvolume
ischangedtoDegraded.
Chapter5.Advancedconfiguration41

QuickRAIDsetupusingtheAVAGOMegaRAIDBIOSconfigurationutility
Notes:
•TheAVAGOMegaRAIDSASadapterandtheAVAGOMegaRAIDBIOSconfigurationutilityareonly
availableonsomemodels.
•Thefollowingstepsinthissectionareintendedtoguideyouthroughaquicksetupofbasic
RAIDfunctionswiththeAVAGOMegaRAIDSASadapter.Foradvancedsetupandconfiguration
usingthisadapter,refertothecompleteMegaRAIDSASSoftwareUserGuidethatisavailableat
http://support.lenovo.com/en_US/guides-and-manuals/detail.page?DocID=UM007543.
Thissectionprovidesinformationaboutthefollowingtopics:
•“InstallingSATAorSASharddiskdrives”onpage42
•“EnteringtheAVAGOMegaRAIDBIOSconfigurationutility”onpage43
•“CreatingRAIDvolumesusingtheAVAGOMegaRAIDBIOSconfigurationutility”onpage43
•“DeletingRAIDvolumesusingtheAVAGOMegaRAIDBIOSconfigurationutility”onpage44
•“Settingthehot-spareharddiskdrive”onpage44
InstallingSATAorSASharddiskdrives
EnsurethatyourcomputerhastheminimumnumberofSATAorSASharddiskdrivesinstalledforthe
followingsupportedlevelsofRAID:
•RAIDLevel0-Stripeddiskarray
–ARAIDLevel0harddiskdrivegroupconsistingofatleastoneharddiskdrive
–Supportedstripsize:8KBto1MB
–Betterperformancewithoutfaulttolerance
•RAIDLevel00-SpannedharddiskdrivegroupwithaseriesofRAID0harddiskdrivegroups
–ARAIDLevel00harddiskdrivegroupconsistingoftwoorfourharddiskdrives
–Supportedstripsize:8KBto1MB
–Betterperformancewithoutfaulttolerance
•RAIDLevel1-Mirroreddiskarray
–ARAIDLevel1harddiskdrivegroupconsistingoftwoorfourharddiskdrives
–Improvedreadperformanceand100%redundancy
•RAIDLevel10-AcombinationofRAIDLevel0andRAIDLevel1
–ARAIDLevel10harddiskdrivegroupconsistingoffourharddiskdrives
–Databeingstripedacrossharddiskdrivegroups
–Providesbothhighdatatransferratesandcompletedataredundancy
•RAIDLevel5-Block-levelstripeddiskarraywithdistributedparity
–ARAIDLevel5harddiskdrivegroupconsistingofatleastthreeharddiskdrives
–Supportedstripsize:8KBto1MB
–Betterperformanceandfaulttolerance
–RAIDLevel5mightnotbeavailableonallmodelsofAVAGOMegaRAIDadapter
•RAIDLevel6-Block-levelstripeddiskarraywithdualdistributedparity
–ARAIDLevel6harddiskdrivegroupconsistingofatleastfourharddiskdrives
–Supportedstripsize:8KBto1MB
42ThinkStationP410UserGuide

–Betterperformanceandfaulttolerancethatcanstanduptolossoftwoharddiskdrives
–RAIDLevel6mightnotbeavailableonallmodelsofAVAGOMegaRAIDadapter
Ensurethat:
•TheAVAGOMegaRAIDSASadaptercardisinstalledinyourcomputer.
•Theharddiskdrivesareconnectedtothisadaptercardandnottotheconnectorsonthesystemboard.
EnteringtheAVAGOMegaRAIDBIOSconfigurationutility
ThissectionprovidesinstructionsonhowtoentertheAVAGOMegaRAIDBIOSconfigurationutility.
ToentertheAVAGOMegaRAIDBIOSconfigurationutility,dothefollowing:
1.Duringthecomputerstartup,followtheinstructionsonthescreen.
2.PressCtrl+HtoentertheCONTROLLERSELECTIONwindow.
3.Selectthecontrolleryouwanttoconfigure,andthenclickStarttoentertheAVAGOMegaRAIDBIOS
configurationutility.
CreatingRAIDvolumesusingtheAVAGOMegaRAIDBIOSconfigurationutility
ThissectionprovidesinstructionsonhowtocreateRAIDvolumesusingtheAVAGOMegaRAIDBIOS
configurationutility.
TocreateRAIDvolumesusingtheAVAGOMegaRAIDBIOSconfigurationutility,dothefollowing:
1.ClickConfigurationWizardontheWebBIOSmainscreentoentertheChoosingtheConfiguration
Typewindow.
2.Presstheupanddownarrowkeystoselectoneofthethreeconfigurationtypes:
•ClearConfiguration:Cleartheexistingconfiguration.
•NewConfiguration:Cleartheexistingconfigurationandcreatenewconfiguration.
•AddConfiguration:Retaintheexistingstorageconfigurationandaddnewharddiskdrives.The
newconfigurationwillnotcauseanydataloss.
3.SelectAddConfiguration,andthenclickNext.Thefollowingtwooptionsaredisplayedinthe
ConfigurationMethodwindow.
•ManualConfiguration:Manuallycreateharddiskdrivegroupsandvirtualharddiskdrives,and
setparameters.
•AutomaticConfiguration:AutomaticallycreateanoptimalRAIDconfiguration.
4.SelectManualConfiguration,andthenclickNext.TheDriveGroupDefinitionwindowisdisplayed.To
createharddiskdrivegroups,dothefollowing:
a.Selectoneormoreharddiskdrivesforthegroup(keeppressingCtrlwhileselectingmorethan
oneharddiskdrive).
b.ClickAddT oArraytomovetheselectedharddiskdrivestoDriveGroups.
c.ClickAcceptDGtocreatetheharddiskdrivegroup.
d.Tocreatemoreharddiskdrivegroups,repeatstepsathroughc.
5.ClickNext.TheSpanDefinitionwindowisdisplayed.Selecttheharddiskdrivegroupthatyouwant
toaddtoaspan,andthenclickAddtoSPAN.Repeatthisstepuntilyouhaveselectedallthehard
diskdrivegroupsyouwant.
6.ClickNext.TheVirtualDriveDefinitionwindowisdisplayed.Changethevirtualharddiskdriveoptions
fromthedefaultsettingslistedonthescreentothesettingsyouwant.ClickAccept,andthenfollow
theinstructionsonthescreentocustomizeyoursettings.
Chapter5.Advancedconfiguration43

7.ClickNext,andthePreviewwindowisdisplayed.
8.Verifyyoursettings,andthenclickAccept.
9.ClickYestosavetheconfiguration.
DeletingRAIDvolumesusingtheAVAGOMegaRAIDBIOSconfigurationutility
ThissectionprovidesinstructionsonhowtodeleteRAIDvolumesusingtheAVAGOMegaRAIDBIOS
configurationutility.
TodeleteRAIDvolumesusingtheAVAGOMegaRAIDBIOSconfigurationutility,dothefollowing:
1.EntertheAVAGOMegaRAIDBIOSconfigurationutility.See“EnteringtheAVAGOMegaRAIDBIOS
configurationutility”onpage43.
2.Clickthevirtualharddiskdrivesyouwanttodelete,andthentheVirtualDrivewindowisdisplayed.
3.ClickDelete,andthenclickGo.
4.ClickYestosaveyourchanges.
Settingthehot-spareharddiskdrive
Thissectionprovidesinstructionsonhowtosetthehot-spareharddiskdrive.
Tosetthehotspaceharddiskdrive,dothefollowing:
1.EntertheAVAGOMegaRAIDBIOSconfigurationutility.See“EnteringtheAVAGOMegaRAIDBIOS
configurationutility”onpage43.
2.Clicktheharddiskdriveyouwanttosetasthehot-spareharddiskdrive.TheDrivewindowisdisplayed.
3.SelectMakeGlobalHSPorMakeDedicatedHSP,andthenclickGo.
ThemainscreenoftheAVAGOMegaRAIDBIOSconfigurationutilityisdisplayed.Theharddiskdrive
youselectedislistedasahot-spareharddiskdriveintherightpane.
44ThinkStationP410UserGuide

Chapter6.Troubleshooting,diagnostics,andrecovery
Thischapterprovidessolutionstoresolveyourcomputerproblems.Followthestepsinthebasicprocedure
forresolvingcomputerproblems,whichhelpsyoumakegooduseofthetroubleshooting,diagnostics,
andrecoveryinformation.
•“Basicprocedureforresolvingcomputerproblems”onpage45
•“Troubleshooting”onpage45
•“Diagnosingproblems”onpage53
•“Recoveryinformation”onpage55
Basicprocedureforresolvingcomputerproblems
Itisrecommendedthatyouusethefollowingproceduretoresolvecomputerproblemsyouareexperiencing:
1.Ensurethat:
a.Thecablesforallconnecteddevicesareconnectedcorrectlyandsecurely.
b.Allconnecteddevicesthatrequireacpowerareconnectedtoproperlygrounded,functioning
electricaloutlets.
c.AllconnecteddevicesareenabledintheBIOSsettingsofyourcomputer.Referto“Enabling
ordisablingadevice”onpage34.
Iftheseactionsdonotresolveyourproblem,continuewiththenextstep.
2.Useanantivirusprogramtoseeifyourcomputerhasbeeninfectedbyavirus.Iftheprogramdetects
avirus,removethevirus.Iftheantivirusprogramdoesnotresolveyourproblem,continuewiththe
nextstep.
3.Goto“Troubleshooting”onpage45andfollowtheinstructionsforthetypeofproblemyouare
experiencing.Ifthesetroubleshootinginstructionsdonotresolveyourproblem,continuewiththe
nextstep.
4.Runthediagnosticprogram.Referto“Diagnosingproblems”onpage53.Ifthediagnosticprogram
doesnotresolveyourproblem,continuewiththenextstep.
5.Recoveryouroperatingsystem.Referto“Recoveryinformation”onpage55.
6.Ifnoneoftheseactionssolveyourproblem,contacttheLenovoCustomerSupportCenter.Foralistof
LenovoSupportphonenumbers,gotohttp://www.lenovo.com/support/phone.Formoreinformation
abouthelp,service,andtechnicalassistance,refertoChapter8“Gettinginformation,help,and
service”onpage101.
Troubleshooting
Attention:Donotopenyourcomputerorattemptanyrepairbeforereadingandunderstandingthe“Read
thisfirst:Importantsafetyinformation”onpagev.
Usethetroubleshootinginformationtofindsolutionstoproblemsthathavedefinitesymptoms.
Startupproblems
Thecomputerdoesnotstartupwhenyoupressthepowerbutton.
Solutions:
Ensurethat:
©CopyrightLenovo2016,201745

•Thepowercordiscorrectlyconnectedtotherearofthecomputerandtoaworkingelectricaloutlet.
•Ifyourcomputerhasasecondarypowerswitchontherearofthecomputer,ensurethatitisswitchedon.
•Thepowerindicatoronthefrontofthecomputerison.
•Thecomputervoltagematchesthevoltageavailableattheelectricaloutletforyourcountryorregion.
Theoperatingsystemfailstostartup.
Solution:
EnsurethatthestartupdevicesequencesetintheSetupUtilityprogramincludesthedevicewhere
theoperatingsystemresides.Usually,theoperatingsystemisontheinternalstoragedrive.Formore
information,referto“Changingthestartupdevicesequencepermanently”onpage37.
Thecomputerbeepsmultipletimesbeforetheoperatingsystemstartsup.
Solution:
Ensurethatnokeysarestuck.
Audioproblems
TheaudiocannotbeheardontheWindowsoperatingsystem.
Solutions:
•IfyouareusingpoweredexternalspeakersthathaveanOn/Offcontrol,ensurethat:
–TheOn/OffcontrolissettotheOnposition.
–Thespeakerpowercableisconnectedtoaproperlygrounded,functionalacelectricaloutlet.
•Ifyourexternalspeakershaveavolumecontrol,ensurethatthevolumeisnotsettoolow.
•ClickthevolumeiconintheWindowsnotificationareaonthetaskbar.Ensurethatthemutespeakers
settingsarenotselectedandnoneofthevolumesettingsissettoolow.
Note:IfthevolumeiconisnotdisplayedintheWindowsnotificationarea,addtheicontothenotification
area.RefertotheWindowshelpsystem.
•Forsomecomputersthathaveafrontaudiopanel,ensurethatthevolumeisnotsettoolow.
•Ensurethatyourexternalspeakers(andheadphones,ifused)areconnectedtothecorrectaudio
connectorsonthecomputer.Mostspeakercablesarecolor-codedtomatchtheconnectors.
Note:Whenexternal-speakerorheadphonecablesareconnectedtotheaudioconnectors,theinternal
speaker,ifpresent,isdisabled.Inmostcases,ifanaudioadapterisinstalledinoneoftheexpansion
slots,theaudiofunctionbuiltintothesystemboardisdisabled.Therefore,youmustusetheaudio
connectorsontheaudioadapter.
•EnsurethattheprogramyouarerunningisdesignedforuseontheWindowsoperatingsystem.Ifthe
programisdesignedtoruninDOS,theprogramdoesnotusetheWindowssoundfeature.Theprogram
mustbeconfiguredtouseSoundBlasterProorSoundBlasteremulation.
•Ensurethattheaudiodevicedriversarecorrectlyinstalled.
Thesoundcomesfromoneoftheexternalspeakers.
Solutions:
•Ensurethatthespeakercableisinsertedcompletelyintotheconnectoronthecomputer.
•DependingonyourWindowsversion,dooneofthefollowing:
46ThinkStationP410UserGuide

–ForWindows7:ClickthevolumeiconintheWindowsnotificationareaonthetaskbar.Then,click
thespeakericonontopofthevolumecontrol.
–ForWindows10:Right-clickthevolumeiconintheWindowsnotificationareaonthetaskbar.Then,
clickOpenVolumeMixerandselectthedesiredspeaker.
Note:IfthevolumeiconisnotdisplayedintheWindowsnotificationarea,addtheicontothenotification
area.
Then,clicktheLevelstabandensurethattheBalancesettingsaresetcorrectly.
CDorDVDproblems
ACDorDVDdoesnotwork.
Solutions:
•Ensurethatthepowercableandsignalcablearesecurelyconnectedtothedrive.
•Ensurethatthediscisinsertedcorrectly,withitslabelup.
•Ensurethatthediscyouareusingisclean.Toremovedustorfingerprints,wipethedisccleanwithasoft
clothfromthecentertotheoutside.Wipingadiscinacircularmotionmightcauselossofdata.
•Ensurethatthediscyouareusingisnotscratchedordamaged.Tryinsertinganotherdiscthatyou
knowisgood.Ifyoucannotreadfromaknown-gooddisc,youmighthaveaproblemwithyouroptical
driveorthecablingtoyouropticaldrive.
•IfyouhavemultipleCDorDVDdrivesinstalled(oracombinationofCDandDVDdrives),tryinsertingthe
discintotheotherdrive.Insomecases,onlyoneofthedrivesisconnectedtotheaudiosubsystem.
Abootablerecoverymedium,suchastheProductRecoveryCD,cannotbeusedtostartyour
computer.
Solution:
EnsurethattheCDorDVDdriveissetasthetoppriorityoftheBootPriorityOrderintheSetupUtility
program.Referto“Selectingatemporarystartupdevice”onpage37forinformationaboutviewingand
changingthestartupsequence.
Note:Onsomecomputermodels,thestartupsequenceispermanentlysetandcannotbechanged.
AblackscreenisdisplayedinsteadoftheDVDvideo.
Solutions:
•RestarttheDVDplayerprogram.
•Tryalowerscreenresolutionorcolordepth.
•Closeanyopenfiles,andthenrestartthecomputer.
ADVDmoviedoesnotplay.
Solutions:
•Ensurethatthediscsurfaceiscleanandnotscratched.
•Checkthediscorpackageforregionalcoding.Youmightneedtopurchaseadiscwithcodingfor
theregionwhereyouareusingyourcomputer.
NoaudiooronlyintermittentaudiocomesoutwhileaDVDmovieisplaying.
Solutions:
•Checkthevolumecontrolsettingsonyourcomputerandonyourspeakers.
Chapter6.Troubleshooting,diagnostics,andrecovery47

•Ensurethatthediscsurfaceiscleanandnotscratched.
•Checkallcableconnectionstoandfromthespeakers.
•UsetheDVDmenuforthevideotoselectadifferentaudiotrack.
Theplaybackissloworchoppy.
Solutions:
•Disableanybackgroundprograms,suchasAntiVirusorDesktopThemes.
•Ensurethatvideoresolutionislowerthan1152x864pixels.
Amessageindicatinginvaliddiscornodiscfoundisdisplayed.
Solutions:
•Ensurethatthediscisinthedrivewiththeshinysideofthediscfacingdown.
•Ensurethatvideoresolutionislowerthan1152x864pixels.
•EnsurethattheDVDorCDisinsertedintoanappropriateopticaldrive.Forexample,donotinsert
aDVDintoaCD-onlydrive.
Intermittentproblems
Intermittentproblemsrefertotheproblemsoccuronlyoccasionallyandaredifficulttorepeat.
Solutions:
•Ensurethatallcablesandcordsaresecurelyconnectedtothecomputerandattacheddevices.
•Ensurethatwhenthecomputerison,thefangrillisnotblocked(thereisairflowaroundthegrill),andthe
fansareworking.Ifairflowisblockedorthefansarenotworking,thecomputermightoverheat.
•IfSmallComputerSystemInterface(SCSI)devicesareinstalled,ensurethatthelastexternaldevicein
eachSCSIchainisterminatedcorrectly.Formoreinformation,refertoyourSCSIdocumentation.
Storagedriveproblems
SomeorallstoragedrivesaremissingfromtheSetupUtilityprogram.
Solutions:
•Ensurethatthesignalcablesandpowercablesforallthestoragedrivesareconnectedcorrectly.
•IfthecomputerisinstalledwithSASstoragedrives,ensurethattheAVAGOMegaRAIDSASadapter
iscorrectlyconnected.
Thecomputercannotstartupfromthecorrectstoragedriveorthemessage“NoOperatingSystem
Found”isdisplayed.
Solutions:
•Ensurethatthesignalcablesandpowercablesforallthestoragedrivesareconnectedcorrectly.
•Ensurethatthecomputerstartsupfromthecorrectstoragedrive.Setthestoragedrive,onwhichthe
operatingsystemresides,asthefirststartupdeviceintheSetupUtilityprogram.Referto“Changingthe
startupdevicesequencepermanently”onpage37.
Note:Inrarecases,thestoragedrivewiththeoperatingsystemmightgetcorruptedordamaged.Ifthis
problemoccurs,replacethestoragedrive.RefertoChapter7“Installingorreplacinghardware”onpage57.
48ThinkStationP410UserGuide

EthernetLANproblems
ThecomputercannotconnecttoanEthernetLAN.
Solutions:
•ConnectthecablefromtheEthernetconnectortotheRJ45connectorofthehub.
•EnabletheEthernetLANfeatureintheSetupUtilityprogram.Referto“UsingtheSetupUtilityprogram”
onpage33.
•EnabletheEthernetLANadapter.
1.ClicktheStartbuttontoopentheStartmenu.
2.DependingonyourWindowsversion,dooneofthefollowing:
–ForWindows7:ClickControlPanel.
–ForWindows10:ClickWindowsSystem➙ControlPanel.
3.ViewControlPanelbyLargeiconsorSmallicons,andthenclickNetworkandSharingCenter➙
Changeadaptersettings.
4.Right-clicktheEthernetLANadaptericonandclickEnable.
•UpdateorreinstalltheEthernetLANdriver.Referto“Keepingyourcomputercurrent”onpage24.
•Installallnetworkingsoftwarethatisnecessaryforyournetworkenvironment.CheckwithyourLAN
administratorforthenecessarynetworkingsoftware.
•Setthesameduplexfortheswitchportandtheadapter.Ifyouconfiguredtheadapterforfullduplex,
ensurethattheswitchportisalsoconfiguredforfullduplex.Settingthewrongduplexmodemight
degradeperformance,causedataloss,orresultinlostconnections.
WhenaGigabitEthernetmodelcomputerisusedataspeedof1000Mbps,theEthernetLAN
connectionfailsorerrorsoccur.
Solution:
ConnectthenetworkcabletotheEthernetconnectorusingCategory5wiringanda100BASE-Thub/switch
(not100BASE-X).
AGigabitEthernetmodelcomputershouldconnecttothenetworkataspeedof1000Mbpsbutat
onlyaspeedof100Mbps.
Solutions:
•Tryanothercable.
•Setthelinkpartnertoauto-negotiate.
•Settheswitchtobe802.3ab-compliant(gigabitovercopper).
TheWakeOnLANfeaturedoesnotwork.
Solution:
EnabletheWakeOnLANfeatureintheSetupUtilityprogram.Referto“UsingtheSetupUtilityprogram”
onpage33.
WirelessLANproblem
Note:ThewirelessLANfeatureisavailableonlyonsomemodels.
Chapter6.Troubleshooting,diagnostics,andrecovery49

ThewirelessLANfeaturedoesnotwork.
Solutions:
•EnablethewirelessLANfeatureintheSetupUtilityprogram.Referto“UsingtheSetupUtilityprogram”
onpage33.
•ForWindows10,enablethewirelessLANfeatureinWindowsSettings.ClicktheStartbuttontoopenthe
Startmenu,andthenclickSettings➙Network&Internet➙Wi-Fi.TurnontheWi-Fifeature.
•EnablethewirelessLANadapter.
1.ClicktheStartbuttontoopentheStartmenu.
2.DependingonyourWindowsversion,dooneofthefollowing:
–ForWindows7:ClickControlPanel.
–ForWindows10:ClickWindowsSystem➙ControlPanel.
3.ViewControlPanelbyLargeiconsorSmallicons,andthenclickNetworkandSharingCenter➙
Changeadaptersettings.
4.Right-clickthewirelessLANadaptericonandclickEnable.
•UpdateorreinstallthewirelessLANdriver.Referto“Keepingyourcomputercurrent”onpage24.
Bluetoothproblems
Note:TheBluetoothfeatureisavailableonlyonsomemodels.
TheBluetoothfeaturedoesnotwork.
Solutions:
•EnabletheBluetoothfeatureintheSetupUtilityprogram.Referto“UsingtheSetupUtilityprogram”
onpage33.
•ToenabletheBluetoothdevices,dependingonyourWindowsversion,dooneofthefollowing:
–ForWindows7:
1.ClicktheStartbuttontoopentheStartmenu.Right-clickComputer,andthenclickProperties.
2.ClickDeviceManager.Typetheadministratorpasswordorprovideconfirmationifprompted.
3.ExpandBluetoothRadiostodisplaytheBluetoothdevices.Then,right-clickeachBluetooth
deviceandthenClickEnable.
4.ExpandNetworkadapters.Then,right-clickeachBluetoothdeviceandthenClickEnable.
–ForWindows10:
1.Right-clicktheStartbuttontoopentheStartcontextmenu.
2.ClickDeviceManager.Typetheadministratorpasswordorprovideconfirmationifprompted.
3.ExpandBluetoothtodisplaytheBluetoothdevices.Then,right-clickeachBluetoothdeviceand
thenClickEnabledevice.
4.ExpandNetworkadapters.Then,right-clickeachBluetoothdeviceandthenClickEnabledevice.
•ToturnontheBluetoothradioonWindows10,dothefollowing:
1.ClicktheStartbuttontoopentheStartmenu.
2.ClickSettings➙Devices➙Bluetooth&otherdevices.
3.TurnontheBluetoothswitchtoenabletheBluetoothfeature.
•UpdateorreinstalltheBluetoothdriver.Referto“Keepingyourcomputercurrent”onpage24.
50ThinkStationP410UserGuide

NosoundcomesfromtheBluetoothheadsetorheadphones.
Solution:
SettheBluetoothheadsetorheadphonesasthedefaultdevice.
1.Exittheapplicationthatusesthesounddevice(forexample,WindowsMediaPlayer).
2.Right-clickthevolumeiconintheWindowsnotificationareaonthetaskbar.
Note:IfthevolumeiconisnotdisplayedintheWindowsnotificationarea,addtheicontothe
notificationarea.RefertoWindowhelpsystem.
3.ClickPlaybackdevices.
4.IfyouareusingtheHeadsetprofile,selectBluetoothHands-freeAudio,andthenclickSetDefault.If
youareusingtheAVprofile,selectStereoAudio,andthenclickSetDefault.
5.ClickOK.
Performanceproblems
Excessivefragmentedfilesexistonthestoragedrives.
Solution:
UsetheWindowsdiskdefragmentationordiskoptimizationfeaturetocleanupthefiles.
Note:Dependingonthevolumeofthestoragedrivesandamountofdatastoredonthestoragedrives,the
disk-defragmentationprocessmighttakeuptoseveralhours.
1.Closeanyopenprogramsandwindows.
2.ClicktheStartbuttontoopentheStartmenu.
3.DependingonyourWindowsversion,dooneofthefollowing:
•ForWindows7:ClickComputer.
•ForWindows10:ClickWindowsSystem➙FileExplorer➙ThisPC.
4.Right-clickyourCdriveandthenclickProperties.
5.ClicktheToolstab.
6.DependingonyourWindowsversion,dooneofthefollowing:
•ForWindows7:ClickDefragmentnow.SelectthedesireddriveandthenclickDefragmentdisk.
•ForWindows10:ClickOptimize.SelectthedesireddriveandthenclickOptimize.
7.Followtheinstructionsonthescreen.
Thefreestoragedrivespaceisinsufficient.
Solutions:
Freeupthestoragedrivespace.
•CleanoutyourInbox,SentItems,andDeletedItemsfoldersfromyoure-mailapplication.
•CleanupyourCdrive.
1.ClicktheStartbuttontoopentheStartmenu.
2.DependingonyourWindowsversion,dooneofthefollowing:
–ForWindows7:ClickComputer.
–ForWindows10:ClickWindowsSystem➙FileExplorer➙ThisPC.
Chapter6.Troubleshooting,diagnostics,andrecovery51

3.Right-clickyourCdriveandthenclickProperties.
4.Checktheamountoffreespace,andthenclickDiskCleanup.
5.Alistofunnecessaryfilecategoriesisdisplayed.Selecteachfilecategoryyouwanttodelete,
andthenclickOK.
•TurnsomeWindowsfeaturesofforremovesomeunnecessaryprograms.
1.ClicktheStartbuttontoopentheStartmenu.
2.DependingonyourWindowsversion,dooneofthefollowing:
–ForWindows7:ClickControlPanel.
–ForWindows10:ClickWindowsSystem➙ControlPanel.
3.ViewControlPanelbyLargeiconsorSmallicons,andthenclickProgramsandFeatures.
4.Dooneofthefollowing:
–ToturnsomeWindowsfeaturesoff,clickTurnWindowsfeaturesonoroff.Followthe
instructionsonthescreen.
–Toremovesomeunnecessaryprograms,selecttheprogramyouwanttoremove,andthenclick
Uninstall/ChangeorUninstall.
Thefreememoryspaceisinsufficient.
Solutions:
•Right-clickablankareaonthetaskbarandopenTaskManager.Then,endsometasksyouarenot
performing.
•Installadditionalmemorymodules.Referto“Installingorreplacinghardware”onpage58.Topurchase
memorymodules,goto:
http://www.lenovo.com
Serialconnectorproblem
Theserialconnectorcannotbeaccessed.
Solutions:
•Connecttheserialcablefromtheserialconnectoronthecomputertotheserialdevice.Iftheserialdevice
hasitsownpowercord,connectthepowercordtoagroundedelectricaloutlet.
•Turnontheserialdeviceandkeepthedeviceonline.
•Installanyprogramssuppliedwiththeserialdevice.Refertothedocumentationthatcomeswiththe
serialdeviceformoreinformation.
•Ifyouaddedoneserial-connectoradapter,ensurethattheadapterisinstalledcorrectly.
USBdeviceproblems
AUSBdevicecannotbeaccessed.
Solutions:
•ConnecttheUSBcablefromtheUSBconnectortotheUSBdevice.IftheUSBdevicehasitsownpower
cord,connectthepowercordtoagroundedelectricaloutlet.
•TurnontheUSBdeviceandkeepthedeviceonline.
•InstallanydevicedriversorprogramssuppliedwiththeUSBdevice.Refertothedocumentationthat
comeswiththeUSBdeviceformoreinformation.
52ThinkStationP410UserGuide

•DisconnectandreconnecttheUSBconnectortoresettheUSBdevice.
TheWindows7operatingsystemcannotbeinstalledfromanexternalopticaldriveoranexternal
USBdevice.
Solution:
Gotohttps://support.lenovo.com/us/en/documents/ht104142formoreinformation.
Softwareanddriverproblems
Forsomeprograms,datescannotbesortedincorrectorder.
Solution:
Someprogramsdevelopedbeforetheyear2000useonlythelasttwodigitsofayeartosortdates,assuming
thefirsttwodigitsare19.Consequently,datescannotbesortedincorrectordernowadays.Checkwith
yoursoftwaremanufacturertorefertoifanyupdatesareavailable.Manysoftwaremanufacturersmake
updatesavailablefromtheWorldWideWeb.
Someprogramsdonotworkasexpected.
Solutions:
1.Checkwhethertheproblemiscausedbyaprogram.
a.Ensurethatthesoftwareiscompatiblewithyourcomputer.Refertotheinformationsuppliedwith
thesoftwareformoreinformation.
b.Verifythatothersoftwareworkscorrectlyonyourcomputer.
c.Verifythatthesoftwareyouareusingworksonanothercomputer.
2.Iftheproblemiscausedbyaprogram:
•Refertotheprinteddocumentationthatcomeswiththeprogramorthehelpsystemoftheprogram
fortroubleshootinginformation.
•Updatetheprogram.Referto“Keepingyourcomputercurrent”onpage24.
•Uninstalltheprogramandthenreinstallit.Todownloadaprogramthatispreinstalledonyour
computer,gotohttp://www.lenovo.com/supportandfollowtheinstructionsonthescreen.
Adevicedoesnotworkcorrectlyduetodevicedriverproblems.
Solution:
Updatethedevicedriver.Referto“Keepingyourcomputercurrent”onpage24.
Diagnosingproblems
Manycomputerproblemscanbesolvedwithoutoutsideassistance.Ifyouexperienceaproblemwithyour
computer,thefirstplacetostartisthetroubleshootinginformationinyourcomputerdocumentation.Ifyou
suspectasoftwareproblem,seethedocumentation,includingreadmefilesandhelpinformationsystems,
thatcomewiththeoperatingsystemorprogram.ThinkStationcomputerscomewithasetofdiagnostic
programsthatyoucanusetohelpyouidentifyhardwareproblems.
DiagnosingproblemswithLenovoSolutionCenterontheWindows7operatingsystem
LenovoSolutionCenterispreinstalledonyourcomputerandalsoisavailablefordownloadat:
http://www.lenovo.com/diags
Chapter6.Troubleshooting,diagnostics,andrecovery53

Notes:
•IfyouareusinganotherWindowsoperatingsystemratherthantheWindows7,youcanfindthelatest
informationaboutdiagnosticsforyourcomputerat:
http://www.lenovo.com/diagnose
•IfyouareunabletoisolateandrepairtheproblemyourselfafterrunningLenovoSolutionCenter,saveand
printthelogfilescreatedbytheprogram.YouneedthelogfileswhenyouspeaktoaLenovotechnical
supportrepresentative.
LenovoSolutionCenterenablesyoutotroubleshootandresolvecomputerproblems.Itcombinesdiagnostic
tests,systeminformationcollection,securitystatus,andsupportinformation,alongwithhintsandtipsfor
optimalsystemperformance.
Whenyouaresettingupyourcomputer,theLenovoSolutionCenterprogrampromptsyoutocreaterecovery
media.Youcanusetherecoverymediatorestorethestoragedrivetothefactorydefaultsettings.
Foradditionalinformation,seetheLenovoSolutionCenterhelpsystem.
DiagnosingproblemswithLenovoCompanionontheWindows10operatingsystem
LenovoCompanionispreinstalledonyourcomputerandalsoisavailablefordownloadat:
https://shop.lenovo.com/us/en/accessories/software/apps/lenovo-apps/companion/
Note:IfyouareunabletoisolateandrepairtheproblemyourselfafterrunningLenovoCompanion,save
andprintthelogfilescreatedbytheprogram.YouneedthelogfileswhenyouspeaktoaLenovotechnical
supportrepresentative.
LenovoCompanionsupportsthehardwarescanfunction.Itcombinesdiagnostictests,systeminformation
collection,securitystatus,andsupportinformation,alongwithhintsandtipsforoptimalsystemperformance.
Thetroubleshootinginformationorthediagnosticprogramsmighttellyouthatyouneedadditionalor
updateddevicedriversorothersoftware.Youcangetthelatesttechnicalinformationanddownloaddevice
driversandupdatesfromtheLenovoSupportWebsiteat:
http://www.lenovo.com/support
Foradditionalinformation,seetheLenovoCompanionhelpsystem.
DiagnosingproblemswithThinkStationDiagnosticsontheWindows7andWindows10operating
systems
ThinkStationDiagnosticsispreinstalledonyourcomputerandalsoisavailablefordownloadat:
http://www.lenovo.com/diags
Note:IfyouinstallWindows7byyourself,ensurethatThinkStationDiagnosticsisinstalledafterLenovo
SolutionCenterifbothprogramsareneededonthesamecomputer.
ThinkStationDiagnosticsenablesyoutotroubleshootandresolvecomputerproblems.Theprogramnotifies
youofanyissuesdetectedbythereal-timehardwarediagnosticmonitoringfunction.Theprogramalso
providesthedetailsoftheissue,analyzespossiblecauses,andprovidessolutions.
Hardwarediagnostics
Thehardwarediagnosticsfunctionenablesyourcomputertomonitorhardwarecomponentsinrealtimefor
potentialissuesorerrorswithoutimpactingtheperformance.Whenanissueorerrorisdetected,hardware
diagnosticinformationispresentedinoneofthefollowingways:
54ThinkStationP410UserGuide

•IftheThinkStationDiagnosticsapplicationisinstalledandrunningonyourcomputer,anissueorerror
messageisdisplayedintheWindowsnotificationarea.GotoThinkStationDiagnosticsformore
informationandsuggestedsolutions.
•IftheThinkStationDiagnosticsapplicationisnotinstalledorrunningonyourcomputer,anerrorcodeis
displayedonthefour-digitdiagnosticdisplay(availableonsomemodels)onthefrontofthecomputer.For
detailedinformation,doeitherofthefollowing:
–Checktheerrorcodeat:
http://thinkworkstationsoftware.com/diags.html
–IftheLenovoPCDiagnosticsapplicationisinstalledinyoursmartphone,usetheapplicationtotransfer
theerrorcodefromthecomputertothesmartphoneforfurtheranalysis.Theapplicationisavailablefor
downloadatbothGooglePlayandiTunesAppStore.
Thehardwarediagnosticsfunctionisenabledonyourcomputerbydefault.Ifyouwanttodisablethe
function,dothefollowing:
1.StarttheSetupUtilityprogram.See“StartingtheSetupUtilityprogram”onpage33.
2.Fromthemaininterface,selectAdvanced➙Diagnostics,andthenpressEnter.
3.SelectReal-timeDiagnosticsMonitoringandpressEnter.ThenselectDisabledandpressEnter.
4.TosavesettingsandexittheSetupUtilityprogram,pressF10orFn+F10(dependingonthekeyboard
settings).Then,selectYesinthewindowdisplayed,andpressEnter.
Recoveryinformation
Thissectionprovidesinstructionsonhowtorecoveryouroperatingsystem.
Note:Ifadevicedoesnotworknormallyafterrecoveringtheoperatingsystem,updatethedevicedriver.
Referto“Keepingyourcomputercurrent”onpage24.
RecoveryinformationforWindows7
TorecoveryourWindows7operatingsystem,usethefollowingsolutions:
•UseWindowsrecoverysolutions.
–UseSystemRestoretorestoresystemfilesandsettingstoanearlierpoint.
1.ClicktheStartbuttontoopentheStartmenu.
2.ClickControlPanel.ViewControlPanelbyLargeiconsorSmallicons,andthenclickRecovery
➙OpenSystemRestore.
3.Followtheinstructionsonthescreen.
–UsetheWindowsrecoveryenvironmentbydoingoneofthefollowing:
–Afterseveralconsecutivefailedbootattempts,theWindowsrecoveryenvironmentmightstart
automatically.Followtheinstructionsonthescreentochoosetheappropriaterecoverysolution.
–Turnonorrestartyourcomputer.Then,repeatedlypressandreleaseF8orFn+F8(dependingonthe
keyboardsettings)untiltheAdvancedBootOptionswindowopens.SelectRepairYourComputer,
pressEnter,andfollowtheinstructionsonthescreentochoosetheappropriaterecoverysolution.
•UsetherecoverymediumyoucreatedearlierwiththeRecoveryMediaCreatorprogramtorestoreonly
theCdriveortheentirestoragedrivetothefactory-defaultsettings.
1.Selecttherecoverymediumasthestartupdevice.See“Selectingatemporarystartupdevice”
onpage37.
2.Followtheinstructionsonthescreentochoosetheappropriaterecoverysolution.
Chapter6.Troubleshooting,diagnostics,andrecovery55

•UsetherecoverydiscsetprovidedbyLenovotorestoretheentirestoragedrivetothefactory-default
settings.
–Ifyourcomputercomeswiththerecoverydiscset,followtheinstructionsshippedwiththediscset.
–Ifyourcomputerdoesnotcomewiththerecoverydiscset,contacttheLenovoCustomerSupport
Centertoorderarecoverydiscset.See“Callingforservice”onpage102.
RecoveryinformationforWindows10
TorecoveryourWindows10operatingsystem,usethefollowingsolutions:
•UseWindowsrecoverysolutions.
–UserecoverysolutionsinWindowsSettings.
1.ClicktheStartbuttontoopentheStartmenu.
2.ClickSettings➙Update&security➙Recovery.
3.Choosetheappropriaterecoverysolutionbyfollowingtheinstructionsonthescreen.
–UseSystemRestoretorestoresystemfilesandsettingstoanearlierpoint.
1.ClicktheStartbuttontoopentheStartmenu,andthenclickWindowsSystem➙ControlPanel.
2.ViewControlPanelbyLargeiconsorSmallicons,andthenclickRecovery➙OpenSystem
Restore.
3.Followtheinstructionsonthescreen.
–UsetheFileHistorytooltorestoreyourfilesfromabackup.
Note:IfyouusetheFileHistorytooltorestoreyourfilesfromabackup,ensurethatyoubackedup
yourdataearlierwiththetool.
1.ClicktheStartbuttontoopentheStartmenu,andthenclickWindowsSystem➙ControlPanel.
2.ViewControlPanelbyLargeiconsorSmallicons,andthenclickFileHistory➙Restorepersonal
files.
3.Followtheinstructionsonthescreen.
–UsetheWindowsrecoveryenvironmentbydoingoneofthefollowing:
–Afterseveralconsecutivefailedbootattempts,theWindowsrecoveryenvironmentmightstart
automatically.Followtheinstructionsonthescreentochoosetheappropriaterecoverysolution.
–SelecttherecoverymediumyoucreatedearlierwiththeWindowstoolasthestartupdevice.Refer
to“Selectingatemporarystartupdevice”onpage37.Then,followtheinstructionsonthescreen
tochoosetheappropriaterecoverysolution.
Note:Tocreatearecoverymedium,referto“Goodmaintenancepractices”onpage24.
•UsetherecoveryUSBkeyprovidedbyLenovotorestoretheentirestoragedrivetothefactory-default
settings.
–IfyourcomputercomeswiththerecoveryUSBkey,followtheinstructionsshippedwiththeUSBkey.
–IfyourcomputerdoesnotcomewiththerecoveryUSBkey,contacttheLenovoCustomerSupport
CentertoorderarecoveryUSBkey.Referto“Callingforservice”onpage102.
56ThinkStationP410UserGuide

Chapter7.Installingorreplacinghardware
Thischaptercontainsthefollowingtopics:
•“Handlingstatic-sensitivedevices”onpage57
•“Preparingyourcomputerandremovingthecomputercover”onpage57
•“Installingorreplacinghardware”onpage58
•“Completingthepartsreplacement”onpage98
Handlingstatic-sensitivedevices
Donotopenthestatic-protectivepackagecontainingthenewpartuntilthedefectiveparthasbeenremoved
andyouarereadytoinstallthenewpart.Staticelectricity,althoughharmlesstoyou,canseriouslydamage
computercomponentsandoptions.
Whenyouhandleoptionsandothercomputercomponents,taketheseprecautionstoavoidstatic-electricity
damage:
•Limityourmovement.Movementcancausestaticelectricitytobuilduparoundyou.
•Alwayshandleoptionsandothercomputercomponentscarefully.HandlePCI/PCI-Expresscards,
memorymodules,systemboards,andmicroprocessorsbytheedges.Nevertouchanyexposedcircuitry.
•Preventothersfromtouchingtheoptionsandothercomputercomponents.
•Touchthestatic-protectivepackagecontainingtheparttoametalexpansion-slotcoverorother
unpaintedmetalsurfaceonthecomputerforatleasttwoseconds.Thisreducesstaticelectricityfrom
thepackageandyourbodybeforeyouinstallorreplaceanewpart.
•Whenpossible,removethenewpartfromthestatic-protectivepackage,andinstallitdirectlyinthe
computerwithoutsettingthepartdown.Whenthisisnotpossible,placethestatic-protectivepackageon
asmooth,levelsurfaceandplacethepartonthepackage.
•Donotplacethepartonthecomputercoverorothermetalsurface.
Preparingyourcomputerandremovingthecomputercover
Attention:Donotopenyourcomputerorattemptanyrepairbeforereadingandunderstandingthe“Read
thisfirst:Importantsafetyinformation”onpagev.
CAUTION:
Beforeyouopenthecomputercover,turnoffthecomputerandwaitseveralminutesuntilthe
computeriscool.
Beforeinstallingorremovinganyhardwarecomponentinyourcomputer,dothefollowingtoprepareyour
computerandremovethecomputercover:
1.Removeanymediafromthedrivesandturnoffallattacheddevicesandthecomputer.Then,disconnect
allpowercordsfromelectricaloutletsanddisconnectallcablesthatareconnectedtothecomputer.
2.Unlockanylockingdevicethatsecuresthecomputercover.See“Lockingyourcomputer”onpage27.
3.Removethetwoscrewsthatsecurethecomputercover.
©CopyrightLenovo2016,201757
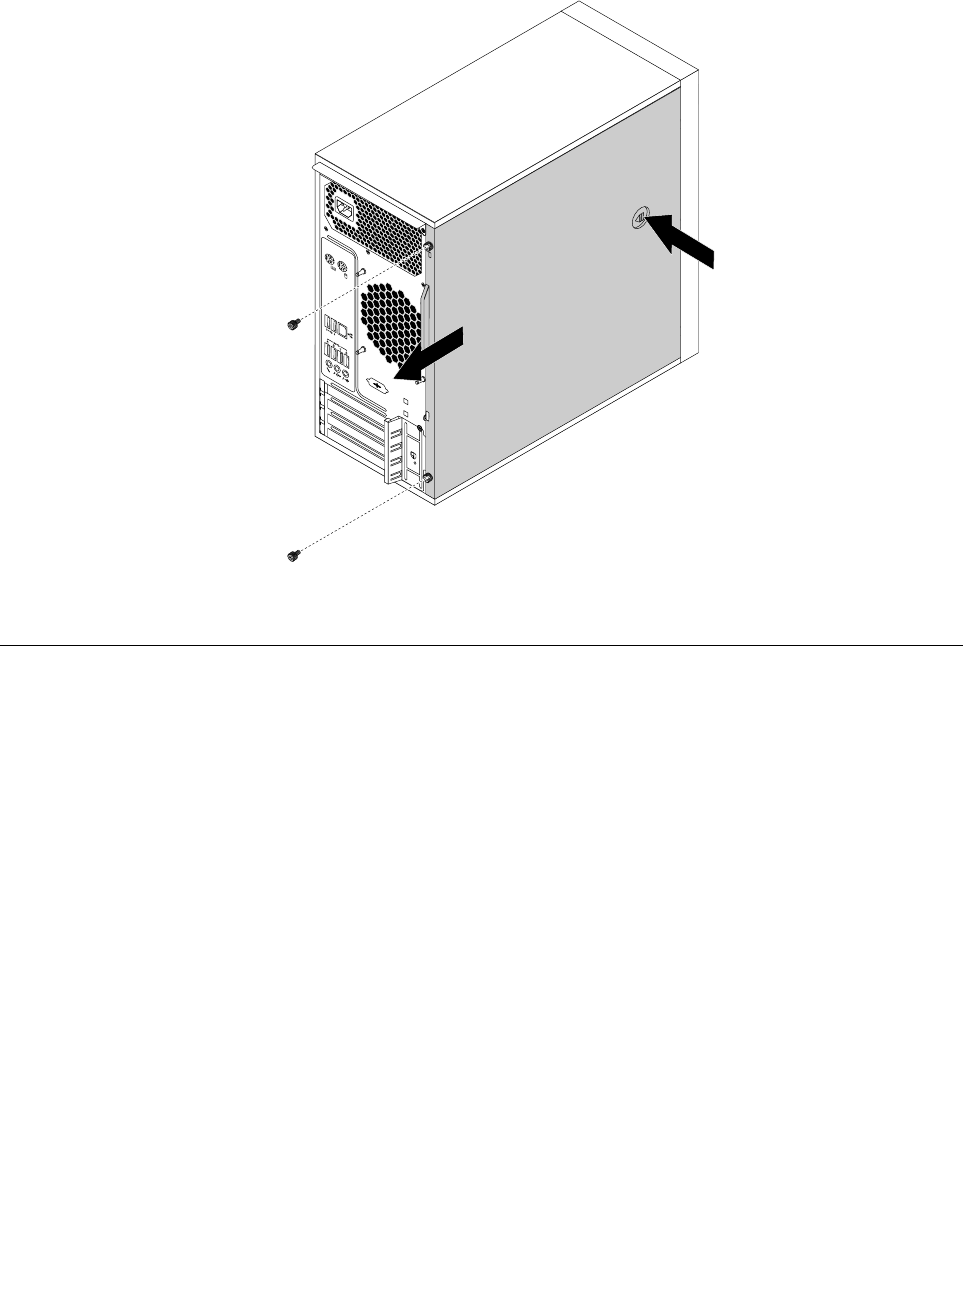
4.Pressthecover-releasebuttononthesideofthecomputerandslidethecovertotherearofthe
computertoremovethecover.
Figure10.Removingthecomputercover
Installingorreplacinghardware
Thissectionprovidesinstructionsonhowtoinstallorreplacehardwareforyourcomputer.Youcanexpand
thecapabilitiesofyourcomputerandmaintainyourcomputerbyinstallingorreplacinghardware.
Attention:Donotopenyourcomputerorattemptanyrepairbeforereadingandunderstandingthe“Read
thisfirst:Importantsafetyinformation”onpagev.
Notes:
•Dependingonyourcomputermodel,someofthehardwarepartsinthissectionmightnotbeavailable.
•UsecomputerpartsprovidedonlybyLenovo.
•Wheninstallingorreplacinganoption,usetheappropriateinstructionsinthissectionalongwiththe
instructionsthatcomewiththeoption.
•Inmostareasoftheworld,LenovorequiresthereturnofthedefectiveCRU.Informationaboutthiswill
comewiththeCRUorwillcomeafewdaysaftertheCRUarrives.
Externaloptions
Youcanconnectexternaloptionstoyourcomputer,suchasexternalspeakers,aprinter,orascanner.For
someexternaloptions,youmustinstalladditionalsoftwareinadditiontomakingthephysicalconnection.
Wheninstallinganexternaloption,see“Frontview”onpage1and“Rearview”onpage3toidentifythe
requiredconnector.Then,usetheinstructionsthatcomewiththeoptiontohelpyoumaketheconnection
andinstallanysoftwareordevicedriversthatarerequiredfortheoption.
58ThinkStationP410UserGuide
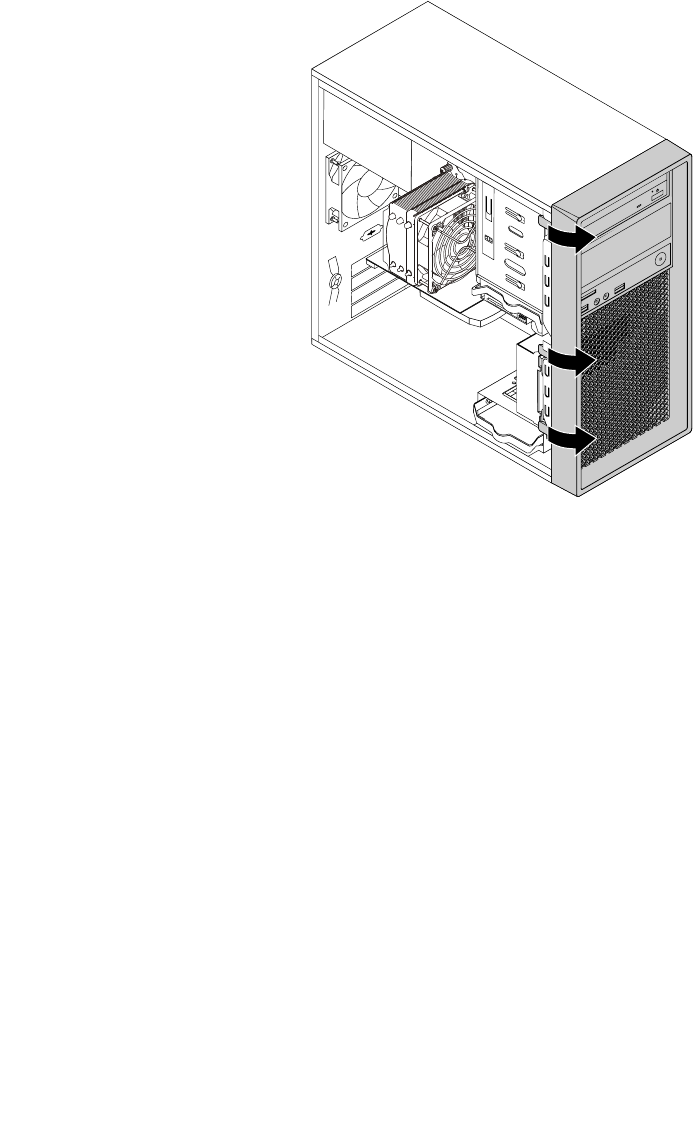
Frontbezel
Attention:Donotopenyourcomputerorattemptanyrepairbeforereadingandunderstandingthe“Read
thisfirst:Importantsafetyinformation”onpagev.
Toremoveandreinstallthefrontbezel,dothefollowing:
1.Prepareyourcomputer.See“Preparingyourcomputerandremovingthecomputercover”onpage57.
2.Releasethethreeplastictabsontheleftsideandpivotthefrontbezeloutwardtoremoveitfromthe
computer.
Figure11.Removingthefrontbezel
3.Toreinstallthefrontbezel,alignthethreeplastictabsontherightsideofthefrontbezelwiththe
correspondingholesinthechassis.Thenpivotthefrontbezelinwardsuntilitsnapsintoposition
ontheleftside.
Whattodonext:
•Toworkwithanotherpieceofhardware,gototheappropriatesection.
•Tocompletetheinstallationorreplacement,goto“Completingthepartsreplacement”onpage98.
Powerbutton
Attention:Donotopenyourcomputerorattemptanyrepairbeforereadingandunderstandingthe“Read
thisfirst:Importantsafetyinformation”onpagev.
Toreplacethepowerbutton,dothefollowing:
1.Prepareyourcomputer.See“Preparingyourcomputerandremovingthecomputercover”onpage57.
2.Removethefrontbezel.See“Frontbezel”onpage59.
3.Locatethepowerbutton.See“Computercomponents”onpage5.
4.Disconnectthepowerbuttoncablefromthepowerbuttonconnectoronthesystemboard.See“Parts
onthesystemboard”onpage5.
Chapter7.Installingorreplacinghardware59
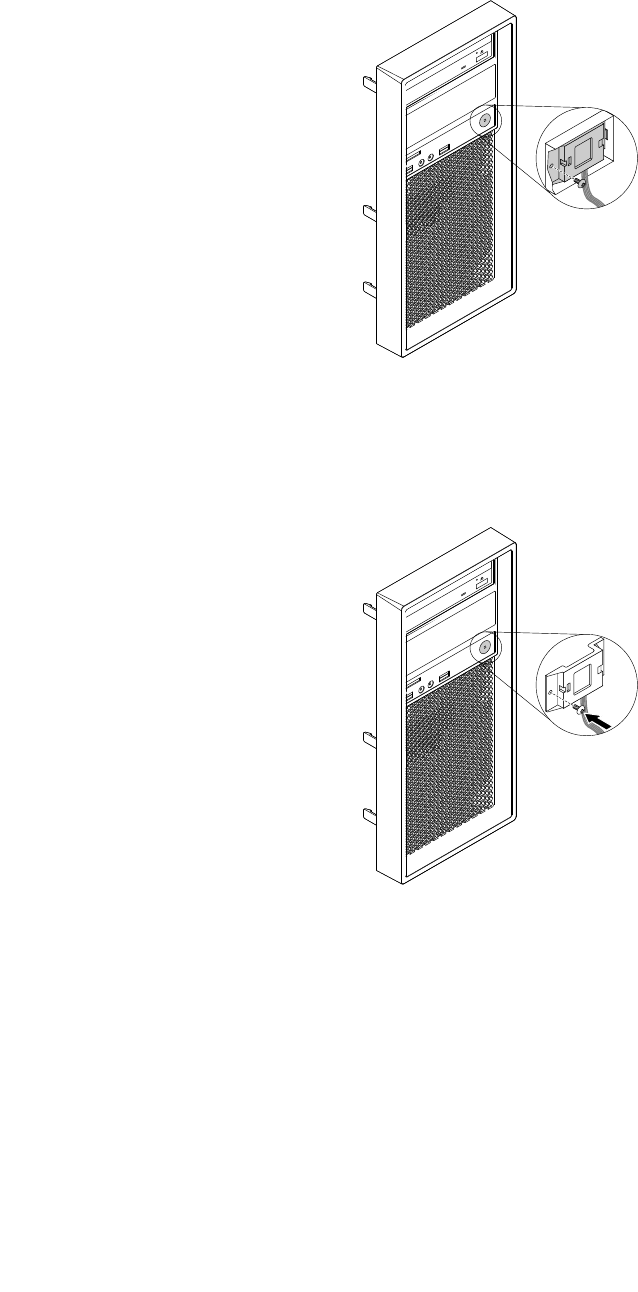
5.Removethescrewthatsecuresthepowerbuttontothefrontbezel.Then,removethepowerbutton
fromthefrontbezel.
Figure12.Removingthepowerbutton
6.Positionthenewpowerbuttonsothatthescrewholeinthepowerbuttonisalignedwiththe
correspondingholeinthefrontbezel.Theninstallthescrewtosecurethepowerbuttontothefrontbezel.
Figure13.Installingthepowerbutton
7.Connectthepowerbuttoncabletothepowerbuttonconnectoronthesystemboard.See“Partson
thesystemboard”onpage5.
8.Reinstallthefrontbezel.See“Frontbezel”onpage59.
Whattodonext:
•Toworkwithanotherpieceofhardware,gototheappropriatesection.
•Tocompletetheinstallationorreplacement,goto“Completingthepartsreplacement”onpage98.
60ThinkStationP410UserGuide
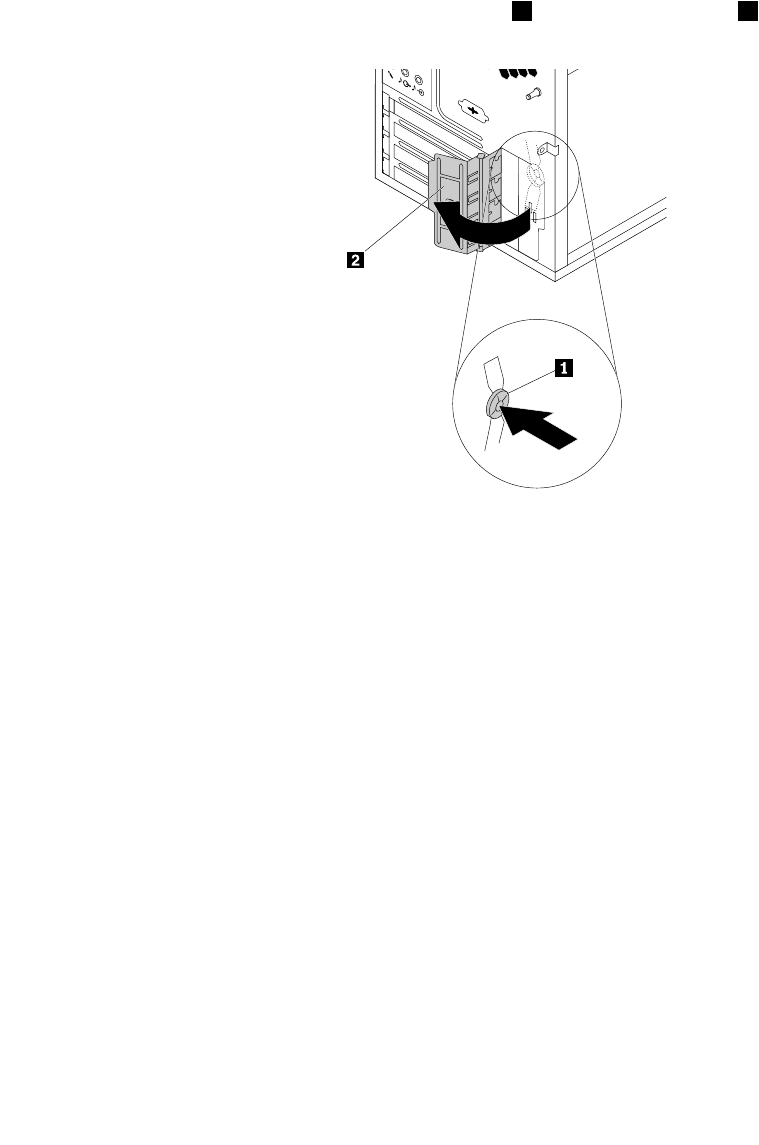
PCIExpresscard
Attention:Donotopenyourcomputerorattemptanyrepairbeforereadingandunderstandingthe“Read
thisfirst:Importantsafetyinformation”onpagev.
YourcomputerhasonePCIExpressx4cardslot,onePCIExpressx8cardslot,andtwoPCIExpressx16
cardslots(graphicscardavailableonsomemodels).
ToinstallorreplaceaPCIExpresscard,dothefollowing:
1.Prepareyourcomputer.See“Preparingyourcomputerandremovingthecomputercover”onpage57.
2.Attherearofthecomputer,pressthereleasebutton1toopenthecardlatch2.
Figure14.OpeningthePCIExpresscardlatch
Chapter7.Installingorreplacinghardware61
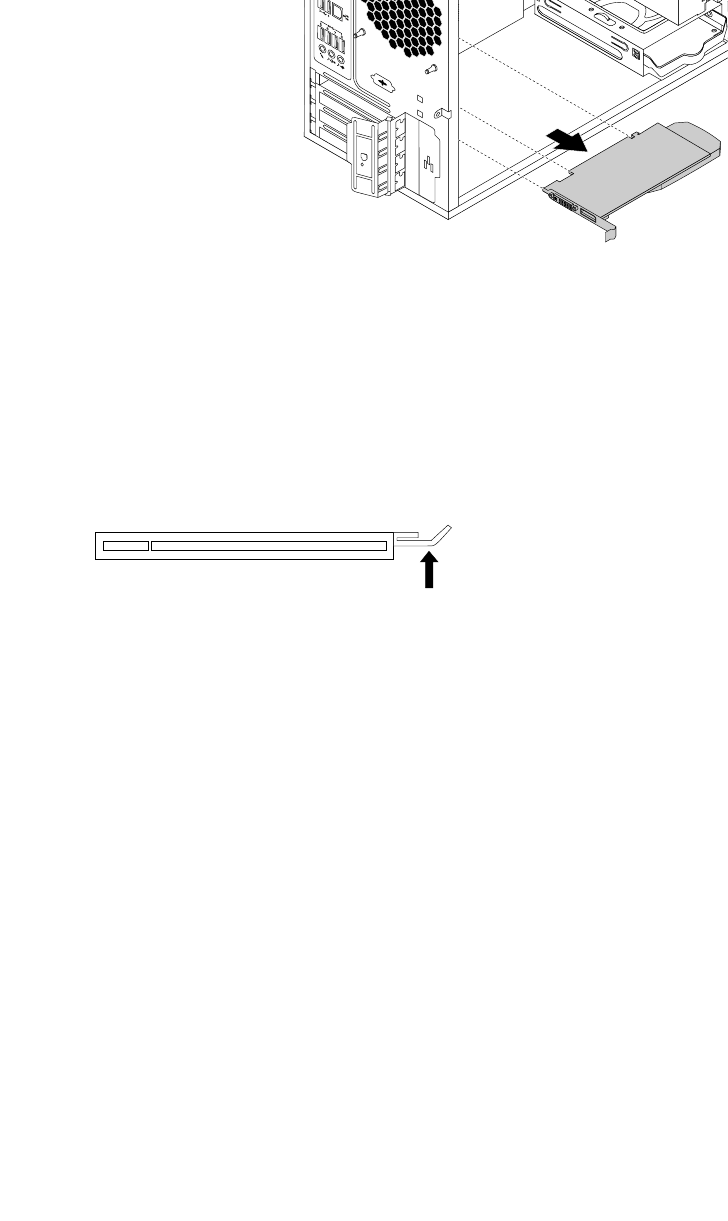
3.DependingonwhetheryouareinstallingorreplacingaPCIExpresscard,dooneofthefollowing:
•IfyouareinstallingaPCIExpresscard,removetheappropriatemetalslotcover.
•IfyouarereplacinganoldPCIExpresscard,grasptheoldcardthatiscurrentlyinstalledandgently
pullitoutoftheslot.
Figure15.RemovingaPCIExpresscard
Notes:
a.Thecardfitstightlyintotheslot.Ifnecessary,alternatelymoveeachsideofthecardasmall
amountuntilthecardisremovedfromtheslot.
b.Ifthecardisheldinplacebyaretaininglatch,pressthecardretaininglatchasshownto
disengagethelatch.Thengraspthecardandgentlypullitoutoftheslot.
Figure16.Disengagingthecardretaininglatch
4.RemovethenewPCIExpresscardfromitsstatic-protectivepackage.
5.Installthenewcardintotheappropriateslotonthesystemboard.See“Partsonthesystemboard”
onpage5.
Note:IfyouareinstallingaPCIExpressx16graphicscard,ensurethatthememory-slotretainingclips
areclosedbeforeyouinstallthecardtoavoidanyinterferenceduringtheinstallation.
62ThinkStationP410UserGuide
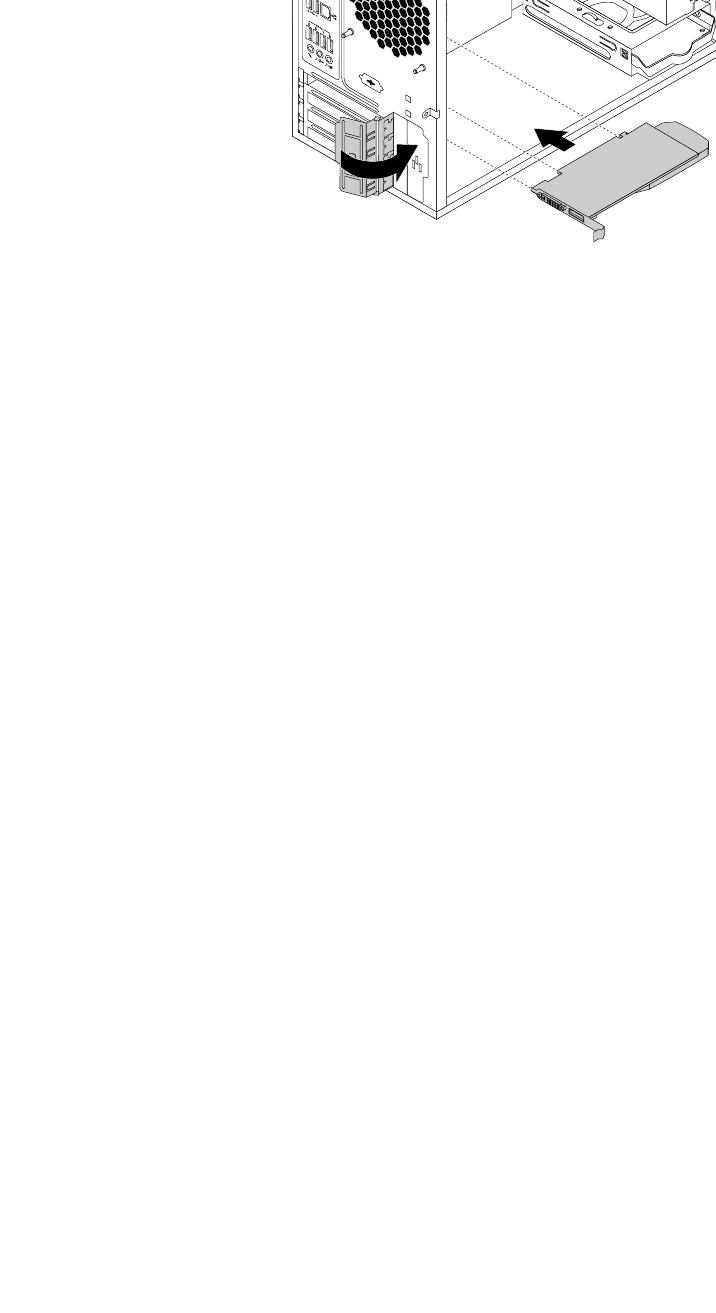
6.PivotthecardlatchtotheclosedpositiontosecurethePCIExpresscard.
Figure17.InstallingaPCIExpresscard
Whattodonext:
•Toworkwithanotherpieceofhardware,gototheappropriatesection.
•Tocompletetheinstallationorreplacement,goto“Completingthepartsreplacement”onpage98.
Full-lengthPCIExpresscard
Attention:Donotopenyourcomputerorattemptanyrepairbeforereadingandunderstandingthe“Read
thisfirst:Importantsafetyinformation”onpagev.
YourcomputerhasonePCIExpressx4cardslot,onePCIExpressx8cardslot,andtwoPCIExpressx16
cardslots(graphicscardavailableonsomemodels).
Toreplaceafull-lengthPCIExpresscard,dothefollowing:
1.Prepareyourcomputer.See“Preparingyourcomputerandremovingthecomputercover”onpage57.
2.LaythecomputeronitssideforeasieraccesstothePCIExpresscardslots.
Chapter7.Installingorreplacinghardware63
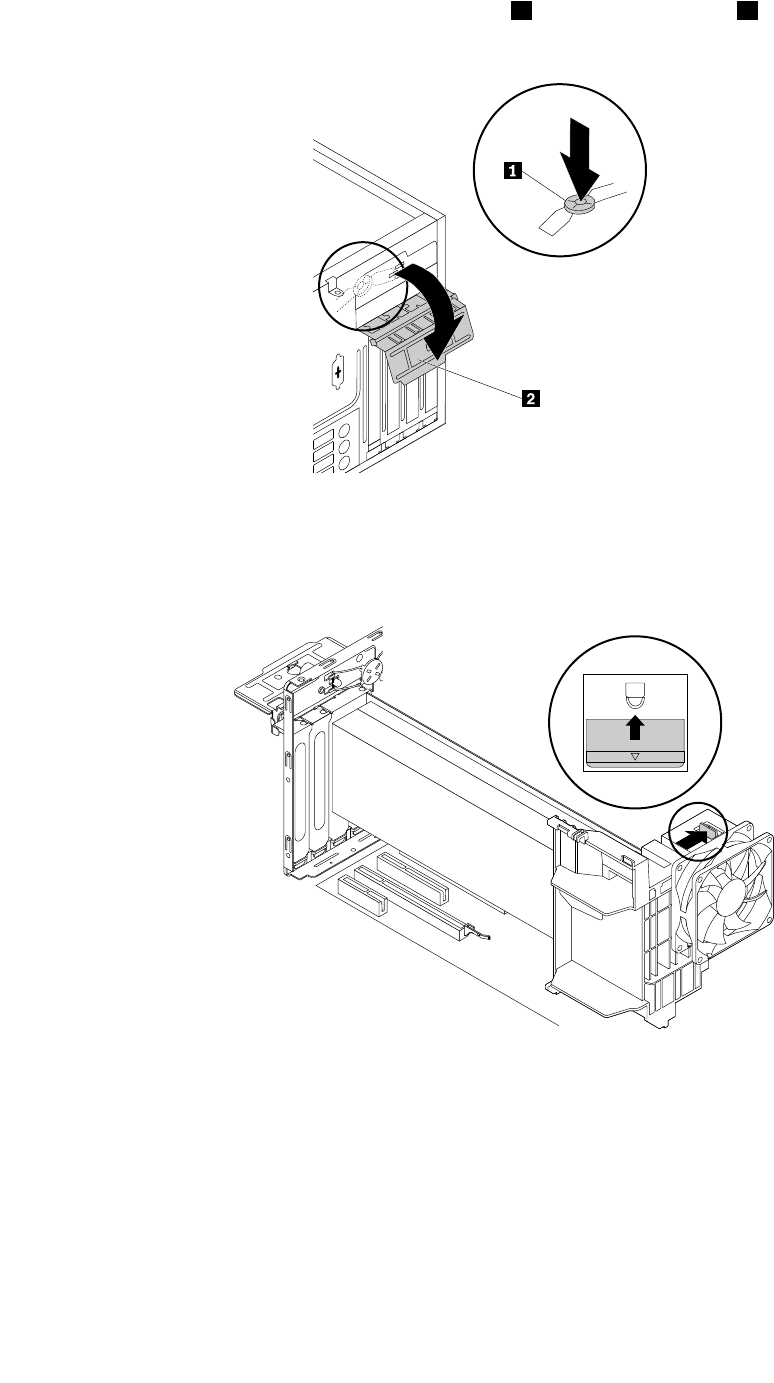
3.Attherearofthecomputer,pressthereleasebutton1toopenthecardlatch2.
Figure18.OpeningthePCIcardlatch
4.Pivotthetabonthefrontfanassemblyoutwardtoopenthelatchinside.
Figure19.Openingthelatchonthefrontfanassembly
64ThinkStationP410UserGuide
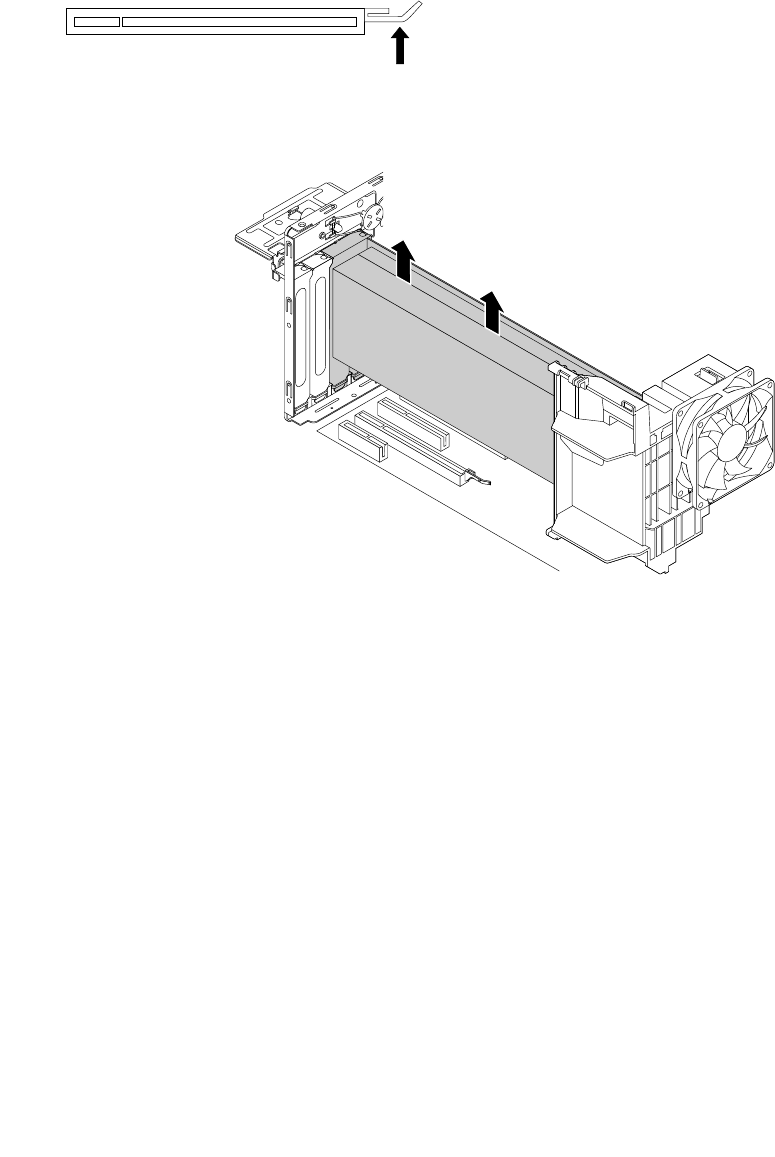
5.Grasptheoldcardthatiscurrentlyinstalledandgentlypullitoutoftheslot.
Notes:
•Thecardfitstightlyintotheslot.Ifnecessary,alternatelymoveeachsideofthecardasmallamount
untilthecardisremovedfromtheslot.
•Ifthecardisheldinplacebyaretaininglatch,pressthecardretaininglatchasshowntodisengage
thelatch.Thengraspthecardandgentlypullitoutoftheslot.
Figure20.Disengagingthecardretaininglatch
Figure21.Removingthefull-lengthPCIExpresscard
6.Removethenewfull-lengthPCIExpresscardfromitsstatic-protectivepackage.
Chapter7.Installingorreplacinghardware65
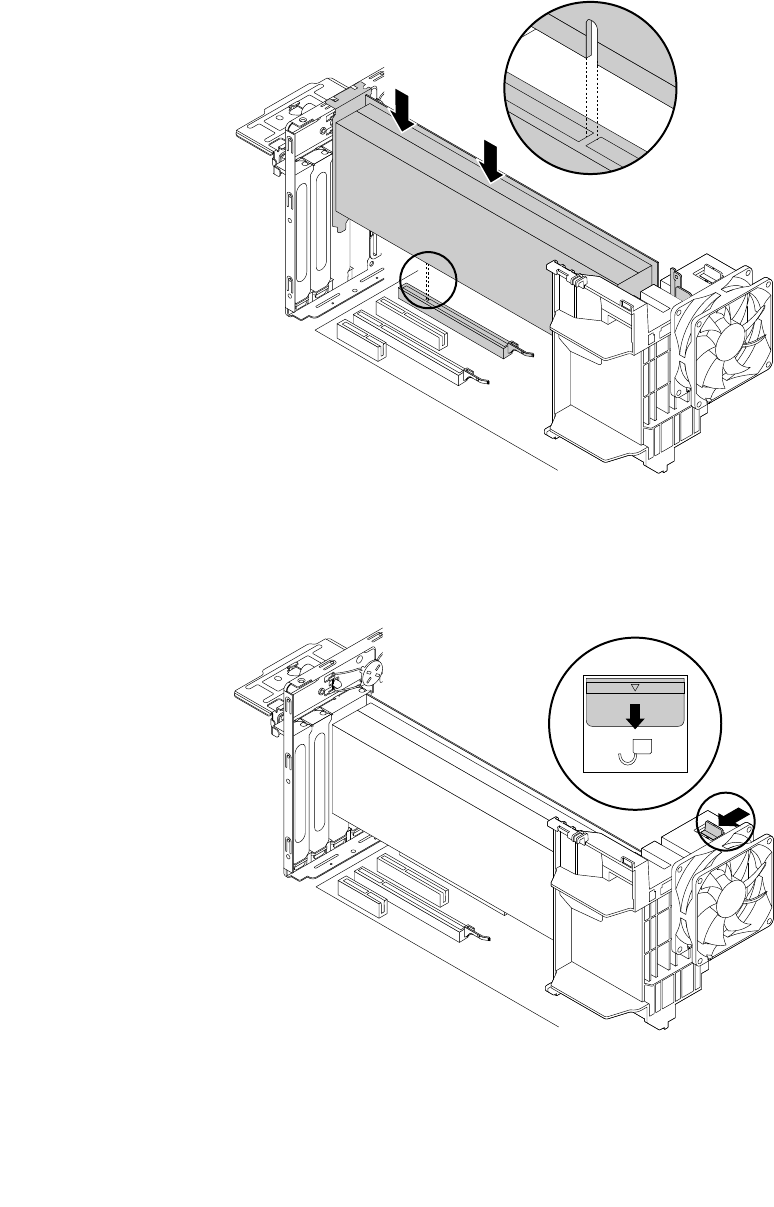
7.Alignthenotchonthenewfull-lengthPCIExpresscardwiththeslotkeyinaPCIExpressx16card
slotonthesystemboard.Then,insertthenewcarddownwardintothecardslotuntilitissecured
tightly.See“Partsonthesystemboard”onpage5.
Note:Ensurethatthememory-slotretainingclipsareclosedbeforeyouinstallthecardtoavoidany
interferenceduringtheinstallation.
Figure22.Installingafull-lengthPCIExpresscard
8.Pivotthetabonthefrontfanassemblyinwardtoclosethelatchinside.
Figure23.Closingthelatchonthefrontfanassembly
66ThinkStationP410UserGuide
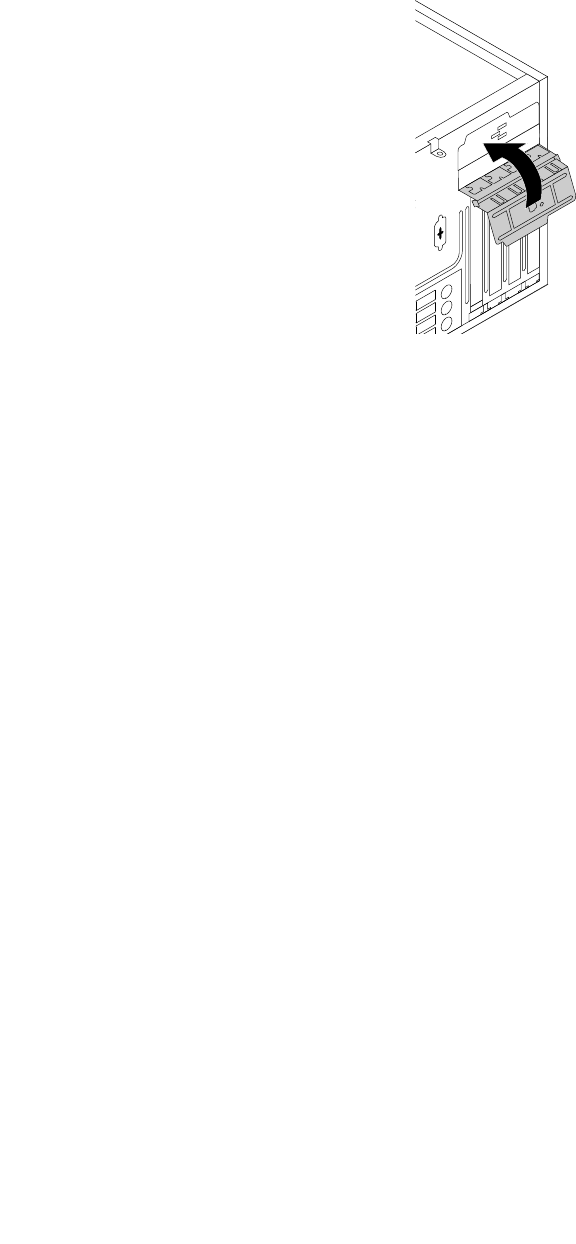
9.Pivotthecardlatchtotheclosedpositiontosecurethefull-lengthPCIExpresscard.
Figure24.Pivotingthecardlatch
Whattodonext:
•Toworkwithanotherpieceofhardware,gototheappropriatesection.
•Tocompletetheinstallationorreplacement,goto“Completingthepartsreplacement”onpage98.
M.2solid-statedrive
Attention:Donotopenyourcomputerorattemptanyrepairbeforereadingandunderstandingthe“Read
thisfirst:Importantsafetyinformation”onpagev.
ToinstallorreplaceanM.2solid-statedrive,dothefollowing:
1.Prepareyourcomputer.See“Preparingyourcomputerandremovingthecomputercover”onpage57.
2.Laythecomputeronitssideforeasieraccesstothesystemboard.
3.DependingonwhetheryouareinstallingorreplacinganM.2solid-statedrive,dooneofthefollowing:
•IfyouarereplacinganM.2solid-statedrive,dothefollowing:
a.LocateandremovetheM.2solid-statedriveadapter.See“PCIExpresscard”onpage61.
Chapter7.Installingorreplacinghardware67
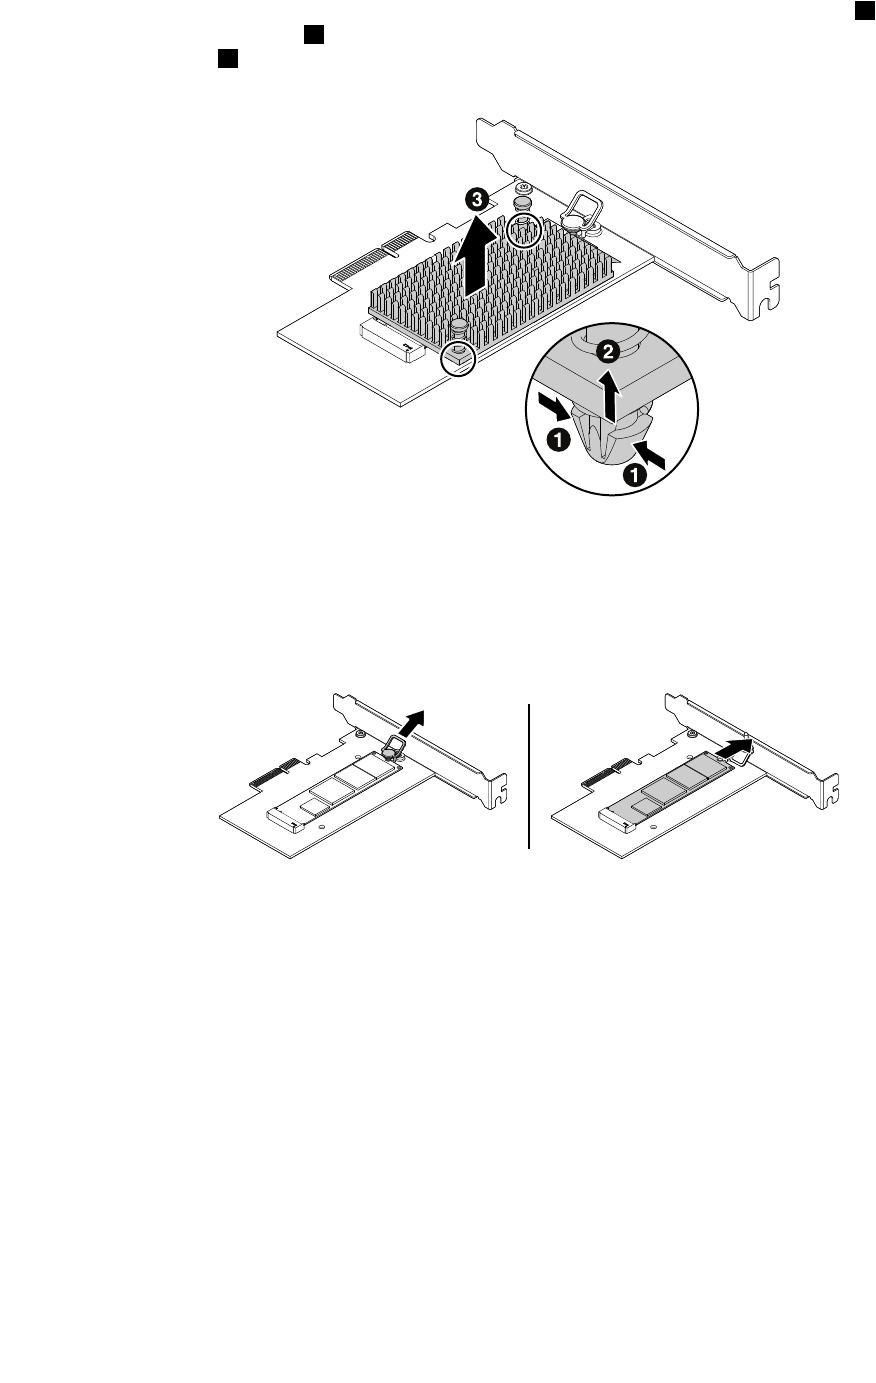
b.Theheatsinkissecuredbytwomountingstuds.Pinchtheclipsofthestudsinward1and
pushthestudsupward2toreleasetheheatsink.Then,lifttheheatsinkofftheM.2solid-state
driveadapter3.
Figure25.RemovingtheheatsinkfromtheM.2solid-statedriveadapter
c.TheM.2solid-statedriveissecuredbyaretentionlatch.Pullthehandleoftheretentionlatch
outwardtoreleasetheM.2solid-statedrive.Then,gentlypulltheM.2solid-statedriveoutof
theM.2slot.
Figure26.RemovingtheM.2solid-statedrive
•IfyouareinstallinganM.2solid-statedrive,pulloutwardthehandleoftheretentionlatchinthe
M.2solid-statedriveadapter.
68ThinkStationP410UserGuide
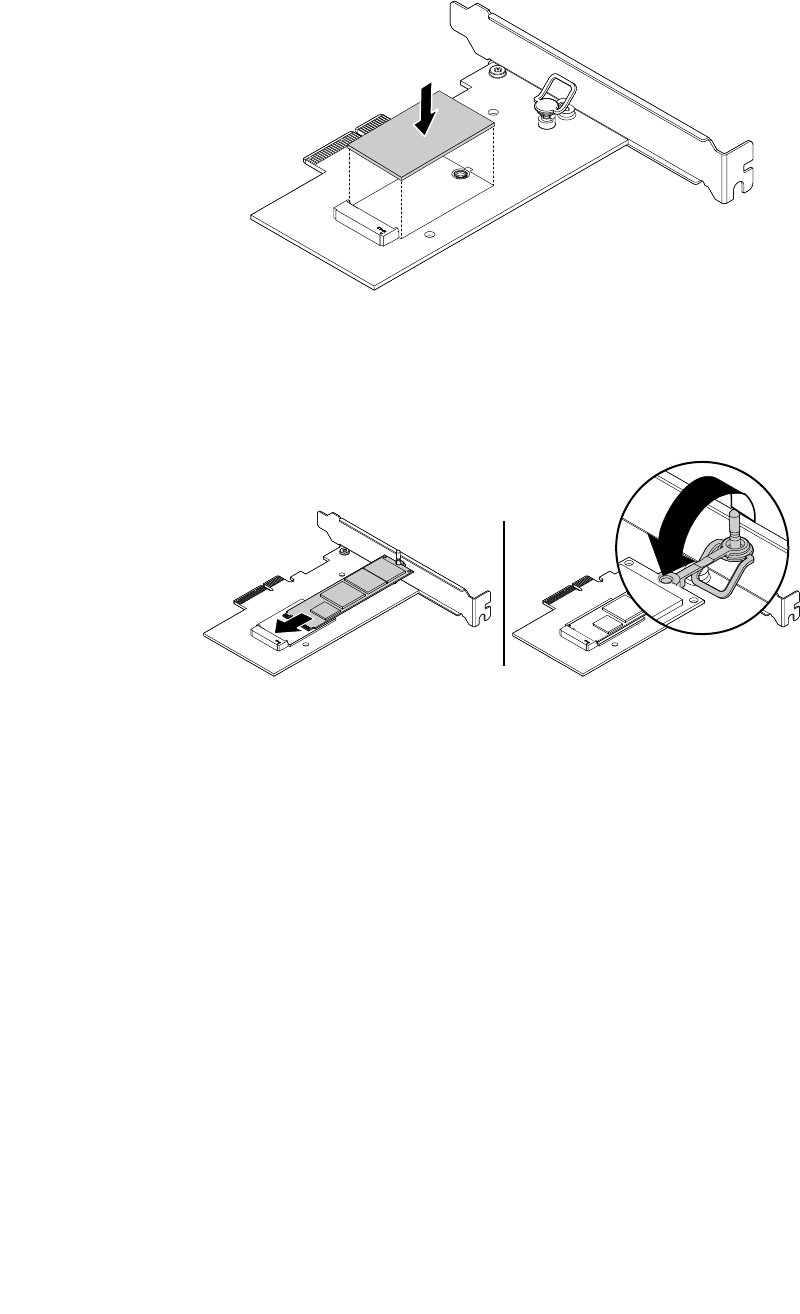
4.EnsurethatathermalpadisplacedinpositionontheM.2solid-statedriveadapter.
Figure27.Installingthethermalpad
5.InsertthenewM.2solid-statedriveintotheM.2slot.Then,inserttheplugoftheretentionlatchintothe
holetosecurethenewdrive.
Figure28.InstallingtheM.2solid-statedrive
Chapter7.Installingorreplacinghardware69
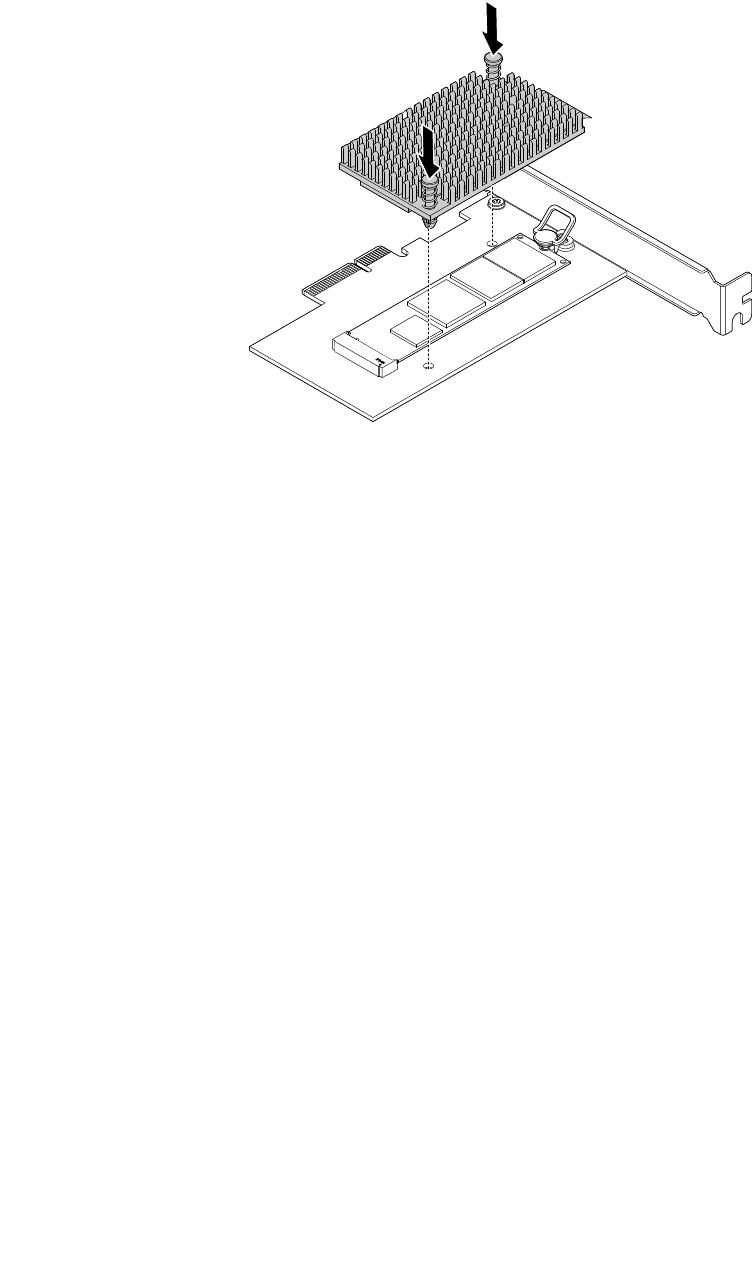
6.PositiontheheatsinkontheM.2solid-statedriveadapter.Ensurethatthetwomountingstudsinthe
heatsinkarealignedwiththeholesintheM.2solid-statedriveadapter.Then,pushthemountingstuds
downwardtosecuretheheatsinktotheadapter.
Figure29.Installingtheheatsink
7.InstalltheM.2solid-statedriveadapterintotheappropriatePCIExpresscardslotonthesystemboard.
See“PCIExpresscard”onpage61.
Note:ItisrecommendedthatyouinstalltheM.2solid-statedriveadapterintothePCIExpressx16card
slot.See“Partsonthesystemboard”onpage5.
Whattodonext:
•Toworkwithanotherpieceofhardware,gototheappropriatesection.
•Tocompletetheinstallationorreplacement,goto“Completingthepartsreplacement”onpage98.
Memorymodule
Attention:Donotopenyourcomputerorattemptanyrepairbeforereadingandunderstandingthe“Read
thisfirst:Importantsafetyinformation”onpagev.
YourcomputerhasfourmemoryslotsforinstallingorreplacingDDR4DIMMsthatprovideuptoamaximum
of128GBsystemmemory.Wheninstallingorreplacingamemorymodule,usethefollowingguidelines:
•UseanyofDDR4ECCUDIMMsorDDR4ECCRDIMMsforyourcomputer.DonotinstalltheUDIMMs
andRDIMMsintothesamecomputer.
•Use8GBECCUDIMMsuptoamaximumof32GB.
•Use8GB,16GB,or32GBECCRDIMMsinanycombinationuptoamaximumof128GBsystemmemory.
70ThinkStationP410UserGuide
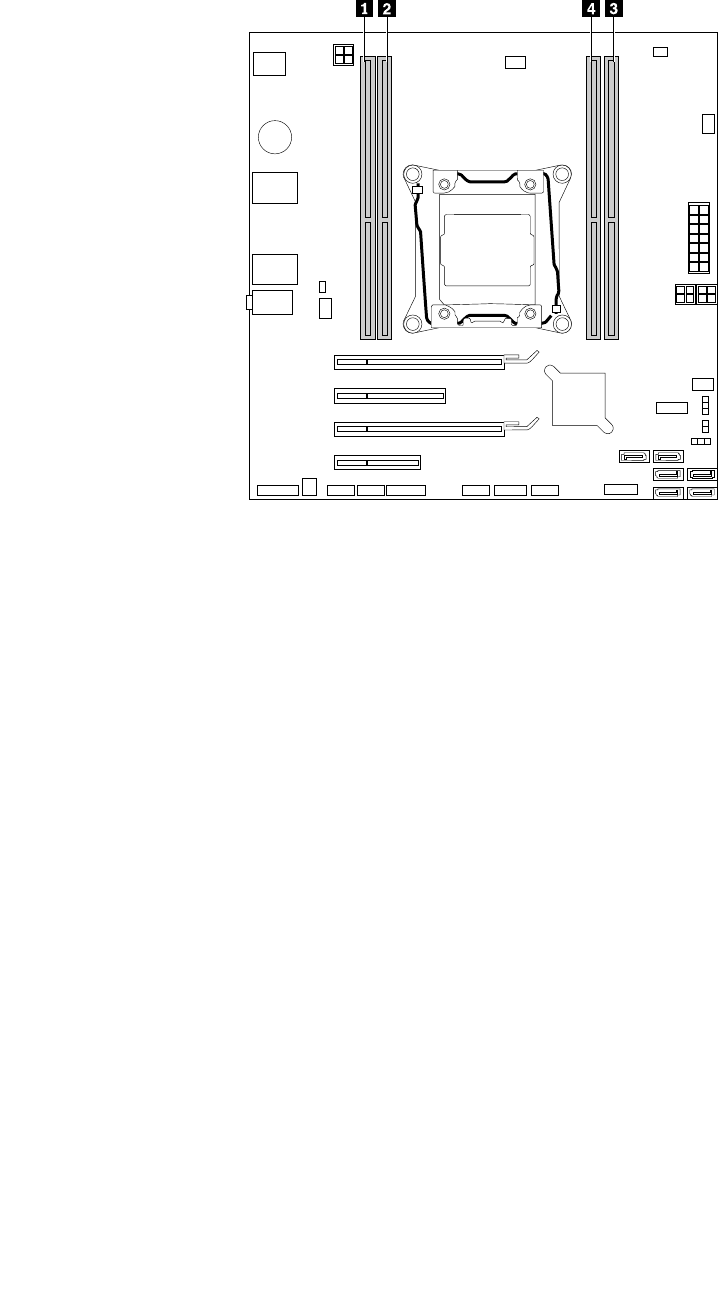
Installmemorymodulesinthenumericalorderasshown.Thenumbers1,2,3,and4indicatetheinstallation
sequence.
Figure30.Memorymoduleinstallation–order
Toinstallorreplaceamemorymodule,dothefollowing:
1.Prepareyourcomputer.See“Preparingyourcomputerandremovingthecomputercover”onpage57.
2.Laythecomputeronitssideforeasieraccesstothesystemboard.
3.Locatethememoryslots.See“Partsonthesystemboard”onpage5.
4.Removeanypartsthatmightpreventyouraccesstothememoryslots.Dependingonyourcomputer
model,youmightneedtoremovethePCIExpressx16graphicscardforeasieraccesstothememory
slots.See“PCIExpresscard”onpage61.
5.Dependingonwhetheryouareinstallingorreplacingamemorymodule,dooneofthefollowing:
Chapter7.Installingorreplacinghardware71
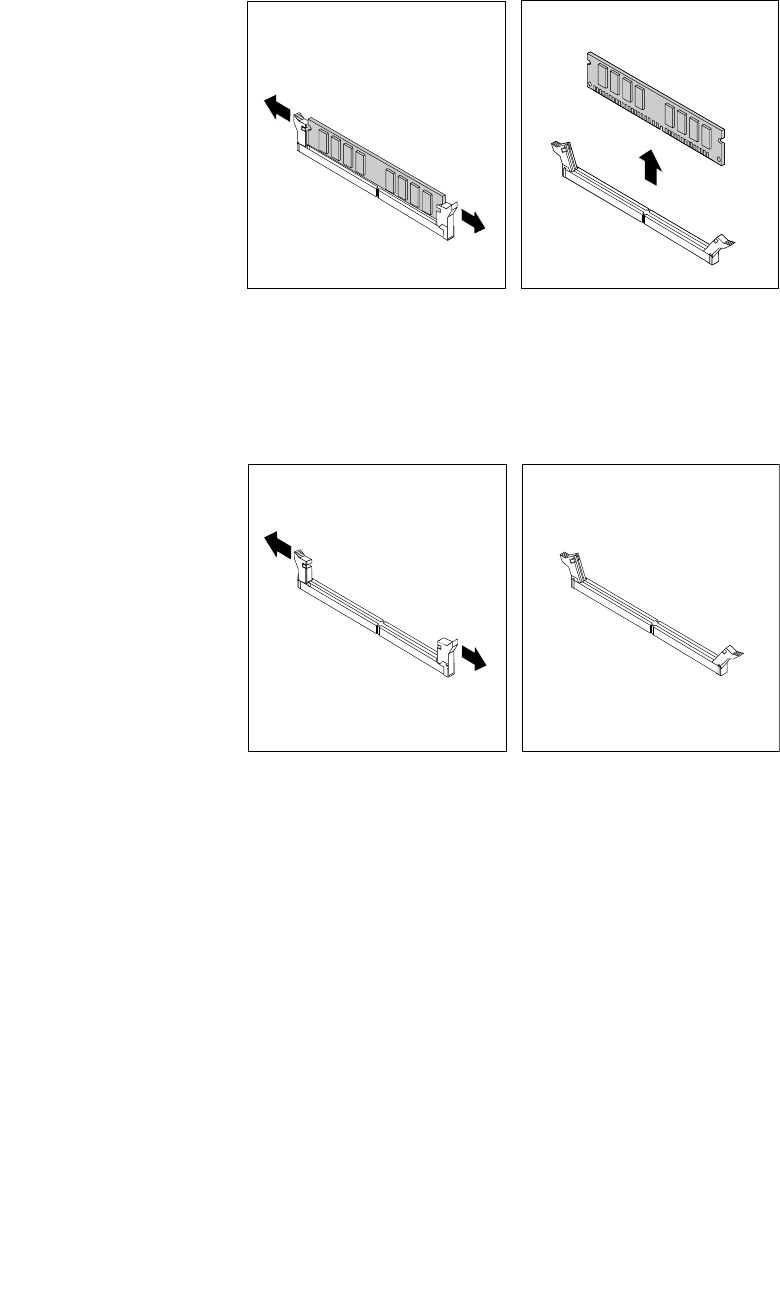
•Ifyouarereplacinganoldmemorymodule,opentheretainingclipsandgentlypullthememory
moduleoutofthememoryslot.
Figure31.Removingamemorymodule
•Ifyouareinstallingamemorymodule,opentheretainingclipsofthememoryslotintowhichyou
wanttoinstallthememorymodule.
Figure32.Openingtheretainingclips
72ThinkStationP410UserGuide
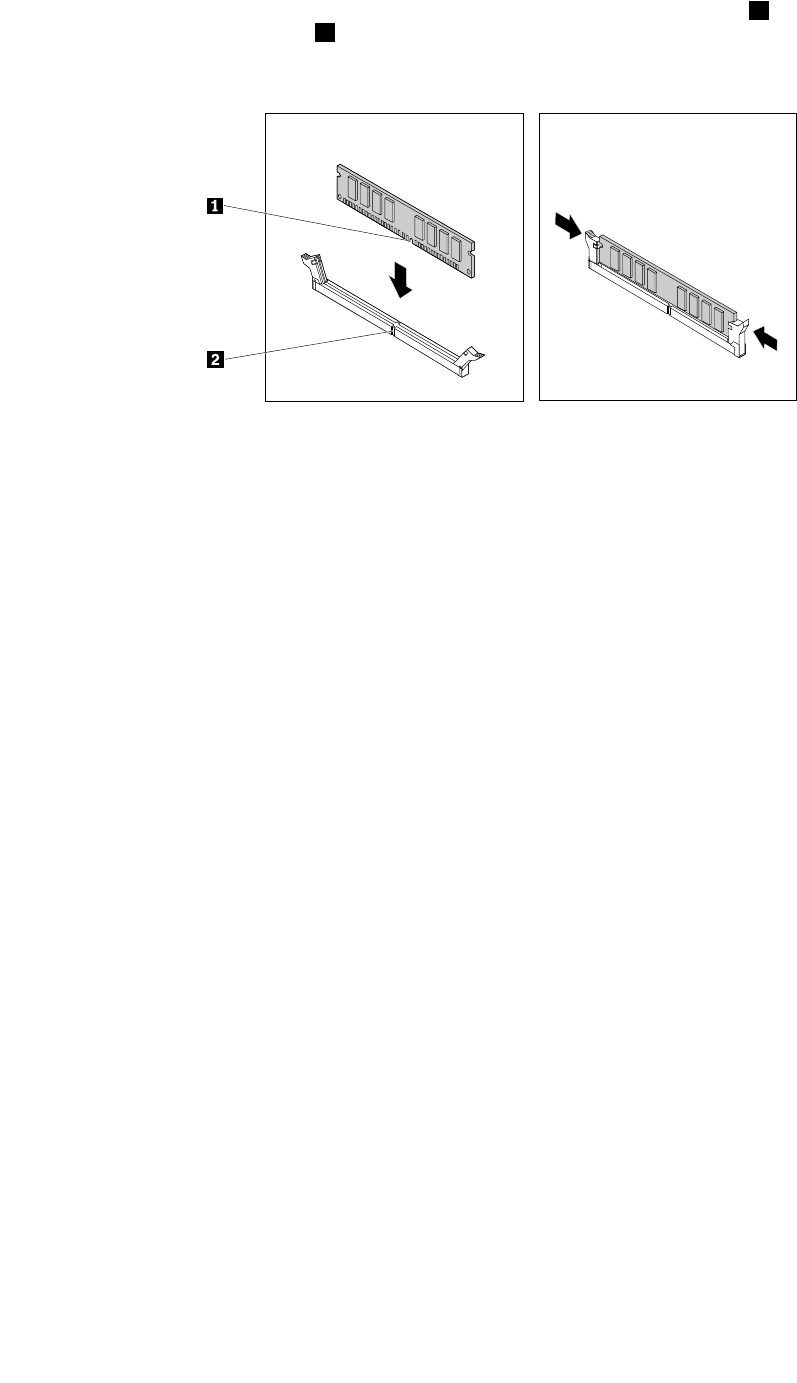
6.Positionthenewmemorymoduleoverthememoryslot.Ensurethatthenotch1onthememory
moduleisalignedwiththekey2intheslot.Pushthememorymodulestraightdownintotheslotuntil
theretainingclipscompletelyclose.
Figure33.Installingamemorymodule
7.ReinstallthePCIExpressx16graphicscardifyouhaveremovedit.
Whattodonext:
•Toworkwithanotherpieceofhardware,gototheappropriatesection.
•Tocompletetheinstallationorreplacement,goto“Completingthepartsreplacement”onpage98.
Opticaldrive
Attention:Donotopenyourcomputerorattemptanyrepairbeforereadingandunderstandingthe“Read
thisfirst:Importantsafetyinformation”onpagev.
Note:Forsomecomputermodels,theoptical-drivebaymightbeinstalledwithanopticaldrive,a5.25-inch
flexmodule,aflexstorageenclosure,afront-accessstorageenclosure,oranoptical/storagecombination
enclosure.
Toinstallorreplaceanopticaldrive,dothefollowing:
1.Prepareyourcomputer.See“Preparingyourcomputerandremovingthecomputercover”onpage57.
2.Removethefrontbezel.See“Frontbezel”onpage59.
3.Ifyouareinstallinganopticaldrive,dothefollowing:
a.Removethemetalstaticshieldfromthedesireddrivebay.
Chapter7.Installingorreplacinghardware73
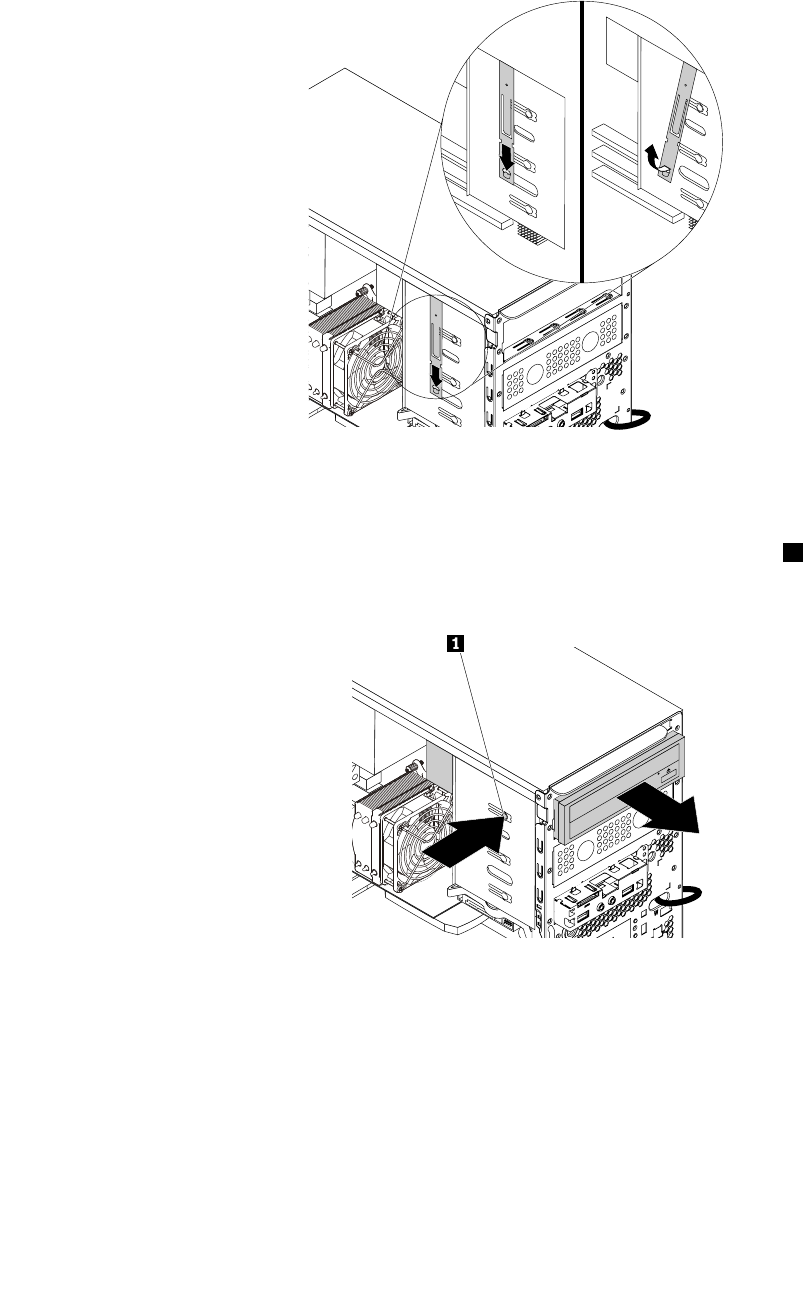
b.Locatetheoptical-driveretainerfromtheleftsideofthecomputer.Pushtheretainerdownwards
tounlocktheretainer.Thenlifttheretaineroutofthechassis.
Figure34.Removingtheoptical-driveretainerfromthecomputer
•Ifyouarereplacinganopticaldrive,dothefollowing:
a.Disconnectcablesfromtherearoftheopticaldrive,pressthereleasebutton1,andthenslide
theopticaldriveoutofthechassis.
Figure35.Removingtheopticaldrive
b.Removetheopticaldriveretainerfromtheleftsideoftheopticaldrive.
74ThinkStationP410UserGuide
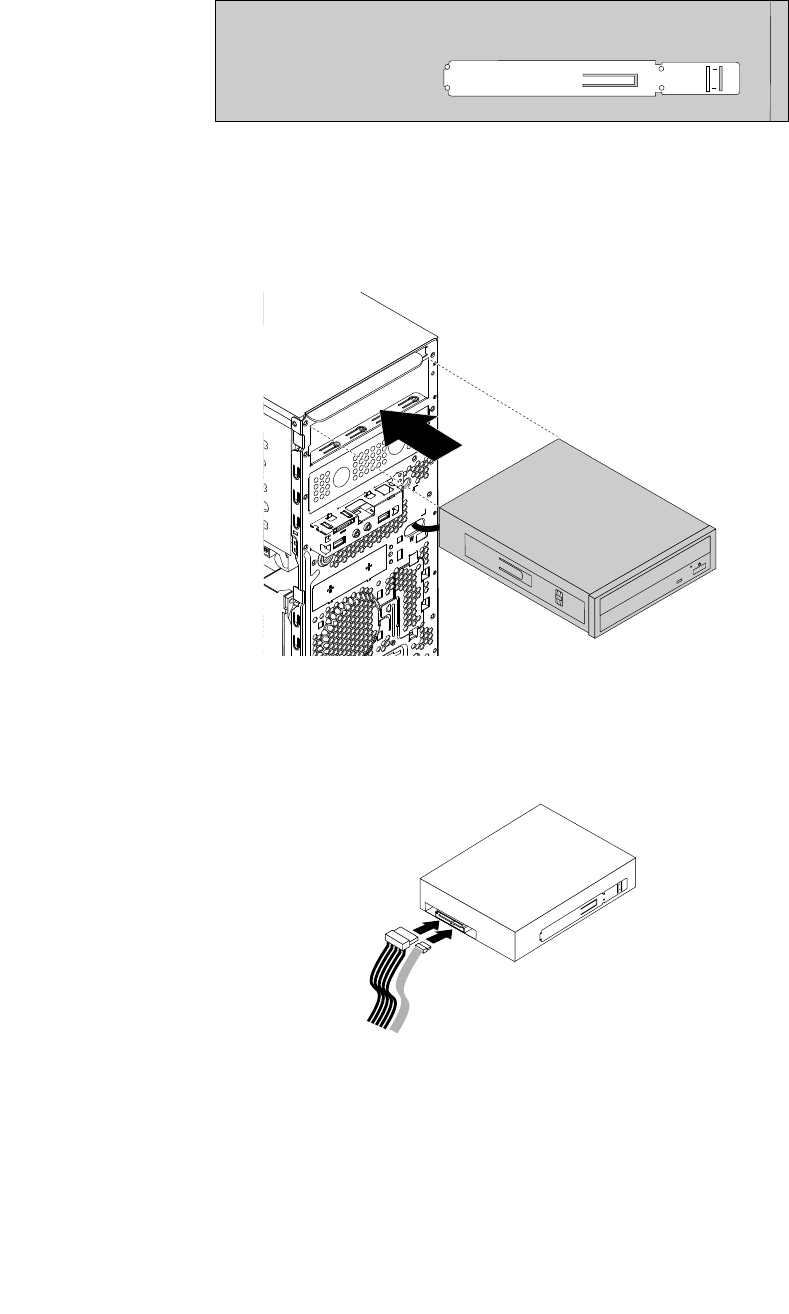
4.Installtheopticaldriveretainerontotheleftsideofthenewopticaldrive.
Figure36.Installingtheopticaldriveretainer
5.Slidethenewopticaldriveintothedrivebayfromthefrontofthecomputeruntiltheopticaldrive
snapsintoposition.
Figure37.Installingtheopticaldrive
6.Connectthecablestotherearofthenewopticaldrive.
Figure38.Connectingthecablestotherearofthenewopticaldrive
7.Ifyouareinstallinganewopticaldrive,removetheplasticpanelinthefrontbezelforthedesired
drivebay.
Whattodonext:
•Toworkwithanotherpieceofhardware,gototheappropriatesection.
Chapter7.Installingorreplacinghardware75
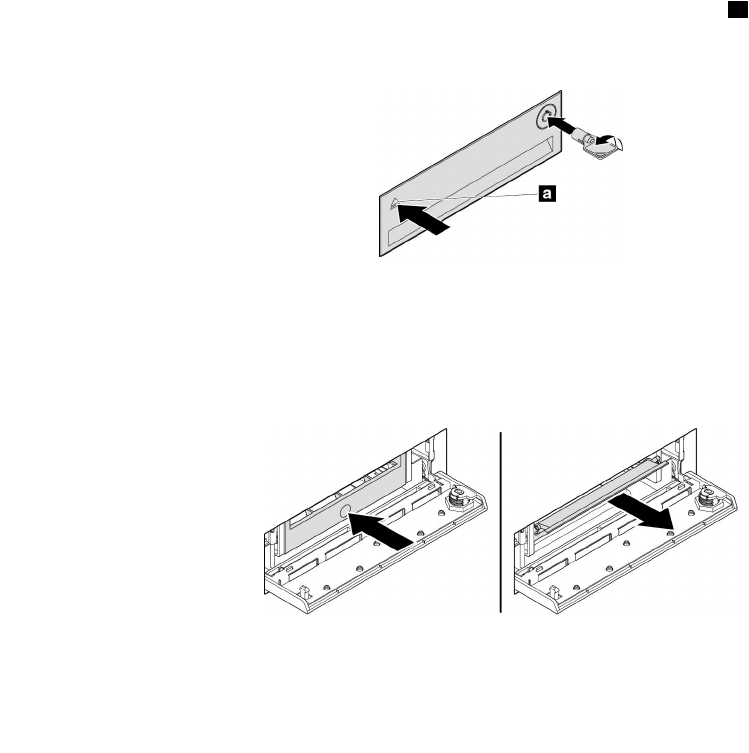
•Tocompletetheinstallationorreplacement,goto“Completingthepartsreplacement”onpage98.
Storagedriveinthefront-accessstorageenclosure
Attention:Donotopenyourcomputerorattemptanyrepairbeforereadingandunderstandingthe“Read
thisfirst:Importantsafetyinformation”onpagev.
Youcaninstallorreplaceastoragedriveinthefront-accessstorageenclosure.Thestoragedrivecanbe
hot-swappable,whichmeansthatyoucaninstallorreplacethedrivewithouteventurningoffyourcomputer.
Thestoragedriveinthefront-accessstorageenclosureishot-swappableonlywhenthefollowing
requirementsaremet:
•TheSATAcableofthefront-accessstorageenclosureisconnectedtotheeSATAconnectoronthesystem
board.Toverifythecableconnection,see“Preparingyourcomputerandremovingthecomputercover”
onpage57and“Partsonthesystemboard”onpage5formoreinformation.
•Theoperatingsystemofyourcomputerdoesnotresideonthestoragedriveinstalledinthefront-access
storageenclosure.
Attention:Ifanyoftheaboverequirementsarenotmet,donotinstallorreplacethestoragedrivewhenthe
computeristurnedon.Otherwise,dataonthestoragedrivemightgetdamaged.
3.5-inchstoragedrive
Toinstallorreplacea3.5-inchstoragedrive,dothefollowing:
1.Beforeremovinganold3.5-inchstoragedrive,safelyejecttheoldstoragedrivefromtheoperating
systemfirst.Formoreinformation,seetheWindowshelpsystem.
2.Unlocktheenclosurecoverwiththeprovidedkeyasshown.Pressthenotchatoopentheenclosure
cover.
Figure39.Openingthefront-accessstorageenclosurecover
3.Pressthepitonthebracketcover,andthengraspthetiltedcovertopullthebracketoutofthe
front-accessstorageenclosure.
Figure40.Removingthebracketfromthefront-accessstorageenclosure
76ThinkStationP410UserGuide
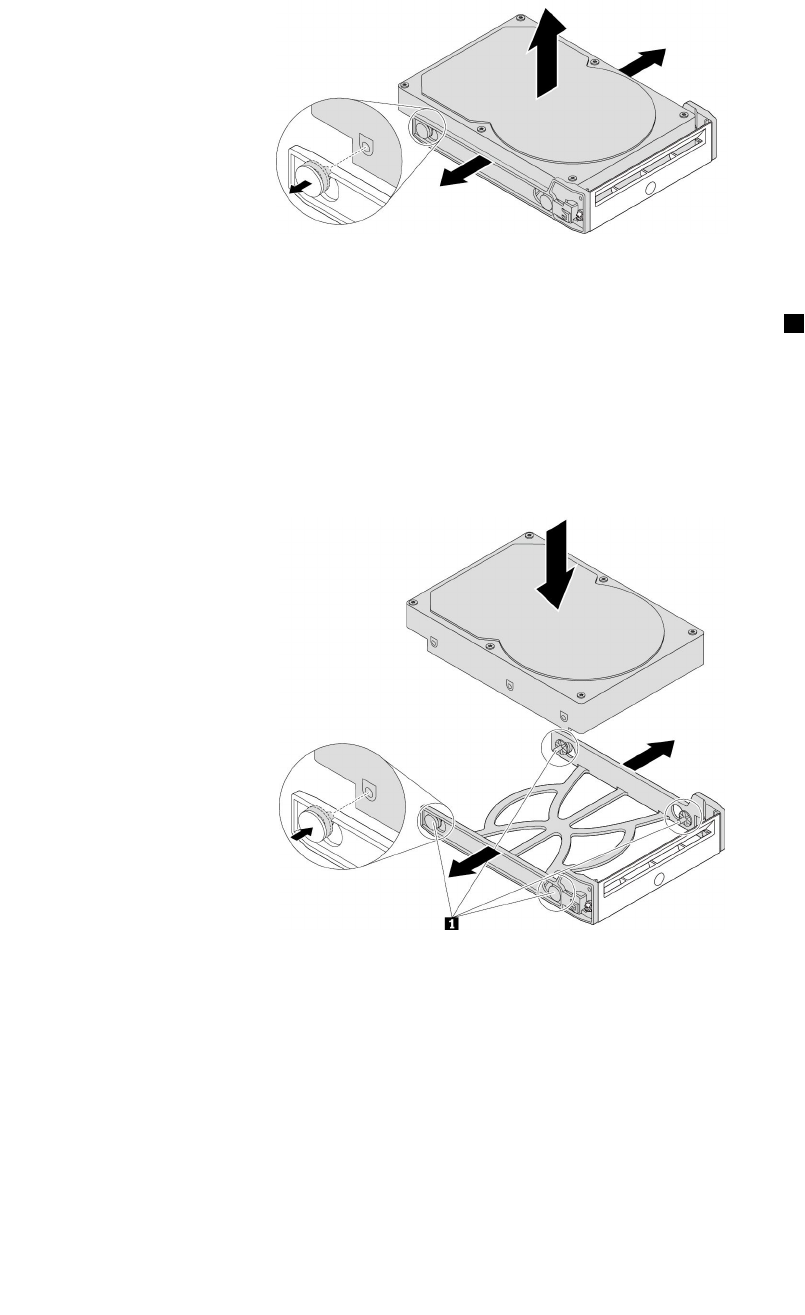
4.Flexbothsidesofthebrackettoremovethe3.5-inchstoragedrivefromthebracket.
Figure41.Removingthe3.5-inchstoragedrivefromthebracket
5.Toinstallanew3.5-inchstoragedrive,flexbothsidesofthebracketandalignpins1onthebracket
withthecorrespondingholesinthenewstoragedrive.
Notes:
•Ensurethatthecircuitboardfacesdownwardandtheconnectorsfacetowardtherearofthebracket.
•Donottouchthecircuitboardonthestoragedriveduringoperation.
Figure42.Installingthe3.5-inchstoragedriveintothebracket
Chapter7.Installingorreplacinghardware77
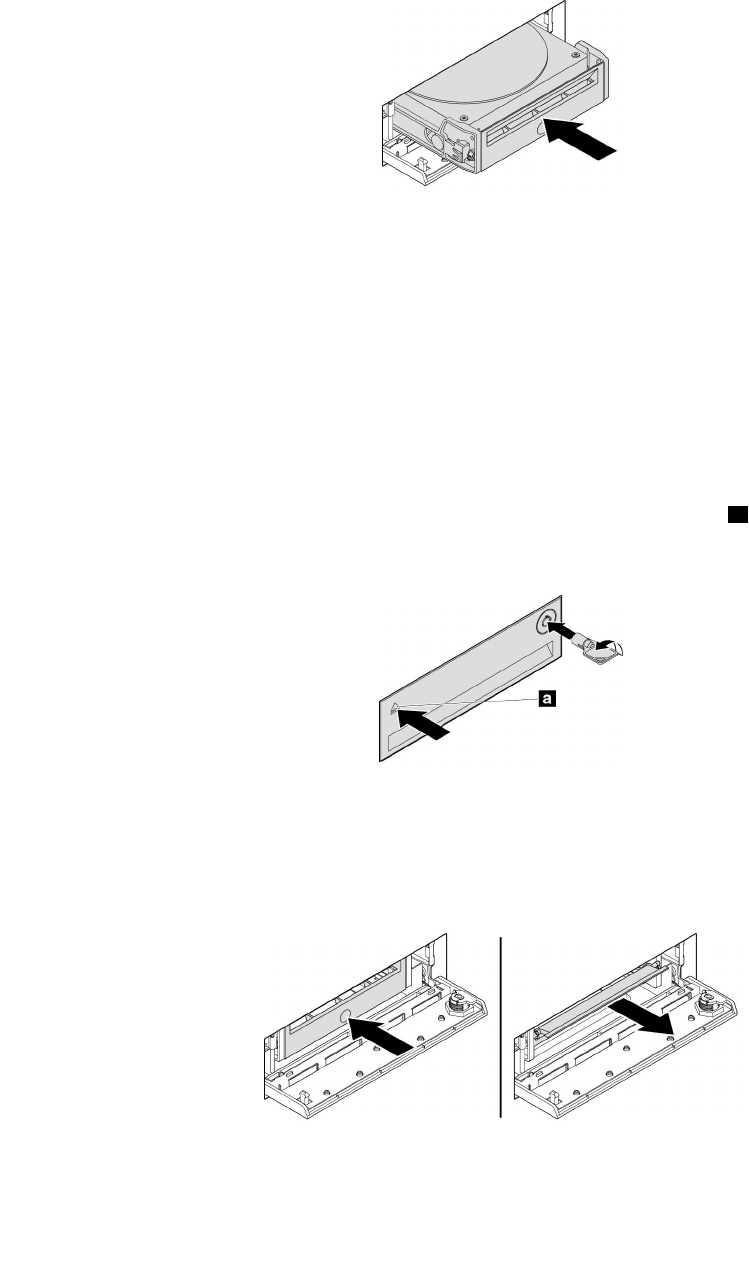
6.Slidethebracketwiththenew3.5-inchstoragedriveintothefront-accessstorageenclosureuntilit
snapsintoposition.Pressthenotchtosecuretheenclosurecoverandlocktheenclosurecoverwith
thekey.
Figure43.Installingthe3.5-inchstoragedriveintothefront-accessstorageenclosure
Whattodonext:
•Toworkwithanotherpieceofhardware,gototheappropriatesection.
•Tocompletetheinstallationorreplacement,goto“Completingthepartsreplacement”onpage98.
2.5-inchstoragedrive
Toinstallorreplacea2.5-inchstoragedrive,dothefollowing:
1.Beforeremovinganold2.5-inchstoragedrive,safelyejecttheoldstoragedrivefromtheoperating
systemfirst.Formoreinformation,seetheWindowshelpsystem.
2.Unlocktheenclosurecoverwiththeprovidedkeyasshown.Pressthenotchatoopentheenclosure
cover.
Figure44.Openingthefront-accessstorageenclosurecover
3.Pressthepitonthebracketcover,andthengraspthetiltedcovertopullthebracketoutofthe
front-accessstorageenclosure.
Figure45.Removingthebracketfromthefront-accessstorageenclosure
78ThinkStationP410UserGuide

4.Ifyouarereplacinga2.5-inchstoragedrive,dothefollowing:
a.Flexbothsidesofthebrackettoremovethe2.5-inchstoragedrivefromthebracket.
Figure46.Removingthe2.5-inchstoragedrivefromthebracket
b.Liftthetab1ofthemetalbracketandpushthemetalbracketwithforceasshown.Thenslidethe
bracketandremoveitfromtheplasticframe.
Figure47.Removingthemetalbracketfromtheplasticframeoftheconverter
c.Carefullyflexbothsidesofthemetalbrackettoremovethestoragedrivefromthebracket.
Figure48.Removingthestoragedrivefromthemetalbracket
5.Toinstallanew2.5-inchstoragedriveintothefront-accessstorageenclosure,dothefollowing:
Chapter7.Installingorreplacinghardware79
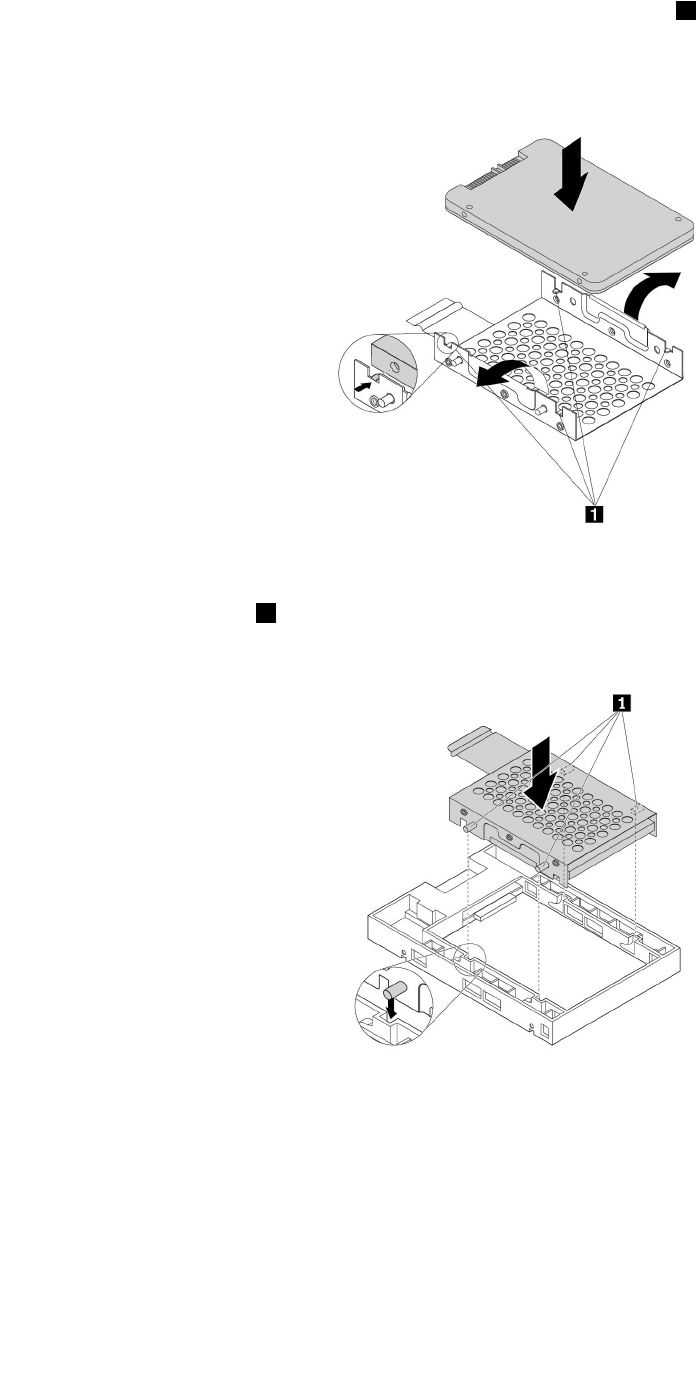
a.Carefullyflexbothsidesofthemetalbracketandalignthefourtabs1onthemetalbracketwiththe
correspondingholesinthenewstoragedrive.
Note:Ensurethattheconnectorsofthestoragedrivefacetowardthetabofthemetalbracket.
Figure49.Installingthe2.5-inchstoragedriveintothemetalbracket
b.Insertthefourposts1onthemetalbracketintothecorrespondingslotsintheplasticframe
asshown.
Figure50.Insertingthemetalbracketintotheplasticframeoftheconverter
80ThinkStationP410UserGuide

c.Pushthemetalbracketdownuntilthetab1isslightlycurved.Then,pushthebracketwiththe
storagedriveforwardasshownuntilthetab1snapsintoposition.
Figure51.Installingthemetalbracketintotheplasticframeoftheconverter
d.Flexbothsidesoftheplasticbracketandalignpins1ontheplasticbracketwiththecorresponding
holesintheplasticframeoftheconverter.
Notes:
•Ensurethatthecircuitboardfacesdownwardandtheconnectorsfacetowardtherearofthe
bracket.
•Donottouchthecircuitboardonthestoragedriveduringoperation.
Figure52.Installingtheconverterwiththe2.5-inchstoragedriveintotheplasticbracket
Chapter7.Installingorreplacinghardware81
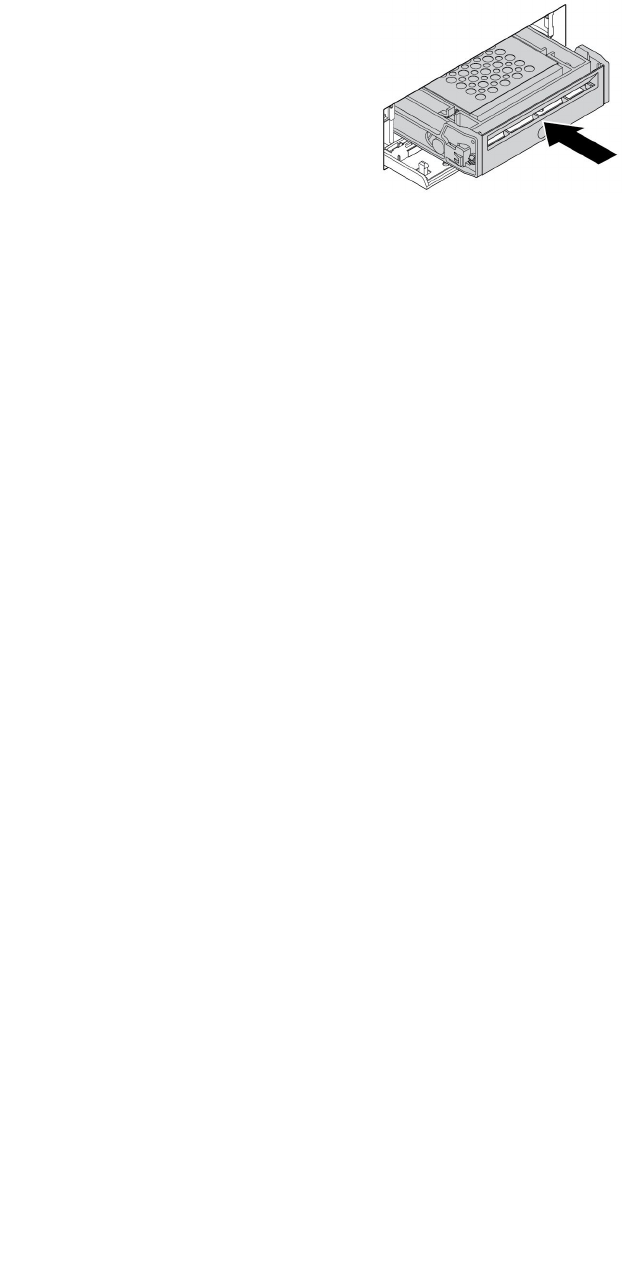
6.Slidetheplasticbracketwiththenew2.5-inchstoragedriveintothefront-accessstorageenclosure
untilitsnapsintoposition.Pressthenotchtosecuretheenclosurecoverandlocktheenclosure
coverwiththekey.
Figure53.Installingthebracketwiththe2.5-inchstoragedriveintothefront-accessstorageenclosure
Whattodonext:
•Toworkwithanotherpieceofhardware,gototheappropriatesection.
•Tocompletetheinstallationorreplacement,goto“Completingthepartsreplacement”onpage98.
Deviceintheoptical/storagecombinationenclosure
Attention:Donotopenyourcomputerorattemptanyrepairbeforereadingandunderstandingthe“Read
thisfirst:Importantsafetyinformation”onpagev.
Anoptical/storagecombinationenclosuremightbeequippedwithoneorbothofthefollowingcomponents:
•Slimopticaldrive
•Harddiskdrive
Installingorreplacingadeviceintheoptical/storagecombinationenclosureinvolvesthefollowingoperations:
•“Slimopticaldrive”onpage82
•“Harddiskdrive”onpage83
Note:Foraflexstorageenclosure,theinformationaboutinstallingorreplacingaharddiskdrivealsoapplies.
Slimopticaldrive
Attention:Donotopenyourcomputerorattemptanyrepairbeforereadingandunderstandingthe“Read
thisfirst:Importantsafetyinformation”onpagev.
Toinstallorreplaceaslimopticaldriveintheoptical/storagecombinationenclosure,dothefollowing:
1.Slidetheenclosureoutofthechassis.See“Opticaldrive”onpage73.
82ThinkStationP410UserGuide

2.Ifyouarereplacinganoldslimopticaldrive,presstheclipthroughtheholeinthetopoftheenclosure
asshownandpushforwardtheslimopticaldrive.Then,slidetheslimopticaldriveoutoftheenclosure.
Figure54.Removingtheslimopticaldrivefromtheenclosure
3.Insertanewslimopticaldriveintotheenclosureuntilyouhearaclick.Theslimopticaldriveissecured
inplace.
Figure55.Installingtheslimopticaldriveintheenclosure
Whattodonext:
•Toworkwithanotherpieceofhardware,gototheappropriatesection.
•Tocompletetheinstallationorreplacement,goto“Completingthepartsreplacement”onpage98.
Harddiskdrive
Attention:Donotopenyourcomputerorattemptanyrepairbeforereadingandunderstandingthe“Read
thisfirst:Importantsafetyinformation”onpagev.
Toinstallorreplaceaharddiskdriveintheoptical/storagecombinationenclosure,dothefollowing:
1.Slidetheenclosureoutofthechassis.See“Opticaldrive”onpage73.
Chapter7.Installingorreplacinghardware83
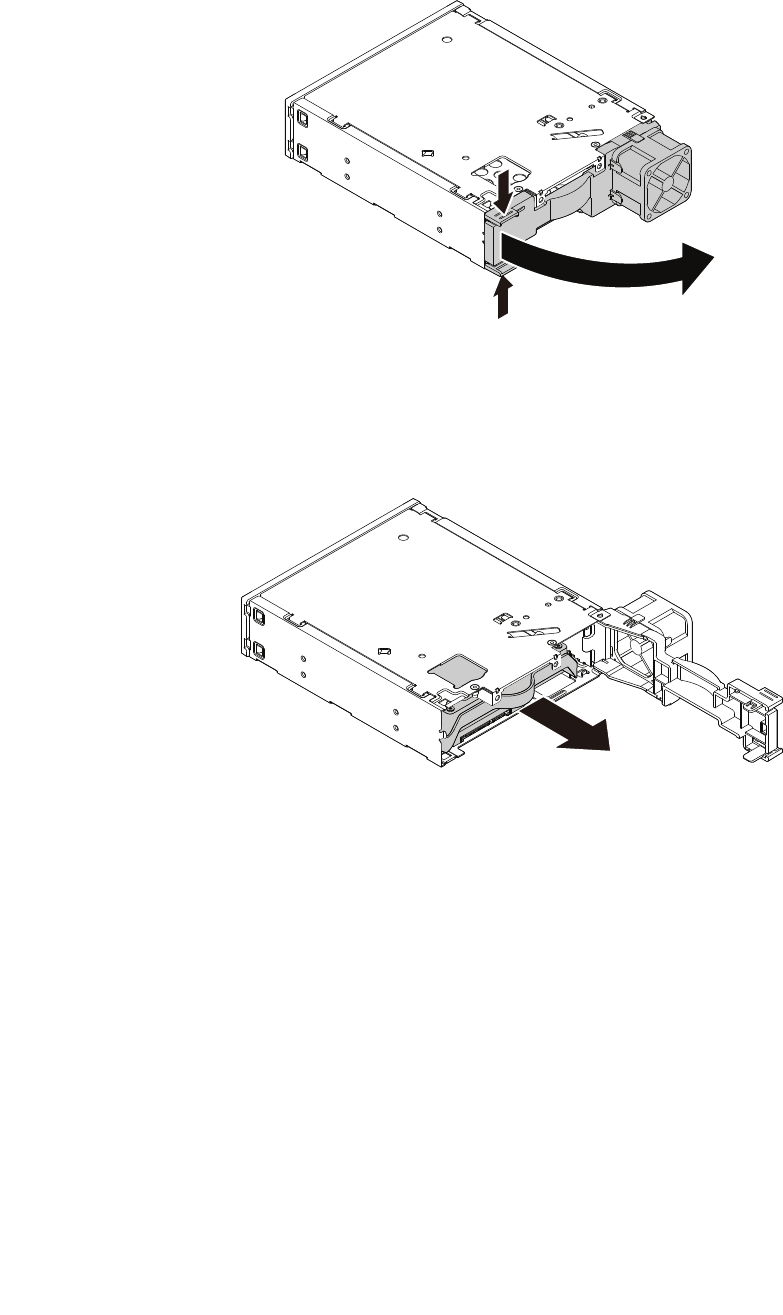
2.Pinchthetwoclipstowardeachotherasshowntoopentherearcoveroftheenclosure.
Figure56.Openingtheenclosurefromtherear
3.Ifyouarereplacinganoldharddiskdrive,dothefollowing:
a.Slidetheharddiskdriveoutoftherearoftheenclosure.
Figure57.Removingtheharddiskdrivefromtherear
b.Flextwosidesofthebrackettoremovetheharddiskdrivefromthebracket.
84ThinkStationP410UserGuide
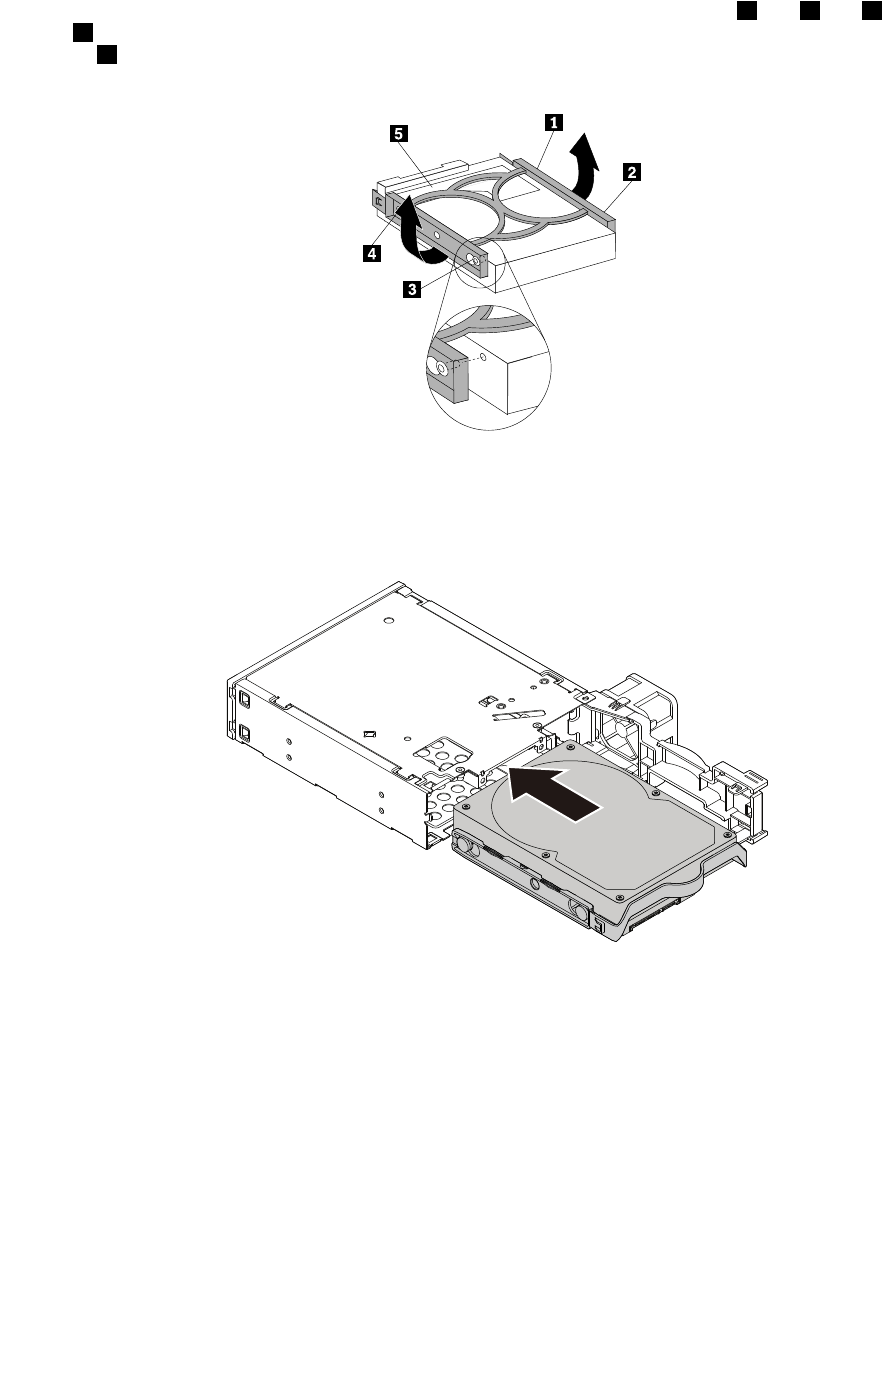
4.Toinstallanewharddiskdriveintothebracket,flexthebracketandalignpin1,pin2,pin3,and
pin4onthebracketwiththecorrespondingholesintheharddiskdrive.Donottouchthecircuit
board5onthebottomoftheharddiskdrive.
Figure58.Installingtheharddiskdriveintothebracket
5.Slidethenewharddiskdriveintotheenclosurefromtherearuntilitsnapsintoposition.
Figure59.Installingtheharddiskdriveintotheenclosure
Chapter7.Installingorreplacinghardware85
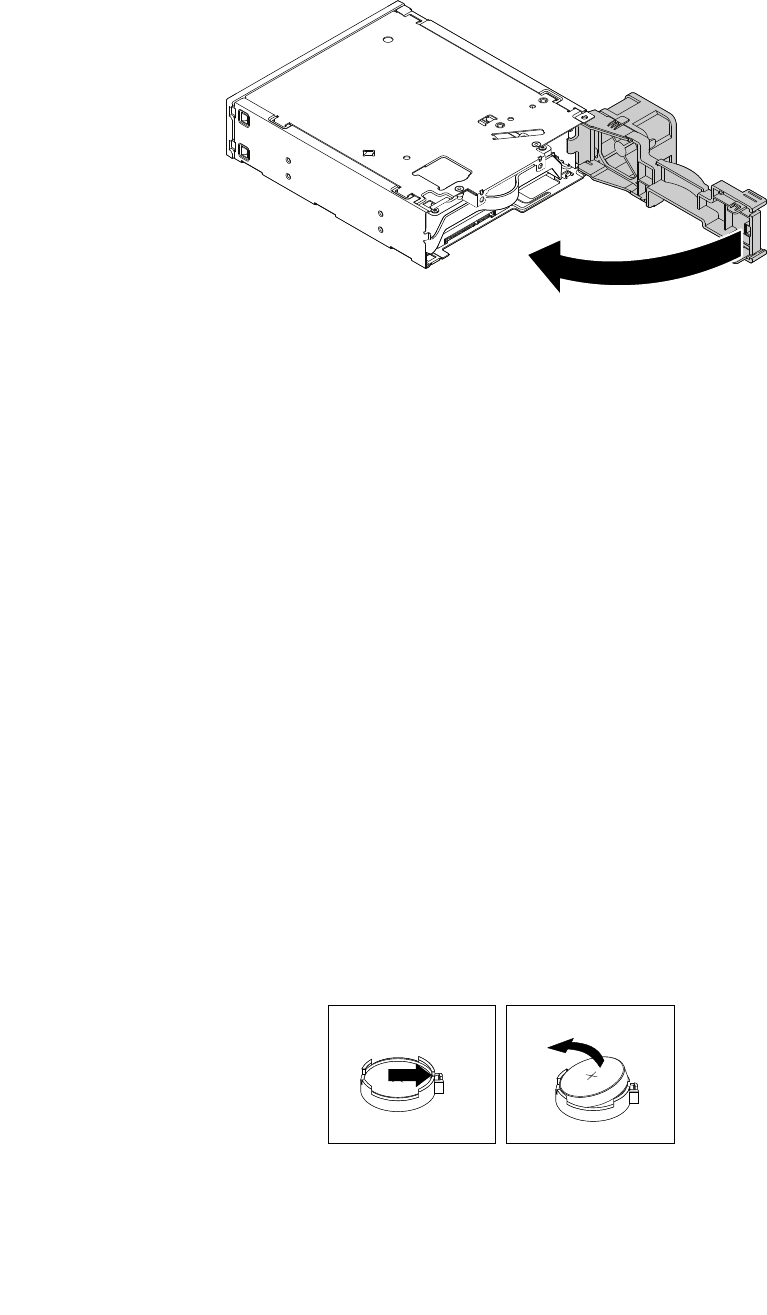
6.Pivottherearcoveroftheenclosureinwarduntilyouhearaclick.Therearcoverissecuredinplace.
Figure60.Pivotingtherearcoverinward
Whattodonext:
•Toworkwithanotherpieceofhardware,gototheappropriatesection.
•Tocompletetheinstallationorreplacement,goto“Completingthepartsreplacement”onpage98.
Battery
Attention:Donotopenyourcomputerorattemptanyrepairbeforereadingandunderstandingthe“Read
thisfirst:Importantsafetyinformation”onpagev.
Yourcomputerhasaspecialtypeofmemorythatmaintainsthedate,time,andsettingsforbuilt-infeatures.
Abatterykeepsthisinformationactivewhenyouturnoffthecomputer.
Thebatterynormallyrequiresnochargingormaintenancethroughoutitslife;however,nobatterylasts
forever.Ifthebatteryfails,thedate,time,andconfigurationinformation(includingpasswords)arelost.An
errormessageisdisplayedwhenyouturnonthecomputer.
Refertothe“Lithiumcoincellbatterynotice”intheSafety,Warranty,andSetupGuideforinformationabout
replacinganddisposingofthebattery.
Toreplacethebattery,dothefollowing:
1.Prepareyourcomputer.See“Preparingyourcomputerandremovingthecomputercover”onpage57.
2.Locatethebattery.See“Partsonthesystemboard”onpage5.
3.Removetheoldbattery.
Figure61.Removingtheoldbattery
86ThinkStationP410UserGuide
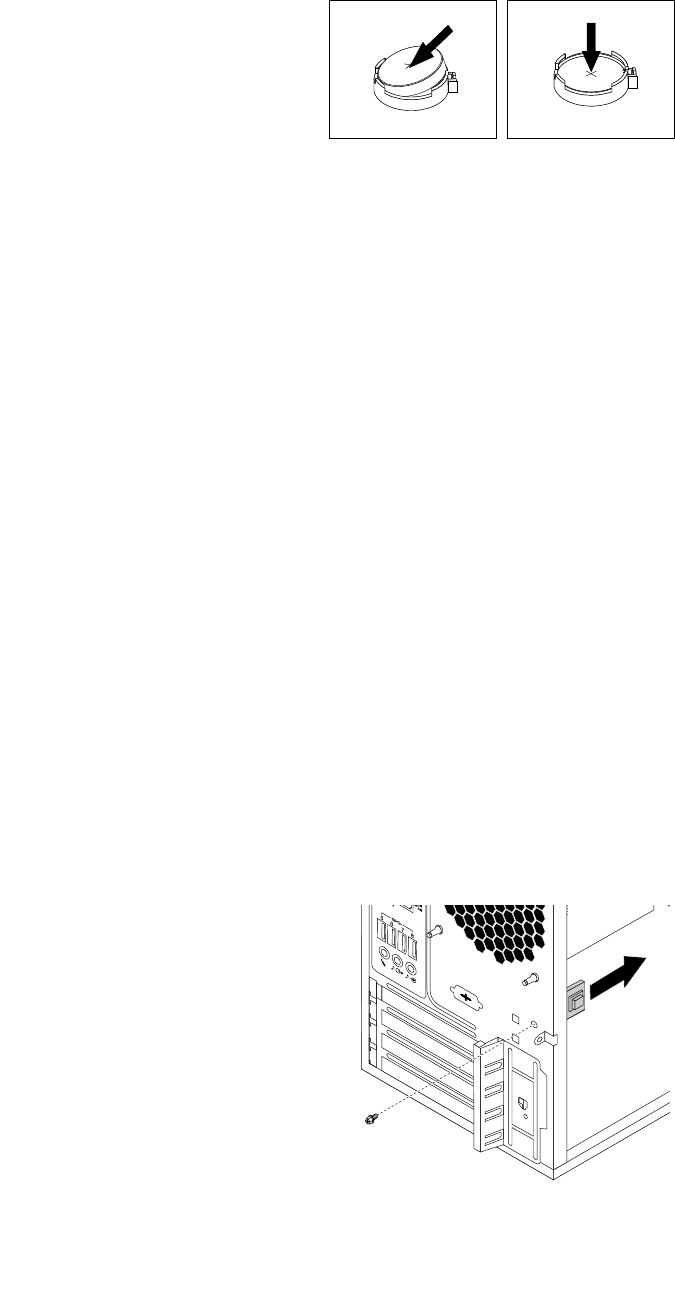
4.Installanewbattery.
Figure62.Installinganewbattery
5.Reinstallthecomputercoverandconnectthecables.See“Completingthepartsreplacement”on
page98.
Note:Whenthecomputeristurnedonforthefirsttimeafterreplacingthebattery,anerrormessage
mightbedisplayed.Thisisnormalafterreplacingthebattery.
6.Turnonthecomputerandallattacheddevices.
7.UsetheSetupUtilityprogramtosetthedate,time,andanypasswords.See“UsingtheSetupUtility
program”onpage33.
Whattodonext:
•Toworkwithanotherpieceofhardware,gototheappropriatesection.
•Tocompletetheinstallationorreplacement,goto“Completingthepartsreplacement”onpage98.
Coverpresenceswitch
Attention:Donotopenyourcomputerorattemptanyrepairbeforereadingandunderstandingthe“Read
thisfirst:Importantsafetyinformation”onpagev.
Toreplacethecoverpresenceswitch,dothefollowing:
1.Prepareyourcomputer.See“Preparingyourcomputerandremovingthecomputercover”onpage57.
2.Locatethecoverpresenceswitch.See“Computercomponents”onpage5.
3.Disconnectthecoverpresenceswitchcablefromthecoverpresenceswitchconnectoronthesystem
board.See“Partsonthesystemboard”onpage5.
4.Removethescrewthatsecuresthecoverpresenceswitchandremovethecoverpresenceswitch
fromthechassis.
Figure63.Removingthecoverpresenceswitch
Chapter7.Installingorreplacinghardware87
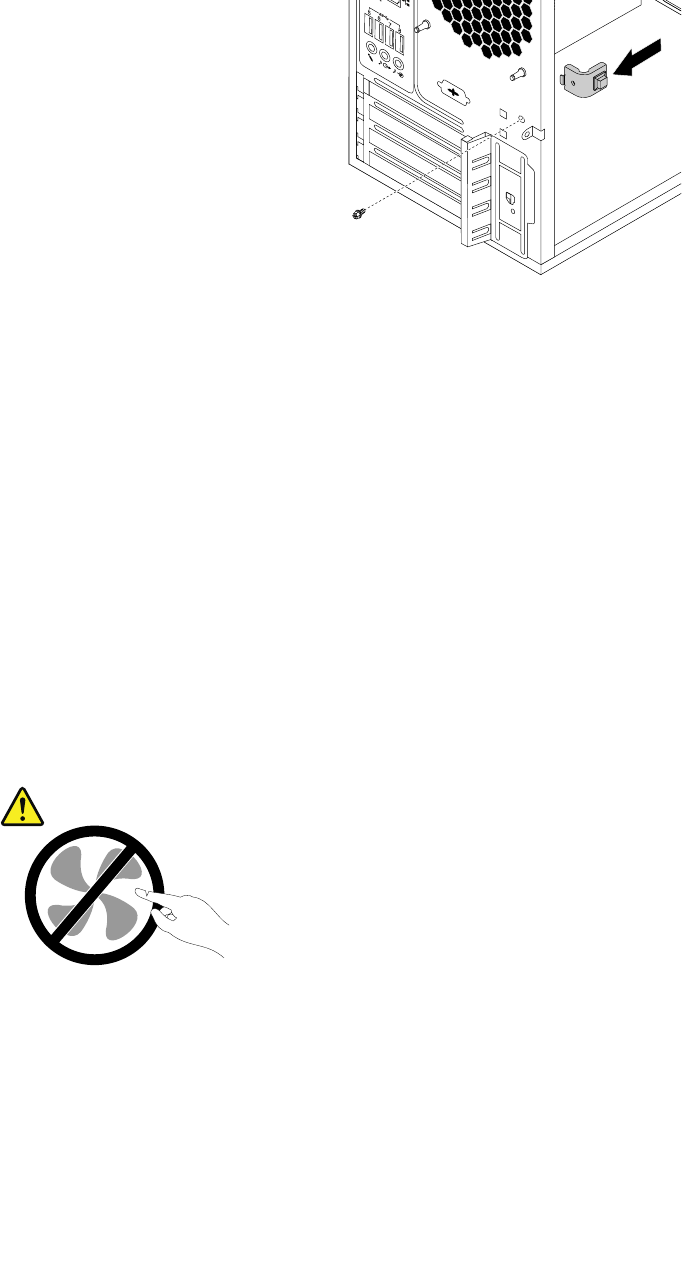
5.Positionthenewcoverpresenceswitchsothatthescrewholeinthecoverpresenceswitchisaligned
withthecorrespondingholeinthechassis.Theninstallthescrewtosecurethecoverpresence
switchtothechassis.
Figure64.Installingthecoverpresenceswitch
6.Connectthecoverpresenceswitchcabletothecoverpresenceswitchconnectoronthesystem
board.See“Partsonthesystemboard”onpage5.
Whattodonext:
•Toworkwithanotherpieceofhardware,gototheappropriatesection.
•Tocompletetheinstallationorreplacement,goto“Completingthepartsreplacement”onpage98.
Powersupplyassembly
Attention:Donotopenyourcomputerorattemptanyrepairbeforereadingandunderstandingthe“Read
thisfirst:Importantsafetyinformation”onpagev.
Althoughtherearenomovingpartsinyourcomputerafterthepowercordhasbeendisconnected,the
followingwarningsarerequiredforyoursafetyandproperUnderwritersLaboratories(UL)certification.
CAUTION:
Hazardousmovingparts.Keepfingersandotherbodypartsaway.
88ThinkStationP410UserGuide

CAUTION:
Neverremovethecoveronapowersupplyoranypartthathasthefollowinglabelattached.
Hazardousvoltage,current,andenergylevelsarepresentinsideanycomponentthathasthislabel
attached.Therearenoserviceablepartsinsidethesecomponents.Ifyoususpectaproblemwith
oneoftheseparts,contactaservicetechnician.
Toreplacethepowersupplyassembly,dothefollowing:
1.Prepareyourcomputer.See“Preparingyourcomputerandremovingthecomputercover”onpage57.
2.Disconnectthepowersupplyassemblycablesfromthesystemboardandalldrives.See“Partson
thesystemboard”onpage5.
3.Releasethepowersupplyassemblycablesfromthecableclipsandties.
4.Laythecomputeronitssideandremovethefourscrewsattherearofthechassisthatsecurethe
powersupplyassembly.Thenslidethepowersupplyassemblytothefrontofthecomputerandthenlift
itoutofthechassis.
Figure65.Removingthescrewsforthepowersupplyassembly
5.Ensurethatthenewpowersupplyassemblyisthecorrectreplacement.
6.Installthenewpowersupplyassemblyintothechassissothatthescrewholesinthepowersupply
assemblyalignwiththoseinthechassis.
7.Installandtightenthefourscrewstosecurethepowersupplyassembly.
Note:UseonlyscrewsprovidedbyLenovo.
8.Connectthepowersupplyassemblycablestothesystemboardandeachofthedrives.
9.Securethepowersupplyassemblycableswiththecableclipsandtiesinthechassis.
Chapter7.Installingorreplacinghardware89
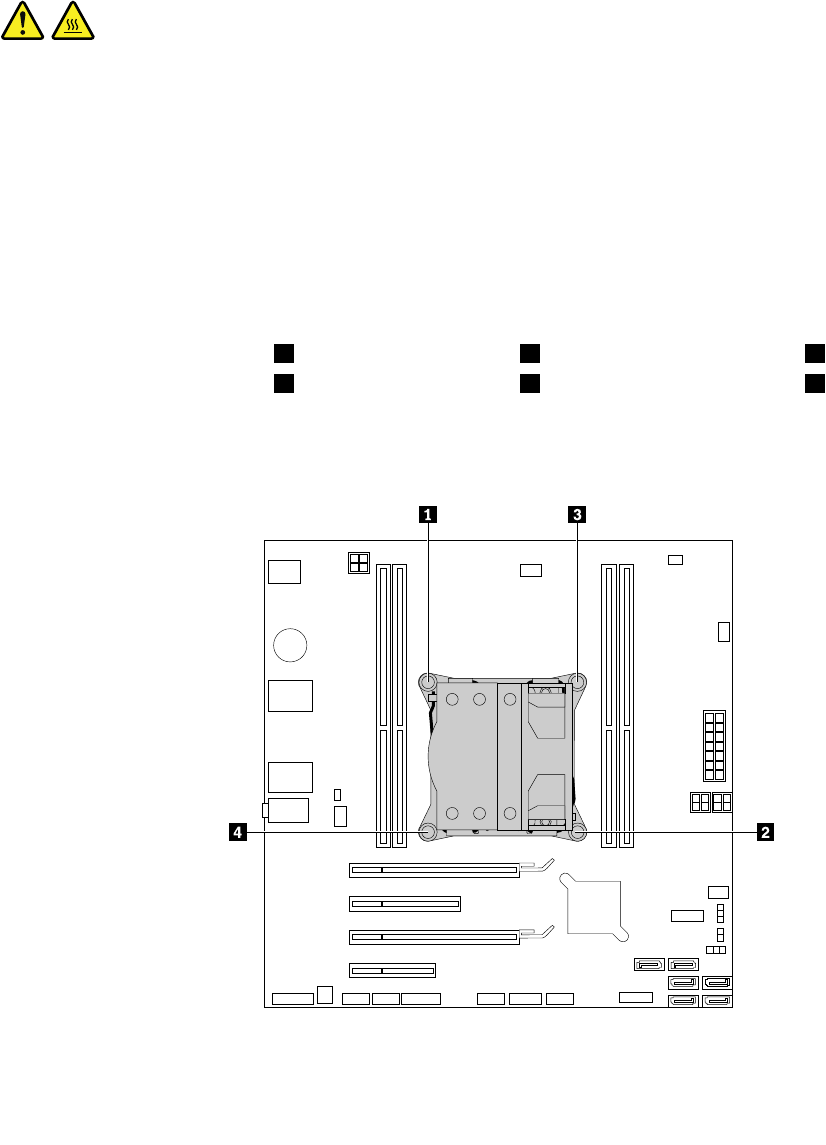
Whattodonext:
•Toworkwithanotherpieceofhardware,gototheappropriatesection.
•Tocompletetheinstallationorreplacement,goto“Completingthepartsreplacement”onpage98.
Heatsinkandfanassembly
Attention:Donotopenyourcomputerorattemptanyrepairbeforereadingandunderstandingthe“Read
thisfirst:Importantsafetyinformation”onpagev.
CAUTION:
Theheatsinkandfanassemblymightbeveryhot.Beforeyouopenthecomputercover,turnoffthe
computerandwaitseveralminutesuntilthecomputeriscool.
Toreplacetheheatsinkandfanassembly,dothefollowing:
1.Prepareyourcomputer.See“Preparingyourcomputerandremovingthecomputercover”onpage57.
2.Laythecomputeronitssideforeasieraccesstothesystemboard.
3.Locatetheheatsinkandfanassembly.See“Partsonthesystemboard”onpage5.
4.Disconnecttheheatsinkandfanassemblycablefromthemicroprocessorfanconnectoronthesystem
board.See“Partsonthesystemboard”onpage5.
5.Followthefollowingsequencetoremovethefourscrewsthatsecuretheheatsinkandfanassembly
tothesystemboard:
a.Partiallyremovescrew1,thenfullyremovescrew2,andthenfullyremovescrew1.
b.Partiallyremovescrew3,thenfullyremovescrew4,andthenfullyremovescrew3.
Note:Carefullyremovethefourscrewstoavoidanypossibledamagetothesystemboard.Thefour
screwscannotberemovedfromtheheatsinkandfanassembly.
Figure66.Removingtheheatsinkandfanassembly
90ThinkStationP410UserGuide
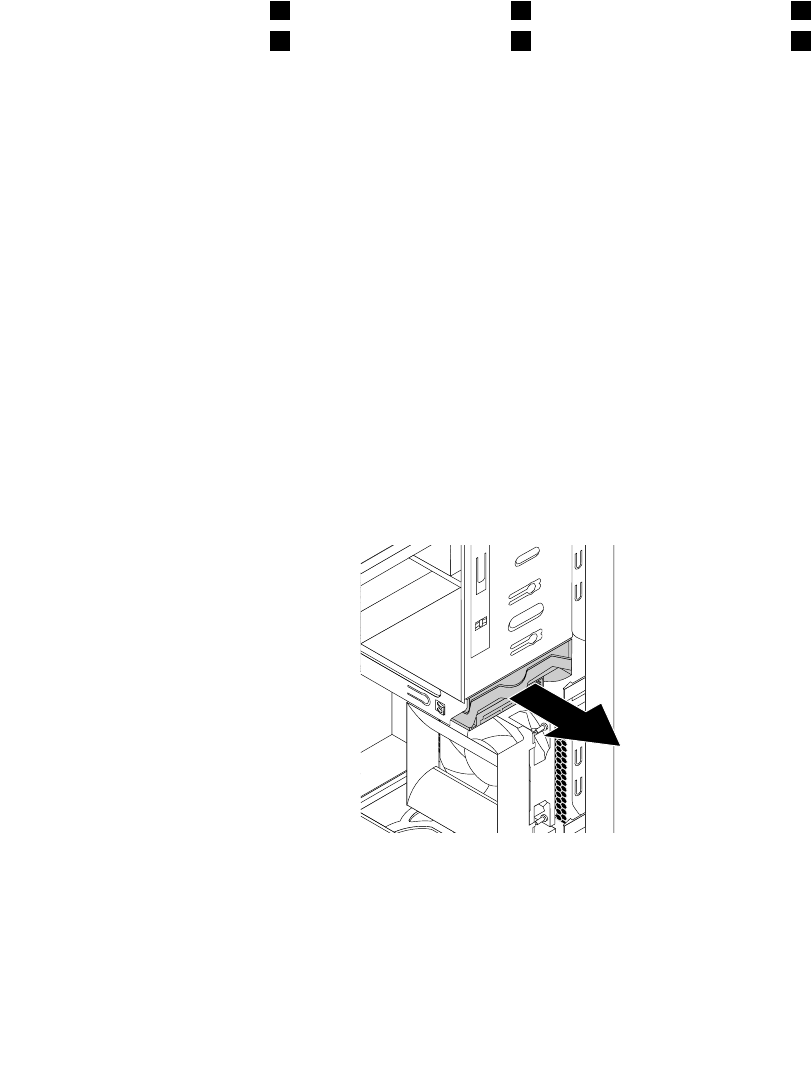
6.Liftthefailingheatsinkandfanassemblyoffthesystemboard.
Notes:
•Youmighthavetogentlytwisttheheatsinkandfanassemblytofreeitfromthemicroprocessor.
•Donottouchthethermalgreasewhilehandlingtheheatsinkandfanassembly.
7.Positionthenewheatsinkandfanassemblyonthesystemboard.Ensurethatthefourscrewsare
alignedwiththeholesinthesystemboard.
Note:Ensurethattheheatsinkandfanassemblycableistowardthemicroprocessorfanconnector
onthesystemboard.
8.Followthefollowingsequencetoinstallthefourscrewstosecurethenewheatsinkandfanassembly.
Donotover-tightenthescrews.
a.Partiallytightenscrew1,thenfullytightenscrew2,andthenfullytightenscrew1.
b.Partiallytightenscrew3,thenfullytightenscrew4,andthenfullytightenscrew3.
9.Connecttheheatsinkandfanassemblycabletothemicroprocessorfanconnectoronthesystem
board.See“Partsonthesystemboard”onpage5.
Whattodonext:
•Toworkwithanotherpieceofhardware,gototheappropriatesection.
•Tocompletetheinstallationorreplacement,goto“Completingthepartsreplacement”onpage98.
Primaryharddiskdrive
Attention:Donotopenyourcomputerorattemptanyrepairbeforereadingandunderstandingthe“Read
thisfirst:Importantsafetyinformation”onpagev.
Toreplacetheprimaryharddiskdrive,dothefollowing:
1.Prepareyourcomputer.See“Preparingyourcomputerandremovingthecomputercover”onpage57.
2.Locatetheprimaryharddiskdrive.See“Computercomponents”onpage5.
3.Disconnectthesignalcableandthepowercablefromtheharddiskdrive.
4.Pullthehandletoreleaseandremovetheharddiskdrivefromthedrivecage.
Figure67.Removingtheprimaryharddiskdrive
5.Flexthesidesofthebrackettoremovetheharddiskdrivefromthebracket.
Chapter7.Installingorreplacinghardware91
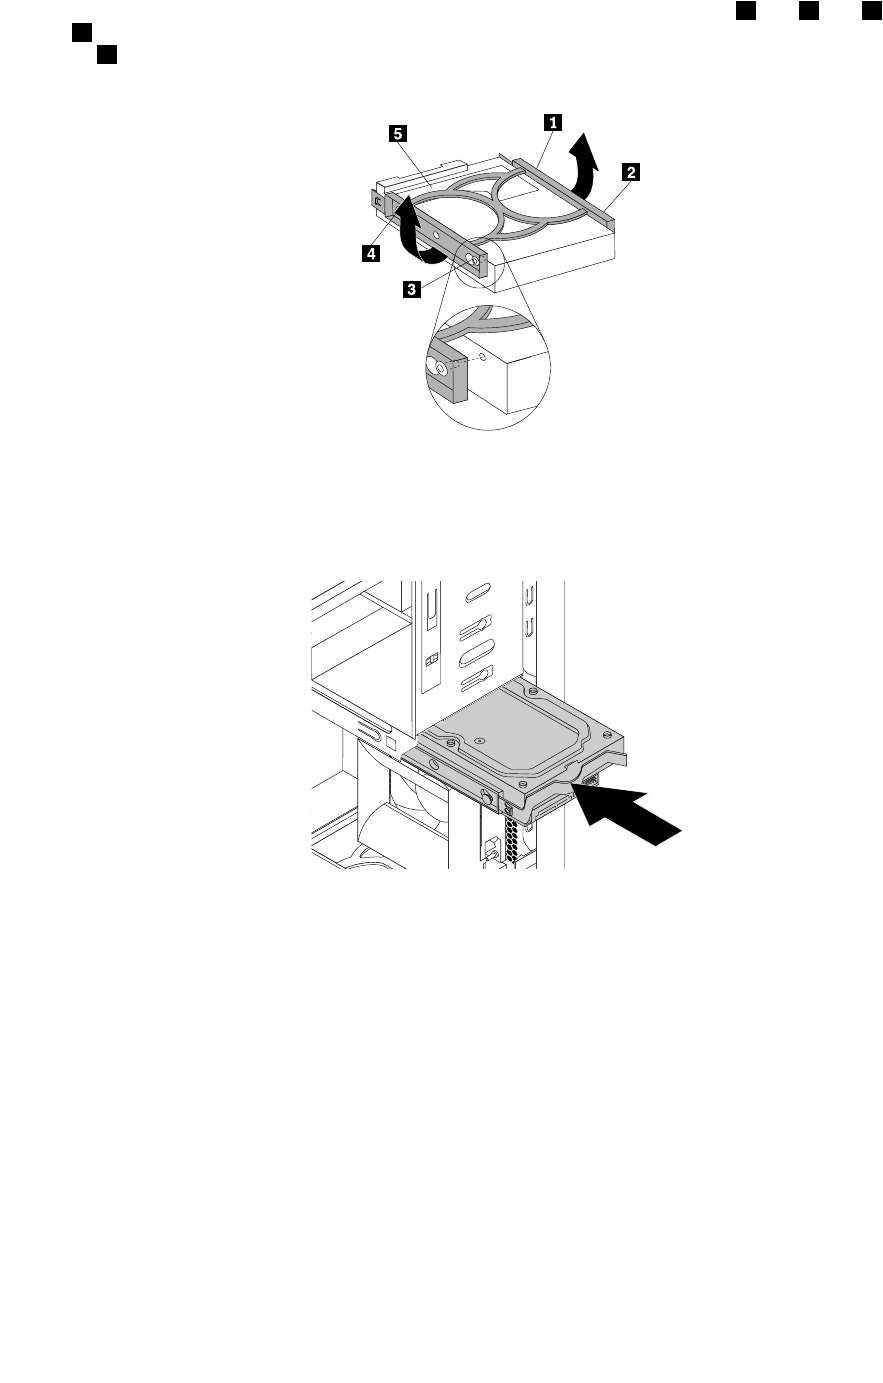
6.Toinstallanewharddiskdriveintothebracket,flexthebracketandalignpin1,pin2,pin3,and
pin4onthebracketwiththecorrespondingholesintheharddiskdrive.Donottouchthecircuit
board5onthebottomoftheharddiskdrive.
Figure68.Installingtheharddiskdriveintothebracket
7.Slidethenewharddiskdriveintothedrivecageuntilitsnapsintoposition.
Figure69.Installingtheprimaryharddiskdrive
8.Connectthesignalcableandthepowercabletothenewharddiskdrive.
Whattodonext:
•Toworkwithanotherpieceofhardware,gototheappropriatesection.
•Tocompletetheinstallationorreplacement,goto“Completingthepartsreplacement”onpage98.
Secondaryharddiskdrive
Attention:Donotopenyourcomputerorattemptanyrepairbeforereadingandunderstandingthe“Read
thisfirst:Importantsafetyinformation”onpagev.
Note:Yourcomputercomeswithasecondarystoragedrivebayforinstallingorreplacingasecondary
3.5-inchharddiskdriveora2.5-inchsolid-statedrive.
Toreplacethesecondaryharddiskdrive,dothefollowing:
92ThinkStationP410UserGuide
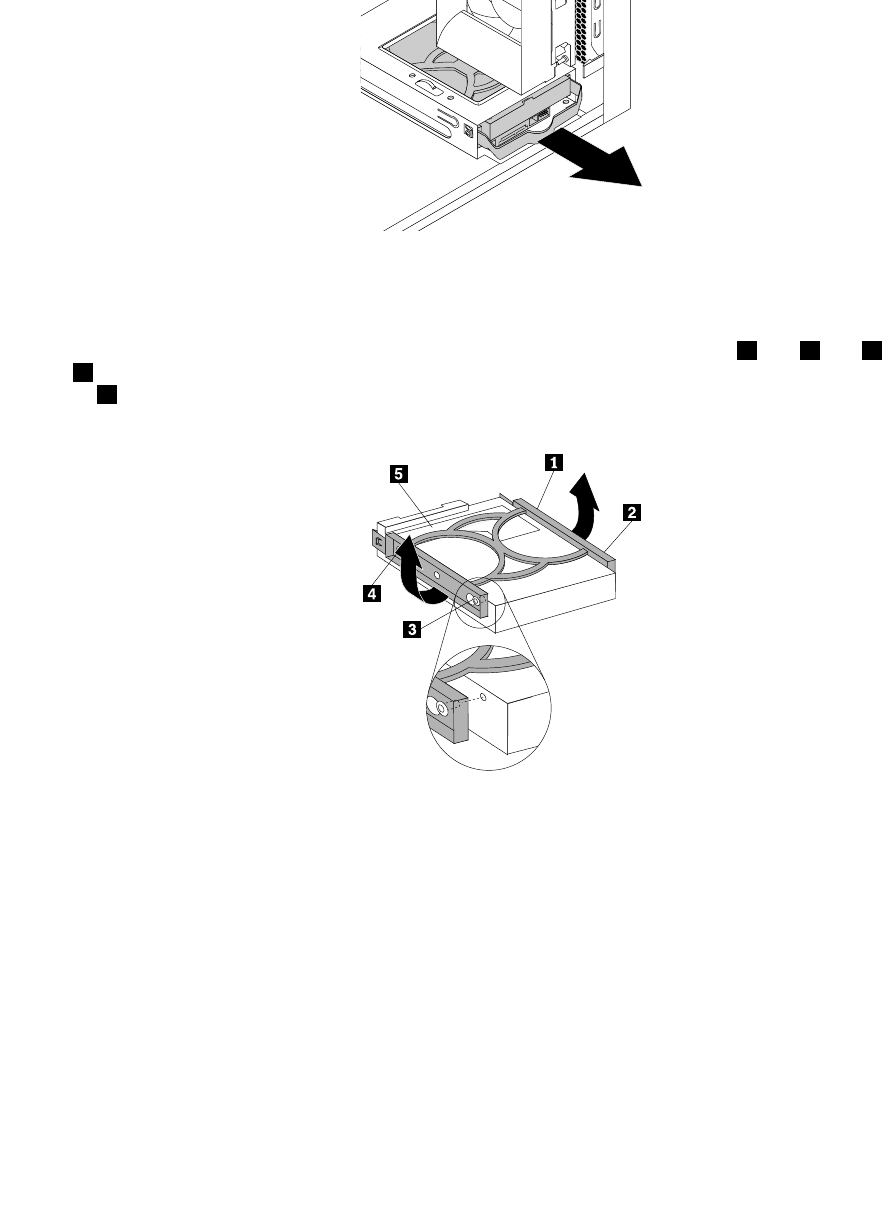
1.Prepareyourcomputer.See“Preparingyourcomputerandremovingthecomputercover”onpage57.
2.Locatethesecondaryharddiskdrive.See“Computercomponents”onpage5.
3.Disconnectthesignalcableandthepowercablefromtheharddiskdrive.
4.Pullthehandletoreleaseandremovetheharddiskdrivefromthehard-disk-drivecage.
Figure70.Removingthesecondaryharddiskdrive
5.Flexthesidesofthebrackettoremovetheharddiskdrivefromthebracket.
6.Toinstallanewharddiskdriveintothebracket,flexthebracketandalignpin1,pin2,pin3,and
pin4onthebracketwiththecorrespondingholesintheharddiskdrive.Donottouchthecircuit
board5onthebottomoftheharddiskdrive.
Figure71.Installingtheharddiskdriveintothebracket
Chapter7.Installingorreplacinghardware93
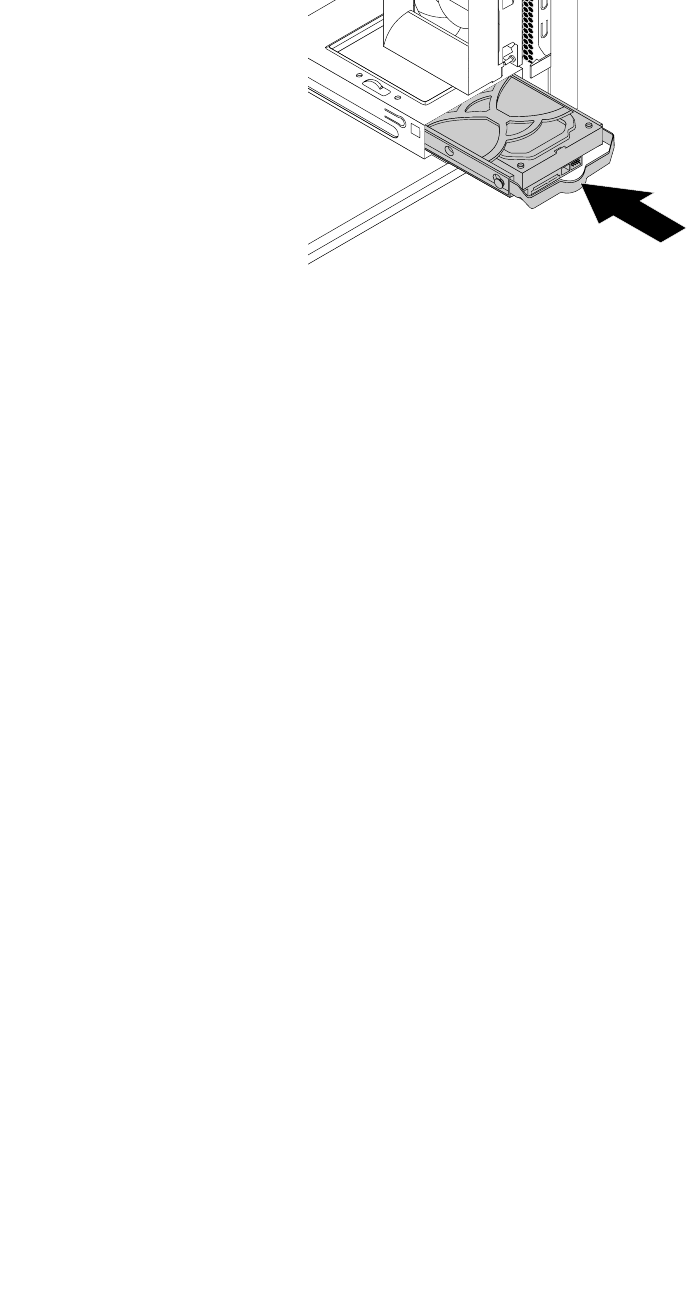
7.Slidethenewharddiskdriveintothedrivecageuntilitsnapsintoposition.
Figure72.Installingthesecondaryharddiskdrive
8.Connectthesignalcableandthepowercabletothenewharddiskdrive.
Whattodonext:
•Toworkwithanotherpieceofhardware,gototheappropriatesection.
•Tocompletetheinstallationorreplacement,goto“Completingthepartsreplacement”onpage98.
Solid-statedrive
Thesolid-statedriveisonlyavailableonsomemodels.Thissectionprovidesthefollowinginstructions:
•“Installingthesolid-statedrive”onpage94
•“Replacingthesolid-statedrive”onpage96
Installingthesolid-statedrive
Attention:Donotopenyourcomputerorattemptanyrepairbeforereadingandunderstandingthe“Read
thisfirst:Importantsafetyinformation”onpagev.
Toinstallthesolid-statedrive,dothefollowing:
94ThinkStationP410UserGuide

1.Installthesolid-statedriveintothestorageconvertershippedwiththesolid-statedrive.Theninstallthe
fourscrewstosecurethesolid-statedrivetothestorageconverter.
Figure73.Installingthesolid-statedriveintothestorageconverter
2.Removethe3.5-inchstoragedrivebracketoutofthechassis.
3.Toinstallthestorageconverterintothe3.5-inchstoragedrivebracket,flexthebracketandalignpin1,
pin2,pin3,andpin4onthebracketwiththecorrespondingholesinthestorageconverter.
Figure74.Installingthestorageconvertertogetherwiththesolid-statedriveintothestoragedrivebracket
4.Installthestorageconverterwiththebracketintothedesiredstoragedrivebay.See“Primaryharddisk
drive”onpage91or“Secondaryharddiskdrive”onpage92.
5.Connectthesignalcableandthepowercabletothesolid-statedrive.
Chapter7.Installingorreplacinghardware95
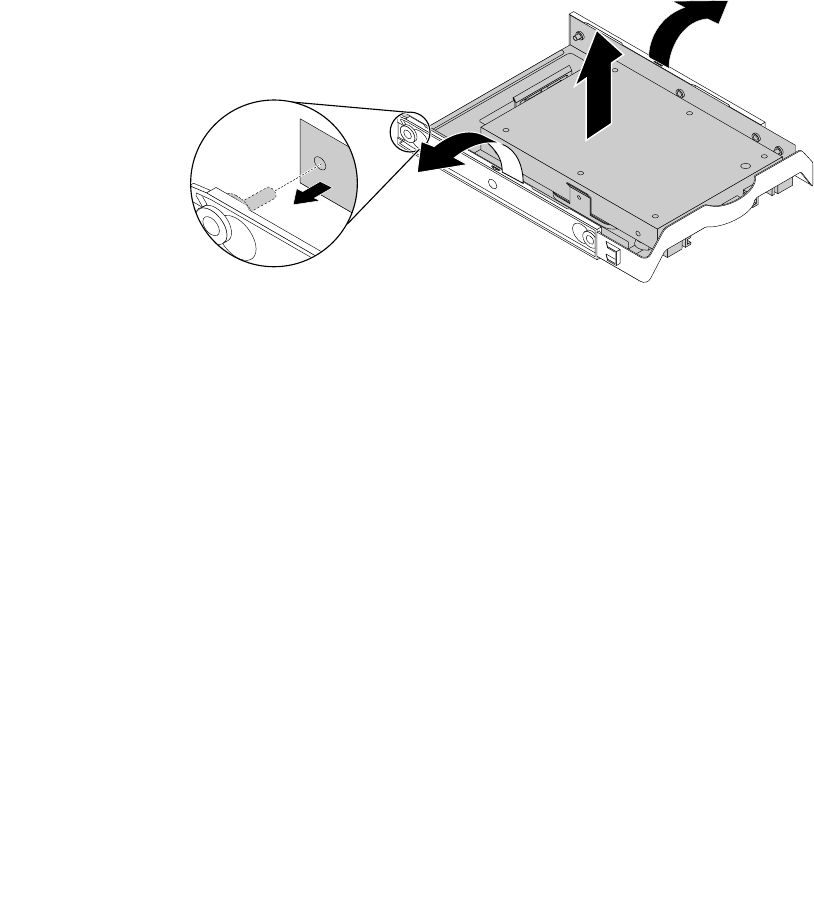
Whattodonext:
•Toworkwithanotherpieceofhardware,gototheappropriatesection.
•Tocompletetheinstallationorreplacement,goto“Completingthepartsreplacement”onpage98.
Replacingthesolid-statedrive
Attention:Donotopenyourcomputerorattemptanyrepairbeforereadingandunderstandingthe“Read
thisfirst:Importantsafetyinformation”onpagev.
Toreplacethesolid-statedrive,dothefollowing:
1.Prepareyourcomputer.See“Preparingyourcomputerandremovingthecomputercover”onpage57.
2.Locatethedesiredstoragedrivebay.See“Internaldrives”onpage7.
3.Disconnectthesignalcableandpowercablefromthesolid-statedrive.
4.Removethestorageconverterwiththesolid-statedrivefromthestoragedrivebay.See“Primaryhard
diskdrive”onpage91or“Secondaryharddiskdrive”onpage92.
5.Flexthesidesoftheplastic3.5-inchstoragedrivebrackettoremovethestorageconverterfromthe
bracket.
Figure75.Removingthestorageconverterfromthe3.5-inchstoragedrivebracket
96ThinkStationP410UserGuide
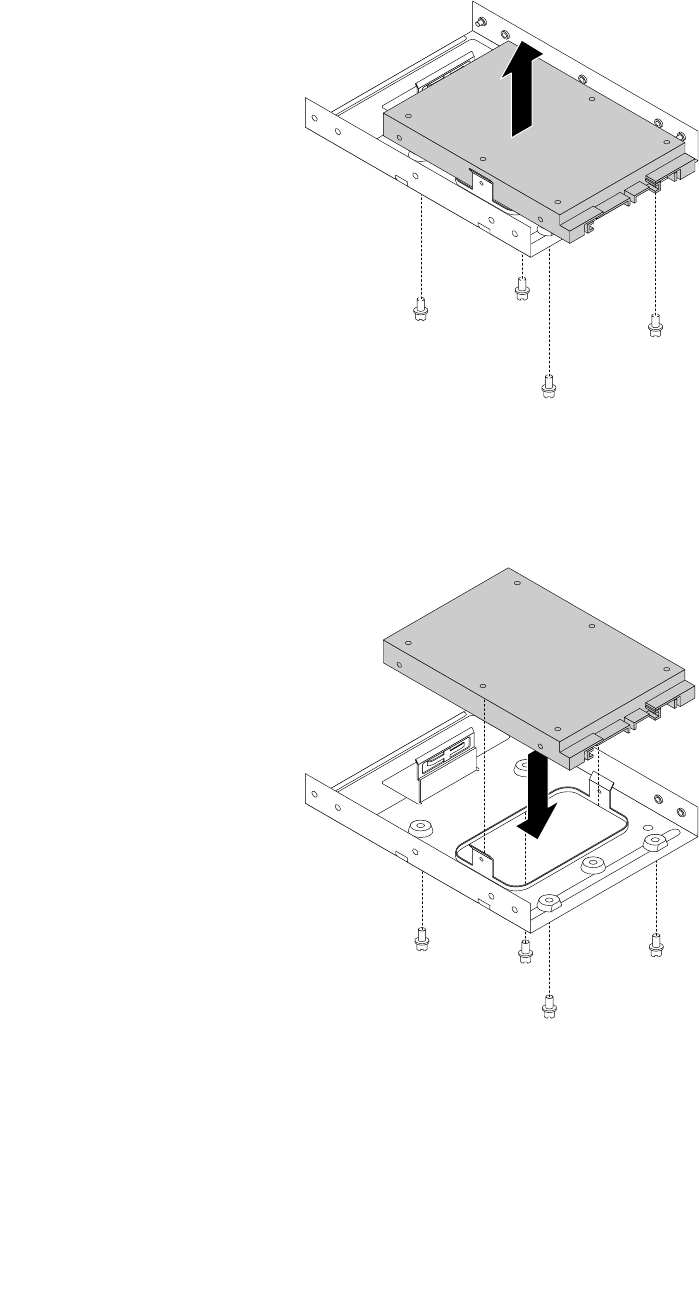
6.Removethefourscrewsthatsecurethesolid-statedrive.Thenliftthesolid-statedriveoutofthe
storageconverter.
Figure76.Removingthesolid-statedrivefromthestorageconverter
7.Installanewsolid-statedriveintothestorageconverter.Theninstallthefourscrewstosecurethe
newsolid-statedrivetothestorageconverter.
Figure77.Installingthenewsolid-statedriveintothestorageconverter
Chapter7.Installingorreplacinghardware97
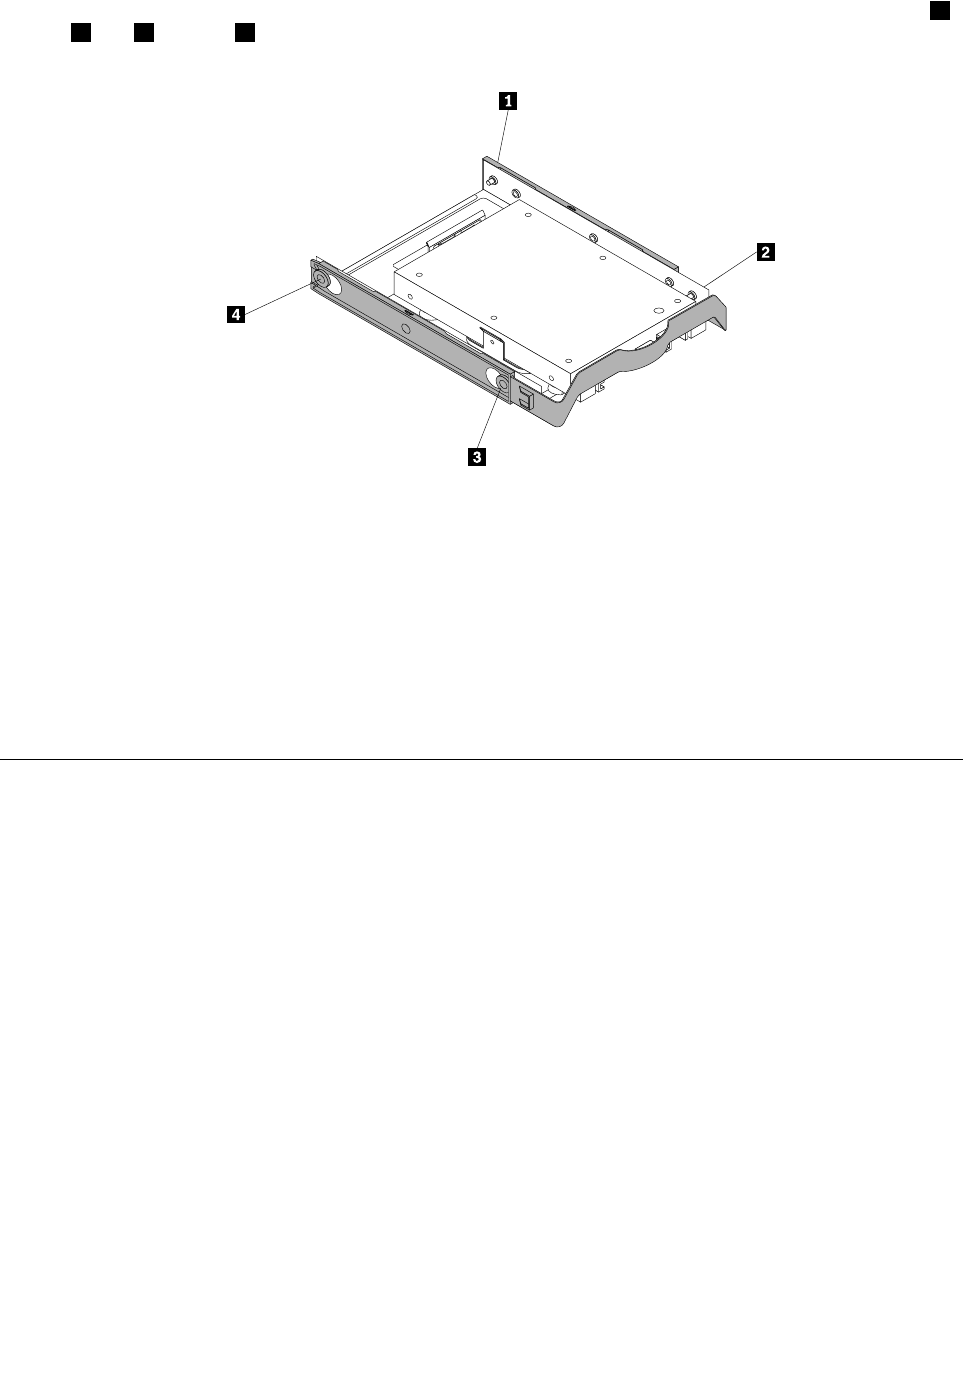
8.Toinstallthestorageconverterintothe3.5-inchstoragedrivebracket,flexthebracketandalignpin1,
pin2,pin3,andpin4onthebracketwiththecorrespondingholesinthestorageconverter.
Figure78.Installingthestorageconverterwiththenewsolid-statedriveintothestoragedrivebracket
9.Installthestorageconverterwiththebracketintothestoragedrivebay.See“Primaryharddiskdrive”on
page91or“Secondaryharddiskdrive”onpage92.
10.Connectthesignalcableandthepowercabletothesolid-statedrive.
Whattodonext:
•Toworkwithanotherpieceofhardware,gototheappropriatesection.
•Tocompletetheinstallationorreplacement,goto“Completingthepartsreplacement”onpage98.
Completingthepartsreplacement
Aftercompletingtheinstallationorreplacementforallparts,reinstallthecomputercoverandreconnect
cables.Dependingonthepartsyouinstalledorreplaced,youmightneedtoconfirmtheupdatedinformation
intheSetupUtilityprogram.Referto“UsingtheSetupUtilityprogram”onpage33.
Toreinstallthecomputercoverandreconnectcablestoyourcomputer,dothefollowing:
1.Ensurethatallcomponentshavebeenreassembledcorrectlyandthatnotoolsorloosescrewsareleft
insideyourcomputer.See“Computercomponents”onpage5forthelocationsofvariouscomponents
inyourcomputer.
2.Ensurethatthecablesareroutedcorrectlybeforereinstallingthecomputercover.Keepcablesclearof
thehingesandsidesofthecomputerchassistoavoidinterferencewithreinstallingthecomputercover.
98ThinkStationP410UserGuide
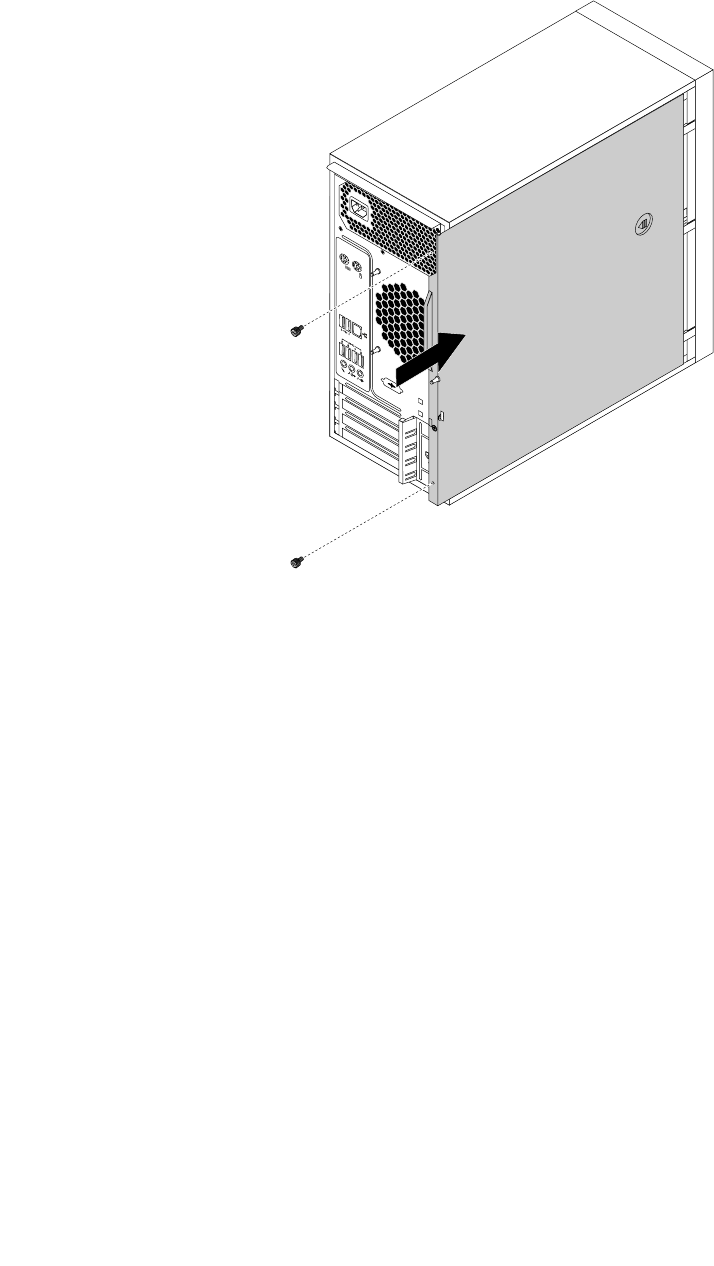
3.Positionthecomputercoveronthechassissothattherailguidesonthebottomofthecomputer
coverengagetherailsonthechassis.Then,pushthecovertothefrontofthecomputeruntilitsnaps
intoposition.
Figure79.Reinstallingthecomputercover
4.Installthescrewstosecurethecomputercover.
5.Placethecomputerinanuprightposition.
6.Ifthereisanylockingdeviceavailable,lockthecomputercover.See“Lockingyourcomputer”on
page27.
7.Reconnecttheexternalcablesandpowercordstothecorrespondingconnectorsonthecomputer.
See“Hardwarelocations”onpage1.
8.Updatetheconfigurationofyourcomputerifnecessary.See“UsingtheSetupUtilityprogram”on
page33.
9.Ifanewlyinstalledhardwarecomponentdoesnotworkcorrectly,updatethedevicedriver.See
“Keepingyourcomputercurrent”onpage24.
Chapter7.Installingorreplacinghardware99

100ThinkStationP410UserGuide

Chapter8.Gettinginformation,help,andservice
Thischaptercontainsthefollowingtopics:
•“Informationresources”onpage101
•“Helpandservice”onpage102
Informationresources
Youcanusetheinformationinthissectiontoaccessusefulresourcesrelatingtoyourcomputingneeds.
Accessingtheuserguideinvariouslanguages
Toaccesstheuserguideinvariouslanguages,goto:
http://www.lenovo.com/support
Windowshelpsystem
TheWindowshelpsystemprovidesyouwithdetailedinformationaboutusingtheWindowsoperatingsystem.
ToaccesstheWindowshelpsystem,dothefollowing:
1.ClicktheStartbuttontoopentheStartmenu.
2.DependingonyourWindowsversion,dooneofthefollowing:
•ForWindows7:ClickHelpandSupport.Youcanchoosetousetheonlineorofflinehelpatthe
bottomofthescreen.
•ForWindows10:ClickGetHelp.
Note:UsingonlinehelpforWindows7orthehelpforWindows10requiresanactiveInternetconnection.
Safetyandwarranty
TheSafety,Warranty,andSetupGuideprovidedwithyourcomputercontainsimportantsafetyinformation,
productwarrantyterms,initialsetupprocedure,andlegalnotices.Ensurethatyoureadandunderstandall
safetyinformationintheSafety,Warranty,andSetupGuidebeforeusingyourcomputer.
Inaddition,readandunderstand“Readthisfirst:Importantsafetyinformation”onpagevbeforeusingyour
computer.Thisprefaceprovidesadditionalsafetyinformationthatappliestotopicsandtasksdescribedin
thisUserGuide.
LenovoWebsite
TheLenovoWebsite(http://www.lenovo.com)providesup-to-dateinformationandservicestohelpyoubuy,
upgrade,andmaintainyourcomputer.Youalsocandothefollowing:
•Shopfordesktopandnotebookcomputers,monitors,projectors,upgrades,andaccessoriesforyour
computer,andspecialoffers.
•Purchaseadditionalservices,suchassupportforhardware,operatingsystems,programs,network
setupandconfiguration,andcustominstallations.
•Purchaseupgradesandextendedhardwarerepairservices.
•Accesstroubleshootingandsupportinformationforyourcomputermodelandothersupportedproducts.
•FindaServiceProviderlocatednearyou.
©CopyrightLenovo2016,2017101

LenovoSupportWebsite
TechnicalsupportinformationisavailableontheLenovoSupportWebsiteat:
http://www.lenovo.com/support
ThisWebsiteisupdatedwiththelatestsupportinformationsuchasthefollowing:
•Driversandsoftware
•Diagnosticsolutions
•Productandservicewarranty
•Productandpartsdetails
•Userguidesandmanuals
•Knowledgebaseandfrequentlyaskedquestions
•LenovoSupportphonenumbers
Frequentlyaskedquestions
Fortheanswerstofrequentlyaskedquestionsaboutyourcomputer,goto:
http://www.lenovo.com/support/faq
Helpandservice
Thissectionprovidesinformationaboutobtaininghelpandservice.
Callingforservice
Duringthewarrantyperiod,youcangethelpandinformationbytelephonethroughtheCustomerSupport
Center.Forthewarrantyperiodofyourcomputer,gotohttp://www.lenovo.com/warranty-status.Foralistof
LenovoSupportphonenumbers,gotohttp://www.lenovo.com/support/phone.
Note:Phonenumbersaresubjecttochangewithoutnotice.Ifthenumberforyourcountryorregionisnot
provided,contactyourLenovoresellerorLenovomarketingrepresentative.
Thefollowingservicesareavailableduringthewarrantyperiod:
•Problemdetermination-Trainedservicepersonnelareavailabletoassistyouwithdetermininga
hardwareproblemanddecidingwhatactionisnecessarytofixtheproblem.
•Hardwarerepair-Iftheproblemiscausedbyhardwareunderwarranty,trainedservicepersonnelare
availabletoprovidetheapplicablelevelofservice.
•EngineeringChangemanagement-Theremightbechangesthatarerequiredafteraproducthas
beensold.LenovooryourresellerwillmakeselectedEngineeringChanges(ECs)thatapplytoyour
hardwareavailable.
Theseitemsarenotcoveredbythewarranty:
•ReplacementoruseofpartsnotmanufacturedfororbyLenovoornon-warrantedLenovoparts
•Identificationofsoftwareproblemsources
•ConfigurationofBIOSaspartofaninstallationorupgrade
•Changes,modifications,orupgradestodevicedrivers
•Installationandmaintenanceofnetworkoperatingsystems(NOS)
•Installationandmaintenanceofprograms
Ifpossible,beatyourcomputerwhenyoucall.Havethefollowinginformationavailable:
•Machinetypeandmodel
•Serialnumbersofyourhardwareproducts
102ThinkStationP410UserGuide

•Descriptionoftheproblem
•Exactwordingofanyerrormessages
•Hardwareandsoftwareconfigurationinformation
Usingotherservices
Youmighttravelwithyourcomputerorrelocateittoacountryorregionwherethemachinetypeforyour
desktopornotebookcomputerissold.Insuchasituation,yourcomputermightbeeligibleforInternational
WarrantyService,whichautomaticallyentitlesyoutoobtainwarrantyservicethroughoutthewarrantyperiod.
Servicewillbeperformedbyserviceprovidersauthorizedtoperformwarrantyservice.
Servicemethodsandproceduresvarybycountry,andsomeservicesmightnotbeavailableinallcountries.
InternationalWarrantyServiceisdeliveredthroughthemethodofservice(suchasdepot,carry-in,or
on-siteservice)thatisprovidedintheservicingcountry.Servicecentersincertaincountriesmightnotbe
abletoserviceallmodelsofaparticularmachinetype.Insomecountries,feesandrestrictionsmight
applyatthetimeofservice.
TodeterminewhetheryourcomputeriseligibleforInternationalWarrantyServiceandtoviewalistofthe
countriesorregionswhereserviceisavailable,gotohttp://www.lenovo.com/support.
FortechnicalassistancewiththeinstallationoforquestionsrelatedtoServicePacksforyourpreinstalled
MicrosoftWindowsproduct,gotohttp://support.microsoft.com.YoualsocancontacttheLenovoCustomer
SupportCenterforhelp.Somefeesmightapply.
Purchasingadditionalservices
Duringandafterthewarrantyperiod,youcanpurchaseadditionalservices.Examplesoftheseadditional
servicesinclude:
•Supportforhardware,operatingsystems,andprograms
•Networksetupandconfigurationservices
•Upgradedorextendedhardwarerepairservices
•Custominstallationservices
Serviceavailabilityandservicenamemightvarybycountryorregion.Formoreinformationaboutthese
services,gototheLenovoWebsiteat:
http://www.lenovo.com
Chapter8.Gettinginformation,help,andservice103

104ThinkStationP410UserGuide

AppendixA.Systemmemoryspeed
TheIntelXeon®microprocessorfamiliescompatiblewiththisThinkStationcomputerfeatureanintegrated
memorycontroller,whichprovidesthemicroprocessorwithdirectaccesstothesystemmemory.Because
ofthisdesign,thesystemmemoryspeedwillbedeterminedbyanumberoffactors,includingthe
microprocessormodelandthetype,speed,size(capacity),andnumberofDIMMsinstalled.Refertothe
followingtablefortheinformationonthesupportedsystemmemoryspeedforyourowncomputermodel.
Table1.DIMMtypeandspeed:UDIMMPC4-2400
DIMMoperatingvoltageMicroprocessormodelMemoryfrequency
1.2V
IntelXeonE5-2637v4,E5-1680v4,
E5-1660v4,E5-1650v4,E5-1630v4,
E5-1620v4
2400MHz
1.2VIntelXeonE5-2630v4,E5-2623v4,
E5-2620v4,E5-1607v4,E5-1603v42133MHz
1.2VIntelXeonE5-2609v4,E5-2603v41866MHz
Table2.DIMMtypeandspeed:RDIMMPC4-2400
DIMMoperatingvoltageMicroprocessormodelMemoryfrequency
1.2V
IntelXeonE5-2637v4,E5-1680v4,
E5-1660v4,E5-1650v4,E5-1630v4,
E5-1620v4
2400MHz
1.2VIntelXeonE5-2630v4,E5-2623v4,
E5-2620v4,E5-1607v4,E5-1603v42133MHz
1.2VIntelXeonE5-2609v4,E5-2603v41866MHz
©CopyrightLenovo2016,2017105

106ThinkStationP410UserGuide

AppendixB.SupplementalinformationabouttheUbuntu
operatingsystem
Inlimitedcountriesorregions,Lenovoofferscustomersanoptiontoordercomputerswiththepreinstalled
Ubuntu®operatingsystem.
IftheUbuntuoperatingsystemisavailableonyourcomputer,readthefollowinginformationbeforeyouuse
thecomputer.IgnoreanyinformationrelatedtoWindows-basedprograms,utilities,andLenovopreinstalled
applicationsinthisdocumentation.
AccessingtheLenovoLimitedWarranty
ThisproductiscoveredbythetermsoftheLenovoLimitedWarranty(LLW),versionL505-0010-0208/2011.
YoucanviewtheLLWinanumberoflanguagesfromthefollowingWebsite.ReadtheLenovoLimited
Warrantyat:
http://www.lenovo.com/warranty/llw_02
TheLLWalsoispreinstalledonthecomputer.ToaccesstheLLW,gotothefollowingdirectory:
/usr/share/doc/lenovo-doc
IfyoucannotviewtheLLWeitherfromtheWebsiteorfromyourcomputer,contactyourlocalLenovooffice
orresellertoobtainaprintedversionoftheLLW.
AccessingtheUbuntuhelpsystem
TheUbuntuhelpsystemprovidesinformationabouthowtousetheUbuntuoperatingsystem.Toaccessthe
helpsystemfromtheUnity,moveyourpointertotheLaunchbar,andthenclicktheHelpicon.Ifyoucannot
findtheHelpiconfromtheLaunchbar,clicktheSearchicon,andtypeHelptosearchit.
TolearnmoreabouttheUbuntuoperatingsystem,goto:
http://www.ubuntu.com
Gettingsupportinformation
Ifyouneedhelp,service,technicalassistance,ormoreinformationabouttheUbuntuoperatingsystemor
otherapplications,contacttheprovideroftheUbuntuoperatingsystemortheprovideroftheapplication.
Ifyouneedtheserviceandsupportforhardwarecomponentsshippedwithyourcomputer,contact
Lenovo.FormoreinformationabouthowtocontactLenovo,refertotheUserGuideandSafety,Warranty,
andSetupGuide.
ToaccessthelatestUserGuideandSafety,Warranty,andSetupGuide,goto:
http://www.lenovo.com/support
©CopyrightLenovo2016,2017107

108ThinkStationP410UserGuide

AppendixC.Regulatoryinformation
Thelatestcomplianceinformationisavailableat
http://www.lenovo.com/compliance.
Exportclassificationnotice
ThisproductissubjecttotheUnitedStatesExportAdministrationRegulations(EAR)andhasanExport
ClassificationControlNumber(ECCN)of5A992.c.Itcanbere-exportedexcepttoanyoftheembargoed
countriesintheEARE1countrylist.
Electronicemissionsnotices
ThefollowinginformationreferstoLenovopersonalcomputermachinetypes30B2and30B3.
FederalCommunicationsCommissionDeclarationofConformity
ThisequipmenthasbeentestedandfoundtocomplywiththelimitsforaClassBdigitaldevice,pursuant
toPart15oftheFCCRules.Theselimitsaredesignedtoprovidereasonableprotectionagainstharmful
interferenceinaresidentialinstallation.Thisequipmentgenerates,uses,andcanradiateradiofrequency
energyand,ifnotinstalledandusedinaccordancewiththeinstructions,maycauseharmfulinterference
toradiocommunications.However,thereisnoguaranteethatinterferencewillnotoccurinaparticular
installation.Ifthisequipmentdoescauseharmfulinterferencetoradioortelevisionreception,whichcanbe
determinedbyturningtheequipmentoffandon,theuserisencouragedtotrytocorrecttheinterferenceby
oneormoreofthefollowingmeasures:
•Reorientorrelocatethereceivingantenna.
•Increasetheseparationbetweentheequipmentandreceiver.
•Connecttheequipmentintoanoutletonacircuitdifferentfromthattowhichthereceiverisconnected.
•Consultanauthorizeddealerorservicerepresentativeforhelp.
Lenovoisnotresponsibleforanyradioortelevisioninterferencecausedbyusingotherthanspecifiedor
recommendedcablesandconnectorsorbyunauthorizedchangesormodificationstothisequipment.
Unauthorizedchangesormodificationscouldvoidtheuser'sauthoritytooperatetheequipment.
ThisdevicecomplieswithPart15oftheFCCRules.Operationissubjecttothefollowingtwoconditions:(1)
thisdevicemaynotcauseharmfulinterference,and(2)thisdevicemustacceptanyinterferencereceived,
includinginterferencethatmaycauseundesiredoperation.
ResponsibleParty:
Lenovo(UnitedStates)Incorporated
1009ThinkPlace-BuildingOne
Morrisville,NC27560
PhoneNumber:919-294-5900
IndustryCanadaClassBemissioncompliancestatement
CANICES-3(B)/NMB-3(B)
EuropeanUnionconfirmity
©CopyrightLenovo2016,2017109

EUContact:Lenovo,Einsteinova21,85101Bratislava,Slovakia
Modelswithoutaradiodevice:ThisproductisinconformitywiththeprotectionrequirementsofEU
CouncilEMCDirective2014/30/EUontheapproximationofthelawsoftheMemberStatesrelatingto
electromagneticcompatibility.
Modelswitharadiodevice:Thisproductisinconformitywithalltherequirementsandessential
normsthatapplytoEUCouncilR&TTEDirective1999/5/EC(untilJune12,2017)andCouncil
RadioEquipmentDirective2014/53/EU(fromJune13,2017)ontheapproximationofthelaws
oftheMemberStatesrelatingtoradioequipment.ThefulltextofthesystemEUdeclarationof
conformityandtheEUwirelessmoduledeclarationsareavailableatthefollowingInternetaddress:
http://www3.lenovo.com/us/en/social_responsibility/EU_DoC_workstations/
Lenovocannotacceptresponsibilityforanyfailuretosatisfytheprotectionrequirementsresultingfrom
anon-recommendedmodificationoftheproduct,includingtheinstallationofoptioncardsfromother
manufacturers.ThisproducthasbeentestedandfoundtocomplywiththelimitsforClassBequipment
accordingtoEuropeanStandardsharmonizedintheDirectivesincompliance.ThelimitsforClassB
equipmentwerederivedfortypicalresidentialenvironmentstoprovidereasonableprotectionagainst
interferencewithlicensedcommunicationdevices.
GermanClassBcompliancestatement
DeutschsprachigerEUHinweis:
HinweisfürGerätederKlasseBEU-RichtliniezurElektromagnetischenVerträglichkeit
DiesesProduktentsprichtdenSchutzanforderungenderEU-Richtlinie2014/30/EU(früher2004/108/EC)zur
AngleichungderRechtsvorschriftenüberdieelektromagnetischeVerträglichkeitindenEU-Mitgliedsstaaten
undhältdieGrenzwertederKlasseBderNormgemäßRichtlinie.
Umdiesessicherzustellen,sinddieGerätewieindenHandbüchernbeschriebenzuinstallierenundzu
betreiben.DesWeiterendürfenauchnurvonderLenovoempfohleneKabelangeschlossenwerden.
LenovoübernimmtkeineVerantwortungfürdieEinhaltungderSchutzanforderungen,wenndasProdukt
ohneZustimmungderLenovoverändertbzw.wennErweiterungskomponentenvonFremdherstellernohne
EmpfehlungderLenovogesteckt/eingebautwerden.
Deutschland:
EinhaltungdesGesetzesüberdieelektromagnetischeVerträglichkeitvonBetriebsmitteln
DiesesProduktentsprichtdem„GesetzüberdieelektromagnetischeVerträglichkeitvonBetriebsmitteln“
EMVG(früher„GesetzüberdieelektromagnetischeVerträglichkeitvonGeräten“).DiesistdieUmsetzungder
EMVEURichtlinie2014/30/EU(früher2004/108/EWG)inderBundesrepublikDeutschland.
ZulassungsbescheinigunglautdemDeutschenGesetzüberdieelektromagnetischeVerträglichkeit
vonBetriebsmitteln,EMVGvom20.Juli2007(früherGesetzüberdieelektromagnetische
VerträglichkeitvonGeräten),bzw.derEMVEURichtlinie2014/30/EU(früher2004/108/EC),für
GerätederKlasseB.
DiesesGerätistberechtigt,inÜbereinstimmungmitdemDeutschenEMVGdasEG-Konformitätszeichen
-CE-zuführen.VerantwortlichfürdieKonformitätserklärungnachParagraf5desEMVGistdieLenovo
(Deutschland)GmbH,Meitnerstr.9,D-70563Stuttgart.
110ThinkStationP410UserGuide
InformationeninHinsichtEMVGParagraf4Abs.(1)4:
DasGeräterfülltdieSchutzanforderungennachEN55024undEN55022KlasseB.
Koreanwireless-radiocomplianceinformation
JapanVCCIClassBcompliancestatement
Japancompliancestatementforproductswhichconnecttothepowermainswithratedcurrent
lessthanorequalto20Aperphase
Japannoticeforacpowercord
Theacpowercordshippedwithyourproductcanbeusedonlyforthisspecificproduct.Donotusetheac
powercordforotherdevices.
LenovoproductserviceinformationforTaiwan
KeyboardandmousecompliancestatementforTaiwan
Eurasiancompliancemark
Brazilaudionotice
Ouvirsonscommaisde85decibéisporlongosperíodospodeprovocardanosaosistemaauditivo.
Mexicowireless-radiocomplianceinformation
Advertencia:EnMexicolaoperacióndeesteequipoestásujetaalassiguientesdoscondiciones:(1)es
posiblequeesteequipoodispositivonocauseinterferenciaperjudicialy(2)esteequipoodispositivodebe
aceptarcualquierinterferencia,incluyendolaquepuedacausarsuoperaciónnodeseada.
AppendixC.Regulatoryinformation111

Additionalregulatoryinformation
Foradditionalregulatoryinformation,refertotheRegulatoryNoticeshippedwithyourcomputer.Depending
ontheconfigurationofyourcomputerandthecountryorregionwherethecomputerwaspurchased,
youmighthavereceivedadditionalprintedregulatorynotices.Allregulatorynoticesareavailableonthe
LenovoSupportWebsiteinelectronicformat.Toaccesselectroniccopiesofthedocumentation,goto
http://www.lenovo.com/support.
112ThinkStationP410UserGuide

AppendixD.WEEEandrecyclinginformation
Lenovoencouragesownersofinformationtechnology(IT)equipmenttoresponsiblyrecycletheirequipment
whenitisnolongerneeded.Lenovooffersvariousprogramsandservicestoassistequipmentownersin
recyclingtheirITproducts.Thelatestenvironmentalinformationisavailableat
http://www.lenovo.com/ecodeclaration.
ImportantWEEEinformation
TheWEEEmarkingonLenovoproductsappliestocountrieswithWEEEande-wasteregulations(for
example,theEuropeanWEEEDirective,IndiaE-WasteManagement&HandlingRules).Appliancesare
labeledinaccordancewithlocalregulationsconcerningwasteelectricalandelectronicequipment(WEEE).
Theseregulationsdeterminetheframeworkforthereturnandrecyclingofusedappliancesasapplicable
withineachgeography.Thislabelisappliedtovariousproductstoindicatethattheproductisnottobe
thrownaway,butratherputintheestablishedcollectionsystemsforreclaimingtheseendoflifeproducts.
Usersofelectricalandelectronicequipment(EEE)withtheWEEEmarkingmustnotdisposeofendoflife
EEEasunsortedmunicipalwaste,butusethecollectionframeworkavailabletothemforthereturn,recycle,
andrecoveryofWEEEandtominimizeanypotentialeffectsofEEEontheenvironmentandhumanhealth
duetothepresenceofhazardoussubstances.Lenovoelectricalandelectronicequipment(EEE)maycontain
partsandcomponents,whichatend-of-lifemightqualifyashazardouswaste.
EEEandwasteelectricalandelectronicequipment(WEEE)canbedeliveredfreeofchargetotheplaceof
saleoranydistributorthatsellselectricalandelectronicequipmentofthesamenatureandfunctionas
theusedEEEorWEEE.
ForadditionalWEEEinformation,goto:
http://www.lenovo.com/recycling
WEEEinformationforHungary
Lenovo,asaproducer,bearsthecostincurredinconnectionwiththefulfillmentofLenovo’sobligations
underHungaryLawNo.197/2014(VIII.1.)subsections(1)-(5)ofsection12.
RecyclinginformationforJapan
CollectingandrecyclingadisusedLenovocomputerormonitor
IfyouareacompanyemployeeandneedtodisposeofaLenovocomputerormonitorthatistheproperty
ofthecompany,youmustdosoinaccordancewiththeLawforPromotionofEffectiveUtilizationof
©CopyrightLenovo2016,2017113

Resources.Computersandmonitorsarecategorizedasindustrialwasteandshouldbeproperlydisposed
ofbyanindustrialwastedisposalcontractorcertifiedbyalocalgovernment.InaccordancewiththeLaw
forPromotionofEffectiveUtilizationofResources,LenovoJapanprovides,throughitsPCCollecting
andRecyclingServices,forthecollecting,reuse,andrecyclingofdisusedcomputersandmonitors.For
details,visittheLenovoWebsiteathttp://www.lenovo.com/recycling/japan.PursuanttotheLawfor
PromotionofEffectiveUtilizationofResources,thecollectingandrecyclingofhome-usedcomputers
andmonitorsbythemanufacturerwasbegunonOctober1,2003.Thisserviceisprovidedfreeof
chargeforhome-usedcomputerssoldafterOctober1,2003.Fordetails,visittheLenovoWebsiteat
http://www.lenovo.com/recycling/japan.
DisposingofLenovocomputercomponents
SomeLenovocomputerproductssoldinJapanmayhavecomponentsthatcontainheavymetalsorother
environmentalsensitivesubstances.Toproperlydisposeofdisusedcomponents,suchasaprintedcircuit
boardordrive,usethemethodsdescribedaboveforcollectingandrecyclingadisusedcomputerormonitor.
DisposingofdisusedlithiumbatteriesfromLenovocomputers
Abutton-shapedlithiumbatteryisinstalledinsideyourLenovocomputertoprovidepowertothecomputer
clockwhilethecomputerisoffordisconnectedfromthemainpowersource.Ifyouneedtoreplaceitwitha
newone,contactyourplaceofpurchaseorcontactLenovoforservice.Ifyouneedtodisposeofadisused
lithiumbattery,insulateitwithvinyltape,contactyourplaceofpurchaseoranindustrial-waste-disposal
operator,andfollowtheirinstructions.Disposalofalithiumbatterymustcomplywithlocalordinances
andregulations.
RecyclinginformationforBrazil
DeclaraçõesdeReciclagemnoBrasil
DescartedeumProdutoLenovoForadeUso
Equipamentoselétricoseeletrônicosnãodevemserdescartadosemlixocomum,masenviadosàpontosde
coleta,autorizadospelofabricantedoprodutoparaquesejamencaminhadoseprocessadosporempresas
especializadasnomanuseioderesíduosindustriais,devidamentecertificadaspelosorgãosambientais,de
acordocomalegislaçãolocal.
ALenovopossuiumcanalespecíficoparaauxiliá-lonodescartedessesprodutos.Casovocêpossua
umprodutoLenovoemsituaçãodedescarte,ligueparaonossoSACouencaminheume-mailpara:
reciclar@lenovo.com,informandoomodelo,númerodesérieecidade,afimdeenviarmosasinstruções
paraocorretodescartedoseuprodutoLenovo.
BatteryrecyclinginformationforTaiwan
114ThinkStationP410UserGuide

BatteryrecyclinginformationfortheEuropeanUnion
Notice:ThismarkappliesonlytocountrieswithintheEuropeanUnion(EU).
BatteriesorpackagingforbatteriesarelabeledinaccordancewithEuropeanDirective2006/66/EC
concerningbatteriesandaccumulatorsandwastebatteriesandaccumulators.TheDirectivedeterminesthe
frameworkforthereturnandrecyclingofusedbatteriesandaccumulatorsasapplicablethroughoutthe
EuropeanUnion.Thislabelisappliedtovariousbatteriestoindicatethatthebatteryisnottobethrown
away,butratherreclaimeduponendoflifeperthisDirective.
InaccordancewiththeEuropeanDirective2006/66/EC,batteriesandaccumulatorsarelabeledtoindicate
thattheyaretobecollectedseparatelyandrecycledatendoflife.Thelabelonthebatterymayalso
includeachemicalsymbolforthemetalconcernedinthebattery(Pbforlead,Hgformercury,andCdfor
cadmium).Usersofbatteriesandaccumulatorsmustnotdisposeofbatteriesandaccumulatorsasunsorted
municipalwaste,butusethecollectionframeworkavailabletocustomersforthereturn,recycling,and
treatmentofbatteriesandaccumulators.Customerparticipationisimportanttominimizeanypotential
effectsofbatteriesandaccumulatorsontheenvironmentandhumanhealthduetothepotentialpresenceof
hazardoussubstances.
Beforeplacingelectricalandelectronicequipment(EEE)inthewastecollectionstreamorinwastecollection
facilities,theenduserofequipmentcontainingbatteriesand/oraccumulatorsmustremovethosebatteries
andaccumulatorsforseparatecollection.
DisposingoflithiumbatteriesandbatterypacksfromLenovoproducts
Acoin-celltypelithiumbatterymightbeinstalledinsideyourLenovoproduct.Youcanfinddetailsaboutthe
batteryintheproductdocumentation.Ifthebatteryneedstobereplaced,contactyourplaceofpurchaseor
contactLenovoforservice.Ifyouneedtodisposeofalithiumbattery,insulateitwithvinyltape,contact
yourplaceofpurchaseorawaste-disposaloperator,andfollowtheirinstructions.
DisposingofbatterypacksfromLenovoproducts
YourLenovodevicemightcontainalithium-ionbatterypackoranickelmetalhydridebatterypack.Youcan
finddetailsonthebatterypackintheproductdocumentation.Ifyouneedtodisposeofabatterypack,
insulateitwithvinyltape,contactLenovosales,service,oryourplaceofpurchase,orawaste-disposal
operator,andfollowtheirinstructions.Youalsocanrefertotheinstructionsprovidedintheuserguide
foryourproduct.
Forpropercollectionandtreatment,goto:
http://www.lenovo.com/lenovo/environment
AppendixD.WEEEandrecyclinginformation115

116ThinkStationP410UserGuide
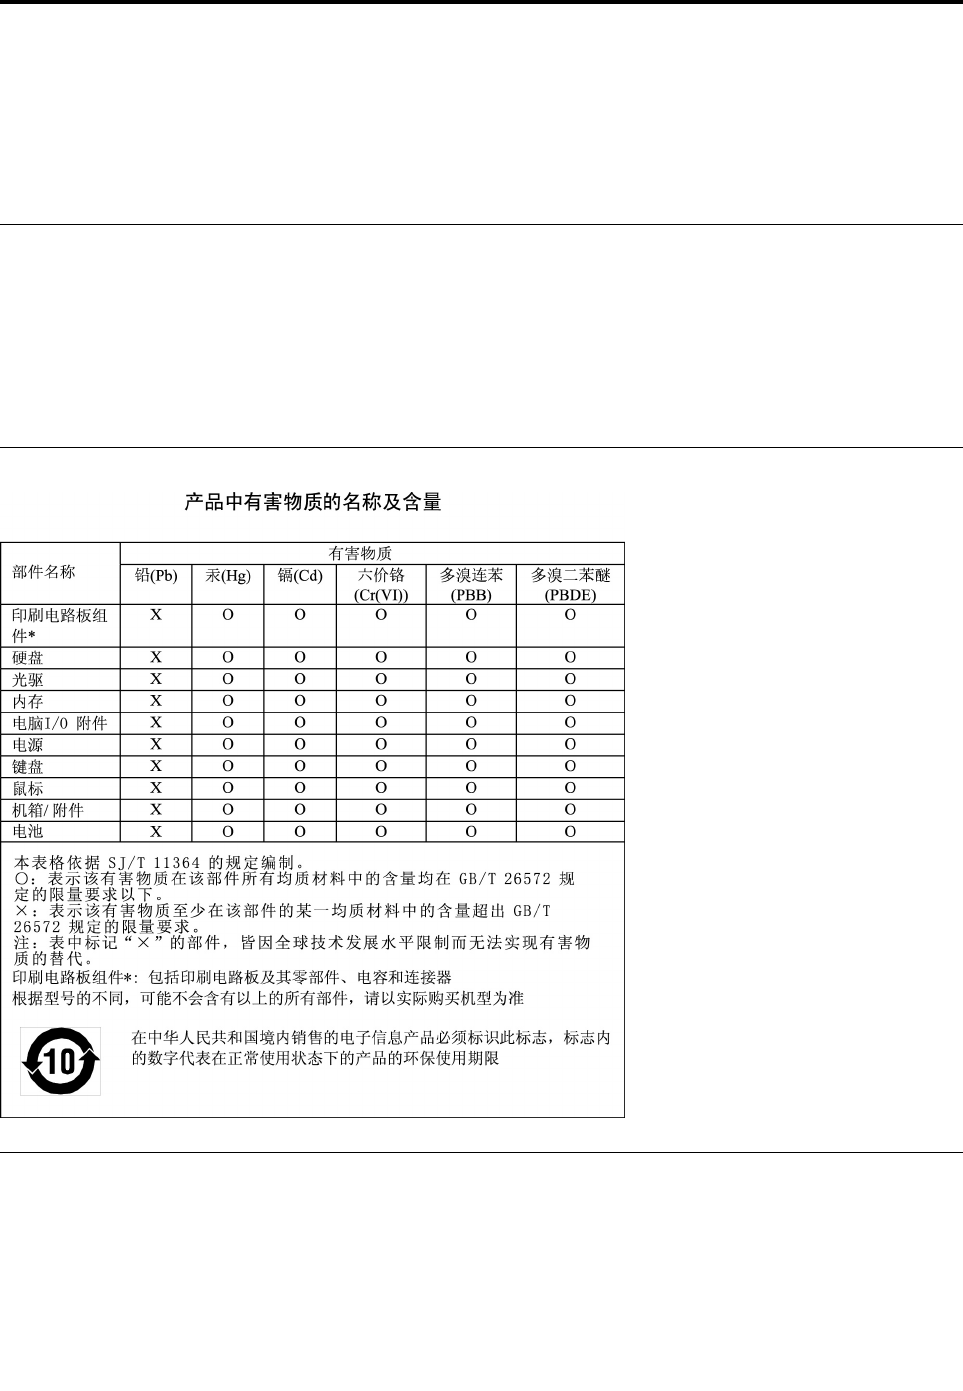
AppendixE.RestrictionofHazardousSubstancesDirective
(RoHS)
Thelatestenvironmentalinformationisavailableat
http://www.lenovo.com/ecodeclaration.
EuropeanUnionRoHS
ThisLenovoproduct,withincludedparts(cables,cords,andsoon)meetstherequirementsofDirective
2011/65/EUontherestrictionoftheuseofcertainhazardoussubstancesinelectricalandelectronic
equipment(“RoHSrecast”or“RoHS2”).
FormoreinformationaboutLenovoworldwidecomplianceonRoHS,goto:
http://www.lenovo.com/social_responsibility/us/en/RoHS_Communication.pdf
ChinaRoHS
TurkishRoHS
TheLenovoproductmeetstherequirementsoftheRepublicofTurkeyDirectiveontheRestrictionoftheUse
ofCertainHazardousSubstancesinWasteElectricalandElectronicEquipment(WEEE).
©CopyrightLenovo2016,2017117
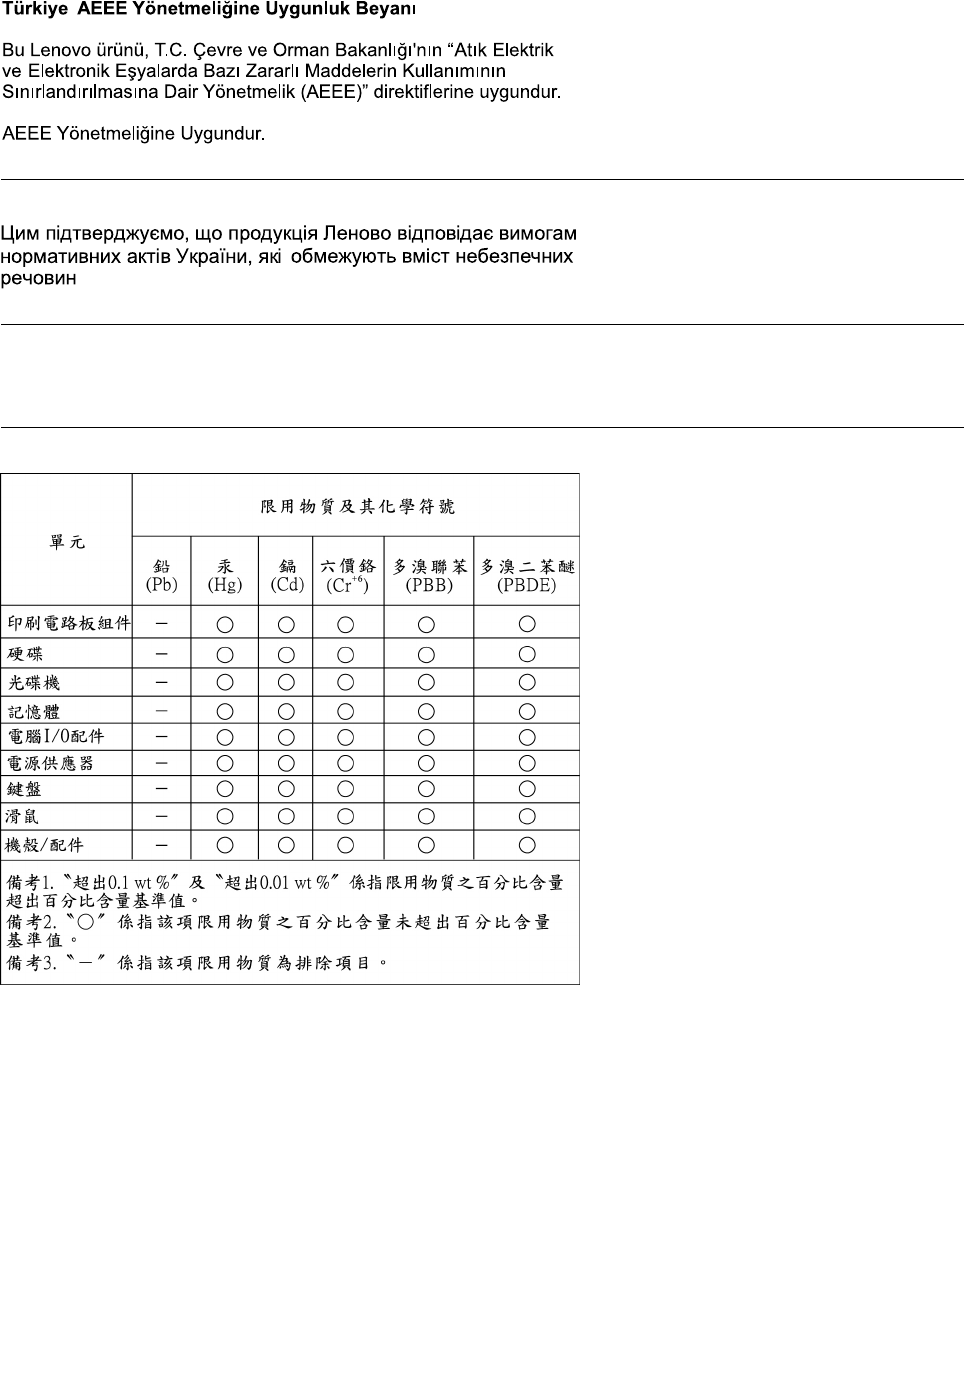
UkraineRoHS
IndiaRoHS
RoHScompliantasperE-Waste(Management&Handling)Rules.
TaiwanRoHS
118ThinkStationP410UserGuide

AppendixF.ENERGYSTARmodelinformation
ENERGYSTAR®isajointprogramoftheU.S.EnvironmentalProtectionAgencyandtheU.S.Department
ofEnergyaimedatsavingmoneyandprotectingtheenvironmentthroughenergyefficientproductsand
practices.
LenovoisproudtoofferourcustomersproductswithanENERGYSTARcompliantdesignation.Some
modelsofthefollowingmachinetypeshavebeendesignedandtestedtoconformtotheENERGYSTAR
programrequirementforcomputersatthetimeofmanufacture:30B20003USand30B20002US.Formore
informationaboutENERGYSTARratingsforLenovocomputers,goto:
http://www.lenovo.com
ByusingENERGYSTARcompliantproductsandtakingadvantageofthepower-managementfeaturesof
yourcomputer,youreducetheconsumptionofelectricity.Reducedelectricalconsumptioncontributesto
potentialfinancialsavings,acleanerenvironment,andthereductionofgreenhousegasemissions.
FormoreinformationaboutENERGYSTAR,goto:
http://www.energystar.gov
Lenovoencouragesyoutomakeefficientuseofenergyanintegralpartofyourday-to-dayoperations.To
helpinthisendeavor,setthefollowingpower-managementfeaturestotakeeffectwhenyourcomputerhas
beeninactiveforaspecifiedduration:
Table3.ENERGYSTARpower-managementfeatures
Windows7orWindows10operatingsystem
Powerplan:Default
•Turnoffthedisplay:After10minutes
•Putthecomputertosleep:After25minutes
•Advancedpowersettings:
–Turnoffharddiskdrives:After20minutes
–Hibernate:Never
ToawakenyourcomputerfromaSleepmode,pressanykeyonyourkeyboard.
Tochangepowersettings,dothefollowing:
1.ClicktheStartbuttontoopentheStartmenu.
2.DependingonyourWindowsversion,dooneofthefollowing:
•ForWindows7:ClickControlPanel.
•ForWindows10:ClickWindowsSystem➙ControlPanel.
3.ViewControlPanelbyLargeiconsorSmallicons,andthenclickPowerOptions.
©CopyrightLenovo2016,2017119

4.Followtheinstructionsonthescreen.
120ThinkStationP410UserGuide

AppendixG.Notices
Lenovomaynotoffertheproducts,services,orfeaturesdiscussedinthisdocumentinallcountries.Consult
yourlocalLenovorepresentativeforinformationontheproductsandservicescurrentlyavailableinyour
area.AnyreferencetoaLenovoproduct,program,orserviceisnotintendedtostateorimplythatonlythat
Lenovoproduct,program,orservicemaybeused.Anyfunctionallyequivalentproduct,program,orservice
thatdoesnotinfringeanyLenovointellectualpropertyrightmaybeusedinstead.However,itistheuser's
responsibilitytoevaluateandverifytheoperationofanyotherproduct,program,orservice.
Lenovomayhavepatentsorpendingpatentapplicationscoveringsubjectmatterdescribedinthis
document.Thefurnishingofthisdocumentdoesnotgiveyouanylicensetothesepatents.Youcansend
licenseinquiries,inwriting,to:
Lenovo(UnitedStates),Inc.
1009ThinkPlace-BuildingOne
Morrisville,NC27560
U.S.A.
Attention:LenovoDirectorofLicensing
LENOVOPROVIDESTHISPUBLICATION“ASIS”WITHOUTWARRANTYOFANYKIND,EITHEREXPRESS
ORIMPLIED,INCLUDING,BUTNOTLIMITEDTO,THEIMPLIEDWARRANTIESOFNON-INFRINGEMENT,
MERCHANTABILITYORFITNESSFORAPARTICULARPURPOSE.Somejurisdictionsdonotallow
disclaimerofexpressorimpliedwarrantiesincertaintransactions,therefore,thisstatementmaynotapply
toyou.
Thisinformationcouldincludetechnicalinaccuraciesortypographicalerrors.Changesareperiodically
madetotheinformationherein;thesechangeswillbeincorporatedinneweditionsofthepublication.
Lenovomaymakeimprovementsand/orchangesintheproductsand/ortheprogramsdescribedinthis
publicationatanytimewithoutnotice.
Theproductsdescribedinthisdocumentarenotintendedforuseinimplantationorotherlifesupport
applicationswheremalfunctionmayresultininjuryordeathtopersons.Theinformationcontainedinthis
documentdoesnotaffectorchangeLenovoproductspecificationsorwarranties.Nothinginthisdocument
shalloperateasanexpressorimpliedlicenseorindemnityundertheintellectualpropertyrightsofLenovo
orthirdparties.Allinformationcontainedinthisdocumentwasobtainedinspecificenvironmentsandis
presentedasanillustration.Theresultobtainedinotheroperatingenvironmentsmayvary.
Lenovomayuseordistributeanyoftheinformationyousupplyinanywayitbelievesappropriatewithout
incurringanyobligationtoyou.
Anyreferencesinthispublicationtonon-LenovoWebsitesareprovidedforconvenienceonlyanddonotin
anymannerserveasanendorsementofthoseWebsites.ThematerialsatthoseWebsitesarenotpartof
thematerialsforthisLenovoproduct,anduseofthoseWebsitesisatyourownrisk.
Anyperformancedatacontainedhereinwasdeterminedinacontrolledenvironment.Therefore,theresult
obtainedinotheroperatingenvironmentsmayvarysignificantly.Somemeasurementsmayhavebeen
madeondevelopment-levelsystemsandthereisnoguaranteethatthesemeasurementswillbethesame
ongenerallyavailablesystems.Furthermore,somemeasurementsmayhavebeenestimatedthrough
extrapolation.Actualresultsmayvary.Usersofthisdocumentshouldverifytheapplicabledatafortheir
specificenvironment.
©CopyrightLenovo2016,2017121

Trademarks
ThefollowingtermsaretrademarksofLenovointheUnitedStates,othercountries,orboth:
Lenovo
TheLenovologo
ThinkStation
TheThinkStationlogo
ThinkVantage
Microsoft,Windows,andWindowsMediaaretrademarksoftheMicrosoftgroupofcompanies.
Intel,Thunderbolt,andXeonaretrademarksofIntelCorporationoritssubsidiariesintheU.S.and/orother
countries.
LinuxisaregisteredtrademarkofLinusTorvalds.
DisplayPortandMiniDisplayPortaretrademarksoftheVideoElectronicsStandardsAssociation.
UbuntuisaregisteredtrademarkofCanonicalLtd.
Othercompany,product,orservicenamesmaybetrademarksorservicemarksofothers.
122ThinkStationP410UserGuide