Lenovo R123 ThinkPad Stack Wireless Router User Manual
Lenovo (Beijing) Limited ThinkPad Stack Wireless Router
Lenovo >
User Manual

THINKPAD STACK PROFESSIONAL KIT
User Guide

1
Introduction
ThinkPad® Stack Professional Kit (hereafter called the stack kit) includes the following four devices:
ThinkPad Stack Bluetooth Speaker
(hereafter called speaker)
ThinkPad Stack Wireless Router
(hereafter called router)
ThinkPad Stack 1TB USB3.0 Hard Drive
(hereafter called hard disk drive)
ThinkPad Stack 10000mAh Power Bank
(hereafter called power bank)
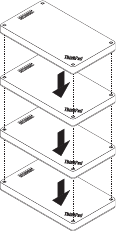
The four devices can be stacked together (in any order and combination) through Pogo pins or
Pogo pads, which provide fast power and data transfer. If any one of the stacked devices is supplied
with power, the power can be transferred to each stacked devices.
The speaker supports the following functions:
Up to six hours of music playback
Built-in hands-free phone function
The router supports the following functions:
Wireless access in the 2.4-GHz band or the 5-GHz band
Internet access through an RJ-45 network cable
Internet access through an external 3G or 4G network card
Remote access to the hard disk drive if it is stacked to the router
Remote access to a USB storage device if it is connected to the router
The hard disk drive supports the following functions:
High-speed access through the USB 3.0 cable
Remote access through the router when they are stacked together

2
Note: Use the ThinkPad Stack Assist app for remote access and control. For more information, go
to:
http://www.lenovo.com/stack
The power bank enables you to do the following:
Charge the speaker and supply power to the router by Pogo pins or Pogo pads.
Charge two mobile phones by Universal Serial Bus (USB) 2.0 connectors at the same time.
Safety information
Keep magnetically sensitive items, such as electronic devices and storage media, more than 10
cm or four inches away from the kit. The strong magnetic fields generated by the magnets
contained in the kit might damage magnetically sensitive items.
Do not attempt to replace the internal rechargeable lithium-Ion batteries. Contact Lenovo
Support for factory replacement if necessary.
Do not let rechargeable lithium-Ion batteries completely discharge and do not store these
batteries in a discharged state.
3
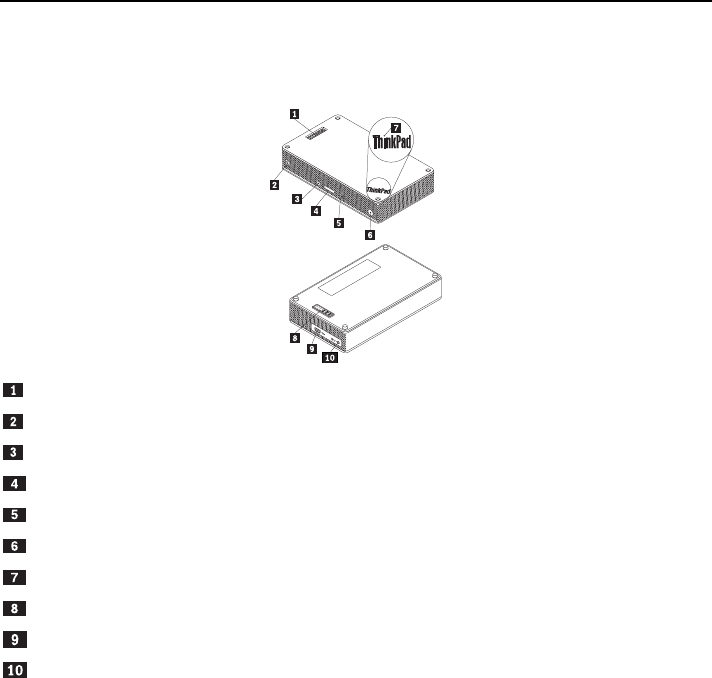
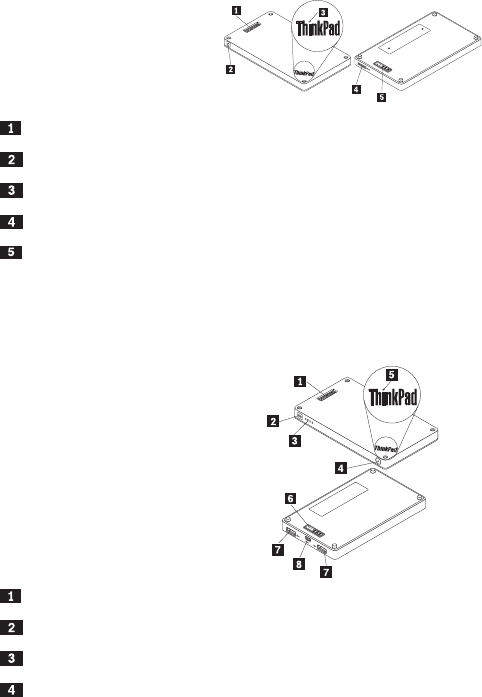
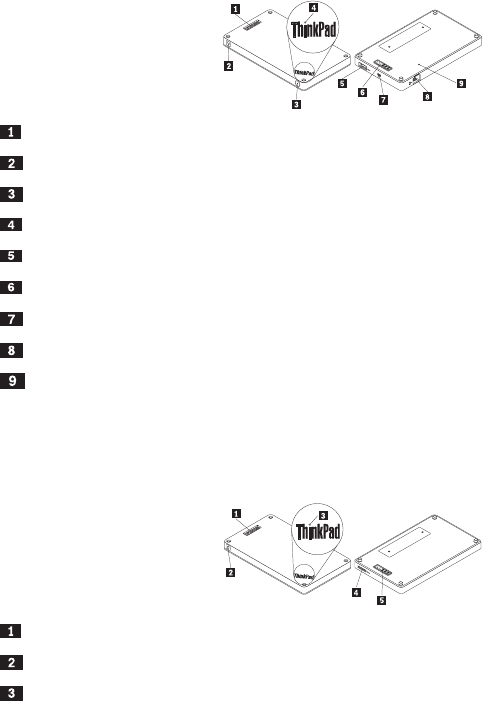
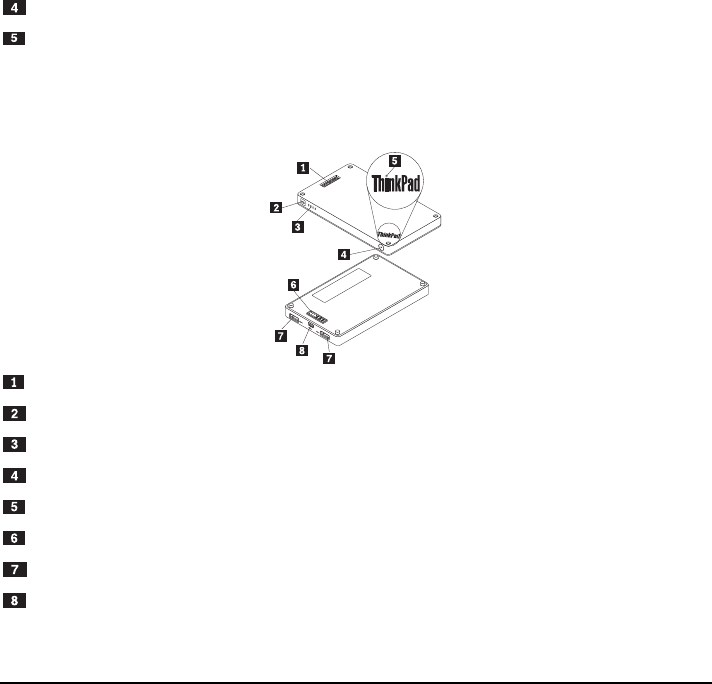
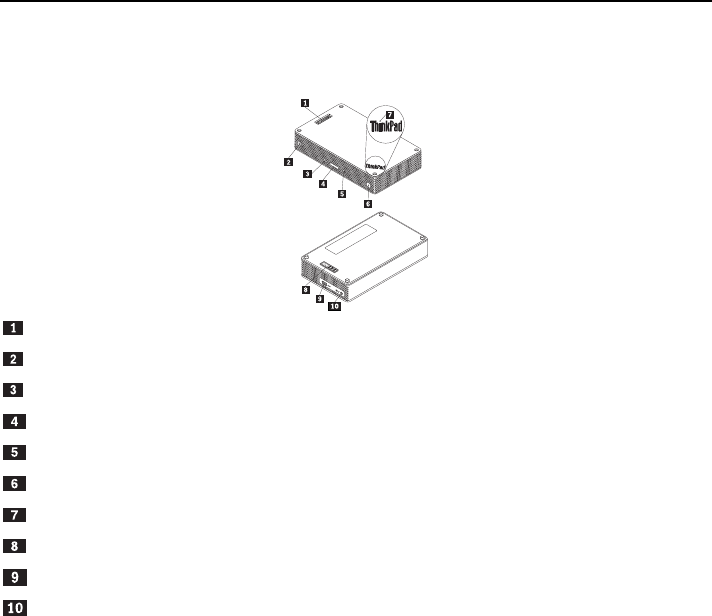
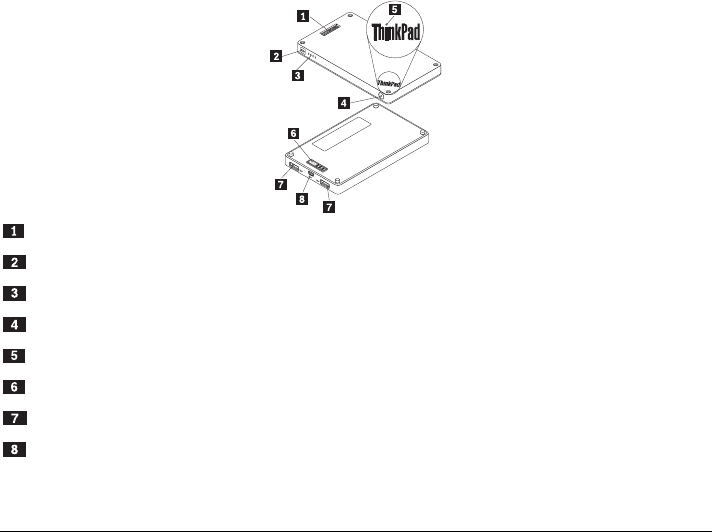
Parts and locations
ThinkPad Stack Bluetooth Speaker
Pogo pins
Speaker icon indicator
Microphone-mute button with LED
Volume button
Play/Pause button
Power button with LED
ThinkPad logo LED
Pogo pad
Micro USB 2.0 connector (for USB charging only)
Audio-in connector
4
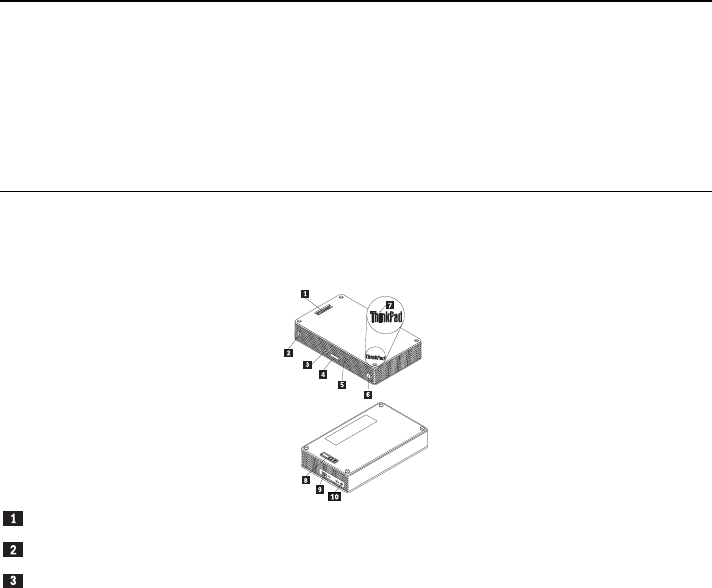
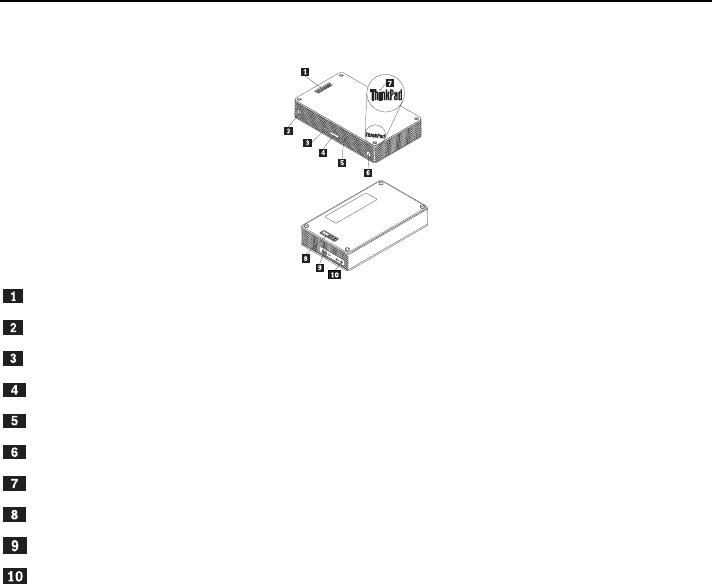
ThinkPad Stack Wireless Router
Pogo pins
Wireless status LED
Power button
ThinkPad logo LED
USB 2.0 connector
Pogo pads
Micro USB 2.0 connector (for USB charging only)
Ethernet connector
Emergency-reset hole
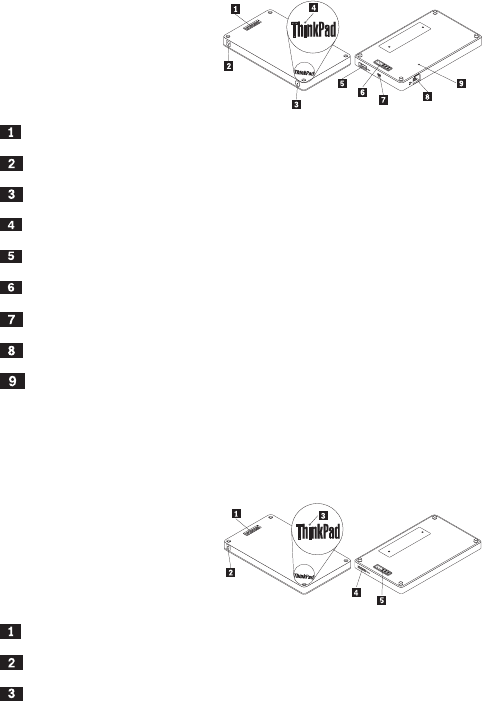
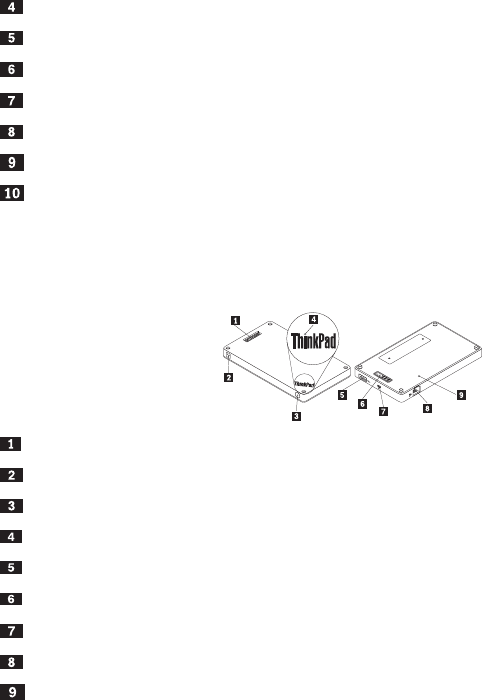
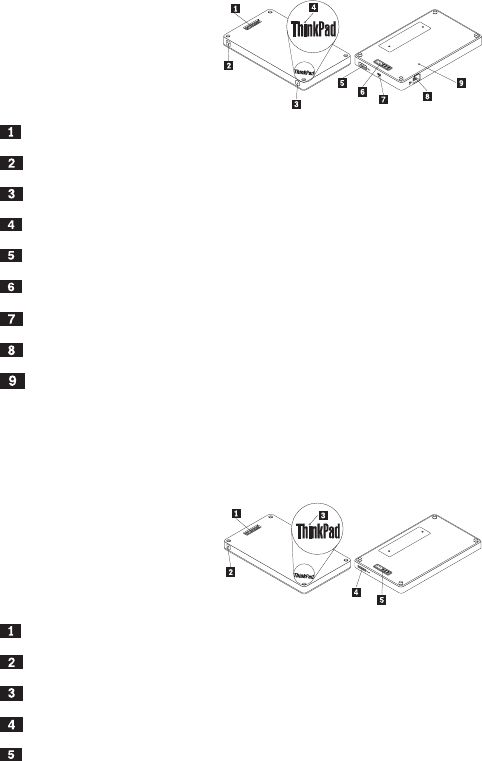
ThinkPad Stack 1TB USB3.0 Hard Drive
Pogo pins
Activity LED
ThinkPad logo LED
5
Micro USB 3.0 connector
Pogo pads
ThinkPad Stack 10000mAh Power Bank
Pogo pins
Battery icon indicator
Battery status indicators
Battery status button
ThinkPad logo indicator
Pogo pads
USB 2.0 connector
Micro USB 2.0 connector

6
Using the kit
Using the speaker
Before using the speaker, pair it with a mobile phone, computer, or other device. To pair the
speaker, do the following:
1. Ensure that the speaker is powered on.
2. Press and hold the power button for about three seconds. The speaker beeps for two times and
the speaker icon indicator starts flashing.
3. Enable the Bluetooth function on the pairing device, and pair with “ThinkPad Stack Bluetooth
Speaker.” The pairing process begins.
4. After the speaker beeps again for two times and the speaker icon indicator stops flashing, the
speaker has been successfully paired with the pairing device.
After the speaker is paired with a device, it is ready for your use. You can take the following
operations:
Turn on the speaker
Press the power button until the green light-emitting diode (LED) in the center of the power button
and the speaker icon indicator are solid on.
Turn off the speaker
Press the power button until the power button LED and the speaker icon indicator are off.
Re-pair after a disconnection
Press the power button.
Turn up the volume
Press the volume-up (+) button.
7
Turn down the volume
Press the volume-down (-) button.
Answer an incoming call
Press the play/pause button.
End a call
Press the play/pause button.
Mute or unmute
Press the microphone-mute button.
Pause or resume music play
Press the play/pause button.
Using the router
Connect the router to power
There are three methods to connect the router to power:
Connect the router to an electrical outlet.
Stack the hard disk drive to the router and connect the hard disk drive to an electrical outlet.
If the power bank contains sufficient power, stack the router to the power bank.

8
Turn on the router
Press the power button for one second until its green LED flashes.
Turn off the router
Press and hold the power button for two seconds until its LED is off.
Connect the router to network
There are two methods to connect the router to network:
Turn on the router. Then connect an RJ-45 network cable to the Ethernet connector on the
router.
Turn on the router. Then connect an external 3G or 4G network card to the USB 2.0 connector
on the router.
After the network connection is established, the power button LED stays on.
Reset the router to default settings
1. Turn on the router.
2. Insert a needle or a straightened paper clip into the emergency-reset hole to press and hold the
reset button for five seconds.
3. Release the reset button. The power button LED flashes.
4. Wait until the power button LED stays on. The router is successfully reset to default settings.
9
Using the hard disk drive
You can use the hard disk drive through either direct access or remote access.
Direct access
Connect one end of the USB 3.0 cable to the micro USB 3.0 connector on the hard disk drive and
the other end to an available USB connector on your computer. A USB 3.0 connector is
recommended for maximum data transfer speed.
Remote access
1. Stack the hard disk drive to the router and turn on the router.
2. Download and install the ThinkPad Stack Assist application on your mobile phone or computer.
For more information, refer to ThinkPad Stack Assist in the later part of this document.
Open the application and follow the instructions on the screen to access the hard disk drive.
Using the power bank
Press the battery status button to check the battery status before using the power bank.
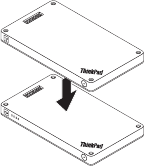
Stack a device to the power bank
When you stack a device to the power bank, ensure that Pogo pins of the device align with Pogo
pads of the power bank, or Pogo pads of the device align with Pogo pins of the power bank.
Charge the speaker
Stack the speaker to the power bank, and the power bank starts to charge the speaker.
Supply power to the router
Stack the router to the power bank and press the power button of the router to power on the router.
The power bank starts to supply power to the router.
Charge mobile phones
Connect your mobile phone to the USB 2.0 connector on your power bank. The power bank can
10
charge two mobile phones at the same time and provide a maximum current of 2.1 A during the
charging process.
Using the stack kit
The four devices can be stacked together in any order and combination. You can stack all of them,
stack some of them, or use them separately. When the power bank is stacked, it can supply power
to the other stacked devices.
Tips on using the stack kit:
When the hard disk drive is stacked with the router, the router can power on or power off the hard
disk drive. It is recommended that if the hard disk drive is not in use, do not stack it with the other
devices.
The router does not include any embedded battery. Therefore, when using the router, ensure that
the power is supplied either by stacking it with the power bank or by using the power adapter.

11
The speaker includes an embedded battery, which can support up to six hours of music playback.
When the battery is low, stack the speaker with the power bank or connect the speaker to a
power supply outlet.
The hard disk drive cannot be accessed wirelessly when stacked with the power bank only. To
access the hard disk drive wirelessly, ensure that you stack it with the router.
ThinkPad Stack Assist
ThinkPad Stack Assist is an assistant application for ThinkPad Stack series products. You can log
on to the management interface of the application from the router and then use the application to
manage other ThinkPad Stack series products.
Hardware requirements
ThinkPad Stack Wireless Router
A device for installing the application
Operating system requirements
Microsoft® Windows® 7, Microsoft Windows 8.1, or later
Android 4.2 or later
iOS 7.0 or later
Download ThinkPad Stack Assist
Go to http://www.lenovo.com/stack or scan the following Quick Response (QR) code.
Contact us
If you have problems with ThinkPad Stack Assist, e-mail us by accswsupport@lenovo.com.

12
Status LEDs
The status LEDs on the devices flash in varied ways to indicate different working states of the
devices.
Status LEDs on the speaker
LED activity Working status
Power button LED and speaker icon indicator stay on Power on
Power button LED and speaker icon indicator stay off Power off
Speaker icon indicator flashes twice at one second
internals
Pairing
Speaker icon indicator flashes for five times Pairing completed
Microphone-mute button LED stays on Muted in a call
Microphone-mute button LED stays off Not muted in a call
Power button LED turns amber Battery low (below 25%)
Power button LED flashes in amber Battery low (below 10%)
ThinkPad logo LED flashes for five times Power present
Status LEDs on the router
LED activity Working status
Power button LED keeps flashing in green Power-on (initializing or resetting)
Power button LED stays on in green Power-on (initialized, ready for
wireless connection)

13
LED activity Working status
Power button LED stays off Power-off
Wireless status LED stays on in green Wireless connection established
Wireless status LED keeps flashing in green Data transmitting
Wireless status LED keeps flashing in amber Connection error (initialization or
network connection failed)
Wireless status LED stays off Power-off, initializing, or resetting
ThinkPad logo LED flashes five times Power present
Status LEDs on the hard disk drive
LED activity Working status
Activity LED keeps flashing in green Active (sending or receiving data)
Activity LED stays on in green Powered but not active
Activity LED stays off Not powered
ThinkPad logo LED flashes five times
Power present
14
Status LEDs on the power bank
Battery status LEDs Battery power remaining
Four indicators are lit in green. > 80%
Three indicators are lit in green. 50% - 80%
Two indicators are lit in green. 20% - 50%
Only one indicator is lit in green. < 20%
Only one indicator is lit in amber. < 10%
Charging
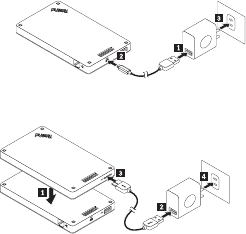
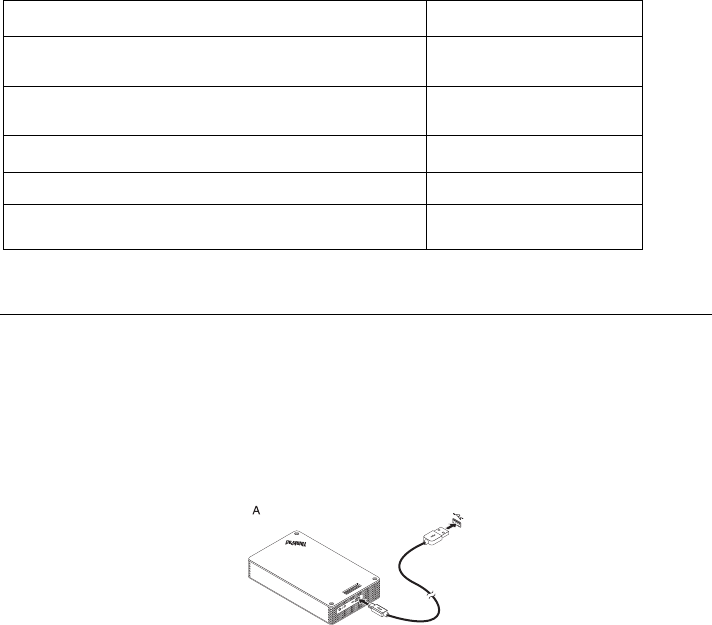
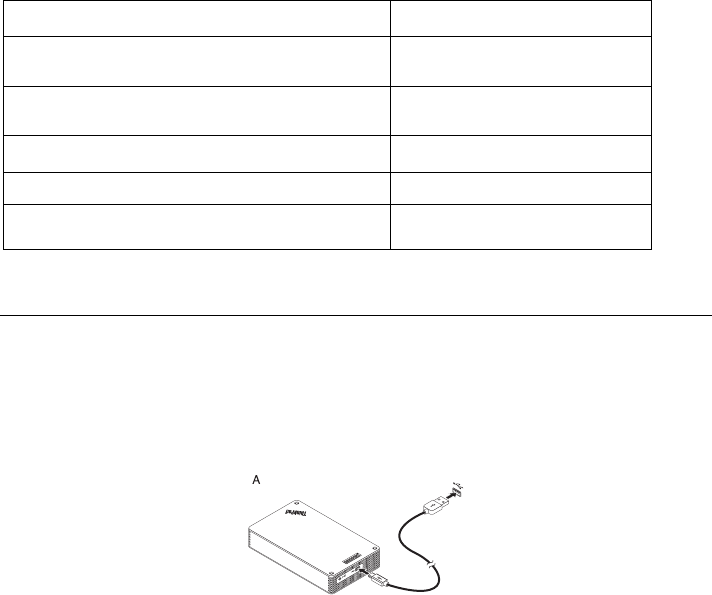
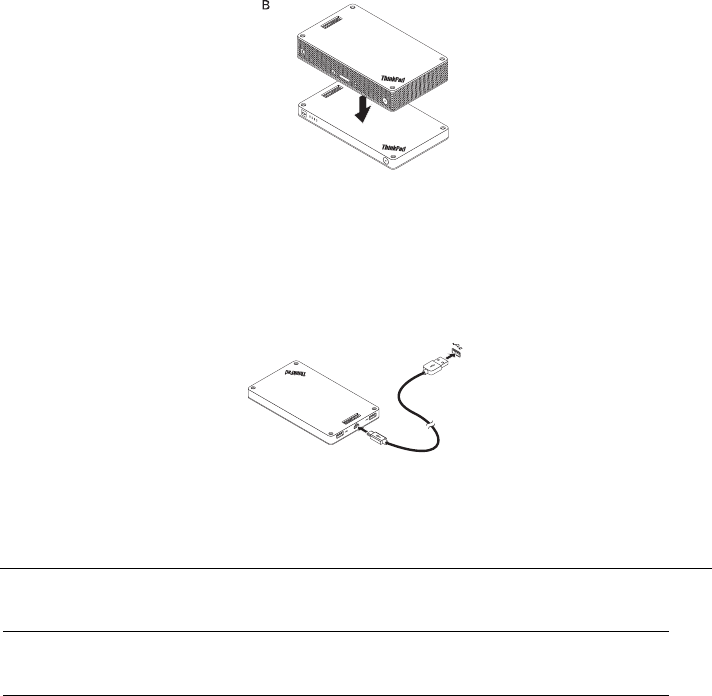
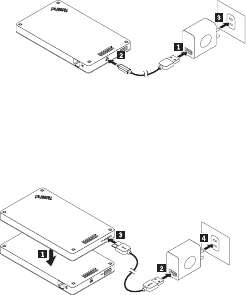
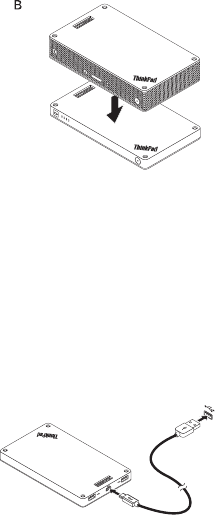
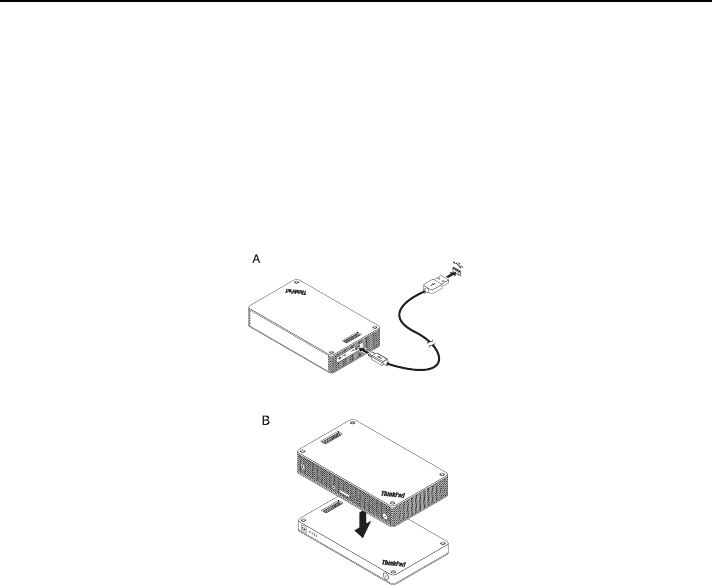
Charging the speaker
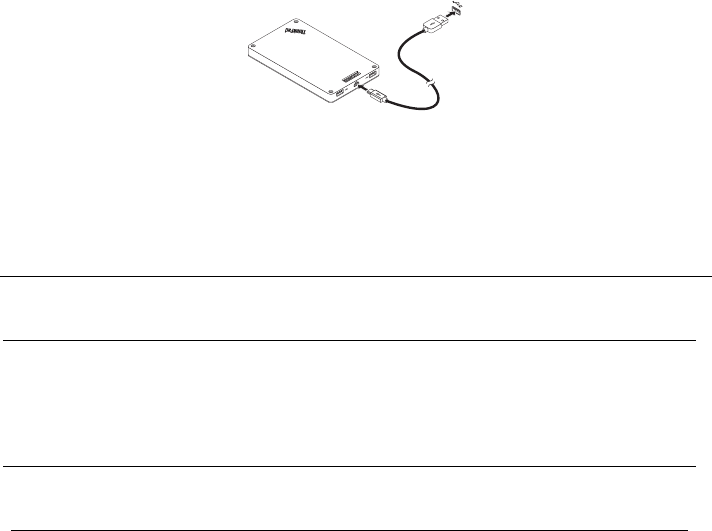
The speaker comes with a USB charging cable. To charge the speaker, do one of the following:
Connect one end of the USB cable to the micro USB connector on the speaker. Then connect the
other end of the USB cable to the USB connector of a computer (as shown in Picture A).
You can also charge the speaker by stacking the speaker to the power bank (as shown in Picture
B).

15
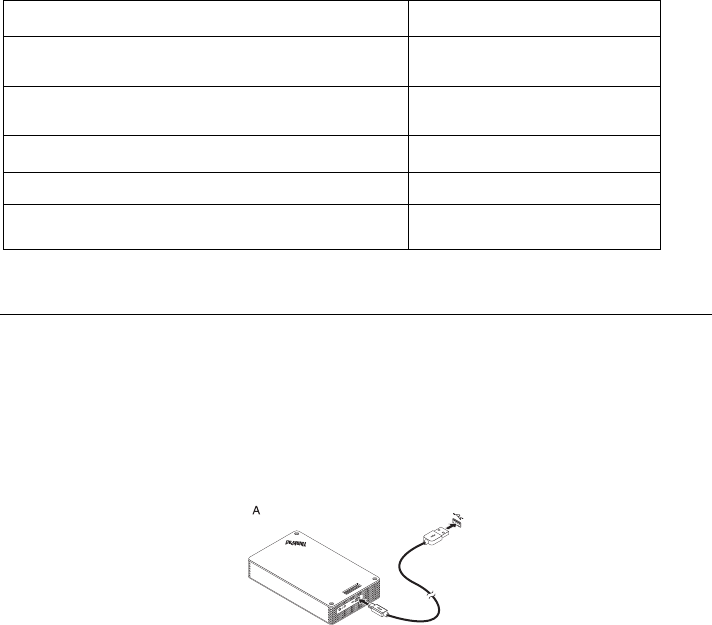
Charging the power bank
The power bank comes with a USB charging cable. Connect one end of the USB cable to the micro
USB connector on the power bank. Then connect the other end of the USB cable to the USB
connector of the Lenovo 10W AC power adapter or the USB connector on a computer. The battery
icon indicator stays on and battery status indicators flash when the power bank is under charging.
Note: The router and hard disk drive do not include any embedded battery. Therefore, when using
the router or hard disk drive, ensure that the power is supplied either by stacking it with the power
bank or by using the power adapter.
Troubleshooting
Problem: The speaker cannot be powered on by pressing the power button.
Solution: Ensure that the speaker is sufficiently charged.
Problem: The mobile phone or computer cannot establish a Bluetooth connection with the
speaker.

16
Solution: Follow the correct pairing steps and ensure that the device to be paired has the
Bluetooth function enabled.
Problem: The speaker cannot play music.
Solution: Ensure that the pairing is successful.
Problem: A call comes in when I am listening to music on the speaker. When I finish the call,
the speaker cannot resume the music play automatically.
Solution: Try to resume the music play on the phone.
Problem: The mobile phone cannot find the speaker through the Bluetooth searching
function.
Solution: Ensure that the speaker is powered on and has entered pairing mode.
Problem: There is always disconnection or noises after the speaker and a mobile phone are
paired.
Solution:
Ensure that the speaker is sufficiently charged.
Ensure that there are no wireless-radio devices between the mobile phone and the
speaker.
If the speaker is stacked with the router, ensure that the distance between the mobile
phone and the speaker is within 6 meters (19.7 feet).
Problem: The speaker is paired with a mobile phone through Bluetooth connection, but I
cannot listen to the music.
Solution:
Ensure that both phone audio and media audio are switched to the paired speaker in the
Bluetooth setting or the player setting on the mobile phone.
Some mobile phones do not have a complete stereo Bluetooth module, hence no function
of music play through a Bluetooth device. You can connect the speaker to other mobile

17
phones to check if the speaker works.
Problem: Some functions of the player are not available on the speaker.
Solution: Some functions of a player are not supported by the speaker. Ensure that you use
a compatible player on the mobile phone.
Problem: The router cannot access the network.
Solution: This problem might be caused by wrong settings of the router. Try reconfiguring the
router using the ThinkPad Stack Assist application.
Problem: The router cannot be turned on when stacked to the power bank.
Solution:
1. Ensure that the power bank is sufficiently charged.
If the problem persists, connect the router to an electrical outlet.
Problem: The hard disk drive is directly stacked to a speaker. The read/write performance of
the hard disk drive drops when the speaker is playing music.
Solution: This problem might be caused by the vibration of the speaker. Remove the speaker
or stack it to the hard disk drive indirectly.
Problem: The charging speed of the power bank becomes slow when it is charging two
mobile phones by USB 2.0 connectors or other ThinkPad Stack series products by Pogo pins
or Pogo pads at the same time.
Solution: Disconnect the mobile phones or other ThinkPad Stack series products from the
power bank. When the power consumption is higher than the charging current, the charging
speed of the power bank becomes slow.
Problem: The power bank cannot be charged when stacked with other devices.
Solution: Ensure that the USB charging cable is firmly connected to the micro USB
connector on the power bank.
Problem: The power bank cannot charge the mobile phone by the USB 2.0 connector.

Solution: Remove the USB cable from the power bank and wait for three seconds. Then
connect the USB cable to the power bank again.
First Edition (April 2015)
© Copyright Lenovo 2015.
Lenovo, the Lenovo logo, ThinkPad, and the ThinkPad logo are trademarks of Lenovo in the United States, other
countries, or both.
Microsoft, Windows is trademark of the Microsoft group of companies. Other company, product, or service names
may be trademarks or service marks of others.
LIMITED AND RESTRICTED RIGHTS NOTICE: If data or software is delivered pursuant a General Services
Administration “GSA” contract, use, reproduction, or disclosure is subject to restrictions set forth in Contract No.
GS-35F-05925.

THINKPAD STACK PROFESSIONAL KIT
用户指南

20
简介
ThinkPad Stack Professional Kit(以下简称连接套件)包括以下四个设备:
ThinkPad Stack Bluetooth Speaker
(以下简称扬声器)
ThinkPad Stack Wireless Router
(以下简称路由器)
ThinkPad Stack 1TB USB3.0 Hard Drive
(以下简称硬盘驱动器)
ThinkPad Stack 10000mAh Power Bank
(以下简称移动电源)
四个设备可通过探针连接器连接在一起(按任意顺序和组合),提供快速供电和数据传输。如果为任
一已连接的设备供电,电力可传输到每一个连接的设备。
扬声器支持以下功能:
长达六个小时的音乐播放
内置免提电话功能
路由器支持以下功能:
2.4
GHz 频段或 5 GHz 频段中的无线接入
通过 RJ-45 网络线缆的因特网访问
通过外接 3G 或 4G 网卡的因特网访问
远程访问硬盘驱动器(如果连接到路由器)
远程访问 USB 存储设备(如果连接到路由器)
硬盘驱动器支持以下功能:
通过 USB 3.0 线缆的高速访问
当它们连接在一起时,通过路由器进行远程访问
注意:请使用 ThinkPad Stack Assist 应用程序进行远程访问和控制。如需要更多信息,请转至:
21
http://www.lenovo.com/stack
通过该移动电源,可执行以下操作:
通过探针连接器为扬声器充电并为路由器供电。
通过通用串行总线 (USB) 2.0 接口同时为两部手机充电。
安全信息
磁性敏感物品(如电子设备和存储介质)应放在离该套件 10 厘米或 4 英寸以外。套件中包含
的磁体产生的强磁场可能会损坏磁性敏感物品。
请勿尝试更换内部可充电锂离子电池。如有必要,请与 Lenovo 支持人员联系以返厂更换。
请勿让可充电锂离子电池完全放电,也不要在电池处于放电状态时存储。
部件和位置
ThinkPad Stack Bluetooth Speaker
探针连接器
扬声器图标指示灯
带 LED 指示灯的麦克风静音按钮
22
音量按钮
播放/暂停按钮
带 LED 指示灯的电源按钮
ThinkPad 徽标 LED 指示灯
探针连接器
微型 USB 2.0 接口(仅用于 USB 充电)
音频输入接口
ThinkPad Stack Wireless Router
探针连接器
无线状态 LED 指示灯
电源按钮
ThinkPad 徽标 LED 指示灯
USB 2.0 接口
探针连接器
微型 USB 2.0 接口(仅用于 USB 充电)
以太网接口
紧急复位孔
23
ThinkPad Stack 1TB USB3.0 Hard Drive
探针连接器
活动 LED 指示灯
ThinkPad 徽标 LED 指示灯
微型 USB 3.0 接口
探针连接器
ThinkPad Stack 10000mAh Power Bank
探针连接器
电池图标指示灯
电池状态指示灯
电池状态按钮

24
ThinkPad 徽标指示灯
探针连接器
USB 2.0 接口
微型 USB 2.0 接口
使用套件
使用扬声器
使用扬声器前,请将其与手机、计算机或其他设备配对。要为扬声器配对,请执行以下操作:
1. 请确保扬声器已开启。
2. 按住电源按钮约 3 秒。扬声器发出两次蜂鸣,且扬声器图标指示灯开始闪烁。
3. 启用配对设备上的蓝牙功能,并与“ThinkPad Stack Bluetooth Speaker”配对。配对过程随即开
始。
4. 扬声器再次发出两次蜂鸣且扬声器图标指示灯停止闪烁,表明扬声器已与配对设备成功配对。
将扬声器和设备配对后,即可使用扬声器。您可以执行以下操作:
开启扬声器
按下电源按钮,直至电源按钮中心的绿色发光二极管(LED)指示灯和扬声器图标指示灯处于常亮状
态。
关闭扬声器
按下电源按钮,直至电源按钮 LED 指示灯和扬声器图标指示灯熄灭。
断开连接后重新配对
按电源按钮。
调高音量
按增大音量(+)按钮。

25
调低音量
按减小音量(-)按钮。
接听来电
按播放/暂停按钮。
结束通话
按播放/暂停按钮。
静音或取消静音
按麦克风静音按钮。
暂停或继续播放音乐
按播放/暂停按钮。
使用路由器
将路由器连接到电源
有三种方法可以将路由器连接到电源:
将路由器连接到电源插座。
将硬盘驱动器连接到路由器并将硬盘驱动器连接到电源插座。
如果移动电源电量充足,请将路由器连接到移动电源。

26
开启路由器
按下电源按钮一秒,直至其绿色 LED 指示灯闪烁。
关闭路由器
按住电源按钮两秒,直至其 LED 指示灯熄灭。
将路由器连接到网络
有两种方法可以将路由器连接到网络:
开启路由器。然后将 RJ-45 网络线缆连接到路由器的以太网接口。
开启路由器。然后将外接 3G 或 4G 网卡连接到路由器的 USB 2.0 接口。
建立网络连接后,电源按钮 LED 指示灯保持亮起。
将路由器重置为缺省设置
1. 开启路由器。
2. 将针或拉直的曲别针插入紧急复位孔,按住重置按钮五秒。
3. 松开重置按钮。电源按钮 LED 指示灯闪烁。
4. 等待至电源按钮 LED 指示灯保持亮起。路由器成功重置为缺省设置。
使用硬盘驱动器
可通过直接访问或远程访问使用硬盘驱动器。
直接访问
27
将 USB 3.0 线缆的一端连接到硬盘驱动器上的微型 USB 3.0 接口,另一端连接到计算机上可用的
USB 接口。建议最大数据传输速度使用 USB 3.0 接口。
远程访问
1. 将硬盘驱动器连接到路由器,开启路由器。
2. 在手机或计算机上下载并安装 ThinkPad Stack Assist 应用程序。需要更多信息,请参阅文档后
面部分中的“ThinkPad Stack Assist”。
打开应用程序并按照屏幕上的说明访问硬盘驱动器。
使用移动电源
在使用移动电源前按下电池状态按钮检查电池状态。
将设备连接到移动电源
将设备连接到移动电源时,请确保设备的探针连接器与移动电源的探针连接器一致,或设备的探针连
接器与移动电源的探针连接器一致。
为扬声器充电
将扬声器连接到移动电源,移动电源开始为扬声器充电。
为路由器供电
将路由器连接到移动电源,按下路由器的电源按钮开启路由器。移动电源开始为路由器供电。
为手机充电
将手机连接到移动电源的 USB 2.0 接口。移动电源可以同时为两个手机充电,充电过程中提供最大
2.1 A 的电流。
使用连接套件
四个设备可按任意顺序和组合连接在一起。您可以将全部设备或部分设备连接在一起,或单独使用。
当连接上移动电源时,移动电源可以为其他连接的设备供电。

28
使用连接套件的提示:
当硬盘驱动器与路由器连接时,路由器可以开启或关闭硬盘驱动器。如果不使用硬盘驱动器,建
议不要将其与其他设备连接。
路由器不包含任何嵌入式电池。因此,使用路由器时,请确保通过将其与移动电源连接或使用电
源适配器供电。
扬声器包含一个嵌入式电池,可支持长达六个小时的音乐播放。当电池电量低时,将扬声器与移
动电源连接,或将扬声器连接到电源插座。
当只与移动电源连接时,无法无线访问硬盘驱动器。要无线访问硬盘驱动器,请确保将其与路由
器连接。
ThinkPad Stack Assist
ThinkPad Stack Assist 是 ThinkPad Stack 系列产品的辅助程序。可以通过路由器登录至该应用程
序的管理界面,然后使用该应用程序管理其他 ThinkPad Stack 系列产品。

29
硬件要求
ThinkPad Stack Wireless Router
用于安装该应用程序的设备。
操作系统要求
Microsoft Windows 7、Microsoft Windows 8.1 或更高版本
Android 4.2 或更高版本
iOS 7.0 或更高版本
下载 ThinkPad Stack Assist
访问 http://www.lenovo.com/stack 或者浏览以下快速响应(QR)代码。
联系我们
如果对 ThinkPad Stack Assist 有问题,请发送电子邮件至 accswsupport@lenovo.com。
状态 LED 指示灯
设备上的状态 LED 指示灯以不同的方式闪烁,用来指示设备的不同工作状态。
扬声器上的状态 LED 指示灯
LED 指示灯活动 工作状态
电源按钮 LED 指示灯和扬声器图标指示灯保持亮
起
开机
电源按钮 LED 指示灯和扬声器图标指示灯保持熄
灭
关闭电源
扬声器图标指示灯每隔一秒闪烁两次 正在配对

30
LED 指示灯活动 工作状态
扬声器图标指示灯闪烁五次 配对完毕
麦克风静音按钮 LED 指示灯保持亮起 在通话中静音
麦克风静音按钮 LED 指示灯保持熄灭 在通话中未静音
电源按钮 LED 指示灯变为琥珀色 电池电量低(低于 25%)
电源按钮 LED 指示灯以琥珀色闪烁 电池电量低(低于 10%)
ThinkPad 徽标 LED 指示灯闪烁五次 电源存在
路由器上的状态 LED 指示灯
LED 指示灯活动 工作状态
电源按钮 LED 指示灯保持以绿色闪烁。 开机(初始化或重置)
电源按钮 LED 指示灯保持绿色 开机(已初始化,可供无线连接)
电源按钮 LED 指示灯保持熄灭 关闭电源
无线状态 LED 指示灯保持绿色 已建立无线连接
无线状态 LED 指示灯保持以绿色闪烁 数据传输
无线状态 LED 指示灯保持以琥珀色闪烁 连接错误(初始化或网络连接失败)
无线状态 LED 指示灯保持熄灭 关闭电源、初始化或重置
ThinkPad 徽标 LED 指示灯闪烁五次 电源存在
硬盘驱动器上的状态 LED 指示灯
LED 指示灯活动 工作状态
活动 LED 指示灯保持以绿色闪烁 活动(发送或接收数据)
活动 LED 指示灯保持绿色 通电,但不处于活动状态
活动 LED 指示灯保持熄灭 未通电
ThinkPad 徽标 LED 指示灯闪烁五次 电源存在
31
移动电源上的状态 LED 指示灯
电池状态 LED 指示灯 电池剩余电量
四个指示灯发出绿光。 > 80%
三个指示灯发出绿光。 50% - 80%
两个指示灯发出绿光。 20% - 50%
只有一个指示灯发出绿光。 < 20%
只有一个指示灯发出琥珀光。 < 10%
充电
为扬声器充电
扬声器附带 USB 充电线缆。要为扬声器充电,请执行以下某项操作:
将 USB 线缆的一端连接到扬声器的微型 USB 接口。然后将 USB 线缆的另一端连接到计算机
的 USB 接口(如图 A 所示)。
还可以通过将扬声器与移动电源连接,为扬声器充电(如图 B 所示)。
32
为移动电源充电
移动电源附带 USB 充电线缆。将 USB 线缆的一端连接到移动电源的微型 USB 接口。然后将
USB 线缆的另一端连接到 Lenovo 10W 交流电源适配器的 USB 接口或计算机的 USB 接口。当移
动电源正在充电时,电池图标指示灯保持亮起,电池状态指示灯闪烁。
注意:路由器和硬盘驱动器不包含任何嵌入式电池。因此,使用路由器或硬盘驱动器时,请确保通过
将其与移动电源连接或使用电源适配器为其供电。
故障诊断
问题:按电源按钮无法开启扬声器。
解决方案:请确保扬声器已充分充电。
问题:手机或计算机无法与扬声器建立蓝牙连接。
解决方案:请按照正确的配对步骤进行操作,并确保要配对的设备已启用蓝牙功能。
问题:扬声器无法播放音乐。
解决方案:请确保配对成功。

33
问题:正在用扬声器听音乐时,有电话打进来。通话结束后,扬声器不能自动继续播放音
乐。
解决方案:尝试恢复手机上的音乐播放。
问题:手机无法通过蓝牙搜索功能找到扬声器。
解决方案:确保扬声器开启,且已进入配对模式。
问题:扬声器与手机配对后,总是断开连接或有噪音。
解决方案:
请确保扬声器已充分充电。
请确保手机与扬声器之间没有无线设备。
如果扬声器与路由器连接,请确保手机与扬声器之间的距离小于 6 米(19.7 英尺)。
问题:扬声器已通过蓝牙连接与手机配对,但无法听音乐。
解决方案:
请确保在手机的蓝牙设置或播放器设置中,电话音频和媒体音频已切换至配对扬声器。
某些手机没有完整的立体声蓝牙模块,因此没有通过蓝牙设备播放音乐的功能。可将扬
声器连接至其他手机以检查扬声器是否工作。
问题:播放器的某些功能无法在扬声器上使用。
解决方案:扬声器不支持播放器的某些功能。请确保使用的是与手机兼容的播放器。
问题:路由器无法访问网络。
解决方案:此问题可能是由路由器的错误设置引起的。请使用 ThinkPad Stack Assist 应用
程序尝试重新配置路由器。
问题:当连接到移动电源时,无法开启路由器。
解决方案:
1. 请确保移动电源已充分充电。
如果问题仍然存在,请将路由器连接到电源插座。
问题:硬盘驱动器直接连接到扬声器。当扬声器播放音乐时,硬盘驱动器的读/写性能下降。

34
解决方案:此问题可能是由扬声器的振动引起的。卸下扬声器或将其间接连接到硬盘驱动
器。
问题:当同时为两个手机(通过 USB 2.0 接口)或其他 ThinkPad Stack 系列产品(通过
探针连接器)充电时,移动电源的充电速度变慢。
解决方案:断开手机或其他 ThinkPad Stack 系列产品与移动电源的连接。当能耗超过充电电
流时,移动电源的充电速度变慢。
问题:当与其他设备连接时,移动电源无法充电。
解决方案:请确保 USB 充电线缆牢固地连接到移动电源的 micro USB 接口。
问题:移动电源不能通过 USB 2.0 接口为手机充电。
解决方案:从移动电源上拔下 USB 线缆,并等待三秒。然后将 USB 线缆再次连接到移动
电源。
35

第一版(2015 年 4 月)
© Copyright Lenovo 2015.
Lenovo、Lenovo 徽标、ThinkPad 和 ThinkPad 徽标是 Lenovo 在美国和/或其他国家或地区的商标。
Microsoft、Windows 是 Microsoft 公司集团的商标。其他公司、产品或服务名称可能是其他公司的商标或者服务
标记。
有限权利声明:如果数据或软件依照通用服务管理(GSA)合同提供,其使用、复制或公开受编号为 GS-35F-
05925 的合同条款的约束。

THINKPAD STACK PROFESSIONAL KIT
Benutzerhandbuch

38
Einführung
Das ThinkPad Stack Professional Kit (im Folgenden als Stack Kit bezeichnet) umfasst die folgenden
vier Einheiten:
ThinkPad Stack Bluetooth Speaker
(im Folgenden als Lautsprecher bezeichnet)
ThinkPad Stack Wireless Router
(im Folgenden als Router bezeichnet)
ThinkPad Stack 1TB USB3.0 Hard Drive
(im Folgenden als Festplattenlaufwerk bezeichnet)
ThinkPad Stack 10000mAh Power Bank
(im Folgenden als Netzstromleiste bezeichnet)
Die vier Einheiten können – in beliebiger Reihenfolge und Kombination – durch Pogo-Kontaktstifte
oder die Pogo-Kontaktfläche gestapelt werden, sodass eine schnelle Stromversorgung und
Datenübertragung erfolgt. Wenn eine der gestapelten Einheiten mit Strom versorgt wird, kann
dieser an jede der gestapelten Einheiten transferiert werden.
Der Lautsprecher unterstützt folgende Funktionen:
Bis zu sechs Stunden Musikwiedergabe
Integrierte Freisprechfunktion für Mobiltelefon
Der Router unterstützt folgende Funktionen:
Drahtloser Zugriff in den Frequenzbändern 2,4 GHz und 5 GHz
Internetzugang über ein RJ45-Netzwerkkabel
Internetzugriff über eine externe 3G- oder 4G-Netzwerkkarte
Fernzugriff auf das Festplattenlaufwerk, wenn es mit dem Router gestapelt ist
Fernzugriff auf eine USB-Speichereinheit, wenn sie an den Router angeschlossen ist
Das Festplattenlaufwerk unterstützt folgende Funktionen:

39
Hochgeschwindigkeitszugriff über das USB 3.0-Kabel
Fernzugriff über den Router (bei kombinierter Stapelung)
Hinweis: Für Fernzugriff und Fernbedienung verwenden Sie die ThinkPad Stack Assist-App.
Weitere Informationen finden Sie unter:
http://www.lenovo.com/stack
Die Netzstromleiste bietet Ihnen folgende Möglichkeiten:
Sie können den Lautsprecher laden und den Router mit Strom versorgen (über Pogo-
Kontaktstifte oder die Pogo-Kontaktfläche).
Sie können zwei Mobiltelefone über USB (Universal Serial Bus) 2.0-Anschlüsse gleichzeitig
laden.
Sicherheitsinformationen
Halten Sie magnetisch empfindliche Teile wie elektronische Einheiten und Speichermedien
mindestens 10 cm vom Kit entfernt. Die starken Magnetfelder, die von den Magneten im Kit
erzeugt werden, können magnetisch empfindliche Teile beschädigen.
Versuchen Sie nicht, die internen wiederaufladbaren Lithium-Ionen-Akkus auszutauschen. Für
den Werksaustausch wenden Sie sich ggf. an den Lenovo Support.
Entladen Sie wiederaufladbare Lithium-Ionen-Akkus niemals vollständig. Bewahren Sie diese
Art von Akkus nicht im entladenen Zustand auf.

40
Komponenten und deren Lage
ThinkPad Stack Bluetooth Speaker
Pogo-Kontaktstifte
Lautsprechersymbol-Anzeige
Taste zur Mikrofonstummschaltung mit LED
Lautstärketaste
Wiedergabe/Pause-Taste
Netzschalter mit LED
ThinkPad-Logo mit LED
Pogo-Kontaktfläche
Mikro-USB 2.0-Anschluss (nur zum Laden über USB)
Audioeingang

41
ThinkPad Stack Wireless Router
Pogo-Kontaktstifte
Statusanzeige für drahtlose Verbindung
Netzschalter
ThinkPad-Logo mit LED
USB 2.0-Anschluss
Pogo-Kontaktfläche
Mikro-USB 2.0-Anschluss (nur zum Laden über USB)
Ethernet-Anschluss
Notrücksetzöffnung
ThinkPad Stack 1TB USB3.0 Hard Drive
Pogo-Kontaktstifte
Betriebsanzeige
ThinkPad-Logo mit LED

42
Mikro-USB 3.0-Anschluss
Pogo-Kontaktfläche
ThinkPad Stack 10000mAh Power Bank
Pogo-Kontaktstifte
Akkusymbol-Anzeige
Akkuladestand-Anzeigen
Akkuladestand-Taste
ThinkPad-Logo-Anzeige
Pogo-Kontaktfläche
USB 2.0-Anschluss
Mikro-USB 2.0-Anschluss
Kit verwenden
Lautsprecher verwenden
Bevor Sie den Lautsprecher verwenden, koppeln Sie ihn mit einem Mobiltelefon, einem Computer
oder einer anderen Einheit. Gehen Sie zum Koppeln folgendermaßen vor:
43
1. Stellen Sie sicher, dass der Lautsprecher eingeschaltet ist.
2. Halten Sie den Netzschalter etwa drei Sekunden lang gedrückt. Der Lautsprecher gibt zwei
Signaltöne aus und die Lautsprechersymbol-Anzeige beginnt zu blinken.
3. Aktivieren Sie die Bluetooth-Funktion an der zu koppelnden Einheit und wählen Sie für die
Kopplung „ThinkPad Stack Bluetooth Speaker“ aus. Der Kopplungsvorgang beginnt.
4. Der Lautsprecher und die andere Einheit sind miteinander gekoppelt, wenn der Lautsprecher
erneut zwei Signaltöne ausgibt und die Lautsprechersymbol-Anzeige aufhört zu blinken.
Wenn der Lautsprecher mit einer anderen Einheit gekoppelt ist, können Sie den Lautsprecher
verwenden. Sie können folgende Funktionen auswählen:
Lautsprecher einschalten
Drücken Sie den Netzschalter so lange, bis die grüne LED in der Mitte des Netzschalters und die
Lautsprechersymbol-Anzeige dauerhaft leuchten.
Lautsprecher ausschalten
Drücken Sie den Netzschalter so lange, bis die LED des Netzschalters und die
Lautsprechersymbol-Anzeige erloschen sind.
Erneutes Pairing nach Verbindungstrennung ausführen
Drücken Sie den Betriebsspannungsschalter.
Lautstärke erhöhen
Drücken Sie die Lauter-Taste (+).
Lautstärke verringern
Drücken Sie die Leiser-Taste (-).
Eingehenden Anruf annehmen
Drücken Sie die Wiedergabe/Pause-Taste.

44
Anruf beenden
Drücken Sie die Wiedergabe/Pause-Taste.
Stummschaltung ein- bzw. ausschalten
Drücken Sie die Mikrofon-Stummschaltungstaste.
Musikwiedergabe anhalten/fortsetzen
Drücken Sie die Wiedergabe/Pause-Taste.
Router verwenden
Router an Strom anschließen
Es gibt drei Möglichkeiten, den Router an den Strom anzuschließen:
Verbinden Sie den Router mit einer Netzsteckdose.
Stapeln Sie das Festplattenlaufwerk mit dem Router und schließen Sie das Festplattenlaufwerk
an eine Netzsteckdose an.
45
Wenn die Netzstromleiste ausreichend aufgeladen ist, stapeln Sie den Router mit der
Netzstromleiste.
Router einschalten
Drücken Sie den Netzschalter eine Sekunde lang, bis die grüne Anzeige blinkt.
Router ausschalten
Halten Sie den Netzschalter für zwei Sekunden gedrückt, bis die Anzeige erlischt.
Router an Netzwerk anschließen
Es gibt zwei Möglichkeiten, den Router an ein Netzwerk anzuschließen:
Schalten Sie den Router ein. Schließen Sie dann ein RJ45-Netzwerkkabel an den Ethernet-
Anschluss des Routers an.
Schalten Sie den Router ein. Schließen Sie dann eine externe 3G- oder 4G-Netzwerkkarte an
den USB 2.0-Anschluss des Routers an.
Wenn die Netzwerkverbindung hergestellt ist, leuchtet die Anzeige des Netzschalters dauerhaft.
Standardeinstellungen des Routers wiederherstellen
1. Schalten Sie den Router ein.
2. Führen Sie eine Nadel oder das Ende einer aufgebogenen Büroklammer in die
Notrücksetzöffnung ein und halten Sie so die Rücksetzungstaste fünf Sekunden lang gedrückt.
3. Lassen Sie die Taste wieder los. Die Anzeige des Netzschalters leuchtet.
46
4. Warten Sie, bis die Anzeige des Netzschalters dauerhaft leuchtet. Der Router ist jetzt auf die
Standardeinstellungen zurückgesetzt.
Festplattenlaufwerk verwenden
Sie können das Festplattenlaufwerk über Direktzugriff oder über Fernzugriff verwenden.
Direktzugriff
Schließen Sie ein Ende des USB 3.0-Kabels an den Mikro-USB 3.0-Anschluss am
Festplattenlaufwerk und das andere Ende des Kabels an einen freien USB-Anschluss an Ihrem
Computer an. Verwenden Sie für die maximale Geschwindigkeit bei der Datenübertragung einen
USB 3.0-Anschluss.
Fernzugriff
1. Stapeln Sie das Festplattenlaufwerk mit dem Router und schalten Sie den Router ein.
2. Laden Sie die Anwendung ThinkPad Stack Assist herunter und installieren Sie sie auf Ihrem
Computer oder Mobiltelefon. Weitere Informationen finden Sie im Abschnitt ThinkPad Stack
Assist weiter hinten in diesem Dokument.
Öffnen Sie die Anwendung und befolgen Sie die Anweisungen auf dem Bildschirm, um auf das
Festplattenlaufwerk zuzugreifen.
Netzstromleiste verwenden
Bevor Sie die Netzstromleiste verwenden, drücken Sie die Akkuladestand-Taste, um den
Akkuladestand zu überprüfen.
Einheit mit der Netzstromleiste stapeln
Wenn Sie eine Einheit mit der Netzstromleiste stapeln, achten Sie auf die richtige Ausrichtung der
Pogo-Kontaktstifte der Einheit an der Pogo-Kontaktfläche der Netzstromleiste bzw. der Pogo-
Kontaktfläche der Einheit an den Pogo-Kontaktstiften der Netzstromleiste.
47
Lautsprecher laden
Stapeln Sie den Lautsprecher mit der Netzstromleiste. Die Netzstromleiste lädt nun den
Lautsprecher.
Router mit Strom versorgen
Stapeln Sie den Router mit der Netzstromleiste und drücken Sie den Netzschalter des Routers, um
ihn einzuschalten. Die Netzstromleiste versorgt nun den Router mit Strom.
Mobiltelefone laden
Schließen Sie das Mobiltelefon über den USB 2.0-Anschluss an die Netzstromleiste an. Mit der
Netzstromleiste können zwei Mobiltelefone gleichzeitig geladen werden. Während des
Ladevorgangs liefert die Netzstromleiste bis zu 2,1 A.
Stack Kit verwenden
Die vier Einheiten können in beliebiger Reihenfolge und Kombination gestapelt werden. Sie können
alle oder nur einige Einheiten stapeln oder diese separat nutzen. Wenn die Netzstromleiste
gestapelt wird, kann sie die anderen gestapelten Einheiten mit Strom versorgen.
48
Tipps zur Stack Kit-Verwendung:
Wenn das Festplattenlaufwerk mit dem Router gestapelt wird, kann der Router das
Festplattenlaufwerk ein- oder ausschalten. Es wird empfohlen, ein Festplattenlaufwerk, das nicht
verwendet wird, auch nicht mit anderen Einheiten zu stapeln.
Der Router enthält keinen integrierten Akku. Wenn Sie den Router verwenden, sollten Sie daher
sicherstellen, dass die Stromversorgung entweder durch eine Stapelung mit der Netzstromleiste
oder durch das angeschlossene Netzteil gewährleistet wird.
Der Lautsprecher enthält einen integrierten Akku, der bis zu sechs Stunden Musikwiedergabe
ermöglicht. Wenn der Akkuladezustand niedrig ist, stapeln Sie den Lautsprecher mit der
Netzstromleiste oder schließen Sie ihn an eine Netzsteckdose an.
Der drahtlose Zugriff auf das Festplattenlaufwerk ist nicht möglich, wenn dieses nur mit der
Netzstromleiste gestapelt wird. Um drahtlos auf das Festplattenlaufwerk zuzugreifen, muss
dieses mit dem Router gestapelt werden.
ThinkPad Stack Assist
ThinkPad Stack Assist ist eine Hilfsanwendung für ThinkPad Stack-Einheiten. Sie können sich über
den Router in der Verwaltungsoberfläche der Anwendung anmelden und von dort andere ThinkPad
Stack-Einheiten verwalten.
Hardwarevoraussetzungen
ThinkPad Stack Wireless Router
Eine Einheit zum Installieren der Anwendung
Betriebssystemvoraussetzungen
Microsoft Windows 7, Microsoft Windows 8.1 oder höher
Android ab Version 4.2
49
iOS ab Version 7.0
ThinkPad Stack Assist herunterladen
Gehen Sie auf http://www.lenovo.com/stack oder scannen Sie den folgenden QR-Code.
Kontakt
Wenn Sie Schwierigkeiten mit ThinkPad Stack Assist haben, schreiben Sie eine E-Mail an
accswsupport@lenovo.com.
Statusanzeigen
Die Funktionszustände der Einheiten werden durch unterschiedlich blinkende Statusanzeigen
gekennzeichnet.
Statusanzeige des Lautsprechers
LED-Aktivität Funktionszustand
Netzschalter-LED und Lautsprechersymbol-Anzeige
leuchten dauerhaft
Eingeschaltet
Netzschalter-LED und Lautsprechersymbol-Anzeige
leuchten nicht
Ausschalten
Lautsprechersymbol-Anzeige blinkt zweimal pro
Sekunde
Pairing
Lautsprechersymbol-Anzeige blinkt fünfmal Kopplung abgeschlossen

50
LED-Aktivität Funktionszustand
LED der Mikrofon-Stummschaltungstaste leuchtet
dauerhaft
Stummschaltung während
eines Gesprächs
LED der Mikrofon-Stummschaltungstaste leuchtet nicht Mikrofon während eines
Gesprächs aktiv
Netzschalter-LED wird gelb Niedriger Akk
5 %)
uladestand
(unter 2
LED des Netzschalters blinkt gelb Niedriger Akkuladestand
(unter 10 %)
ThinkPad-Logo-Anzeige blinkt fünfmal Netzstrom vorhanden
LED-Aktivität unktionszustandF
Netzschalter-LED blinkt grün Eingeschaltet (wird initialisiert oder
zurückgesetzt)
Netzschalter-LED leuchtet dauerhaft grün Eingeschaltet (ist initialisiert und bereit
für drahtlose Verbindung)
Netzschalter-LED leuchtet nicht Ausgeschaltet
Statusanzeige für drahtlose
leuchtet dauerhaft grün
Verbindung Drahtlose Verbindung ist hergestellt
Statusanzeige für drahtlose
grün
Verbindung blinkt Daten werden übertragen
Statusanzeige für drahtlose
gelb
Verbindung blinkt Verbindungsfehler (Initialisierung oder
Netzwerkverbindung fehlgeschlagen)
Statusanzeige des Routers

51
LED-Aktivität Funktionszustand
Statusanzeige für drahtlose Verbindung
leuchtet nicht
Ausgeschaltet, wird initialisiert oder
zurückgesetzt
ThinkPad-Logo-Anzeige blinkt fünfmal Netzstrom vorhanden
Statusanzeige des Festplattenlaufwerks
LED-Aktivität Funktionszustand
Betriebsanzeige blinkt grün In Betrieb (Daten werden gesendet oder
empfangen)
Betriebsanzeige leuchtet dauerhaft grün Eingeschaltet, aber nicht in Betrieb
Betriebsanzeige leuchtet nicht Nicht eingeschaltet
ThinkPad-Logo-Anzeige blinkt fünfmal Netzstrom vorhanden
Statusanzeige der Netzstromleiste
Anzeige des Akkuladezustands Verbleibender Akkuladestand
Vier grüne Lichter > 80 %
Drei grüne Lichter 50% - 80%
Zwei grüne Lichter 20% - 50%
Ein grünes Licht < 20 %
Ein gelbes Licht < 10 %

52
Aufladen
Lautsprecher laden
Der Lautsprecher wird mit einem USB-Ladekabel geliefert. Führen Sie einen der folgenden Schritte
aus, um den Akku des Lautsprechers zu laden:
Schließen Sie ein Ende des USB-Kabels an den Mikro-USB-Anschluss des Lautsprechers an.
Schließen Sie dann das andere Ende des USB-Kabels an den USB-Anschluss eines Computers
an (siehe Abbildung A).
Sie können den Lautsprecher auch laden, wenn Sie ihn mit der Netzstromleiste stapeln (siehe
Abbildung B).
53
Netzstromleiste laden
Die Netzstromleiste wird mit einem USB-Ladekabel geliefert. Schließen Sie ein Ende des USB-
Kabels an den Mikro-USB-Anschluss der Netzstromleiste an. Schließen Sie dann das andere Ende
des USB-Kabels an den USB-Anschluss eines 10-W-Netzteils (Wechselstrom) von Lenovo oder an
den USB-Anschluss eines Computers an. Während des Ladevorgangs leuchtet die Akkusymbol-
Anzeige dauerhaft und die Akkuladestand-Anzeigen blinken.
Hinweis: Weder der Router noch das Festplattenlaufwerk enthalten einen integrierten Akku. Wenn
Sie den Router oder das Festplattenlaufwerk verwenden, sollten Sie daher sicherstellen, dass die
Stromversorgung entweder durch eine Stapelung mit der Netzstromleiste oder durch das
angeschlossene Netzteil gewährleistet wird.
Fehlerbehebung
Problem: Der Lautsprecher wird durch Drücken des Netzschalters nicht eingeschaltet.
Lösung: Achten Sie darauf, dass der Akku des Lautsprechers ausreichend geladen ist.
Problem: Das Mobiltelefon oder der Computer kann keine Bluetooth-Verbindung zum
Lautsprecher herstellen.
Lösung: Führen Sie die Pairing-Schritte ordnungsgemäß aus und achten Sie darauf, dass an
der Pairing-Einheit die Bluetooth-Funktion aktiviert ist.
Problem: Der Lautsprecher spielt keine Musik ab.
Lösung: Stellen Sie sicher, dass das Pairing erfolgreich verlaufen ist.
Problem: Während ich über den Lautsprecher Musik höre, geht ein Anruf ein. Wenn ich das
Gespräch beende, wird die Musikwiedergabe über den Lautsprecher nicht automatisch

54
fortgesetzt.
Lösung: Versuchen Sie, die Musikwiedergabe über das Mobiltelefon fortzusetzen.
Problem: Der Lautsprecher wird über die Bluetooth-Suchfunktion des Mobiltelefons nicht
erkannt.
Lösung: Achten Sie darauf, dass der Lautsprecher eingeschaltet und zur Kopplung im Pairing-
Modus ist.
Problem: Nach der Kopplung von Lautsprecher und Mobiltelefon wird die Verbindung immer
unterbrochen oder es sind Störgeräusche vorhanden.
Lösung:
Achten Sie darauf, dass der Lautsprecher ausreichend geladen ist.
Stellen Sie sicher, dass keine Einheiten mit Funkverbindung zwischen dem Mobiltelefon
und dem Lautsprecher vorhanden sind.
Wenn der Lautsprecher mit dem Router gestapelt wird, sollte die Entfernung zwischen
Mobiltelefon und Lautsprecher maximal sechs Meter betragen.
Problem: Lautsprecher und Mobiltelefon sind über die Bluetooth-Verbindung miteinander
gekoppelt, aber ich kann keine Musik hören.
Lösung:
Überprüfen Sie in den Bluetooth-Einstellungen oder den Player-Einstellungen des
Mobiltelefons, ob die Audioeinstellungen des Mobiltelefons für Telefon und Medien dem
gekoppelten Lautsprecher zugeordnet sind.
Einige Mobiltelefone verfügen nicht über ein Bluetooth-Stereomodul, daher ist auch keine
Musikwiedergabe über eine Bluetooth-Einheit möglich. Sie können den Lautsprecher an
andere Mobiltelefone anschließen und so prüfen, ob der Lautsprecher funktioniert.
Problem: Einige Player-Funktionen sind am Lautsprecher nicht verfügbar.
Lösung: Einige Player-Funktionen werden vom Lautsprecher nicht unterstützt. Achten Sie

55
darauf, dass Sie auf dem Mobiltelefon einen kompatiblen Player verwenden.
Problem: Der Router hat keinen Netzwerkzugriff.
Lösung: Dieses Problem wird möglicherweise durch falsche Routereinstellungen verursacht.
Versuchen Sie, den Router über die Anwendung ThinkPad Stack Assist neu zu konfigurieren.
Problem: Der Router kann nicht eingeschaltet werden, wenn er mit der Netzstromleiste
gestapelt ist.
Lösung:
1. Achten Sie darauf, dass die Netzstromleiste ausreichend geladen ist.
Wenn das Problem weiterhin bestehen bleibt, schließen Sie den Router an eine Netzsteckdose an.
Problem: Die Netzstromleiste lädt das Mobiltelefon nicht über den USB 2.0-Anschluss.
Lösung: Trennen Sie das USB-Kabel von der Netzstromleiste und warten Sie drei Sekunden.
Schließen Sie dann das USB-Kabel erneut an die Netzstromleiste an.
Problem: Das Festplattenlaufwerk ist direkt mit einem Lautsprecher gestapelt. Die Lese-
/Schreibleistung des Festplattenlaufwerks nimmt ab, wenn über den Lautsprecher Musik
wiedergegeben wird.
Lösung: Dieses Problem wird möglicherweise durch die Schwingungen des Lautsprechers
verursacht. Entfernen Sie den Lautsprecher oder stapeln Sie ihn indirekt mit dem
Festplattenlaufwerk.

Erste Ausgabe (April 2015)
© Copyright Lenovo 2015.
Lenovo, das Lenovo Logo, ThinkPad und das ThinkPad-Logo sind Marken von Lenovo in den USA und/oder
anderen Ländern.
Microsoft Windows ist eine Marke der Microsoft-Unternehmensgruppe. Weitere Unternehmens-, Produkt- oder
Servicenamen können Marken anderer Hersteller sein.
HINWEIS ZU EINGESCHRÄNKTEN RECHTEN (LIMITED AND RESTRICTED RIGHTS NOTICE): Werden Daten
oder Software gemäß einem GSA-Vertrag (General Services Administration) ausgeliefert, unterliegt die
Verwendung, Vervielfältigung oder Offenlegung den in Vertrag Nr. GS-35F-05925 festgelegten Einschränkungen.

THINKPAD STACK PROFESSIONAL KIT
Guía del usuario

58
Introducción
ThinkPadStackProfessionalKit(deahoraenadelantedenominadoelkit)incluyelossiguientescuatro
dispositivos:
ThinkPadStackBluetoothSpeaker
(deahoraenadelantedenominadoelaltavoz)
ThinkPadStackWirelessRouter
(deahoraenadelantedenominadoeldireccionador)
ThinkPadStack1TBUSB3.0HardDrive
(deahoraenadelantedenominadalaunidaddediscoduro)
ThinkPadStack10000mAhPowerBank
(deahoraenadelantedenominadoelbancodeenergía)
Loscuatrodispositivossepuedenapilar(enordenoenotracombinación)mediantepatillasPogooáreas
Pogo,lasqueproporcionanunarápidatransferenciadeenergíaydatos.Sialgunodelosdispositivos
apiladosrecibeenergía,dichaenergíasepuedetransmitiracadaunodelosdispositivosapilados.
Elaltavozescompatibleconlassiguientesfunciones:
Hastaseishorasdereproduccióndemúsica
Funcióndemanoslibresincorporada
Eldireccionadorescompatibleconlassiguientesfunciones:
Accesoinalámbricoenlabandade2,4GHzolabandade5GHz
AccesoaInternetmedianteuncablederedRJ‐45
AccesoaInternetmedianteunatarjetadered3Go4Gexterna
Accesoremotoaunaunidaddediscodurosiseapilaeneldireccionador
AccesoremotoaundispositivodealmacenamientoUSBsiseconectaaldireccionador
Launidaddediscoduroadmitelassiguientesfunciones:
AccesodealtavelocidadmedianteelcableUSB3.0

59
Accesoremotomedianteeldireccionador,cuandoseapilanjuntos
Nota:uselaaplicaciónThinkPadStackAssistparaelaccesoycontrolremoto.Paraobtenermásinformación,
vayaa:
http://www.lenovo.com/stack
Elbancodeenergíalepermiterealizarlosiguiente:
CargarelaltavozysuministrarenergíaaldireccionadormediantelaspatillasPogooáreasPogo.
CargardosteléfonosmóvilesmedianteconectoresUniversalSerialBus(USB)2.0almismotiempo.
Información de seguridad
Mantengacualquierartículosensiblealmagnetismo,comodispositivoselectrónicosymediosde
almacenamiento,amásde10cmocuatropulgadasdelkit.Losfuertescamposmagnéticosgenerados
porlosimanesdentrodelkitpuedendañarlosartículossensiblesalmagnetismo.
Nointentecambiarlasbateríasinternasdeionesdelitiorecargables.ComuníqueseconSoportede
Lenovopararecibirunasustitucióndefábrica,sifueranecesario.
Nodejequelasbateríasdeionesdelitiosedescarguencompletamenteynolasalmaceneenestadode
descarga.
60
Piezas y ubicaciones
ThinkPad Stack Bluetooth Speaker
PatillasPogo
Indicadordeliconodelaltavoz
BotóndesilenciodelmicrófonoconLED
Botóndevolumen
BotónReproducir/Pausa
Botóndeinicio/apagadoconLED
LEDdellogotipodeThinkPad
ÁreaPogo
ConectormicroUSB2.0(soloparacargaUSB)
Conectordeentradadeaudio
61
ThinkPadStackWirelessRouter
PatillasPogo
LEDdeestadoinalámbrico
Botóndeencendido
LEDdellogotipodeThinkPad
ConectorUSB2.0
ÁreasPogo
ConectormicroUSB2.0(soloparacargaUSB)
ConectorEthernet
Orificioderestablecimientodeemergencia
ThinkPad Stack 1TB USB3.0 Hard Drive
PatillasPogo
LEDdeactividad
LEDdellogotipodeThinkPad
62
ConectormicroUSB3.0
ÁreasPogo
ThinkPadStack10000mAhPowerBank
PatillasPogo
Indicadordeiconodelabatería
Indicadoresdeestadodelabatería
Botóndeestadodelabatería
IndicadordellogotipodeThinkPad
ÁreasPogo
ConectorUSB2.0
ConectormicroUSB2.0
Utilización del kit
Uso del altavoz
Antesdeutilizarelaltavoz,debeemparejarloconunteléfonocelular,sistemauotrodispositivo.Para
emparejarelaltavoz,realicelosiguiente:
63
1. Asegúresedequeelaltavozestéencendido.
2. Mantengapresionadoelbotóndeencendidoalrededordetressegundos.Elaltavozemitiráunsonidos
dosvecesyelindicadordeliconodelaltavozcomenzaráaparpadear.
3. ActivelafuncióndeBluetootheneldispositivodeemparejamientoyemparéjelocon"ThinkPadStack
BluetoothSpeaker".Comenzaráelprocesodeemparejamiento.
4. Cuandoelaltavozhayaemitidoelsonidonuevamentedosvecesyelindicadordeliconodelaltavozdeje
deparpadear,elaltavozsehabráasociadocorrectamenteconeldispositivodeemparejamiento.
Despuésdequeelaltavozsehayaemparejadoconundispositivo,estálistoparasuuso.Puederealizarlas
siguientesoperaciones:
Encenderelaltavoz
PresioneelbotóndeencendidohastaqueelLED(diodoemisordeluz)verdeenelcentrodelbotónde
encendidoyelindicadordeliconodelaltavozseenciendandemanerapermanente.
Apagarelaltavoz
PresioneelbotóndeencendidohastaqueelLEDyelindicadordeliconodelaltavozseapaguen.
Cómovolveraemparejardespuésdeunadesconexión
Pulseelbotóndeencendido.
Subirelvolumen
PulseelbotónSubirvolumen(+).
Bajarelvolumen
PulseelbotónBajarvolumen(‐).
Responderunallamadaentrante
Presioneelbotónparareproducir/pausar.
64
Finalizarunallamada
Presioneelbotónparareproducir/pausar.
Silenciaroactivarelsonido
Presioneelbotóndesilenciarelmicrófono.
Pausaroreanudarlareproduccióndemúsica
Presioneelbotónparareproducir/pausar.
Utilización del direccionador
Conectareldireccionadoralafuentedealimentación
Existentresmétodosparaconectareldireccionadoraunafuentedealimentación:
Conecteeldireccionadoraunatomadealimentacióneléctrica.
Apilelaunidaddediscoduroeneldireccionadoryconectelaunidaddediscoduroconunatomade
alimentacióneléctrica.
Sielbancodeenergíatieneenergíasuficiente,apileeldireccionadorenelbancodeenergía.

65
Encendereldireccionador
PulseelbotóndeencendidoduranteunsegundohastaqueelLEDverdeparpadee.
Apagareldireccionador
MantengapulsadoelbotóndeencendidodurantedossegundoshastaqueelLEDseapague.
Conectareldireccionadoralared
Existendosmétodosparaconectareldireccionadoralared:
Enciendaeldireccionador.Acontinuación,conecteuncablederedRJ‐45alconectorEthernetdel
direccionador.
Enciendaeldireccionador.Acontinuación,conecteunatarjetadered3Go4GexternaalconectorUSB
2.0deldireccionador.
Despuésdequesehayaestablecidolaconexiónalared,elLEDdelbotóndeencendidopermanece
encendido.
Restablecereldireccionadoralosvalorespredeterminados
1. Enciendaeldireccionador.
2. Inserteelextremodeunaagujaounclipparapapelenderezadoenelorificioderestablecimientode
emergenciaymantengapresionadoelbotónderestablecimientoporcincosegundos.
3. Luego,suelteelbotónderestablecimiento.ElLEDdelbotóndeencendidoparpadeará.
4. EsperehastaqueelLEDdelbotóndeencendidosemantengaencendido.Eldireccionadorserestableció
66
satisfactoriamentealosvalorespredeterminados.
Utilización de la unidad de disco duro
Puedeusarlaunidaddediscoduromedianteaccesodirectooremoto.
Accesodirecto
ConecteunextremodelcableUSB3.0alconectormicroUSB3.0delaunidaddediscoduroyelotro
extremoaunconectorUSBdisponibleenelsistema.SerecomiendausarunconectorUSB3.0paraobtener
lamáximavelocidaddetransferenciadedatos.
Accesoremoto
1. Apilelaunidaddediscoduroeneldireccionadoryenciendaeldireccionador.
2. DescargueeinstalelaaplicaciónThinkPadStackAssistensuteléfonomóvilosistema.Paraobtenermás
información,consulteThinkPadStackAssistenlaúltimapartedeestedocumento.
Abralaaplicaciónysigalasinstruccionesenlapantallaparaaccederalaunidaddediscoduro.
Utilización del banco de energía
Presioneelbotóndeestadodelabateríaparacomprobarelestadodelabateríaantesdeusarelbancode
energía.
Apilarundispositivoenelbancodeenergía
Cuandoapilaundispositivoenelbancodeenergía,asegúresedequelaspatillasPogodeldispositivose
alineenconlasáreasPogodelbancodeenergía,oquelasáreasPogodeldispositivosealineenconlas
patillasdelbancodeenergía.
Cargarelaltavoz
Apileelaltavozenelbancodeenergíayelbancodeenergíacomenzaráacargarelaltavoz.
Suministrarenergíaaldireccionador

67
Apileeldireccionadorenelbancodeenergíaypresioneelbotóndeinicio/apagadoeneldireccionadorpara
encenderlo.Elbancodeenergíacomienzaasuministrarenergíaaldireccionador.
Cargarteléfonosmóviles
ConecteelteléfonomóvilalconectorUSB2.0delbancodeenergía.Elbancodeenergíapuedecargardos
teléfonosmóvilesalmismotiempoysuministrarunacorrientemáximade2,1Aduranteelprocesodecarga.
Utilización del kit
Loscuatrodispositivossepuedenapilarentresíencualquierordenycombinación.Puedeapilarlostodos,
algunosousarlosporseparado.Cuandoseapilaelbancodeenergía,puedesuministrarenergíaalosotros
dispositivosapilados.
Consejossobrelautilizacióndelkit:
Cuandoseapilalaunidaddediscoduroconeldireccionador,eldireccionadorpuedeencenderoapagar
launidaddediscoduro.Silaunidaddediscoduronoestáenuso,serecomiendanoapilarlaconotros
dispositivos.

68
Eldireccionadornoincluyeningunabateríaintegrada.Porlotanto,alusareldireccionador,asegúresede
quesesuministreenergíaalapilarconelbancodeenergíaoatravésdeladaptadordealimentación.
Elaltavozincluyeunabateríaintegradaquepermitehastaseishorasdereproduccióndemúsica.Cuando
labateríaestébaja,apileelaltavozconelbancodeenergíaoconecteelaltavozaunatomade
alimentación.
Nosepuedeaccederalaunidaddediscodurocuandoseapilaúnicamenteconelbancodeenergía.Para
accederalaunidaddediscodurodeformainalámbrica,asegúresedeapilarlaconeldireccionador.
ThinkPad Stack Assist
ThinkPadStackAssistesunaaplicacióndeasistenciaparalosproductosdelaserieThinkPadStack.Puede
iniciarsesiónenlainterfazdegestióndelaaplicacióndesdeeldireccionadory,acontinuación,usarla
aplicaciónparagestionarotrosproductosdelaserieThinkPadStack.
Requisitosdehardware
ThinkPadStackWirelessRouter
Undispositivoparainstalarlaaplicación
Requisitosdelsistemaoperativo
MicrosoftWindows7,MicrosoftWindows
8.1oposterior
Android4.2oposterior
iOS7.0oposterior
DescargarThinkPadStackAssist
Vayaahttp://www.lenovo.com/stackoescaneeelsiguientecódigoderespuestarápida(QR).

69
Póngaseencontactoconnosotros
Si tiene problemas con ThinkPad Stack Assist, escríbanos un correo electrónico a
accswsupport@lenovo.com.
LED de estado
LosLEDdeestadoenlosdispositivosseiluminandedistintasmanerasparaindicarestadosde
funcionamientodiferentesdelkit.
LED de estado en el altavoz
ActividadLEDEstadodefuncionamiento
LEDdelbotóndeencendidoyelindicadordeliconodelaltavoz
permanecenencendidos
Encendido
LEDdelbotóndeencendidoyelindicadordeliconodelaltavoz
permanecenapagados
Desactivar
Elindicadordeliconodelaltavozparpadeadosvecesen
intervalosdeunsegundo
Emparejando
ElindicadordeliconodelaltavozparpadeacincovecesEmparejamientocompletado
ElLEDdelbotóndesilenciarelmicrófonopermanece
encendido
Ensilencioenunallamada
ElLEDdelbotóndesilenciarelmicrófonopermaneceapagadoSinsilencioenunallamada
ElLEDdelbotóndeencendidosevuelvedecolorámbarBateríabaja(menosde25%)
ElLEDdelbotóndeencendidoparpadeadecolorámbar Bateríabaja(menosde10%)
ElLEDdellogotipodeThinkPadparpadeacincovecesEnergíapresente

70
LED de estado en el direccionador
ActividadLEDEstadodefuncionamiento
ElLEDdelbotóndeencendidoparpadeadecolor
verde
Encendido(inicializandoo
restableciendo)
ElLEDdelbotóndeencendidosemantiene
encendidodecolorverde
Encendido(inicializado,listoparala
conexióninalámbrica)
ElLEDdelbotóndeencendidosemantieneapagadoDesactivar
ElLEDdeestadoinalámbricosemantieneencendido
decolorverde
Conexióninalámbricaestablecida
ElLEDdeestadoinalámbricoparpadeadecolor
verde
Transmitiendodatos
ElLEDdeestadoinalámbricoparpadeadecolor
ámbar
Errordeconexión(inicializacióno
conexiónderedfallida)
ElLEDdeestadodeconexiónsemantieneapagadoDesactivar,inicializandoorestableciendo
ElLEDdellogotipodeThinkPadparpadeacincovecesEnergíapresente
LED de estado en la unidad de disco duro
ActividadLEDEstadodefuncionamiento
ElLEDdeactividadparpadeadecolorverdeActivo(enviandoorecibiendodatos)
ElLEDdeactividadsemantieneencendidodecolor
verde
Conalimentación,peronoactivo
ElLEDdeestadosemantieneapagadoSinalimentación
ElLEDdellogotipodeThinkPadparpadeacincovecesEnergíapresente
71
LED de estado en el banco de energía
LEDdeestadodelabateríaEnergíadelabateríarestante
Cuatroindicadoresseiluminandecolorverde. >80%
Tresindicadoresseiluminandecolorverde.50%‐80%
Dosindicadoresseiluminandecolorverde.20%‐50%
Solounindicadorseiluminadecolorverde. <20%
Solounindicadorseiluminadecolorámbar. <10%
Cargando
Cargar el altavoz
ElaltavozseproporcionaconuncabledecargaUSB.Paracargarelaltavoz,realiceunadelassiguientes
acciones:
ConecteunextremodelcableUSBalconectormicroUSBenelaltavoz.Acontinuación,conecteelotro
extremodelcableUSBalconectorUSBdeunsistema(comosemuestraenlaImagenA).
Tambiénpuedecargarelaltavozalapilarloenelbancodeenergía(comosemuestraenlaImagenB).
72
Cargar el banco de energía
ElbancodeenergíaseproporcionaconuncabledecargaUSB.ConecteunextremodelcableUSBal
conectormicroUSBenelbancodeenergía.Luego,conecteelotroextremodelcableUSBalconectorUSB
deladaptadordealimentacióndeCAde10WdeLenovooalconectorUSBenunsistema.Elindicadordel
iconodelabateríasemantieneencendidoylosindicadoresdeestadodelabateríaseiluminan
intermitentementecuandoelbancodecargaseestácargando.
Nota:eldireccionadorylaunidaddediscoduronoincluyenningunabateríaintegrada.Porlotanto,alusar
eldireccionadorolaunidaddediscoduro,asegúresedequesesuministreenergíaalapilarconelbancode
energíaoatravésdeladaptadordealimentación.

73
Resolución de problemas
Problema:elaltavoznoseenciendealpulsarelbotóndeencendido.
Solución:asegúresedequeelaltavozcuenteconcargasuficiente.
Problema:elteléfonocelularoelsistemanopuedeestablecerunaconexiónBluetoothconel
altavoz.
Solución:sigalospasoscorrectosdeemparejamientoyasegúresedequeeldispositivoquese
emparejarádisponedelafuncióndeBluetoothhabilitada.
Problema:elaltavoznopuedereproducirmúsica.
Solución:asegúresedequeelemparejamientoserealicesatisfactoriamente.
Problema:serecibeunallamadacuandoestoyescuchandomúsicaenelaltavoz.Cuandofinalizo
llamada,elaltavoznopuedereanudarlareproduccióndemúsicaautomáticamente.
Solución:intentereanudarlareproduccióndemúsicaenelteléfono.
Problema:elteléfonocelularnopuedeencontrarelaltavozmediantelafuncióndebúsquedade
Bluetooth.
Solución:asegúresedequeelaltavozestéencendidoyquehayaingresadoalamodalidadde
emparejamiento.
Problema:siempreocurreunadesconexiónoseescuchanruidosdespuésdeemparejarelaltavoz
yunteléfonomóvil.
Solución:
Asegúresedequeelaltavozcuenteconcargasuficiente.
Asegúresedequenohayadispositivosderadioinalámbricaentreelteléfonomóvilyel
altavoz.
Sielaltavozestáapiladoconeldireccionador,asegúresedequeladistanciaentreelteléfono
móvilyelaltavozseade6metrosomenos(19,7pies).
Problema:elaltavozseemparejaconunteléfonocelularatravésdelaconexiónBluetooth,pero

74
nopuedoescucharmúsica.
Solución:
Asegúresedequeelaudiodeteléfonoyaudiodemediosesténactivadosparaelaltavoz
emparejadoenlaconfiguracióndeBluetoothoenlaconfiguracióndelreproductorenel
teléfonocelular.
AlgunosteléfonosmóvilesnotienenunmóduloBluetoothestéreocompleto,porlotanto
ningunafuncióndemúsicasereproduceatravésdeundispositivodeBluetooth.Puede
conectarelaltavozaotrosteléfonosmóvilesparacomprobarsielaltavozfunciona.
Problema:algunasfuncionesdelreproductornoestándisponiblesenelaltavoz.
Solución:lasfuncionesdealgunosreproductoresnosoncompatiblesconelaltavoz.Asegúresede
usarunreproductorcompatibleenelteléfonocelular.
Problema:eldireccionadornopuedeaccederalared.
Solución:esteproblemapuedetenersucausaenvaloresincorrectosdeldireccionador.Intente
volveraconfigurareldireccionadormediantelaaplicaciónThinkPadStackAssist.
Problema:launidaddediscoduroestáapiladadirectamenteenunaltavoz.Elrendimientode
lecturayescrituradelaunidaddediscodurodisminuyecuandoelaltavozestáreproduciendo
música.
Solución:esteproblemapuedetenersucausaenlavibracióndelaltavoz.Quiteelaltavozoapílelo
enlaunidaddediscoduroindirectamente.
Problema:lavelocidaddecargadelbancodeenergíadisminuyecuandosecargandosteléfonos
móvilesmediantelosconectoresUSB2.0uotrosproductosdelaserieThinkPadStackmediante
patillasPogooáreasPogoalmismotiempo.
Solución:desconectelosteléfonosmóvilesolosotrosproductosdelaserieThinkPadStackdel
bancodeenergía.Cuandoelconsumodeenergíaesmayorquelacorrientedecarga,lavelocidad
decargadelbancodeenergíadisminuye.

75
Problema:elbancodeenergíanosepuedecargaralapilarloenotrosdispositivos.
Solución:asegúresedequeelcabledecargaUSBestéconectadofirmementealconectormicro
USBenelbancodeenergía.
Problema:elbancodeenergíanocargaelteléfonomóvilmedianteelconectorUSB2.0.
Solución:quiteelcableUSBdelbancodeenergíayesperetressegundos.Luego,vuelvaaconectar
elcableUSBalbancodeenergía.

Primeraedición(abrilde2015)
©CopyrightLenovo2015.
Lenovo,ellogotipodeLenovo,ThinkPadyellogotipodeThinkPadsonmarcasregistradasdeLenovoenEstadosUnidosoen
otrospaíses.
Microsoft,WindowsesunamarcaregistradadelgrupodeempresasdeMicrosoft.Otrosnombresdeempresas,productoso
serviciospuedensermarcasregistradasodeserviciodeotros.
AVISODEDERECHOSLIMITADOSYRESTRINGIDOS:Silosproductososoftwaresesuministransegúnelcontrato“GSA”
(GeneralServicesAdministration),lautilización,reproducciónodivulgaciónestánsujetasalasrestriccionesestablecidasen
elContratoNúm.GS‐35F‐05925.

THINKPAD STACK PROFESSIONAL KIT
Guide d'utilisation

78
Présentation
ThinkPad Stack Professional Kit (ci-après, le kit d'empilage) comprend les quatre périphériques
suivants :
ThinkPad Stack Bluetooth Speaker
(ci-après, le haut-parleur)
ThinkPad Stack Wireless Router
(ci-après, le routeur)
ThinkPad Stack 1TB USB3.0 Hard Drive
(ci-après, l'unité de disque dur).
ThinkPad Stack 10000mAh Power Bank
(ci-après, le chargeur d'alimentation)
Ces quatre périphériques peuvent être empilés ensemble (dans n'importe quel ordre et dans
n'importe quelle combinaison) avec des broches ou des blocs Pogo, ce qui confère de meilleures
performances et une vitesse de transfert de données optimale. Si l'un des périphériques empilés
est sous tension, l'alimentation électrique peut être transférée à chacun des périphériques empilés.
Le haut-parleur prend en charge les fonctions suivantes :
Jusqu'à six heures de lecture de musique
Fonction téléphone mains libres intégrée
Le routeur prend en charge les fonctions suivantes :
Accès sans fil sur la bande 2,4 GHz ou 5 GHz
Accès Internet via un câble réseau RJ-45
Accès Internet via une carte réseau externe 3G ou 4G
Accès à distance à l'unité de disque dur si elle est empilée au routeur.
Accès à distance au périphérique de stockage USB s'il est connecté au routeur
L'unité de disque dur prend en charge les fonctions suivantes :

79
Accès haut débit via un câble USB 3.0
Accès à distance via le routeur si ces périphériques sont empilés ensemble.
Remarque : utilisez l'application ThinkPad Stack Assist pour un accès et un contrôle à distance.
Pour plus d'informations, allez à l'adresse :
http://www.lenovo.com/stack
Le chargeur d'alimentation vous permet d'effectuer les opérations suivantes :
Charger le haut-parleur et alimenter le routeur avec des broches ou des blocs Pogo.
Charger deux téléphones mobiles à la fois via des connecteurs USB 2.0.
Consignes de sécurité
Maintenez les appareils sensibles aux champs magnétiques, comme les périphériques
électroniques et les supports de stockage, à plus de 10 cm (4 pouces) du kit. Les puissants
champs magnétiques générés par les aimants contenus dans le kit peuvent endommager les
appareils sensibles aux champs magnétiques.
Ne tentez pas de remplacer les batteries internes au lithium-ion rechargeables. Contactez
Lenovo Support pour un remplacement en usine si nécessaire.
Ne laissez pas des piles ou des batteries au lithium-ion rechargeables se décharger
complètement et ne les rangez pas déchargées.
80
Pièces et emplacements
ThinkPad Stack Bluetooth Speaker
Broches Pogo
Voyant de l'icône haut-parleur
Bouton de coupure du micro avec voyant
Bouton Volume
Bouton Lecture/Pause
Bouton d'alimentation avec voyant
Voyant du logo ThinkPad
Bloc pogo
Connecteur micro USB 2.0 (pour une alimentation USB uniquement)
Connecteur entrée audio
ThinkPad Stack Wireless Router
81
Broches Pogo
Voyant d'état de la connexion sans fil
Bouton d'alimentation
Voyant du logo ThinkPad
Connecteur USB 2.0
Blocs Pogo
Connecteur micro USB 2.0 (pour une alimentation USB uniquement)
Connecteur Ethernet
Orifice de réinitialisation d'urgence
ThinkPad Stack 1TB USB3.0 Hard Drive
Broches Pogo
Voyant d'activité
Voyant du logo ThinkPad
Connecteur micro USB 3.0
Blocs Pogo
82
ThinkPad Stack 10000mAh Power Bank
Broches Pogo
Voyant de l'icône de la batterie.
Voyants d'état de la batterie
Bouton de l'état de la batterie
Voyant du logo ThinkPad
Blocs Pogo
Connecteur USB 2.0
Connecteur micro USB 2.0
Utilisation du kit
Utiliser le haut-parleur
Avant d'utiliser le haut-parleur, couplez-le avec un téléphone mobile, un ordinateur ou un autre
périphérique. Pour coupler le haut-parleur, procédez comme suit :
1. Vérifiez que le haut-parleur est allumé.
2. Maintenez le bouton d'alimentation enfoncé pendant environ trois secondes. Le haut-parleur
83
émet un signal sonore deux fois et le voyant de l'icône du haut-parleur se met à clignoter.
3. Activez la fonction Bluetooth sur le périphérique de couplage et jumelez-le avec « ThinkPad
Stack Bluetooth Speaker ». Le processus de couplage commence.
4. Le haut-parleur émet à nouveau un signal sonore deux fois et le voyant de l'icône du haut-parleur
s'arrête de clignoter lorsque ce dernier est bien jumelé au périphérique de couplage.
Une fois le haut-parleur couplé avec un périphérique, il est prêt et vous pouvez en profiter. Vous
pouvez effectuer les opérations suivantes :
Allumer le haut-parleur
Appuyez sur le bouton d'alimentation jusqu'à ce que le voyant vert au centre du bouton
d'alimentation et le voyant de l'icône du haut-parleur soient fixes.
Éteindre le haut-parleur
Appuyez sur le bouton d'alimentation jusqu'à ce que le voyant du bouton d'alimentation et celui de
l'icône du haut-parleur soient éteints.
Coupler à nouveau après une déconnexion
Appuyez sur le bouton d'alimentation.
Augmenter le volume
Appuyez sur le bouton d'augmentation du volume (+).
Baisser le volume
Appuyez sur le bouton de réduction du volume (-).
Répondre à un appel entrant
Appuyez sur le bouton lecture/pause.
Terminer un appel

84
Appuyez sur le bouton lecture/pause.
Activer/désactiver le son
Appuyez sur le bouton de coupure du micro.
Mettre sur pause et reprendre la lecture de la musique
Appuyez sur le bouton lecture/pause.
Utilisation du routeur
Brancher le routeur à l'alimentation
Il existe trois méthodes pour brancher le routeur à l'alimentation :
Brancher le routeur à une prise de courant.
Empiler l'unité de disque dur au routeur et brancher l'unité de disque dur à une prise de
courant.
Si le chargeur d'alimentation a une alimentation suffisante, empilez le routeur au chargeur
d'alimentation.

85
Allumer le routeur
Appuyez sur le bouton d'alimentation pendant une seconde jusqu'à ce que le voyant vert clignote.
Éteindre le routeur
Appuyez sur le bouton d'alimentation et maintenez-le enfoncé pendant deux secondes jusqu'à ce
que son voyant s'éteigne.
Brancher le routeur au réseau
Il existe deux méthodes pour brancher le routeur au réseau :
Allumer le routeur. Brancher ensuite le câble réseau RJ-45 au connecteur Ethernet sur le
routeur.
Allumer le routeur. Brancher ensuite la carte réseau 3G ou 4G au connecteur USB 2.0 sur le
routeur.
Une fois la connexion réseau établie, le voyant du bouton d'alimentation reste allumé.
Restaurer le routeur aux paramètres par défaut
1. Allumez le routeur.
2. Insérez la pointe d'une aiguille ou d'un trombone déplié dans l'orifice de réinitialisation
d'urgence et maintenez le bouton de réinitialisation enfoncé pendant cinq secondes.
3. Relâchez le bouton de réinitialisation. Le voyant du bouton d'alimentation clignote.
4. Attendez que le voyant du bouton d'alimentation reste allumé. Le routeur est bien réinitialisé sur
86
ses paramètres par défaut.
Utiliser l'unité de disque dur
Vous pouvez utiliser une unité de disque dur via un accès direct ou à distance.
Accès direct
Branchez une extrémité du câble USB 3.0 au connecteur micro USB 3.0 de l'unité de disque dur et
l'autre au connecteur USB disponible sur votre ordinateur. Un connecteur USB 3.0 est recommandé
pour une vitesse de transfert de données optimale.
Accès à distance
1. Empilez l'unité de disque dur au routeur et allumez ce dernier.
2. Téléchargez et installez l'application ThinkPad Stack Assist sur votre téléphone mobile ou
ordinateur. Pour plus d'informations, reportez-vous à la section ThinkPad Stack Assist dans la
dernière partie de ce document.
Lancez l'application et suivez les instructions qui s'affichent à l'écran afin d'accéder à l'unité de
disque dur.
Utilisation du chargeur d'alimentation
Appuyez sur le bouton de l'état de la batterie pour vérifier l'état de la batterie avant d'utiliser le
chargeur d'alimentation.
Empiler un périphérique au chargeur d'alimentation
Quand vous empilez un périphérique au chargeur d'alimentation, assurez-vous que les broches
Pogo du périphérique sont alignées aux blocs Pogo du chargeur d'alimentation ou que les blocs
Pogo du périphérique sont alignés aux broches Pogo du chargeur d'alimentation.
Charger le haut-parleur
Empilez le haut-parleur au chargeur d'alimentation et ce dernier se mettra à charger le haut-parleur.

87
Alimentation du routeur
Empilez le routeur au chargeur d'alimentation et appuyez sur le bouton d'alimentation du routeur
pour le mettre sous tension. Le chargeur d'alimentation se mettra à alimenter le routeur.
Charger des téléphones portables
Branchez votre téléphone portable au connecteur USB 2.0 sur votre chargeur d'alimentation. Le
chargeur d'alimentation peut charger deux téléphones portables en même temps et fournir un
courant maximal de 2,1 A pendant le chargement.
Utilisation du kit d'empilage
Les quatre périphériques peuvent être empilés ensemble, dans n'importe quel ordre et dans
n'importe quelle combinaison. Vous pouvez tous les empiler, ou en empiler quelques-uns
seulement, ou bien les utiliser séparément. Une fois le chargeur d'alimentation empilé, celui-ci peut
alimenter les autres périphériques empilés.
88
Conseils d'utilisation du kit d'empilage:
Si vous empilez l'unité de disque dur avec le routeur, ce dernier peut mettre sous tension ou hors
tension l'unité de disque dur. Si vous n'utilisez pas l'unité de disque dur, il est recommandé de ne
pas l'empiler aux autres périphériques.
Le routeur ne comporte aucune batterie intégrée. Par conséquent, lorsque vous utilisez le
routeur, vous devez vous assurer de la présence d'une alimentation électrique, en l'empilant à un
chargeur d'alimentation ou en utilisant un boîtier d'alimentation.
Le haut-parleur comporte une batterie intégrée, laquelle peut prendre en charge jusqu'à six
heures de lecture de musique. Lorsque la batterie est faible, empilez le haut-parleur au chargeur
d'alimentation ou branchez-le à une prise de courant.
Il n'est pas possible d'accéder à l'unité de disque dur sans aucun fil lorsque celle-ci est empilée
uniquement au chargeur d'alimentation. Pour accéder à votre unité de disque dur sans fil,
empilez-la avec le routeur.
ThinkPad Stack Assist
ThinkPad Stack Assist est une application d'assistance pour les produits de la gamme ThinkPad
Stack. Vous pouvez vous connecter à l'interface de gestion de l'application à partir du routeur puis
utiliser l'application afin de gérer d'autres produits de la gamme ThinkPad Stack.
Configuration matérielle requise
ThinkPad Stack Wireless Router
Un périphérique pour installer l'application
Configuration du système d'exploitation
Microsoft Windows 7, Microsoft Windows 8.1, ou version ultérieure
89
Android 4.2 ou version ultérieure
iOS 7.0 ou version ultérieure
Télécharger ThinkPad Stack Assist
Allez à l'adresse : http://www.lenovo.com/stack ou scannez le code Réponse Rapide (QR).
Nous contacter
Si vous rencontrez des problèmes avec ThinkPad Stack Assist, envoyez-nous un e-mail à l'adresse
suivante : accswsupport@lenovo.com.
Voyants d'état
Les voyants d'état des périphériques clignotent de différentes manières pour indiquer divers états
de fonctionnement de ces derniers.
Voyants d'état du haut-parleur
Activité du voyant État de fonctionnement
Le voyant du bouton d'alimentation et celui de
l'icône du haut-parleur restent allumés
Sous tension
Le voyant du bouton d'alimentation et celui de
l'icône du haut-parleur restent éteints
Hors tension
Le voyant de l'icône du haut-parleur clignote deux
fois à une seconde d'intervalle
Couplage

90
Activité du voyant État de fonctionnement
Le voyant de l'icône du haut-parleur clignote cinq
fois
Couplage terminé
Le voyant du bouton de coupure du micro reste
allumé
Son désactivé pendant un appel
Le voyant du bouton de coupure du micro reste
éteint
Son non désactivé pendant un
appel
Le voyant du bouton d'alimentation est orange Le niveau de charge de la batterie
est faible (moins de 25 %).
Le voyant du bouton d'alimentation clignote en
orange
Le niveau de charge de la batterie
est faible (moins de 10 %).
Le voyant du logo ThinkPad clignote cinq fois Alimentation présente
Voyants d'état du routeur
Activité du voyant État de fonctionnement
Le voyant du bouton d'alimentation clignote en
vert
Sous tension (initialisation ou
réinitialisation)
Le voyant du bouton d'alimentation reste vert Sous tension (initialisé, prêt pour
une connexion sans fil)
Le voyant du bouton d'alimentation reste éteint Hors tension
Le voyant d'état de la connexion sans fil reste vert Connexion sans fil établie
Le voyant d'état de la connexion sans fil clignote
en vert
Transmission de données

91
Activité du voyant État de fonctionnement
Le voyant d'état de la connexion sans fil clignote
en orange
Erreur de connexion (échec de
l'initialisation ou de la connexion au
réseau)
Le voyant d'état de la connexion sans fil reste
éteint
Hors tension, initialisation ou
réinitialisation
Le voyant du logo ThinkPad clignote cinq fois Alimentation présente
Voyants d'état de l'unité de disque dur
Activité du voyant État de fonctionnement
Le voyant d'activité clignote en vert Actif (envoi ou réception de
données)
Le voyant d'activité reste vert Sous tension mais non actif
Le voyant d'activité reste éteint Hors tension
Le voyant du logo ThinkPad clignote cinq fois Alimentation présente
Voyants d'état du chargeur d'alimentation
Voyants d'état de la batterie Batterie restante
Quatre voyants sont allumés en vert. > 80 %
Trois voyants sont allumés en vert. 50% - 80%
Deux voyants sont allumés en vert. 20% - 50%
Un voyant seulement est allumé en vert. < 20 %
Un voyant seulement est allumé en orange. < 10 %
92
Chargement
Chargement du haut-parleur
Le haut-parleur est livré avec un câble d'alimentation USB. Pour charger le haut-parleur, effectuez
l'une des opérations suivantes :
Branchez l'une des extrémités du câble USB au connecteur micro USB du haut-parleur.
Branchez ensuite l'autre extrémité du câble USB au connecteur USB d'un ordinateur (comme
indiqué sur l'image A).
Vous pouvez aussi charger le haut-parleur en empilant ce dernier au chargeur d'alimentation
(comme indiqué sur l'image B).
Chargement du chargeur d'alimentation
Le chargeur d'alimentation est livré avec un câble d'alimentation USB. Branchez l'une des
extrémités du câble USB au connecteur micro USB du chargeur d'alimentation. Branchez ensuite
l'autre extrémité du câble USB au connecteur USB du boîtier d'alimentation Lenovo 10W AC ou au
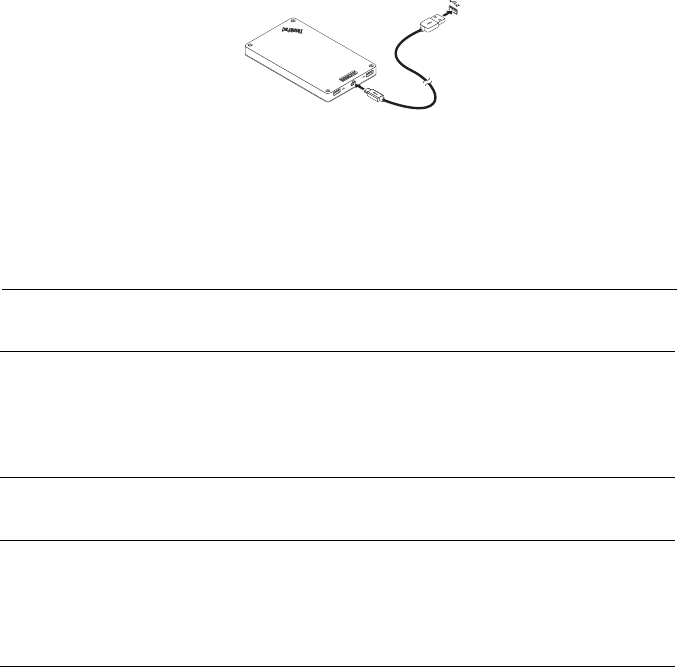
93
connecteur USB d'un ordinateur. Le voyant de l'icône de la batterie reste allumé et les voyants
d'état de la batterie clignotent quand le chargeur d'alimentation est en chargement.
Remarque : le routeur et l'unité de disque dur ne comportent aucune batterie intégrée. Par
conséquent, lorsque vous utilisez le routeur ou l'unité de disque dur, vous devez vous assurer de la
présence d'une alimentation électrique, en empilant l'appareil à un chargeur d'alimentation ou en
utilisant un boîtier d'alimentation.
Identification et résolution des incidents
Problème : le haut-parleur ne s'allume pas lorsque j'appuie sur le bouton d'alimentation.
Solution : vérifiez que le haut-parleur est suffisamment chargé.
Problème : le téléphone portable ou l'ordinateur ne parvient pas à établir une connexion
Bluetooth avec le haut-parleur.
Solution : suivez les étapes de couplage appropriées et vérifiez que la fonction Bluetooth
est bien activée sur le périphérique à coupler.
Problème : le haut-parleur ne lit pas la musique.
Solution : vérifiez que votre couplage a réussi.
Problème : je reçois un appel alors que je suis en train d'écouter de la musique avec le
haut-parleur. Quand je termine l'appel, le haut-parleur ne reprend pas la lecture de la
musique automatiquement.
Solution : essayez de reprendre la lecture de la musique sur le téléphone.
Problème : le téléphone portable ne trouve pas le haut-parleur avec la fonction de

94
recherche Bluetooth.
Solution : vérifiez que le haut-parleur est bien sous tension et qu'il est en mode couplage.
Problème : il y a toujours une déconnexion ou des bruits une fois que le haut-parleur et le
téléphone portable sont couplés.
Solution :
Vérifiez que votre haut-parleur est suffisamment chargé.
Assurez-vous qu'il n'y a pas de périphérique radio sans fil entre le téléphone portable et
le haut-parleur.
Si le haut-parleur est empilé au routeur, assurez-vous que le téléphone portable et le haut-
parleur sont à moins de 6 mètres de distance maximum (19,7 pieds).
Problème : le haut-parleur est couplé avec un téléphone portable via une connexion
Bluetooth mais je n'arrive pas à écouter de la musique.
Solution :
Vérifiez que le son du téléphone et du support audio a été basculé sur le haut-parleur
couplé dans les paramètres Bluetooth ou dans ceux du lecteur sur le téléphone portable.
Certains téléphones portables ne disposent pas d'un module Bluetooth stéréo complet, d'où
l'impossibilité de lire de la musique via un périphérique Bluetooth. Vous pouvez connecter le
haut-parleur à un autre téléphone portable pour vérifier s'il fonctionne.
Problème : certaines fonctions du lecteur ne sont pas disponibles sur le haut-parleur.
Solution : certaines fonctions d'un lecteur peuvent ne pas être prises en charge par le haut-
parleur. Vérifiez que le lecteur que vous utilisez est compatible sur le téléphone portable.
Problème : le routeur ne peut pas accéder au réseau.
Solution : ce problème peut provenir d'un mauvais paramétrage du routeur. Essayez de
reconfigurer le routeur en utilisant l'application ThinkPad Stack Assist.
Problème : le routeur ne s'allume pas lorsqu'il est empilé au chargeur d'alimentation.

95
Solution :
1. Vérifiez que le chargeur d'alimentation est suffisamment chargé.
Si le problème persiste, branchez le routeur à une prise de courant.
Problème : l'unité de disque dur est directement empilée au haut-parleur. Les performances
de lecture/écriture de l'unité de disque dur chutent lorsque le haut-parleur lit de la musique.
Solution : ce problème peut être causé par les vibrations du haut-parleur. retirez le haut-
parleur ou empilez-le à l'unité de disque dur indirectement.
Problème : la vitesse de chargement du chargeur d'alimentation ralentit quand deux
téléphones portables en même temps sont en chargement via les connecteurs USB 2.0, ou
d'autres produits de la gamme ThinkPad Stack via des broches ou des blocs Pogo.
Solution : débranchez les téléphones portables ou d'autres produits de la gamme ThinkPad
Stack du chargeur d'alimentation. Lorsque la consommation d'énergie est supérieure au
courant de charge, la vitesse de chargement du chargeur d'alimentation ralentit.
Problème : le chargeur d'alimentation ne charge pas lorsqu'il est empilé aux autres
périphériques.
Solution : vérifiez que le câble d'alimentation USB est bien connecté au connecteur micro
USB sur le chargeur d'alimentation.
Problème : le chargeur d'alimentation ne parvient pas charger le téléphone portable via le
connecteur USB 2.0.
Solution : retirez le câble USB du chargeur d'alimentation et attendez trois secondes.
Branchez ensuite à nouveau le câble USB au chargeur d'alimentation.

Première édition (avril 2015)
© Copyright Lenovo 2015.
Lenovo, le logo Lenovo, ThinkPad et le logo ThinkPad sont des marques de Lenovo aux États-Unis et/ou dans
certains autres pays.
Microsoft, Windows est une marque du groupe Microsoft. Les autres noms de sociétés, de produits et de services
peuvent appartenir à des tiers.
REMARQUE SUR LES DROITS LIMITÉS ET RESTREINTS : Si les données ou les logiciels sont fournis
conformément à un contrat General Services Administration (« GSA »), l'utilisation, la reproduction et la
divulgation sont soumises aux restrictions stipulées dans le contrat n° GS-35F-05925.

THINKPAD STACK PROFESSIONAL KIT
ユーザー・ガイド

98
概要
ThinkPad Stack Professional Kit (これ以降、「スタック・キット」と呼びます) には次の 4 つのデ
バイスが含まれています。
ThinkPad Stack Bluetooth Speaker
(これ以降、「スピーカー」と呼びます)
ThinkPad Stack Wireless Router
(これ以降、「ルーター」と呼びます)
ThinkPad Stack 1TB USB3.0 Hard Drive
(これ以降、「ハードディスク・ドライブ」と呼びます)
ThinkPad Stack 10000mAh Power Bank
(これ以降、「電源バンク」と呼びます)
4 つのデバイスはポゴピンまたはポゴ・パッドを使用して 1 つに積み重ねることができます (順
序や組み合わせは問いません)。これによって電源やデータのすばやい転送ができます。積み重ね
られたデバイスのいずれかに電源が供給されると、その電源を積み重ねられた各デバイスに転送で
きます。
スピーカーは次の機能をサポートしています。
最長 6 時間の音楽再生
内蔵のハンズフリー電話機能
ルーターは次の機能をサポートしています。
帯域 2.4 GHz または 5 GHz のワイヤレス接続
RJ-45 ネットワーク・ケーブルを使用したインターネット接続
外付け 3G または 4G ネットワーク・カードを使用したインターネット接続
ルーターに積み重ねたハードディスク・ドライブへのリモート・アクセス
ルーターに接続している USB ストレージ・デバイスへのリモート・アクセス
ハードディスク・ドライブは次の機能をサポートしています。

99
USB 3.0 ケーブルを使用した高速アクセス
ルーターを使用したリモート・アクセス (一緒に積み重ねられている場合)
注: リモート・アクセスおよび制御には、ThinkPad Stack Assist アプリを使用します。詳しく
は、以下を参照してください。
http://www.lenovo.com/stack
電源バンクは、次のことを実行できます。
スピーカーを充電し、ポゴピンまたはポゴ・パッドでルーターに電源を供給します。
USB (ユニバーサル・シリアル・バス) 2.0 コネクターで 2 台の携帯電話を同時に充電しま
す。
安全上の注意
電子デバイスやストレージ・メディアなど磁気に敏感な製品は、キットから 10 cm (4 インチ)
以上離してください。キットの磁石から発生する強力な磁界によって、磁気に敏感な製品が損
傷する恐れがあります。
内蔵型充電式リチウムイオン電池を交換しないでください。必要であれば、工場での交換を依
頼する手順について Lenovo サポートに問い合わせてください。
再充電可能なリチウムイオン電池を完全に放電させたり、放電状態で保管したりしないでくだ
さい。

100
部品および位置
ThinkPad Stack Bluetooth Speaker
ポゴピン
スピーカー・アイコン・インジケーター
マイクロホンの消音ボタン (LED 付き)
ボリューム・ボタン
再生/一時停止ボタン
電源ボタン (LED 付き)
ThinkPad ロゴ LED
ポゴ・パッド
マイクロ USB 2.0 コネクター (USB 充電専用)
オーディオ入力コネクター
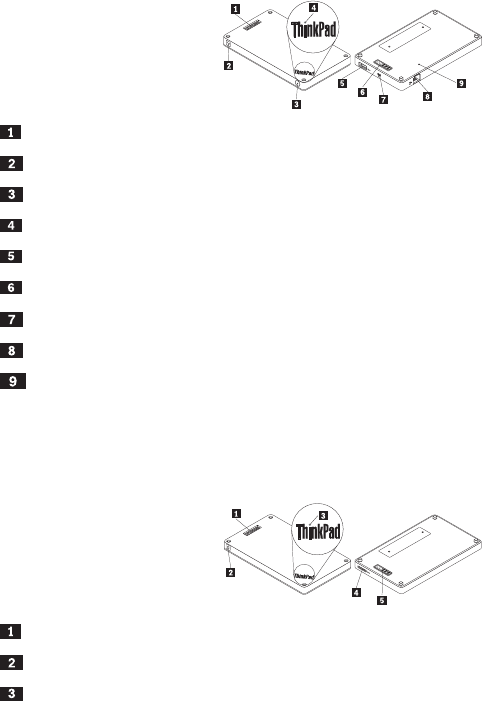
101
ThinkPad Stack Wireless Router
ポゴピン
ワイヤレス状況 LED
電源ボタン
ThinkPad ロゴ LED
USB 2.0 コネクター
ポゴ・パッド
マイクロ USB 2.0 コネクター (USB 充電専用)
イーサネット・コネクター
緊急用リセット・ホール
ThinkPad Stack 1TB USB3.0 Hard Drive
ポゴピン
活動 LED
ThinkPad ロゴ LED

102
マイクロ USB 3.0 コネクター
ポゴ・パッド
ThinkPad Stack 10000mAh Power Bank
ポゴピン
バッテリー・アイコン・インジケーター
バッテリー状況インジケーター
バッテリー状況ボタン
ThinkPad ロゴ・インジケーター
ポゴ・パッド
USB 2.0 コネクター
マイクロ USB 2.0 コネクター
キットの使用
スピーカーの使用
スピーカーを使用する前に、スピーカーを携帯電話、コンピューター、その他のデバイスとペアリ
ングします。スピーカーをペアリングするには、次のようにします。
103
1. スピーカーの電源が入っていることを確認してください。
2. 電源ボタンを約 3 秒間押したままにします。スピーカーのビープ音が 2 回鳴り、スピーカー
・アイコン・インジケーターが点滅し始めます。
3. ペアリングするデバイスで Bluetooth 機能を有効にして、「ThinkPad Stack Bluetooth
Speaker」とペアリングします。ペアリング処理が開始されます。
4. スピーカーのビープ音が再び 2 回鳴り、スピーカー・アイコン・インジケーターの点滅が止ま
ると、スピーカーは正常にペアリングするデバイスとペアリングされています。
スピーカーがデバイスとペアリングされると、使用できるようになります。次のような操作ができ
ます。
スピーカーの電源を入れる
電源ボタン中央の緑色の発光ダイオード (LED) およびスピーカー・アイコン・インジケーターが
点灯したままになるまで、電源ボタンを押します。
スピーカーの電源を切る
電源ボタンの LED およびスピーカー・アイコン・インジケーターが消灯するまで、電源ボタンを
押します。
切断して再ペアリングする
電源ボタンを押します。
スピーカーのボリュームを上げる
ボリュームを上げる (+) ボタンを押します。
スピーカーのボリュームを下げる
ボリュームを下げる (-) ボタンを押します。
着信のコールに応答する
再生/一時停止ボタンを押します。
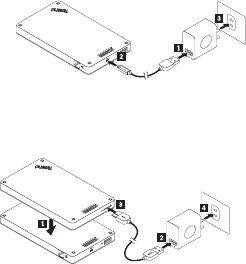
104
通話を終える
再生/一時停止ボタンを押します。
消音/消音解除
マイクロホンの消音ボタンを押します。
音楽再生の一時停止/再開
再生/一時停止ボタンを押します。
ルーターの使用
ルーターを電源に接続する
ルーターを電源に接続するには、3 つの方法があります。
ルーターを電源コンセントに接続します。
ルーターにハードディスク・ドライブを積み重ね、ハードディスク・ドライブを電源コンセン
トに接続します。
電源バンクに十分な電力がある場合は、ルーターを電源バンクに積み重ねます。
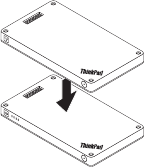
105
ルーターの電源を入れる
緑色の LED が点滅するまで、1 秒間電源ボタンを押します。
ルーターの電源を切る
LED が消灯するまで、電源ボタンを 2 秒間押し続けます。
ルーターをネットワークに接続する
ルーターをネットワークに接続するには、2 つの方法があります。
ルーターの電源を入れます。次に、ルーターの RJ-45 ネットワーク・ケーブルをイーサネッ
ト・コネクターに接続します。
ルーターの電源を入れます。次に、外付け 3G または 4G ネットワーク・カードをルーター
の USB 2.0 コネクターに接続します。
ネットワーク接続が確立されると、電源ボタン LED が点灯します。
ルーターをデフォルト設定にリセットする
1. ルーターの電源を入れます。
2. 緊急用リセット・ホールに針やまっすぐに伸ばしたクリップを挿入して、リセット・ボタンを
5 秒間押し続けます。
3. リセット・ボタンを放します。電源ボタン LED が点滅します。
4. 電源ボタン LED が点灯したままになるまで待ちます。ルーターが正常にデフォルト設定にリ
セットされます。
106
ハードディスク・ドライブの使用
直接アクセスでもリモート・アクセスでもハードディスク・ドライブを使用できます。
直接アクセス
USB 3.0 ケーブルの一端をハードディスク・ドライブのマイクロ USB 3.0 コネクターに接続し、
もう一端をコンピューターの使用可能な USB コネクターに接続します。最大データ転送速度を得
るには、USB 3.0 コネクターをお勧めします。
リモート・アクセス
1. ハードディスク・ドライブをルーターに積み重ね、ルーターの電源を入れます。
2. 携帯電話またはコンピューターに、ThinkPad Stack Assist アプリケーションをダウンロード
してインストールします。詳しくは、本書で後述する「ThinkPad Stack Assist」を参照してく
ださい。
アプリケーションを開き、画面の指示に従ってハードディスク・ドライブにアクセスします。
電源バンクの使用
電源バンクを使用する前にバッテリー状況を確認するには、バッテリー状況ボタンを押します。
電源バンクへのデバイスの積み重ね
電源バンクにデバイスを積み重ねる時は、デバイスのポゴピンと電源バンクのポゴ・パッドの位
置、またはデバイスのポゴ・パッドと電源バンクのポゴピンの位置が合っていることを確認してく
ださい。
スピーカーの充電
電源バンクにスピーカーを積み重ねると、電源バンクはスピーカーの充電を開始します。
ルーターへの電源供給
電源バンクにルーターを積み重ねてルーターの電源ボタンを押すと、ルーターの電源が入ります。
電源バンクはルーターへの電源供給を開始します。

107
携帯電話の充電
携帯電話を電源バンクの USB 2.0 コネクターに接続します。電源バンクは 2 台の携帯電話を同
時に充電できます。充電中の最大電流は 2.1 A です。
スタック・キットの使用
4 つのデバイスは、好きな順序や組み合わせで 1 つに積み重ねることができます。すべてを積み
重ねることも、一部を積み重ねることも、別々に使用することもできます。電源バンクを積み重ね
た場合は、そのほかの積み重ねられたデバイスに電源を供給できます。
スタック・キットを使用する場合のヒント:
ハードディスク・ドライブとルーターを積み重ねた場合、ルーターでハードディスク・ドライ
ブの電源をオンまたはオフにできます。ハードディスク・ドライブを使用しない場合は、その
ほかのデバイスと積み重ねないことをお勧めします。
ルーターには、内蔵バッテリーはありません。したがって、ルーターを使用する場合は、電源
108
バンクと積み重ねるかまたは電源アダプターを使用して、必ず電源が供給されるようにしてく
ださい。
スピーカーには内蔵バッテリーがあり、最長 6 時間の音楽再生をサポートします。バッテリー
の残量が少ないときは、スピーカーを電源バンクと積み重ねるか、またはスピーカーを電源コ
ンセントに接続します。
ハードディスク・ドライブを電源バンクのみと積み重ねた場合は、ワイヤレスにアクセスでき
ません。ハードディスク・ドライブにワイヤレスにアクセスするには、必ずルーターと積み重
ねてください。
ThinkPad Stack Assist
ThinkPad Stack Assist は、ThinkPad Stack シリーズ製品の補助アプリケーションです。ルーター
からアプリケーションの管理インターフェイスにログオンし、アプリケーションを使用して他の
ThinkPad Stack シリーズ製品を管理できます。
ハードウェア要件
ThinkPad Stack Wireless Router
アプリケーションをインストールするデバイス
オペレーティング・システム要件
Microsoft Windows 7、Microsoft Windows 8.1 以降
Android 4.2 以降
iOS 7.0 以降
ThinkPad Stack Assist のダウンロード
http://www.lenovo.com/stack にアクセスするか、または次の QR (クイック・レスポンス) コード
をスキャンします。
109
連絡先
ThinkPad Stack Assist に問題がある場合、accswsupport@lenovo.com に電子メールでご連絡ください
。
状況 LED
デバイスの状況 LED は、さまざまな点滅方法でデバイスの動作状況を示します。
スピーカーの状況 LED
LED の動作 動作状況
電源ボタン LED およびスピーカー・アイコン・インジケ
ーターが点灯
電源オン
電源ボタン LED およびスピーカー・アイコン・インジケ
ーターが消灯
電源オフ
スピーカー・アイコン・インジケーターが 1 秒間隔で 2
回点滅
ペアリング
スピーカー・アイコン・インジケーターが 5 回点滅 ペアリング完了
マイクロホンの消音ボタン LED が点灯 通話中は消音
マイクロホンの消音ボタン LED が消灯 通話中に消音しない
電源ボタン LED が黄色に変化 バッテリー低下 (25 % 未
満)

110
LED の動作 動作状況
電源ボタン LED が黄色に点滅 バッテリー低下 (10 % 未
満)
ThinkPad ロゴ LED が 5 回点滅 電源あり
ルーターの状況 LED
LED の動作 動作状況
電源ボタン LED が緑色に点滅し続ける 電源オン (初期化またはリセット中)
電源ボタン LED が緑色に点灯 電源オン (初期化完了、ワイヤレス接続
使用可能)
電源ボタン LED が消灯 電源オフ
ワイヤレス状況 LED が緑色に点灯 ワイヤレス接続が確立されている
ワイヤレス状況 LED が緑色に点滅し続ける データ転送中
ワイヤレス状況 LED が黄色に点滅し続ける 接続エラー (初期化またはネットワーク
接続失敗)
ワイヤレス状況 LED が
消灯
電源オフ、初期化中またはリセット中
ThinkPad ロゴ LED が 5 回点滅 電源あり

111
ハードディスク・ドライブの状況 LED
LED の動作 動作状況
活動 LED が緑色に点滅し続ける アクティブ (データ送受信中)
活動 LED が緑色に点灯 電源は入っているがアクティブではない
活動 LED が消灯 電源が入っていない
ThinkPad ロゴ LED が 5 回点滅 電源あり
電源バンクの状況 LED
バッテリー状況 LED バッテリー電源の残量
4 つのインジケーターが緑色に点灯している。 > 80 %
3 つのインジケーターが緑色に点灯している。 50% - 80%
2 つのインジケーターが緑色に点灯している。 20% - 50%
1 つのインジケーターのみが緑色に点灯している。 < 20 %
1 つのインジケーターのみが黄色に点灯している。 < 10 %
充電
スピーカーの充電
スピーカーには USB 充電ケーブルが付属しています。スピーカーを充電するには、以下のいずれ
かを実行します。
USB ケーブルの一端を、スピーカーのマイクロ USB コネクターに接続します。次に USB ケ
ーブルのもう一端をコンピューターの USB コネクターに接続します (図 A 参照)。
また、スピーカーを電源バンクと積み重ねて充電することもできます (図 B 参照)。

112
電源バンクの充電
電源バンクには USB 充電ケーブルが付属しています。USB ケーブルの一端を、電源バンクのマ
イクロ USB コネクターに接続します。次に USB ケーブルのもう一端を Lenovo 10W AC 電源
アダプターの USB コネクターまたはコンピューターの USB コネクターに接続します。電源バ
ンクが充電中のときは、バッテリー・アイコン・インジケーターが点灯したままで、バッテリー状
況インジケーターが点滅します。
注: ルーターおよびハードディスク・ドライブには、内蔵バッテリーがありません。したがって、
ルーターまたはハードディスク・ドライブを使用する場合は、電源バンクと積み重ねるかまたは電
源アダプターを使用して、必ず電源が供給されるようにしてください。

113
問題判別
問題: 電源ボタンを押してもスピーカーの電源が入りません。
解決策: スピーカーが十分に充電されていることを確認してください。
問題: 携帯電話またはコンピューターがスピーカーとの Bluetooth 接続を確立できませ
ん。
解決策: ペアリングの正しい手順に従って、ペアにするデバイスの Bluetooth 機能が使用
可能になっていることを確認してください。
問題: スピーカーが音楽を再生できません。
解決策: ペアリングが正常であることを確認してください。
問題: スピーカーで音楽を聞いている時に着信があります。通話が終わっても、スピーカ
ーが自動的に音楽の再生を再開しません。
解決策: 電話で音楽の再生を再開してください。
問題: 携帯電話が Bluetooth の検索機能でスピーカーを見つけられません。
解決策: スピーカーの電源が入っており、ペアリング・モードに入っていることを確認してく
ださい。
問題: スピーカーと携帯電話をペアリングすると、いつも切断されたりノイズが入ったりしま
す。
解決策:
スピーカーが十分に充電されていることを確認してください。
携帯電話とスピーカーの間に障壁物がないことを確認してください。
スピーカーがルーターと積み重ねられている場合は、携帯電話とスピーカーの間の距
離が 6 メートル (19.7 フィート) 以内であることを確認してください。
問題: スピーカーが Bluetooth 接続で携帯電話とペアリングされていますが、音楽を聴く
ことができません。
解決策:

114
Bluetooth 設定または携帯電話のプレイヤー設定で、電話オーディオおよびメディア
・オーディオの両方がペアリングされたスピーカーに切り替わっていることを確認し
てください。
一部の携帯電話には完全なステレオ Bluetooth モジュールがないため、Bluetooth デ
バイスを使用した音楽再生機能がありません。スピーカーが機能するかどうかを確認
するには、スピーカーを他の携帯電話に接続します。
問題: プレーヤーの機能の一部がスピーカーでは使用できません。
解決策: プレーヤーの一部の機能は、スピーカーではサポートされていません。携帯電話
で互換性のあるプレイヤーを使用していることを確認してください。
問題: ルーターがネットワークに接続できません。
解決策: ルーターの設定が間違っている可能性があります。ThinkPad Stack Assist アプリケー
ションを使用してルーターを再構成してください。
問題: ルーターを電源バンクに積み重ねた場合、ルーターの電源が入りません。
解決策:
1. 電源バンクが十分に充電されていることを確認してください。
問題が解決しない場合は、ルーターを電源コンセントに接続してください。
問題: ハードディスク・ドライブをスピーカーに直接積み重ねています。スピーカーで音楽
を再生すると、ハードディスク・ドライブの読み取り/書き込みパフォーマンスが低下しま
す。
解決策: スピーカーの振動が原因である可能性があります。スピーカーを取り外すか、また
はスピーカーをハードディスク・ドライブから隔てて積み重ねてください。
問題: USB 2.0 コネクターでの 2 台の携帯電話の充電や、ポゴピンまたはポゴ・パッド
での他の ThinkPad Stack シリーズ製品の充電を同時に行うと、電源バンクの充電速度が

115
遅くなります。
解決策: 携帯電話や他の ThinkPad Stack シリーズ製品を電源バンクから取り外してくださ
い。電力消費量が充電電流を上回ると、電源バンクの充電速度は遅くなります。
問題: 電源バンクをほかのデバイスと積み重ねた場合、電源バンクが充電されません。
解決策: USB 充電ケーブルが電源バンクのマイクロ USB コネクターにしっかりと接続さ
れていることを確認してください。
問題: 電源バンクが USB 2.0 コネクターで携帯電話を充電できません。
解決策: USB ケーブルを電源バンクから取り外して、3 秒間待ちます。USB ケーブルを
電源バンクに再接続します。

第 1 版 (2015 年 4 月)
© Copyright Lenovo 2015.
Lenovo、Lenovo ロゴ、ThinkPad、および ThinkPad ロゴは、Lenovo Corporation の米国およびその他の国に
おける商標です。
Microsoft および Windows は、Microsoft グループの商標です。他の会社名、製品名およびサービス名等はそれ
ぞれ各社の商標です。
制限付き権利に関する通知: データまたはソフトウェアが米国一般調達局 (GSA: General Services
Administration) 契約に準じて提供される場合、使用、複製、または開示は契約番号 GS-35F-05925 に規定され
た制限に従うものとします。

ThinkPadRegulatoryNotice
Aboutthisdocument
ThisdocumentprovidesregulatoryinformationaboutThinkPad®StackBluetooth
SpeakerandThinkPadStackWirelessRouter.
FederalCommunicationsCommissionDeclarationof
Conformity
ThinkPadStackBluetoothSpeaker-S123(FCCID:A5MS123)
ThinkPadStackWirelessRouter-R123(FCCID:A5MR123)
Note:TheThinkPadStackBluetoothSpeaker(Model:S123)andtheThinkPad
StackWirelessRouter(Model:R123)underwentcertificationprocessfortheFCC
Part15SubpartBcomplianceunderitsFCCIDnumber.
ThisequipmenthasbeentestedandfoundtocomplywiththelimitsforaClassB
digitaldevice,pursuanttoPart15oftheFCCRules.Theselimitsaredesigned
toprovidereasonableprotectionagainstharmfulinterferenceinaresidential
installation.Thisequipmentgenerates,uses,andcanradiateradiofrequency
energyand,ifnotinstalledandusedinaccordancewiththeinstructions,may
causeharmfulinterferencetoradiocommunications.However,thereisno
guaranteethatinterferencewillnotoccurinaparticularinstallation.Ifthis
equipmentdoescauseharmfulinterferencetoradioortelevisionreception,which
canbedeterminedbyturningtheequipmentoffandon,theuserisencouragedto
trytocorrecttheinterferencebyoneormoreofthefollowingmeasures:
•Reorientorrelocatethereceivingantenna.
•Increasetheseparationbetweentheequipmentandreceiver.
•Connecttheequipmentintoanoutletonacircuitdifferentfromthattowhich
thereceiverisconnected.
•Consultanauthorizeddealerorservicerepresentativeforhelp.
Lenovoisnotresponsibleforanyradioortelevisioninterferencecausedby
usingotherthanspecifiedorrecommendedcablesandconnectorsorby
unauthorizedchangesormodificationstothisequipment.Unauthorizedchanges
ormodificationscouldvoidtheuser'sauthoritytooperatetheequipment.
ThisdevicecomplieswithPart15oftheFCCRules.Operationissubjecttothe
followingtwoconditions:(1)thisdevicemaynotcauseharmfulinterference,
and(2)thisdevicemustacceptanyinterferencereceived,includinginterference
thatmaycauseundesiredoperation.
1

ResponsibleParty:
Lenovo(UnitedStates)Incorporated
1009ThinkPlace-BuildingOne
Morrisville,NC27560
PhoneNumber:919-294-5900
RFExposurecompliance
TheradiatedenergyfromtheThinkPadStackBluetoothSpeakerandtheThinkPad
StackWirelessRouterconformstotheFCClimitoftheSAR(SpecificAbsorption
Rate)requirementsetforthin47CFRPart2section1093.
RadioFrequencyinterferencerequirements
WhenyouusetheThinkPadStackWirelessRouterinthe802.11a/ac/n
transmissionmode:
•5GHzbandoperationislimitedto5150–5250MHzand5725–5850MHz.
•Highpowerradarsareallocatedasprimaryusersofthe5250to5350MHzand
5650to5850MHzbands.Theseradarstationscancauseinterferencewith
and/ordamagethisdevice.
Canada—IndustryCanada(IC)
ICNumber
ThinkPadStackBluetoothSpeaker-S123(ICID:5903G-S123)
ThinkPadStackWirelessRouter-R123(ICID:5903G-R123)
Lowpowerlicense-exemptradiocommunicationdevices(RSS-210)
Operationissubjecttothefollowingtwoconditions:
1.Thisdevicemaynotcauseinterference.
2.Thisdevicemustacceptanyinterference,includinginterferencethatmay
causeundesiredoperationofthedevice.
WhenyouusetheThinkPadStackWirelessRouterinthe802.11a/ac/n
transmissionmode:
•Thedevicesfortheband5150–5250MHzareonlyforindoorusagetoreduce
potentialforharmfulinterferencetoco-channelMobileSatellitesystems.
2

•Highpowerradarsareallocatedasprimaryusers(meaningtheyhavepriority)
of5250–5350MHzand5650–5850MHzandtheseradarscouldcause
interferenceand/ordamagetoLELAN(Licence-ExemptLocalAreaNetwork)
devices.
LorsquevousutilisezleThinkPadStackWirelessRouterenmodedetransmission
802.11a/ac/n:
•Toutappareildestinéàlabande5150-5250MHzdevraêtreexclusivement
utiliséenintérieurafinderéduirelesrisquesdeperturbations
électromagnétiquesgênantessurlessystèmesdesatellitemobiledansun
mêmecanal.
•Lesradarsàfortepuissancesontdésignéscommelesutilisateursprincipaux
(c'est-à-direqu'ilssontprioritaires)desbandes5250-5350MHzet5650-5850
MHz.Ilspeuventprovoquerdesperturbationsélectromagnétiquessurles
appareilsdetypeLELAN(réseaudecommunicationlocalsanslicence)ou
lesendommager.
ExposureofhumanstoRFfields(RSS-102)
ThedeviceemployslowgainintegralantennasthatdonotemitRFfieldinexcess
ofHealthCanadalimitsforthegeneralpopulation;consultSafetyCode6,
obtainablefromHealthCanada'sWebsiteathttp://www.hc-sc.gc.ca/.
Theradiatedenergyfromtheantennasconnectedtothewirelessadapters
conformstotheIClimitoftheRFexposurerequirementregardingICRSS-102,
Issue4.
Numérod'homologationIC
ThinkPadStackBluetoothSpeaker-S123(ICID:5903G-S123)
ThinkPadStackWirelessRouter-R123(ICID:5903G-R123)
Remarquerelativeauxappareilsdecommunicationradiodefaiblepuissance
sanslicence(CNR-210)
Lefonctionnementdecetyped'appareilestsoumisauxdeuxconditions
suivantes:
1.Cetappareilnedoitpasperturberlescommunicationsradio.
2.Cetappareildoitsupportertouteperturbation,ycomprislesperturbations
quipourraientprovoquersondysfonctionnement.
Expositiondesêtreshumainsauxchampsradioélectriques(RF)(CNR-102)
Cetéquipementutilisedesantennesintégralesàfaiblegainquin'émettentpasun
champélectromagnétiquesupérieurauxnormesimposéesparleMinistéredela
3

santécanadienpourlapopulation.ConsultezleSafetyCode6surlesiteWebdu
Ministéredelasantécanadienàl'adressehttp://www.hc-sc.gc.ca.
Cetappareilémiseparlesantennesreliéesauxadaptateurssansfilrespectela
limited'expositionauxradiofréquencestellequedéfinieparIndustrieCanada
dansladocumentCNR-102,version4.
EuropeanUnion-CompliancetotheElectromagnetic
CompatibilityDirective
ThisproductisinconformitywiththeprotectionrequirementsofEUCouncil
Directive2004/108/EContheapproximationofthelawsoftheMember
Statesrelatingtoelectromagneticcompatibility.Lenovocannotaccept
responsibilityforanyfailuretosatisfytheprotectionrequirementsresultingfrom
anon-recommendedmodificationoftheproduct,includingtheinstallationof
optioncardsfromothermanufacturers.Thisproducthasbeentestedandfound
tocomplywiththelimitsforClassBInformationTechnologyEquipmentaccording
toEuropeanStandardEN55022.ThelimitsforClassBequipmentwerederived
fortypicalresidentialenvironmentstoprovidereasonableprotectionagainst
interferencewithlicensedcommunicationdevices.
Lenovo,DigitalPark,Einsteinova21,85101Bratislava,Slovakia
GermanClassBcompliancestatement
HinweisfurGeratederKlasseBEU-RichtliniezurElektromagnetischen
Vertraglichkeit
DiesesProduktentsprichtdenSchutzanforderungenderEU-Richtlinie
2004/108/EG(fruher89/336/EWG)zurAngleichungderRechtsvorschriftenuber
dieelektromagnetischeVertraglichkeitindenEU-Mitgliedsstaatenundhaltdie
GrenzwertederEN55022KlasseBein.Umdiesessicherzustellen,sinddie
GeratewieindenHandbuchernbeschriebenzuinstallierenundzubetreiben.
DesWeiterendurfenauchnurvonderLenovoempfohleneKabelangeschlossen
werden.LenovoubernimmtkeineVerantwortungfurdieEinhaltungder
Schutzanforderungen,wenndasProduktohneZustimmungderLenovoverandert
bzw.wennErweiterungskomponentenvonFremdherstellernohneEmpfehlung
derLenovogesteckt/eingebautwerden.
Deutschland:
EinhaltungdesGesetzesüberdieelektromagnetischeVerträglichkeitvon
Betriebsmitteln
4

DiesesProduktentsprichtdem„Gesetzüberdieelektromagnetische
VerträglichkeitvonBetriebsmitteln“EMVG(früher„Gesetzüberdie
elektromagnetischeVerträglichkeitvonGeräten“).DiesistdieUmsetzung
derEU-Richtlinie2004/108/EG(früher89/336/EWG)inderBundesrepublik
Deutschland.
ZulassungsbescheinigunglautdemDeutschenGesetzuberdie
elektromagnetischeVertraglichkeitvonBetriebsmitteln,EMVGvom20.
Juli2007(fruherGesetzuberdieelektromagnetischeVertraglichkeitvon
Geraten),bzw.derEMVEGRichtlinie2004/108/EC(fruher89/336/EWG),fur
GeratederKlasseB.
DiesesGeratistberechtigt,inUbereinstimmungmitdemDeutschenEMVG
dasEG-Konformitatszeichen-CE-zufuhren.Verantwortlichfurdie
KonformitatserklarungnachParagraf5desEMVGistdieLenovo(Deutschland)
GmbH,Gropiusplatz10,D-70563Stuttgart.InformationeninHinsichtEMVG
Paragraf4Abs.(1)4:
DasGeräterfülltdieSchutzanforderungennachEN55024undEN55022
KlasseB.
English
Hereby,Lenovo(Singapore)Pte.Ltd.,declaresthatthewirelessequipmentlisted
inthissectionareincompliancewiththeessentialrequirementsandotherrelevant
provisionsofDirective1999/5/EC.
EUFrequencybandrestrictionforaThinkPadStackWirelessRouter
WhenyouusetheThinkPadStackWirelessRouterinthe802.11a/ac/n
transmissionmode:
•5GHzbandoperationislimitedto5150–5250MHz.
•Usageofthisdeviceislimitedtoindoorintheband5150to5250MHz
(channels36,40,44,48).
5

Bulgarian
СнастоящотоLenovo(Singapore)Pte.Ltd.декларира,чебезжичното
оборудване,споменатовтозираздел,съответстванаосновнитеизисквания
идругиприложимиразпоредбинаДиректива1999/5/EO.
ОграничениевЕСзачестотнилентизаThinkPadStackWirelessRouter
КогатоизползватеThinkPadStackWirelessRouterврежиманапреносна
данни802.11a/ac/n:
•Работатавлентовиядиапазонсчестота5GHzеограниченадо
5150–5250MHz.
•Употребатанатоваустройствоеограниченаназакритовлентовия
диапазонот5150до5250MHz(канали36,40,44,48).
Croatian
Ovime,Lenovo(Singapore)Pte.Ltd.,izjavljujedaopremazabežičnukomunikaciju
kojajenavedenauovomodjelu,sukladnajesanužnimzahtjevimaidrugim
ograničenjimaDirektive1995/5/EC.
OgraničenjefrekvencijskogpojasazaThinkPadStackWirelessRouteru
Europskojuniji
KadkoristiteThinkPadStackWirelessRouterunačinuzaprijenos802.11a/ac/n:
•funkcioniranjepojasafrekvencijeod5GHzograničenojenafrekvencijuu
rasponuod5150do5250MHz
•upotrebauređajaograničenajenazatvoreneprostoreunutarpojasaod5150
od5250MHz(kanali36,40,44,48)
Czech
TímtoLenovo(Singapore)Pte.Ltd.prohlašuje,žebezdrátovázařízeníuvedená
vtétočástidokumentusplňujízákladníidalšírelevantníustanovenísměrnice
1999/5/ES.
OmezeníEUprofrekvenčnípásmauproduktuThinkPadStackWireless
Router
PřipoužitízařízeníThinkPadStackWirelessRoutervpřenosovémrežimu802.11
a/ac/n:
•Provozvpásmu5GHzjeomezennafrekvence5150-5250MHz.
•Nafrekvenci5150až5250MHz(kanály36,40,44,48)lzetotozařízenípoužívat
pouzevevnitřníchprostorách.
6

Danish
Lenovo(Singapore)Pte.Ltd.erklærerhermed,atdettrådløseudstyr,derernævnt
idetteafsnit,overholderdevæsentligekravogandrerelevantebestemmelseri
EU-direktiv1999/5/EC.
RestriktionerforfrekvensbåndiEUforenThinkPadStackWirelessRouter
NårdubrugerThinkPadStackWirelessRouteri802.11
a/ac/n-transmissionstilstanden:
•5GHzbånddrifterbegrænsettil5150-5250MHz.
•Brugafdenneenhederbegrænsettilindendørsbrugifrekvensbåndet5150
til5250MHz(kanal36,40,44,48).
Dutch
HierbijverklaartLenovo(Singapore)Pte.Ltd.,datdedraadlozeapparatuurdie
inditgedeeltewordengenoemd,voldoenaandeessentiëlevereistenenandere
relevantebepalingenvanDirective1999/5/EC.
EU-beperkingvanfrequentiebandvooreenThinkPadStackWirelessRouter
WanneerudeThinkPadStackWirelessRoutergebruiktindetransmissiemodus
802.11a/ac/n,geldthetvolgende:
•Hetgebruikvande5GHzbandisbeperkttot5150-5250MHz.
•Hetgebruikvanditapparaatisbeperkttotgebruikbinnenshuisindebandvan
5150tot5250MHz(kanalen36,40,44en48).
Estonian
Lenovo(Singapore)Pte.Ltd.kinnitabsellesjaotisesnimetatudtraaditaside
seadmetevastavustdirektiivi1999/5/EÜpõhinõuetelejanimetatuddirektiivist
tulenevatelemuudeleasjakohastelesätetele.
SeadmeThinkPadStackWirelessRoutersagedusalapiirangudEL-is
Þegarþúnotar802.11a/ac/nsendingarstillingunaíThinkPadStackWireless
Router:
•5GHzsagedusalatööonpiiratudvahemikuga5150–5250MHz.
•Sedaseadetvõibkasutadasiseruumidessagedusvahemikus5150–5250MHz
(kanalid36,40,44,48).
7

Finnish
Lenovo(Singapore)Pte.Ltd.ilmoittaatäten,ettätässäjaksossamainittulangaton
laitteistoovatdirektiivin1999/5/EYpakollistenvaatimustenjadirektiivinmuiden
asiaankuuluvienmääräystenmukaiset.
ThinkPadStackWirelessRouter-reitittimentaajuusalueenrajoitusEU:n
alueella
KunkäytätThinkPadStackWirelessRouter-reititintä802.11a/ac/n-siirtotilassa:
•5GHz:ntaajuustoimintoonrajoitettu5150–5250MHz:iin.
•Tämälaiteontarkoitettukäytettäväksisisätiloissataajuusalueella5150–5
250MHz(kanavat36,40,44ja48).
French
Parlaprésente,Lenovo(Singapore)Pte.Ltd.déclarequelematérielsansfil
répertoriédanscettesectionestconformeauxexigencesessentiellesainsiqu'aux
autresdispositionsapplicablesdelaDirective1999/5/CE.
RestrictionliéeàlabandedefréquencepourunThinkPadStackWireless
Routerauseindel'Unioneuropéenne
LorsquevousutilisezleThinkPadStackWirelessRouterdanslemodede
transmission802.11a/ac/n:
•Labande5GHzestlimitéeàunefréquenceallantde5150à5250MHz.
•Cepériphériquedoitêtreutiliséexclusivementàl'intérieur,danslabandede
fréquencede5150à5250MHz(canaux36,40,44,48).
German
HiermiterklärtLenovo(Singapur)Pte.Ltd.,dassdiedrahtlosenGeräte,diein
diesemAbschnittaufgeführtsind,dieVoraussetzungenundandererelevanten
RichtlinienderDirektive1999/5/ECerfüllen.
EU-FrequenzbandeinschränkungfürThinkPadStackWirelessRouter
BeiVerwendungdesThinkPadStackWirelessRouterimÜbertragungsmodus
802.11a/ac/n:
•Der5GHz-Bandbetriebistauf5150bis5250MHzbegrenzt.
•DieVerwendungdieserEinheitistaufdenInnenbereichunddasFrequenzband
von5150bis5250MHz(Kanäle36,40,44,48)beschränkt.
8

Greek
Μετηνπαρούσα,ηLenovo(Singapore)Pte.Ltd.δηλώνειότιοασύρματος
εξοπλισμόςπουαναφέρεταισεαυτήντηνενότητασυμμορφώνεταιμετις
ουσιώδειςαπαιτήσειςκαιτιςλοιπέςσχετικέςδιατάξειςτηςΟδηγίας1999/5/ΕΚ.
ΠεριορισμόςεύρουςσυχνοτήτωνστηνΕΕγιαένανδρομολογητήThinkPad
StackWirelessRouter
ΚατάτηχρήσητουδρομολογητήThinkPadStackWirelessRouterστηλειτουργία
αναμετάδοσης802.11a/ac/n:
•Ηλειτουργίαστηζώνητων5GHzπεριορίζεταιστα5150-5250MHz.
•Ηχρήσηαυτήςτηςσυσκευήςπεριορίζεταισεεσωτερικούςχώρουςστοεύρος
συχνοτήτων5150έως5250MHz(κανάλια36,40,44,48).
Hungarian
ALenovo(Singapore)Pte.Ltd.ezennelkijelenti,hogyafejezetbenemlítettvezeték
nélküliberendezésmegfelelaz1999/5/EKdirektívaalapvetőkövetelményeinekés
egyébvonatkozóelőírásainak.
FrekvenciatartományravonatkozóeurópaiunióskorlátozásaThinkPad
StackWirelessRoutereszközhöz
AThinkPadStackWirelessRouter802.11a/ac/nátvitelimódbanvaló
használatakor:
•Az5GHz-essávbanvalóműködés5150–5250MHz-rekorlátozódik.
•Azeszközhasználatabeltérrekorlátozódikaz5150–5250MHztartományban
(csatornák:36,40,44,48).
Icelandic
HérmeðlýsirLenovo(Singapore)Pte.Ltdþvíyfiraðþráðlausibúnaðurinnsem
getiðerumíþessumhlutauppfyllirallarkröfurogönnurviðkomandiákvæði
tilskipunar1999/5/EC.
TakmarkanirESBátíðnisviðifyrirThinkPadStackWirelessRouter
Þegarþúnotar802.11a/ac/nsendingarstillingunaíThinkPadStackWireless
Router:
•5GHztíðnisviðiðtakmarkastvið5150-5250MHz.
•Notkunþessatækisertakmörkuðviðinnanhússnotkunátíðnisviðinu5150til
5250MHz(rásir36,40,44,48).
9

Italian
Conlapresente,Lenovo(Singapore)Pte.Ltd.,dichiarachel'equipaggiamento
wirelesselencatoinquestasezioneèconformeairequisitiessenzialieadaltre
disposizionirilevantidelladirettiva1999/5/EC.
RestrizioniUEsullabandadifrequenzaperThinkPadStackWirelessRouter
QuandosiutilizzaThinkPadStackWirelessRouterconmodalitàditrasmissione
802.11a/ac/n:
•Ilfunzionamentodibandada5GHzsilimitaa5150-5250MHz.
•L'utilizzodiquestodispositivoèlimitatoadambientichiusiinbandacompresa
tra5150e5250MHz(canali36,40,44,48).
Latvian
AršoLenovo(Singapore)Pte.Ltd.paziņo,kašajāsadaļānorādītābezvaduiekārta
atbilstDirektīvas1999/5/EKpamatprasībāmuncitiemsaistītajiemnoteikumiem.
EUfrekvenčujosluierobežojumspiederumamThinkPadStackWireless
Router
JaThinkPadStackWirelessRouterlietojat802.11a/ac/nsūtīšanasrežīmā:
•5GHzjoslasdarbībatiekierobežota5150-5250MHzdiapazonā;
•šīsierīceslietošanatiekatļautatikaiiekštelpāsjoslāno5150līdz5250MHz
(kanālos36,40,44,48).
Lithuanian
Šiuo„Lenovo(Singapore)Pte.Ltd.“pareiškia,kadšiameskyriujenurodytas
belaidėįrangaatitinkaDirektyvos1999/5/EBpagrindiniusreikalavimusirkitas
susijusiasnuostatas.
„ThinkPadStackWirelessRouter“taikomasESdažniųjuostosapribojimas
Kainaudojate„ThinkPadStackWirelessRouter“802.11a/ac/nperdavimorežimu:
•Naudojimas5GHzdažniudiapazonuapribotasiki5150–5250MHz.
•Šįįrenginįpatalposegalimanaudoti5150–5250MHzdažniųdiapazonu
(kanalai:36,40,44,48).
10

Norwegian
Lenovo(Singapore)Pte.Ltd.erklærerhervedatdettrådløseutstyreteri
samsvarmeddeviktigstekraveneogandrerelevantebestemmelseriEU-direktiv
1999/5/EØF.
EU-begrensningerforfrekvensbåndforenThinkPadStackWirelessRouter
NårdubrukerThinkPadStackWirelessRouteri802.11a/ac/n-overføringsmodus,
gjelderfølgende:
•5GHz-båndbrukenerbegrensettil5150–5250MHz.
•Enhetenerbegrensettilinnendørsbrukforbåndetfra5150til5250MHz
(kanalene36,40,44,48).
Polish
NiniejszymfirmaLenovo(Singapore)Pte.Ltd.deklaruje,żewymienionywtej
sekcjisprzętbezprzewodowyjestzgodnyzzasadniczymiwymaganiamiiinnymi
odpowiednimipostanowieniamiDyrektywy1999/5/WE.
OgraniczeniepasmaczęstotliwościwUniiEuropejskiejdotycząceroutera
ThinkPadStackWirelessRouter
GdyThinkPadStackWirelessRouterjestużywanywtrybachtransmisji802.11
a/ac/n:
•działaniepasma5GHzjestograniczonedo5150–5250MHz,
•użytkowanietegourządzeniajestograniczonedownętrzabudynkówipasm
częstotliwościod5150do5250MHz(kanały36,40,44,48).
Portuguese
Pelopresente,Lenovo(Singapore)Pte.Ltd.,declaraqueoequipamentosemfios
listadonestasecçãoestáemconformidadecomosrequisitosessenciaiseoutras
provisõesrelevantesdaDirectiva1999/5/EC.
RestriçãodabandadefrequênciasdaUEaplicávelaumThinkPadStack
WirelessRouter
QuantoutilizaroThinkPadStackWirelessRouternomododetransmissão802.11
a/ac/n:
•Funcionamentonabandade5GHzlimitadoa5150-5250MHz.
•Autilizaçãodestedispositivoestálimitadaàutilizaçãonointerior,nabanda
5150a5250MHz(canais36,40,44,48).
11

Romanian
Prinaceasta,Lenovo(Singapore)Pte.Ltd.,declarăcăechipamentulfărăfirlistat
înaceastăsecţiunerespectăcerinţeleesenţialeşialteprevederirelevanteale
Directivei1999/5/CE.
RestricţiaUEprivindbandadefrecvenţăaunuirouterThinkPadStack
WirelessRouter
CândutilizaţiThinkPadStackWirelessRouterînmoduldetransmisie802.11
a/ac/n:
•Utilizareabenziipe5GHzestelimitatăla5150–5250MHz.
•Utilizareaacestuidispozitivestelimitatălaspaţiileinterioare,înbanda5150–
5250MHz(canalele36,40,44,48).
Slovakian
SpoločnosťLenovo(Singapore)Pte.Ltd.týmtovyhlasuje,žebezdrôtové
zariadenieuvedenévtejtočastijevsúladesozákladnýmipožiadavkamiaďalšími
relevantnýmiustanoveniamismernice1999/5/ES.
ObmedzeniefrekvenčnéhopásmaEÚpresmerovačThinkPadStackWireless
Router
AksmerovačThinkPadStackWirelessRouterpoužívatevprenosovomrežime
802.11a/ac/n:
•Prevádzkavpásme5GHzjeobmedzenána5150–5250MHz.
•Používanietohtozariadeniajeobmedzenénainteriérvpásme5150až5250
MHz(kanály36,40,44,48).
Slovenian
StempodjetjeLenovo(Singapur)Pte.Ltd.izjavlja,dajebrezžičnaoprema,
navedenavtemrazdelku,skladnazosnovnimizahtevamiindrugimistem
povezanimipredpisiDirektive1999/5/ES.
OmejitveEvropskeunijegledefrekvenčnegapasuzausmerjevalnikThinkPad
StackWirelessRouter
ČeusmerjevalnikThinkPadStackWirelessRouteruporabljatevnačinuprenosa
802.11a/ac/n:
•Uporabav5-GHzpasujeomejenanafrekvenceod5150do5250MHz.
•Napravajeomejenananotranjouporabovpasuod5150do5250MHz(kanali
36,40,44in48).
12

Spanish
Enestedocumento,Lenovo(Singapore)Pte.Ltd.,declaraqueelequipo
inalámbricoqueapareceenestaseccióncumplelosrequisitosesencialesyotras
exigenciasrelevantesdelaDirectiva1999/5/EC.
RestriccióndebandadefrecuenciadelaUEparaThinkPadStackWireless
Router
AlusarelThinkPadStackWirelessRouterenelmododetransmisión802.11
a/ac/n:
•Elfuncionamientode5GHzdebandaestálimitadoa5.150-5.250MHz.
•Lautilizacióndeestedispositivoestálimitadaainterioresenlabandade5.150
a5.250MHz(canales36,40,44,48).
Swedish
HärmedtillkännagerLenovo(Singapore)Pte.Ltd.attdentrådlösautrustningen
somangesidettaavsnittuppfyllerdeväsentligakravenochandrarelevanta
bestämmelseridirektivet1999/5/EC.
FrekvensområdesbegränsninginomEUförThinkPadStackWirelessRouter
NärduanvänderThinkPadStackWirelessRouteri802.11a/ac/n-sändningsläge:
•5GHzbandanvändningärbegränsadtill5150–5250MHz.
•Enhetenfårbaraanvändasinomhusifrekvensområdet5150–5250MHz
(kanal36,40,44och48).
Formodel:
NoticeforusersinJapan
Trademarks
Lenovo,theLenovologo,andThinkPadaretrademarksofLenovointheUnited
States,othercountries,orboth.
Othercompany,product,orservicenamesmaybetrademarksorservicemarks
ofothers.
13

FirstEdition(April2015)
©CopyrightLenovo2015.
LIMITEDANDRESTRICTEDRIGHTSNOTICE:Ifdataorsoftwareisdelivered
pursuantaGeneralServicesAdministration“GSA”contract,use,reproduction,or
disclosureissubjecttorestrictionssetforthinContractNo.GS-35F-05925.