Lexmark C925 Quick Reference Guide
2014-07-06
: Lexmark Lexmark-Lexmark-C925-Quick-Reference-Guide lexmark-lexmark-c925-quick-reference-guide lexmark pdf
Open the PDF directly: View PDF ![]() .
.
Page Count: 9
Quick Reference
Loading paper and
specialty media
Setting the paper size and type
The Paper Size setting is automatically sensed according to the
position of the paper guides in each tray except in the standard
150-sheet tray (Tray 1) and in the multipurpose feeder. The Paper Size
setting for Tray 1 is set manually via the wheel on the tray, while the
Paper Size setting for the multipurpose feeder is set in the Paper Size
menu.
From the home screen, navigate to:
> Paper Menu > Paper Size/Type > select a tray > select the
paper size or type >
Only Tray 1 has Plain Paper as the factory default Paper Type setting.
Custom 2, 3, 4, 5, and 6 are the default settings for the other trays.
Loading the standard or optional
550-sheet tray
The printer has standard150- (Tray 1) and 250-sheet trays (Tray 2), and
it may have one or more optional 550-sheet trays. All 550-sheet trays
support the same paper sizes and types. The only sizes that are
supported for both long-edge and short-edge feeding are Letter and
A4. Anything longer than A4 should be fed with the short edge of the
page entering the printer first, anything shorter should be fed with
the long edge of the page entering the printer first.
Any unusual sized sheets or heavy weight media should be loaded
into the multipurpose feeder, which can support up to 50 sheets.
CAUTION—TIPPING HAZARD: To reduce the risk of
equipment instability, load each paper drawer or tray
separately. Keep all other drawers or trays closed until needed.
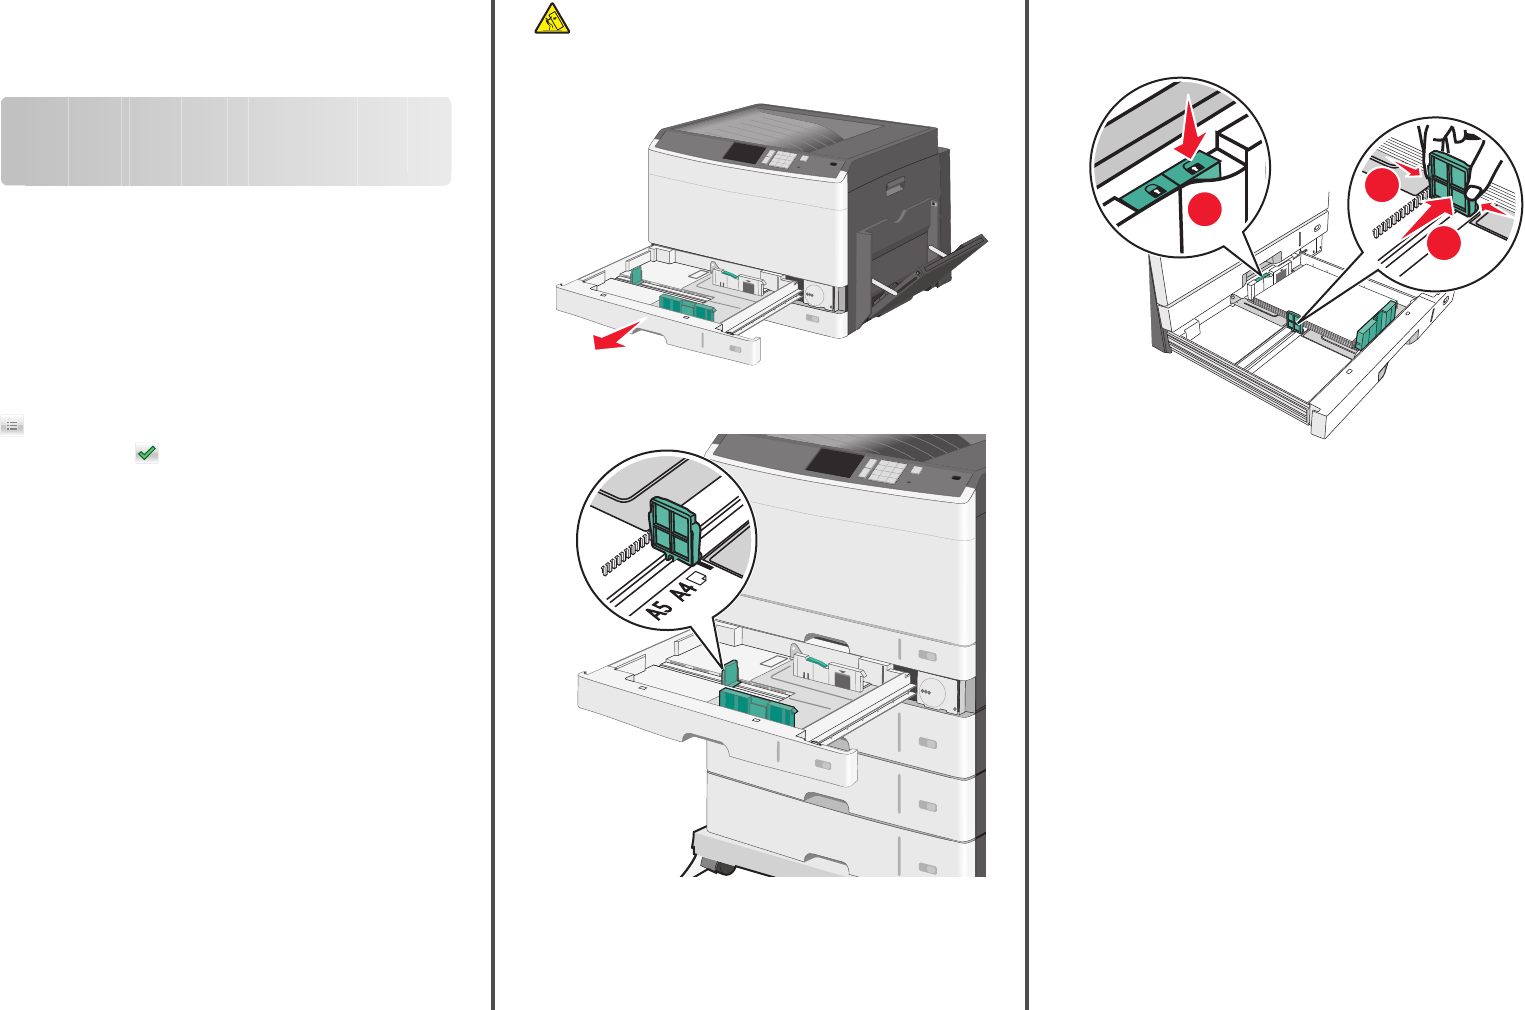
1Pull the tray out.
Notice the size indicators at the bottom of the tray. Use these
indicators to help position the guides.
2Make sure to unlock the width guide lock at the rear of the tray.
Squeeze the width guide tabs as shown, and then slide the guide
to the correct position for the paper size being loaded.
2
3
1
Note: Always use the paper width guide lock at the rear of the
tray to prevent the margins from being knocked out of
adjustment.
1
3Squeeze the length guide tabs together, and then slide the length
guide to the correct position for the paper size being loaded.
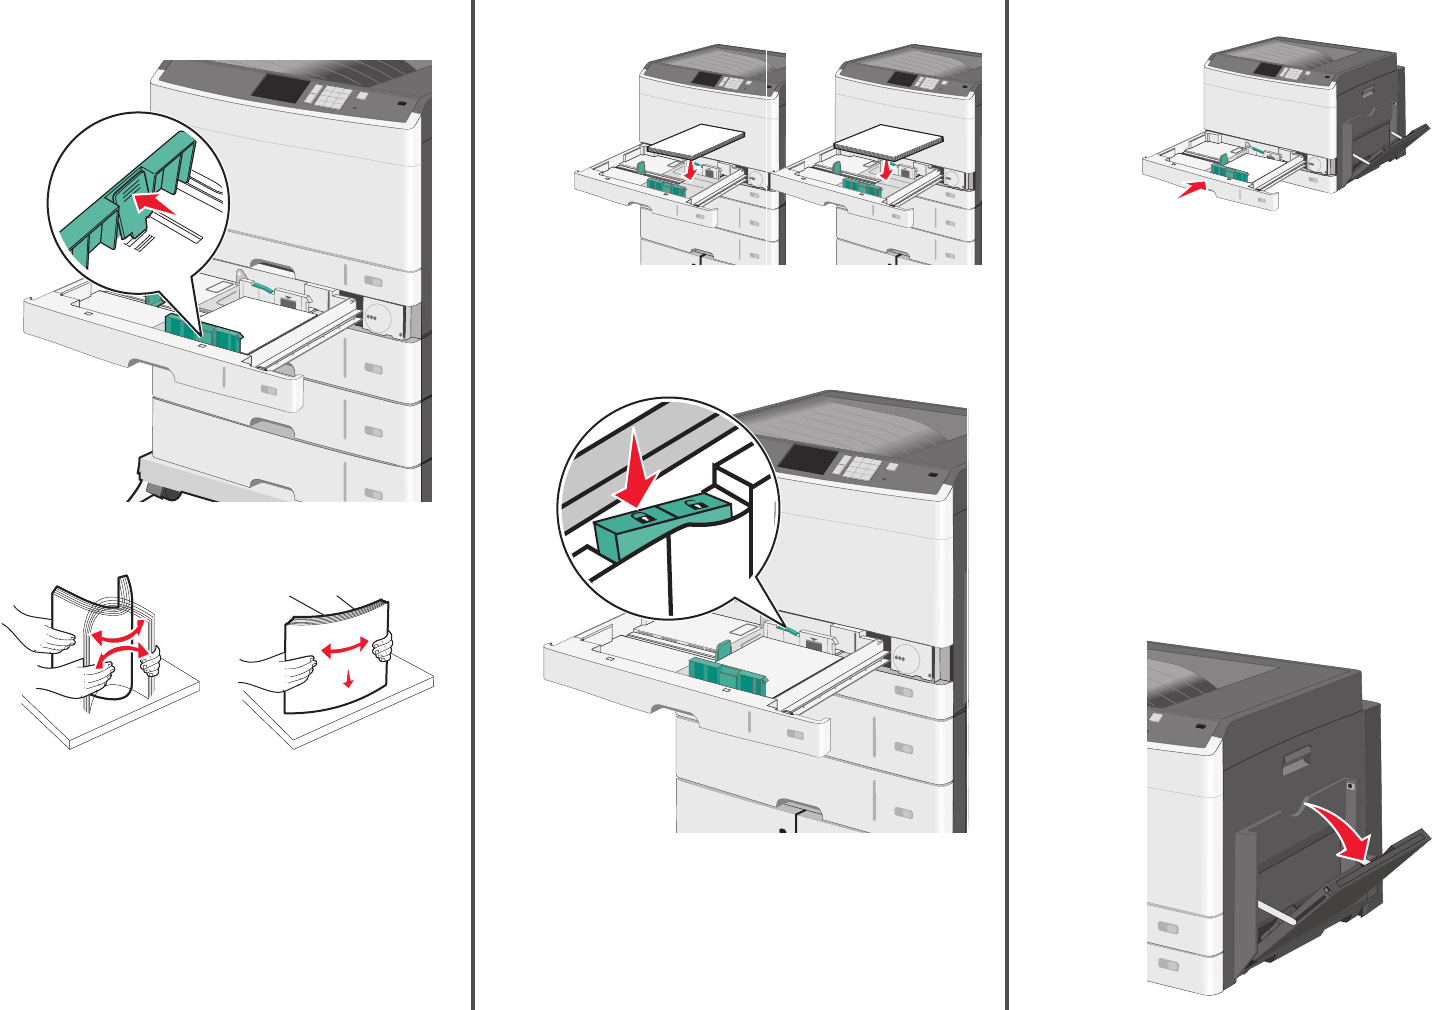
4Flex the sheets back and forth to loosen them. Do not fold or
crease the paper. Straighten the edges on a level surface.
5Load the paper stack with the recommended print side faceup.
Load the paper in either the long-edge or short-edge orientation
as described at the beginning of this section.
Notes:
•Load sizes larger than A4 in the short-edge orientation.
•Make sure the paper is below the maximum fill line located
on the edge of the paper tray. Overloading the tray can cause
paper jams and possible printer damage.
Long-edge orientation Short-edge orientation
6Adjust both the width and length guides to lightly touch the edge
of the paper stack. Make sure the paper fits loosely in the tray, lies
flat, and is not bent or wrinkled.
7Lock the width guide.
8Insert the tray.
9From the printer control panel, set the Paper Size and Paper Type
for the tray based on the paper you loaded.
Loading the multipurpose feeder
The multipurpose feeder can hold several sizes and types of print
media, such as transparencies, labels, card stock, and envelopes. It
can be used for single-page or manual printing, or as an additional
tray.
The multipurpose feeder can hold approximately:
•50 sheets of 75-g/m2 (20-lb) paper
•10 envelopes
•20 transparencies
Note: Do not add or remove paper or specialty media when the
printer is printing from the multipurpose feeder or when the printer
control panel indicator light is blinking. Doing so may cause a jam.
1Pull down the multipurpose feeder door.
2
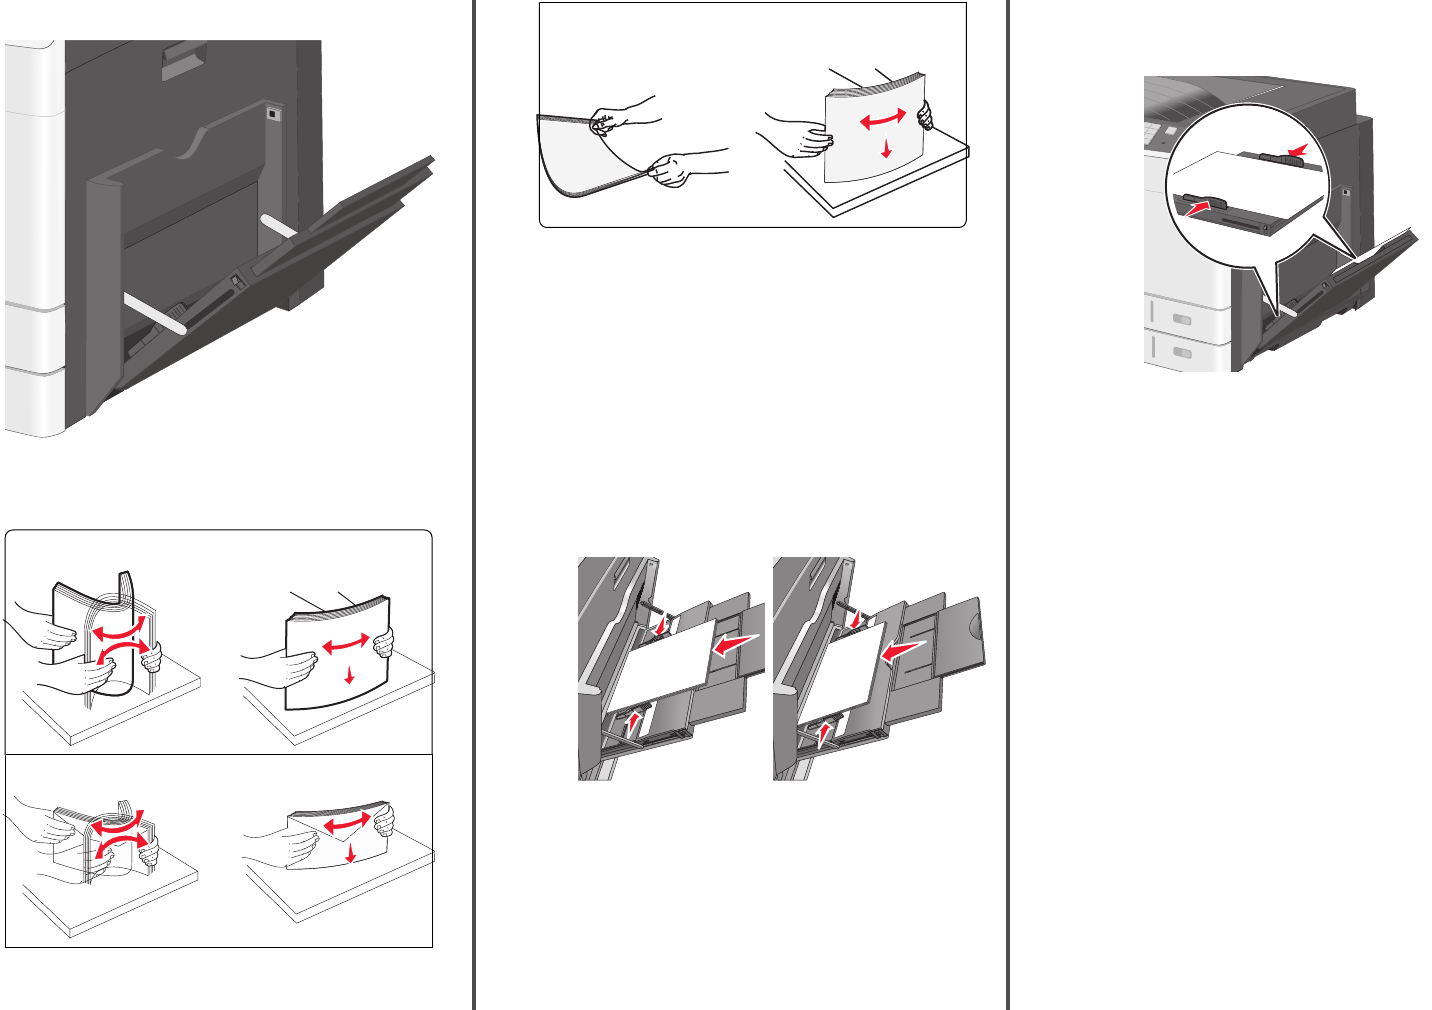
2Gently pull the extension until it is fully extended.
3Flex the sheets of paper or specialty media back and forth to
loosen them. Do not fold or crease them. Straighten the edges on
a level surface.
Paper
Envelopes
Transparencies
Note: Avoid scratching or touching the print side.
4Load the paper or specialty media. Slide the stack gently into the
multipurpose feeder until it comes to a stop.
Notes:
•Load A3-, A6-, 11x17, JIS B4-, Statement- and legal-size media
in short-edge orientation.
•Load A4-, A5-, Exec-, JIS B5- and letter-size media in long-edge
orientation.
•Load envelopes flap side up in short-edge orientation.
•Do not exceed the maximum amount of media that the
multipurpose feeder can hold.
•Load only one size and type of paper at a time.
Long-edge orientation Short-edge orientation
Warning—Potential Damage: Never use envelopes with
stamps, clasps, snaps, windows, coated linings, or self-stick
adhesives. These envelopes may severely damage the printer.
5Adjust the width guide to lightly touch the edge of the stack. Make
sure the paper or specialty media fits loosely in the multipurpose
feeder, lies flat, and is not bent or wrinkled.
6From the printer control panel, set the Paper Size and Paper Type
for the multipurpose feeder (MP Feeder Size and MP Feeder Type)
based on the paper or specialty media loaded.
Linking and unlinking trays
Linking trays
Tray linking is useful for large print jobs or for printing multiple copies.
When one linked tray is empty, paper feeds from the next linked tray.
When the Paper Size and Paper Type settings are the same for any
trays, the trays are automatically linked. The Paper Size setting is
automatically sensed according to the position of the paper guides
in each tray except Tray 1 and the multipurpose feeder. The Paper
Size setting for the multipurpose feeder must be set manually from
the Paper Size menu. The Paper Type setting must be set for all trays
from the Paper Type menu. The Paper Type menu and the Paper Size
menu are both available from the Paper Size/Type menu.
Unlinking trays
Note: Trays that do not have the same settings as any other tray are
not linked.
Change one of the following tray settings:
•Paper Type
Paper Type names describe the paper characteristics. If the name
that best describes your paper is used by linked trays, assign a
3
different Paper Type name to the tray, such as Custom Type [x],
or define your own custom name.
•Paper Size
Load a different paper size to automatically change the Paper Size
setting for a tray. Paper Size settings for the multipurpose feeder
are not automatic; they must be set manually from the Paper Size
menu.
Warning—Potential Damage: Do not assign a Paper Type name that
does not accurately describe the type of paper loaded in a tray. The
temperature of the fuser varies according to the specified Paper Type.
Prints may not be properly processed if an inaccurate Paper Type is
selected.
Creating a custom name for a paper
type
If the printer is on a network, you can use the Embedded Web Server
to define a name other than Custom Type [x] for each of the custom
paper types loaded into the printer.
1Type the printer IP address into the address field of your Web
browser.
Note: If you do not know the IP address of the printer, then you
can:
•View the IP address on the printer control panel in the TCP/IP
section under the Networks/Ports menu.
•Print a network setup page or the menu settings pages and
locate the IP address in the TCP/IP section.
2Click Settings > Paper Menu > Custom Name > type a name >
Submit.
Note: This custom name will replace the Custom Type [x] name
under the Custom Types and Paper Size and Type menus.
3Click Custom Types > select a paper type > Submit.
Assigning a custom paper type name
1From the home screen, navigate to:
> Paper Menu > Paper Size/Type
2Select the tray number or MP Feeder Type.
3Touch the left or right arrow until Custom Type [x] or another
custom name appears.
4Touch .
Clearing jams
By carefully selecting paper and specialty media and loading it
properly, you should be able to avoid most jams. For more
information, see “Avoiding jams” on page 4. If jams do occur, follow
the steps outlined in this chapter.
To resolve the jam messages, you must clear the entire paper path,
and touch Continue to clear the message and resume printing. The
printer prints a new copy of the jammed pages if Jam Recovery is set
to On or Auto; however, the Auto setting does not guarantee the page
will print.
Note: Jam recovery is set to Auto by default. The printer reprints
jammed pages unless the memory required to hold the pages is
needed for other printer tasks.
Avoiding jams
Paper tray recommendations
•Make sure the paper lies flat in the tray.
•Do not remove a tray while the printer is printing.
•Do not load a tray while the printer is printing. Load it prior to
printing, or wait for a prompt to load it.
•Do not load too much paper. Make sure the stack height does not
exceed the indicated maximum height.
•Make sure the guides in the tray or the multipurpose feeder are
properly positioned and are not pressing too tightly against the
paper or envelopes.
•Push the tray in firmly after loading paper.
Paper recommendations
•Use only recommended paper or specialty media.
•Do not load wrinkled, creased, damp, bent, or curled paper.
•Flex and straighten paper before loading it.
•Do not use paper that has been cut or trimmed by hand.
•Do not mix paper sizes, weights, or types in the same stack.
•Make sure all sizes and types are set correctly in the printer control
panel menus.
•Store paper per manufacturer recommendations.
Understanding jam numbers and
locations
When a jam occurs, a message indicating the jam location appears
on the display. Open doors and covers and remove trays to access
jam locations. To resolve any paper jam message, you must clear all
jammed paper from the paper path.
1
2
3
4
Area Jam numbers What to do
1200 Open the side cover, and then remove any
jams.
201 Open the side cover, and then remove any
jams.
203 Open the side cover, and then remove any
jams.
2230 1Open the side cover.
2Lower the duplex unit, and then remove
any jams.
231-239 1Open the side cover.
2Lower the duplex unit, and then remove
any jams.
324x 1Open the side cover, and then remove
any jams.
2Open each tray, and then remove any
jams.
4
Area Jam numbers What to do
4250 1Remove all media from the multipurpose
feeder.
2Flex and stack the media.
3Reload paper or media in the
multipurpose feeder.
4Adjust the paper guides.
5Touch Continue, jam cleared.
200 paper jam
1Open the side door.
CAUTION—HOT SURFACE: The inside of the printer
might be hot. To reduce the risk of injury from a hot
component, allow the surface to cool before touching.
2Pull the jammed paper up and out to remove it from the paper
path.
Notes:
•Make sure all paper fragments are removed.
•If the page is in the fuser, the fuser nip release lever should
be lowered and should be switched to envelope mode.
•After removing the jammed page, return the lever to the
proper position.
3Close the side door.
4Touch Continue, jam cleared.
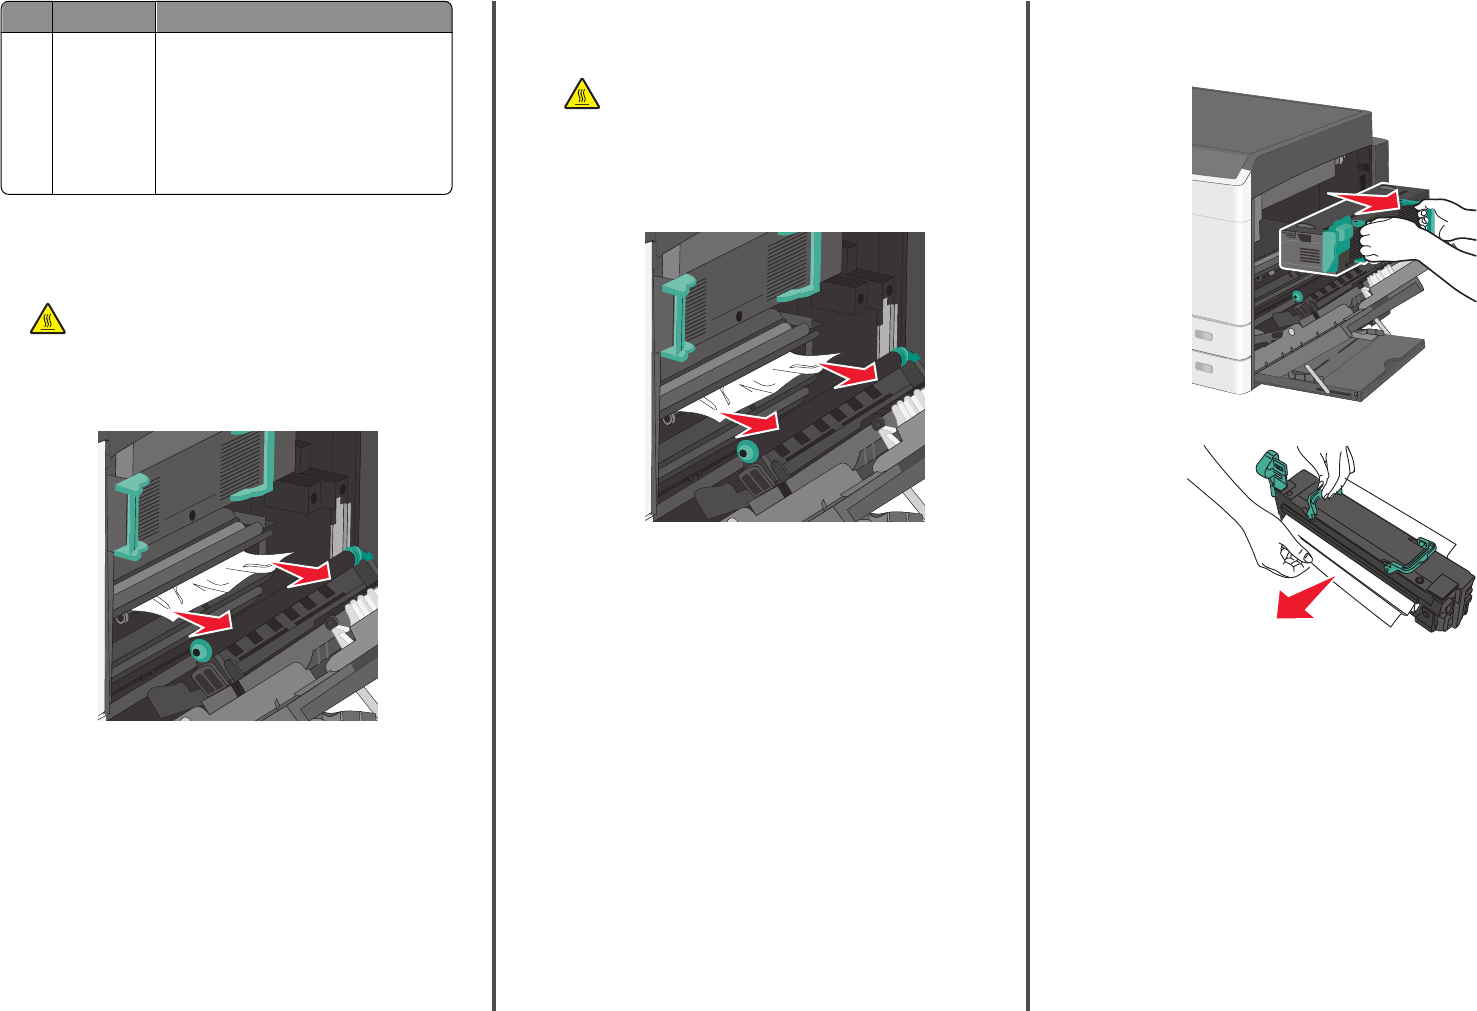
201 paper jam
1Open the side door.
CAUTION—HOT SURFACE: The inside of the printer
might be hot. To reduce the risk of injury from a hot
component, allow the surface to cool before touching.
2Determine where the jam is located, and then remove it:
aIf the paper is visible under the fuser, then grasp it on each
side and pull it out.
bIf the paper is not visible, then you will need to remove the
fuser unit.
Warning—Potential Damage: Do not touch the center of
the fuser unit. Doing so will damage the fuser.
1Lift the handles on each side of the fuser, and then pull to
remove the fuser unit.
2Remove the jammed paper.
Notes:
•Make sure all paper fragments are removed.
•Pull the jammed paper downwards.
•If the paper is in the fuser, then the fuser nip release
lever should be lowered and should be switched to
envelope mode.
•After removing the jammed paper, return the lever to
the proper position.
5
3Align the fuser unit using the handles on each side, and
then place it back into the printer.
3Close the side door.
4Touch Continue, jam cleared.
203 paper jam
1Grasp any jammed paper visible in the standard exit bin, and then
gently pull it out.
Notes:
•Make sure all paper fragments are removed.
•If the page is in the fuser, then the fuser nip release lever
should be lowered and should be switched to envelope
mode.
•After removing the jammed page, return the lever to the
proper position.
2Touch Continue, jam cleared.
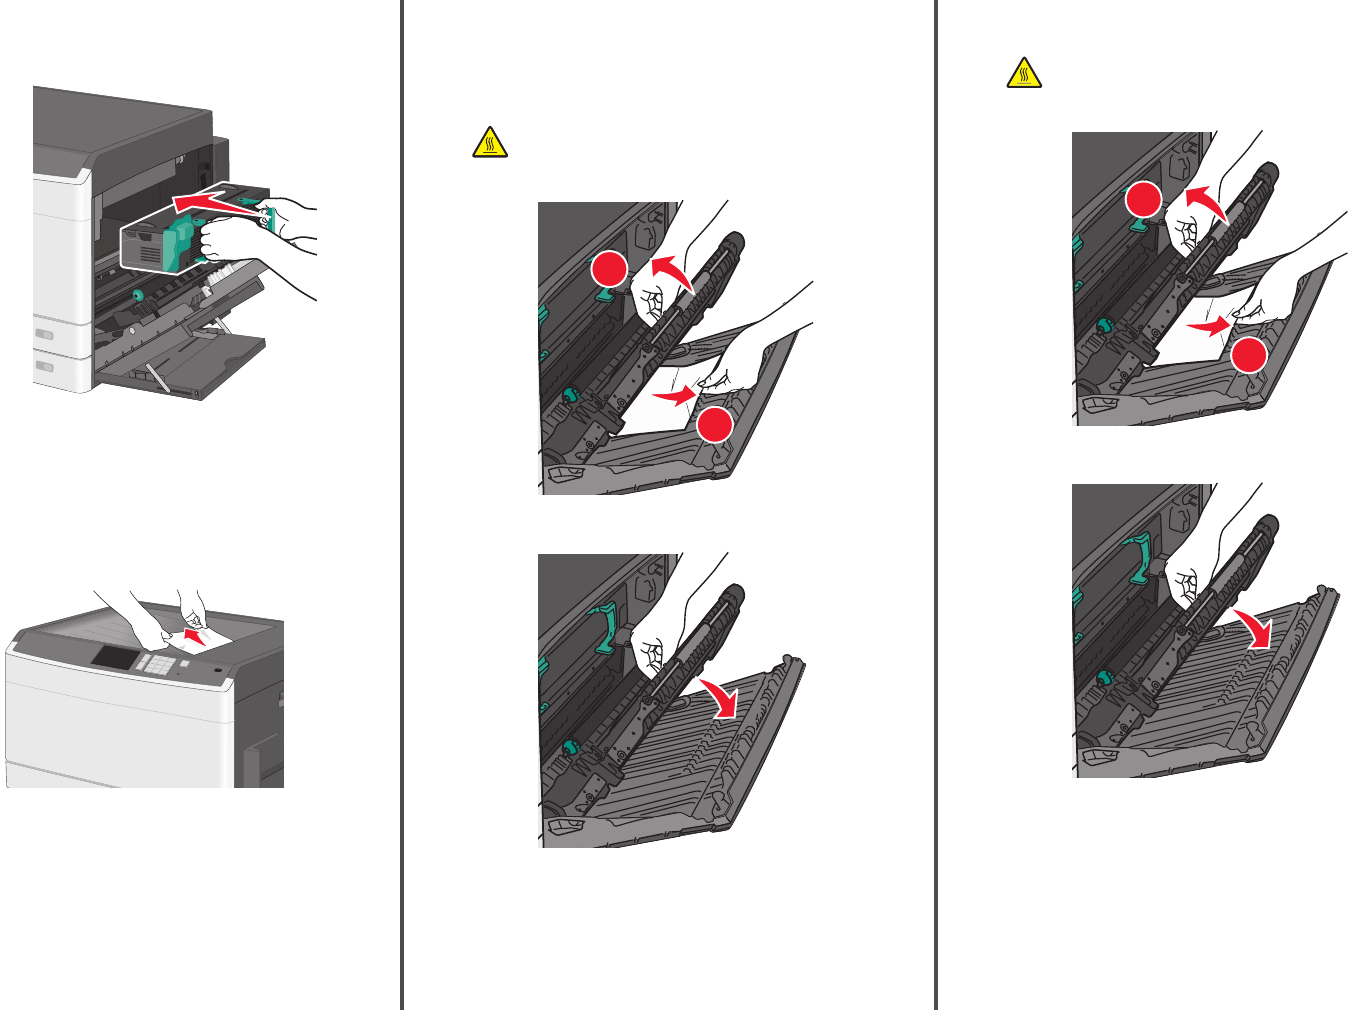
230 paper jam
1Open the side door.
2Hold onto the handles of the duplexing unit, open the cover, and
then remove any jammed paper.
CAUTION—HOT SURFACE: The inside of the printer
might be hot. To reduce the risk of injury from a hot
component, allow the surface to cool before touching.
1
2
3Close the cover on the duplexing unit.
4Close the side door.
5Touch Continue, jam cleared.
231–239 paper jams
1Open the side door.
2Hold onto the handles of the duplexing unit, open the cover, and
then remove any jammed paper.
CAUTION—HOT SURFACE: The inside of the printer
might be hot. To reduce the risk of injury from a hot
component, allow the surface to cool before touching.
1
2
3Close the cover of the duplexing unit.
4Close the side door.
5Touch Continue, jam cleared.
6
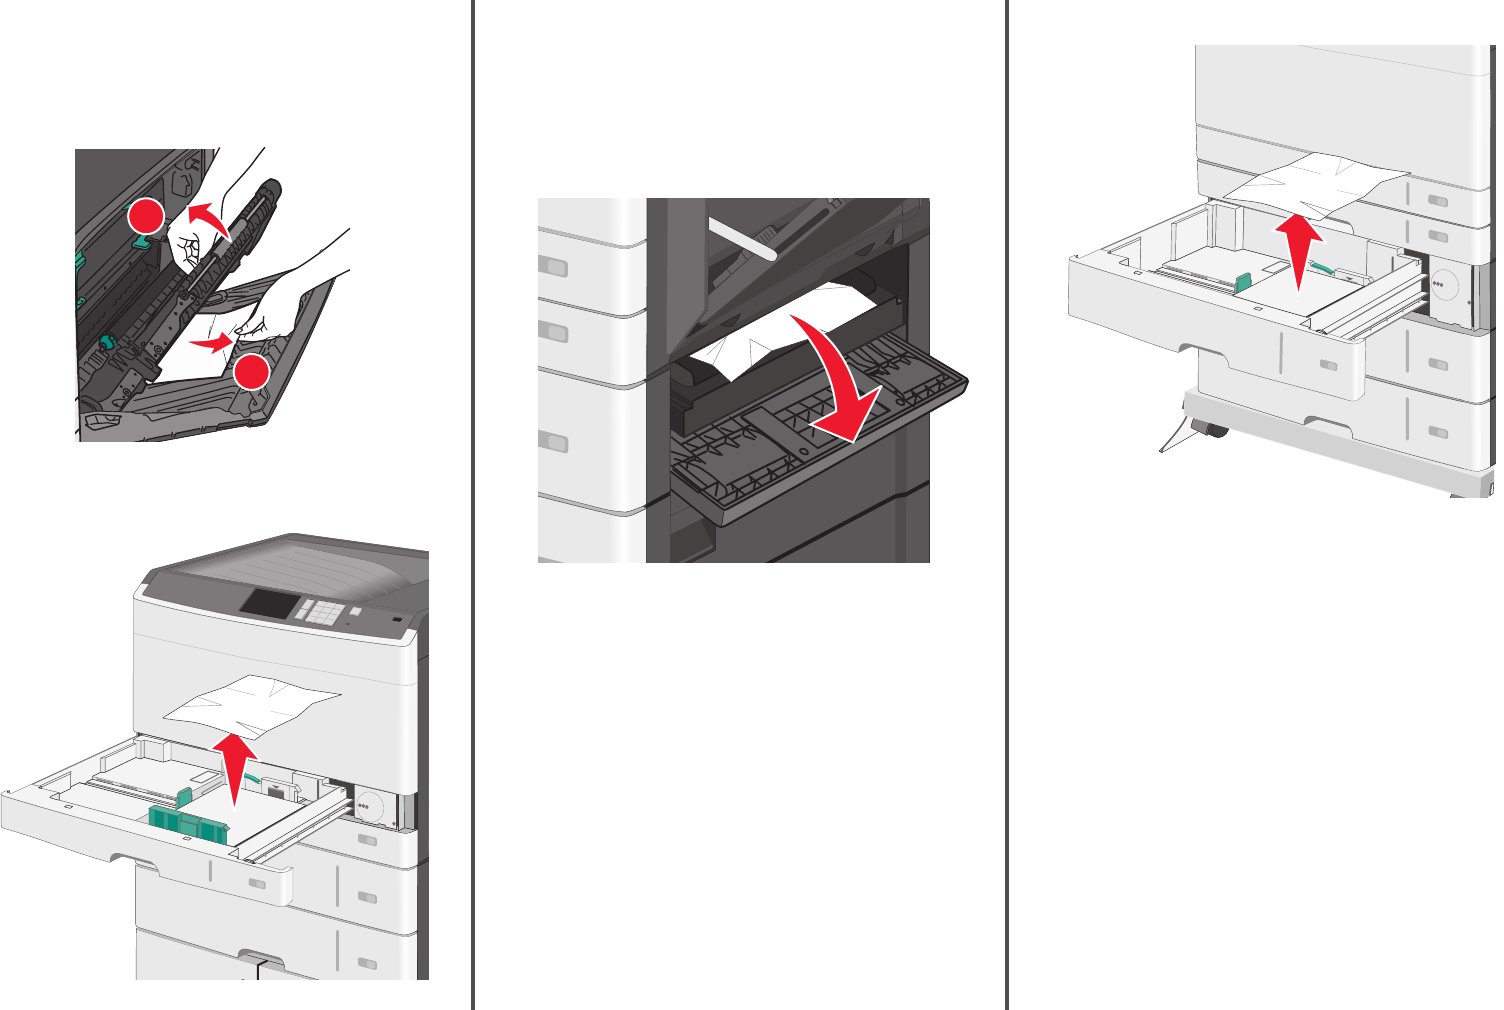
24x paper jam
Paper jam in Tray 1
1Check the side access door to trays and then pull the jammed
pages out.
1
2
Note: Make sure all paper fragments are removed.
2Open Tray 1, and then pull the jammed pages straight up and out.
Note: Make sure all paper fragments are removed.
3Close Tray 1.
4Touch Continue, jam cleared.
Paper jam in one of the optional trays
1Check the side access door to trays and then pull the jammed
pages out.
Note: Make sure all paper fragments are removed.
2Open the specified tray, and then pull the jammed pages out.
Note: Make sure all paper fragments are removed.
3Close the tray.
4Touch Continue, jam cleared.
7

250 paper jam
1Remove any jammed pages from the multipurpose feeder.
2Load paper into the multipurpose feeder.
3Touch Continue, jam cleared.
8

Index
Numerics
200 paper jam 5
201 paper jam 5
203 paper jam 6
230 paper jam 6
231–239 paper jams 6
24x paper jam 7
250 paper jam 8
550-sheet tray (standard or optional)
loading 1
A
assigning a custom paper type name 4
avoiding paper jams 4
C
card stock
loading in multipurpose feeder 2
custom paper type
assigning 4
custom paper type name
creating 4
Custom Type [x]
changing name 4
E
envelopes
loading in multipurpose feeder 2
J
jam numbers
understanding 4
jam numbers and locations 4
jams
avoiding 4
clearing 4
locating 4
jams, clearing
200 paper jam 5
201 paper jam 5
203 paper jam 6
230 paper jam 6
231–239 paper jams 6
24x paper jam 7
250 paper jam 8
L
linking trays 3
loading
550-sheet tray (standard or optional) 1
multipurpose feeder 2
loading card stock
in multipurpose feeder 2
loading envelopes
in multipurpose feeder 2
loading the multipurpose feeder 2
loading the standard tray 1
loading transparencies
in multipurpose feeder 2
M
multipurpose feeder
loading 2
P
paper jams
avoiding 4
paper jams, clearing
231-239 paper jams 6
24x paper jam 7
250 paper jam 8
paper size
setting 1
paper type
setting 1
S
setting the paper size 1
setting the paper type 1
standard tray
loading 1
T
transparencies
loading in multipurpose feeder 2
trays
linking 3
unlinking 3
U
unlinking trays 3
9
