Lezyne USA orporated 26PV104F CONNECT DRIVE FRONT User Manual 72859 MANUAL FOR Y12 CONNECT DRIVE PAIR R0A3
Lezyne USA, Incorporated CONNECT DRIVE FRONT 72859 MANUAL FOR Y12 CONNECT DRIVE PAIR R0A3
User Manual

72859-A3
English User Manual
READ ENTIRE MANUAL BEFORE OPERATION to ensure proper use and care of your new Lezyne
LED light. Traffic laws mandang lighng vary from country to country. Inform yourself about
lighng laws and regulaons in the country of use. Lezyne LED lights do not conform to the
German road traffic regulaon StVZO.
Warnings
DO NOT LOOK DIRECTLY INTO LIGHT BEAM or shine into eyes of another.
Lezyne LED Lights have a water resistance rang of IPX7 under IEC standard 60529. Submerging
the device is not recommended. If moisture does enter the casing, air out unl completely dry.
DO NOT ATTEMPT TO REMOVE ELECTRONICS. Doing so will void warranty.
Lezyne USA Inc. does not accept any liability for injuries or other damages resulng from the use
of this product in any circumstances.
Warranty
Mounting
Operation
1. On/Off: hold buon two (2) sec.
2. Mode cycle: click buon
MODE MEMORY: The light remains in the output seng it is switched OFF in.
THERMAL PROTECTION: If the operang temperature of the light is too high, the light auto-
macally lowers the lumen output.
Run Times and Modes
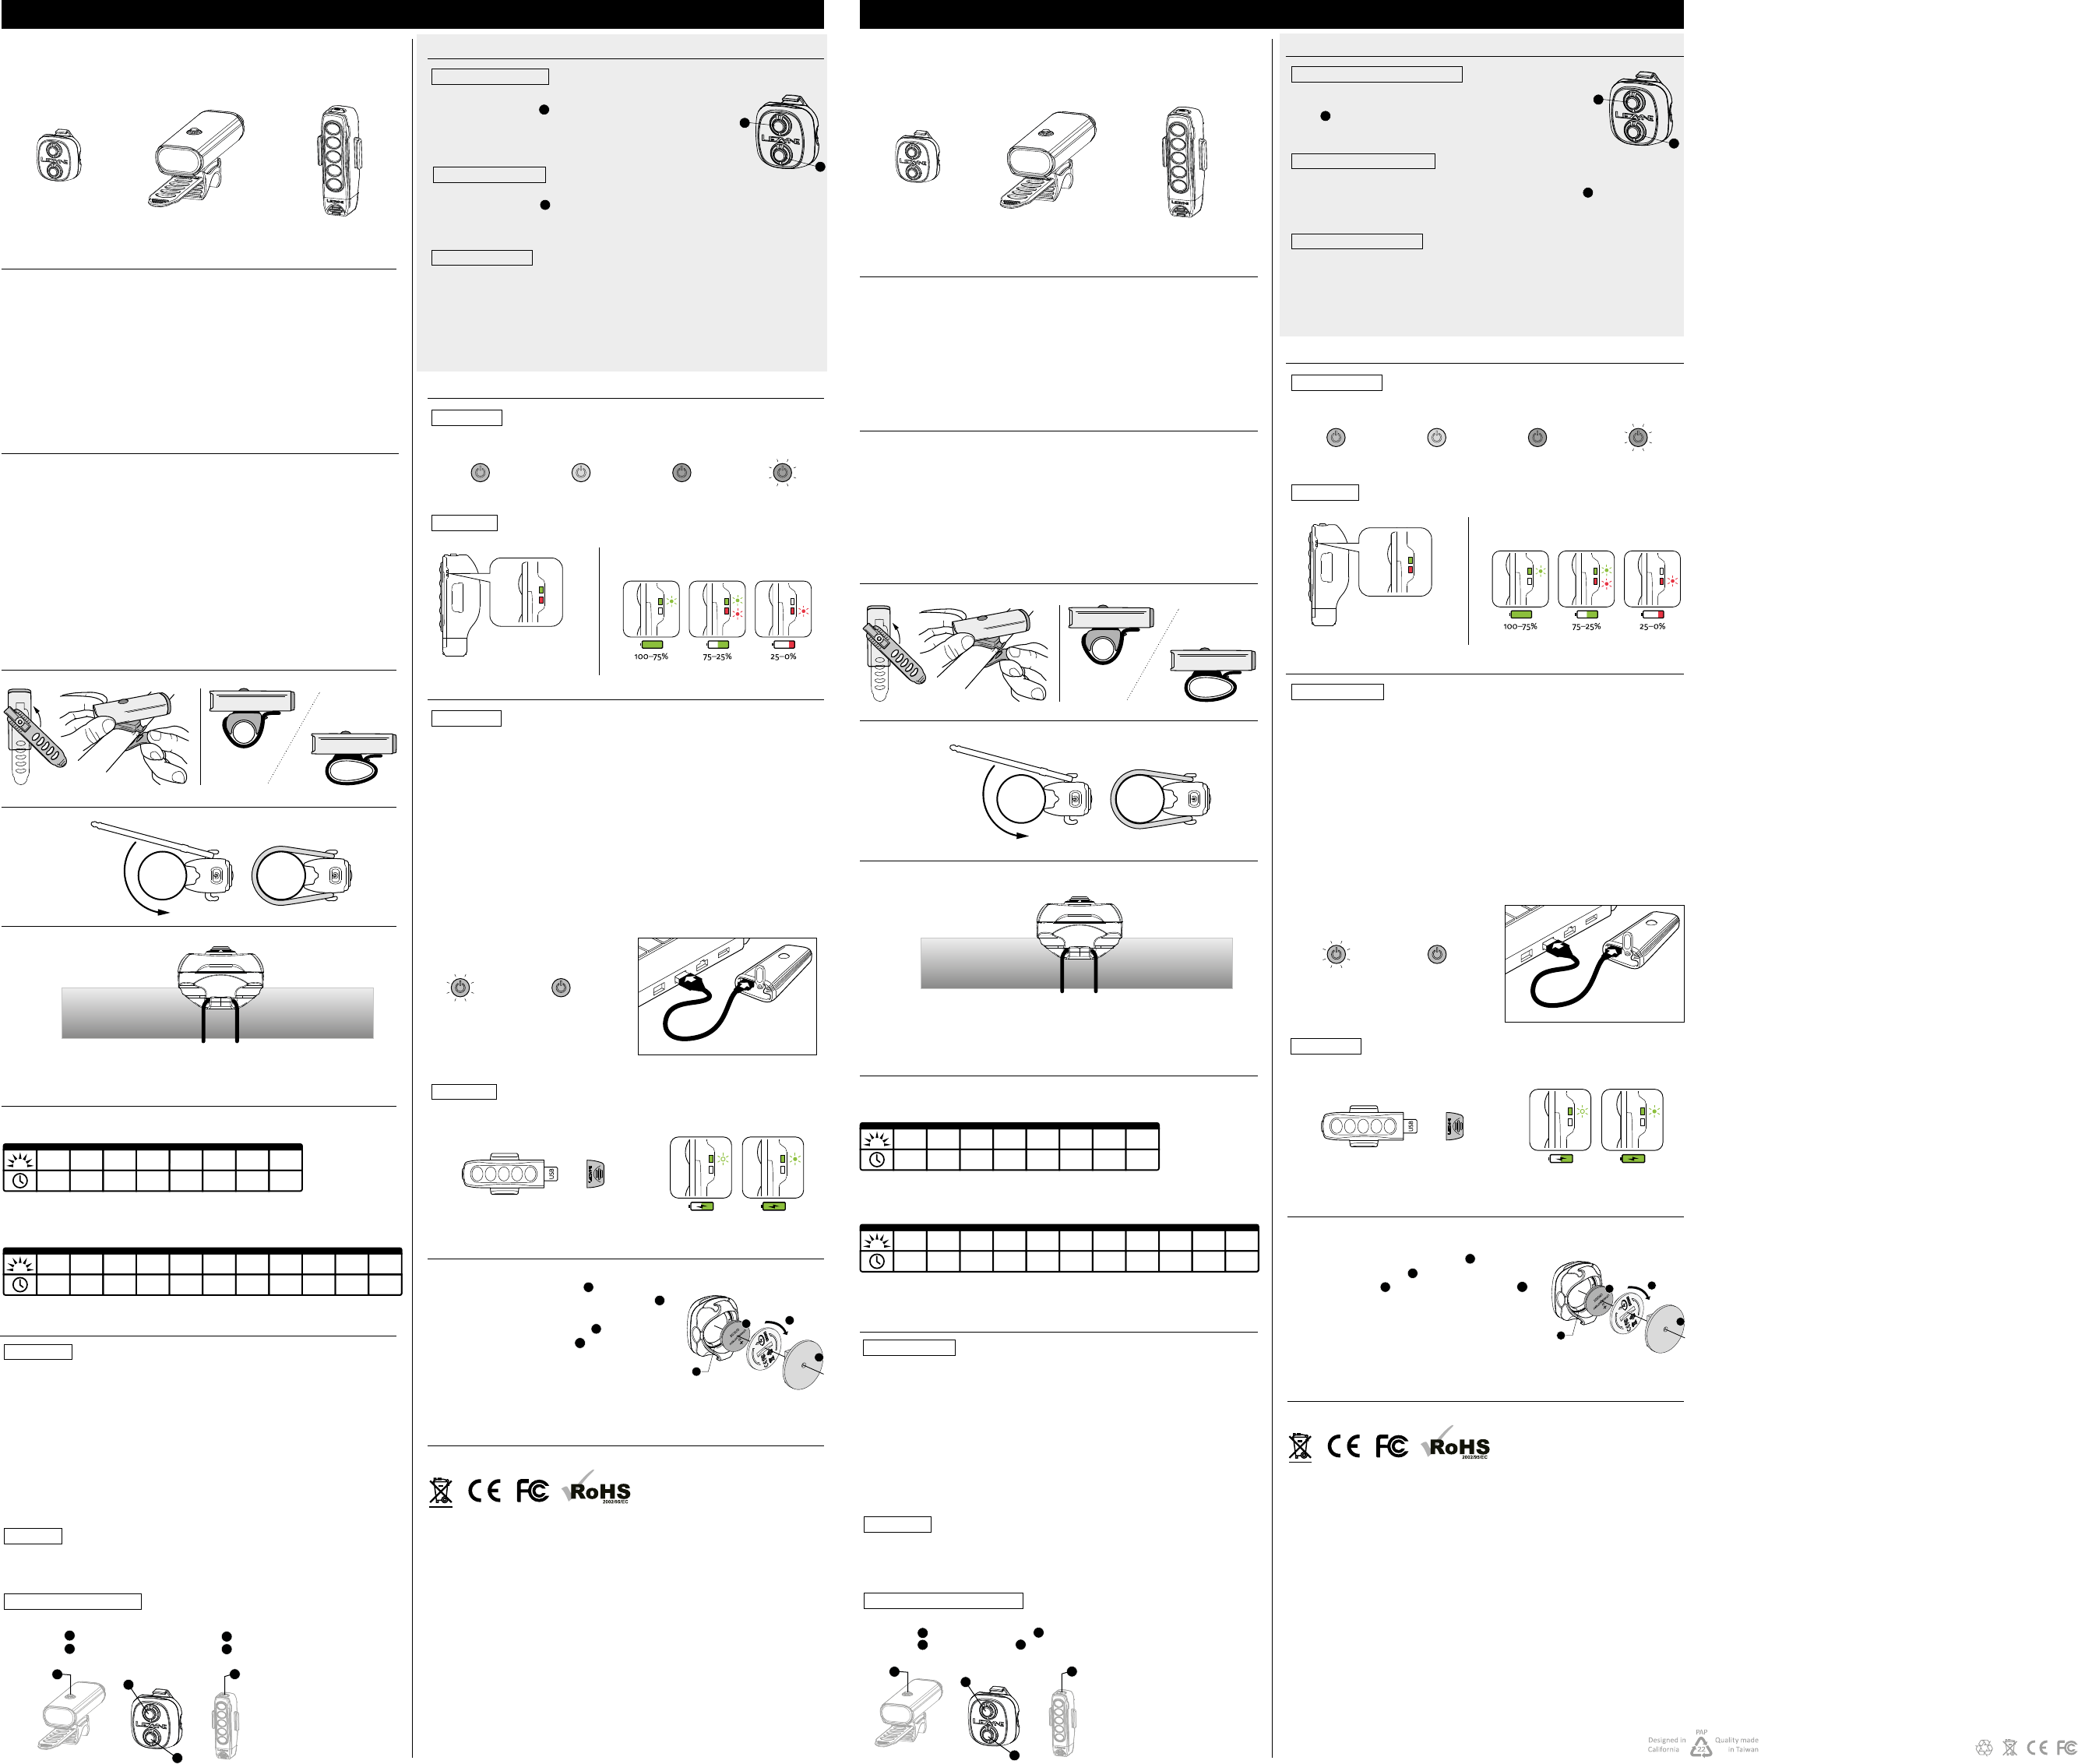
100% 50% 10% 5%
Illuminates green Illuminates yellow Illuminates red Flashes red
Charging
Before using your Lezyne LED Light for the first me, fully charge baery.
To charge your light:
For more informaon on Lezyne products, visit: www.lezyne.com
Charging
1
Fully Charged
Flashes
green or blue
Illuminates
green or blue
More Information
In U.S. and U.K., Lezyne LED Lights carry a two (2) year warranty from the original
purchase date to the original owner (proof of purchase required). Lezyne Baeries
carry a six (6) month warranty from the original purchase date. Lezyne warranes cover
any manufacturing defects in materials or workmanship. Issues not covered by
warranty include normal wear & tear, improper installaon, aempng to access or
modify electronics, damage or failure due to accident, misuse, abuse and/or neglect.
For all warranty issues worldwide, please contact the retailer that sold the product.
Lezyne USA, Inc. does not accept any liability for injuries or other damages resulng
from the improper use or improper installaon of this product in any circumstance.
For any warranty quesons contact: warranty@lezyne.com
Garantie
Aux U.S. et en Angleterre, les LED sont couvertes par une garane de 2 ans (date
d'achat du premier acheteur). Les baeries, elles, sont garanes 6 mois (date d'achat).
La garane Lezyne couvre les défaut de fabricaon ou le matériel. Les problèmes non
couverts par la garane comprennent l'usure normale, une mauvaise installaon, la
tentave d'accès ou de modificaon des composants électroniques, des dommages ou
des défaillances dus à un accident, une mauvaise ulisaon, un abus et / ou une
négligence.
Pour toute demande de garane, merci de contacter le revendeur original du produit.
Pour toute demande de garane, vous pouvez également contacter Lezyne à l'adresse
warranty@lezyne.com
RACE MODE: With the light OFF, hold buon for five (5) seconds, unl light flashes.
The light is now in Race Mode where only Overdrive and Economy outputs are selectable. The
light will remain in Overdrive Race Mode even when switched OFF. Repeat the step above
to return to the normal mode set.
MODE COURSE: Lampe éteinte, maintenez le bouton On/Off pendant 5 secondes
jusqu'à ce que la LED fasse un flash. Le mode Course sera acvé et vous n'aurez que 2
modes: Overdrive (pleine puissance) et Economie. si vous éteignez la LED, le mode
course restera acvé. Il faut rappuyer sur le bouton On/Off pendant 5 seconde lampe
éteinte pour revenir au mode normal.
3
30:30
h : min
LUMENS
FLASH 6
150
3:15
h : min
LUMENS
DAY FLASH 1
100
4:45
h : min
LUMENS
DAY FLASH 2
45
1:30
h : min
LUMENS
BLAST
15
4:30
h : min
LUMENS
ENDU RO
3
18:00
h : min
LUMENS
ECONO MY
25
5:00
h : min
LUMENS
FLASH 1
15
5:00
h : min
LUMENS
FLASH 2
15
5:00
h : min
LUMENS
FLASH 3
20
6:00
h : min
LUMENS
FLASH 4
5
17:45
h : min
LUMENS
FLASH 5
Connect Drive Rear
Connect Drive Front
NOTE: Remove plasc insulaon cover on baery body before use.
How To Change the Battery of Wireless Remote Button
Take out protecve foam from wireless
remote.
Use a coin to open baery cover by
turning counterclockwise.
Replace CR2032 baery and make sure
the sealing ring is in the groove to ensure
water resistance.
Install the cover and turn clockwise to CLOSE.
Put protecve foam back in wireless remote.
2
1
3
4
SEATPOST SEATPOST
HANDLEBAR
o-ring
REAR LIGHT
PAIR FRONT LIGHT
TRANSPORT MODE
FRONT LIGHT
1. On/Off: hold buon two (2) sec.
2. Mode cycle: click buon
REAR LIGHT
REAR LIGHT
WIRELESS REMOTE BUTTON
Montage
TIGE DE
SELLE
TIGE DE
SELLE
CINTRE
o-ring
LAMPE ARRIÈRE
TÉLÉCOMMANDE
800
8:45
h : min
LUMENS
DAY FLASH
400
3:00
h : min
LUMENS
BLAST
250
5:15
h : min
LUMENS
ENDU RO
150
9:00
h : min
LUMENS
ECONOMY
15
76:00
h : min
LUMENS
FEMTO
150
16:00
h : min
LUMENS
FLASH
150
14:30
h : min
LUMENS
PULSE
800
1:20
h : min
LUMENS
OVERDRIVE
Pair the Wireless Remote Button with LED Light
Battery Indicator
PAIR REAR LIGHT
CONNECT DRIVE FRONT LED CONNECT DRIVE REAR
WIRELESS REMOTE BUTTON
1
2
1. Hold front light buon two (2) sec to switch power on.
2. Hold Wireless Remote buon three (3) or more sec unl
front light automacally switches off.
3. Pair complete when the front light automacally switches off.
FRONT LIGHT
REAR LIGHT
FRONT LIGHT
Opération
1. Bouton On/Off . Appuyer deux (2) sec.
2. Changer de Mode : Appuyer sur le bouton
Temps d'exécution et Modes
3
30:30
h : min
LUMENS
FLASH 6
150
3:15
h : min
LUMENS
DAY FLASH 1
100
4:45
h : min
LUMENS
DAY FLASH 2
45
1:30
h : min
LUMENS
BLAST
15
4:30
h : min
LUMENS
ENDU RO
3
18:00
h : min
LUMENS
ECONO MY
25
5:00
h : min
LUMENS
FLASH 1
15
5:00
h : min
LUMENS
FLASH 2
15
5:00
h : min
LUMENS
FLASH 3
20
6:00
h : min
LUMENS
FLASH 4
5
17:45
h : min
LUMENS
FLASH 5
Arrière
Avant
LAMPES AVANT
Jumelage de LED Avant
MODE TRANSPORT
Jumelez le bouton sans fil avec la LED
Indicateur de niveau de batterie
Jumelage de LED arrière
Lampe éteinte, maintenant les bouton des lampes avant et arrière pendant 20
secondes jusqu'à ce que les lampes flashent. Puis relachez les boutons. Les lumières
sont maintenant en mode Transport.
Le mode transport annule les connecons sans fil (un mode avion en soit). Il permet
également un mode stockage longue durée. Pour ré-acver les foncons sans fil, suivez la
procédure de jumelage.
1
2
1. Maintenez le bouton On/Off de la LED 2 secondes pour l'allumer.
2. Maintenanez le bouton de la télécommande pendant 3
secondes ou plus jusqu'à ce que la LED s'éteigne.
3. Le jumelage est effecf quand la LED s'éteind
Once Paired with Front / Rear Light:
1. Buon funcons the same as Front Light buon .
2. Buon funcons the same as Rear Light buon .
WIRELESS REMOTE BUTTON
USB
100% 50% 10% 5%
S'allume en Vert S'allume en Jaune S'allume en Rouge Flash rouge
Charge
Chargement Complètement chargé
Flashes
Vert ou Bleu
Allumé en vert
ou bleu
LAMPE ARRIERE
LAMPE AVANT
LAMPE AVANT
USB
Light will be charged aer 2–3 hours or when buon illuminates solid green.
Pour plus d'informaons sur les produits Lezyne, rendez-vous sur : www.lezyne.com
Plus d'informations
NOTE: Rerer le cache plasque du boier de la baerie avant ulisaon
Comment Changer La Batterie Avec Une Télécommande Sans Fil
enlevez la mousse de la télécommande
Ulisez une pièce pour ouvrir le couvre baerie
en tournant dans le sens an-horaire
Remplacez les piles CR2032 et asurez vous que le
joint est bien à sa place, assurant une étanchéïté
complète.
Installez le couvre baerie et revissez pour fermer.
Installez la mousse dans le boier
2
1
3
4
LAMPE ARRIÈRE
La lampe sera chargée après 2-3 heures ou quand le bouton est allumé en vert.
Attention
CONNECTION AVANT LED STRIP CONNECT DRIVE
BOUTON SANS FIL
Manuel de l’utilisateur en Français
LISEZ TOUT LE MANUEL AVANT L'UTILISATION pour vous assurer que votre nouvelle
lampe LED Lezyne fonconne correctement. Les lois sur la circulaon imposant
l'éclairage varient d'un pays à l'autre. Informez-vous sur les lois et règlements
d'éclairage dans le pays d'ulisaon. Les LED Lezyne ne sont pas conformes à la
réglementaon allemande StVZO.
NE REGARDEZ PAS DIRECTEMENT DANS LE FAISSEAU DE LUMIERE et ne projeez pas
dans ceux des autres.
Les LED Lezyne sont étanches IPX7 au standard 60529. Plonger la LED sous l'eau n'est
pas recommandé. Si de lhumidité rentre dans la boite, neoyez la jusqu'à ce qu'elle
soit complètement sèche.
N'ESSAYEZ PAS DE RETIRER L'ÉLECTRONIQUE. Faire cela annulera la garane.
LEZYNE USA Inc refusera toute garane ou autres dommages causés par une mauvaise
ulisaon du matériel.
MODE MEMOIRE: Quand vous éteignez la lampe sur un mode précis, elle se rallumera
avec ce même mode.
PROTECTION THERMIQUE: si la lampe devient trop chaude du fait de son fonconne-
ment, elle baissera automaquement sa puissance d'éclairage.
1. Maintenez le bouton On/Off de la LED 2 secondes pour l'allumer.
2. Maintenanez le bouton de la télécommande pendant 3 secondes ou plus
jusqu'à ce que la LED s'éteigne.
3. Le jumelage est effecf quand la LED s'éteind
1. Éteignez la lampe
2. Enlevez la protecon de la prise USB
3. Connectez le cable micro USB à la LED et branchez-le à une source d'énergie
4. Une fois que la lampe charge, le bouton On/Off s'allume en vert. Si le câble USB
est branché à une prise 2 Ampères, le bouton On/Off s'allumera en Bleu.
5. Rerez le câble de la lampe et assurez vous de bien remere le cache plasque sur la prise
USB afin d'assurer l'étanchéïté complète du boier.
Si le bouton ne s'allume pas une fois la LED connectée à une source d'énergie, essayez
une autre prise ou assurez vous que l'électricité arrive bien.
La Lampe sera chargée après 5 ou 8,5 heures (4-6 heures branchée sur une prise 2
Ampères)
Garantía
En EUA y en Inglaterra, las luces LED Lezyne poseen dos (2) años de garana a parr de
la compra original (se requiere prueba de compra). Las baterias Lezyne poseen seis (6)
meses de garana desde la fecha de compra original. La garana Lezyne cubre
cualquier fallo de defectos de manufactura en materiales o trabajo. Problemas que no
son cubiertos por la garana incluyen deterioro normal & uso, instalación inapropiada,
intento de acesar o modificar los componentes electrónicos, daño o falla por
accidente, mal uso, abuso y/o negligencia.
Para todos los problemas de garana por favor contacte la oficina que le vendió el
producto original.
Para cualquier pregunta sobre garana contacte warranty@lezyne.com
MODO CARRERA: Con la luz apagada, sostenga el botón por cinco (5) segundos, hasta
que la luz destelle. La luz está ahora en modo carrera donde solo son seleccionables las
opciones Overdrive y Económica. La luz se mantendrá en Overdrive modo carrera
aunque se cambie a Apagado. Repita el paso arriba para volver al modo normal.
Ensamblaje
POSTE DE
ASIENTO
POSTE DE
ASIENTO
MANUBRIO
o-ring
LUZ TRASERA
CAMBIO A CONTROL REMOTO
Modo de operar
1. On / Off sostenga el botón por dos (2) segundos.
2. Modo ciclo: presione el botón
Modos y Tiempos
Conexión trasera
Conexión delantera
LUZ DELANTERA
SINCRONICE LA LUZ DELANTERA
MODO TRANSPORTE
Sincronice el control remoto con la luz LED light
Indicador de batería
SINCRONICE LA LUZ TRASERA
Con la luz apagada, sostenga el botón de la luz delantera/trasera por veinte (20)
segundos hasta que el botón delantero/trasero destelle. Luego suelte el botón. La luz
está ahora en Modo transporte.
El modo transporte inhabilita todas las funciones wireless y es pensado para viaje de avión y
almacenamiento de larga duración. Para re-habilitar la función wireless siga el procedimiento
de sincronización.
1
2
1. Sostenga el botón de la luz delantera dos (2) segundos para encernder.
2. Sostenga el botón del control remoto for tres (3) segundos hasta
que la luz delantera se apague automácamente.
3. La sincronización se completa cuando la luz delantera se apaga
automácamente.
100% 50% 10% 5%
Se ilumina verde Se ilumina amarilla Se ilumina roja Destella roja
Cargando
Cargando Cargado completo
Destella verde
o azul
Se ilumina verde
o azul
LUZ TRASERA
LUZ DELANTERA
LUZ DELANTERA
USB
Para más información en productos Lezyne, visite: www.lezyne.com
Más información
Notese: Quite la cubierta de aislamiento térmico de plásco en la bateria antes de usarse.
COMO CAMBIAR LA BATERIA CON CONTROL REMOTO
Quite la espuma protectora del control wireless.
Use una moneda para abrir la cubiera de la bateria
girandola en sendo horario.
Remplace la bateria CR2032 y asegúrese que el
sello del anillo esté en la ranura para asegurar
que sea resistente al agua.
Instale la cubierta nuevamente y gire en sendo
horario para CERRAR.
Ponga la espuma de protección de nuevo en el
control wireless.
2
1
3
4
LUZ TRASERA
La luz se caragará después de 2 - 3 horas o cuando el botón iluminado se ponga verde.
Cargando Cargado
Advertencias
CONEXION DELANTERA DRIVE CINTA LED CONECTA
EL DRIVE
BOTON PARA EL CONTROL
REMOTO WIRELESS
Manual del usuario en español
LEA EL MANUAL COMPLETO ANTES DE UTILIZAR EL DISPOSITIVO para asegurar el uso
apropiado y cuidado de su nueva luz LED Lezyne. Las leyes de tráfico que obligan el uso
de luz varia de país en país. Infórmese sobre las leyes de uso de luces y regulaciones en
el país donde lo usará. Las luces LED Lezyne no siguen las normas de tráfico alemanas
StVZO
NO MIRE DIRECTAMENTE HACIA EL RAYO DE LUZ o proyecte el mismo en los ojos de
otra persona.
Las luces LED Lezyne poseen resistencia al agua clasificada de IPX7 bajo el IEC estándar
60529. Sumergir el disposivo no es recomendable. Si entra humedad en la caja,
séquelo hasta que esté completamente seco.
NO INTENTE REMOVER LOS COMPONENTES ELECTRONICOS. Si lo hace perderá la
garana.
Lezyne USA Inc., no se responsabiliza por daños que resultan del uso de este producto
en cualquier circunstancia.
MODO MEMORIA: La luz se manene en la configuración de salida está en modo
apagado.
PROTECCION TERMICA: Si la temperatura de funcionamiento de la luz es muy alta, la luz
de salida se disminuye automácamente.
1. Sostenga el botón de la luz trasera por dos (2) segundos para encender.
2. Sostenga el botón del control remoto for tres (3) segundos hasta que la luz trasera
se apague automácamente.
3. La sincronización se completa cuando la luz trasera se apaga automácamente.
1. Apague la luz
2. Quite el protector que cubre el USB
3. Conecte el micro cable USB y encienda el puerto USB
4. Una vez que esté cargando, el botón destellará verde; si el puerto USB lo
permite, la luz usará carga High Efficiency (HE) y el botón destellará azul.
5. Quite la luz del cargador y reinstale el sello USB - asegúrese que el puerto de USB está
correctamente instalado para ser resistente al agua.
Si el botón no destella cuando conectado, el puerto de USB podría no estar conectado
-intente otro puerto de USB.
La luz se caragará después de 5 - 8.5 horas (4 - 6 horas con carga HE) o cuando el botón
iluminado se ponga verde o azul.
Una vez sincronizado con la luz delantera / trasera:
1. Botón funciona igual que el botón de la luz delantera .
2. Botón funciona igual que el botón de la luz trasera .
1. On / Off: sostenga el botón por dos (2) segundos.
2. Modo ciclo: botón de reloj
LUZ TRASERA
BOTON PARA EL CONTROL REMOTO WIRELESS
1.
2.
3.
4.
5.
1.
2.
3.
4.
5.
1. Bouton On/Off . Appuyer deux (2) sec.
2. Modes : Appuyez sur le bouton
LAMPE ARRIÈRE
Une fois jumelez avec la lampe Avant/ Arrière
1. Le bouton a la même foncon que le bouton d'une LED avant
2. Le bouton a la même foncon que le bouton d'une lampe arrière
BOUTON SANS FIL
1.
2.
3.
4.
5.
800
8:45
h : min
LUMENS
DAY FLASH
400
3:00
h : min
LUMENS
BLAST
250
5:15
h : min
LUMENS
ENDU RO
150
9:00
h : min
LUMENS
ECONOMY
15
76:00
h : min
LUMENS
FEMTO
150
16:00
h : min
LUMENS
FLASH
150
14:30
h : min
LUMENS
PULSE
800
1:20
h : min
LUMENS
OVERDRIVE
1
2
ab
a
b
1
2
4
1
2
1
2
1
2
3
4
1
2
3
a
b
1
2
1
2
4
1
2
3
a
b
1
2
1
2
ab
1
2
ab
Antes de usar su luz Lezyne LED por primera vez, cargue la batería completamente.
Para cargar su luz:
Under certain circumstances, the wireless remote buon may take up to 5 seconds
to turn lights on.
1. Hold rear light buon two (2) sec to switch power on.
2. Hold Wireless Remote buon three (3) sec unl rear light automacally switches
off.
3. Pair complete when the Rear light automacally switches off.
With the light OFF, hold Front / Rear light buon twenty (20) sec unl Front / Rear light
fast flashes.Then release the buon. The light is now in Transport Mode.
Transport Mode disables all wireless funcon and is intended for airplane travel and long term
storage. To re-enable the wireless funcon, follow the pairing procedure.
1. Switch light OFF
2. Remove USB protecve cover
3. Connect micro USB cable and light to powered USB port
4. Once charging, buon will flash green; if USB port is capable, light will use High
Efficiency (HE) charging and buon will flash blue
If buon does not flash when plugged in, selected USB port may not be powered—try
another USB port.
Light will be charged aer 5–8.5 hours (4–6 with HE charging) or when buon
illuminates solid green or blue.
5. Remove light from charger and reinstall USB protecve cover—ensure USB protecve
cover is fully installed for water resistance
800
8:45
h : min
LUMENS
DAY FLASH
400
3:00
h : min
LUMENS
BLAST
250
5:15
h : min
LUMENS
ENDU RO
150
9:00
h : min
LUMENS
ECONOMY
15
76:00
h : min
LUMENS
FEMTO
150
16:00
h : min
LUMENS
FLASH
150
14:30
h : min
LUMENS
PULSE
800
1:20
h : min
LUMENS
OVERDRIVE
3
30:30
h : min
LUMENS
FLASH 6
150
3:15
h : min
LUMENS
DAY FLASH 1
100
4:45
h : min
LUMENS
DAY FLASH 2
45
1:30
h : min
LUMENS
BLAST
15
4:30
h : min
LUMENS
ENDU RO
3
18:00
h : min
LUMENS
ECONO MY
25
5:00
h : min
LUMENS
FLASH 1
15
5:00
h : min
LUMENS
FLASH 2
15
5:00
h : min
LUMENS
FLASH 3
20
6:00
h : min
LUMENS
FLASH 4
5
17:45
h : min
LUMENS
FLASH 5
Avant d'uliser la LED Lezyne pour la première fois, chargez la enèrement. Pour charger la
lumière:
NOTE: Lights and wireless remote buon must be within 1 meter of each other to
successfully pair.
Lezyne USA, 645 Tank Farm Rd., Unit F, San Luis Obispo, California 93401 72859-Y12-LED-CONNECT-PAIR-GUIDE-R0-A3
2
800
8:45
h : min
LUMENS
DAY FLASH
400
3:00
h : min
LUMENS
BLAST
250
5:15
h : min
LUMENS
ENDU RO
150
9:00
h : min
LUMENS
ECONOMY
15
76:00
h : min
LUMENS
FEMTO
150
16:00
h : min
LUMENS
FLASH
150
14:30
h : min
LUMENS
PULSE
800
1:20
h : min
LUMENS
OVERDRIVE
800
8:45
h : min
LUMENS
DAY FLASH
400
3:00
h : min
LUMENS
BLAST
250
5:15
h : min
LUMENS
ENDU RO
150
9:00
h : min
LUMENS
ECONOMY
15
76:00
h : min
LUMENS
FEMTO
150
16:00
h : min
LUMENS
FLASH
150
14:30
h : min
LUMENS
PULSE
800
1:20
h : min
LUMENS
OVERDRIVE
Warnung
Garantie
Montage
Modi und Laufzeiten
Sattelstütze Sattelstütze
Lenker
o-ring
Rücklicht
Fernschaltung
CONNECT DRIVE FRONT LED STRIP CONNECT DRIVE
Fernbedienungsknopf
警告
操作方法
1. ボタンを2秒間長押ししてオン/オフさせます。
2. モードの切り替えはボタンを押します。
作動時間とモード
100% 50% 10% 5%
緑に点灯 黄に点灯 赤に点灯 赤に点滅
充電
Lezyne製品に関して詳しくは、こちらをご覧ください:www.lezyne.com
充電中 充電完了
緑または青に点滅 緑または青に点灯
詳しくは
レースモード: ライトがオフの状態で、ライトが点滅するまでボタンを5秒間長押ししてくだ
さい。これでライトはレースモードに切り替わり、OverdriveとEconomy モードのみを選べ
ます。ライトをオフにしても、Overdriveのレースモードとなったままとなります。通常の
モードに戻す場合は、上記の手順を再度行い、元にに戻してください。
3
30:30
h : min
LUMENS
FLASH 6
150
3:15
h : min
LUMENS
DAY FLASH 1
100
4:45
h : min
LUMENS
DAY FLASH 2
45
1:30
h : min
LUMENS
BLAST
15
4:30
h : min
LUMENS
ENDU RO
3
18:00
h : min
LUMENS
ECONO MY
25
5:00
h : min
LUMENS
FLASH 1
15
5:00
h : min
LUMENS
FLASH 2
15
5:00
h : min
LUMENS
FLASH 3
20
6:00
h : min
LUMENS
FLASH 4
5
17:45
h : min
LUMENS
FLASH 5
コネクトリア
コネクトフロント
注意:使用前にバッテリー本体のプラスチック製絶縁カバーを取り外してください。
ワイヤレスリモートスイッチ搭載のバッテリーの交換方法
ワイヤレスリモートから保護フォーム を取り外します。
硬貨でバッテリーカバー を反時計回りに開きます。
CR2032 バッテリー を交換したら、密閉用リング を溝
に確実にはめ、水の浸入を防いでください。
カバーを再び取り付け、時計回りに閉めます。
保護フォームをワイヤレスリモートに取り付けます。
2
1
3
4
シートポスト シートポスト
ハンドルバー
Oリング
リアライト
フロントライトのペアリング
トランスポートモード
フロントライト
1. ボタンを2秒間長押ししてオン/オフさせます。
2. モードの切り替えはボタンを押します。
リアライト
リアライト
リモートスイッチ
フロントライトのペアリング
バッテリーインジケーター
リアライトのペアリング
コネクションドライブフロント LEDストリップコネクトドライブ
ワイヤレスリモートボタン
ライトがオフの状態で、フロント/リアライトが早く点滅するまでフロント/リアライトボタン
を20秒間長押しし、そのあとボタンを離します。これでライトはトランスポートレースモード
に切り替わります。
トランスポートモードは、すべてのワイヤレス機能を無効にし、航空機での持ち運びや長期保管
のためのモードです。ワイヤレス機能を再び有効にするには、ペアリングの手順に従ってくださ
い。
1
2
1. フロントライトボタンを2秒間長押しして電源をオンにします。
2. フロントライトが自動的にオフになるまで、ワイヤレスリモートボ
タン を3秒以上長押しします。
3. フロントライトが自動的にオフになれば、ペアリングは完了です。
フロントライト
リアライト
フロントライト
フロント / リアライトとペアリングさせたら:
1. ボタン はフロントライトボタン と同じ機能を果たします。
2. ボタン はリアライトボタン と同じ機能を果たします。
ワイヤレスリモートボタン
USB
ライトは2 - 3時間で充電が完了するか、ボタンが緑に点灯します。
ユーザーズマニュアル
お使いになる前にマニュアルを全て必ず読み、Lezyne LED ライトを正しく使用および保管しましょう。
ライトの点灯を義務付ける道路交通法は国により異なります。お住いの国のライトに関する法律や規
則を確認してください。Lezyne LED ライトはドイツの道路規則StVZOで許可されていません。
ライトのビームを直視したり、誰かの目に向けてはいけません。
LezyneLEDライトは、IEC基準60529の耐水指標IPX7仕様です。本デバイスを水没させることは推
奨しません。水分がケース内に入った場合、完全に乾くまで外気に触れさせてください。
電子部品を取り外さないでください。保証対象外となる恐れがあります。
LezyneUSA社は、いかなる状況においても、本製品の使用により生じた怪我またはその他損傷の
責任を一切負いません。
保証
アメリカおよびイギリスでは、LezyneLEDライトは、元の所有者に対して元の購入日から2年間の保
証が付いています(レシート等の購入証明が必要です)。Lezyneバッテリーは、元の購入日から6ヶ
月の保証が付いています。Lezyneの保証は、材料または製造上の欠陥を含みます。保証対象外とな
る問題には、通常の消耗、不適切な取り付け、電子機器の分解または改造、事故、誤用、乱用およびま
たは放置による損傷または故障が含まれます。
それ以外の国での保証に関しては、本製品を販売した販売店にお尋ねください。
保証に関してご質問がある場合は、こちらまでご連絡ください:warranty@lezyne.com
取り付け
1. ライトのスイッチをオフにします。
2. USB 保護カバーを取り外します。
3. Micro USB ケーブルとライトを電源とつながっているUSB ポートに差し込みます。
4. 充電が開始されたら、ボタンが緑に点滅します。USB ポートによっては、ライトがHigh
Efficiency(HE、高効率)充電を行うものがあり、その場合はボタンが青に点滅します。
ケーブルを差し込んでもボタンが点滅しない場合、お使いのUSBポートが電源とつながってい
ないかもしれません。他のUSBポートをお試しください。
ライトは5-8.5時間(高効率充電では4-6時間)で充電が完了するか、ボタンが緑または青に
点灯します。
5.ライトを充電器から外し、USB保護カバー取り付けます。USB保護カバーは水の浸入を
防ぐよう、密閉されていることを確認してください
充電中 充電完了
Lesen Sie die Bedienungsanleitung bevor Sie unsere LED-Lampe benutzen um eine
sachgemäße Benutzung zu gewährleisten. Die Straßenverkehrsordnung unterscheidet
sich von Land zu Land. Informieren Sie sich über die geltenden Gesetze und Richtlinien.
Nur entsprechend gekennzeichnete Lezyne-LED-Lampen entsprechen der deutschen
StVZO.
Sehen Sie nicht direkt in den Lichtstrahl und leuchten Sie nicht in die Augen anderer
Personen.
Lezyne LED Lampen sind wasserdicht nach IPX7 unter IEC Standard 60529. Das Gerät
sollte nicht untergetaucht werden. Wenn Feuchgkeit in das Gehäuse eingedrungen ist
sollte das Gerät vollständig an der Lu trocknen.
Enernen Sie NIEMALS die Elektronik. Dies häe ein Erlöschen der Garane zur Folge.
Lezyne USA Inc. übernimmt in keinem Fall die Haung für Verletzungen oder sonsge
Schäden, die aus der Verwendung dieses Produkts resuleren.
In den USA und im U.K. bietet Lezyne zwei (2) Jahre Garane auf Lezyne LED-Lampen,
gülg ab dem ursprünglichen Kaufdatum und für den ursprünglichen Eigentümer
(Kaufnachweis erforderlich). Lezyne Akkus bieten sechs (6) Monate Garane zu
gleichen Vorraussetzungen. Diese Garane deckt Material-, und Herstellungsfehler ab.
Fälle die nicht von der Garane abgedeckt sind: normaler Verschleiß, unsachgemäße
Installaon, der Versuch auf die Elektronik zuzugreifen, modifizieren der Elektronik,
Beschädigung oder Ausfall durch Unfall, Missbrauch, falsche Behandlung und
Vernachlässigung.
Für alle Garaneansprüche weltweit, wenden Sie sich bie direkt an den Händler bei
dem Sie das Gerät gekau haben.
Bei Fragen bezüglich der Garane wenden Sie sich bie an: warranty@lezyne.com
Deutsche Bedienungsanleitung
Bedienung
1. An/Aus Knopf zwei (2) Sek. drücken
2. Modi Zyklus: Knopf drücken
3
30:30
h : min
LUMENS
FLASH 6
150
3:15
h : min
LUMENS
DAY FLASH 1
100
4:45
h : min
LUMENS
DAY FLASH 2
45
1:30
h : min
LUMENS
BLAST
15
4:30
h : min
LUMENS
ENDU RO
3
18:00
h : min
LUMENS
ECONO MY
25
5:00
h : min
LUMENS
FLASH 1
15
5:00
h : min
LUMENS
FLASH 2
15
5:00
h : min
LUMENS
FLASH 3
20
6:00
h : min
LUMENS
FLASH 4
5
17:45
h : min
LUMENS
FLASH 5
Connect Rear
Connect Front
Vorderlicht
Paarung Vorderlicht
Transport Modus
Verbingung zwischen Fernbedienungsknopf und der LED
Akku Ladeanzeige
Paarung Ruecklicht
Bei ausgeschaltetem Licht, durecken Sie den Schalter fuer Vorder- und Ruecklicht fuer
zwanzig (20) Sekunden, bis beide Lichter blinken. Danach den Schalter loslassen. Das
Licht befindet sich nund im Transport Modus.
Der Transport Modus schaltet alle Drahtlosfunkonen aus und ist fuer Reisen mit dem
Flugzeug und langen Lagerungszeiten gedacht. Um die Drahtlosfunkonen widerherzustel-
len, folgen Sie den Paarungs Anweisungen.
1
2
1. Druecken Sie den Knopf am Vorderlicht fuer zwei (2) Sek. bis es angeht.
2. Druecken sie Knopf des Fernschalters fuer drei (3) oder mehr
Sekunden, bis sich das Vorderlicht automasch ausschaltet.
3. Die Paarung ist ferg wenn sich das Vorderlicht automasch
ausgeschaltet hat.
100% 50% 10% 5%
Leuchtet Gruen Leuchtet Gelb Leuchtet Rot Blinkt Rot
Laedt
Laden Komplee Aufladung
Blingt gruen
oder blau
Leuchtet gruen
oder blau
Ruecklicht
Vorderlicht
Vorderlicht
USB
Für mehr Informaonen über Lezyne Produkte, besuchen Sie bie: www. lezyne.com
Mehr Informationen
HINWEIS: Enernen Sie die Plaskhuelle der Baerie
Batterie Entfernung Des Fernschalters
Entfernen Sie den Schutzschaum von dem Fernschalter
Verwenden Sie ein Muenze umd das Batteriefach zu
oeffnen. Oeffnen entgegen dem Uhrzeigersinn.
Wechseln Sie die CR2032 Batterie und gehen Sie auf
Sicher, dass der Dichtungsring am richtigen Order
platziert ist.
Bauen Sie die Plastikhuelle wieder ein. Drehen im
Uhrzeigersinn.
Legen Sie den Schutzschaum wieder in den Fernschalter.
2
1
3
4
Ruecklicht
Licht wird nach 2 - 3 Stunden aufgeladen bzw. wenn der Knopf dauerha gruen leuchtet.
Thermische Schutzfunkon: Wenn die Temperatur der LED zu hoch ist, wird der
Lumenoutpot automasch gedimmt.
1. Druecken Sie den Knopf 2 fuer zwei (2) Sekunden bis es angeht.
2. Druecken Sie Knopf des Fernschalters fuer drei (3) oder mehr Sekunden, bis sich
das Vorderlicht automasch ausschaltet.
3. Die Paarung ist ferg wenn sich das Ruecklicht automasch ausgeschaltet hat.
1. Schlaten Sie das Licht aus
2. Enernen Sie die USB Schutzkappe
3. Verbinden Sie das Micro USB Kabel mit dem Licht
4. Beim Laden leuchtet der Knopf auf der LED gruen; Bei Moeglichkeit wird das
Licht "High Efficiency" (HE) Laden benutzen und der Ladeknopf blau blinken.
5. Enernen Sie das Licht vom Ladegeraet und setzen Sie die USB Schutzkappe wieder auf, um
opmalen Schutz vor Wasser und Feuchgkeit zu bieten.
Sollte dieser Knopf nicht blinken waehrend des Ladevorgangs, hat der USB Port eventuell
keinen Strom- benutzen Sie einen anderen USB Port.
Das Licht is nach 5 - 8,5 Stunden voll geladen (4-6 mit "HE" Ladung). Der Knopf leuchtet
dauerha gruen oder blau.
MODE MEMORY: Das Licht bleibt in dem zuletzt verwendeten Modus.
RACE MODE: Wenn das Licht AUS ist, druecken und halten Sie den Knopf fuer fuenf (5)
sekunden, bis das Licht blinkt. Das Licht befindet sich jetzt im "Race Mode" und kann
nur noch zwischen dem "Overdrive" und "Economy" Mode wechseln. Das Licht bleibt im
"Overdrive Race Mode", auch wenn das Licht ausgeschaltet wird. Um aus dem "Race
Mode" wieder rauszukommen bie die Schrie widerholen.
1. An/Aus Knopf zwei (2) Sek. drücken
2. Modi Zyklus: Knopf drücken
Rücklicht
Sobald das Licht einmal mit dem Front-/Rücklicht verbunden ist:
1. Knopf funkoniert genauso wie Knopf auf dem Vorderlicht
2. Knopf funkoniert genauso wie Knopf auf dem Rücklicht
Fernbedienung Schalter
1.
2.
3.
4.
5.
1.
2.
3.
4.
5.
laedt aufgeladen
a
b
1
2
a
b
1
2
4
1
2
1
2
3
1
2
4
1
2
3
1
2
ab
1
2
ab
Bevor Sie Ihre Lezyne LED zum erstenmal benutzen, laden Sie diese komple auf. Um Ihr Licht
zu laden:
モードメモリー: ライトをオフにしても、選択された出力モードのままとなることです。
熱から守るには: ライトの作動環境温度が高すぎると、ライトは出力ルーメン数を自動的に
下げます。
1. リアライトボタンを2秒間長押しして電源をオンにします。
2. リアライトが自動的にオフになるまで、ワイヤレスリモートボタン を3秒以上長押ししま
す。
3. リアライトが自動的にオフになれば、ペアリングは完了です。
Lezyne LED ライトを初めて使用する前に、バッテリーを完全に充電してください。ライトを充電
するには:
FEDERAL COMMUNICATIONS COMMISSION INTERFERENCE STATEMENT
This equipment has been tested and found to comply with the limits for a Class B digital device, pursuant to part 15 of the FCC Rules. These limits are designed to provide reasonable
protecon against harmful interference in a residenal installaon. This equipment generates, uses and can radiate radio frequency energy and, if not installed and used in
accordance with the instrucons, may cause harmful interference to radio communicaons. However, there is no guarantee that interference will not occur in a parcular
installaon. If this equipment does cause harmful interference to radio or television recepon, which can be determined by turning the equipment off and on, the user is encouraged
to try to correct the interference by one or more of the following measures:
-Reorient or relocate the receiving antenna.
-Increase the separaon between the equipment and receiver.
-Connect the equipment into an outlet on a circuit different from that to which the receiver is connected.
-Consult the dealer or an experienced radio/ TV technician for help.
CAUTION:
Any changes or modificaons not expressly approved by the grantee of this device could void the user's authority to operate the equipment.
This device complies with Part 15 of the FCC Rules. Operaon is subject to the following two condions: (1) this device may not cause harmful interference, and (2) this device must
accept any interference received, including interference that may cause undesired operaon.
RF exposure warning
The equipment complies with FCC RF exposure limits set forth for an uncontrolled environment.
The equipment must not be co-located or operang in conjuncon with any other antenna or transmier.Radio Frequency (RF) Exposure Informaon
The radiated output power of the Wireless Device is below the Industry Canada (IC) radio frequency exposure limits. The Wireless Device should be used in such a manner such that
the potenal for human contact during normal operaon is minimized.
This device has also been evaluated and shown compliant with the IC RF Exposure limits under portable exposure condions. (antennas are less than 20 cm of a person's body).
Informaons concernant l'exposion aux fréquences radio (RF)
La puissance de sore émise par l’appareil de sans fil est inférieure à la limite d'exposion aux fréquences radio d'Industry Canada (IC). Ulisez l’appareil de sans fil de façon à
minimiser les contacts humains lors du fonconnement normal.
Ce périphérique a également été évalué et démontré conforme aux limites d'exposion aux RF d'IC dans des condions d'exposion à des appareils portables. (les antennes sont
moins de 20 cm du corps d'une personne).
Canada, Industry Canada (IC) Notices
This device contains licence-exempt transmitter(s)/receiver(s) that comply with Innovation, Science and Economic Development Canada’s licence-
exempt RSS(s). Operation is subject to the following two conditions:
1.This device may not cause interference.
2.This device must accept any interference, including interference that may cause undesired operation of the device.
Canada, avis d'Industry Canada (IC)
L’émetteur/récepteur exempt de licence contenu dans le présent appareil est conforme aux CNR d’Innovation, Sciences et Développement
économique Canada applicables aux appareils radio exempts de licence. L’exploitation est autorisée aux deux conditions suivantes :
1.L’appareil ne doit pas produire de brouillage;
2.L’appareil doit accepter tout brouillage radioélectrique subi, même si le brouillage est susceptible d’en compromettre le fonctionnement.