Life Technologies WUBR508GN 802.11bgn USB Dongle User Manual
Life Technologies Holdings Pte Ltd 802.11bgn USB Dongle
user manual
1
100027791
Life Technologies
Conector USB SpeedPlus
Quick Installiaton Guide
2
Version 1.0
3
Contents
1. Package Contents..........................................................................5
2. WiFi Network Card Installation...................................................6
3. Connect to Wireless Access Point.............................................11
4
Copyright statement
No part of this publication may be reproduced, stored in a retrieval system, or transmitted in
any form or by any means, whether electronic, mechanical, photocopying, recording, or
otherwise without the prior writing of the publisher.
April 2012

5
1. Package Contents
Before you starting to use this WiFi network card, please check if
there’s anything missing in the package, and contact your dealer of purchase
to claim for missing items:
Package Contents
Please make sure you have the following in the box:
WiFi network card
CDROM
Nota: if anything is missing, please contact your vendor
6
2. WiFi Network Card Installation
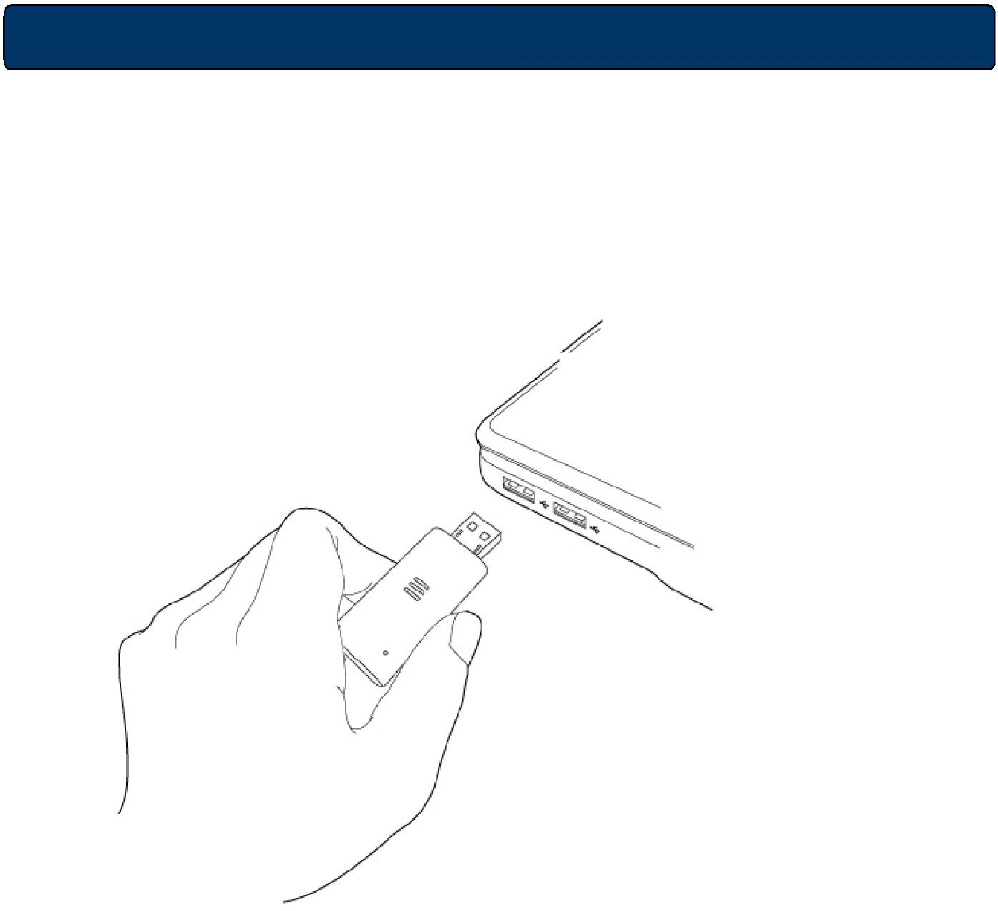
1. Insert the WiFi network card into an empty USB 2.0 port of your computer.
Never use force to insert the card, if you feel it’s stuck, flip the card over and try again.
7
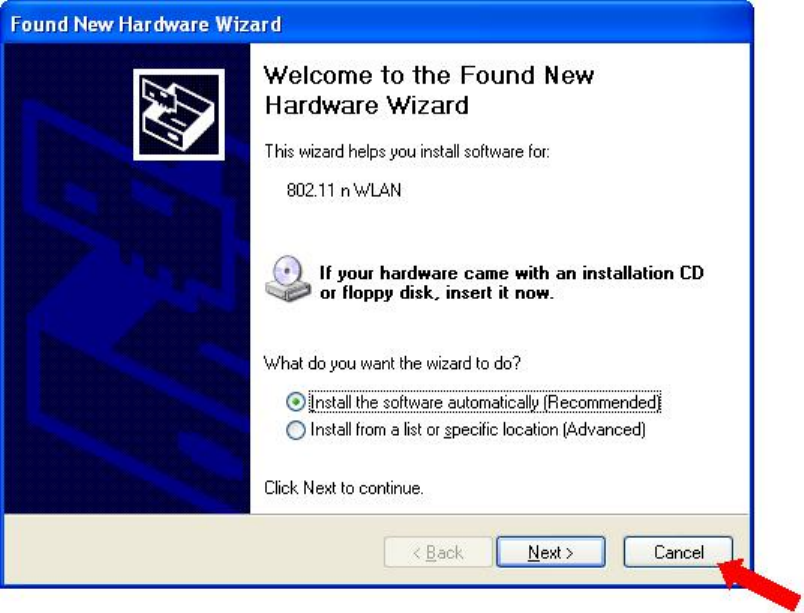
2. If he following message appear on your computer, click ‘Cancel’
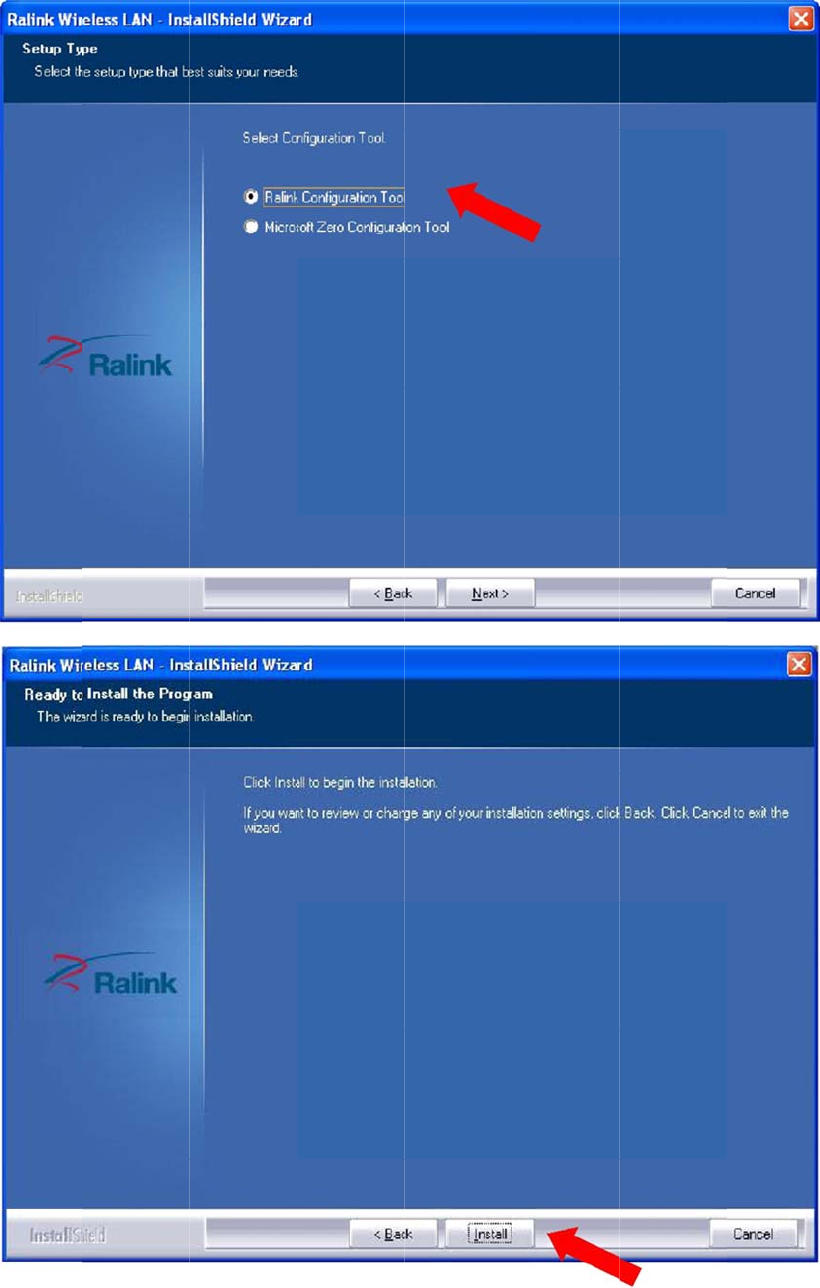
3. Insert the Driver CD then wait for the Autorun prompt..
4. If Autorun does not work, please browse the CD content and double click the
“Setup.exe”.
5. Click “Next” and then follow the instructions on the screen to continue the
installation.

8
9
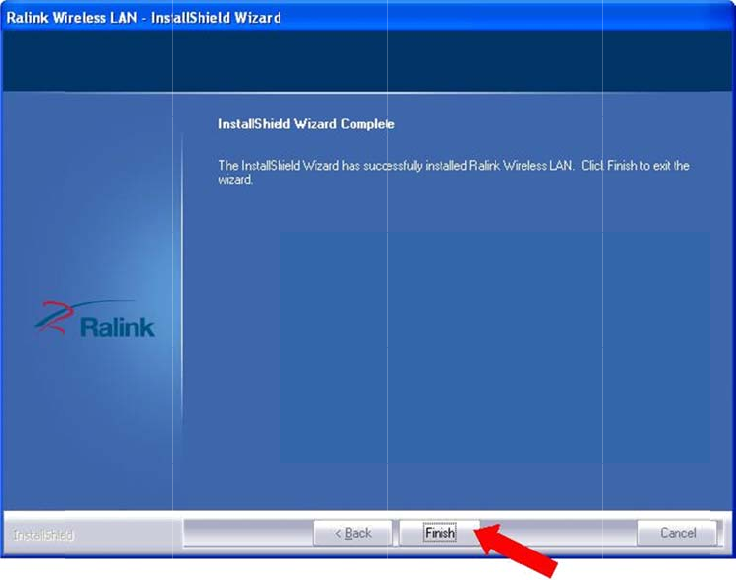
6. W
h
ins
h
en you se
e
s
tallation
e
this mes
process.
sage, ple
a
10
a
se click “
F
F
inish” to
c
c
omplete
t
the driver
11
3. Connect to Wireless Access Point
1. After installation is complete, a small Ralink icon appears in the notifications
area of the taskbar. You can double click it to maximize the RaUI dialog box.
2. When starting RaUI, the system will connect to the AP with best signal strength
without setting a profile or matching a profile setting. When starting RaUI, it will
issue a scan command to a WiFi network card. After two seconds, the AP list will be
updated with the results of a BSS list scan. The AP list includes most used
fields, such as SSID, network type, channel used, wireless mode, security status and
the signal percentage. The arrow icon indicates the connected BSS or IBSS network.
The dialog box is shown below.
You could click the two buttons which red arrow pointed to open the “Site Survey”
and “Link Information” page to show detail information.
12
3. You could follow the steps to connect to the AP which you want to connect
(Example to Configure Connection with WPA2-PSK).
a. Select the AP and click “Connect” icon
b. Authentication/Encryption function appears.
13
c. Select WPA2-PSK as the Authentication Type. Select TKIP or AES
encryption. Enter the WPA Pre-Shared Key.
d. Click "OK". Be careful, if the WPA Pre-Shared Key entered is not
correct, you won’t be able to exchange any data frames, even
though the AP can be connected.
14
4. At last, if you want to know more using method of RaUI, you could refer to the
help file by click the question mark at the top right corner of RaUI to open it.
15
Federal Communication Commission Interference Statement
This equipment has been tested and found to comply with the limits for a
Class B digital device, pursuant to Part 15 of the FCC Rules. These limits are
designed to provide reasonable protection against harmful interference in a
residential installation. This equipment generates, uses and can radiate radio
frequency energy and, if not installed and used in accordance with the instructions,
may cause harmful interference to radio communications. However, there is no
guarantee that interference will not occur in a particular installation. If this
equipment does cause harmful interference to radio or television reception, which
can be determined by turning the equipment off and on, the user is encouraged to try
to correct the interference by one or more of the following measures:
- Reorient or relocate the receiving antenna.
- Increase the separation between the equipment and receiver.
- Connect the equipment into an outlet on a circuit different from that to
which the receiver is connected.
- Consult the dealer or an experienced radio/TV technician for help.
FCC Caution: Any changes or modifications not expressly approved by the party
responsible for compliance could void the user's authority to operate this equipment.
-The Country Code Selection feature is disabled for products marketed in the US/Canada
This device complies with Part 15 of the FCC Rules. Operation is subject to the
following two conditions: (1) This device may not cause harmful interference,
and (2) this device must accept any interference received, including interference
that may cause undesired operation.
This EUT is compliance with SAR for general population/uncontrolled exposure limits in
ANSI/IEEE C95.1-1999 and had been tested in accordance with the measurement
methods and procedures specified in OET Bulletin 65 Supplement C.
This equipment should be installed and operated with minimum distance 0.5cm between
the radiator & your body.
16
Canada - Industry Canada (IC)
This device complies with Industry Canada license exempt RSS standard(s). Operation is
subject to the following two conditions: (1) this device may not cause interference,
and (2) this device must accept any interference, including interference that may
cause undesired operation of the device.
Le présent appareil est conforme aux CNR d'Industrie Canada applicables aux appareils radio
exempts de licence. L'exploitation est autorisée aux deux conditions suivantes : (1) l'appareil ne
doit pas produire de brouillage, et (2) l'utilisateur de l'appareil doit accepter tout brouillage
radioélectrique subi, même si le brouillage est susceptible d'en compromettre le fonctionnement.
CAN ICES-3 (B)/NMB-3(B)
IC Radiation Exposure Statement
This EUT is compliance with SAR for general population/uncontrolled exposure limits in
IC RSS-102 and had been tested in accordance with the measurement methods and
procedures specified in IEEE 1528. This equipment should be installed and operated with
minimum distance 0.5cm between the radiator & your body.