Light Speed Vision 174M Camera User Manual
Light Speed Vision (Beijing) Co.,Ltd. Camera
User manual
QHY174M COLDMOS Astronomy Camera Manual
01 Software Installation
1. Download and install ASCOM platform from the link below
http://ascom-standards.org/Downloads/Index.htm
2. Download and install the System Driver from the link below
http://note.youdao.com/share/?token=786920BD40DE4F11A12C792EA39B285B&gid=7234866#/
3. Download and install the ASCOM Driver from the link below
http://note.youdao.com/share/?token=64FD5A0238A84D1FBA0BD2D5D68F259F&gid=7234866# /
4. QHY174M camera uses SharpCap as the default capture software. Please download SharpCap
from the link below. QHY174M camera can run on SharpCap 2.9 or later versions
http://www.sharpcap.co.uk/sharpcap/downloads
Note that QHY174M requires the latest qhyccd.dll for the new version of SharpCap, and QHYCCD
has already made an update patch for it. You can download it from the link below
http://note.youdao.com/share/?token=A4F2944B7C324BEC8505C5A119FCB0E9&gid=7234866#/
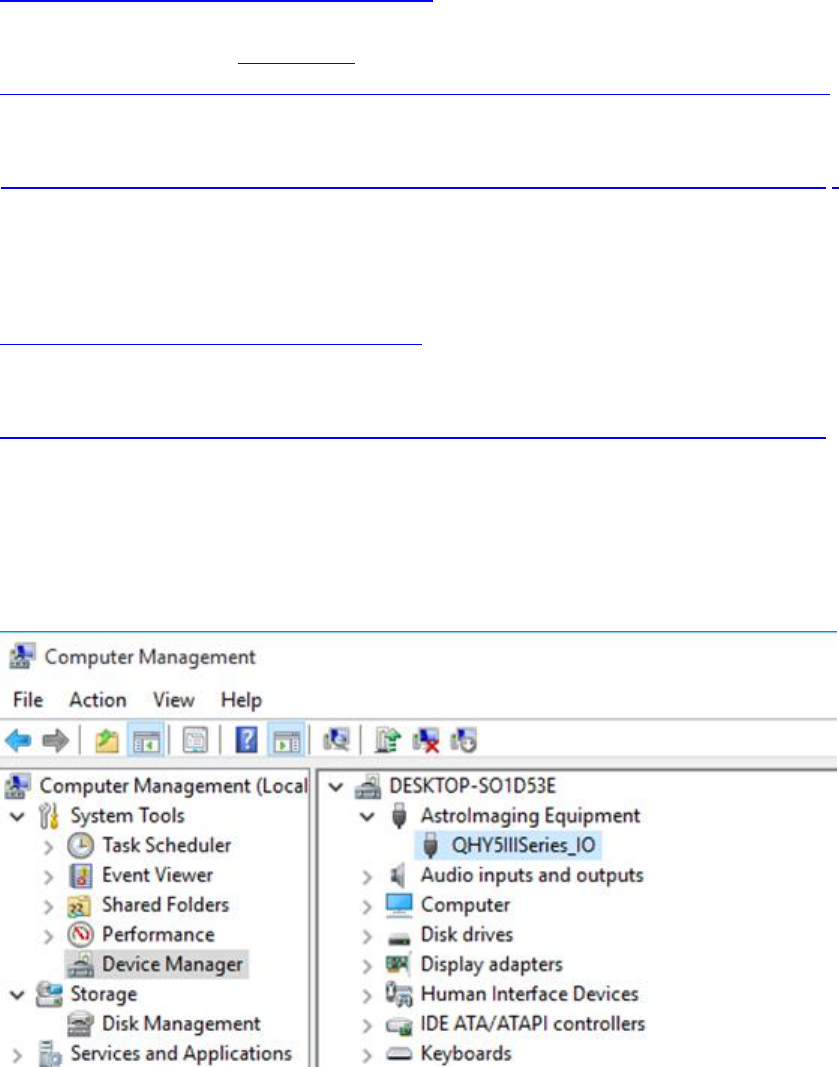
5. Connect QHY174M to your PC with USB3.0 cable. For the first time the system will find a new
device and search the driver. You can skip the online searching by clicking "Skip obtaining driver
software from Windows Update" and the computer will find the drivers. After installation is
complete successfully, you can find the device in the device manager as shown in the picture
below
02 How to Connect QHY174M to Color Filter Wheel
QHY174M is a monochromatic camera and it is frequently used with color filter wheel. With its
M42/2inch lense mount(this has already been installed on QHY174M), connecting it with QHY
color filter wheel will be simple and quick. QHY174M supports connections both with
QHYCFW2-S and QHYCFW2-M.
Take QHYCFW2-M for example, you can refer to the following instructions in the link below to set
up your QHYCFW-M.
http://www.qhyccd.com/ManualCFW2M2.1.html
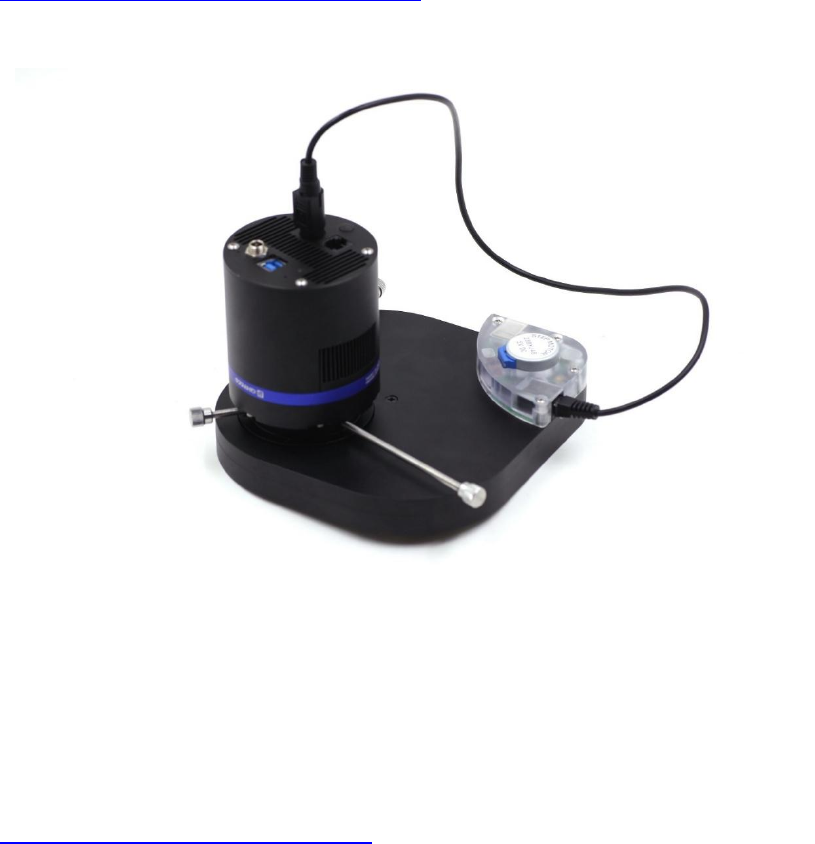
After you've installed color filters for your QHYCFW2-M properly, you can begin to connect it with
QHY174M as shown in the picture below.
First, you need to stick QHY174M into QHYCFW2-M as shown in the picture above. Then you
should screw those three bolts in. At the first time you screw bolts, you may find it a little bit
difficult to screw in, in this case, please make sure that the bolts are pointing towards the center
and apply a little bit more of force. Finally, you should connect your QHY174M with QHYCFW2-M
by using DIN4/RJ11 cable, which is included in the box.
The last thing you need to do before using QHY174M with QHYCFW2-M is to open the link below
to download and install the drivers(CFW2 and Filter[RS232]) for QHYCFW2-M.
http://www.qhyccd.com/QHYCFW2-M.html
Now, you should be all set. Read the following parts to know how to use QHY174M with color
filter wheel in SharpCap, MAXIMDL, and Sequence Generator Pro.
03 Use QHY174M in SharpCap
1. Connect your QHY174M to color filter wheel with DIN4/RJ11 cable. Connect your QHY174M to

12V power supply. Connect your QHY174M to your computer with USB3.0 cable. Before running
SharpCap, make sure filterwheel's initialization is finished. When it is initializing, you can hear the
sound gear makes. When it is finished, you will see the color lights flash. If you start SharpCap
before initialization is finished, SharpCap cannot detect the filterwheel.
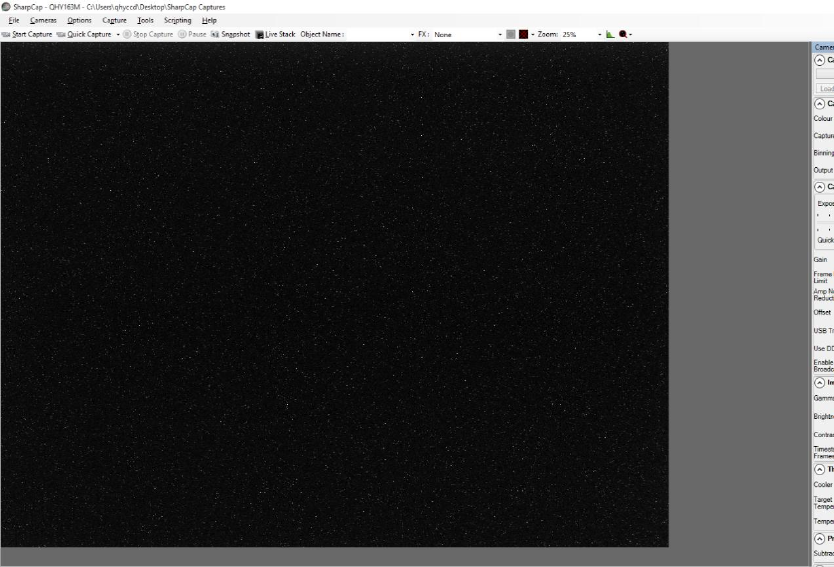
2. Run SharpCap. If the aforementioned software and drivers all have been installed properly, the
video image will appear automatically and you will se the frame rate at the lower-left corner of
the software as shown below
3. If you have started the SharpCap before connecting camera to your PC. You can click
menu->cameras->rescan for cameras to search the camera and check on the camera name
(QHY174M in this case).
4. To make sure the camera can run properly, the software will start the camera at the lowest
speed, which makes the frame rate much lower than the highest frame rate declared on its
webpage. Now you can try to get the most out of it by changing several settings. First you can try
to set the exposure time to 1ms, then try to reduce the "USB traffic" value. For modern computer
with i7-4 core, it should get the max performance. But please note that not all computers can get
the best performance due to various reasons such as the CPU loading, the saving-energy mode
setting, the mainboard performance and USB3.0 port performance. Sometimes the display size
may also impede obtaining the best performance. So you can try to use the "Zoom" function to
reduce the display size to see if it helps. Normally speaking the QHY174M can get more than
22.5FPS@16mega full resolution.
5. Adjust filterwheel position. You can select which filter you are going to use by changing the
position of filterwheel as shown in the following picture.
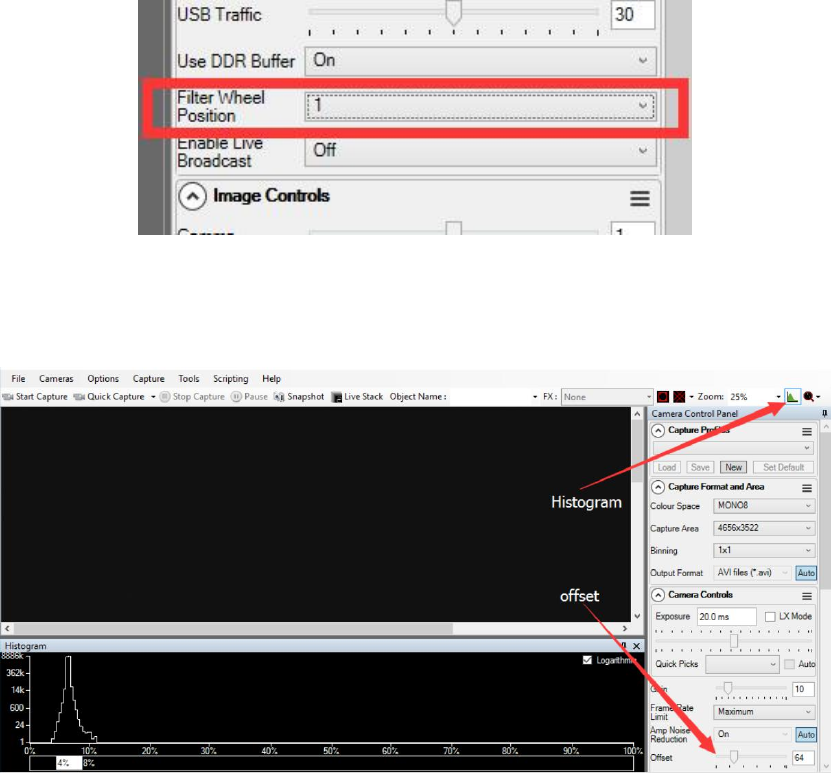
6. Adjust the offset. When you block the light thoroughly, you may find that the image is not
really zero. Sometimes this will lower the quality of image contrast. You can adjust the offset to
make the histogram peak close to zero in order to get a better background. You can open the
histogram to confirm that.
7. If you want to try 16bit image, you can switch the Colour Space to "MONO16".
8. By check the "LX" mode you can expand the exposure setting range and take long exposure
shot. QHY174M camera has the anti-amp light control circuit and it can reduce the amplifier glow
significantly. Note that it's impossible to reduce the glow in the corner thoroughly, and it's normal
to see a very small amount of glow in the corner when you do long exposure.
A typical long exposure image in +20 ℃, 5 sec exposure and 50% gain of QHY174M is shown
below.
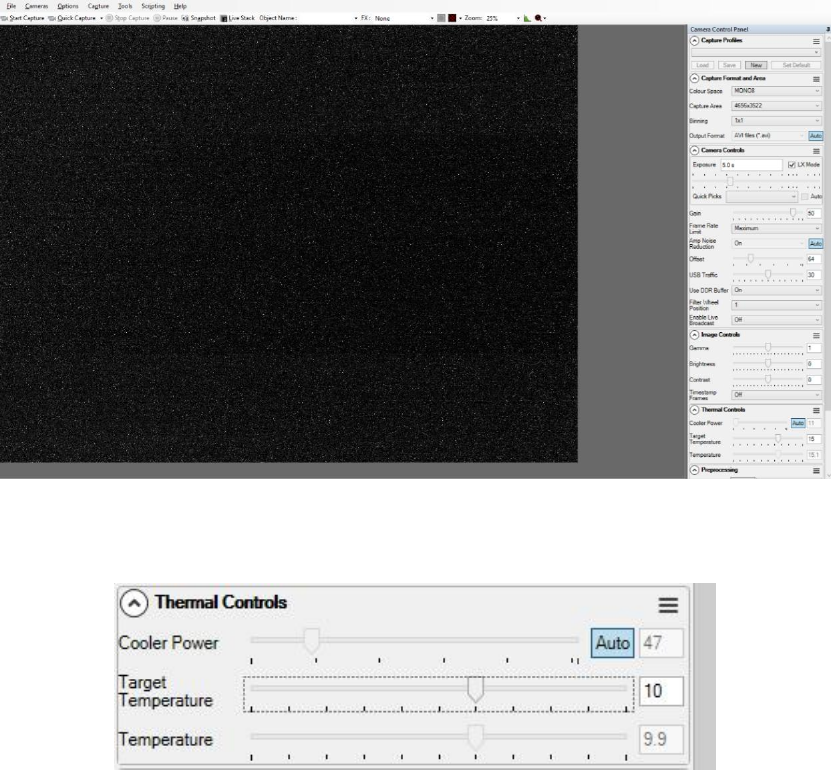
9. After you connect 12V power supply for QHY174M to power the TEC cooling circuit, you can
set the CMOS sensor cooling temperature in the "Thermal Controls" section in SharpCap as
shown in the following picture.
Basically, you can control the temperature of CMOS by either adjusting "Cooler Power" or clicking
"Auto" and adjusting "Target Temperature". You can also see the CMOS temperature at lower-left
corner of the software.
Before use this function, you should read the content about how to protect the cooler in the FAQ
section.
04 Use QHY174M with ASCOM
You can connect many software that support ASCOM. Currently QHY63M only supports normal
ASCOM connection and does not support the ASCOM VIDEO connection. Please note that
QHY174M always transfers maximum bit depth by ASCOM to make the best DSO imaging
performance. The image format is 16bit width and patch zero on low bit.
MAXIMDL
1. First you have to make sure that both ASCOM Platform and ASCOM driver have been installed.
If not, please install it first.
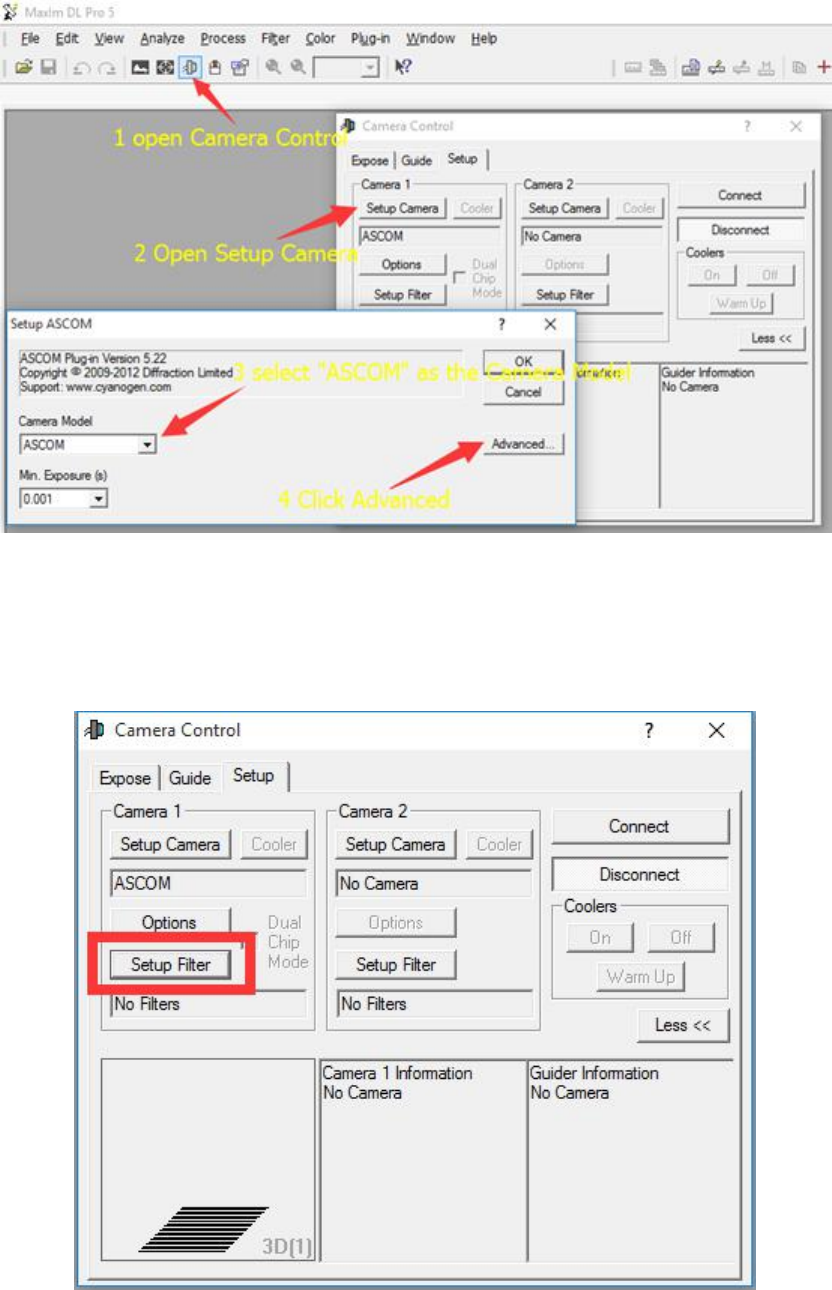
2. Start MAXIMDL
3. Follow the instructions shown below to finish the setup
Normally, you can set the gain=1 and offset=10 to start. Keep clicking "Okay" to return to Camera
Control window.
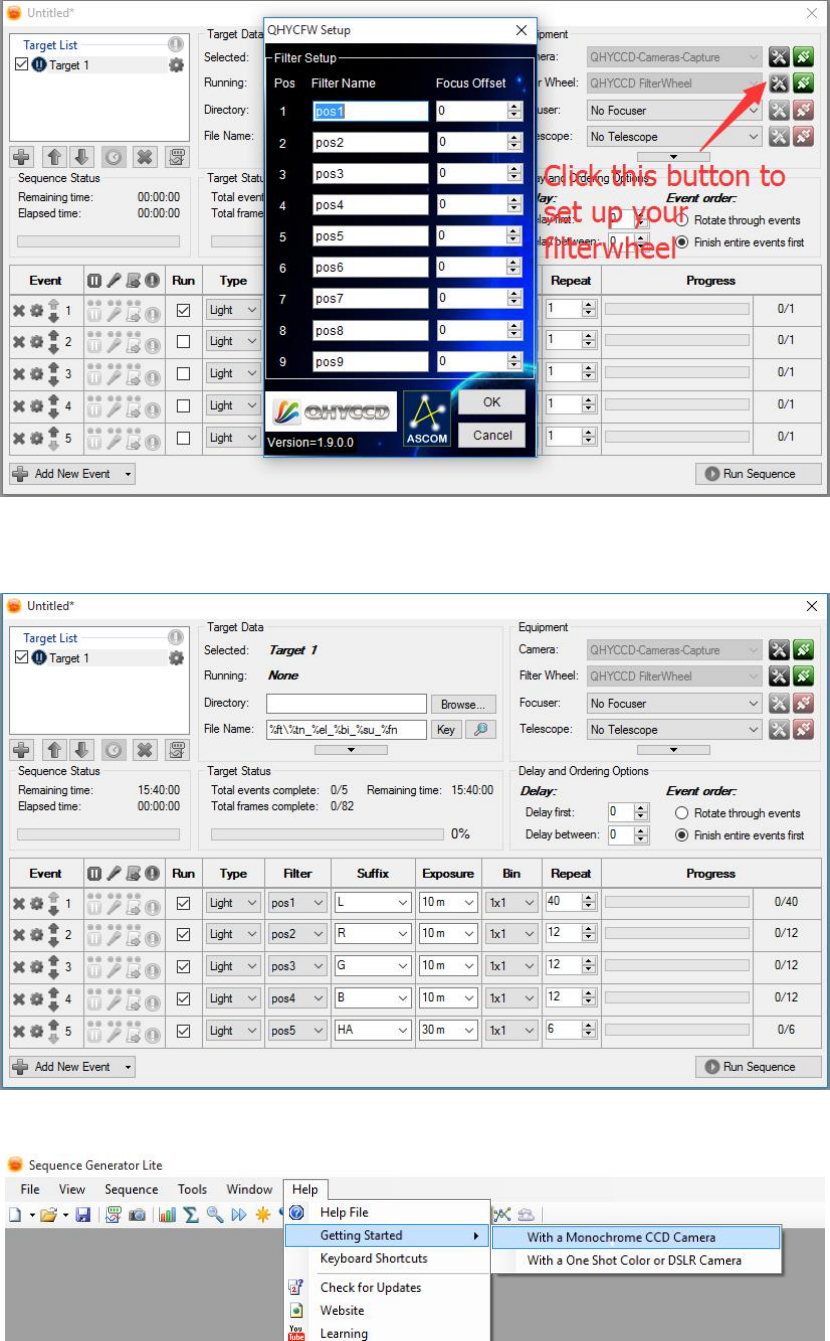
The following instructions are going to show you how to configure filterwheel(QHYCFW2-M) in
MAXIMDL.
Click "Setup Filter" in the Camera Control window.
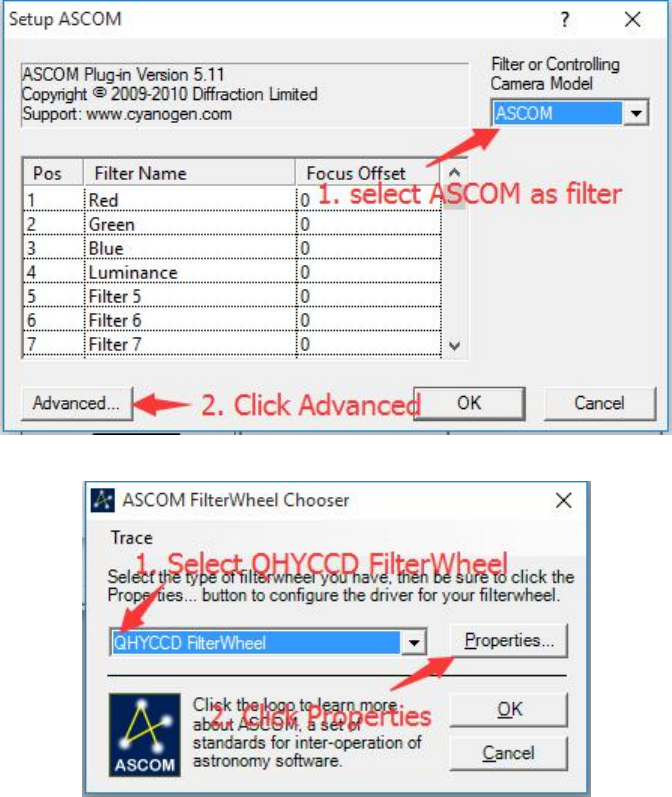
In the window shown below, you can set up your filterwheel
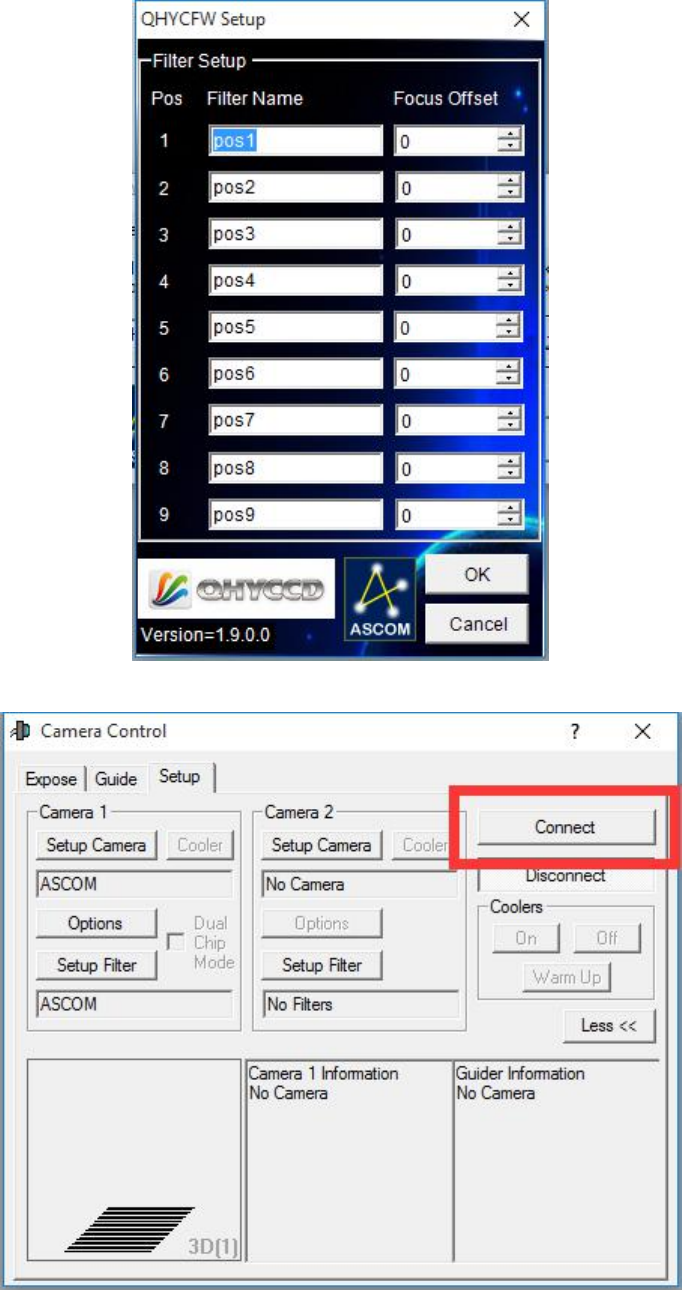
Keep clicking "OK" to return to the Camera Control window. Click "Connect"

Sequence Generator Pro
Sequence Generator Pro is an extremely powerful image capture suite. It can perform many
complex tasks in order to meet your imaging needs. After you connect your gears and configure
Sequence Generator Pro properly, you can go to sleep and see images in the morning.
To use QHY174M in Sequence Generator Pro, you can follow the instructions listed below.
Open sequencer by clicking the button in the red rectangle as shown in the picture below.
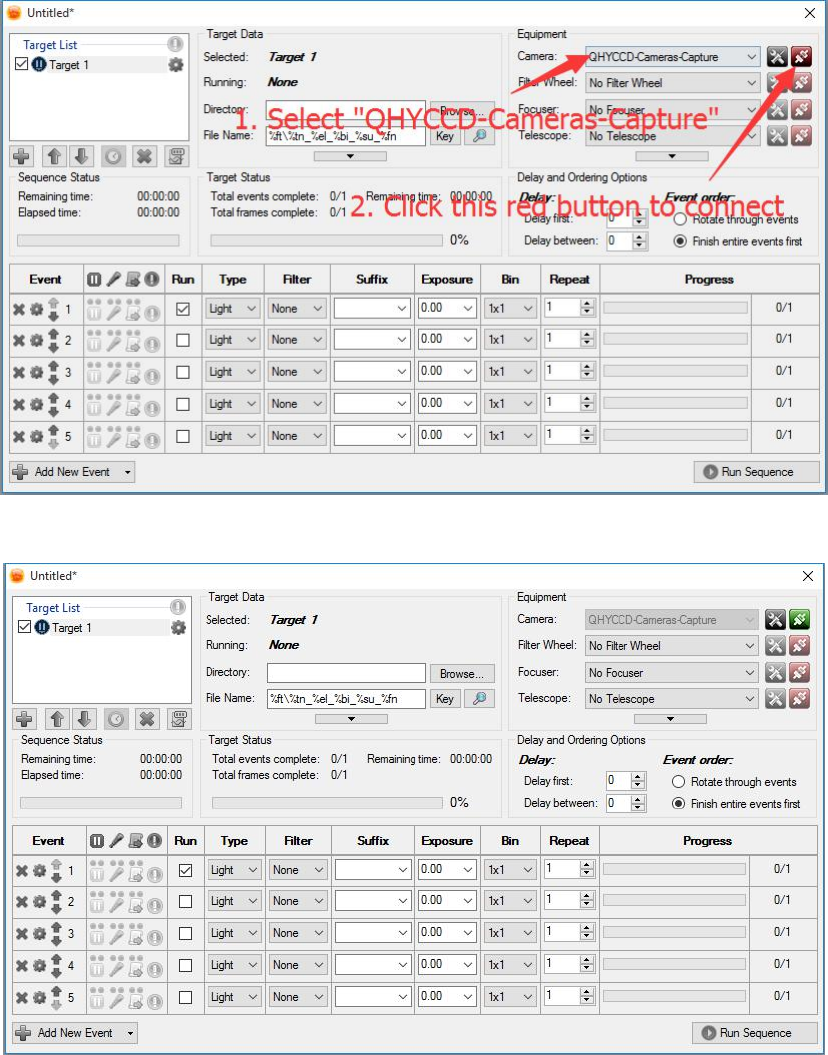
If you've connected QHY174M to your PC before click that red button. The red button will turn to
green as shown in the picture below.
The next step is going to connect your filterwheel(QHYCFW2-M). Before you select QHYCCD
FilterWheel as the filter and click the red connect button, you should also make sure you've
connected QHY174M to filterwheel(QHYCFW2-M) with DIN4/RJ11 cable, you've plugged in the
12V power supply cable, you've installed the FilterWheel drivers, and the initialization of
filterwheel has been finished.
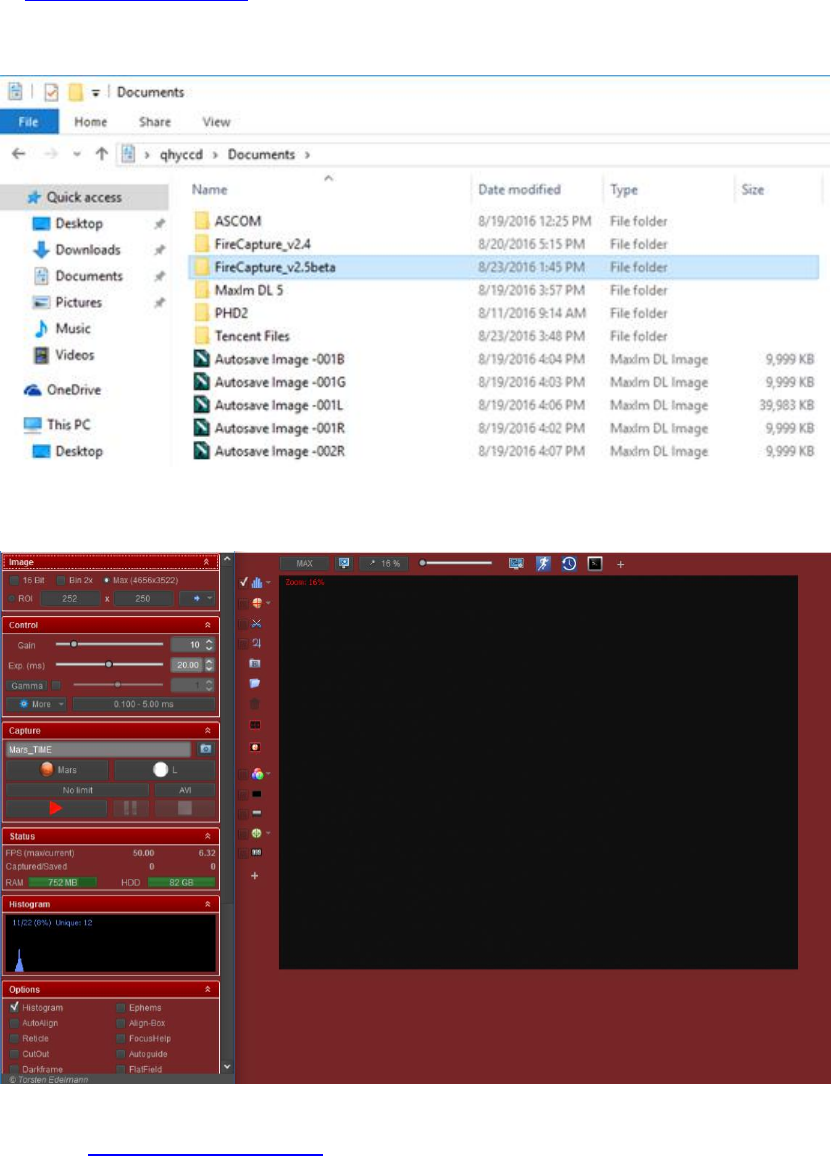
For example, you can change the filter names to Lum, Red, Green, Blue, Ha as you installed them
this way. Then you make schedule events to take turns to use these filters as shown in the
following picture.
For detailed and helpful tutorial of this software, please go to its website to check its help
content.
05 Use QHY174M in FireCapture
The latest FireCapture supports QHY63M already. Please go to FireCapture website to download
its v2.5 BETA (32-bit) version.
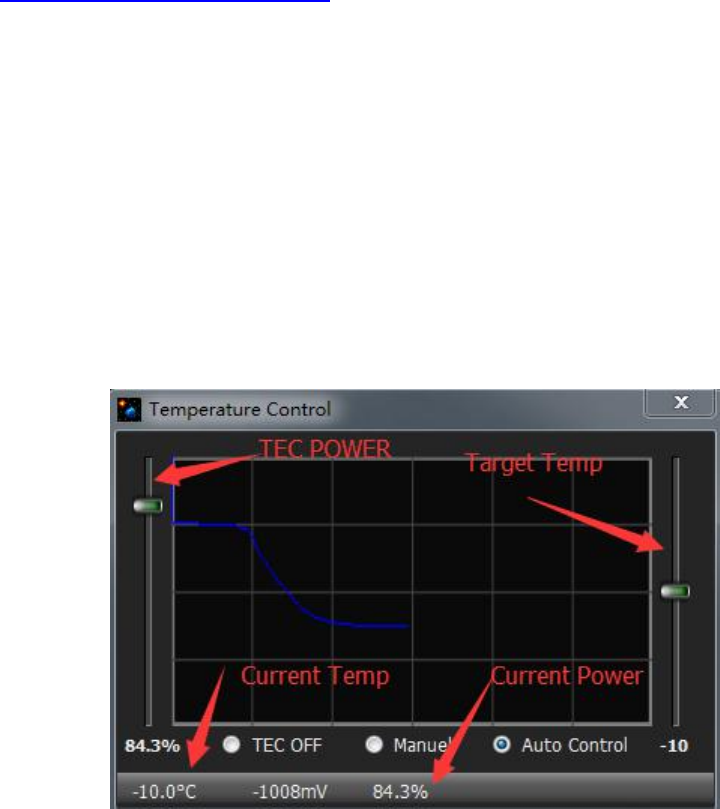
By default, it will be installed in the "Documents" folder. After it was installed successfully,
navigate to "Document folder", and you will find its installation folder as shown below.
Enter that folder and run "FireCapture.exe", then select QHYCCD camera. And after the loading,
you will see the image on FireCapture like shown below.
For detailed and helpful tutorial of this software, please go to its website to check the tutorial
section at http://www.firecapture.de/
06 Use QHY174M in EZCAP_QT
EZCAP_QT is the software developed by QHYCCD. This software has the basic capture function for
QHYCCD deep sky cameras. You can use this QHY63M camera with filterwheel in this software.
You can download it from the link below.
http://www.qhyccd.com/QHY174.html
1. Install EZCAP_QT software.
2. Connect your QHY174M to 12V power supply. Connect your QHY174M to color filter wheel
with DIN4/RJ11 cable. Connect your QHY174M to your computer with USB3.0 cable.
3. Run EZCAP_QT. Select "Connect" in Menu->Camera. If the camera is successfully connected.
The title of EZCAP_QT will display the camera firmware version and the camera ID as shown
below.
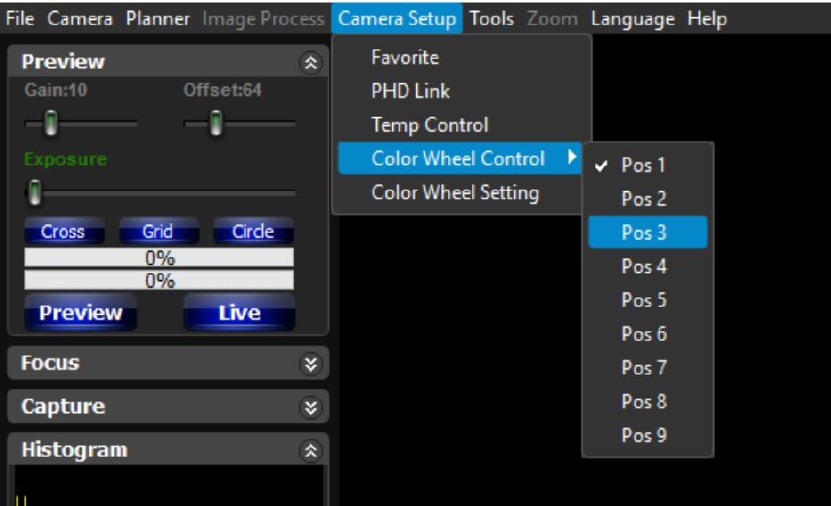
4. In Menu->Camera Setup, Click "Temp Control" and set the CMOS sensor temperature. You
can enable the "Auto Control " and set the target temperature . For example here we set the
temperature to -10C. The CMOS temperature will come to -10C very fast (in about 2-3minute). If
you want to close the TEC, you can select "TEC OFF". If you just want to set the TEC power but
not the temperature. You can select "Manual" and then set the percent of the TEC power.
5. You can select which filter you are going to use by changing the position of filterwheel as
shown in the following picture.
5. You can use the preview tab to do preview. And use the focus tools to do focus. Then use the
capture tab to capture image.
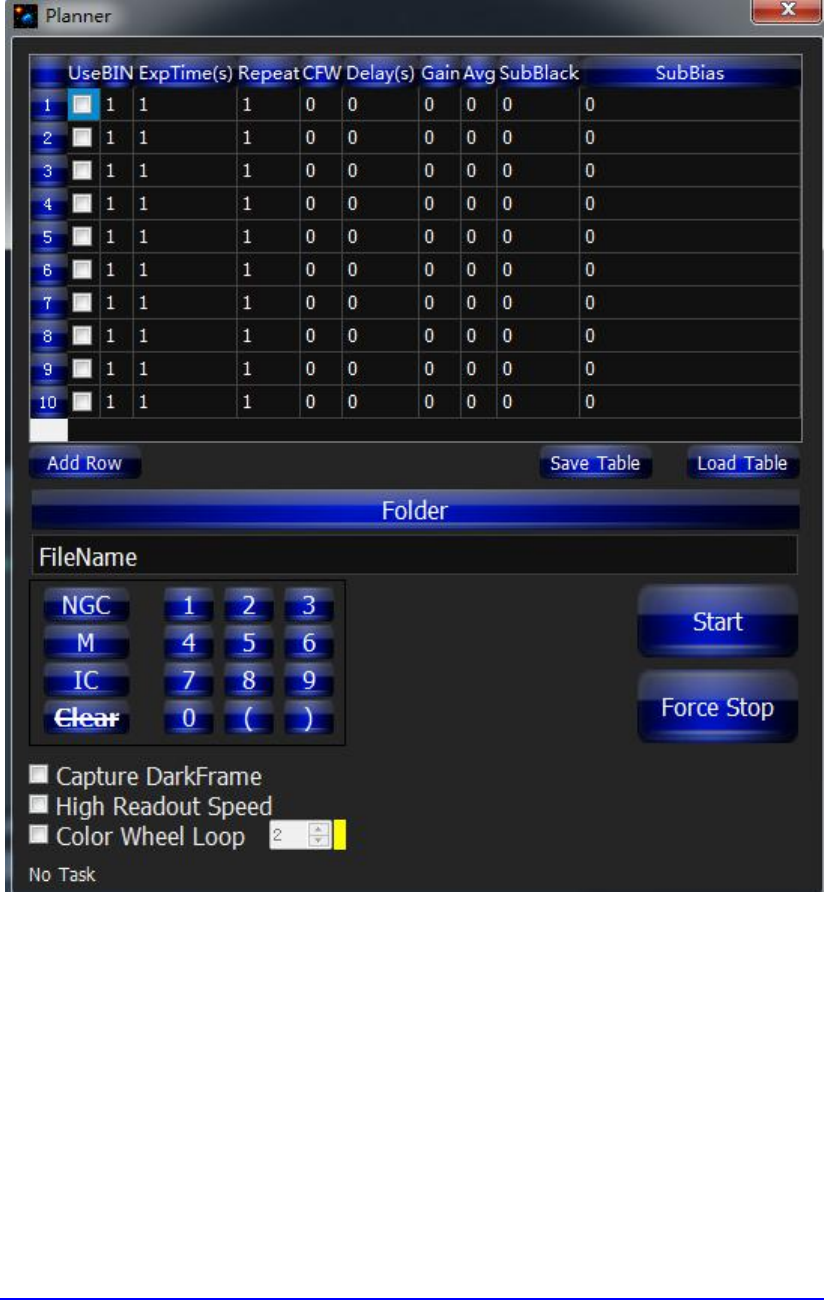
6. In EZCAP_QT there is a planner for image tasking. You can capture a series images by using
the table below.
07 Use BroadCast Video Streaming
BroadCast video steaming is a special function that QHY174M supports. It can send the video
image to multiple target software via QHYCCD BroadCast video driver. For example, you can use
the SharpCap software to control the QHY174M camera and at the same time the video
appearing on the SharpCap will be sent to any of softwares that support the WDM camera, like
the HandyAvi, Adobe video encoder, online Chat software etc. This function is very useful for the
video live boardcast applications.
1. Install the BroadCast Video WDM Driver from the link below
http://note.youdao.com/share/?token=104F4758D58B4EBF898063EC1BE99BBF&gid=7234866#/
2. Connect QHY63M to your PC and start SharpCap
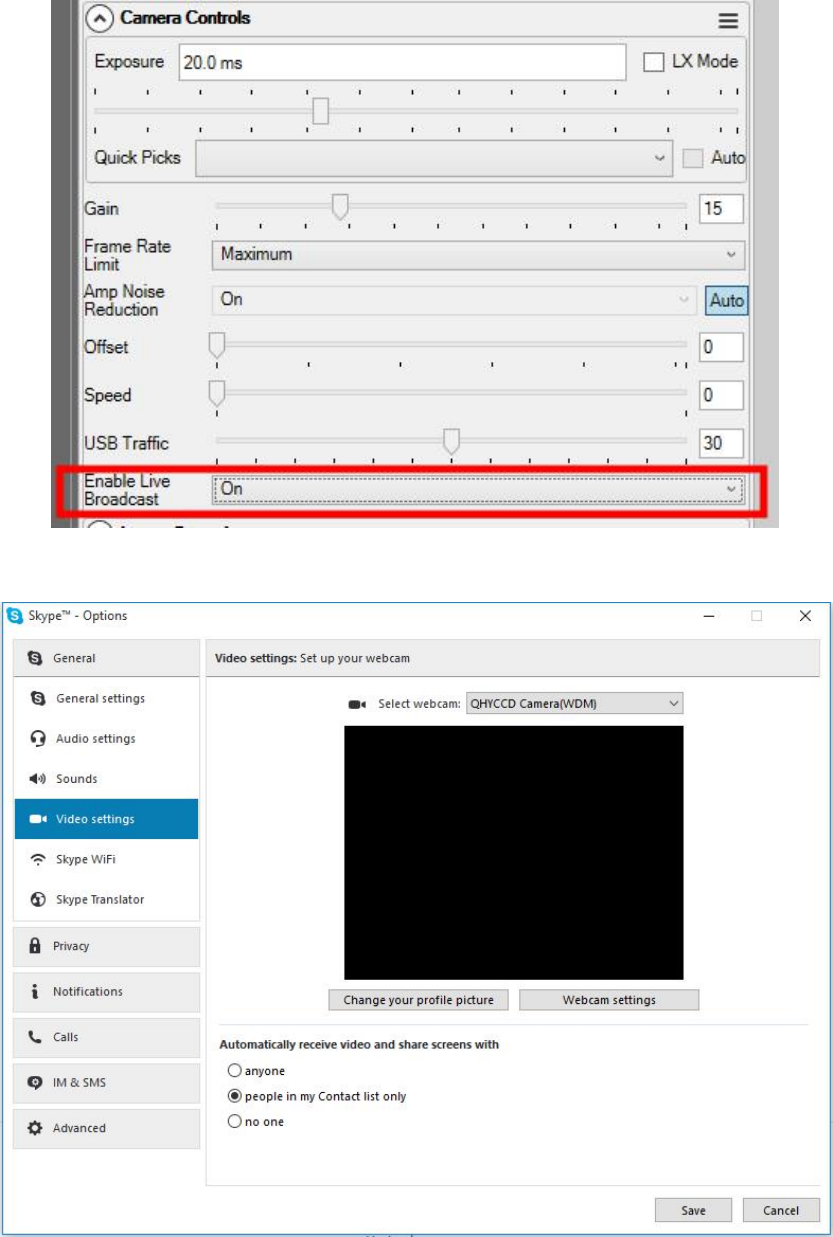
3. Turn on "Enable Live Broadcast" at the bottom of Camera Control panel in SharpCap as shown
below.
4. Select "QHYCCD camera (WDM)" as your webcam in the software you are using.
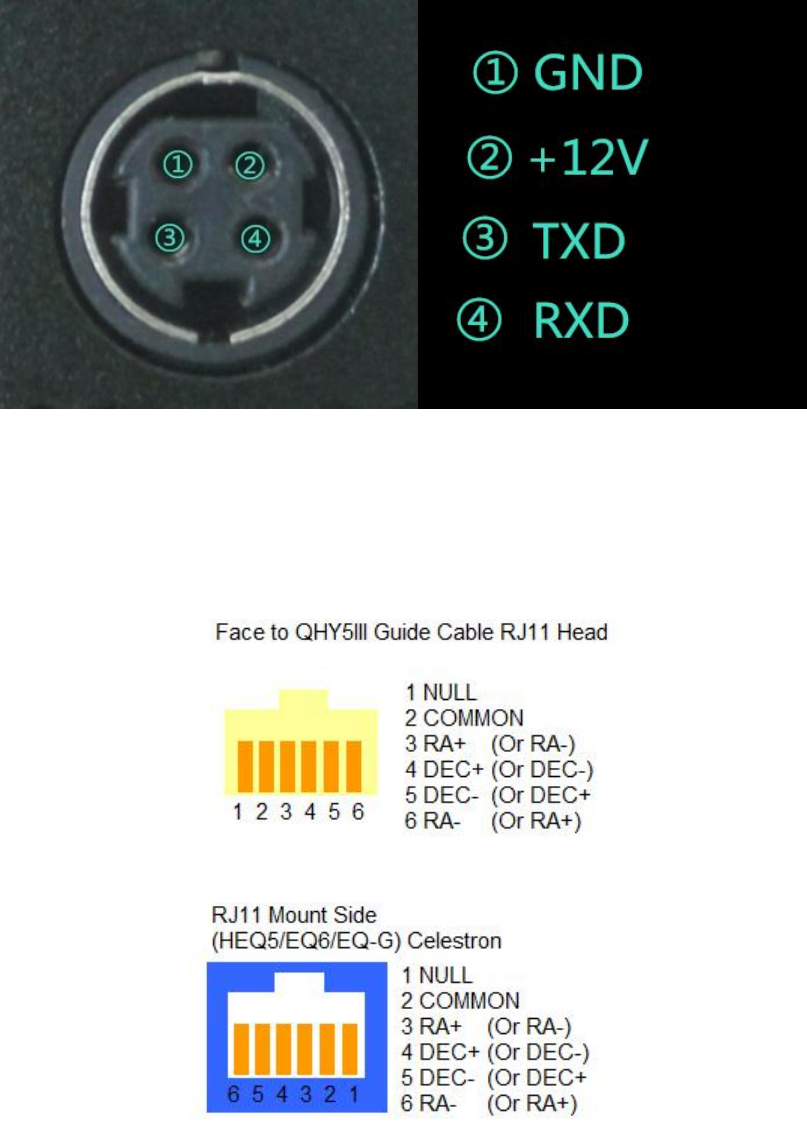
08 QHY174M Color Wheel Control Port
drawing of pin number arrangement
09 QHY63M Guide Port Cable RJ11 Pin sequence
This connector is fully compatible with the EQ5/EQ6/Celestron/ iOpton Guide Socket. The Pin
Sequence is (When face to the connector of the cable)
The Socket side (mount side) is
If you are using other mount, please check if it is the same pin sequence with the
HEQ5/EQ6/Celestron/iOpton.
10 FAQ
1. Does QHY174M support 10bit or 12bit?
QHY174M supports both 10bit and 12bit output(For 10bit, it is 0-255, and it only uses the high
8bit, for 12bit it is 0-4095 map to 0-65535).
2. How to get maximum FPS?
Since QHY174M has very high data bandwidth. Not all computer can get the maximum FPS.
Normally I7-4core should have no problem for that. The CPU loading will also affect the
maximum FPS. So please reduce the CPU load by close other applications when using camera. If
the CPU load is too high, the software may become very slow or hang.
3. How to avoid the camera hanging?
If you camera always hangs. It may be caused by many reasons. You can check the following
things.
3.1 If your computer is via chipset, or some type of the mainboard. In SharpCap it cannot get
image at all. (But in ASCOM it works well). In this condition, you need enable the DDR buffer of
the camera. Current SharpCap supports DDR function enable. The next version SharpCap will
support it.
3.2 If there is power leak for your mounts and computers? The power leak may cause the leak
current transfer from computer to the camera via the GND. This may affect the USB transfer and
cause the data packet lost and cause it hang. You need to make sure the computer and the
mount is well grounded.
3.3 If the USB port's voltage not enough? Some computer's USB port +5V is not enough. It may
cause the camera always hangs. In this condition you can use a powered USB3.0 HUB to connect
camera and get the good +5V power for camera.
3.4 If your CPU load is too high? If CPU load is too high, it will cause many frame lost and cause
the camera hangs. You can increase the USB traffic value to reduce the FPS and get more stable
video transfer.
3.5 If the USB cable connection is good enough? Sometimes the contact issue in the USB cable to
camera or USB cable to computer will cause the signal loss and cause camera to hang. Especially
when you move the cables. In this condition. You can try to add a little silicon oil into the USB
socket/plug .This can increase the contact a lot better.
3.6 Avoid the statics. Sometimes the static electricity on human body will cause the camera to
hang. You can touch the computer metal case for first before touch the camera to let the static
electricity on your body release.
3.7 Some computer's front USB port is not so good for high speed transfer (The reason is it
connected to mainboard by a cable and which has no good signal integrity). If you found the
camera always hang on front USB port. You can try the USB port on backside of the computer
(which is connected to chipset directly on the mainboard).
4. What's the interface to telescope? How to use C/CS lens on QHY63M?
QHY174M supports C lens but currently doesn't support CS lens. You need order the optional C
adapter for QHY174M with this adapter the back focal is 17.0mm and you can use the C-mount
lens with it. Since this sensor is one inch, you need to choose the lens which can cover the one
inch image circle.
5. How to clean the CMOS sensor and the optic windows of the camera?
If you found there is dust on the CMOS sensor. You can screw off the front part of the QHY174M.
The QHY174M's CMOS sensor has the AR coating so you need to be careful to clean it. You can
use the clean kit for DSLR sensor to do it.
The optic window is the IR cut coating or AR coating. So you need to be careful when cleaning it.
You can also use the DSLR clean tools or the lens paper. Don't use strong force to clean it. The
coating is not so hard and it is easy to get scratch when you use strong force on it.
6. How is the anti-amplifier function in QHY174M?
QHY174M camera has the anti-amp light control circuit and it can reduce the amplifier glow
significantly. Note that it's impossible to reduce the glow in the corner thoroughly, and it's normal
to see a very small amount of glow in the corner when you do long exposure.
This is a demo picture for the QHY174M glow in 60sec exposure and high gain. Dark frame
calibration can remove it completely.
7. What's on-camera DDR buffer and what is benefit for?
The QHY174M has the on-camera 128MB DDRII image buffer. It brings two advantages: It can
buffer whole image and avoid it lost during USB transfer. Because CMOS sensor outputs the
image continuous after exposure end and it does not allow the pause. But the computer may
have some pause due to the multi-task feature of the windows. If the pause is too long, the small
buffer in the USB transfer chip will full and the coming image data will lost. And it will cause one
frame is lost some data and this frame will be a bad frame. For short exposure it maybe not cause
big problem because the next frame will comes soon. But for long exposure it means you lost a
long exposure frame. The 128MB DDRII buffer can solve this problem by storing the whole
frame into it and transfer. Even the computer has big pause it will not lost data.
Another advantage is that it will make the video more smooth when in some slow computer or
some mainboard which is not friendly to USB3.0(like the VIA chipset) . In these computers they
cannot handle the high speed USB data well and the data is always lost. With this DDR it can
buffer the input image data and then send to computer. Even the high frequency pause happens,
it can keep the USB data lossless.
Note; The current SharpCap version has no options for enable/disable the DDR buffer. It is always
working in DDR bypass mode. In future SharpCap it will support the DDR enable function. The
current ASCOM driver is always working under DDR enabled mode.
8. How to protect the cooler in QHY174M?
The cooler in QHY174M can lower the CMOS temperature to a value that's almost 40 degrees
centigrade below the ambient temperature. So you need to be careful to avoid thermal shock,

which refers to when the cooler's temperature rises or fall dramatically, the cooler is subjected to
strong internal stress due to contraction principle. Drastic thermal shock can shorten cooler's
service life or permanently break it.
So when you begin to adjust the CMOS temperature, you should avoid setting "Cooler Power" to
its maximum value, and you should gradually turn up the "Cooler Power" value. When you turn
off the power, if the "Cooler Power" value is very big, you should gradually turn it down before
turn off the power.
11 Camera Maintenance
Drying the CCD Chamber
The CCD sensor is located in a CCD chamber. This chamber is airproof and connect to the socket
of the silicone gel tube on one side of the QHY63M front case. If there is moisture and cause the
CCD sensor glass get dew. You can connect the silicone gel tube on the socket to dry it.
Please put the effective silicone gel into the silicone gel tube. Make sure this is a cotton inside to
prevent the silicone gel get into the CCD chamber.
Avoid CCD chamber optic window get dew
If the environment humidity very high, the optic window of the CCD chamber may get dew. The
QHY174M has the build-in heat board on this optic window to heat the optic window to avoid it.
In most conditions it can take effect.
If the optic window still get dew please try the following method.
1. Avoid the CCD Camera face down to ground. The cold air is heavy than warm air, if you put the
camera facing down to the ground, the cold air is easy to get the optic window and cause it very
cold and get dew
2. Increase the temperature of the CCD sensor. You can increase the CCD sensor temperature a
little to prevent the optic window get dew.
3. Check if the heat board working. If the heat board not working, the optic window is easy to
get dew. Normally the heat board can get about 65-70C in +25C environment. If it is not so warm,
it maybe the problem of the heat board damaged. Need to contact QHYCCD to replace one heat
board.
12 Parameter Table
CMOS Sensor
Sony IMX174 Exmor CMOS sensor (Color)
Effective Area
11.34mm*7.13mm Typical 1/1.2inch
Active Pixel
1936*1216 2.35mega pixels
Pixel Size
5.86um*5.86um

QE
TBD
Exposure
5us-900sec
Frame rate
138FPS @ 1936*1216
260FPS@960*600
490FPS@480*300
Fullwell
>32 Ke
ADC Bit
10/12bit, Output 8bit/12bit
Readout Noise
5.3e@Gain0 2.8e@Gain60 1.6e@Gain100
TEC
2-stage TEC with -40C below ambient with temperature reg
ular
Data interface
USB 3.0 high speed interface
Built-in DDR memory
128MB DDR memory
Interface
12v power port,6pin RJ11 4PIN Color Wheel Control Port
Software
SharpCap, EZCAP_QT, ASCOM Driver, WDM Driver, Live
Video BroadCast Driver. Support FireCapture.
13 In the Box
Accessory Item
Quantity
USB3.0 cable(1.5m)
1
Self-locking power cable
1
6pin guide cable
1
Car power adapter
1
Drying tube
1
desiccant
1
M42/1.25inch adaptor
1
Driver download card
1
Inspection report
1
camera
1
Optional accessories

12V power adapter + power cable 1
C-adapter lens mount 1
This device complies with Part 15 of the FCC rules. Operation is subject to the following two
conditions: 1) this device may not cause harmful interference, and 2) this device must accept any
interference received, including interference that may cause undesired operation.
Note: This equipment has been tested and found to comply with the limits for a Class B digital
device, pursuant to part 15 of the FCC Rules. These limits are designed to provide reasonable
protection against harmful interference in a residential installation. This equipment generates, uses
and can radiate radio frequency energy and, if not installed and used in accordance with the
instructions, may cause harmful interference to radio communications. However, there is no
guarantee that interference will not occur in a particular installation. If this equipment does cause
harmful interference to radio or television reception, which can be determined by turning the
equipment off and on, the user is encouraged to try to correct the interference by one or more of
the following measures:
—Reorient or relocate the receiving antenna.
—Increase the separation between the equipment and receiver.
—Connect the equipment into an outlet on a circuit different from that to which the receiver is
connected.
—Consult the dealer or an experienced radio/TV technician for help.
Changes or modifications not expressly approved by the party responsible for compliance could
void the user's authority to operate the equipment.
The product can be used for a variety of occasions, such as the roof, indoor
balcony, classrooms, children's playground, landscape platforms, etc., using
the 12V power supply with the use of computers, the product can be
connected to either power adapter or 12V battery.