Lightcomm Technology CVS0336P Car Multimedia System User Manual manual
Lightcomm Technology Co., Ltd. Car Multimedia System manual
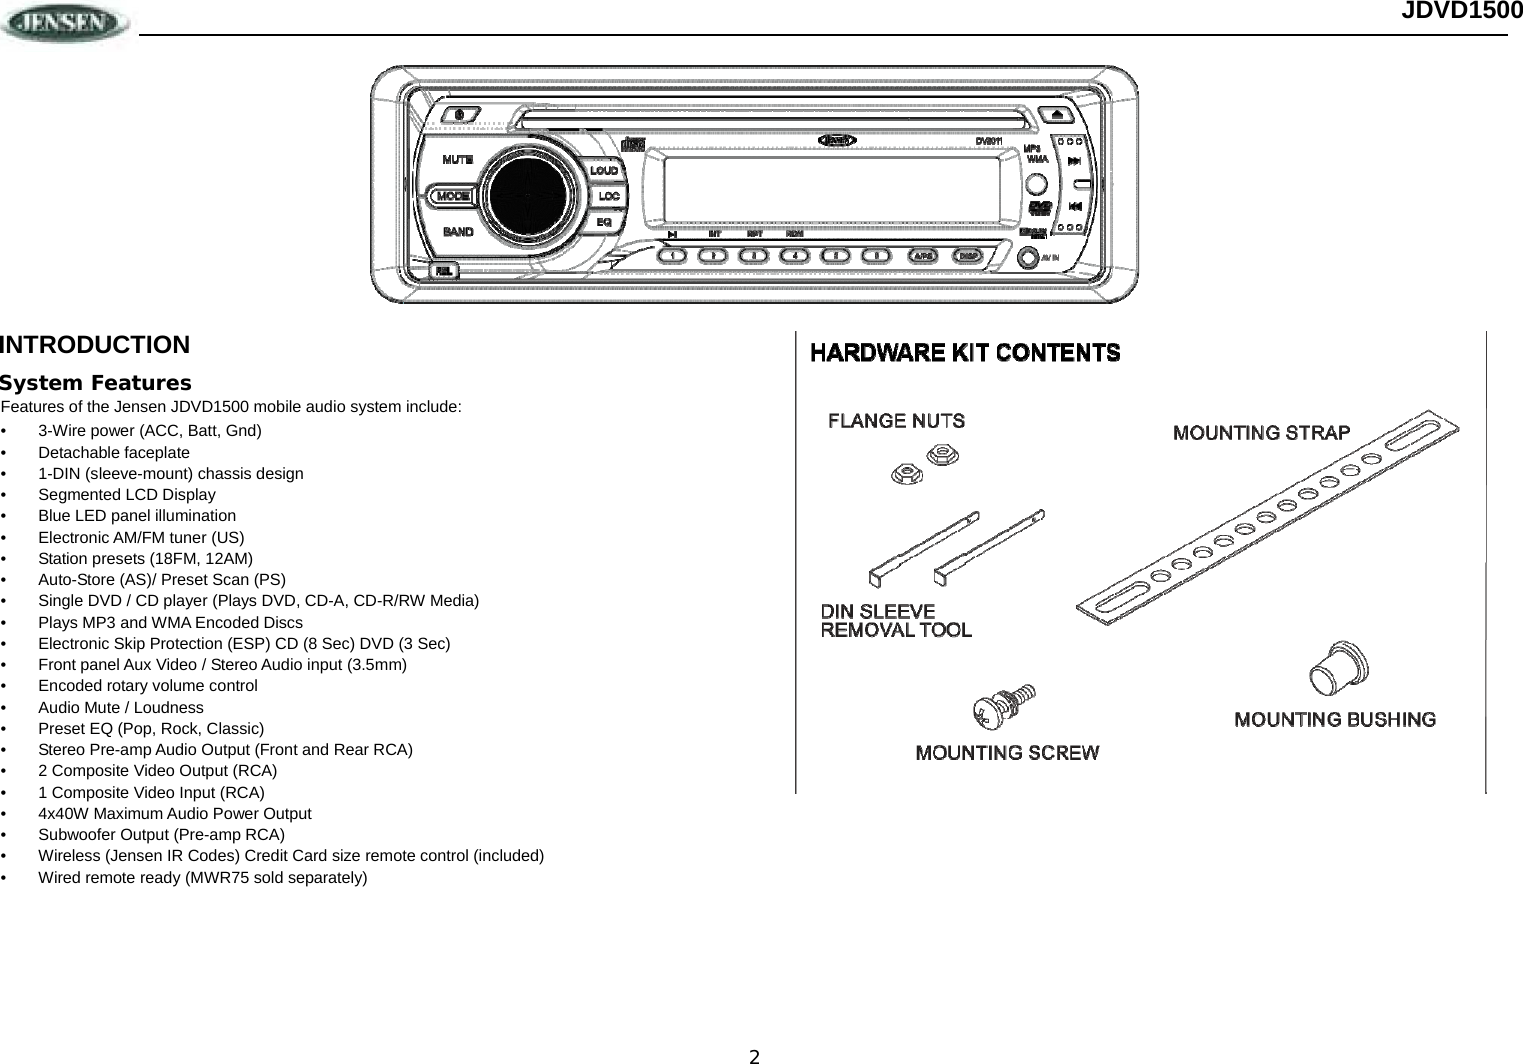
UserManual.wiki
>
Lightcomm Technology
>
CVS0336P User Manual
User Manual
Navigation menu
Upload a User Manual
Namespaces
Wiki Guide
HTML
PDF
Info
Views
User Manual
Discussion / Help
Navigation


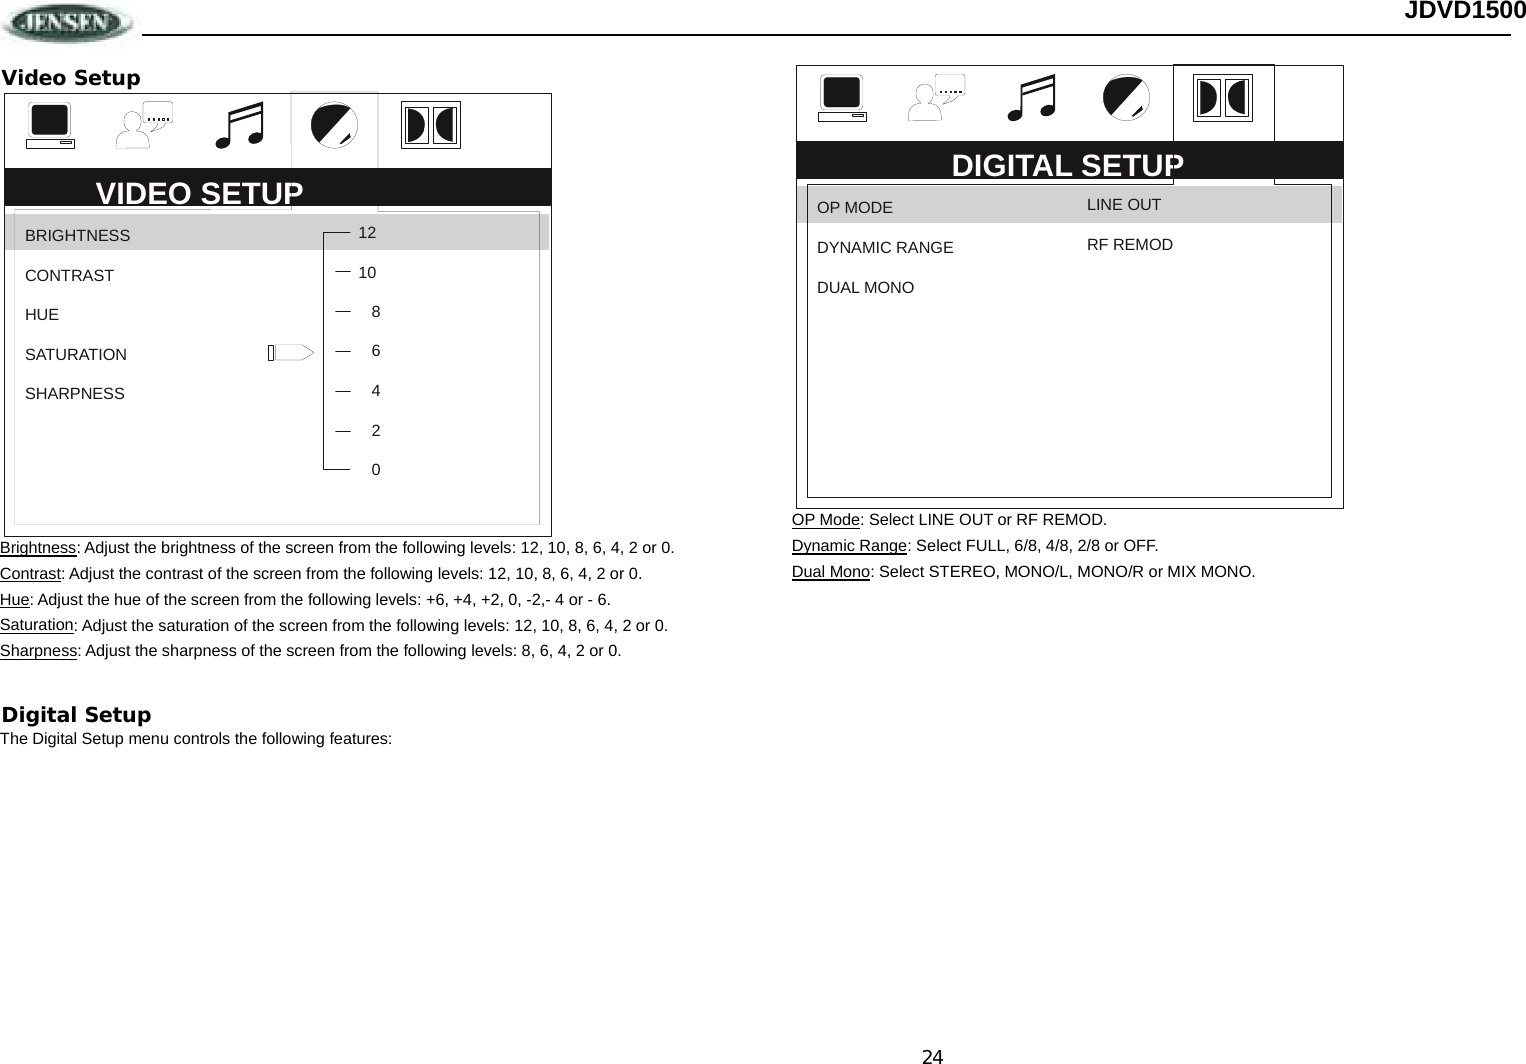
![15 JDVD1500 MP3/WMA OPERATION MP3 and WMA (Windows Media Audio) music files are digital audio files that are compressed to allow more files on a single CD. This unit can play MP3/WMA directly from files contained on a CD-R/RW using the buttons on the receiver (or optional remote) as described below. Many types of software are available for converting audio files into MP3/WMA formats. Jensen recommends Nero, MusicMatch Jukebox or Roxio Easy CD Creator. Depending on the media type and recording method, some CD-R/RW's may be incompatible with this unit. The unit supports playback of MP3/WMA and CDDA (CDA), Mixed-Mode CDs and CD-Extra (including multisession discs), but discs on which the session has not been closed will not play. Notes on MP3/WMA Play This unit can play MP3 (MPEG1, 2, 2.5 Audio Layer 3) and WMA ver. 7 and 8. However, the MP3 recording media and accepted formats are limited. When writing MP3/WMA, pay attention to the following restrictions. Acceptable Media The MP3/WMA recording media acceptable to this unit are CD-ROM, CD-R and CD-RW. When using CD-RW, use full format rather than quick format to prevent malfunction. Acceptable Medium Formats The following formats are available for the media used in this unit. The maximum number of characters used for file name including the delimiter (".") and three-character extension are indicated in parentheses. • ISO 9660 Level 1 (11 characters) • ISO 9660 Level 2 (31 characters) • Joliet (31 characters) Up to 200 characters can be displayed in the long file name format. For a list of available characters, see the instruction manual of the writing software. The media reproducible on this unit has the following limitations: • Maximum number of nested folders: 15 • Maximum number of files per disc: 796 (199 MP3+199 WMA+199 MPG+199 JPG) • Maximum number of folders per disc: 199 • Maximum number of sessions per disc: 5 MP3/WMA written in formats other than those listed above will not play successfully and their file names or folder names will not be displayed properly. MP3/WMA Encoder and CD Writer Settings Use the following settings when compressing audio data in MP3 data with the MP3 encoder: • Transfer bit rate: 32 - 320 kbps • Sampling frequency: 32,44.1,48 kHz (WMA) 16,22.05,24,32,44.1, 48kHz (Mp3) When using a CD writer to record MP3/WMA up to the maximum disc capacity, disable additional writing. To record an empty disc up to the maximum capacity at once, select the “disc at once” option. Entering ID3 Tag This unit supports ID3 tag versions 1.0 and 1.1. Controlling Disc Playback When a video monitor is installed, a screen similar to the following will appear when an MP3 disc is played. Select one of these icons to access the corresponding media on your disc. If the media type is not present, the icon will not be selectable. Play/Pause Disc Playback (>/||) Press the >/|| button (5) on the control panel (or >/|| on the remote control) to suspend disc play. Press the >/|| button(5) again to resume disc Play. Repeat Play (3/RPT) Press the 3/RPT button (11 on the control panel (or the RPT button on the remote control) during disc play repeatedly to activate Repeat Mode: • Press 3/RPT once to turn repeat off. • Press 3/RPT twice to repeat play the current track. • Press 3/RPT three times to repeat play the current folder. 01. CHERRYPOP CHRISISSA 02. CRAZYTO WN03. PHISH 04. BIPHISH 05. BOPHISH 06. FRPHISH 07. GIGUPHISH... 08. PHISH CH09.——————01.- 02.80 'S.ALLMANBRO 03 .DISCO-FUNK 04 .OLDIES 05 [‐]PHISHGUMBO.MP3 —Audio Photos Video](https://usermanual.wiki/Lightcomm-Technology/CVS0336P/User-Guide-3076866-Page-15.png)