Lightcomm Technology CVS0336P Car Multimedia System User Manual manual
Lightcomm Technology Co., Ltd. Car Multimedia System manual
User Manual

JDVD1500
CD / MP3 / WMA / DVD PLAYER / RECEIVER
Installation and Operation Manual
2
JDVD1500
INTRODUCTION
System Features
Features of the Jensen JDVD1500 mobile audio system include:
• 3-Wire power (ACC, Batt, Gnd)
• Detachable faceplate
• 1-DIN (sleeve-mount) chassis design
• Segmented LCD Display
• Blue LED panel illumination
• Electronic AM/FM tuner (US)
• Station presets (18FM, 12AM)
• Auto-Store (AS)/ Preset Scan (PS)
• Single DVD / CD player (Plays DVD, CD-A, CD-R/RW Media)
• Plays MP3 and WMA Encoded Discs
• Electronic Skip Protection (ESP) CD (8 Sec) DVD (3 Sec)
• Front panel Aux Video / Stereo Audio input (3.5mm)
• Encoded rotary volume control
• Audio Mute / Loudness
• Preset EQ (Pop, Rock, Classic)
• Stereo Pre-amp Audio Output (Front and Rear RCA)
• 2 Composite Video Output (RCA)
• 1 Composite Video Input (RCA)
• 4x40W Maximum Audio Power Output
• Subwoofer Output (Pre-amp RCA)
• Wireless (Jensen IR Codes) Credit Card size remote control (included)
• Wired remote ready (MWR75 sold separately)

3
JDVD1500
• IR repeater eye ready (IRPMRPT sold separately)
• Regulatory Certifications: FCC
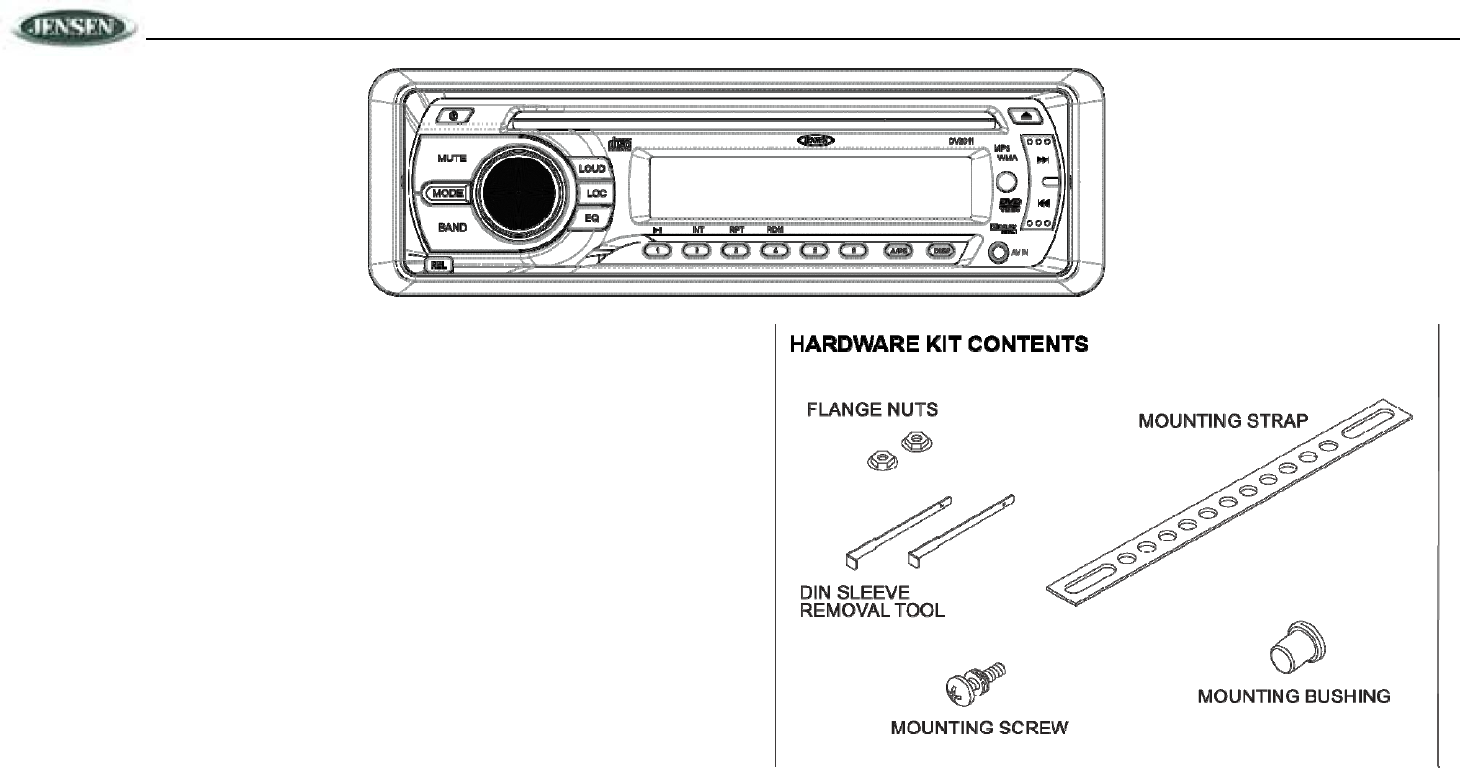
Content List
• Jensen Heavy Duty Radio
• Hardware Kit
• Installation Manual
• Quick reference Guide
SAFETY INFORMATION
When Driving
Keep the volume level Iow enough to be aware of the road and traffic conditions.
When Washing your Vehicle
Do not expose the product to water or excessive moisture. Moisture can cause electrical shorts, fire
or other damage.
When Parked
Parking in direct sunlight can produce very high temperatures inside your vehicle. Give the interior
a chance to cool down before starting playback.
Use the Proper Power Supply
This product is designed to operate with a 12 volt DC negative ground battery system (the standard
system in a North American vehicle).
Protect the Disc Mechanism
Avoid inserting any foreign objects into the disc slot. Misuse may cause malfunction or permanent
damage due to the precise mechanism of this unit.
CAUTION:
THIS MOBILE DVD PLAYER IS A CLASS I LASER PRODUCT. THIS UNIT USES A VISIBLE/
INVISIBLE LASER BEAM WHICH COULD CAUSE HAZARDOUS RADIATION IF EXPOSED
DIRECTLY. BE SURE TO OPERATE THE MOBILE DVD PLAYER AS INSTRUCTED.
USE OF CONTROLS OR ADJUSTMENTS OR PERFORMANCE OR PROCEDURES OTHER
THAN THOSE SPECIFIED HEREIN MAY RESULT IN HAZARDOUS RADIATION EXPOSURE.
DO NOT OPEN COVERS AND DO NOT REPAIR BY YOURSELF. PLEASE REFER SERVICING
TO A QUALIFIED TECHNICIAN.
WARNING:
• TO REDUCE THE RISK OF FIRE OR ELECTRIC SHOCK, DO NOT EXPOSE THIS
EQUIPMENT TO RAIN OR MOISTURE.
• TO REDUCE THE RISK OF FIRE OR ELECTRIC SHOCK AND ANNOYING
INTERFERENCE, USE ONLY THE RECOMMENDED ACCESSORIES.
• THIS DEVICE IS INTENDED FOR CONTINUOUS OPERATION.
This product incorporates copyright protection technology that is protected by method claims of
certain U.S. Patents and other intellectual property rights owned by Macrovision Corporation and
other rights owners. Use of this copyright protection technology must be authorized by Macrovision
Corporation, and is intended for home and other limited viewing uses only unless otherwise
authorized by Macrovision Corporation. Reverse engineering or disassembly is prohibited.
Region Management Information
This Mobile DVD Player is designed and manufactured to respond to the Region Management
Information recorded on individual DVD discs. If the Region number described on the DVD disc
does not correspond to the Region number(s) supported by this Mobile DVD Player, the disc will
not play in this unit.
4
JDVD1500
DISC NOTES
Compatible Disc Types
DVD Video
DVDs contain excellent sound and video quality due to Dolby Digital and MPEG2 encoding. A DVD
is 12 cm in diameter and can hold more than seven times the data of a CD-ROM. The maximum
playing time can be up to 2 hours (a double-sided DVD is up to 4 hours). There are four types of
DVD discs: single-layer single-sided (1), two-layer single-sided (2), single-layer doublesided (3),
and two-layer double-sided (4).
CD-DA
CD-DA discs can play voice data. The playing time of the standard 12 cm CD-DA disc is 74 minutes.
DTS-CD
The DTS digital surround sound uses 6 digital sound tracks to replace the analog voice tracks in
movies.
HDCD
HDCD, or “High Definition Compatible Digital,” is a recording/playing technology that improves CD
audio quality. Based on full compliance with CD specifications, it can enhance the quality and
quantity of digital sounds in the highest scale. It encodes the required messages that were
deserted by the CD format, and stores the related commands into the LSB. Without changing the
CD format, it is output through the 24-bit D/A converter, which will ultimately enhance the quality of
playback.
MP3/WMA/JPEG
This unit is compatible with CD-R, CD-RW, and CD-ROM discs containing MP3, WMA, and JPEG
tracks.
CD-R/CD-RW
This unit is compatible with CD-R and CR-RW discs that support ISO9660 specifications. “.MP3”,
“.JPG”, “.JPEG”, “.AC3”, “.PCM”, “.MPG”, “.MPE”, and “.WAV” formats can be included on
ISO9660-compatible discs.
DVD-R / DVD-RW
This unit is compatible with DVD-R and DVD-RW discs that support UDF specifications. “.MP3”,
“.JPG”, “.JPEG”, “.AC3”, ”.PCM”, “.MPG”, “.MPE”, and “.WAV” formats can be included on
UDFcompatible discs.
Incompatible Disc Types
• 8 cm disc
• CD ROM
• CDV, CDI, CDG
• LD
• DVD ROM
• DVD RAM
NOTE: DVD-R and DVD-RW discs will not play unless the recording session is closed and
the DVD is finalized.
Table 1: General Disc Information
Disc Type Logo Diameter/
Playable Sides Playback Time
DVD Video
12 cm single/double
side
(1 layer & 2 layer)
133 minutes (4.7 GB)
242 minutes (8.5 GB)
266 minutes (9.4 GB)
484 minutes (17 GB)
Audio CD 12 cm single side 74 minutes
MP3/MWA Disc CD-Rs or CD-RWs recorded in MP3, MPEG1 or 2, 2.5 Audio Layer 3 and
WMA Version 7 and 8. The recorded format must be compliant with ISO
9660 Level 1, ISO 9660 Level 2, Romeo, or Joliet.
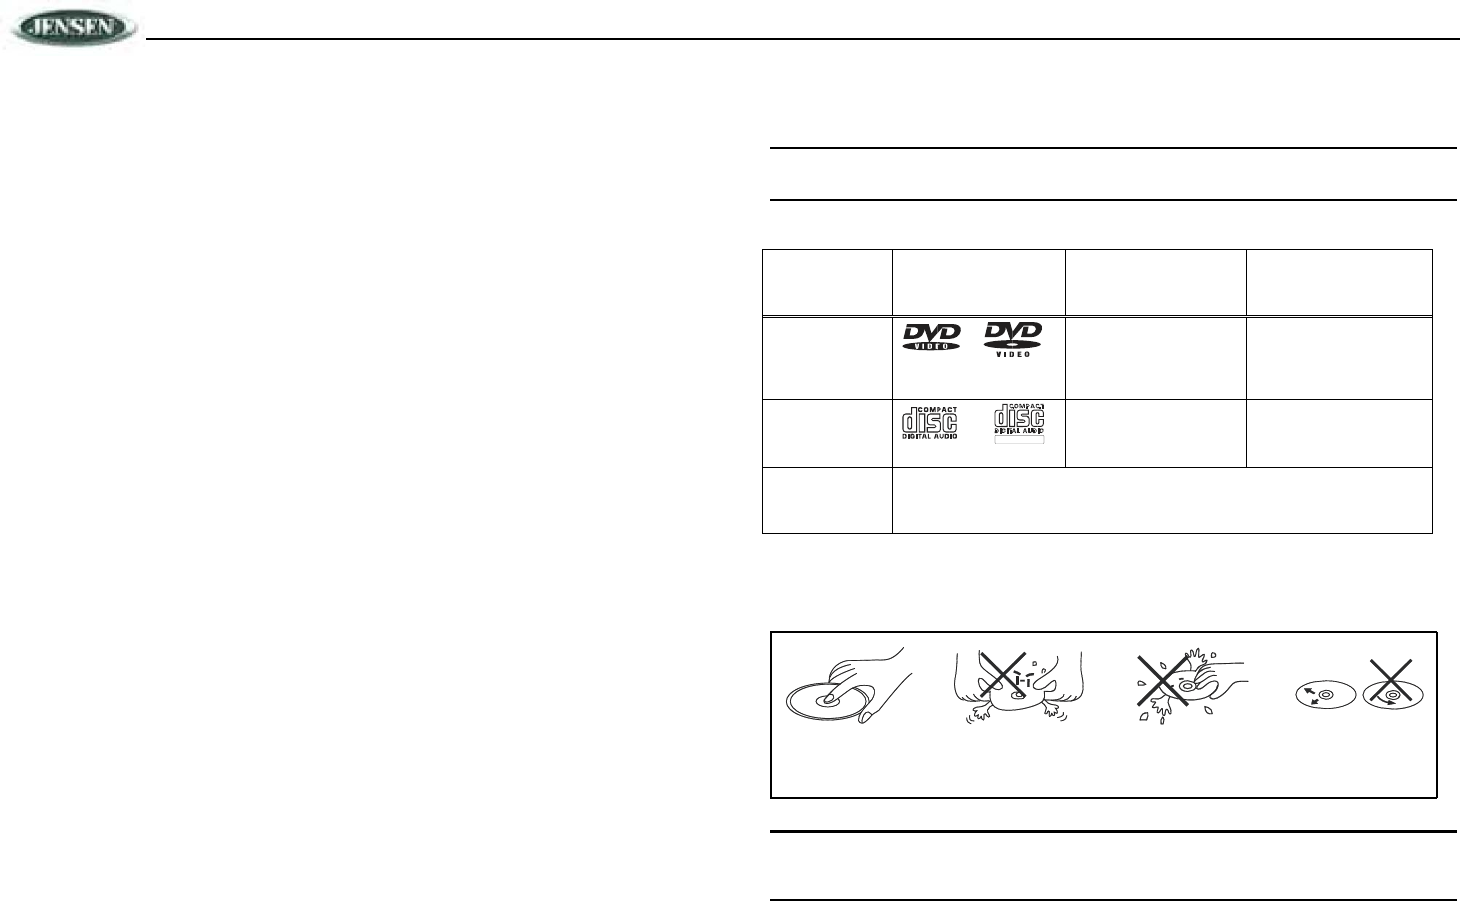
Disc Maintenance
Before playing, wipe the disc using a clean cloth, working from the center hole towards the outside
edge.
Never use benzene, thinners, cleaning fluids, anti-static liquids or any other solvent.
INSTALLATION
This unit can be property installed with either a “Front” (conventional DIN front mount) or “Rear”
(DIN rear mount installation, utilizing threaded screw holes at the sides of the unit chassis) mount.
For details, refer to installation methods A and B.
TM
REWRITABLE
NOTE: A disc may become scratched (although not enough to make it unusable)
depending on how you handle it and other conditions in the usage environment. These
scratches are not an indication of a problem with the player.
Insert label Do not bend. Never touch
the under side
of the disc.
Wipe clean from
the center to the
edge.
side up.
5
JDVD1500
Before You Begin
1. Disconnect Battery
Before you begin, always disconnect the battery negative terminal.
2. Remove Transport Screws
Important Notes
• Before final installation, test the wiring connections to make sure the unit is connected
properly and the system works.
• Use only the parts included with the unit to ensure proper installation. The use of unauthorized
parts can cause malfunctions.
• Consult with your nearest dealer if installation requires the drilling of holes or other
modifications to your vehicle.
• Install the unit where it does not interfere with driving and cannot injure passengers if there is
a sudden or emergency stop.
• If the installation angle exceeds 30º from horizontal, the unit might not give optimum
performance.
• Avoid installing the unit where it will be subject to high temperatures from direct sunlight, hot
air, or from a heater, or where it would be subject to excessive dust, dirt or vibration.
• Be sure to remove the control panel before installing the unit.
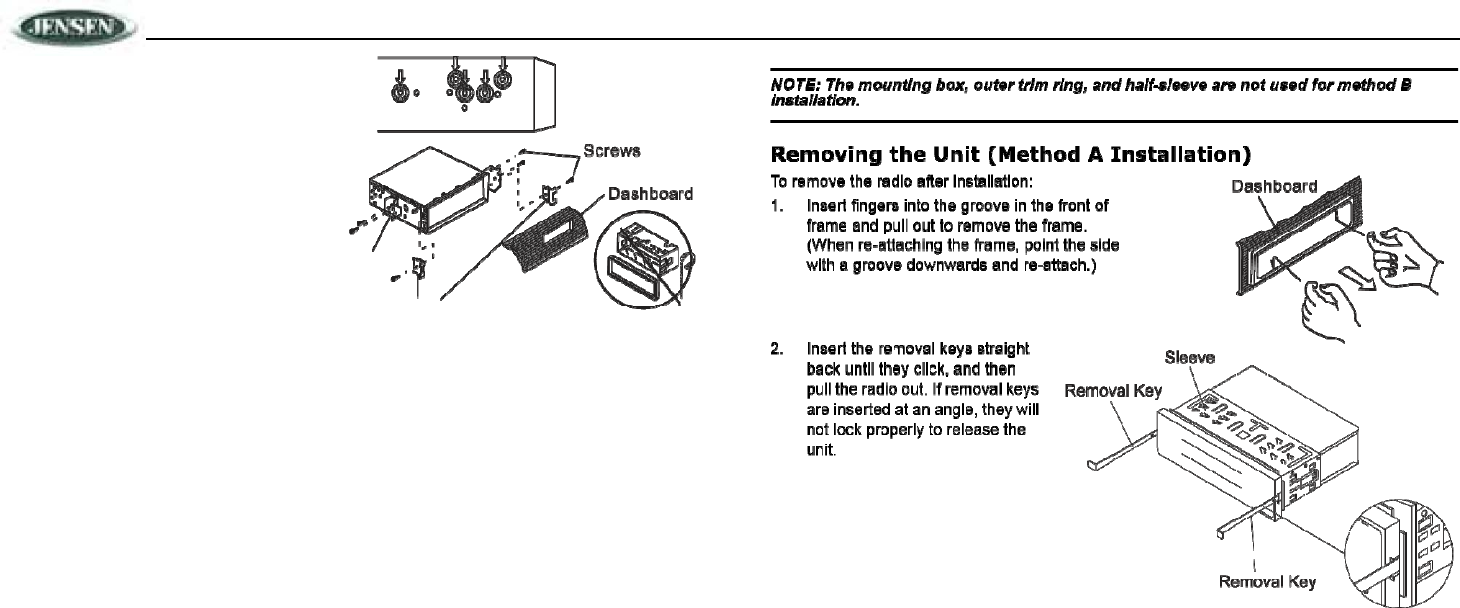
DIN Front Mount (Method A)
1. Slide the mounting sleeve off of the chassis if
Dashboard it has not already been removed.
If it is locked into position, use the removal
keys (supplied) to disengage it. The removal
keys are depicted in “DIN Rear Mount
(Method B)” on page 5.
2. Check the dashboard opening size by sliding
the mounting sleeve into it. If the opening is
not large enough, carefully cut or file as
necessary until the sleeve easily slides into
the opening. Do not force the sleeve into the
opening or cause it to bend or bow. Check that there will be sufficient space behind the
dashboard for the radio chassis.
3. Locate the series of bend tabs along the top, bottom and sides of the mounting sleeve. With
the sleeve fully inserted into the dashboard opening, bend as many of the tabs outward as
necessary to firmly secure the sleeve to the dashboard.
4. Place the radio in front of the dashboard opening so the wiring can be brought through the
mounting sleeve.
5. Follow the wiring diagram carefully and make certain all connections are secure and insulated
with crimp connectors or electrical tape to ensure proper operation.
6. After completing the wiring connections, turn the unit on to confirm operation (vehicle
accessory switch must be on). If the unit does not operate, recheck all wiring until the problem
is corrected. Once proper operation is achieved, turn the accessory switch off and proceed
with final mounting of the chassis.
7. Carefully slide the radio into the mounting
sleeve making sure it is right-side-up until it is
fully seated and the spring clips lock it into
place.
8. Attach one end of the perforated support strap
(supplied) to the screw stud Dashboard
on the rear of the chassis using the hex nut
provided.
Fasten the other end of the Plain Washer
perforated strap to a secure Screw (5 x 25mm)
part of the dashboard either
Rubber
Bushing above or below the radio
using the screw and plain Hex Nut (5mm)
washer provided. Bend the strap, as necessary, to position it. Some vehicle installations
provide cavity for rear support. In these applications, place the rubber bushing over the screw
stud and insert the radio.
CAUTION: The perforated rear support strap or rear rubber mounting bushing must be
used in the installation of the radio. Installation without either may result in damage to
the radio or the mounting surface and void the manufacturer’s warranty.
9. Test radio operation by referring to the operating instructions for the unit.
10. When wiring is complete, reconnect the battery negative terminal.
11. Push the trim plate against the chassis until it is fitted. You must do this before you install
the control panel, otherwise it can't be attached.
DIN Rear Mount (Method B)
This unit has threaded holes in the chassis side panels which may be used with the original factory
mounting brackets of some vehicles to mount the radio to the dashboard. Please consult with your
local mobile stereo shop for assistance on this type of installation.
1. Remove the existing factory radio from the dashboard or center console mounting. Save all
hardware and brackets as they will be used to mount the new radio.
2. Carefully unsnap the plastic trim ring from the front of the new radio chassis. Remove and
discard the trim ring.
3. Remove the factory mounting brackets and hardware from the existing radio and attach them
to the new radio. Select a position where the screw holes of the bracket and the screw holes
of the main unit are aligned (are fitted). Tighten the screws at 2 places on each side. Do not
exceed M5 x 9 MM
182
53
BendTabs
ScrewStud
ScrewStud
SupportStrap
6
JDVD1500
F
actory maximum screw size. Longer
Mounting screws may damage
Bracket components inside the
chassis.
4. Wire the new radio to the Hook
(Remove) vehicle as outlined in the
Universal Installation instructions.
5. When wiring is complete, reconnect the
battery negative terminal.
6. Mount the new radio assembly to the dashboard or center console using the reverse
procedure of step 1.
CAUTION:
• DO NOT insert the DCP from the left side. Doing so may damage it.
• The DCP can easily be damaged if dropped or subjected to a strong shock. When the
release button is pressed and the DCP is unlocked, the vehicle's vibrations may cause
it to fall. To prevent damage to the DCP, always store it in a protective case after
detaching it.
• The rear connector that connects the main unit and the DCP is an extremely important part.
Be careful not to damage it by pressing on it with fingernails, pens, screwdrivers, etc.
• If the DCP is dirty, remove debris with a soft, dry cloth only. You can use a cotton swab
soaked in isopropyl alcohol to clean the socket on the back of the DCP.
7
JDVD1500
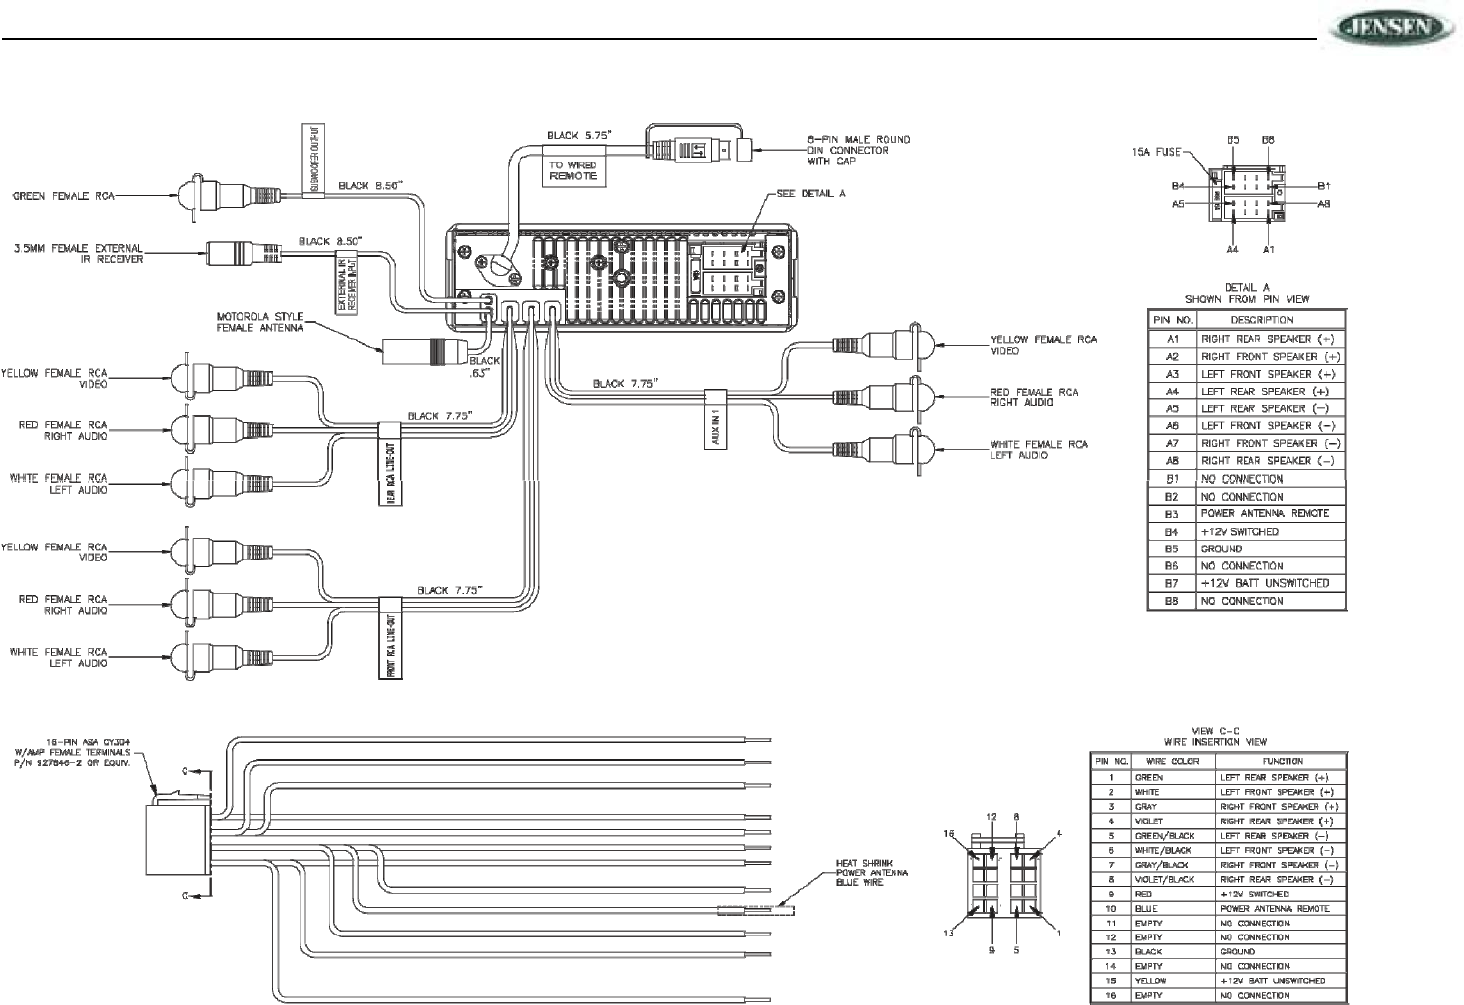
WIRING
8
JDVD1500
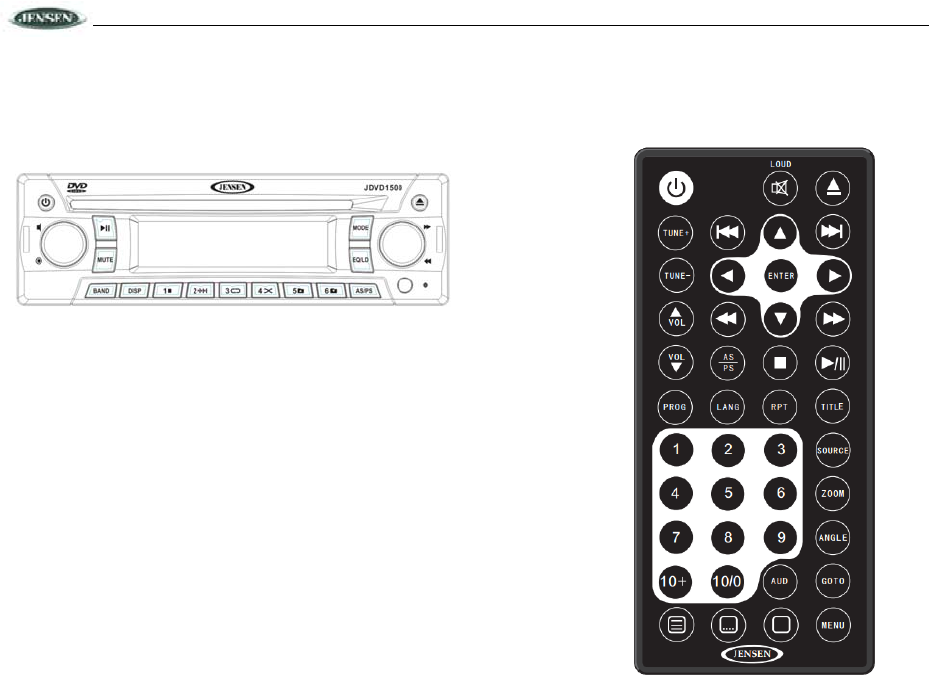
CONTROLS AND INDICATORS
The buttons located on the unit and the remote control that perform the same function are assigned the same number
for reference on the diagrams and in the text.
Front Panel Operation
1. Power
2. Eject
3. Audio Control Button
4. Volume Control Knob
5. Play/Pause
6. Mute
7. Band Select
8. Clock Display
9. Preset 1, Stop Disc Playback
10. Preset 2, Intro Scan
11. Preset 3, Repeat Play
12. Preset 4, Random Play
13. Preset 5, Folder Down
14. Preset 6, Folder Up
15. Auto Store/Preset Scan
16. Mode/Source Select
17. Preset Equalizer/Loudness Boost Setting
18. Confirm Button
19. Fast Forward/Rewind and Advance Chapter/Previous Chapter knob
20. Infrared senor
21. Reset
22. Disc slot
Remote Control Operation
Using the Remote Control
Point the remote control towards the player front face remote sensor IR (2). The operation angle is approximately 30
degrees in each direction of the front of the remote sensor.
9
JDVD1500
Ref
#
Button Function
26 TITLE Display the TITLE menu stored on DVD disc
27 TUNE- Tune down one step
28 <</TRACK Search in reverse rapidly
29 >>/TRACK Search forward rapidly
30 0-9 Enter track/chapter number directly. Use GOTO to search.
31 GOTO Used with numeric buttons to search disc
32 Press to mute/resume audio.
Ref # Button Function
1 /POWER Turn the unit ON or OFF
2 /EJECT Eject the disc
3 >>|/TRACK Skip to the next track/chapter
4 Stop disc playback
5 >|| Play/pause the disc (for disc play mode)
6 |<</TRACK Go to previous track/chapter
7 VOL
/
\
Increase the volume level
8 VOL
\
/
Decrease the volume level
9 AUDIO Select the desired adjustment mode (BASS, TREBLE, BALANCE,
FADE).
10 SOURCE Change between tuner, disc (DVD/VCD/CD/MP3) play mode, AUX IN
and BT mode
11 Display statistical disc information during playback
12 PROG Display programmed playback screen, allowing you to enter tracks to
play in programmed order.
13 TUNE+ Tune up one step
14 RPT Repeat current track/chapter
15 AS/PS Press and hold to save the 18 strongest station in your are
Press once to automatically scan through the stored channel
16 Change the SUBTITLE language on multi-subtitle language DVD discs
17 ANGLE Change the viewing angle on multi-angle DVD discs
18 MENU (PBC) Display the root menu stored on DVD discs/Switch between PBC ON and
PBC OFF on VCD discs
10
JDVD1500
Remote Control Functions
BASIC OPERATION
19 Display the SETUP menu
20 ZOOM Increase the picture size
21 10+ Feature not used on this model
22 10/0
23 <, >
/
\
,
\
/
Select items left/right and ahead/back in menu mode
24 ENTER Confirm selection of track/chapter
25 LANG Change the audio sound track on multi-audio sound track DVD discs.
Change the sound mode of VCD discs

11
JDVD1500
Power On/Off ( )
Press the button (1) on the front of the unit ON or OFF.
Volume Control
To increase the volume, rotate the audio control knob (3) clockwise.
To decrease the volume, rotate the audio control knob counter clockwise. When the volume is
adjusted, the volume level is shown on the display panel as a number ranging from “0” (lowest) to
“40” (highest).
Mute
Press the MUTE button (6) to mute the audio output. “MUTE” will appear on the display. Press
MUTE again to restore the audio output to the previous level.
Mode
Press the MODE button (16) to select a different mode of operation, as indicated on the display
panel. Available modes include Tuner, DVD, AUX IN and BT.
Equalizer (EQ) And Loudness(LOUD)
The preset equalizer applies preset sound effects to the unit’s audio output signal. To adjust the
preset equalizer, press the EQ/LD button (17). Press repeatedly to choose between the following
modes: FLAT, POP, CLAS, ROCK.
When listening to music at low volume levels, this feature will boost the bass and treble ranges to
compensate for the characteristics of human hearing. Press and hold the EQ/LD button (17) to
activate this feature. “LOUD ON” appears on the display panel. Press and hold the EQ/LD
button(17) again to turn the LOUD function off.
Display Selector (DISP)
This unit can display either the clock time or radio frequency/CD player functions. Press the DISP
button (8) to display the time. The correct time of day can be set by pressing and holding the DISP
button.
Setting the Clock (DISP)
To set the clock, perform the following steps:
1. Press the DISP button (8) to display the clock.
2. Press and hold the DISP button (8) until the time display flashes.
3. Within 5 seconds, turn the audio control knob (6) to adjust the hour to the desired setting.
4. Press and hold the DISP button (8) to move to the minutes field.
5. Turn the audio control knob to adjust the minutes to the desired setting.
6. Press the DISP button again to return to radio frequency or disc play and normal operation will
resume automatically.
Auxiliary Input Operation
You can connect another audio system to the unit through the AUX IN terminals on the back (AUX
IN) of the unit. Once the device is connected, press the MODE button (16) on the front panel or the
SOURCE button on the remote control to select “AUX ” mode.
PA
PA function is available if user already install the microphone.
Reset
Use a pencil or any non-metallic object to press and hold the RESET button(21) for five seconds to
reset the main unit. The unit will return to the factory default settings.
AUDIO MENU
Press the volume control button (3) to access the Audio Menu. You can navigate through the Audio
Menu items by pressing the volume control button repeatedly. Once the desired menu item appears
on the display, adjust that option by turning the audio control knob within 10 seconds. The unit will
automatically exit the Audio Menu after six seconds of inactivity. The following menu items can be
adjusted.
Bass Level (BAL)
Use the Volume Control knob(4) to adjust the Bass level range from “-7” to “+7”.
Treble Level (TRE)
Use the Volume Control knob(4) to adjust the Treble level range from “-7” to “+7”.
Balance (BAL)
Use the Volume Control knob(4) to adjust the Balance between the right and left speakers from
“R 7” (full right) to “L 7” (full left). “0” represents an equal balance between the right and left
speakers.
12
JDVD1500
Fader (FAD)
Use Volume Control knob(4) to adjust the Fader between the front and rear speakers from “R 7”
(full rear) to “F 7” (full front). “0” represents an equal balance between the front and rear speakers.
SYSTEM MENU
Press and hold the audio control button(3) to access the System Menu. And then you can navigate
through the System Menu items by pressing the volume control button repeatedly. Once the
desired menu item appears on the display, adjust that option by turning the audio control knob(3)
within 10 seconds. The unit will automatically exit the System Menu after six seconds of inactivity.
The following menu items can be adjusted.
RCA out
Use the Volume Control knob(4) to adjust RCA out: FIXED or VARI
Radio area
Use the Volume Control knob(4) to adjust radio area to be USA or EUR.
BT
Use the Volume Control knob(4) to open or close Bluetooth.
PRE-VOLUME
Use the Volume Control knob(4) to set volume
RESET
Press the Confirm Button(18),The Unit will return to the factory default settings.
TUNER OPERATION
Select a Band
Press the BAND button (7) on the control panel (or the SOURCE button on the remote control) to
change between three FM bands and two AM bands. Each band stores up to six preset stations.
Tuning
Manual Tuning
Rotate the volume know forward or backward(19)to change the radio frequency number up or
down one step.
If using the remote control, press the TUNE + or TUNE - buttons to change the radio frequency
number up or down one step.
Auto Seek Tuning
顺时针或逆时针旋转不放 for more than three seconds to move to the next station automatically.

13
JDVD1500
Preset Stations
Six numbered preset buttons store and recall stations for each band.
Store a Station
Select a band (if needed), then select a station. Press and hold a preset button (9-14) for three
seconds. The preset number will appear in the display.
Recall a Station
Select a band (if needed). Press a preset button (9-14) to select the corresponding stored station.
Automatically Store / Preset Scan
Automatically Store
Select a band (if needed). Press AS/PS (15) for more than three seconds to automatically select six
strong stations and store them in the current band. The new stations replace any stations already
stored in that band.
Preset Scan
Select a band (if needed). Press AS/PS (15) to scan stations stored in the current band. The unit
will pause for ten seconds at each preset station. Press AS/PS again to stop scanning when the
desired station is reached.
Stereo
The unit will automatically pick up a stereo signal, when available. When in stereo mode, the “ST”
icon appears in the display. When no stereo signal is available, the unit will automatically revert to
mono operation, and no icon will be displayed.
14
JDVD1500
AUDIO CD OPERATION
Insert and Eject Disc
Insert a disc into the disc slot (22), label-side up, with the unit turned on. The unit will play the first
track on the disc. Press the eject button (2) to stop disc play and eject the disc. The unit does
not have to be turned on to eject the disc.
Controlling Disc Playback
Track Select
Rotate the volume know forward or backward (19) for less than one second to advance to the
next track on the CD. The selected track number will appear on the display. Long rotate the
volume know forward or backward (19) to fast forward or fast reverse through the disc.
NOTE: When the last track finishes playing, the unit will automatically play the CD again.
Play/Pause Disc Playback (>/||)
Press the >/|| button (5) on the control panel (or >/|| on the remote control) to suspend disc play.
Press the >/|| button again to resume disc Play.
Intro Scan (2 INT)
Press the 2/INT button (9) on the control panel to play the first 10 seconds of each track
sequentially. Press 2/INT again to stop Intro Scan and resume normal play at the current track.
Repeat Play (3/RPT)
Press the 3/RPT button (11) on the control panel (or the RPT button on the remote control) during
disc play repeatedly to activate Repeat Mode:
• Press 3/RPT once to turn repeat off.
• Press 3/RPT twice to repeat play the current track.
• Press 3/RPT three times to repeat play the whole disc.
Random Play (4/RDM)
Press the 4/RDM button (12) during disc play to play all tracks on a CD in random, shuffled order.
Press 4/RDM again to stop random play.
15
JDVD1500
MP3/WMA OPERATION
MP3 and WMA (Windows Media Audio) music files are digital audio files that are compressed to
allow more files on a single CD. This unit can play MP3/WMA directly from files contained on a CD-
R/RW using the buttons on the receiver (or optional remote) as described below. Many types of
software are available for converting audio files into MP3/WMA formats. Jensen recommends Nero,
MusicMatch Jukebox or Roxio Easy CD Creator. Depending on the media type and recording
method, some CD-R/RW's may be incompatible with this unit. The unit supports playback of
MP3/WMA and CDDA (CDA), Mixed-Mode CDs and CD-Extra (including multisession discs), but
discs on which the session has not been closed will not play.
Notes on MP3/WMA Play
This unit can play MP3 (MPEG1, 2, 2.5 Audio Layer 3) and WMA ver. 7 and 8. However, the MP3
recording media and accepted formats are limited. When writing MP3/WMA, pay attention to the
following restrictions.
Acceptable Media
The MP3/WMA recording media acceptable to this unit are CD-ROM, CD-R and CD-RW. When
using CD-RW, use full format rather than quick format to prevent malfunction.
Acceptable Medium Formats
The following formats are available for the media used in this unit. The maximum number of
characters used for file name including the delimiter (".") and three-character extension are
indicated in parentheses.
• ISO 9660 Level 1 (11 characters)
• ISO 9660 Level 2 (31 characters)
• Joliet (31 characters)
Up to 200 characters can be displayed in the long file name format. For a list of available
characters, see the instruction manual of the writing software. The media reproducible on this unit
has the following limitations:
• Maximum number of nested folders: 15
• Maximum number of files per disc: 796 (199 MP3+199 WMA+199 MPG+199 JPG)
• Maximum number of folders per disc: 199
• Maximum number of sessions per disc: 5
MP3/WMA written in formats other than those listed above will not play successfully and their file
names or folder names will not be displayed properly.
MP3/WMA Encoder and CD Writer Settings
Use the following settings when compressing audio data in MP3 data with the MP3 encoder:
• Transfer bit rate: 32 - 320 kbps
• Sampling frequency: 32,44.1,48 kHz (WMA) 16,22.05,24,32,44.1, 48kHz (Mp3) When using a
CD writer to record MP3/WMA up to the maximum disc capacity, disable additional writing. To
record an empty disc up to the maximum capacity at once, select the “disc at once” option.
Entering ID3 Tag
This unit supports ID3 tag versions 1.0 and 1.1.
Controlling Disc Playback
When a video monitor is installed, a screen similar to the following will appear when an MP3 disc is
played.
Select one of these icons to access the corresponding media on your disc. If the media type is not
present, the icon will not be selectable.
Play/Pause Disc Playback (>/||)
Press the >/|| button (5) on the control panel (or >/|| on the remote control) to suspend disc play.
Press the >/|| button(5) again to resume disc Play.
Repeat Play (3/RPT)
Press the 3/RPT button (11 on the control panel (or the RPT button on the remote control) during
disc play repeatedly to activate Repeat Mode:
• Press 3/RPT once to turn repeat off.
• Press 3/RPT twice to repeat play the current track.
• Press 3/RPT three times to repeat play the current folder.
01. CHERRYPOP
CHRISISSA 02. CRAZYTO WN03. PHISH 04. BI
PHISH 05. BO
PHISH 06. FR
PHISH 07. GI
GUPHISH... 08. PHISH CH09.
—
—
—
—
—
—
01.-
02.80 'S
.ALLMANBRO 03
.DISCO-FUNK 04
.OLDIES 05
[‐]
PHISH
GUMBO.MP3
—
Audio Photos Video

16
JDVD1500
• Press 3/RPT four times to repeat play the whole disc.
Random Play (4/RDM)
Press the 4/RDM button (12 during disc play to play all files on a disc in random, shuffled order.
Press 4/RDM again to turn random play off.
Track Select
Rotate the volume know forward or backward (19) for less than one second to advance to the
next track on the CD. The selected track number will appear on the display. Long rotate the
volume know forward or backward or fast reverse through the disc.
File Select
Press the 5 button (13) to access a lower folder level (FOLDER DN).
Press and hold the 6 button (14) to access a higher folder level (FOLDER UP).
DVD/DISC OPERATION
17
JDVD1500
Once a DVD disc is inserted into the unit, the unit will automatically start playback from the
beginning of the disc. Once the preview tracks have been played, the DVD MENU, ROOT or TITLE
of the DVD disc will appear on the TFT monitor and “ROOT” will be displayed on the LCD panel.
DVD Menu Button Functions
During DVD playback, you can use the following buttons to navigate the DVD, Root, or Title menu
of the disc.
Control Panel
• Rotate the volume know forward (19) to move through introductory chapters and access the
DVD menu.
• Press the >/|| button (5) to choose the highlighted item on the menu.
Remote Control (see “Remote Control Operation” on page 8)
• Use the directional buttons ( , , and ) on the remote control to navigate the menu.
• Press the ENTER button to confirm the selected item.
Controlling Disc Playback
When viewing the DVD or Root Menu, press the >/|| button (5) to choose the highlighted item on
the menu. Once playback begins, the LCD will display the Chapter: Playback Time in the following
format: “001 00:03”.
Play/Pause Disc Playback (1/>/||)
Press the 1/>/|| button (5) on the control panel (or the >/|| button on the remote control) to suspend
disc play.
Stop Disc Playback ( )
Press the button(9) on the remote control to enter “RESUME STOP MODE.” Press the >/||
button to resume playback from the previous location.
Press the button(9) twice consecutively to clear stop mode. With stop mode cleared, if the >/||
button is pressed, the disc will resume playback from the beginning of the disc.
Chapter Select
Rotate the volume know forward or backward one step on the control panel or remote control
to advance to the next or previous chapter on the disc.
Fast Forward/Reverse
Press the or button on the remote control to fast forward or fast reverse through the disc.
Keep pressing and releasing the button to increase the rate from 2X to 4X, 8X, 16X and 32X.
Press >|| on the remote control or >/|| (5) on the control panel to resume normal playback.
Repeat Play (3/RPT)
Press the 3/RPT button (11) on the control panel (or the RPT button on the remote control) to
select the repeat mode as follows:
DVD: RPT OFF > RPT CHAPTER > RPT TITLE > RPT ALL
VCD/CD: RPT OFF > RPT ONE > RPT ALL
• Select CHAPTER to continuously repeat the current chapter.
• Select TITLE to continuously repeat the current title.
• Select TRACK to continuously repeat the current track.
• Select ALL to continuously repeat all chapters/tracks on the current disc. After playing the last
chapter/track, the unit will stop and display the elapsed time.
NOTE: The REPEAT feature does not support VCD 2.0 (with PBC ON).
Title Menu Function (DVD Only)
If the DVD has multiple titles recorded on the disc, you can select a specific title from the title menu
from which to start playback.
1. Press the TITLE button on the remote control during playback to display the title menu.
2. Select the preferred title using the remote control arrow keys (24) and confirm by pressing the
ENTER button.
PBC (Play Back Control) (VCD Only)
For VCDs with play back functionality, play back control (PBC) provides additional controls for VCD
playback.
Press the MENU button on remote control to toggle the PBC function “On”/”Off”. Once PBC is on,
playback starts from track one of the play list.
NOTE: During VCD playback you can press the LANG button on the remote control during
playback to switch the sound between mono and stereo sound in the following order: MONO
LEFT > MONO RIGHT > MIX MONO > STEREO.
Remote Control Direct Track Entry
To select a track directly, use the number pad on the remote control. For single digit entries, press
“0” followed by the single digit track number (for example, track 5 is entered as “05”).
18
JDVD1500
Goto Search
Perform the following steps to use the GOTO feature to access a specific location on a disc:
DVD Title/Chapter Search
To play a specific title/chapter:
1. Press the GOTO button. The on-screen display information will appear with the CHAPTER
number highlighted (CHAPTER 00/00).
2. Use the arrow (<, >, /\, \/) buttons to move the cursor between the TITLE and CHAPTER fields.
3. Use the numeric buttons on the remote control to enter the desired title/chapter number.
4. Press the ENTER button. DVD Time Search
To enter an exact playback starting point:
1. Press the GOTO button twice for TITLE time or three times for CHAPTER time.
2. Use the arrow (<, >, /\, \/) buttons to move the cursor through the TIME field (00:00:00).
3. Use the numeric buttons on the remote control to enter the playback starting point.
4. Press the ENTER button.
CD/VCD Disc/Track Search
Press the GOTO button once for DISC GO TO, twice for TRACK GO TO or three times for SELECT
TRACK.
• Choose DISC GO TO to select an exact playback starting point relative to the total disc
playing time.
• Choose TRACK GO TO to select an exact playback starting time within the current track.
• Choose SELECT TRACK to enter a specific track number for playback.
Use the arrow (<, >, /\, \/) buttons to move the cursor through the time field (00:00:00). Use the
numeric buttons on the remote control to enter the playback starting point and then press the
ENTER button.
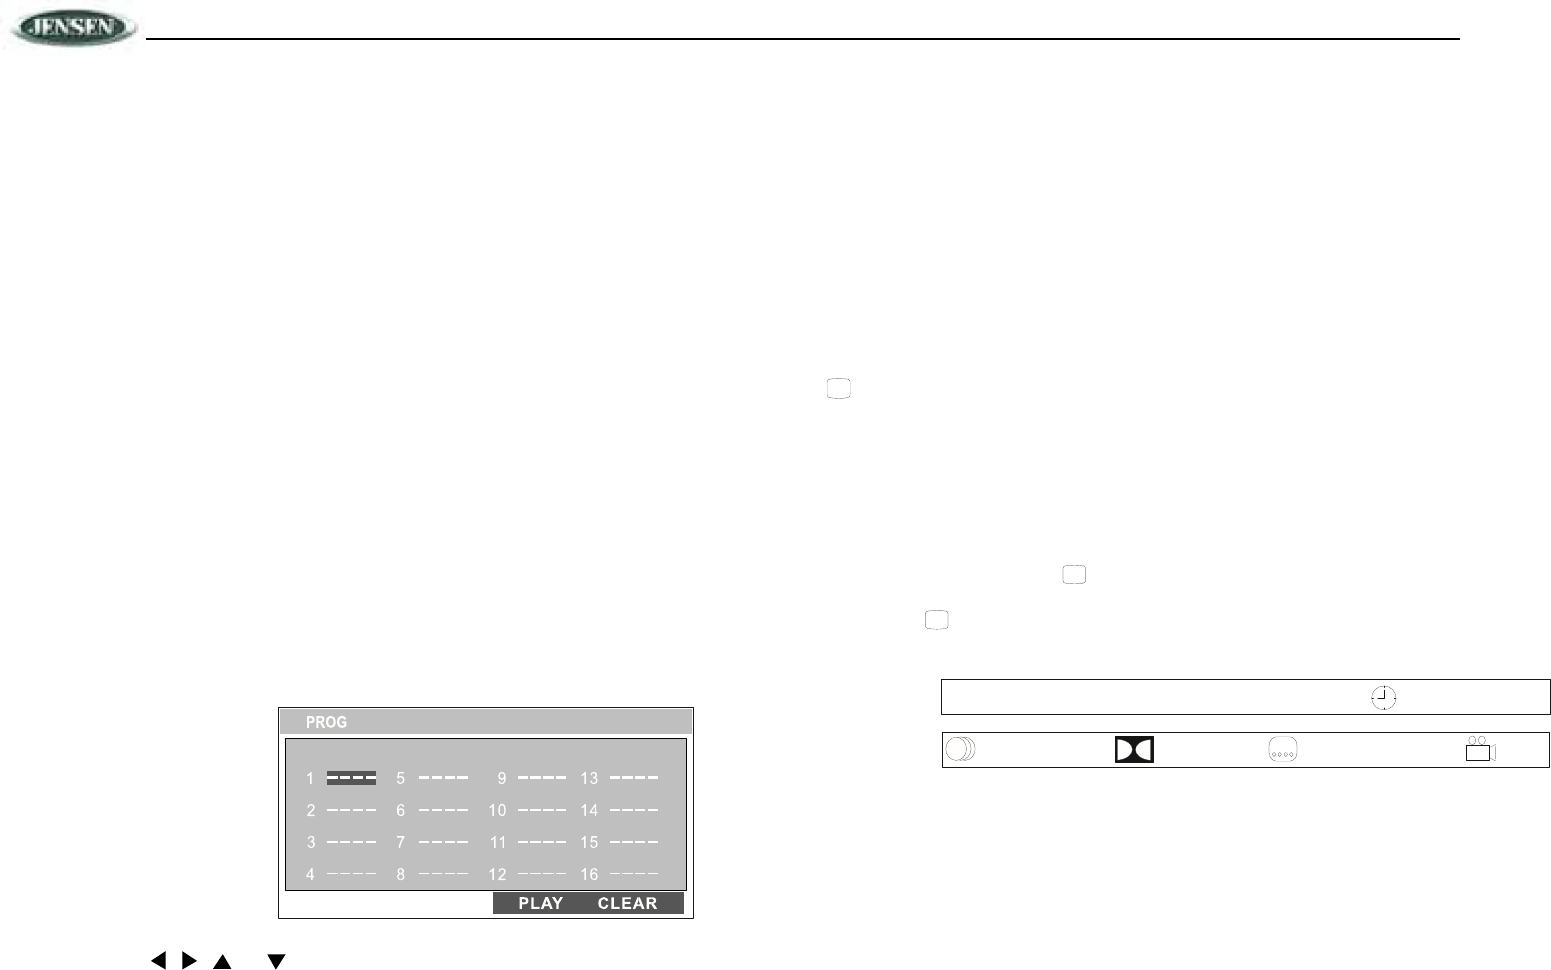
Programmed Playback
1. Press the PROG button (8) on the remote control to access the programmed playback screen:
the “PROG” screen.
3. Use the number buttons on the remote control to enter a track number in each field.
4. Press the >/|| button (18) on the remote control or highlight “PLAY” on screen and then
press the ENTER button (5) to begin playback in the numbered order indicated.
To delete the list, highlight “CLEAR” and then press ENTER. Press PROG to exit the programmed
playback screen.
DVD Playback Features
The following remote control features, along with many others, are available during DVD playback
(see “Remote Control Operation” on page 15 for complete functionality):
• LANG: Press to choose an alternate audio language, if available.
• .... SUBTITLE: Press to select an alternate subtitle language, if available.
• ANGLE: Press to select an alternate viewing angle, if available.
• ZOOM: Press to zoom the picture at ZOOM 2, ZOOM 3, ZOOM 4, ZOOM 1/2, ZOOM 1/3
or ZOOM 1/4, or select OFF to return to normal view.
NOTE: Feature availability is dependent upon DVD embedded information.
Playback Information
During DVD and VCD playback, press the button (28) on the remote control to display playback
information on the screen, including the media playing and current playback time.
Continue pressing the button to display additional information, as indicated below. DVD
Playback Information
The following information is displayed at the top of the screen during DVD playback:
• TT 5/8 – “5 / 8" indicates the fifth of 8 titles on the DVD is currently playing.
• CH 2/16 – “2 / 16" indicates that the second of 16 chapters on the DVD is currently playing.
• Press repeatedly to view the following information: for elapsed/remaining playing time:
• 00:02:18 – total elapsed playing time for disc
• C –00 :34 :37 – remaining playing time
• T 00:02:18 – total elapsed playing time for current track
5TTDVD 00:33:34 16
/
2CH
/
8–
4ENG OFF CH1/5ENG 5.1 1
/
cursor buttons (16) Use the , , 2. or on the remote control to access the fields on
19
JDVD1500
• C –00 :34 :37 – remaining playing time for current track
• 1/5 ENG – English is the selected audio language out of 5 possible choices
• 5.1 CH – The current language is recorded in 5.1 surround sound
• 1/4 ENG – English is the selected subtitle language out of 4 possible
choices
• OFF – There are no alternate angles recorded for this scene
VCD Playback Information
The following information is displayed at the top of the screen during VCD playback:
• TRK ##/## – “1/18” indicates the first of 18 tracks on the VCD is currently playing.
• PBC: Indicates when PBC (Playback Control) is turned on.
• – “X” indicates repeat play is OFF, “1” indicates repeat track, “D” indicates repeat directory,
and “A” indicates repeat disc.
• Press repeatedly to view the following information for elapsed/remaining playing time:
• 00:02:18 – total elapsed playing time for disc
VCD TRK1/18 00:33:34 –

20
JDVD1500
• C –00 :34 :37 – remaining playing time
• T 00:02:18 – total elapsed playing time for current track • C –00 :34 :37 – remaining
playing time for current track
Remote Control Direct Track Entry
To select a track directly, use the number pad on the remote control (10). For single digit entries,
press the corresponding number. For two digit entries, press the 10+ button followed by the last digit
(i.e., for track 16, press 10+ and then 6).
GOTO Direct Track/Chapter Access
Use the GOTO function to access a track (chapter) directly.
1. Press the GOTO button (26) on the remote control. The On Screen Display information will
appear with the track number highlighted.
2. Use the number keys on the remote control to enter the 3-digit track number directly (i.e.
for track 10, enter “010”.
3. Press the ENTER button to confirm and begin playback.
BLUETOOTH OPERATION
21
JDVD1500
Bluetooth Menu Options
NOTE: Please note that some Bluetooth menu options are only available while the unit is in
Bluetooth Audio mode.
Press and hold the Audio Control button (3) to enter System adjustment mode. Repeatedly press
the Audio Control button(3) to access the “BT ON/OFF” menu function.
Rotate the volume control knob (4) to select BT ON. The following menu options are available when
the unit is in BT mode.
• BT Pair: Press the Confirm button(18) to start pairing with a Bluetooth enabled
device.
• BT Device: Press the Confirm button(18) to view a list of previously paired mobile
devices models. Rotate the Fast forward/rewind and advance
chapter/previous chapter knob(19) to view devices from the list. You cannot
delete a device that is actively connected. Press the Confirm button(18) to select
the device. Press the the Fast forward/rewind and advance chapter/previous
chapter knob button(19) to choose Lock/Unlock, Disconnect/Cnonect or Delete
for this device.
• LOCK/UNLOCK: The JDVD1500 can store up to 5 devices for Bluetooth
connection. The devices are stored in FIFO (First In First Out) order. To prevent a
device from being bumped from the list when more than 5 devices are used, you
must lock the device. To Lock/Unlock a device, press the Confirm button(18) to
change Lock or Unlocked.
• DISCONNECT: To disconnect a paired device, press the Confirm button(18) to
temporarily remove the Bluetooth link. The link can be re-established through your
phone menu by selecting the JDVD1500 for connection.
Device 1
Device 2
Device 3
Device 4
Device 5
BT Device Press Enter
Device 1
…
…
…
Device 5
Lock/Unlock
Connect/Disconnect
Delete
Lock/Unlock
Connect/Disconnect
Delete
Press Enter
Use | or |>> << to
Navigate the List
22
JDVD1500
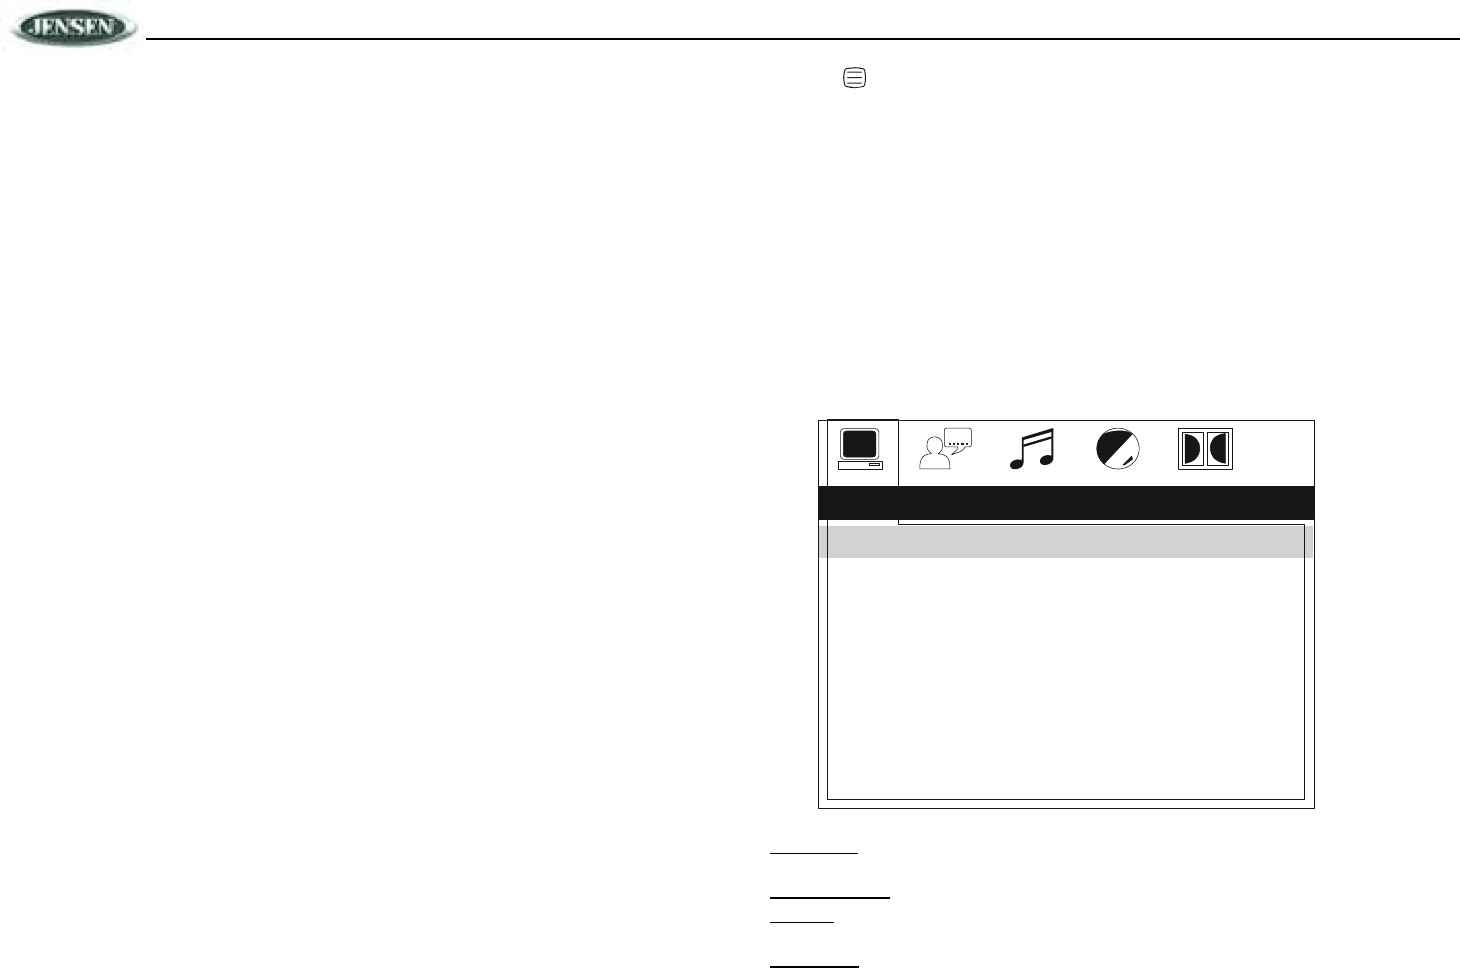
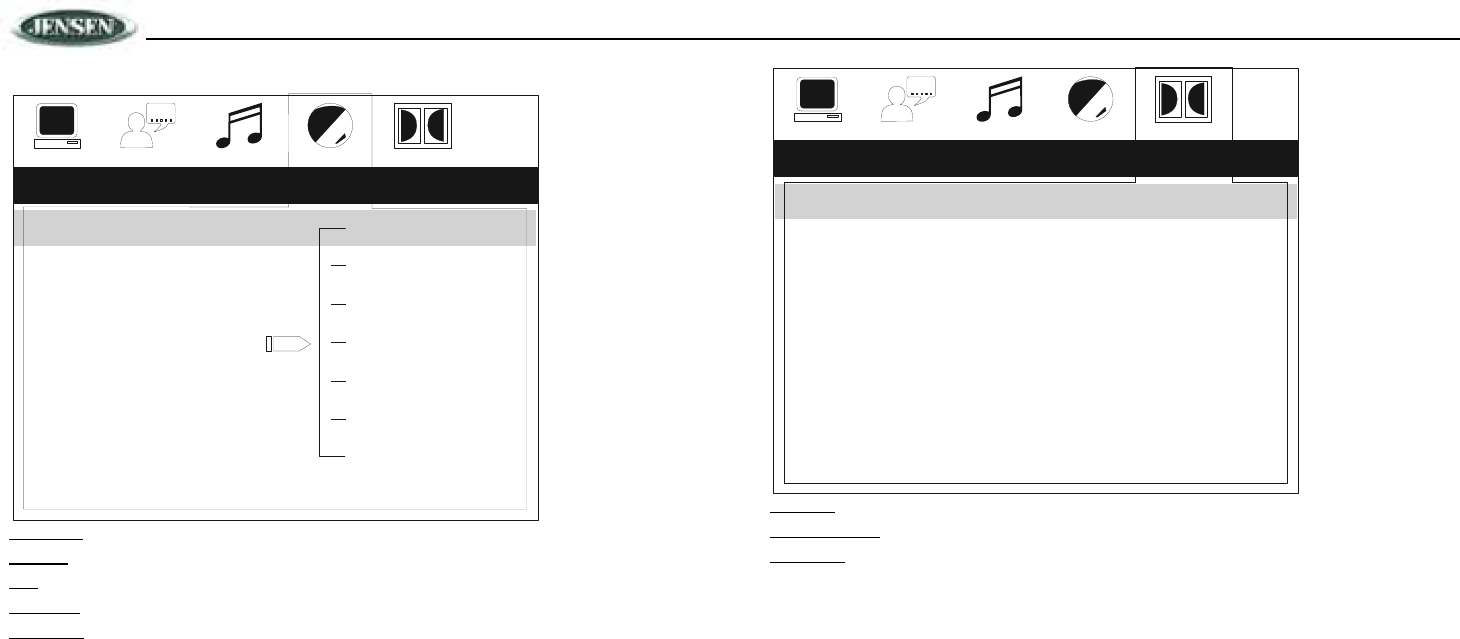
SETUP MENU
Press the (setup) button on the remote control to access the SETUP menu. Use the arrow (<, >)
buttons to choose between from the following menu categories:
• SYSTEM Setup
• LANGUAGE Setup
• AUDIO Setup
• Video Setup
• DIGITAL Setup
While in the setup menus, use the (<, >, /\, \/) buttons to select options and change settings.
1. Use the /\ (up) / \/ (down) buttons to select the setting to be changed.
2. Press ENTER to cycle through each possible option or display a list of the options. When a list
of options appears, press the /\ (up) / \/ (down) buttons to move among the displayed options.
3. Press ENTER again to choose the option and change the setting.
System Setup
The System Setup menu controls the following features:
TV SYSTEM: This item is used to select a TV signal system to match your TV set. Select one of
the following options: NTSC, PAL60, PAL or AUTO.
SCREEN SAVER: Turn Screen Saver feature On/Off.
TV TYPE: Select one of the following picture formats: 4:3PS, 4:3 LB or 16:9. 4:3 is a letterbox
selection, and 16:9 is wide screen.
PASSWORD: This item allows the selection of a new four-digit code to use for security purposes.
SYSTEMSETUP
TV SYSTEM
SCREEN SAVER
TV TYPE
PASSWORD
RATING
DEFAULT
AUTO
NTSC
PAL

23
JDVD1500
RATING: Select the parental control level for all DVD play. The security password is required to
make changes to this feature.
DEFAULT: Use this item to restore default settings at any time.
Language Setup
The Language Setup menu controls the following features:
On-Screen Display (OSD) Language: Set the OSD language to one of the following: English,
German, Spanish, French, or Portuguese.
Audio Language: Set the audio language to one of the following: English, Japan, French, Spanish,
Portuguese, German or Latin.
Subtitle Language: Set the subtitle language to one of the following: English, Japan, French,
Spanish, Portuguese, German or OFF.
Menu Language: Set the menu language to one of the following: English, Japan, French, Spanish,
Portuguese, German or Latin.
Audio Setup
The Audio Setup menu controls the following features:
Audio Out: This item defines the digital output format.
Key: This item changes the audio output key.
AUDIO SETUP
AUDIO OUT
KEY
SPDIF/OFF
SPDIF/RAW
SPDIF/PCM
LANGUAGESETUP
OSD LANGUAGE
AUDIO LANG
SUBTITLE LANG
MENU LANG
ENGLISH
GERMAN
SPANISH
FRENCH
24
JDVD1500
Video Setup
Brightness: Adjust the brightness of the screen from the following levels: 12, 10, 8, 6, 4, 2 or 0.
Contrast: Adjust the contrast of the screen from the following levels: 12, 10, 8, 6, 4, 2 or 0.
Hue: Adjust the hue of the screen from the following levels: +6, +4, +2, 0, -2,- 4 or - 6.
Saturation: Adjust the saturation of the screen from the following levels: 12, 10, 8, 6, 4, 2 or 0.
Sharpness: Adjust the sharpness of the screen from the following levels: 8, 6, 4, 2 or 0.
Digital Setup
The Digital Setup menu controls the following features:
OP Mode: Select LINE OUT or RF REMOD.
Dynamic Range: Select FULL, 6/8, 4/8, 2/8 or OFF.
Dual Mono: Select STEREO, MONO/L, MONO/R or MIX MONO.
DIGITAL SETUP
OP MODE
DYNAMIC RANGE
DUAL MONO
LINE OUT
RF REMOD
VIDEO SETUP
BRIGHTNESS
CONTRAST
HUE
SATURATION
SHARPNESS
12
10
8
6
4
2
0

25
JDVD1500
TROUBLESHOOTING SPECIFICATIONS
DVD/CD
Symptom Cause Solution
No power The vehicle ignition is not on If the power supply is
properly connected to the
vehicle accessory terminal,
switch the ignition key to
“ACC”.
The fuse is blown Replace the fuse.
Disc cannot be loaded or
ejected
Presence of CD disc inside
the player
Remove the disc in the
player and insert the new
one.
Inserting the disc in reverse
direction
Insert the compact disc with
the label facing upward.
Compact disc is extremely
dirty or disc is defective
Clean the disc or try to play
a new one.
Temperature inside the
vehicle is too high
Wait until the ambient
temperature returns to
normal.
Condensation Leave the player off for an
hour or so, then try again.

26
JDVD1500
Signal to Noise Ratio. . . . . . . . . . . . . . . . . . . . . . . . . . . . . . . . . . . . . . . . . . . . . . . . . . > 90dB
Dynamic Range. . . . . . . . . . . . . . . . . . . . . . . . . . . . . . . . . . . . . . . . . . . . . . . . . . . . . . > 90dB Frequency
Response . . . . . . . . . . . . . . . . . . . . . . . . . . . . . . . . . . . . 20Hz to 20KHz +/- 3dB
Channel Separation. . . . . . . . . . . . . . . . . . . . . . . . . . . . 2 Channel (Stereo) > 60dB @ 1KHz
Video
Color System. . . . . . . . . . . . . . . . . . . . . . . . . . . . . . . . . . . . . . . . . . . . . . . . . . . . . NTSC/PAL Video
Output . . . . . . . . . . . . . . . . . . . . . . . . . . . . . . . .Composite 1.0 Vp-p (+/- 0.2) 75 - ohm Video Input . . . . . . . . . . . . . . . . . . . . . . . . . . . . . . .
Vp-p (+/- 0.2) 75 - ohm
Audio
Max Output Power . . . . . . . . . . . . . . . . . . . . . . . . . . . . . . . . . . . . . . . . . . .40W x 4 channels Load Impedance
(speakers) . . . . . . . . . . . . . . . . . . . . . . . . . . . . . . . . . . . . . . . . . . . . 4 ohms Line Out Level/Load . . . . . . . . . . . . . . . . . . . . . . . . . . . . .
400mV/10k ohm load
Line Out Impedance . . . . . . . . . . . . . . . . . . . . . . . . . . . . . . . . . . . . . . . . . . . . . . . . . 200 ohm
Auxiliary Input
Frequency Response . . . . . . . . . . . . . . . . . . . . . . . . . . . . . . . . . . . . . . 20Hz to 20KHz +3dB Input Maximum
Voltage. . . . . . . . . . . . . . . . . . . . . . . . . . . . . . . . . . . . . . . . . . . . . . . 1200mV Input
Impedance . . . . . . . . . . . . . . . . . . . . . . . . . . . . . . . . . . . . . . . . . . . . . . . . . . . .4.7k ohm
FM Radio
Frequency Range . . . . . . . . . . . . . . . . . . . . . . . . . . . . . . . 87.5-107.9 MHz (200 kHz Space) Usable
Sensitivity . . . . . . . . . . . . . . . . . . . . . . . . . . . . . . . . . . . . . . . . < 15dB at S/N 30 dBu Stereo
Separation . . . . . . . . . . . . . . . . . . . . . . . . . . . . . . . . . . . . . . . . . . . . > 25 dB at 1KHz S/N
Ratio. . . . . . . . . . . . . . . . . . . . . . . . . . . . . . . . . . . . . . . . . . . . . . . . . . . . . . . . . . . > 50dB
AM/MW
Frequency Range . . . . . . . . . . . . . . . . . . . . . . . . . . . . . . . . . . . . . 530-1710 (10 kHz Space) Usable Sensitivity . . . . . . . . . . . . . . . . . . . . . . . . . . . . . . . . . . . . . . .
20dBu
S/N Ratio. . . . . . . . . . . . . . . . . . . . . . . . . . . . . . . . . . . . . . . . . . . . . . . . . . . . . . . . . . . > 40dB
General
Operating Voltage . . . . . . . . . . . . . . . . . . . . . . . . . . . . . . . . . . . . . . . . . . . . . . . DC 11 -14.4V Grounding System . . . . . . . . . . . . . . . . . . . . . . . . . . . . . . . . . . . . .
.
Ground Fuse . . . . . . . . . . . . . . . . . . . . . . . . . . . . . . . . . . . . . . . . . . . . . . . . . 15-Amp Mini ATM Type Operating Temperature . . . . . . . . . . . . . . . . . . . . . . . . . . . . .
0ºC to 50ºC
Unit Mounting Angle . . . . . . . . . . . . . . . . . . . . . . . . . . . . . . . . . . . . . . . . . . . . . . . . . . . .< 30º
No sound Volume is too low Adjust volume to audible
level.
Wiring is not properly
connected
Check wiring connections.
The operation keys do not
work
Control panel not properly
installed
Reinstall control panel.
The built-in microcomputer
is not operating properly
due to noise
Press the RESET button.
Sound skips The installation angle is
more than 30 degrees
Adjust the installation angle
to less than 30 degrees.
The disc is dirty or defective Clean the disc and try to
play again or use new disc.
Cannot tune to radio
station, auto-seek does
not work
The antenna cable is not
connected
Insert the antenna cable
firmly.
The signals are too weak Select a station manually.
ERROR Mechanism Error Press the eject button to
correct the problem. If the
error code does not
disappear, consult your
nearest service dealer.
Disc Error Disc is dirty/scratched/
upside down
Replace the disc.

27
JDVD1500
STATEMENT
This device complies with Part 15 of the FCC rules. Operation is subject to the following two conditions: 1) this device may not cause harmful interference, and 2) this device must accept any interference
received, including interference that may cause undesired operation.
This equipment has been tested and found to comply with the limits for a Class B digital device, pursuant to Part 15 of the FCC rules. These limits are designed to provide reasonable protection against
harmful interference in a residential installation. This equipment generates, uses and can radiate radio frequency energy and if not installed and used in accordance with the instructions, may cause
harmful interference to radio communications. However, there is no guarantee that interference will not occur in a particular installation. If this equipment does cause harmful interference to radio or
television reception, which can be determined by turning the equipment off and on, the user is encouraged to try correct the interference by one or more of the following measures:
- Reorient the receiving antenna.
- Increase the separation between the equipment and receiver.
- Connect the equipment into and outlet on a circuit different from that to which the receiver is connected.
- Consult the dealer or an experienced radio/TV technician for help.
You are cautioned that changes or modifications not expressly approved by the party responsible for compliance could void your authority to operate the equipment.

DV2011
ASA Electronics Corporation
www.asaelectronics.com www.jensenrvdirect.com
©2010 ASA Electronics Corporation
v.123010
24