Lighthouse Worldwide Solutions APEXZ Light scattering airborne particle counter User Manual
Lighthouse Worldwide Solutions Light scattering airborne particle counter Users Manual
Users Manual
Lighthouse Worldwide Solutions Pre-Release Review Copy ApexZ Operators Manual
248083466-1 1 | P a g e
Lighthouse Worldwide Solutions Pre-Release Review Copy ApexZ Operators Manual
248083466-1 2 | P a g e
Lighthouse Worldwide Solutions Pre-Release Review Copy ApexZ Operators Manual
248083466-1 3 | P a g e
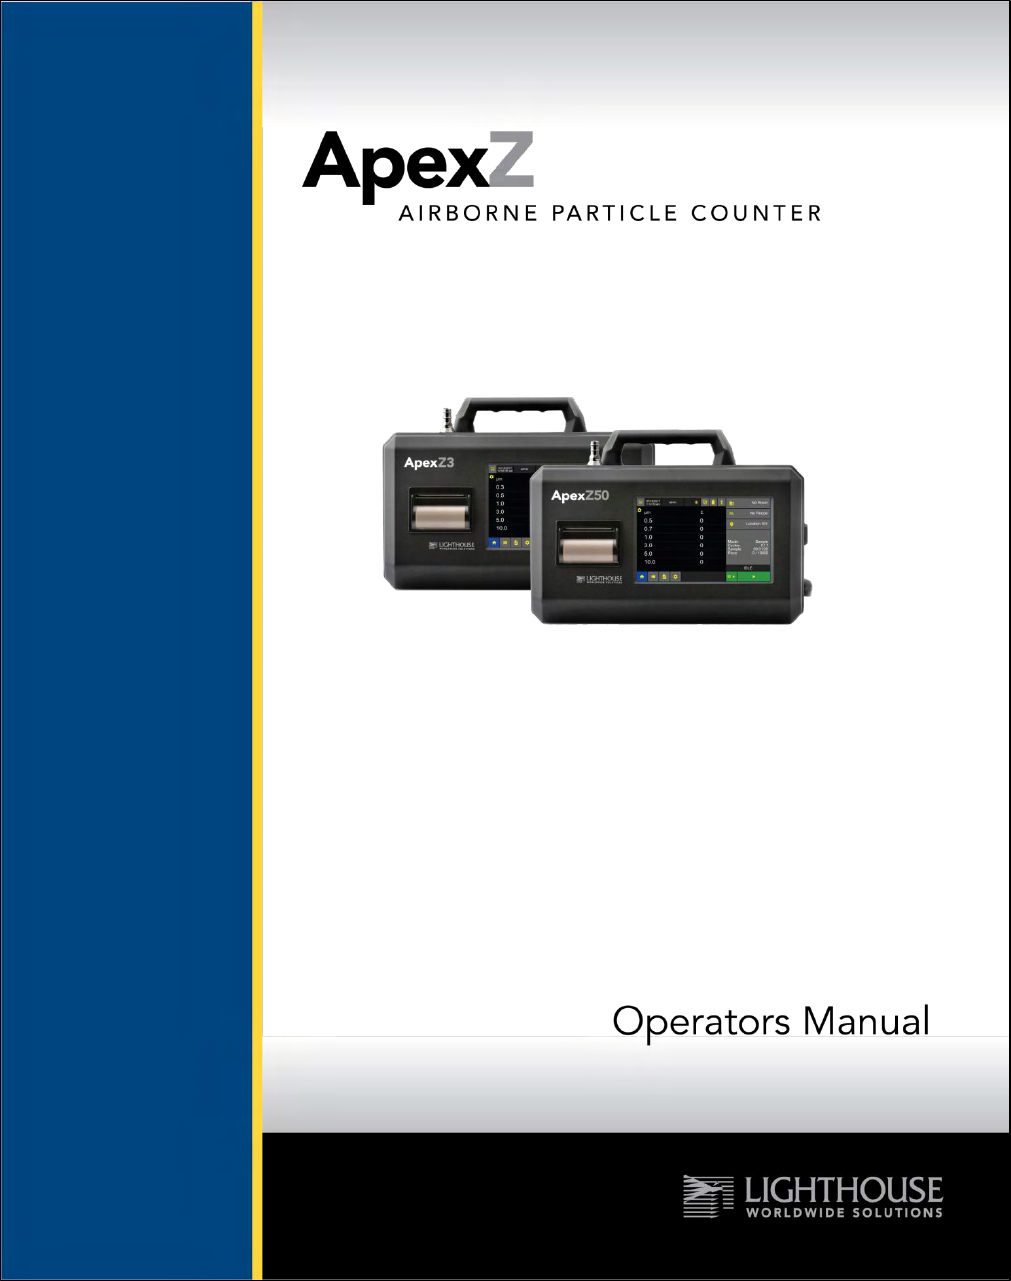
Lighthouse Worldwide Solutions
and
Airborne Particle Counters
Operators Manual
Lighthouse Worldwide Solutions Pre-Release Review Copy ApexZ Operators Manual
248083466-1 4 | P a g e
Copyright ©2017 by Lighthouse Worldwide Solutions. All rights reserved. No part of this document may be
reproduced by any means except as permitted in writing by Lighthouse Worldwide Solutions.
The information contained herein constitutes valuable trade secrets of Lighthouse Worldwide Solutions. You
are not permitted to disclose or allow to be disclosed such information except as permitted in writing by
Lighthouse Worldwide Solutions.
The information contained herein is subject to change without notice. Lighthouse Worldwide Solutions is not
responsible for any damages arising out of your use of the LMS program.
LMSTM, LMS ExpressTM, ApexZTM, ApexZ3TM , ApexZ50TM are trademarks of Lighthouse Worldwide Solutions.
Microsoft®, Microsoft WindowsTM are trademarks of Microsoft Corporation.
Manufactured by:
Lighthouse Worldwide Solutions
1221 Disk Drive
Medford, Oregon 97501
LWS Part Number: 123456789-1 Rev 1
Lighthouse Worldwide Solutions Pre-Release Review Copy ApexZ Operators Manual
248083466-1 5 | P a g e
Table of Contents
Safety ..........................................................................................................................................................................9
About this Manual ..................................................................................................................................................9
General Safety ........................................................................................................................................................9
Laser Safety ......................................................................................................................................................... 10
Battery Safety ...................................................................................................................................................... 11
Power Safety ........................................................................................................................................................ 12
Sampling Safety ................................................................................................................................................... 13
Operating Safety .................................................................................................................................................. 13
Electrostatic Safety Information .......................................................................................................................... 13
Compliance .............................................................................................................................................................. 15
FCC Notice ........................................................................................................................................................... 15
CE Notice ............................................................................................................................................................. 16
Introduction ............................................................................................................................................................. 17
Overview .............................................................................................................................................................. 17
Description .......................................................................................................................................................... 17
Accessories .......................................................................................................................................................... 17
Specifications ....................................................................................................................................................... 18
Enclosure and Ports – ApexZ3 ............................................................................................................................. 19
Enclosure and Ports - ApexZ50 ............................................................................................................................ 20
Printer Paper Installation .................................................................................................................................... 21
Welcome to the ApexZ ............................................................................................................................................ 22
Running a Sample from the Home Screen .......................................................................................................... 23
View Options ....................................................................................................................................................... 24
Data Table View ................................................................................................................................................... 25
Histogram View ................................................................................................................................................... 26
Grid View ............................................................................................................................................................. 27
History View ........................................................................................................................................................ 30
Graph View .......................................................................................................................................................... 31
Environmental View ............................................................................................................................................ 32
Instrument Settings ................................................................................................................................................. 33
Time Zone & Daylight Savings ............................................................................................................................. 34
Date ..................................................................................................................................................................... 35
Time ..................................................................................................................................................................... 36
Lighthouse Worldwide Solutions Pre-Release Review Copy ApexZ Operators Manual
248083466-1 6 | P a g e
Date and Time Format ......................................................................................................................................... 37
Audio/Visual ........................................................................................................................................................ 38
Options ................................................................................................................................................................ 39
Enable Users ........................................................................................................................................................ 39
Zero Counting ...................................................................................................................................................... 39
Pump Startup ....................................................................................................................................................... 39
Audit Trail ............................................................................................................................................................ 40
Maintenance ........................................................................................................................................................ 41
Export Configuration ........................................................................................................................................... 42
Import Configuration ........................................................................................................................................... 43
Update Firmware ................................................................................................................................................. 44
Instrument Settings Reset ................................................................................................................................... 45
Factory Reset ....................................................................................................................................................... 46
About Screen ....................................................................................................................................................... 47
Users ........................................................................................................................................................................ 49
User Levels ........................................................................................................................................................... 49
Add a New User ................................................................................................................................................... 50
User Login ............................................................................................................................................................ 53
User Logout ......................................................................................................................................................... 54
Change User Password ........................................................................................................................................ 55
Change User First and Last Name ........................................................................................................................ 55
Rooms ...................................................................................................................................................................... 57
Add a Room ......................................................................................................................................................... 57
Assign Locations to a Room ................................................................................................................................. 57
Enter Room Name ............................................................................................................................................... 58
Locations .................................................................................................................................................................. 59
Edit Location Name ............................................................................................................................................. 59
Enter Location Name ........................................................................................................................................... 59
Assign Location to a Room .................................................................................................................................. 59
Recipes ..................................................................................................................................................................... 61
Custom Recipes ................................................................................................................................................... 62
Custom Recipe - Channel Sizes ............................................................................................................................ 63
Custom Recipe - Warning and Alarm Thresholds ................................................................................................ 64
Custom Recipe - Sample Settings ........................................................................................................................ 66
Lighthouse Worldwide Solutions Pre-Release Review Copy ApexZ Operators Manual
248083466-1 7 | P a g e
Custom Recipe – Locations .................................................................................................................................. 67
Edit - Custom Recipes .......................................................................................................................................... 68
Certification Recipes ................................................................................................................................................ 71
Certification Recipe - Type Settings ..................................................................................................................... 72
Certification Recipe - Channels and Target Limits ............................................................................................... 73
Certification Recipe - Sample Settings................................................................................................................. 74
Certification Recipe - Locations ........................................................................................................................... 75
Certification Recipe - Name ................................................................................................................................. 76
Edit - Certification Recipes .................................................................................................................................. 77
Communications ...................................................................................................................................................... 79
Ethernet ............................................................................................................................................................... 79
DHCP .................................................................................................................................................................... 81
Wi-Fi..................................................................................................................................................................... 82
Print ..................................................................................................................................................................... 84
USB ...................................................................................................................................................................... 85
Data Screen ............................................................................................................................................................. 87
Scroll data records ............................................................................................................................................... 87
Data Columns ...................................................................................................................................................... 88
Data Columns - Expanded ................................................................................................................................... 89
Data Records - Select ........................................................................................................................................... 92
Data Records - Tag ............................................................................................................................................... 93
Data Records - Export to Print or USB. ................................................................................................................ 94
Data Records - Select Data Records for Report ................................................................................................... 97
Report Type: Sample .......................................................................................................................................... 98
Report Type: Certification Standard ................................................................................................................... 99
Filter Data Records - Date and Time .................................................................................................................. 100
Filter Data Records - Rooms .............................................................................................................................. 101
Filter Data Records - Recipe .............................................................................................................................. 102
Filter Data Records - Locations .......................................................................................................................... 103
Filter Data Records - Tag ................................................................................................................................... 104
Filter Data Records - Alert/Fault ........................................................................................................................ 105
Paper Feed ......................................................................................................................................................... 106
Data Records - Delete All ................................................................................................................................... 107
Reports .................................................................................................................................................................. 108
Lighthouse Worldwide Solutions Pre-Release Review Copy ApexZ Operators Manual
248083466-1 8 | P a g e
Report Screen .................................................................................................................................................... 108
Report Screen Filters ......................................................................................................................................... 109
Deleting a Report ............................................................................................................................................... 110
Terminology: ...................................................................................................................................................... 111

Lighthouse Worldwide Solutions Pre-Release Review Copy ApexZ Operators Manual
248083466-1 9 | P a g e
Safety
About this Manual
This manual describes the setup, operation and use of the Lighthouse Worldwide Solutions ApexZ family
of Portable Airborne Particle Counters. The word “ApexZ”, “unit” or “instrument” may be used in place
of a specific model in this ApexZ Operators Manual.
General Safety
Warnings and cautions are used throughout this manual and the reader should become familiar with the
meaning of a warning before operating the particle counter. Most warnings will appear in the left
margin of the page next to the subject or step to which it applies. Take care when performing any
procedures preceded by or containing a warning. The classifications of warning are defined as follows:
Laser – pertaining to exposure to visible or invisible LASER radiation.
Electrostatic – pertaining to electrostatic discharge.
Network Connection – pertaining to communication ports and instrument damage.
WARNING: There are no user serviceable components inside the particle counter.
Lighthouse Worldwide Solutions Pre-Release Review Copy ApexZ Operators Manual
248083466-1 10 | P a g e
WARNING: There are no user-serviceable components inside the
particle counter. The use of controls, adjustments or procedures
other than those specified within this manual may result in
personal injury and/or damage to this instrument.
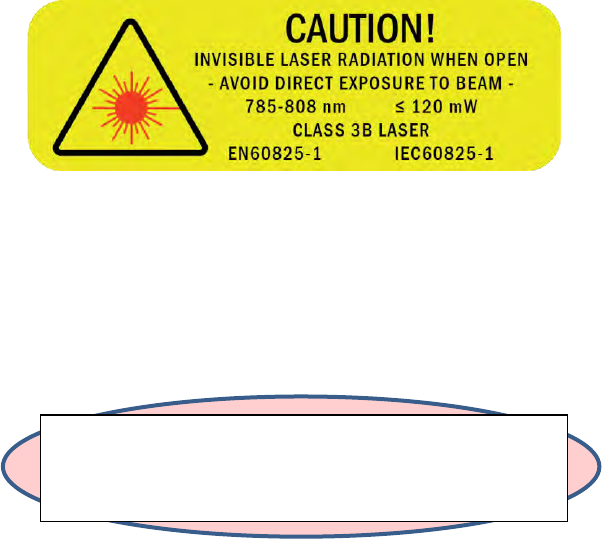
Laser Safety
This product is considered to be a Class 1 LASER product (as defined by FDA 21 CFR, §1040.10 and IEC
60825-1:2014) when used under normal operation and maintenance. Performing service on the internal
sensor can, however, result in exposure to invisible radiation. The particle counter has been evaluated
and tested in accordance with EN 61010-1:2012, “Safety Requirements for Electrical Equipment for
Measurement, Control and Laboratory Use” and IEC 60825-1:2014, “Safety of LASER Products”. For
further technical assistance, contact our Technical Support Team at 1-800-945-5905 (USA Toll Free), or
1-541-770-5905.
Laser Warning Label
Lighthouse Worldwide Solutions Pre-Release Review Copy ApexZ Operators Manual
248083466-1 11 | P a g e
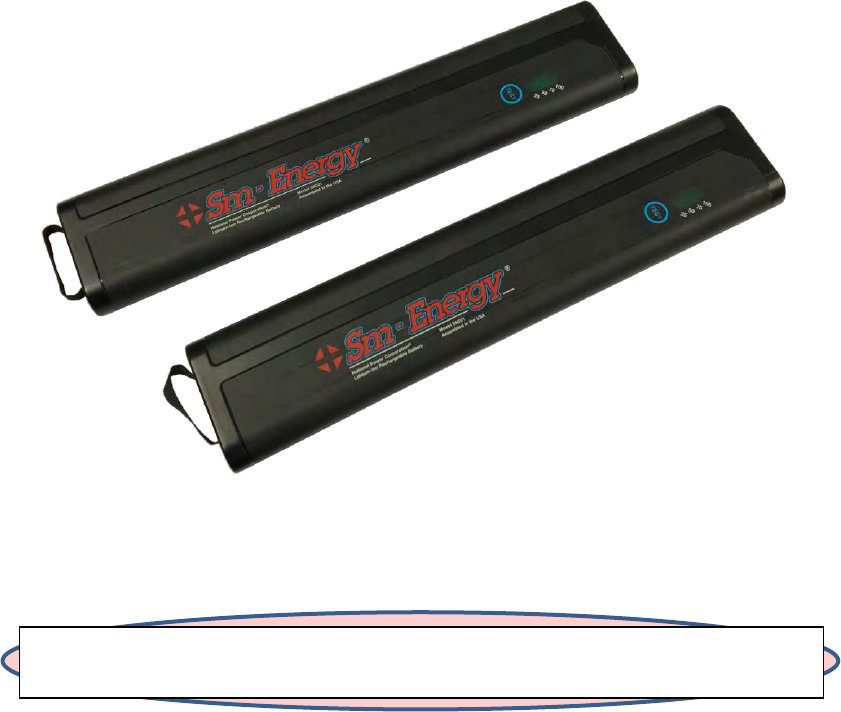
Battery Safety
Battery Type:
National Power Sm-Energy®
Model: SM221
Lithium-Ion Rechargeable Battery, 14.4V, 6.45Ah, 93Wh
WARNING: Only use batteries provide with the ApexZ by Lighthouse Worldwide Solutions. Use of
unauthorized batteries may cause damage to equipment, void warranty, and pose a threat to safety.
Lighthouse Worldwide Solutions Pre-Release Review Copy ApexZ Operators Manual
248083466-1 12 | P a g e
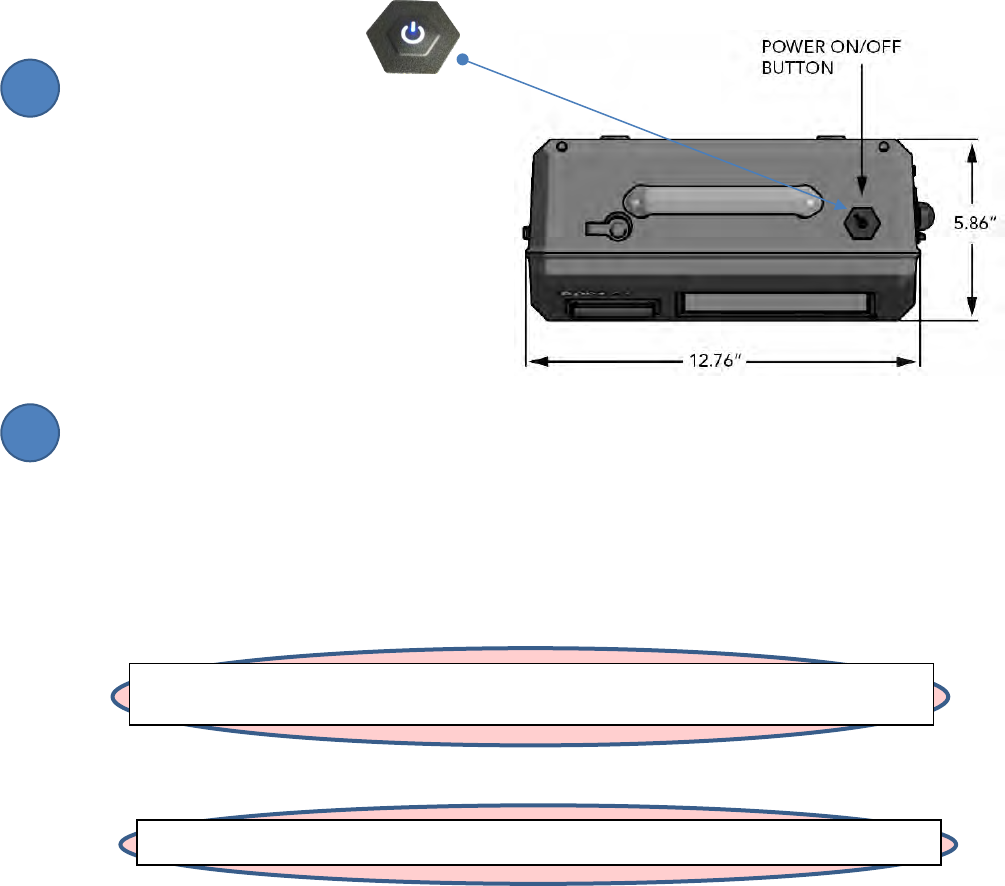
Power Safety
Start Up
This is the Power Button.
Press the power button to
turn on the ApexZ particle counter.
Note with a large database of 10,000 records,
startup will extend while the database is being
loaded.
Shut Down
To shut down press the power button ONCE and DO NOT hold it down.
It is permissible to shut down the ApexZ particle counter from any one of the user interface screens.
Users are not required to logout before ApexZ is shut down. If Users are enabled, shutting down the
ApexZ will logout the current user and will require a user to login when the ApexZ is next started.
WARNING: DO NOT PRESS AND HOLD THE POWER BUTTON TO SHUT DOWN.
THIS WILL CAUSE A HARD POWER SHUT DOWN AND WILL CORRUPT THE DATABASE.
WARNING: If the ApexZ is shut down during a sample, that sample will not be completed or saved.
2
1
Lighthouse Worldwide Solutions Pre-Release Review Copy ApexZ Operators Manual
248083466-1 13 | P a g e
WARNING: Do not attempt to sample reactive gasses (such as hydrogen or oxygen) with
this instrument. Reactive gasses create an explosion hazard in the instrument. Sampling
any gas under pressure can damage the instrument and void the warranty. Sampling any
gas that is not the same density as ambient air can result in inaccurate data. Do NOT
allow water, solvents, or other liquids to enter the instrument via the inlet tube - the
instrument will be damaged and the warranty voided.
WARNING: The use of controls, adjustments or procedures other than those specified
within this manual may result in personal injury and/or damage to this instrument.
Attempts by untrained personnel to disassemble, alter, modify or adjust the electronics
or optics may result in personal injury and damage to the instrument and will void its
warranty. There are no user-serviceable components inside the particle counter. Only
factory authorized service personnel should repair or service this instrument and its
optical system. If replacement of the power supply or its AC power cord is required,
replace it only with a power supply or cord having as good as or better ratings than
specifications provided by Lighthouse Worldwide Solutions. Attempting to use an under-
rated power supply or cord can expose the instrument and adjacent equipment to the
user to dangerous shock and fire hazards. Failure to meet this requirement will void the
CE certification, void the instrument warranty and can result in serious personal injury.
Sampling Safety
Operating Safety
Electrostatic Safety Information
WARNING: Electrostatic discharge (ESD) can damage or destroy electronic components.
Therefore, any service or maintenance work should be done at a static-free work station.
A static-free work station requires an ESD consultant to evaluate the work environment
and propose the equipment and apparel needed for a work station to be successful.
Lighthouse Worldwide Solutions Pre-Release Review Copy ApexZ Operators Manual
248083466-1 14 | P a g e

Lighthouse Worldwide Solutions Pre-Release Review Copy ApexZ Operators Manual
248083466-1 15 | P a g e
Compliance
FCC Notice
This device complies with Part 15 of the FCC Rules. Operation is subject to the following two conditions:
(1) this device may not cause harmful interference, and (2) this device must accept any interference
received, including interference that may cause undesired operation.
Class A Digital Devices
NOTE: This equipment has been tested and found to comply with the limits for a Class A digital device,
pursuant to Part 15 of the FCC Rules. These limits are designed to provide reasonable protection against
harmful interference when the equipment is operated in a commercial environment. This equipment
generates, uses, and can radiate radio frequency energy and, if not installed and used in accordance
with the instruction manual, may cause harmful interference to radio communications. Operation of
this equipment in a residential area is likely to cause harmful interference in which case the user will be
required to correct the interference at his expense.
NOTE: Any changes or modifications not expressly approved by Lighthouse Worldwide Solutions could
void your authority to operate this equipment.
FCC RF Exposure Statement
This equipment complies with FCC RF exposure limits set forth for an uncontrolled environment. This
equipment was verified for RF exposure and found to comply with FCC OET-65 RF exposure
requirements.
WARNING: Making changes to the antenna or the equipment is not permitted. Doing so may result in
the equipment exceeding the FCC RF exposure guidelines. This equipment must not be co-located or
operated in conjunction with any other antenna or radio transmitter.

Lighthouse Worldwide Solutions Pre-Release Review Copy ApexZ Operators Manual
248083466-1 16 | P a g e
CE Notice
EU CE DECLARATION OF CONFORMITY
Manufacturer’s Name: Lighthouse Worldwide Solutions, Inc.
Manufacturer’s Address: Lighthouse Worldwide Solutions, Inc.
1221 Disk Drive
Medford, OR 97501 USA
Declares the product:
Product Name: ApexZ
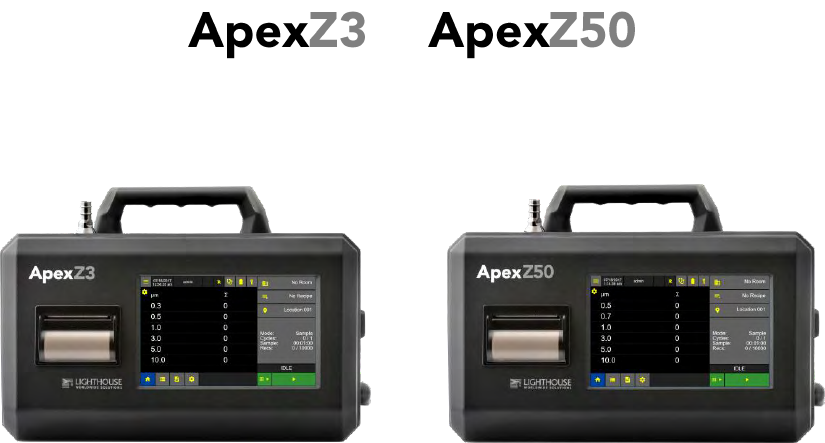
Model Number(s): ApexZ3, ApexZ50
Conforms to the following Product Specifications:
SAFETY
EN61010-1:2010
Safety Requirements for Electrical Equipment for
Measurement, Control, and Laboratory Use Part 1:
General Requirements IEC 61010-1:2010
CAN/CSA C22.2
No. 1010.1-1992
Safety Requirements for Electrical Equipment for
Measurement, Control and Laboratory Use, Part 1:
General Requirements
EMC
EN61326-1:2006
Electrical Equipment for Measurement, Control and
Laboratory Use EN 61326-1:2006
Supplementary information
The product herewith complies with the requirements of the Low Voltage Directive 73/23/EEC amended by
Directive 93/68/EEC and the EMC Directive 89/336/EEC amended by Directive 93/68/EEC and carries the CE
marking accordingly.
Fremont, CA. ______________________________________
Jerry Szpak – Director, Engineering
Lighthouse Worldwide Solutions Pre-Release Review Copy ApexZ Operators Manual
248083466-1 17 | P a g e
Introduction
Overview
This operating manual introduces the Lighthouse ApexZ portable particle counters and includes
instructions for inspecting, installing, using and maintaining the instrument.
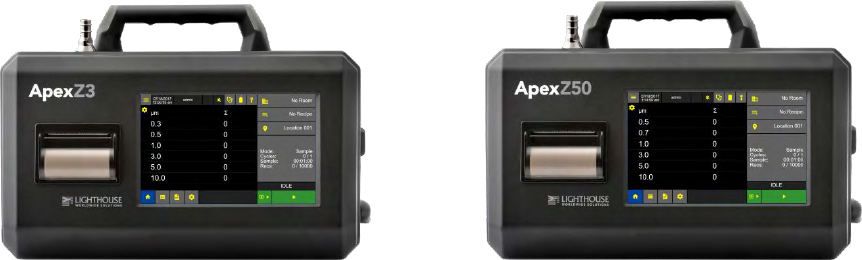
Description
The ApexZ portable particle counter comes standard with 6 particle-size channels (ApexZ3: 0.3, 0.5, 1.0,
3.0, 5.0, 10.0 microns), (ApexZ50: 0.5, 0.7, 1.0, 3.0, 5.0, 10.0 microns) and a flow rate of (ApexZ3: 1.0
CFM), (ApexZ50: 100LPM). The instrument uses a LASER diode light source and LASER beam shaping
optics to illuminate a cross section of the air flow path. As particles move along this path, they cross the
LASER beam and scatter light. The scattered light rays from particles cutting through the beam are
steered to a photodiode using a system of collection optics. The photodiode converts the image into a
current which is converted to a voltage and amplified by an electronic circuit. The amplitude of the
voltage pulse is proportional to the light scattered, which in turn is proportional to the size of the
particle. The voltage pulses created by the particle are then processed by additional electronics that
analyze the height of each pulse and therefore, the size of each corresponding particle. The result is
that the number of particles of various sizes is determined. The ApexZ is effective in both ultra-clean
areas (such as ISO Class 1 or Grade A) and in more traditional clean zones rated as ISO Class 3 or higher.
Refer to Specifications in this manual for additional instrument information.
Accessories
ApexZ Includes: USB cable A to B, USB flash drive 512 MB with lanyard, tripod mini 7” telescoping, ISO
probe (ApexZ3: 1 CFM, ApexZ50 100 LPM), ISP clamp, tubing (ApexZ3: 3/8“ ID x 1/2” OD BevXX 10 feet,
ApexZ50 ½” ID x 5/8” OD BevXX 10 feet), Zero count filter, 24 VDC 5.0 amp power adapter and power
cord, *1 Li-Ion Smart battery included (2 battery slot capacity), 2x rolls of printer paper, Calibration
certificate, USB key with Datasheet, Read Me First and Operators Manual.
Lighthouse Worldwide Solutions Pre-Release Review Copy ApexZ Operators Manual
248083466-1 18 | P a g e
Specifications
Size Range
ApexZ3: 0.3 - 10.0 µm; ApexZ50: 0.5 – 10.0 µm.
Standard 6 Channels
ApexZ3: 0.3, 0.5, 1.0, 3.0, 5.0, 10.0 µm; ApexZ50: 0.5, 0.7, 1.0, 3.0, 5.0, 10.0 µm.
Flow rate
ApexZ3: 1.0 CFM (28.3 LPM), ApexZ50 100 LPM.
Laser Source
Laser Diode.
Zero Count Level
< 1 count / 5 minutes (per ISO 21501-4).
Concentration Limits
1,000,000 particles / ft3 @ 10% coincidence loss suitable for ISO classes 1-8 cleanrooms.
Counting Efficiency
50% @ 0.3 µm; 100% for particles > 1.5 X first channel particle size.
Calibration
Designed for ISO 21501-4 compliance.
Self-Diagnostics
Laser power/current/supply, flow out-of-range, no flow, PA background/supply/health.
Count Modes
Sample, Concentration, Beep, Custom Recipes and Certification Modes.
Data Storage
10,000 sample records, 1,000 locations, 50 recipes, 50 report sessions, 25 users.
Communication
Ethernet, Wi-Fi (802.11 a/b/g/n)
Supporting Software
LMS Express, LMS Express RT
Environmental Sensors
Temperature/relative humidity probe: 32-122 °F(0-50°C)+/-1°F(0.5°C),15-90%+/-2%RH.
Touch Screen Display
7.0 inch (8.89 cm), 1200 x 800 IPS color touch screen.
Speakers
2x adjustable up to 70 dB to indicate status and alerts.
Carry Handle
With RGB LED’s for status and alarms.
Printer
Embedded panel-mount printer.
Reports
EU GMP, FED-209E, ISO-14644-1:1999, and ISO-14644-1:2015 regulatory pass/fail reports
displayed on screen or printed.
Alert
User configurable warnings and alarms.
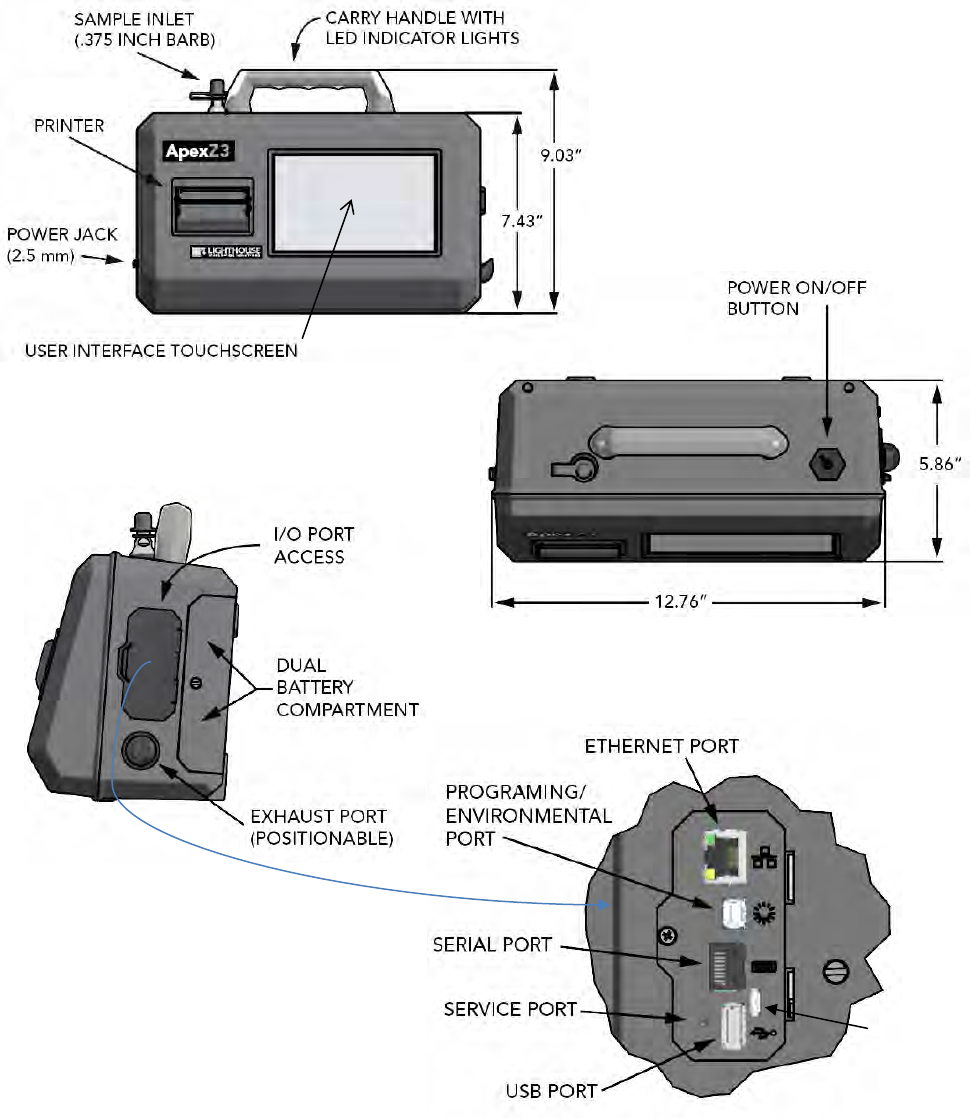
Sample Inlet
ApexZ3: 3/8 inch Inlet nozzle; ApexZ50: ½ inch inlet nozzle.
Sample Output
Internally filtered to HEPA standard (>99.97% @ 0.3 µm); with rotatable exhaust fitting for
directed flow.
Vacuum Source
Internal blower, automatic flow control
Enclosure
Chemically Resistant Polycarbonate blend, conductive lining, VHP compatible
Power
External power supply: 24 VDC, 5 A max draw
Battery
Battery Run Time
2x Li-Ion, removable and rechargeable
ApexZ3: 2 batteries 11 hours nominal use, 50% duty cycle no printing
ApexZ50 2 batteries 8 hours nominal use, 50% duty cycle no printing
Dimensions
12.76“ (l) x 6.23” (w) x 8.88” (h), (32.41 x 15.82 x 22.55 cm)
Temperature Range
50°F to 104°F (10°C to 40°C), 20% to 95% relative humidity, non-condensing
Weight
7.05 lbs. (3.19 kg) without batteries, battery weight 1.35 lbs. (0.61 kg)
Languages
English (U.S.)
Lighthouse Worldwide Solutions Pre-Release Review Copy ApexZ Operators Manual
248083466-1 19 | P a g e
Enclosure and Ports – ApexZ3
(Service Only)
Micro USB
(Service Only)
Lighthouse Worldwide Solutions Pre-Release Review Copy ApexZ Operators Manual
248083466-1 20 | P a g e
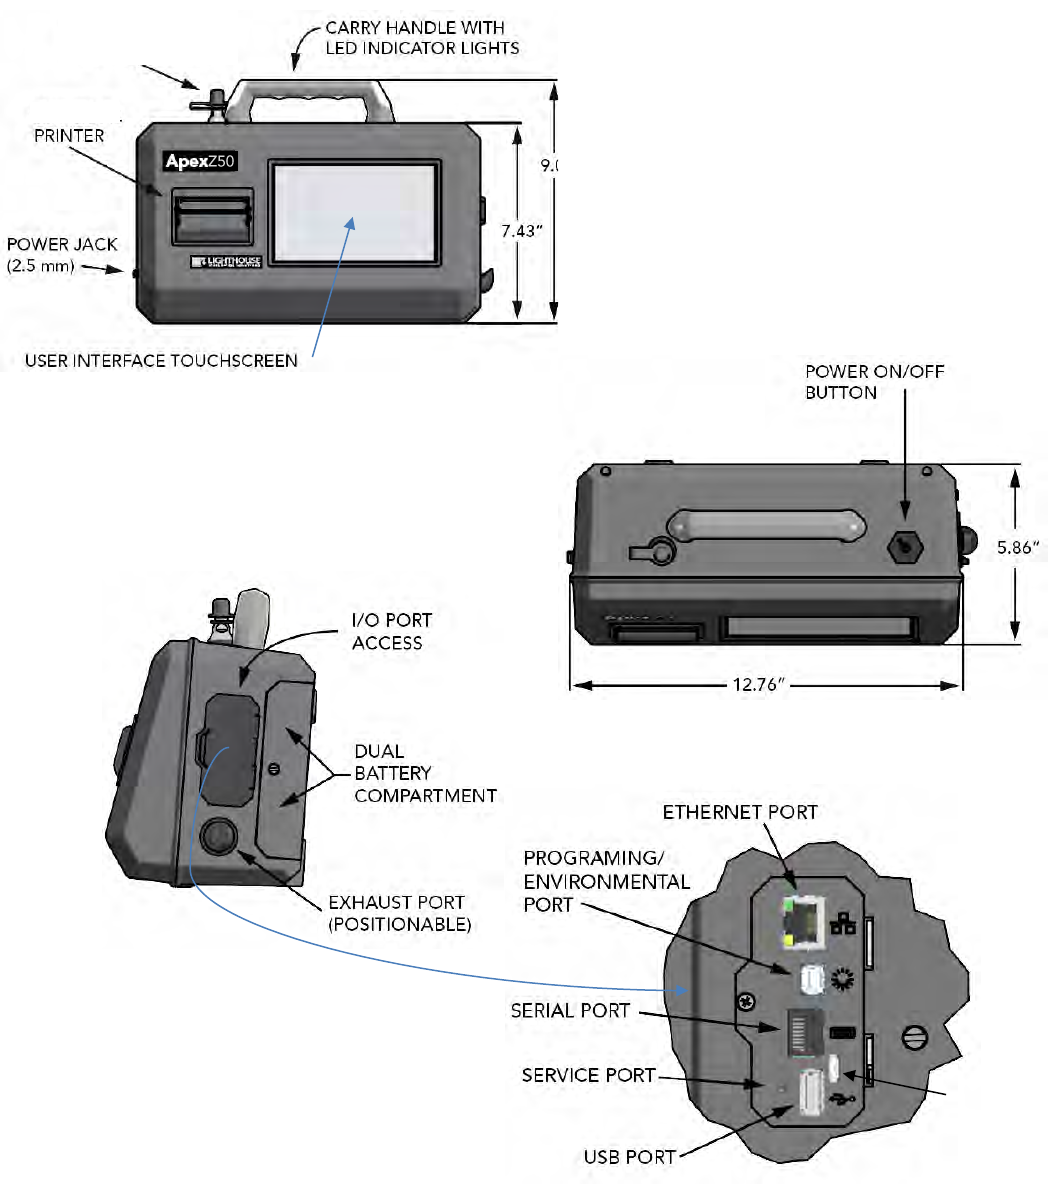
Enclosure and Ports - ApexZ50
SAMPLE INLET
(0.5 INCH BARB)
(Service Only)
Micro USB
(Service Only)
Lighthouse Worldwide Solutions Pre-Release Review Copy ApexZ Operators Manual
248083466-1 21 | P a g e
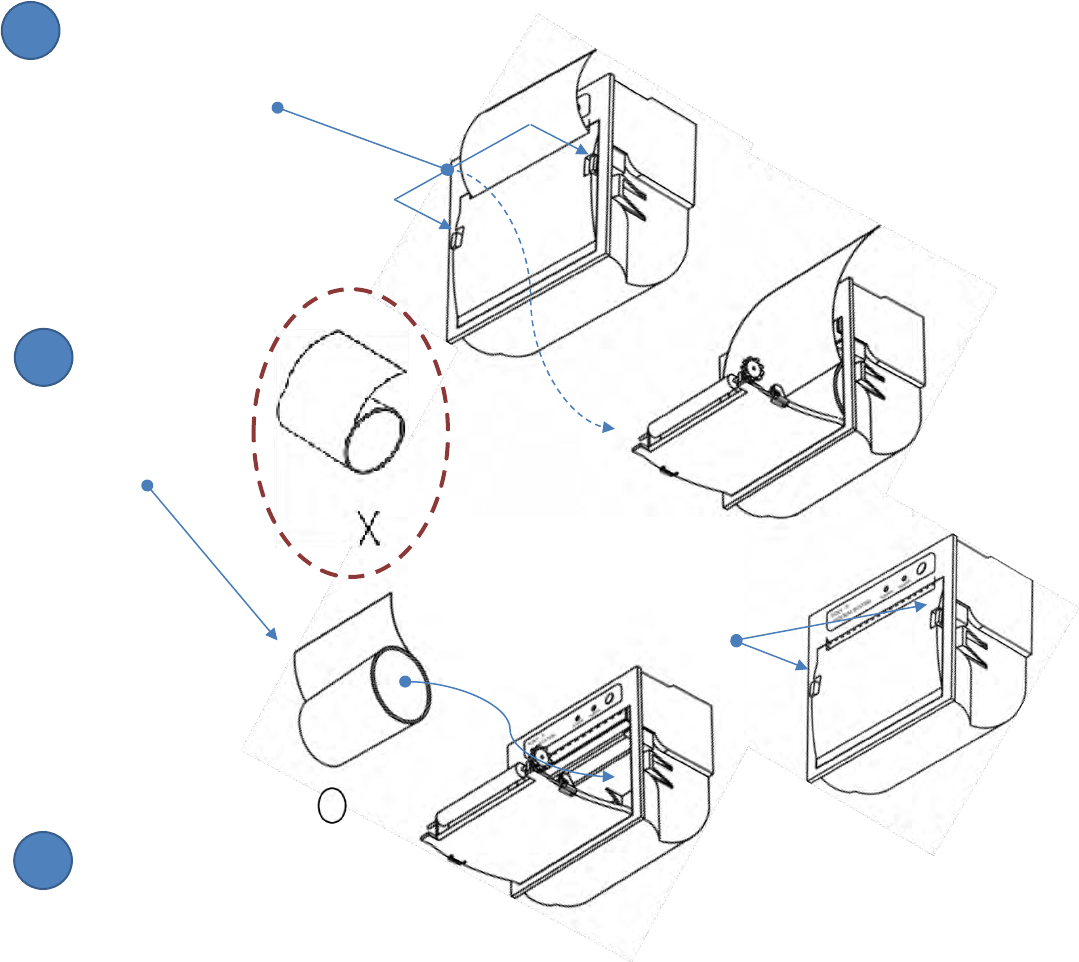
Printer Paper Installation
Load the printer paper with the paper coming from the back side of the roll.
Open Printer Door
Pinch the left and right
printer door tabs and
gently pull open the
printer door.
Load Printer Paper
Insert the printer
paper roll with the
paper feeding
from the back
of the roll.
Close Printer Door
Close the printer door
so that the left and right printer
door tabs snap shut.
Printer paper
tears here.
2
1
3
Lighthouse Worldwide Solutions Pre-Release Review Copy ApexZ Operators Manual
248083466-1 22 | P a g e
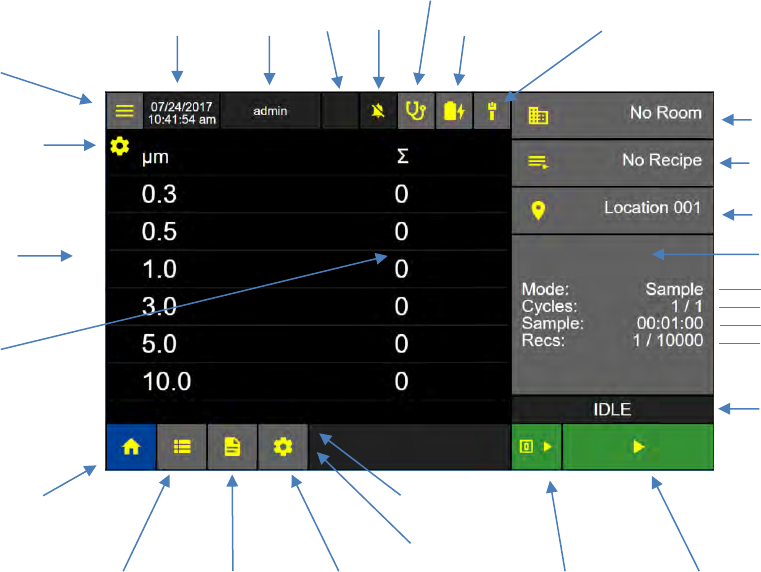
Welcome to the ApexZ
The Home Screen on the ApexZ can be thought of as your particle counting dash board. You have access
from the Home Screen to all functions of the ApexZ portable particle counter. Let’s take a tour of the
major functional areas of the ApexZ Home Screen User Interface.
Date & Time
User
Battery Status
Home
Screen
Data
Screen
Ethernet/Wi-Fi
Room
Recipe
Location
Start/Stop
Sample
Press here to display the
View Options Bar
View Settings
Particle Size µm
(microns)
Data Display
(displays up to 3 columns)
Mode
#/# of Cycles
Self-Diagnostics
ostics
Self-Diagnostics
Sample Time
# / Total Records
Sampling Status
Reports
Screen
Current Cycle
Countdown
Total Sample
Countdown
Configuration
Screen
Zero Count
Start/Stop
Sample Settings
USB
Alarms
ostics
Self-Diagnostics
Lighthouse Worldwide Solutions Pre-Release Review Copy ApexZ Operators Manual
248083466-1 23 | P a g e
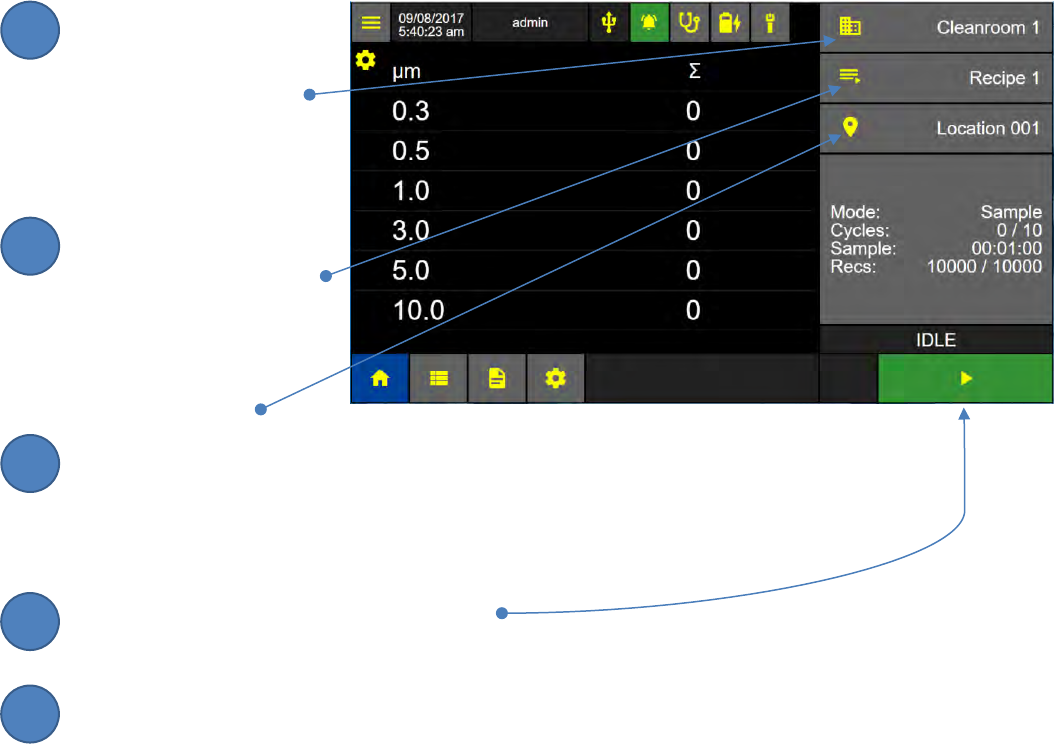
Running a Sample from the Home Screen
Home
. To run a sample from the Home Screen select a Room, a Recipe, a Location and then press START.
Select a Room
Press the Room button to
select a room from the
configuration room list.
Select a Recipe
Press the Recipe button to
select a recipe from the
configuration recipe list.
Select a Location
Press the Location button to select a location from the recipe location list.
Ready to Start Sample!
Press the start button to START the sample.
To stop a sample, press the STOP button.
2
3
1
4
5
Lighthouse Worldwide Solutions Pre-Release Review Copy ApexZ Operators Manual
248083466-1 24 | P a g e
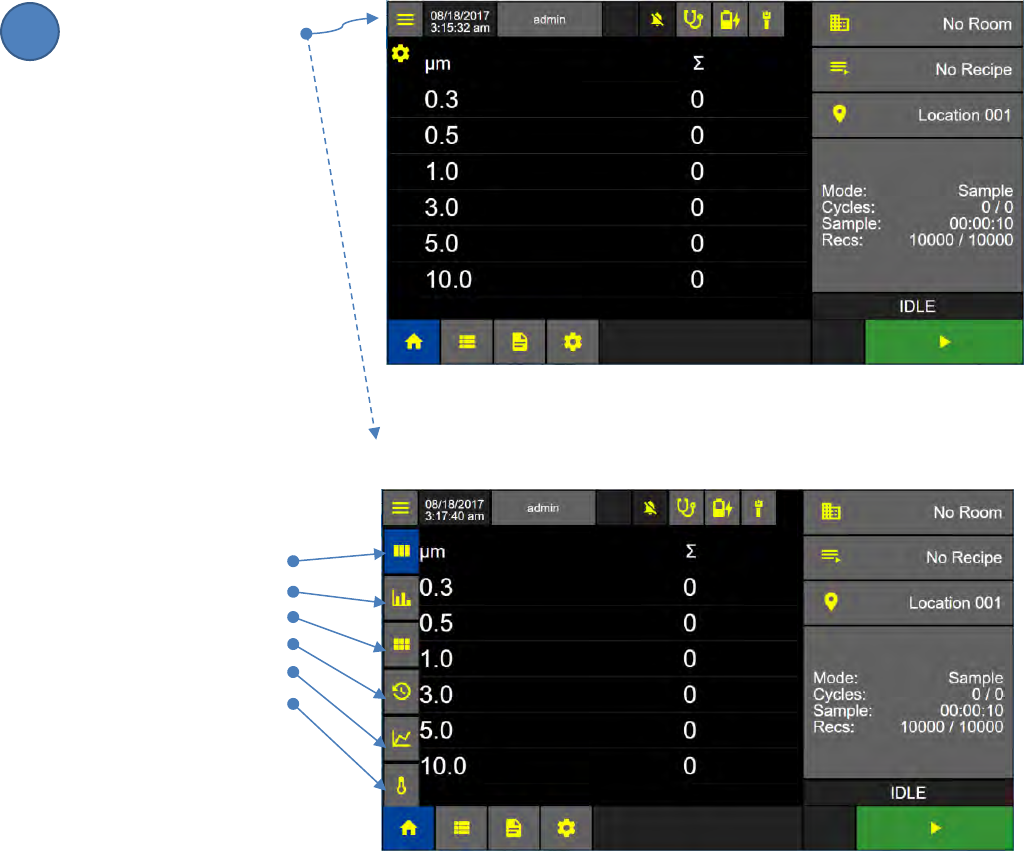
View Options
While a sample is running particle count data may be viewed through multiple View Options. Data,
while being sampled can be viewed in a Data Table, on a Histogram, Grid, or Graph, or be viewed as it is
being sampled.
Press the View Options
button to display the
View Setting Menu.
The View Setting Menu contains
buttons for the following Views
- Data Table
- Histogram
- Grid
- History
- Graph
- Environmental
Home Screen
View Options Bar Displayed
1
Lighthouse Worldwide Solutions Pre-Release Review Copy ApexZ Operators Manual
248083466-1 25 | P a g e
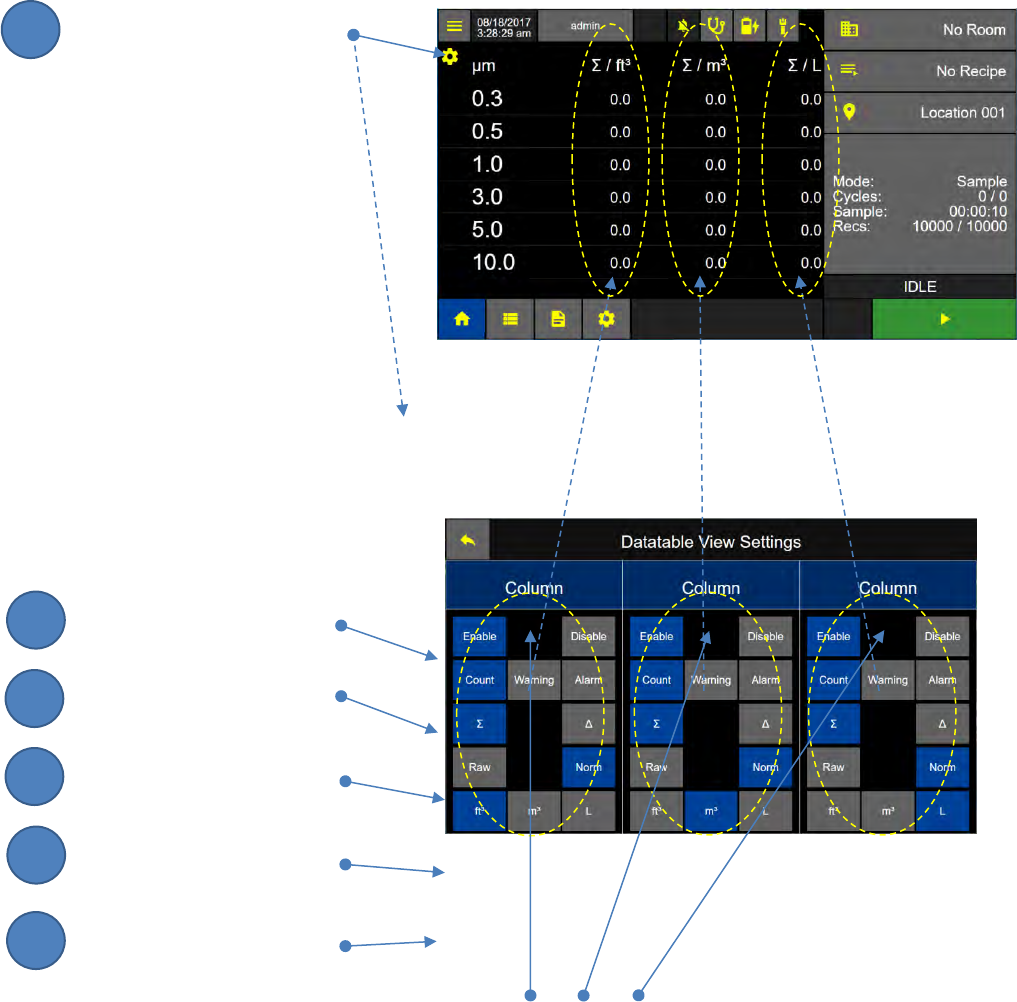
Data Table View
Press the gear button,
while the Data Table view is
displayed, to view the settings
available for the Data Table.
The Data Table view allows the instrument
to display 1-3 columns of sampling data.
The user can select the following
parameters:
Enable or Disable a column
Count or Alarm
Cumulative or Differential
Raw or Normalized
Units for Normalized
ft3 – cubic feet
m3 – cubic feet
L - liters Column: 1 2 3
Data Table View Settings Screen
Home Screen
2
3
1
4
5
6
Lighthouse Worldwide Solutions Pre-Release Review Copy ApexZ Operators Manual
248083466-1 26 | P a g e
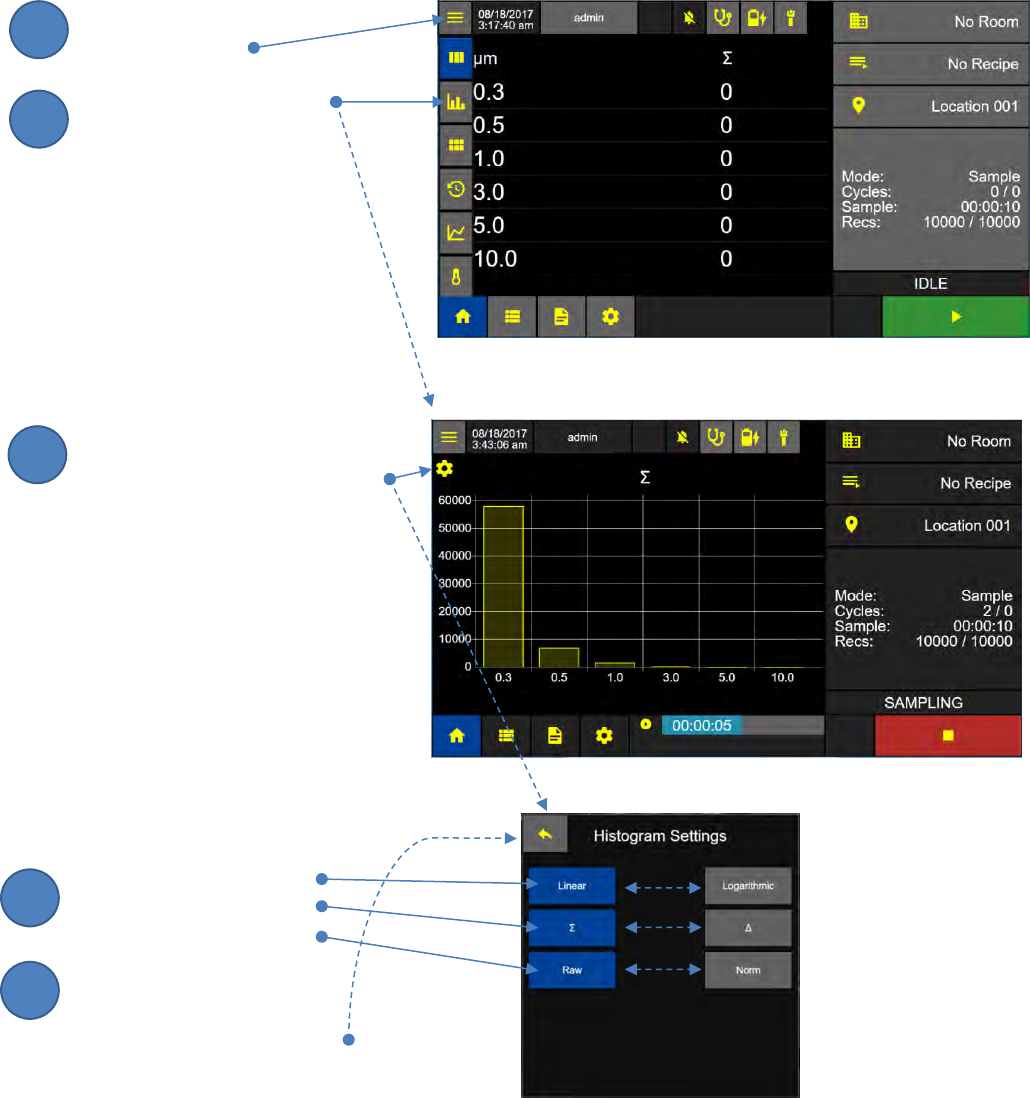
Histogram View
The Histogram View displays real time particle count data as a Histogram.
Press the View Options
Menu button.
Press the Histogram View
Button to display the
Histogram View Screen.
To change how data is displayed
on the histogram, press the gear
button to view the Histogram
Settings Screen.
Select
Linear or Logarithmic
Cumulative or Differential
Raw or Normalized
Press the Back Arrow Button
to save Histogram View
settings.
Histogram Settings Screen
Histogram View Screen
Home Screen Data View
2
3
1
4
5
Lighthouse Worldwide Solutions Pre-Release Review Copy ApexZ Operators Manual
248083466-1 27 | P a g e
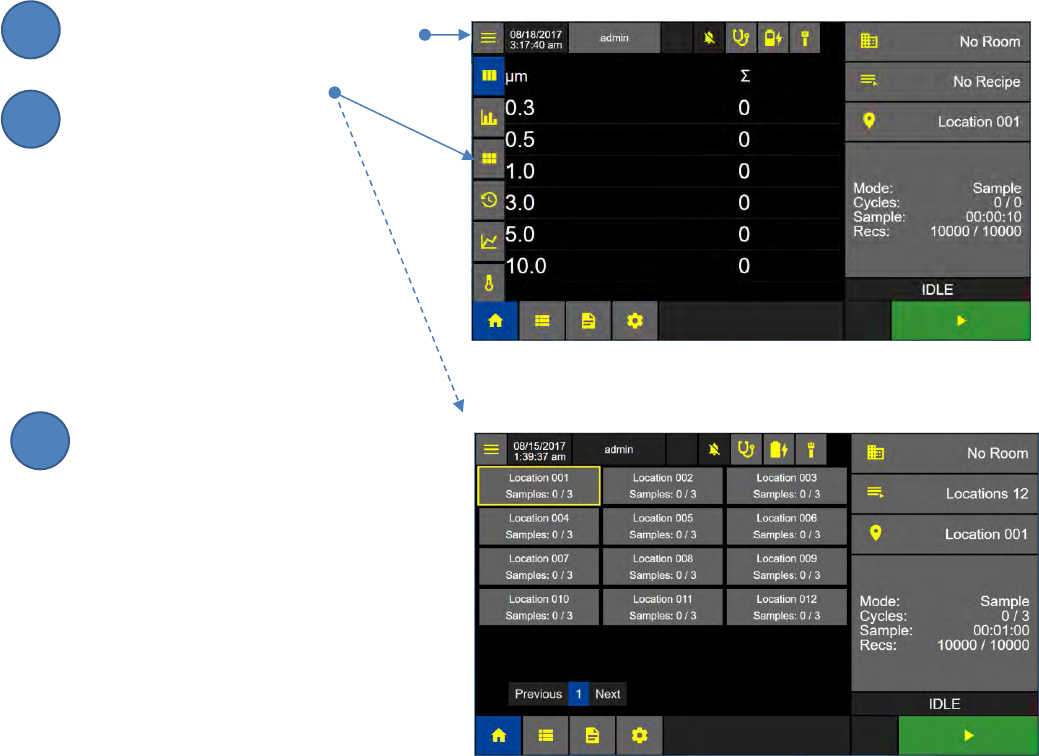
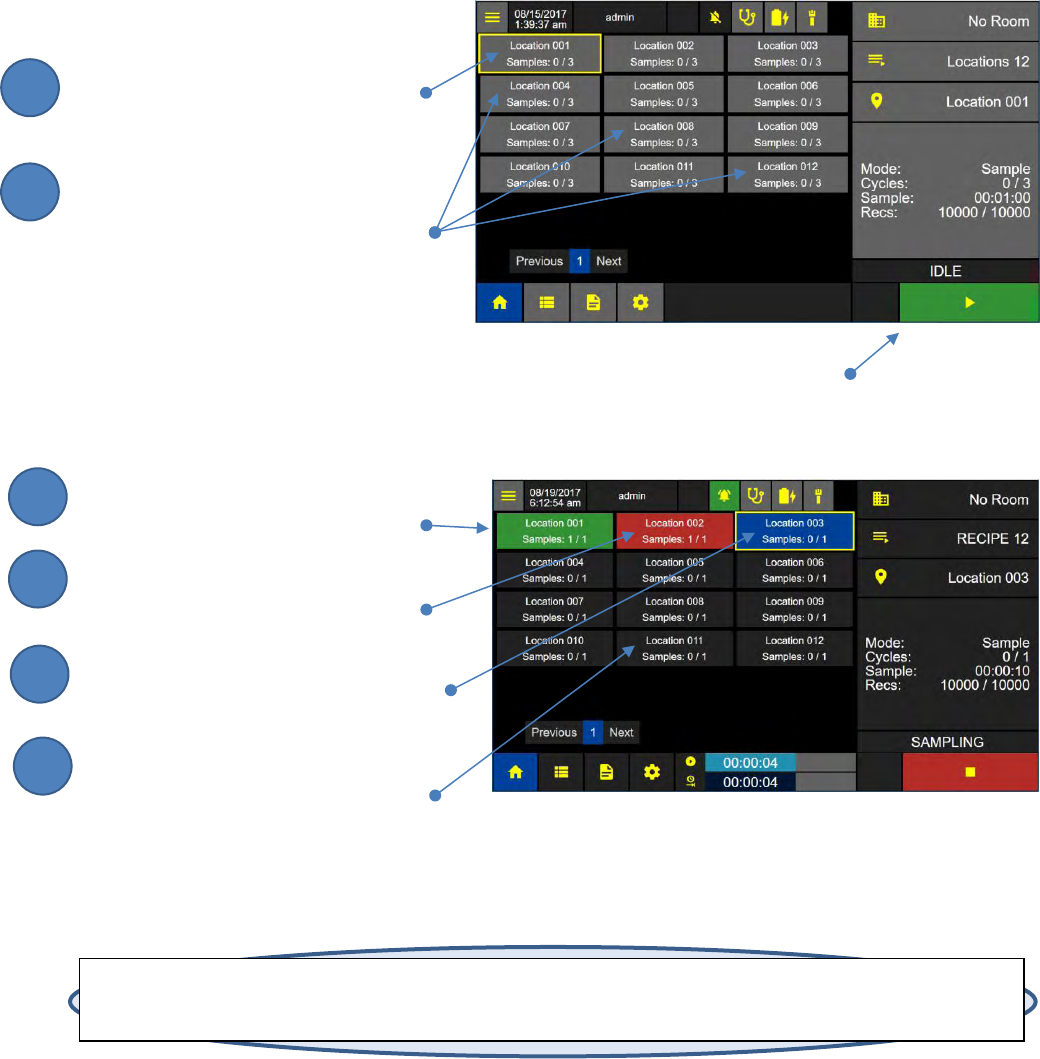
Grid View
When the user is running a recipe, the Grid View can be used to keep the user, at a glance to see the
status, state and progress of the recipe.
Grid View displays a location button for each location assigned to the currently selected recipe. The
background color of each button indicates if the location is selected, and if it has been sampled, passed,
failed or in fault. ApexZ will move to the next sequential location by default after the current location is
complete. Alternatively the user may manually select a different location by pressing the desired
location button.
Press the View Options Menu button.
Press the Grid View Button
to display the Grid View
Screen.
When the user is running a recipe, the
Grid View can be used to keep the user, at
a glance to see the status, state, and
progress of the recipe.
Grid View Screen
Home Screen with View Options Bar
2
3
1
Lighthouse Worldwide Solutions Pre-Release Review Copy ApexZ Operators Manual
248083466-1 28 | P a g e
Location Background Color
Yellow Outline:
Press a location button to select that
Location. The yellow outline indicates
that the location has been selected.
Grey:
The grey background location button
indicates that location has not been
sampled yet and is available to be
selected as the next location.
Green:
Location Sample Completed/PASSED.
Red:
Location Sample Completed/FAILED.
Blue:
Location currently sampling – No errors
(no over limit, no instrument fault)
Dark Grey:
Location not sampled, locked during
active sampling.
Note: When a Recipe is being run the user will be prompted to start each sample at each location. The user may select any of
the available locations from that Recipe to be the next location. When the desired next location has been selected and the
sample probe is at the matching location, the user may press Start to begin sampling at that location.
Grid View Screen
Press Start to start sampling
at the selected location.
2
1
3
4
5
6
Lighthouse Worldwide Solutions Pre-Release Review Copy ApexZ Operators Manual
248083466-1 29 | P a g e
Grid View Button Colors
When ApexZ is in the following states, buttons representing the locations associated with the current
recipe will display as follows:
Idel - When the ApexZ is idle and not running.
Grey Not sampled yet, location is available to select for next sample.
Sampling – when the ApexZ is actively sampling.
Red: Location sample completed - failed.
Yellow: 1 or more samples are over the limit.
Blue: Currently sampling and no errors.
Green: Completed sample passed no errors.
Dark Grey: Not sampled yet, locked during sampling.
Sample Completed – Immediately after an ApexZ sample has been completed.
Red: Sample over the limit and/or Instrument fault.
Green: Sample passed limits, no instrument faults.
Grey: Not sampled yet, available to select for next sample.
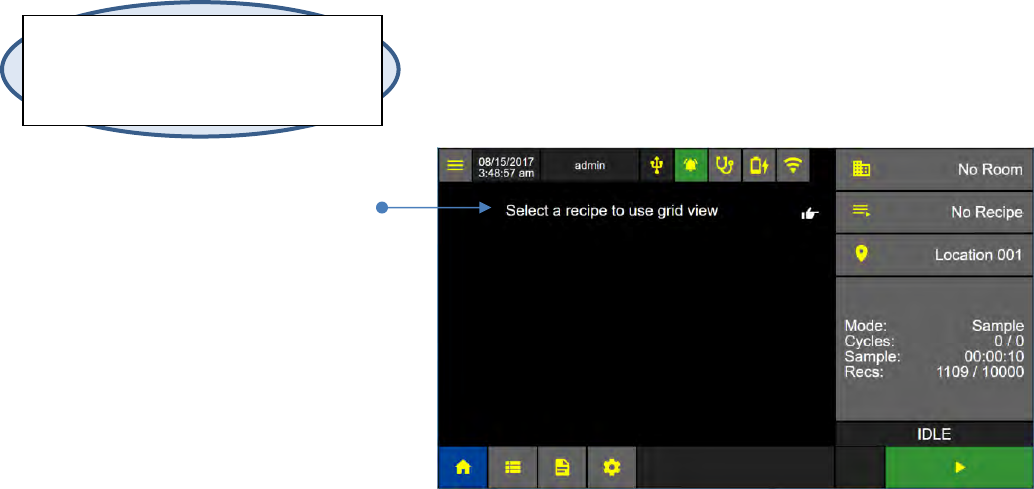
This is an example of Grid View
when “No Recipe” has been
selected.
Note: The Grid View will only be available
while a recipe is being run. If No Recipe is
selected then the Grid View will not display
and locations.
Lighthouse Worldwide Solutions Pre-Release Review Copy ApexZ Operators Manual
248083466-1 30 | P a g e
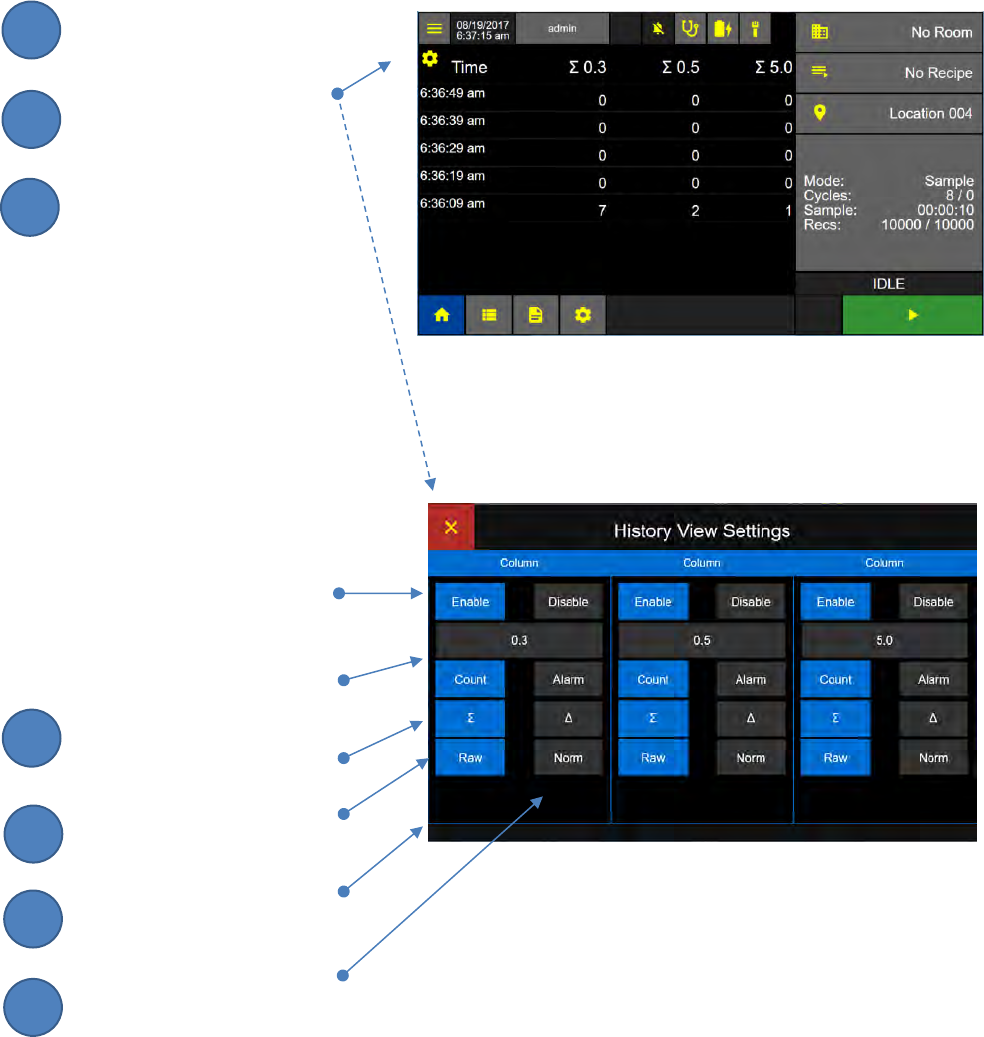
History View
The History View displays the last 5 recorded data records. The user can customize up to 3 columns of
data to be displayed on the History View.
From History View
Press the gear button to view the
History View Settings screen.
Select Settings for up to 3 data columns.
Enable or Disable Column
Channel Size per column
Count or Alarm
Cumulative or Differential
Raw or Normalized
Normalized units, ft3, m3, L
History View Screen
History View Settings Screen
2
3
1
4
5
6
7
Lighthouse Worldwide Solutions Pre-Release Review Copy ApexZ Operators Manual
248083466-1 31 | P a g e
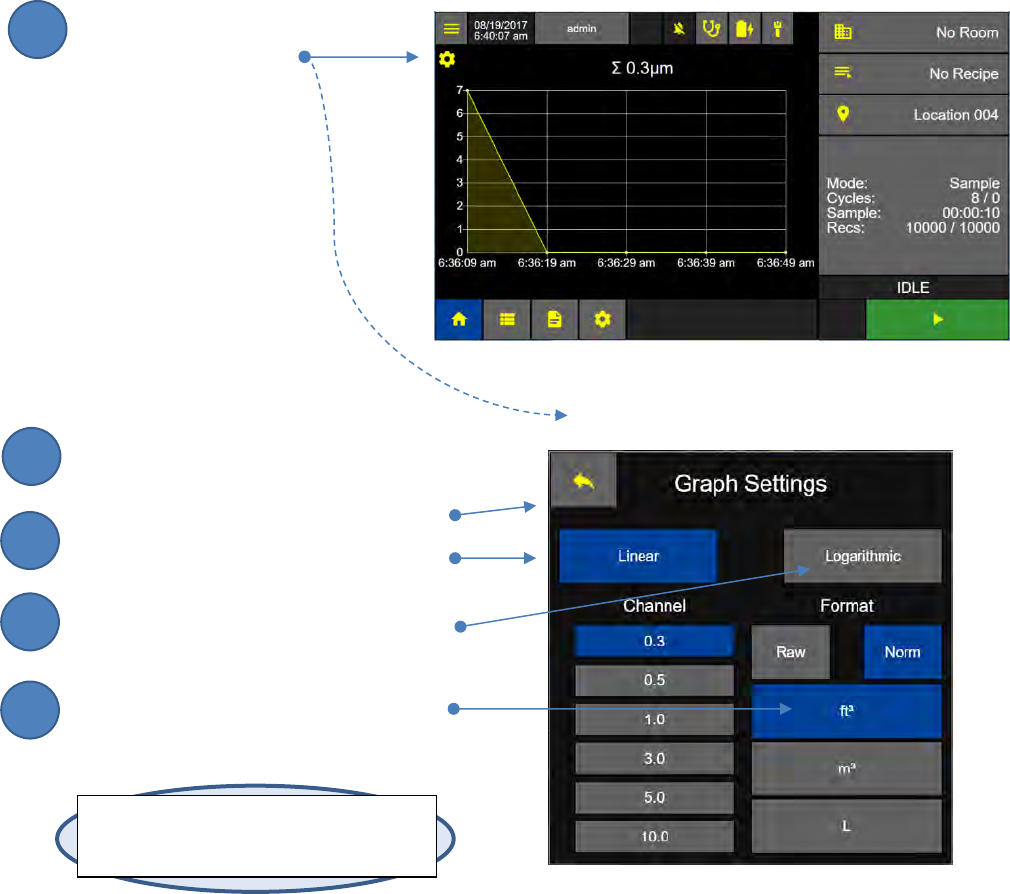
Graph View
The Graph View displays the last 5 recorded samples on a line graph.
From Graph View
Press the gear icon to display the
Graph Settings screen.
Select Linear or Logarithmic
Select Channel size
Select Format Raw or Normalized
Select Normalized Units
Graph View Screen
Graph Settings Screen
Note: For Graph View the ApexZ graphs the
last 5 recorded samples, regardless of which
location the data was recorded at.
2
3
1
4
5
Lighthouse Worldwide Solutions Pre-Release Review Copy ApexZ Operators Manual
248083466-1 32 | P a g e
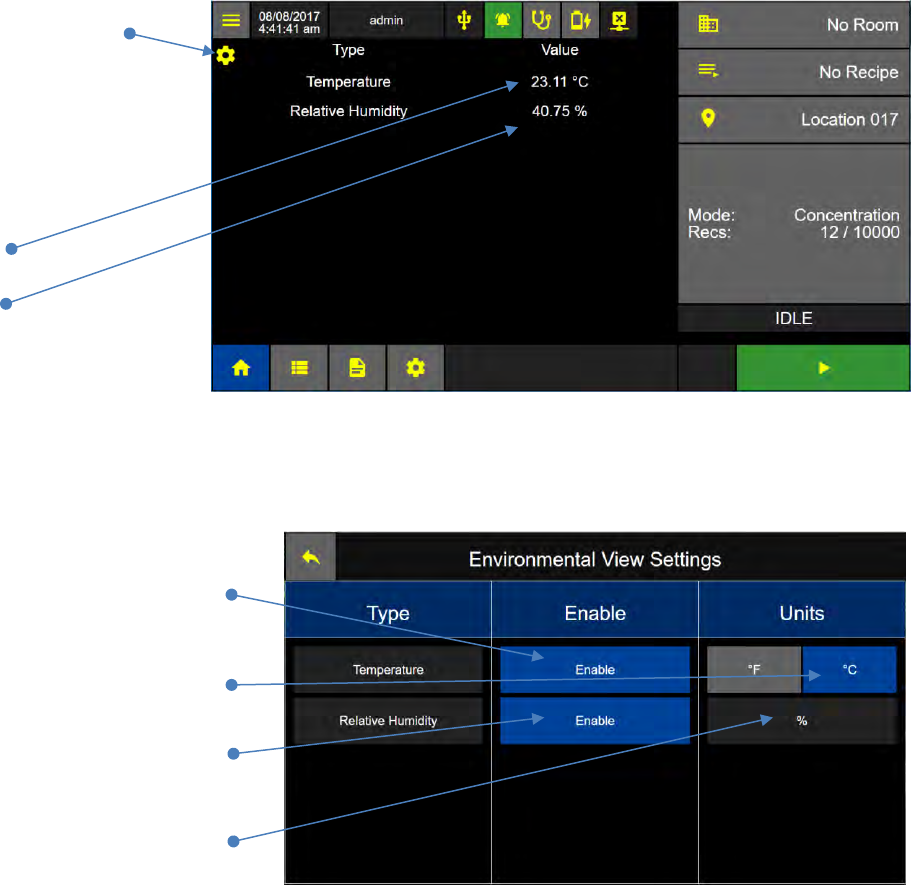
Environmental View
If one or more environmental sensors are attached to the ApexZ, the ApexZ will record environmental
data along with particle counts. Environmental data for the currently running sample can be viewed on
the Environmental View. Connect a Temperature / Humidity probe to ApexZ and then enable the
Temperature and Relative Humidity Settings.
Press the gear icon
to view the
Environmental
View Settings Screen.
Temperature
Humidity
Enable Temperature and Humidity Sensors
Press the enable button
to enable the
Temperature sensor.
Press Units for either
degrees °F or degrees °C.
Press the enable button
to enable Relative Humidity
sensor.
Relative Humidity
will be displayed as %.
Environmental View Screen
Environmental View Settings Screen
Lighthouse Worldwide Solutions Pre-Release Review Copy ApexZ Operators Manual
248083466-1 33 | P a g e
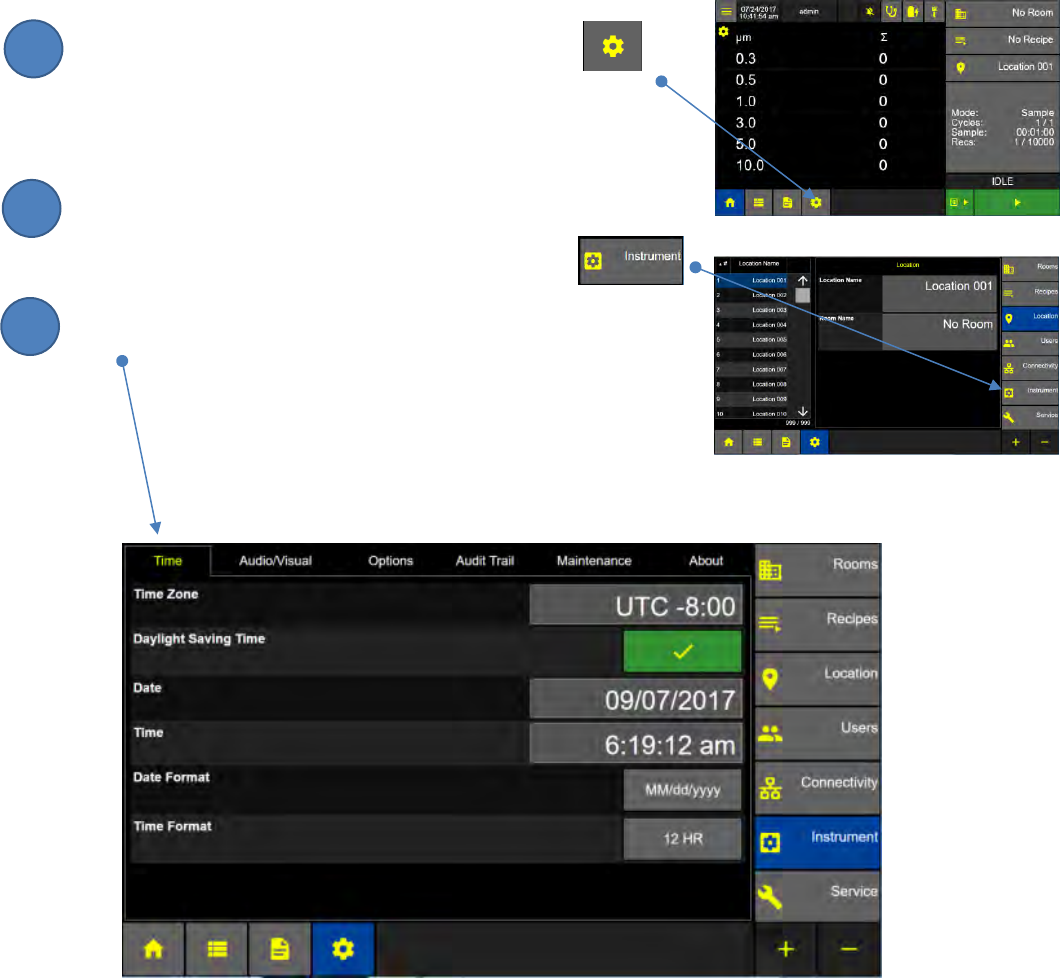
Instrument Settings
The Instrument Settings screen allows the user to view or edit settings for Time Zone, Daylight Savings
Time, Date, Tim, Date and Time Formats, Audio/Visual and Options. In addition a Maintenance tab is
provided for importing and exporting configurations, updating firmware and resetting instrument and
factory settings. The About tab displays the Instrument Name, Model #, Serial #, Sensor #, Calibration
Due, and Firmware version #’s.
From the Home screen press the Configuration button
to display the configuration screen.
From the Configuration screen press the Instrument button
to display the Instrument Settings screen.
Press the Time tab to display or edit the time zone, daylight savings
time, date, time, date and time formats.
Instrument Settings Time Screen
2
3
1
Lighthouse Worldwide Solutions Pre-Release Review Copy ApexZ Operators Manual
248083466-1 34 | P a g e
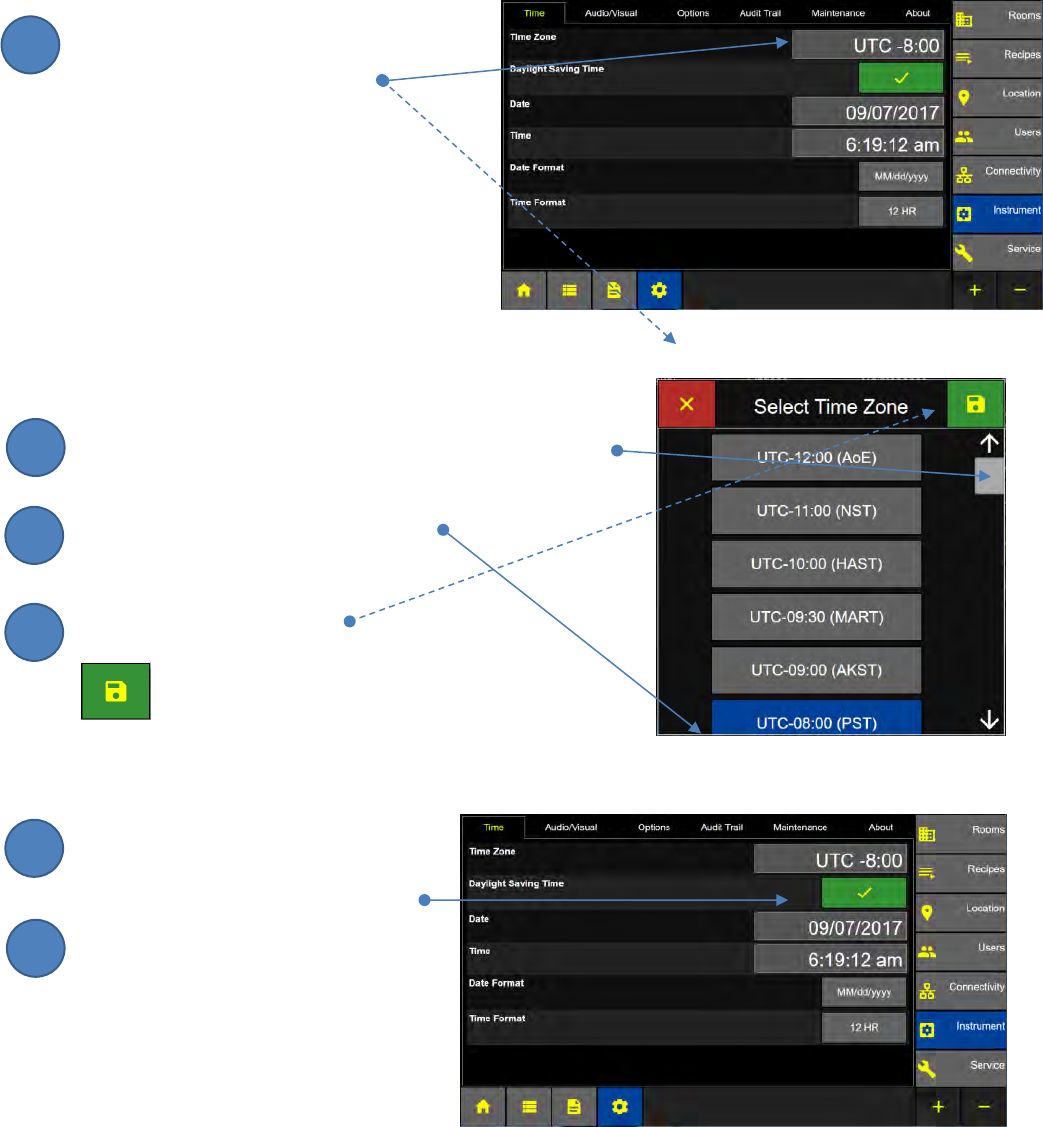
Time Zone & Daylight Savings
Set the Time Zone
Press the Time Zone button to display
the Select Time Zone Screen.
To set the Time Zone
Use the scroll bar to scroll up or down the Time Zone list.
Press and select your UTC-Time Zone.
Press the green save button
to save the UTC-Time Zone.
Set Daylight Saving Time
Press the Daylight Saving Time button to
enable or disable Daylight Savings Time.
Press the Date button to display the
Enter Date Screen.
Instrument Settings: Time Screen
Select Time Zone Screen
Instrument: Time Screen
2
3
1
4
5
6
Lighthouse Worldwide Solutions Pre-Release Review Copy ApexZ Operators Manual
248083466-1 35 | P a g e
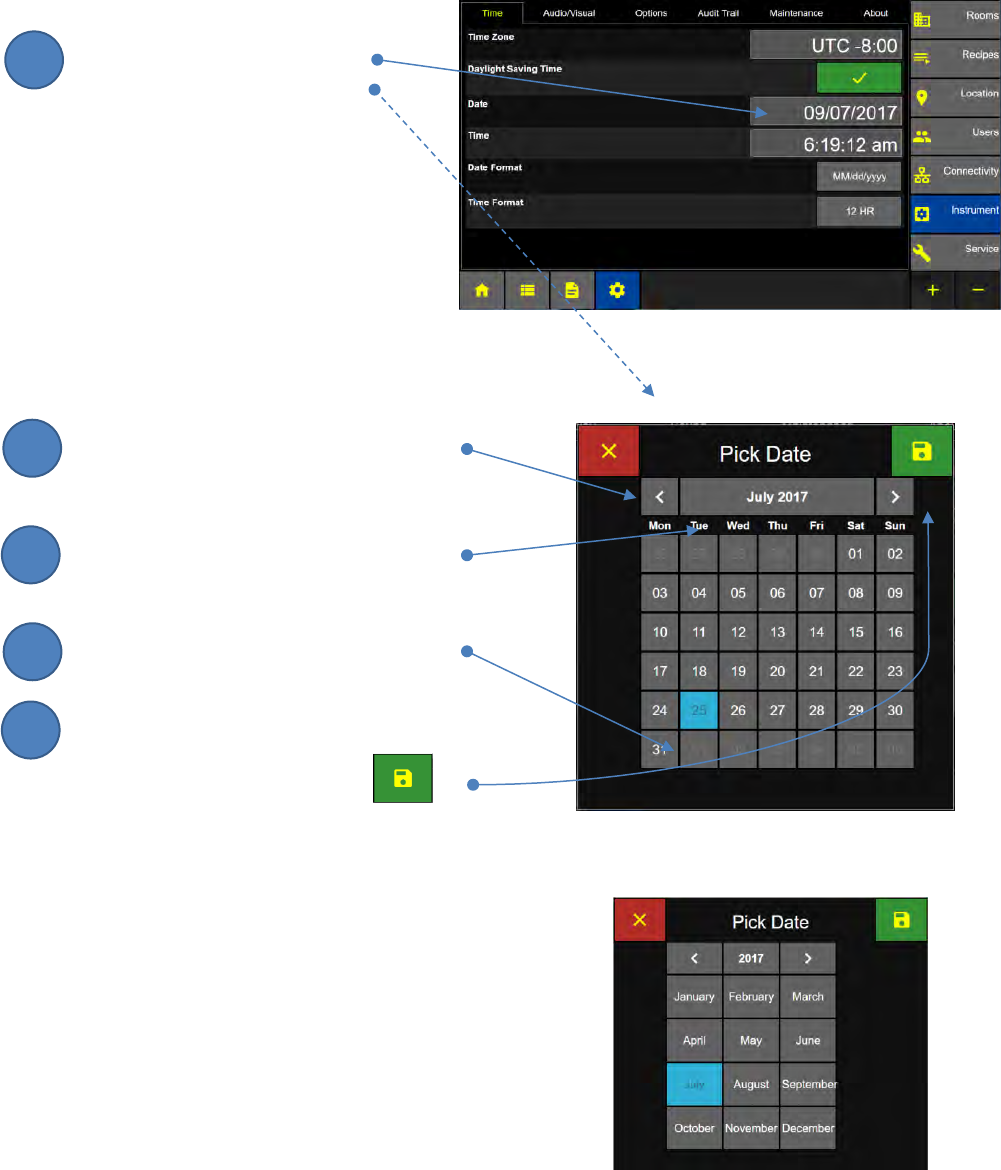
Date
HOME – CONFIG – Instrument – Time
Set Today’s Date
Press the Date Input button
to display the Pick Date screen.
Select Day/Month/Year
Press right/left arrow buttons
to Increase / decrease the month.
Press the month/year button to display
the Pick Date - Month/Year Screen.
Select Today’s Date
Press the green SAVE button
to save the date settings.
Instrument Settings: Time Screen
Pick Date Screen
Pick Date - Month/Year Screen
2
3
1
4
5
Lighthouse Worldwide Solutions Pre-Release Review Copy ApexZ Operators Manual
248083466-1 36 | P a g e
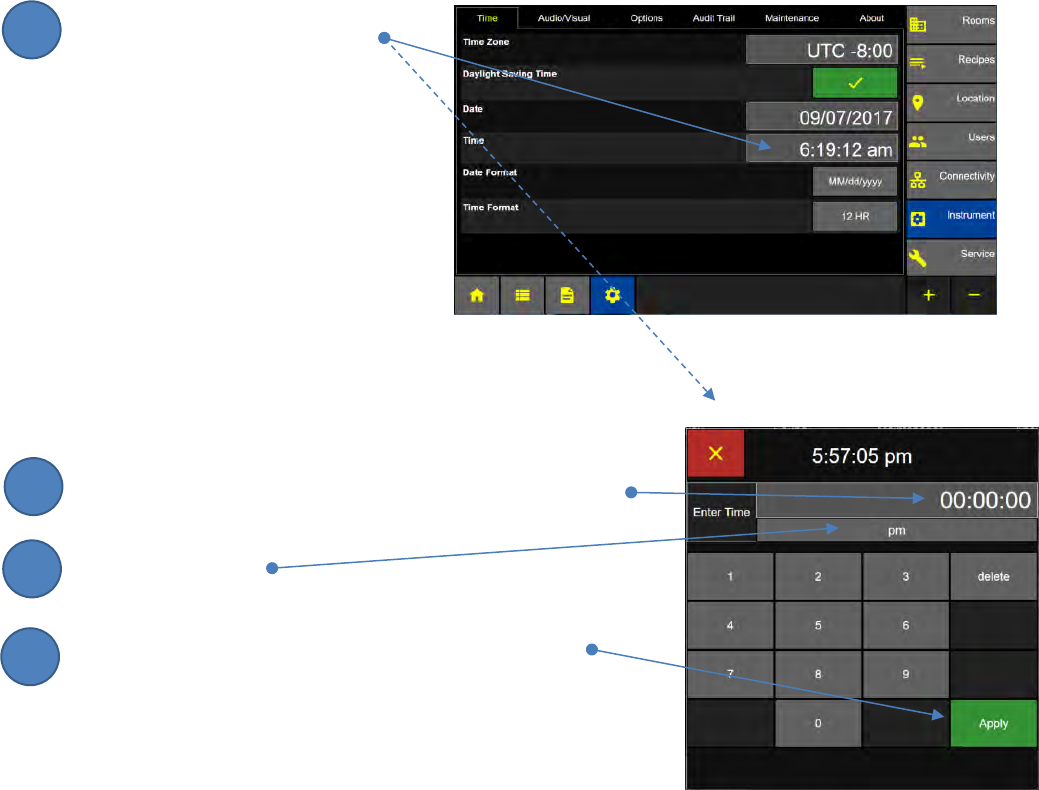
Time
Press the Time input button to
display the Enter Time keypad.
Enter Time on the keypad
Enter the current time on the numeric keypad: HH:MM:SS.
Select am or pm.
Press the green Apply button to save the current time.
Instrument Settings: Time Screen
Enter Time Screen
2
3
1
4
Lighthouse Worldwide Solutions Pre-Release Review Copy ApexZ Operators Manual
248083466-1 37 | P a g e
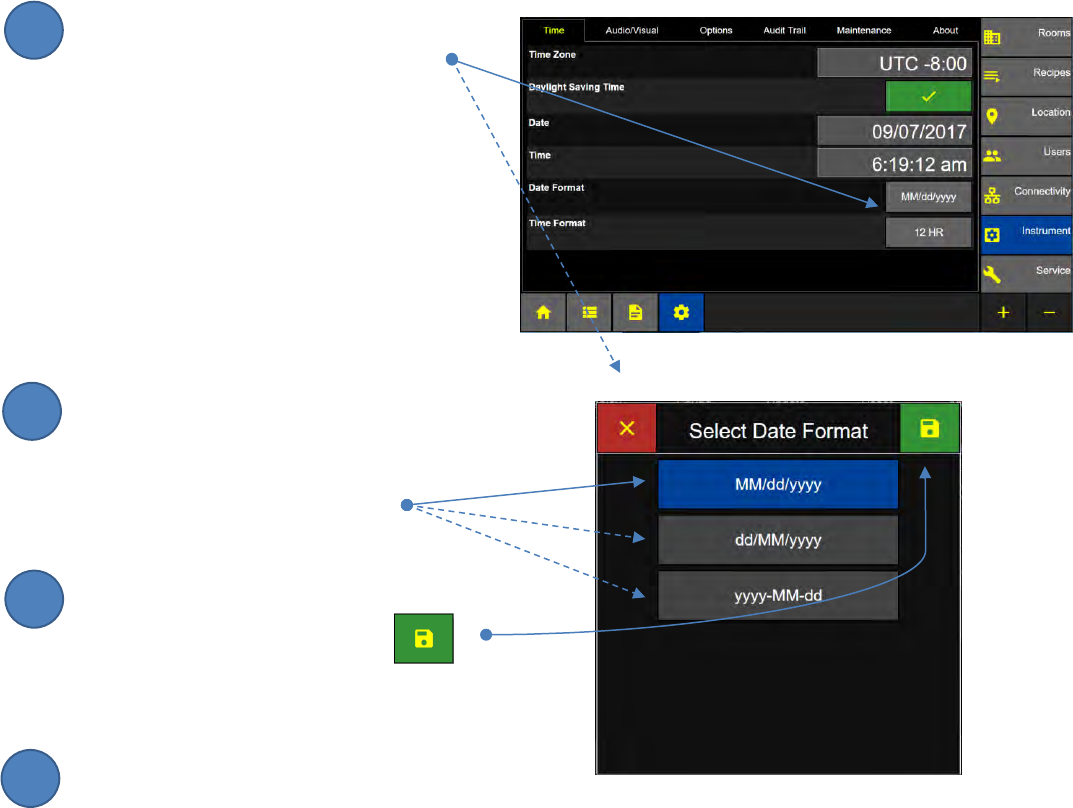
Date and Time Format
Set Date Format
Press the Date Format Input button to
display the Select Date Format Screen.
Select Date Format
Select one date format:
MM/dd/yyyy (Month/Day/Year)
dd/MM/yyyy (Day/Month/Year)
yyyy-MM-dd (Year/Month/Day)
Press the green Save button
to save the date format.
Set Time Format
Press the Time Format button to
Toggle between 12 or 24
hour time format.
Instrument: Time Screen
Instrument: Time Screen
Select Date Format Screen
2
3
1
4
Lighthouse Worldwide Solutions Pre-Release Review Copy ApexZ Operators Manual
248083466-1 38 | P a g e
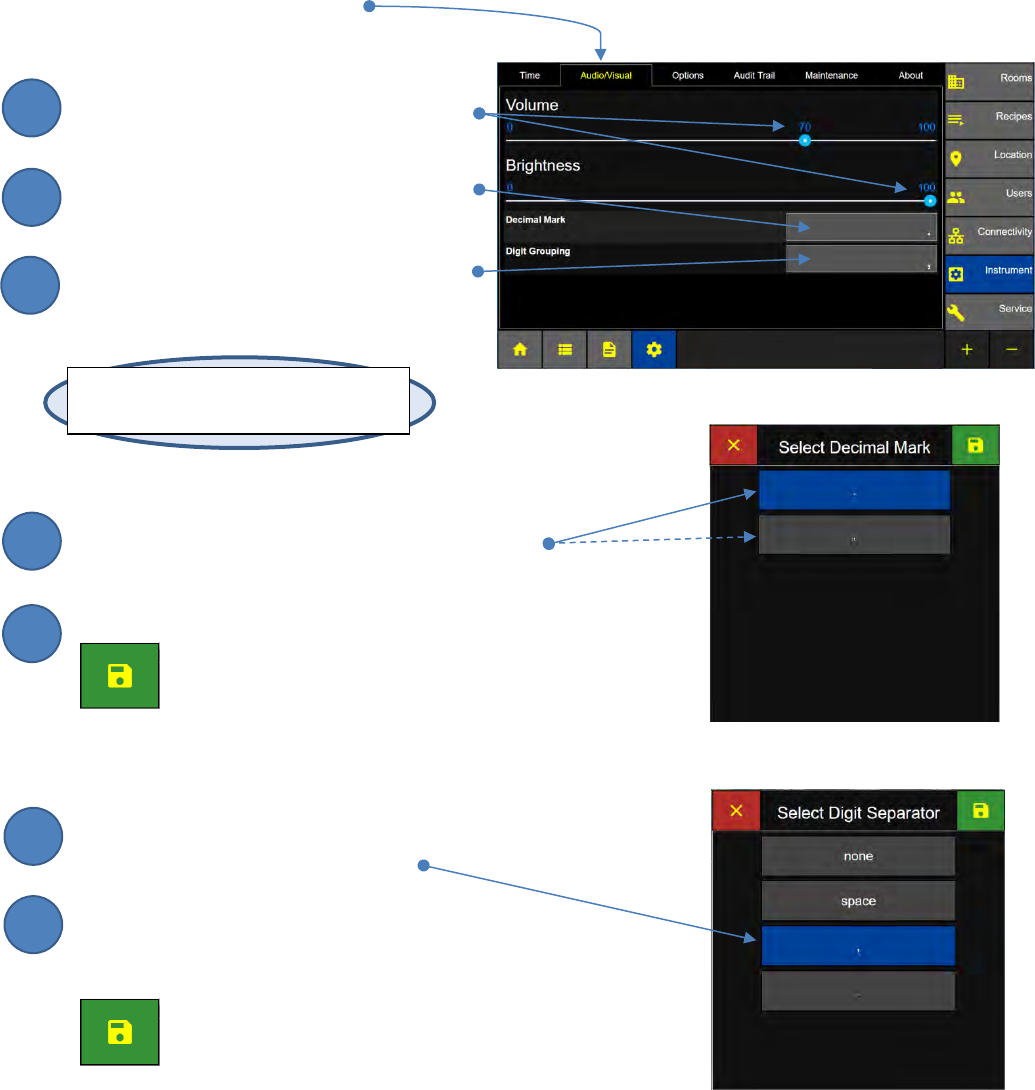
Audio/Visual
HOME – CONFIG – Instrument – Audio/Visual
Volume and Brightness
Touch and slide the volume or brightness
button from 0 – 100%.
Press the Decimal Mark button to
display the Select Decimal Mark screen.
Press the Digit Grouping button to
display the Select Digit Separator screen.
Decimal Mark
Select the Period or Comma for the decimal mark.
Press the green save button to
Save the Decimal Mark.
Digit Separator
Select the Digit Separator.
The digit separator will be applied
to normalized data counts.
Press the green save button to
Save the Digit Separator.
Instrument: Audio/Visual Screen
Select Digital Separator Screen
Note: When Alarms are enabled
Alarms will sound at 100% volume.
Select Decimal Mark Screen
2
3
1
4
5
6
7
Lighthouse Worldwide Solutions Pre-Release Review Copy ApexZ Operators Manual
248083466-1 39 | P a g e
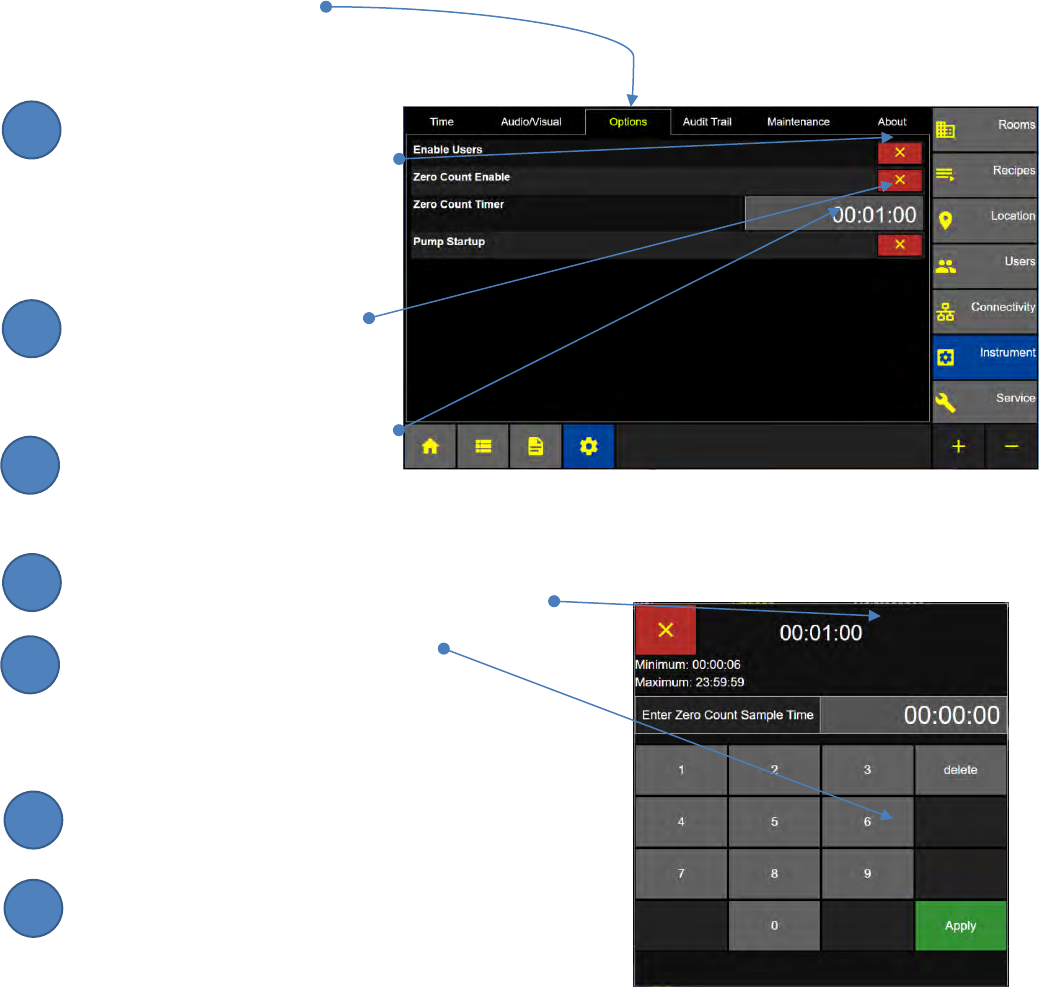
Options
HOME – CONFIG – Instrument – Options
Enable Users
Press the Enable Users button to
enable users and force users to
logon to the ApexZ.
Zero Counting
Press the Zero Count Enable
button to enable the Zero Count
Start button on the Home
Screen.
Press the Zero Count Timer to
display the Enter Zero Count Sample Time Screen.
Enter the zero count sample time on the keypad
Press the green Apply button to save
the zero count time setting.
Pump Startup
Enable Pump Startup to:
Start pump immediately after pressing START.
(Pump will run during delay time period).
Disable Pump Startup to:
Start pump after the sample Delay Time has completed.
Instrument Options Screen
Enter Zero Count Sample Time Screen
2
3
1
4
5
6
7
Lighthouse Worldwide Solutions Pre-Release Review Copy ApexZ Operators Manual
248083466-1 40 | P a g e
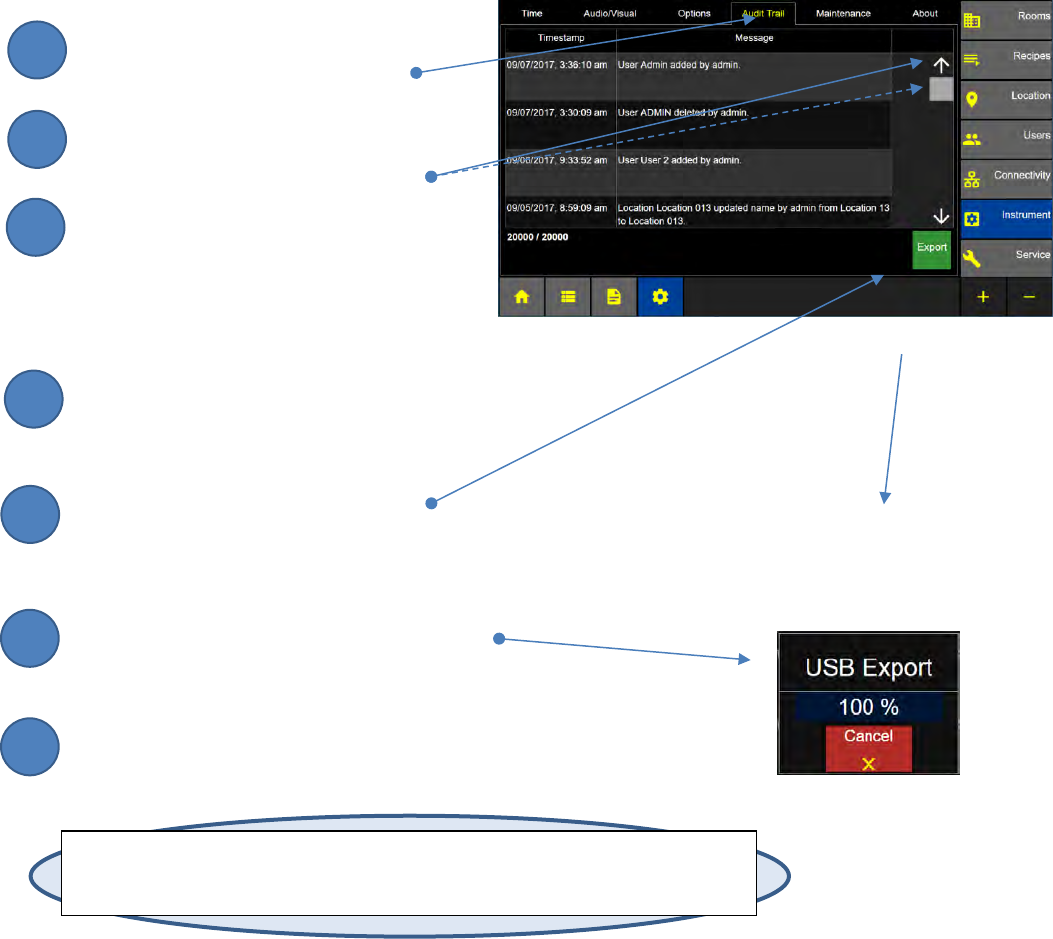
Audit Trail
Audit Trail
Press the Audit Trail Tab to
display the Audit Trail Screen.
Press the arrow button or slide the elevator
bar to scroll up and down the audit trial
history.
Insert a USB key prepare to export the audit
trail.
Export Audit Trail
Insert a USB key into the instrument.
If no USB key is inserted then the Export
button will be inactive.
Press the Export button to export
the audit trail to USB key.
A countdown message box will appear until
100% has been exported to USB key.
The USB file will be named:
Audit_YYMMDD_HHMMSS_ApexName.csv
Note: Export Audit Trail requires that a USB key is inserted into ApexZ. If no USB key is
present then the Export button will have a dark background. When the USB key is present
the Export button will have a green background.
Audit Trail Screen
2
3
1
4
5
6
7
Lighthouse Worldwide Solutions Pre-Release Review Copy ApexZ Operators Manual
248083466-1 41 | P a g e
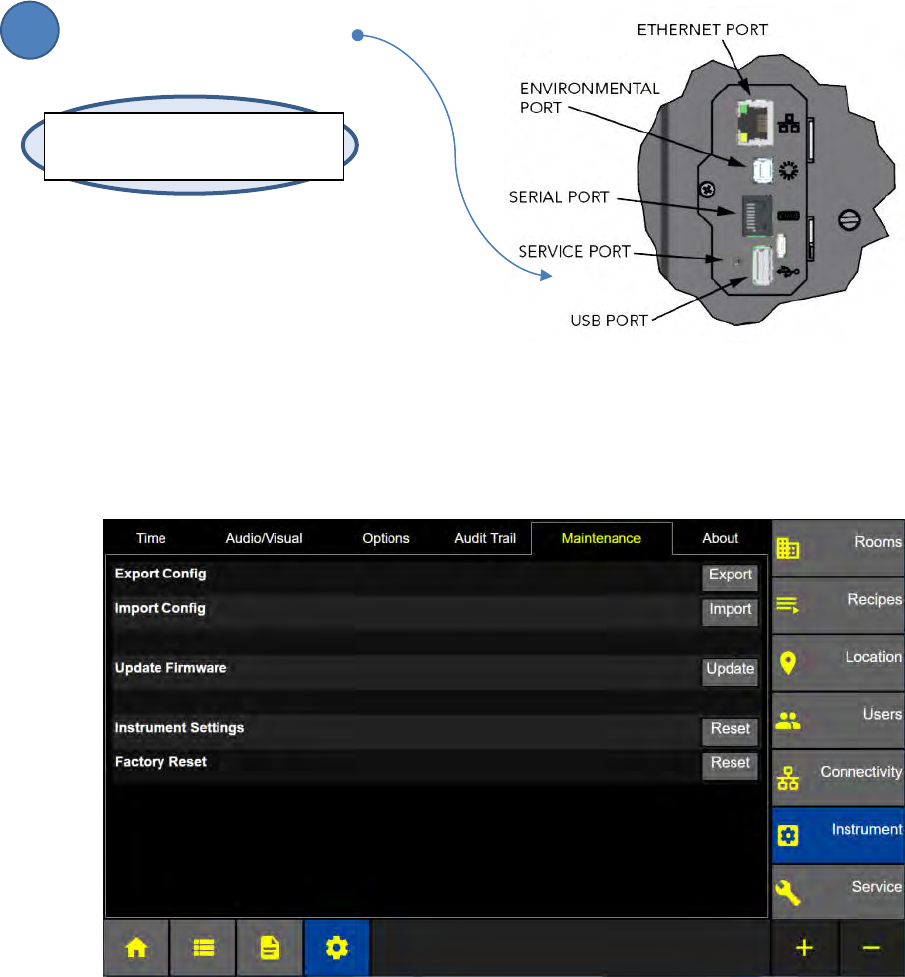
Maintenance
HOME – CONFIG – Instrument – Maintenance
The Maintenance screen allows the user to import and export configurations, update firmware and
reset instrument and factory settings. A USB key will be required to activate Export/Import/Update.
Insert USB key into USB port.
Instrument: Maintenance Screen with USB inserted
Note: If no USB is connected Export,
Import and Update will be disabled.
1
Lighthouse Worldwide Solutions Pre-Release Review Copy ApexZ Operators Manual
248083466-1 42 | P a g e
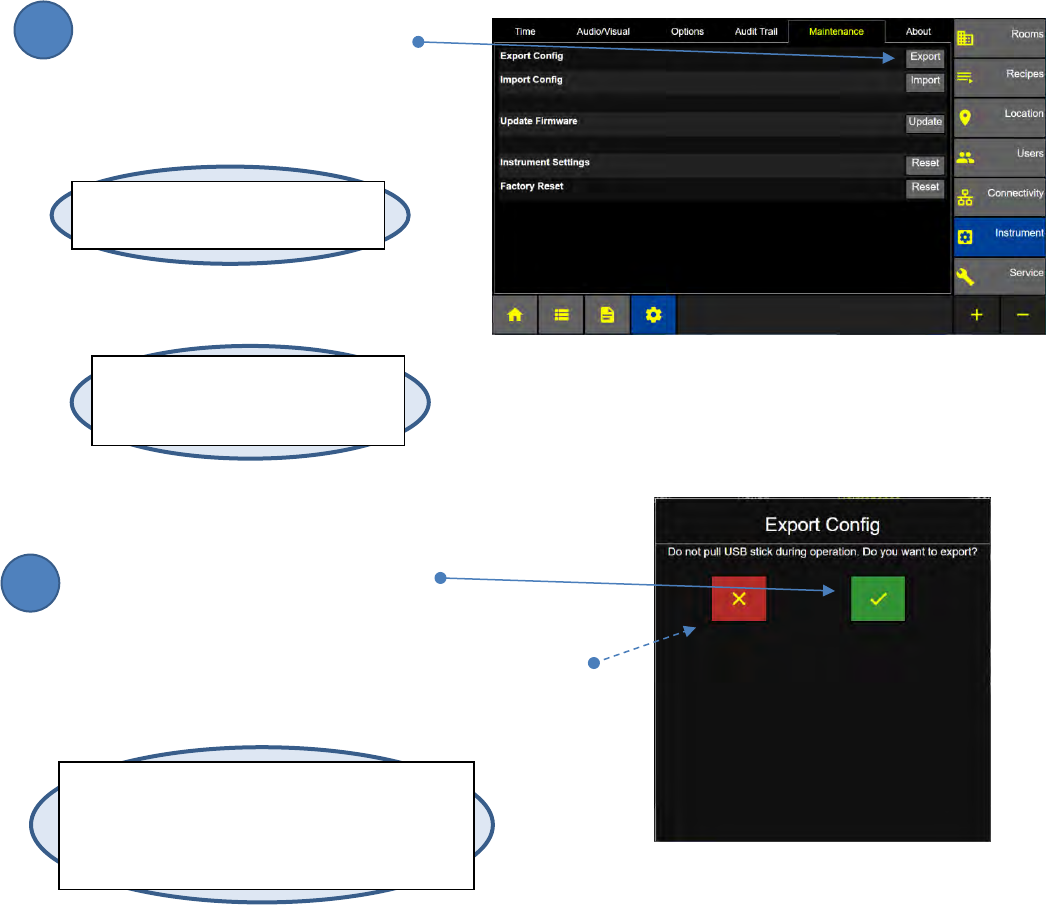
Export Configuration
ApexZ can export it’s configuration to a file on a USB key. This configuration file can be saved as a
backup or it can be Imported onto another ApexZ instrument (see Import Configuration).
Export Configuration
Press the Export button to display
the Export Configuration screen.
Confirm Export Configuration
Press the green check box to export
the ApexZ’s configuration to the USB stick.
Or press the red x box to cancel the Export.
Export Configuration Screen
Note: Exported configuration files will be named:
config_YYMMDD_HHMMSS_SERIALNUMBER.json or
Config_YYMMDD_HHMMSS_InstrumentName.json
(if the unit has been assigned an Instrument Name)
HHMMSS will be in UTC, not local time.
Instrument: Maintenance Screen
Note: If no USB is connected Export,
Import and Update are disabled.
Note: All locations, rooms, recipes,
user settings will be saved to the
configuration file.
2
1
Lighthouse Worldwide Solutions Pre-Release Review Copy ApexZ Operators Manual
248083466-1 43 | P a g e
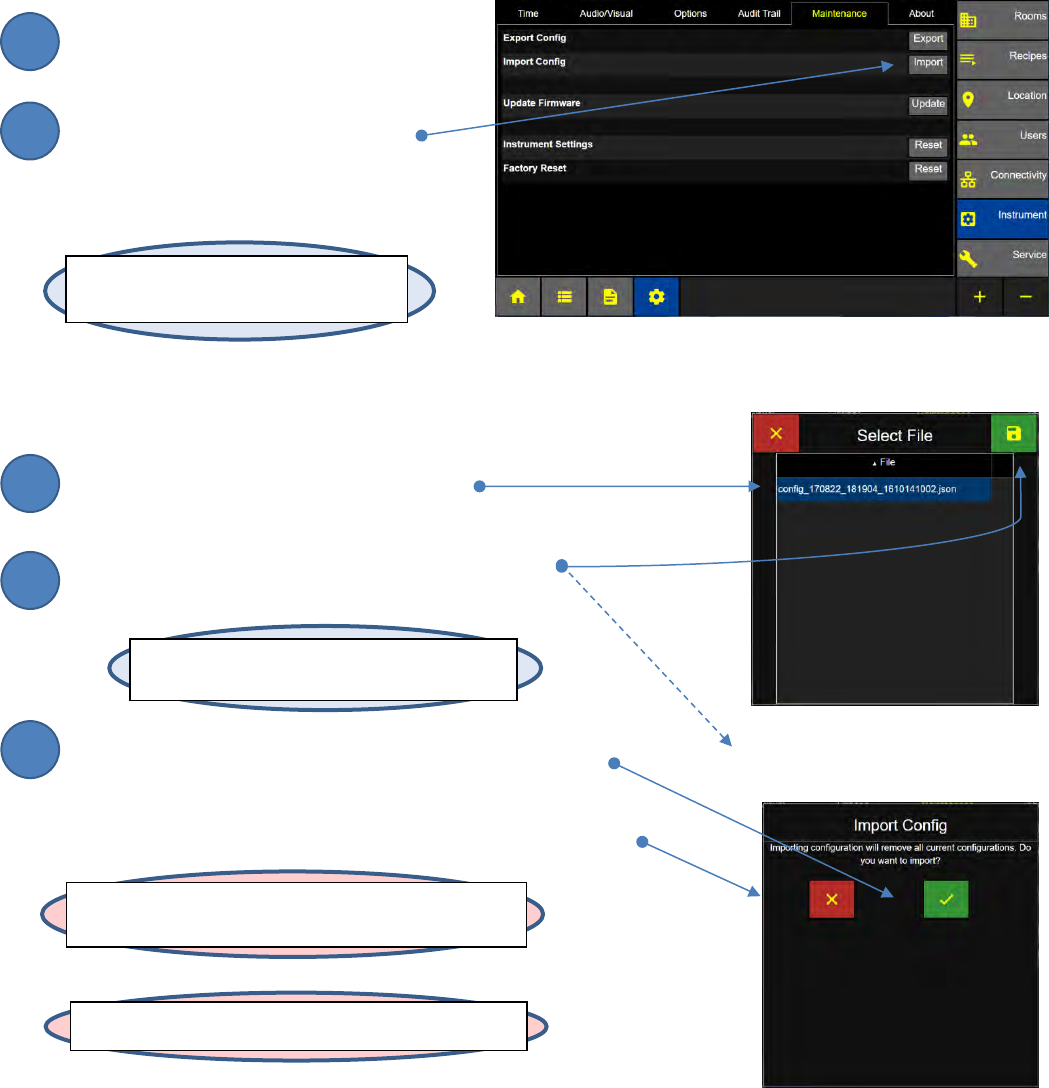
Import Configuration
ApexZ can import it’s configuration from a file on a USB key. This configuration file can be imported
from a backup copy or it can be Imported as a clone of another ApexZ instrument configuration (see
Export Configuration).
Import Configuration
Insert a USB stick into the USB slot on
ApexZ.
Press the Import button to display
the Select File to Import screen.
Select a saved configuration file to import
from the USB stick.
Press the green Save button to display the Import
Configuration pop up screen.
Press the green check box to Import the Configuration
or press the red x box to cancel and the
configuration will not be imported.
WARNING: Do not pull the USB stick out during operation.
Note: When no USB is connected Export,
Import and Update will be disabled.
Instrument: Maintenance Screen
Select File to Import Screen
WARNING: Importing a configuration file will replace the
ApexZ’s current configuration entirely.
Import Configuration Confirmation
Note: Importing Configuration will remove
all current configuration settings.
2
3
1
4
5
Lighthouse Worldwide Solutions Pre-Release Review Copy ApexZ Operators Manual
248083466-1 44 | P a g e
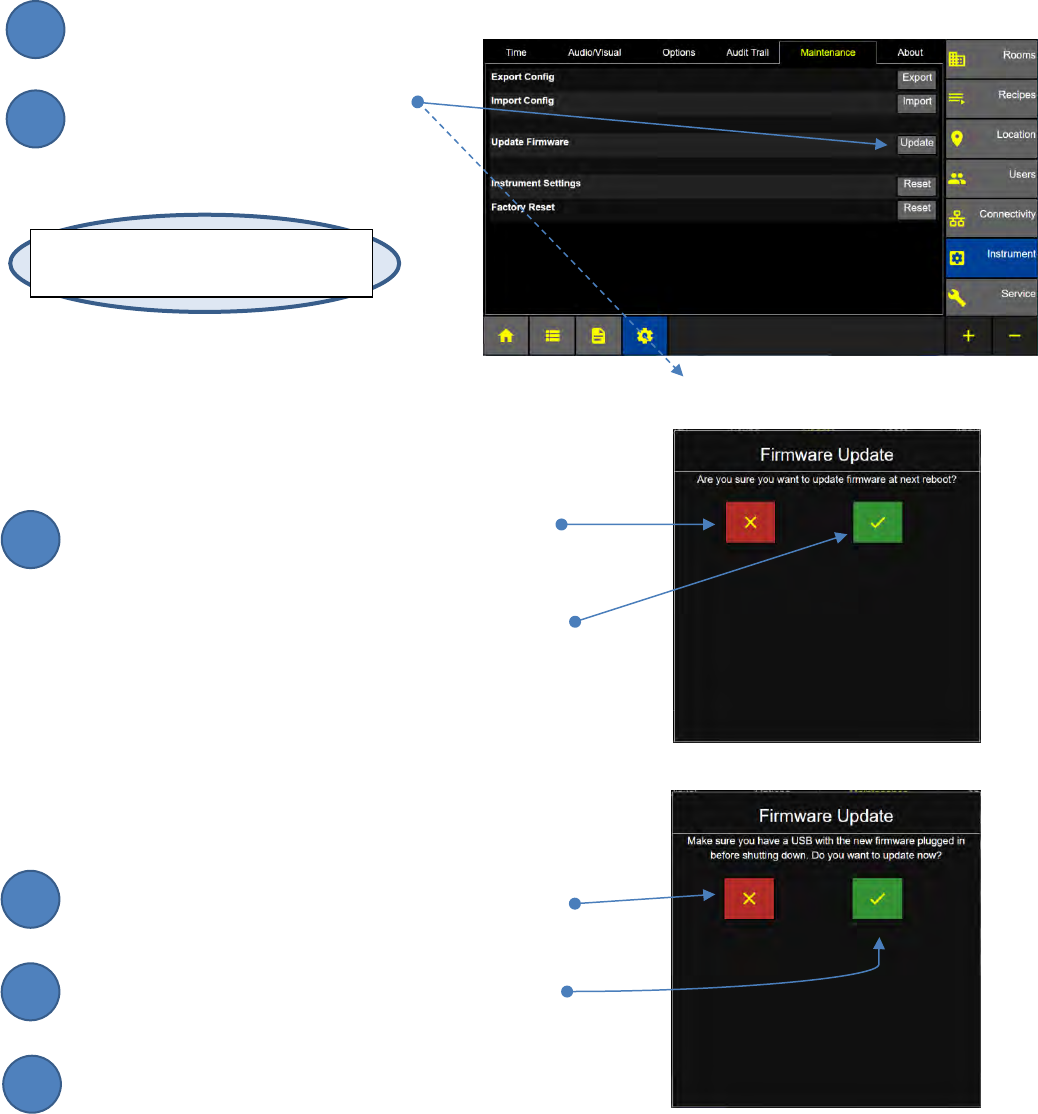
Update Firmware
To update the instruments firmware make sure the firmware upload file is copied on a USB key and then
follow these steps.
Insert the USB key with FW Upload File
Press the Update button to display
the Firmware Update Screen.
Update Firmware
Press the red x button for NO UPDATE and return
to the Instrument Maintenance Screen. Or press
the green check box to Update the Firmware
from the USB stick.
Update Firmware – Confirmation
Press the red x button to ABORT the firmware update.
and return to the Instrument Maintenance Screen.
Press the green check box to UPDATE the Firmware
from the USB stick.
ApexZ will reboot. After reboot the USB key may be removed.
Instrument: Maintenance Screen
Firmware Update Screen
Note: If no USB is connected Export,
Import and Update will be disabled.
Instrument Maintenance Screen
Firmware Update Confirmation Screen
2
3
1
4
5
6
Lighthouse Worldwide Solutions Pre-Release Review Copy ApexZ Operators Manual
248083466-1 45 | P a g e
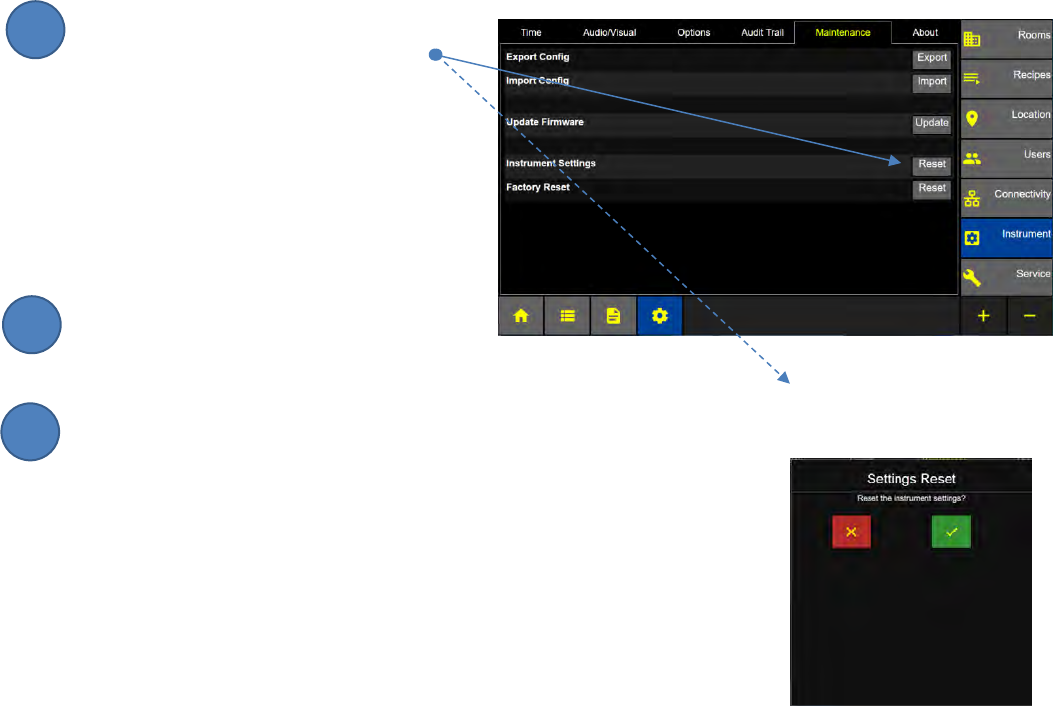
Instrument Settings Reset
Instrument Settings
Press the Instrument Settings Reset button
to display the Settings Reset Screen.
Reset Instrument Settings
Press the green check box to RESET the
instrument settings.
Press the red x box to CANCEL and abort resetting the Instrument.
Settings Reset List (these settings will be reset from Instrument Settings Reset)
Instrument Settings:
Users enabled/disabled, volume, brightness, decimal mark, digit grouping,
date, time, time zone, daylight savings time.
View Settings:
Data table, Histogram, History, Graph, and Environmental view settings.
Connectivity Settings:
Ethernet enabled/disabled, IP, Subnet, MAC address, DHCP enabled/disabled
Wi-Fi enabled/disabled, Bluetooth enabled/disabled, Print output settings, USB output settings.
Print Options:
Data Raw or Normal, Data Cumulative or Differential, Statistics (mean, minimum, maximum, standard
deviation, standard error, 95% UCL), Formatting (model, serial #, calibration date, user name, tag,
separator, company, address), Output (on sample, on alarm), font size.
Zero Count Settings:
Zero count enabled/disabled, Zero count sample time.
Pump Startup:
Pump start up enable/disabled.
Instrument: Maintenance Screen
Settings Reset Screen
2
3
1
Lighthouse Worldwide Solutions Pre-Release Review Copy ApexZ Operators Manual
248083466-1 46 | P a g e
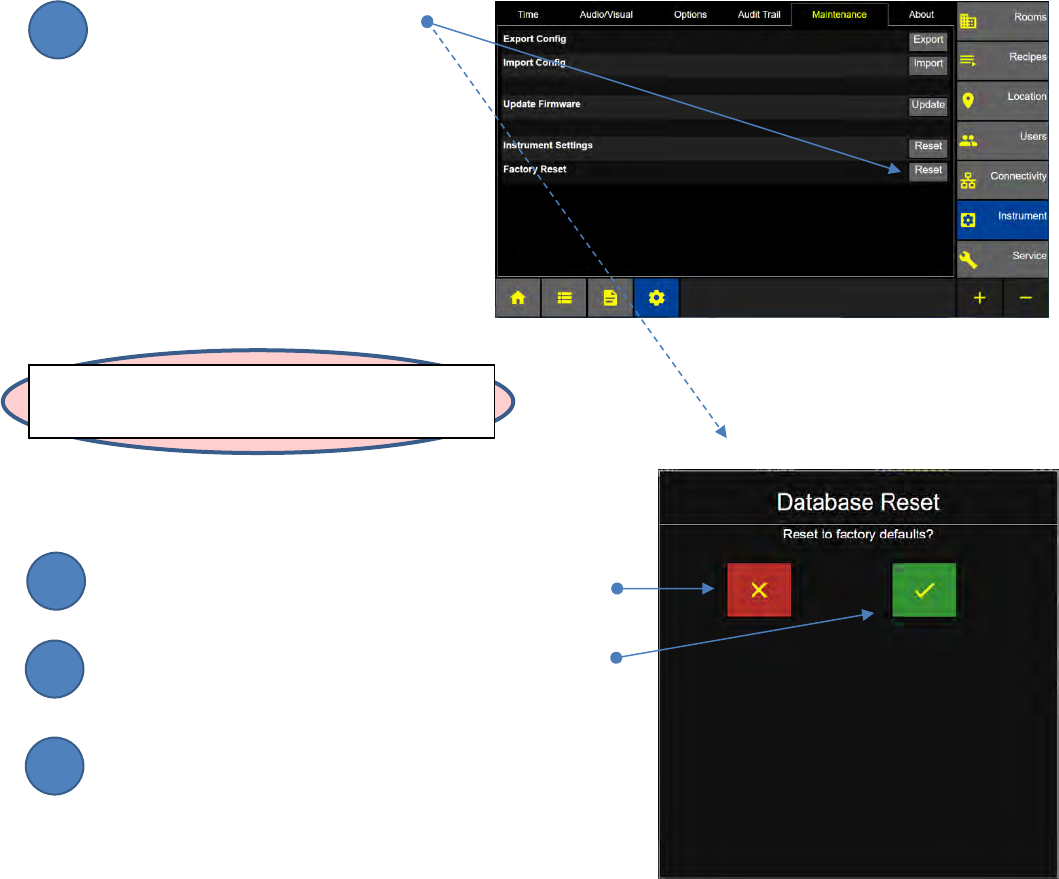
Factory Reset
Pressing Factory Reset will DELETE all data on the ApexZ and return the instrument’s configuration to it’s
original factory default configuration. There is no data recovery after a Factory Reset. .
Press the Factory Reset button
to display the
Database Reset Screen.
Reset to Factory Defaults
Press the red x box to cancel and abort resetting
the instrument to factory defaults.
Press the green check box to RESET the instrument
to factory defaults.
All Data will be deleted and the instrument will be
restored to factory defaults.
Database Reset Screen
Instrument: Maintenance Screen
WARNING: Factory Reset will delete all data and
configuration from ApexZ.
2
3
1
4

Lighthouse Worldwide Solutions Pre-Release Review Copy ApexZ Operators Manual
248083466-1 47 | P a g e
About Screen
HOME – CONFIG – Instrument – About
View Firmware Versions
Instrument Name
Model
Serial #
Sensor #
Calibration Due Date
MEAN Firmware Version
MAIN Firmware Version
SIB Firmware Version
POWER Firmware Version
Open Source Libraries
Press the Instrument Name button
to display the Enter Instrument Name Screen.
The ApexZ name will be used exporting
configuration to USB and by the mobile app
Basecamp.
Enter the new instrument name
on the keyboard.
After entering the Instrument Name
Press the green Apply button.
Press the “Libraries We Use” button to pop up
a list of Open Source Libraries used by ApexZ.
Settings: About Screen
Enter Instrument Name Screen
Licenses/Libraries Screen
2
3
1
4
Lighthouse Worldwide Solutions Pre-Release Review Copy ApexZ Operators Manual
248083466-1 48 | P a g e
Lighthouse Worldwide Solutions Pre-Release Review Copy ApexZ Operators Manual
248083466-1 49 | P a g e
Users
User Levels
The ApexZ has 3 different User Groups, Operators, Power Users and Administrators.
Users in the Operator Group:
Operators can start and stop samples.
Operators can change locations.
Operators can start and stop recipes.
Operators cannot make new users.
Operators cannot access configuration.
Users in the Power User Group
Power Users can do all that Operators can do.
Power Users can view and edit configuration.
A Power User cannot make new users.
User in the Administrator Group
Administrators can do what Power Users can do.
Administrators can create new users.
Note: Changing the admin account password,
first and last name is recommended.
Lighthouse Worldwide Solutions Pre-Release Review Copy ApexZ Operators Manual
248083466-1 50 | P a g e
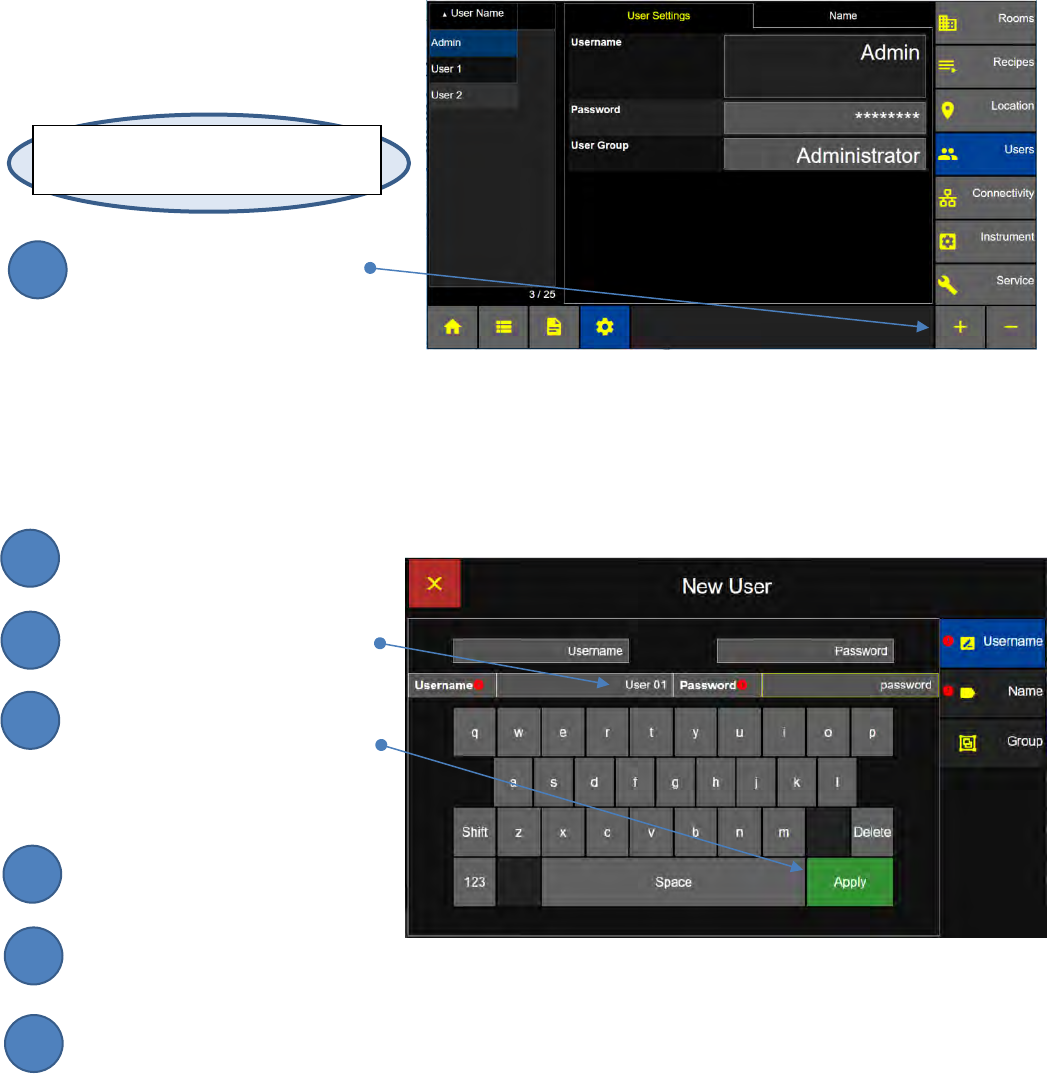
Add a New User
Home – CONFIG – Users - +
Add New Users
Press the + sign to
Add a new User and
Display the New User
and Password Screen.
Enter User Name
Touch the Username input box.
Enter user name on keyboard.
Press Apply and the new username
will display in the username box. ,
Enter Password
Touch the Password input box.
Enter Password on keyboard.
Press Apply and the new password
will be displayed in the Password box
as “********”.
User Settings Screen
New User and Password Screen
Note: In order to add new users Login as
an Administrator level user.
2
3
1
4
5
6
7

Lighthouse Worldwide Solutions Pre-Release Review Copy ApexZ Operators Manual
248083466-1 51 | P a g e
Enter First and Last Name
Press the Name button below the
Username button to advance from the
Username Tab to the Name Tab.
Enter First Name
Touch the First Name input box.
Enter First Name from the keyboard.
Press Apply and the first name will
be displayed above.
Enter Last Name
Touch the Last Name input box.
Enter the Last Name from the keyboard.
Press Apply and the last name will be
displayed in the last name box.
Press the Group button to move
to the Select User Group screen.
First and Last Name Screen
2
1
8
Lighthouse Worldwide Solutions Pre-Release Review Copy ApexZ Operators Manual
248083466-1 52 | P a g e
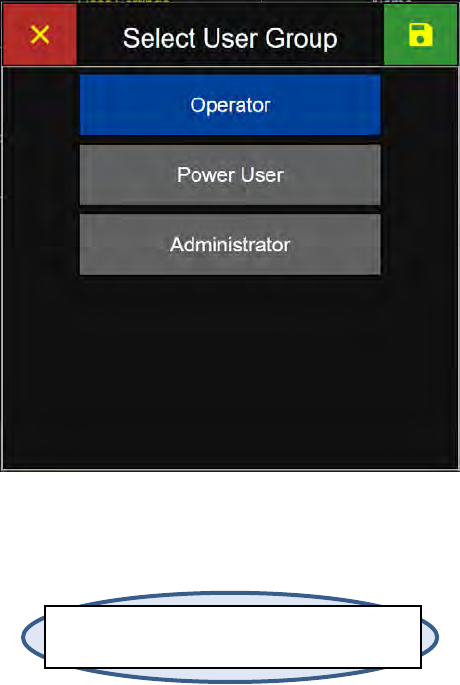
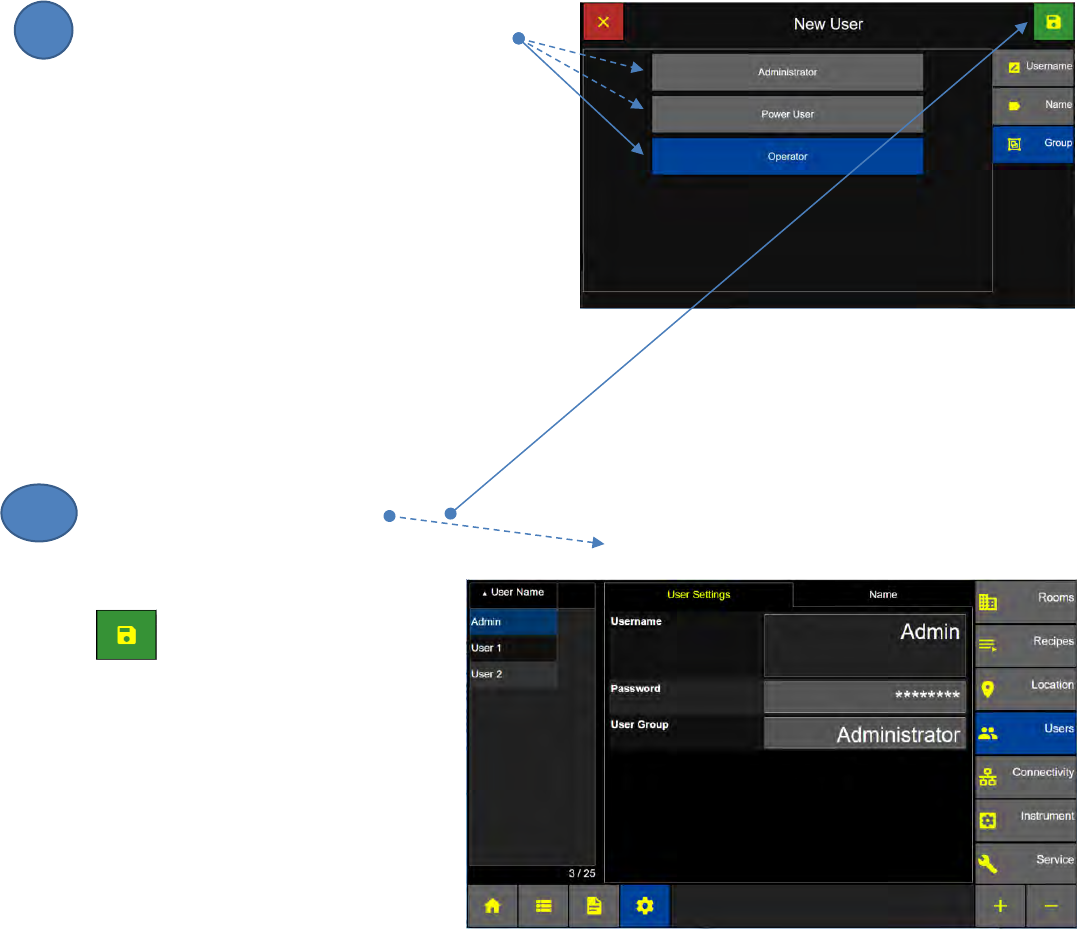
Select User Group
Press to select either
Administrator, Power User or Operator.
Administrator
has full instrument configuration access and can
create new users on ApexZ.
Power User
has full instrument configuration access, but
CANNOT create new users on ApexZ.
Operator
has full instrument access to preset configurations
but no access to edit configuration.
Press the green Save button to
save the User Group and
display the User Name List Screen
User Name List Screen
9
10
Lighthouse Worldwide Solutions Pre-Release Review Copy ApexZ Operators Manual
248083466-1 53 | P a g e
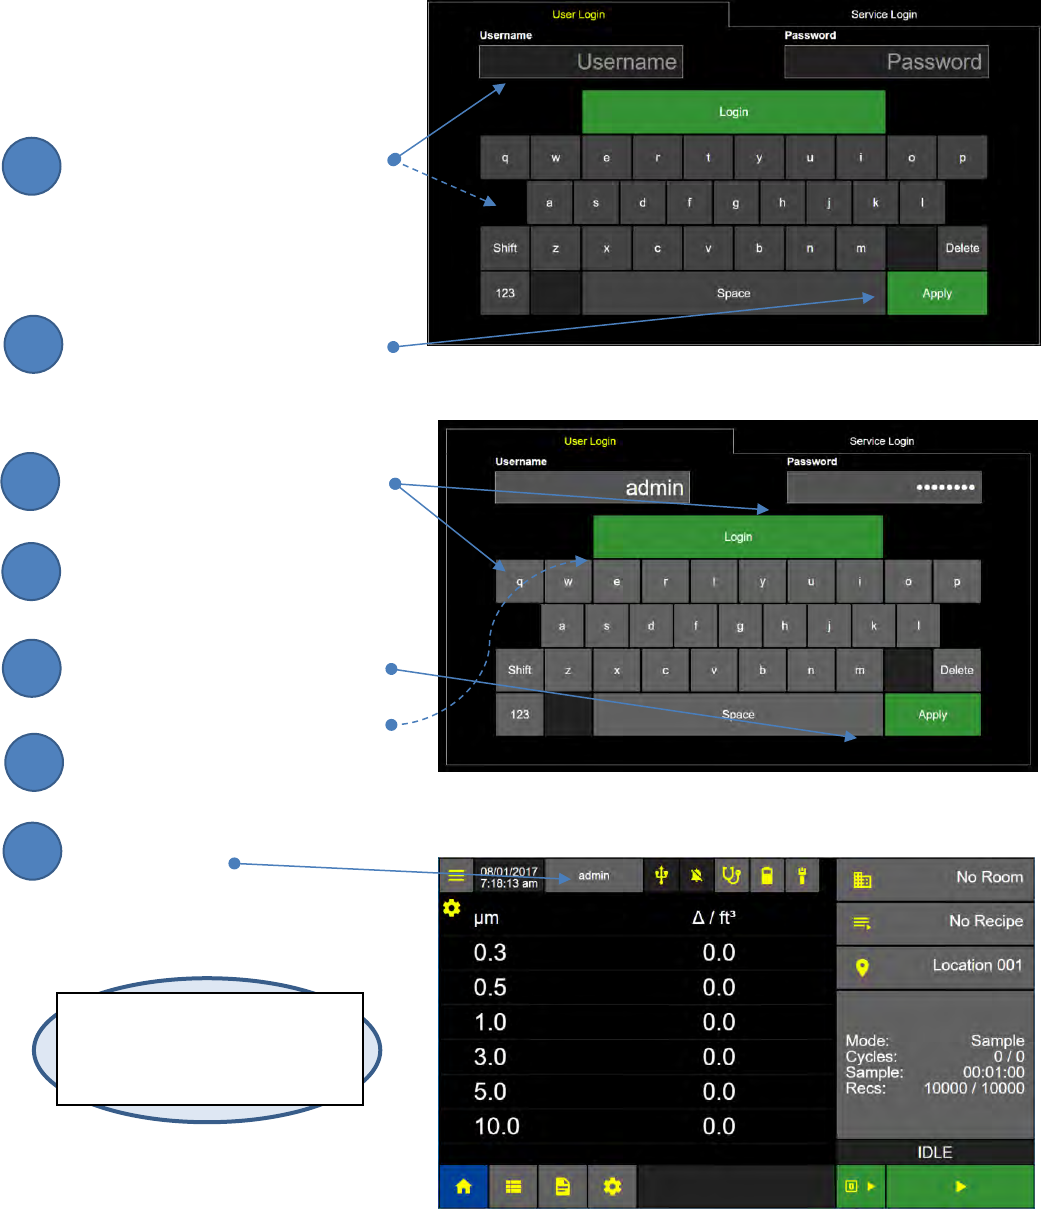
User Login
Logging in to the ApexZ requires
both a Username and a Password.
Enter Username
Touch the Username box then
enter “admin” (lower case) from
the login keypad.
The username “admin” will display
in the username box.
Press the green Apply button
Enter Password
Touch the Password box
Then enter “password” (lower case)
from the login keypad and
“********” will appear in the
password box.
Press the green Apply button.
Press the Login button.
You are now logged in
As “admin”
Login Screen User Name
Login Screen Password
Home Screen “admin” logged in
Note: To display the login screen
when the ApexZ is powered on,
Enable Users on the Configuration
Instrument Options Screen.
2
3
1
4
5
6
7
Lighthouse Worldwide Solutions Pre-Release Review Copy ApexZ Operators Manual
248083466-1 54 | P a g e
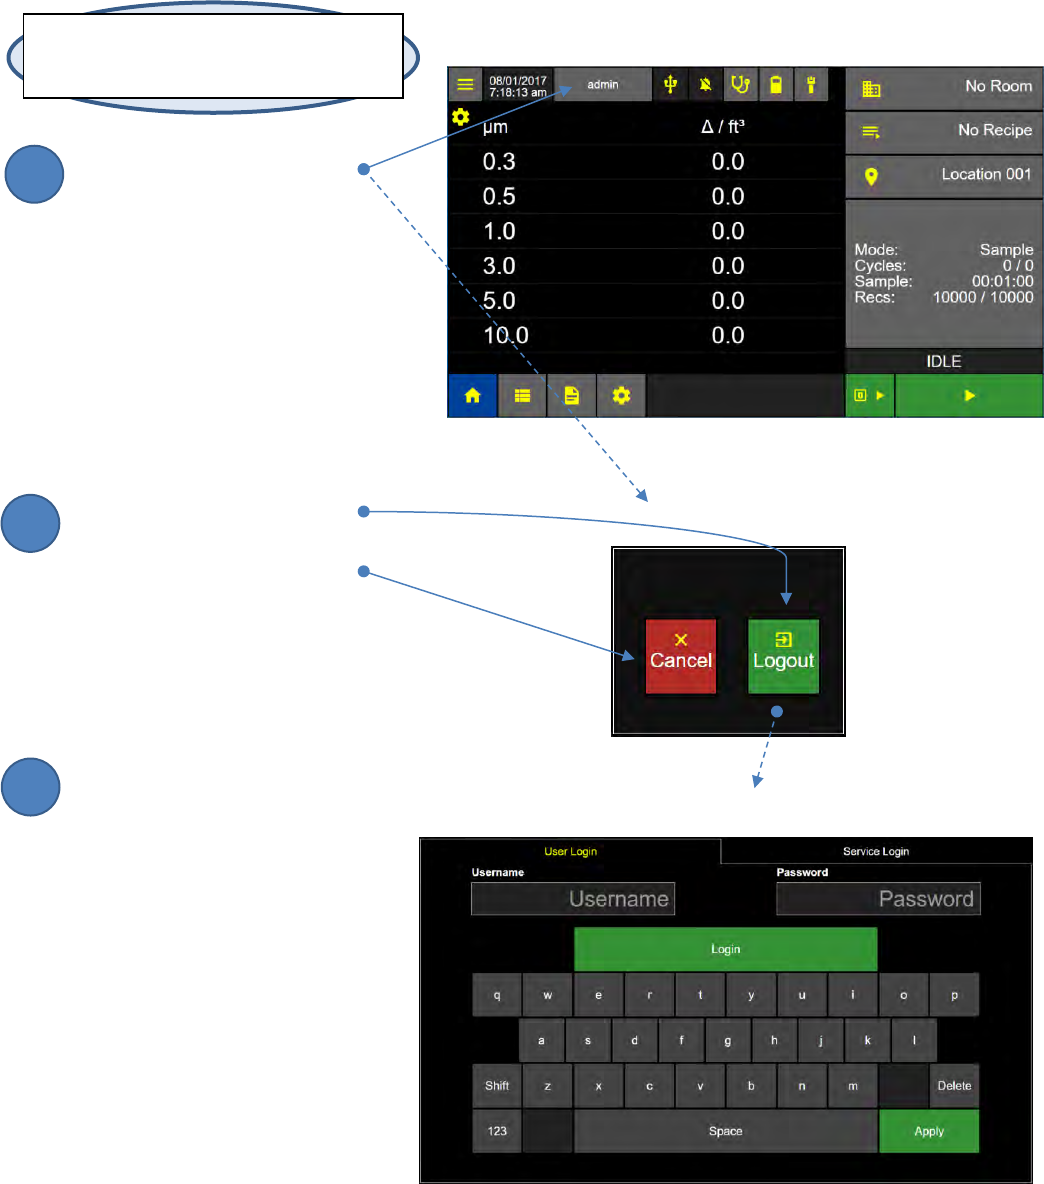
User Logout
Press the User button
to display the Logout screen
Press Logout to logout
Or press Cancel to remain
logged in.
If you press Logout then ApexZ
will return to the Login Screen.
Home Screen: User Enabled
Logout Screen
Note: If you press the Username button and it
does not display the Logout screen: Check that
Users are “enabled”.
Login Screen
2
3
1
Lighthouse Worldwide Solutions Pre-Release Review Copy ApexZ Operators Manual
248083466-1 55 | P a g e
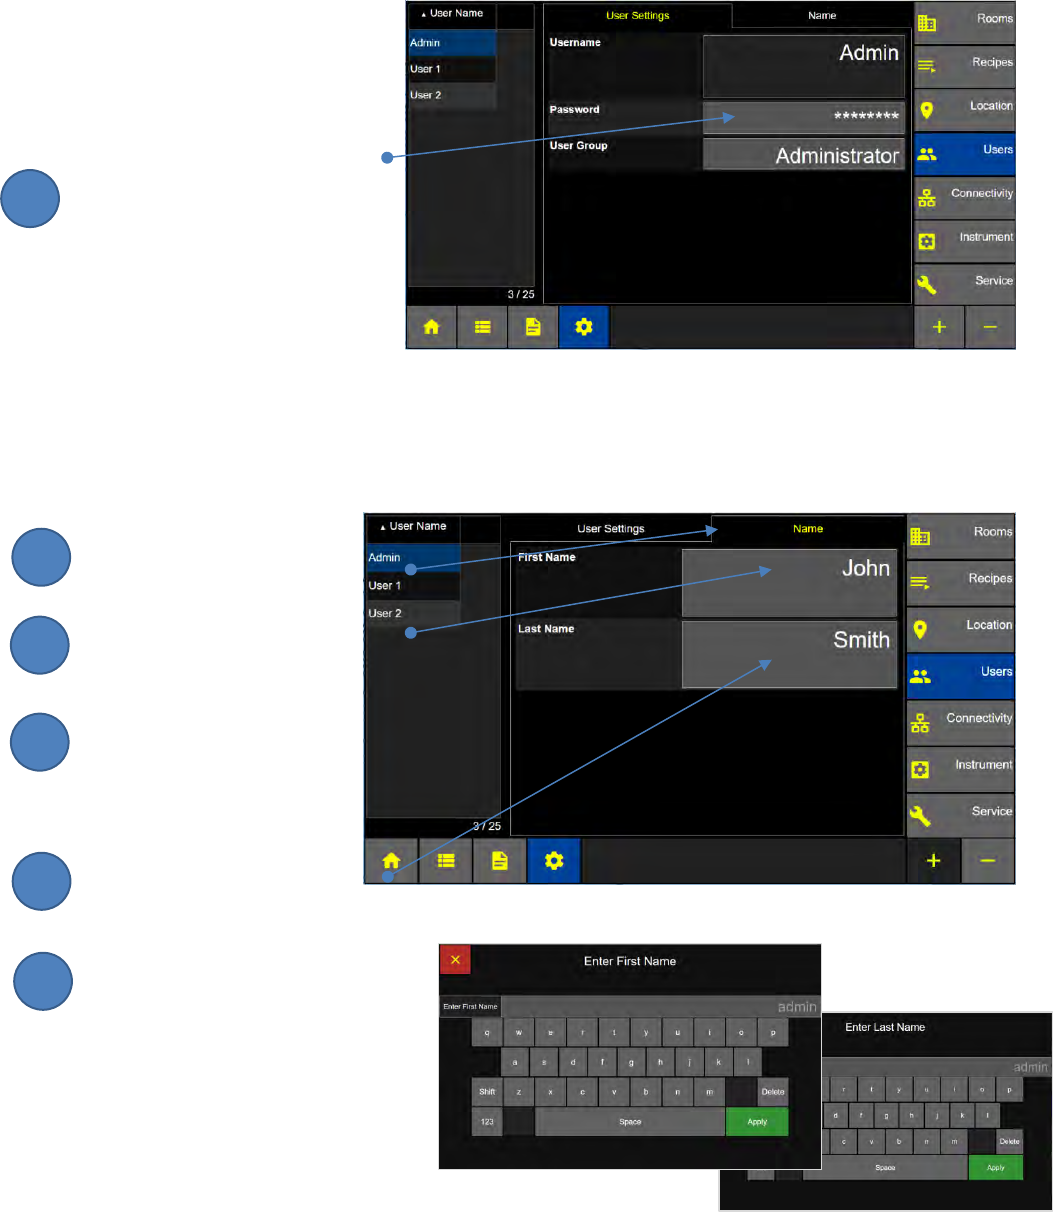
Change User Password
HOME – CONFIG – Users – User Settings
Change the “admin” user password.
ApexZ is shipped with one user
name: “admin” and the password
is preset to “password” (case
sensitive).
Press the Password button to
Change the user password.
Change User First and Last Name
Change the “admin” First Name
Press the Name Tab to
display the User First and
Last Name Screen.
Press First Name to display
the input keyboard.
Enter the users First Name
and press apply to save.
Change the “admin” Last Name
Press Last name to display
the
input keyboard.
Enter the users Last Name and
press apply to save.
Configuration: Users Screen - User Settings Tab
Configuration: Users Screen - Name Tab
2
3
1
4
5
6
Lighthouse Worldwide Solutions Pre-Release Review Copy ApexZ Operators Manual
248083466-1 56 | P a g e
Lighthouse Worldwide Solutions Pre-Release Review Copy ApexZ Operators Manual
248083466-1 57 | P a g e
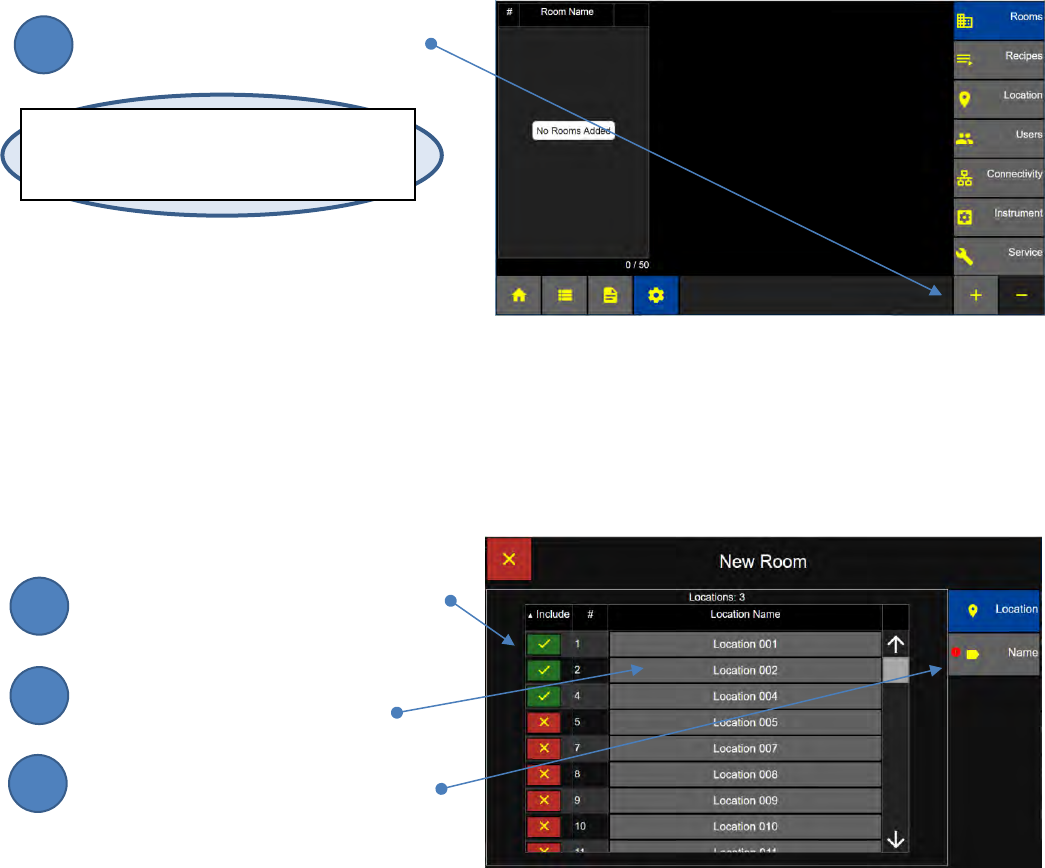
Rooms
Add a Room
HOME – CONFIG – Rooms
Press the + button to add a Room.
Assign Locations to a Room
Select Locations to Include in Room
Press the red x button to include each
location for the new room. The button
will change to a green checkmark.
Press a location name button to
rename a location.
Press the Name button to display the
Enter New Room Screen.
Note: ApexZ can store up to 50 room names. At
least 1 Location must be assigned to a Room and
each location may only be assigned to 1 Room.
Rooms Screen
Include Locations Screen
1
2
3
1
Lighthouse Worldwide Solutions Pre-Release Review Copy ApexZ Operators Manual
248083466-1 58 | P a g e
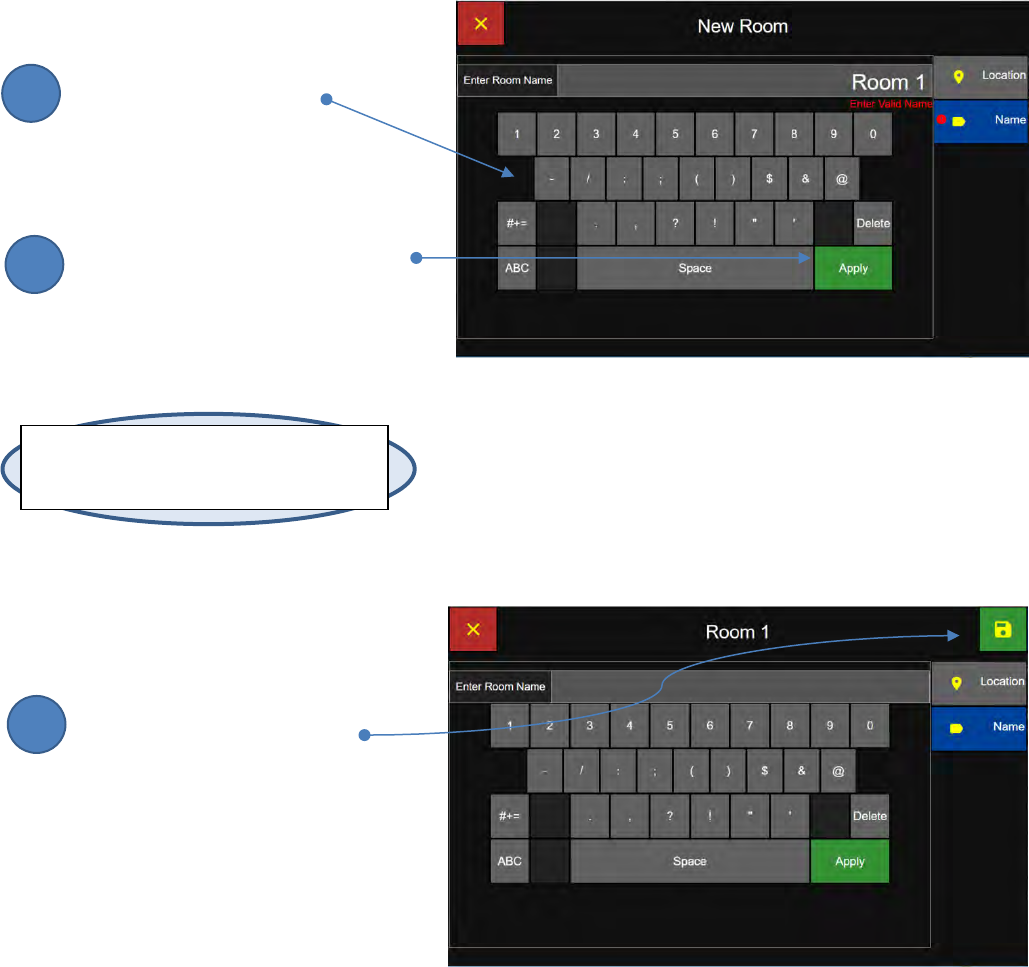
Enter Room Name
Enter Room Name
Use the keyboard to enter
the New Room’s Name.
Press Apply
Then press the green Apply button
to save the Room name.
Press Save
Press the green Save button to
Save the new room name.
Note: A Room may contain multiple locations
but a location may only be assigned to one
room. Duplicate room names are permitted.
Room Name Screen
Save Room Screen
2
3
1

Lighthouse Worldwide Solutions Pre-Release Review Copy ApexZ Operators Manual
248083466-1 59 | P a g e
Locations
HOME – CONFIG – Location
Edit Location Name
Press the Location Name button
to display the Enter Location Name
screen.
Press the Room Name button
to display the Select Room screen
to assign or reassign the location to a
room.
Enter Location Name
Enter the Location Name
with the keyboard.
Press the green Apply button
to save the location name.
Assign Location to a Room
Select the room for the new location
from the Room list on the left.
Press the green Save button
to save the Room selected.
Note: The Room Locations list will display locations
assigned to that Room Name. If room “No Room” is
selected then all locations will display.
Location Screen
Enter Location Name Screen
Select Room Screen
Note: If a room has only one location selected, the
user cannot reassign that location to a different
room. Instead enable the new location then disable
the undesired location.
1
2
1
2
1
2
Lighthouse Worldwide Solutions Pre-Release Review Copy ApexZ Operators Manual
248083466-1 60 | P a g e
Lighthouse Worldwide Solutions Pre-Release Review Copy ApexZ Operators Manual
248083466-1 61 | P a g e
Recipes
Custom and Certification Standard Recipes
The ApexZ supports multiple Sample Recipes and Cleanroom Standards including: Custom, EU GMP,
Federal Standard 209E, ISO 14644-1: 1999 and ISO 14644-1: 2015. To add, edit, or delete recipes, if
users are enabled, login as an Administrator or Power User account. If users are not enabled on the
instrument, anyone can add, edit, or delete the instruments’ recipes.
Certification Standard Recipes conform to the certified standard specifications for room size, room class,
and room operation.
To view the Certification Recipe Types:
From the Home screen press the Configuration button to display the Configuration Screen.
From the Configuration Screen press the Recipe button.
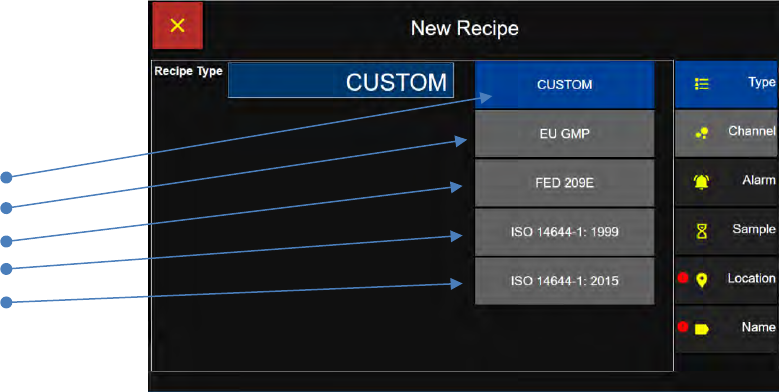
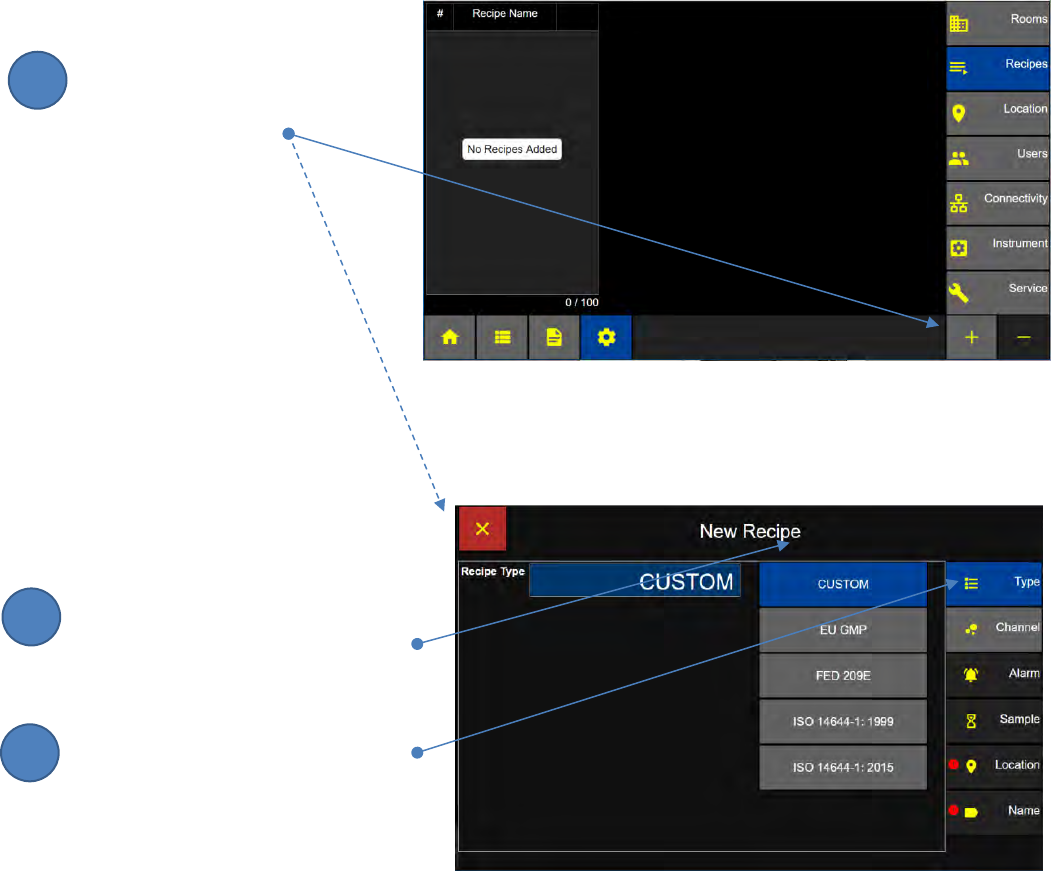
Press the + button to Add a New Recipe.
Select a Recipe Type
Custom
EU GMP
FED 209E
ISO 14644-1: 1999
ISO 14644-1: 2015
Recipe Type Screen
Lighthouse Worldwide Solutions Pre-Release Review Copy ApexZ Operators Manual
248083466-1 62 | P a g e
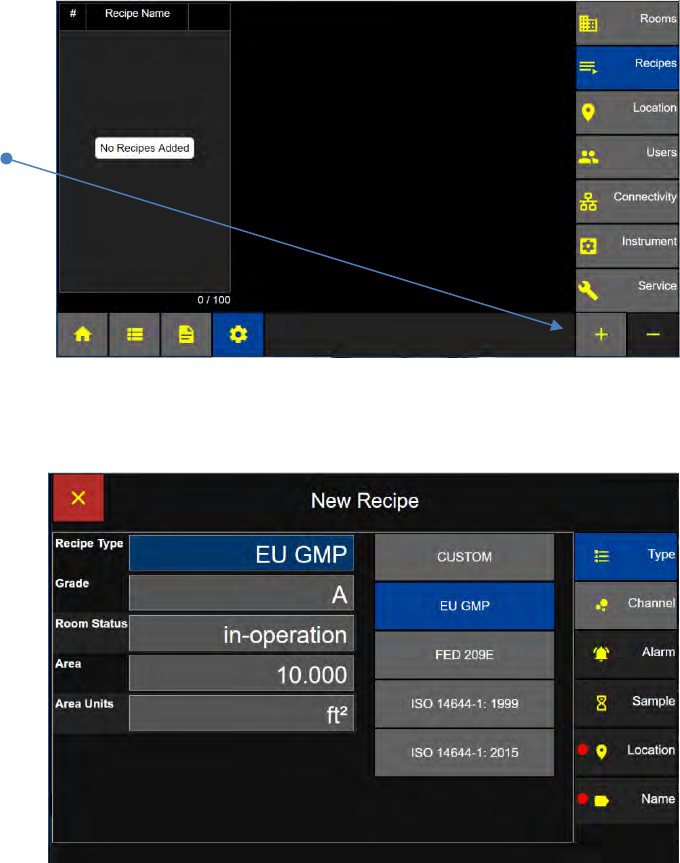
Custom Recipes
ApexZ Custom Recipes allow the operator to select customized sampling parameters for channel, alarm,
sample times, and location.
Add a new Recipe
Press the + button to add
a new recipe and display the
New Recipe Screen.
Select a Recipe Type
Press the CUSTOM button
to select the Recipe Type CUSTOM.
Press the Channel tab
to advance to the Channel Screen.
Configuration: Recipe Screen
Custom Recipe: Recipe Type Screen
1
2
3
Lighthouse Worldwide Solutions Pre-Release Review Copy ApexZ Operators Manual
248083466-1 63 | P a g e
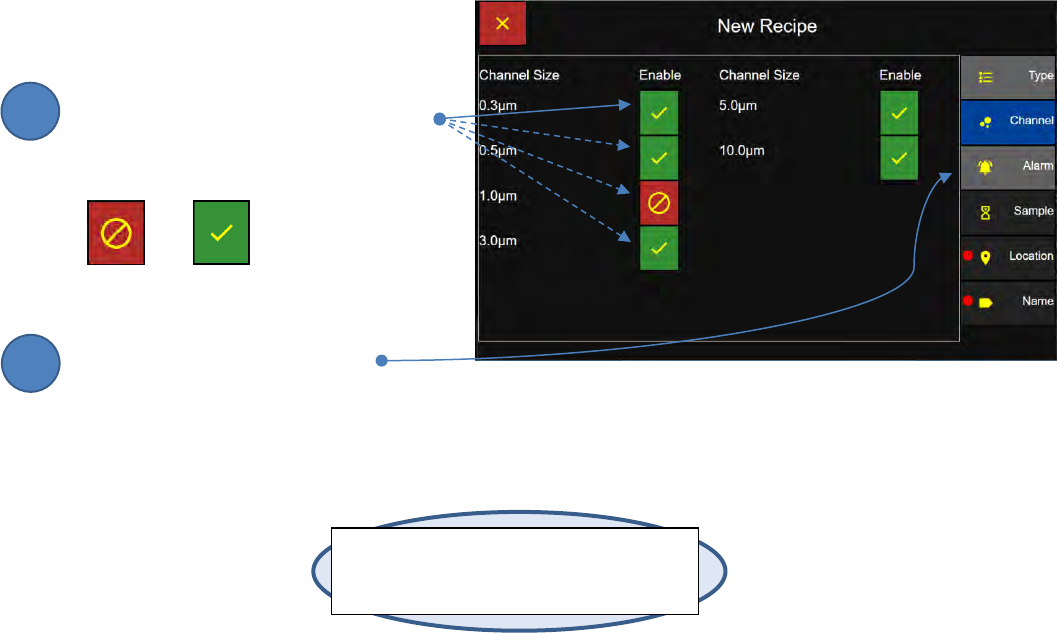
Custom Recipe - Channel Sizes
Enable or Disable Particle Size Channels
Press the Enable/Disable button to
Enable or disable any channel for
the New Recipe.
Disabled Enabled
Press the Alarm tab to display
the Alarm Screen.
Note: The user may not disable all channels.
At least 1 channel must be enabled to create
a new recipe.
Custom Recipe: Channels Screen
2
1
Lighthouse Worldwide Solutions Pre-Release Review Copy ApexZ Operators Manual
248083466-1 64 | P a g e
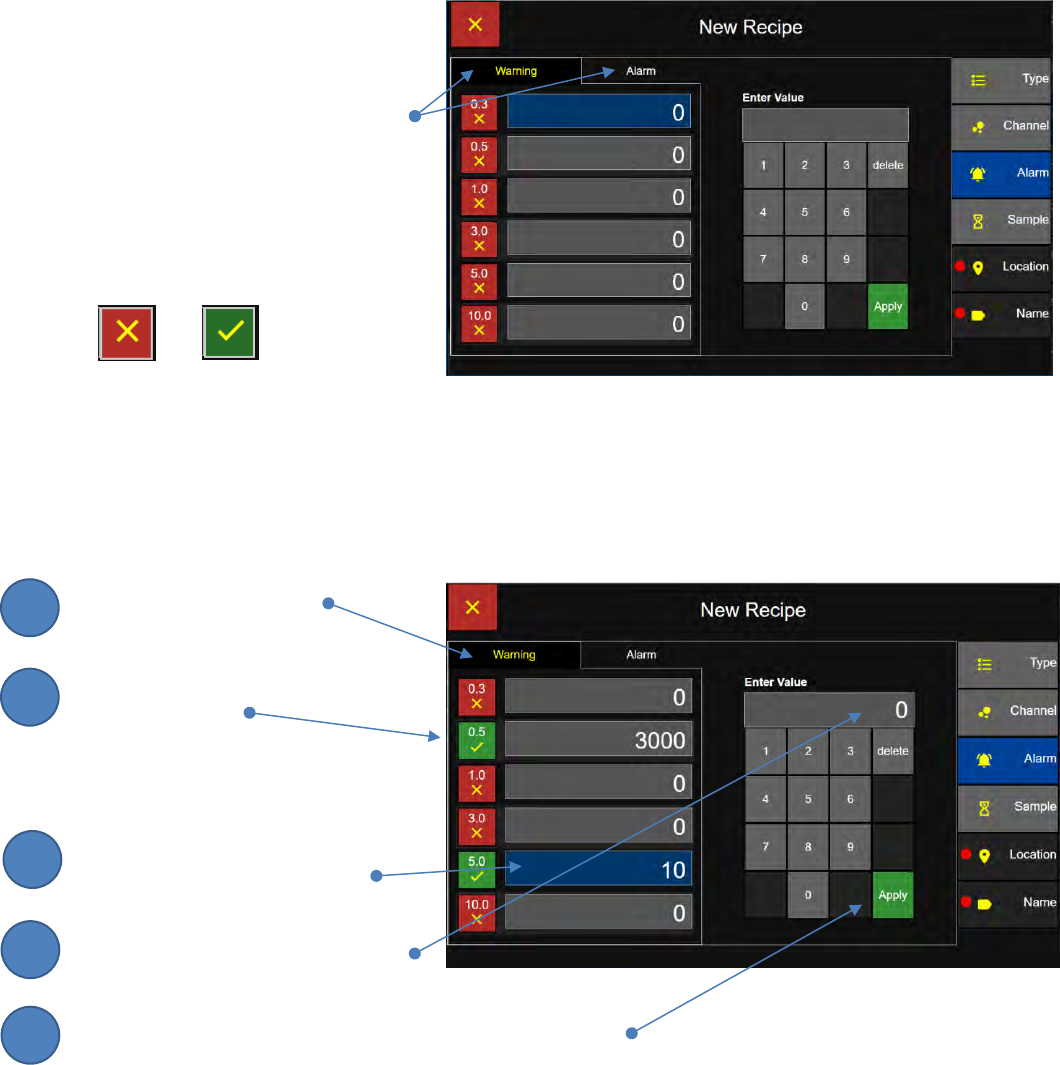
Custom Recipe - Warning and Alarm Thresholds
Enable/Disable Warnings
ApexZ allows the user to set specific
warning and alarm values
for each particle size channel
for a Custom Recipe.
The user can enable or disable
warnings or alarms for each channel
size.
Disabled Enabled
Enable Warning Channels
Select the “Warning” tab.
Press the toggle button to
Enable or disable warnings
for the channel.
Set Warning Values
Touch the Warning input button and
it will highlight in blue to show
that it is selected.
Enter Warning value on the keypad.
Press Apply to save and the warning value will be displayed
in the channel’s warning value box.
Custom Recipe: Warnings Screen
Custom Recipe: Alarms Screen
2
3
1
4
5
Lighthouse Worldwide Solutions Pre-Release Review Copy ApexZ Operators Manual
248083466-1 65 | P a g e
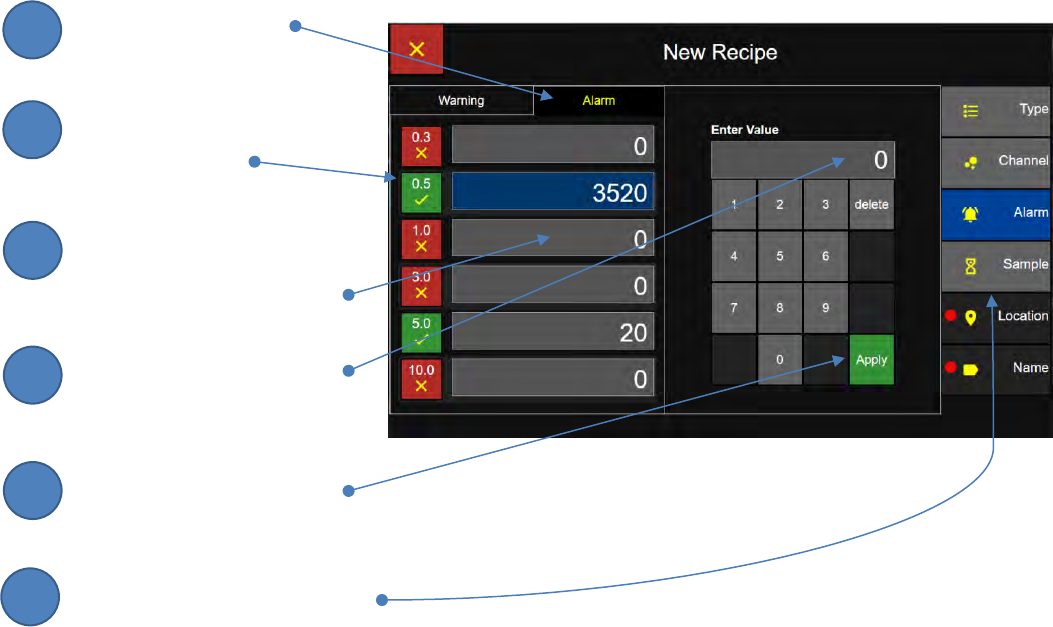
Set Alarm Values
Select the Alarm Tab.
Press the toggle button to
enable or disable alarms for the
desired channel.
Touch the Alarm value button
and it will highlight in blue
to show it is selected.
Enter the Alarm value with
the numeric keypad.
Press the Apply button
to save the Alarm value.
Press the Sample button to
advance to the Sample screen.
2
3
1
4
5
6
Lighthouse Worldwide Solutions Pre-Release Review Copy ApexZ Operators Manual
248083466-1 66 | P a g e
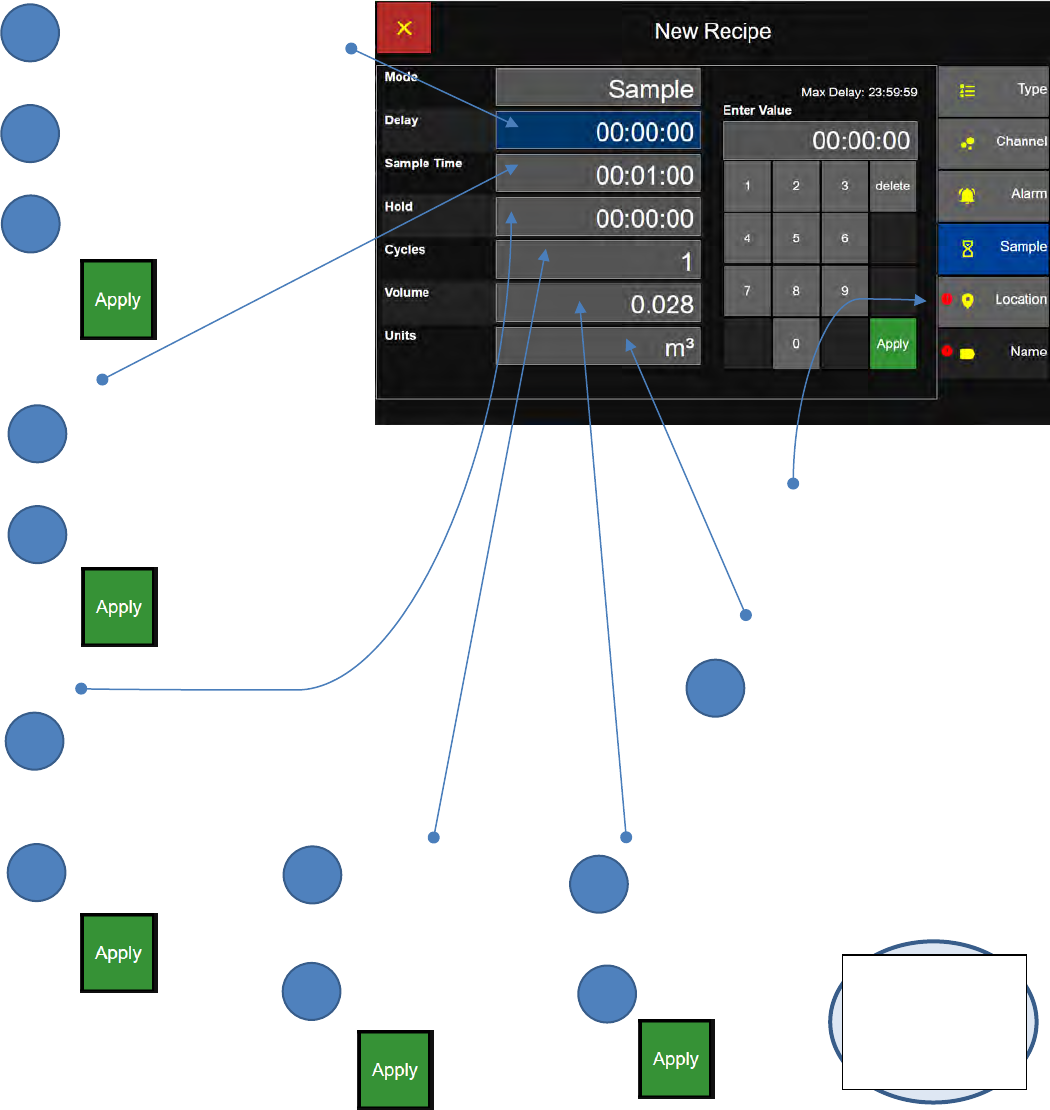
Custom Recipe - Sample Settings
Delay
Press the Delay button
and the button will turn blue
to indicate that it is selected.
Enter the delay time
with the numeric key pad.
Press Apply to store the value.
Sample
Press the Sample button
and change the sample time
with the numeric keypad.
Press Apply to store the value.
Hold
Press the Hold button
and change the hold time
between cycles using
the numeric key pad.
Then press Apply.
Custom Recipe: Sample Settings Screen
Cycles
Press the Cycles button
and change the # of
cycles with the
numeric keypad.
Then press Apply.
Volume
Press the Volume button
and change the sample
volume with the numeric
keypad.
Then press Apply.
Location
Press the Location Tab
to advance to the
Location screen.
Units
Press the Units button to
change the units:
ft3 - cubic feet
m3 - cubic meters
L - liters
Note:
The sample time will
change accordingly
to the Volume; and
vis versa.
2
3
1
2
1
2
1
2
1
2
1
1
Lighthouse Worldwide Solutions Pre-Release Review Copy ApexZ Operators Manual
248083466-1 67 | P a g e
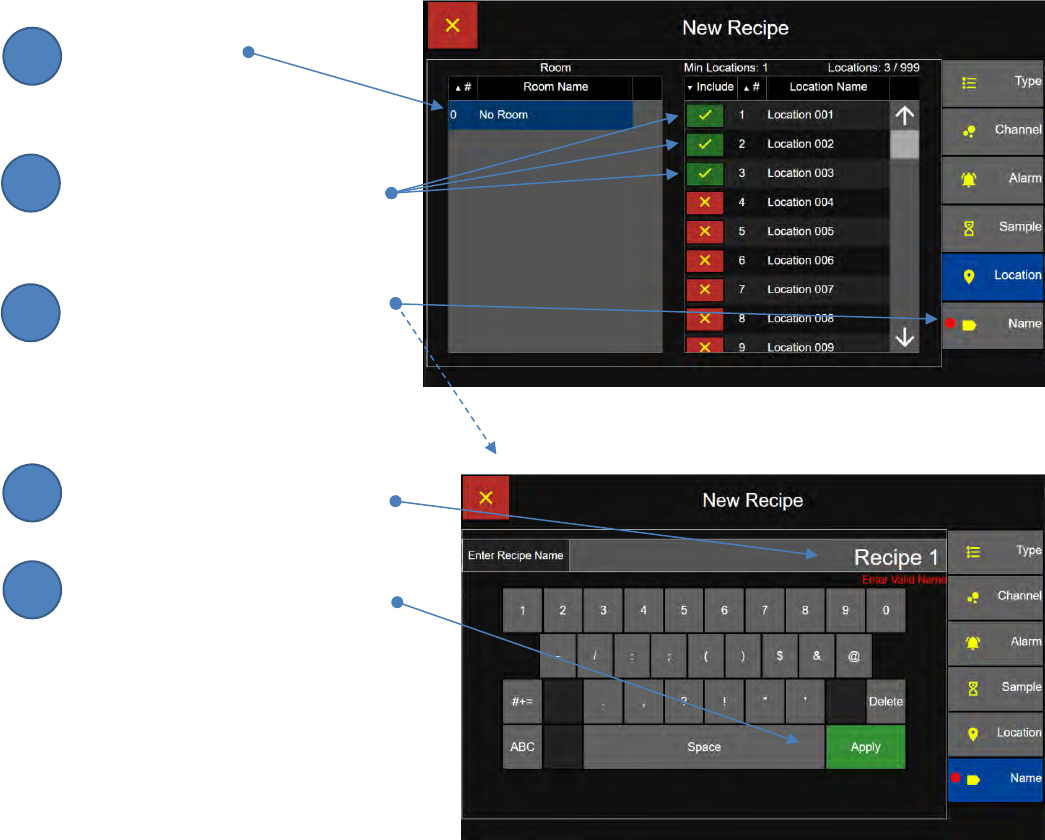
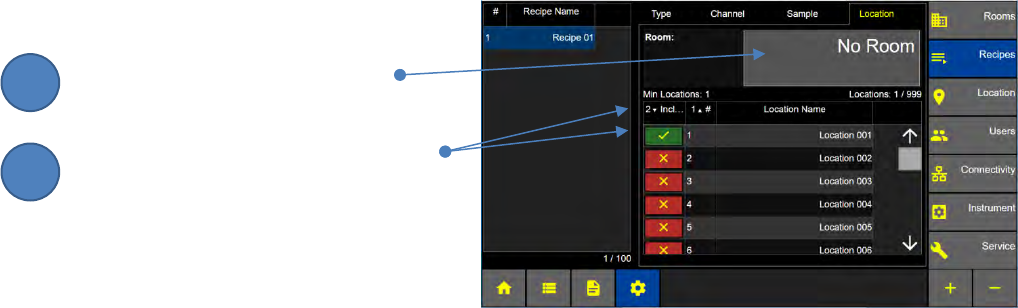
Custom Recipe – Locations
Select Room
Select a room.
Select Locations
Press the enable/disable toggle
button to enable the desired
locations to be sampled.
Press the Name tab to display
the Enter Recipe Name Screen.
Enter Custom Recipe Name
Enter the Custom Recipe Name
Using the keypad
Press the Apply button to save
the Name and display the
Save Recipe Screen.
Custom Recipe Location Screen
Enter Recipe Screen
2
3
1
4
5
Lighthouse Worldwide Solutions Pre-Release Review Copy ApexZ Operators Manual
248083466-1 68 | P a g e
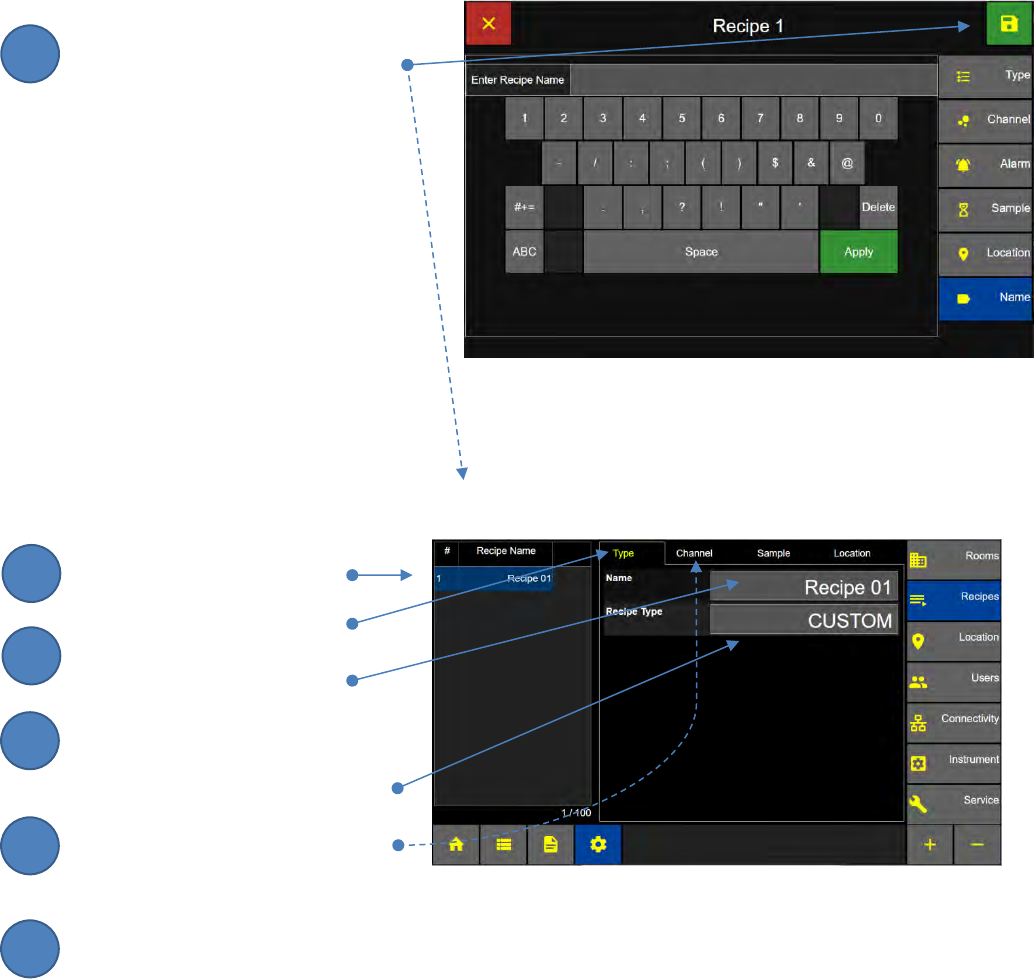
Save Custom Recipe
Press the Save button to save
the recipe and return to
the Recipe Configuration Screen.
Edit - Custom Recipes
Edit Recipe Name/Type
Select a Recipe Name to edit.
Press the Type Tab.
Press the Name button to
edit the Recipe Name.
Press the Recipe Type button to
edit the Recipe Type.
Press the Channel Tab to display
the Channel, Warning and
Alarm settings.
Configuration: Recipes Screen
Configuration: Save Recipe Screen
6
2
3
1
4
5
Lighthouse Worldwide Solutions Pre-Release Review Copy ApexZ Operators Manual
248083466-1 69 | P a g e
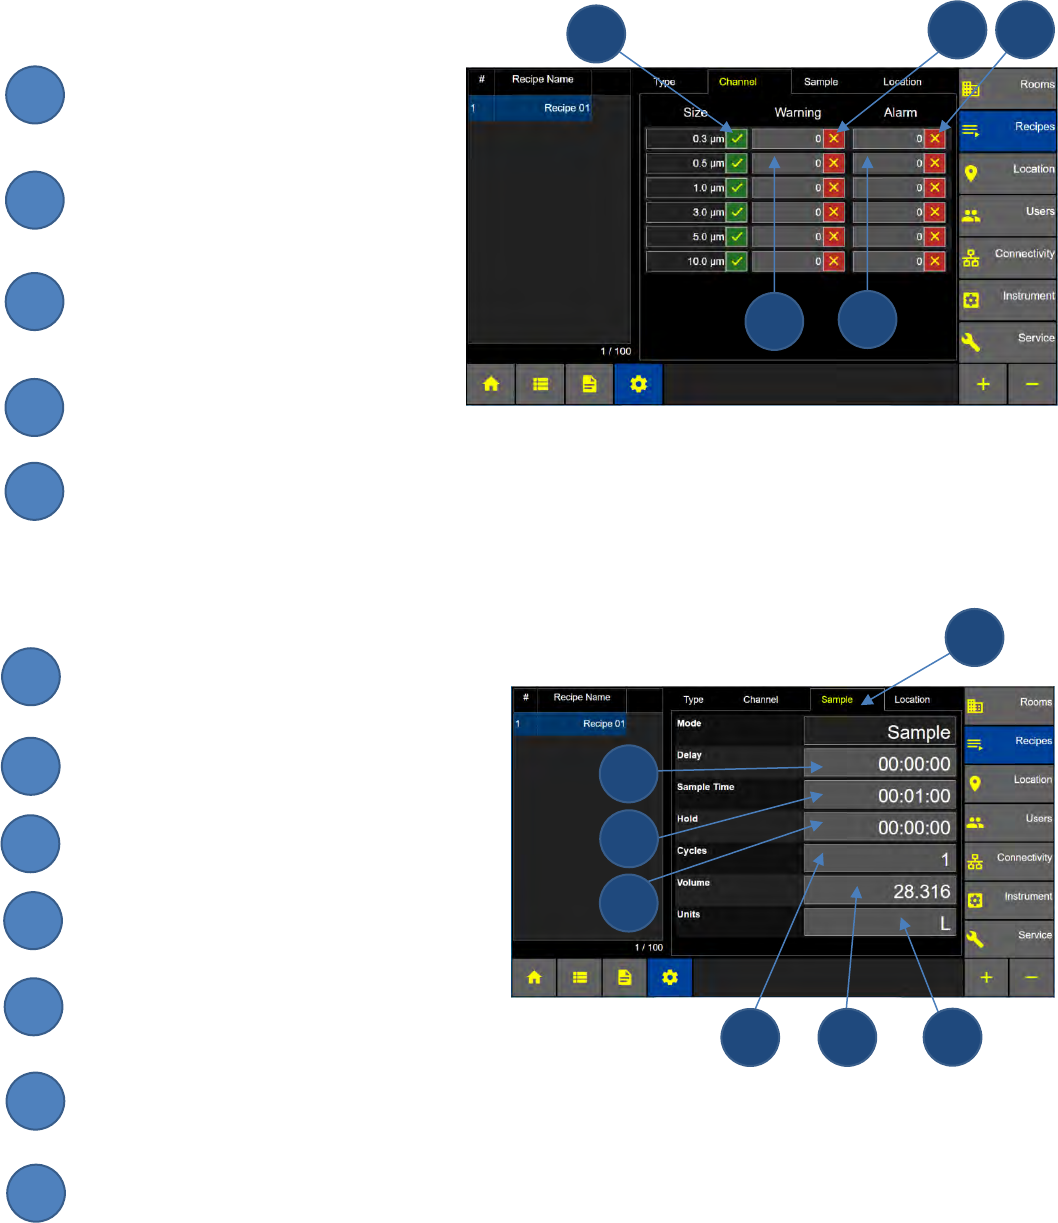
Edit Custom Recipe Channel, Warning and Alarms
Enable or disable the particle channels
by pressing the enable/disable toggle
button.
Enable or disable the particle warning
limit by pressing the enable/disable
toggle button.
Enter Warning limits by pressing the
warning limit value buttons and use the
pop up key pad to enter the value.
Enable or disable the particle Alarm
limits by pressing the enable/disable button for the desired channels.
Enter Alarm limits by pressing the alarm limit button and using the pop up key pad to enter the value.
Edit Custom Recipe Sample Settings
Press the Sample Tab to Edit Sample Settings.
Press the Delay value button to
enter a value using the keypad.
Press the Sample Time button to enter the
sample time using the pop up keypad.
Press the Hold button to enter the hold
time using the pop up keypad.
Press the Cycles button to enter the
number of cycles using the pop up keypad.
Press the Volume button to enter the sample volume using the pop up keypad.
Press the Units button to edit the Volume Units: ft3 (cubic feet), m3 (cubic meters) or L (liters).
Edit Custom Recipe Channels
Recipe Sample Settings
2
3
5
1
4
1
2
3
4
5
2
3
5
1
4
6
7
1
7
6
5
4
3
2
Lighthouse Worldwide Solutions Pre-Release Review Copy ApexZ Operators Manual
248083466-1 70 | P a g e
Edit Custom Recipe Room/Locations
Press the Room button to edit the
Room associated with this Custom Recipe.
Press the enable/disable toggle button
to include or not include specific locations
for the Custom Recipe.
Edit Custom Recipe Locations
2
1
Lighthouse Worldwide Solutions Pre-Release Review Copy ApexZ Operators Manual
248083466-1 71 | P a g e
Certification Recipes
HOME – CONFIG – Recipes
Add a Recipe
Press the + button to
add a new recipe and display
the New Recipe screen.
Certification Recipe Types
EU GMP
European Union Good
Manufacturing Processes
FED 209E
Federal Standard 209E
ISO 14644-1: 1999
ISO 14633-1:2015
Configuration: Recipes Screen
Lighthouse Worldwide Solutions Pre-Release Review Copy ApexZ Operators Manual
248083466-1 72 | P a g e
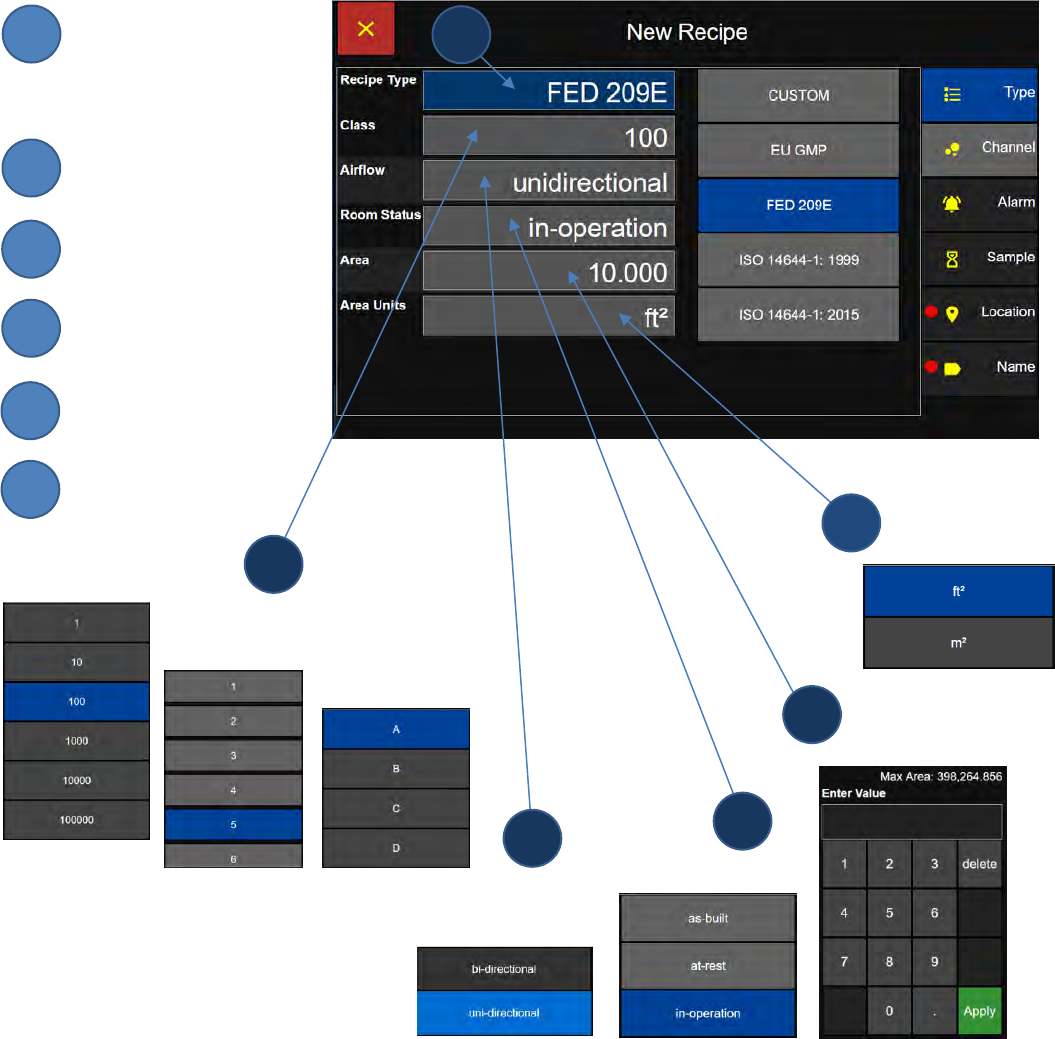
Certification Recipe - Type Settings
Select your desired
certification recipe
type standard.
Select Class or Grade
Select Airflow
Select Room Status
Select Area
Select Area Units
Certification Recipe Type Screen
Room Status
Grade
EU GMP
Area Units
Room Area
2
3
5
1
6
Airflow
FED 209E only
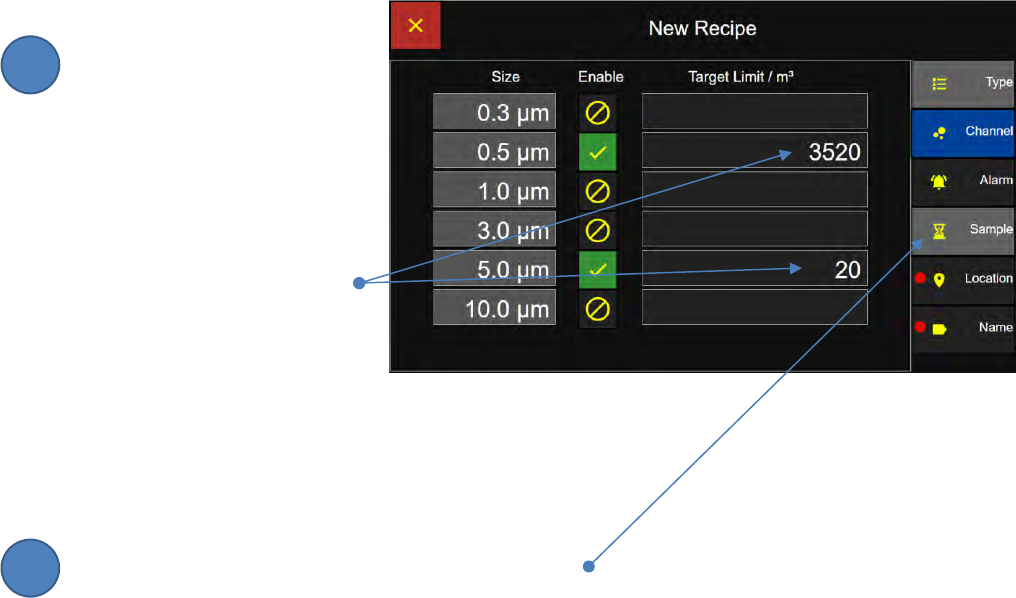
1
2
4
6
ISO
4
5
3
FED 209E
Lighthouse Worldwide Solutions Pre-Release Review Copy ApexZ Operators Manual
248083466-1 73 | P a g e
Certification Recipe - Channels and Target Limits
ApexZ certification recipes will automatically enable the required channels and assign target limits
according to the selected standard type for each particle size channel. Channels not required for the
standard will be disabled and no values will be shown. The user cannot edit any of the enabled or
disabled channels, nor may any target limits be modified.
Enable/Disable Channels
Target limits may not be added,
modified or deleted.
Shown here are the target
limits calculated for:
EU GMP Recipe
Grade: A
Room Status: In Operation
Area: 10.000
Area units: Square feet (ft2)
Press the Sample button to display the Sample Screen.
Example: EU GMP Recipe Channels Screen
2
1
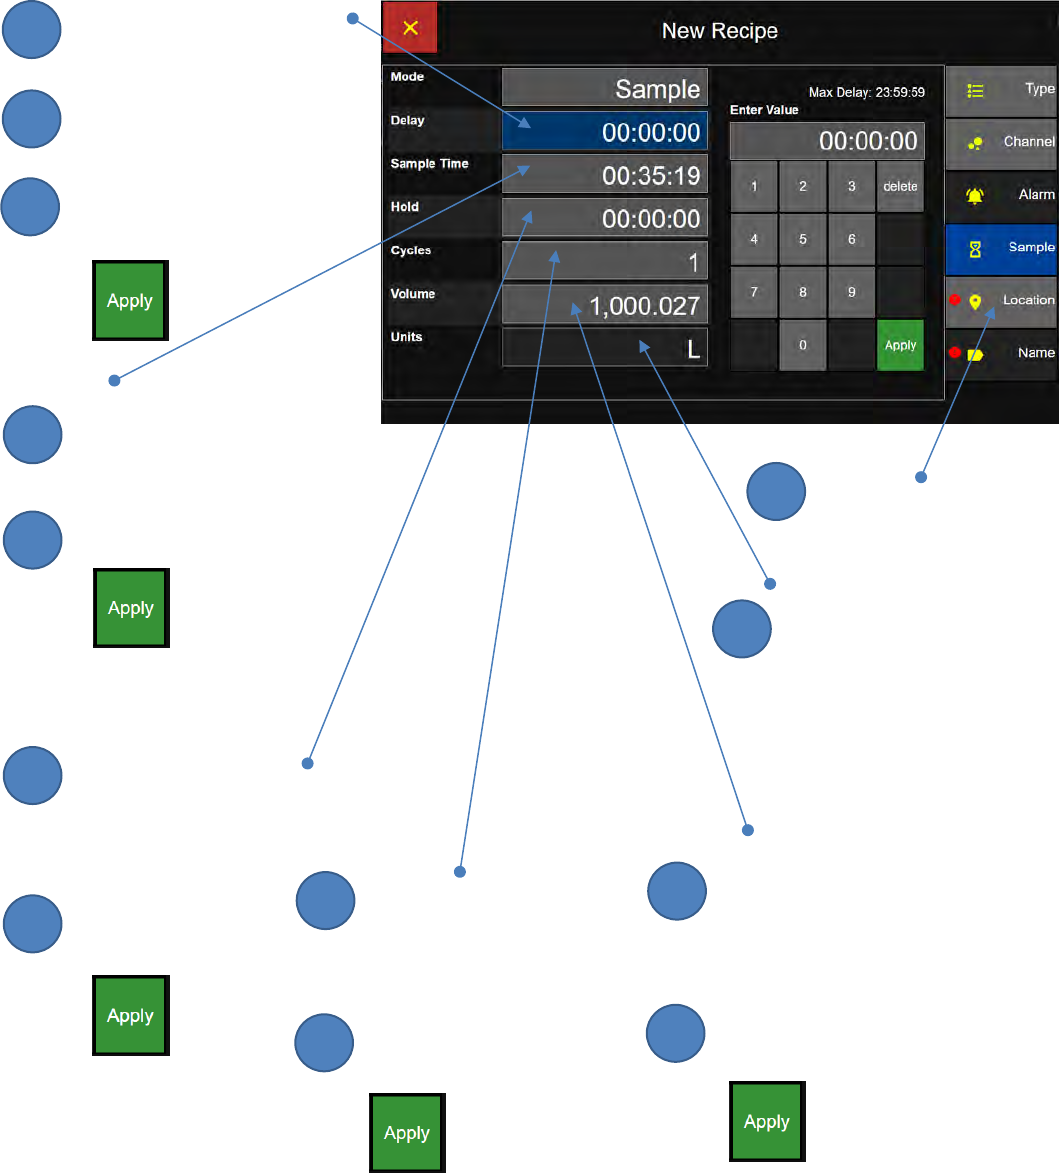
Lighthouse Worldwide Solutions Pre-Release Review Copy ApexZ Operators Manual
248083466-1 74 | P a g e
Certification Recipe - Sample Settings
Delay
Press the Delay button
and the button will turn blue
to indicate that it is selected.
Enter the delay time
with the numeric key pad.
Press Apply to store the value.
Sample
Press the Sample button
and change the sample time
with the numeric keypad.
Press Apply to store the value.
Hold
Press the Hold button
and change the hold time
between cycles using
the numeric key pad.
Press Apply to
store the value.
Certification Recipe Sample Screen
Cycles
Press the Cycles button
and change the # of
cycles with the
numeric keypad.
Press Apply to
Store the value.
Volume
Press the Volume button
and change the sample
volume with the numeric
keypad.
Press Apply to
Store the value.
Location
Press the Location Tab
to advance to the
Location screen.
Units
View the volume units pre-
assigned per the standard.
ft3 - cubic feet
m3 - cubic meters
L - liters
2
3
1
2
1
2
1
2
1
2
1
1
1
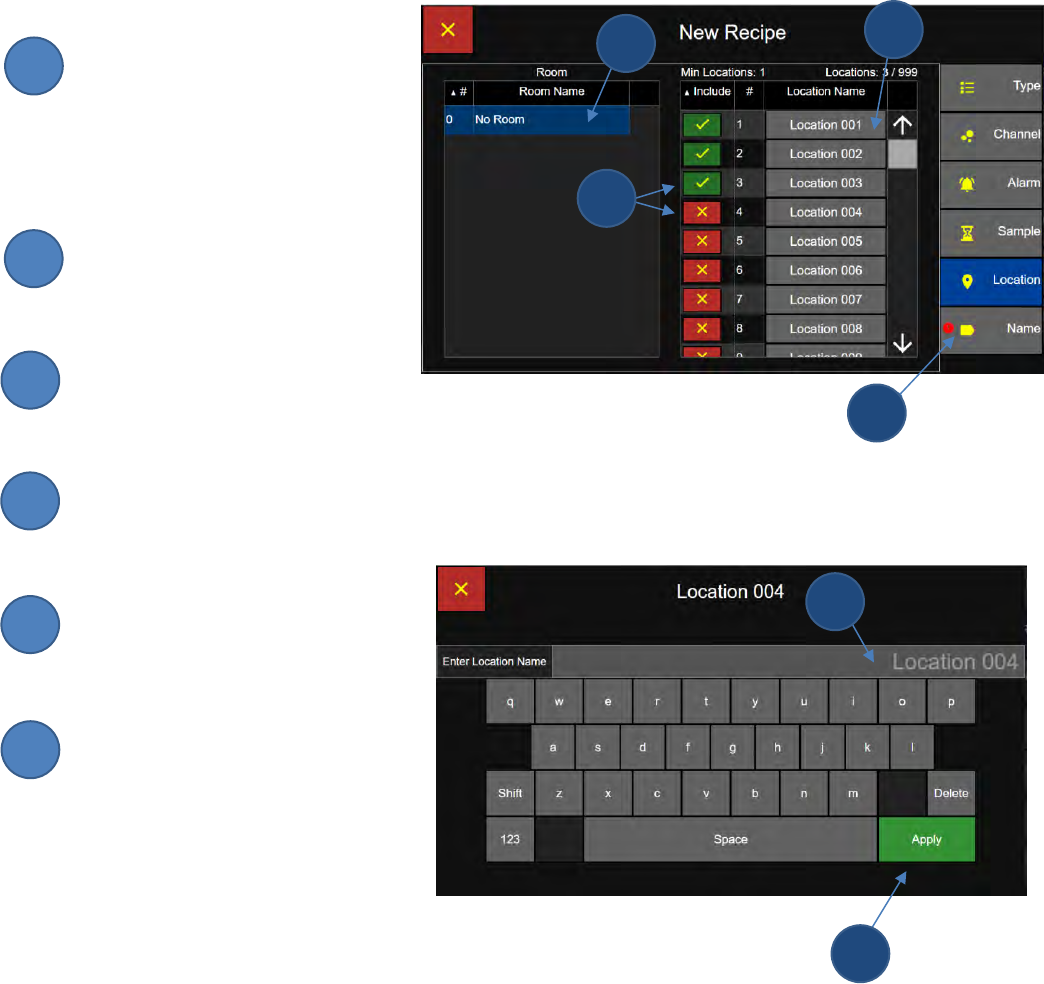
Lighthouse Worldwide Solutions Pre-Release Review Copy ApexZ Operators Manual
248083466-1 75 | P a g e
Certification Recipe - Locations
Select Room
Select a Room Name button.
Select Locations
Press the enable/disable toggle
button to enable the desired
locations to be sampled.
Press a Location Name button
to edit the location name.
Using the keypad enter
a new location name for the
selected location number.
Press the Apply button to
save the new location name
for that location number.
Press the Name Tab to display
the Enter Location Name Screen.
EU GMP Recipe Location Screen
Enter Location Name Screen
2
3
4
5
6
2
1
5
4
1
3
6
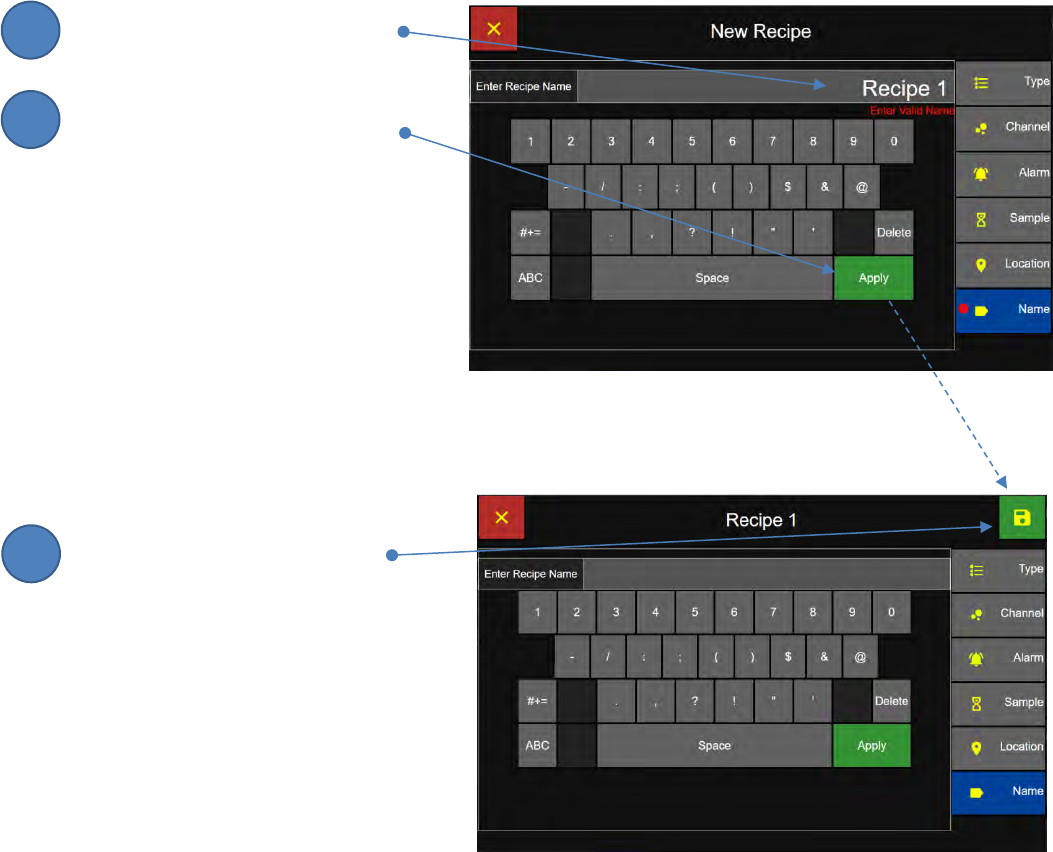
Lighthouse Worldwide Solutions Pre-Release Review Copy ApexZ Operators Manual
248083466-1 76 | P a g e
Certification Recipe - Name
Enter Certification Recipe Name
Enter the Certification Recipe Name
using the keypad.
Press the Apply button to save
the new Recipe Name and
display the Save Recipe button.
Save Certification Recipe Name
Press the Save button to save
the recipe and return to the
Recipe Configuration Screen.
Enter Recipe Name Screen
Save Recipe Screen
2
3
1
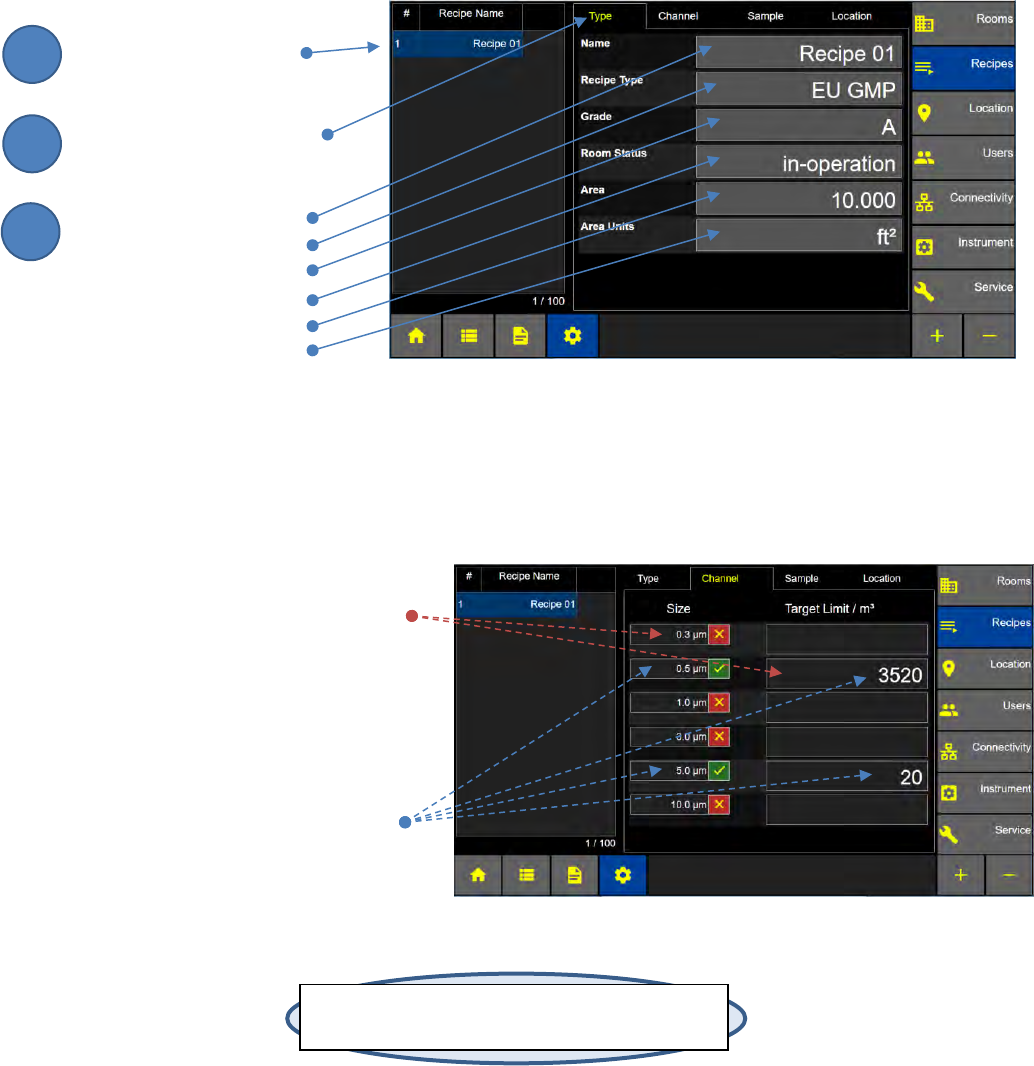
Lighthouse Worldwide Solutions Pre-Release Review Copy ApexZ Operators Manual
248083466-1 77 | P a g e
Edit - Certification Recipes
Edit Recipe Type Settings
Select the Recipe Name
to Edit.
Press the Type Tab
Press each button to edit:
Recipe Name
Recipe Type
Grade
Room Status
Area
Area Units
View Recipe Channels and Target Limits
For certification recipes, enabled
channels and target limits are fixed
and may not be modified.
Shown here are the target limits for the
following EU GMP certification report
for Room, Grade, Status and Area.
Grade A
Room Status: In Operation
Area: 10,000
Area Units: ft3
Edit Recipe Type Settings Screen
Note: Particle size channels enabled and target limits
are fixed for each specified certification standard.
Edit Recipe Channel and Target Limits Screen
2
3
1
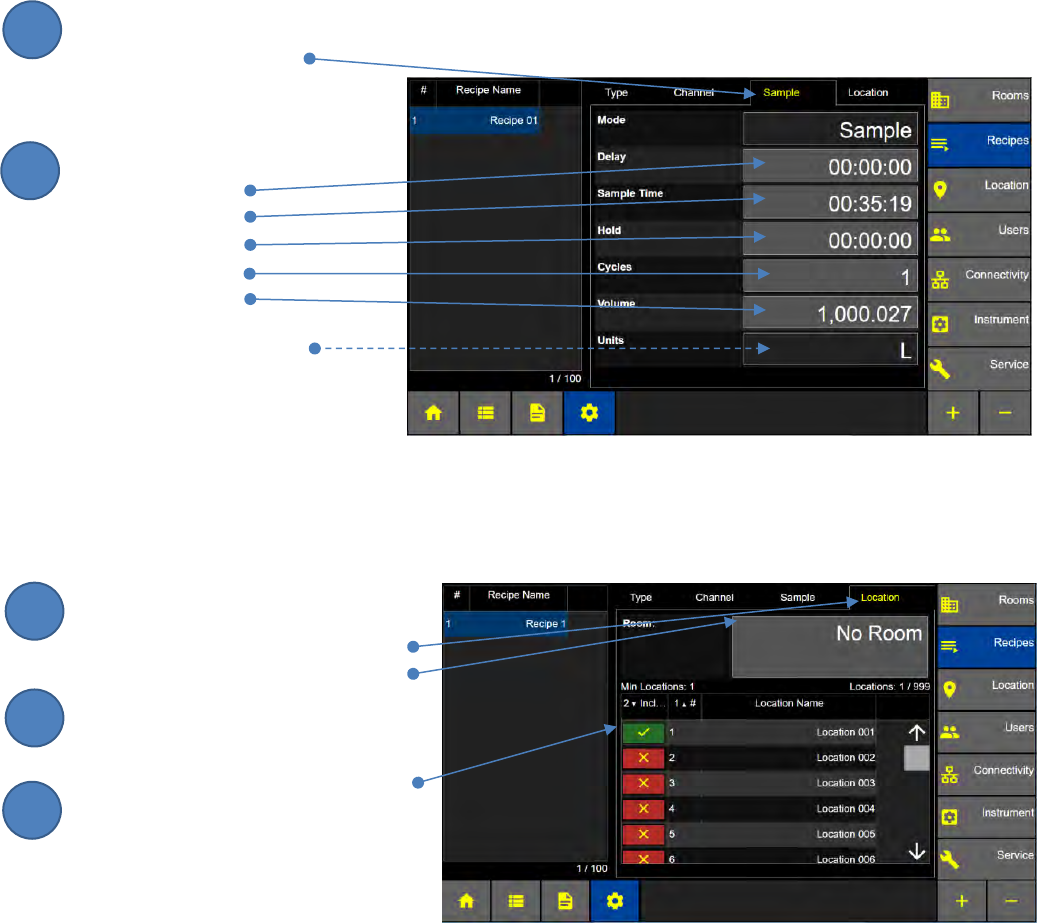
Lighthouse Worldwide Solutions Pre-Release Review Copy ApexZ Operators Manual
248083466-1 78 | P a g e
Edit Certification Recipe Sample Settings
Press the Sample Tab
Press the button to edit:
Delay Time
Sample Time
Hold Time
# of Cycles
Volume
Units (Liters, view only)
Edit Certification Recipe Locations
Press the Locations Tab
Press the Room button
to edit the selected Room.
Press the enable button to include
locations in the Recipe.
Edit Recipe Sample Settings Screen
Edit Recipe Locations Screen
2
3
1
2
1
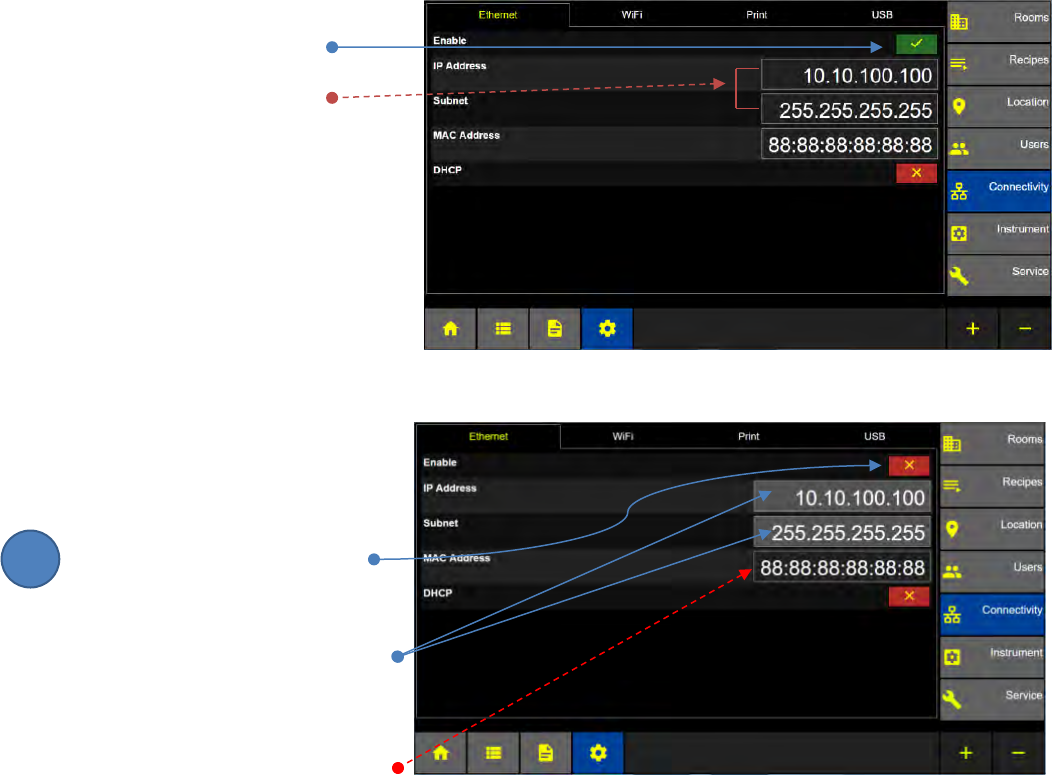
Lighthouse Worldwide Solutions Pre-Release Review Copy ApexZ Operators Manual
248083466-1 79 | P a g e
Communications
Communication to the ApexZ can be set up via a wired Ethernet connection or a wireless Wi-Fi connection. With
the Ethernet connection enabled, data from the ApexZ can be transferred manually or real time to the LMS
Express 8 Software. The ApexZ can also be remotely controlled and configured via Lighthouse’s mobile device
application Basecamp.
Ethernet
HOME – CONFIG – Connectivity – Ethernet tab
Ethernet Address Enabled
When Ethernet is enabled
the IP Address and Subnet
buttons will be locked.
Ethernet Address Disabled
To set or change the instruments IP
or Subnet addresses you must
disable Ethernet first.
Press the enable/disable toggle
button to disable Ethernet and
allow input of a new setting.
The IP and Subnet buttons will
change to light grey indicating the
button is available to edit.
MAC Address is fixed and cannot
be changed.
Ethernet Disabled Screen
Ethernet Enabled Screen
1
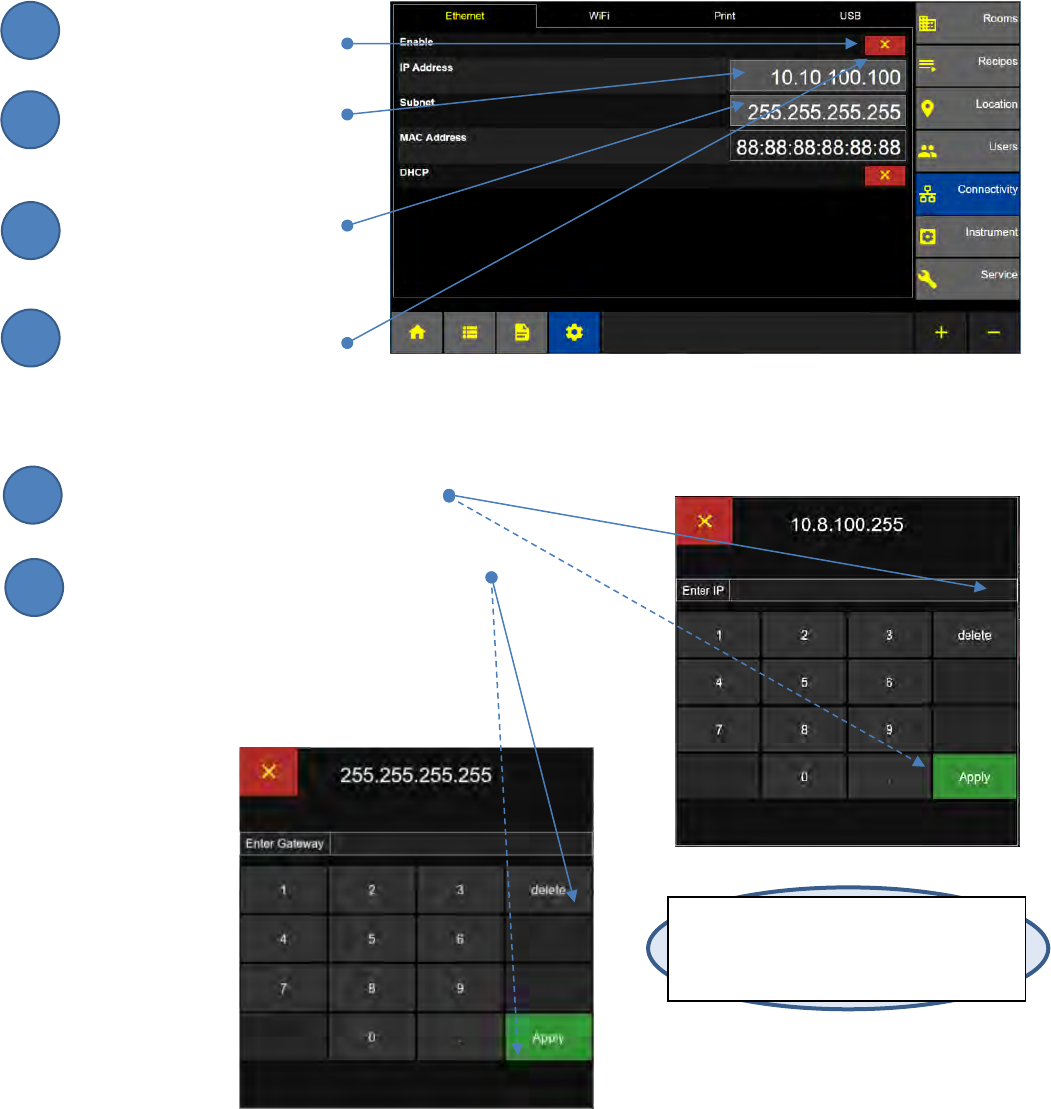
Lighthouse Worldwide Solutions Pre-Release Review Copy ApexZ Operators Manual
248083466-1 80 | P a g e
Enter a new Ethernet Address
Press the toggle button to
disable Ethernet.
Press the IP Address button
to display the
Enter IP keypad.
Press the Subnet button
to display the
Enter Subnet keypad.
To enable the new Ethernet
settings press the Ethernet
enable toggle button.
The MAC Address is fixed.
Enter the IP address using the keypad
and press the green Apply button.
Enter the Subnet Address using the keypad
and press the green Apply button.
Note: Once Ethernet is enabled the IP and
Subnet addresses will be locked and greyed
out. They cannot be changed while
Ethernet is enabled.
Enter IP keypad
Enter Subnet Keypad
2
3
1
4
5
6
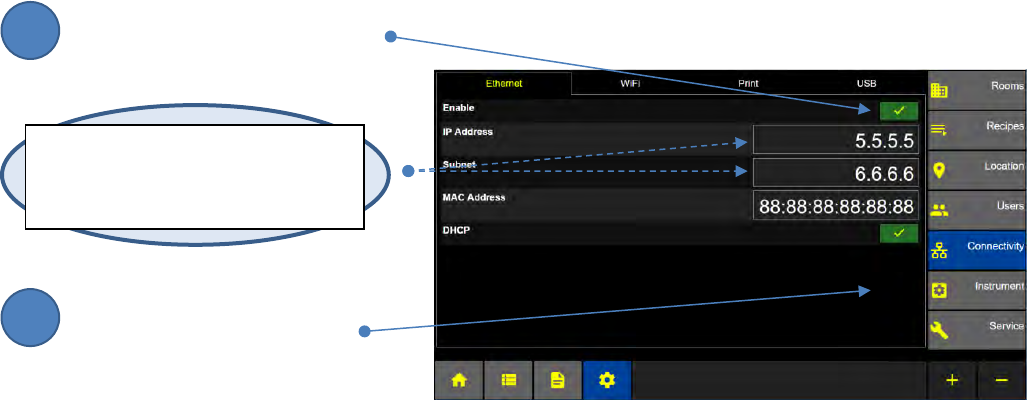
Lighthouse Worldwide Solutions Pre-Release Review Copy ApexZ Operators Manual
248083466-1 81 | P a g e
DHCP (Dynamic Host Configuration Protocol)
Press the Enable Ethernet button
Press the Enable DHCP button
Note: When DHCP is enabled: The IP and
Subnet addresses will be dynamically
assigned by your network.
Ethernet DHCP Enabled Screen
2
1
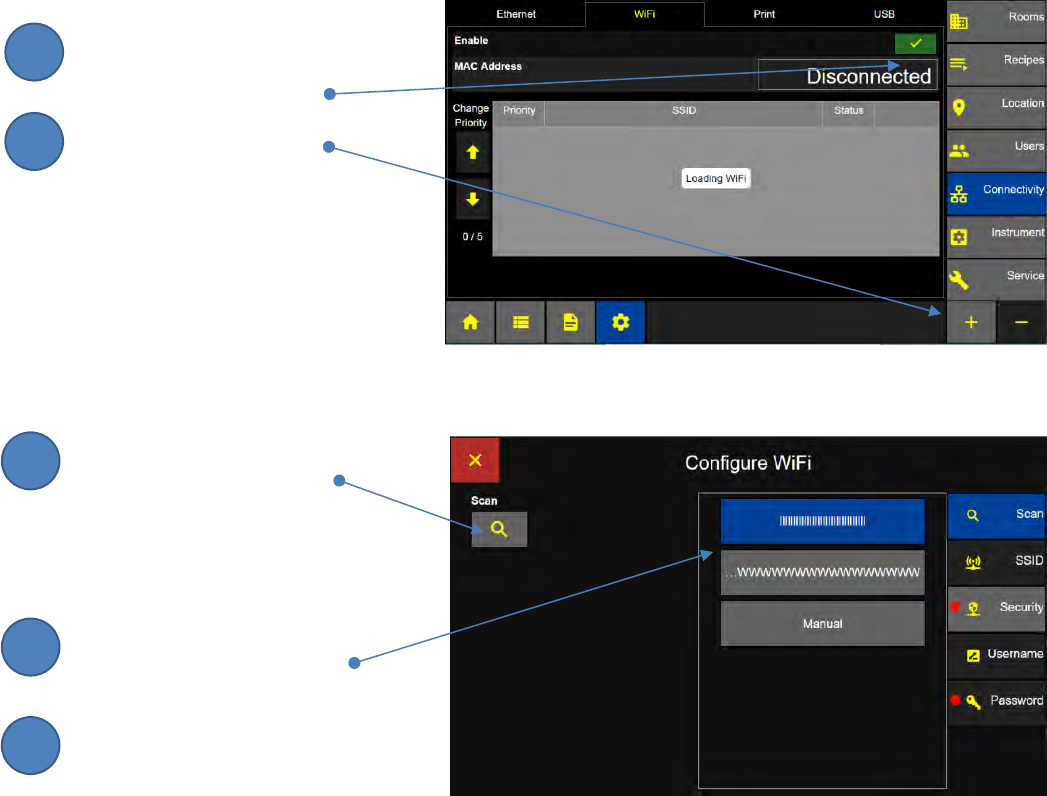
Lighthouse Worldwide Solutions Pre-Release Review Copy ApexZ Operators Manual
248083466-1 82 | P a g e
Wi-Fi
HOME – CONFIG – Connectivity – Wifi tab
Enable Wi-Fi
Press the Wi-Fi Enable button
to enable Wi-Fi.
Press the + button to
Configure one to five
Wi-Fi connections.
Press Scan to search for available
Wi-Fi networks or routers
in the area.
ApexZ will scan for available
Wi-Fi networks
Select a Wi-Fi network for
your ApexZ communications.
Press the Connect Button.
Connecting Message…
Connection Successful Message…
Press the check mark.
Wi-Fi is status active.
Configuration: Wi-Fi Screen
2
3
1
4
5
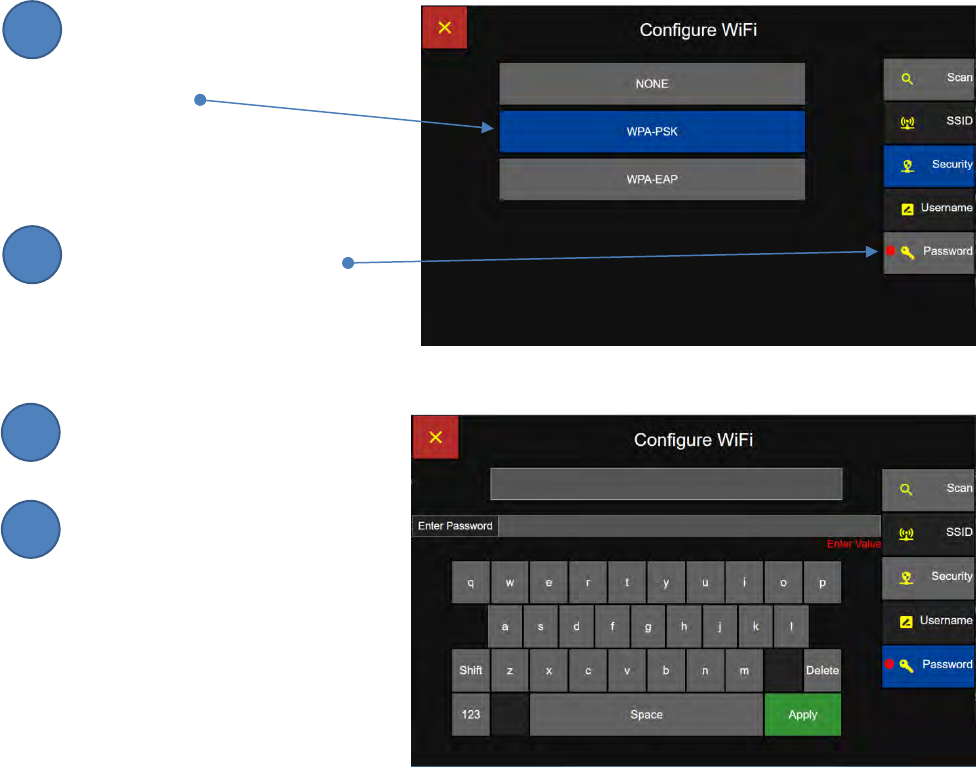
Lighthouse Worldwide Solutions Pre-Release Review Copy ApexZ Operators Manual
248083466-1 83 | P a g e
Press Security and select one of:
None
WPA-PSK
WPA-EAP
Press the Password Button.
Enter password on
the keyboard screen
and press Apply.
Press Save to Connect.
When the ApexZ successfully
connects to the Wi-Fi network, a
“Connection Successful” message
will appear.
2
3
1
4
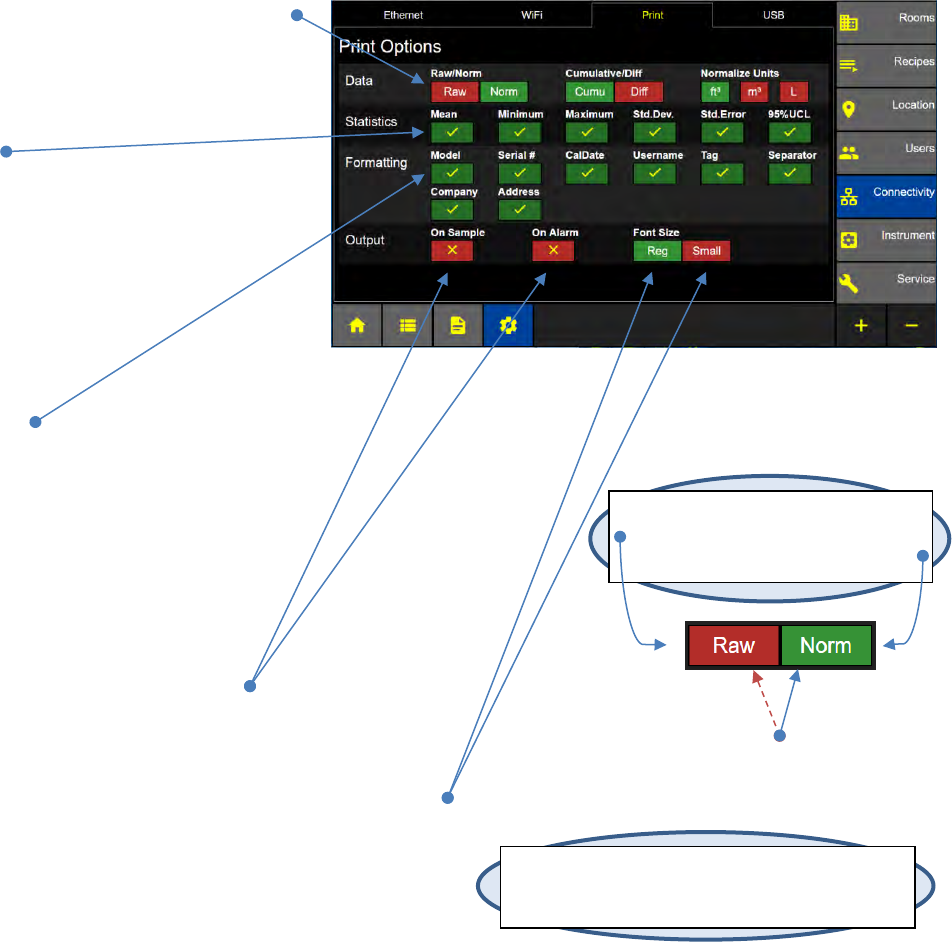
Lighthouse Worldwide Solutions Pre-Release Review Copy ApexZ Operators Manual
248083466-1 84 | P a g e
Print
HOME – CONFIG – Connectivity – Print tab
Print Options
The Print Options screen allows the user to setup how printouts will be formatted. Users can set data
formats to Raw or Normalized, Cumulative or Differential and choose the normalized unit of measure
(cubic feet, cubic meters or Liters). Certain statistics can also be enabled to print on reports. These
include: Mean, Minimum, Maximum, Standard Deviation, Standard Error and 95% UCL.
Data Format
Enable or Disable data formats:
Select Raw or Normalized
Select Cumulative and/or Differential
Select Normalize Units ft3, m3, L
Statistics
Enable/Disable printing statistics for:
Mean
Minimum
Maximum
Std. Dev.
Std. Error
95% UCL
Formatting
Enable/Disable printing the following:
Model
Serial #
Calibration Date
Username
Tag
Separator
Output On Sample, On Alarm
If Output on Sample is enabled each record
will be printed when the sample is complete.
If Output on Alarm is enabled the alarm data will be printed
every time an alarm is recorded.
Font Size Enable either Reg (regular font size)
or Small (reduced font size).
Configuration: Print Settings Screen
Note:
Green buttons indicate active options.
Red buttons indicates inactive options.
Disabled Enabled
Note: The User may enable both output “On
Sample” and “On Alarm” (this will output to the
printer on every sample and on every alarm record).
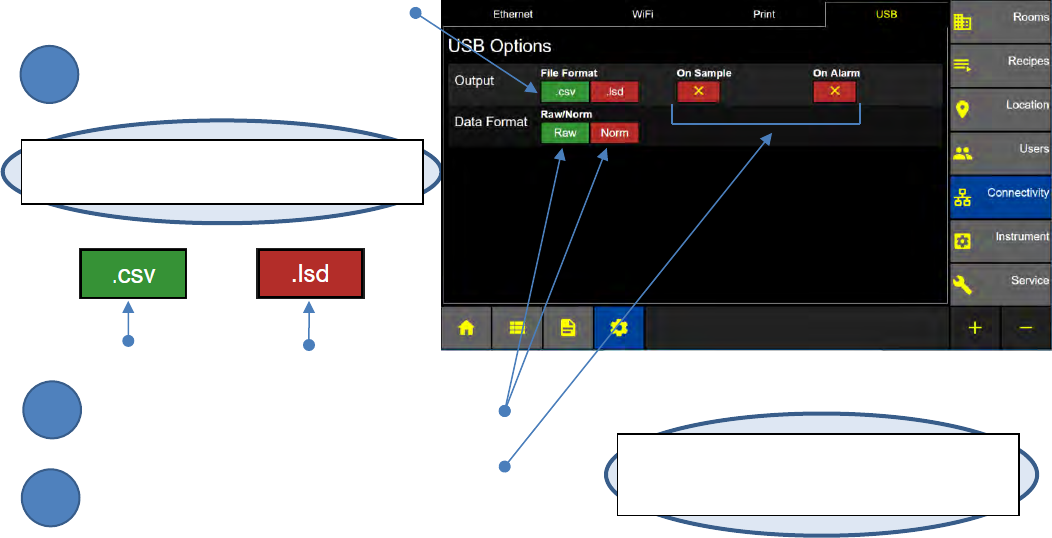
Lighthouse Worldwide Solutions Pre-Release Review Copy ApexZ Operators Manual
248083466-1 85 | P a g e
USB
HOME – CONFIG – Connectivity – USB tab
USB Options
The USB Options screen allows the user to select how to format data exported to USB. Data can be
exported to USB as .csv (comma separated value) or .lsd (Lighthouse Secure Data) files. The format for
particle data can be set to Raw or Normalized; cubic feet, cubic meters or liters. The user may also
select to output data records to USB on every sample, every alarm, or both.
Output File Format, On Sample, On Alarm
Select .csv or .lsd file format
Select Data Format: Raw or Normalized.
Select Output on Sample and/or On Alarm.
Note: Green buttons indicate active options.
Red buttons indicates inactive options.
Note: The User may enable both output “On
Sample” and output “On Alarm. (This will output
to USB every sample and every alarm record).
Configuration: USB Screen
Enabled Disabled
2
3
1
Lighthouse Worldwide Solutions Pre-Release Review Copy ApexZ Operators Manual
248083466-1 86 | P a g e
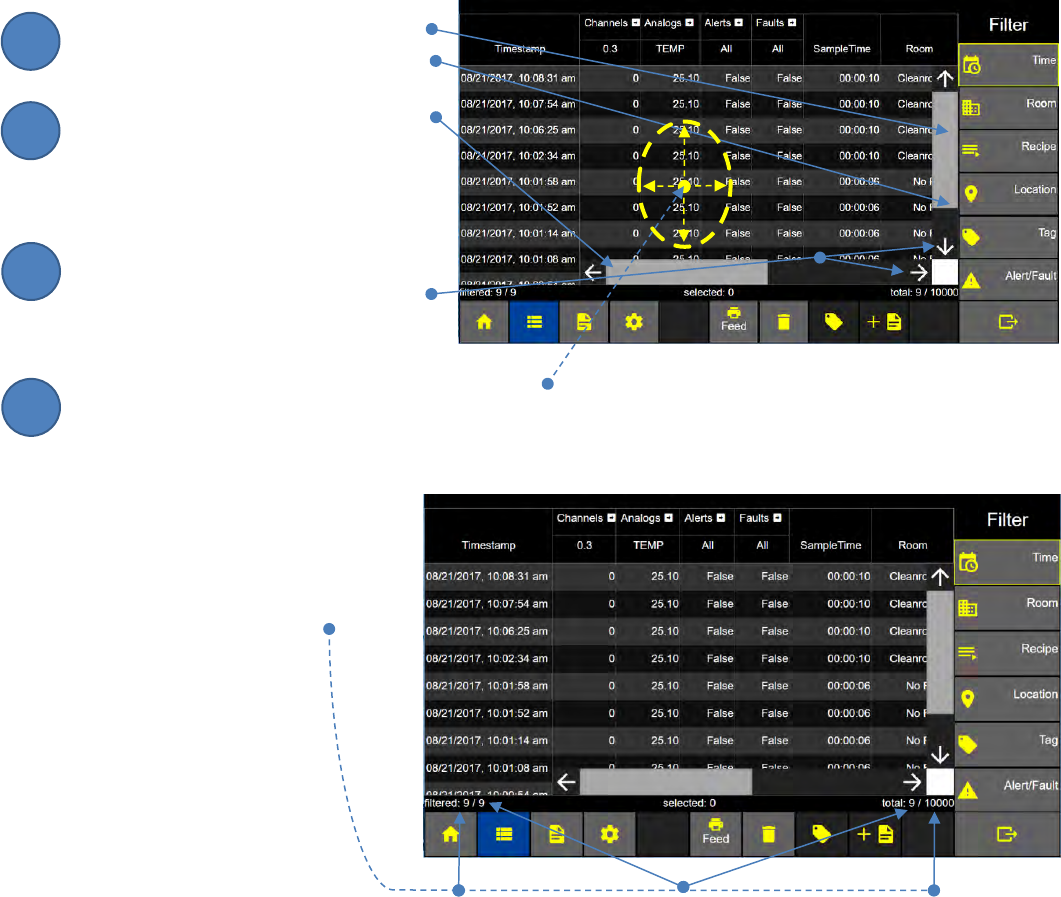
Lighthouse Worldwide Solutions Pre-Release Review Copy ApexZ Operators Manual
248083466-1 87 | P a g e
Data Screen
Scroll data records
The ApexZ can store up to 10,000 sample data records and display them via the Data Screen. By default
data for the first channel, first environmental sensor, first alert, and first fault will be displayed.
Additional columns can be displayed by clicking on the column headings with arrow buttons to the right.
Press the right arrow button to expand and the left arrow button to collapse that column grouping.
There are three ways to scroll through the data records on the ApexZ.
Slide Elevator Bars
Slide the vertical elevator bar up and
down to scroll through data records
saved on the ApexZ.
Slide the horizontal elevator bar
right and left to view additional
data columns.
Press the Arrow Keys
The user can also press the arrow
buttons to scroll data records
up/down or right/left.
Swipe the Data display region to scroll
Using your finger and swipe the data screen region
up or down, right or left. The data displayed
will scroll accordingly up or down, right or left.
Total Data Records View
View the Data Record Totals for
Data Records Filtered
Data Records Saved
Data Records Capacity
Data Screen
Data Screen
Total Records Filtered
Total Record Capacity
Total Records Saved
2
3
1
4
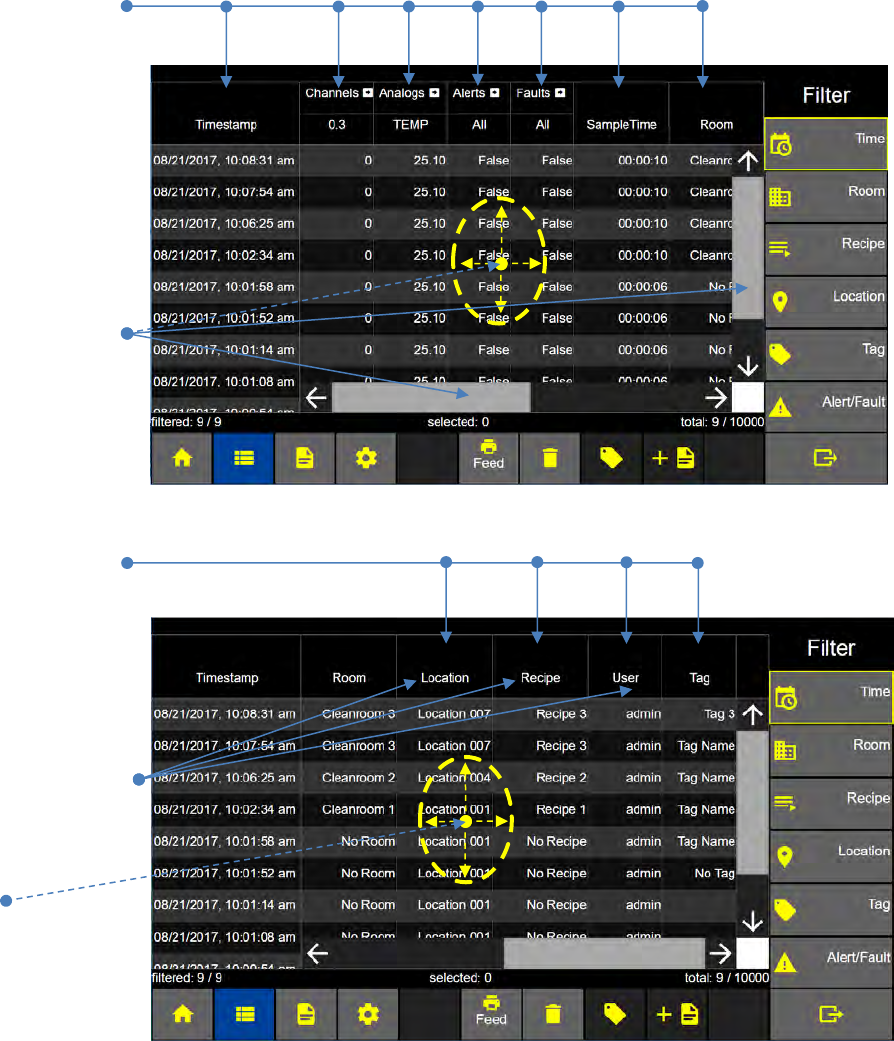
Lighthouse Worldwide Solutions Pre-Release Review Copy ApexZ Operators Manual
248083466-1 88 | P a g e
Data Columns
By default channels, analogs, alerts, and fault columns are compressed. To expand a columns press the
arrow button on each of the corresponding column headings.
Data Record Columns 1-6
1. Timestamp
2. Channels
3. Analogs
4. Alerts
5. Faults
6. Sample Time
7. Room
Swipe the screen or
slide the Elevator Bar
to view additional
columns to the right
left, above or below.
Data Record Columns 8-11
8. Location
9. Recipe
10. User
11. Tag
Swipe the screen or
slide the Elevator Bar
to view additional
columns to the right
or left.

Lighthouse Worldwide Solutions Pre-Release Review Copy ApexZ Operators Manual
248083466-1 89 | P a g e
Data Columns - Expanded
Expand channel size columns
Press the right arrow button
to expand the channel columns.
Expanded Channel Sizes columns:
Press the left arrow button
to collapse the Channels columns
Data Screen: Channels View Expanded
Data Screen: Channels View Expanded
2
1
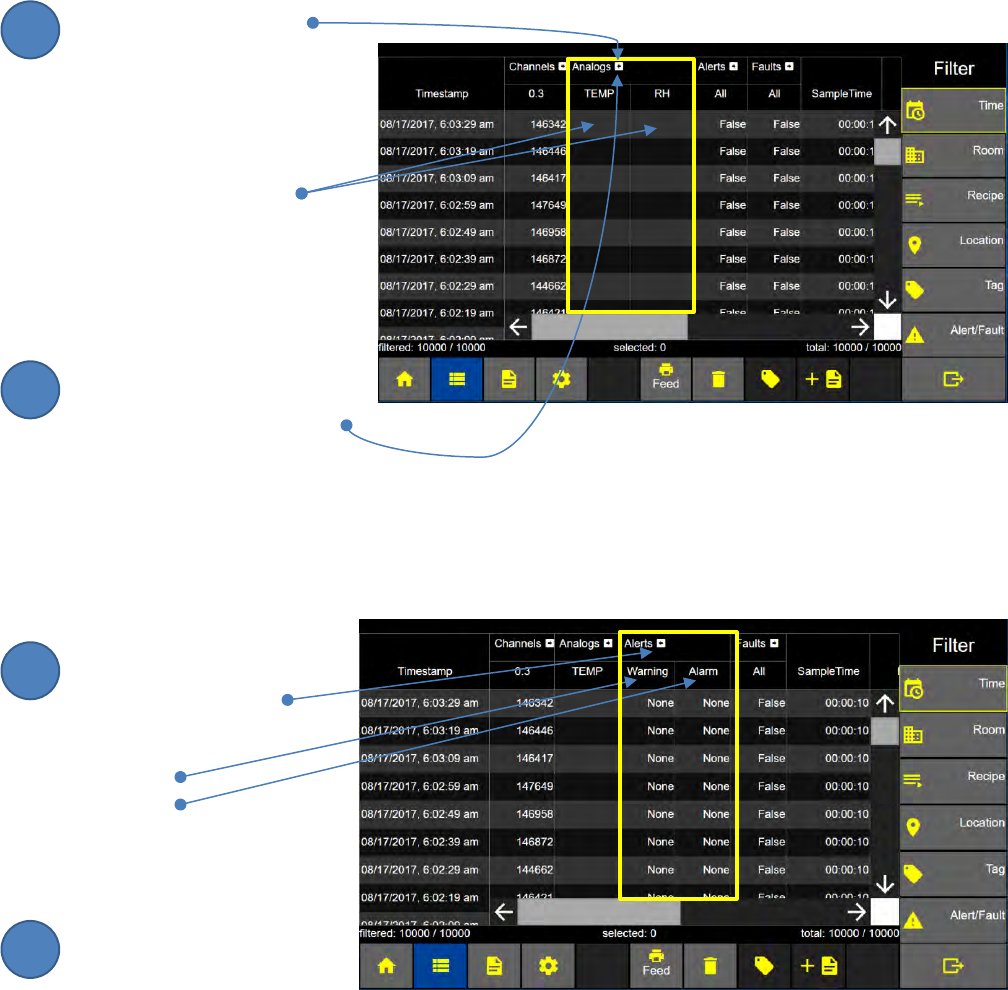
Lighthouse Worldwide Solutions Pre-Release Review Copy ApexZ Operators Manual
248083466-1 90 | P a g e
Expanded Analog status column view
Press the right arrow
button to expand the
analog data columns:.
TEMP – temperature
RH- relative humidity
Collapse Analog status column view
Press the left arrow button
to collapse display of the
additional Analog columns.
Expanded Alerts status column view
Press the Alerts right arrow
button to expand the
Alert columns:
Warning
Alarm
Collapse Alert status column view
Press the left arrow button
to collapse the alert data
columns.
Data Screen: Analog View Expanded
Data Screen: Alert View Expanded
4
4
3
6
5
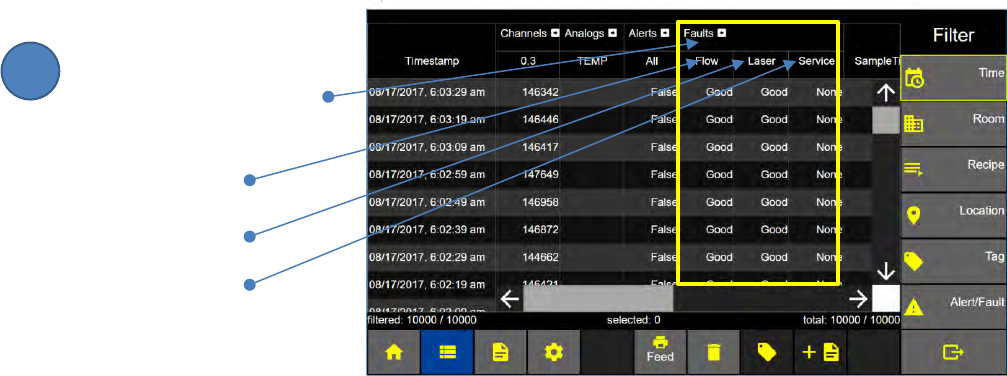
Lighthouse Worldwide Solutions Pre-Release Review Copy ApexZ Operators Manual
248083466-1 91 | P a g e
Expanded Fault status column view
Press the arrow button
to expand or collapse
the Faults status columns.
Flow fault
Laser fault
Service fault
Data Screen: Faults View Expanded
7

Lighthouse Worldwide Solutions Pre-Release Review Copy ApexZ Operators Manual
248083466-1 92 | P a g e
Data Records - Select
Select a single record
To select a single data record on
the Data Screen, press the data
record and it will highlight blue to
indicate it has been selected.
Press the same record again
and the blue highlight will be
removed, indicating that the
record is no longer selected.
Select multiple records
To select a continuous range or set of data, do the following.
While a selected data record
is highlighted blue.
Touch another record above
or below that record.
The records between the first
highlighted record and the second
selected record will also be
highlighted blue and included in
the data selection.
Data Screen
Data Screen
2
3
1
2
1

Lighthouse Worldwide Solutions Pre-Release Review Copy ApexZ Operators Manual
248083466-1 93 | P a g e
Data Records - Tag
Tags can be used to add batch names or numbers, short notes, or notations to a single data record or a
group of selected data records.
Select Data Records to Tag
Select a single data record
or a group of data records .
Press the Tag button to display
the Enter Tag Name Screen.
Tag Name
The Tag Name can be up to
16 characters long.
Enter the Tag Name
Press Apply to save the Tag Name
to the data records.
Data Screen
Enter Tag Name Screen
2
1
3
4
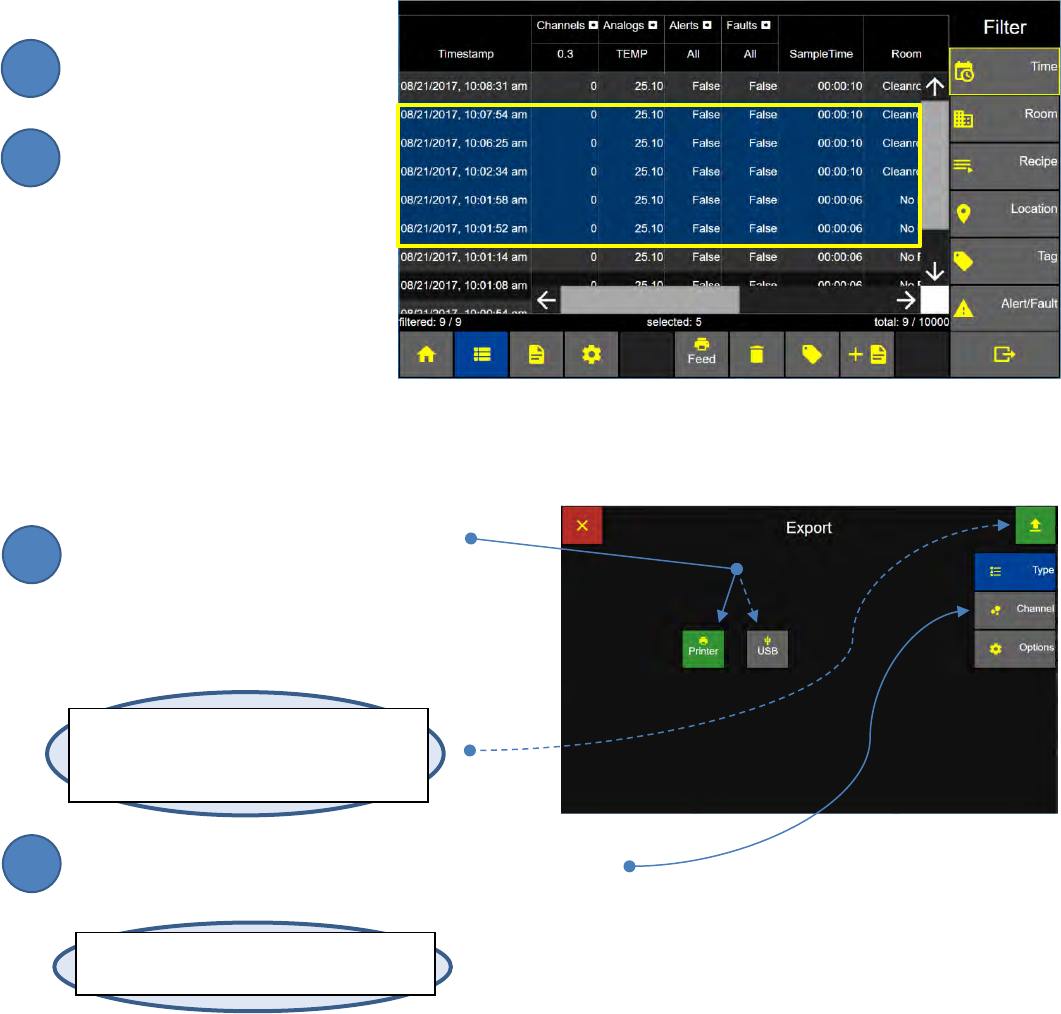
Lighthouse Worldwide Solutions Pre-Release Review Copy ApexZ Operators Manual
248083466-1 94 | P a g e
Data Records - Export to Print or USB.
Data on the ApexZ can be output to the ApexZ printer or exported to a file on a USB key.
Select Data Records to Export or Print.
Select a single data record
or a group of data records.
Press the Export button to
display the Export Screen.
Select Export to Printer or USB
Select the Export Output Type by pressing
either the printer or USB buttons.
The selected output type button will turn green.
Press the Channel button to display the Export Channels.
Data Screen
Export Type Screen
Note: At any time the user may press the
green and yellow Export button to export
with the given settings.
Note: If the USB button is grey or disabled,
attach a USB key to the ApexZ USB port.
2
1
4
3
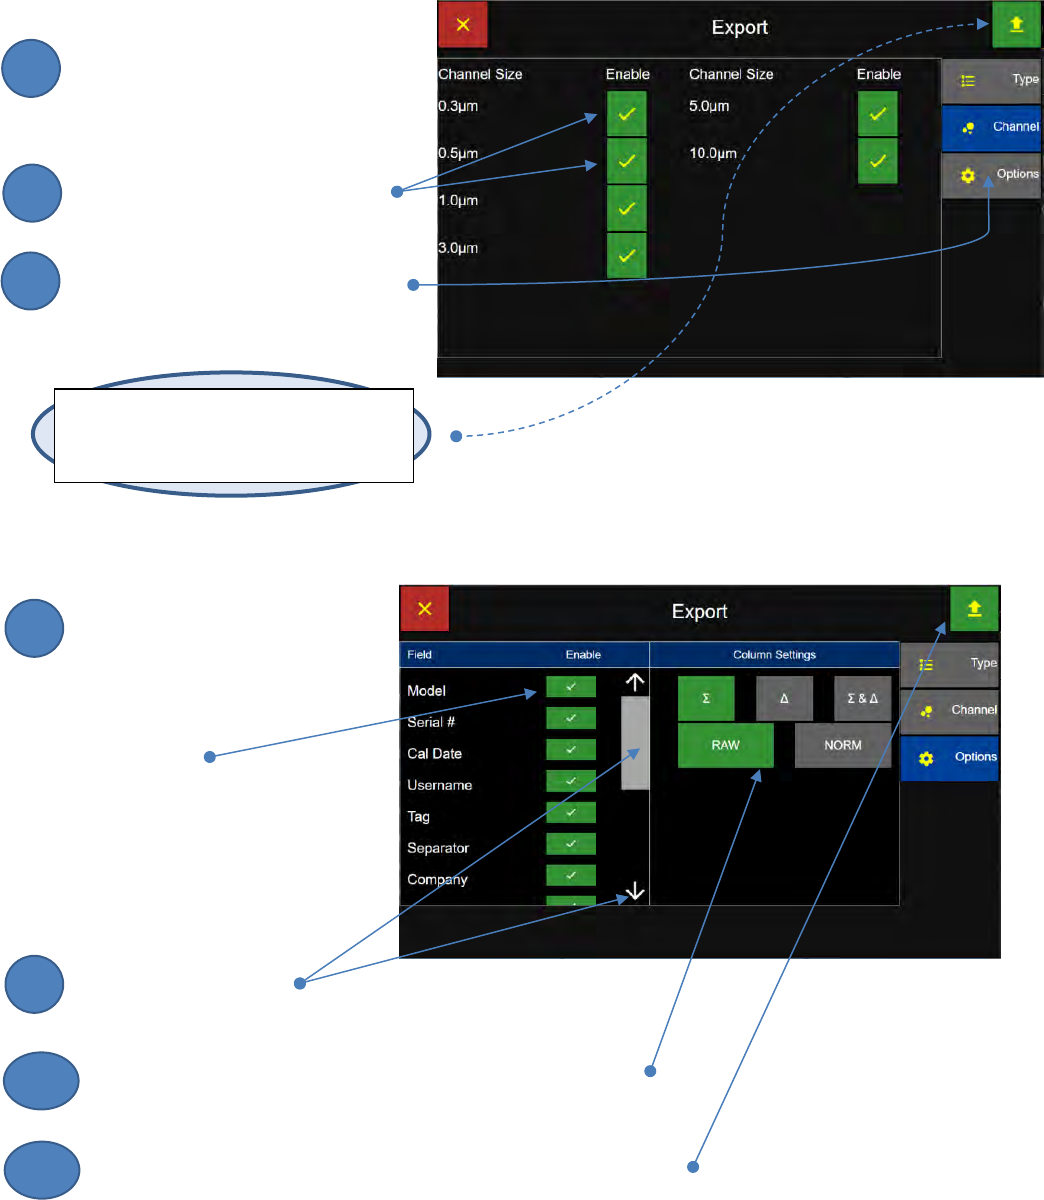
Lighthouse Worldwide Solutions Pre-Release Review Copy ApexZ Operators Manual
248083466-1 95 | P a g e
Select Export Channels
Press the Channel button to
display the channels enabled or
disabled for the Export.
The user may press any channel
to disable or enable for the Export.
Press the Options button to display
the Export Options Screen.
Select Export Options
Press the Enable/Disable toggle
buttons to enable/disable the
following fields from the export.
Model
Serial #
Calibration Due
Username
Tag
Separator
Company
Slide the elevator bar
or press the up/down arrows to scroll up/down of the field list.
Set the column settings to Cumulative, Differential or Both;
Raw or Normalized with units of measure.
Press the green Export button to Export the selected data records
using the current settings.
Export Channel Screen
Export Options List 1 Screen
Note: At any time the user may press the
green and yellow Export button to export
with the given settings.
6
7
5
9
8
10
11
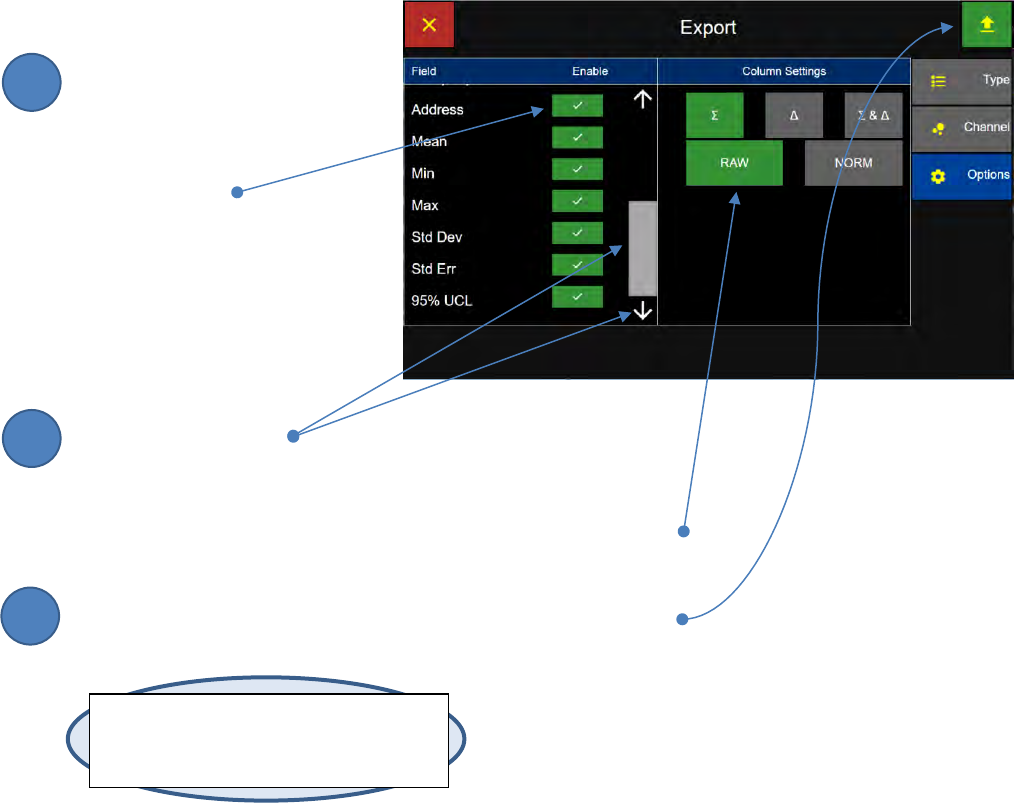
Lighthouse Worldwide Solutions Pre-Release Review Copy ApexZ Operators Manual
248083466-1 96 | P a g e
Select Export Options continued
Press any Field button to
enable or disable that field
in the Export.
Address
Mean
Minimum
Maximum
Standard Deviation
Standard Error
95% UCL
Slide the elevator bar
or press the up/down arrows to scroll up/down the field list.
Set the Column Settings for the data to be exported to Cumulative,
Differential or Both; Raw or Normalized with units of measure.
Press the green Export button to Export with the current settings.
Export Options List 2 Screen
Note: At any time the user may press the
green and yellow Export button to export
with the given settings.
2
3
1
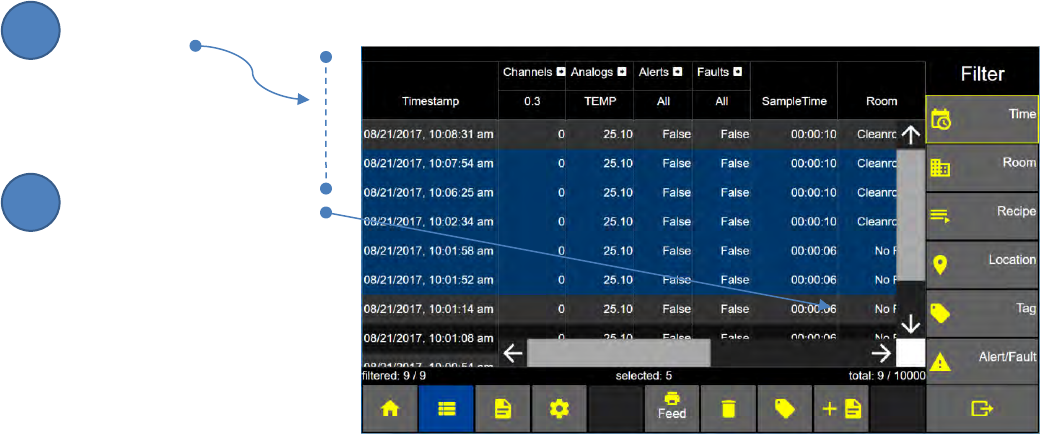
Lighthouse Worldwide Solutions Pre-Release Review Copy ApexZ Operators Manual
248083466-1 97 | P a g e
Data Records - Select Data Records for Report
While a single data record or a group of data records are selected, the user can press the “+ Report”
button to use the selected data records to create a new report.
Follow these steps to select the data records, report type, channels; enter a new report name and save
the report.
Select Data Records to Make Report
Press and highlight the desired data records.
Press the + Report button.
ApexZ will use the highlighted
records to create a new
report.
Data Screen
2
1

Lighthouse Worldwide Solutions Pre-Release Review Copy ApexZ Operators Manual
248083466-1 98 | P a g e
Report Type: Sample
Sample Report Type Screen
Press the Sample button to
select Report type Sample.
Press the Channel button to
display the Report Channels Screen.
Sample Report Channels Screen
To disable a channel press the green check box
and it will change to a red x box indicating that
that channel is disabled for the Report.
Press the Name button to
display the Report Name Screen.
Report Name Screen
Enter the Report Name from the keyboard.
Press the green Apply button to apply the
report name.
Press the green Save button to save the
report and return to the Data Screen.
Sample Report Type Screen
Sample Report Channels Screen
Report Name Screen
3
4
5
6
7
8
9
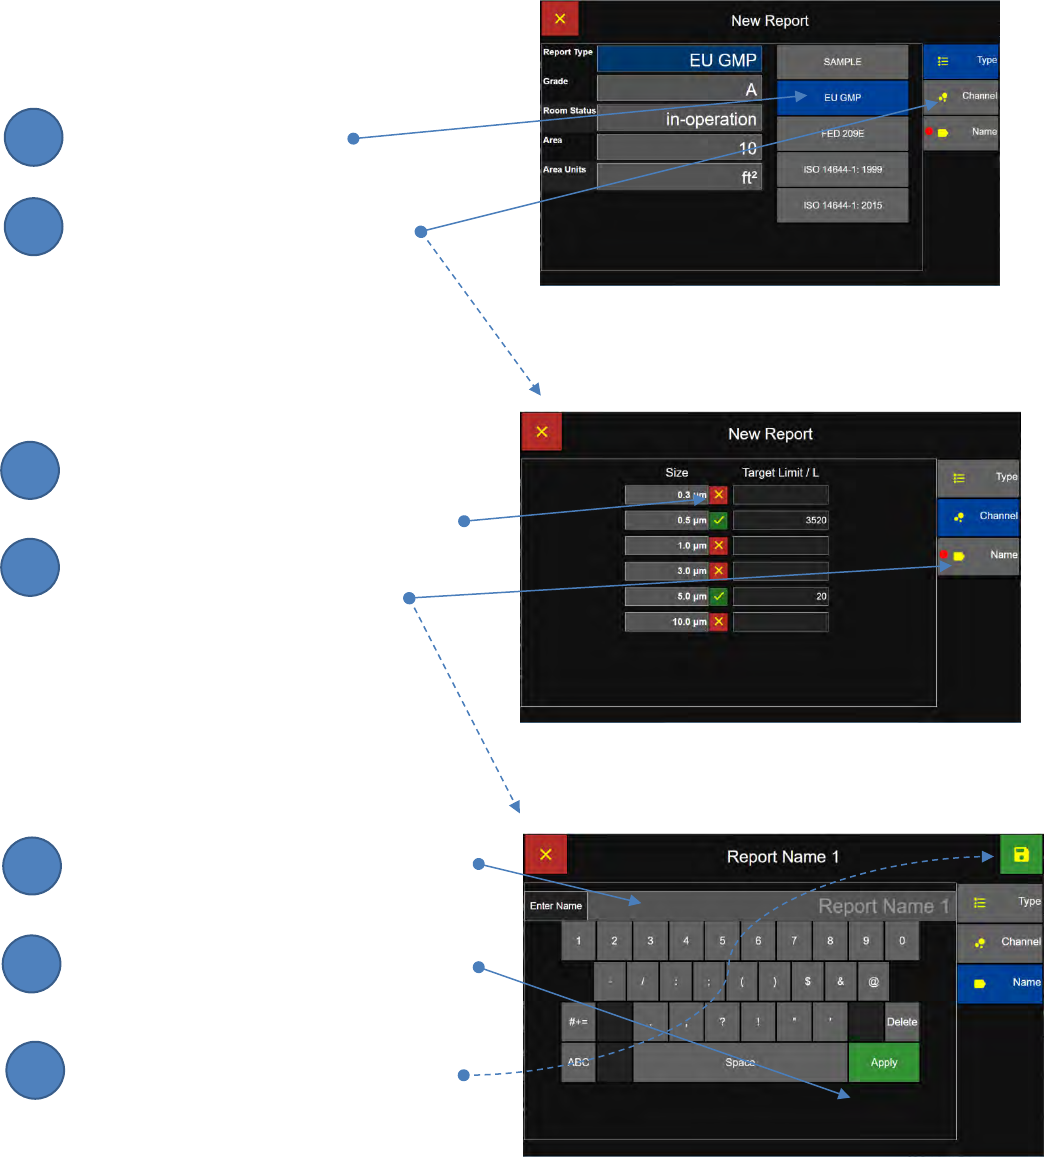
Lighthouse Worldwide Solutions Pre-Release Review Copy ApexZ Operators Manual
248083466-1 99 | P a g e
Report Type: Certification Standard
EU GMP Report Type Screen
Press the EU GMP button to
select Report type EU GMP.
Press the Channel button to
display the Report Channels Screen.
EU GMP Report Channels Screen
To disable a channel press the green check box
and it will change to a red x box indicating that
that channel is disabled for the Report.
Press the Name button to
display the Report Name Screen.
Report Name Screen
Enter the Report Name from the keyboard.
Press the green Apply button to apply the
report name.
Press the green Save button to save the
report and return to the Data Screen.
EU GMP Report Type Screen
EU GMP Report Channels Screen
Report Name Screen
2
3
1
4
5
6
7
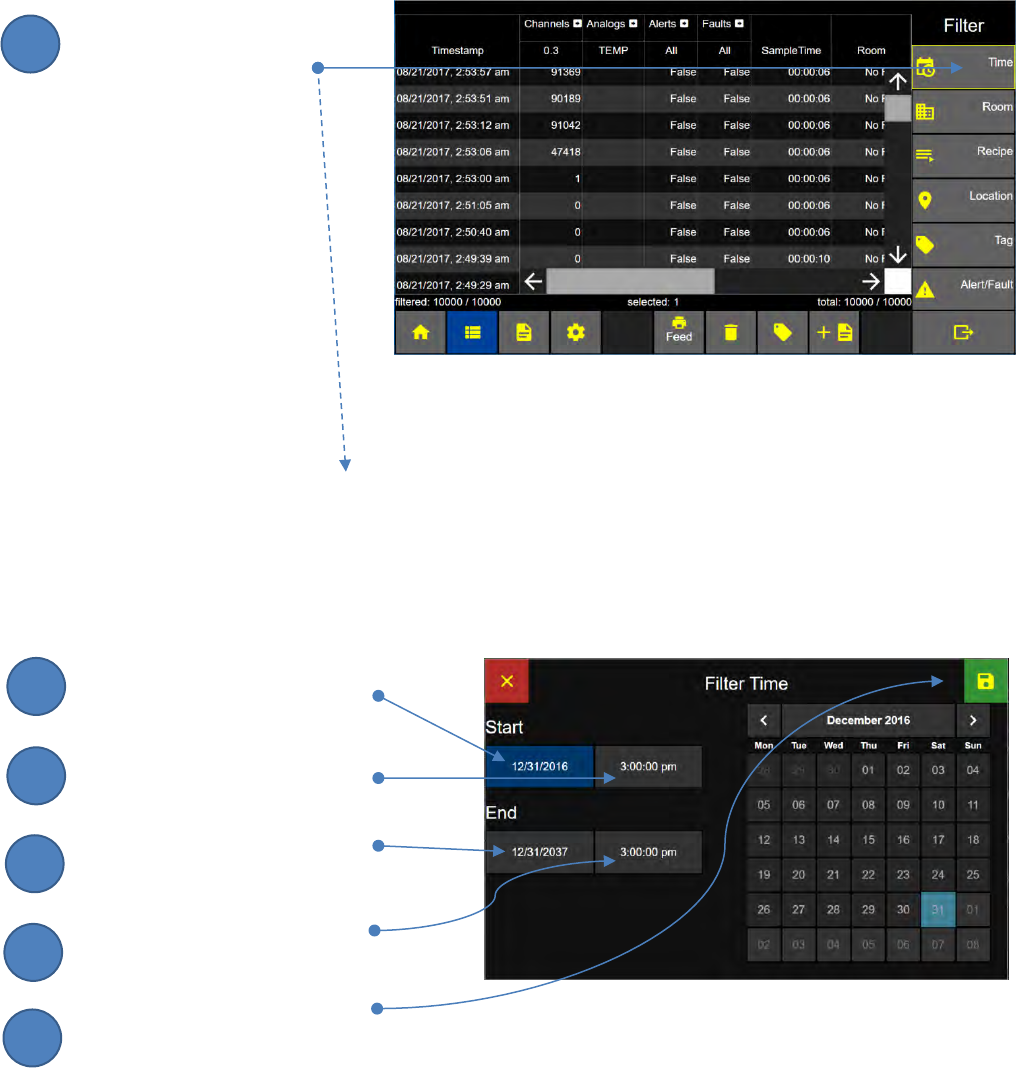
Lighthouse Worldwide Solutions Pre-Release Review Copy ApexZ Operators Manual
248083466-1 100 | P a g e
Filter Data Records - Date and Time
Select Filter Time
Press the Time button to display
the Filter Time Screen.
Enter the start and end dates to filter data records.
The ApexZ3 will display only the data from the Start date/time to the End date/time.
Press the Start Date button and
Enter Start Date on keypad
Press the Start Time button and
Enter the Start Time on keypad
Press the End Date button and
Enter the End Date on keypad
Press the End Time button and
Enter the End Time
Press the green Save button to
activate the filter settings and
return to the Data Screen.
Data Screen
Filter Data - Time Screen
3
4
2
5
1
6
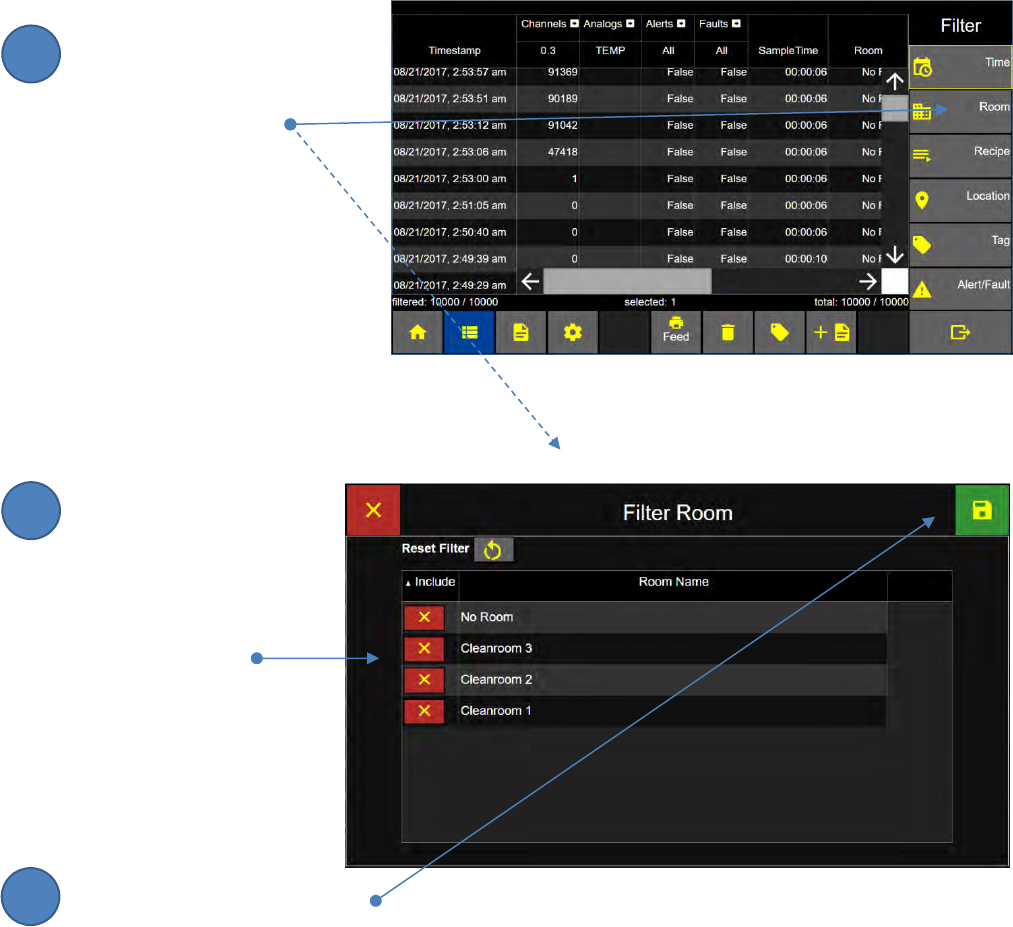
Lighthouse Worldwide Solutions Pre-Release Review Copy ApexZ Operators Manual
248083466-1 101 | P a g e
Filter Data Records - Rooms
Select the Filter Room Tab
Press the Room button to
display the Filter Room Screen.
Include Rooms in the Data Filter
Press the red x button to
change to a green check
mark button to include the
Room Name in the
Data Table Filter.
Room Name List
Press the green Save button to
activate the filter settings and
return to the Data Screen.
Filter Room Screen
Data Screen
2
1
3
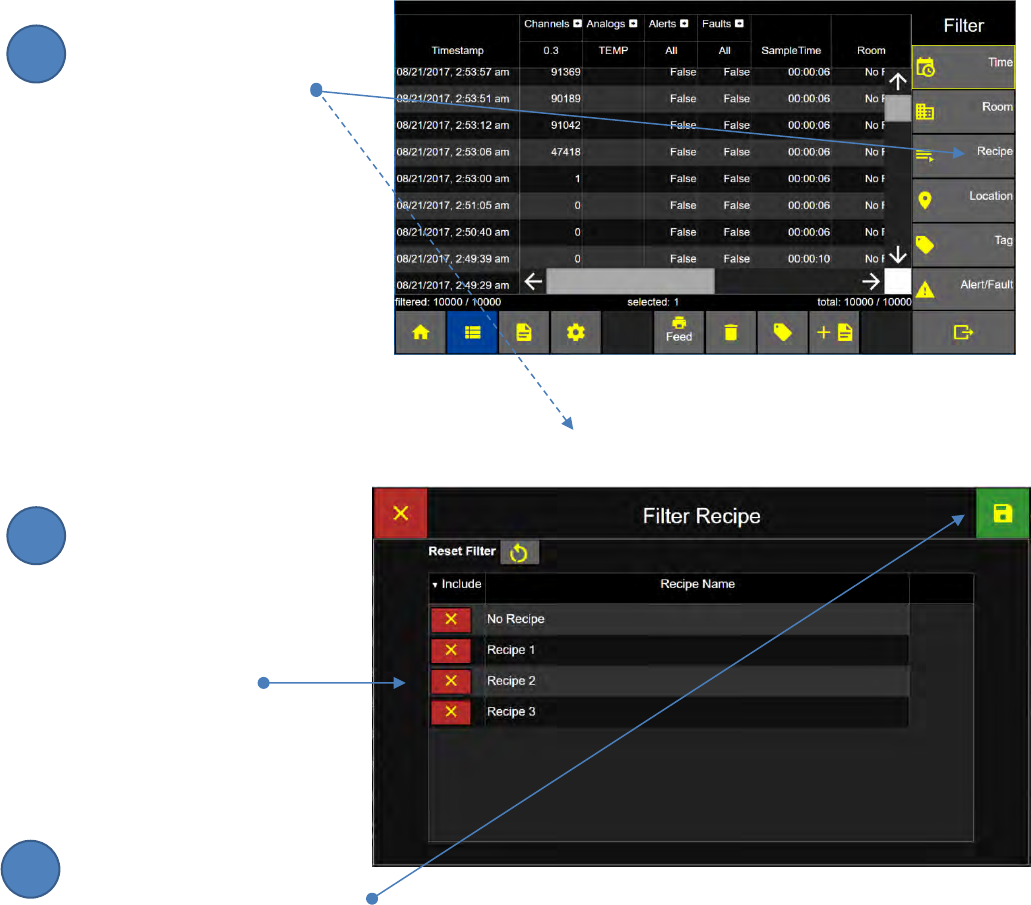
Lighthouse Worldwide Solutions Pre-Release Review Copy ApexZ Operators Manual
248083466-1 102 | P a g e
Filter Data Records - Recipe
Select the Filter Recipe Tab
Press the Recipe button to
display the Filter Recipe Screen.
Include Recipes in the Data Filter
Press the red x button to
change to a green check mark
button to include the Recipe
Name in the
Data Table Filter.
Recipe Name List
Press the green Save button to
activate the filter settings and
return to the Data Screen.
Filter Recipe Screen
Data Screen
2
3
1
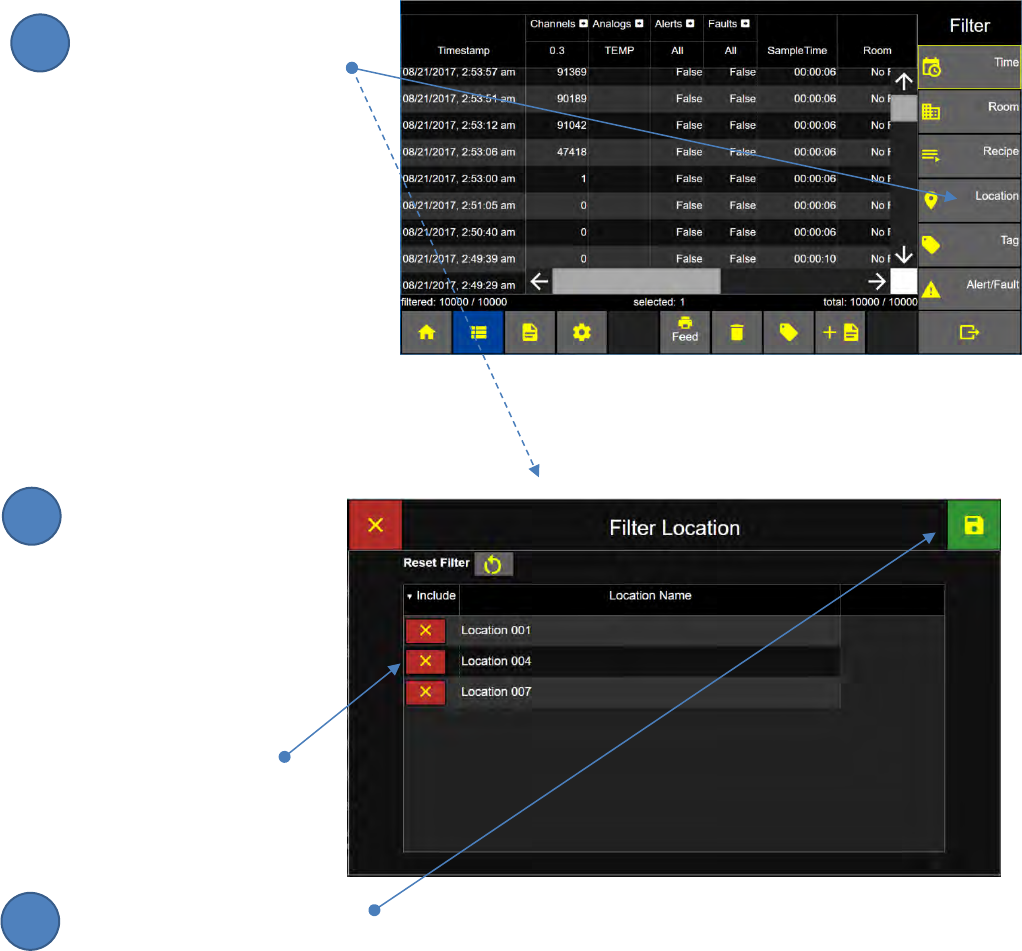
Lighthouse Worldwide Solutions Pre-Release Review Copy ApexZ Operators Manual
248083466-1 103 | P a g e
Filter Data Records - Locations
Select the Filter Location Tab
Press the Location button to
display the Filter Location
Screen.
Include Locations in the Data Filter
To filter data records by
the location they were
recorded at, press the red
x button to change to a
green check mark button
to include the Location
Name in the
Data Table Filter.
Location Name List
Press the green Save button to
activate the filter settings and
return to the Data Screen.
Filter Location Screen
Data Screen
2
3
1
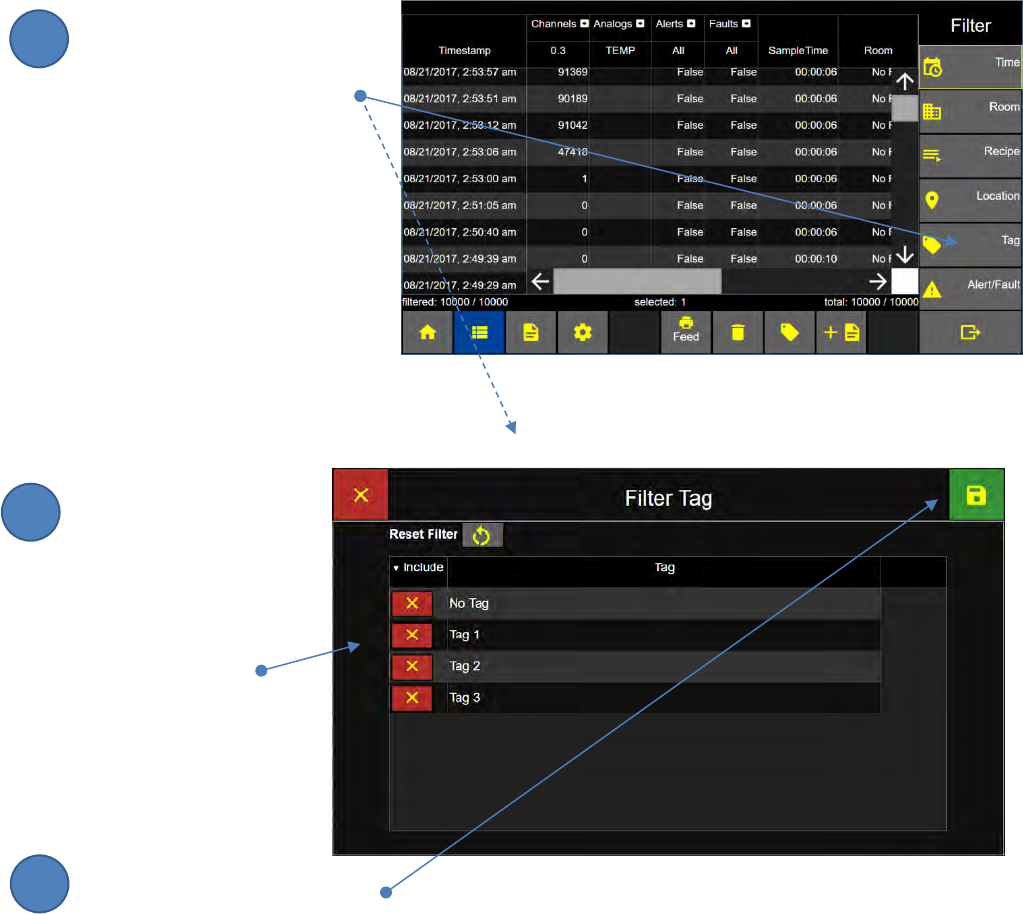
Lighthouse Worldwide Solutions Pre-Release Review Copy ApexZ Operators Manual
248083466-1 104 | P a g e
Filter Data Records - Tag
Select the Filter Tag Tab
Press the Tag button to
display the Filter Tag Screen.
Include Tags in the Data Filter
Press the red x button to
change to a green check
mark button to include
the Tag Name in the
Data Table Filter.
Tag Name List
Press the green Save button to
activate the filter settings and
return to the Data Screen.
Filter Tag Screen
Data Screen
2
3
1

Lighthouse Worldwide Solutions Pre-Release Review Copy ApexZ Operators Manual
248083466-1 105 | P a g e
Filter Data Records - Alert/Fault
Select the Filter Alert/Fault Tab
Press the Alert/Fault button to
display the Filter Alert/Fault
Screen.
Include Alert/Faults in the Data Filter.
Press the red x button to change
to a green check mark button to
include the Alert/Fault name in
the Data Table Filter.
Alarm Fault
Flow Fault
Laser Fault
Service Fault
Warning Fault
Press the green Save button to
activate the filter settings and
return to the Data Screen.
Filter Data - Alert/Fault Screen
Data Screen
2
3
1
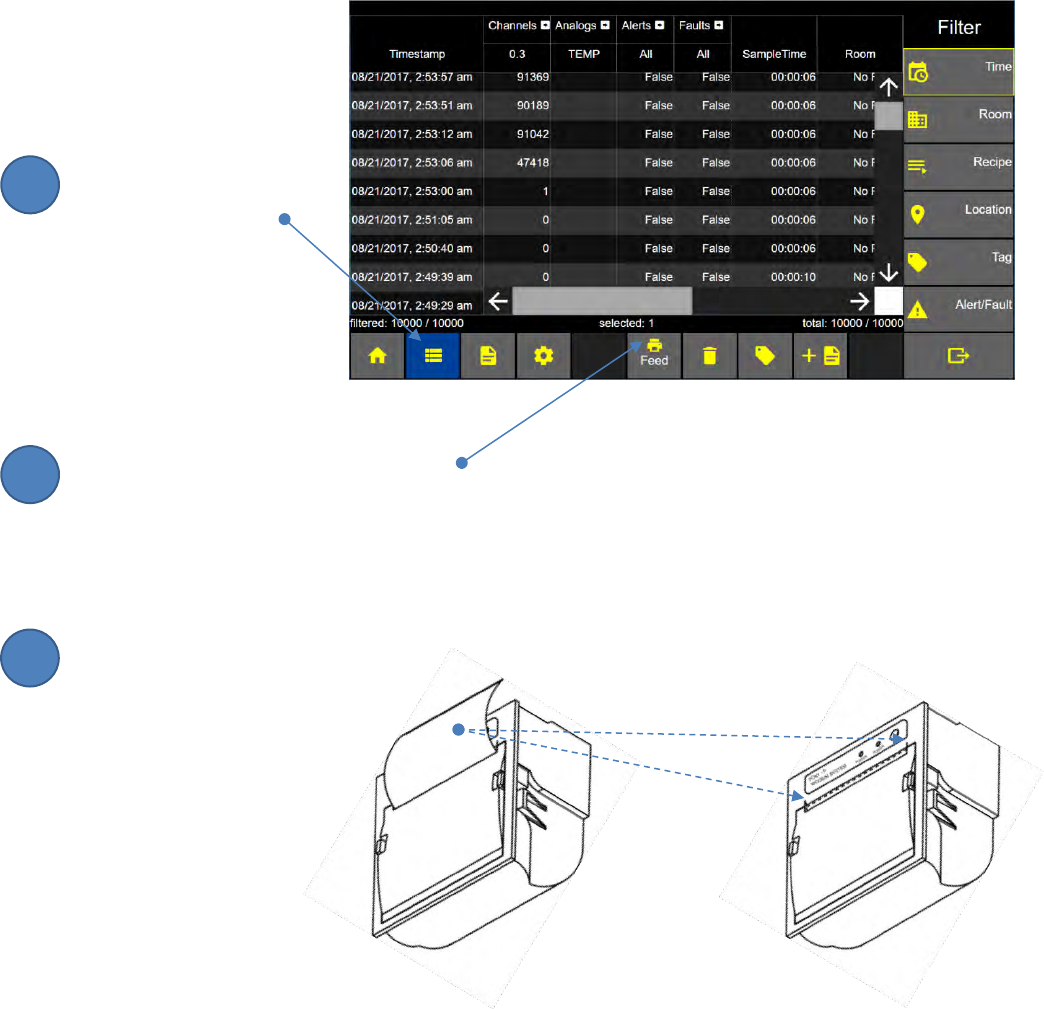
Lighthouse Worldwide Solutions Pre-Release Review Copy ApexZ Operators Manual
248083466-1 106 | P a g e
Paper Feed
The printer paper feed button is located on the ApexZ Data Screen. Press the printer paper feed button
to advance the printer paper. When the report is finished printing, pull the paper gently upward and to
the side to tear the printer paper along the serrated edge of the printer enclosure.
From the Home screen
press the Data button
for the Data screen.
Advance the printer paper
Press the Paper Feed button to advance
the paper from the ApexZ embedded printer.
Tear off the printed report
Tear the printed report along the
serrated edge of the printer paper
opening.
Data Screen
The printer paper tears along
the serrated edge here.
2
3
1
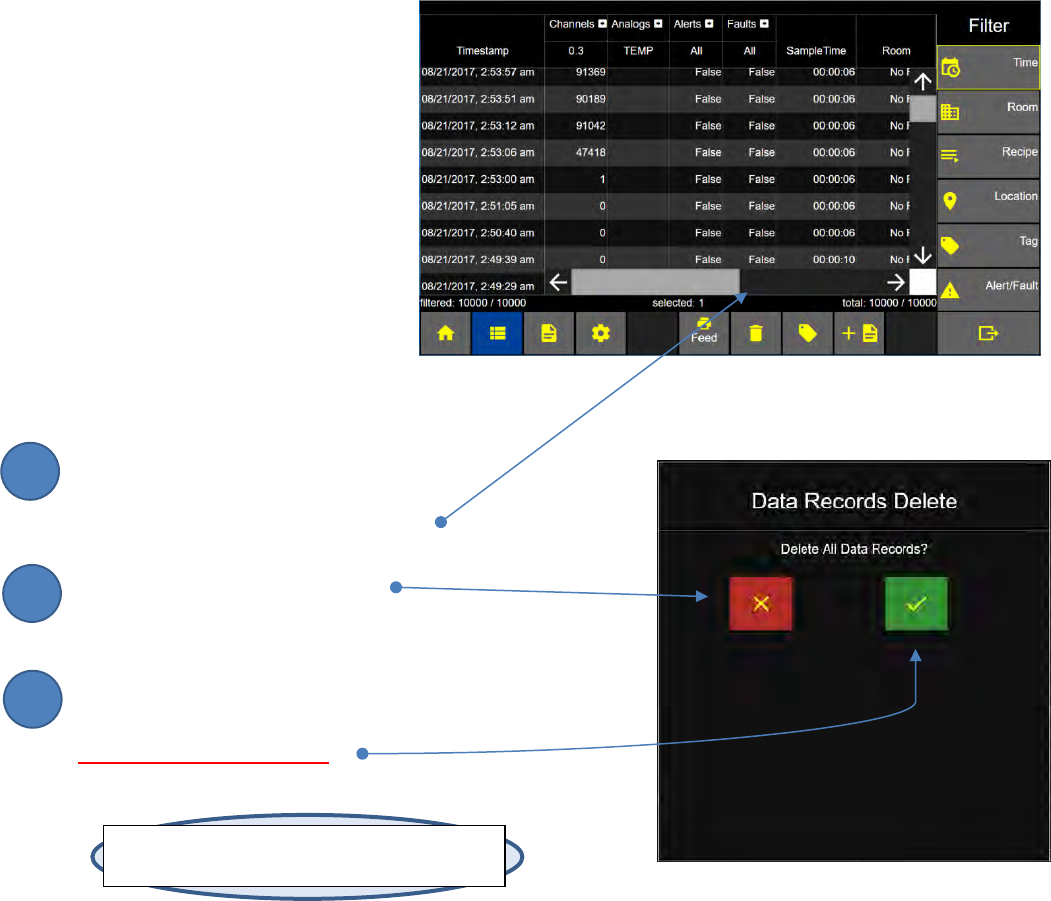
Lighthouse Worldwide Solutions Pre-Release Review Copy ApexZ Operators Manual
248083466-1 107 | P a g e
Data Records - Delete All
10,000 data records can be saved in
the ApexZ database.
After the 10,000th data record has
been saved the database will wrap
and the next sample data record will
overwrite the oldest data record.
Data records may not be deleted
individually or in a selected group.
Deleting data records will delete
ALL data records.
Press the trash can button to display
the Data Records Delete Screen.
Press the red x button to cancel;
Data records will NOT be deleted.
Press green check mark button to
DELETE ALL DATA RECORDS
Note: ApexZ can only delete all records. There is
no option to delete individual records.
Data Screen
Confirm Delete Data Records Screen
2
3
1
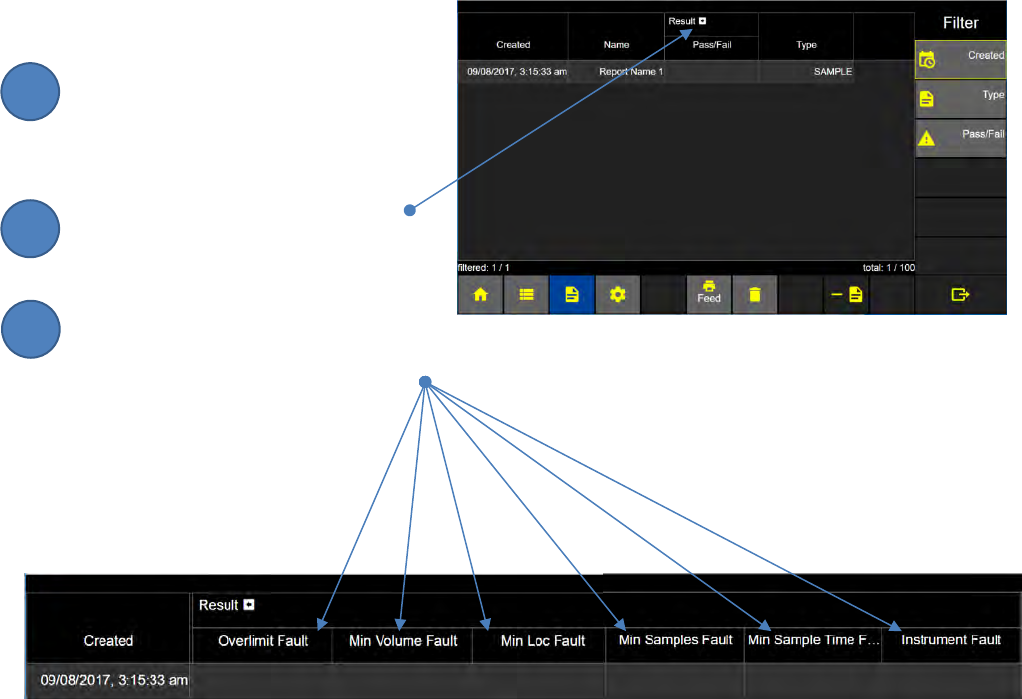
Lighthouse Worldwide Solutions Pre-Release Review Copy ApexZ Operators Manual
248083466-1 108 | P a g e
Reports
Report Screen
Selecting a Report
Select a report
Expand Result Columns
Press the arrow button to
expand or collapse the
Result columns including:
Over Limit Fault
Minimum Volume Fault
Minimum Locations Fault
Minimum Sample Time Fault
Instrument Fault
2
3
1
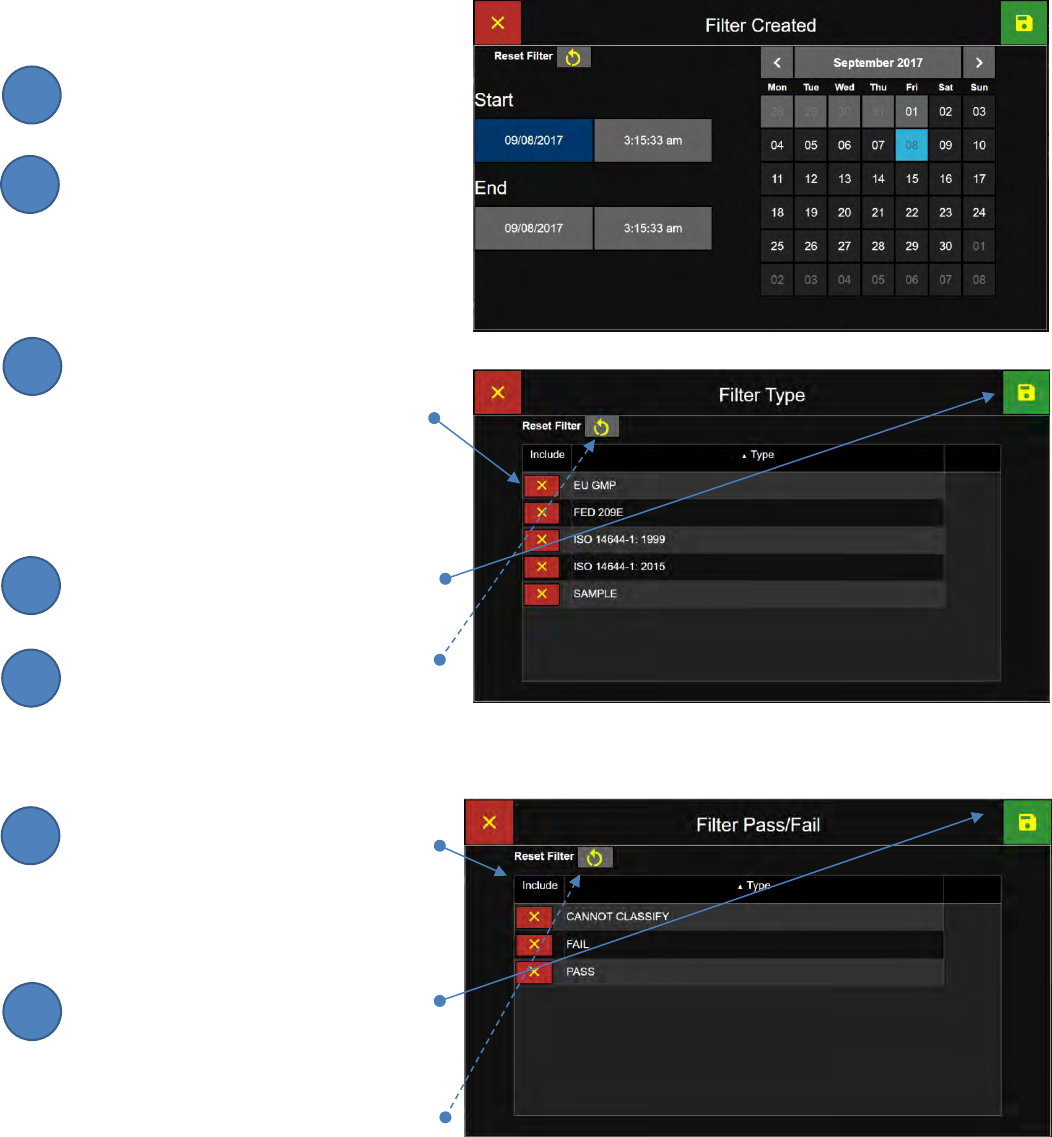
Lighthouse Worldwide Solutions Pre-Release Review Copy ApexZ Operators Manual
248083466-1 109 | P a g e
Report Screen Filters
Filter by Created Date
Select a Data Record Start Date Range
Select a Data Record End Date Range
Filter by Report Type
To filter by Report Type press the red x
button in the include column. This will
change to a green check button and
enable the filter for that report type.
The user may enable any number of
report type filters.
Press the Save button to save and
initiate the filter(s).
To reset the filter list press the
RESET FILTER button.
Filter by Pass/Fail
To filter by report status
Pass/Fail/Cannot Classify, press
the red x button in the include column.
This will change to a green check mark
button and enable the filter for that
report status.
Press the green Save button to save
the filter settings and initiate the report
list filter.
Press the Reset Filter button to disable
all filters on the screen.
2
3
1
4
5
6
7
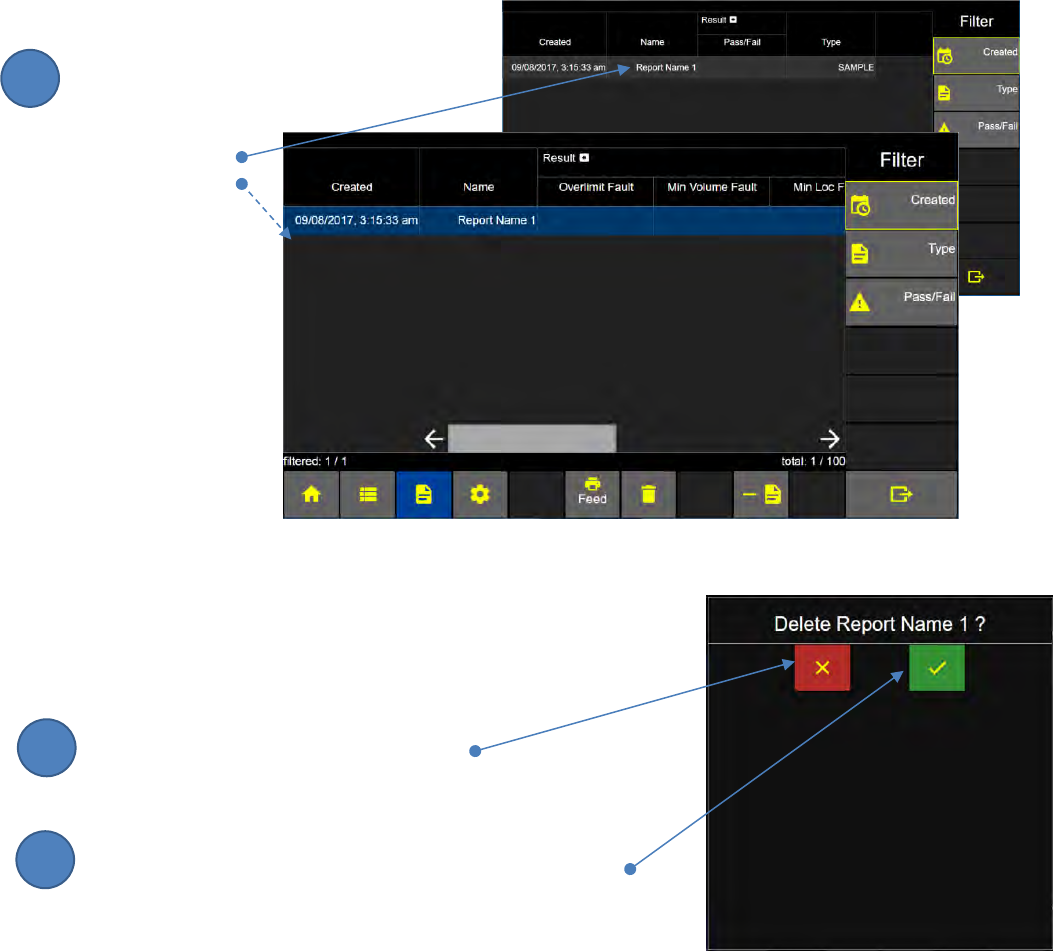
Lighthouse Worldwide Solutions Pre-Release Review Copy ApexZ Operators Manual
248083466-1 110 | P a g e
Deleting a Report
To delete a report from the Report Screen list simply select the report line and press the Export Report
button.
Deleting a Report
Select the report to delete
and that report line will
highlight in blue
indicating
it has been
selected.
.
Press the red x button to CANCEL DELETE
and the report will not be deleted.
Press the green check mark to DELETE the selected report.
2
3
1
Lighthouse Worldwide Solutions Pre-Release Review Copy ApexZ Operators Manual
248083466-1 111 | P a g e
Terminology:
Select: Touch the screen with your finger.
Press: Touch the screen with your finger.
Enter with the keypad: Touch the screen keypad with your finger and type the required input.
Button: area on screen user can touch to input data
Toggle button: this is a button that displays only 2 options, touch or slide to change between options.
Enable/Disable:
Red x box: this is a button that indicates disabled.
Green check mark box: this is a button that indicates enabled.