User manual

Quick Start Guide
Table of Contents
Technical Specificaion ............................................................................... 1
Brief Introduction ..................................................................................... 2
Set Up Camera for mobile device.............................................................. 3
Set Up Wi-Fi Without Network Cable ....................................................... 8
View in Windows Web Browsers ............................................................ 10
Frequently Asked Questions ................................................................... 14

1 / 16
Technical Specification:
Pixel
5 megapixel CMOS
Resolution
1080P/720P/480P Selectable
Video format
AVI
Frames
25
View angle
90°
Distance of motion detection shooting
6 m straight-line distance
Minimum illumination
1LUX
Power Supply:
5VDC
Continuous shooting time
Above 24 hours
Compressed format
H.264
Sound recording range
5
Storage temperature
-20-80
℃
Operating temperature
-10-60
℃
Operating humidity
15-85%RH
Play software
VLCPlayer / SMPlayer
Computer operation system
Windows/Mac OS X
Mobile phone operation system
Android / iOS
Web browser
IE7 and above,chrome,firefox safari.etc
Most important customers
4
2 / 16
Brief introduction
This WIFI camera is aiming to provide an integrated solution for users to watch live
video after WIFI connection, which can be either widely applied in remote
controlled equipment like RC toys and drones etc, or work independently after
being powered by DC 5V power.
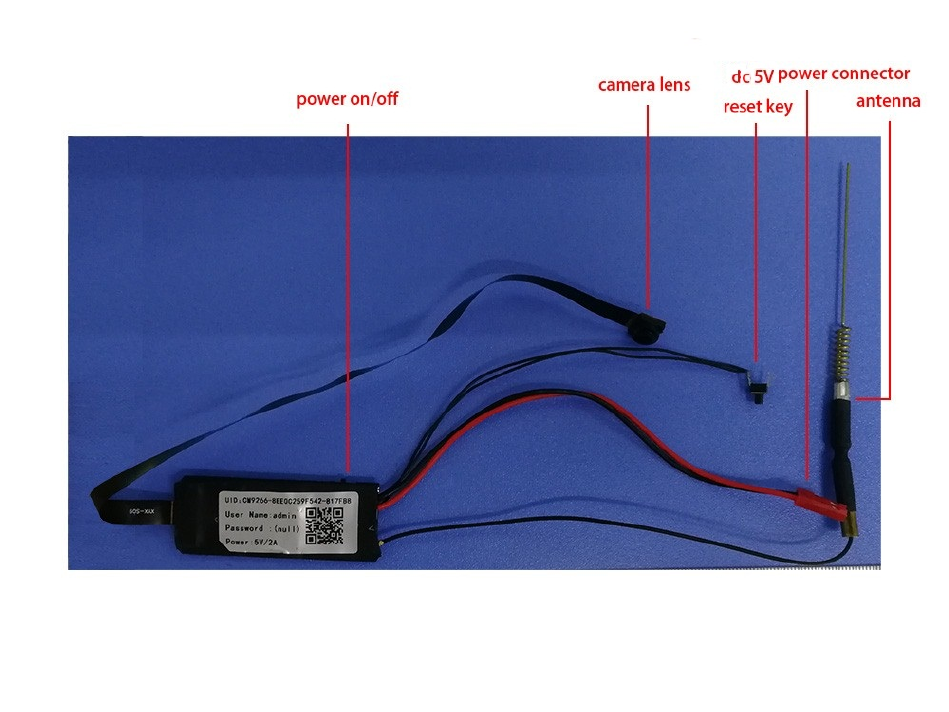
Illustration of Product:
3 / 16
For Mobile Device
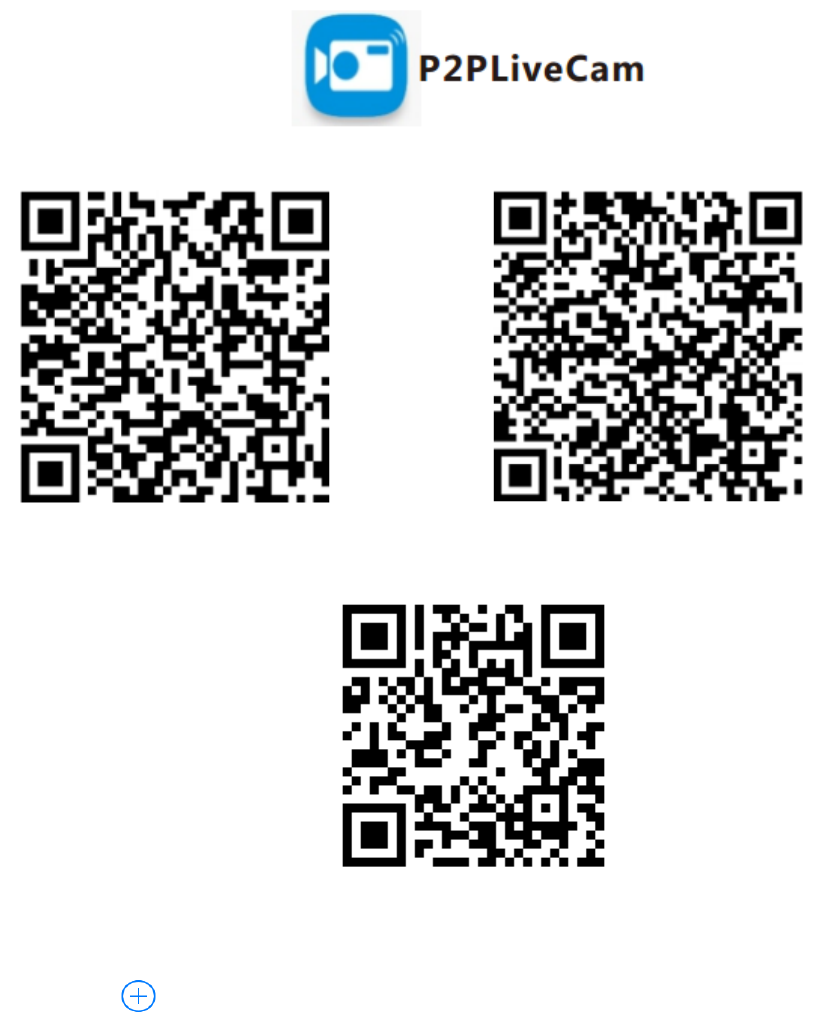
1. Download P2PLiveCam from App Store for IOS devices or from Google’s
Play Store for Android devices. For easy installation, please scan the QR code to
download and install P2PLiveCam. If your android device cannot access Google’
s Play Store, please google P2PLiveCam directly.
P2PLiveCam in App Store
P2PLiveCam in Google Play
Android APK for Direct Downloading
2. Tap on to add your new camera. Click Add new online Camera, and
enter camera’s UID and password to add a new camera. When using the camera
for the first time, please refer to Set Up Wi-Fi Without Network Cable to set up
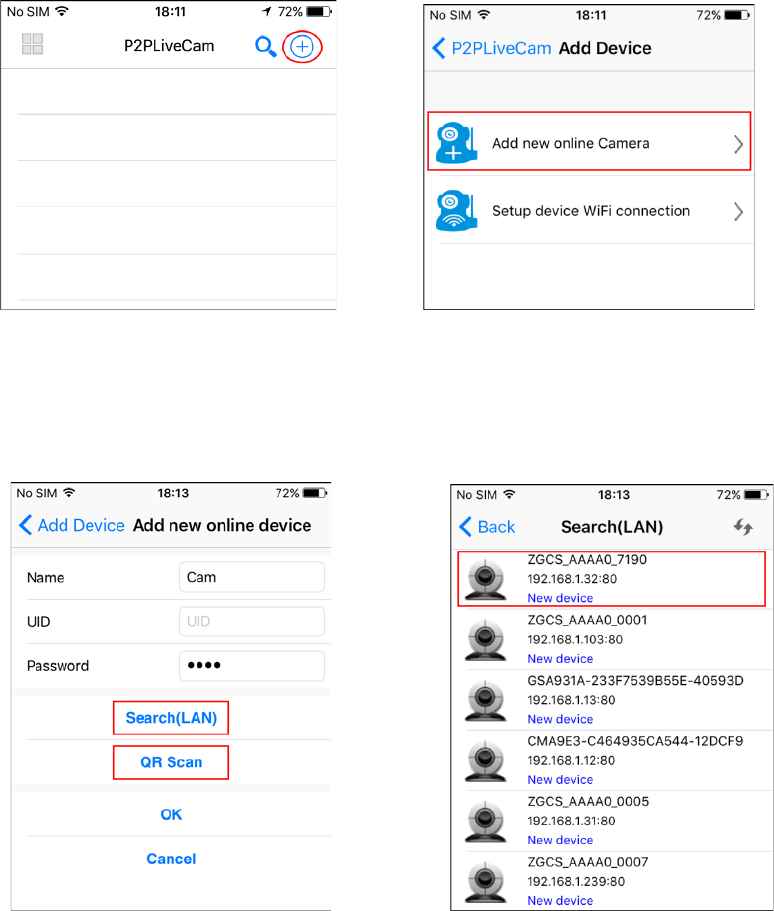
4 / 16
the camera’s connection to your router and then add it to the device list by
clicking Add new online Camera.
3. There are 2 ways to enter the camera’s UID quickly, by scanning the QR Code on
the camera and searching the cameras in LAN. Click QR Scan to initiate the scan
and click Search (LAN) to search the cameras in LAN.
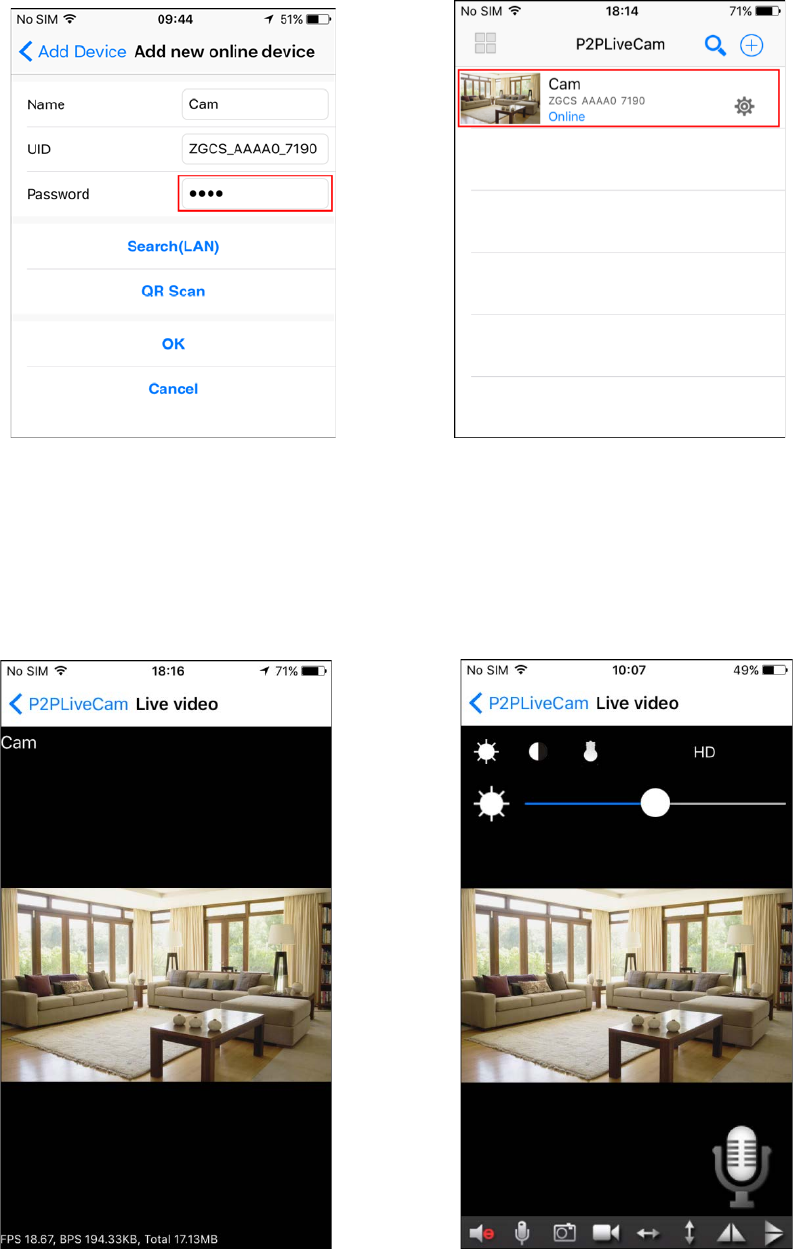
4. Enter the camera’s name and its P2P password. By default the P2P password is
8888. After clicking OK, the camera will be added successfully.
5 / 16
5. Select the camera you have just added to start viewing live video. Tap on the
black area to launch the control panel.
6. Instruction for the icons and buttons on live video page:
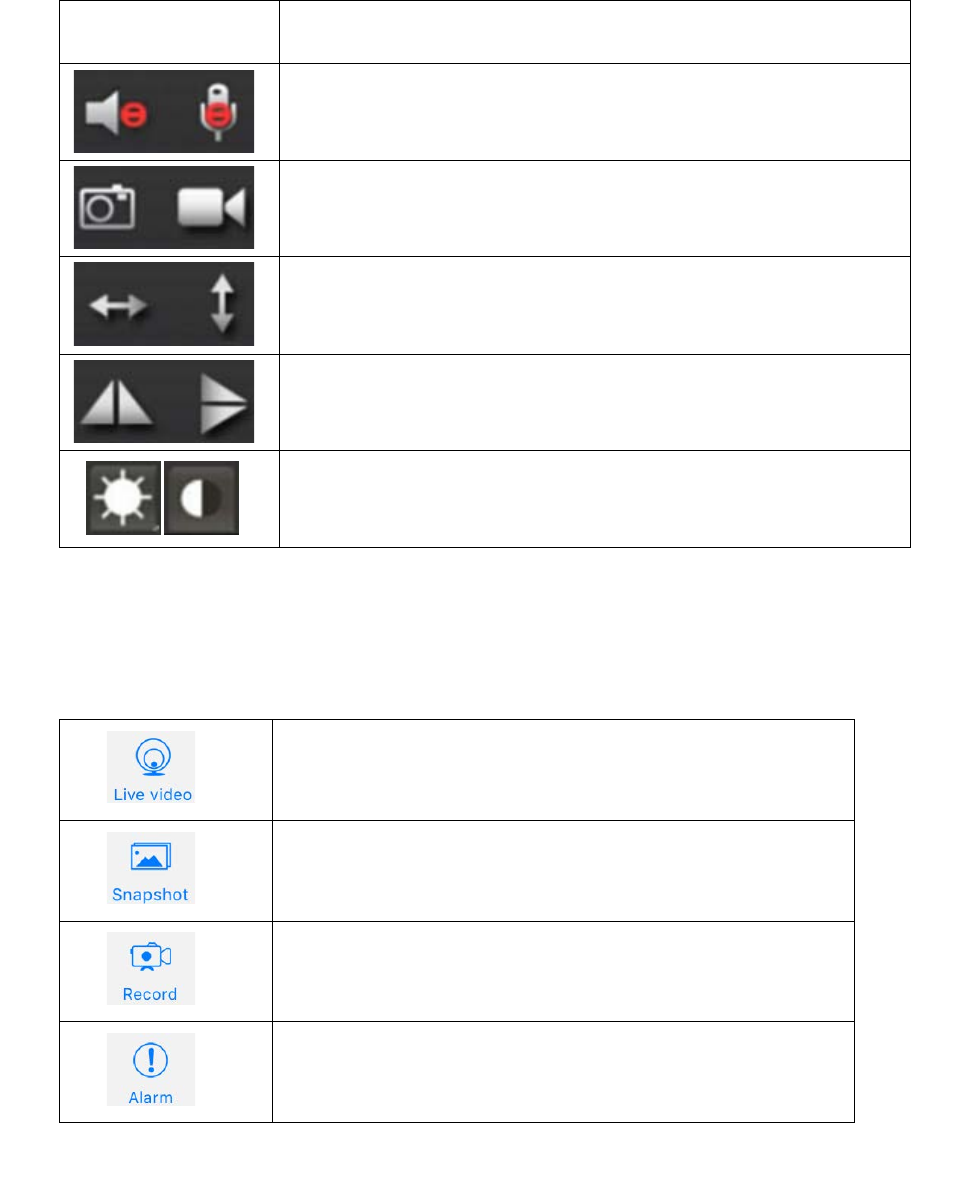
6 / 16
Pan/tilt control Slither the video to pan or tilt the camera
Allow users to listen to the camera’s audio feedback and
talk to the camera.
Take snapshots and record video files.
Horizontal and vertical cruise.
Flip the image horizontally and vertically.
Adjust the brightness and contrast.
1. Instructions for other pages:
View the current live video
View the snapshots taken
View the record files in your mobile device or in the
camera
Check the alarm events
*Notice: This IP Camera is designed to only supplement existing residential and
business security systems.
Set Up Camera
1. Press the camera item in the camera list for about 3 seconds to start configuring
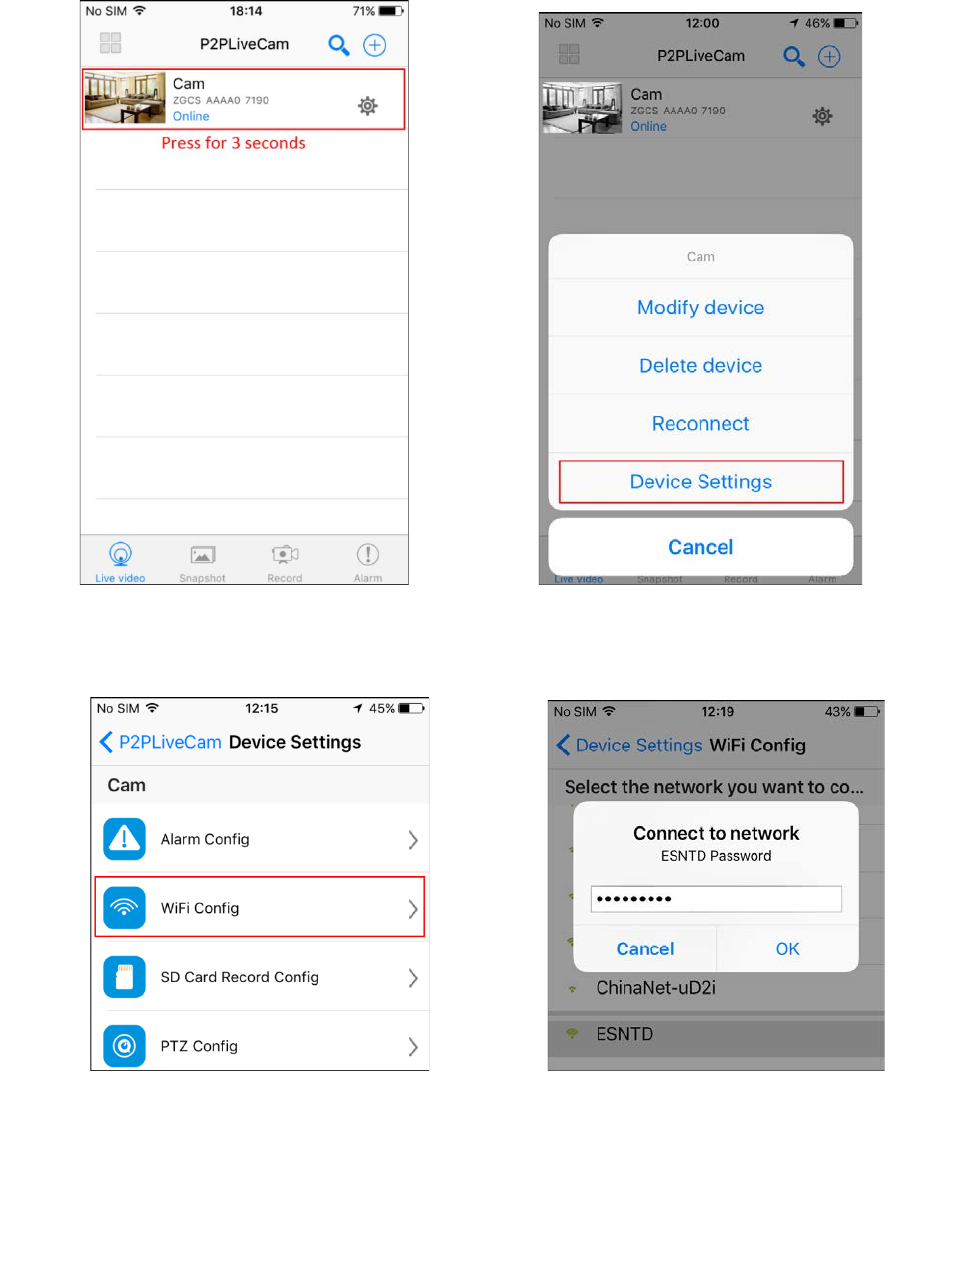
7 / 16
your camera.
2. The camera will start scanning for Wi-Fi connections. Select your Wi-Fi network
ID (SSID). Enter the password for the Wi-Fi connection.
3. When Wi-Fi is successfully configured, you can now disconnect the network
cable from your camera and start using your camera as a wireless device.
*Notice: Please wait for at least 30s (maximum to 1 minute) for Wi-Fi mode to
be completely functional.
4. After setting up Wi-Fi, we can set up SD card recording mode.
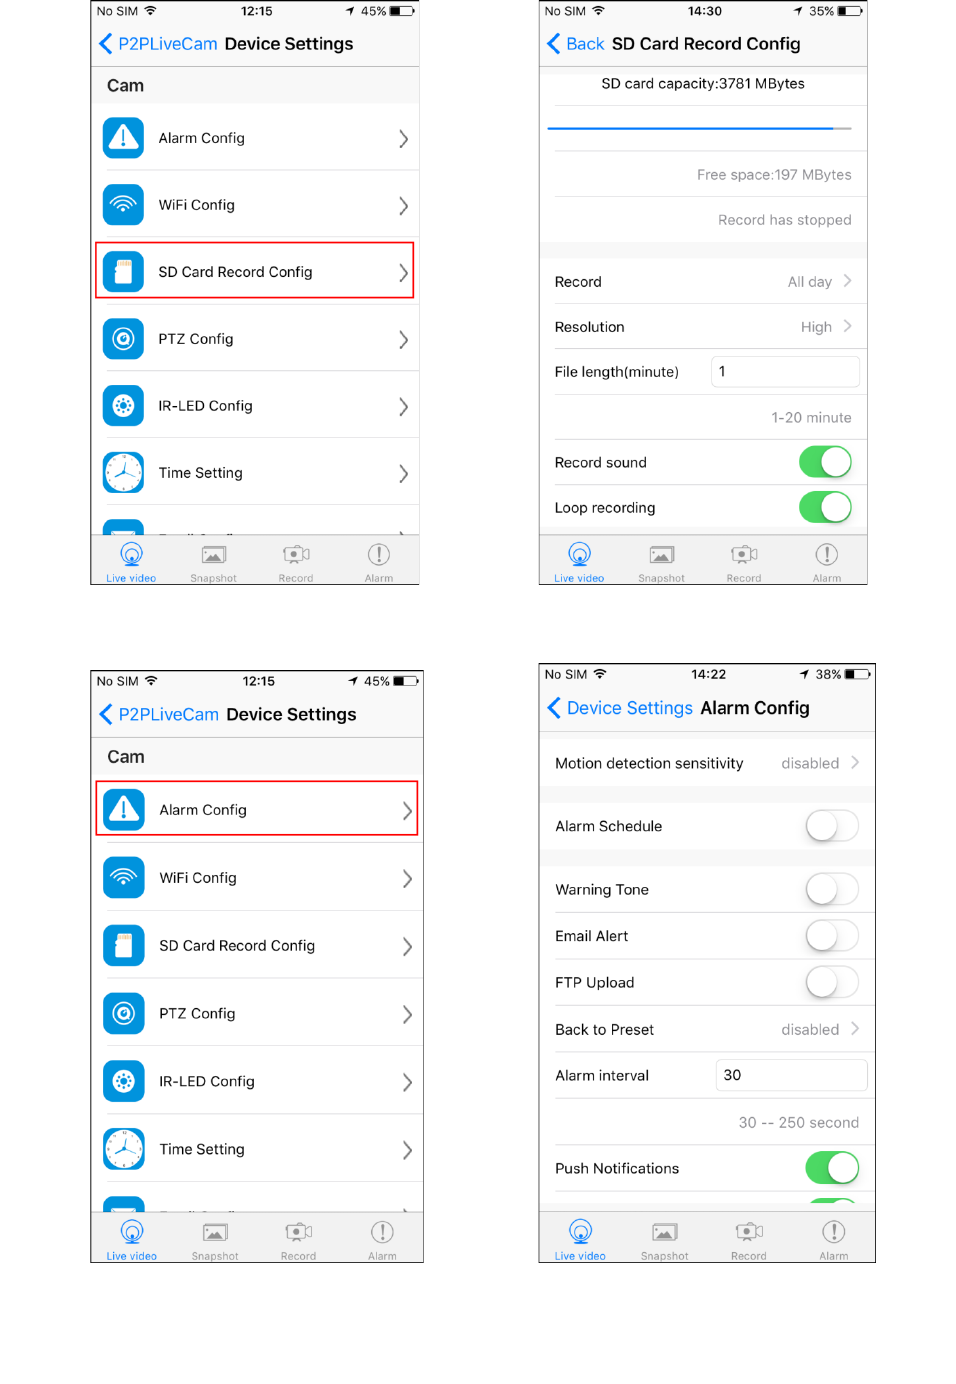
8 / 16
5. Set up Alarm config to enable motion detection alarm.
Set Up Wi-Fi Without Network Cable
9 / 16
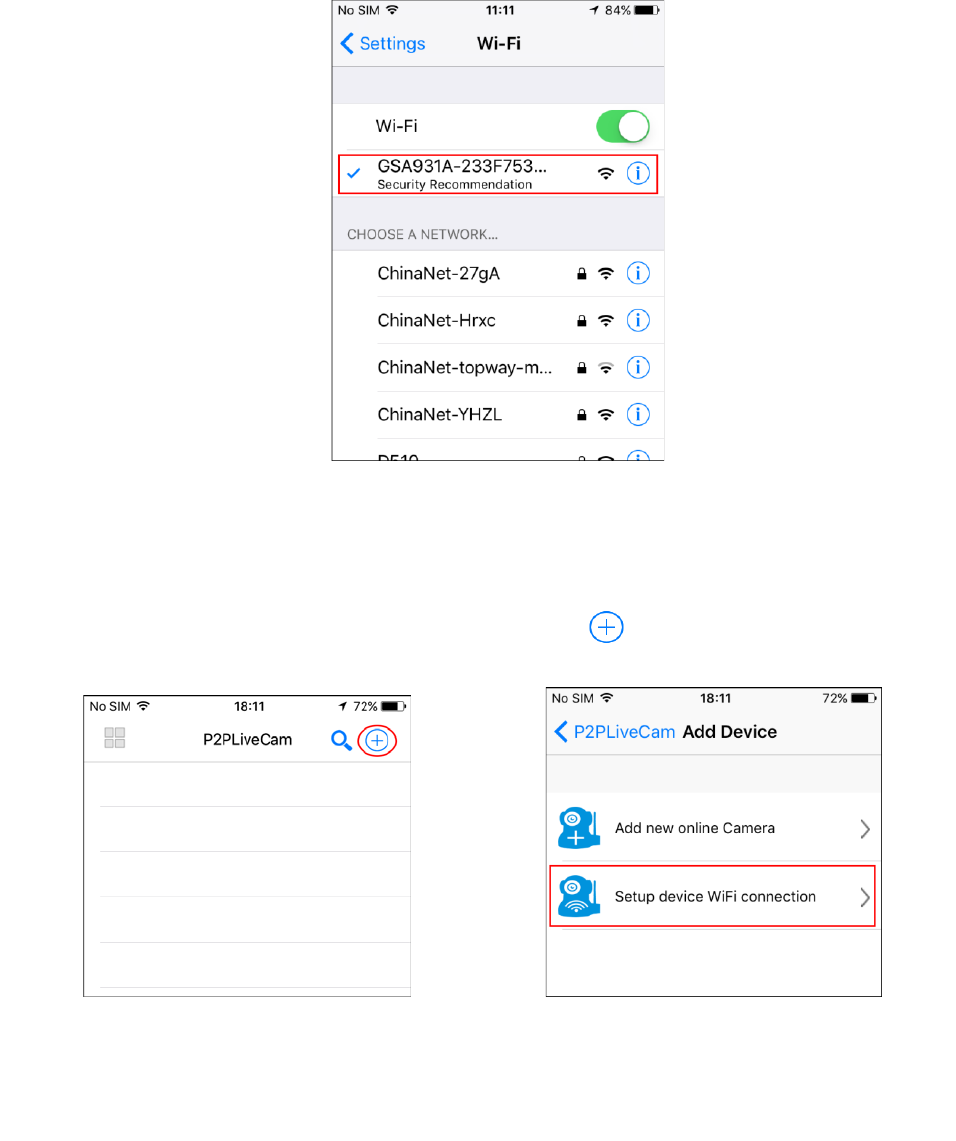
*Tips
Please make sure your camera is in AP Mode
before setting up Wi-Fi connection. AP Mode
can be achieved by long pressing the reset
button on the camera or at the bottom of it until
the camera emits a beep sound.
1. Go to “Settings” on your device and then
tap on “Wi-Fi”, and then make your device
connected to the network that has the
same UID as the camera.
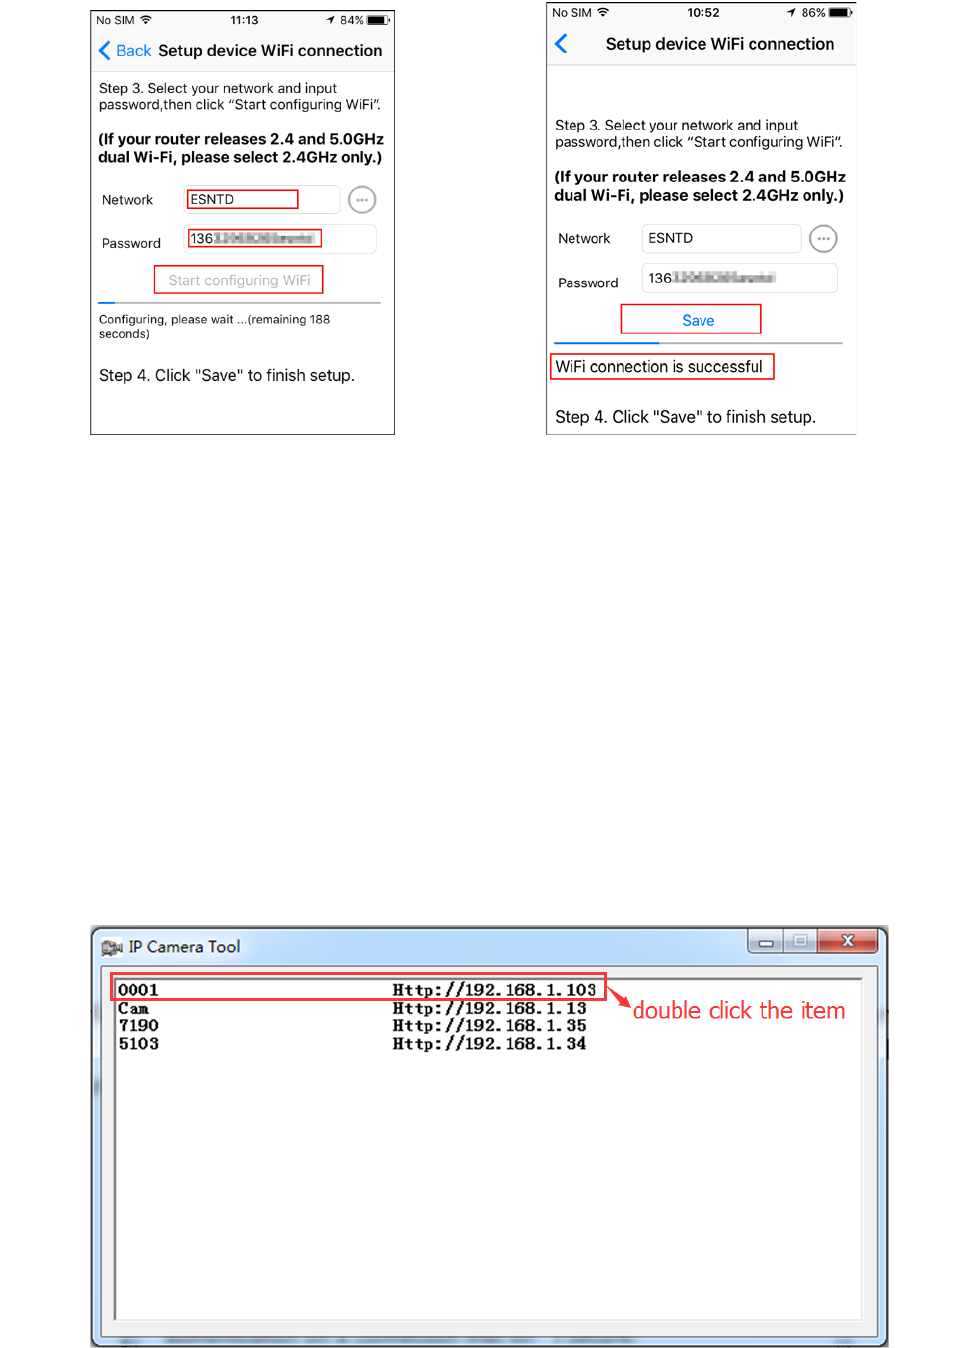
2. Once the camera is in AP Mode, we can set up Wi-Fi connection without
network cable connected to the camera. Tap on to add your new camera.
Click Setup device WiFi connection.
3.
Make sure of the specific network you want your camera connected to and the
correct W-Fi password, and then click Start configuring WiFi.
10 / 16
*Notice: The current WiFi connection is not supportive of 5.0GHz Wi-Fi, so
please make sure the network your camera is connecting to is a 2.4Hz
one.
4. Click Save to add the camera to the P2PCamera list after the status bar shows
WiFi connection is successful.
*Notice: If the app always shows failure, try set up Wi-Fi by connecting a
network cable with the camera and router:
View in Windows Web Browsers
1. Run IP Camera Finder shown as IPCamera.exe in CD’s Windows folder. Double
click the camera item listed in the camera list.
11 / 16
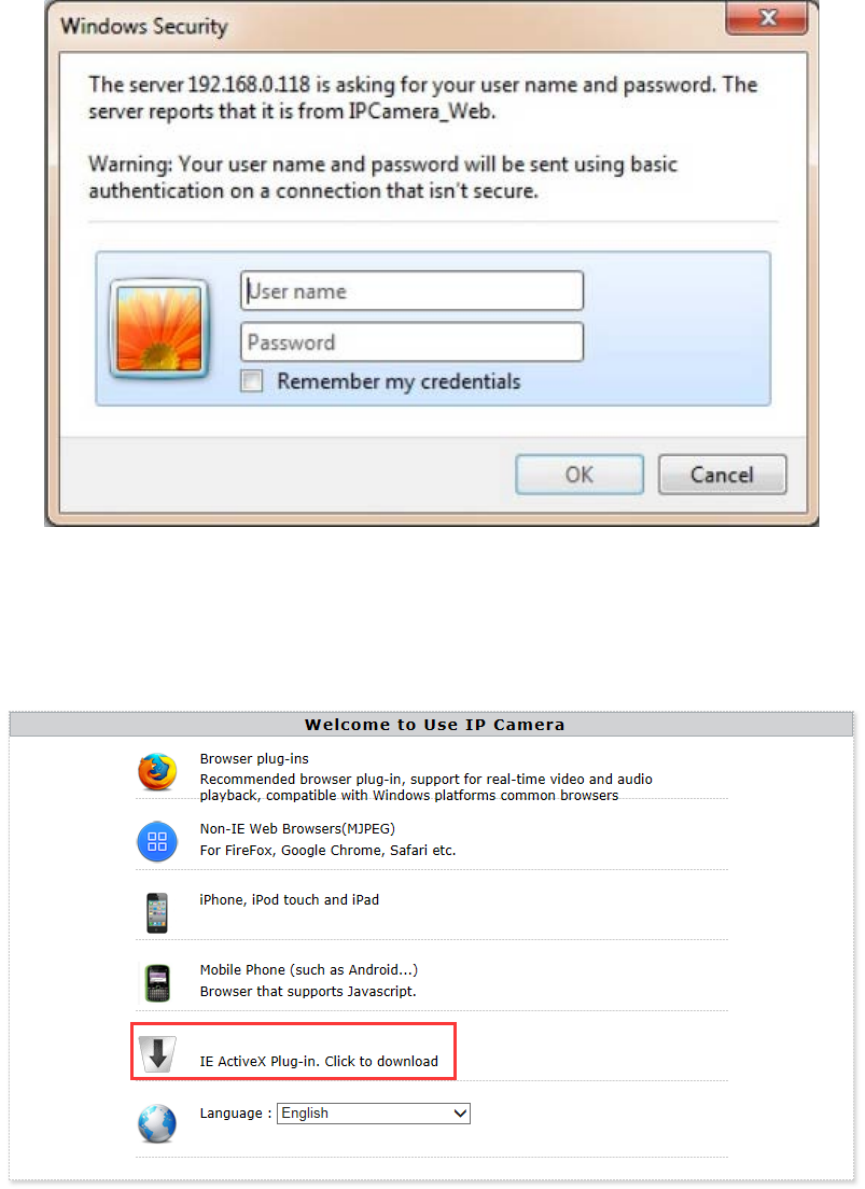
2. The default web browser will try automatically logging into the camera. The
default username is admin. There is no password by default, so leave the
password field blank.
3. Download web browser plug-in and install it to support playing live videos in
Windows web browsers. Please ignore system warnings when downloading or
installing the plug-ins.

12 / 16
4. After installing the plug-in, choose Browser plug-ins mode to get live videos.
5. Instructions for buttons on the panel.
Back to the welcome page
Single camera view mode
4 camera view mode
9 camera view mode
Click the button for camera settings
Resolution
Change the video’s resolution
Definition
Change the video’s quality
Pan/Tilt Speed
Change the speed of Pan/Tilt
8 direction keys and the center one is rotation center
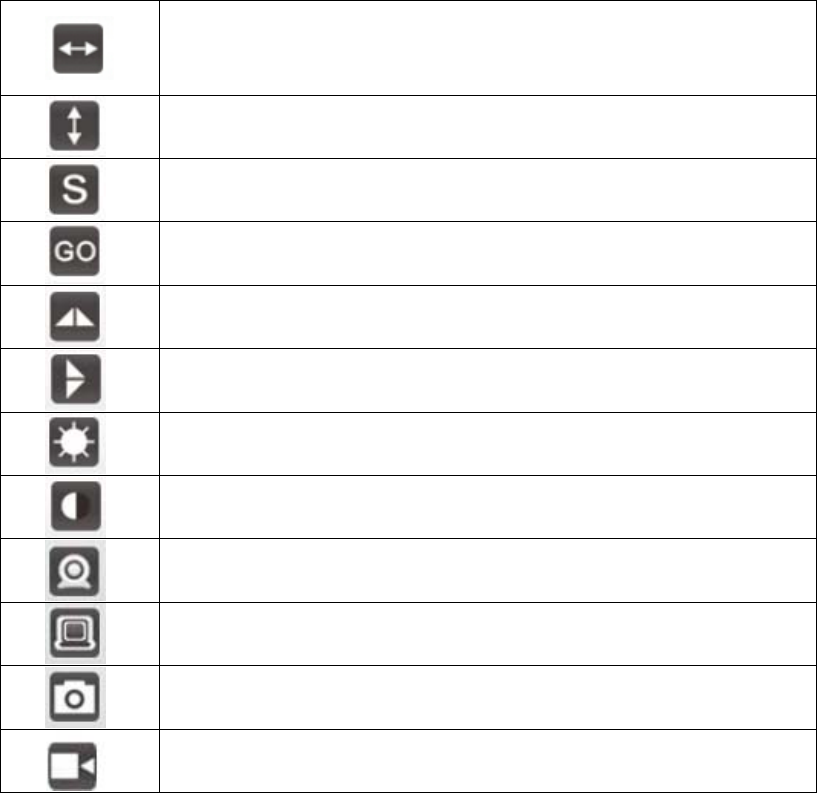
13 / 16
The horizontal cruise will pan automatically
The vertical cruise will tilt automatically
Set preset position
Go to the specific preset position you have set
Invert the video horizontally
Invert the video vertically
Adjust the brightness of the video
Adjust the contrast of the video
Receive audio feedbacks from the camera
Send audio to the camera
Take snapshots with the camera
Record videos to PC
*Tips
What are preset positions?
Preset positions are IP camera’s memorized P/T positions. Once you set a preset position, you do
not need to pan the camera to your preferred position. You simply press the preset button that
corresponds to the preset you want to see and the camera will move to that position
automatically.
14 / 16
Frequently Asked Questions
1. Why does my computer or security software say the software is dangerous and
it is a virus?
The software will detect devices in your network and install a plug-in for live video viewing.
That seems like a virus though it does no harm to your PC in fact. Please ignore the warning
and continue.
2. Why can’t the search tool detect the camera?
Please make sure the network cable is connected. Turn off the firewall and security software
on your computer. Make sure the camera is connected to the router instead of the computer.
3. Why does the camera always ask for username and password, or it says
“incorrect user”?
The camera’s default username is [admin], and its default password is N/A, which means you
just leave it blank. If you forget your username or password, you can reset the camera to
factory settings to get the default username and password.
4. Why can’t I get live video in web browser?
Please download and install plug-in before getting live video. If there is still no live video,
check whether or not the plug-in is enabled in your web browser?
5. How can I reset the camera to factory settings?
Please long press the reset button under or on the camera for about 3 to 5 seconds until the
camera’s indicator is off. Please make sure the power supply is connected when you are doing
it.
6. Why can’t the camera record videos?
Please make sure you are running the web browser as an administrator. Right click the web
browser and select Run as Administrator to run as an administrator. For android app, please
insert a TF card into the camera before recording?
7. Why is the image blurry?
Remove the protective film on the lens and rotate the lens of the camera to get a clear image.
8. How can I improve it when the live video appears in black screen but showing
no image?
Triple click the app name on the title bar of live video page to switch to software decode mode. By
default the app decodes images through hardware decoder for its high efficiency of decoding.
Users can switch between the states of software decode mode and hardware decode mode by
triple-clicking the app name.
15 / 16
FCC Warning Statement
This equipment has been tested and found to comply with the limits for a Class B digital
device, pursuant to part 15 of the FCC Rules. These limits are designed to provide reasonable
protection against harmful interference in a residential installation. This equipment generates,
uses and can radiate radio frequency energy and, if not installed and used in accordance with
the instructions, may cause harmful interference to radio communications. However, there is
no guarantee that interference will not occur in a particular installation. If this equipment
does cause harmful interference to radio or television reception, which can be determined by
turning the equipment off and on, the user is encouraged to try to correct the interference by
one or more of the following measures:
• Reorient or relocate the receiving antenna.
• Increase the separation between the equipment and receiver.
• Connect the equipment into an outlet on a circuit different from that to which the receiver
is connected.
• Consult the dealer or an experienced radio/TV technician for help.
Caution: Any changes or modifications to this device not explicitly approved by manufacturer
could void your authority to operate this equipment.
This device complies with part 15 of the FCC Rules. Operation is subject to the following two
conditions: (1) This device may not cause harmful interference, and (2) this device must
accept any interference received, including interference that may cause undesired operation.
Radiation Exposure Statement
This equipment complies with FCC radiation exposure limits set forth for an uncontrolled
environment. This equipment should be installed and operated with minimum distance 20cm
between the radiator and your body.
This transmitter must not be co-located or operating in conjunction with any other antenna or
transmitter.
16 / 16
ISED Statement
-English: This device complies with Industry Canada license-exempt RSS standard(s).
Operation is subject to the following two conditions: (1) This device may not cause interference, a
nd (2) This device must accept any interference, including interference that may cause undesired
operation of the device. The digital apparatus complies with Canadian CAN ICES-3 (B)/NMB-3(B).
-French: Le présentappareilestconforme aux CNR d'Industrie Canada applicables aux appareils
radio exempts de licence. L'exploitationestautorisée aux deux conditions suivantes: (1) l'appareil
ne doit pas produire de brouillage, et (2) l'utilisateur de l'appareildoit accepter tout brouillageradi
oélectriquesubi, mêmesi le brouillageest susceptible d'encompromettre le fonctionnement.
This radio transmitter (ISED certification number: 7032A-WIFICAM1) has been approved by
Industry Canada to operate with the antenna types listed with the maximum permissible gain
indicated. Antenna types not included in this list, having a gain greater than the maximum gain
indicated for that type, are strictly prohibited for use with this device.
Le présent émetteur radio (ISED certification number: 7032A-WIFICAM1) a été approuvé par
Industrie Canada pour fonctionner avec les types d'antenne énumérés ci-dessous et ayant un
gain admissible maximal. Les types d'antenne non inclus dans cette liste, et dont le gain est
supérieur au gain maximal indiqué, sont strictement interdits pour l'exploitation de l'émetteur.
Radiation Exposure Statement
This equipment complies with Canada radiation exposure limits set forth for an uncontrolled
environment. This equipment should be installed and operated with minimum distance 20cm
between the radiator & your body.
Déclaration d'exposition aux radiations
Cet équipement est conforme Canada limites d'exposition aux radiations dans un environnement
non contrôlé. Cet équipement doit être installé et utilisé à distance minimum de 20cm entre le
radiateur et votre corps.