Lisheng DMR89 Digital DMR TWO WAY RADIO / TRANSCEIVER with Analogue function User Manual DM R89
Lisheng (Fujian) Communications Co., Ltd. Digital DMR TWO WAY RADIO / TRANSCEIVER with Analogue function DM R89
Lisheng >
User Manual
Foreword
Thank you for purchasing our Professional DMR Digital Two Way Radio. This easy to use radio will always
offer you reliable, clear and high efficiency communication services.
Please read this manual carefully before using this radio, the information presented herein will help you to
find the maximum performance, operating method and maintenance of your radio.
Contents
Safety Information----------------------------------------------------------------------------------------------------------
Product Check--------------------------------------------------------------------------------------------------------------
Preparing Your Radio for Use-------------------------------------------------------------------------------------------
Charging the Battery---------------------------------------------------------------------------------------------------
Attaching the Battery---------------------------------------------------------------------------------------------------
Attaching the Antenna-------------------------------------------------------------------------------------------------
Attaching the Belt Clip-------------------------------------------------------------------------------------------------
Powering Up the Radio-----------------------------------------------------------------------------------------------
Adjusting the Volume--------------------------------------------------------------------------------------------------
Select a Channel-------------------------------------------------------------------------------------------------------
Transmit/Receive-------------------------------------------------------------------------------------------------------
Radio Overview-----------------------------------------------------------------------------------------------------------
Side Button PF1/PF2-------------------------------------------------------------------------------------------------
LCD Display Icon------------------------------------------------------------------------------------------------------
LED Indicator----------------------------------------------------------------------------------------------------------
Keypad-----------------------------------------------------------------------------------------------------------------
Functions Operation Instruction-----------------------------------------------------------------------------------
Making and Receiving Calls----------------------------------------------------------------------------------------
PTT Key------------------------------------------------------------------------------------------------------------------
Select a Zone----------------------------------------------------------------------------------------------------------
Select the channels-----------------------------------------------------------------------------------------------
Receive and Response a call.---------------------------------------------------------------------------------------
Receive and Response a Zone Call------------------------------------------------------------------------------
Receive and Response Private Call------------------------------------------------------------------------------
Receive All call. -----------------------------------------------------------------------------------------------------
Making a Radio Call-----------------------------------------------------------------------------------------------------
Making a Call with the Channel Selector Knob-----------------------------------------------------------------
Making a Group Call-----------------------------------------------------------------------------------------------------
Making an All Call-----------------------------------------------------------------------------------------------------
Making a Group Call or Private Call with the One Touch Access Button----------------------------
Talkaround-----------------------------------------------------------------------------------------------------
Radio Check-----------------------------------------------------------------------------------------------------
Sending a Radio Check-----------------------------------------------------------------------------------------------------
Remote Monitor-----------------------------------------------------------------------------------------------------
Initiating Remote Monitor-----------------------------------------------------------------------------------------------------
Scan Lists-----------------------------------------------------------------------------------------------------
Viewing an Entry in the Scan List------------------------------------------------------------------
Responding to a Transmission During a Scan------------------------------------------------------------------
Contacts Settings------------------------------------------------------------------
Making a Private Call from Contacts------------------------------------------------------------------
Call Indicator Settings------------------------------------------------------------------
Viewing Recent Calls------------------------------------------------------------------
Storing Answered/Un-answered Call------------------------------------------------------------------
Deleting a Call from a Call List------------------------------------------------------------------
Viewing un-answered calls------------------------------------------------------------------
Emergency Operation------------------------------------------------------------------
Text Message Features------------------------------------------------------------------
Editing and sending a message------------------------------------------------------------------
Sending a Quick Text Message------------------------------------------------------------------
Sending a Quick Text Message with the One Touch Access Button-----------------
Forwarding a Text Message-----------------------------------------------------------------
Managing Sent Text Messages-----------------------------------------------------------------
Viewing a Sent Text Message-----------------------------------------------------------------
Sending a Sent Text Message-----------------------------------------------------------------
Deleting All Sent Text Messages from Sent Items-----------------------------------------------------------------
Receiving a Text Message-----------------------------------------------------------------
Managing Received Text Messages-----------------------------------------------------------------
Viewing a Text Message from the Inbox-----------------------------------------------------------------
Viewing a Telemetry Status Text Message from the Inbox------------------------------
Deleting a Text Message from the Inbox-----------------------------------------------------------------
Deleting All Text Messages from the Inbox-----------------------------------------------------------------
Privacy-----------------------------------------------------------------
Security-----------------------------------------------------------------
Radio Disable-----------------------------------------------------------------
Radio Enable-----------------------------------------------------------------
Utilities-----------------------------------------------------------------
Lock keyboard or unlock keyboard-----------------------------------------------------------------
Turning the Radio Tones/Alerts On or Off-----------------------------------------------------------------
Setting the Squelch Level-----------------------------------------------------------------
Setting the Power Level-----------------------------------------------------------------
Turning the LED indicator On or Off-----------------------------------------------------------------
Turning the Intro Screen On or Off-----------------------------------------------------------------
Turning the VOX On or Off-----------------------------------------------------------------
Language-----------------------------------------------------------------
Turning the Password and Lock On or Off-----------------------------------------------------------------
Changing the Password-----------------------------------------------------------------
Accessing General Radio Information-----------------------------------------------------------------
Checking the Radio Alias and ID-----------------------------------------------------------------
Checking the Firmware Version-----------------------------------------------------------------
Checking the CPU Version-----------------------------------------------------------------
Safety Information
z Please read the following safety information in order to offer you security and high efficiency during
operation.
z Please turn off the radio before entering an inflammable and explosive area.
z Do not replace the battery or charging when you are in an inflammable and explosive area.
z Please turn off the radio when you are close to the blast area or detonator zone.
z Do not use any radio which has a damaged antenna. It may cause a minor burn when the damaged
antenna touches your skins.
z Do not attempt to dismantle the radio unless professional technical person.
z To avoid the problems which caused by EMI and EMC, turn off your radios in any places where posted
notices “Please turn off your radios”. For example, the hospital or other health care places.
z Turn off your radio before boarding an aircraft. Any use of the radio must be in accordance with airline
regulations or flight crew’s instructions.
z If the vehicles have carried with an air bag, do not put your radios within the air bag expand coverage.
z Do not expose the radio to direct sunlight over a long time, nor place it close to the heating equipment.
z Do not place the radio in any excessively dusty, humid or wet place, nor an unstable surface.
z When the portable radio is transmitting, please hold the radio in a vertical position and speak to the
Microphone.
z If you carry a radio on your body, please keep the antenna away from your body 2.5cm at least when the
radio is transmitting.
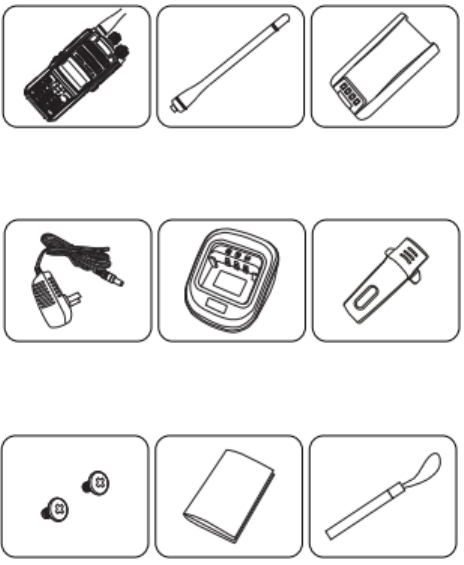
Product Check
We suggest you to check the packing box first before using it. Please carefully unpack the box and check if
all the items which listed in following table are received. If you find any loss or damage, please contact your
dealer immediately.
Radio Antenna Battery
Adaptor Charger Belt Clip
Screws User Manual Hand Strap
Items QTY.
Antenna 1
Battery 1
Adaptor 1
Belt Clip 1
Screws 2
Hand Strap 1
User Manual 1
Note: Pictures are only for your references, please take the real objects as standard!
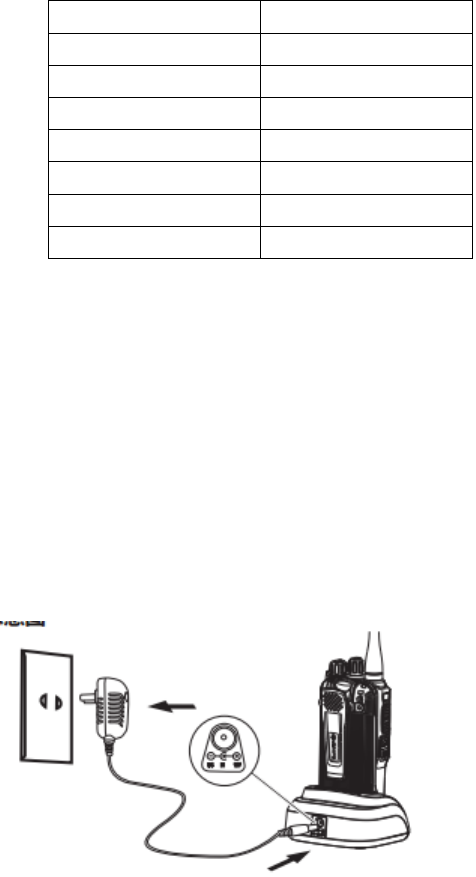
Preparing Your Radio for Use
Charging the Battery
Please only use the battery which specified by the manufacturer. Unauthorized batteries may cause the
failure of Ex-protection or bodily injury and property damages.
Please follow these steps to charge the battery:
z Before charging, please plug the adaptor’s cable into the charger’s input jack.
z Connect the adaptor with the AC Power socket. You will see a red light and green light flash at the same
time then go out. Insert the radio or battery into the cradle of the charger. The LED glows red light and start
to charge.
zThe battery charging will last about 4 hours. When the LED glows green, the battery is fully charged.
zPlease cut the power and take out the radio or battery.
Note:
1 .Make sure the radio is switched off during charging.
2. Overcharging may affect the battery performance.
Attaching the Battery
Align the battery with the rails on the back of the radio. Press the battery firmly, and slide upward until you
hear a ‘click’ sound.
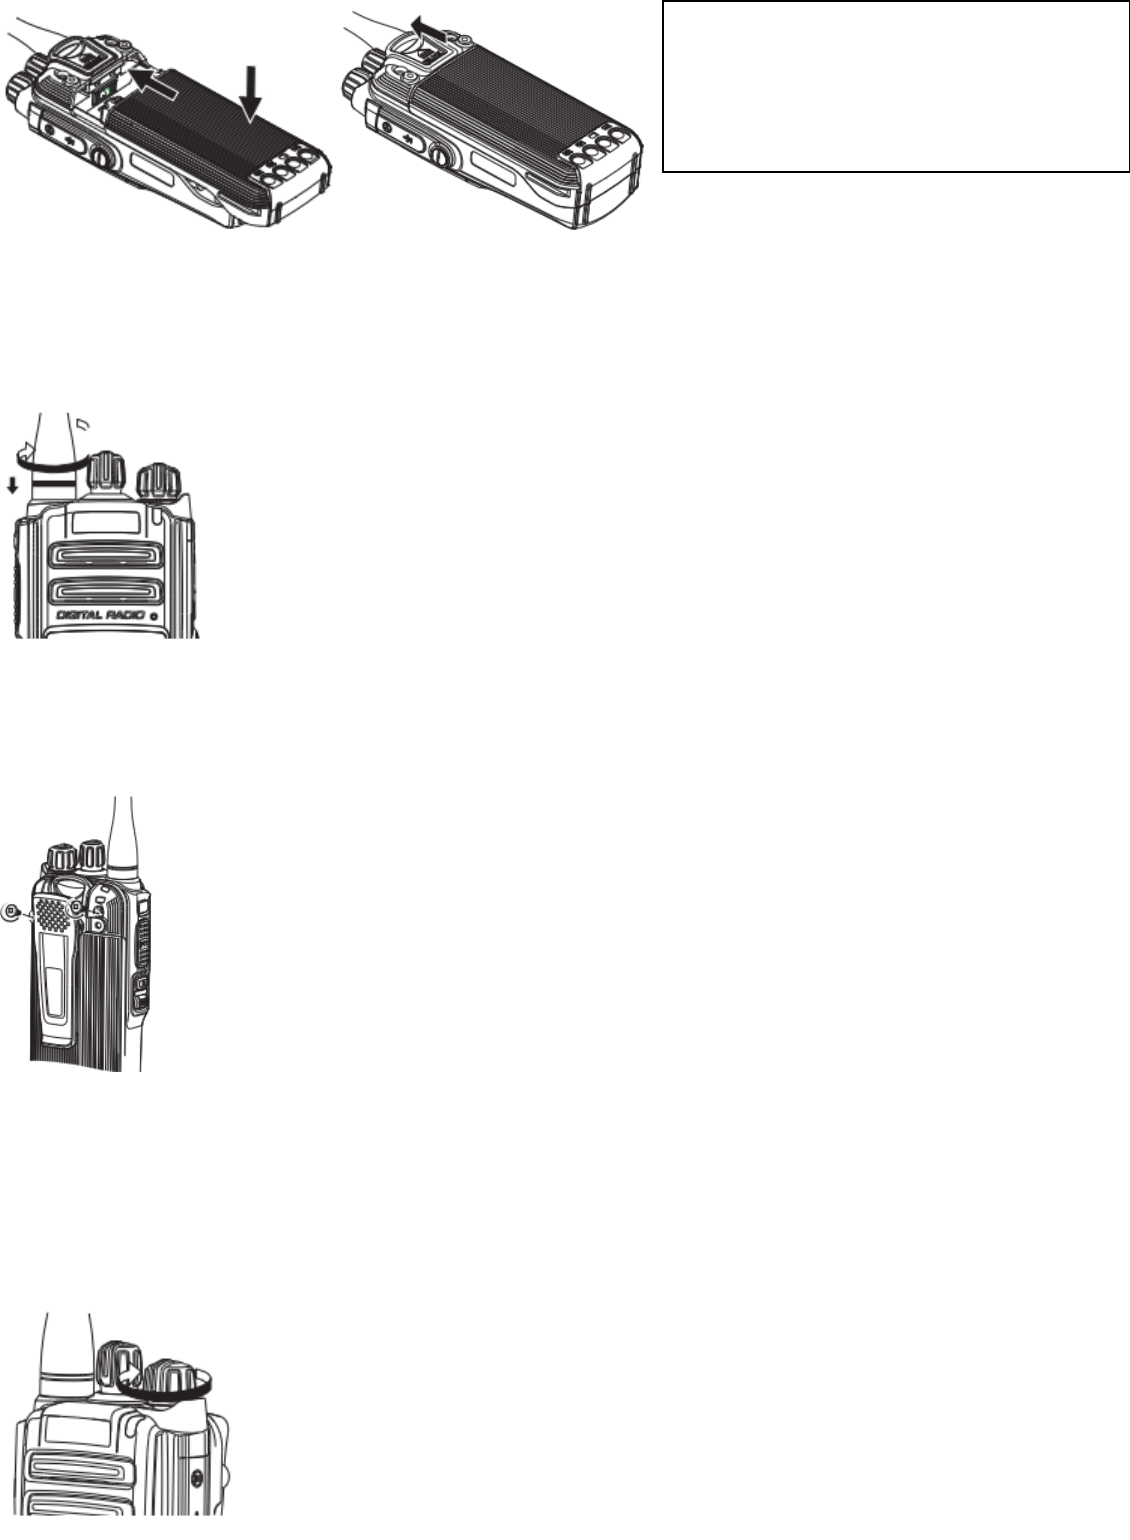
Attaching the Antenna
Turn off the radio, set the antenna in its receptacle and turn clockwise.
Attaching the Belt Clip
Remove the battery first, line up the holes and insert 2pcs screws. Use the correct and fit screwdriver to
tighten clockwise. With the opposite way to remove the belt clip.
Powering Up the Radio
Rotate the On/Off/Volume Control Knob clockwise until you hear a click. You see DMR on the radio’s
display momentarily, The LED lights up solid green and the Home screen lights up if the backlight setting is
set to turn on.
To remove the battery, turn the radio off. Push
upward the battery latch into unlock position
and hold, and slide the battery down and off
the rails

Adjusting the Volume
To increase the volume, turn the On/Off/Volume Control Knob clockwise.
To decrease the volume, turn this knob counterclockwise
Select a Channel
Turn the channel knob to select the channel number. The radio has 1000pcs channels and
250pcs channel zones (Each zone can set 16pcs channels). Each channel can set Analog
mode or Digital mode. You can select the channel zones from LCD menu. When you switch
to Analog mode, some functions can’t be used; the icon of referring to digital function will be
grey. You can cancel some functions via software, but once you cancel them, the menu will not show the
icon on LCD.
Transmit/Receive
Hold the radio about 2.5cm to 5cm from your mouth. It is important that the antenna
is 2.5 cm away from your face. Press the PTT button, the red LED will be
illuminated
and whilst keeping it pressed, speak into the microphone in your normal voice. And
release the PTT key to receive, the green LED will illuminate.
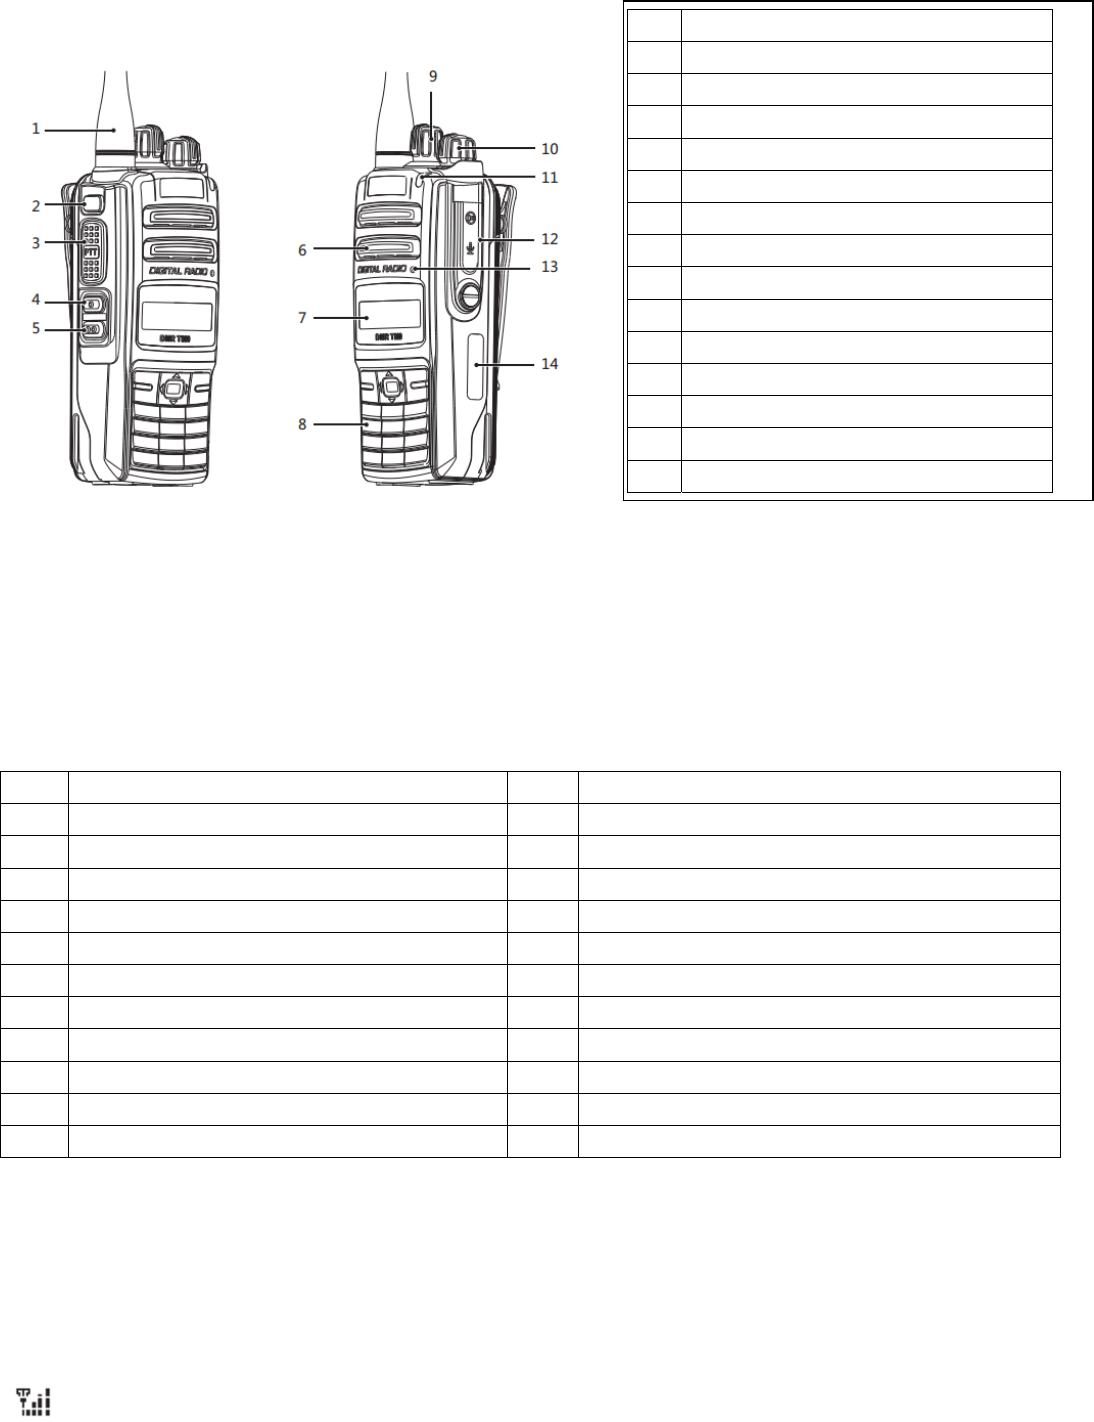
Radio Overview
z Side Button PF1/PF2
Note: These side buttons PF1/PF2 can be allocated for certain functionalities by software. The functions
features that can be programmed are listed below, you can active/deactivate the function by short press or
long press once your definite the key in advanced.
• Short press – Pressing and releasing rapidly.
• Long press – Pressing and holding for the programmed duration
No. Programed functions on side button No. Programed functions on side button
1 All Alert Tones On/Off 12 Repeater/Talk Around
2 Emergency On 13 Scan On/Off
3 Emergency Off 14 Tight/Normal Squelch
4 High/Low Power 15 Privacy On/Off
5 Monitor 16 VOX On/Off
6 One Touch Access “1” 17 Manual Dial For Private
7 One Touch Access “2” 18 Lone Work On/Off
8 One Touch Access “3”
9 One Touch Access “4”
10 One Touch Access “5”
11 One Touch Access “6”
z LCD Display Icon
The LCD display of your radio shows radio status, text entries, and menu entries. The following are icons
that appear on the status bar at the top of the radio’s display. Icons are displayed on the status bar,
arranged left-to-right, in order of appearance/usage and are channel specific.
Received Signal Strength Indicator
The number of bars displayed represents the radio signal strength. Four bars indicate the strongest signal.
This icon is only displayed while receiving.
No. Items
1Antenna
2EmergencyButton
3PTTKey
4SideButtonPF1
5SideButtonPF2
6Speaker
7LCDDisplay
8Keypad
9ChannelKnob
10On/Off/VolumeControlKnob
11LEDIndicator
12SP/MICCover
13MIC
14Battery

Power Level
Radio is set at Low power or High power.
Battery
The number of bars(0-4) shown indicates the charge remaining in the battery. Blinks show battery is low.
Encryption
The privacy feature is enabled.
Monitor
Selected channel is being monitored.
Emergency
Radio is in Emergency mode.
Scan
Scan feature is enabled.
Unread Message
The text message has not been read.
Full Message
The test message has already full.
Tones Disable
Tones are turned off.
Talk Around
In the absence of a repeater, radio is currently configured for direct radio to radio communication.
Call Icons
Private Call
Indicate a Private Call in progress.
In the Contacts list, it indicates a subscriber alias(name) or ID (number).
Group Call/All Call
Indicate a Group Call or All Call in progress.
In the contacts list, it indicates a group alias(name) or ID(number).
z LED Indicator
The LED indicator shows operation status of your radio.
Red: Radio is in transmitting signal, sending test message, sending a privacy-enabled call or data.
Green: Radio is Powered on or receiving signal, receiving test message, receiving a privacy-enabled call or
data.
Blinking Red: Radio is in scan mode.
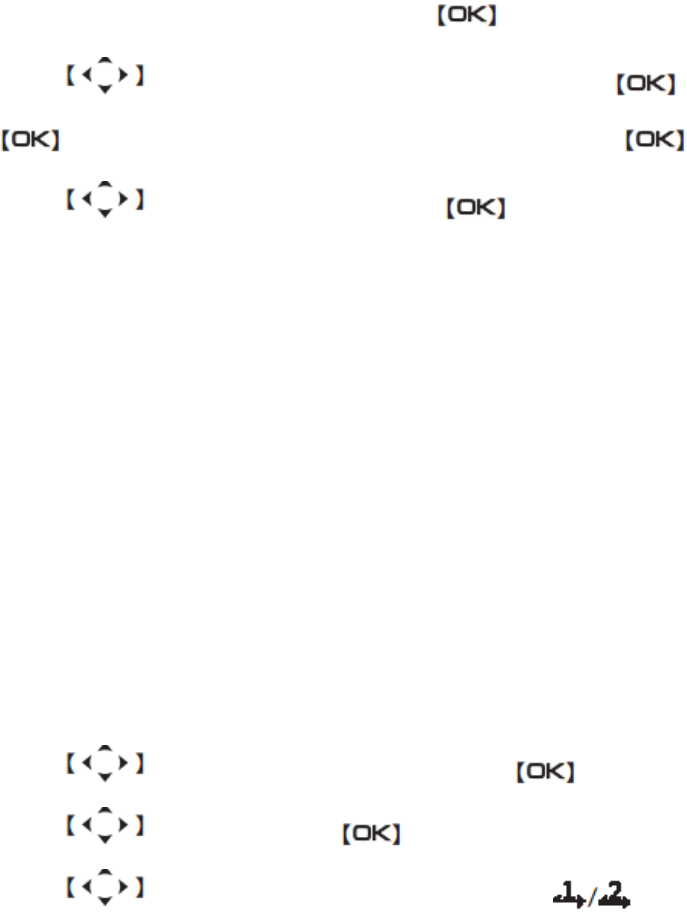
z Keypad
y Users can check the menu function by pressing , after choose one function, press to confirm or press
back to last menu.
y Users can use the 3 X 4 alphabet and digital keypad to view the function, also can input the alias, ID and message. Some
character needs to press more times, you can check as below tab
Functions Operation Instruction
1. Making and Receiving Calls
PTT Key
Each channel can be set for Analog mode or digital mode. Procedure below:
1. Press PTT to send the signal, release the PTT to receive.
2. If you active the talk permit tone, until you hear a warning, you can talk again.
3. If you open the function of “Channel free warning”, the other radios when release PTT key, you can hear a warning. It
means this channel is free, wait for your answer.
4. If your call is stopped, you still can hear a warning. If you don’t want to hear the warning, you can close all beep and
warning function.
5. Tune the channel knob to select the channel.
Select a Zone
A Zone is a channel zone. This radio can support max 250 channel zones. Each zone supports 16 channels. Follow below
procedure to select a channel zone.
1. Press key to access menu.
2. Press to select the “Zone”. Then press key to confirm.
3.The LCD will show √ icon to indicate the current channel Zone.
4. Press key to select the Zones which you want. Then press key to confirm.
5. The LCD will display “Zone X”, then return to standby.
Select the channels
After you confirm the channel zone, turn the channel knob to select the channels.
Receive and Response a call.
When the LED is green, the radio is receiving. When the LED is red, the radio is transmitting.
Receive and Response a Zone Call
Your radio should be within this zone. When you radio is receiving a zone call. Procedure below:
1 The LED will be green.
2. The first line of LCD will display the signal bar and alias of call party. The second line of LCD will show the alias of zone
and icon of a zone call (only available under the digital mode.)
3. Press PTT key to response the call. The LED will be red.
4. Speak to microphone.
5. Release the PTT to receive.
Receive and Response Private Call.
Single call is one radio to call other radio between two radios.
Total two types single call. One is, before call to check if the signal is existed. Other type is to call directly.
When you are receiving the single call, procedure below:
1. LED will be green.
2. The first line of LCD will show signal ICON and call ID. The second line will show single call and ICON.
3. Press PTT to talk radio. If the radio active the “channel free indicator” function, when you release the PTT key, you will
hear a short warning. It means this channel is free now.
4. Press PTT key to reply the call. LED will be red.
5. Waiting for the talk permit tone(if active) is over, talk to microphone.
6. Release PTT key to receive.
7. If not any signal is received during setting time, the call will be over.
8. You will hear a short warning, and the LCD will show the call is over.
Receive All call.
All call is one radio to call all radio on one channel. You can send some important information to other radios on channel.
When you receive the all call, procedure below:
1. LED will be green.
2. The first line of LCD will show signal icon and call alias. The second line will show all call and icon.
3. When the all call is over, radio will return to standby. If you active “channel free indictor” function, when others radio
release the PTT, you will hear a short warning. It means this channel is free now.
4. You can’t rely any all call.
Note: When you are receiving the all call, if you turn to other channels, the radio will stop to receive the all call. During the
all call, you can’t use any pre-programmed key, until the all call is over.
Making a Radio Call
After selecting your channel, you can select a subscriber alias or ID, or group alias or ID by using:
• The Channel Selector Knob
• A programmed One Touch Access button
• The Contacts list
• Manually dial(by contact lists)
Note: If radio doesn’t active the “Privacy” function, it can’t send the encryption codes. Only with same encryption codes
between two radios, them can decode and talk each other.
Making a Call with the Channel Selector Knob
Making a Group Call
To make a call to a group of users, your radio must be configured as part of that group.
Procedure bellow:
1. Select the channel with the active group alias or ID. Press the programmed One Touch Access button.
2. Hold the radio vertically 1 to 2 inches(2.5 to 5.0cm) from your mouth.
3. Press the PTT button to make the call. The LED lights up solid red. The LCD display the group alias or ID.
4. Wait for the Talk Permit Tone to finish (if enabled) and speak clearly into the microphone.
5. Release the PTT button to listen, and when the target radio responds, the LED blinks green. You see the Group Call
icon, the group alias or ID, and transmitting radio alias or ID on your display.
6. If the Channel Free Indication feature is enabled, you hear a short alert tone the moment the target radio releases the
PTT button, indicating the channel is free for you to respond. Press the PTT button to respond or If there is no voice
activity for a predetermined period of time, the call ends.
7. Radio returns to the screen you were on prior to initiating the call. You can also make a Group Call via Contacts list.
Making an All Call
This feature allows you to transmit to all users on the channel. Your radio must be programmed to allow you to use this
feature. Procedure below:
1. Using the channel knob to select the channel with the active group alias or ID.
2. Hold the radio vertically 1 to 2 inches (2.5 to 5.0 cm) from your mouth.
3. Press the PTT button to make the call. The LED lights up solid green. The Group Call icon appears in the display.
4. Wait for the Talk Permit Tone to finish (if enabled) and speak clearly into the microphone.
Note:Users on the channel cannot respond to an All Call.
Making a Group Call or Private Call with the One Touch Access Button
The One Touch Access feature allows you to make a Group or Private Call to a predefined alias or ID easily. This feature
can be assigned to a short or long programmable button press, or to a long numeric button press.
You can ONLY have one alias or ID assigned to a One Touch Access button. Your radio can have multiple One Touch
Access buttons programmed.
1. Press the programmed One Touch Access button to make a Group or Private Call to the predefined alias or ID.
2. Hold the radio vertically 1 to 2 inches (2.5 to 5.0 cm) from your mouth.
3. Press the PTT button to make the call. The LED lights up solid red. The caller alias/Group/Private Call icon appears in
the display.
4. Wait for the Talk Permit Tone to finish (if enabled) and speak clearly into the microphone.
5. Release the PTT button to listen. When the target radio responds, the LED blinks green
6. If the Channel Free Indication feature is enabled, you hear a short alert tone the moment the target radio releases the
PTT button, indicating the channel is free for you to respond. Press the PTT button to respond. Or if there is no voice
activity for a predetermined period of time, the call ends.
7. Radio returns to the screen you were on prior to initiating the call.
Note: For a Private Call, you hear a short tone when the call ends.
Talkaround
You can continue to communicate when your repeater is not operating, or when your radio is out of the repeater’s range but
within talking range of other radios. This is called “talkaround”.
Procedure below:
Press the programmed Repeater/Talkaround button to toggle between talkaround and repeater modes. Or follow the
procedure below:
1. Press to access the menu, press to select.
2. Press to ‘Utilities’ and press to select.
3. Press to ‘Talkaround’ and press to confirm.
4. If radio now in ‘Repeater’ mode, then you will see ‘Repeater’. But if radio now in ‘Talkaround’, then you will see
‘Talkaround’.
5. Press to select, the display show ‘Talkaround’ or ‘Repeater’.
6. The screen automatically returns to the previous menu.
Note: The Talkaround setting is retained even after powering down.
Monitor Feature (Only available in Analog mode)
Use the Monitor feature to make sure a channel is clear before transmitting.
1. Press and hold the programmed Monitor button and listen for activity.The monitor icon appears on the status bar and
the LED lights up green
2. Press again the programmed Monitor button to exit Monitor status. The radio will alert a tone, LED turns off and the
monitor icon disappears on the status bar.
.
Radio Check
If enabled, this feature allows you to determine if another radio is active in a system without disturbing the user of that radio.
No audible or visual notification is shown on the target radio. This feature is only applicable for subscriber aliases or IDs
Sending a Radio Check
Procedure below:
1. Press to access the menu to ‘Contacts’, press to select.
2. Press to the required ‘subscriber alias or ID’ and press to confirm. Select or manual dial, then press
to confirm, display show ‘manual dial Radio Number’, press again to confirm.
3. Press to ‘Radio Check’, and then press to select.
4. The display shows Radio Check, ‘subscriber alias or ID’, which indicates the requirement is in progress, LED lights up
solid Red light.
5. Wait for acknowledgement.
6. If successful, a positive indicator tone sounds and the display shows positive mini notice. OR If unsuccessful, a
negative indicator tone sounds and the display shows negative mini notice.
7. Radio returns to the subscriber alias or ID screen.
Note: f the button is pressed when the radio is waiting for acknowledgement, a tone sounds, and the radio terminates all
retries and exits Radio Check mode.
Remote Monitor
Use the Remote Monitor feature to turn on the microphone of a target radio (subscriber alias or IDs only). No audible or
visual indication is given to the target radio. You can use this feature to monitor, remotely, any audible activity surrounding
the target radio. Your radio must be programmed to allow you to use this feature
Initiating Remote Monitor
Procedure below:
1. Press to access the menu to ‘Contacts’, press to select.
2. Press to the required ‘subscriber alias or ID’ and press to confirm. Select or manual dial, then press
to confirm, display show manual dial Radio Number, press again to confirm.
3. Press to ‘Remote Monitor’, and press select.
4. The display shows ‘Radio Check’, ‘subscriber alias or ID’, which indicates the requirement is in progress, LED lights up
solid Red light.
5. The radio alert a beep tone, LED lights up solid red light.
6. Wait for acknowledgement.
7. If successful, your radio starts playing audio from the monitored radio for a programmed duration and display shows
Rem. Monitor. Once the timer expires, the radio sounds an alert tone and the LED turns off.
8. If unsuccessful, radio returns to screen.
Scan Lists
Scan lists are created and assigned to individual channels/groups. Your radio scans for voice activity by cycling through the
channel/group sequence specified in the scan list for the current channel/group. Your radio can support up to 250 scan lists,
with a maximum of 31 members in a list. Each scan list supports a mixture of both analog and digital entries. You can add,
delete, or prioritize channels by editing a scan list. You can attach a new scan list to your radio via Front Panel
Viewing an Entry in the Scan List
1. Press to access the menu to ‘Contacts’, press to select.
2. Press to ‘Scan List’, press to select.
3. Press view each member on the list. The priority icon appears left of the member’s alias, if set, to
indicate whether the member is on a Priority 1 or Priority 2 channel list. You cannot have multiple Priority 1 or Priority 2
channels in a scan list. There is no priority icon if priority is set to None.
Editing the Scan List
If you want to set up priority channels, or add/delete channel in scan list, you need program and operate them via software.
Scan
When you start a scan, your radio cycles through the programmed scan list for the current channel looking for voice activity.
The LED blinks red and the scan icon appears on the status bar.
During a dual mode scan, if you are on a digital channel, and your radio locks onto an analog channel, it automatically
switches from digital mode to analog mode for the duration of the call. This is also true for the reverse.
There are two ways of initiating scan:
• Main Channel Scan (Manual): Your radio scans all the channels/groups in your scan list. On entering scan, your radio
may – depending on the settings – automatically start on the last scanned “active” channel/group or on the channel where
scan was initiated.
• Auto Scan (Automatic): Your radio automatically starts scanning when you select a channel/group that has Auto Scan
enabled.
Starting and Stopping Scan
Press the programmed Scan button to start or stop Scan. OR Follow the procedure below.
1. Use the Channel Selector Knob to select a channel programmed with a scan list.
2. Press to access the menu, press to select.
3. Press to ‘Scan State’ and press to select.
4. Press to required scan state and press to select
5. The display shows Scan On when scan is enabled. The LED blinks red and the scan icon appears. OR The display
shows Scan Off if scan is disabled. The LED turns off and the scan icon disappears.
Responding to a Transmission During a Scan
During scanning, your radio stops on a channel/group where activity is detected. The radio stays on that channel for a
programmed time period known as “hang time”. Procedure below;
1. Hold the radio vertically 1 to 2 inches (2.5 to 5.0 cm) from your mouth. If the Channel Free Indication feature is enabled,
you hear a short alert tone the moment the transmitting radio releases the PTT button, indicating the channel is free for
you to respond.
2. Press the PTT button during hang time. The LED lights up solid red.
3. Wait for the Talk Permit Tone to finish (if enabled) and speak clearly into the microphone. OR Wait for the PTT Side
tone to finish (if enabled) and speak clearly into the microphone.
4. Release the PTT button to listen.
5 If you do not respond within the hang time, the radio returns to scanning other channels/groups
Contacts Settings
Contacts provide “address-book” capabilities on your radio. Each entry corresponds to an alias or ID that you use to initiate
a call. Each entry, depending on context, associates with one of five types of calls: Group Call, Private Call, All Call, PC Call
or Dispatch Call. PC Call and Dispatch Call are data-related. They are only available with the applications. Refer to the
data applications documentation for more information.
Note: If the Privacy feature is enabled on a channel, you can make privacy-enabled Group Call, Private Call, and All Call on
that channel. Only target radios with the same Privacy Key OR the same Key Value and Key ID as your radio are able to
unscramble the transmission.
Your radio supports digital Contacts lists with a maximum of 1000 members.
Each entry within Contacts displays the following information:
• Call Type
• Call Alias
• Call ID
Note:You can add, or edit subscriber IDs for the Digital Contacts list. Deleting subscriber IDs can only be performed by
your dealer.
Making a Private Call from Contacts
Procedure below;
1. Press to access the menu, press to select.
2. Press to ‘Contacts’ and press to select; Or input a radio ID number to keypad, the radio display call ID
and press to confirm.
3. Press PTT to start a call, LED will be red. The LCD will show ‘Channel alias or ID’ and single call icon. The target radio
LED will be red. Then LCD will show ‘Channel alias or ID’ and single call icon.
4. Wait for the Talk Permit Tone to finish (if enabled) and speak clearly into the microphone.
5. Release the PTT to receive. The LED will be green. And the LCD will show the user ID from target radio.
6. If you active “Channel Free Indictor” function, when target radio release the PTT, you will hear a short warning. It
means this channel is free now.
7. If haven’t any call within pre-programmed time, the call will be finished. The radio will sent out a warning.
Call Indicator Settings
You can select, or turn on or off ringing tones for a received Call Alert, procedure below:
1. Press to access the menu, press to select.
2. Press to ‘Radio Settings’, press to select.
3. Press to ‘Tones/Alerts’, press to select.
4. Display show on, press to active. Or display shows off, press to call record function to record Radio can
record your call log. You can check the ‘Missed/ Outgoing / Answered’ record from your radio.
You also can operate as below:
• Store the ID to contact list from call log.
• Delete the call log.
Viewing Recent Calls
The lists are Missed, Answered, and Outgoing. Procedure below:
1. Press to access the menu to Call Log, press to select.
2. Press to required list and press to select.
3. The display shows the most recent entry at the top of the list
4. Press to view the list.
Storing Answered/Un-answered Call
The lists are Answered/Un-answered Call, Procedure below:
1. Press to access the menu to Call Log, press to select.
2. Press to Call Alias/ID to choose storing menu and press to select.
3. The display blink and input the name and ID, press to confirm.
Deleting a Call from a Call List
1. Press to access the menu.to Call Log
2. Press to the required list and press to select.
3. Press to the required alias or ID and press to select.
4. Press to Delete and press to select.
6 Press to select yes to delete the entry. The display shows positive mini notice.
OR press to No to return to the previous screen
Viewing un-answered calls
No matter when missed the calls, radio will always display an un-answered call.
You could select to check immediately or check later.
1. The display show un-answered calls, and the call ID and check?
2. Press to view call list, press to select.
3. Press to un-answered call, and then press to select.
4. Press to un-answered ID, the list show on the screen.
Emergency Operation
An Emergency Alarm is used to indicate a critical situation. You are able to initiate an Emergency at any time on any screen
display even when there is activity on the current channel
Your radio supports three Emergency Alarms:
• Regular – Radio transmits an alarm signal and shows audio indicators.
• Silent – Radio transmits an alarm signal without any audio indicators.
• Silent with Voice –Radio transmits an alarm signal without any audio indicators, but allow incoming calls to sound
through the radio’s speaker
Note: Only ONE of the Emergency Alarms above can be assigned to the programmed Emergency button.
Text Message Features
Editing and sending a message
Your radio supports message character maximum is 144.characters.
1. Press to access menu mode to “Messages” item. Press to enter
2. Press to select the “Write” item, press to enter.
3. Editing the messages by keypad, press leftward/right forward one position, , # key is blank, * key cancel one
character.
4. After editing, press to confirm.
5. Press to “Send” item, Press to confirm. Then press to select one ID to send the message. Or
you can select the “Manual Dial” item to input a ID. Press to confirm and send the message.
6. The LCD display show “Sending to ID/ alias”.
7. If sending message is successful, radio will send out a warning, and the LCD show “Message Send”.
If sending message is failure, you radio will send out a warning and LCD will show “Fail to Send”.
Sending a Quick Text Message
Your radio supports a maximum of 50 Quick Text messages as programmed by your dealer.
While Quick Text messages are predefined, you can edit each message before sending it.
Your radio supports message character maximum is 144.characters.
1. Press to access the menu, press to confirm
2. Press to’ Messages’ and press to confirm
3. Press to ‘Quick Text’ and press to confirm
4. Pressto the required Quick Text and press to select. or press to the required alias or ID and
press to confirm The display shows transitional mini notice, confirming your message is being sent.
5 If the message is sent, a tone sounds and the display shows positive mini notice. OR If the message is not sent, a low
tone sounds and the display shows negative mini notice.
Sending a Quick Text Message with the One Touch Access Button
1. Press the programmed One Touch Access button to send a predefined Quick Text message to a predefined alias or ID.
2. The display shows transitional mini notice, confirming your message is being sent. If the message is sent, a tone
sounds and the display shows
Forwarding a Text Message
1. Press to access the menu to inbox to select a Message, press to resend , press to confirm
2. Press to requirement alias or ID, and press to confirm.
Or press to manual dial, press to confirm. Input user ID and press to confirm.
3. Your LCD display ‘subscriber/group alias or ID’, show message is in sending.
4. If the message is sent, a tone sounds and the display shows positive mini notice. OR If the message is not sent, a low
tone sounds and the display shows negative mini notice.
Managing Sent Text Messages
Once a message is sent to another radio, it is saved in Sent Items. The most recent sent text message is always added to
the top of the Sent Items list. The Sent Items folder is capable of storing a maximum of fifty (50) last sent messages. When
the folder is full, the next sent text message automatically replaces the oldest text message in the folder.
Viewing a Sent Text Message
1. Press to access menu to Message item, press to confirm.
2. Press to sent items, press to confirm.
3. Press to the required message and press to confirm.
Sending a Sent Text Message
You can select one of the following options while viewing a sent message:
y Resend – Select resend, will resend the selected message to target group alias or ID.
y Forward – Select forward, will forward the selected message to target group alias or ID.
y Edit – Select Edit, will edit the message before sending.
y Delete – Delete message
Note1: If you exit the message sending screen while the message is being sent, the radio updates the status of the
message in the Sent Items folder without providing any indication in the display or via sound.
Note 2: If the radio changes mode or powers down before the status of the message in Sent Items is updated, the radio
cannot complete any In-Progress messages and automatically marks it with a Send Failed icon
Note 3: The radio supports a maximum of five (5) In-Progress messages at one time. During this period, the radio cannot
send any new message and automatically marks it with a Send Failed icon.
Deleting All Sent Text Messages from Sent Items
1. Press to access menu to Message item, press to confirm.
2. Press to sent items, press to confirm.
3. Press to delete all, press to confirm.
4. Press to Yes and press to select. The display shows positive mini notice
OR press to No and press to return to the previous screen.
Receiving a Text Message
When your radio receives a message, the display shows the Notification List with the alias or ID of the sender and the
message icon.
You can select one of the following options when receiving a text message:
y Read
y Read Later
y Delete
Note: The radio exits the Text Message alert screen and sets up a Private or Group Call to the sender of the message if the
PTT button is pressed when the radio is displaying the alert screen.
Managing Received Text Messages
Use the Inbox to manage your text messages. The inbox is capable of storing a maximum of 30 messages.
Your radio supports the following options for text messages:
• Reply
• Forward
• Delete
• Delete All
Note: Text messages in the Inbox are sorted according to the most recently received.
Viewing a Text Message from the Inbox
1. Press to access menu to Message item, press to confirm.
2. Press to Inbox, press to confirm.
3. Press view message
4. Press to select the current message, and press again to reply, forward, or delete that message.
Uncheck message will show in the first line with an exclamation mark !.
Viewing a Telemetry Status Text Message from the Inbox
1. Press to access menu
2. Press to message item, press to select
3. Press to inbox, press to select
4. Press to the required message, press to select, press again to enter sub-menu.
5. Press to reply, press to select
6. Press to edit message, press to select. Your LCD display will show blink cursor. You can edit
message by keypad or send predefined Quick Text message,
7. After editing a message, press to select
8. You radio show ‘subscriber/group alias or ID’, which confirm now is sending message.
9. If message send successfully, radio will show a positive voice and display show message sent. Otherwise display will
show message failure to send.
Deleting a Text Message from the Inbox
1. Press to access menu.
2. Press to message item, press to select
3. Press to inbox, press to select
4. Press to the required message, press to select, press again to enter sub-menu.
5. Press to delete, press to select
6. Your display will show or Yes and press to select.
7. The display shows positive mini notice
8. The screen returns to the Inbox.
Deleting All Text Messages from the Inbox
1. Press to access menu.
2. Press to message item, press to select
3. Press to inbox, press to select
4. Press to Delete All, press to select
5. Your display will show or Yes and press to select.
6. The display shows positive mini notice
7. The screen returns to the Inbox.
Note: When you select the Inbox and it contains no text messages, the display shows List Empty
Privacy
If enabled, this feature helps to prevent eavesdropping by unauthorized users on a channel by the use of a software based
scrambling solution. The signaling and user identification portions of a transmission are not scrambled.
Your radio must have privacy enabled on the channel to send a privacy-enabled transmission, although this is not a
necessary requirement for receiving a transmission. While on privacy enabled channel, the radio is still able to receive
clear (unscrambled) transmissions.
Your radio supports Enhanced Privacy. To unscramble a privacy-enabled call or data transmission, your radio must be
programmed to have the same Key Value and Key ID as the transmitting radio
If your radio receives a scrambled call that is of a different Key Value and Key ID, you will hear nothing at all.
Security
You can enable or disable any radio in the system. For example, you might want to disable a stolen radio, to prevent the
thief from using it, and enable that radio, when it is recovered.
Radio Disable
1. Press to access menu.to ‘contacts’, press to select
2. press to the required alias or ID, Press to select
3. Press to ‘Disable’, to select
4. The display shows transitional mini notice, indicating the request is in progress. The LED blinks green.
5. If successful, a positive indicator tone sounds and the display shows positive mini notice.
Or if unsuccessful, a negative indicator tone sounds and the display shows negative mini notice
Radio Enable
1. Press to access menu.to ‘contacts’, press to select
2. press to the required alias or ID, Press to select
3. Press to ‘Enable’, to select
4. The display shows Radio Enable and the subscriber alias or ID. The LED lights up solid red.
5. If successful, the radio sounds a positive indicator tone and the display shows positive mini notice.
OR If unsuccessful, the radio sounds a negative indicator tone and the display shows negative mini notice
Utilities
Lock keyboard or unlock keyboard
You can lock the keyboard to prevent un-attention input. Procedure below:
1. Press to access menu, press to select
2. Press to ‘Utilities’, press to select
3. Press to ‘Radio Settings’’, press to select
4. Press to ‘Keyboard Lock’, press to select
5. The display show Keyboard Locked, and return to main screen.
6. If want to unlock the keyboard, press to select, and then press
7. The display show keyboard unlocked, and return to main screen.
Turning the Radio Tones/Alerts On or Off
You can enable and disable all radio tones and alerts if needed.
1. Press to access menu
2. Press to ‘Utilities’, press to select
3. Press to ‘Radio Settings’’, press to select
4. Press to ‘Radio Tones/Alerts’’, press to select
5. Press to enable all tones. The display shows √beside Enabled.
OR Press to disable all tones. The √ disappears from beside Enabled.
Setting the Squelch Level
You can adjust your radio's squelch level to filter out unwanted calls with low signal strength or channels that have a higher
than normal background noise
Settings: ‘Normal’ is the default. ‘Tight’ filters out (unwanted) calls and/or background noise.
However, calls from remote locations may also be filtered out. Procedure below:
1. Press to access menu
2. Press to ‘Utilities’, press to select
3. Press to ‘Radio Settings’’, press to select
4. Press to ‘Squelch’’, press to select
5. The display shows ‘Tight and Normal’. Press to the required setting and press to enable.
The √appears besides selected setting
6. Screen returns to the previous menu.
Setting the Power Level
You can customize your radio’s power setting to high or low for each channel.
Settings: ‘High’ enables communication with radios located at a considerable distance from you.
‘Low’ enables communication with radios in closer proximity. Procedure below:
1. Press to access menu
2. Press to ‘Utilities’, press to select
3. Press to ‘Radio Settings’’, press to select
4. Press to ‘Power’’, press to select the required setting and press to select. √appears beside
selected setting.
5. Screen returns to the previous menu.
Turning the LED indicator On or Off
You can enable and disable the LED indicator if needed.
1. Press to access menu
2. Press to ‘Utilities’, press to select
3. Press to ‘Radio Settings’’, press to select
4. Press to ‘LED Indicator’’, press to select the required setting and press to select. √appears
beside selected setting.
5. Screen returns to the previous menu.
Turning the Intro Screen On or Off
You can enable and disable Intro Screen if needed.
1. Press to access menu
2. Press to ‘Utilities’, press to select
3. Press to ‘Radio Settings’’, press to select
4. Press to ‘Intro Screen’’, press to select the required setting and press to select. √appears
beside selected setting.
5. Screen returns to the previous menu.
Turning the VOX On or Off
You can enable and disable VOX if needed.
1. Press to access menu
2. Press to ‘Utilities’, press to select
3. Press to ‘Radio Settings’’, press to select
4. Press to ‘VOX’’, press to select the required setting and press to select. √appears beside
selected setting.
5. Screen returns to the previous menu.
Language
You can freely select the Chinese/English if needed.
1. Press to access menu
2. Press to ‘Utilities’, press to select
3. Press to ‘Radio Settings’’, press to select
4. Press to ‘Language’’, press to select the required setting and press to select. √appears
beside selected setting.
5. Screen returns to the previous menu.
Turning the Password and Lock On or Off
You can enable and disable Password and Lock if needed.
1. Press to access menu
2. Press to ‘Utilities’, press to select
3. Press to ‘Radio Settings’’, press to select
4. Press to ‘Password Lock’’, press to select. Enter your current password.
5. If the password is correct:
Press to enable Password Lock. The display shows√beside Enabled.
OR Press to disable Password Lock. The √disappears from beside Enabled.
OR If the password is incorrect:
The display shows Wrong Password and automatically returns to the previous menu.
Changing the Password
1. Press to access menu
2. Press to ‘Utilities’, press to select
3. Press to ‘Radio Settings’’, press to select
4. Press to ‘Passwd Lock’’, press to select
5. If the password is correct: Press to Change ‘Pwd’ and press to select.
OR If the password is incorrect: The display shows ‘Wrong Password’ and automatically returns to the previous menu.
6. Enter a new password.
7. Re-enter the new eight-digit password.
8. 8 If both of the new password inputs match: The display shows Password Changed.
OR If both of the new password inputs do not match, the display shows Passwords Do Not Match.
Accessing General Radio Information
Your radio contains information on the following:
y Local Radio alias and ID
y Firmware version
•CPU version
Checking the Radio Alias and ID
Displays the ID of your radio
Procedure:
Press the programmed Radio Alias and ID button to check your radio alias and ID. You hear a positive indicator tone.
OR follow the procedure below.
1. Press to access the menu.
2. Press to ‘Utilities’ and press to select.
3. Press to ‘Radio Info’ and press to select.
4. Press to ‘My Number’ and press to select.
5. The first line of the display shows the radio alias. The second line of the display shows the radio ID
You can also press the programmed Radio Alias and ID button
6. press to return to the previous screen
Checking the Firmware Version
Display the firmware and codeplug versions on your radio. Procedure below:
1. Press to access the menu.
2. Press to ‘Utilities’ and press to select.
3. Press to ‘Radio Info’ and press to select.
4. Press to ‘Versions’ and press to select.
5. The display shows the current firmware and codeplug versions.
Checking the CPU Version
1. Press to access the menu.
2. Press to ‘Utilities’ and press to select.
3. Press to ‘Radio Info’ and press to select.
4. Press to ‘CP Ver.’ and press to select.
5. The display shows the current CPU version.
SPECIFICATION
General
Frequency Range 400-470 MHz
Channel Capacity 1000
Channel Spacing Digital:12.5kHz
Working Voltage 7.4V Rated
Frequency Stability ±1.5 ppm
Antenna Impedance 50Ω
Dimension (H*W*D) 137 x 61 x 40mm
Weight About 260g (with battery, antenna, belt clip)
Transmitter
Power Output 4W/0.5W

4FSK Digital Modulation 12.5kHz Data & Voice: 7K6φFXW
Spurious Emission -36dBm<1GHz; -30dBm>1GHz
Modulation Limiting ±2.5kHz @ 12.5 kHz; ±5.0kHz @ 25 kHz
Adjacent Channel Power 60dB @ 12.5 kHz
Audio Response +1~-3dB
Audio Distortion ≤5%
Receiver
Sensitivity (Analog) 0.2μV (12dB SINAD)
Sensitivity (Digital) 0.3μV /BER5%
Selectivity TIA603 ETSI
60dB @ 12.5kHz
Intermodulation
TIA603
ETSI
65dB @ 12.5 kHz
Spurious Response Rejection
TIA603
ETSI
70dB @ 12.5 kHz
SNR
40dB @ 12.5 kHz
Conducted Spurious Emission -57 dBm
Audio Power Output 1W
Audio Distortion ≤5%
Audio Response +1~-3dB
Environmental Specifications
RFRadiationInformation
RFRadiationProfile
RadioFrequency(RF)isafrequencyofelectromagneticradiationintherangeatwhichradio
signalsaretransmitted.RFtechnologyiswidelyusedincommunication,medicine,food
processingandotherfields.Itmaygenerateradiationduringuse.
RFRadiationSafety
Inordertoensureuserhealth,expertsfromrelevantindustriesincludingscience,engineering,
medicineandhealthworkwithinternationalorganizationstodevelopstandardsforsafe
exposuretoRFradiation.Thesestandardsconsistof:
UnitedStatesFederalCommunicationsCommission,CodeofFederalRegulations;47CFRpart2
sub‐partJ;
AmericanNationalStandardsInstitute(ANSI)/InstituteofElectricalandElectronicEngineers(IEEE)
C95.1‐1992;
InstituteofElectricalandElectronicEngineers(IEEE)C95.1–1999;
InternationalCommissiononNon‐IonizingRadiationProtection(ICNIRP)1998;
FCCRegulations
FederalCommunicationCommission(FCC)requiresthatallradiocommunicationproductsshould
meettherequirementssetforthintheabovestandardsbeforetheycanbemarketedintheU.S,
andthemanufacturershallpostaRFlabelontheproducttoinformusersofoperational
instructions,soastoenhancetheiroccupationalhealthagainstexposuretoRFenergy.
OperationalInstructionsandTrainingGuidelines
Toensureoptimalperformanceandcompliancewiththeoccupational/controlledenvironment
RFenergyexposurelimitsintheabovestandardsandguidelines,usersshouldtransmitnomore
than50%ofthetimeandalwaysadheretothefollowingprocedures:
a. YourradioradiatesmeasurableRFenergyonlywhileitistransmitting(duringtalking),not
whenitisreceiving(listening)orinstandbymode.
b. Keeptheradioatleast2.5centimetersawayfromyourbodyduringtransmission.
FCC Statement:
This device complies with part 15 of the FCC Rules. Operation is subject to the following
two conditions: (1) This device may not cause harmful interference, and (2) this device
must accept any interference received, including interference that may cause undesired
operation.
This equipment has been tested and found to comply with the limits for a Class B digital
device, pursuant to part 15 of the FCC Rules. These limits are designed to provide
reasonable protection against harmful interference in a residential installation. This
equipment generates, uses and can radiate radio frequency energy and, if not installed
and used in accordance with the instructions, may cause harmful interference to radio
communications. However, there is no guarantee that interference will not occur in a
particular installation. If this equipment does cause harmful interference to radio or
television reception, which can be determined by turning the equipment off and on, the
user is encouraged to try to correct the interference by one or more of the following
measures:
—Reorient or relocate the receiving antenna.
—Increase the separation between the equipment and receiver.
—Connect the equipment into an outlet on a circuit different from that to which the
receiver is connected.
—Consult the dealer or an experienced radio/TV technician for help.
Caution: Any changes or modifications not expressly approved by the party responsible
for compliance could void the user's authority to operate the equipment.
IC Statement
This device complies with Industry Canada licence-exempt RSS standard(s).
Operation is subject to the following two conditions:
(1) this device may not cause harmful interference, and (2) this device must accept any
interference, including interference that may cause undesired operation of the device.
Le présent appareil est conforme aux CNR d'Industrie Canada applicables aux appareils radio
exempts de licence. L'exploitation est autorisée aux deux conditions suivantes :
(1) l'appareil ne doit pas produire de brouillage, et (2)l'utilisateur de l'appareil doit accepter
tout brouillage radioélectrique subi,même si le brouillage est susceptible d'en compromettre
le fonctionnement.

SAFETYTRAININGINFORMATION
Lisheng (Fujian) Communications Co., Ltd. radio generators RF electromagnetic energy
during transmit mode. This radio is designed for and classified as “Occupational Use Only”,
meaning it must be used only during the course of employment by individuals aware of the
hazards, and the ways to minimize such hazards. This radio is NOT intended for use by the
“General Population” in an uncontrolled environment.
This radio has been tested and complies with the FCC RF exposure limits for “Occupational Use Only”. In addition,
Lisheng (Fujian) Communications Co., Ltd. complies with the following Standards and Guidelines with
regard to RF energy and electromagnetic energy levels and evaluation of such levels for exposure to humans:
FCC OET Bulletin 65 Edition 97-01 Supplement C, Evaluating Compliance with FCC Guidelines for Human Exposure to
Radio Frequency Electromagnetic Fields.
American National Standards Institute (C95.1-1992), IEEE Standard for Safety Levels with Respect to Human Exposure
to Radio Frequency Electromagnetic Fields, 3 kHz to 300 GHz.
American National Standards Institute (C95.3-1992), IEEE Recommended Practice for the Measurement of Potentially
Hazardous Electromagnetic Fields– RF and Microwave.
The following accessories are authorized for use with this product. Use of accessories other than those (listed in the
instruction) specified may result in RF exposure levels exceed the FCC requirements for wireless RF exposure.
ToensurethatyourexposetoRFelectromagneticenergyiswithintheFCCallowablelimitsfor
occupationaluse,alwaysadheretothefollowingguidelines:
DO NOT operate the radio without a proper antenna attached, as this may damaged the radio and may also cause you
to exceed FCC RF exposure limits. A proper antenna is the antenna supplied with this radio by the manufacturer or
antenna specifically authorized by the manufacturer for use with this radio.
DO NOT transmits for more than 50% of total radio use time (“50%duty cycle”). Transmitting more than 50% of the time
can cause FCC RF exposure compliance requirements to be exceeded. The radio is transmitting when the “TX indicator”
lights red. You can cause the radio to transmit by pressing the “PTT” switch.
ALWAYS keep the antenna at least 2.5 cm (1 inch) away from the body when transmitting and only use the belt-clip
which is listed in instructions when attaching the radio to your belt, etc., to ensure FCC RF exposure compliance
requirements are not exceeded. To provide the recipients of your transmission the best sound quality, hold the antenna
at least 5 cm (2 inches) from your mouth, and slightly off to one side.
TheinformationlistedaboveprovidestheuserwiththeinformationneededtomakehimorherawareofRF
exposure,andwhattodotoas‐surethatthisradiooperateswiththeFCCRFexposurelimitsofthisradio.
ElectromagneticInterference/Compatibility
During transmissions, Lisheng (Fujian) Communications Co., Ltd. generates RF energy that can possibly
cause interference with other devices or systems. To avoid such interference, turn off the radio in areas where
signs are posted to do so. DO NOT operate the transmitter in areas that are sensitive to electromagnetic radiation
such as hospitals, aircraft, and blasting sites.
Occupational/ControlledUse
Theradiotransmitterisusedinsituationsinwhichpersonsareexposedasconsequenceoftheiremployment
providedthosepersonsarefullyawareofthepotentialforexposureandcanexercisecontrolovertheirexposure.