Loopcomm Technology LP-9318A High Power 802.11B/G/N Outdoor Wireless AP Router(1T1R) User Manual 20131107x
Loopcomm Technology,.Inc. High Power 802.11B/G/N Outdoor Wireless AP Router(1T1R) 20131107x
Users Manual

UserManual
Ver1.0.0
Ⓒ2013/9

1
Contents
INTRODUCTION..............................................................................................................................................................3
GETTING STARTED.......................................................................................................................................................3
Package Contents........................................................................................................................................................3
LED Indicators..............................................................................................................................................................4
Inside Panel..................................................................................................................................................................4
Power over Ethernet (PoE) Adapter..........................................................................................................................5
MOUNTING INSTRUCTIONS.......................................................................................................................................6
Desktop Mounting (Indoor).........................................................................................................................................6
Wall Mounting...............................................................................................................................................................6
Pole Mounting...............................................................................................................................................................7
PLUG AND PLAY SETUP GUIDE................................................................................................................................8
ADDITIONAL SETTINGS.............................................................................................................................................10
Accessing the Settings Menu...................................................................................................................................10
Open your Web Browser...........................................................................................................................................10
Welcome to the Smart Setup Wizard......................................................................................................................11
Set the System Clock................................................................................................................................................11
Wireless Network ID..................................................................................................................................................12
Wireless Network Security........................................................................................................................................12
Setup Summary..........................................................................................................................................................14
WIRELESS SETTINGS.................................................................................................................................................15
Basic Settings.............................................................................................................................................................15
Security........................................................................................................................................................................17
Wi-Fi Protected Setup (WPS)..................................................................................................................................17
WDS Settings.............................................................................................................................................................19
Antenna Settings........................................................................................................................................................20
Advanced Settings.....................................................................................................................................................20
SMART FEATURES......................................................................................................................................................21
Access Schedule........................................................................................................................................................21
User Access Control..................................................................................................................................................21
Wireless Coverage Controls.....................................................................................................................................22
IP SETTINGS.................................................................................................................................................................23
MANAGEMENT FEATURES.......................................................................................................................................25
System Status.............................................................................................................................................................25
Network Statistics.......................................................................................................................................................25
System Clock..............................................................................................................................................................25
Upgrade Firmware.....................................................................................................................................................25

2
Save and Reload Settings........................................................................................................................................27
Password Settings.....................................................................................................................................................27
TECHNICAL SPECIFICATIONS.................................................................................................................................28
DEFAULT SETTINGS...................................................................................................................................................28
TROUBLESHOOTING AND SUPPORT INFORMATION.......................................................................................28
TROUBLE SHOOTING.................................................................................................................................................29
WARRANTY AND REGULATORY INFORMATION................................................................................................32

3
INTRODUCTION
ThankyouforpurchasingthisLoopcommproduct.AtLoopcommwestrivetoprovideyouwiththehighestqualityproducts
throughinnovationandadvancedtechnology.Weprideourselvesondelivering
Email:service@loopcomm.com
Call:+886‐2‐8686‐9685
Web:http://www.loopcomm.com
GETTING STARTED
Package Contents
Checktomakesureyouhaveallthecontentswithinyourpackage:
HighPowerWirelessNAccessPoint
30ftPoweroverEthernetCable
StandardEthernetCable
PowerAdapter
MetalDesktopStand
MetalPoleMountingClamp
PlasticPoleMountingTie
CDwithUser’sGuide
4
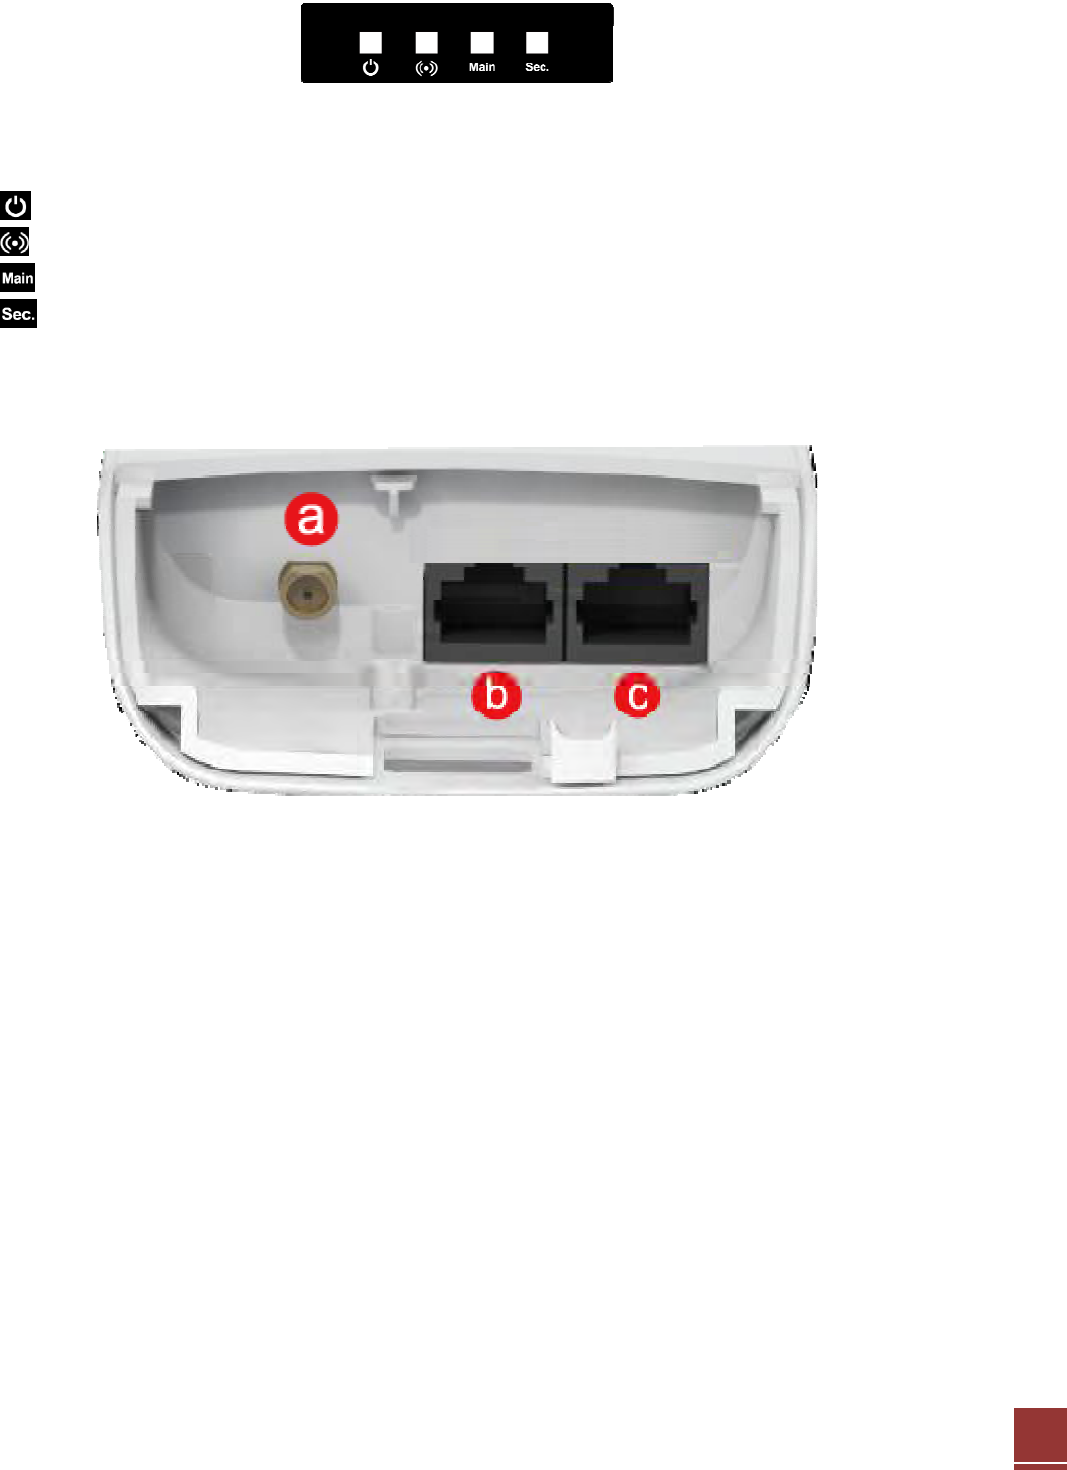
LED Indicators
Power: Whenlit,thepowerison.
Wireless Activity: BlinksrapidlywhenwirelessdatatrafficispassingthroughtheProAccessPoint.
Main: ShowstheconnectionstatusoftheNetworkportonthePoEAdapter
Sec.:Showstheconnectionstatusanddataactivityofyourlocalnetwork(networkdevicesconnectedtothePro
AccessPoint.
Inside Panel
a. Optional External Antenna Port: RJ‐SMAantennaconnector.CompatiblewithallantennaswithRP‐SMAconnectors.
Upgradabletohighgainantennasformorerange.SeetheExternalAntennaconfigurationsectionforsetupprocedures.
b. PoE Port: PoweroverEthernetcapableRJ‐45portusedtoconnecttheProAccessPointtotheincludedPoEAdapter
forpoweranddataconnectivity.
c. LAN Port: RJ‐45portusedtoconnectadditionalnetworkdevicestotheProAccessPoint.
5
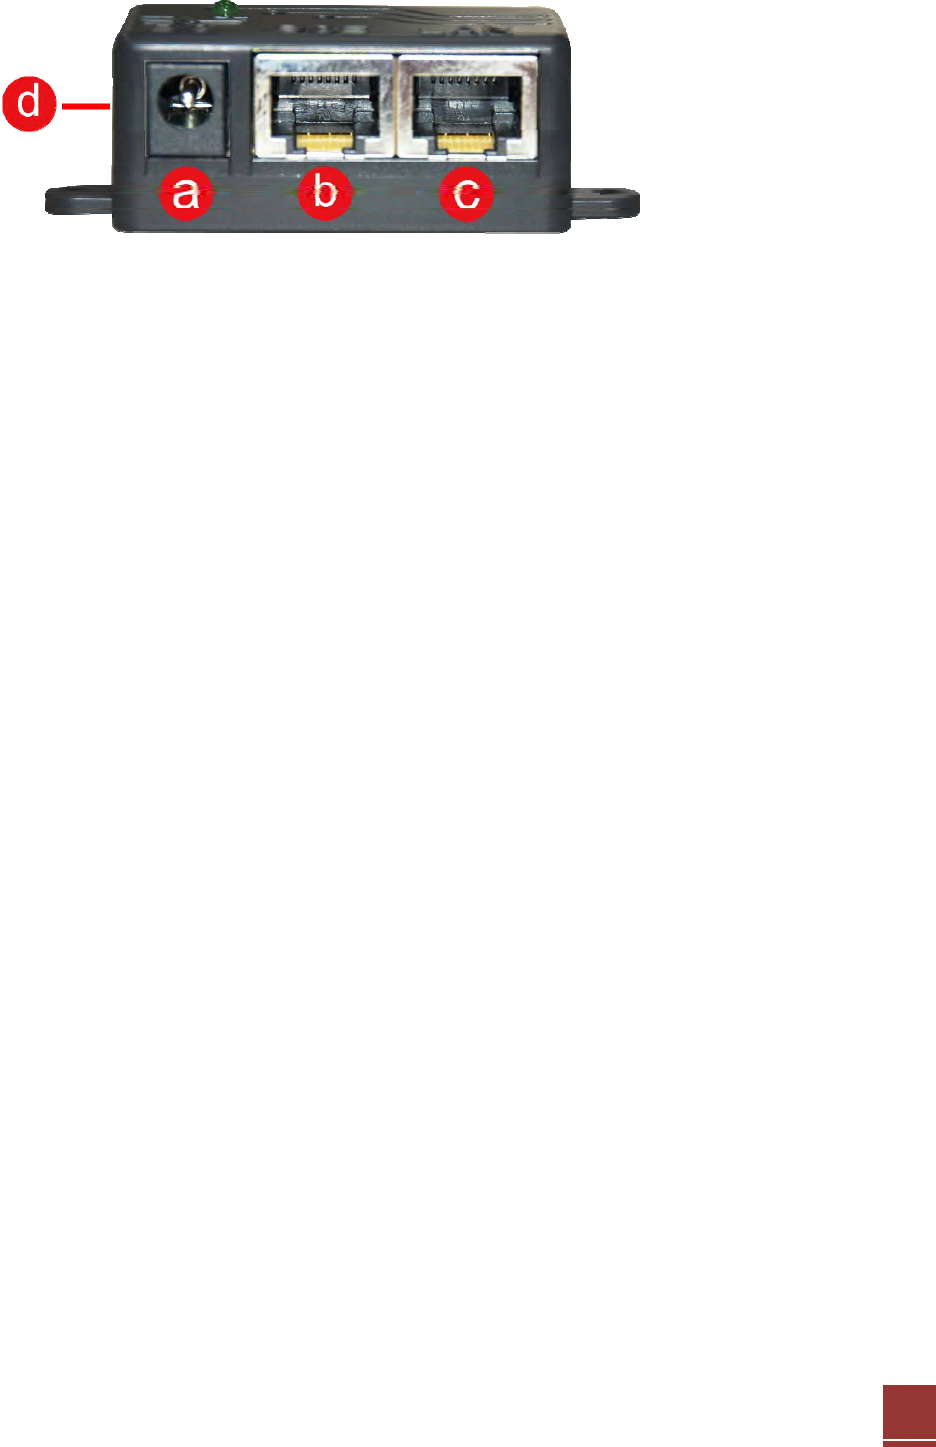
Power over Ethernet (PoE) Adapter
a. Power Adapter Port: ConnecttheincludedpoweradaptertothePoEadapterportforpoweringtheProAccess
Point.
b. AP Port: ConnectaPoEcablebetweenthePoEAdapter’sAPportandthePoEportontheProAccessPointto
providepoweranddatatotheProAccessPoint.
c. Network Port: Connectstoanavailableportonanetworkswitchorrouter’sLANport.
d. Reset Button: TheeasytoaccessresetbuttonislocatedonthebackofthePoEAdapter.Pressingtheresetbutton
willreboottheProAccessPoint.ToresettheProAccessPointtodefaultsettings,holdtheresetbuttondownfor5‐10
secondsandrelease.
6
MOUNTING INSTRUCTIONS
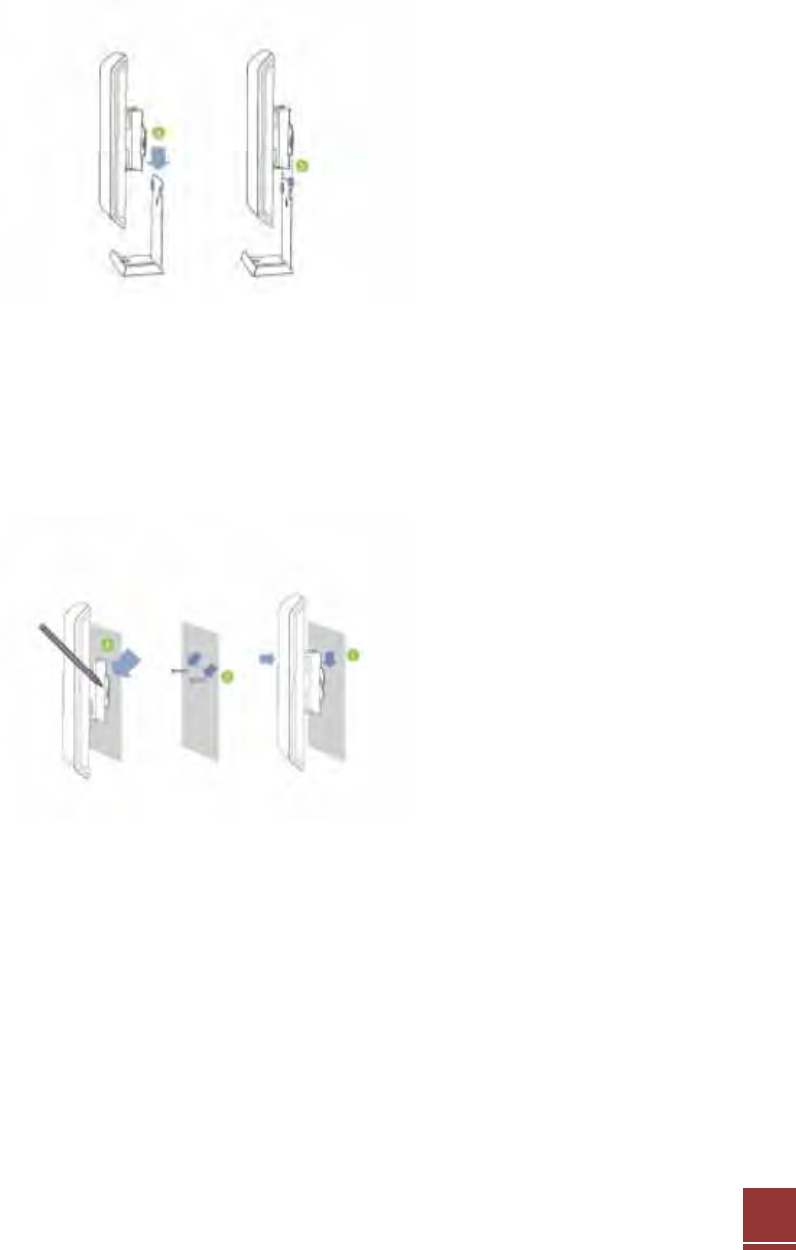
Desktop Mounting (Indoor)
a. Placethestandinanoptimumlocation.
b. SecuretheLP‐9318AontothedesktopmountbyslidingitdownontotheLshapeddesktopmount.
c. Positionthecablessothattheyareneatlytuckedandnotobstructingthestand
Wall Mounting
a. PlacetheLP‐9318Aagainstthewall,useapencilandmarktwolocationsthroughthemountingholeonthewall.
b. RemovetheLP‐9318Aandsecurelydrilltwoscrewswhereyou’vemarkedonthewall.screwswhereyou’ve
markedonthewall.andthewallsotheLP‐9318Acanslidebemountedontothescrews.
c. MounttheLP‐9318AontothesecuredscrewsandadjustthescrewsifneededtosecuretheAccessPointtothe
wall.

7
Pole Mounting
a. PlacetheLP‐9318Aagainstthepole.
b. Usetheincludedhoseclamporplastictieandsecureitthroughthesmallerholelocatedonthebottomofthe
mountingbracket.Useascrewdrivertotightentheclampuntiltheadapterissecurelymountedtothepole.
8
PLUG AND PLAY SETUP GUIDE
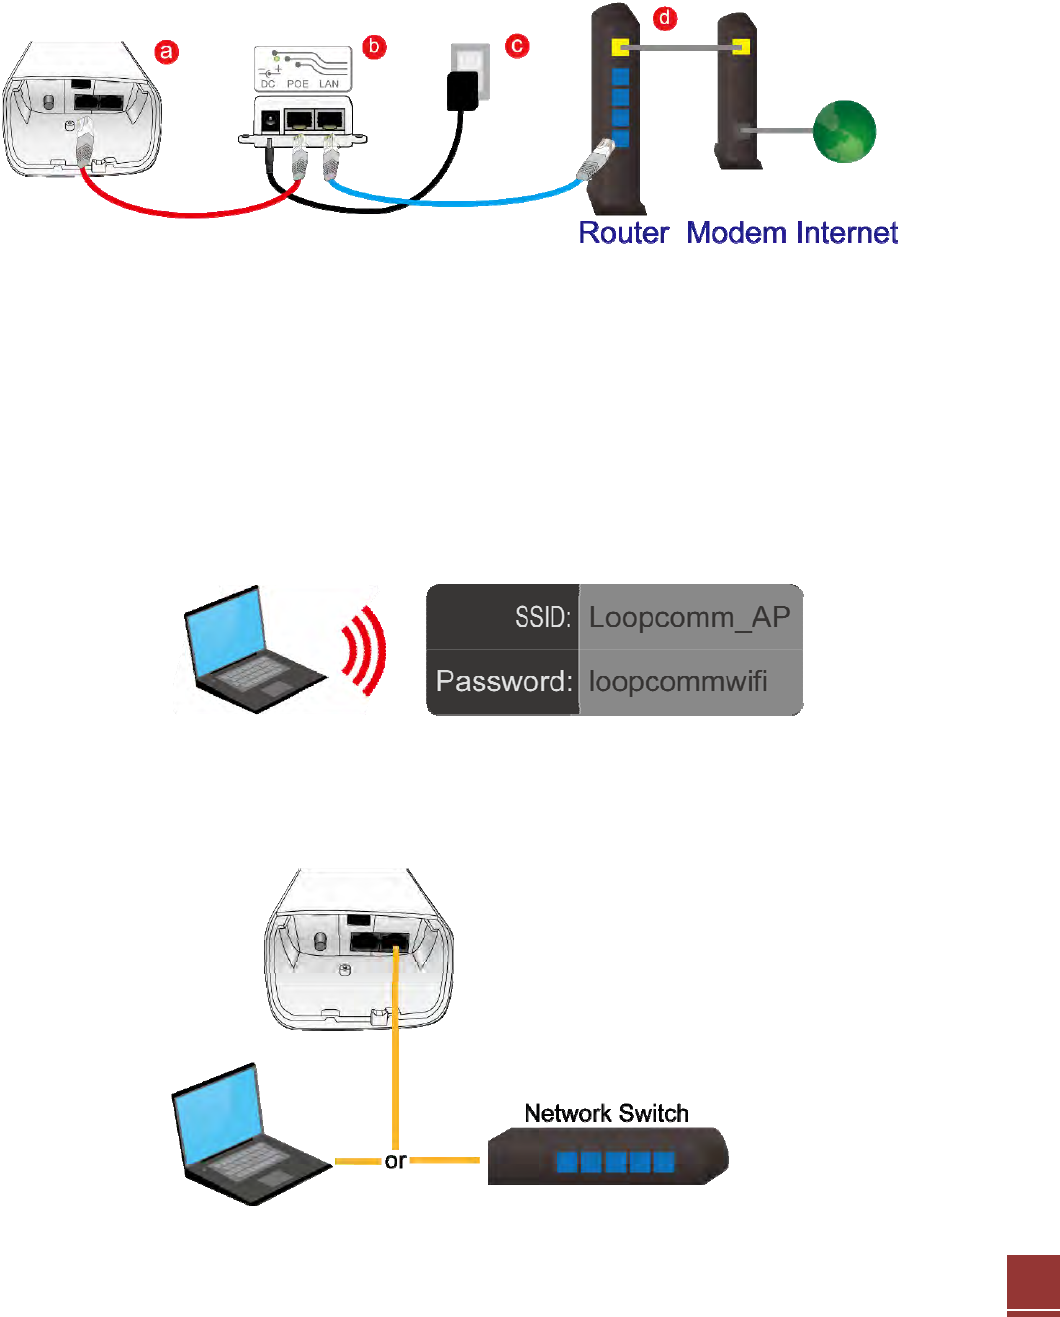
Connect your Pro Access Point to your Router
a.
OpenthelidoftheAccessPointandcheckthatthePoEcableissecurelyfastenedtotheMain port
b.
LocatethePoEAdapterandconnectthe30ftPoEcabletothePOE port onthePoEadapter
c.
LocatethepoweradapterandconnectoneendtoapoweroutletandtheotherendtotheDC port onthePoEadapter.
d.
LocatetheshorternetworkcableandconnectoneendtotheLAN port onthePoEadapterandtheothertoyourrouter’s
network(LAN)port,oranetworkswitch.
Note: Use only Ethernet cables that do NOT support PoE for this connection.
e.
Allowupto2minutesfortheProAccessPointtoconfigureitselftoyournetwork.(DHCPNetworksOnly)
Connect your PC to the Pro Access Point
Connecting Wirelessly:
WithyourPCorMac,scanforavailablewirelessnetworksandlocatethewirelessnetworkfortheProAccessPoint:
BydefaulttheProAccessPointwillhaveaSSIDwiththename:Loopcomm_AP. ThedefaultWPAsecuritykeyis:
loopcommwifi.
Wired Connections:

9
AttachanywireddevicestotheProAccessPointusingEthernetcables.
YourPlugandPlaysetupisnowcomplete.YoumaynowusetheProAccessPointtoaccessyournetwork.

10
ADDITIONAL SETTINGS
Accessing the Settings Menu
ToaccessthesettingsmenuforadditionalchangestotheconfigurationofyourAccessPoint,youwillneedtoaccessthe
settingsmenu.ThesettingsmenuwillallowyoutochangeallfeaturesandsettingsfortheAccessPoint.Toaccessthe
settingsmenufollowtheinstructionsbelow:
a. ScanforavailablewirelessnetworksonyourPCandconnecttothefollowingnetwork:
b. TheSettingsMenucanNOTbeaccessedwithawiredconnectiontotheProAccessPoint.Yourcomputermustbe
connectedtowithawirelessconnectiontotheProAccessPoint.
Open your Web Browser
a. Openyourwebbrowser
b. Typein:http://setup.loopcomm.comintothewebaddressbar
c. Ifthewebmenufailstoopen,thentypeinthefollowingIPaddressintoyourwebaddressbar:http://192.168.1.240
11
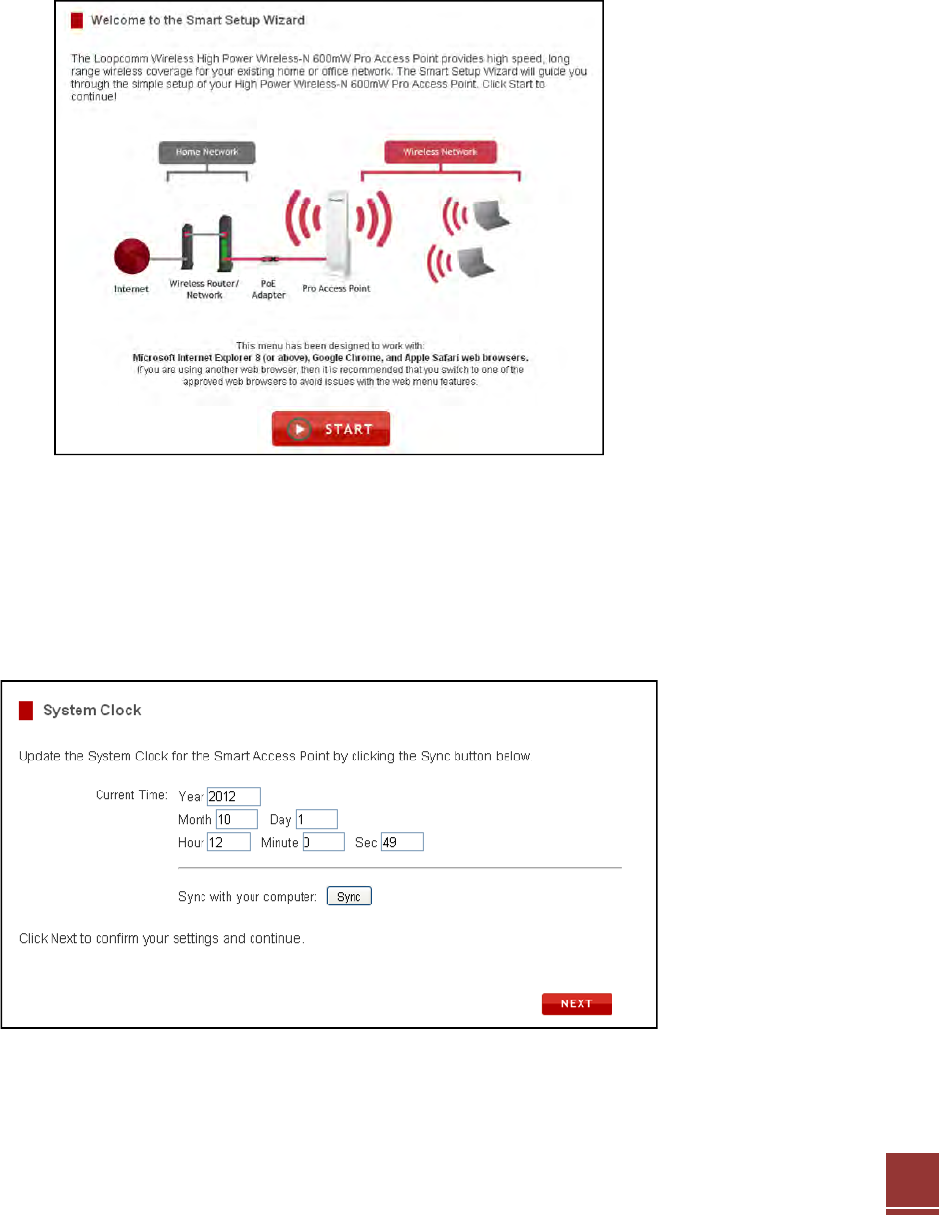
Welcome to the Smart Setup Wizard
Whenthewebmenuappears,clickStart tocontinuetothenextpage.
Thewizardwillguideyouthroughthesetupofyour:
1. SystemClock
2. WirelessNetworkSSID
3. WirelessNetworkSecurityKey
ClickStart tobegin
Set the System Clock
TheSystemClockisusedforsystemlogsandsettingschedulesforInternetaccess.ClickSynctosynchronizetheSystem
Clockwiththetimeonyourcomputer.
ClickNexttoContinue

12
Wireless Network ID
TheIDofyourWirelessNetworkis:Loopcomm_AP
Tochangeit,enteranewnameintheSSIDfield.UsersconnectingwirelesslytotheAccessPointwillusethisIDto
identifyyourwirelessnetwork.
ClickNexttocontinue.
Wireless Network Security
ThedefaultSecurityKey(WPA)ofyourwirelessnetworkis:loopcommwifi
Tochangeit,enteranewkeyintheSecurityKeyfield.Thekeymustbeatleast8characterslong.

13
ClickNexttoapplyyoursettings.
TheAccessPointwillreboot.Thisprocessmaytakeupto2minutes.Donotrefreshthewebpage.Thepagewill
automaticallyreloadwiththeconnectionstatus.

14
Setup Summary
TheSetupSummaryprovidesyouwithinformationregardingyourcurrentsettings.
Ifyouhavewirednetworkdevices,youmayattachthemtothewiredportsonthebackoftheAccessPointforadditional
wiredconnectivity.
ForinformationonadditionalsettingsandconfigurationsforyourProAccessPoint,continuetothenextsection.

15
WIRELESS SETTINGS
Basic Settings
TheWirelessBasicSettingspageallowsyoutoadjust
settingsforyourwirelessnetwork.Thesesettings
areforadjustingtheAccessPointafteryouhave
alreadygonethroughtheSmartSetupWizardand
wishtoadjustyourcurrentconfigurations.
Disable Wireless LAN Interface:
Turnsoffallwirelessaccess.
Band:
Allowsyoutosetupaccessunderaspecific
combinationofWi‐Fispeedstandards.
Broadcast SSID:
DisablingthebroadcastingofyourSSIDwillmakeitsooutsideuserscannotseeyournetworkwhentheyscanfor
wirelessnetworks.UsersmustmanuallyentertheSSIDtoconnect.
Data Rate:
Adjustthespeedofyourwirelessnetwork.ItisrecommendedthatyouuseAutoforthisselection.
SSID of Wireless network:
ThisisthenameofyourWirelessnetworkandthenamethatuserswillscanfortoconnectwirelessly.
Multiple SSID:
Youmayaddoneadditional(SSID)toyouWirelessnetwork.TheadditionalSSIDcanhaveitsownsecurity,bandand
dataratesettings.YoumayrestrictusersforspecificSSIDsorprovideaccessonlytosomeuserswithlowerbandwidth
bychangingtheband.(i.e.onlyallow802.11baccesstospecificusers)
Channel Width:
Wi‐Fioperatesintwoseparatechannelwidths,20Hzand40Hz.20Hzallowsoperationonchannels1‐11,while40Hzis
5‐11.40Hzallowsforfasterspeeds.Selectthechannelwidthyouwishtouseforyournetwork.
Control Sideband:
Thisrelatestothechannelnumberusedforyourwirelessnetwork.Anupperbandrepresentshigherchannelsand
viceversa.
Channel Number:
Thechannelnumberusedforyourwirelessnetwork.Ifthereareotherwirelessnetworksusingthesamechannel,this
maycauseslowerperformance.Youmayadjustthechannelheretoattempttoimproveperformancethroughless
interference.
WMM:
Prioritizesaudioandvideocontentgoingoveryourwirelessnetwork.
Associated Clients:

16
DisplaysallwirelessconnectionstotheProAccessPoint
17
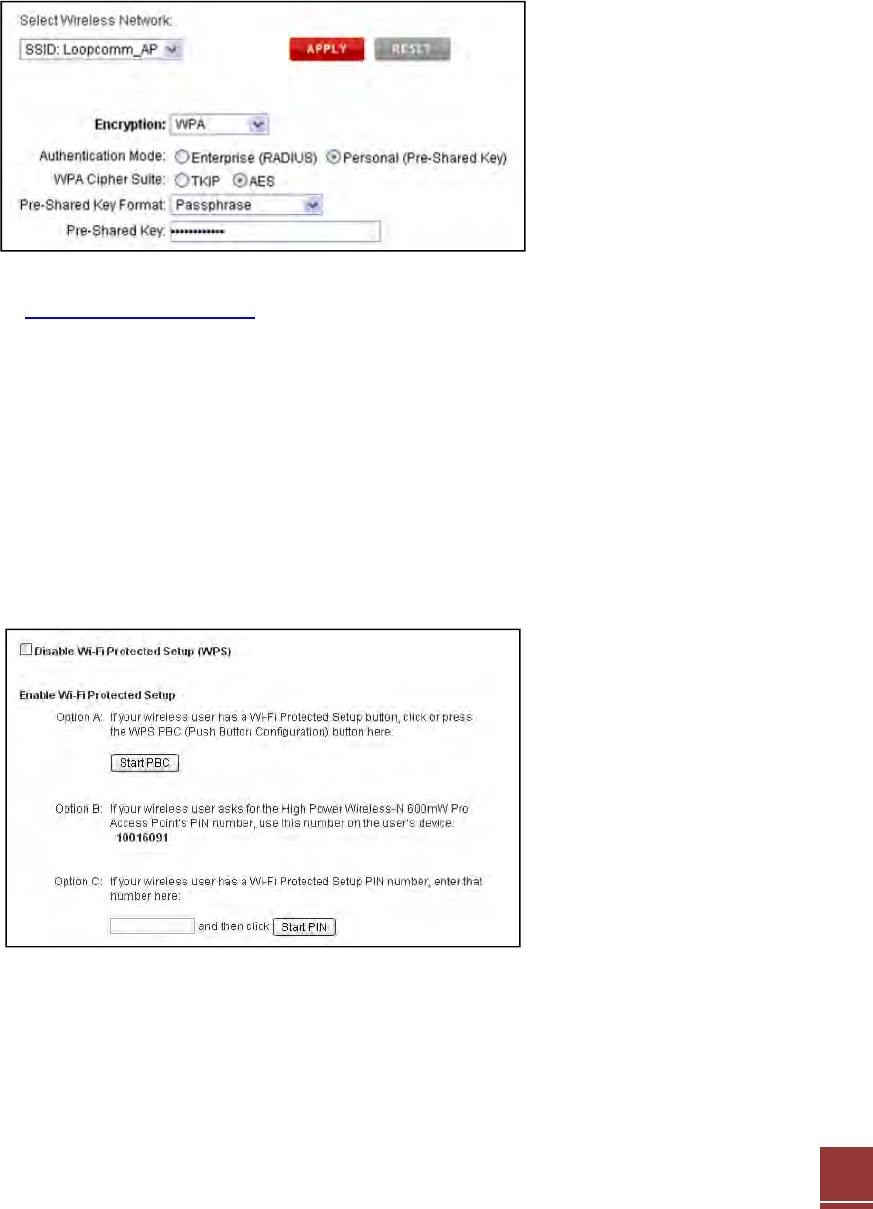
Security
Wirelesssecurityallowsyoutochangethesecuritytype,password/keyandformatofyourwirelessnetworksecurity
settings.
Note:ThesecuritykeyyouselectmustbeusedbyallcomputersanddevicesconnectingtotheAccessPointwirelessly.
Usingthedropdownmenu,youcanselectwhichnetworkyouwishtoconfigureandadjustthesecuritysettingsfor
(standardwirelessnetworkorthemultipleSSIDnetwork).
FormoreinformationonthedifferencesbetweenthetypesofWi‐Fisecurityavailable,pleasechecktheLearningCenter
oftheLoopcommwebsite:http://www.loopcomm.com
Note:WEP64bitand128bitsecurityisamoreprimitiveWiFisecurityencryptiontypeandlimitswirelessperformance
andspeedfromtheAccessPoint.ItisrecommendedtouseWPAorWPA2asyourencryptiontype.Note:Someolder
WindowsXPcomputers(PreServicePack3)maynotsupportWPA2.
Wi-Fi Protected Setup (WPS)
WPSisaWi‐FifeaturecreatedtomakeWi‐Fisetupsimplerandeasier.Somewirelessdevicesandadapterssupportthis
featurewithvaryingnames(i.e.onetouchsetuporWPS).
YoumayenableWPSsetupherebyselectingthetypeofWPSsetupyouwishtouse.TheAccessPointsupportsalltypes
ofWPSsetup:

18
Push button:
YoumaypushtheWPSbuttononthewebmenu.TheAccessPointdoesnothaveaphysicalWPSbutton.
19
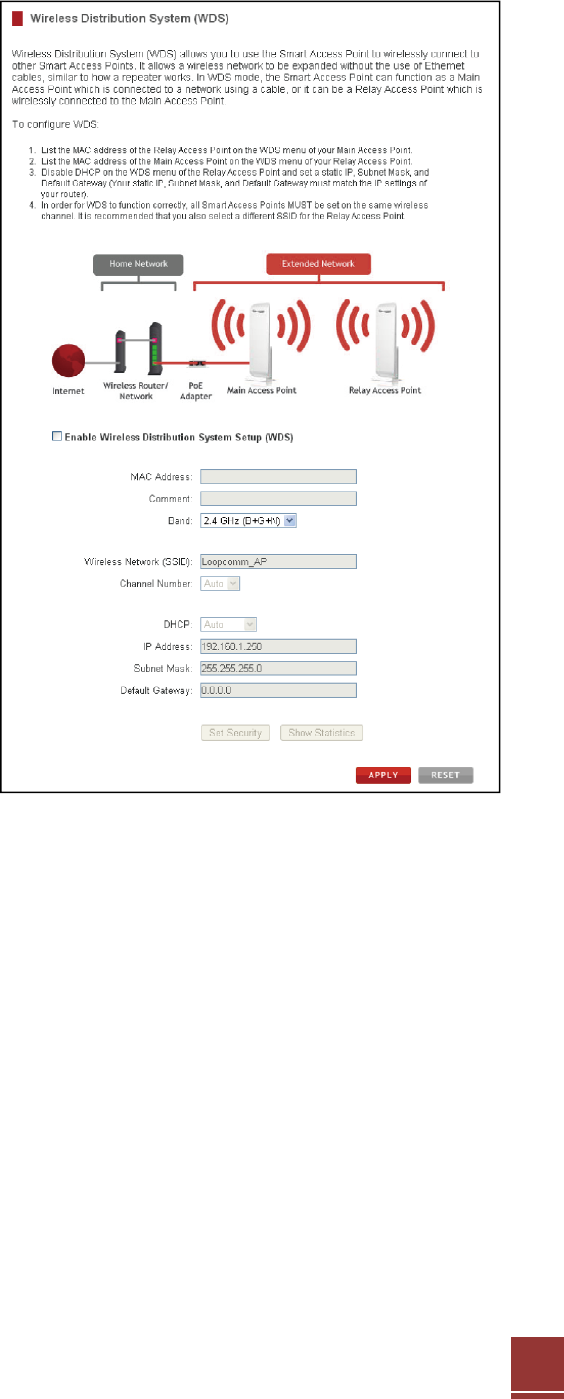
WDS Settings
WirelessDistributionSystem(WDS)allowsyoutousethe
AccessPointtowirelesslyconnecttootherProAccess
Points.Itallowsawirelessnetworktobeexpanded
withouttheuseofEthernetcables,similartohowa
repeaterworks.InWDSmode,theAccessPointcan
functionasaMainAccessPointwhichisconnectedtoa
networkusingacable,oritcanbeaRelayAccessPoint
whichiswirelesslyconnectedtotheMainAccessPoint.
ToconfigureWDSmodeyouwillneedtoadjustthe
settingsforthefollowingfields:
a. Enable WDS: FirstyoumustenabledtheWDS
functiontouseit.
b. MAC Address: EntertheMACaddressofthe
ProAccessPointthatyouwishtoconnectto.If
youareconfiguringtheMainAccessPointthen
youwouldneedtoenterthe“RelayAccess
Point’s”MACAddresshere.The“RelayAccess
Point”AccessPoint’s”MACAddresshere.The
“RelayAccessPoint”
c. Comment: Provideacomment,suchas“Main
AccessPoint”toeasilyrememberwhichAccess
PointbelongstowhichMACAddressentry.
d. Band: Selectthewirelessbandyouwishto
operateon.
e. Wireless Network (SSID): EnterthewirelessSSIDofyourAccessPoint.EnsurethatallWDSAccessPoints
haveuniqueSSID’s.DonotusethesameSSIDfortwoseparateAccessPoints.
f. Channel: EnsurethatallProAccessPoints,MainorRelayoperateonthesamewirelesschannel.
g. DHCP: WDSmoderequiresthatyouhaveastaticIPaddressforyourAccessPoint.EnterastaticIPaddressfor
yourAccessPointbyselecting“Disable”undertheDHCPfield.
h. IP Address: TheIPaddressoftheProAccessPointshouldbeonthesameIPaddresssubnetastheMainor
RelayAccessPoints.Forexample,ifthenetworkyouareconnectedtohasanIPaddressrangeof
192.168.1.100–192.168.1.200,thentheIPaddressoftheProAccessPointshouldalsobe192.168.1.1xx.
i. Subnet Mask: ThesubnetmaskfortheProAccessPointshouldbethesameasthenetworkyouare
connectingto.(i.e.255.255.255.0)
j. Default Gateway: ThisentryistypicallytheIPaddressofyournetworkrouter.(i.e.192.168.1.1)
20
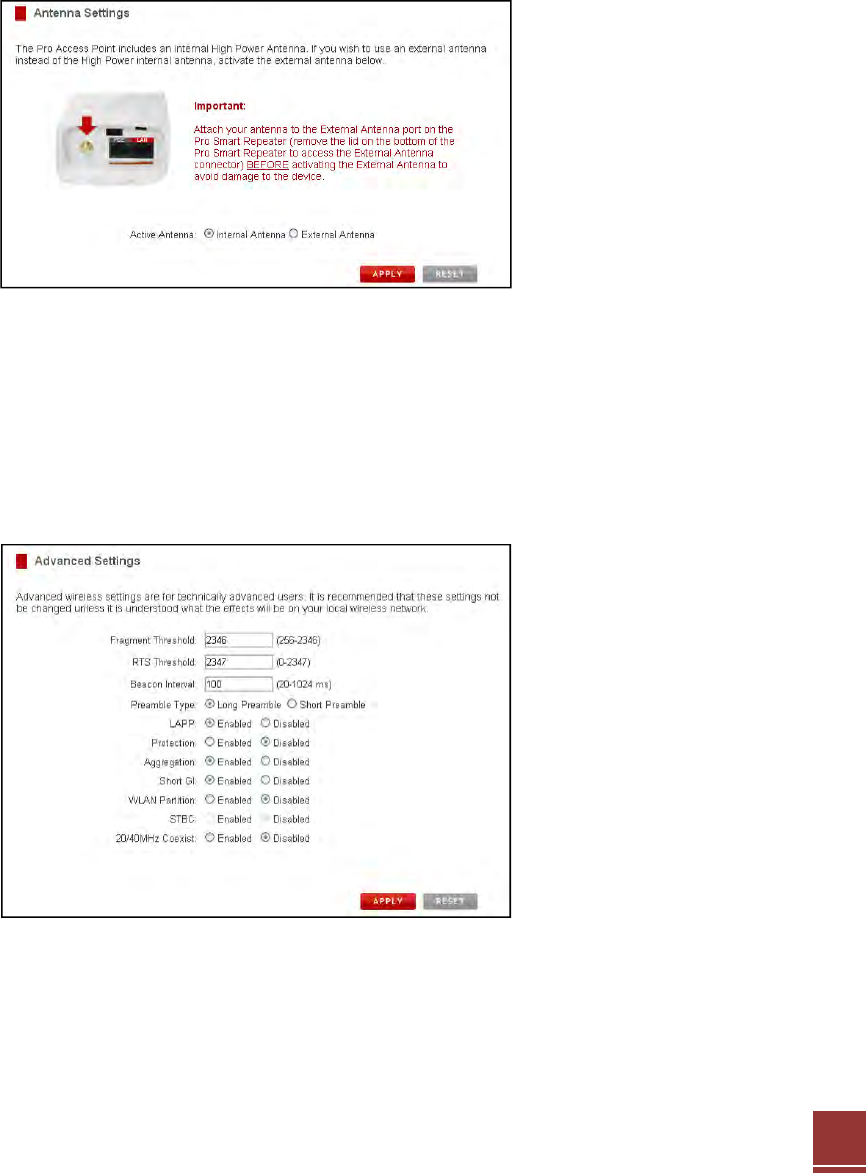
Antenna Settings
TheAccessPointincludesaninternalHighGainAntenna,however,ifyouwishtouseanexternalantennainsteadofthe
internalantenna,youmayactivatetheExternalAntennaporthere.
TheExternalAntennaPortisaRP‐SMAportandacceptsRP‐SMAantennaconnections.Itiscompatiblewithmosthigh
gainantennas.
ItisimportantthatyouattachtheexternalantennatotheExternalAntennaPortBEFOREactivatingtheExternal
AntennaPorttoavoiddamagetotheProAccessPoint.
Afteryouhaveattachedtheexternalhighgainantenna,selecttheExternalAntennaselectionunderActiveAntennaand
clickApply.AftertheAccessPointreboots,yourexternalantennawillbeactiveandreadyforuse.
Advanced Settings
ItisrecommendedthatonlyexpertsinWi‐FiconfigurationadjusttheadvancedwirelesssettingsfortheAccessPoint.
Thesesettingsallowyoutocontrolthedetailsofyourwirelessnetworkconfiguration.
21
SMART FEATURES
TheAccessPointprovidesyourwirelessnetworkwithSmartFeaturesthathelptoprovideconvenienceandprotectionfor
yourwirelessnetwork.TheSmartFeaturesallowyoutocontrolaccesstoyourwirelessnetworkthroughon/offschedules,
specificuserauthorizationsaswellasthroughthesizeofyourwirelesscoverageforyourwirelessnetwork.
Note:ThesesettingsonlyapplytousersconnectingthroughtheProAccessPointtoyournetwork.
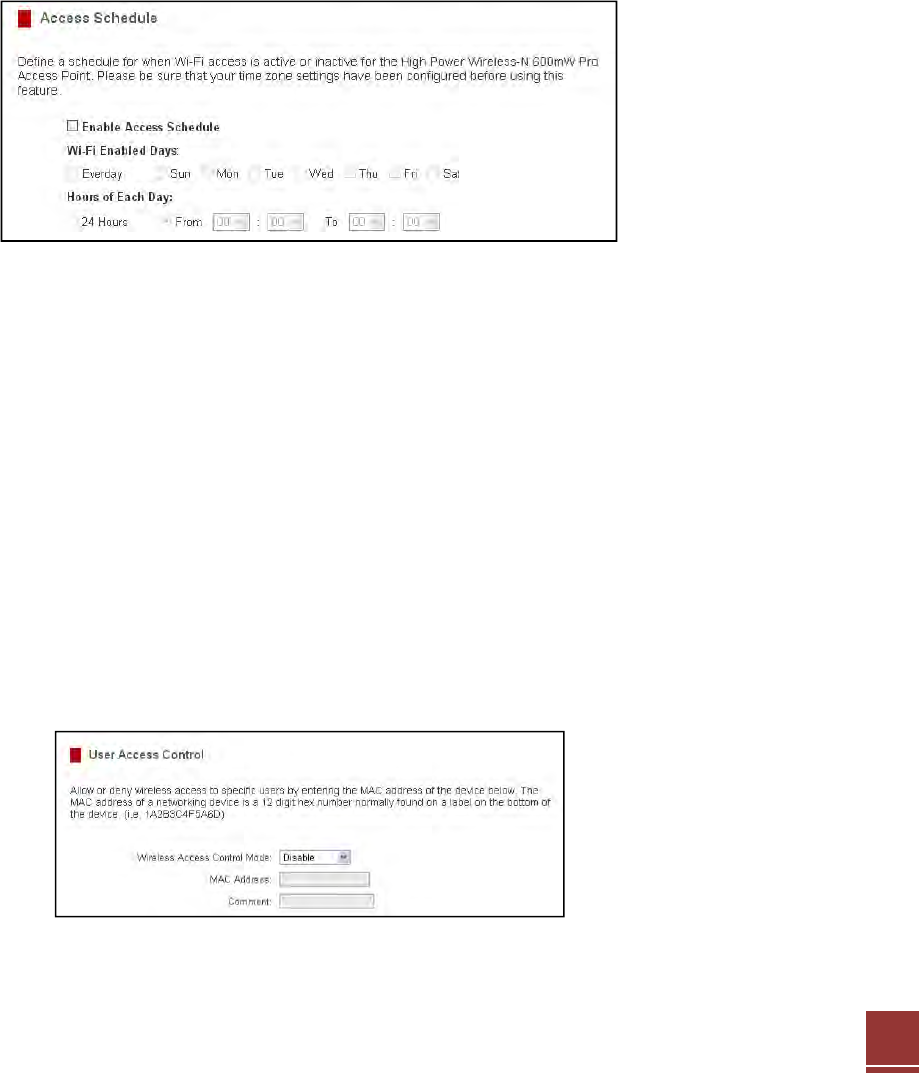
Access Schedule
YoucansetascheduleforwhenyourWi‐FiisenabledordisabledthroughtheAccessSchedulefeature.Todoso:
a. EnableAccessSchedule
b. SelectwhichdaysyouwishforyourWi‐Fitobeavailable
c. SelectthetimeframeduringthatdaythatyouwishforWi‐Fitobeavailable
d. ApplyChanges
Note:MakesureyouhavealreadyconfiguredyourTimeZoneSettingsinorderforyourscheduletoworkcorrectly.Time
ZoneSettingscanbeadjustedfromthewebmenuunderManagement>TimeZoneSettings.
User Access Control
UserAccessallowsyoutodenyaccessorallowaccesstospecificusersconnectingwirelesslytoyourwirelessnetwork.
EachnetworkingdevicehasauniqueaddresscalledaMACaddress(a12digithexnumber).ByinputtingtheMAC
addressintothefield,youcandefinewhetherthatdeviceisallowedintoyournetworkornotallowed.Whenentering
theMACaddress,onlyenteralpha‐numericalcharacters(i.e.A1B233C45566).

22
Wireless Coverage Controls
AdjusttheoutputpoweroftheProAccessPointtocontrolthecoveragedistanceofyourwirelessnetwork.Forasmaller
coverageareayoucanselectaloweroutputpower.Forthemaximumwirelesscoverageselectthe100%selection.Note
thatifyouselectaloweroutputpower,yourconnectiontoyourHomeNetworkwillalsodecreaseinrange.Sobecareful
andtestyoursignalstrengthaftereachadjustment.

23
IP SETTINGS
IP Address:
TheIPaddressoftheAccessPoint.
Subnet Mask:
ThesubnetoftheAccessPoint.
Default Gateway:
TheAccessPointtoanothernetwork,normallytheAccessPointoryourrouter.
DHCP:
TheAccessPointincludesa‘Smart’AUTO DHCP featuretohelpmanagetheIPaddresseswithinyourwirelessnetwork
andwithyourrouter.WhentheAccessPointisconnectedtoyourhomenetwork/routerthoughtthe‘Network’portthe
AUTODHCPwilldeterminewhetheritcanreceiveanIPaddressfromyourrouter.Ifitcanitwillautomaticallyswitchto
aclientandallowyourroutertoassignitanIPaddress.However,whenthereisnoconnectionavailable,theAccess
PointwillactasaDHCPServer.YoumayalsomanuallycontroltheIPsettingsoftheAccessPointbychoosing,Client,
ServerorDisabledfromtheDHCPdropdownmenu.Thisisonlyforadvancedusers.
DHCP Client Range:
TherangeofIPaddressestheAccessPoint’sDHCPserverwillassigntousersanddevicesconnectingtotheAccessPoint.
Disabled / Static DHCP:
IfyournetworkrequirestheuseofmanualIPaddressassignments,selectthisoption.YoumaymanuallyentertheIP
addresssettingsoftheAccessPointsoitreflectsthecorrectaddressestoworkwithyourspecificnetwork.
Note:InStaticIPmode,thesetupURL:http://setup.loopcomm.comwillnolongerwork.Youwillneedtomanuallyenter
theIPaddressoftheAccessPointtoaccessthesetupmenuinthefuture.
Domain Name:
TheDomainNameallowsyoutochangetheURLwhichisusedtoaccesstheSetupMenufortheAccessPoint.For
example,enteringhttp://setup.loopcomm.comintoyourwebbrowserwhileconnectedtotheAccessPoint,willguide
youtotheWebmenufortheAccessPoint.BychangingtheDomainName,youwillchangetheURLenteredtoaccess
theWebmenu.IfyouforgettheDomainNameyouenteredandcannolongeraccesstheWebmenu,thenyouwillneed

24
toresetyourAccessPointtodefaultsettingsbyholdingdowntheresetbuttononthebackpanelfor5‐10seconds.
25
MANAGEMENT FEATURES
TheManagementfeaturesontheAccessPointallowyoutoviewthestatusofyourAccessPointandyourwirelessnetwork.
System Status
TheAccessPointSystemStatuspageprovidesfullinformationregardingthesystem,wirelessnetworkand
configurationsaswellasthecurrentIPsettingsoftheAccessPoint.Thispageisoftenusedtocheckthehealthofyour
wirelessnetworkandthelinktoyourhomerouter/network.
Network Statistics
TheNetworkStatisticspageprovidesdetailedtrafficdataforeachconnectiontype.Viewthispagetoseetheamountof
trafficgoingthroughtheAccessPoint’swiredorwirelessconnections.
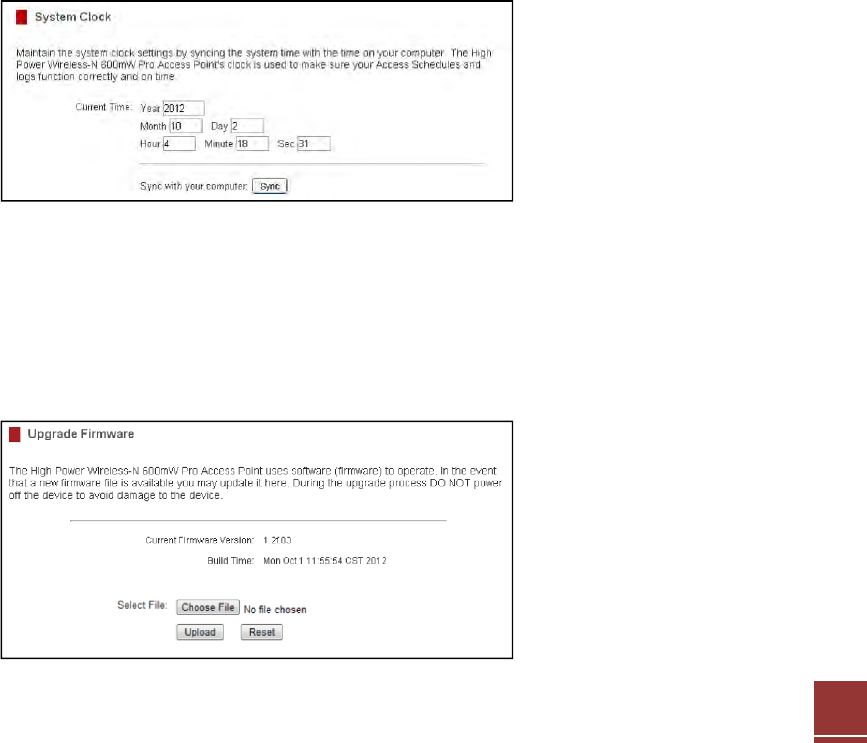
System Clock
MaintaintheinternalclockfortheProAccessPointbysyncingwithyourcomputer’stime.Yoursystemclocksettings
needtobeaccurateinorderforsystemlogsandwirelessaccessschedulestoworkcorrectly.
Upgrade Firmware
TheAccessPointusesinternetsoftware(firmware)tooperate.Intheeventthatanewfirmwarefileisavailableyoumay
updateithere.DuringtheupgradeprocessDONOTpoweroffthedevicetoavoiddamagetotheAccessPoint.Tocheck
fornewfirmwareclicktheCheckbutton.Ifanewfirmwareisavailableyouwillbegiventheoptiontoinstall.

26
Tomanuallyupgradeyourfirmware:
a. Downloadthefilefromthehttp://www.loopcomm.com/supportwebsiteandrememberthelocationwhereyou
savedit.FirmwarefilesmayalsobeprovidedbyLoopcommsupportreps.
b. ClickBrowseandlocatethefile.
c. ClickUploadtobeginupgrading.
Note:Firmwarefilesnormallyhavea.binfileextension.

27
Save and Reload Settings
Savingyourcurrentsettingsallowsyoutoback‐upyourcurrentsettingswhichmaybereloadedatalatertime.This
featuremaybeusefulfortestingnewfeaturesandsettingswithouthavingtoworryaboutreturningtoastable
platform.
YoumayalsoresettheAccessPoint’ssettingstofactorysettingsbypressingReset.ByresettingtheAccessPointyouwill
loseallpreviousconfigurationsandwillneedtoruntheSmartSetupWizardagaintoreconnecttoaHomeNetwork.
Password Settings
Bydefault,theAccessPointdoesnotrequireapasswordtologintothewebmenu.Ifyouwishtoenableapasswordto
protectunauthorizedaccesstothewebmenuandSmartSetupWizard,youmayenteronehere.
Tosavecurrentsettings:
a. ClickSave
b. Selectafilenameandlocation
Toloadpreviouslysavedsettings:
c. ClickBrowse
d. Locatethepreviouslysavedsettingsfile
e. ClickUploadtorestorethesettingstothesaved

28
TECHNICAL SPECIFICATIONS
DEFAULT SETTINGS
ThedefaultsettingsforyourAccessPointarelistedhere.IfforsomereasonyouneedtoreturnyourAccessPointbackto
defaultsettings,holddowntheResetbuttononthebackpanelfor10seconds.TheProAccessPointwillresetbackto
factorysettingsaslistedbelow:
IPAddress:192.168.1.240
DHCP:Auto
WebMenuAccess:http://setup.loopcomm.com
SSID:Loopcomm_AP
SecurityKey(WPA/AES):loopcommwifi
TROUBLESHOOTING AND SUPPORT INFORMATION
Weareheretohelp.IfyouhaveanyissueswithyourAccessPointpleasecontactus.
TocontactLoopcommTechnicalSupportuseoneofthefollowingmethods:
Phone:+886‐2‐8686‐9685
Email:service@loopcomm.com
Web:www.loopcomm.com/support

29
TROUBLE SHOOTING
Thetipsinthisguidearelistedinorderofrelevance.Trysolution(a)beforetryingsolution(b),etc.
I entered setup.loopcomm.com and it failed to open the Web Menu.
a. MakesureyourcomputerisconnectedtotheAccessPointwirelesslyandNOTusinganetworkcable.Ensurethe
powerispluggedinandon.Trytoaccessthesetupmenuagain.
b. Enterthefollowingwebaddressintoyourwebbrowser:http://setup.loopcomm.com
c. Poweroff(unplugthepoweradapter)theProAccessPointandpoweritbackon.Tryagain.
d. ResetyourAccessPointtodefaultsettingsbyholdingtheResetButton(locatedonthebackpanel)forten(10)
secondsandtryagain.

30
The Access Point is not functioning and the Power LED keeps blinking
a. Thenetwork(Ethernet)cableyouareusingisnotcompatiblewiththeAccessPoint.Replacethenetworkcable
betweenthePoEAdapterandyourrouter/switchwithaNon‐PoECable.
Tip:HowtocheckwhetheryourcableisaPoEcableoraNon‐PoEcable:
Checktheconnectortipofthenetworkcabletoseeifthereare4wiresor8wires.Non‐PoEcablesuseonly4
wires.
b. IfyouhaveacomputerornetworkdeviceattachedtotheLANportoftheProAccessPoint,checkthatthecableisa
Non‐PoEcable.SomeunsupportedPoEdevicesmaycausepowerconflictswiththeAccessPoint.
I do not have Internet access when connecting to the Access Point
a. YourrouterororiginalnetworkmaynothaveInternetaccess.FirstchecktoseeifyouareabletoaccesstheInternet
byconnectingdirectlywithyourrouter.Ifyoucannot,thereisaproblemwithyourrouterthatneedstobefixedfirst.
Ifyouareabletoaccesstheinternet,continuewiththefollowingtroubleshootingoptionsbelow.
b. CheckthattheAccessPointiscorrectlyconnectedtoyourrouterornetworkswitch.Theroutershouldbeconnected
totheNetworkPortonthePoEAdapter(NotdirectlytotheAccessPoint).ThePoEadaptershouldbeconnectedto
theAccessPoint’sPoEport.Aftertheconnectionhasbeenestablished,allowupto2minutesfortheAccessPointto
configureitselftoyourrouter’ssettings.
c. YourroutermaybeusingStaticIPassignments.Ifso,youwillneedtoconfigureaStaticIPfortheAccessPoint.
ConnectyourPCtotheAccessPointusinganEthernetcable.DisconnectyourPCfromanywirelessnetworksthatit
maybeconnectedto.Accessthewebmenuatsetup.loopcomm.comusingawebbrowser.AccesstheIPsettings
menufromthelefthandnavigationbar.Select‘Disable’undertheDHCPdropdownmenuandenteranIPaddress
thatmatchesyourrouter’sIPsettings.
d. DetachthecablefromthePoEAdaptertoyourrouterandresetitbacktodefaultsettingsbyholdingdownthereset
button(redcircle)onthebackofthePoEAdapterfortheAccessPointfor5‐10seconds.Afterithasreset,reattachit
toyourrouter’snetworkport.Allowupto2minutesfortheAccessPointtoreconfigureitselftoyournetworkand
attempttoaccesstheInternetthroughtheAccessPoint’swiredorwirelessnetwork.
My Access Point was working fine previously but now I can no longer access the Internet through the
Access Point.
a. Thesettingsonyourrouter’snetworkmayhavechangedoryoumayhavelostinternetconnectiononyourhome
router.AnychangestotheDHCPsettingsofyourhomeroutermayaffecttheinternetconnectionoftheAccessPoint.
Checkthesettingsonyourrouterandtryagain.
b. ReboottheAccessPointbyunpluggingthePoEAdapter’spoweradapterandpluggingitbackin.Allowupto2
minutesfortheAccessPointtoreconfigureitselftoyournetwork.Checktoseeifyourconnectionhasbeen
reestablishedbyviewingawebsite.

31
I can no longer access the Web Menu or the Access Point no longer responds.
a. DoublecheckthatyouareconnectedtotheAccessPointandnottoyourhomerouter.Disconnectyourcomputer
fromallwirelessnetworksandconnectbacktotheProAccessPoint’swirelessnetworkID(default:Loopcomm_AP)
Trytoaccessthewebmenuagain.
b. Ifyouareadvancedinnetworkingtroubleshooting,logontoyourhomerouter’swebinterface.LookfortheDHCP
clientlistandtrytofindtheIPaddressofyourAccessPointassignedbyyourhomerouter.Onceyouhaveit,connect
totheAccessPointwirelessly.OpenyourwebbrowserandentertheIPaddressintotheaddressbar.
c. ResettheAccessPointbacktodefaultsettingsandtrytheSmartSetupWizardagain.ToresettheAccessPointback
todefaultsettings,holdtheResetButton(onthePoEAdapter)downforfive(5)toten(10)seconds.AftertheAccess
Pointhasfullyreset,connecttotheAccessPointwirelessly.LogintotheWebMenuathttp://setup.loopcomm.com
andreconfigurethesettingsforyourAccessPoint.
The connection through the Access Point seem slow. File transfers take a long time to transfer.
a. Youmaybetoofarawayfromthewirelessnetwork.Wirelessdatatransferspeedsdegradeasdistancesincrease
betweenyourcomputerandtheAccessPoint.
b. YoumaybedownloadingfromtheInternetandnotwithinyourlocalnetwork.FilestransferredthroughtheInternet
arelimitedbyyourISPspeedandthedatadownloadspeedsfromthewebsitethatyouaredownloadingfrom.
c. YourcomputermaybeusinganolderWi‐Fiadapterwithlowerspeedlimits(802.11b/g)
d. YoumayhaveinterferenceonthewirelesschannelthattheAccessPointiscurrentlyusing.Trychangingthechannel
ofyourwirelessnetwork.
The range from the Access Point seems low.
a. Checktoseethatyourwirelessoutputsettingsareat100%.GototheWebMenu,WirelessSettingsandcheckthe
AdvancedSettings.Makesuretheoutputpowerisat100%.
b. YourAccessPointmaybeinstalledinapoorlocation.AvoidsettingupyourAccessPointinareaswithhigh
interference,suchas,nearfridges,microwaves,metallicobjectsandlowsurfaces.InstalltheAccessPointinahigher
locationifpossible.
c. ChecktheconnectionsoftheAntennastotheAccessPoint.Tightenthemifnecessary.
d. AdjustthedirectionoftheAccessPointindifferentangles.Theinternalantennaisahighpowerdirectionalantenna
andwillrequireadjustingtofindtheoptimalorientation.
My Wireless Access Schedule is being erratic and not working at the correct times.
YouneedtoadjustyourTimeZoneSettingsfromtheManagementWebMenupage.
WiFi Protected Setup (WPS) is not working. Push button configuration does not detect the connection.
TheAccessPointsupportsWPSconnectionshoweversomecompaniesmayuseproprietarycodefortheirownpush
buttonconfigurations.TryconnectingusingtheWindowswirelessutilityorMacwirelessutilityinstead.

32
WARRANTY AND REGULATORY INFORMATION
The Loopcomm Technology Limited Warranty
Warranty Period:
TheLoopcommLimitedWarrantyisforone(1)yearfromthedateofpurchasefornewproducts.Refurbished
productscarrytheLimitedWarrantyforthirty(30)daysafterthedateofpurchase.
Guarantee:
LoopcommwarrantstotheoriginalpurchaserthatthehardwareofthisLoopcommproductshallbefreeofdefectsin
design,assembly,material,orworkmanship.
Conditions:
TheLoopcommLimitedWarrantyisforrepairorreplacementonlyatthesolediscretionofLoopcomm.Loopcomm
doesnotissueanyrefundsforpurchasedproduct.IntheeventthatLoopcommisunabletorepairorreplacea
product(i.e.discontinuedproduct),Loopcommwillofferacredittowardthepurchaseofasimilarproductofequalor
lesservaluedirectfromLoopcomm.Anyrepairedorreplacementproductswillbewarrantedfortheremainderofthe
originalWarrantyPeriodorthirty(30)days,whicheverislonger.Loopcommreservestherighttodiscontinueanyof
itsproductswithoutnotice,anddisclaimsanylimitedwarrantytorepairorreplaceanysuchdiscontinuedproduct.
Loopcommreservestherighttoreviseormakechangestothisproduct,itsdocumentation,packaging,specifications,
hardware,andsoftwarewithoutnotice.IfanyportionoftheLoopcommLimitedWarrantyisfoundtobe
unenforceable,itsremainingprovisionsshallremainineffect.AllcostsofshippingtheproducttoLoopcommshallbe
bornesolelybythepurchaser.
Limitations:
INNOEVENTSHALLLoopcommLIABILITYEXCEEDTHEAMOUNTPAIDBYYOUFORTHEPRODUCTFROMDIRECT,
INDIRECT,SPECIAL,INCIDENTALORCONSEQUENTIALDAMAGESRESULTINGFROMTHEUSEOFTHEPRODUCT,ITS
ACCOMPANYINGSOFTWARE,ACCESSORIESORITSDOCUMENTATION.TheLoopcommLimitedWarrantydoesnot
applyif:(a)theproductassemblyhasbeenopenedordamaged,(b)theproductoritssoftwareorfirmwarehasbeen
alteredormodified,(c)theproducthasnotbeenusedandinstalledinaccordancetoLoopcomm’instructions,(d)the
producthasbeensubjectedtomisuse,ornegligence.Loopcommdoesnotguaranteethecontinuedavailabilityofa
thirdparty’sserviceforwhichthisproduct’suseoroperationmayrequire.TheLoopcommLimitedWarrantydoesnot
protectagainstactsofGod,vandalism,theft,normalwearandtear,obsolescenceandenvironmentaldamagessuch
as,butnotlimitedto,weatherandelectricaldisturbances.TheLoopcommLimitedWarrantyisthesolewarrantyfor
thisproduct.Therearenootherwarranties,expressedor,exceptrequiredbylaw,implied,includingtheimplied
warrantyorconditionofquality,performancemerchantability,orfitnessforanyparticularpurpose.

33
How to Claim Warranty:
Intheeventthatyouhaveaproblemwiththisproduct,pleasegotowww.loopcomm.comtofindhelponsolvingyour
problem.Intheeventthatyoucannotandneedtofileawarrantyclaim,pleasecallLoopcomm’CustomerServiceor
visitwww.loopcomm.comtofilloutaReturnAuthorization(RMA)formandobtainaReturnAuthorization(RMA)
number.AdatedproofoforiginalpurchaseandtheRMAnumberisrequiredtoprocesswarrantyclaims.Youare
responsibleforproperlypackagingandshippingtheproductatyourcostandrisktoLoopcomm.Thebearerofcost
relatedtoshippingrepairedorreplacedproductbacktothepurchaserwillbeatthesolediscretionofLoopcommand
determinedbasedonthedetailsofeachRMAcase.CustomersoutsideoftheUnitedStatesofAmericaare
responsibleforallshippingandhandlingcostsincludingcustomduties,taxesandallotherrelatedcharges.
Technical Support:
TheLoopcommLimitedWarrantyisnotrelatedtotheterms,conditionsandpoliciesofLoopcomm’TechnicalSupport
offerings.Forquestionsregardingsupport,pleasecontactservice@loopcomm.com

34
Regulatory Information
FCC Statement and Declaration:
LoopcommdeclaresthatthisdevicecomplieswithPart15oftheFCCRulesandRegulations.Operationofthisdevice
issubjecttothefollowingtwo(2)conditions:
(1) Thisdevicemaynotcauseharmfulinterference
(2) Thisdevicemustacceptanyinterferencereceived,includinginterferencethatmaycauseundesiredoperation.
FCC Notice:
ThisequipmenthasbeentestedandfoundtocomplywiththelimitsforaClassBdigitaldevice,pursuanttoPart
15oftheFCCRules.Theselimitsaredesignedtoprovidereasonableprotectionagainstharmfulinterferenceina
residentialinstallation.Thisequipmentgenerates,usesandcanradiateradiofrequencyenergyand,ifnotinstalled
andusedinaccordancewiththeinstructions,maycauseharmfulinterferencetoradiocommunications.However,
thereisnoguaranteethatinterferencewillnotoccurinaparticularinstallation.Ifthisequipmentdoescause
harmfulinterferencetoradioortelevisionreception,whichcanbedeterminedbyturningtheequipmentoffand
on,theuserisencouragedtotryandcorrecttheinterferencebyoneormoreofthefollowingmeasures:
Reorientorrelocatethereceivingantenna.
Increasethedistancebetweentheequipmentandthereceiver.
Connecttheequipmenttoanoutletonacircuitdifferentfromthattowhichthereceiverisconnected.
Consultthedealeroranexperiencedradio/TVtechnicianforhelp.
FCC Caution and Safety Notices:
Anychangesormodifications(includingtheantennas)madetothisdevicethatarenotexpresslyapprovedbythe
manufacturermayvoidtheuser’sauthoritytooperatetheequipment.Thisdeviceanditsantenna(s)mustnotbe
co‐locatedoroperatinginconjunctionwithanyotherantennaortransmitter.Avoiduseofthisproductnearwater
orduringanelectricalstormastheremaybearemoteriskofelectricalshockfromlighting.Thisproductmay
containlead,knowntotheStateofCaliforniatocausecancer,andbirthdefectsorotherreproductiveharm.Wash
handsafterhandling.ThisdevicemustalwaysbeusedwithaListedComputerordevice.
RFRadiationExposureandHazardStatement:
To ensure compliance with FCC RF exposure requirements, this device must be installed in a location such that the
antenna of the device will be greater than 20 cm (8 in.) away from all persons. Using higher gain antennas and types of
antennas not covered under the FCC certification of this product is not allowed. Installers of the radio and end users of
the product must adhere to the installation instructions provided in this manual. This transmitter must not be co-located
or operating in conjunction with any other antenna or transmitter.
Non‐modificationStatement:
Use only the integral antenna supplied by the manufacturer when operating this device. Unauthorized antennas,
modifications, or attachments could damage the TI Navigator access point and violate FCC regulations. Any

35
changes or modifications not expressly approved by the party responsible for compliance could void the user's
authority to operate this equipment.
DeploymentStatement:
This product is certified for outdoors deployment only. Do not install or use this product indoor.