Lorex Technology LWB6801-W 1080p USB WIRE-FREE RECEIVER G2 User Manual
Lorex Technology Inc. 1080p USB WIRE-FREE RECEIVER G2 Users Manual
Users Manual
HD Wire-Free Security System G2
English Version 1.0 Quick Reference Guide
www.lorex.com
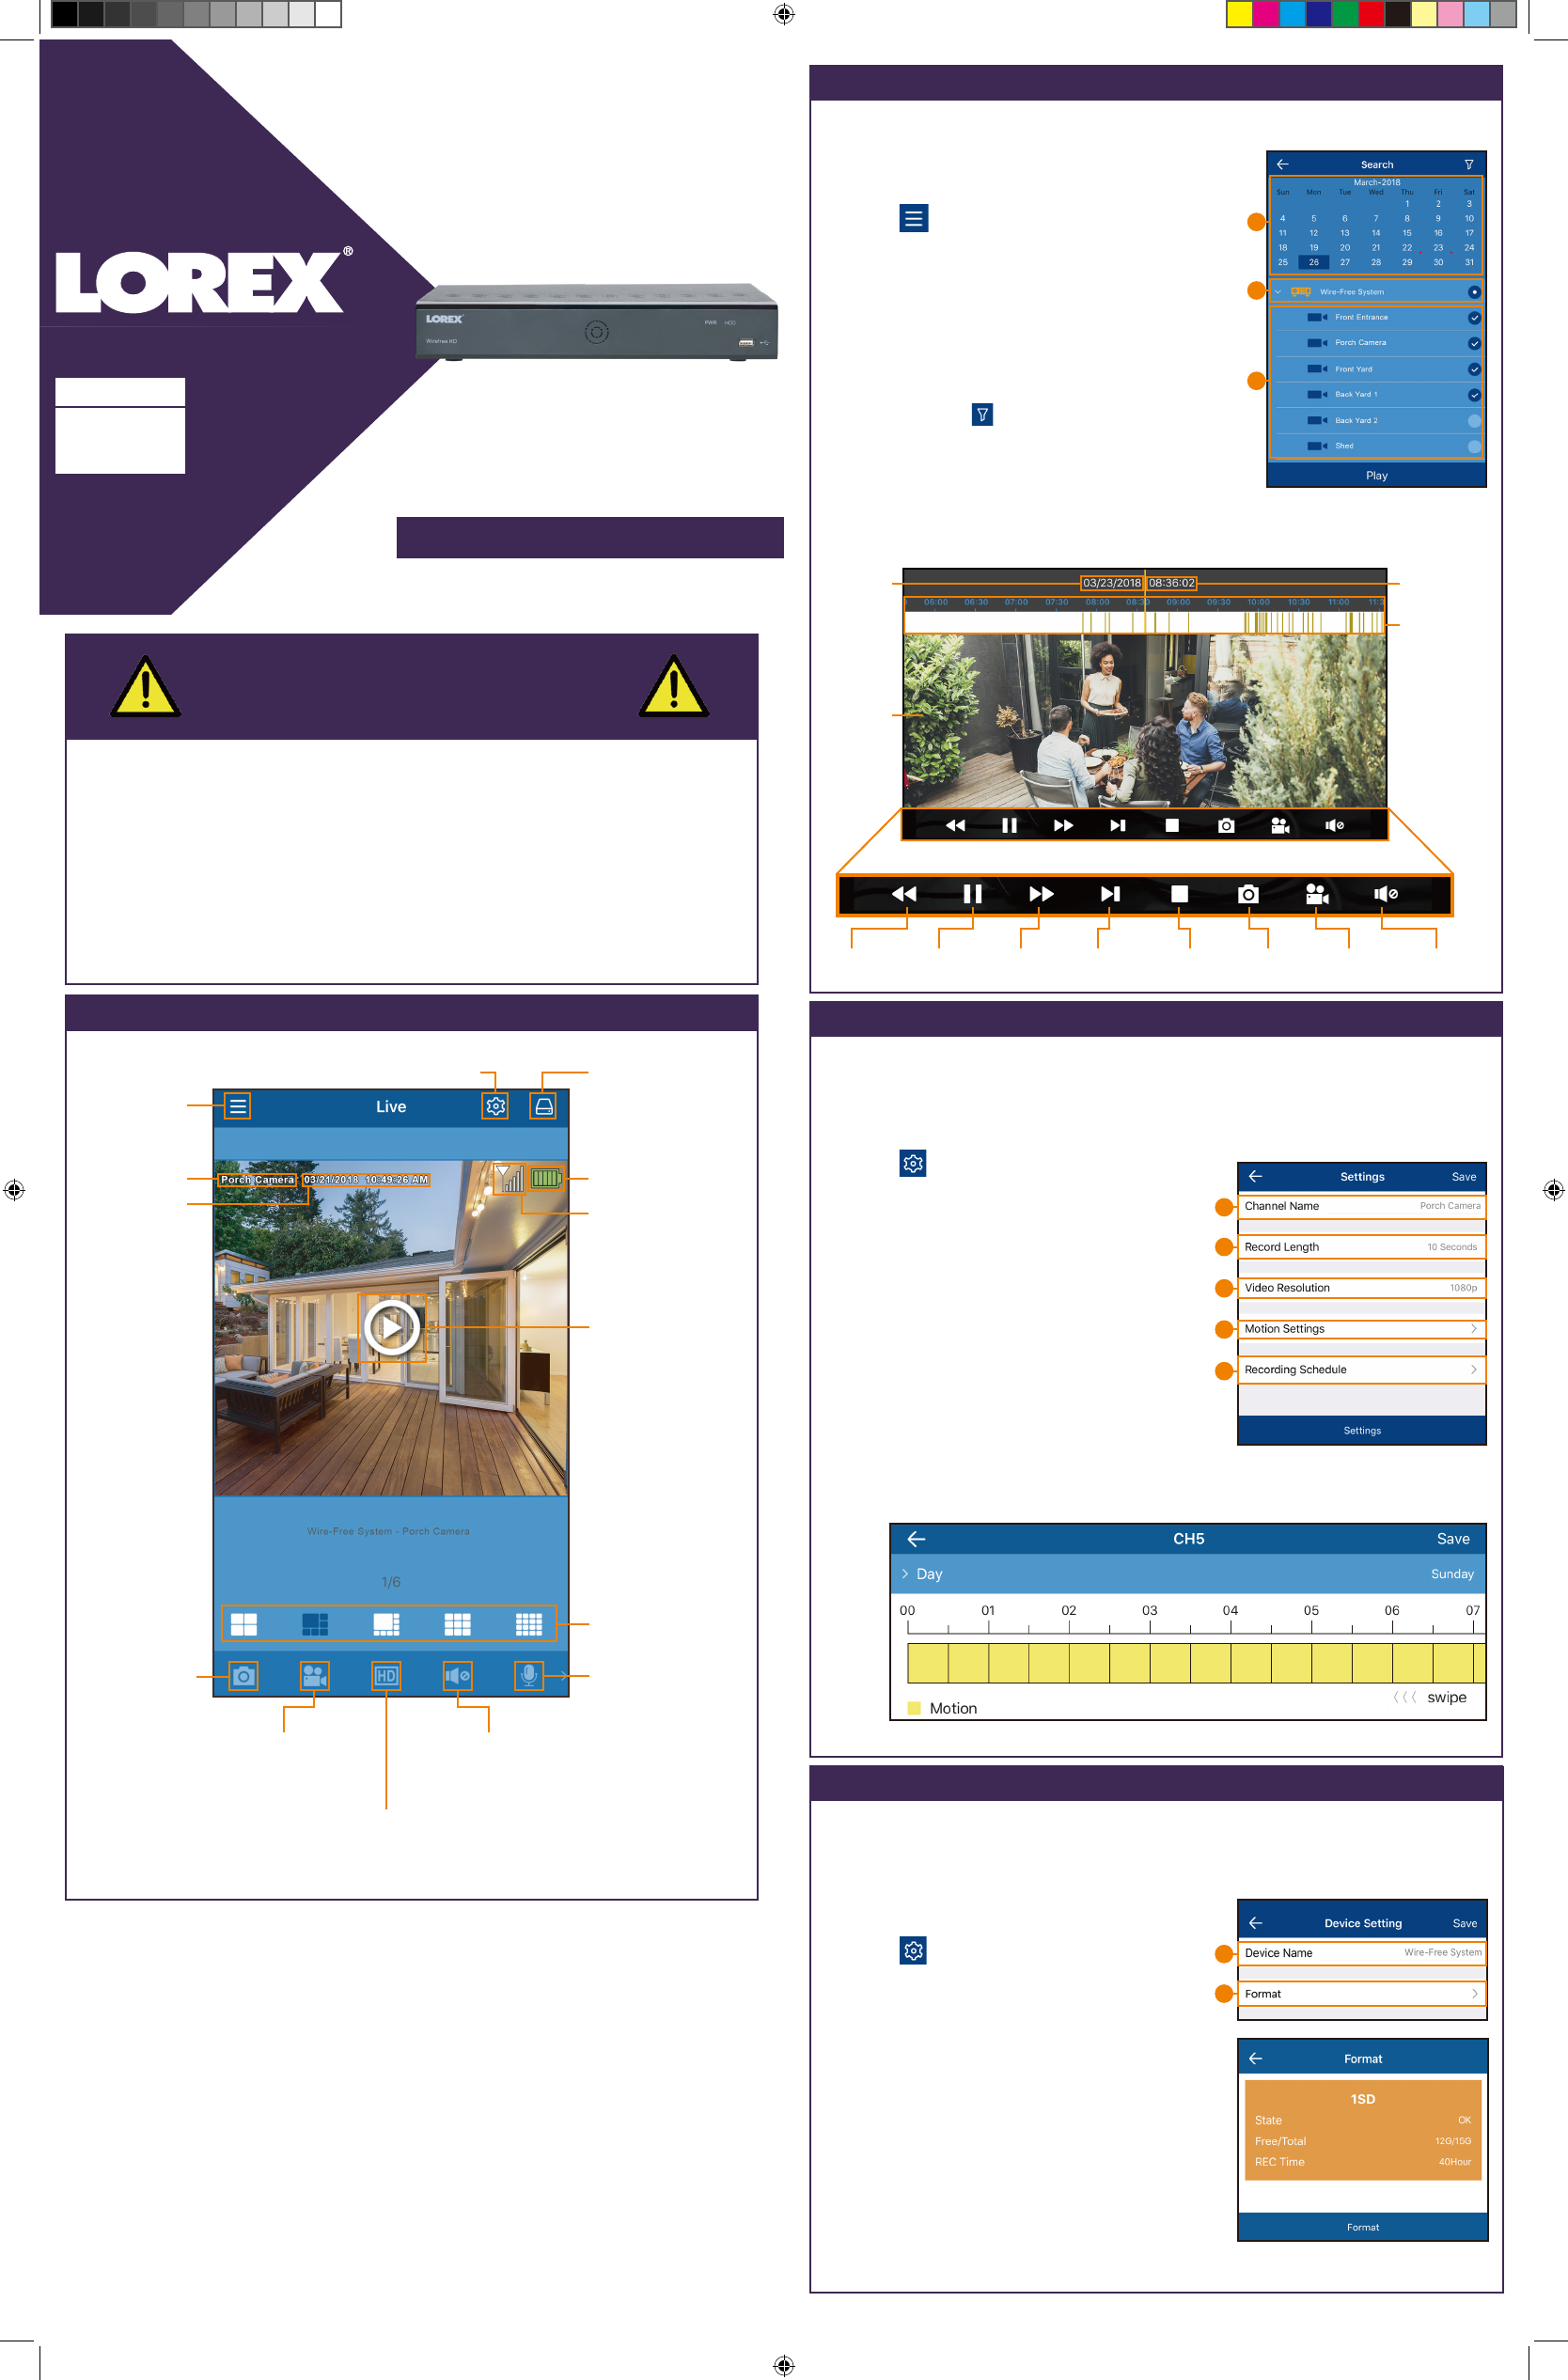
Lorex Cirrus: App Overview
Before You Start
LHB926_QRG_EN_R1
Lorex Cirrus: Playback
GUIDE
2 / 2
· Upgrade your recorder rmware and mobile app to the latest
versions.
· Please note that an upload speed of 3.5Mbps is required for remote
video streaming. Up to 3 devices may connect to the system at the
same time.
· Ensure you have completed initial setup of the Lorex Cirrus app and
the recorder as detailed in the Quick Connection Guide.
Main menu
Play back recorded video using the Lorex Cirrus app.
To play back recorded video:
1. Launch the Lorex Cirrus app.
Playback Controls:
2. Tap , then tap Playback .
3. Set search options for playback:
Video timeline.
Tap to start
playback from
the selected
time. Pinch or
spread ngers
to change the
time period.
Playback
date
Lorex Cirrus: Camera Settings
Change camera settings using the Lorex Cirrus app.
To change camera settings:
1. Launch the Lorex Cirrus app.
2. Tap a channel in Live View to select it.
3. Tap to open settings for the selected
channel.
4. Congure the following as needed:
a. Channel Name: Enter a name of your choice
for the channel (e.g., Porch Camera).
b. Record Length: Set the recording length
when motion is detected.
c. Video Resolution: Set 720p or 1080p
recording.
d. Motion Settings: Congure motion
detection settings. See the “Optimizing
Motion Detection” section in the Quick
Connection Guide for details.
e. Recording Schedule: Congure the recording
5. Tap SAVE to save settings.
Lorex Cirrus: Device Settings
Change recorder name and format storage using the Lorex Cirrus app.
To change device settings:
1. Launch the Lorex Cirrus app.
2. Tap a channel on the device you want to
edit from Live View.
3. Tap , then tap Settings .
4. Congure the following as needed:
a. Device Name: Enter a name of your
choice for the recorder (e.g., Wire-Free
System).
b. Format: Tap to select a storage device
(hard drive or microSD card) to format.
Tap Format to conrm the selected
device and begin formatting.
IMPORTANT: Formatting a storage device
will erase all recordings and snapshots.
This step cannot be undone.
NOTE: Only the admin user can format
memory.
5. Tap Save to save settings.
Select channels for
live viewing from all
connected devices
Congure settings for
selected channel
Channel name
Date and time
stamp
Battery strength
indicator
Wireless signal
strength indicator
Tap to start live view
Split-screen options
Save a snapshot
of the current
live view
Tap to enable the
camera’s intercom;
tap again to stop
Tap to start manual
recording; tap again
to stop
Tap to switch to full HD video
quality; tap again for reduced
video quality that is optimized
for streaming
Tap to switch
between muted and
unmuted
4. Tap Play to begin playback.
a. Tap a recorder to reveal available
channels.
b. Tap channels to include in search.
c. Tap a date from the calendar to
seach for recordings from. Dates with
recordings available are marked with a
red dot.
NOTE: Tap to lter recordings by
type and resolution.
Playback
time
Video
playback
Slower Play / Pause Faster Next Frame Stop Snapshot Manual
Recording
Mute / Unmute
You can use playback mode in portrait or landscape mode. Landscape mode
shown below:
schedule for the selected camera by day. Tap Day to select the day of the week.
Tap squares on the timeline to enable motion recording during specied times
(yellow for enabled, white for disabled). Tap Save when nished.
a
b
c
a
b
c
d
e
a
b
LHB926 Series
LHB926_QRG_EN_R1.indd 1 6/6/2018 4:09:20 PM
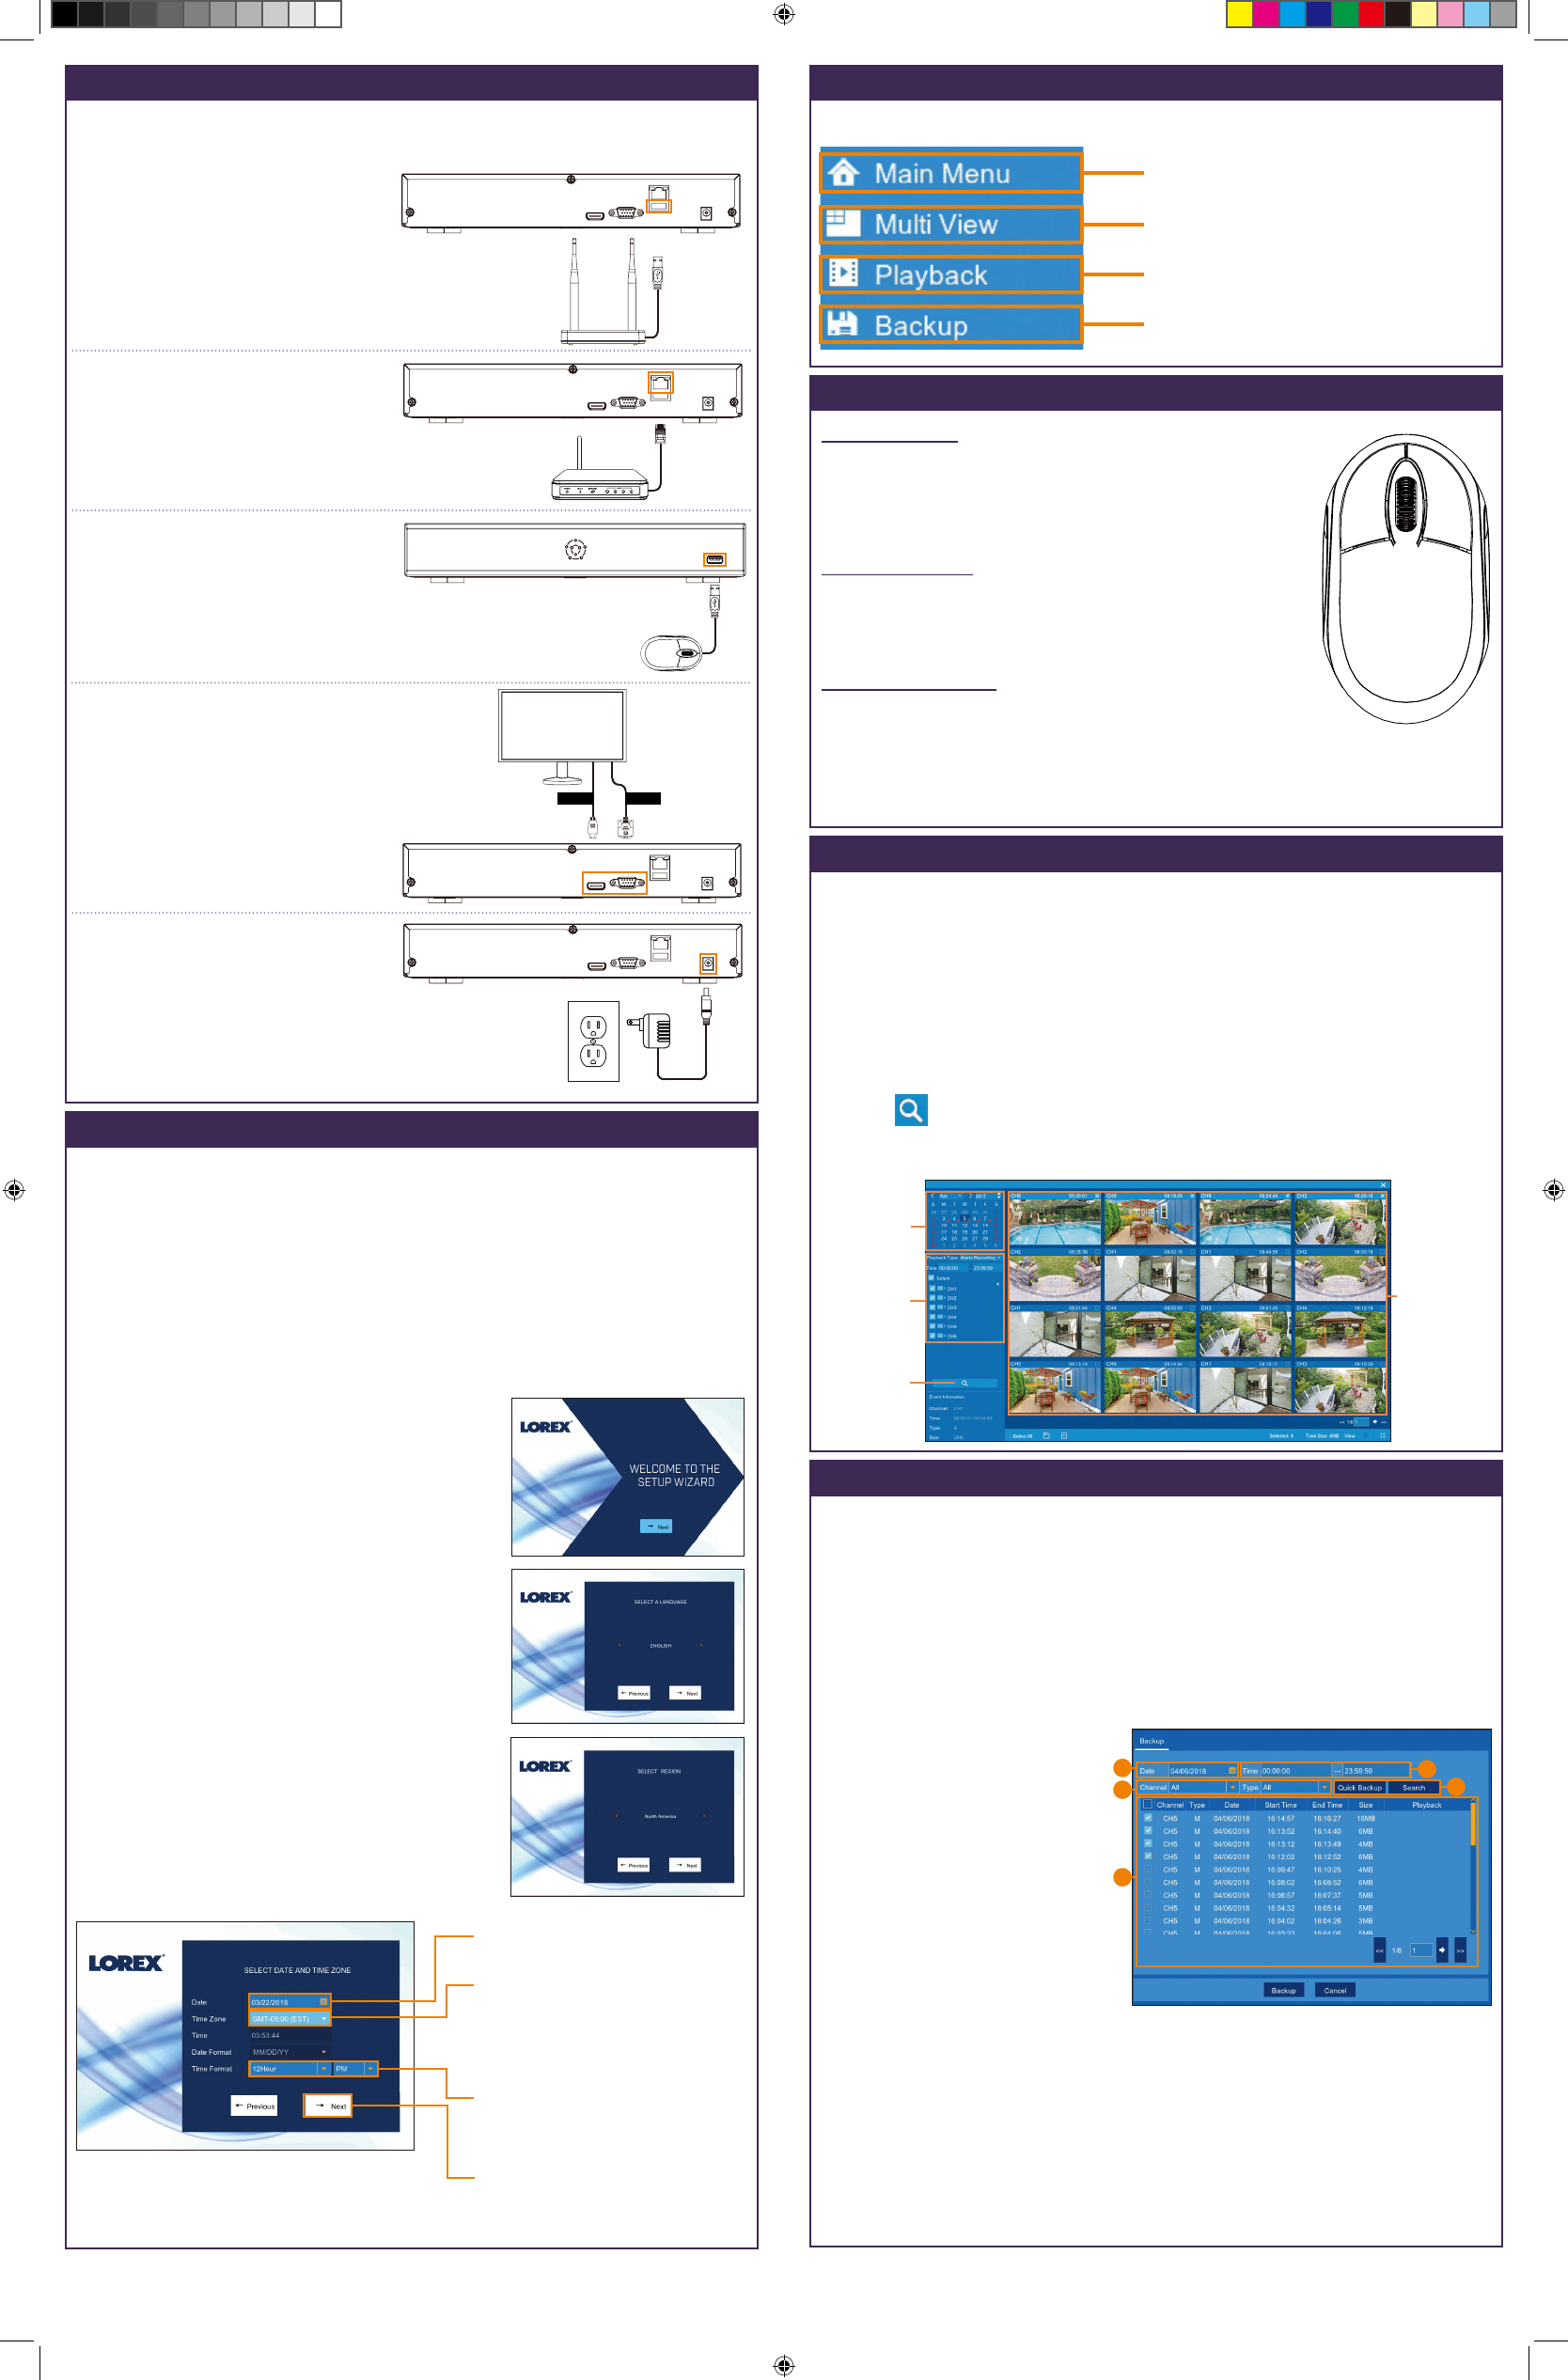
Recorder: Using the Mouse
1. LEFT-CLICK:
· During split-screen display mode: Double-click an
individual channel to view it in full-screen. Double-click
again to return to the split-screen display mode.
· While navigating menus: Click to open a menu option.
2. RIGHT-CLICK:
· During live view: Right-click anywhere on the screen
to open the Quick Menu.
· While navigating menus: Right-click to exit menus.
3. SCROLL WHEEL:
· While navigating menus: Scroll to move up / down
through the menu content.
1 2
NOTE: In live view, hover the mouse cursor over the top of the screen to
open the Navigation Bar. Move the mouse cursor away from the top of the
screen to close the Navigation Bar.
3
Recorder: Initial Setup Wizard
1. Log in using the system user name (default: admin) and your new, secure
password you recorded on the Quick Connection Guide.
3. Click the arrow keys to select a
language for the on-screen display. Click Next
5. Enter the date and time:
6. Review the information you have set for the recorder. Click Accept to conrm.
Click to select the correct date
from the calendar.
Select the correct time zone from
the dropdown.
Select a time format from the
dropdown. For 12Hour format,
select either AM or PM from the
second dropdown.
Click Next to conrm.
For users who wish to use the recorder interface rather than connecting to
the system using the Lorex Cirrus app, you will have to complete the recorder
Setup Wizard to conrm the correct date and time for the system.
To complete the setup wizard:
2. The Setup Wizard launches. Click Next to begin.
to conrm.
4. Click the arrow keys to select your region. Click
Next to conrm.
LHB926_QRG_EN_R1
Recorder: Search and Playback
Search for and play back video recordings on the recorder.
To play back recorded video:
1. From live view, right-click and then click Playback .
2. Log in using the system user name (default: admin) and your new, secure
password you recorded on the Quick Connection Guide.
3. Use the calendar on the left-side of the screen to select the date to playback.
4. Check off the channels you would like to search for recordings from on the left-
side of the screen.
5. Click to search for recordings.
6. Search results appear as thumbnails. Double-click any recording to begin video
playback.
Select
the day to
playback
Select
channels to
playback
Double-click
any event
to begin
playback
Click to
search for
recordings
NOTE: If you did not use the Lorex Cirrus app for initial setup, you will be
prompted to enter the default username (admin) and password (00000000 ),
and then create a new password for the recorder.
Recorder: Backup
Back up video recordings to a USB ash drive (not included).
To back up recorded video:
1. Insert a USB ash drive (not included) into one of the USB ports marked Mouse /
Backup on the back of the recorder.
NOTE: It is recommended to format USB ash drives prior to using them with your
wire-free system.
2. From live view, right-click and then click Backup.
3. Log in using the system user name (default: admin) and your new, secure password
you recorded on the Quick Connection Guide.
4. Congure the following:
ab
c
e
d
5. The Backup Type screen appears. Select a letype for your backup les, then
click Save.
6. The USB ash drive contents are shown on screen. Navigate to the location you
want to save the backup les in, then click OK to begin the back up. Progress is
shown on screen.
NOTE: Do not disconnect the USB ash drive until the backup is complete.
a. Date: Enter the date to search
for recordings from.
b. Time: Enter a start and end
time for your search.
c. Channel / Type: Select the
channel and recording type
to search for, or select All
to browse all channels and
recording types.
d. Search / Quick Backup: Click
Search to show all recordings
that t your search criteria, or
click Quick Backup to back up
all recordings that t the search criteria.
e. (Not applicable for Quick Backup) Recordings that t the search are shown on
screen. Check recordings you want to back up, then click Backup.
Recorder: Full Setup
1. Connect the wireless receiver to
the USB port on the back panel of
the recorder.
2. Connect the recorder to your
router using the included
Ethernet cable.
5. Connect the included power
adapter to the recorder. Wait a few
minutes for the system to start
up.
To set up the recorder:
The recorder setup detailed in the Quick Connection Guide is a simplied
setup. In order to access features using the recorder, you must complete the
full setup detailed below.
NOTE: The receiver includes double-sided tape and
mounting screws for optional wall mounting for
improved line-of-sight with cameras.
3. Connect the included mouse to
the USB port on the front panel
of the recorder.
4. Connect a monitor (not included)
to the HDMI or VGA port of the
recorder (HDMI cable included;
VGA cable not included).
HDMI VGA*
OR
Recorder: Quick Menu
Right-click anywhere on the live viewing screen to open the Quick Menu.
Search for and play back recordings.
Select camera / live display view.
Open the Main Menu.
Back up video recordings or snapshots
to a USB ash drive (not included).
LHB926_QRG_EN_R1.indd 2 6/6/2018 4:09:29 PM
LHB926_QRG_EN_R1
LHB926_QRG_EN_R1.indd 3 6/6/2018 4:09:29 PM
Caution
FCC
Caution: The user is cautioned that changes or modifications not expressly approved by the party responsible for compliance could void the user's authority to operate the
equipment.
This device complies with Part 15 of the FCC Rules and Industry Canada licence-exempt RSS standard(s). Operation is subject to the following two conditions: (1) this device
may not cause harmful interference, and (2) this device must accept any interference received, including interference that may cause undesired operation.
Le présent appareil est conforme aux CNR d’Industrie Canada applicables aux appareils radio exempts de licence. L’exploitation est autorisée aux deux conditions suivantes :
(1) l’appareil ne doit pas produire de brouillage, et
(2) l’utilisateur de l’appareil doit accepter tout brouillage radioélectrique subi, même si le brouillage est susceptible d’en compromettre le fonctionnement.
NOTE: This equipment has been tested and found to comply with the limits for a Class B digital device, pursuant to Part 15 of the FCC Rules. These limits are designed to
provide reasonable protection against harmful interference in a residential installation. This equipment generates, uses and can radiate radio frequency energy and, if not
installed and used in accordance with the instructions, may cause harmful interference to radio communications. However, there is no guarantee that interference will not occur
in a particular installation.
If this equipment does cause harmful interference to radio or television reception, which can be determined by turning the equipment off and on, the user is encouraged to try to
correct the interference by one or more of the following measures:
-- Reorient or relocate the receiving antenna.
-- Increase the separation between the equipment and receiver.
-- Connect the equipment into an outlet on a circuit different from that to which the receiver is connected.
-- Consult the dealer or an experienced radio/TV technician for help.
FCC& IC Radiation Exposure Statement:
This equipment complies with FCC and Canada radiation exposure limits set forth for an uncontrolled environment. This equipment should be installed and operated with a
minimum distance of 20cm between the radiator and your body.
This transmitter must not be co-located or operating in conjunction with any other antenna or transmitter.
Déclaration d’IC sur l’exposition aux radiations:
Cet équipement est conforme aux limites d’exposition aux radiations définies par le Canada pour des environnements non contrôlés. Cet équipement doit être installé et utilisé à
une distance minimum de 20 cm entre l’antenne et votre corps.
Cet émetteur ne doit pas être installé au même endroit ni utilisé avec une autre antenne ou un autre émetteur.