Lutron Electronics 0039 Wireless Roller 64 for HomeWorks User Manual master
Lutron Electronics Company Inc Wireless Roller 64 for HomeWorks master
Users Manual
Sivoia QED™
Wireless Roller 64™
for HomeWorks®
Installation
Instructions
Sivoia QEDTM |Wireless Roller 64 for HomeWorks
Installation Instructions
SIVOIA QEDTM Wireless Roller 64 Installation Instructions 1
Tools Required:
Tape Measure 1/4” Hex-Head Driver
Wire Cutter/Stripper Level
Pliers Power Drill
#2 Phillips Screwdriver
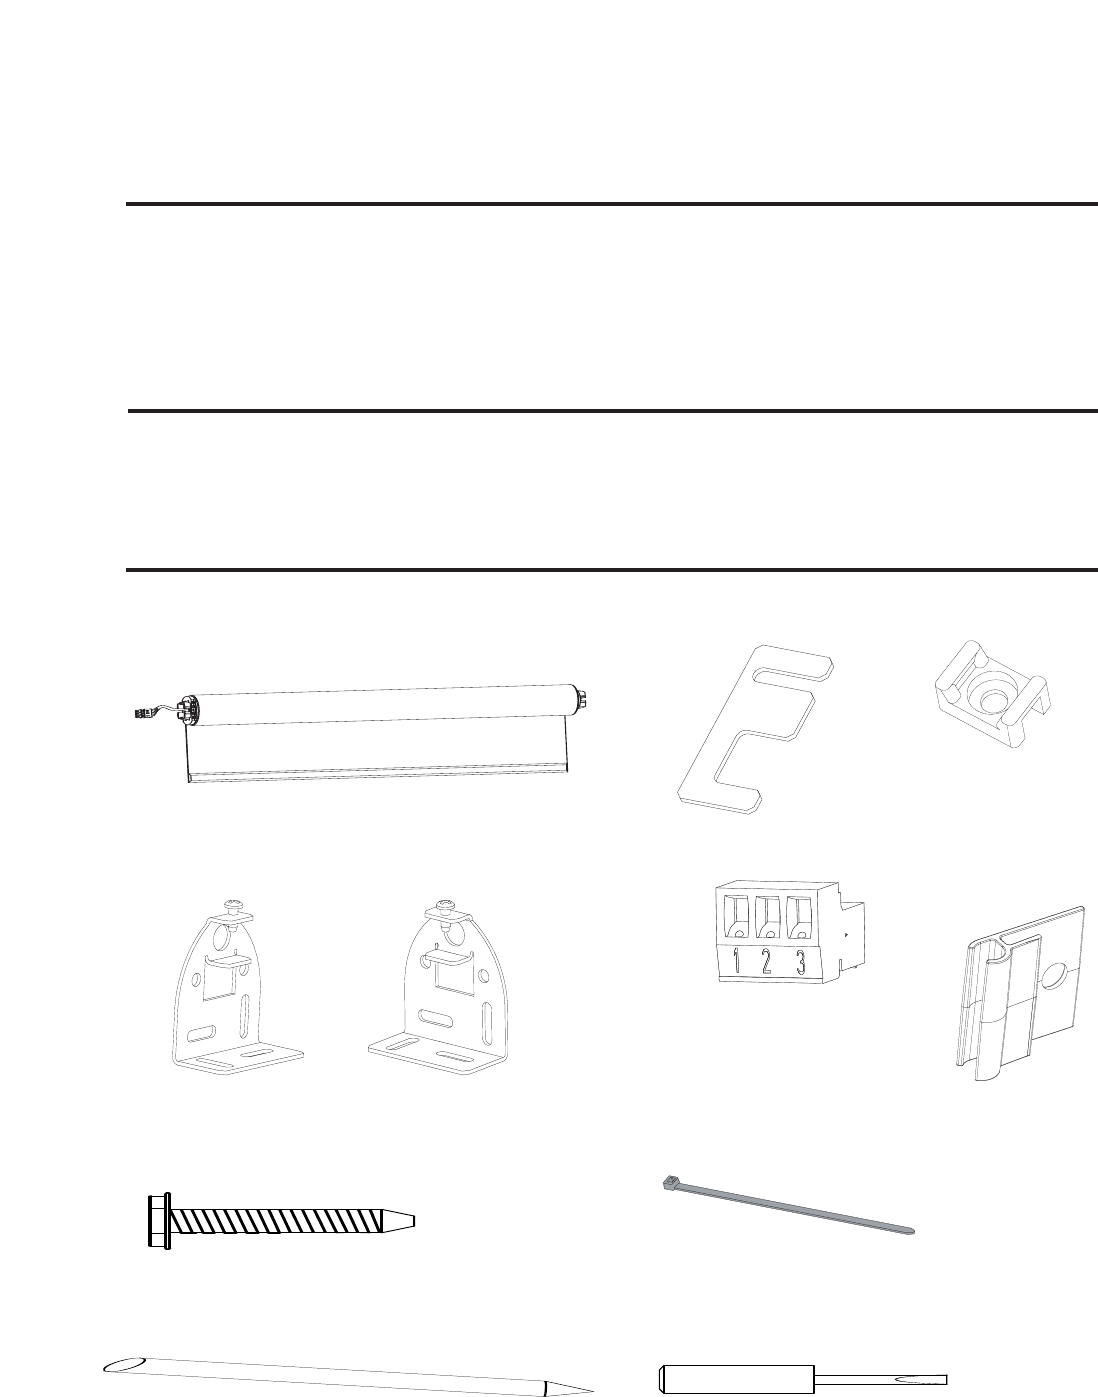
Sivoia QED™Wireless Roller 64
Standard Mounting Brackets
with Retaining Screws
(5) Mounting Screws
(#8x1-3/4" (#8x44mm) Hex Head Screws)
(1) 3 Pin Terminal Block
(Actual Size)
(1) Programming Stylus (1) Screwdriver
(2) 4” (102mm) Cable Ties
Notes:
1) For Wireless Roller 64 programming refer to the HomeWorks®Illumination Online Help.
2) The Electronic Drive Unit (EDU) will need to be powered to complete installation.
Wireless Shades will not function until they are addressed and programmed using the
HomeWorks®Illumination Software.
Box Contents:
(2) Bracket Leveling Spacer (2) Cable Tie Anchor
(2) Antenna
Mounting Clips

SIVOIA QEDTM Wireless Roller 64 Installation Instructions 2
Warning: Incorrect installation can lead to severe injury, follow all installation instructions.
Notes:
• The Sivoia QED Wireless Roller 64 must be used only with window treatments approved by Lutron.
• There must be a clearance of at least 1.3 feet (0.4 meters) between the fully lowered system
and any permanent object.
• Installation shall be executed by a qualified electrician according to national wiring rules.
• Before shade installation, remove any unnecessary cords and disable any equipment not
needed for powered operation. The Sivoia QED Wireless Roller 64 has a maximum rated operating
time of 8 min. out of 20.
• Codes: Install in accordance with all local and national electrical codes.
• Environment: Ambient operating temperature: 0-40°C, 32-104°F, 0-90% humidity, non-condensing.
Indoor use only.
Sivoia QEDTM |Wireless Roller 64 for HomeWorks
Installation Instructions (continued)
SIVOIA QEDTM Wireless Roller 64 Installation Instructions 3
Sivoia QEDTM |Wireless Roller 64 for HomeWorks
Installation Instructions (continued)
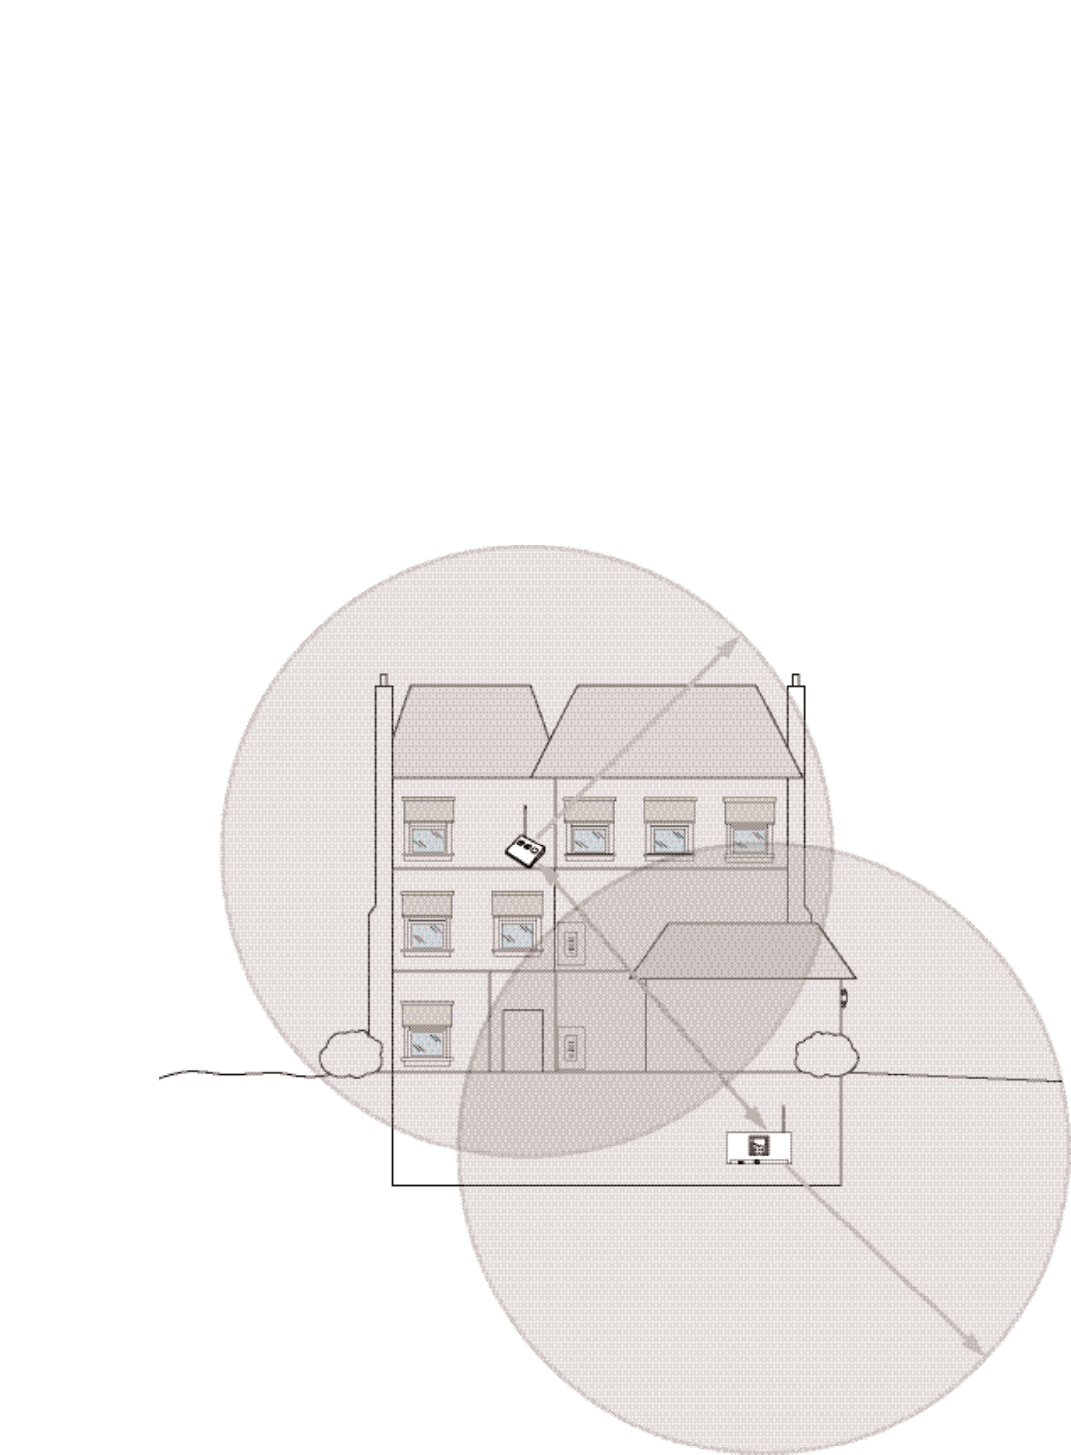
• RF Device Placement: Wireless shades must be located within 30 feet (9m) of an RF Signal
Repeater or an RF Processor. The distance between repeater and processor must be less than
60 feet (18m).
Wireless shades will not function until they are addressed and programmed. See the HomeWorks
Illumination Software Online Help.
Wireless shades are programmed with a personal computer using the HomeWorks
Illumination Software.
30 feet (9m)
30 feet (9m)
SIVOIA QEDTM Wireless Roller 64 Installation Instructions 4
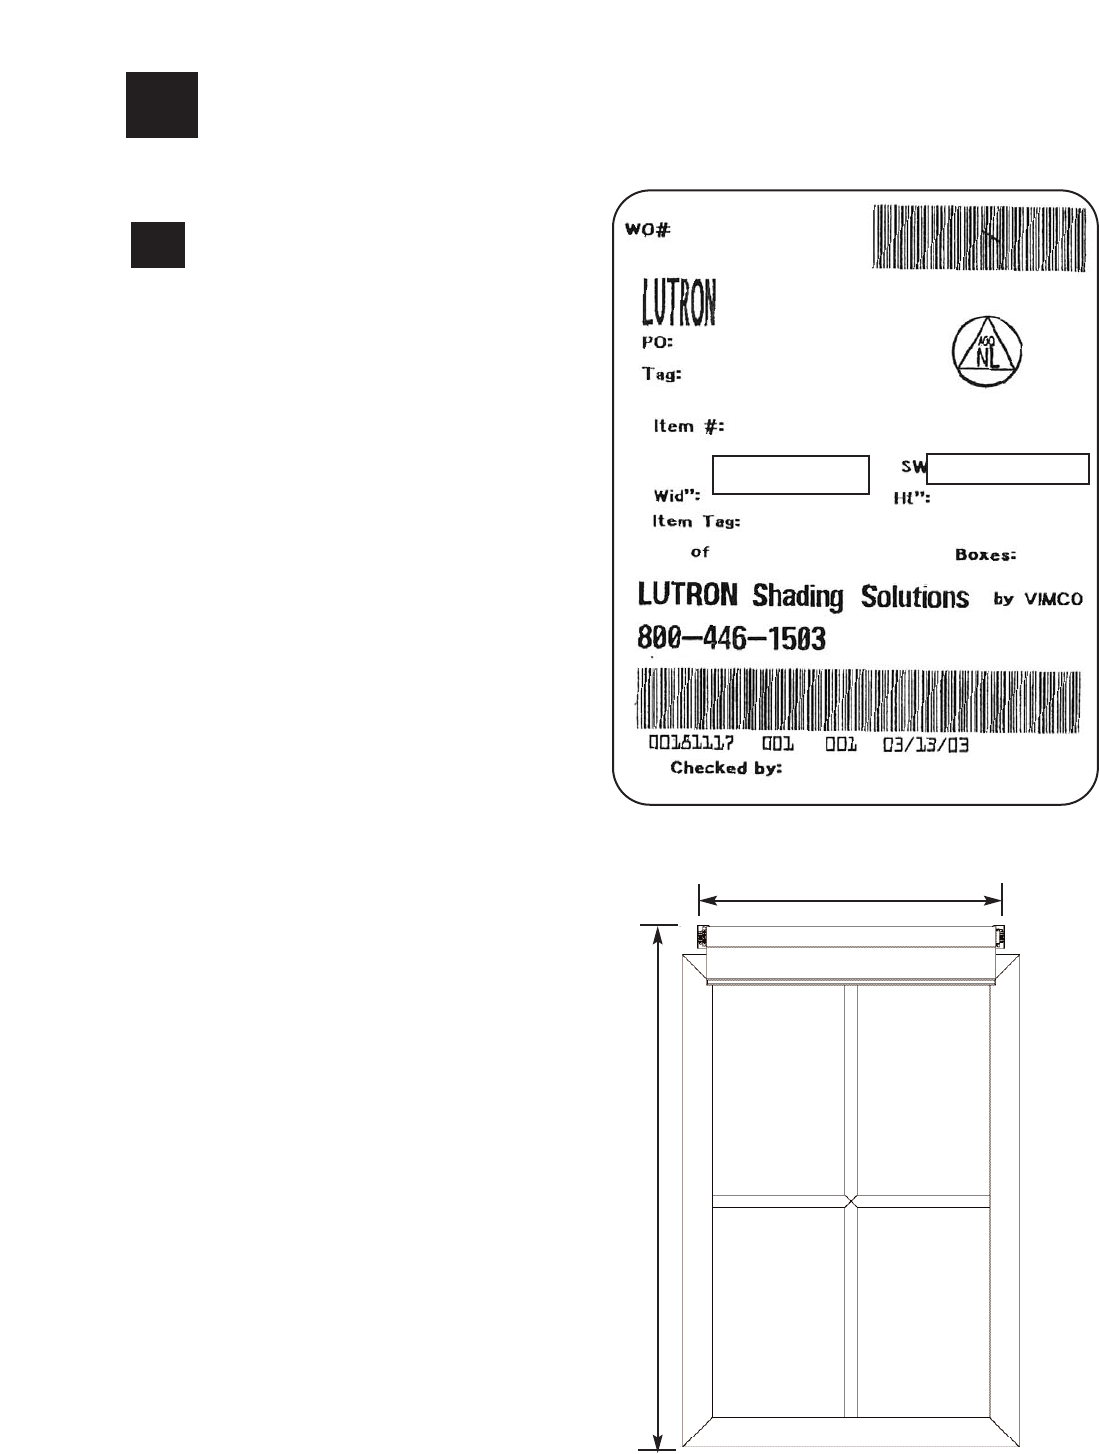
1Confirm System Dimensions
1.1
1
System Width
(Bracket to Bracket Width)
System Height
System Width System Height
Compare system dimensions on
the package label with the window
dimensions to verify appropriate
window/shade combination.
1.1
Package Label
SIVOIA QEDTM Wireless Roller 64 Installation Instructions 5
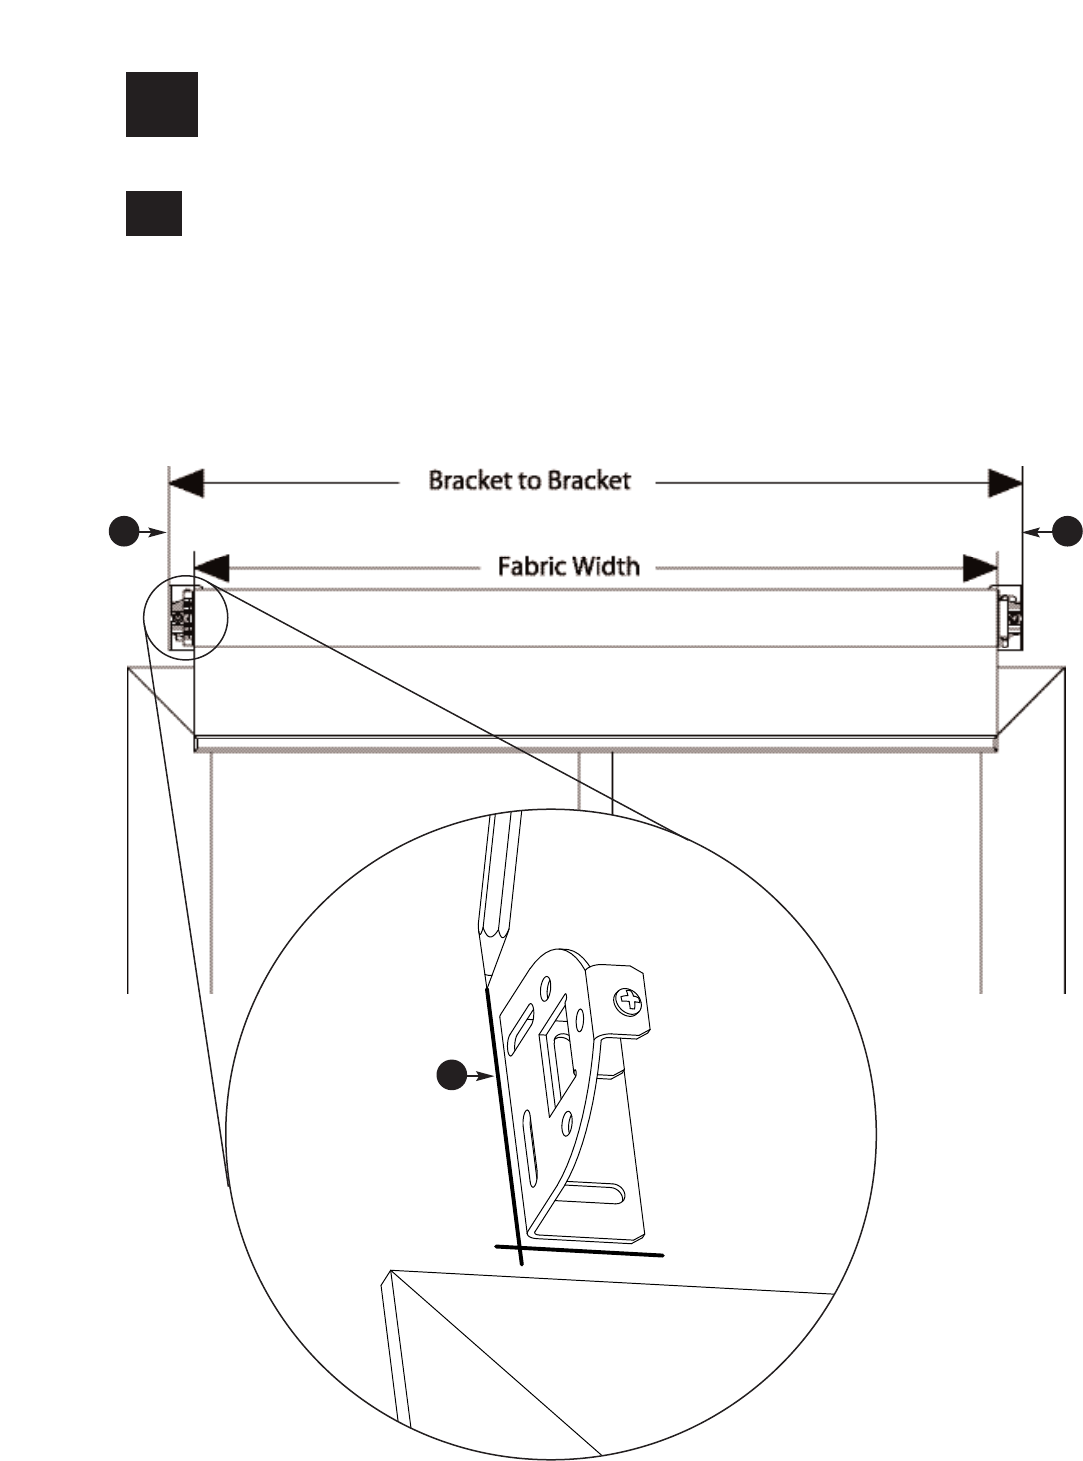
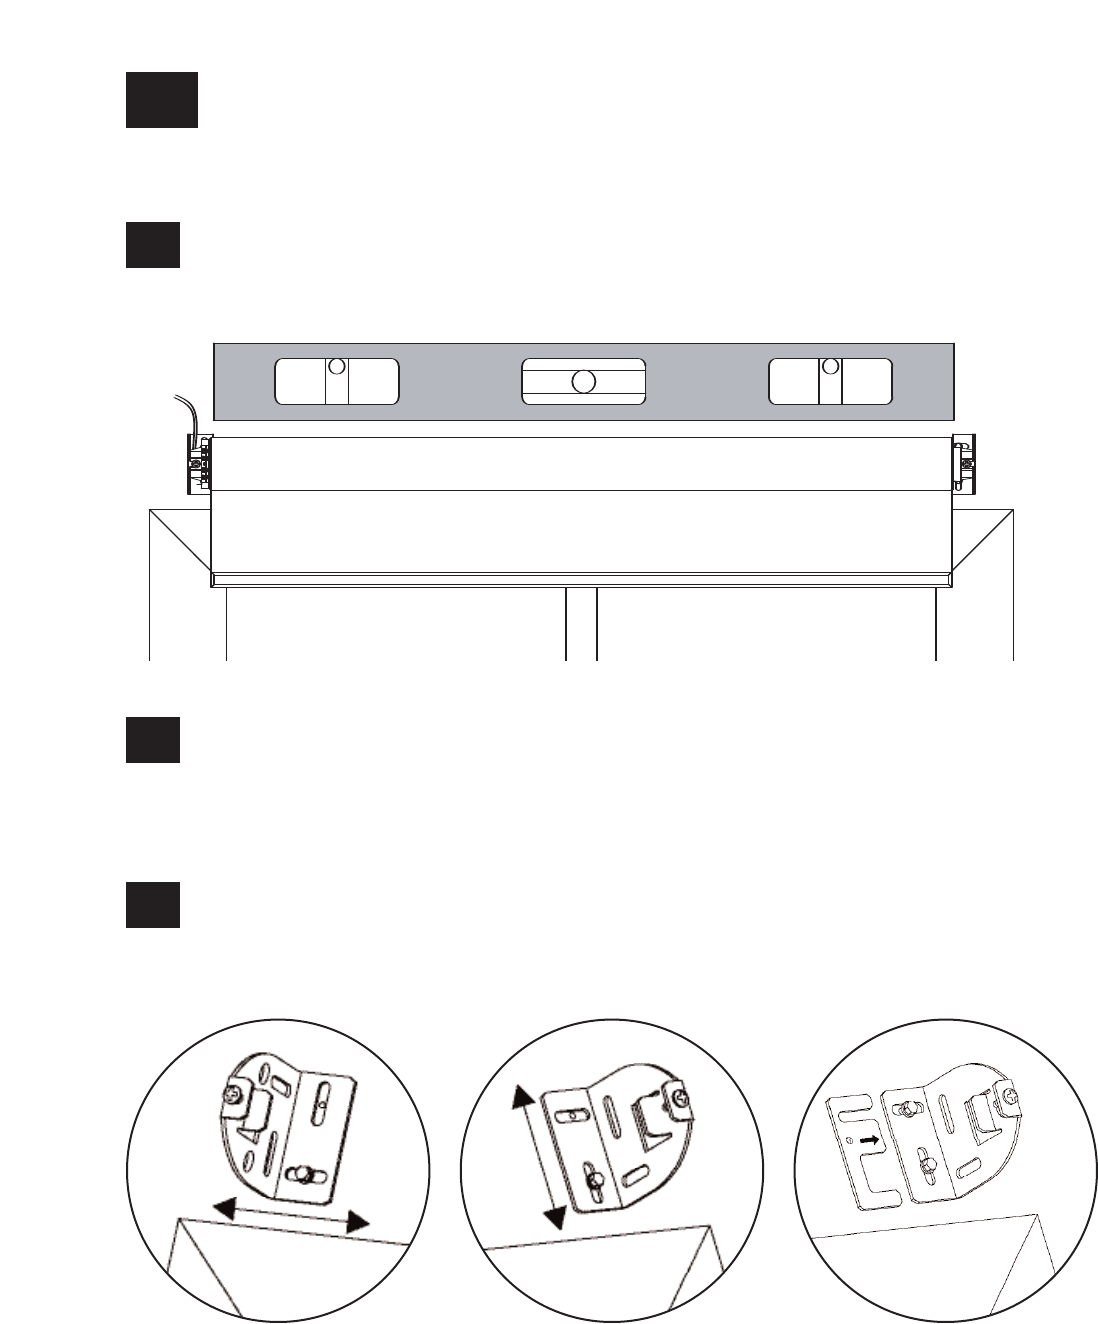
2Position the Mounting Brackets
Mark the location of the mounting brackets so that they are centered over the window.
Note: Bracket to Bracket distance = Fabric Width + 1.5” (38 mm) = System Width.
Note: For ceiling and jamb mount, allow clearance to prevent fabric from rubbing against trim, window,
top treatment, etc.
Note: Wall mount may require blocks (not provided) to clear trim.
2.1
AA
A
(System Width)
SIVOIA QEDTM Wireless Roller 64 Installation Instructions 6
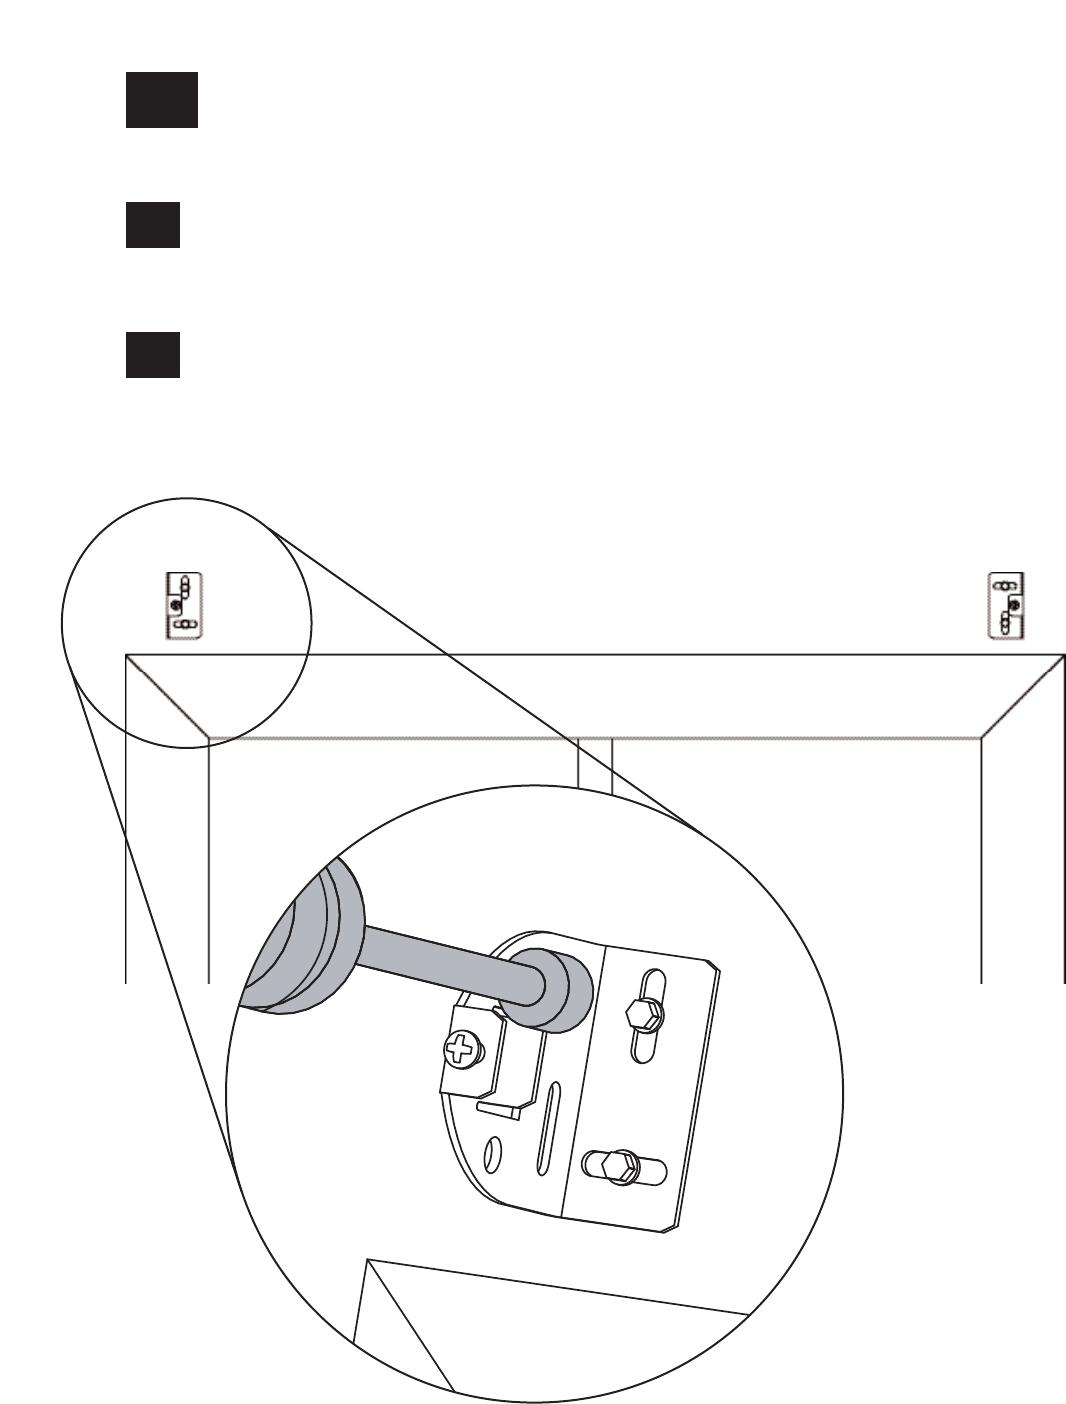
3Install the Mounting Brackets
Install the first mounting bracket.
3.1
Install the second mounting bracket.
Note: Put a screw in the center of each slot. Use slots as needed to
ensure brackets are level and plumb as positioned.
3.2
4Pre-drill for Cable Run
Wall Mount
Wall Mount
SIVOIA QEDTM Wireless Roller 64 Installation Instructions 7
DANGER - Locate and lock breaker to the shade power supply in the OFF position
or unplug the power plug-in transformer before doing any wiring.
Choose one of the options below to drill for cable access.
Note: Cable should exit from wall, ceiling, or jamb on EDU side of system.
Note: Leave 12-18” (30-45 cm) of cable exposed.
Wall Mount with wires through:
A) Wall: 1” in from end of system and .5” from top of bracket
B) Ceiling: .5” in from end of system and .5” from mounting wall
C) Jamb: 1” from top of bracket and .5” from mounting wall
4.1
ABC
SIVOIA QEDTM Wireless Roller 64 Installation Instructions 8
4Pre-drill for Cable Run: (continued)
Ceiling Mount
Ceiling Mount with wires through:
A) Wall: 1” in from end of system and .5” from ceiling
B) Ceiling: 1” in from end of system and .5” from back of bracket
C) Jamb: 1” from back of bracket and .5” from ceiling
4.2
Ceiling Mount
ABC
SIVOIA QEDTM Wireless Roller 64 Installation Instructions 9
4Pre-drill for Cable Run: (continued)
Jamb Mount
Jamb Mount with wires through:
A) Wall: .5” from ceiling and .5” from outside of jamb
B) Ceiling: .5” from wall and .5” from outside of jamb
C) Jamb: .5” from ceiling and .5” from wall
4.3
Jamb Mount
ABC
SIVOIA QEDTM Wireless Roller 64 Installation Instructions 10
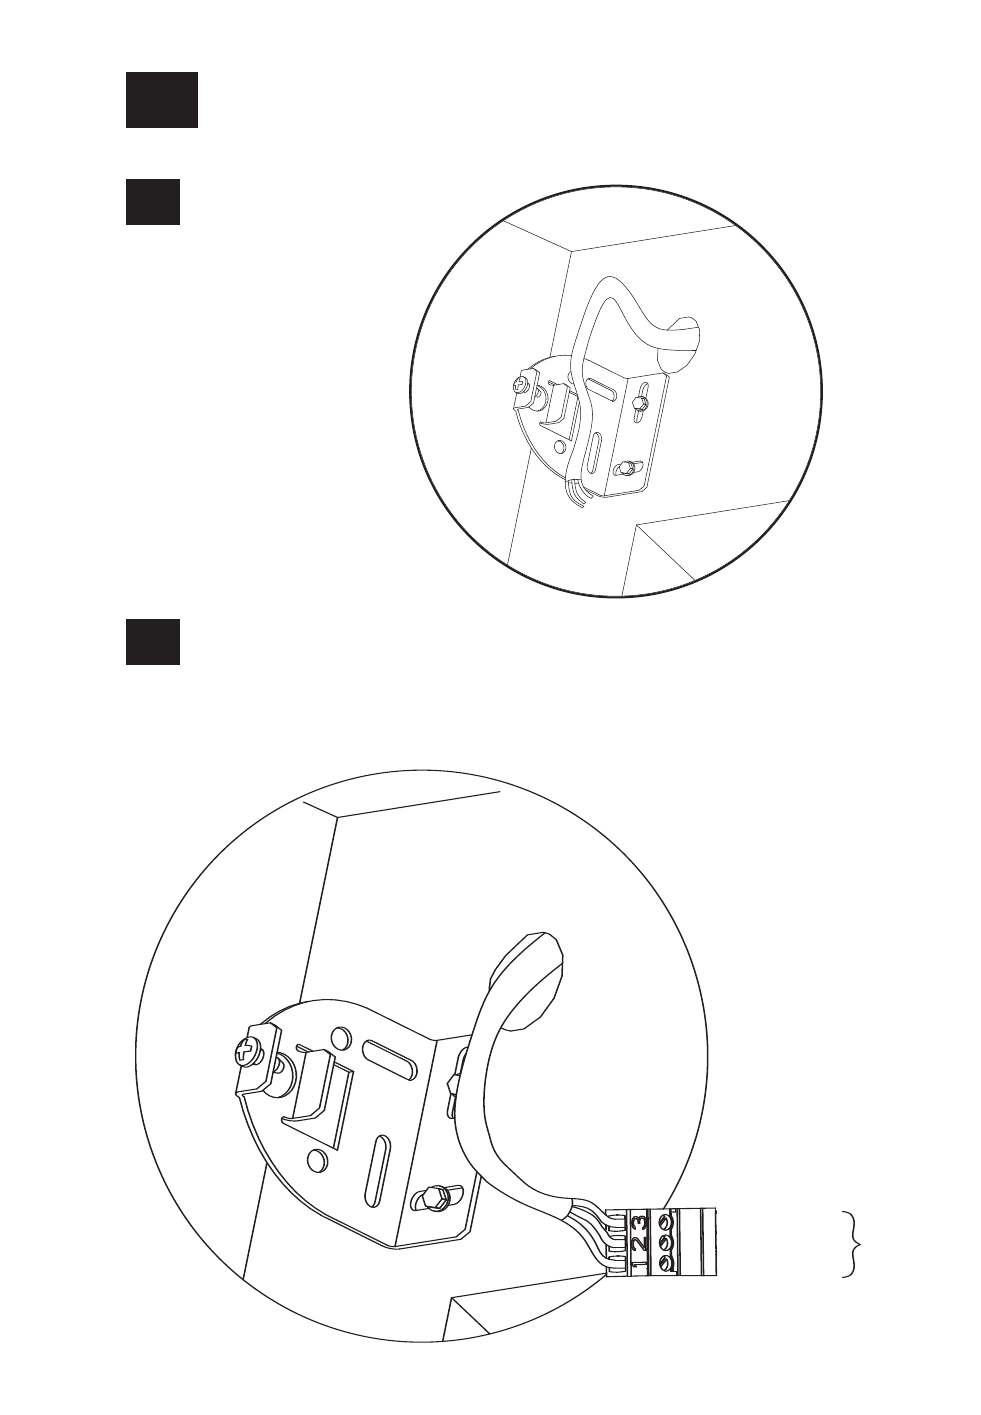
5Wire 3-Pin Terminal Block
Strip 2” of jacket
off cable run from
the wall.
5.1
Wire 3-Pin terminal block (provided) to cable using the included screwdriver.
5.2
To EDU
Connector
EGND (Pin 3)
24 VAC (Pin 2)
24 VAC (Pin 1)
SIVOIA QEDTM Wireless Roller 64 Installation Instructions 11
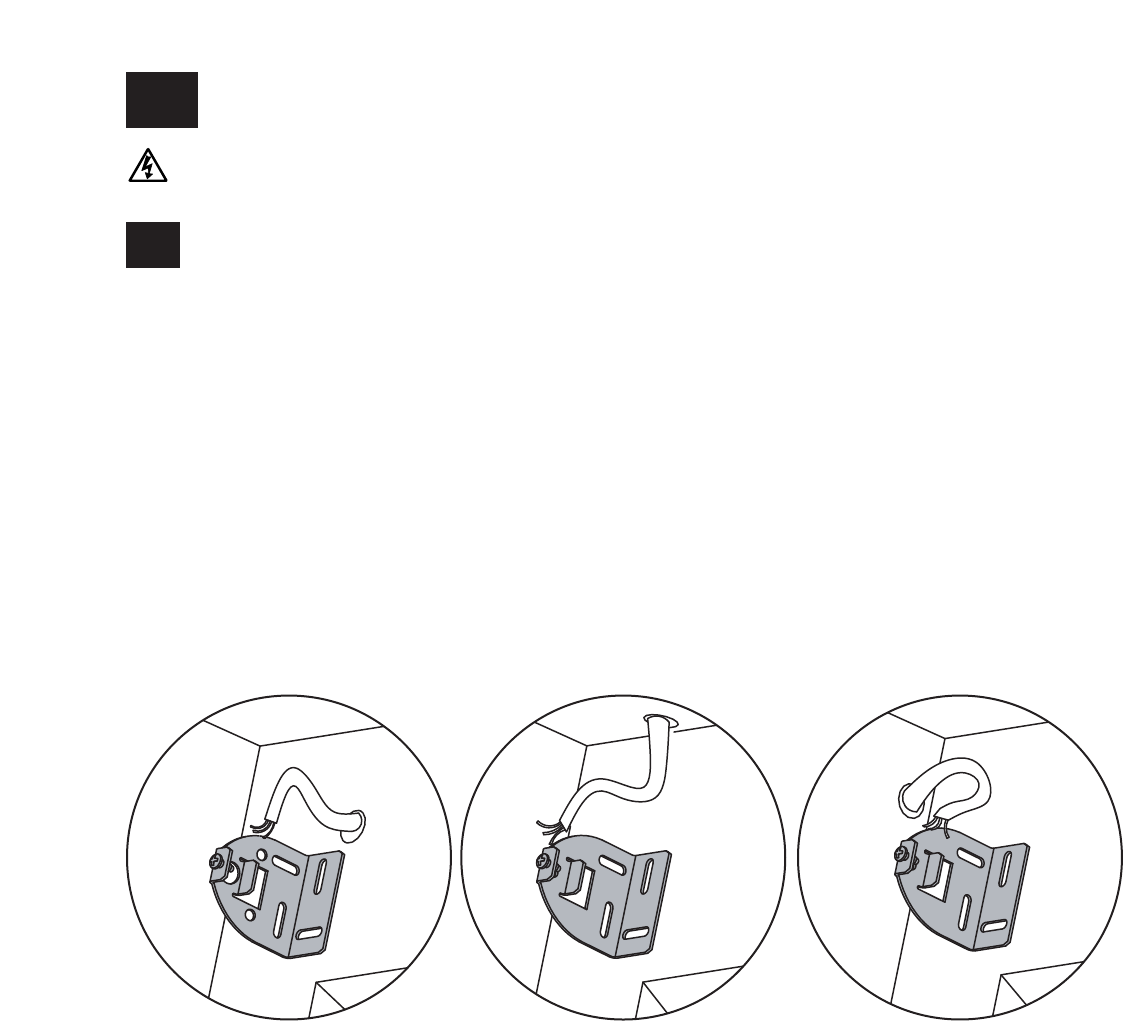
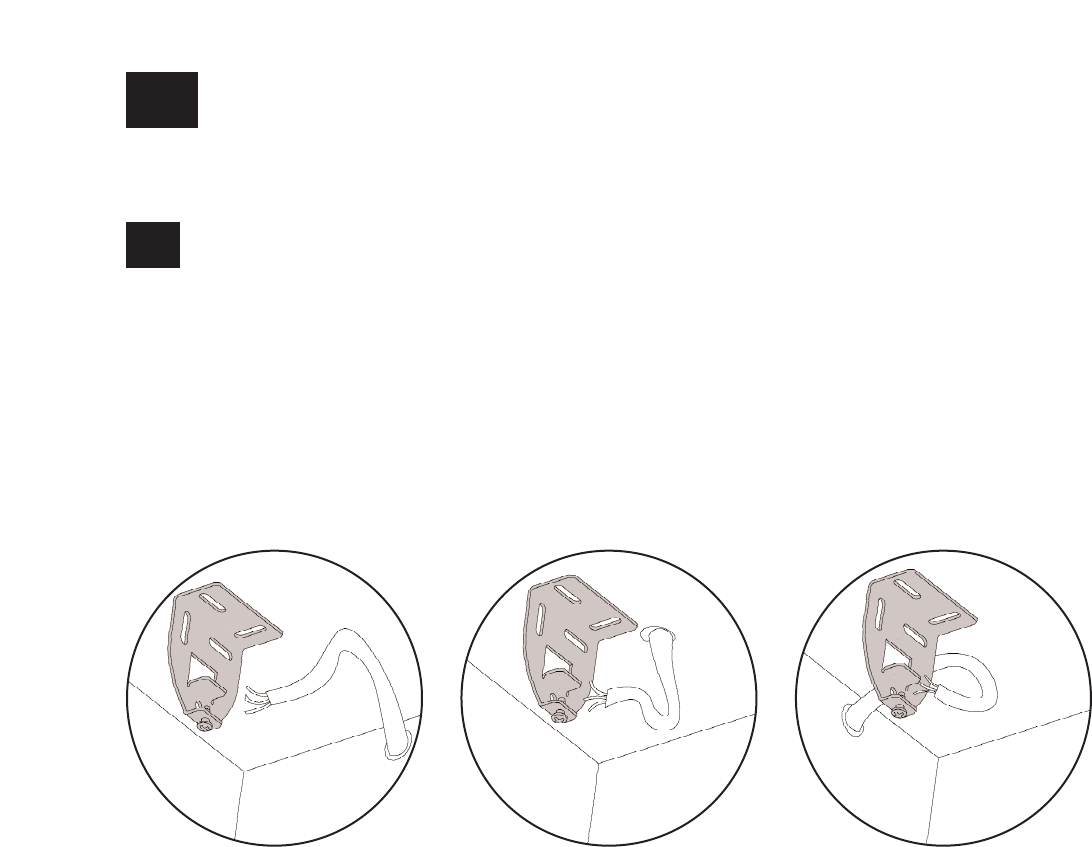
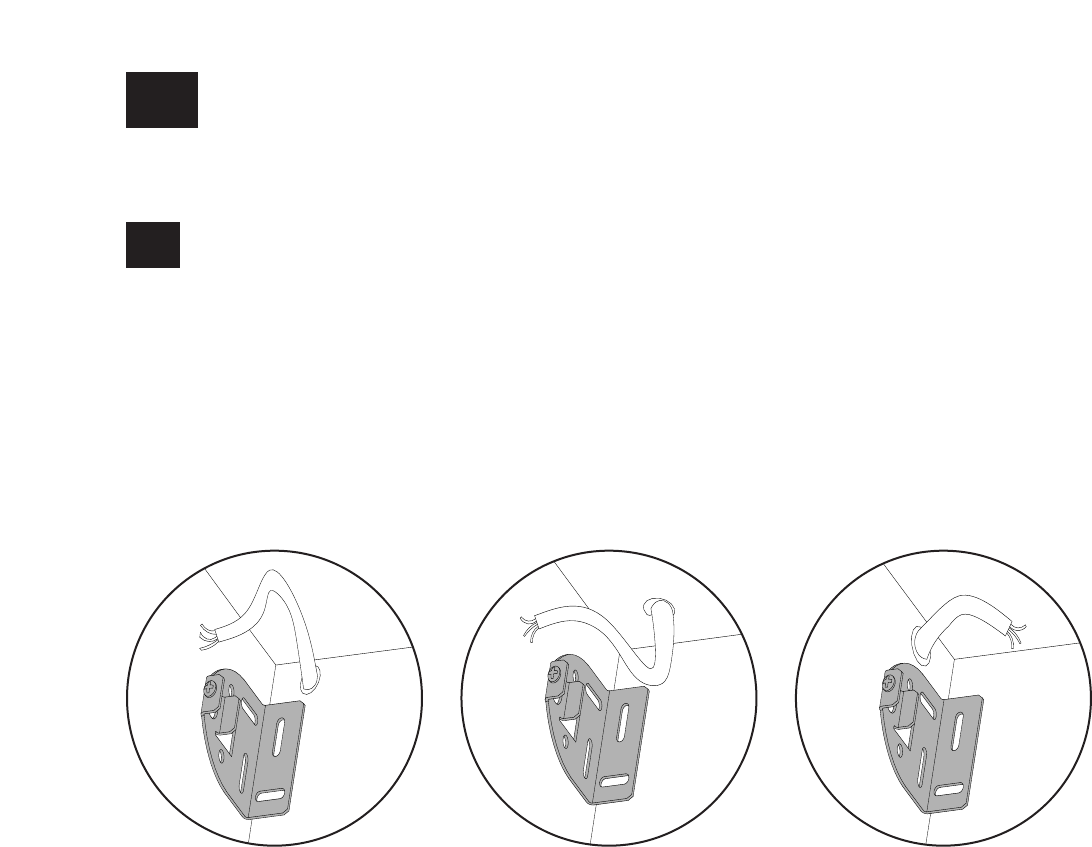
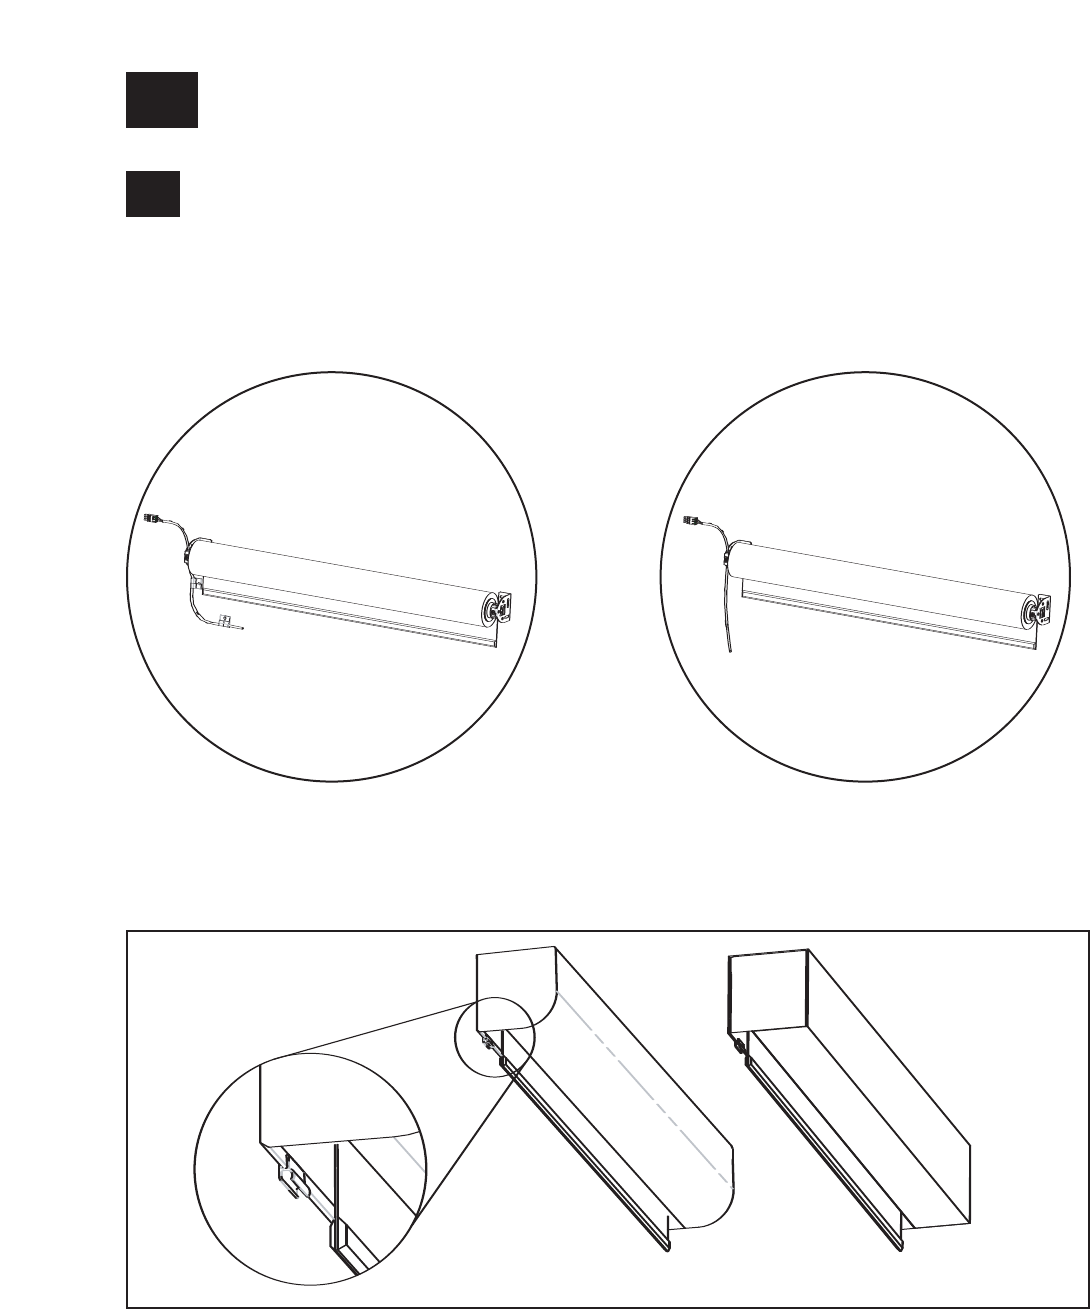
6Orient the Buttons and Wiring
For the following bracket and button orientations, route the wires as shown.
6.1
Note: The buttons should be accessible when the shade is installed
Note: The wires may go in either or both of the indicated slots
Buttons
Either Direction
Either Direction
Either Direction
Either Direction
SIVOIA QEDTM Wireless Roller 64 Installation Instructions 12
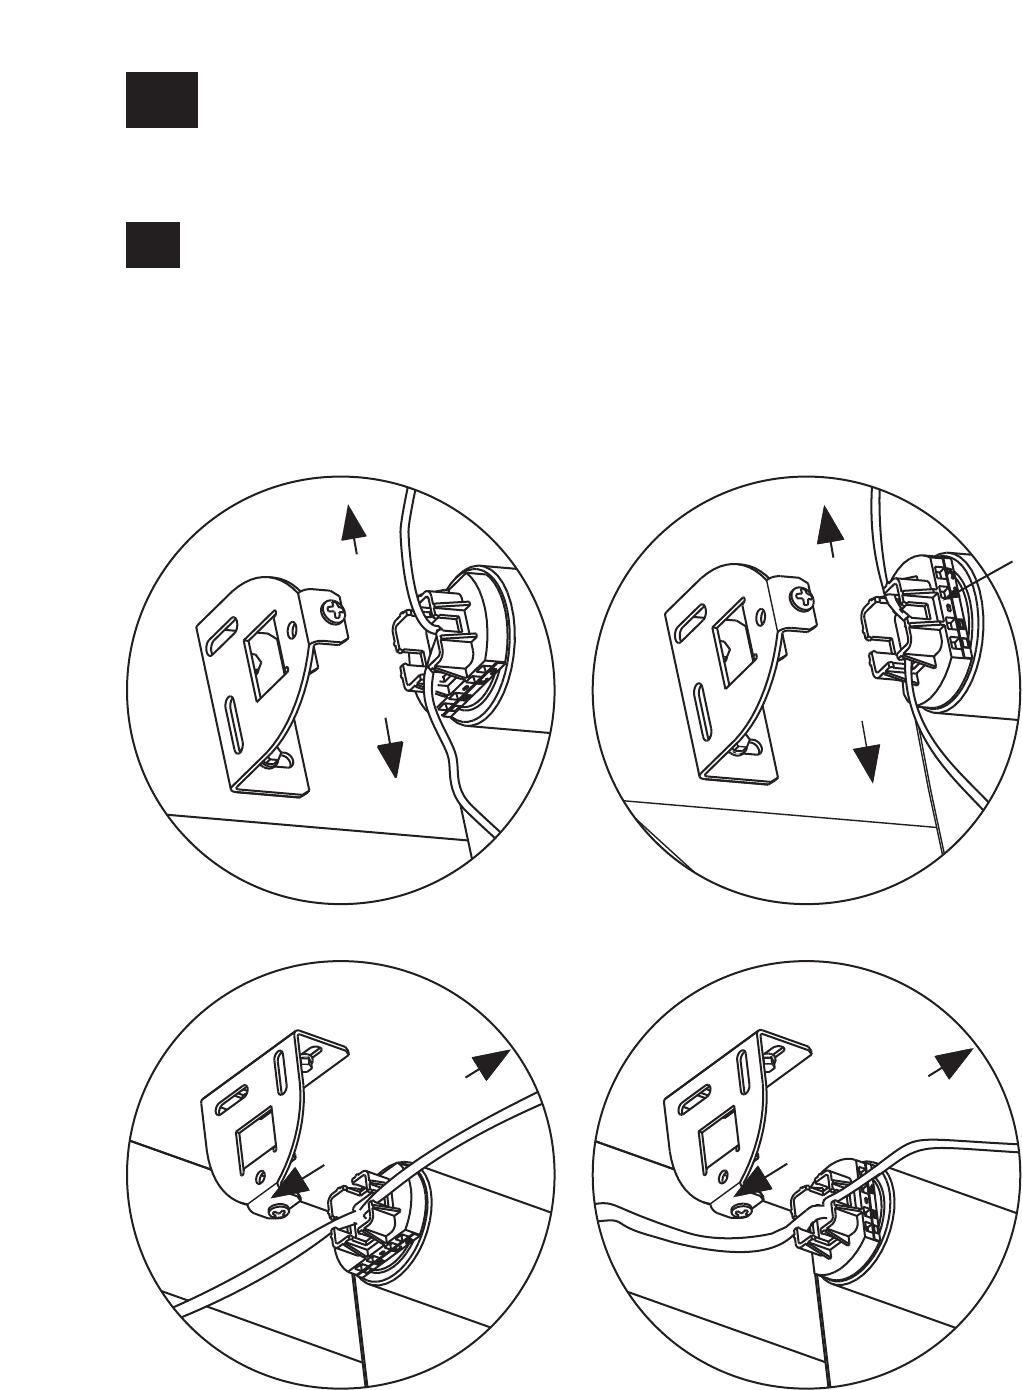
7Mount the Shade
Install the idler side of the shade onto its bracket.
7.1
Depress the spring loaded idler by pressing the shade towards the idler, and install the EDU
side of the shade onto its bracket.
7.2
SIVOIA QEDTM Wireless Roller 64 Installation Instructions 13
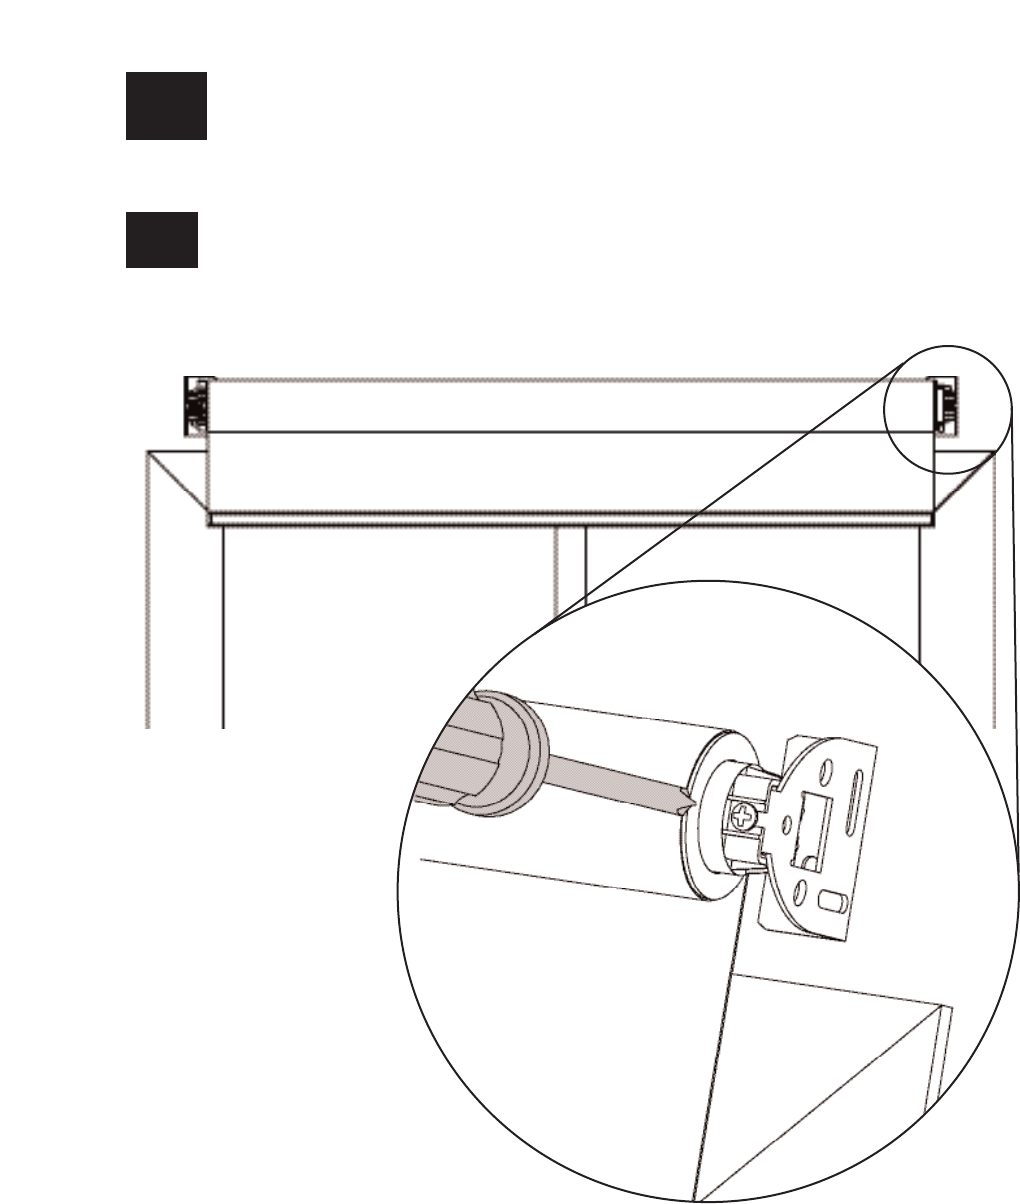
8Adjust the Shade
Ensure that the shade is level and centered.
8.1
Adjust shade by removing the necessary screws and moving the brackets as needed, or
installing bracket leveling spacers.
Note: You may have to remove the shade to access the bracket screws.
8.2
Reinstall and tighten the screws.
8.3
14
9Secure the Antenna
SIVOIA QEDTM Wireless Roller 64 Installation Instructions
WARNING: - The antenna is covered with a clean Plastic sleeve to protect it. Do not
cut the antenna or remove the plastic sleeve. Do not modify the antenna.
For optimal performance secure the antenna in 1 of 3 configurations shown below using
the antenna clips provided.
9.1
Antenna mounted parrallel with shade
use these configurations. When Pocket
or Fascia is not used.
Antenna mounted straight down.
Antenna clipped to bottom of Pocket or Fascia - This configuration provides optimal performance with
metal Fascia.
Note: Lutron has tested this product with the antenna mounted in the configurations above
and found that these provide optimal performance.
SIVOIA QEDTM Wireless Roller 64 Installation Instructions 15
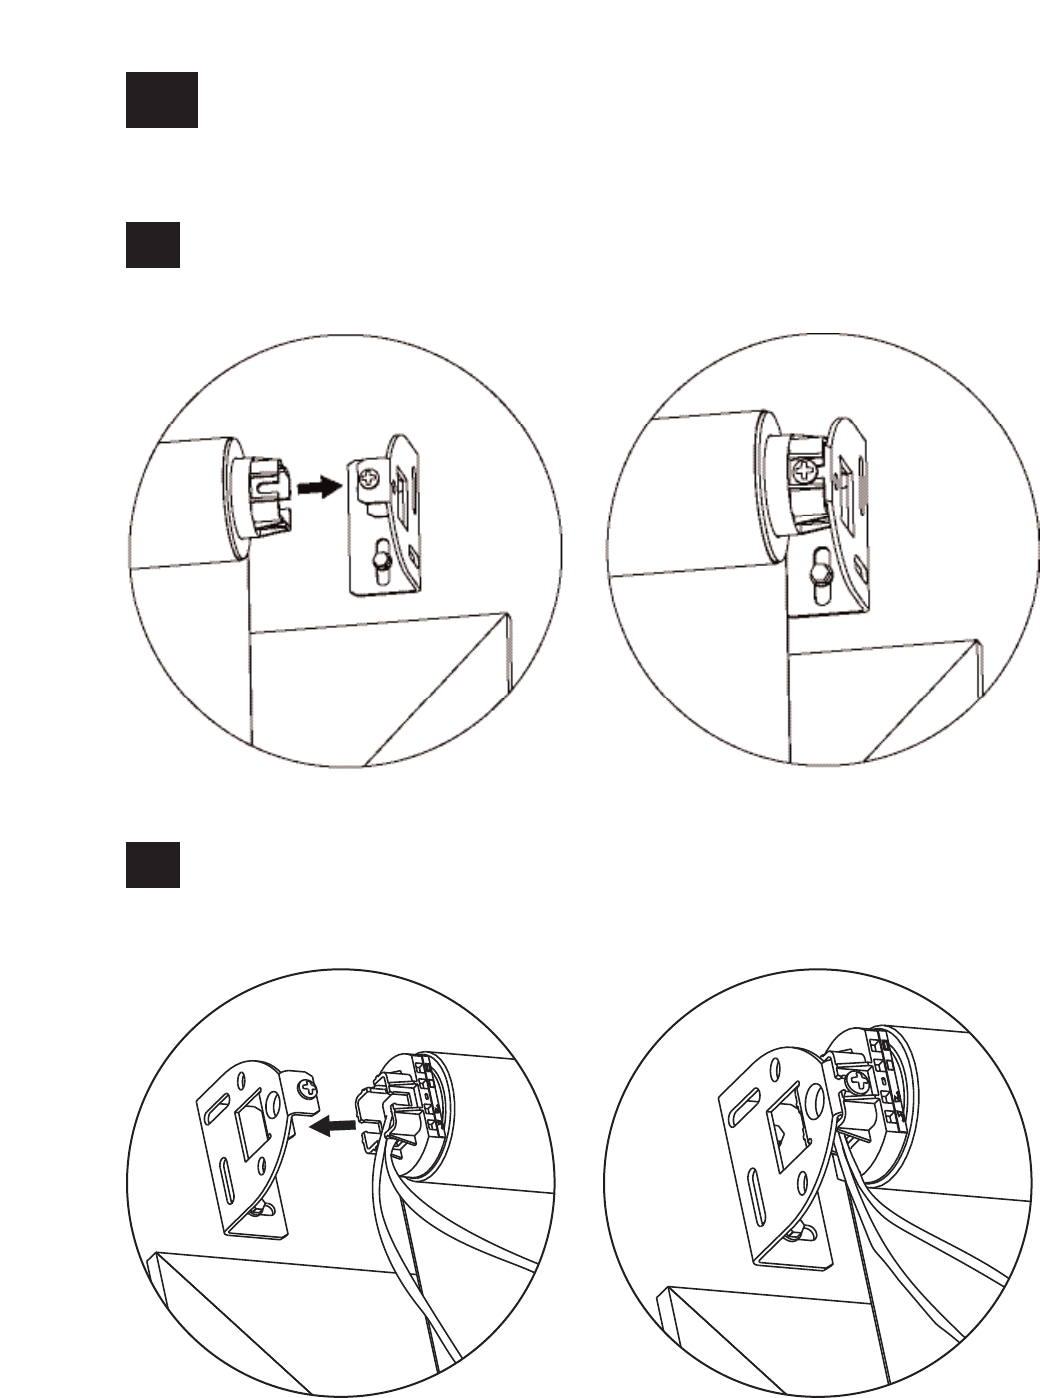
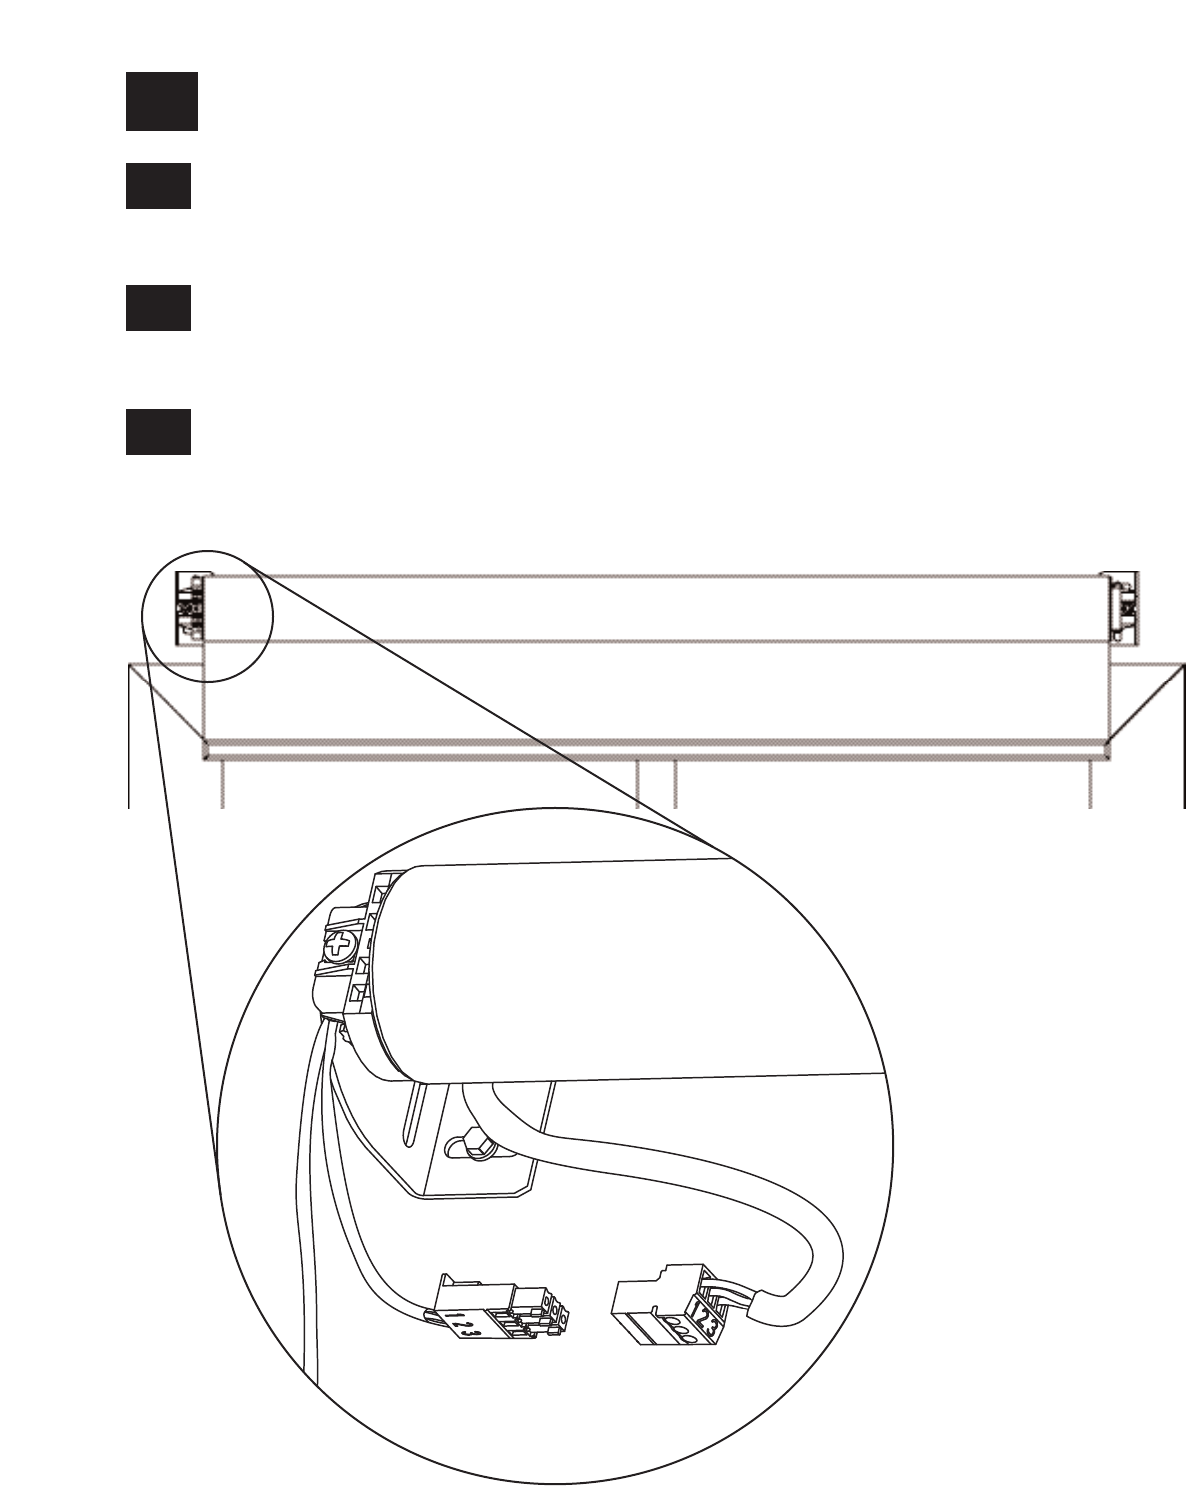
10 Connect Terminal Blocks
Plug 7-pin terminal block on cable into EDU terminal block attached to shade bracket
(a cable tie can be used to secure the terminal blocks together).
10.1
Dress wires to ensure fabric does not rub while the shade is moving.
WARNING: Do not cut wires coming out of shade. Doing so will damage the antenna.
10.2
Copy the serial number located on every shade’s harness and shade location on page 21 of this
manual. This will ease addressing and programming later on the installation.
10.3
SIVOIA QEDTM Wireless Roller 64 Installation Instructions 16
11 Secure and Check the Shade
Tighten retaining screws in each bracket to secure the shade.
11.1
SIVOIA QEDTM Wireless Roller 64 Installation Instructions 17
Reconnect power to the shade power supply.
Use the programming stylus to run the shade up and down using the adjustment
buttons ( ), re-level if needed.
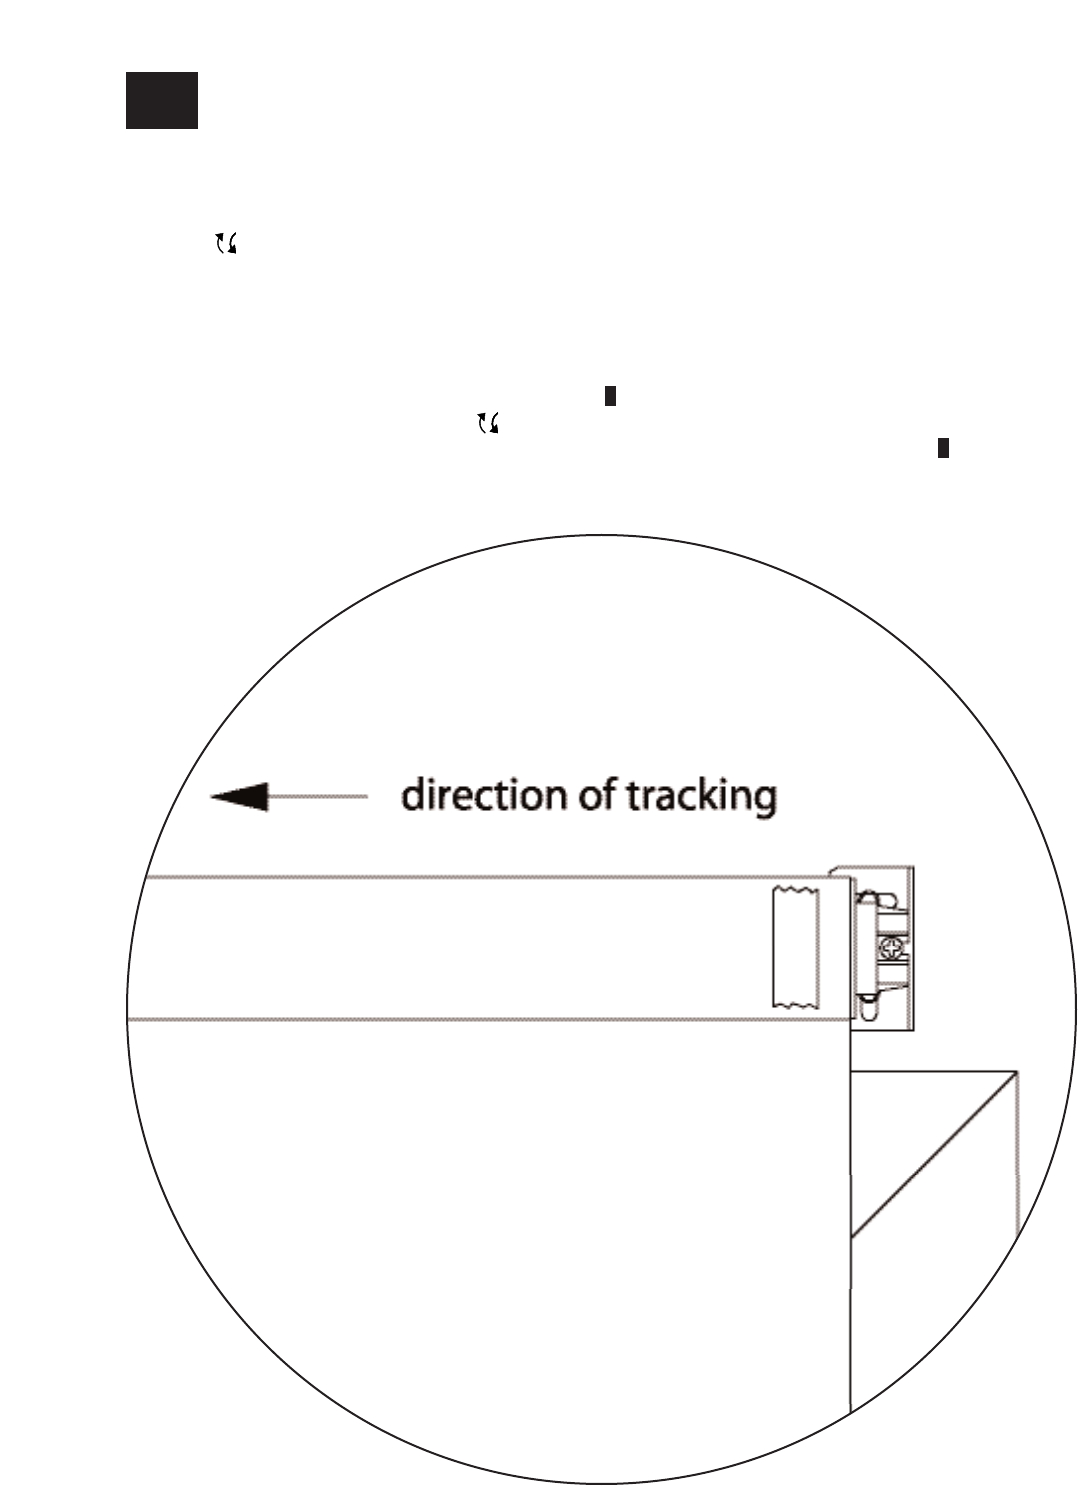
Observe: Pay careful attention to the shade roll up to ensure that it does not telescope
extremely to one side or the other.
Tip: Slight telescoping is normal. However, if the shade is telescoping severely to one
side and it is level, press the “Close Limit Button” ( ), and lower the shade all the way
down using the adjustment buttons ( ). Place a piece of tape on the side of the tube
that the fabric is telescoping away from when finished press the “Close Limit Button” ( )
once. This technique is referred to as “SHIMMING”. The shade will always track towards
the side that the tape (shim) is placed on.
11.2 Secure and Check the Shade (continued)

Press and hold the “Open
Limit Button” ( ) for 5
seconds. The green LED on
the roller shade EDU will
flash for 2 seconds, then go
dark, indicating that the
current position has been
stored as the Open Limit.
Adjust the position of the
EDU to the desired Open
Limit using the adjustment
buttons ( ).
Note: Setting the Open Limit lower than the Close Limit will cause the shade to move down
when raise is pressed and up when lower is pressed.
Setting the Open Limit from the EDU
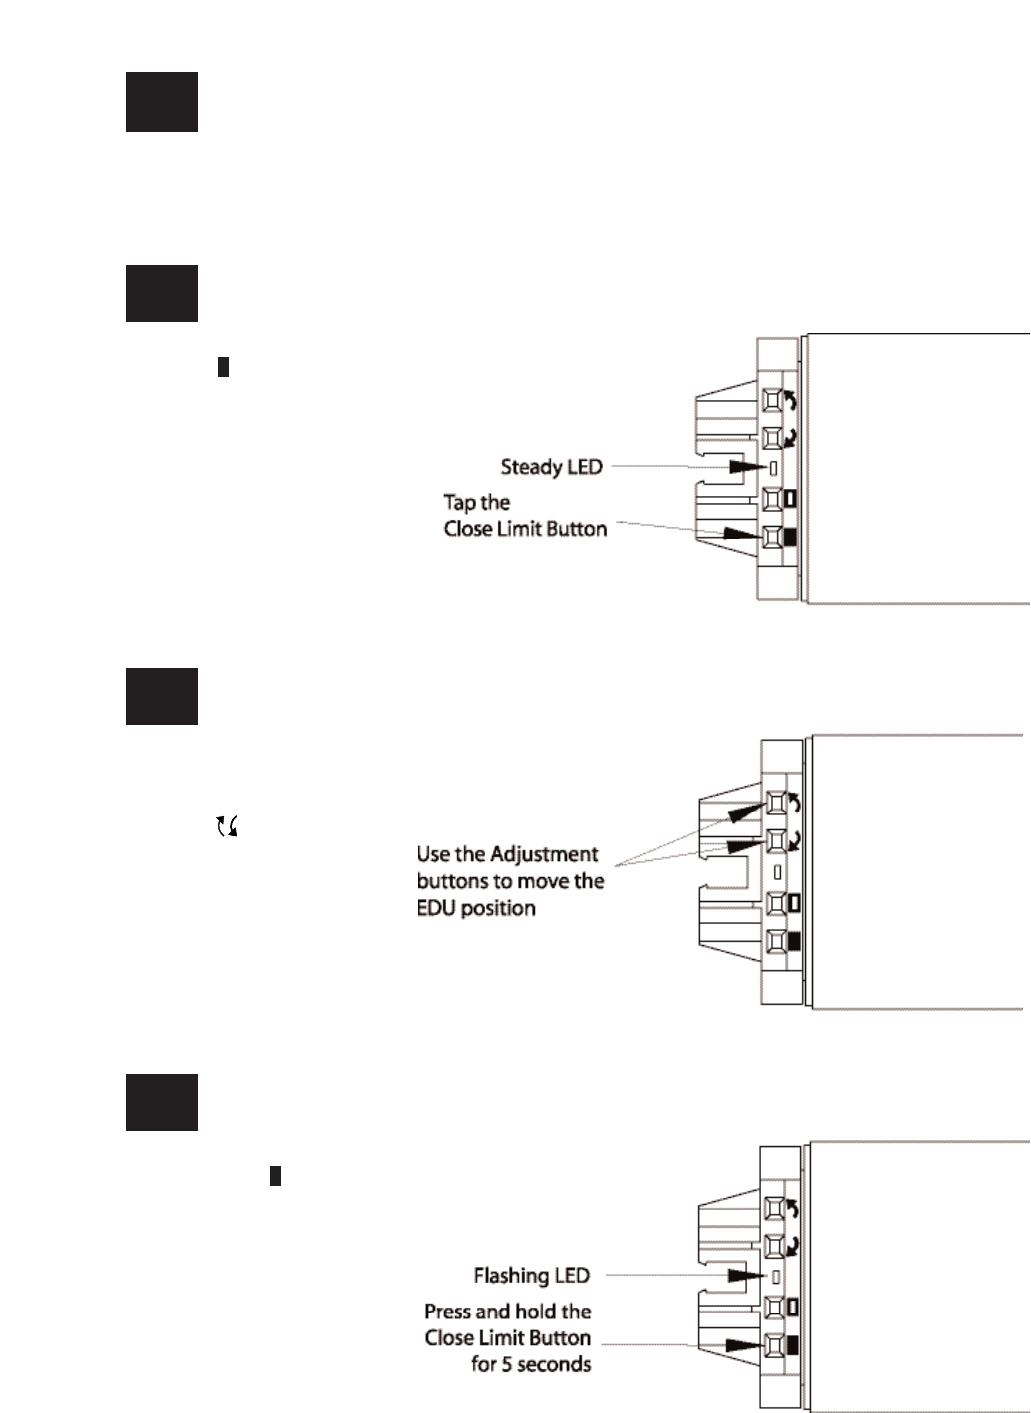
12 Setting Limits from the EDU
Tap the “Open Limit Button”
( ), the green LED on the
roller shade EDU will turn on
steady, indicating that the EDU
is in “Set Open Limit Mode.”
12.1
12.2
12.3
SIVOIA QEDTM Wireless Roller 64 Installation Instructions 18
SIVOIA QEDTM Wireless Roller 64 Installation Instructions 19
12.5
12.6
12.4
12 Setting Limits from the EDU (continued)
Setting the Close Limit from the EDU
Press and hold the “Close
Limit Button” ( ) for 5
seconds. The green LED on
the roller shade EDU will
flash for 2 seconds, then go
dark, indicating that the
current position has been
stored as the Close Limit.
Tap the “Close Limit
Button” ( ). The green
LED on the roller Shade
EDU will turn on steady,
indicating that the EDU is
in “Set Close Limit Mode”.
Adjust the position of the
EDU to the desired Close
Limit using the adjustment
buttons ( ).

SIVOIA QEDTM Wireless Roller 64 Installation Instructions 20
13 Finish System Programming
The Sivoia QED shade is now installed, wired, and the OPEN/CLOSE limits for each shade have
been set.
The next step is to finish programming the system, using the HomeWorks Illumination Software.
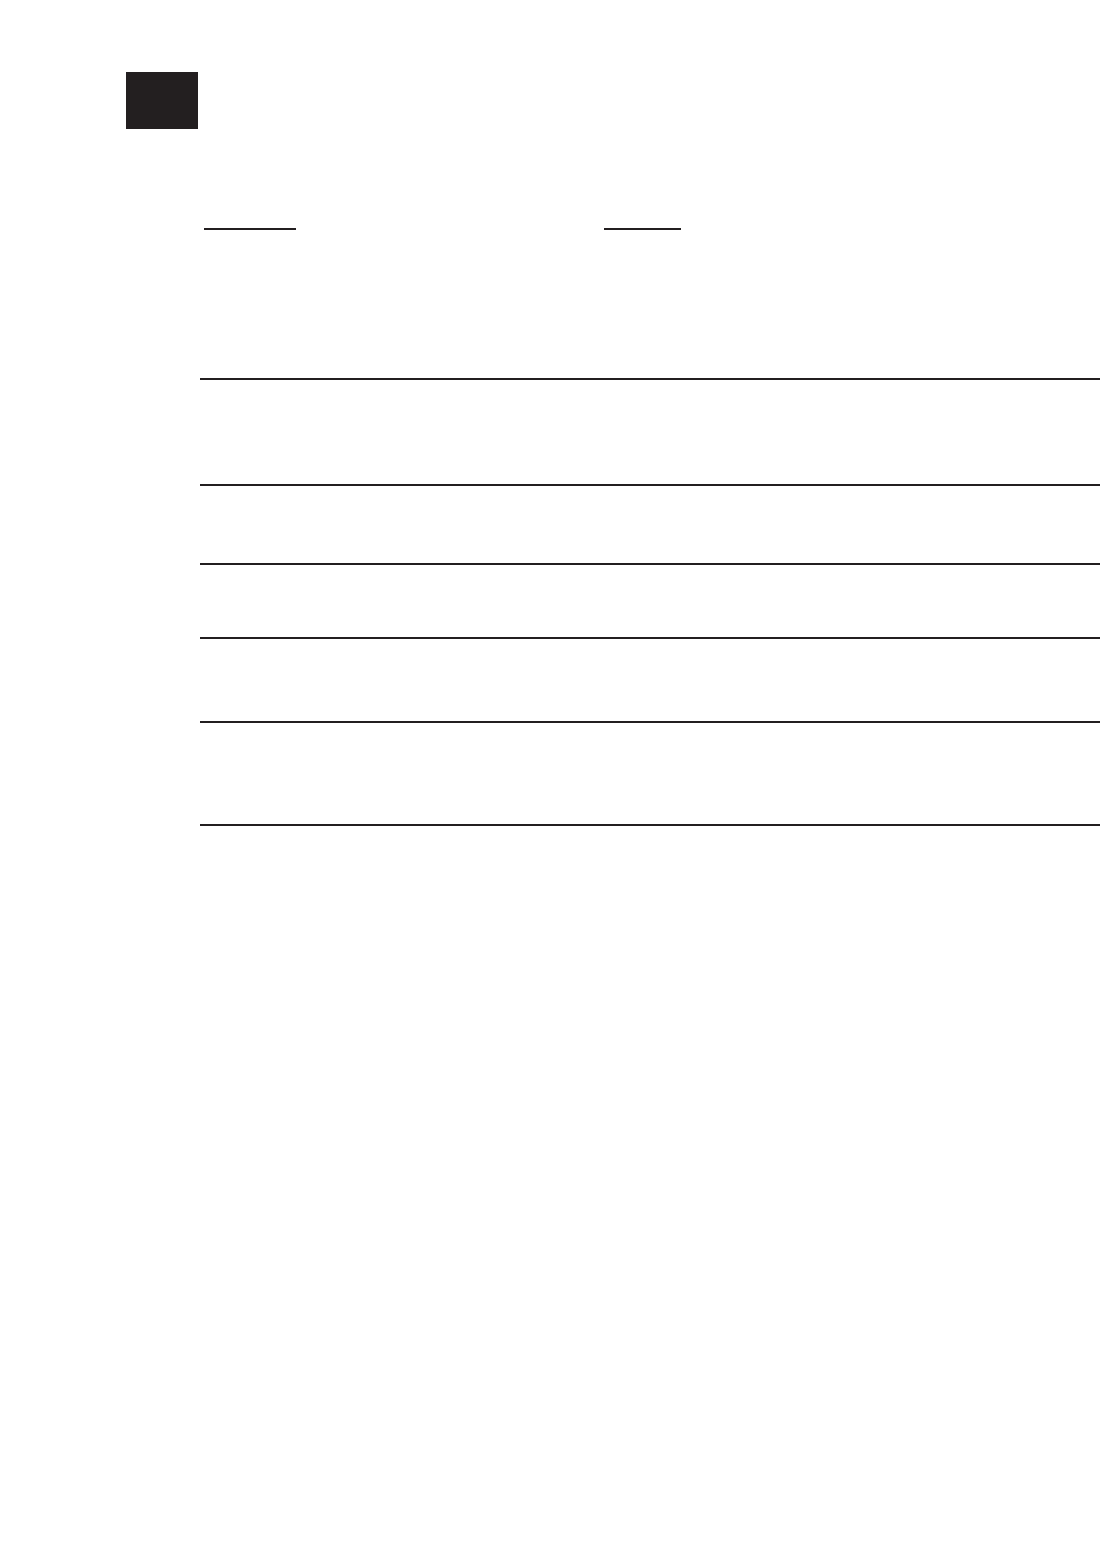
Symptom
Shade will not move using
adjustment buttons on EDU...
Solution
...EDU is not powered - check EDU Power.
By unplugging and re-plugging in EDU.
LED should light for 5 seconds.
...Shade is caught on something - free shade.
...Shade is not programmed to keypad or event.
Shade does not fully open or fully close... ...Limits have been set incorrectly - refer to “set
open limit” and “set close limit” sections on re-set
limits using HW1 Software.
...Shade fabric is caught on something - free shade.
Fabric not level... ...Check that brackets are mounted level.
...Check that fabric is tracking correctly on
the shade tube.
Fabric not centered over window... ...Check that brackets are centered.
Shade does not move smoothly... ...Check for binding of shade fabric on side
channels.
...Check fabric tracking.
Wireless Shade can not be addressed.... ...Shade is out of RF communications range.
Move RF signal repeater or RF processor to
within 30 feet (9m) of shade.
21
14 Troubleshooting
SIVOIA QEDTM Wireless Roller 64 Installation Instructions

SIVOIA QEDTM Wireless Roller 64 Installation Instructions 22
Shade Location Serial
Number
1
2
3
4
5
6
7
8
9
10
11
12
13
14
15
16
17
18
19
20
21
22
23
24
25
26
27
28
29
30
31
32
Shade Location Serial
Number
33
34
35
36
37
38
39
40
41
42
43
44
45
46
47
48
49
50
51
52
53
54
55
56
57
58
59
60
61
62
63
64

FCC Information
NOTE: This equipment has been tested and
found to comply with the limits for a Class B
digital device, pursuant to part 15 of the FCC
rules. These limits are designed to provide
reasonable protection against harmful
interference in a residential installation. This
equipment generates, uses and can radiate
radio frequency energy and, if not installed and
used in accordance with the instructions, may
cause harmful interference to radio or television
reception, which can be determined by turning
the equipment off and on, the user is
encouraged to try to correct the interference
by one or more of the following measures:
•Reorient or relocate the receiving antenna.
•Increase the separation between the
equipment and receiver.
•Connect the equipment into an outlet on a
circuit different from that to which the
receiver is connected.
•Consult the dealer or an experienced
radio/TV technician for help.
Caution: Changes or modifications not
expressly approved by Lutron Electronics Co.
could void the user's authority to operate
this equipment.
Industry Canada
Information
The term “IC” before the radio
certification number only signifies that
Industry Canada technical specifications
were met.
Limited Warranty
Lutron offers an 8-year limited warranty for our
shading systems. Please contact customer
service or visit our website for a complete
warranty statement.
Lutron reserves the right to make improve-
ments or changes to these products without
prior notice. Although every attempt is made to
ensure that this information is accurate and up
to date, please check with Lutron to confirm
product availability, the latest specifications,
and suitability for your application.
These products may be covered by one or
more of the following US patents:
5,983,783
and corresponding foreign patents.
US and foreign patents pending.
Lutron, the Sunburst logo, and Sivoia are
registered trademarks, and Sivoia QED is a
trademark of Lutron Electronics Co., Inc.
Technical Assistance
WORLD
HEADQUARTERS
Lutron Electronics Co., Inc.
7200 Suter Road
Coopersburg, PA 18036
United States
Tel: +1-610-282-3800
Fax:+1-610-282-1243
CUSTOMER
SERVICE/ORDERING
USA +1-888-LUTRON1
08.00 - 20.00 EST
CUSTOMER SERVICE
/E-MAIL
shadinginfo@lutron.com
TECHNICAL SUPPORT
& SERVICES
USA +1-800-523-9466 –
24 hours/7 days
INTERNET:
www.lutron.com
©2006 LUTRON Electronics Co., Inc.
Printed in the U.S.A.
P/N 045-119 REV. A