Lutron Electronics 0120 RF In-Wall Occupancy Dimmer User Manual Vive Integral Fixture Controls INSTALL 041600
Lutron Electronics Company Inc RF In-Wall Occupancy Dimmer Vive Integral Fixture Controls INSTALL 041600
032515a_FCC_IC manual
Lutron Electronics Co., Inc. 7200 Suter Road
Coopersburg, PA 18036-1299 USA
Customer Assistance | 1.844.LUTRON1 U.S.A. / Canada | +1.888.235.2910 Mexico | +1.610.282.3800 Others | www.lutron.com/support
Part of the Vive System
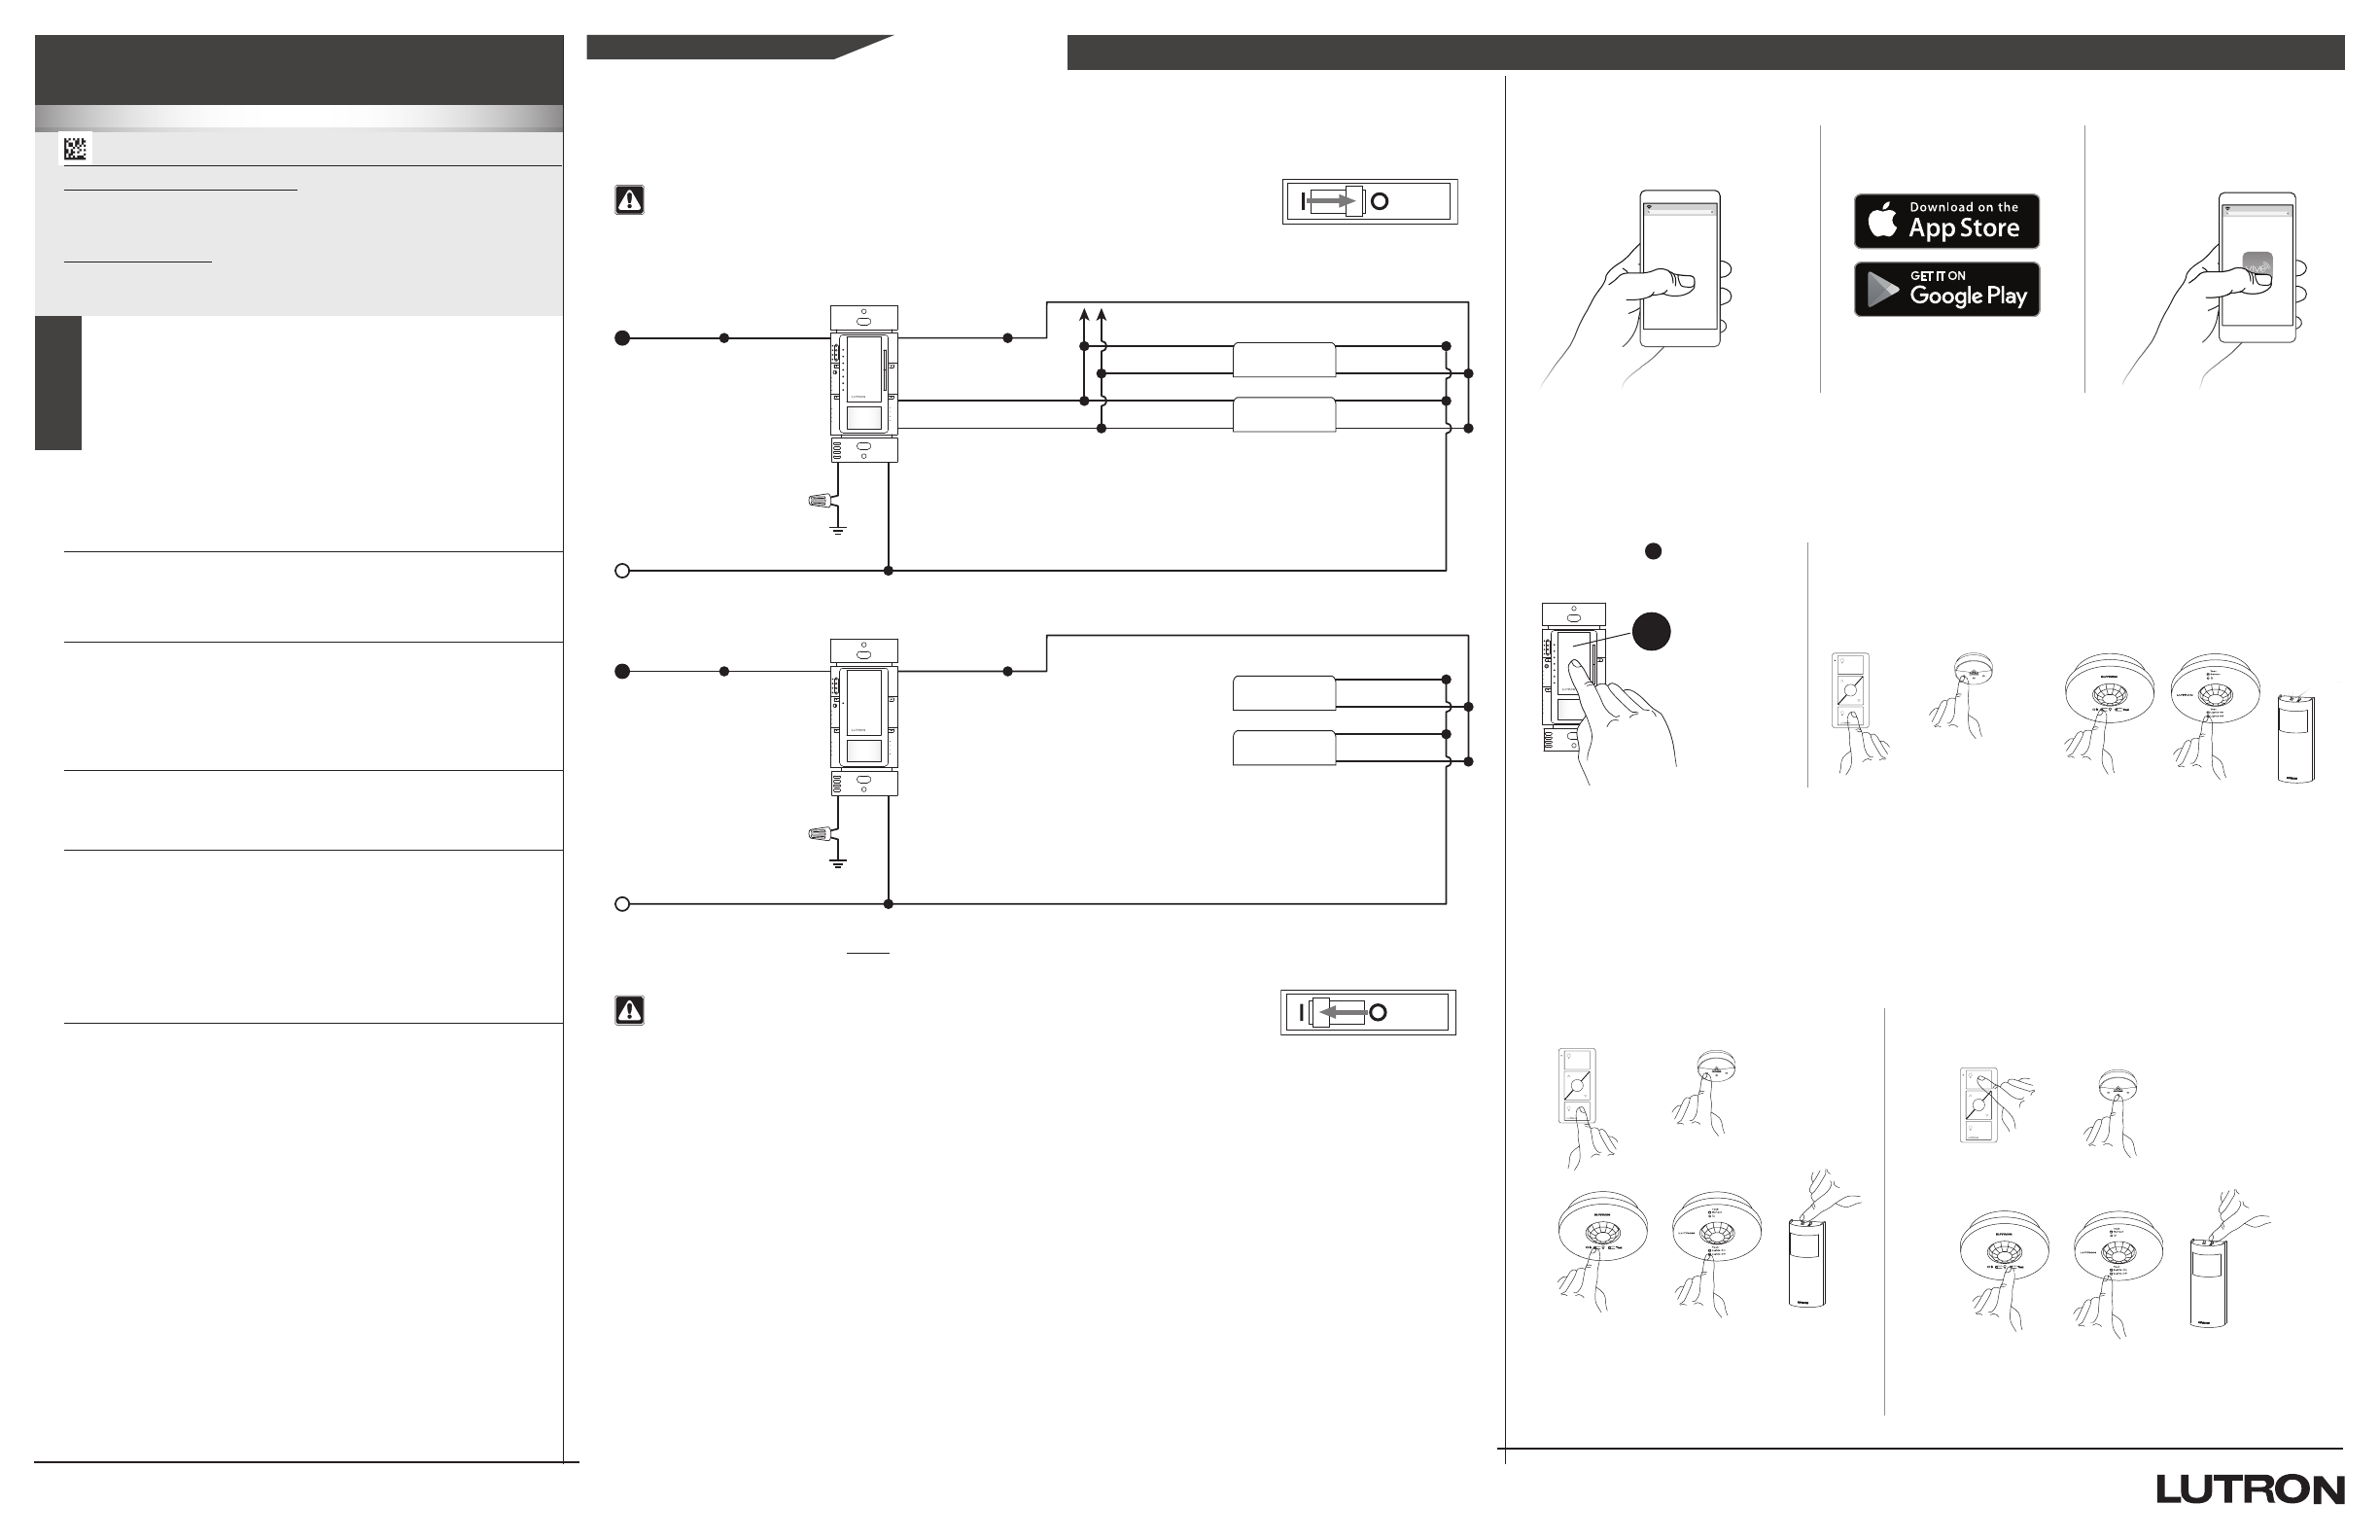
Vive Sensor Dimmer / Switch Wiring
Start Here
English
Important Notes:
• Neutral is required for product to function. If a neutral wire is not present,
consult a licensed electrician.
• When power is applied, the sensor dimmer / switch can be manually
turned on / off after the first 10 seconds and the sensor will automatically
control the load after 2 minutes.
• The sensor requires an unobstructed view of the room and line-of-sight
to detect motion.
• Hot objects or moving air currents can affect the performance of the
sensor and may cause it to turn on unexpectedly or not function as
desired.
•CAUTION: To reduce the risk of overheating and possible damage to
other equipment, do NOT use to control receptacles.
• Class 2 / Class 1 wiring: Install in accordance with all national and local
electrical codes.
• For indoor use only. Operate between 32°F – 104°F (0°C – 40°C),
ambient. 0% to 90% humidity, non-condensing.
• Clean only with soft, damp cloth, no chemical cleaners.
0–10V- RF Sensor Dimmer
MRF2S-8SD010 Occupancy / Vacancy
MRF2S-8SDV010 Vacancy Only
RF Sensor Switch
MRF2S-8SS Occupancy / Vacancy
MRF2S-8SSV Vacancy Only
4. Wait 2 minutes
• The sensor dimmer / switch will manually control the load after the first 10 seconds.
• Once power has been restored, the sensor dimmer / switch will automatically control the load after the first 2 minutes.
5. Set desired settings (optional)
2. Connect Wires
1. Turn off power
WARNING: Shock Hazard. May result in serious injury or death. Turn OFF power at
circuit breaker or fuse before installing or servicing the unit.
3. Turn on power
WARNING: Shock Hazard. Could result in minor or moderate personal injury. Ground
connection required before connecting power
Please read before installing
032515
Rev. A
06/2018
For set-up, programming, and troubleshooting
with a Vive system, please refer to the installation
instructions included with the Vive hub or at
www.lutron.com
Compatible Devices
Works with all ballasts and drivers that provide a current source
compliant to ANSIC137.1-201x 0–10 V.
Lighting
Electronic fluorescent ballast or LED driver
120 – 277 V~ 50 / 60 Hz 8 A
Canada:
120 V~ 50 / 60 Hz 8 A
0–10 V- Load Rating
• One sensor dimmer / switch can sink up to 50 mA of current.
• Controls up to 25 drivers or ballasts.
• ANSI C137.1-201x 0–10 V requires the driver / ballast to limit the current
draw to 2.0mA maximum.
Motion Coverage
• Major: 30 ft × 30 ft (9 m × 9 m) [900 ft2 (81 m2)]
• Minor: 20 ft × 20 ft (6 m × 6 m) [400 ft2 (36 m2)]
Wireless Communication
• Range of wireless communication is 60ft (18m) line-of-sight or 30ft
(9m) through walls.
• Wireless communication is affected by the installation or physical setup
of the room.
• Keep all wireless devices visible within the space. Do not place behind
large furniture or appliances.
• Do NOT mount in a metal partition wall or metal power pole.
For more information and additional wiring instructions, visit: www.lutron.com/TechnicalDocumentLibrary/048687.pdf and/or
www.lutron.com/TechnicalDocumentLibrary/3691097.pdf
m30
15
5
1
Occ
Lrn
Fixd
Vac
Mode
Hi
Med
Low
Min
PIR
Alt
m30
15
5
1
Occ
Lrn
Fixd
Vac
Mode
Hi
Med
Low
Min
PIR
Alt
Gray (–)Gray (–) White
White
Gray (–) White
White
Violet (+)Violet (+) Black
Black
Violet (+) Black
Black
Ground
Ground
Green
Green
Black
Black
Black
Black
White
White
Neutral
Neutral
Note: Program all desired settings before installing the wallplate.
Line / Hot
Line / Hot
120–277 V~
50 / 60 Hz
120–277 V~
50 / 60 Hz
a. Sensor Dimmer - Single Pole Wiring
b. Sensor Switch - Single Pole Wiring
Programming without a Vive Hub or in optional multi-location
applications (associating wireless devices to sensor dimmer / switch)
Un-associating a wireless device from a sensor dimmer/switch
Programming with a Vive Hub
1.
Use an iOSR or AndroidT compatible
device.
1.
Press and hold T for until the lights
flash (about 7seconds).
1.
Rapidly tap the wireless device button three
times and hold on the fourth until the lights
begins to flash rapidly; release the button.
Within 1 second of releasing the button, rapidly
tap it three times again.
2.
Press and hold the wireless device button shown below until the lights
flash (about 6seconds).
2.
To test that the wireless device has been successfully
un-associated, press “Test” or d and verify that the
wireless device no longer controls the load.
2.
Download the Lutron Vive app.
3.
Open the app and follow
the instructions.
Note: For further information on set up, programming, and troubleshooting with a Vive system, please refer to the
installation instructions included with the Vive hub or visit www.lutron.com/vive
Note: To associate multiple wireless devices, repeat steps 1 and 2 above for each wireless device.
Pico wireless
control
(upto10)
Radio Powr Savr
daylight sensor
(1maximum)
Radio Powr Savr occupancy / vacancy sensor
(up to 10)
X
Vive
X
Test
Link
Test
Link
Test
Link
m30
15
5
1
Occ
Lrn
Fixd
Vac
Mode
Hi
Med
Low
Min
PIR
Alt
T
120–277 V~
50 / 60 Hz
120–277 V~
50 / 60 Hz
Canada:
Canada:
• See other side of sheet for details on how to select custom settings.
•FCC / IC - Supplier Declaration of Conformity
This device complies with part 15 of the FCC Rules and Industry Canada license-exempt RSS standard(s). Operation is subject to the following two conditions: (1) This device may not cause
interference and (2) This device must accept any interference, including interference that may cause undesired operation. Modification not expressly approved by Lutron Electronics Co., Inc.
could void the user’s authority to operate this equipment.
NOTE: This equipment has been tested and found to comply with the limits for a Class B digital device, pursuant to part 15 of the FCC Rules. These limits are designed to provide
reasonable protection against harmful interference in a residential installation. This equipment generates, uses and can radiate radio frequency energy and, if not installed and used in
accordance with the instructions, may cause harmful interference to radio communications. However, there is no guarantee that interference will not occur in a particular installation. If this
equipment does cause harmful interference to radio or television reception, which can be determined by turning the equipment off and on, the user is encouraged to try to correct the
interference by one or more of the following measures:
• Re-orient or relocate the receiving antenna.
• Increase the separation between the equipment and receiver.
• Connect the equipment into an outlet on a circuit different from that to which the receiver is connected.
Ce dispositif est conforme à la section 15 des règlements du FCC et des standards CNR exempt de licence d’Industrie Canada. L'opération est sous réserve des deux conditions suivantes :
(1) Cet appareil ne peut causer d'interférence nuisible, et
(2) Cet appareil doit tolérer toute interférence, même celle pouvant affecter son fonctionnement. Tout changement ou modification sans l'autorisation expresse de Lutron Electronics Co.,
Inc. pourrait annuler le droit d'utiliser cet équipement.
REMARQUE : Cet équipement a été testé et jugé conforme aux limites applicables aux dispositifs numériques Classe B, conformément à la section 15 des régles de la FCC. Ces limites sont
conçues pour procurer une protection raisonnable contre les perturbations nuisibles en application résidentielle. Cet équipement génère, utilise et peut radier l'énergie de fréquences
radiophoniques. S'il n'est pas installé et utilisé selon les directives, peut causer des interférences radiophoniques nuisibles. Cependant, il n’y a aucune garantie qu’aucune interférence ne se
produira dans une installation précise. Si votre équipement produit de l'interférence à la réception radiophonique ou télévisuelle, ce qui peut être détecté en coupant et refermant l'alimentation
au système d’éclairage. Dans le cas d’interférence, l'utilisateur sera contraint d’essayer de corriger la situation par un ou plusieurs des moyens suivants :
• Réorienter ou re-localiser l'antenne de réception
• Augmenter la distance séparant l'équipement et le récepteur
• Brancher l’équipement sur un circuit différent que celui sur lequel le récepteur est branché
• Demander l'aide du distributeur ou d'un technicien expérimenté en radio et télévision
m30
15
5
1
Occ
Lrn
Fixd
Vac
Mode
Hi
Med
Low
Min
PIR
Alt
m30
15
5
1
Occ
Lrn
Fixd
Vac
Mode
Hi
Med
Low
Min
PIR
Alt
m30
15
5
1
Occ
Lrn
Fixd
Vac
Mode
Hi
Med
Low
Min
PIR
Alt
m30
15
5
1
Occ
Lrn
Fixd
Vac
Mode
Hi
Med
Low
Min
PIR
Alt
ALL PROGRAMMING IS OPTIONAL
Programming is not required for default functionality
Reset Factory Defaults
Test Mode
Note: It may be necessary to reset the device to factory default settings. Before beginning, ensure the device is
connected and powered.
Note: Any associations or programming previously set up with the sensor dimmer / switch will be erased and will
need to be re-programmed after resetting to factory defaults.
1. Rapidly tap T three times and hold on the fourth until the lights begins to flash rapidly; release T.
2. Within 1 second of releasing
T
, rapidly tap
T
three times again and the lights will flash slowly indicating that the
device has been reset to factory defaults.
Test mode has a short timeout (< 15 seconds) that will test the coverage of the sensor with the current settings.
1. Wait at least 2 minutes after power is turned on.
2. Press and hold
T
until the PIR lens flashes (about 3 seconds).
3. The device will exit test mode after 5 minutes of inactivity or when any button is pressed.
The sensor LED behind the lens will turn on while occupied and turn off while vacant.
Vive Sensor Dimmer / Switch
Part of the Vive System
For set-up, programming, and troubleshooting with a
Vive system, please refer to the installation instructions
included with the Vive hub or at www.lutron.com
Lutron Electronics Co., Inc. 7200 Suter Road
Coopersburg, PA 18036-1299 USA
Lutron, Pico, Maestro, and Vive are trademarks of Lutron Electronics Co., Inc. registered in the U.S. and other countries. Radio Powr Savr is a trademark of Lutron Electronics Co., Inc.
App Store is a service mark of Apple, Inc. Android and Google Play are trademarks of Google LLC. iOS is a trademark or registered trademark of Cisco in the U.S. and other countries and is used under license.
© 2018 Lutron Electronics Co., Inc.
Customer Assistance | 1.844.LUTRON1 U.S.A. / Canada | +1.888.235.2910 Mexico | +1.610.282.3800 Others | www.lutron.com/support
Symptom Possible Causes and Solutions
Lights can not be manually
turned ON or OFF with
the newly installed sensor
dimmer / switch.
• Verify proper wiring. Neutral must be connected for product to
function properly.
• Wait 10 seconds and try to turn ON or OFF again.
Wireless device will not
associate to a sensor
dimmer / switch.
• Wireless device is out of range.
• Wireless performance is being affected by the physical setup
of the space. See Wireless Communication section for more
information.
Not all of the sensor
modes are available when
programming.
• Sensor modes are limited for vacancy only models
(MRF2S-8SDV010 and MRF2S-8SSV).
• Device may be part of a Vive system.
Lights do not automatically
turn ON when space is
occupied.
• Sensor Mode is set to Vacancy (Manual-ON / Auto-OFF).
• The sensor dimmer / switch may be a vacancy only model
(MRF2S-8SDV010 and MRF2S-8SSV).
• The room may be too bright for the current light level setting for
Fixed ALD Level.
Driver / ballast cannot be
dimmed up or down.
Lens flashes when trying to
dim the lights.
• Verify proper connection of gray and purple wires.
• Driver / ballast does not comply with ANSIC137.1-201x 0–10V.
See www.lutron.com/TechnicalDocumentLibrary/048687.pdf
Troubleshooting www.lutron.com/support
1 Sensor Mode is locked as “Vacancy” in vacancy only models (MRF2S-8SDV010 and
MRF2S-8SSV).
2 Available in standalone. Not available when used in a Vive system.
3 Only available with the sensor dimmer. Not available with sensor switch.
4 Available in standalone. When the device is used in a Vive system, these adjustments are
only available via the Vive software.
5 Learning ALD (Ambient Light Detection): Lights remain off if enough natural light is present.
If the lights turn on and the user does not want that much light, they can tap
T
within
5seconds of entering the space. Similarly, if the lights do not turn on when entering a space
and the user wants more light, they can tap
T
within 5seconds of entering the space.
Over time, the sensor will learn the preferred light level.
6 Fixed ALD: Lights turn on only when there is less than a set (locked) amount of natural light
available. The level can be adjusted in “Fixed ALD Level” settings.
7 This setting will override the sensor mode of the Radio Powr Savr occupancy / vacancy
sensor.
IL
Indicator LEDs
2
Tapswitch
(on / off)
MP
Sensor LED
(behind lens)
See Test Mode
section.
Sensor
mode
4, 7
Timeout
4
M
PIR lens
Sensor dimmer shown
PIR
sensitivity
4
Raise
3
Maestro
LEDs
Lower
3
Alt
2
L
R
ML
Alt
High-End Trim
3, 4
1. Press and hold
T
and
R
until a
ML
flashes (about 6 seconds).
2. Press and hold
R
until the top
ML
is lit and the lights stop brightening.
3. Tap
L
until the desired level is achieved. Press and hold
T
until the
ML
stops flashing (about 6 seconds).
Low-End Trim
3, 4
1. Press and hold T and
L
until a
ML
flashes (about 6 seconds).
2. Press and hold
L
until the bottom
ML
is lit and the lights stop dimming.
3. Tap
R
until the lights are on and stable (no flickering) and the desired level is achieved. Press and hold T until the
ML
stops flashing (about 6 seconds).
Occupancy Level
3, 4
The level which the sensor dimmer turns on when motion is detected. This level is adjustable from 1% to 100% within the range of
the low-end and high-end trims.
1. Press and hold
M
and
R
until a
ML
flashes (about 6 seconds).
2. Tap
R
or
L
until desired level is achieved.
3. Press and hold
M
until the
ML
stops flashing (about 6 seconds).
Vacancy Level
3, 4
The level which the sensor dimmer dims or turns off when motion has not been detected for the timeout period. This level is
adjustable from 1% to 100% within the range of the low-end and high-end trims.
1. Press and hold M and
L
until a
ML
flashes (about 6 seconds).
2. Tap
R
or
L
until desired level is achieved.
3. Press and hold M until the
ML
stops flashing (about 6 seconds).
Fixed ALD Level
2 (MRF2S-8SD010 and MRF2S-8SS only)
The light level that determines when a sensor will turn lights on or keep lights off when detecting occupancy. This setting only affects
sensors set to “Fixed ALD” mode.
1. Press and hold M and Alt until an IL flashes (about 3 seconds).
2. The “Fixed ALD” light level will now be displayed by the
IL
. Tap
M
to cycle to the desired setting.
3. Press and hold
M
until the
IL
turns solid (about 3 seconds).
Walk-through Mode
2
Allows the lights to turn off before the Timeout has expired if occupancy is detected only briefly.
1. Press and hold and
Alt
until an
IL
flashes (about 3 seconds).
2. The walk-through setting will now be displayed by the IL . Tap Alt to cycle to the desired setting.
3. Press and hold Alt until the IL turns solid (about 3 seconds).
Electronic Off
2
Affects how the lights are turned off. If enabled, the driver will still have power but the lights will be turned off. If disabled, the driver will
not have power and the lights will be turned off.
1. Press and hold and
M
until an
IL
flashes (about 3 seconds).
2. The electronic off setting will now be displayed by the IL . Tap M to cycle to the desired setting.
3. Press and hold M until the IL turns solid (about 3 seconds).
Change Basic Settings
Change Advanced Settings
Check Current Settings2
1. Press and hold the desired programming button ( ,
M
, or
P
) until an
IL
flashes (about 3seconds).
2. Tap the same programming button to cycle to your desired setting.
3. Press and hold the same programming button until the
IL
turns solid (about 3seconds). The setting has been saved.
For complete programming options and additional information, visit www.lutron.com/TechnicalDocumentLibrary/048687.pdf
Timeout: 15 minutes
Sensor Mode: Occupancy (Auto-On / Auto-Off)1
PIR Sensitivity: High
Occupied Level: 100%
Vacancy Level: 0%
Fixed ALD Level: Low (when in Fixed ALD mode)
Default Settings
To display the current settings, tap the Timeout ( ), Sensor Mode (
M
),
or PIR Sensitivity (
P
) button. The indicator LED ( IL ) that corresponds to
the current setting will illuminate.
T
P
Timeout
4Sensor Mode
1
(determines when lights turn on)
PIR Sensitivity
4
m30
15
5
1
Occ
Lrn
Fixd
Vac
Mode
Hi
Med
Low
Min
PIR
Alt
m30
15
5
1
Occ
Lrn
Fixd
Vac
Mode
Hi
Med
Low
Min
PIR
Alt
m30
15
5
1
Occ
Lrn
Fixd
Vac
Mode
Hi
Med
Low
Min
PIR
Alt
m30
15
5
1
Occ
Lrn
Fixd
Vac
Mode
Hi
Med
Low
Min
PIR
Alt
100%
45%
100%
55%
1%
1%
30 minutes
15 minutes
5 minutes
1 minute
Occupancy (Auto-ON / Auto-OFF)4
Occupancy with Learning ALD
2, 5
Occupancy with Fixed ALD
2, 6
Vacancy (Manual-ON / Auto-OFF)4
High
Medium
Low
Minimum
High (turn ON lights unless area has a lot of light)
Medium
Low
Minimum (turn ON lights only when room is dark)
(unused)
(unused)
Disabled
Enabled
(unused)
(unused)
Enabled
Disabled
0%
100%
Default settings in bold