Contents
- 1. Users Manual
- 2. User Manual
Users Manual
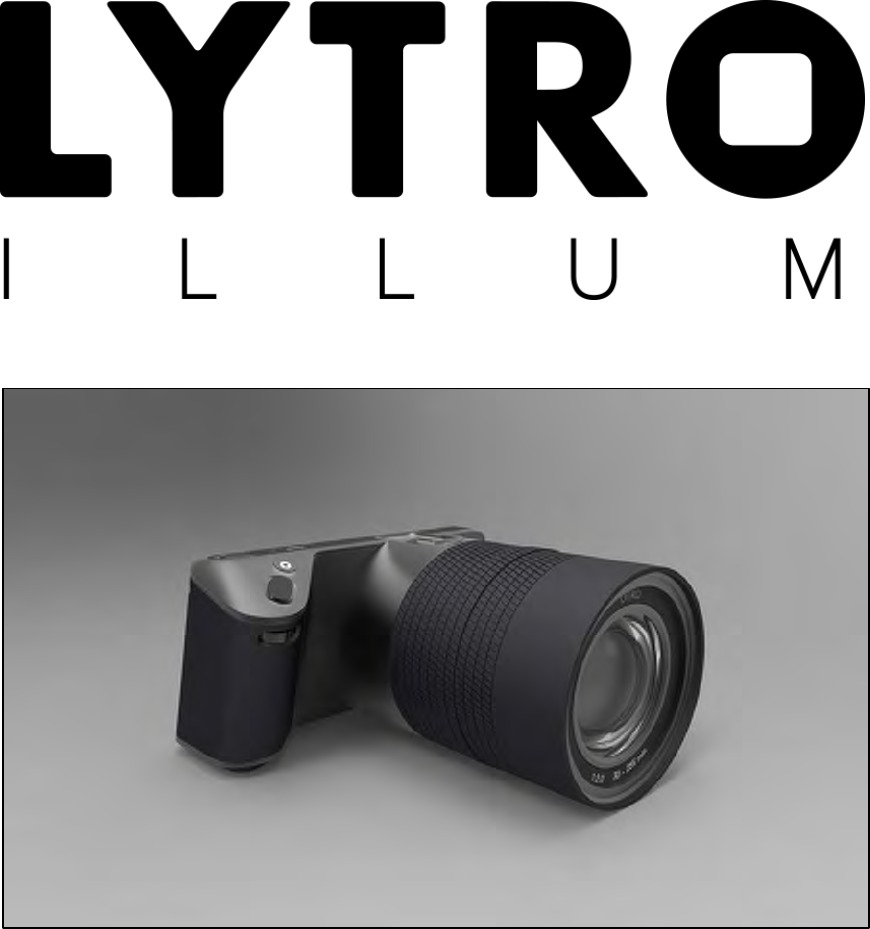
USER MANUAL
Table of contents
Tableofcontents.....................................................................................................................X
IntroducingtheLYTROILLUM............................................................................................X
Benefitsofthelightfield.......................................................................................................X
LearningtouseLytroILLUM................................................................................................x
Quickreferenceguide............................................................................................................X
Cameraexterior.................................................................................................................................X
Inthebox..............................................................................................................................................X
Productrequirements.....................................................................................................................X
TouchscreenlayoutinCaptureMode.........................................................................................X
InformationBar................................................................................................................................................X
MenuBar,page1.............................................................................................................................................X
MenuBar,page2.............................................................................................................................................X
TouchscreenlayoutinPlaybackMode......................................................................................X
GettingStarted..........................................................................................................................X
Chargingthebattery.........................................................................................................................X
Insertingthechargedbattery.......................................................................................................X
Insertingthestraprings.................................................................................................................X
InsertinganSDcard.........................................................................................................................X
Poweringon(andoff)......................................................................................................................X
Usingthesetupassistant...............................................................................................................X
Puttingthecameratosleep/wakingthecamera...................................................................X
CaptureMode............................................................................................................................X
Physicalcontrols.............................................................................................................................xx
TouchscreenlayoutinCaptureMode.......................................................................................xx
InformationBar...............................................................................................................................xx
MenuBar,page1.............................................................................................................................xx
MenuBar,page2.............................................................................................................................xx
Additionalmenufeatures(offbydefault)..............................................................................xx
HidinganddisplayingtheMenuBarandInformationBar.........................................................xx
Choosinganexposuremode........................................................................................................xx
SettingtheISO..................................................................................................................................xx
Settingtheshutterspeed..............................................................................................................xx
SettingtheEVcompensation.......................................................................................................xx
Usingautofocus................................................................................................................................xx
Tappingthescreentofocus.........................................................................................................xx
Usingmanualfocus.........................................................................................................................xx
Settingthewhitebalance.............................................................................................................xx
Usingtheliveexposurehistogram............................................................................................xx
UsingtheHorizonLevel................................................................................................................xx
Adjustingtheopticaloffset..........................................................................................................xx
Usingagridoverlay........................................................................................................................xx
Shootingwithcontinuousshutter.............................................................................................xx
Usingtheselftimer........................................................................................................................xx
Applyingexposurebracketing....................................................................................................xx
Applyingfocusbracketing............................................................................................................xx
OpeningtheSettingsmenu............................................................................................................x
Usingaflash......................................................................................................................................xx
PlaybackMode........................................................................................................................xx
TouchscreenlayoutinPlaybackMode....................................................................................xx
ProcessingaLivingPictureforrefocusing.............................................................................xx
RefocusingaLivingPicture..........................................................................................................xx
UsingGridView................................................................................................................................xx
Usingthereviewhistogram.........................................................................................................xx
Deletingapicture............................................................................................................................xx
OpeningtheSettingsmenu..........................................................................................................xx
DepthCompositionFeatures.............................................................................................xx
Therefocusablerange...................................................................................................................xx
Depthscale........................................................................................................................................xx
Opticaloffsetforcapture..............................................................................................................xx
SpotDepthFeedback......................................................................................................................xx
DepthHistogramandDepthOverlay........................................................................................xx
Focusbracketing.............................................................................................................................xx
Settings......................................................................................................................................xx
FormatSDcard.................................................................................................................................xx
Brightness..........................................................................................................................................xx
Exposuresimulation......................................................................................................................xx
Clippingwarning.............................................................................................................................xx
iOSConnect........................................................................................................................................xx
Cameracontrols...............................................................................................................................xx
Instantreviewtime........................................................................................................................xx
Sounds.................................................................................................................................................xx
Moreinformation.................................................................................................................XX

Introducing the LYTRO ILLUM
LYTROILLUMisalightfieldcameraandsoftwareplatformdesignedtoredefinethe
wayweportraytheworldaroundus.Harnessingthefullpowerofthelightfield,the
LYTROILLUMwillgivephotographersauniquewayofcapturingvisualexperiences
—notasastaticcrosssectionofrealitybutaninteractivewindowintotheirworld
throughLightFieldPhotography.
Benefits of the light field
Unlikeaconventionaldigitalcamera,theLYTROILLUMcapturesthelightfield,
whichincludesthedirectionoflight.Mostrecently,lightfieldcameraslivedonlyin
academiclabs–viaaroomfulofcamerastetheredtoasupercomputer.Lytro’s
scientistsandengineershaveoptimizedthistechnologysothatthepowerofthe
lightfieldcanfitrightinyourpocket.
Capturingthisfundamentallynewdatagivesconsumersunprecedentedcapabilities,
includingtheabilitytofocus,changetheperspective,viewin3Dallafterapicture
istaken.PhotographersusingtheLYTROILLUMhavenewcreativeopportunitiesto
tellstoriesandcapturemoments,deliveringLivingPicturestofriends,family,and
clients.
Learning to use the LYTRO ILLUM
This User Manual is a technical reference for using the LYTRO ILLUM. It
explains how to operate the camera, and the behavior of each of the modes,
settings, and buttons.
For many photographers, getting the most out of a light field camera may require
additional education and thought on how to best compose and capture images
with depth.
Watch education and training videos at training.lytro.com
Lytro has developed a series of educational and training materials, including
videos, online help, and transformational galleries.
Visit www.training.lytro.com to get in-depth information in the following
categories:
• Orientation & Setup
• Light Field 101
• Light Field in the Field
• Workflow
The educational material covers the LYTRO ILLUM ecosystem including,
camera, desktop software, publishing to web and mobile devices.
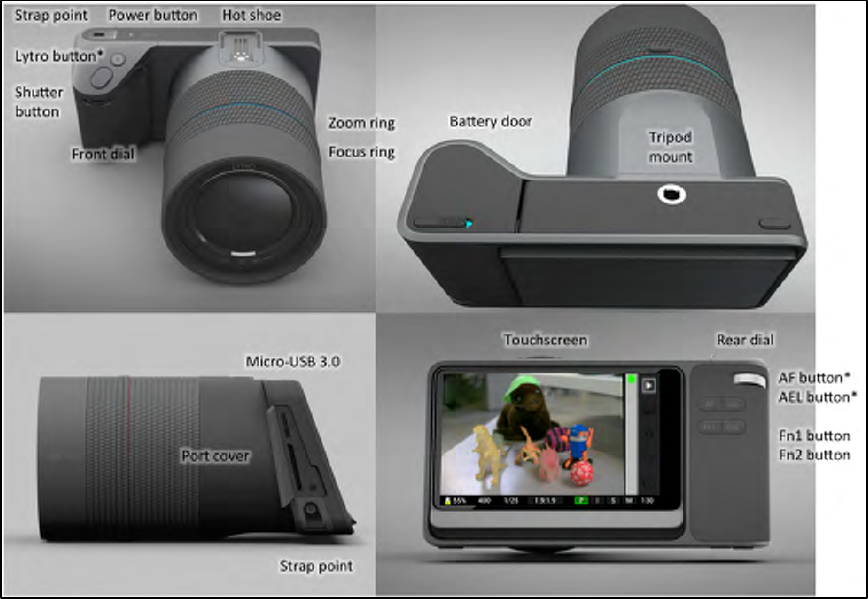
Quick reference guide
Camera exterior
In the box
• LYTROILLUMCamera
• LYTROILLUMQuickStartGuide
• LYTROILLUMQuickCharger
• LYTROILLUMRechargeableLiionBattery
• LYTROILLUMLensCap
• LYTROILLUMLensHood
• Shoulder/neckstrap
• Strapanchors(2)
• Neutraldensityfilter(ND8)–72mm
• MicroUSB3.0cable
• Lenscloth
Product requirements
SDcard(notincluded)
MacOSX10.8.5orhigher(min:4GBRAM,IntelCore2Duoornewer),or64bitWindows7or64bit
Windows8(min:4GBRAM,DirectX10.0anddualprocessorCPU)
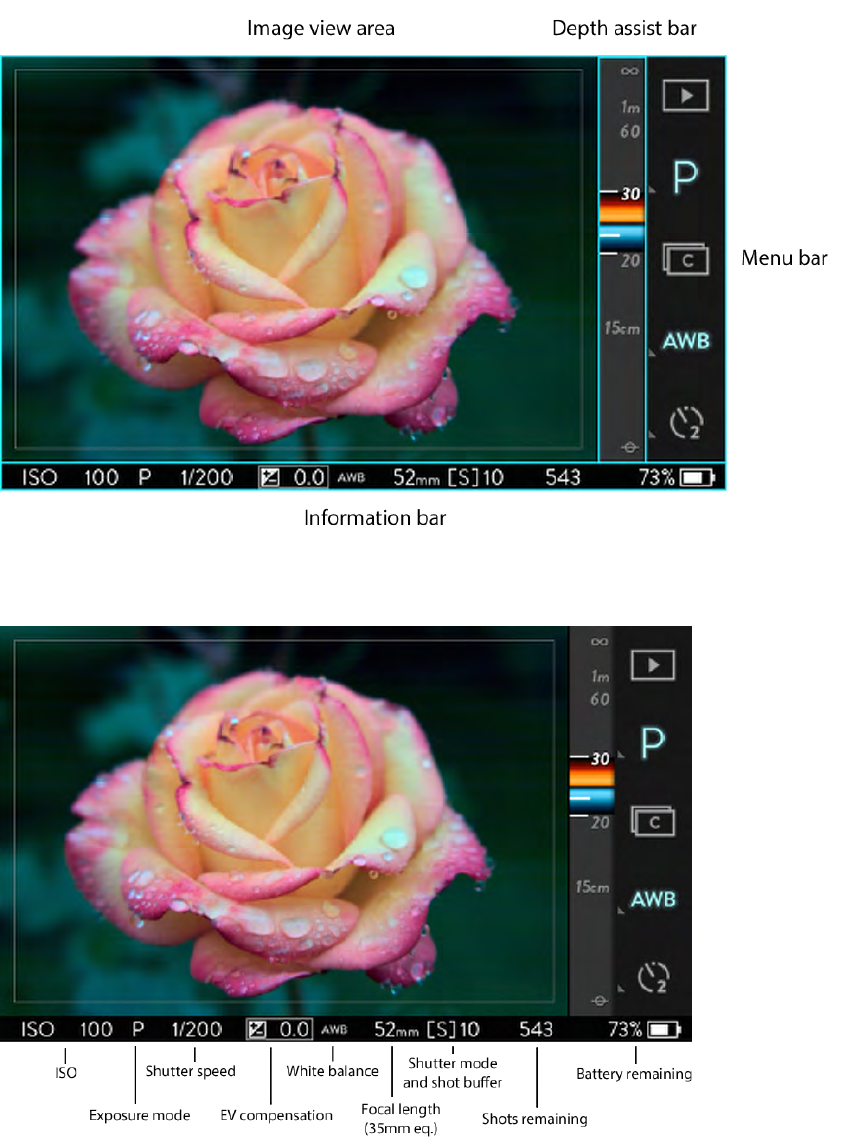
Touchscreen layout in Capture Mode
Information Bar
Menu Bar, page 1
Menu Bar, page 2
Touchscreen layout in Playback Mode
Getting Started
Charging the battery
Before using the camera for the first time, charge the lithium-ion battery. Place
the battery into the included quick charger, and plug the charger into a standard
110- or 220-volt, 50-60 Hz electrical outlet. When taking the camera out of the
box, the battery may be partially charged; a fully discharged battery may take
four hours or more to charge completely.
During charging, the LED on the charger will illuminate. When charging is
complete, the LED will turn off. A blinking LED indicates a power or connection
problem, such as the battery not being inserted properly.
Inserting the charged battery
The battery compartment is on the underside of the camera. Hold the camera
upside down and slide the thumb-latch to one side to open the door. Insert the
charged battery, hold the door fully closed, and slide the latch back to the locked
position.
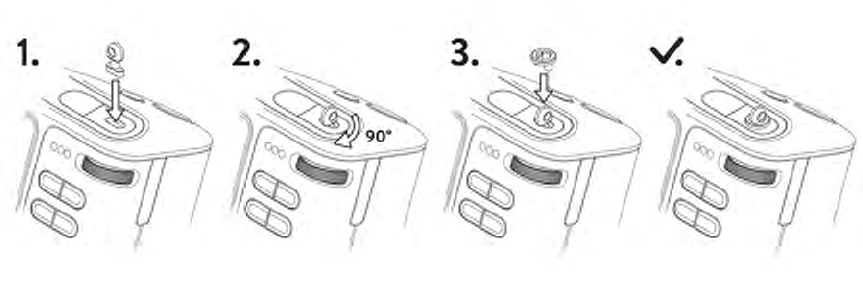
Inserting the strap rings
To prepare camera for use with a strap, install the included strap anchors. Insert
an anchor into the strap point on the top of the camera beside the power button.
Turn it 90 degrees to position it. Then place one of the included collars over the
strap anchor and press down until it snaps into place. Repeat theses steps for
the strap point on the side of the camera, below the port cover.
Once strap anchors are installed, attach the strap using the split-rings.
Inserting an SD card
Open the port cover and insert a SD, SDHC, or SDXC card into the SD card slot.
Close the port cover. For optimum performance, format an SD the first time it is
use it in the camera (see Settings, page XX).
Powering on (and off)
Briefly press the power button to turn the camera on. To power off, press the
power button for 3 seconds, then release.
Using the set-up assistant
The first time the camera is turned on, there is a walk through to set-up the
camera, where there is the selection of the language for the camera to use,
select time zone, and set the date and time. The camera will then give a very
brief overview of its most unique controls and features.
Putting the camera to sleep/waking the camera
When the camera is on, briefly press the power button to put the camera to sleep
and conserve power. To wake the camera, briefly press the power button again.

Capture Mode
Each time the camera is powered on, it will start up in Capture Mode. If there’s a
compatible SD card in place, and the card is not full, the camera is ready to
capture a Living Picture. Compose the shot by looking at the live view displayed
on the screen. When ready to capture a picture, press the shutter button all the
way down and release.
To operate the camera in Capture Mode, use a combination of physical controls
and on-screen controls.
Physical controls
Note that these are the default behaviors of the controls. Many can be customized in Settings (see page XX).
• Powerbutton—whenthecameraisoff,abriefpressturnsiton;whenthecamerais
on,abriefpressputsthecameratosleeporwakesitup,alongpressturnsitoff
• Lytrobutton—ahalfpressdisplaysdepthfeedbackfortheobjectatthecenterofthe
frame;afullpressdisplaysalivedepthhistogramanddepthoverlay
• Shutterbutton—ahalfpressengagesautoexposurelock(AEL);afullpressreleases
theshutter
• Frontdial—setstheISO(inISOPriorityMode);setsShutterSpeed(inShutterSpeed
PriorityModeandManualMode)
• Zoomring—adjuststhefocallengthofthelens
• Focusring—adjuststhefocusofthelens
• Reardial—setstheEVcompensationinProgram,ISOPriority,andShutterSpeed
PriorityModes;setstheISOinManualMode
• AFbutton—activatesautofocuswhenpressed,locksautofocuswhilehelddown
• AELbutton—lockstheexposureatthecurrentsettingwhilehelddown
• Hyperfocalbutton—setsthefocusofthelenstothelightfieldhyperfocalposition
(movesthefarendoftherefocusablerangetoinfinity)
• Fn—togglesbetweenCaptureModeandPlaybackMode
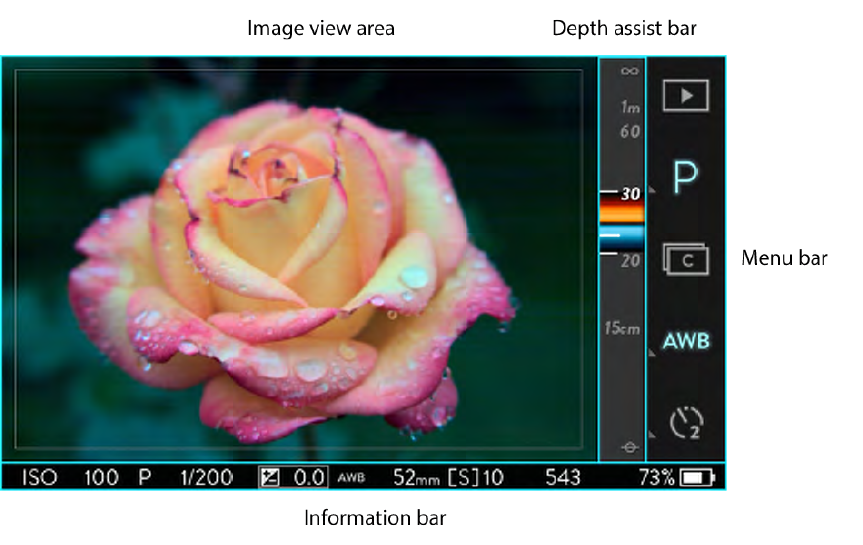
Touchscreen layout in Capture Mode
• Imageviewarea—displaystheliveview;sensorcropregionisindicatedbythethin
grayframe
• DepthAssistBar—displaystherefocusablerange(indicatedbythecoloredbands)fora
LivingPicturecapturedatthecurrentsettings
• MenuBar—displaystouchcontrolicons(swipeuptoscrolltoadditionalpages)
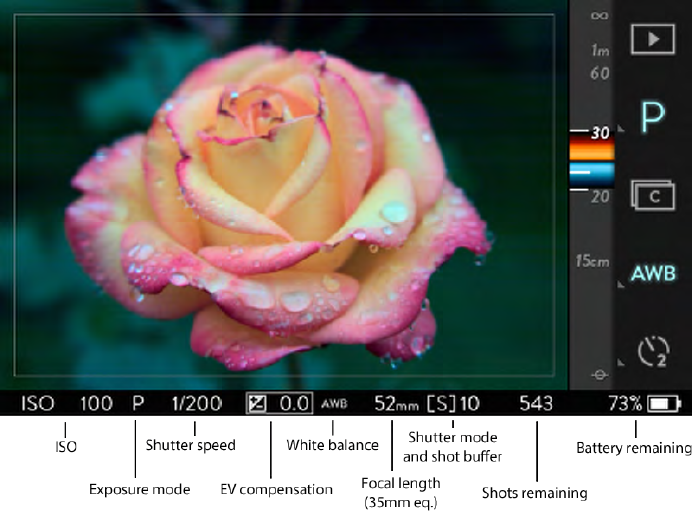
• InformationBar—displayscurrentcapturesettings,aswellasSDcardandbattery
status
Information Bar
• ISOindicator—displaysthecurrentISO;taptosetISOinISOPriorityModeandManual
Mode
• Shutterspeedindicator—displaysthecurrentshutterspeed;taptosetspeedin
ShutterPriorityModeandManualMode
• EVcompensationindicator—displaysthecompensationcurrentlyselected;taptoset
compensation(notavailableinManualMode)
• Exposuremodeindicator—PforProgram,IforISOPriority,SforShutterSpeed
Priority,MforManual;replacedbyalocksymbolwhenAEislocked
• Whitebalanceindicator—displaysthecurrentwhitebalancesetting
• Focallengthindicator—displaysthecurrentfocallength(35mmequivalent)
• Shuttermodeindicator—displaysSforsingleandCforcontinuousshuttersetting;
replacedbyselftimerindicatorwhenselftimerisactivated
• Shotbufferindicator—displaysthenumberofshotsthebuffercancurrentlyhold
• Shotsremainingindicator—displayshowmanyadditionalLivingPicturestheSDcard
canhold;whennoSDcardisinserted,thenoSDcardindicatorwillappearhere
• WiFi(iOSConnect)indicator—visibleonlywhenthecameraisenabledasanaccess
pointinSettings,iOSConnect
• Batterychargeindicator—displaysthebattery’sremainingcharge
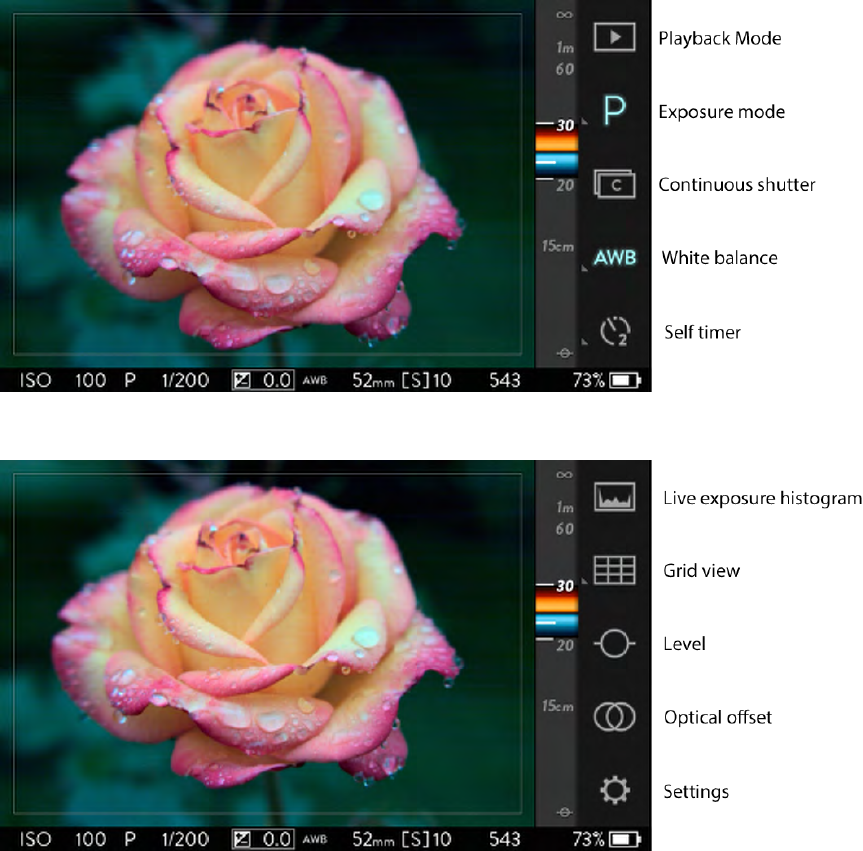
Menu Bar, page 1
Note that the order of the icons in the Menu Bar may be customized and additional icons may be added (see
Settings, page XX). The default order is referenced here.
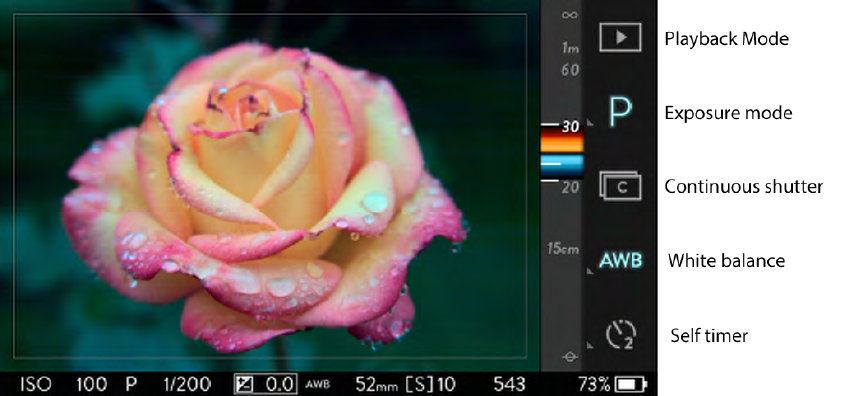
• PlaybackModeicon—taptoopenPlaybackMode,displayingthemostrecentLiving
Picture
• ExposureModeicon—taptoopenthesubmenuforsettingthemode;iconchangesto
reflectthecurrentmode
• ContinuousShuttericon—activatescontinuousshutterwhentapped/illuminated
• WhiteBalanceicon—taptoopenthesubmenuforsettingthewhitebalance;icon
changestoreflectthecurrentsetting
• SelfTimericon—taptoactivatetheselftimer;tapandholdopensthesubmenutoset
thecountdownat2or10seconds;iconchangestoreflectthecurrentsetting
Menu Bar, page 2
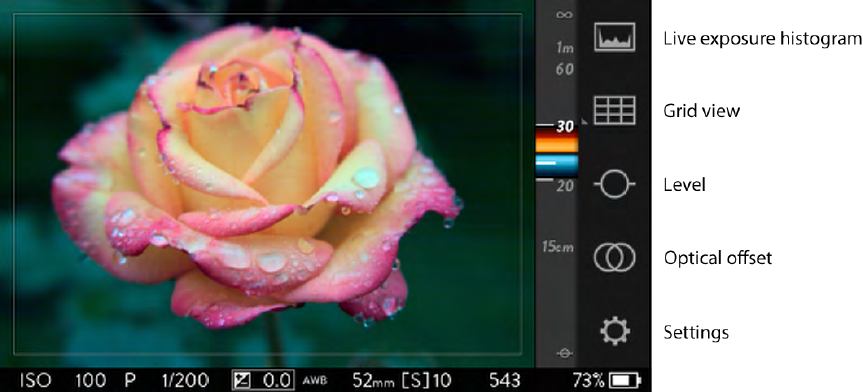
• Histogramicon—displaystheliveexposurehistogramonscreenwhen
tapped/illuminated
• GridOverlayicon—taptoactivategridoverlay;tapandholdopensthesubmenufor
selectingthestyleofoverlay;iconchangestoreflectthecurrentselection
• HorizonLevelicon—displayslevelindicatorsattheleftandbottomofthescreenwhen
tapped/illuminated
• OpticalOffseticon—taptoactivateopticaloffsetcontrol(usingthefrontdial)and
display(attherightedgeofthescreen)
• Settings—openstheSettingsmenu(thiswillreplacetheliveview;tapCAPTUREorpress
theshutterbuttonhalfwaytoclosethemenuandrestoretheliveview)
Additional touch control icons (not in the Menu Bar by default)
TheadditionaltouchcontrolsbelowmaybeaddedtotheMenuBar.Fordetailson
selectingandreorderingthecontrolsshownintheMenuBarseeRearrangemenu,
pageXX.
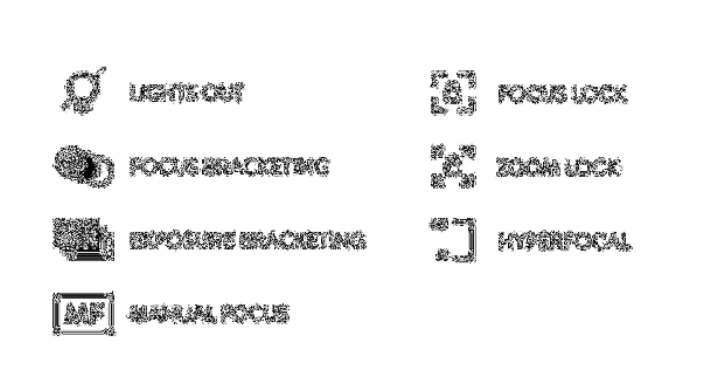
• FocusBracketingicon—taptoactivatefocusbracketing;tapandholdopensonscreen
selectionbands,whichcanbeswipedtosetthenumberofshotsandtheincrementin
focusstepsbetweeneachshot
• ExposureBracketingicon—taptoactivateexposurebracketing;tapandholdopens
onscreenselectionbands,whichcanbeswipedtosetthenumberofshotsandthe
incrementinEVcompensationbetweeneachshot
• ManualFocusicon—whentapped/illuminated,autofocusisdisabled
• Lightsouticon–taptopowerdownthetouchscreen.Tapandholdanywhereonthe
screentorestorepower
• FocusLockicon—whentapped/illuminated,thefocusringisdisabled
• ZoomLockicon—whentapped/illuminated,thezoomringisdisabled
• Hyperfocalicon—whentapped,thefocusismovedtothelightfieldhyperfocal
positionforthecurrentfocallength
Using the Depth Assist Bar
See Depth Assist Bar in Depth composition features, page XX.
Hiding and displaying the Menu Bar and Information Bar
The Menu Bar can be hidden from view by swiping it to the right. To display it
again, swipe left from the right edge of the screen. The Information Bar can be
hidden from view by swiping it down. To display it again, swipe up from the
bottom edge of the screen.
Choosing an exposure mode
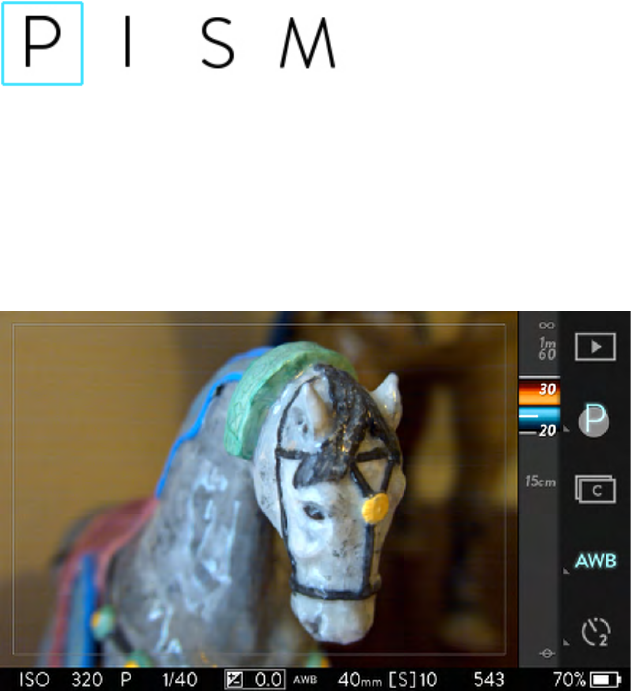
The camera offers four exposure modes. The first letter of the currently selected
mode appears in the exposure mode indicator in the Information Bar at the
bottom of the screen. It is also displayed and illuminated as the exposure mode
icon — the first item in the Menu Bar. To select a different mode, tap the
exposure mode icon. The exposure mode submenu will open to the left,
displaying the four mode options.
Tap the exposure mode icon to open the submenu displaying the four options.
• P; Program Mode — the camera sets the ISO and the shutter speed based on metered value and
EV compensation value
• I; ISO Priority Mode — manually set the ISO, and the camera sets the shutter speed based on
metered value and EV compensation
• S; Shutter Priority Mode — manually set the shutter speed, and the camera sets ISO based on
metered value and EV compensation
• M; Manual Mode — manually set both the shutter speed and the ISO
Tap on one of the letter options to set the exposure mode. The submenu will
close, and the new selection will now be displayed as the exposure mode icon as
well as in the exposure mode indicator in the Information Bar. If no selection is
made, after a few seconds the submenu will close.
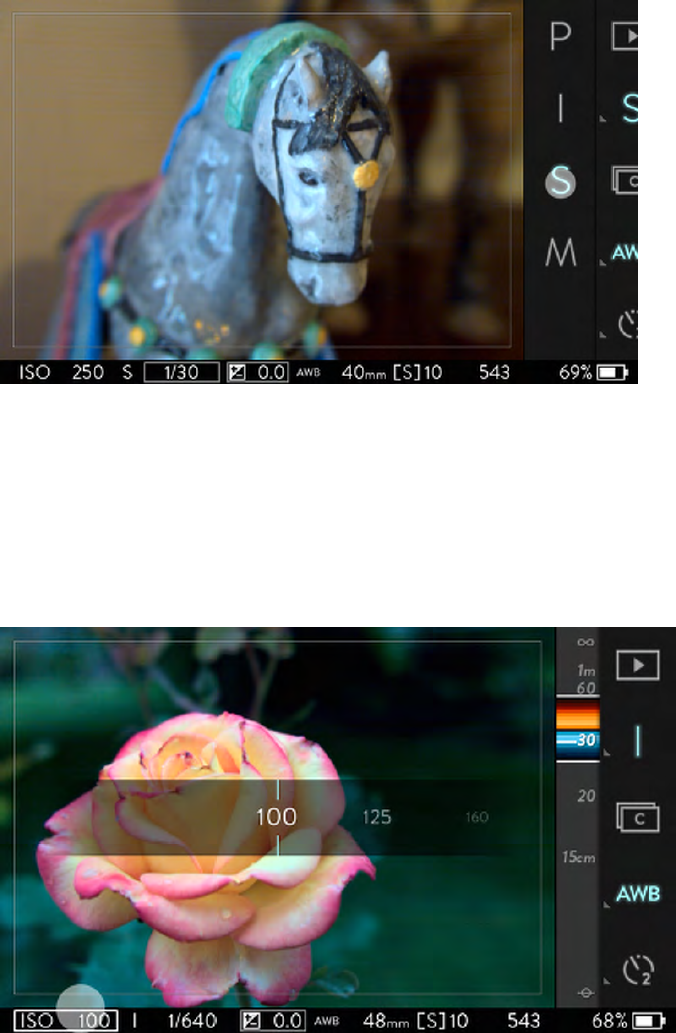
Tap one of the four options in the submenu to set the exposure mode.
Setting the ISO
In ISO Priority Mode and Manual Mode, set the ISO by tapping the ISO indicator
at the left end of the Information Bar. A selection band will open across the
middle of the screen, with the current ISO at the center. Available ISO speeds
range from 80 to 3200.
Tap the ISO indicator to open the ISO selection band.
Swipe the band from right to left to increase the ISO, or from left to right to lower
it. Tap on any ISO visible in the selection band to go directly to that setting.
Double-tap on the selection band returns to the initial ISO setting.
Once the selection has been made, tap the screen anywhere outside of the
selection band to close the band. A half press of the shutter button will also close
the selection band. A full press will close it and take a picture.
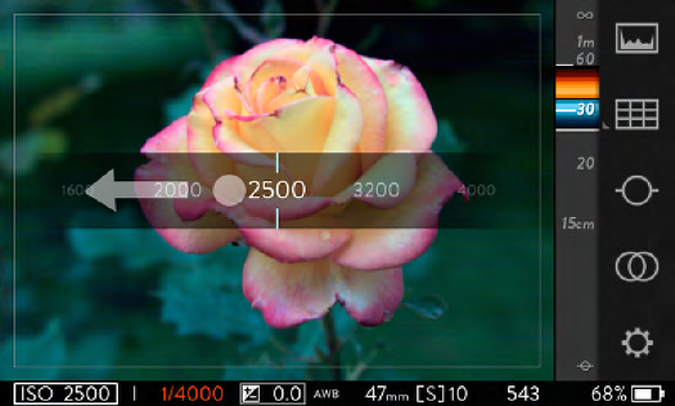
Swipe the ISO selection band to increase or lower the ISO.
Set the ISO using the front dial while in ISO Priority Mode or using the rear dial
while in Manual Mode*. As the dial is rotated, the ISO indicator in the Information
Bar at the bottom of the screen will change to display the current setting.
*Note that the functions assigned to the front and rear dials in the various exposure modes can
be changed (see Settings, page XX). The default assignments are referenced here.
Setting the shutter speed
In Shutter Priority Mode and Manual Mode, set the shutter speed by tapping the
shutter speed indicator in the information bar at the bottom of the screen. A
selection band will open across the middle of the screen, with the current speed
at the center. Available shutter speeds range from 1/4000th of a second to 32
seconds.
[Screenshot: shutter speed selection band displayed; shutter speed indicator highlighted, displays
1/30]
Tap the shutter speed indicator to open the shutter speed selection band.
Swipe the band from right to left to increase the shutter speed, or from left to right
to lower it. Tap on any speed visible in the selection band to go directly to that
speed. Double-tap on the selection band to the initial shutter speed setting.
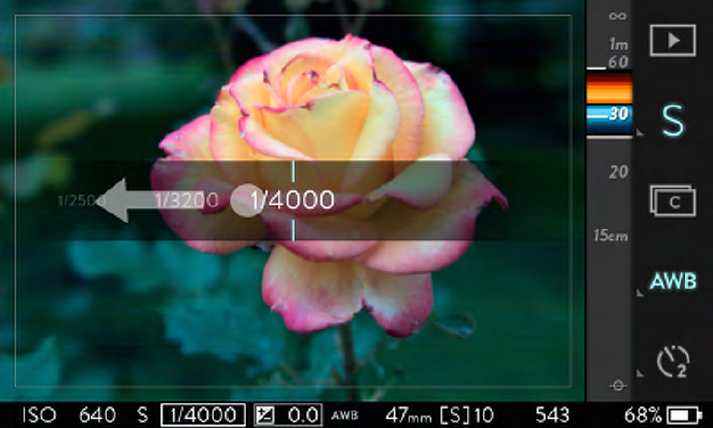
Swipe the shutter speed selection band to increase or lower the speed.
Once the selection has been made, tap the screen anywhere outside of the
selection band to close the band. A half press of the shutter button will also close
the selection band. A full press will close it and take a picture.
Set the shutter speed using the front dial while in Shutter Priority Mode or Manual
Mode*. As the dial is rotated, the shutter speed indicator in the Information Bar at
the bottom of the screen will change to display the current setting.
*Note that the functions assigned to the front and rear dials in the various exposure modes can
be changed (see Settings, page XX). The default assignments are referenced here.
Setting the EV compensation
Exposure value compensation is available in all exposure modes except Manual
Mode. Set the EV compensation by tapping the EV compensation indicator in the
information bar at the bottom of the screen. A selection band will open across the
middle of the screen, with the current setting at the center. The available settings
range from -2.0 to +2.0.
Swipe the band from right to left to increase the compensation, or from left to
right to lower it. Tap on any value visible in the selection band to go directly to
that setting. Double-tap on the selection band to return to the initial compensation
setting.
Once the selection has been made, tap the screen anywhere outside of the
selection band to close the band. A half press of the shutter button will also close
the selection band. A full press will close it and take a picture.
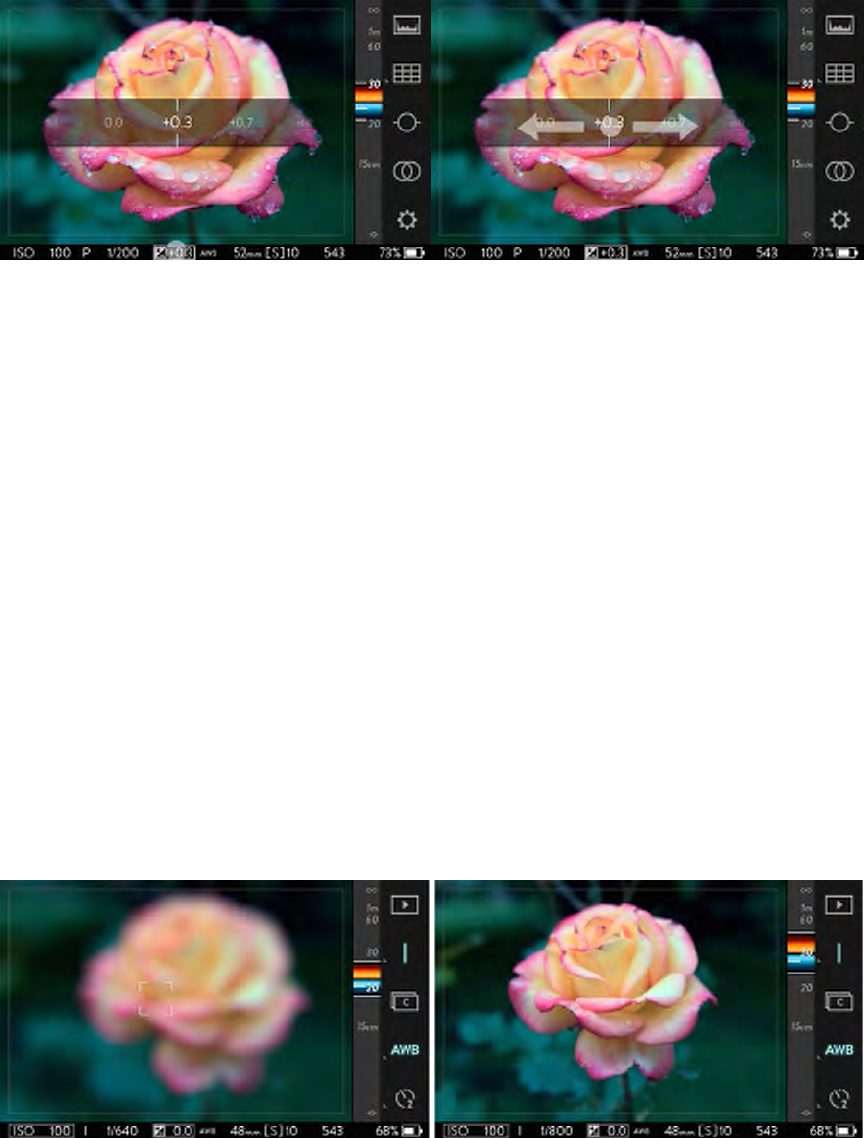
Tap
the EV compensation indicator to open
the selection band.
Swi
pe the selection band to set the EV
compensation.
Set the EV compensation using the rear dial while in Program, ISO Priority, and
Shutter Priority Modes*. As the dial is rotated, the shutter speed indicator in the
Information Bar at the bottom of the screen will change to display the current
setting.
*Note that the functions assigned to the front and rear dials in the various exposure modes can
be changed (see Settings, page XX). The default assignments are referenced here.
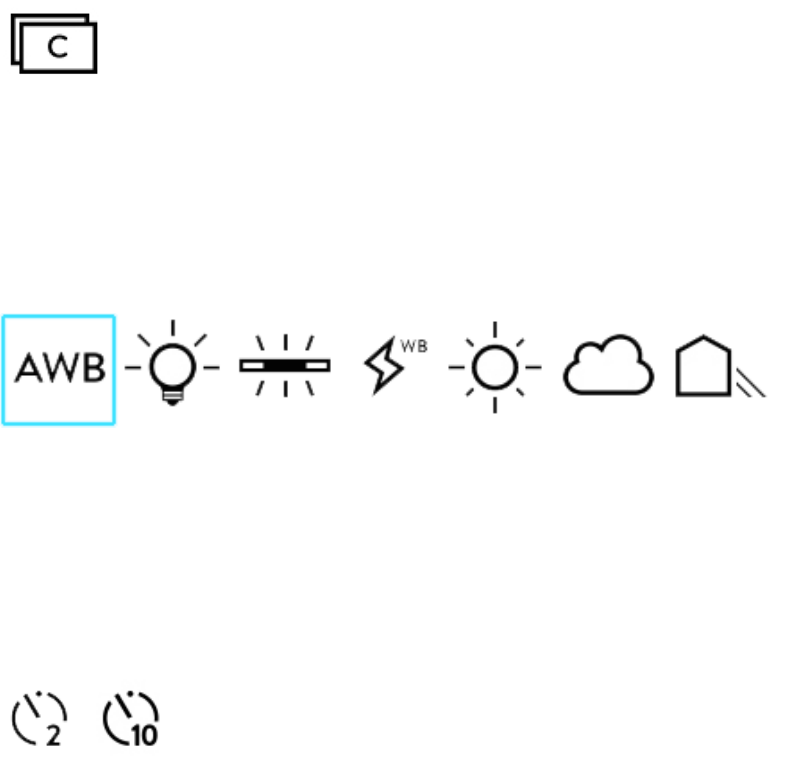
Using autofocus
Press the AF button to focus on the object at the center of the screen. Tap the
screen to focus the lens on any area of the live view (see Tapping the screen to
focus, below). This will not work if autofocus is disabled (see Using manual focus,
page XX).
Tapping the screen to focus
Focus by simply tapping the screen in the area to bring into focus. This will not
work if autofocus is disabled (see Using manual focus, page XX).
Focus the lens by tapping the screen.
Shooting with continuous shutter
When continuous shutter is active, the camera will trigger the shutter as rapidly
as possible for as long as the shutter button is held down — or until the shot
buffer is full. To activate continuous shutter mode, tap the Continuous Shutter
icon in the Menu bar and the icon will illuminate. To return to single shutter mode,
tap the icon again.
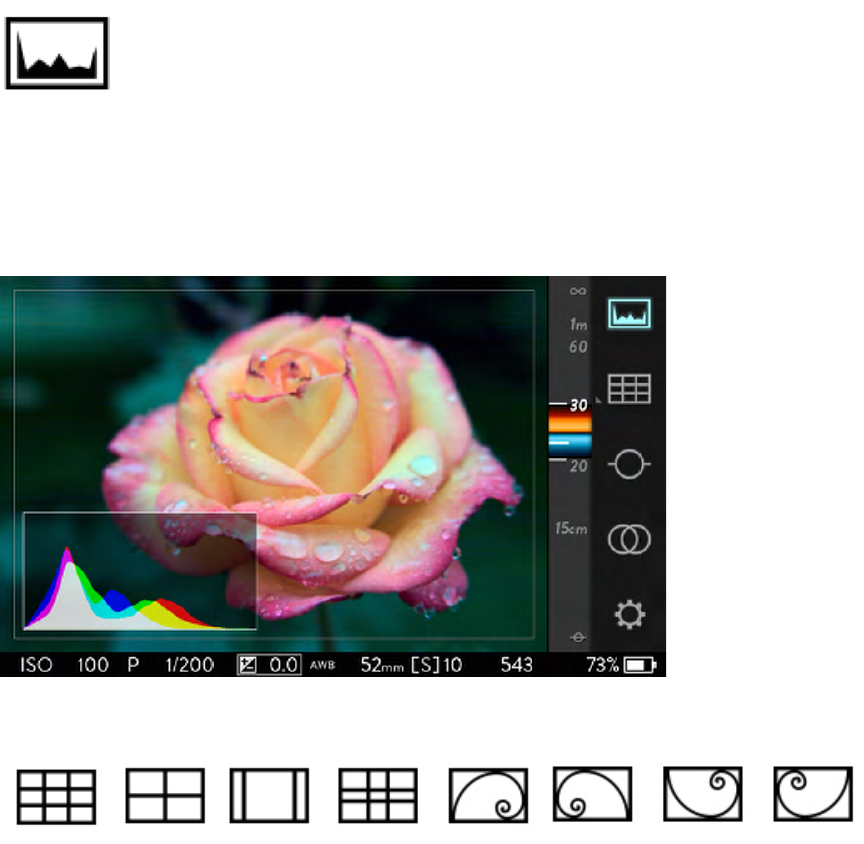
Setting the white balance
To set the white balance, tap the White Balance icon in the Menu Bar. A
submenu will open to the left, displaying available options. Swipe up on the
submenu to view additional options. Tap any option to change the setting. The
submenu will close, and the new selection will now be displayed as the White
Balance icon as well as in the white balance indicator in the Information Bar. If no
selection is made, after a few seconds the submenu will close.
Using the self-timer
To activate the self-timer and set the countdown duration, tap and briefly hold the
Self-Timer icon. The icon will illuminate and a submenu will open to the left, with
options for 2 and 10 seconds. Tap on the desired selection, the submenu will
close, and the new selection will now be displayed as the Self-Timer icon. The
self-timer indicator will also replace the shutter mode indicator in the Information
Bar. If no selection is made after a few seconds, the submenu will close.
To turn off the self-timer, tap the icon again. The camera will remember the
selected countdown the next time the self-timer is activated.
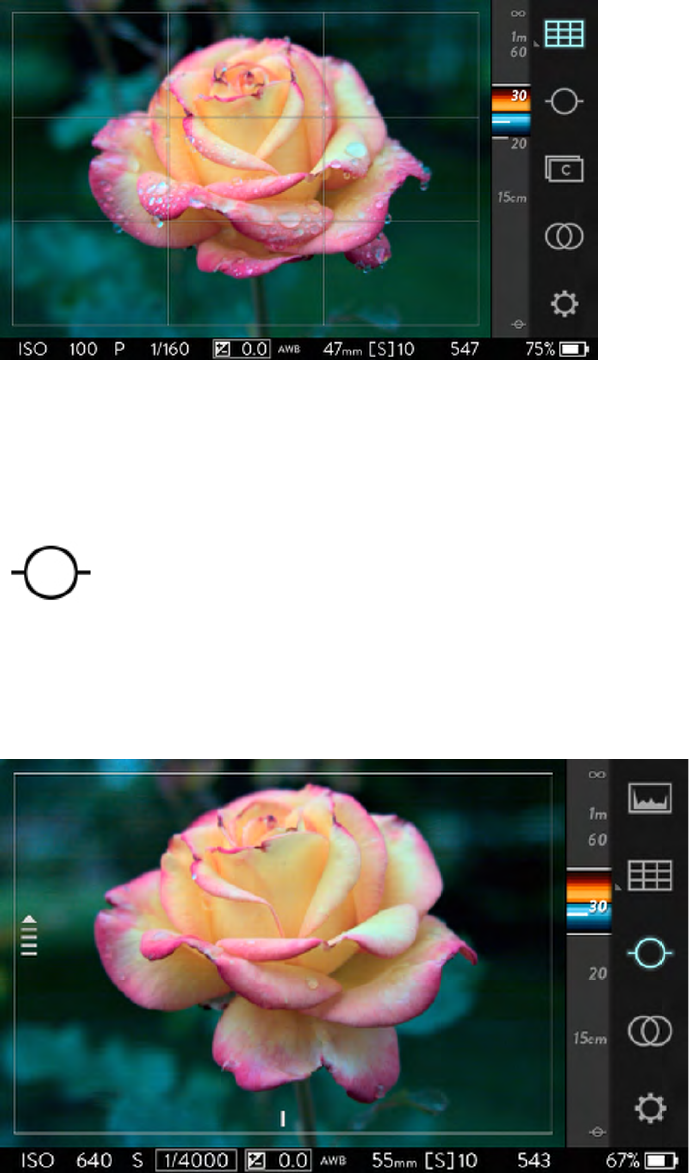
Using the live exposure histogram
To view an exposure histogram for the live view, tap the Exposure Histogram
icon in the Menu Bar at the right-hand edge of the screen. The icon will
illuminate, and the histogram will be displayed in the lower left-hand corner of the
screen. To close the histogram, tap the icon again.
Activate the live exposure histogram to evaluate a potential shot.
Applying a grid overlay
To select a grid overlay and apply it to the live view, tap and briefly hold the Grid
Overlay icon. A submenu will open to the left, displaying available options. Swipe
up on the submenu view additional options. Tap any option to select an overlay
style. The submenu will close, and the new selection will now be displayed as the
Grid Overlay icon. If no selection is made, after a few seconds the submenu will
close.
Activate the rule-of-thirds grid view.
To turn off the grid overlay, tap the icon again. The camera will remember your
selected settings the next time the overlay is activated.
Using the horizon level
To turn on the level indicator, tap the Horizon Level icon in the Menu Bar at the
right-hand edge of the screen. The icon will illuminate and the level indicators will
appear at the bottom and the left-hand edge of the live view.
Activate the horizon level to assist with a potential shot.
When the camera is level, each indicator will appear as a small horizontal or
vertical tick mark. If the camera isn’t level, an arrow will extend away from one or

both tick marks, indicating the direction(s) to tilt the camera. The longer the
arrow, the more camera tilt is needed to be level.
If an arrow extends from the left indicator, simply tilt the lens up or down, until the
arrow retracts and disappears. If an arrow extends from the bottom indicator, tilt
the camera to the left or right until the arrow retracts and disappears.
To turn off the level indicators, tap the Horizon Level icon again.
Adjusting the optical offset
See Opticaloffset, in Depth composition features, page XX.
Opening the Settings menu
Open the Settings menu by tapping the Settings icon in the Menu Bar. The menu
will replace the live view. For details on each of the available Settings, see the
Settings section on page XX. To close the menu and return to Capture Mode and
the live view, tap on the word CAPTURE at the top left of the screen, or press the
shutter button halfway.
Applying focus bracketing
When focus bracketing is active, each time the shutter button is pressed, the
camera will take a series of pictures, varying the focus for each. (For a more
detailed explanation, see Focus bracketing, on page XX.) To activate focus
bracketing and set the parameters, tap and hold the Focus Bracketing icon,
which can be added to the Menu Bar (see Rearrange Menu, page XX).
Two selection bands will open across the middle of the screen, with the current
settings at the center. The upper band shows the number of pictures that will be
taken, 3 or 5. The lower band shows the increment that will be applied, from 1 to
10, in ‘Focus Steps’. Swipe the bands to change the settings. Double-tap a
selection band to return to the initial setting.
Once selections have been made, tap the screen anywhere outside of the
selection bands to close them. A half press of the shutter button will also close

the selection bands. A full press will close them and take a series of pictures
using the new settings.
To turn off focus bracketing, tap the icon again. The camera will remember your
selected settings the next time focus bracketing is activated.
Applying exposure bracketing
When exposure bracketing is active, the camera will take pictures at a range of
exposure compensation values each time the shutter button is pressed. To
activate exposure bracketing and set the parameters, tap and hold the exposure
bracketing icon, which can then be added to the Menu Bar (see Rearrange Menu,
page XX).
Two selection bands will open across the middle of the screen, with the current
settings at the center. The upper band shows the number of pictures that will be
taken, 3 or 5. The lower band shows the exposure value increment that will be
applied, 1/3 EV, 2/3 EV, 1EV, or 2 EV. Swipe the bands to change the settings.
Double-tap on a selection band returns it to the initial setting.
Once selections are made, tap the screen anywhere outside of the selection
bands to close them. A half press of the shutter button will also close the
selection bands. A full press will close them and take a series of pictures using
the new settings.
To turn off exposure bracketing, tap the icon again. The camera will remember
your selected settings the next time exposure bracketing is activated.
Using manual focus
When manual focus is selected, autofocus is automatically disabled. Set the
focus by rotating the focus ring. Manual focus is selected by tapping the Manual
Focus icon, which can be added to the Menu Bar (see Rearrange Menu, page
XX).
Using a flash
A standard flash can be mounted to the camera’s hot shoe, allowing basic flash
synchronization. The flash will be triggered each time the shutter opens. The
synch speed (the fastest shutter speed at which you can use a flash) is 1/250.
Lytro will offer a fully compatible flash with TTL flash metering beginning in late
2014.
Playback Mode
To enter Playback Mode from Capture Mode, tap the Playback Mode icon at the
top of the Menu Bar, press the Fn button, or swipe the screen from left to right.
The last Living Picture taken will be displayed, a new set of icons will appear in
the Menu Bar at the right edge of the screen, and the contents of the Information
Bar will also change. To view an older picture, simply swipe the screen from left
to right. To go back to the first picture displayed, swipe from right to left.
To return to Capture Mode, tap the Capture Mode icon at the top of the Menu
Bar, press the Fn button, or swipe the screen from right to left when the most
recent picture is displayed. Press shutter button halfway to return to Capture
Mode.
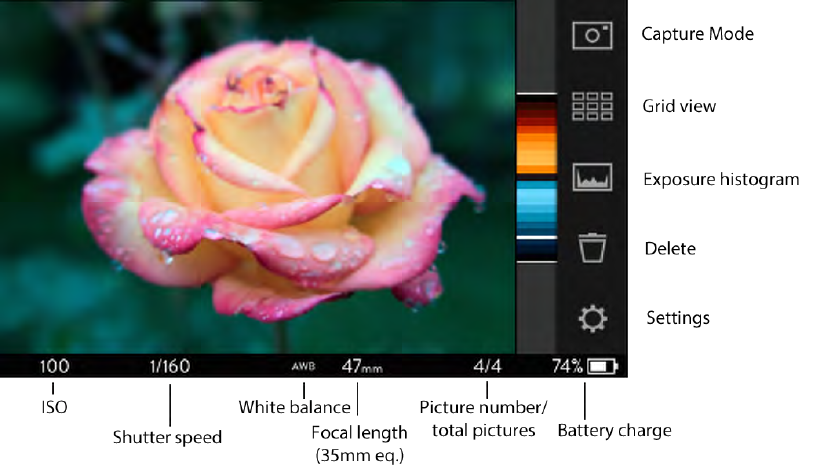
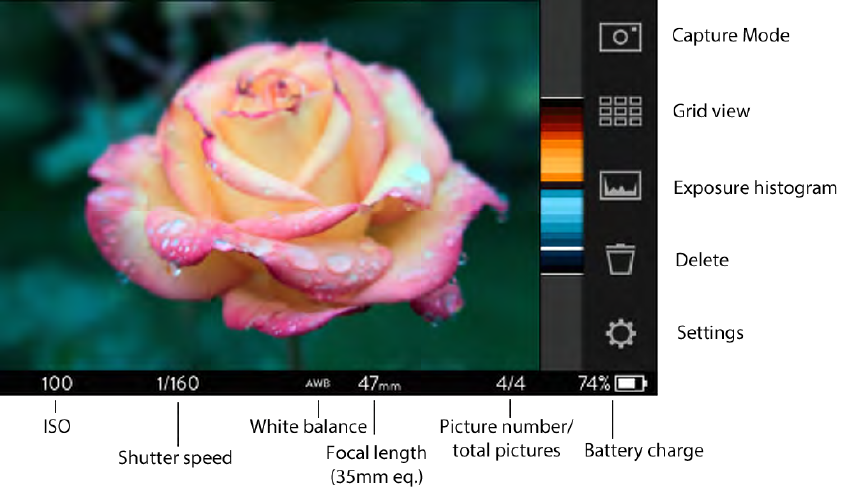
Touchscreen layout in Playback Mode
InformationBar
• ISOreview—showstheISOatwhichthecurrentlydisplayedpicturewastaken
• Shutterspeedreview—showstheshutterspeedatwhichthecurrentlydisplayed
picturewastaken
• Whitebalancereview—showsthewhitebalancesettingatwhichthecurrently
displayedpicturewastaken
• Focallengthreview—displaysthefocallength(35mmequivalent)atwhichthe
currentlydisplayedpicturewastaken
• Picturenumber/totalpicturesindicator—showsthenumberofthepicturecurrently
displayedandthetotalnumberofpicturesontheSDcard
• WiFi(iOSConnect)indicator—visibleonlywhenthecameraisenabledasanaccess
pointinSettings,iOSConnect
• Batterychargeindicator—displaysthebattery’sremainingcharge
MenuBar
• CaptureModeicon—taptoreturnthecameratoCaptureMode
• GridViewicon—taptodisplayathumbnailgridofthepicturesstoredontheSDcard
• ExposureHistogramicon—whentapped/illuminated,anexposurehistogramforthe
picturecurrentlydisplayedisshown
• Deleteicon—taptodeletethepicturecurrentlydisplayed
• Settingsicon—taptoopentheSettingsmenu(thiswillclosePlaybackMode)
Processing a Living Picture for refocusing
A Living Picture can be refocused by simply tapping the screen, but the camera
has to process the picture first. The first time a picture is viewed, it will
automatically be processed for refocusing.
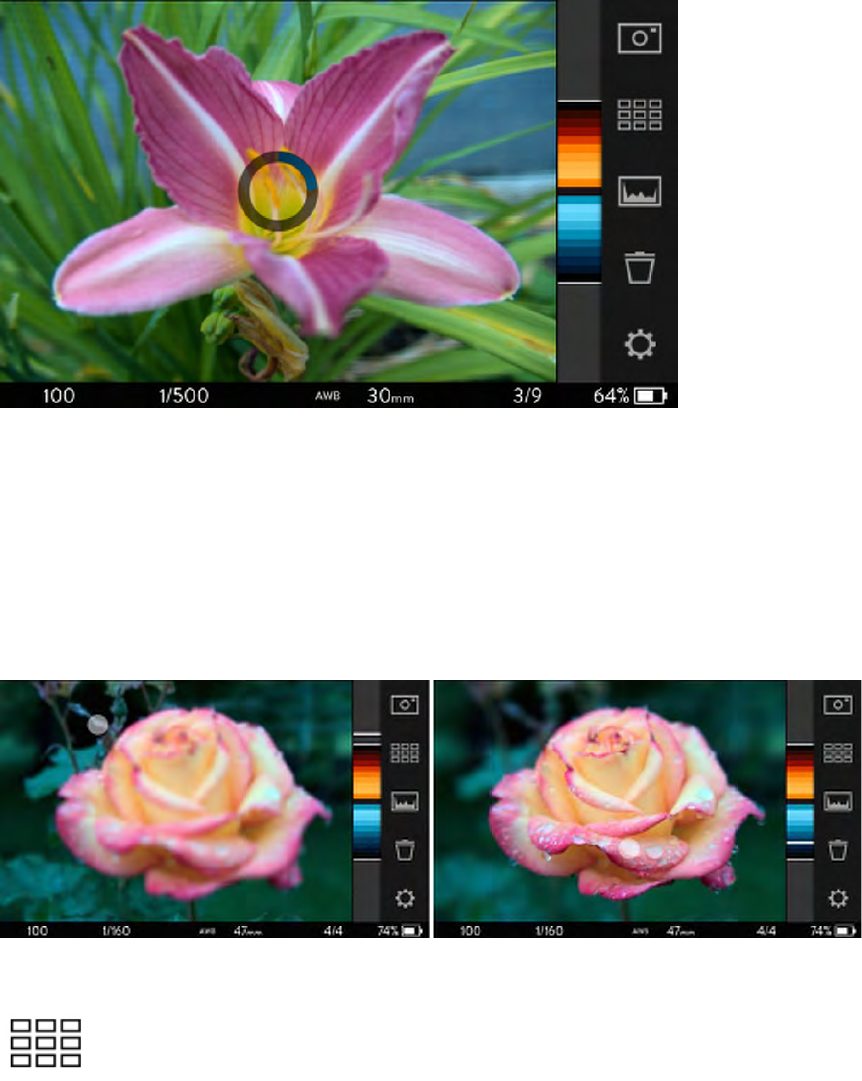
A small progress window will appear over the center of the picture during
processing. When the progress window disappears — usually in just a second or
two — the picture is ready to be refocused by tapping the screen.
Indicator of a Living Picture being processed
Refocusing a Living Picture
Once a picture has been processed, refocus it by just tapping the screen. The
camera will re-center the focus as closely as possible to the spot tapped.
Depending on the composition of the picture, some areas may fall outside the
refocusable range — essentially the original depth of field that was in effect when
the shot was taken.
Refocus a Living Picture by tapping the touchscreen.
Using grid view
To sort through the Living Pictures on the SD card more quickly, select grid view.
Tap the Grid View icon in the Menu Bar at the right-hand edge of the screen. The
icon will illuminate, and a thumbnail grid of 12 pictures will replace the single-
picture view.
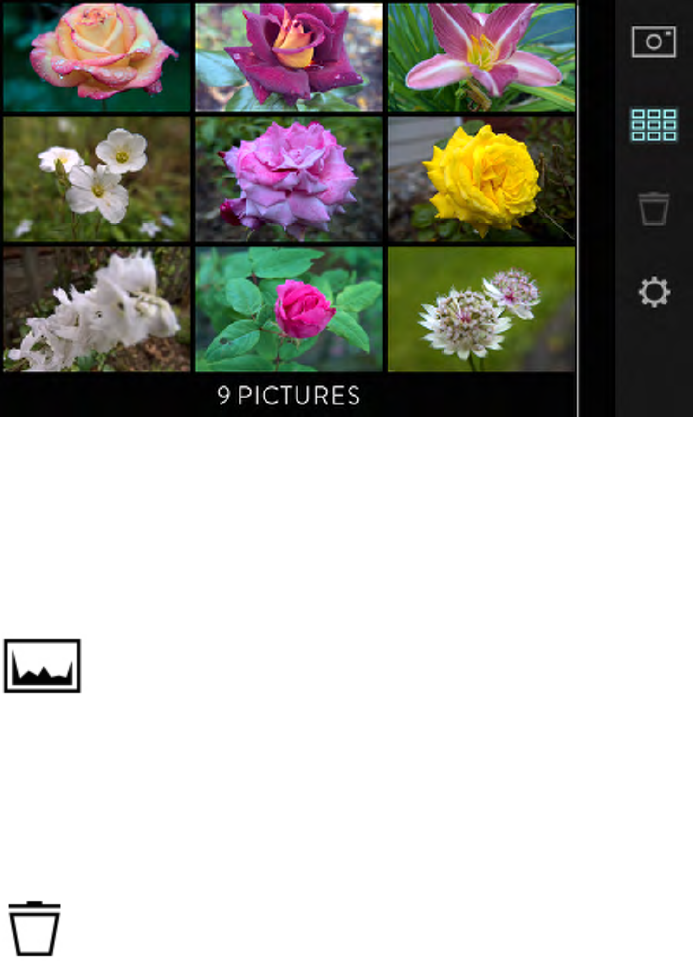
Tap the Grid View icon to display 12 pictures at a time.
Swipe the screen from left to right to view older pictures, or from right to left to
view newer ones. When the 12 newest pictures are displayed, swiping from right
to left will the return the camera to Capture Mode. If any of the thumbnails are
tapped, the picture will expand to fill the screen, closing Grid View.
Using the review exposure histogram
To view an exposure histogram for each picture as it is displayed, tap the
histogram icon in the Menu Bar. The icon will illuminate and the histogram will
appear in the lower left-hand corner of the screen. To close the histogram, tap
the icon again.
Deleting a picture
To delete the picture currently displayed, tap the Delete icon in the Menu Bar at
the right-hand edge of the screen. A window will open with two options: OK or
CANCEL. Tap OK to delete the picture.

Opening the Settings menu
You can open the Settings menu by tapping the Settings icon in the Menu Bar.
The Settings menu will display, closing Playback Mode. For details on each of
the available Settings, see the Settings section beginning on page XX.
To close the Settings menu, tap CAPTURE at the top left of the screen, or press
the shutter button halfway. The camera will always return to Capture Mode when
exiting Settings. To get back to Playback Mode, tap the Playback Mode icon in
the Menu Bar again, press the Fn button, or swipe the screen from left to right.
Depth composition features
The refocusable range
The Living Pictures captured with the LYTRO ILLUM can be, just by tapping. This
ability to refocus is remarkable, but it does have limits — what we call the
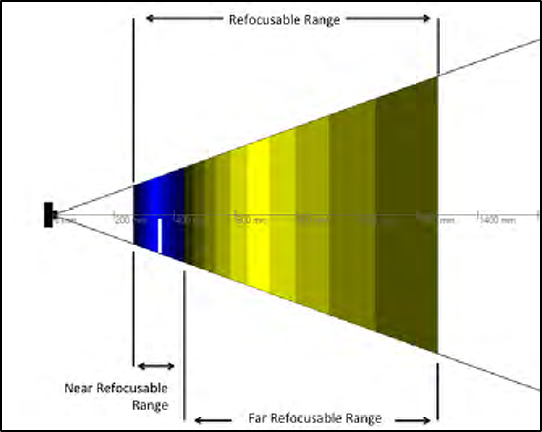
refocusable range — for every picture. The refocusable range comprises all the
points brought into relatively sharp focus after a picture is captured.
The refocusable range is made up of two component ranges: the near
refocusable range, which is closer to the camera, and the far refocusable range,
which is further away. Each offers a spectrum of relative sharpness, depending
on the depth who which the image is refocused.
In the illustrations below, the brighter the shade of the blue or yellow band, the
sharper objects at that distance will appear when refocused. The brightest band
in each component range is its core — where objects will appear sharpest when
refocusing.
The refocusable range with the lens zoomed to a 50mm focal length (35mm equivalent)
and the optical focus at approximately 42cm. Physical distances from the camera are
shown in gray.
The refocusable range varies widely, depending on the zoom and focus positions
of the camera when a picture is captured.
Depth Assist Bar
The Depth Assist Bar appears as a column near the right edge of the screen. The
orange and blue bands within the bar show where the current refocusable range
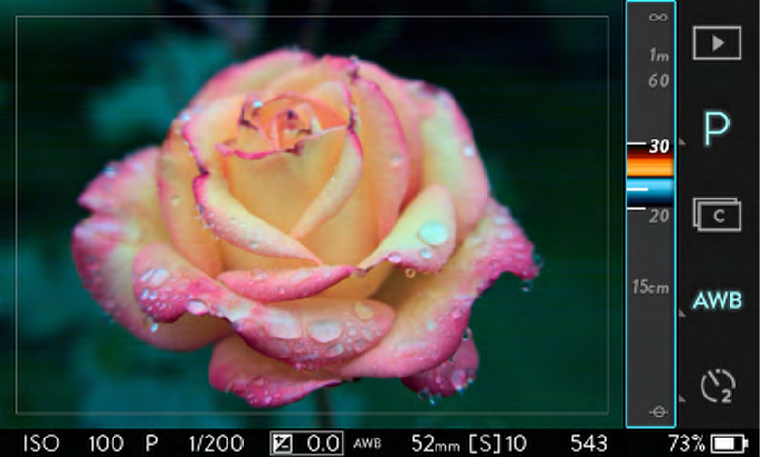
falls in terms of distances from the camera. The objects within that range are the
ones that can be refocused on after the Living Picture is captured.
Each of the colored bands represents one slice of the depth within the
refocusable range, called Focus Steps. The brighter the color of a Focus Step,
the sharper the objects at that distance will appear when it is refocused.
In the Depth Assist Bar, the orange and blue bands, or Focus Steps, represent the
refocusable range. The numbers indicate the physical distances from the camera.
The distances are measured from the sensor plane symbol visible on the right
side of the camera’s exterior. While the measurements are mostly accurate, they
are not perfect. Think them as useful guide, there to give a good sense of where
the refocusable range is located.
Optical offset
When looking at the live view, the shallow depth of field is due to the f/2.0 main
lens. There is often much more in the refocusable range than what appears
sharp in the live view. The optical offset plots the optical focus position used in
the live view (and for autofocus) to the refocusable range — and can be adjusted
to suit the style of Living Picture being captured.
When the optical offset is at the default setting, objects at the core of the near
refocusable range will appear sharply focused in the live view. This means that a
Living Picture can be refocused on whatever looked sharp in the live view when it
was taken, as well as on objects somewhat further away, since most of the
refocusable range will fall beyond that point.
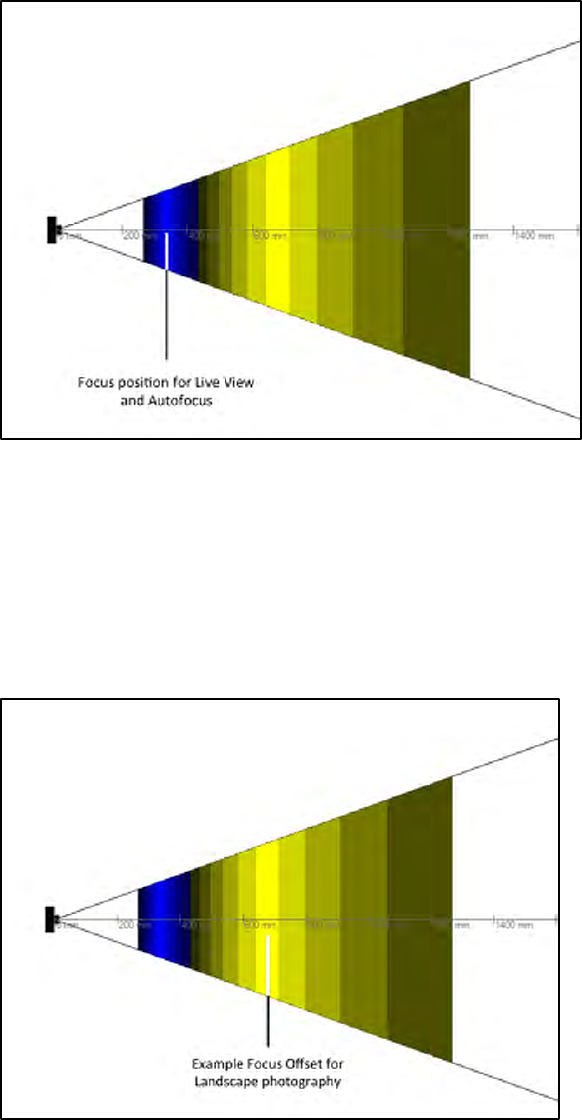
The default optical offset, with the focus position used for the live view and for autofocus
set at the core of the near refocusable range
Depending on the style of photography and the subjects being shot, it may be
advantageous to relocate the optical offset position. As an example, when
shooting landscapes, set the optical offset to the core of the far refocusable
range. Then, when composing a shot by focusing on a distant object, most of the
refocusable range would be available for closer objects.
An adjusted optical offset position that might be used for landscape photography.
To adjust the optical offset, add the Optical Offset icon to the Menu Bar (see
Rearrange Menu, page XX) then tap it. The Menu Bar will be hidden, and a depth
scale will be displayed.
Bands in shades of blue represent the near refocusable range, and bands in
shades of orange represent the far refocusable range. The current optical offset
position is indicated by a white band (the default position is -4). Rotate the front
dial to relocate the optical offset closer or further away in the refocusable range.
To close the depth scale, unhide the Menu Bar by swiping left from the right edge
of the screen. The optical offset will remain at the new setting until it is changed
using these same steps.
Spot Depth Feedback
Spot Depth Feedback allows to check the distance of the object at the center of
the live view. Press the Lytro button halfway to activate it. A light blue band will
appear on the Depth Assist Bar, representing the distance of the object from the
camera. It is then easy to see if the object falls within the focusable range,
indicated by the orange and blue Focus Steps. Activating Spot Depth Feedback
does not affect the focus of the camera.
Depth Histogram and Depth Overlay
The LYTRO ILLUM offers live, interactive depth analysis in the form of the Depth
Histogram and Depth Overlay. Both provide feedback on where subjects fall
relative to the refocusable range. To activate them, fully press the Lytro button.
The Depth Histogram consists of bands extending out to the right of a depth
scale. Bands in shades of blue represent the near refocusable range, and bands
in shades of orange represent the far refocusable range. The more there is
available to refocus on at a given depth, the further the band beside it will extend
to the right.
Glancing at the histogram can tell if you have a substantial subject within the
refocusable range. To maximize the impact of refocusing, it is ideal to have a
significant histogram wave in both the near refocusable range and the far
refocusable range. Waves outside of the refocusable range correspond to objects
in the background or foreground that can not be refocused.
The Depth Overlay provides the same kind of information as the Depth
Histogram, but displays it as an overlay on objects in the live view. Objects that
fall within the near refocusable range are edged with blue. Objects that fall within
the far refocusable are edged with orange. Instantly see whether there is enough
subject matter in each of the ranges to provide good refocusing possibilities.
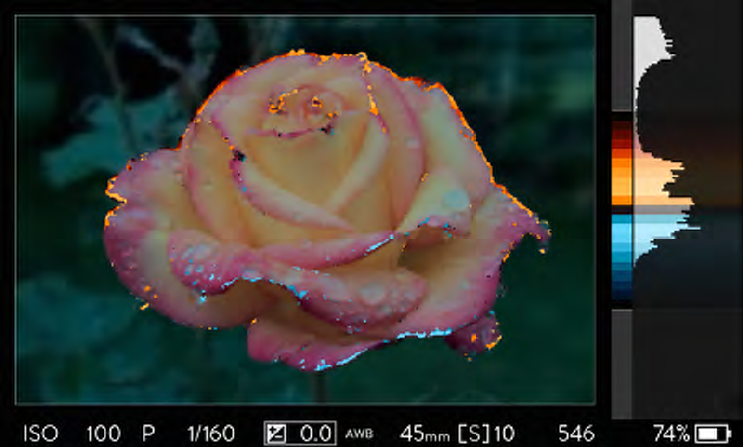
Evaluate a potential shot using the Depth Overlay. Objects in the near refocusable range
are edged in blue; those in the far refocusable range are edged in orange.
Focus bracketing
Like the more familiar exposure bracketing, focus bracketing causes the camera
to take a series of pictures each time the shutter button is pressed. But instead of
varying the exposure between each picture, the camera varies the focus. That
means the refocusable range is shifting, too, so there is a better chance of
capturing a picture with great possibilities for refocusing.
The change in focus between each picture is expressed in Focus Steps. Choose
the number of Focus Steps, from 1 to 10, between each picture. One can
choose 3 or 5 pictures.
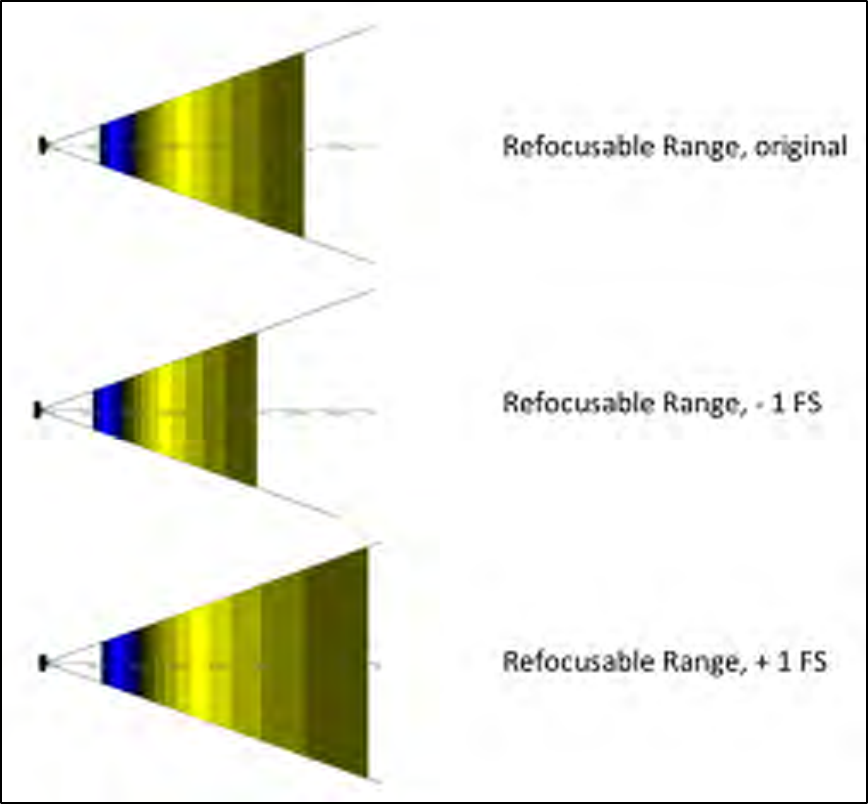
The refocusable range as captured with focus bracketing set to 3 pictures and 1 Focus
Step (FS).
To use focus bracketing, add it to the Menu Bar (see Rearrange Menu, page XX).
Then activate it and set the number of pictures that will be taken and the number
of Focus Steps between each picture. For help setting those parameters, see
Applying focus bracketing, on page XX.
Settings
You can open the Settings menu from either Capture or Playback Mode by
tapping the Settings icon in the Menu Bar. The Settings menu will fill the screen,
replacing whatever was displayed. Swipe the touchscreen to scroll up or down
through the menu.
To close the Settings menu, tap CAPTURE at the top left of the screen, or press
the shutter button halfway. The camera will always return to Capture Mode when
exiting Settings. To return to Playback Mode, tap the Playback Mode icon in the
Menu Bar again, press the Fn button, or swipe the screen from left to right.
Format SD card
For best performance, format your SD card when first using it in the camera, and
again after using it in any other device. Please note that formatting the card will
erase any data stored on it. To begin, tap FORMAT SD CARD in the Settings menu.
A window will open with two options: FORMAT or CANCEL. To continue with
formatting, tap FORMAT. When formatting is complete, tap DONE to return to the
Settings menu.
Brightness
Adjust the brightness of the screen by tapping BRIGHTNESS in the Settings menu
and dragging the slider. Or slide the AUTO-BRIGHTNESS selector to the ON
position, and the camera will automatically adjust the brightness to the lighting
conditions.
Sounds
Tap SOUNDS in the Settings menu, and by dragging the slider, adjust the volume
of the sounds produced by the camera. Turn off either all sounds or just the touch
sounds by sliding the appropriate selector to the OFF position.
Exposure simulation
The live view can be set to simulate the exposure that will result if a Living
Picture is captured using the current settings. To activate exposure simulation,
open the Settings menu, look for EXPOSURE SIMULATION, and slide the selector to
the AUTO position.
Clipping warning
When clipping warning is turned on, pulsing stripes will indicate any areas of the
Live View that will be overexposed if a Living Picture is captured using the
current settings. To activate clipping warning, open the Settings menu, look for
CLIPPING WARNING, and slide the selector to the ON position.
Instant preview
Set the duration of the instant preview from 1 to 15 seconds or turn instant
preview off. Open the Settings menu, and tap INSTANT PREVIEW. Swipe up to see
additional duration options. Tap on a selection to set the duration. A half press of
the shutter button dismisses the preview and immediately restores the live view.
File format
You can select which file format the camera records in, Lytro RAW or Lytro
XRAW. Tap FILE FORMAT in the Settings menu, then tap on your selection.
Lytro RAW files contain the raw light field picture data and can only be viewed on
the camera or on a computer running a copy of Lytro Desktop that has been
paired with the camera. Lytro XRAW files contain the raw light field picture data
as well as the pairing data required to properly process the light field. Lytro
XRAW can viewed using any copy of Lytro Desktop, but is a much larger file.
iOS Connect
To connect your iOS device to the LYTRO ILLUM over Wi-Fi, open the Settings
menu and tap iOS CONNECT. Set ACCESS POINT to ON.
On your iOS device, go to Settings, Wi-Fi. Make sure Wi-Fi is activated. Under
CHOOSE A NETWORK, tap OTHER. Enter the network name as displayed on the
camera (be sure to use uppercase and lowercase letters exactly as shown).
Select WPA security, and enter the password as displayed on the camera. If the
iOS device is within range, it should connect to the camera’s network.
Long exposure noise reduction
Activate this feature to reduce noise in Living Pictures taken with long exposure
times. Look for LONG EXPOSURE NOISE REDUCTION in the Settings menu and slide
the selector to the ON position. Then, whenever a long exposure time is selected
(either manually or automatically), the camera will take a second picture using
the same settings, but with the shutter closed — recording only noise. Because
the noise recorded in the two pictures will be identical, the camera can use the
second picture to identify the noise and suppress it in the picture.
Camera controls
Many of the physical camera controls can be assigned different functions, others
can have their functions modified in one way or another. Tap CAMERA CONTROLS

in the Settings menu to open the camera controls submenu containing the
options below.
SHUTTER HALF-PRESS
Tap to display the five functions that may be assigned to the half press of
the shutter button: AE-L (autoexposure lock), AF (engage autofocus), AF +
AE-L (engage autofocus and autoexposure lock), and OFF. Tap an option to
select it.
EXPOSURE DIALS
Tap to display the two options, DEFAULT and ALTERNATE, for the functions
assigned to each dial in the various exposure modes. Tap an option to
select it. The assignments for each dial in each exposure mode are shown
below.
DEFAULT
P; Program Mode
I; ISO Priority Mode
S; Shutter Priority Mode
M; Manual Mode
Front dial
NA
Shutter speed
ISO
Shutter speed
Rear dial
EV Compensation
EV Compensation
EV Compensation
ISO
ALTERNATE
Front dial
EV Compensation
EV Compensation
ISO
ISO
Rear dial
NA
Shutter Speed
EV Compensation
Shutter Speed
LENS RINGS
Tap to display the two options, DEFAULT and ALTERNATE, for behavior of the
lens rings. Tap an option to select it.
REARRANGE MENU
Tap to display all of the touch control icons that can be assigned to the
Menu Bar. The pages of the Menu Bar are shown as columns from left to
right. Icons are shown in their current positions, and those that are currently
assigned are illuminated. To relocate an assigned icon, tap and drag it to a
new location.
To assign an icon to the Menu Bar, double-tap it. The icon will illuminate
and is now available to tap and drag to relocate it.
REMAP BUTTONS
Tap to assign any of a range of functions to each of the four physical
buttons on the back of the camera. There is an illustration of the four
buttons, labeled A, B, C, and D. To the right appears the same four letters,
each followed by the function currently assigned to it. Tap one of these to
assign a different function.
A list of options will be displayed. Swipe up to scroll to additional options.
The current function is indicated by a checkmark, and options that are
currently assigned to one of the other three buttons are indicated by the
letter of that button. Tap a function to assign it, and then the first screen
appears.
AE-L
Tap to display the three options for behavior of the AE-L button, then tap an
option to select it. Select WHILE PRESSED, and autoexposure will be locked
only while the AE-L button is pressed. Select CONTINUOUS, and pressing the
AE-L button will lock autoexposure until the button is pressed again. Select
ONE SHOT, and pressing the AE-L button will lock autoexpsoure until the
shutter has been triggered.
General
Tap GENERAL in the Settings menu to open the submenu containing the options
below.
DATE & TIME
Tap to display the selection wheels for the date and time. Swipe up or down
to change any selection. Choose the 24-hour clock option by swiping the
selector to the ON position.
TIME ZONE
Tap to display a list of locations and their respective time zones. Swipe up to
scroll to additional locations/zones. Tap to make a selection.
LANGUAGE
Tap to display the options for the language used by the camera. Tap to
make a selection.
DISTANCE MEASUREMENTS
To change the unit of measurement used by the camera, slide this selector
from feet to meters or vice versa.
ABOUT
Tap to display the build-code of the camera.
UPDATE FIRMWARE

Tap to update the camera firmware, which takes several minutes. A window
will open with two options: CANCEL or UPDATE. To continue with the update,
tap UPDATE.
TRANSFER PAIRING DATA TO SD CARD
HELP
Replay the walk-through of the camera’s most unique controls and features
that played during initial set-up. Tap HELP, then tap FIRST TIME USER HELP.
RESET
Reset the camera to factory settings. The default functions will be restored
for all buttons and controls, and only the default touch control icons will be
assigned to the Menu Bar. Tap RESET. A window will open with two options:
RESET or CANCEL. To continue with the reset, tap RESET.
Resources
• Lytro website – www.lytro.com
• Training – www.training.lytro.com
• Lytro Desktop – www.lytro.com/downloads
• Lytro Support – support.lytro.com
Federal Communication Commission Interference Statement
This equipment has been tested and found to comply with the limits for a Class B digital device, pursuant to
Part 15 of the FCC Rules. These limits are designed to provide reasonable protection against harmful
interference in a residential installation. This equipment generates, uses and can radiate radio frequency
energy and, if not installed and used in accordance with the instructions, may cause harmful interference to
radio communications. However, there is no guarantee that interference will not occur in a particular
installation. If this equipment does cause harmful interference to radio or television reception, which can be
determined by turning the equipment off and on, the user is encouraged to try to correct the interference by
one or more of the following measures:
Reorient or relocate the receiving antenna.
Increase the separation between the equipment and receiver.
Connect the equipment into an outlet on a circuit different from that to which the receiver is connected.
Consult the dealer or an experienced radio/TV technician for help.
FCC Caution: Any changes or modifications not expressly approved by the party responsible for
compliance could void the user's authority to operate this equipment.
This device complies with Part 15 of the FCC Rules. Operation is subject to the following two
conditions: (1) This device may not cause harmful interference, and (2) this device must accept any
interference received, including interference that may cause undesired operation.
This device and its antenna(s) must not be co-located or operating in conjunction with any other
antenna or transmitter.
For product available in the USA/Canada market, only channel 1~11 can be operated. Selection of
other channels is not possible.
This device will not permit operations on channels 116-128 for 11na and 120-128 for 11a which
overlap the 5600 -5650MHz band.
Portable Device
IMPORTANT NOTE:
Federal Communication Commission (FCC) Radiation Exposure Statement
This EUT is compliance with SAR for general population/uncontrolled exposure limits in ANSI/IEEE
C95.1-1999 and had been tested in accordance with the measurement methods and procedures
specified in OET Bulletin 65 Supplement C. This equipment should be installed and operated contact
with the radiator & your body.

©2014Lytro,Inc.Allrightsreserved.Lytro,IllumandtheLytrologoare
trademarksofLytro,Inc.IntheUSandothercountries,WindowsandDirectXare
registeredtrademarksofMicrosoftCorporationandMacOSisaregistered
trademarkofAppleInc.SD,SDHC,andSDXCLogosaretrademarksofSD3C,LLC.All
otherbrandsandproductnamesaretrademarksorregisteredtrademarksoftheir
respectiveowners.