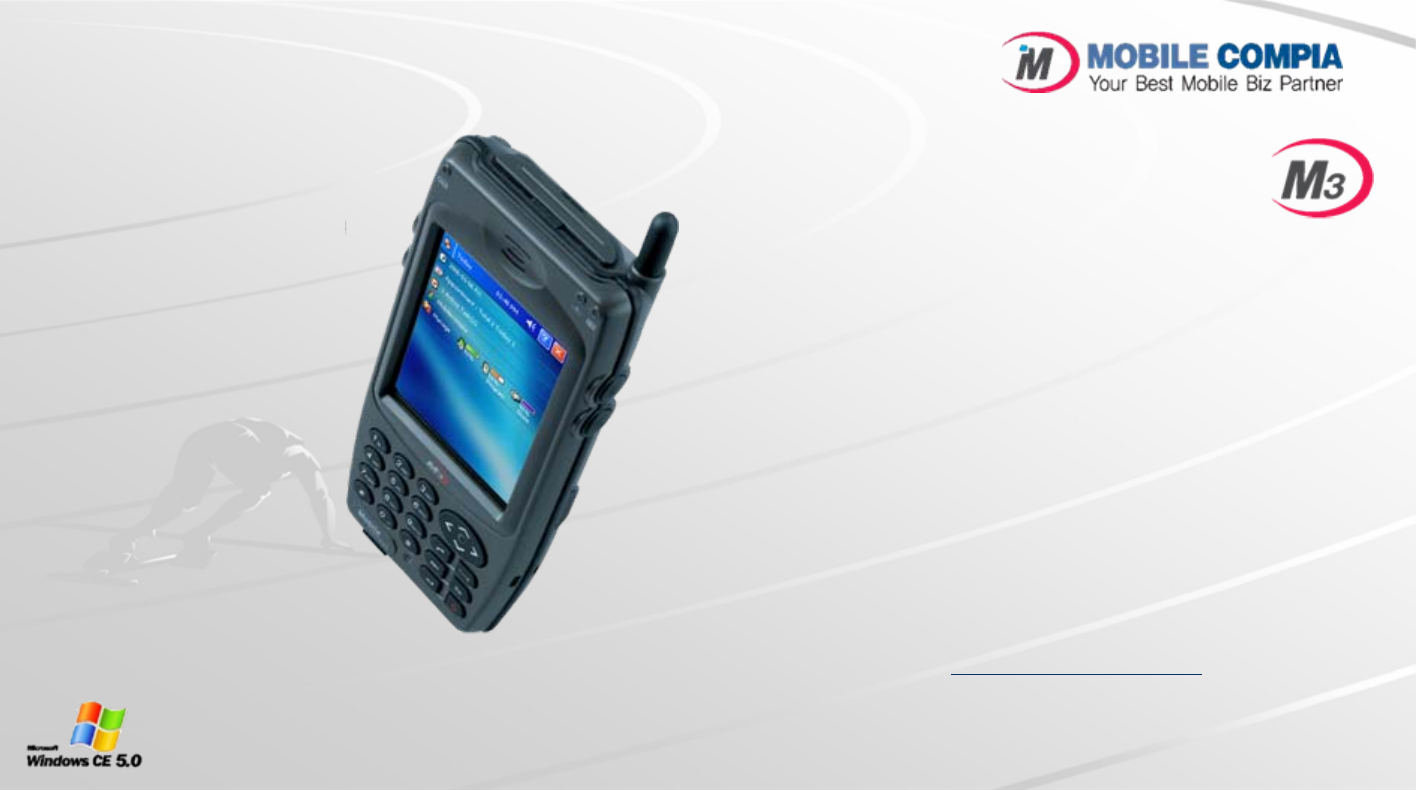
M3 Mobile MC-6500S Portable Data Collection Terminal User Manual 1
M3 Mobile Co., Ltd Portable Data Collection Terminal 1
User Manual

2
Note
zThis manual is subject to copyright protection along with all relevant rights.
zNo part of this document can be copied, reproduced, changed or translated in whole or in part by any means
without prior written consent of MOBILECOMPIA Co., Ltd.
zThe content of the manual is provided “as-is” and be subject to change at any time without notice.
zMOBILE COMPIA Co., Ltd. makes no warranty of any kind with regard to this manual, including, but not limited
to, the implied warranties of merchantability and fitness for a particular purpose.
zMicrosoft, ActiveSync, Windows, Windows logos, Windows CE 5.0 logos are trademarks, or registered
trademarks of Microsoft Corporation in the United States and/or other countries. Microsoft OEM products are
licensed by Microsoft Licensing Inc., a entirely owned subsidiary of Microsoft Corporation.
zAll other product names in this document or product are company names, trademarks or registered trademarks
of the respective owners.

3
Copyright and Agreement
zThis user manual is provided “as-is”. It may contain editing error or omitting due to the difficulty of expressing
technical feature.
zIf an application program provided by other supplier using by M3, refer to the supplier for a program manual.
zThe application program providers have the responsibility of indicating their contact number for customer
service on M3 terminal, item box, or program.
zMobileCompia Corporation do not warranty any programs produced and added by the third software companies
after M3 products are distributed from our factories.
zMobileCompia Corporation has the right to ask warranty of any programs to the program providers to meet the
needs of mobile networking companies.
zThe contents in the user’s manual are protected under the Software Copyright Act. Copy, reproduction,
distribution of the contents in the user’s manual without any written agreement notice of MobileCompia Co. Ltd.,
is considered as criminal actions.
zWindows, MS Office, Outlook, ActiveSync, Internet Explorer programs are the registered brand of Microsoft.
zM3 is the registered brand of MobileCompia Co. Ltd.
zThe brands of other products and service referred in this manual belong to corresponding providers.

4
Caution when using M3 (1)
zUser Caution
–When the unit is lost or stolen, notify to network provider immediately.
–Do not rent the unit to third person without authorized permission.
–Do not use the unit while driving.
–For technical help, contact designated service centers.
–Contact responding suppliers directly for questions on applications and work programs other than
hardware and basic installed applications.
–Use supplied adapter and accessories by MobileCompia Co. Ltd.
–Any defect on a unit while using other batteries, chargers and accessories can not get warranty.
zCarrying and Storage Caution
–Avoid to use the device under high temperature and humidity. It may cause fatality to the device.
–Avoid intentional dropping from high elevation. It may cause fatality to the device.
–Charge batteries fully before the first time use of the device.

5
Caution when using M3 (2)
zDo not reconstruct
–Do not reconstruct M3 for any purpose.
–It may cause fire in the unit, and wound or electric shock to users.
–Any defect caused by reconstructing units, can not get warranty.
zIllegal copy of mobile phone is prohibited
–The person who reproduces mobile phone and uses this mobile phone is considered as criminals.
–The use of lost or stolen mobile phone is considered as a criminal act.
–Keeping the lost or stolen mobile phone after turning power off, is considered as a criminal act.
6
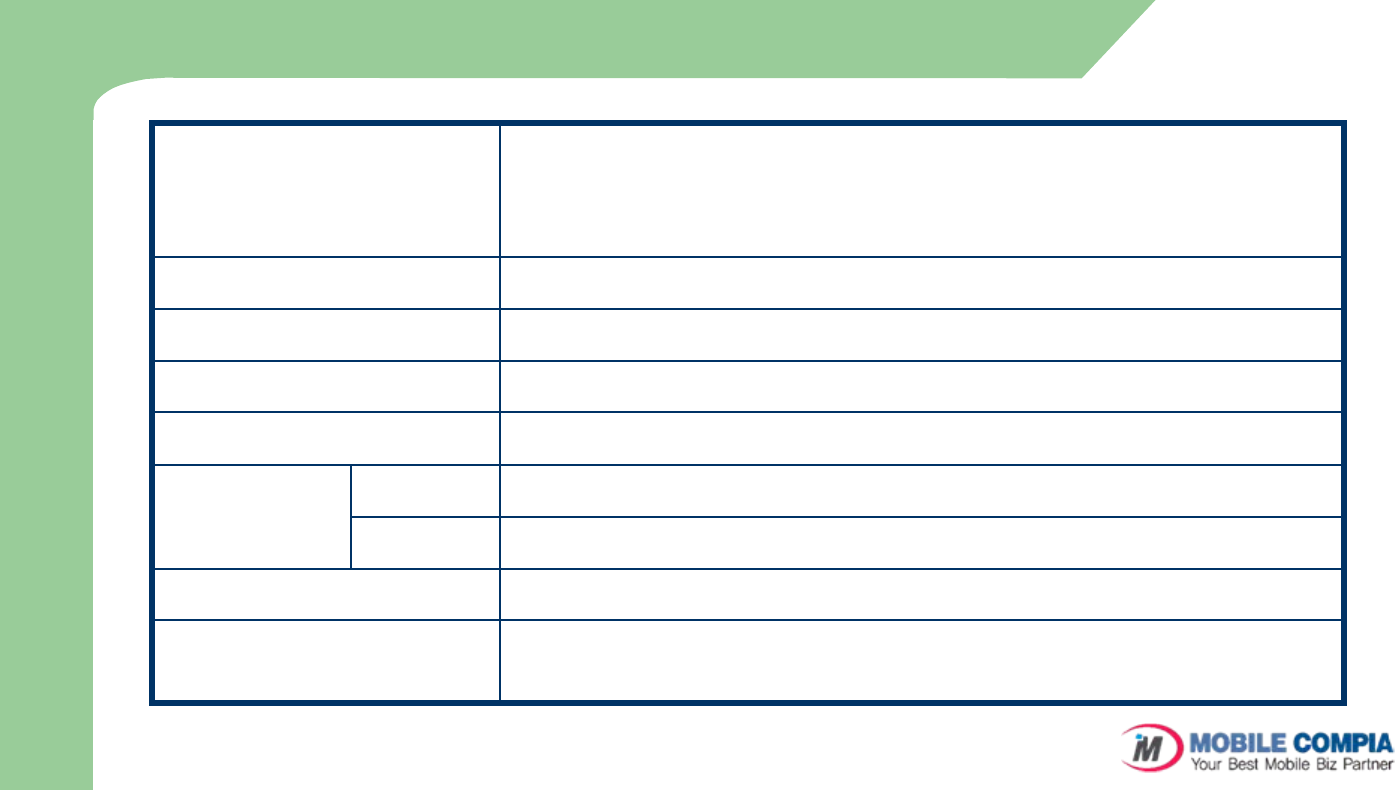
Size and Features
Used frequency band
GSM 850 (TX) 824 ~ 849 MHz / (RX) 869 ~ 894 MHz
GSM 900 (TX) 880 ~ 915 MHz / (RX) 925 ~ 960 MHz
GSM 1800 (TX) 1710 ~ 1785 MHz / (RX) 1805 ~ 1880 MHz
GSM 1900 (TX) 1850 ~ 1910 MHz / (RX) 1930 ~ 1990 MHz
Band width 200 KHz
External appearance 78.6 x 160 x 24.9mm (Width x length x height)
Weight 300g
Transmission output power Maximum 0.3W
Main body -10 ℃~ +50 ℃
Adapter -10 ℃~ +50 ℃
Relative Humidity 5% ~ 80%
AC Power Input : AC 100 ~ 250V, 50 ~ 60Hz
Output : DC +5.2V, 3.0A
Operational
Temperature

7
Contents
zNote 2
zCopyright and Agreement 3
zCaution when using M3 4
zSize and Features 6
1. M3 Introduction 9
Product Composition 10
Name and function of each part 12
Input Button 14
Soft/Hard Reset 15
How to use stylus pen 16
LED/Battery attaching/detaching 17
Charging 18
How to connect to PC 19
How to optimize battery longevity 20
2. Basic Usage 21
Calibration 22
Main Window 23
C
o
n
t
e
n
t
s
Screen Rotation 25
Infrared Communication 26
Bluetooth Communication 27
Function Key mode 29
Transcriber/Keyboard 30
3. How to use internet 32
Via GPRS/EDGE 33
Via Wireless LAN 35
Via USB 36
Via Bluetooth 37
4. ActiveSync 38
ActiveSync Introduction 39
Installing ActiveSync 40
Synchronization of data 41
ActiveSync Troubleshooting 42

8
Contents
C
o
n
t
e
n
t
s
5. How to use the Phone 43
Init Screen 44
Key Pad 45
Status icon/Display window 46
Phone function 47
Voice Conversation via Bluetooth 48
SMS send and receive/Phone settings 49
6. Usage of Scanner/Camera 50
How to use Scanner 51
How to use Camera 52
7. Usage of Pims 53
Today 54
InfoBox 55
SmartMemo 60
SWRecoder 63
8. Usage of Application and Utility programs 65
Calculator/Image Viewer 66
MS-Backup 67
Menu Settings/Touch Protector 68
9
M
3
소
개
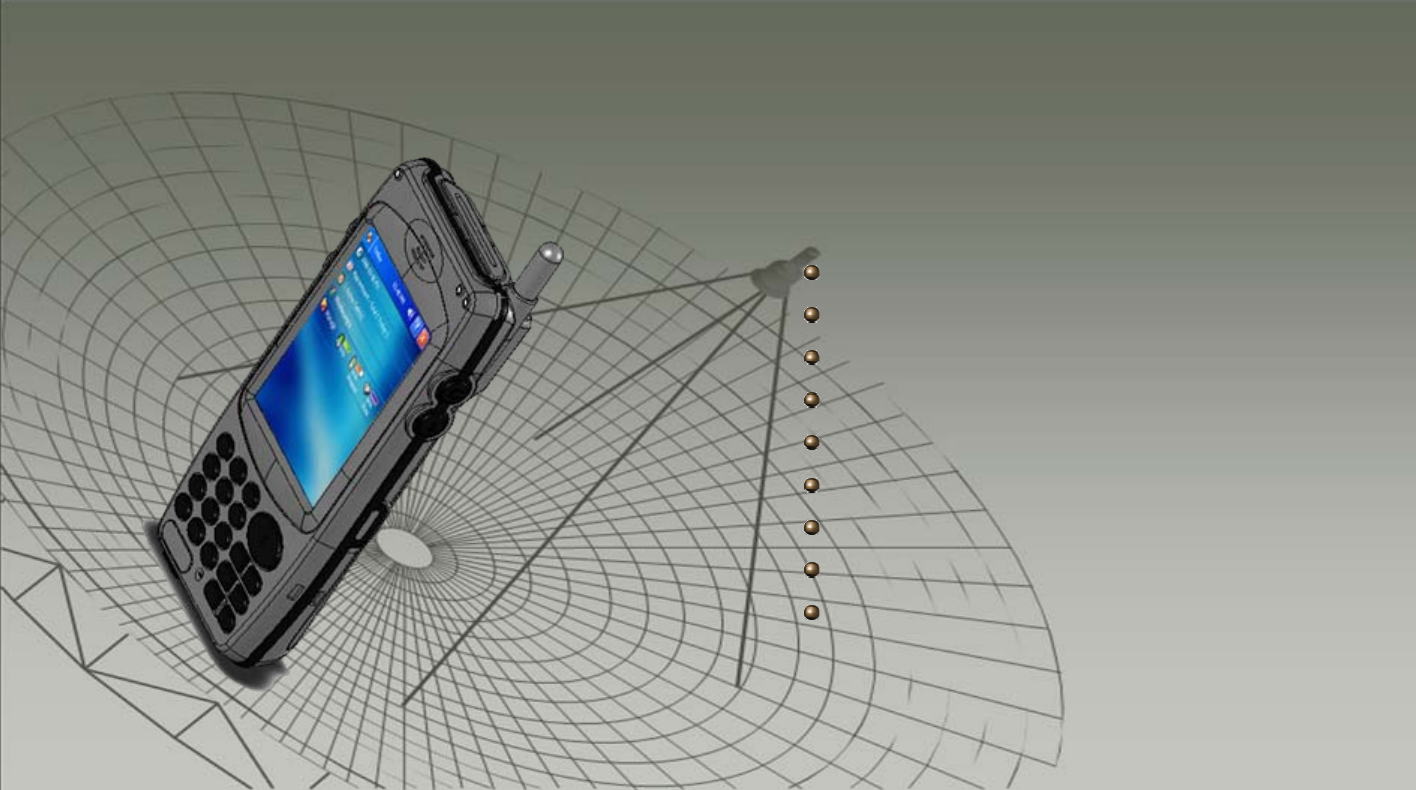
1. M3 Introduction
Product Composition
Name and Function of each part
Input Button
Soft/Hard Reset
How to use Stylus pen
LED Battery Attaching/Detaching
Charging
How to connect to PC
How to optimize Battery Longevity
10
Product Composition (1)
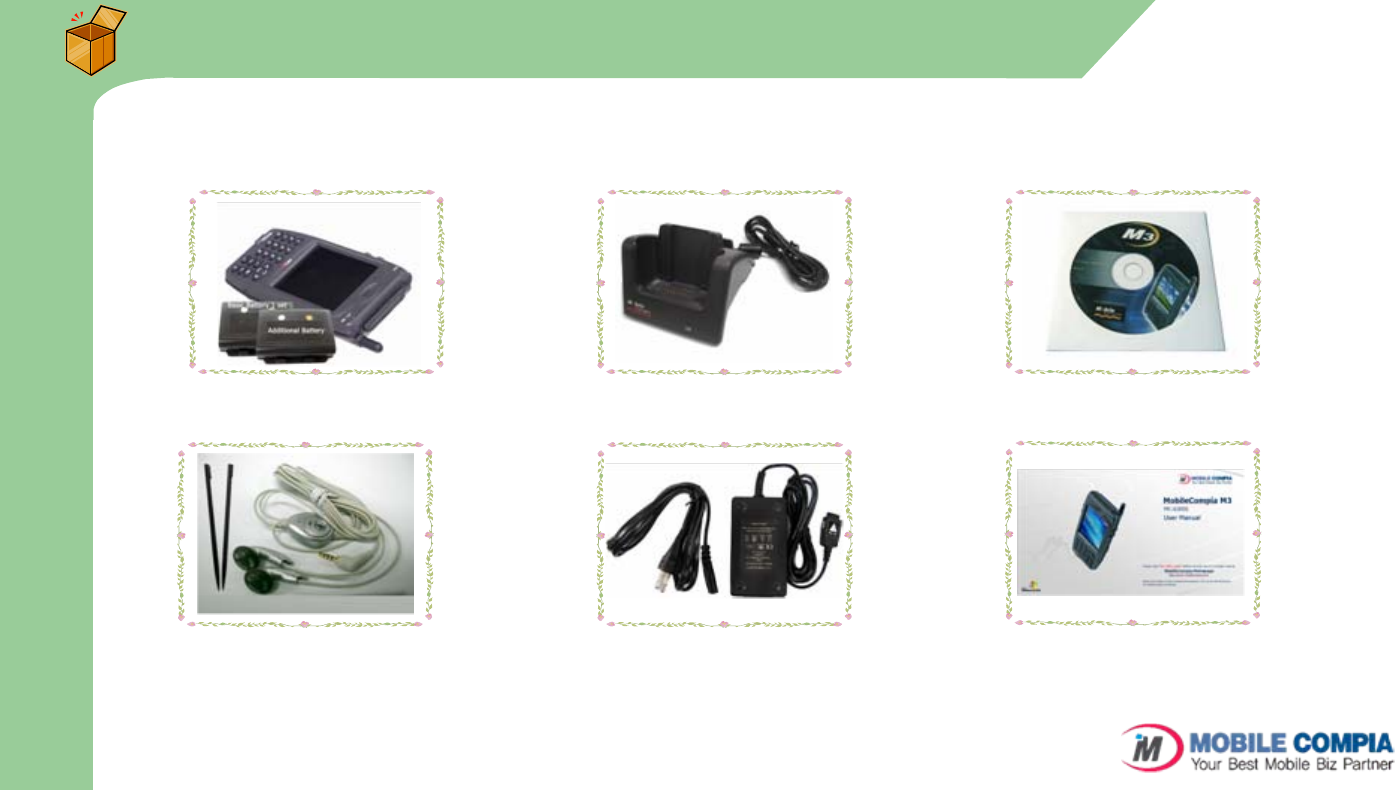
zAt the first time of opening the product box, please check if it contains all the basic components,
listed as following.
M3 plus main terminal
+ 2 units of standard battery Cradle + USB cable Manual CD + ActiveSync 3.x
Ear Mic Phone + 2 units of Stylus pen Portable Adapter User Manual
M3
I
n
t
r
o
d
u
c
t
i
o
n
11
Product Composition (2)
zHow to use the manual
–This manual provides detailed information to make using the device easier and faster.
–The content related to phone or communication in this manual is only applicable when the device is
equipped with GSM/GPRS/EDGE module for Voice and Data communication.
–The features described in this manual can not be used when it is not equipped in the device (e.g. GSM,
WLAN, Bluetooth, IrDA, Scanner, Camera).
–This manual contains the basic usage which user should know in order to use the device. For more
detailed description, please refer to the manual in CD.
–The content of this manual is subject to change without prior notice due to product improvement or
modification of its functions, etc.
M3
I
n
t
r
o
d
u
c
t
i
o
n
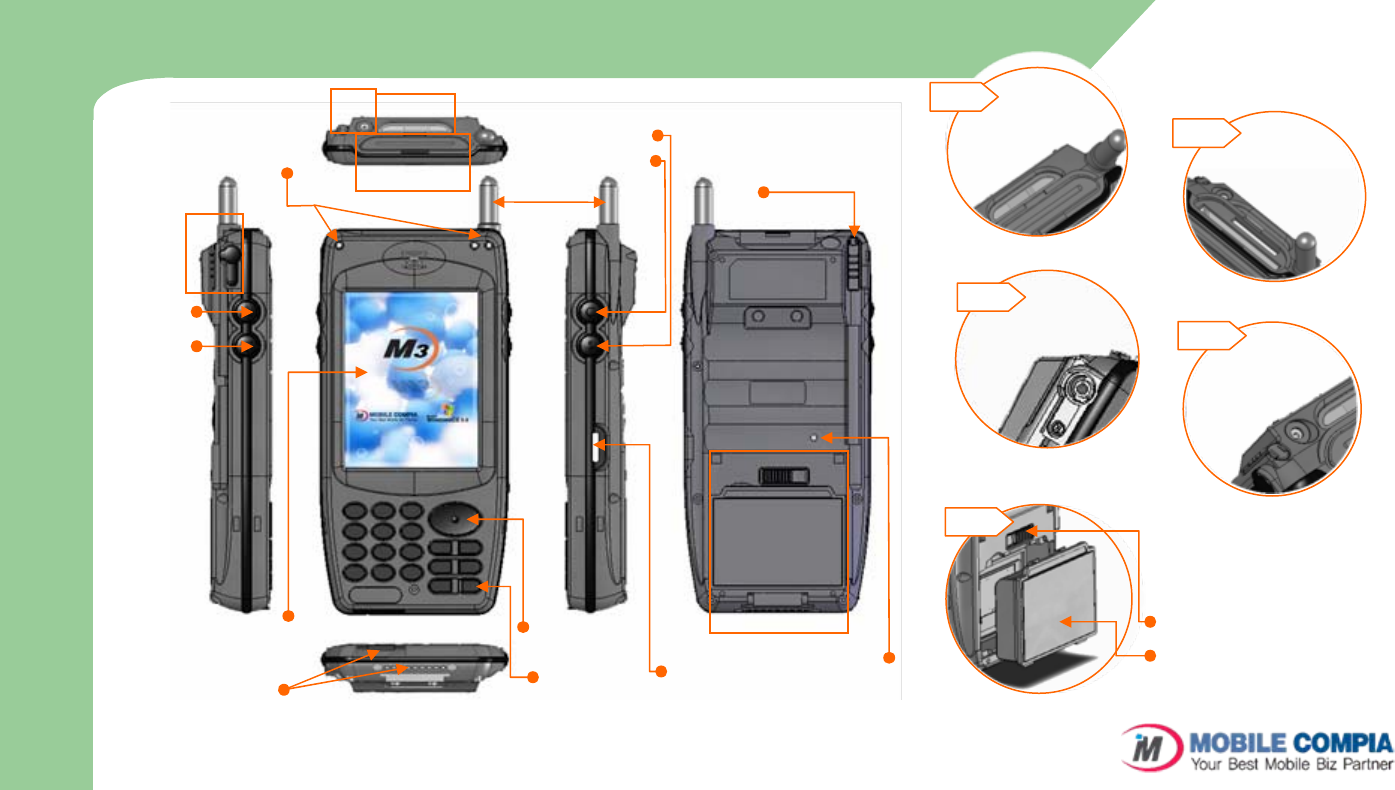
The location of camera and the availability of Flash is depending on the model of M3.
MC-6300S(Camera is located at Top-most, No Flash),
MC-6500S(Camera is located at the rear of device, With Flash)
12
Name and function of each part (MC-6300S)
12
CF/SD extension
Slot
Camera Lens
ESC
Function Key
a
d
c
b
b
a
Barcode Scanner
Window
cEar Mic Plug d
e
e
Battery Lock
Battery
Antenna
LCD touch Screen Navigation Button
LCD Power
Button
Scanner Button
Camera Button
Infrared Communication
Port (IrDA) Reset Switch
Stylus Pen
Charge & USB/serial port
Upper (portable)
Lower (Cradle) use
Charge Ramp(Left)
Scanner Ramp(Right-Right)
M3
I
n
t
r
o
d
u
c
t
i
o
n
13
d
Charge Ramp(Left)
GSM/GPRS/EDGE Status
Ramp (Right-Left)
Scanner Ramp(Right-Right)
M3
I
n
t
r
o
d
u
c
t
i
o
n
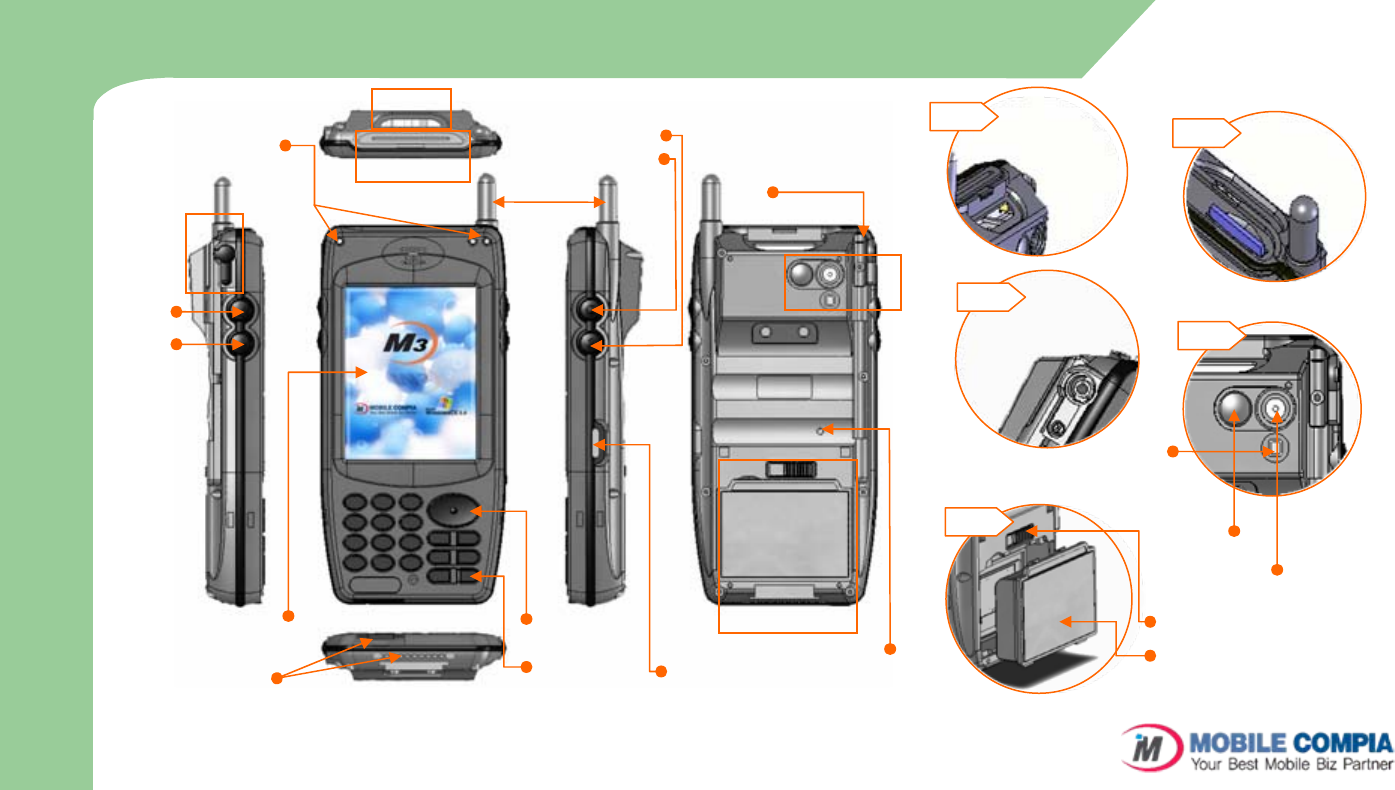
Name and function of each part (MC-6500S)
Camera Lens
a
d
c
b
b
a
c
Camera Mirror
Flash
d
e
e
ESC
Function Key
LCD touch Screen
Charge & USB/serial port
Upper (portable)
Lower (Cradle) use
Navigation Button
LCD Power
Button Infrared Communication
Port (IrDA) Reset Switch
Stylus Pen
Scanner Button
Camera Button
Antenna
Barcode Scanner
Window Mini SD
Extension Slot
Ear Mic Plug
Battery Lock
Battery
14
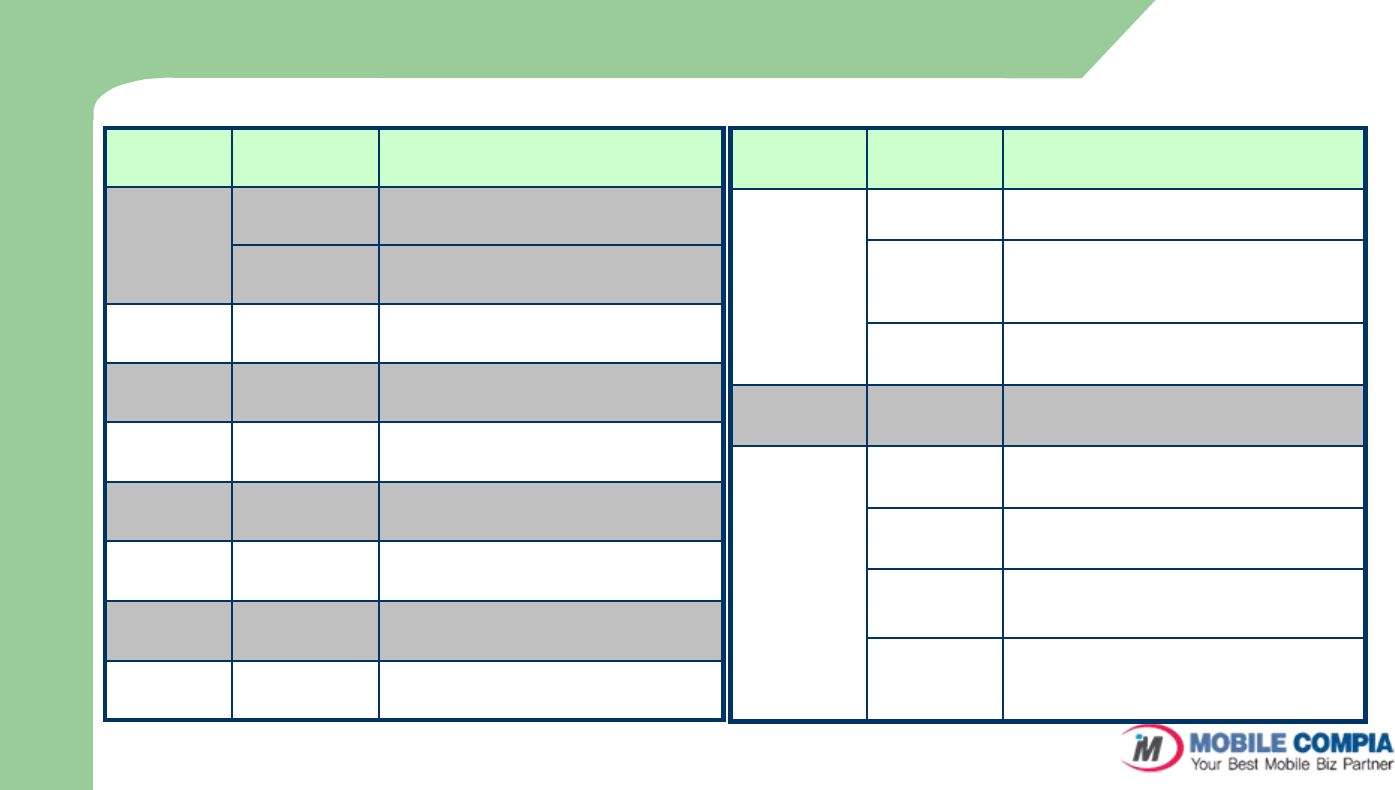
Input Button
Button Action Function
Click Software Reset
Click again
after long
press
Hardware Reset
(long press of about 4 seconds and then
click one more time)
Long press Power Off (used for complete power off)
Phone button Press Run or display/hide the Phone program
Click (Tap) Item select/click
Double Click Same as Double Click on PC
Drag & Drop As like mouse, can drag item to a certain
position
Tap & Hold Keep pressing screen with stylus pen.
Possible to select menu
(Copy, Delete, Paste)
LCD Click
Reset button
Button Action Function
Press Power ON/OFF
Long press Backlight ON/OFF
Number
button Press Number Input
ESC button Press ESC (Escape) function
Function
button Press Changes to Function Mode
Navigation
button Press Moves to Up/Down and Left/right
Scanner
button Press Activates Scanner Beam
Camera
button Press Activates Camera capture
Return
button Press Execute Selected application (Enter)
Power
button
M3
I
n
t
r
o
d
u
c
t
i
o
n
15
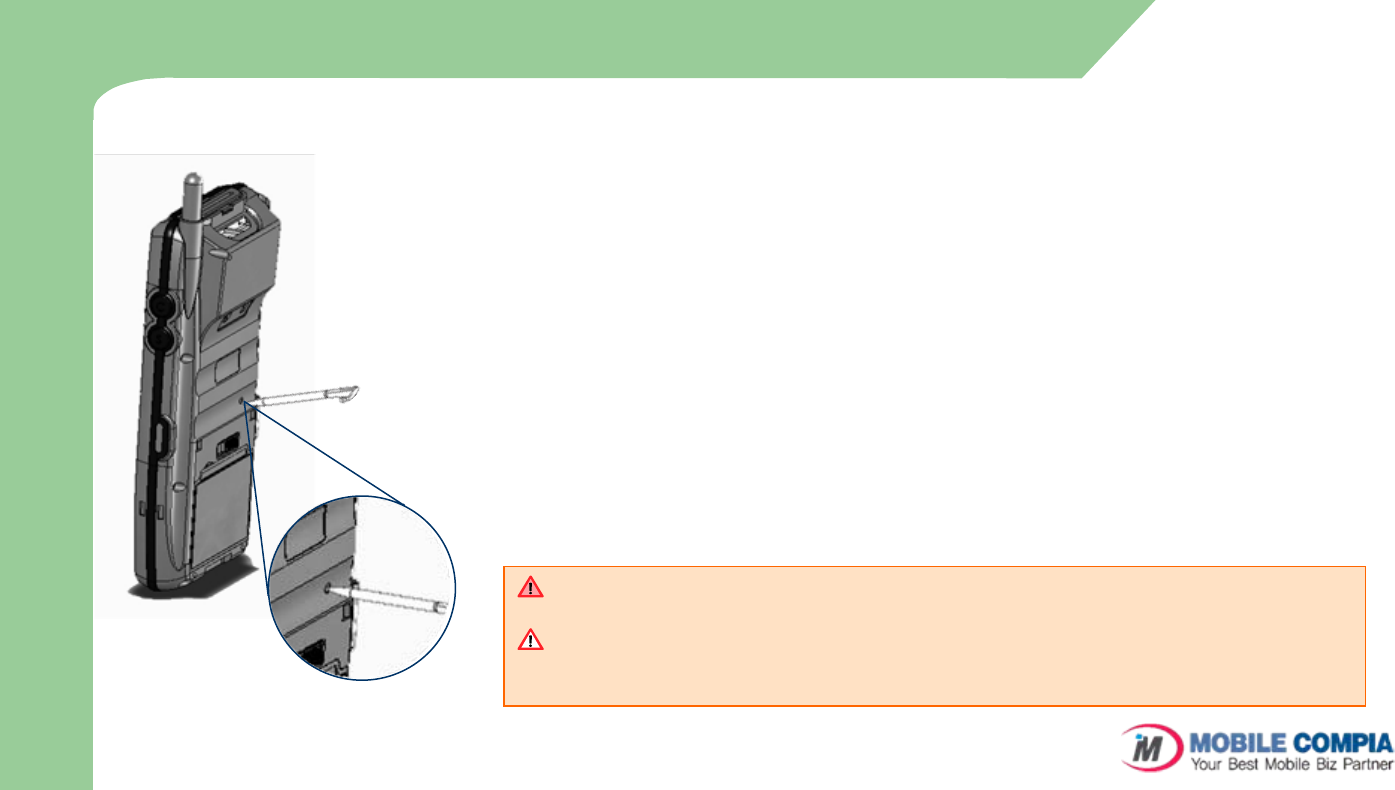
Soft/Hard Reset
zSoft Reset
–Press reset groove briefly as like
the picture.
–For unexpected error occurred
while using software, click reset
button.
–In soft reset mode, application
will be shut down, and unsaved
data will be lost. However saved
data and file will be safe.
zHard Reset
–Press reset groove for more than 4
seconds and the press it briefly one
more time.
–For fatal problem with a device, and
application problem beyond the soft
reset solution, hard reset is required.
–User shall caution that all data will be set
as default value except data in flash disk
folder.
–Press the reset button for more than 4
seconds. The initial screen will be briefly
popped up and then immediately goes
off.
When doing soft reset, pressing reset button longer than one second may trigger hard
reset.
When doing hard reset, every created data, data file and programs personal managing
data downloaded from PC will be lost. To avoid such cases, use external storage device
or internal flash disk having regular back up of important data
M3
I
n
t
r
o
d
u
c
t
i
o
n
16
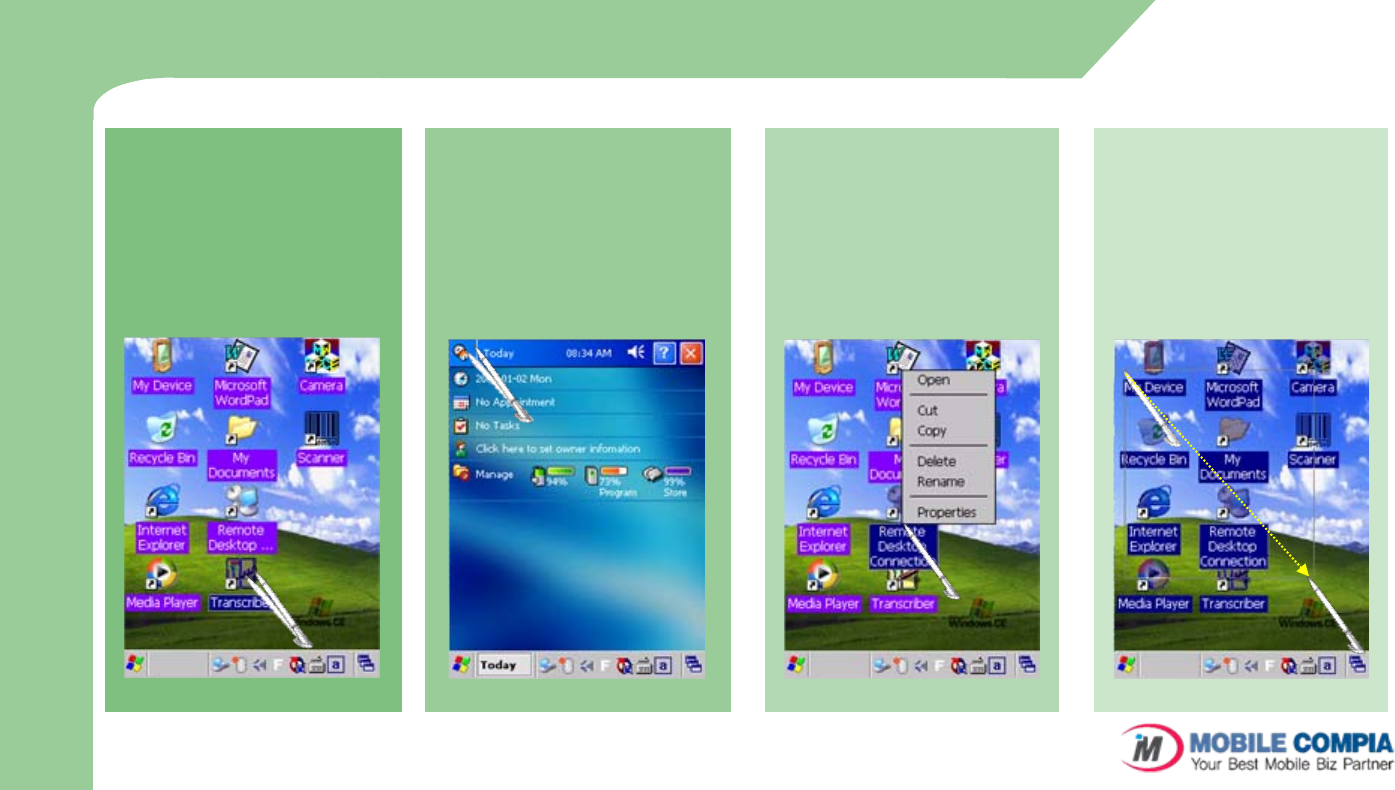
zTo drag
Similar function as mouse
drag function of computer,
with pressing screen, drag
item to move to other position.
zLong Press
After tapping, leave Stylus
pen touching the screen. This
function is frequently used for
file copy, delete, and paste or
with when keyboard is using.
zDouble Click
Similar function as mouse
double click function of
computer, click screen twice
zTap
To select items or executing,
tap the touch screen one
time.
How to use Stylus Pen
x2
M3
I
n
t
r
o
d
u
c
t
i
o
n
17
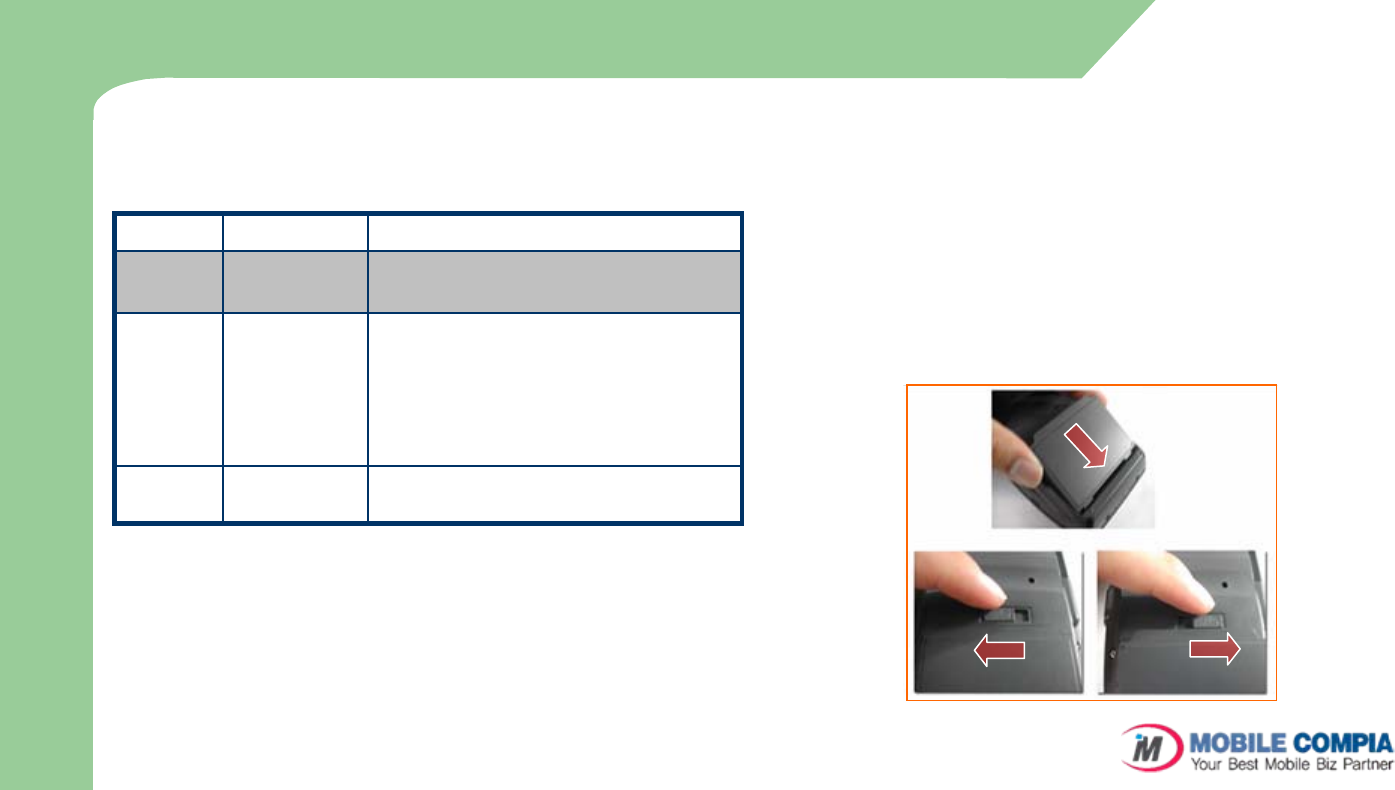
LED / Battery attaching/detaching
zLED Alarm
–Informs Charging, Scanner Status.
Type LED Status Details
LED for
charging Red
Green Charging
Charging complete
GSM
/GRPS
Status
LED
Blue Blinking
Blue On
Blue OFF
GSM/GPRS Standby
(within range of phone/internet)
GSM/GPRS in use
(phone/SMS/internet in use)
GSM/GPRS is off or out of range
Scanner
LED Green When the barcode data is successfully read
zBattery attaching/detaching
–Attaching Battery
As picture shown, put the battery pack to back of PDA,
and lock the battery pack with locking device.
–Detaching Battery
Press locking device to the right, then using upper notch,
detach the battery from main body.
M3
I
n
t
r
o
d
u
c
t
i
o
n
18
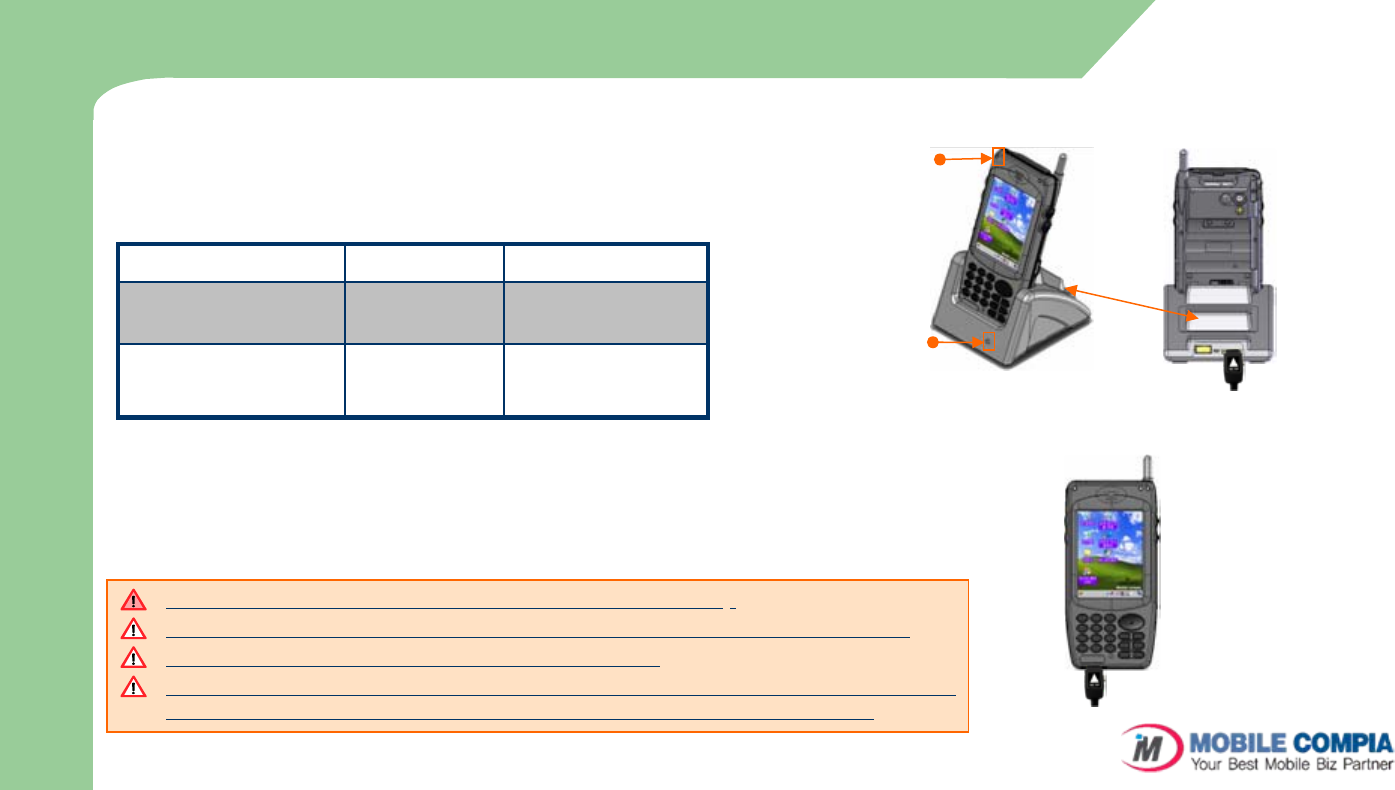
Charging
zConnect plug-in from charger to charge jack of main
body, or charge jack of cradle, and then place main
body onto cradle.
zCharging LED
zWhen charging, the status of the battery attached to
main body can be confirmed by the LED left of upper
corner of main body. Also the status of Sub-battery
can be confirmed by the LED right of low corner of
Cradle.
Type LED Status Details
Direct charging to main
body Red
Green Charging
Charging Complete
Cradle Charging
(Extra battery charging) Red
Green Charging
Charging Complete
zCharging in Cradle
zCharging using portable adapter
Separate Battery
Main body
Charging LED
Separate Battery
Charging LED
Do not use any other charger except one (5.2 V / 3A) provided .
Make sure to handle it gentle; damage with excessive force may cause no warranty.
Incongruent change of battery can cause the explosion.
When attached battery is completely discharged, plug charger to main body, then reset
the device to check if screen is back on. To use, do at least 10 minute charging.
M3
I
n
t
r
o
d
u
c
t
i
o
n
19
How to connect to PC
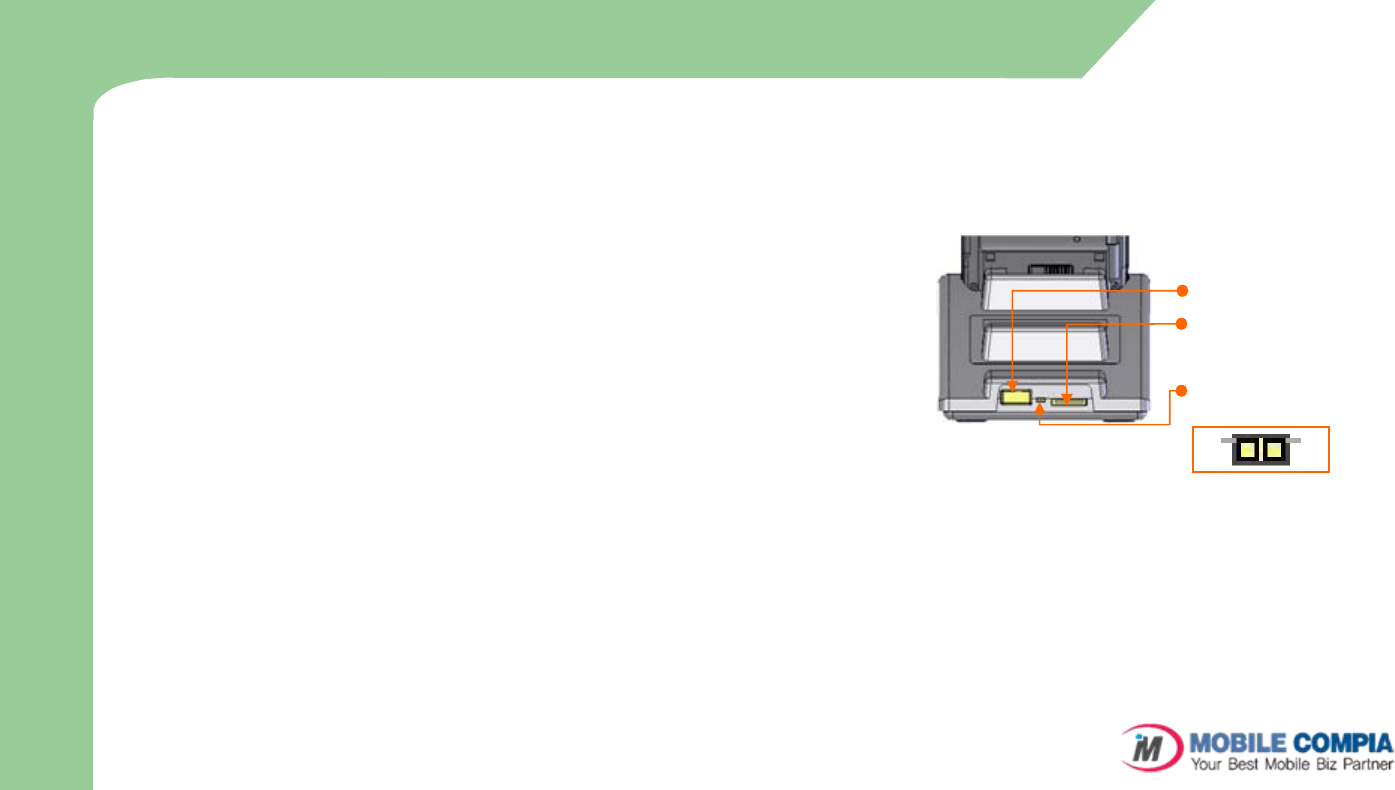
zA cradle of M3 supports charging and USB connection.
zConnecting step of cradle of M3 is as following.
–Connect charger to USB cradle. (24pin connector)
–Connect charger to power source. (to wall)
–Connect USB cable of USB cradle to USB port of desktop PC.
–Place M3 onto docking cradle then execute Synchronization with Desktop
PC.
zThe location of USB port can be at the back, front or side of PC
and the shape of USB port is identical on Desktop PC and
Notebook.
zUSB host function is available by putting USB cable into USB port
of Cradle.
Connecting to Cradle
USB Host/Client
AC Power
USB Host/Client
changeover switch
HC
M3
I
n
t
r
o
d
u
c
t
i
o
n
20
How to optimize battery longevity
zWhen you work outside of office or at home, you will
especially want your battery to last as long as possible. There
are several tips for longer battery life.
zWhen you are not using the device, turn it off by pressing
LCD power button.
–When you use the battery power, if you do not touch the keyboard
or use a stylus pen or mouse for more than 3 minutes, the device
will automatically be shut down. Shorten this time (Settings ->
Control Panel -> Power -> Schemes) to have longer battery life.
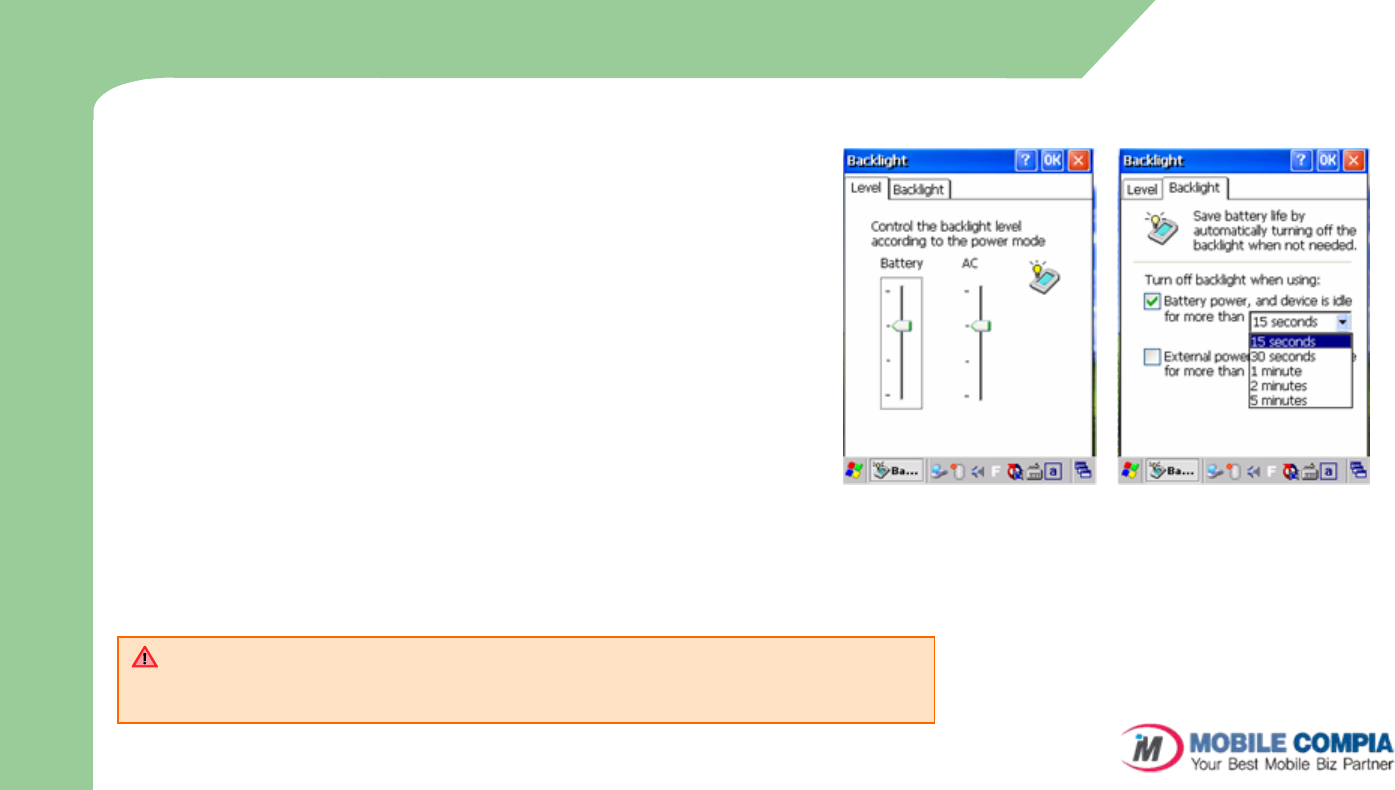
zLCD Backlight and Keypad Backlight set to the minimum
brightness.
–On Start > Settings > Control Panel > Backlight > Level, scroll
down the level of brightness at Battery mode to the minimum. On
the Backlight tap, check 'Battery power, and device is idle' and set
the time to 15 second.
If battery power is too low, “Too Low Battery” message will appear on the taskbar
and start window. In that case, you have to recharge M3 using the charger.
Otherwise, it may cause problems in the system.
Backlight Properties
M3
I
n
t
r
o
d
u
c
t
i
o
n
21
2. Basic Usage
Calibration
Main window
Screen Rotation
Infrared Communication
Bluetooth Communication
Function Key Mode
Transcriber/Keyboard
22
Calibration
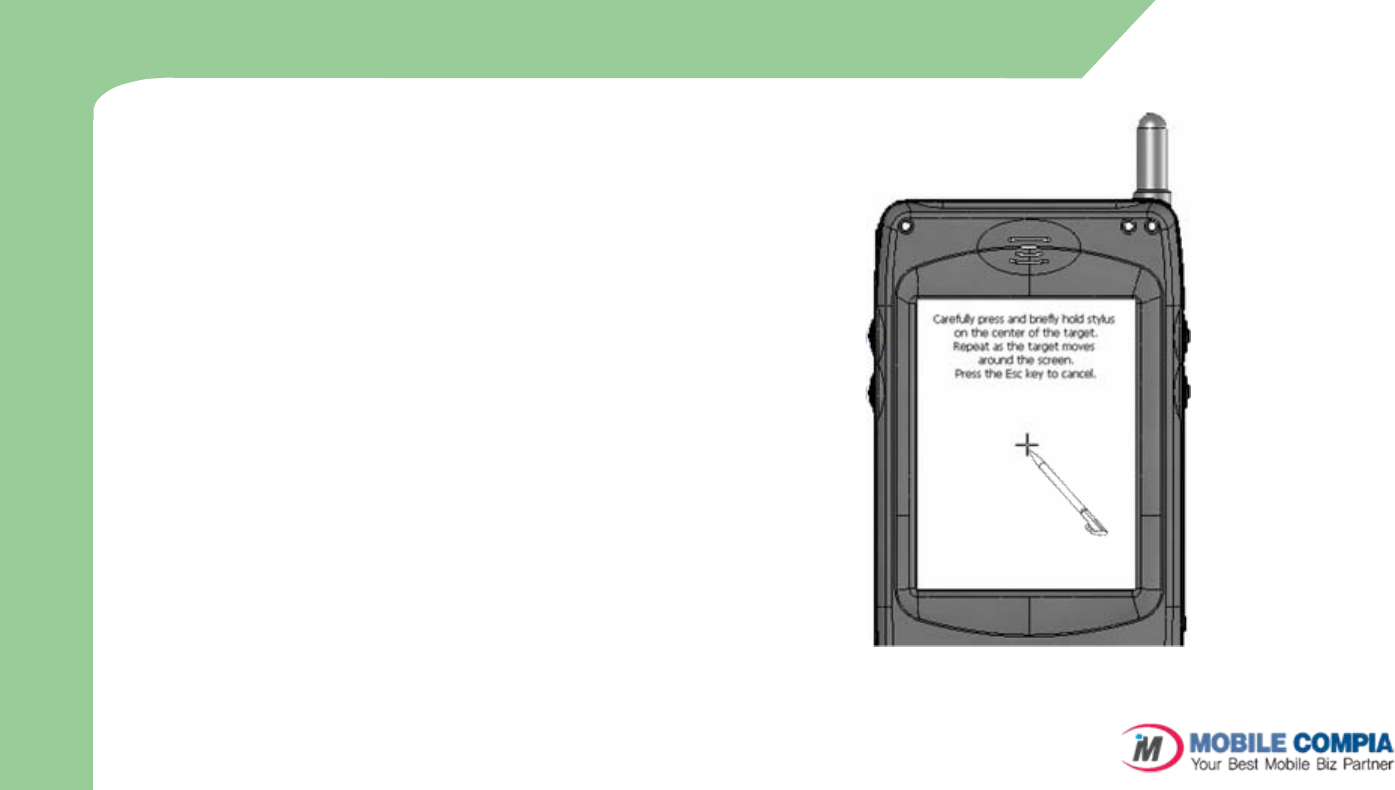
zChoose ‘Recalibrate’ on Control Panel /
Stylus / Calibration tab (Fn + 4)
zScreen setup wizard will start. Screen
setup wizard calibrates the touch screen.
zPress and hold the (+) mark for more
than 1 second and release it. Keep
chasing and pressing this (+) mark as it
moves around. When all processes are
complete, M3 will automatically show the
main screen. Check if the LCD touch
input works correct after calibration.
B
a
s
i
c
U
s
a
g
e
23
Main Window (1)
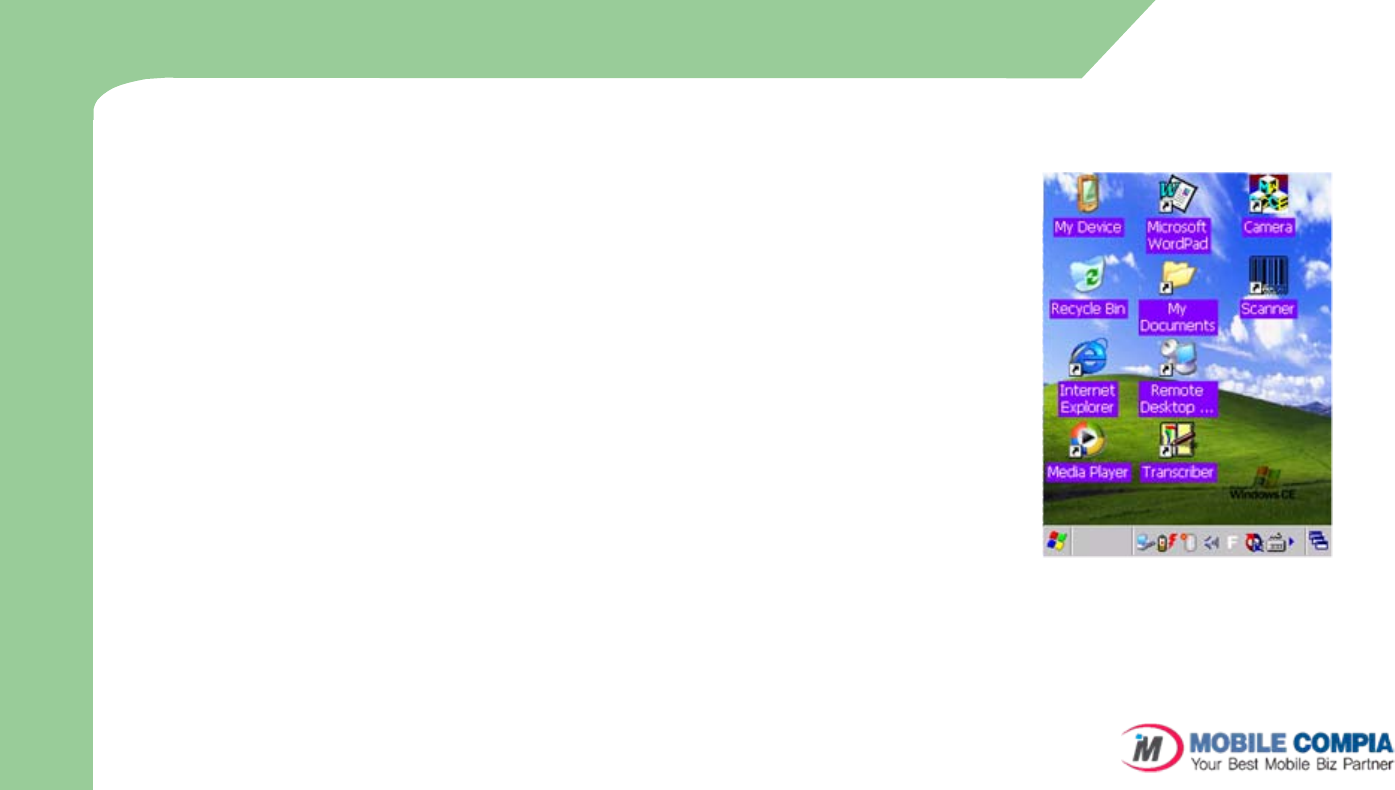
zMain window consists of Desktop and Taskbar.
zIn the background screen, you can see short cut icons of main programs.
The details of icons are as follows:
My Device : It displays the folders and files which the device contains.
Recycle Bin: Completely delete or restore files and data.
(After emptying the recycle bin, the files and data can not be restored anymore, so please be cautious)
Internet Explorer: It explores web or intranet.
Media Player: it plays digital audio or video file.
(Media player supports files in ASF, WMA, MP3, WAV format.)
MS WordPad: it is used for creating and managing documents.
My Documents: it saves and displays program, file and data.
zIn M3 you can use the same function like clicking right button of the mouse
in a desktop PC.
–If you press and hold the LCD touch panel with the stylus pen, the right button menu will appear.
–Using the right button menu, you can carry out various tasks such as icon arrangement, the renewal of the
background screen, copy/cut/paste of files and data, creating new folders, set-up features. Main window
B
a
s
i
c
U
s
a
g
e
24
Main Window (2)
zThe taskbar is designed to be simple and user-
friendly.
zStart icon is the starting point of program.
If you point the start menu with the stylus pen, you can
see various menus including program, favorites, document,
setting, help, and run. If you choose each time, detailed
executable programs appear. If you choose and press the
requested program, you can run the program of your
choice.
zIf you select ‘Taskbar and Start Menu’, you can
enable the general options like ‘Always on top’, ‘Auto
hide’ and ‘Show Clock’.
zIf you press the quick link icon, the program link
menu will appear. Using this function you can
operate frequently used programs more promptly.
It consists of Infrared Communication, Alarm, Backlight
Control, Task Manager and Wireless LAN.
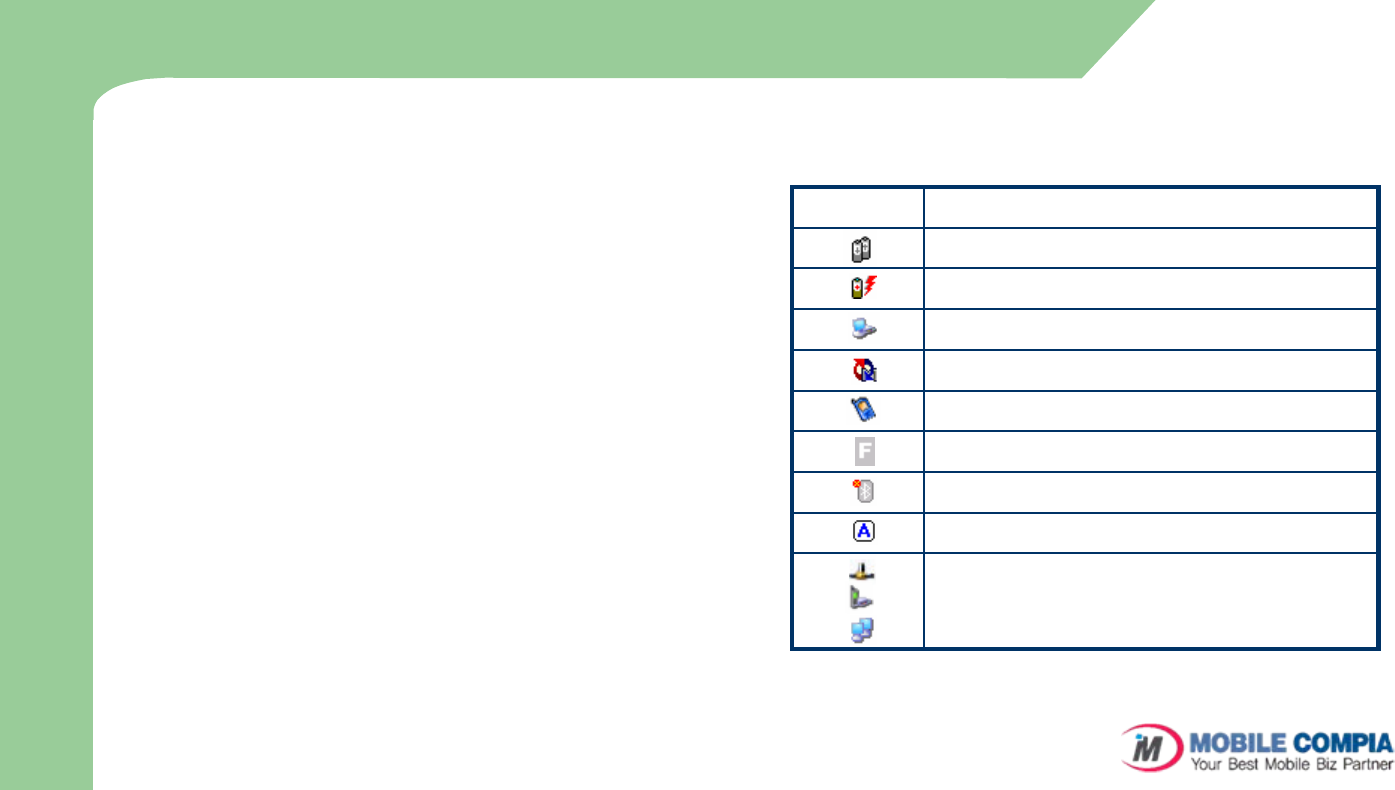
Icon Details
Low Battery
Battery in charging
Connected to Desktop PC via USB
Quick link icon
Phone program icon
Function status icon
Bluetooth status/menu icon
Caps Lock activated icon
Network connection status
Status of internet connection via GPRS
Status of internet connection via WLAN
zStatus indication icon on the taskbar
B
a
s
i
c
U
s
a
g
e
25
Screen Rotation
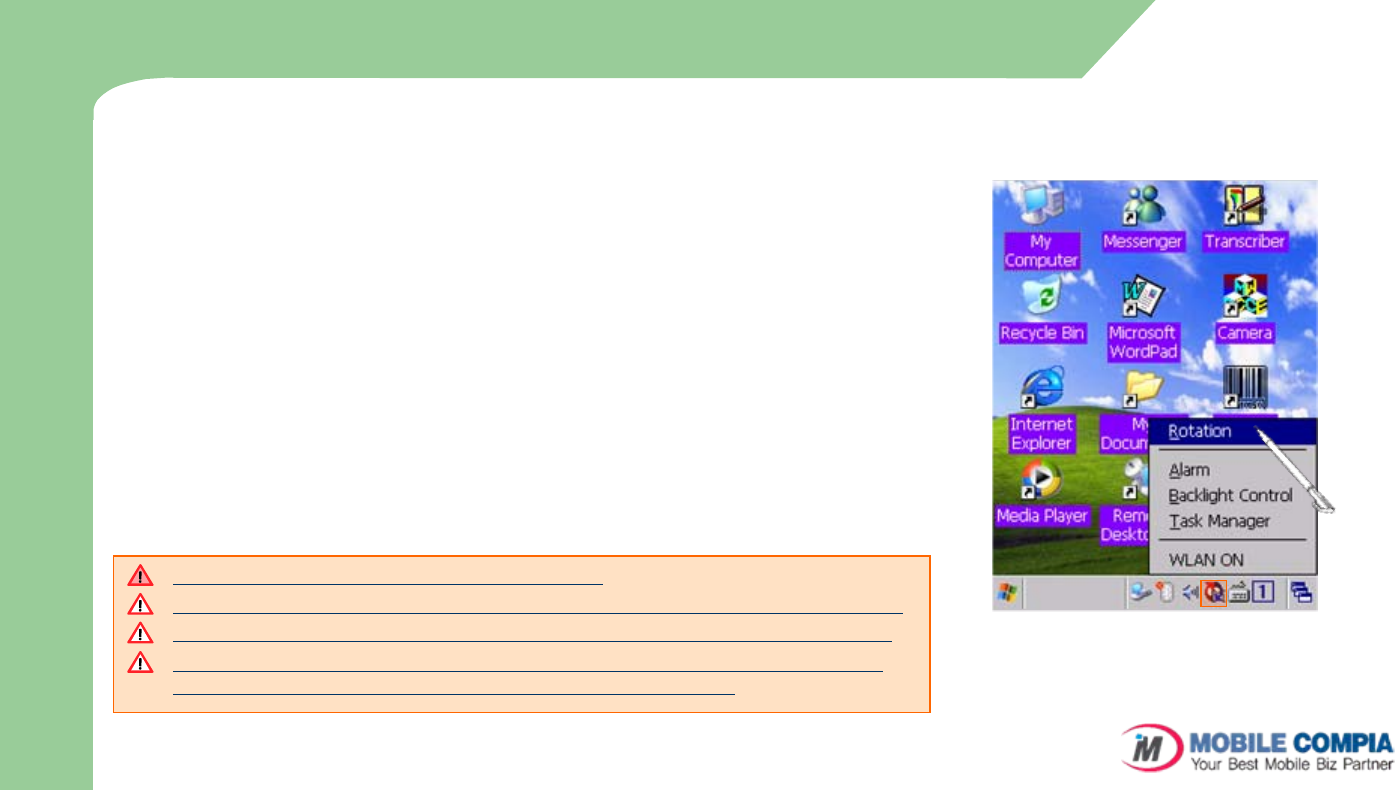
zRotate the screen to different angle. With Screen
rotation, screen can be rotated vertically or horizontally.
Desktop screen is not applied with this function to get
better rotation, set up the size of desktop screen
within 240 x 240 pixels.
zTo rotate the screen:
–Press the quick link icon and select the screen rotation.
–Run application programs. You can use this function in
various programs such as My Computer, Media player, My
Documents, Internet Explorer, Microsoft WordPad, Image
Viewer, Personal organizer Management, etc.
Some devices might not support screen rotation.
In screen rotation mode, you can only use software keyboard to key in characters.
Sometimes, when you rotate the screen, it would not fit to the size of the screen.
When you see an application program in landscape mode, rotate the screen first
then run the application program in order to get a normal view.
Screen Rotation
B
a
s
i
c
U
s
a
g
e
26
Infrared Communication
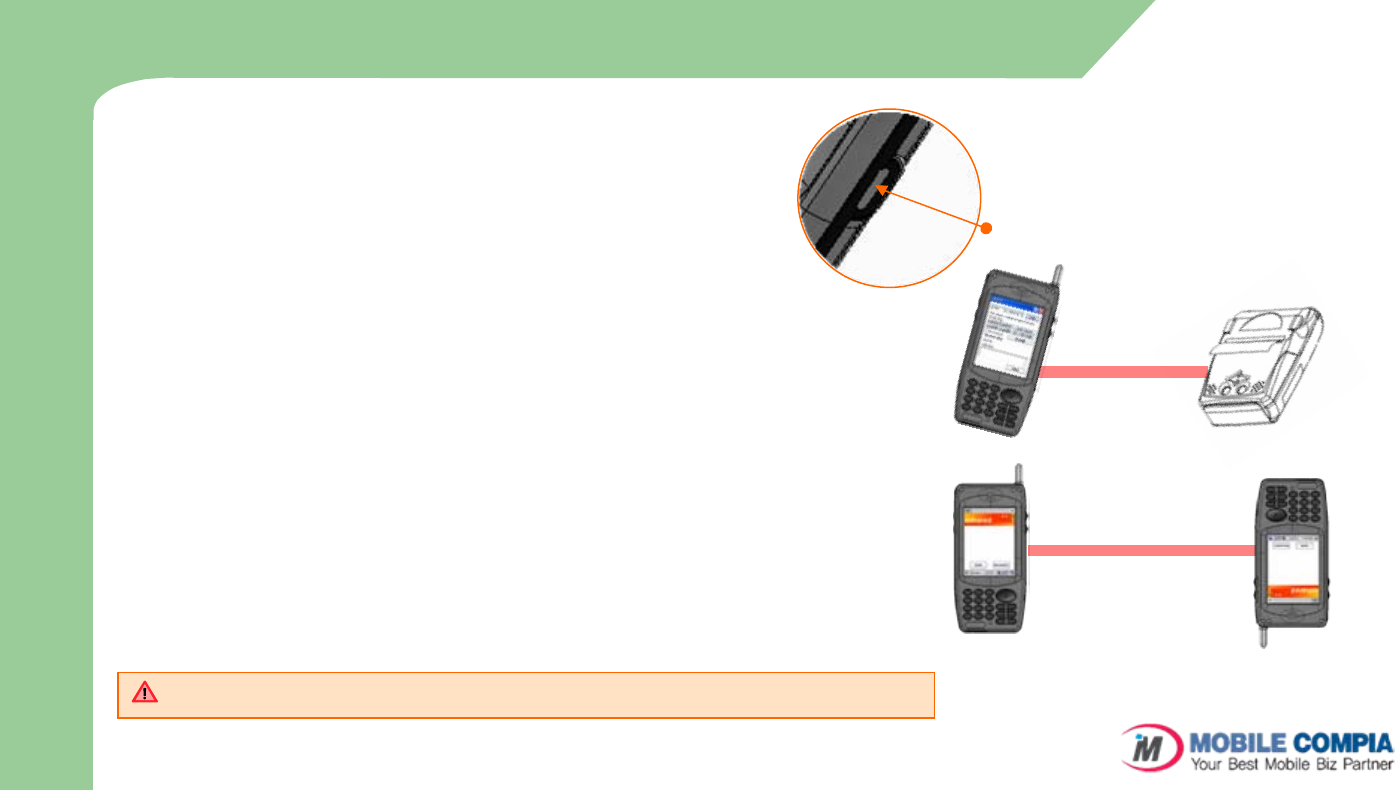
zIt carries out infrared communication using OBEX
(Object Exchange Protocol). OBEX features provides
an effective and simple binary protocol to exchange
data in an efficient and convenient manner
zM3 can communicate with desktop, notebook, pocket
PC as well as other PDA that has OBEX protocol for
the IrDA communication.
zTo use infrared communication
–Locate Infrared communication port to be in series with
an infrared (IrDA) port with other device.
–Press a quick link icon > Infrared communication menu.
–Infrared communication program is started and you can
exchange data.
–If you want to have a serial communication with the
device like printer, it is possible by connecting the COM
Port.
※It is advised to communicate within the shortest distance.
Shorter distance makes data transmission faster.
IrDA Communication Port
Connecting to IrDA Printer
File transmission between PDA
IrDA port is optional. Device without IrDA port can not use this feature.
B
a
s
i
c
U
s
a
g
e
27
Bluetooth Communication (1)
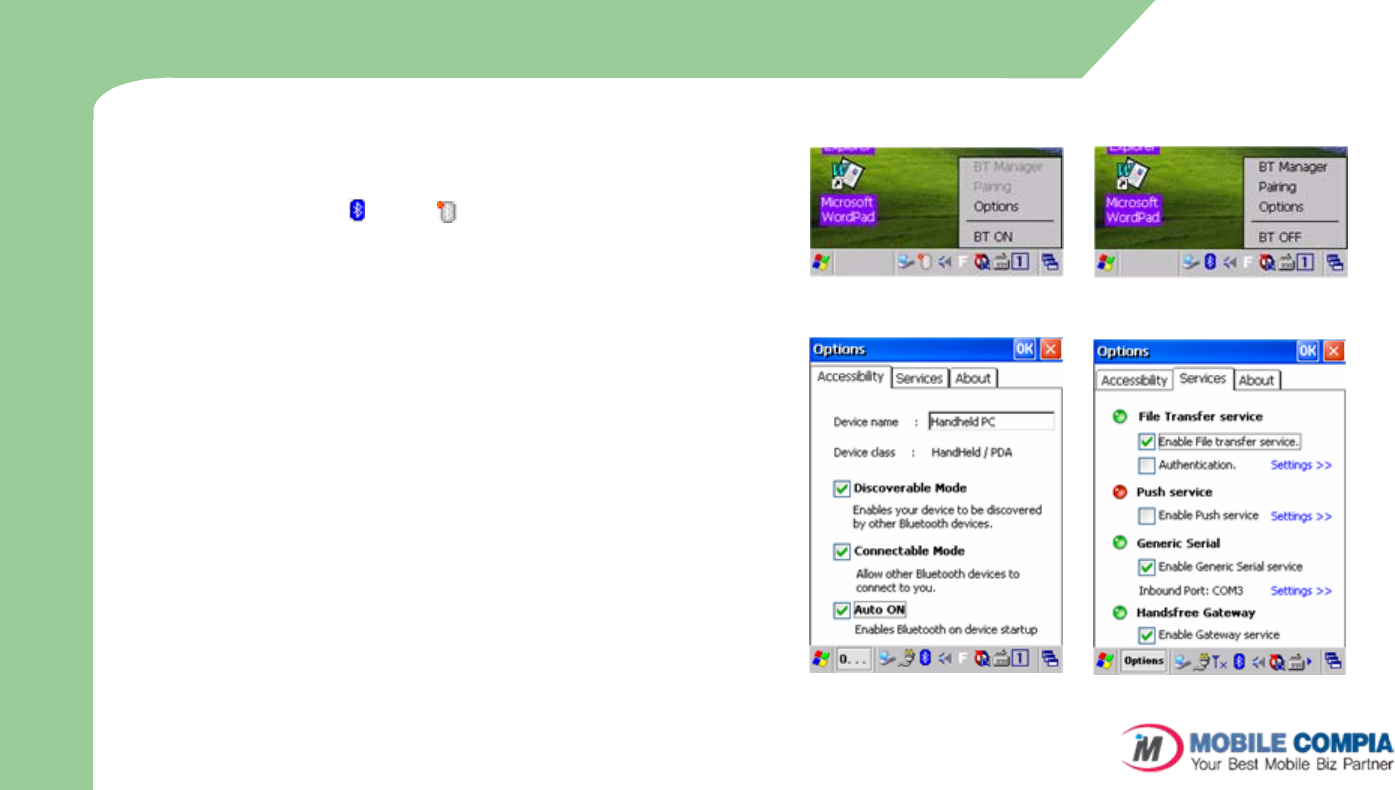
zBluetooth On/Off
–The user can on/off the power of Bluetooth (will be called as
‘BT’ from now on) by selecting the Bluetooth Tray Icon.
–Switch to ON ( )/OFF ( ) by clicking BT ON/OFF on the
popped up menu.
zOptions Menu
–Accessibility: Change of BT Device Name, Setting for
Discoverable/Connectable Mode and Auto ON.
Device Name
It is a Name to be shown when other BT Device discovers the
user’s BT.
Discoverable Mode
When Discoverable Mode enabled, other BT can discover the user’s
BT Device.
Connectable Mode
When Connectable Mode enabled, other BT can connect to the user’s
BT Device.
Auto On
By Device Reset or Power On, BT Device will be turned on
automatically.
–Service: Services in BT device.
File Transfer Service
Enable File transfer service: When enabled, the File transfer between the
user’s BT and other BT is possible.
Authentication: When enabled, only authenticated users can use File
Transfer service.
Push Service
When enabled, the personal contact information file (Vcard) can be
exchanged.
Generic Serial
When enabled, other BT can get a Serial connection with the user’s BT.
•Handsfree Gateway
When enabled, Redial and connection from headset is possible.
Bluetooth On/Off
Options Menu
B
a
s
i
c
U
s
a
g
e
28
Bluetooth Communication (2)
zSupported Service
–ActiveSync, File Transfer, Business Card Exchange, LAN Access, Generic
Serial, PAN Connection, Handsfree connection.
–Choose the service you want from the Bluetooth Manager and then start
connecting procedure.
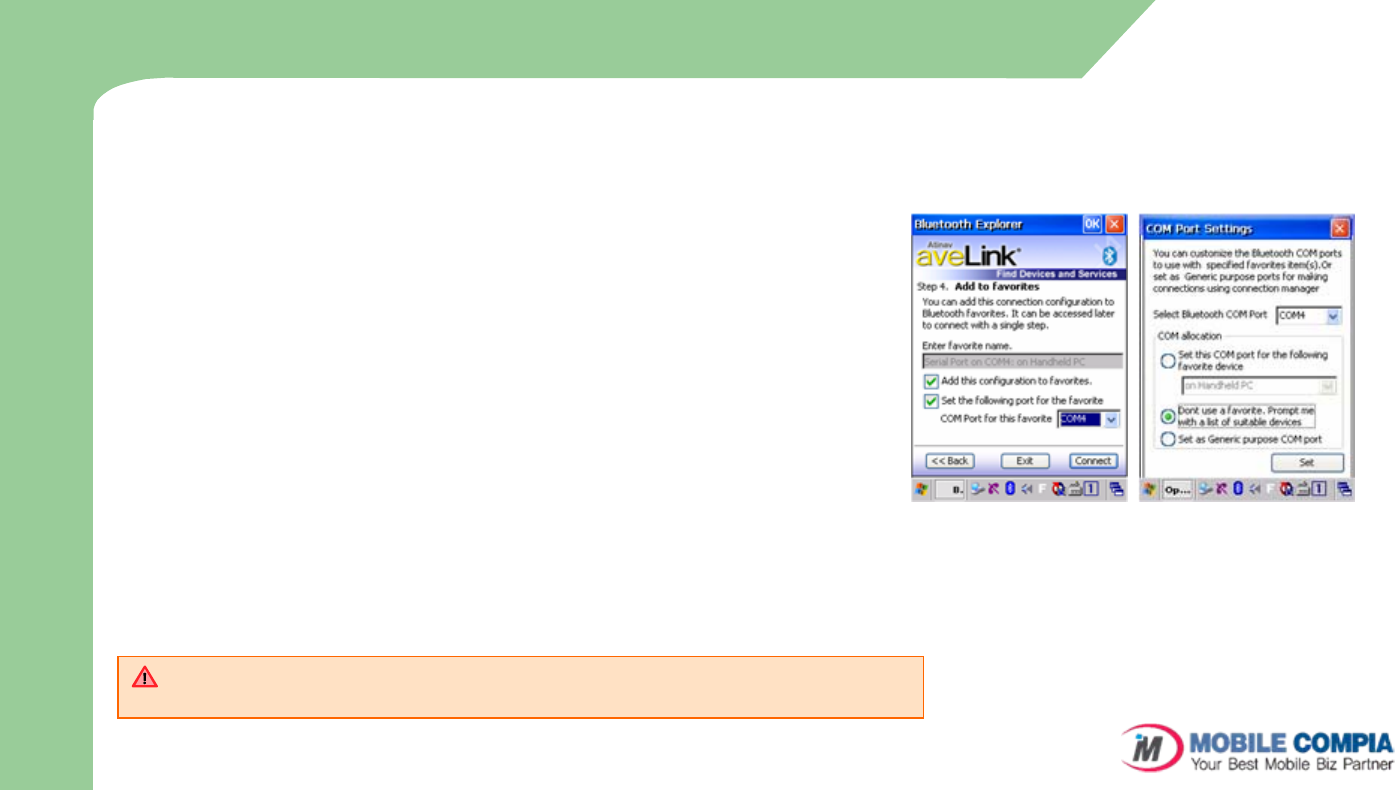
zGeneric Serial
–User can make a serial connection with other BT device that supports serial
communication.
–On Bluetooth Serial communication, three ports are supported.
Inbound Port: COM4, Outbound Port: COM4, COM9
–When connecting for Bluetooth Serial communication, user can allocate the
com ports for outbound communication.
Set this COM port for the following favorite device.: When this option
is selected, user can allocate the selected COM Port to one of favorite BT
devices.
Don’t use a favorite. Prompt me with a list of suitable devices. :
When this option is selected, user will be directed either to Favorite page
(when there are favorite devices registered) or to Device Search page to
select the device for connecting.
Set as Generic purpose COM port.: When this option is selected, the
selected com port is only for generic use. It means that next time the user
should make a connection manually using connection manager.
Favorite COM port assignment.
Bluetooth is optional. Device without Bluetooth module can not use the Bluetooth
feature.
B
a
s
i
c
U
s
a
g
e
29
Function Key Mode
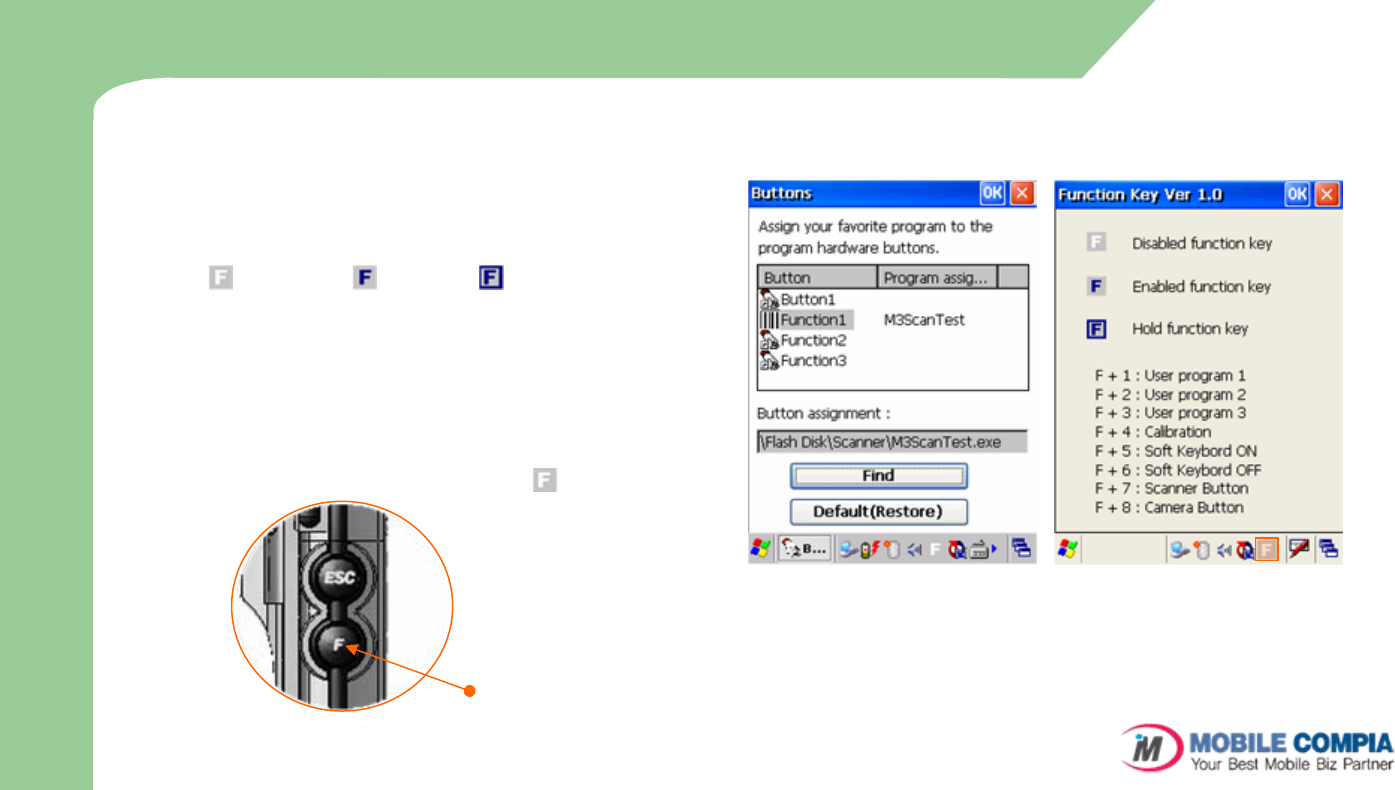
zIf you press the down button on the left side, you
can change the Function Mode.
–Pressing the Function key changes the state of Function
in turn
–(Disabled) (Enabled) (Hold-Enabled)
zHow to use the Function Key :
–Press 1~8 number keys on Function Enable or Hold
Mode.
–Under Start < Programs < Utility < Buttons you can set
the ‘User programs'.
※You can view help by double clicking on the task bar.
Function Key
Function Key menu Function Key Help
B
a
s
i
c
U
s
a
g
e
30
Transcriber/Keyboard (1)
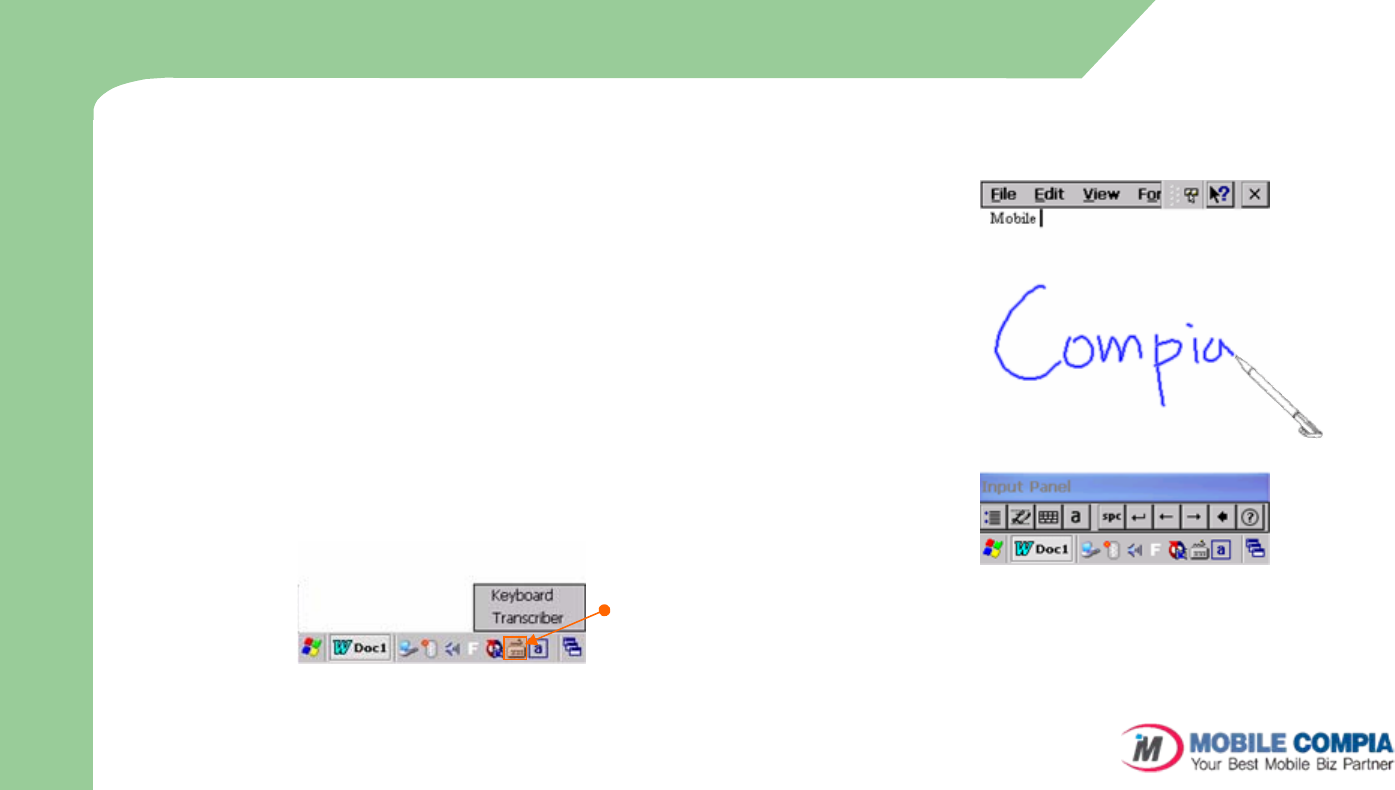
zTranscriber
–When you want to key in characters in making document or
setting, start Transcriber. Using the stylus pen you can draw
characters that you want on the screen. This program will
recognize the characters by itself and transform them into
typeface characters. To start the Transcriber, run the
program as the following order: start > program >
Transcriber.
–The picture below shows how to start the Transcriber, using
the ‘keyboard’ icon on the taskbar and the picture right-side
shows how the Transcriber works in keying in characters on
Microsoft Word Pad. When Microsoft Transcriber is running,
you will see the ‘Input Panel’ tool bar pops up.
Input select menu
Transcriber Input Panel
Long press
B
a
s
i
c
U
s
a
g
e
31
Transcriber/Keyboard (2)
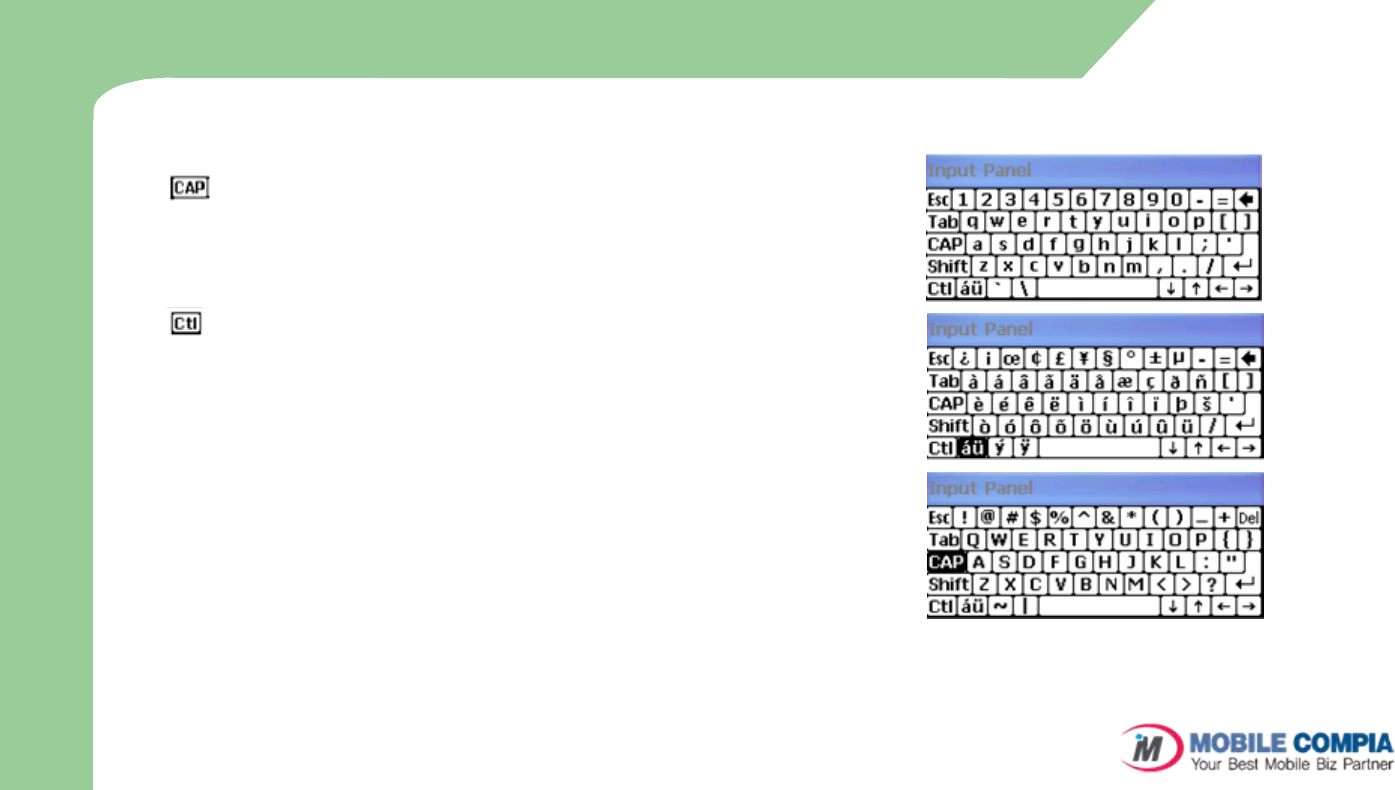
zKeyboard
–Upper/lower case Selection
Press this icon to change upper and lower case letter. If you
select upper case, capital letter and its character will appear
on the number key pad. It serves the same function with
Shift key.
–Hot key Selection
If you use hot key such as “z”, “x”, “c” and “v”, you can carry
out Cancel, Cut, Copy, and Paste, respectively.
If you want to change the features of soft keyboard, select
keyboard in Go to Start> Setting> Control Panel> Input
Panel and click the option you like to set up.
–Input Method
To carry out character key-in using [keyboard] input, press
keyboard icon on the taskbar. In case of {Script
Reorganization}, you can key in by activating Transcriber in
the following order. Start > program > Transcriber. When
you press the keyboard once, it will appear on the screen and
one more press will make it disappear. Keyboard Input Panel
B
a
s
i
c
U
s
a
g
e
32
3. How to use Internet
Via GPRS/EDGE
Via Wireless LAN
Via USB
Via Bluetooth
33
Via GPRS/EDGE (1)
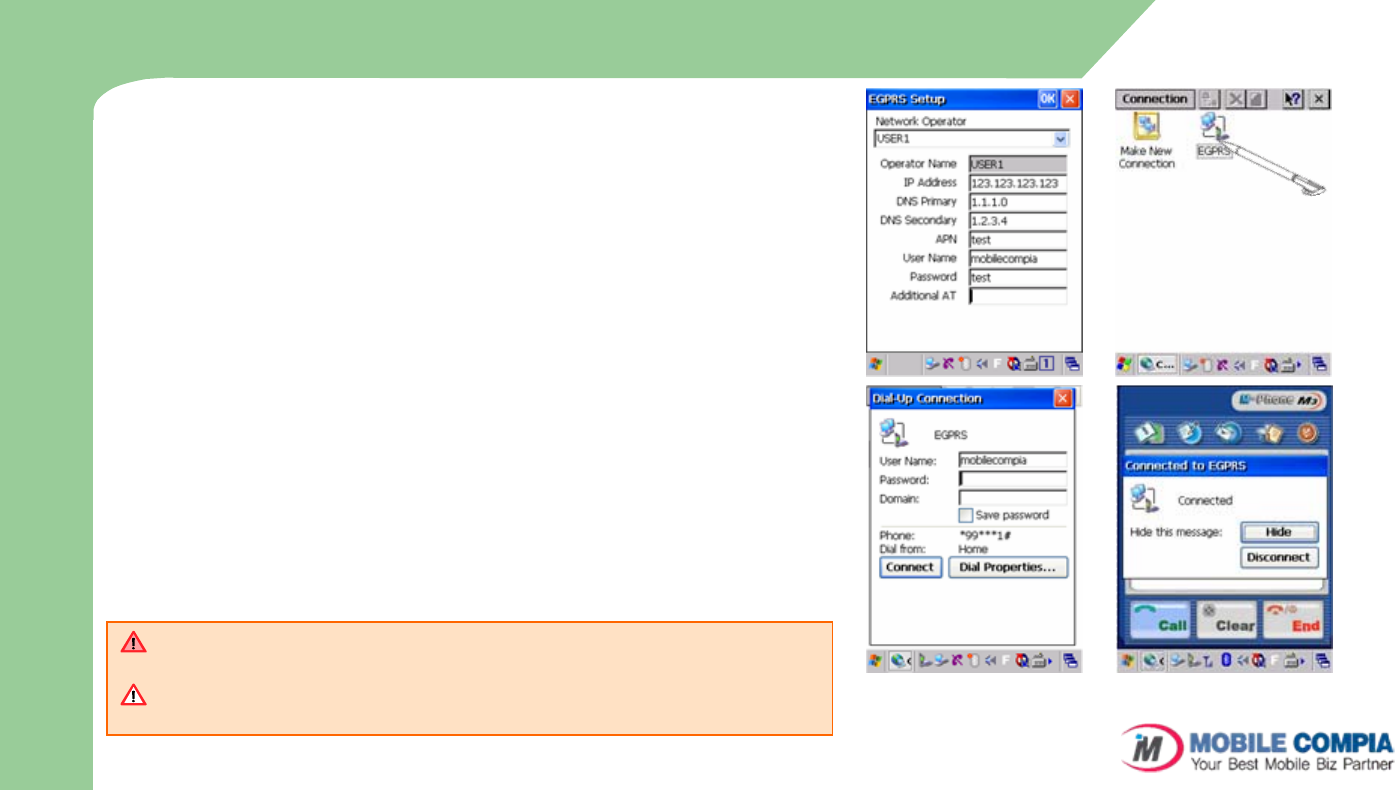
zHow to set GPRS/EDGE
–Select the 4th icon (configuration menu) on the program
menu.
–On the Configuration menu, select EGPRS settings.
–Insert setting values for desired network and click ok to save.
–User can check the saved EGPRS settings at [Start / Settings
/ Network and Dial-up Connections].
zHow to connect to GPRS/EDGE
–User can connect to EGPRS by double clicking the EGPRS
icon at [Start / Settings / Network and Dial-up Connection].
–When user intends to connect to the Internet (e.g. opening
Internet Explorer), Connecting to EGPRS box pops up
automatically to let user to connect to EGPRS.
zHow to disconnect EGPRS connection
–Double click the ‘EGPRS Tray Icon’ on the tray bar.
–Click disconnect button on ‘Connecting to EGPRS’ box.
H
o
w
t
o
u
s
e
I
n
t
e
r
n
e
tIf EGPRS is built in at manufacturing, the network setting is done by
default.
If the network setting is deleted by mistake, it can be restored by
resetting the device. GPRS/EDGE Connect/Disconnect
34
Via GPRS/EDGE (2)
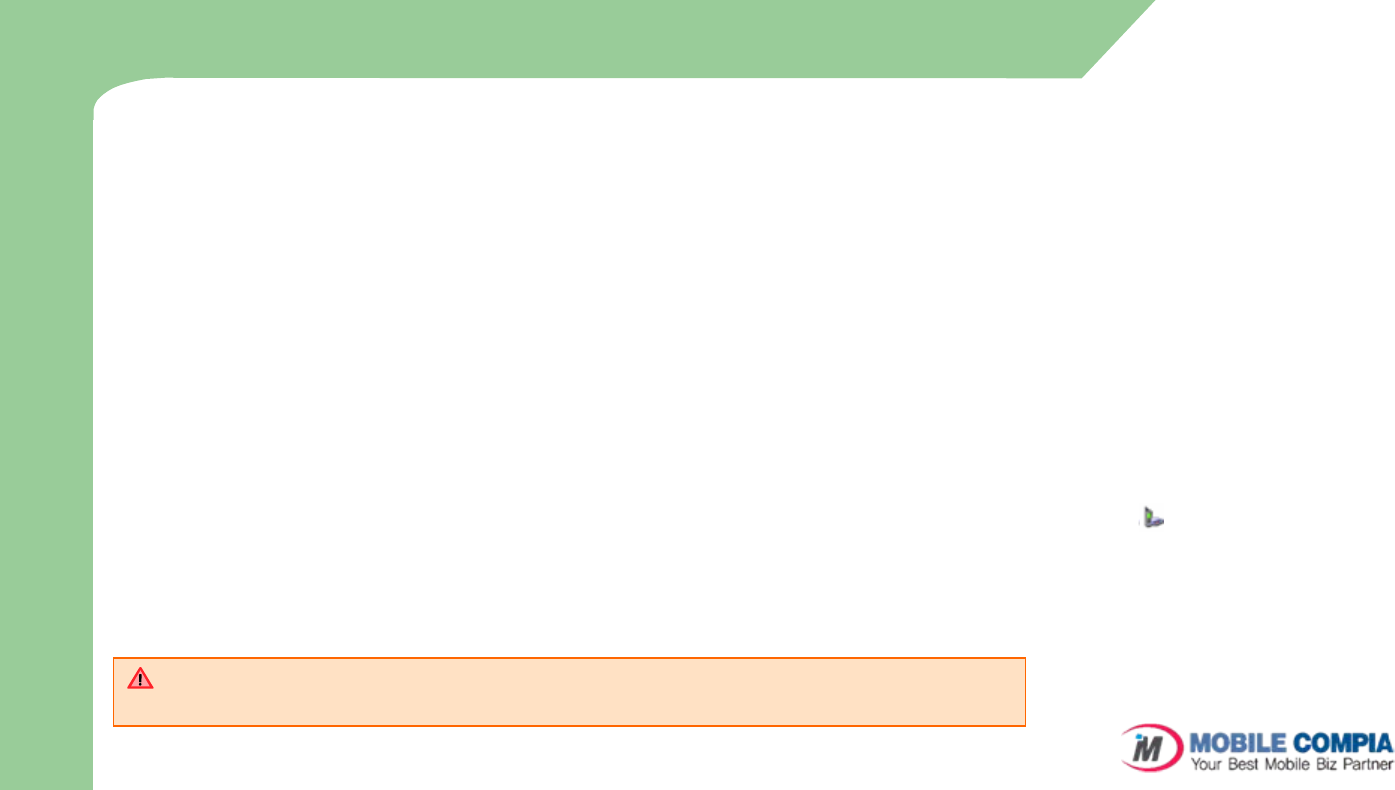
zHow to connect the GPRS/EDGE manually
–Start / Settings / Network and Dial-up Connections or Control Panel / Network and Dial-up Connections.
–Select make new Connection. Enter the name of connection. check dial-up connection, and press next. (ex. Make Name:GPRS)
–Select Hayes Compatible on COM1
–Press [configure..], and set [Device properties] .
Port Settings Tab :
Set a Baud Rate to 460800. other data remain as the picture below.
Call Options Tab :
On Extra settings Enter special modem commands “+CGDCONT=1”,”IP”,”apn_name” then press OK.
–After done with configuration, input “*99***1#” in the ‘Phone number’ edit box and leave all the rest untouched. As last press
‘Finish’ button.
–Now the connection icon would have been generated on the ‘Network and Dial-UP Connections’ Window as the picture below.
On the window which pops up by double-clicking on this icon, user needs to input the username and the password, provided
by the SIM card or Network provider.
–Check mark “ save password”, then press “connect” to finish Internet setting After using Internet, press button from
taskbar to disconnect
–On the internet explorer, select View >Internet Options and under Autodial name on the Connection Tab, you can choose the
name which has been generated. If the configuration setting was not correct, the name would not be displayed.
–Now you can use internet just by running Internet Explorer without extra procedure for Dial-Up Connecting.
This way of setting is used when there is GPRS/EDGE module installed, but the user does not
want to use the mobilecompia's phone program or there is no phone program installed.
H
o
w
t
o
u
s
e
I
n
t
e
r
n
e
t
35
Via Wireless LAN
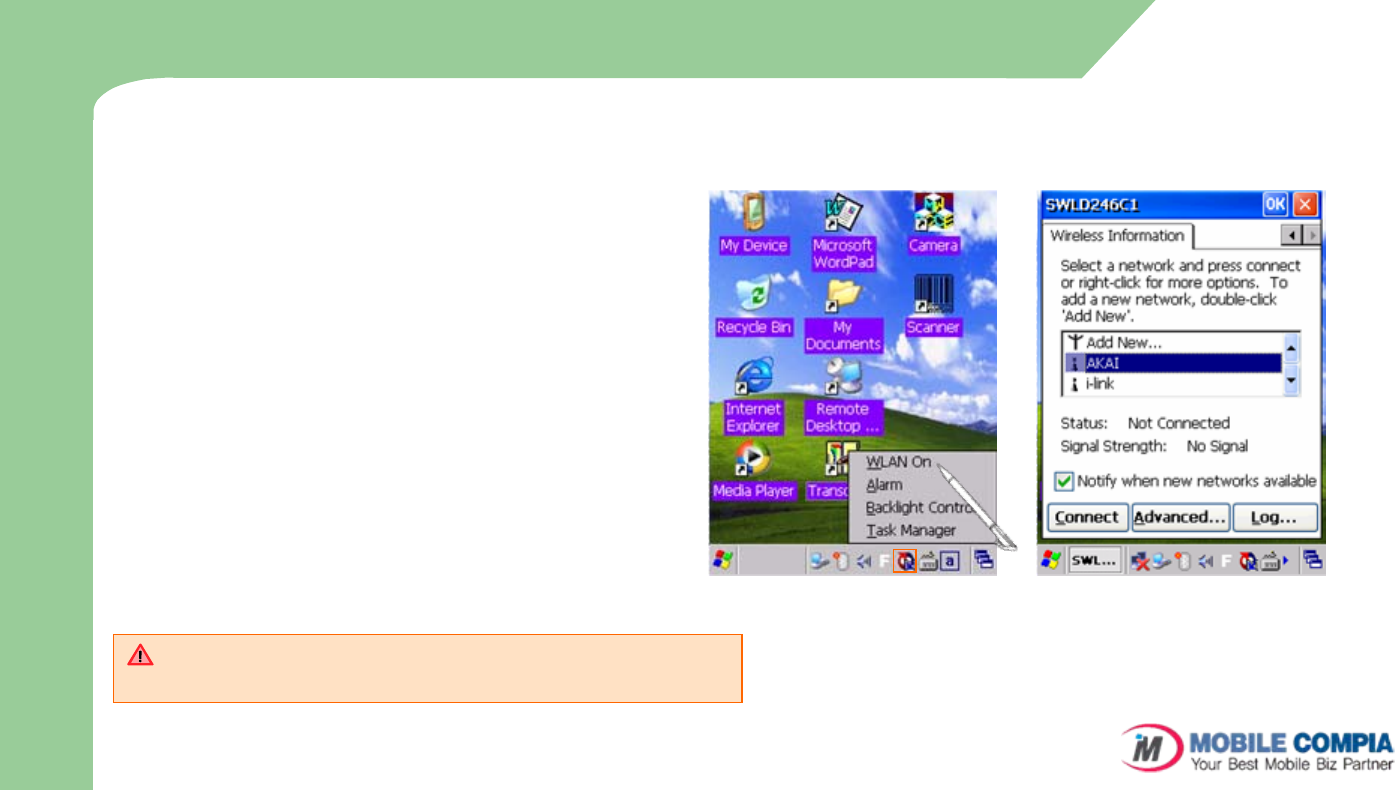
zYou can connect to internet via Wireless LAN.
Wireless LAN supports IEEE 802.11b and
802.11g.
zHow to connect WLAN :
–Turn on the AP (Access Point) device which
supports IEEE 802.11b and 802.11g.
–Click quick link icon/ WLAN On.
–On the WLAN connecting program, choose the
AP device and click connect.
–To disconnect WLAN, click quick link icon/ WLAN
Off.
zIF you are assigned with correct IP address
After connecting to WLAN, you can make use
of Internet.
WLAN connecting screen
Wireless LAN is optional. You can only use WLAN, when the
WLAN module is built in to the device.
H
o
w
t
o
u
s
e
I
n
t
e
r
n
e
t
36
Via USB
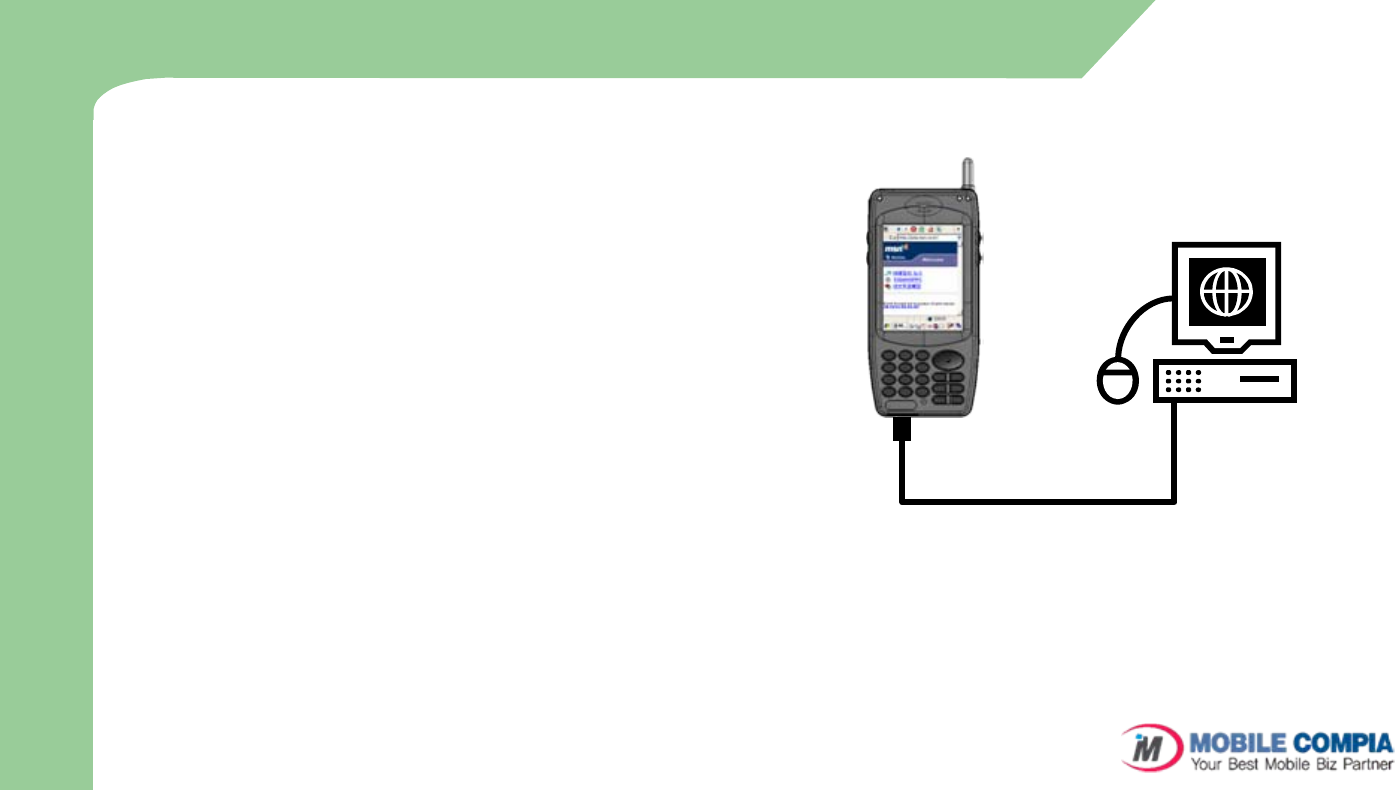
zUsing internet via direct USB connection to PC
–This connection method is used at ‘PC connection’ menu
under control panel. Internet connection can be
established by having a partnership with PC using USB
ActiveSync. When you want to obtain upgraded program
or file from internet, using USB connection can save the
communication expense.
zHow to connect
–At ActiveSync connection, please say ok or cancel for
partnership request in order to use internet.
–Please change the Autodial name at Internet explorer >
view > internet options > connection in order to have
internet via USB.
※Please make sure that PC has a connection to
internet.
USB connection to PC
H
o
w
t
o
u
s
e
I
n
t
e
r
n
e
t
37
Via Bluetooth
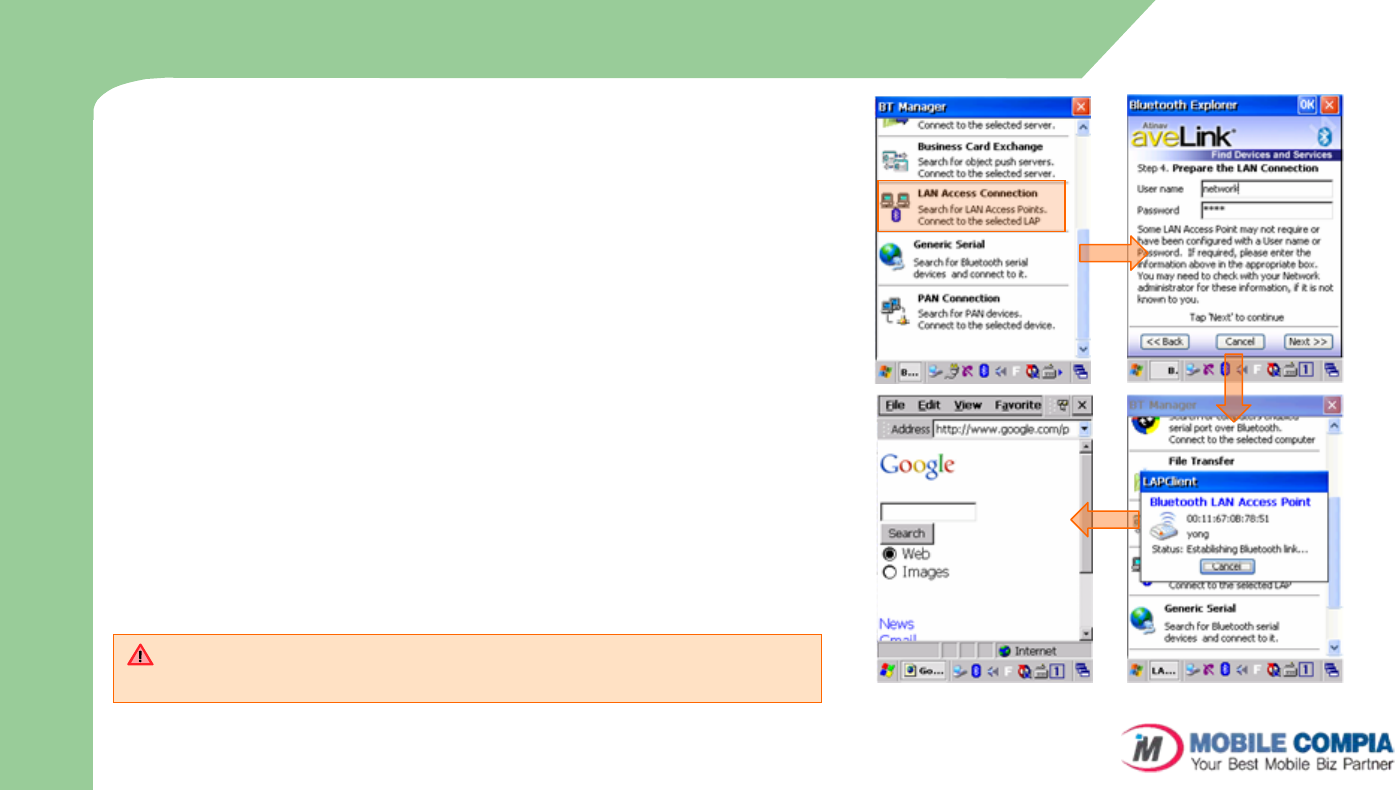
zUsing internet via Bluetooth
–Please turn on the Bluetooth dongle on PC which has a
LAN service ability.
–Please turn on the Bluetooth and click the Bluetooth icon
on the tray bar. When the Bluetooth menu appears,
choose BT Manager.
–On the BT Manager, please select LAN Access.
–Please follow the instruction on the screen.
If User name and password are required at LAN connection,
please fill it on the screen, if not, please proceed to connect.
–Run the internet explorer, when LAN connection is
established.
–If the LAN connection via Bluetooth successfully
established, using internet via Bluetooth is possible.
Internet connection via Bluetooth
Bluetooth is optional. Device without built-in Bluetooth can not use
Bluetooth service.
H
o
w
t
o
u
s
e
I
n
t
e
r
n
e
t
38
4. ActiveSync
ActiveSync Introduction
Installing ActiveSync
Synchronization of Data
ActiveSync Troubleshooting
Bill
39
ActiveSync Introduction
zSync is an abbreviation of “Synchronization” and refers to the process of making data in PDA
and desktop computer to be same by linking both data.
–Sync is an abbreviation of ‘Synchronization” and refers to the process of making data in PDA and desktop
computer to be same by linking both data. When either PDA or PC modifies data, it updates others to the
most recent data.
–Not all the data is synchronized at same time. It follows the option settings of ActiveSync, provided by
Microsoft.
zBy linking M3 and computer, you can make data in both devices in the same status
(synchronization) or install, copy, move, delete programs for business purpose and others.
zIt is compulsory to install this program in order to install business programs, synchronize data,
back up and synchronize contact numbers in an address book, etc.
A
c
t
i
v
e
S
y
n
c
Do not connect USB of Cradle to desktop PC before installing Active Sync to desktop PC..
It may cause a desktop PC cannot recognize PDA since Active Sync contains PDA program
driver. Make sure to have the step 2 “Your device was not detected" of below installing
process.
40
Installing ActiveSync
zHow to install ActiveSync
–Place Active Sync CD in CD Rom of desktop PC, installation will automatically executed.
–When clicking [next] button, if [your device was not detected] sign is shown, then click [cancel] button.
–Connect USB cable from cradle to computer USB port. Then place M3 on cradle after turn the screen on.
–If [new hardware searching wizard] screen is shown, then click [next]. Now driver will be installed
automatically. Click [finish].
–If [Set Up a partnership] screen is shown, make a partnership, then click [next].
–If [Setup Complete] is shown, then press [finish] to close the installation.
–With [Microsoft Active Sync] screen is shown, synchronization of programs that were selected when
partnership was made starts.
zWhat is Partnership ?
–The certification process that approves data communication between M3 and computer.
※Microsoft outlook 2000 and above version is able to Sync with M3, however Outlook Express is not reliable.
please re-try the synchronization if connection is disturbed by
strong noise or static.
A
c
t
i
v
e
S
y
n
c

41
Synchronization of Data
zIf you see the Microsoft ActiveSync window in the desktop PC, you can find an option icon. If you click this
option icon, taps such as “Sync Options”, “Sync Mode”, “Rules” will appear.
z“Sync Options” is a menu that you can select an item to synchronize.
–Contact, Appointments, Tasks, File, Channel, etc.
z“Sync Mode” enables you to choose synchronization methods. According to the selected synchronization mode,
there are 3 following methods:
–Continuously while the device is connected: In this mode, if you want to carry out synchronization, connect the device to the
desktop computer. ActiveSync will immediately start synchronization and synchronize according to the user’s input of changes in
a computer or the device.
–Only upon connection: If you want to carry out the synchronization after the first synchronization on a manual basis, click Sync.
–Manually: In this mode, ActiveSync will not run automatically. In order to carry out synchronization, click Sync.
zSynchronization is the process of updating M3 and desktop PC after comparing their data. Any files including
personal organizer management data, etc in M3 can synchronize with those in the desktop PC.
A
c
t
i
v
e
S
y
n
c

42
ActiveSync Troubleshooting
zWhen active Sync is not working
–Check the USB cable that connect the cradle and desktop PC if properly connected.
–Check if LCD and power is on.
–Open the windows by selecting [File>Connection Settings] of ActiveSync program.
Check if [Allow USB connection with this desktop computer] is check marked.
If it is not checked, please check it and then retry to sync.
–Try soft / hard reset. Make sure to save all data and close all executing program.
–Press [start> setting> control panel> system] select [hardware] tap, then double click on device manager.
Check if “universal serial bus controllers” or “Window CE USB Devices” has yellow exclamation mark sign
underneath of the folder.
※If see the yellow exclamation mark sign, try below steps
1. Double click “ Microsoft USB Sync “ under Windows CE USB Devices folder.
2. Double click “ update “ from Driver tap.
3. From window [device driver update wizard] , press [next] button, then select [search appropriate driver for device],
then double click [next].
4. After check “ Microsoft Windows Updates”, press [next].
5. Most updated USB driver is automatically downloaded from MS website via internet.
6. Restart computer and try Sync again.
A
c
t
i
v
e
S
y
n
c
43
5. How to use the Phone
Init Screen
Key Pad
Status icon/display window
44
Init Screen
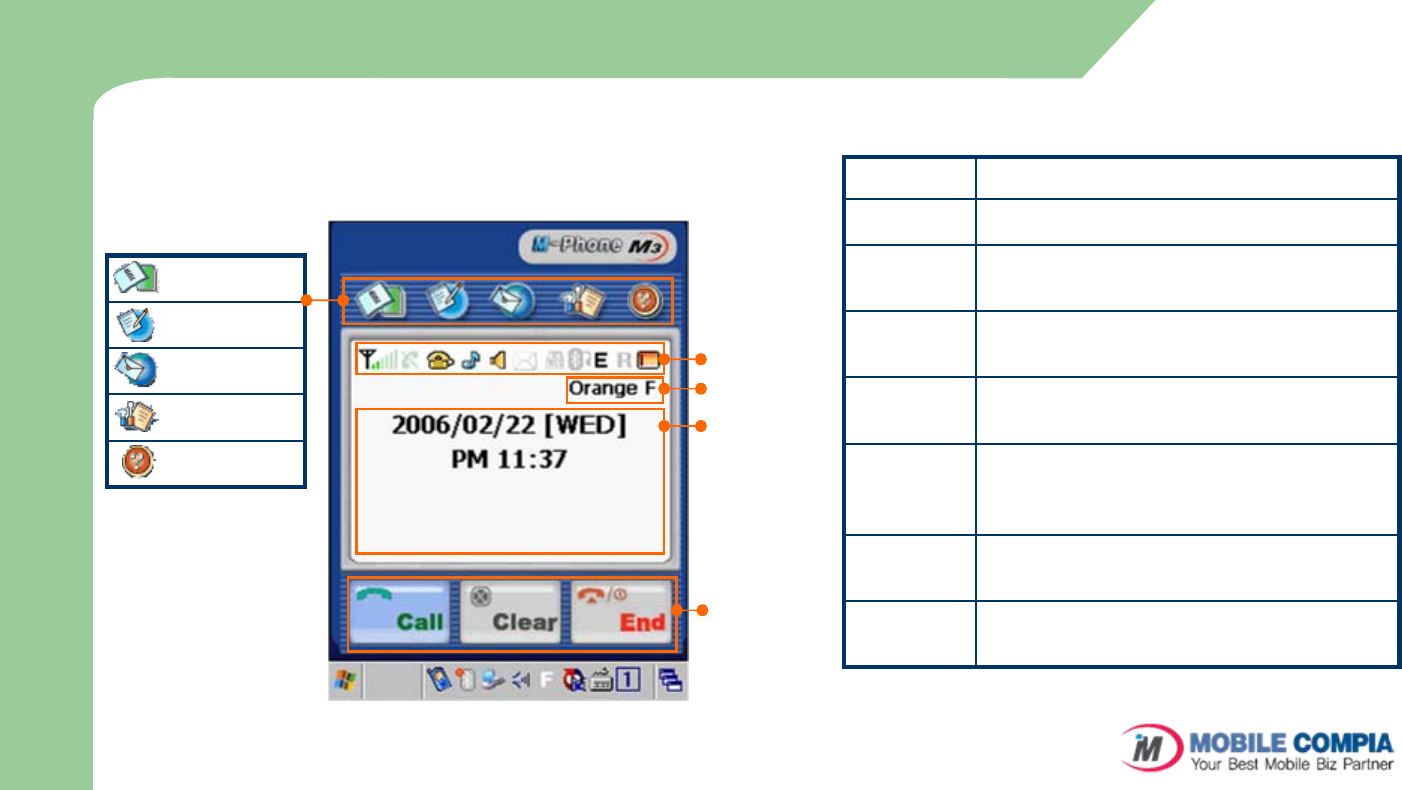
zPhone Main Screen
PhoneBook
Call List
SMS
Configuration
Information
PhoneBook It shows Phone Book Dialog.
Call List It shows recently dialed and received call
SMS It shows received/Sent SMS and screen to
write SMS.
Configuratio
nIt manages settings for Phone and additional
service.
Information It shows S/W, F/W version, IMEI, Phone
number
Indicator Bar It displays the important information of phone.
(Signal strength, Bell/Vibration, Security
Mode, BT Headset, Roaming and Battery status.)
Status bar It displays current Data/Time, Call status, Missed
message, etc.
Call control You can input Call, Delete and End key.
Indicator Bar
Operator
Time&Date
Call Status
Call Key
Clear Key
End Key
H
o
w
t
o
u
s
e
t
h
e
P
h
o
n
e
45
Key Pad
zKey Pad
H
o
w
t
o
u
s
e
t
h
e
P
h
o
n
e
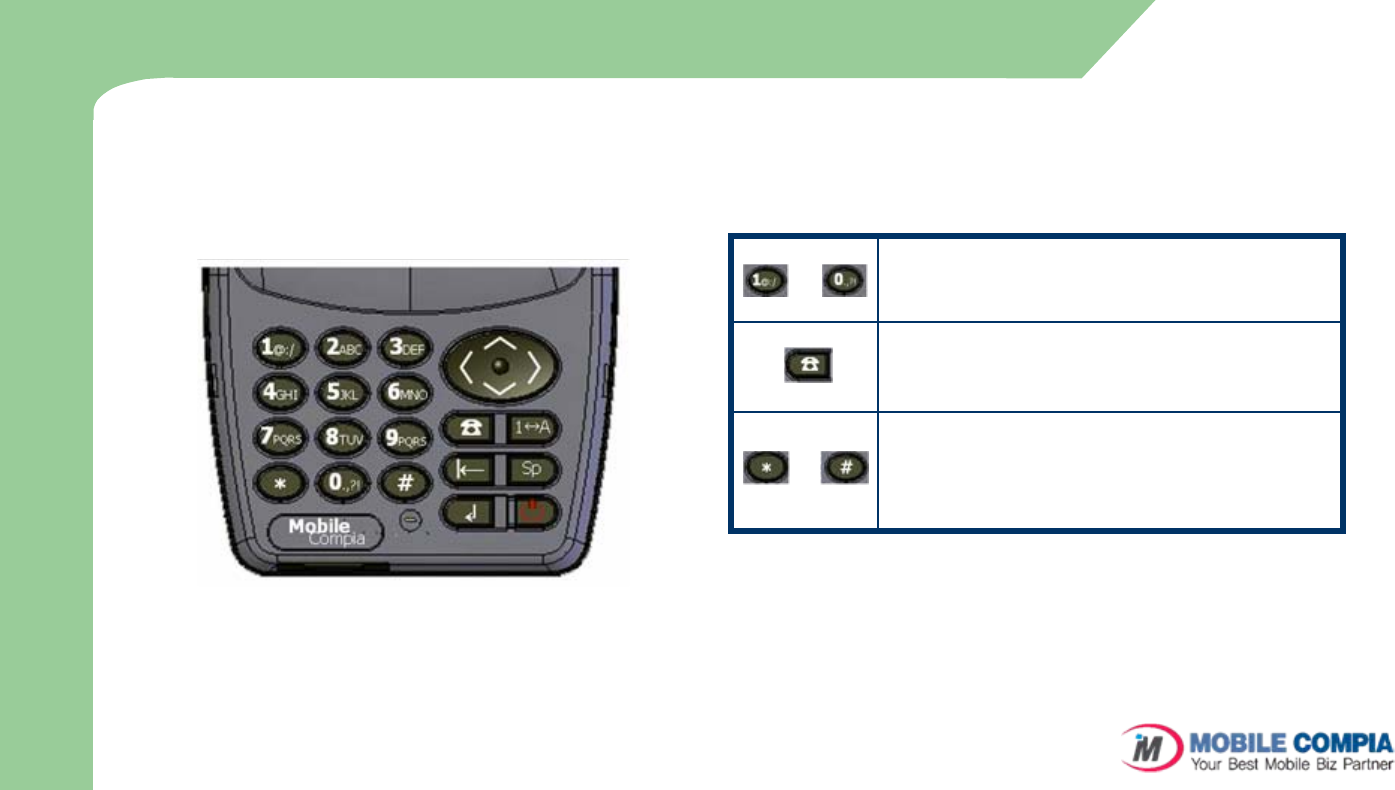
~ It is used to dial the number and can be
used as speed-dial.
It runs the Phone Program.
It can Show and Hide the Phone Program.
It inputs ‘*’, ‘#’ symbols. Long press of ‘*’
converts to Manner Mode and Long press of
‘#’inputs ‘+’symbol.
46
Status icon/Display window
zStatus Icon
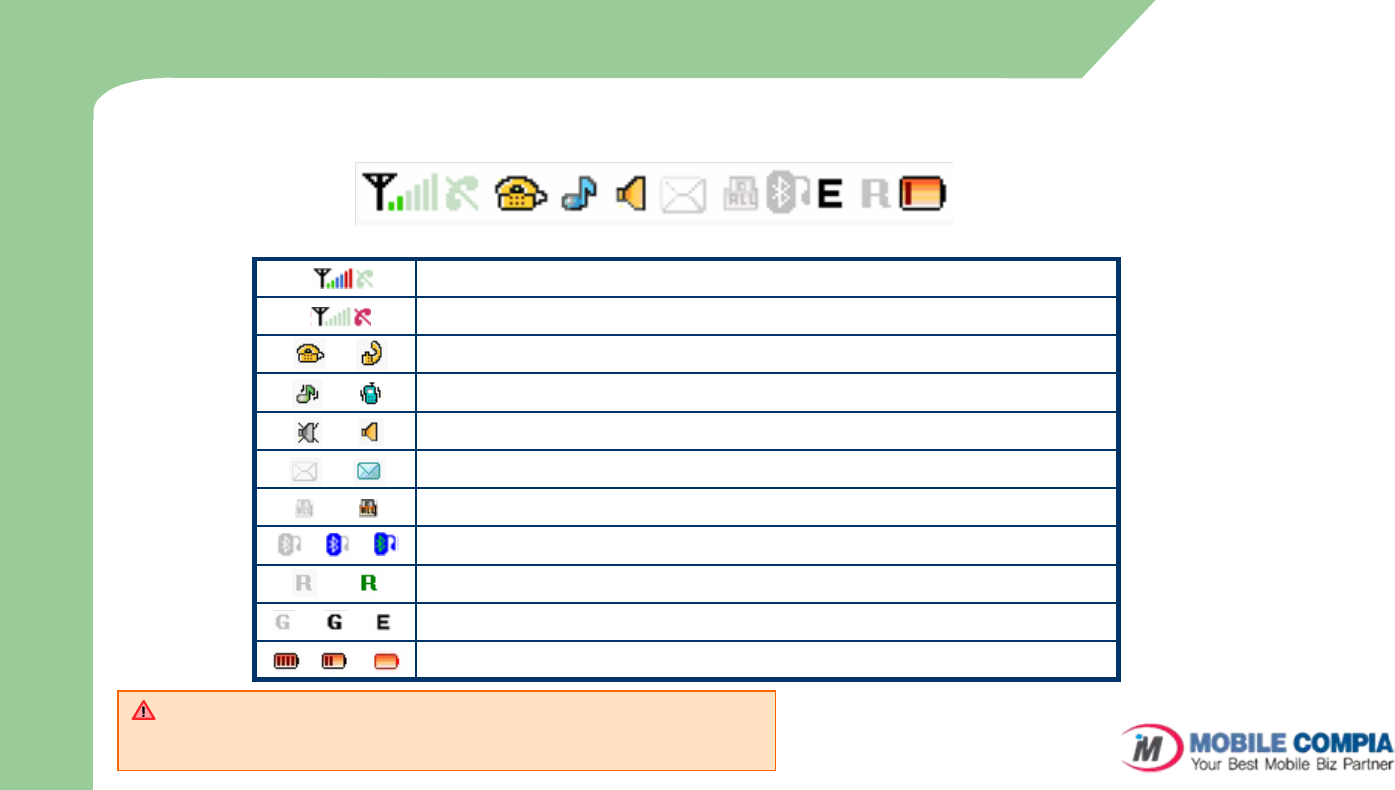
–These are small icons which are located on the top of screen, indicating the state of Phone Program.
When battery is low, you will hear the alert sound. If you do not
recharge the device immediately after the alert, the phone will be
compulsory off. Even though the phone is off, you can still use the PDA.
H
o
w
t
o
u
s
e
t
h
e
P
h
o
n
e
It indicates the signal strength (full state).
It indicates that there is no signal.
Ready to call or receive / on the phone.
Bell state (Bell, Vibration and Vibration & Bell).
Mute / Unmute while on the phone.
It indicates that there is SMS Message to read.
It indicates the state of privacy lock. (Default Password : 0000)
It indicates the state of BT Connection.
It indicates the state of Roaming. (Green : Roaming Active)
It displays the availability of GPRS and EDGE connection
It indicates the state of Battery.

47
Phone function
zHow to turn on/off the phone
–To turn on the phone
While phone is off, press the ‘End’ button for 2 to 3 seconds.
The phone is on with initializing sound.
–To turn off the phone
While phone is on, press the ‘End’ button for 2 to 3 seconds.
zDialing
–Insert the numbers using key pad on the phone main screen, and press ‘Call’ button.
–If you press the ‘Call’ button without numbers, the recent call list will be displayed.
if you press the ‘Call’ button one more time, you can dial to most recently dialed number.
–You can dial to the selected number by pressing ‘Call’ button on Phonebook, Call list, SMS list.
–If the speed-dial is assigned. You can dial to the number by long press of corresponding speed-dial.
–By long press of button on ear-mic, you can make a call to the recent dialed/received number.
zAnswering
–On the receiving call window, you can answer the call by clicking ‘Answer’ button.
–On the receiving call window, you can answer the call by pressing ear-mic button.
–On the receiving call windows, if you press the ‘Mute’, the bell sound will be off.
H
o
w
t
o
u
s
e
t
h
e
P
h
o
n
e
48
Voice Conversation via Bluetooth
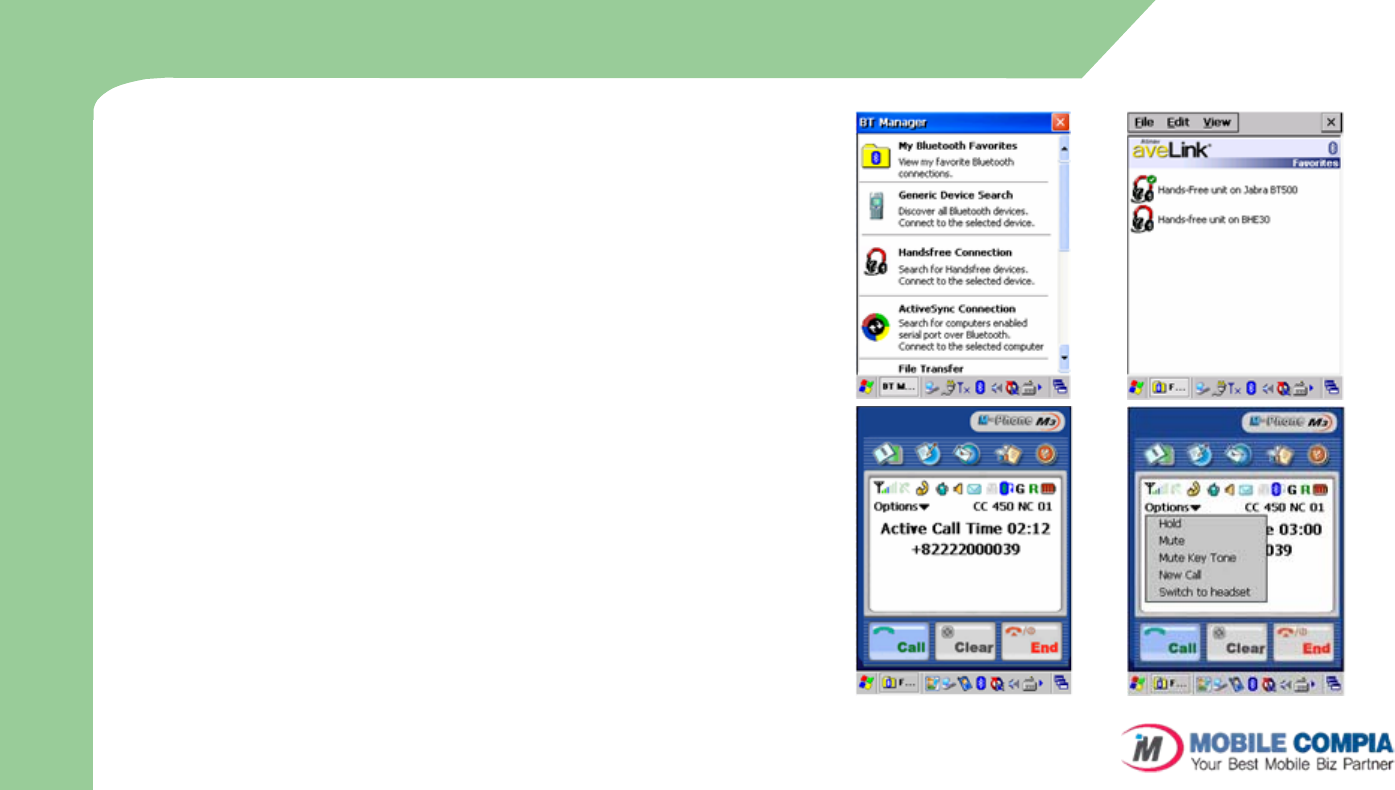
zConnecting with a Bluetooth Headset
1) Please set the Bluetooth Headset to Pairable mode.
2) Please do BT_ON and select BT Manager.
3) Select Hands free Connection and establish the connection to the
Headset.
zMaking a phone call via Bluetooth Headset
1) Please connect the Headset with Bluetooth device.
2) Using the button on the Headset, you can connect the Headset
to Bluetooth device, dialing and answering the call.
The call volume can be adjusted using the volume key on the
Headset.
3) While calling, you can use the Options Menu of the phone
program.
If you select ‘Switch to Headset’, the voice conversation will be
preceded via Bluetooth Headset And if you select ‘Switch to
Phone’, the voice conversation will be preceded via the device.
(Note: The Bluetooth Connection should be established in
advance)
H
o
w
t
o
u
s
e
t
h
e
P
h
o
n
eConnection via Bluetooth Headset

49
SMS send and receive/Configuration
zTo receive SMS
–When SMS is received, the received content will be displayed on the popped up window.
–In order to check the received SMS, please go to the rec/sent list on the SMS menu and then select the
SMS to read.
–For the unchecked SMS, the mail icon ( ) will be displayed.
zTo send SMS
–To send SMS, please move to SMS message windows and select SMS write tap. Insert the number of
receiver or retrieve the number by searching. As last click ‘Send’ button to send the SMS.
–The sent message is stored automatically in sent SMS list.
zConfiguration
–Config : You can set Bell, Date Time, SMS, GPRS and CSD.
–Security : You can set PIN Check, PIN Change, Privacy (Default password: ‘0000’) and Change Password.
–Phone Settings : You can set Call Diverting, Call Waiting and Network Selection.
H
o
w
t
o
u
s
e
t
h
e
P
h
o
n
e
50
6. Usage of Scanner/Camera
How to use Scanner
How to use Camera
51
How to use Scanner
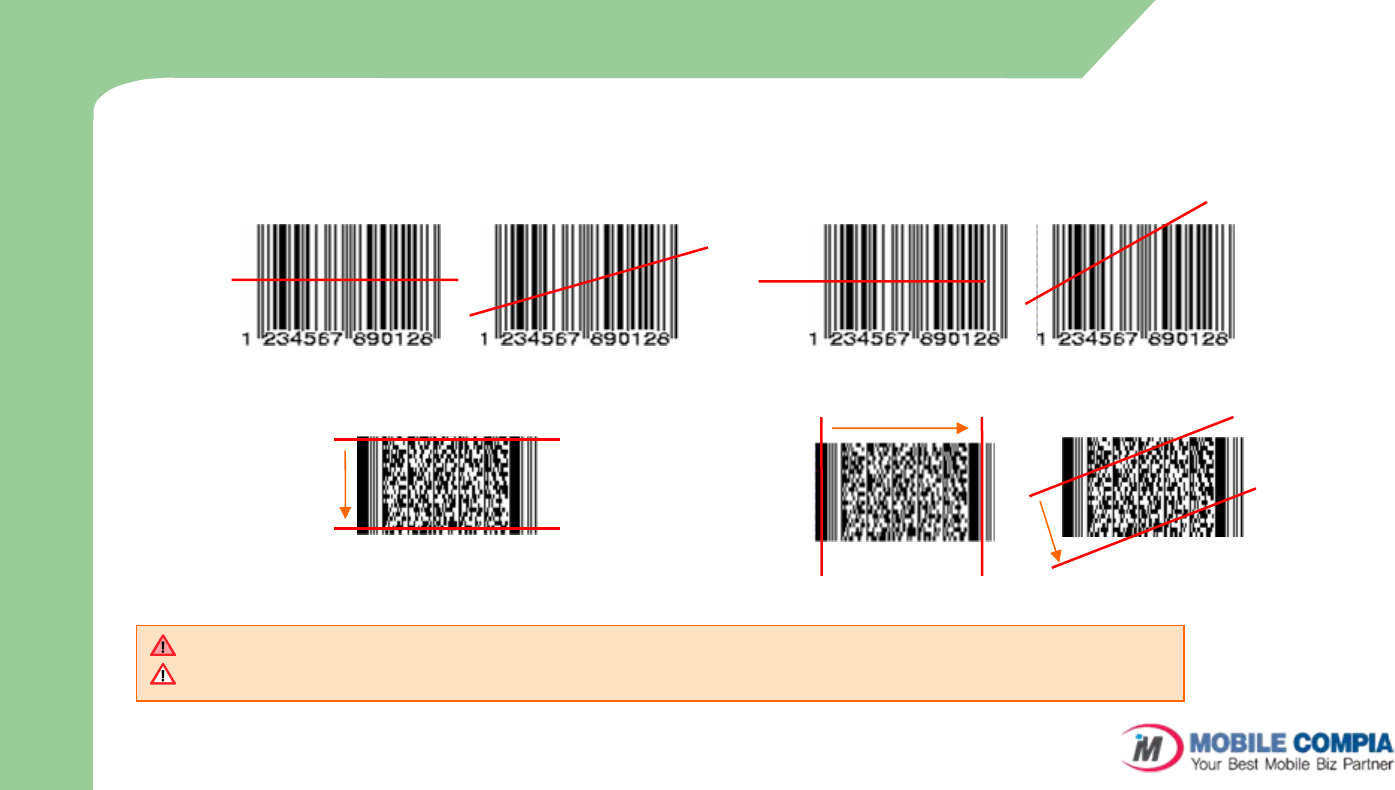
zHow to use scanner
–Usage of 1D Scanner
–Usage of 2D Scanner
U
s
a
g
e
o
f
S
c
a
n
n
e
r
/
C
a
m
e
r
a
Correct way Incorrect way
Scanner is optional. You can not use scan feature with no scanner enabled device.
2D Barcode Scanner is optional. Only with 2D Barcode scanner enabled device, you can do 2D barcode scan.
Correct way Incorrect way
52
How to use Camera
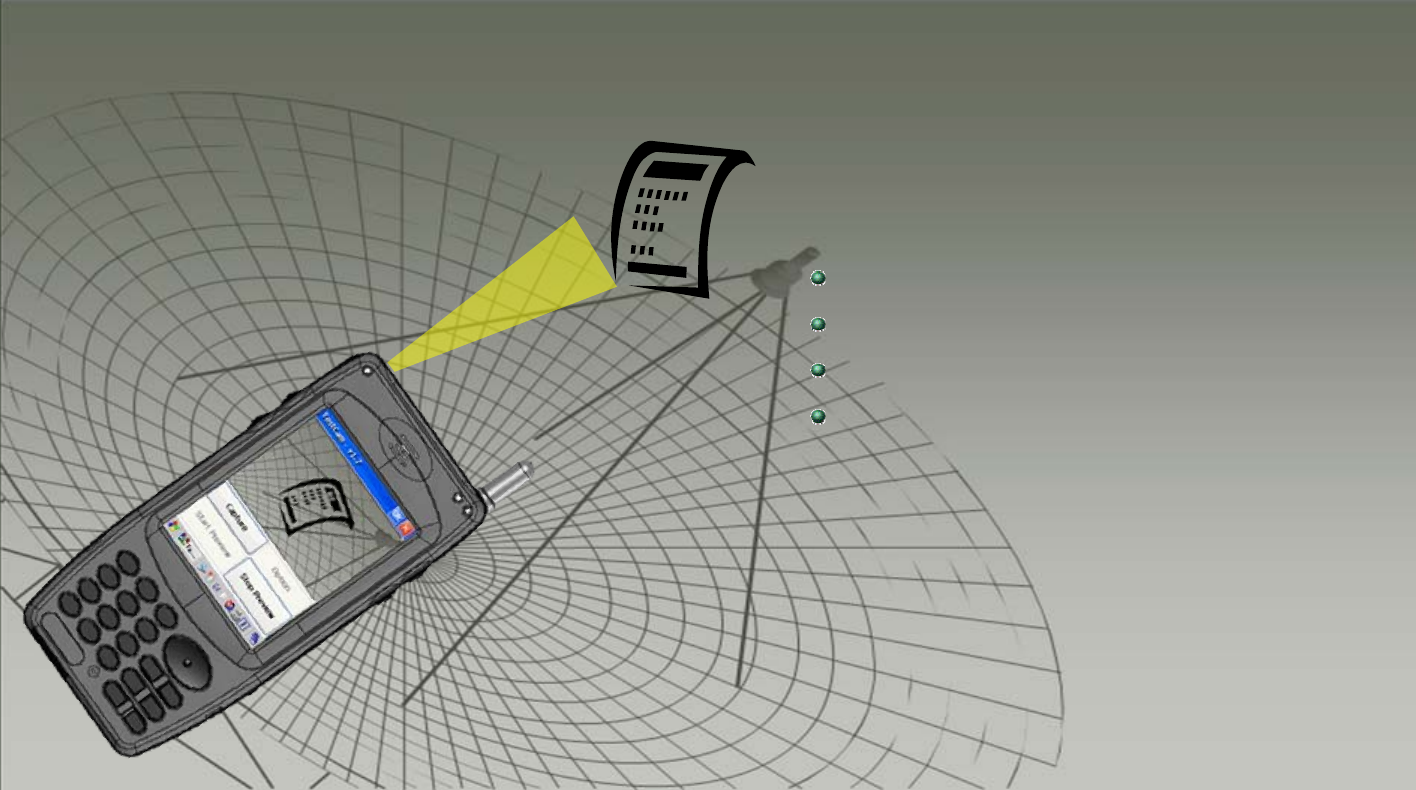
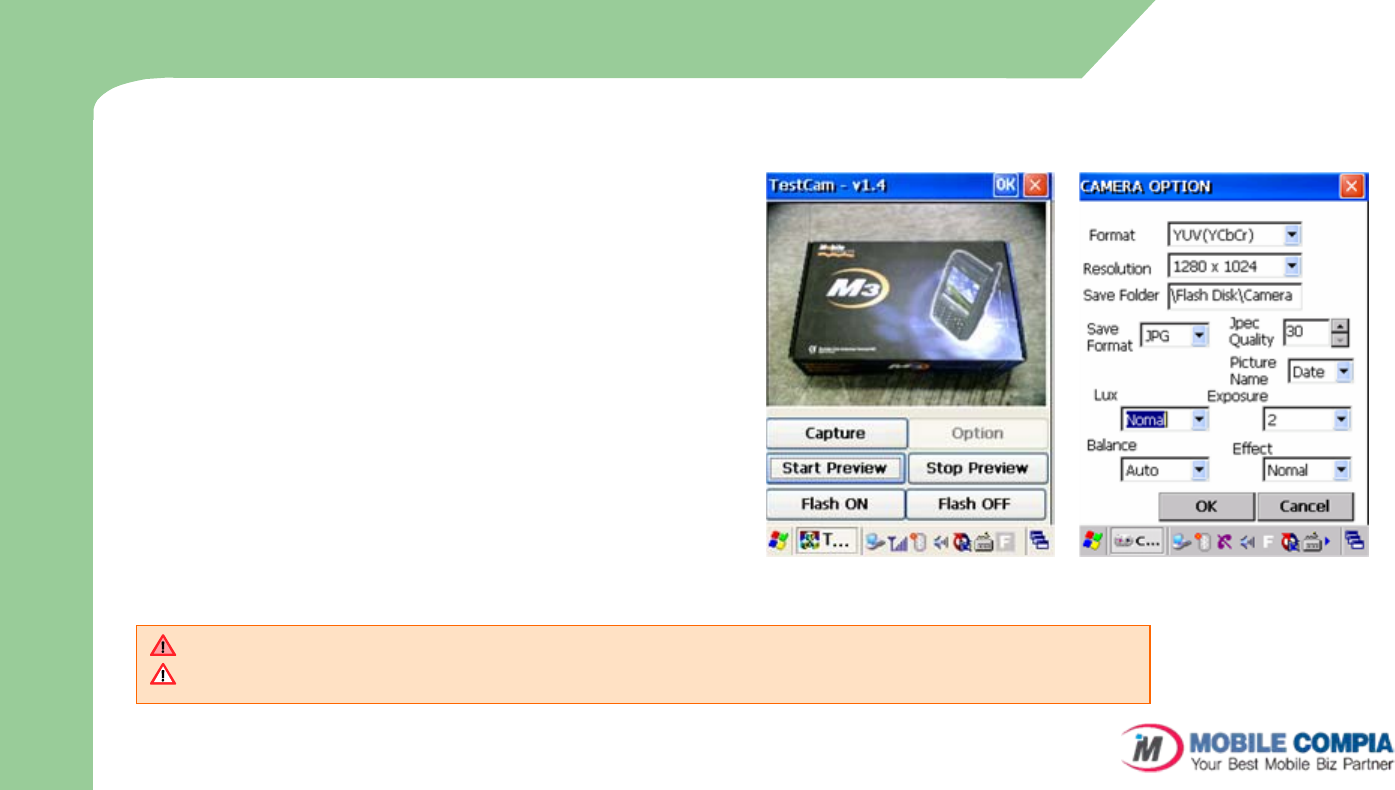
zHow to use the Camera demo program
–To turn on the camera
Run the program and press the ‘Start Preview’ button.
–To capture the image
You can take picture by pressing the ‘Capture’ button
after pressing ‘Start Preview’ button.
The captured image will be saved in the path that you
set on the option menu.
–Flash On/Off
On Preview mode, you can turn on/off Flash by
pressing Flash On/Off button.
–To turn off the camera
You can turn off the camera by pressing ‘Stop Preview’
after pressing ‘Start Preview’ button.
–Camera Option menu
On option menu, you can set the settings for Image
and Save option. Camera demo program/option window
Camera is optional. On the device with no built-in camera, Camera function can not be used.
On the device without camera flash, you can use the flash function.
U
s
a
g
e
o
f
S
c
a
n
n
e
r
/
C
a
m
e
r
a
53
7. Usage of Pims
Today
InfoBox
SmartMemo
SWRecoder
54
Today
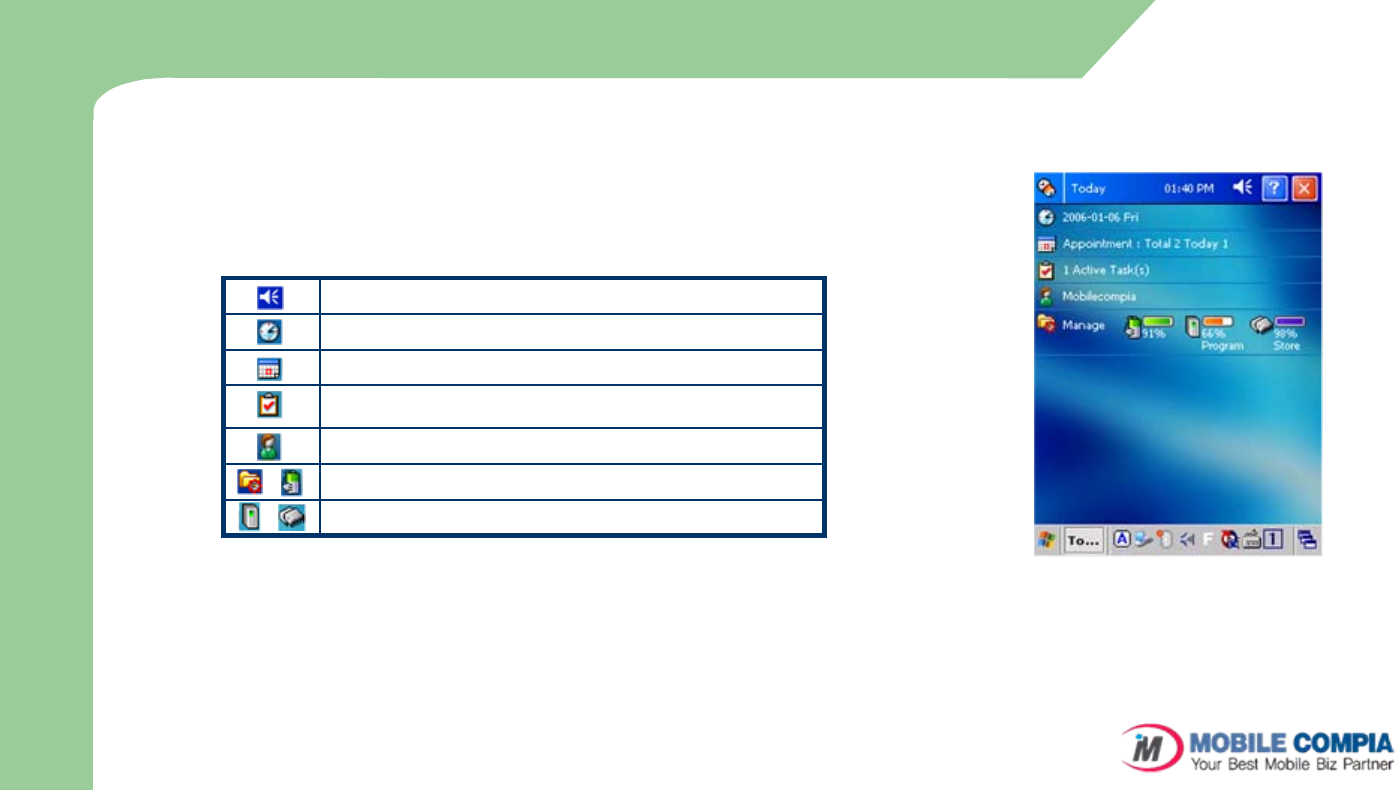
zTo get the Today window, select Start > Programs > Pims > Today.
–Today window displays the summarized information of user’s day schedule. Today
window consists of sound, time, date, schedule, task, user information and manage item.
If you click each item, you can view and edit it.
–The explanation of each icon on Today window is as following:
zOwner Information
–It is used to get an information of M3 owner’s name, company, address, telephone
number and note. On Today window only owner’s name and telephone number will be
displayed.
–In order to create or edit the owner’s information, tap on the owner information section.
At the owner property window, you can insert each information of owner and if you wish
to access to network resource, insert username and password on Network ID dialog.
U
s
a
g
e
o
f
P
i
m
s
It displays the property of Volume and Sound.
It displays the property of Time and Date.
It displays the day schedule of user.
It displays the day task of user.
It displays the property of owner.
It displays the property of power.
It displays the property of system.
Today Window
55
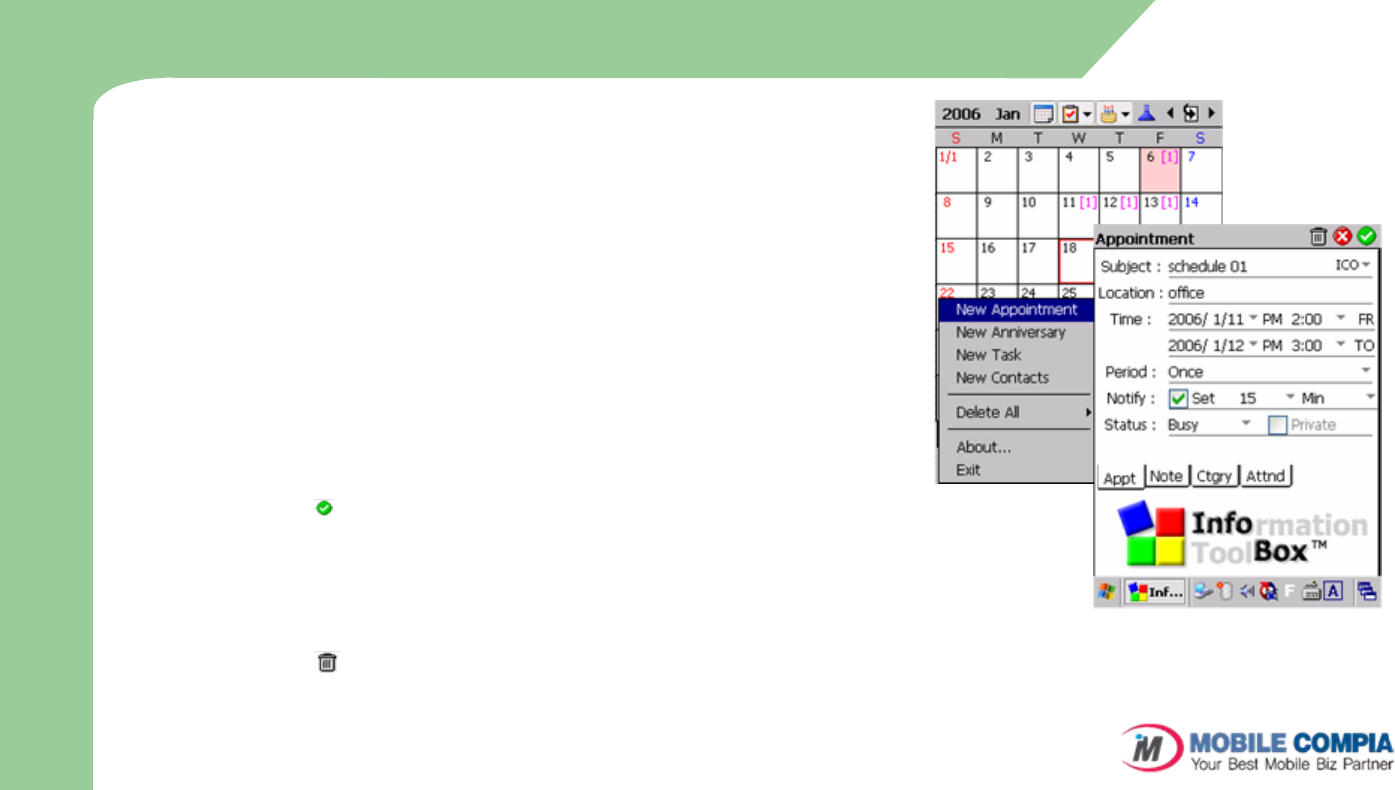
InfoBox (1)
zInfoBox lets user to manage appointment, task and contacts easily
with one application.
–InfoBox provides the capability to add, edit and delete appointment,
anniversary, task and contacts.
–In InfoBox, you can vies appointment, anniversary and task daily, weekly and
monthly.
–The infoBox can be synchronized with MS Outlook item by item.
zAppointment, Anniversary Add/Edit/Delete
–Appointment, Anniversary Add/Edit
In order to make a new appointment/anniversary, tap on ‘InfoBox’ at the left
bottom of InfoBox window or press the desired date for awhile and select ‘New
appointment/anniversary’.
In order to edit existing appointment/anniversary, press the desired item from
the list for awhile and select ‘Edit Appointment’.
To save and exit the appointment/anniversary input/edit window, press the
icon( ) on the right-up side.
–Appointment, Anniversary View/Delete
Once the appointment/anniversary data is saved, you can view it by pressing
the relevant date..
To delete the saved appointment/anniversary, press the desired data from the
list for awhile and select ‘Delete Appointment’.
On the appointment/anniversary edit window, you can delete it by pressing the
icon( ).
To delete entire schedule data (appointment, anniversary), select ‘Delete all’
from the ‘InfoBox’ Menu on the left-down side.
InfoBox Menu/Add appointment screen
U
s
a
g
e
o
f
P
i
m
s
56
InfoBox (2)
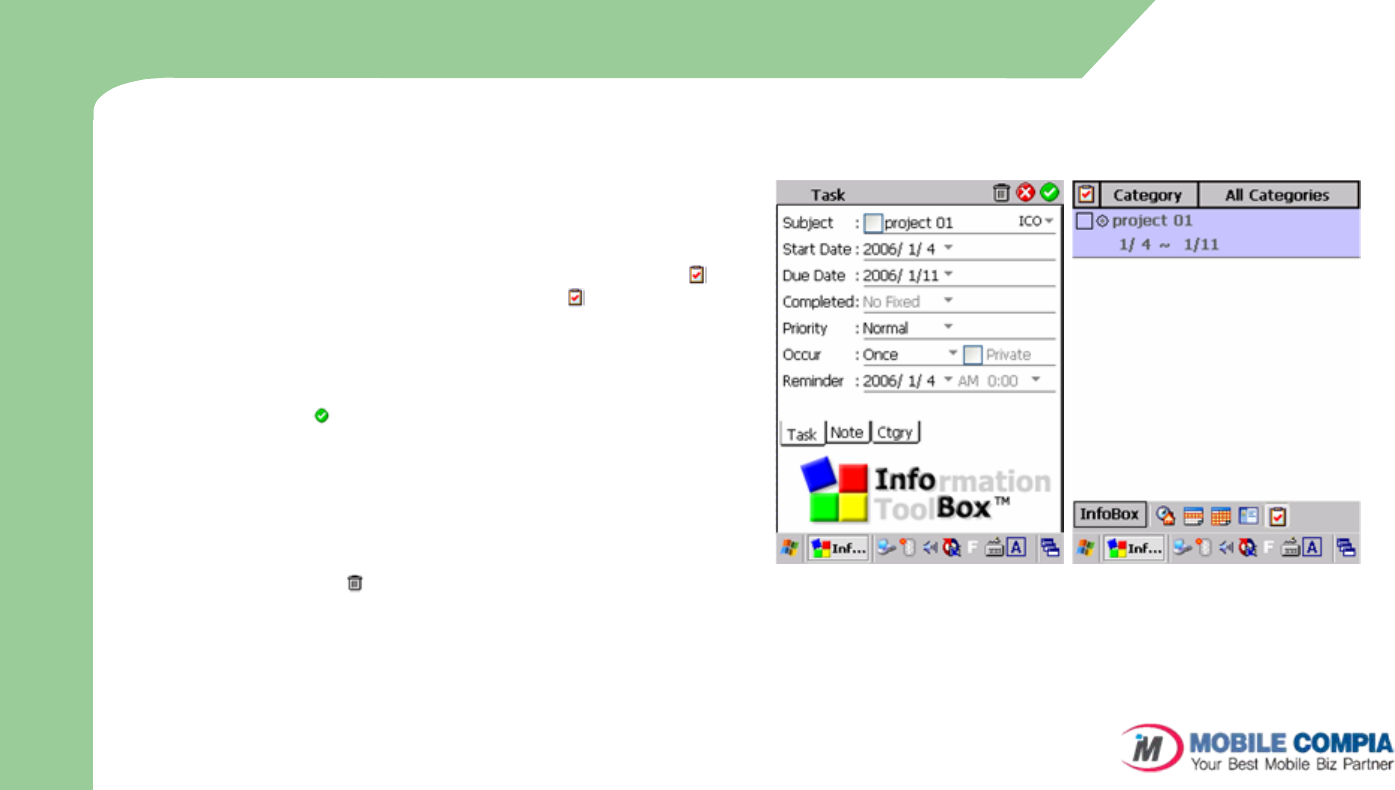
zTask Add/Edit/Delete
–Task Add/Edit
In order to make a new task, tap on ‘InfoBox’ at the left
bottom of InfoBox window or press the desired date for
awhile and select ‘New Task’.
You can also input a new task by pressing the Icon( ) on
the tool bar and then press the icon( ) on the left-up
side of task list.
In order to edit existing task data, press the desired item
from the list for awhile and select ‘Edit Task’.
To save and exit the Task input/edit window, press the
icon( ) on the right-up side.
–Task View/Delete
Once the Task data is saved, all the date within the task
period will be marked with dot (•) on the view screen.
To delete the saved Task, press the desired data from the
list for awhile and select ‘Delete Task’.
On the Task edit window, you can delete it by pressing
the icon( ).
To delete entire task data, select ‘Delete all’ from the
‘InfoBox’ menu on the left-down side.
Task Add screen/Task list screen
U
s
a
g
e
o
f
P
i
m
s
57
InfoBox (3)
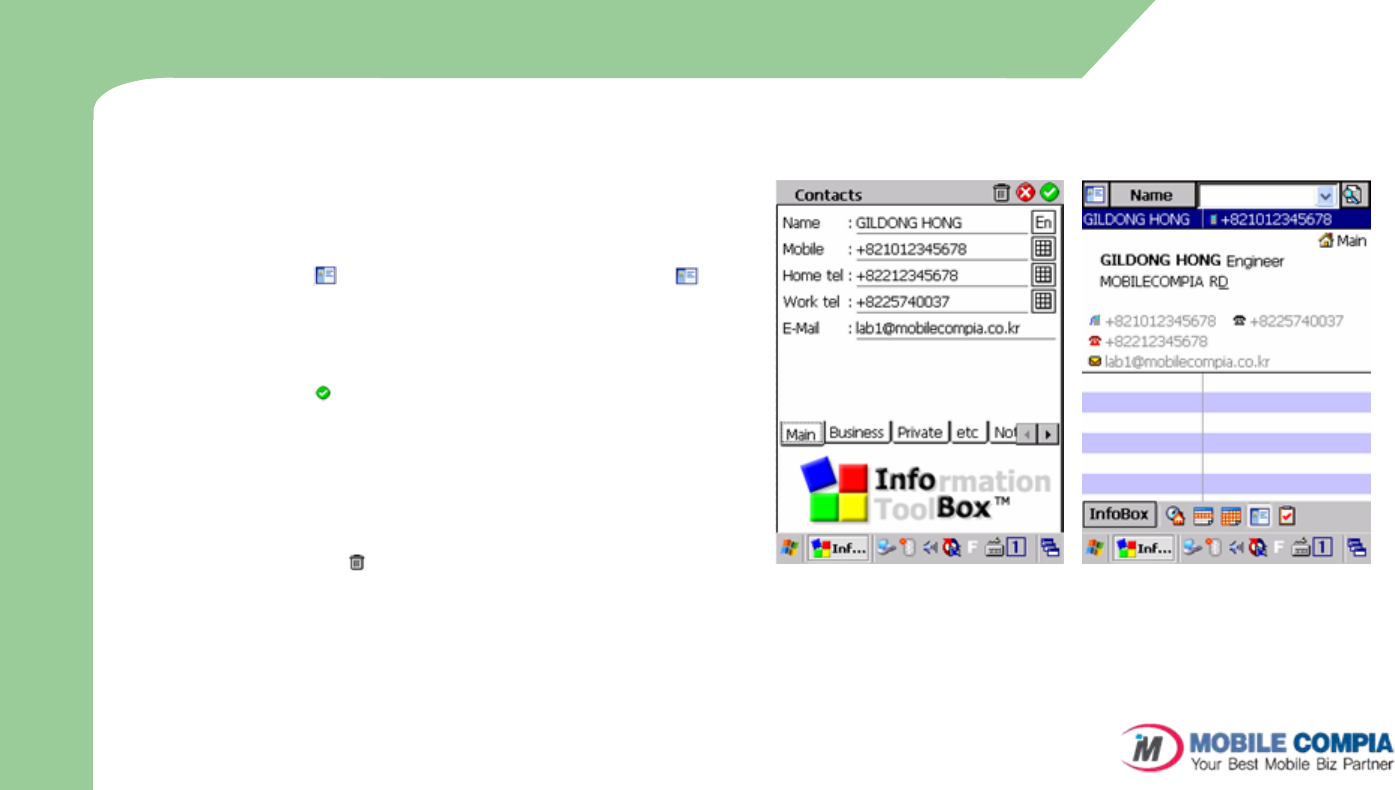
Contacts add screen/Contacts list screen
zContacts Add/Edit/Delete
–Contacts Add/Edit
In order to make a new contact, tap on ‘InfoBox’ at the
left bottom of InfoBox window and select ‘New Contacts’.
You can also input a new contacts by pressing the
icon( ) on the tool bar and then press the icon( ) on
the left-up side of contact list.
In order to edit existing contacts data, press the desired
item from the list for awhile and select ‘Edit Contacts’.
To save and exit the contacts input/edit window, press the
icon( ) on the right-up side.
–Contacts View/Delete
Once the contacts data is saved, the data will be displayed
on the contacts list.
To delete the saved contacts, press the desired data from
the list for awhile and select ‘Delete Contacts’.
On the contacts edit window, you can delete it by pressing
the icon( ).
To delete entire contacts data, select ‘Delete all’ from the
‘InfoBox’ menu on the left-down side.
U
s
a
g
e
o
f
P
i
m
s
58
InfoBox (4)
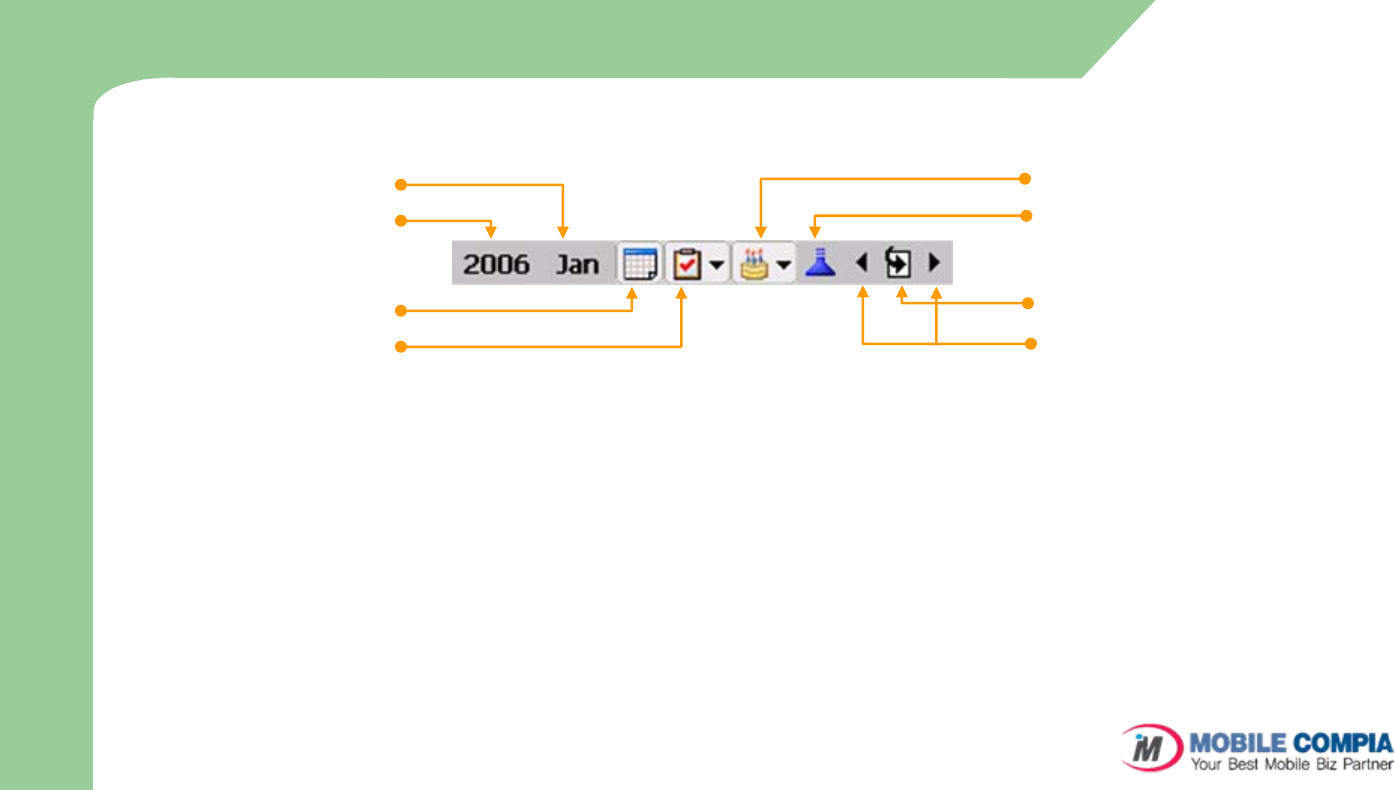
zToolbar
–Year display / change
You can change the year by selecting it from the list (if you press
‘Select Year’, you can input it yourself.)
–Month display / change
You can change the month by selecting it from the list.
–Appointment display
When this icon is pressed, the saved appointment will be displayed
on daily/weekly/monthly list.
–Task display
When this icon is pressed, the saved task will be displayed on
daily/weekly/monthly list.
When the ‘down sign’ beside task icon is pressed, you can view the
task data by priority or completion.
–Anniversary display
When this button is pressed, the saved anniversary will be displayed
on daily/weekly/monthly list.
When the ‘down sign’ beside anniversary icon is pressed, you can
view the anniversary data by category.
Year display/change
Month display/change
Appointment display
Task display
Anniversary display
Display be category
Return to current date
Move page
–Display by category
When this button is pressed, the appointment, anniversary, task data will
be displayer by category on daily/weekly/monthly list.
–Move Page
When the left or right move page button is pressed, the
daily/weekly/monthly list will be moved to before or next
daily/weekly/monthly list.
–Return to current date
When this button is pressed, you can return to the day of today which
has been set on the system.
The day of today will be marked with red ground on the
daily/weekly/monthly view.
U
s
a
g
e
o
f
P
i
m
s
59
InfoBox (5)
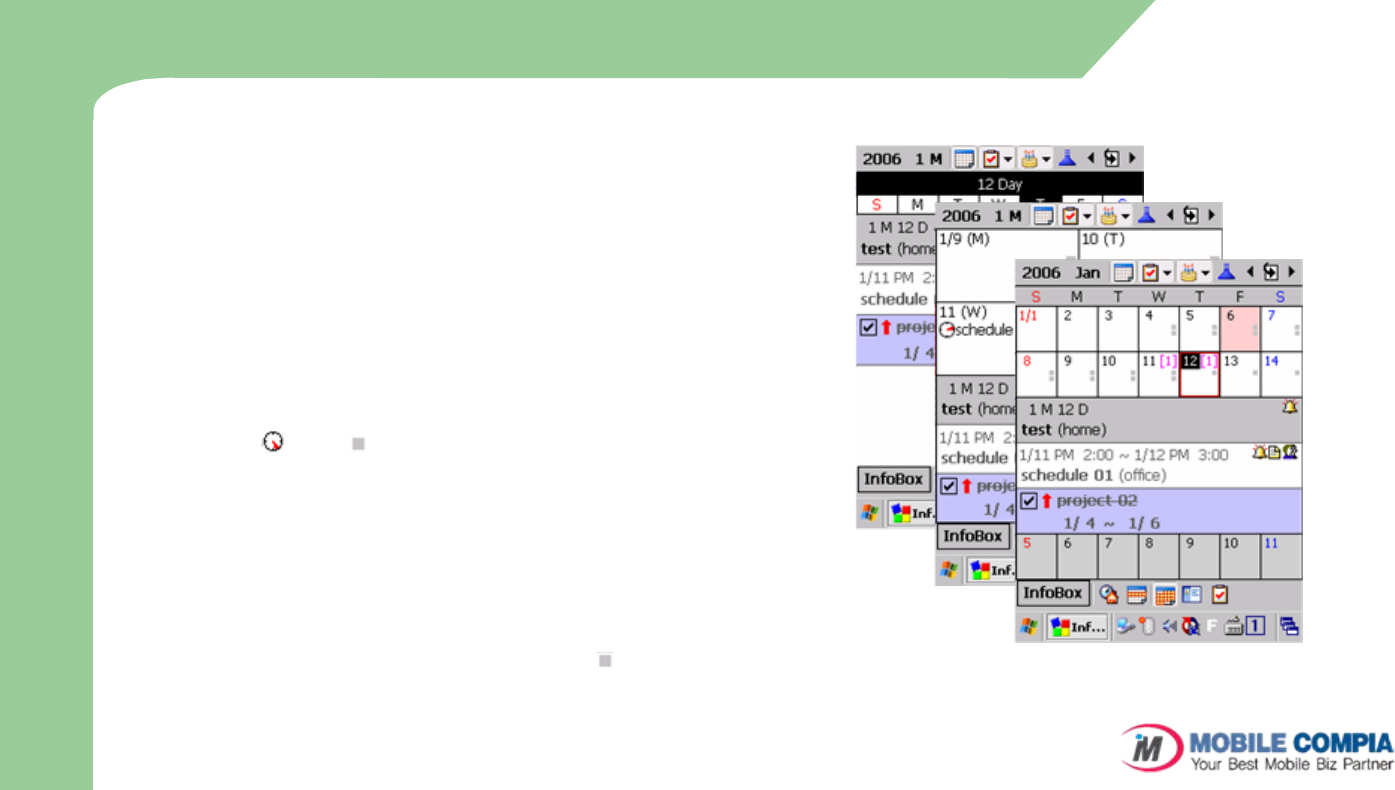
zDaily view
–When daily view is selected, the relevant appointment,
anniversary and task on that day will be displayed.
–Appointment, Anniversary and Task will be displayed on the
list with white, gray and blue ground respectively.
zWeekly view
–When weekly view is selected, the relevant appointment,
anniversary and task on that week will be displayed.
–If you press the relevant date, Appointment, Anniversary and
Task will be displayed on the list with white, gray and blue
ground respectively.
–Appointment, Task and Anniversary will be indicated with
icon( ), icon( ) and black ground respectively on the
relevant date.
zMonthly view
–When monthly view is selected, the relevant appointment,
anniversary and task on that month will be displayed.
–If you press the relevant date, Appointment, Anniversary and
Task will be displayed on the list with white, gray and blue
ground respectively.
–Appointment, Task and Anniversary will be indicated with
number of appointments in red color, icon( ) and black
ground respectively on the relevant date. Daily, Weekly, Monthly View
U
s
a
g
e
o
f
P
i
m
s
60
SmartMemo (1)
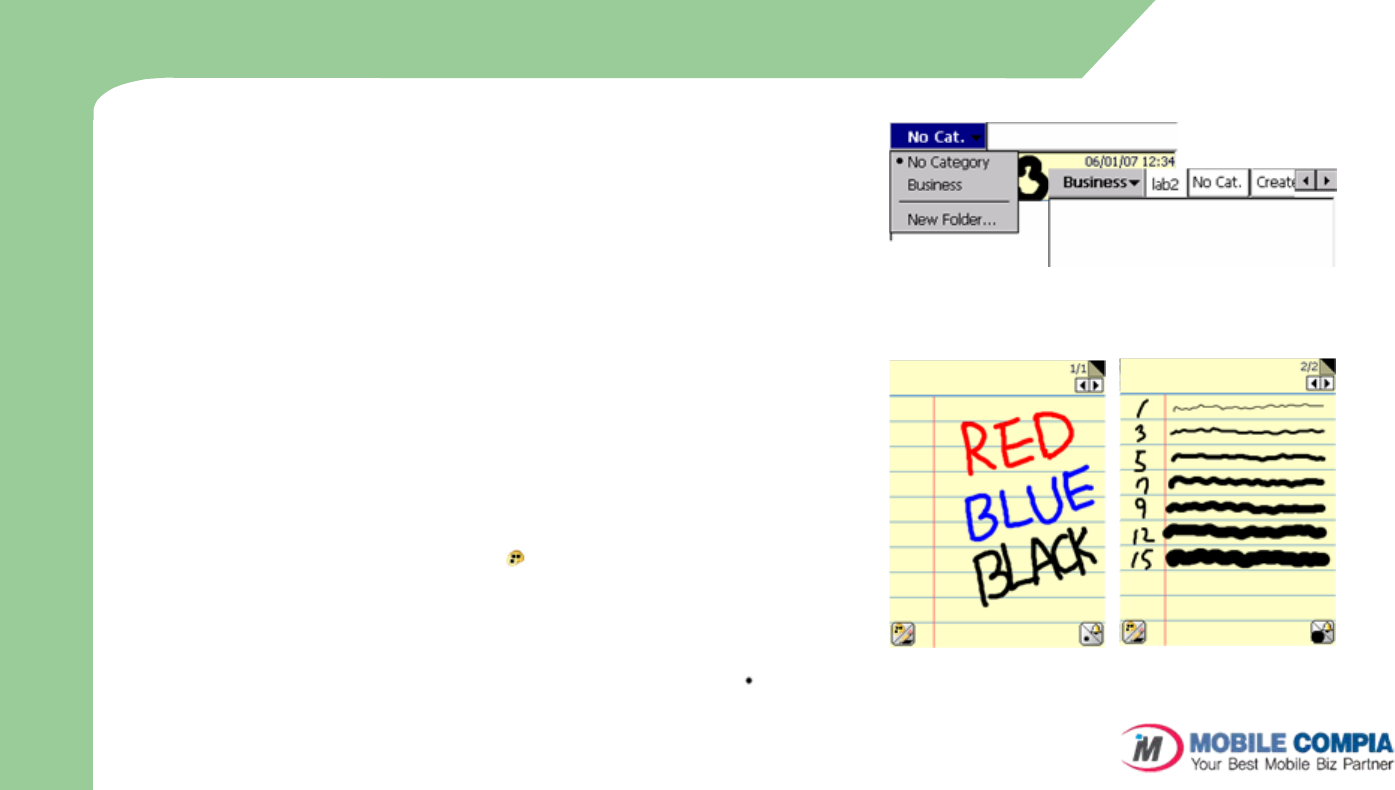
zSettings
–Category
Using menus above the window, you can create, edit and delete the
category.
Using the left-up menu, you can either create new main category or delete
existing main category (by long press of the category name).
On each main category (except ‘No category’), you can create a sub
category using ‘create’ menu.
–Program Configuration
When you press the Option menu on the bottom of window, you can set
the location to save data and the default category which the program
opens at.
When the menu animation is active, the movement of menu box on new
memo window will somewhat softer.
zMemo Menu
–Color Change
If you press the palette icon( ) on the left-bottom of window, you can
change the pen color.
You can choose the pen color from the selection on the left and using the
right scroll bar, you can adjust the brightness of color.
–Change of pen thickness
You can adjust the pen thickness using the thickness icon( ).
Category setting Menu
Color change/ Pen thickness
U
s
a
g
e
o
f
P
i
m
s
61
Smart Memo (2)
zMemo Menu (Continue from previous page)
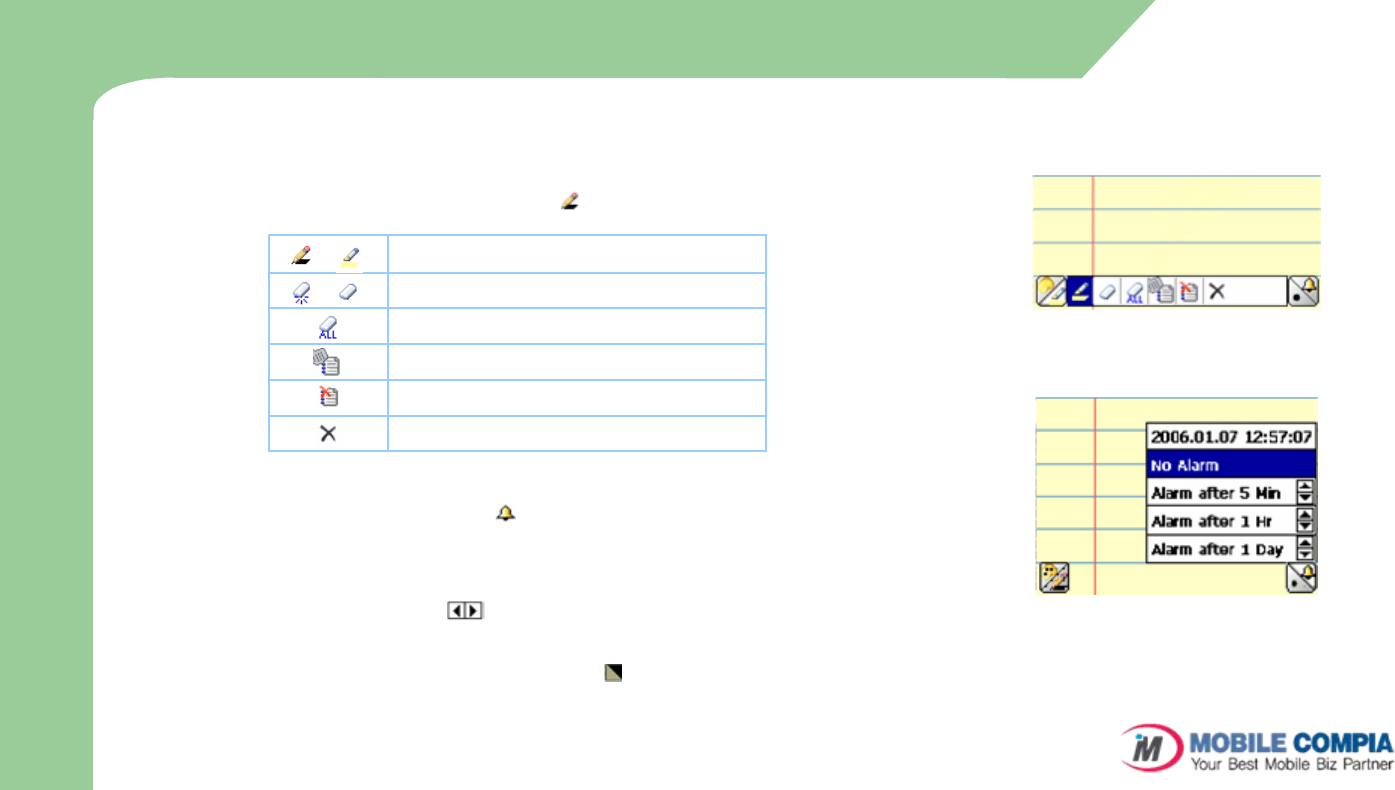
–Mode Change
If you press the left-down pen icon( ), you can choose the mode.
–Alarm setting
If you press the alarm icon( ) on the right-bottom side, you can set the alarm for the
relevant memo.
You can check the current time from the alarm menu.
–Page Move / Exit
If you press the icon( ) on the right-above side, you can move from page to page.
(Maximum 10 pages)
The current page you can check with page number on the right-above of page.
To save and exit, you can press the icon( ) on the right-above.
,,
Opaque/Transparent pen
Partial/Total erase
Erase current page
Delete current page
Delete entire memo
Save and Exit
Mode change menu
Alarm setting menu
U
s
a
g
e
o
f
P
i
m
s
62
Smart Memo (3)
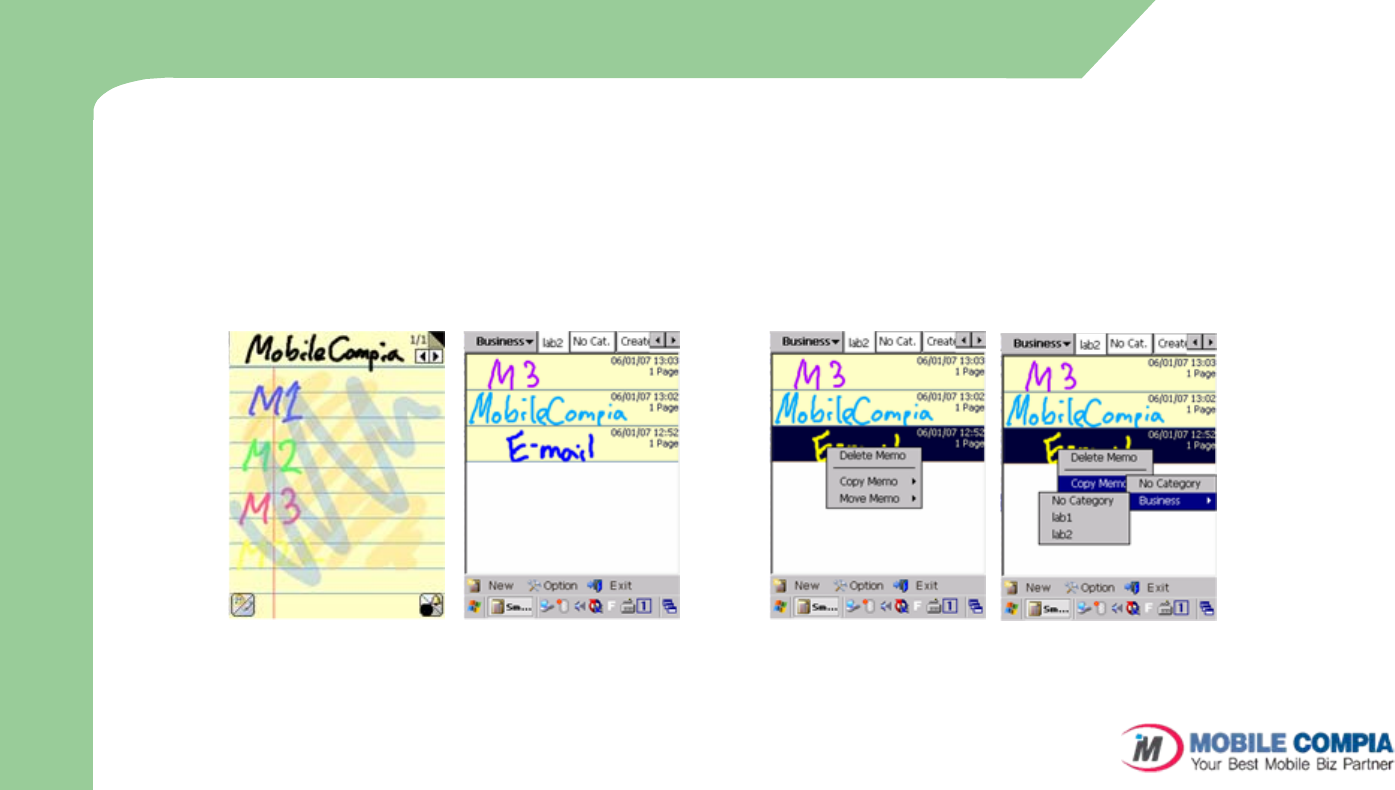
zWriting a Memo / Memo List
–How to write a memo
On the new memo page, you can write a memo using stylus pen.
–Memo List
On the memo list, you can check the saved date and the number of pages.
You can delete, copy and move the memo by pressing the relevant memo for awhile.
Writing a Memo / Memo list Memo list
U
s
a
g
e
o
f
P
i
m
s
63
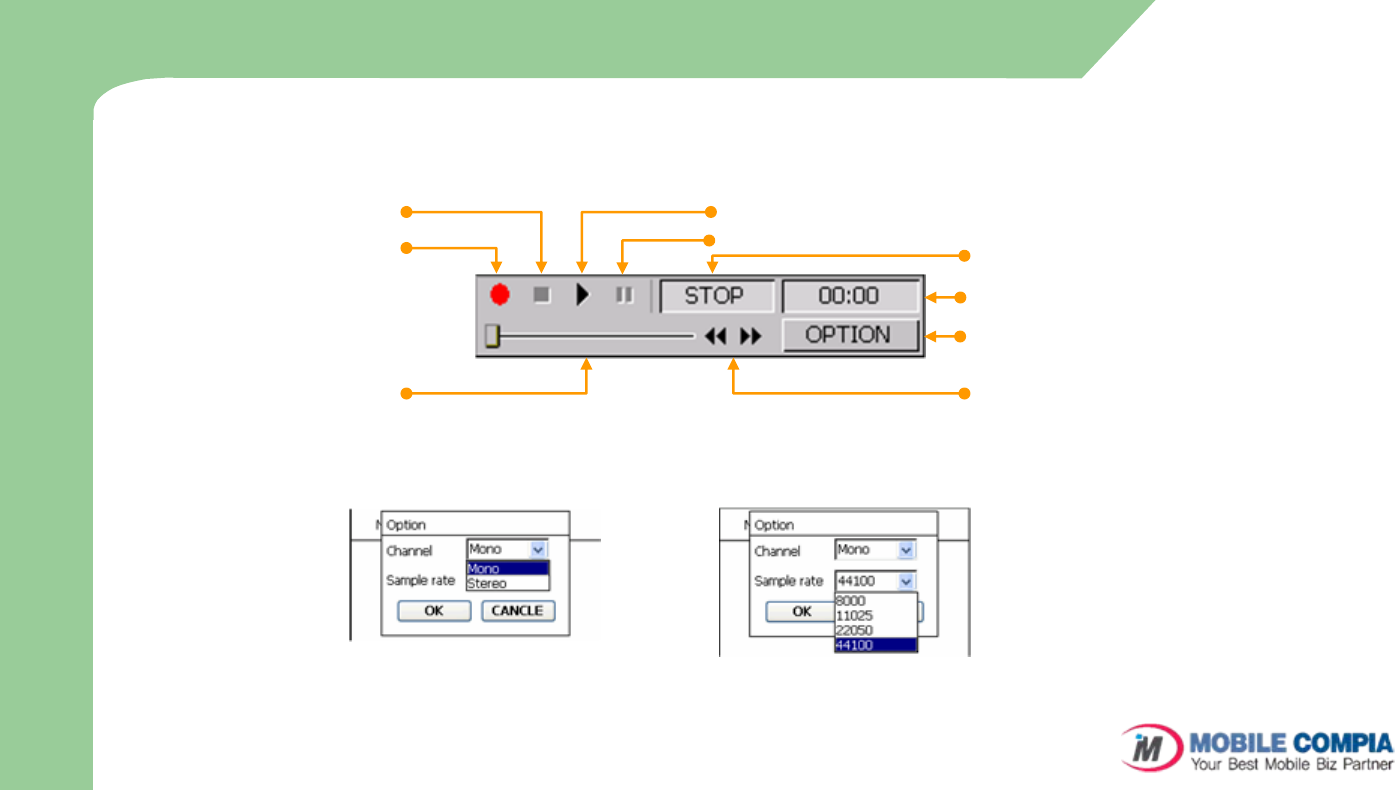
Status
Time
Option Menu
Forward, Backward
SWRecoder (1)
zSettings
–Tool bar
On the toolbar, you can play, stop, record, forward, backward and move. If you press the option menu, you can set the channel and
sample rate.
High sample rate raises the quality of recording, but it requires bigger file capacity.
Record
Stop Play
Pause
Progress bar
Option Menu screen
U
s
a
g
e
o
f
P
i
m
s
64
SWRecoder (2)
zSettings (Continue from previous page)
–Saving / Sorting
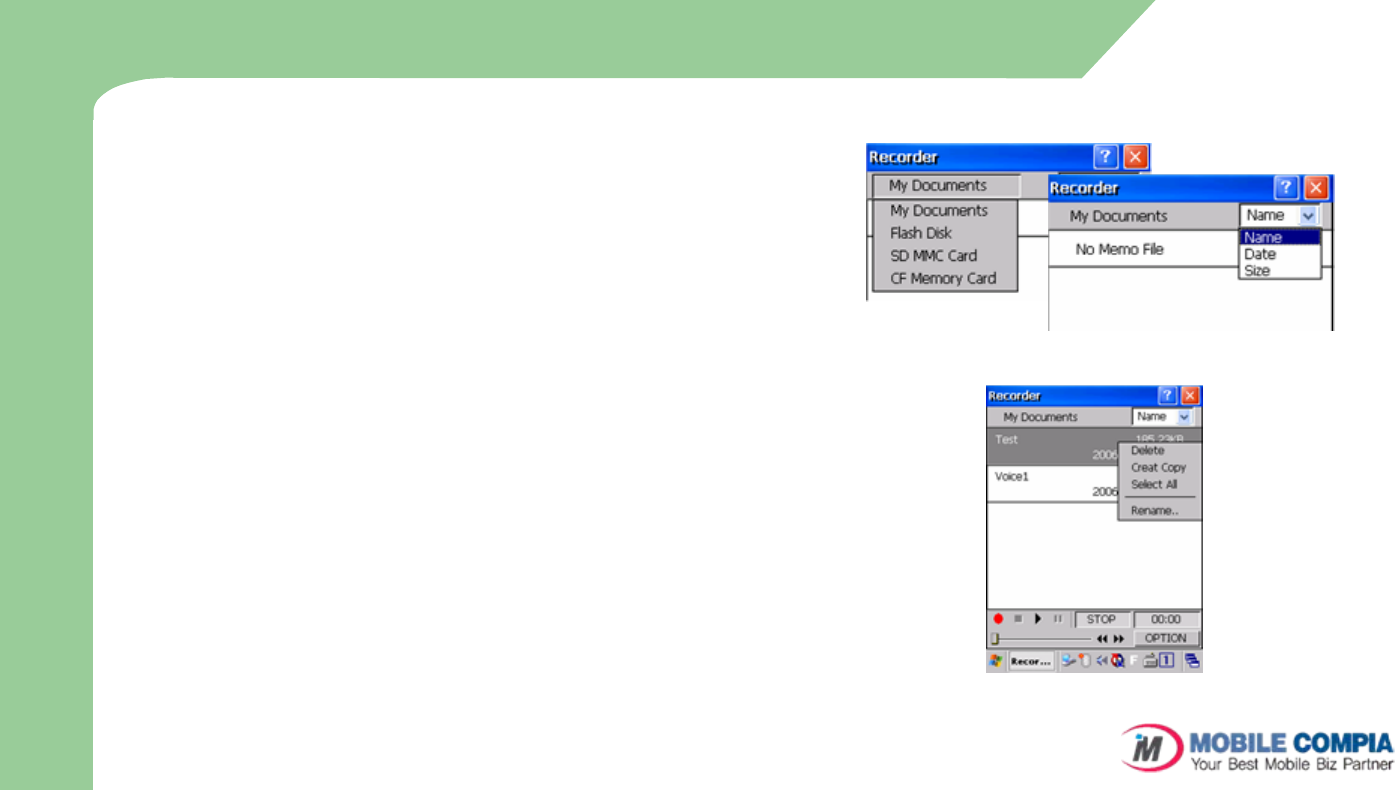
You can save the recorded data to My Documents, Flash Disk, SD
MMC Card, and CF Card. The data will be saved as ‘ave’ file under
Voice Memo folder on the relevant saving path.
On the menu left-above, you can select the saving path.
You can sort the list by name, by date and by size. You can select
this on the right-above drop down menu.
–Function / List
By pressing the record button, you can start the voice recording.
To stop the recording, you need to press the stop button.
To play the recorded data, you first need to choose the relevant
data from the list and press the play button.
While playing you can move the place to play with forward and
backward button. It is also possible by moving the progress bar.
To pause while playing, you need to press the pause button and to
play again, just press the pause button one more time.
If you press a recorded data on the list for awhile, you can delete,
create copy, select all and rename it.
Saving / Sorting Menu screen
List Menu screen
U
s
a
g
e
o
f
P
i
m
s
65
8. Usage of Application and Utility programs
Calculator
Image Viewer
MS-Backup
Menu Settings
Touch Protector
66
Calculator/Image Viewer
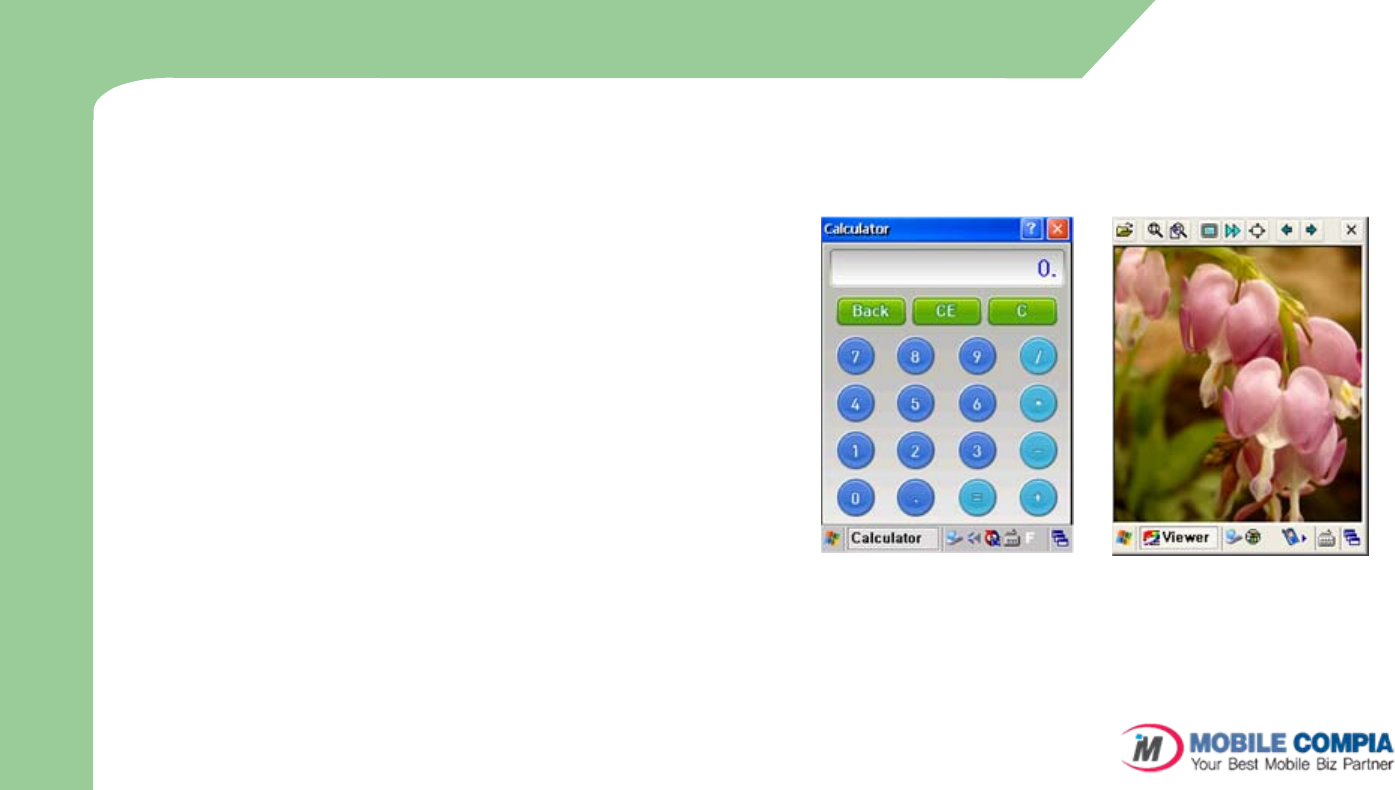
zCalculator
–M3 offers a calculator application. Using this
application you can do a simple calculation.
–To run the calculator, select Go to start >
Programs > Application > Calculator.
zImage Viewer
–You can see the image file using the image viewer.
–To run the image viewer, select Go to Start>
Programs> Application Programs> Image Viewer.
The viewer supports various image files such as jpg,
gif, bmp, tif, png, etc.
A
p
p
l
i
c
a
t
i
o
n
/
U
t
i
l
i
t
yCalculator Image Viewer
67
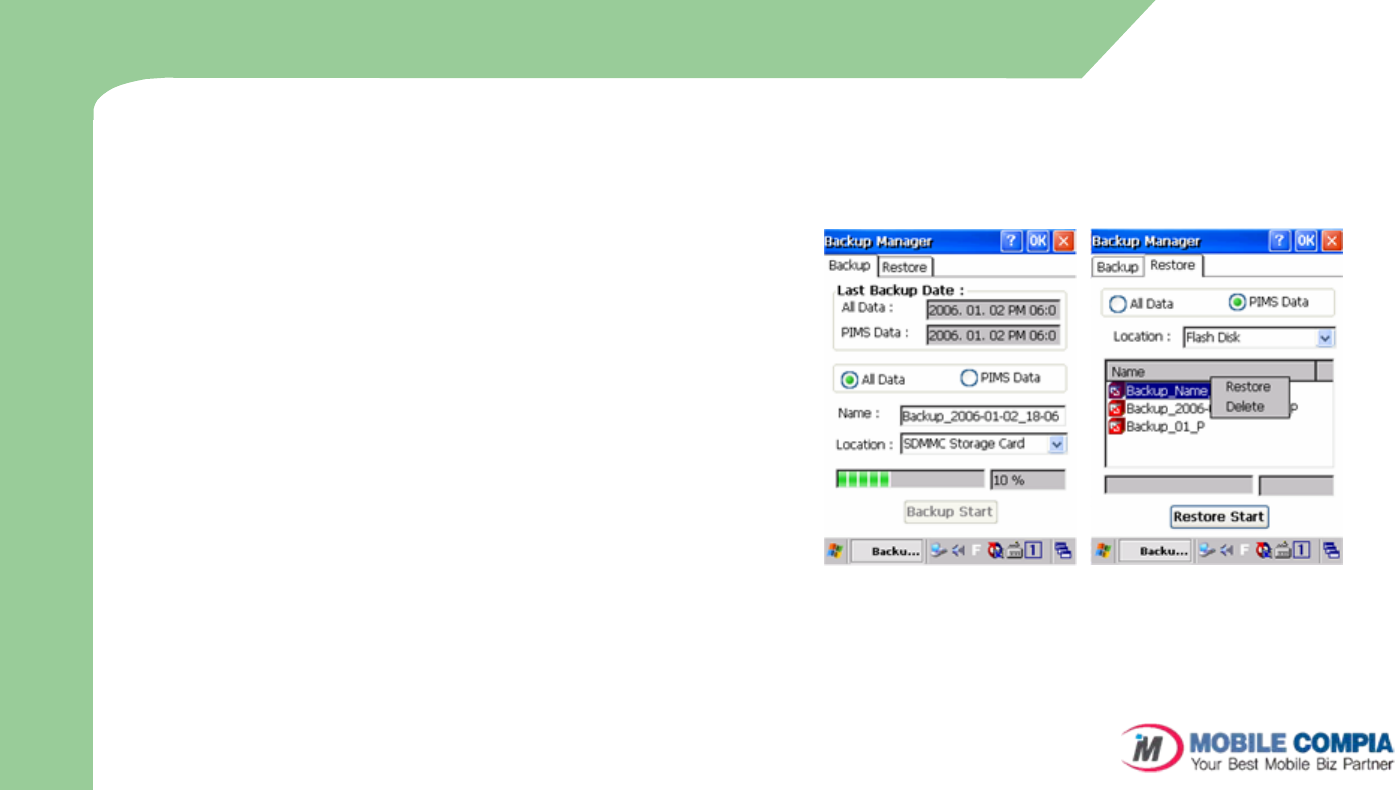
MS-Backup
zBackup
–How to set the saving location and name.
Under the Backup tap On the Backup Manager window, you can
assign the saving location to Flash Disk, SD MMC Card and CF
Card.
In the Name box, you can input the backup name to save with.
You can check the latest backup date under the ‘Last Backup
Date’ box.
–How to backup
All Data : All the file, registry and Pims data will be backed up
except Flash Disk
PIMS Data : Only Pims data will be backed up.
Once you have completed with type, name and location setting,
you can start the backup by pressing the ‘Backup Start’ button.
zRestore
–How to restore
Under the Restore tap on the Backup Manager window, you can
restore the data by pressing the ‘Restore Start’ button after
setting the type, Location and the file name to be restored.
When the restore is complete, the device will restart
automatically.
You can delete or restore the backup data by double clicking the
relevant file on the list.
Backup, Restore screen
A
p
p
l
i
c
a
t
i
o
n
/
U
t
i
l
i
t
y
68
Menu Settings/Touch Protector
zMenu Settings
–In the Menu, you can select the programs to be included
in the favorites.
–The installed programs will automatically appear on the
program list. Check the check box of the program to be
added.
–You can see the added item in Start>Programs>Favorites
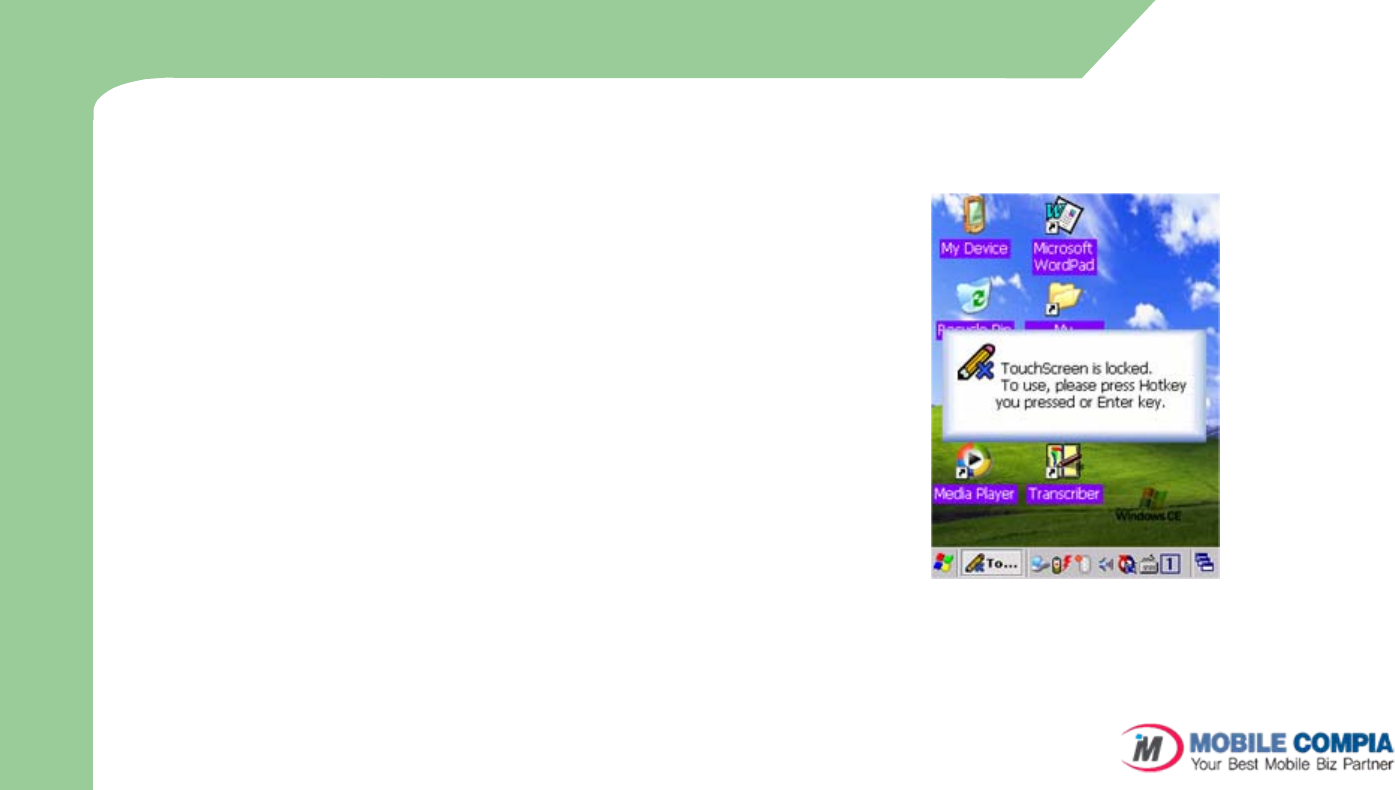
zTouch Protector
–This utility is useful for protecting a touch screen being
pressed while other application is in operation.
Touch Protector is activated
A
p
p
l
i
c
a
t
i
o
n
/
U
t
i
l
i
t
y
Safety Information
1 . SAFETY INFORMATION FOR FIXED WIRELESS
TERMINALS
.POTE NTIALLY EXPLOSIVE ATMOSPHERES
Turn your phone OFF when in any area with a potentially
explosive atmosphere and obey all signs and instructions.
Sparks in such areas could cauls e an explosion or fire resulting
in bodily injury or even death.
INTERFERENCE TO MEDICAL DIVICES
Certain electronic equipment may be shielded against RF
signal from you wireless phone. (pacemakers, Hearing Aids,
and so on) Turn your phone OFF in health c are
facilities when any regulations posted in these areas instruct
you to do so. RF signals may affect improperly installed or
inadequately shielded electronic system in motor vehicles.
.EXPOSURE TO RF ENERGY
Use only the supplied or an approved replacement antenna. Do
not touch the antenna unnecessarily when the phone is in use.
Do not move the antenna close to, or couching any exposed
part of the body when making a call.
SAFETY INFORMATION FOR RF
EXPOSURE
Body worm operation
This device was tested for typical body-worn operations with
the back of the phone kept 15 mm. from the body. To maintain
compliance with FCC RF exposure requirements, use only belt-
clips, holsters or similar accessories that maintain a 15 mm.
separation distance between the user’s body and the back of
the phone, including the antenna. The use of belt-clips, holsters
and similar accessories should not contain metallic components
in its assembly. The use of accessories that do not satisfy these
requirements may not comply with FCC RF exposure
requirements, and should be avoided.

SAR INFORMATION
THIS MODEL PHONE MEETS THE GOVERNMENT’S
REQUIREMENTS FOR EXPOSURE TO RADIO WAVES.
Your wireless phone is a radio transmitter and receiver. It is designed
and manufactured not to exceed the emission limits for exposure to
radiofrequency (RF) energy set by the Federal Communications
Commission of the U.S. Government. These limits are part of
comprehensive guidelines and establish permitted levels of RF energy for
the general population. The guidelines are based on standards that were
developed by independent scientific organizations through periodic and
thorough evaluation of scientific studies. The standards include a
substantial safety margin designed to assure the safety of all persons,
regardless of age and health. The exposure standard for wireless mobile
phones employs a unit of measurement known as the Specific Absorption
Rate, or SAR. The SAR limit set by the FCC is 1.6 W/kg. *
Tests for SAR are conducted with the phone transmitting at its highest
certified power level in all tested frequency bands. Although the SAR is
determined at the highest certified power level, the actual SAR level of
the phone while operating can be well below the maximum value. This is
because the phone is designed to operate at multiple power levels so as
to use only the power required to reach the network. In general, the
closer you are to a wireless base station antenna, the lower the power
output. Before a phone model is available for sale to the public, it must be
tested and certified to the FCC that it does not exceed the limit
established by the government adopted requirement for safe exposure.
The tests are performed in positions and locations (e.g., at the ear and
worn on the body) as required by the FCC for each model. The highest
SAR value for this model phone when tested for use at the ear is 0.199
W/Kg and when worn on the body , as described in this user guide, is
0.595 W/Kg . (Body-worn measurements differ among phone models,
depending upon available accessories and FCC requirements). While
there may be differences between the SAR levels of various phones and
at various positions, they all meet the government requirement for safe
exposure. The FCC has granted an Equipment Authorization for this
model phone with all reported SAR levels evaluated as in compliance
with the FCC RF exposure guidelines. SAR information on this model
phone is on file with the FCC and can be found under the Display Grant
section of http://www.fcc.gov/ oet/fccid after searching on FCC ID:
U7XMC-6500S
Additional information on Specific Absorption Rates (SAR) can be found
on the Cellular Telecommunications Industry Asso-ciation (CTIA) web-
site at http://www.wow-com.com. * In the United States and Canada, the
SAR limit for mobile phones used by the public is 1.6 watts/kg (W/kg)
averaged over one gram of tissue. The standard incorporates a sub-
stantial margin of safety to give additional protection for the public and to
account for any variations in measurements.
U.S.A.
U.S.FEDERAL COMMUNICATIONS
COMMISSION
RADIO FREQUENCY INTERFERENCE
STATEMENT
INFORMATION TO THE USER
NOTE : This equipment has been tested and found to comply with the
limits for a Class B digital device pursuant to Part 15 of the FCC
Rules. These limits are designed to provide reasonable protection
against harmful Interference in a residential installation This
equipment generates, uses, and can radiate radio frequency energy
and, if Not installed and used in accordance with the instructions, may
cause harmful Interference to radio communications. However, there
is no guarantee that interference will not occur in a particular
Installation. If this equipment does cause harmful interference to radio
or television reception, which can be determined by turning the
equipment off and on, the user is encouraged to try to correct the
interference by one or more of the following measures:
*- Reorient or relocate the receiving antenna.
Increase the separation between the equipment and receiver.
*- Connect the equipment into an outlet of a circuit different from that
to which the receiver is connected.
*- Consult the dealer or an experienced radio/TV technician for
assistance.
Changes or modification not expressly approved by the party
responsible for Compliance could void the user’s authority to
operate the equipment. Connecting of peripherals requires the use
of grounded shielded signal cables.
FCC Compliance
Information
This device complies with Part 15 of FCC Rules.
Operation is subject to the following two conditions:
(1) This device may not cause harmful interference, and
(2) This device must accept any interference received.
Including interference that may cause undesired
operation.
