M3 Mobile MC-7500S GSM Phone with Bluetooth User Manual
M3 Mobile Co., Ltd GSM Phone with Bluetooth
Contents
- 1. MC 7500S User manual
- 2. MC 7500S User manual 1
MC 7500S User manual 1


2
Note
zThis manual is subject to copyright protection along with all relevant rights.
zNo part of this document can be copied, reproduced, changed or translated in whole or in part by any means
without prior written consent of MOBILECOMPIA Co., Ltd.
zThe content of the manual is provided “as-is” and be subject to change at any time without notice.
zMOBILECOMPIA Co., Ltd. makes no warranty of any kind with regard to this manual, including, but not limited
to, the implied warranties of merchantability and fitness for a particular purpose.
zMicrosoft, ActiveSync, Windows, Windows logos, Windows Mobile 5.0 logos are trademarks, or registered
trademarks of Microsoft Corporation in the United States and/or other countries. Microsoft OEM products are
licensed by Microsoft Licensing Inc., a entirely owned subsidiary of Microsoft Corporation.
zAll other product names in this document or product are company names, trademarks or registered trademarks
of the respective owners.

3
Copyright and Agreement
zThis user manual is provided “as-is”. It may contain editing error or omitting due to the difficulty of expressing
technical feature.
zIf an application program provided by other supplier using by M3 SKY, refer to the supplier for a program
manual.
zThe application program providers have the responsibility of indicating their contact number for customer
service on M3 SKY terminal, item box, or program.
zMobileCompia Corporation do not warranty any programs produced and added by the third software companies
after M3 SKY products are distributed from factories.
zMobileCompia Corporation has the right to ask warranty of any programs to the program providers to meet the
needs of mobile networking companies.
zThe contents in the user’s manual are protected under the Software Copyright Act. Copy, reproduction,
distribution of the contents in the user’s manual without any written agreement notice of MobileCompia Co.
Ltd., is considered as criminal actions.
zWindows, MS Office, Outlook, ActiveSync, Internet Explorer programs are the registered brand of Microsoft.
zM3 SKY is the registered brand of MobileCompia Co. Ltd.
zThe brands of other products and service referred in this manual belong to corresponding providers.

4
Caution when using M3 SKY (1)
zUser Caution
–When the unit is lost or stolen, notify to network provider immediately.
–Do not rent the unit to third person without authorized permission.
–Do not use the unit while driving.
–For technical help, contact designated service centers.
–Contact responding suppliers directly for questions on applications and work programs other than
hardware and basic installed applications.
–Use supplied adapter and accessories by MobileCompia Co. Ltd.
–Any defect on a unit while using other batteries, chargers and accessories can not get warranty.
zCarrying and Storage Caution
–Avoid to use the device under high temperature and humidity. It may cause fatality to the device.
–Avoid intentional dropping from high elevation. It may cause fatality to the device.
–Charge batteries fully before the first time use of the device.

5
Caution when using M3 SKY (2)
zDo not reconstruct
–Do not reconstruct M3 SKY for any purpose.
–It may cause fire in the unit, and wound or electric shock to users.
–Any defect caused by reconstructing units, can not get warranty.
zIllegal copy of mobile phone is prohibited
–The person who reproduces mobile phone and uses this mobile phone is considered as criminals.
–The use of lost or stolen mobile phone is considered as a criminal act.
–Keeping the lost or stolen mobile phone after turning power off, is considered as a criminal act.
6
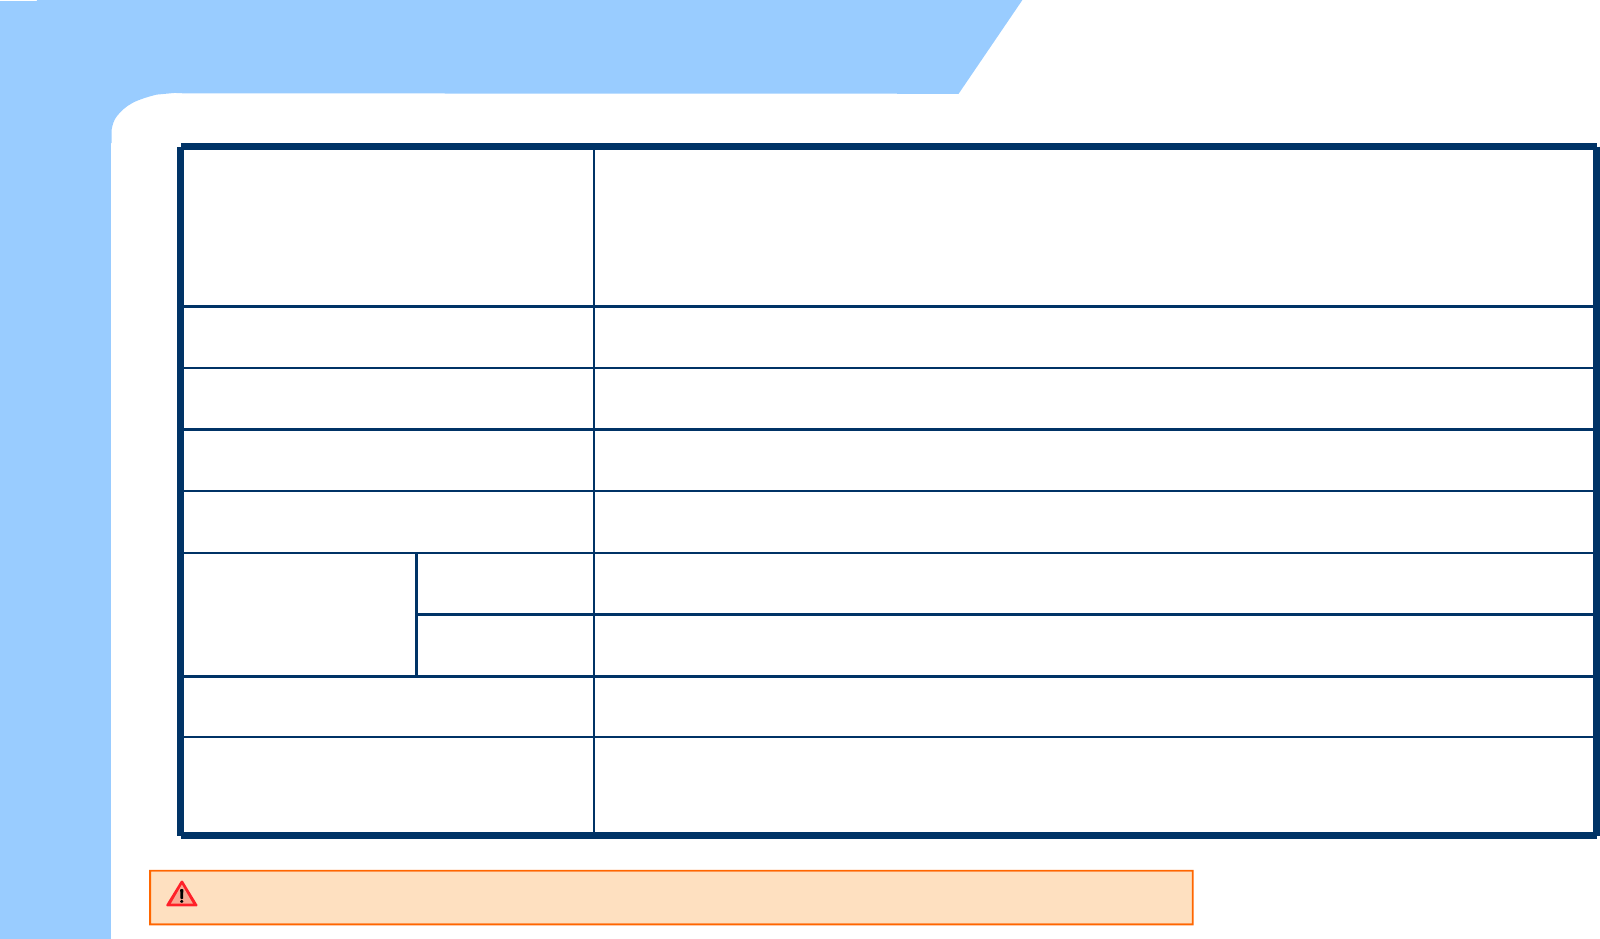
Used frequency band
GSM 850 (TX) 824 ~ 849 MHz / (RX) 869 ~ 894 MHz
GSM 900 (TX) 880 ~ 915 MHz / (RX) 925 ~ 960 MHz
GSM 1800 (TX) 1710 ~ 1785 MHz / (RX) 1805 ~ 1880 MHz
GSM 1900 (TX) 1850 ~ 1910 MHz / (RX) 1930 ~ 1990 MHz
Band width 200 KHz
External appearance 78.6 x 163.5 x 24.9mm (Width x length x height)
Weight 320g
Transmission output power Maximum 0.3W
Main body -10 ⳃ~ +50 ⳃ
Operational
Temperature Adapter -10 ⳃ~ +50 ⳃ
Relative Humidity 5% ~ 80%
AC Power Input : AC 100 ~ 250V, 50 ~ 60Hz
Output : DC +5.2V, 3.0A
Size and Features
Supported Frequency Bands can differ depending on the supplied antenna.

7
Contents
CONTENTS
zNote 2
zCopyright and Agreement 3
zCaution when using M3 4
zSize and Features 6
1. M3 Introduction 9
Product Composition 10
Name and function of each part 12
Input Buttons 13
Soft/Hard Reset 14
How to use stylus pen 15
LED/Battery attaching/detaching 16
Charging 17
How to connect to PC 18
2. Basic Usage 19
Calibration 20
Main screen 23
Input screen 24
3. ActiveSync 29
ActiveSync Introduction 30
Installing ActiveSync 31
Synchronization of data 32

CONTENTS
4. How to use internet 33
Via GPRS/EDGE 34
Via Wireless LAN 36
Browsing the Web Site 39
5. How to use the Phone 44
Init Screen 45
Phone Control 46
Phone call and receive 47
Phone book 48
SMS send and receive 49
Phone function 51
Phone setting 52
Contents
6. Usage of Device 53
Camera 54
Bluetooth 58
IrDA 63
GPS 64
Scanner 66

9
1. Introduction
Product Composition
Name and Function of each part
Input Buttons
Soft/Hard Reset
How to use Stylus pen
LED Battery Attaching/Detaching
Charging
How to connect to PC
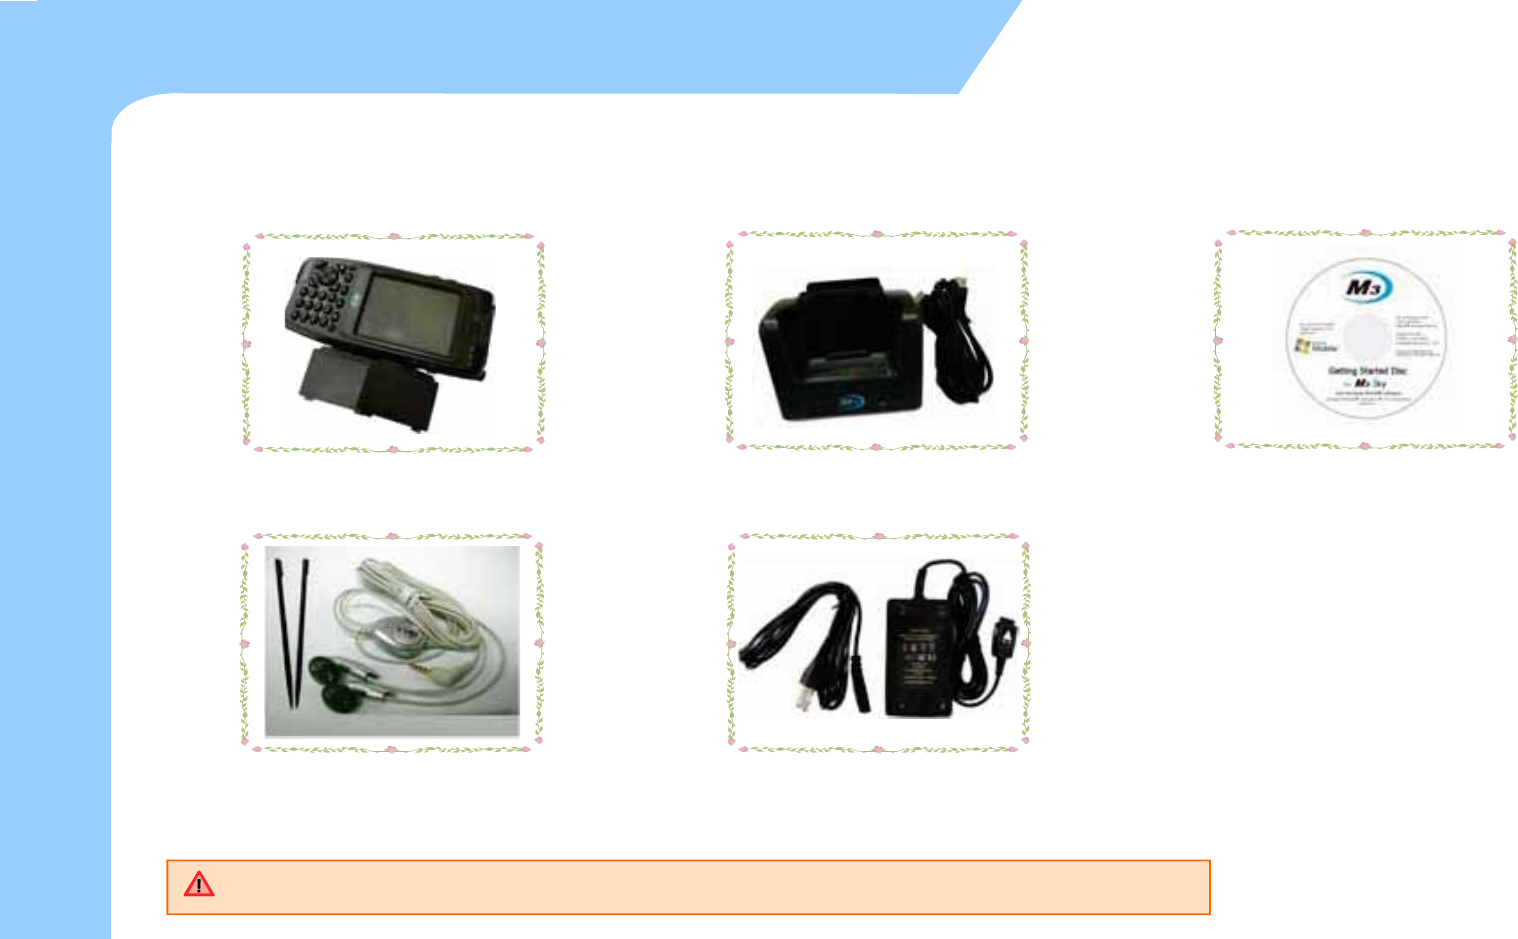
Product Composition (1)
zAt the first time of opening the product box, please check if it contains all the basic
components, listed as following.
Introduction
M3 SKY main terminal
+ 2 units of standard battery Cradle + USB cable CD + ActiveSync 4.x
Ear Mic Phone
+ 2 units of Stylus pen
Portable Adapter
10 The product components may differ depending on the supplied products.

zHow to use the manual
–This manual provides detailed information to make using the device easier and faster.
–The content related to phone or communication in this manual is only applicable when the device is
equipped with GSM/GPRS/EDGE module for Voice and Data communication.
–The features described in this manual can not be used when it is not equipped in the device (e.g. GSM,
WLAN, Bluetooth, IrDA, Scanner, Camera, GPS).
–The content of this manual is subject to change without prior notice due to product improvement or
modification of its functions, etc.
Product Composition (2)
Introduction
11
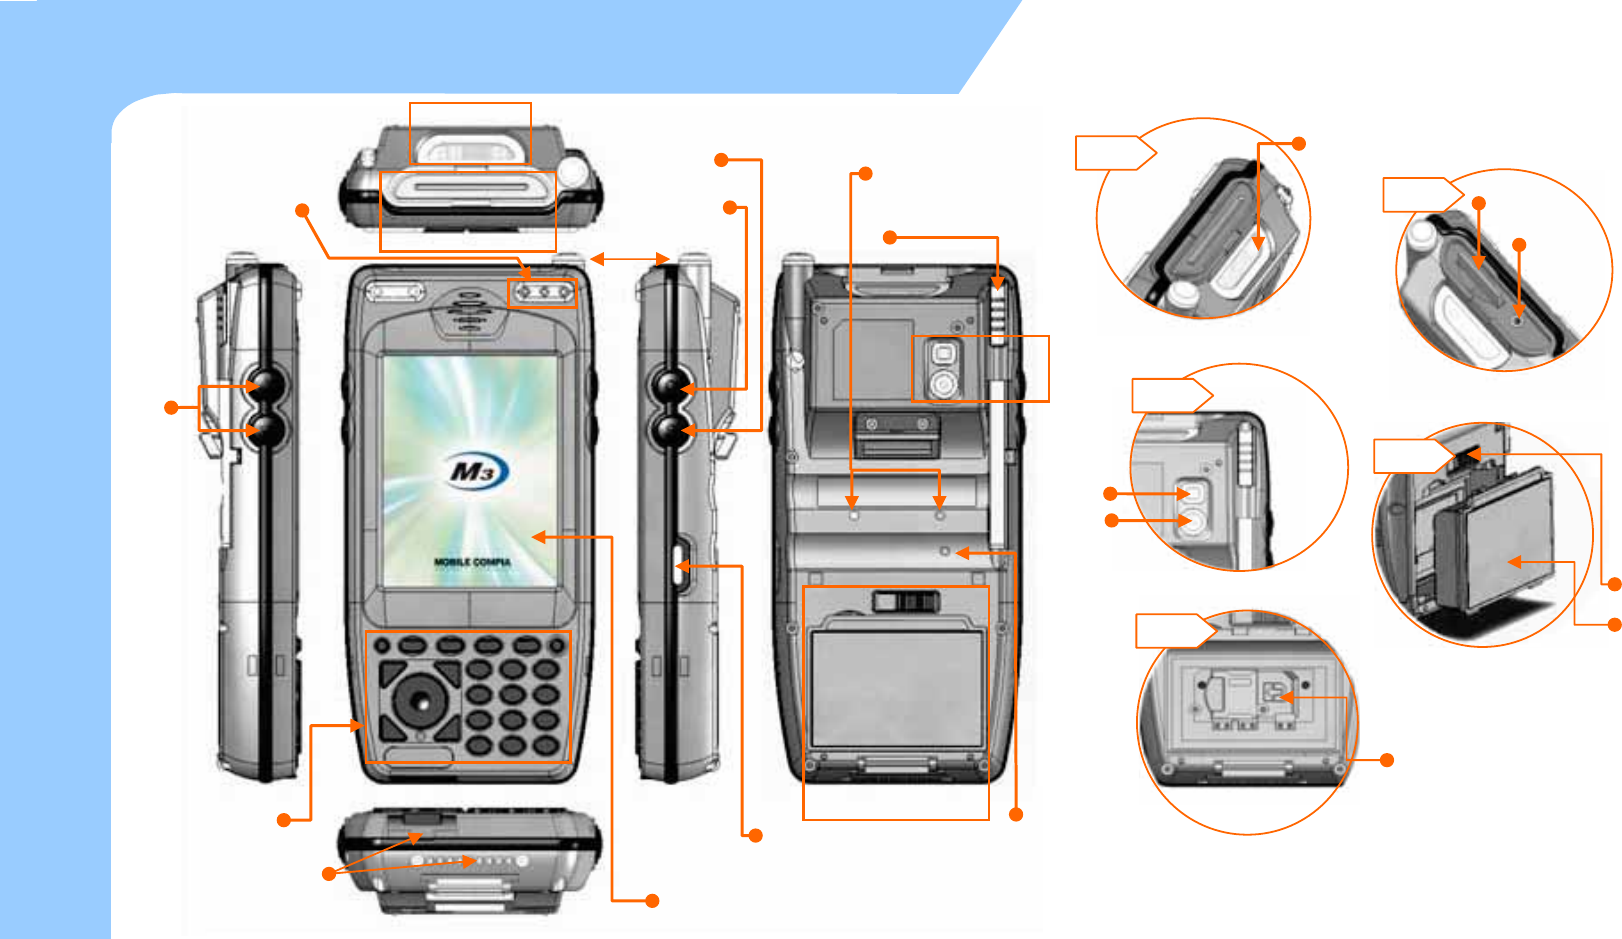
Name and function of each part
Introduction
12
Volume
Button
Antenna
Scanner Button
B
C
Battery Loc
k
Battery
E
Infrared Communication
Port (IrDA)
Key Pad
Charge & USB/serial port
Upper (portable)
Lower (Cradle) use
Charge Ramp (Left)
GSM/GPRS/EDGE Status
Ramp (Center)
Scanner Ramp (Right)
LCD touch Screen
Reset Switch
Pistol Grip Connecter
EF
D
Stylus Pen
B
Barcode Scanner
Window
CMini SD Extension Slo
t
Ear Mic Plug
D
Flash
Camera
F
SIM Card Slot
Camera Button
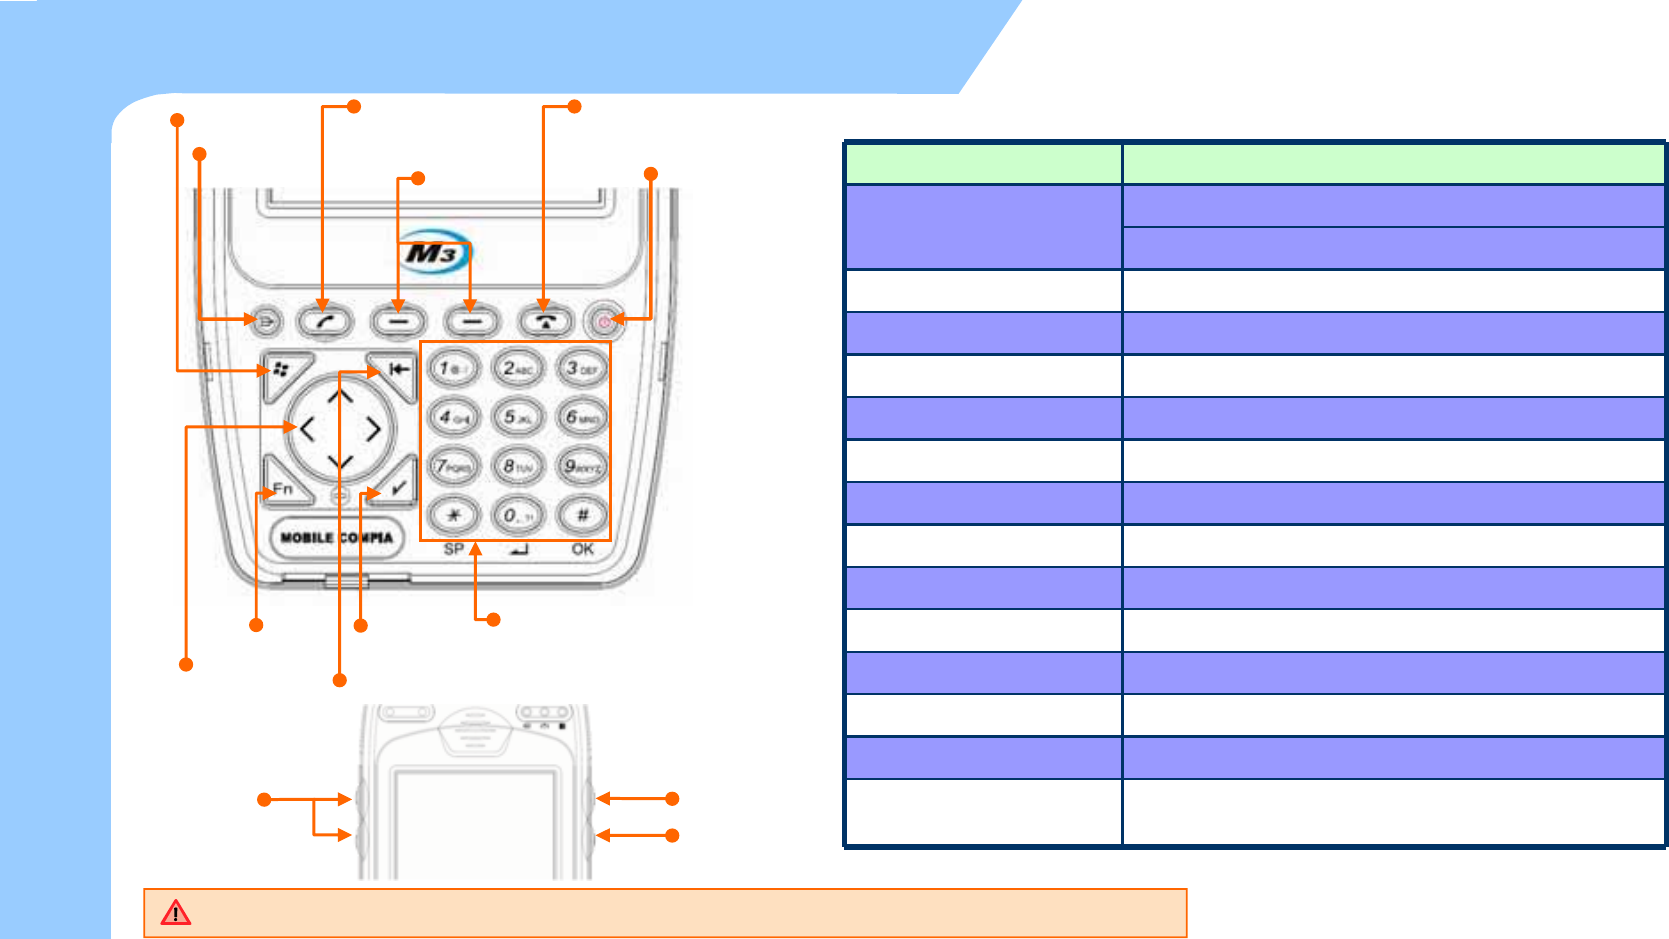
Component Description
Press to toggle the device on/off.
Power button
Long press to menu (Backlight, Display, etc) Function
Phone/Call function press to accept the call or to execute the phone
End function press to hang-up/reject the call.
Input keys Press to input alphabet characters or numbers
Left, right function button press to lunch an assigned application or function
Alphanumeric press to switch between alphabet and number input
Start button Press to display the Start menu.
Backspace button press to move back
Function button press to Function Key with (*, 0, #)
Direction button press to move left,right and up,down
Return button press to confirm the action
Scanner button Press to launch the barcode data scan application
Camera button Press to launch the Pictures & Videos
Volume button Press the top key to increase volume, press the
bottom key to decrease volume.
Input Button
Introduction
Power button
Input keys
Alphanumeric
button
Phone/Call button End button
Left, right function button
Direction Button
Start button
Function button
Backspace button
Return button
Volume
Button
13
Scanner Button
Camera Button
Some key functions might not be supported, depending on the option.
zSoft Reset
- A soft reset allows your device to get a fresh start,
similar to rebooting a computer.
- This restarts your device and adjusts memory
allocation.
- All records and entries are retained after a soft reset.
- Unsaved data in open programs may in some cases be
lost.
14
Introduction
Soft/Hard Reset
ⴗⴘⴙ
Press ⴗ+ⴘ
and ⴙpower button
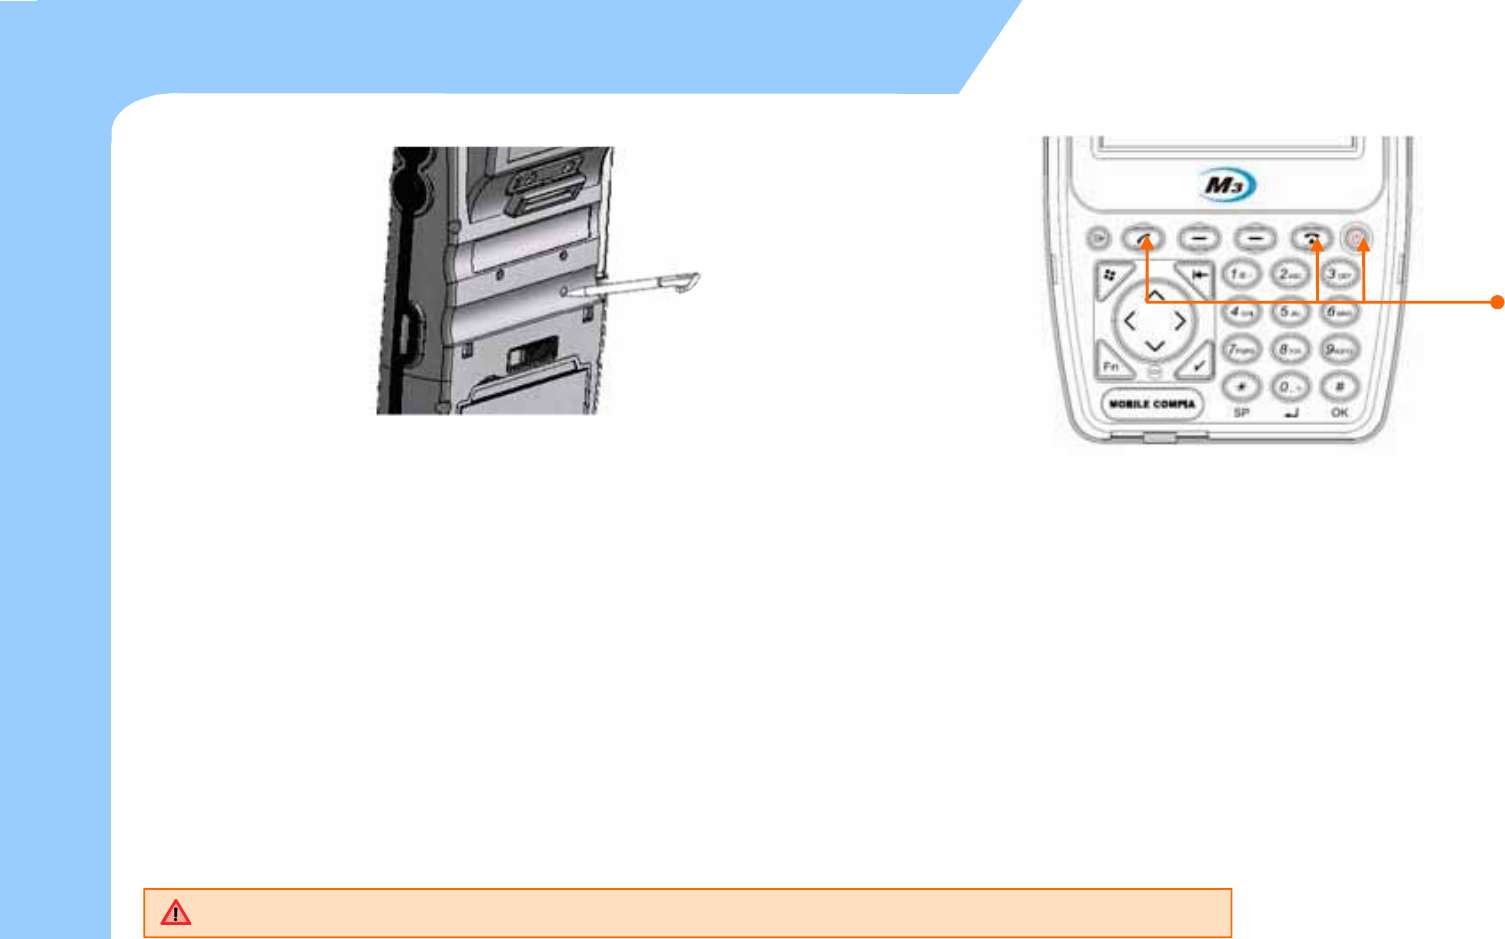
zHard Reset
- A hard reset removes power to your device.
- This erases all records and entries, deletes all additional
programs you have installed, and restores the device’s default
factory settings.
- Never perform a hard reset unless a soft reset does not correct
your problem.
zTo perform a hard reset :
ÆPress the power button for more than 12 seconds to turn off the power (can be confirmed by LCD off)
ÆWhile pressing call and end button, please press the power button shortly.
ÆWhen the [CLEAN BOOT WARNING] window will pop up with message “All data will be lost! Do you want to continue?”
“1. YES 0. NO, please press 1 to perform the Hard Reset.
Please mind that you need to set up the standard timezone date, and time. After power off.
15
How to use Stylus Pen
Introduction
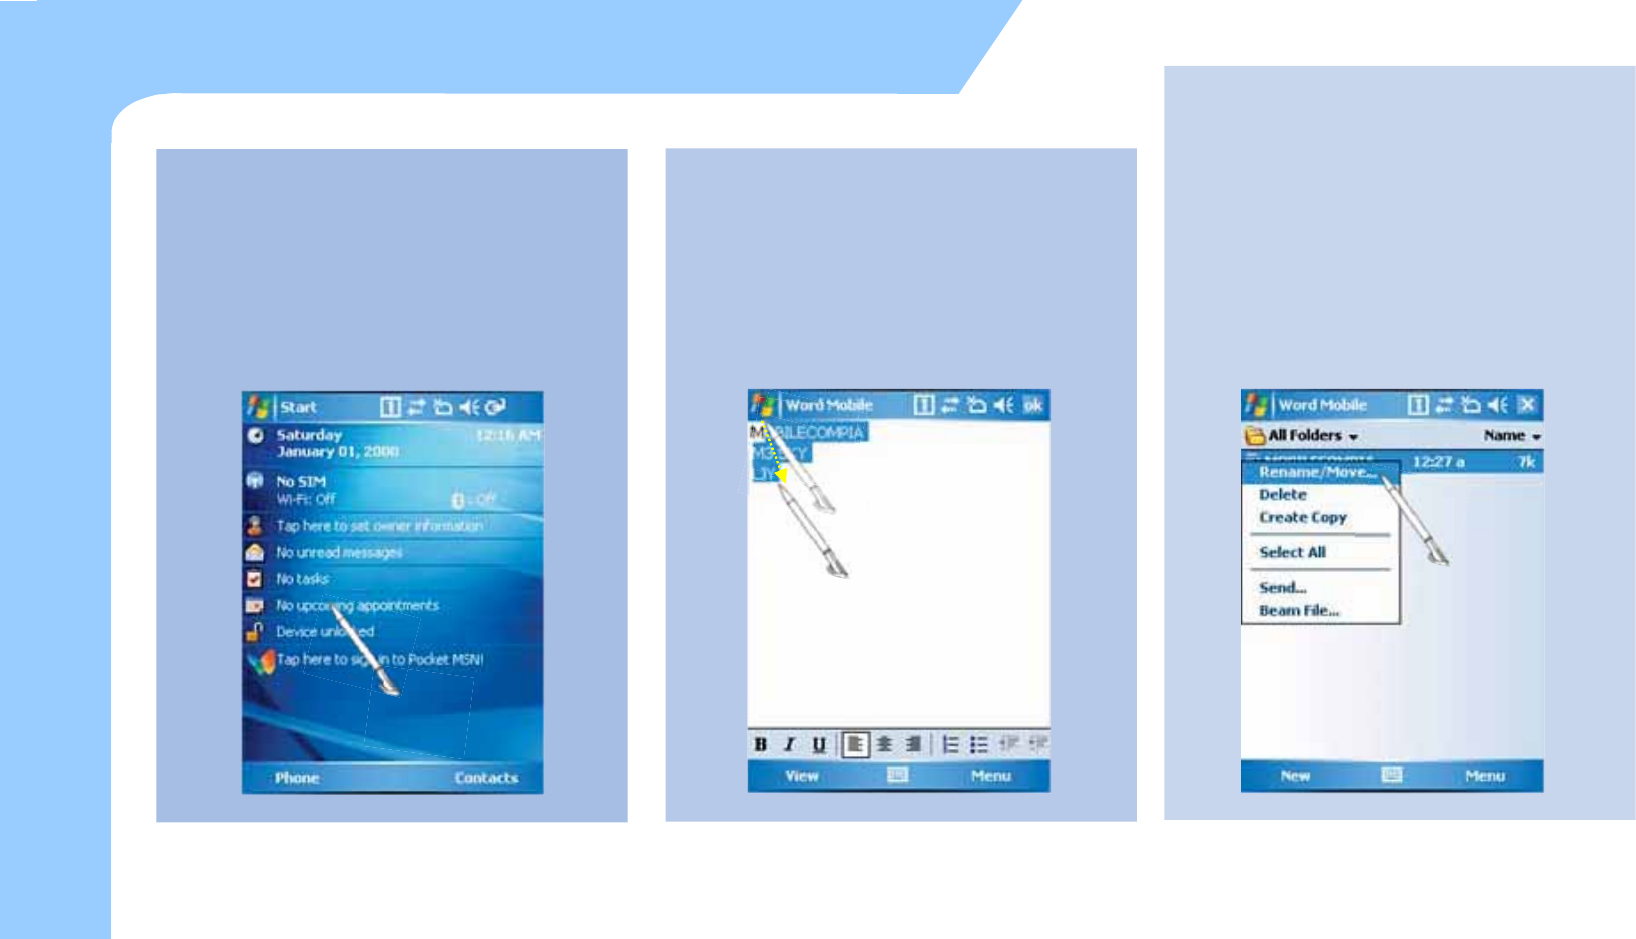
zLong Press
Leave Stylus pen touching the screen
for long and you can select the menu
on the pop-up screen.
You can also select functions available
in the designated item using the pop-
up menu.
The function of the pop-up menu can
be different according to the program.
zDrag
It is used when you select the text.
Please drag the desired part with
stylus pen attached on the screen.
zTap
Tap the touch screen one
time using a Stylus pen to select
and execute items and files.
16
LED / Battery attaching/detaching
Introduction
zLED Alarm
–Informs Charging, Scanner Status.
Type LED Status Details
LED for
charging
Red
Green
Charging
Charging complete
GSM
/GRPS
Status
LED
Blue Blinking
Blue On
Blue OFF
GSM/GPRS Standby
(within range of phone/internet)
GSM/GPRS in use
(phone/SMS/internet in use)
GSM/GPRS is off or out of range
Scanner
LED Green When the barcode data is successfully read
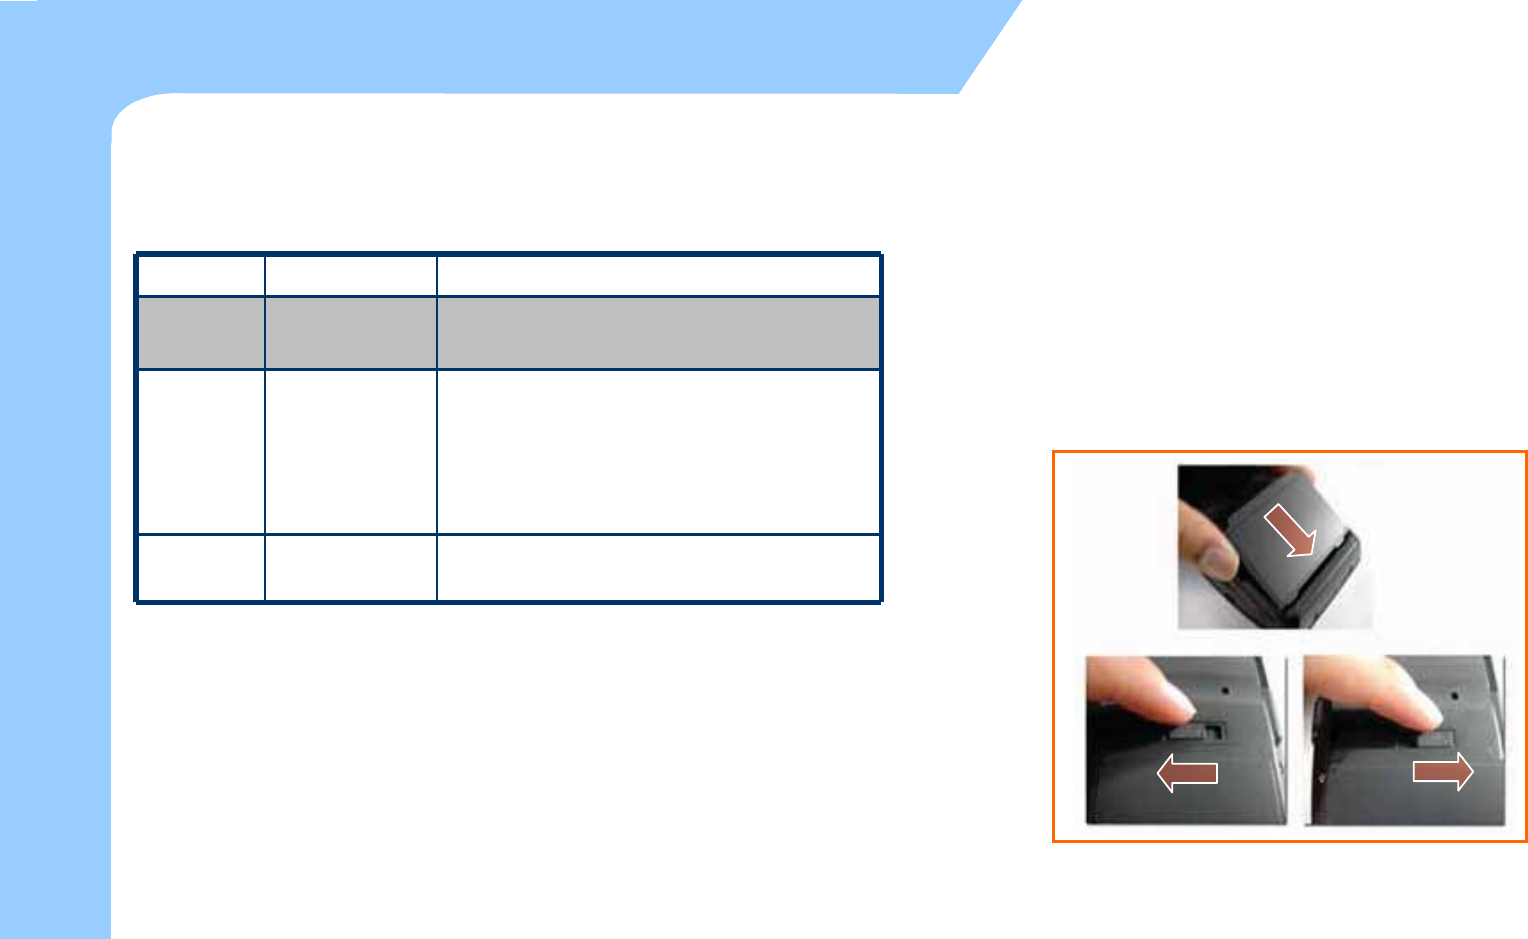
zBattery attaching/detaching
–Attaching Battery
As picture shown, put the battery pack to back of PDA,
and lock the battery pack with locking device.
–Detaching Battery
Press locking device to the right, then using upper
notch, detach the battery from main body.
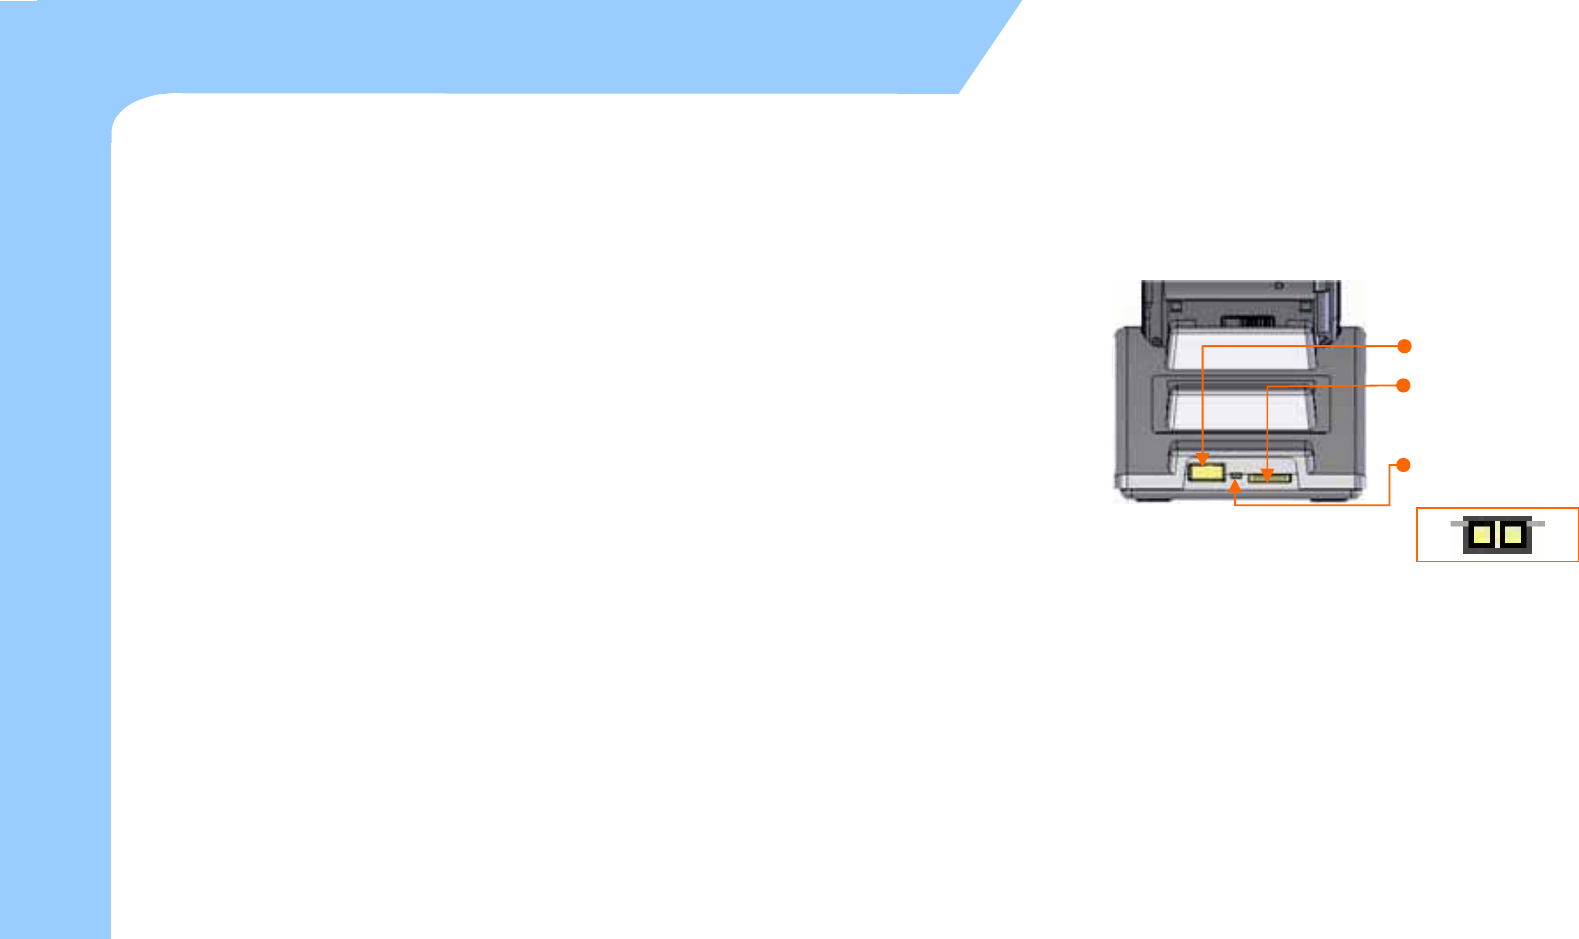
17
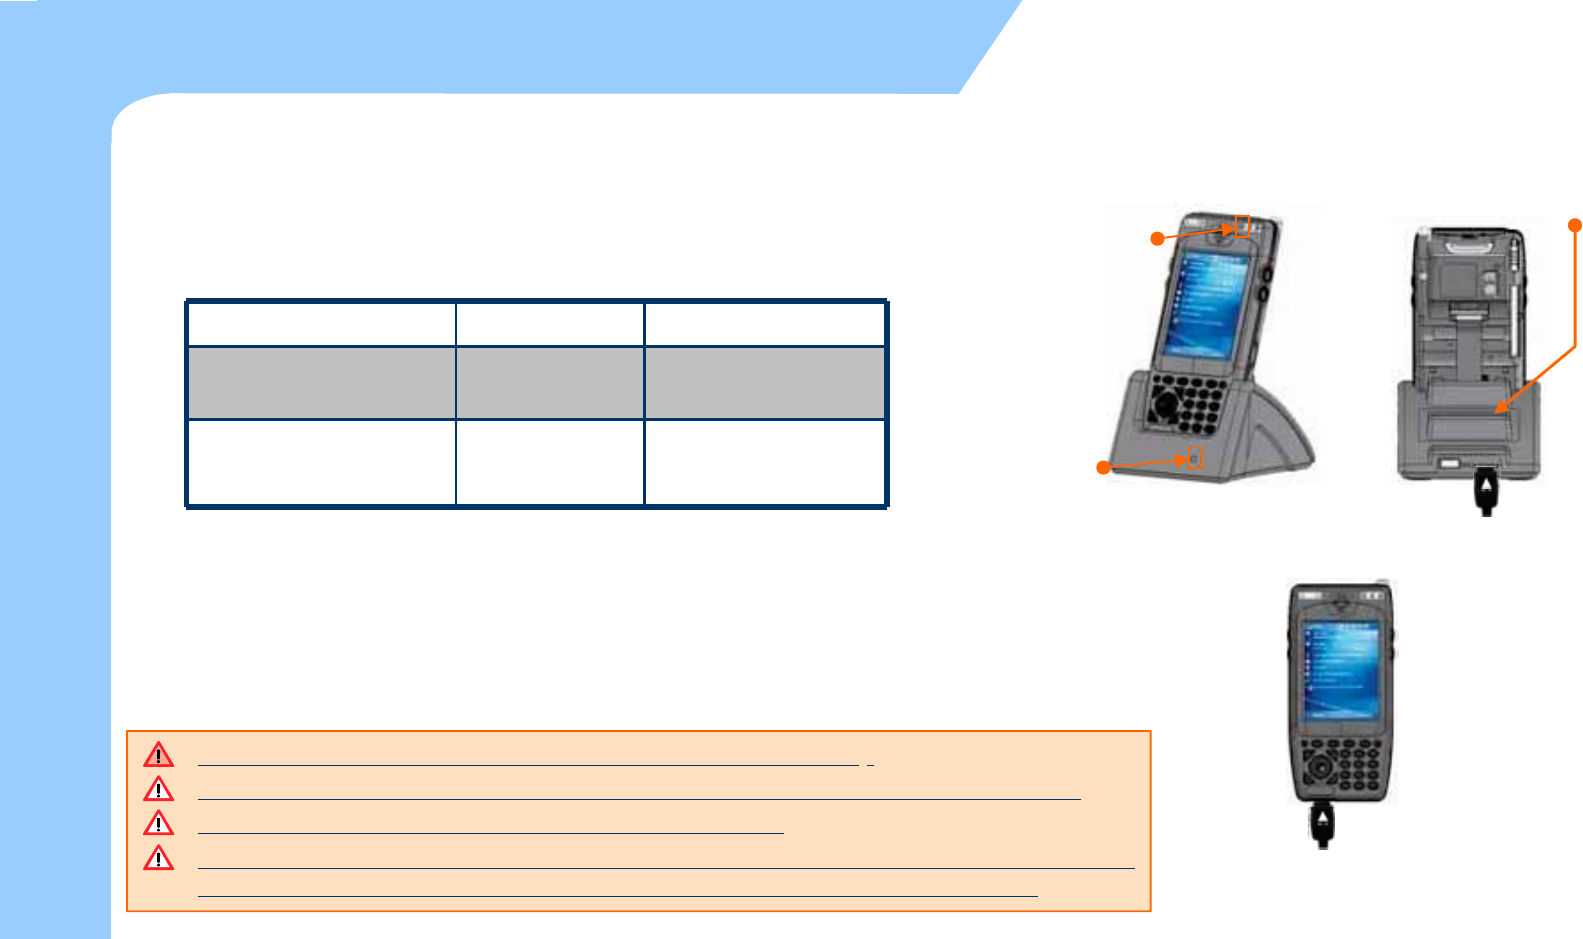
Introduction
zConnect plug-in from charger to charge jack of main
body, or charge jack of cradle, and then place main
body onto cradle.
zCharging LED
zWhen charging, the status of the battery attached to
main body can be confirmed by the LED left of upper
corner of main body. Also the status of Sub-battery
can be confirmed by the LED right of low corner of
Cradle.
Type LED Status Details
Charging
Direct charging to main
body
Red
Green
Charging
Charging Complete
Cradle Charging
(Extra battery charging)
Red
Green
Charging
Charging Complete
zCharging in Cradle
zCharging using portable adapter
Separate Battery
Main body
Charging LED
Separate Battery
Charging LED
Do not use any other charger except one (5.2 V / 3A) provided .
Make sure to handle it gentle; damage with excessive force may cause no warranty.
Incongruent change of battery can cause the explosion.
When attached battery is completely discharged, plug charger to main body, then reset
the device to check if screen is back on. To use, do at least 10 minute charging.
18
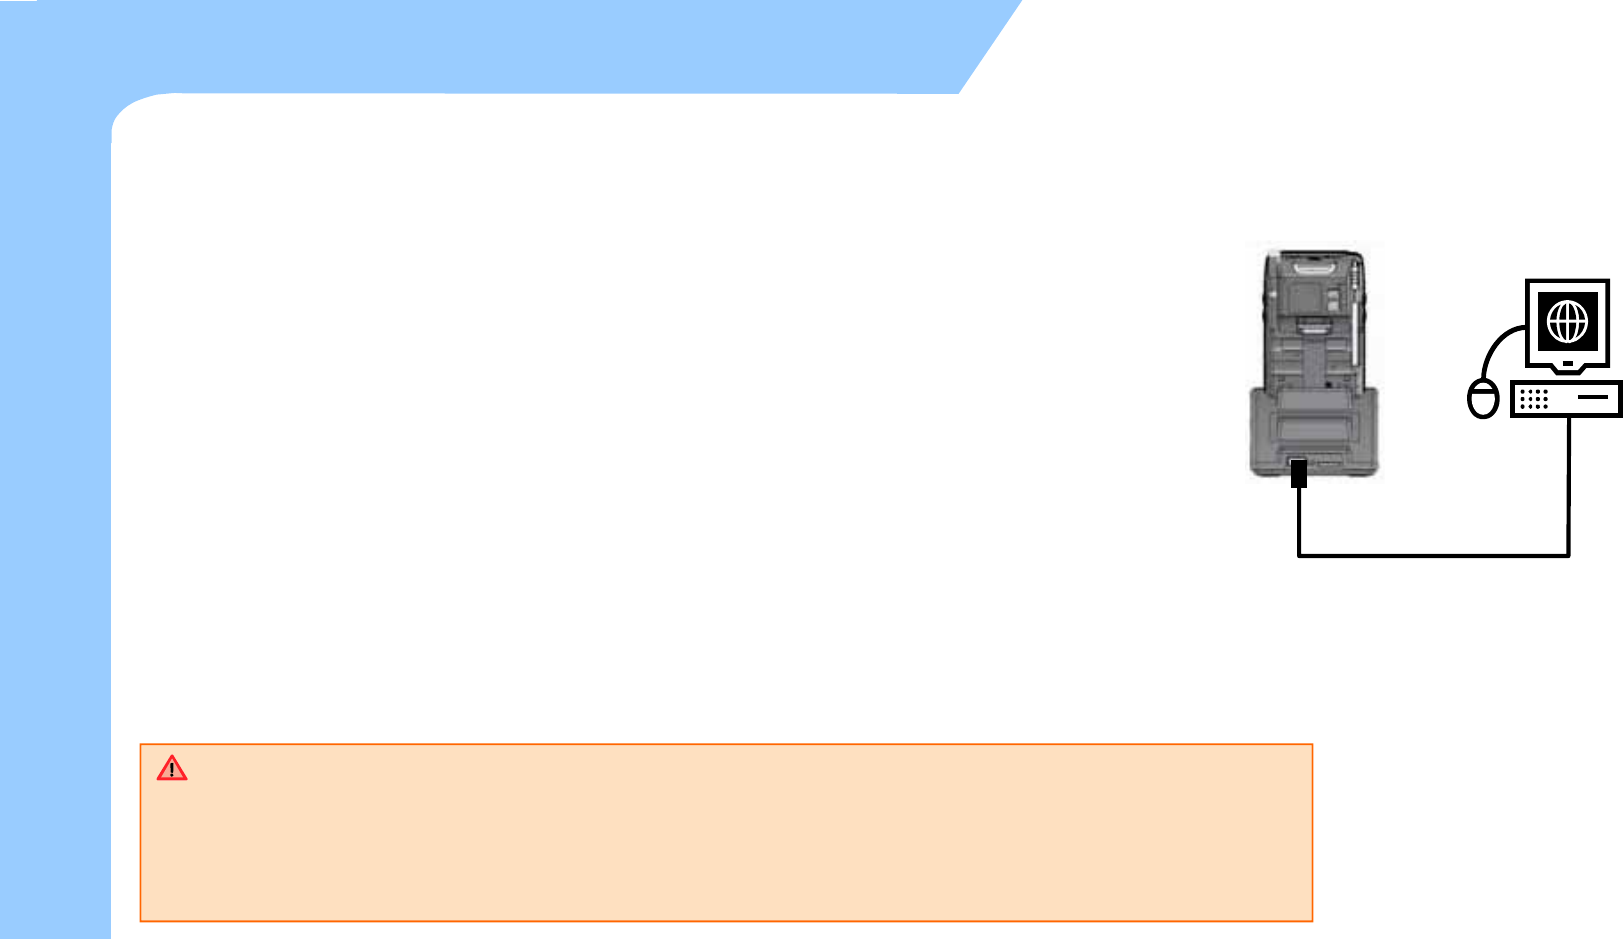
How to connect to PC
zA cradle of M3 SKY supports charging and USB connection.
zConnecting step of cradle of M3 SKY is as following.
–Connect charger to USB cradle. (24pin connector)
–Connect charger to power source. (to wall)
–Connect USB cable of USB cradle to USB port of desktop PC.
–Place M3 SKY onto docking cradle then execute Synchronization with
Desktop PC.
zThe location of USB port can be at the back, front or side of PC
and the shape of USB port is identical on Desktop PC and
Notebook.
zUSB host function is available by putting USB cable into USB port
of Cradle.
Connecting to Cradle
USB Host/Client
AC Power
USB Host/Client
changeover switch
HC
Introduction

19
2. Basic Usage
Calibration
Main screen
Input Screen

zCalibrate the touch screen as shown below, at first time use or when cold (hard) booted.
20
Calibration (1)
Basic Usage
Tap the screen one time with
a Stylus pen
Tap the (+) mark with the
Stylus pen as it moves around.
You can see the screen how
to use the Stylus. If you
don't need it, click the Skip.
ⴗPress and hold the Stylus pen on the screen then
select the Cut on the pop-up menu.
ⴘPress and hold the Stylus pen like the arrow on screen,
Tap the Paste on the pop-up menu.
ⴙWhen all processes are complete, click the Next.
ⴗⴘⴙ

zCalibration continue....
21
Basic Usage
Calibration (2)
Set up the standard time zone
date, and time.
To set up a password, tap 'Next'
otherwise tap 'Skip'.
To set up a password set up a
password type and password.
To set up an e-mail account,
tap 'Next' otherwise tap 'Skip'.
zCalibration continue....
22
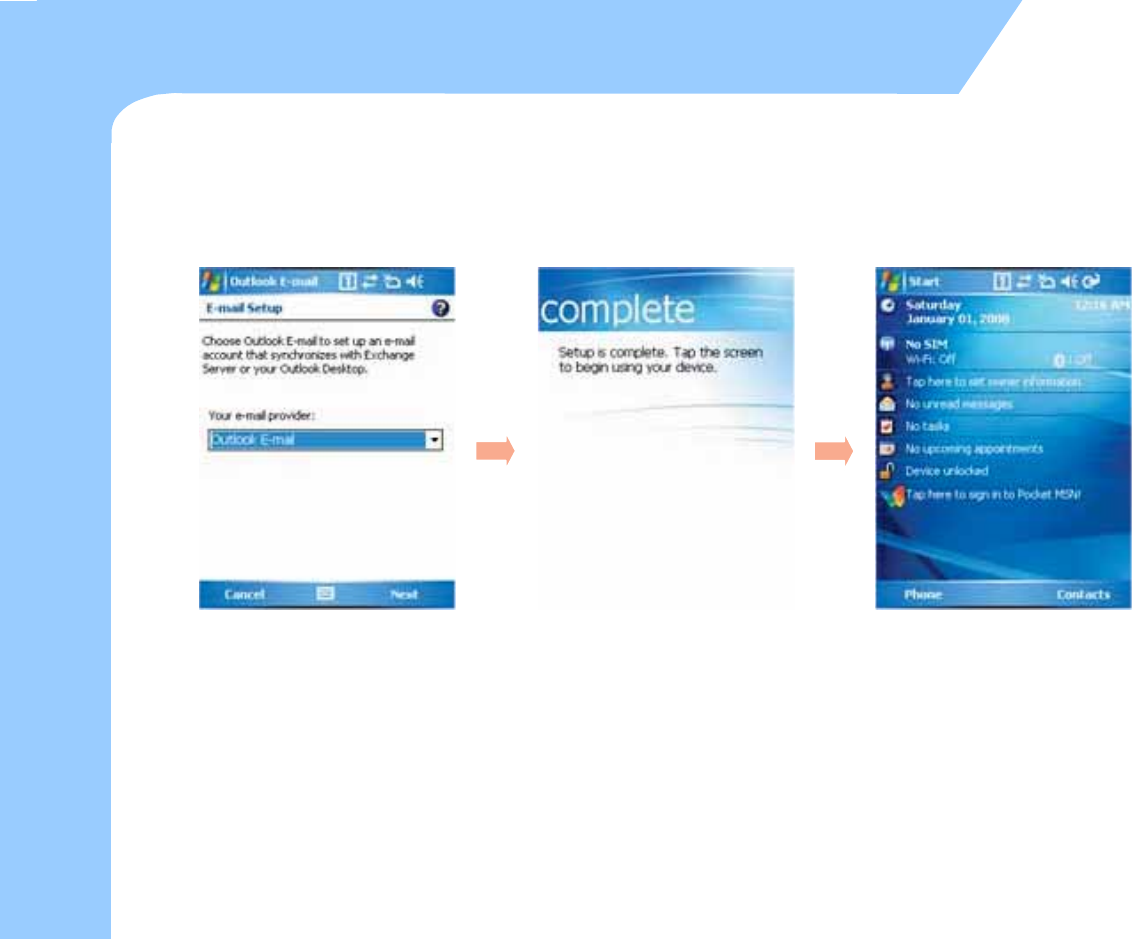
Calibration (3)
Basic Usage
Choose outlook e-mail to set up
an e-mail account and then tap
the 'Next'.(POP3/IMAP/Outlook
/E-mail)
If you choose outlook E-mail or
POP3/IMAP and then tap the
'Next', you should set up it step
by step.
When all processes are complete,
tap the screen to start system.
You can see the screen above
after the Calibration.
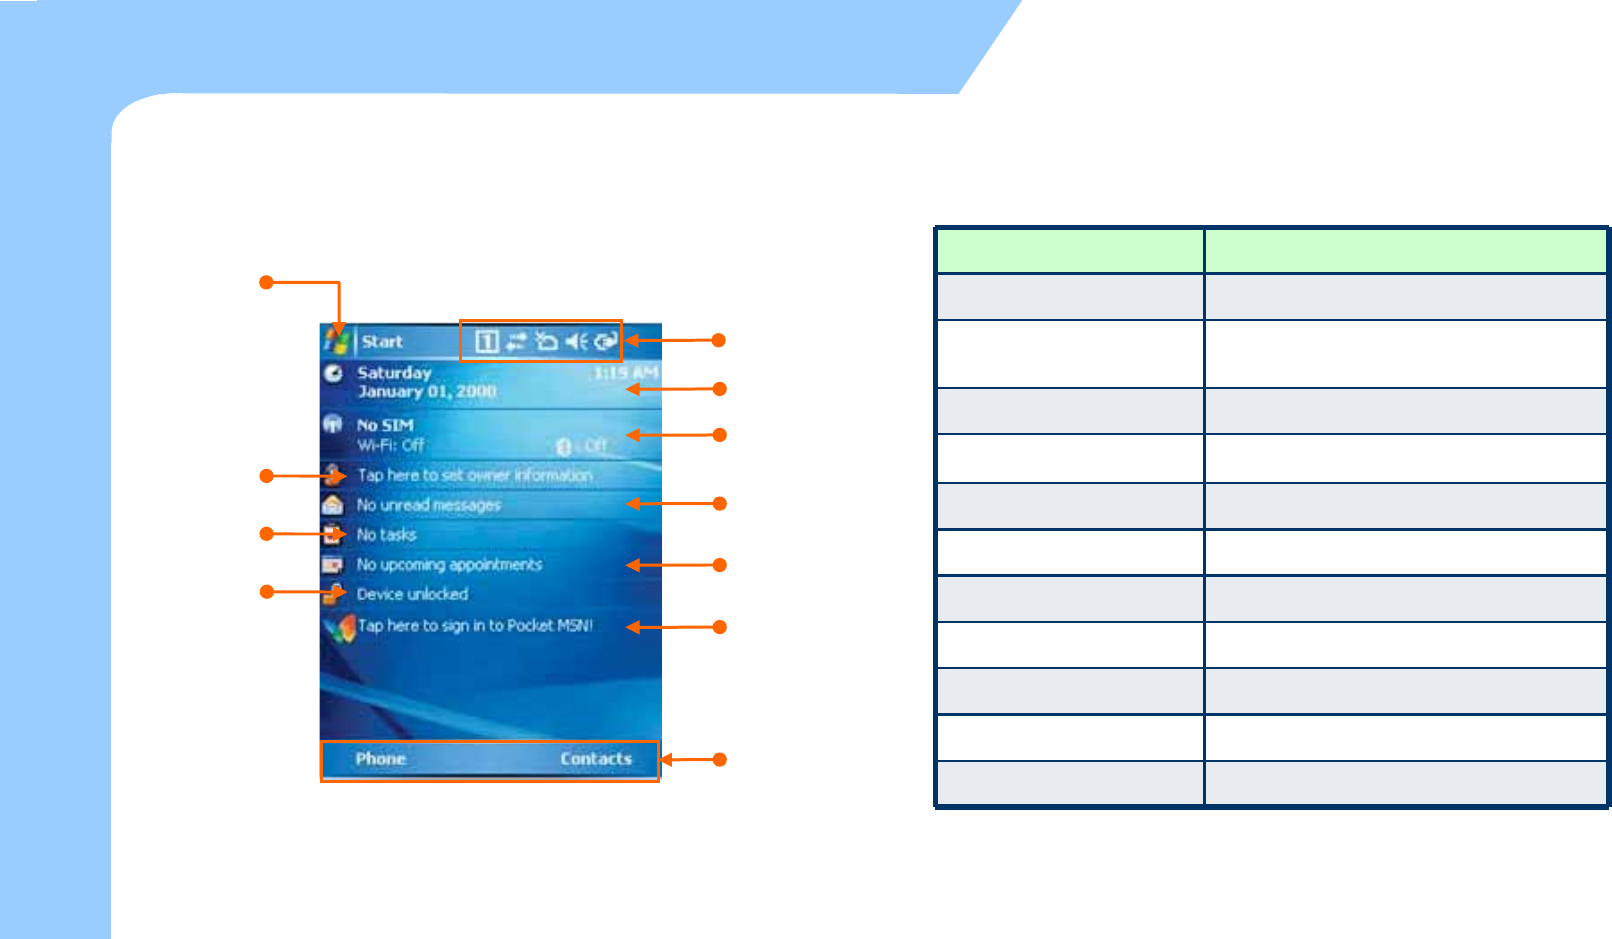
Main Screen
zMain screen
–Main Screen is set below
23
Basic Usage
Start menu
Day/Time info
Wireless info
User info
Info bar
Messages info
Task info
Today info
Lock info
Pocket MSN info
Left / Right function info
Button function
Start menu
Info bar
Day/Time info
Wireless info
User info
Messages info
Task info
Today info
Lock info
Pocket MSN info
Select the program you want to use.
View the power, modem, sound, input
mode and connecting view.
View the current date and time.
View the Wireless power and state.
View the personal information.
View the Messages received.
View the task information.
View the Today’s information.
View the screen / Lock information.
View the Pocket MSN information.
Left/Right Function info View the Left / Right information.
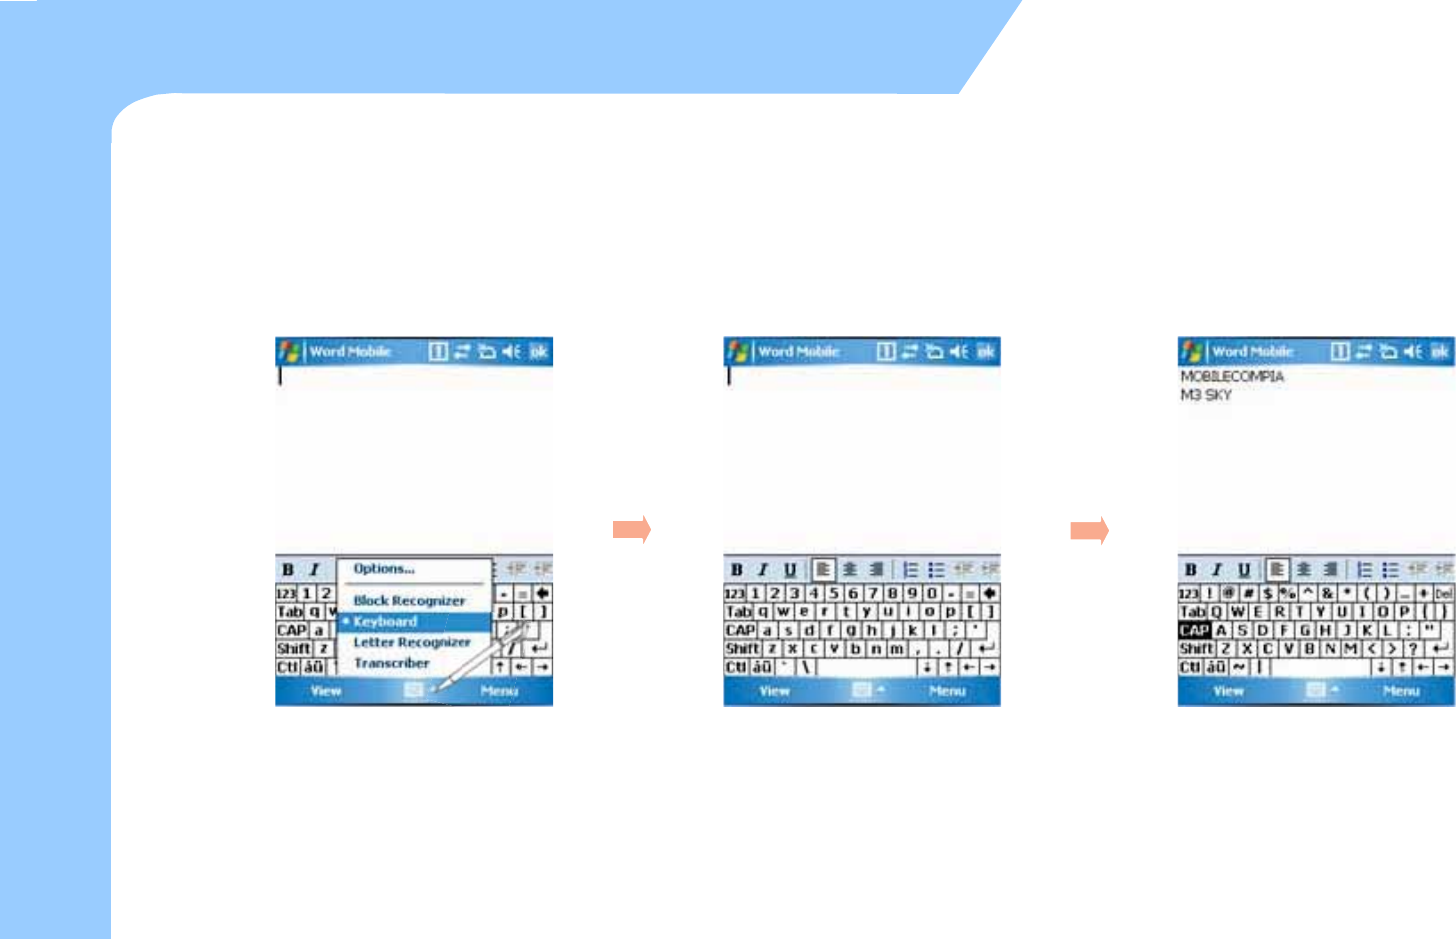
zTo use Input
- Process this program " Start > Programs > Word Mobile".
zTo use the Keyboard Input
24
Basic Usage
Tap the arrow next to the
keyboard icon and then select
the keyboard on the menu
screen as a picture above.
This is the Keyboard Input
Screen.
You can input the letter, number
and characters when you click
the each icon on the keyboard
Input screen.
Input Screen (1)
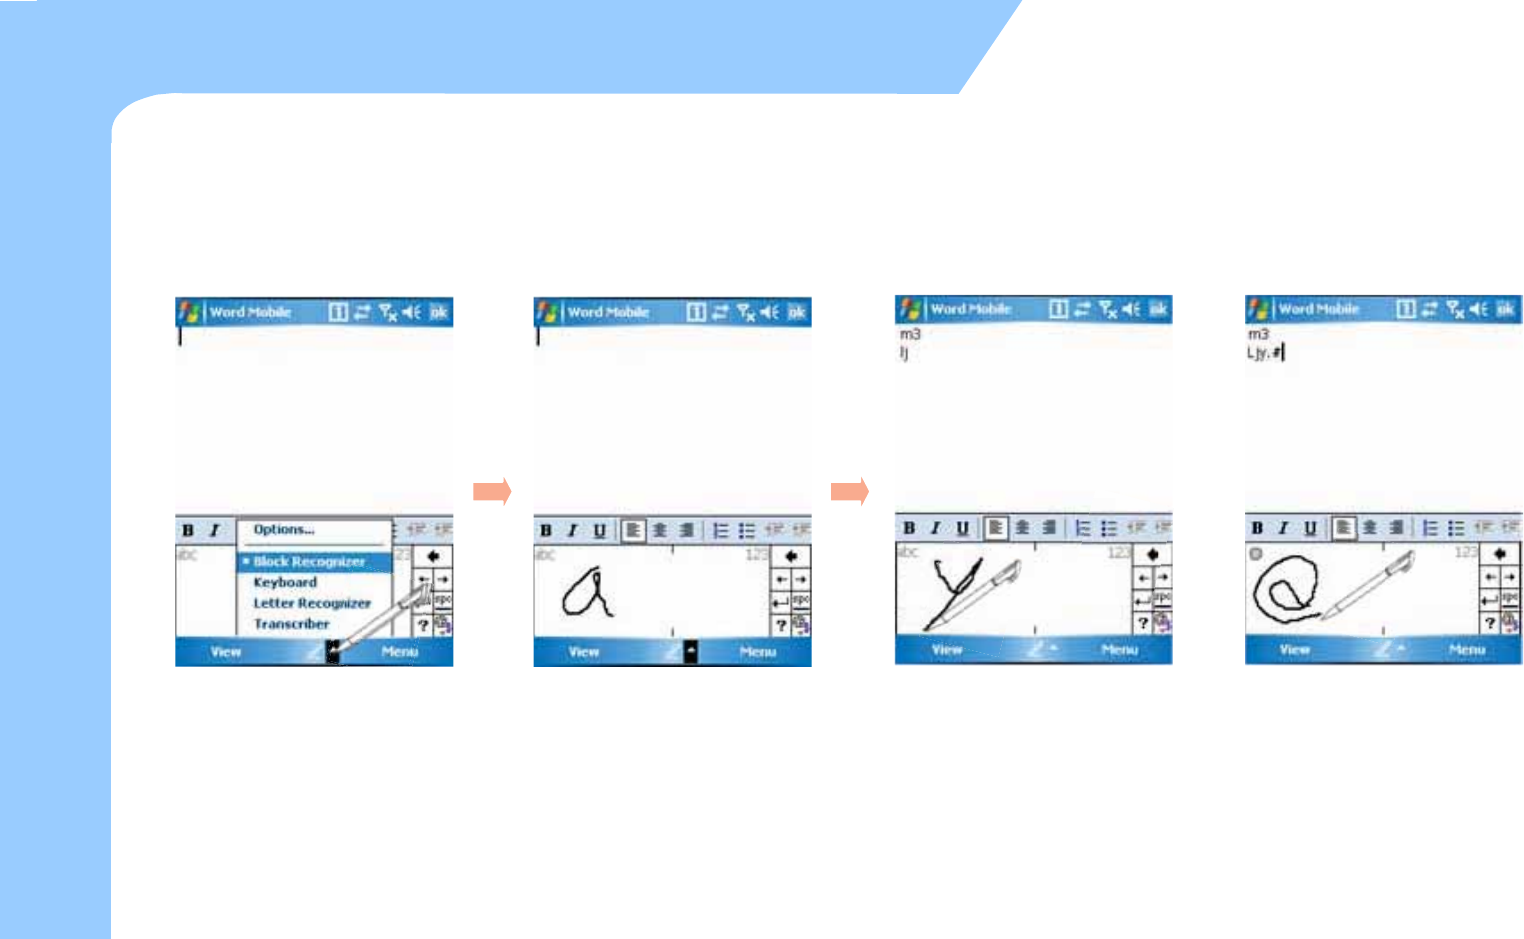
zUsage of Block Recognizer input.
25
Input Screen (2)
Basic Usage
Tap the arrow next to the
keyboard icon and then select the
Block Recognizer on the menu
screen as a picture above
It is the screen of block
recognizer input.
In this input screen you can input
letters in 'abc' and numbers in '123 ‘
each in the input box seen on the
screen.
In the input screen of block
recognizer you can input special
letters and characters by tapping
the input box once.
26
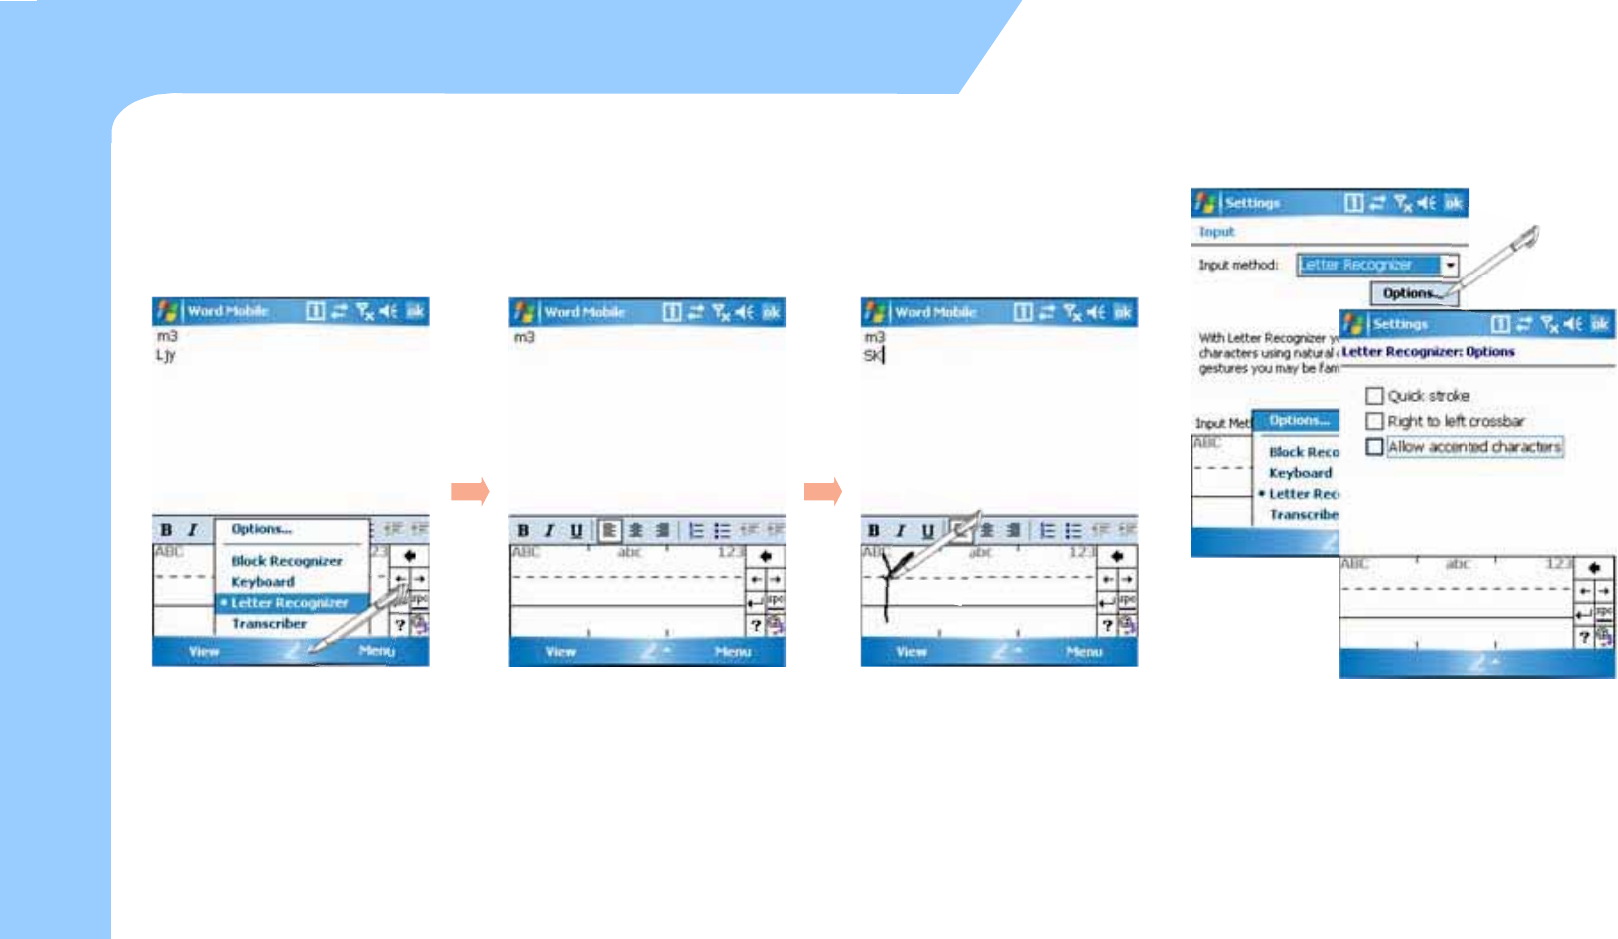
zUsage of Letter Recognizer
Input Screen (3)
Basic Usage
Select the arrow next to the
keyboard icon and then Select the
'Letter Recognizer' on the menu
screen as the picture above.
This is the 'Letter Recognizer'
screen.
In the ‘Letter Recognizer' input
screen, you can input the capital
letters in 'ABC', the small letters
in 'abc' and numbers in '123' each
in the input box seen on the screen.
Please choose ‘Options…’ on the input menu.
Select ‘Letter Recognizer’ as input method and
then click ‘Options…’. Here you can configure the
input modes.
27
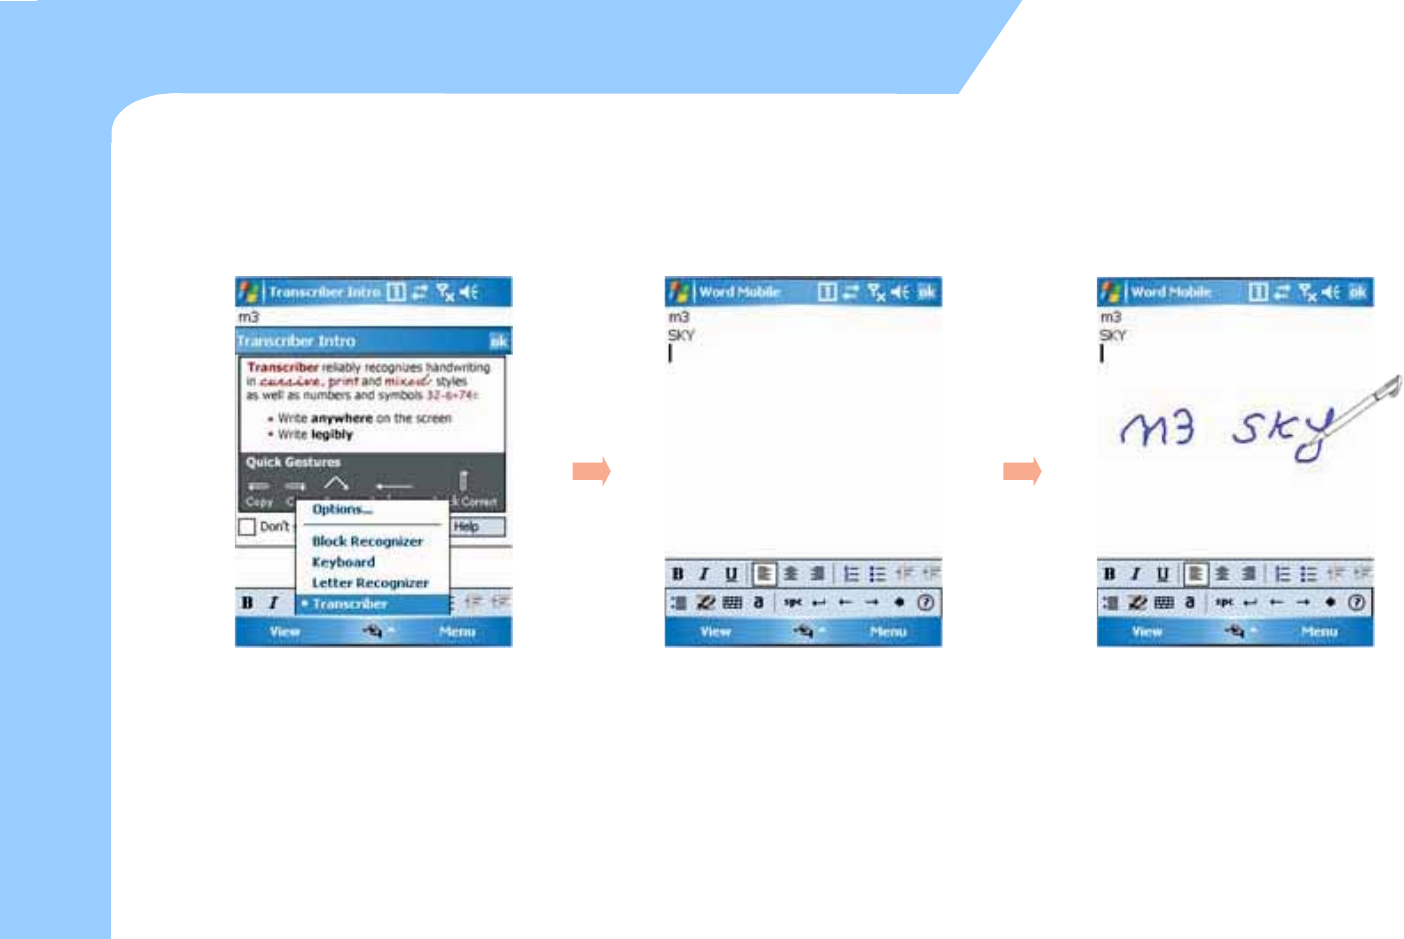
zUsing transcriber input
–Transcriber is a writing recognizer program. It provides you various writing input and input menu.
Input Screen (4)
Basic Usage
Select the arrow next to the
keyboard icon and then select the
Transcriber on the menu like the
picture.
This is the Transcriber input
screen.
If you input letters, numbers and
characters on the screen with the
stylus pen, it would be written
automatically on the place where
the cursor is blinking. You do not
have to concern about the input
box when using transcriber.
28
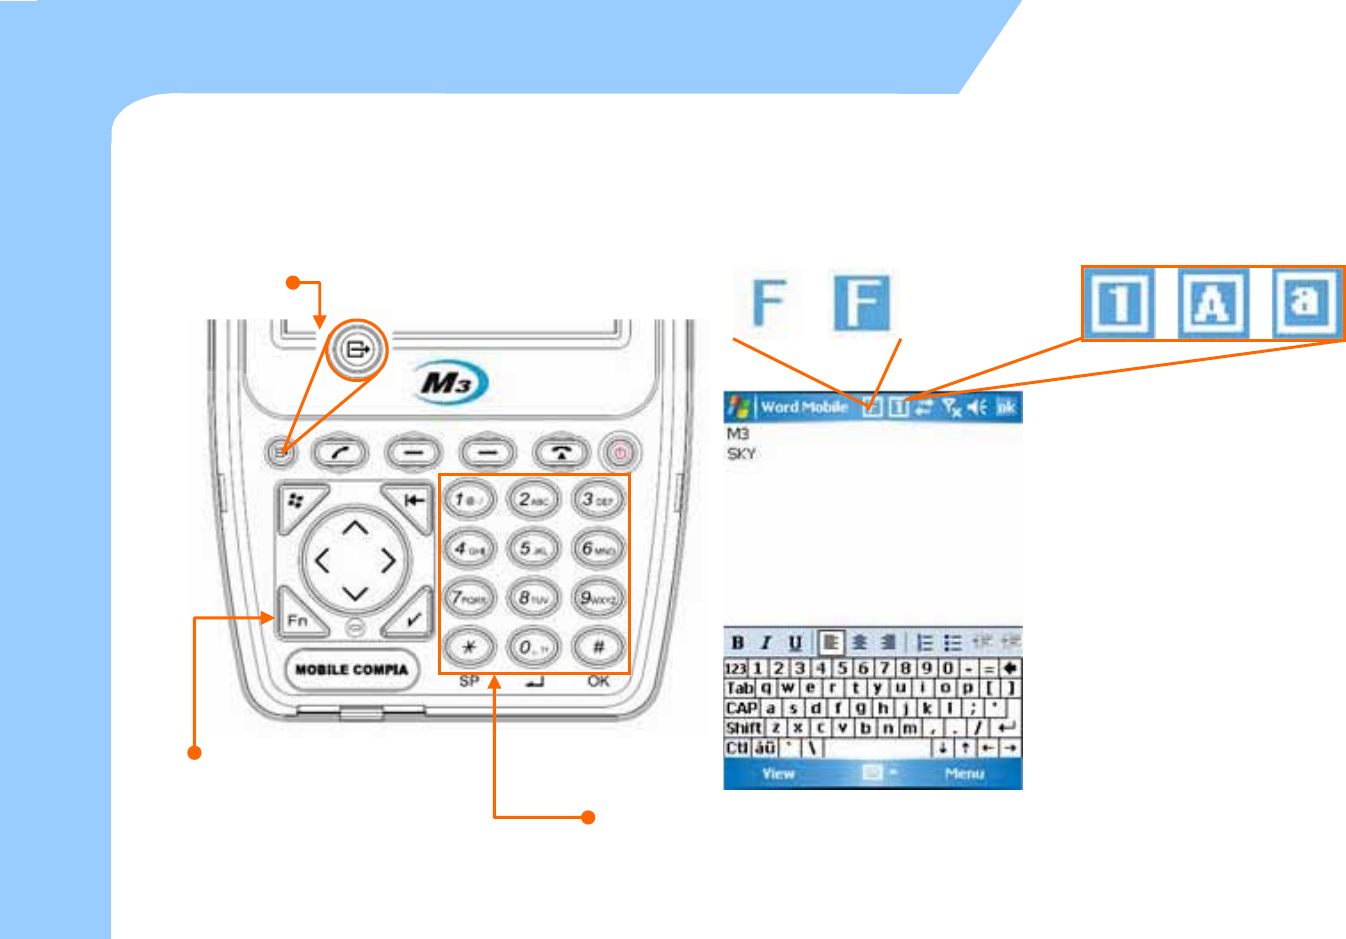
zInput by using Keypad
–You can input numbers and letters by using Keypad.
Input Screen (5)
Basic Usage
Convert ‘1 ,A, a’ using the input convert button
on the input screen as the left picture. Then you
can input capital letters, small letters, numbers
and characters using keypads.
For example, in the case of inputting the M3
SKY, Convert to ‘a’ > Keypad 6 > convert to ‘1’>
Keypad 3 > Convert to ‘A’ > Keypad 7(4 times)
> Keypad 5(twice) > Keypad 9 (3 times)
By pressing ‘*’, ‘0’,’#’ while ‘Fn’ button is
pressed, you can apply ‘Space’, ‘Enter’ and ‘OK’
function respectively.
Pressing ‘Fn’ Key will change the function mode
in following order : ‘Fn’ one time mode -> ‘Fn’
hold mode -> ‘Fn’ disable mode
Alphanumeric button
Input Key button
Function button

3. ActiveSync
ActiveSync Introduction
Installing ActiveSync
Synchronization of Data
ActiveSync Troubleshooting

ActiveSync Introduction
zSync is an abbreviation of “Synchronization” and refers to the process of making data in PDA
and desktop computer to be same by linking both data.
–Sync is an abbreviation of ‘Synchronization” and refers to the process of making data in PDA and desktop
computer to be same by linking both data. When either PDA or PC modifies data, it updates others to the
most recent data.
–Not all the data is synchronized at same time. It follows the option settings of ActiveSync, provided by
Microsoft.
zBy linking M3 SKY and computer, you can make data in both devices in the same status
(synchronization) or install, copy, move, delete programs for business purpose and others.
zIt is compulsory to install this program in order to install business programs, synchronize data,
back up and synchronize contact numbers in an address book, etc.
Do not connect USB of Cradle to desktop PC before installing Active Sync to desktop PC..
It may cause a desktop PC cannot recognize PDA since Active Sync contains PDA program
driver.
30
ActiveSync
31
zTo install ActiveSync
- Select the ActiveSync program in the CD provided, and then install it to
the computer.
–Once the installation is complete, connecting window will start. Connect
the cradle with PC using USB cable, and then dock the device on the
cradle.
–When the device is recognized on the PC, Connection will be established
after assigning the port for it automatically.
zThe definition of Partnership
–It is the process of paring PC with PDA in order to exchange the data each
other. Via this process, the data on the PC and on the PDA can be
synchronized.
ⲻThe synchronization is available with Outlook 2003 or above version. It is
not supported on the outlook express which is provided together with
Windows OS.
ActiveSync
ActiveSync install /connect
Please re-try the synchronization if connection is disturbed by strong noise or static.
–To install ActiveSync on the host computer, download version 4.1 or higher from the Microsoft web
site at http://www.microsoft.com. Refer to the installation included with the ActiveSync software.
–Microsoft recommends installing ActiveSync on the host computer before connecting the mobile
computer.
USB connection to PC

32
ActiveSync
zIf you see the Microsoft ActiveSync window in the desktop PC, you can find an option icon. If you click this
option icon, taps such as “Sync Options”, “Sync Mode”, “Rules” will appear.
z“Sync Options” is a menu that you can select an item to synchronize.
–Contact, Calendar, E-mail, Tasks, Memo, Favorite, Files, Media, etc.
z“Sync Mode” enables you to choose synchronization methods. According to the selected synchronization mode,
there are 3 following methods:
–Continuously while the device is connected: In this mode, if you want to carry out synchronization, connect the device to the
desktop computer. ActiveSync will immediately start synchronization and synchronize according to the user’s input of changes in
a computer or the device.
–Only upon connection: If you want to carry out the synchronization after the first synchronization on a manual basis, click Sync.
–Manually: In this mode, ActiveSync will not run automatically. In order to carry out synchronization, click Sync.
zSynchronization is the process of updating M3 and desktop PC after comparing their data. Any files including
personal organizer management data, etc in M3 can synchronize with those in the desktop PC.
Synchronization of Data
When Troubleshooting the ActiveSync, Check the solutions below.
zEnsure the correct USB cable is used in the cradle with USB port of the PC.
zEnsure the power input cable of M3 Sky or LCD.
zPlease re-try the Synchronization after Soft-reset or Hard-reset. Finish the running program
and save the data for sure before resetting.

Via GPRS/EDGE
Via Wireless LAN
Browsing the Web Site
4. How to use Internet
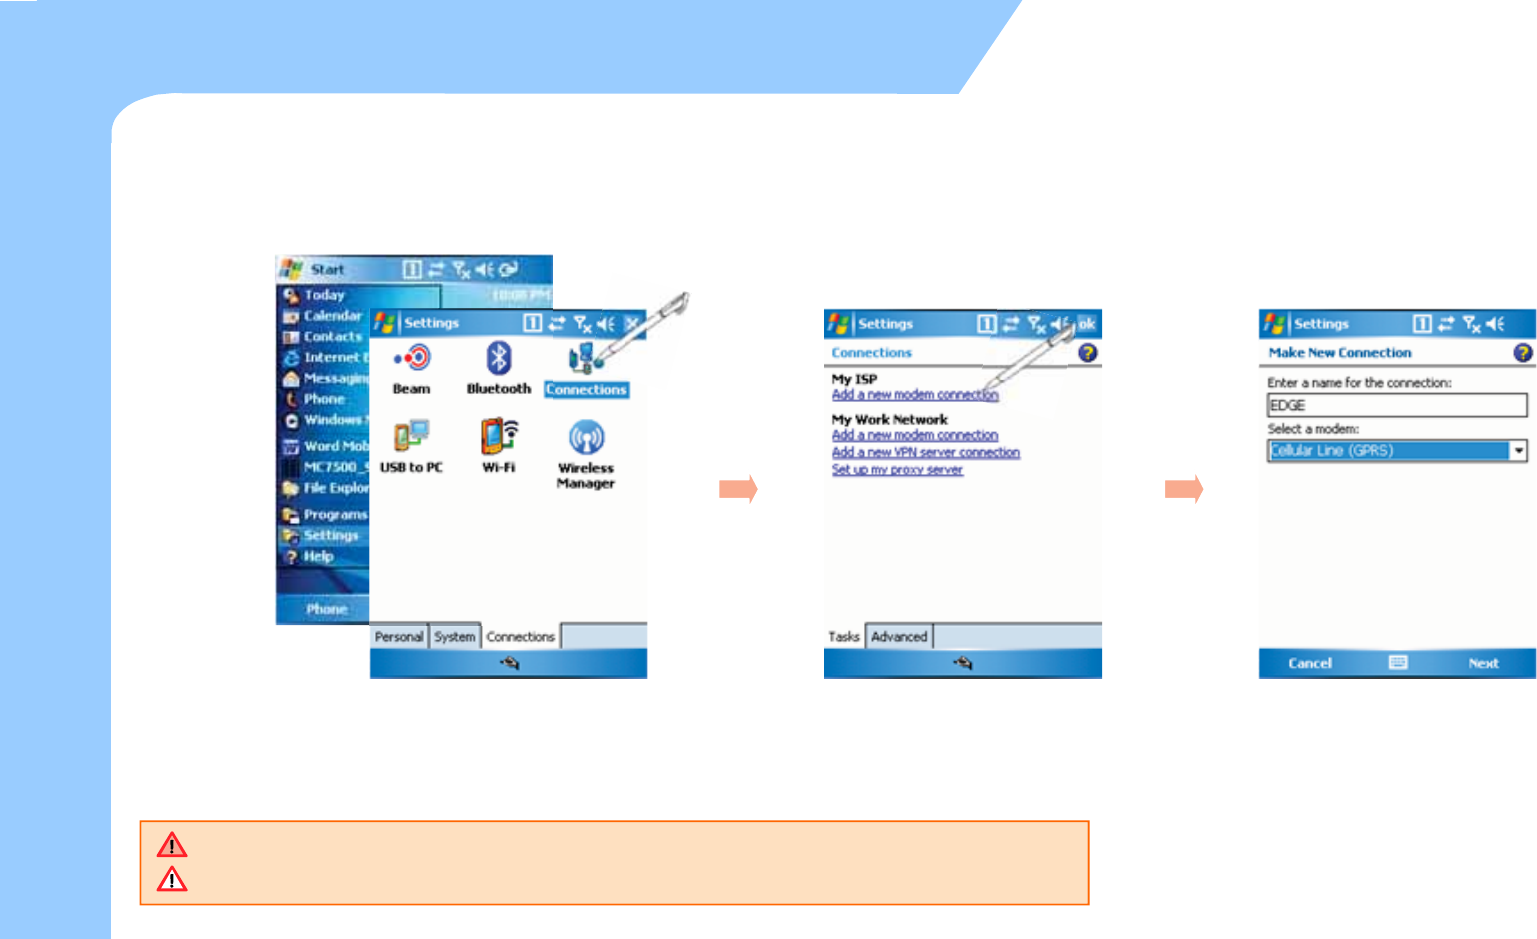
Via GPRS/EDGE (1)
How to use Internet
zTo connect to the Internet via GPRS/EDGE(1)
Tab ‘Start > Settings > Connections’ Select ‘Add a new modem connection’
of ‘My ISP’ in the ‘Connections’.
Put the name you want into the
‘Enter a name for the connection’.
Then select the ‘cellular Line(GPRS)’
in the ‘Select a modem’.
34
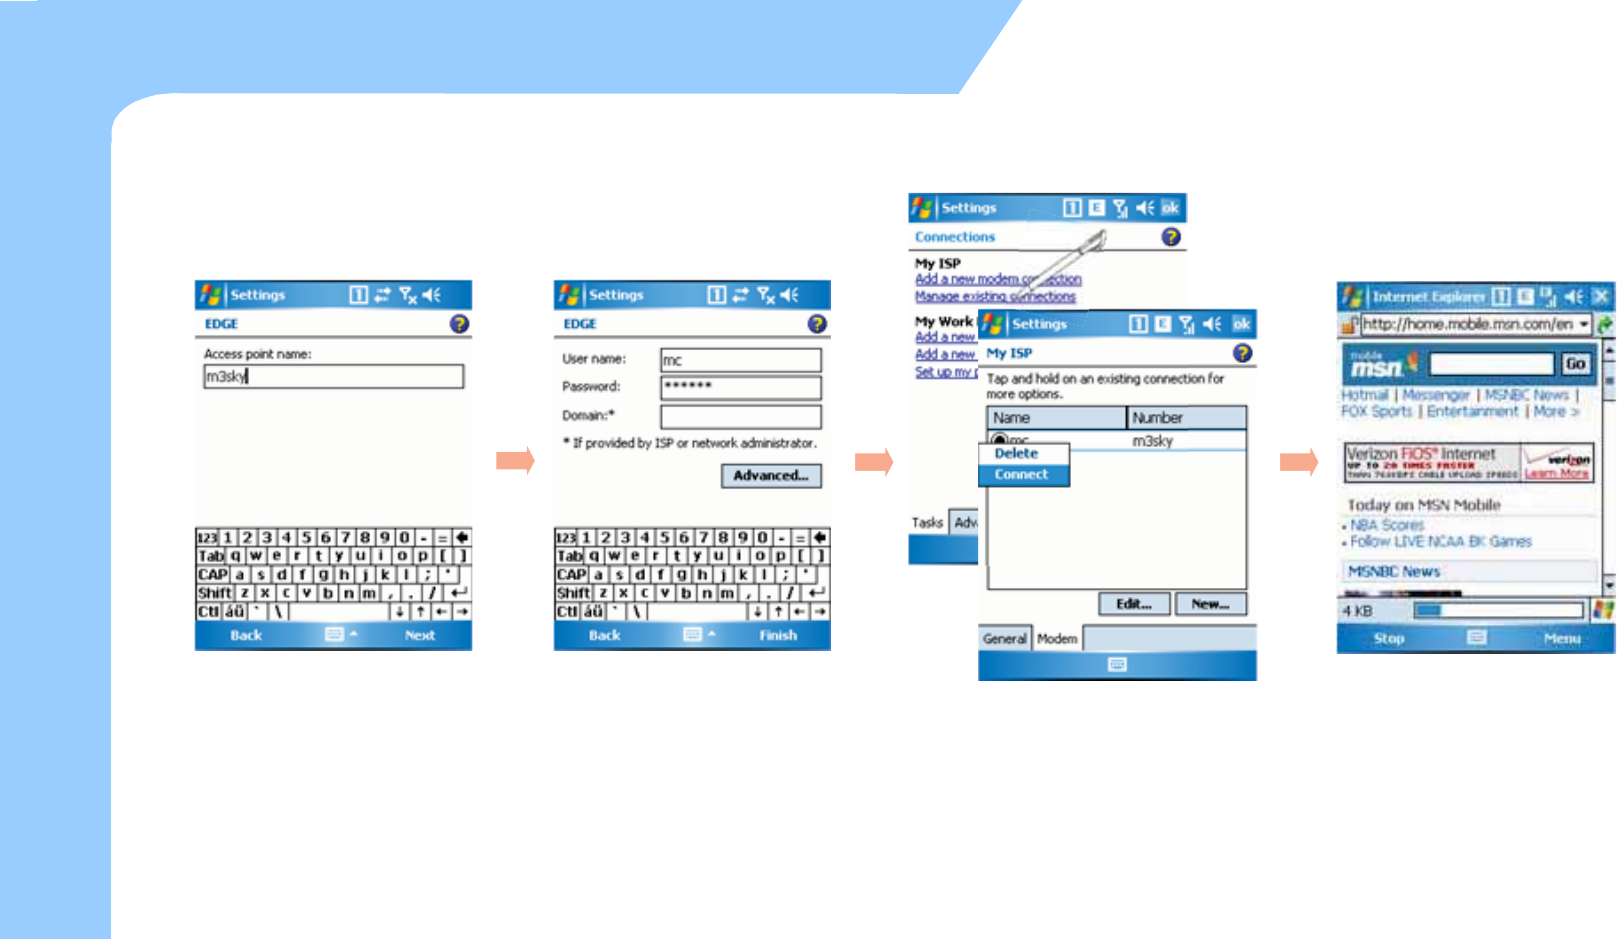
zTo connect to the Internet via GPRS/EDGE(2)
35
Via GPRS/EDGE (2)
How to use Internet
Input the Access point name
suitable to the SIM Card / Operator
company of Network then Tab the
‘Next’.
Tap the ‘Finish’ after input the
User name and password
according to the setting.
(In some cases, it is required to
set IP address at the advanced
menu.)
Select the ‘Manage existing connections’
on the Connections. Choose the ISP which
you want to connect to as picture above.
* The saved settings automatically applied
at connecting.
You can explore the Internet using
GPRS / EDGE connection.
36
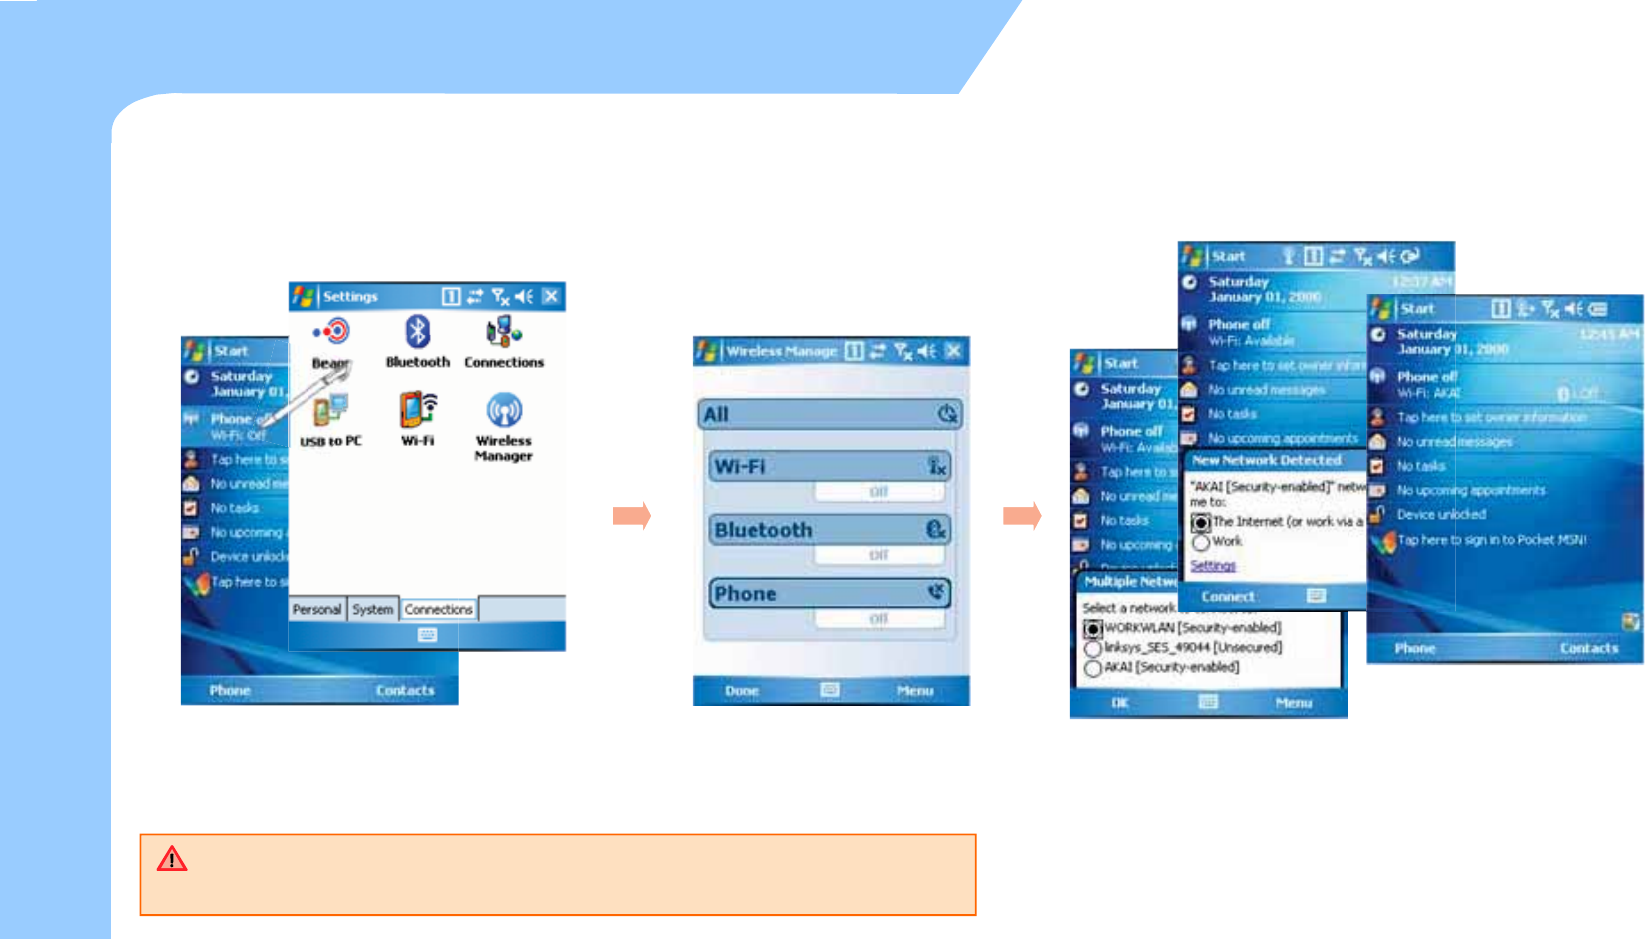
Via Wireless LAN (1)
How to use Internet
zYou can use the Wireless Network Via Wireless LAN.
zM3 SKY supports IEEE 802.11b and 802.11g.
zTo connect the Wireless LAN (AP must be on and functioning)
Wireless LAN is optional. You can only use WLAN, when the WLAN
module is built in to the device.
On the Today Main screen, you select
Wireless state bar or go to ‘Start >
Settings > Connections>’ Wireless Manager.
Tap the WI-Fi on the ‘Wireless
Manager' to turn WLAN on.
When the dialogue box is appeared, Select the AP you want and
then, you can connect the Network with it.
To connect directly on the Main Screen
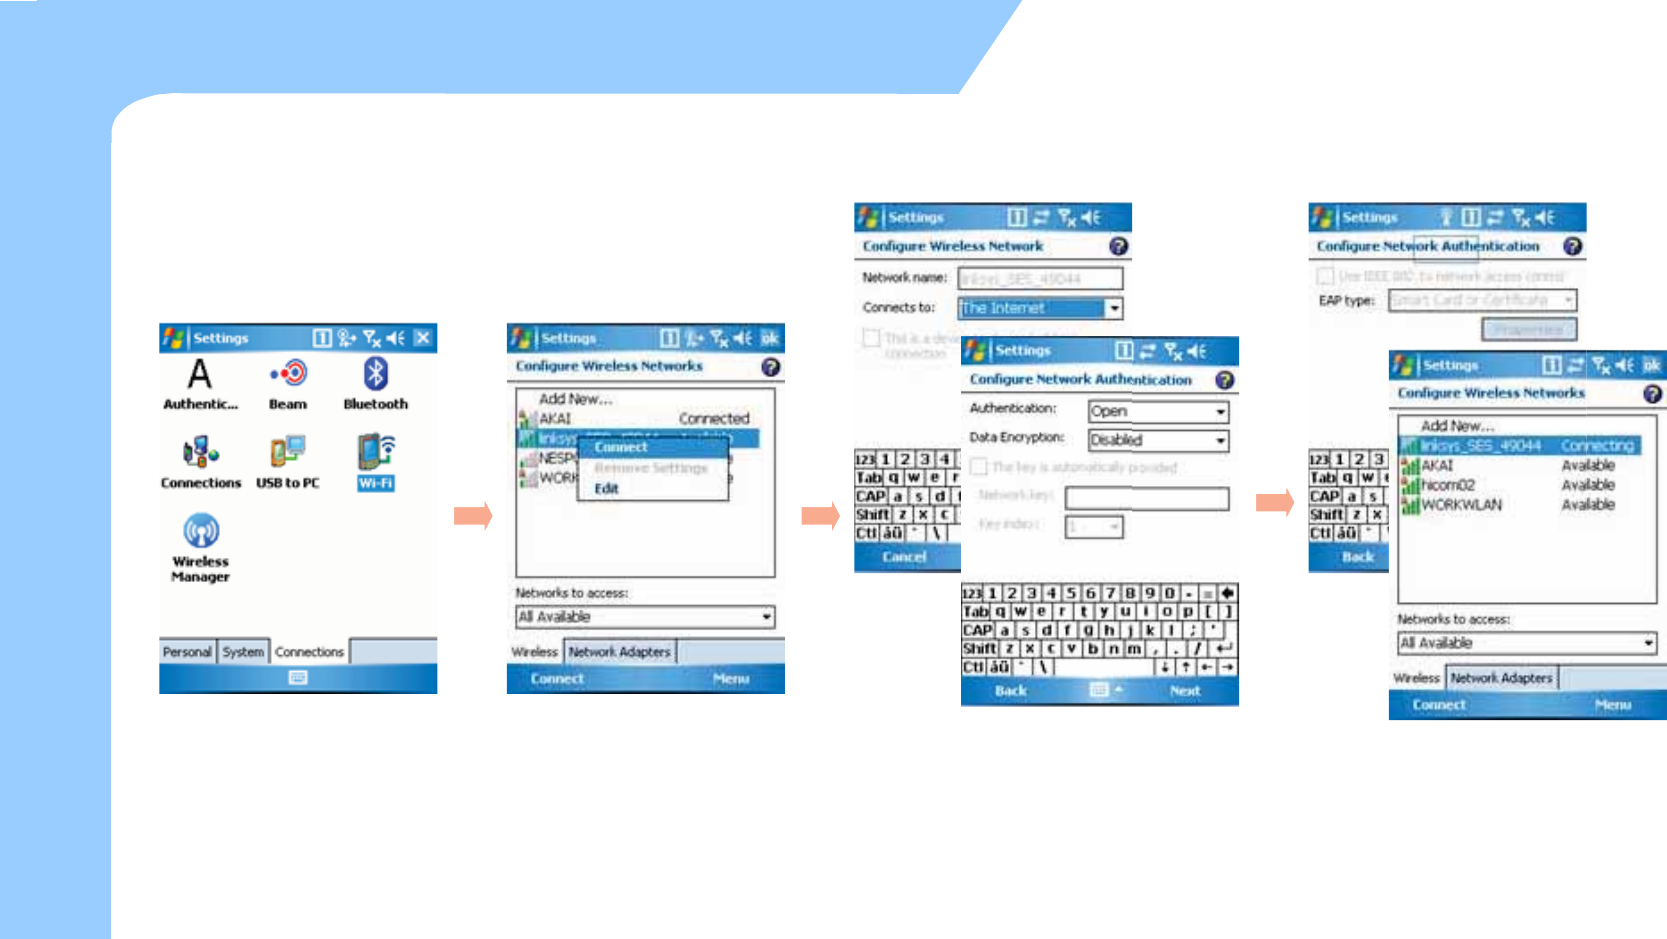
zTo connect via Wi-Fi menu
37
Via Wireless LAN (2)
How to use Internet
On the settings screen, you select
Wi-Fi Icon.
You can also tap Start > Settings >
Connections>Wi-Fi.
Configure the connect type then
click the 'Next'.
Configure the connect type then click the 'Next'.
Input the authentification data then click
the 'Next'.
After configure Network authentification,
tap the 'Finish'. You can see the wireless
Networks available.
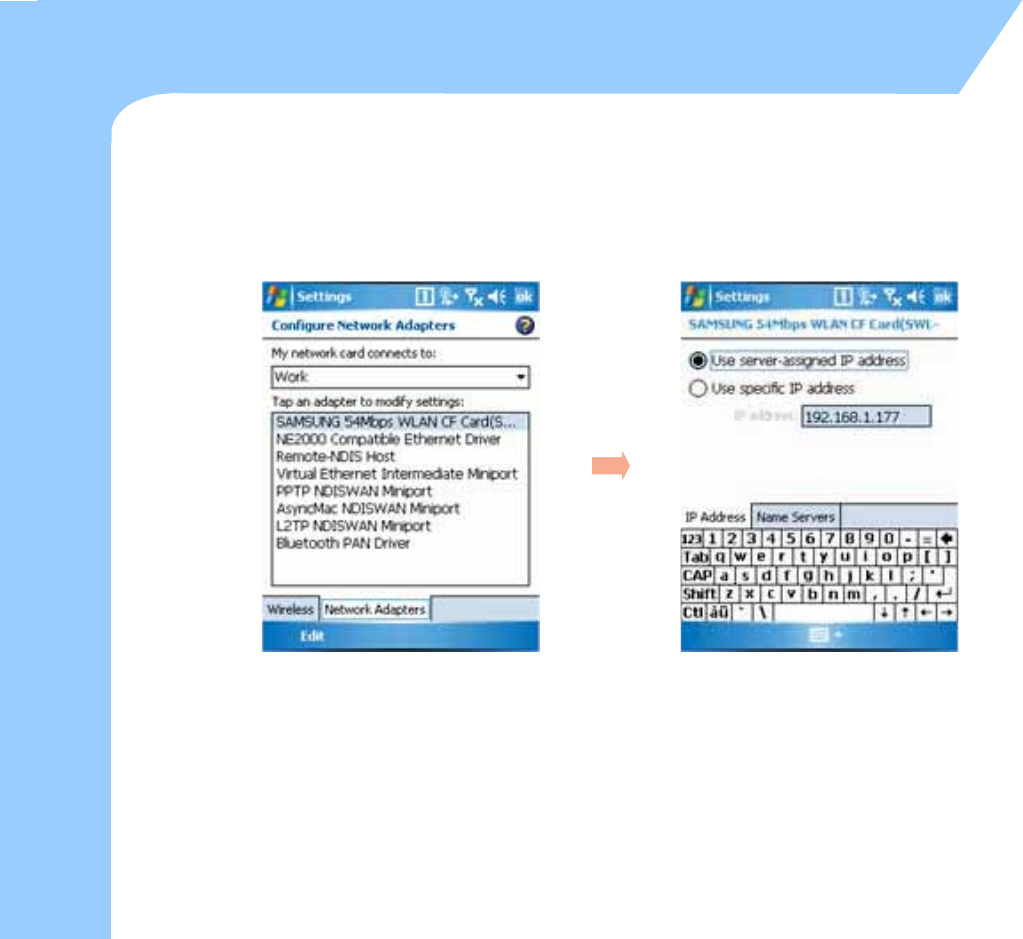
zContinue from the last page
–Configure DHCP / Static IP
38
How to use Internet
Via Wireless LAN (3)
Tap an adapter to modify setting
on the wireless LAN card and
select the 'Edit'.
If you configure the IP as DHCP,
Click the 'Use Server-assigned IP address.
If you configure the IP as Static,
Click the 'Use Specific IP address.
39
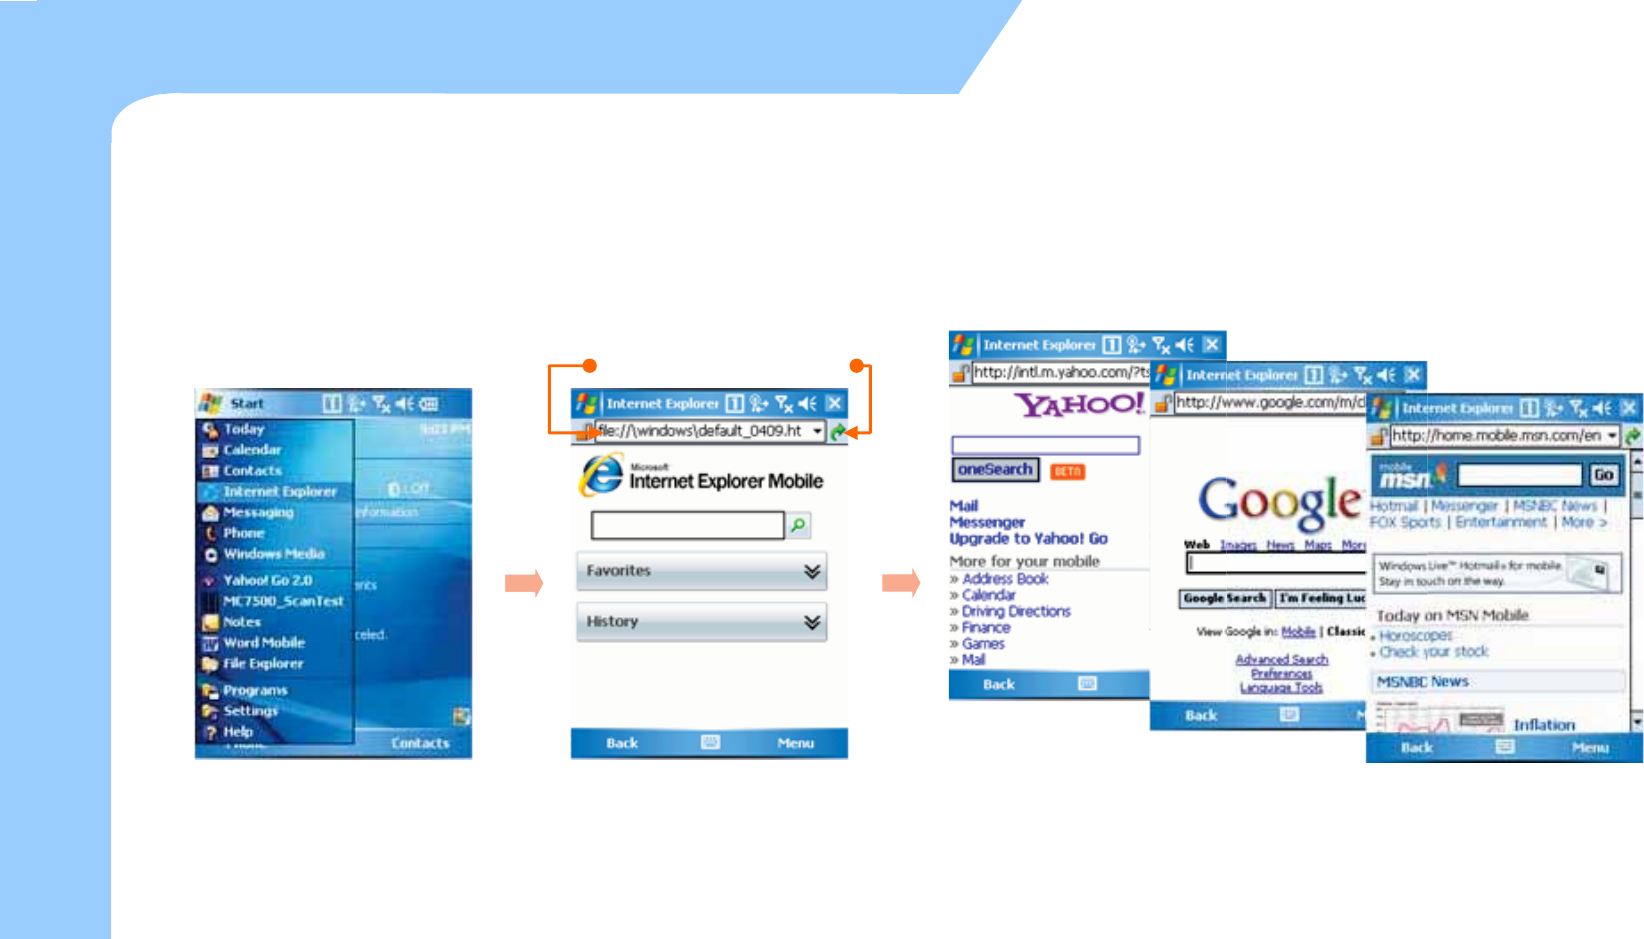
How to use Internet
Browsing the Web Site (1)
zMicrosoft Internet Explorer
- Via GPRS / EGDE , Wireless LAN and Activesync connection, you can browse the web.
- You can download programs and files by accessing the Internet.
To use the Internet Explorer
Tap 'Start > Internet Explorer This is the Internet Explorer
processing screen.
Address Window
Searching
Input the address you want on the address window in upper of the screen, then
click the 'search'. It will try to connect to that web address via Wireless network
that is connected.
zContinue from the last page.
40
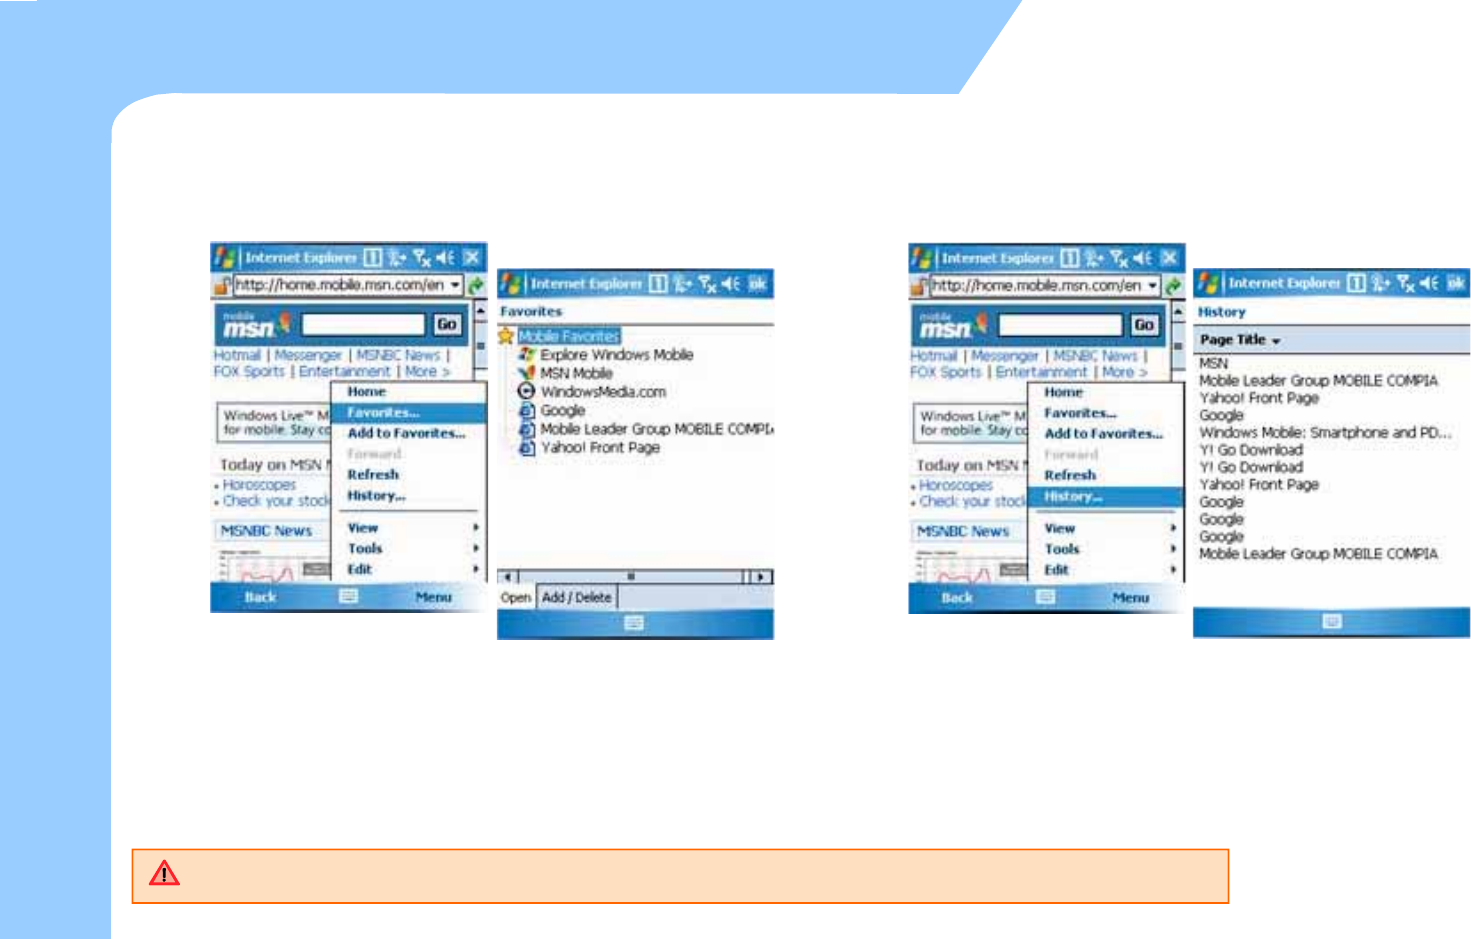
How to use Internet
Browsing the Web Site (2)
On the 'Menu > Favorites...' you can see the list of sites that you
have saved and browse to it directly. The favorite page is like the
picture above.
On the Menu > History... You can see the list of sites that you have
recently visited. The history page is like the picture above.
See the 'Start > Help' if you want to know more about how to use the Internet Explorer
zTo set up an e-mail account
41
How to use Internet
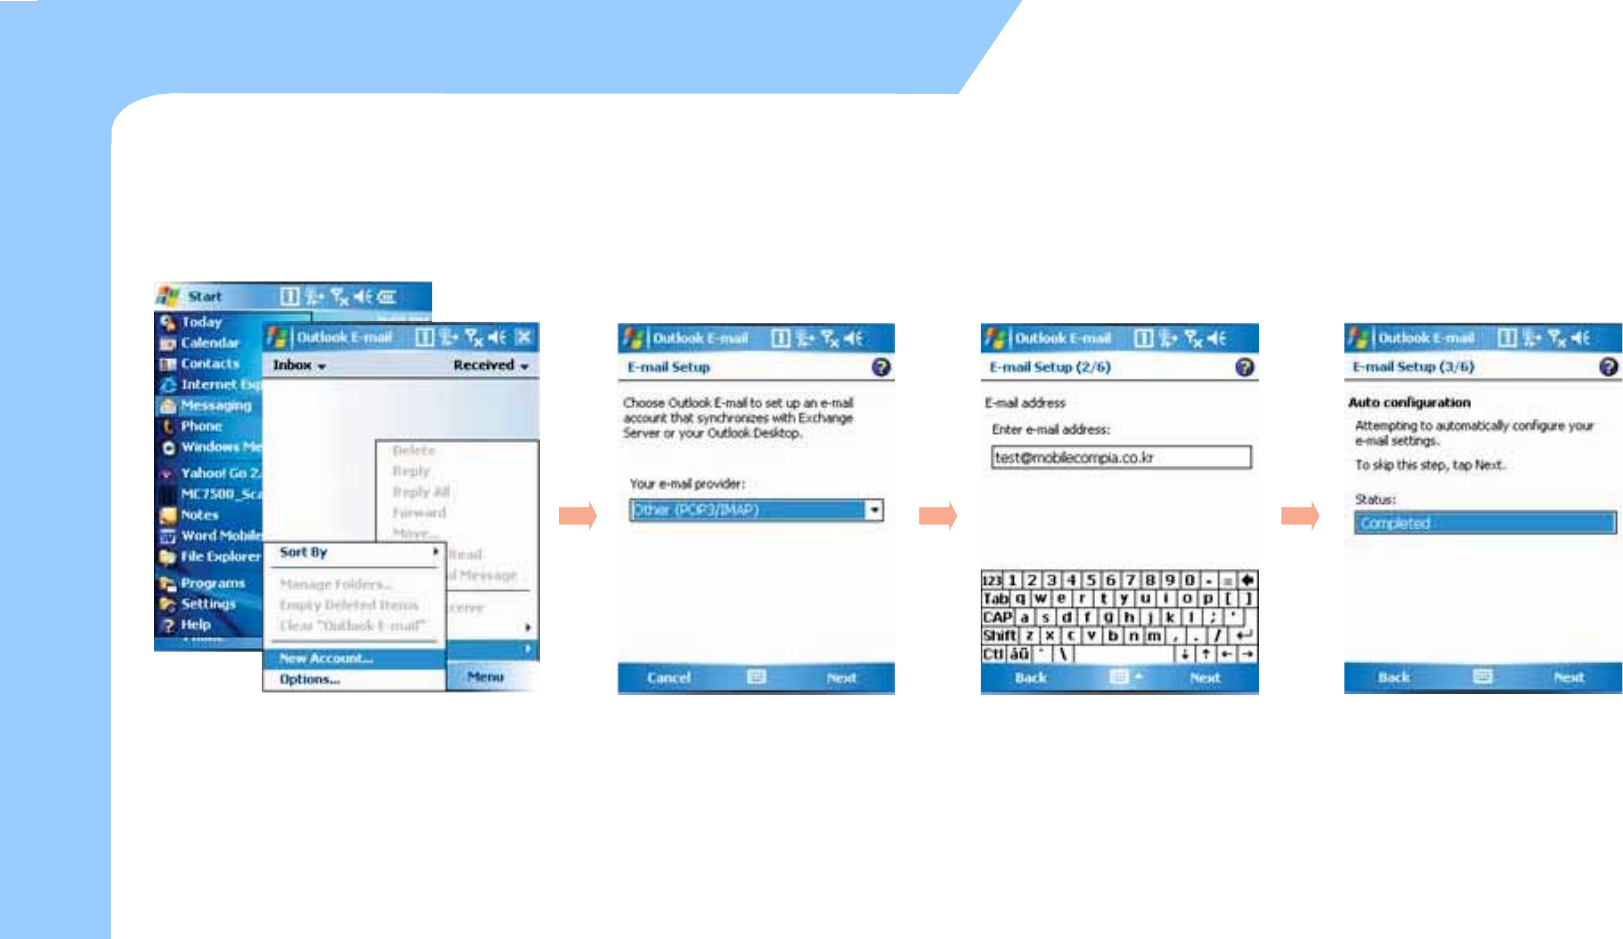
Browsing the Web Site(3)
Process the 'Start > Messaging'. Select the
'Menu > Tools > New Account...in the outlook
E-mail box.
Set an E-mail provider for 'other‘
then tap 'Next.'
Input the E-mail address on the
Enter e-mail address , then tap ‘
Next '.
When the Status is for completed,
tap the 'Next'.
zContinue from last page
42
How to use Internet
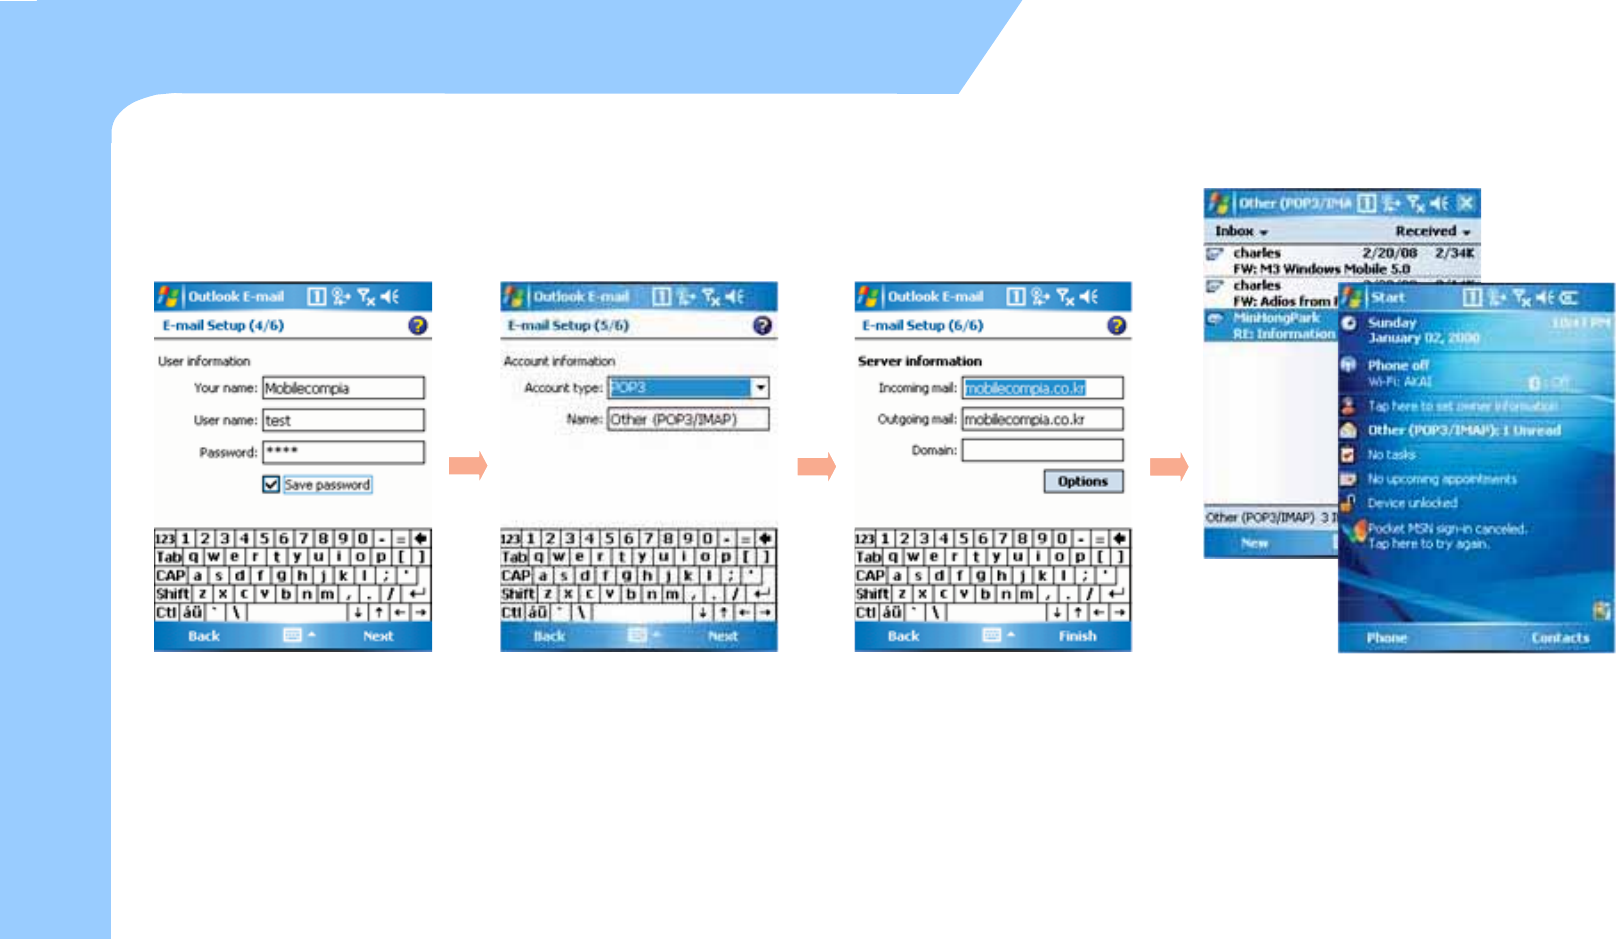
Browsing the Web Site (4)
Set an E-mail provider for 'other‘
then tap 'Next'.
Select the Account Type and put
the Name then tap 'Next'.
Input the 'Incoming mail, Outgoing
mail, Domain' then select 'Finish'.
* For detailed setting menu, please
click ‘Options’.
After finishing the setting you can send and
receive E-mail using the e-mail account.

zTo send and receive an E-mail
43
How to use Internet
Browsing the Web Site(5)
< To receive an e-mail>
Select the 'Message' on the 'Today'
Select the 'Send / Receive' in the 'Menu' and check the received mail.
<To send an e-mail>
After process the 'Message' program , select the 'New' .
You can send an e-mail when you select the 'Send' after writing a new
e-mail.

44
5. How to use the Phone
Init Screen
Phone Control
Phone call and receive
Phone book
SMS send and receive
Phone functions
Phone setting
Init Screen
45
How to use the Phone
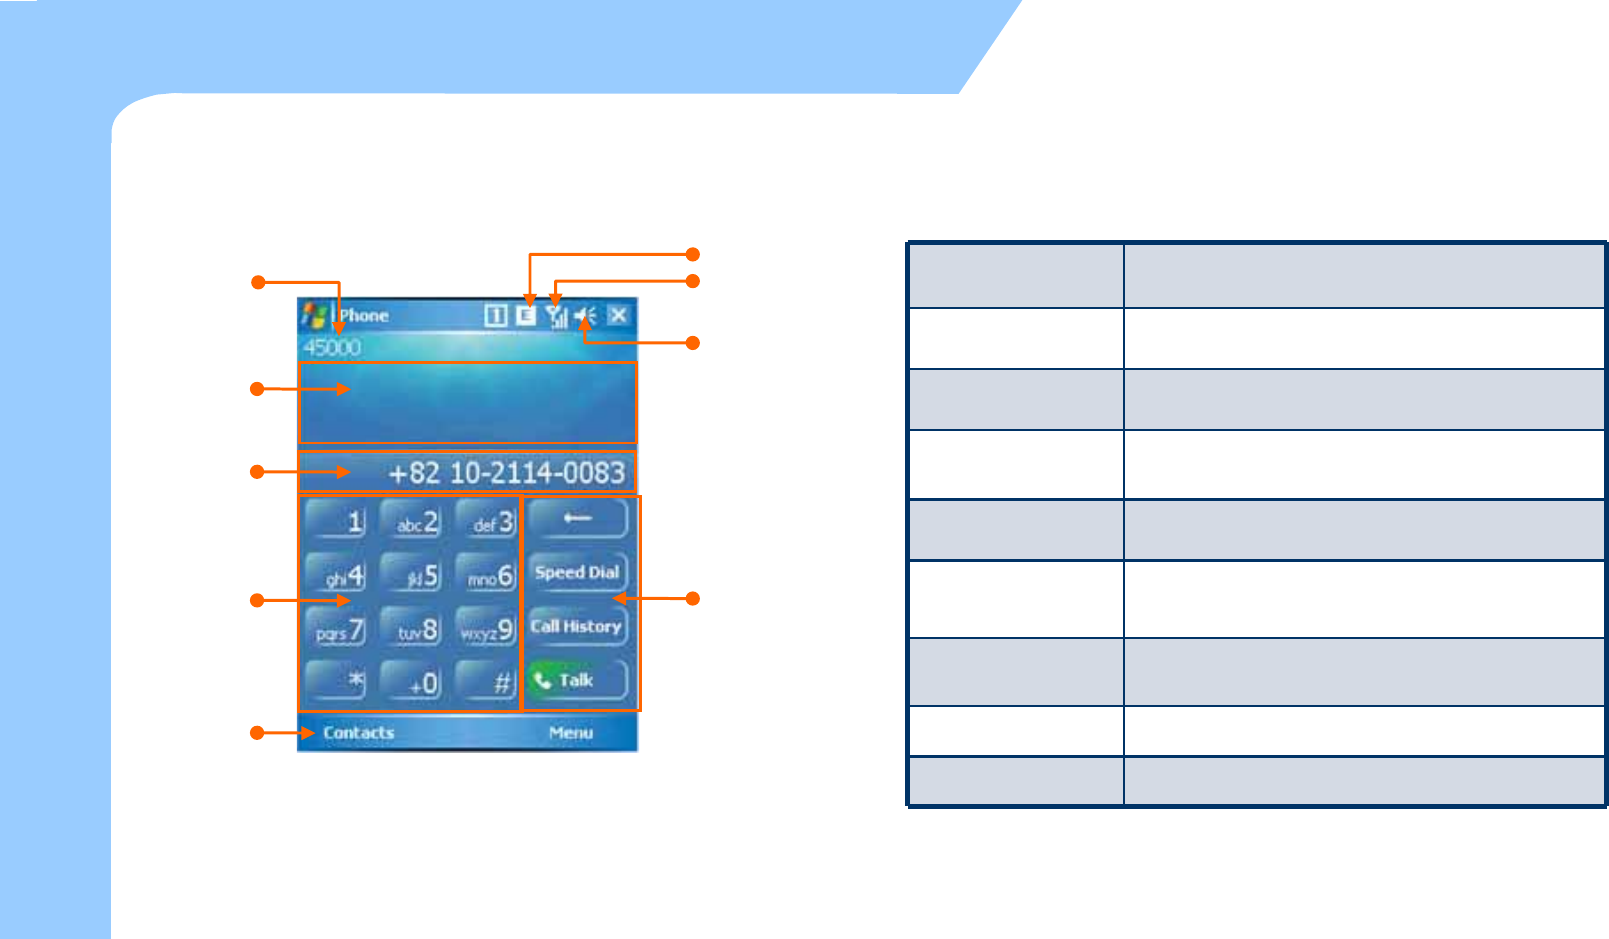
zPhone Main Screen
GSM Operator
Network Type
GSM / Network Status
Volume
Call Status
Input Number
Key Pad
Contacts
Phone Menu
GSM Operator It indicates the current Network Provider.
Call Status It shows Call Status.
Input Number It shows Inputted Numbers.
Key Pad It is used to dial the number and can be used
as speed-dial.
Contact It shows Phone Book Dialog.
Network Type It displays the availability of GPRS and EDGE
connection.
GSM/Network
Status It indicates the signal strength.
Volume It is Volume on/off and vibrate
Phone Menu Talk, End, Speed Dial, Call History, etc menu…
zPhone Program On/Off
46
Phone Control
How to use the Phone
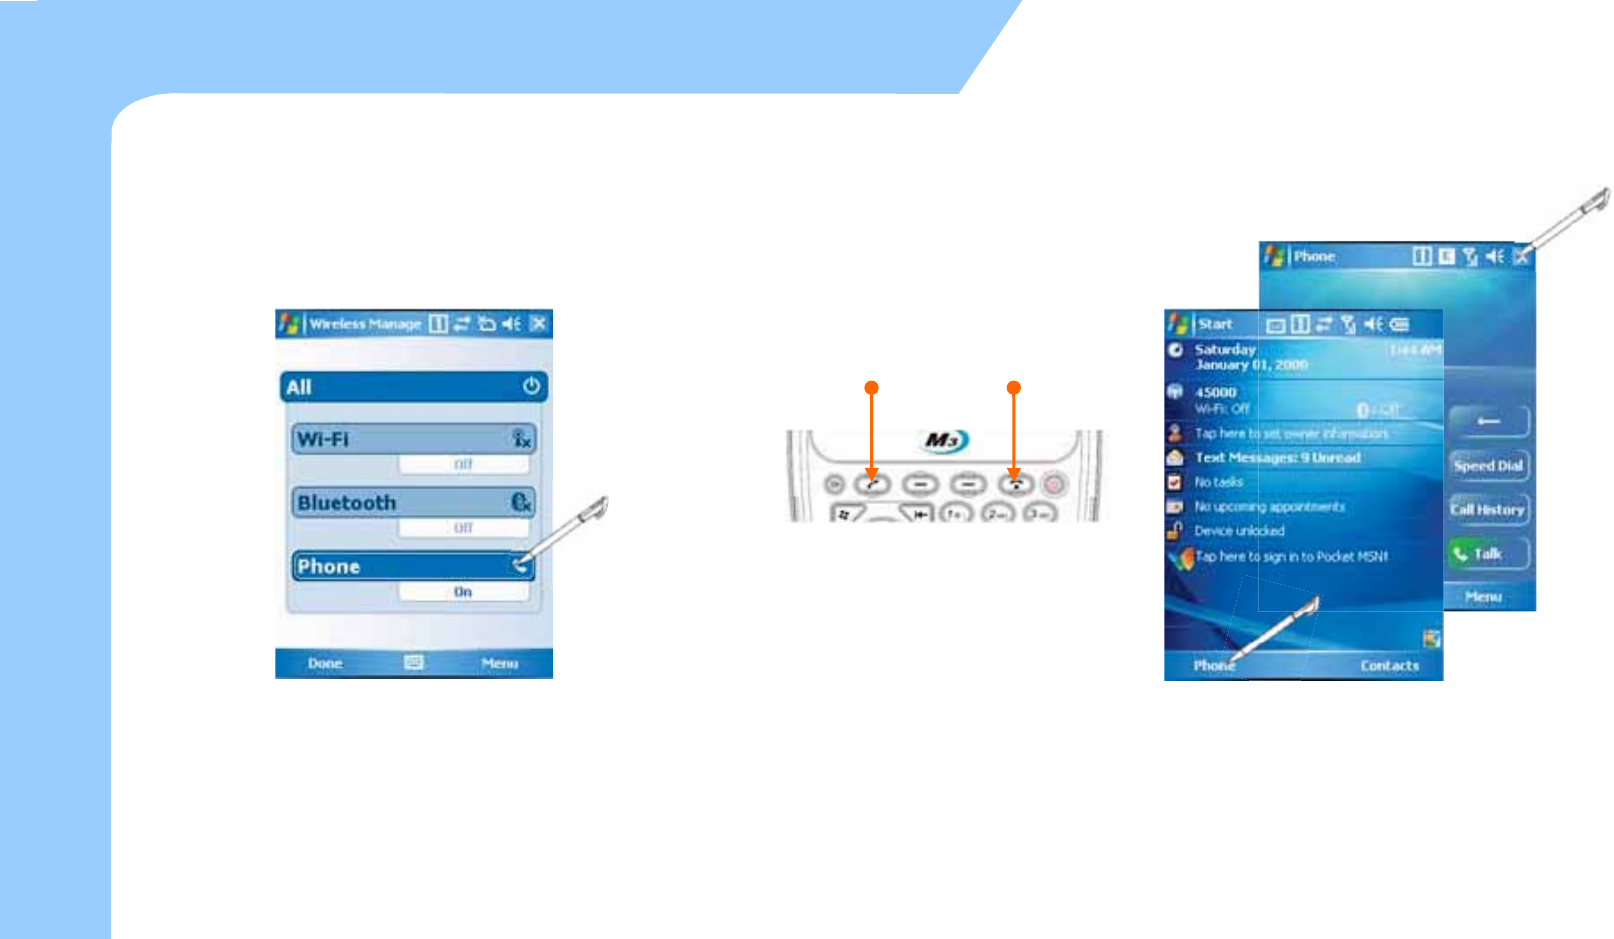
You can turn on and off phone
in Wireless Manager
zPhone Call Send/End
SEND END
Tap the Phone button on the left bottom of
the Today Screen and then you can process the
Phone program. Also you can finish the program
using the X button.
Select the SEND and END button like
the picture above to start and finish
the Phone program.
zPhone Call
47
How to use the Phone
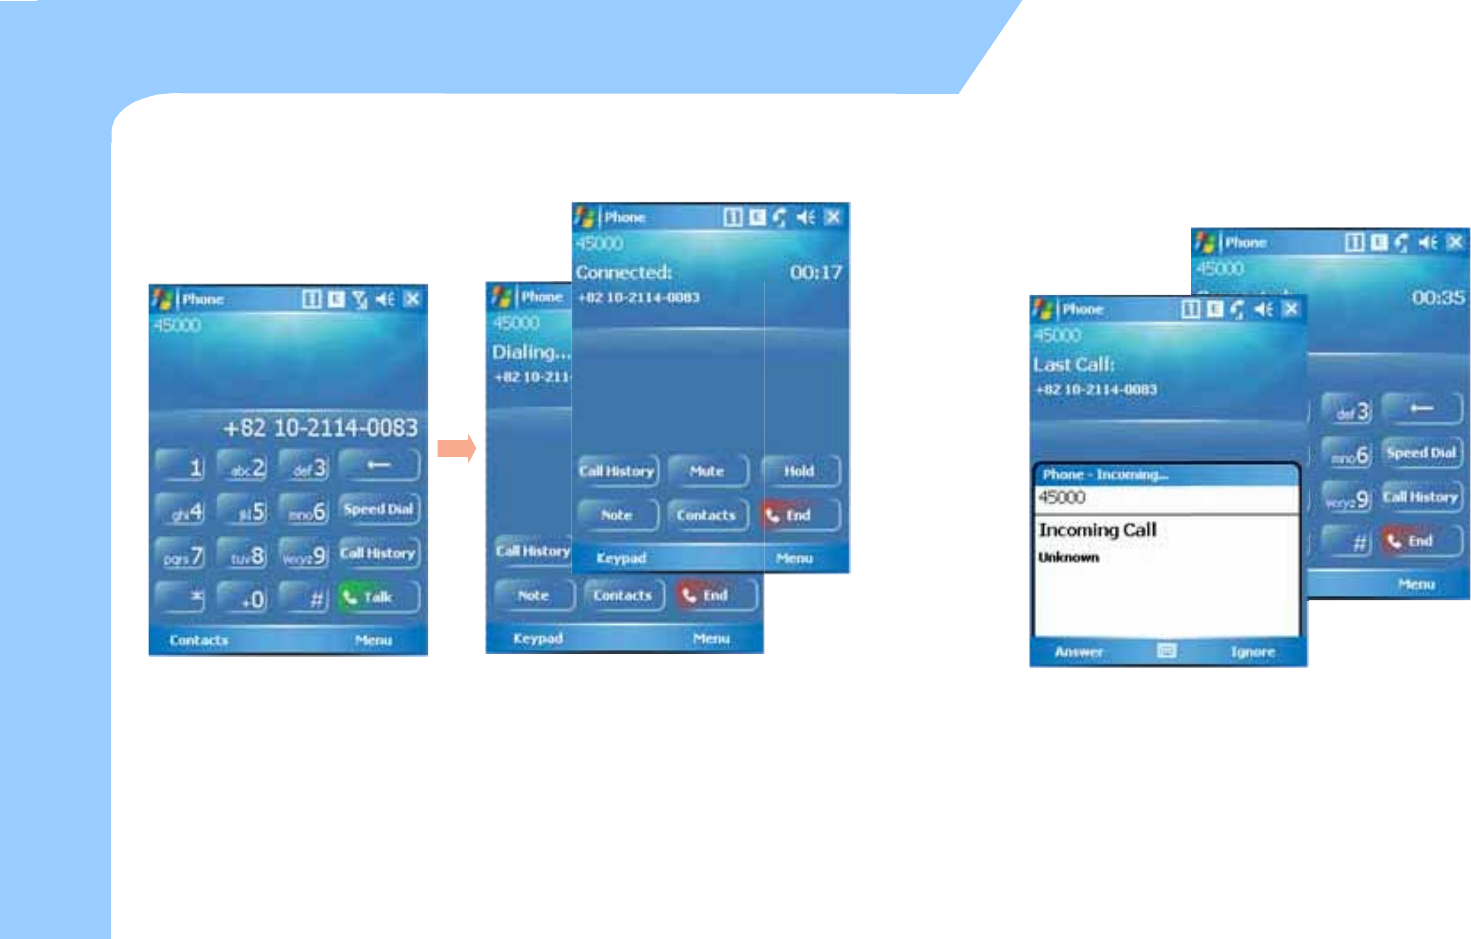
Phone Call and Receive
To make a call:
1.Input number via program keypad
or device keypad.
2.Make a call by pressing the ‘Talk’
button on the program, or pressing
‘SEND’ button on the device.
To hang up:
Press the ‘END’ button on the program or
on the device.
zPhone Receive
When you get the Incoming Call, you can receive
the phone call tapping the Answer button. If you
don’t want to receive it just tap the Ignore button.
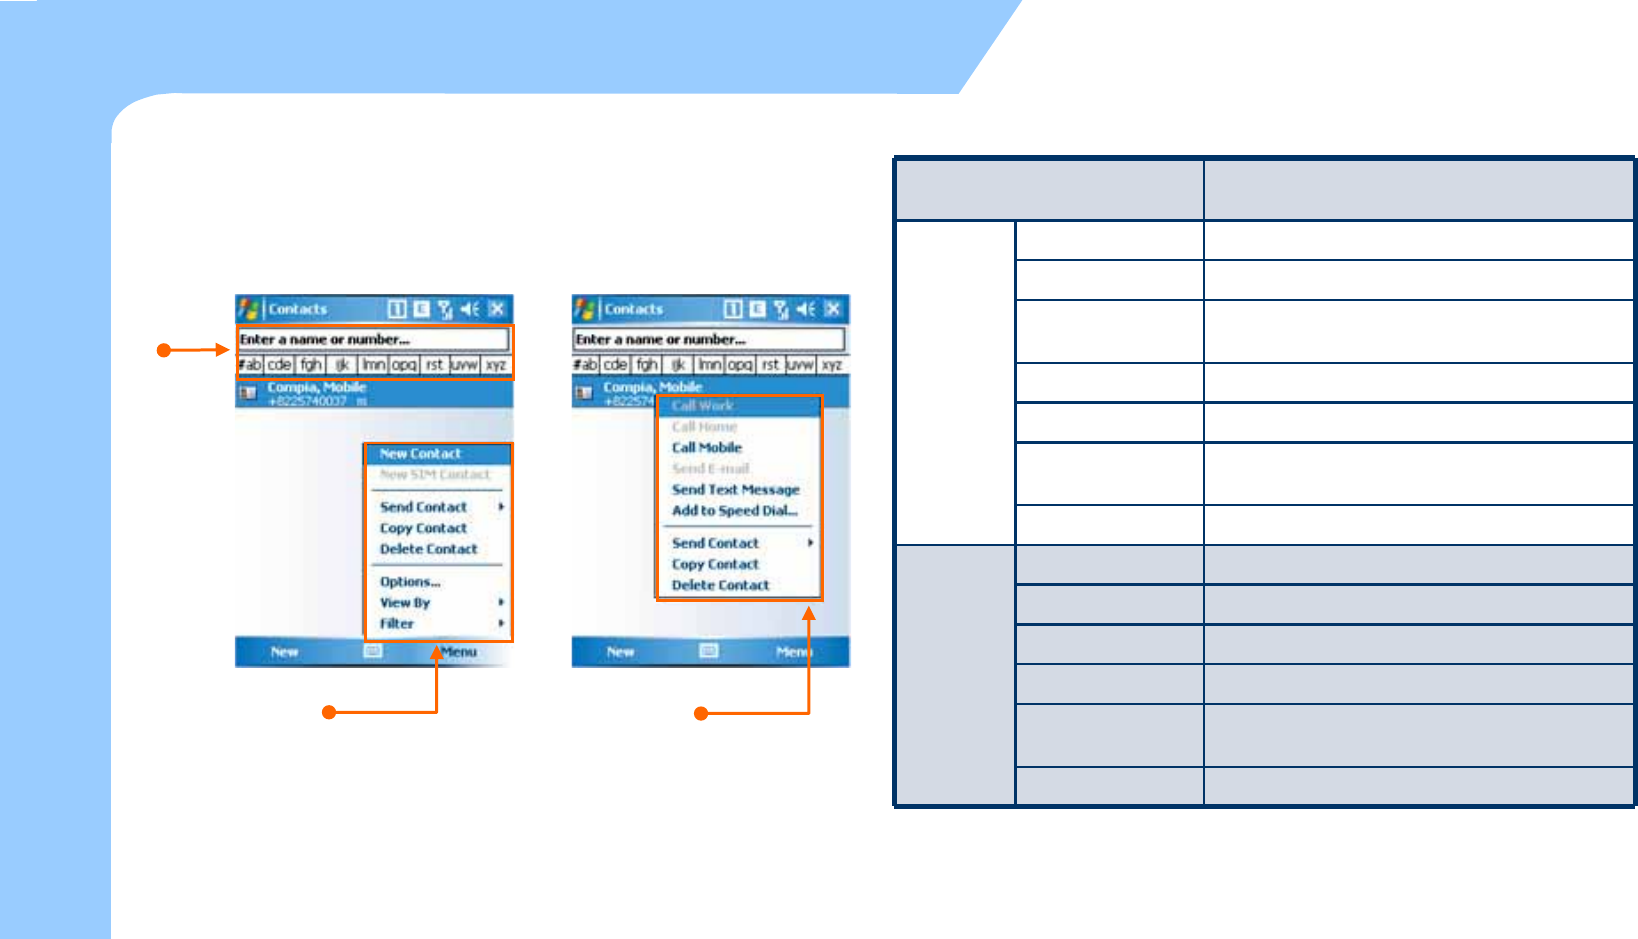
Phonebook
zTo use Phonebook
48
How to use the Phone
Searching
A name or
Number.
Contacts Menu Contacts Option
Searching Contacts You can search the contacts by writing the
name and number or tapping.
New Contact Input the new contact
New SIM Contact Input the contact to the SIM Card.
Send Contact Transmit the information of Contact by BEAM
or SMS.
Copy/Delete Copy or delete the Contact
Options Set the Options for Contact.
View By See the Contact by Type ( Name , Company,
Number … )
Contacts
Menu
Filter Filter the information you want.
Call W/H/M Call by the number on the Contact.
Send E-mail Send an E-mail by the address on the Contact.
Send SMS Send SMS by the number on the Contact.
Add to Speed Dial Add the number on the Contact to Speed Dial.
Send Contact Send the information of Contact by BEAM or
SMS.
Contacts
Option
Copy/Delete Copy and Delete the Contact.
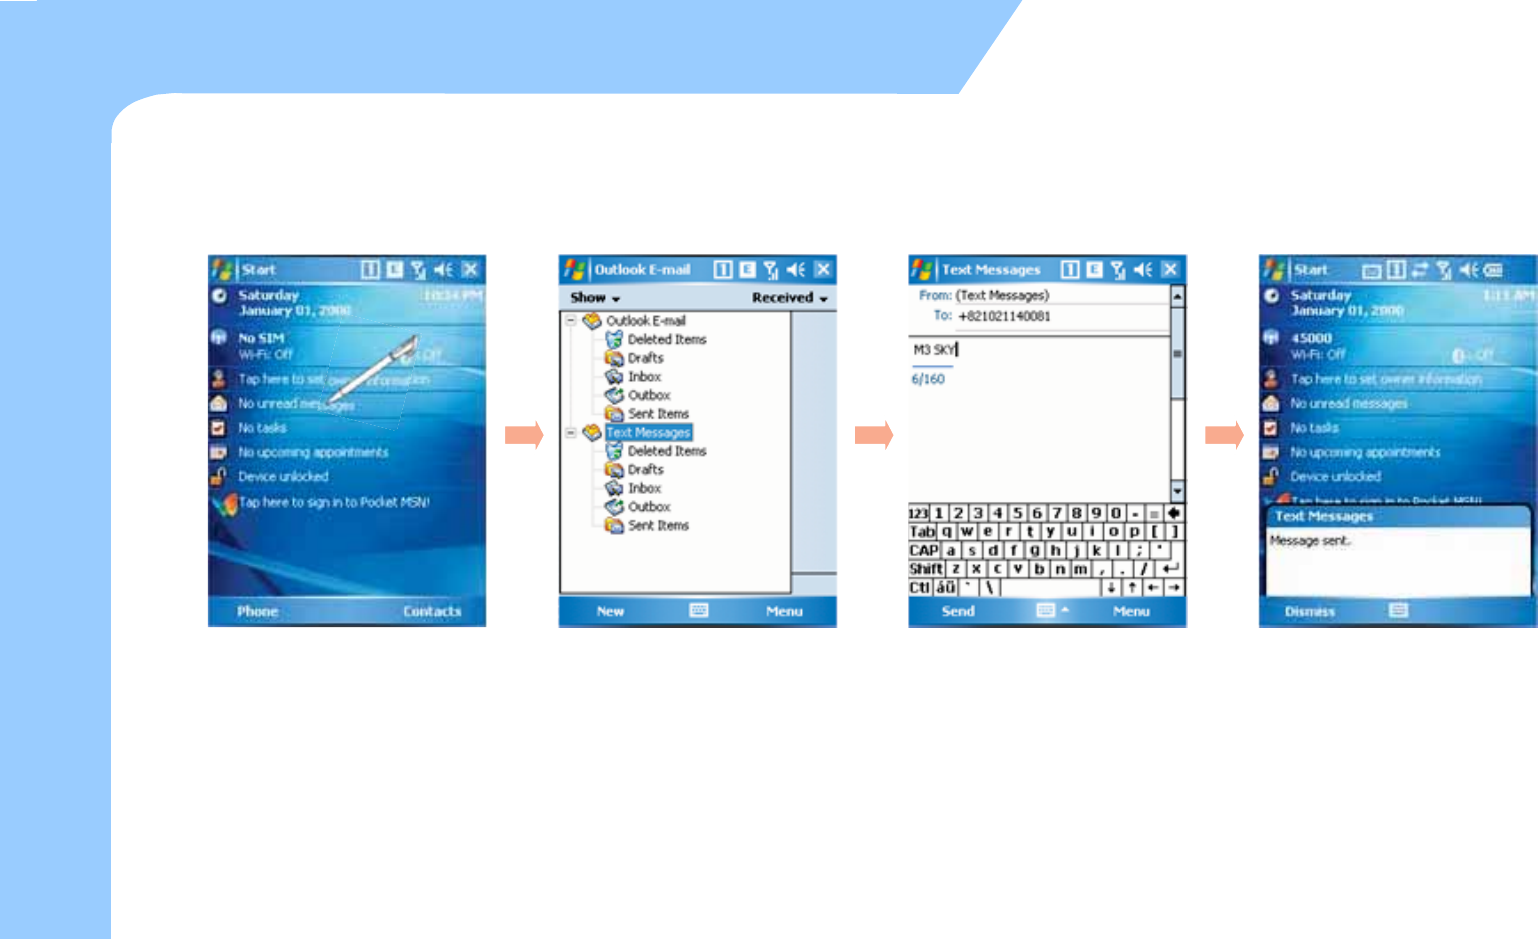
zHow to send SMS
49
How to use the Phone
SMS send and receive(1)
Select ‘message information’ menu
on the main screen to send SMS.
You can also send SMS by selecting
‘SMS send’ menu on Contacts or any
other applications.
Change to the ‘Text Messages’ on
the Message Program like the
picture above and tap the ‘New’ on
the bottom.
Input the phone number and
message. Tap the send to send
SMS.
You can see the pop-up screen
when SMS is sent successfully.
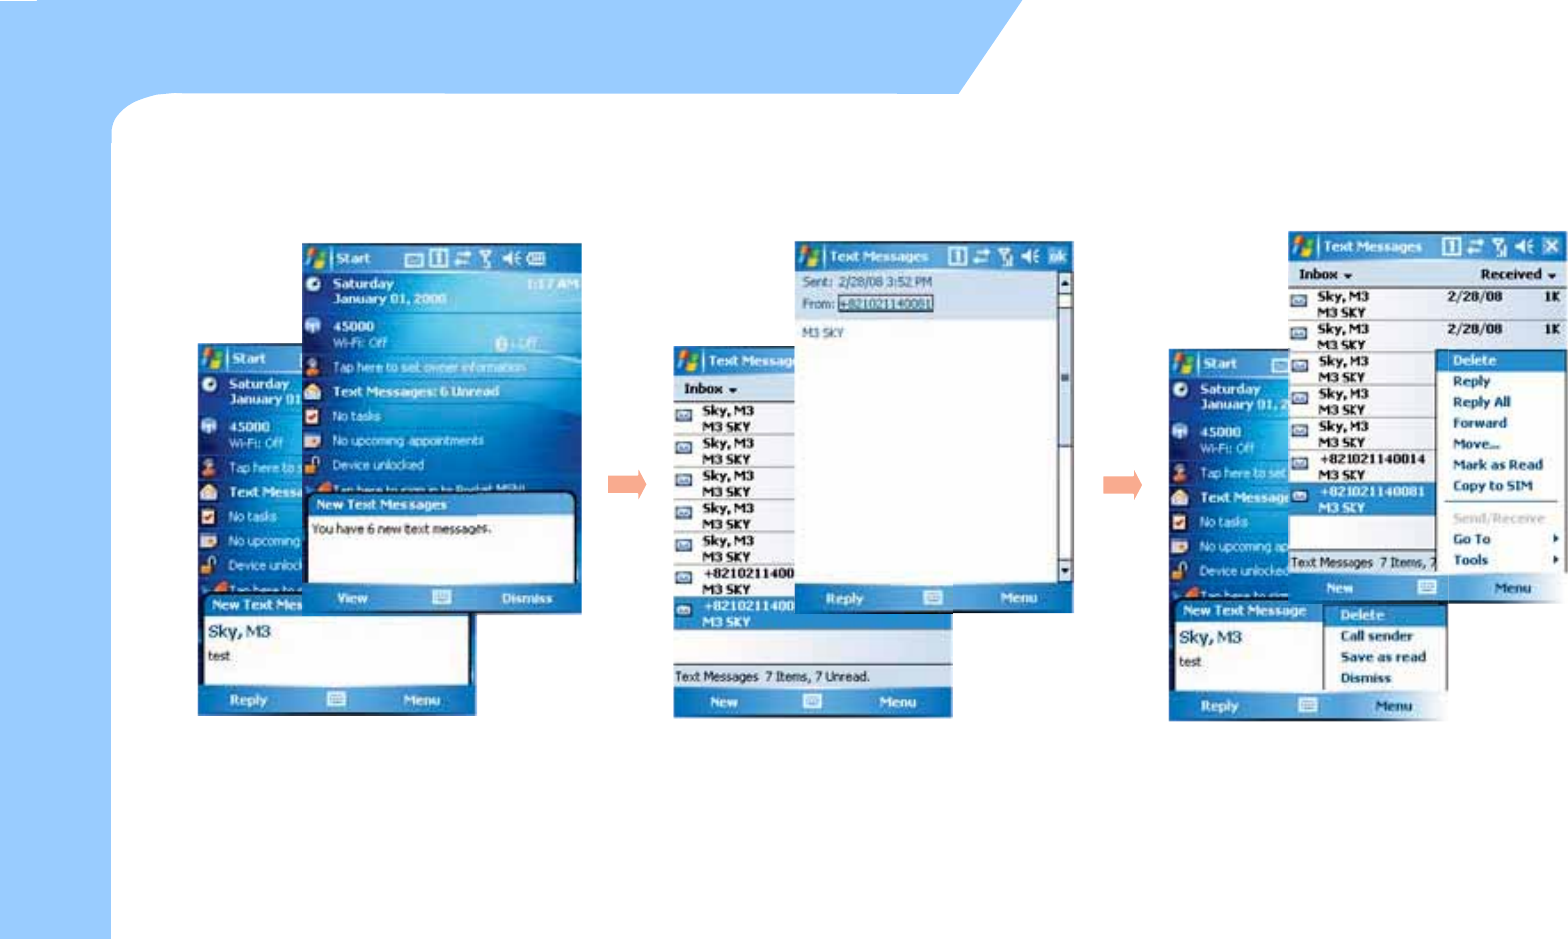
zHow to receive SMS
50
How to use the Phone
SMS sent and receive (2)
When connected to the GSM network,
new message arrival will be alerted a
picture above.
By tapping one of the received messages, the
content will be displayed on the separate
window as picture above.
Controlling received SMS can be done by using
the menu on the ‘New Text Message' alert
window or on the Text Messages program.
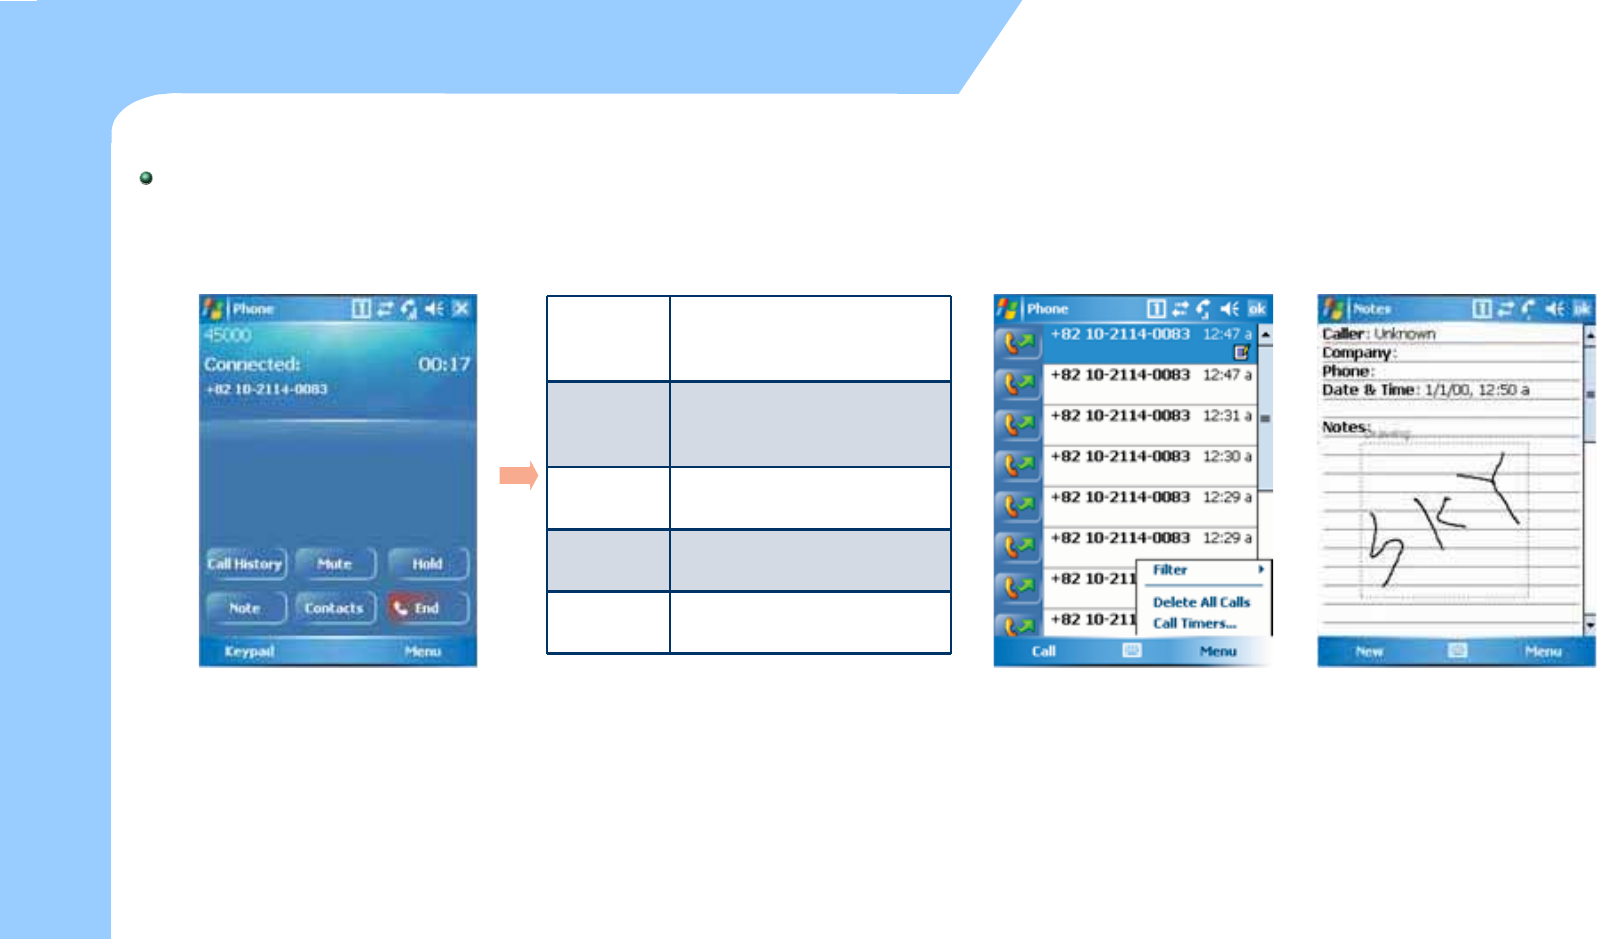
Controls while on the phone
Functions while on the phone
51
How to use the Phone
You can use various functions
when you select the button on
the bottom while talking on the
phone.
You can see the list of recent
calls by selecting ‘Call History’.
You can take a memo While talking
on the phone by selecting the Note.
Keypad
Change to Mode available to
input the Number on the
screen.
Mute
Setting for receiver not to
hear my voice while on the
phone.
Hold Hold for a moment while on
the phone
Contact Move to Contact
End End phone call
Featured functions while on the phone
Phone setting
Phone setting
52
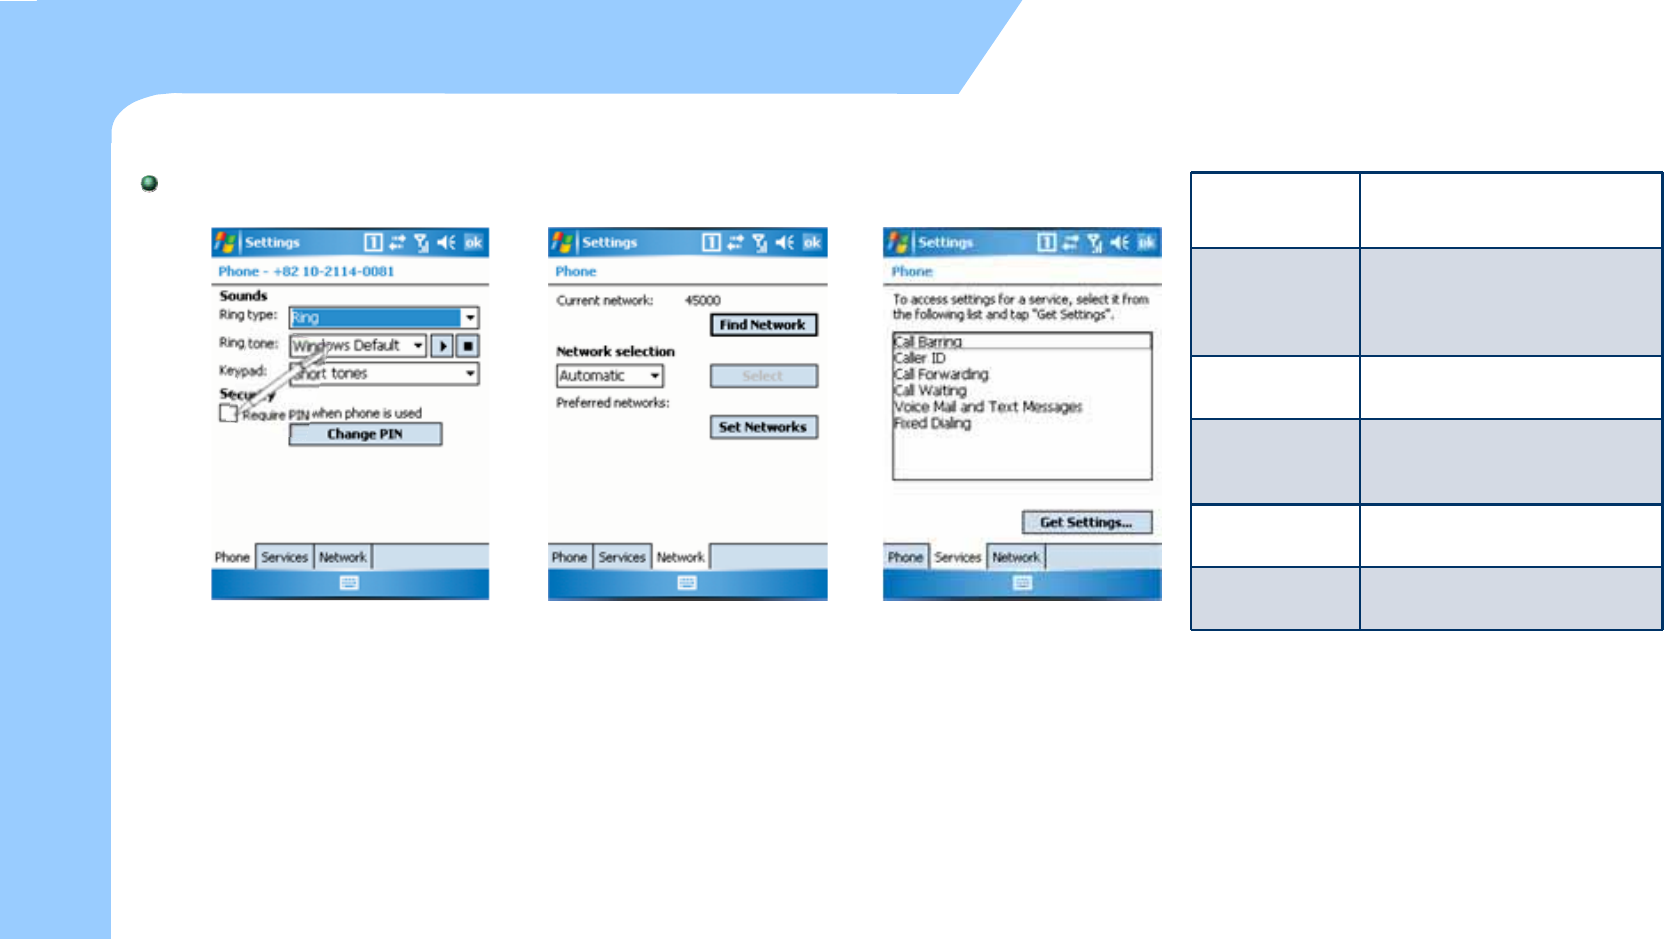
How to use the Phone
Tap the ‘Start > Settings > Personal
tap > Phone’ and in that menu you
can set the Security and Sounds.
Check the ‘Require PIN when phone
is used’ check box when PIN lock is
required.
Tap the ‘Start > Personal Tab >
Phone > Network’ to set an
information related to the Network.
( Change the Network ..)
Tap the ‘Start > Personal Tab >
Phone > Services Tab ‘ to set an
information related to the Service.
( In the Network or SIM )
Call Barring Block the calling to the specific
number.
Caller ID
Turn on or off the Caller ID
function. If it is enabled, your
number will be shown to the
receiver.
Call Forwarding You can forward the incoming
call to the other number.
Call Waiting
You can receive another call
while you are talking on the
phone.
Voice Mail Text
Messages
Set the SMS Service Center
number and Voice Mail number.
Fixed Dialing Limit the available phone
functions using PIN2.
Description of Service Menus

6. Usage of Device
Camera
Bluetooth
IrDA
GPS
Scanner
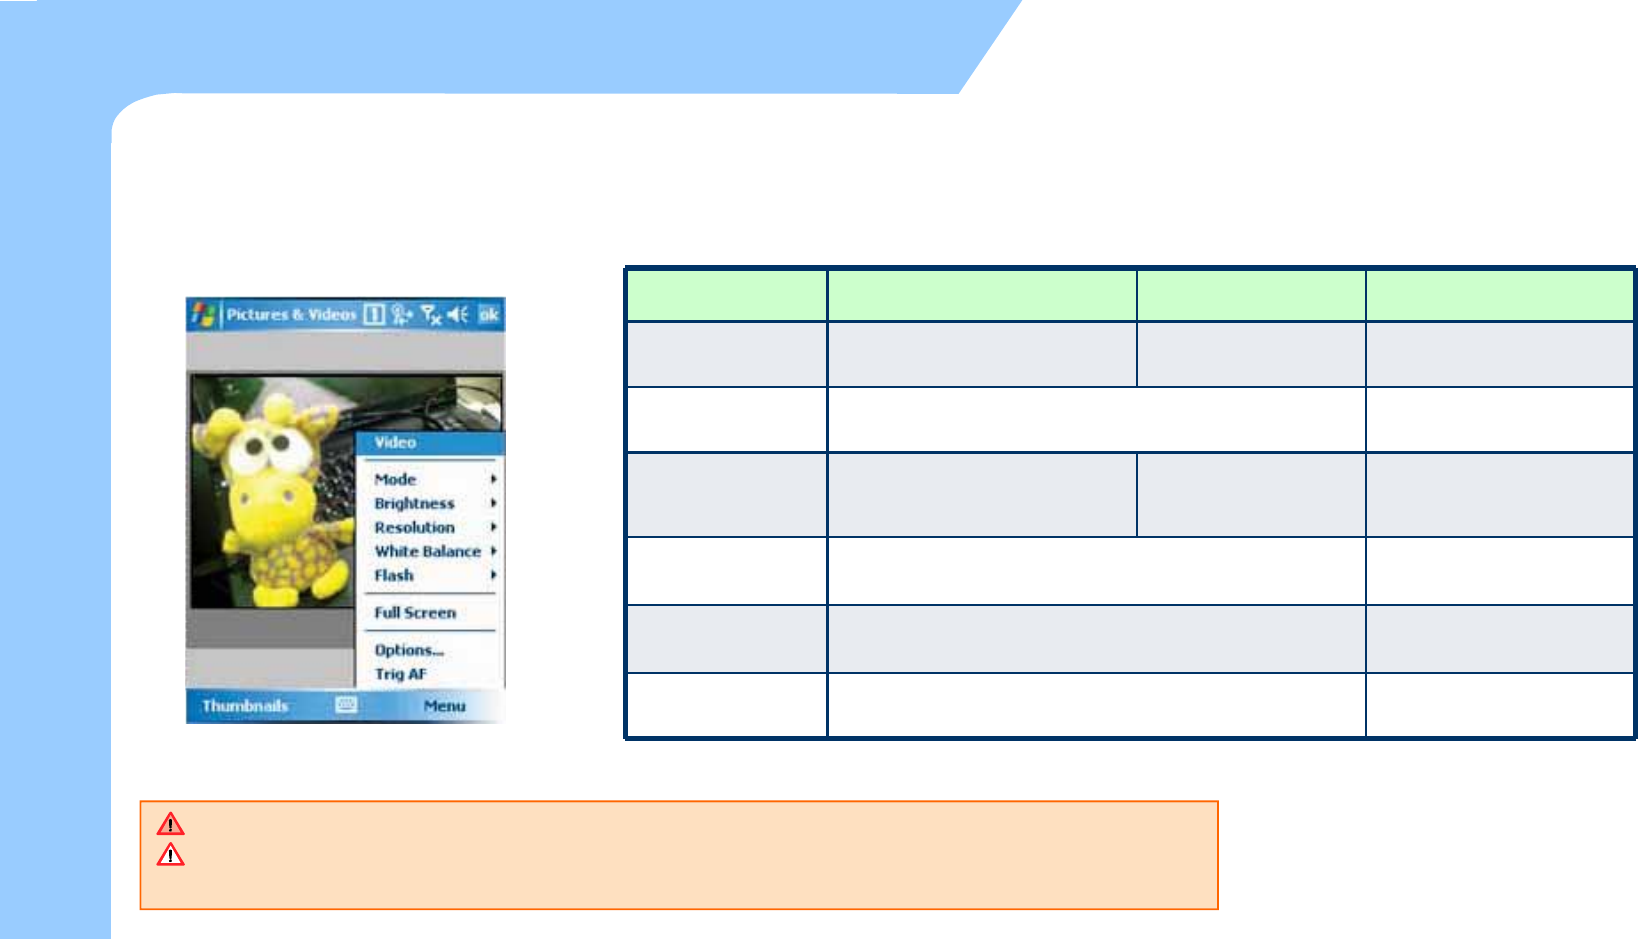
To use the Camera (1)
zNotice before taking pictures
- The camera equipped with the M3 Sky is supported 2 mega pixels.
Usage of Device
Function Still Video Comment
Mode Normal, Burst, Timer N/A Setting for taking photo
Brightness -3, -2, -1, 0, +1, +2, +3 Setting for Brightness
Resolution QCIF, QVGA, CIF,
VGA ,SVGA, SXGA, UXGA QCIF, QVGA Setting for size
White Balance Automatic, Sunny, Cloudy, Fluorescent, Incandescent Setting for White
balance
Flash Flash ON, Flash OFF Setting for Flash
ON/OFF
AF Trig AF Setting for Auto Focus
Camera Program Processing Screen
Camera is optional. On the device with no built-in camera, Camera function can not be used.
QCIF(176x144), QVGA(320x240), CIF(352x288), VGA(640x480), SVGA(800x600)
SXGA(1280x960), UXGA(1600x1200)
54
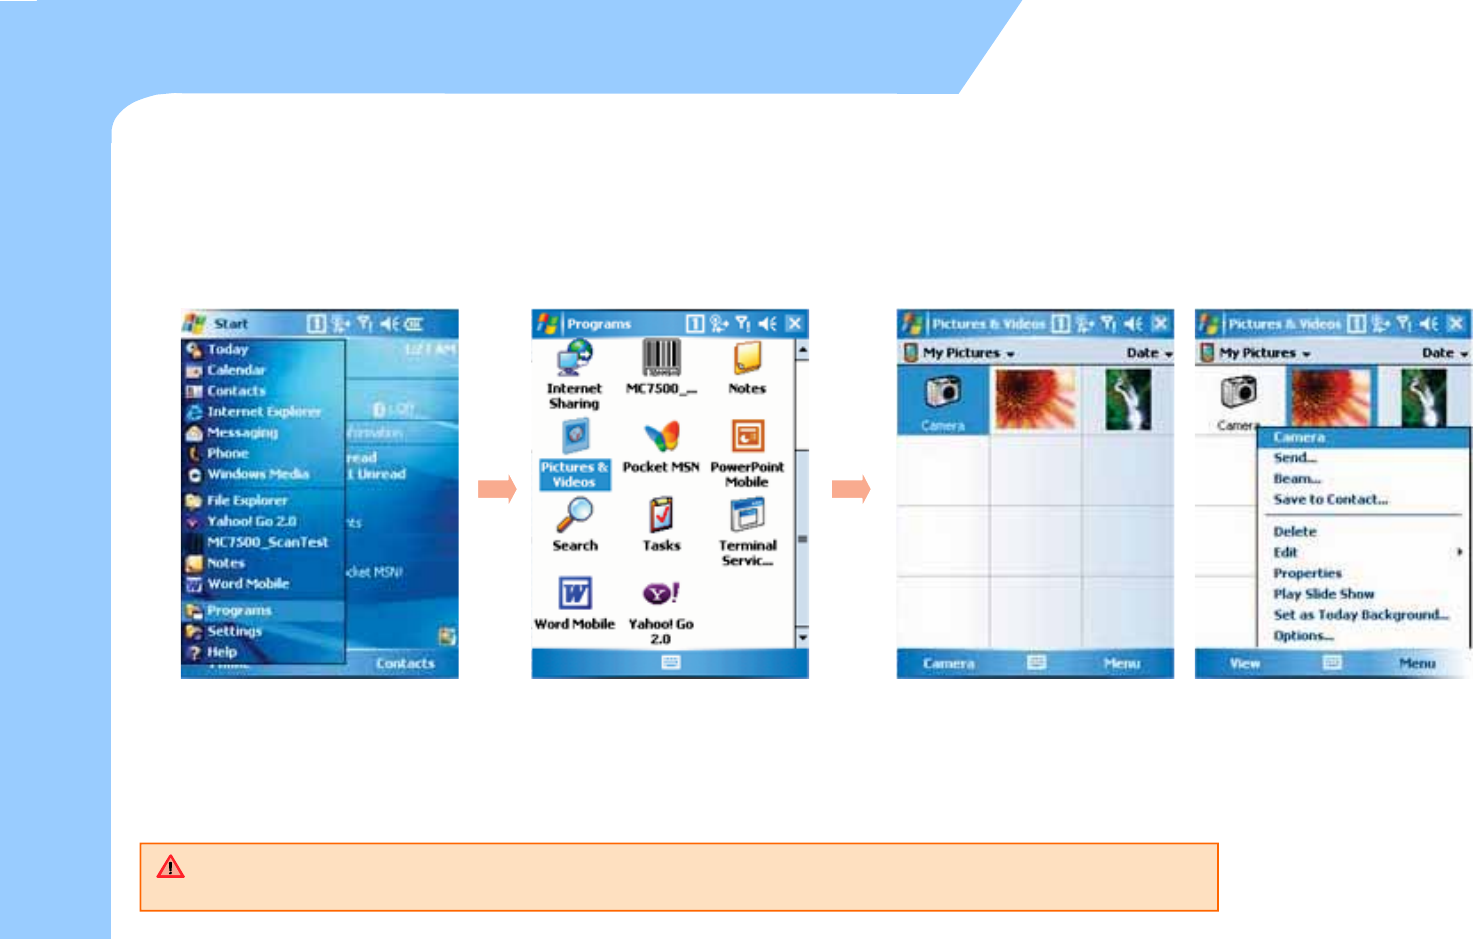
zTo process the camera program
- You can process the camera program when you tap the camera button or tap the camera icon on the
'picture or video'.
To use the camera (2)
Usage of Device
Select the 'Start > Programs > Pictures & Video. You can process the camera program when you select the camera
icon on the Picture & Video or select the camera icon in the menu.
55
Tap the ‘Menu > Options … > Camera Tab’ and then you can set the route of the storage memory ,
name and quality. You can set the Video on the Video Tab.
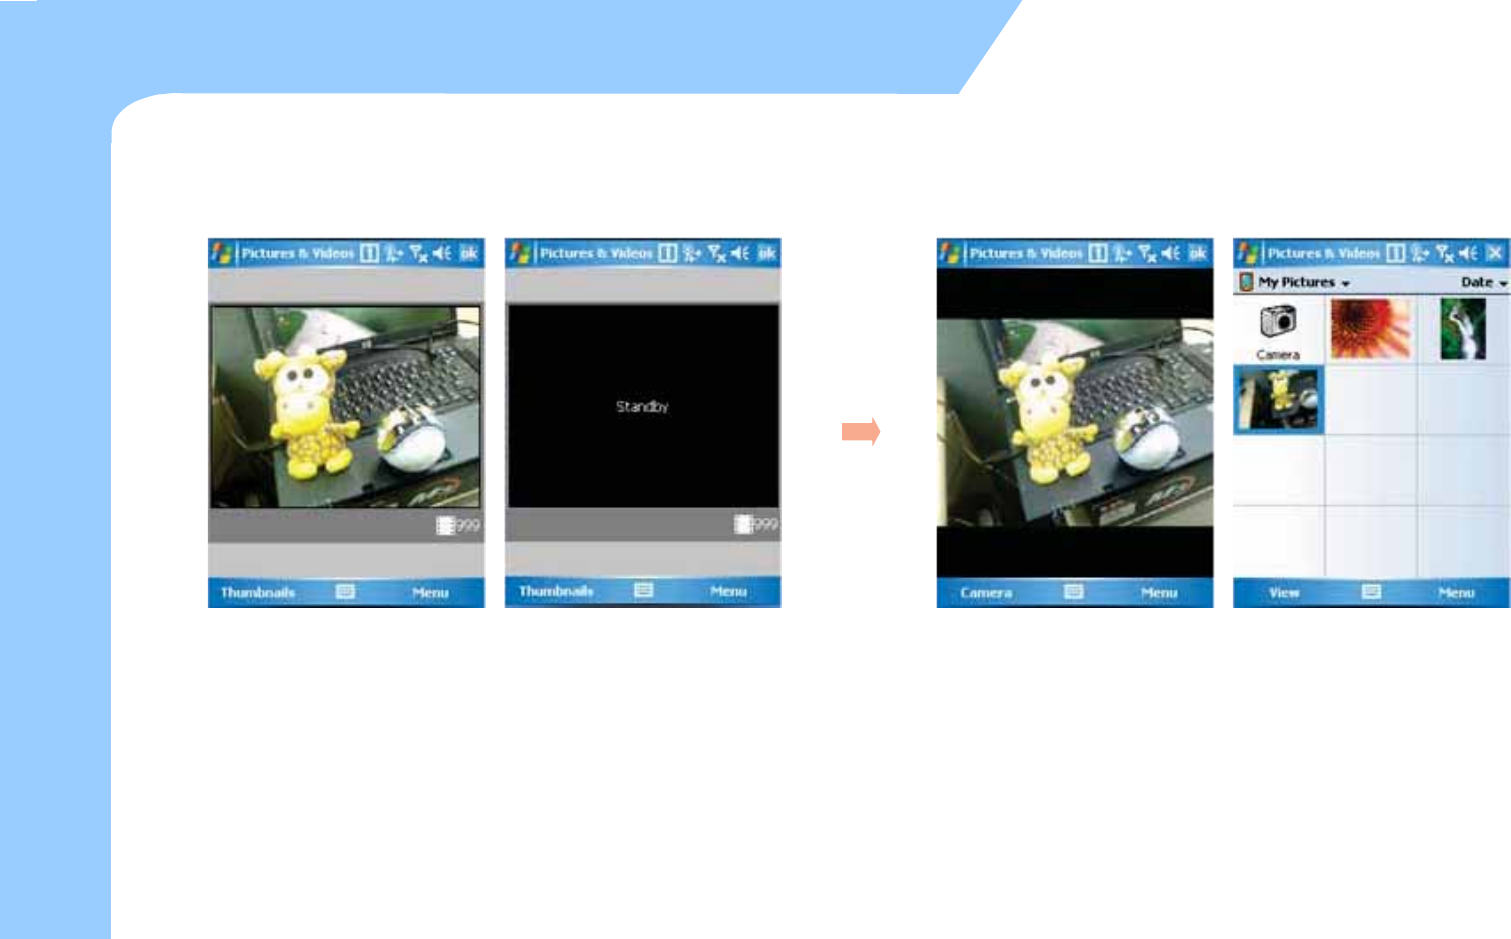
zTaking a Still photo
Usage of Device
56
Execute the camera program first. Move around to focus the desired
item.
Finally press the camera button to take a picture.
After executing the camera program , Preview mode will be changed
to standby mode after certain amount of time.
In order to start Preview Mode again, just tap the screen or press the
camera button.
After taking a picture, the captured image will be displayed on the screen.
If you want to execute the camera program, tap the camera button at the
bottom or click the camera icon on the left of window.
You can see the list of pictures taken previously by tapping ‘Thumbnails’ in
the Camera shooting mode.
To use the camera (3)
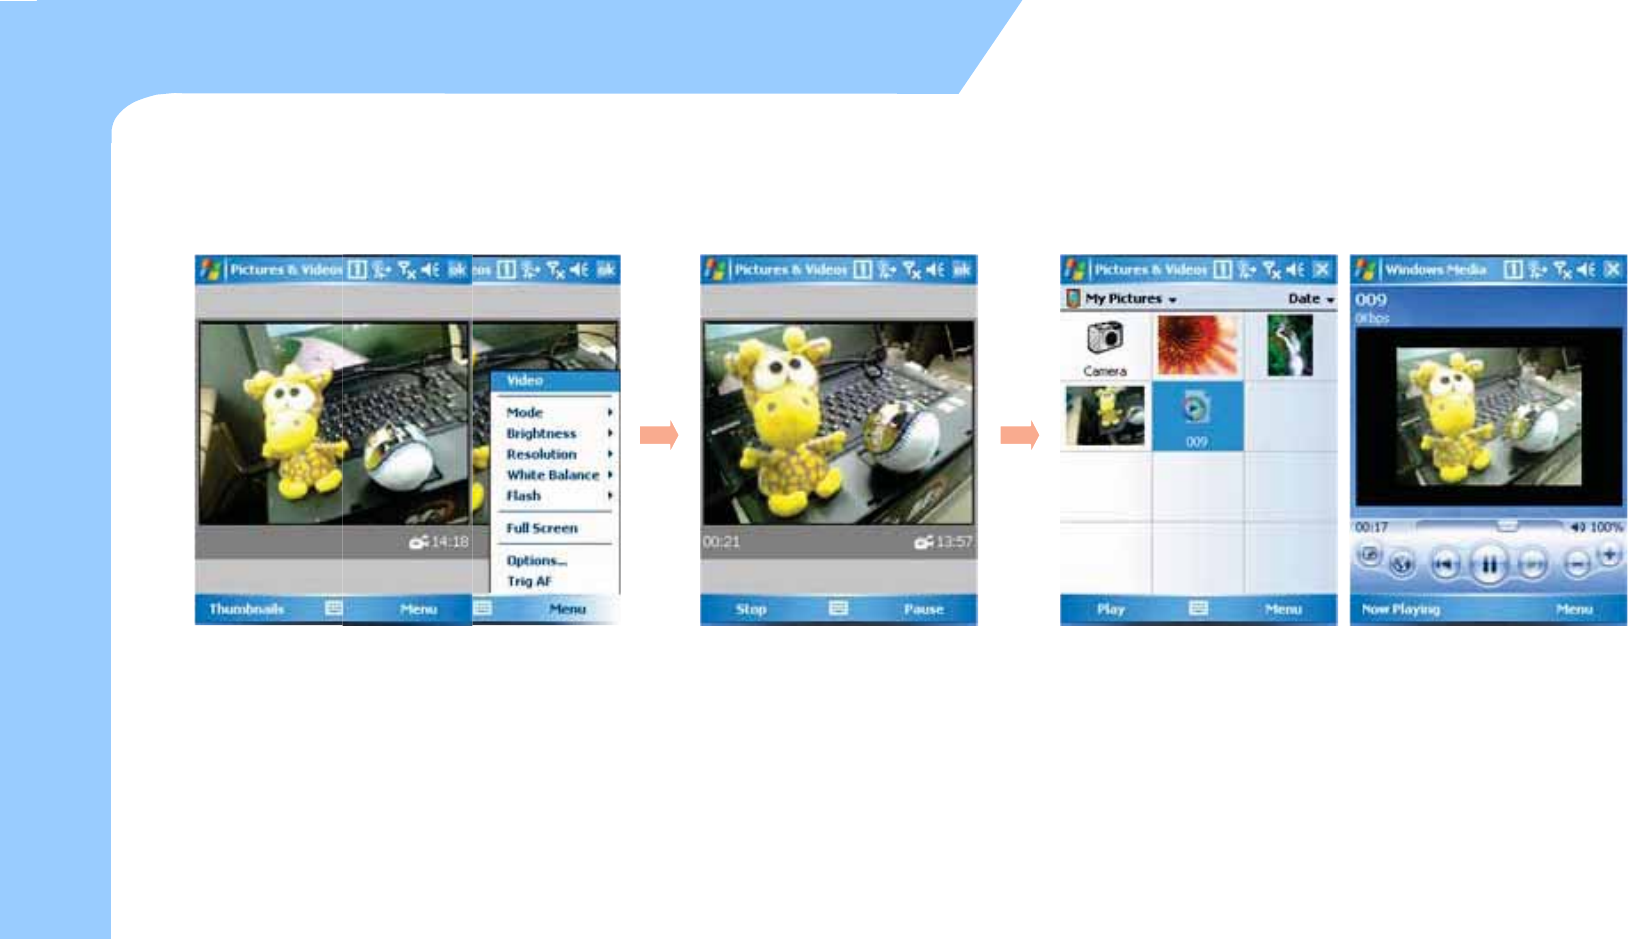
zTaking videos
57
Usage of Device
If you want to take a video, select ‘Menu >
Videos' after executing the camera program.
While taking a video, you can
either stop (by tapping stop
button) or pause. (by tapping
pause button)
If you want to watch the video taken, Select the 'Thumbnails' first
to see the list of video files available.
When you select the video you want, you can play the video
recorded.
To use the camera (4)

zBluetooth On / Off
58
Bluetooth Communication(1)
Usage of Device
On the 'Today Main Screen' , select the Wireless State
bar or Tap 'Start > Settings > Connections and select
‘Wireless Manager’.
Bluetooth is optional. Device without built-in Bluetooth can not use Bluetooth service.
Bluetooth support the transmission and reception of files between the serial connecting service and
Windows Mobile device.
To turn on/off Bluetooth, tap the
Bluetooth on the Wireless Manage
The status of Bluetooth can be seen
on the wireless status bar on the
main screen.
59
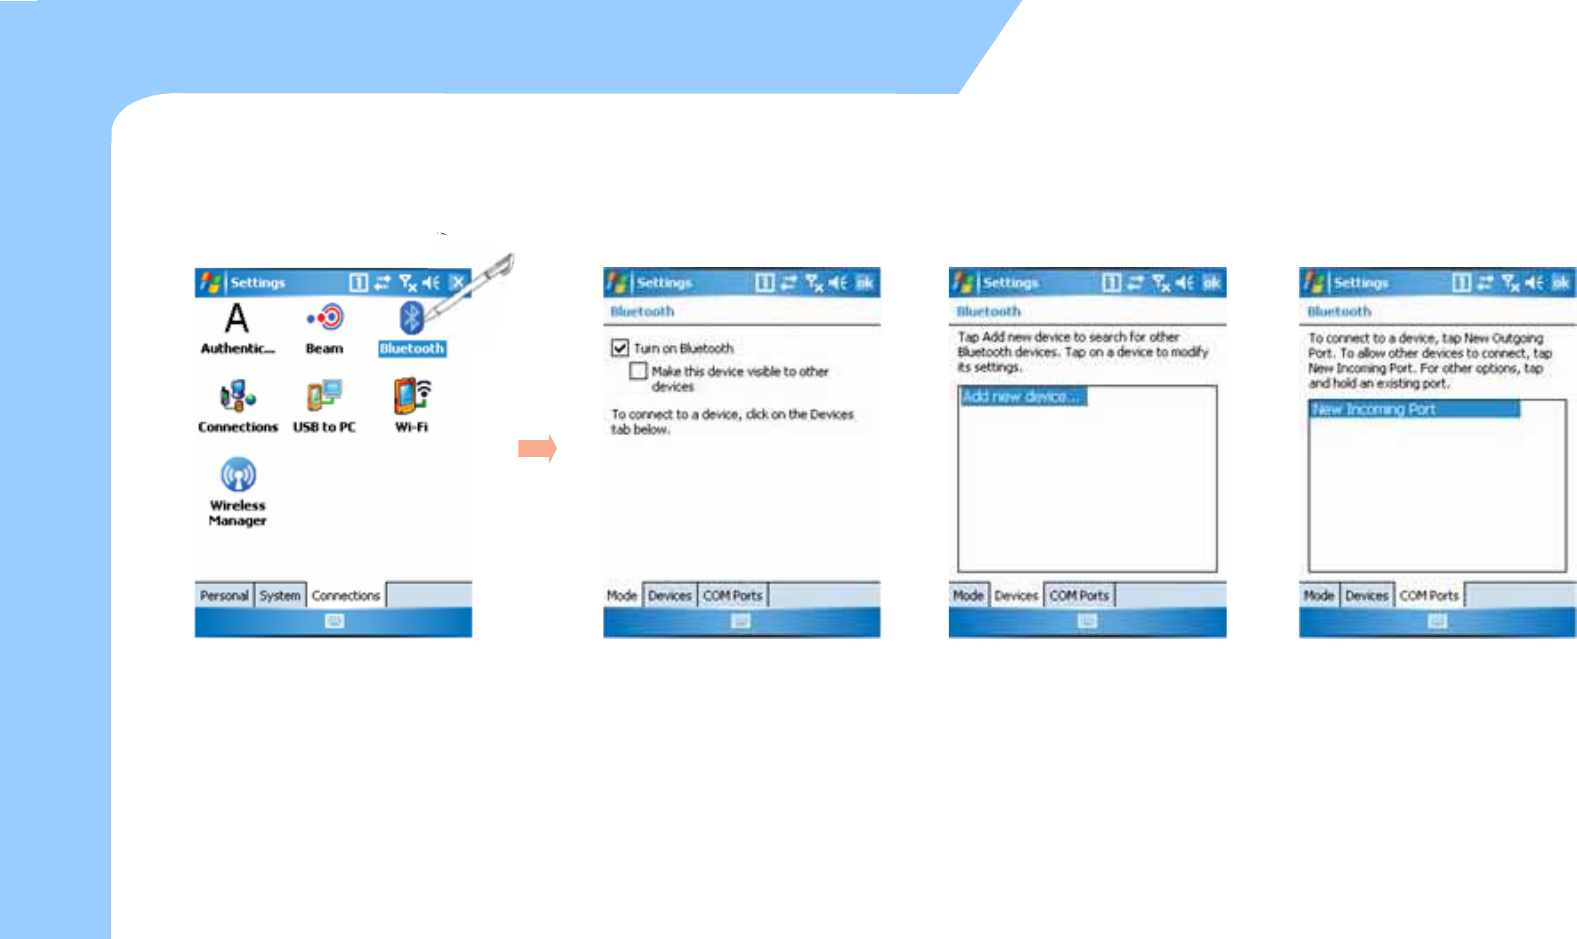
zSetting the Bluetooth
-On the Bluetooth setting screen, you can set the Mode, connecting to BT device and COM settings
viceUsage of De
You can set the Bluetooth mode
and establish connection when
you tap the 'Bluetooth' icon on
the Start > Settings > Connections.
In the Mode tab, you can turn
on/off Bluetooth and make visible
or invisible the device from outside.
In the device tab, you can search
and connect to other Bluetooth
devices.
In the COM Ports tab, you can
set incoming Port and outgoing
Port.
Bluetooth Communication(2)
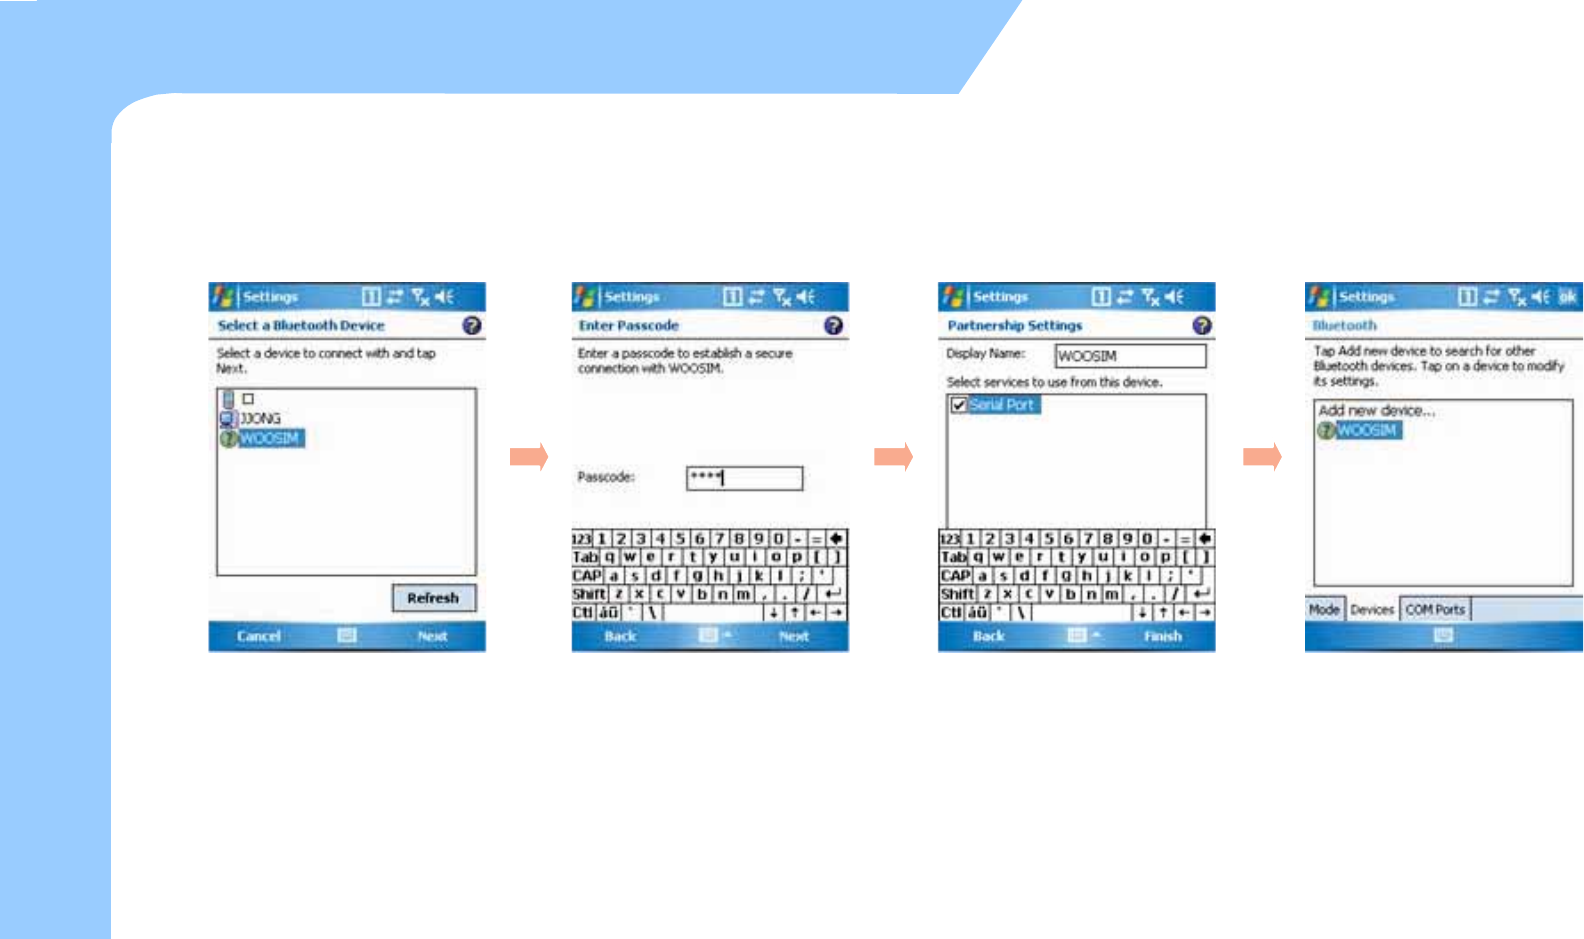
zTo connect the Bluetooth
- you can establish the connection by searching, matching pin code and selecting the service.
60
Usage of Device
You can search the Bluetooth device
available when you select the 'Add
new device...' on the Device Tab.
Select a device to connect with and
tap 'Next' . Also you can select
the 'Refresh' button if there is no
device available.
Enter a Passcode to establish a
secure connection.
The passcode can be fixed one
or the one which is negotiated
between two parties in before
hand.
It shows the service available
on the Bluetooth device.
It shows the registered devices.
To add more device, please tab
‘Add new device’.
Bluetooth Communication(3)
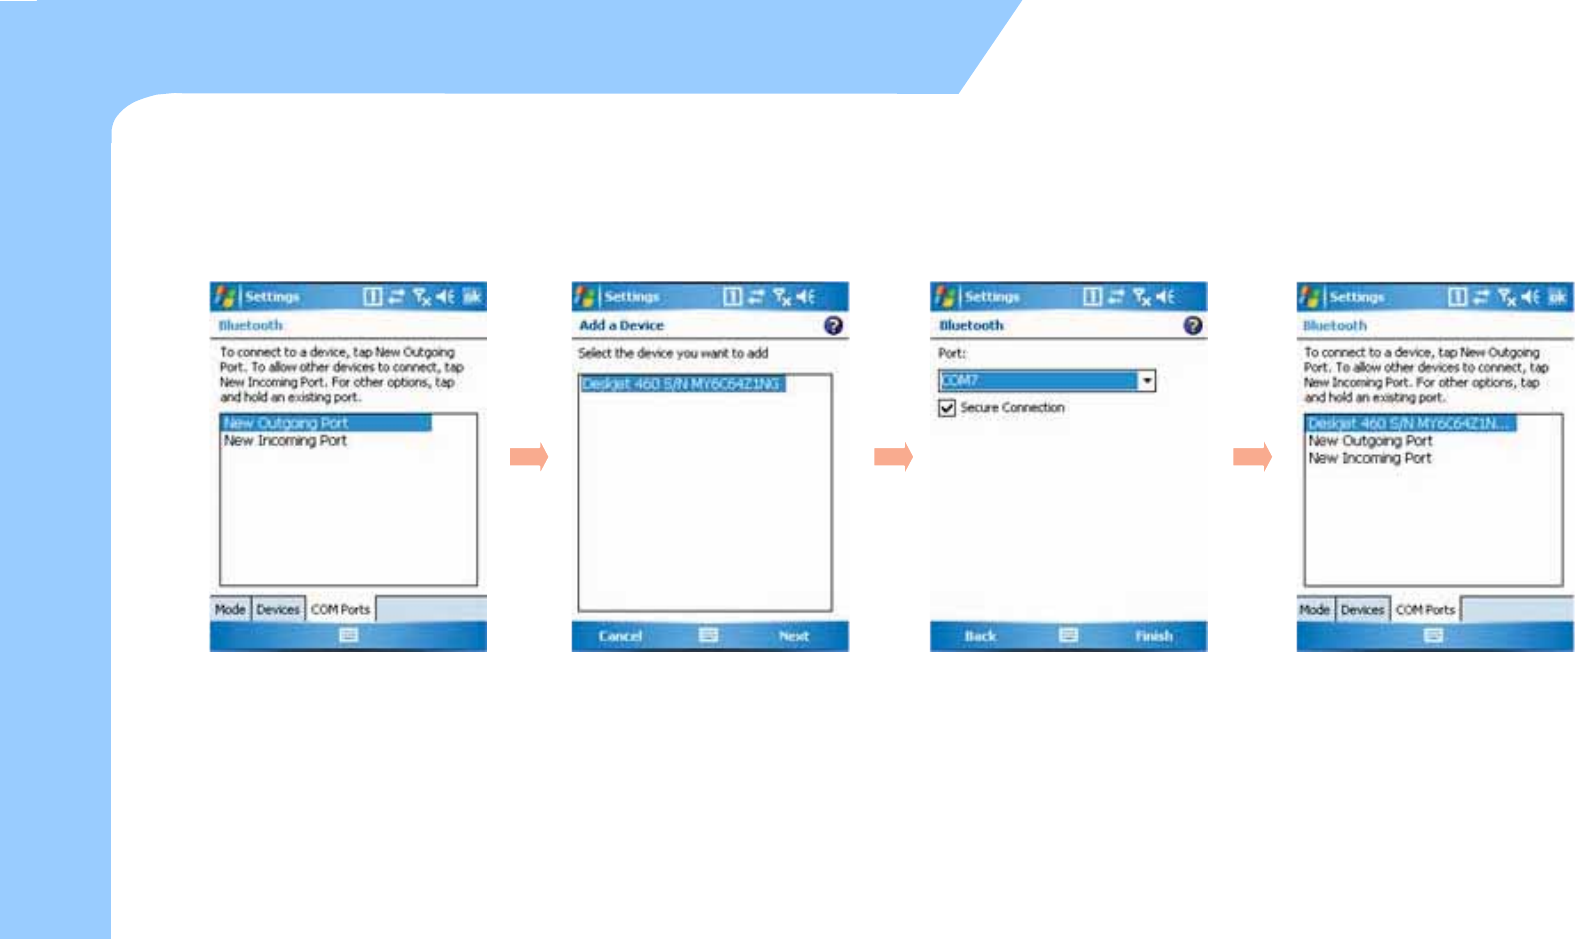
zHow to make the serial connection via Bluetooth
–It is possible to assign the registered device to the COM port.
61
Usage of Device
Once the device is registered,
please tap ‘COM Ports’ tab and
then select ‘New Outgoing Port’.
Select the device you wand to add
and tap 'Next'.
Select the port which is available,
and then tab ‘Finish’.
Once the connection is made, you
can use the available service.
Bluetooth Communication(4)
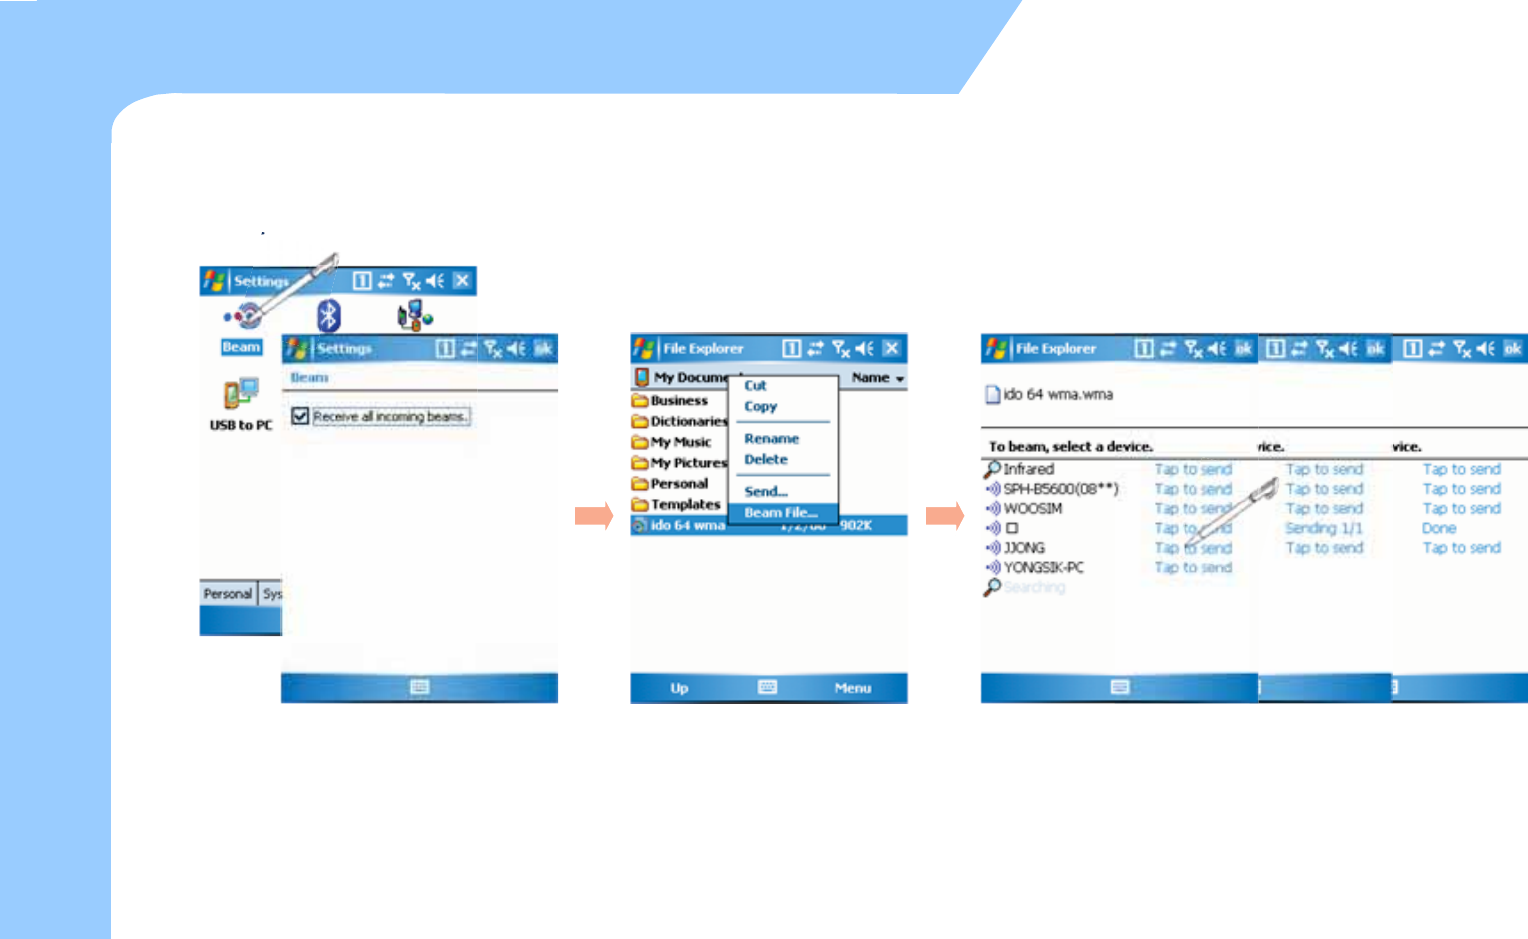
zTransferring files via Bluetooth connection.
- It is possible to transfer files between Windows Mobile devices via Bluetooth.
62
Usage of Device
In order to transfer files via Bluetooth
connection, please go to 'Start > Settings >
Connections > Beam‘ and then Check
the 'Receive all incoming Beams ‘.
Select the file you want to transfer
in the File Explorer. Press the file
name long and tab ‘Beam File’.
By tapping ‘Beam File’, the list of available Bluetooth devices
shown. Please choose the device to transfer the file to.
Bluetooth Communication(5)
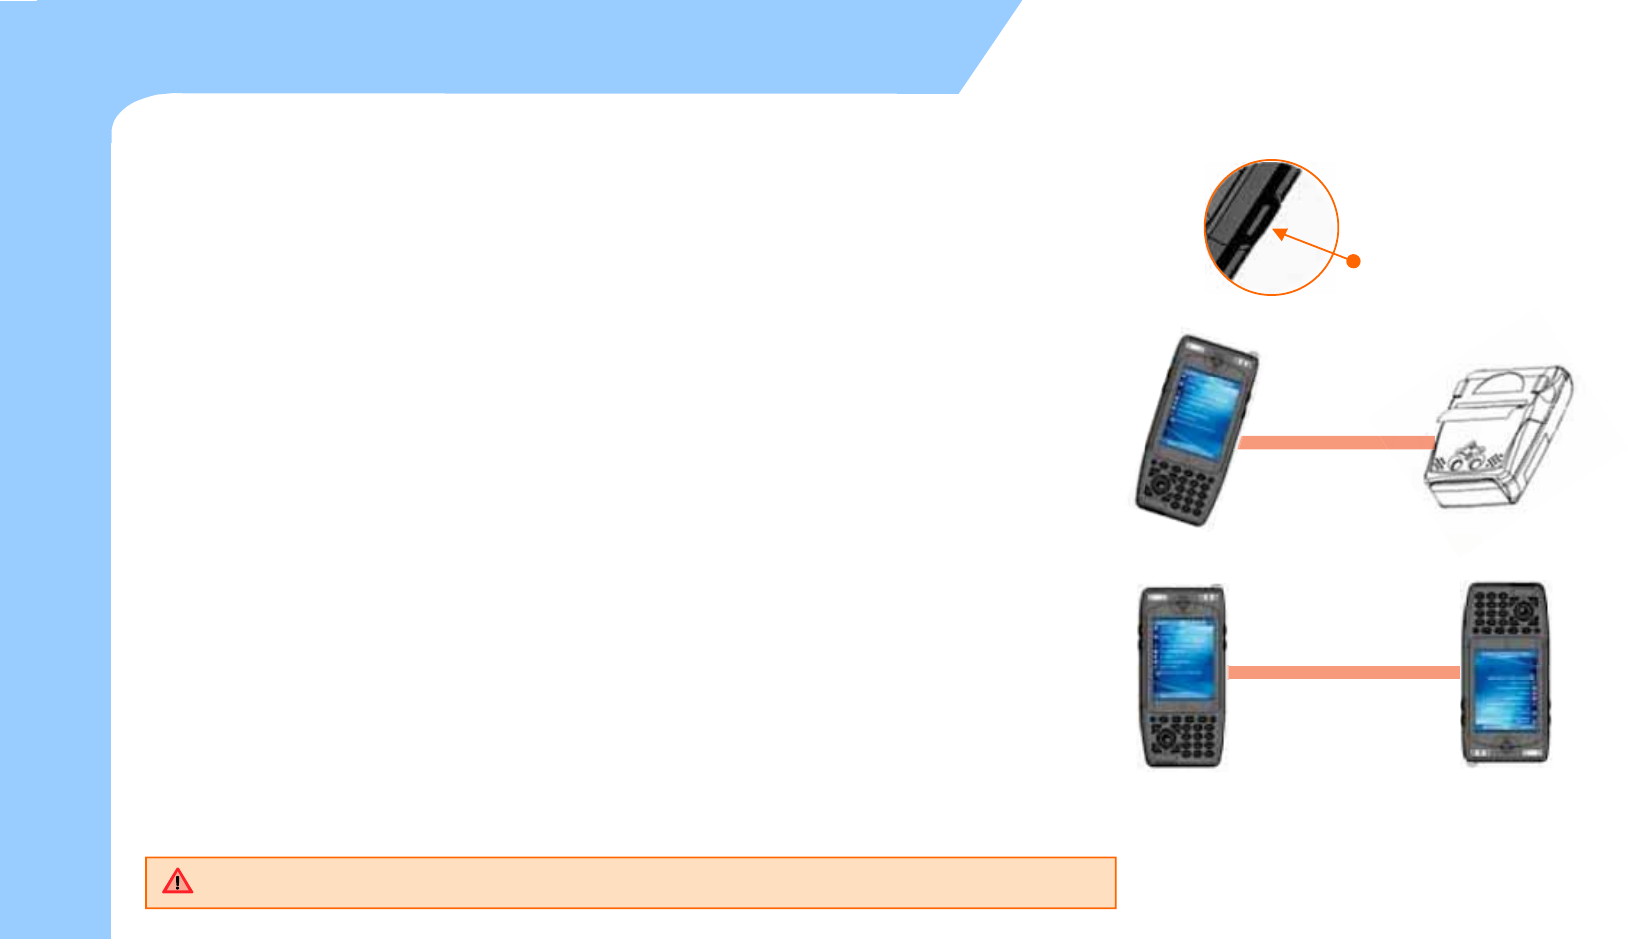
zTo connect via IrDA
M3 Sky can communicate with desktop, notebook, pocket PC as
well as other PDA that has OBEX protocol for the IrDA
communication.
To use infrared communication
Locate Infrared communication port to be in series with an infrared
(IrDA) port with other device.
Press a quick link icon > Infrared communication menu.
Infrared communication program is started and you can exchange
data.
If you want to have a serial communication with the device like
printer, it is possible by connecting the COM Port.
ⲻIt is advised to communicate within the shortest distance.
Shorter distance makes data transmission faster.
63
Usage of Device
IrDA Communication
IrDA Communication Port
Connecting to IrDA Printer
File transmission between PDA
IrDA port is optional. Device without IrDA port can not use this feature.
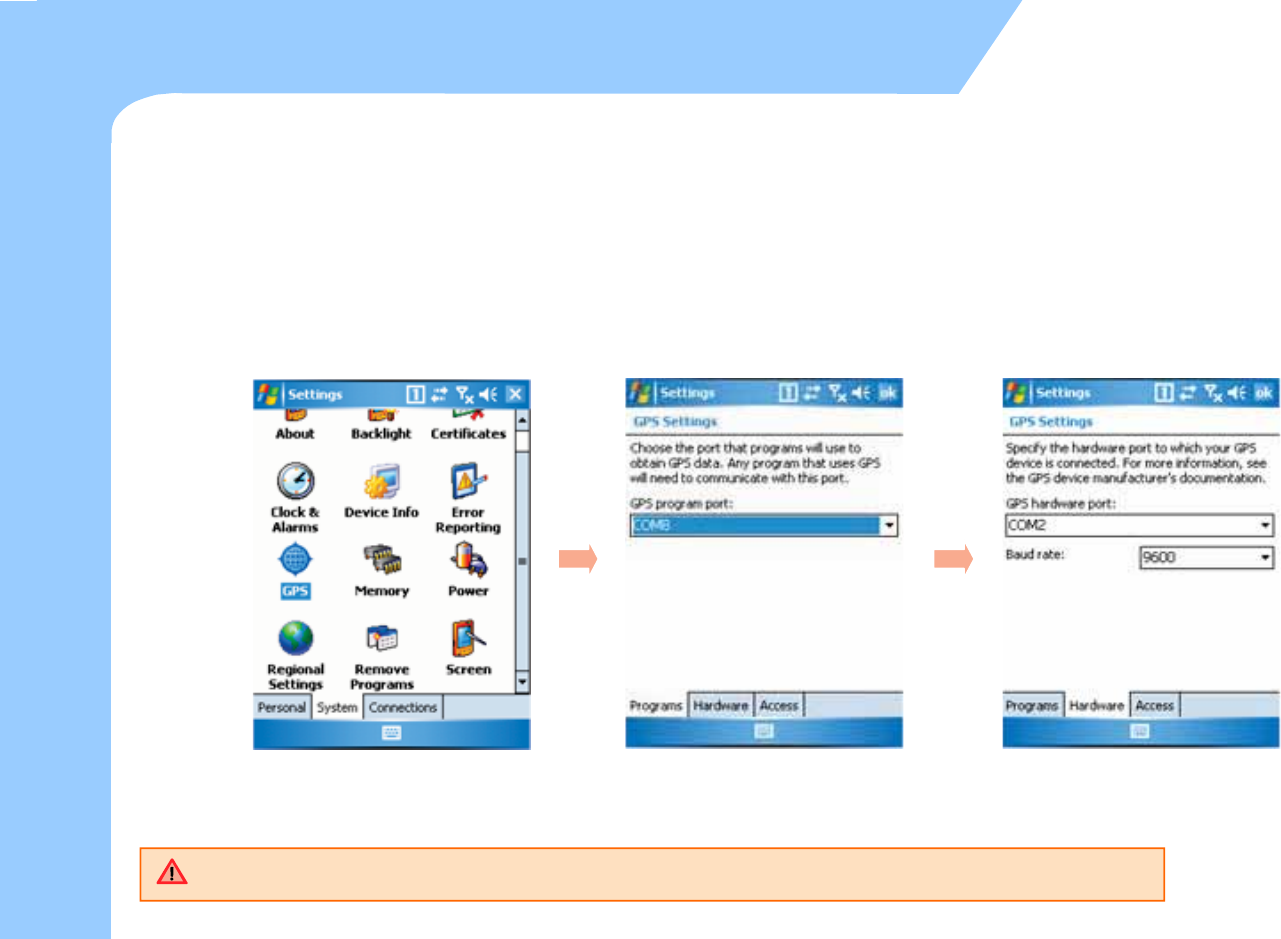
zTo set the GPS
–Tap the ‘Start > Settings > System Tab > GPS’ and then you can set the information related to the GPS.
–You don’t have to set additional information when there is a single program which uses GPS data. When
there are more than one program which use GPS data, you need to set the program port and hardware
port required for each program.
64
Usage of Device
To use the GPS(1)
Select the GPS on the System Tab. Set the GPS Program Port which
is not yet used.
Set the Hardware port of the device.
GPS hardware port for M3 sky is
COM2 and with baud rate of 9600.
GPS is optional. GPS feature is not available on the unit with no GPS module integrated.
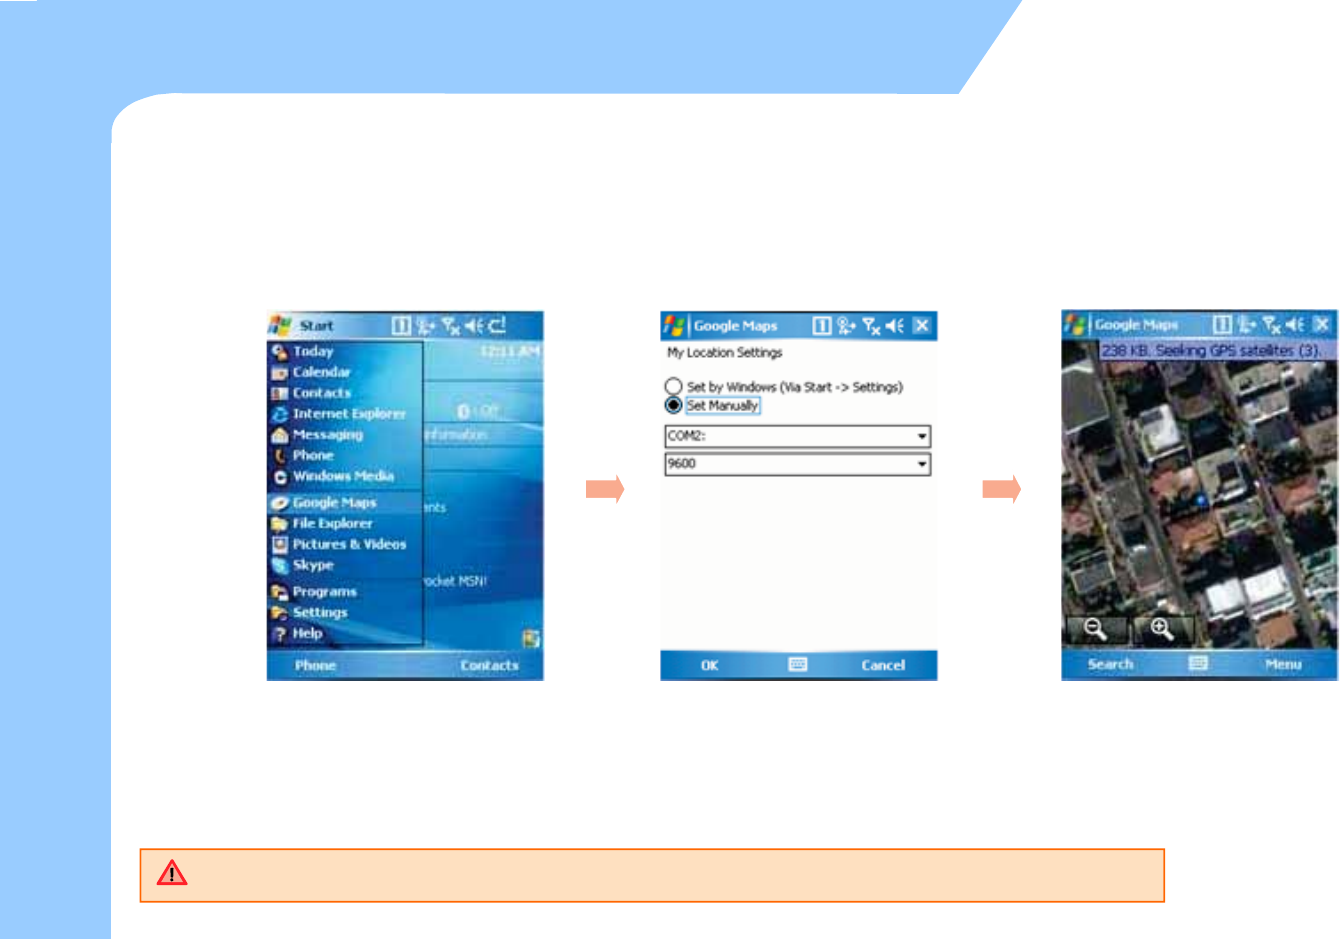
zTo Connect the GPS
- When there is a single GPS program, please use the GPS hardware port (COM2). When there are more
than one GPS program, please use the pre-defined GPS program port.
65
Usage of Device
To use the GPS(2)
Execute the GPS program you want. Set the COM Port and Baud Rate. It is available to use various
application using GPS like searching
the current location.
Sample GPS map is not provided by MobileCompia
66
Usage of Device
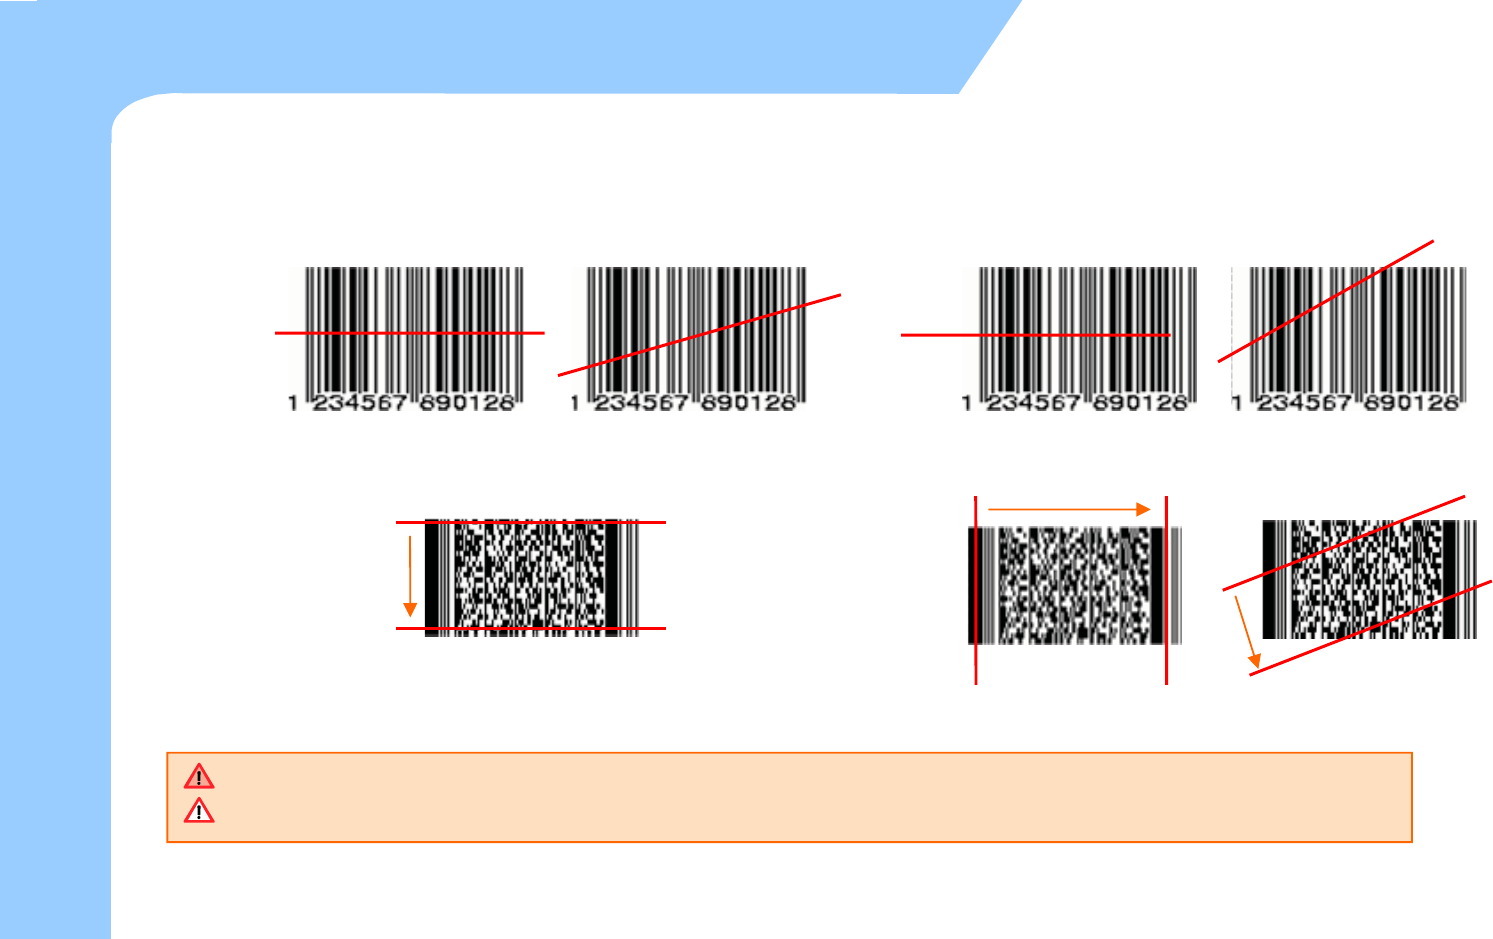
zHow to use scanner
–Usage of 1D Scanner
–Usage of 2D Scanner
To use the scanner
Correct way Incorrect way
Scanner is optional. You can not use scan feature with no scanner enabled device.
2D Barcode Scanner is optional. Only with 2D Barcode scanner enabled device, you can do 2D barcode scan.
Correct way Incorrect way
CAUTION: Changes or modifications not expressly approved by the manufacturer
responsible for compliance could void the user’s authority to operate the equipment
WAR NING
This device complies with part 15 of the FCC Rules. Operation is subject to the
following two conditions: (1) This device may not cause harmful interference, and (2)
this device must accept any interference received, including interference that may cause
undesired operation.
INFORMATION TO USER:
This equipment has been tested and found to comply with the limit of a Class B digital
device, pursuant to Part 15 of the FCC Rules. These limits are designed to provide
reasonable protection against harmful interference in a residential installation. This
equipment generates, uses and can radiate radio frequency energy and, if not installed
and used in accordance with the instructions, may cause harmful interference to radio
communications. However, there is no guarantee that interference will not occur in a
particular installation; if this equipment does cause harmful interference to radio or
television reception, which can be determined by turning the equipment off and on, the
user is encouraged to try to correct the interference by one or more of the following
measures:
1. Reorient / Relocate the receiving antenna.
2. Increase the separation between the equipment and receiver.
3. Connect the equipment into an outlet on a circuit difference from that to which
the receiver is connected.
4. Consult the dealer or an experienced radio/TV technician for help

10
For Your Safety
FCC RF Exposure Information
WARNING! Read this information before operating the phone.
In August 1996, the Federal Communications (FCC) of he United
States, with its action in Report and Order FCC 96-326, adopted
an updated safety standard for human exposure to radio
frequency (RF) electromagnetic energy emitted by FCC
regulated transmitters. Those guidelines are consistent with
the safety standard previously set by both U.S. and
international standards bodies.
The design of this phone complies with the FCC guidelines and
these international standards.
CAUTION
Use only the supplied and approved antenna. Use of
unauthorized antennas or modifications could impair call
quality, damage the phone, void your warranty and/or result in
violation of FCC regulations. Do not use the phone with a
damaged antenna. If a damaged antenna comes into contact
with skin, a minor burn may result. Contact your local dealer
for a replacement antenna.
Body-worn Operation
This device was tested for typical body-worn operations with
the back of the phone kept 0.59 inches (1.5cm) between the
user’s body and the back of the phone. To comply with FCC RF
exposure requirements, a minimum separation distance of 0.59
inches(1.5cm) must be maintained between the user's body
and the back of the phone. Third-party belt-clips, holsters, and
similar accessories containing metallic components should not
be used. Body-worn accessories that cannot maintain 0.59
inches(1.5cm) separation distance between the user's body
and the back of the phone, and have not been tested for typical
body-worn operations may not comply with FCC RF exposure
limits and should be avoided.