M3 Mobile MM3 Portable Data Collection Terminal User Manual Pt 2
M3 Mobile Co., Ltd Portable Data Collection Terminal Pt 2
Contents
User Manual Pt 2
Via HSDPA (1)
e
t
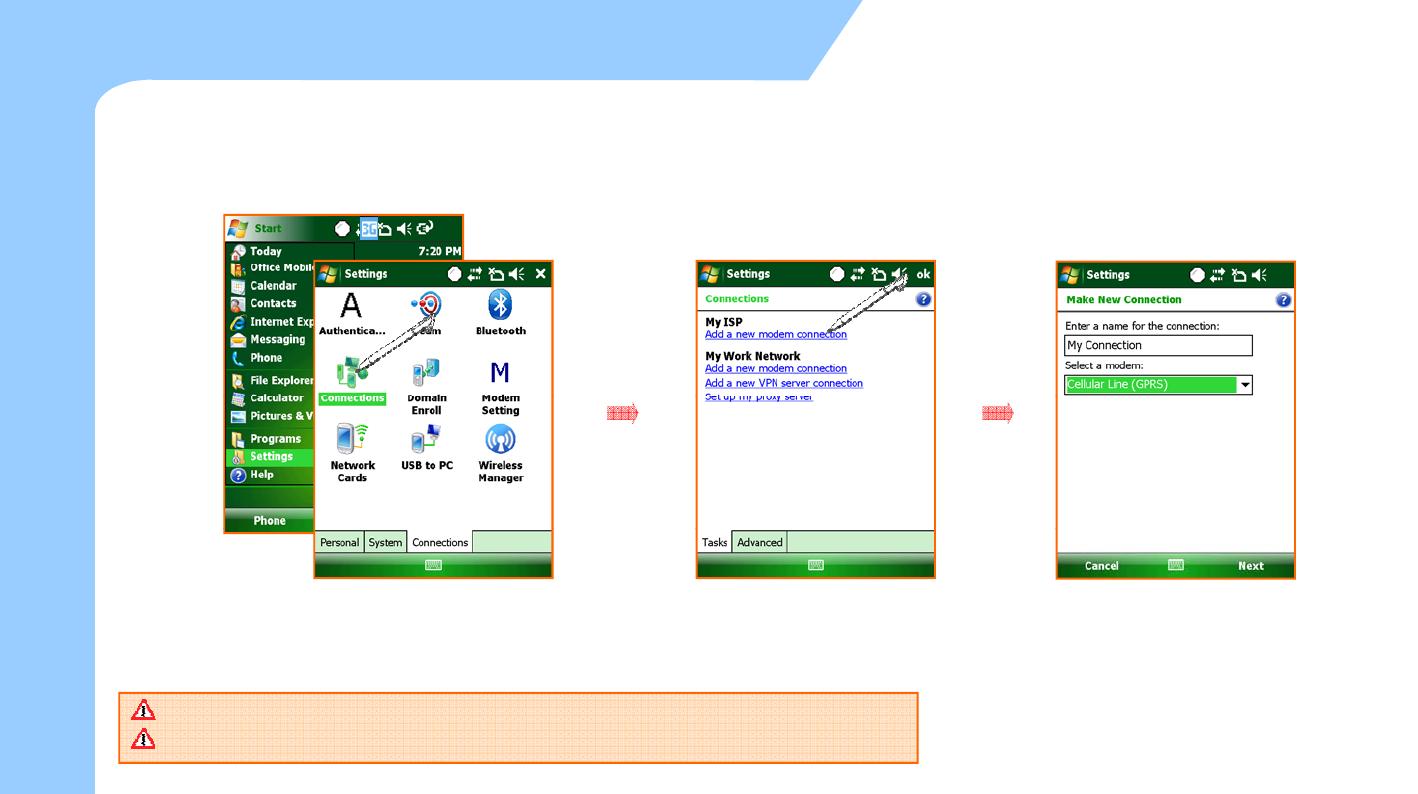
zTo connect to the Internet via Wireless WAN (1)
s
e Intern
e
ow to u
s
H
Tab ‘Start > Settings > Connections’ Select ‘Add a new modem connection’
of ‘My ISP’ in the ‘Connections’. Put the name you want into the
‘Enter a name for the connection’.
T
h
e
n
se
l
ect
t
h
e
‘
ce
ll
u
l
a
r Lin
e(G
PR
S)
’
Then
select
the
cellular
Line(GPRS)
in the ‘Select a modem’.
31
WWAN service is optional.
It is not available in the device which does not have WWAN module installed.
Via HSDPA (2)
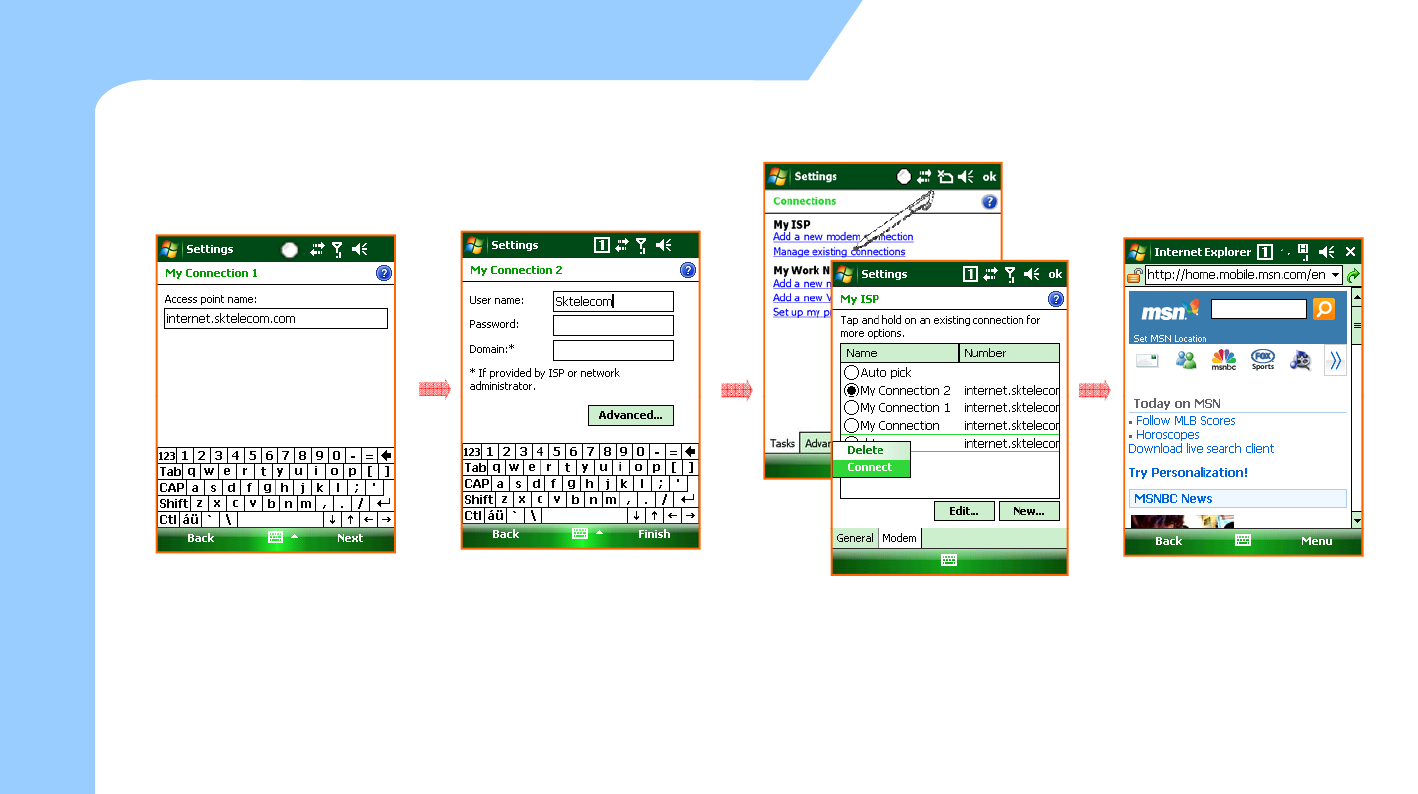
zTo connect to the Internet via Wireless WAN (2)
e
t
s
e Intern
e
ow to u
s
H
Input the Access point name
suitable to the SIM Card / Operator
company of Network then Tab the
‘
Next’.
Tap the ‘Finish’ after input the
User name and password
according to the setting.
(
In some cases
,
it is re
q
uired to
Select the ‘Manage existing connections’
on the Connections. Choose the ISP which
you want to connect to as picture above.
* Th d tti t ti ll li d
You can explore the Internet using
WWAN connection.
32
(,q
set IP address at the advanced
menu.)
*
Th
e save
d
se
tti
n
g
s au
t
oma
ti
ca
ll
y app
li
e
d
at connecting.
Via Wireless WLAN (1)
e
t
z
Y
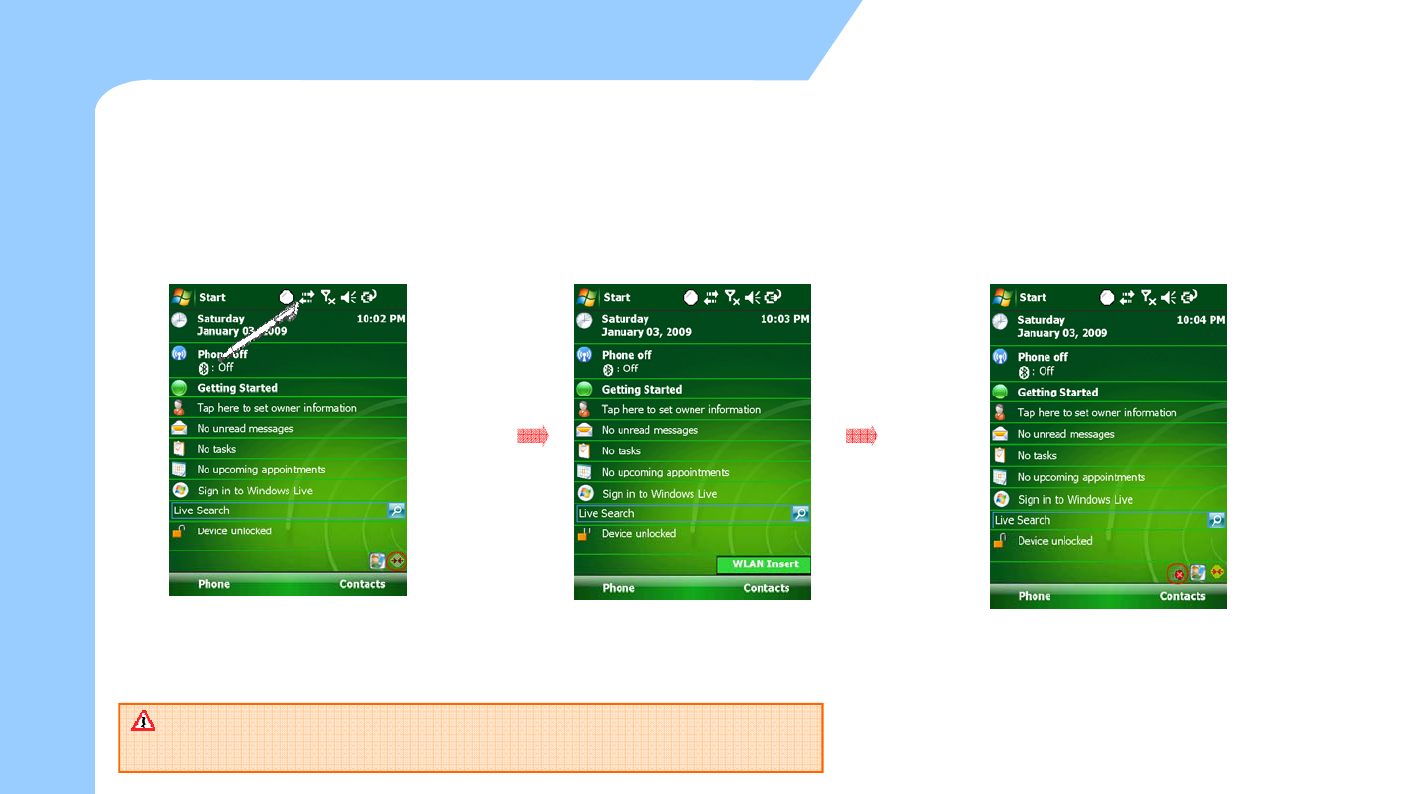
ou can use the Wireless Network Via Wireless LAN.
zMM3 supports IEEE 802.11a, IEEE 802.11b and 802.11g.
zTo connect the Wireless LAN (AP must be on and functioning)
To connect directly on the Main Screen
s
e Intern
e
ow to u
s
H
On the Today Main screen, you select
Wireless state bar or go to ‘Start >
S tti > C ti >’ Wi l M
Tap the WI-Fi on the ‘Wireless
Mana
g
er' to turn WLAN on. When the dialogue box is appeared, Select the AP you want and
then
,
y
ou can connect the Network with it.
33
Wireless LAN is optional. You can only use WLAN, when the WLAN
module is built in to the device.
S
e
tti
n
g
s
>
C
onnec
ti
ons
>’
Wi
re
l
ess
M
ana
g
er.
g
,y
Via Wireless WLAN (2)
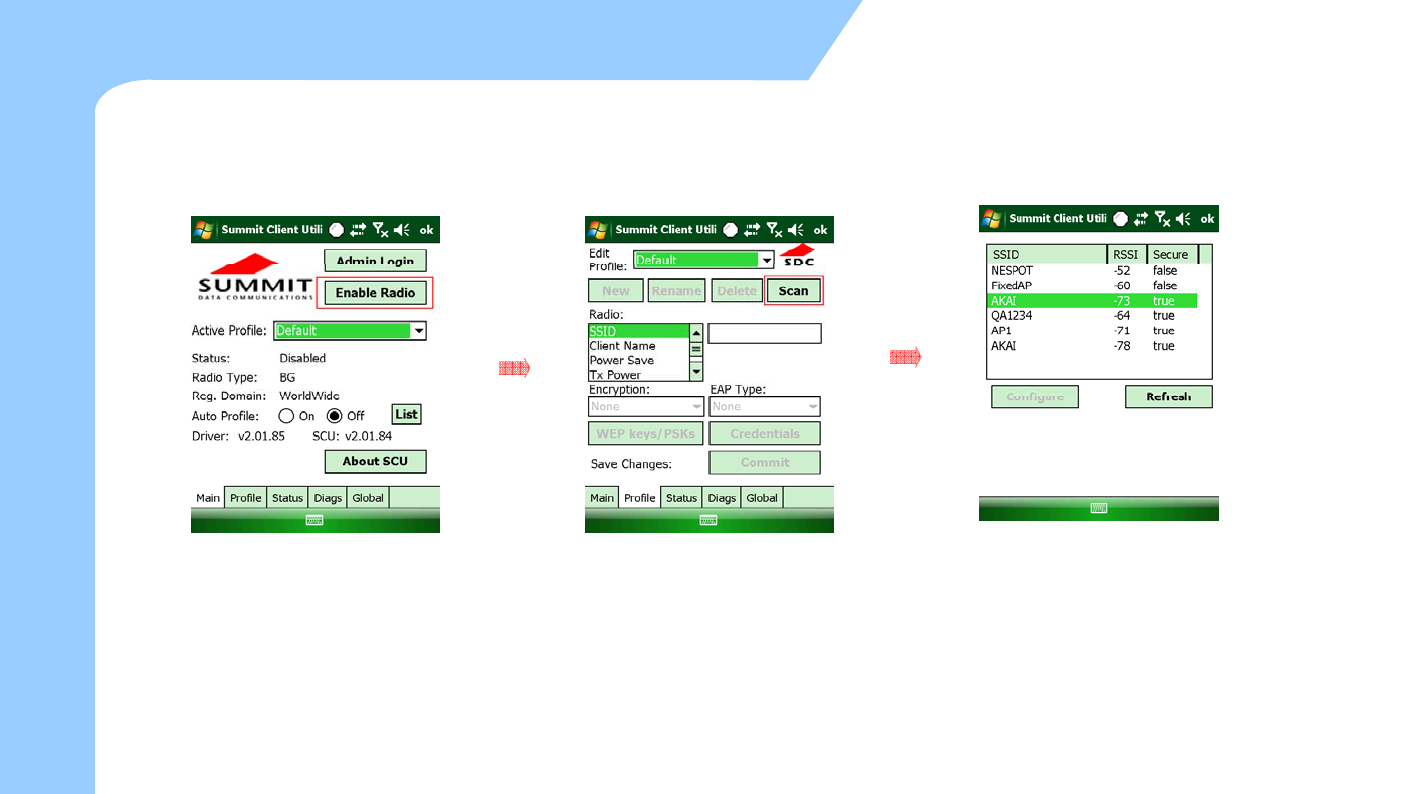
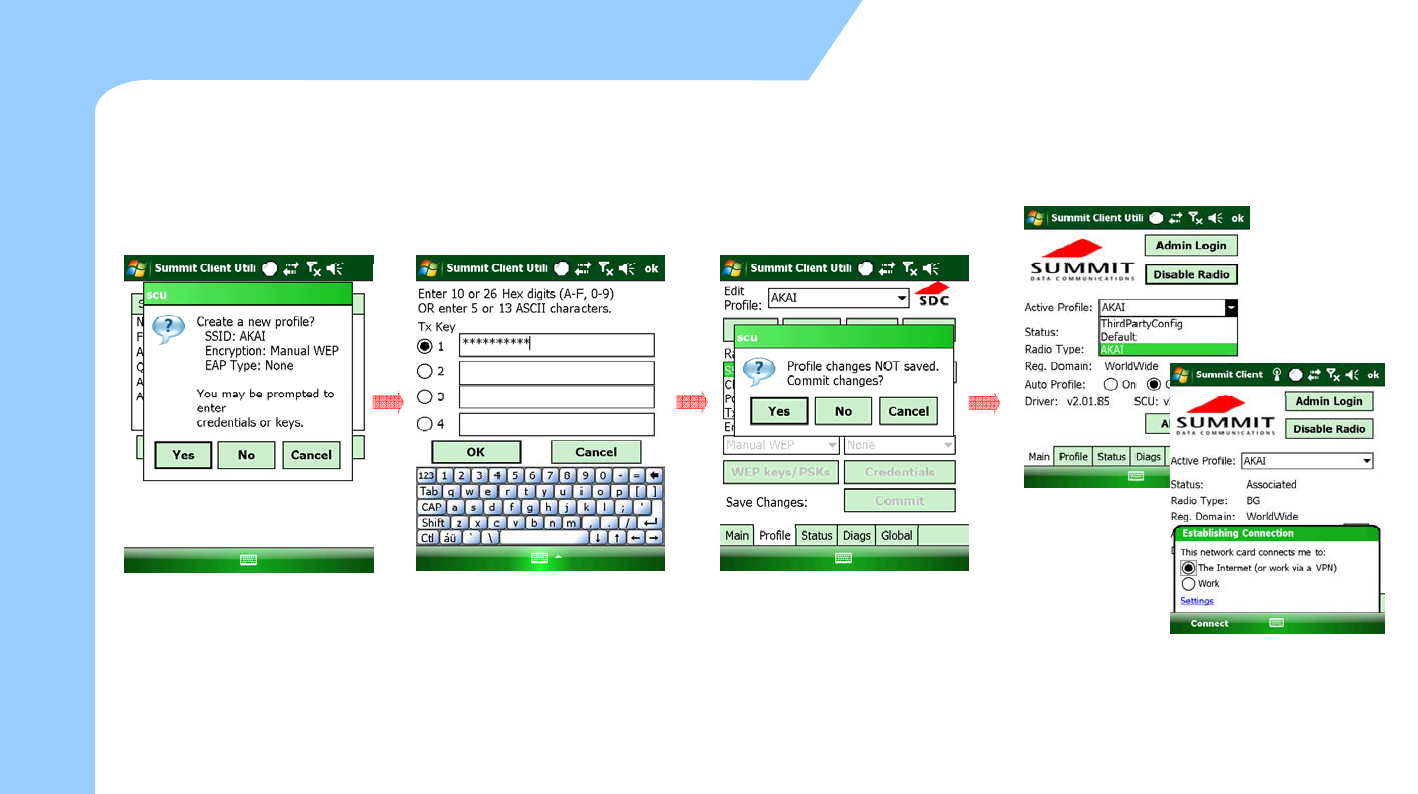
zTo connect via Wi-Fi menu
e
t
s
e Intern
e
ow to u
s
H
On the settings screen, you select
Wi
Fi Icon
Configure the connect type then
click the
'
Next
'After configure Network authentification,
tap the
'
Finish
'
You can see the wireless
34
Wi
-
Fi
Icon
.
You can also tap Start > Settings >
Connections>Wi-Fi.
click
the
Next
.
tap
the
Finish
.
You
can
see
the
wireless
Networks available.
Via Wireless WLAN (3)
zContinue from the last page
–Configure DHCP / Static IP
e
t
s
e Intern
e
ow to u
s
H
35

Browsing the Web Site (1)
e
t
zMicrosoft Internet Explorer
- Via Wireless WAN , Wireless LAN and Active sync connection, you can browse the web.
- You can download programs and files by accessing the Internet.
s
e Intern
e
To use the Internet Explorer Address Window Searching
ow to u
s
H
Tap 'Start > Internet Explorer
This is the Internet Explorer
Itthdd tthdd idi fth th
36
Tap
'Start
>
Internet
Explorer
This
is
the
Internet
Explorer
processing screen.
I
npu
t
th
e a
dd
ress you wan
t
on
th
e a
dd
ress w
i
n
d
ow
i
n upper o
f
th
e screen,
th
en
click the 'search'. It will try to connect to that web address via Wireless network
that is connected.
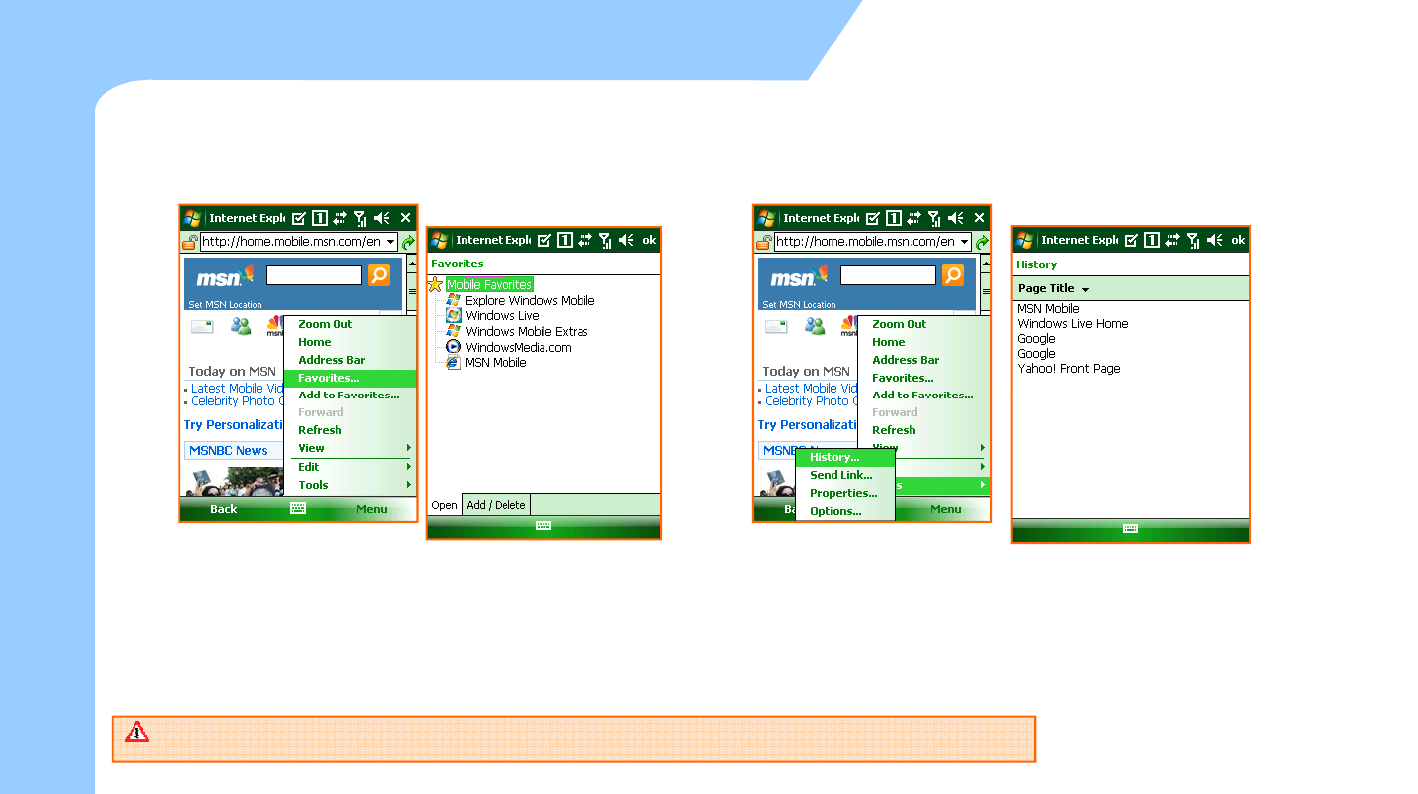
Browsing the Web Site (2)
zContinue from the last page.
e
t
s
e Intern
e
ow to u
s
H
On the 'Menu > Favorites...' you can see the list of sites that you
have saved and browse to it directly. The favorite page is like the
picture above.
On the Menu > History... You can see the list of sites that you have
recently visited. The history page is like the picture above.
37 See the 'Start > Help' if you want to know more about how to use the Internet Explorer
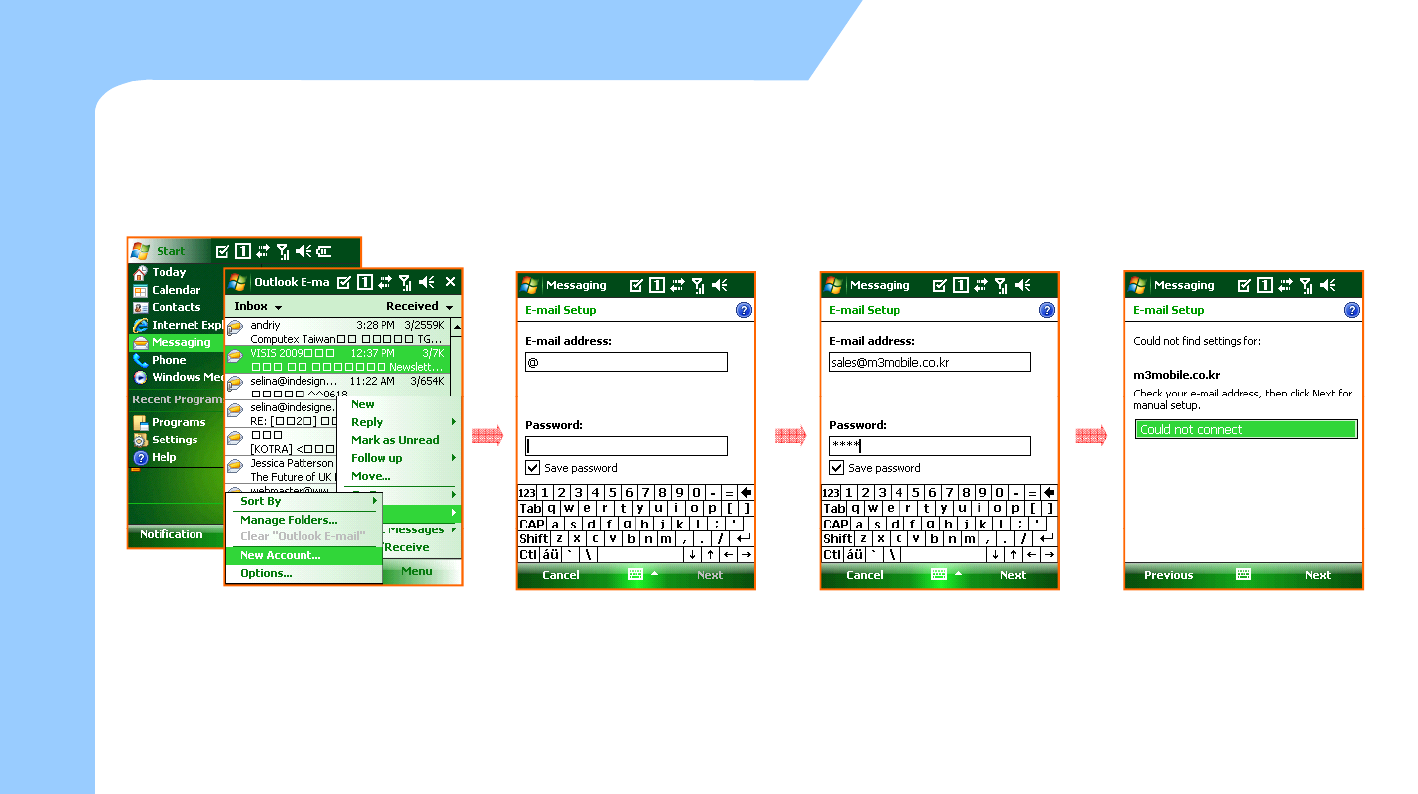
Browsing the Web Site (3)
zTo set up an e-mail account
e
t
s
e Intern
e
ow to u
s
H
Process the 'Start > Messaging'. Select the
'Menu > Tools > New Account...in the outlook Set an E-mail provider for 'other‘
then tap 'Next.' Input the E-mail address on the
Enter e-mail address , then tap ‘ When the Status is for completed,
ta
p
the 'Next'.
38
E-mail box. Next '.
p
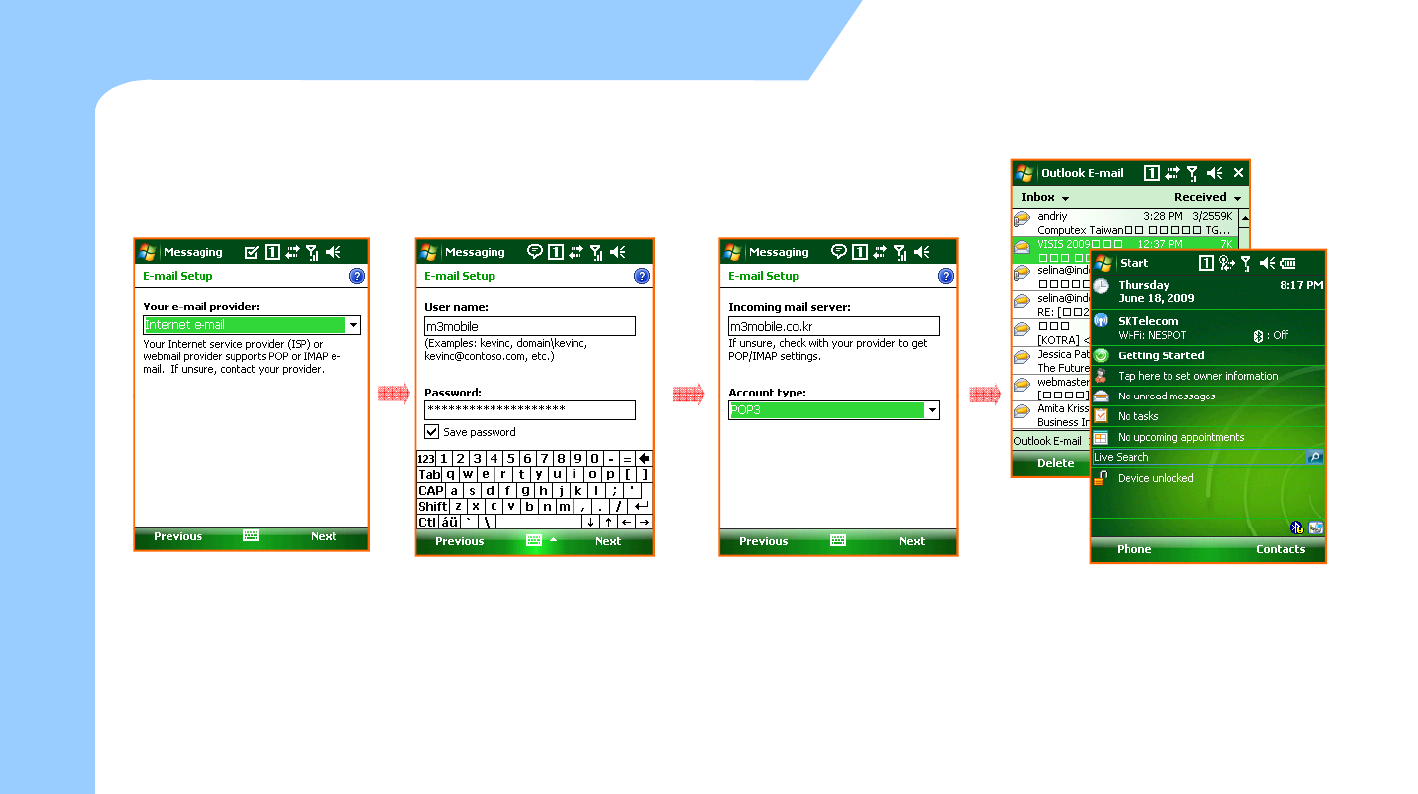
Browsing the Web Site (4)
zContinue from last page
e
t
s
e Intern
e
ow to u
s
H
Set an E-mail provider for 'other‘
then tap 'Next'. Select the Account Type and put
the Name then tap 'Next'. Input the 'Incoming mail, Outgoing
mail, Domain' then select 'Finish'.
* For detailed setting menu, please
click
‘
Options
’
.
After finishing the setting you can send and
receive E-mail using the e-mail account.
39
click
Options .
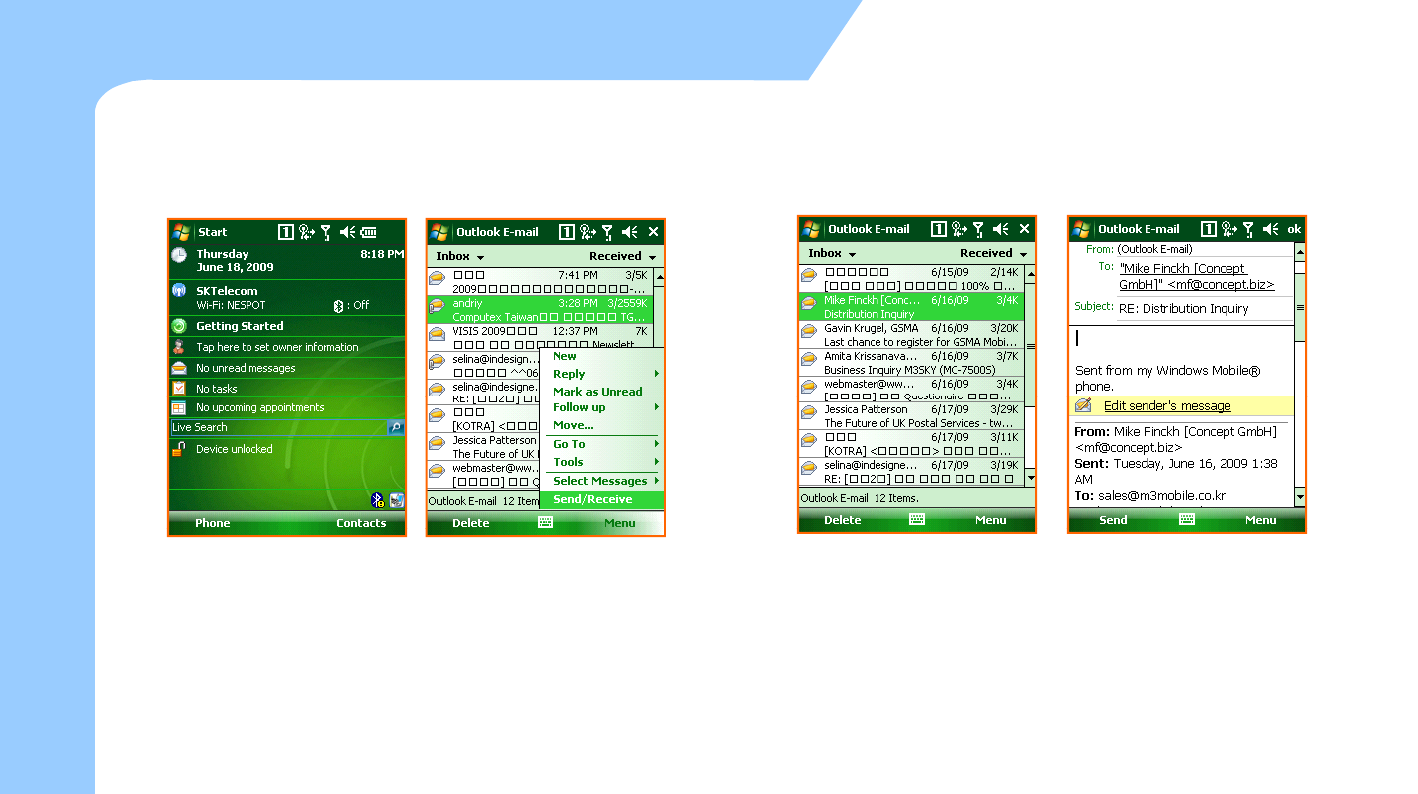
Browsing the Web Site (5)
zTo send and receive an E-mail
e
t
s
e Intern
e
ow to u
s
H
< To receive an e-mail>
Select the 'Message' on the 'Today'
Select the 'Send / Receive' in the 'Menu' and check the received mail.
<To send an e-mail>
After process the 'Message' program , select the 'New' .
You can send an e-mail when you select the 'Send' after writing a new
e-mail.
40

5 How to use the Phone
5
.
How
to
use
the
Phone
Init Screen
Phone Control
Phone call and receive
Phone book
SMS send and receive
Phone functions
Phone setting
41
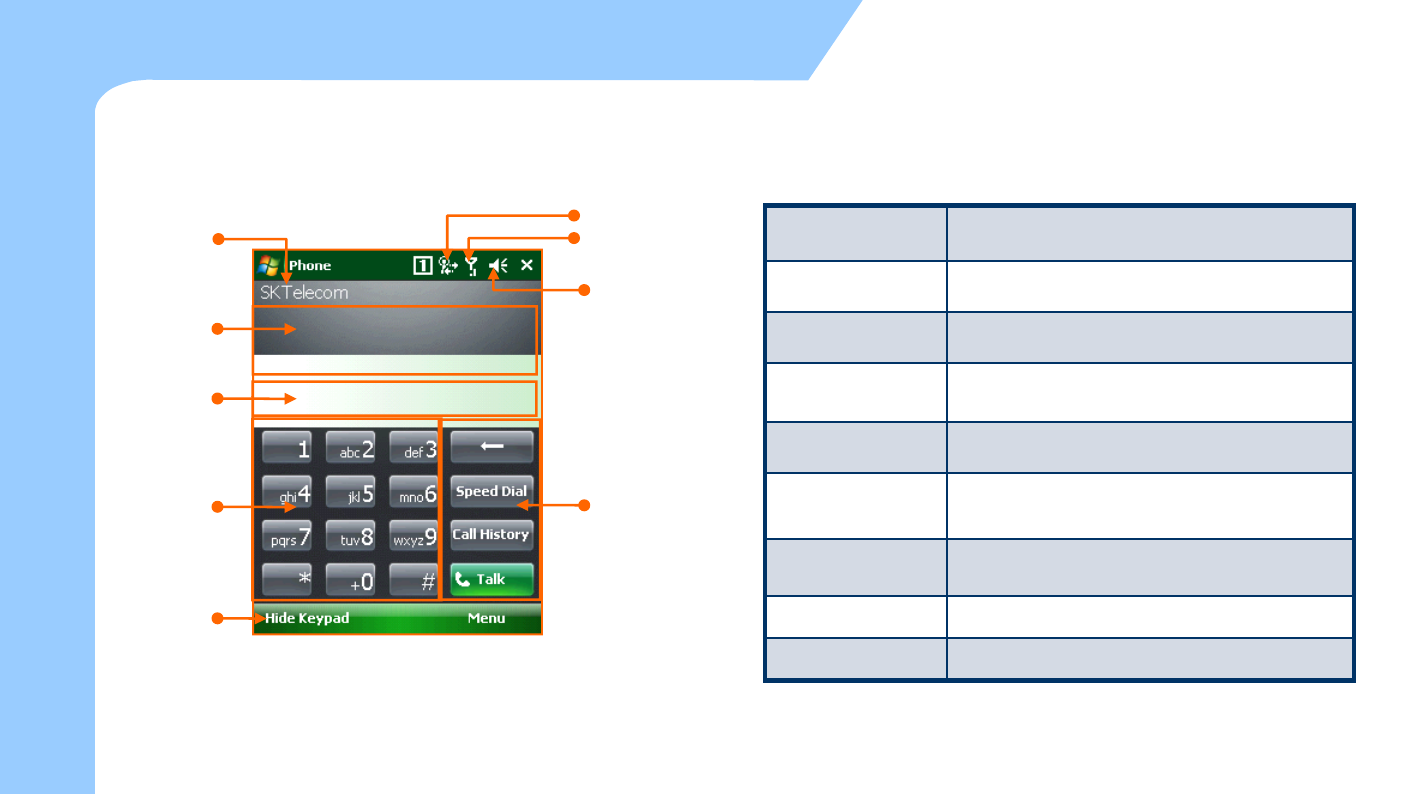
Init Screen
o
ne
zPhone Main Screen
GSM Operator Network Type
HSDPA / Network Status GSM Operator It indicates the current Network Provider.
e
the Ph
o
Volume
Call Status
Input Number
Call Status It shows Call Status.
Input Number It shows Inputted Numbers.
Key Pad
It is used to dial the number and can be used
o
w to us
e
Input
Number
Key Pad Phone Menu
Key
Pad
as speed-dial.
Contact It shows Phone Book Dialog.
Network Type It displays the availability of GPRS and EDGE /
HSDPA connection.
H
o
Contacts
GSM/Network
Status It indicates the signal strength.
Volume It is Volume on/off and vibrate
Phone Menu
Talk End Speed Dial Call History etc menu
42
Phone
Menu
Talk
,
End
,
Speed
Dial
,
Call
History
,
etc
menu
…
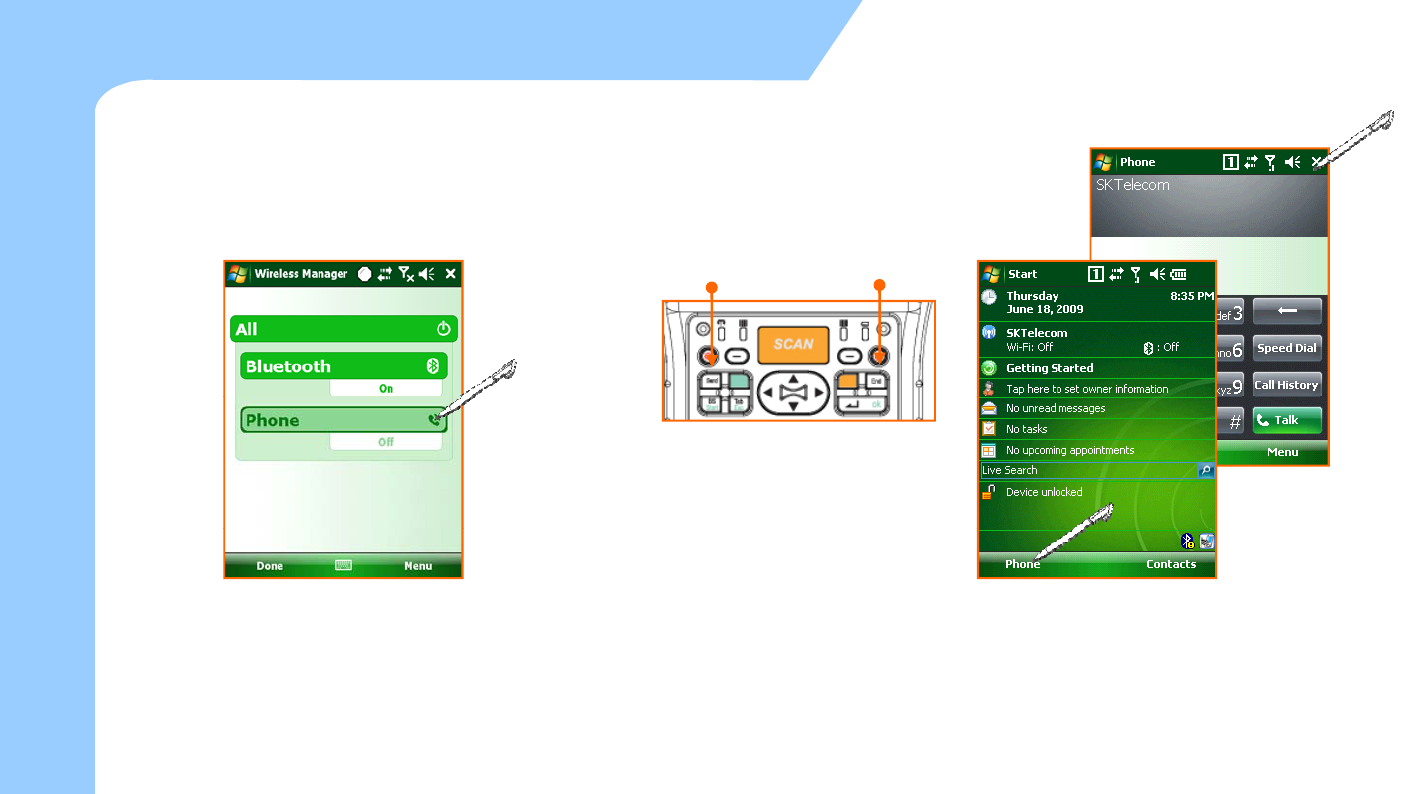
Phone Control
zPhone Program On/Off
o
ne
zPhone Call Send/End
SEND
END
e
the Ph
o
SEND
END
o
w to us
e
Select the SEND and END button like
H
o
You can turn on and off phone
in Wireless Manager Tap the Phone button on the left bottom of
the Today Screen and then you can process the
Ph Al fi i h th
the picture above to start and finish
the Phone program.
43
Ph
one pro
g
ram.
Al
so you can
fi
n
i
s
h
th
e pro
g
ram
using the X button.
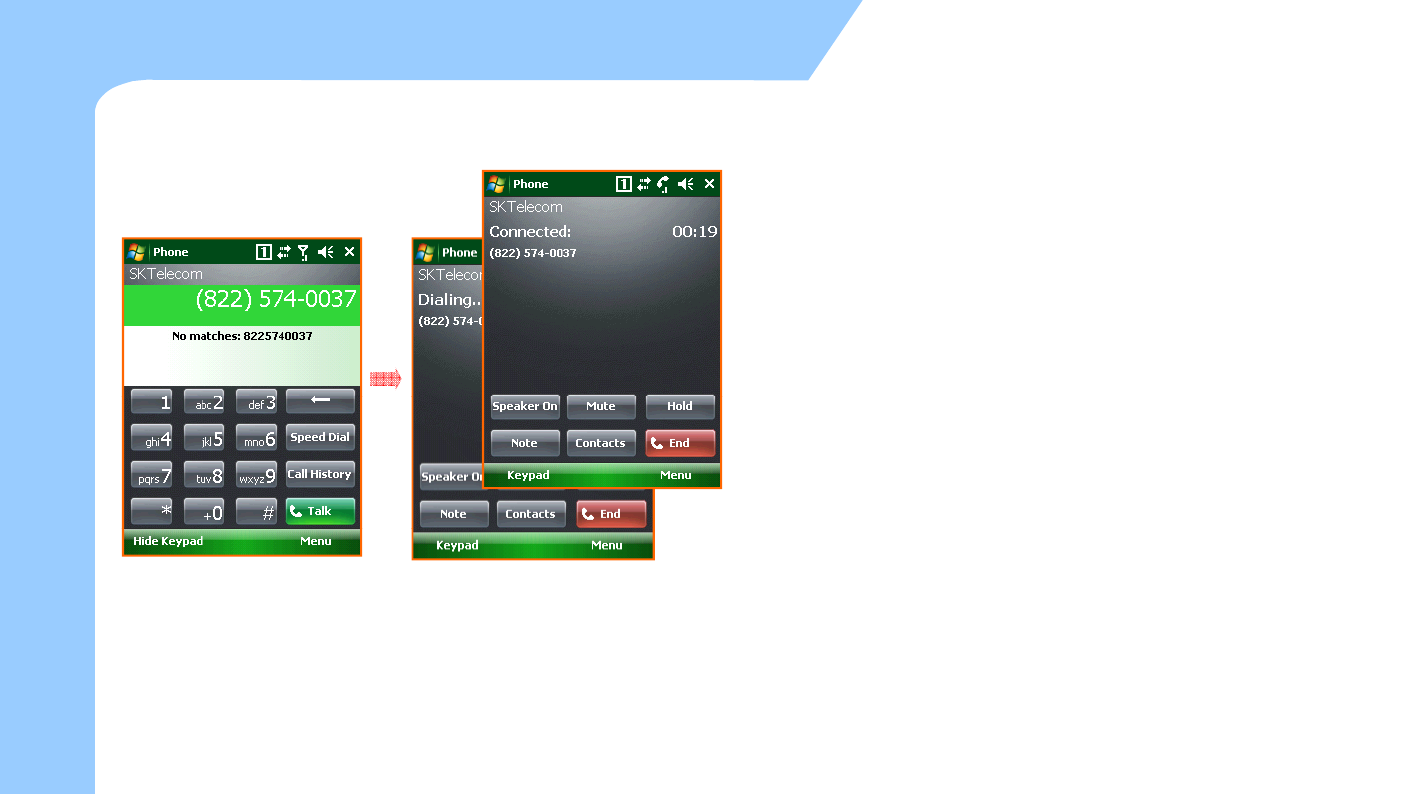
Phone Call and Receive
zPhone Call
o
ne
e
the Ph
o
o
w to us
e
H
o
To make a call:
1.Input number via program keypad
or device keypad.
2 Make a call by pressing the
‘
Talk’
To hang up:
Press the ‘END’ button on the program or
on the device.
44
2
.
Make
a
call
by
pressing
the
Talk
button on the program, or pressing
‘SEND’ button on the device.
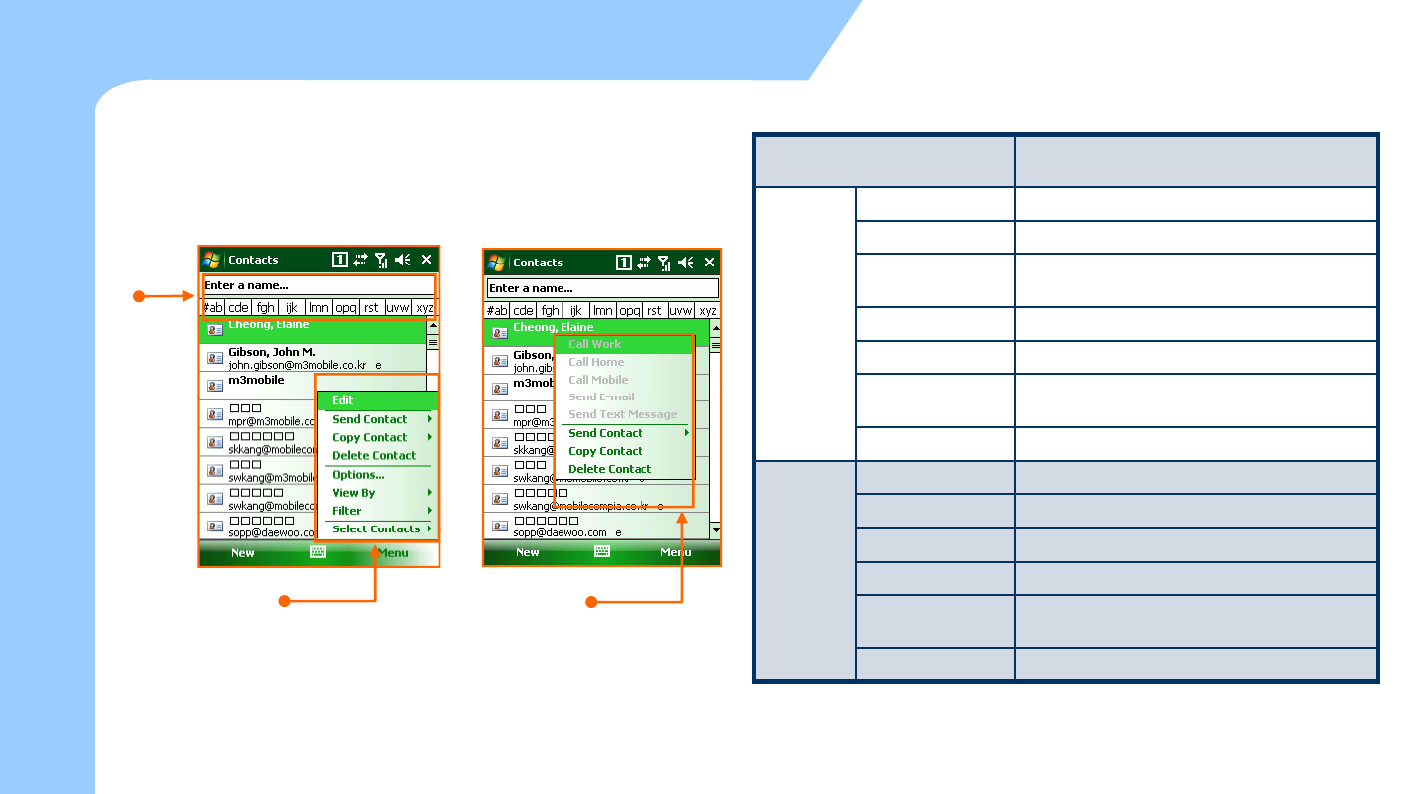
Phonebook
zTo use Phonebook
o
ne
Searching
A name or
Searching Contacts You can search the contacts by writing the
name and number or tapping.
New Contact Input the new contact
New SIM Contact Input the contact to the SIM Card.
e
the Ph
o
Number.
Contacts
Menu
Send Contact
T
ransmit the information of Contact by BEAM
or SMS.
Copy/Delete Copy or delete the Contact
Options Set the Options for Contact.
Vi B
See the Contact by Type ( Name , Company,
o
w to us
e
Vi
ew
B
y
See
the
Contact
by
Type
(
Name
,
Company,
Number … )
Filter Filter the information you want.
Call W/H/M Call by the number on the Contact.
Send E-mail Send an E-mail by the address on the Contact.
H
o
Contacts Menu Contacts Option Contacts
Option
Send SMS Send SMS by the number on the Contact.
Add to Speed Dial Add the number on the Contact to Speed Dial.
Send Contact Send the information of Contact by BEAM or
SMS.
C/Dlt
CdDltthCtt
45
C
opy
/D
e
l
e
t
e
C
opy an
d
D
e
l
e
t
e
th
e
C
on
t
ac
t
.
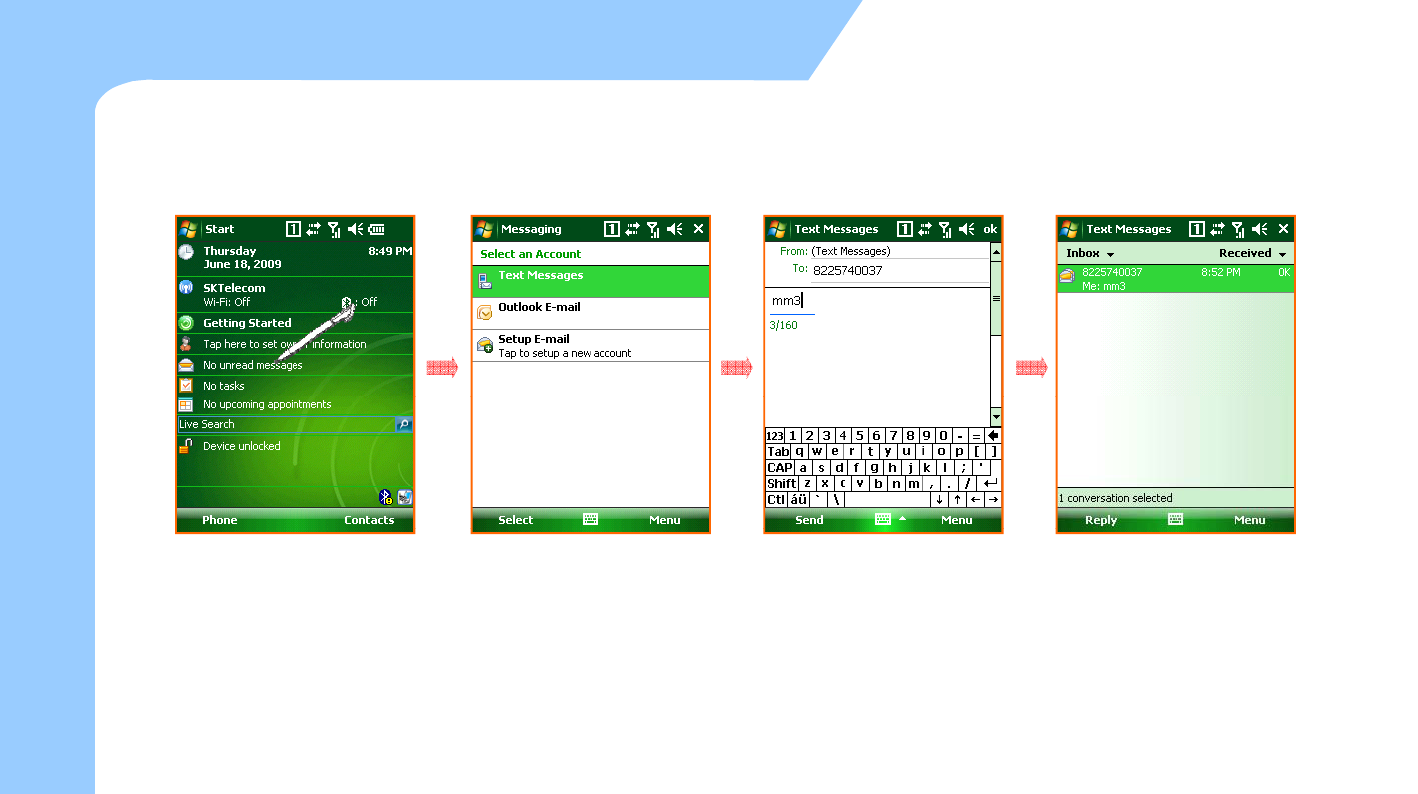
SMS send and receive
zHow to send SMS
o
ne
e
the Ph
o
o
w to us
e
H
o
Select ‘message information’ menu
on the main screen to send SMS.
You can also send SMS by selecting
‘SMS send’ menu on Contacts or any
other applications
Change to the ‘Text Messages’ on
the Message Program like the
picture above and tap the ‘New’ on
the bottom.
Input the phone number and
message. Tap the send to send
SMS.
You can see the pop-up screen
when SMS is sent successfully.
46
other
applications
.

6 Usage of Device
6
.
Usage
of
Device
Camera
Bluetooth
GPS
Scanner
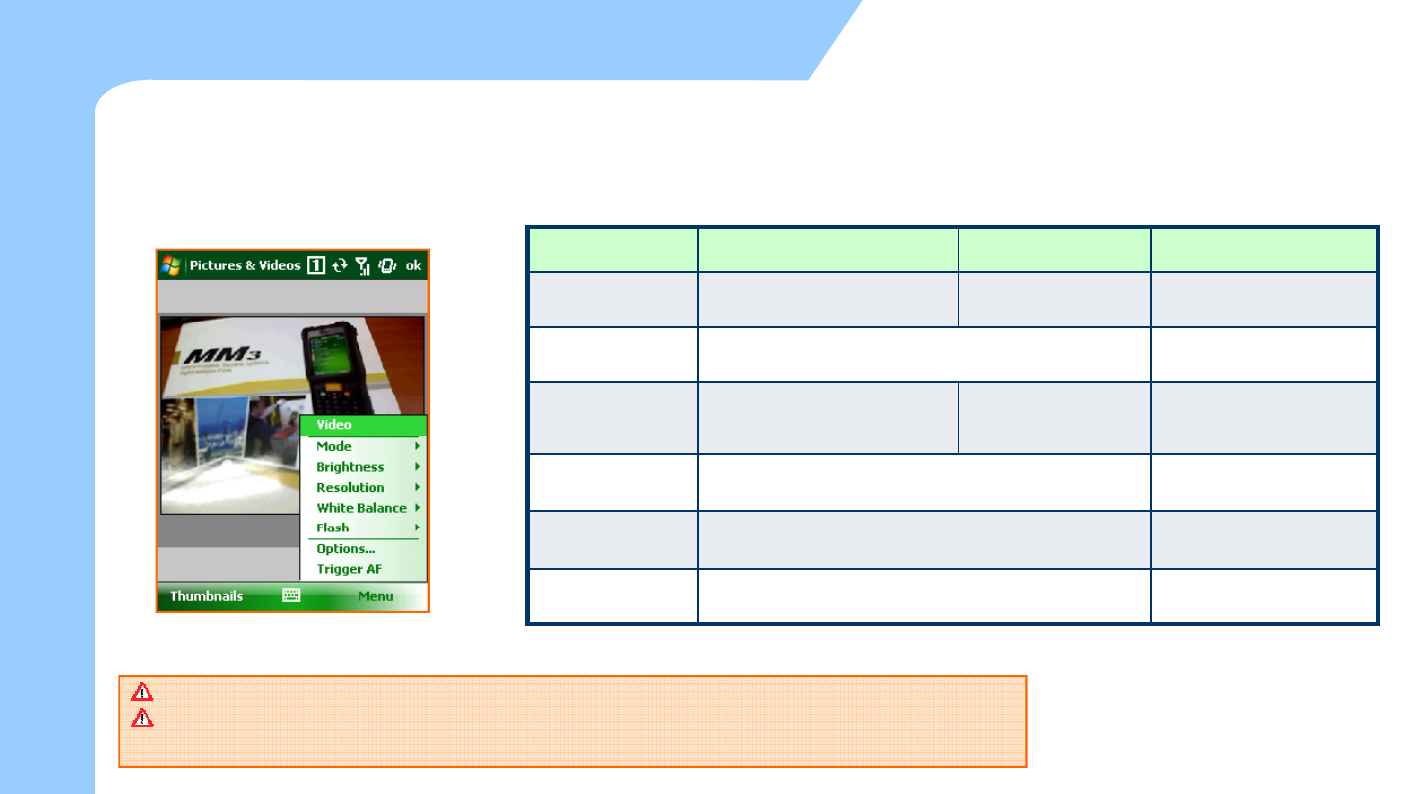
To use the Camera (1)
zNotice before taking pictures
- The camera equipped with the MM3 is supported 2 mega pixels.
Function Still Video Comment
o
f Device
Mode Normal, Burst, Timer N/A Setting for taking photo
Brightness -3, -2, -1, 0, +1, +2, +3 Setting for Brightness
Usage
o
Resolution QCIF, QVGA, CIF,
VGA ,SVGA, SXGA, UXGA QCIF, QVGA Setting for size
White Balance Automatic, Sunny, Cloudy, Fluorescent, Incandescent Setting for White
balance
Setting for Flash
Flash Flash ON, Flash OFF
Setting
for
Flash
ON/OFF
AF Trig AF Setting for Auto Focus
Camera Program Processing Screen
Camera is optional. On the device with no built-in camera, Camera function can not be used.
QCIF(176x144), QVGA(320x240), CIF(352x288), VGA(640x480), SVGA(800x600)
SXGA(1280x960), UXGA(1600x1200)
48
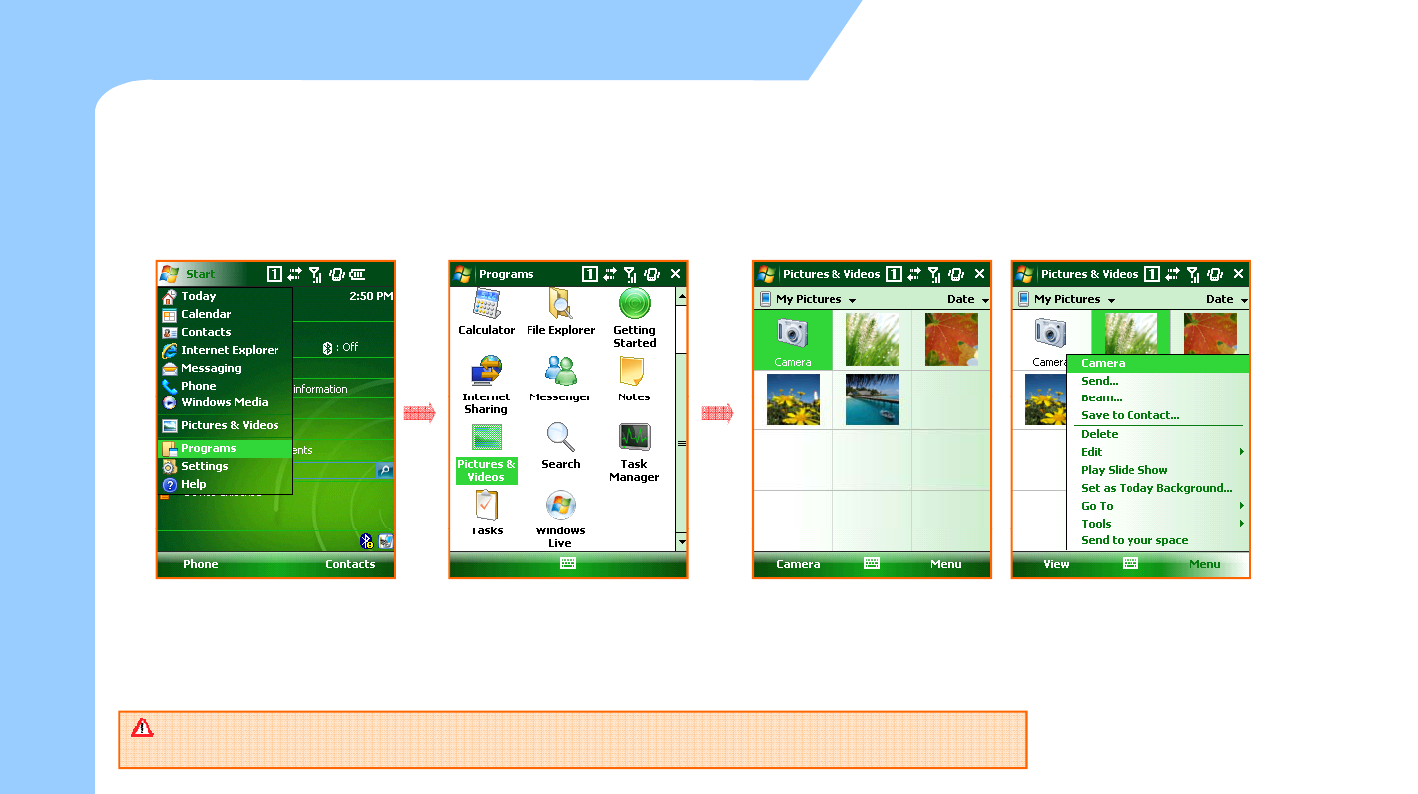
To use the camera (2)
zTo process the camera program
- You can process the camera program when you tap the camera button or tap the camera icon on the
'picture or video'.
e
o
f Devic
e
Usage
o
Select the 'Start > Programs > Pictures & Video. You can process the camera program when you select the camera
icon on the Picture & Video or select the camera icon in the menu.
49 Tap the ‘Menu > Options … > Camera Tab’ and then you can set the route of the storage memory ,
name and quality. You can set the Video on the Video Tab.
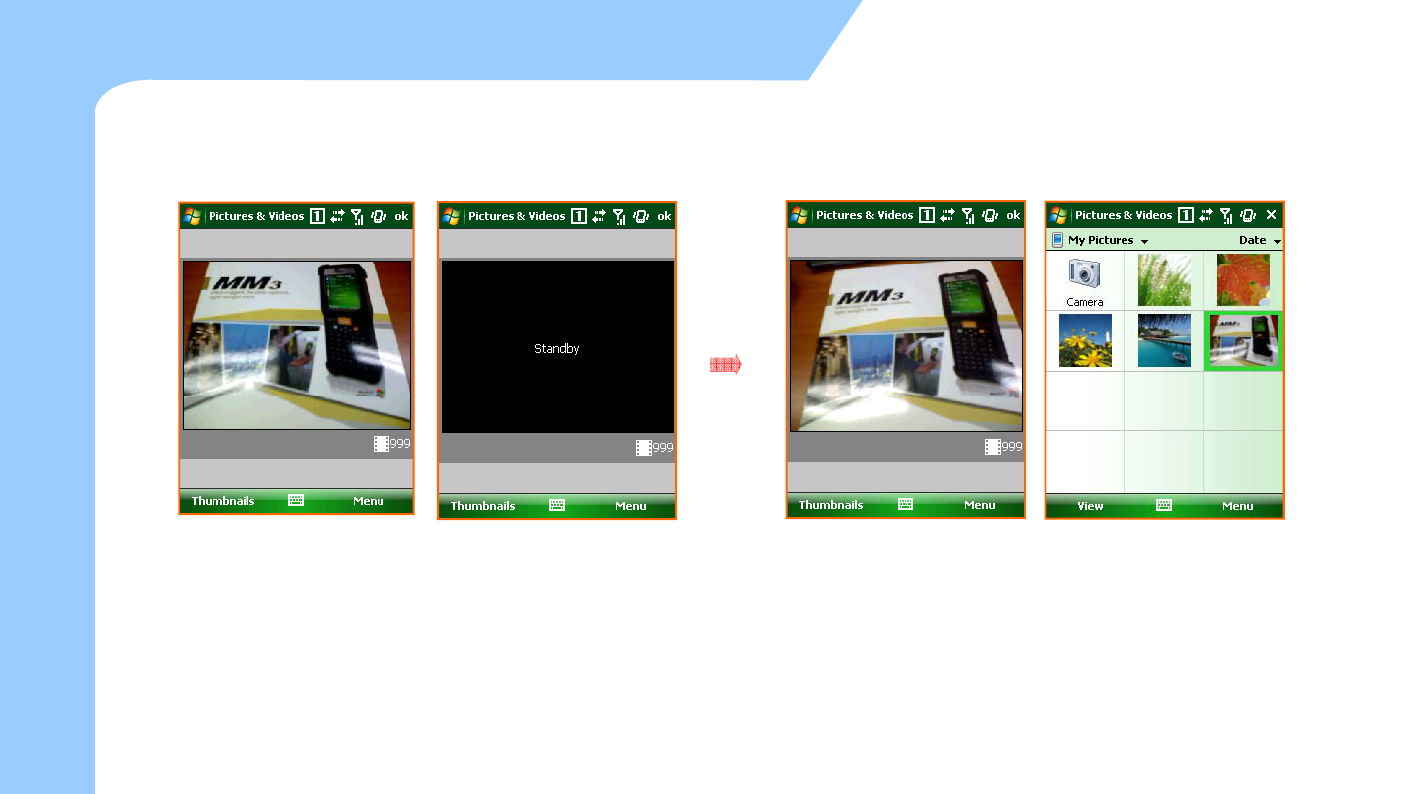
To use the camera (3)
zTaking a Still photo
o
f DeviceUsage
o
Execute the camera program first. Move around to focus the desired
item.
Finally press the camera button to take a picture.
After executing the camera program , Preview mode will be changed
to standby mode after certain amount of time.
In order to start Preview Mode again just tap the screen or press the
After taking a picture, the captured image will be displayed on the screen.
If you want to execute the camera program, tap the camera button at the
bottom or click the camera icon on the left of window.
You can see the list of pictures taken previously by tapping ‘Thumbnails’ in
the Camera shooting mode.
50
In
order
to
start
Preview
Mode
again
,
just
tap
the
screen
or
press
the
camera button.
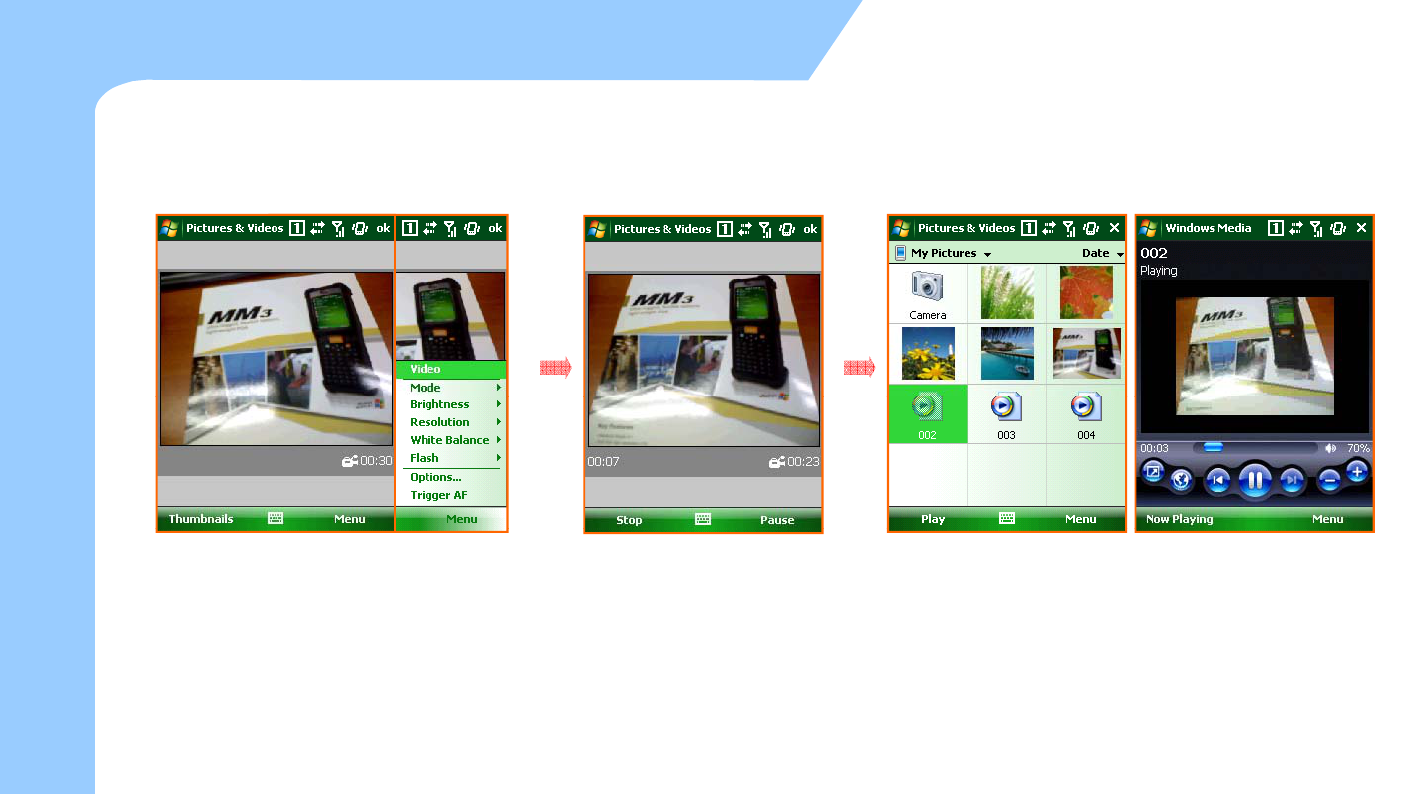
To use the camera (4)
zTaking videos
o
f DeviceUsage
o
If you want to take a video, select ‘Menu >
Videos' after executing the camera program. While taking a video, you can
either stop (by tapping stop
button) or pause. (by tapping
pause button)
If you want to watch the video taken, Select the 'Thumbnails' first
to see the list of video files available.
When you select the video you want, you can play the video
recorded.
51
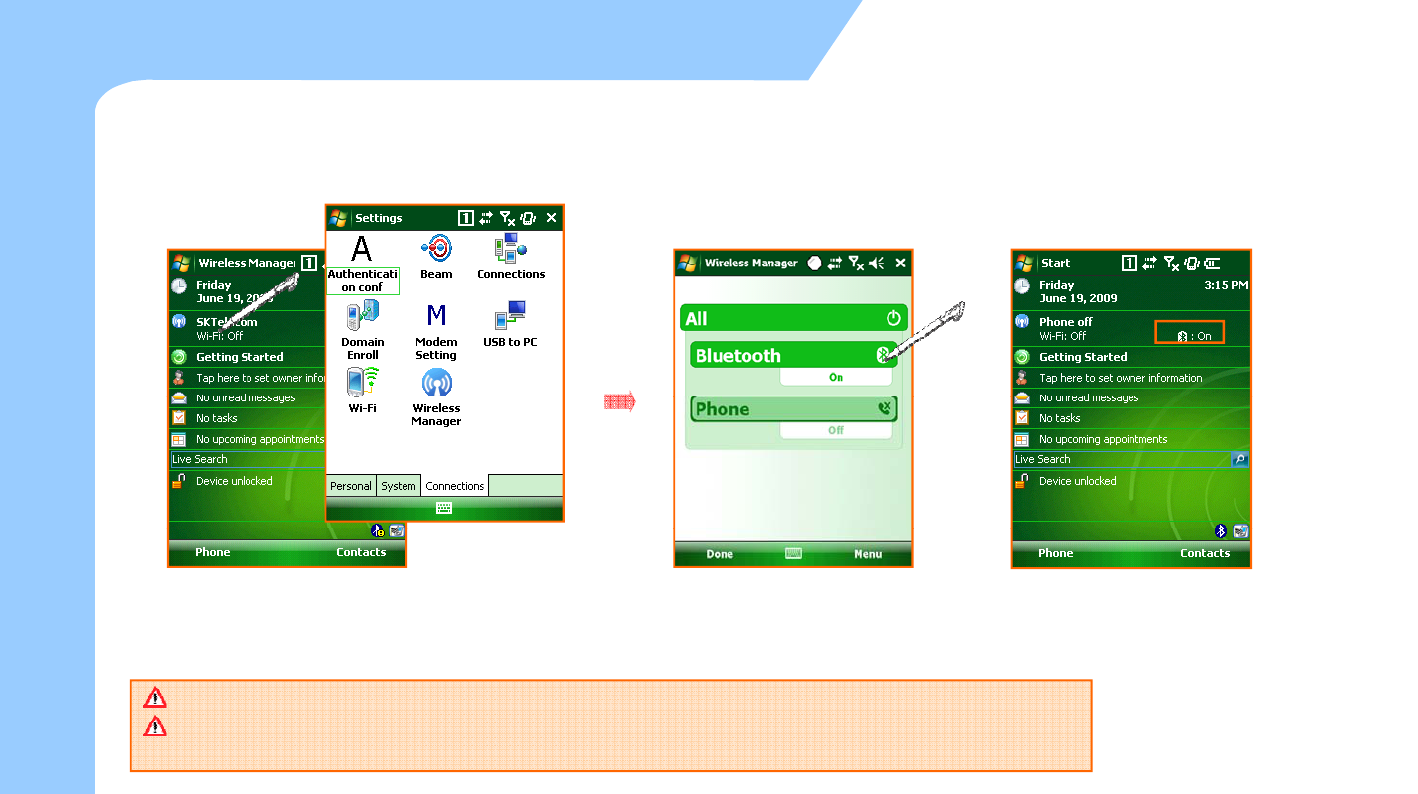
Bluetooth Communication (1)
zBluetooth On / Off
o
f DeviceUsage
o
On the 'Today Main Screen' , select the Wireless State
bar or Tap 'Start > Settings > Connections and select
‘Wireless Manager’.
To turn on/off Bluetooth, tap the
Bluetooth on the Wireless Manage
The status of Bluetooth can be seen
on the wireless status bar on the
main screen.
52
Bluetooth is optional. Device without built-in Bluetooth can not use Bluetooth service.
Bluetooth support the transmission and reception of files between the serial connecting service and
Windows Mobile device.
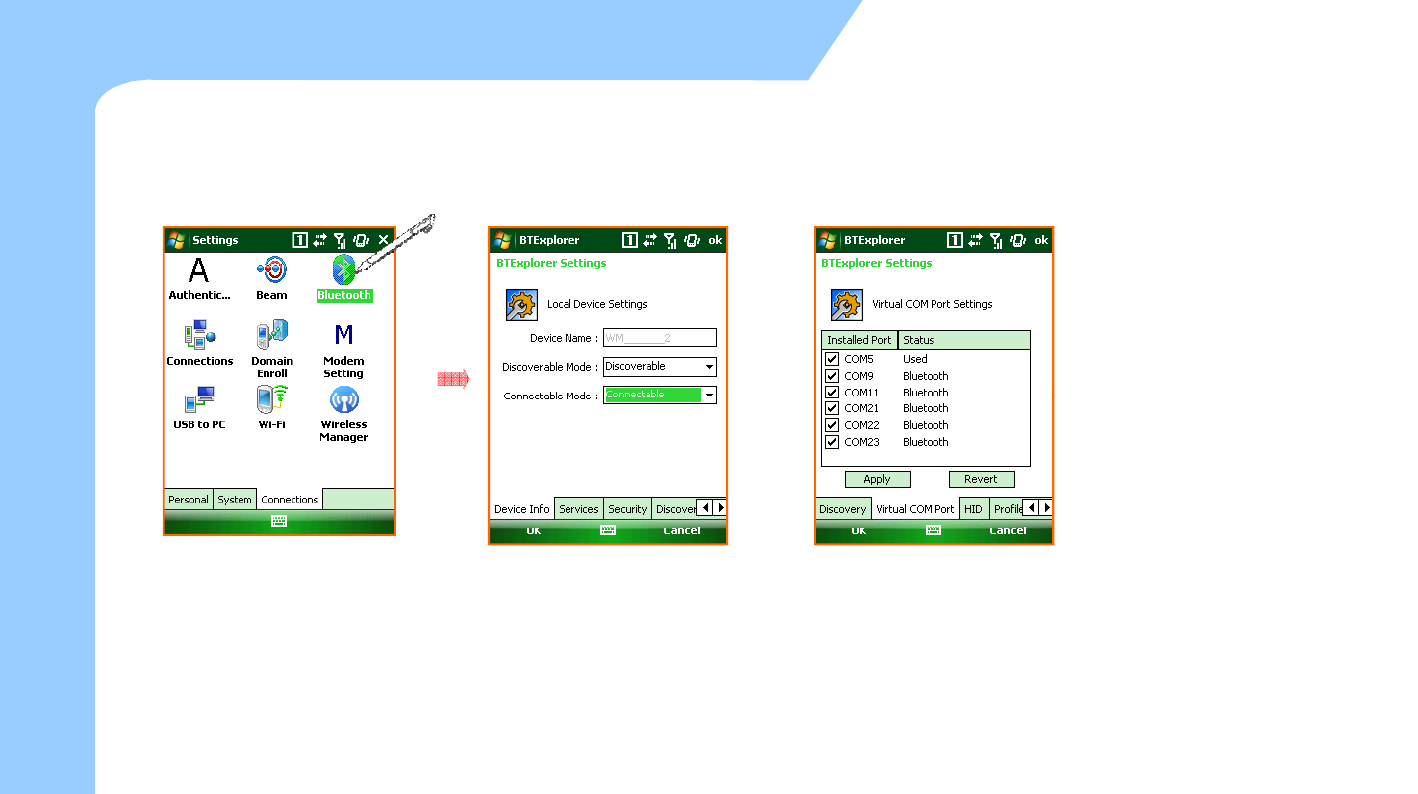
Bluetooth Communication (2)
zSetting the Bluetooth
-On the Bluetooth setting screen, you can set the Mode, connecting to BT device and COM settings
o
f DeviceUsage
o
You can set the Bluetooth mode
and establish connection when
you tap the 'Bluetooth' icon on
the Start > Settings > Connections.
In the device tab, you can search
and connect to other Bluetooth
devices.
In the COM Ports tab, you can
set incoming Port and outgoing
Port.
53
Bluetooth Communication (3)
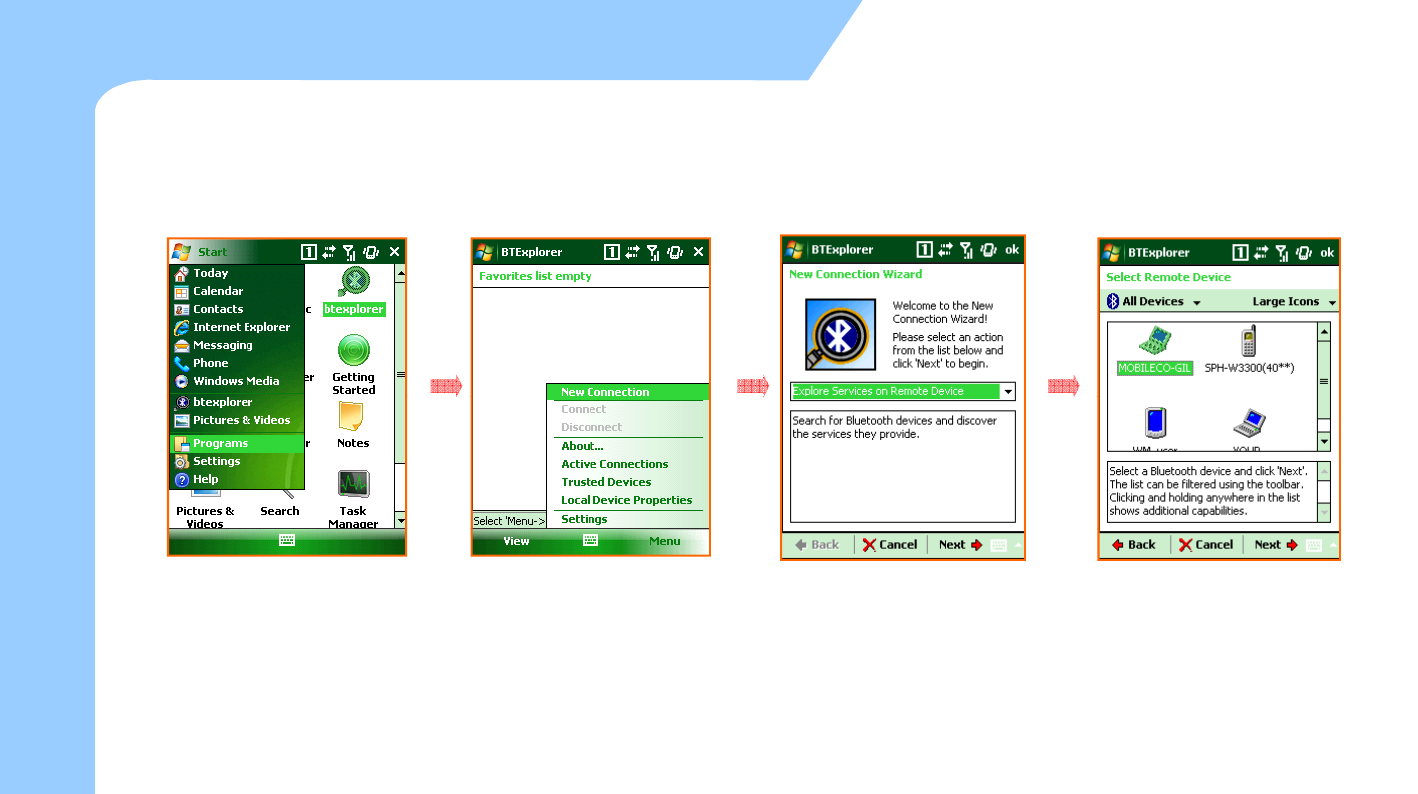
zTo connect the Bluetooth
- you can establish the connection by searching, matching pin code and selecting the service.
o
f DeviceUsage
o
You can search the Bluetooth device
available when you select the 'Add
new device...' on the Device Tab.
Select a device to connect with and
Enter a Passcode to establish a
secure connection.
The passcode can be fixed one
or the one which is negotiated
It shows the service available
on the Bluetooth device. It shows the registered devices.
To add more device, please tab
‘Add new device’.
54
Select
a
device
to
connect
with
and
tap 'Next' . Also you can select
the 'Refresh' button if there is no
device available.
or
the
one
which
is
negotiated
between two parties in before
hand.
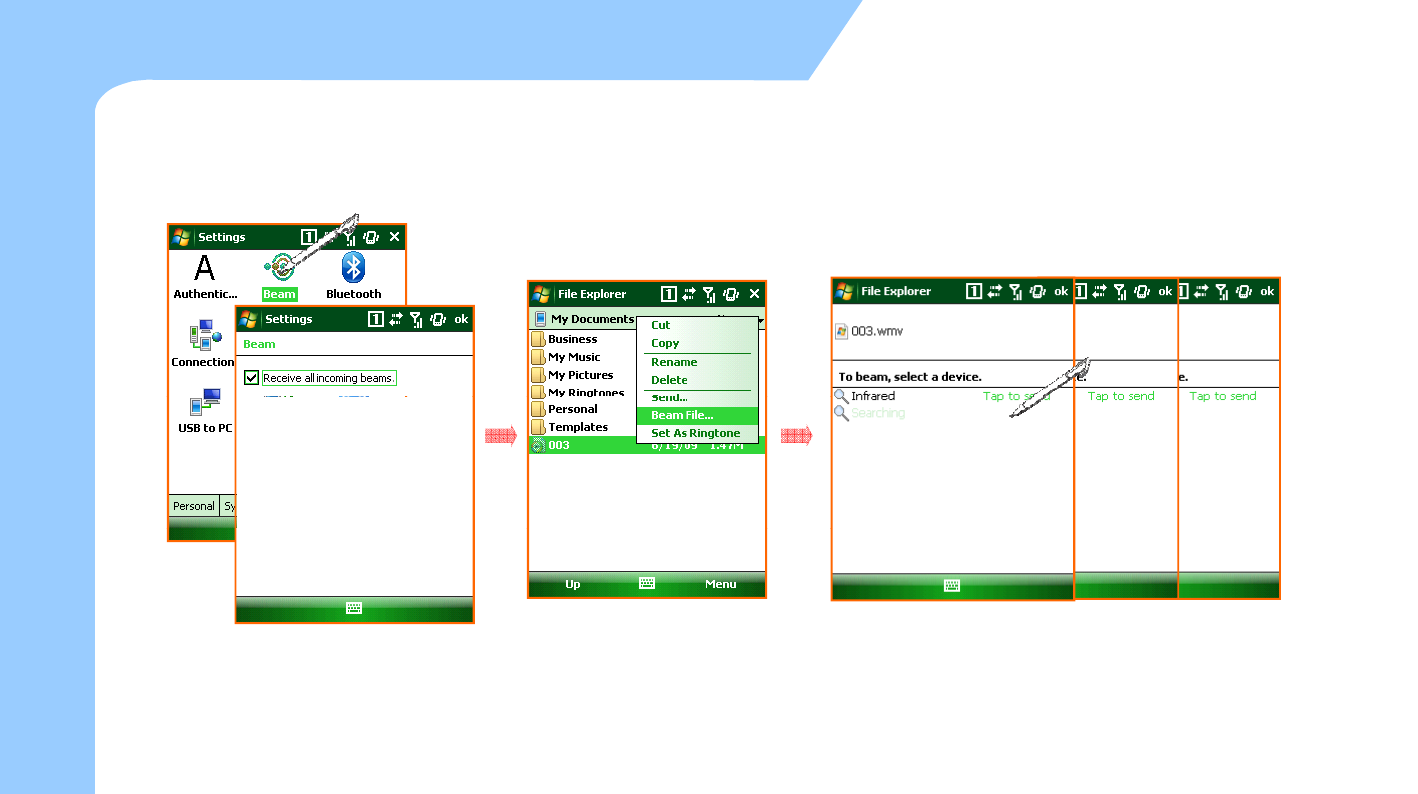
Bluetooth Communication (4)
zTransferring files via Bluetooth connection.
- It is possible to transfer files between Windows Mobile devices via Bluetooth.
o
f DeviceUsage
o
In order to transfer files via Bluetooth
connection please go to
'
Start > Settings >
Select the file you want to transfer
in the File Explorer Press the file
By tapping ‘Beam File’, the list of available Bluetooth devices
shown Please choose the device to transfer the file to
55
connection
,
please
go
to
Start
>
Settings
>
Connections > Beam‘ and then Check
the 'Receive all incoming Beams ‘.
in
the
File
Explorer
.
Press
the
file
name long and tab ‘Beam File’.
shown
.
Please
choose
the
device
to
transfer
the
file
to
.
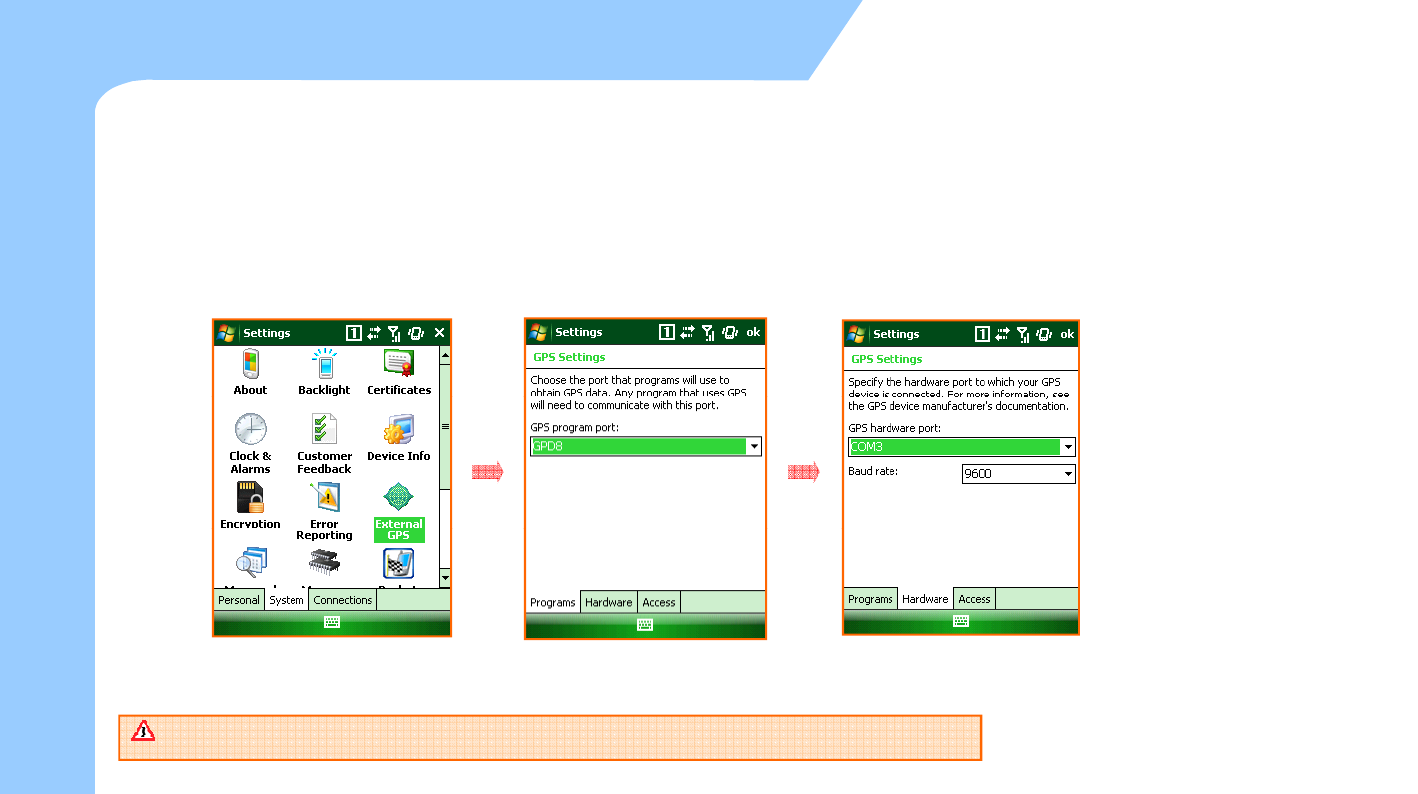
To use the GPS
zTo set the GPS
–Tap the ‘Start > Settings > System Tab > GPS’ and then you can set the information related to the GPS.
–You don’t have to set additional information when there is a single program which uses GPS data. When
there
are
more
than
one
program
which
use
GPS
data,
you
need
to
set
the
program
port
and
hardware
there
are
more
than
one
program
which
use
GPS
data,
you
need
to
set
the
program
port
and
hardware
port required for each program.
o
f DeviceUsage
o
Select the GPS on the System Tab.
Se
t
the GPS Pro
g
ram Por
t
which Set the Hardware port of the device.
56
Select
the
GPS
on
the
System
Tab.
g
is not yet used. GPS hardware port for MM3 is
COM2 and with baud rate of 9600.
GPS is optional. GPS feature is not available on the unit with no GPS module integrated.

To use the Scanner (1)
zTo scan the barcode, there are two scanner programs installed on the device
1
M3
ScanTest
1
.
M3
ScanTest
-It is a sample test program. It is only for testing the scanning feature of the device.
It can not be used for business application.
o
f Device
2. ScanEmul
-It is a program which can be used to output the scanned data on the application.
(like MS Word
-
Pad Internet Explorer or Business Application)
Usage
o
(like
MS
Word
Pad
,
Internet
Explorer
or
Business
Application)
- The ScanEmul program must be running if you want to scan barcodes.
57
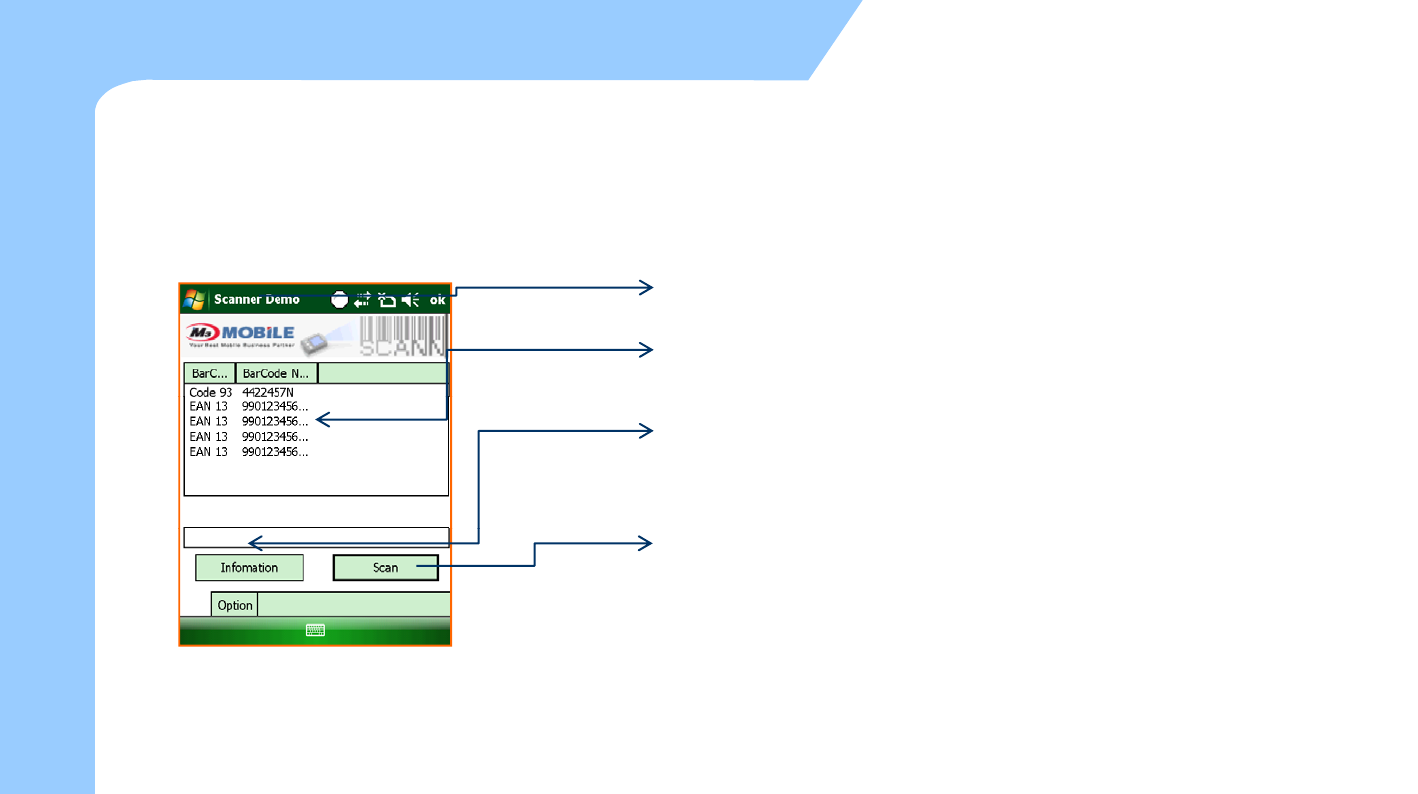
To use the Scanner (2)
zThis program is located under Flash Disk -> Scanner folder
The Scanned Data will be displayed here
Y h i f i lik Fi i
You need to select this tab to configure Settings
o
f Device
Y
ou can
g
et t
h
e
i
n
f
ormat
i
on
lik
e
Fi
rmware vers
i
on,
DLL version and Decoder version.
It is to tri
gg
er the scan beam.
Usage
o
gg
You can also Use ‘S’ button on the right side
of Device to trigger it.
58
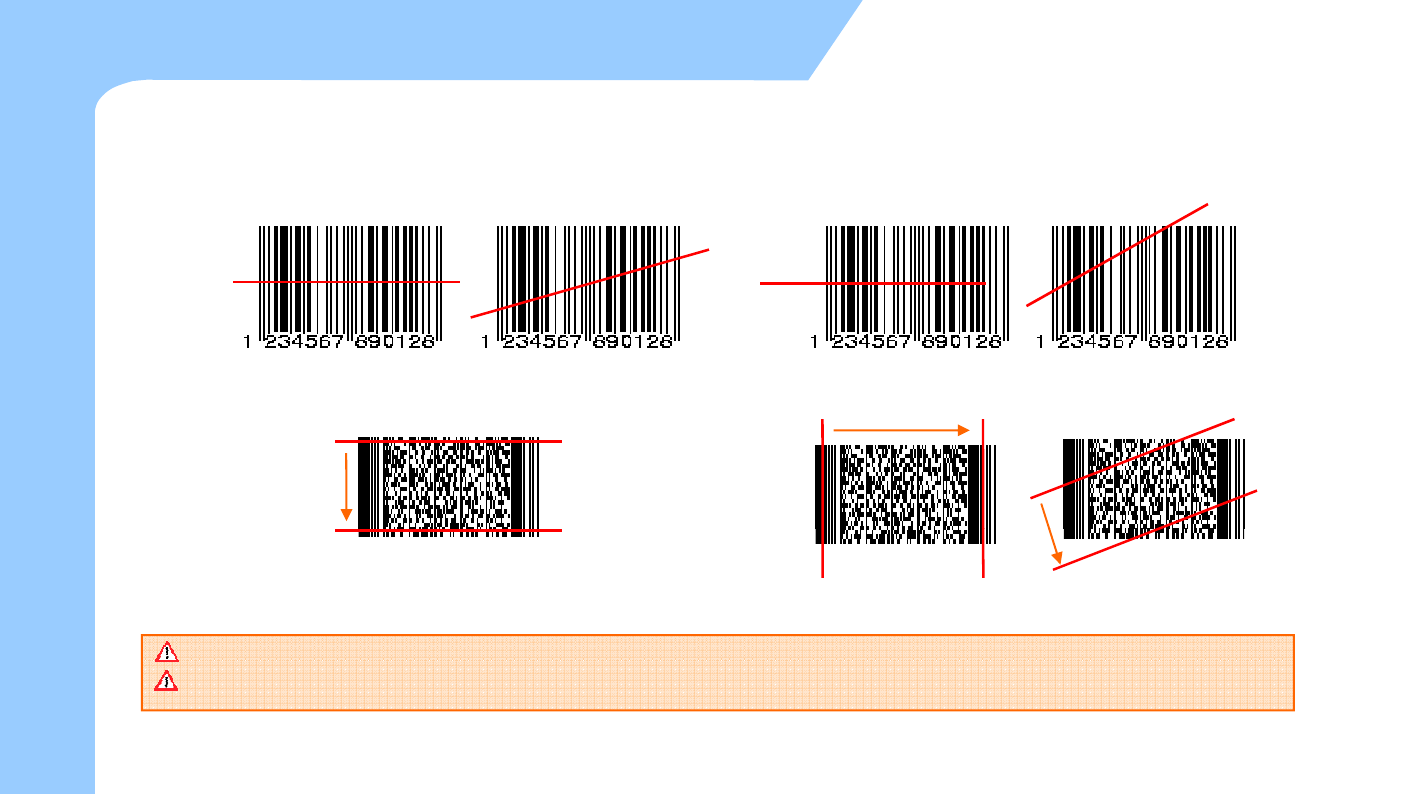
To use the Scanner (3) Scan Test
zHow to use scanner
–Usage of 1D Scanner (MC-7100S, MC-7500S)
o
f Device
Usage of 2D Scanner (MC
7700S)
Correct way Incorrect way
Usage
o
–
Usage
of
2D
Scanner
(MC
-
7700S)
Sca
nn
e
r i
s
opt
i
o
n
a
l. Y
ou
ca
n n
ot
use
sca
n f
eatu
r
e
wi
t
h n
o
sca
nn
e
r
e
n
ab
l
ed
de
vi
ce
.
Correct way Incorrect way
59
Scanner
is
optional.
You
can
not
use
scan
feature
with
no
scanner
enabled
device.
2D Barcode Scanner is optional. Only with 2D Barcode scanner enabled device, you can do 2D barcode scan. (MC-7700S)
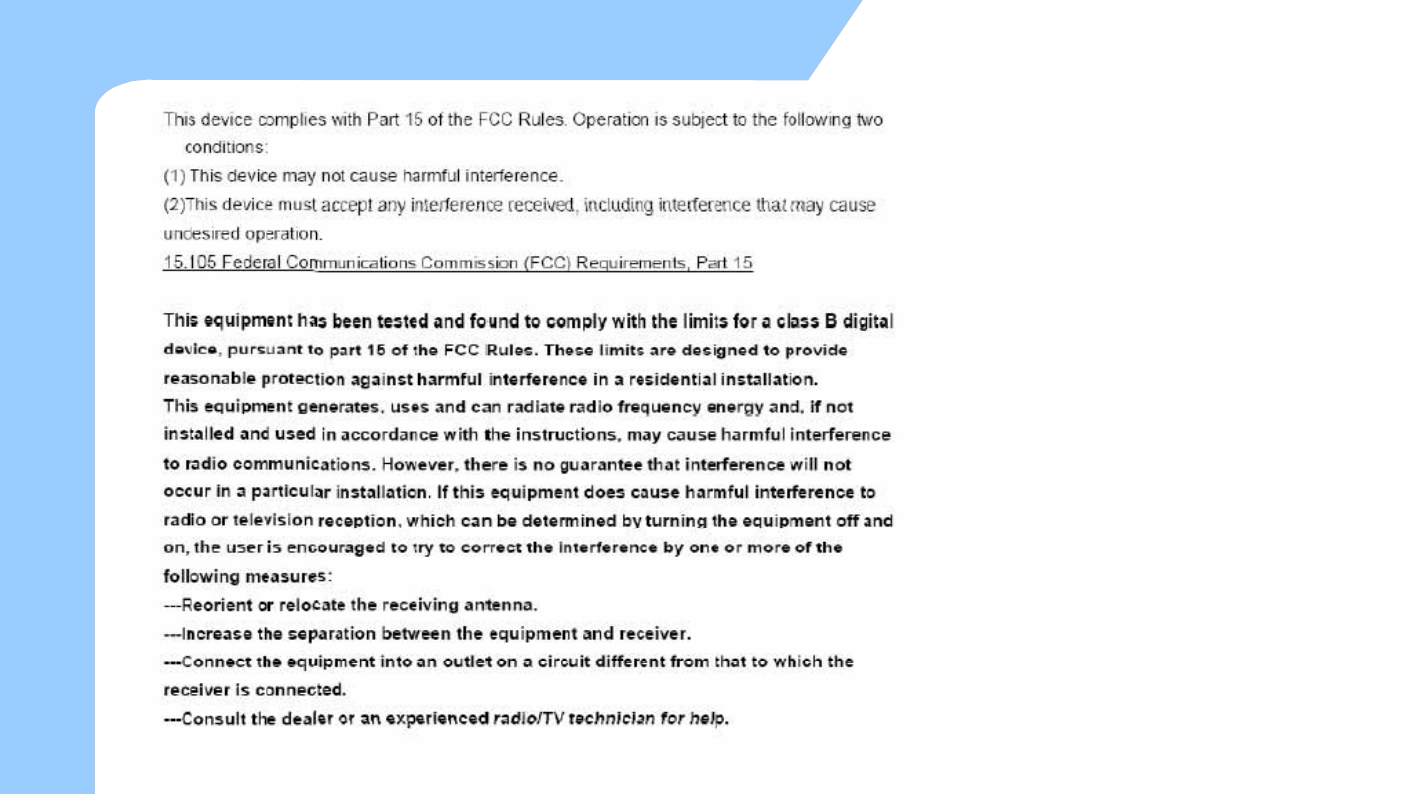
FCC Warning
61
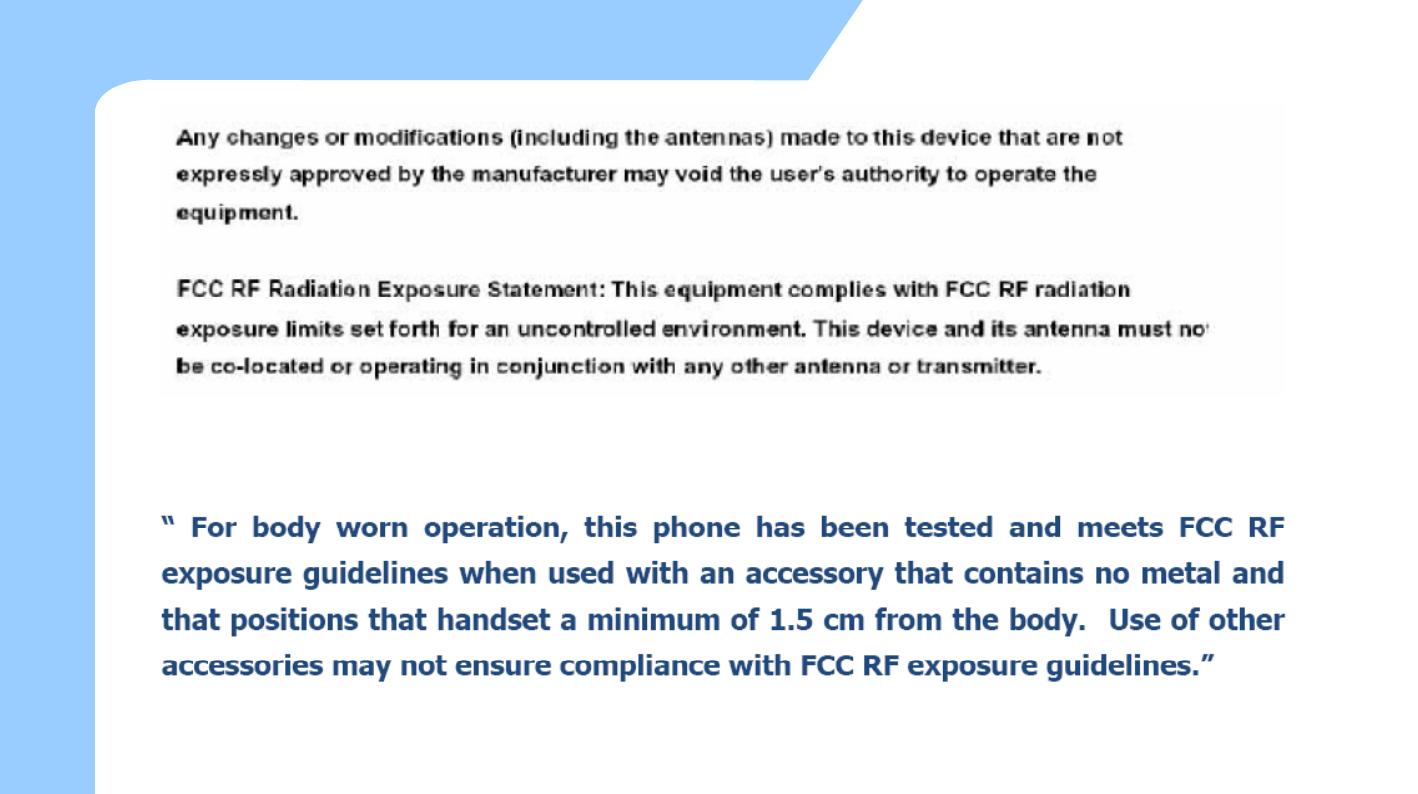
FCC Warning
62