MAXWEST TELECOM TAB7270K Tablet PC User Manual 7170K ai
MAXWEST TELECOM Tablet PC 7170K ai
UserManual.wiki
>
MAXWEST TELECOM
>
TAB7270K User Manual
Users Manual
Navigation menu
Upload a User Manual
Namespaces
Wiki Guide
HTML
PDF
Info
Views
User Manual
Discussion / Help
Navigation


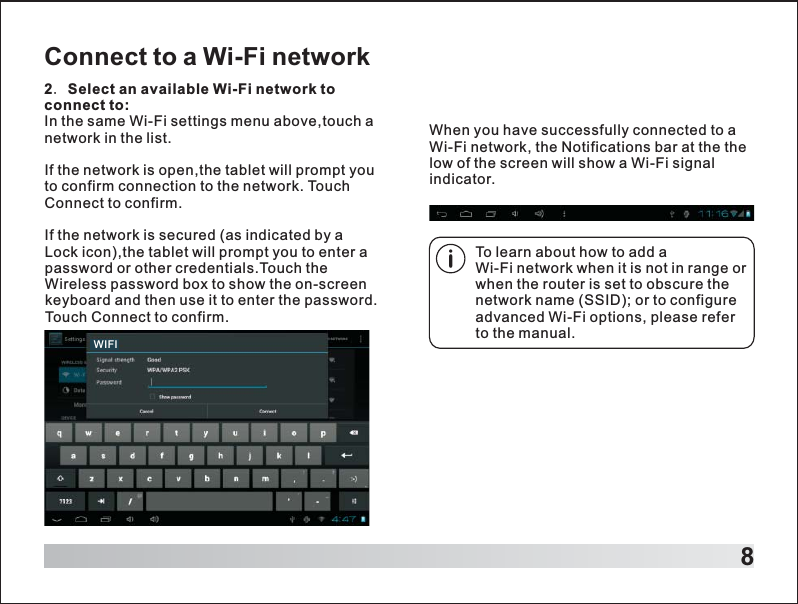
![7Connect to a Wi-Fi networkThe Notification bar displays icons that indicate your tablet’s Wi-Fi status.Notification that an open Wi-Fi network is in range.Connected to a Wi-Fi network (wavesindicate connection strength). There are no Wi-Fi networks in range, or the Wi-Fi radio is off.[no icon]1. Turn on the Wi-Fi radio if it is not already on. To turn on Wi-Fi:a.Go to the Home screen: Press the Home key.b.Open the Settings menu: tap the icon right up on the home screen to get into the launcher, then touch Settings icon.c.Open the Wireless & networks menu: Slide the icon to ON status.If a network that you have connected to previously is found, the tablet will connect to it.If you don't see your network in the list, you can force the tablet to re-scan. To scan for networks, tap the Menu key, and then touch Scan.When Wi-Fi is on, the tablet will look for and display a list of available Wi-Fi networks.WIFI 0001WIFI 0002](https://usermanual.wiki/MAXWEST-TELECOM/TAB7270K/User-Guide-2443234-Page-8.png)

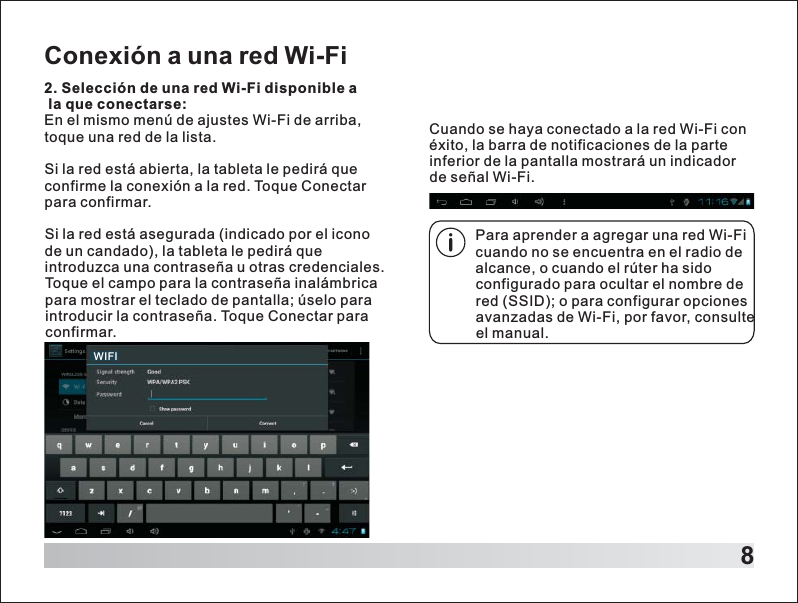
![7Conexión a una red Wi-FiLa barra de notificaciones muestra iconos que indica el estado Wi-Fi de su tableta. Notificación sobre una red Wi-Fi encendida en el radio de alcance.Conectado a una red Wi-Fi (las ondas indican la intensidad de la conexión). No hay redes Wi-Fi en el radio de alcance, o la radio Wi-Fi está apagada.[No hay ocono]1. Encienda la radio Wi-Fi, si todavía no lo estuviera. Para encender el Wi-Fi:a. Vaya a la pantalla de inicio: Pulse el botón Home.b. Abra el menú de ajustes: toque el icono que hay en la pantalla de inicio para entrar en la lanzadera, después toque el icono de ajustes.c. Abra el menú Inalámbrico y redes: Desplace el icono hasta el estado de encendido (ON).Si se encontrara una red a la que se hubiera conectado previamente, la tableta se conectará a ella.Si no viera su red en la lista, podrá hacer que la tableta realice una nueva búsqueda. Para buscar redes, toque sobre el botón Menu y después toque Scan (Buscar).Cuando el Wi-Fi esté encendido, la tableta buscará y mostrará una lista de redes Wi-Fi disponibles.WIFI 000 1WIFI 000 2](https://usermanual.wiki/MAXWEST-TELECOM/TAB7270K/User-Guide-2443234-Page-19.png)